instruction manual infrared thermometer - refco · instruction manual infrared thermometer...
TRANSCRIPT
Instruction Manual Infrared Thermometer
Bedienungsanleitung Infrarot Thermometer
Mode d’emploi Thermomètre à infrarouge
Istruzioni per l’uso Termometro a infrarossi
Manual de instrucciones Termómetro infrarrojo
LP-88 4686697
Instruction Manual LP-88 English
1
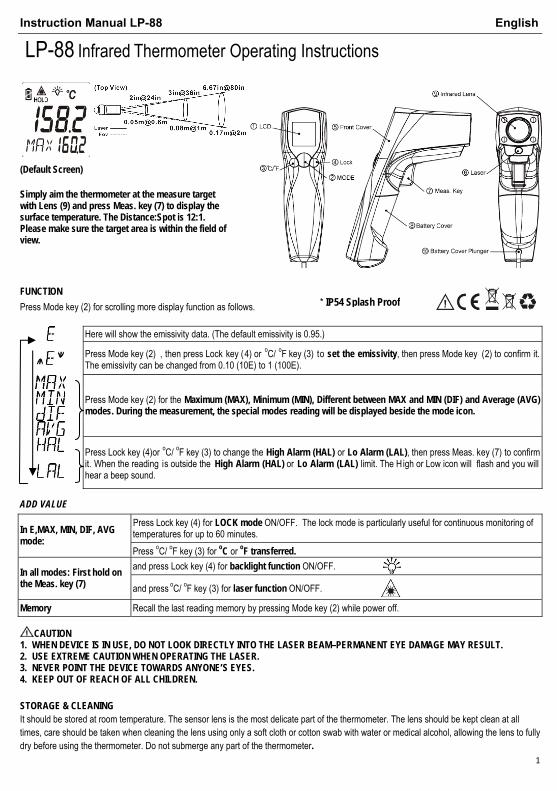
LP-88 Infrared Thermometer Operating Instructions
(Default Screen)
Simply aim the thermometer at the measure target with Lens (9) and press Meas. key (7) to display the surface temperature. The Distance:Spot is 12:1. Please make sure the target area is within the field of view.
FUNCTION
Press Mode key (2) for scrolling more display function as follows.
Here will show the emissivity data. (The default emissivity is 0.95.)
Press Mode key (2) , then press Lock key (4) or oC/ oF key (3) to set the emissivity, then press Mode key (2) to confirm it. The emissivity can be changed from 0.10 (10E) to 1 (100E).
Press Mode key (2) for the Maximum (MAX), Minimum (MIN), Different between MAX and MIN (DIF) and Average (AVG) modes. During the measurement, the special modes reading will be displayed beside the mode icon.
Press Lock key (4)or oC/ oF key (3) to change the High Alarm (HAL) or Lo Alarm (LAL), then press Meas. key (7) to confirm it. When the reading is outside the High Alarm (HAL) or Lo Alarm (LAL) limit. The High or Low icon will flash and you will hear a beep sound.
ADD VALUE
Press Lock key (4) for LOCK mode ON/OFF. The lock mode is particularly useful for continuous monitoring of temperatures for up to 60 minutes. In E,MAX, MIN, DIF, AVG
mode: Press oC/ oF key (3) for oC or oF transferred.
and press Lock key (4) for backlight function ON/OFF. In all modes: First hold on the Meas. key (7) and press oC/ oF key (3) for laser function ON/OFF.
Memory Recall the last reading memory by pressing Mode key (2) while power off.
CAUTION 1. WHEN DEVICE IS IN USE, DO NOT LOOK DIRECTLY INTO THE LASER BEAM–PERMANENT EYE DAMAGE MAY RESULT. 2. USE EXTREME CAUTION WHEN OPERATING THE LASER. 3. NEVER POINT THE DEVICE TOWARDS ANYONE’S EYES. 4. KEEP OUT OF REACH OF ALL CHILDREN.
STORAGE & CLEANING It should be stored at room temperature. The sensor lens is the most delicate part of the thermometer. The lens should be kept clean at all times, care should be taken when cleaning the lens using only a soft cloth or cotton swab with water or medical alcohol, allowing the lens to fully dry before using the thermometer. Do not submerge any part of the thermometer.
* IP54 Splash Proof
English Instruction Manual LP-88
2
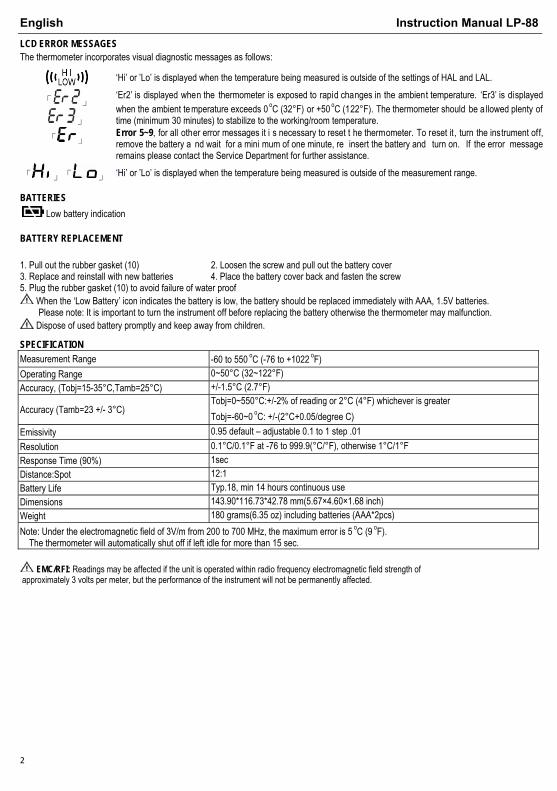
LCD ERROR MESSAGES The thermometer incorporates visual diagnostic messages as follows:
‘Hi’ or ’Lo’ is displayed when the temperature being measured is outside of the settings of HAL and LAL.
「 」
」
‘Er2’ is displayed when the thermometer is exposed to rapid changes in the ambient temperature. ‘Er3’ is displayed when the ambient temperature exceeds 0 oC (32°F) or +50 oC (122°F). The thermometer should be a llowed plenty of time (minimum 30 minutes) to stabilize to the working/room temperature.
「 」 Error 5~9, for all other error messages it i s necessary to reset t he thermometer. To reset it, turn the instrument off, remove the battery a nd wait for a mini mum of one minute, re insert the battery and turn on. If the error message remains please contact the Service Department for further assistance.
「 」「 」 ‘Hi’ or ’Lo’ is displayed when the temperature being measured is outside of the measurement range.
BATTERIES Low battery indication
BATTERY REPLACEMENT
1. Pull out the rubber gasket (10) 2. Loosen the screw and pull out the battery cover 3. Replace and reinstall with new batteries 4. Place the battery cover back and fasten the screw 5. Plug the rubber gasket (10) to avoid failure of water proof
When the ‘Low Battery’ icon indicates the battery is low, the battery should be replaced immediately with AAA, 1.5V batteries. Please note: It is important to turn the instrument off before replacing the battery otherwise the thermometer may malfunction.
Dispose of used battery promptly and keep away from children.
SPECIFICATION
Measurement Range -60 to 550 oC (-76 to +1022 oF) Operating Range 0~50°C (32~122°F) Accuracy, (Tobj=15-35°C,Tamb=25°C) +/-1.5°C (2.7°F)
Accuracy (Tamb=23 +/- 3°C) Tobj=0~550°C:+/-2% of reading or 2°C (4°F) whichever is greater Tobj=-60~0 oC: +/-(2°C+0.05/degree C)
Emissivity 0.95 default – adjustable 0.1 to 1 step .01 Resolution 0.1°C/0.1°F at -76 to 999.9(°C/°F), otherwise 1°C/1°F Response Time (90%) 1sec Distance:Spot 12:1 Battery Life Typ.18, min 14 hours continuous use Dimensions 143.90*116.73*42.78 mm(5.67×4.60×1.68 inch) Weight 180 grams(6.35 oz) including batteries (AAA*2pcs) Note: Under the electromagnetic field of 3V/m from 200 to 700 MHz, the maximum error is 5 oC (9 oF). The thermometer will automatically shut off if left idle for more than 15 sec.
EMC/RFI: Readings may be affected if the unit is operated within radio frequency electromagnetic field strength of approximately 3 volts per meter, but the performance of the instrument will not be permanently affected.
ey
(6) Laser
Rubber Gasket
Bedienungsanleitung LP-88 Deutsch
3
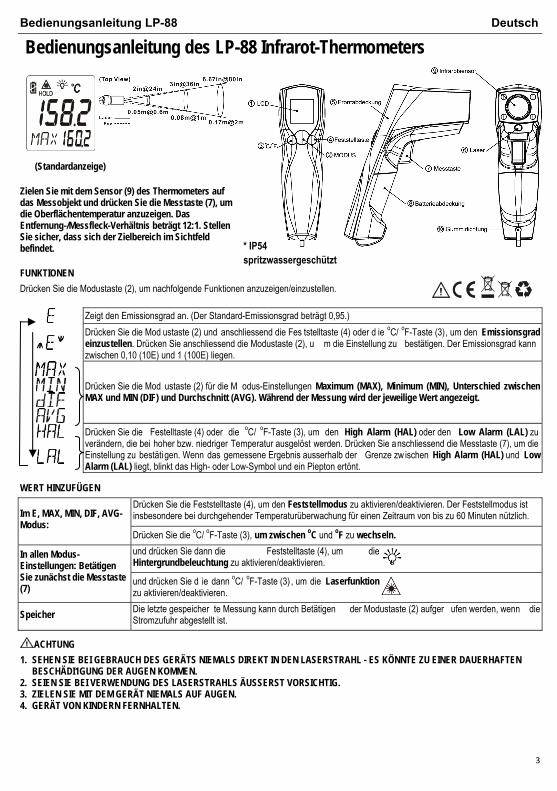
Bedienungsanleitung des LP-88 Infrarot-Thermometers
(Standardanzeige)
Zielen Sie mit dem Sensor (9) des Thermometers auf das Messobjekt und drücken Sie die Messtaste (7), um die Oberflächentemperatur anzuzeigen. Das Entfernung-/Messfleck-Verhältnis beträgt 12:1. Stellen Sie sicher, dass sich der Zielbereich im Sichtfeld befindet.
FUNKTIONEN
Drücken Sie die Modustaste (2), um nachfolgende Funktionen anzuzeigen/einzustellen.
Zeigt den Emissionsgrad an. (Der Standard-Emissionsgrad beträgt 0,95.)
Drücken Sie die Mod ustaste (2) und anschliessend die Fes tstelltaste (4) oder d ie oC/ oF-Taste (3), um den Emissionsgrad einzustellen. Drücken Sie anschliessend die Modustaste (2), u m die Einstellung zu bestätigen. Der Emissionsgrad kann zwischen 0,10 (10E) und 1 (100E) liegen.
Drücken Sie die Mod ustaste (2) für die M odus-Einstellungen Maximum (MAX), Minimum (MIN), Unterschied zwischen MAX und MIN (DIF) und Durchschnitt (AVG). Während der Messung wird der jeweilige Wert angezeigt.
Drücken Sie die Festelltaste (4) oder die oC/ oF-Taste (3), um den High Alarm (HAL) oder den Low Alarm (LAL) zu verändern, die bei hoher bzw. niedriger Temperatur ausgelöst werden. Drücken Sie anschliessend die Messtaste (7), um die Einstellung zu bestäti gen. Wenn das gemessene Ergebnis ausserhalb der Grenze zw ischen High Alarm (HAL) und Low Alarm (LAL) liegt, blinkt das High- oder Low-Symbol und ein Piepton ertönt.
WERT HINZUFÜGEN
Drücken Sie die Feststelltaste (4), um den Feststellmodus zu aktivieren/deaktivieren. Der Feststellmodus ist insbesondere bei durchgehender Temperaturüberwachung für einen Zeitraum von bis zu 60 Minuten nützlich. Im E, MAX, MIN, DIF, AVG-
Modus: Drücken Sie die oC/ oF-Taste (3), um zwischen oC und oF zu wechseln.
und drücken Sie dann die Feststelltaste (4), um die Hintergrundbeleuchtung zu aktivieren/deaktivieren.
In allen Modus-Einstellungen: Betätigen Sie zunächst die Messtaste (7)
und drücken Sie d ie dann oC/ oF-Taste (3) , um die Laserfunktion zu aktivieren/deaktivieren.
Speicher Die letzte gespeicher te Messung kann durch Betätigen der Modustaste (2) aufger ufen werden, wenn die Stromzufuhr abgestellt ist.
ACHTUNG
1. SEHEN SIE BEI GEBRAUCH DES GERÄTS NIEMALS DIREKT IN DEN LASERSTRAHL - ES KÖNNTE ZU EINER DAUERHAFTEN BESCHÄDI1GUNG DER AUGEN KOMMEN.
2. SEIEN SIE BEI VERWENDUNG DES LASERSTRAHLS ÄUSSERST VORSICHTIG. 3. ZIELEN SIE MIT DEM GERÄT NIEMALS AUF AUGEN. 4. GERÄT VON KINDERN FERNHALTEN.
* IP54 spritzwassergeschützt
Deutsch Bedienungsanleitung LP-88
4
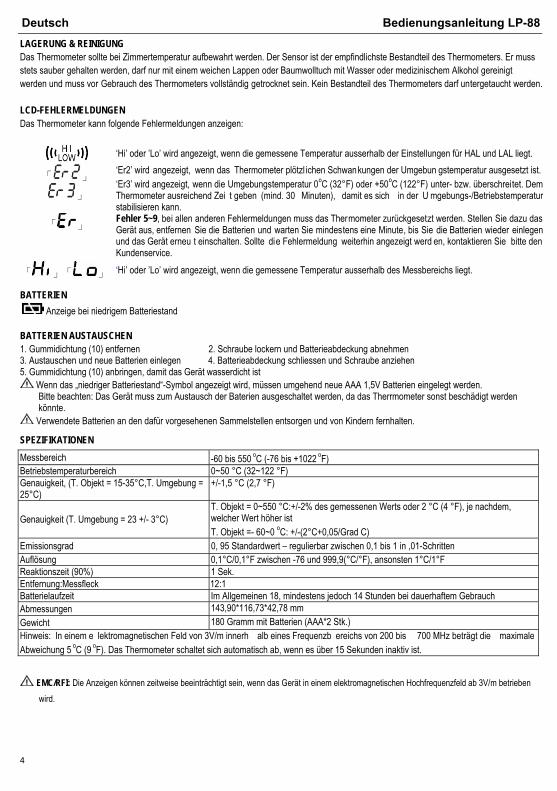
LAGERUNG & REINIGUNG Das Thermometer sollte bei Zimmertemperatur aufbewahrt werden. Der Sensor ist der empfindlichste Bestandteil des Thermometers. Er muss stets sauber gehalten werden, darf nur mit einem weichen Lappen oder Baumwolltuch mit Wasser oder medizinischem Alkohol gereinigt werden und muss vor Gebrauch des Thermometers vollständig getrocknet sein. Kein Bestandteil des Thermometers darf untergetaucht werden. LCD-FEHLERMELDUNGEN Das Thermometer kann folgende Fehlermeldungen anzeigen:
‘Hi’ oder ’Lo’ wird angezeigt, wenn die gemessene Temperatur ausserhalb der Einstellungen für HAL und LAL liegt.
「 」
」
‘Er2’ wird angezeigt, wenn das Thermometer plötzl ichen Schwankungen der Umgebun gstemperatur ausgesetzt ist. ‘Er3’ wird angezeigt, wenn die Umgebungstemperatur 0oC (32°F) oder +50oC (122°F) unter- bzw. überschreitet. Dem Thermometer ausreichend Zei t geben (mind. 30 Minuten), damit es sich in der U mgebungs-/Betriebstemperatur stabilisieren kann.
「 」 Fehler 5~9, bei allen anderen Fehlermeldungen muss das Thermometer zurückgesetzt werden. Stellen Sie dazu das Gerät aus, entfernen Sie die Batterien und warten Sie mindestens eine Minute, bis Sie die Batterien wieder einlegen und das Gerät erneu t einschalten. Sollte die Fehlermeldung weiterhin angezeigt werd en, kontaktieren Sie bitte den Kundenservice.
「 」「 」 ‘Hi’ oder ’Lo’ wird angezeigt, wenn die gemessene Temperatur ausserhalb des Messbereichs liegt.
BATTERIEN Anzeige bei niedrigem Batteriestand
BATTERIEN AUSTAUSCHEN 1. Gummidichtung (10) entfernen 2. Schraube lockern und Batterieabdeckung abnehmen 3. Austauschen und neue Batterien einlegen 4. Batterieabdeckung schliessen und Schraube anziehen 5. Gummidichtung (10) anbringen, damit das Gerät wasserdicht ist
Wenn das „niedriger Batteriestand“-Symbol angezeigt wird, müssen umgehend neue AAA 1,5V Batterien eingelegt werden. Bitte beachten: Das Gerät muss zum Austausch der Baterien ausgeschaltet werden, da das Therrmometer sonst beschädigt werden könnte.
Verwendete Batterien an den dafür vorgesehenen Sammelstellen entsorgen und von Kindern fernhalten.
SPEZIFIKATIONEN
Messbereich -60 bis 550 oC (-76 bis +1022 oF) Betriebstemperaturbereich 0~50 °C (32~122 °F) Genauigkeit, (T. Objekt = 15-35°C,T. Umgebung = 25°C)
+/-1,5 °C (2,7 °F)
Genauigkeit (T. Umgebung = 23 +/- 3°C) T. Objekt = 0~550 °C:+/-2% des gemessenen Werts oder 2 °C (4 °F), je nachdem, welcher Wert höher ist T. Objekt =- 60~0 oC: +/-(2°C+0,05/Grad C)
Emissionsgrad 0, 95 Standardwert – regulierbar zwischen 0,1 bis 1 in ,01-Schritten Auflösung 0,1°C/0,1°F zwischen -76 und 999,9(°C/°F), ansonsten 1°C/1°F Reaktionszeit (90%) 1 Sek. Entfernung:Messfleck 12:1 Batterielaufzeit Im Allgemeinen 18, mindestens jedoch 14 Stunden bei dauerhaftem Gebrauch Abmessungen 143,90*116,73*42,78 mm Gewicht 180 Gramm mit Batterien (AAA*2 Stk.) Hinweis: In einem e lektromagnetischen Feld von 3V/m innerh alb eines Frequenzb ereichs von 200 bis 700 MHz beträgt die maximale Abweichung 5 oC (9 oF). Das Thermometer schaltet sich automatisch ab, wenn es über 15 Sekunden inaktiv ist.
EMC/RFI: Die Anzeigen können zeitweise beeinträchtigt sein, wenn das Gerät in einem elektromagnetischen Hochfrequenzfeld ab 3V/m betrieben wird.
e
(6) Laser
ummidichtung
ng
Notice d’utilisation LP-88 Français
5
Instructions de fonctionnement du thermomètre infrarouge LP-88
(Écran par défaut)
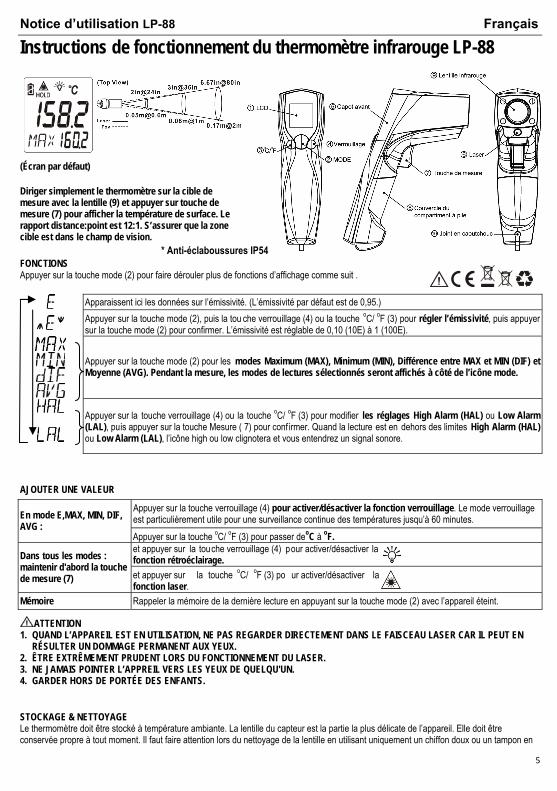
Diriger simplement le thermomètre sur la cible de mesure avec la lentille (9) et appuyer sur touche de mesure (7) pour afficher la température de surface. Le rapport distance:point est 12:1. S’assurer que la zone cible est dans le champ de vision.
FONCTIONS Appuyer sur la touche mode (2) pour faire dérouler plus de fonctions d’affichage comme suit .
Apparaissent ici les données sur l’émissivité. (L’émissivité par défaut est de 0,95.)
Appuyer sur la touche mode (2), puis la tou che verrouillage (4) ou la touche oC/ oF (3) pour régler l’émissivité, puis appuyer sur la touche mode (2) pour confirmer. L’émissivité est réglable de 0,10 (10E) à 1 (100E).
Appuyer sur la touche mode (2) pour les modes Maximum (MAX), Minimum (MIN), Différence entre MAX et MIN (DIF) et Moyenne (AVG). Pendant la mesure, les modes de lectures sélectionnés seront affichés à côté de l’icône mode.
Appuyer sur la touche verrouillage (4) ou la touche oC/ oF (3) pour modifier les réglages High Alarm (HAL) ou Low Alarm (LAL), puis appuyer sur la touche Mesure ( 7) pour conf irmer. Quand la lecture est en dehors des limites High Alarm (HAL) ou Low Alarm (LAL), l’icône high ou low clignotera et vous entendrez un signal sonore.
AJOUTER UNE VALEUR
Appuyer sur la touche verrouillage (4) pour activer/désactiver la fonction verrouillage. Le mode verrouillage est particulièrement utile pour une surveillance continue des températures jusqu’à 60 minutes. En mode E,MAX, MIN, DIF,
AVG : Appuyer sur la touche oC/ oF (3) pour passer deoC à oF. et appuyer sur la touche verrouillage (4) pour activer/désactiver la fonction rétroéclairage. Dans tous les modes :
maintenir d'abord la touche de mesure (7) et appuyer sur la touche oC/ oF (3) po ur activer/désactiver la
fonction laser.
Mémoire Rappeler la mémoire de la dernière lecture en appuyant sur la touche mode (2) avec l’appareil éteint.
ATTENTION 1. QUAND L’APPAREIL EST EN UTILISATION, NE PAS REGARDER DIRECTEMENT DANS LE FAISCEAU LASER CAR IL PEUT EN
RÉSULTER UN DOMMAGE PERMANENT AUX YEUX. 2. ÊTRE EXTRÊMEMENT PRUDENT LORS DU FONCTIONNEMENT DU LASER. 3. NE JAMAIS POINTER L’APPREIL VERS LES YEUX DE QUELQU'UN. 4. GARDER HORS DE PORTÉE DES ENFANTS.
STOCKAGE & NETTOYAGE Le thermomètre doit être stocké à température ambiante. La lentille du capteur est la partie la plus délicate de l’appareil. Elle doit être conservée propre à tout moment. Il faut faire attention lors du nettoyage de la lentille en utilisant uniquement un chiffon doux ou un tampon en
ntille infrarouge
* Anti-éclaboussures IP54

Français Notice d’utilisation LP-88
coton imbibé d’eau ou d’alcool, ce qui permet à la lentille d’être entièrement sèche avant d’utiliser le thermomètre. Ne pas submerger une quelconque partie du thermomètre.
MESSAGES D’ERREUR LCD Le thermomètre incorpore les messages visuels de diagnostic suivants :
‘Hi’ ou ’Lo’ s’affiche quand la température mesurée est en dehors des réglages HAL et LAL.
「 」
」
‘Er2’ s’affiche quand le thermomètre est exposé à des changements rapides de température ambiante. ‘Er3’ s’affiche quand la température ambiante est en dessous de 0oC (32°F) ou supérieure à +50oC (122°F). Il faut laisser du temps au thermomètre (30 minutes au minimum) pour se stabiliser à la température de fonctionnement/ambiante.
「 」 Erreur 5~9, pour tous les autres messages d’erreur il est néces saire de réini tialiser le thermomètre. Pour ce faire , éteindre l'appareil, retirer les piles et attendre au minimum une minute, réinsérer le s piles et mettre en march e. Si le message d'erreur demeure, contacter le service entretien pour obtenir une aide supplémentaire.
「 」「 」 ‘Hi’ ou ’Lo’ s’affiche quand la température mesurée est en dehors de la plage de lecture.
PILES Indication de niveau faible des piles
REMPLACEMENT DES PILES 1. Retirer le joint en caoutchouc (10) 2. Desserrer la vis et retirer le couvercle du compartiment à pile 3. Remplacer et réinstaller les nouvelles piles 4. Replacer le couvercle du compartiment à pile et revisser la vis 5. Fixer le joint en caoutchouc (10) pour éviter une perte d’étanchéité
Quand l’icône ‘Pile faible’ indique que le niveau des piles est faible, celles-ci doivent être remplacées immédiatement par des piles AAA, 1,5V. À noter : il est important d’éteindre l’instrument avant de remplacer les piles ou le thermomètre peut mal fonctionner.
Jeter sans délai les piles usagées et les tenir hors de portée des enfants.
SPÉCIFICATION Plage de lecture -60 à 550 oC (-76 à +1022 oF) Plage de fonctionnement 0~50°C (32~122°F) Précision, (Tobj=15-35°C,Tamb=25°C) +/-1,5°C (2,7°F)
Précision (Tamb=23 +/- 3°C) Tobj=0~550°C:+/-2% de la lecture ou 2°C (4°F) suivant la plus grande des occurrences Tobj=-60~0 oC: +/-(2°C+0,05/°C)
Emissivité 0,95 par défaut – réglable de 0,1 à 1 par palier de ,01 Résolution 0,1°C/0,1°F de -76 à 999,9(°C/°F), autrement 1°C/1°F Temps de réponse (90 %) 1sec Durée de vie de la pile Typ.18, 14 heures minimum d’utilisation continue Poids 180 grammes piles comprises (2 piles AAA*) Remarque : dans un champ électromagnétique de 3V/m de 200 à 700 MHz, l’erreur maximum est de 5 oC (9 oF). Le thermomètre s’arrêtera automatiquement s’il est laissé au repos pendant plus de 15 secondes.
EMC/RFI : les lectures peuvent être affectées si l’unité fonctionne dans une puissance de champ électromagnétique de fréquence radio d’environ 3 volts par mètre, mais la performance de l’instrument ne sera pas affectée de manière permanente
de mesure
(6) Laser
en caoutchouc
partiment à pile
6
Distance:Point 12:1
Dimensions 143,90*116,73*42,78 mm
Manual de uso LP-88 Italiano
7
Termometro a infrarossi LP-88 – Istruzioni d’uso
(Schermata predefinita)
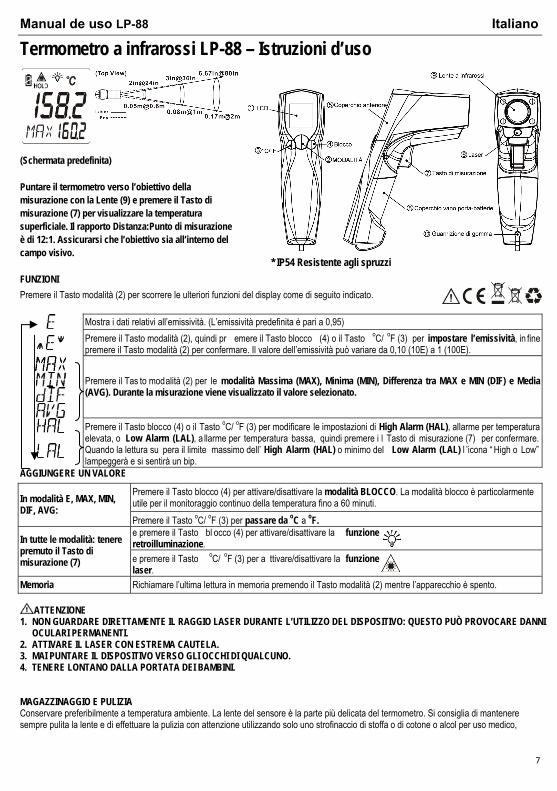
Puntare il termometro verso l’obiettivo della misurazione con la Lente (9) e premere il Tasto di misurazione (7) per visualizzare la temperatura superficiale. Il rapporto Distanza:Punto di misurazione è di 12:1. Assicurarsi che l’obiettivo sia all’interno del campo visivo.
FUNZIONI
Premere il Tasto modalità (2) per scorrere le ulteriori funzioni del display come di seguito indicato.
Mostra i dati relativi all’emissività. (L’emissività predefinita è pari a 0,95)
Premere il Tasto modalità (2), quindi pr emere il Tasto blocco (4) o il Tasto oC/ oF (3) per impostare l’emissività, in fine premere il Tasto modalità (2) per confermare. Il valore dell’emissività può variare da 0,10 (10E) a 1 (100E).
Premere il Tas to modalità (2) per le modalità Massima (MAX), Minima (MIN), Differenza tra MAX e MIN (DIF) e Media (AVG). Durante la misurazione viene visualizzato il valore selezionato.
Premere il Tasto blocco (4) o il Tasto oC/ oF (3) per modificare le impostazioni di High Alarm (HAL), allarme per temperatura elevata, o Low Alarm (LAL), a llarme per temperatura bassa, quindi premere i l Tasto di misurazione (7) per confermare. Quando la lettura su pera il limite massimo dell’ High Alarm (HAL) o minimo del Low Alarm (LAL) l ’icona “ High o Low” lampeggerà e si sentirà un bip.
AGGIUNGERE UN VALORE
Premere il Tasto blocco (4) per attivare/disattivare la modalità BLOCCO. La modalità blocco è particolarmente utile per il monitoraggio continuo della temperatura fino a 60 minuti. In modalità E, MAX, MIN,
DIF, AVG: Premere il Tasto oC/ oF (3) per passare da oC a oF. e premere il Tasto bl occo (4) per attivare/disattivare la funzione retroilluminazione. In tutte le modalità: tenere
premuto il Tasto di misurazione (7) e premere il Tasto oC/ oF (3) per a ttivare/disattivare la funzione
laser.
Memoria Richiamare l’ultima lettura in memoria premendo il Tasto modalità (2) mentre l’apparecchio è spento.
ATTENZIONE 1. NON GUARDARE DIRETTAMENTE IL RAGGIO LASER DURANTE L’UTILIZZO DEL DISPOSITIVO: QUESTO PUÒ PROVOCARE DANNI
OCULARI PERMANENTI. 2. ATTIVARE IL LASER CON ESTREMA CAUTELA. 3. MAI PUNTARE IL DISPOSITIVO VERSO GLI OCCHI DI QUALCUNO. 4. TENERE LONTANO DALLA PORTATA DEI BAMBINI. MAGAZZINAGGIO E PULIZIA Conservare preferibilmente a temperatura ambiente. La lente del sensore è la parte più delicata del termometro. Si consiglia di mantenere sempre pulita la lente e di effettuare la pulizia con attenzione utilizzando solo uno strofinaccio di stoffa o di cotone o alcol per uso medico,
* IP54 Resistente agli spruzzi
Italiano Manual de uso LP-88
8
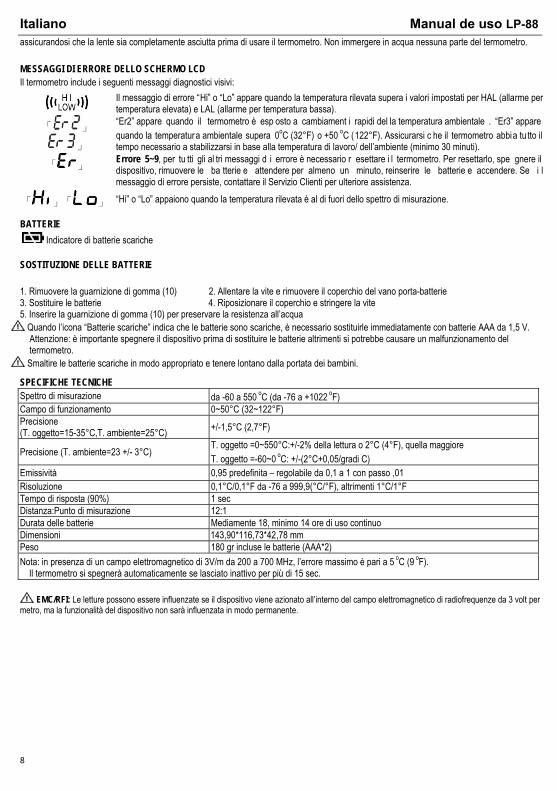
assicurandosi che la lente sia completamente asciutta prima di usare il termometro. Non immergere in acqua nessuna parte del termometro. MESSAGGI DI ERRORE DELLO SCHERMO LCD Il termometro include i seguenti messaggi diagnostici visivi:
Il messaggio di errore “Hi” o “Lo” appare quando la temperatura rilevata supera i valori impostati per HAL (allarme per temperatura elevata) e LAL (allarme per temperatura bassa).
「 」
」
“Er2” appare quando il termometro è esp osto a cambiament i rapidi del la temperatura ambientale . “Er3” appare quando la temperatura ambientale supera 0oC (32°F) o +50 oC (122°F). Assicurarsi c he il termometro abbia tu tto il tempo necessario a stabilizzarsi in base alla temperatura di lavoro/ dell’ambiente (minimo 30 minuti).
「 」 Errore 5~9, per tu tti gli al tri messaggi d i errore è necessario r esettare i l termometro. Per resettarlo, spe gnere il dispositivo, rimuovere le ba tterie e attendere per almeno un minuto, reinserire le batterie e accendere. Se i l messaggio di errore persiste, contattare il Servizio Clienti per ulteriore assistenza.
「 」「 」 “Hi” o “Lo” appaiono quando la temperatura rilevata è al di fuori dello spettro di misurazione.
BATTERIE Indicatore di batterie scariche
SOSTITUZIONE DELLE BATTERIE
1. Rimuovere la guarnizione di gomma (10) 2. Allentare la vite e rimuovere il coperchio del vano porta-batterie 3. Sostituire le batterie 4. Riposizionare il coperchio e stringere la vite 5. Inserire la guarnizione di gomma (10) per preservare la resistenza all’acqua
Quando l’icona “Batterie scariche” indica che le batterie sono scariche, è necessario sostituirle immediatamente con batterie AAA da 1,5 V. Attenzione: è importante spegnere il dispositivo prima di sostituire le batterie altrimenti si potrebbe causare un malfunzionamento del termometro.
Smaltire le batterie scariche in modo appropriato e tenere lontano dalla portata dei bambini.
SPECIFICHE TECNICHE Spettro di misurazione da -60 a 550 oC (da -76 a +1022 oF) Campo di funzionamento 0~50°C (32~122°F) Precisione (T. oggetto=15-35°C,T. ambiente=25°C) +/-1,5°C (2,7°F)
Precisione (T. ambiente=23 +/- 3°C) T. oggetto =0~550°C:+/-2% della lettura o 2°C (4°F), quella maggiore T. oggetto =-60~0 oC: +/-(2°C+0,05/gradi C)
Emissività 0,95 predefinita – regolabile da 0,1 a 1 con passo ,01 Risoluzione 0,1°C/0,1°F da -76 a 999,9(°C/°F), altrimenti 1°C/1°F Tempo di risposta (90%) 1 sec Distanza:Punto di misurazione 12:1 Durata delle batterie Mediamente 18, minimo 14 ore di uso continuo Peso 180 gr incluse le batterie (AAA*2) Nota: in presenza di un campo elettromagnetico di 3V/m da 200 a 700 MHz, l’errore massimo è pari a 5 oC (9 oF). Il termometro si spegnerà automaticamente se lasciato inattivo per più di 15 sec.
EMC/RFI: Le letture possono essere influenzate se il dispositivo viene azionato all’interno del campo elettromagnetico di radiofrequenze da 3 volt per metro, ma la funzionalità del dispositivo non sarà influenzata in modo permanente.
misurazione
(6) Laser
ione di gomma
ta-batterie
Dimensioni 143,90*116,73*42,78 mm

Manual de uso LP-88 Español
9
Instrucciones de uso del termómetro infrarrojo LP-88
(Pantalla predeterminada)
Apunte la lente (9) del termómetro hacia el objetivo que desea medir y pulse el gatillo de medición (7) para visualizar la temperatura de la superficie. La relación distancia- objetivo es de 12:1. Asegúrese de que el área del objetivo a medir se encuentre dentro del campo de visión.
FUNCIONES
Presione el botón MODO (2) para desplazarse por las siguientes funciones de la pantalla:
Aquí se indican los datos de emisividad (la emisividad predeterminada es de 0.95).
Presione el botón MODO (2) y luego el botón BLOQUEO (4) o oC/ oF (3) para ajustar la emisividad. Presione nuevamente el botón MODO (2) para confirmar los cambios. La emisividad se puede ajustar de 0.10 (10E) a 1 (100E).
Presione el botón M ODO (2) para seleccionar los modos máximo (MAX), mínimo (MIN), diferencia entre máximo y mínimo (DIF) y promedio (AVG). Durante la medición, la lectura del modo seleccionado aparecerá junto al símbolo correspondiente.
Presione el botón BL OQUEO (4) o oC/ oF (3) para ajustar los val ores de alarma alta (HAL) o alarma baja (LAL). Pulse el gatillo de medición (7) para confirmar los cambios. Si la lectura sobrepasa el rango establecido de alarma alta (HAL) o baja (LAL), el símbolo correspondiente aparecerá en la pantalla de modo intermitente y se emitirá un sonido de aviso.
FUNCIONES ADICIONALES
Presione el botón BLOQUEO (4) para encender o apagar el modo de BLOQUEO. Este modo sirve para efectuar un control continuo de las temperaturas hasta por 60 minutos. En los modos E,MAX, MIN,
DIF y AVG: Presione el botón oC/ oF (3) para cambiar entre oC y oF. y presione el botón BLOQUEO (4) para encender o apagar la función de iluminación de fondo. En todos los modos:
Primero mantenga apretado el gatillo de medición (7) y presione el botón oC/ oF (3) para encender o apagar la función de
láser.
Memoria Presione el botón MODO (2) para consultar la última lectura guardada en la memoria cuando el aparato esté apagado.
PRECAUCIÓN
1. CUANDO EL APARATO ESTÉ EN USO, NO MIRE DIRECTAMENTE AL RAYO LÁSER. ESTO PUEDE OCASIONAR DAÑO PERMANENTE EN LOS OJOS.
2. TENGA SUMA PRECAUCIÓN AL UTILIZAR EL LÁSER. 3. NUNCA APUNTE EL APARATO A LOS OJOS DE NINGUNA PERSONA. 4. MANTENGA EL APARATO FUERA DEL ALCANCE DE LOS NIÑOS.
ALMACENAMIENTO Y LIMPIEZA
* Protección contra salpicaduras de agua IP54

Español Manual de uso LP-88
10
Conserve el aparato a temperatura ambiente. La lente del sensor es el componente más delicado del termómetro y debe mantenerse limpia en todo momento. Tenga cuidado al limpiar la lente y utilice solamente un paño suave o un trozo de algodón humedecido con agua o alcohol medicinal. Asegúrese de que la lente esté completamente seca antes de utilizar el termómetro. No sumerja ninguna parte del termómetro en ningún tipo de líquido. AVISOS DE ERROR EN LA PANTALLA LCD
El termómetro incluye los siguientes avisos visuales de diagnóstico:
Cuando la temperatura medida se encuentra fuera del rango establecido de alarma al ta (HAL) y baja (LAL), a parece el aviso ‘Hi’ o ’Lo’.
「 」
」
El aviso ‘Er2’ aparece cuando el termómet ro está expuesto a cambios bruscos en la temperatura del amb iente. El aviso ‘Er3’ aparece cuando la temperatura del ambiente es menor a 0 oC (32°F) o mayor a 50 oC (1 22°F). El termómetro necesita un rango de tiempo (mínimo 30 minutos) para adaptarse a la temperatura del ambiente.
「 」 En el caso de que ap arezca cualquier otro aviso de error (5~9), deberá reiniciar el termómetro. Para ello, a páguelo, retire la batería, espere por lo menos un minuto, coloque nuevamente la batería y encienda el termómetro. Si el aviso de error persiste, diríjase al servicio técnico para obtener ayuda.
「 」「 」 Los avisos ‘Hi’ y ’Lo’ aparecen cuando la temperatura medida se encuentra fuera del rango de medición.
BATERÍAS Señal de batería baja
SUSTITUCIÓN DE LA BATERÍA
1. Retire la junta de goma (10) 2. Afloje el tornillo y abra la tapa de la batería (8) 3. Cambie la batería 4. Coloque la tapa de la batería (8) y apriete el tornillo 5. Coloque la junta de goma (10) para garantizar que el termómetro quede protegido contra el agua.
Cuando la señal de ‘batería baja’ aparezca, se deberá reemplazar la batería inmediatamente. Utilice solamente baterías AAA, 1.5V. Importante: Apague el aparato antes de cambiar la batería. De lo contrario, el termómetro puede funcionar incorrectamente.
Deseche las baterías usadas inmediatamente y manténgalas fuera del alcance de los niños.
ESPECIFICACIONES Rango de medición de -60 a +550 oC (de -76 a +1022 oF) Rango de operación de 0 a 50°C (de 32 a 122°F) Precisión (temp. obj.=15-35°C, temp. amb.=25°C) +/-1.5°C (2.7°F)
Precisión (temp. amb. =23 +/- 3°C) Temp. obj.= de 0 a 550°C:+/-2% de lectura o 2°C (4°F), lo que sea mayor Temp. obj.= de -60 a 0 oC: +/-(2°C+0.05/grados C)
Emisividad 0.95 predeterminado – ajustable de 0.1 a 1, en incrementos de 01 Resolución 0.1°C/0.1°F de -76 a 999.9(°C/°F), de lo contrario 1°C/1°F Tiempo de respuesta (90%) 1 segundo Relación distancia-objetivo 12:1 Vida útil de la batería Típicamente 18 horas, mín. 14 horas de uso continuo Peso 180 gramos (6.35 onzas) incluidas las baterías (AAA*2 piezas) Nota: En un campo electromagnético de 3V/m entre 200 a 700 MHz, el margen máximo de error es de 5 oC (9 oF). El termómetro se apaga automáticamente si se deja de utilizar por más de 15 segundos.
EMC/RFI: Las lecturas pueden verse afectadas si el aparato es utilizado dentro de un campo electromagnético de radiofrecuencia con potencia de aproximadamente 3 voltios por metro. Sin embargo, el funcionamiento del aparato no se afectará de forma permanente.
medición
(6) Láser
unta de goma
a
Dimensiones 143.90*116.73*42.78 mm (5.67×4.60×1.68 pulgadas)

1
REFCO Manufacturing Ltd. Industriestrasse 11 6285 Hitzkirch - Switzerland Telefon +41 41 919 72 82 Telefax +41 41 919 72 83 [email protected] www.refco.ch