instruction mi iap10-t/igp10-t - cascade...
TRANSCRIPT

MI IAP10-T/IGP10-TMay 2010
Instruction
I/A Series® Intelligent Pressure Transmitters
IAP10 Absolute Pressure and IGP10 Gauge Pressurewith HART Communication
Installation, Operation, Calibration, Configuration, and Maintenance

MI IAP10-T/IGP10-T – May 2010

Contents
Figures..................................................................................................................................... v
Tables..................................................................................................................................... vi
1. Introduction ...................................................................................................................... 1
General Description .................................................................................................................. 1
Reference Documents ............................................................................................................... 1
Transmitter Identification ......................................................................................................... 2
Standard Specifications ............................................................................................................. 5
Product Safety Specifications ................................................................................................... 11ATEX and IECEx Warnings .............................................................................................. 14ATEX Compliance Documents .......................................................................................... 14IECEx Compliance Documents ......................................................................................... 14
2. Installation ...................................................................................................................... 15
Transmitter Mounting ............................................................................................................ 15Sanitary Process Connection .............................................................................................. 16Pulp and Paper Process Connection ................................................................................... 18
Sleeve Type Connector .................................................................................................. 18Threaded Type Connector ............................................................................................ 19
Typical Transmitter Piping ..................................................................................................... 20
Positioning the Housing .......................................................................................................... 21
Positioning the Display ........................................................................................................... 22
Setting the Write Protect Jumper ............................................................................................ 22
Cover Locks ............................................................................................................................ 23
Wiring .................................................................................................................................... 23Accessing Transmitter Field Terminals ............................................................................... 23Wiring the Transmitter to a Control Loop ......................................................................... 24Multidrop Communication ................................................................................................ 27Connecting the Transmitter to an I/A Series System .......................................................... 28
3. Operation Via Local Display ........................................................................................... 29
Entering Numerical Values ..................................................................................................... 30
Reranging ................................................................................................................................ 31
Viewing the Database .............................................................................................................. 31
Viewing the Pressure Range .................................................................................................... 31
Testing the Display ................................................................................................................. 31
Error Messages ...................................................................................................................... 32
iii

MI IAP10-T/IGP10-T – May 2010 Contents
4. Calibration ...................................................................................................................... 33
General Calibration Notes ...................................................................................................... 33
Calibration Setup .................................................................................................................... 35Setup of Electronic Equipment ........................................................................................... 36Field Calibration Setup ...................................................................................................... 36Bench Calibration Setup .................................................................................................... 37
Calibration Using a PC20 ....................................................................................................... 37
Calibration Using a PC50 ....................................................................................................... 37
Calibration Using a HART Communicator ............................................................................ 37
Calibration Using the Optional Local Display ........................................................................ 37Zero Adjustment Using External Zero Button .................................................................... 40
Error Messages ...................................................................................................................... 42
5. Configuration.................................................................................................................. 43
Configurable Parameters ......................................................................................................... 43
Configuration Using a PC20 ................................................................................................... 44
Configuration Using a PC50 ................................................................................................... 44
Configuration Using a HART Communicator ........................................................................ 44
Configuration Using the Optional Local Display .................................................................... 44
Character Lists ........................................................................................................................ 52
Error Messages ........................................................................................................................ 52
6. Maintenance.................................................................................................................... 55
Error Messages ........................................................................................................................ 55
Parts Replacement ................................................................................................................... 55Replacing the Terminal Block Assembly ............................................................................. 55Replacing the Electronics Module Assembly ....................................................................... 56Removing and Reinstalling a Housing Assembly ................................................................ 57Adding the Optional Display ............................................................................................. 58Replacing the Sensor Assembly ........................................................................................... 58
Index .................................................................................................................................... 59
iv

v
Figures
1 Transmitter Identification ............................................................................................ 3 2 Top Level Structure Diagram ....................................................................................... 4 3 Minimum Allowable Absolute Pressure vs.
Process Temperature with Fluorinert Fill Fluid ............................................................ 7 4 IAP10 and IGP10 Transmitter Mounting .................................................................... 16 5 Mounting of Transmitter with Sanitary Tri-Clamp Type Connection ......................... 16 6 Mounting of Transmitter with Sanitary Mini Tank Spud Seal ..................................... 17 7 Welding Procedure ...................................................................................................... 18 8 Mounting of Transmitter with Sleeve Type Pulp and Paper Process Connection ......... 19 9 Mounting of Transmitter with Threaded Type Pulp and Paper Process Connection .... 20
10 Typical Transmitter Piping .......................................................................................... 21 11 Hot Process Piping ....................................................................................................... 21 12 Housing Screw or Clip Location .................................................................................. 22 13 Cover Lock Location .................................................................................................... 23 14 Accessing Field Terminals ............................................................................................ 24 15 Identification of Field Terminals .................................................................................. 24 16 Supply Voltage and Loop Load .................................................................................... 25 17 Loop Wiring Transmitters ........................................................................................... 27 18 Wiring Several Transmitters to a Common Power Supply ........................................... 27 19 Typical Multidrop Network ......................................................................................... 28 20 Local Display Module .................................................................................................. 29 21 Top Level Structure Diagram ....................................................................................... 30 22 Display Test Segment Patterns ..................................................................................... 32 23 4 to 20 mA Output Calibration Setup of Electronic Equipment .................................. 36 24 Transmitter Piping ....................................................................................................... 36 25 Bench Calibration Setup .............................................................................................. 37 26 Calibration Structure Diagram ..................................................................................... 39 27 Calibration Structure Diagram (Continued) ................................................................ 40 28 Configuration Structure Diagram ................................................................................ 46 29 Configuration Structure Diagram (Continued) ............................................................ 47 30 Configuration Structure Diagram (Continued) ............................................................ 48 31 Replacing the Electronics Module Assembly and Display ............................................. 57

vi
Tables
1 Reference Documents .................................................................................................. 1 2 Minimum Loop Load and Supply Voltage Requirements ............................................. 9 3 Electrical Safety Specifications ...................................................................................... 12 4 Operation Error Messages ............................................................................................ 32 5 Calibration Menu ........................................................................................................ 38 6 Calibration Error Messages .......................................................................................... 42 7 Configurable Parameters .............................................................................................. 43 8 Configuration Menu .................................................................................................... 45 9 Alphanumeric Character List ........................................................................................ 52
10 Numeric Character List ................................................................................................ 52 11 Configuration Error Messages ...................................................................................... 52

1. Introduction
General DescriptionThe IAP10-T Intelligent Absolute Pressure and IGP10-T Intelligent Gauge Pressure Transmitters measure pressure by applying the pressure to a silicon strain gauge microsensor within the sensor assembly. This microsensor converts the pressure to a change in resistance, and the resistance change is converted to a 4 to 20 mA or digital signal proportional to the pressure. This measurement signal is transmitted to remote receivers over the same two wires that supply power to the transmitter electronics. These wires also carry two-way data signals between the transmitter and remote communication devices.
The transmitter allows direct analog connection to common receivers while still providing full Intelligent Transmitter Digital Communications using a HART Communicator.
The transmitter can be supplied with direct connected pressure seals or with remote pressure seals.
For more detailed information on the principle of operation of the transmitter, refer to document TI 037-096, available from Invensys.
Reference Documents
Table 1. Reference Documents
Document Description
Dimensional Prints
DP 020-217 Dimensional Print – IAP10 and IGP10 Pressure Transmitters with Pulp and Paper Process Connections
DP 020-218 Dimensional Print – IAP10 and IGP10 Pressure Transmitters with Sanitary Tri-Clamp Process Connections
DP 020-219 Dimensional Print – IAP10 and IGP10 Pressure Transmitters with Sanitary Mini Tank Spud Process Connections
DP 020-342 Dimensional Print – PSFLT Pressure Seals
DP 020-343 Dimensional Print – PSFPS and PSFES Pressure Seals
DP 020-344 Dimensional Print – IGP10 Gauge Pressure Transmitters (High Pressure)
DP 020-345 Dimensional Print – PSFAR Pressure Seals
DP 020-346 Dimensional Print – PSFAD Pressure Seals
DP 020-347 Dimensional Print – PSTAR Pressure Seals
DP 020-348 Dimensional Print – PSTAD Pressure Seals
DP 020-349 Dimensional Print – PSISR Pressure Seals
DP 020-350 Dimensional Print – PSISD Pressure Seals
DP 020-351 Dimensional Print – PSSCR Pressure Seals
DP 020-353 Dimensional Print – PSSCT Pressure Seals
1

MI IAP10-T/IGP10-T – May 2010 1. Introduction
Transmitter IdentificationSee Figure 1 for transmitter data plate contents. For a complete explanation of the Model Number code, see the parts list. The firmware version is identified on the top line of the display when VIEW DB (View Database) is selected in the top level structure (see Figure 2).
DP 020-354 Dimensional Print – PSSSR Pressure Seals
DP 020-355 Dimensional Print – PSSST Pressure Seals
DP 020-447 Dimensional Print – IAP10 and IAP20 Absolute Pressure and IGP10, IGP20, IGP25, and IGP50 Gauge Pressure Transmitters
Parts Lists
PL 009-006 Parts List – IAP10 Absolute and IGP10 Gauge Pressure Transmitters
PL 009-010 Parts List – IGP10 High Gauge Pressure Transmitter
Instructions
MI 020-366 Instruction – I/A Series Intelligent Pressure Transmitters Operation, Configuration, and Calibration Using a HART Communicator
MI 020-369 Instruction – Pressure Seals
MI 020-427 Instruction – Intrinsic Safety Connection Diagrams and Nonincendive Circuits
MI 020-495 Instruction – PC20 Intelligent Transmitter Configurator
MI 020-501 Instruction – PC50 Intelligent Field Device Tool (Installation and Parts List)
MI 020-520 Instruction – PC50 Intelligent Field Device Tool with Advanced DTM Library
MI 022-138 Instruction – Bypass Manifolds - Installation and Maintenance
Technical Information
TI 37-75b Technical Information – Transmitter Material Selection Guide
TI 037-097 Technical Information – Process Sealing of I/A Series Pressure Transmitters for use in Class 1, Zone 0, 1, and 2 Hazardous Locations
Table 1. Reference Documents (Continued)
Document Description
2

1. Introduction MI IAP10-T/IGP10-T – May 2010
Figure 1. Transmitter Identification
CALIBRATED RANGE
MAXIMUM WORKING PRESSURE
MODEL CODE
SERIAL NUMBER
STYLE
PLANT AND DATE OF MANUFACTURE
MODELREFERENCEAUX. SPEC.SUPPLYCUST. TAG
STCAL. RANGE
ORIGINMWP
CUSTOMER TAG
SUPPLY VOLTAGE
AUXILIARY SPECIFICATION CODE
3

MI IAP10-T/IGP10-T – May 2010 1. Introduction
Figure 2. Top Level Structure Diagram
N
N
N
N
CONFIG
CALIB
VIEW DB
TST DSP
N
LOCAL MODE, GO TO CONFIGURATION MENU
OFF-LINE, GO TO CALIBRATION MENU
ON-LINE MODE
ON-LINE MODE
STEP THROUGH DATABASE DISPLAY
STEP THROUGH DISPLAY TEST PATTERN
E
E
E
E
E
CANCEL EXIT MODE SELECT MENU, RETURN TO ON-LINE MODE
NE
NE
N = NEXT BUTTON E = ENTER BUTTON
(measurement M1 or M2) (measurement M2 or M1)E E
N
N
RERANGE LOCAL MODE, GO TO RERANGE MENUE
N
4

1. Introduction MI IAP10-T/IGP10-T – May 2010
Standard Specifications
Operative Limits
Span and Range Limits
Influence Operative Limits
Sensor Body Temperature(a)
Silicone Fill FluidFluorinert Fill FluidNeobee Fill Fluidpvdf Inserts
-46 and +121°C (-50 and +250°F)-29 and +121°C (-20 and +250°F)-18 and +121°C (0 and 250°F)-7 and +82°C (20 and 180°F)
Electronics TemperatureWith LCD Display
-40 and +85°C (-40 and +185°F)(b)
-40 and +85°C (-40 and +185°F)(c)
Relative Humidity 0 and 100%
Supply Voltage 11.5 and 42 V dc
Output Load(d) 0 and 1450 ohms
Mounting Position No Limit
Vibration 6.3 mm (0.25 in) double amplitude from 5 to 15 Hz with aluminum housing and from 5 to 9 Hz with 316 ss housing.0 to 30 m/s (0 to 3 “g”) from 15 to 500 Hz with aluminum housing and0 to 10 m/s (0 to 1 “g”) from 9 to 500 Hz with 316 ss housing.
(a) Refer to MI 020-369 for temperature limits with pressure seals.
(b) -40 and +75°C (-40 and +167°F) for transmitters with ATEX flameproof classification.(c) Display updates are slowed and readability decreased at temperatures below -20°C (-4°F).
(d) 250 Ω minimum load is required for communication with a HART Communicator.
Span Limit Code Span Limits(a) Range Limits(a)
C 7 and 210 kPa28 and 840 inH2O
0 and 210 kPa0 and 840 inH2O
D 0.07 and 2.1 MPa10 and 300 psi23 and 690 ftH2O
0 and 2.1 MPa0 and 300 psi0 and 690 ftH2O
E 0.7 and 21 MPa100 and 3000 psi
0 and 21 MPa0 and 3000 psi
F(b,c) 14 and 42 MPa2000 and 6000 psi
0 and 42 MPa0 and 6000 psi
G(b,c) 35 and 105 MPa5000 and 15,000 psi
0 and 105 MPa0 and 15,000 psi
H(b,c) 70 and 210 MPa10,000 and 30,000 psi
0 and 210 MPa0 and 30,000 psi
K(b,c) 17 and 52 MPa2500 and 7500 psi
0 and 52 MPa0 and 7500 psi
5

MI IAP10-T/IGP10-T – May 2010 1. Introduction
Maximum Overrange Pressure and Proof Pressure
CAUTION!!!1. Exceeding the overrange pressure limit for the transmitter can cause damage to the transmitter, degrading its performance.2. The transmitter may be nonfunctional after application of the proof pressure.
Suppressed Zero
For applications requiring a suppressed zero, the maximum span and the upper and lower range limits of the transmitter can not be exceeded.
Sensor Fill Fluid
Silicone Oil (DC 200) or Fluorinert (FC-43)Neobee M-20 (for transmitters with sanitary process connection) Not applicable with IGP10 Span Limit Codes G and H.
Minimum Allowable Absolute Pressure vs. Process Temperature
IGP10: Not Applicable.IAP10: With Silicone Fill Fluid: up to 120 °C (250 °F) at full vacuum.
With Fluorinert Fill Fluid: Refer to Figure 3.
(a)Values listed are in absolute or gauge pressure units, as applicable.
(b)Not available with pressure seals.(c)Applicable to IGP10 only
Span LimitCode
Maximum Overrange Pressure(a) Proof Pressure(a)(c)
C 0.31 MPa (45 psi) 827 kPa (120 psi)
D 3.1 MPa (450 psi) 8.27 MPa (1200 psi)
E 31 MPa (4500 psi) 79.3 MPa (11,500 psi)
F(b) 58 MPa (8400 psi) 152 MPa (22,000 psi)
G(b) 137 MPa (19,500 psi) 310 MPa (45,000 psi)
H(b) 231 MPa (33,000 psi) 567 MPa (81,000 psi)
K(b) 79 MPa (11,250 psi) 155 MPa (22,500 psi)(a)Values listed are in absolute or gauge pressure units, as applicable.
(b)Applicable to IGP10 only.(c)Meets ANSI/ISA Standard S82.03-1988
Span Limit Code Span Limits(a) Range Limits(a)
6

1. Introduction MI IAP10-T/IGP10-T – May 2010
Figure 3. Minimum Allowable Absolute Pressure vs.Process Temperature with Fluorinert Fill Fluid
Mounting Position
The transmitter can be mounted in any orientation. It can be directly mounted to the process with either the direct connected or pipe mounted designs. The housing can be rotated up to one full turn to any desired position for access to adjustments, display, or conduit connections. See “Positioning the Housing” on page 21. The display (if present) can also be rotated in the housing to any of four different positions at 90° increments. See “Positioning the Display” on page 22.
NOTEPosition effect zero shift for all calibrated spans can be eliminated by readjusting zero output after installation.
Approximate Mass
Process Connections
IAP10 and IGP10 transmitters can be directly connected to the process using its 1/2 NPT external thread or optional G 1/2 B connection. If the optional mounting bracket is used, the transmitter can be connected to the process via the 1/2 NPT external thread, 1/4 NPT internal thread, or optional G 1/2 B connection.
Using the optional mounting bracket, IGP10 transmitters with Span Limit Code G can connect to the process via the 1/4 NPT internal thread, G 1/2 B external thread, or Autoclave F-250-C with 9/16-18 internal gland thread.
IAP10, IGP10:With Optional 316 ss Housing:With Pressure Seals:
1.5 kg (3.3 lb)Add 1.1 kg (2.4 lb)Varies with seal used
TEMPERATURE °F
TEMPERATURE °C
AB
SO
LUT
E P
RE
SS
UR
E, m
mH
g
-25 0 50 100 150 200 250
20
40
60
80
100
120
140
-80 0 30 60 90 120
Fluorinert FC-43 Fluid
(operating area above curve)
7

MI IAP10-T/IGP10-T – May 2010 1. Introduction
Using the optional mounting bracket, IGP10 transmitters with Span Limit Code H are connected using the Autoclave F-250-C with 9/16-18 internal gland thread.
IAP10 and IGP10 Transmitters with a sanitary process connection connect to the process via a Tri-Clamp process connector, a threaded connection, or a mini tank spud.
IAP10 and IGP10 Transmitters with a pulp and paper process connection connect to the process via a threaded or sleeve type connection.
Process Wetted Materials
IAP10 or IGP10Diaphragm: Co-Ni-Cr, 316L ss, or Hastelloy C Process Connectors: 316L ss or Hastelloy C
IGP10 with Span Limit Code G: 15-5 ss or Inconel X-750
IGP10 with Span Limit Code H: 13-8 Mo ss
Pressure Seals: Refer to MI 020-369Sanitary Process Connections: 316L ss, Hastelloy C
Pulp and Paper Process Connections 316L ss, Hastelloy C
Reference Pressure Side (Low Pressure Side) Materials
IGP10: Silicon, Pyrex, RTV, 316L ss, and CeramicNot applicable with IGP10 Span Limit Codes G and H
Process Pressure and Temperature Limits for Pressure Seals
Refer to MI 020-369
Electrical Connections
Field wires enter through 1/2 NPT, PG 13.5, or M20 threaded entrances on either side of the electronics housing. Leads terminate under screw terminals and washers on the terminal block in the field terminal compartment. To maintain RFI/EMI, environmental, and explosionproof ratings, unused conduit connection must be plugged with metal plug (provided), inserted to five full threads for 1/2 NPT connections; seven full threads for M20 and PG 13.5 connections
Field Wiring Reversal
Accidental reversal of field wiring will not damage the transmitter, provided the current is limited to 1 A or less by active current limiting or loop resistance. Sustained currents of 1 A will not damage the electronics module or sensor but could damage the terminal block assembly and external instruments in the loop.
Adjustable Damping
The transmitter response time is normally 1.0 second or the electronically adjustable setting of 0.00 (none), 0.25, 0.50, 1, 2, 4, 8, 16, or 32 seconds, whichever is greater, for a 90% recovery from an 80% input step as defined in ANSI/ISA S51.1.
8

1. Introduction MI IAP10-T/IGP10-T – May 2010
Output Signal
4 to 20 mA dc linear.
Zero and Span Adjustments
Zero and span are adjustable from the HART Communicator. They are also adjustable at the transmitter using the display. An optional external self-contained moisture sealed pushbutton assembly allows local resetting of zero without removing the housing cover.
Power-up Time
Less than 2.0 seconds for output to reach the first valid measurement, then at the electronic damping rate to reach the final measured variable value.
Supply Voltage
Power supply must be capable of providing 22 mA when the transmitter is configured for 4 to 20 mA output. Ripple of up to 2 V pp (50/60/100/120 Hz) is tolerable, but instantaneous voltage must remain within specified range.
The supply voltage and loop load must be within specified limits. This is explained in detail in “Wiring” on page 23. A summary of the minimum requirements is listed in the following table.
Electrical Ground Connections
The transmitter is equipped with an internal ground connection within the field wiring compartment and an external ground connection at the base of the electronics housing. To minimize galvanic corrosion, place the wire lead or contact between the captive washer and loose washer on the external ground screw. If shielded cable is used, earth (ground) the shield at the field enclosure only. Do not ground the shield at the transmitter.
HART Communicator Connection Points
The HART Communicator can be connected in the loop as shown in “Wiring” on page 23. It can also be connected directly to the transmitter at the two upper banana plug receptacles.
Test Points
The two lower banana plug receptacles (designated CAL) can be used to check transmitter output when configured for 4 to 20 mA. Measurements should be 100-500 mV dc for 0-100% transmitter output.
Table 2. Minimum Loop Load and Supply Voltage Requirements
HART Communication
No HART Communication
Minimum Resistance 250 Ω 0Minimum Supply Voltage 17 V 11.5 V
9

MI IAP10-T/IGP10-T – May 2010 1. Introduction
Remote Communications
The transmitter communicates bidirectionally over the 2-wire field wiring to a HART Communicator. The information that can be continuously displayed is:
♦ Process Measurement (expressed in one or two types of units)
♦ Transmitter Temperature (sensor and electronics)
♦ mA Output (equivalent)
The information that can be remotely displayed and reconfigured includes:
♦ Output in Pressure Units. Percent Output on local display is also supported.
♦ Zero and Span, including reranging
♦ Zero Elevation or Suppression
♦ Linear Output
♦ Pressure Units (from list provided)
♦ Temperature Sensor Failure Strategy
♦ Electronic Damping
♦ Poll Address (Multidrop mode)
♦ External Zero (Enable or Disable)
♦ Failsafe Direction
♦ Tag, Description, and Message
♦ Date of Last Calibration
Communications Format
Communication is based upon the FSK (Frequency Shift Keying) technique. The frequencies are superimposed on the transmitter power/signal leads.
4 to 20 mA Output
The transmitter sends its pressure measurement to the loop as a continuous 4 to 20 mA dc signal. It also communicates digitally with the HART Communicator at distances up to 3000 m (10 000 ft). Communication between the remote configurator and the transmitter does not disturb the 4 to 20 mA output signal. Other specifications are:
Data Transmission Rate: 1200 Baud4 - 20 mA Update Rate: 30 times/secondOutput when Fail Low: 3.60 mAOutput when Fail High: 21.00 mAOutput when Underrange 3.80 mAOutput when Overrange 20.50 mAOutput when Offline: User configurable between
4 and 20 mA
10

1. Introduction MI IAP10-T/IGP10-T – May 2010
Product Safety Specifications
DANGER!To prevent possible explosions and to maintain flameproof, explosionproof, and dust-ignitionproof protection, observe applicable wiring practices. Plug unused conduit opening with the provided metal pipe plug. Both plug and conduit must engage a minimum of five full threads for 1/2 NPT connections; seven full threads for M20 and PG 13.5 connections.
WARNING!To maintain IEC IP66/IP68 and NEMA Type 4X protection, the unused conduit opening must be plugged with the metal plug provided. Use a suitable thread sealant on both conduit connections. In addition, the threaded housing covers must be installed. Turn covers to seat the O-ring into the housing and then continue to hand tighten until the cover contacts the housing metal-to-metal.
NOTE1. These transmitters have been designed to meet the electrical safety description listed in Table 3. For detailed information or status of testing laboratory approvals/certifications, contact Invensys.2. Wiring restrictions required to maintain electrical certification of the transmitter are provided in these instructions. See “Wiring” on page 23.
11

MI IAP10-T/IGP10-T – May 2010 1. Introduction
Table 3. Electrical Safety Specifications
Agency Certification, Types of Protection,
and Area Classification Application Conditions
Electrical Safety Design
Code
ATEX flameproof: II 2 GD EEx d IIC, Zone 1.
SIRA 04ATEX1349Temperature Class T6, T85°C,Ta = -40 to +75°C
D
ATEX intrinsically safe: II 1 GD EEx ia IIC, Zone 0.
SIRA 06ATEX2055XTemperature Class T4,Ta = -40 to +80°C
E
ATEX protection n: II 3 GD EEx nL IIC,Zone 2.
SIRA 06ATEX4056XTemperature Class T4, Ta = -40 to +80°C
N
ATEX multiple certifications, ia & ib and n. Refer to Codes E and N for details.
Applies to Codes E and N but not toCode D.(a) M
ATEX multiple certifications, ia & ib, d, and n. Refer to Codes D, E and N for details.
Applies to Codes D, E, and N.(a)
P
CSA intrinsically safe for Class I, Division 1, Groups A, B, C, and D; Class II, Division 1, Groups E, F, and G; Class III, Division 1.
Also, Zone certified intrinsically safe Ex ia IIC and energy limited Ex nA II.
Connect per MI 020-427. Temperature Class T4A at 40°C (104°F) and T3C at 85°C (185°F) maximum ambient.
Temperature Class T4 at 40°C (104°F), and T3 at 85°C (185°F) max. ambient.
CCSA explosionproof for Class I, Division 1, Groups B, C, and D; dust-ignitionproof for Class II, Division 1, Groups E, F, and G; Class III, Division 1.
Maximum Ambient Temperature 85°C(185°F).
CSA for Class I, Division 2, Groups A, B, C, and D; Class II, Division 2, Groups F and G; Class III, Division 2.
Temperature Class T4A at 40°C (104°F) and T3C at 85°C (185°F) maximum ambient.
CSA field device zone certified flameproof Ex d IIC. Also, all certifications of Code C above.
Maximum Ambient Temperature 85°C(185°F). B
12

1. Introduction MI IAP10-T/IGP10-T – May 2010
CSA intrinsically safe for Class I, Division 1, Groups A, B, C, and D; Class II, Division 1, Groups E, F, and G; Class III, Division 1.
Also, Zone certified intrinsically safe Ex ia IIC and energy limited Ex nA II.
Connect per MI 020-427. Temperature Class T4A at 40°C (104°F), and T3C at 85°C (185°F) maximum ambient.
Temperature Class T4 at 40°C (104°F), and T3 at 85°C (185°F) max. ambient.
L(IGP10 only)
CSA for Class I, Division 2, Groups A, B, C, and D; Class II, Division 2, Groups F and G; Class III, Division 2.
Temperature Class T4A at 40°C (104°F) and T3C at 85°C (185°F) maximum ambient.
FM intrinsically safe for Class I, Division 1, Groups A, B, C, and D; Class II, Division 1, Groups E, F, and G; Class III, Division 1.
Also, Zone certified intrinsically safe AEx ia IIC.
Connect per MI 020-427. Temperature Class T4A at 40°C (104°F) and T4 at 85°C (185°F) maximum ambient.
Temperature Class T4 at 85°C (185°F) maximum ambient.
FFM explosionproof for Class I, Division 1, Groups B, C, and D; dust-ignitionproof for Class II, Division 1, Groups E, F, and G; Class III, Division 1.
Temperature Class T6 at 80°C (176°F) and T5 at 85°C (185°F) maximum ambient.
FM nonincendive for Class I, Division 2, Groups A, B, C, and D; Class II, Division 2, Groups F and G; Class III, Division 2.
Temperature Class T4A at 40°C (104°F) and T4 at 85°C (185°F) maximum ambient.
FM field device zone certified flameproof AEx d IIC. Also, all certifications of Code F above.
Temperature Class T6 at 75°C (167°F) maximum ambient. G
FM intrinsically safe for Class I, Division 1, Groups A, B, C, and D; Class II, Division 1, Groups E, F, and G; Class III, Division 1.
Also, Zone certified intrinsically safe AEx ia IIC.
Connect per MI 020-427. Temperature Class T4A at 40°C (104°F), and T4 at 85°C (185°F) maximum ambient.
Temperature Class T4 at 85°C (185°F) maximum ambient. R
(IGP10 only)
FM nonincendive for Class I, Division 2, Groups A, B, C, and D; Class II, Division 2, Groups F and G; Class III, Division 2.
Temperature Class T4A at 40°C (104°F) and T4 at 85°C (185°F) maximum ambient.
Table 3. Electrical Safety Specifications (Continued)
Agency Certification, Types of Protection,
and Area Classification Application Conditions
Electrical Safety Design
Code
13

MI IAP10-T/IGP10-T – May 2010 1. Introduction
ATEX and IECEx WarningsDo not open while circuits are alive.
ATEX Compliance DocumentsEN 50014: 1997 (inc amendments A1 and A2)EN 50018: 2000 (inc amendment A1)EN 50020: 2002EN 50284: 1999EN 50281-1-1: 1998EN 60079-15: 2004
IECEx Compliance DocumentsIEC 60079-0 (Edition 3.1): 2000IEC 60079-1 (Edition 5): 2003IEC 60079-11 (Edition 4): 1999IEC 60079-15 (Edition 2): 2001
IECEx intrinsically safe: Ex ia IIC. IECEx SIR 06.0010XTemperature Class T4, Ta = -40 to +80°C.
T
IECEx protection n: Ex nL IIC IECEx SIR 06.0011XTemperature Class T4, Ta = -40 to +80°C.
U
IECEx flameproof: Ex d IIC IECEx SIR 05.0003XTemperature Class T6, Ta = -40 to +75°C
V
(a) User must permanently mark (check off in rectangular block on data plate) one type of protection only (ia and ib, d, or n). This mark cannot be changed once it is applied.
Table 3. Electrical Safety Specifications (Continued)
Agency Certification, Types of Protection,
and Area Classification Application Conditions
Electrical Safety Design
Code
14

2. Installation
CAUTION!!!To avoid damage to the transmitter sensor, do not use any impact devices, such as an impact wrench or stamping device, on the transmitter.
NOTE1. The transmitter should be mounted so that any moisture condensing or draining
into the field wiring compartment can exit through one of the two threaded conduit connections.
2. Use a suitable thread sealant on all connections.
Transmitter MountingThe IAP10 and IGP10 transmitters with the 1/2 NPT external thread can be directly connected to the process or mounted to a vertical or horizontal pipe or a surface using the optional mounting set. See Figure 4.
For dimensional information, refer to DP 020-447. For IGP10 transmitters with Span Limit Code G, H, or K, refer to DP 020-344.
NOTE1. Do not directly mount the IAP10 and IGP10 transmitters to the process using
the 1/4 NPT internal thread. This thread should only be used to connect to the process when the transmitter is mounted with an optional (-M1 through -M6) mounting set.
2. Do not directly mount IGP10 transmitters with Span Limit Code G or H. Use the optional mounting set as shown in Figure 4.
3. Do not mount IAP10 or IGP10 transmitters using the conduit connection and optional mounting set when vibration conditions exceed 20 m/s2 (2 “g”).
4. 4. If the transmitter is not installed in the vertical position, readjust the zero output to eliminate the position zero effect. Be aware that an absolute pressure transmitter cannot be zeroed by venting the transmitter to atmosphere.
15

MI IAP10-T/IGP10-T – May 2010 2. Installation
Figure 4. IAP10 and IGP10 Transmitter Mounting
Sanitary Process ConnectionThe IAP10 and IGP10 transmitters with a sanitary process connector employ a Tri-Clamp type connection or mini tank spud seal. Install the transmitter as shown in Figures 5 and 6. For dimensional information, see the following documents:
Tri-Clamp Type Connector: DP 020-218
Mini Tank Spud Connector: DP 020-219
Figure 5. Mounting of Transmitter with Sanitary Tri-Clamp Type Connection
NOTE1. If the transmitter is to be mounted horizontally (side of a tank), the housing
should be oriented so that the vent is self draining. Do not mount the vent facing up.
VESSEL OR PIPE
PROCESS CONNECTION1/2 NPT EXTERNAL THREAD AND 1/4 NPTINTERNAL THREAD
FOR SURFACE MOUNTING, REPLACEU-BOLT WITH TWO0.375 INCH DIAMETERBOLTS OF SUFFICIENTLENGTH TO PASSTHROUGH BRACKETAND SURFACE.
VERTICAL DN 50 OR 2-INCH PIPESHOWN. ROTATE U-BOLT 90° FORMOUNTING TO HORIZONTAL PIPE.
SPACER THREADSINTO CONDUITCONNECTION
1/2 NPT EXTERNAL THREAD
USE THIS CONDUITCONNECTION TO MOUNT TRANSMITTERIF ACCESS TO EXTERNALGROUND IS REQUIRED
TRI-CLAMP TYPE CONNECTOR
PROCESS PIPE
VENT WITH CAP
16

2. Installation MI IAP10-T/IGP10-T – May 2010
2. If the vent is to face down, it is recommended that the protective cap be
removed.
3. If the vent clogs, replace it with Foxboro Part Number D0186DQ (W.L.Gore part number PMF100318). It is recommended that spare vents be stocked and replaced at a predetermined interval as part of preventive maintenance. When installing a new vent, the applied torque should be 0.6 to 0.8 N•m (5 to 7 in•lb).
4. If the transmitter is subject to routine wash down such as in typical sanitary applications and the vent is orientated so that it is self draining, the vent will stay clear and longer intervals between preventive maintenance may be realized.
5. If the vent becomes clogged, the resulting pressure measurement error may be as much as 1.5 inH2O per degree C change in temperature. This error is positive with decreasing temperature and negative with increasing temperature.
Figure 6. Mounting of Transmitter with Sanitary Mini Tank Spud Seal
The tank spud must be welded into a hole cut in the tank as follows:
1. Cut a hole into the process vessel.to accept the spud. The spud should fit snugly and uniformly. The nominal diameter of the spud is:3.73 inch (94.7 mm). To assure that the seal is always covered by process fluid, the top of the hole should be below the minimum measurement level.
2. Position the spud mounting ring so that it aligns as close as possible with the inside wall of the tank and that the weep hole is at the bottom.
3. Tack weld the spud mounting ring to the outside of the tank in four places.
4. Weld the spud mounting ring to the inner surface of the tank per the following notes.
NOTE1. 1. Spud is 316 stainless steel. Use compatible welding rod. Do not distort spud
mounting ring by using excessive heat.
TRI-CLAMP TYPE CONNECTOR
TANK WALL
TANK SPUD
VENT
17

MI IAP10-T/IGP10-T – May 2010 2. Installation
2. 2. Weld the spud mounting ring in sections as indicated in Figure 7.
3. 3. After each section is welded, cool right away with water until the temperature is less than 700°F (370°C) before welding the next section.
5. Grind the weld smooth so that the surface is free from irregularities where dirt can lodge.
6. Outer surface can be welded if desired after inner weld is completed.
Figure 7. Welding Procedure
Pulp and Paper Process ConnectionThe IAP10 and IGP10 transmitters with a pulp and paper process connector are available in two designs - sleeve type and threaded type. Install the transmitter as explained below. For dimensional information, see DP 020-217.
Sleeve Type Connector1. Cut a hole into the process vessel.to accept the weld spud. The spud should fit snugly
and uniformly. The nominal diameter of the spud is:For nominal 1 inch connector: 1.32 inch (33.4 mm)For Nominal 1 1/2 inch connector: 1.90 inch (48.3 mm)
2. Position the sleeve into the hole so that it aligns as close as possible with the inside wall of the vessel
3. Tack weld using the welding sequence shown in Figure 7. Cool each section with water until the temperature is below 700°F (370°C) before proceeding to the next section.
4. Weld the circumference of the sleeve using compatible stainless steel welding rod.
NOTEThe welder should meet the requirements of ANSI B31.3, ASME Section IX or other codes, if applicable.
5. Lubricate the O-ring with appropriate lubricant and install it into the sleeve, ensuring that it is properly seated.
1
2
3
4
5 6
18

2. Installation MI IAP10-T/IGP10-T – May 2010
NOTE
If the gasket is not properly seated, a process leak may occur.
6. Insert the transmitter sensor into the sleeve and hold it in place with cap screws.
Figure 8. Mounting of Transmitter with Sleeve Type Pulp and Paper Process Connection
Threaded Type Connector1. Cut a hole into the process vessel.to accept the weld spud. The spud should fit snugly
and uniformly. The nominal diameter of the spud is:For nominal 1 inch connector: 1.50 inch (38.1 mm)For nominal 1 1/2 inch connector: 2.38 inch (60.3 mm)For nominal 1 1/2 inch connector for Ametek spud: 1.99 inch (50.5 mm)Position the connector into the hole so that it aligns as close as possible with the inside wall of the vessel
2. Tack weld using the welding sequence shown in Figure 7. Cool each section with water until the temperature is below 700°F (370°C) before proceeding to the next section.
NOTEInvensys recommends using a heat sink during this operation.
1 inch size: Part Number N1214YS1 1/2 inch size:Part Number N1214YR
3. Weld the circumference of the connector using compatible stainless steel welding rod.
NOTEThe welder should meet the requirements of ANSI B31.3, ASME Section IX or other codes, if applicable.
WELD
SLEEVE
O-RING
VESSEL WALL
CAP SCREW
NOTE: 1 1/2 INCH SIZE SHOWN
VENT
19

MI IAP10-T/IGP10-T – May 2010 2. Installation
4. After the connector has cooled, remove the heat sink.
5. Lubricate the gasket with appropriate lubricant and install it into the connector, ensuring that it is properly seated.
NOTEIf the gasket is not properly seated, a process leak may occur.
6. Thread the sensor into the connector hand tight. Then tighten approximately 1/8 turn more.
Figure 9. Mounting of Transmitter with Threaded Type Pulp and Paper Process Connection
Typical Transmitter PipingFigure 10 shows a typical piping application. Calibration supply pressure can be applied via a calibration screw. The lower conduit port can be used as a drain for moisture buildup in terminal compartment.
NOTE1. Invensys recommends the use of snubbers in installations prone to high levels of
fluid pulsations.
2. IAP10 and IGP10 Transmitters mounted directly to process piping or a pressure vessel, could require the use of a shutoff valve (shown) to comply with the requirements of ASME Power Piping Code B31.1 and Chemical and Petroleum Piping Code B31.3.
VESSEL WALLWELD
SLEEVE GASKET
NOTE: 1 INCH SIZE SHOWN
VENT
20

2. Installation MI IAP10-T/IGP10-T – May 2010
Figure 10. Typical Transmitter Piping
For hot process applications above the operative limits of your transmitter [121°C (250°F) for silicone fill fluid or 82°C (180°F) for fluorinert fill fluid], such as steam, additional piping is required to protect the transmitter from the hot process. See Figure 11. The piping is filled with water or process fluid. Mount the transmitter below the pressure connection at the pipe. Although the transmitter is shown mounted vertically, you can also mount it horizontally unless sediment is present. The calibration tee is not required if a calibration screw is used for field calibrations.
If trapped vapor pockets cannot be tolerated in a liquid service and a horizontal process connection is used, install a pipe elbow and vertically position the transmitter with the housing below the process connection.
Figure 11. Hot Process Piping
Positioning the HousingThe transmitter housing (topworks) can be rotated up to one full turn in the counterclockwise direction when viewed from above for optimum access to adjustments, display, or conduit
TRANSMITTER
CALIBRATION SCREW
BLOCK AND BLEED VALVE (SHUTOFF)
UPPER CONDUIT PORT LOWER CONDUIT PORT
(OPTION -V2, -V3, OR -V4)
NOTE: Block and Bleed Valve Maximum Pressure40 MPa (6000 psi at 38°C) (100°F)25 MPa (4000 psi at 250°C) (400°F)
Calibration Screw Maximum Pressure0.7 MPa (100 psi with Poly-Flo Fitting) (F0101ES)
VESSEL OR PIPE
SHUTOFF VALVE
FILLING TEE
BLOCK AND BLEED VALVE
21

MI IAP10-T/IGP10-T – May 2010 2. Installation
connections. Housings have either an anti-rotation screw or a retention clip that prevent the housing from being rotated beyond a safe depth of housing/sensor thread engagement.
WARNING!If the electronics housing is removed for maintenance, it must be hand tightened to the bottom of the threads, but not over-tightened upon reassembly. See “Removing and Reinstalling a Housing Assembly” on page 57.
Figure 12. Housing Screw or Clip Location
Positioning the DisplayThe display (optional in some models) can be rotated within the housing to any of four positions at 90° increments. To do this, grasp the two tabs on the display and rotate it about 10° in a counterclockwise direction. Pull out the display. Ensure that the O-ring is fully seated in its groove in the display housing. Turn the display to the desired position, reinsert it in the electronics module, aligning the tabs on the sides of the assembly, and twist it in the clockwise direction.
CAUTION!!!Do not turn the display more than 180° in any direction. Doing so could damage its connecting cable.
Setting the Write Protect JumperYour transmitter has write protection capability. This means that the external zero, local display, and remote communications can be prevented from writing to the electronics. Write protection is set by moving a jumper that is located in the electronics compartment behind the optional display. To activate write protection, remove the display as described in the previous section, then remove the jumper or move it to the lower position as shown on the exposed label. Replace the display.
ANTI-ROTATION SCREWOR RETENTION CLIP
RETENTION CLIP
CUP
HOUSING
CLIP
22
2. Installation MI IAP10-T/IGP10-T – May 2010
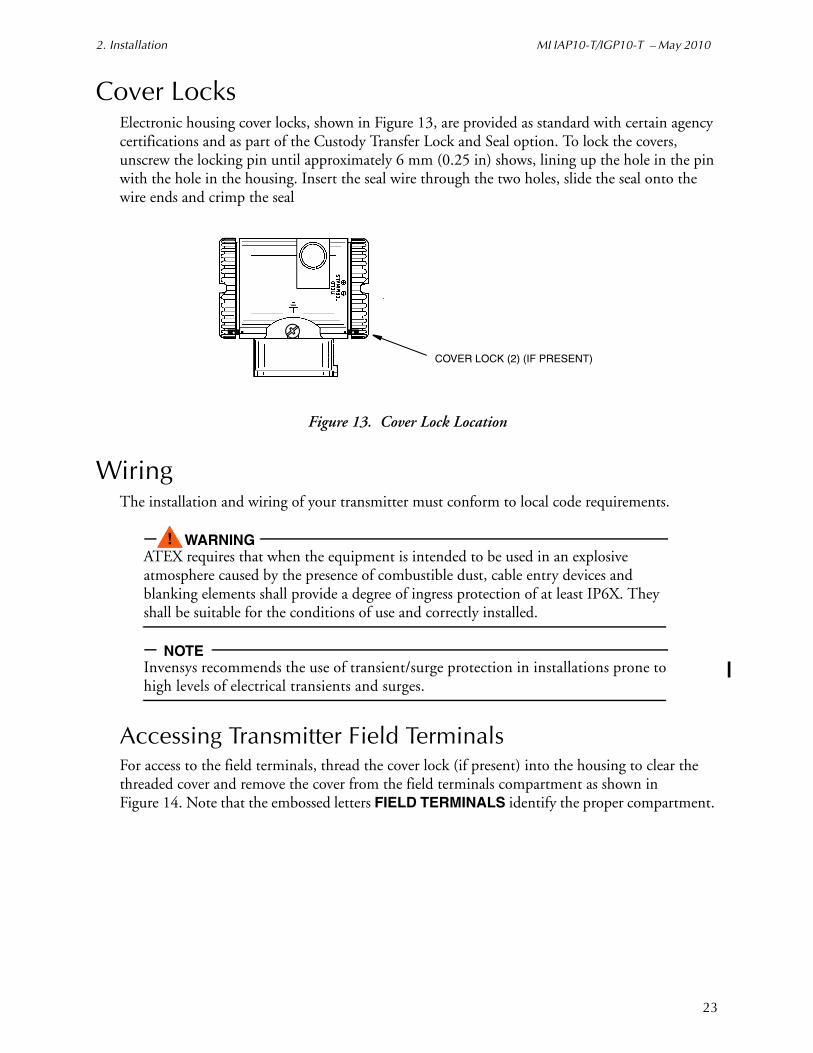
Cover Locks
Electronic housing cover locks, shown in Figure 13, are provided as standard with certain agency certifications and as part of the Custody Transfer Lock and Seal option. To lock the covers, unscrew the locking pin until approximately 6 mm (0.25 in) shows, lining up the hole in the pin with the hole in the housing. Insert the seal wire through the two holes, slide the seal onto the wire ends and crimp the seal
Figure 13. Cover Lock Location
WiringThe installation and wiring of your transmitter must conform to local code requirements.
WARNING!ATEX requires that when the equipment is intended to be used in an explosive atmosphere caused by the presence of combustible dust, cable entry devices and blanking elements shall provide a degree of ingress protection of at least IP6X. They shall be suitable for the conditions of use and correctly installed.
NOTEInvensys recommends the use of transient/surge protection in installations prone to high levels of electrical transients and surges.
Accessing Transmitter Field TerminalsFor access to the field terminals, thread the cover lock (if present) into the housing to clear the threaded cover and remove the cover from the field terminals compartment as shown in Figure 14. Note that the embossed letters FIELD TERMINALS identify the proper compartment.
COVER LOCK (2) (IF PRESENT)
23

MI IAP10-T/IGP10-T – May 2010 2. Installation
Figure 14. Accessing Field Terminals
Figure 15. Identification of Field Terminals
Wiring the Transmitter to a Control LoopWhen wiring the transmitter, the supply voltage and loop load must be within specified limits. The supply output load vs. voltage relationship is:
RMAX = 47.5 (V - 11.5) and is shown in Figure 16.
NOTEThe relationship when the optional shorting bar is used is:
RMAX = 46.8 (V - 11).
Any combination of supply voltage and loop load resistance in the shaded area can be used. To determine the loop load resistance (transmitter output load), add the series resistance of each component in the loop, excluding the transmitter. The power supply must be capable of supplying 22 mA of loop current.
EXTERNAL EARTH
REMOVE COVER TO ACCESS WIRING TERMINALS.
1/2 NPT, PG 13.5, OR M20 CONDUIT CONNECTION FOR CUSTOMER WIRING. ONE ON OPPOSITE SIDE ALSO. PLUG UNUSED OPENING WITH PLUG PROVIDED (OR EQUIVALENT).
(GROUND)
CAL
(+)
(-)
EARTH (GROUND) SCREW
BANANA PLUG RECEPTACLES FORCALIBRATION CONNECTIONS. TO READTRANSMITTER OUTPUT, ATTACH METERLEADS HERE (100 TO 500 MV REPRE-SENTING 4 TO 20 mA CURRENT).
OPTIONAL SHORTING BAR (SB-11) TO REDUCE MINIMUM VOLTAGE FROM 11.5 V dc TO 11 V dc ALSO PLUGS IN HERE.
BANANA PLUG RECEPTACLES FORHART CONNECTIONS
TRANSMITTERSIGNALCONNECTIONS
(+)
(–)
HHT
24

2. Installation MI IAP10-T/IGP10-T – May 2010
Figure 16. Supply Voltage and Loop Load
Examples:
1. For a loop load resistance of 880 Ω, the supply voltage can be any value from 30 to 42 V dc.
2. For a supply voltage of 24 V dc, the loop load resistance can be any value from 250 to 594 Ω (zero to 594 Ω without a HART Communicator connected to the transmitter).
To wire one or more transmitters to a power supply, proceed with the following steps.
1. Remove the cover from the transmitter field terminals compartment.
2. Run signal wires (0.50 mm2 or 20 AWG, typical) through one of the transmitter conduit connections. Use twisted single pair to protect the 4 to 20 mA output and/or remote communications from electrical noise. Maximum recommended length for signal wires is:
♦ 3050 m (10,000 ft) using single pair cable and adhering to requirements of HART physical layer implementation defined in HART Document HCF_SPEC-53. Use CN=1 when calculating max. lengths.
♦ 1525 m (5000 ft) in a multidrop (15 devices maximum) mode.Screened (shielded) cable could be required in some locations.
403020100
4211.5
1450
1400
1300
1200
1100
1000
900
800
700
600
500
400
300
200
100
0
TYPICAL SUPPLY VOLTAGEAND LOAD LIMITS
V dc LOAD (OHMS)
24 250 AND 59430 250 AND 88032 250 AND 975
OPERATING AREA
MINIMUM LOAD(SEE NOTE)
SUPPLY VOLTAGE, V dc
OU
TP
UT
LO
AD
, Ω
NOTES:1. THE MINIMUM LOAD FOR THE HART COMMUNICATOR IS 250 Ω.2. THE TRANSMITTER CAN FUNCTION WITH AN OUTPUT LOAD LESS THAN THE MINIMUM, PROVIDED THAT A REMOTE CONFIGURATOR IS NOT CONNECTED TO IT. CONNECTING A REMOTE CONFIGURATOR WHILE OPERATING IN THIS AREA COULD CAUSE OUTPUT DISTURBANCES AND/OR COMMUNI- CATION PROBLEMS.
25

MI IAP10-T/IGP10-T – May 2010 2. Installation
NOTE
Do not run transmitter wires in same conduit as mains (ac power) wires.
3. If shielded cable is used, earth (ground) the shield at the power supply only. Do not ground the shield at the transmitter.
4. Plug unused conduit connection with the 1/2 NPT, PG 13.5, or M20 metal plug provided (or equivalent). To maintain specified explosionproof and dust-ignitionproof protection, plug must engage a minimum of five full threads for 1/2 NPT connections; seven full threads for M20 and PG 13.5 connections.
5. Connect an earth (ground) wire to the earth terminal in accordance with local practice.
CAUTION!!!If the signal circuit must be earthed (grounded), it is preferable to do so at the negative terminal of the dc power supply. To avoid errors resulting from earth loops or the possibility of short-circuiting groups of instruments in a loop, there should be only one earth in a loop.
6. Connect the power supply and receiver loop wires to the “+” and “–” terminal connections.
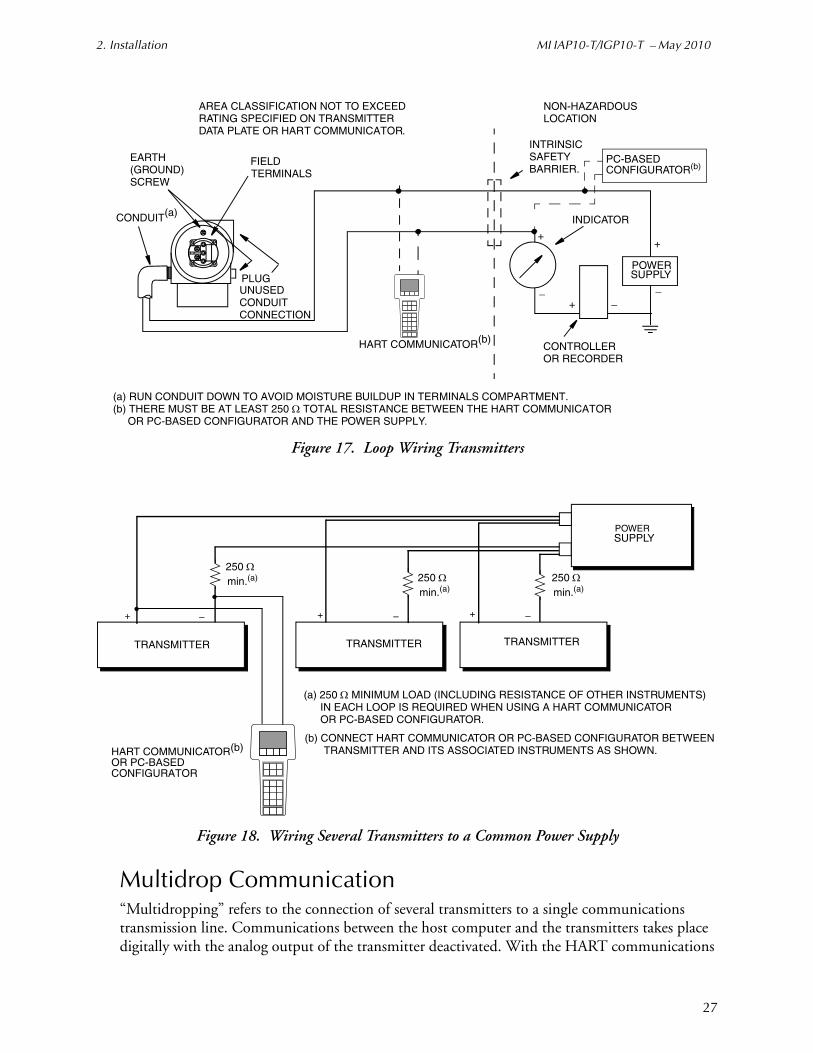
7. Connect receivers (such as controllers, recorders, indicators) in series with power supply and transmitter as shown in Figure 17.
8. Reinstall the cover onto the housing by rotating it clockwise to seat the O-ring into the housing and then continue to hand tighten until the cover contacts the housing metal-to-metal. If cover locks are present, lock the cover per the procedure described in “Cover Locks” on page 23.
9. If wiring additional transmitters to the same power supply, repeat Steps 1 through 8 for each additional transmitter. The setup with multiple transmitters connected to a single power supply is shown in Figure 18.
10. A HART Communicator or PC-Based Configurator can be connected in the loop between the transmitter and the power supply as shown in Figures 17 and 18. Note that a minimum of 250 Ω must separate the power supply from the HART Communicator and PC-Based Configurator.
26
2. Installation MI IAP10-T/IGP10-T – May 2010
Figure 17. Loop Wiring Transmitters
Figure 18. Wiring Several Transmitters to a Common Power Supply
Multidrop Communication“Multidropping” refers to the connection of several transmitters to a single communications transmission line. Communications between the host computer and the transmitters takes place digitally with the analog output of the transmitter deactivated. With the HART communications
NON-HAZARDOUSLOCATION
INTRINSICSAFETYBARRIER.
HART COMMUNICATOR(b)
INDICATOR
CONTROLLEROR RECORDER
(a) RUN CONDUIT DOWN TO AVOID MOISTURE BUILDUP IN TERMINALS COMPARTMENT.(b) THERE MUST BE AT LEAST 250 Ω TOTAL RESISTANCE BETWEEN THE HART COMMUNICATOR
TERMINALS
EARTH(GROUND)SCREW
PLUG UNUSEDCONDUITCONNECTION
CONDUIT(a)
AREA CLASSIFICATION NOT TO EXCEEDRATING SPECIFIED ON TRANSMITTERDATA PLATE OR HART COMMUNICATOR.
FIELD
++
+
__
_
POWER SUPPLY
OR PC-BASED CONFIGURATOR AND THE POWER SUPPLY.
PC-BASEDCONFIGURATOR(b)
HART COMMUNICATOR(b)
(a) 250 Ω MINIMUM LOAD (INCLUDING RESISTANCE OF OTHER INSTRUMENTS) IN EACH LOOP IS REQUIRED WHEN USING A HART COMMUNICATOR
(b) CONNECT HART COMMUNICATOR OR PC-BASED CONFIGURATOR BETWEEN TRANSMITTER AND ITS ASSOCIATED INSTRUMENTS AS SHOWN.
OR PC-BASEDCONFIGURATOR
OR PC-BASED CONFIGURATOR.
250 Ωmin.(a)
POWERSUPPLY
TRANSMITTERTRANSMITTERTRANSMITTER
+++ – – –
250 Ωmin.(a) 250 Ω
min.(a)
27

MI IAP10-T/IGP10-T – May 2010 2. Installation
protocol, up to 15 transmitters can be connected on a single twisted pair of wires or over leased telephone lines.
The application of a multidrop installation requires consideration of the update rate necessary from each transmitter, the combination of transmitter models, and the length of the transmission line. Multidrop installations are not recommended where Intrinsic Safety is a requirement. Communication with the transmitters can be accomplished with any HART compatible modem and a host implementing the HART protocol. Each transmitter is identified by a unique address (1-15) and responds to the commands defined in the HART protocol.
Figure 19 shows a typical multidrop network. Do not use this figure as an installation diagram. Contact the HART Communications Foundation, (512) 794-0369, with specific requirements for multidrop applications.
Figure 19. Typical Multidrop Network
The HART Communicator can operate, configure, and calibrate IASPT transmitters with HART communication protocol in the same way as it can in a standard point-to-point installation.
NOTEIASPT transmitters with HART communication protocol are set to poll address 0 (POLLADR 0) at the factory, allowing them to operate in the standard point-to-point manner with a 4 to 20 mA output signal. To activate multidrop communication, the transmitter address must be changed to a number from 1 to 15. Each transmitter must be assigned a unique number on each multidrop network. This change deactivates the 4 to 20 mA analog output.
Connecting the Transmitter to an I/A Series SystemThe transmitter can also send its measurement to an I/A Series system as a digital signal via an FBM214/215. Wiring terminations at the transmitter are the same as described above. For other system wiring details, refer to the installation instructions provided with the I/A Series system.
HOST MODEM
POWERSUPPLY
LOAD
IDP10-TIDP10-T IDP10-T
28

3. Operation Via Local Display
A local display, as shown in Figure 20, has two lines of information. The upper line is a 5-digit numeric display (4-digit when a minus sign is needed); the lower line is a 7-digit alphanumeric display. The display provides local indication of measurement information.
The display can be configured to meet your specific needs. If configured Show 1, M1 is displayed. If configured Show 2, M2 is displayed. To temporarily view the alternate measurement, press the Enter button. After showing this measurement for a brief period, the display reverts to the configured display. If configured Toggle, the display toggles between M1 and M2. When M2 is displayed, an M2 message blinks in the lower right of the display.
The display also provides a means for performing calibration and configuration, viewing the database, testing the display, and reranging the transmitter via the 2-button keypad. You can access these operations by means of a multi-level menu system. Entry to the Mode Select menu is made (from normal operating mode) by pressing the Next button. You can exit this menu, restore your prior calibration or configuration, and return to the normal operating mode at any time by going to Cancel and pressing the Enter button.
The top level structure diagram is shown in Figure 21.
Figure 20. Local Display Module
NEXT ENTER
34.5 INH2O
NEXT
PUSHBUTTON
ENTER
PUSHBUTTON
EXTERNAL ZERO BUTTON(LATCHED [NONACTIVATING] POSITION)
29

MI IAP10-T/IGP10-T – May 2010 3. Operation Via Local Display
Figure 21. Top Level Structure Diagram
Entering Numerical ValuesThe general procedure for entering numerical values in Calibration and Configuration is as follows:
1. At the appropriate prompt, press the Enter button. The display shows the last (or default) value with the first digit flashing.
2. Use the Next button to select the desired first digit, then press the Enter button. Your selection is entered and the second digit flashes.
3. Repeat Step 2 until you have created your new value. If the number has less than five characters, use leading or trailing zeros for the remaining spaces. When you have configured the fifth space, the display prompts you to place the decimal point.
4. Move the decimal point with the Next button until it is where you want it and press the Enter button.
NOTE1. The decimal point may not be placed directly after the first digit. For example, you can not enter a value as 1.2300; you must enter it as 01.230.2. The decimal position is identified by flashing except at the position after the fifth digit. At that position (representing a whole number), the decimal point is assumed.
5. The display advances to the next menu item.
N
N
N
N
CONFIG
CALIB
VIEW DB
TST DSP
N
LOCAL MODE, GO TO CONFIGURATION MENU
OFF-LINE, GO TO CALIBRATION MENU
ON-LINE MODE
ON-LINE MODE
STEP THROUGH DATABASE DISPLAY
STEP THROUGH DISPLAY TEST PATTERN
E
E
E
E
E
CANCEL EXIT MODE SELECT MENU, RETURN TO ON-LINE MODE
NE
NE
N = NEXT BUTTON E = ENTER BUTTON
(measurement M1 or M2) (measurement M2 or M1)E E
N
N
RERANGE LOCAL MODE, GO TO RERANGE MENUE
N
30

3. Operation Via Local Display MI IAP10-T/IGP10-T – May 2010
Reranging
You can access the Rerange mode in the top level menu (see Figure 21). Entry to the Mode Select menu is made (from normal operating mode) by pressing the Next button. The display reads RERANGE. You can then adjust M1 URV and/or M1 LRV in the following two submenus.
M1 URV:
To edit the upper range value, press Enter at the prompt M1 URV. Use the procedure “Entering Numerical Values” on page 30 section to edit this parameter.
M1 LRV:
Similar to M1URV immediately above.
Viewing the DatabaseYou can access the View Database mode by the multi-level menu system described above. Entry to the Mode Select menu is made (from normal operating mode) by pressing the Next button. The display reads RERANGE. Use the Next button to get to VIEW DB. Acknowledge your choice of this selection by pressing the Enter button. The display shows the first item in the database. You can step through the database display by repeated use of the Next button. You can abort this procedure at any time by pressing the Enter button.
Viewing the Pressure RangeThe values of M1LRV and M1 URV can be viewed in VIEW DB as described above.
Testing the DisplayYou can access the Test Display mode by the same multi-level menu system that was used to enter Reranging, Calibration, Configuration, and View Database mode. Entry to the Mode Select menu is made (from normal operating mode) by pressing the Next button. The display reads RERANGE. Use the Next button to get to TST DSP. Acknowledge your choice of this selection by pressing the Enter button. The display shows the first test segment pattern. You can step through the five patterns by repeated use of the Next button. You can abort the test at any time by pressing the Enter button. The five patterns are shown in Figure 22.
31

MI IAP10-T/IGP10-T – May 2010 3. Operation Via Local Display
Figure 22. Display Test Segment Patterns
Error Messages Table 4. Operation Error Messages
Parameter Condition TestedError
Message Action
Normal Operation
Write Protection Enabled
WR PROT Displays periodically to notify user that unit is in Write Protect.
Any non-On-line Condition
OFFLINE Notifies user of a non-On-line condition.
Startup Database OK or corrupted
INITERR User should perform SET GDB procedure. See “SET GDB:” on page 51.
ALL HORIZONTAL SEGMENTS ON
ALL SEGMENTS OFF
ALL SEGMENTS ON
ALL VERTICAL SEGMENTS ON
ALL DIAGONAL SEGMENTS AND DECIMAL POINTS ON
32

4. Calibration
NOTE1. For best results in applications where high accuracy is required, rezero the
transmitter output once it has stabilized at the final operating temperature.
2. Zero shifts resulting from position effects and/or static pressure effects can be eliminated by rezeroing the transmitter output.
3. After calibrating transmitters operating with a 4 to 20 mA (or 1 to 5 V dc) output signal, check the underrange and overrange output values to ensure that they extend beyond 4 and 20 mA (or 1 and 5 V dc) respectively.
General Calibration Notes1. Each transmitter is factory characterized over its full rated pressure range. One benefit
of this process is that every transmitter can measure any applied pressure within its range limits regardless of the calibrated range. The applied pressure is measured and converted into an internal digital value of pressure. This digital value of pressure is always available whether the transmitter is calibrated or not. Calibration assures that the transmitter rated accuracy is achieved over the calibrated range.
2. The internal digital value of pressure can be displayed on the optional local display, transmitted digitally, and converted to a 4 to 20 mA analog output signal.
3. Each transmitter is factory calibrated to either a specified or a default calibrated range. This calibration optimizes the accuracy of the internal digital value of pressure over that range. If no range is specified, the default range is zero to the sensor upper range limit (URL).
4. The transmitter database has configurable values for both lower range value (LRV) and upper range value (URV). These values are used for two functions.
a. Defining the Calibrated Range When Using Local Pushbuttons for Calibration:
♦ When either CAL LRV or CAL URV is initiated from the local pushbuttons, the transmitter expects that the pressure applied at the time the button is pressed is equal to the LRV or URV value respectively.
♦ This function trims the internal digital value of pressure; that is, it performs a calibration based on the application of accurate pressures equal to the values entered for LRV and URV in the transmitter database.
♦ This function also sets the 4 and 20 mA output points; that is, the 4 and 20 mA points correspond to the values of LRV and URV in the database.
♦ The value of LRV can be larger than the value of URV.
b. Reranging Without the Application of Pressure:
♦ Since the transmitter continually determines an internal digital value of the measured pressure from the lower range limit (LRL) to the upper range limit
33
MI IAP10-T/IGP10-T – May 2010 4. Calibration
(URL), the 4 and 20 mA output points can be assigned to any pressure values (within the span and range limits) without application of pressure.
♦ The reranging function is accomplished by entering new database values for LRV and URV.
♦ Reranging does not affect the calibration of the transmitter; that is, it does not affect the optimization of the internal digital value of pressure over a specific calibrated range.
♦ If the reranged LRV and URV are not within the calibrated range, the measured values may not be as accurate as when they are within the calibrated range.
5. When the optional local display is used, the internal digital value of pressure is sent directly to the indicator.
♦ The display can show any measured pressure in selected units regardless of the calibrated range and the values of LRV and URV (within the limits of the transmitter and display).
♦ If the measured pressure is outside the range established by the LRV and URV values in the database, the display shows the measurement but also continually blinks to indicate that the measurement is out of range. The mA current signal is saturated at either the low or high overrange limit respectively but the display continually shows the pressure.
6. When configured for 4 to 20 mA output, the internal digital value of pressure is converted to an analog current signal.
♦ The transmitter sets the output at 4 mA for the LRV and 20 mA for the URV.
♦ There is an independent trim on the digital-to-analog conversion stage. This trim allows for slight adjustment of the 4 and 20 mA outputs. This compensates for any slight difference that exists between the transmitter mA output and an external reference device which is measuring the current.
♦ The mA trim does not affect the calibration or the reranging of the transmitter and does not affect the internal digital value of pressure or the transmission or display of measured pressure.
♦ The mA trim can be done with or without pressure applied to the transmitter.
7. Zeroing from the local display does not affect the span.
When the transmitter is zeroed to compensate for installed position effect, the transmitter can have either LRV pressure applied (CAL LRV) or zero pressure applied (CAL AT0). If the range is zero-based, either method produces the same result. However, if the range is not zero-based, it is advantageous to have both methods available.
For example, consider a pressure transmitter having a range of 50 to 100 psig. If it is not feasible to vent the transmitter to atmosphere for zeroing, it can be zeroed while the LRV pressure of 50 psi is applied by using the CAL LRV function. On the other hand, if the transmitter has been installed but there is no pressure in the process line yet, it can be zeroed while open to atmosphere by using the CAL AT0 function.
34

4. Calibration MI IAP10-T/IGP10-T – May 2010
a. Zeroing with LRV Pressure Applied (CAL LRV):
♦ Before using this zeroing function, apply a pressure to the transmitter equal to the value of LRV stored in the transmitter database.
♦ When you zero the transmitter, the internal digital value of the pressure is trimmed to be equal to the value of LRV stored in the database and the mA output set to 4 mA.
♦ If zeroing is done when the applied pressure is different from the LRV pressure value in the database, the internal digital value of pressure is biased by the difference in the values but the output is still set at 4 mA.
♦ The CAL LRV and CAL URV function should be used when calibrating a transmitter for a specific range with known input pressures applied for the LRV and URV.
b. Zeroing a Gauge Pressure Transmitter with Zero Pressure Applied (CAL AT0):
NOTEDo not use the CAL AT0 function with an absolute pressure transmitter. If an absolute pressure transmitter is vented to atmosphere, it does not have zero pressure applied but instead has the barometric pressure (approximately 14.7 psia) applied.
♦ Make sure that the applied pressure is at zero. This means venting the transmitter to atmosphere.
♦ When you zero the transmitter, the internal digital value of the pressure is trimmed to be equal to zero and the mA output set to an appropriate value such that the mA output is a normal 4 mA when the LRV pressure is applied later.
c. Zeroing an Absolute Pressure Transmitter
To zero an absolute pressure transmitter, the LRV can be temporarily set to the barometric pressure and a CAL LRV function performed with the transmitter vented to atmosphere. Then, the LRV can be set back to the proper value.
Calibration SetupThe following sections show setups for field or bench calibration. Use test equipment that is at least three times as accurate as the desired accuracy of the transmitter.
NOTEIt is not necessary to set up calibration equipment to rerange the transmitter to a different range. The transmitter can be accurately reranged by simply changing the lower range value and the upper range value, which are stored in the transmitter database.
35

MI IAP10-T/IGP10-T – May 2010 4. Calibration
Setup of Electronic Equipment
Figure 23. 4 to 20 mA Output Calibration Setup of Electronic Equipment
Field Calibration SetupField calibration is performed without disconnecting the process piping. This is only possible if the transmitter is piped as shown in Figure 24.
Figure 24. Transmitter Piping
If the transmitter is to be removed from the process for calibration, refer to “Bench Calibration Setup”below.
An adjustable air supply and a pressure measuring device are required. For example, a dead weight tester or an adjustable clean air supply and pressure gauge can be used.
(+)
(–)
250 Ω PRECISION RESISTOR
VOLTMETER POWER SUPPLY
(–) (+)(+)(–)
Resistor: 250 Ω, ±0.01%, 1 W minimum (Part No. E0309GY)
Power supply: Refer to Figure 16
Digital Voltmeter: readings from 1.000 to 5.000 V dcHART COMMUNICATOROR PC-BASEDCONFIGURATOR
TRANSMITTER
CALIBRATION SCREW
BLOCK AND BLEED VALVE (SHUTOFF) (OPTION -V2, -V3, AND -V4)
NOTE: Block and Bleed Valve Maximum Pressure40 MPa (6000 psi at 38°C (100°F)25 MPa (4000 psi at 250°C (400°F)
Calibration Screw Maximum Pressure0.7 MPa (100 psi with Poly-Flo Fitting (F0101ES)
FROM PROCESS
36

4. Calibration MI IAP10-T/IGP10-T – May 2010
Bench Calibration SetupThe bench calibration setup requires disconnecting the process piping. For calibration setup without disconnecting the process piping, refer to “Field Calibration Setup”above.
The bench calibration setup is shown in Figure 25. If calibrating the output signal, also connect equipment as shown in Figure 23
Figure 25. Bench Calibration Setup
Calibration Using a PC20To calibrate the transmitter using a PC20 Configurator, follow the procedure in MI 020-495.
Calibration Using a PC50To calibrate the transmitter using a PC50 Configurator, follow the procedure in MI 020-501 andMI 020-520.
Calibration Using a HART CommunicatorTo calibrate the transmitter using a HART Communicator, follow the procedure in MI 020-366.
Calibration Using the Optional Local DisplayTo access the Calibration mode (from normal operating mode), press the Next button. The display reads CALIB, the first item on the menu. Acknowledge your choice of this selection by pressing the Enter button. The display shows the first item in the Calibration menu.
NOTE1. 1. During calibration, a single change could affect several parameters. For this
reason, if an entry is entered in error, re-examine the entire database or use the Cancel feature to restore the transmitter to its starting configuration and begin again.
BLEED VALVES(NEEDLE TYPE)
CALIBRATINGPRESSURESOURCE
37

MI IAP10-T/IGP10-T – May 2010 4. Calibration
2. 2. During adjustment of 4 and 20 mA in the Calibration menu, the milliampere
output does not reflect live measurement values.
NOTEIt is not necessary to use the ADJ4mA or ADJ20mA menu selections (commonly known as mA Trim) unless there is a plant requirement to make the 4 and 20 mA output values exactly match readings on certain plant calibration equipment and the calibration operations done result in a small but unacceptable difference between the transmitter mA output and the test equipment mA readout values.
Proceed to calibrate your transmitter by using the Next key to select your item and the Enter key to specify your selection per Figure 26 and 27. At any point in the calibration you can Cancel, restore your prior calibration and return to the on-line mode or Save your new calibration.
Table 5. Calibration Menu
Item Description
CAL AT0(a) Calibrate at zero pressure.CAL LRV Calibrate with pressure at 0% of transmitter range
(LRV).CAL URV Calibrate with pressure at 100% of transmitter range
(URV).ADJ 4mA Adjust nominal 4 mA output.ADJ20mA Adjust nominal 20 mA output.CALDATE Enter the calibration date.ADJ 4mA causes the following four submenus.A 4mAΔΔ Increase 4 mA output by large step.A 4mA∇∇ Decrease 4 mA output by large step.A 4mAΔ Increase 4 mA output by small step.A 4mA∇ Decrease 4 mA output by small step.ADJ 20mA causes the following four submenus.A 20mAΔΔ Increase 20 mA output by large step.A 20mA∇∇ Decrease 20 mA output by large step.A 20mAΔ Increase 20 mA output by small step.A 20mA∇ Decrease 20 mA output by small step.(a) Function not applicable to absolute pressure transmitters.
38

4. Calibration MI IAP10-T/IGP10-T – May 2010
Figure 26. Calibration Structure Diagram
ADJ 4mA
E
N
E
A 4mAΔΔ A 4mAΔΔ
A 4mA∇∇ A 4mA∇∇
A 4mAΔ A 4mAΔ
A 4mA∇ A 4mA∇
N
N
N
N
E
E
E
ADJ20mA
N
N
N
N
E
N
A 20mAΔΔ A 20mAΔΔ
A 20mA∇∇ A 20mA∇∇
A 20mAΔ A 20mAΔ
A 20mA∇ A 20mA∇
N
N
N
N
E
E
E
N
N
N
N
CAL AT0: To set or reset the zero point at zero pressure, apply zero pressure to the transmitter and, at display of CAL AT0, press Enter. This can be done whether LRV is zero or not. Completion is indicated by the display AT0 Done.
CAL LRV: To set or reset 0% of range input, apply pressure to the transmitter equal to the lower range value (LRV) in the transmitter database and, at display of CAL LRV, press Enter. Completion is indicated by the display LRV Done.
CAL URV: To set or reset 100% of range input, apply pressure to the transmitter equal to the upper range value (URV) in the transmitter database and, at display of CAL URV, press Enter. Completion is indicated by the display URV Done.
ADJ4mA: If you configured your transmitter operating mode as 4 to 20 mA, you can adjust the 4 mA output by going to ADJ4mA using the Next button and press Enter. This menu item is bypassed if you configured your transmitter for multidrop mode (poll address other than zero).
To increase the 4 mA output by a large (0.025 mA) step, press Enter at the display A 4mAΔΔ. To decrease it by a large step, go to the display A 4mA∇∇ by pressing the Next
E = ENTERN = NEXT
E
E
E
E
E
E
E
E
E
CALDATE
(continued on next figure)
CAL AT0(a) AT0 DONEE
N
CAL LRV LRV DONEE
N
N
N
E
E
CAL URV URV DONEE
N N
E
Note:(a) Not applicable to Absolute Pressure Transmitters.
39

MI IAP10-T/IGP10-T – May 2010 4. Calibration
Figure 27. Calibration Structure Diagram (Continued)
Commentary on Figure 27
CALDATE
This is not a required entry but can be used for recordkeeping or plant maintenance purposes. To edit the calibration date, go to CALDATE with the Next button and press Enter. You then can change the day, month, and year. The display shows the last date with the day flashing. Use the Next button to step through the menu of digits to select the desired day, then press Enter. Repeat this process for the month and year.
Zero Adjustment Using External Zero ButtonAn optional external zero adjustment mechanism in the electronics housing allows calibration at zero differential pressure (the CAL AT0 function) or at the lower range value differential pressure (the CAL LRV function) without removing the electronics compartment cover. The mechanism is magnetically activated through the housing wall to prevent moisture from entering the enclosure.
To use this feature:
1. Unlatch the external zero button by turning it 90° in a counterclockwise direction so that the screwdriver slot lines up with the two holes in the face of the adjacent part. Do not push the button in with the screwdriver while doing this.
CANCEL
SAVE
N
CALDATE
Display Day Increment DayN
N
E
E
E
E
Display Month Increment MonthN
Display Year Increment YearN
*If character is not the last position on the display line, advances to next character.**If character is the last position on the display line, advances to next menu item.
(CONTINUED FROM PREVIOUS FIGURE)
NOTE: Commentary about this diagram immediately follows.
Discard all changes, return to ONLINE.
Save database changes, return to ONLINE.E
E
N
40

4. Calibration MI IAP10-T/IGP10-T – May 2010
2. To set or reset the zero point at zero pressure, apply zero pressure to the transmitter
and press the external zero button until the display reads CAL AT0. Release the button. The display reads CAL WAIT and then RESET (calibration is complete).
To set or reset the 0% of range input, apply the lower range value (LRV) pressure to the transmitter and press and hold the external zero button until the display reads CAL LRV (it reads CAL AT0 first). Release the button. The display reads CAL WAIT and then RESET (calibration is complete).
NOTEIf the optional display is not present, the same functions can be accomplished by depending on the length of time the external zero button is depressed. Press and hold the button for 1 to 3 seconds for CAL AT0 or for 5 or more seconds for CAL LRV. Therefore, if your LRV is zero, just depress the button for a few seconds. However, if your LRV is not zero, use caution when using the external zero button without the optional display because you must rely strictly on the length of time the button is depressed to differentiate between CAL AT0 and CAL LRV.
Other possible messages are:DISABLD if EX ZERO is configured EXZ DISIGNORED if the transmitter is not in the on-line mode.WP ENAB if write protection jumper is in write protect position.
If additional rezeroing is required after Steps 1 and 2 have been accomplished, repeat Step 2.
3. Relatch the external zero button by turning it 90° in a clockwise direction to prevent accidental pressing of the button. Do not push the button in with the screwdriver while doing this.
41

MI IAP10-T/IGP10-T – May 2010 4. Calibration
Error Messages
Table 6. Calibration Error Messages
Parameter Condition TestedError
Message User Action
Password Protection
Password BAD PWD Bad password entered, use another.
Write Protection
Write protection enabled
REJECT Displays when user attempts an action that is write protected.
ZERO Internal offset too large
BADZERO Check applied pressure, configured M1 LRV and configured M1 EOFF.
SPAN Slope too large or too small
BADSPAN Check applied pressure, configured M1 LRV and configured M1 EFAC.
M1 URV M1URV > max pressure in EGU
URV>FMX Entered pressure is greater than maximum rated pressure of transmitter. Check entry. Verify EGUs.
M1URV < min pressure in EGU
URV<FMN Entered pressure is less than minimum rated pressure of transmitter. Check entry. Verify EGUs.
M1 URV = M1 LRV LRV=URV Cannot set span to 0. Check entry. Check M1 LRV.
M1 turndown exceeds limit
BADTDWN Check entry. Check M1 LRV.
M1 LRV M1LRV > max pressure in EGU
LRV>FMX Entered pressure is greater than maximum rated pressure of transmitter. Check entry. Verify EGUs.
M1LRV < min pressure in EGU
LRV<FMN Entered pressure is less than minimum rated pressure of transmitter. Check entry. Verify EGUs.
M1 URV = M1 LRV LRV=URV Cannot set span to 0. check entry. Check M1 URV.
M1 turndown exceeds limit
BADTDWN Check entry. Check M1 URV.
42

5. Configuration
Configurable ParametersThe following table lists all the configurable parameters and the factory default for the IAP10-T and IGP10-T Transmitters. The factory default values have been customized if the transmitter was ordered with optional feature -C2. The table also shows which parameters are configurable with the integral vs. remote configurators.
Table 7. Configurable Parameters
Parameter CapabilityFactoryDefault
Configurable with
Application Requirement
Integ.Indic.
RemoteConfig.
Descriptors
Tag Number 8 characters max Tag Number No Yes
Descriptor 16 characters max Tag Name No Yes
Message 32 characters max Inst Location No Yes
Input
Calibrated Range LRV to URV in units listed in (a) below
See (b) below when not specified per S.O.
Yes Yes
Output
Meas. #1 Output 4 to 20 mA or Fixed Current. Specify Poll Address (1-15) for Fixed Current.
4 to 20 mA Yes Yes
Meas. #1 Mode Linear Linear Yes Yes
Meas #1 EGUs Select from units listed in (a) below.
Same as Calibrated Range
Yes Yes
Meas. #2 Mode Linear Linear Yes Yes
Meas #2 EGUs If linear, select from units listed in (a) below
Same as Calibrated Range
Yes Yes
Temp. Sensor Fail Strategy Normal oper or fail-safe Fail-safe Yes
Fail-safe High or Low High Yes Yes
External Zero Enabled or Disabled Enabled Yes Yes
Damping 0 to 32 seconds None Yes Yes
Poll Address 0 - 15 0 Yes Yes
LCD Indicator (c) Meas #1 EGU or % Lin Meas #1 EGU Yes No
43

MI IAP10-T/IGP10-T – May 2010 5. Configuration
Configuration Using a PC20To configure the transmitter using a PC20 Configurator, follow the procedure in MI 020-495.
Configuration Using a PC50To configure the transmitter using a PC50 Configurator, follow the procedure in MI 020-501 and MI 020-520.
Configuration Using a HART CommunicatorTo configure the transmitter using a HART Communicator, follow the procedure in MI 020-366.
Configuration Using the Optional Local DisplayYou can access the Configuration mode by the same multi-level menu system that was used to enter Calibration mode. Entry to the Mode Select menu is made (from normal operating mode) by pressing the Next button. The display reads CALIB, the first item on the menu. Press the Next button again to get to the second item on the menu, CONFIG. Acknowledge your choice of this selection by pressing the Enter button. The display shows the first item in the Configuration menu. You can then configure items shown in the following table. The standard factory default configuration is also given in this table.
The standard factory default configuration is not used if custom configuration option -C2 has been specified. Option -C2 is a full factory configuration of all parameters to the user’s specifications.
NOTE1. You can configure most parameters using the local display. However, for more
complete configuration capability, use a HART Communicator or PC-Based configurator.
(a)psi, inHg, ftH2O, inH2O, atm, bar, mbar, MPa, Pa, kPa, kg/cm2, g/cm2, mmHg, torr, mmH2O
(b)Span Code C: 0 to 30 psi; Span Code D: 0 to 300 psi; Span Code E: 0 to 3000 psi; Span Code F: 0 to 6000 psi; Span Code G: 0 to 15000 psi; Span Code H: 0 to 30000 psi.
(c)Measurement #2 can be displayed at any time by pressing the Enter button regardless of the local displayconfiguration. This reverts to Measurement #1 or % Lin (as configured) when power is cycled off and on.
Table 7. Configurable Parameters (Continued)
Parameter CapabilityFactoryDefault
Configurable with
Application Requirement
Integ.Indic.
RemoteConfig.
44

5. Configuration MI IAP10-T/IGP10-T – May 2010
2. During configuration, a single change can affect several parameters. For this
reason, if an entry is entered in error, re-examine the entire database or use the Cancel feature to restore the transmitter to its starting configuration and begin again.
Proceed to configure your transmitter by using the Next button to select your item and the Enter button to specify your selection per the following three figures. At any point in the configuration you can Cancel your changes and return to the on-line mode, or Save your changes.
Table 8. Configuration Menu
Item DescriptionInitial FactoryConfiguration
POLLADR Poll Address: 0 - 15 0
EX ZERO(a) External Zero: enable or disable Enable
S2 FAIL Temperature Sensor Failure Strategy: S2FATAL or S2NOFTL S2FATAL
OUT DIR 4 to 20 mA Output: forward or reverse Forward
OUTFAIL 4 to 20 mA Output: fail mode output - low or high High
OFFL MA 4 to 20 mA Output in offline mode - last or user set USER MA
DAMPING Damping: none, 1/4, 1/2, 1, 2, 4, 8, 16, or 32 seconds None
M1 MODE Output: linear or type of square root(b) Linear
M1DISP Local Indicator Display in linear mode: in percent or engineering units
M1EGU
M1 EGU User-Defined Engineering Units inH2O or psi
M1EOFF Offset applied to the Primary Value 0
M1 URV Primary Upper Range Value URL
M1 LRV Primary Lower Range Value 0
M2 MODE Output: linear or type of square root Linear
M2 EGU User-Defined Engineering Units Same as M1 EGU
DISPLAY Display M1, M2, or Toggle between M1 and M2 M1
CALDATE Calibration Date - - -
ENA PWD Enable password; no password, configuration only, or configuration and calibration
NO PWD
CFG PWD User set configuration password (six characters) - - -
CAL PWD User set calibration password (six characters) - - -
SET GDB Rewrite all calibration and configuration values with default values
- - -
(a) Applies only if transmitter contains External Zero option.
(b) Square root is not applicable to absolute pressure, gauge pressure, and level measurement.
45

MI IAP10-T/IGP10-T – May 2010 5. Configuration
Figure 28. Configuration Structure Diagram
EX ZERO EXZ DIS EXZ ENA
EEN
OUT DIR
E N
OUT FWD OUT REVNE
N EE
DAMPING NO DAMP DAMP 1/4E
N
N
EE
OUTFAIL FAIL LO FAIL HIE
N
N
EE
DAMP 1/2 DAMP 32N N
EE
POLLADR 0 1
EEN
E N
M1 MODE M1 LIN M1SQ<1CE N
EE
M1SQ<4LN
E
(continued on next figure)
N
N
2 15
EE
NN
M1 DISP M1 EGU LIN PCTE
N
N
N
S2 FAIL S2 FATAL S2 NOFTL
EEN
E N
NOTES:
1. OUTFAIL sets mA output to goeither High or Low under certainfailure conditions, such as a sensorfailure.
2. Square root functions should notbe selected on absolute and gaugepressure or level transmitters.
3. LIN PCT provides percent outputon local display only).
OFFL MA LAST MA USER MAE
N
N
EE
DisplayDigit
NE ImplementDigit
NM1SQ<nC
E
E E
46

5. Configuration MI IAP10-T/IGP10-T – May 2010
Figure 29. Configuration Structure Diagram (Continued)
M1 EGUE
N
*If character is not the last position on the display line, advances to next character.**If character is the last position on the display line, advances to next menu item.
M1 URV Display Digit Increment Digit
N
NE
E***
N
E
N
E
M1 LRV Display Digit Increment Digit
N
NE
E***
M2 MODE Similar to M1 MODE
M2 EGU
CALDATE
Similar to M1 EGU
(continued from previous figure)
inH2O inHg atm
EEE
NN
N
(continued on next figure)
M1EOFF Display Digit Increment Digit
N
NE
E***
DISPLAYE
SHOW M1N
SHOW M2 TOGGLE
E EE
N
47

MI IAP10-T/IGP10-T – May 2010 5. Configuration
Figure 30. Configuration Structure Diagram (Continued)
Commentary on Configuration Structure Diagram
In general, use the Next button to select your item and the Enter button to specify your selection.
CANCEL
SAVE
N
CALDATE
Display Day Increment DayN
N
E
E
E
E
Display Month Increment MonthN
Display Year Increment YearN
N
(continued from previous figure)
Discard all changes, return to ONLINE
Save database changes, return to ONLINE
Display Character
Increment Character
N
E
***
ENA PWD NO PWDS CFGONLYECFG+CAL
N
E
N or E N or E
Display Character
Increment Character
N
E ***
CAL PWDCFG PWD
E E
CFG PWD
Display Character
Increment Character
N
E
N or E
N
SET GDB CLEAR DB Performs Reset and returns to ONLINE
EE
N
*If character is not the last position on the display line, advances to next character.**If character is the last position on the display line, advances to next menu item.
Display Character
Increment Character
N
E
48

5. Configuration MI IAP10-T/IGP10-T – May 2010
POLLADR:
To configure the transmitter poll address, press Enter. Use the Next button to select an address of 0 through 15, then press Enter. An address of 1 through 15 is used for multidrop mode with a fixed mA output.
EX ZERO:
The External Zero feature allows the optional external zero pushbutton to be disabled for additional security. To configure this feature, go to EX ZERO with the Next button and press Enter. Use the Next button to select EXZ DIS or EXZ ENA and press Enter.
S2 FAIL:
The temperature sensor compensates for changes in temperature in the transmitter electronics. Failure of this sensor can cause a 4 to 20 mA accuracy change of up to 0.25%. The S2 FAIL feature allows you to specify action (or no action) if such a failure occurs. To configure this feature, go to S2 FAIL with the Next button and press Enter. Use the Next button to select S2 FATAL (to have the output go to that configured in OUTFAIL) or S2 NOFTL (to continue operation with a temperature sensor failure). This parameter has no effect if POLLADR is configured to any number from 1 through 15.
OUT DIR:
To configure the Output Direction, go to OUT DIR with the Next button and press Enter. Use the Next button to select OUT FWD (4 - 20 mA) or OUT REV (20 - 4 mA) and press Enter. This parameter has no effect if POLLADR is configured to any number from 1 through 15.
OUTFAIL:
The Outfail feature provides high or low output with certain malfunctions. To configure the fail mode output, go to OUTFAIL with the Next button and press Enter. Use the Next button to select FAIL LO or FAIL HI and press Enter. This parameter has no effect if POLLADR is configured to any number from 1 through 15.
OFFL MA:
The Off-line mA feature enables you to set the output to a specified value or to the last value if the transmitter goes off-line. To configure the off-line output, go to OFFL MA with the Next button and press Enter. Use the Next button to select LAST MA or USER MA and press Enter. If you selected USER MA, press Enter again at the display of digits. Then use the Next button to step through the library of digits to select the desired first digit, then press Enter. Your selection is entered and the second character flashes. Repeat this procedure until you have entered the last digit. Then use the Next button to move the decimal point to its desired location and press Enter. The display advances to the next menu item.
DAMPING:
To configure additional damping, go to DAMPING with the Next button and press Enter. Use the NEXT button to select NO DAMP, DAMP 1/4, DAMP 1/2, DAMP 1, DAMP 2, DAMP 4, DAMP 8, DAMP 16, or DAMP 32 and press Enter.
49
MI IAP10-T/IGP10-T – May 2010 5. Configuration
M1 MODE:
To configure the mode of the primary output, go to M1 MODE with the Next button and press Enter. Use the Next button to select M1 LIN and press Enter. M1SQ<1C (square root with cutoff below 1% of calibrated pressure range), M1SQ<4L (square root with linear below 4% of calibrated pressure range), or M1SQ<4L (square root with linear below 4% of calibrated pressure range), or M1SQ<nC (square root with user configured cutoff specified between 0 and 20% of the flow range) is not applicable to absolute or gauge pressure measurement.
M1 DISP:
To configure the optional local indicator to show engineering units or percent, go to M1 DISP with the Next button and press Enter. Use the Next button to select M1 EGU or LIN PCT and press Enter. LIN PCT only provides percent readings on the local display. The M1 engineering unit is used for remote communication of Measurement #1, even if LIN PCT is selected.
M1 EGU:
To configure pressure engineering units for your display and transmission, go to M1 EGU with the Next button and press Enter. Because M1 MODE is configured as M1 LIN, you are asked to specify one of the following pressure labels: psi, inHg, ftH2O, inH2O, atm, bar, mbar, MPa, Pa, kPa, kg/cm2, g/cm2, mmHg, torr, or mmH2O. Your transmitter then automatically adjusts M1EFAC (engineering factor), M1 URV (upper range value), and M1 LRV (lower range value). M1EOFF is defaulted to zero.
M1EOFF:
You can introduce an offset by entering a nonzero value for M1EOFF. The offset affects the value of PV that is transmitted in engineering units, transmitted as an analog mA signal, and displayed in the (optional) local display. This feature can be used in such applications as an elevated water storage tank where the transmitter is at grade level but the output is to correspond to the level of the tank. It can also be used for a grade level water storage tank where the transmitter is installed above the bottom of the tank and the output is to correspond to the level in the tank.
M1 URV:
To edit the upper range value, press Enter at the prompt M1 URV. Use the procedure “Entering Numerical Values” on page 30 to edit this parameter.
M1 LRV:
Similar to M1URV immediately above.
M2 MODE:
M2 is a secondary measurement that is read by the Model 275 HART Communicator and can be displayed on the optional display. You might use this feature to display M1 in your primary pressure units and M2 in a different set of pressure units. To configure this parameter, go to M2 MODE with the Next button and press Enter. Use the next button to select M2 LIN and press Enter.
M2 EGU:
Similar to M1 EGU.
50

5. Configuration MI IAP10-T/IGP10-T – May 2010
DISPLAY:
To display M1, M2, or to toggle between M1 and M2, go to DISPLAY with the Next button and press Enter. Use the Next button to select SHOW M1, SHOW M2, or TOGGLE and press Enter.
CALDATE:
This is not a required entry but can be used for record-keeping or plant maintenance purposes. To edit the calibration date, go to CALDATE with the Next button and press Enter. You then can change the day, month, and year. The display shows the last date with the day flashing. Use the Next button to step through the library of digits to select the desired day, then press Enter. Repeat this process for the month and year.
ENA PWD:
To enable or disable the password feature, go to ENA PWD with the Next button and press Enter. Use the Next button to select NO PWDS (password not required for either calibration or configuration), CFGONLY (password required to configure but not to calibrate), or CFG+CAL (passwords required to both configure and calibrate) and press Enter.
If you selected CFG ONLY, the display changes to CFG PWD. Press either the Next or Enter button. Use the Next button to step through the library of characters to select the desired first character, then press Enter. Your selection is entered and the second character flashes. Repeat this procedure until you have created your password. If the password has less than six characters, use blanks for the remaining spaces. When you have configured the sixth space, the display advances to the next menu item.
If you selected CFG+CAL, the display changes to CAL PWD. To create the Calibration password, press either the Next or Enter button. Use the Next button to step through the library of characters to select the desired first character, then press Enter. Your selection is entered and the second character flashes. Repeat this procedure until you have created your password. If the password has less than six characters, use blanks for the remaining spaces. When you have configured the sixth space, the display advances to CFG PWD. Use the same procedure to create the configuration password.
NOTEIn normal operation, the CAL PWD allows access to only calibration mode. The CFG PWD allows access to both configuration and calibration.
CAUTION!!!Record your new password before saving changes to the database.
SET GDB:
If your transmitter database becomes corrupted and you receive an INITERR message upon startup, this function enables you to rewrite all calibration and configuration values with default values.
51

MI IAP10-T/IGP10-T – May 2010 5. Configuration
CAUTION!!!
Any calibration and configuration values that you have entered will be lost. Therefore, SET GDB should not be selected if your transmitter is functioning normally.
Character Lists
*List only applies to a HART Communicator not to the optional local display.
Error Messages
Table 9. Alphanumeric Character List
Character List*
@, (comma)A-Z (uppercase)[\]^_ (underscore)space!“#$%&
‘()*+-./0-9:;<>=?
Table 10. Numeric Character List
Character List
–. (decimal point)0 through 9
Table 11. Configuration Error Messages
Parameter Condition Tested Error Message User Action
Password Protection
Password BAD PWD Bad password entered, use another.
52

5. Configuration MI IAP10-T/IGP10-T – May 2010
Write Protection
Write Protection Enabled
REJECT Displays when user attempts an action that is write protected.
M1EFAC M1EFAC < 0 -M1EFAC Negative M1 EFAC is not valid. Change M1 EFAC to positive value.
M1EFAC = 0 0M1EFAC M1 EFAC = 0 is not valid. Change M1 EFAC to positive value.
M1 URV M1URV > max pressure in EGU
URV>FMX Entered pressure is greater than maximum rated pressure of transmitter. Check entry. Verify EGUs.
M1URV < min pressure in EGU
URV<FMN Entered pressure is less than minimum rated pressure of transmitter. Check entry. Verify EGUs.
M1 URV = M1 LRV LRV=URV Cannot set span to 0. Check entry. Check M1 LRV.
M1 turndown exceeds limit
BADTDWN Check entry. Check M1 LRV.
M1 LRV M1LRV > max pressure in EGU
LRV>FMX Entered pressure is greater than maximum rated pressure of transmitter. Check entry. Verify EGUs.
M1LRV < min pressure in EGU
LRV<FMN Entered pressure is less than minimum rated pressure of transmitter. Check entry. Verify EGUs.
M1 URV = M1 LRV LRV=URV Cannot set span to 0. Check entry. Check M1 URV.
M1 turndown exceeds limit
BADTDWN Check entry. Check M1 URV.
M2EFAC M2EFAC < 0 -M2EFAC Negative M2 EFAC is not valid. Change M2 EFAC to positive value.
M2EFAC = 0 0M2EFAC M2 EFAC = 0 is not valid. Change M2 EFAC to positive value.
Table 11. Configuration Error Messages (Continued)
Parameter Condition Tested Error Message User Action
53

MI IAP10-T/IGP10-T – May 2010 5. Configuration
54

6. Maintenance
DANGER!For nonintrinsically safe installations, to prevent a potential explosion in a Division 1 hazardous area, de-energize transmitters before you remove threaded housing covers. Failure to comply with this warning could result in an explosion resulting in severe injury or death.
Error MessagesFor error messages displayed on the HART Communicator refer to MI 020-366.
Parts ReplacementParts replacement is generally limited to the electronics module assembly, housing assembly, sensor assembly, terminal block assembly, cover O-rings, and optional display. For part numbers relating to the transmitter and its options, see the following parts lists:
IAP10 Absolute and IGP10 Gauge Pressure Transmitters: PL 009-006
IGP10 High Gauge Pressure: PL 009-010
Replacing the Terminal Block Assembly1. Turn off transmitter power source.
2. Remove the Field Terminals and the Electronics compartment covers by rotating them counterclockwise. Screw in cover lock if applicable.
3. Remove the digital display (if applicable) as follows: grasp the two tabs on the display and rotate it about 10° in a counterclockwise direction.
4. Remove the electronics module from the housing by loosening the two captive screws that secure it to the housing. Then pull the module out of the housing far enough to gain access to the cable connectors on the rear of the module.
5. Remove the four socket head screws securing the terminal block.
6. Disconnect the terminal block cable connector from the electronics module.
7. Remove the terminal block and the gasket under it.
8. Connect the new terminal block cable connector to the electronics module.
9. Install the new terminal block and new gasket and reinstall the four screws to 0.67 N⋅m (6 in⋅lb) in several even increments.
10. Reinstall the electronics module (and digital display if applicable).
11. Reinstall the covers onto the housing by rotating them clockwise to seat the O-ring into the housing and then continue to hand tighten until the each cover contacts the
55

MI IAP10-T/IGP10-T – May 2010 6. Maintenance
housing metal-to-metal. If cover locks are present, lock the cover per the procedure described in “Cover Locks” on page 23.
12. Turn on transmitter power source.
Replacing the Electronics Module AssemblyTo replace the electronics module assembly, refer to Figure 31 and proceed as follows:
1. Turn off transmitter power source.
2. Remove the electronics compartment cover by rotating it counterclockwise. Screw in cover lock if applicable.
3. Remove the digital display (if applicable) as follows: grasp the two tabs on the display and rotate it about 10° in a counterclockwise direction. Pull out the display and disconnect its cable.
4. Remove the electronics module from the housing by loosening the two captive screws that secure it to the housing. Then pull the module out of the housing far enough to gain access to the cable connectors on the rear of the module.
CAUTION!!!The electronics module is “one assembly” at this point and is electrically and mechanically connected to topworks with a flexible ribbon signal cable, a 2-wire power cable, and in some cases, a cable for an external zero pushbutton. Do not exceed the slack available in these cables when removing the assembled module.
5. Unplug all cable connectors from the rear of the electronics module and place the module on a clean surface.
6. Predetermine connector orientation, then insert the cable connectors into the replacement module. Replace the module in the housing using care not to pinch the cables between the module and the housing. Tighten the two screws that secure the module to the housing.
7. Connect the cable from the digital display to the electronics module. Ensure that the O-ring is fully seated in the display housing. Then, holding the digital display by the tabs at the sides of the display, insert it into the housing. Secure the display to the housing by aligning the tabs on the sides of the assembly and rotating it about 10° in a clockwise direction.
8. Reinstall the cover onto the housing by rotating it clockwise to seat the O-ring into the housing and then continue to hand tighten until the cover contacts the housing metal-to-metal. If cover locks are present, lock the cover per the procedure described in “Cover Locks” on page 23.
9. Turn on transmitter power source.
The module replacement procedure is now complete.
56

6. Maintenance MI IAP10-T/IGP10-T – May 2010
Figure 31. Replacing the Electronics Module Assembly and Display
Removing and Reinstalling a Housing AssemblyTo remove and reinstall a housing assembly, refer to Figure 31 and proceed as follows:
1. Remove the electronics module per Steps 1 through 5 in the previous procedure.
2. If your housing has an anti-rotation screw, remove the red lacquer from the screw recess. Turn the screw three full turns counterclockwise.
3. If your housing has a retention clip, remove the red lacquer from the screw recess. Remove the screw completely, and slide the clip off the housing. Save the clip and screw for future use,
4. Remove the housing by rotating it counterclockwise (when viewed from the top). Use caution to avoid damaging the sensor cable.
5. Inspect the sensor O-ring for damage. If the O-ring is damaged, replace it with the appropriate O-ring. (See parts list for your transmitter). Lubricate the O-ring with silicone lubricant (Foxboro Part Number 0048130 or equivalent). Verify that the O-ring is situated in the groove of the neck.
WARNING!Failure to reuse or install the proper O-ring for a CSA labeled product violatesANSI / ISA 12.27.01.
6. Feed the sensor cable through the housing neck into the electronics compartment.
7. Screw the housing onto the sensor neck until it bottoms. Do not over tighten. Be careful not to damage the sensor cable or dislodge the neck O-ring.
HOUSING ASSEMBLY
TO REMOVE ELECTRONICS MODULE, REMOVE TWO CROSS RECESS SCREWS.
TO REMOVE DISPLAY FROM ELECTRONICS MODULE, TWIST DISPLAY COUNTER-CLOCKWISE TO RELEASE TABS AND PULL OUT, THEN UNPLUG CABLE CONNECTOR.
57

MI IAP10-T/IGP10-T – May 2010 6. Maintenance
8. If your housing has an anti-rotation screw, engage the screw until it touches the sensor
neck and back it off 1/8th turn. It is important that the screw is not touching the sensor. Fill the screw recess with red lacquer (Foxboro Part Number X0180GS or equivalent). the housing may then be rotated up to one full turn counterclockwise for optimum access.
9. If your housing has a retention clip, insert the clip over the boss in the housing neck so that the hole in the clip is aligned with the hole in the boss. Install the screw but do not tighten. Rotate the housing up to one full turn counterclockwise for optimum access. Tighten the retention clip screw and fill the screw recess with red lacquer (Foxboro Part Number X0180GS or equivalent). The housing can still be rotated for optimum access.
10. Reinstall the electronics module per Steps 6 through 9 in the previous procedure.
Adding the Optional DisplayTo add the optional display, refer to Figure 31 and proceed as follows:
1. Turn off transmitter power source.
2. Remove the electronics compartment cover by rotating it counterclockwise. Screw in cover lock if applicable.
3. Plug the display into the receptacle at the top of the electronics assembly.
4. Ensure that the O-ring is seated in its groove in the display housing. Then insert the display into the electronics compartment by grasping the two tabs on the display and rotating it about 10° in a clockwise direction.
5. Install the new cover (with a window) onto the housing by rotating it clockwise to seat the O-ring into the housing and then continue to hand tighten until the cover contacts the housing metal-to-metal. If cover locks are present, lock the cover per the procedure described in “Cover Locks” on page 23.
6. Turn on transmitter power source.
Replacing the Sensor AssemblyTo replace the sensor assembly, refer to Figure 31 and proceed as follows:
1. Remove the electronics module as described above.
2. Remove the housing as described above. Sensor is left.
3. Install housing on new sensor.
4. Reinstall electronics module.
58
Index
CCalibration
Using a HART Communicator 37Using a PC20 Configurator 37Using a PC50 Configurator 37Using the Local Display 37
Calibration Notes 33Calibration Setup 35Configurable Parameters 43Configuration
Using a HART Communicator 44Using a PC20 Configurator 44Using a PC50 Configurator 44Using the Local Display 44
Cover Locks 23
DDisplay, Positioning the 22
EError Messages
Calibration 42Configuration 52Operation 32
HHousing, Positioning the 21
IIdentification 2Installation 15
MMaintenance 48, 55Mounting 15
OOperation 29
59
MI IAP10-T/IGP10-T – May 2010 Index
IS V
SUE DATES DEC 2001 OCT 2003 APR 2004 FEB 2005 FEB 2006 AUG 2006
PParts Replacement 55Piping, Typical Transmitter 20
RReference Documents 1Reranging 31
SSpecifications
Product Safety 11Standard 5
WWiring 23Write Protect Jumper 22
ZZero Adjustment Using External Zero Button 40
OCT 2007 JUL 2008 MAR 2009 MAY 2010
ertical lines to the right of text or illustrations indicate areas changed at last issue date.
Invensys Operations Management5601 Granite Parkway Suite 1000Plano, TX 75024United States of Americahttp://www.iom.invensys.com
Global Customer SupportInside U.S.: 1-866-746-6477Outside U.S.:1-508-549-2424 or contact your local Invensys representative.Email: [email protected]: http://support.ips.invensys.com
Invensys, Foxboro, and I/A Series are trademarks of Invensys plc, its subsidiaries, and affiliates.All other brand names may be trademarks of their respective owners.
Copyright 2001-2010 Invensys Systems, Inc.All rights reserved
0510