instruction sheet - cervezacasera.com.mxcervezacasera.com.mx/wp-content/uploads/2017/11/b72.pdf ·...
TRANSCRIPT

Page 1 of 22 www.KegLand.com.au Last Updated 1/30/2018 8:44 PM
Instruction Sheet
Robobrew 35L All In One Brewery with Pump
Generation 3
Model: KL04749

Page 2 of 22 www.KegLand.com.au Last Updated 1/30/2018 8:44 PM
WARNING IMPORTANT INFORMATION ! 1. Please read this ENTIRE instruction sheet before using the
Robobrew unit. If you are unsure about any part of using
this brewery please refer to the Youtube videos that we have made or contact your local distributor.
2. If the Robobrew is damaged in any way do not use it.
Contact your local distributor. 3. NEVER turn on the pump without attaching the recirculation
arm shown in step 4 of the instructions. If you do not fit this
arm you could be at risk of spraying hot wort into the air causing injury. Please
4. NEVER turn on the pump without first attaching the
recirculation arm first. Also do not run the pump dry for extended periods. This can damage the pump.
5. If at any stage the recirculation arm is not fitted and/or needs
to be removed always ensure the ball valve is turned off (see instructions under the heading BEFORE WE START)
6. Do not boil dry. Do not turn on the elements if there is less than 4 liters of
liquid in the boiler. This is the minimum fill level.
Recirculation
Arm

Page 3 of 22 www.KegLand.com.au Last Updated 1/30/2018 8:44 PM
PARTS CHECKLIST Main RoboBrew Unit With Pump Glass Lid Immersion Chiller Rotating Recirculation Arm Extension with Male & Female Camlocks + Camlock
Washer RoboBrew Boiler Perforated False Bottom + Hoop Ring Thread, Nut & Washer Malt Pipe Assembly:
a) Malt Pipe Body b) Malt Pipe Handle c) Malt Pipe Lower Tube (with 3/8 male thread) d) Malt Pipe Upper Tube with x2 welded lock springs e) Malt Pipe false bottom with 3/8 female thread (no silicone o-ring required) f) Malt Pipe Secondary Mesh Screen g) Malt Pipe Cover Screen with Silicone U-Seal Gasket h) Malt Pipe Upper Tube with Overflow Funnel i) Malt Tube Black Silicone Plug
BEFORE WE START Your RoboBrew will enable you to have the
freedom in crafting your own craft beer.
In this instruction manual we’ll teach you the basics to get you on your way to making your very own all grain craft beer. The RoboBrew was created to help introduce the public into All Grain Brewing without the headaches of drilling holes in pots and wiring up boxes. Here we strive to help you on your journey into the homebrew world. With a world class customer support base behind us and a growing community of friendly and helpful brewers of all skill levels, we all strive to get each others beer to be the best beer you can make.

Page 4 of 22 www.KegLand.com.au Last Updated 1/30/2018 8:44 PM
Firstly there are some things we need to discuss in terms of safety.
As we will be dealing with electricity, hot liquids, pumps etc. There are some inherent dangers that need to be considered prior to operating. Always use a sturdy bench
where the Robobrew cannot fall over. Do not brew in an area with poor ventilation, high foot traffic area or any area where children can reach the Robobrew unit.
Before you start using the brewery check that you have all the components in these instructions.
Please also check that before you fill the Robobrew unit that
this ball valve on the side of the unit is turned off and is in the horizontal position (shown in the
picture to the right).

Page 5 of 22 www.KegLand.com.au Last Updated 1/30/2018 8:44 PM
1. Boiler Perforated False Bottom Assembly This model of RoboBrew has been designed with a perforated false bottom (legged false bottom) for the boiler. This
false bottom HAS NOT been designed so you can place grain directly onto this screen. This false bottom is designed to
protect your pump from solids and drawing in things such as hop pellets, flowers, spices, grain, etc. This false
bottom adds significantly to the reliable operation of the RoboBrew units and it’s recommended that this screen is always
in place if the pump is going to be used.
The false bottom has legs that suspend
the false bottom about 20mm above the base of the boiler so all liquid that exits into the pump our out via the ball valve
will be filtered using this screen.
A fully stainless hoop ring with a thread and nut will need to be manually attached
to aid in lifting out the false bottom. These parts will be in your RoboBrew kit.
Once the screen is in place fill the boiler
with the desired amount of water for
mashing in. Set the temperature on the display and wait for the water to heat up.

Page 6 of 22 www.KegLand.com.au Last Updated 1/30/2018 8:44 PM
2. Tap Assembly The tap for the Robobrew is fairly straight forward to fit. Make sure the silicon seal is on the tap body prior to installation. (see image below).
The lock nut can be tightened onto the thread from the inside of the Robobrew boiler.
SILICONE SEAL
Page 7 of 22 www.KegLand.com.au Last Updated 1/30/2018 8:44 PM
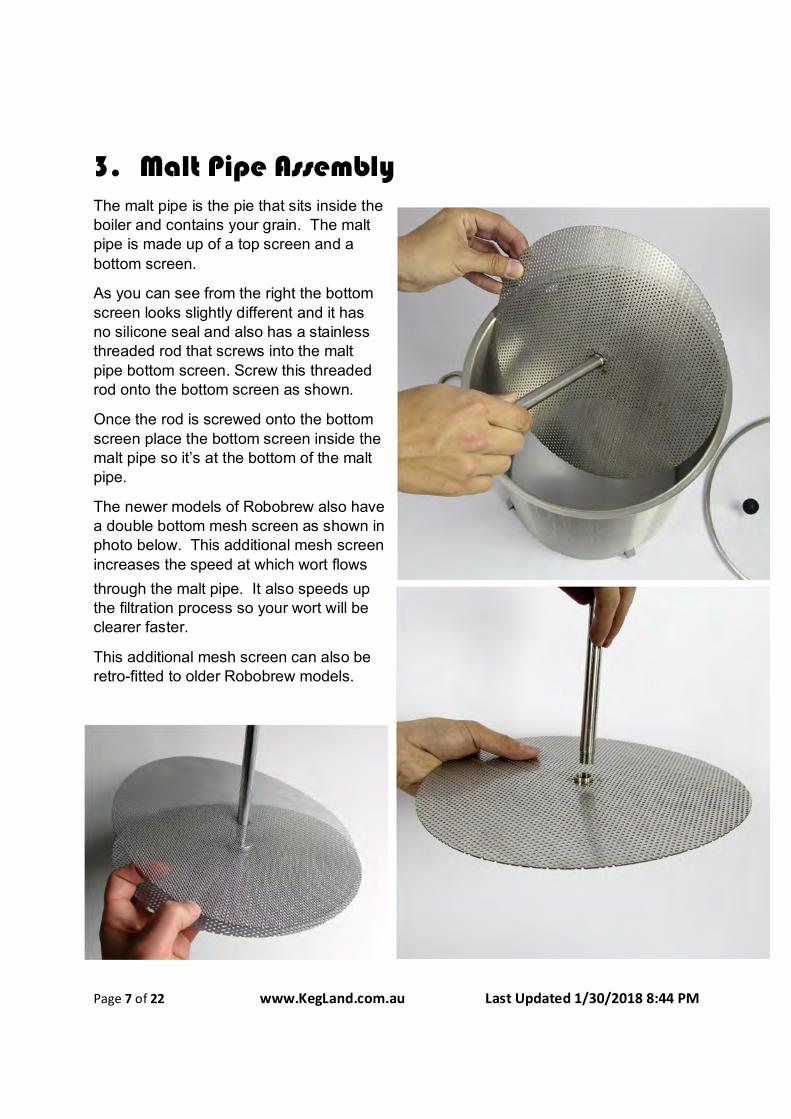
3. Malt Pipe Assembly The malt pipe is the pie that sits inside the boiler and contains your grain. The malt pipe is made up of a top screen and a
bottom screen.
As you can see from the right the bottom
screen looks slightly different and it has no silicone seal and also has a stainless threaded rod that screws into the malt
pipe bottom screen. Screw this threaded rod onto the bottom screen as shown.
Once the rod is screwed onto the bottom
screen place the bottom screen inside the malt pipe so it’s at the bottom of the malt pipe.
The newer models of Robobrew also have a double bottom mesh screen as shown in photo below. This additional mesh screen
increases the speed at which wort flows
through the malt pipe. It also speeds up the filtration process so your wort will be clearer faster.
This additional mesh screen can also be retro-fitted to older Robobrew models.

Page 8 of 22 www.KegLand.com.au Last Updated 1/30/2018 8:44 PM
Once the bottom screen is in place use the extension tube and place this on top of the other stainless
tube that you just attached to the bottom screen.
There is no need to push this extension tube all the way to the
bottom.
After you have attached the
extension pipe you can then use the small black silicone plug and put this over the hole at the top of
the extension pipe. This plug will prevent grain for pouring into the middle of the pipe and ending up in
the boiler.

Page 9 of 22 www.KegLand.com.au Last Updated 1/30/2018 8:44 PM
We recommend installing the malt pipe handle before you add your grain and malt pipe into to your RoboBrew.
To fit the handle feed one end of the handle through one hole in the malt
piple. Push the handle in on one side far enough so you have enough clearance on the other side to feed
the handle into the opposing hole.
Once the handle has been fitted you
can lift/maneuver the malt pipe easily.

Page 10 of 22 www.KegLand.com.au Last Updated 1/30/2018 8:44 PM
4. Mashing We recommend lifting up the malt pipe empty to insert the malt pipe handle before you add your grain.
Once the malt pipe has been assembled you can pour your grain into the malt piple. The
malt pipe is designed to take up to abour 9kg of grain but in the majority of recipes you will probably only probably use 4-5kg.
Once the grains have been poured into the malt pipe it’s important to stir in the grains
and remove all dough balls (dry spots).
Thoroughly stirring the grain will take you about 2-5 minutes.
Once you have stired in the grain fit the top
screen (show to right)
The top screen should be placed so that it
lightly touches the top of the grain. The
silicon seal (shown in photo to right) is not a necessary component and will be not packed
with the new Robobrew from units manufactured after March 2018.
Once you have fitted the top screen use the
stainless siphon cone and place this over the extension tube with the cone side facing up.
Push down on the cone until the extension
tube and cone is sitting gently against the top screen. (shown to the left)
Please note: Only use 500w element to increase temperature when Malt Pipe is inserted.
Using the powerful 1900w element with malt
pipe inserted may scorch the bottom of your RoboBrew.
NOTE: The wattage buttons on 110-120v Robobrew units is less.

Page 11 of 22 www.KegLand.com.au Last Updated 1/30/2018 8:44 PM
5. Fitting the Camlocks together Recirculation is something that can be done easily using the pump that is built into this model of Robobrew.
It is recommended to purchase some extra silicon tubing with the Robobrew as this will help with with
transfering the wort from the Robobrew unit to your fermenter using the pump or the ball valve.
If you are recirculating during mashing it is
recommend that you only use the 500watt element. This will normally be fast enough on it’s own to
gently heat the mash.
The recirculation speed can be controlled using the ball vave at the base of the recurculation arm.
NOTE: Due to the power constraint on 110v AC systems the wattage of the 110v Robobrew units in countries such as America will be less than what is
shown in the photos to the right.
WARNING: The recirulation arm must be fitted
whenever the pump is in use. Follow these instructions to fit the recirculation arm.
Before attaching your recirculation arm, please check to see if the silicone washer is still in the female camlock. If that has rattled loose or fallen off
it will not make an entire seal and will leak when the pump is in use.
We must stress not to rotate the rotating racking arm
while it is engaged in the lock down position. If you need to rotate the racking arm to fill your fermenter, please switch off the pump and readjust the camlock
to the position you need then re-engage the
camlock.

Page 12 of 22 www.KegLand.com.au Last Updated 1/30/2018 8:44 PM
6. Temperature The temperature on the display reads the temperature at the bottom of the boiler near where the element is mounted. It is important to understand that this is not the core
temperature of the mash. If you recirculate for long enough the mash temp will
eventually be close to the display temp. With that said if you want to increase the termperature of the mash it is normally fastest and easiest to overshoot the desired mash temperature by a few degrees while using a secondary thermometer in the mash
to keep an eye on the core temperature of the mash.
A photo to the right shows the placement of the probe. The probe placement has been
designed like this as it prevents the element from overheating and scorching wort by taking the temperature of the wort closest
to the element. This is why your strike temperature needs to accurate!

Page 13 of 22 www.KegLand.com.au Last Updated 1/30/2018 8:44 PM
7. Sparging Once you have mashed your grain for 60-90 minutes it’s then time to sparge the grain.
Using the malt pipe handle lift the malt pipe out of the boiler and
rotate 90 degrees until you see the feet of the malt pipe locate near the wire supports. (see
picture to the right)
Once the feet have been located
place the malt pipe down and ensure its securely in place.
Pour warm water (approximatley 75-80C) ontop of the grain inside
the malt pipe and this will rinse the grain of the majority of remaining sugars. This process will probably
require 5-15 liters of water depending on your recipe and desired gravity that you are trying
to achieve. We highly recommend a
secondary vessel to hold hot/warm water for this process. If not hot water directly from your
faucet will do.
Page 14 of 22 www.KegLand.com.au Last Updated 1/30/2018 8:44 PM
8. Boiling Boiling is one of the final steps to making beer in the Robobrew. Simply set the temperature to 120C and turn on both elements. Once the Robobrew has started to boil normally the single 1900 watt element is sufficient to maintain a constant rolling boil.
Then make your hop additions as per your recipe.
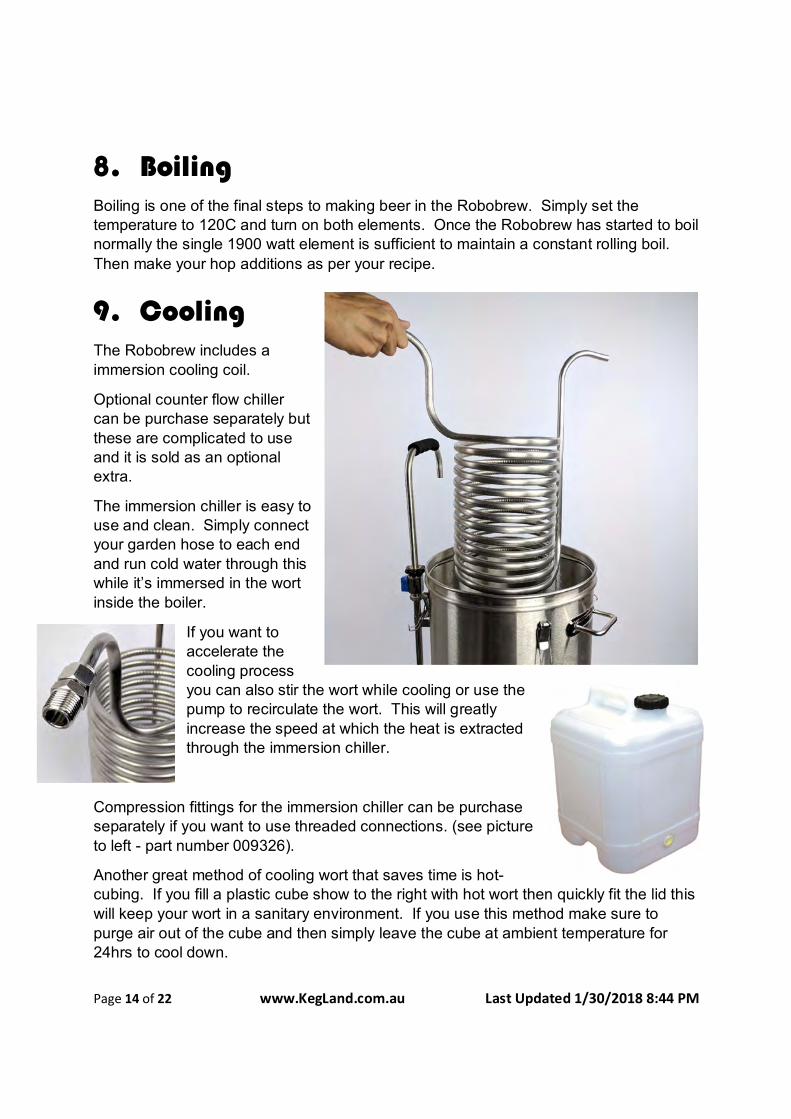
9. Cooling The Robobrew includes a
immersion cooling coil.
Optional counter flow chiller can be purchase separately but
these are complicated to use and it is sold as an optional extra.
The immersion chiller is easy to use and clean. Simply connect your garden hose to each end
and run cold water through this while it’s immersed in the wort
inside the boiler.
If you want to accelerate the
cooling process you can also stir the wort while cooling or use the pump to recirculate the wort. This will greatly
increase the speed at which the heat is extracted through the immersion chiller.
Compression fittings for the immersion chiller can be purchase separately if you want to use threaded connections. (see picture
to left - part number 009326).
Another great method of cooling wort that saves time is hot-cubing. If you fill a plastic cube show to the right with hot wort then quickly fit the lid this
will keep your wort in a sanitary environment. If you use this method make sure to
purge air out of the cube and then simply leave the cube at ambient temperature for 24hrs to cool down.

Page 15 of 22 www.KegLand.com.au Last Updated 1/30/2018 8:44 PM
Although the immersion cooling coil was intended to be used with cold water running through it there is also another method that is worth mentioning. That is to run the hot
wort through the coil then to immerse the coil into an ice bath.
If you prefer to use this method then connect some silicon tubing to the recirculation
arm and then the other end to the immersion cooling coil. Recirculate boiling wort
through the coil and back into the boiler for at least 5 mintues to make sure the coil is hot and any potencial bacteria in the coil is exposed to boiling wort.
Then place the cooling coil into a bucket of ice water. Use the ball valve on the
recirculation arm to adjust the flow rate. Adjusting the flow rate on the recirculation arm will effect the temperature on the output of the coil. So use this adjustment to achieve
your desired wort temperature so the wort is at a suitable temperature to put into your fermenter.

Page 16 of 22 www.KegLand.com.au Last Updated 1/30/2018 8:44 PM
Digital Controller and Temperature Settings Display Actual Temp – This displays the current temperature. Please be aware that this is the temperature that is taken at the bottom of the Robobrew close the the element. As a
result this temperature will often not be the same as the core temperature inside the grain in the malt pipe. Typically if you want to increase the core temperature of the grain in the malt pipe you will have to set the target termperature several degrees
warmer than your desired mash core temperature.
Target Temp – This is the target temperature at which the elements will continue to
opperate. Once the target temperature is reached the elements will turn off.
Time Elapsed – This is the amount of time that has elapsed. This will only be
displayed in auto mode.
Target Time – This is the amount of time allocated to a particular stage. This will only be displayed in auto mode. The once the time elapsed has reached the target time the unit will cycle to the next stage.
Stages 1-6 – This model has 6 different stages at which you can preset a time and temperature. Once the time has cycled out from one stage it will jump to the next stage.
Once all the stages are complete the alarm will sound. If you set 00:00 in the time for a
particular stage that stage will be skipped.

Page 17 of 22 www.KegLand.com.au Last Updated 1/30/2018 8:44 PM
Buttons 1. On/Off – This button is to turn off on or off the power. 2. Temp – Pressing this button will allow you to change the temperature. Press this
button once quickly and the target temperature setting will start flashing. Then
use the +/- buttons to adjust the temperature. The Robobrew can cycle between Celcius and Farenheit by simply pressing and holding down the temp button for more than a few seconds.
3. Time – Pressing this button will allow you to change the target time. 4. Auto/Man – This button switches between automatic/stages and manual mode.
5. +/- - The plus and minus buttons are to incriment and decrease the time and temperature settings.
6. S1-S6 – This button is to cycle between the different stages. This button will only
work in automatic mode not manual.
7. Play/Pause – This button will play or pause the brewing process. When the pause button is pressed the elements are turned off and the timer will stop.
Factory Reset
To reset all the settings on the Robobrew and clear all the stages the fastest way to do
this is by quickly pressing the “+” and “-“ buttons at the same time quickly. Both buttons must be pressed at exactly the same time in order for this to work.
NOTE: This reset will also reset the calibration figure.
Calibration
This model of robobrew has a temperature calibration feature. If you find that the actual temperature on the display is not correct this can be calibrated. This proceedure is not normally required and if you are unsure of what you are doing it’s best if you leave the
calibration 0. To adjust the calibration settings follow the instructions below:
1. Power up the Robobrew and press the pause button.
2. Press and hold down the time button until the calibration number is displayed. 3. Adjust the calibration number between -10 and +10. A positive figure will
increase the displayed temperature and a negative figure will decrease the
displayed temerperature. For instance if your Robobrew is reading 200C on the display but it should be reading 250C then use a calibration figure of positive 5.
4. Press the time button again to return to the home screen.
Note: The calibration figure must be set in celcius but it will effect the displayed temperature in both celcius and farenheit.

Page 18 of 22 www.KegLand.com.au Last Updated 1/30/2018 8:44 PM
Manual Mode The Robobrew is easiest to opperate in the manual mode. When in manual mode there are only 4 buttons that you need to use. Temp, positive, negative, and play/pause button. To adjust the temperature you must pause the operation then simply press the
temp button and use the positive and negative buttons to adjust the desired target termpature.
Auto Mode In the automatic mode there are 6 different stages that can be set into the Robobrew.
These stages can be used to program a stepped mash or alternatively it can be used to
set a timer to pre-heat water so your mash in water is already pre-heated when you
wake up on your brew day.
Once the play button has been pressed the stages will cycle through from S1 to S6. If any of the stages are set with time being 00:00 then this stage will be skipped. To setup
the stages use the following instructions:
1. Press the pause button and put the robobrew into Auto mode using the auto/man button.
2. Press the S1-S6 button to select the stage that you want to adjust. 3. Use the temp, time and positive and negative buttons to set the desired
temperature and time for that stage.
4. Press the S1-S6 button to move to the next stage and repeat step 3 until all the desired stages are setup.
5. You do not need to use all stages if you do not want to. If you set a stage to 00:00 time this stage will be ignored.
6. Once you finish setting up all the stages use the S1-S6 button to select the stage
that you want to start from (normally S1) then push the play button and the stages will begin in sequence.
7. It is possible to jump forward and backward to different stages if desired. To do
this just hit the pause button then use the S1-S6 key to select the stage you want to start then hit the play button and this stage will begin.
8. When a partuclar stage is being played the icon for that particular stage will flash
on the display. 9. When all stages are complete the Robobrew will sound an alarm and it will hold
the last set temperature in the stage settings.

Page 19 of 22 www.KegLand.com.au Last Updated 1/30/2018 8:44 PM
SUPPORT Please join the RoboBrew Users Group on facebook for recipe help, tips and tricks to operating your RoboBrew. If you need hardware support please contact your nearest Robobrew distributor.
ERROR MESSAGES
Error Message Problem/Solution E1 This is a temperature probe error. It normally means the temp
probe is not plugged in, or has a poor connection or could be faulty. E2 This indicates there is most likely a short circuit to the temperature
probe. The probe might need to be replaced. E3 This indicates the boil dry has most likely been triggered. Make
sure the water level is up to the minimum mark. Then power cycle the unit to make the error dissapear.
E4 This indicates that the temperature is too hot. Please make sure the ventilation holes on the base of the unit are unobstructed. Make sure the unit has not boiled dry and you have the unit filled at least to the minimum level marking.

Page 20 of 22 www.KegLand.com.au Last Updated 1/30/2018 8:44 PM
Recommended Accessories Silicon Tubing
Silicon tubing is great for transfering the wort from the Robobrew unit to your fermenter or into a hot cube. We recommend heavy duty silicon tubing with 12mm ID and
18.5mm OD. This tubing has part number KL03773 and can be ordered from any good Robobrew distributor. This Silicon tubing is plasticiser free so there is no BPA. It’s
also suitable for temperatures up to 200C so it’s suitable for the transfer of hot wort. Unfortunately silicon tubing is more expensive than vinyl (PVC) tubing however it’s
better suited for this application.
Sodium Percarbonate Brewery Cleaner Sodium Percarbonate is a great cleaner for removing protein,
hop material and tannins that start to build up in your brewery. Sodium percarbonate is a popular choice for many home brewers as it’s highly effective, it decomposes quickly into
oxygen and sodium bicarbonate. It’s very effective at killing
bacteria, mold spores, virusus and various other microorganisms. So even once it’s fully decomposed it does not
harm finished beer if it happens to get left in the brewery somehow.
Stainless Mash Paddle
These long handled stainless mash paddle. Ideal for removing
dough balls and aid in equalising
the heat of the mash from stirring.
Part number KL03810
Refractometer A refractometer is a fantastic tool to take instant gravity readings of hot wort. This tool will help you optimise your sparging. If you want to collect the maximum sugars from

Page 21 of 22 www.KegLand.com.au Last Updated 1/30/2018 8:44 PM
your malt pipe you can keep sparging in the malt pipe until the wort falling from the underside of the malt pipe reaches 1.010. This tool is siginifiacntly
better than the hydrometers as they give a faster reading without having to calibrate the reading based on the temperature of the wort. (part number
KL03759)
Heavy Duty Gloves These heavy duty gloves are great for handling chemicals, and also for grabbing items covered in hot wort. They have
long sleeves on them and are perfect for brewing with. Part number # KL05289)
RoboBrew Thermal Jacket This jacket makes a significant difference when comparing the efficiency of the RoboBrew units and it’s a jacket that will pay itself off in energy saving so it's a good option to any new RoboBrew User. 10% faster heat up time, 50% less heat loss from the boiler.
The one jacket size fit’s both RoboBrew 35L with pump and also without pump. The jacket is made from thick neoprene which is easy to hose down after use. Part number: KL04831

Page 22 of 22 www.KegLand.com.au Last Updated 1/30/2018 8:44 PM
Distillation Lid for RoboBrew (47mm hole) Make beer and spirits! With this handy attachment you will be able to fit an AlcoEngine Pot or Reflux still to your RoboBrew. Part Number: KL03483
AlcoEngine Pot Still A pure pot still is used when you want the flavour of the wash to come through. For instance, if you ferment fruit or grains, it will allow some of that flavour to enter your distillate.
If you use a reflux still, you would just end up with pure, unflavoured vodka. Inject some flavour into your drinks with the Alcoengine Distilling Pot Still!
With an all copper construction for smoothness of taste it comes with a digital thermometer and is simple to use.
Part Number: KL04633
AlcoEngine Reflux Still With its easy to use operation, amazing features, and rock-solid reliability, the Spirit Maker is the foundation of Pure Neutral Alcohol Distilling. Even as our competitors try to catch up, the technologies and features built into this design keep our homemade alcohol distiller years ahead of the DIY home distilling trend. Part Number: KL04640