instructions for - h installation of satellite channels
TRANSCRIPT

Page - 1 -
Instructions for -
Installation of Satellite
Channels Updated: March 2011
EN
GL
ISH
Experience Reality
AQUOS LCD-TVs – Spring/Summer 2011

Page - 2 -
LE820 - LE822 - LE814 - LE824 - LE914 - LE925
Contents:
1. First installation
2. Sort channels manually
3. Receive signal from special satellites
4. Special case: attenuator
5. Frequently asked questions
6. Description of terms
In case during the installation of satellite channels on your 812 or 822 series
SHARP LCD television you encounter problems or questions, refer to these
installation guidelines.
In the following part of the manual you will find examples of installations and
answers to frequently asked questions concerning the above-mentioned
device series:
When the device has already been fully installed:
In course of the first installation the device didn't find the expected stations?
Search for satellites hasn't been fully carried out?
The number of found stations seems to small?
Remedy:
First of all run a software update, so that the device has the latest software!
(Update 8/8/10 = Version 1.06) The software can be found in the service area
of SHARP website.
After updating software start the installation of the TV again!
In order to do so enter the menu “Set up“
After entering the menu highlight „ Reset“ and confirm your choice with the
„OK “- button on the remote control. Confirm the resetting and
restarting of the device (see user manual). This will take a few seconds. After
this the image of first installation will appear on the device.

Page - 3 -
1. First installation
When the device is switched on for the first time, first of all you need to set
the language and later the type of installation (usually „Home“) and at the
end choose the country in which the device will be used. After all these actions
the following image will appear:
In order to install satellite channels choose „Skip“ and confirm your choice
with „OK “-button on the remote control.
The following image will appear:
Choose „Yes“ and confirm your choice with the „OK “ button on the
remote control.

Page - 4 -
The following image will appear:
Remain on the button „Change settings" and confirm the choice with the „OK
“-button on the remote control. You will see the following:
Choose the setting applicable to your satellite device and confirm your choice
with the „OK “-button on the remote control. You can find an overview of
settings in the chapter „Frequently asked questions" in the appendix. The
example shows installation for a satellite device with an individual connection
(only Astra).

Page - 5 -
After confirmation you will see the following image:
Don't change anuthing and confirm it with the „OK“ button on the remote
control.
Now you will see the following:
Choose the preferred satellite and confirm your choice with the „OK “-button
on the remote control (in this example Astra1).
You will now see the following image:

Page - 6 -
Choose „Yes“ and confirm your choice with the „OK “ button on the remote
control.
Now you will see the following:
Confirm the displayed setting by pressing the „OK “-button on the remote
control. (An explanation of this setting can be found in the chapter
„Frequently asked questions" in the appendix). The example shows the
installation for a satellite device with an individual connection (only Astra).
After confirmation you will see the following image:
If you use a satellite device with an "exotic" LNB, here you can set the
oscillator frequencies of upper and lower sidebands. For a normal, standard
LNB confirm the displayed settings by pressing the „OK “-button on the
remote control.
The following happens then:

Page - 7 -
If the settings are correct, don't change anything and confirm the choice of
„Continue“ option with the „OK “ button on the remote control.
Now you will see the following:
Please don't start the search yet! Please highlight „Change settings“ and
confirm your choice with the „OK “-button on the remote control.
The following image will appear:
Don't change anything and confirm the point „Coded channels“ and confirm
your choice with the „OK “ button on the remote control.
Now you will see the following:

Page - 8 -
Choose „Yes“ or „No“ to conduct the search including or excluding coded
channels and confirm your choice with „OK “-button on the remote control.
! If you choose "Yes", coded channels will be included in the search. In the
list of channels they will appear after the channels that can be received
freely. If you choose the "No" option (factory setting), the coded
programs will be automatically deleted in course of automatic sorting. If
later you need coded channels, you will have to repeat the installation
process.
Now highlight the option "Start search" and confirm the choice with the „OK
“-button on the remote control. (The symbol rates are standard values and
ususally don't have to be changed, exceptions listed in the chapter "Receive
special satellites".)

Page - 9 -
After pressing the „OK“ button you will see the following:
Don't change anything and confirm "Yes" with the „OK“ button on the
remote control.
Now you will see the following:
The device has started automatic search for tv stations.
The installation of satellite channels may, according to chosen settings or
the chosen system configuration take more or less time.
After the end of the automatic search the following image will appear:

Page - 10 -
After choosing the mode of sorting and confrming it with „OK“ the TV will
start displaying the tv-station which is stored at channel slot number one.
! Take into consideration the fact that the device may have more than one
satellite channel list. Depending on the chosen system configuration there
could be up to 4 various lists, which can be called up with the "SAT"
button on the remote control. They are named SAT 1 to SAT 4 and after
changing channel or by pressing the Info button the name of the current
list will be displayed in the upper right corner of the screen (see
photograph below). Lists which are not needed (e.g. in case of receiving
signal only from Astra), can be hidden by using the menu (see user
manual, "Input skip").

Page - 11 -
2. Sort channels manually
When during the display of a channel you press the „OK“ button on the
remote control,
on the right edge of the screen a list of automatically sorted channels will
appear. If you want to change the sequence of channels, it is posible by using
the menu, „Set up“ and the point „Channel settings“. See the following
image:
Confirm your choice with the „OK “-button on the remote control.
Now you will see the following:

Page - 12 -
Don't change anything and confirm "Program settings" with the „OK“
button on the remote control.
The following image will appear:
Enter the 4-digit pin number (factory setting 1234) !
Now you will see the following image:

Page - 13 -
Confirm „Satellite settings“ with the „OK“ button.
In case in the original search settings 2 or more satellites are selected, you will
see the following image:
Choose the satellites, whose channel lists you would like to process and
confirm your choice by pressing the „OK“ -button on the remote control.
If in the search settings only one satellite is selected, this choice will be
skipped and shortly the following image will appear:

Page - 14 -
Choose „Manual set-up" and you will see the following:
Confirm your choice with the „OK “-button on the remote control.
Now you will see the following:
Confirm the choice „Yes“ by pressing the „OK“- button on the remote
control.
The following image will appear:

Page - 15 -
! Don't use the function key "Delete"- yellow button in the on-screen
menu - in order to delete channels, before you sort all channels, as other
channels will also be deleted. This would mean that you would have to
spend a lot of time allocating other channels. These channels would not
appear on the list of stored channels any more. This leads to a situation in
which some channels from the normal sequence are missing (e.g. 1, 2, 3, 5,
9…., e.g. the programs 4, 7, 8 would be missing).
It is best to remove unwanted channels by moving from the list in a
manner described below.
Using arrow keys choose the channel which is supposed to be moved. With
the „B“ (blue) button you can mark the channel (e.g. VOX). The following
image appears:
Using arrow keys on the remote control choose the new position:
You can also look through the list of channels going 10 channels back or
forth at a time, by using the arrow key "Left" and "Right" on the
navigation panel of the remote control.

Page - 16 -
Further steps for moving channels in the following screen:
Confirm the newly chosen channel location by pressing „OK“ button on the
remote control. The channel will be moved to the chosen location and the
following channels will be moved one place ahead.
Page - 17 -
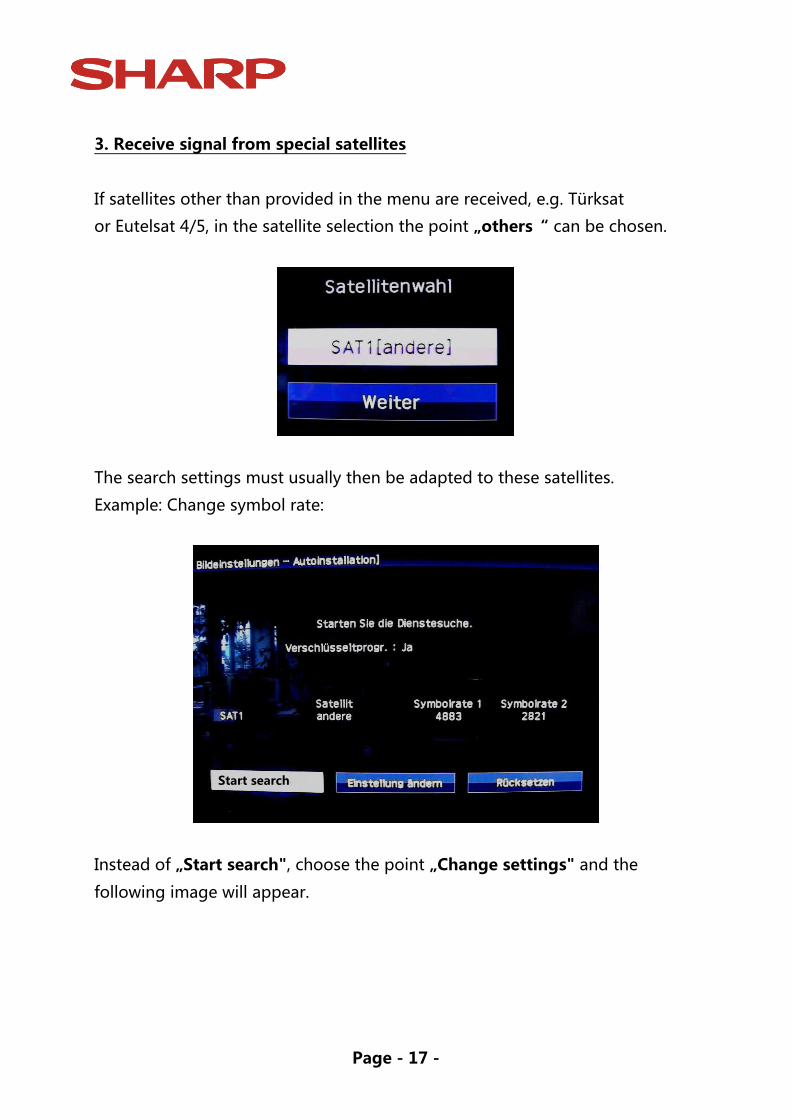
3. Receive signal from special satellites
If satellites other than provided in the menu are received, e.g. Türksat
or Eutelsat 4/5, in the satellite selection the point „others“ can be chosen.
The search settings must usually then be adapted to these satellites.
Example: Change symbol rate:
Instead of „Start search", choose the point „Change settings" and the
following image will appear.
Start search

Page - 18 -
Choose the point „SAT-Symbolrate 1“ and change the symbol rate over the
digit keyboard of the remote control, as shown on the following image.
If necessary carry out the same action with regard to „SAT-symbol rate 2“.
You can find the right value for symbol rates in the Internet at the website of
the relevant satellite operator or the program provider.
Important: You can pre-program 2 symbol rates per one search run. In
case on the satellite more symbol rates are available, by using the point of
menu "Additional search" you can carry out many additional searches with
further 2 symbol rates each, till all symbol rates are found.

Page - 19 -
4. Special case: attenuator
In some rare cases it may happen that during the reception of HD channel
for a short time small squares appear on the screen or the sound stalls.
Often such effects are caused by the fact that the level of the satellite antenna
is too high.
First of all check whether the device has the latest software.
If necessary download software updates from the following website:
http://www.sharp.de/cps/rde/xchg/de/hs.xsl/-
/html/service_downloads.htm.
If the above-mentioned error still appears after updating software, it is
recommended to to reduce the level of the satellite antenna with the
attenuator.
In order to set the actuator correctly, you can use the gauge of reception field
strength and quality in the device menu. Switch the tv on in the satellite
reception mode and choose a free HD channel and later choose the following
options:
„Menu > Setup > Settings > Channel settings > Antenna setup digital"
Possibly you will be asked to enter PIN-code. Enter the 4-digit PIN number.
Now choose „Satellite set-up“ the following image will appear.

Page - 20 -
Choose „Test antenna“ and the following image will be shown:
Using the attenuator change the input level of the device, but
during the process observe the „Quality“ scale and using the atennuator set
the possibly highest value. It should reach 37-42. A value of over 42 is also
good. While setting quality pay attention to the „Signal strength“ scale,
when quality is set at maximum, the value of signal strength shouldn't sink
below 60 (dB), so that also in bad weather the signal is sufficient.
After successful setting errors in reception of HD channels don't appear any
more.
35 35
77 77

Page - 21 -
5. Frequently asked questions
Why haven't satellites been fully searched?
Check the settings of SAT_system configuration
(e.g. individual or DiSEqC_system).
Why does the number of found channels seem too small?
Check the settings of SAT_system configuration
(e.g. individual or DiSEqC_system).
Why hasn't the device found the expected channels in course of automatic
installation?
Please keep in mind that when searching through numerous satellites
the device allocates channels to up to four SAT_lists.
Make sure that your satellite equipment is suitable for receiving digital
channels, as also analogue LNC's can receive some channels (old
satellite equipment, community equipment, single cable solutions).
Why doesn't the device find all channels even after changing search settings?
It is possible that even during the repeated search the changed search
settings are not applied so that the device doesn't receive all channels
just like earlier.
In such case using the "Set up" menu, subpoint "Reset" reset the device
to its default setting.
Is it possible to go through the program list also in blocks?
During normal operation of the tv it is possible to use „Green“ and
„Yellow“ buttons in order to progress in blocks of ten chanels.
When sorting channels in the "Set up" menu you can use arrow keys
"Right" and "Left" in the navigation panel you can browse through
channels in blocks of ten.

Page - 22 -
6. Definition of terms concerning satellite reception
This compendium was prepared with the aid of the Internet website www.wikipedia.de
You can find further information concerning this subject on the same webpage.
DiSEqC - Digital Satellite Equipment Control
describes a digital control signal technology, applied in the building cabling of
satellite reception facilities, DiSEqC-control signals compared to the 14/18-
Volt- and 22-kHz control signals enable broader range of functions in satellite
reception.
DiSEqC switching commands are transmitted serially as digitally encrypted
data words.
22kHz Switchbox – Switch for two satellites
22kHz Switchbox is an electronic switch which is controlled with a 22kHz
signal from the satellite receiver. The switch can be found between the
receivers and the satellite equipment. Attention! When this point is not
properly configured, it could happen that only one satellite will be found in a
search (usually the satellite which is connected to the first port (0kHz) of the
switchbox).
Toneburst
To obtain another switch criterion (along with 14/18 volt and 22 kHz) tone
burst was introduced. Here only one sequence of bits (e.g. "0" = satellite A or
"1" satellite B) is modulated onto the 22 kHz signal.
Highband 22kHz signal
The 22kHz signal is required for switching between lower and upper sideband.
Thus the 22kHz signal is another switch criterion (along with 14/18 Volt) and is
transmitted by the satellite receiver to the multiswitch/LNB.
Toneburst switchbox - switch for two satellites

Page - 23 -
22kHz Switchbox is an electronic switch which is controlled with a 22kHz
signal from the satellite receiver. The switch can be found between the
receivers and the satellite equipment. Attention! When this point is not
properly configured, it could happen that only one satellite will be found in a
search (usually the satellite which is connected to the first port (0kHz) of the
switchbox).
Multiswitch
Multiswitch is usually applied in order to distribute one or more satellite
signals to many satellite ports in one house.
The main task is the distribution of signals delivered byLNB to individual
satellite receivers. Moreover, its purpose (depeding on the design) is the
feeding of terrestrial or cable tv signals into antenna lines to participants.
Repetition rate (in DiSEqC operation)
The repetition rate shows how often the digital command from the satellite
receiver should be transmitted to multiswitch. Usually here the choice „0 –
repetitions“ can be retained. However, if there is a problem with the
actuation of the equipment, try repetition rate "1" or "2".
Community installation (single cable system)
is a type of antenna system arrangement in which through abandoning direct
current-remote power supply 14/18 Volt and DiSEqC-control signals a high-
frequency signal in frequency range 950 – 2250 MHz (satellite range) can be
linearly delivered to many participants of a community radio reception system.
In this case it is possible to distinguish between simple single cable solutions
and programmable single cable solutions. Currently SHARP LCD-TV supports
only the simple solution.
Simple single-cable systems can be often found in older community facilities
and most often don't transmit digital channels but only analogue ones.
Astra 1 / Astra 2 / Astra 3
In the installation menu of LCD-TV you can choose from various Astra
satellites.

Page - 24 -
Usually satellite systems are adapted to satellites from the "Astra 1" family.
Astra 1 is a tv satellite on the orbital position 19.2° East
Astra 2 is a tv satellite on the orbital position 28.2° East
Astra 3 is a tv satellite on the orbital position 23.5° East
LNB - low-noise block converter
Low-noise signal converter (LNB) is the first electronic module of a satellite
reception system located in focus of a parabolic antenna It converts the
satellite frequency of for example 10.7–11.75 or 11.8–12.75 GHz to the 950–
2150 MHz range and thus enables transfer through a coaxial cable and
reception with a satellite receiver.
LNB – Intermediate frequency
Intermediate frequency is necessary to transmit the received signal without
any problems and losses to the satellite receiver with a normal coaxial cable.
The conversion is achieved through mixing the received signal with a local
oscillator frequency multiplicatively (typically: 9.75 GHz for lower band and
10.6 GHz for upper band reception).
For some LNB's setting a differing intermediate frequency may be necessary.
Some foreign satellites require this.
Symbol rate
The symbol rate simply shows how many symbols per second are being
emitted - how "high" the symbol is depends on the transmission system.
The symbol rates can vary greatly depending on the satellite and the tv
provider.
More than 10 various symbol rates are possible on one and the same satellite.
Transponder
A Transponder on a satellite receives data and transmits it again. For example
a ground-based radio station can transmit data signals for tv to a
geostationary satellite , which will send back the signal back to Earth. Any

Page - 25 -
suitable satellite antenna with visual contact with a satellite can receive the
signal.
A transponder can transmit many different satellite channels.