instructions for installing the brooks belt-drive on … · web viewtitle instructions for...
TRANSCRIPT
Thanks for Ordering The MondoDrive-14 Belt Conversion Kit
from
READ THIS BEFORE UNPACKING YOUR KIT!
This instruction booklet contains detailed steps for installing the belt drive conversion kit on Triumph Bonneville T100 motorcycle and variants (America, etc). Please pay careful attention to the instructions regarding the unpacking and handling of your belt. The belt can be damaged if handled improperly. If you have any questions concerning installation of your belt drive, please contact us via e-mail at [email protected]. This will ensure you receive the most prompt and accurate reply.
Rev 1.1; 5/1/09Copyright 1998 & beyond, Scootworks, Inc. All Rights Reserved.
All graphics, and descriptions in this installation instruction booklet are intended for personal use only. Any reproduction, publishing or distribution of any materials in this booklet is strictly prohibited without the expressed written consent of Scootworks, Inc.
Instructions for Installing the Scootworks MondoDrive-14
(Be sure to visit www.scootworks.com and select [Information Center] from the main page, for more info and color pictures!)
Tools Needed:
Phillips-head screwdriver Flat-head screwdriver Socket wrench pull bar Large torque wrench calibrated in foot-pounds Set of Metric Allen Keys Torx T30 wrench or socket tip 8mm socket/wrench 13mm open-end wrench 14mm socket and/or wrench 17mm socket and/or wrench 19mm socket and/or wrench 24mm socket and/or wrench 36mm socket Small amount of RED Loctite (maximum strength thread locking compound)
The installation of the Scootworks Belt Drive is exactly the same as replacing the OEM sprockets and chain, including removing the swing arm. However, Scootworks wanted to assist you as much as possible with the installation process, and developed this instruction package. If there are any steps you feel need improvement in instructions, please email [email protected] and specify the area you are having trouble with.
UNPACKING! The shipping container and contents must be inspected by the purchaser for damage to goods immediately upon receipt of goods, and a claim must be filed with the carrier if damage is discovered. The purchaser must Scootworks within 24 hours from receipt of damaged goods to file a claim, and for further instructions. Your Scootworks Belt Drive will come packed with the front pulley assembly, the rear pulley, the belt, a belt tension tester, a chain guard extension & m6x1.0 bolt, and these printed instructions. Uncoil the belt, with the teeth turned inward. DO NOT fold the belt inside out, nor pinch to a fold of less than 1 1/2"! This will permanently damage the Kevlar and/or Carbon Fiber material used in the construction of the belt. While the belt is VERY strong, these are important handling precautions that should be followed closely. There is more info on this in the FAQ page.
BEGIN INSTALLATION
1. Use a 13mm wrench and loosen the bolt on each exhaust clamp for the muffler cans. Use a 13mm wrench, loosen the nuts that secure both passenger pegs, and remove them form the bike. Gently push the muffler bracket toward the bike to remove the muffler hangar from the passenger footpeg mount, and twist the muffler canister. Use a twisting motion on the canister while pulling rearward. The muffler should slip off of the head pipe, and open the space around the rear axle for easier access. Remove both muffler canisters in this manner. See next picture…
Scootworks, Inc.2
2. Loosen the 8mm chrome bolts around the perimeter of the front sprocket cover. Remove the bolts and the cover, exposing the front sprocket.
Scootworks, Inc.3

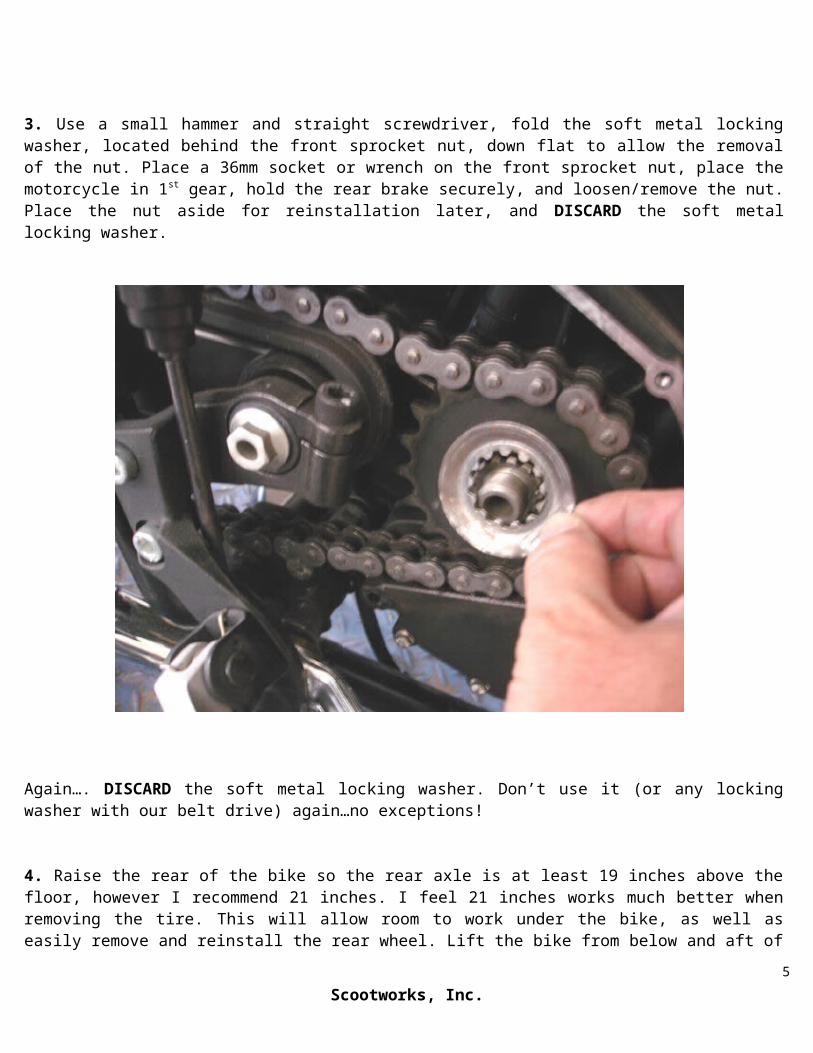
3. Use a small hammer and straight screwdriver, fold the soft metal locking washer, located behind the front sprocket nut, down flat to allow the removal of the nut. Place a 36mm socket or wrench on the front sprocket nut, place the motorcycle in 1st gear, hold the rear brake securely, and loosen/remove the nut. Place the nut aside for reinstallation later, and DISCARD the soft metal locking washer.
Again…. DISCARD the soft metal locking washer. Don’t use it (or any locking washer with our belt drive) again…no exceptions!
4. Raise the rear of the bike so the rear axle is at least 19 inches above the floor, however I recommend 21 inches. I feel 21 inches works much better when removing the tire. This will allow room to work under the bike, as well as easily remove and reinstall the rear wheel. Lift the bike from below and aft of the engine area, as we’ll need to have the wheel spinning freely above the ground in the next few steps.
5. Loosen the rear axle nut on the RH side of the bike. The RH nut is usually 24mm, and LH axle head is usually 19mm. Remove the axle nut and washer. Use an 8mm wrench and loosen both rear axle adjusters and slip the axle as far forward as possible. Break the chain and remove it (a pair of bolt cutters or grinder works well for this, if you don’t have a chain breaker). Remove the front sprocket. Adjust the rear axle rearwards to approximately mid-point in it’s range.
Scootworks, Inc.4
6. Slip the rear axle out of the rear wheel. Pay attention to the location of the spacers on either side of the wheel, you’ll need to remember this for re-installation of the wheel. Remove the wheel from the swingarm area. Use a 14mm wrench and remove the 5 rear sprocket nuts. Remove the sprocket from the wheel. Place the nuts aside for re-installation later.
Scootworks, Inc.5

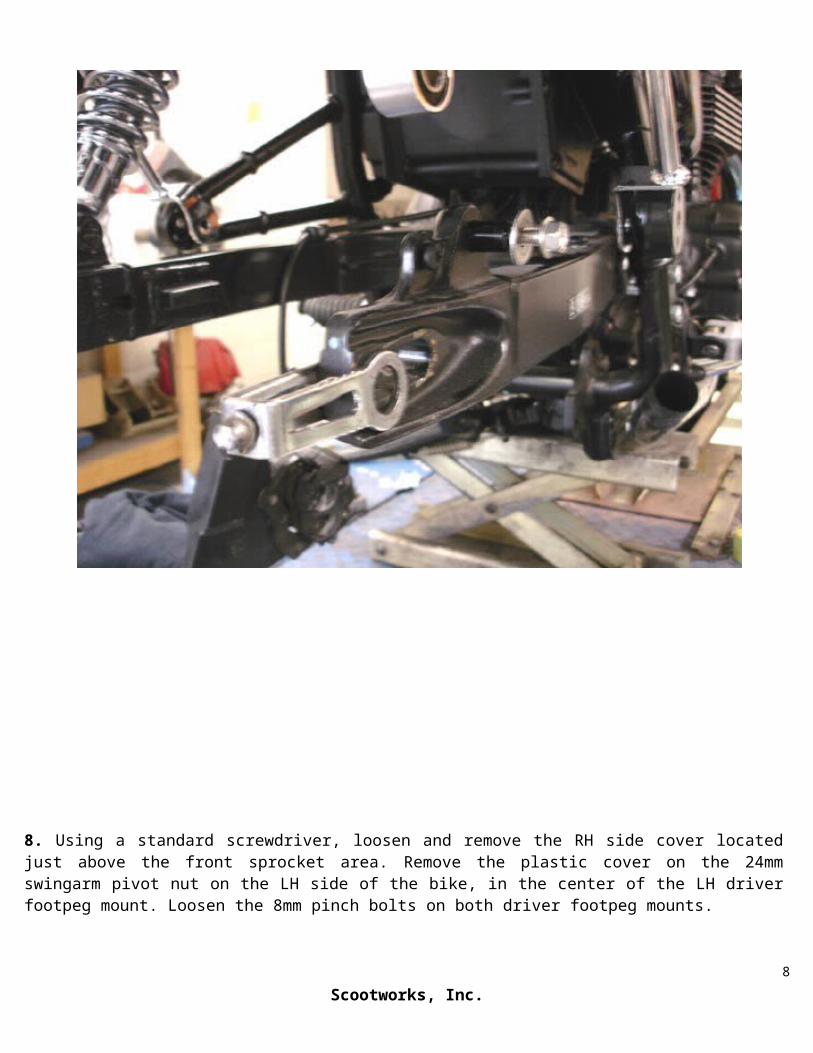
7. Remove the 8mm bolt that secures the rear brake hose to the LH side of the swingarm. Reinstall the bolt for re-use later. Remove the chain guard from the swingarm…this requires a 6mm wrench for the front bolt, and a T30 Torx for the rear bolt. Using a 13mm wrench, remove the lower shock bolt from each side. Pull the lower shock ends free from the shock attachments on the swingarm on both sides. You swingarm should now look something like the swingarm pictured below…
Scootworks, Inc.6

8. Using a standard screwdriver, loosen and remove the RH side cover located just above the front sprocket area. Remove the plastic cover on the 24mm swingarm pivot nut on the LH side of the bike, in the center of the LH driver footpeg mount. Loosen the 8mm pinch bolts on both driver footpeg mounts.
9. Using a 17mm wrench on the RH side of the swingarm pivot bolt, and a 24mm wrench on the LH side of the swingarm pivot bolt, loosen and remove the 24mm nut on the LH side of the swingarm pivot bolt. Use a rubber mallet and gently tap the swingarm pivot bolt from left to right, and pull it out of the swingarm pivot. Loosen the two 8mm bolts that secure both driver pegs to the frame. This will allow the swingarm to be easily removed. Remove the swingarm.
Scootworks, Inc.7
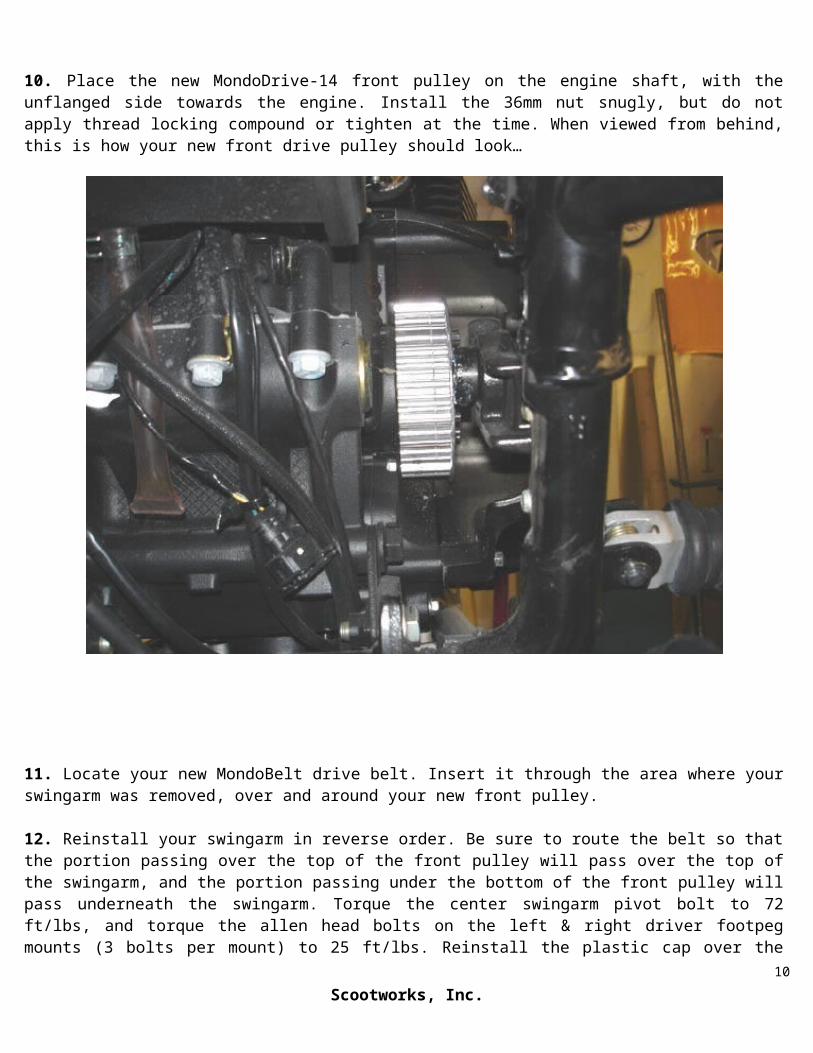
10. Place the new MondoDrive-14 front pulley on the engine shaft, with the unflanged side towards the engine. Install the 36mm nut snugly, but do not apply thread locking compound or tighten at the time. When viewed from behind, this is how your new front drive pulley should look…
11. Locate your new MondoBelt drive belt. Insert it through the area where your swingarm was removed, over and around your new front pulley.
12. Reinstall your swingarm in reverse order. Be sure to route the belt so that the portion passing over the top of the front pulley will pass over the top of the swingarm, and the portion passing under the bottom of the front pulley will pass underneath the swingarm. Torque the center swingarm pivot bolt to 72 ft/lbs, and torque the allen head bolts on the left & right driver footpeg mounts (3 bolts per mount) to 25 ft/lbs. Reinstall the plastic cap over the swingarm nut on the LH side of the bike. Reattach the rear shocks using thread locking agent on the bolts, and torque to 10 ft/lbs.
13. Test fit the new rear pulley on the hub of the wheel. Place the pulley on the wheel with the bolt-on flange towards the wheel. Due to minor variations in manufacturing tolerances at Triumph, ScootWorks pulleys may be a _very_ tight fit on the center protrusion. If necessary, although not common, you may use sandpaper on the inner bore of the rear pulley to fit it to the rear hub. Our black coated rear pulleys are often a very tight fit, and the excess material will push out of the center bore as you install it on the hub.
Scootworks, Inc.8

Install the rear pulley, and tighten the 5 attachment nuts. Torque to 35 ft-lbs. In a “star” pattern, tightening opposing bolts on rotation. The black drives will require a gradual tightening of these 5 nuts, to slowly work it onto the hub. This insures a very well centered rear pulley. Once tightened all the way down onto the rear hub, loosen the nuts, and set the torque to 35 ft-lbs.
14. Reinstall the rear wheel and disk brake caliper assembly, etc. Follow the disassembly instructions in reverse, including the reattachment of the rear brake caliper hose, etc. Pull the belt over the rear pulley when installing the rear wheel, making sure it properly engages with the rear pulley’s teeth.
15. Final trim…Reinstall RH side battery cover, mufflers, etc… Look over the disassembly procedure to make sure you don’t overlook anything. DO NOT reinstall the front sprocket cover at this time!
16. Reinstall the chain guard using the spacer supplied. Install the chain guard spacer onto the swingarm where the rear chain guard bolt was attached using the original Torx bolt, and leave loose. Attach the chain guard to the swingarm at the front using the original allen bolt, and leave loose. Using the supplied m6x1.0 bolt, insert the bolt through the rear chain guard bracket and into the threaded top hole of the new spacer. Tighten all chain guard & spacer bolts at this time.
You’re now ready to lock the front pulley, adjust tension, and wrap it up!
Scootworks, Inc.9
ADJUSTING THE BELT TENSION
It’s now time to apply the RED (permanent) Loctite to the front pulley nut/threads. Be sure the threads in the front pulley’s nut are free of oil, and the threads on the shaft at also clean and dry. Apply a liberal amount of RED Loctite to the threads inside of the nut and on the threaded end of the output shaft prior to installing the nut…-NOT- to the splines on the shaft. Make sure you torque to 90 ft lbs within a short time of using the RED loctite, as it will cure and you’ll be unable to finish torque setting to 90 ft/lbs. Wait 24 hours before riding the bike after setting the torque to 90 ft/lbs, to allow time for the Loctite to cure. This is VERY important.
Reinstall the front sprocket cover…
BELT TENSION - begin the adjust belt tension procedure by setting the rear wheel adjusters to a point where the belt is snug and can be twisted about 90 degrees. Don't "second guess" the following adjustments, follow this procedure in it’s entirety... At this time, make the final torque setting on the front pulley while in 1st gear and while holding the rear brake. Torque the 27mm nut on the front pulley to 90 ft/lbs. Next, make the final adjustments to the belt tension. Use the Belt Tension Tool supplied with the kit. Also, _BE SURE_ to read all of the FAQs on the Scootworks Belt Drive below _BEFORE_ attempting to 'test drive' your new belt drive system. Correct initial adjustment is critical to the long life of your new belt! Please remember that the belt, while strong, is not indestructible if set up incorrectly!
With the bike on a lift and the rear wheel off of the ground, rotate the tire while “plucking” the belt. Note the location of the wheel when the belt tension is highest. Place a mark on the tire pointing straight down with the wheel in this position. Remove the bike from the lift, and position the bike with the tire mark pointing straight down. Using the Scootworks Belt Tension Tester supplied with the kit, perform the following test: The bike should be on level ground, transmission in neutral, and rider on. Unbolt the voltage regulator and move to one side. Place a ruler along the mounting bracket for the voltage regulator, to measure the belt deflection. Apply 10 lbs of force upward on the return side (bottom) of the belt at mid-span, just behind the voltage regulator bracket . The belt should be adjusted to deflect between 1/2" and 5/8", but no more than 5/8" at the loosest point measured.
Once adjusted, we recommend that you perform is what we call a "pick check". When the belt is "picked" along the edge like a guitar string, it will generate a tone. Observe this when the belt drive installation is new, and use it as a point of reference during the life of your belt. It may sound silly, but it has held true on all of the systems we've installed locally over the last few years, and is a common practice among those who service belt driven motorcycles.
NOTE: CHECK THE TENSION OF YOUR BELT AFTER APPROXIMATELY 2000-4000 MILES.It is very important to check the tension of your belt after 2000-4000 miles of use, and re-adjust it if necessary. There should be no more adjustments needed after that, but as with any good maintenance program, you should always be aware of your belt tension, and check it periodically.
Additional notes:
1. Once everything is connected and the wheel turns freely, begin to torque all fasteners beginning with the forward components and working backwards to the rear of the bike (e.g., swing arm pivot bolt, other swing arm and shock bolts/nuts, wheel hardware, etc.).
Torque values:
Scootworks, Inc.10

§ Swing arm pivot shaft nut: 72ft/lbs
§ Shock absorber nuts: 15ft/lbs each
§ Rear axle nut: 72ft/lbs
§ Rear pulley nuts: 35ft/lbs
§ Front pulley nut: 90ft/lbs
Maintenance
There isn’t a lot of maintenance required for the belt drive system. Check the belt tension periodically, and keep the system free of dirt and debris.
FAQ's (Frequently Asked Questions)
Question- I recently saw a HD Belt, and it was very wide. Is the Belt used in the Scootworks Belt Drive of an adequate size for my bike? Answer- Many of the older belts for H-D systems were wide, as they used an older technology. Many are simple rubber timing belts with a fiber reinforcement. The newer belt driven bikes use a technology incorporating Kevlar & Carbon Fiber in their construction, making them much stronger as well as much smaller. The belt used in the Scootworks Belt Drive is one such belt, and has a higher tensile strength than a #60 steel roller chain. It has been road tested for thousands of miles, and is more than adequate for the application.
Question- I currently have to adjust my chain every 1000-2000 miles. I have a friend with a belt driven bike, and he has to tension his belt also. Will I have to periodically adjust my belt tension? Answer- Chains stretch across their entire lifespan. Cord reinforced rubber drive belts used on some motorcycles also stretch. The composition of the belt used in the Scootworks Belt Drive doesn't lend itself to stretch the way conventional belts do. Usually, after initial installation, the Scootworks belt will need a single tension adjustment after 'break in' (somewhere between 1000-4000 miles, depending on rider). This tension adjustment is due to several variables that occur during break-in :
The belt will wear to match the exact contour of the drive pulleys. A very small amount of belt elongation will occur when new (usually only a few thousandths of an inch!). It's virtually maintenance free.
Question- Does the Scootworks Belt Drive system require any additional materials, fasteners, etc. for installation? Answer- The Scootworks Drive System comes complete with all parts needed for installation, including detailed step-by-step instructions. One only needs to supply RED (permanent) loctite thread locking compound.
Question- How long does it take to install a Scootworks Belt Drive? Answer- We've had dealers install these systems in under 1 hour, and I've installed many, many of these in my personal shop in just over 1 hr, by myself. My personal motorcycle shop at home is equipped with only average tools, a lift, etc. Conversely, I've had some people report that their local dealership charged them for as much as 8 hours of
Scootworks, Inc.11

labor... So, this obviously depends on many variables. Items such as the speed of the individual performing the installation, stuck fasteners, contamination of components to be removed, tools available, problems understanding instructions, individual skillsets, etc are beyond our control. Remember, we are only an email or phone call away, to answer any of your questions.
Question- Will I have to cut or modify anything to get the Scootworks Belt Drive system on my bike? Answer- No, the Scootworks Belt Drive is a direct replacement for your original chain drive system. Following the instructions for a conventional OEM chain replacement, the Scootworks Belt Drive slips back into place as if your bike came with it originally!
Question- Will the Scootworks Belt Drive require an additional belt guard? The bike in your pictures has the belt exposed and I'd like to cover it to keep rider's feet safe. Answer- The Scootworks Belt Drive was designed to retain the use of your existing chain guard. There are no clearance problems and the OEM chain guard works nicely with your new belt drive system. Some customers have fabricated their own lower guard, to eliminate the possibility of a stone entering the system, but reports (and personal experiences) with this failure mode indicate that operation without a lower guard is practically a non-issue.
Question- Does the Scootworks Belt Drive reduce acceleration? Answer- There is some minor reduction in acceleration from start is a little less than the OEM chain drive and sprocket installation. This is due to an improvement in the final drive ratio. However, there is a very noticeable reduction in engine RPM's at cruising speeds, making the ride much more relaxed. The reason for the difference is due to the change in ratios used by Scootworks in the belt drive system. One of the design criteria was to reduce engine speed to make hiway speed operation more enjoyable, and to improve gas mileage.
Question- What gear ratio have you selected for the Triumph belt drive, and will I loose horsepower or top end speed??Answer- The engine will produce the same horsepower, irrespective of the final drive ratio. Power to the ground will increase a bit, as the belt drive efficiency is about 98% vs. a chain being in the mid-80% range (at it's best!). Since the power band is at a different vehicle speed, you'll notice some difference in acceleration at different speeds. Top speed will remain the same, as the amount of HP developed by the engine will only do a certain amount of work.
The bike may not leap out of the hole as it did (by comparison), depending on the year model of your bike. The belt drive is shipped as 2.375:1, and was optimized at that ratio after much experimentation. Much additional info is available in the FAQ's section of our website at www.scootworks.com , in the "FAQ's (Frequently Asked Questions)" section. You can also view the installation instructions and learn more about it in the "Information Resource Center" portion of our site.
Question- When I received my Scootworks Belt Drive, I examined everything closely. I accidentally turned the belt "teeth out", and folded it together. A white stripe appeared in between two teeth of the belt. Is it OK to install it anyway?? Answer- No, do not install this belt. While the belt has a tensile strength higher than a #60 steel chain, the Kevlar composition is not designed to fold or bend tightly. Never bend the belt smaller than about 1 1/2", and absolutely _never_ bend it inside out (as if you're inspecting the "teeth" closely). This will damage or break the Kevlar and Carbon Fiber material, and lead to premature failure.
Scootworks, Inc.12

Question- Is there any danger in damaging the output shaft bearing of the engine, due to the tension required by a belt? Answer- An engineering study was performed on the installation, taking into consideration the tension of the belt, additional load presented by the engine, the location of the shaft bearings on the shaft, and the type of bearings used by Triumph in the design of the output shaft. Load data indicated that the shaft loads were well within the bearing design parameters. Feedback from field testing has indicated, with well over 80,000 miles of use on the test installation and hundreds of thousands of miles logged by our customers around the world, that no additional wear has occurred in the bearings of the output shaft and drive system free motion is unchanged.
Question- Does the swing arm have to be removed for installation? Answer- Yes. It may sound scary, but is really quite simple and is outlined both in the shop manual and in the instruction booklet supplied by Scootworks. The only thing special is the requirement that the back wheel be raised to remove the swing arm (just as in the chain replacement procedure). If you have your work done by a mechanic, he wouldn't encounter anything different from a conventional swingarm pull.
Question- How do you get the locking washer bent back around the front drive nut? Answer- DON’T! Follow the instructions for the use of RED loctite, 90 ft-lbs of torque, and do not use the locking washer with the belt drive.
Question- I received my Scootworks Belt Drive, but am unsure of the correct direction of installation for the rear pulley. Which side of the pulley should be turned towards the hub of the wheel? Answer- Install the rear pulley with the bolt-on flange side facing the wheel.
Question- I'm not sure I have the belt tension set correctly. Are there any simple methods to use as a starting point? Answer- Sure. Correct belt tension is easy to accomplish, with very little practice. Once all is installed, begin the adjust belt tension procedure by setting the rear wheel adjusters to a point where the belt is snug and can be twisted about 90 degrees.. Don't "second guess" the following adjustments, follow this procedure in it’s entirety... Use the Belt Tension Tool supplied with the kit. Also, _BE SURE_ to read all of the FAQs on the Scootworks Belt Drive _BEFORE_ attempting to 'test drive' your new belt drive system. Correct initial adjustment is critical to the long life of your new belt! Please remember that the belt, while strong, is not indestructible if incorrectly installed.
With the bike on a lift and the rear wheel off of the ground, rotate the tire while “plucking” the belt. Note the location of the wheel when the belt tension is highest. Place a mark on the tire pointing straight down with the wheel in this position. Remove the bike from the lift, and position the bike with the tire mark pointing straight down. Using the Scootworks Belt Tension Tester supplied with the kit, perform the following test: The bike should be on level ground, transmission in neutral, and rider on. Unbolt the voltage regulator and move to one side. Place a ruler along the mounting bracket for the voltage regulator, to measure the belt deflection. Apply 10 lbs of force upward on the return side (bottom) of the belt at mid-span, just behind the voltage regulator bracket. The belt should be adjusted deflect between 1/2" and 5/8", but no more than 5/8" at the loosest point measured.
Once adjusted, we recommend that you perform is what we call a "pick check". When the belt is "picked" along the edge like a guitar string, it will generate a tone. Observe this when the belt drive installation is new, and use it as a
Scootworks, Inc.13
point of reference during the life of your belt. It may sound silly, but it has held true on all of the systems we've installed locally over the last few years, and is a common practice among those who service belt driven motorcycles.
NOTE: CHECK THE TENSION OF YOUR BELT AFTER APPROXIMATELY 2000-4000 MILES.It is very important to check the tension of your belt after 2000-4000 miles of use, and re-adjust it if necessary. There should be no more adjustments needed after that, but as with any good maintenance program, you should always be aware of your belt tension, and check it periodically.
Question- My Belt makes a slight 'squeak' when I roll the bike slowly. Is there anything I can do for this? Answer- This is normal for the technology and fit we use in the MondoDrive-14. An old "trick" used by many belt driven motorcycle owners of all brands, is to occasionally rub the edges of the belt with a bar of soap to eliminate "dry squeak". The "squeak" is usually caused by small particles of dirt that become embedded in the belt while riding, and/or by a clean and dry belt while rubbing against the edge of the pulleys (much like rubbing a clean finger around the top of a wine glass). A little dry soap will "lubricate" the edge of the belt, and eliminate "ringing" or "squeaking", should it occur.
Question- I don't want to run my belt as tight as recommended by Scootworks. Can I operate with the belt a little more slack? Answer- No. If the belt is adjusted outside of our design parameters, the mechanical shock generated when placing the bike into gear as well as that of the vibration transmitted from the engine to the drive train, will destroy the belt. An overly loose belt will allow the input pulley to generate transients many times greater than would normally exist in normal operation. Additionally, micro-oscillations will occur along the length of the belt’s lower track that will destroy the Kevlar and Carbon Fiber in the belt and lead to premature belt failure. The leading cause of premature belt failure is under-tensioning. Adjust the belt to the correct tension as recommended by Scootworks, nothing else.
Question- I know how to install and adjust a belt, and don't care to bother with the tension tool if the belt tension feels OK to me. Is it really that important to use the tool, or do I just need it for the initial installation?Answer- I really wish we could call this something other than a belt, because we've answered this question many thousands of times since 1998. The only similarities between our belting and conventional belting that most are familiar with, is the fact that it is a continuous loop of semi-flexible material. Try to forget anything else you know about belting, including the common myths that exist about motorcycle drive belts. The single most common cause of premature Kevlar & Carbon Fiber belt failure is under tensioning. Micro-oscillations in the return track of the belt, as a result of incorrect tensioning, will destroy the Kevlar in short order. Often, a belt adjusted outside of specification as little as 1/8"-3/16" @ 10 lbs. will destroy a belt that would otherwise last for many tens of thousands a miles. It's almost impossible to distinguish this difference by "feel" or see it with the human eye. This is the reason our kits are supplied with the tension testing tool…to insure this adjustment is made correctly. The good thing is, once the initial and break-in adjustments are made, you can almost forget about your drive system. The tool makes this adjustment accurately, and is VERY easy to use. Be sure to read the installation instructions completely, and familiarize yourself with the tool. There is a separate instruction and FAQ on our website at www.scootworks.com for the tool, in the event you would only like to read about that.
Question- How tight does the belt need to be? I was afraid to get it too tight for fear I might snap it. How tight is too tight? Answer- These belts are STRONG! You can literally lift an automobile off the ground with this type of belt. Follow the belt tension instructions above and the belt drive will perform correctly.
Scootworks, Inc.14

Question- My bike jumps suddenly when I place it in gear from a cold start. Is this normal, and will it damage the belt? Answer- Start the engine, and hold the clutch "in" for about 30 seconds before you place it in gear. There isn't anything wrong, and many bikes with wet clutches will do this when cold. If unused for a while, a wet clutch will displace the oil from the clutch plates and create a vacuum, giving the appearance that the clutch isn't disengaged. Pumping the clutch doesn't usually help, but holding it in as I outlined will make that first shift into gear nice and smooth. This will also help minimize stress on the belt (and the rest of the drive train!) when starting a cold engine.
Question- Is there any lubrication or other maintenance on the belt drive after it's installed? Answer- Only once, at about 2000-4000 miles. Once the belt drive is installed with the proper tension on the belt, the only other adjustment is a minor retensioning after break-in. ...unlike a chain which requires lubrication every 600 miles. Chains normally stretch over time and require periodic readjustment. The Scootworks Belt drive uses a Kevlar/Carbon fiber reinforced belt similar to that used on other "modern" belt driven motorcycles. Since there is no belt stretch (well, only about .002"!), the system requires no adjustment. A great by-product of having a belt drive instead of a chain is the fact that you no longer have all that grease and grime to clean from your rear wheel, tire and rim that a chain will deposit there.
Question- I'm going to remove my belt/swingarm to perform lowering modifications to my bike. Are there any precautions I need to observe when reinstalling a used belt? Answer- Inspect the belt for any physical damage. If there is any damage, now is the perfect time to replace it..it's very inexpensive. If you decide to reinstall the old belt, be sure to mark it's original direction of installation, and reinstall it so it runs in the same direction it originally did…just as with a radial belted auto tire.
Question- Does Scootworks have a Warranty of any type? I've looked all over the web site and couldn't find anything. Answer- Certainly! Scootworks Inc. warrants the workmanship of all materials manufactured by us to be free of defects for a period of twelve (12) months from the date of purchase. As with any other belt drive manufacturer, the belt is warranted to be free of defects at the time of purchase only. You can find more information on the first page of the Scootworks WebPage, at the bottom of the page under ‘Warranty & Return Policies’.
Scootworks, Inc.15