instructions for use - dental chair - dental equipment - …ie.a-dec.com/en/~/media/adec/document...
TRANSCRIPT

A-dec 300 LED Dental LightModels 371L — 378L
Instructions for Use

A-dec 300 LED Dental Light Instructions for Use
Copyright© 2018 A-dec Inc. All rights reserved.
A-dec Inc. makes no warranty of any kind with regard to this material, including, but not limited to, the implied warranties of merchantability and fitness for a particular purpose. A-dec Inc. shall not be held liable for any errors contained herein or any consequential or other damages concerning the furnishing, performance or use of this material. The information in this document is subject to change without notice. If you find any problems in the documentation, please report them to us in writing. A-dec Inc. does not warrant that this document is error-free.
No part of this document may be copied, reproduced, altered, or transmitted in any form or by any means, electronic or mechanical, including photocopying, recording, or by any information storage and retrieval system, without prior written permission from A-dec Inc.
Trademarks and Additional Intellectual Property RightsA-dec, the A-dec logo, A-dec Inspire, Cascade, Century Plus, Continental, Decade, ICX, ICV, Performer, Preference, Preference Collection, Preference ICC, Radius, and reliablecreativesolutions are trademarks of A-dec Inc. and are registered in the United States and other countries. A-dec 500, A-dec 400, A-dec 300, A-dec 200, and EasyFlex are also trademarks of A-dec Inc. None of the trademarks or trade names in this document may be reproduced, copied, or manipulated in any manner without the express, written approval of the trademark owner.
Certain touchpad symbols are proprietary to A-dec Inc. Any use of these symbols, in whole or in part, without the express written consent of A-dec Inc., is strictly prohibited.
Medicom® and SafeShield™ are registered and unregistered trademarks of A.R. Medicom Inc.
Regulatory InformationRegulatory information mandated by agency requirements is provided in the Regulatory Information, Specifications, and Warranty document (p/n 86.0221.00), which is available in the Document Library at www.a-dec.com.
Product ServiceProduct service is available through your local authorized A-dec dealer. For service information, or to locate an authorized dealer, contact A-dec at 1.800.547.1883 in the USA and Canada or 1.503.538.7478 worldwide, or visit www.a-dec.com.
Product Models and Versions Covered in This Document
Model Versions A-dec LED Dental Light Description
371L A Support-Side Mounted
372L A Radius® Mounted
374L A Cabinet Mounted
375L A Wall Mounted
376L A Ceiling Mounted
377L A Track Mounted
378L A Simulator Mounted
86.0670.00 Rev B 1
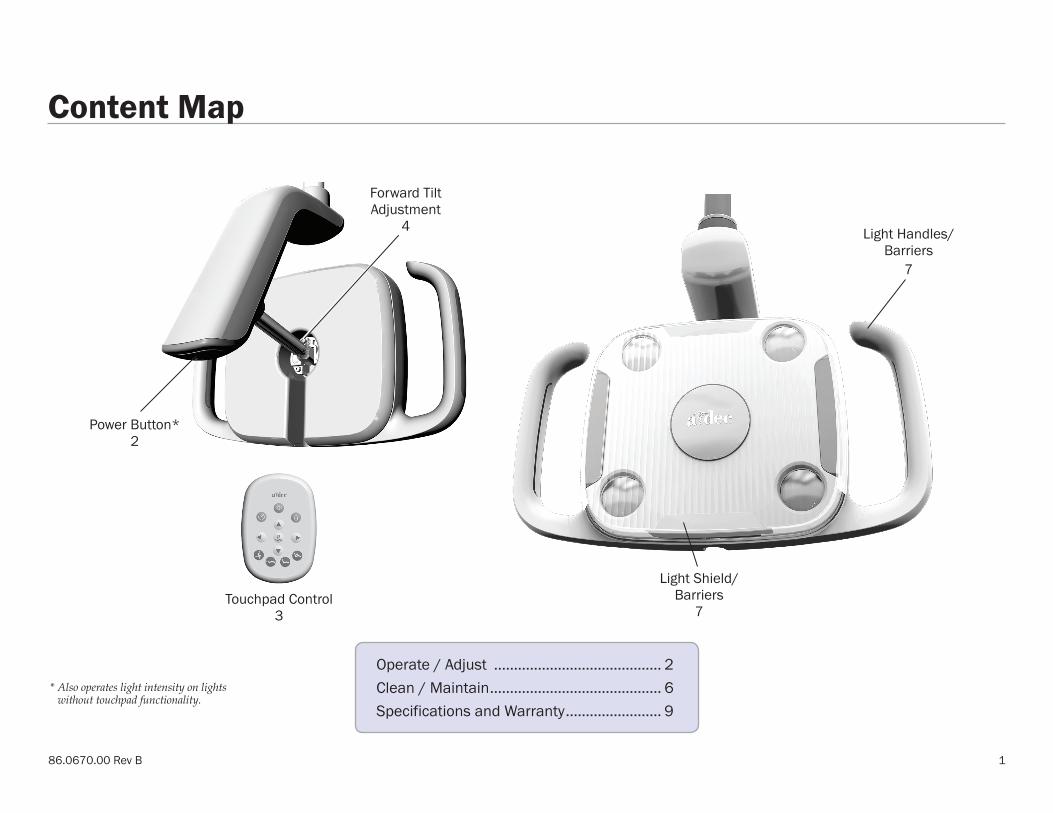
* Also operates light intensity on lights without touchpad functionality.
Content Map
Operate / Adjust .......................................... 2Clean / Maintain ........................................... 6Specifications and Warranty ........................ 9
Power Button* 2
Light Shield/Barriers
7
Light Handles/Barriers
7
Forward Tilt Adjustment
4
Touchpad Control 3

A-dec 300 LED Dental Light Instructions for Use Operate / Adjust
2
Operate / Adjust
Basic OperationHow you operate the A-dec 300 LED dental light depends on how your dental light is configured.
Dental Lights without Touchpad FunctionalityTo turn on the light and change light intensity, use the power button on the dental light. If the light does not turn on, verify that the delivery system and/or chair power is on.
Dental Lights with Touchpad FunctionalityTo turn on the light, use the touchpad or the power button on the dental light. To change light intensity, use the touchpad. For more information about touchpad operation, see “Touchpad Control” on page 3.
NOTE If you have a dental light without touchpad functionality, and you inadvertently press the dental light button, the indicator light will turn on. To turn off the indicator light, press and hold the dental light button. For additional questions about your specific equipment configuration, contact your local authorized A-dec dealer.
Power Button
A-dec Touchpad
Dental Light Button
Indicator Light

86.0670.00 Rev B 3
Touchpad ControlDental Light Button ( ) For dental lights with touchpad functionality:• Press to turn on the light. The light always turns on in the high
intensity mode. If the light does not turn on, verify that the delivery system and/or chair power is on.
• Press again to switch to the composite/low mode. The indicator light on the touchpad flashes continuously when the light is in the composite/low mode.
• Press and hold to turn off the light.
Dental Light Auto On/Off Feature The auto on/off feature turns on the light automatically when the chair back reaches a preset treatment position. The light turns off when you press or . If you press again, the chair returns to its previous position, and the light will turn back on. The light always turns on in high-intensity mode.
To disable the auto on/off feature, press and hold or and at the same time for three seconds. One beep indicates that the auto on/off function is off. To re-enable, repeat this step. Three beeps indicate that the auto on/off feature is activated.
WARNING Ensure that the patient is positioned safely before using the chair preset functions. Always take extra care with small children and patients with limited mobility. Never leave the patient unattended while the chair is in motion.To stop the chair at any point, push any chair positioning button on the footswitch or touchpad.
Standard Touchpad
Note: Touchpad symbols are proprietary to A-dec Inc.
Deluxe Touchpads
Dental Light Button
Entry/Exit X-Ray/Rinse
Treatment 2Treatment 1
Indicator Light
Program Button

A-dec 300 LED Dental Light Instructions for Use Operate / Adjust
4
LightingComposite/Low ModeThe composite/low mode reduces light intensity and premature curing of photo-initiated composites, sealants, and adhesives.
Focal RangeThe dental light features a fixed focal range that provides optimum illumination between 16 – 30 inches (400 mm – 750 mm) from the oral cavity.
Range of MotionThree axes of rotation provide a wide range of motion. Use this capability to position the light for a clear view of tooth surfaces and minimal interference with other equipment and the dental team.
Forward Tilt AdjustmentIf the light head does not hold its tilt position, or is difficult to tilt, adjust the forward tilt tension screw with a 7/64" hex key. Turn the screw clockwise to increase tension or counterclockwise to decrease tension.
NOTE Other tension adjustments require disassembly. Please contact your authorized A-dec dealer if the light requires additional adjustments.

86.0670.00 Rev B 5
Circuit Breaker LocationUnder abnormal conditions, the circuit breaker interrupts the flow of electricity. If the circuit breaker trips, reset it by pushing the circuit breaker button on the power supply. The power supply is typically located in the utilities area of your dental chair (see the table below for the circuit breaker location).
Chair Model Power Supply Location Circuit Breaker Button Location
A-dec 511 chair Chair motor pump area
CB 1
MAINS
INPUT
VACUUM
RELAY13A @
250V
~ MAXPOWER ON M
ODE
ASSISTANT'S ARM
& CONTROL HEAD
CB 3
8A MAX
OUTPUT
0V~ 2
4V~
DATA
CB 5CB 4MAINS OUTPUT
POWER 4A MAX
SIDE
SUPPORT
ARM
DENTAL
LIGHT
MASTER TOGGLE
CONTROL OF POWER
SWITCH ON
NC COM N
ONO CONNECTION
REQUIRED
SWITCH OFF
CB 2
CONNECT AIR SUPPLY
FROM MASTER TOGGLE
A-dec 311 and A-dec 411 chair Chair motor pump area
A-dec 200, Cascade,® Decade,® Performer,® and early model A-dec chairs
Utility floor box
10AMP
10AMP
10AMP
10AMP
10AMP
CB5
CB1
CB4

A-dec 300 LED Dental Light Instructions for Use Clean / Maintain
6
Clean / Maintain
Barrier ProtectionA-dec recommends barrier protection for all applicable touch and transfer surfaces. Touch surfaces are areas that come into contact with hands and become potential cross-contamination points during dental procedures. Transfer surfaces are areas that come into contact with instruments and other inanimate objects.
In the USA, barriers must be produced under the Current Good Manufacturing Practice (CGMP) as specified by the U.S. Food and Drug Administration (USFDA). For regions outside the USA, refer to the medical device regulations specific to your location.
IMPORTANT For recommendations on cleaning and chemical disinfection of touch and transfer surfaces (where barrier protection is not applicable or when barriers are compromised), please see the A-dec Equipment Asepsis Guide (p/n 85.0696.00).
NOTE For proper use and disposal of barriers, see the instructions provided by the barrier manufacturer.

86.0670.00 Rev B 7
Dental Light BarriersLight HandlesUse barriers on the light handles to prevent cross contamination. The handles are shaped to easily accept the same disposable plastic sleeves designed for the air/water syringe.
Light ShieldBarriers help protect and keep the dental light shield clean during procedures. Use only optically-correct barrier film that does not alter the light quality. A-dec recommends the SafeShield™ disposable barrier by Medicom® (see page 8 for ordering information).
If you do not use a barrier, carefully clean the light shield in place using a soft cotton cloth with non-abrasive soap and water.
CAUTION Do not remove the shield unless absolutely necessary. The shield is fitted with a gasket to prevent dust and debris from entering the lens assembly. If liquid or dirt should bypass the gasket, the shield can be removed for cleaning. Use a flat-blade tool that won’t damage the light housing. After removing the shield, do not touch or attempt to clean the multi-lens assembly or you may damage the components.
Power ButtonUse one piece of barrier film to cover the power button.
Shield
Multi-Lens AssemblyLight Handle with Barrier

A-dec 300 LED Dental Light Instructions for Use Clean / Maintain
8
Dental Light Maintenance ItemsContact your authorized A-dec dealer to order these dental light maintenance items.Description Part Number
Medicom SafeShield Disposable Barrier(package of 10)
9565
LED Lens Shield and Gasket
90.1343.00

86.0670.00 Rev B 99
A-dec 300 LED Dental Light Instructions for Use Specifications / Warranty
Specifications
Power and Light SpecificationsPower: 15 watts maximumFocal Range: 16" – 30" (400 mm – 750 mm)LED Type: white HB-LED, 94 CRIColor Temperature: white 5000 KelvinLight Pattern: 3.8" H x 5.7" W at 27.6" (95 mm H x 145 mm W at 700 mm)Nominal Light Intensity:
• high: 25,000 lux (2323 fc)• composite*/low: 8,000 lux (743 fc)
Heat Output: 51 BTU / hour
* Composite mode is an industry accepted term and is not intended to meet the ISO 9680:2014, 5.2.10 standard.
IMPORTANT For additional specifications, identification of symbols, and other regulatory requirements, see the Regulatory Information, Specifications, and Warranty document (p/n 86.0221.00), which is available in the Document Library at www.a-dec.com.
NOTE Specifications are subject to change without notice. Requirements may vary depending on your location. For more information, contact your authorized A-dec dealer.
Warranty
Warranty information is provided in the Regulatory Information, Specifications, and Warranty document (p/n 86.0221.00), which is available in the Document Library at www.a-dec.com.

86.0670.00 Rev BCopyright 2018 A-dec Inc.
All rights reserved.IFUcov3
A-dec United KingdomEU Authorized RepresentativeAustin House, 11 Liberty WayNuneaton, Warwickshire CV11 6RZEngland Tel: 0800.ADEC.UK (2332.85) within UKTel: +44.(0).24.7635.0901 outside UK
A-dec AustraliaUnit 85-9 Ricketty StreetMascot, NSW 2020AustraliaTel: 1.800.225.010 within AUSTel: +61.(0).2.8332.4000 outside AUS
A-dec Headquarters2601 Crestview DriveNewberg, Oregon 97132United StatesTel: 1.800.547.1883 within USA/CANTel: +1.503.538.7478 outside USA/CANFax: 1.503.538.0276www.a-dec.com
A-dec ChinaA-dec (Hangzhou) Dental Equipment Co., Ltd.528 Shunfeng Road Qianjiang Economic Development ZoneHangzhou 311106, Zhejiang, ChinaTel: 400.600.5434 within ChinaTel: +86.571.89026088 outside China
Begin Right Side Layout Pages here. Align top of text box to pink line
ÍvÈ.Ç&fÈ.00:Î