instructions for use (operation) - pentax … ce zeichen garantiert, daß dieses produkt die in der...
TRANSCRIPT

PENTAX ULTRASOUND VIDEO BRONCHOSCOPE
EB-1970UK
Only For the Americas
This Instructions for Use describes the recommended procedures for inspecting and preparing the equipment prior to its use. For the cleaning and maintenance of the equipment after its use, please refer to theseparate Instructions for Use (reprocessing).
INSTRUCTIONS FOR USE(OPERATION)

Product OverviewThis instrument photographs the subject of observation using a solid-state image sensor and ultrasound transducer located at the endoscope tip under the light transmitted from the processor/light source. The target of the observation will be monitored by the physician using the endoscopic image and ultrasound image displayed on the video monitors. The endoscopic procedure is performed by inserting an aspiration needle into the instrument channel inlet on the control body.
The bending section angulates in the intended direction and angle by operating the Angulation Control Lever; and air or fluids can be suctioned from the distal end of the endoscope by operating the Suction Control Valve.
Indication for UseThe EB-1970UK, Ultrasound Video Bronchoscope, is intended to provide optical visulalization of, ultrasonic visualization of, and therapeutic access to, the Pulmonary Track including but not restricted to organs, tissues, and subsystem: Nasal Passage, Pharynx, Larynx, Trachea, Bronchial Tree (including access beyond the stem), and underlying areas. The instrument is introduced per orally when indications consistent with the requirement for procedure are observed in adult and pediatric patient populations.
Application Medical purpose: Provide images for optical visualization, ultrasound recording, and/or diagnostic aid.
Patient populations: Adults and pediatrics who have been determined by the physician to be appropriate candidates for the use of this instrument
Intended anatomical area: Airways and tracheobronchial tree
User: Medical doctors (expert approved by the medical safety officer to perform for endoscopic examinations at each medical facility)
Place of Use: Medical facillity
Functions Used FrequentlyThe frequently used functions in this model are as follows:
• Angulation capability using control lever
• Remote control operation using remote buttons
• Suctioning function
Removable ComponentsOF-B179 Suction Control Valve
OF-B190 Inlet Seal
OE-B3 Inlet Cap
WarningThe balloon used with this endoscope contains latex, which may cause allergic reactions. Due to the potential for severe allergic reactions to medical devices containing latex (natural rubber), healthcare professionals are encouraged to identify latex sensitive patients, professionals, and other high-risk groups and be prepared to treat allergic reactions promptly.
NotesRead this Instructions for Use (IFU) before operating, and save this book for future reference. Failure to read and thoroughly understand the information presented in this IFU, as well as those developed for ancillary endoscopic equipment and accessories, may result in serious injury, including infection by cross contamination to the patient and/or user. Furthermore, failure to follow the instructions in this IFU or the companion Instructions for Use (Reprocessing) may result in damage to, and/or malfunction of, the equipment.
It is the responsibility of each medical facility to ensure that only well-educated and appropriately trained personnel, who are competent and knowledgeable about the endoscopic equipment, antimicrobial agents/processes, and hospital infection control protocol be involved in the use and the reprocessing of these medical devices. Known risks and/or potential injuries associated with flexible endoscopic procedures include, but are not limited to, the following: perforation, infection, hemorrhage, burns, and electric shock.
This IFU describes the recommended procedures for inspecting and preparing the equipment prior to its use.
It does not describe how an actual procedure is to be performed, nor does it attempt to teach the beginner the proper technique or any medical aspects regarding the use of the equipment. For the cleaning and maintenance after its use, please refer to the separate Instructions for Use (Reprocessing)”.
If you have any questions regarding the information in this IFU or concerns pertaining to the safety and/or use of this equipment, please contact your local PENTAX representative.

Sterility StatementThis endoscope identified in this IFU is reusable semi-critical devices. Since it is packaged non-sterile, it must be high-level disinfected or sterilized BEFORE inital use. Prior to each subsequent procedure, it must be subjected to an appropriate cleaning and either high-level disinfection or sterilization processes.
Refer to the companion PENTAX Instruction for Use (Reprocessing) describing in detail the recommended instructions on the care, cleaning, disinfection, and sterilization of this endoscope.
ContraindicationPlease consult regional and national health authority recommendations and requirements regarding protocols to follow in order to reprocess and/or destroy endoscopes that will be used or have been determined to have been used (post procedure) on patients afflicted with Creutzfeldt-Jacob Disease (CJD or vCJD).
ConventionsThroughout this IFU, the following conventions will be used to indicate a potentially hazardous situation which, if not avoided;
WARNING : could result in death or serious injury.
CAUTION : may result in minor or moderate injury or property-damage.
NOTE : may result in property-damage. Also advises owner/operator about important information on the use of this equipment.
Prescription StatementFederal (U.S.A) law restricts this device to sale by or on the order of a physician or other appropriately licensed medical professional.
Symbols on MarkingSymboles distinctifs
このCEマーキングはEC指令への適合宣言マークです。The CE marking assures that this product complies with the requirements of the EC directive for safety.Das CE Zeichen garantiert, daß dieses Produkt die in der EU erforderlichen Sicherheitsbestimmungen erfüllt.Le logo CE certifie que ce produit est conforme aux normes de sécurité prévues par la Communauté Européenne.II marchio CE assicura che questo prodotto è conforme alle direttive CE relative alla sicurezza.La marca CE asegura que este producto cumple todas las directivas de seguridad de la CE.
Attention, consult instructions for useAttention, consulter le manuel d’utilisation
Symbol for “Authorised Representative in the European Union”
Symbol for “DATE OF MANUFACTURE”
Symbol for “MANUFACTURER”
Type BF applied part (Safety degree specified by IEC 60601-1)Partie appliquée de type BF (niveau de sécurité spécifié par la norme CEI 60601-1)

TABLE OF CONTENTS
1. NOMENCLATURE AND FUNCTION .............................................................................................. 1
1-1. Ultrasound Video Bronchoscope ...................................................................................... 1
1-2. Accessories ............................................................................................................... 3
1-3. Video Processors ........................................................................................................ 3
1-4. Ultrasound Scanning Unit .............................................................................................. 4
2. PREPARATION AND INSPECTION FOR USE ................................................................................... 5
2-1. Inspection of the Video Processor .................................................................................... 5
2-2. Inspection of the Ultrasound Scanning Unit ......................................................................... 6
2-3. Inspection of Endoscope ............................................................................................... 6
2-4. Preparation before the Examination .................................................................................. 19
2-5. Preparation just before Insertion of Endoscope .................................................................... 22
3. DIRECTIONS FOR USE ........................................................................................................... 24
3-1. Operation .................................................................................................................. 24
3-2. Pretreatment ............................................................................................................. 25
3-3. Insertion and Withdrawal ............................................................................................... 26
3-4. FNA (Fine Needle Aspiration) .......................................................................................... 29
4. CARE AFTER USE ................................................................................................................ 32
SPECIFICATIONS ..................................................................................................................... 34

BENDING SECTION
INSERTION TUBE
ANGULATION CONTROL LEVER
Angulates the distal end
REMOTE BUTTON 3
Push to activate the VCRfor recording liveprocedures.
REMOTE BUTTON 4
Push to select light measurment method AVE/PEAK.
MODEL DESIGNATION
CONTROL BODY
INSTRUMENTCHANNEL INLET
REMOTE BUTTON 2
Push to activate thehardcopy systemthat was selectedbetween “FILE” and“HARD COPY”.
UMBILICAL CORD
REMOTE BUTTON 1
Push to freeze an image.
SUCTION NIPPLE
For attachment to externalsuction source
STRAIN RELIEF BOOT STRAIN RELIEF BOOT
–B179)SUCTION CONTROL VALVE (OFPress down to aspirate throughthe instrument channel.
INLET SEAL (OF-B190)
Allows passage of accessories whilepreventing escape of fluids and air.
ELECTRICAL CONTACT PLUG
RED VENTILATION CAP OF-C5
SCANNING UNIT CONNECTOR CABLE
Provides venting of endoscope interiorto equalize internal and external pressures.This cap must be removed before immersion.
VENTING CONNECTOR
Accepts “RED” Ventilation Cap andLeakage Tester.
PVE CONNECTOR
Can be rotated within a 180º range
SOAKING CAP OE-C9
This cap must be securely attached before immersion. Align the black arrow on the soaking cap with the green dot at the base of the silver collar surrounding the electrical contact plug on the PENTAX PVE connector. Press the cap down onto the metal collar and turn clockwise to secure.
WATER INJECTION CONNECTORAllows connection of special injection tube (OE-B5) for manual filling of balloon with de-aerated water.
STRAIN RELIEF BOOT
STRAIN RELIEF BOOT
SCANNING UNIT CONNECTOR LOCK
Securely locks the scanning unit connector of the PENTAX endoscope into the scanning unit (Hitachi Medical)to ensure proper contact with and functioning of the electronic circuitry.
STRAIN RELIEF BOOT
SCANNING UNIT CONNECTOR SCANNING UNIT CONNECTOR SOAKING CAP (OE-U1)
CAUTION:The scanning unit connector for this Ultrasound Bronchoscope is NOT immersible without its soaking “cap” attached. Prior to immersion, the two-component soaking cap/casing must be securely attached to the connector to maintain the instrument’s watertight integrity. Failure to properly secure the soaking cap can result in fluid invasion and instrument damage.
CAUTION:Prior to immersion this cap must be attached to the scanning unit connector.
EB-1970UK 2.0
Model Name
Minimum Instrument Channel Width
– 1 –
1. NOMENCLATURE AND FUNCTION
1-1. Ultrasound Video Bronchoscope
NOTE:
Function of each button depends upon the processor. The function can be changed. For more details, refer to the Instructions for Use supplied with the processor. The following table shows the factory setting.
*Remote Button 1 Freeze
*Remote Button 2 Copy
*Remote Button 3 VCR
*Remote Button 4 Enhance
*Setting at factory

BENDING SECTION
INSERTION TUBE
ANGULATION CONTROL LEVER
Angulates the distal end
REMOTE BUTTON 3
Push to activate the VCRfor recording liveprocedures.
REMOTE BUTTON 4
Push to select light measurment method AVE/PEAK.
MODEL DESIGNATION
CONTROL BODY
INSTRUMENTCHANNEL INLET
REMOTE BUTTON 2
Push to activate thehardcopy systemthat was selectedbetween “FILE” and“HARD COPY”.
UMBILICAL CORD
REMOTE BUTTON 1
Push to freeze an image.
SUCTION NIPPLE
For attachment to externalsuction source
STRAIN RELIEF BOOT STRAIN RELIEF BOOT
–B179)SUCTION CONTROL VALVE (OFPress down to aspirate throughthe instrument channel.
INLET SEAL (OF-B190)
Allows passage of accessories whilepreventing escape of fluids and air.
ELECTRICAL CONTACT PLUG
RED VENTILATION CAP OF-C5
SCANNING UNIT CONNECTOR CABLE
Provides venting of endoscope interiorto equalize internal and external pressures.This cap must be removed before immersion.
VENTING CONNECTOR
Accepts “RED” Ventilation Cap andLeakage Tester.
PVE CONNECTOR
Can be rotated within a 180º range
SOAKING CAP OE-C9
This cap must be securely attached before immersion. Align the black arrow on the soaking cap with the green dot at the base of the silver collar surrounding the electrical contact plug on the PENTAX PVE connector. Press the cap down onto the metal collar and turn clockwise to secure.
WATER INJECTION CONNECTORAllows connection of special injection tube (OE-B5) for manual filling of balloon with de-aerated water.
STRAIN RELIEF BOOT
STRAIN RELIEF BOOT
SCANNING UNIT CONNECTOR LOCK
Securely locks the scanning unit connector of the PENTAX endoscope into the scanning unit (Hitachi Medical)to ensure proper contact with and functioning of the electronic circuitry.
STRAIN RELIEF BOOT
SCANNING UNIT CONNECTOR SCANNING UNIT CONNECTOR SOAKING CAP (OE-U1)
CAUTION:The scanning unit connector for this Ultrasound Bronchoscope is NOT immersible without its soaking “cap” attached. Prior to immersion, the two-component soaking cap/casing must be securely attached to the connector to maintain the instrument’s watertight integrity. Failure to properly secure the soaking cap can result in fluid invasion and instrument damage.
CAUTION:Prior to immersion this cap must be attached to the scanning unit connector.
EB-1970UK 2.0
Model Name
Minimum Instrument Channel Width
– 2 –
CAUTION:Immediately after use, the metal light guide plug and the electrical contact plugs/pins of the endoscope
may be HOT. To avoid burns, do not touch these areas immediately after use. For safer handling after a
procedure, grasp the PVE connector housing.
CAUTION:NEVER perform electro-surgery and endoscopic laser therapy with this scope.
CAUTION:Ensure that the soaking caps (OE-C9 and OE-U1) have been securely attached to prevent the caps from coming off during reprocessing. Failure to securely attach the soaking caps can result in endoscope damage.
CAUTION:To avoid damaging the endoscope, do NOT twist, rotate or bend any of the strain relief boots. The strain relief boots of the scanning unit connector cable and the umbilical cord should never be grasped together or pressed firmly against each other to avoid the potential for endoscope damage in these areas.
DISTAL END
– 3 –
1-2. Accessories
CAUTION:
• Because of the effect that accessories that are inserted used through the instrument channel of the endoscope can have on the performance of the endoscope itself, it is strongly recommended that the accessory manufacturer should be consulted to confirm compatibility with PENTAX endoscopes before use.
• The maximum outer diameter of an endoscopic accessory instrument must be at least 0.2 mm less than the specified instrument channel diameter in PENTAX endoscopes. Working length of an endoscopic accessory instrument should be approximately 30 cm longer than the endoscope working length.
NOTE:
• For patient contact endoscopic accessories, follow the specific and detailed instructions on use, care, and maintenance supplied with each product.
• To confirm the exact condition of any new accessory device, check the labeling/packaging accompanying the product. Each label/package should clearly identify the contents as either sterile or non-sterile.
1-3. Video Processors
NOTE:
• Water bottle and air pump are not used with these endoscopes.
• Please read the Instructions for Use supplied with the processor.
WARNING: Do not install, operate or store electro-medical equipment in a dusty environment. Accumulation of dust within these units may cause malfunction, smoke, or ignition.
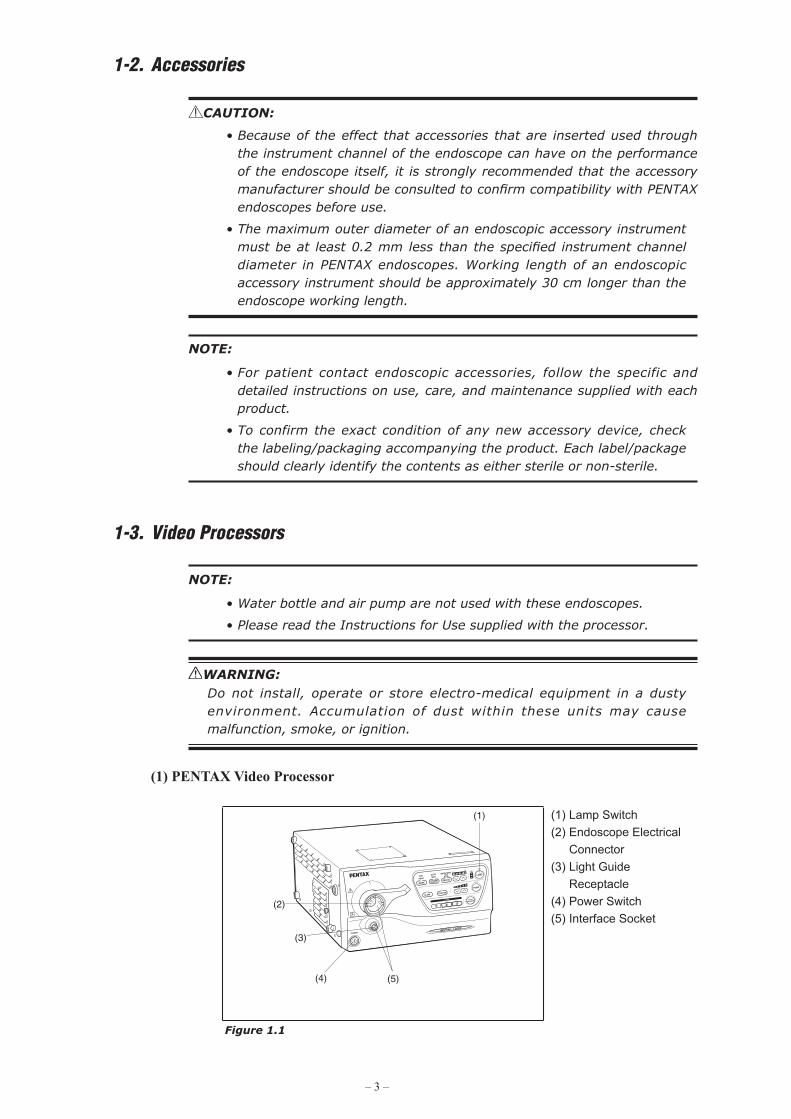
(1) PENTAX Video Processor
(1)
(4)
(2)
(3)
(5)
(1) Lamp Switch(2) Endoscope Electrical
Connector(3) Light Guide
Receptacle(4) Power Switch(5) Interface Socket
Figure 1.1

– 4 –
CAUTION:Replace the lamp before the lamp life expires. Prior to use, check the lamp life indicator. Excessive use of the lamp beyond the lamp life could cause the lamp to explode resulting in damage to the video processor. Refer to the processor's Instructions for Use regarding the lamp life.
NOTE:
Software update may be required depending on the software version of the PENTAX Video Processor. If the software is not updated, the image will not be displayed. If the images are not displayed correctly, please contact your local PENTAX service facility.
1-4. Ultrasound Scanning Unit
1) The ultrasound scanning units made by Hitachi Medical Corporation listed below are currently compatible with PENTAX ultrasound endoscopes.
Compatible Ultrasound Scanning Units・Model EUB-5500
・HI VISION Preirus
2) For complete details on the handling, operation, care and maintenance, etc. of the ultrasound scanning units, refer to the instructions for use provided with the unit.
NOTE:
If the scanning unit models shown above have been purchased separately from the PENTAX ultrasound endoscope, minor modifications to the scanning unit may be required to ensure complete compatibility, Should you have any questions on this subject, please contact your local PENTAX service facility.

– 5 –
2. PREPARATION AND INSPECTION FOR USEPrior to use, the endoscope, video processor and endoscopic accessory instruments must be carefully inspected for cleanliness and proper function to determine that they are appropriate for patient use:
NOTE:
This video endoscope is only compatible with PENTAX video processor.
CAUTION:To avoid discontinuation of endoscopic procedure, have an extra (spare) instrument available as a standby device, should any unforeseen event or circumstance render the original instrument inoperatable and/or unsafe for patient.
2-1. Inspection of the Video Processor
Please refer to the Instructions for Use for the PENTAX video processor for complete instructions.
WARNING: To avoid the risk of an electric shock, check that the video processor is properly grounded, or that it is connected to an appropriate isolation transformer (PENTAX SAT-1300 or other medical purpose isolation transformers). Also, be sure to use a video processor specified by PENTAX.
1) Plug the processor into a properly grounded receptacle with the power switch in the OFF position.
2) Make sure that the PVE connector is aligned with the interface socket on the front panel of the processor.
3) Connect the endoscope to the interface socket on the processor as illustrated.
(1)(1) PENTAX Video Processor
Figure 2.1
4) Rotate the locking lever clockwise after insertion.
CAUTION:After connecting the endoscope to the video processor, always make sure that the endoscope is firmly secured to the Endoscope Electrical Connector by turning the locking lever to the “lock” position.

– 6 –
5) Turn on the processor to check for proper functioning.6) Turn off the air pump switch for use with the bronchoscope.7) Press the lamp switch of the processor to ignite the lamp.
CAUTION:Do not look directly at the light emitted from the endoscope distal tip or the processor unit. The intense light might hurt your eyes. Turn off the lamp when looking directly at the endoscope distal tip.
8) Make sure that light comes from the distal end of the connected endoscope. The lamp will light several seconds after the lamp button is pressed.
9) Check if the display appears on the monitor.10) Prior to each procedure, check the endoscope image quality displayed on the
monitor. Confirm that the image quality, color, automatic brightness (iris) functions are acceptable as per the instructions provided with the PENTAX video processor.
2-2. Inspection of the Ultrasound Scanning Unit
Please refer to the Instructions for Use provided with the unit for complete instructions.
1) Turn the Breaker switch ON.2) Press the ON/STANDBY key. Wait until start-up disappears.3) Insert the scanning unit connector into the socket of the scanning unit.4) Turn the locking lever to LOCK position.5) Select the probe to be used, and then press the ENTER key.6) Check if the scope name "EB-1970UK" and ultrasound image appear on the
monitor.7) For complete details on the handling, operation, care and maintenance, etc. of the
ultrasound scanning unit, refer to the Instruction for Use provided with the unit.
2-3. Inspection of Endoscope
WARNING:
Disassembling or modifying a PENTAX endoscope may impair its original functionality and possibly result in a serious injury. Never disassemble or modify the endoscope.
WARNING:
If the endoscope is intended to be clinically used after testing of individual endoscope functions without further reprocessing, the following precaution should be exercised.
Use sterile or bacteria-free water during individual endoscope function tests to avoid recontamination of the previously reprocessed instrument by waterborne microorganisms. Tap water, especially that which may be left idle and uncovered for a prolonged period of time, should not be used during any inspection/testing of the endoscope.
– 7 –
Before proceeding with inspection of individual functions, PENTAX endoscopes should be tested for the integrity of their water-tight design (example: tear in the instrument channel).
CAUTION:PENTAX endoscopes should be tested for the integrity of their water-tight design using PENTAX leakage tester. If the endoscope is used in a condition where the integrity of its water-tight design is compromised, it could result in endoscope damage due to permeated water.
CAUTION:
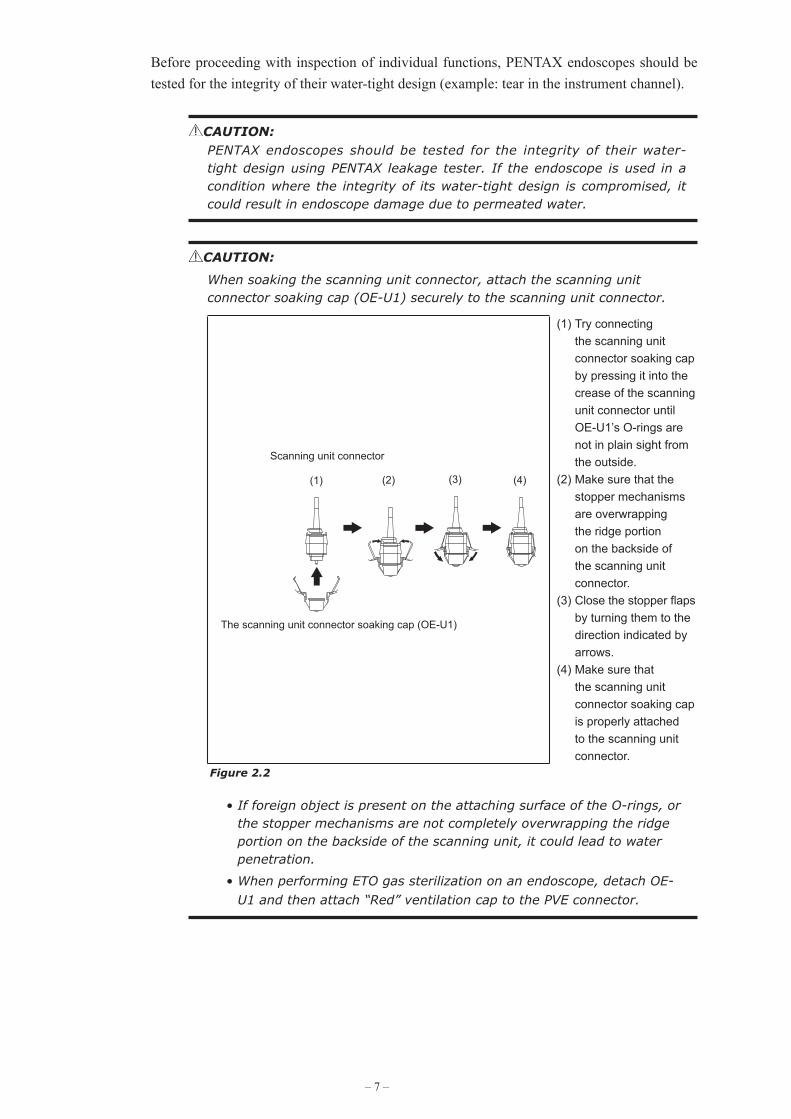
When soaking the scanning unit connector, attach the scanning unit connector soaking cap (OE-U1) securely to the scanning unit connector.
The scanning unit connector soaking cap (OE-U1)
Scanning unit connector
(1) (2) (3) (4)
(1) Try connecting the scanning unit connector soaking cap by pressing it into the crease of the scanning unit connector until OE-U1’s O-rings are not in plain sight from the outside.
(2) Make sure that the stopper mechanisms are overwrapping the ridge portion on the backside of the scanning unit connector.
(3) Close the stopper flaps by turning them to the direction indicated by arrows.
(4) Make sure that the scanning unit connector soaking cap is properly attached to the scanning unit connector.
Figure 2.2
• If foreign object is present on the attaching surface of the O-rings, or the stopper mechanisms are not completely overwrapping the ridge portion on the backside of the scanning unit, it could lead to water penetration.
• When performing ETO gas sterilization on an endoscope, detach OE-U1 and then attach “Red” ventilation cap to the PVE connector.

– 8 –
CAUTION:
Various types of endoscope leakage testers exist including manual, electro-mechanical and “automated” versions, some of which are stand alone units and others which may be integrated into Automated Endoscope Reprocessors (AERs)/Washers-Disinfectors (WDs). It must be recognized that PENTAX does not evaluate non-PENTAX leak tester systems to satisfy their specific product claims, for their effectiveness to accurately detect leaks and/or for their compatibility with PENTAX endoscopes. Insufficient pressures may reduce the likelihood for accurate leak detection, especially if the endoscope's distal bending section is not flexed during testing. Excessive pressures may adversely affect the endoscope, especially if pressurization occurs during automated reprocessing at elevated temperatures. PENTAX accepts no responsibility for use of non-PENTAX leakage testers.
Users should check with the leak tester manufacturer and confirm their specific product claims, including compatibility with PENTAX endoscopes at various temperatures and their ability to detect leaks with/without fluid immersion and with/without flexing of the endoscope's distal bending section.
1) Inspection of the Insertion Tubea) Check the entire surface of the insertion tube for abnormal conditions such as
sharp edges, dents, crush marks, wrinkles, bumps, buckles, excessive bending, protrusions, bite marks, peeling of outer sheath, cuts/holes or other irregularities. Any crush or indentation of the flexible shaft of the endoscopes can cause damage to the internal mechanisms of the endoscopes.
b) Similarly, check the condition of the umbilical cord for outward signs of damage such as buckling, crush marks, etc.
WARNING: To avoid serious damage to the patient or possibility of malfunction during a procedure, do not use any endoscope if you find any abnormalities or outward signs of damage.
c) These areas [A], [B] should be checked for ANY abnormalities or irregularities. If anything unusual is found including but not limited to rough textured surfaces, cracks, brittleness, sharp-edges, holes, peeling, tackiness, etc., the endoscope should NOT BE USED. During this inspection process check the surface/condition of the adhesive by applying slight pressure with one's gloved fingers and by slightly wiping this area with dry gauze.Make sure the glue is not peeling, nor does it have roughened texture or any sharp-edges.

– 9 –
(1)
(2)
(3) (4)
(1) Bending Section(2) Close-Up View(3) [A] Black Adhesive
Band(4) [B] Black Adhesive
Band
Figure 2.3
d) Make sure that the entire endoscope is clean and has been subjected to either a high-level disinfection or sterilization process before each patient use.
WARNING: From the standpoint of infection control, all instruments must be reprocessed prior to first time use, after any repairs/service and before every patient use.
CAUTION:In order to obtain crisp endoscopic images, when utilizing chemo-thermal processes for reprocessing PENTAX endoscopes, the instruments should be allowed to return to room temperature prior to use and/or further handling.
2) Inspection of insertion tube flexibilitya) Form an arch with the Insertion Tube as shown in the figure below.
Approx.20cm
Approx.10cm
Figure 2.4
b) Gently raise/lower the left/right hands alternately and confirm equal flexibility for the length of the arch. Do NOT use the endoscope if there are any:
• extraordinarily rigid portion which do not bend as easily as the rest of the archor
• extraordinarily flexible portions which bend much more than the rest of the arch.

– 10 –
Figure 2.5
Figure 2.6
c) Repeat steps a) and b) above until the inspection of the entire insertion tube is complete. If the endoscope fails the inspection above;
• Do NOT use the endoscope and • Contact your PENTAX service facility.
CAUTION:
When performing this inspection, ensure that other components of the endoscope (transducer, grooves for balloon, distal end, control body, etc.) are not damaged by impact to surface or objects in the area.
Do NOT adjust the bending section of the endoscope as part of this inspection. Maintain the distal end in a straight orientation.
• Hold the Insertion Tube at the junction of the insertion tube and bending section,
• Do not close your hand around the bending section.

– 11 –
CAUTION:The distal end of the endoscope as well as the electrical contacts/pins on the PVE connector must be protected against damage from impact. Never apply excess force such as twisting, or severe bending to the flexible portion of the endoscope. These actions could result in endoscope damage or membrane/tissue damage to the patient. Therefore, do not use the endoscope if there is any sign of abnormalities in the distal end of the endoscope.
CAUTION:During pre-use inspection, ensure that the distal objective lens and the illumination (LCB) cover glass are clean and no residues are present on these distal surfaces. If not, crisp images can NOT be displayed.
NOTE:
As indicated elsewhere in PENTAX product labeling, endoscopes particularly the quality of the endoscope image should be checked prior to patient use.
CAUTION:
When transporting the endoscope, do NOT grasp or carry it only by its umbilical cord or insertion tube, and take care to protect the distal tip of the insertion portion from damage. Loosely coil both the umbilical cord and insertion tube so that the endoscope can be carried by grasping both the control body and distal portion of the insertion portion in one hand and the PVE connector in the other hand. Failure to do so could result in severe impact damage that will require repair by PENTAX service personnel.
Figure 2.7

– 12 –
CAUTION:
Flexible endoscopes and other sophisticated medical instruments are constructed of special materials, unique parts and intricate components with strict dimensional tolerances. Specialized assembly techniques and application of specific sealants and/or adhesives are required to ensure the watertight integrity and maintain the functionality of these devices. It is therefore imperative that endoscopes be routinely checked to ensure that parts used in their construction are not loose, missing or compromised that could otherwise negatively affect the functionality of these devices. Compromised or loose components could result in device failure, endoscope damage (via fluid invasion) and/or in incomplete decontamination of used instruments.
PENTAX recommends that prior to use endoscopes should be carefully inspected for their integrity and checked for any “looseness” in the mating or joining of components including the following parts/areas:
• the channel inlet assembly (biopsy inlet port) (1)
• the suction nipple/connector (2)
• suction valve cylinder (3)
• venting connector (4)
• light guide plug (5)
• water injection connector (6)
• basically, any inlet or outlet port associated with an internal channel, an indirect patient contact portion of the endoscope
One method to check for looseness is to lightly grip the exposed part, and while grasping the component carefully attempt to move it in various directions.
Use of a lint-free gauze while grasping metal parts is recommended as a protection for one’s fingers.
If any part/component remains loose (after attempting to tighten) and/or if there is any indication or suspicion of an abnormality or outward signs of damage, do NOT use the endoscope. Contact your local PENTAX service facility.
(4)
(2)
(1)
(6)
(3)
(5)
Figure 2.8

– 13 –
CAUTION:
To avoid damaging the endoscopes, do NOT twist, rotate or excessively bend any of the insertion tube strain reliefs (1), (2) during inspection, clinical use, reprocessing, or any handling activity. Be particularly cautious for the insertion tube strain relief (1). When wiping the insertion tube and the umbilical cord, use a slow back and forth motion to wipe them along the tube/cable. Never apply excessive force or torque on these strain reliefs or slim tubes/cables. During ANY handling of the instrument avoid excess force, twisting, rotation and/or bending of the actual insertion tubes and umbilical cord to prevent inadvertent damage (crush, compression, deformity, etc.) to these parts as well as to internal components contained within the endoscope.
(3) (4)
Do NOT Twist or Rotate Do NOT Bend
(2)
(2)
(1)
(1) Insertion tube
Strain relief boot
(2) Strain relief boot
(3) Do NOT Twist or Rotate
(4) Do NOT Bend
Figure 2.9
3) Inspection of Angulation Controla) Slowly manipulate the angulation control lever to see that it functions smoothly.
Be certain that a full and appropriate range of angulation is possible.
(1)
(1) Up-Down
Figure 2.10
b) Check that the observed image turns in the intended direction when the control lever is operated to move the angulation up/down.
c) Engage fully the angulation control to be certain that the position of the angulated tip can be stabilized.

– 14 –
WARNING:
Prior to use ensure that the angulation control can rotate smoothly, that there is no grinding or excess friction within the angulation system and that the bending section bends freely and smoothly. NEVER APPLY EXCESSIVE FORCE TO THE ANGULATION CONTROL!
ANY lack of smooth operation of the angulation control may be an early indication of internal damage to and/or part(s) failure within the endoscope’s angulation system. To avoid the possibility of further endoscope damage or the potential for malfunction of the angulation system, do NOT use the endoscope if the angulation mechanism does not operate properly.
A “frozen” bending section can make instrument extraction from a patient more difficult.
CAUTION:
When an endoscope exhibits excessive “lever play” or if angulation is lost in any direction, do NOT use the instrument.
Excessive “lever play” can be defined as rotating of the angulation control lever in any one direction for more than 30 degrees without any corresponding distal tip angulation. The examples above are indications that service is required to avoid more serious problems with the angulation control system, including angle or pulley cable/wire breakage and/or the possibility of a “frozen” distal bending section. Do not apply excessive force to the angulation control lever of any problem or strangeness is recognized during angulation operation.
4) Inspection of Suction Mechanisma) Prior to use, the suction control valve (OF-B179) should be inspected. Remove
the suction valve from the control body and make sure that the O-ring and rubber part are not damaged or worn.
(1)
(2)(3)
(1) OF-B179(2) O-Ring
OF-B181(3) Rubber part
Figure 2.11
WARNING: Make sure that the correct suction valve (OF-B179) is being used. Worn or damaged suction valve and/or O-ring should be replaced with new ones which have already been subjected to a high-level disinfection or sterilization procedure prior to use (O-ring set, model OF-B181, is optionally available). Failure to do so could result in continuous aspiration which in certain clinical situations can suction tissue into the distal channel opening at the distal end and/or create a loss of insufflated air via the suction system. A compromised valve could also result in the potential for reflux or spit-back of patient fluids that may present infection control risks.

– 15 –
b) Connect suction source tube from an external suction source to the suction nipple located on the control body. Place the distal end of the endoscope in a basin of sterile water and depress the suction control valve. Water should be rapidly aspirated into the suction system collection container.
(1) (3)
(2)
(4)
(1) Suction Source Tube(2) Depress(3) Suction Control Valve(4) Suction Nipple
Figure 2.12
(1) (2)
(3)
(1) Correct(2) Incorrect(3) Metal
Figure 2.13
WARNING:
Make sure suction control valve OF-B179 is correctly attached (see figure 2.13).
Improperly installed suction valves may not function as originally intended. Such valves may not return to their neutral (released) positions and/or they may provide continuous suction.
Continuous aspiration can cause loss of air/fluid, difficulty in maintaining proper insufflation and/or inadvertent suctioning of tissue into the distal instrument channel opening. Also it could possibly result in the potential for reflux or spitback of patient fluids.
c) Release the suction valve to determine if the suction valve freely returns to its OFF position and the aspiration of water ceases.
d) If the suction valve does not function properly, does not move smoothly or feels “sticky”, remove it from the suction cylinger. Apply a very small amount of silicone oil (OF-Z11) to the O-ring and rubber part. Do NOT use excess oil, avoid “blobs”, large drops and/or squirts of oil directly onto the metal valve stem – instead, simply place a small droplet of oil on one’s sterile gloved forefinger and gently swirl between thumb and forefinger. Next place the suction valve with O-ring in-between thumb and finger and gently rotate the suction valves so that the oil is evenly applied to the outer edges of the O-ring. Make sure the oil is applied to the O-ring and wipe off all excess.

– 16 –
WARNING: If the instrument is to be used immediately after the inspection, use only sterile or bacteria-free water. To avoid recontamination of a previously reprocessed endoscope, avoid use of idle/uncovered tap water.
WARNING: An inlet seal in good condition must be attached to the instrument channel inlet to prevent loss of suction and a risk of cross contamination to the end user due to the potential for reflux (spit-back) of patient fluids. Worn inlet seals will result in leakage and should be replaced. To ensure maximum performance of these sealing mechanisms, consider replacing the inlet seal with a new fully reprocessed one for each procedure.
5) Inspection of Injection Tube (OE-B5)a) Check that there is no cracking on the outer surface of the tube of the Injection
Tube.b) Check that there are no scratches, cracking, or chipping of the O-ring of the
Injection Tube.
(1) O-Ring(2) Tube
Figure 2.14
6) Inspection of Aspiration Needle
WARNING:
To prevent instrument damage and/or accidental tissue puncture, always confirm that the needle tip is completely retracted within the sheath. Do not pass the needle through an angulated distal bending section. Always maintain a straight (non-angulated) bending section when introducing the needle.
WARNING:
The use of any needle that shows any sign of damage or difficulty of operation must be avoided. Any malfunction of a needle during a patient procedure could result in serious injury to the patient. Also, the use of damaged needle may result in serious and costly damage to the endoscope.
WARNING:
Be sure to adhere to the instruction provided by the manufacturer of each needle.
(1) (2)
– 17 –
a) Confirm that the needle tip will be completely retracted into the sheath.
b) Remove the inlet seal. The needle should be slowly inserted through the instrument channel inlet with insertion tube in a straight position.
CAUTION:When connecting an endoscopic accessory that attaches to the instrument channel inlet by means of a terminal luer lock (e.g.syringe, EBUS-TBNA needle), be careful to rotate the accessory only until it engages the instrument port fitting. Overtightening the accessory could cause damage to the endoscope. If there is any doubt as to the suitability of the endoscope for use, do not use the endoscope and contact your local PENTAX service facility.
CAUTION:There should be no resistance encountered. If resistance is encountered, do not attempt to introduce the needle further, the instrument channel may be damaged and the endoscope should not be used. Contact the PENTAX service facility.
c) Ensure that the sheath extends from the distal tip.d) Withdraw the needle slowly with the insertion tube in a straight position.
CAUTION:
Several factors can affect the ease/difficulty of needle passage through the endoscope channel:
• Outside diameter of needle compared to inside channel diameter
• The curve or bend (bending radius) within a channel through which the needle will pass
• Damaged accessory
• Length and/or rigidity of the distal needle
• Length of any (long) rigid portion (e.g. needle junction to catheter shaft)
Such pre-use inspection will allow for uninterrupted and more expeditious examinations. To confirm the absence of severe channel damage affecting the watertight integrity of the endoscope, perform appropriate leakage testing of the endoscope per PENTAX instructions.
CAUTION:
The needles are available from a variety of sources. Depending upon their particular design, quality and/or construction the actual needle (distal portion) may become bent due to passage through the instrument channel of the bronchoscope, especially if repeatedly inserted. Users must recognize the potential for some needles to bend and retain a curve instead of their normal straight position. When aspiration needles are used in this bent/curved condition, end users should exercise extra care to ensure that the needles can be applied as intended.

– 18 –
CAUTION:
Endoscopic accessory instruments (EAIs) may be used with PENTAX flexible endoscopes. It should be understood that special care and caution must be exercised when using accessories, particularly non-PENTAX products through the instrument/suction channel of an endoscope. This is especially true when attempting to pass accessories through narrow channels when curved in a tight bending radius.
Please note that damage to the endoscope and/or accessory instrument is possible if excessive force is applied during insertion (or withdrawal) of the EAI. Also, using excessive force during insertion causes the withdrawal of the EAI to be more difficult. To prevent equipment damage, device failure, or patient injury, please adhere to the following precautions:
• Never apply too much pressure or excessive force during insertion through the instrument channel.
• Never attempt to force endoscopic accessories, such as biopsy forceps through a fully angulated distal bending section.
• Prior to using accessories from another source (non-PENTAX products), contact PENTAX to confirm if the device has been checked for compatibility.
Failure to follow these recommendations can result in endoscope and/or accessory damage/failure, including but not limited to:
• Channel puncture/leakage
• Fluid invasion
• Fiber breakage
• Other internal component failure
Should resistance be encountered when inserting an accessory, STOP! If resistance is at the endoscope tip, slightly withdraw the accessory, reduce the angulation (within the bending section), then slowly and carefully advance the accessory under direct vision.
Several factors can affect the ease/difficulty of accessory passage through the endoscope channel:
• Outside diameter of accessory compared to inside channel diameter
• Non-flexible (rigid) portions of an accessory
• The curve or bend (bending radius) within a channel through which the accessory will pass
• Damaged accessory
Due to the variables above, prior to each procedure, it is important to check the particular accessory intended to be used to satisfy the clinical procedure to be performed. Such pre-use inspections will allow for uninterrupted and more expeditious examinations.
To confirm the absence of severe channel damage affecting the watertight integrity of the endoscope, perform appropriate leak testing of the endoscope per PENTAX instructions.
WARNING: From the standpoint of infection control, all patient contact accessories must be thoroughly cleaned and subjected to an appropriate high-level disinfection or sterilization process before being used for the first time and subsequently after each clinical use.

– 19 –
CAUTION:
The instrument channel is made of stainless steel, noryl and fluorine-contained polymers.
When any fluids are used with these endoscopes, please read carefully and follow all instructions in the instruction for use supplied with the fluids for use and pay special attention to any reactions with the materials identified in the intended fluid path. Only the user can determine if the fluids are appropriate for patient use.
NOTE:
Bronchoscope instrument channels are composed of both stainless steel and polymers containing fluorine. PENTAX is not aware of any reports of material incompatibility between these materials and fluids that are commonly used during endoscopic procedures. As relates to reprocessing, PENTAX publishes a list of compatible detergents and disinfectants. In the event that the healthcare team intends to infuse a less commonly or rarely used fluid through the instrument channel in conjunction with a procedure, it is strongly advised that the manufacturer of the fluid be consulted for material compatibility information with stainless steel and polymers containing fluorine. Also, please consult the PENTAX list of compatible reprocessing agents for guidance regarding compatible detergents and disinfectants.
NOTE:
Accessories should always be inspected and checked with the particular endoscope prior to each procedure.
CAUTION:Do NOT clinically use the endoscope if any irregularity or abnormality is suspected. If there is any doubt as to the suitability of use for any endoscope component, replace it with a new fully reprocessed one. An instrument irregularity may cause endoscope damage and/or compromise patient or user safety.
2-4. Preparation before the Examination
WARNING:
The latex balloons are disposable. They are provided sterile for single patient use.
WARNING:
Please be advised that PENTAX balloons, Model OE-A52 for EB-1970UK supplied for endoscopic ultrasound applications are made of latex material. Appropriate precautions are therefore recommended. Due to the potential severe allergic reactions to medical devices containing latex (natural rubber), healthcare professionals are encouraged to identify latex sensitive patients, professionals themselves, a high-risk group and be prepared to treat allergic reactions promptly.

– 20 –
CAUTION:
• When attaching or removing the latex balloon, be careful not to damage the endoscope, especially the sensitive transducer, optical lenses or bending section at the distal portion.
• Make sure there are no pinholes or tears in the balloon packaging. If there are any signs of abnormalities such as stains, tears or any other indications that the packaging has previously been damaged or opened, use a new balloon with the packaging intact.
1) Ensure that the endoscope is connected properly to the video processor.2) Connect the scanning unit connector of the endoscope ultrasound scanning unit.3) Attach the injection tube OE-B5 to the water injection connector located below
the control head.
(1)
(1) Injection Tube (OE-B5)
Figure 2.15
4) A syringe filled with de-aerated sterile water attached, inject water into the injection tube. Check to ensure that water exit from endoscope distal tip.
5) Gently attach the balloon provided onto the tip of the endoscope in the following manner.
a) Insert the distal end of the endoscope to the large opening #1 of the balloon that is being stretched and opened by the balloon attachment adapter. At this time, hem of the large opening #1 of the balloon is wedged into the groove 1 of the distal end of the endoscope (Figure 2.16).
b) After making sure the large opening #1 of the balloon is wedged into the groove 1, carefully remove the balloon attachment adapter.
(1)
(2)
(3)
(1) Balloon (OE-A52)(2) Large Opening #1(3) Small Opening #2
Figure 2.16

– 21 –
(2)(3)
(1)
(1) Distal End of Bronchoscope (EB-1970UK)
(2) Groove 1(3) Groove 2
Figure 2.17
CAUTION:When inserting the distal end of the endoscope into the balloon, make sure that the transducer is facing up.
NOTE:
When a balloon is attached as shown in the drawing below, there is still air present inside the balloon at this point. In order to completely purge air from inside the balloon, inject de-aerated sterile water until the air inside the balloon is completely removed.
(1)
(1) De-aerated Sterile Water
Figure 2.18
c) Stretch the small opening #2 of the balloon and pull the small opening #2 of the balloon so that the distal tip of the endoscope will be exposed and the edge of the small opening #2 will be wedged into groove 2 (Figure 2.18).
Figure 2.19
WARNING:
Use de-aerated sterile water when injecting water into a balloon.

– 22 –
6) Inject 3mL de-aerated sterile water into the balloon.
CAUTION:When stretching or widening either balloon opening, be careful not to exert too much tension or force to prevent inadvertent rupture or damage to the balloon.
CAUTION:Do not overfill the balloon with water. The maximum volume of water should not exceed 3mL. Confirm the distension of balloon by monitoring the volume of water injected and by observing the sonographic image.
2-5. Preparation just before Insertion of Endoscope
WARNING:
From the standpoint of infection control, every endoscope should be properly disinfected or sterilized before being used for the first time. The endoscope should have been properly cleaned and disinfected or sterilized after any previous use and after being returned for any repairs/service.
Refer to the companion Instructions for Use describing in detail PENTAX reprocessing instructions.
WARNING: Current infection control guidelines require that endoscopes and their patient contact accessories either be sterilized or at the least be subjected to high-level disinfection. Accessories which ENTER STERILE TISSUE or THE VASCULAR SYSTEM must be sterilized before patient use. Only the user can determine if any instruments and accessories have undergone appropriate infection control procedures prior to each clinical use.
1) If the endoscope has just recently been reprocessed, has been prepared or stored properly and passed all pre-procedure inspections, the instrument should be ready to use. If necessary, the endoscope’s insertion tube may be wiped down with sterile gauze moistened with 70-90% medical grade ethyl or isopropyl alcohol.
WARNING: Contact the manufacturer and follow local regulations regarding safe use, appropriate handling and disposal of cleaning and disinfection solution including alcohol. Material Safety Data Sheets (Health and Safety Data Sheets or similar documents depending upon country) available from the cleaning and disinfection solution (including alcohol) manufacturer should provide guidance to end users about composition, hazards, chemical and physical properties, first aid, handling and storage, stability, precautions, disposal, etc. associated with cleaning and disinfection solution including alcohol.

– 23 –
2) Gently clean the objective lens and the light guides with a sterile cotton-tip applicator moistened with 70-90% medical grade ethyl or isopropyl alcohol. A sterile lens cleaner (anti-fogging agent) may also be applied via sterile gauze or other sterile applicator.
3) Check the endoscopic image and confirm that it is of acceptable quality for clinical use. Refer also to the Instructions for Use supplied with the PENTAX video processor for inspection of the image quality.
4) Prior to trans-oral insertion of the endoscope, place a bite-block (mouthpiece) into the patient’s mouth to protect the endoscope from damage during the procedure. Failure to do so can result in scratches, tears and/or crushing of the insertion portion of the endoscope. (if the endoscope is to be introduced trans-orally).
5) Apply a medical grade water soluble lubricant to the insertion tube. Do not use petroleum based lubricants.
NOTE:
The objective lens and the light guides must be kept free of the lubricant and excess lens cleaner.
CAUTION:Never drop this equipment or subject it to severe impact as it could compromise the functionality and/or safety of the unit. Should this equipment to be mishandled or dropped, do not use it. Return it to an authorized PENTAX service facility for inspection or repair.
– 24 –
3. DIRECTIONS FOR USE
WARNING: This instrument should only be used by physicians who have thoroughly studied all the characteristics of this instrument and who are familiar with the proper techniques of endoscopy. There is a possibility of backflow and/or spit-back of patient fluids, chemicals, etc. from the Instrument Channel Inlet or the Suction Control Valve. During the procedure, always wear protective garments such as surgical gloves, gowns, face masks, etc. to minimize the risk of cross contamination.
WARNING: When using this instrument on a patient with invasive medical device such as pacemaker, consult a physician specialized in the field to determine whether the use of this instrument is safe by taking all factors into consideration.
The PENTAX ultrasound video bronchoscope is specialty instrument that house a distal, precision transducer for ultrasonic imaging. It must be recognized that compared to conventional endoscopes, the distal end of this ultrasound endoscope contains a longer dital rigid section. This design combined with its forward oblique optics result in the distal tip not being in full endoscopic view. Only medical professionals appropriately trained in EUS technique should operate this device and special care should be exercised when using this instrument. Use caution during any movement or angulation of the endoscope tip to avoid patient trauma, tissue damage and/or perforation. Never apply excessive pressure of the endoscope tip against patient tissue.
3-1. Operation
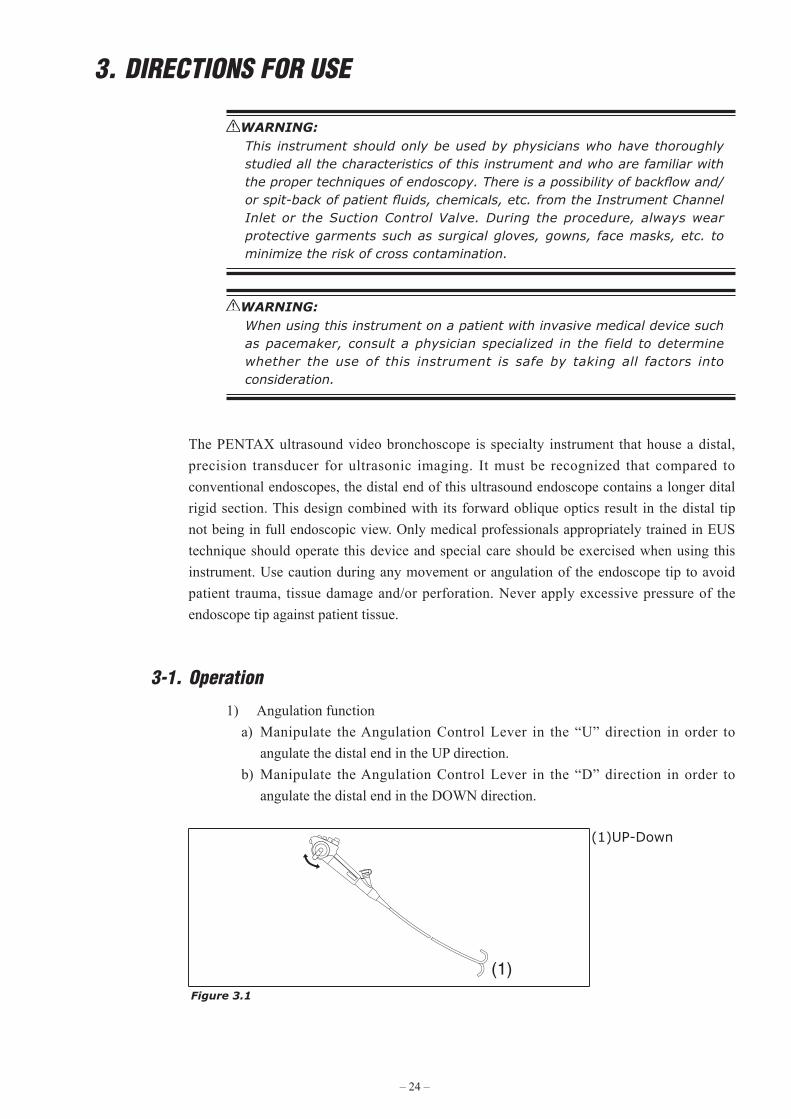
1) Angulation functiona) Manipulate the Angulation Control Lever in the “U” direction in order to
angulate the distal end in the UP direction.b) Manipulate the Angulation Control Lever in the “D” direction in order to
angulate the distal end in the DOWN direction.
(1)
(1)UP-Down
Figure 3.1

– 25 –
2) Suction functiona) Connect the suction source tube from an external suction source to the suction
nipple located on the control body.b) Depress the Suction Valve to suction fluid and/or gas, debris.c) Release the Suction Valve to stop suctioning.
(1)
(2)
(3)
(4)
(1) Suction Source Tube(2) Depress(3) Suction Control Valve(4) Suction Nipple
Figure 3.2
3) Remote Button functionFunction assigned to each Remote Button is activated by pressing the corresponding Remote Button.
Refer to the Instructions for Use supplied with the processor for assignment of function to each Remote Button.
The following table shows the factory setting.
Remote Button 1 FreezeRemote Button 2 CopyRemote Button 3 VCRRemote Button 4 Enhance
3-2. Pretreatment
The patient should be prepared in your normal endoscopy regimen.
Please be advised that PENTAX balloons, supplied for endoscopic ultrasound applications are made of latex material and appropriate precautions, are therefore, recommended.
WARNING:
Balloon used with your endoscope contains latex, which may cause allergic reactions. Due to the potential severe allergic reactions to medical devices containing latex (natural rubber), healthcare professionals are encouraged to identify latex sensitive patients, professionals themselves, a high-risk group and be prepared to treat allergic reactions promptly.

– 26 –
3-3. Insertion and Withdrawal
CAUTION:
Patient material and secretions should be removed from the area of observation to eliminate the potential to blur the endoscopic image and/or obscure the illumination system.
Continuing use of the light guide with sticky debris might cause steam because debris is deprived of moisture by heat. As a result, endoscopic images become blurry. If steam is found on the light guide during a procedure, stop it immediately and withdraw the endoscope carefully from a patient.
Ideally all patients should be prepped well to maximize visualization of the intended areas of interest. Patient material and secretions should be removed from the area of observation to eliminate the potential to blur the endoscopic image and/or obscure the illumination system.
1) Slowly insert the endoscope under direct vision.Deflate the balloon before insertion, and inflate the balloon after endoscope placement into the airway.
(1)
(1) Bite Block
Figure 3.3
2) (ENDOSCOPES TO BE INTRODUCED TRANSORALLY)When the distal end of the endoscope is passed through the pharynx, the patient should be gently biting down on the bite block to maintain the bite block’s position during the procedure.
3) Adjust the intensity of the video processor to obtain a brightness level suitable for observation.
CAUTION:The light emission from the endoscope could cause thermal injury. To minimize the risk, use only the minimum amount of brightness and avoid close stationary viewing and unnecessary prolonged use.
4) The angulation control should be used as needed to position the endoscope. Angulation of the tip should be performed under direct vision in a gentle and deliberate manner.
– 27 –
WARNING:
Ensure that the angulation controls can rotate smoothly, that there is no grinding or excess friction within the angulation system and that the bending section bends freely and smoothly.
NEVER APPLY EXCESSIVE FORCE TO THE ANGULATION CONTROLS!
ANY lack of smooth operation of the angulation controls may be an early indication of internal damage to and/or part(s) failure within the endoscope’s angulation system. To avoid the potential for malfunction of the angulation system, do NOT use the endoscope if the angulation mechanism does not operate properly. Use of endoscope with suspect angulation mechanism could lead to angulated distal end to not being able to be released and could cause possibly perforation.
If during a procedure angulation is lost in any direction such as when “cables snap” (broken pulley wire, broken angle wire, etc.), do NOT continue to use the instrument and do NOT rotate the angulation controls. Should the angulation system fail for any reason, stop the procedure and carefully withdraw the endoscope under direct visualization.
The examples above are indications that service is required to avoid more serious problems with the angulation control system, including the possibility of a “frozen” bending section.
A “frozen” bending section can make instrument extraction from a patient more difficult.
5) If bronchial secretions or other debris are present in the lungs, making observation difficult, suctioning should be performed.
WARNING: Avoid suctioning foreign objects and solid particles that are large enough to potentially clog the Suction Channel and Suction Control Valve. If such objects and/or particles have been suctioned into the endoscope, insure that they have been completely removed from the endoscope before continuing to use it. If the Suction Control Valve has been clogged to the extent that it is not possible to stop the suctioning operation, detach the Suction Source Tube that is attached to the endoscope from the suction source, detach the Suction Control Valve from the endoscope, and remove any trapped debris that might be preventing the Suction Control Valve from operating properly. If it is impossible to confirm that all foreign objects and solid particles have been removed from the Suction Channel, do not use the endoscope and contact your local PENTAX service facility.
CAUTION:Do not apply excessively negative pressures (high suction settings) and/or prolonged contact of the distal instrument channel opening (endoscope tip) against mucosal surfaces to avoid “suction polyps”, bleeding and/or other trauma to the patient. During aspiration keep an endoscopic view of patient anatomy as clear as possible and maintain some distance from endoscope tip to tissue to avoid suctioning of mucosa onto/into the distal channel opening.

– 28 –
6) Image capture, hard copy documentation, video recording, etc. may be carried out as necessary.
NOTE:
Leaving the finger on the remote button could cause the function (hard copy or recording, etc.) to be activated inadvertently.
7) Connect the PENTAX ultrasound endoscope to a compatible Hitachi Medical Corporation ultrasound scanning unit and follow instructions provided with the ultrasound scanning unit.
8) A de-aerated sterile water-filled balloon is placed in contact with the target area to be observed. Inflate the balloon with deaerated sterile water as previously explained in section 2-4 of this instructions for use entitled “PREPARATION BEFORE THE EXAMINATION”.
9) Guide the endoscope tip to the area to be observed sonographically.
WARNING:
Do NOT overfill the balloon with water. The amount of de-aerated water injected should not exceed 3mL.
10) Following the instructions for use provided with the scanning unit, observe the sonographic image on the monitor, and obtain desired photographic and/or video documentation as necessary.
(2)
(1)
(1) Orientation Mark Side(2) Right-Left Orientation
Mark
Figure 3.4
11) Relationship between direction of the ultrasound endoscope and the orientation mark on the image is shown in the figure above.
12) Before withdrawing the endoscope, shrink the balloon and then trapped air should be suctioned to reduce patient discomfort.
13) When attempting to withdraw the endoscope, straightened the endoscope tip to its neutral position. Always withdraw the endoscope under direct visualization.
14) Finally, remove the bite block.
WARNING:
If for any reason, the image is lost due to power shortage, lamp or processor failure, etc., the endoscope tip should be straightened to its neutral position, and the insertion tube should be carefully and slowly withdrawn from the patient. If the endoscope is withdrawn without releasing the angulation lock lever, it may cause an injury such as perforation to the patient.
– 29 –
3-4. FNA (Fine Needle Aspiration)
WARNING: Accessories that ENTER STERILE TISSUE, THE VASCULAR SYSTEM, BLOOD VESSELS, or MUCUS MEMBRANES must be sterile.
WARNING: All patient contact accessories must be thoroughly cleaned and subjected to an appropriate high-level disinfection or sterilization process before being used for the first time and subsequently after each clinical use.
WARNING: To prevent instrument damage and/or accidental tissue puncture, always confirm that the needle tip is completely retracted within the sheath. Do not pass the needle through an angulated distal bending section. Always maintain a straight (non-angulated) bending section when introducing the needle.
WARNING: For ALL types of endoscopic accessory instruments, always maintain clear endoscopic and sonographic images of the accessory during advancement, use, and withdrawal of the device. Otherwise, patient injury (e.g., puncture) could result.
CAUTION:
Endoscopic accessory instruments (EAIs) such as aspiration needles may be used with PENTAX flexible endoscope. It should be understood that special care and caution must be exercised when using accessories, particular non-PENTAX products through the channel of an endoscope. This is especially true when attempting to pass accessories through a narrow channel that is curved into a tight bending radius.
Please note that damage to the endoscope and/or accessory instrument is possible if excessive force is applied during insertion (or withdrawal) of an EAI. To prevent equipment damage or device failure, please adhere to the following precautions:
• Never apply too much pressure or excessive force during insertion through the instrument channel.
• Never attempt to force endoscopic accessories through a fully angulated distal bending section.
• Prior to using accessories, contact PENTAX to confirm that the device has been checked for functional compatibility with PENTAX endoscopes.
Failure to follow these recommendations can result in endoscope and/or accessory damage/failure, including but not limited to:
• Channel puncture/leakage
• Fluid invasion
• Fiber breakage
• Other internal component failure

– 30 –
1) Remove the inlet seal and insert the needle through the instrument channel inlet with insertion tube in a straight position. Be certain that the distal needle tip is completely retracted into the sheath during insertion.
CAUTION:
When connecting an endoscopic accessory that attaches to the instrument channel inlet by means of a terminal luer lock (e.g.syringe, EBUS-TBNA needle), be careful to rotate the accessory only until it engages the instrument port fitting. Overtightening the accessory could cause damage to the endoscope. If there is any doubt as to the suitability of the endoscope for use, do not use the endoscope and contact your local PENTAX service facility.
CAUTION:
Should resistance be encountered when inserting an accessory, STOP! If resistance is encountered at the endoscope tip, slightly withdraw the accessory, reduce the angulation of the distal bending section, and slowly and carefully advance under direct vision.
2) When the sheath of the needle becomes visible in the viewing endoscopic field, operate the needle according to the instructions supplied with the needle. Always maintain endoscopic and sonographic views of the needle during advancement.
(2)
(1)
(1) Endoscopic view(2) Distal tip of the sheath
Figure 3.1
3) At the conclusion of the aspiration procedure, slowly retract the needle tip into the sheath, and withdraw the needle slowly with insertion tube in a straight position.
CAUTION:
Aspiration needles are available from a variety of sources. Depending upon their particular design, quality, and/or construction the actual needle (distal portion) may become bent due to passage through the instrument channel of the bronchoscope, especially if repeatedly inserted. Users must recognize the potential for some needles to bend and retain a curve instead of their normal straight position. When aspiration needles are used in this bent/curved condition, end users should exercise extra care to ensure that the needles can be used as intended.
WARNING:
Be sure to adhere to the instructions provided by the manufacturer of the needle.

– 31 –
CAUTION:
Follow the manufacturer's instructions for use in order to properly reprocess and store an aspiration needles prior to subsequent use.
– 32 –
4. CARE AFTER USEFor the cleaning and maintenance of the equipment after its use, please refer to the separate Instructions for Use (reprocessing).
WARNING:
Instrument repairs should only be performed by an authorized PENTAX service facility. PENTAX assumes no liability for any patient/user injury, instrument damage or malfunction, or REPROCESSING FAILURE due to repairs made by unauthorized personnel.
Your local PENTAX service facility can provide a list of “compatible” reprocessing agents with PENTAX endoscopes based upon material compatibility and functionality studies performed by PENTAX, Japan. These tests of course apply only to genuine PENTAX parts, components and materials including proprietary adhesives, sealants, lubricants, etc. specifically selected for use in PENTAX endoscopes to satisfy their original design criteria. PENTAX manual reprocessing instructions supplied with each product have been validated for PENTAX endoscopes utilizing exclusive PENTAX parts/materials and assembled based upon proprietary PENTAX manufacturing technologies and/or servicing techniques.
It must be recognized that PENTAX does not evaluate non-PENTAX parts, components, materials and/or servicing methods and therefore questions regarding material compatibility and/or functionality of PENTAX instruments built with these unauthorized, untested and unapproved items, materials, repair/assembly methods must be referred to the third party service organization and/or device remanufacturer. It is unknown to PENTAX if serviced or remanufactured instruments (performed by unauthorized PENTAX entities) which still bear a PENTAX label are within PENTAX device specifications and/or if unauthorized activities have significantly changed the instrument’s performance, intended use, safety and/or effectiveness.
These companies should confirm the ability for these serviced/remanufactured devices to be reprocessed safely and effectively with reprocessing agents/systems recognized as compatible by PENTAX for standard PENTAX products. These third party companies and/or remanufacturers should be consulted to confirm if they have performed reprocessing validation studies on instrument models which they have serviced (or remanufactured) that support the cleaning, high-level disinfection and/or sterilization of these endoscopes via the normal endoscope OEM reprocessing recommendations, standard AER device-specific instructions and/or their own unique reprocessing recommendations.
Ultimately, owners of these medical devices are responsible for selecting an appropriate service facility or vendor whose activities will render an instrument equivalent to the expectations and quality of a finished device supplied by the endoscope OEM.

– 33 –
Prior to returning any instrument for repair to PENTAX, the instrument should first undergo appropriate reprocessing/decontamination procedures for the purpose of infection control.Check with your local PENTAX service facility for more details.
1) All instruments requiring repair should be shipped in the original carrying case with appropriate packing along with comments describing the instrument damage and complaint.2) A repair purchase order number, contact name and phone number of the individual responsible for authorizing repairs, as well as shipping address should be included.3) The ventilation cap (OF-C5) should be attached to the instrument if it will be shipped by air freight.4) Any accessories and/or endoscope components potentially related to the endoscope damage or complaint should also be returned with the endoscope.5) Soaking caps should also be returned with the endoscope to check/confirm the integrity of their watertight seal.6) After servicing, all endoscopes must be reprocessed prior to patient use.7) For disposal of instruments, follow local or country regulations.
CAUTION:Never drop this equipment or subject it to severe impact as it could compromise the functionality and/or safety of the unit. Should this equipment to be mishandled or dropped, do not use it. Return it to an authorized PENTAX service facility for inspection or repair.
CAUTION:
• The service life of this product is 6 years from the date of manufacture.
• Follow the instructions in the Instructions for Use for appropriate pre-use inspections, proper usage, care after use, storage, and replacement of consumables.
• Have the vendor/specialist specified by PENTAX to perform repairs and annual periodic inspections.
WARNING:
Follow the national or local laws/guidelines to appropriately dispose of the
consumables. Ask the manufacturer or PENTAX service facility about the
disposal of the instrument.

– 34 –
SPECIFICATIONSEndoscope Model EB-1970UK
Field of View 100° (45° Forward oblique)
Depth of Field 2 - 50 mm
Tip AngulationUp 120°
Down 90°
Rigid Distal WidthProbe φ6.5 x 7.0 mm
Optic (O.D.) φ7.4 mm
Distal End Width (O.D.) φ7.4 mm
Insertion Tube Width (O.D.) φ6.3 mm
Maximum Insertion Portion Width (O.D.) φ8.0 mm
*Minimum Instrument Channel Width (I.D.) φ2.0 mm
Insertion Tube Working Length 600 mm
Total Length 860 mm
Acoustic Frequency 5 -10 MHz switchable
Scan Direction Longitudinal
Scan System Convex
Scan Angle 75°
Balloon Removable
Operating environment
Ambient temperature 10 - 40°C
Relative humidity 30 - 85%RH
Air pressure 700 - 1060 hPa
Storage environment
Ambient temperature -20 - 60°C
Relative humidity 0 - 85%RH
Air pressure 700 - 1060 hPa
**Maximum reprocessing temperature 60°C
Degree of protection against electric shock Type BF (Use on heart is prohibited)
* There is no guarantee that instruments selected solely on the basis of minimum instrument channel width will be compatible with the endoscope.
**PENTAX flexible endoscopes should not be exposed to temperatures in excess of 140°F(60°C) during either reprocessing or storage. In reprocessing, depending on detergents, even if the temperature does not exceed 60°C, the scopes may be damaged. For specific brands of compatible detergents, please contact your local PENTAX service facility or sales representative.
Warning: Balloon used with your endoscope contains latex, which may cause allergic reactions. Due to the potential severe allergic reactions to medical devices containing latex (natural rubber), healthcare professionals are encouraged to identify latex sensitive patients, professionals themselves, a high-risk group and be prepared to treat allergic reacions promptly.
Note: Specifications are subject to change without prior notice and without any obligation on the part of the manufacturer.
DISTAL ENDEB-1970UK
(1)
(2)
(3)
(4)
(5)
(6)
(1) Grooves for Balloon(2) Light Guide(3) Instrument Channel(4) Objective Lens(5) Water Injection Channel/Port(6) Convex Array Transducer
2014.06 6217001 S016 R02 printed in JAPAN
HOYA Corporation2-7-5 Naka-Ochiai, Shinjuku-ku, Tokyo 161-8525 Japan
PENTAX Medical Company A Division of PENTAX of America, inc.3 Paragon Drive Montvale, New Jersey 07645-1782 USATel: +1-201-571-2300 Toll Free: +1-800-431-5880Fax: +1-201-391-4189
PENTAX Canada Inc. 1770 Argentia Road Mississauga, Ontario L5N 3S7 CanadaTel: +1-905-286-5585 Fax: +1-905-286-5571
PENTAX Europe GmbHJulius Vosseler Strasse 104, 22527 Hamburg, Germany EC REP Tel: +49-40-561-920Fax: +49-40-560-4213
Manufacturing Site HOYA Corporation, PENTAX Miyagi Factory30-2 Okada, Aza-Shimomiyano, Tsukidate, Kurihara-shi, Miyagi 987-2203 Japan
•Specificationsaresubjecttochangewithoutnoticeandwithoutanyobligationon the part of the manufacturer.
88896
NOTICE
These instruments are used with Class B Medical Equipment (specified CISPR11) and are intended for Hospitals, Ambulatory Surgery Centers, and Medical Clinics.
Together, these endoscopes and the compatible processor comply with EN 60601-1-2 for EU, IEC 60601-1-2 for other countries.
When used in clinical or residential areas near radio and TV receiver units, these instruments may cause radio interference.
To avoid and resolve adverse electromagnetic effects, do NOT operate these instruments near the RF energy equipment.