instructions manual for the used in conjunction with
TRANSCRIPT

doctorseyes™
INSTRUCTIONS MANUALfor the
Canon A650
used in conjunction with
doctorseyes
Compact System
™
doctorseyesJ.L.Blosser Inc.
22 North Main Liberty,MO 64068
call 800-200-3594 or816-781-3206
www.doctorseyes.com
Version 2008 1.3

doctors the world of digital dental imagingeyes.com doctors the world of digital dental imagingeyes.com

24 1
Table of contents:..................................................................Page
A) The doctorseyes system:
B) Setting up the Canon A650 camera:
C) Useful Informations:
Elements of the “compact” and “professional” system .......................4
How to mount Winglights & Chin support ..............................................7
Charging the controller.............................................................................7
Summary of camera settings..................................................................11
Setting the C-mode..................................................................................12
calibrating
How to Activate the macro mode ...........................................................14
Recommendation for right distance to object.......................................17
.......................................................................
How to mount the Ringlight on the Canon A650....................................5
Working with the PLC-Compact Controller ............................................7
The PLC-4 Professional Power + Light Controller .................................9
the custom white balance setting.......................................13
Examples for dental photography setup ...............................................16
Improving depth of focus 17
Factors which affect image quality ........................................................18
ISO Speed / Image compression ............................................................18
Useful gadgets and hints ........................................................................19
Resetting camera to default ...................................................................23
Transferring pictures to pc & printing jobs ..........................................23
doctors the world of digital dental imagingeyes.comdoctors the world of digital dental imagingeyes.com

doctorseyes Compact System for the
Dear Dental Photographer,
Congratulations and thank you for choosing the doctors ringlight System.
eyes
Canon A650
This manual will give you instructions and tips on how to set upyour Canon A650 to be used in conjunction with the doctorsRinglight and obtain optimal imaging results. Our lighting systemis very easy to use and it’s usage is very intuitive. In section Ayou will find how to mount and operate the ring light system.Section B will explain camera settings and section C will provideyou with further useful information and show some examplesetups for dental photography. Furthermore you will findadditional and more detailed information in the camera’s user’sguide.
Never look directly into the LED light beam. The intensebright light can burn the retina.If necessary, provide the patient with protectiveeyewear or a mask.
Note: It is normal for the Ringlight to become warmwhen in use.
When working with patients, do not leave the powerand light controller connected to the power supply. Inaddition, never leave the camera connected to itspower supply.
eyes
As we strive for continual product innovation, your commentsand suggestions are always welcome.
We hope you enjoy the world of digital dental photography.
Warning
Warning
232
For more information on doctors products visit:eyes
Www.doctorseyes.com
doctors
dimensions (mm)...50 x 130 x 74weight ....................240gcharging capacity ..2200 mAhmax. duration.........up to 3.5
hoursvoltage...................4.8 V =charging display ...yescharging voltage....8V - 12V ~
eyes Power and LightController Compact PLC-4
charging time.........approx. 3hours
doctors
dimensions (mm) ...55 x 124 x 30weight.....................194gcharging capacity ...2200 mAhmax. duration .........up to 3.5
hoursvoltage ...................4.8 V =charge display........yescharging voltage.....8V - 12V ~charging time .........approx. 3
hours
eyes Power and LightController Compact PLC-C
Technical specifications:
doctors the world of digital dental imagingeyes.com doctors the world of digital dental imagingeyes.com

doctors the world of digital dental imagingeyes.com
22 3
CanonPowershot A650 IS
MountingElement
Ring Light
Wing Light
Macro Lens
Chin SupportMountingElement
Power & LightController PLC-4
Wing LightConnector
long as they work with PictBridge -
check for the Symbol.
1) Turn the camera in playbackmode.
2)The button on the back ofthe camera will be illuminated inblue.
3) Select an image in the displayusing the button and press
the button to send it to theprinter.
4) The button will blink blueand printing will start.
You can use the supplied AV cableto shoot or playback images usinga TV.
1) Turn off the camera and the TV.2) Connect the AV cable to the
camera’s A/V OUT terminal.Open the terminal cover byslipping a fingernail under theleft edge and plug the AV cablein all the way.
3) Plug the other ends of the AVcable to the VIDEO IN andAUDIO IN jacks on the TV.
4) Turn on the TV and switch it tovideo mode.
5) Turn on the camera.
How it works:
Shooting/Playback Using a TV
doctors the world of digital dental imagingeyes.com
AdapterTube
MagneticCoupling

4 21
Brightnessdisplay
Brightnessbutton +/-
Adaptertube
Magneticcoupling
CanonPowershotA 650 IS
Flexibledisplay
LED in use
LED control
Power & LightController PLC-4
The compact system consists of:
Canon A650 Digital Cameradoctors RinglightMacro Lens +4Power + Light Controller “compact”Charging Unit for ControllerAdapter tube for Canon A650Adapter ring 52-62Adapter ring with magnetic coupling 62-72
Optional:MirrorsDiffusorChinrestMounting Element
eyes
6) Quick-view of pictures
7) Resetting Settings to defaultvalues
You can easily view your shots byjust moving the switch on the rearside of the camera to playbackmode
1. Press the MENU button.
2. Use the button to select
the menu.
3. Use the button toselect [Reset All].
4. Press the FUNC/SET button.
Accept the setting:
5. Use the OK button to select[OK]
6. Press the FUNC/SET button toleave menu
8) Printing images directly
from the camera
The camera allows you to printimages directly from the withoutprior downloading to a computer.
Connect the camera to a printerthat uses the standard printing
protocol “PictBridge” You can
also use a non-Canon printer as
doctors the world of digital dental imagingeyes.com doctors the world of digital dental imagingeyes.com

5
The professional system consists of:
Canon A650 Digital Cameradoctors RinglightMacro Lens +4Power + Light Controller “professional”Charging Unit for ControllerAdapter tube for Canon A650Adapter ring 52-62Adapter ring with magnetic coupling 62-72
Optional:WinglightsMirrorsDiffusorChinrestMounting Element
eyes
Camera
Adapter tube
Adapter ring
Magnetic coupling
Mounting element
Closeup lens
Power & LightController PLC-C
How to mount the Ringlight onthe Canon A650
1. The camera should be turnedoff.
20
direction buttons3) Choose desired compression
with left or right buttons4) Confirm with FUNC/SET button
Always use Superfine
ISO Speed EquivalentValues: AUTO, High ISO Auto, 80,100, 200, 400, 800Please choose a higher ISO Speedwhen your images seem to be outof focus. If you choose too high anISO speed then the picture qualitywill decrease.
Helps confirm the vertical andhorizontal positioning of thesubject.
1) Press the “ON” button on top ofthe camera to activate thecamera
2) Press the “MENU” button on theright bottom corner on the rearside of the camera
3) Select the red “Rec” Menu -usually it is already selected
4) Step up or downwards with thedirection button
5) Choose the option “Grid Lines” inthe menu Display Overlay usingthe direction button to the right.
6) Press menu button to confirmchoice
Recommendation:
5) Display Grid lines
How to select:
doctors the world of digital dental imagingeyes.com doctors the world of digital dental imagingeyes.com

2. Press the ring release button,hold it down, and turn the ringcounter-clockwise.
3. When the mark on the camera
and the mark on the ring arealigned, lift off the ring.
4. Align the mark on the lensadapter tube with the mark onthe camera. Turn the adaptertube clockwise as far as themark on the camera goes. (Toremove the adapter tube,including the Ringlight, turn theadapter in the opposite directionby holding down the ring releasebutton.)
5. Screw on the 58-62 mm adapterring with the magnetic couplingon the adapter tube.
6. Attach the Power & LightController to the bottom of thecamera using the tripod screw.
7. Snap the Ringlight on themagnetic coupling and plug thecable into the Power & LightController.
8. When using the professionalPower & Light ControllerPLC-4 itis possible to attach the optionaldoctors Winglights.Press on to the attachment
eyes
196
4) Compression of data andadjusting the ISO Speed
Image compression:
How to change value:
Factors which affect image quality
Recommendation: chooseFilesize above M2. M2 - S are forusage on PC screens.
How to change value:1) Press FUNC/SET,2) Step 6x downwards with
direction buttons,3. Choose desired resolution
with direction buttons Left orright
4) confirm with FUNC/SETbutton
You can choose 3 differentcompression rates: Superfine,Fine, Normal (choosing “normal”would allow more images to fit onthe SD card but it results in lessquality.
1) Press FUNC/SET2) Step 5x downwards with
Filesizes:L (large) res.: 3648 x 2736 pxlM (medium) res.: 2816 x 2112 pxlM2 (med.2) res.: 2720 x 1704 pxlM3 (med.3) res.: 1600 x 1200 pxlS (small) res.: 640 x 480 pxl
doctors the world of digital dental imagingeyes.com doctors the world of digital dental imagingeyes.com
7
spheres so they snap on. Thespheres are located on theside of the Ringlight.TheCables are to be inserted intothe sockets on the front of thePower & Light Controller.
9. Other options include themountable mirrors, These areto be connected directly to theringlight by sliding the mirrorinto the attachment element.The Screw will hold the mirrorin the desired position.Attach the optional chinsupport accordingly.
The doctors diffusoreyes
When using the ring light forsmile shots the diffusor helps tosmoothly spread the light outputhelping to prevent reflectionsand shading effects in betweenthe leds and it has a softeningeffect.
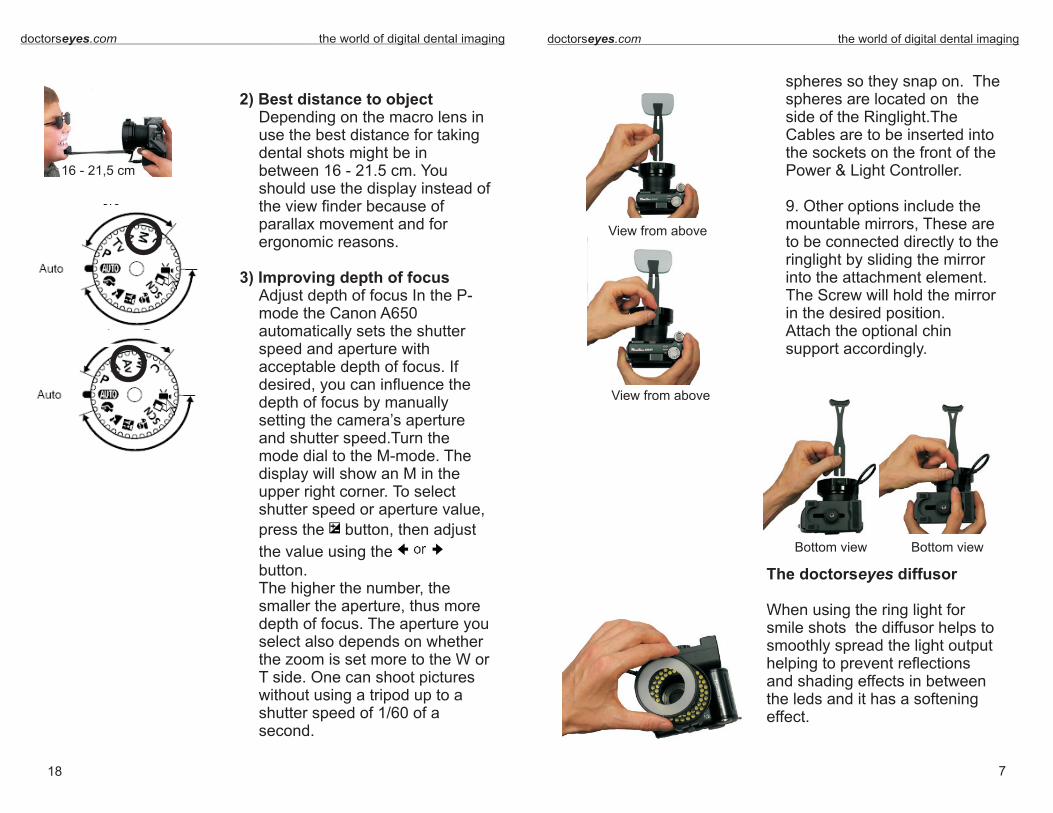
2) Best distance to object
3) Improving depth of focus
Depending on the macro lens inuse the best distance for takingdental shots might be inbetween 16 - 21.5 cm. Youshould use the display instead ofthe view finder because ofparallax movement and forergonomic reasons.
Adjust depth of focus In the P-mode the Canon A650automatically sets the shutterspeed and aperture withacceptable depth of focus. Ifdesired, you can influence thedepth of focus by manuallysetting the camera’s apertureand shutter speed.Turn themode dial to the M-mode. Thedisplay will show an M in theupper right corner. To selectshutter speed or aperture value,
press the button, then adjust
the value using thebutton.The higher the number, thesmaller the aperture, thus moredepth of focus. The aperture youselect also depends on whetherthe zoom is set more to the W orT side. One can shoot pictureswithout using a tripod up to ashutter speed of 1/60 of asecond.
18
View from above
View from above
Bottom view Bottom view
16 - 21,5 cm
doctors the world of digital dental imagingeyes.com doctors the world of digital dental imagingeyes.com

178
Charging the Controller
Working with the PLC-CompactController
On / Off button
When charging the controller, onlyuse the power unit provided bydoctors . Connect the powerunit to the socket on the frontof the controller.
The blinking loading symbol showsthe loading status even when thecontroller is turned off.
When the controller is fullycharged, the loading symbolchanges from red to green. The redlow battery symbol disappears aftercharging.
When the PLC4 is fully charged theblinking charging symbol willdisappear. The elements of thebattery will appear on the display. Itwill take approx. 3 hours to chargebut you can stop charging at anytime. The battery has no memoryeffect.
Important: You can have thebattery connected to powerconstantly due to trickle charge.(Effective from Firmware versiongreater 2.3)
is on the right upper front side ofthe PLC-C. When it is switched onthe brightness display and theyellow segment display will light up
eyes
eyes.comdoctors ®
Power input jack
Charging Control Display
eyes.comdoctors ®
position
brightness
ultrabright
f1 f2
Charging Display PLC 4
made in Germany
PLC-46 V DCdoctorseyes.com
®
eyes.comdoctors ®
Macro lens :Dig. Zoom:Zoom:Macro mode:
+4dpton4xon
16 cm
16 cm
Macro lens :Dig. Zoom:Zoom:Macro mode:
+4dpton3xon16 cm
16 Macro lens :Dig. Zoom:Zoom:Macro mode:
+4dpton3xon
16 cm
Macro lens :Dig. Zoom:Zoom:Macro mode:
+4dpton9,1xon
1) Examples for dental photography setups
Macro lens :Dig. Zoom:Zoom:Macro mode:
+4dpton2xon
Macro lens :Dig. Zoom:Zoom:Macro mode:
+4dpton5,6xon16 cm
16 cm
doctors the world of digital dental imagingeyes.com doctors the world of digital dental imagingeyes.com

9
Brightness control
LED control
Brightness and batterycapacity
Charging the controller unit
above the second button on theright side the brightness can bechanged in 2 steps. The yellowsymboldisplays the actual setting
With the left button you canactivate or deactivate LEDS in 4configurations (half ring right -half ring left - simulation twin flashunit - full ring)
The brightness of the ringlight willstay constant even if the capacityof the battery condition isdecreasing. The Ringlight willshut off when the batterycondition drops below minimumcapacity. A red light will show analert. The Controller can be usedimmediately after connecting tothe main power.
The controller should be chargedwith the supplied charging unit.Connect the controller unit withthe charging unit and thenconnect to the main power. Theloading process is displayed witha flashing symbol. The chargingprocess is finished whenthe red symbol turns green, Thewarning symbol for low capacitywill stop glowing.
eyes.comdoctors ®
eyes.comdoctors ®
eyes.comdoctors ®
eyes.comdoctors ®
eyes.comdoctors ®
7) Saving the settings
"C"
8) How to choose Av (Setting the Aperture) in the c mode(custom) to gain more depth of field.
Note:
1. Press the MENU button2. Step up 1 position for “Save Settings”
3. Choose yes by stepping to the right
4. Confirm now all the settings will be saved to your custommode until changed again.
You can leave the c mode at anytime and when you returnto the c mode (custom) your settings that have been savedwill be available again on demand
1. Set the mode dial to Av and save thIs setting as describedbefore in item 7.
2. Now turn mode dial back to c mode (custom) to get hold ofthe settings which have been saves like the white balanceor zoom position. It will show C in the right upper cornerwith a Av below it.
3. By using the direction buttons you can now changethe aperture to 8 as shown on your display at the bottom inthe center position.
You will now gain the maximum depth of field butconsider that the shutter speed will increase and it mightcause camera shake.
C) Additional functions worth knowing
1) Examples for dental picture setups2) Best distance to object3) Improving depth of focus4) Compression of data and adjusting the ISO Speed5) Display gridlines on display6) Viewing images on your computer7) Resetting Settings to Their Default Values8) Printing images directly from the camera
doctors the world of digital dental imagingeyes.com doctors the world of digital dental imagingeyes.com
16

the camera then fixes the AFframe at the center. This isconvenient for making sure thefocus is exactly where you wantit.
1. Press the MENU button.
2. In the menu, use the
Button to select [AFFrame].
3. Aim your camera to the toothor region that should be infocus and therelease button without taking apicture letting the camerafocus. Keep your finger on thebutton slightly pressed downholding the point of focus andletting the AF frame turn green.
4. Then adjust the camera’sposition until all the teeth anddetails are shown in thedisplay of the camera.
5. Take the picture.
Determine your favorite zoomposition by zooming in or out byadjusting the angle of view withthe zoom lever. Saving yoursettings now lets the cameraalways go to the same zoomangle when starting up thecamera.
How the “focus trick” works:
slightly press
6) Determininig the favoritezooming position
10
The PLC-4 Professional Power +Light Controller
On / Off:
Brightness control:
Switching of LED segments:
The PLC-4 can be activated withthe button on the top right side andthe blue display will be illuminated.
The brightness can be adjusted in13 steps with “+” and “-” buttonson the right side. The currentsettingwill be displayed via a bar chartand when reaching the brightestlevel the word “ultrabright” will bedisplayed.
You can activate or deactivatesegments on the Ring andWinglights. This gives the user amaximum of light situations.The 3 pairs of buttons on the leftside allows you control of the ledsegments. The activated segmentswill be displayed
Every Setting is also displayed witha specific number. When reachingthe last setting the presets startfrom the beginning. The presetscan be selected by pressing thebuttons accordingly. Whenpressing the button longer than 1sec., you step from one setting tothe next more rapidly. This willspeed up the process of finding thedesired settings. You only need to
position
brightness
ultrabright
f1 f2
position
temp brightness
ultrabright
f1 f2
prog. 21 2 doctorseyes.com®
position
temp brightness
ultrabright
f1 f2
prog. 21 2 doctorseyes.com®
position
brightness
ultrabright
f1 f2
position
temp brightness
ultrabright
f1 f2
prog. 21 2 doctorseyes.com®
15
doctors the world of digital dental imagingeyes.com doctors the world of digital dental imagingeyes.com

11
look on the camera’s display.Tip: When making shots of thefront teeth then it is more efficientusing light supplied by the thewings and deactivating segmentsfrom the ring light.
The PLC-4 allows for twopreferred lighting combinations tobe saved and each retrieved bythe push of a button. This isespecially helpful when a specificlighting combination is usedrepeatedly. To save a lightsegment combination, have thecamera lit the way it should besaved. Press either the '1' or '2'button longer longer than onesecond. The light combination isstored when you see 'f1' and 'P1'in the controller display. Toretrieve the lighting combination,press the same number again(either 1 or 2).
The digital camera offersnumerous settings and optionsfor taking pictures. The followinglist summarizes settings andoptions one should choose fordental photography:
Memory - storage function:
B) Summary of camerasettings
position
brightness
ultrabright
f1 f2
position
temp brightness
ultrabright
f1 f2
prog. 21 2 doctorseyes.com®
14
white paper or cloth and pressthe DISP button. If you areviewing it with the LCD monitor,ensure that the center frame iscompletely filled with the whiteimage. If you are using theoptical viewfinder, ensure thatthe entire field is filled. Pleasenote, however, that the centerframe will not display when the
digital zoom is used or when
is displayed.3. Press the FUNC/SET button.
When using the doctors ring &wing light we recommend using thecustom white balance.
1. Press the button.
2. Use the button to selectthe flower symbol.The zoom bar will display whileyou adjust the zoom. At zoomranges not possible for macrophotography, the bar will appear
yellow and the icon will grayout. The image will be recordedat standard focusing distance.
The
The AF frame indicates the area ofthe composition on which thecamera focuses. Select "center" -
Note:
4) Activating the Macro Mode
5) Selecting an AF Frame Mode
eyes
icon will appear on theLCD display when active.
doctors the world of digital dental imagingeyes.com doctors the world of digital dental imagingeyes.com

1) Switching to C mode (custom))2) Shutting off the automatic flash
light3) Using the Custom White
Balance4) Activating the macro mode5) Selecting an AF Frame Mode6) Determininig the favorite
zooming position7) Saving the settings8) Setting the aperture for more
depth in focus
Should your results not beas expected then you can alwaysreset the cameras settings back toits delivery status and then performsetup for dental shots asdescribed below. The setupprocess for dental photography willhave been completed when thecamera is delivered to you.
Turn the mode dial so that the Csymbol is next to the marking. Youcan save frequently used shootingmodes and various shootingsettings to the C mode c .When necessary, you can thenshoot images with previouslysaved custom settings by simplyturning the mode dial back to Cmode. Settings that are notretained when the shooting modeis changed or when the power isturned off (such as continuousshooting or self-timer) are instead
Note:
1) switching to C-mode (custom)
( ustom)
retained.
In order to work properly with thedoctors Ringlight, turn off thecamera’s flash.Push the upper control buttonwith the flash symbol repeatedlyuntil the “no flash” symbolappears. The same symbol willappear later on the camera’sdisplay to remind you of the flashsetting.
The light supplied by our ring lightis equivalent to a cloudy lightsituation. In order to reproducethe right tooth colors in yourpractice you should perform a
custom white balance reading
with the camera. Some lightsituations are too difficult for theAWB (auto white balance) settingto interpret correctly.
1. Select
- Press the FUNC/SET button.
- Use the button toselect AWB and choose
with the button.
2. Aim the camera at a piece of
2) Deactivation of theautomatic flash light
3) Using the Custom WhiteBalance
eyes
FUNC/SET
1312
doctors the world of digital dental imagingeyes.com doctors the world of digital dental imagingeyes.com