integrated content management guide
TRANSCRIPT

MemberDirect Integrated Services Content Management Guide
Release 1.0 September, 2005

EXCEPT AS EXPRESSLY PERMITTED IN THIS PUBLICATION, OR BY THE PROVISIONS OF THE COPYRIGHT ACT, NO PART OF THIS PUBLICATION MAY BE REPRODUCED IN ANY FORM BY ANY MEANS WITHOUT THE WRITTEN PERMISSION OF CREDIT UNION CENTRAL OF BRITISH COLUMBIA.
CREDIT UNION CENTRAL OF BRITISH COLUMBIA IS NOT RESPONSIBLE FOR ANY ERRORS OR OMISSIONS CONTAINED IN THIS PUBLICATION AND EXPRESSLY DISCLAIMS LIABILITY, WHETHER UNDER CONTRACT OR IN NEGLIGENCE OR OTHERWISE, TO ANY USER INCLUDING SUBSCRIBERS AND OTHER PERSONS WHO MAY USE THIS PUBLICATION AND TO MEMBERS, CLIENTS, AND CUSTOMERS OF SUCH SUBSCRIBERS AND OTHER PERSONS.
CREDIT UNION CENTRAL OF BRITISH COLUMBIA EXPRESSLY DISCLAIMS LIABILITY FOR LOSS OR DAMAGE, WHETHER DIRECT OR INDIRECT, RESULTING FROM ANY USE OF THIS PUBLICATION, INCLUDING, WITHOUT LIMITATION, ANY LOSS OR DAMAGE ARISING AS A RESULT OF THE PROCEDURES OR FORMS CONTAINED IN THIS PUBLICATION BEING DETERMINED NOT TO BE VALID OR ENFORCEABLE OR NOT ATTAINING THE END DESIRED BY THE USER. Author: Ronald W. Hearn, 6/05

September 2005 Rel. 1.0 i
Table of Contents Table of Contents................................................................................................................ i
Table of Figures ................................................................................................................vi
Preface...............................................................................................................................1 Who Should Use This Guide? ......................................................................................................... 1 How This Document is Organized? ................................................................................................ 1 Typographical Conventions and Stylistic Conventions................................................................... 2 Trademark Acknowledgements....................................................................................................... 3 Revision History.............................................................................................................................. 3
Getting Started ...............................................................................................................1-1 Browsers and Operating Systems Supported................................................................................ 1-1 Preparing To Use the Content Management System.................................................................... 1-1 Disabling Pop-up Blockers........................................................................................................... 1-2
Windows XP Service Pack 2 .................................................................................................... 1-2 Microsoft Client and Windows 98/Windows ME Users .............................................................. 1-2
Verifying Whether Microsoft Client is installed on your PC ................................................... 1-2 Installing Microsoft Client on your PC .................................................................................... 1-3
Obtaining a TeamSite Digital Certificate ..................................................................................... 1-4 Before You Start....................................................................................................................... 1-4 Obtaining and Installing the Certificate.................................................................................... 1-4 Installing the Certificate into a Java Runtime Environment................................................... 1-12
For JRE Version 1.5.x (Java Runtime 5.0 and Later)........................................................ 1-17 Logging on to TeamSite ......................................................................................................... 1-18
Additional Certificate Information ............................................................................................. 1-21 Certificate Expiration ............................................................................................................. 1-21
How to Renew an Existing Digital Certificate Before Expiry ........................................... 1-21 Viewing a Certificate in Internet Explorer ........................................................................ 1-22 Removing an Unwanted or Expired Certificate................................................................. 1-22
Exporting and Installing a Certificate on a FireFox Browser................................................. 1-22 Export and Installation Procedure...................................................................................... 1-22
Installing the VisualFormat Toolbar....................................................................................... 1-25 Installation Procedure ........................................................................................................ 1-25
Workaround for Windows XP Service Pack 2 Users ................................................................. 1-25 Allowing Active Content........................................................................................................ 1-25
Resolving Broken Images in VisualFormat for IE 6 users ................................................ 1-26 Enabling Local Files Manager.................................................................................................... 1-27
The Content Management Process ..................................................................................2-1 Understand Your Website ............................................................................................................ 2-1 TeamSite ContentCenter .............................................................................................................. 2-1

MemberDirect Integrated Content Management Guide Table of Contents
September 2005 Rel. 1.0 ii
Content Management Concepts.................................................................................................... 2-1 User Management..................................................................................................................... 2-2
Author Role ......................................................................................................................... 2-2 Version Management................................................................................................................ 2-4
File Version History ............................................................................................................ 2-5 File Conflicts ....................................................................................................................... 2-5
Undoing Changes ..................................................................................................................... 2-6 Reverting to a Previous Version of a File................................................................................. 2-6 Task Management .................................................................................................................... 2-7
What You Can and Cannot Change.............................................................................................. 2-7 Logging On to the ContentCenter ................................................................................................ 2-8
Regular Log On ........................................................................................................................ 2-9 Displaying Logon Information ................................................................................................. 2-9 Logging Off .............................................................................................................................. 2-9
Using ContentCenter Professional and ContentCenter Standard ............................................... 2-10 Working with ContentCenter Professional (CCPro) .............................................................. 2-10
Pagination .......................................................................................................................... 2-11 Working in the Content Tab .............................................................................................. 2-11 Working in the Workflow Tab........................................................................................... 2-17 Working with Jobs............................................................................................................. 2-18 Working with Tasks........................................................................................................... 2-18 Resolving Conflicts ........................................................................................................... 2-19
Working with ContentCenter Standard (CCStd) .................................................................... 2-19 Using the How Do I Module ............................................................................................. 2-20 Using the My Workareas Module...................................................................................... 2-20 Using the My Favorites Module ........................................................................................ 2-20 Using the Tasks Module .................................................................................................... 2-20 Using the Work-in-Progress Module................................................................................. 2-21 Using the New Forms Module........................................................................................... 2-21 Using VisualPreview ......................................................................................................... 2-22 Using the File Actions Menu............................................................................................. 2-22
Importing a File .......................................................................................................................... 2-23 Importing Content Using the CCPro Interface ....................................................................... 2-23 Importing Content Using the CCStd Interface ....................................................................... 2-23
Renaming Files and Folders ....................................................................................................... 2-24 Deleting Files and Folders.......................................................................................................... 2-25
Deleting a Folder .................................................................................................................... 2-25 Deleting Folders with Locked Files................................................................................... 2-26 Removing a Deleted Folder from the Deploy to Live Workflow...................................... 2-26
Deleting Workarea Folders..................................................................................................... 2-27 Deleting Workarea Files......................................................................................................... 2-27 Restoring Deleted Content ..................................................................................................... 2-28
Restoring Multiple Items ................................................................................................... 2-28 Restoring Staging Area Items ............................................................................................ 2-28
Creating a New Page and Navigation......................................................................................... 2-29 Creating a New Folder............................................................................................................ 2-29
Using CCPro...................................................................................................................... 2-29 Using CCStd ...................................................................................................................... 2-29
Generating, Previewing, and Submitting the Output File....................................................... 2-29 Generating the index.jsp File ............................................................................................. 2-29 Submitting Your Changes.................................................................................................. 2-30
MemberDirect Integrated Content Management Guide Table of Contents
September 2005 Rel. 1.0 iii
Modifying a Page ....................................................................................................................... 2-30 Moving a Page............................................................................................................................ 2-31
Moving a Folder ..................................................................................................................... 2-31 Deleting a Page........................................................................................................................... 2-32
Introduction to Content Management Forms ..................................................................3-1 What is a Form? ........................................................................................................................... 3-1 Using Forms ................................................................................................................................. 3-1
Creating the Form Entry file..................................................................................................... 3-1 Form Categories and Types ................................................................................................. 3-2 Selecting a Form Entry ........................................................................................................ 3-2 Using CCPro........................................................................................................................ 3-2
Editing an Existing Form Entry................................................................................................ 3-4 File Structure for Form Entries............................................................................................ 3-4 Locating an Existing Form Entry......................................................................................... 3-4 Entering Data into a Form ................................................................................................... 3-4
Content Display Period............................................................................................................. 3-6 Adding Call-to-Action Hyperlinks ........................................................................................... 3-7
Specifying URLs for Link-to Fields .................................................................................... 3-7 File Structure for Generated Files and Shared Content ....................................................... 3-8
Navigating to Different Form Pages....................................................................................... 3-10 Saving Your Entries ............................................................................................................... 3-10
Generating an Output File .......................................................................................................... 3-10 New Form Entries.............................................................................................................. 3-11
Using Content Management Forms .................................................................................4-1 Page-layout Forms........................................................................................................................ 4-1
Page-Layout Form Sections ..................................................................................................... 4-1 Primary Content Page .......................................................................................................... 4-2 Secondary Content Page ...................................................................................................... 4-3 Global Portlets Page ............................................................................................................ 4-9 Banners .............................................................................................................................. 4-10 Child Page Order ............................................................................................................... 4-12 Advanced Metadata Page .................................................................................................. 4-15
Variable Primary Content Components.................................................................................. 4-17 Home Web Page ................................................................................................................ 4-17 Home Page Form ............................................................................................................... 4-17
Promotional Web Pages ......................................................................................................... 4-21 Promotional Form................................................................................................................... 4-21
Promotional Content Page ................................................................................................. 4-21 Other Content Page............................................................................................................ 4-25
Simple Web Pages.................................................................................................................. 4-27 Simple Form ........................................................................................................................... 4-28
Standard Content Page....................................................................................................... 4-28 Simple-Alternate Form........................................................................................................... 4-29 Rates Overview Page.............................................................................................................. 4-29 Rates Overview Form............................................................................................................. 4-29
Product Table Page ............................................................................................................ 4-29 Rates Detail Pages .................................................................................................................. 4-30
Rates Detail Form.............................................................................................................. 4-31 Job Posting Pages ................................................................................................................... 4-32

MemberDirect Integrated Content Management Guide Table of Contents
September 2005 Rel. 1.0 iv
Job Posting Form ............................................................................................................... 4-32 List of Documents Pages ........................................................................................................ 4-35
List of Documents Form.................................................................................................... 4-35 Include Pages.......................................................................................................................... 4-37
Include Pages Form ........................................................................................................... 4-37 Rates Data Forms ....................................................................................................................... 4-39
Foreign Exchange Form ......................................................................................................... 4-39 Prime Form............................................................................................................................. 4-39 Product Form.......................................................................................................................... 4-40 Term Deposit Form ................................................................................................................ 4-41
Branch Contact Information Forms............................................................................................ 4-44 Regions ................................................................................................................................... 4-44 Services .................................................................................................................................. 4-44 Cities....................................................................................................................................... 4-45 Provinces ................................................................................................................................ 4-45 Contact Labels ........................................................................................................................ 4-45 Hours ...................................................................................................................................... 4-46
Regular Office Hours......................................................................................................... 4-46 Holiday Hours.................................................................................................................... 4-48 Special Hours..................................................................................................................... 4-49
Details..................................................................................................................................... 4-52 Branch Information ................................................................................................................ 4-52 Branch Contact Details........................................................................................................... 4-54 Predefined Hours .................................................................................................................... 4-56 Regular Office Hours ............................................................................................................. 4-56 Holiday Hours ........................................................................................................................ 4-56 Special Hours.......................................................................................................................... 4-57
Online Banking Marketing Portlets............................................................................................ 4-58 Banner .................................................................................................................................... 4-59 Marketing (Offer Presentment) .............................................................................................. 4-59 Quick Navigation.................................................................................................................... 4-59 Rates Portlet............................................................................................................................ 4-59 Shortcuts ................................................................................................................................. 4-59 Section Portlets ....................................................................................................................... 4-59 Specific Portlets...................................................................................................................... 4-59 Creating Online Banking Marketing Portlets ......................................................................... 4-60
No Marketing Portlets Displayed on Online Banking Pages............................................. 4-60 Displaying External Links on all Online Banking Pages................................................... 4-60 Displaying External Links only on Specific Pages............................................................ 4-62 Displaying External Links only on Accounts Pages.......................................................... 4-62
Managing Shared Content ..............................................................................................5-1 Forms for Shared Content ............................................................................................................ 5-1
Standard Content ...................................................................................................................... 5-1 Banner ...................................................................................................................................... 5-1 Marketing (Offer Presentment) ................................................................................................ 5-1 Quick Navigation...................................................................................................................... 5-2 Rates Portlet.............................................................................................................................. 5-2 Shortcuts ................................................................................................................................... 5-2
Managing Your Files.................................................................................................................... 5-2 Generating and Previewing Shared Content with Forms ......................................................... 5-2

MemberDirect Integrated Content Management Guide Table of Contents
September 2005 Rel. 1.0 v
Including Shared Content into a Web Page.............................................................................. 5-3 Updating Shared Content ......................................................................................................... 5-3 Deleting Shared Content from a Web Page.............................................................................. 5-4
Managing Rates Data......................................................................................................6-1 Rates File Structure ...................................................................................................................... 6-1 Creating a New Product Type ...................................................................................................... 6-2
Generating and Previewing Rates Data ............................................................................... 6-2 Including a Product on a Rates Overview Page ........................................................................... 6-2 Creating a New Web Page to Display Product Details ................................................................ 6-3 Updating Existing Product Rates.................................................................................................. 6-3 Removing Rates from a Web Page............................................................................................... 6-3 Deleting a Product Type............................................................................................................... 6-4
Managing Branch Information........................................................................................7-1 Branch Information File Structure................................................................................................ 7-1 Creating New Branch Information ............................................................................................... 7-2
Generating and Previewing Branch Information...................................................................... 7-2 Updating Existing Branch Information ........................................................................................ 7-2 Deleting Branch Information........................................................................................................ 7-3 Refreshing Rates Data, Page, and Branch Information ................................................................ 7-4
Refreshing Data ........................................................................................................................ 7-4
Appendix A - Glossary ................................................................................................... A-1
Icon Reference ............................................................................................................... B-1
Index ...................................................................................................................... Index-1

September 2005 Rel. 1.0 vi
Table of Figures Figure 1-1: Windows 98/ME Network Configuration Tab .......................................................... 1-3 Figure 1-2: Install From Disk Window ........................................................................................ 1-3 Figure 1-3: Security Alert when Installing a Certificate .............................................................. 1-5 Figure 1-4: Security Information Warning................................................................................... 1-5 Figure 1-5: CUCBC Client Certificate Authority......................................................................... 1-5 Figure 1-6: Login to the CUCBC Client Certificate Authority .................................................... 1-6 Figure 1-7: Welcome Page of Certificate ..................................................................................... 1-6 Figure 1-8: Retrieve CA Certificate Page..................................................................................... 1-7 Figure 1-9: Add Certificate Page.................................................................................................. 1-7 Figure 1-10: Security Warning..................................................................................................... 1-7 Figure 1-11: Certificate Installed Message................................................................................... 1-8 Figure 1-12: Welcome Screen (Redisplayed)............................................................................... 1-8 Figure 1-13: Select Request Window........................................................................................... 1-8 Figure 1-14: Advanced Certificate Requests................................................................................ 1-9 Figure 1-15 Advanced Certificate Request Form....................................................................... 1-10 Figure 1-16: Key Options on Advance Certificate Request Form ............................................. 1-10 Figure 1-17: Confirm Certificate Request .................................................................................. 1-11 Figure 1-18: Install Certificate Window..................................................................................... 1-11 Figure 1-19: Add the Certificate Window.................................................................................. 1-11 Figure 1-20: Certificate Installed Window................................................................................. 1-11 Figure 1-21: Internet Options on Internet Explorer.................................................................... 1-12 Figure 1-22: Internet Explorer Content Tab ............................................................................... 1-12 Figure 1-23: Certificates Window on IE Internet Options ......................................................... 1-13 Figure 1-24: Certificate Export Wizard (displayed with Windows XP Home Edition)............. 1-13 Figure 1-25: Export Private Key Page........................................................................................ 1-14 Figure 1-26: Export File Format Page of Certificate Export Wizard ......................................... 1-14 Figure 1-27: Password Selection Window ................................................................................. 1-15 Figure 1-28: File to Export Page ................................................................................................ 1-15 Figure 1-29: Certificate Export Completion Page...................................................................... 1-16

MemberDirect Integrated Content Management Guide Table of Figures
September 2005 Rel. 1.0 vii
Figure 1-30: Select Control Panel .............................................................................................. 1-16 Figure 1-31: Java Plug-ins on the Control Panel........................................................................ 1-17 Figure 1-32: Security Tab on Java Plug-in................................................................................. 1-17 Figure 1-33: Certificates Page .................................................................................................... 1-18 Figure 1-34: Browser Address Field .......................................................................................... 1-18 Figure 1-35: Client Authentication............................................................................................. 1-19 Figure 1-36: TeamSite ContentCenter Login Page .................................................................... 1-19 Figure 1-37: ContentCenter Professional Interface Showing Workflow View.......................... 1-19 Figure 1-38: Password Prompt to Access the Client Authentication Keystore .......................... 1-20 Figure 1-39: Interwoven Internal Security Warning .................................................................. 1-20 Figure 1-40: Example of Certificate Renewal Email ................................................................. 1-21 Figure 1-41: Tools Tab on FireFox Browser.............................................................................. 1-22 Figure 1-42: Firefox Advanced Options - Certificates ............................................................... 1-23 Figure 1-43: Certificate Manager ............................................................................................... 1-23 Figure 1-44 Select .pfx File ........................................................................................................ 1-24 Figure 1-45: Password Entry Dialog Box .................................................................................. 1-24 Figure 1-46: Alert Box ............................................................................................................... 1-24 Figure 1-47: Security Section of Internet Explorer's Internet Options (Advance) Window ...... 1-26 Figure 2-1: ContentCenter Logon Page........................................................................................ 2-8 Figure 2-2: ContentCenter Professional Interface Page ............................................................. 2-10 Figure 2-3: Pagination Information on ContentCenter............................................................... 2-11 Figure 2-4: Location Bar on ContentCenter Page ...................................................................... 2-12 Figure 2-5: Navigation Page of ContentCenter .......................................................................... 2-12 Figure 2-6: Workflow Tab View................................................................................................ 2-17 Figure 3-1: Select Form Window................................................................................................. 3-3 Figure 3-2: New Forms Module ................................................................................................... 3-3 Figure 3-3: Field Types on Form File .......................................................................................... 3-4 Figure 3-4: Content Display Period Section................................................................................. 3-6 Figure 3-5: Content Display Period Field .................................................................................... 3-6 Figure 3-6: Call to Action Section of a Form............................................................................... 3-7 Figure 3-7: Call To Action Field .................................................................................................. 3-7 Figure 3-8: Workarea Root Directory .......................................................................................... 3-8 Figure 3-9: Page Navigation Panel............................................................................................. 3-10 Figure 4-1: Primary Content Page of Page-layout Form Category .............................................. 4-2 Figure 4-2: Secondary Content Page of Page-layout Form Category .......................................... 4-3

MemberDirect Integrated Content Management Guide Table of Figures
September 2005 Rel. 1.0 viii
Figure 4-3: Portlets Section .......................................................................................................... 4-4 Figure 4-4: Example of a Marketing (Offer Presentment) Portlet................................................ 4-4 Figure 4-5: Marketing (Offer Presentment) Portlet ...................................................................... 4-5 Figure 4-6: Example of a Quick Navigation portlet ..................................................................... 4-6 Figure 4-7: Quick Navigation Portlet ........................................................................................... 4-6 Figure 4-8: Example of a Rates Portlet ........................................................................................ 4-7 Figure 4-9: Rates Portlet............................................................................................................... 4-7 Figure 4-10: Example of Shortcuts on a Web Page...................................................................... 4-8 Figure 4-11: Shortcuts Portlet ...................................................................................................... 4-8 Figure 4-12: Include Portlet.......................................................................................................... 4-9 Figure 4-13: Global Portlets Page of a Page-layout Form............................................................ 4-9 Figure 4-14: Override Rates Portlet ........................................................................................... 4-10 Figure 4-15: Banner Content Page of a Page-layout Form ........................................................ 4-10 Figure 4-16: Banner section of Footer Content .......................................................................... 4-11 Figure 4-17: Include Section of Footer Content......................................................................... 4-12 Figure 4-18: Child and Actual Pages.......................................................................................... 4-13 Figure 4-19: Child Page Order Window .................................................................................... 4-14 Figure 4-20: Cloned Page option on the Child Page Order Window ......................................... 4-14 Figure 4-21: Actual Page Option on Child Order Window........................................................ 4-15 Figure 4-22: Advanced Metadata Page ...................................................................................... 4-15 Figure 4-23: Publish Period Window......................................................................................... 4-16 Figure 4-24: Example of a Home Page ...................................................................................... 4-17 Figure 4-25: Promotional Content Section of the Home Page Form.......................................... 4-18 Figure 4-26: Primary/Secondary Content Window.................................................................... 4-19 Figure 4-27: Primary Content Section of the Home Page Form ................................................ 4-20 Figure 4-28: Example of a Promotional Page ............................................................................ 4-21 Figure 4-29: Promotional Content Floating Menu ..................................................................... 4-22 Figure 4-30: Main Promo Section of Promotional Content Page............................................... 4-23 Figure 4-31: Medium Promo Section of Promotional Form ...................................................... 4-24 Figure 4-32: Small Promo Section of Promotional Form........................................................... 4-25 Figure 4-33: Other Content Page of Promotional Form ............................................................. 4-25 Figure 4-34: Standard Content Section of Other Content Page.................................................. 4-26 Figure 4-35: Include Content Section of the Other Content Page .............................................. 4-27 Figure 4-36: Example of a Simple Page..................................................................................... 4-27 Figure 4-37: Standard Content page of the Simple Form........................................................... 4-28

MemberDirect Integrated Content Management Guide Table of Figures
September 2005 Rel. 1.0 ix
Figure 4-38: Example of Rates Overview page.......................................................................... 4-29 Figure 4-39: Product Table page of Rates Overview Form........................................................ 4-30 Figure 4-40: Example of a Rates Detail Page............................................................................. 4-31 Figure 4-41: Show Product Details Page of the Rate Details Form ........................................... 4-31 Figure 4-42: Example of a Job Posting Page.............................................................................. 4-32 Figure 4-43: Job Posting Page of the Job Posting Form – View 1 ............................................. 4-33 Figure 4-44: Job Posting Page of the Job Posting Form – View 2 ............................................. 4-34 Figure 4-45: Header Page of the List of Document Form.......................................................... 4-36 Figure 4-46: Document Page of the List of Documents Form ................................................... 4-36 Figure 4-47: Footnote Page of the List of Documents Form...................................................... 4-37 Figure 4-48: Include Content Page of the Include Form ............................................................ 4-38 Figure 4-49: Foreign Exchange Form for Rates Data Pages ...................................................... 4-39 Figure 4-50: Prime Form for Rates Data Pages.......................................................................... 4-40 Figure 4-51: Products Form for Rates Data Pages ..................................................................... 4-40 Figure 4-52: Term Deposits Form for Rates Data Pages............................................................ 4-42 Figure 4-53: Regions Form for Branch Contact Information Pages........................................... 4-44 Figure 4-54: Services Form for Branch Contact Information Pages .......................................... 4-44 Figure 4-55: City Form for Branch Contact Information Pages................................................. 4-45 Figure 4-56: Provinces Form for Branch Contact Information Pages........................................ 4-45 Figure 4-57: Contact Label Form for Branch Contact Information Pages ................................. 4-46 Figure 4-58: Regular Office Hours Page of Hours Form – View One....................................... 4-47 Figure 4-59: Regular Office Hours Page of Hours Form – View Two ...................................... 4-48 Figure 4-60: Holiday Hours Page of the Hours Form ................................................................ 4-49 Figure 4-61: Special Hours Page of Hours Form – View One ................................................... 4-50 Figure 4-62: Special Hours Page of Hours Form – View Two .................................................. 4-51 Figure 4-63: Branch Information Page of the Details Form....................................................... 4-53 Figure 4-64: Branch Contact Details Page of the Details Form ................................................. 4-55 Figure 4-65: Predefined Hours Page of the Details Form .......................................................... 4-56 Figure 4-66: Online Banking Marketing Portlets Section .......................................................... 4-58 Figure 4-67: Specific Portlet available in the Online Banking Marketing Portlets .................... 4-59 Figure 4-68: Section Portlet section available in the Online Banking Marketing Portlets......... 4-60 Figure 4-69: Selecting Shortcuts on the Portlets Page ............................................................... 4-61 Figure 4-70 – Selecting a new Section Portlet ........................................................................... 4-61 Figure 4-71: Selecting Shortcuts on the Portlets page................................................................ 4-62 Figure 4-72: Selecting Banking Global on the Section Portlets ................................................. 4-62

September 2005 Rel. 1.0 1
Preface
This guide is intended for use by financial institutions that use the MemberDirect Online Access System. It explains how to use the MemberDirect Integrated Services Content Management product to manage the content on a MemberDirect website. This product uses the TeamSite ContentCenter application of Interwoven Inc. Therefore, there are references to TeamSite and the ContentCenter in this guide.
Who Should Use This Guide? Updating your website’s content using the MemberDirect Integrated Services Content Management product (referred to in this document as "the Integrated product") does not require any technical resources. This means that different departments such as Marketing or Human Resources can update their content on your website without technical assistance. You don’t need to know HTML or be a web developer to use the Content Management System.
However, there are some simple requirements for use of the system:
• Good knowledge of credit union products and services • Basic web skills such as navigating through a website • Internet access
How This Document is Organized? This document is comprised of the following sections:
Chapter One – Getting Started provides you with information about the Integrated product, including information about browsers and operating systems, pop-up blockers and logging on.
Chapter Two – The Content Management Process explains content management concepts and describes how to use the ContentCenter interface to perform such functions as importing content, renaming and deleting files and folders, and creating a new page and navigation.
Chapter Three –Introduction to Content Management Forms provides an overview of the forms used to manage your website.

MemberDirect Integrated Content Management Guide Preface
September 2005 Rel. 1.0 2
Chapter Four – Using Content Management Forms provides step-by-step instructions for using page layout, rates data, branch information, and shared content forms.
Chapter Five – Managing Shared Content explains how to re-use content such as a banner or marketing offer on multiple pages.
Chapter Six – Managing Rates Data provides instructions for managing rates data files, creating and deleting a product type, and updating and removing rates.
Chapter Seven – Managing Branch Information describes the file structure for branch information and explains how to create, update, and delete branch information.
Appendix A – Glossary defines terms and concepts used in the Integrated product.
Appendix B – Icon Reference summarizes and defines the icons used in the ContentCenter.
Typographical Conventions and Stylistic Conventions The following documentation conventions are used in this document:
Items in document Appear as follows Clickable page elements such as page buttons, links, checkboxes, tabs, menus, dropdown lists, or dialogue box items
Click Finish.
Clicking on a sequence of links or buttons Click on Tools > Pop-up Blocker > Turn Off Pop-up Blocker
Pages, page components, and window names
Complete the fields on the Quick Navigation portlet as follows:
Web page boxes, headings, and fields …above the paragraph specified in the following Content field.
Folder and file names /Personal/AboutUs
Values or codes displayed on a page, including those selected from a list or entered by a user.
Select a.m. or p.m. from the dropdown list.
Emphasis Enter a destination in the Destination field by doing one of the following steps:
References to other documents or sections of the same or different documents.
For further information on VisualFormat, see Installing the VisualFormat Toolbar.
Web page URL or address and email addresses
www.mycuname.com/Personal/AboutUs [email protected]
System messages, prompts, and warnings “The export was successful”
Keyboard keys Press the [Enter] key.

MemberDirect Integrated Content Management Guide Preface
September 2005 Rel. 1.0 3
Note that the term "client" is used throughout this document refer to the end user of the MemberDirect system, whether they are members of an institution or customers of a bank or other financial institution. In addition, the term "institution" refers to any type of financial institution such as credit unions, banks, trusts, etc.
Trademark Acknowledgements ®MemberDirect name and design are registered trademarks owned by Credit Union Central of Canada.
®TeamSite is a registered trademark of Interwoven Inc.
Revision History
September, 2005 Initial release of document.

September, 2005 Rel. 1.0 1-1
Getting Started
This chapter provides you with the information needed to use the MemberDirect Integrated Services Content Management product. It includes information about browsers and operating systems and what you need to do before you can use the product. It also tells you how to log on and off the system.
Browsers and Operating Systems Supported The Integrated product only supports the operating systems and web browsers shown in the following table. Ensure you are using a computer with one of the following operating systems and web browsers.
Operating System Web Browser/Software Version Windows 2000 IE 6.0 (SP1, English)
IE 5.5 (SP2, SP3, English) Mozilla 1.5 (English) MSFT VM Sun JVM 1.4.2
Windows XP SP1 IE 6.0 SP1, English Sun JVM 1.4...
Mac 10.3 Mozilla 1.6, English
Solaris 9 Mozilla 1.6, English
Preparing To Use the Content Management System Before you can use the Content Management system or even log on it, you must complete the following steps:
• Disable pop-up blockers • Obtain a TeamSite digital certificate • Install the VisualFormat toolbar • Review the workaround for Windows XP Service Pack 2 users • Allow active content on your computer • Enable local files management software

MemberDirect Integrated Content Management Guide Getting Started
September, 2005 Rel. 1.0 1-2
Disabling Pop-up Blockers If there is a pop-up blocker application enabled on your computer, you must disable it when using the TeamSite6.5. If you are using IE 6 with SP2 installed, you must disable the pop-up blocker. To disable IE pop-up blocker:
Click on Tools > Pop-up Blocker > Turn Off Pop-up Blocker.
Windows XP Service Pack 2 Windows XP Service Pack 2 was released after TeamSite 6.5, thus the enhanced browsing security provided by SP2 affects TeamSite 6.5’s functionality. At the minimum, you must disable pop-up blocker to allow TeamSite 6.5 to function. (See also Workaround for Windows XP Service Pack 2 Users.)
For more information about Windows XP Service Pack enhanced browsing security, see http://www.microsoft.com/technet/prodtechnol/winxppro/maintain/sp2brows.mspx
Microsoft Client and Windows 98/Windows ME Users If you are using Windows 98 or Windows ME, ensure that Microsoft Client is installed on your PC before installing a CA digital certificate.
Verifying Whether Microsoft Client is installed on your PC To verify whether Microsoft Client is installed on your PC, complete the following steps:
1. Open the Control Panel from the Start Menu (Start > Control Panel).
2. Click on Network. Under the Configuration tab, you will see Client for Microsoft Networks as shown in Figure 1-1.

MemberDirect Integrated Content Management Guide Getting Started
September, 2005 Rel. 1.0 1-3
Figure 1-1: Windows 98/ME Network Configuration Tab
If you do not see Microsoft Client listed in your network components list, you must install Microsoft Client before you will be able to install a CA Digital Certificate, as described below.
Installing Microsoft Client on your PC Complete the following steps to install Microsoft Client on your PC:
1. Go to Start > Control Panel > Network.
2. Click on the Configuration tab and then on the Add button.
3. Highlight Client and then click on Add again.
4. Highlight Microsoft and Client for Microsoft Networks and then click on OK.
5. Insert your Windows installation disk in your CD-ROM drive.
6. Select your CD-ROM drive and click on OK as shown in Figure 1-2.
Figure 1-2: Install From Disk Window

MemberDirect Integrated Content Management Guide Getting Started
September, 2005 Rel. 1.0 1-4
Once this process has been completed and you have Microsoft Client installed on your PC, you can install a CA Digital Certificate (see Obtaining and Installing the Certificate).
Obtaining a TeamSite Digital Certificate The MemberDirect Integrated Services Content Management system is based on the TeamSite ContentCenter application from Interwoven Inc. In order to use the system, you must obtain a TeamSite digital certificate.
You only need to perform this procedure once. If you need to install your digital certificate into multiple browsers, refer to the procedure in this chapter for installing the certificate on a secondary browser, such as FireFox.
Note: To ensure the security of the content management system, the TeamSite server employs browser-side authentication in addition to your username and password. This will ensure that only authorized users may access or attempt to access the TeamSite server.
Your certificate is as important as your password and must be kept confidential and secure at all times. If you move to a new computer, you will need to move the certificate with you to the new computer.
Before You Start Before you can install the certificate, you must have your TeamSite ID and password that will be provided by the CUCBC Client Implementation and Projects team (email: [email protected]).
There are three basic steps to installing the certificate:
1. Obtaining a certificate and installing it into your web browser.
2. Installing the certificate into your Java Runtime Environment. (You must have Sun Microsystems version of Java before you can install the certificate.)
After completing the above steps, you are ready to access the MemberDirect Integrated Services Content Management site (https://admin.memberdirect.net).
Step-by-step instructions for obtaining the certificate are provided below.
Obtaining and Installing the Certificate Before you obtain the certificate, open a browser and ensure your Internet connection is running. Then, complete the following steps.
1. Enter https://certs.cucbc.com in the address box of your web browser and click Go. You will see the pop-up box shown in Figure 1-3:

MemberDirect Integrated Content Management Guide Getting Started
September, 2005 Rel. 1.0 1-5
Figure 1-3: Security Alert when Installing a Certificate
2. Click on Yes to continue. Depending on your security level, you may see the pop-up box shown in Figure 1-4:
Figure 1-4: Security Information Warning
If the above warning appears, click on Yes. The screen shown in Figure 1-5 will be displayed:
Figure 1-5: CUCBC Client Certificate Authority
3. Click on Access Code Login. You will be prompted to login with your username and access code, as shown in Figure 1-6.
Click on Access Code Login

MemberDirect Integrated Content Management Guide Getting Started
September, 2005 Rel. 1.0 1-6
Figure 1-6: Login to the CUCBC Client Certificate Authority
4. Log in to the CUCBC Client Certificate Authority by entering your TeamSite user ID and password in the User name and Password boxes and then click on OK. The one-time password is your TeamSite password. The Welcome page shown in Figure 1-7 will be displayed. When you log in subsequently, you will use the Certificate Login.
Note: You will only get three chances to enter your access code. After three incorrect attempts, your User ID will become disabled and you will need to contact CUCBC to have it reset.
Figure 1-7: Welcome Page of Certificate
5. Click on Retrieve the CA certificate or certificate revocation list and then on Next. The page shown in Figure 1-8 will be displayed.
Click Here

MemberDirect Integrated Content Management Guide Getting Started
September, 2005 Rel. 1.0 1-7
Figure 1-8: Retrieve CA Certificate Page
6. Click on Install this CA certificate on the Retrieve CA Certificate page. You will see the pop-up box shown in Figure 1-9.
Figure 1-9: Add Certificate Page
7. Click on the Yes button. You will either see the pop-up box shown in Figure 1-10 or one that asks you if you would like to add this certificate to the root store.
Figure 1-10: Security Warning
8. Click on Yes on either pop-up.
You have now told your web browser to trust CUCBC’s digital web certificates. The window shown in Figure 1-11 will be displayed.
Click on this Link

MemberDirect Integrated Content Management Guide Getting Started
September, 2005 Rel. 1.0 1-8
Figure 1-11: Certificate Installed Message
You may now request and install a new digital certificate. Click on Home in the upper right corner as shown above. The Welcome screen will be redisplayed as shown in Figure 1-12.
9. Click on Request a Certificate and then on Next
Figure 1-12: Welcome Screen (Redisplayed)
You will see a screen similar to the one shown in Figure 1-13.
10. . Click on Advanced request and then on Next.
Figure 1-13: Select Request Window
The Advance Certificate Requests page will be displayed as shown in Figure 1-14.
11. Click on Submit a certificate request to this CA using a form and then on Next.
Click Here
Click Here
Click Here

MemberDirect Integrated Content Management Guide Getting Started
September, 2005 Rel. 1.0 1-9
Figure 1-14: Advanced Certificate Requests
The Advanced Certificate Request form shown in Figure 1-15 will be displayed.
12. Enter your data on the form shown in Figure 1-15. Replace any default information with your institution's information in each field.
Note that the email address MUST be your current email address used for business purposes. Certificate expiry notifications will be sent to this email address.
Click Here

MemberDirect Integrated Content Management Guide Getting Started
September, 2005 Rel. 1.0 1-10
Figure 1-15 Advanced Certificate Request Form
13. Ensure that you have the Key Size set to 1024 and click on the checkbox beside Mark keys as exportable as shown in Figure 1-16.
Figure 1-16: Key Options on Advance Certificate Request Form
Click this Box
Key Size must be 1024

MemberDirect Integrated Content Management Guide Getting Started
September, 2005 Rel. 1.0 1-11
14. Click on Submit at the bottom right of the request form. The pop-up box shown in Figure 1-17 will appear.
15. Click on Yes to confirm the certificate request as shown below. Your new certificate is now ready to be installed.
Figure 1-17: Confirm Certificate Request
The window shown in Figure 1-18 will be displayed. Click on Install this certificate.
Figure 1-18: Install Certificate Window
You will see the pop-up box shown in Figure 1-19.
16. Click on Yes.
Figure 1-19: Add the Certificate Window
You have now successfully installed a new digital certificate. You will see the window shown in Figure 1-20 that confirms installation of the certificate
Figure 1-20: Certificate Installed Window
17. Close your web browser and then reopen it. Then, complete next phase of the installation as described below.
Click Here
Click on Yes

MemberDirect Integrated Content Management Guide Getting Started
September, 2005 Rel. 1.0 1-12
Installing the Certificate into a Java Runtime Environment Java applets are used by the TeamSite ContentCenter to allow user to edit their content management files. A digital certificate is required to use this functionality. Therefore, before you can install the certificate into your Java Runtime Environment, ensure that the Sun Microsystems version of Java is installed on your machine. Then, complete the installation of the certificate as follows.
1. Once you have installed the certificate on your Internet Explorer browser, click on Tools > Internet Options as shown in Figure 1-21.
Figure 1-21: Internet Options on Internet Explorer
2. Click on the Content tab and then on Certificates as shown in Figure 1-22.
Figure 1-22: Internet Explorer Content Tab
3. Click on the certificate that you just installed – that is certs.cucbc.com under the Issued By column. Then, click on Export as shown in Figure 1-23.
Click Here
Click Here
Click on the Content Tab

MemberDirect Integrated Content Management Guide Getting Started
September, 2005 Rel. 1.0 1-13
Figure 1-23: Certificates Window on IE Internet Options
If you are using the home edition of Windows XP, you will see the Certificate Export Wizard shown in Figure 1-24. Otherwise, the page shown in Figure 1-25 will be displayed.
Figure 1-24: Certificate Export Wizard (displayed with Windows XP Home Edition)
If you see Certificate Export Wizard, click on Next. The page shown in Figure 1-25 will be displayed.
4. Click on Yes, export the private key and then on Next on the Export Private Key page shown in Figure 1-25. Be sure to enter your desired password to protect the certificate.
Click on certs.cucbc.com
Click on Next
Click on Export

MemberDirect Integrated Content Management Guide Getting Started
September, 2005 Rel. 1.0 1-14
Figure 1-25: Export Private Key Page
5. Click on the checkbox beside Include all certificates in the certification path if possible and then on Next as shown in Figure 1-26.
Figure 1-26: Export File Format Page of Certificate Export Wizard
6. Enter and confirm your TeamSite password on the Password page of the Certificate Export Wizard as shown in Figure 1-27 and then click on Next. The password is required to protect the private key.
Click Here
Click this Checkbox
MemberDirect Integrated Content Management Guide Getting Started
September, 2005 Rel. 1.0 1-15
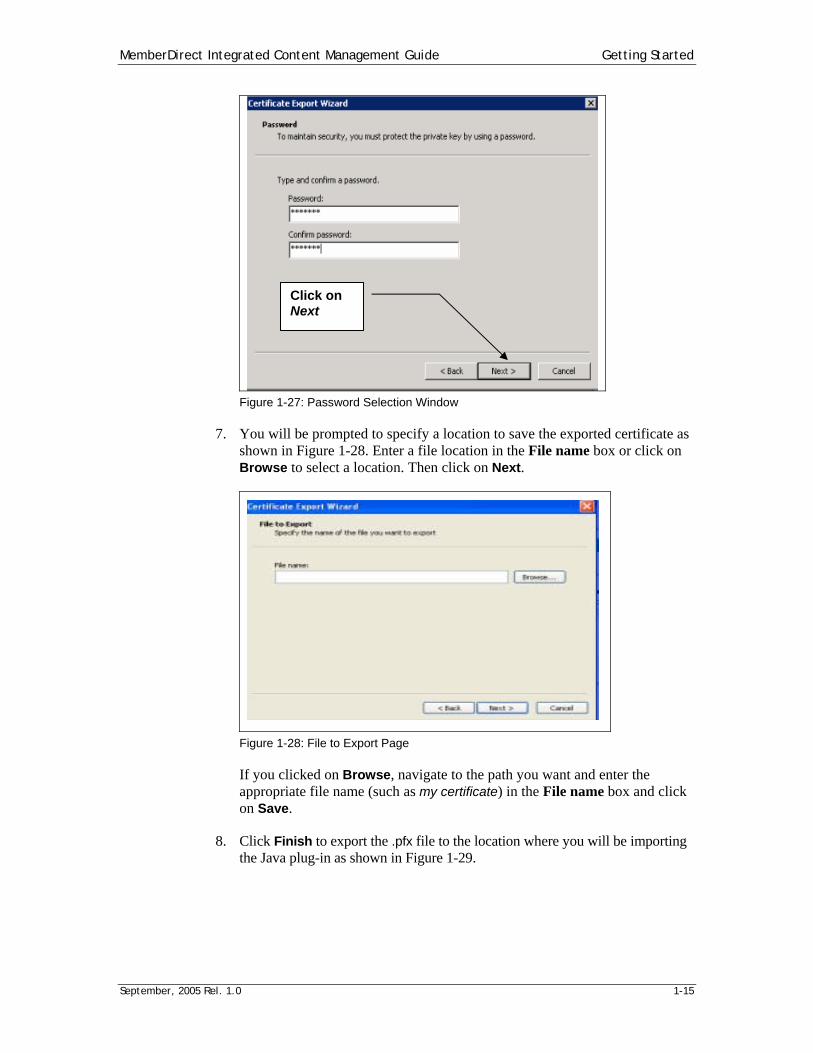
Figure 1-27: Password Selection Window
7. You will be prompted to specify a location to save the exported certificate as shown in Figure 1-28. Enter a file location in the File name box or click on Browse to select a location. Then click on Next.
Figure 1-28: File to Export Page
If you clicked on Browse, navigate to the path you want and enter the appropriate file name (such as my certificate) in the File name box and click on Save.
8. Click Finish to export the .pfx file to the location where you will be importing the Java plug-in as shown in Figure 1-29.
Click on Next

MemberDirect Integrated Content Management Guide Getting Started
September, 2005 Rel. 1.0 1-16
Figure 1-29: Certificate Export Completion Page
9. The Certificate Export Wizard will display the message "The export was successful". Then, click on OK.
10. Open the Control Panel by clicking Start > Control Panel as shown in Figure 1-30.
Figure 1-30: Select Control Panel
11. Click on your Java plug-in as shown in Figure 1-31.
Note: IBM Java plug-in is not recommended.
Click Here
Click Here

MemberDirect Integrated Content Management Guide Getting Started
September, 2005 Rel. 1.0 1-17
Figure 1-31: Java Plug-ins on the Control Panel
Note: Although the client certificates work with both 1.4.x and 1.5.x, we recommend upgrading to Java 1.5.x (now called Java Runtime 5.0) for ease of installation and use.
For JRE Version 1.5.x (Java Runtime 5.0 and Later) For JRE Version 1.5x (and later), the certificate registry for the Java Virtual Machine (VM) is managed in the same way that the browsers manage the registry. Complete this process as follows.
i. Open the Java plug-in on the Control Panel as described above in Step 10. Click on the Security tab and then on the Certificates as shown in Figure 1-32.
Figure 1-32: Security Tab on Java Plug-in
ii. At the top of the Certificates page shown in Figure 1-33, a drop-down menu allows you to select the different certificate lists for Java, including trusted web sites, trusted CA signers, and client certificates. Under each of these headings, you can perform the following functions:
• Import new certificates to be appended to the existing list
Click This Plug-in
Click Here
Click on Security Tab

MemberDirect Integrated Content Management Guide Getting Started
September, 2005 Rel. 1.0 1-18
• Delete existing certificates from the list • Display the data from the database
Click on the drop-down menu on the Certificates page and select Trusted Certificates as shown in Figure 1-33. Then, click on Import to import the .pfx file and enter your password when prompted.
Figure 1-33: Certificates Page
Once you have completed the steps for either Java 1.4 or Java 1.5, you should now be ready to access the TeamSite ContentCenter as described below.
Logging on to TeamSite To login to the TeamSite ContentCenter, complete the following steps.
1. Enter https://admin.memberdirect.net/ in the address field of your browser as shown in Figure 1-34.
Figure 1-34: Browser Address Field
Then, click on OK as shown in Figure 1-35.
Click on Import
Click Here to Select Trusted Certificates

MemberDirect Integrated Content Management Guide Getting Started
September, 2005 Rel. 1.0 1-19
Figure 1-35: Client Authentication
2. Login with your TeamSite ContentCenter account and role in the Login screen shown in Figure 1-36. Refer to Logging On in Chapter 2 – The Content Management Process for more information on logging on the ContentCenter.
Figure 1-36: TeamSite ContentCenter Login Page
3. After logging on to the TeamSite ContentCenter, click on Edit to trigger the Java Plug-in as shown in Figure 1-37.
Figure 1-37: ContentCenter Professional Interface Showing Workflow View
Click on OK
Click Here

MemberDirect Integrated Content Management Guide Getting Started
September, 2005 Rel. 1.0 1-20
4. The first time you edit a file each TeamSite session, you will be prompted with two pop up windows. The first one is shown in Figure 1-38. It prompts you enter the password you created when you installed the certificate into your Java Runtime Environment (Figure 1-27).
Figure 1-38: Password Prompt to Access the Client Authentication Keystore
The above prompt will reappear after the login to your session expires.
Note: The page that is displayed depends on the version of Windows you are using.
5. When you see the pop-up shown in Figure 1-39, click on Yes.
Figure 1-39: Interwoven Internal Security Warning
Your Java Plug-in will now be loaded with your client certificate and your file edit should load to your PC.
At this point, you have completed installing the certificate.
Enter Password Here
Click on Yes

MemberDirect Integrated Content Management Guide Getting Started
September, 2005 Rel. 1.0 1-21
Additional Certificate Information The following section provides you with additional information about certificates, such as certificate expiry, renewing an expiring certificate, viewing a certificate, and removing a certificate.
Certificate Expiration The certificate that you installed is valid for only one year. You can renew it before it expires when you receive an automatic email reminding you to renew an existing certificate 30 days before it expires. Figure 1-40 shows an example of the renewal email.
Figure 1-40: Example of Certificate Renewal Email
If the certificate is not renewed, a second reminder is sent 15 days prior to certificate expiry. Further reminders will be sent five days, two days, and one day prior to expiry as well on the actual expiration date. Once the certificate has been renewed, no further reminders will be received.
If the certificate is allowed to expire, you must apply to CUCBC in writing for a new access code to install a new certificate.
How to Renew an Existing Digital Certificate Before Expiry To renew an existing digital certificate before it expires, complete the following steps:
1. Enter https://certs.cucbc.com in a browser and then click on Go. You will see the page shown in Figure 1-5.
2. Click on Certificate Login.
3. Complete Steps 9 – 17 under Obtaining and Installing the Certificate.
MemberDirect Integrated Content Management Guide Getting Started
September, 2005 Rel. 1.0 1-22
Viewing a Certificate in Internet Explorer To view a certificate using Internet Explorer (IE), click on Tools > Internet Options > Content > Certificates. The Certificates pop up box shown in Figure 1-23 lists all certificates available to you under your personal folder. This is where your CA certificate resides.
Removing an Unwanted or Expired Certificate To remove an unwanted or expired certificate, display the Certificates box as described above. Then, complete the following steps:
1. Click once on the certificate you want to remove to highlight it.
2. Click on the Remove button and then on Close to close Certificates box.
3. Click on OK to close the Internet Options box and return to your web browser.
Exporting and Installing a Certificate on a FireFox Browser Expert users who use the Mozilla Firefox browser can export and install a client certificate on their browser.
To install a client certificate on to a FireFox browser, you must first use an Internet Explorer browser to create your certificate, and then transport and import it to FireFox. You will need access to an Internet Explorer machine each year to review your certificate. However, you can use FireFox on a daily basis without any problems. You should also be able to use any other browser with Client Certificate capabilities without any problems, provided that TeamSite supports it.
Before you can start the installation on Firefox, you must already have installed the certificate for Internet Explorer (see Obtaining and Installing the Certificate).
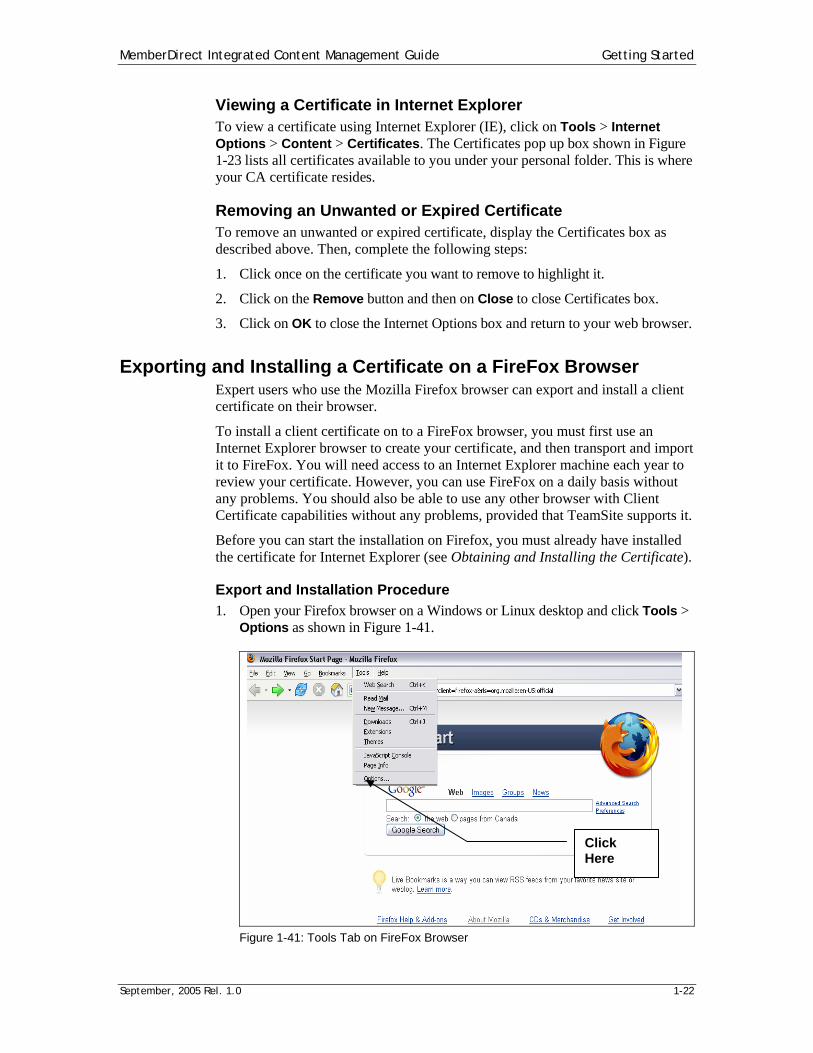
Export and Installation Procedure 1. Open your Firefox browser on a Windows or Linux desktop and click Tools >
Options as shown in Figure 1-41.
Figure 1-41: Tools Tab on FireFox Browser
Click Here

MemberDirect Integrated Content Management Guide Getting Started
September, 2005 Rel. 1.0 1-23
2. Inside Options, click on Advanced > Certificates > Manage Certificates > Your Certificates as shown in Figure 1-42.
Figure 1-42: Firefox Advanced Options - Certificates
You will see the window shown in Figure 1-43.
3. Under the Your Certificates tab, click on Import.
Figure 1-43: Certificate Manager
Click Here
Click Here

MemberDirect Integrated Content Management Guide Getting Started
September, 2005 Rel. 1.0 1-24
4. Select the .pfx file that you exported from Internet Explorer as shown in Figure 1-44.
Figure 1-44 Select .pfx File
5. Click on Open and enter the password you specified earlier (in the export process) in the Password Entry Dialog box shown in Figure 1-45.
Figure 1-45: Password Entry Dialog Box
6. You will see the Alert box shown in Figure 1-46. Click on OK to continue.
Figure 1-46: Alert Box
7. Close the Firefox Certificate Manager by clicking the OK button and then restart Firefox.
Click Here to Select the .pfx File

MemberDirect Integrated Content Management Guide Getting Started
September, 2005 Rel. 1.0 1-25
8. You should now have the Digital Certificate installed on your browser and are ready to access TeamSite ContentCenter. You can verify the certificate by going to https://cert.cucbc.com and login with the certificate by clicking on Certificate Login
Note: Users that have a certificate can also export it to their home computer.
Installing the VisualFormat Toolbar The VisualFormat toolbar is rich-text formatting (RTF) tool. Some forms used in the ContentCenter are VisualFormat-enabled. The first time you open a VisualFormat-enabled form, the ContentCenter prompts you to install the VisualFormat software. The software is installed as a component of your browser. After it is installed, you will not be prompted to install it again when you use that browser to open a VisualFormat-enabled form on any server.
Note: Depending on the page in your site, images, tables and other block-level elements added via the VisualFormat toolbar may have unexpected results. This is because some pages only allow paragraphs or call-to-action links.
Installation Procedure To install VisualFormat, follow the instructions that are displayed when you open a VisualFormat-enabled form for the first time.
Note: You must have administrator privileges on your Windows client computer for VisualFormat to install it successfully.
Workaround for Windows XP Service Pack 2 Users Microsoft Windows XP Service Pack 2 includes significant changes affecting VisualFormat that are related to security, especially in regard to the download, installation, and scripting of the eWebEditPro ActiveX control. Some changes are minor and simply require the user to click an additional time or two to download and install the editor. The most significant change affects the VisualFormat in data entry modes.
To allow VisualFormat to work, you must:
1 Check Allow active content to run in files on My Computer in Advanced Internet Options.
2 Allow pop-up windows
Allowing Active Content By default, Windows XP Service Pack 2 (XPSP2) prevents active content, such as JavaScript, from accessing files on the client computer. For VisualFormat to function properly in data design or data entry modes, active content must be allowed to run on the client.
To allow active content to run:

MemberDirect Integrated Content Management Guide Getting Started
September, 2005 Rel. 1.0 1-26
1. Open Internet Options by selecting Tools > Internet Options from the Internet Explorer menu.
2. Select the Advanced tab. 3. Scroll down to the Security section. 4. Check Allow active content to run in files on My Computer (as shown in
Figure 1-47).
Figure 1-47: Security Section of Internet Explorer's Internet Options (Advance) Window
Resolving Broken Images in VisualFormat for IE 6 users Images and pictures inserted from VisualFormat may appear as broken. This issue is caused by Internet Explorer 6's default settings for handling session variable/cookies passed between application/site.
Internet Explorer 6.0 is designed to filter any session object/variable, which is crucial for the previewing/viewing of images in VisualFormat. Internet Explorer 6.0 introduced support for the Platform for Privacy Preferences (P3P) Project, which silently rejects cookies sent from third party sites/application when the privacy setting for the browser is set to Medium.
To resolve this issue, complete the following steps:
1. Launch Internet Explorer.
2. Click Tools and then Internet Options.
3. Click the Privacy tab and then Advanced.
4. Click to select the Override automatic cookie handling check box and select the Always allow session cookies check box.

MemberDirect Integrated Content Management Guide Getting Started
September, 2005 Rel. 1.0 1-27
5. Login to TeamSite and verify that an inserted image via VisualFormat is displayed correctly.
Enabling Local Files Manager The first time you download files or edit file without using TeamSite forms, ContentCenter prompts you to install software that manages your local ContentCenter files. The software is installed as a component of your browser. After it is installed, you do not need to install the software again when you use that browser to edit or download content.
To install the software, follow the instructions in the prompt.

September, 2005 Rel. 1.0 2-1
The Content Management Process
The Integrated product allows you to add, modify, and delete content on your MemberDirect web site. Before creating any content, you should determine where the content will be located on the website. The Integrated product locates a web page content based on the path specified in the URL. For example, the URL, www.mycuname.com/Personal/AboutUs, is interpreted by the application to locate content residing in the /Personal/AboutUs folder. To create a new page, About Us, under Personal, you must create the AboutUs folder under /Personal and then save the content for this page within the /Personal/AboutUs folder. (See Creating a New Folder in this chapter.)
By default, your site navigation is determined by the sub-folders residing within the /Personal or /Business folder. You should never rename these root folders.
Understand Your Website Each page on your website consists of various components, such as navigation and content areas. Some components are predefined as part of the application, such as online application forms. To modify these predefined components, you must submit a change request. For other components such as the content pieces (including various portlets), you have full control of them.
TeamSite ContentCenter The Integrated product is based on the TeamSite ContentCenter platform. There are two interfaces available – ContentCenter Professional (CCPro) and ContentCenter Standard (CCStd). These interfaces are used to perform various content management tasks. (See Using ContentCenter Professional and ContentCenter Standard.)
Content Management Concepts The Integrated product is based upon the following key concepts. Your use of the product will be enhanced by being familiar them.
User Management Determines a user’s access to Integrated product features.
(Cont'd.)

MemberDirect Integrated Content Management Guide The Content Management Process
September, 2005 Rel. 1.0 2-2
Version Management Preserves a file’s revision history.
Task Management Describes and automates business practices.
Forms Guides the creation of and controls the appearance of content.
Deployment Publishes ready content to environments beyond the one where it was created.
User Management User management involves authentication, which is the process of verifying that the person attempting to access the system is a valid user. Users must log in by entering a user name and password to access the ContentCenter. User names and passwords are verified against entries in configuration files maintained by the system’s administrator.
User management also involves roles. The ContentCenter offers access to a wide set of features and functionality. Roles define the areas and features that users can access and protect users from performing actions that they might not intend to take. When users log into ContentCenter, they can access only the locations assigned to them and only the features available to the role they selected. Role selection is verified against entries in configuration files maintained by the ContentCenter administrator; users who select roles to which they have not been assigned are denied access.
Users can be assigned to either Author or Editor. By default, your role is as an Editor to provide you with greater control over your content. If you want to customize your workflow and restrict certain users from submitting content without approval, user accounts with Author roles can be created for your users.
The content lifecycle begins with the work of Authors. Authors are primary content creators and can range from the graphic artist who creates images for marketing materials to a webmaster responsible for your institution's website. Before content is released into the production environment, its quality must be ensured. As managerial users, Editors supervise the work of Authors to ensure its quality. Editors are technical contributors that manage the development of content within their workareas.
Author Role The Author role is summarized below.
Profile • Familiar with basic tasks such as saving, copying, deleting files and browsing folders
• Familiar with content development tools and email, but do not require sophisticated knowledge of the system that manages their content
• Any person who creates content that needs to be managed is a candidate for the Author role
(Cont'd.)

MemberDirect Integrated Content Management Guide The Content Management Process
September, 2005 Rel. 1.0 2-3
Access • Full access to the workarea assigned to perform the following functions:
Access (Cont'd.) • Create, edit, import, and delete folders and files • Copy, rename, lock, revert files Edit file properties • View files in context of all content in staging area • Work with tasks assigned to them No access to administrative operations: • Get Latest, Make Public/Private, Merge
Environment • Belongs to one workarea (or many by request only) • Receives tasks from Editors and can be notified of new or
overdue task by automated email messages as custom workflow • Uses ContentCenter primarily to:
o Manage tasks o Open files for editing o Edit file properties
Work is typically reviewed by Editors before it is submitted to the staging area.
Editor Role The Editor role is shown below.
Profile • Familiar with content management concepts and the system’s range of features
• Knows how to manage file versions, compare and merge files, initiate jobs, and assign tasks to contributors
• Any person who must manage segments of content development is a candidate for this power user role
Access • Full access to workareas that they own. • Can perform all Author functions as well as:
o Get Latest, Merge, Make Public/Private, Unlock o View all jobs and assign task o Approve and reject content
Environment • Owns one workarea1 (or many by request only) • Uses the ContentCenter primarily to:
o Create content o Monitor job progress o Assign tasks to contributors o Review their work o Submit approved work to the staging area
1All workareas are owned by the Master user at CUCBC for ease of maintenance.

MemberDirect Integrated Content Management Guide The Content Management Process
September, 2005 Rel. 1.0 2-4
(Cont'd.)
• The role will occasionally: o Resolve conflicts between files o Revert files to previous versions
Note: The Administrator and Master roles can only assigned to administrators at CUCBC.
Version Management The term, version, is used generally to refer to an entry in a file’s history and to copies of the file that exist in other ContentCenter areas such as the staging area or another workarea.
Version management refers to how contributors use the aspects of a file, such as file properties and version history, to identify and promote the most desirable content. Typically, version management activities are performed by advanced ContentCenter users.
Version management activities are shown below.
Activity Description
List modified files Lists only the workarea fields that are modified and filters out content that has not changed. Use this function to:
• Find files that are modified • Review only the workarea content that is different from
content in the staging area • Submit content to the staging area
List locked file Lists only the locked files on in a workarea. Use this function to:
• View all files that you have locked, or unlock them • View only the workarea files that are locked • Monitor the locking activities
View file properties Accesses file size, owner, location, modification date, modification/modifier history, etc. This function allows you to:
• View the statistics of a file • View file permissions • Make a file public or private • View a file’s development history or revert to an older
version
Lock files Controls who can edit files. The default locking behavior ensures a user’s changes are submitted before others can submit theirs. When a file is locked, other users in the same workarea cannot edit the file until the owner of the lock submits the work or manually releases the lock.
(Cont'd.)

MemberDirect Integrated Content Management Guide The Content Management Process
September, 2005 Rel. 1.0 2-5
Compare files and folders
Compares the contents, source, or properties of files and folders in any ContentCenter area to any other area. Use this function to:
• Check whether there are conflicts between a workarea and the staging area
• Check what items changed between one edition and the next
View file versions Examines how content was developed over time. Use this function to:
• Compare different versions of a file • Revert content to a previous version
Revert files to older versions
Restores modified content back to a previous version. Use this function to:
• To revert to an older version if you examine modified content and an older version of the content is more desirable than the current one.
• Compare different versions of a file to find which contains the most desirable content.
Delete files and folders
Removes content from a workarea. Deleted files must be submitted to the staging area to remove the corresponding content in the staging area.
File Version History A file’s version history is a record of its development over time. Each time a modified file is submitted to the staging area, a “snapshot” or version, of the file is saved. When you view versions, you can access any previous version of the file along with such statistics as dates of modification and user names of the people who modified the file.
File Conflicts File conflicts occur when the same text, or lines of code, in a file is modified in two areas. For example, a writer and a graphic designer need to edit a document in their respective workareas. Both update the file in their workarea with the most recently submitted version in the staging area. The writer revises the text of the document in their workarea, while the graphic designer adds a graphic to the same file in their workarea.
Comparing the two workareas would reveal files that are modified in one area or the other, and files that are changed in both places (conflicts). At that point, the user who is performing the comparison can bring differences from the other area into their area, and can further inspect the differences between conflicting files.
The first user to submit their work changes the staging area version of the file (it contains their modifications). When other users attempt to submit their work, ContentCenter notifies them that the staging area version contains changes they might need and provides the opportunity for users to merge those changes and resubmit.

MemberDirect Integrated Content Management Guide The Content Management Process
September, 2005 Rel. 1.0 2-6
Note: It is unlikely that you will encounter this scenario since there is only one workarea created for you. If you are currently editing a file; other users have to wait till you have submitted your changes before they can modify the same file.
Undoing Changes If you made some changes on a particular web page and you have not yet submitted them, you can undo your uncommitted changes back to the last submitted version by:
1. Selecting the corresponding index.jsp file.
2. Clicking on Edit > Undo Changes to undo your uncommitted changes.
Note: All of your current changes will be lost once you have undone your uncommitted changed.
Reverting to a Previous Version of a File The following procedure will revert to a previous version of a file. Note that you must be logged on as an Editor in ContentCenter Professional (CCPro) to revert to a previous version.
1. Locate the corresponding index.jsp file that contains the web page content to which you want to revert.
2. Check the file properties for the corresponding index.jsp file by clicking on the Properties link.
In the File Property window, the value for TeamSite/Templating/ PrimaryDCR indicates the file name for the Form Entry file, while the value for TeamSite/Templating/PrimaryDocumentType indicates the file structure as <form category>/<form type> for Form Entry files.
3. Using on the above information, locate the corresponding Form Entry file under the /templatedata/<form category>/<form type>/data folder.
4. View the file versions by selecting the corresponding Form Entry file and then click on File > Versions. You can identify a particular version that you want based on the modified timestamp indicated for each file version.
5. Click on the Revert link by the file version you want to revert. A warning page will be displayed
6. Click on Yes on the bottom of the warning page to confirm that you want to continue.
7. Locate the corresponding index.jsp file again and then click Edit link to edit the file.
8. Verify the reverted changes in the form and then click on the Generate button to verify your reverted changes in the pop-up preview window. Close the pop-up window after you have finished the verification.
9. If reverted changes are correct, click on Finish to submit your changes; otherwise, repeat Steps 4 – 9 to revert your changes to a different version.

MemberDirect Integrated Content Management Guide The Content Management Process
September, 2005 Rel. 1.0 2-7
10. Click the Next>> button to submit your reverted changes.
11. Enter a comment in the dialogue box and then click Finish button to deploy your reverted changes to Live.
Task Management The ContentCenter offers functionality that enables your organization to map its business processes to the content management system by creating workflow templates. Workflow templates describe the human and automated tasks involved in the business processes they represent. Workflows can be customized to match your business processes.
Users who are responsible for creating jobs in the system are given access to workflow templates. Job creators select the workflow that matches the kind of job they want to initiate. They also specify job parameters such as the users who are to perform specific tasks, the workarea where tasks are to be performed, and files associated with tasks.
Contributors might be notified of new tasks by email or by checking their task list in ContentCenter. When contributors complete tasks, they send them to the next step of the workflow process by selecting a transition. If the task is a decision point, the contributor might need to select from several possible transitions (for example, they would need to decide whether to approve or reject content if the task was an approval task).
There is a default Submit Workflow that allows you to commit your changes by submitting files to Staging area. There is also created a Submit and Deploy to Live workflow for you to submit your changes and deploy those changes to Live. When you modify a file using a form, the Submit and Deploy to Live workflow will be triggered automatically when you choose to submit your changes. If these workflows do not match your business processes, they can be disabled and customized to meet your needs.
What You Can and Cannot Change The following website items can be modified by using the Integrated product tool:
• The web page that is generated by ContentCenter forms (index.jsp) • Home page • Promotional page • Simple page • Rate overview page • Rates detail page • Job posting page • List of documents page • Rates data (xml file)
(Cont'd.)

MemberDirect Integrated Content Management Guide The Content Management Process
September, 2005 Rel. 1.0 2-8
• Branch information • Create/move/delete a web page The following website items cannot be modified via the ContentCenter (users can submit change request for customizing these items instead):
• Online Banking related forms • Online application forms (such as Membership Application) • Calculators • Find Branch/ATM online form • Search online form • Site Map page • Term Deposit Selector • Default Rates Portlet (Can be turned on or off via ContentCenter) • My Markets portlet (Can be turned on or off via ContentCenter) • My Stocks portlet (Can be turned on or off via ContentCenter)
Logging On to the ContentCenter The process of logging on to the ContentCenter product differs depending on whether it is a first time or regular log on. The ContentCenter Logon page is shown in Figure 2-1.
Figure 2-1: ContentCenter Logon Page
The ContentCenter verifies the user name, password, and role you enter against configuration files set up by your ContentCenter administrator. It allows you access based on your role (see User Management). Access to content is based on area and file permissions set by the owners of that content.

MemberDirect Integrated Content Management Guide The Content Management Process
September, 2005 Rel. 1.0 2-9
Regular Log On The regular log on procedure into the ContentCenter is:
1. Open your web browser and enter the following URL as https://admin.memberdirect.net.
2. Enter your Username and Password.
3. Select interface either Standard or Professional (the default interface will appear in the ContentCenter box).
4. Select user role as Editor (the default is Editor).
5. Click Logon.
Displaying Logon Information The About screen displays the following information about the current logon session:
• User name • Role • Server name • Version number • Build number • Date installed (on CCPro screen only) • Date of last update (on CCPro screen only)
To view login and version information, click About. To return to the previous screen, click Close.
Logging Off To log off from the ContentCenter, click on Logout at the top right corner of the page beside About and Help. The ContentCenter Logon page will be displayed (see Figure 2-1).
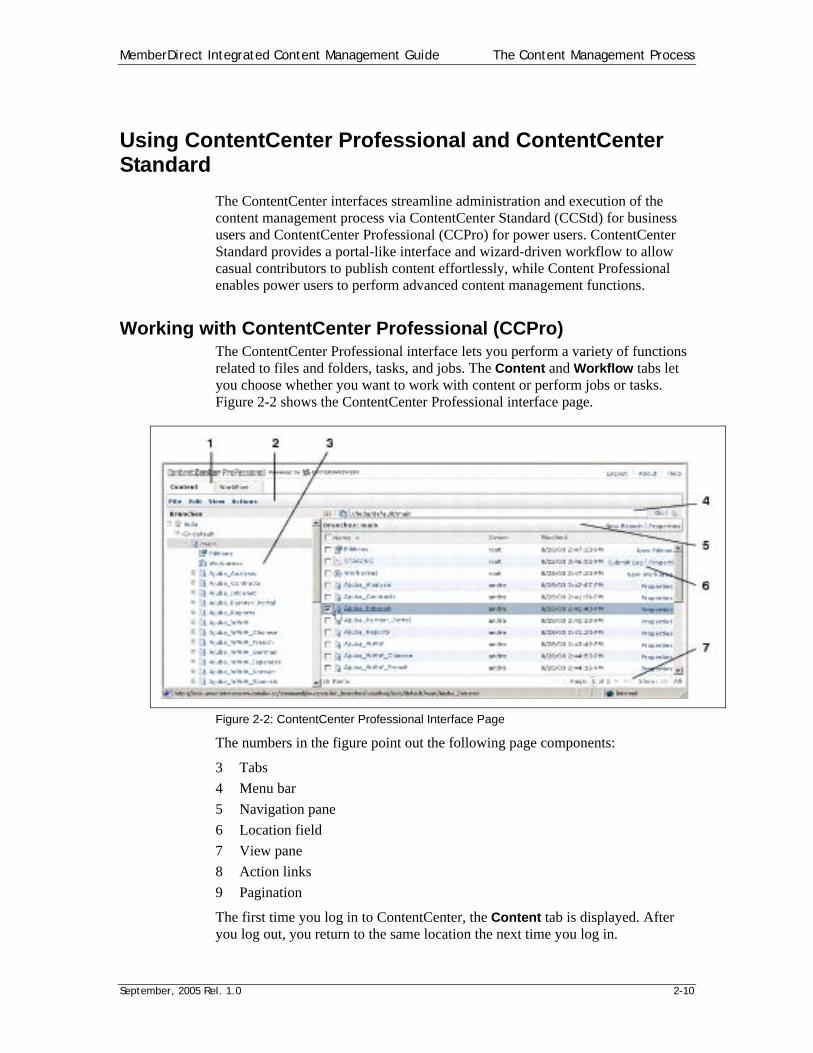
MemberDirect Integrated Content Management Guide The Content Management Process
September, 2005 Rel. 1.0 2-10
Using ContentCenter Professional and ContentCenter Standard
The ContentCenter interfaces streamline administration and execution of the content management process via ContentCenter Standard (CCStd) for business users and ContentCenter Professional (CCPro) for power users. ContentCenter Standard provides a portal-like interface and wizard-driven workflow to allow casual contributors to publish content effortlessly, while Content Professional enables power users to perform advanced content management functions.
Working with ContentCenter Professional (CCPro) The ContentCenter Professional interface lets you perform a variety of functions related to files and folders, tasks, and jobs. The Content and Workflow tabs let you choose whether you want to work with content or perform jobs or tasks. Figure 2-2 shows the ContentCenter Professional interface page.
Figure 2-2: ContentCenter Professional Interface Page
The numbers in the figure point out the following page components:
3 Tabs 4 Menu bar 5 Navigation pane 6 Location field 7 View pane 8 Action links 9 Pagination
The first time you log in to ContentCenter, the Content tab is displayed. After you log out, you return to the same location the next time you log in.

MemberDirect Integrated Content Management Guide The Content Management Process
September, 2005 Rel. 1.0 2-11
Pagination Some ContentCenter views provide pagination information at the bottom of the pane as shown in Figure 2-3. Pagination information provides the following information:
1 Number of items 2 Move to first page arrow 3 Move to previous page arrow 4 Current page 5 Move to the next page arrow 6 Move to last page arrow 7 All link to display all items without regard to pagination The number of items listed on a page is configured by your systems administrator.
Figure 2-3: Pagination Information on ContentCenter
To display a specific page, enter the page number in the Current Page field (4) and press [Enter] to display that page.
Working in the Content Tab The Content tab enables users to work with content outside the context of jobs or tasks and to perform many administrative operations. For example, Editors might review the progress of content development, update the contents of workareas, or submit production-ready content to staging area.
Menus and Action Links The Content tab menu bar has four pull-down menus—File, Edit, View, and Actions and action links—Compare, Get Latest, Import, Edit, Preview, and Submit. Action links are shortcuts to frequently used menu items. Note that Get Latest is not available to Authors.
ContentCenter functionality is context-sensitive. That is, users have access to only the functionality permitted to them based on their role and permissions set by area and content owners. When an action is not permitted the menu item and action links for that action are deactivated or “grayed-out”.
The Location Bar The line below the menu bar displays the URL showing the location of the contents of the view pane, as shown in Figure 2-4. There are two icons to the left of the URL. Click the first one to display all content you have marked as a favorite. Click the second one to display all the workareas for which you have permissions.

MemberDirect Integrated Content Management Guide The Content Management Process
September, 2005 Rel. 1.0 2-12
Figure 2-4: Location Bar on ContentCenter Page
The Location Bar consists of
1 Shortcut to My Favorites view 2 Shortcut to My Workarea view 3 Location field – enter a path and then click on Go 4 Move up one folder
The Navigation Pane The navigation pane displays a tree view of content stores and branches and of folders when you are navigating within a workarea. The currently selected location is highlighted, as shown in Figure 2-5.
Figure 2-5: Navigation Page of ContentCenter
The Navigation Page displays the following information with branch navigation shown on the left and workarea navigation on the right:
1 Navigation page title bar 2 Content server name 3 Links to area views 4 Back to branch navigation 5 Current workarea 6 Current location In the navigation tree, click the plus sign ( ) to open stores, branches, workareas, and folders. You can click on an area or folder name in the navigation tree to display its contents in the view pane on the right side of the screen without opening the folder in the navigation tree.

MemberDirect Integrated Content Management Guide The Content Management Process
September, 2005 Rel. 1.0 2-13
The View Pane After you select the area you want to work in, you can focus on specific items by selecting one of the following options from the View menu:
• Modified Files • Locked Files • All and Deleted Files • My Workareas • My Modified Files • My Locked Files • My Local Files • My Favorites
As you navigate content, you may have other command options, such as creating new workareas, creating editions, and creating new folders and files. Links to these commands are on the right side of the view title bar.
Click a column heading to sort listed items. The icon indicates the column currently sorted and the sort order. Click the column heading again to invert the sort order.
Click an item’s name to view it. To select items in the view pane:
• Check the check boxes that correspond to items you want • Check the check box that corresponds to the Name column heading to select
everything in the view • Check the check boxes that correspond to items you do not want to work
with and select Edit > Invert Select to select the items you do want
To perform actions on items in the view pane:
1. Select the items you want to work with.
2. Select an option from one of the menus, or click action link (some action links are listed for each item; you do not need to select the item before clicking the link).
Modified Files The Modified Files view lists files and folders in the current location that are modified by you or by other users. To display the Modified File list, navigate to the workarea location that contains the items you want and select Modified Files from the View menu. The list displays information in the following sortable columns:
Column Column Contents
Name Folder name or file name
Folder Path relative to the workarea (the name of the workarea is displayed in the title bar)
Modified by User name of the person who most recently modified the item
Modified Date and time that the items was last modified

MemberDirect Integrated Content Management Guide The Content Management Process
September, 2005 Rel. 1.0 2-14
While in the Modified Files view, you can perform the following functions:
• Undo changes and restore an item back to its unmodified state by clicking the Undo Change link that corresponds with the item you want
• Access an item’s properties by clicking the Properties link that corresponds with the item you want
• Add a new folder to the workarea by clicking New Folder in the title bar
• View the properties of the current location by clicking Properties in the title bar
Locked Files The Locked Files view lists files in the current location that area locked by you or by other users. To view the Locked Files list, navigate to the workarea location that contains the items you want and select Locked Files from the View menu. The list displays information in the following sortable columns:
Column Column Contents
Name Folder name or file name
Folder Path relative to the workarea (the name of the workarea is display in the title bar)
Locked by User name of the person who locked the item
Modified Date and time that the item was locked
While in the Locked Files view, you can perform the following functions:
• Unlock an item by checking the check boxes that correspond with the item you want and select Actions > Unlock
• Edit an item by clicking the Edit link that corresponds to the item you want
All and Deleted Files The All and Deleted Files view lists all files in the current location including those files. The icon represents content that has been removed from both workarea and staging area.
The staging area retains copies of deleted workarea files, providing they were submitted at least once. The icon represents content that is deleted from the workarea and that has a copy in the staging area. Such deletions are displayed in the All Files view to remind you to submit them to delete copies in the staging area. You can also restore deleted content listed in the All Files view through the Restore link. Files that have been removed from both workarea and staging area can also be restored. (See Restoring Deleted Content.)
Note: Files that exist only in a workarea (and have never been submitted to the staging area) are permanently removed when deleted.
To view the All and Deleted Files list, navigate to the workarea location that contains the items you want and select View All and Deleted Files from the View menu. The list displays information in the following sortable columns:
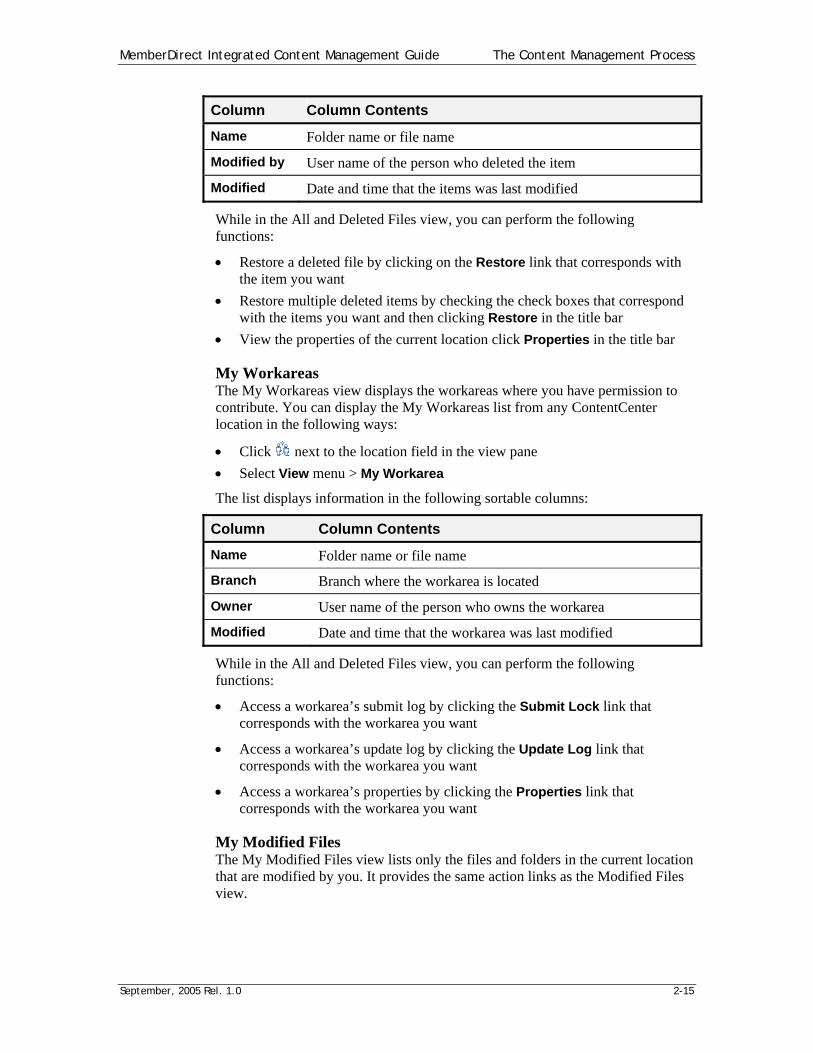
MemberDirect Integrated Content Management Guide The Content Management Process
September, 2005 Rel. 1.0 2-15
Column Column Contents
Name Folder name or file name
Modified by User name of the person who deleted the item
Modified Date and time that the items was last modified
While in the All and Deleted Files view, you can perform the following functions:
• Restore a deleted file by clicking on the Restore link that corresponds with the item you want
• Restore multiple deleted items by checking the check boxes that correspond with the items you want and then clicking Restore in the title bar
• View the properties of the current location click Properties in the title bar
My Workareas The My Workareas view displays the workareas where you have permission to contribute. You can display the My Workareas list from any ContentCenter location in the following ways:
• Click next to the location field in the view pane • Select View menu > My Workarea
The list displays information in the following sortable columns:
Column Column Contents
Name Folder name or file name
Branch Branch where the workarea is located
Owner User name of the person who owns the workarea
Modified Date and time that the workarea was last modified
While in the All and Deleted Files view, you can perform the following functions:
• Access a workarea’s submit log by clicking the Submit Lock link that corresponds with the workarea you want
• Access a workarea’s update log by clicking the Update Log link that corresponds with the workarea you want
• Access a workarea’s properties by clicking the Properties link that corresponds with the workarea you want
My Modified Files The My Modified Files view lists only the files and folders in the current location that are modified by you. It provides the same action links as the Modified Files view.

MemberDirect Integrated Content Management Guide The Content Management Process
September, 2005 Rel. 1.0 2-16
My Locked Files The My Locked Files view lists only the files in the current location that are locked by you. It provides the same action links as the Locked Files view.
My Local Files The My Local Files view lists files that have been downloaded from the Content Server to your local system. If you are using ContentCenter forms to update your content, you do not need to download files locally before you edit the files. Thus, you do not need to view your local files.
My Favorites The My Favorites view lists files and folders that you add to the list. My Favorites gives you quick access to items that you work with frequently.
Note: Up to 50 items can be stored in My Favorites.
To view your My Favorites list, select My Favorites from the View menu or click the My Favorites icon next to the location field. The list displays information in the following sortable columns:
Column Column Contents
Name Folder name and file name
Folder Path relative to the workarea
Area Branch name and area
Adding a Folder or File to My Favorites To add a folder or file to My Favorites:
1. Check the check box next to the folder or file you want to add.
2. Select Add to Favorites from the View menu.
The item will be added to your favorites list.
Adding a File to My Favorites from VisualPreview To add a file to My Favorites from VisualPreview:
1. Navigate to the file you want to add.
2. Select Add to Favorites from the More menu.
The file will be added to your favorites list.
Removing an Item from My Favorites To remove an item from My Favorites:
1. Check the check box next to the folder or file you want to remove.
2. Click Remove (on the title bar).
The My Favorites screen will be refreshed and the selected item will no longer appear on the My Favorites list.

MemberDirect Integrated Content Management Guide The Content Management Process
September, 2005 Rel. 1.0 2-17
Working in the Workflow Tab When you click on the Workflow tab, you can choose whether you want to view jobs or tasks. The Jobs and Tasks views are divided into two panes:
• The list pane (top) lists items that match the selected view and your filtering criteria
• The details pane (bottom) displays the properties of the item selected in the list pane the following information
Figure 2-6 shows the Workflow view, which displays the following information:
1 Workflow tab view with Jobs selected 2 View menu 3 Selected job/task 4 Job/task details 5 Filtering fields 6 Action Menu
Figure 2-6: Workflow Tab View
You can filter and sort items in the list pane by clicking the View drop-down menu to select the types of items you want to see. You can further filter the view by selecting an option from the Filter drop-down menu and entering a value that corresponds to items you want to list. The icon is displayed next to the column heading that corresponds to filter type.

MemberDirect Integrated Content Management Guide The Content Management Process
September, 2005 Rel. 1.0 2-18
Sorting Items You can sort the listed items by clicking a column heading. The icon indicates the sort column and order. Items are arranged alpha-numerically or by importance, if the importance column is selected. Click the column heading again to invert the sort order.
The Job Details pane displays the properties for the item highlighted in the top pane. Properties might include due date, who owns the item, who requested the item, priority, etc. You may need to scroll to see all the details. The items displayed in this area are configured by your ContentCenter administrator and might be different from the examples described in this document.
Working with Jobs The jobs and tasks you work with depend upon your role within your institution. Typically, Editors assign work to Authors. When Authors finish the requested work, they mark their tasks done. The work would then be routed to Editors for review. A Job ends when the last task in the job is finished. Jobs can also end manually (as shown in the table below). Ending jobs removes them and all their associated tasks from the system.
You can work with jobs from these locations:
• The Workflow tab > Jobs view • The Content tab > Actions menu > Assign and Attach to Task options • Notification email that tell you when you have a new task
The following table shows the actions you can perform while in the Workflow tab > Jobs view.
Action Procedure
Edit job properties
Edit the information in the input fields and click Save. Only values displayed inside input fields can be edited. You can enter information directly into an input field if it is empty or the text is not gray.
Initiate a new job Click on New Job in the upper right corner of the page.
View advanced job properties
Open the Actions menu and select Change Properties, then click Advanced in the Job Properties window.
End Jobs Open the Actions menu for the job you want to end and select End Job.
Working with Tasks The tasks you work with depend on your role, workarea permissions, task type, whether files are attached, and the status of those files. For example:
• Review tasks allows you to approve or reject the files attached to the task • Submit tasks that contain files in conflict with the staging area give you the
option to resolve those conflicts

MemberDirect Integrated Content Management Guide The Content Management Process
September, 2005 Rel. 1.0 2-19
• Assignment tasks let authors mark their work as Done
Resolving Conflicts The ContentCenter evaluates whether the content you submit has changed in the staging area since the time you last updated your work. The Resolve Conflicts screen is displayed if the staging area contains changes to the content you are submitting. Files in conflict are listed together with information about their location in the workarea, type of conflict, and an Actions menu.
You can resolve conflicts in any of the following ways:
• Click Overwrite All to overwrite the corresponding staging area files with your own
• Select Actions > Merge Differences to open the Merge tab in the Differences screen and begin combining changes
• Select Actions > Get Latest to overwrite that workarea file with the version in the staging area
• Select Actions > Detach from Task to remove that file and continue resolving conflicts for others. The file is not deleted from the workarea, but is only removed from the submit process.
• Select Actions > Visual Differences to open the Visual tab in the Differences screen and evaluate the differences between the two versions
• Select Actions > Edit to further edit that file
Only the Detach from Task option is available for unmodified files and lock conflicts.
Working with ContentCenter Standard (CCStd) The first screen you see when you log into the ContentCenter Standard interface is the CCStd home page. From here, you can perform the following functions:
• View commonly asked questions in the How Do I module • Browse to and preview any of the workareas listed in the My Workareas
module • Go directly to any of the files in the My Favorites module and open them for
editing or viewing • View or modify tasks belonging to you or groups you belong to from the
Tasks module • From the Work in Progress module, view or modify files that you are
working on but have not yet been approved by a reviewer • Display forms for content entry and display from the New Forms module
Note: All files, folders, and workareas shown on the CCStd home page are on the ContentCenter system that you logged onto to reach this page. This page does not show files and folders that are on your local system (such as the C: drive on your computer). See Importing a File for details about moving files and folders from your local system onto the ContentCenter system.

MemberDirect Integrated Content Management Guide The Content Management Process
September, 2005 Rel. 1.0 2-20
Using the How Do I Module This module contains commonly asked questions about ContentCenter. Click on a question to display its answer.
Using the My Workareas Module This area contains links to all of the workareas to which you have access. You can browse workarea contents by clicking Browse to the right of the workarea name. The ContentCenter file window is displayed. From this window, you can click File Actions > Preview (or file name itself) to display the website together with the VisualPreview toolbar.
Using the My Favorites Module This module contains links to files, folders, or both. Files or folders appear in this module after you add them as described in Using the File Actions Menu. Up to 50 items can be stored in My Favorites.
From this module you can:
• View or edit any file shown in this module • Browse any folder shown in this module • Perform a variety of additional actions on the files shown in this module • Remove a file or folder from the My Favorites module
Note: If a file is deleted from a workarea by you or another user, it still appears in your My Favorites list until you remove it. Such files are represented by a icon.
Using the Tasks Module This module shows the tasks requiring some kind of action by you. To view a list of individual tasks that are assigned specifically to you, click My Tasks. To view a list of group tasks assigned to a group to which you belong, click Group Tasks.
The task list is separated into four columns:
• Priority – The priority of the task: Very high High Medium Low Very low
• Task - The task number, which is generated automatically by ContentCenter when the job containing the task is initiated.
If a task could cause a conflict with the workarea (for example, if approving changes to a file would conflict with other changes to the file that were approved earlier), the following symbol is displayed next to the task number:
• Task Description - A brief summary of the task entered by the creator of the
job

MemberDirect Integrated Content Management Guide The Content Management Process
September, 2005 Rel. 1.0 2-21
• Due Date - The date by which you must complete the task
Available Actions You can perform the following actions while in the Tasks Module:
• View information and instructions about a task by clicking a task number to see information and instructions about that task. The ContentCenter Task Details screen appears. From there, you can edit, preview, or attach task files; approve or reject changes; change task properties; etc.
• Sort the task list entries by heading by clicking on a column heading. The heading used for sorting is indicated by an up or down arrow to the right of the column name. An up arrow ( ) indicates that tasks are displayed in ascending order. A down arrow ( ) indicates descending sort order.
Using the Work-in-Progress Module This module shows your workareas and all of the files in them that:
• You have modified and not yet submitted for approval • You have modified and submitted, but that have not yet been approved
by a reviewer
Note: Only one workarea’s contents can be displayed at a time. If you have access to more than one workarea, a drop-down list labeled Content lets you select which one is displayed. When you select a workarea, all of its work-in-progress contents appear in this area.
Available Actions While in the Work in Progress module, you can:
• Import files from your local system (such as your C: drive) into one of your workareas. To do this, click Import and follow the instructions in Importing a File.
• Submit some or all of the files in the Work in Progress module. To do this, click Submit.
• Edit a file by clicking Edit to the right of the file name. If the file is edited with a separate editing application, it opens in the editing application and the ContentCenter file editing wizard appears and you can edit the file, attach it to a task, submit it, etc. If the file is a form entry file, its contents are displayed in the Edit Form screen. From there, you can proceed as described in Using Content Management Forms.
• Perform a variety of actions on a file such as copy, move, rename, delete, and so. To do this, click the down arrow to the right of the file name and select the desired action.
Using the New Forms Module This module shows the forms that are available for your use. If you have access to more than one workarea, a drop-down list labeled Workareas lets you select which workarea’s forms are displayed in the module.

MemberDirect Integrated Content Management Guide The Content Management Process
September, 2005 Rel. 1.0 2-22
When you complete a form and save it, a file containing all of the information (that is, your form entries) is created. For example, if you fill in a Press Release form, it would be available for further use in a variety of ways after you save your work. For example, you could attach the file to a task so others could review your work or you could format the file for display on a website.
The New Forms module provides a convenient way to open a blank form to fill in. Workareas containing forms are shown in bold and are designated by this icon: . The forms themselves are shown as links under the workarea name and are designated by this icon: . To open a form, click either its name or the New link to the right of the name. The form edit wizard appears from which you can add form entries, save them in a file, attach the file to a task, etc. (See Using Content Management Forms.)
If the list of forms is too long to fit on one screen, a set of links in the bottom, right corner of the screen lets you page forward and backward to additional screens or reset the current screen so that all forms are displayed on one scrollable list.
Using VisualPreview When you click the name of a file in the Content or My Favorites module of the ContentCenter home page, the file is displayed together with the VisualPreview toolbar. VisualPreview lets you view the contents of a file and check the file’s links before performing some other action on the file (such as editing, moving, renaming, etc.).
If you decide not to perform any actions on the file, you can close VisualPreview without changing the file by clicking your browser’s Back button. To make the VisualPreview toolbar disappear while the file stays open for viewing, click the X in the top-right corner of the VisualPreview toolbar.
If you decide to perform an action on the file, select the action from the VisualPreview toolbar.
Note: Some file types cannot be previewed in a browser window because their extension settings are not recognized by Local File Manager. If you try to preview such a file, VisualPreview displays a message stating this. If this happens, view the contents of the file by opening it in an editing program by clicking either the download link in the message or Edit in the VisualPreview toolbar. In some situations, the file still might not be viewable. If that happens, contact your ContentCenter administrator.
Using the File Actions Menu The File Actions links in the file list let you perform many additional actions. The following list describes all possible actions you can perform on a file. Some of these actions might not be available for all files. Factors such as file locks and access permissions could make some of these actions unavailable to you. If an action is unavailable, it is either displayed in gray on the File Actions drop-down menu or it is not displayed at all.

MemberDirect Integrated Content Management Guide The Content Management Process
September, 2005 Rel. 1.0 2-23
Importing a File You can import content from your local system or from any network drive that is mapped to your local system into any ContentCenter workarea location that you have permission to modify. The import process is slightly different depending on the ContentCenter interface screen in which you are working.
Note: The import process requires ContentCenter’s Local Files Manager. If this is the first time you are performing an action that requires Local Files Manager, ContentCenter will prompt you to install it.
Importing Content Using the CCPro Interface To import content from within the Content tab in CCPro:
1. Navigate to the workarea folder where you want to place the content (destination folder).
2. Click Import. The Import screen is displayed. The title bar of the screen indicates the destination folder where the files you choose to import will be placed.
3. Select the files and folders you want to import as follows:
a. Use the drop-down menu at the top of the screen to navigate up to a parent folder.
b. Single-click folders to select them. Double-click folders to navigate into them.
c. Select a continuous range of items by selecting the first item in the range and hold the [Shift] key down. Then, select the last item in the range.
d. Select multiple discontinuous items by holding the [Ctrl] key down, then single-click the items you want.
4. Click Add.
The items are added to the list in the bottom field of the Import screen. Select items in that list and click Remove to remove them from the import list. Removing items from the import list does not delete the items from your system; it merely removes them from the Import list.
5. Click Import.
The items are imported. The view pane returns to the view from which you began the import process.
Importing Content Using the CCStd Interface To import a file using CCStd, complete the following steps:
1. In the current folder field (the first field in the screen), navigate to the folder on your local system containing the file you want to import by:
• Click the down-arrow to display all of the parent folders leading to the current folder
• Click a parent folder name to enter it and display its contents

MemberDirect Integrated Content Management Guide The Content Management Process
September, 2005 Rel. 1.0 2-24
• Double-click a subfolder name to move into it and display its contents • Click the Up link to move up one folder level
2. In the folder contents field (the second field in the screen labeled Name), click the name of the file you want to import and click Add. The file name appears in the import list shown in the next field
Importing a Subfolder To import an entire subfolder, click the subfolder name and click Add.
Displaying a Subfolder's Content To display the contents of a subfolder in the folder contents field, double-click the subfolder name. From there, you can select individual files to import.
Adding a Continuous Range of Files To add a continuous range of files to the import list, click the first file name, hold the [Shift] key down, and click the last file name. The entire range of file names is highlighted. Click Add to move the entire range to the import list.
Adding More than One File To add more than one file to the import list if the files are not in a continuous range, click each file name while you hold the [Control] key down. Each file name is highlighted. Click Add to move all of the highlighted files to the import list.
3. When the Import list in the last field on the screen contains all of the files you want to import, click Import and then Next. The Import File screen appears. From this screen, you can select the location in a workarea into which the file is be imported and specify what will happen next to the file.
Note: An error message is displayed if a file with the same name already exists in the import location. You can either:
• Cancel the import process to retain the original version of the file, or
• Overwrite the original version with the version your are importing by clicking the check box next to the file to import and then clicking Next
Renaming Files and Folders You can rename workarea items, but not items in other areas. When you rename files, the original files are deleted. You must submit those deleted files to remove them from the staging area.
Note that files do not lose their version history when they are renamed. The ContentCenter keeps track of the name change in the file’s history and older versions of the file are not lost.
Note: Do not use any special characters or spaces in file or folder name.

MemberDirect Integrated Content Management Guide The Content Management Process
September, 2005 Rel. 1.0 2-25
To rename a file or folder using CCPro:
1. Check the check box for the item you want to rename.
2. Select File > Rename.
3. Enter a name for the item. If you are renaming a file, ensure that you append a file extension to the name. (File extensions begin with a period and are generally 3-4 characters long, for example .html, .txt, .gif. File extensions indicate which applications your system uses to open files.)
4. Click OK.
A copy of the original file is created and given the specified name and the original file is deleted. The view pane displays the view from which you started the action, including deleted items that have been previously submitted. (You must submit deleted files to remove them from the staging area.)
Deleting Files and Folders Workarea content that has never been submitted to the staging area is permanently removed when it is deleted. Workarea content that has been submitted at least once can be restored after it is deleted.
The ContentCenter retains the version history of deleted content and uses the most recently submitted versions to restore deleted content. You can even restore content that is deleted from the staging area.
Deleting a Folder To delete a folder, complete the following steps using CCPro. (Note that you can delete a file only using CCPro.)
1. Check the check box for the folder you want to delete. 2. Select File > Delete.
3. One of the following prompts will inform you of the consequences of deleting the selected items: • If you are deleting content that exist only in the workarea, the prompt
warns you that deleting the items will permanently remove them
• If you are deleting content that has been previously submitted to the staging area, the prompt informs you that the items will be removed from the staging area only when the deleted items are submitted. In other words, the workarea versions will be deleted, but not versions in other areas. To remove a page from your live site, you must submit your deleted items to remove the items from the staging area.
4. Click Delete.
The items will be deleted. The view pane displays the view from which you started the action, including deleted items that have been previously submitted. (You must submit deleted files to remove them from the staging area.)
MemberDirect Integrated Content Management Guide The Content Management Process
September, 2005 Rel. 1.0 2-26
5. After a folder is deleted, you must refresh the sitemap via the RefreshData page on the preview server to allow the changes take effect on the preview server.
6. Confirm your changes on live by submitting the deleted folder and deploying your change to live by invoking the Submit and Deploy to Live workflow.
Note: The icon indicates items that are deleted in the workarea, but have corresponding versions in the staging are, regardless whether they were originally a folder or a file. That is, at some time prior to being deleted, the original file was submitted to the staging area.
Renaming, moving, or deleting files that have been previously submitted does not affect versions of those files in other areas. To remove those versions, you must submit the deleted items.
Deleting Folders with Locked Files You may be unable to delete folders if these folders contain locked files and see following error as the last comment for the Content Submission Task: "Checked out files prevent submitting".
You will see the icon next to the folder indicating that the folder has been deleted. Even after selecting the Overwrite all option and then Submit, the Submit screen will disappear. However, the folder will remain in the workarea and staging area.
To resolve this issue, perform the following steps to restore the delete folder and unlock any files within the folder or its subfolders before performing delete:
1. Click on Get Latest.
2. Open the folder, and unlock all locked files within the folder and its subfolder if any.
3. Click on Submit to submit the folder back to the staging area.
4. Delete the folder from the workarea and then submit the deleted folder in the staging area.
Note: To avoid this situation, always unlock all files in the folder before deleting the folder. See Locked Files.
Removing a Deleted Folder from the Deploy to Live Workflow To remove a deleted folder from live:
1. Select the deleted folder. 2. Click on Submit. 3. Select Submit and Deploy to Live workflow, and then click Next. 4. Enter Submit Comment and then click Submit. 5. To verify the workflow is completed, ensure the workflow is not pending on
the Workflow panel. If your job is showing on the Workflow panel, allow it time to complete the task.
6. Click on the Refresh Sitemap link on the Refresh Data page on your production website to refresh the sitemap after the workflow is completed.

MemberDirect Integrated Content Management Guide The Content Management Process
September, 2005 Rel. 1.0 2-27
The deleted page should be removed from the production site.
Note: Removing a page will cause all the references (hyperlinks) to this page to break. If you have captured a reference to this page as part of the content on other web pages, ensure you have removed all the references to this page before removing the page.
Once a deleted folder is submitted, you cannot restore the deleted folder and the files within it.
Deleting Workarea Folders To delete a workarea folder using CCPro:
1. Check the check box for the folder you want to delete.
2. Select File > Delete.
3. One of the following prompts informs you of the consequences of deleting the selected folder:
• If you are deleting a folder that exists only in the workarea, the prompt warns you that deleting the folder will permanently remove it.
• If you are deleting a folder that has been previously submitted to the staging area, the prompt informs you that the items will be removed from the staging area only when the deleted items are submitted. That is, the workarea versions will be deleted, but not versions in other areas.
4. Click Delete.
The folder is deleted. The view pane displays the view from which you started the action, including deleted folders that have been previously submitted. (You must submit deleted folders to remove them from the staging area.)
Deleting Workarea Files To delete workarea content using CCPro:
1. Check the checkbox for the file you want to delete.
2. Select Actions > Lock. Then, click the Lock button.
Note: You must lock the file first before you can delete it.
3. Select the locked file that you want to delete.
4. Select File > Delete.
5. One of the following prompts informs you of the consequences of deleting the selected file:
• If you are deleting a file that exists only in the workarea, the prompt warns you that deleting the file will permanently remove it.
• If you are deleting a file that has been previously submitted to the staging area, the prompt informs you that the items will be removed from the staging area only when the deleted items are submitted. That is, the workarea versions will be deleted, but not versions in other areas.

MemberDirect Integrated Content Management Guide The Content Management Process
September, 2005 Rel. 1.0 2-28
6. Click Delete.
The file is deleted. The view pane displays the view from which you started the action, including deleted files that have been previously submitted. (You must submit deleted files to remove them from the staging area.)
Note: The icon indicates the deleted item — regardless whether they were originally a folder or a file — that is deleted in the workarea, but have corresponding versions in the staging area. This means that, at some time prior to deletion, the original file was submitted to the staging area. Renaming, moving, or deleting files that have been previously submitted does not affect versions of those files in other areas. To remove those versions, you must submit the deleted items.
Restoring Deleted Content You can restore content only if the content was submitted to the staging area at least once prior to deletion. A version of the item does not have to exist in the staging area in order for you restore the workarea item. Therefore, you can restore items even when they have been deleted from the staging area.
The icon represents content that is deleted from the workarea and that has a copy in the staging area. Such deletions are displayed in the All Files view to remind you that you must submit them to also delete copies in the staging area. You can also restore deleted content listed in the All Files view through the Undo Changes link.
Files that have been removed from both the workarea and staging area can also be restored. The All and Deleted Files view lists all files in the current location including those files. The icon indicates content that has been removed from both workarea and staging area. A Restore link is available for each of those files.
Note: You can only restore a file, but not a folder.
Restoring Multiple Items To restore multiple items using CCPro, complete the following steps:
1. Navigate to the location that contains the deleted items you want to restore.
2. Select View > View All and Deleted Files.
3. Select the items you want to restore.
4. Click Restore in the title bar.
5. The files are restored to the most recent version of the file before it was deleted.
Restoring Staging Area Items To restore staging area items:
1. Restore the corresponding deleted workarea items.
2. Submit the restored workarea items.

MemberDirect Integrated Content Management Guide The Content Management Process
September, 2005 Rel. 1.0 2-29
Creating a New Page and Navigation To create a new page, you must first create a folder for the page. The folder represents the navigation. After creating the new folder, you can create the content file and store it in the new folder. Either the ContentCenter Professional or Standard interface can be used to create a new page and navigation.
Creating a New Folder You can create a new folder using either CCPro or CCStd as shown below.
Using CCPro To create a new folder using ContentCenter Professional (CCPro), first navigate to any folder under /Personal or /Business where you want to create the new navigation. Then, complete the following steps:
1. Select File > New Folder. 2. Enter a name for the folder. (Do not put any spaces in the folder name.) 3. Click OK.
Note: Do not create child pages (folders) directly under /Personal or /Business. Create the folder for child pages under their subfolders.
Using CCStd To create a new folder using ContentCenter Standard (CCStd), first navigate to the sub-folder under /Personal or /Business where you want to create the new navigation. Then, complete the following steps:
1. Click New Folder. 2. Enter a name for the folder. (Do not put any spaces in the folder name.) 3. Click Finish.
The new folder will be created and the view pane will display the current location, including the newly created folder.
The default web page URL on your site is set as index.jsp file. Thus, you should name the content output file generated by page-layout category forms as index.jsp. You can use any one of the forms under the page-layout category to generate the index.jsp and save the file into these new folders.
Generating, Previewing, and Submitting the Output File There are eight forms available for providing different page layouts to capture generate the index.jsp and save the file into these new folders.different types of content (See Web Page Forms.)
You can create a new form entry with any form under the page-layout category (See Creating a New Form Entry File.). After you’ve completed the form, you can generate the output file with the form.
Generating the index.jsp File To generate the index.jsp file for both CCStd and CCPro, complete the following steps:

MemberDirect Integrated Content Management Guide The Content Management Process
September, 2005 Rel. 1.0 2-30
1. Enter all required information into the form fields and then click Generate.
2. Click on Browse to select the new folder you have created, or enter the full file path in the Select an Output File text field. Then, enter the filename as index. For example, to save the content into /Personal/AboutUs, you would enter /Personal/AboutUs/index into the text field.
Note: You only need to enter the filename once. The dialog box will not appear when you regenerate the output file again.
3. Click OK. A preview window will display the content file you have generated.
Submitting Your Changes If your preview content looks correct and is ready for deployment, submit your changes via CCStd or CCPro, as described below. Once your changes are committed, they will be deployed to the live site instantly.
To submit your changes using CCStd:
1. Click Next>> if your preview content looks correct; otherwise, you can edit the content again and regenerate the output page.
2. Select Submit Now as the Next Action. Then click Next>> to submit your changes. Note: If you do not want to submit your changes immediately, select Keep
Work in Progress instead before clicking Next. 3. Enter comments in the Submit Comments field and then click Next>>. 4. Click Done.
To submit your changes using CCPro:
1. Click Finish if your preview content looks correct; otherwise, you can edit the content again and regenerate the output page.
2. Select Submit Now as the Next Action and then click Next>> to submit your changes.
Note: If you do not want to submit your changes immediately, select Submit Later instead before clicking Next to end the workflow.
3. Enter comments in the Submit Comments field and then click Finish. After changes are committed, your change will be deployed to Live automatically.
Note: To deploy your changes at a later time, follow the steps shown below in Modifying a Page.
Modifying a Page To modify page content, you must edit the corresponding index.jsp file for a particular web page as follows:
1. Navigate to the folder that contains the index.jsp output file to be modified.

MemberDirect Integrated Content Management Guide The Content Management Process
September, 2005 Rel. 1.0 2-31
2. Click Edit to edit the index.jsp file. The form entry opens in the corresponding from that generated this index.jsp output file.
3. Edit the content as needed. 4. Generate, preview, and submit your changes as described about under
Generating, Previewing and Submitting the Output File.
Moving a Page When you move a page, you are also moving the website navigation as well. Be aware of pages containing child pages – moving page also moves all the child pages along with it. To move any navigation, you must move a folder that represents that web page. Since the folder contains the page content file (index.jsp) and sub-folders, moving a folder will also move all content.
Moving a Folder To move a folder, complete the following steps using CCPro. (Note that you can move a file only using CCPro.)
1. Check the check box for the folder you want to move. 2. Select File > Move.
The view pane displays the Move screen. The title bar shows the name of the folder.
3. Enter a destination in the Destination field by doing one of the following steps: a. Enter the path to the location where you want to move the selected folder
OR b. Click Browse. Then, select the location you want and click OK.
4. Click OK.
The items are deleted from the current location and moved to the specified destination. The view pane displays the view from which you started the action, including deleted folder that have been previously submitted. (You must submit deleted folders in order to remove them from the staging area and the live site.)
5. Navigate to the destination folder to verify that the folders you moved are present.
You can click on the index.jsp filename to bring up the preview window for preview your changes. Click Submit to submit your folder in the new destination.
Note: Always ensure that no other user is modifying any pages that you are moving. If there is, allow them to complete their changes or roll back their changes first before moving those pages. Otherwise, you will create file conflicts. (See Modified Files and File Conflicts).

MemberDirect Integrated Content Management Guide The Content Management Process
September, 2005 Rel. 1.0 2-32
Deleting a Page When you delete a page, you must also delete the folder in which the web page resides. Once the folder is deleted, both the website navigation and its content would get deleted as well. Be aware of pages containing child pages – deleting a page will delete all the child pages as well. If you do not want to delete the child pages, move those child pages before deleting the page (See Moving a Page).
Note: If the output files within the folder and its sub-folders have never been submitted to the staging area, they will be permanently removed when they are deleted. You can restore a file only if it has been submitted at least once. (See Restoring Deleted Content).
You would not be able to restore a page (consisting of a folder with an index.jsp file) after it is deleted from the staging area. When a folder is deleted, it and its contents cannot be restored.

September, 2005 Rel. 1.0 3-1
Introduction to Content Management Forms
This chapter tells you how to use forms in order to manage the content on your MemberDirect website.
What is a Form? A form is a template that guides the creation of website content and also controls its appearance. Using a form allows you can enter data independently from the appearance of the finished content. The form captures the data that you enter and saves it in a form entry file.
Each form has an associated presentation template that defines how your form entries will appear when displayed. For example, a presentation template could specify the size, color, or layout of a web page.
By combining a form entry file with a presentation template, a form allows you to generate an output file in HTML, XML or JSP format as defined by the presentation template. This output file can be used as a web page or as content to be displayed on a web page.
By using form entries, you do not have to learn HTML, XML or JSP in order to manage a dynamic website. Each form entry has the functionality to generate and preview output files. A wizard-based workflow is associated with each form entry to enable you to publish content instantly.
Using Forms Both CCPro and CCStd provide you access to create new form entries, as well as allowing you to edit existing form entries to update some or all of the information in forms. After entering information in a form, you submit it to save in the form entry file.
A new form entry contains a form with blank fields and displays Untitled in the upper left corner. For an existing form, the file name will appear in the upper left corner instead.
Creating the Form Entry file There are various types form entries designed for you to capture different types of content. The form categories and their associated form types are shown in the following table:

MemberDirect Integrated Content Management Guide Content Management Forms
September, 2005 Rel. 1.0 3-2
Form Category Form Type
Branch Cities contact-labels details hours provinces regions services
Content Standard
page-layout Home include job-posting list-of-documents promotional rates-details rates-overview simple
Portlet Banner marketing-offer quick-navs rates shortcuts
Rates foreign-exchange prime products term-deposits
Form Categories and Types The form category refers to the type of content shown on the page such as information about rates or branches. The form type refers to the type of form used to enter the content for a form category. Each category has specific form types for the entry of content. For example, to enter content for the rates category, you would use foreign-exchange, prime, products or term-deposits form types. Note that you cannot change the names of either the form categories or form types.
Selecting a Form Entry You can select a new form entry via either CCPro or CCStd as shown below.
Using CCPro To select a new form entry using CCPro:
1. Select File > New Form Entry on the Content tab.
The Select Form window opens as shown in Figure 3-1: Select Form Window.
2. Select the form you want and click Next.

MemberDirect Integrated Content Management Guide Content Management Forms
September, 2005 Rel. 1.0 3-3
Figure 3-1: Select Form Window
Alternatively, you can select a form indicated as [form category]: [form type] on the CCStd home page in the New Forms module.
Using CCStd To select a new form entry using from CCStd, click either the New link or the form name from the New Forms module (see Figure 3-2: New Forms Module) on the CCStd page.
Figure 3-2: New Forms Module
Form Category
Form Type
Form Type
Form Category
Click Next after Selecting Form
Click Here to Display Next Page of Forms

MemberDirect Integrated Content Management Guide Content Management Forms
September, 2005 Rel. 1.0 3-4
Note: Some forms are listed on a second page of the New Forms module; you can click on to display next page icon to access the other forms.
After you select a form, a blank version of the form appears. You can enter the required content on the blank form. Form entry files are saved to the templatedata/[form category]/[form type]/data folder in your content area.
Editing an Existing Form Entry The ContentCenter allows you to edit the values in existing forms. The first step is to locate the entry and then to edit it as required.
File Structure for Form Entries All generated index.jsp files should be located on the /Personal and /Business folders (and their folders), with folder names matching your site's navigation. Any shared content should be located under the /SharedContent folder.
Locating an Existing Form Entry You can use CCStd to locate an existing form entry through on of the following modules:
• The My Workareas module on the home page • The My Favorites module on the home page • The Work in Progress module on the home page
When you locate the form entry file you want to edit, click Edit to the right of its name. To view the form entry file without editing it, click the file name.
Entering Data into a Form You can enter information into a form entry file as shown in Figure 3-3.
Figure 3-3: Field Types on Form File
Fields with Asterisks are Mandatory
Text File
Field with Browse Button
Field with View Calendar
Field Icons
Expand/Collapse Icon

MemberDirect Integrated Content Management Guide Content Management Forms
September, 2005 Rel. 1.0 3-5
The following table shows the type of fields on forms and how to complete them.
Type of Field Procedure
Text Fields Place the mouse pointer in the field, single-click, and enter the text to appear in the field. You can click in a field name to move the cursor to that field. The tab key also moves the cursor to the next field.
Fields with an Asterisk
All fields that have an asterisk (*) beside the field name are required field and must be completed Some fields, such as a date, might require a specific format. That format or other information about the field is available by clicking the question mark next to the field name (when it is available). If you enter invalid data in a field with a specific format or do not provide required data, the field turns red when you try to save the form entries and a message also displays to indicate the error. The error message may show clickable page numbers to help you navigate to the error. You cannot save form entries until all required fields contain valid data.
Fields with a Browse Button
Some fields have a Browse button next to them. Use this button to locate a file by:
1. Clicking the Browse button to display the Link to File dialog box. The directory that appears was set up when the form was defined.
2. Navigating to the file you want to use. The path to the file displays in the field in the form.
Fields with a View Calendar
Some fields have a View Calendar button next to them. Use this button to select a date by: 1. Clicking the View Calendar button; then a calendar
window displays. 2. Select a date you want to specify. The date displays in the
field in the form. Alternatively, you can enter a valid date in mm/dd/yyyy format.
Field Icons Some fields have expand/collapse icons on the left side of the form. These icons are and . Use these icons can be expanded to show the entire contents of the field or collapsed to show only the field label.
Other fields have the following icons in the top, right corner to create, move, or remove a field:
Creates an additional field or section containing a group of fields on the form
Moves the field up one level in the form Moves the field down one level in the form Removes the field from the form

MemberDirect Integrated Content Management Guide Content Management Forms
September, 2005 Rel. 1.0 3-6
VisualFormat Feature The VisualFormat feature might be available in text areas. This feature displays buttons in the text area that allow you to format text. If VisualFormat is enabled, its toolbar appears after you click in a text area. For further information on VisualFormat, see Installing the VisualFormat Toolbar.
Content Display Period After you have created or edited form data, you can preview and publish your content. However, you may restrict a content period for a particular piece of content within a web page; you need to explicitly specify a content display period. For content that can be regulated, you would see the Content Display Period section available in a form as shown in Figure 3-4.
Figure 3-4: Content Display Period Section
To specify a content display period, you would insert a Content Display Period section by clicking on the icon. The Content Display Period section contains the fields shown in Figure 3-5:
Figure 3-5: Content Display Period Field
Complete the Content Display Period fields as follows:
Start Date* Enter a valid start date in mm/dd/yyyy format. (You can select a date from the calendar by clicking on the View Calendar button.)
From: Enter a valid starting time in hh:mm 12-hour format (the default is 09:00). If you leave the field blank, the application will assume it will start at 00:00 AM on the start date you have specified.
AM/PM Select a.m. or p.m. from the dropdown list.
End Date Enter a valid end date in mm/dd/yyyy format. (You can select a date from the calendar by clicking on the View Calendar button.)
To: Enter a valid end time in hh:mm 12-hour format (the default is 05:00). If you leave the field blank, the application will assume it will end at 00:00 AM on the end date you have specified.

MemberDirect Integrated Content Management Guide Content Management Forms
September, 2005 Rel. 1.0 3-7
AM/PM Select a.m. or p.m. from the dropdown list.
Note: To specify a time as midnight, enter 00:00 or 12:00 a.m; for noon, enter 12:00 p.m.
Adding Call-to-Action Hyperlinks A call to action is a hyperlink related to a specific piece of content on a web page. An example of a call to action is a link that takes the user to a mortgage application.
For content pieces with a call to action, you would see the Call to Action section within a form as shown in Figure 3-6:
Figure 3-6: Call to Action Section of a Form
To insert a call to action for a specific content piece, click on the icon in the Call to Action section to display the fields showing in Figure 3-7.
Figure 3-7: Call To Action Field
Complete the Call to Action fields as follows:
Text* Enter the display text for the call to action (a hyperlink).
Link To*: Enter a URL for the call to action (a hyperlink). See Specifying URLs for Link-to Fields.
Click on the icon again to insert more call to action links.
Most Call-to-Action sections allow you to enter any number of links. If the icon appears grayed out such as , you have reached the allowed limit for Call to Action links.
Specifying URLs for Link-to Fields You can specify a fully qualified HTTP URL when you want to refer to a page on an external web site. For example: http://www.cucbc.com
Note: Start the URL with http:// to indicate it is a HTTP page.
You should use partial URLs to refer to a web page on your own site. For example: /Personal/AboutUs.

MemberDirect Integrated Content Management Guide Content Management Forms
September, 2005 Rel. 1.0 3-8
Note: Always start your partial URLs with a slash (/). Without a slash, the URL will be come a relative path to your current page. For example, you want to refer to a page on /Personal. If your current page is located on /Personal/AboutUs/Services, the relative page to Personal is /Personal/AboutUs/Services/Personal, which will turn into an invalid reference unless you do have a Personal child page under /PersonalAboutUs/Services.
File Structure for Generated Files and Shared Content In the root of your workarea, you should only see following folders and one index.jsp file as shown in Figure 3-8. The index.jsp file in the root of your workarea should only be modified by developers at CUCBC. Each folder in the root of your workarea has a special use for categorizing your content. Determine an appropriate folder to save or import your content into these predefined folders. Do not create sub-folders or import files directly into the root of your workarea.
Figure 3-8: Workarea Root Directory
The folders in the root of your workarea are as follows:

MemberDirect Integrated Content Management Guide Content Management Forms
September, 2005 Rel. 1.0 3-9
Personal The Personal folder contains sub-folders that represent the navigation of each web page on your personal banking website. Each sub-folder including the Personal folder should contain an index.jsp file that is generated by ContentCenter forms under the Page Layout form category. (See Creating a New Page and Navigation.)
Business The Business folder contains sub-folders that represent the navigation of each web page on your business banking website. Each sub-folder including the Business folder should contain an index.jsp file that is generated by ContentCenter forms under the Page Layout form category. (See Creating a New Page and Navigation.)
Resources The Resources folder contains information about styles, branding, scripts and decorators for your website. The content within the Resources folder should only be modified by developers at CUCBC. Only advanced users who understand how to modify these files can modify or import files into the Resources folder.
SharedContent The SharedContent folder contains shared content that is generated by ContentCentere forms under the Content or Portlet forms categories. You can create sub-folders within the SharedContent folder to categorize your shared content for better file management. If you rename or move content or sub-folders under the SharedContent folder, you must modify all web pages (index.jsp) that contain references to those renamed or moved files to reflect the changes.
Under SharedContent folder, there is an images folder. You should import all your images files into this folder. You can create sub-folders under this folder to categorize your image files. Under SharedContent folder, there is also a documents folder. You should import all your documents such as PDF, Word or text documents into this folder. You can create sub-folders under this folder to categorize your documents. Refer to Importing Files in The Content Management Process.
Data The Data folder contains an atms folder that contains xml data files and corresponding xml schema files for ATM information. Files under this folder should only be modified by developers at CUCBC or advanced users who understand the xml structure and schema required by the ATM locator on your website.

MemberDirect Integrated Content Management Guide Content Management Forms
September, 2005 Rel. 1.0 3-10
Under the Data folder, there is also a branches folder that contains xml data files and corresponding xml schema files. The xml schema files are defined by developers at CUCBC. You should never alter the schema files. Each xml file under the branches folder and its sub-folders are generated by ContentCenter forms under the Branch form category. To modify branch information, edit the xml data files. (See Managing Branch Information.)
Also under the Data folder, there is rates folder that contains xml data files and corresponding xml schema files. Each xml schema files are defined by developers at CUCBC. You should never alter the schema files. Each xml files under each sub-folder is generated by ContentCenter forms under the Rates form category. To modify rates information, edit these xml data files. (See Managing Rates Data.)
templatedata All form-related files are contained in this folder.
Navigating to Different Form Pages If a form contains multiple pages, the Page Navigation panel located on the bottom of a form is displayed as shown in Figure 3-9: Page Navigation Panel. The page navigation panel shows the current page number and the total pages contained in the form. You can navigate to a different page by clicking on the icons on the page navigation panel or entering the page number and pressing the [Enter] key on your keyboard.
Figure 3-9: Page Navigation Panel
Saving Your Entries If this form entry file already has a name, click Save to update the file with the current entries. If you have not yet saved this form entry file, click Save to save the form entry file with an automatically generated file name. The file name will be based on the data you specified in the Title field if any.
Generating an Output File
Your form entries cannot be viewed as publishable content at this point. You must generate publishable content by combining the form entry file with a presentation template. The file that you generate is called an output file. Because the form entry file and the output file are two distinct files, you must regenerate
Enter a Page Number to Display

MemberDirect Integrated Content Management Guide Content Management Forms
September, 2005 Rel. 1.0 3-11
the published content if you change the form entries (that is, if you modify the form entry file). To regenerate an output file, click on Generate.
New Form Entries For a new form entry, you must specify an output file name and location. When you click Generate, the Generate Options page appears. This page allows you to specify an output file name and location by using the Browse button to save the output file to a dedicated folder. Different content pieces need to be saved in different folders that mirror the sitemap and file organization in your website. See the following section for details about these folders.

September, 2005 Rel. 1.0 4-1
Using Content Management Forms
This chapter tells you how to use the forms for each of the following form categories:
• Page-layout forms • Rates data forms • Branch Information forms • Online Banking Marketing portlets
Page-layout Forms This category provides different page layouts for the following types of web pages:
• Home (page-layout: home) • Promotional Pages (page-layout: promotional) • Simple Pages (page-layout: simple) • Rates Overview Pages (page-layout: rates-overview) • Rates Details Pages (page-layout: rates-details) • Job Posting Pages (page-layout: job-posting) • List of Documents Pages (page-layout: list-of-documents) • Include Pages (page-layout: include)
You can use one of the forms listed above that best fit your content to create a new web page. Each form contains multiple pages that contain different components to be shown on the same web page.
Page-Layout Form Sections Each of the page-layout forms listed above has the following form pages:
• Primary Content • Secondary Content • Child Page Order • Advanced Metadata
Each template has a variable Primary Content element. However, the secondary content, child page order, and advanced metadata elements are all the same.

MemberDirect Integrated Content Management Guide Using Content Management Forms
September, 2005 Rel. 1.0 4-2
Primary Content Page The first section of each template in the page-layout Primary Content page is the Metadata section shown in Figure 4-1.
Figure 4-1: Primary Content Page of Page-layout Form Category
Metadata The Metadata section contains a description and keyword that allows Internet search engines (such as. www.yahoo.ca) to match a keyword specified in a web page and to display a link to the matched web page on the searched result page along with the description.
The Metadata section allows you to specify the following information for a web page. Complete the section fields as follows. Page Title* Enter a title for this page that will be used as the HTML title, the
description in the page navigation, and the breadcrumb for the page.
Keywords Enter keywords or phrases for this web page. You can specify the description and keywords as the metadata for a particular page in the Metadata section (on the last page of each page-layout form). Each keyword or phrase should be separated by a comma.
Description Enter a description for this web page. Do not include any images in the description.
Unique Identifier
This field checks to determine if the entry in the Page Title is unique, that is, that there are no other pages on the site with the same page title. The value you entered in the Page Title field will be displayed in this field. Click on the Check ID… button beside the identifier to see if the page title is unique. The system will display all pages that have the same page name if there are any. If there are other pages with that name, change the Page Title to a unique name. If the system does not display any page names, then the name you entered is unique.

MemberDirect Integrated Content Management Guide Using Content Management Forms
September, 2005 Rel. 1.0 4-3
Layouts Select one of the available decorators to be used for this page.
Secondary Content Page The second page of each form in the page-layout category is the Secondary Content page, shown in Figure 4-2. This page allows you to specify the following information for page portlets and banners that appear on a web page:
Figure 4-2: Secondary Content Page of Page-layout Form Category
Portlets Click the icon to select one of the portlet options – Marketing, Quick Navigation, Rates, Shortcuts, or Include (see Portlets in this section).
Global Portlets
Click the icon to select one of the portlet options - Rates, Index, or Stock portlets (see Global Portlets in this section).
Banner Click the icon to select one of the portlet options – Banner or Include Banner (see Banners in this section)
Portlets Page A Portlets page is available on each page layout category form entry as shown in Figure 4-3. If there are no portlets captured for this page, you would see - 0 items show in the Portlets page heading.
You are limited to five portlets for each web page. Portlets captured with page-layout category form entry are only visible to that particular web page. If you wish to show a portlet on multiple web pages and do not wish to recapture the same portlet information, use the portlet forms for shared content (see Forms for Shared Content in Managing Shared Content) and include the output file in the Include section under Portlets section.
Click to Capture Portlets

MemberDirect Integrated Content Management Guide Using Content Management Forms
September, 2005 Rel. 1.0 4-4
Figure 4-3: Portlets Section
To capture portlets, click on the icon. The floating menu shown in Figure 4-4 allows you to select the following portlets in any order you choose:
• Marketing (Offer Presentment) • Quick Navigation • Rates • Shortcuts • Include
Note: All the portlets are displayed within a limited area on a page. Although there is no limit on how much content you can enter into each field on any form for a portlet, you should ensure that the image and/or text included in the portlet do not alter your web page layout. If an image is too large or the text for a call to action is too long, it could widen the portlet display area and distort the page layout. If your page layout appears distorted when you preview your changes, try resizing your images or rephrasing the text to correct the distorted layout.
The portlets available for each page-layout category are described below.
Marketing (Offer Presentment) Portlet Figure 4-4 shows an example of how a Marketing (Offer Presentment) portlet will appear on a web page.
Figure 4-4: Example of a Marketing (Offer Presentment) Portlet
If you selected Marketing (Offer Presentment) from the floating menu, you would see the Marketing (Offer Presentment) portlet shown in Figure 4-5:

MemberDirect Integrated Content Management Guide Using Content Management Forms
September, 2005 Rel. 1.0 4-5
Figure 4-5: Marketing (Offer Presentment) Portlet
Complete the fields on the Marketing (Offer Presentment) portlet as follows:
Title Enter the title that will appear as the heading for this marketing offer portlet.
Image Enter the image file name or select the image file using the Browse button.
Alt Text If a file name is entered in the Image field, enter alternative text for the specified image.
Content* Enter information about the marketing offer in this field. You may want to use the VisualFormat function to simplify text entry and editing. See Installing the VisualFormat Toolbar in Getting Started for more information.
Call to Action
Enter any required call to action links for this portlet. See Adding Call to Action Hyperlinks in The Content Management Process.
Content Display Period
If you wish to restrict the viewing of the portlet, enter a content display period. See Content Display Period in The Content Management Process for more information.

MemberDirect Integrated Content Management Guide Using Content Management Forms
September, 2005 Rel. 1.0 4-6
Quick Navigation Portlet Figure 4-6 shows how a Quick Navigation portlet appears on a web page.
Figure 4-6: Example of a Quick Navigation portlet
If you select Quick Navigation from the floating menu, you would see the Quick Navigation portlet section shown in Figure 4-7:
Figure 4-7: Quick Navigation Portlet
Complete the fields on the Quick Navigation portlet as follows: Title Enter the title that will appear as the heading for this Quick
Navigation portlet. Call to Action
Enter any required call to action links for this portlet. See Adding Call to Action Hyperlinks in The Content Management Process.
Content Display Period
If you wish to restrict the viewing of the portlet, enter a content display period. See Content Display Period in The Content Management Process for more information.
Rates Portlet Figure 4-8 shows how a rates portlet will appear on a web page.

MemberDirect Integrated Content Management Guide Using Content Management Forms
September, 2005 Rel. 1.0 4-7
Figure 4-8: Example of a Rates Portlet
If you selected Rates from the floating menu, you would see the Rates portlet shown in Figure 4-9. This portlet lets you enter rate information for financial products such as loans and term deposits.
Figure 4-9: Rates Portlet
Complete the fields on the Rates portlet as follows: Title Enter the title that will appear as the heading for this Rates
portlet. Call to Action Enter any required call to action links for this portlet. See
Adding Call to Action Hyperlinks in The Content Management Process.
Rates Click the icon to insert another group of rates. Product/Rate* Click the Select… button to select a particular rate. Then, if
you want to insert one or more product/rate sections, click the icon.

MemberDirect Integrated Content Management Guide Using Content Management Forms
September, 2005 Rel. 1.0 4-8
Content Display Period
If you wish to restrict the viewing of the portlet, enter a content display period. See Content Display Period in The Content Management Process for more information.
Shortcuts Figure 4-10 shows how the Shortcuts portlets appear on a web page:
Figure 4-10: Example of Shortcuts on a Web Page
If you selected Shortcuts from the floating menu, you would see the Shortcuts portlet shown in Figure 4-11. This portlet allows you to create or change links to other pages on your website.
Figure 4-11: Shortcuts Portlet
Complete the fields on the Shortcuts portlet as follows: Title Enter the title that will appear as the heading for this Shortcuts
portlet. Shortcuts Each shortcut consists of a call to action. Click the icon to
insert another shortcut.
Call to Action Enter a call to action links for this portlet. See Adding Call to Action Hyperlinks in The Content Management Process.

MemberDirect Integrated Content Management Guide Using Content Management Forms
September, 2005 Rel. 1.0 4-9
Content Display Period
If you wish to restrict the viewing of the portlet, enter a content display period. See Content Display Period in The Content Management Process for more information.
Include If you have created a portlet within any portlet category form, you can include that portlet in a web page without re-entering the data. To include a portlet, select Include from the floating menu. You would see the Include portlet section shown in Figure 4-12.
Figure 4-12: Include Portlet
To include a particular portlet in a web page, use the Browse button to select from Shared Content, the output file you have generated.
Note: Only include a shared portlet with Marketing, Quick Navigation, Rates, and Shortcuts. Including other files on these forms may have unexpected results.
Global Portlets Page The Global Portlets page gives you the ability to turn on or off the rate, indexes, and stock portlets that appear on the right side of the screen. By default, all the portlets are inherited from the Home page. (Currently, the global rates portlet is not available.) Figure 4-13 shows as example of the Global Portlets page.
Figure 4-13: Global Portlets Page of a Page-layout Form

MemberDirect Integrated Content Management Guide Using Content Management Forms
September, 2005 Rel. 1.0 4-10
Select one of the following options for each of Global Rates, Index and Stock: Inherit Inherit the Rates portlet (Default value). Enable Enable the Rates portlet. Enable This Page Only
Enable the Rates portlet for this page only.
Disable Disable the Rates portlet. Disable This Page Only
Disable the Rates portlet for this page only.
Override Rates Portlet If you select Override Rates Portlet, you would see the Override Rates Portlet shown in Figure 4-14:
Figure 4-14: Override Rates Portlet
The Override Rates Portlet allows you to select a different portlet to use by clicking on the Browse button. You can also specify that this portlet is enabled only for the current pages and not all pages by clicking on the radio button beside This Page Only.
Banners Only one banner can be captured in the Banner Content page. If a banner is not captured for this page, you will see - 0 items in the Banner Content section heading, as shown in Figure 4-15.
Figure 4-15: Banner Content Page of a Page-layout Form
The floating menu shown in Figure 4-15 allows you to select a banner or include an existing one.
Click to add additional Banner Content

MemberDirect Integrated Content Management Guide Using Content Management Forms
September, 2005 Rel. 1.0 4-11
The banner captured with a page-layout category form is only visible to that particular web page. If you wish to show the same banner on multiple web pages and you do not want to recapture the same banner again, use the banner form (See Forms for Shared Content in Managing Shared Content) and include the output file in the Include section under Footer Content section.
Banner Option If you selected Banner from the floating menu in Banner Content section, you would see the Banner section shown in Figure 4-16.
Figure 4-16: Banner section of Footer Content
Complete the Banner sections fields as follows: Title Enter the title for this banner. The banner title would not be
displayed on the web page – it is for your reference only. Image Click the icon to insert additional image files. If a banner
contains more then one image, the banner will display these image files in a rotating sequence.
Select Image File*
Click on the Browse button to select an image file or enter the path and file name if you know it.
Alt Text* Enter alternative text for the specified image.
Link to If you want the banner image to be clickable, enter a URL to which to link the image.
Content Display Period
If you wish to restrict the viewing of the banner, enter a content display period. See Content Display Period in The Content Management Process for more information.
Including Banners If you have created a banner with the banner form, you can include any banner created in a web page without re-entering the data again. To include a banner, select Include from the floating menu. You would see the Include section shown in Figure 4-17.
Click to Add More Images

MemberDirect Integrated Content Management Guide Using Content Management Forms
September, 2005 Rel. 1.0 4-12
Figure 4-17: Include Section of Footer Content
To include a particular banner in a web page, click the Browse button to select from Shared Content, the output file you have generated.
Note: Only include a shared banner file. Including other files may have unexpected results.
Child Page Order The third page of each form in the page-layout category is the Child Page Order page. This page allows you to specify the following types of child pages for a web page:
• Cloned pages • Actual pages
A cloned page is a page that refers to an actual page on which the content shown in the cloned page originates. An actual page is a web page that has an actual file created under the specified location. For example, if you are editing /Catalogue/ Widget and you want to specify the order of two child pages: Specifications and Testimonials in that order. All the specifications reside in a single location, such as /Specs/Widget. Instead of copying the content in two places, /Specs/Widget is cloned as Specification so that there is URL /Catalogue/Widget/Specification. However, in the ContentCenter, no such file exists, there is only /Spec/Widget.
In the case of Testimonials, there is a page at /Catalogue/Widget/Testimonials that can be edited in the ContentCenter. Therefore, /Specs/Widgets is a cloned page, while /Catalogue/Widget/ Testimonials is an actual page. In addition, since /Specs/Widget includes two children, /Specs/Widget/ModelAA3 and /Specs/Widget/ModelAA4, cloning /Specs/Widget will also clone its children, giving the following URLs: /Catalogue/Widget/Specification/ModelAA3 /Catalogue/Widget/Specification/ModelAA4
Figure 4-18 shows the relationship between cloned and actual pages.

MemberDirect Integrated Content Management Guide Using Content Management Forms
September, 2005 Rel. 1.0 4-13
Figure 4-18: Child and Actual Pages
Figure 4-19 shows an example of the Child Page Order Window.

MemberDirect Integrated Content Management Guide Using Content Management Forms
September, 2005 Rel. 1.0 4-14
Figure 4-19: Child Page Order Window
To enter more child pages, click on the icon again until you have included all required child pages. The order listed on the form entry here will be the display order on the website of the navigation for these child pages.
To rearrange the child page order that you have entered previously, click on the or icons only if there are more than two child pages available
Cloned Page The Cloned Page section of the Child Page Order window contains the fields shown in Figure 4-20:
Figure 4-20: Cloned Page option on the Child Page Order Window
Enter the Cloned Page information as follows:
Page Path* This is a read-only field and can only be modified through a change request. Normally, you should not need to provide any value in this field when you specify a child page.
Clone of* Enter the folder name that contains the child page or use the Browse button to select the child page output file.
Actual Page The Actual Page section of the Child Order window contains the fields shown in Figure 4-21:
Click to select a Cloned or Actual page
Click to Add More Child Pages
Click to Change the Child Page
Order
Click to Change the Child Page
Order

MemberDirect Integrated Content Management Guide Using Content Management Forms
September, 2005 Rel. 1.0 4-15
Figure 4-21: Actual Page Option on Child Order Window
Enter the Actual Page information as follows:
Page Path* This is a read-only field and can only be modified through a change request. Normally, you should not need to provide any value in this field when you specify a child page.
Advanced Metadata Page On the last page of each page-layout category form is the Advanced Metadata page, shown in Figure 4-22.
Figure 4-22: Advanced Metadata Page
Complete the Metadata section fields as follows:
Misc Titles Enter a miscellaneous title for this web page.
Click to Add More Child Pages
Click to Change the Child Page
Order

MemberDirect Integrated Content Management Guide Using Content Management Forms
September, 2005 Rel. 1.0 4-16
Page Name Enter a page name for this web page. Publish Period
Enter date and time when you want the page published. (See Publish Period below).
Primary Nav Add page to the primary navigation area of the web page. Secondary Nav
Add page to the secondary navigation area of the web page.
Global Nav Add page to the global navigation area of the web page.
Footer Nav Add page to the footer navigation area of the web page. Online Nav Add page to the online navigation area of the web page. Arbitrary Nav Roles
Arbitrary Nav is the same as the other navigation options except that it allows you to create new navigation types when needed.
Parameters Values that are set on individual pages that are inherited by descendants.
Publish Period If a publish period restriction is not set for a page, you will see - 0 items shown indicated on the Publish Period section heading. To insert a publish period, click on the icon and complete the fields shown in Figure 4-23:
Figure 4-23: Publish Period Window
Enter the Publish Period date information as follows: Start Date* Enter a valid start date in mm/dd/yyyy format. (You can select a
date from the calendar by clicking on the View Calendar button.) From: Enter a valid starting time in hh:mm 12-hour format (the default
is 09:00). If you leave the field blank, the application will assume it will start at 00:00 AM on the start date you have specified.
AM/PM Select a.m. or p.m. from the dropdown list. End Date* Enter a valid end date in mm/dd/yyyy format. (You can select a
date from the calendar by clicking on the View Calendar button.) To: Enter a valid end time in hh:mm 12-hour format (the default is
05:00). If you leave the field blank, the application will assume it will end at 00:00 AM on the end date you have specified.
AM/PM Select a.m. or p.m. from the dropdown list.
Click to Remove Publish Period
Click to Add a Publish Period

MemberDirect Integrated Content Management Guide Using Content Management Forms
September, 2005 Rel. 1.0 4-17
Note: To specify a time as midnight, enter 00:00 or 12:00 a.m; for noon, enter 12:00 p.m.
To remove a publish period restriction, click the icon as shown in Figure 4-23.
Variable Primary Content Components The Primary Content element contains variable components depending on which template you have chosen to use.
Home Web Page Figure 4-24 shows an example of a Home page for a website. The page content is captured using the Home Page form described below.
Figure 4-24: Example of a Home Page
Home Page Form The Home Page form is used to capture content for a website's home page. It consists of Promotional and Primary/Secondary Content sections.
Promotional Content
Primary Content will appear below the Promotional Content
Secondary Content

MemberDirect Integrated Content Management Guide Using Content Management Forms
September, 2005 Rel. 1.0 4-18
Promotional Content Section Figure 4-25 shows the Promotional Content section of the Home Page form. It is used to capture content for the Promotion Content section of the Home page.
Figure 4-25: Promotional Content Section of the Home Page Form
Complete the Promotional Content section fields as follows:
Image* Click on the Browse button to select an image file for the Promotional Content. You can also enter the image's path and file name if you know it.
Alt Text* Enter alternative text for the specified image.
Heading* Enter a heading for this section.
Content* Enter the content for this section. Do not include any images in this content.
Call To Action Enter a Call to Action link (see Adding Call to Action Hyperlinks in The Content Management Process).
Click to Add More Promotional Content
Sections

MemberDirect Integrated Content Management Guide Using Content Management Forms
September, 2005 Rel. 1.0 4-19
Content Display Period
Enter a content display period. See Content Display Period in The Content Management Process for more information.
To insert an additional Promotional Content section, click on the icon by the Promotional Content heading.
Primary Content/Secondary Content Section The Primary/Secondary Content section of the Home Page form allows you to enter additional content for your Home page. Refer to Figure 4-24 to see how the Primary/Secondary content is displayed on the Home page.
Figure 4-26 shows the Primary/Secondary Content window. It allows you to select either the Primary Content or Secondary Content section by clicking on the
icon as shown below.
Figure 4-26: Primary/Secondary Content Window
Figure 4-27 shows the Primary Content section of the Home Page form. The Secondary Content section is identical to the Primary Content window.
Click to see the fields in Primary or
Secondary Content

MemberDirect Integrated Content Management Guide Using Content Management Forms
September, 2005 Rel. 1.0 4-20
Figure 4-27: Primary Content Section of the Home Page Form
Complete the section fields as follows: Heading Enter a heading to appear above the paragraph specified in the
following Content field. Link to If you want the heading to be shown as a hyperlink, specify a
URL for the hyperlink in this field. Content* Enter information about the primary or secondary content in
this field. You may want to use the VisualFormat function to simplify text entry and editing. See Installing the VisualFormat Toolbar in Getting Started for more information.
Call To Action Enter a Call to Action link (see Adding Call to Action Hyperlinks in The Content Management Process).
Content Display Period
Enter a content display period. See Content Display Period in The Content Management Process for more information.

MemberDirect Integrated Content Management Guide Using Content Management Forms
September, 2005 Rel. 1.0 4-21
Promotional Web Pages Figure 4-28 shows an example of a Promotional web page. It contains three promotional sections – Main, Medium, and Small, as well as other content. You add or change promotional information using the Promotional form (page-layout: promotional).
Figure 4-28: Example of a Promotional Page
Promotional Form The Promotional (page-layout: promotional) form is used to capture content for a website's promotional page.
Promotional Content Page To capture promotional content as described above, you would use the Promotional Content page which is the second page of the Promotional form. When you display this page, click on the icon by the Promotional Content heading to display the dropdown menu shown in Figure 4-29.
Main Promo
Small Content
Other Content
Medium Promo

MemberDirect Integrated Content Management Guide Using Content Management Forms
September, 2005 Rel. 1.0 4-22
Figure 4-29: Promotional Content Floating Menu
Click on the one of the following three promotional sections on the floating menu:
• Main Promo (default section) • Medium Promo • Small Promo
You can select any promo section in any order. However, for the best presentation, a medium promo should always be followed by a small promo.
Main Promo Section The Main Promo section appears on the Promotional Content form and is the default section. This section contains the fields shown in Figure 4-30.
Select a Promotional Content Section

MemberDirect Integrated Content Management Guide Using Content Management Forms
September, 2005 Rel. 1.0 4-23
Figure 4-30: Main Promo Section of Promotional Content Page
Complete the Main Promo fields as follows:
Heading* Enter a heading for the Main Promo section. Content* Enter the content for the Main Promo section. Image* Click on the Browse button to select an image for the Main
Promo section. Alt Text* Enter alternative text for the specified image.
Call To Action
Enter a Call to Action link (see Adding Call to Action Hyperlinks in The Content Management Process).
Content Display Period
Enter a content display period. See Content Display Period in The Content Management Process for more information.
To insert an additional main promo section, select Main Promo again on the floating menu on the Promotional Content page (Figure 4-29).

MemberDirect Integrated Content Management Guide Using Content Management Forms
September, 2005 Rel. 1.0 4-24
Medium Promo Section To insert a Medium Promo section on a Promotional page, click on Medium Promo on the floating menu on the Promotional Content page (Figure 4-29). This section contains the fields shown in Figure 4-31:
Figure 4-31: Medium Promo Section of Promotional Form
Although the medium promo section contains the same data fields on the main promo section, the presentation of each section is different on the web page.
Small Promo Section After each Medium Promo section, select a Small Promo on the floating menu on the Promotional Content page (Figure 4-29) for a better presentation. This section contains the fields shown in Figure 4-32:

MemberDirect Integrated Content Management Guide Using Content Management Forms
September, 2005 Rel. 1.0 4-25
Figure 4-32: Small Promo Section of Promotional Form
Complete the Small Promo fields as follows:
Heading* Enter a heading for the Small Promo section. Content* Enter the content for the Small Promo section. Call To Action Enter a Call to Action link (see Adding Call to Action
Hyperlinks in The Content Management Process). Content Display Period
Enter a content display period. See Content Display Period in The Content Management Process for more information.
Other Content Page The Other Content page allows you to insert additional content by clicking the icon to display the floating menu shown in Figure 4-33. T
Figure 4-33: Other Content Page of Promotional Form
The floating menu allows you to select either Standard Content or Include Content as described below.
Standard Content Section You can add additional standard content to a Promotional page by clicking on Standard Content under the Other Content page and then entering the required content. The standard content section contains an optional title and a paragraph as shown in Figure 4-34.
Click to Display Floating Menu

MemberDirect Integrated Content Management Guide Using Content Management Forms
September, 2005 Rel. 1.0 4-26
Figure 4-34: Standard Content Section of Other Content Page
Complete the Standard Content fields as follows: Heading Enter a heading to appear above the paragraph specified in the
following Content field. Link to If you want the heading to be shown as a hyperlink, specify a
URL for the hyperlink in this field. Content* Enter information about the standard content in this field. You
may want to use the VisualFormat function to simplify text entry and editing. See Installing the VisualFormat Toolbar in Getting Started for more information.
Call To Action Enter a Call to Action link (see Adding Call to Action Hyperlinks in The Content Management Process).
Content Display Period
Enter a content display period. See Content Display Period in The Content Management Process for more information.
You can insert additional paragraphs by inserting multiple Standard Content sections.

MemberDirect Integrated Content Management Guide Using Content Management Forms
September, 2005 Rel. 1.0 4-27
Include Content Section If you have generated any output file with standard content (see Standard Content), you can include the output file from Shared Content in the Include Content section under the Other Content page as shown in Figure 4-35.
Figure 4-35: Include Content Section of the Other Content Page
Click the Browse to select the output file from shared content to be included. If you know the path and name of the output file, you can enter it in the Include This File field.
Note: Including files other than shared standard content may have expected results.
Simple Web Pages Simple web pages consist of content, a links or call to action, portlets and a footer. Figure 4-36 shows an example of a simple page.
Figure 4-36: Example of a Simple Page

MemberDirect Integrated Content Management Guide Using Content Management Forms
September, 2005 Rel. 1.0 4-28
Simple Form To capture a simple web page that contains text descriptions in a paragraph format, you can use the Simple form (page-layout:simple). This form consists of the standard pages (Page Information, Portlets, Footer Content, and Metadata) as well as the Standard Content page, which is described below.
Standard Content Page The Standard Content page is the second page of the Simple form. It allows you to specify an optional heading and a paragraph as shown in Figure 4-37.
Figure 4-37: Standard Content page of the Simple Form
The Standard Content page of the Simple form contains the same fields as the one shown on the Other Content Section of the Promotional page except for the Use Shared Content checkbox (See Other Content).
To add additional Standard Content sections into this page, click on the icon beside the Standard Content heading.
Click to Add More Standard Content sections.
Click to specify whether to use Shared Content.

MemberDirect Integrated Content Management Guide Using Content Management Forms
September, 2005 Rel. 1.0 4-29
Simple-Alternate Form The Simple-Alternate form is virtually identical to the Simple form except that you can enter HTML markup in the content text area of the Standard Content page.
Rates Overview Page Rates overview pages show information on your most popular or requested rates such as mortgage or foreign exchange rates. Figure 4-38 shows an example of a Rates Overview page.
Figure 4-38: Example of Rates Overview page
Rates Overview Form To capture a Rates Overview page, you would use the Rates Overview form (page-layout: rates-overview form) to complete the Product Table.
Product Table Page The Product Table page is the second page of the Rates Overview form. It allows you to insert a Product Table that will represent a rates table showing on the Rates Overview page. This page contains the fields shown in Figure 4-39.
Effective Date
Rates Table Heading
Call to Action
Product/Rate

MemberDirect Integrated Content Management Guide Using Content Management Forms
September, 2005 Rel. 1.0 4-30
Figure 4-39: Product Table page of Rates Overview Form
Show Effective Date*
Click on the Yes radio button if you want the effective date of the rates to appear on the Rates Overview page. Otherwise, click on No. The default value is Yes.
Heading* Enter the heading that is to appear on the Rates table. Show Selected Product
Click on the icon if you wish to insert additional product/rate information into this product table.
Product/Rate* Click the Select… button to select a particular rate.
Call To Action Enter a Call to Action link for the product/rate (see Adding Call to Action Hyperlinks in The Content Management Process).
Note: The Product/Rate information you selected is defined by the forms under the Rates category (See Rates Data Forms). If a rate is not defined, update your rates data first (See Managing Rates Data).
To insert more product tables, click the icon by the Product Table heading.
Rates Detail Pages Rates Detail pages display rate information about a specific financial product such as mortgages, foreign exchange, term deposits, etc. Figure 4-40 shows a Rates Detail page that display rate information about RRSPs.
Click to Add Another Product/Rate
Click to Select a Rate
Click to Add Another Product Table

MemberDirect Integrated Content Management Guide Using Content Management Forms
September, 2005 Rel. 1.0 4-31
Figure 4-40: Example of a Rates Detail Page
Rates Detail Form The Rates Detail Form (page-layout: rates-details) is used specify which groups of rates to show on a Rates Detail web page.
Show Product Details Page The Show Product Details page appears on the second page of the Rates Details form. This page allows you to insert multiple product detail tables. Each Show Product Details page represents a product detail table that is appears on a web page and contains the fields shown in Figure 4-41.
Figure 4-41: Show Product Details Page of the Rate Details Form
A Product Detail Table showing all the rates under the same product subcategory
Click to Add Another Product Category/Subcategory

MemberDirect Integrated Content Management Guide Using Content Management Forms
September, 2005 Rel. 1.0 4-32
Complete the Show Product Details fields as follows:
Show Effective Date*
Click on the Yes radio button if you want the effective date of the rates to appear on the Rates Detail page. Otherwise, click on No. The default value is Yes.
Product Category or Subcategory*
Use the Select… button to select a product category or subcategory to display on the Rates Detail page.
To insert more product/rates details, click the icon by the Show Product Details heading.
Note: The product category or subcategory you selected is defined by the forms under the Rates category (See Forms For Rates Data). If a category or subcategory is not defined, update your rates data first (See Managing Rates Data).
Job Posting Pages Job posting pages allow you to provide information about currently available job positions at your institution. Figure 4-42 shows an example of information on a Job Posting page.
Figure 4-42: Example of a Job Posting Page
Job Posting Form The Job Posting form (page-layout: job posting) is used to capture job posting information to appear on Job Posting web pages.

MemberDirect Integrated Content Management Guide Using Content Management Forms
September, 2005 Rel. 1.0 4-33
Job Posting Page Job Posting page appears on the second page of the Job Posting form, as shown in Figures 4-43 and 4-44.
Figure 4-43: Job Posting Page of the Job Posting Form – View 1
Click to Add Another Job Posting

MemberDirect Integrated Content Management Guide Using Content Management Forms
September, 2005 Rel. 1.0 4-34
Figure 4-44: Job Posting Page of the Job Posting Form – View 2
Complete the Job Posting page fields as follows: Position Name*
Enter the name of the position, such as Financial Services Representative.

MemberDirect Integrated Content Management Guide Using Content Management Forms
September, 2005 Rel. 1.0 4-35
Position Description*
Enter a description of the position.
Qualification* Enter the qualifications required for the position.
Job Reference Number*
Enter a job reference number for the position.
Closing Date for Application*
Enter a closing for the position.
Job Location Enter the job's location.
How To Apply* Enter instructions for applying for the job such as an email address, fax number, or snail-mail address.
Footnote Enter a footnote – if required.
Content display period
Enter a content display period. See Content Display Period in The Content Management Process for more information.
To insert additional job postings into the same web page, click the icon by the Job Posting heading.
List of Documents Pages List of Documents pages display information on documents and other files that can be downloaded from your website, such as newsletters and corporate reports. They consist of document titles, a summary or description of the document, the document type (such as PDF, Word, etc.), document size, and a link.
List of Documents Form The List of Documents form (page-layout: list of documents) is used to capture a list of documents, such as download forms or newsletters.
Header Page The Header page appears on the second page of the List of Documents form. This section contains the fields shown in Figure 4-45:

MemberDirect Integrated Content Management Guide Using Content Management Forms
September, 2005 Rel. 1.0 4-36
Figure 4-45: Header Page of the List of Document Form
Complete the Header page fields as follows: Heading Enter a heading for the web page. Content Enter any content for the header. Use the VisualFormat toolbar for
to simplify entry of your content. For further information on VisualFormat, see Installing the VisualFormat Toolbar.
Document Page The Document page appears on the third page of the List of Documents form. This page contains the fields shown in Figure 4-46:
Figure 4-46: Document Page of the List of Documents Form
Complete the Document page fields as follows:
Click to Add Another Document Section

MemberDirect Integrated Content Management Guide Using Content Management Forms
September, 2005 Rel. 1.0 4-37
File Name* Click on the Browse button to select a PDF, Word or Text file or enter the file's path and file name if you know it.
Title* Enter a title for the document.
Description* Enter a brief description for the document.
To insert additional documents into the same web page, click the icon by the Document heading to insert an additional Document section.
Footnote Page The Footnote page is the fourth page of the List of Documents form. This page contains the fields shown in Figure 4-47.
Figure 4-47: Footnote Page of the List of Documents Form
Enter any required footnote in the Footnote field. Use the VisualFormat toolbar for to simplify entry of the footnote. For further information on VisualFormat, see Installing the VisualFormat Toolbar.
Include Pages Include Pages display shared content your web site.
Include Pages Form The Include Pages form is used to specify shared content to appear on your website. It consists of the standard pages (Page Information, Portlets, Footer Content, and Metadata) as well as the Include Content page, which is described below.
Include Content Page The Include Content page appears on the second page of the Include Content form as shown in Figure 4-48.

MemberDirect Integrated Content Management Guide Using Content Management Forms
September, 2005 Rel. 1.0 4-38
Figure 4-48: Include Content Page of the Include Form
Complete the Include Content page as follows: Include This File*
Use the Browse button to select an output file that is generated by Shared Content Standard form or enter the file's path and file name if you know it.
To include additional shared content into the same web page, click the icon by the Include Content heading.
Note: Including files other than shared standard content may result in unexpected results.
Click to Add Another Include Content Section

MemberDirect Integrated Content Management Guide Using Content Management Forms
September, 2005 Rel. 1.0 4-39
Rates Data Forms The following forms are used for capturing different types of rates data:
• Foreign Exchange (rates: foreign exchange) • Prime (rates: prime) • Products (rates: products) • Term Deposits (rates: term deposits)
You can use whichever form that best categorizes your rates data to capture the information.
Foreign Exchange Form For rates that contain buy and the sell information, such as foreign exchange, use the Foreign Exchange form to capture information to display on the Rates Data pages. This form consists of one page and is shown in Figure 4-49.
Figure 4-49: Foreign Exchange Form for Rates Data Pages
Complete the form fields as follows:
Effective Date* Enter a valid effective date (in mm/dd/yyyy format) for this group of foreign exchange rates. You can select a date from the calendar by clicking on the View Calendar button.
Product Details*
Click the icon to insert an additional product details section.
Product Description*
Enter the description for this type of foreign exchange, such as U.S. Dollars.
Currency Code*
Enter the currency code for this type of foreign exchange, such as USD for U.S. dollars.
Buy* Enter a buy rate for the foreign exchange type.
Sell* Enter a sell rate for the foreign exchange type.
Prime Form The Prime form is used to capture information for the prime rate. This form consists of one page that contains the fields shown in Figure 4-50.
Click to Add Another Product Details Section

MemberDirect Integrated Content Management Guide Using Content Management Forms
September, 2005 Rel. 1.0 4-40
Figure 4-50: Prime Form for Rates Data Pages
Complete the Prime form as follows: Effective Date* Enter a valid effective date (in mm/dd/yyyy format) for this
prime rate. You can also select a date from the calendar by clicking on the View Calendar button.
Product Details*
Enter the following information for the prime rate.
Product Description*
Enter the description for this prime rate.
Rate* Enter the current rate for this prime rate.
Product Form The Product form is used products other than foreign exchange, prime rate, and term deposits. It consists of one page that contains the fields shown in Figure 4-51.
Figure 4-51: Products Form for Rates Data Pages
Complete the Products form fields as follows: Effective Date* Enter a valid effective date (in mm/dd/yyyy format) for this
product. You can select a date from the calendar by clicking on the View Calendar button.
Click to Add Another Subcategory
Click to Add Another Product

MemberDirect Integrated Content Management Guide Using Content Management Forms
September, 2005 Rel. 1.0 4-41
Category Description*
Enter a category for this product group (such as Mortgage).
Subcategory Click the icon to add an additional subcategory. Subcategory Description*
Enter the subcategory for this product group, (such as First Mortgage or Second Mortgage).
Product Details
Click the icon to add additional product details under this subcategory.
Product Description*
Enter a description for this product.
Rate* Enter the rate for this product.
+/- Prime Use the dropdown menu to select + Prime or – Prime to specify whether the rate for this product is plus or minus the prime rate.
Type* Specify whether the rate for this product is fixed or variable by clicking on either the Fixed or Variable radio button.
Term Deposit Form The Term Deposit form is used to capture rate and product information for term deposits. This form consists of one page that contains the fields shown in Figure 4-52.

MemberDirect Integrated Content Management Guide Using Content Management Forms
September, 2005 Rel. 1.0 4-42
Figure 4-52: Term Deposits Form for Rates Data Pages
Complete the Term Deposit form fields as follow: Effective Date* Enter a valid effective date (in mm/dd/yyyy format) for this
term deposit. You can select a date from the calendar by clicking on the View Calendar button.
Category Description*
Enter a category for this product group (such as Non-redeemable Term Deposits).
Subcategory Click the icon to add an additional subcategory. Subcategory Description*
Enter the subcategory for this product group, (such as Monthly Interest Term Deposit or Annual Interest Term Deposit).
Product Details
Click the icon to add additional products under this subcategory.
Product Description*
Enter a description for this term deposit.
Rate* Enter the rate for this term deposit.
+/- Prime Use the dropdown menu to select + Prime or – Prime to specify whether the rate for this term deposit is plus or minus the prime rate.
Click to Add Another Subcategory
Click to Add Another Product

MemberDirect Integrated Content Management Guide Using Content Management Forms
September, 2005 Rel. 1.0 4-43
Type Specify whether the rate for this term deposit is fixed or variable by clicking on either the Fixed or Variable radio button.
Product Term* Use the dropdown Menu to specify the term for the term deposit – either Redeemable, Non-redeemable, or Flexible.
Minimum Deposit*
Enter the minimum deposit amount required for this term deposit.
Range Enter the following information about the time period (range) for the term deposit:
Unit* Select the unit of time to express the range for the term deposit by clicking on either the Day, Month, or Year radio button.
Min* Enter the minimum value for this range.
Max* Enter the maximum value for this range.

MemberDirect Integrated Content Management Guide Using Content Management Forms
September, 2005 Rel. 1.0 4-44
Branch Contact Information Forms The Branch Contact Information forms contain information about contacting branch such as its location, services offered, and hours of service. The forms are:
• Regions (branch: regions) • Services (branch: services) • Cities (branch: cities) • Provinces (branch: provinces) • Contact Labels (branch: contact-labels) • Hours (branch: services) • Details (branch: details)
Instructions for completing these forms are as follows.
Regions The Regions form allows you to define a list of regions or cities where your branches are located. This form consists of one page and contains the fields shown in Figure 4-53:
Figure 4-53: Regions Form for Branch Contact Information Pages
Enter a description for city/region/area that categorizes the region for your branches in the City/Region field.
To insert an additional region, click the icon to insert additional City/Region sections.
Services The Services form allows you to define a list of the services offered by your branches. This form consists of one page and contains the fields shown in Figure 4-54:
Figure 4-54: Services Form for Branch Contact Information Pages
Click to Add Another City/Region Section
Click to Add Another Services Offered Section

MemberDirect Integrated Content Management Guide Using Content Management Forms
September, 2005 Rel. 1.0 4-45
Enter a description for each service offered by your branches in the Service field, such as RRSPs. To insert additional services, click the icon to insert additional Service Offered sections.
Cities The Cities form allows you to define a list of cities where your branches are located. This form consists of one page and contains the fields shown in Figure 4-55.
Figure 4-55: City Form for Branch Contact Information Pages
Enter a name for the cities where your branches are located in the City Name field. To insert additional cities, click the icon to insert additional City sections.
Provinces The Provinces form allows you to define a list of provinces where your branches are located. This form consists of one page and contains the fields shown in Figure 4-56:
Figure 4-56: Provinces Form for Branch Contact Information Pages
Complete the Provinces form as follows:
Province* Enter the name of the province.
Prov. Abbreviation*
Enter an abbreviation for the province, such as BC for British Columbia.
To insert additional provinces, click the icon to insert additional Province sections.
Contact Labels The Contact Labels form allows you to define a list of contact labels for your branches. This form consists of one page and contains the fields shown in Form 4-57:
Click to Add Another City Section
Click to Add Another Province Section

MemberDirect Integrated Content Management Guide Using Content Management Forms
September, 2005 Rel. 1.0 4-46
Figure 4-57: Contact Label Form for Branch Contact Information Pages
Enter a description for the contact (such as the main phone number, or toll free number) in the Contact Name field. To insert additional contact names, click the
icon to insert additional Contact Label sections.
Hours If your branches are operated under the same office or holiday hours, you can use the Hours form to capture common hours that these branches use. The Hours form allows you to define the following common branch hours:
• Regular office hours • Holiday hours • Special hours
Regular Office Hours The first page of the Hours form is the Regular Office Hours section. To insert a set of common regular office hours, click the icon to insert the Regular Office Hours section. This page contains the fields shown in Figures 4-58 and 4-59. These fields define the regular working hours for each day of the week.
Click to Add Another Contact Label Section

MemberDirect Integrated Content Management Guide Using Content Management Forms
September, 2005 Rel. 1.0 4-47
Figure 4-58: Regular Office Hours Page of Hours Form – View One
Click to Add Another Regular Office Hours Section
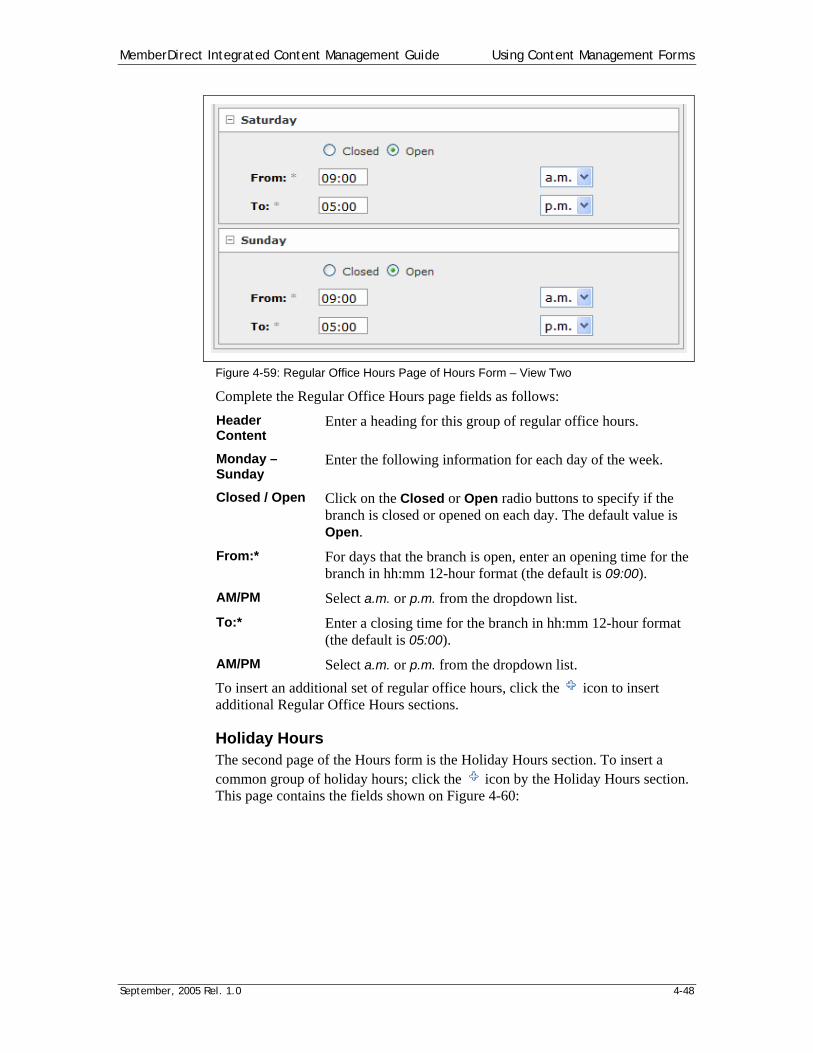
MemberDirect Integrated Content Management Guide Using Content Management Forms
September, 2005 Rel. 1.0 4-48
Figure 4-59: Regular Office Hours Page of Hours Form – View Two
Complete the Regular Office Hours page fields as follows: Header Content
Enter a heading for this group of regular office hours.
Monday – Sunday
Enter the following information for each day of the week.
Closed / Open Click on the Closed or Open radio buttons to specify if the branch is closed or opened on each day. The default value is Open.
From:* For days that the branch is open, enter an opening time for the branch in hh:mm 12-hour format (the default is 09:00).
AM/PM Select a.m. or p.m. from the dropdown list. To:* Enter a closing time for the branch in hh:mm 12-hour format
(the default is 05:00). AM/PM Select a.m. or p.m. from the dropdown list. To insert an additional set of regular office hours, click the icon to insert additional Regular Office Hours sections.
Holiday Hours The second page of the Hours form is the Holiday Hours section. To insert a common group of holiday hours; click the icon by the Holiday Hours section. This page contains the fields shown on Figure 4-60:

MemberDirect Integrated Content Management Guide Using Content Management Forms
September, 2005 Rel. 1.0 4-49
Figure 4-60: Holiday Hours Page of the Hours Form
Complete the Holiday Hours page fields as follows: Header Content
Enter a heading for this group of holiday hours.
Holiday Name Enter the name of the holiday, such as Easter Monday.
Date* Enter the date on which the holiday falls in mm/dd/yyyy format. (You can select a date from the calendar by clicking on the View Calendar button.)
Enter the following information for each holiday. Click the icon to insert additional holidays.
Closed / Open Click on the Closed or Open radio buttons to specify if the branch is closed or opened on the holiday. The default value is Open.
From:* If the branch is open the holiday, enter an opening time for the branch in hh:mm 12-hour format (the default is 09:00).
AM/PM Select a.m. or p.m. from the dropdown list. To:* Enter a closing time for the branch in hh:mm 12-hour format
(the default is 05:00). AM/PM Select a.m. or p.m. from the dropdown list.
Special Hours The third page of the Hours form is the Special Hours section. This page allows you to specify special operating hours, such as during RRSP season. To insert a common group of special hours, click on the icon by the Special Hours heading. This page contains the following fields as shown in Figures 4-61 and 4-62:
Click to Add Another Holiday Hours Section
Click to Add Another Holiday Section

MemberDirect Integrated Content Management Guide Using Content Management Forms
September, 2005 Rel. 1.0 4-50
Figure 4-61: Special Hours Page of Hours Form – View One
Click to Add Another Special Hours Section
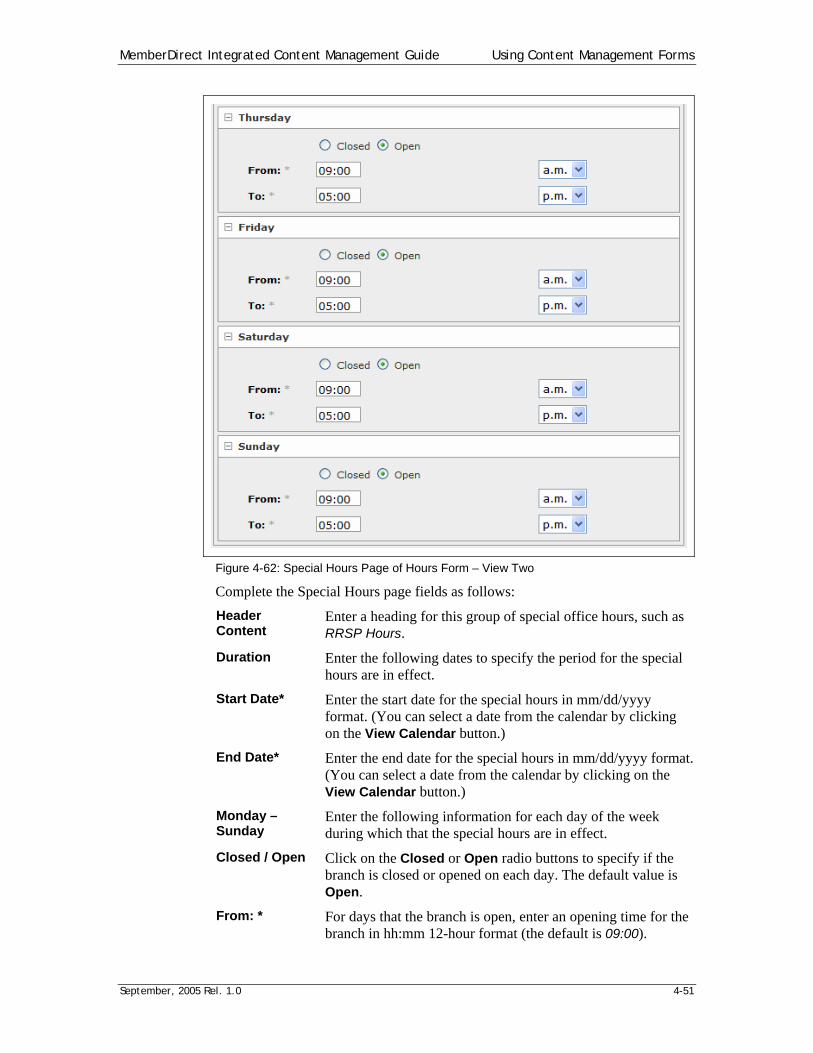
MemberDirect Integrated Content Management Guide Using Content Management Forms
September, 2005 Rel. 1.0 4-51
Figure 4-62: Special Hours Page of Hours Form – View Two
Complete the Special Hours page fields as follows: Header Content
Enter a heading for this group of special office hours, such as RRSP Hours.
Duration Enter the following dates to specify the period for the special hours are in effect.
Start Date* Enter the start date for the special hours in mm/dd/yyyy format. (You can select a date from the calendar by clicking on the View Calendar button.)
End Date* Enter the end date for the special hours in mm/dd/yyyy format. (You can select a date from the calendar by clicking on the View Calendar button.)
Monday – Sunday
Enter the following information for each day of the week during which that the special hours are in effect.
Closed / Open Click on the Closed or Open radio buttons to specify if the branch is closed or opened on each day. The default value is Open.
From: * For days that the branch is open, enter an opening time for the branch in hh:mm 12-hour format (the default is 09:00).

MemberDirect Integrated Content Management Guide Using Content Management Forms
September, 2005 Rel. 1.0 4-52
AM/PM Select a.m. or p.m. from the dropdown list. To:* Enter a closing time for the branch in hh:mm 12-hour format
(the default is 05:00). AM/PM Select a.m. or p.m. from the dropdown list.
Details The Details form (branch: details) is used to capture data about a specific branch location. This form contains the following pages for capturing information for a particular branch:
• Branch Information • Branch Contact Details • Predefined Hours • Regular Office Hours • Holiday Hours • Special Hours
Instructions for completing these form pages are as follows
Branch Information Branch Information appears on the first page of the Details form. This page contains the fields shown in Figure 4-63.
Note: When creating, updating, or deleting branch information, keep in mind that these changes will be reflected only in your Branch Locator and on online application forms; they will not update the branch information in the online banking section of your site.
You can only add a new branch or change existing branch information in the online banking section by submitting a change request to CUCBC Client Support. The Client Implementations & Project Team will contact you to implement your required changes.

MemberDirect Integrated Content Management Guide Using Content Management Forms
September, 2005 Rel. 1.0 4-53
Figure 4-63: Branch Information Page of the Details Form
Complete the Branch Information section for the branch as follows: Branch Name* Enter the branch name. Branch Number
Enter the branch number (if any).
Transit Number
Enter the transit branch number (if any).
Region* Select the region for this branch using the dropdown menu.
Note: Items on the dropdown menu are captured on the Regions (branch: regions) form (see Regions). If the region is not listed, modify the Regions output file first.
Services Offered
Select the services offered by this branch by clicking on the appropriate radio button, such as Banking.
Note: Items in this field are captured on the Services (branch: services) form (see Services). If the service is not listed, modify the Services output file first.
Show branch list dropdown*
Click on No if you do not want this branch to show up in the drop down lists of branches that are on the form.
Name displayed in branch list dropdown
Enter the name of the branch you want displayed in the drop down list.
Click to Add Another Line for the Address

MemberDirect Integrated Content Management Guide Using Content Management Forms
September, 2005 Rel. 1.0 4-54
Address* Enter the address for this branch. Click on the icon if the address contains more than one line.
City* Select the city in which this branch is located by using the dropdown menu.
Note: Items in the dropdown menu are captured on the Cities (branch: cities) form (see Cities). If the city is not listed, modify the Cities output file first.
Province* Select the province in which this branch is located by using the dropdown menu.
Note: Items in this field are captured on the Provinces (branch: provinces) form (see Provinces). If the province is not listed, modify the Provinces output file first.
Postal Code Enter the postal code if applicable.
Branch Contact Details The second page of the details form is the Branch Contact Details page. This page contains the fields shown in Figure 4-64.

MemberDirect Integrated Content Management Guide Using Content Management Forms
September, 2005 Rel. 1.0 4-55
Figure 4-64: Branch Contact Details Page of the Details Form
Complete the Branch Contact Details page for the branch as follows: Contact Info Click the icon to insert additional contact information. Contact label* Use the dropdown menu to select a label to describe the type
of contact information, such as Main Phone Number.
Note: Items on the dropdown menu are captured on the Contact Labels (branch: contact-labels) form (see Provinces). If the region is not listed, modify the Provinces output file first.
Phone Number
Enter the following information about the branch's phone number.
Area Code* Enter the branch's area code. The default area code is 604. Phone* Enter the branch's phone number. The phone number can
contain a space or hyphen. You can also enter use letters instead of numbers, such as 555-SAVE.
Ext Enter an extension, if any.
Click to Add Additional Contact Information
Click to Insert an Image File

MemberDirect Integrated Content Management Guide Using Content Management Forms
September, 2005 Rel. 1.0 4-56
Phone Operating Hours*
Click on the radio button to enter the branch's phone operation hours – either Business Hours or 24 Hours.
Additional Contact Information
Enter the following information about the branch, if needed.
Image Click the icon to insert an image file. Select Image Files*
Click on the Browse button to select an image file.
Alt Text* Enter alternative text for the specified image. Caption Enter a caption for this image, if applicable. Additional Content
Enter additional contact information, if needed.
Predefined Hours The third page of the Details is the Predefined Hours section as shown in Figure 4-65. To include a set of predefined hours that was defined on the Hours form (see Hours), click the icon to insert a set of Predefined Hours:
Figure 4-65: Predefined Hours Page of the Details Form
Complete the Predefined Hours page for the branch as follows:
Display These Predefined Hours*
Click on the Select… button to select a set of predefined hours.
Regular Office Hours This page contains the same data fields in the Regular Office Hours page as are captured on the Regular Office Hours page of the Hours form (see Regular Office Hours). However, regular office hours specified in this Details form are specific to this particular branch only.
Holiday Hours This section contains the same data fields in the Holiday Hours section as are captured on the Holiday Hours page of the Hours form (see Holiday Hours). However, holiday hours specified in this Details form are specific to this particular branch only.
Click to Insert Another Predefined Hours Section

MemberDirect Integrated Content Management Guide Using Content Management Forms
September, 2005 Rel. 1.0 4-57
Special Hours This section contains the same data fields in the Special Hours section as are captured on the Special Hours page of the Hours form (see Special Hours). However, special hours specified in this Details form are specific to this particular branch only.

MemberDirect Integrated Content Management Guide Using Content Management Forms
September, 2005 Rel. 1.0 4-58
Online Banking Marketing Portlets The Online Banking Marketing portlets allow you to enable or disable a specific marketing portlet for each individual Online Banking function. A "function" refers to all pages visited in order to complete a transaction or access information. For example, if the Marketing portlet is enabled for Pay Bills, it can be distinct from other marketing portlets in other online banking functions, such as the portlet visible for Account Activity. Note that a marketing portlet for a function will be visible at each step of the function. For example, the marketing portlets for the Pay Bills feature will appear on each Pay Bill page.
Figure 4-66 shows the Portlets section of the Online Marketing portlet.
Figure 4-66: Online Banking Marketing Portlets Section
To capture portlets, click on the icon, as shown in Figure 4-66. The floating menu shown in this figure allows you to select the following portlets in any order:
• Banner • Marketing (Offer Presentment) • Quick Navigation • Rates • Shortcuts • Specific portlets
Note: All portlets are displayed within a limited area on a page. Although there is no limit on how much content you can enter into each field on any form for a portlet, you should ensure that the image and/or text included in the portlet do not alter your web page layout. If an image is too large or the text for a call to action is too long, it could widen the portlet display area and distort the page layout. If your page layout appears distorted when you preview your changes, try resizing your images or rephrasing the text to correct the distorted layout.
The portlets available for each Online Banking Marketing function are as follows.
Click to Capture Portlets

MemberDirect Integrated Content Management Guide Using Content Management Forms
September, 2005 Rel. 1.0 4-59
Banner The Banner form (portlet: banner form) contains the same data fields as those shown on the Banner page of the Footer Content form under the Page Layout category (See Banners in this chapter).
Marketing (Offer Presentment) The Marketing (Offer Presentment) form (portlet: marketing-offer) contains the same data fields as those shown on the Marketing portlet of any form under the Page Layout category (See Marketing (Offer Presentment) Portlet in this chapter).
Quick Navigation The Quick Navigation form (portlet: quick-navs) contains the same data fields as those shown on the Quick Navigation portlet on any form under the Page Layout category (See Quick Navigation Portlet in this chapter).
Rates Portlet The Rates Portlet form (portlet: rates) contains the same data fields as those shown on the Rates portlet on any form under the Page Layout category (See Rates Portlet in this chapter).
Shortcuts The Shortcuts form (portlet: shortcuts) contains the same data fields as those shown on the Shortcut portlet on any form under the Page Layout category (See Shortcuts Portlet in this chapter).
Specific Portlets Specific portlets are user-defined portlets that you can include in an Online Banking function. If you selected Specific Portlet from the floating menu on the Online Banking Marketing portlets, you would see the Specific portlet shown in Figure 4-67:
Figure 4-67: Specific Portlet available in the Online Banking Marketing Portlets
Click on the Browse button to locate and select a custom-defined portlet to appear on Online Banking pages. Normally, the portlet will be a .jsp file that should reside in /SharedContent/Marketing/OnlineBanking/Common.

MemberDirect Integrated Content Management Guide Using Content Management Forms
September, 2005 Rel. 1.0 4-60
Section Portlet The Section portlet allows you to import portlets that may have already been defined for the Accounts, Payments, Transfer functions, Services, or Global to a specific feature of online banking such as stop cheques or account activity, for example. If you selected Section Portlet from the floating menu on the Online Marketing portlets, you would see the Section portlet shown in Figure 4-68:
Figure 4-68: Section Portlet section available in the Online Banking Marketing Portlets
Creating Online Banking Marketing Portlets There are approximately sixty-five files that represent each specific feature of Online Banking that you can edit to include your marketing portlets. These files are located at /SharedContent/Marketing/OnlineBanking. If you look in that directory, you will see files that start with the word "feature". These files represent an individual feature that is available to a specific section of Online Banking. For example, feature_account_activity.jsp represents the Account Activity function that is available in the Accounts section. If you wish to include a marketing portlet on the Account Activity page then you would edit the file feature_account_activity.jsp. However, you will also see five files that start with section. Adding portlets to the Section files will make your portlets available throughout that section of online banking. For example, if you want to add a marketing portlet that would appear in the Accounts section, you would edit the file section_accounts.jsp and add the portlets you wish to include.
The following examples demonstrate the various features of the online banking marketing portlet.
Example 1 No Marketing Portlets Displayed on Online Banking Pages
If you do not want any marketing portlets shown on any Online Banking page, you do not need to select any option on the Online Banking Marketing portlet.
Example 2 Displaying External Links on all Online Banking Pages
You wish to display the following list of external links on every online banking page:

MemberDirect Integrated Content Management Guide Using Content Management Forms
September, 2005 Rel. 1.0 4-61
• Credit Union Central of BC: http://www.cucbc.com • Credit Union Central of Canada: http://www.cucentral.ca
Procedure 1. Navigate to the directory /SharedContent/Marketing/OnlineBanking and edit
the file section_banking.jsp.
2. Select Shortcuts on the Portlets page as shown in Figure 4-69.
Figure 4-69: Selecting Shortcuts on the Portlets Page
3. Complete the required information for Shortcuts as shown in Figure 4-70.
Figure 4-70 – Selecting a new Section Portlet
4. Save, Generate and submit the file, section_banking.jsp.
5. Navigate back to the /SharedContent/Marketing/OnlineBanking directory. Then, make the following changes shown in Steps 6 and 7 to the following files:
• section_accounts.jsp • section_payments.jsp • section_transfers.jsp • section_services.jsp
Click on Shortcuts

MemberDirect Integrated Content Management Guide Using Content Management Forms
September, 2005 Rel. 1.0 4-62
6. Click on Section Portlet as shown in Figure 4-71.
Figure 4-71: Selecting Shortcuts on the Portlets page
7. Select Banking Global as shown in Figure 4-72
Figure 4-72: Selecting Banking Global on the Section Portlets
8. Save, generate, and submit the files.
Example 3 Displaying External Links only on Specific Pages
You wish to display the following list of external links only on all online banking pages except the Payments pages:
• Credit Union Central of BC: http://www.cucbc.com • Credit Union Central of Canada: http://www.cucentral.ca
Procedure The steps are identical to Example 2 except in Step 5edit the file section_payments.jsp and make sure that there is no section portlet included. If there is a section portlet, click the to remove it.
Example 4 Displaying External Links only on Accounts Pages
You wish to display the following list of external links only on the Accounts:
• Credit Union Central of BC: http://www.cucbc.com • Credit Union Central of Canada: http://www.cucentral.ca
No other portlets are to appear on any other Online Banking pages.
Click Section Portlet
Click on Banking Global

MemberDirect Integrated Content Management Guide Using Content Management Forms
September, 2005 Rel. 1.0 4-63
Procedure 2. Navigate to the directory /SharedContent/Marketing/OnlineBanking and edit
the file section_accounts.jsp.
3. Select Shortcuts on the Portlets page as shown in Figure 4-69.
4. Complete the required information for Shortcuts as shown in Figure 4-70
5. Save, Generate, and Submit the section_accounts.jsp file.
6. Navigate to the /SharedContent/Marketing/OnlineBanking directory. Then, check that there is not a Section portlet in the following files:
• section_payments.jsp • section_transfers.jsp • section_services.jsp
If there is a Section portlet in the above file, delete it.
Example 5 Displaying External Links only on Accounts Pages and add a link to another page
You wish to display the following list of external links only on Accounts pages:
• Credit Union Central of BC: http://www.cucbc.com • Credit Union Central of Canada: http://www.cucentral.ca
In addition, you only want to appear on the Add New Payee page:
• Credential Direct: http://www.credentialdirect.com
Procedure 1. The procedure for the first part of this example is the same as Example 4
(Steps 1-4).
2. Add the link to the Add New Payee page by navigating to the directory /SharedContent/Marketing/OnlineBanking and edit the feature_payments_managebills_add.jsp file.
3. Select Shortcuts on the Portlets page as shown in Figure 4-69.
4. Complete the required information for Shortcuts as shown in Figure 4-70.
5. Save, Generate, and Submit the section_accounts.jsp file.
September, 2005 Rel. 1.0 5-1
Managing Shared Content
If you have common content, such as a banner or a marketing offer, to be displayed on multiple web pages, use forms for shared content (See Forms for Shared Content in Managing Shared Content). The forms allow you to capture content once and then include them where needed on other pages.
Forms for Shared Content The following forms are available for capturing shared content.
• Standard content (content: standard) • Banner (portlet: banner) • Marketing offer (portlet: marketing-offer) • Quick navigation (portlet: quick-navs) • Rates portlet (portlet: rates) • Shortcuts (portlet: shortcuts)
Content captured with these forms can be included in any form under the page-layout category. These forms are described below.
Standard Content The Standard Content form (content: standard form) contains the same data fields as those shown on the Banner portlet Other Content page of the Promotional form under the Page Layout category (See Standard Content).
Banner The Banner form (portlet: banner form) contains the same data fields as those shown on the Banner page of the Footer Content form under the Page Layout category (See Banner).
Marketing (Offer Presentment) The Marketing (Offer Presentment) form (portlet: marketing-offer) contains the same data fields as those shown on the Marketing portlet of any form under the Page Layout category (See Marketing (Offer Presentment)).

MemberDirect-MemberConnect Content Management Guide Managing Shared Content
September, 2005 Rel. 1.0 5-2
Quick Navigation The Quick Navigation form (portlet: quick-navs) contains the same data fields as those shown on the Quick Navigation portlet on any form under the Page Layout category (See Quick Navigation).
Rates Portlet The Rates Portlet form (portlet: rates) contains the same data fields as those shown on the Rates portlet on any form under the Page Layout category (See Rates).
Shortcuts The Shortcuts form (portlet: shortcuts) contains the same data fields as those shown on the Shortcut portlet on any form under the Page Layout category (See Shortcuts).
See the following chapter for more information about shared content.
Managing Your Files For better file management, save all the output files for shared content into a common folder so you can locate these shared content easily. For instance, there is shared content for masthead and it is saved under /SharedContent/Masthead within your workarea. The following table provides recommended file locations for each type of shared content.
Form Category/Form Type Output File Location
content: standard /SharedContent/Standard
portlet: banner /SharedContent/Banner
portlet: marketing-offer /SharedContent/MarketingOffer
portlet: quick-navs /SharedContent/QuickNavs
portlet: rates /SharedContent/RatesPortlet
portlet: shortcuts /SharedContent/Shortcuts
If each shared content type contains many files, create sub-folders within each output file location listed above. You can use sub-folders to further categorize your shared content.
Six forms are available for shared content (See Forms for Shared Content in Managing Shared Content). You can use a new for entry of these shared content forms to capture a new shared content.
Generating and Previewing Shared Content with Forms To generate shared content (using either CCStd or CCPro), complete the following steps:
MemberDirect-MemberConnect Content Management Guide Managing Shared Content
September, 2005 Rel. 1.0 5-3
1. Enter all the required fields into the form, and then click on Generate.
2. Click on Browse to select the new folder you have created, or enter the full file path into the Select an Output File text field. You can enter any valid file name for the shared content. (Do not use any special character or spaces in your file name.) For examples, to save the shared content into SharedContent/Banner, enter /SharedContent/Banner/ visa_banner in the text field.
Note: You only need to provide the filename once. This dialog box will not be redisplayed when you regenerate the output file again.
3. Click on OK.
A preview window will display the content file you have generated.
The process for submitting your changes are the same as the ones described in Submitting Your Changes.
Including Shared Content into a Web Page You can include shared content into any web page that allows you to include shared content. For shared content generated by a standard form, you can include the file into a web page generated by the Include form (See Include Pages) or the promotional form (See Include Content).
For shared portlets, such as marketing offer, quick navigation, rates, and shortcuts, you can include the file into any web page under the Portlets section (See Including Banner under Portlets Section).
For a shared banner, you can include the file into any web page under the footer content section (See Including Banner under Footer Content Section).
After you have included shared content into an existing page, you would follow steps in Modifying a Page in The Content Management Process to generate and preview your changes.
Updating Shared Content If you have used the file locations shown under Managing Your Files in The Content Management Process, you should be able to locate shared content under /SharedContent folder.
To edit shared content, click on the corresponding Edit link for the file. The corresponding form entry opens in the appropriate form to allow you to edit the content.
The steps for generating and previewing the shared content file are the same as the ones described in the earlier section (See Generating and Previewing Shared Content with Forms).
Once shared content is updated, this change will be reflected automatically to all web pages that refer to this shared content.

MemberDirect-MemberConnect Content Management Guide Managing Shared Content
September, 2005 Rel. 1.0 5-4
Deleting Shared Content from a Web Page To remove shared content from a web page, you would:
1. Locate the corresponding web page file (index.jsp) under either /Personal, /Business or in the sub-folders under these folders.
2. Follow the steps in Modifying a Page in The Content Management Process to modify the web page. To remove included shared content, you click the icon to remove the corresponding section that included this shared content.
3. After modifying the page, follow the steps in Modifying a Page to generate and preview your changes.

September, 2005 Rel. 1.0 6-1
Managing Rates Data
Four rates forms are available for generating output files for rates data (See Rate Data Forms).
All rates data output files must be stored in a sub-folder under the folder in xml format. You can create sub-folders under /Data/rates folder to categorize each rate’s category.
Rates File Structure The following table is a sample file structure showing the location of rates data forms.
Form Category/Form Type Output File Location
rates: foreign-exchange (See Foreign Exchange)
/Data/rates/foreign-exchange/forEx.xml
rates: prime (See Prime)
/Data/rates/prime/prime.xml
rates: products (See Product)
/Data/rates/account/account.xml /Data/rates/credit-card/creditCard.xml /Data/rates/loan/loans.xml /Data/rates/mortgage/mortgage.xml /Date/rates/rrsp/rrsp.xml
rates: term-deposits (See Term Deposits)
/Data/rates/term-deposit/flexible.xml /Data/rates/term-deposit/nonredeemable.xml /Data/rates/term-deposit/redeemable.xml
Each sub-folder within the /Data/rates folder represents a product type. There is no limit on how many output files a sub-folder can hold. For example, the term deposit product type could contain three subcategories: flexible, nonredeemable, and redeemable. Each file within the sub-folder, term-deposit, is representing a different sub-category. Note: If you name or re-name a sub-folder, do not use special characters or
spaces.

MemberDirect-MemberConnect Content Management Guide Managing Rates Data
September, 2005 Rel. 1.0 6-2
Creating a New Product Type The Products form (See Product) is a general form that is suitable for capturing most of the product information. Thus, you can use this form to capture different product types. To categorize each product type, you would create a sub-folder for each product type, such as Account or RRSP, and then generate an output file into the sub-folder. For example, if your institution offers RRIFs as the new product type. To create a new product type for RRIF, you would create a sub-folder named as rrif under the /Data/rates folder first to categorize this new product. (See Creating a New Folder in The Content Management Process). You then can create a new form entry using the products form.
Generating and Previewing Rates Data Complete the following steps to generate an output file for rates data using either CCStd or CCPro:
1. Enter all the required fields into the form, and then click Generate.
2. Click Browse to select the new folder you have created, or enter the full file path into the Select an Output File text field. You can provide any valid file name for the rates data. (Do not use any special character or spaces in your file name.) For instance, to save the rates data file as rrif.xml in the /Data/rates/rrif folder, enter /Data/rates/rrif/rrif in the text field.
Note: You only need to provide the file name once. This dialog box will not be redisplayed when you regenerate the output file again.
3. Click OK.
A preview window will display the Rates Data file you have generated.
Note: If you want to verify that a particular rate is actually updated and appears on a particular web page, first locate the corresponding web page (index.jsp) on your workarea and then click the file name to preview the corresponding web page.
After you have verified your changes for the Rates Data Output file, submit and deploy your changes. Steps for submitting your changes are the same as the ones described in the earlier section (See Submitting Your Changes).
Note: You must refresh Rates Data on the RefreshData page before you can see your changes. (See Refreshing Rates Data, Page and Branch Information in Managing Branch Information.)
Including a Product on a Rates Overview Page To add a product to a Rates Overview page, first locate the Rates Overview page from your workarea and then click the Edit link by the index.jsp file to modify the corresponding web page. The form entry for the Rates Overview page will appear in the Rates Overview form.

MemberDirect-MemberConnect Content Management Guide Managing Rates Data
September, 2005 Rel. 1.0 6-3
You can add more product tables or rates to the Product Table section (See Product Table ) within the Rates Overview form. The steps to modify a Rates Overview page are the same as the steps to modify a web page (See Modifying a Page).
Note: By default, the Rates Overview page is located in /Personal/Rates. The location of a Rates Overview page could be different if you have altered your sitemap. Also, if you have previously created new Rates Overview pages, there could be more than one Rates Overview page on your site.
Creating a New Web Page to Display Product Details The steps to create a new page for a Product Detail page (See Rates Detail Page) are the same as those for creating a new web page (See Creating a New Page and Navigation). To create a Product Detail page, use the Rates Details form (See Show Product Details ) to select which product category or subcategory to show on this new page.
Updating Existing Product Rates All the existing rates data are saved in the sub-folders under /Data/rates (See Rates File Structure). To edit the rates data, locate the corresponding file within these sub-folders that contain the rates information and then click the Edit link. The form entry for the rates data opens in corresponding forms (See Forms for Rates Data).
The steps for generating and previewing the rates data are the same as those described in the earlier section (See Generating and Previewing Rates Data).
Once the rates data is updated, these changes will be reflected automatically on all web pages that refer to these rates.
Removing Rates from a Web Page To remove rates from a web page, complete the following steps:
1. Locate the corresponding web page file (index.jsp) under either /Personal, /Business, or sub-folders under these folders.
2. Complete the steps in Modifying a Page.
3. Click the icon to remove the corresponding section that refers to a particular rate or a product table.
4. After modifying the page, generate and preview your changes (See Modifying a Page).

MemberDirect-MemberConnect Content Management Guide Managing Rates Data
September, 2005 Rel. 1.0 6-4
Deleting a Product Type There may be times where you want to remove a product type, for example instance, if your institution no longer offers a particular product. Before you remove a rate’s data file for to the product type, you must remove any rates that refer to the product type from all the web pages that display such rates (See Removing Rates from a Web Page rates above).
To remove a product type, delete the corresponding file with the corresponding sub-folder under the /Data/rates folder. If this sub-folder only contains one file, you would want to delete the sub-folder as well after the file is deleted. (See Deleting Files and Folders.)

September, 2005 Rel. 1.0 7-1
Managing Branch Information
There are seven forms available for generating output files for branch information (See Branch Contact Information in Using Content Management Forms). All branch output files must be stored in a sub-folder under the /data/branches folder in xml format.
Branch Information File Structure The following table shows the file location of the branch related information:
Form Category: Form Type Output File Location
branch: cities (See Cities)
/Data/branches/cities/cities.xml
branch: contact-labels (See Contact Labels)
/Data/branches/contact-labels/contact-labels.xml
branch: details (See Details)
/Data/branches/<filename>.xml Note that the <filename> can be any valid file name (no spaces or special characters are allowed in a file name). The /Data/branches folder can contain multiple xml files. Each file represents a different branch.
branch: hours (See Hours)
/Data/branches/hours/hours.xml
branch: provinces (See Provinces)
/Data/branches/provinces/provinces.xml
branch: regions (See Regions)
/Data/branches/regions/regions.xml
branch: services (See Services)
/Data/branches/services/services.xml
Note: Never rename the sub-folders under the /Data/branches folder or rename the files in these sub-folders. However, you can use any valid file name for the output files that are generated by the Details form.
All the branch detail output files should be saved under the /Data/branches folder. The branch locator displays this branch information on your website. By default, the branch locator is located in /Personal/ToolsAndCalculators/ FindBranchATM/ on your website.

MemberDirect-MemberConnect Content Management Guide Managing Branch Information
September, 2005 Rel. 1.0 7-2
Creating New Branch Information When your institution opens a new branch, you can use the Details form to set up information about the branch on your website (See Details).
Generating and Previewing Branch Information Complete the following steps to generate an output file for branch information using either CCStd or CCPro:
1. Enter all the required fields into the form, and then click Generate.
2. Click Browse to select the /Data/branches folder or enter the full file path into the Select an Output File text field. You can provide any valid file name for the branch information. (Do not use any special character or spaces in your file name.) For example, to save the branch output file as branch1.xml in the /Data/branches folder, enter /Data/branches/branch1 in the text field.
Note: You only need to provide the file name once. This dialog box will not be redisplayed when you regenerate the output file again.
3. Click OK.
A preview window will display the Branch Output file you have generated.
Note: If you want to verify that a particular branch is actually created and appears on a branch location, first locate the corresponding web page (index.jsp) for the branch location and then click the file name to preview your changes.
After you have verified your changes for the Branch Data Output file, submit and deploy your changes. The steps for submitting your changes are the same as the ones described in the earlier section (See Submitting Your Changes).
Note: You must refresh Branches on the RefreshData page before you can see your changes. (See Refreshing Rates Data, Page and Branch Information in Managing Branch Information.)
Updating Existing Branch Information All branch information is stored in the /Data/branches folder (See Branch Information File Structure). To edit existing branch information, locate the appropriate branch file and then click the Edit link to open corresponding form entry in a branch form (See

MemberDirect-MemberConnect Content Management Guide Managing Branch Information
September, 2005 Rel. 1.0 7-3
Branch Contact Information).
The steps for generating and previewing branch information are the same as those described in the earlier section (See Generating and Previewing Branch Information).
Once the branch information is updated, these changes will be reflected automatically on the Branch Locator.
Deleting Branch Information When your institution closes a branch, you will want to delete its branch information from the Branch Locator. To delete a branch, delete the corresponding branch output file under the /Data/branches folder.
To remove branch files, complete the following steps using CCPro:
1. Check the check box for the branch files you want to delete.
2. Select File > Delete.
One of the following prompts informs you of the consequences of deleting the selected items:
• If you are deleting content that exist only in the workarea, then the prompt warns you that deleting the items will permanently remove them
• If you are deleting content that has been previously submitted to the staging area, the prompt informs you that the items will be removed from the staging area only when the deleted items are submitted. That is, the workarea versions will be deleted, but not versions in other areas. In order to remove a page from your live site, you must submit your deleted items to remove the items from the staging area.
3. Click Delete.
The items will be deleted. The view pane displays the view from which you started the action, including the deleted items that have been previously submitted. (You must submit deleted files to remove them from the staging area.)
4. After a branch file is deleted, refresh the preview and branches via the RefreshData page on the preview server to allow the changes take effect on the preview server. (See Refreshing Rates Data, Page and Branch Information in Managing Branch Information.)
5. To confirm your changes on live, submit the deleted folder and deploy your change to live by starting the Submit and Deploy to Live workflow.

MemberDirect-MemberConnect Content Management Guide Managing Branch Information
September, 2005 Rel. 1.0 7-4
Refreshing Rates Data, Page, and Branch Information After updating rates data (see Forms for Rates Data), branches (see Forms for Branch Contact Information) or page information (see Page Information Section), you must refresh these data respectively using the refresh data page on your preview or production website to refresh your changes.
Refreshing Data The following table shows how to refresh rates, branch and page information data.
Data to Refresh Link to Click
Rates Data Click Refresh Rates link on the Refresh Data page.
Branch Data Click Refresh Branches link on the Refresh Data page.
Page Information Click Refresh Sitemap link on the Refresh Data page.
If you deleted a file or folder, you must click on the Refresh Preview link on the /RefreshData page first to review those files or folders from the preview site before clicking on other links to refresh a specific types of data respectively.
Before previewing your changes to rates, branches or page information on your preview website, you must access the refresh data page as /RefreshData” on you preview website to refresh the data you have changed. (For example, your preview website URL is https://preview.mycu.com, your refresh data page on preview is https://preview.mycu.com/RefreshData).
After you have submitted your changes to rates, branches or page information, you must refresh these changes on your production website. To access the refresh data page on the production website, you would specify the URL on your production website instead. (Note that you do not need to click the Refresh Preview link on the production site.)

September, 2005 Rel. 1.0 A-1
Appendix A - Glossary
The following glossary defines terms and concepts that you should understand as you work with Integrated product:
Branches – Represent different lines of content development, such as foreign language versions of a Web site. (Note: Do not confuse this with branches of a financial institution.)
CCPro – ContentCenter Professional for power users is the new TeamSite 6 ContentCenter family of interfaces (See Working with ContentCenter Professional (CCPro.
CCStd – ContentCenter Standard for business users is the new TeamSite 6 ContentCenter family of interfaces (See Working with ContentCenter Standard (CCStd)).
Conflicts – Occurs during Submit and Get Latest operations when:
• During Submit action – The workarea contains modified content and corresponding staging area content has changed since the last Get Latest operation was performed on the location where the Submit operation is taking place.
• During Get Latest action – The workarea contains modified content.
Content stores – Represent a collection of branches.
Editions – Read-only snapshots of the content in staging areas at various points in its development.
Form – A template that guides the creation and controls the appearance of content. Forms are set up and maintained by ContentCenter administrators. After you select a form, a blank version of it appears on your screen so that you can fill it in with form entries. Form entry files are saved to the templatedata/ form_category/form_type/data folder in your workarea. For example, form entries for a home page might be saved in: workarea/templatedata/page-layout/home/data.
Form Entry - The information you enter in a blank form. Form entry files are stored in locations you select within the templatedata/form_category/ form_type/data folder in your workarea and are available for you and other users to recall and use as necessary.
Get Latest – Staging area content that is different from the workarea content into the workarea.

MemberDirect-MemberConnect Content Management Guide Appendix A - Glossary
September, 2005 Rel. 1.0 A-2
Job – A set of tasks assigned to one or more people. All jobs are based on predefined workflows. When you start a job based on a workflow, you specify who should perform each task, and then you initiate the job. You will perform each task is notified through the Workflow tab > Tasks view (and optionally through email) of the ContentCenter Professional user interface. You can also perform the tasks through the Tasks module on the ContentCenter Standard user interface page on which there is a task to perform. After a task is completed, the job proceeds to the next task in its sequence that was defined by the workflow. When all of the tasks in a job are done, the job is complete.
Output File - A file that you generate by combining form entries with a presentation template. The output file is typically in HTML format for use as a web page, although it can be other file types. You can generate output pages using any combination of available form entries and presentation templates.
Presentation Template – A template that defines how your form entries will appear when displayed. For example, a presentation template could specify the size, color, and layout of a web page. If you have multiple presentation templates, you can display the same form entries in multiple ways.
Preview – View your content prior to submitting, deploying, or generating an output file from it. Previewing is useful after you have finished working on a file to ensure that your changes appear as you intended prior to making the file publicly available.
Publish – The publishing of finished content to environments beyond the one where it was created.
For example, you could create a press release from within ContentCenter, submit the final version for approval and inclusion in the staging area, and then publish the finished version to a production system that allows the general population to access it. Not all ContentCenter users have the ability to deploy content; permission to do so is controlled by an administrator.
Staging areas – The location where the work of all contributors is ready for creation of an edition and publishing.
Submit - After you perform an action on a file, you must submit the file so that it can be approved and integrated into the staging area. For example, if you edit a file in your workarea, you must submit it so that your changes can be reviewed and promoted to the staging area when approved. When your work reaches the staging area, it is integrated with the work of other contributors into publishable, deployable content.
Task – A single step that is part of a job. There are two types of tasks: individual and group.
• Individual tasks are assigned to a specific person. If an individual task is assigned to you, it appears under either the Workflow tab > Tasks > My Tasks view of the ContentCenter Professional user interface or under My Tasks in the Tasks module of your ContentCenter Standard user interface home page. From there, you can complete the task.

MemberDirect-MemberConnect Content Management Guide Appendix A - Glossary
September, 2005 Rel. 1.0 A-3
• Group tasks are assigned to a group of people, any one of whom can perform the task. (Groups are defined and maintained by ContentCenter administrators and other maintainers of the ContentCenter system.) If a group task is assigned to your group, it appears either under the Workflow tab > Tasks > Unassigned Group Tasks view of the ContentCenter Professional user interface or under Group Tasks in the Tasks module of your ContentCenter Standard home page. From there, you can take ownership of the task and complete it.
After you perform a task, the job proceeds to the next task in its predefined sequence. When all of the tasks in a job are done, the job is complete.
Version – The numbered iteration of a content file. Whenever you submit a file and it is approved, ContentCenter saves the new version of the file containing your changes and retains the original, pre-edited version. Because previous versions are not deleted, you can view all previous versions of the file, see when and by whom each version was modified, and, if necessary, revert the current file back to an earlier version. Note that versioning only occurs when a file is submitted to the staging area. If you only edit a file and save your changes, a new version is not created until the file enters the staging area.
Workareas – Protected areas where you develop and test content without affecting the work of other contributors or “live” content.
Workflow – A sequence of tasks that can be assigned to one or more people. For example, a workflow could define three tasks: to edit some text, to add an image, and to review the work. Whenever you start a job, it must be based on a predefined workflow.

September, 2005 Rel. 1.0 B-1
Icon Reference
The following table describes many of the icons used in the ContentCenter:
Icon Description
Represents the Content Server. It is the first, or “root”, node of the navigation tree (branch view).
Represents a Content Store. These are second level nodes in the navigation tree (branch view).
Shortcut to the My Favorites view.
Indicates that a tip is available for the corresponding form field.
Opens the calendar widget.
Toolbar Icons
When this icon in the toolbar, it takes you to the Advanced Search screen. When this icon in the location bar, it initiates a simple search.
Takes you to the Compare Areas screen.
Initiates a Get Latest operation.
Initiates an Import operation.
Initiates an Edit operation.
Initiates a Preview operation.
Initiates a Submit operation.
Navigates up one directory (Location bar).
Navigates to the Tags screen (Properties screen title bar).
Navigates to the Versions screen (Properties screen title bar).
Area Icons
Represents branches.
Represents editions.
Represents staging areas.
Represents workareas.

MemberDirect-MemberConnect Content Management Guide Appendix B – Icon Reference
September, 2005 Rel. 1.0 B-2
File and Folder Icons
Represents folders
Represents private folders. Items marked private cannot be submitted to the staging area.
Represents files that are not modified or locked.
Represents files that are currently locked by other users. You would not be able to edit or submit these files.
Represents files that are currently locked by other users and modified in he workarea. You would not be able to edit or submit these files.
Represents files that are currently locked by you. Other users would not be able to edit or submit these files.
Represents files that are currently locked by you. Other users would not be able to edit or submit these files.
Represents files that are private. Items marked private cannot be submitted to the staging area.
Represents files that have been submitted at least once before deletion, and that are deleted in both the workarea and the staging area.
Represents files that have been submitted at least once before deletion, and that are currently deleted in the workarea only.
Represents deleted file that were never submitted to the staging area, and that are associated with tasks or the My Favorites view. Update logs also display this icon for unsubmitted items that were deleted during an update. These fields are irrecoverable.
Action icons
Enables you to generate an output file form forms entries. It is displayed in the form window.
Opens the Compare screen where you can compare changes between two areas.
Opens the differences screen where you can view the differences between two versions of a file side-by-side.
Enables you to start a new job.
Opens a dialog box where you can specify settings.
Enables you to save changes to a form, task, job or other item.

MemberDirect-MemberConnect Content Management Guide Appendix B – Icon Reference
September, 2005 Rel. 1.0 B-3
Task
Indicates that files attached to the task are in conflict with the staging area. User action is required.
Highest priority.
High priority.
Medium priority.
Low priority.
Lowest priority.
Opens details in a separate browser window.

September, 2005 Rel. 1.0 Index-1
Index
active content, allowing, 1-25 adding files, in ContentCenter Standard
(CCStd), 2-24 Advanced Metadata page, 4-15 All and Deleted Files view, in
ContentCenter Professional (CCPro), 2-14 Author role, 2-2
Banner Content page, 4-10 Banner form
for Online Banking Marketing portlets, 4-57
for Shared Content, 5-1 banner option
on Footer Content page, 4-11 including on a web page, 4-11
Branch Contact Information forms, 4-44 Cities form, 4-45 Contact Labels form, 4-45 Provinces form, 4-45 Regions form, 4-44 Services form, 4-44
Branch Contract Details page, 4-54 branch information
creating new, 7-2 deleting, 7-3 file structure, 7-1 generating and previewing, 7-2 managing, 7-1 updating, 7-2
Branch Information page, 4-52 broken images, resolving in VisualFormat,
1-26 browsers, supported, 1-1 Business folder, 3-9
call-to-action hyperlinks, 3-7 CCPro. See ContentCenter Professional CCStd. See ContentCenter Standard
certificates, digital. See digital certificates, TeamSite
changes submitting, 2-30 undoing, 2-6
Child Page Order, 4-12 Cities form, 4-45 conflicts, resolving in ContentCenter
Professional (CCPro), 2-19 Contact Labels form, 4-45 content display period, 3-6 content management process, 2-1
concepts, 2-1 permitted changes, 2-7 TeamSite ContentCenter, 2-1 user management. See also user
management user management, 2-2
content tab, in ContentCenter Professional (CCPro), 2-11
All and Deleted Files view, 2-14 location bar, 2-11 Locked Files view, 2-14 menu and action links, 2-11 Modified Files view, 2-13 My Favorites view, 2-16 See also My
Favorites view, in ContentCenter Professional
My Local Files view, 2-16 My Locked Files view, 2-16 My Modified Files view, 2-15 My Workareas view, 2-15 navigation pane, 2-12 view pane, 2-13
content, importing. See importing content ContentCenter Professional (CCPro), 2-9
Content tab, 2-11. See also Content tab deleting folders with locked files, 2-26 jobs, working with, 2-18 page components, 2-10

MemberDirect-MemberConnect Content Management Guide Index
September, 2005 Rel. 1.0 Index-2
ContentCenter Professional (CCPro) (continued)
pagination, 2-11 resolving conflicts, 2-19 tasks, working with, 2-18 Workflow tab, 2-16 See also Workflow
tab, in ContentCenter Professional ContentCenter Standard (CCStd), 2-19
File Actions menu, 2-22 How Do I module, 2-20 My Favorites module, 2-20 My Workareas module, 2-20 New Forms module, 2-21 Tasks module, 2-20 Work-in-Progress module, 2-21
creating new folders, 2-29
data, refreshing, 7-4 Data folder, 3-9 deleted content, restoring, 2-28. See also
restoring deleted content deleting
a product type, 6-4 branch information, 7-3 files, workarea, 2-27 folders, 2-25
from Deploy to Live workflow, 2-26 with locked files, 2-26 workarea, 2-27
pages, 2-32 shared content, 5-4
Details form, 4-52 Branch Contract Details page, 4-54 Branch Information page, 4-52 Holiday Hours page, 4-56 Predefined Hours page, 4-56 Regular Office Hours page, 4-56 Special Hours page, 4-57
digital certificates, TeamSite, 1-4 certificate expiration, 1-21
renewing a certificate, 1-21 installing into a Java Runtime
Environment, 1-12 JRE Version 1.5 (and later), 1-17
installing on a FireFox browser, 1-22 installation procedure, 1-22
obtaining, 1-4 access code login, 1-5 Client Certificate Authority, logging
into, 1-6 preparation for installation, 1-4
removing, 1-22 viewing in Internet Explorer, 1-22
disabling pop-up blockers, 1-2 displaying a subfolder's content, in
ContentCenter Standard (CCStd), 2-24 document audience, 1 document organization, 1 Document page, on List of Documents form,
4-36
Editor role, 2-3
favorites. See My Favorites file conflicts, 2-5 file structure
branch information, 7-1 form entries, 3-4 generated files, 3-8 rates, 6-1 shared content, 3-8
files adding, using ContentCenter Standard
(CCStd) continuous range of files, 2-24 more than one file, 2-24
deleting, 2-25 importing. See importing files renaming, 2-24
Files Actions menu, in ContentCenter Standard (CCStd), 2-22
folders Business, 3-9 creating new, 2-29 Data, 3-9 deleting, 2-25
from Deploy to Live workflow, 2-26 with locked files, 2-26 workarea, 2-27
moving, 2-31 Personal, 3-9 renaming, 2-25 Resources, 3-9 SharedContent, 3-9 Templatedata, 3-10 workarea, 3-8
Footnote page, on List of Documents form, 4-37
Foreign Exchange form, 4-39 form entries
editing, 3-4 entering data, 3-4

MemberDirect-MemberConnect Content Management Guide Index
September, 2005 Rel. 1.0 Index-3
file structure, 3-4 generating new, 3-11 locating, 3-4 saving, 3-10 selecting
using ContentCenter Professional (CCPro), 3-2
using ContentCenter Standard (CCStd), 3-3
Form Entry file, creating, 3-1 forms
call-to-action hyperlinks, 3-7 content display period, 3-6 defined, 3-1 file structure for generated files and
shared content, 3-8 link-to fields, 3-7 navigating to form pages, 3-10 types of fields, 3-5 types, 3-2 using, 3-1
generating branch information, 7-2 index.jsp file, 2-30 output file, 3-10 rates data, 6-2 shared content, 5-2
Global Portlets page, 4-9 Glossary, A-1
Header page, on List of Documents form,
4-35 Holiday Hours page
on the Details form, 4-56 on Hours form, 4-48
Home Page form, 4-17 Promotional Content section, 4-18 promotional web pages, 4-21 See also Promotional form
Hours form, 4-46 Holiday Hours page, 4-48 Regular Office Hours page, 4-46 Special Hours page, 4-49
How Do I module, in ContentCenter Standard (CCStd), 2-20
icon reference, B-1 images, selecting for Promotional Content
page, 4-18 importing content
using ContentCenter Professional (CCPro), 2-23
using ContentCenter Standard (CCStd), 2-23 adding a continuous range of files, 2-24 adding more than one file, 2-24 displaying a subfolder's content, 2-24 importing a subfolder, 2-24
importing files, 2-23 Include Content, on Other Content page,
4-25 Include Pages form, 4-37
Include Content page, 4-37 including
banners on a web page, 4-11 portlets on a web page, 4-9 shared content on a web page, 5-3
index.jsp file, generating new, 2-29 Job Details Pane, in ContentCenter
Professional, 2-18 Job Posting form, 4-32
Job Posting page, 4-33 Job Posting pages, 4-32 jobs, in ContentCenter Professional, 2-18
link-to fields, specifying URLS to, 3-7 List of Documents form, 4-35
Document page, 4-36 Footnote page, 4-37 Header page, 4-35
local files view, 2-16 local files manager, installing, 1-27 location bar, in ContentCenter Professional
(CCPro), 2-11 Locked Files view, in ContentCenter
Professional (CCPro), 2-14 My Locked Files view, 2-16
logging off, 2-9 logging on, to the ContentCenter, 2-8
log on information, 2-9 regular log on, 2-9
Marketing (Offer Presentment) form for Online Banking marketing portlets,
4-59 for Shared Content, 5-1
Marketing (Offer Presentment) portlet, 4-4 menu and action links, in ContentCenter
Professional (CCPro), 2-11

MemberDirect-MemberConnect Content Management Guide Index
September, 2005 Rel. 1.0 Index-4
Microsoft Client, and Windows 95 and ME users, 1-2
installing, 1-3 verifying installation, 1-2
Modified Files view, in ContentCenter Professional (CCPro), 2-13, 2-15
modifying pages, 2-30 moving
folders, 2-31 pages, 2-31
multiple items, restoring, 2-28 My Favorites module, in ContentCenter Standard (CCStd), 2-20 My Favorites view
in ContentCenter Professional (CCPro), 2-16 adding a file from VisualPreview, 2-16 adding a folder or file to, 2-16 removing an item from, 2-16
My Locked Files view, in ContentCenter Professional (CCPro), 2-15
My Modified Files view, in ContentCenter Professional (CCPro), 2-15
My Workareas module in ContentCenter Professional (CCPro),
2-15 in ContentCenter Standard (CCStd), 2-20
navigation, in form pages, 3-10 navigation pane, in ContentCenter
Professional (CCPro), 2-12 New Forms module, in ContentCenter
Standard (CCStd), 2-21
Online Banking Marketing portlets, 4-58
Banner form, 4-59 Creating, 4-60 Examples
displaying external links on Accounts pages, 4-62 and adding a link to another page,
4-63 displaying external links on all Online
Banking pages, 4-60 displaying external links on specific
pages, 4-62 no portlets displayed on Online
Banking pages, 4-60 Marketing (Offer Presentment) form, 4-59 Quick Navigation form, 4-59
Rates Portlet form, 4-59 Section portlets, 4-60 Shortcuts form., 4-59 Specific portlets, 4-59
operating systems, supported, 1-1 Other Content page, 4-25
Include Content, 4-27 Standard Content, 4-25
output file, generating, 3-10
page components, in ContentCenter Professional (CCPro), 2-10
Page Layout forms 4-1 Advanced Metadata page, 4-15 Banner Content page, 4-10. See also
Banner Content page form sections, 4-1 Global Portlets page, 4-9. See also Global
Portlets page Portlets page, 4-3. See also Portlets page Primary Content page, 4-2 Secondary Content page, 4-3
Page Navigation panel, 3-10 pages
deleting, 2-32 modifying, 2-30 moving, 2-31
pagination, in ContentCenter Professional (CCPro), 2-11
Personal folder, 3-9 pop-up blockers, disabling, 1-2 Portlets page, 4-3
including portlets on a web page, 4-9 Marketing (Offer Presentment) portlet,
4-4 Quick Navigation portlet, 4-6 Rates portlet, 4-6 Shortcuts portlet, 4-8
Predefined Hours page, on the Details form, 4-56
previewing branch information, 7-2 rates data, 6-2 shared content, 5-2
Primary Content page, 4-2 Prime form, 4-38 Product Detail page, creating a new page
for, 6-3 Product form, 4-40 product rates, updating, 6-3
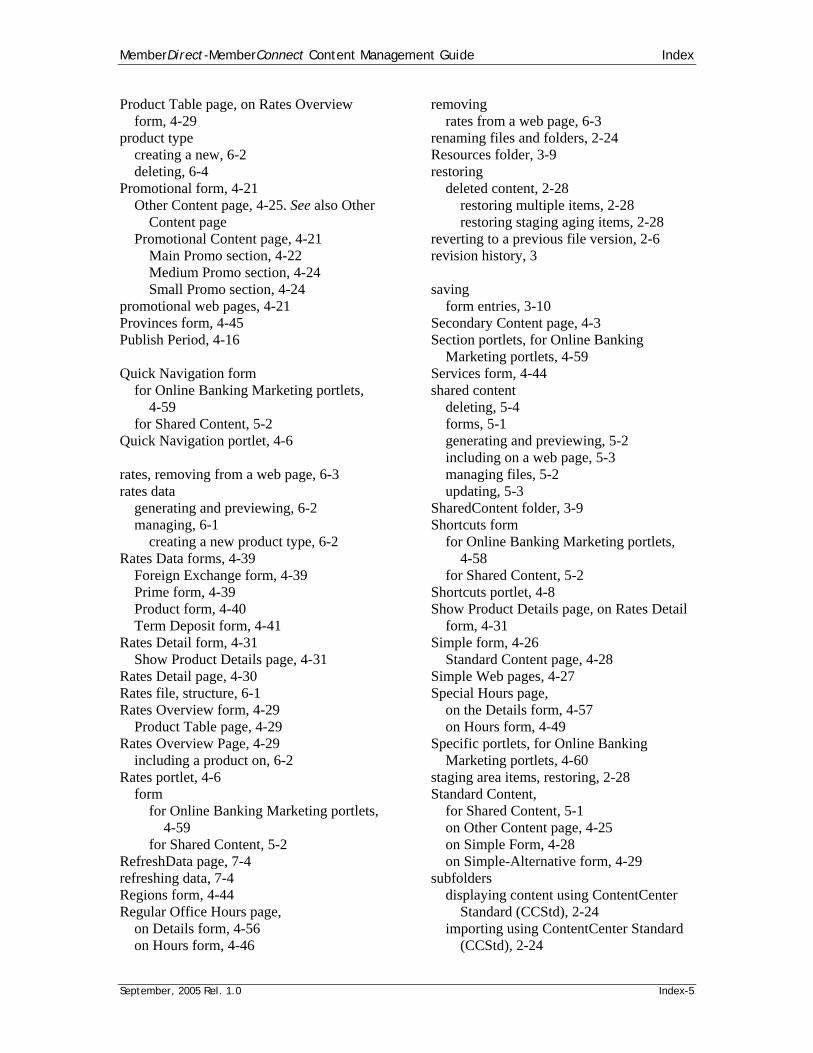
MemberDirect-MemberConnect Content Management Guide Index
September, 2005 Rel. 1.0 Index-5
Product Table page, on Rates Overview form, 4-29
product type creating a new, 6-2 deleting, 6-4
Promotional form, 4-21 Other Content page, 4-25. See also Other
Content page Promotional Content page, 4-21
Main Promo section, 4-22 Medium Promo section, 4-24 Small Promo section, 4-24
promotional web pages, 4-21 Provinces form, 4-45 Publish Period, 4-16
Quick Navigation form
for Online Banking Marketing portlets, 4-59
for Shared Content, 5-2 Quick Navigation portlet, 4-6
rates, removing from a web page, 6-3 rates data
generating and previewing, 6-2 managing, 6-1
creating a new product type, 6-2 Rates Data forms, 4-39
Foreign Exchange form, 4-39 Prime form, 4-39 Product form, 4-40 Term Deposit form, 4-41
Rates Detail form, 4-31 Show Product Details page, 4-31
Rates Detail page, 4-30 Rates file, structure, 6-1 Rates Overview form, 4-29
Product Table page, 4-29 Rates Overview Page, 4-29
including a product on, 6-2 Rates portlet, 4-6
form for Online Banking Marketing portlets,
4-59 for Shared Content, 5-2
RefreshData page, 7-4 refreshing data, 7-4 Regions form, 4-44 Regular Office Hours page,
on Details form, 4-56 on Hours form, 4-46
removing rates from a web page, 6-3
renaming files and folders, 2-24 Resources folder, 3-9 restoring
deleted content, 2-28 restoring multiple items, 2-28 restoring staging aging items, 2-28
reverting to a previous file version, 2-6 revision history, 3
saving
form entries, 3-10 Secondary Content page, 4-3 Section portlets, for Online Banking
Marketing portlets, 4-59 Services form, 4-44 shared content
deleting, 5-4 forms, 5-1 generating and previewing, 5-2 including on a web page, 5-3 managing files, 5-2 updating, 5-3
SharedContent folder, 3-9 Shortcuts form
for Online Banking Marketing portlets, 4-58
for Shared Content, 5-2 Shortcuts portlet, 4-8 Show Product Details page, on Rates Detail
form, 4-31 Simple form, 4-26
Standard Content page, 4-28 Simple Web pages, 4-27 Special Hours page,
on the Details form, 4-57 on Hours form, 4-49
Specific portlets, for Online Banking Marketing portlets, 4-60
staging area items, restoring, 2-28 Standard Content,
for Shared Content, 5-1 on Other Content page, 4-25 on Simple Form, 4-28 on Simple-Alternative form, 4-29
subfolders displaying content using ContentCenter
Standard (CCStd), 2-24 importing using ContentCenter Standard
(CCStd), 2-24

MemberDirect-MemberConnect Content Management Guide Index
September, 2005 Rel. 1.0 Index-6
submitting changes, 2-30 task management, 2-7
Tasks module, in ContentCenter Standard
(CCStd), 2-20 tasks, in ContentCenter Professional
(CCPro), 2-18 TeamSite ContentCenter, 2-1 Templatedata folders, 3-10 Term Deposit form, on Rates Data forms,
4-41 trademarks, 3 typographical conventions, 2
undoing changes, 2-6 updating
branch information, 7-2 shared content, 5-3
user management, 2-2 Author role, 2-2 Editor role, 2-3
version management, 2-4
file conflicts, 2-5
version history, 2-5 view pane, in ContentCenter Professional
(CCPro), 2-12 VisualFormat
installing toolbar, 1-25 resolving broken images in, 1-26
VisualPreview, in ContentCenter Standard (CCStd), 2-22
Windows 98 and ME users, and Microsoft
Client, 1-2 Windows XP Service Pack 2, 1-2
workaround for, 1-25 workarea
files, deleting, 2-27 folders, 3-9
deleting, 2-27 Workflow tab, in ContentCenter
Professional (CCPro), 2-17 Job Details pane, 2-18 sorting items, 2-18
Work-in-Progress module, in ContentCenter Standard (CCStd), 2-21