integrated microbattery charger for autonomous systems
TRANSCRIPT

Brigham Young University Brigham Young University
BYU ScholarsArchive BYU ScholarsArchive
Theses and Dissertations
2004-02-09
Integrated Microbattery Charger for Autonomous Systems Integrated Microbattery Charger for Autonomous Systems
Brian W. Lefevre Brigham Young University - Provo
Follow this and additional works at: https://scholarsarchive.byu.edu/etd
Part of the Electrical and Computer Engineering Commons
BYU ScholarsArchive Citation BYU ScholarsArchive Citation Lefevre, Brian W., "Integrated Microbattery Charger for Autonomous Systems" (2004). Theses and Dissertations. 118. https://scholarsarchive.byu.edu/etd/118
This Thesis is brought to you for free and open access by BYU ScholarsArchive. It has been accepted for inclusion in Theses and Dissertations by an authorized administrator of BYU ScholarsArchive. For more information, please contact [email protected], [email protected].

INTEGRATED MICROBATTERY CHARGER FOR
AUTONOMOUS SYSTEMS
by
Brian W. LeFevre
A thesis submitted to the faculty of
Brigham Young University
in partial fulfillment of the requirements for the degree of
Master of Science
Department of Electrical and Computer Engineering
Brigham Young University
December 2003

BRIGHAM YOUNG UNIVERSITY
GRADUATE COMMITTEE APPROVAL
of a thesis submitted by
Brian W. LeFevre
This thesis has been read by each member of the following graduate committee andby majority vote has been found to be satisfactory.
Date Craig S. Petrie, Chair
Date Richard H. Selfridge
Date John N. Harb
BRIGHAM YOUNG UNIVERSITY
As chair of the candidate’s graduate committee, I have read the thesis of Brian W.LeFevre in its final form and have found that (1) its format, citations, and biblio-graphical style are consistent and acceptable and fulfill university and departmentstyle requirements; (2) its illustrative materials including figures, tables, and chartsare in place; and (3) the final manuscript is satisfactory to the graduate committeeand is ready for submission to the university library.
Date Craig S. PetrieChair, Graduate Committee
Accepted for the Department
Michael A. JensenGraduate Coordinator
Accepted for the College
Douglas M. ChabriesDean, College of Engineering and Technology

ABSTRACT
INTEGRATED MICROBATTERY CHARGER FOR AUTONOMOUS SYSTEMS
Brian W. LeFevre
Department of Electrical and Computer Engineering
Master of Science
This thesis presents a microbattery recharging circuit suitable for autonomous
microsystems. The battery charger chosen for this design is a constant current battery
charger. Two methods of regulating the constant-current are discussed. A published
shunt regulator design is analyzed and is presented with enhancements to the design.
A series regulator that controls the current to the battery with a switch is designed
and fabricated in a 1.5µm CMOS process. The fabricated prototype occupies less
than 2.20x2.20mm and is expected to dissipate less than 25µW of power. A discrete
model of the integrated circuit is constructed and tested to demonstrate that the series
regulator will work using a solar cell as the energy source. The design of the charger is
a major step toward the construction of a completely integrated autonomous system.
ACKNOWLEDGMENTS
I would like to gratefully acknowledge the support and encouragement from
my wife Emy. I also appreciate the support of my committee members, Dr. Craig
Petrie, Dr. Richard Selfridge, and Dr. John Harb. I am also grateful for all my family
members who willingly edited and helped with this thesis.

vi

Contents
Acknowledgments v
List of Figures xii
1 Introduction 1
1.1 Autonomous Systems . . . . . . . . . . . . . . . . . . . . . . . . . . . 1
1.1.1 Desired Qualities . . . . . . . . . . . . . . . . . . . . . . . . . 2
1.2 Thesis Overview . . . . . . . . . . . . . . . . . . . . . . . . . . . . . . 3
2 Recharge Architectures 5
2.1 Slow Battery Chargers . . . . . . . . . . . . . . . . . . . . . . . . . . 6
2.2 Fast Battery Chargers . . . . . . . . . . . . . . . . . . . . . . . . . . 6
2.2.1 Temperature Charge Indicators . . . . . . . . . . . . . . . . . 7
2.2.2 Voltage Charge Indicators . . . . . . . . . . . . . . . . . . . . 7
2.3 Charging Schemes for the NiZn Microbattery . . . . . . . . . . . . . . 8
3 Evaluation of a Shunt Regulator Design 11
3.1 Overview . . . . . . . . . . . . . . . . . . . . . . . . . . . . . . . . . . 11
3.2 System Design . . . . . . . . . . . . . . . . . . . . . . . . . . . . . . . 11
3.2.1 Shunt Circuitry . . . . . . . . . . . . . . . . . . . . . . . . . . 11
3.2.2 Comparator . . . . . . . . . . . . . . . . . . . . . . . . . . . . 12
3.2.3 Voltage Reference . . . . . . . . . . . . . . . . . . . . . . . . . 13
3.3 Limitations of Integrating Discrete Shunt Regulator System . . . . . 15
3.3.1 Voltage Reference Limitations . . . . . . . . . . . . . . . . . . 15
3.3.2 Resistors . . . . . . . . . . . . . . . . . . . . . . . . . . . . . . 17
3.3.3 Bipolar PNP Transistor . . . . . . . . . . . . . . . . . . . . . 17
vii

3.3.4 Diode . . . . . . . . . . . . . . . . . . . . . . . . . . . . . . . 19
3.4 Integrated Circuit Implementation . . . . . . . . . . . . . . . . . . . . 20
3.5 Fabrication and Testing . . . . . . . . . . . . . . . . . . . . . . . . . 21
3.6 Conclusion . . . . . . . . . . . . . . . . . . . . . . . . . . . . . . . . . 23
4 Integrated Recharge Circuit Design and Fabrication 25
4.1 Overview . . . . . . . . . . . . . . . . . . . . . . . . . . . . . . . . . . 25
4.1.1 Basic Structure . . . . . . . . . . . . . . . . . . . . . . . . . . 25
4.2 Discrete Implementation and Testing . . . . . . . . . . . . . . . . . . 26
4.3 System Design . . . . . . . . . . . . . . . . . . . . . . . . . . . . . . . 27
4.3.1 MOS Switches . . . . . . . . . . . . . . . . . . . . . . . . . . . 27
4.3.1.1 PMOS Switch . . . . . . . . . . . . . . . . . . . . . . 28
4.3.1.2 NMOS Switch . . . . . . . . . . . . . . . . . . . . . 29
4.3.2 Voltage Reference . . . . . . . . . . . . . . . . . . . . . . . . . 30
4.3.2.1 Startup Circuit . . . . . . . . . . . . . . . . . . . . . 32
4.3.2.2 Amplifier . . . . . . . . . . . . . . . . . . . . . . . . 33
4.3.3 Comparator . . . . . . . . . . . . . . . . . . . . . . . . . . . . 34
4.4 Simulations and Results . . . . . . . . . . . . . . . . . . . . . . . . . 36
4.5 Power Dissipation . . . . . . . . . . . . . . . . . . . . . . . . . . . . . 41
4.6 Integrated Circuit Implementation . . . . . . . . . . . . . . . . . . . . 41
4.6.1 Two Systems on Chip . . . . . . . . . . . . . . . . . . . . . . 41
4.6.2 Fixing the problems . . . . . . . . . . . . . . . . . . . . . . . 43
4.7 Conclusion . . . . . . . . . . . . . . . . . . . . . . . . . . . . . . . . . 43
5 Conclusions and Future Work 45
5.1 Conclusion . . . . . . . . . . . . . . . . . . . . . . . . . . . . . . . . . 45
5.2 Future Work . . . . . . . . . . . . . . . . . . . . . . . . . . . . . . . . 46
5.2.1 Testing . . . . . . . . . . . . . . . . . . . . . . . . . . . . . . . 46
5.2.2 Voltage Reference . . . . . . . . . . . . . . . . . . . . . . . . . 46
5.2.3 Other Batteries . . . . . . . . . . . . . . . . . . . . . . . . . . 46
5.2.4 Programmability . . . . . . . . . . . . . . . . . . . . . . . . . 47
viii

5.2.5 Precision . . . . . . . . . . . . . . . . . . . . . . . . . . . . . . 47
A Chip Data Sheet 51
A.1 Overview . . . . . . . . . . . . . . . . . . . . . . . . . . . . . . . . . . 51
B Device Sizes 55
C Transistor Models 57
C.1 Overview . . . . . . . . . . . . . . . . . . . . . . . . . . . . . . . . . . 57
C.2 Lot Information . . . . . . . . . . . . . . . . . . . . . . . . . . . . . . 57
C.3 NMOS . . . . . . . . . . . . . . . . . . . . . . . . . . . . . . . . . . . 57
C.4 PMOS . . . . . . . . . . . . . . . . . . . . . . . . . . . . . . . . . . . 59
Bibliography 62
ix

x

List of Figures
1.1 Block Diagram of an Example Autonomous System . . . . . . . . . . 2
2.1 Voltage of NiZn Cell During Charge. . . . . . . . . . . . . . . . . . . 9
3.1 Simplified Schematic of Shunt Battery Charger System. . . . . . . . . 12
3.2 Schematic of Shunt Regulator System . . . . . . . . . . . . . . . . . . 13
3.3 Reference Voltage vs. Solar Cell Current . . . . . . . . . . . . . . . . 14
3.4 Reference Voltage vs. Threshold . . . . . . . . . . . . . . . . . . . . . 16
3.5 Reference Voltage vs. Mobility . . . . . . . . . . . . . . . . . . . . . . 16
3.6 Parasitic PNP Transistor . . . . . . . . . . . . . . . . . . . . . . . . . 18
3.7 Effects of Low β on Shunt Regulator . . . . . . . . . . . . . . . . . . 19
3.8 Diode-Connected MOSFET . . . . . . . . . . . . . . . . . . . . . . . 20
3.9 Programming the Voltage Reference to Correct Process Variation . . 21
3.10 Layout of Shunt Regulator System . . . . . . . . . . . . . . . . . . . 22
4.1 Simplified Schematic of Series Regulator System . . . . . . . . . . . . 26
4.2 Cycling the Microbattery With a Discrete Series Charger. . . . . . . . 27
4.3 MOSFET Voltage Reference and Startup Circuitry . . . . . . . . . . 30
4.4 Reference Voltage vs. Temperature . . . . . . . . . . . . . . . . . . . 32
4.5 Voltage Reference Amplifier . . . . . . . . . . . . . . . . . . . . . . . 34
4.6 Cascode Amplifier . . . . . . . . . . . . . . . . . . . . . . . . . . . . . 35
4.7 Switching Voltage vs. Comparator Gain . . . . . . . . . . . . . . . . 37
4.8 Four Regions of Operation . . . . . . . . . . . . . . . . . . . . . . . . 37
4.9 Discharged Battery and Solar Energy . . . . . . . . . . . . . . . . . . 38
4.10 Charged Battery and Solar Energy . . . . . . . . . . . . . . . . . . . 39
4.11 Charged Battery and No Solar Energy . . . . . . . . . . . . . . . . . 39
4.12 Discharged Battery and No Solar Energy . . . . . . . . . . . . . . . . 40
xi
4.13 Cycle Through All the Regions . . . . . . . . . . . . . . . . . . . . . 40
4.14 Layout of Series Regulator . . . . . . . . . . . . . . . . . . . . . . . . 42
A.1 Specification Sheet . . . . . . . . . . . . . . . . . . . . . . . . . . . . 52
A.2 Connection Diagram . . . . . . . . . . . . . . . . . . . . . . . . . . . 53
xii

Chapter 1
Introduction
1.1 Autonomous Systems
The development of the microchip has revolutionized the world today. It is
common for one microchip to combine several systems that have historically required
their own chip. These system-on-chip (SOC) designs accomplish complex tasks, draw-
ing less power and costing less than multiple microchip designs. A typical SOC is
comprised of analog-to-digital converters, microprocessors, and memory [1]. More
recently, SOCs have incorporated transmit and receive capabilities [2].
Wise describes a microchip SOC that integrates micro-electromechanical sys-
tems (MEMS) and micropower electronics for wireless communication [3]. The inclu-
sion of MEMS introduces a variety of applications for SOCs. MEMS can be used as
either sensors, such as a capacitive sensor, or actuators, such as a bistable RF switch.
A sensor that has the ability to measure, store, and transmit data is invaluable for
many applications. For remote applications, such as a bridge stress sensor, an au-
tonomous system may be required. A remote autonomous system is self-sustaining
and typically requires a portable, long term power supply or an energy scavenging
device to generate its required power.
Typical power supplies are large and bulky compared to microdevices. Even
a small coin cell battery like those found in watches is much larger than many mi-
crochips. Recent advances in microbattery technology by LaFollette and Harb have
enabled the fabrication of battery cells on silicon wafers [4]. This research has lead to
nickel-zinc (NiZn) microbatteries fabricated by Humble [5]. These batteries provide
1

energy storage ideal for autonomous systems because they are small and have high
energy density. They also provide excellent power delivery during peak demand, such
as switching a MEMS device or transmitting data. The energy stored in the battery
can be harvested from the sun using a solar cell or from vibrations using piezoelectric
materials. For high light conditions, a solar cell would be an ideal energy source. The
energy from the sun could be converted to electrical power that can be transferred to
the microbattery. The solar cell does not continuously provide power; there are times
of shadow or darkness where the solar cell is incapable of powering the autonomous
system. The battery must store enough energy to power the system throughout the
periods of low light conditions.
As part of the effort to integrate all the components of an autonomous system
on a single substrate, this thesis examines an integrated charger circuit suitable for
microbatteries. A block diagram of the target autonomous system is shown in Fig-
ure 1.1. The battery charger will regulate the power received from the solar cell, and
the power will be used to charge the battery. The complete integrated autonomous
system will be the subject of future work.
Charge
Circuitry
Solar
Cell
MEMS
SensorBattery
Figure 1.1: Block Diagram of an Example Autonomous System
1.1.1 Desired Qualities
To achieve integration, the system is designed using a typical CMOS integrated
circuit process. The microbattery can be constructed on top of the silicon wafer
2

as a post-fabrication step. It should be mentioned that a solar cell is not easily
integrated in a standard CMOS process. The solar cell requires several p-n junctions
to create the voltage necessary to recharge the battery and power the system. It
is possible for several isolated p-n junctions to be created using silicon-on-insulator
(SOI) technology; the CMOS recharge circuit should easily port over to an SOI CMOS
process as a future project if desired. It is intended that all of the devices necessary
for the autonomous system will eventually be integrated on one substrate; this work
focuses on the design and integration of the battery charger.
The solar cell produces a relatively low current level. The majority of this
current should be transferred to the battery when the battery is recharging. The
power should not be wasted on the circuitry that controls the transfer of energy.
The sensor system will gather information periodically. To increase the amount
of information the sensor acquires, a relatively efficient charger should be used. The
sensor can cycle through periods of high power and periods of standby or low power.
The rate at which the sensor cycles is determined by the speed and efficiency of the
charger.
To keep the size and cost of the system low and because a simple circuit is
easier to design for low power, the charger design will be a low complexity design.
Size is the key factor. Size governs the cost of an integrated circuit. The battery
charger should ideally be the size of the battery or smaller. This way, the battery can
be built above the charger and costly chip space is not lost.
1.2 Thesis Overview
This thesis is divided into three chapters, each chapter discussing a step of
the design of an integrated battery charger. The first step is the choice of charger
architecture. The next step is an examination of the design that was developed
at Brigham Young University by Bennet [6], a constant-current charger with a shunt
regulator to control the current. The final step is the redesign of a complete integrated
battery charger. The charger is a constant-current architecture, using a solar cell to
provide the current and using a switch to series-regulate the current to the battery.
3

Chapter Two presents background information on battery charger architec-
tures. Different techniques are discussed and compared. Chapter Three discusses
the approach used by Bennet. The limitations of implementing Bennet’s design in
a CMOS process are discussed. Chapter Four presents a new charger designed for
this thesis. A discrete proof-of-concept version was implemented and the layout of
an integrated version is discussed. Chapter Five describes future work that can be
performed to further develop the battery charger and the autonomous system.
4

Chapter 2
Recharge Architectures
The architecture of battery chargers widely vary in their methods of recharg-
ing. Battery charger methods utilize either voltage and/or current [7]. Constant volt-
age chargers are very simple; they generate a voltage to which the battery charges.
This charging voltage can be difficult to maintain since not all power supplies can
produce the necessary current. Without using a very large power supply, the current
is initially limited until the battery voltage approaches the charging voltage. With
a limited current, the voltage charger behaves a lot like a constant current charger.
Constant current chargers supply a current that the battery stores as energy. When
the battery approaches full charge the current can be lowered to help the battery from
over-charging. Constant current battery chargers can be classified by the speed that
they charge the battery. A “Slow” recharger charges the battery at a current that is
much lower than the current rating1 of the battery. A “Fast” recharger charges the
battery at a current that is very close to, if not higher than, the current rating of the
battery.
Considering the limited energy available to the autonomous system, this thesis
only discusses a constant current charger. However, a mixture of these techniques is
found in many commercial systems. These architectures are examined in this chapter,
and the architecture for this research project is selected.
1 The current rating is the amp-hour capacity of a battery. It is the amount of current that abattery can deliver for one hour before the battery voltage reaches the end-of-life point.
5

2.1 Slow Battery Chargers
Slow battery chargers are also known as trickle charge systems; they use a very
low current to charge the battery. Such a low current can flow indefinitely without
damaging the battery. The trickle charger has a very simple design, one that requires
only a DC power supply and a large resistor to limit the current from the power
supply. However, the low current charges the battery very slowly. Some batteries
take over twelve hours to completely charge. Despite the long charging time, the
trickle charger is common in many household battery chargers because of its low
cost.
2.2 Fast Battery Chargers
Fast battery chargers can usually charge batteries in about one hour, some in as
little as fifteen minutes. Some fast architectures use a current that is about 1.2 times
the current rating. The high current can damage the battery if it is overcharged. If
the energy provided by the charger is higher than the energy required by the chemical
reaction to charge the battery, the excess current may cause unwanted side reactions.
Damage results in loss of battery life and energy storage capability. Since the battery
cannot withstand the high current, an end of charge (EOC) indicator must monitor
the battery. This increases the complexity and cost of the battery charger.
EOC indicators can determine when to reduce the charging current by sensing
the voltage, the temperature, or both. Temperature sensing is preferred over voltage
sensing because it is more reliable; if the temperature of the battery changes signif-
icantly the battery may be damaged regardless of the voltage applied to it. Basic
temperature and voltage EOC indicators are discussed in the following subsections.
Once the battery is fully charged the current must be reduced to prevent
damage. Typical fast chargers cut the current down to a trickle charge after the fast
charge has finished. The trickle of current will keep the battery at full charge while
it remains in the charger.
6

2.2.1 Temperature Charge Indicators
The temperature charge indicator monitors the battery for changes in heat.
When the battery is fully charged it dissipates the excess energy as heat. To deter-
mine an EOC, the indicator either compares the battery temperature to the ambient
temperature or just monitors the temperature change over time.
A ∆T implementation of the temperature charge indicator compares the tem-
perature of the battery with the ambient temperature to determine the end of charge.
For example, in nickel cadmium (NiCd) or nickel metal-hydride (NiMH) batteries, the
battery is fully charged and the current is lowered when the battery temperature is
10C above the ambient temperature. This method requires two thermal sensors, one
for the battery and one for the ambient temperature.
A ∆T/∆t method monitors the change in temperature of the battery over time.
The slope of the temperature change is measured by taking samples of temperature
and comparing them to the previous samples. When the temperature slope increases
past a critical value, the system will then reduce the current to the battery. Often
the ∆T/∆t uses signal processing to collect and compare the samples.
2.2.2 Voltage Charge Indicators
The voltage of the battery can indicate its approximate state of charge. There-
fore, the battery voltage can be compared to a reference voltage to determine the end
of charge. When the battery voltage surpasses the reference voltage, the charging
current is reduced. However, as the charging current drops so does the voltage on the
battery. This drop in voltage is caused by smaller drop across the internal resistance
of the battery and it affects the apparent voltage of the battery. The lower current
can continue to charge the battery yet should be low enough to not damage the bat-
tery, just like the trickle charger. Li-Ion batteries use this method because if they
overcharge, even in the slightest, they may explode.
Another voltage charge indicator, the ∆V/∆t, monitors the battery for changes
in the slope of the voltage. The slope in NiMH and NiCd batteries levels off and then
drops when the battery is fully charged. This leveling is easy to detect by sensing a
7

slope of zero. The voltage drop is also easily detected by monitoring the slope. Slope
characteristics of batteries vary, thus increasing the complexity of this EOC indicator.
2.3 Charging Schemes for the NiZn Microbattery
The NiZn microbattery is the target battery for this charger design. This bat-
tery requires certain strict specifications. The charger must be easy to integrate, low
power, efficient, and simple. These qualities are used to evaluate the battery charger
and were discussed in Section 1.1.1. The comparison of the recharge architectures
against the desired qualities can be seen in Table 2.1. Most of the previously dis-
cussed architectures could work with the NiZn battery [8], but not all of them meet
the specifications.
Table 2.1: Comparison of recharge architectures
Architecture Ease of Integration Low Power Efficient SimpleTrickle Charge
√ √–
√
∆T –√ √
–∆T/∆t
√ √ √–
∆V/∆t√ √ √
–Voltage Reference
√ √ √ √
Although a trickle charger is easy to integrate, low power, and simple, it is
very slow and inefficient. A slow recharge time is not practical for many autonomous
systems. This method wastes solar cell energy by limiting the current to the battery.
The ∆T architecture is the only system that is not easy to integrate. It requires
two thermal diodes that are physically separated from each other, permitting two
uncorrelated temperature readings. Due to the limited size of a microsystem, the
diodes may have to be too close to each other to produce a measurable temperature
difference. Another disadvantage is that the NiZn microbattery is not thermally
characterized. Without the thermal information the complexity of the system is
unknown.
8

The ∆T/∆t method suffers from the same lack of thermal characterization as
the ∆T method. It also requires storage and comparison of temperature samples.
Often the samples are digitized and digital signal processing (DSP) is used to de-
termine the state of charge. The analog-to-digital conversion and DSP algorithms
require complex circuitry.
The NiZn microbattery voltage slope curve, as seen in Figure 2.1, is not as
simple as the NiCd or NiMH curves described above. The voltage’s slope actually
increases at the end of charge. The change in slope is also dependent on intensity of
the current used to charge the battery. Such issues make the ∆V solution much more
complex.
Figure 2.1: Voltage of NiZn Cell During Charge.(Courtesy of [5])
A voltage reference EOC meets all the specifications. The charger requires a
current and voltage source. The current is provided by a solar cell, as mentioned in
9

Section 1.1, and a temperature-insensitive voltage reference can be easily integrated
in a small area on a chip. The solar cell can deliver a high current, compared to the
battery current rating, which enables a fast recharge. Changing the size of the solar
cell will change the current produced by it. The maximum current should only be
delivered under full light conditions. The reference voltage is compared to the battery
voltage and a regulator controls the current. The voltage reference, comparator, and
regulator are simple items to integrate in one system. The voltage reference EOC
indicator is chosen for this research because it meets the given specifications. Two
designs to regulate the solar cell current are presented in the following two chapters.
10

Chapter 3
Evaluation of a Shunt Regulator Design
3.1 Overview
A constant current battery charging circuit using a voltage reference indica-
tor has been designed and tested at Brigham Young University by Bennet [6]. His
discrete recharge circuit controlled the current by using a shunt regulator. Bennet
also designed and simulated an integrated version of the shunt regulator. The de-
sign is discussed in this chapter along with the limitations of implementing it as an
integrated circuit.
3.2 System Design
The shunt regulator system creates a reference voltage and compares it to the
voltage of the microbattery. If the battery voltage is slightly above the reference
voltage, the system will shunt the current from the solar cell to ground. This method
requires a diode or a diode-equivalent circuit to disconnect the battery from the
system when the current is being shunted. All of these functions are implemented in
three building blocks, the shunt circuitry and diode, the comparator, and the voltage
reference as seen in Figure 3.1. The complete schematic for the system is seen in
Figure 3.2. The blocks are discussed in the following subsections.
3.2.1 Shunt Circuitry
The shunt circuitry consists of an NMOS transistor, a PNP transistor, and a
diode. The NMOS draws current through the base of the PNP when the comparator
11

V oltage
R eference
+
R echarge C ircuit IntegratedMicrobattery
E nergyS cavenger
S hunt
C ircuitry-
V dd
Solar
Cell
Figure 3.1: Simplified Schematic of Shunt Battery Charger System.
determines that the battery voltage is above the reference voltage. The PNP shunts
the current from the solar cell to ground, stopping the current flow into the battery.
As the current is being shunted, the diode prevents the current from flowing out of
the battery to ground; thus the battery does not discharge.
3.2.2 Comparator
A simple voltage comparison between the reference voltage and the battery
voltage can determine if the battery is fully charged. As seen in Figure 3.2, the com-
parison is done using two transistors configured in a differential pair. The differential
pair draws the majority of the current through R4 down the side with the higher volt-
age. When the battery voltage surpasses the reference voltage, the current through
MN2 rises and turns on the shunt system. The differential pair in this system has
additional resistors R1 and R2 in the load. The resistor R2 allows the output voltage
to be sufficiently low when the current is flowing down that side, ensuring that the
shunt circuitry is off. When the output is high, the shunt circuitry turns on and stops
the current flowing into the battery.
12

Comparator Volatage Reference Shunt Circuitry
Figure 3.2: Schematic of Shunt Regulator System
3.2.3 Voltage Reference
To assure that the battery does not overcharge, a voltage reference must be
used. The voltage reference creates a voltage that is independent of the supply voltage,
solar cell current, and temperature. This independence was achieved through a unique
circuit designed by Bennet. The circuit uses only five transistors to create a stable
voltage.
The reference voltage can be defined as the solar cell voltage minus the voltage
drop across R5:
Vref = Vsc − I5R5. (3.1)
The voltage reference should not vary with changes in the solar cell voltage, which is
a diode voltage (0.7V ) above the battery as it is being charged. Therefore,
∆Vref = ∆Vsc −∆I5R5 = 0. (3.2)
13

To create a reference voltage that does not vary with solar cell voltage, the change in
the current through R5 must be proportional to the change in the solar cell voltage.
∆I5 =∆Vsc
R5
. (3.3)
To control the current, a simple bias is created using two diode-connected transistors.
The voltage of the diode-connected transistors varies little with increase in solar
cell voltage because the large resistor R7 opposes the current change. The reference
voltage is set and stabilized at 1.8V through the sizing of the transistors and resistors.
The dependence of the voltage reference on solar cell current is shown in Figure 3.3.
The reference was simulated as if the battery was reaching full charge.
10 20 30 40 50 60 70 80 90 1001.8
1.805
1.81
1.815
1.82
1.825
1.83
1.835
Current µA
Vre
f
Figure 3.3: Reference Voltage vs. Solar Cell Current
14

3.3 Limitations of Integrating Discrete Shunt Regulator System
Although Bennet’s design simulated as desired, there are several issues that
make a physical layout of the circuit difficult to implement. The first issue is that
the voltage reference is highly influenced by process variation. Another issue is that
the large resistors have large tolerances. The next is the poor efficiency of the PNP
transistor. The last is that the diode leaks current to ground. All of these issues are
discussed in the following subsections.
3.3.1 Voltage Reference Limitations
The voltage reference requires very precise sizing of transistors and resistors
to control the current. The reference voltage may differ due to small variations in the
fabrication process. The design is not very robust, meaning some chips on a wafer
may have an accurate reference voltage but some may not. The dependence can be
overcome through trimming as described in Section 3.4.
Two possible process variables that affect the reference voltage design of Fig-
ure 3.2 are threshold and mobility. The mobility of electrons can range from about
500 to about 700cm2/V s and the threshold can vary from about 0.35 V to 0.59V [9].
As the threshold voltage increases, so does the reference voltage. This is because the
voltage above the two diode-connected transistors, MN5 and MN6, will also rise. This
rise will lower the gate source voltage of MP3 which lowers the current being mirrored
for the reference. This relationship between threshold voltage and reference voltage
is shown in Figure 3.4, obtained via circuit simulation. As the mobility of electrons
increases the reference voltage decreases. This simulation is shown in Figure 3.5.
If an inaccurate Vref is used to sense the EOC for the battery, the battery will
not charge to the optimal voltage. For example, if the threshold changes to 0.4V the
battery will only charge to 1.5V . Also if the threshold changes to 0.6V the battery
will overcharge to 1.9V , which could damage the battery.
15

0.3 0.35 0.4 0.45 0.5 0.55 0.6 0.651.35
1.4
1.45
1.5
1.55
1.6
1.65
1.7
1.75
1.8
1.85
Threshold Vth
Vre
f
Figure 3.4: Reference Voltage vs. Threshold
500 520 540 560 580 600 620 640 660 680 7001.78
1.79
1.8
1.81
1.82
1.83
1.84
1.85
1.86
1.87
Mobility µo
Vre
f
Figure 3.5: Reference Voltage vs. Mobility
16

3.3.2 Resistors
The process variation significantly affects resistors on integrated circuits. Re-
sistors are fabricated with very high tolerances in CMOS processes. Due to this
tolerance error, many resistors are laser trimmed to tune their values. This trimming
is very expensive and adds another step after the fabrication process. Most errors
are in the range of ±30% [10]. As with standard discrete components, the actual
resistance of integrated resistors varies between instances. This is due to the process
variations across a wafer. The very large resistors in the shunt circuit introduce the
possibility of variation.
As seen in Equation 3.3, a resistance error will also change the reference volt-
age. If the resistance is lower than designed, the reference voltage will rise. The rise
can damage the battery. Conversely, if the resistance is higher the battery will never
fully charge, thus reducing its capability.
3.3.3 Bipolar PNP Transistor
A PNP BJT in a CMOS process is a parasitic device. It is parasitic because the
transistor is a side effect of the process and not normally used in designs. Figure 3.6
shows a simplified layout and cross-section of the parasitic transistor. The p-type
substrate is used as the collector, an N-well as the base, and an active p-diffusion as
the emitter. The substrate must be connected to the lowest voltage of the circuit and
therefore, so must the collector. It is not possible to connect the collector to anything
else, which severely limits use of the PNP.
Another problem is the PNP has very low current gain, in the range of 2 to
25. In the TSMC 0.25µm process, the parasitic β is about 2, for the AMI 1.6µm
process used the β is unpublished. With such a low beta, a large base current is
needed to shunt all of the solar cell current to ground. Assuming the beta is two, the
base current needs to be about two-thirds of the entire solar cell current, which is a
large percentage of the solar cell current.
Simulations show the current to the battery never is totally shunted using a
PNP transistor with a low β. With a β of 2, the shunt system is very ineffective.
17

E
B
C
Substrate
Tie
NWell
Tie
Figure 3.6: Parasitic PNP Transistor
18

Figure 3.7 shows that as the battery voltage increases, the current to the battery does
not decrease to zero. The battery will be overcharged and damaged.
1 1.5 2 2.50
10
20
30
40
50
60
70
80
90
100
Battery Voltage V
I µA
To BatteryShunted
Figure 3.7: Effects of Low β on Shunt Regulator
3.3.4 Diode
The diode is key to the shunt regulator system because it impedes the flow
of current from the battery to the rest of the circuit, effectively isolating the battery
from the circuit. P-N junction diodes are created by the same process as the PNP
transistor. It therefore behaves just like the transistor as described in Section 3.3.3.
This implies that some of the diode current will be lost to the substrate.
When designing the diode, special consideration is needed to reduce the β of
the parasitic transistor. With a beta of two, one third the diode current will be lost
to the substrate. This loss is undesirable; the battery should receive all the current
to minimize charging time. The loss can be eliminated by using a diode-connected
MOSFET instead of a p-n junction diode. Figure 3.8 shows that the transistor will
19
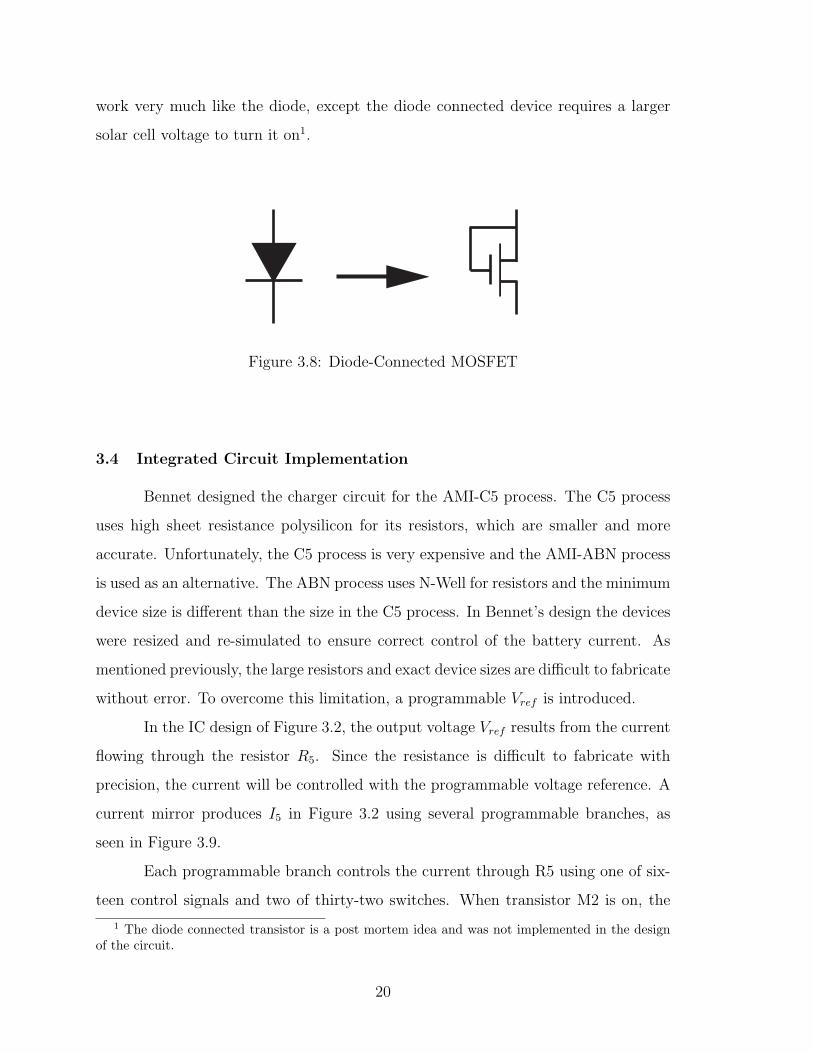
work very much like the diode, except the diode connected device requires a larger
solar cell voltage to turn it on1.
Figure 3.8: Diode-Connected MOSFET
3.4 Integrated Circuit Implementation
Bennet designed the charger circuit for the AMI-C5 process. The C5 process
uses high sheet resistance polysilicon for its resistors, which are smaller and more
accurate. Unfortunately, the C5 process is very expensive and the AMI-ABN process
is used as an alternative. The ABN process uses N-Well for resistors and the minimum
device size is different than the size in the C5 process. In Bennet’s design the devices
were resized and re-simulated to ensure correct control of the battery current. As
mentioned previously, the large resistors and exact device sizes are difficult to fabricate
without error. To overcome this limitation, a programmable Vref is introduced.
In the IC design of Figure 3.2, the output voltage Vref results from the current
flowing through the resistor R5. Since the resistance is difficult to fabricate with
precision, the current will be controlled with the programmable voltage reference. A
current mirror produces I5 in Figure 3.2 using several programmable branches, as
seen in Figure 3.9.
Each programmable branch controls the current through R5 using one of six-
teen control signals and two of thirty-two switches. When transistor M2 is on, the
1 The diode connected transistor is a post mortem idea and was not implemented in the designof the circuit.
20

Control
Control
CurrentMirrorVoltage
ReferenceCurrent
M2M5
Figure 3.9: Programming the Voltage Reference to Correct Process Variation
current reference is passed to the transistor M5. M5 draws about 1/10 of the mirror
current. Each time a block is turned on, Vref changes about 100mV . This small
change limits the error to 50mV . The programmable voltage makes the circuit more
robust. Since every chip can be programmed separately, the process variations are
overcome.
3.5 Fabrication and Testing
The shunt regulator system was fabricated by MOSIS using the AMI-ABN
1.6µm process in the summer of 2002. Figure 3.10 shows the layout of the circuit.
The tools used to perform the layout were not configured properly. The layout tools
did not allow for proper layout-versus-schematic (LVS) checking. As a result, there
were errors in the layout and the circuit was not functional. During test, a short was
discovered that disabled the entire circuit.
The above problems with fabrication and test were the impetus for designing
a new circuit. The new circuit was designed to overcome the problems of integration.
The tools were fixed to ensure proper checking of the circuit for this new design. The
new design will be presented in the next chapter.
21

Figure 3.10: Layout of Shunt Regulator System
22

3.6 Conclusion
The circuit designed by Bennet shows good initial work towards an integrated
battery charger system. The design is simple and simulates very well using discrete
BJT models. When integrated circuit parameters were used in simulation, the circuit
did not perform well. Therefore, the shunt regulator system as designed by Bennet
is well suited for a discrete implementation, but not for integration.
23

24

Chapter 4
Integrated Recharge Circuit Design and Fabrication
4.1 Overview
Another way to regulate the current to the battery is to use a series regulator,
which will solve some of the shunt regulator problems. A series regulator controls the
current flowing into the battery with a switch. The switch allows for more control of
the current and eliminates a few problematic devices required by the shunt regulator.
Namely, the diode and PNP transistor from the shunt regulator will not be necessary;
the switch assumes both jobs.
Design considerations along with some advantages and disadvantages of the
series regulator are discussed in this chapter. The feasibility of the design was demon-
strated through the construction and testing of a discrete circuit. After successfully
testing the discrete circuit, the complete system was designed for AMI 1.6µm CMOS
process and sent to MOSIS for fabrication.
4.1.1 Basic Structure
The series regulator is shown in Figure 4.1. Much like the shunt regulator, a
voltage reference block creates the desired charging voltage (Vref ) and the comparator
checks the battery voltage against Vref to determine an end of charge. Unlike the
shunt regulator, a transistor switch controls the current flow between the solar cell and
the battery as shown in the figure. The design of each component will be discussed
more completely in Section 4.3.
25

So
lar
Ce
llV oltage
reference
V dd
+ -
R echarge C ircuitIntegrated
Microbattery
E nergy
S cavenger
C omparator
Figure 4.1: Simplified Schematic of Series Regulator System
4.2 Discrete Implementation and Testing
A model of the circuit was tested using standard discrete components and
a stand-alone fabricated microbattery. A micropower op-amp compares the battery
voltage and a reference voltage created by an external power supply. A discrete
NMOS power transistor controls the current to the battery. The solar cell powers the
amplifier and charges the battery.
After connecting the microbattery, the system was charged and discharged
many times; the measured results are shown in Figure 4.2. The figure shows the
battery voltage as it was discharged by the battery testing system and recharged by
the discrete circuitry. A 150 Watt incandescent bulb was used as the light source.
The discrete components prove that the series regulator will work. The test also
determined that the solar cell is too large for the battery. The battery will have a
longer life if the charging current is lower. The solar cell produces a current in the
milli-Ampere range and the open circuit voltage is about 5 Volts. If desired, a smaller
solar cell can be designed to produce a lower current. The lower current will extend
the life of the battery.
26

1.6
1.65
1.7
1.75
1.8
1.85
11365.315
11365.526
11365.596
11376.043
11376.883
11377.094
11377.164
11387.653
11388.49
11388.697
11388.767
11399.248
11400.095
11400.291
11400.361
11410.897
11411.738
11411.943
11412.013
11422.464
11423.305
11423.506
11423.576
11434.055
11434.901
11435.098
11435.168
11445.641
11446.485
11446.687
11446.757
11457.237
11458.079
11458.281
11458.351
Time (s)
Volta
ge (V
)
Figure 4.2: Cycling the Microbattery With a Discrete Series Charger.
4.3 System Design
This section discusses each of the basic blocks in detail. It also examines vari-
ous influential design decisions. The most important decisions include the following:
the kind of switch that should be used, how to start up the voltage reference, and
how to bias the comparator.
4.3.1 MOS Switches
Integrated circuit design allows for many different implementations of a simple
switch. The simplest switch can be implemented with just one transistor. The tran-
sistor acts as a high impedance path when it is turned off and a low impedance path
27
when it is turned on. A low impedance will allow current to flow through the transis-
tor and charge the battery. The NMOS and PMOS transistors both have advantages
and disadvantages as switches when used in the system of Figure 4.1.
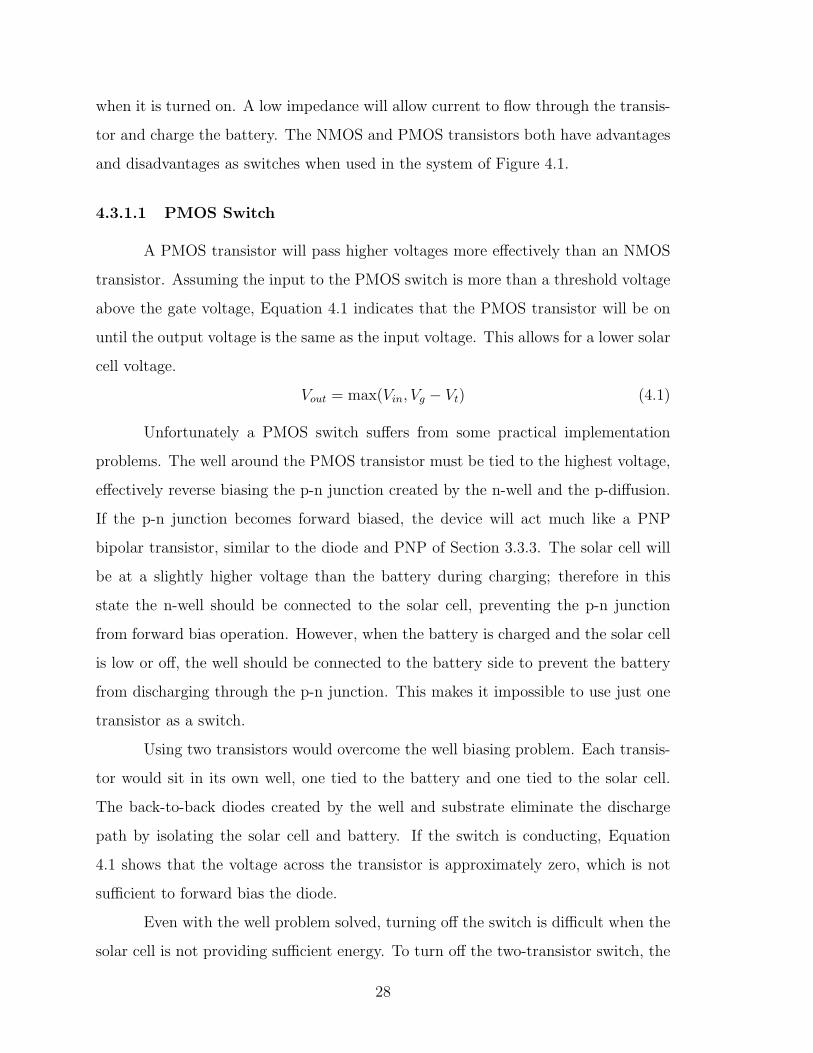
4.3.1.1 PMOS Switch
A PMOS transistor will pass higher voltages more effectively than an NMOS
transistor. Assuming the input to the PMOS switch is more than a threshold voltage
above the gate voltage, Equation 4.1 indicates that the PMOS transistor will be on
until the output voltage is the same as the input voltage. This allows for a lower solar
cell voltage.
Vout = max(Vin, Vg − Vt) (4.1)
Unfortunately a PMOS switch suffers from some practical implementation
problems. The well around the PMOS transistor must be tied to the highest voltage,
effectively reverse biasing the p-n junction created by the n-well and the p-diffusion.
If the p-n junction becomes forward biased, the device will act much like a PNP
bipolar transistor, similar to the diode and PNP of Section 3.3.3. The solar cell will
be at a slightly higher voltage than the battery during charging; therefore in this
state the n-well should be connected to the solar cell, preventing the p-n junction
from forward bias operation. However, when the battery is charged and the solar cell
is low or off, the well should be connected to the battery side to prevent the battery
from discharging through the p-n junction. This makes it impossible to use just one
transistor as a switch.
Using two transistors would overcome the well biasing problem. Each transis-
tor would sit in its own well, one tied to the battery and one tied to the solar cell.
The back-to-back diodes created by the well and substrate eliminate the discharge
path by isolating the solar cell and battery. If the switch is conducting, Equation
4.1 shows that the voltage across the transistor is approximately zero, which is not
sufficient to forward bias the diode.
Even with the well problem solved, turning off the switch is difficult when the
solar cell is not providing sufficient energy. To turn off the two-transistor switch, the
28

gate voltages must be higher than both the battery and the solar cell voltage. If the
voltage is not high enough for both transistors to be off, the well biasing problem
returns. When the battery is low, the solar cell should power the circuitry that
drives the gate voltage. Conversely, when the solar cell is producing little energy,
the battery should power the circuitry. Unfortunately, the battery would lose energy
when it powers the circuitry. This problem requires a sophisticated solution increasing
the complexity of the comparator.
4.3.1.2 NMOS Switch
The NMOS transistor does not suffer from the turn-off problems of the PMOS
switch. The transistor turns off when the gate voltage is low. So when the solar
cell is low, the comparator is off, and the switch will be off, eliminating the need to
power any circuitry with the battery. The single supply simplifies the design of the
comparator considerably.
The NMOS transistor does not suffer from the forward biased p-n junction
problem like a PMOS switch. The substrate of the NMOS is tied to the lowest
possible voltage, which is ground for this single supply design.
The NMOS transistor does not pass high voltages as effectively as a PMOS
transistor. The gate voltage of the NMOS transistor must be a threshold above the
battery voltage to allow current to flow. This relationship is similar to that stated in
Equation 4.1, and is shown in Equation 4.2.
Vout = min(Vin, Vg − Vt) (4.2)
Since the gate voltage is never higher than the solar cell, the voltage across the con-
ducting transistor will always be Vt, the threshold. This voltage across the transistor
requires that the solar cell maximum voltage be higher than the battery by at least
a threshold (increased by the CMOS body effect); thus a larger solar cell is needed.
To create a higher open-circuit solar cell voltage, more P-N junctions can be used.
The NMOS switch is used for this design because of its simplicity. The NMOS
will allow for simple control circuitry, with the disadvantage that a slightly higher
29

solar cell voltage must be used. The solar cell must be able to provide a voltage at
least Vt( 1V ) higher than the battery’s charging voltage.
4.3.2 Voltage Reference
I1 I2
Startup Circuitry
Figure 4.3: MOSFET Voltage Reference and Startup Circuitry
The voltage reference used for this project is a novel idea introduced by Fi-
lanovsky [11] and further developed at Brigham Young University by David Dai [12]
and Dr. Don Comer. The voltage reference relies on the thermal properties of the
mobility of electrons and transistor threshold voltage.
30

Filanovsky explains that a constant current forced through a diode-connected
transistor creates a stable gate voltage of 13ppm/C. The gate-source voltage is given
by
Vgs = Vtn +
√2ID
µnCox(W/L)︸ ︷︷ ︸Veff
, (4.3)
where Veff is the voltage required to allow the current ID through the transistor. Vtn
varies −2mV/C, much like a p-n junction in typical voltage references. In charts
given by Casey [13] the resistance of doped silicon rises slightly from 300K to 400K.
The rise in resistance indicates a drop in mobility, which causes a rise in Veff .
Through balancing the drain current and size of a MOSFET, a voltage refer-
ence can be created with a very small error over a large range of temperatures [12].
The schematic of the voltage reference is shown in Figure 4.3. The reference is cre-
ated by forcing a constant current through the diode-connected transistor N0. The
closed-loop gain of the op-amp is about three, resulting in a transistor current of
ID =3Vgs − Vgs
R= 2
Vgs
R. (4.4)
Once the reference circuit is biased in its normal operating condition, the current
through N0 varies minimally; thus the output of the voltage reference varies only
slightly as well. Figure 4.4 shows the simulated voltage reference versus temperature
change. As temperature increases, so does Vgs until it peaks and starts to lower again.
The overall voltage change over the 0 to 100C range is 0.38%
This voltage reference is sensitive to changes in threshold just as the voltage
reference designed by Bennet. The voltage reference is linearly affected by the change
in threshold. The threshold can change by 0.35V , this results in a 0.6V change in
the reference output. As shown in Equation 4.3, if the threshold voltage increases, so
does Vgs. However, as mobility decreases, the resistance that controls ID increases,
thus decreasing ID. Therefore the largest effect of process variation comes from the
threshold voltage. The process variations can be overcome by trimming or adjusting
the resistors.
31

0 10 20 30 40 50 60 70 80 90 1001.1565
1.1566
1.1567
1.1568
1.1569
1.157
1.1571
Temperature oC
Vre
f
Figure 4.4: Reference Voltage vs. Temperature
4.3.2.1 Startup Circuit
The voltage reference has two stable operating points. The first stable op-
erating point occurs when all the voltages and currents are zero. When current is
flowing through the diode-connected FET and the amplifier is creating a non-zero
voltage, the second operating point is established. The second operating point is the
one desired to produce the reference voltage.
A startup circuit is required to ensure that the reference returns to the desired
operating region after conditions of low power and restart. The startup circuit senses
when the output of the reference is low and if the solar cell can provide enough energy
to turn on the voltage reference. A sensor is implemented with an inverter designed
to have a very low switching point. The inverter changes the analog voltage into
a discrete signal, which indicates that the voltage reference is biased at the wrong
operating point.
As seen in Figure 4.3, when the reference output is low, inverter I1 signals a
digital ‘1’. A second inverter uses the digital signal to control a PMOS transistor
32

that allows current to flow directly from the solar cell to the diode-connected transis-
tor. When the reference returns to normal operation, the output is higher than the
switching point of the first inverter. The first inverter produces a logic low level and
second inverter turns the PMOS current injector off by driving its gate to a high volt-
age. The voltage reference is then unaffected by the startup circuitry during normal
operation.
The switching point of the inverter is governed by
Vswitch =Vsc + Vtp +
(Vtn
õn(W/L)n
µp(W/L)p
)1 +
õn(W/L)n
µp(W/L)p
. (4.5)
In the AMI-ABN process the ratio of µn/µp is about 3. Commonly, digital circuits
have equal length transistor gates. The previous equation simplifies to
Vswitch =Vsc + Vtp +
(Vtn
√3Wn
Wp
)1 +
√3Wn
Wp
. (4.6)
The switching voltage is controlled by the ratio of the widths of p and n transistors.
This design requires the solar cell voltage (Vsc) be limited to ensure the switch-
ing point of the inverter is lower than the reference voltage. If the solar cell voltage
is too high, the digital signal will always be on and the solar cell will continuously
drive current into the voltage reference. The continuous current does not allow the
voltage reference to generate a proper temperature-independent voltage. To allow for
larger solar cell voltages, inverter I1 is designed to have a low switching point. The
NMOS transistor was designed to be eight times larger than the PMOS transistor.
This limits the solar cell to a maximum of about 7V . The lower limit of the solar cell
is about a threshold above the desired full battery voltage, or about 3V . This range
of voltages can be easily realized with about four to ten stacked solar cells.
4.3.2.2 Amplifier
The amplifier isolates the voltage reference from the power supply and pro-
vides a stable current to the diode-connected MOSFET. As shown in Figure 4.5, the
amplifier is a differential input, single ended output with two gain stages. The input
33
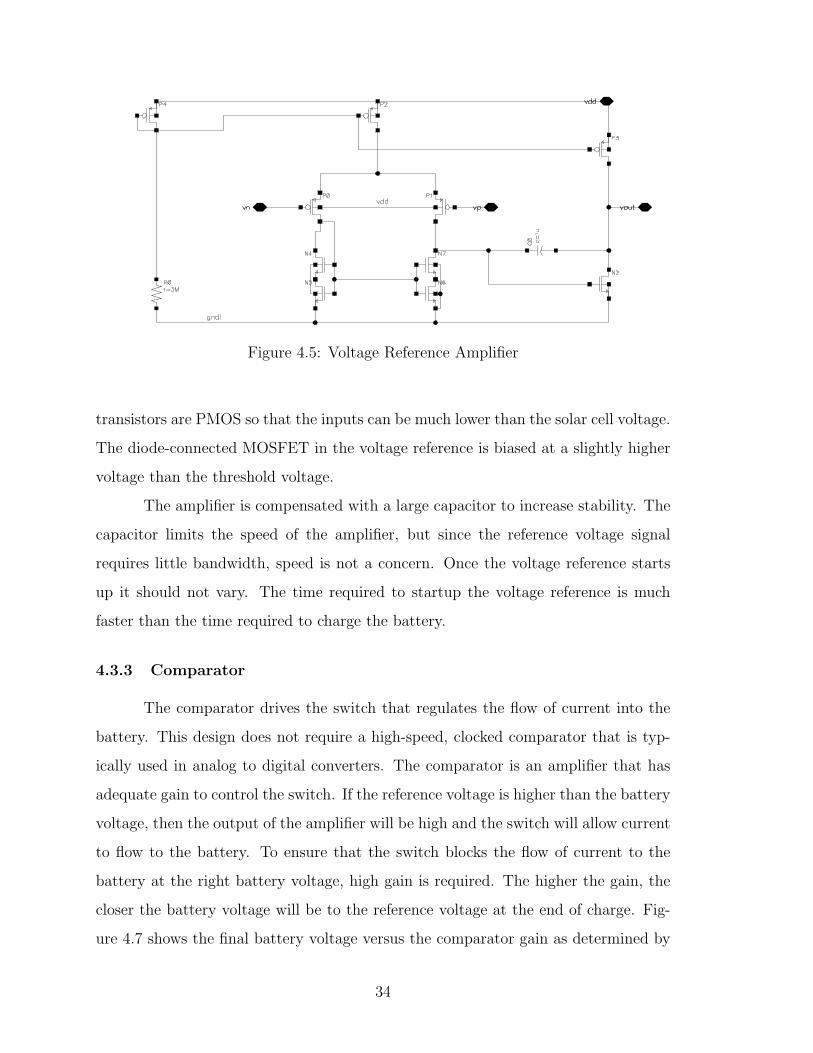
Figure 4.5: Voltage Reference Amplifier
transistors are PMOS so that the inputs can be much lower than the solar cell voltage.
The diode-connected MOSFET in the voltage reference is biased at a slightly higher
voltage than the threshold voltage.
The amplifier is compensated with a large capacitor to increase stability. The
capacitor limits the speed of the amplifier, but since the reference voltage signal
requires little bandwidth, speed is not a concern. Once the voltage reference starts
up it should not vary. The time required to startup the voltage reference is much
faster than the time required to charge the battery.
4.3.3 Comparator
The comparator drives the switch that regulates the flow of current into the
battery. This design does not require a high-speed, clocked comparator that is typ-
ically used in analog to digital converters. The comparator is an amplifier that has
adequate gain to control the switch. If the reference voltage is higher than the battery
voltage, then the output of the amplifier will be high and the switch will allow current
to flow to the battery. To ensure that the switch blocks the flow of current to the
battery at the right battery voltage, high gain is required. The higher the gain, the
closer the battery voltage will be to the reference voltage at the end of charge. Fig-
ure 4.7 shows the final battery voltage versus the comparator gain as determined by
34

Bias Circuitry
Figure 4.6: Cascode Amplifier
35

simulations. A large gain was achieved using a cascode amplifier with NMOS inputs
as seen in Figure 4.6. NMOS input transistors allow for higher input voltages, like
those produced by the voltage reference and battery during normal operation. Thus,
two different amplifiers were designed for this system. The voltage reference op-amp
has PMOS inputs, requires a compensation capacitor, and requires two stages. The
comparator-amplifier is a single-stage, cascode amplifier with no compensation ca-
pacitors required. The cascode amplifier does not drive resistive loads as does the
two stage amplifier. The gain of the cascode amplifier is
AV ≈ − 1
2g2
mr2ds. (4.7)
The cascode devices generate a higher output resistance that gives the amplifier higher
gain, thus reducing error in the end-of-charge sense point. The gain of the amplifier
was simulated to be over 55dB According to Figure 4.7, the comparator will control
the battery voltage to within 5mV of the reference voltage.
The biasing circuit for the amplifier is also shown in Figure 4.6. The biasing
circuit uses replica bias techniques to ensure proper operating conditions over process
and temperature.
4.4 Simulations and Results
The simulations of the circuit include all four operating regions of the system.
The four regions are:
• High energy from the solar cell and discharged battery
• High energy from the solar cell and charged battery
• Low energy from the solar cell and discharged battery
• Low energy from the solar cell and charged battery.
The most important simulation results are obtained in the region where the
battery is discharged and the solar cell produces energy as seen in Figure 4.9. This
region shows the battery charging to the reference voltage and then leveling off as
36

0 100 200 300 400 500 600 700 800 900 10000.001
0.01
0.1
1
Gain
Vol
tage
aw
ay fr
om
V re
f
PMOSNMOS
Figure 4.7: Switching Voltage vs. Comparator Gain
V
V
sc
BATT
solar cell onbattery discharged
solar cell onbattery charged
solar cell offbattery discharged
solar cell offbattery charged
Figure 4.8: Four Regions of Operation
37

desired, with the charging current going to zero. The battery is modeled as a large
capacitor approximating the curve of Figure 2.1. The oscillation in Figure 4.9 is the
point where the voltage reference reaches the desired value; this oscillation can be
removed by increasing the compensation capacitor. The other simulation conditions,
depicted in Figures 4.10 through 4.12, show no activity for the other operating regions,
which indicate proper operation (e.g. the battery remains charged when there is not
enough solar cell energy in Figure 4.11). Figure 4.13 show simulation results for all
regions sequentially in time. The system starts with a discharged battery and full
solar energy, then the solar energy is removed and the battery is discharged via an
external current source. The solar energy is then increased and the battery charges
back to the desired level.
0 5 10 15 20 25−0.5
0
0.5
1
1.5
2
2.5
Vbat
Vref
Ibat
x104
Time (s)
Figure 4.9: Discharged Battery and Solar Energy
38

50 100 150 200 250−0.5
0
0.5
1
1.5
2
2.5
Vbat
Vref
Ibat
Time (s)
Figure 4.10: Charged Battery and Solar Energy
0 50 100 150 200 250 300 350−0.5
0
0.5
1
1.5
2
Vbat
Vref
Ibat
Time (s)
Figure 4.11: Charged Battery and No Solar Energy
39

0 50 100 150 200 250 300 350−0.2
0
0.2
0.4
0.6
0.8
1
1.2
Vbat
Vref
Ibat
Time (s)
Figure 4.12: Discharged Battery and No Solar Energy
0 50 100 150 200 250 300 350−2
−1
0
1
2
3
4
Vbat
Vref
Ibat
x104
Vsc
Time (s)
External BatteryDischarge
Figure 4.13: Cycle Through All the Regions
40
4.5 Power Dissipation
The power dissipation of the battery charger was simulated using two different
solar cell currents. If the solar cell is producing 50µA the voltage reference consumes
about 8µA and the comparator consumes about 5µA. That results in 23.6µW dissi-
pated by the reference and 14.75µW dissipated by the comparator. With the solar
cell current, the battery receives 37µA.
When the solar cell is producing 10µA the comparator dissipates 4.57µW and
the comparator dissipates 5.18µW . The system will take much longer to recharge the
battery but that is mainly due to the lower current produced by the solar cell and
not by the power consumption of the charger.
4.6 Integrated Circuit Implementation
The series regulator suffers from some of the same limitations at the shunt
regulator. Namely, the resistors are very large, taking up a lot of room on the chip.
The voltage reference depends on the threshold voltage of the diode-connected tran-
sistor, which can vary from chip to chip. It is recommended that a non-resistor based
reference [14] be used for the next version of the design.
Design tools provide a way to compare the layout and the schematic, ensuring
they match. The logical connections are compared, ensuring that all the devices
are connected properly. The physical sizes of all the devices, including resistors and
capacitors, are also compared. If the design correctly simulates and passes the layout
versus schematic (LVS) check, it has a much higher chance of working as designed.
Layout-versus-schematic checking was used in this design.
4.6.1 Two Systems on Chip
Two systems are laid out on the chip as seen in Figure 4.14. The first system
consists of all the devices but does not have any capacitors or resistors connected to it.
The resistors and capacitors will be added externally to test and adjust the system.
This provides for design testability and the highest flexibility, since these devices are
41
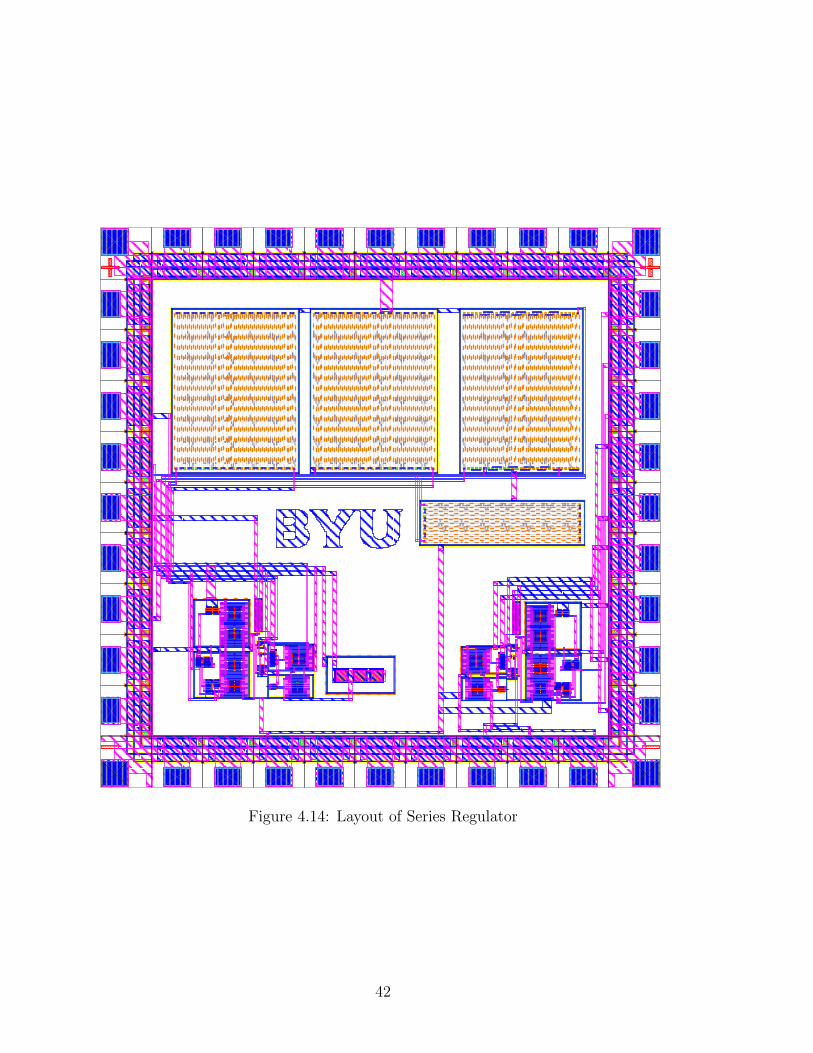
Figure 4.14: Layout of Series Regulator
42

prone to variation. The second system on the chip is complete with all the biasing
resistors and feedback connected; it is a complete charger for the microbattery.
4.6.2 Fixing the problems
The resistors take up about 2/3 of the chip. They are large because they
are used to limit the current into the low-power amplifiers. Two of the key resistors
are intertwined, reducing the mismatch between the resistors. Two other resistors
bias the amplifiers. If they vary from their target values, the amplifiers will not be
drastically affected. One final resistor sets the bias current on the voltage reference. If
that resistor varies, the reference voltage will also vary also. Both sides of the resistor,
along with the sides of the voltage reference feedback resistors, contain taps that can
be accessed through pins. These taps allow adjustment of the total resistances by
adding external resistors in parallel.
4.7 Conclusion
This chapter presented a charger design that implemented a constant-current
charging method using a voltage end of charge indicator and a series current regulator.
The current to the battery is controlled using an NMOS switch. When the battery
voltage is the same as a reference voltage created by a diode connected MOSFET and
an amplifier, a comparator will switch the MOSFET to prohibit current to flow to
the battery. The concept was tested using discrete components and was successful.
The series regulator was designed to be implemented in an integrated circuit and was
sent to MOSIS to be fabricated. At this time, the recharger integrated circuit has
not been tested.
43

44

Chapter 5
Conclusions and Future Work
5.1 Conclusion
Recent advances in system-on-chip technology have led to work on autonomous
systems–systems that can run remotely for an extended period of time. Microbatteries
designed at Brigham Young University are ideal energy storage components for an
autonomous system. These batteries provide energy storage in a small area integrated
onto a chip. This energy can supply peak currents to aid in sensing or transmitting
data.
When the microbattery is part of an autonomous system, an integrated battery
charger must control the power from an energy harvesting device such as a solar cell or
piezoelectric transducer. The battery charger must be easy to integrate, low power,
efficient, and simple. Several battery charger architectures were considered and a
constant current, voltage reference indicator, series-regulated system was chosen for
this research.
The two methods of charging the battery were investigated; they are variations
of the constant current charging architecture. The first method, originally designed
by Bennet as a discrete system, used a shunt regulator. As the battery nears the
end of charge, the excess power supplied by the solar cell is shunted to ground. This
system works well as a discrete systems but neither a PNP shunt transistor nor an
isolation diode is easily constructed in a typical CMOS process.
This thesis introduced a series regulator that controls the current to the battery
using a switch. The switch can completely turn on and off the current flow to the
45

battery. The design is very simple and is more suitable for integration. The series
regulator is simple and effective at controlling the charging cycle of the battery.
5.2 Future Work
The research has made significant progress towards an integrated battery
charger system. The integration of this research provides a complete battery charger
control in a single chip.
5.2.1 Testing
The chip was fabricated by MOSIS and was not returned at this point of
writing. Testing of the chip will determine the effectiveness of integrated microbattery
charger. Simulations of the chip did produce promising results, but the end result is
still undetermined.
5.2.2 Voltage Reference
The MOSFET voltage reference is not fully developed, implemented, or tested.
However, simulations show good potential for success. More work can be done to
limit the variation and lower the power of the voltage reference. A different voltage
reference architecture that limits uses of large resistors may also be considered to
reduce the required chip area.
5.2.3 Other Batteries
Other microbatteries, besides the NiZn batteries, are being developed at Brig-
ham Young University. These batteries require different charging voltages and have
different charging characteristics. Li-Ion batteries are of great interest because of
their high energy density.
All the batteries being developed need to be extensively characterized to de-
termine optimal charging voltages, currents, and temperatures. The thermal charac-
teristics of the batteries are unknown; the battery may need to charge to a different
46

voltage at a different temperature and this should be accounted for by the recharge
circuit.
5.2.4 Programmability
With different batteries and possibilities of series combinations of batteries,
programmability would increase the utility of the battery charger. Currently, the
charging voltage is set in the integrated circuit and only way to change it is to use ex-
ternal resistors. These resistors could be placed inside the microchip and the reference
voltage can be “programmed” by varying the combinations of resistors.
5.2.5 Precision
Due to process variation each battery charger will be slightly different. To
overcome the variation, trim resistors are added externally. The low power require-
ment demands the use of large resistors that introduce error in the design. If more
advanced processes were used to fabricate the chip, more precision can be achieved.
47

48

Appendix
49

50

Appendix A
Chip Data Sheet
A.1 Overview
The following pages contain the data sheet for the chip. The data sheet ex-
plains the pin names and connections. It also explains the proper way to connect
external components to the battery charger system.
51

Figure A.1: Specification Sheet
52
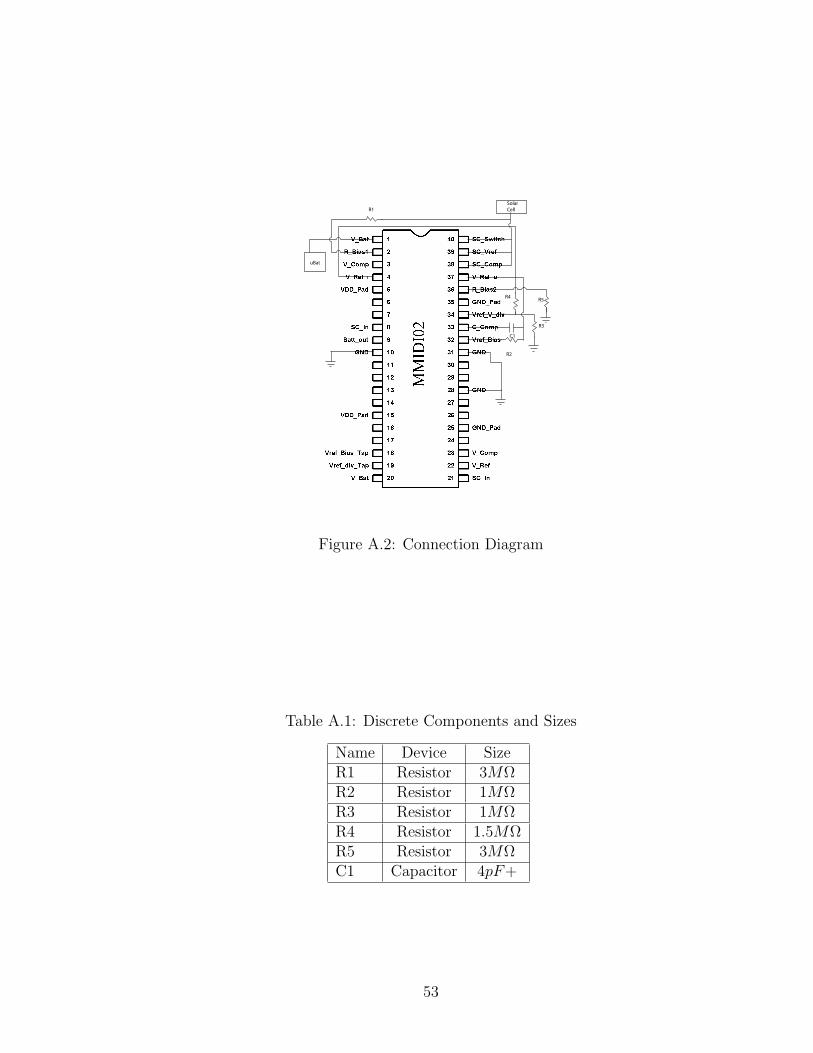
SolarCell
uBat
R1
R2
R3
C1
R4R5
Figure A.2: Connection Diagram
Table A.1: Discrete Components and Sizes
Name Device SizeR1 Resistor 3MΩR2 Resistor 1MΩR3 Resistor 1MΩR4 Resistor 1.5MΩR5 Resistor 3MΩC1 Capacitor 4pF+
53

54

Appendix B
Device Sizes
Table B.1: Reference Amp Device Sizes
Devices Size MultiplierP0-P3 20/3.2 4P4 20/3.2 1N2, N4-N7 20/3.2 2R0 3MΩC0 4pF
Table B.2: Cascode Comparator Device Sizes
Devices Size MultiplierP0-P3 20/3.2 4P4-P9 20/3.2 1N0-N3 20/3.2 4N4 40/3.2 4N5-N6, N11 40/3.2 1N7, N112-N14 20/3.2 1N9, N15 20/3.2 2N10 40/3.2 2R0 3MΩ
55

56

Appendix C
Transistor Models
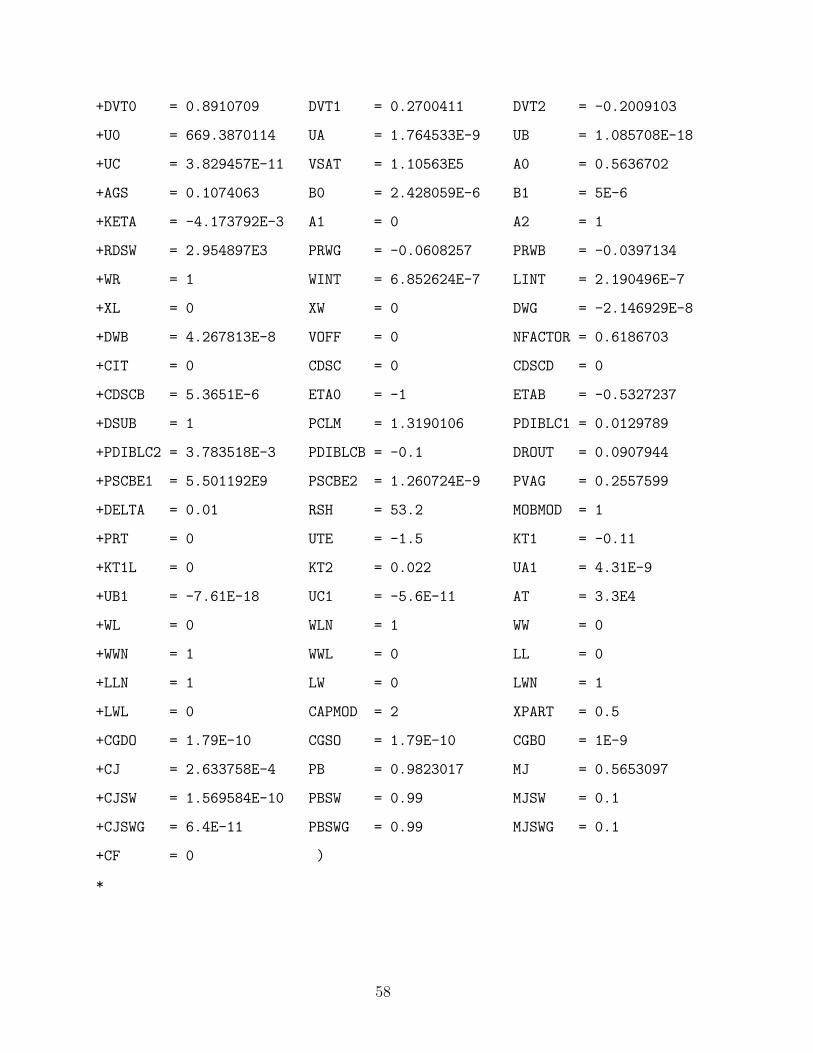
C.1 Overview
This appendix lists spice models used to design the chip. These models can
be found on the MOSIS website.
C.2 Lot Information
T29V SPICE BSIM3 VERSION 3.1 PARAMETERS
SPICE 3f5 Level 8, Star-HSPICE Level 49, UTMOST Level 8
* DATE: Oct 24/02
* LOT: T29V WAF: 8202
* Temperature_parameters=Default
C.3 NMOS
.MODEL CMOSN NMOS ( LEVEL = 49
+VERSION = 3.1 TNOM = 27 TOX = 3.11E-8
+XJ = 3E-7 NCH = 7.5E16 VTH0 = 0.5226871
+K1 = 0.9213463 K2 = -0.0814952 K3 = 4.1421676
+K3B = -1.9875411 W0 = 1.685077E-6 NLX = 1E-8
+DVT0W = 0 DVT1W = 0 DVT2W = 0
57
+DVT0 = 0.8910709 DVT1 = 0.2700411 DVT2 = -0.2009103
+U0 = 669.3870114 UA = 1.764533E-9 UB = 1.085708E-18
+UC = 3.829457E-11 VSAT = 1.10563E5 A0 = 0.5636702
+AGS = 0.1074063 B0 = 2.428059E-6 B1 = 5E-6
+KETA = -4.173792E-3 A1 = 0 A2 = 1
+RDSW = 2.954897E3 PRWG = -0.0608257 PRWB = -0.0397134
+WR = 1 WINT = 6.852624E-7 LINT = 2.190496E-7
+XL = 0 XW = 0 DWG = -2.146929E-8
+DWB = 4.267813E-8 VOFF = 0 NFACTOR = 0.6186703
+CIT = 0 CDSC = 0 CDSCD = 0
+CDSCB = 5.3651E-6 ETA0 = -1 ETAB = -0.5327237
+DSUB = 1 PCLM = 1.3190106 PDIBLC1 = 0.0129789
+PDIBLC2 = 3.783518E-3 PDIBLCB = -0.1 DROUT = 0.0907944
+PSCBE1 = 5.501192E9 PSCBE2 = 1.260724E-9 PVAG = 0.2557599
+DELTA = 0.01 RSH = 53.2 MOBMOD = 1
+PRT = 0 UTE = -1.5 KT1 = -0.11
+KT1L = 0 KT2 = 0.022 UA1 = 4.31E-9
+UB1 = -7.61E-18 UC1 = -5.6E-11 AT = 3.3E4
+WL = 0 WLN = 1 WW = 0
+WWN = 1 WWL = 0 LL = 0
+LLN = 1 LW = 0 LWN = 1
+LWL = 0 CAPMOD = 2 XPART = 0.5
+CGDO = 1.79E-10 CGSO = 1.79E-10 CGBO = 1E-9
+CJ = 2.633758E-4 PB = 0.9823017 MJ = 0.5653097
+CJSW = 1.569584E-10 PBSW = 0.99 MJSW = 0.1
+CJSWG = 6.4E-11 PBSWG = 0.99 MJSWG = 0.1
+CF = 0 )
*
58

C.4 PMOS
.MODEL CMOSP PMOS ( LEVEL = 49
+VERSION = 3.1 TNOM = 27 TOX = 3.11E-8
+XJ = 3E-7 NCH = 2.4E16 VTH0 = -0.8476404
+K1 = 0.4513608 K2 = 2.379699E-5 K3 = 13.3278347
+K3B = -2.2238332 W0 = 9.577236E-7 NLX = 7.534987E-7
+DVT0W = 0 DVT1W = 0 DVT2W = 0
+DVT0 = 1.1623904 DVT1 = 0.3238803 DVT2 = -0.0499006
+U0 = 236.8923827 UA = 3.833306E-9 UB = 1.487688E-21
+UC = -1.08562E-10 VSAT = 1.844017E5 A0 = 0.2402221
+AGS = 0.1463634 B0 = 3.616274E-6 B1 = 5E-6
+KETA = -1.069813E-3 A1 = 0 A2 = 0.364
+RDSW = 1.928149E3 PRWG = 0.1775431 PRWB = -0.1874418
+WR = 1 WINT = 7.565065E-7 LINT = 8.486462E-8
+XL = 0 XW = 0 DWG = -2.13917E-8
+DWB = 3.857544E-8 VOFF = -0.0877184 NFACTOR = 0.2508342
+CIT = 0 CDSC = 2.924806E-5 CDSCD = 1.497572E-4
+CDSCB = 1.091488E-4 ETA0 = 0.26103 ETAB = -0.0163174
+DSUB = 0.2873 PCLM = 0.015015 PDIBLC1 = 1.001279E-3
+PDIBLC2 = 1E-3 PDIBLCB = -1E-3 DROUT = 0.0237243
+PSCBE1 = 3.353579E9 PSCBE2 = 5.021337E-10 PVAG = 14.984985
+DELTA = 0.01 RSH = 77.9 MOBMOD = 1
+PRT = 0 UTE = -1.5 KT1 = -0.11
+KT1L = 0 KT2 = 0.022 UA1 = 4.31E-9
+UB1 = -7.61E-18 UC1 = -5.6E-11 AT = 3.3E4
+WL = 0 WLN = 1 WW = 0
+WWN = 1 WWL = 0 LL = 0
+LLN = 1 LW = 0 LWN = 1
+LWL = 0 CAPMOD = 2 XPART = 0.5
+CGDO = 2.33E-10 CGSO = 2.33E-10 CGBO = 1E-9
59

+CJ = 3.035635E-4 PB = 0.7392918 MJ = 0.4278001
+CJSW = 1.82197E-10 PBSW = 0.99 MJSW = 0.1406384
+CJSWG = 3.9E-11 PBSWG = 0.99 MJSWG = 0.1406384
+CF = 0 )
*
60
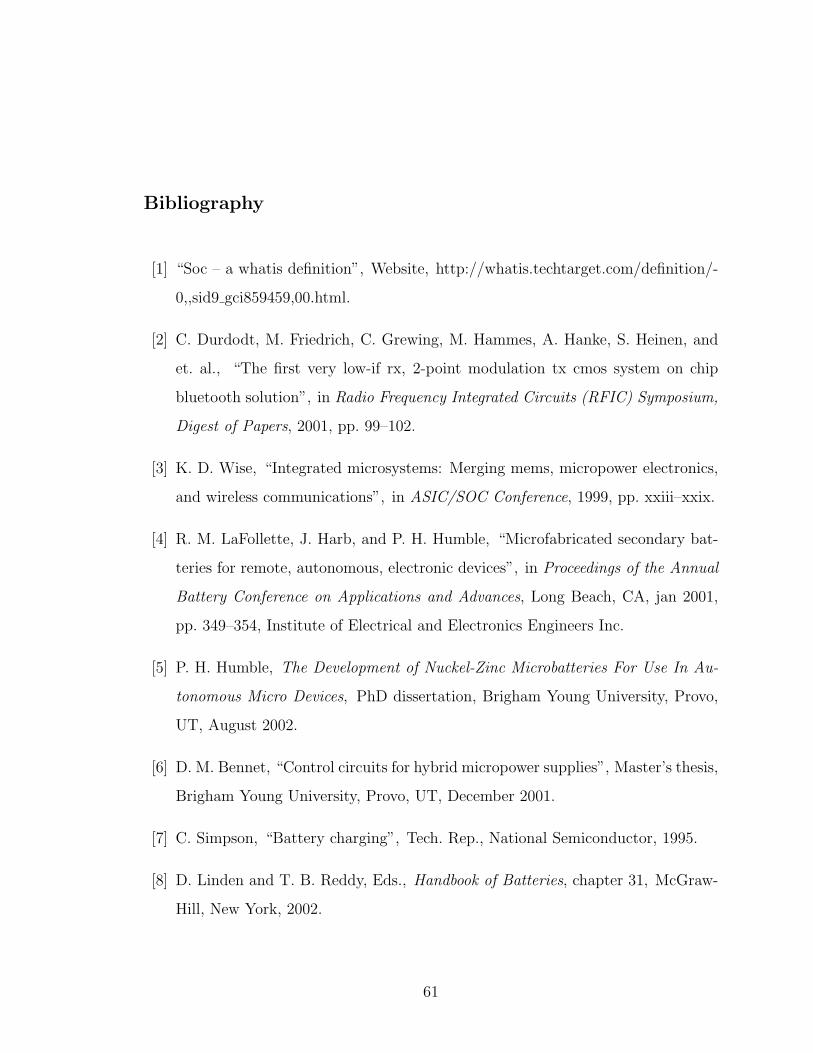
Bibliography
[1] “Soc – a whatis definition”, Website, http://whatis.techtarget.com/definition/-
0,,sid9 gci859459,00.html.
[2] C. Durdodt, M. Friedrich, C. Grewing, M. Hammes, A. Hanke, S. Heinen, and
et. al., “The first very low-if rx, 2-point modulation tx cmos system on chip
bluetooth solution”, in Radio Frequency Integrated Circuits (RFIC) Symposium,
Digest of Papers, 2001, pp. 99–102.
[3] K. D. Wise, “Integrated microsystems: Merging mems, micropower electronics,
and wireless communications”, in ASIC/SOC Conference, 1999, pp. xxiii–xxix.
[4] R. M. LaFollette, J. Harb, and P. H. Humble, “Microfabricated secondary bat-
teries for remote, autonomous, electronic devices”, in Proceedings of the Annual
Battery Conference on Applications and Advances, Long Beach, CA, jan 2001,
pp. 349–354, Institute of Electrical and Electronics Engineers Inc.
[5] P. H. Humble, The Development of Nuckel-Zinc Microbatteries For Use In Au-
tonomous Micro Devices, PhD dissertation, Brigham Young University, Provo,
UT, August 2002.
[6] D. M. Bennet, “Control circuits for hybrid micropower supplies”, Master’s thesis,
Brigham Young University, Provo, UT, December 2001.
[7] C. Simpson, “Battery charging”, Tech. Rep., National Semiconductor, 1995.
[8] D. Linden and T. B. Reddy, Eds., Handbook of Batteries, chapter 31, McGraw-
Hill, New York, 2002.
61

[9] “Spice corner parameters”, Website, http://www.mosis.org/Technical/Testdata-
/ami abn corner bsim3.txt.
[10] P. M. Brown, A Guide to Analog ASICs, p. 40, Academic Press, Inc., 1992.
[11] I. M. Filanovsky, “Voltage reference using mutual compensation of mobility and
threshold voltage temperature effects”, in IEEE International Symposium on
Circuits and Systems, Geneva, Switzerland, 2000, vol. 5, pp. 197–200.
[12] D. Dai, “Mosfet voltage reference”, Unpublished, but sent to IEEE Proceedings,
2003.
[13] H. C. Casey, Devices for Integrated Circuits: Silicon and III-V Compound Semi-
conductors, John Wiley & Sons, Inc., New York, 1999.
[14] A. Buck, C. McDonald, S. Lewis, and T. R. Viswanathan, “A cmos bandgap
reference without resistors”, in Digest of Technical Papers, San Francisco, CA,
USA, 2000, pp. 442–443, 475.
62