integration note for cisco touch 10 - atlona · integration note velocity is an easy to use control...
TRANSCRIPT

Atlona Integration NoteVelocity
Cisco Touch 10Integration Note for

Velocity 2
Version Release Date Notes
1 Aug 2019 Initial release
2 May 2020 Updated for Velocity FW 2.0.1
Version Information

Velocity 3
Integration Note
Velocity is an easy to use control system, designed to ensure all devices can be integrated into a system without a large amount of programming needed. Velocity provides an easy way to set up and control a Cisco Touch 10 when used with the Cisco SX series devices.
1. Once all the devices are on the network and their IPs found, open a browser on a local network computer.
2. Type in the IP of the SX20 into the browser address bar.
3. Enter the Username and Password for the SX20. By default the username and password will be admin/admin. A new screen will open.
4. Username and Password can be updated at this time, if not updating, move on to the next step.
5. Select Setup: Configuration from the top navigation. A new screen will open.
NOTE: The following instructions will show the SX20 but the instructions are the same for all Cisco SX series products.

Velocity 4
Integration Note
6. Enable control for the unit.
a. To enable serial control, select SerialPort from the side menu and select On from the Mode drop down menu.
b. To enable SSH control, select NetworkServices from the side menu and scroll to the SSH section. Select On from the Mode drop down menu and ensure AllowPublicKey is On as well.
c. To enabled Telnet control, select NetworkServices from the side menu. Select On from the Telnet Mode drop down menu.

Velocity 5
Integration Note
7. Once control has been set up, the Touch 10 will need to be set up. Select Integration: In-Room Control. A new screen will open.
8. Select the Launch Editor button. The editor screen will open.
9. Once in the editor, set up all the buttons and sliders that will be needed for control.
10. Select the Export button, to send the configuration to the SX20.
11. Select the = button and choose Export to file.
12. Select the location on the local PC and press the Save button. The Touch 10 is now ready to be integrated with Velocity.
Velocity 6
Integration Note
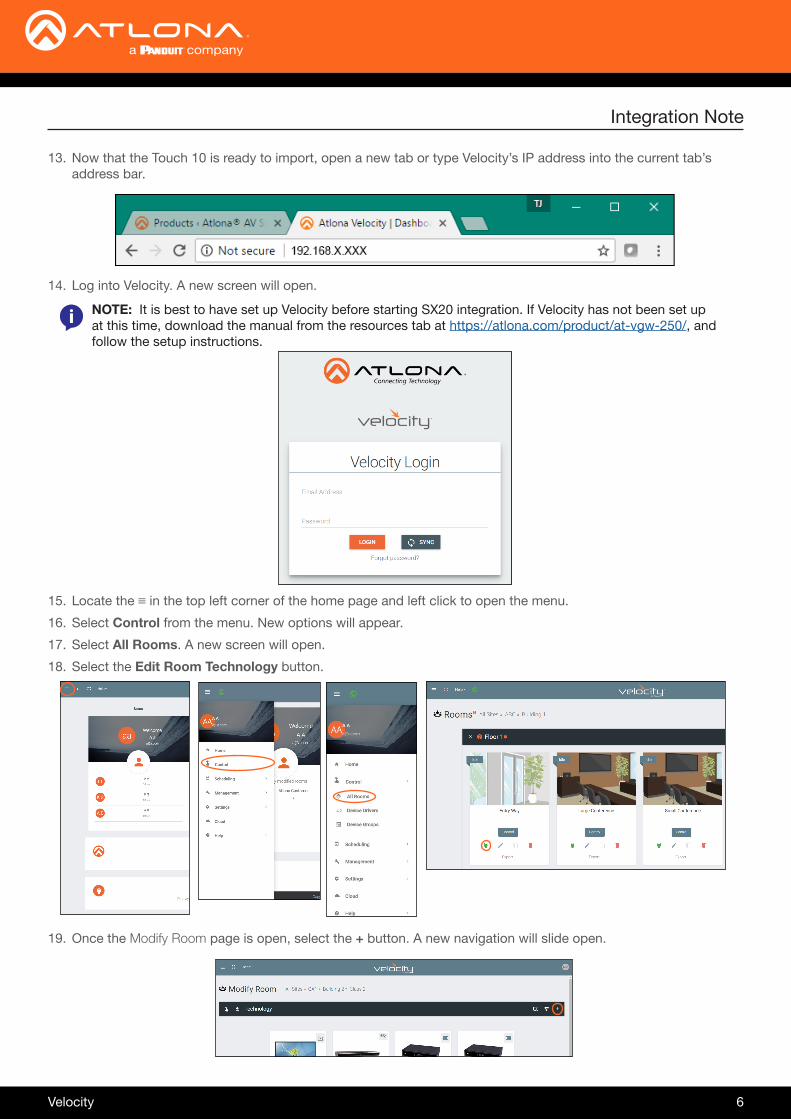
14. Log into Velocity. A new screen will open.
19. Once the Modify Room page is open, select the + button. A new navigation will slide open.
NOTE: It is best to have set up Velocity before starting SX20 integration. If Velocity has not been set up at this time, download the manual from the resources tab at https://atlona.com/product/at-vgw-250/, and follow the setup instructions.
13. Now that the Touch 10 is ready to import, open a new tab or type Velocity’s IP address into the current tab’s address bar.
15. Locate the ≡ in the top left corner of the home page and left click to open the menu.
16. Select Control from the menu. New options will appear.
17. Select All Rooms. A new screen will open.
18. Select the Edit Room Technology button.

Velocity 7
Integration Note
20. Type cisco tele into the search field and press enter or the SEARCH button.
21. Select the Add button next to Cisco: Switcher: Cisco Telepresence CE Firmware. The navigation will close and the Cisco Telepresence will appear in the room.
22. Select the edit button on the Cisco Telepresence tile. A new menu will slide open on the left side of the screen.
23. Select SSH, Telnet, or RS232 from the Control Type drop down. New information fields will open.
NOTE: Serial control does not support authentication.
Velocity 8
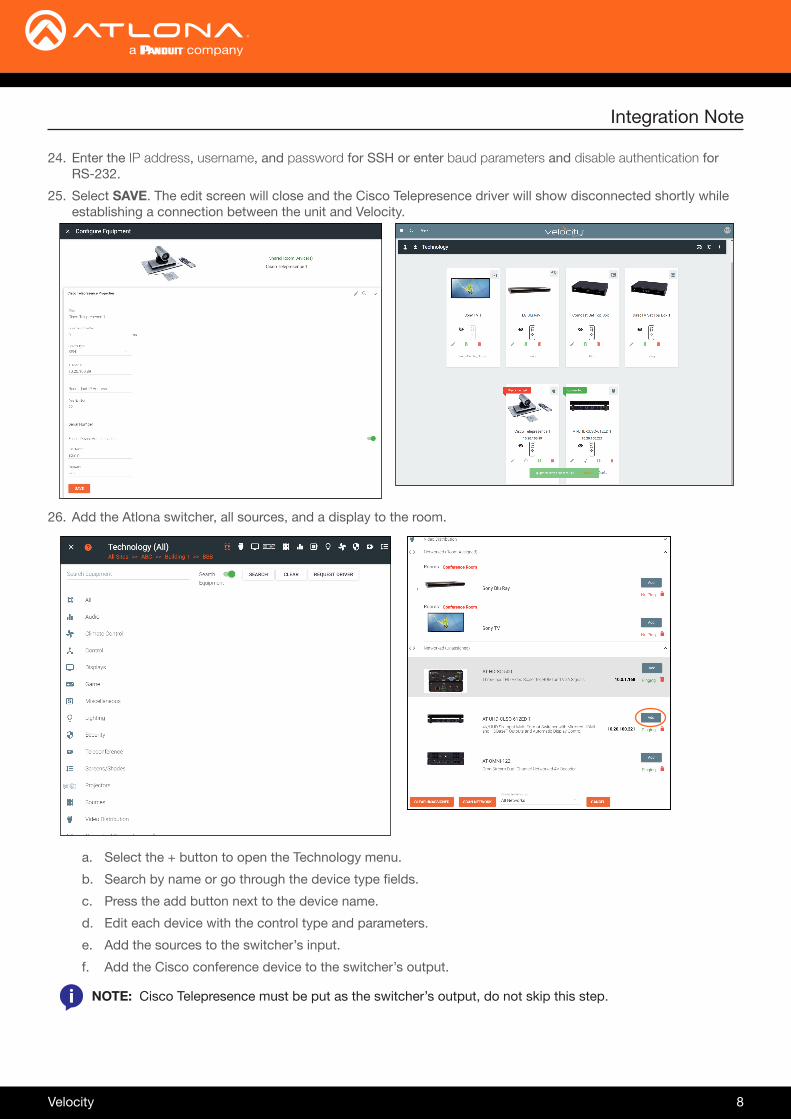
24. Enter the IP address, username, and password for SSH or enter baud parameters and disable authentication for RS-232.
25. Select SAVE. The edit screen will close and the Cisco Telepresence driver will show disconnected shortly while establishing a connection between the unit and Velocity.
Integration Note
26. Add the Atlona switcher, all sources, and a display to the room.
a. Select the + button to open the Technology menu.
b. Search by name or go through the device type fields.
c. Press the add button next to the device name.
d. Edit each device with the control type and parameters.
e. Add the sources to the switcher’s input.
f. Add the Cisco conference device to the switcher’s output.
NOTE: Cisco Telepresence must be put as the switcher’s output, do not skip this step.

Velocity 9
Integration Note
27. Select the edit button on the Cisco Telepresence tile.
28. Scroll to the Video Input section and select the AV source. By default the Show slider will be selected. With a switcher, this should be disabled, select the slider so that it turns grey.
29. Select the display in the Output section.NOTE: The display must be set to the Video Output, do not skip this step.
30. Select the SAVE button. The device will cycle to disconnected until the settings apply.
31. Select the Room Options button on the top right of the Modify Room page. A new menu will slide open.
Velocity 10
Integration Note
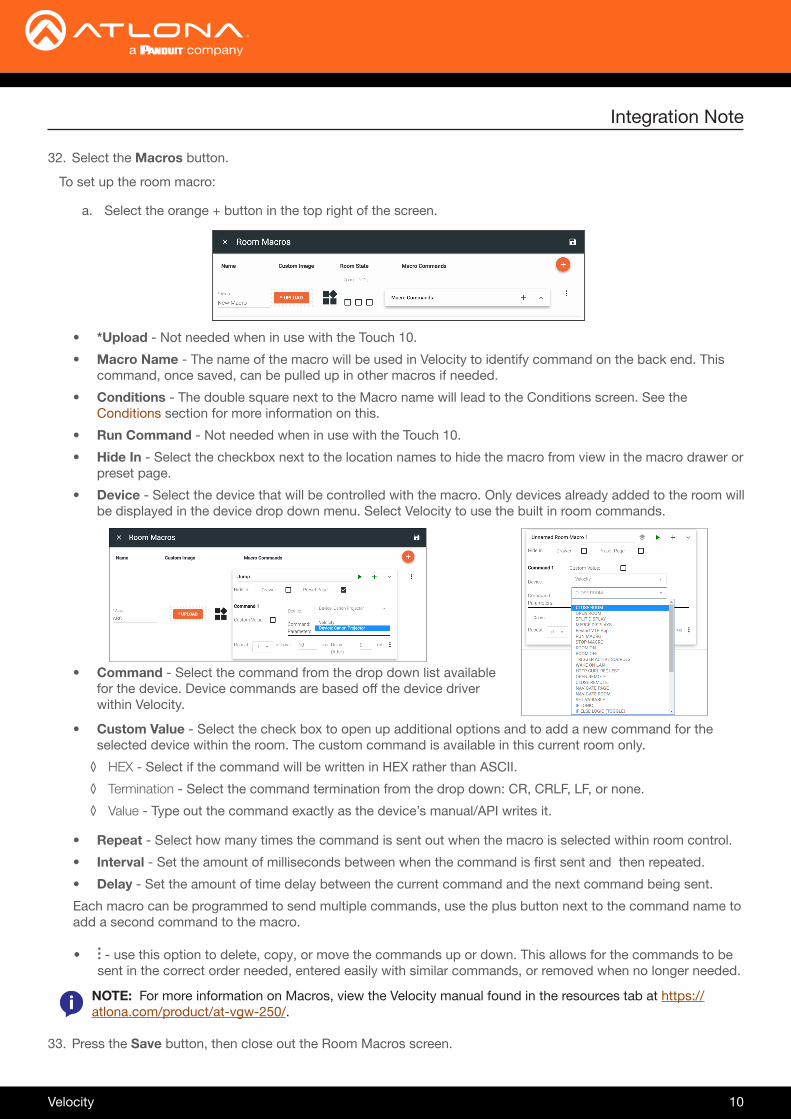
32. Select the Macros button.
33. Press the Save button, then close out the Room Macros screen.
To set up the room macro:
a. Select the orange + button in the top right of the screen.
NOTE: For more information on Macros, view the Velocity manual found in the resources tab at https://atlona.com/product/at-vgw-250/.
• *Upload - Not needed when in use with the Touch 10.
• Macro Name - The name of the macro will be used in Velocity to identify command on the back end. This command, once saved, can be pulled up in other macros if needed.
• Conditions - The double square next to the Macro name will lead to the Conditions screen. See the Conditions section for more information on this.
• Run Command - Not needed when in use with the Touch 10.
• Hide In - Select the checkbox next to the location names to hide the macro from view in the macro drawer or preset page.
• Device - Select the device that will be controlled with the macro. Only devices already added to the room will be displayed in the device drop down menu. Select Velocity to use the built in room commands.
• Command - Select the command from the drop down list available for the device. Device commands are based off the device driver within Velocity.
• : - use this option to delete, copy, or move the commands up or down. This allows for the commands to be sent in the correct order needed, entered easily with similar commands, or removed when no longer needed.
.
• Repeat - Select how many times the command is sent out when the macro is selected within room control.
• Interval - Set the amount of milliseconds between when the command is first sent and then repeated.
• Delay - Set the amount of time delay between the current command and the next command being sent.
Each macro can be programmed to send multiple commands, use the plus button next to the command name to add a second command to the macro.
• Custom Value - Select the check box to open up additional options and to add a new command for the selected device within the room. The custom command is available in this current room only.
◊ HEX - Select if the command will be written in HEX rather than ASCII.
◊ Termination - Select the command termination from the drop down: CR, CRLF, LF, or none.
◊ Value - Type out the command exactly as the device’s manual/API writes it.

Velocity 11
Integration Note
36. Scroll to the In Room Control section.
37. Select the IMPORT button. If using External Source Controls, skip to the next page for instructions.
38. Find the file on the local PC and press the Open button. The commands will populate inside the In Room Control section.
External Source Input will display the current source, such as the switcher added to the input section earlier.
39. Set each command to apply a source, macro, or variable when the button is pressed.
The Additional Options are for automation and status. When active (green), the room on/off trigger will activate when the SX20 goes into or out of standby or halfwake mode.
For source buttons there will be three options: clicked, pressed, and released. Select only one for applying the source, to avoid multiples of the same command being sent.
For other buttons and control functions, Macros can be applied to them. Select Macro from the drop down, then the specific macro to apply when that widget is pressed.
e.g. Macro - Blu Ray Play on widget six. When the button is pressed on Touch 10 it will press play on the blu ray.
e.g. Apply source - AT-UHD-CLSO-612ED HDMI1 on widget one for when the button on the Touch 10 is pressed.
34. Select the edit button on the Cisco Telepresence tile.
35. Scroll to the Variables and Additional Options sections.
The Variables section is for status verification. When the standby or halfwake value is 0, the unit will be in standby or halfwake mode. When the value is 1, the unit will be awake.

Velocity 12
Integration Note
Audio sliders can be set up to be used with in room audio, such as DPSs or certain audio control on Atlona devices.
e.g. Audio Slider - AT-UHD-CLSO-612ED: Line Out Gain. When the slider is used on Touch 10 it will adjust the volume of the 612ED output.
Touch 10 labels can be set up to display variables. Select Variable from the drop down menu and then the specific variable from the drop down menu.
e.g. Variable - %LineGain. When the audio is adjusted on the slider, the label will adjust to the line level.
Once the commands and buttons are set up inside the Touch 10, press the Query button to import the commands. The Ext. Sources xxx commands and information will appear in the commands list.
Query will only pull in already set up commands and these buttons will appear under the Share button on the Touch 10. The commands can be assigned to Apply Source or Macro.
The check boxes at the end of the commands decide if the button always appear (unchecked) on the Touch 10 with or without signal, or if the Touch 10 will grey out the button (checked) when not seeing any signal from the selected controlled device.
External Source Controls
If using external sources, see the Cisco Telepresence Customization Guides found on the Cisco website. The commands must be set up before continuing with Velocity set up.
The Touch 10 is now ready for control. Additional buttons or macros can be added after the fact but the current set up will be overwritten and need to be set up again.

© 2019 Atlona Inc. All rights reserved. “Atlona” and the Atlona logo are registered trademarks of Atlona Inc. All other brand names and trademarks or registered trademarks are the property of their respective owners. Pricing, specifications and availability subject to change without notice. Actual products, product images, and online product images may vary from images shown here.
Toll free US International
atlona.com • 877.536.3976 • 41.43.508.4321