integrity desktop manager guide · integrity desktop manager guide, product version 4.0 i zld...
TRANSCRIPT

Smarter Security™
Integrity Desktop Manager GuideManaging Integrity Desktop in the Enterprise
ZLD 1-0220-0400-2003-07-29

Integrity Desktop Manager Guide, Product Version 4.0 iZLD 1-0220-0400-2003-07-29
Preface
This document is the Integrity Desktop Management Guide, product version 4.0.
Document Revision History
About Zone Labs, Inc.Zone Labs, one of the most trusted brands in Internet security, is a leading creator of endpoint security solutions protecting millions of PCs from risks posed by hackers and data theft. The company's award-winning endpoint security product line is deployed in global enterprises, small businesses and consumers' homes, protecting them from Internet-borne threats. Zone Labs Integrity™ is an endpoint security management platform that protects corporate data and productivity while ZoneAlarm, ZoneAlarm Pro and ZoneAlarm Plus are among the most popular and successful Internet security products available today.
Founded in 1997, Zone Labs is a private company headquartered in San Francisco, California, USA, with European headquarters in Frankfurt, Germany. For more information, please visit Zone Labs at www.zonelabs.com.
Zone Labs Document Number
DocumentPublication
DateComments
ZLD 1-0220-0400-2003-07-29 2003-07-29 Document for Integrity Desktop, product version 4.0.
Integrity Desktop Manager Guide, Product Version 4.0 iiZLD 1-0220-0400-2003-07-29
© 2002 Zone Labs, Inc. All Rights Reserved. TrueVector, ZoneAlarm, Zone Labs, the Zone Labs logo and Zone Labs Integrity are either registered trademarks or trademarks of Zone Labs, Inc. U.S. Patent No. 5,987,611. Reg. U.S. Pat. & TM Off. Cooperative Enforcement and Policy Lifecycle Management are service marks of Zone Labs, Inc. All other trademarks are the property of their respective owners. 1060 Howard Street, San Francisco, CA 94103. USA.
No part of this publication may be reproduced, distributed or transmitted in any form or by any means, electronic or mechanical, for any purpose, without the express written permission of Zone Labs, Inc. and its licensors. Users Subject to Standard License Terms and Conditions. Zone Labs, ZoneAlarm, ZoneAlarm Pro, True Vector, and Zone Labs Integrity are trademarks of Zone Labs, Inc. All other trademarks are the property of their respective owners.
You may not export or re-export this publication outside of the jurisdiction in which you obtained it without the appropriate United States or foreign government licenses. You may not reverse engineer, de-compile, or disassemble, modify, or create derivative works based upon, this publication in whole or in part or remove any proprietary or other legal notices or labels on this publication.
Information in this publication is subject to change without notice. The publication may have errors or defects and its accuracy and reliability are not guaranteed. ACCORDINGLY, ZONE LABS MAKES NO EXPRESS WARRANTIES, ORAL OR WRITTEN, REGARDING THE PUBLICATION. THE PUBLICATION IS PROVIDED “AS IS” WITHOUT WARRANTY OF ANY KIND. ZONE LABS DISCLAIMS ANY AND ALL OTHER WARRANTIES, WHETHER EXPRESSED, IMPLIED, OR STATUTORY, INCLUDING, BUT WITHOUT LIMITATION, THE IMPLIED WARRANTIES OF NONINFRINGEMENT OF THIRD PARTY RIGHTS, MERCHANTABILITY, AND FITNESS FOR A PARTICULAR PURPOSE.
This product includes software developed by the Apache Software Foundation http://www.apache.org.

Integrity Desktop Manager Guide, Product Version 4.0 iiiZLD 1-0220-0400-2003-07-29
Contents
Chapter 1 Introducing Integrity Desktop 4.0
What’s New in Integrity Desktop 4.0? ................................................................. 1Integrity Desktop Benefits ................................................................................. 2Running Integrity Desktop ................................................................................. 3
Periodic Configuration File Downloading ................................................................... 3Automatic Alert Log Uploading .............................................................................. 3Single Policy Enforcement ................................................................................... 3Cooperative Enforcement ..................................................................................... 3
How this Guide is Organized .............................................................................. 3Naming Conventions Used in this Document ....................................................... 4Syntactic Conventions Used in this Document ..................................................... 5
Line Breaks and Hyphenation................................................................................ 5Single-step Procedures........................................................................................ 6Specifying Configuration File or Policy File Parameters .................................................. 6
Notes and Cautions........................................................................................... 6Single-Step Procedures ..................................................................................... 7
Chapter 2 System Requirements
The following sections list the hardware and software components required to successfully install and run the Integrity Desktop version 4.0 program. ................. 8Recommended System Requirements ................................................................. 8Minimum System Requirements......................................................................... 8Windows System Requirements.......................................................................... 8
Chapter 3 Upgrading to Integrity Desktop 4.0
Upgrade Guidelines........................................................................................... 9Upgrading, SMS, and Rebooting .......................................................................... 10Upgrading and Policy Deployment ........................................................................ 10
Specific Upgrade Scenarios ............................................................................. 10Upgrading ZoneAlarm Pro 2.6 to Integrity Desktop 4.0 ................................................ 10Using the Reset Command Line Parameter .............................................................. 11Upgrading Zone Alarm Pro - Integrity Desktop 3.1 to Integrity Desktop 4.0 ........................ 11Upgrading ZoneAlarm Pro Users to Integrity Desktop 4.0 ............................................. 12

Integrity Desktop Manager Guide, Product Version 4.0 ivZLD 1-0220-0400-2003-07-29
Chapter 4 Installing Integrity Desktop 4.0
Before You Begin ............................................................................................ 13Initial Installation, SMS, and Reboot ..................................................................... 13
Performing a Default Installation ...................................................................... 13Default Installation .......................................................................................... 14
Performing a Non-default Installation ............................................................... 14Installation Command Lines............................................................................. 14
Overview of Installation Command Lines ................................................................. 15Limitations on Installation Command Line Length...................................................... 15Installation Command Line Switches ..................................................................... 16General Installation Command Line Switches ........................................................... 17Tutorial and Wizard Installation Command Line Switches ............................................. 27Set or Modify Password Installation Command Line Switches......................................... 28The Configuration File Installation Command Line Specifier .......................................... 33The Policy File Installation Command Line Switch ..................................................... 33
Post-installation Configuration Files ................................................................. 34Optional Installation Resources ........................................................................ 34
Optional Installation Wrappers............................................................................. 34Optional Installation Deployment Tools................................................................... 34
Changing an Existing Installation ..................................................................... 34
Chapter 5 Using Operational Command Lines
Types of Command Lines................................................................................. 35Types of Command Lines ................................................................................... 35
Operational Command Lines ............................................................................ 36Overview of Operational Command Lines................................................................. 36Operational Command Line Switches ..................................................................... 36Set or Change License Key Operational Command Line Switch....................................... 37Set or Modify Passwords Operational Command Line Switches ....................................... 38The -config Operational Command Line Switch ......................................................... 41The Policy Operational Command Line Switch .......................................................... 41
Creating and Running Operational Command Lines............................................ 41Creating an Operational Command Line Batch File ..................................................... 42Running an Operational Command Line Batch File..................................................... 42
Chapter 6 Saving Configuration Files
Saving Integrity Desktop Settings ..................................................................... 44

Integrity Desktop Manager Guide, Product Version 4.0 vZLD 1-0220-0400-2003-07-29
Chapter 7 Uninstalling Integrity Desktop
Before You Begin ............................................................................................ 46Performing Prompted Uninstallation ................................................................. 46
Default Uninstallation....................................................................................... 46Performing a Command Line Uninstallation ...................................................... 47Upgrading to Integrity Desktop......................................................................... 47
Chapter 8 VPN Setup
Before You Begin ............................................................................................ 48Supported Versions of Microsoft Windows................................................................ 48Supported VPN Protocols ................................................................................... 48
Overview of VPN Setup.................................................................................... 49Identifying Trusted Network Resources ............................................................. 49
Types of Network Resources ............................................................................... 50Granting Programs Access ............................................................................... 53
Granting Program Access in Response to an Alert Box ................................................. 54Granting Program Access with the Control Center....................................................... 54
Enabling VPN Protocols................................................................................... 56Using Troubleshooting Aids ............................................................................. 57
Enabling Alert Logging ...................................................................................... 58Automatically Assigning New Network Resources to the Trusted Zone............................... 60Enabling Program Learning Mode ......................................................................... 60
Chapter 9 Automatically Downloading Configuration Files
What’s New in this Release? ............................................................................ 62Downloading Updated Configuration Files ......................................................... 62
Before You Begin ............................................................................................ 62Web Server Requirements .................................................................................. 63Configuration or XML Policy File Requirements ......................................................... 63
Configuring the autoconfig Element or Section.................................................... 63Editing the autoconfig Element in an XML Policy File.................................................. 63Editing the autoconfig Section in a Configuration File ................................................. 66
Updating with Zone Labs Integrity Server .......................................................... 69

Integrity Desktop Manager Guide, Product Version 4.0 viZLD 1-0220-0400-2003-07-29
Chapter 10 Automatically Uploading Alert Logs
What’s New in this Release? ............................................................................ 70Uploading Archived Alert Logs ......................................................................... 70
Before You Begin ............................................................................................ 70Microsoft IIS.................................................................................................. 71ZALogUpload Active Server Page .......................................................................... 72
Configuring the autouploadlog Element or Section ............................................... 72Managing Microsoft IIS Security........................................................................... 72Editing the autouploadlog Element in an XML Policy File ............................................. 77Editing the autouploadlog Section in a Configuration File ............................................. 80
The TempUploadResponseLogFile Receipt File.................................................. 82Responding to Certificate Alert Dialog Boxes ..................................................... 83Locating and Viewing Log Files ........................................................................ 84
Uploaded Log Files Naming Convention.................................................................. 84Example Log File Contents ................................................................................. 84Reading Uploaded Alerts ................................................................................... 85Event Types................................................................................................... 86ICMP Message Types........................................................................................ 88TCP Packet Type Flags...................................................................................... 89
Chapter A Supplemental Administrator Utilities
Running the Product Finder Utility ................................................................... 90Using the Policy Update Utility ........................................................................ 91
Policy Update Utility File-naming Conventions .......................................................... 91Running the Policy Update Utility......................................................................... 93
Appendix B Managing Passwords and Files
Managing Clear-text Passwords ........................................................................ 94Using Windows Script Files ................................................................................ 94Managing Custom Configuration Files .................................................................... 95
Managing Clear-text Data Files......................................................................... 96Managing Clear-text Policy Files........................................................................... 96Managing Clear-text Alerts and Log Files................................................................. 96
Index

Integrity Desktop Manager Guide, Product Version 4.0 1ZLD 1-0220-0400-2003-07-29
Chapter 1Introducing Integrity Desktop 4.0
This document describes how to install and configure Integrity Desktop 4.0.
Integrity Desktop 4.0 is designed to address the most rigorous of network security challenges posed by existing and emerging hostile threats on the Internet. This includes targeted as well as random intrusions such as port scanning, operating system fingerprinting, denial of service attacks as well as the full array of malware threats including Trojan horses, worms, viruses and malicious code.
The Integrity Desktop security engine does not rely on signature updates such as those used by most anti-virus software and intrusion detection systems. Instead, Integrity Desktop utilizes advanced application control and sophisticated protection at the network layer to neutralize threats.
What’s New in Integrity Desktop 4.0?The following summarizes some of the more notable additions or enhancements to Integrity Desktop 4.0:
Custom Security Zones
Specify endpoint firewall rule sets for traffic to or from different segments of trusted networks
Value: lets administrators assign distinct levels of access to different network resources
Location-based Rules
Apply firewall and application rules based on the MAC addresses of network resources
Value: customize access to devices at particular locations, even when they use non-unique private IP addresses
Total Client Lockdown
Can now prevent all users - even those with local administrator rights on their PCs - from modifying IT-specified policies or disabling Integrity protections.
Value: ensures endpoint security is in force for all users at all times
User Spoofing Protection
Prevent simulated keyboard or mouse input designed to disable endpoint security
Value: stops a threat other endpoint firewall products are susceptible to

Chapter 1 Introducing Integrity Desktop 4.0
Integrity Desktop Manager Guide, Product Version 4.0 2ZLD 1-0220-0400-2003-07-29
Outbound E-mail Protection
Stop hacker code from sending E-mail or Spam using an employee's personal E-mail account
Value: defeats a potential security breach and source of enterprise embarrassment or liability
Customizable User Interface
Modify overview and tech support text, program permissions display, and other UI elements
Value: lets administrators guide end users' experiences based on the needs of the enterprise
Automatic VPN Detection and Configuration
Apply appropriate settings the first time a user attempts a remote access connection
Value: frees end users from making VPN configuration decisions and enables trouble free remote access
Incremental Policy Updates
Push only changed policy attributes to clients, rather than entire new policy files
Value: minimizes bandwidth usage and provides a policy history that aids troubleshooting
Integrity Desktop BenefitsIntegrity Desktop 4.0:
Provides the most proven and relied-upon endpoint security protection available
Closes a huge hole in network security: Trojan Horses exploiting unprotected PCs
Defends against custom-coded attacks designed to steal enterprise data
Blocks new forms of attack that defeat legacy products such as anti-virus and Intrusion Detection Systems with a superior “guilty until proven innocent” approach
Adds immediate security enhancement to any computer upon installation
Thwarts the most sophisticated new hacker tactics, such as abuse of trusted applications
Quarantines potentially dangerous e-mail attachments that evade other defenses
Provides a simple method for upgrading, via a configuration change, to a centrally managed client
Includes support for Windows 95
Integrity Desktop 4.0 is recognized by numerous reviewers as a superior security effectiveness and usability. Benefit from using Zone Labs, the most trusted name in endpoint security.

Chapter 1 Introducing Integrity Desktop 4.0
Integrity Desktop Manager Guide, Product Version 4.0 3ZLD 1-0220-0400-2003-07-29
Running Integrity DesktopIntegrity Desktop is designed to operate in two types of networks:
Networks that do not contain any instance of Integrity Server
Hybrid networks that contain both a Web server and an Integrity Server, and a mix of Integrity Desktop, Integrity Flex, and Integrity Agent clients
In hybrid networks, Integrity Desktop operates in conjunction with a Web server while Integrity Agent and Integrity Flex operate in conjunction with the network’s Integrity Server.
The following sections provide an overview of various aspects of Integrity Desktop operation.
Periodic Configuration File DownloadingWhen used in conjunction with a standards-based Web server, Integrity Desktop can be configured to periodically download (“pull”) security policies from the server.
This differs from the deployment (“push”) of enterprise security policies performed in a network equipped with Integrity Server.
Automatic Alert Log UploadingIf a Microsoft Internet Information Services (IIS) server is available on the local network, Integrity Desktop can be configured to periodically upload archived alert log files to the server.
Single Policy EnforcementIntegrity Desktop recognizes only a single security policy operating on the client computer.
This differs from the policy arbitration performed when Integrity Agent or Integrity Flex operates in a network equipped with Integrity Server.
Cooperative EnforcementThis feature enables administrators to specify the acceptable version level of Integrity Desktop when a user logs on through an Integrity-compatible Cisco VPN. See the Administrator Guide for more detailed information about co-operative enforcement.
How this Guide is OrganizedThis management guide explains how to install, configure, and manage Integrity Desktop. The remaining chapters in this document contain the following information:
Chapter 2, ”System Requirements,” provides an overview of the hardware and software necessary to run Integrity Desktop.

Chapter 1 Introducing Integrity Desktop 4.0
Integrity Desktop Manager Guide, Product Version 4.0 4ZLD 1-0220-0400-2003-07-29
Chapter 3, ”Upgrading to Integrity Desktop 4.0,” describes how to upgrade an existing Zone Labs product to Integrity Desktop 4.0.
Chapter 4, ”Installing Integrity Desktop 4.0,” describes how to perform an initial installation of Integrity Desktop.
Chapter 5, ”Using Operational Command Lines,” describes how to use command lines to modify user-level or installation-level passwords, or to cause Integrity Desktop to read new settings from a policy file.
Chapter 6, ”Saving Configuration Files,” explains how to save Integrity Desktop’s settings into a text-based policy file.
Chapter 7, ”Uninstalling Integrity Desktop,” describes how to remove Integrity Desktop from a computer.
Chapter 8, ”VPN Setup,” describes how to configure Integrity Desktop for use on a Virtual Private Network (“VPN”).
Chapter 9, ”Automatically Downloading Configuration Files,” explains how to cause Integrity Desktop to periodically download a policy file from a central Web server.
Chapter 10, ”Automatically Uploading Alert Logs,” explains how to configure Integrity Desktop to periodically upload alert log files to a Microsoft IIS server.
Appendix B, ”Managing Passwords and Files,” provides some guidelines for using and storing clear-text passwords and scripts.
Naming Conventions Used in this DocumentThere are three Integrity Client operating modes. This document uses the generic term “Integrity Client installer” to refer to three separate installation programs:
iclientSetup_IDen.exe, which installs Integrity Desktop operating mode
iclientSetup_IFen.exe, which installs Integrity Flex operating mode
iclientSetup_IAen.exe, which installs Integrity Agent operating mode
The en in the file name denotes the English language version of Integrity Client.
After installation, this document uses the generic term “Integrity Client program” or “Integrity Client” to refer to settings or operations that apply to all three Integrity Client operating modes. The following table lists the primary differences between the three Integrity Client operating modes.
DefaultOperating Mode
Works with Integrity Server?
Complete Control Center?
Displays Policies Panel?
Performs Policy Arbitration?
Integrity Desktop No Yes No No
Integrity Flex Yes Yes Yes Yes
Integrity Agent Yes No Yes Yes

Chapter 1 Introducing Integrity Desktop 4.0
Integrity Desktop Manager Guide, Product Version 4.0 5ZLD 1-0220-0400-2003-07-29
Syntactic Conventions Used in this DocumentThis document uses the command syntax conventions specified by the Microsoft Manual of Style1. The following example illustrates the general form of this syntax:
SampleParameter= VariableName { Yes | No } arguments…[options]
The following table lists the specific elements and syntactic conventions used in this document.
Line Breaks and HyphenationIn a configuration file, an Integrity Client configuration file parameter statement consists of a single line of text. In this document, some example parameter statements may be too long to fit onto a single line. When examples are too long to fit on a single line, line breaks are added; line breaks may also be added to improve the readability of long parameter statements.
Whenever line breaks are added, any additional lines are indented. The following example illustrates the general form of a long configuration file parameter statement to which line breaks and indentation have been added.
[Programs] Default=Allow Local Connect {Allow | Disallow | Ask},
AllowInternetConnect {Allow | Disallow |Ask}, AllowLocalServer {Allow | Disallow | Ask},
1.Microsoft. Microsoft Manual of Style, 2nd Edition. Microsoft Press, May 1998. ISBN 1-57231-890-2
Element Name DescriptionParameter Bold Identifies a specific parameter or command.
{ } Braces Indicates a set of choices from which the user must choose.
| OR choice. Unlike a logical OR, in a configuration parameter statement the pipe symbol separates two mutually exclusive choices.
When used in this context, the user types one of the choices, not the symbol.
arguments Italic Specifies a variable name or other information the user must provide, such as a path and file name.
… Ellipsis Indicates that multiple arguments are repeated in a parameter statement.
The user types only the information, not the ellipsis (…).
[options] Brackets In configuration file parameter statements, brackets indicate optional items.
When used to list options, brackets indicates that the user types only the information within the brackets, not the brackets.
[SectionName] Section Heading Brackets also identify configuration file section headers.
When used to identify the beginning of a configuration file section the brackets must be included.
Chapter 1 Introducing Integrity Desktop 4.0
Integrity Desktop Manager Guide, Product Version 4.0 6ZLD 1-0220-0400-2003-07-29
AllowInternetServer {Allow | Disallow | Ask}, AllowPassLock {Yes | No}, Changes Frequently {Yes | No}
Examples that have added line breaks are also preceded by the statement “(line breaks added for readability)”.
Hyphens are never inserted into configuration file parameter statements: if a hyphen appears it must be included as part of the parameter statement.
Single-step Procedures
In addition to multi-step numbered procedures, this document also contains single-step procedures. The following illustrates the general form of a single-step procedure.
To perform a single-step procedure:
Perform the single action described in the body of the single-step procedure.
Most single-step procedures are followed by a brief description of illustration of the results of the single-step procedure’s action.
Specifying Configuration File or Policy File Parameters
To change the default value for that parameter, type one of the following boolean values:
Yes, 1, Allow, On, and True are equivalent values
No, 0, Disallow, Off, and False are equivalent values
Notes and CautionsThis document two types of specially annotated text: notes and cautions.

Chapter 1 Introducing Integrity Desktop 4.0
Integrity Desktop Manager Guide, Product Version 4.0 7ZLD 1-0220-0400-2003-07-29
Notes
Cautions
Single-Step ProceduresIn addition to multi-step numbered procedures, this document also contains single-step procedures. The following illustrates the general form of a single-step procedure.
To perform a single-step procedure:
Perform the single action described in the body of the single-step procedure.
Most single-step procedures are followed by a brief description of illustration of the results of the single-step procedure’s action.
ti
Notes emphasize related, reinforcing, interesting, or other “special” information.
tizt
Cautions identify actions or processes that can potentially damage data or programs.

Integrity Desktop Manager Guide, Product Version 4.0 8ZLD 1-0220-0400-2003-07-29
Chapter 2System Requirements
The following sections list the hardware and software components required to successfully install and run the Integrity Desktop version 4.0 program.
Recommended System RequirementsIntegrity Desktop is optimized for use under the recommended requirements listed below:
Microsoft® Windows® 95 OSR2, 98 SE, NT 5, SP6a, 2000 Professional SP 3 or greater, XP (all SPs)
IBM PC or 100% compatible
Pentium II processor 450 MHz or higher
128 MB or higher RAM
10 MB Hard disk space
All versions of Windows must include Internet Explorer 5.0 or greater.
Minimum System RequirementsIntegrity Desktop is functional but not optimized under the minimum requirements listed below.
Microsoft® Windows® 95 OSR2, 98 SE, NT 5, SP6a, 2000 SP 3 or greater, XP (all SPs)
IBM PC or 100% compatible
Pentium processor 233 MHz or higher
32 MB RAM
10 MB Hard disk space
All versions of Windows must include Internet Explorer 5.0 or greater.
Windows System RequirementsMicrosoft Windows® has minimum system resource requirements. Contact Microsoft® or visit www.microsoft.com for more information.

Integrity Desktop Manager Guide, Product Version 4.0 9ZLD 1-0220-0400-2003-07-29
Chapter 3Upgrading to Integrity Desktop 4.0
Zone Labs, Inc. designed Integrity Desktop 4.0 for easy upgrade. However, some older Zone Labs products, particularly products that were not designed for use in an enterprise setting, have special upgrade requirements.
Upgrade GuidelinesThe following table lists the upgrade paths from older Zone Labs products to Integrity Desktop 3.7
The specific cases listed in the preceding table produce the following general rules governing upgrade:
All uninstallations remove all existing user settings. The only way to save user settings is to perform an upgrade.
ToZo
ne A
larm
Pro
-
Inte
grit
y D
eskt
op 3
.1
Inte
grit
y A
gent
1.0
(n
o lo
nger
sup
port
ed)
Inte
grit
y A
gent
1.5
(n
o lo
nger
sup
port
ed)
Inte
grit
y C
lient
3.5
Inte
grit
y C
lient
3.7
Inte
grit
y C
lient
4.0
FromZone Alarm Pro - Integrity Desktop 3.1
— D D U U U
Integrity Agent 1.0 (no longer supported)
U — U U U U
Integrity Agent 1.5 (no longer supported)
U D — U U U
Integrity Client 3.5 D D D — U U
Integrity Client 3.7 D D D D — U
Integrity Client 4.0 D D D D D —
D = Downgrade after uninstalling previous version
U = Exclusive Upgrade

Chapter 3 Upgrading to Integrity Desktop 4.0
Integrity Desktop Manager Guide, Product Version 4.0 10ZLD 1-0220-0400-2003-07-29
Installation of consumer products (such as Zone Alarm or Zone Alarm Pro) over Integrity enterprise products is not permitted: You must uninstall the enterprise-level product before installing the consumer product.
Downgrading deletes all existing user settings.
Downgrading the release level of a product is not allowed: you must uninstall the higher-numbered release before installing the lower numbered release.
Upgrades preserve user settings, but allows the user the choice of removing existing settings.
Upgrading, SMS, and RebootingTo complete an upgrade of an existing instance of a Zone Labs product to Integrity Client, it is necessary to reboot the computer to complete the upgrade process.
To allow the deployment of Integrity Client with third-party systems management tools such as Microsoft System Management Server (SMS), use the /noreboot installation command line switch to defer reboot to a more convenient time. The key word is defer: the computer must eventually be rebooted to complete the upgrade process.
Reboot of the computer, and thus the use of the noreboot switch, is not required during an initial (sometimes referred to as “clean”) installation of Integrity Client. Instead, to properly initialize Windows settings and variables a newly installed Integrity Client must be run for the first time while the computer has an administrator-level user logged in.
Upgrading and Policy DeploymentAfter upgrading, updated instances of Integrity Client receive fresh enterprise security policies from Integrity Server.
The following sections describe three specific upgrade scenarios.
Specific Upgrade ScenariosThis section describes specific issues for three specific upgrade scenarios:
“Upgrading ZoneAlarm Pro 2.6 to Integrity Desktop 4.0,” in the following section
“Upgrading Zone Alarm Pro - Integrity Desktop 3.1 to Integrity Desktop 4.0,” on page 11
“Upgrading ZoneAlarm Pro Users to Integrity Desktop 4.0,” on page 12
This chapter also includes a brief review of the Integrity Desktop installation-level passwords.
Upgrading ZoneAlarm Pro 2.6 to Integrity Desktop 4.0Choose one of the following procedures based on whether or not a ZoneAlarm Pro 2.6 installation-level password has been set.

Chapter 3 Upgrading to Integrity Desktop 4.0
Integrity Desktop Manager Guide, Product Version 4.0 11ZLD 1-0220-0400-2003-07-29
If the ZoneAlarm Pro 2.6 Installation-level Password is Not Set
Complete the following tasks when a ZoneAlarm Pro 2.6 password installation has not been set:
1 Run the ZoneAlarm Pro 2.6 uninstall program.
2 Manually remove the ZoneAlarm Pro 2.6 database files.
3 Install Integrity Desktop and set an Integrity Desktop installation-level password.
If the ZoneAlarm Pro 2.6 Installation-level Password is Set
Complete the following major steps when a ZoneAlarm Pro 2.6 password installation is set:
1 Run the ZoneAlarm Pro 2.6 uninstall program.
2 Decide whether or not to preserve existing ZoneAlarm Pro 2.6 user security preferences.
3 Install Integrity Desktop and supply the ZoneAlarm Pro installation-level password.
To preserve existing user security preferences, do not include the /reset switch in the installation command line.
To remove existing user security preferences, include the reset switch in the installation command line. See ”Using the Reset Command Line Parameter,” in the following section, and “/reset,” on page 24, for more information about the reset switch.
Using the Reset Command Line ParameterDuring installation, Integrity Client attempts to use the settings contained in the ZoneAlarm Pro 2.6 database.
The use of the reset parameter, described on page 24, ensures that existing ZoneAlarm Pro 2.6 personal policy’s settings will be removed. Otherwise, Integrity Desktop’s personal policy can only be modified by importing settings from a configuration file (default name policy.ini) on the local machine.
Upgrading Zone Alarm Pro - Integrity Desktop 3.1 to Integrity Desktop 4.0
Complete the following major steps to upgrade Zone Alarm Pro - Integrity Desktop 3.1 to Integrity Desktop 4.0:
1 Decide whether or not to preserve existing Zone Alarm Pro - Integrity Desktop 3.1 user security preferences.
2 Install Integrity Desktop 4.0 over Zone Alarm Pro - Integrity Desktop 3.1 and supply the installation-level password.
To preserve existing user security preferences, do not include the reset switch in the installation command line.

Chapter 3 Upgrading to Integrity Desktop 4.0
Integrity Desktop Manager Guide, Product Version 4.0 12ZLD 1-0220-0400-2003-07-29
To remove existing user security preferences, include the reset switch in the installation command line. See ““Using the Reset Command Line Parameter,” on page 11,” and “Reset,” on page 24, for more information about the reset switch.
Upgrading ZoneAlarm Pro Users to Integrity Desktop 4.0Any time a consumer-level product is upgraded to Integrity Desktop, the consumer product’s security and preferences settings are lost.

Integrity Desktop Manager Guide, Product Version 4.0 13ZLD 1-0220-0400-2003-07-29
Chapter 4Installing Integrity Desktop 4.0
This chapter describes how to install Integrity Desktop 4.0.
This chapter is organized into the following main sections:
“Performing a Default Installation,” in the following section, describes how to perform a default installation of Integrity Desktop
“Performing a Non-default Installation,” on page 14, describes how to use installation command line switches to change the default behaviors of the Integrity Desktop installation program
“Post-installation Configuration Files,” on page 34, provides an overview of the use of policy files to configure Integrity Desktop’s initial settings after installation has been completed.
Before You BeginTo complete the procedure in this chapter, you will need a copy of the Integrity Desktop installation program iclientSetup_IDen.exe.
Initial Installation, SMS, and RebootUnlike upgrades, initial (sometimes referred to as “clean”) installations of Integrity Client do not require the reboot of the upgraded computer.
Instead, to properly initialize Windows settings and variables a newly installed Integrity Client must be run for the first time while the computer has an administrator-level user logged in.
Performing a Default InstallationUnlike Integrity Flex or Integrity Agent, Integrity Desktop does not operate in conjunction with a corresponding Integrity Server. This means that the configuration, deployment, installation, and administration tools provided by Integrity Server are not available.
Complete the following single-step procedure to perform a default installation of Integrity Desktop.
To perform a default installation of Integrity Desktop:
Double-click the Integrity Desktop installation program iclientSetup_IDen.exe.
The installation program starts. As part of the default installation process, a series of dialog boxes and information displays appears.

Chapter 4 Installing Integrity Desktop 4.0
Integrity Desktop Manager Guide, Product Version 4.0 14ZLD 1-0220-0400-2003-07-29
Default InstallationRun in its default state, during an initial installation the Integrity Desktop installation program:
Prompts for installation options and user information
Asks whether or not to run the setup wizard
Asks whether or not to run the Integrity Desktop tutorial
Asks whether or not to start the Integrity Desktop program
The next section describes how to use installation command line switches to specify a non-default installation.
Performing a Non-default InstallationUse installation command lines to change the default installation and first-time startup behaviors of the Integrity Desktop installation program.
Installation Command LinesThere are two distinct types of Integrity Client command lines
Installation command lines, described in this chapter
Operational command lines described in “Operational Command Lines,” on page 36
The following table illustrates the primary differences between the two types of command lines.
OperationalCharacteristic Installation Command Line Operational Command Line
When used During installation After installation
Used with file Integrity Client Installation program iclientSetup_IXen.exe.a
a.Where IX equals ID for Integrity Desktop, IF for Integrity Flex, of IA for Integrity Agent, and en is the language code.
Integrity Client program file iclient.exe.
Parameter delimiter Slash mark (“/”) Dash (“-”)
Configuration file specifier • Does not include a special preced-ing command line switch
• Path and file name specifier must be enclosed in quotation marks (")
• Must be the last switch on an installation command line
• Must be preceded by the -config command line switch
• Path and file name specifier must be enclosed in quotation marks (")
• Must be the last switch on an operational command line

Chapter 4 Installing Integrity Desktop 4.0
Integrity Desktop Manager Guide, Product Version 4.0 15ZLD 1-0220-0400-2003-07-29
Overview of Installation Command Lines
The following illustrates the general form of an Integrity Client installation command line (line break added for readability):
iclientSetup_110n.exe [/switch_1 /switch_2 … /switch_n] ["C:\full\path\to\configuration.ini"]
The installation command line consists of three primary elements:
iclientSetup_110n.exe is the name of the Integrity Client installation program, where n is 1, 2, or 3, depending on client type.
Optional command line switches, preceded by the slash mark (“/”), specify non-default installation and post-installation behaviors.
C:\full\path\to\configuration.ini specifies the path to an optional installation configuration file to be loaded by Integrity Client after installation is completed.
Limitations on Installation Command Line LengthDifferent versions of Microsoft Windows place differing constraints on the maximum size of installation command lines.
The following table contains the known limitations for installation command lines supplied directly to different versions of Microsoft Windows, as well as for installation command lines included as part of an Integrity Server installation package.
Windows Version Maximum Installation CommandLine Length (characters + spaces)
Command line installation values
98 SE 127
NT, 2000, XP 277
Integrity Server client deployment package values
98 219
NT 226
2000 195
XP 199

Chapter 4 Installing Integrity Desktop 4.0
Integrity Desktop Manager Guide, Product Version 4.0 16ZLD 1-0220-0400-2003-07-29
The Configuration File Installation Command Line Specifier
Special syntactic rules apply to the installation configuration file command line specifier ("C:\full\path\to\configuration.ini" in the example in the preceding section). If specified in an installation command line, the configuration file specifier:
Must be the last element on the command line
Must not be prefaced by a slash. This is the only command line element that does not require a delimiter character.
Must enclose the path name and filename in quotation marks (")
Can use Microsoft Windows’ Universal Naming Convention (UNC) of \\servername\sharename to refer to a policy file located on a shared network resource
When the installation configuration file command line specifier is used, Integrity Client ignores the Policy_Info section of the specified configuration file.
Installation Command Line Error Messages
If you use a dash delimiter (“-”) in an installation command line, the Integrity Client installation programs displays the following error message.
Installation Command Line SwitchesAll installation command line switches are preceded by a slash mark (“/”).
Integrity Client recognizes eighteen installation command line switches (seventeen for Integrity Desktop). The following table groups the installation command line switches into four functional categories and identifies the page in this chapter where a complete description of the switch can be found.
If you use a dash delimiter (“-”) in an installation command line, the Integrity Client installation program displays this Command Line Error message box.
Command Line Switch Description Page
General Installation Command Line Switches
/errlog Path Specifies an installation error log file. 18
/forceupgrade Suppress the display of the Previous Settings dialog box. 18
/install_log Path Specifies a non-default location for the installation log file. 19
/installdir Path Specifies a non-default location for Integrity Client program files. 19
/lickey LicenseKey Specifies the product license key. 20
/noreboot Suppresses automatic rebooting after an upgrade. 20
/nostartup Suppresses automatic startup of Integrity Client at boot. 21

Chapter 4 Installing Integrity Desktop 4.0
Integrity Desktop Manager Guide, Product Version 4.0 17ZLD 1-0220-0400-2003-07-29
General Installation Command Line Switches
Use the General installation command line switches group to specify:
Non-default installation behaviors
Non-default locations for the post-installation folders and files used by Integrity Client
/notminimized After installation, display the Integrity Client Control Center. 21
/rbprompt Overrides silent install by displaying a reboot prompt. 22
/reboot Force a reboot after installation. 22
/regfile Specifies the path to a file containing Windows Registry entries. 22
/reset Clears existing Zone Labs configuration settings. 23
/s Specifies silent (prompt-free) installation. 24
/upgradekey Supplies an existing upgrade key. 26
/upgradekeyset Specifies a new upgrade key. 24
Tutorial and Wizard Installation Command Line Switches
/notutorial Suppresses display of the product tutorial. 27
/nowizards Suppresses display of the configuration wizard. 28
/i Suppresses both the product tutorial and configuration wizard. 28
Set or Modify Password Command Line Switches
/passwset UserPwordNew Specifies a new optional user-level password. 29
/password UserPwordOld Supplies an existing user-level password. 29
/pwinstset InstallPwordNew Specifies a new optional installation-level password.l 31
/pwinst InstallPwordOld Supplies an existing installation-level password. 32
Specify an optional installation configuration file
"Path to Configuration File" Specifies the path and name of an optional installation configuration file. 33
For networks with Integrity Server only, specify an optional installation policy file
/policy "Path to Policy File" Specifies the path and name of an optional installation policy file. 33
Command Line Switch Description Page

Chapter 4 Installing Integrity Desktop 4.0
Integrity Desktop Manager Guide, Product Version 4.0 18ZLD 1-0220-0400-2003-07-29
The following tables list the nine general installation command line switches in alphabetical order.
General Installation Command Line Switches
/errlog Path
Use errlog to specify an error log file’s name and storage location.
The following illustrates the general form of the errlog installation command line switch (line break added for readability):
IDSetup_1101.exe /errlog "C:\PathName\ErrorLogFileName.txt" … "C:\Path\To\Configuration.ini"
The path specifier:
• Must be enclosed in quotation marks (")
• Can use Microsoft Windows’ Universal Naming Convention (UNC) of \\servername\sharename to refer to an installation configuration file located on a shared network resource
If errlog is used in a command line with the /s (“silent”) switch, described on page 24, the s switch must immediately precede the errlog command.
The following illustrates the use of the errlog installation command line switch in conjunction with the s installation command line switch (line break added for readability):
IDSetup_1101.exe [/s] /errlog "C:\PathName\ErrorLogFileName.txt" /… C:\Path\to\ErrorLog.txt"
Specifying the s switch without the errlog switch automatically creates an error log file named ErrorLog.txt and saves it in the Integrity Client program folder at C:\Program Files\Zone Labs\Integrity Client\. To modify the default behavior of the s switch, use the errlog switch to specify a different path and file name. See the s switch for more information.
Default Value: None — ErrLog must include a path and file name specifier.
General Installation Command Line Switches
/forceupgrade
Use forceupgrade to suppress the Previous Settings dialog box that offers the user the choice of overwriting their existing settings during the upgrade process: This has the effect of forcing users to retain their existing Integrity Client settings.
The following illustrates the general form of the forceupgrade installation command line parameter:
iclientSetup_1101.exe /forceupgrade
When used on the same installation command line as the /s switch, the forceupgrade switch has no effect.
Default: No default value.

Chapter 4 Installing Integrity Desktop 4.0
Integrity Desktop Manager Guide, Product Version 4.0 19ZLD 1-0220-0400-2003-07-29
General Installation Command Line Switches
/install_log Path
Use install_log to a specify a secure non-default destination for the installation log file Install.Log.
The following illustrates the general form of the install_log installation command line switch:
iclientSetup_1101.exe /install_log "C:\Full\Path\To\InstallLog.txt"
• The folder specified by the path name must be created before specifying install_log : The install_log installation command line switch can not be used to create a new folder.
• When using install_log, always enclose the complete path name in quotation marks (").
If install_log was used to place the install log in a non-default location, specify the location of the install log at uninstallation as follows:
zauninst.exe "c:\PathToInstallLog\InstallLog.txt"
Default Value: "C:\Program Files\Zone Labs\Integrity Client\". Zone Labs recom-mends that the default folder name be used.
General Installation Command Line Switches
/installdir Path
Use installdir to specify an alternative destination for the Integrity Client program files. The following illustrates the general form of the installdir installation command line switch:
iclientSetup_1101.exe /installdir "C:\Program Files\ Folder"
• The installdir switch specifies where Integrity Client program files are stored: installdir does not change the storage locations of Integrity Client database files.
• When using installdir, always enclose the complete path name in quotation marks (").
• Do not use installdir and the /s switch, described on page 24, in the same installation command line: if installdir and the s switch, described on page 24, are used in the same command line, Integrity Client can not display errors resulting from invalid path and filename specifications.
Default Value: C:\Program Files\Zone Labs\Integrity Client\. Zone Labs, Inc. recommends that the default folder name be used.

Chapter 4 Installing Integrity Desktop 4.0
Integrity Desktop Manager Guide, Product Version 4.0 20ZLD 1-0220-0400-2003-07-29
General Installation Command Line Switches
/lickey LicenseKey
Use lickey to supply an existing Integrity Client license key to the installation program.
The following illustrates the general form of the lickey installation command line:
iclientSetup_1101.exe /lickey nnnnnnnnnnnnnnnnnnnn
When using lickey, do not:
• Include dash characters (“-”)
• Enclose the license key in quotation marks (").
The Integrity Client license key can also be entered manually from the Graphical User Interface (GUI) after installation.
Default: No default value.
General Installation Command Line Switches
/noreboot
Use noreboot to defer the computer reboot required to complete an upgrade of Integrity Client. The following illustrates the general form of the noreboot installation command line switch:
iclientSetup_1101.exe /noreboot
For upgrades:
• The noreboot switch prevents the reboot required to complete an upgrade of Integrity Client. Use noreboot when an upgrade of Integrity Client will be managed by a third-party installer setup tool such as Microsoft’s SMS, and that setup tool needs to perform more tasks after performing an upgrade of Integrity Client.
After the third-party installer’s tasks are completed, the installer tool must force a reboot of the client computer to complete the upgrade.
Noreboot does not remove the requirement to reboot the computer to complete an upgrade. Noreboot merely defers the required reboot so that reboot can be managed by a third-party installation process such as SMS.
• Integrity Client begins protecting the upgraded computer only after a reboot has completed.
Initial (sometimes referred to as “clean”) installations of Integrity Client do not require reboot of the computer.
Default Value: Use noreboot to suppress the automatic rebooting necessary to complete an upgrade. Because initial (so-called “clean”) installations of Integrity Client do not automatically reboot, the use of noreboot is unnecessary for initial installations. Instead, to properly initialize Windows settings and variables a newly installed Integrity Client must be run for the first time while the computer has an administrator-level user logged in.

Chapter 4 Installing Integrity Desktop 4.0
Integrity Desktop Manager Guide, Product Version 4.0 21ZLD 1-0220-0400-2003-07-29
General Installation Command Line Switches
/nostartup
Use nostartup to specify that the Integrity Client installation program not ask whether to start the program after an initial installation.
The following illustrates the general form of the nostartup installation command line switch:
iclientSetup_1101.exe /nostartup
Because the nostartup installation command line switch does not provide the user with an opportunity to respond to the startup prompt, the newly installed instance of Integrity Client will not be started after installation.
Default Value: Off. Unless specified by nostartup, the installation program asks to start Integrity Client after an initial installation.
General Installation Command Line Switches
/notminimized
Use notminimized to force the display of the Integrity Client Control Center when Integrity Client starts for the first time after installation.
When the /s switch is included as part of an installation command line, the Integrity Client installation program starts Integrity Client for the first time in so-called “minimized” mode: Only the Integrity icon appears in the Windows system tray. The notminimized installation command line switch overrides this default behavior.
Default Value: Off (Control Center is minimized) for installations that include the /s installation command line switch.

Chapter 4 Installing Integrity Desktop 4.0
Integrity Desktop Manager Guide, Product Version 4.0 22ZLD 1-0220-0400-2003-07-29
General Installation Command Line Switches
/rbprompt
Use rbprompt in conjunction with the s (“silent”) switch, described on page 24, to prompt the user to perform the reboot required to complete an upgrade of Integrity Client; the reboot prompt is only displayed if reboot is required by the updgrade process.
The following illustrates the general form of the rbprompt installation command line switch:
iclientSetup_1101.exe /s /rbprompt
The rbprompt can only be used in conjunction the s switch: rbprompt allows a reboot prompt, and only a reboot prompt, to be displayed as part of a silent upgrade.
• If rbprompt is specified as part of an upgrade of Integrity Client that is managed by a third-party installer setup tool such as Microsoft’s SMS, rbprompt will require a response to the reboot prompt before allowing the installer setup script to continue.
• Integrity Server’s Client Deployment feature automatically includes the “/s /rbprompt” command pair as part of an Integrity Client installation package. To reboot automatically after an upgrade do not select the Run installer without UI… check box. Instead, in the Additional Commands text entry area, specify the s command line switch without a corresponding /rbprompt switch.
• Using rbprompt on the same installation command line as the noreboot installation com-mand line switch, described on page 20, suppreses the display of the reboot prompt dialog box: noreboot defers the reboot to the controlling third-party installation setup tool, such as SMS. (As described in the description of /noreboot, an upgrade is not complete until a reboot has been performed).
Default Value: Use rbprompt to modify the default operation of the s switch. Unless explicitly specified by rbprompt, the s switch suppresses all messages, and after an upgrade (as distin-guished from a clean install) automatically reboots the computer.
General Installation Command Line Switches
/reboot
Use reboot to force a reboot of Integrity Client after installation.
Normally, when the Integrity Client installation program does not detect files from an existing Zone Labs product during the installation process, the computer is not automatically rebooted. Use the reboot switch to force a reboot under all circumstances.
Default: No default value.

Chapter 4 Installing Integrity Desktop 4.0
Integrity Desktop Manager Guide, Product Version 4.0 23ZLD 1-0220-0400-2003-07-29
General Installation Command Line Switches
/regfile
Use the regfile switch to have the Integrity Client installation program apply Windows Registry keys and values contained in a “.reg” file to the Windows Registry at the time of installation.
The following illustrates the general form of the regfile command.
iclientSetup_1101.exe /regfile="c:\full\path\to\registry\RegFile.reg"
Any valid Windows filename can be used, but the .reg file must:
• Contain valid Windows Registry keys and values
• Use the .reg file name extension
When creating a client installation package with Integrity Server, you can include a .reg file in an installation package. The /regfile switch directs the Integrity Client installation program to apply the keys and values of the .reg file to the Windows Registry.
To include a registry file in the client installation package:
1 Create a package using the Client Deployment | New Package screen.
2 In the Integrity Server folder hierarchy, navigate to the folder containing the package you just created. The following illustrates the default path (line break added):.0
c:\Program Files/ZoneLabs/Integrity/jakarta-tomcat-n.n.n/ webapps/integrity/package/PackageName
3 In the folder specified by PackageName:
a Create a new folder named extras.
b Place the .reg file in the extras folder.
4 In Integrity Server, return to the Client Deployment | List dialog box, select the installation package, and click Edit.
The Client Deployment’s Edit Package screen appears.
5 In the Install Parameters section, in the Additional Command Line Switches text entry area, add the command line switch /regfile.
6 Click Save.
A registry file can also be referenced by the Policy Update Utility.

Chapter 4 Installing Integrity Desktop 4.0
Integrity Desktop Manager Guide, Product Version 4.0 24ZLD 1-0220-0400-2003-07-29
General Installation Command Line Switches
/reset
Use reset during upgrade or reinstallation to completely clear all Integrity Client settings. The following illustrates the general form of the reset installation command line switch:
iclientSetup_1101.exe /pwinst InstallPasswordOld /reset
If an installation-level password was specified during initial installation, the pwinst switch must appear on the same command line with reset.
Default Value: Off.
The reset installation command line switch must be used with caution. After using reset, all Integrity Client personal policy settings except the installation-level password are lost and must be reinitialized.
General Installation Command Line Switches
/s
Use s (for “silent”) to suppress all Integrity Client installation program messages.
If used, the s switch must be the first switch on the installation command line.

Chapter 4 Installing Integrity Desktop 4.0
Integrity Desktop Manager Guide, Product Version 4.0 25ZLD 1-0220-0400-2003-07-29
The following illustrates the general form of the s installation command line switch:
iclientSetup_1101.exe /s
If used, the s switch:
• Must be the first switch on the installation command line.
• Forces a reboot if the installer detects files from an existing Zone Labs product on the computer, and those files cannot be replaced at the time the installation or upgrade of Integrity Client is performed. This is true even if the Clean Install check box is selected by the user.
• Automatically creates an error log file named ErrorLog.txt and saves it in the Integrity Client program folder. To change the default path and file name of the Integrity Client program folder, use the errlog switch.
Do not use installdir and the /s switch in the same installation command line. If installdir and s are used together on the same command line, errors resulting from invalid path and filename specifications will not be displayed during installation.
Integrity Client does not allow the TrueVector security engine to be shut down silently unless an installation-level password is supplied.
There are two conditions that affect how an upgrade will or will not be performed:
• An installation-level password was set for the existing installation, and you supply the installation-level password on the command line during re-installation, then a silent installation is performed. If the installation-level password is not correctly specified, the upgrade fails silently.
• An upgrade key was set for the existing installation, and you supply the upgrade key on the command line during re-installation, then a silent installation is performed. If the upgrade key is not correctly specified, the upgrade is performed but not silently.
The following illustrates the use of the s command line switch in conjunction with the pwinst switch:
iclientSetup_1101.exe /s /pwinst InstallPwordOld
See pwinst, on page 32, for more information.
Default value: Off. Unless explicitly disabled by the use of s, messages and prompts are displayed by the Integrity Client installation program.
General Installation Command Line Switches (continued)
/s

Chapter 4 Installing Integrity Desktop 4.0
Integrity Desktop Manager Guide, Product Version 4.0 26ZLD 1-0220-0400-2003-07-29
General Installation Command Line Switches
/upgradekey
Use the upgradekey switch to specify an existing upgrade key. The following illustrates the general form of the upgradekey switch:
iclientSetup_1101.exe /upgradekey upgradeKeyOld
• Use the /upgradekeyset installation command line switch, described in the following table in this section, to create a new upgrade key during initial installation.
• Use the /upgradekey and /upgradekeyset installation command lines on the same command line to change the value of an existing upgrade key during a re-installation.
• Use the -upgradekey operational command line switch, described on page 1, to specify an existing upgrade key during reconfiguration of an existing instance of Integrity Client.
The upgrade key suppresses:
• Any dialogs that normally appear during reconfiguration or upgrade. Contrast this with the installation-level password which prevents anyone from uninstalling or upgrading Integrity Client without supplying the password.
• The TrueVector shutdown dialog box.
For example, if an upgrade key is set, and someone attempts to reconfigure or re-install without supplying the upgrade key, the Integrity Client installation program completes the upgrade: Any upgrade dialogs will, however, be shown.
The Integrity Client installation program suppresses dialogs if an installation-level password is specified. This means upgrades performed in conjunction with an installation-level password, the upgrade key does not also need to be specified.
Use the upgradekeyset installation command line switch, described in the next table in this section, to specify the upgrade key during initial installation. After initial installation, use the upgradekey operational command line switch, described on page, to change an existing upgrade key.
Default: No default value.

Chapter 4 Installing Integrity Desktop 4.0
Integrity Desktop Manager Guide, Product Version 4.0 27ZLD 1-0220-0400-2003-07-29
Tutorial and Wizard Installation Command Line SwitchesUse the tutorial and wizard command line switches group to specify whether or not the Integrity Client tutorial and wizard are displayed as part of the installation process. The following tables list the three tutorial and wizard command line switches.
General Installation Command Line Switches
/upgradekeyset
Use the upgradekeyset switch to create a new upgrade key at the time Integrity Client is installed. The following illustrates the general form of the upgrade key switch:
iclientSetup_1101.exe /upgradekeyset upgradeKeyNew
• Use the /upgradekey installation command line switch, described in the previous table in this section, to specify a silent (prompt free) upgrade of an existing installation.
• Use the /upgradekey and /upgradekeyset installation command lines on the same command line to change the value of an existing upgrade key during a re-installation.
• Use the -upgradekey operational command line switch, described on page 1, to specify an existing upgrade key during reconfiguration of an existing instance of Integrity Client.
The upgrade key suppresses the dialogs that normally appear during reconfiguration or upgrade. Contrast this with the installation-level password which prevents anyone from uninstalling or upgrading Integrity Client without supplying the password.
For example, if an upgrade key is set, and someone attempts to reconfigure or re-install without supplying the upgrade key, the Integrity Client installation program completes the upgrade: Any upgrade dialogs will, however, be shown.
The Integrity Client installation program suppresses dialogs if an installation-level password is specified. This means upgrades performed in conjunction with an installation-level password, the upgrade key does not also need to be specified.
Default: No default value.
Tutorial and Wizard Installation Command Line Switches
/notutorial
Use notutorial to suppress the automatic display of the Integrity Client tutorial after installation is completed. The following illustrates the general form of the notutorial installation command line switch:
iclientSetup_1101.exe /notutorial
Default Value: Off. If not explicitly disabled by the use of notutorial, the installation program asks the user if they want to view the tutorial as part of an initial installation.

Chapter 4 Installing Integrity Desktop 4.0
Integrity Desktop Manager Guide, Product Version 4.0 28ZLD 1-0220-0400-2003-07-29
Set or Modify Password Installation Command Line SwitchesIntegrity Desktop recognizes both a user-level and an installation-level password.
The following table lists the functional differences between the two password types.
Tutorial and Wizard Installation Command Line Switches
/nowizards
Use nowizards to suppress the automatic display of the Integrity Client configuration wizard after installation is completed. The following illustrates the general form of the nowizards command line switch:
iclientSetup_1101.exe /nowizards
Default value: Off. If not explicitly disabled by the use of nowizards, the installation program asks if the user wants to run the configuration wizard as part of an initial installation.
Tutorial and Wizard Installation Command Line Switches
/i
Use i to combine the operation of both the notutorial and nowizards command line switches. The following illustrates the general form of the i installation command line switch:
iclientSetup_1101.exe /i
In this example, the i switch suppresses both the automatic start of the Integrity Client tutorial and the automatic start of the Integrity Client configuration wizard after installation is completed.
Default value: Off.
Zone Labs, Inc. recommends you not set a user-level password. A user-level password prevents the end-user from responding to Integrity Desktop alerts and interferes with the application of centrally administered updates and changes.
Function User-levelPassword
Installation-levelPassword
Enable override of user-level password
Enable silent installations, uninstalls, or upgrades
Prevent changes to personal security settings
Prevent shutting down Integrity Desktop
Prevent uninstalling Integrity Desktop
Settable from Control Center
Settable from installation command line (“/” delimiter)
Changeable from operational command line (“-” delimiter)

Chapter 4 Installing Integrity Desktop 4.0
Integrity Desktop Manager Guide, Product Version 4.0 29ZLD 1-0220-0400-2003-07-29
Use the set or modify password installation command line switches group to:
Set passwords during installation
Change existing passwords during reinstallation
Enable changes to an existing instance of Integrity Client
The following tables list the four set or modify passwords command line switches.
Set or Modify Password Installation Command Line Switches
/passwset UserPwordNew
Use passwset to define a new user-level password.
A user-level password:
• Must be a minimum of 6 characters and a maximum of 31 characters, and cannot contain spaces
• Can only be set when no Integrity Client database files (“.rdb” file name extension) are present in the computer’s C:\%windir%\Internet Logs folder
The following illustrates the general form of the passwset installation command line switch:
iclientSetup_1101.exe /passwset UserPwordNew
Zone Labs, Inc. recommends that a user-level password not be set during initial installation of Integrity Client. A user-level password prevents the end-user from responding to Integrity Client alerts and interferes with the application of centrally administered updates and changes.
Default Value: No default value.
Set or Modify Password Installation Command Line Switches
/password UserPwordOld
Use the password switch to supply a previously defined user-level password to the Integrity Client installation program. The following illustrates the general form of the password installation command line switch:
iclientSetup_1101.exe /password UserPwordOld
After installation, the password switch can be used in conjunction with passwset (described in the preceding table entry) to update an existing user-level password. In the following, password enables an existing user-level password to be modified:
iclientSetup_1101.exe /password UserPwordOld /passwset UserPwordNew
Default Value: Not applicable during initial installation.

Chapter 4 Installing Integrity Desktop 4.0
Integrity Desktop Manager Guide, Product Version 4.0 30ZLD 1-0220-0400-2003-07-29

Chapter 4 Installing Integrity Desktop 4.0
Integrity Desktop Manager Guide, Product Version 4.0 31ZLD 1-0220-0400-2003-07-29
Set or Modify Password Installation Command Line Switches
/pwinstset InstallPwordNew
Use pwinstset to define a new installation-level password. An installation-level password prevents unauthorized changes to an existing Integrity Client installation.
If an installation-level password was set during installation, and a user attempts to uninstall Integrity Client without specifying the installation-level password, the following dialog box appears.
If the correct installation level password is not supplied, the uninstallation process stops.
• An installation-level password must be a minimum of 6 characters and a maximum of 31 characters, and can not contain spaces.
Installation-level passwords do not affect the user’s ability to change his or her personal security settings.
Installation-level passwords can be:
• Set from the command line only during initial installation
• Changed during reinstallation if the pwinst switch appears on the same installation command line to enable the change
The reset switch, does not clear the installation password.
Integrity Client provides no other methods for changing or updating an installation-level password.
Install Password dialog box.

Chapter 4 Installing Integrity Desktop 4.0
Integrity Desktop Manager Guide, Product Version 4.0 32ZLD 1-0220-0400-2003-07-29
The following table inset illustrates three uses of the pwinstset installation command line switch.
Default Value: No default value.
Set or Modify Password Installation Command Line Switches
/pwinst InstallPwordOld
Use pwinst to supply a previously defined installation-level password to the Integrity Client installation program. The following illustrates two variations of the pwinst installation command line switch:
iclientSetup_1101.exe /pwinst InstallPwordOld [/additional switches…]
iclientSetup_1101.exe /pwinst InstallPwordOld /pwinstset InstallPwordNew
Default Value: Not applicable during initial installation.
Set or Modify Password Installation Command Line Switches (continued)
/pwinstset InstallPwordNew
Initial installation
iclientSetup_1101.exe /pwinstset InstallPwordNew
• In this example pwinstset sets the installation-level password for the first time.
Changing an installation-level password without the reset switch.
iclientSetup_1101.exe /pwinst InstallPwordOld /pwinstset InstallPwordNew
In this example:
• Pwinst specifies the existing installation-level password to enable a change to the installation-level password
• Pwinstset changes the installation-level password
Clearing the user-level password with the reset switch (line break added).
iclientSetup_1101.exe /pwinst InstallPwordOld /pwinstset InstallPwordNe /reset
In this example:
• Pwinst specifies the existing installation-level password to enable specifying a new installation-password
• Pwinstset specifies a new installation-level password
• Reset clears the existing user-level password

Chapter 4 Installing Integrity Desktop 4.0
Integrity Desktop Manager Guide, Product Version 4.0 33ZLD 1-0220-0400-2003-07-29
The Configuration File Installation Command Line SpecifierUse the installation configuration file command line specifier to specify an optional installation configuration file to load when installation is completed. The following table lists the installation configuration file command line switch.
The following table describe the installation configuration file command line specifier.
The Policy File Installation Command Line SwitchThe /policy installation command line switch is used in conjunction with Integrity Server only. Do not use the policy installation command line switch with Integrity Desktop.
If used, the installation configuration file specifier must not be prefaced by a slash (“/”) and must be the last switch on an installation command line.
Configuration File Installation Command Line Switch
"Path to Configuration File"
Use the installation configuration file specifier to specify an installation configuration file to be loaded after installation has completed. The following illustrates the placement of the configuration file command line switch.
iclientSetup_1101.exe [/switches…] "C:\Full\path\to\Configuration.ini"
Do not confuse the installation configuration file specifier with the /policy switch. If used, the installation configuration file specifier:
• Must not be used on the same installation command line as the /policy switch
• Must not be prefaced by a slash mark (“/”)
• Must be the last switch on the command line
The installation configuration file specifier:
• Must be enclosed in quotation marks (")
• Can be any valid Windows filename, but must use the .ini filename extension
• Can use Microsoft Windows Universal Naming Convention (UNC) of \\servername\sharename to refer to an installation configuration file located on a shared network resource
When an installation configuration file is specified on a command line, Integrity Client ignores the Policy_Info section of the specified configuration file.

Chapter 4 Installing Integrity Desktop 4.0
Integrity Desktop Manager Guide, Product Version 4.0 34ZLD 1-0220-0400-2003-07-29
Post-installation Configuration FilesPolicy files are text-based files that specify a complete set of Integrity Desktop operational and security settings.
There are three basic strategies for using a policy file during installation. Ranging from simplest to most complex these strategies are permissive, connective, and standard:
Permissive specifies an installation policy file that contains low (“permissive”) security settings so that a newly installed instance of Integrity Desktop can immediately use any and all network resources and programs it discovers after initial startup.
Connective specifies a policy file that lists the specific network resources and programs that a newly installed instance of Integrity Desktop needs to use to retrieve a corporate security policy from a Web server.
Standard specifies a comprehensive policy file that lists all the network resources and programs an instance of Integrity Desktop will use during normal operation.
Refer to the Integrity Client Reference Guide for details about policy file sections, parameters, and variables.
Optional Installation ResourcesYou can enhance default installation processes with installation wrappers and deployment tools.
Optional Installation WrappersNetwork administrators can use an installation packaging program — such as InstallShield, Wise, or WinZip Self-extractor — to deploy the Integrity Desktop installation program, installation command line, and installation policy file in a single package or “wrapper.”
Optional Installation Deployment ToolsNetwork administrators can use standard program deployment tools, such as Microsoft’s System Management Server (SMS) or IBM Tivoli’s Business Systems Manager to configure and deploy Integrity Desktop to client computers not served by an Integrity Server.
Changing an Existing InstallationAfter Integrity Desktop has been installed, use an operational command line, described in Chapter 5, ”Using Operational Command Lines,” to change user-level or installation passwords, or to reload settings from a policy file.

Integrity Desktop Manager Guide, Product Version 4.0 35ZLD 1-0220-0400-2003-07-29
Chapter 5Using Operational Command Lines
After Integrity Desktop has been installed, use operational command line switches to:
Reset existing user-level or installation-level passwords
Apply an updated license key to an existing instance Integrity Desktop
Cause Integrity Desktop to read new settings from a policy (configuration) file
Types of Command LinesUse operational command lines to change post-installation password and configuration settings of Integrity Desktop.
Types of Command LinesThere are two distinct types of Integrity Client command lines
Operational command lines, described in this chapter
Installation command lines described in “Installation Command Lines,” on page 14”
The following table illustrates the primary differences between the two types of command lines.
This rest of this chapter consists of two sections:
““Operational Command Lines,” in the following section
“Creating and Running Operational Command Lines,” on page 41
OperationalCharacteristic Installation Command Line Operational Command Line
When used During installation After installation
Used with file Integrity Client Installation program iclientSetup_IXen.exe.a
a.Where IX equals ID for Integrity Desktop, IF for Integrity Flex, of IA for Integrity Agent, and en is the language code.
Integrity Client program file iclient.exe.
Parameter delimiter Slash mark (“/”) Dash (“-”)
Configuration file specifier • Does not include a special preced-ing command line switch
• Path and file name specifier must be enclosed in quotation marks (")
• Must be the last switch on an installation command line
• Must be preceded by the -config command line switch
• Path and file name specifier must be enclosed in quotation marks (")
• Must be the last switch on an operational command line

Chapter 5 Using Operational Command Lines
Integrity Desktop Manager Guide, Product Version 4.0 36ZLD 1-0220-0400-2003-07-29
Operational Command LinesUse operational command lines to:
Set or change user-level or installation-level passwords
Force Integrity Client to load an optional configuration or policy file
Overview of Operational Command Lines
The following illustrates the general form of an Integrity Client operational command line (line break added for readability):
iclient.exe [-switch_1 -switch_2 … -switch_n] [-config "C:\full\path\to\configuration.ini"]
The operational command line consists of three primary elements:
iclient.exe is the name of the Integrity Client program.
Optional command line switches, preceded by a dash (“-”), set new installation-level or user-level passwords, modify existing passwords, or specify a license key value.
-config C:\full\path\to\configuration.ini specifies the path to an optional configuration file to be loaded by a previously installed instance of Integrity Client.
The Configuration File Operational Command Line Switch
Special syntactic rules apply to the installation configuration file command line switch (-config "C:\full\path\to\configuration.ini" in the example in the preceding section). If specified in an installation operational command line, the -config switch:
Must be the last switch on the command line, followed by the path name and file name of the configuration file
Must be prefaced by a dash (“-”)
Must enclose the path name and filename in quotation marks (")
Can use Microsoft Windows’ Universal Naming Convention (UNC) of \\servername\sharename to refer to a policy file located on a shared network resource
When the operational configuration file command line switch is used, Integrity Client ignores the Policy_Info section of the specified configuration file.
Operational Command Line SwitchesAll operational command line switches are preceded by a dash (“-”).
Integrity Client recognizes seven operational command line switches (six for Integrity Desktop). The following table groups the operational command line switches into four

Chapter 5 Using Operational Command Lines
Integrity Desktop Manager Guide, Product Version 4.0 37ZLD 1-0220-0400-2003-07-29
functional categories and identifies the page in this chapter where a complete description of the switch can be found.
Set or Change License Key Operational Command Line Switch
Use the general operational command line switch to supply a license key to a previously installed instance of Integrity Client. The following table lists the general operational command line switch.
Command Line Switch Description Page
General Operational Command Line Switch
-lickey LicenseKey Specifies the product license key. 37
Set or Modify Password Operational Line Switches
-passwset UserPwordNew Specifies a new optional user-level password. 38
-password UserPwordOld Specifies an existing user-level password. 39
-pwinstset InstallPwordNew Specifies a new optional installation-level password.l 40
-pwinst InstallPwordOld Specifies an existing installation-level password. 40
Specify an optional operational configuration file
-config "Path to Configuration File" Specifies the path and name of an optional installation configuration file. 41
For networks with Integrity Server only, specify an optional operational policy file
-policy "Path to Policy File" Use policy only in conjunction with Integrity Server, not with Integrity Desktop 41
General Operational Command Line Switches
-lickey LicenseKey
Use lickey to supply a new or updated license key to an existing instance of Integrity Client.
The following illustrates the general form of the lickey operational command line:
iclient.exe -lickey nnnnnnnnnnnnnnnnnnnn
When using lickey, do not:
• Include dash characters (“-”) in the license key specifier
• Enclose the license key in quotation marks (").
The Integrity Client license key can also be entered manually from the Graphical User Interface (GUI) after installation.
Default: No default value.

Chapter 5 Using Operational Command Lines
Integrity Desktop Manager Guide, Product Version 4.0 38ZLD 1-0220-0400-2003-07-29
Set or Modify Passwords Operational Command Line SwitchesUse the general operational command line switches group to set new user-level or installation-level passwords, or to supply existing passwords. The following tables list the four set or modify passwords operational command line switches.
General Operational Command Line Switches
-upgradekey
Use the upgradekey switch to specify an existing upgrade key. The following illustrates the general form of the upgradekey switch:
iclientSetup_1101.exe -upgradekey upgradeKeyOld
• Use the /upgradekey installation command line switch, described on page 8, to specify an existing upgrade key during reconfiguration of an existing instance of Integrity Client.
• Use the /upgradekeyset installation command line switch, described on page 8, to create a new upgrade key during initial installation.
The upgrade key suppresses the dialogs that normally appear during reconfiguration or upgrade. Contrast this with the installation-level password which prevents anyone from uninstalling or upgrading Integrity Client without supplying the password.
Default: No default value.
Set or Modify Password Operational Command Line Switches
-passwset UserPwordNew
Use passwset to set a new user-level password.
A user-level password:
• Must be a minimum of 6 characters and a maximum of 31 characters, and can not contain spaces
• Can only be set when no Integrity Client database files (“.rdb” file name extension) are present in the computer’s C:\%windir%\Internet Logs folder
The following illustrates the general form of the passwset operational command line switch:
iclient_1101.exe /passwset UserPwordNew
Zone Labs, Inc. recommends that a user-level password not be set. A user-level password prevents the end-user from responding to Integrity Client alerts and interferes with the application of centrally administered updates and changes.
Default Value: No default value.

Chapter 5 Using Operational Command Lines
Integrity Desktop Manager Guide, Product Version 4.0 39ZLD 1-0220-0400-2003-07-29
Set or Modify Password Operational Command Line Switches
-password UserPwordOld
Use the password switch to supply a previously defined user-level password to Integrity Client. The following illustrates the general form of the password operational command line switch:
iclient.exe -password UserPwordOld
After installation, the password switch can be used in conjunction with passwset (described in the preceding table entry) to update an existing user-level password. In the following, password enables an existing user-level password to be modified:
iclient.exe -password UserPwordOld -passwset UserPwordNew
Default: None.

Chapter 5 Using Operational Command Lines
Integrity Desktop Manager Guide, Product Version 4.0 40ZLD 1-0220-0400-2003-07-29
Set or Modify Password Operational Command Line Switches
-pwinstset InstallPwordNew
Use pwinstset to set a new installation-level password. An installation-level password prevents unauthorized changes to an existing Integrity Desktop installation.
• An installation-level password must be a minimum of 6 characters and a maximum of 31 characters, and can not contain spaces.
• Installation-level passwords do not affect the user’s ability to change his or her personal security settings.
The following table inset illustrates three uses of the pwinstset operational command line switch.
Installation-level passwords can be:
• Set from the command line only during initial installation
• Changed during reinstallation if the pwinst switch appears on the same installation command line to enable the change
The reset switch, does not clear the installation password.
Integrity Client provides no other methods for changing or updating an installation-level password.
Default Value: No default value.
Set or Modify Password Operational Command Line Switches
-pwinst InstallPwordOld
Use pwinst to supply a previously defined installation-level password to a previously installed instance of Integrity Client. The following illustrates two variations of the pwinst operational command line switch:
iclient.exe -pwinst InstallPwordOld [/additional switches…]
iclient.exe -pwinst InstallPwordOld -pwinstset InstallPwordNew
Default Value: None.
No current installation-level password
iclient.exe -pwinstset InstallPwordNew
• In this example pwinstset sets the installation-level password for the first time.
Changing an existing installation-level password
iclient.exe -pwinst InstallPwordOld -pwinstset InstallPwordNew
In this example:
• Pwinst specifies the existing installation-level password to enable a change to the installation-level password
• Pwinstset changes the installation-level password

Chapter 5 Using Operational Command Lines
Integrity Desktop Manager Guide, Product Version 4.0 41ZLD 1-0220-0400-2003-07-29
The -config Operational Command Line SwitchUse the config operational command line switch to direct a previously installed instance of Integrity Client to load a configuration file. The following table lists the config operational command line switch.
The following table describes the config operational command line switch.
The Policy Operational Command Line SwitchDo not use the -policy operational command line switch in conjunction with Integrity Desktop. The policy operational command line switch can only be used with Integrity Agent or Integrity Flex.
Creating and Running Operational Command LinesThere are three ways to run an Integrity Desktop operational command line:
If used, the config operational command line switch must be prefaced by a dash (“-”) and must be the last switch on an operational command line.
Configuration File Operational Command Line Switch
-config "Path to Configuration File"
Direct a previously installed instance of Integrity Client to load a configuration file. The following illustrates the placement of the configuration file command line switch.
iclient_1101.exe [/switches…] -config "C:\Full\path\to\Configuration.ini"
Do not confuse the -config operational command line switch with the -policy operational command line switch.
If used, the config operational command line switch:
• Must not be used on the same command line with the policy operational command line switch.
• Must be prefaced with a dash (“-”)
• Must be the last switch on the command line
The path and file name specifier used with the config switch:
• Must be enclosed in quotation marks (")
• Can be any valid Windows filename, but must use the .ini filename extension
• Can use Microsoft Windows Universal Naming Convention (UNC) of \\servername\sharename to refer to an installation configuration file located on a shared network resource
After using -config, the Control Center does not display certain new settings until after Integrity Desktop has been restarted.
When config is specified on a command line, Integrity Client ignores the Policy_Info section of the specified configuration file.

Chapter 5 Using Operational Command Lines
Integrity Desktop Manager Guide, Product Version 4.0 42ZLD 1-0220-0400-2003-07-29
Type the command into the Windows Start menu’s Run dialog box.
Type the command line into the Start in text entry area of a Windows shortcut (“.lnk” file name extension).
Type the command line into a Windows batch file (“.bat” file name extension).
Creating an Operational Command Line Batch FileThe following procedure illustrates how to type an operational command line into a Windows batch file.
To type a command line into a Windows batch file:
1 In the C:\Program Files\Zone Labs\Integrity Client folder, right-click in an open area then choose New | Text Document from the shortcut menu.
Windows creates an empty text document named New Text Document.txt.
2 Rename the new text document to FileName.bat. The Integrity Desktop program accepts any valid Windows file name, but the .bat file name extension must be used.
3 Right-click on the newly created batch file then choose Edit from the pop-up menu.
Windows opens the batch file into the computer’s default text editing program.
4 In the text editing window, type the following:
.\iclient.exe [-PwordInstallOld] [-PwordUserOld] -config ".\FileName.ini"
Include the -PwordInstallOld switch only if an installation-level password was previously specified for this instance of the Integrity Desktop program.
Include the -PwordUserOld switch only if a user-level password was previously specified for this instance of the Integrity Desktop program.
FileName.ini is the name of an Integrity Desktop policy file. Enclose the file name in quotation marks (").
5 Save the changes and exit the text editing program.
Use the following procedure to run the completed batch file.
Running an Operational Command Line Batch FileComplete the following procedure to run a batch file containing an Integrity Desktop operational command line.
To run a command line batch file:
1 If it is running, shut down the Integrity Desktop program. In the Windows System Tray, right-click on the Integrity icon then choose Shutdown Zone Labs Integrity…
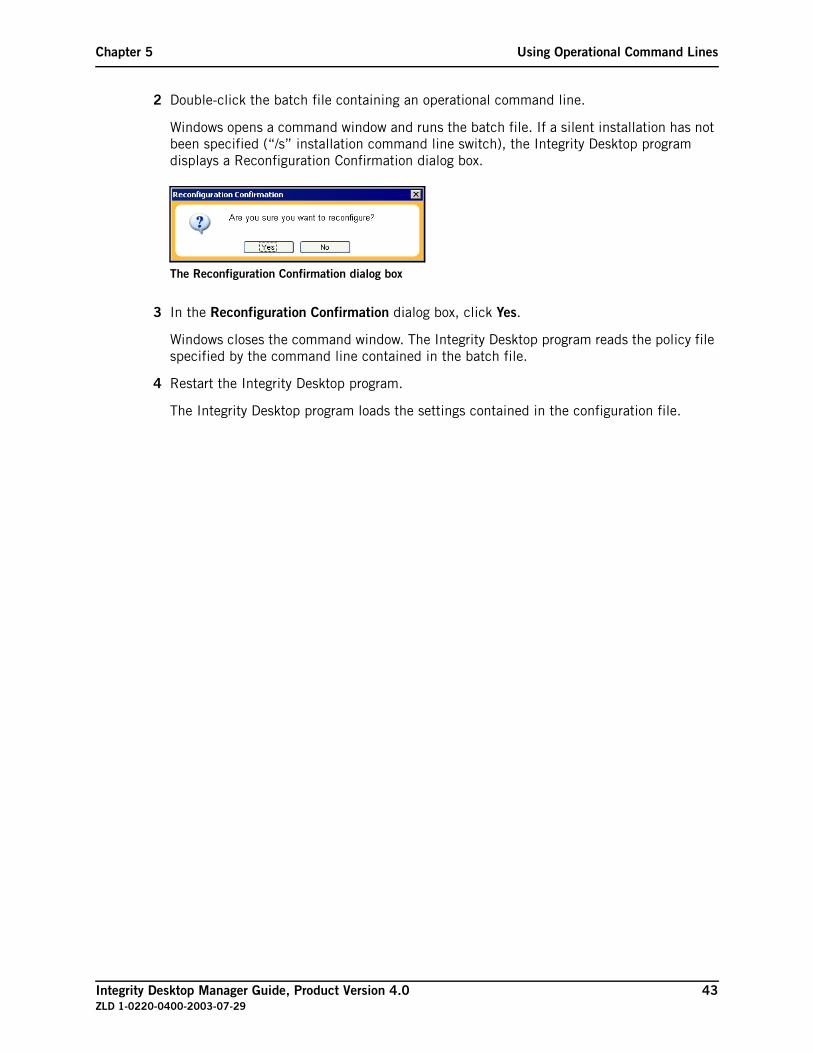
Chapter 5 Using Operational Command Lines
Integrity Desktop Manager Guide, Product Version 4.0 43ZLD 1-0220-0400-2003-07-29
2 Double-click the batch file containing an operational command line.
Windows opens a command window and runs the batch file. If a silent installation has not been specified (“/s” installation command line switch), the Integrity Desktop program displays a Reconfiguration Confirmation dialog box.
3 In the Reconfiguration Confirmation dialog box, click Yes.
Windows closes the command window. The Integrity Desktop program reads the policy file specified by the command line contained in the batch file.
4 Restart the Integrity Desktop program.
The Integrity Desktop program loads the settings contained in the configuration file.
The Reconfiguration Confirmation dialog box

Integrity Desktop Manager Guide, Product Version 4.0 44ZLD 1-0220-0400-2003-07-29
Chapter 6Saving Configuration Files
Integrity Desktop provides a way to save current security and configuration settings into a text-based file. The file can then be used to apply the settings to other instances of Integrity Desktop either during or after installation.
Saving Integrity Desktop SettingsComplete the following procedure to save Integrity Desktop’s settings into a text-based file named policy.txt.
To view and save Integrity Desktop Settings:1 In the Windows System Tray, double-click on the Integrity icon (shown at left) to open the
Integrity Desktop program’s Control Center.
2 In the Integrity Desktop Control Center, click to open the Overview panel then click the Preferences tab.
The Overview panel’s Preferences tab appears.
Integrity Desktop does not export all elements or attributes to an XML Policy file.
The Overview panel’s Preferences Tab
For Integrity Desktop, use the Backup and Restore feature to save settings in an XML Policy file. (For Integrity Flex or Integrity Agent, use the Policies tab).

Chapter 6 Saving Configuration Files
Integrity Desktop Manager Guide, Product Version 4.0 45ZLD 1-0220-0400-2003-07-29
3 In the Preferences tab, click Backup.
Integrity Desktop saves current configuration and security settings in a Zone Labs XML Policy file.

Integrity Desktop Manager Guide, Product Version 4.0 46ZLD 1-0220-0400-2003-07-29
Chapter 7Uninstalling Integrity Desktop
This chapter describes how to uninstall Integrity Desktop 4.0.
Before You BeginTo complete the procedure in this chapter, you will need a copy of the Integrity Desktop uninstallation program zauninst.exe.
Zauninst.exe is normally placed into the default installation folder C:\Program Files\Zone Labs\Integrity Client by the installation program. If, however, the install_log installation command line switch, described on page 19, was used to specify a non-default pathname and folder for the installation log file, a separate copy of zauninst.exe must be obtained and copied to the installation folder in order to uninstall Integrity Desktop.
Performing Prompted UninstallationComplete the following single-step procedure to have the Integrity Desktop uninstallation program prompt you during uninstallation.
To perform a default uninstallation of Integrity Desktop:Double-click the Integrity Desktop uninstallation program zauninst.exe.
The uninstallation program starts. The uninstallation program prompts the user to confirm the uninstallation.
Default UninstallationRun in its default state, the Integrity Desktop installation program performs a “clean” uninstallation: database files and registry entries are automatically removed from the computer.
Zauinst.exeIcon
The Select uninstall type dialog box

Chapter 7 Uninstalling Integrity Desktop
Integrity Desktop Manager Guide, Product Version 4.0 47ZLD 1-0220-0400-2003-07-29
Performing a Command Line UninstallationVersion 3.5 of Integrity Client automatically performs a clean uninstallation. Because of this,
Integrity Client version 3.5 no longer supports the /clean command line switch.
Upgrading to Integrity DesktopZone Lab designed its Integrity family of programs for easy upgrade. However, some older Zone Labs products, particularly products that were not designed for use in an enterprise setting, have special upgrade requirements. For more information about specific upgrade issues see Chapter 3, “Upgrading to Integrity Desktop 4.0.”

Integrity Desktop Manager Guide, Product Version 4.0 48ZLD 1-0220-0400-2003-07-29
Chapter 8VPN Setup
Microsoft’s Virtual Private Network (VPN) allows portable computers, such as laptop computers, to connect to a corporate network via a dial-up modem connection.
Unless properly configured, Integrity Desktop, like all Integrity products, will attempt to block the use of unrecognized programs or network entities necessary to create and use an VPN connection.
This chapter describes how to configure Integrity Desktop to work with most Windows VPN clients.
Before You BeginIntegrity Desktop is compatible with the following versions of Microsoft Windows and VPN protocols.
Supported Versions of Microsoft WindowsThe following table lists the versions of Microsoft Windows operating systems that are compatible with Integrity Desktop:
Supported VPN ProtocolsThe following table lists the VPN-related networking protocols that are recognized by Integrity Desktop.
Windows Operating System Revision Levels
Windows 98 All
Windows ME All
Windows NT 4.0 Service Packs (SP) 3, 4, 5, or 6
Windows 2000 Professional SPs 1, or 2
Windows XP All
Networking Protocol Explanation and Comments
AH Authentication Header protocol.
DES and 3DES 56-bit and 168-bit Data Encryption Standards.
ESP Encapsulating Security Payload protocol.
GRE Generic Routing Encapsulation protocol.

Chapter 8 VPN Setup
Integrity Desktop Manager Guide, Product Version 4.0 49ZLD 1-0220-0400-2003-07-29
Overview of VPN SetupConfiguring Integrity Desktop to operate with a VPN consists of three major tasks:
“Identifying Trusted Network Resources,” in the following section
“Granting Programs Access,” on page 53
“Enabling VPN Protocols,” on page 56
Each of these sections contain the steps necessary to complete each of these tasks.
Identifying Trusted Network ResourcesThe first major task required to enable Integrity Desktop to operate with a VPN client is to add to the Trusted Zone all the network resources used by the VPN client.
Adding network resources to the Trusted Zone allows Integrity Desktop to automatically use these resources without blocking traffic or generating alerts.
H.323 RAS H.323 Registration-Admission-Status.
H.323. is an umbrella recommendation from the International Telecommunications Union (ITU) for multimedia communications over Local Area Networks (LANs).
IKE Internet Key Exchange protocol.
IPSec IP Security Protocol.
Only the Windows 2000 VPN client automatically includes IPSec support.
L2F, L2TP Layer 2 Forwarding protocol, Layer 2 Tunneling Protocol.
L2TP is a more secure variation of PPTP.
LDAP Lightweight Directory Access Protocol.
PPTP Point-to-Point Tunneling Protocol.
RADIUS Remote Authentication Dial-In User Service.
SKIP Simple Key Management for Internet Protocol.
XAUTH Extended Authentication.
Networking Protocol Explanation and Comments (continued)

Chapter 8 VPN Setup
Integrity Desktop Manager Guide, Product Version 4.0 50ZLD 1-0220-0400-2003-07-29
Types of Network ResourcesFor a given VPN configuration, there are two categories of network resources: required and optional. The following table lists the two categories of resource and describes how to define the resources to Integrity Client.
Type of Network Resource Type of Integrity Desktop Network Element
Required VPN resources.
VPN network equipment, such as:
• VPN Concentrators or Gateways
• Corporate LANs that will be accessed by the VPN client computer
• Corporate Wide-area network (WAN) subnets that will be accessed by the VPN client computer
Use the Firewall panel’s Zones tab to identify the following types of network resources to Integrity Client:
• IP Address
• Host / site
Network resources accessed by the VPN client computer, such as:
• Computers
• LANs, and WANs
Use the Firewall panel’s Zones tab to identify the following types of network resources to Integrity Client:
• IP Address or IP Range
• Host / Site
• Subnet
• Programs or services required to provide VPN connectivity.
In the Program Control panel’s Programs tab:
• Programs used to provide VPN connectivity, including Windows services.
VPN Resources that vary by installation
Originating network resources, such as:
• A home network
• Local client computer’s NIC loopback addressa
Use the Firewall panel’s Zones tab to identify the following types of network resources to Integrity Client:
• IP Address or IP Range
• Subnet

Chapter 8 VPN Setup
Integrity Desktop Manager Guide, Product Version 4.0 51ZLD 1-0220-0400-2003-07-29
Some examples fall into more than one category depending on how they are used in a given network.
Undesired Blocking of Remote Networks
Integrity Desktop cannot identify networks on the remote side of a VPN connection. Traffic from these networks will be blocked if not explicitly added to the Trusted Zone.
Complete the following procedure to add network resources to the Trusted Zone.
DNS Servers Use the Firewall panel’s Zones tab to identify the following types of network resources to Integrity Client:
• IP Address
• Host / site
Dynamic Host Control Protocol (DHCP) Servers Use the Firewall panel’s Zones tab to identify the following types of network resources to Integrity Client:
• IP Address
• Host / site
Security servers such as:
• Remote Authentication Dial-In User Service (RADIUS)
• Access Control Entry (ACE)
• Terminal Access Controller Access Control System (TACACS+)
Use the Firewall panel’s Zones tab to identify the following types of network resources to Integrity Client:
• IP Address
• Host / site
a.Do not run proxy software on a client computer that has a local host loopback IP address of 127.0.0.1.
Type of Network Resource Type of Integrity Desktop Network Element

Chapter 8 VPN Setup
Integrity Desktop Manager Guide, Product Version 4.0 52ZLD 1-0220-0400-2003-07-29
To add a network resource to the Trusted Zone:
1 Open the Firewall panel’s Zones tab. In the Integrity Desktop Control Center, click Firewall, then click the Zones tab.
The Firewall panel’s Zones tab appears.
2 In the Firewall panel’s Zones tab:
a In the list of networks right-click on an entry type.
A shortcut menu appears.
b In the shortcut menu choose Add, then choose one of the four types of network resource listed under “Types of Network Resources,” on page 50.
Host/Site
IP Address
IP Range
The Firewall panel’s Zones tab

Chapter 8 VPN Setup
Integrity Desktop Manager Guide, Product Version 4.0 53ZLD 1-0220-0400-2003-07-29
Subnet
The dialog box for the type of network resource being added appears. The Add Host/Site dialog box is shown here.
3 In the Add dialog box:
a In the Zone list, choose Trusted.
b In the Description text entry area, type a free-form text description of the new resource.
c Type other IP address or host information as required.
4 Click OK to save your changes and return to the Firewall panel’s Zones tab.
Integrity Desktop adds the new network resource to the list of network resources.
5 Perform one of the following:
Repeat the procedure to add other network resource types to the Trusted Zone
— or —
In the Firewall panel’s Zones tab, click Apply to add the new network resources to the Integrity Desktop database.
6 Continue to the next section.
Granting Programs AccessThe second major task is to grant access to VPN client programs required for network access. For example, for VPNs that use Cisco VPN concentrators, Cisco provides the following three programs for use with its Series 3000 gateways:
cvpnd.exe
ipsecdialer.exe
The Add Host/Site dialog box is one of four network resource dialog
Assign the network resources required by the VPN client to the Trusted Zone.

Chapter 8 VPN Setup
Integrity Desktop Manager Guide, Product Version 4.0 54ZLD 1-0220-0400-2003-07-29
xauth.exe
Integrity Desktop provides two ways to grant network to a program. Both of these are described in the following sections:
““Granting Program Access in Response to an Alert Box,” in the following section
“Granting Program Access with the Control Center,” on page 54
Granting Program Access in Response to an Alert BoxWhen a program requests network access for the first time, or if a program was not previously been granted access, Integrity Desktop displays a New Program alert box.
When a New Program Alert box appears, perform the following steps to allow a program to access the network.
To respond to a New Program Alert box:
1 If you want Integrity Desktop to automatically grant this program network access the next time it requests it, select the Remember this answer the next time I use this program check box.
2 Click Yes to grant the program access.
Integrity Desktop adds the program to the list in the Program Control panel’s Programs tab.
Granting Program Access with the Control CenterIt is also possible to change the access permission of a program that is already recognized by Integrity Desktop.
Hierarchy of Program Access Permissions
Integrity Desktop uses the following rules to apply access and server permissions to programs:
A New Program alert box
Click Yes to grant the program access. Check Remember this program… to have Integrity Desktop automatically grant this program network access the next time it requests it

Chapter 8 VPN Setup
Integrity Desktop Manager Guide, Product Version 4.0 55ZLD 1-0220-0400-2003-07-29
A program cannot access the Trusted Zone without a corresponding access level to the Internet Zone.
A program cannot have server permissions without corresponding access rights.
As permission choices are made, Integrity Desktop 4.0 automatically applies these rules to the other permissions categories.
Complete the following procedure to use the Control Center to grant a program access.
To add trusted programs:
1 In the Integrity Desktop Control Center, click Program Control, then click the Programs tab.
The Program Control panel’s Programs tab appears.
2 On the Programs tab, click Add.
3 To assign access permission to the new program, in the Programs tab:
a In the Access column, click one of the icons under Trusted.
A shortcut menu appears
b In the menu choose Allow.
Integrity Desktop places a green check mark under Trusted in the Server column.
4 Perform one of the following:
The Program panel’s Programs tab
Use the shortcut menu to allow a program to act as a server.

Chapter 8 VPN Setup
Integrity Desktop Manager Guide, Product Version 4.0 56ZLD 1-0220-0400-2003-07-29
Repeat the procedure to grant access to additional trusted programs
— or —
Continue to the next procedure, “”Enabling VPN Protocols”
Enabling VPN ProtocolsIn its default configuration. Integrity Desktop allows specific VPN protocols through the firewall at high security. Use the following procedure to verify this setting.
To enable specific VPN protocols through the Integrity Desktop firewall at high security:
1 Open the Advanced Settings dialog box:
a In the Firewall panel, click the Main tab.
In a few cases specifying BlockFragments equal to Yes may interfere with the operation some of slow network connections, such as dial-up VPN connections.

Chapter 8 VPN Setup
Integrity Desktop Manager Guide, Product Version 4.0 57ZLD 1-0220-0400-2003-07-29
b In the Firewall panel’s Main tab, in the Internet Zone Security area click the Advanced button.
The Advanced Settings dialog box appears.
2 In the Advanced Settings dialog box, in the General Settings area, click to select the Allow VPN protocols at high security check box.
3 Click OK to save the changes and return to the Program panel’s Programs tab.
This completes Integrity Desktop VPN setup.
Using Troubleshooting AidsThe following sections describe three Integrity Desktop settings that can help when troubleshooting a newly installed VPN client:
“Enabling Alert Logging,” in the following section
“Automatically Assigning New Network Resources to the Trusted Zone,” on page 60
“Enabling Program Learning Mode,” on page 60
The steps necessary to complete each of these tasks are contained in the following sections.
The Firewall panel’s Advanced Settings dialog box
Choosing ALLOW VPN Protocols at high security allows the AH, GRE, ESP, and SKIP protocols to transit the network at high security.

Chapter 8 VPN Setup
Integrity Desktop Manager Guide, Product Version 4.0 58ZLD 1-0220-0400-2003-07-29
Enabling Alert LoggingIf problems occur, the Integrity Desktop alert log can provide useful troubleshooting information. Perform the following procedure enable alert logging.
To enable Integrity Desktop alert logging:
1 In the Integrity Desktop Control Center, click Alerts & Logs, then click the Main tab.
The Alerts & Logs panel’s Main tab appears.
2 In the Main tab, in the Event Logging area choose On.
Integrity Desktop enables alert logging.
The Alerts & Logs panel’s Main tab

Chapter 8 VPN Setup
Integrity Desktop Manager Guide, Product Version 4.0 59ZLD 1-0220-0400-2003-07-29
3 In the Main tab, click Advanced.
The Advanced Alerts and Log Settings dialog box, Alert Event tab, appears.
4 In the Advanced Alerts and Log Settings dialog box:
a Click Check All to enable alerts for all blocked network traffic.
b Click OK to return to the Alerts & Logs panel’s Main tab.
Viewing the Alert Log
Perform the following one-step procedure to view the Integrity Desktop alert log.
To view the Integrity Desktop alert log:¨ In the Alerts & Logs tab, click the Log Viewer tab.
The Integrity Desktop alert log appears.
The Advanced Alerts and Log Settings dialog box, Alert Events tab

Chapter 8 VPN Setup
Integrity Desktop Manager Guide, Product Version 4.0 60ZLD 1-0220-0400-2003-07-29
Automatically Assigning New Network Resources to the Trusted Zone
During troubleshooting, direct Integrity Desktop to automatically assign newly detected network resources to the Trusted Zone.
To assign newly detected network resources to the Trusted Zone:
1 If it is not already open from the preceding procedure, open the Advanced Settings dialog box:
a In the Firewall panel, click the Main tab
b In the Firewall panel’s Main tab click the Advanced button.
The Advanced settings dialog box appears. (Shown on page 57).
2 In the Advanced Settings dialog box, in the Network Settings area, click to select the Include networks in the Trusted Zone upon detection option button.
3 Click OK to save your changes and close the Advanced Settings dialog box.
Integrity Desktop applies the changes to the database.
Enabling Program Learning ModePlace Integrity Desktop in learning mode to allow new programs to be added automatically to the list of recognized programs.
c
The following procedure applies low security settings to aid in troubleshooting. When troubleshooting has been completed, be sure to return the security settings to the levels necessary to protect the VPN client computer.

Chapter 8 VPN Setup
Integrity Desktop Manager Guide, Product Version 4.0 61ZLD 1-0220-0400-2003-07-29
To enable learning mode:
1 In the Integrity Desktop Control Center, click Program Control, then click the Main tab.
The Program Control panel’s Main tab appears.
2 In the Main tab, in the Program Control area drag the program control slider to Low.
Integrity Desktop applies learning mode.
Be sure to return the Program Control slider to a more secure setting after completing troubleshooting of the VPN connection.
The Program panel’s Main tab

Integrity Desktop Manager Guide, Product Version 4.0 62ZLD 1-0220-0400-2003-07-29
Chapter 9Automatically Downloading Configuration Files
This chapter describes how to use the autoconfig section of a configuration file to automati-cally download (“pull”) updated security policies from a Web server at specified intervals.
What’s New in this Release?Beginning with product version 4.0, Integrity Desktop exports (writes) and imports (reads) configuration and security settings in a new Zone Labs XML Policy format (.xml filename extension). Because of this, this chapter now contains a description of the new Zone Labs XML Policy’s autoconfig element and attributes.
To ensure compatibility with previous releases, Integrity Desktop 4.0 retains the ability to read, but not write, older style configuration files (.ini filename extension). Because of this, this chapter also retains its description of the older style configuration file’s autoconfig section and parameters.
Downloading Updated Configuration FilesIn networks that are not equipped with Integrity Server, Integrity Desktop supports two ways of updating a client computer’s configuration:
Manually download a configuration of XML Policy file to a computer, then use command line parameters to force Integrity Desktop to read the file.
Direct Integrity Desktop to periodically download (“pull”) a configuration of XML Policy file from a network server and read the file.
Both of these methods differ from the deployment (“push”) of enterprise security policies used in networks equipped with Integrity Server. See the Zone Labs Administrator Guide for more information about enterprise security policy configuration and deployment.
Before You BeginAutomatic downloading of configuration files requires the following two components:
A properly configured Web server
An XML Policy file or older style configuration file
Each of these components are described in the following sections.

Chapter 9 Automatically Downloading Configuration Files
Integrity Desktop Manager Guide, Product Version 4.0 63ZLD 1-0220-0400-2003-07-29
Web Server RequirementsUnlike automatic alert log uploading, which requires Microsoft IIS, automatic downloading of configuration files can be performed from any standards-based Web server.
Configuration or XML Policy File RequirementsIn an old style configuration file, the autoconfig configuration file section specifies from where and how often to download configuration files that are stored on a web server.
In the new Zone Labs XML Policy file, the autoconfig element’s attributes specify from where and how often to download configuration files that are stored on a web server.
Procedures for configuration both types of file are contained in the following section.
Configuring the autoconfig Element or SectionBeginning with product version 4.0, Integrity Desktop exports (writes) and imports (reads) configuration and security settings in a new Zone Labs XML Policy format (.xml filename extension). To ensure compatibility with previous releases, Integrity Desktop 4.0 also retains the ability to read, but not write, older style configuration files (.ini filename extension).
This section contains two procedures:
“Editing the autoconfig Element in an XML Policy File,” in the following section
“Editing autoconfig Configuration File Parameters,” on page 68.
Both procedures provide a step-by-step description of the steps necessary to specify auto-matic configuration file download settings in an XML Policy file or configuration file.
Editing the autoconfig Element in an XML Policy FileThe Zone Labs XML Policy contains a complete set of security and environment elements and attributes. In networks that do not have Zone Labs Integrity Server, use the autoconfig element and its attributes contained in an XML Policy file to schedule periodic downloads of updated security policies.
In the following example, the autoconfig section of a configuration file specifies the download of a configuration file named policy.xml. Integrity Desktop downloads the file to, and reads the downloaded file from, the Integrity Desktop installation folder (the folder containing the program file iclient.exe).
The following section describes each of the autoconfig element’s attributes in detail.
/ZoneLabsSettings/configuration <configuration … />
<autoconfig autoCheck="true" source="machine.company.com/pathName/policy.xml" frequency="boot" timeout="60" retries="3" retryInterval="3" lastDownloadTime="invalid date"/> …

Chapter 9 Automatically Downloading Configuration Files
Integrity Desktop Manager Guide, Product Version 4.0 64ZLD 1-0220-0400-2003-07-29
List of autoconfig Configuration File Parameters
The following table lists the autoconfig element’s attributes.
/ZoneLabsSettings/configuration/autoconfig
Attribute Type, Values and Description (Sheet 1 of 2)
autoCheck
Enable periodic downloading of configuration files.
Type: boolean
Recognized values: true, false
Specify the autoCheck attribute equal to true to enable the automatic, periodic downloading of configuration files from a Web server.
The autocheck element must be true to enable the other autoconfig attributes described in this table.
frequency
Specify how often to download an XML Policy or configuration file.
Type: integer
Recognized values: boot, daily, weekly, integer number of minutes.
Use the frequency attribute to specify how often to seek a new configuration file at the address specified by the source parameter, described later in this table.
• Any integer value is interpreted as the number of minutes.
• Integrity Client can not check for an updated configuration file more frequently than the end-point computer is re-booted.
The autocheck element, described earlier in this table, must be true to enable the frequency attribute.
lastDownloadTime
Read-only time of last successful download.
Type: Read-only formatted string.
Displayed value: String formatted as yyyy-mm-dd_hh:mm:ss
Integrity Desktop automatically updates the value of the lastDownloadtime attribute at the time a successful download has completed.
The autocheck element, described earlier in this table, must be true to enable the updating of the lastDownloadtime attribute.
retries
Specify how many times to attempt a download.
Type: integer
Recognized values: Integer number of retry attempts.
Use the retries attribute to specify how many times Integrity Desktop will attempt to complete an unsuccessful download.
• The retries attribute operates in conjunction with the retryInterval attribute described in the following attribute table entry, and the timeout attribute, described later in this table.
• The autocheck element, described earlier in this table, must be true to enable the retries attribute.

Chapter 9 Automatically Downloading Configuration Files
Integrity Desktop Manager Guide, Product Version 4.0 65ZLD 1-0220-0400-2003-07-29
See also the XML Policy Reference for a complete description of the Zone Labs XML Policy.
Editing autoconfig XML Policy Attributes
Complete the following procedure to type autoconfig attributes into an XML Policy file.
XML and Case-sensitivity
Unlike older style configuration files, XML is case sensitive: autoconfig (the correct XML Policy capitalization) is not the same as AutoConfig, autoConfig, or any other variation of upper and lower case characters. Be sure to capitalize XML elements and attributes as written in the following procedure.
retryInterval
Specify how long to wait between unsuccessful download attempts.
Type: integer
Recognized values: Integer number of seconds.
Use the retryIntervalo attribute to specify how many seconds to wait between unsuccessful download attempts.
• The retryInterval attribute operates in conjunction with the retries attribute described in the preceding table entry, and the timeout attribute described later in this table.
• The autocheck element, described earlier in this table, must be true to enable the retryInterval attribute.
source
Specify the source of configuration or XML Policy files.
Type: Formatted string
Recognized values: Valid URL or IP address of a Web server containing configuration of XML Policy files.
Use the source attribute to specify the location of the Web server containing configuration or XML Policy files.
The autocheck element, described earlier in this table, must be true to enable the source attribute.
timeout
Specify how long to wait before abandoning an unsuccessful download attempt.
Type: integer
Recognized values: Integer number of seconds.
Use the retries attribute to specify how many seconds Integrity Desktop will wait before abandoning a download attempt.
• The timeout attribute operates in conjunction with the retries attribute, and the retryInterval attribute, both described earlier in this table.
• The autocheck element, described earlier in this table, must be true to enable the timeout attribute.
Level 4 Child Elements
None The autoconfig element contains no child elements.
/ZoneLabsSettings/configuration/autoconfig (continued)
Attribute Type, Values and Description (Sheet 2 of 2)

Chapter 9 Automatically Downloading Configuration Files
Integrity Desktop Manager Guide, Product Version 4.0 66ZLD 1-0220-0400-2003-07-29
To type autoconfig parameters into an XML Policy file:
1 Open the XML Policy file into a text-editing program. The default text-editing program for Windows is Notepad although you may prefer to use an editor designed to work with XML elements and attributes.
2 In the XML Policy file, locate the running ruleset’s autoconfig element:
a Search for or browse to the ruleset that contains a name="runningrulset” attribute as shown in the following example:
<ruleset name="runningruleset" start="afterstartup" stop="onshutdown">Only the running ruleset’s autoconfig element will properly configure automatic configuration file download.
b From the running ruleset element, search for or browse forward (downward) in the XML Policy file for the autoconfig child element. The following illustrates the general form of the autoconfig element (line break added:
<autoconfig autoCheck="true" source="machine.company.com" frequency="boot" timeout="60" retries="3" retryInterval="3"/>
3 In the XML Policy file, add or modify the autoconfig element’s attributes, including the quotation marks:
a Type autoCheck="true"
b Type source="http://Web_Srver_Address/Configurations/FileName.xml"
c Type frequency="[boot, daily | weekly | Integer number of minutes]"
d Optionally, type values for timeout, retries, and retryInterval.
4 Save the changes and exit the text-editing program.
After adding the autoconfig parameters to the client computer’s XML Policy file, use an operational command line to direct Integrity Desktop on the client computer to read the file.
Editing the autoconfig Section in a Configuration FileA security policy contains a complete set of security and environment variables. In networks that do not have Zone Labs Integrity Server, use the autoconfig section of a configuration file to schedule periodic downloads of updated security policies.
In the following example, the autoconfig section of a configuration file specifies the download of a configuration file named policy.ini. Integrity Desktop downloads the file to, and reads the downloaded file from, the Integrity Desktop installation folder (the folder containing the program file iclient.exe).
[autoconfig] Autocheck={Yes | No} Source=http://ServerAddress/Configurations/Configuration.ini Frequency={Boot | Daily | Weekly | Integer Number of Minutes} Timeout=IntegerNumberOfSeconds Retries=IntegerValue RetryInterval=IntegerNumberOfSeconds

Chapter 9 Automatically Downloading Configuration Files
Integrity Desktop Manager Guide, Product Version 4.0 67ZLD 1-0220-0400-2003-07-29
The following section describes each of the autoconfig section’s parameters in detail.
List of autoconfig Configuration File Parameters
The following table lists the six parameters recognized by the autoconfig section of a configuration file.
autoconfigParameter Description
Autocheck Use Autocheck to enable or disable automatic downloading of configuration files from a Web server.
• Type Autocheck=Yes to enable automatic downloading
• Type Autocheck=No to disable automatic downloading
Specify AutoCheck equal to Yes to enable the remaining autoconfig parameters.
Frequency Use Frequency to specify the how often Integrity Desktop checks for updated config.ini files.
The following example command line illustrates the general form of the Frequency parameter:
Frequency=[Boot, Daily | Weekly | IntegerNumberOfMinutes]
• Boot attempts to download a configuration file each time Integrity Desktop (as distinguished from the computer) is started
• An integer value specifies a number of minutes. Interval must be greater than 60 minutes.
Retries Use Retries to specify the number of times Integrity Desktop will attempt to load an configuration file after an original download attempt fails.
In the following example, Integrity Desktop tries 3 times to download a file after an initial failure
Retries=3
If, after the third attempt, Integrity Desktop is not successful, the next download attempt will occur as determined by the value of Frequency, above.

Chapter 9 Automatically Downloading Configuration Files
Integrity Desktop Manager Guide, Product Version 4.0 68ZLD 1-0220-0400-2003-07-29
Editing autoconfig Configuration File Parameters
Complete the following procedure to type autoconfig parameters into a configuration file.
To type autoconfig parameters into a configuration file:
1 Open the configuration file into a text-editing program. The default text-editing program for Windows is Notepad.
2 Perform one of the following:
In the text editing window, locate the autoconfig section of the configuration file
— or —
RetryInterval Use RetryInterval to specify the number of seconds Integrity Desktop waits after a failed download before trying again.
In the following example, Integrity Desktop waits 600 seconds (10 minutes) after an initial failure before making another attempt to download the file.
RetryInterval=600
Source Use Source to specify the URL of the remote configuration file. Both standard HTTP and HTTPS (Secure Socket Layer) transfers are supported.
The following two examples illustrate the Source parameter:
source=http://111.111.111.111/Configuration/config.ini
source=https://MyServer.com/Configuration/config.ini
In these examples, Integrity Desktop downloads a configuration file from IP address 111.111.111.111 or from the server named MyServer.
• After Integrity Desktop uploads an updated configuration file, it enforces the security configuration defined by that file immediately.
• When https is used, the web server may require user authentication such as a password, depending on the type of authentication method used on the server.
Timeout Use Timeout to specify the number of seconds to wait before abandoning a scheduled download.
In the following example, Integrity Desktop waits 60 seconds for a scheduled file download to commence or resume.
Timeout=60
If a scheduled download can not be completed within the timeout period, then Integrity Desktop:
• Abandons the download
• Waits for the value of the RetryInterval parameter to expire
• Attempts to complete an interrupted download as many times as specified by the Retries parameter
• Abandons the download until the next interval specified by the Frequency parameter.
autoconfigParameter Description (continued)
Chapter 9 Automatically Downloading Configuration Files
Integrity Desktop Manager Guide, Product Version 4.0 69ZLD 1-0220-0400-2003-07-29
If the configuration file does not contain an autoconfig section, type [autoconfig]
3 In the configuration file, below the autoconfig section heading:
a Type AutoCheck=Yes
b Type Source=http://Web_Server_Address/Configurations/FileName.ini
c Specify a value for Frequency.
d Specify a value for Timeout, Retries, and Retry Interval.
4 Save the changes and exit the text-editing program.
After adding the autoconfig parameters to the client computer’s configuration file, use an operational command line to direct Integrity Desktop on the client computer to read the file.
Updating with Zone Labs Integrity ServerAs stated earlier, this chapter describes how to use the autoconfig section of a configuration file to periodically download (“pull”) a security configuration from a Web server to Integrity Desktop.
If your local network is equipped with Zone Labs Integrity Server, use Policy Studio to config-ure and deploy (“push”) enterprise policies to either Integrity Agent or Integrity Flex. Refer to the Integrity Server Administrator Guide for detailed information about configuring and deploying enterprise security policies to these other types of Integrity Client.

Integrity Desktop Manager Guide, Product Version 4.0 70ZLD 1-0220-0400-2003-07-29
Chapter 10Automatically Uploading Alert Logs
As it protects a computer, Integrity Desktop stores alerts in encrypted database files (.rdb file name extension).
The AlertLog section of a policy file can be used to cause Integrity Desktop to periodically archive alerts in text-based files. The autouploadlog section of a configuration or XML Policy file can then be used to periodically upload the archived alert log data to a Windows IIS server.
This chapter describes how to set up Integrity Desktop to periodically upload alert logs to a Windows IIS server.
What’s New in this Release?Beginning with product version 4.0, Integrity Desktop exports (writes) and imports (reads) configuration and security settings in a new Zone Labs XML Policy format (.xml filename extension). Because of this, this chapter now contains a description of the new Zone Labs XML Policy’s autoconfig element and attributes.
To ensure compatibility with previous releases, Integrity Desktop 4.0 retains the ability to read, but not write, older style configuration files (.ini filename extension). Because of this, this chapter also retains its description of the older style configuration file’s autouploadlog section and parameters.
Uploading Archived Alert LogsIn networks that are not equipped with Integrity Server, Integrity Desktop provides a mechanism for uploading archived alert logs. This method of uploading archived alert logs differs from the automatic collection of alert data from Integrity Flex or Integrity Agent performed in networks equipped with Integrity Server.
See the Zone Labs Administrator Guide for more information about Integrity Server and enterprise alert log collection.
Before You BeginAutomatic uploading of Integrity Desktop alert logs requires two software components:
Installation and configuration of Microsoft Internet Information Services (IIS) on the server that will receive the uploaded alert logs.
A copy of Zone Labs, Inc.’s Active Server Page file IDLogUPload.asp.
Both of these required components are described below.

Chapter 10 Automatically Uploading Alert Logs
Integrity Desktop Manager Guide, Product Version 4.0 71ZLD 1-0220-0400-2003-07-29
Microsoft IISThe first component required for automatic alert log uploading only is Microsoft Windows’ Internet Information Services (IIS).
IIS Configuration Guidelines
The IIS server assigned to receive uploaded alert logs:
Does not require its own domain.
Does not need to be dedicated entirely to log uploading. Ensure, however, that running IIS does not conflict with other services and shared server requirements in the network.
Should not be placed in a network DMZ1 for both security and traffic throughput reasons.
Must be accessible to all client workstations that perform alert log uploading.
IIS and Data Transfer Protocols
Integrity Desktop alert log upload uses either HTTP or HTTPS formats to upload archive log files. The following table lists the primary differences between the two modes as they apply to alert log uploading.
IIS and Security Certificates
IIS can run on both the standard and server versions of Windows. Note, however, that certain standard versions of Windows — such as Windows 2000 Professional — may not properly support the stand-alone Certificate Authority feature used to upload Integrity Desktop alert logs in secure (HTTPS) mode.
If you are unfamiliar with Web and IIS server administration — including SSL certificates, DNS resolution and security patching — Zone Labs, Inc. recommends that you obtain professional assistance installing and configuring IIS.
1. When used in the context of data networking, the term DMZ describes equipment positioned between a network's internal and external defenses.
Transfer Protocol Summary
HTTP HTTP (Hypertext Transfer Protocol):
• Transfers data in plain-text format
• Does not require client computers to accept Security Certificates
When the destination IIS server is used for purposes other than receiving uploaded alert logs, and is also configured to use SSL, it is necessary to create a virtual directory to enable HTTP.
HTTPS HTTPS (Hypertext Transfer Protocol Secure):
• Uses Secure Socket Layer (SSL) to encrypt data
• Requires a Certificate Authority
For alert log upload it is recommended, but not required, to use a stand-alone root Certificate Authority.

Chapter 10 Automatically Uploading Alert Logs
Integrity Desktop Manager Guide, Product Version 4.0 72ZLD 1-0220-0400-2003-07-29
IIS and Passwords
HTTPS authentication may also require password protection. Though it is prudent to employ passwords, they can interfere with automatic log upload.
ZALogUpload Active Server PageThe second component required for automatic upload of log files is the Active Server Page IDLogUPload.asp. Obtain IDLogUPload.asp from:
The Integrity Desktop Web site at https://pt01.zonelabs.com/zapid
Your Zone Labs Systems Engineer or sales representative
After installing and configuring IIS and acquiring a copy of IDLogUPload.asp, proceed to the next section to enable and configure automatic alert log upload.
Configuring the autouploadlog Element or SectionInstalling and configuring Integrity Desktop to perform automatic alert log uploading consists of three primary tasks:
““Creating and Configuring a Destination Folder on the IIS Server Computer,” in the following section
“Enabling Alert Log Archival,” on page 74
“Configuring the autouploadlog Element or Section,” on page 77
Perform each of these tasks in the order listed to configure alert log upload.
Task 1: Creating and Configuring a Destination Folder on the IIS Server Computer
The first task required by alert log uploading is to configure the destination folder on the IIS server computer that will received uploaded alert logs.
Managing Microsoft IIS SecurityOperated in its default mode, Microsoft IIS may not provide sufficient levels of system security.
A complete discussion of IIS security is beyond the scope of this document. Within the context of uploading archived alert logs, the following general guidelines can help improve IIS security:
Assign Windows folders special access permissions to enable only Integrity Desktop to create log files in the destination folder.

Chapter 10 Automatically Uploading Alert Logs
Integrity Desktop Manager Guide, Product Version 4.0 73ZLD 1-0220-0400-2003-07-29
Create a special username, such as ZALogAdmin, for alert log uploading and assign the name the necessary access permissions.
For more information about IIS, consult:
Your computer’s online help
The Microsoft Web site at http://www.microsoft.com/WindowsServer2003/iis/default.mspx
Whatever steps you take to improve the default security of Microsoft IIS, periodically review your system’s security status to help prevent misuse or exploitation of IIS security behaviors.
To create and configure the server’s destination folder:
1 On the IIS server computer, create the destination folder UploadedLogs. On the server that will receive uploaded alert logs:
a Find the C:\inetpub\wwwroot folder.
b In the wwroot folder, create a sub-folder named UploadedLogs.
After these steps have been completed, the full path will on the server computer will be C:\inetpubs\wwwroot\UploadedLogs
2 Enable Write permissions for the UploadedLogs folder. In the C:\inetpub\wwwroot folder:
a On the server computer, right-click the UploadedLogs folder then select Properties from the shortcut menu.
The UploadedLogs Properties dialog box appears.
b In the UploadedLogs Properties dialog box, click the Security tab.
c In the Security tab, in the Group or user names area choose Everyone.
d In the Security tab, in the Permissions for Everyone area under Allow, click to select the Write check box.
3 Click Apply, then click OK to close the UploadedLogs Properties dialog box.
Windows applies the write permission to the UploadedLogs folder.
4 Create a new Virtual Directory and assign Read and Write permissions to it.
a In the Windows Start menu, in Administrative Tools choose Internet Service Manager.
b In the Internet Service Manager dialog box, right-click on the entry for the local machine, then in the shortcut menu choose New | Virtual directory.
c In the New Virtual Directory dialog box, create a new virtual directory named UploadedLogs and map the directory to the \Intepub\wwwroot\UploadedLogs folder created in step 1, above.
d Click OK to apply the changes and return to the Internet Service Manager dialog box.
e In the File menu, choose Close to close the Internet Service Manager dialog box.

Chapter 10 Automatically Uploading Alert Logs
Integrity Desktop Manager Guide, Product Version 4.0 74ZLD 1-0220-0400-2003-07-29
5 On the server computer, copy the IDLogUPload.asp file to the c:\inetpub\wwwroot folder.
After completing this step, both the UploadedLogs folder and the IDLogUPload.asp file are in the server computer’s C:\Innetpath\wwroot folder.
Specifying Non-standard Folder Names
If you specify a path and subdirectory naming convention different than the one used in the preceding procedure, you must also change the value of RemoteRelativeDirectory in IDLogUPload.asp to the non-standard path name.
Proceed to ““Enabling Alert Log Archival,” in the following section.
Task 2: Enabling Alert Log ArchivalThe second task required to perform alert log uploading is to enable alert log archival.
The C:\inetpub\wwwroot folder contains the UploadedLogs folder and the IDLogUPload.asp file

Chapter 10 Automatically Uploading Alert Logs
Integrity Desktop Manager Guide, Product Version 4.0 75ZLD 1-0220-0400-2003-07-29
To enable alert log archival:
1 In the Integrity Desktop Control Center, click Alerts & Logs, then click the Main tab.
The Alerts & Logs panel’s Main tab appears.
2 In the Alerts & Logs panel’s Main tab:
a in the Event Logging area, choose On to enable event logging.
b In the Program Logging area, choose Medium or High to enable program logging.
The Alerts & Logs panel’s Main tab

Chapter 10 Automatically Uploading Alert Logs
Integrity Desktop Manager Guide, Product Version 4.0 76ZLD 1-0220-0400-2003-07-29
3 In the Alerts & Logs panel’s Main tab, click the Advanced button then click the Log Control tab.
The Advanced Alerts and Logs Settings dialog box, Log Control tab appears.
4 In the Advanced Alerts and Logs dialog box’s Log Control tab:
a In the Archive Log text files every box, check the Archive Log text files every check box.
b In the Log Archive Frequency area, in the Archive Log text files every box choose the interval in days to archive alerts before uploading.
c Zone Labs, Inc. recommends leaving the alert log folder set to its default value. To change the default folder location for Integrity Desktop archived alert logs, In the Log Archive Location area, click Browse then choose a folder to store local copies of Integrity Desktop log files. The default folder location for Integrity Desktop log files is C:\Windows\Internet Logs\.
d To customize the delimiter parameter, in the Log Archive Appearance area choose Tab, Comma, or Semicolon.
5 Click Apply to save any changes, then click OK to return to the Alerts & Logs section’s Main tab.
Integrity Desktop saves the changes in the database.
Proceed to ““Configuring the autouploadlog Element or Section,” in the following section.
The Advanced Alerts and Log Settings dialog box, Log Control tab

Chapter 10 Automatically Uploading Alert Logs
Integrity Desktop Manager Guide, Product Version 4.0 77ZLD 1-0220-0400-2003-07-29
Task 3: Configuring the autouploadlog Element or SectionThe third and final task required to perform alert log uploading is to manually edit the autouploadlog section of the client computer’s XML Policy or configuration file.
Beginning with product version 4.0, Integrity Desktop exports (writes) and imports (reads) configuration and security settings in a new Zone Labs XML Policy format (.xml filename extension). To ensure compatibility with previous releases, Integrity Desktop 4.0 also retains the ability to read, but not write, older style configuration files (.ini filename extension).
This section contains two procedures:
“Editing the autouploadlog Element in an XML Policy File,” in the following section
“Editing the autouploadlog Section in a Configuration File,” on page 80.
Both procedures provide a step-by-step description of the steps necessary to specify automatic uploading of archived alert data in an XML Policy file or configuration file.
Editing the autouploadlog Element in an XML Policy FileThe Zone Labs XML Policy contains a complete set of security and environment elements and attributes. In networks that do not have Zone Labs Integrity Server, use the autouploadlog element and its attributes contained in an XML Policy file to schedule periodic uploads of archived alert log data.
In the following example, the autouploadlog element of an XML Policy file specifies path to the Active Server Page (ASP) file IDLogUPload.asp, as well as specifying the upload frequency, time, and retry intervals.
The following section describes each of the autouploadlog element’s attributes in detail.
/ZoneLabsSettings/configuration <configuration … />
<autouploadlog enabled="true" host="IIS Server_Address/IDLogUPload.asp" frequency="boot" action="archive" timeout="60" retries="3" retryInterval="3"/>
…

Chapter 10 Automatically Uploading Alert Logs
Integrity Desktop Manager Guide, Product Version 4.0 78ZLD 1-0220-0400-2003-07-29
List of autouploadlog Configuration File Parameters
The following table lists the autouploadlog element’s attributes.
/ZoneLabsSettings/configuration/autouploadlog
Attribute Type, Values and Description (Sheet 1 of 2)
enable
Enable periodic uploading or archived log files.
Type: boolean
Recognized values: true, false
Specify the enable attribute equal to true to enable the automatic, periodic uploading of archived log files to a Microsoft IIS server.
The enable element must be true to enable the other autouploadlog attributes described in this table.
frequency
Specify how often to upload archived log files.
Type: integer
Recognized values: boot, daily, weekly, integer number of minutes.
Use the frequency attribute to specify how often Integrity Desktop uploads archived log files to the Windows IIS server specified by the host parameter, described in the following table entry.
• Any integer value is interpreted as the number of minutes.
• Integrity Client can not upload archived log files more frequently than the end-point computer is re-booted.
The enable element, described earlier in the preceding table entry, must be true to enable the frequency attribute.
host
Specify the location of the Windows IIS Server and IDLogUPload.asp Active Server Page.
Type: Formatted string
Recognized values: Valid pointer to the IDLogUPload.asp Active Server Page.
Use the host attribute to specify the URL or IP address of the Windows IIS server to receive uploaded log files. For example:
http:\\101.102.103.104\inetpubs\wwwroot\UploadedLogs
In the preceding example:
• Either http or https (secure transfer mode) are valid transfer modes.
• The path name \inetpubs\wwwroot\ is the Zone Labs-standard path name. If a different path name is specified, you must update the RemoteRelativeDirectory variable in the IDLogUPload.asp Active Server Page to reflect the new path.
• The last variable in the host attribute must be the name of the Active Server Page IDLogUPload.asp.
The enable element, described earlier in this table, must be true to enable the host attribute.

Chapter 10 Automatically Uploading Alert Logs
Integrity Desktop Manager Guide, Product Version 4.0 79ZLD 1-0220-0400-2003-07-29
See also the XML Policy Reference for a complete description of the Zone labs XML Policy.
Editing autouploadlog XML Policy Attributes
The autouploadlog element in a Zone Labs XML Policy has no corresponding Control Center section. Complete the following procedure to manually type the autouploadlog parameters into a configuration file.
XML and Case-sensitivity
Unlike older style configuration files, XML is case sensitive: autouploadlog (the correct XML Policy capitalization) is not the same as AutoUploadlLog, autoUploadLog, or any other variation of upper and lower case characters. Be sure to capitalize XML elements and attributes as written in the following procedure.
retries
Specify how many times to attempt an upload.
Type: integer
Recognized values: Integer number of retry attempts.
Use the retries attribute to specify how many times Integrity Desktop will attempt to complete an unsuccessful upload.
• The retries attribute operates in conjunction with the retryInterval attribute described in the following attribute table entry, and the timeout attribute, described later in this table.
• The enable element, described earlier in this table, must be true to enable the retries attribute.
retryInterval
Specify how long to wait between unsuccessful upload attempts.
Type: integer
Recognized values: Integer number of seconds.
Use the retryIntervalo attribute to specify how many seconds to wait between unsuccessful upload attempts.
• The retryInterval attribute operates in conjunction with the retries attribute described in the preceding table entry, and the timeout attribute described later in this table.
• The enable element, described earlier in this table, must be true to enable the retryInterval attribute.
timeout
Specify how long to wait before abandoning an unsuccessful upload attempt.
Type: integer
Recognized values: Integer number of seconds.
Use the retries attribute to specify how many seconds Integrity Desktop will wait before abandoning a download attempt.
• The timeout attribute operates in conjunction with the retries attribute, and the retryInterval attribute, both described earlier in this table.
• The enable element, described earlier in this table, must be true to enable the timeout attribute.
Level 4 Child Elements
None The autouploadlog element contains no child elements.
/ZoneLabsSettings/configuration/autouploadlog (continued)
Attribute Type, Values and Description (Sheet 2 of 2)

Chapter 10 Automatically Uploading Alert Logs
Integrity Desktop Manager Guide, Product Version 4.0 80ZLD 1-0220-0400-2003-07-29
To type autouploadlog parameters into an XML Policy file:
1 Open the XML Policy file into a text-editing program. The default text-editing program for Windows is Notepad although you may prefer to use an editor designed to work with XML elements and attributes.
2 In the XML Policy file, locate the running ruleset’s autoconfig element:
a Search for or browse to the ruleset that contains a name="runningrulset” attribute as shown in the following example:
<ruleset name="runningruleset" start="afterstartup" stop="onshutdown">Only the running ruleset’s autoconfig element will properly configure automatic upload or archived alert log data.
b From the running ruleset element, search for or browse forward (downward) in the XML Policy file for the autouploadlog child element. The following illustrates the general form of the autoconfig element (line break added:
<autouploadlog enabled="true" host="IIS Server_Address/IDLogUPload.asp" frequency="boot" action="archive" timeout="60" retries="3" retryInterval="3"/>
3 In the XML Policy file, add or modify the autouploadlog element’s attributes, including the quotation marks:
a Type enable="true"
b Type host="http://IIS_Server_Address/IDLogUPload.asp"
c Type frequency="IntegerValue", where IntegerValue specifies the number of minutes between uploads.
d Optionally, type a value for timeout, retries, and retryInterval.
4 Save the changes and exit the text-editing program.
5 After adding the autouploadlog parameters to the client computer’s configuration file:
a Use an operational command line to direct Integrity Desktop to read the file.
b Restart Integrity Desktop to being the alert log upload process. The next upload or archived alert logs occurs at the interval specified by the Frequency attribute.
After adding the autouploadlog parameters to the client computer’s XML Policy file, use an operational command line to direct Integrity Desktop on the client computer to read the file.
Editing the autouploadlog Section in a Configuration FileA security policy contains a complete set of security and environment variables. In networks that do not have Zone Labs Integrity Server, use the autoupload section of a configuration file to schedule periodic uploads of archived event logs.
In the following example, the autouploadlog section of a configuration file specifies the download of a configuration file named policy.ini. Integrity Desktop downloads the file to, and reads the downloaded file from, the Integrity Desktop installation folder (the folder containing the program file iclient.exe).

Chapter 10 Automatically Uploading Alert Logs
Integrity Desktop Manager Guide, Product Version 4.0 81ZLD 1-0220-0400-2003-07-29
In the following example, the autouploadlog section of a configuration file specifies path to the Active Server Page (ASP) file IDLogUPload.asp, as well as specifying the upload frequency, time, and retry intervals.
The following section describes each of the autoconfig section’s parameters in detail.
List of autouploadlog Configuration File Parameters
Use the autouploadlog section of a configuration file on the client computer to enable automatic uploading of Integrity Desktop archived alert log files to a Windows IIS server.
The following table lists the seven parameters recognized by the autouploadlog section of a configuration file.
[autouploadlog] Mode= On DestinationURL=https://IIS_ServerAddress/IDLogUPload.asp Frequency=Daily Timeout=60 Retries=2 RetryInterval=120
autouploadlog Parameters Description
DestinationURL= http://ServerAddress/ IDLogUPload.asp — or — https://ServerAddress/ IDLogUPload.asp
URL or IP address of the destination server that will receive uploaded log files.
• ServerAddress is either the URL or IP Address of the computer running IIS.
• The last variable in DestinationURL must be the name of the Active Server Page IDLogUPload.asp.
• If a different path name is specified, update the RemoteRelativeDirectory variable in IDLogUPload.asp to reflect the new path.
Frequency= {Boot | Daily | Weekly | IntegerNumberOfMinutes}
How frequently to upload the Integrity Desktop log file to the destination address.
• Boot uploads an alert log when Integrity Desktop (not the computer) is restarted.
• Any integer value is interpreted as the number of minutes.
• The smallest permissible interval is 60 minutes.
Mode= {On | Off}
Enables or disables automatic uploading of log files.
Retries= IntegerValue
Number of times an unsuccessful log file upload will be retried.
RetryInterval= IntegerNumberOfSeconds
Number of seconds to wait before retrying an unsuccessful log file upload.
Timeout= IntegerNumberofSeconds
Number of seconds before abandoning an unsuccessful log file upload.

Chapter 10 Automatically Uploading Alert Logs
Integrity Desktop Manager Guide, Product Version 4.0 82ZLD 1-0220-0400-2003-07-29
Editing autouploadlog Configuration File Parameters
The autouploadlog section of a configuration file has no corresponding Control Center section. Complete the following procedure to manually type the autouploadlog parameters into a configuration file.
Before you Begin
You will need a previously created configuration file to complete the procedure in this section. If necessary, complete the procedure under “Saving Integrity Desktop Settings,” on page 44, before beginning the following procedure.
To manually type autouploadlog parameters into a configuration file:
1 Open the configuration file into a text-editing program. The default text-editing program for Windows is Notepad.
2 Perform one of the following:
In the Notepad window, locate the autouploadlog section of the configuration file
— or —
If the configuration file does not contain an autouploadlog section, type [autouploadlog]
3 In the configuration file, below the autouploadlog section heading:
a Type Mode=1
b Type DestinationURL=http://IIS_Server_Address/IDLogUPload.asp
c Specify a value for Frequency.
d Specify a value for Timeout, Retries, and RetryInterval.
4 Save the changes and exit the text-editing program.
5 After adding the autouploadlog parameters to the client computer’s configuration file:
a Use an operational command line to direct Integrity Desktop to read the file. See Chapter 5, ”Using Operational Command Lines, for more information about operational command lines.
b Restart Integrity Desktop to being the alert log upload process. The next upload or archived alert logs occurs at the interval specified by the Frequency parameter.
The TempUploadResponseLogFile Receipt FileEach time log file connectivity is established the IIS server sends a receipt file named TempUploadResponseLogfile.txt to the client computer’s C:\%Windir%\System32\ZoneLabs folder. (%Windir% is the Windows environment variable that points to a given computer’s Windows root folder).

Chapter 10 Automatically Uploading Alert Logs
Integrity Desktop Manager Guide, Product Version 4.0 83ZLD 1-0220-0400-2003-07-29
The following example shows the contents of a TempUploadResponseLogFile receipt file:
Existing instances of TemUploadResponseLogFile are overwritten whenever a new receipt file is stored into the ZoneLabs folder.
Responding to Certificate Alert Dialog BoxesWhen using HTTPS to upload alert logs, each client computer’s Web browser must be configured to accept the IIS server’s certificate. Otherwise, when log uploads are attempted, a security alert similar to the one shown below appears on the client machine.
Uploaded directory : UploadedLogs/ Uploaded file : 111.222.333.444SLAVEZERO_08-13-02_13-04-39.txt
Remote IP Address : 111.222.333.444 All Raw Headers: Host: 111.222.555.666 User-Agent: ZoneLabs ZoneAlarm Pragma: no-cache Cookie: ASPSESSIONIDQGGQGUBU=DAGDEGKAIMPFDDLKJNIDHIAF Content-Length: 2181 Content-Type: multipart/form-data80d8b7d7-77a0-4782-9210-27bed2ec703c
Authorized User : Certificate Serial Number : Remote Host Name : 111.222.333.444 Remote User Name :
The Security Alert dialog box

Chapter 10 Automatically Uploading Alert Logs
Integrity Desktop Manager Guide, Product Version 4.0 84ZLD 1-0220-0400-2003-07-29
Click Yes to the Security Alert: the client computer will not generate additional Security Alerts during that session.
To enable each client computer’s browser to automatically accept your IIS certificate, refer to your system’s on-line help.
Locating and Viewing Log FilesUnless otherwise specified, Integrity Desktop stores log files to be uploaded in C:\Windows\Internet Logs.
Uploaded Log Files Naming ConventionUploaded alert log files are stored in the Uploads folder as plain-text. The file name consists of the client computer name and date and time in twenty-four hour format.
The following example illustrates the general form of an uploaded log file name:
zapidlogtest_07_30_02_10_16_13.txt
In the preceding example:
zapidlogtest is the name of the computer that uploaded the alert log file
07_30_02 indicates that the alert log file was uploaded on July 30, 2002
10_16_13 indicates that the alert log file was uploaded at 10:16:13 AM
Example Log File ContentsThe following lists the contents of a typical log file (line breaks added for readability).
Empty alert log files are not uploaded: This means that if no alerts have occurred during the period between scheduled uploads, Integrity Desktop does not perform alert log upload.
ZoneAlarm Logging Client v4.0.059 Windows NT-5.0.2195-Service Pack 2-SP type,date,time,source,destination,transport FWIN,2002/04/30,12:48:37 -7:00 GMT,216.236.205.198:2755,216.15.66.231:445,TCP (flags:S) FWIN,2002/04/30,12:48:37 -7:00 GMT,216.236.205.198:2756,216.15.66.231:139, TCP (flags:S) FWIN,2002/04/30,12:48:37 -7:00 GMT,192.168.0.1:2757,216.15.66.231:139, TCP (flags:S) PE,2002/04/30,22:27:21 -7:00 GMT,Generic Host Process for Win32 Services, 0.0.0.0:0,N/A

Chapter 10 Automatically Uploading Alert Logs
Integrity Desktop Manager Guide, Product Version 4.0 85ZLD 1-0220-0400-2003-07-29
Reading Uploaded AlertsThe following example illustrates the general form of an alert log entry.
Type,Date,Time,Source,Destination,Transport
The following table list each of the six fields in the order they appear in a file entry.
Field Description
Type The type of event. See the table under “”Event Types,” in the following section, for a detailed description of each of the eight Integrity Desktop event types.
Date The date of the alert as yyyy/mm/dd.
Time The local time of the alert. This field also displays the hours difference between the computer’s local and Greenwich Mean Time (GMT) time zones.
Source Can be one of two values:
• The IP address of the computer that sent the blocked packet and the port used.
— or —
• The program on the client computer that requested access permission.
Destination The destination IP address and port of a blocked packet.
Transport The data transfer protocol of the alert.

Chapter 10 Automatically Uploading Alert Logs
Integrity Desktop Manager Guide, Product Version 4.0 86ZLD 1-0220-0400-2003-07-29
Event TypesThe following table describes each of the eight Integrity Desktop event types.
Event Type Description
ACCESS The ACCESS entry indicates that Program Control prevented a program from accessing remote resources. The following example illustrates an ACCESS event entry (line breaks added for readability):
ACCESS, 2000/09/07,16:45:57 -5:00 GMT, Microsoft Internet Explorer was not allowed to connect to the Internet (64.55.37.186)., N/A,N/A
The preceding example illustrates the placement of the following ACCESS fields:
• Date and time
• The program that attempted to access the Internet
• The IP Address the program was trying to connect to
FWIN FWIN (firewall, inbound) indicates that the firewall blocked an incoming request; some, but not all, FWIN events are connection attempts. The following example illustrates an FWIN event entry (line breaks added for readability):
FWIN, 2000/03/07,14:44:58,-8:00 GMT, Src=192.168.168.116:0, Dest=192.168.168.113:0, Incoming, ICMP
The preceding example illustrates the placement of the following FWIN fields:
• Date and time
• Source IP Address and port number
• Destination IP Address and port number
• The protocol as either TCP, UDP, ICMP, or IGMP
When ZoneAlarm Pro blocks an Internet Control Message Protocol (ICMP) packet or TCP packet, the log entry also includes supplemental identifiers.
• ICMP message identifiers are listed under “ICMP Message Types,” on page 88.
• ICMP packet type identifiers are listed under “TCP Packet Type Flags,” on page 89.
FWLOOP FWLOOP (firewall loopback) indicates that the firewall blocked a loopback packet addressed to the Network Interface Card (NIC). The address of system loopbacks is generally 127.0.0.1.

Chapter 10 Automatically Uploading Alert Logs
Integrity Desktop Manager Guide, Product Version 4.0 87ZLD 1-0220-0400-2003-07-29
FWOUT FWOUT (firewall, outbound) indicates that the firewall blocked an outbound request from a program. The following example illustrates an FWOUT event entry (line breaks added for readability):
FWOUT, 2000/03/07,14:47:02,-8:00 GMT, QuickTime Player Application tried to access the Internet. Remote host: 192:168:1:10
The preceding example illustrates the placement of the following FWOUT fields:
• Date and time
• The program that attempted to access the Internet
• The remote host the program was trying to connect to
FWROUTE FWROUTE (firewall, routing) indicates that the firewall blocked a packet that was not addressed to or from the computer, but that attempted to route through it.
LOCK LOCK (Integrity Desktop Internet Lock) indicates that a program attempted to access the Internet while the Internet Lock was engaged. The following example illustrates a LOCK event entry (line breaks added for readability):
LOCK, 2000/09/07,16:43:3‘0 -7:00 GMT, Yahoo! Messenger, 207.181.192.252, N/A
The preceding example illustrates the placement of the following LOCK fields:
• Date and time
• The program that attempted to access the Internet
• The IP Address the program was trying to connect to
Event Type Description (continued)

Chapter 10 Automatically Uploading Alert Logs
Integrity Desktop Manager Guide, Product Version 4.0 88ZLD 1-0220-0400-2003-07-29
ICMP Message TypesWhen ZoneAlarm Pro blocks an inbound Internet Control Message Protocol (ICMP) packet, the log entry also identifies the type of ICMP message.
MS MS (Mailsafe) events indicates that MailSafe quarantined a file received by your e-mail client. The following example illustrates a MS event entry (line breaks added for readability):
MS, 2000/09/08,09:45:56 -5:00 GMT, Microsoft Windows(TM) Messaging Subsystem Spooler, Renamed e-mail attachment of type .HLP to .zla,N/A
The preceding example illustrates the placement of the following MS fields:
• Date and time
• The e-mail delivery mechanism; in the preceding example it is Microsoft Windows(TM) Messaging Subsystem Spooler
• The name and type of the file that was quarantined.
PE PE (Program Event) indicates that a program attempts to access the Internet. The following example illustrates a PE event entry (line breaks added for readability):
PE, 2000/03/22,17:17:11 -8:00 GMT, Netscape Navigator application file,192.168.1.10
• Date and time
• The program that attempted to access the Internet
• The IP Address and Port number the program was trying to connect to
Event Type Description (continued)
Code Description
0 Echo Reply
3 Destination Unreachable
4 Source Quench
5 Redirect
8 Echo Request
9 Router Advertisement
10 Router Solicitation
11 Time Exceeded
12 Parameter Problem
13 Timestamp Request
14 Timestamp Reply
15 Information Request

Chapter 10 Automatically Uploading Alert Logs
Integrity Desktop Manager Guide, Product Version 4.0 89ZLD 1-0220-0400-2003-07-29
TCP Packet Type FlagsTCP Flags identify specific TCP packet types.
16 Information Reply
17 Address Mask Request
18 Address Mask Reply
Code Description (continued)
Flag Description
4 Low-order unused bit
8 High-order unused bit
A ACK
F FIN
P Push
R Reset
S SYN
U URGENT

Integrity Desktop Manager Guide, Product Version 4.0 90ZLD 1-0220-0400-2003-07-29
Chapter ASupplemental Administrator Utilities
Zone Labs, Inc. has created two supplemental utilities to aid in the detection and reconfigu-ration of Zone Labs products:
A Product Finder Utility, described in the following section, scans the client computer for previously installed instances of Zone Labs products.
A Product Update Utility, describes on page 91, simplifies and enhances the update of Integrity Client security and configuration settings.
Contact your Zone Labs support representative to obtain either of these free utilities.
Running the Product Finder UtilityThe Zone Labs Product Finder Utility productfind.exe finds any Zone Labs products previously installed on a computer, and outputs the results to a text file named check.log.
To run the Product Finder Utility:
1 Copy the Product Finder Utility program file productfind.exe to a Windows folder.
2 Perform one of the following:
Double-click the Product Finder Utility program’s icon
From a DOS command line, type Productfind.exe /S
The Product Finder Utility:
Examines the Windows registry.
Creates a file named check.log in the same Windows folder that contains the Product Finder Utility.
The check.log file produced by the Product Finder Utility contains a single-digit code that corresponds to a particular Zone Labs product. The following table lists the single-digit codes output by the Product Finder Utility and the Zone Labs product that corresponds to that single-digit code.
Code Product Name
0 No Zone Labs product installed
1 Integrity Client, including Integrity Agent version 3.1 and higher
2 ZoneAlarm Pro
3 ZoneAlarm Plus
4 ZoneAlarm

Chapter A Supplemental Administrator Utilities
Integrity Desktop Manager Guide, Product Version 4.0 91ZLD 1-0220-0400-2003-07-29
Using the Policy Update UtilityUse the Policy Update Utility to perform simple reconfiguration of Integrity Client.
Policy Update Utility File-naming ConventionsThe Policy Update Utility program file update.exe operates in conjunction with three supplemental configuration files:
config.xml contains security and configuration settings in Zone Labs XML Policy format. See the Integrity Client Reference Guide for a complete description of XML Policy elements and attributes.
update.ini contains an optional upgrade key value as well as optional startup or shutdown messages. See “Specifying Policy Update Parameters,” in the following section, for a list of update.ini parameters and values.
registry.reg contains Windows Registry keys and values. See “Specifying Windows Registry Keys and Values,” on page 92, for an overview of the registry.reg file.
XML Policy files can be created using Integrity Server’s Policy Studio or the Integrity Client Control Center (graphical user interface).
You can use a simple text editor, such as Notepad, to create or edit each of these files.
5 Integrity Agent, versions 3.0 or lower
6 Zone Alarm Pro - Integrity Desktop
9 Unknown product or Zone Labs OEM product
Code Product Name (continued)

Chapter A Supplemental Administrator Utilities
Integrity Desktop Manager Guide, Product Version 4.0 92ZLD 1-0220-0400-2003-07-29
Specifying Policy Update Parameters
The Policy Update Utility can read settings as well as startup or shutdown messages from an update.ini file. The following table lists the update.ini parameters and values recognized by the Policy Update Utility.
Specifying Windows Registry Keys and Values
The Policy Update Utility can read new or modified values for the Windows Registry from a registry.reg file.
The Windows Registry contains keys and values that specify a wide range of Windows operating system settings, file locations, and operational behaviors. To acquire more information about the Windows Registry, including Registry keys and values, consult the following information sources:
In the Windows on-line help, search for the words Windows Registry or regedit.
In the Windows Registry Editor utility (regedit), browse the on-line help
Parameter Function
Close=Free-form String Use the Close update file parameter to have the Policy Update Utility display a closing message immediately before the update utility stops.
If no text is specified, the closing message is not shown. See also the Open parameter, described later in this table.
Key=UpgradeKeyOld Use the Key update file parameter to have the Policy Update Utility perform a silent reconfiguration.
An upgrade key must have been specified at the time Integrity Client was installed.
See also “/upgradekey,” on page 26.
Open=Free-form String Use the Open update file parameter to have the Policy Update Utility display an opening message immediately after the update utility starts.
If no text is specified, the opening message is not shown. See also the Close parameter, described earlier in this table.
suppressreboot=[Yes | No] Specify the suppressreboot update file parameter equal to Yes to have the Policy Update utility suppress the reboot of the computer after reconfiguration is complete.
Suppressing reboot merely defers the reboot to a more convenient time, such as until after a multi-task upgrade script has completed.
Modifying keys and values in the Windows Registry must be performed with extreme care. Incorrectly specified Registry values may prevent the proper operation of Windows or any programs running on the computer.

Chapter A Supplemental Administrator Utilities
Integrity Desktop Manager Guide, Product Version 4.0 93ZLD 1-0220-0400-2003-07-29
Running the Policy Update UtilityComplete the following procedure to run the Policy Update Utility.
To use the Policy Update Utility to reconfigure Integrity Client:
1 Place the Policy Update Utility program file update.exe anywhere on the client computer.
2 In the same folder as update.exe, place:
A policy file named config.xml.
An optional update file named update.ini containing parameters as described under ”Specifying Policy Update Parameters,” on page 92.
An optional registry file named registry.reg containing new or modified Windows Registry keys and values.
3 Run the Policy Update Utility. Perform one of the following:
In the folder containing the update.exe program file, double-click on the file to start the Policy Update Utility
In a DOS command window, browse to the folder containing the update.exe program file and type update.exe
The Policy Update Utility reconfigures Integrity Client with the policy settings contained in the supplemental files described under “Policy Update Utility File-naming Conventions,” on page 91.

Integrity Desktop Manager Guide, Product Version 4.0 94ZLD 1-0220-0400-2003-07-29
Appendix BManaging Passwords and Files
Both the Integrity Client installer and Integrity Client programs exchange and store certain information in clear-text form. Though not generally a problem, this appendix suggests the following two ways to protect clear-text information and files:
““Managing Clear-text Passwords,” in the following section
“Managing Clear-text Data Files,” on page 96
Managing Clear-text PasswordsDuring installation, the Integrity Desktop installation program prompts for an installation-level password. An installation-level password typed in response to this prompt is submitted as clear-text: the password is neither encrypted nor concealed from an onlooker or a program such as a key-logging Trojan horse.
This section describes two approaches to managing clear-text Integrity Desktop passwords:
““Using Windows Script Files,” in the following section
“Using Compiled Programs,” on page 95
Using Windows Script FilesOne way to conceal a plain-text password is to create an installation script. A Windows batch file or script file (.bat, .cmd, or .vbs file name extension) runs the Integrity Desktop installa-tion program and passes it all the command line switches, including the password.
The following table lists the advantages and disadvantages of using a script file to manage a clear-text password.
In summary, script files provide an easily implemented way to conceal plain-text passwords from casual observation. Script files do not, on the other hand, deter a moderately knowl-edgeable user from reading the contents of the plain-text script.
Advantages of Script Files
• A script helps conceal the password from novice users and malicious key-logging programs.
Disadvantages of Script Files
• A knowledgeable user can read the plain-text contents of a script so access to the script must be managed.
• When a batch or script file (.bat or .cmd file name extension) is executed, commands can be observed as they are passed to the command window.
• Earlier versions of Windows may require downloading and installation of Microsoft’s Windows Scripting Host (WSH). Some security departments disable the Microsoft Windows Scripting Host (WSH) necessary to run Visual Basic Scripts.

Appendix B Managing Passwords and Files
Integrity Desktop Manager Guide, Product Version 4.0 95ZLD 1-0220-0400-2003-07-29
Tips on Using Script Files
Some simple ways to enhance the basic password protection provided by a script file are:
Keep the script file on a central server rather than multiple workstations. (See also “Managing Custom Configuration Files,” on page 27).
If the script file is distributed: Include two lines in file: one to delete the script file, and one to clean the recycle bin so the deleted script can't be easily recovered.
Set the files read, write, and execute permissions to make casual reading more difficult.
Using Compiled Programs
A second, more effective, way to conceal plain-text passwords is to compile the install commands into a program.
The following table lists the advantages and disadvantages of using a compiled program to manage a clear-text password.
Tips on Using Compiled Programs
Some simple ways to enhance the password protection provided by a compiled program are:
Use compiled Visual Basic Script (“.vbs” file name extension). VBS is very similar to Visual Basic and is a less technically demanding way to create a compiled installation script.
Keep the compiled installation program on a central server rather than multiple workstation’s. See also “Managing Custom Configuration Files,” on page 27).
If the file is distributed, include two commands in the program: one to delete the program file, and one to clean the recycle bin so the deleted program can't be easily recovered.
Managing Custom Configuration FilesIn addition to managing clear-text passwords, the accidental release of the configuration file might expose details of the corporate security policies and the IP address of the Integrity Server for that client.
Zone Labs, Inc. therefore recommends:
Centrally storing and controlling access to any optional configuration files
Advantages of Compiled Programs
• The Integrity Agent installer is invoked silently and the password is effectively concealed from onlookers.
• Any programming language can be used.
Disadvantages of Compiled Programs
• Requires knowledge of writing and compiling a program.
• Decompiling the program is still possible, so access to the compiled program must be managed.

Appendix B Managing Passwords and Files
Integrity Desktop Manager Guide, Product Version 4.0 96ZLD 1-0220-0400-2003-07-29
Deleting the files after installation is completed
After installation, the contents of the configuration file are merged into the Integrity Agent and thereafter maintained in an encrypted state.
Managing Clear-text Data FilesThe Integrity Desktop programs use clear-text files to store two types of information:
Policy file information, containing IP addresses, known programs and components, and other configuration information
Alerts and log files that may contain information of value to system intruders
The following sections describe ways to minimize unauthorized access both types of files.
Managing Clear-text Policy FilesPolicy files (default name policy.ini) contain information of potential use to a system intruder. To make this information more difficult to Zone Labs, Inc. recommends that policy files be stored only on a central server or on an Integrity Server.
Managing Clear-text Alerts and Log FilesThe Integrity Desktop client programs store alerts and log files in the C:\%windir$\Internet Logs\ folder, where %windir% is a Windows system variable that identifies where Windows program files are stored.
In some cases, alerts and log files may contain information — such as the names of programs running on a system — that may be useful to intruders. Because of this it is recommended that you upload then delete alerts and log files on a regular basis.

Integrity Desktop Manager Guide, Product Version 4.0ZLD 1-0220-0400-2003-07-29
Index
0-93DES Data Encryption Standard 48
AActive Server Page 70Advanced Alerts and Log Settings 76alert log uploading
default file names 74destination folder for 73destination folder permissions 73enabling 74folder hierarchy 74Log Control tab 76overview of tasks 72protocols supported 71requirements for 70
alert logsas troubleshooting aid 58settings dialog box 59
alerts and logs filesmanaging 96protecting contents of 96
anti-virus, Integrity Desktop and 1AutoCheck, values for 67AutoConfig 63–66autoconfig, as XML Policy element 63autouploadlog
as XML Policy element 77parameters 81–82specifying 82
BBlockFragments, and VPN connections 56
bold, use of 5braces, use of 5brackets, use of 5
Ccase sensitivity, in XML Policy 65, 79cautions 6certificates
alert dialog boxes 83Security Alert dialog box 83
check.log 90clean switch
availability of 47deprecated 47
clean uninstallation, as default 47codes, product 90command lines, see installation command lines or operational command lines
command lines, types of 14, 35config command line switch
and Policy_Info section 16, 41general form of 41preceding by dash 14, 35syntactic requirements 14, 16, 35
configuration files"pulled" 62and Integrity Desktop 4.0 62, 70and policy switch 33and slash mark 33AutoConfig 63–66compatibility with 62, 70continued support for 62, 70file and pathname specifier 14, 35general form of 33in Integrity Agent or Flex 44policy_Info section ignored in 33, 41post-installation use of 16, 36protecting 95requirements for downloading 62specifying during installation 33using 62viewing 44
Configuration Wizard, see wizardconsumer products, upgrading 10Control Center
availability of 4displaying after installation 21
CTRL-ALT-double-click 44
Ddash
use of 28, 36data files, protecting 96database files
Integrity Client 70Zone Alarm 11
default installation 14default operating modes 4DES (Data Encryption Standard) 48dialog box
Advanced Alerts and Log Settings 76Security Alert 83
document naming conventions 4downgrading
and user settings 10rules for 10
Eellipsis, use of 5enterprise security policies 3
“pulled” 62, 69
errlog switchand s switch 18default value for 18general form of 18
error log file, location of 18, 25error message, command line 16ESP (Encapsulating Security Payload protocol) 48
event types, log file 86–88
Ffile naming conventions, installation programs 4
fragmented packets, see packet fragments
fragments, see packet fragments 56
GGRE (Generic Routing Encapsulation protocol) 48
HH.323 49hardware, required 8Host/Site, defining 52hyphens, in long command lines 5, 6
Ii switch
default value for 28general form of 28
iclientSetup_IAen.exe 4iclientSetup_IDen.exe 4, 13iclientSetup_IFen.exe 4IDLogUPload.asp 70, 72IDSetup_110n.exe 14, 35IIS issues 73IIS, see MicrosoftIIS, see Microsoft IISIKE (Internet Key Exchange protocol) 49
install_logconditions for use 16location of 16
install_log switchdefault value for 19general form of 19
installationdefault behavior of 14display of wizard duringperforming default 13

Integrity Desktop Manager Guide, Product Version 4.0ZLD 1-0220-0400-2003-07-29
installation command linescompared with operational command lines 14, 35delimiters in 14, 15, 18, 35elements of 15error messages in 16general form of 15limitations on size 15overview 14, 35overview of differences between 14, 35switches in 17–33used for 17
installation deployment tools 34installation log file, location of 19installation program 4, 13installation-level password
compared to user-level password 28reset of 31, 40scope of 28
installdir switchand invalid path and file names 19and quotation marks 19and s switch 19, 25default value for 19general form of 19
Integrity Clientdefinition of 4
Integrity Desktopalert log uploading 3and Integrity Server 13and Web servers 3installation program 13network types 3policy arbitration 4
IP addressesdefining to Integrity Client 52
IP Range, defining to Integrity Client 52IPSec (IP Security Protocol) and Windows 49
italic, use of 5
LL2F (Layer 2 Forwarding protocol) 49LDAP
see Lightweight Directory Access Protocol
License keyinstallation command line switch 37
license keyformat for 37installation command line switch 16
license key, see lickey switchlickey switch
default value for 18, 20, 22, 37general form of 18, 20, 37
lickey, see License keyLightweight Directory Access Protocol 49
line breaks, in command lines 5, 6
log filescontents of 84Date parameter 85Destination parameter 85event types 86–88location of 84naming conventions for 84packet type flags 89reading 85Source parameter 85Time parameter 85Transport parameter 85Type parameter 85viewing 84
long command lines 5
Mmalware 1Microsoft
IIS 63, 71, 72, 82Manual of Style 5security issues 72supported operating systems 8Systems Management Server 20, 22, 34Universal Naming Convention 18
Nnetworks
defining to Integrity Client 52noreboot switch
and SMS 20default value of 20general form of 20installation versus upgrade 20required by upgrade 20
nostartup switchdefault value for 21, 24general form of 21, 24
notes 6notutorial switch
default value for 27general form of 27
Nowizards switchdefault value for 28general form of 28
Ooperating systems, supported 8operational command lines
compared with Installation command lines 14, 35delimiters in 14, 35, 36elements of 36overview 14, 35
overview panelStatus tab 44
Ppacket fragments
and BlockFragments parameter 56and VPN connections 56
parameter valuesequivalency 6
passwinstset switchdefault value for 32general form of 32
password switchand passwset switch 29default value for 29, 39general form of 29, 39
passwordsand compiled programs 95and Trojan horse 94behaviors of 28modifying 40protecting 94recommendations for 38scope of 28setting 38syntactic requirements for 38, 40threats to 94
passwsetdefault value for 38
passwset switchdefault value for 29general form of 29, 38syntactic requirements for 29syntactic requirements of 31
path and file names, enclosing in quotation marks 14, 35
Pentium, versions supported 8pipe symbol, use of 5Policies panel
availability of 4policy arbitration 4policy files
managing 96protecting contents of 96types of 34
Policy switch, incompatibility with Integrity Desktop 41
Policy Updateparameters 92supplemental files 91, 93
policy_Info sectionand config switch 41
policy_Info section, ignored by config command line switch 16
portscanning of 1
PPTPPoint-to-Point Tunneling Protocol 49
product codes, output by Product Finder 90
Product Findercheck.log 90output file 90product codes 90
productfind.exe 90

Integrity Desktop Manager Guide, Product Version 4.0ZLD 1-0220-0400-2003-07-29
programsgranting access to 53hierarchy of permissions 55trusted 2
pwinst switchand pwinsetset switch 32default value for 32, 40general form of 32, 40
pwinstset switchand pwinst switch 32, 40and reset switch 32default value for 40general form of 40
Qquotation marks
use of 14, 33, 35, 41
RRADIUS, see Remote Authentication Dial-In User Service
RAM, minimum requirement 8RAS, see H.323rbprompt switch
and GUI reboot prompt 22and s switch 22default value for 22general form of 22, 23
rebootafter upgrade 20and initial installation 10and s switch 25messages 22required after upgrade 10
reboot, forcing after installation 22receipt files 82registry, Windows 92registry.reg 91Remote Authentication Dial-In User Service, VPN support for 49
required hardware 8required software 8reset
and user preferences 11Reset switch
and pwinstset switch 32reset switch
use of 17reset switch, scope of 24reset switch, use of 24running ruleset, configuration of 66, 80
Ss switch
and errlog switch 18and error log 25and installdir switch 19, 25and rbprompt switch 22and reboot 25default value for 25general form of 25position of 24risks of using 25syntactic requirements 24used during upgradeused with errlog switch 18
script filesfor passwords 94pros and cons 94suggestions for use 95
securityreview of practices 73
Security Alert dialog box 83security policies
"pulled" 3"pushed" 3
security, Microsoft IIS 72servers, access permissions for 55setup Wizard 14silent upgrade, see s switchSKIP (Simple Key Management for Internet Protocol) 49
slash markuse of 15, 28, 33, 41
SMSsee Microsoft, Systems Management Server
software, required 8Status tab, Overview panel 44subnet
defining to Integrity Client 53Syntactic conventions
slash mark 33syntactic conventions
bold 5braces 5brackets 5dash 36ellipsis 5hyphen 5, 6in XML Policy 65, 79italic 5slash mark 15, 41
system requirements 8
TTempUploadResponseLogFile 82
example of 83tips, see notesTrojan horse 1, 2Trojan horse, and passwords 94
troubleshootingremoving temporary settings for 60settings for 60techniques for 57using Program Learning mode for 60
tutorialas part of installation 14
tutorial, controlling display of 27
UUNC see Microsoft Universal Naming Convention
UNC, see Microsoft Universal Naming Convention
uninstallingand install_log switch 46and user settings 9clean 46default 46required programs 46Zauninst.exe 46
update.exe 91update.ini 91upgrading
and consumer products 10and reboot switch 10and user settings 9, 12, 18completing 20guidelines for 9rebooting after 20requirements for 9silent 22
uploaded log files, see log filesuploading, alert logs 70user settings 9user-level password
compared to installation-level password 28recommendations for 28, 29, 38reset of 32scope of 28
VVBS, see Visual Basic Scriptviewing configuration settings 44Virtual Private Network
allowing protocols for 57Cisco 3concentrators or gateways 50granting network access in 53optional resources 50–51overview of steps 49required network resources 50responding to Alert boxes for 54supported protocolstroubleshooting of 57
Visual Basic Scriptand passwordsperforming cleanup with
VPN, see Virtual Private Network

Integrity Desktop Manager Guide, Product Version 4.0ZLD 1-0220-0400-2003-07-29
WWAN (wide-area Network) 50warnings, see cautionswide-area network 50Windows
and installation command lines 15and VPN support 48command line limitations 15IISregistry keys and values 91, 92Scripting Host (WSH) 94System Tray icon 44Universal Naming Convention 33, 41
WinZip 34Wizard
setup 14WSH, see Windows Scripting Host
XXAUTH (Extended Authentication protocol) 49
XML Policyand autoconfig element 63and autouploadlog element 77and Integrity Desktop 4.0 62, 70autoconfig section 63case sensitivity in 65, 79general format of 63, 77
ZZauninst.exe
location of 46obtaining 46