intel® matrix storage manager 7 - gigabyte global
TRANSCRIPT

Document Number: XXXXXX
Intel® Matrix Storage Manager 7.0 User's Manual
March 2007 Revision 1.0

2 ver7.0 / User's Manual
INFORMATION IN THIS DOCUMENT IS PROVIDED IN CONNECTION WITH INTEL® PRODUCTS. NO LICENSE, EXPRESS OR IMPLIED, BY ESTOPPEL OR OTHERWISE, TO ANY INTELLECTUAL PROPERTY RIGHTS IS GRANTED BY THIS DOCUMENT. EXCEPT AS PROVIDED IN INTEL’S TERMS AND CONDITIONS OF SALE FOR SUCH PRODUCTS, INTEL ASSUMES NO LIABILITY WHATSOEVER, AND INTEL DISCLAIMS ANY EXPRESS OR IMPLIED WARRANTY, RELATING TO SALE AND/OR USE OF INTEL PRODUCTS INCLUDING LIABILITY OR WARRANTIES RELATING TO FITNESS FOR A PARTICULAR PURPOSE, MERCHANTABILITY, OR INFRINGEMENT OF ANY PATENT, COPYRIGHT OR OTHER INTELLECTUAL PROPERTY RIGHT. Intel products are not intended for use in medical, life saving, or life sustaining applications.
Intel may make changes to specifications and product descriptions at any time, without notice.
Designers must not rely on the absence or characteristics of any features or instructions marked "reserved" or "undefined." Intel reserves these for future definition and shall have no responsibility whatsoever for conflicts or incompatibilities arising from future changes to them.
The Intel® Matrix Storage Manager may contain design defects or errors known as errata which may cause the product to deviate from published specifications. Current characterized errata are available on request.
Contact your local Intel sales office or your distributor to obtain the latest specifications and before placing your product order.
Intel, Intel® Matrix Storage Manager, Intel® Matrix Storage Technology, Intel® Rapid Recover Technology, and the Intel logo are trademarks or registered trademarks of Intel Corporation or its subsidiaries in the United States and other countries.
*Other names and brands may be claimed as the property of others.
Copyright © 2007, Intel Corporation. All rights reserved.

ver7.0 / User's Manual 3
Contents 1 Introduction...................................................................................................... 7
1.1 Terminology........................................................................................... 7 1.2 Reference Documents.............................................................................. 9 1.3 Table, Figure and Equation Samples...............Error! Bookmark not defined. 1.4 Cross References .........................................Error! Bookmark not defined.
2 Intel® Matrix Storage Manager Features .............................................................10 2.1 Feature Overview...................................................................................10 2.2 RAID 0 (Striping) ...................................................................................10 2.3 RAID 1 (Mirroring) .................................................................................11 2.4 RAID 5 (Striping with Parity) ...................................................................11 2.5 RAID 10................................................................................................12 2.6 Matrix RAID ..........................................................................................12 2.7 RAID Migration ......................................................................................13 2.8 RAID Level Migration..............................................................................13 2.9 Intel® Rapid Recover Technology ............................................................14 2.10 Advanced Host Controller Interface ..........................................................15
2.10.1 Native Command Queuing .........................................................15 2.10.2 Hot Plug ..................................................................................15
3 RAID BIOS Configuration ...................................................................................16 3.1 Overview ..............................................................................................16 3.2 Enabling RAID in BIOS............................................................................16
4 Intel® Matrix Storage Manager Option ROM.........................................................17 4.1 Overview ..............................................................................................17 4.2 User Interface .......................................................................................17 4.3 Version Identification .............................................................................17 4.4 RAID Volume Creation............................................................................18
5 Loading Driver During OS Installation..................................................................23 5.1 Overview ..............................................................................................23 5.2 F6 Installation Method............................................................................23
5.2.1 Automatic F6 Floppy Creation.....................................................23 5.2.2 Manual F6 Floppy Creation.........................................................23 5.2.3 F6 Installation Steps .................................................................24
6 Intel® Matrix Storage Manager Installation..........................................................25 6.1 Overview ..............................................................................................25 6.2 Where to Obtain Software.......................................................................25 6.3 Installation Steps...................................................................................25 6.4 How to Confirm Software Installation .......................................................30 6.5 Version Identification .............................................................................32
6.5.1 Version Identification Using Intel® Matrix Storage Console............32

4 ver7.0 / User's Manual
6.5.2 Version Identification Using Driver File ........................................32 7 RAID-Ready Setup ............................................................................................33
7.1 Overview ..............................................................................................33 7.2 System Requirements ............................................................................33 7.3 RAID-Ready System Setup Steps.............................................................33
8 RAID Migration.................................................................................................34 8.1 Overview ..............................................................................................34 8.2 RAID Migration Steps: RAID-Ready to 2-drive RAID 0/1 .............................34 8.3 RAID Migration Steps: RAID-Ready to 3 or 4-drive RAID 0/5.......................36
9 Volume Creation...............................................................................................43 9.1 RAID Volume Creation............................................................................43 9.2 Recovery Volume Creation ......................................................................50
9.2.1 Recovery Volume Creation in Basic Mode.....................................50 9.2.2 Recovery Volume Creation in Advanced Mode...............................51
Appendix A Error Messages.................................................................................................57
A.1 Incompatible Hardware .....................................................................................57
A.2 Operating System Not Supported .......................................................................57
A.3 Source Hard Drive Cannot Be Larger ...................................................................57
A.4 Hard Drive Has System Files ..............................................................................58
A.5 Source Hard Drive is Dynamic Disk .....................................................................58
Figures
Figure 1. Matrix RAID........................................................................................13 Figure 2. User Prompt .......................................................................................17 Figure 3. Start Menu Item..................................................................................31 Figure 4. Driver Details Example.........................................................................31 Figure 5. Driver Version Information ...................................................................32 Figure 6. Tray Icon Status .................................................................................35 Figure 7. User Interface Status...........................................................................36 Figure 8. Progress Dialog...................................................................................36
Tables
Table 1. RAID 0 Overview..................................................................................11 Table 2. RAID 1 Overview..................................................................................11 Table 3. RAID 5 Overview..................................................................................12 Table 4. RAID 10 Overview ................................................................................12 Table 5. Recovery Volume Overview ...................................................................14

ver7.0 / User's Manual 5
6 ver7.0 / User's Manual
Revision History
Document Number
Revision Number
Description Revision Date
N/A 1.0 Initial release using new template
• Based on doc titled IMST 5.7 RAID-AHCI Manual rev2.7
• Adds information on Intel® Rapid Recover Technology setup
• General User's Manual document clean-up
• Aligns document name with release version in order to lessen customer confusion
March 2007
§

Introduction
ver7.0 / User's Manual 7
1 Introduction
The purpose of this document is to enable a user to properly set up and configure a system using Intel® Matrix Storage Manager. It provides steps for set up and configuration, as well as a brief overview on Intel® Matrix Storage Manager features.
Note: The information in this document is only relevant on systems with a supported Intel chipset that include a supported Intel chipset, with a supported operating system.
Supported Intel chipsets - http://support.intel.com/support/chipsets/imsm/sb/CS-020644.htm
Supported operating systems - http://support.intel.com/support/chipsets/imsm/sb/CS-020648.htm
Note: The majority of the information in this document is related to either software configuration or hardware integration. Intel is not responsible for the software written by third party vendors or the implementation of Intel components in the products of third party manufacturers.
Customers should always contact the place of purchase or system/software manufacturer with support questions about their specific hardware or software configuration.
1.1 Terminology
Term Description
AHCI Advanced Host Controller Interface: an interface specification that allows the storage driver to enable advanced Serial ATA features such as Native Command Queuing, native hot plug, and power management.
Continuous Update Policy
When a recovery volume is using this policy, data on the master drive is copied to the recovery drive automatically as long as both drives are connected to the system.
Intel® Matrix Storage Manager Option ROM
A code module built into the system BIOS that provides boot support for RAID volumes as well as a user interface for configuring and managing RAID volumes.
Master Drive The hard drive that is the designated source drive in a recovery volume.
Matrix RAID Two independent RAID volumes within a single RAID array.
Member A hard drive used within a RAID array.

Introduction
8 ver7.0 / User's Manual
Term Description
Migration The process of converting a system's data storage configuration from a non-RAID configuration (pass-thru) to a RAID configuration.
Hot Plug The unannounced removal and insertion of a Serial ATA hard drive while the system is powered on.
NCQ Native Command Queuing: a command protocol in Serial ATA that allows multiple commands to be outstanding within a hard drive at the same time. The commands are dynamically reordered to increase hard drive performance.
On Request Update Policy
When a recovery volume is using this policy, data on the master drive is copied to the recovery drive when you request it. Only changes since the last update process are copied.
OS Operating System
Port0 A serial ATA port (connector) on a motherboard identified as Port0.
Port1 A serial ATA port (connector) on a motherboard identified as Port1.
Port2 A serial ATA port (connector) on a motherboard identified as Port2.
Port3 A serial ATA port (connector) on a motherboard identified as Port3.
POST Power-On Self Test
RAID Redundant Array of Independent Drives: allows data to be distributed across multiple hard drives to provide data redundancy or to enhance data storage performance.
RAID 0 (striping) The data in the RAID volume is striped across the array's members. Striping divides data into units and distributes those units across the members without creating data redundancy, but improving read/write performance.
RAID 1 (mirroring) The data in the RAID volume is mirrored across the RAID array's members. Mirroring is the term used to describe the key feature of RAID 1, which writes duplicate data to each member; therefore, creating data redundancy and increasing fault tolerance.
RAID 5 (striping with parity)
The data in the RAID volume and parity are striped across the array's members. Parity information is written with the data in a rotating sequence across the members of the array. This RAID level is a preferred configuration for efficiency, fault-tolerance, and performance.
RAID 10 (striping and mirroring)
The RAID level where information is striped across a two disk array for system performance. Each of the drives in the array has a mirror for fault tolerance. RAID 10 provides the performance benefits of RAID 0 and the redundancy of RAID 1. However, it requires four hard drives.
RAID Array A logical grouping of physical hard drives.

Introduction
ver7.0 / User's Manual 9
Term Description
RAID Level Migration The process of converting a system's data storage configuration from one RAID level to another.
RAID Volume A fixed amount of space across a RAID array that appears as a single physical hard drive to the operating system. Each RAID volume is created with a specific RAID level to provide data redundancy or to enhance data storage performance.
Recovery Drive The hard drive that is the designated target drive in a recovery volume.
Recovery Volume A volume utilizing Intel(R) Rapid Recover Technology.
1.2 Reference Documents
Document Document No./Location
Not Applicable
Intel® Matrix Storage Manager Features
10 ver7.0 / User's Manual
2 Intel® Matrix Storage Manager Features
2.1 Feature Overview
The Intel® Matrix Storage Manager software package provides high-performance Serial ATA and Serial ATA RAID capabilities for supported operating systems.
Supported operating systems - http://support.intel.com/support/chipsets/imsm/sb/CS-020648.htm
The key features of the Intel® Matrix Storage Manager are as follows:
• RAID 0
• RAID 1
• RAID 5
• RAID 10
• Matrix RAID
• RAID migration and RAID level migration
• Intel® Rapid Recover Technology
• Advanced Host Controller Interface (AHCI) support
2.2 RAID 0 (Striping)
RAID 0 uses the read/write capabilities of two or more hard drives working in unison to maximize the storage performance of a computer system.
Table 1 provides an overview of the advantages, the level of fault-tolerance provided, and the typical usage of RAID 0.

Intel® Matrix Storage Manager Features
ver7.0 / User's Manual 11
Table 1. RAID 0 Overview
Hard Drives Required:
2-6
Advantage: Highest transfer rates
Fault-tolerance:
None – if one disk fails all data will be lost
Application: Typically used in desktops and workstations for maximum performance for temporary data and high I/O rate. 2-drive RAID 0 available in specific mobile configurations.
Refer to the following web site for more information on RAID 0: http://support.intel.com/support/chipsets/iaa_raid/sb/CS-009337.htm
2.3 RAID 1 (Mirroring)
A RAID 1 array contains two hard drives where the data between the two is mirrored in real time to provide good data reliability in the case of a single disk failure; when one disk drive fails, all data is immediately available on the other without any impact to the integrity of the data.
Table 2 provides an overview of the advantages, the level of fault-tolerance provided, and the typical usage of RAID 1.
Table 2. RAID 1 Overview
Hard Drives Required:
2
Advantage: 100% redundancy of data. One disk may fail, but data will continue to be accessible. A rebuild to a new disk is recommended to maintain data redundancy.
Fault-tolerance:
Excellent – disk mirroring means that all data on one disk is duplicated on another disk.
Application: Typically used for smaller systems where capacity of one disk is sufficient and for any application(s) requiring very high availability. Available in specific mobile configurations.
Refer to the following web site for more information on RAID 1: http://support.intel.com/support/chipsets/iaa_raid/sb/CS-009338.htm
2.4 RAID 5 (Striping with Parity)
A RAID 5 array contains three or more hard drives where the data and parity are striped across all the hard drives in the array. Parity is a mathematical method for recreating data that was lost from a single drive, which increases fault-tolerance.
Table 3 provides an overview of the advantages, the level of fault-tolerance provided, and the typical usage of RAID 5.

Intel® Matrix Storage Manager Features
12 ver7.0 / User's Manual
Table 3. RAID 5 Overview
Hard Drives Required:
3-6
Advantage: Higher percentage of usable capacity and high read performance as well as fault-tolerance.
Fault-tolerance:
Excellent - parity information allows data to be rebuilt after replacing a failed hard drive with a new drive.
Application: Storage of large amounts of critical data. Not available in mobile configurations.
Refer to the following web site for more information on RAID 5: http://support.intel.com/support/chipsets/imsm/sb/CS-020653.htm
2.5 RAID 10
A RAID 10 array uses four hard drives to create a combination of RAID levels 0 and 1. It is a striped set whose members are each a mirrored set.
Table 4 provides an overview of the advantages, the level of fault-tolerance provided, and the typical usage of RAID 10.
Table 4. RAID 10 Overview
Hard Drives Required:
4
Advantage: Combines the read performance of RAID 0 with the fault-tolerance of RAID 1.
Fault-tolerance:
Excellent – disk mirroring means that all data on one disk is duplicated on another disk.
Application: High-performance applications requiring data protection, such as video editing. Not available in mobile configurations.
Refer to the following web site for more information on RAID 10: http://support.intel.com/support/chipsets/imsm/sb/CS-020655.htm
2.6 Matrix RAID
Matrix RAID allows you to create two RAID volumes on a single RAID array.
As an example, on a system with an Intel® 82801GR I/O controller hub (ICH7R), Intel® Matrix Storage Manager allows you to create both a RAID 0 volume as well as a RAID 5 volume across four Serial ATA hard drives.
Example: Refer to Figure 1.

Intel® Matrix Storage Manager Features
ver7.0 / User's Manual 13
Figure 1. Matrix RAID
Refer to the following web site for more information on matrix RAID: http://support.intel.com/support/chipsets/imsm/sb/CS-020681.htm
2.7 RAID Migration
The RAID migration feature enables a properly configured PC, known as a RAID-Ready system, to be converted into a high-performance RAID 0, RAID 1, RAID 5, or RAID 10 configuration by adding one or more Serial ATA hard drives to the system and invoking the RAID migration process from within Windows.
The following RAID migrations are supported:
Note: All migrations may not be available as each migration is supported on specific platform configurations.
• RAID-Ready to 2,3,4,5 or 6-drive RAID 0
• RAID-Ready to 2-drive RAID 1
• RAID-Ready to 3,4,5 or 6-drive RAID 5
• RAID-Ready to 4-drive RAID 10
The migrations do not require re-installation of the operating system. All applications and data remain intact.
See the following web site for more information on migrations and the platforms on which each migration is supported: http://support.intel.com/support/chipsets/imsm/sb/CS-020674.htm
2.8 RAID Level Migration
The RAID level migration feature enables a user to migrate data from a RAID 0, RAID 1, or RAID 10 volume to RAID 5 by adding any additional Serial ATA hard drives necessary and invoking the modify volume process from within Windows.

Intel® Matrix Storage Manager Features
14 ver7.0 / User's Manual
The following RAID level migrations are supported:
Note: All migrations may not be available as each migration is supported on specific platform configurations.
• 2-drive RAID 0 to 3,4,5 or 6-drive RAID 5
• 3-drive RAID 0 to 4,5 or 6-drive RAID 5
• 4-drive RAID 0 to 5 or 6-drive RAID 5
• 2-drive RAID 1 to 3,4,5 or 6-drive RAID 5
• 4-drive RAID 10 to 4,5 or 6-drive RAID 5
RAID level migrations do not require re-installation of the operating system. All applications and data remain intact.
See the following web site for more information on RAID level migrations and the platforms on which each migration is supported: http://support.intel.com/support/chipsets/imsm/sb/CS-020674.htm
2.9 Intel® Rapid Recover Technology
Intel® Rapid Recover Technology utilizes RAID 1 (mirroring) functionality to copy data from a designated master drive to a designated recovery drive. The master drive data can be copied to the recovery drive either continuously or on request.
When using the continuous update policy, changes made to the data on the master drive while the system is not docked are automatically copied to the recovery drive when the system is re-docked. When using the on request update policy, the master drive data can be restored to a previous state by copying the data on the recovery drive back to the master drive.
Table 5 provides an overview of the advantages, the disadvantages, and the typical usage of Intel® Rapid Recover Technology.
Table 5. Recovery Volume Overview
Hard Drives Required:
2
Advantage: More control over how data is copied between master and recovery drives; fast volume updates (only changes to the master drive since the last update are copied to the recovery drive); member hard drive data can be viewed in Microsoft Windows Explorer*.
Disadvantage: No increase in volume capacity.
Application: Critical data protection for mobile systems; fast restoration of the master drive to a previous or default state.
Refer to the following web site for more information on Intel® Rapid Recovery Technology: http://support.intel.com/support/chipsets/imsm/sb/CS-026142.htm
Intel® Matrix Storage Manager Features
ver7.0 / User's Manual 15
2.10 Advanced Host Controller Interface
Advanced Host Controller Interface (AHCI) is an interface specification that allows the storage driver to enable advanced Serial ATA features such as Native Command Queuing and Native Hot Plug.
Intel chipsets that support AHCI: http://support.intel.com/support/chipsets/imst/sb/CS-012304.htm
2.10.1 Native Command Queuing
Native Command Queuing (NCQ) is a feature supported by AHCI that allows Serial ATA hard drives to accept more than one command at a time. NCQ, when used in conjunction with one or more hard drives that support NCQ, increases storage performance on random workloads by allowing the drive to internally optimize the order of commands.
Note: To take advantage of NCQ, you need the following:
• Chipset that supports AHCI
• Intel® Matrix Storage Manager
• One or more Serial ATA (SATA) hard drives that support NCQ
2.10.2 Hot Plug
Hot plug, also referred to as hot swap, is a feature supported by AHCI that allows Serial ATA hard drives to be removed or inserted while the system is powered on and running. As an example, hot plug may be used to replace a failed hard drive that is in an externally-accessible drive enclosure.
Note: To take advantage of hot plug, you need the following:
• Chipset that supports AHCI
• Intel® Matrix Storage Manager
• Hot plug capability correctly enabled in the system BIOS by the OEM/motherboard manufacturer

RAID BIOS Configuration
16 ver7.0 / User's Manual
3 RAID BIOS Configuration
3.1 Overview
To install the Intel® Matrix Storage Manager, the system BIOS must include the Intel® Matrix Storage Manager option ROM.
The Intel® Matrix Storage Manager option ROM is tied to the controller hub. Version 7.0 of the option ROM supports platforms based on the Intel® 82801HEM I/O controller hub.
3.2 Enabling RAID in BIOS
Use the following steps to enable RAID in the system BIOS:
Note: The instructions listed below are specific to motherboards manufactured by Intel with a supported Intel chipset. The specific BIOS settings on non-Intel manufactured motherboards may differ. Refer to the motherboard documentation or contact the motherboard manufacturer or your place of purchase for specific instructions. Always follow the instructions that are provided with your motherboard.
1. Press the <F2> key after the Power-On-Self-Test (POST) memory test begins.
2. Select the Advanced menu, then the Drive Configuration menu.
3. Switch the Drive Mode option from Legacy to Enhanced.
4. Enable Intel(R) RAID Technology.
5. Press the <F10> key to save the BIOS settings and exit the BIOS Setup program.

Intel® Matrix Storage Manager Option ROM
ver7.0 / User's Manual 17
4 Intel® Matrix Storage Manager Option ROM
4.1 Overview
The Intel® Matrix Storage Manager option ROM is a PnP option ROM that provides a pre-operating system user interface for RAID configurations. It also provides BIOS and DOS disk services (Int13h).
4.2 User Interface
To enter the Intel® Matrix Storage Manager option ROM user interface, press the <Ctrl> and <i> keys simultaneously when prompted during the Power-On Self Test (POST).
Example: Refer to Figure 2.
Figure 2. User Prompt
NOTE: The hard drive(s) and hard drive information listed for your system can differ from the following example.
4.3 Version Identification
To identify the specific version of the Intel® Matrix Storage Manager option ROM integrated into the system BIOS, enter the option ROM user interface. The version

Intel® Matrix Storage Manager Option ROM
18 ver7.0 / User's Manual
number is located in the top right corner with the following format: vX.Y.W.XXXX, where X and Y are the major and minor version numbers.
4.4 RAID Volume Creation
Use the following steps to create a RAID volume using the Intel® Matrix Storage Manager user interface:
Note: The following procedure should only be used with a newly-built system or if you are reinstalling your operating system. The following procedure should not be used to migrate an existing system to RAID 0. If you wish to create matrix RAID volumes after the operating system software is loaded, they should be created using the Intel® Matrix Storage Console in Windows.
1. Press the <Ctrl> and <i> keys simultaneously when the following window appears during POST:
2. Select option 1. Create RAID Volume and press the <Enter> key.
Intel® Matrix Storage Manager Option ROM
ver7.0 / User's Manual 19
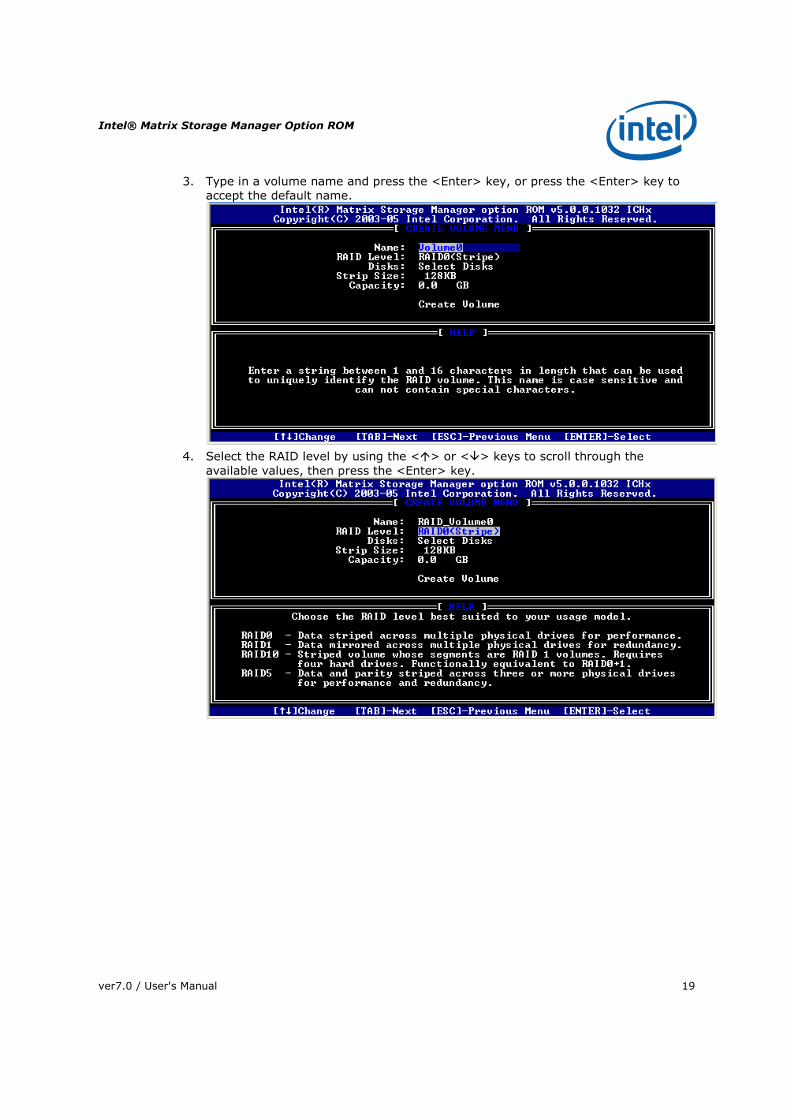
3. Type in a volume name and press the <Enter> key, or press the <Enter> key to accept the default name.
4. Select the RAID level by using the <�> or <�> keys to scroll through the available values, then press the <Enter> key.

Intel® Matrix Storage Manager Option ROM
20 ver7.0 / User's Manual
5. Press the <Enter> key to select the physical disks. A dialog similar to the following will appear:
6. Select the appropriate number of hard drives by using the <�> or <�> keys to scroll through the list of available hard drives. .Press the <Space> key to select a drive. When you have finished selecting hard drives, press the <Enter> key.
Intel® Matrix Storage Manager Option ROM
ver7.0 / User's Manual 21
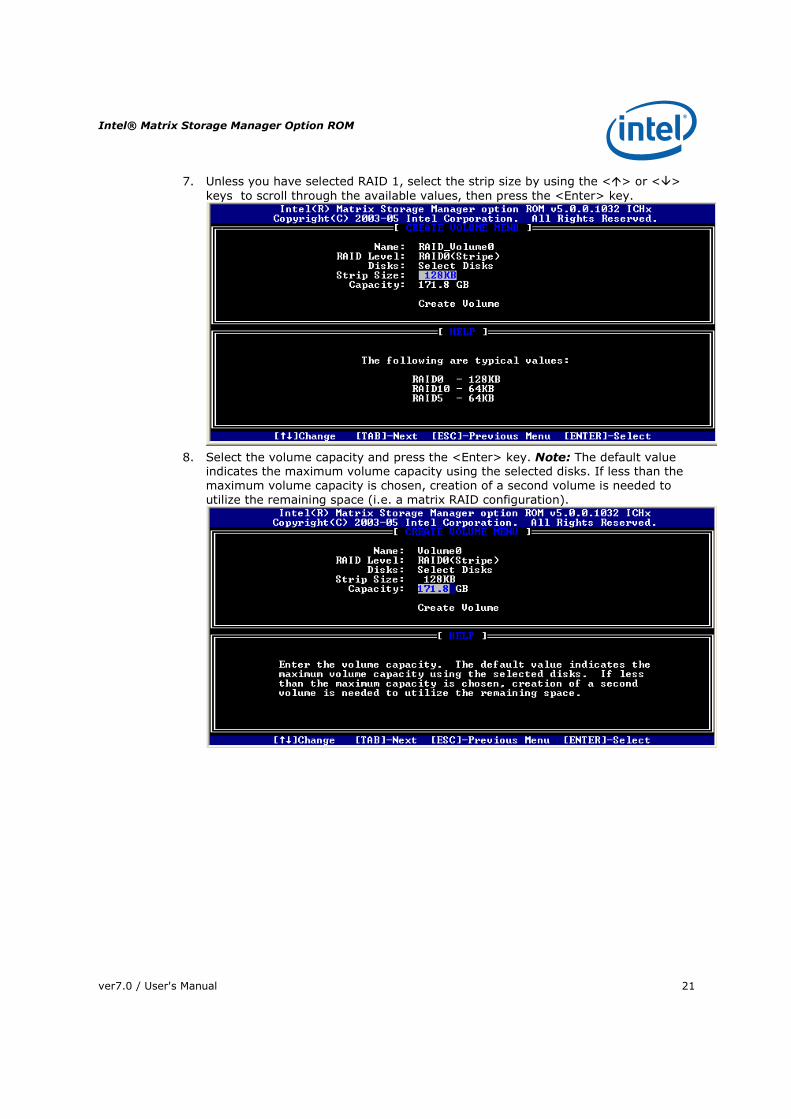
7. Unless you have selected RAID 1, select the strip size by using the <�> or <�>keys to scroll through the available values, then press the <Enter> key.
8. Select the volume capacity and press the <Enter> key. Note: The default value indicates the maximum volume capacity using the selected disks. If less than the maximum volume capacity is chosen, creation of a second volume is needed to utilize the remaining space (i.e. a matrix RAID configuration).

Intel® Matrix Storage Manager Option ROM
22 ver7.0 / User's Manual
9. At the Create Volume prompt, press the <Enter> key to create the volume. The following prompt will appear:
10. Press the <Y> key to confirm volume creation.
11. To exit the option ROM user interface, select option 5. Exit and press the <Enter> key.
12. Press the <Y> key again to confirm exit.
Note: To change any of the information before the volume creation has been confirmed, you must exit the Create Volume process and restart it. Press the <Esc> key to exit the Create Volume process.

Loading Driver During OS Installation
ver7.0 / User's Manual 23
5 Loading Driver During OS Installation
5.1 Overview
Unless using Microsoft Windows Vista*, the Intel® Matrix Storage Manager driver must be loaded during operating system installation using the F6 installation method. This is required in order to install an operating system onto a hard drive or RAID volume when in RAID mode or onto a hard drive when in AHCI mode.
If using Microsoft Windows Vista, this is not required, as the operating system includes a driver for the AHCI and RAID controllers. Refer to Intel® Matrix Storage Manager Installation for instructions on how to installed an updated version of the software after the operating system is installed.
5.2 F6 Installation Method
The F6 installation method requires a floppy with the driver files.
5.2.1 Automatic F6 Floppy Creation
Use the following steps to automatically create a floppy that contains the files needed during the F6 installation process:
1. Download the latest Floppy Configuration Utility from the Intel download site: http://downloadfinder.intel.com/scripts-df/Product_Filter.asp?ProductID=2101
2. Run the .EXE file.
Note: Use F6flpy32.exe on a 32-bit system. Use F6flpy64.exe on a 64-bit system.
5.2.2 Manual F6 Floppy Creation
Use the following steps to manually create a floppy that contains the files needed during the F6 installation process:
1. Download the Intel® Matrix Storage Manager and save it to your local drive (or use the CD shipped with your motherboard which contains the Intel® Matrix Storage Manager). Note: The Intel® Matrix Storage Manager can be downloaded from the following website: http://downloadfinder.intel.com/scripts-df/Product_Filter.asp?ProductID=2101
2. Extract the driver files by running 'C:\IATAXX_CD.EXE –A -A -P C:\<path>'. Note: This is described in the ‘Advanced Installation Instructions’ section of the README.TXT.

Loading Driver During OS Installation
24 ver7.0 / User's Manual
3. Copy the IAAHCI.CAT, IAACHI.INF, IASTOR.CAT, IASTOR.INF, IASTOR.SYS, and TXTSETUP.OEM. files to the root directory of a floppy diskette. Note: If the system has a 32-bit processor, copy the files found in the Drivers folder; if the system has a 64-bit processor, copy the files found in the Drivers64 folder.
5.2.3 F6 Installation Steps
To install the Intel® Matrix Storage Manager driver using the F6 installation method, complete the following steps:
1. Press the <F6> key at the beginning of Windows XP setup (during text-mode phase) when prompted in the status line with the ‘Press F6 if you need to install a third party SCSI or RAID driver’ message. Note: After pressing F6, nothing will happen immediately; setup will temporarily continue loading drivers and then you will be prompted with a screen to load support for mass storage device(s).
2. Press the <S> key to ‘Specify Additional Device’.
3. Insert the floppy disk containing the driver files when you see the following prompt: ‘Please insert the disk labeled Manufacturer-supplied hardware support disk into Drive A:’ and press the <Enter> key. Refer to Automatic F6 Floppy Creation for instructions.
4. Select the RAID or AHCI controller entry that corresponds to your BIOS setup and press the <Enter> key. Note: Not all available selections may appear in the list; use the <�> or <�> to see additional options.
5. Press the <Enter> key to confirm.
At this point, you have successfully F6 installed the Intel® Matrix Storage Manager driver and Windows XP setup should continue. Leave the floppy disk in the floppy drive until the system reboots itself because Windows setup will need to copy the files again from the floppy to the Windows installation folders. After Windows setup has copied these files again, remove the floppy diskette so that Windows setup can reboot as needed.

Intel® Matrix Storage Manager Installation
ver7.0 / User's Manual 25
6 Intel® Matrix Storage Manager Installation
6.1 Overview
After installing an operating system onto a RAID volume or on a Serial ATA hard drive when in RAID or AHCI mode, the Intel® Matrix Storage Manager can be loaded from within Windows. This installs the user interface (i.e. Intel® Matrix Storage Console), the tray icon service, and the monitor service onto the system, allowing you to monitor the health of your RAID volume and/or hard drives.
This method can also be used to upgrade to a newer version of the Intel® Matrix Storage Manager.
Warning: The Intel® Matrix Storage Manager driver may be used to operate the hard drive from which the the system is booting or a hard drive that contains important data. For this reason, you cannot remove or un-install this driver from the system; however, you will have the ability to un-install all other non-driver components.
The following non-driver components can be un-installed:
• Intel® Matrix Storage Console
• Help documentation
• Start Menu shortcuts
• System tray icon service
• RAID monitor service
6.2 Where to Obtain Software
If a CD-ROM was included with your motherboard or system, it should include the Intel® Matrix Storage Manager.
The Intel® Matrix Storage Manager can be downloaded from the following Intel website: http://downloadfinder.intel.com/scripts-df/Product_Filter.asp?ProductID=2101
6.3 Installation Steps
Note: The instructions below assume that the BIOS has been configured correctly and the RAID driver has been installed using the F6 installation method (if applicable).

Intel® Matrix Storage Manager Installation
26 ver7.0 / User's Manual
1. Run the Intel® Matrix Storage Manager executable.
2. Click Next to continue.

Intel® Matrix Storage Manager Installation
ver7.0 / User's Manual 27
3. Carefully review the warning and click Next to continue.

Intel® Matrix Storage Manager Installation
28 ver7.0 / User's Manual
4. Click Yes to accept the license agreement terms.

Intel® Matrix Storage Manager Installation
ver7.0 / User's Manual 29
5. Review the readme if needed and click Next to continue.

Intel® Matrix Storage Manager Installation
30 ver7.0 / User's Manual
6. Click Finish to complete installation and reboot the system.
6.4 How to Confirm Software Installation
Refer to Figure 3 to confirm that Intel® Matrix Storage Manager has been installed.

Intel® Matrix Storage Manager Installation
ver7.0 / User's Manual 31
Figure 3. Start Menu Item
If installation was done by have-disk, F6, or an unattended installation method, you can confirm that the Intel® Matrix Storage Manager has been loaded by completing the following steps:
Note: The following instructions assume Classic mode in Windows* XP Professional.
1. Click on the Start button and then the Control Panel entry.
2. Double-click the System icon. Note: If using Microsoft Windows Vista, first select Classic View.
3. Select the Hardware tab.
4. Click on the Device Manager button.
5. Expand the SCSI and RAID Controllers entry.
6. Right-click on the Intel(R) 82801XX SATA Controller entry.
7. Select the Driver tab.
8. Click on the Driver Details button. The iastor.sys file should be listed. Example: Refer to Figure 4.
Figure 4. Driver Details Example
NOTE: The controller shown here may differ from the controller displayed for your system.

Intel® Matrix Storage Manager Installation
32 ver7.0 / User's Manual
6.5 Version Identification
There are two ways to determine which version of the Intel® Matrix Storage Manager is installed:
1. Use the Intel® Matrix Storage Console
2. Locate the RAID driver (iaStor.sys) file and view the file properties
6.5.1 Version Identification Using Intel® Matrix Storage Console
1. To access the Intel® Matrix Storage Console, refer to Figure 3.
2. Under the View menu, select System Report.
3. Select the Intel® RAID Technology tab for the driver version information. Example: Refer to Figure 5.
Figure 5. Driver Version Information
NOTE: Driver version information shown here may differ from the information displayed for your system.
6.5.2 Version Identification Using Driver File
1. Locate the file iastor.sys in the following path: <System Root>\Windows\System32\Drivers
2. Right-click on iastor.sys and select Properties.
3. Select the Version tab. The version number should be listed after the File Version parameter in the following format: x.y.z.aaaa

RAID-Ready Setup
ver7.0 / User's Manual 33
7 RAID-Ready Setup
7.1 Overview
A "RAID Ready" system is a specific system configuration that allows a user to perform a RAID migration at a later date.
For more information on RAID migrations, see RAID Migration.
7.2 System Requirements
In order for a system to be considered “RAID Ready”, it must meet all of the following requirements:
• Contains a supported Intel chipset
• Includes a single Serial ATA (SATA) hard drive
• RAID controller must be enabled in the BIOS
• Motherboard BIOS must include the Intel® Matrix Storage Manager option ROM
• Intel® Matrix Storage Manager must be loaded
7.3 RAID-Ready System Setup Steps
Note: The system must meet all the requirements listed in System Requirements.
1. Enable RAID in system BIOS using the steps listed in Enabling RAID in BIOS.
2. Install Intel® Matrix Storage Manager driver using the steps listed in F6 Installation Steps.
3. Install Intel® Matrix Storage Manager using the steps listed in Installation Steps.
RAID Migration
34 ver7.0 / User's Manual
8 RAID Migration
8.1 Overview
The following sections explain how to migrate from a RAID-Ready system to a RAID system.
8.2 RAID Migration Steps: RAID-Ready to 2-drive RAID 0/1
Use the following steps to convert a RAID-Ready system into a system with a 2-drive RAID 0 or 1 volume:
Note: The steps listed in this section assume that the system is a properly configured RAID-Ready system. For more information on how to configure a RAID-Ready system, see RAID-Ready System Setup Steps.
Warning: This operation will delete all existing data from the additional hard drive or drives and the data cannot be recovered. It is critical to backup all important data on the additional drives before proceeding. The data on the source hard drive, however, will be preserved.
1. Physically add an additional SATA hard drive to the system.
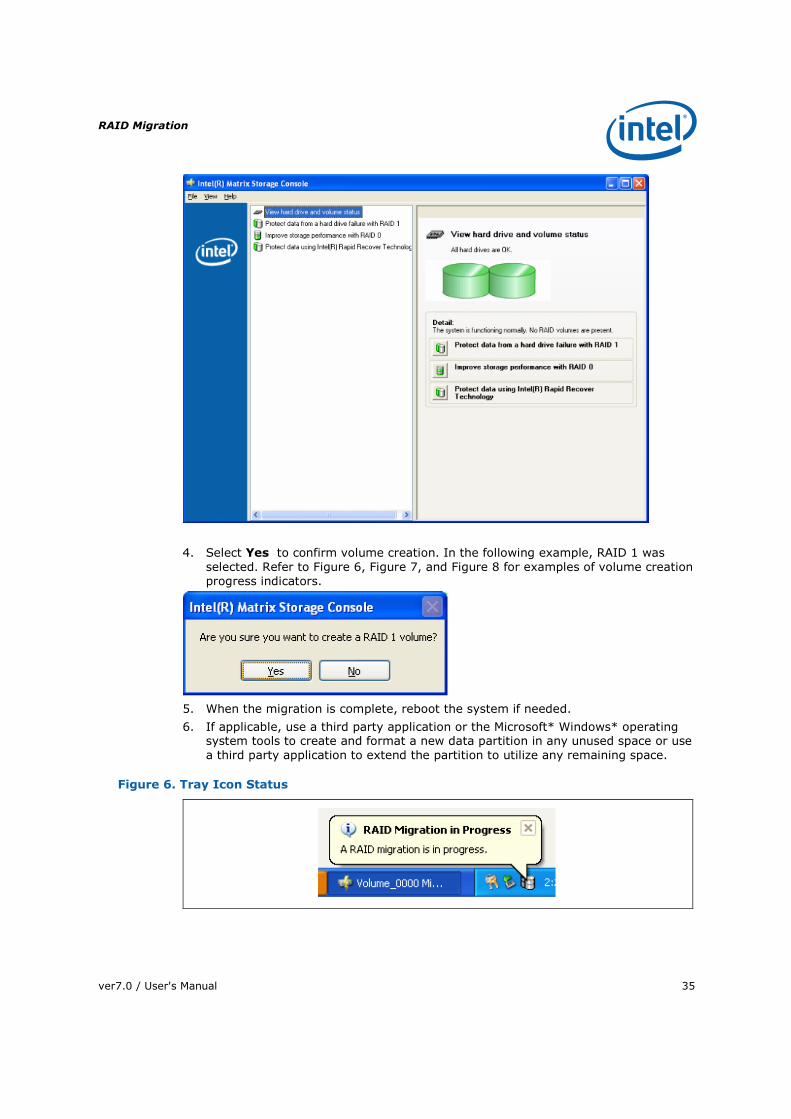
2. Boot into Windows* and open the Intel® Matrix Storage Console. Example: Refer to Figure 3.
3. Select Protect data from a hard drive failure with RAID 1 or Improve storage performance with RAID 0.
RAID Migration
ver7.0 / User's Manual 35
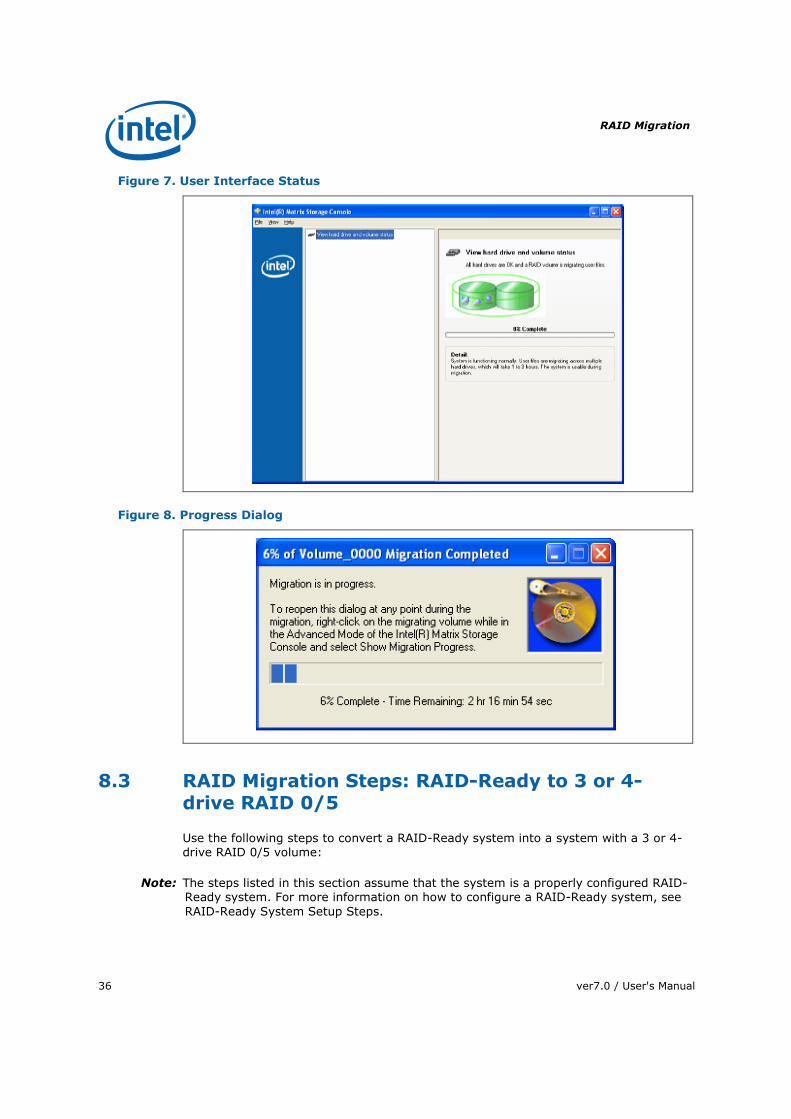
4. Select Yes to confirm volume creation. In the following example, RAID 1 was selected. Refer to Figure 6, Figure 7, and Figure 8 for examples of volume creation progress indicators.
5. When the migration is complete, reboot the system if needed.
6. If applicable, use a third party application or the Microsoft* Windows* operating system tools to create and format a new data partition in any unused space or use a third party application to extend the partition to utilize any remaining space.
Figure 6. Tray Icon Status
RAID Migration
36 ver7.0 / User's Manual
Figure 7. User Interface Status
Figure 8. Progress Dialog
8.3 RAID Migration Steps: RAID-Ready to 3 or 4-drive RAID 0/5
Use the following steps to convert a RAID-Ready system into a system with a 3 or 4-drive RAID 0/5 volume:
Note: The steps listed in this section assume that the system is a properly configured RAID-Ready system. For more information on how to configure a RAID-Ready system, see RAID-Ready System Setup Steps.

RAID Migration
ver7.0 / User's Manual 37
Warning: This operation will delete all existing data from the additional hard drive or drives and the data cannot be recovered. It is critical to backup all important data on the additional drives before proceeding. The data on the source hard drive, however, will be preserved.
Warning: It is very important to note which disk is the source drive (the one containing all of the information to be migrated). On a RAID-Ready system, this can be determined by noting the port the single hard drive is attached to a note during POST. You can also use the Intel® Matrix Storage Manager before the additional disks are installed to verify the port and serial number of the drive that contains the data.
1. Physically add two or three additional SATA hard drives to the system.
2. Boot into Windows* and open the Intel® Matrix Storage Console. Example: Refer to Figure 3.
3. Select Advanced Mode from the View menu.
4. Select Create RAID Volume from Existing Hard Drive from the Actions menu.
5. Click Next to continue.
6. Type in a volume name and press the <Enter> key, or press the <Enter> key to accept the default name.

RAID Migration
38 ver7.0 / User's Manual
7. Select a RAID level.
8. Select a strip size.
9. Click Next to continue.
10. Select a source hard drive source. Note: The source hard drive can be selected by double-clicking on the hard drive, or by single-clicking on the hard drive and then selecting the right arrow key. The data on this hard drive will be preserved and

RAID Migration
ver7.0 / User's Manual 39
migrated to the new RAID volume.
11. Click Next to continue.
12. Select the member hard drives. Note: The member hard drives can be selected by double-clicking on the hard drive, or by single-clicking on the hard drive and then

RAID Migration
40 ver7.0 / User's Manual
selecting the right arrow key.
Warning: The data on the member hard drives will be deleted. Back up all important data before continuing.
13. Click Next to continue.
14. Use the field or the slider bar to specify the amount of available array space that will be used by the volume. Note: Any remaining space can be used to create a

RAID Migration
ver7.0 / User's Manual 41
second volume.

RAID Migration
42 ver7.0 / User's Manual
15. Click Finish to begin the migration process.
16. Once the migration is complete, reboot if needed.
17. If applicable, use a third party application or the Microsoft* Windows* operating system tools to create and format a new data partition in any unused space or use a third party application to extend the partition to utilize any remaining space.

Volume Creation
ver7.0 / User's Manual 43
9 Volume Creation
RAID and recovery volumes can be created using the Intel® Matrix Storage Console.
Note: RAID volume creation is only available as an option if you are have two or more SATA hard drives in addition to another bootable device. If you wish to create a RAID volume using your boot device, you will need to perform a RAID migration. See RAID Migration for instructions on how to perform a migration.
9.1 RAID Volume Creation
Warning: Creating a RAID volume will permanently delete any existing data on the selected hard drives. Back up all important data before beginning these steps. If you wish to preserve the data, see RAID Migration for instructions on how to perform a RAID migration.
To create a RAID volume, use the following steps:
1. Open the Intel® Matrix Storage Console. (Start >> All Programs >> Intel® Matrix Storage Manager >> Intel® Matrix Storage Console)
2. Switch to advanced mode by selecting the Advanced Mode option under the View menu.
3. Select Create RAID Volume under the Actions menu.
Volume Creation
44 ver7.0 / User's Manual
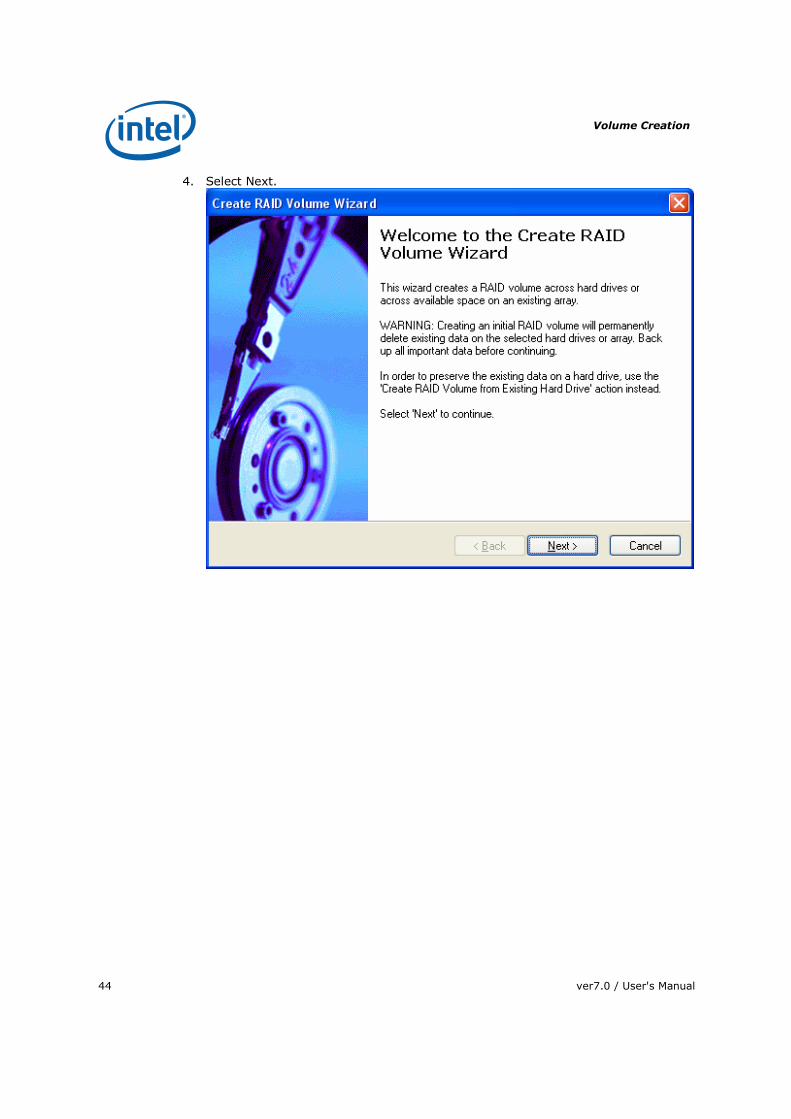
4. Select Next.

Volume Creation
ver7.0 / User's Manual 45
5. Enter a name for the RAID volume.

Volume Creation
46 ver7.0 / User's Manual
6. Select a RAID level.

Volume Creation
ver7.0 / User's Manual 47
7. Select a strip size.
8. Select Next to continue.

Volume Creation
48 ver7.0 / User's Manual
9. Select the hard drives that will be used to create the RAID volume.
10. When you are finished selecting hard drives, select Next to continue.
Volume Creation
ver7.0 / User's Manual 49
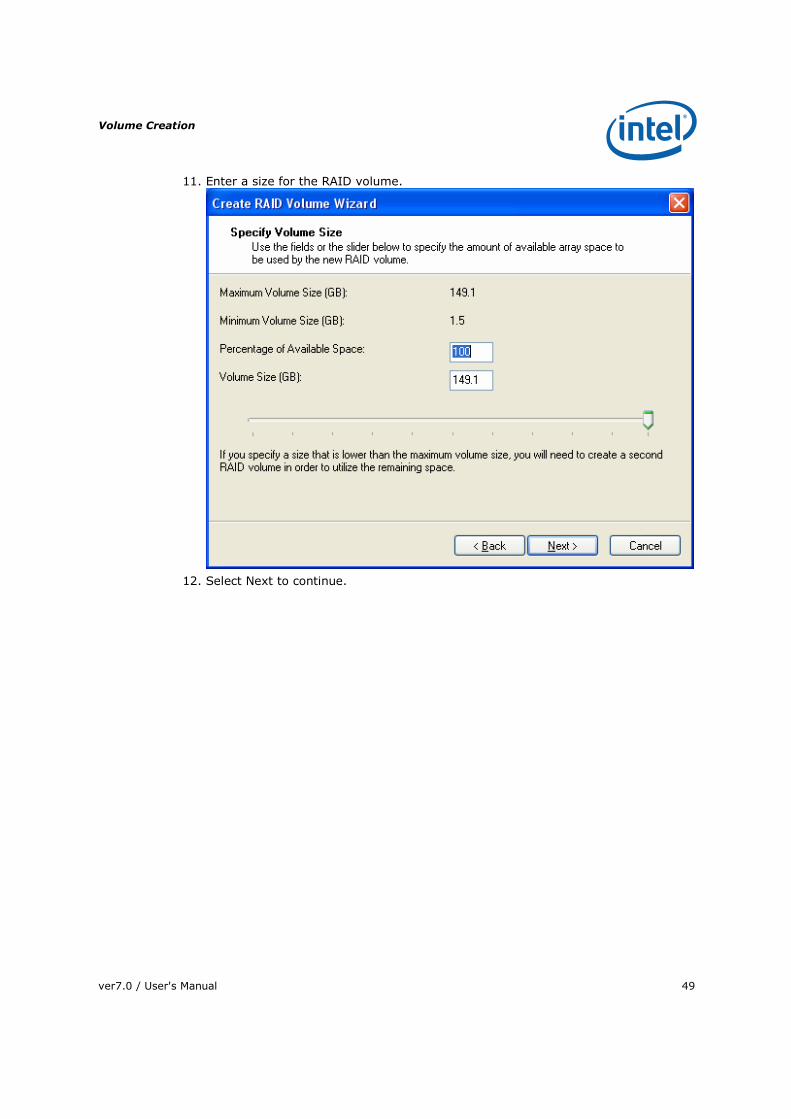
11. Enter a size for the RAID volume.
12. Select Next to continue.

Volume Creation
50 ver7.0 / User's Manual
13. Select Finish to create the RAID volume.
9.2 Recovery Volume Creation
A recovery volume can be created using either Basic mode or Advanced mode in the Intel® Matrix Storage Console.
9.2.1 Recovery Volume Creation in Basic Mode
Warning: Creating a recovery volume will permanently delete any existing data on the drive selected as the recovery drive. Back up all important data before beginning these steps.
Note: This option may or may not be available depending on your system configuration. If you do not see the option listed, refer to Recovery Volume Creation in Advanced Mode.
To create a recovery volume in Basic mode, use the following steps:
1. Open the Intel® Matrix Storage Console. (Start >> All Programs >> Intel® Matrix Storage Manager >> Intel® Matrix Storage Console)

Volume Creation
ver7.0 / User's Manual 51
2. Select Protect data using Intel® Rapid Recover Technology.
3. Select Yes to confirm volume creation.
9.2.2 Recovery Volume Creation in Advanced Mode
Warning: Creating a recovery volume will permanently delete any existing data on the drive selected as the recovery drive. Back up all important data before beginning these steps.
To create a recovery volume in Basic mode, use the following steps:
1. Open the Intel® Matrix Storage Console. (Start >> All Programs >> Intel® Matrix Storage Manager >> Intel® Matrix Storage Console)
2. Select Advanced Mode in the View menu.

Volume Creation
52 ver7.0 / User's Manual
3. 3. Select Create Recovery Volume in the Actions menu.
4. Select Next to continue.
5. Modify the recovery volume name if you wish.

Volume Creation
ver7.0 / User's Manual 53
6. Select a hard drive to be used as the master hard drive for the recovery volume.

Volume Creation
54 ver7.0 / User's Manual
7. Select a hard drive to be used as the recovery hard drive for the recovery volume.
Volume Creation
ver7.0 / User's Manual 55
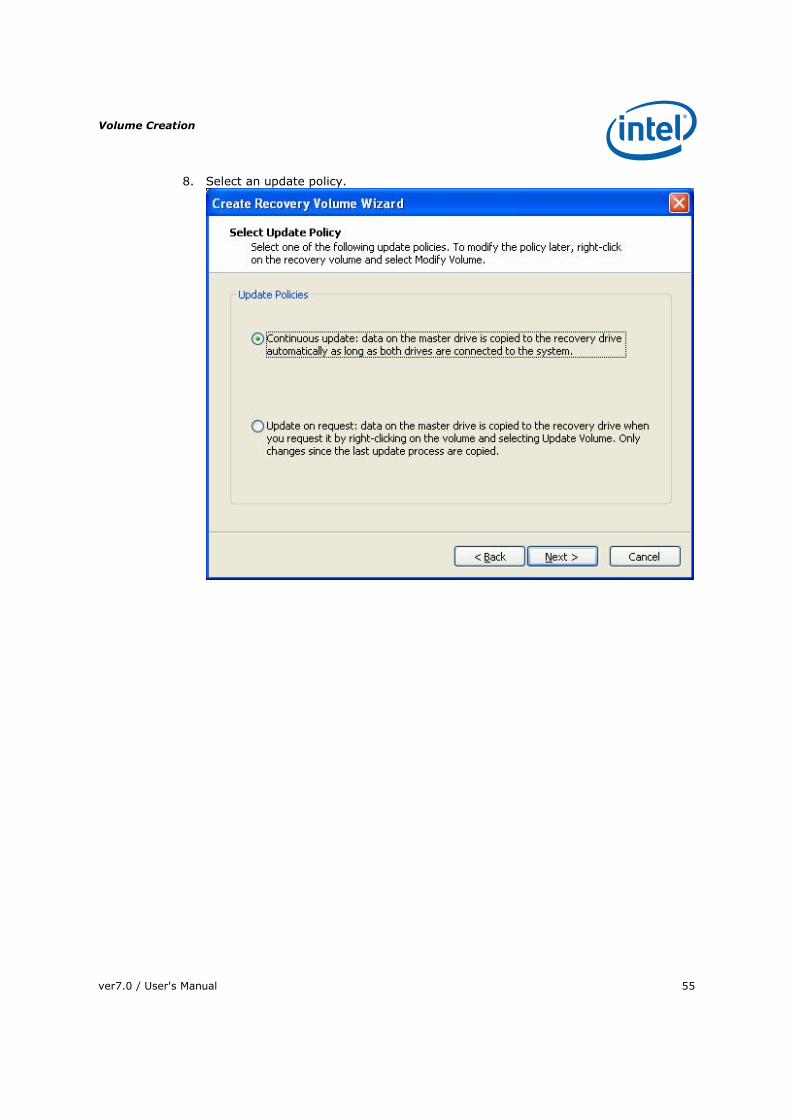
8. Select an update policy.

Volume Creation
56 ver7.0 / User's Manual
9. Select Finish to begin recovery volume creation.

Volume Creation
ver7.0 / User's Manual 57
Appendix A Error Messages
A.1 Incompatible Hardware
Issue: The following error message appears during installation:
Solution: This issue can be resolved by installing the Intel® Matrix Storage Manager on a system with a supported Intel chipset, or by ensuring that AHCI or RAID is enabled in the system BIOS. See http://support.intel.com/support/chipsets/imst/sb/CS-020644.htm for more information.
A.2 Operating System Not Supported
Issue: The following error message appears during installation:
Solution: This issue can be resolved by installing the Intel® Matrix Storage Manager on a supported operating system. See http://support.intel.com/support/chipsets/imsm/sb/CS-020648.htm for more information.
A.3 Source Hard Drive Cannot Be Larger
Issue: When attempting to migrate from a single hard drive (or a RAID-Ready configuration) to a RAID configuration, the following error message appears and the migration process will not begin:
Volume Creation
58 ver7.0 / User's Manual
Solution: Follow the steps listed in the error message to resolve the problem.
A.4 Hard Drive Has System Files
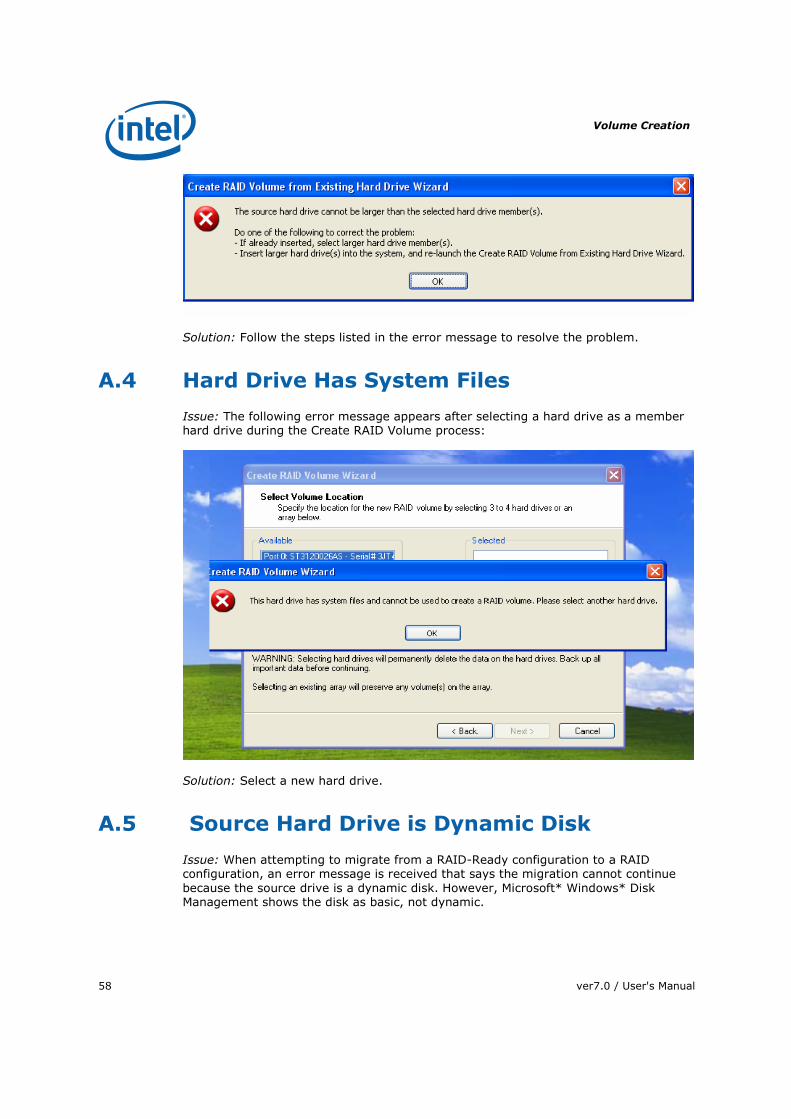
Issue: The following error message appears after selecting a hard drive as a member hard drive during the Create RAID Volume process:
Solution: Select a new hard drive.
A.5 Source Hard Drive is Dynamic Disk
Issue: When attempting to migrate from a RAID-Ready configuration to a RAID configuration, an error message is received that says the migration cannot continue because the source drive is a dynamic disk. However, Microsoft* Windows* Disk Management shows the disk as basic, not dynamic.

Volume Creation
ver7.0 / User's Manual 59
Solution: Reduce the size of the partition by a few MBs and see if that resolves the issue. See http://support.intel.com/support/chipsets/imsm/sb/CS-021322.htm for more information.