intellicold® pharmacy refrigerator operating · pdf fileintellicold® pharmacy...
TRANSCRIPT

www.labcold.com
IntelliCold® Pharmacy Refrigerator Operating Instructions

WEEE: Disposal at end of life. This equipment, when being disposed of in an EU Member State, is subject to the Waste Electrical and Electronic Equipment Regulations (WEEE) and must be recycled and disposed of in accordance with EU directive 2002/96/EC as applied in local laws of that State at the time of disposal. As this item is designed for medical or scientific use, before presenting for collection and disposal it will be necessary for the user to provide documentary evidence of decontamination and/or that it is entirely safe to handle and dismantle outside of a controlled environment. Goods that cannot be so certified fall outside the scope of the Directive and remain the user’s responsibility to dispose of.
Labcold recognises the benefit to the environment of this legislation and is designing products to allow more recycling and less impact on landfill. Please contact your vendor or local Labcold distributor for further advice on disposal of this product at the end of its useful life.
Operating instructions for your
IntelliCold® Pharmacy Refrigeratorfrom Labcold
ContentsBefore use ...............................................................................................................1
A closer look ......................................................................................................2
Alarm battery back up.......................................................2
Remote connections .........................................................2
Plug in and switch on ........................................................................................3
Muting the alarm....................................................................3
Front Panel display ................................................................................................4
High/low temperature alarm .........................................4
Door alarm ............................................................................5
Internal Light.............................................................................6
Minimum/Maximum Temperature Recording ........................................7
Minimum/Maximum Temperature Re-set ...............................................7
Using the SD Card................................................................................................8
Set the Timer...........................................................................9
Downloading data.............................................................11
Viewing data........................................................................12
Caring for your fridge.........................................................................................17
Loading.................................................................................17
Cleaning ...................................................................................17
Defrosting.............................................................................17
Error codes...........................................................................18
Standard Door Lock..........................................................18
Digital Door Lock..................................................................................................19
Trouble Shooting ..............................................................................................22
Useful Information............................................................................................24
IMPORTANT: These operating instructions contain information essential to the safe and reliable operation of your refrigerator. Failure to use your refrigerator in
accordance with these instructions may invalidate your warranty.PLEASE RETAIN AND KEEP IN A SAFE PLACE FOR FUTURE REFERENCE
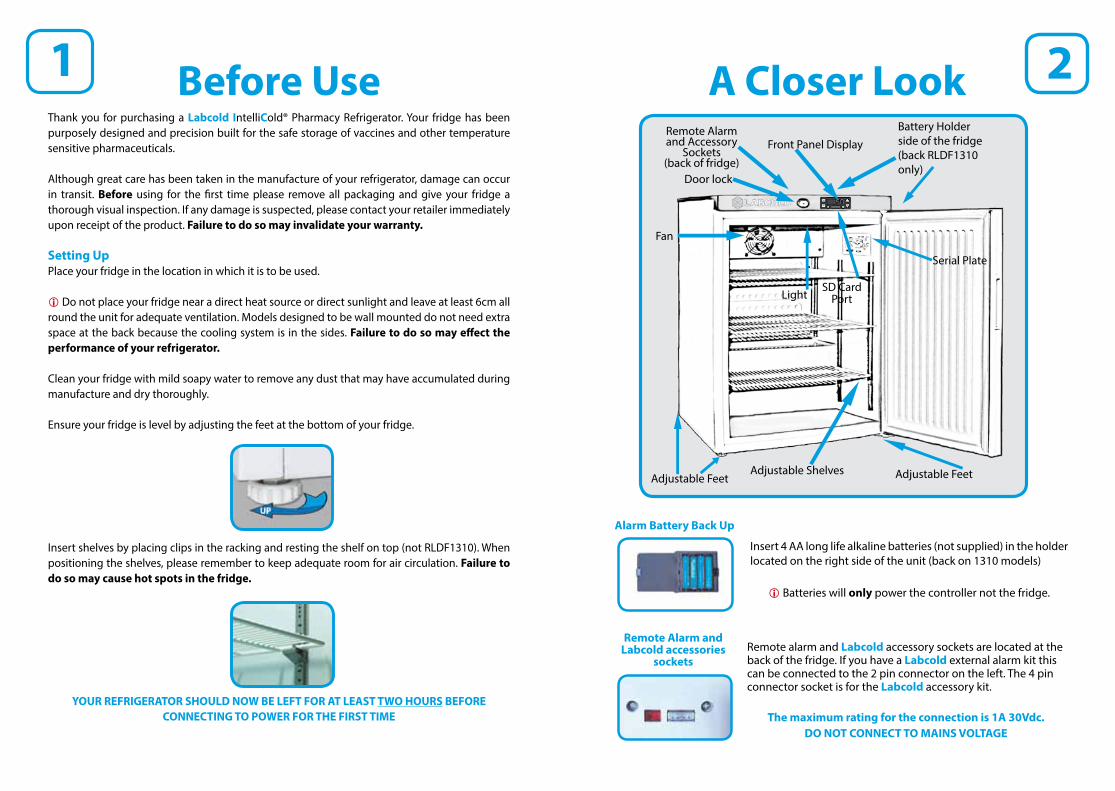
1 Before UseThank you for purchasing a Labcold IntelliCold® Pharmacy Refrigerator. Your fridge has been purposely designed and precision built for the safe storage of vaccines and other temperature sensitive pharmaceuticals.
Although great care has been taken in the manufacture of your refrigerator, damage can occur in transit. Before using for the first time please remove all packaging and give your fridge a thorough visual inspection. If any damage is suspected, please contact your retailer immediately upon receipt of the product. Failure to do so may invalidate your warranty.
Setting UpPlace your fridge in the location in which it is to be used.
Do not place your fridge near a direct heat source or direct sunlight and leave at least 6cm all round the unit for adequate ventilation. Models designed to be wall mounted do not need extra space at the back because the cooling system is in the sides. Failure to do so may effect the performance of your refrigerator.
Clean your fridge with mild soapy water to remove any dust that may have accumulated during manufacture and dry thoroughly.
Ensure your fridge is level by adjusting the feet at the bottom of your fridge.
Insert shelves by placing clips in the racking and resting the shelf on top (not RLDF1310). When positioning the shelves, please remember to keep adequate room for air circulation. Failure to do so may cause hot spots in the fridge.
YOUR REFRIGERATOR SHOULD NOW BE LEFT FOR AT LEAST TWO HOURS BEFORECONNECTING TO POWER FOR THE FIRST TIME
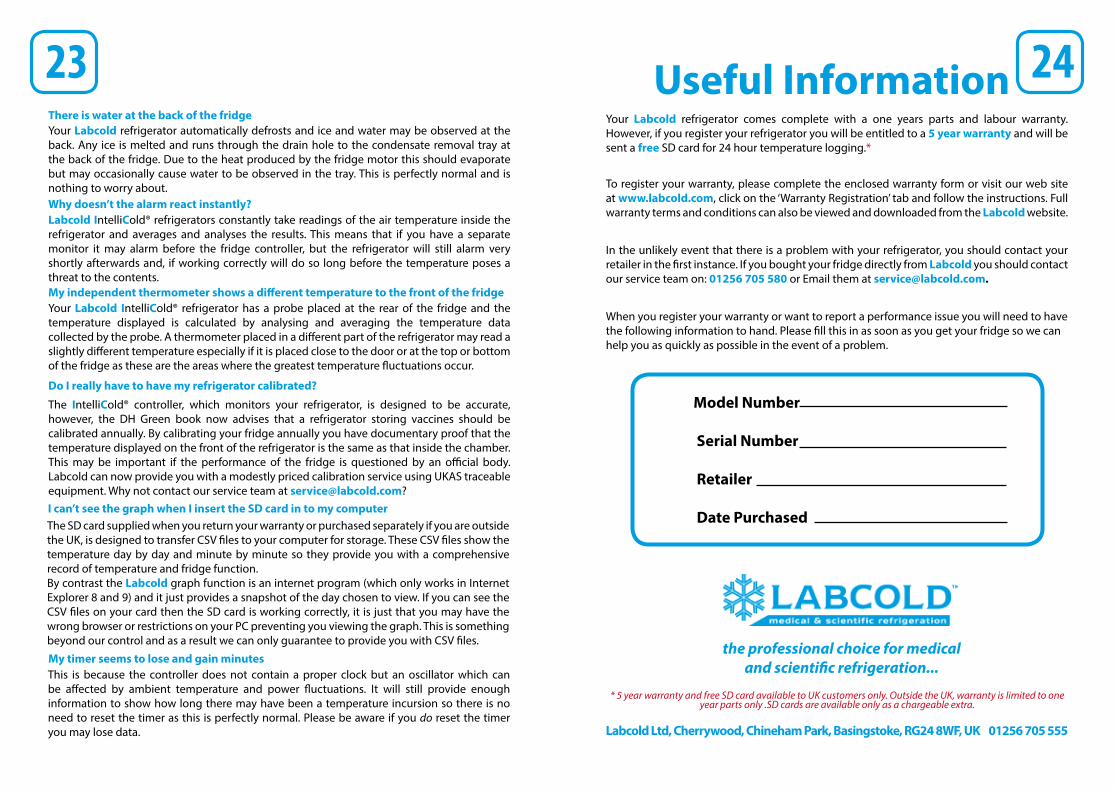
2A Closer Look
Alarm Battery Back Up
Remote Alarm andLabcold accessories
sockets
Insert 4 AA long life alkaline batteries (not supplied) in the holder located on the right side of the unit (back on 1310 models)
Batteries will only power the controller not the fridge.
Remote alarm and Labcold accessory sockets are located at the back of the fridge. If you have a Labcold external alarm kit this can be connected to the 2 pin connector on the left. The 4 pin connector socket is for the Labcold accessory kit.
The maximum rating for the connection is 1A 30Vdc. DO NOT CONNECT TO MAINS VOLTAGE
Door lock
Fan
Adjustable Feet Adjustable FeetAdjustable Shelves
Light
Front Panel Display
Battery Holderside of the fridge(back RLDF1310only)
Serial Plate
SD Card Port
Remote Alarmand Accessory
Sockets(back of fridge)

3 Plug in & switch onBefore plugging in your Labcold refrigerator for the first time make sure the power cable is free from damage and check that your voltage corresponds to that on the serial plate.
It is recommended that you do not use extension cords or multiple socket adapters. Make sure the power cable is not bent, pinched or compressed and that it can be easily accessed.
Once plugged in, the word Labcold will scroll across the display followed by a two digit model number. Alarms will then show on the display and you may hear the audible alarm as the fridge completes its start up diagnostic checks. This is because the controller is factory set to alarm when it senses the temperature inside the refrigerator is above 8oC or below 2oC. The refrigerator is now working and the sensors are detecting the ambient temperature. Once the fridge has cooled sufficiently it will cease to alarm. You can press the ‘alarm mute’ button (see figure 1 below) to cancel the alarms.
The display will then show the temperature inside the fridge correct to one decimal place. This temperature is the actual temperature recorded by the probes inside the refrigerator and as the fridge cools to the set point (factory set at 5oC) so the number on the display will descend accordingly.
ALTHOUGH THE REFRIGERATOR WILL REACH 5oC AFTER AN HOUR (APPROX) YOU SHOULD LEAVE THE FRIDGE RUNNING FOR 24 HOURS BEFORE FILLING WITH TEMPERATURE
SENSITIVE VACCINES AND PHARMACEUTICALS. It is important that you reset the maximum/minimum temperature record after you have loaded the refrigerator for the first time (please see page 7). This will ensure that your daily temperature record is accurate when you start to use the fridge for storing medicines.
Figure 1 - Alarm mute button
Figure 2 - Alarm mute display
4Front Panel Display
Opening for SD cardPress to view the set point of the fridge
Min/Max temperature display Light on
Light off
Confirm buttonAlarm Mute Button
High/Low Temperature Alarm
If the temperature in your refrigerator rises above 8oC an alarm will sound and the front panel will flash Hi and the current temperature inside the fridge. This information will display alternately.
The cause of the rise in temperature should be investigated immediately. Usually, it is simply because the door has been open for a long time or the fridge has been restocked, however, it is recommended that you check the fridge to make sure that the temperature is returning to normal after the alarm has been activated.
Digital temperature display
The display on the front of the refrigerator is designed to constantly show the temperature inside the fridge correct to one decimal place.

5
Door Alarm
If the door of the fridge is left open for more than 3 minutes an audible alarm will sound and the front panel will flash door and display the temperature inside the chamber alternately. If you want to silence the alarm if, for example, you are stocking the fridge, simply press the ‘alarm mute’ button under the temperature display (see page 3).
If the door has been left open for a prolonged period of time you may also experience a Hi alarm. This is because warm air from the room will have entered the fridge while the door was open. It is recommended that you close the door and check that the temperature on the display decreases until it settles around the set point.
IF THE ALARM IS MUTED IT IS TURNED OFF THE REFRIGERATOR WILL NOT ALARM AGAIN FOR THE SAME INCIDENT
If the temperature in your refrigerator drops below 2oC an alarm will sound and the front panel will alternately flash between Lo and the chamber temperature. There could be a number of reasons for this, such as extremely cold items being placed in the fridge.
The cause of the drop in temperature should be investigated immediately and the refrigerator should be monitored to check that it is returning to the correct temperature.
6Internal Light
Your refrigerator is fitted with an energy saving LED light which is factory set to go on when the door is opened and go out when the door is shut.
If you want to turn the light on temporarily you can press the ‘light on’ button and press the ‘light off’ button to turn it off again. The next time the door is opened, the light will return to automatic mode.
If you want the light to stay on all the time, press and hold the ‘light on’ button until the display shows L on. The light will now remain on irrespective of whether the door is closed or open.
If you want the light to remain off at all times, press and hold the ‘light off’ button until the display shows L off. The light will now remain off irrespective of whether the door is closed or open.
To return the light to automatic mode, simply press and hold both the ‘light on’ and ‘light off’ buttons until auto is shown on the display.
Light onButton
Light offButton

7 Min/Max Temperature RecordingThe DH Green Book Chapter 3 recommends that: ‘temperatures in the refrigerator must be monitored and recorded at least once each working day, and documented on a chart for recording temperatures’.
Your Labcold pharmacy refrigerator records the maximum high and minimum low temperatures when connected to mains electricity (if batteries are fitted, it will record when not connected). This information is stored until the fridge is reset.
This information can be accessed if you press the ‘Hi/Lo’ button and release. The display will show Hi and then the highest temperature recorded since the last reset, then Lo and display the lowest temperature.
Min/Max Temperature ResetOnce you have taken the temperatures for the day it is important that you reset the fridge. This is because the refrigerator will always display the high and low temperature since the last temperature reset. The refrigerator does not automatically reset.
To reset the minimum/maximum temperature press the ‘Hi/Lo’ button and hold. An alarm will sound and the current high and low temperatures will be displayed as above. Keeping your finger on the button, the display will then change to flash Hi Lo then revert to normal operation. This means you have successfully reset the minimum/maximum temperature display and the previous high and low temperatures have been deleted.
8When you register the warranty of your Labcold refrigerator (UK customers only, available for purchase elsewhere), you will be sent an SD card. Although it looks like a card you may have in your camera, this SD card will only work with your Labcold fridge and using it for any other purpose may render it unable to perform the data logging function.
Your Labcold refrigerator automatically records performance information such as door openings, temperatures etc. The SD card allows you to extract this information and store it on your computer and/or print hard copy. The information stored in the controller will cover the last 13 months and is not deleted from the fridges’ memory when uploaded. It is recommended that you do this on an annual basis (at least) and use a separate SD card. New cards are available at a small cost from Labcold. Please e-mail [email protected].
Only Labcold SD cards will work with Labcold Fridges
Using the SD Card
Requirements
Your Labcold RLDF/G 10 series pharmacy refrigerator is fitted with the unique IntelliCold® controller which stores temperature data for up to 13 months. To transfer this data to your PC you will require the following:
• A pre-programmed Labcold SD card supplied on return of warranty registration (UK customers only) or purchased separately. Only genuine Labcold SD cards will work with Labcold refrigerators.
• An SD card reader or port (not supplied)• CSV files will display on all PCs and Macs. To display Labcold graphical data you will
require a Windows® PC with Internet Explorer 8 & 9 installed as a web browser. The card will not display graphical data with any other browser, including Chrome.
• Fit batteries (not supplied) as shown on page 2 of the Operating Instructions. This will ensure that temperature logging and the internal clock will continue to operate during a power failure. Batteries must be changed yearly.
Please be aware that your Labcold SD card does not require any software to be downloaded to your computer and will not automatically copy data.
YOU REQUIRE ONE LABCOLD SD CARD PER FRIDGE, OTHERWISE DATA WILL BE LOST OR OVER WRITTEN
Earlier models will reset to the set point ie 5oC. The correct high/low reading will replace this reading as the refrigerator is used, however, if the high and low reading remains at 5oC
please contact the service team on 01256 705 580.

9When you use your Labcold SD card for the first time it is essential that you set the
current date and time. To do this you need to insert your SD card, snowflake side up in the slot underneath the temperature display as shown below.
The SD card will only go into the slot up to the top of the snowflake and should not be inserted any further
Once the card is inserted, wait 5 seconds then press the tick/confirm button located to the left of the display. The fridge will beep and then the word date will show on the display.
The display will then change to allow you to set the year.
10
Using the up and down buttons to the right of the screen, (the top button to increase the number, the bottom to decrease), set the numbers to the last two digits of the current year ie for 2014 select 14.
When you have set the correct year, simply press the tick button and the display will then change to allow you to set the month.
To set the month, use the up and down buttons on the right, with 1 being January, 2 being February etc.
Press the tick button when you have the correct month. The display will then change to allow you to select the day.
To set the day, use the up and down buttons on the right until the display shows todays date.
Press the tick button when you have the correct day. The display will then change to allow you to set the time.
Firstly, you need to set the hour by using the buttons on the right of the display.
Press the tick button when you have the correct hour. The display will then change to allow you to set the minutes.
Set the minutes by using the up and down buttons on the right. When you have the correct digits, press the tick button.
The fridge display will now revert to showing the temperature and the internal timer inside your controller is now set. The card can be removed. Once the timer is set, DO NOT reset it or adjust it, even for changes to GMT or BST, otherwise you will lose data.
IF YOUR REFRIGERATOR DOES NOT HAVE BATTERIES INSTALLED AS A BACK UP, IN THE EVENT OF A MAINS POWER FAILURE THE TIMER MAY NEED TO BE RE-SET. FOLLOW THE INSTRUCTIONS ABOVE TO SET THE TIMER AND PLEASE BE AWARE THAT TEMPERATURE
DATA MAY BE LOST AS A RESULT.
Although the Labcold IntelliCold® controller can store up to 13 months worth of temperature data, it is strongly recommended that temperature data is downloaded every week and stored to your computer or printed as a hard copy.
The refrigerator records the conditions inside the chamber every minute and all this information is downloadable to your Labcold SD card. Although the card can store up to 10 years of data, we recommend that you use a new card every year.
IN THE UNLIKELY EVENT THAT YOU HAVE A PROBLEM WITH YOUR LABCOLD REFRIGERATOR, THE SERVICE TEAM MAY ASK YOU TO DOWNLOAD TEMPERATURE DATA
TO HELP RESOLVE THE ISSUE.
Setting the Timer

11
Insert your Labcold SD card in the SD card slot and press the tick button. It may take up to 5 seconds for the card to register. The display will change from showing the temperature to showing the word load. To download the data, press the tick or confirm button.
The display will then show the number of days the fridge has been running since the data was last downloaded and count down as the data is copied to the card.
If the data has not been downloaded for a long time this may take some time. This is perfectly normal.
When the data has finished downloading, the display will change to show date.
To NOT reset the timer, simply press the button with the cross on it (decline) located on the right side of the SD card slot as shown above. The display will now show done, Aoff and then revert to the current temperature, you can then remove your card. However, if you need to reset the timer, you can now do so by following the instructions on page 9 .
The SD card now has all the temperature data copied to it since the timer was first set on the refrigerator or the last time the data was downloaded from the controller.
The Labcold SD card can now be inserted into a SD card reader attached to a computer to view CSV files. To view the Labcold graph you require a Windows® enabled PC on which Internet Explorer 8 or 9 is installed.
Slot for SD card
Confirm button
Insert card printed side up
Remove card when the display reads done
12
Decline button
Please be aware that you can only view the Labcold graphing software if the file is opened on a Windows® enabled PC in Internet Explorer 8 and 9. CSV files of the stored
data are also provided, and can be opened in any spread sheet application.
Insert your SD card in to a suitable card reader. Open the card in the usual way on your computer. A screen will display similar to this:
A CSV file date 111001 (YY.MM.DD) or 1st October 2011 will always be in the file list. This is not a file recorded from your fridge, but is on the card to give you an opportunity to view
sample data
Click this if you want to use the Labcold graphical viewer. (Works on a PC in
Internet Explorer 8 and 9 only)Soft copy of instructions
CSV files arranged in date descending order
Viewing DataDownloading Data
Please be aware that resetting the date or time may delete and alter data. We recommend that once the timer is set it should not be altered until you get a new card
or power is lost to the controller.

13Opening a CSV File
The Labcold SD card and data download function are primarily designed to allow the capture of temperature data in CSV format which is readable by any spreadsheet
application such as Excel. From this data can then be viewed, saved and displayed graphically if required.
The CSV files will display in date order. The date is shown in reverse for ease of sorting so the first two digits are the year, followed by the month and then the day (YY.MM.DD). A file for the 1st October 2011 is always displayed. This is test data only and is not a reading from your refrigerator. These files can be saved to your computer and will open in any spreadsheet application.
When you open the CSV file it will display readings taken every minute for the date chosen.
The columns read from left to right. The third column is for a second probe. If no probe is installed this column will read at absolute zero (-273.15) which is normal and nothing to worry about. The codes for the other columns are as follows:
COLUMN CODE
A Time Time of reading
B T1 Temperature Probe 1
C T2 Temperature Probe 2
D D Later models 1(on) or 0(off) Door Open
E C Later models 1(on) or 0(off) Compressor Running
F F Later models 1(on) or 0(off) Fan Running
G I Later models 1(on) or 0(off) Light on
H H Later models 1(on) or 0(off) High alarm
I L Later models 1(on) or 0(off) Low alarm
J B Later models 1(on) or 0(off) Battery alarm
K P Later models 1(on) or 0(off) Power off alarm
14
You may see these warning messages (depending on your security settings) when you try to view the graph. Please click ‘allow’. The SD card will not copy to or from your computer
any data or software.
This will now take you to the welcome screen. The screen will open the current month. You can use the arrows next to the word ‘Today’ to select the day, month and even year you require. The earliest date to be viewed will be 1st October 2011.
To view the day you require, click the date on the calendar, the square will then outline in blue and then click on the button ‘Show Selected Data’ located beneath the calendar.
Your data for the day will now display as a graph for the 24 hours of the date selected. For ease of use, if you move your cursor across the graph, the temperature will display in degrees centigrade along with any events.
Click on LabcoldDataLogView.htm as highlighted above. The screen will then change and you may be asked if you want to allow blocked content. Please click ‘allow’.
Using the Labcold Graph Viewer
A secondary graphing option is provided on the Labcold SD card for your convenience. It has been designed to work with Internet Explorer 8 and 9, so may not work on all PCs. If you can see and download the CSV files it indicates that the SD card is functioning correctly. Inability to also view the Labcold graphing option via IE8 or 9 means that there is an incompatibility in your software, hardware or security settings which should be referred to your IT administrator.

15
Please be aware that the boxes beneath the graph have to be ticked for that event to show as a label.
To view data in more detail simply click and hold the button on your mouse and drag for the selected period. This drill down will then display on its own. To return to the full graph, click on the ‘Zoom All Data’ icon on the top left of the graph.
This data will remain on your card so you can just close the Internet tab in the usual way and it will be available when you next insert the card. Should you require a printed copy, just use control + P.
If you want to save all the readings to your computer it is recommended that you download and save your CSV files. This function should work regardless of browser and will provide performance data for every minute that the refrigerator is in operation.
16
IMPORTANT: READ THIS AGREEMENT CAREFULLY. BY INSTALLING, COPYING, RUNNING OR OTHERWISE USING THE LABCOLD SOFTWARE, YOU AGREE TO BE BOUND BY THE TERMS OF THIS LICENSE AGREEMENT. IF YOU DO NOT AGREE TO THE TERMS OF THIS LICENSE AGREEMENT, PLEASE DO INSTALL, RUN, COPY, OR OTHERWISE USE THE LABCOLD SOFTWARE.
This licence agreement(“Licence”) is a legal agreement between you and Labcold Ltd (“Labcold”) concerning your use of the Labcold Software, together with any electronic documentation that may be provided therewith (collectively “the Software”) through the Software. YOU HEREBY AGREE, BOTH ON YOUR OWN BEHALF AND AS AN AUTHORIZED REPRESENTATIVE OF ANY ORGANIZATION FOR WHICH YOU ARE USING THE SOFTWARE (“Employer”), THAT YOU AND THE EMPLOYER WILL USE THE SOFTWARE ONLY IN ACCORDANCE WITH THE FOLLOWING TERMS:
1. Disclaimer of Warranty. You expressly acknowledge and agree that use of the Software is at your sole risk. The Software is provided “as is”, with all faults and without warranty of any kind. Labcold does not warrant that the functions contained in the Software will meet your requirements or those of the Employer, or that the operation of the Software will be uninterrupted or error-free. Furthermore, Labcold does not warrant or make any representation regarding the use or the results of the use of the Software (including the related documentation) in terms of their correctness, accuracy, reliability or otherwise.
LABCOLD EXPRESSLY DISCLAIMS ANY WARRANTY OF MERCHANTABILITY, FITNESS FOR A PARTICULAR PURPOSE OR TITLE WITH RESPECT TO THE SOFTWARE.
The Software may be provided with third-party plug–ins or third-party software or this Software may be provided as a plug-in for or otherwise in association with third-party software. Use of such third-party software will be governed by the applicable license agreement, if any, with such third party.
LABCOLD IS NOT RESPONSIBLE FOR ANY THIRD-PARTY SOFTWARE AND WILL HAVE NO LIABILITY OF ANY KIND FOR YOUR USE OF SUCH THIRD-PARTY SOFTWARE AND MAKES NO WARRANTY OF ANY KIND WITH RESPECT TO SUCH THIRD-PARTY SOFTWARE.
2. Limitation of Liability. In no event will Labcold’s total liability for all damages exceed the amount of money paid to Labcold for the Software that caused the damages unless caused by the gross negligence or intentional misconduct of Labcold.
UNDER NO CIRCUMSTANCES, INCLUDING NEGLIGENCE, WILL LABCOLD BE LIABLE FOR ANY INCIDENTAL, SPECIAL, INDIRECT, PUNITIVE, OR CONSEQUENTIAL DAMAGES, INCLUDING LOST DATA, LOST REVENUE, OR LOST PROFITS, ARISING OUT OF OR RELATING TO THIS LICENSE OR THE SOFTWARE UNLESS CAUSED BY THE GROSS NEGLIGENCE OR INTENTIONAL MISCONDUCT OF LABCOLD.
3. Licence Grant. Subject to the terms and conditions of this Agreement and upon Licensee’s registration or purchase of the Labcold refrigeration product with which the Software is to be used, Labcold grants to you, and you accept, a personal, non-exclusive, non-transferable licence to install and use the Software at a single machine. This Licence is effective until terminated as provided below. You may terminate this Licence by destroying the Software and any copies of the Software in your possession. This Licence will terminate automatically upon any violation of its terms by you or the Employer.
4. Support and upgrading. Licensee is entitled to receive, upon request, version upgrades of the Software at no additional fees. No support is provided for this product by Labcold.
5. Licence Restrictions. You may not do any of the following yourself, or through any third party, and you may not permit any third party with whom you have a business relationships to do any of the following: (A) modify or create derivative works based upon the Software: (B) decompile, disassemble or reverse engineer the Software in whole or in part; (C) defeat, disable, or circumvent any protection mechanism related to the Software; (D) use the Software or any parts of it to develop a product directly competing with the Software.
6. Title and Ownership. This Software is protected by copyright laws and international treaty provisions. Except for the rights expressly granted above, this License transfers to you no right, title or interest in the Software, or any copyright, patent, trademark, trade secret, or other intellectual property or proprietary right in the Software. Labcold retains sole and exclusive title to all portions of the Software and any copies thereof. You agree not to disclose the Software to anyone.
7. Indemnification. Licensor will indemnify Licensee against liability to third parties resulting from claims that the Licensed Software infringes on or violates any patents, copyrights, trade secrets or any other intellectual property rights of such third parties.
8. Controlling Law and Severability. This Licence will be governed by the laws of England and Wales. If for any reason a court of competent jurisdiction finds any provision or portion thereof, to be unenforceable, such provision will be interpreted in order to give effect to such provision to the maximum extent permitted by law, and the remainder of this Licence will continue in full force and effect.
9. Complete Agreement. This Licence constitutes the entire agreement between parties with respect to the use of the Software and supersedes all prior or contemporaneous understandings regarding such subject matter. No amendment to or modification of this Licence will be binding unless in writing and signed by Labcold.
LABCOLD SOFTWARE (LABCOLD DATA LOG VIEWER)SINGLE USER LICENCE AGREEMENT

Caring for your FridgeAs with all refrigerators, your Labcold pharmacy and vaccine fridge, although designed to provide you with many years of fault free service, will perform better if attention is paid to the loading of the fridge and it is regularly cleaned and defrosted.
Loading In order to ensure even temperature distribution throughout your refrigerator it is important that :• The fridge is not overloaded. It is recommended the fridge is only partially filled (around
50%) and even at maximum stock level the content should not exceed two thirds (66%) of the fridges’ capacity.
• The contents are not packed too closely together.• The contents do no touch the wall or the bottom of the fridge and are stored away from
the fan.• When loading new stock in to the fridge, ensure product with the earliest expiry date
are at the front and used first.• After restocking the fridge, check the temperature 10 minutes later to ensure that the
fridge is cooling down, running satisfactorily and is not overstocked.Cleaning
Defrosting
It is recommended that your fridge is cleaned on a regular basis.
It is essential that you unplug the refrigerator from the mains and transfer the contents where they can be stored and monitored at the correct temperatures before
cleaningWhen cleaning you should:• Remove the shelves and clean with weak soapy water. Do not use strong detergents
or bleach• Wipe the inside of the fridge in the same solution and dry with a soft cloth. Take care
to avoid the light fitting and ensure that the drain hole at the back of the fridge is clear of debris
• Wipe the door seal with a damp cloth. Do not use strong detergents or bleach• Gently remove the dust on the back of the fridge. Take care not to damage the pipes
Although your Labcold fridge features automatic off-cycle defrosting, it is recommended that it is defrosted manually if there is a build up of ice. This can happen in times of high humidity, if the door has been opened for a long time, it is overstocked or the ambient temperature is high.
It is essential that you unplug the refrigerator from the mains and transfer the contents where they can be stored and monitored at the correct temperatures before
defrosting
To defrost you should:• Leave unplugged with the door open for at least 6 hours at room temperature or until
any ice is melted. Do not use a sharp implement to remove ice as this will damage the coating of the fridge
• Dry thoroughly and remove any surplus water before returning to use• Leave cooling for at least 6 hours before reloading with vaccines or pharmaceuticals
17 18
Your Labcold pharmacy and vaccine fridge is fitted as standard with a door lock with 2 keys unless the digital lock has been specified. To lock, push the key in gently and twist 90o to the left, to unlock twist 90o to the right. The key can be safely removed from both the locked and unlocked positions.Keys should not be left in the lock as they protrude from the fridge. They could cause a
health and safety hazard or could be knocked, which may damage the lock.
The display on your fridge is designed to display error codes. If you see one it is because the controller, which performs continuous diagnostic system checks, has detected a problem. Most require immediate action.
batt - this means that the batteries need changing. It will only display if batteries are fitted and you can still use the fridge safely
Poff - when this displays it means there is or has been a power failure. If batteries are fitted this will display even if the mains power is off
Start Error - when this displays it means there is a total system failure. Do not use the fridge, remove contents. Please contact your retailer
NTC - when this displays it means that the temperature probe has failed. Do not use the fridge, remove contents. Please contact your retailer
If, when the fridge is first plugged in the display shows test or it continually displays the first two digits of the model number ie 02 (with no decimal point) or the display does not change to an alarm state or show a temperature value after a few minutes, there is a system failure. Do not use the fridge, contact your retailer.
If the display is blank it means either that the controller is not working correctly or the fridge is not getting power. You can check this. If the light comes on when the door is opened and you can hear the fridge working and it feels cold inside it means the display may be faulty. If the light does not come on and the fridge does not feel cold do not use the fridge, please remove contents and contact your retailer.
Error Codes
Door Lock

19 20Getting Started
If the optional Labcold digital lock has been specified this replaces the standard key lock and keys. Your DIGILOCKDF10 is supplied ready for use and fully tested. The door of your IntelliCold® refrigerator will be locked. In order to open the door the controller requires power, so please follow the instructions for your refrigerator. To ensure the lock works in the event of a power failure you must install batteries for the alarm battery backup system as per the instructions.
IF BATTERIES ARE NOT FITTED, THE LOCK WILL NOT OPEN IF THERE IS A POWER FAILURE
The blue LED light will now flash (approximately every 10 seconds) to show that the lock is working and the door is secure.
Opening the door
Once the refrigerator has power, you can now open the door using the factory set code of * 1 2 3 4 5 #
Press the black buttons using the above code and you will hear the lock beginning to operate. The LED will flash rapidly.
Do NOT open the door during this time or you may damage the lock
If the LED light flashes slowly it means the code was not entered correctly or not accepted by the lock. Try again to enter the code taking care to ensure the correct digits are used. When the LED is a constant blue it is safe to open the door.
If you do NOT open the door within 30 seconds the door will re-lock automatically
Digital Door Lock
→LED light
Closing the door
While the door is open the lock will remain in the open state with the pawl retracted. Once the door is closed, the LED light will flash four times and then flash rapidly. You will hear a noise and then the pawl will descend and the door will be locked. This process is factory set to take 5 seconds.
Attempting to open the door during this process may damage the lock
Programming the DIGILOCKDF10
Your DIGILOCKDF10 allows you to change the factory settings in a number of ways so you can tailor the operation of the lock to suit your needs. It is advised that you change the default access code for maximum security. You may also want to change the length of time the lock remains open once the code is entered or takes to lock after closing.
Before you can change the code, you must open the door using the code supplied.
IMPORTANT: The refrigerator door MUST remain open while being re-programmed
Changing the Access Code
When delivered your lock has the access code * 1 2 3 4 5 # as the default setting. It is advised that you change this before operation to a different code of either four, five or six digits using the instructions below. Please note any new number will have to start with a * and end with #
Four digit Access Code
With the door open key in:
* 4 # a b c d #
where a b c d are the NEW digits of the code.Once the door is shut you will need to use this
code to open the door
New code is:
*££££#
Five digit Access Code
With the door open key in:
* 5 # a b c d e #
where a b c d e are the NEW digits of the code.Once the door is shut you will need to use this
code to open the door
New code is:
*£££££#
Six digit Access Code
With the door open key in:
* 6 # a b c d e f #
where a b c d e f are the NEW digits of the code.Once the door is shut you will need to use this
code to open the door
New code is:
*££££££#

DO NOT LOSE THE CODE AS THE DOOR CANNOT BE OPENED WITHOUT IT
Please be aware that if you lose the codes for the refrigerator you will be unable to open the fridge without either removing the door or contacting our Technical Service Department for an engineer visit.
Should you need assistance please call 01256 705 580 or e-mail [email protected]
21 22
Changing the time delays
When delivered, your lock has a time delay of 30 seconds from the time the correct code is entered for the door to be opened and a delay of 5 seconds before the door locks after closing.
To change these times, please follow the instructions below:
To set the time allowed between the access code being entered and the door being opened(default time 30 seconds)
With the door open key in:
* 2 # x y #
where x and y are the NEW time in seconds.You can choose from 5 to 99 seconds.
For second values under 10 please code 05, 06 etc
To set the time between the door being closed and the lock engaging(default time 5 seconds)
With the door open key in:
* 3 # x y #
where x and y are the NEW time in seconds.You can choose from 5 to 99 seconds.
For second values under 10 please code 05, 06 etc
Should you experience a problem when programming the lock the LED will flash rapidly. This means you need to restart the sequence by keying * # . The LED will stop flashing and remain on to show it can now be re-programmed.
If you want to return to the factory settings key in * 1 #
Trouble ShootingMy refrigerator is not working?• Check that the fridge is plugged in and the plug socket is turned on• Try another appliance in the power socket. If this appliance works but your fridge
doesn’t, please contact your retailerThere is water in my fridgeAs part of the automatic off cycle defrost, ice is melted and runs in to the drain hole at the back of the fridge. If this is blocked, water will remain inside the fridge. Please check and clear the drain hole so water can run away freely.The sides of my fridge are hotThe models RLDF/G0110 and RLDF/G0210 have the condenser in the side wall of the refrigerator so the units can be wall mounted. This gives out heat as part of normal operation and is nothing to worry about.
My fridge is making a gurgling noiseAll Labcold refrigerators work by evaporating an environmentally friendly gas. This is what causes the back of the refrigerator to get cold, and as part of this process the gas has to turn back in to liquid. This is why sometimes you will hear liquid sounds coming from the fridge.There is condensation on the glass door of my fridgeIf the fridge door is left open too long, or the fridge is over full, or is working in a high ambient temperature or humid conditions, condensation may form. This is a normal part of the refrigeration process and as long as the temperatures remain in range, is nothing to worry about. Labcold IntelliCold® Pharmacy Refrigerators are designed for temperate climates, 16o to 32oC, with a humidity of 60% RH.
There is ice in my fridgeSmall accumulations of ice on the cold plate are quite normal and should melt away after a few minutes. Larger accumulations can occur for a variety of reasons:• The room is too warm or even damp• The temperature is set too low - please check the set point by pushing the set button.
Please contact the Labcold service team if the set point is too low (i.e below 3oC).• The door is left open too long
The fridge is rockingThis is because the refrigerator is not on a level surface. Check that the feet have been adjusted so the top of the fridge is level and the refrigerator is standing on a hard surface.
How do I check the set point?All Labcold pharmacy refrigerators have a factory set point of 5oC. This is the manufacturers recommend temperature for the storing of vaccines. If you press the set button on the front it will show the temperature the fridge is set to. Should you wish to change the set point please contact the Labcold service team at [email protected].
Labcold IntelliCold® refrigerators constantly take readings of the air temperature inside the refrigerator and averages and analyses the results. This means that if you have a separate monitor it may alarm before the fridge controller, but the refrigerator will still alarm very shortly afterwards and, if working correctly will do so long before the temperature poses a threat to the contents.
Why doesn’t the alarm react instantly?
There is water at the back of the fridgeYour Labcold refrigerator automatically defrosts and ice and water may be observed at the back. Any ice is melted and runs through the drain hole to the condensate removal tray at the back of the fridge. Due to the heat produced by the fridge motor this should evaporate but may occasionally cause water to be observed in the tray. This is perfectly normal and is nothing to worry about.
23 Useful InformationYour Labcold refrigerator comes complete with a one years parts and labour warranty. However, if you register your refrigerator you will be entitled to a 5 year warranty and will be sent a free SD card for 24 hour temperature logging.*
To register your warranty, please complete the enclosed warranty form or visit our web site at www.labcold.com, click on the ‘Warranty Registration’ tab and follow the instructions. Full warranty terms and conditions can also be viewed and downloaded from the Labcold website.
In the unlikely event that there is a problem with your refrigerator, you should contact your retailer in the first instance. If you bought your fridge directly from Labcold you should contact our service team on: 01256 705 580 or Email them at [email protected].
When you register your warranty or want to report a performance issue you will need to have the following information to hand. Please fill this in as soon as you get your fridge so we can help you as quickly as possible in the event of a problem.
Model Number
Serial Number
Retailer
Date Purchased
the professional choice for medical and scientific refrigeration...
Labcold Ltd, Cherrywood, Chineham Park, Basingstoke, RG24 8WF, UK 01256 705 555
* 5 year warranty and free SD card available to UK customers only. Outside the UK, warranty is limited to one year parts only .SD cards are available only as a chargeable extra.
24
My independent thermometer shows a different temperature to the front of the fridgeYour Labcold IntelliCold® refrigerator has a probe placed at the rear of the fridge and the temperature displayed is calculated by analysing and averaging the temperature data collected by the probe. A thermometer placed in a different part of the refrigerator may read a slightly different temperature especially if it is placed close to the door or at the top or bottom of the fridge as these are the areas where the greatest temperature fluctuations occur.
Do I really have to have my refrigerator calibrated?
The IntelliCold® controller, which monitors your refrigerator, is designed to be accurate, however, the DH Green book now advises that a refrigerator storing vaccines should be calibrated annually. By calibrating your fridge annually you have documentary proof that the temperature displayed on the front of the refrigerator is the same as that inside the chamber. This may be important if the performance of the fridge is questioned by an official body. Labcold can now provide you with a modestly priced calibration service using UKAS traceable equipment. Why not contact our service team at [email protected]?I can’t see the graph when I insert the SD card in to my computerThe SD card supplied when you return your warranty or purchased separately if you are outside the UK, is designed to transfer CSV files to your computer for storage. These CSV files show the temperature day by day and minute by minute so they provide you with a comprehensive record of temperature and fridge function. By contrast the Labcold graph function is an internet program (which only works in Internet Explorer 8 and 9) and it just provides a snapshot of the day chosen to view. If you can see the CSV files on your card then the SD card is working correctly, it is just that you may have the wrong browser or restrictions on your PC preventing you viewing the graph. This is something beyond our control and as a result we can only guarantee to provide you with CSV files.
My timer seems to lose and gain minutesThis is because the controller does not contain a proper clock but an oscillator which can be affected by ambient temperature and power fluctuations. It will still provide enough information to show how long there may have been a temperature incursion so there is no need to reset the timer as this is perfectly normal. Please be aware if you do reset the timer you may lose data.

www.labcold.com