intended use - whirlpool emeadocs.whirlpool.eu/_doc/501930000591en.pdf · chart and installation...
TRANSCRIPT

INTENDED USEThis washing machine is exclusively destined to treat machine washable laundry in quantities which are usual for private households.• Observe the instructions given in these
Instructions for Use, the Installation Guide and the Programme Chart when using the washing machine.
• Keep these Instructions for Use, the Programme Chart and the Installation Guide; if you pass on the washing machine to another person, also give him/her Instructions for Use, Programme Chart and Installation Guide.
SAFETY AND GENERAL RECOMMENDATIONS1. Safety instructions• The washing machine is
appropriate for indoor use only.
• Do not store flammable fluids near the appliance.
• The washing machine can be operated by children from the age of 8 years up, as well as by people with reduced physical, sensory or mental capabilities or lack of experience and knowledge, provided they are supervised or instructed regarding the safe use of the washing machine and they understand the dangers resulting from the use. Children must not play with the washing machine. Care and maintenance works on the washing machine must not be carried out by children without being supervised.
• Do not operate the washing machine at temperatures below 5 °C.
• If you want to place a dryer on top of your washing machine, first contact our After-Sales Service or your specialist dealer to verify if this is
possible. This is only admitted if the dryer is fixed on the washing machine by using an appropriate stacking kit available through our After-Sales Service or your specialist dealer.
• After installation, access to the mains plug or to disconnection from mains supply must be ensured at all times via a double-pole switch.
• Turn off the tap when not in use.
• Before any cleaning and maintenance switch off the machine or disconnect it from the mains.
• Never open the door forcibly or use it as a step.
• If necessary, the power cable may be replaced with an identical one obtained from our After-Sales Service. The power cable must only be replaced by a qualified technician or by our After-Sales Service, to avoid dangers.
EN 1

2. Packaging• The packaging material is entirely recyclable,
and marked with the recycling symbol . Adhere to current local regulations when disposing of packaging material.
3. Disposing of packaging and scrapping old washing machines
• The washing machine is built from reusable materials. It must be disposed of in compliance with current local waste disposal regulations.
• Before scrapping, remove all detergent residues and cut off the power cable so that the washing machine is made unusable.
• This appliance is marked according to the European directive 2002/96/EC on Waste Electrical and Electronic Equipment (WEEE).By ensuring this product is disposed of correctly, you will help prevent potential negative consequences for the environment and human health, which could otherwise be caused by inappropriate waste handling of this product.
The symbol on the product, or on the documents accompanying the product, indicates that this appliance may not be treated as household waste. Instead it shall be handed over to the applicable collection point for the recycling of electrical and electronic equipment. Disposal must be carried out in accordance with local environmental regulations for waste disposal.For more detailed information about treatment, recovery and recycling of this product, please contact your local city office, your household waste disposal service or the shop where you purchased the product.
4. FrostDo not place the washing machine in a room prone to frost. If you must, make sure that the washing machine is completely drained after each wash:• Remove inlet hose(s) from water tap and let the
water flow out completely.• Remove drain hose from siphon or handwash
basin and let the water flow out completely.• Empty residual water inside the machine by
following the instructions in the chapter “Draining Residual Water”; tilt the appliance forward with two persons to let the rest water flow out completely.
5. EC Declaration of Conformity• The appliance conforms to the following
European Standards:2006/95/EC Low Voltage Directive2004/108/EC Electromagnetic Compatibility Directive
The Manufacturer is not liable for any damage to laundry resulting from inadequate or incorrect fabric care instructions which have been provided with the garment or article.
EN 2

BEFORE USING THE WASHING MACHINE1. Removing the packaging and inspection• After unpacking, make sure that the washing
machine is undamaged. If in doubt, do not use the washing machine. Contact After-Sales Service or your local retailer.
• Keep the packaging materials (plastic bags, polystyrene parts, etc.) out of reach of children, as they are potentially dangerous.
• If the appliance was exposed to the cold prior to delivery, keep it at room temperature for a few hours before operating.
2. Remove the transport bolts• The washing machine is fitted with transport
bolts to avoid any possible damage to the interior during transport. Before using the machine, it is imperative that the transport bolts are removed.
• After their removal, cover the openings with the 4 enclosed plastic caps.
3. Install the washing machine• Remove the protective film from the control
panel (if available on your model).• Move the appliance without lifting it by the
worktop.• Install the appliance on a solid and level floor
surface, preferably in a corner of the room.• Make sure that all four feet are stable and resting
on the floor and then check that the washing machine is perfectly level (use a spirit level).
• In case of wooden or so-called “floating floors” (for instance certain parquet or laminate floors), place the appliance on a sheet of plywood at least 60 x 60 cm wide/deep and at least 3 cm thick which is secured to the floor.
• Make sure that the ventilation openings in the base of your washing machine (if available on your model) are not obstructed by a carpet or other material.
4. Water inlet• Connect the water inlet hose(s) to the drinking
water supply in accordance with the regulations of your local water company.
• For models with one inlet valve: cold water• For models with two inlet valves: cold AND hot
water, or cold water only (see separate Installation Guide).
• Water tap: 3/4” threaded hose connector
• Water pressure (flow pressure): 100-1000 kPa (1-10 bar).
• Use only new hoses to connect the washing machine to the water supply. Used hoses must not be used and should be discarded.
• For models with hot fill: the hot water inlet temperature must not exceed 60 °C.
5. Drain• Connect the drain hose to the siphon or any
other outlet for drain water (see separate Installation Guide).
• If the washing machine is connected to an integrated drainage system, ensure the latter is equipped with a vent to avoid simultaneous loading and draining of water (siphoning effect).
6. Electrical connection• Electrical connections must be carried out by a
qualified technician in compliance with the manufacturer’s instructions and current standard safety regulations.
• Data regarding voltage, power consumption and protection requirements is given on the inside of the door.
• The appliance must be connected to the mains by means of a socket with an earth connection in accordance with current regulations. The washing machine must be earthed by law. The manufacturer declines all liability for damage to property or injury to persons or animals due to non-compliance with the directions given above.
• Do not use extension leads or multiple sockets.• Before any maintenance on the washing
machine disconnect it from the mains supply.• Do not operate the washing machine if it has
been damaged during transport. Inform the After-Sales Service.
• Mains cable replacement is only to be carried out by After-Sales Service.
• When using a residual current circuit breaker (RCCB), only use a model marked with .
EN 3

DESCRIPTION OF THE WASHING MACHINE
DOOR
BEFORE THE FIRST WASH CYCLE
1. Worktop2. Control panel3. Detergent dispenser4. Service plate (inside the door)5. Door6. Pump access with filter and emergency drain hose (if available) behind the plinth7. Adjustable feet
To open the door, hold the door handle and pull the door. Close the door by pressing it without excessive force until it clicks shut.
To remove any residual water used in testing by the manufacturer, we recommend that you carry out a short wash cycle without laundry.1. Open the tap.2. Close the door.3. Add a small amount of detergent (maximum 1/3 of the quantity the detergent manufacturer
recommends for lightly soiled laundry) to the main wash chamber of the detergent dispenser.4. Select and start programme “Synthetics” at 60 °C (see separate programme chart).
Depending on the model:
EN 4

PREPARATION OF THE WASHING1. Sort the laundry according to...• Type of fabric / care label symbol
Cottons, mixed fibres, easy care/synthetics, wool, handwash items.
• ColourSeparate coloured and white items. Wash new coloured articles separately.
• SizeWash items of different sizes in the same load to improve washing efficiency and distribution in the drum.
• DelicatesWash small items (e.g. nylon stockings, belts etc.) and items with hooks (e.g. bras) in a cloth bag or pillow case with zip. Always remove curtain rings or wash curtains with the rings inside a cotton bag.
2. Empty all pocketsCoins, safety pins etc. can damage your laundry as well as the appliance drum and tub.
3. FastenersClose zips and fasten buttons or hooks; loose belts or ribbons should be tied together.
Stain removal
• Blood, milk, eggs etc. are generally removed by the automatic enzyme phase of the programme.
• To remove red wine, coffee, tea, grass and fruit stains etc. add a stain remover to the main wash chamber of the detergent dispenser.
• Pre-treat heavily-soiled areas with stain remover if necessary.
Dyeing and bleaching• Only use dyes and bleaches that are suitable
for washing machines.• Follow the Manufacturer’s instructions.• Plastic and rubber parts of the washing
machine can be stained by dyes or bleaches.Loading the laundry1. Open the door.2. Load the articles one at a time loosely into the
drum, without overfilling. Observe the load sizes given in the programme chart. Note: overloading the machine will result in unsatisfactory washing results and creased laundry.
3. Close the door. Take care that no laundry gets stuck between door and door seal.
DETERGENTS AND ADDITIVESKeep detergents and additives in a safe, dry place out of the reach of children.Do not use any solvents (e.g. turpentine, benzene); do not machine wash fabrics that have been treated with solvents or flammable liquids.
Only use detergents and/or additives that are specifically produced for domestic washing machines.Observe the recommendations on the care labels of your laundry.The choice of detergent depends on:• Type of fabric• Colour • Recommended wash temperature• Degree and type of soiling
For laundry requiring special treatment (e.g. wool or microfibres), we recommend to use specialized detergents, additives or pre-treatment available on the market.Refer to internet link www.cleanright.eu for more detailed information.Do not use liquid detergent for the main wash when having activated the “Prewash” option.Do not use liquid detergent when selecting a later cycle start / cycle end (depending on the model).DosageFollow the dosage recommendations on the detergent pack. They depend on:• Degree and type of soiling• Size of wash
- full load: follow the detergent manufacturer’s instructions.- half load: 3/4 the amount used for a full load.- minimum load (about 1 kg): 1/2 the amount used for a full load.If there is no reference to a certain wash load on the detergent pack: the detergent manufacturers usually refer their dosing recommendations to 4.5 kg laundry for heavy duty detergent and 2.5 kg laundry for delicate detergent.
• Water hardness in your area (ask for information from your water company). Soft water requires less detergent than hard water.
Laundry type Kind of detergentWhite robust laundry (cold-95°C):
heavy duty detergents with bleach
White delicate laundry (cold-40°C):
mild detergents with bleach and/or optical brighteners
Light /pastel- shaded colours (cold-60°C):
detergents with bleach and/or optical brighteners
Intensive colours (cold-60°C):
colour detergents without bleach/optical brighteners
Black/dark colours (cold-60°C):
special detergents for black/dark laundry
EN 5

Please note:Too much detergent can result in excess foam formation, which reduces washing efficiency.If the washing machine detects too much foam, it may prevent spinning, or prolong the programme duration and increase the water consumption (see also remarks on foam formation in the “Troubleshooting Guide”).Insufficient detergent may result in grey laundry and also calcifies the heating system, drum and hoses.
Where to put detergent and additivesThe detergent drawer has three chambers (fig. “A”).
Main Wash Chamber • Detergent for the main wash• Stain remover• Water softener
Softener Chamber • Fabric softener• Liquid starchPour additives only up to the “MAX” mark.
Prewash Chamber • Detergent for the prewash• Fabric softener ONLY when using Colours 15° plus (if available)
If you use liquid detergent, close the dispenser right after having filled in the detergent.
Insert for the Main Wash Chamber (fig. B - only available for washing machine models with option “Colours 15° plus”):This insert must be used in the main wash chamber if you activate option “Colours 15° plus” and you intend to use liquid detergent for the main wash. IMPORTANT! This insert is suitable for liquid detergents only and must not be used for powder detergents.If you always use liquid detergents for the main wash, you can leave the insert in the main wash chamber even when the option “Colours 15° plus” is not activated.
How to use the option “Colours 15° plus” (if available):If you activate this option, you must • add the insert to the main wash chamber only if you intend to
use liquid detergent for the main wash (fig. C)• pour liquid detergent into the insert placed in the main wash
chamber (fig. D). If you use powder detergent, do not use the insert. Pour powder into the main wash chamber directly.
• pour liquid fabric softener to the prewash chamber (fig. E), according to the dosing recommendations indicated on the softener bottle.
• if you want your laundry to be soft, you can of course add liquid fabric softener to the softener chamber as well
A ( )
B
C
D
E
C
E
D
EN 6
Using chlorine bleach
• Wash your laundry in the desired programme (Cotton, Synthetics), adding an appropriate amount of chlorine bleach to the SOFTENER chamber (close the detergent dispenser carefully).
• Immediately after end of programme, start the “Rinse and Spin” programme to eliminate any residual bleach smell; if you want, you can add softener.Never put both chlorine bleach and softener into the softener chamber at the same time.
• Prefer to use bleaches on oxygen basis; in this case follow the instructions of the manufacturer.
Using starch• Select the “Rinse and Spin” programme and check that the spin
speed is adjusted to not more than 800 rpm.• Start the programme, pull out the detergent dispenser so that
you can see approximately 3 cm of the softener chamber. • Pour the starch solution prepared into the softener chamber
while the water is running into the detergent dispenser.
EN 7

DRAINING RESIDUAL WATER/CLEANING THE FILTER
We recommend that you check and clean the filter regularly, at least two or three times a year, especially:• If the “Clean pump” indication lights up.• If the appliance is not draining properly or if it fails to
perform spin cycles.If the washing machine stands in a room prone to frost, you have to drain residual water after each wash to avoid damages.IMPORTANT: make sure the water has cooled before draining the appliance. 1. Stop the appliance and unplug it.2. To open the plinth (depending on the model):
- Push down the tabs right and left (if available) to release the plinth and remove it (picture “A”).
- Remove the plinth by using the siphon insert of the detergent dispenser: push downwards one side of the plinth with your hand, then push the siphon insert into the gap between plinth and front panel and pry open the plinth (picture “B”).
3. Place a container near the washing machine.4. If your washing machine has an emergency drain hose:
- Unclip the emergency drain hose.If there is no emergency drain hose: place a broad, flat container beneath the filter (picture “D”). Ignore steps 5-8 and proceed with 9.
5. Hold the emergency hose’s end into the container and remove the stopper (picture “C”).
6. Wait until all the water has drained, then refix the stopper at the hose’s end (picture “E”).
7. Refix the emergency drain hose (if available) to the clip.8. Lay an absorbable cotton cloth (e.g. a towel) on the
floor in front of the filter.9. Slowly open the filter by turning it counter-clockwise
(picture “F”); wait until all the water has drained, then unscrew the filter completely and remove it.
10. Only for draining residual water: tilt the appliance forwards carefully (a second person must help you) to allow the water to flow out completely.
11. Only for cleaning the filter: clean the filter and the filter chamber; check that the pump rotor in the filter chamber moves freely.
12. Reinsert the filter and screw it in clockwise as far as it will go.
13. Pour about 1 litre of water into the detergent dispenser to reactivate the “Eco system”. Check that the filter is inserted properly and securely and no water comes out.
14. Reinstall the plinth (picture “G”); if necessary, tilt the washing machine slightly backwards for doing that (a second person must help you).
15. Plug in the washing machine. It is now ready for operation again.
C
B
F
G
E
A
D
EN 8
CARE AND MAINTENANCEAppliance exterior and control panel• Wash down with a soft, damp cloth. Dry with a
soft cloth.Appliance interior• After each washing, leave the door open for some
time to allow the inside of the appliance to dry.• If you never or seldom wash your laundry at
95 °C, we recommend to occasionally run a 95 °C programme without laundry, adding a small amount of detergent, to keep the interior of the appliance clean.
Door seal• Dry the door seal after each washing with an
absorbent cotton cloth; make sure that the door seal is completely dry before closing the door of the empty washing machine.
• Check the condition of the door seal periodically.
Filter• Check and clean the filter regularly, at least two
or three times a year (see “Draining Residual Water/Cleaning The Filter”).
Do not use detergents containing solvents, scouring powder, glass or general purpose cleaners, and flammable fluids. They may harm the plastic surfaces or other parts.
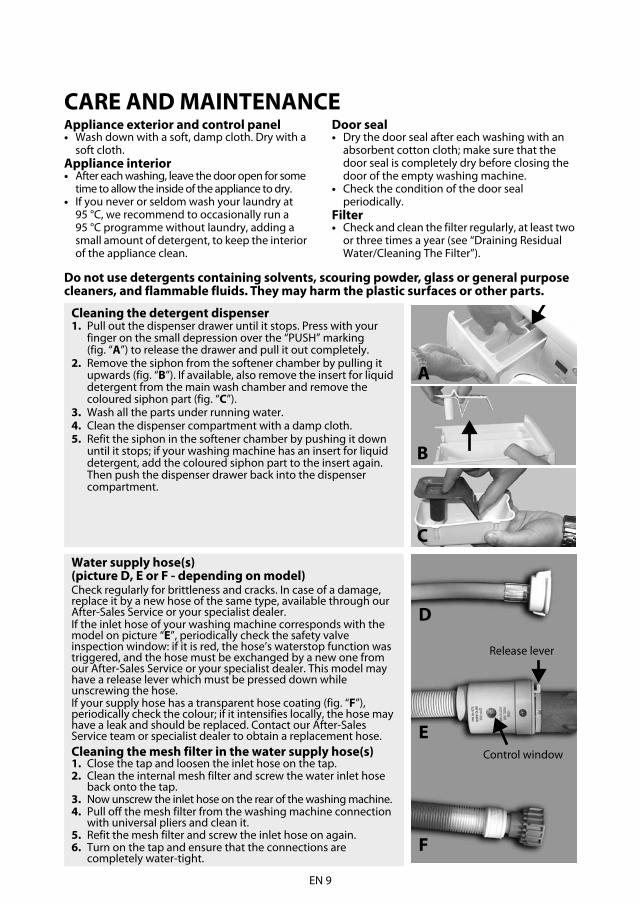
Cleaning the detergent dispenser1. Pull out the dispenser drawer until it stops. Press with your
finger on the small depression over the “PUSH” marking (fig. “A”) to release the drawer and pull it out completely.
2. Remove the siphon from the softener chamber by pulling it upwards (fig. “B”). If available, also remove the insert for liquid detergent from the main wash chamber and remove the coloured siphon part (fig. “C”).
3. Wash all the parts under running water.4. Clean the dispenser compartment with a damp cloth.5. Refit the siphon in the softener chamber by pushing it down
until it stops; if your washing machine has an insert for liquid detergent, add the coloured siphon part to the insert again. Then push the dispenser drawer back into the dispenser compartment.
Water supply hose(s) (picture D, E or F - depending on model)Check regularly for brittleness and cracks. In case of a damage, replace it by a new hose of the same type, available through our After-Sales Service or your specialist dealer.If the inlet hose of your washing machine corresponds with the model on picture “E”, periodically check the safety valve inspection window: if it is red, the hose’s waterstop function was triggered, and the hose must be exchanged by a new one from our After-Sales Service or your specialist dealer. This model may have a release lever which must be pressed down while unscrewing the hose.If your supply hose has a transparent hose coating (fig. “F”), periodically check the colour; if it intensifies locally, the hose may have a leak and should be replaced. Contact our After-Sales Service team or specialist dealer to obtain a replacement hose.Cleaning the mesh filter in the water supply hose(s)1. Close the tap and loosen the inlet hose on the tap.2. Clean the internal mesh filter and screw the water inlet hose
back onto the tap.3. Now unscrew the inlet hose on the rear of the washing machine.4. Pull off the mesh filter from the washing machine connection
with universal pliers and clean it.5. Refit the mesh filter and screw the inlet hose on again.6. Turn on the tap and ensure that the connections are
completely water-tight.
B
C
D
E
F
Control window
Release lever
A
EN 9

TROUBLESHOOTING GUIDEYour washing machine is equipped with various automatic safety functions. These enable faults to be detected in good time and the safety system can react appropriately. These faults are frequently so minor that they can be removed within a few minutes.
Problem Causes, Solutions, TipsAppliance does not start, no indicators are on
• Plug is not properly inserted in socket.• Socket or fuse does not function correctly (use a table lamp or similar
appliance to test it).Appliance does not start although “Start/Pause” has been pressed
• Door is not properly closed.• The “Child lock/Lock buttons” feature has been activated (if
available on your model). To unlock the buttons, push the two buttons marked with the key symbol simultaneously and hold them at least for 3 seconds. The key symbol on the display disappears and the programme can be started.
Appliance stops during the programme, and the “Start/Pause” indicator blinks
• “Rinse hold” is activated. Press “Start/Pause” to spin the laundry. For draining the water without spinning, select “Drain” Programme (if available) or press the “Reset/Drain” button for at least 3 seconds.
• Programme has been changed - reselect desired programme and press “Start/Pause”.
• Programme has been interrupted and eventually door has been opened - close door and restart programme by pressing “Start/Pause”.
• The appliance’s safety system has been activated (see “Failure indicators” in your programme chart).
• Water tap is not opened or water inlet hose is kinked or blocked (“Water tap closed” indicator blinks).
Detergent dispenser contains residues from detergent and/or additives
• Water entering is not enough; the mesh filters of the water supply could be blocked (see “Care And Maintenance”).
Appliance vibrates during spin cycle
• Transport bolts have not been removed; before using the washing machine, it is imperative that the transport bolts are removed.
• Appliance is not level / not standing firmly on all four feet (see separate “Installation Guide”).
“Unbalance during spinning”
The “Spin/Drain” indicator in the programme flow bar blinks, or the spin speed on the display blinks, or the spin speed indicator blinks after the end of the programme (depending on the model).The laundry is still very wet.
Unbalance of the laundry load during spinning prevented the spin phase to avoid damages on the washing machine. This is why the laundry is still very wet. Reason for unbalance can be: small laundry loads (consisting of only few quite big or absorbent items, e.g. towels), or big/heavy laundry items.• If possible avoid small laundry loads.• It is highly recommended that you add other laundry items of different
sizes when washing a big or heavy piece of laundry.If you want to spin the wet laundry, add more laundry items of different sizes, and subsequently select and start the “Rinse & Spin” programme.
Final spin results are poor • Unbalance during spinning prevented spin phase to protect the washing machine (see “Unbalance during spinning”).
• Excessive foam formation prevented spinning; select and start “Rinse & Spin” programme. Avoid excessive detergent dosing (see “Detergents And Additives”).
• “Spin” button has been set to a low spin speed.
EN 10

Description of failure indicators
The washing machine is at a standstill for several minutes in the middle of a running programme; the wash programme seems not to proceed
Normal function of the washing machine used for optimizing the rinse phase. One reason for such a pause can be that you might have used too much detergent; the washing machine automatically interrupts the programme to have the foam reduced. This standstill may be repeated several times until the foam reduction is sufficient to continue the wash cycle. If the foam persists, the red “Service” indicator will light up and the display shows “F18” or “Fod” - refer to the instructions concerning the “Service” indication on the next pages in this case.
Detergent residues on laundry after wash
Whitish residues on dark fabrics are caused by insoluble compounds used in phosphate-free powder detergents.- avoid overdosing of detergent; use liquid detergent; select “Intensive Rinse” option if possible; brush out the fabric.
Programme duration is considerably longer or shorter as indicated in the “programme chart” or on the display (if available)
Normal function of the washing machine to adapt to factors that can have an effect on the programme duration, like excessive foam formation, load unbalance due to heavy laundry items, prolonged heating time resulting from low inlet water temperature etc. Moreover, the sensing system of the washing machine adapts the programme duration to the size of the wash load.Depending on these factors, the duration is recalculated during the programme and updated if necessary; during such periods, an animation appears on the display (if available). For small loads, the programme time indicated in the “programme chart” may be reduced by up to 50%.
Problem Causes, Solutions, Tips
Failureindicator
blinks
DescriptionCauses
Solutions
“Water tap closed”
Appliance has no or insufficient water supply. The “Start/Pause” light blinks.Check whether:• Water tap is fully open and water supply pressure is sufficient.• Kinks are present in the water inlet hose.• Mesh filter of water supply hose is blocked (see “Care And Maintenance”.• The water hose is frozen up.• The safety valve inspection window of your water supply hose is red (provided
your appliance has a water supply hose as shown on picture “D” - see previous chapter “Care And Maintenance”); replace the hose by a new one available through our After-Sales Service or your specialist dealer.
After problem has been removed, restart programme by pressing “Start/Pause”. If the fault occurs again, contact our After-Sales Service (see next chapter).
“Clean pump”
Waste water is not pumped out. The appliance stops in the corresponding programme step; unplug it and check whether:• Kinks are present in the drain hose, or the hose is blocked for another reason.• Filter or pump is blocked (see chapter “Draining Residual Water/Cleaning The
Filter”; make sure the water has cooled before draining the appliance).• The drain hose is frozen up.After problem has been removed, push the “Reset” button for at least 3 seconds; afterwards restart the desired programme. If the fault occurs again, contact our After-Sales-Service (see next chapter).
EN 11

If any of the faults described above persist, unplug the appliance, turn off the water tap and contact our After-Sales Service (see next chapter).
Failureindicator
blinks
Indicationon display
(if available)
DescriptionCauses
Solutions
“Service”
from “F03” to “F43”(except “F18” and
“F24”)
“Electrical module fault”Push the “Reset” button for at least 3 seconds.
“F24” May appear for very water-soaking laundry, or if you added too much laundry for a programme destined for small loads only. Do not overload the washing machine.Push the “Reset” button for at least 3 seconds to stop the programme. Select and start “Rinse and Spin” programme to complete the interrupted wash programme properly.
“F02” or “FA”(if available on your
model, will light up)
“Waterstop fault”Turn the programme selector to the “Off/O” position, pull out the mains plug and turn the water tap off. Tilt the appliance forward carefully (a second person must help you) to allow collected water to flow out from the bottom. Then:• Plug in the appliance again.• Turn the water tap on (if water immediately flows into the
appliance without the appliance being started, there is a failure; turn off the tap and notify the After-Sales Service).
• Select and start the desired programme again.
“F18” or “Fod” “Overfoaming”Too much foam interrupted the wash programme. If your washing machine has a “Dosing Aid” function, and you used it: check if the dosing values set for the different programme groups correspond to the dosing values recommended for the detergents you use (see details in separate Instructions for the “Dosing Aid”).• Select and start the “Rinse & Spin” programme.• Afterwards select and start the desired programme again,
using less detergent. See also description of problem “The machine is at a standstill....” in the previous part of the Troubleshooting Guide.
EN 12
REMAINING MOISTURE CONTENT OF THE LAUNDRY AFTER SPINNINGThe degree of moisture remaining in the laundry after spinning mainly depends on the fabric type, the selected programme and spin speed. The lowest remaining moisture content can be achieved using the wash programme referred to by the Energy Label, with maximum spin speed. This programme is marked in the separate programme chart as “Reference programme for the Energy Label”. Below a survey of the remaining moisture content (in %) related to the various spin-drying efficiency classes:
SAVE ENERGY AND HELP PROTECTING THE ENVIRONMENT• You reach the best use of energy, water, detergent and time by running the programmes with the
maximum load size.• Save energy by using a 60°C instead of a 95°C wash programme, or by using a 40°C instead of a 60°C
wash programme.• Use “Prewash” for heavily soiled laundry only. Save detergent, time, water and energy by not selecting
“Prewash” for lightly or normally soiled laundry.• Do not exceed the detergent dosages indicated in the manufacturer’s instructions.• Select a high spin speed if you intend to dry your laundry in a tumble dryer, in order to reduce time and
energy for the drying process.
EXPLANATION OF THE ENERGY LABEL(only for washing machines with Energy Label according to Directive 2010/30/EU)
The Energy Label contains information on performance and consumption of your washing machine:The bold black arrow marks the energy efficiency class (A+++ = most efficient / D = least efficient).
Spin-drying efficiency class Remaining moisture content in %A (= most efficient) less than 45
B 45 or more, but less than 54C 54 or more, but less than 63D 63 or more, but less than 72E 72 or more, but less than 81
kWh/annum Power consumption per year
L/annum
Water consumption per yeardB
Noise level washing
kg
Maximum load capacitydB
Noise level spinning
Spin drying efficiency class (A = most efficient / G = least efficient)
EN 13

AFTER-SALES SERVICEBefore contacting After-Sales Service:
1. Try to remedy the problem yourself (see “Troubleshooting Guide”).
2. Restart the programme to check whether the problem has solved itself.
3. If the washing machine continues to function incorrectly, call our After-Sales Service.
Specify:• The nature of the problem.• The washing machine model.• The service code (number after the word
SERVICE).
The After-Sales Service sticker can be found inside the door.• Your full address.• Your telephone number and area code.
After-Sales Service phone numbers and addresses are given on the guarantee card. Alternatively, consult the dealer where you purchased the appliance.
ACCESSORIESFor some models, you can obtain via our After-Sales Service or your specialist dealer:• A Pedestal Drawer which can be installed
beneath your washing machine. It raises your machine to allow for more comfortable loading and unloading, as you now no longer need to bend as far to access the door. Furthermore, it offers a great space-management tool and storage solution.
• A Stacking Kit, by which your dryer can be fixed on top of your washing machine.
• A Stacking Kit Shelf, by which your dryer can be fixed on top of your washing machine to save space and to facilitate loading and unloading your dryer in that high position.
• A Cover Panel Kit, by which your washing machine can be built under a continuous kitchen worktop, for example. Check with our After-Sales Service or your specialist dealer if this is possible for your washing machine model.
TRANSPORT/HANDLINGNever lift the appliance by the worktop when transporting.1. Pull out the mains plug.2. Turn off the tap.3. Check that machine door and detergent dispenser are properly closed.4. Disconnect the inlet and drain hoses.5. Eliminate all water from the hoses and from the appliance (see “Draining Residual Water/Cleaning
The Filter”).6. Fit the transport bolts (obligatory).
EN 14

ELECTRICAL CONNECTION
Manufacturer:Whirlpool Europe s.r.l.Viale Guido Borghi 2721025 Comerio (VA)Italy
For Great Britain only
Warning - this appliance must be earthed
Fuse replacementIf the mains lead of this appliance is fitted with a BS 1363A 13amp fused plug, to change a fuse in this type of plug use an A.S.T.A. approved fuse to BS 1362 type and proceed as follows:1. Remove the fuse cover (A) and fuse (B).2. Fit replacement 13A fuse into fuse cover.3. Refit both into plug.Important:The fuse cover must be refitted when changing a fuse and if the fuse cover is lost the plug must not be used until a correct replacement is fitted.Correct replacement are identified by the colour insert or the colour embossed in words on the base of the plug.Replacement fuse covers are available from your local electrical store.
For the Republic of Ireland onlyThe information given in respect of Great Britain will frequently apply, but a third type of plug and socket is also used, the 2-pin, side earth type.
Socket outlet / plug (valid for both countries)If the fitted plug is not suitable for your socket outlet, Please contact After-Sales service for further instruction. Please do not attempt to change plug yourself. This procedure needs to be carried out by a qualified technician in compliance with the manufactures instructions and current standard safety regulations.
EN 15 J - 01/2013

5019 300 00591
Whi
rlpoo
l® R
egis
tere
d tr
adem
ark/
TM T
rade
mar
k of
Whi
rlpoo
l gro
up o
f com
pani
es ©
Cop
yrig
ht W
hirlp
ool E
urop
e s.r
.l. 2
012.
All
right
s re
serv
ed -
http
://w
ww
.whi
rlpoo
l.eu
EE LVPLGB LT