interaction center integration to microsoft lync server · pdf fileinteractive intelligence,...
TRANSCRIPT

Interactive Intelligence, Inc. 7601 Interactive Way Indianapolis, IN 46278
Telephone/Fax (317) 872-3000 www.ININ.com
Interaction Center Integration to Microsoft® Lync™ Server
Administrator’s Guide
Interactive Intelligence Customer Interaction Center® (CIC)
4.0 SU3
Last updated November 24, 2015 (See Change Log for summary of changes.)
Abstract
This administrator’s guide describes the Customer Interaction Center integration with Microsoft’s Lync Server 2013 and Skype for Business Server 2015.

CIC/Lync Server Integration Administrator’s Guide ii
Copyright and trademark information Interactive Intelligence, Interactive Intelligence Customer Interaction Center, Interaction Administrator, Interaction Attendant, Interaction Client, Interaction Designer, Interaction Tracker, Interaction Recorder, Interaction Mobile Office, Interaction Center Platform, Interaction Monitor, Interaction Optimizer, and the “Spirograph” logo design are registered trademarks of Interactive Intelligence, Inc. Customer Interaction Center, EIC, Interaction Fax Viewer, Interaction Server, ION, Interaction Voicemail Player, Interactive Update, Interaction Supervisor, Interaction Migrator, and Interaction Screen Recorder are trademarks of Interactive Intelligence, Inc. The foregoing products are ©1997-2015 Interactive Intelligence, Inc. All rights reserved. Interaction Dialer and Interaction Scripter are registered trademarks of Interactive Intelligence, Inc. The foregoing products are ©2000-2015 Interactive Intelligence, Inc. All rights reserved. Messaging Interaction Center and MIC are trademarks of Interactive Intelligence, Inc. The foregoing products are ©2001-2015 Interactive Intelligence, Inc. All rights reserved. Interaction Director is a registered trademark of Interactive Intelligence, Inc. e-FAQ Knowledge Manager and Interaction Marquee are trademarks of Interactive Intelligence, Inc. The foregoing products are ©2002-2015 Interactive Intelligence, Inc. All rights reserved. Interaction Conference is a trademark of Interactive Intelligence, Inc. The foregoing product is ©2004-2015 Interactive Intelligence, Inc. All rights reserved. Interaction SIP Proxy and Interaction EasyScripter are trademarks of Interactive Intelligence, Inc. The foregoing products are ©2005-2015 Interactive Intelligence, Inc. All rights reserved. Interaction Gateway is a registered trademark of Interactive Intelligence, Inc. Interaction Media Server is a trademark of Interactive Intelligence, Inc. The foregoing products are ©2006-2015 Interactive Intelligence, Inc. All rights reserved. Interaction Desktop is a trademark of Interactive Intelligence, Inc. The foregoing product is ©2007-2015 Interactive Intelligence, Inc. All rights reserved. Interaction Process Automation, Deliberately Innovative, Interaction Feedback, and Interaction SIP Station are registered trademarks of Interactive Intelligence, Inc. The foregoing products are ©2009-2015 Interactive Intelligence, Inc. All rights reserved. Interaction Analyzer is a registered trademark of Interactive Intelligence, Inc. Interaction Web Portal and IPA are trademarks of Interactive Intelligence, Inc. The foregoing products are ©2010-2015 Interactive Intelligence, Inc. All rights reserved. Spotability is a trademark of Interactive Intelligence, Inc. ©2011-2015. All rights reserved. Interaction Edge, CaaS Quick Spin, Intelligence Marketplace, Interaction SIP Bridge, and Interaction Mobilizer are registered trademarks of Interactive Intelligence, Inc. Interactive Intelligence Communications as a Service℠ and Interactive Intelligence CaaS℠ are trademarks or service marks of Interactive Intelligence, Inc. The foregoing products are ©2012-2015 Interactive Intelligence, Inc. All rights reserved. Interaction Speech Recognition and Interaction Quality Manager are registered trademarks of Interactive Intelligence, Inc. Bay Bridge Decisions and Interaction Script Builder are trademarks of Interactive Intelligence, Inc. The foregoing products are ©2013-2015 Interactive Intelligence, Inc. All rights reserved. Interaction Collector is a registered trademark of Interactive Intelligence, Inc. Interaction Decisions is a trademark of Interactive Intelligence, Inc. The foregoing products are ©2013-2015 Interactive Intelligence, Inc. All rights reserved. Interactive Intelligence Bridge Server and Interaction Connect are trademarks of Interactive Intelligence, Inc. The foregoing products are ©2014-2015 Interactive Intelligence, Inc. All rights reserved. The veryPDF product is ©2000-2015 veryPDF, Inc. All rights reserved. This product includes software licensed under the Common Development and Distribution License (6/24/2009). We hereby agree to indemnify the Initial Developer and every Contributor of the software licensed under the Common Development and Distribution License (6/24/2009) for any liability incurred by the Initial Developer or such Contributor as a result of any such terms we offer. The source code for the included software may be found at http://wpflocalization.codeplex.com. A database is incorporated in this software which is derived from a database licensed from Hexasoft Development Sdn. Bhd. ("HDSB"). All software and technologies used by HDSB are the properties of HDSB or its software suppliers and are protected by Malaysian and international copyright laws. No warranty is provided that the Databases are free of defects, or fit for a particular purpose. HDSB shall not be liable for any damages suffered by the Licensee or any third party resulting from use of the Databases. Other brand and/or product names referenced in this document are the trademarks or registered trademarks of their respective companies.
DISCLAIMER INTERACTIVE INTELLIGENCE (INTERACTIVE) HAS NO RESPONSIBILITY UNDER WARRANTY, INDEMNIFICATION OR OTHERWISE, FOR MODIFICATION OR CUSTOMIZATION OF ANY INTERACTIVE SOFTWARE BY INTERACTIVE, CUSTOMER OR ANY THIRD PARTY EVEN IF SUCH CUSTOMIZATION AND/OR MODIFICATION IS DONE USING INTERACTIVE TOOLS, TRAINING OR METHODS DOCUMENTED BY INTERACTIVE.
Interactive Intelligence, Inc. 7601 Interactive Way Indianapolis, Indiana 46278 Telephone/Fax (317) 872-3000 www.ININ.com
CIC/Lync Server Integration Administrator’s Guide iii
Table of contents Chapter 1: Introduction to the CIC/Lync integration .................................. 6
About this document................................................................................................ 6 About Microsoft Lync Server ..................................................................................... 6 About Customer Interaction Center ........................................................................... 6 Release feature information ...................................................................................... 6 Purpose of the integration ........................................................................................ 6
Sharing/synchronization of presence information ..................................................... 7 More call functionality ........................................................................................... 7 CIC client with embedded Lync client ...................................................................... 7 Instant messaging ................................................................................................ 7 Merged company directory .................................................................................... 7
Installation ............................................................................................................. 8 Concepts and terminology ........................................................................................ 9
User types ........................................................................................................... 9 Auto off-hook ...................................................................................................... 9
Components of the integration .................................................................................. 9 Certification ............................................................................................................ 9 Lync requirements ................................................................................................. 10 CIC requirements .................................................................................................. 10 Resources ............................................................................................................ 10
CIC requirements ............................................................................................... 10 Recommended third-party SIP devices .................................................................. 10 Interactive Intelligence Product Information site .................................................... 10 CIC documentation library ................................................................................... 10 Standards-supported RFCs and drafts ................................................................... 10
Overview of administrative tasks ............................................................................. 11
Chapter 2: Network overview and protocol flows ...................................... 12 Endpoint media options .......................................................................................... 13 Network component overview ................................................................................. 13
On-premises customer solution ............................................................................ 14 CaaS cloud solution (remote control model) .......................................................... 16
Protocol flows ....................................................................................................... 17 Inbound routing option 1 ..................................................................................... 17 Inbound routing option 2 ..................................................................................... 18 Inbound routing option 3 ..................................................................................... 19 Calls to Lync endpoint configured as CIC station .................................................... 20
Chapter 3: Configuring Lync Server ........................................................... 21 Create and verify DNS SRV records ......................................................................... 21 Lync mediation server configuration ........................................................................ 21

CIC/Lync Server Integration Administrator’s Guide iv
Configure IC servers as IP/PSTN gateways ............................................................ 22 Configure voice routing .......................................................................................... 24
Access the voice routing group in Lync Server Control Panel .................................... 24 Create a voice policy .......................................................................................... 24 Configure a SIP trunk ......................................................................................... 26
Configure the Lync dial plan ................................................................................... 26 Enable users for Lync Server .................................................................................. 27
Chapter 4: Configuring Lync in Interaction Administrator ......................... 28 Configure line settings ........................................................................................... 28
Set up TLS/MTLS................................................................................................ 31 Configure a line group ........................................................................................... 33 Configure CIC dial plan .......................................................................................... 33 Association of Lync and CIC client calls .................................................................... 36
Configure Lync interaction timeout ....................................................................... 36
Chapter 5: Configuring stations in Interaction Administrator ................... 37 Configure the global SIP station .............................................................................. 37 Configure station settings ....................................................................................... 39
Chapter 6: Configuring users for the integration ....................................... 41 Requirements ....................................................................................................... 41 Configure user settings .......................................................................................... 41
Chapter 7: Configuring the merged company directory ............................. 43 How the merged directory is created ....................................................................... 43 Requirements ....................................................................................................... 43 Create a user with access to Active Directory ............................................................ 43 Configuration of the merged directory in Interaction Administrator .............................. 43 Create or configure the CIC data source ................................................................... 44
Create a data source .......................................................................................... 44 Configure the data source ................................................................................... 44
Create a contact list source .................................................................................... 45 Disable the merged company directory .................................................................... 46
Chapter 8: Configuring presence synchronization ..................................... 47 Introduction to presence synchronization ................................................................. 47 Introduction to configuring presence synchronization ................................................. 47 About the Lync trusted application server configuration.............................................. 47 Prerequisites for activation ..................................................................................... 48 General trusted application activation ...................................................................... 48 Activate an auto-provisioned application .................................................................. 49 Install the Lync Presence Integration Service ............................................................ 49 Configure the IC server for the Lync Presence Integration Service ............................... 50 Lync Presence Integration Service XML configuration ................................................. 52 Lync baseline presence values ................................................................................ 55

CIC/Lync Server Integration Administrator’s Guide v
Chapter 9: Configuring Remote Call Control .............................................. 56 Prerequisites......................................................................................................... 56 Configure IC server for RCC .................................................................................... 56
Enable the RCCServer subsystem in CIC ............................................................... 59 Configuring Lync Server for RCC ............................................................................. 60
Build a trusted application pool ............................................................................ 60 Configure the trusted application .......................................................................... 60 Specify the IP address of the IC server ................................................................. 61
Configure a Lync user to use RCC ............................................................................ 62 Configure the Lync client for RCC ............................................................................ 64 RCC behavior during switchover .............................................................................. 64 Phone number normalization when using Lync RCC ................................................... 64 Troubleshooting .................................................................................................... 65
Lync Status Sync ............................................................................................... 65 RCC .................................................................................................................. 65
Change log ................................................................................................ 67
CIC/Lync Server Integration Administrator’s Guide 6
Chapter 1: Introduction to the CIC/Lync integration About this document This document describes the following:
Overview of the integration
Configuration of the Lync software and users
Configuration of Lync settings in Interaction Administrator
Remote Call Control
About Microsoft Lync Server Microsoft’s Lync Server (Lync) is a unified communications solution that facilitates multiple types of user collaboration, including instant messaging and audio/video conversations.
The Lync client application provides the user interface for Lync Server, and serves as an endpoint for audio/video conversations. The integration supports Lync Server 2013 and Skype for Business Server 2015.
About Customer Interaction Center Customer Interaction Center (CIC) is a suite of contact center applications, with interactive voice response and IP/PBX capabilities.
The CIC client is the desktop management software that comes with Customer Interaction Center. CIC client provides users with access to the contact center functionality and IP/PBX capabilities of CIC.
Note: CIC supports several interaction management client applications. This documentation uses the term “CIC client” to refer to these applications, which include Interaction Connect, Interaction Desktop, and Interaction Client Web Edition.
Release feature information For more information, see the CIC Integration with Microsoft Lync page on the Product Information website at: https://my.inin.com/products/integrations/Pages/Microsoft-Lync.aspx.
Purpose of the integration Lync Server and Customer Interaction Center, when used together, provide a new range of capabilities to users of both systems:
Users who previously used only Lync now have access to all the powerful contact center and IP/PBX capabilities of CIC.
The integration provides CIC users with the instant messaging, voice, and video capabilities of Lync, and the functionality available in the Lync Server platform.

CIC/Lync Server Integration Administrator’s Guide 7
Call center agents using CIC can now view the availability of non-CIC users without leaving the CIC client
In addition to benefiting from the features of each system, users of the integrated systems can realize some more specific functionality. This functionality is described in the following sections.
Sharing/synchronization of presence information CIC and Lync Server share and synchronize presence information between systems, as it is appropriate. Lync Server uses presence information to indicate the availability of a user to participate in instant message conversations. CIC uses presence information to determine whether a user is available to receive calls, participate in chats, and so on. Presence synchronization requires the installation and configuration of the Lync Presence Integration service. For more information about presence synchronization and the service, see Chapter 8: Configuring presence synchronization.
More call functionality Lync users can now place calls from the Lync client to a Lync-enabled CIC user or to the PSTN. And CIC users can place calls to Lync users.
In addition, calls from the PSTN can be directed to Lync users.
CIC client with embedded Lync client Lync-only users can use the Lync interface, while Lync-enabled CIC users can use the Lync functionality embedded in the CIC client.
With the embedded version, users can click a name in the directory and start an instant message conversation, voice call, or video call with that person. CIC handles voice communications, while Lync Server handles video communications.
Instant messaging With the combined company directory in the CIC client, users can view directory entries that include Lync Server users and CIC users. When starting a chat with a person in the directory, one of the following occurs:
If a user starts an instant message from the Lync-enabled company directory in the CIC client, then the CIC client instructs Lync to open the Lync instant messaging interface.
If the person has a CIC user configuration, but does not have a Lync Server user configuration, the chat interaction appears in the CIC chat interface as it did previously.
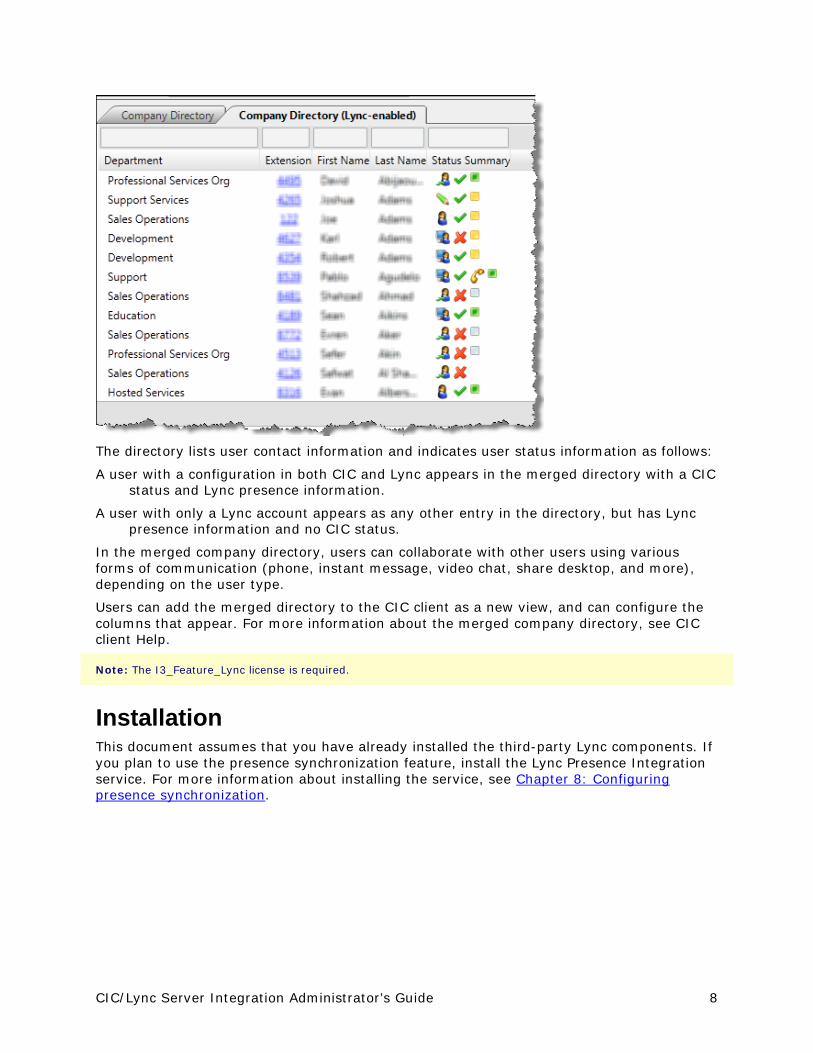
Merged company directory When enabled, the merged, Lync-enabled company directory displays both CIC users and Lync users in one combined directory.
CIC/Lync Server Integration Administrator’s Guide 8
The directory lists user contact information and indicates user status information as follows:
A user with a configuration in both CIC and Lync appears in the merged directory with a CIC status and Lync presence information.
A user with only a Lync account appears as any other entry in the directory, but has Lync presence information and no CIC status.
In the merged company directory, users can collaborate with other users using various forms of communication (phone, instant message, video chat, share desktop, and more), depending on the user type.
Users can add the merged directory to the CIC client as a new view, and can configure the columns that appear. For more information about the merged company directory, see CIC client Help.
Note: The I3_Feature_Lync license is required.
Installation This document assumes that you have already installed the third-party Lync components. If you plan to use the presence synchronization feature, install the Lync Presence Integration service. For more information about installing the service, see Chapter 8: Configuring presence synchronization.
CIC/Lync Server Integration Administrator’s Guide 9
Concepts and terminology As an administrator, be familiar with the following terms and concepts.
User types This document discusses the following types of users:
Lync user: A Lync client user, configured in Lync Server. This user does not have a CIC user account.
CIC user: A CIC client user, configured in Interaction Administrator. This user does not have a Lync Server user account.
Lync-enabled CIC user: A user configured in both Lync Server and Interaction Administrator. This user benefits from the advanced integration features of both the CIC client and the Lync client.
For more information about configuring users for the Lync Server integration, see Chapter 6: Configuring users for the integration.
Auto off-hook The CIC plug-in for the integration allows users to perform operations in Interaction Desktop without requiring input in the Lync user interface. For example, if a user clicks Pickup in the CIC client, the Lync endpoint automatically goes off-hook, as long as the endpoint is running on the same workstation as the CIC client. This feature is convenient when using the CIC client as a phone interface.
Note: Auto off-hook only works with Interaction Desktop. If using any other client, the user must manually pick up the call.
Components of the integration The Lync integration with CIC uses several interfaces to communicate. These interfaces include:
SIP
Lync Client APIs
Microsoft Unified Communications Managed API (UMCA)
Active Directory
Lync Presence Integration service
Certification This integration is a Microsoft-certified Direct SIP solution for Lync. For more information about the certification and a list of certified vendors, https://technet.microsoft.com/en-us/office/dn788945.
This integration is also a Microsoft-certified Lync contact center solution. For more information about the certification and a list of certified applications, see https://technet.microsoft.com/en-us/office/dn788946.
CIC/Lync Server Integration Administrator’s Guide 10
Lync requirements Microsoft Lync Server 2013 or Skype for Business Server 2015, either Enterprise Edition or
Standard Edition
Microsoft Lync Server 2013 or Skype for Business Server 2015 mediation server
Microsoft Lync 2013 or Skype for Business 2015 client, either 32-bit or 64-bit
Microsoft Lync or Skype for Business Trusted Application Server
CIC requirements CIC 2016 R2 or later
Resources The following resources are available to help you install, configure, and troubleshoot SIP-enabled CIC products.
CIC requirements For information about requirements for CIC and the CIC clients, see the Interaction Center Installation and Configuration Guide in the CIC Documentation Library.
Recommended third-party SIP devices Interactive Intelligence validates and recommends certain third-party SIP devices that work well with CIC products. For a list of recommended and validated devices, see the Interactive Intelligence Testlab site at http://testlab.inin.com.
Interactive Intelligence Product Information site The CIC Product Information site at https://my.inin.com/products/cic/Pages/default.aspx is the central location for the latest CIC release information, documentation, system software and hardware requirements, service updates, and downloads.
CIC documentation library The CIC Documentation Library (http://help.inin.com) merges all help systems and documentation installed on the IC server into a single searchable unit. The library enables you to:
Access the entire documentation set from one location.
View or search the entire documentation set for a document title, topic, term, or keyword.
Standards-supported RFCs and drafts Interactive Intelligence uses SIP as its VoIP (Voice over IP) solution for communication with phones and gateways. CIC adheres to SIP standards and uses the Request for Comments (RFC) and RFC Drafts series of documents and specifications, which play a role in the Internet standards process.

CIC/Lync Server Integration Administrator’s Guide 11
Overview of administrative tasks This document assumes that the Lync Server and Lync client software are installed before you begin to install and configure the integration. A Lync feature license is required. Contact your Interactive Intelligence representative for more information about the feature license.
As an administrator, you are responsible for the following tasks:
Configure Lync Server.
For more information, see Chapter 3: Configuring Lync Server.
Configure lines, line groups, and the dial plan in Interaction Administrator.
For more information, see Chapter 4: Configuring Lync in Interaction Administrator.
Configure stations in Interaction Administrator.
For more information, see Chapter 5: Configuring stations in Interaction Administrator.
Configure users in Interaction Administrator.
For more information, see Chapter 6: Configuring users for the integration.
Configure the merged company directory.
For more information, see Chapter 7: Configuring the merged company directory.
Configure presence synchronization.
For more information, see Chapter 8: Configuring presence synchronization.
Configure remote call control (RCC) to allow users to receive calls on a CIC station using the Lync client.
For more information, see Chapter 9: Configuring Remote Call Control.

CIC/Lync Server Integration Administrator’s Guide 12
Chapter 2: Network overview and protocol flows This chapter includes information about the following possible ways to set up the integration:
Endpoint media options
Network component overview
Customer on-premises Solution (no cloud services)
CaaS cloud solution (local control model)
CaaS cloud solution (remote control model)
Protocol flows: Inbound call routing options
Inbound call routing: Option 1: Front-end routing
Inbound call routing: Option 2: Initially all to IC Server
Inbound call routing: Option 3: Initially All to Lync
Calls to Lync endpoint configured as a CIC station

CIC/Lync Server Integration Administrator’s Guide 13
Endpoint media options The following table lists the endpoint media options that are available on the same servers at the same time.
User type User interface/call control
Phone options Usage
CIC User CIC client CIC hard phone
CIC soft phone
Typical CIC user
Lync User Lync client Lync hard phone
Lync soft phone
Typical Lync user
Lync-enabled CIC user
CIC client Lync hard phone
Lync soft phone
Note: These phones are configured as CIC stations.
CIC user (usually a call center agent) in the Lync environment
Lync-enabled CIC user
CIC client with Lync plug-in
Lync hard phone
Lync soft phone
Note: These phones are configured as CIC stations. The Lync client is required for the auto off-hook feature to work.
CIC User (usually a call center agent) in the Lync environment
Lync-enabled CIC user
Lync client Lync hard phone
Lync soft phone
Note: These phones are configured as CIC stations. Auto off-hook is not supported.
Future release
Lync-enabled CIC user
Lync client CIC hard phone
CIC soft phone
RCC
Network component overview In this sections, diagrams show the network components for both on-premises and CaaS environments.
CIC/Lync Server Integration Administrator’s Guide 14
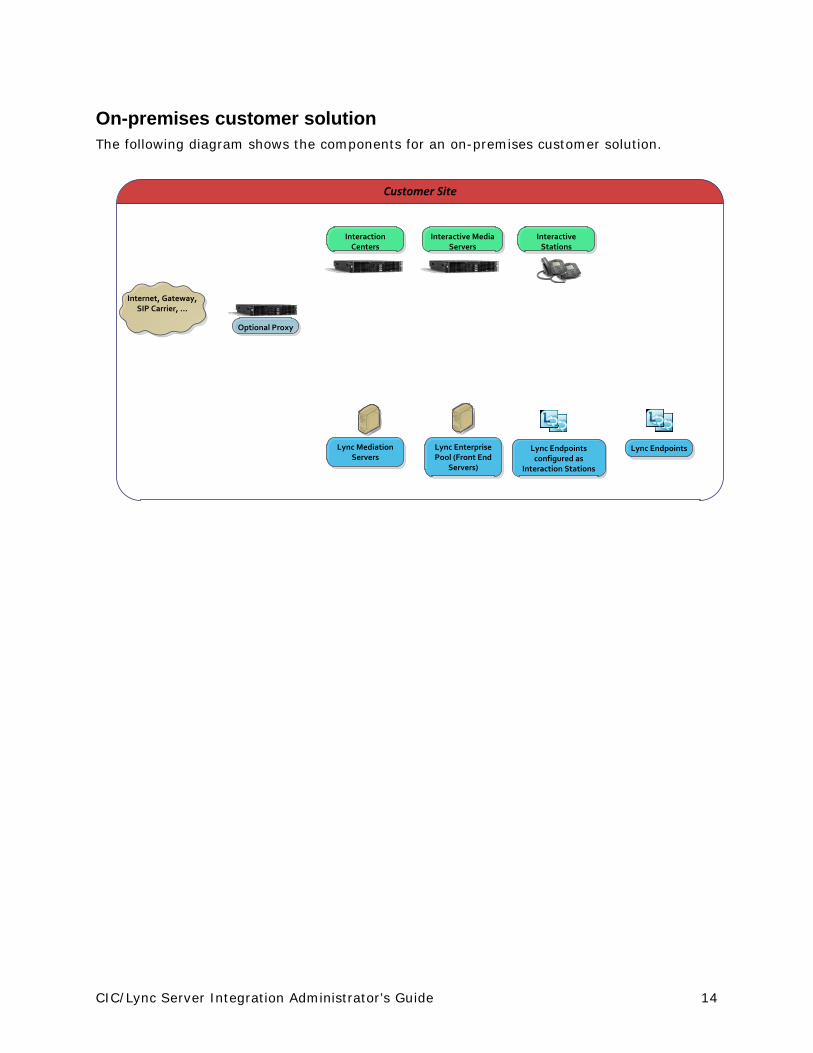
On-premises customer solution The following diagram shows the components for an on-premises customer solution.
Optional Proxy
Internet, Gateway, SIP Carrier, ...
Customer Site
Lync Mediation Servers
Lync Enterprise Pool (Front End
Servers)
Lync EndpointsLync Endpoints configured as
Interaction Stations
Interactive Media Servers
Interactive Stations
Interaction Centers

CIC/Lync Server Integration Administrator’s Guide 15
The following diagram shows the components for a CaaS cloud solution (local control model).
CIC/Lync Server Integration Administrator’s Guide 16
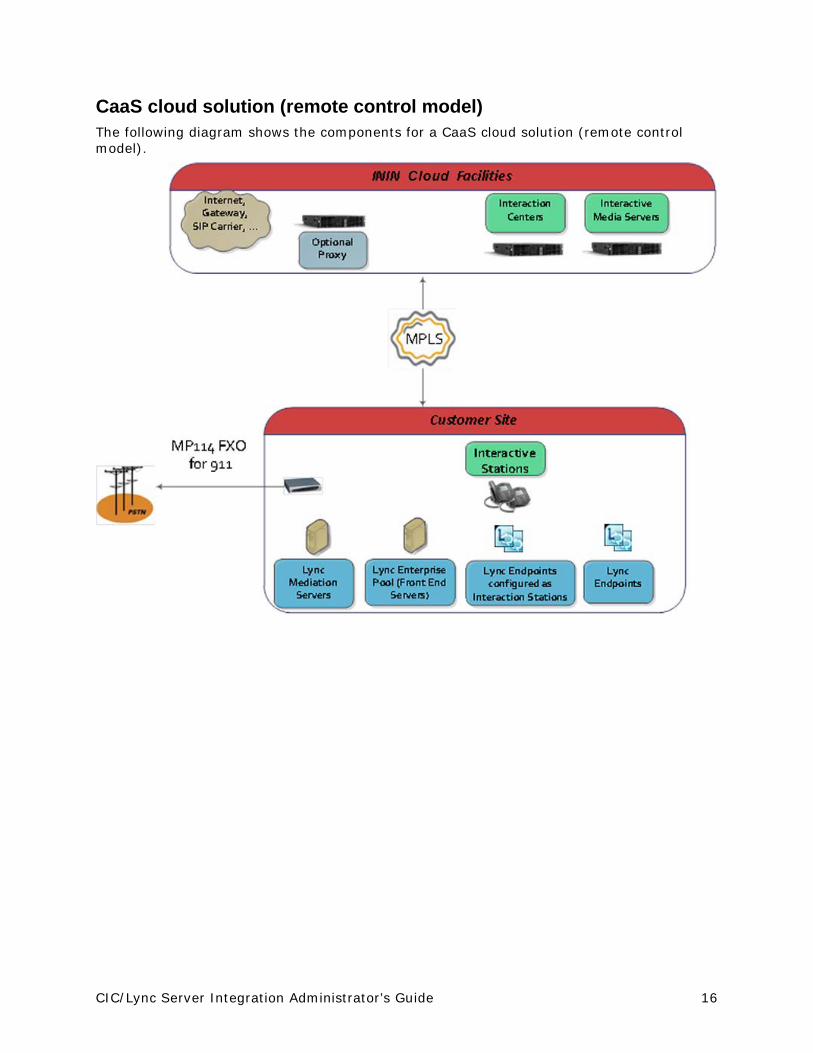
CaaS cloud solution (remote control model) The following diagram shows the components for a CaaS cloud solution (remote control model).

CIC/Lync Server Integration Administrator’s Guide 17
Protocol flows Inbound routing option 1 This diagram shows the inbound call flow where all inbound calls are initially routed to a SIP proxy.
Option 1: A proxy or gateway or carrier can can route calls to the Interaction Center, to Lync, or to both (typically using DNIS).
Proxy
Internet, Gateway, SIP Carrier, ...
Lync Mediation
Servers
Lync Enterprise Pool (Front End
Servers)
Lync Endpoints
Lync Endpoints configured as
Interaction Stations
Interactive Media Servers
Interactive Stations
Interaction Centers
Lege
nd SIP
RTP/SRTP
CIC/Lync Server Integration Administrator’s Guide 18
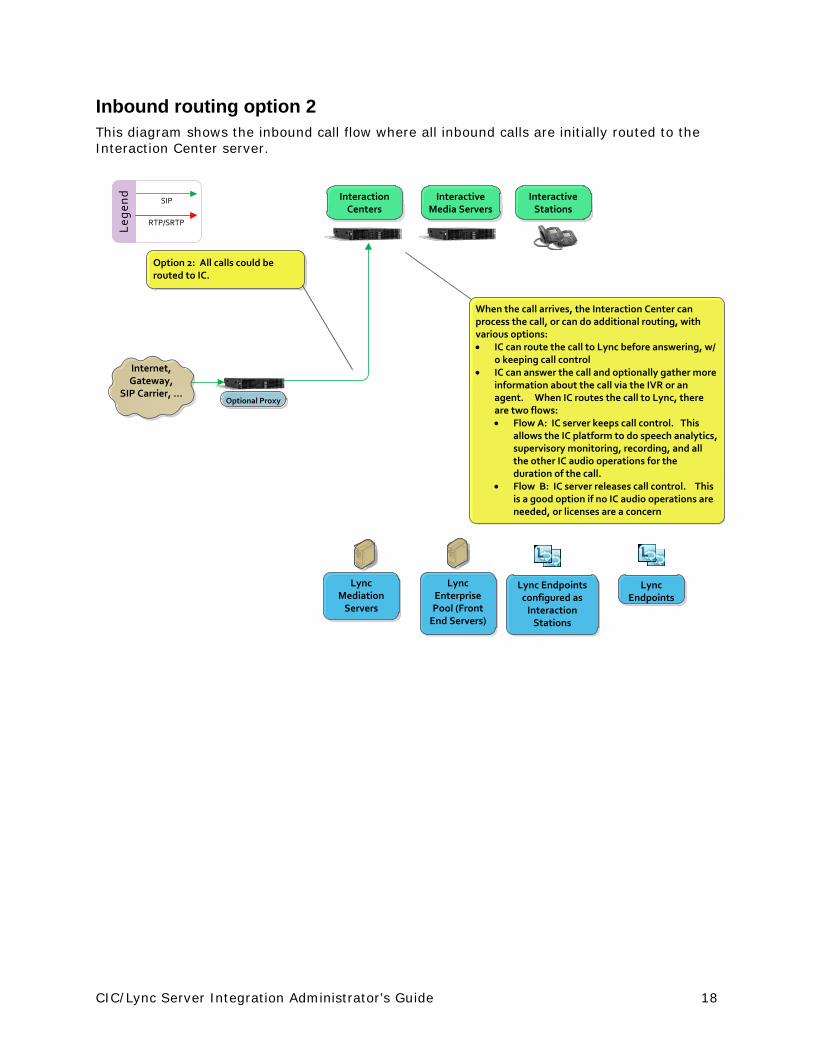
Inbound routing option 2 This diagram shows the inbound call flow where all inbound calls are initially routed to the Interaction Center server.
Option 2: All calls could be routed to IC.
Optional Proxy
Internet, Gateway,
SIP Carrier, ...
When the call arrives, the Interaction Center can process the call, or can do additional routing, with various options: • IC can route the call to Lync before answering, w/
o keeping call control• IC can answer the call and optionally gather more
information about the call via the IVR or an agent. When IC routes the call to Lync, there are two flows:• Flow A: IC server keeps call control. This
allows the IC platform to do speech analytics, supervisory monitoring, recording, and all the other IC audio operations for the duration of the call.
• Flow B: IC server releases call control. This is a good option if no IC audio operations are needed, or licenses are a concern
Interactive Media Servers
Interactive Stations
Interaction Centers
Lync Mediation
Servers
Lync Enterprise Pool (Front
End Servers)
Lync Endpoints
Lync Endpoints configured as
Interaction Stations
Lege
nd SIP
RTP/SRTP
CIC/Lync Server Integration Administrator’s Guide 19
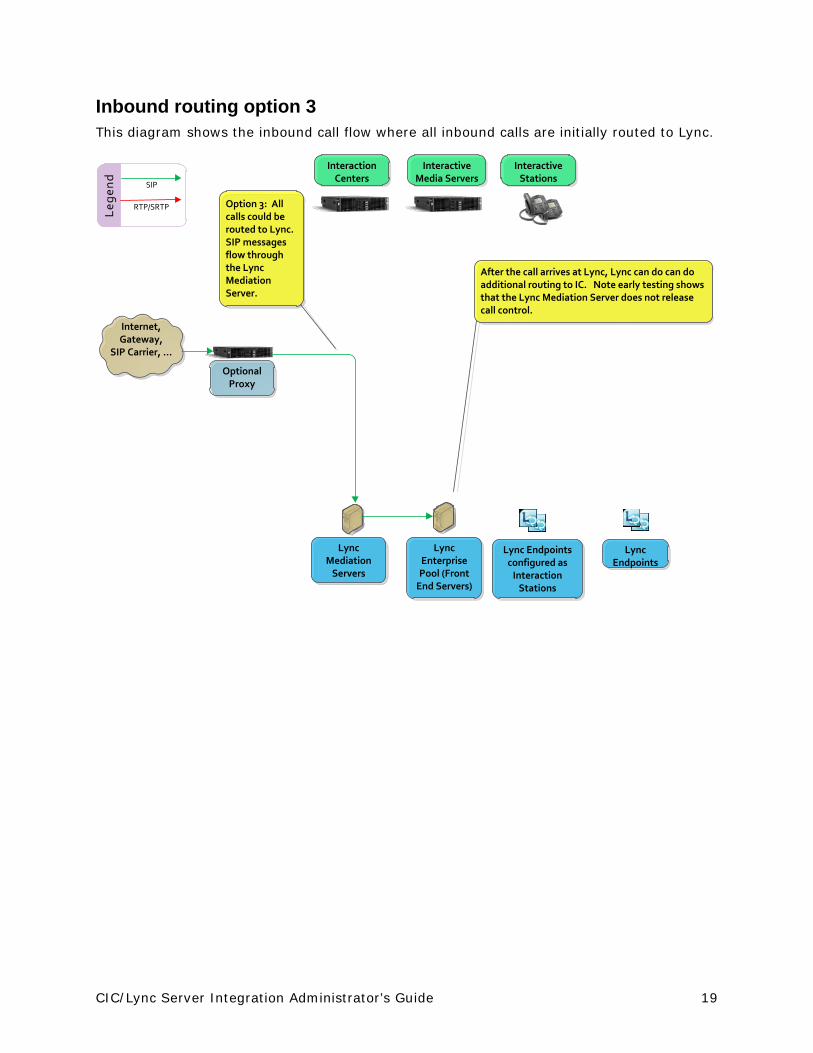
Inbound routing option 3 This diagram shows the inbound call flow where all inbound calls are initially routed to Lync.
After the call arrives at Lync, Lync can do can do additional routing to IC. Note early testing shows that the Lync Mediation Server does not release call control.
Option 3: All calls could be routed to Lync. SIP messages flow through the Lync Mediation Server.
Optional Proxy
Internet, Gateway,
SIP Carrier, ...
Interactive Media Servers
Interactive Stations
Interaction Centers
Lync Mediation
Servers
Lync Enterprise Pool (Front
End Servers)
Lync Endpoints
Lync Endpoints configured as
Interaction Stations
Leg
end
SIP
RTP/SRTP
CIC/Lync Server Integration Administrator’s Guide 20
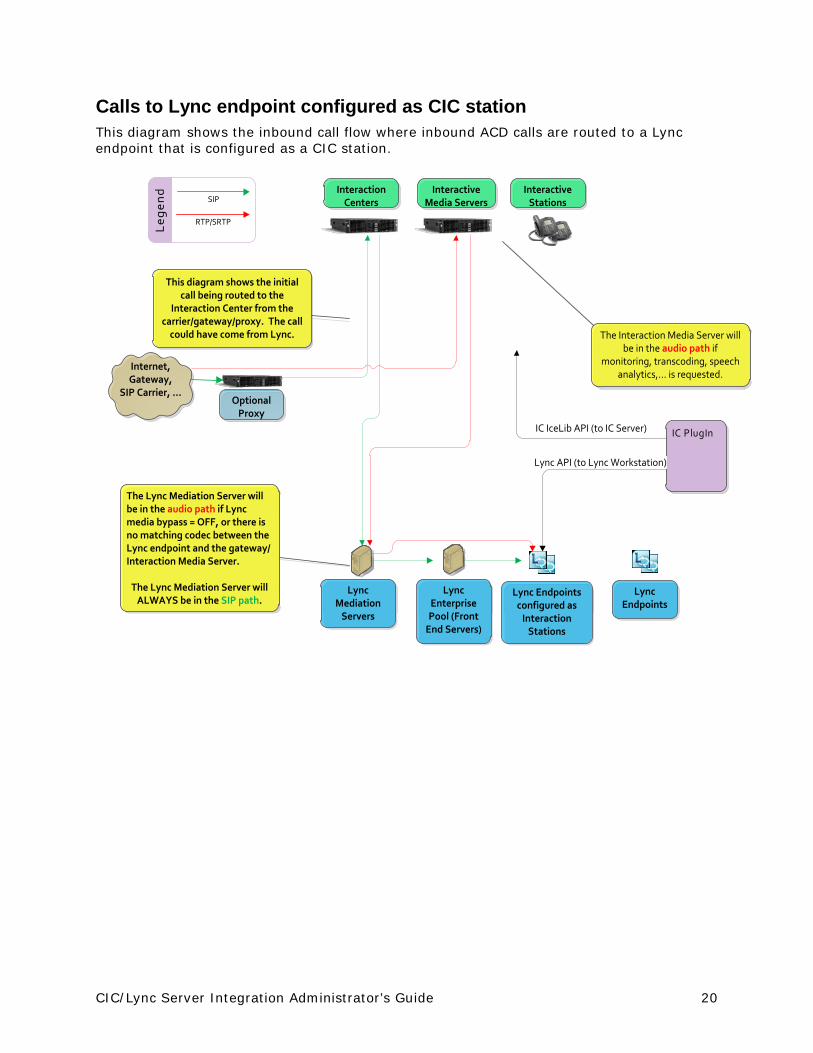
Calls to Lync endpoint configured as CIC station This diagram shows the inbound call flow where inbound ACD calls are routed to a Lync endpoint that is configured as a CIC station.
IC PlugInIC IceLib API (to IC Server)
Lync API (to Lync Workstation)
The Lync Mediation Server will be in the audio path if Lync media bypass = OFF, or there is no matching codec between the Lync endpoint and the gateway/Interaction Media Server.
The Lync Mediation Server will ALWAYS be in the SIP path.
The Interaction Media Server will be in the audio path if
monitoring, transcoding, speech analytics,… is requested.
This diagram shows the initial call being routed to the
Interaction Center from the carrier/gateway/proxy. The call
could have come from Lync.
Optional Proxy
Internet, Gateway,
SIP Carrier, ...
Interactive Media Servers
Interactive Stations
Interaction Centers
Lync Mediation
Servers
Lync Enterprise Pool (Front
End Servers)
Lync Endpoints
Lync Endpoints configured as
Interaction Stations
Leg
end
SIP
RTP/SRTP
CIC/Lync Server Integration Administrator’s Guide 21
Chapter 3: Configuring Lync Server Prior to configuring Lync Server, you must have already installed the Lync Server software, the mediation server, and the Lync client software. For more information, refer to your Lync Server documentation.
Note: The term “Lync Server” is used for whichever version of the server you are configuring, including Skype for Business Server 2015.
This chapter describes the following configuration tasks you must perform to enable the Lync Server software and users for the integration:
Create and verify DNS SRV records.
Configure the Lync mediation server.
Create voice routes for Lync Server.
Create a voice policy that redirects all dialed calls to the Lync mediation server, and then assign that voice policy to all Lync-enabled CIC users.
Enable users for Lync Server.
Note: There are numerous possible configurations for a Lync environment that might require additional configuration of your firewall and/or DNS entries. This documentation does not cover every possible configuration. Please consult with your Lync administrator for more information.
Create and verify DNS SRV records Because the status sync to Lync occurs directly with the server and does not require the agent to be logged in to a Lync client, the DNS server requires two SRV records, one for internal and one for external.
The SRV record authorizes the status sync service to log in on behalf of the agent, set the agent's status, then log out again.
For the internal server, create a DNS SRV record of _sipinternaltls and point it to the relevant Lync application pool.
For the external server, create a DNS SRV record of _sip._tls and point it to the relevant Lync application pool.
To process all traffic as SIP traffic, change the default port number for the external server entry to 5061.
See this Microsoft article on the DNS SRV records for more information: http://technet.microsoft.com/en-us/library/gg398680.aspx
Lync mediation server configuration The Lync mediation server connects the Lync Server with the IC server switchover pair.

CIC/Lync Server Integration Administrator’s Guide 22
Lync Mediation
ServerLync Server
Interaction Center Servers
(Switchover Pair)
Microsoft Lync uses the Lync mediation server to interface to gateways. Each IC server is a gateway. Configure the IC servers as IP/PSTN gateways before you configure the Lync mediation server.
Configure IC servers as IP/PSTN gateways For calling integration scenarios to work with Customer Interaction Center, at least one IC server must be configured as an IP/PSTN gateway in the Lync Server Topology Builder and then associated with the Lync mediation server.
Note: Only users with full administrative permissions can configure servers in the Lync Server Topology Builder.
To add CIC as an IP/PSTN gateway in the Lync Server Topology Builder:
1. Open the Topology Builder and load the topology to configure.
Right-click the PSTN gateways container, then click New IP/PSTN Gateway.
The Define New IP/PSTN Gateway wizard appears.

CIC/Lync Server Integration Administrator’s Guide 23
In the FQDN box, specify the fully qualified domain name of the Interaction Center
server. For a switchover pair, specify the DNS AAAA or A record, which points to both the primary and secondary IC servers. This setting allows the Lync mediation server to locate and connect to whichever IC server is active at the time.
Click Next.
Leave Enable IPv4 as the default, unless your network is set up to use IPv6.
Click Next.
• The Trunk name and Listening port fields auto-populate based on the
FDQN specified on step 1. Specify the port on which the IC server listens for requests, if different from the default port. The default port for TCP is 5066.
Note: For SIP traffic, these ports are non-standard values. Note this value now as you will need it later when configuring the CIC SIP line between Customer Interaction Center and Lync. For more information about line configuration, see Configure line settings.Under SIP Transport Protocol, choose TCP or TLS.Note: If you choose TLS here, see the notes in Chapters 4 and 9 for the TLS setup. Do not use port 11001 here. That port is reserved for RCC. This is the port for connecting TLS.
The same fully qualified domain name will be used later when configuring the domain name setting in the line configuration. For more information about line configuration, see Configure line settings.

CIC/Lync Server Integration Administrator’s Guide 24
• For the Associated Mediation Server, select the IC server or servers that you configured earlier.
• Specify the port on which the IC server listens for requests, if different from the default port. This must be within the range of the listening ports for the respective protocol allowed by the mediation server. This port range is defined under the mediation pool.
Note: You use the same port and gateway FQDN later when you configure the proxy in the SIP line settings. For more information about line configuration, see Configure line settings.
Click Finish to save your changes.
Note: If you use an IC server as your PSTN gateway, any outbound calls Lync-only users make go to the IVR. For Lync-only users to be able to make outbound calls, configure Lync-only users on a non-IC server.
Configure voice routing Voice routing tells Lync Server where to direct various dialed numbers (Dial Plan), which users can access which calling features (Voice Policy), and which rights are authorized for the specified users (PSTN usage record). Voice routes allow users to place calls for which they have a matching PSTN Usage record.
You can configure the voice policy, add the related PSTN usage records, and then add the applicable routes for each PSTN usage record.
Access the voice routing group in Lync Server Control Panel You can configure voice routing from the Voice Routing group in Lync Server Control Panel. To access the Voice Routing group, follow these steps.
1. Start Lync Server Control Panel on the Lync Server.
Click the Voice Routing group.
Create a voice policy In the Lync Server Control Panel, follow these steps to create a voice policy that defines which call features are available and which users have permissions to use those features. The voice policy you create here applies to all Lync-enabled CIC users.
1. Click the Voice Policy tab.
Click New > User policy to create a new user voice policy.
In the Name box, specify a descriptive name for the voice policy.
In the Description box, type an optional description.
Under Calling Features, select the check box next to all features except for Enable bandwidth policy override and Enable malicious call tracing. For more information about the Calling Features options, see the Lync Server help for this dialog box. You can click the Help icon at the top of the dialog box to display the help.
CIC/Lync Server Integration Administrator’s Guide 25
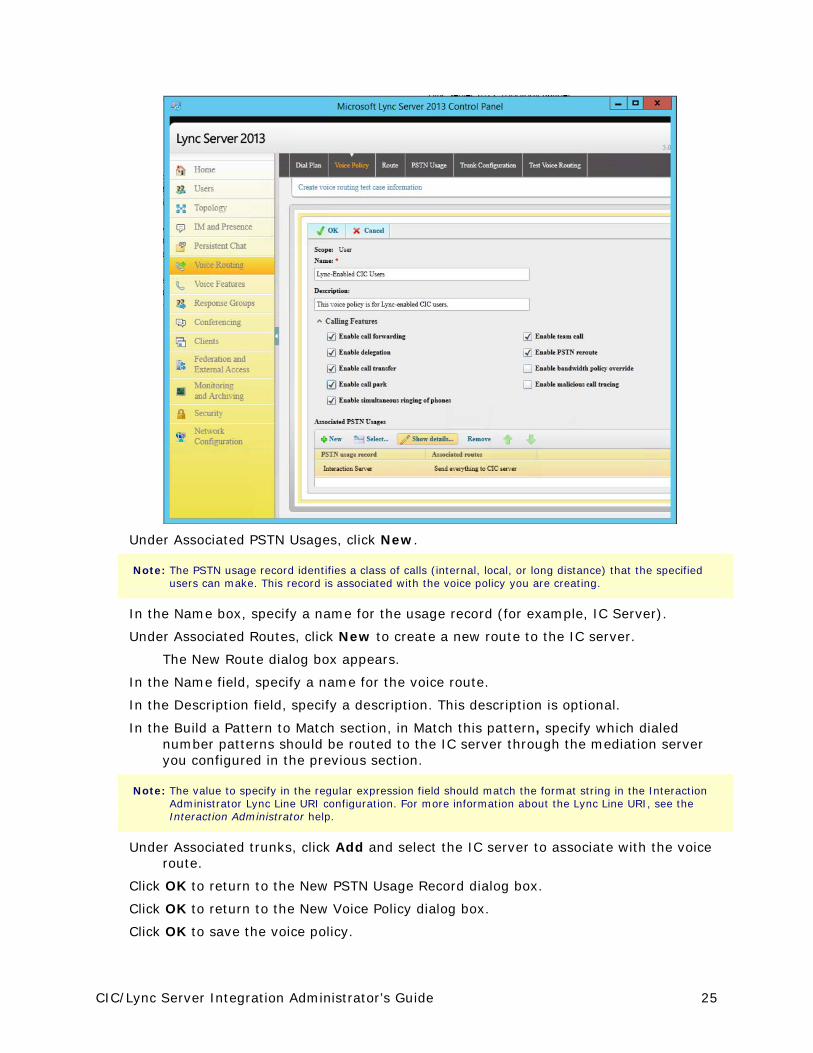
Under Associated PSTN Usages, click New.
Note: The PSTN usage record identifies a class of calls (internal, local, or long distance) that the specified users can make. This record is associated with the voice policy you are creating.
In the Name box, specify a name for the usage record (for example, IC Server).
Under Associated Routes, click New to create a new route to the IC server.
The New Route dialog box appears.
In the Name field, specify a name for the voice route.
In the Description field, specify a description. This description is optional.
In the Build a Pattern to Match section, in Match this pattern, specify which dialed number patterns should be routed to the IC server through the mediation server you configured in the previous section.
Note: The value to specify in the regular expression field should match the format string in the Interaction Administrator Lync Line URI configuration. For more information about the Lync Line URI, see the Interaction Administrator help.
Under Associated trunks, click Add and select the IC server to associate with the voice route.
Click OK to return to the New PSTN Usage Record dialog box.
Click OK to return to the New Voice Policy dialog box.
Click OK to save the voice policy.

CIC/Lync Server Integration Administrator’s Guide 26
Click Commit. Click Commit All to publish the configuration changes.
Configure a SIP trunk 1. In the Voice Routing group, click the Trunk Configuration tab.
2. Click New. Then click Pool trunk.
3. In the Select a Service dialog box, select the IP/PSTN gateway, which is your IC server or DNS AAAA or A record name that you configured earlier.
4. Click OK.
The name of the service appears in the Name box in the New Trunk Configuration dialog box.
5. In the Maximum early dialogs supported box, use the default value of 20.
This value specifies the maximum number of forked responses the PSTN gateway can receive to an invite that it sent to the Lync mediation server.
6. Under Encryption support level, select Required.
7. If the following boxes are not selected, select them:
Check box Description
Enable media bypass Media bypasses the Lync mediation server and is processed by the trunk peer.
Central media processing Indicates that there is a well-known media termination point, such as a PSTN gateway where the media termination has the same IP address as the signaling termination.
Enable refer support Indicates that the trunk peer supports receiving SIP REFER requests from the Lync mediation server. (In Lync Server 2013 this parameter is already set to true in the default configuration.)
Note: For more information about these options, see the Lync Server Control Panel help.
Click OK to save the configuration.
Configure the Lync dial plan The dial plan you create here applies to a group of users-the Lync-enabled CIC users.
1. In the Voice Routing group, click the Dial Plan tab.
2. Click New. Then click User dial plan.
3. In the Name box, type a descriptive name, such as Lync-enabled CIC_Users.
The name you enter also appears in the Simple Name box.
4. In the Description box, specify more descriptive information about the dial plan. This data is optional.
5. Under Associated Normalization Rules, add one or more rules to indicate how to translate dialed phone numbers to E.164 format.

CIC/Lync Server Integration Administrator’s Guide 27
6. Click OK.
7. Click Commit. Click Commit all to publish the configuration.
Enable users for Lync Server Users must be enabled for Lync Server in the Lync Server Control Panel on the Lync front-end server.
1. For each Lync user, in the user configuration, select the Enabled for Lync Server check box.
From the Telephony list, select the appropriate setting for the user (Enterprise Voice or Remote Call Control).
In the Line URI box, specify the user’s line URI.
This line is the same as the user’s station connection address that you configure later. For more information about the connection address, see Configure station settings.
From the Dial plan policy list, select the dial plan policy that you configured earlier.
From the Voice policy list, select the voice policy that you configured earlier.
For more information about using the Lync Server Control Panel, refer to the Microsoft Lync Server Control Panel help.

CIC/Lync Server Integration Administrator’s Guide 28
Chapter 4: Configuring Lync in Interaction Administrator This chapter describes the following configuration tasks in Interaction Administrator:
Configure a line and line group.
Configure the dial plan.
Associate Lync and CIC client calls.
Configure the Integration Correlation Timeout.
Configure line settings In this procedure, you configure a SIP line to use for all calls between CIC and Lync. The line indicates how the IC server should communicate with the Lync mediation server. In the next chapter, you’ll configure stations and associate them with this line.
You configure line settings in Interaction Administrator on the IC server.
1. In the Lines container in Interaction Administrator, right-click the list of line names. Click New.
2. Enter a line name, such as Lync. Click OK.
3. On the Line Configuration page of the SIP Line Configuration tab, select Microsoft Lync from the Line Usage list.
Selecting this Line Usage option does the following:
• Enables the auto off-hook logic. For more information about this feature, see Auto off-hook.
• Forces the Deferred Answer option to On.
• Forces the Enable T.38 Faxing option to Off.
• Adds the SIP header ms-call-source (set to non-ms-rtc) to all SIP messages that Customer Interaction Center sends to Lync.
Note: For more information about these settings, see the SIP Line Configuration topic in the Interaction Administrator help.
In the Domain Name box, specify the fully qualified domain name of the IC server.
This domain name should resolve to the DNS AAAA or A record name that you specified in Configuring IC servers as IP/PSTN gateways.
For Identity (Out), click the ellipsis button for the Calling Address Line Value 1 box.
For the Name box, specify the name you want in the “From” header.
This value can appear in the “From” header if there is no other outbound identity information available.
For the Address line, specify the phone number that represents the IC server.
This number appears in the “from” header for outbound calls if no other information is available. Use the E.164 format.

CIC/Lync Server Integration Administrator’s Guide 29
Note: Do not select the Use Anonymous check box under Outbound Identity. This setting causes problems on the Lync side of the integration.
On the Access page, choose Denied Access and Add the IP address of the Lync mediation server under the Exceptions list.
These settings deny access to this line from all computers, except for the Lync mediation server.
On the Proxy page of the SIP Line Configuration tab, add the IP address and port number of the Lync mediation server.
This port should be the same port you specified in Configuring IC servers as IP/PSTN gateways.
CIC/Lync Server Integration Administrator’s Guide 30
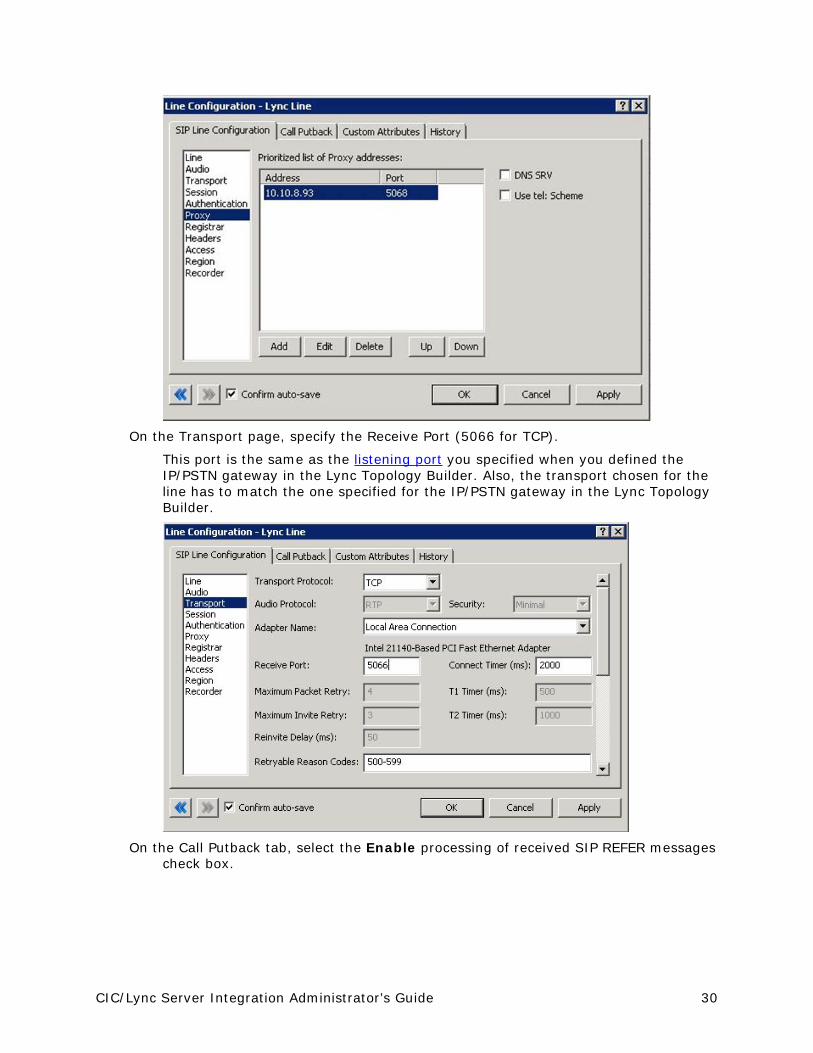
On the Transport page, specify the Receive Port (5066 for TCP).
This port is the same as the listening port you specified when you defined the IP/PSTN gateway in the Lync Topology Builder. Also, the transport chosen for the line has to match the one specified for the IP/PSTN gateway in the Lync Topology Builder.
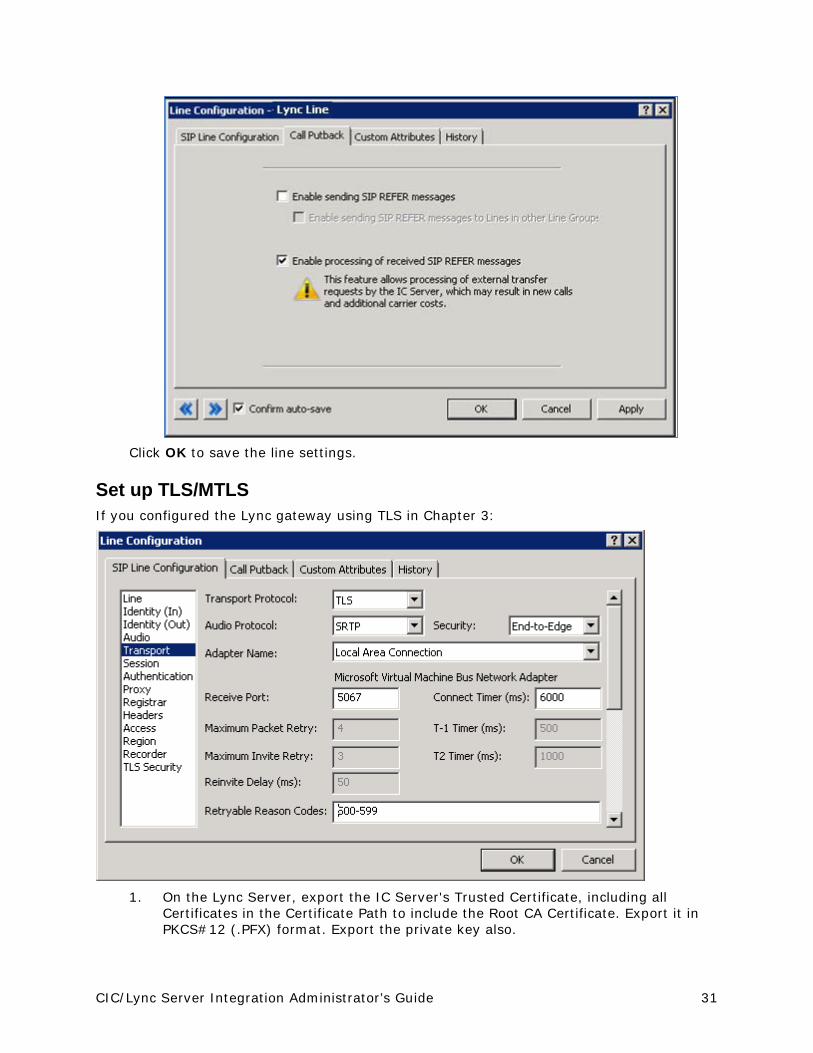
On the Call Putback tab, select the Enable processing of received SIP REFER messages
check box.
CIC/Lync Server Integration Administrator’s Guide 31
Click OK to save the line settings.
Set up TLS/MTLS If you configured the Lync gateway using TLS in Chapter 3:
1. On the Lync Server, export the IC Server's Trusted Certificate, including all
Certificates in the Certificate Path to include the Root CA Certificate. Export it in PKCS#12 (.PFX) format. Export the private key also.

CIC/Lync Server Integration Administrator’s Guide 32
On the IC Server, you need to extract the Public and Private Key. This can be completed by using openSSL or ssl_app-w32r-1-2.exe:
Extract the private key: ssl_app-w32r-1-2.exe pkcs12 -in <pfx_file_name>.pfx -nocerts -nodes -out priv.pem
Extract the public key: ssl_app-w32r-1-2.exe x509 -inform pem -in privpub.pem -pubkey -out pub.pem -outform pem
If checking the Require mutual authentication (MTLS) check box, make sure the certificate that Lync uses to connect to CIC has Client Authentication X509 Extended Key Usage (client EKU). Instructions for how to configure this in Lync can be found in the following articles:
• http://technet.microsoft.com/en-us/library/gg398409.aspx
• http://technet.microsoft.com/en-us/library/bb694035.aspx#BKMK_siteserver1
Import the Line Authority Certificates in CIC.
In Interaction Administrator, choose System Configuration, Certificate Management, and Authority Certificates.
Add the root Certificate Authority (CA) and all the intermediate CA certificates used to sign the Lync certificate.
On the Port-To-Certificate Mappings tab, click Add. Choose the IC Server Certificate created on the Lync Server and select Port: 5066 (the port we chose for the Lync line).

CIC/Lync Server Integration Administrator’s Guide 33
Configure a line group You can define a line group in Interaction Administrator to reserve a group of one or more lines for a specific use. In this procedure, you define a line group for calls going from Customer Interaction Center to Lync.
To configure a line group:
1. In the Line Groups container in Interaction Administrator, right-click in the list of line group names and click New.
2. Enter a line name, such as Lync LG and click OK.
3. In the Description box, specify the purpose of the line.
4. Select Use as Dial Group to indicate that the dial plan should use this group in the dial plan phone number configuration.
5. On the Members tab, select the Lync line and add it to the Currently Selected Lines list.
This association links the Lync line with the line group.
6. Click OK to save the line group configuration.
Configure CIC dial plan There are two options you can use to configure the dial plan.
The preferred option is to add phone numbers for all Lync-only users to the dial plan.
CIC/Lync Server Integration Administrator’s Guide 34
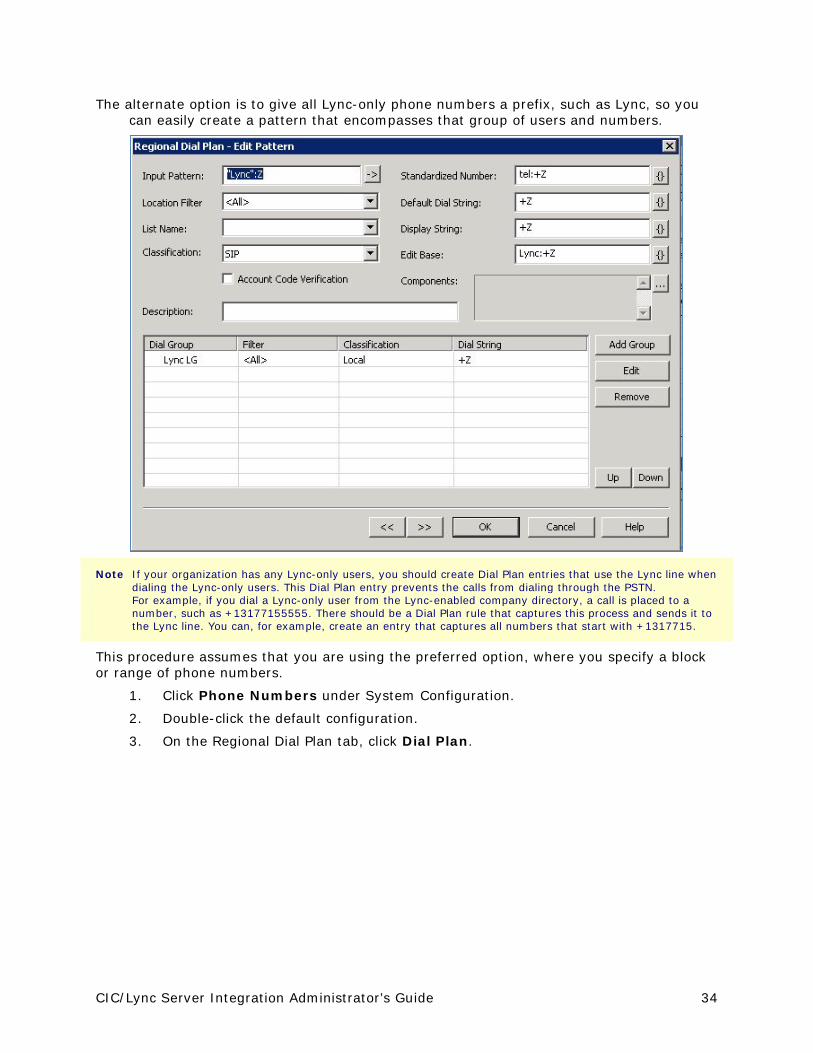
The alternate option is to give all Lync-only phone numbers a prefix, such as Lync, so you can easily create a pattern that encompasses that group of users and numbers.
Note If your organization has any Lync-only users, you should create Dial Plan entries that use the Lync line when dialing the Lync-only users. This Dial Plan entry prevents the calls from dialing through the PSTN. For example, if you dial a Lync-only user from the Lync-enabled company directory, a call is placed to a number, such as +13177155555. There should be a Dial Plan rule that captures this process and sends it to the Lync line. You can, for example, create an entry that captures all numbers that start with +1317715.
This procedure assumes that you are using the preferred option, where you specify a block or range of phone numbers.
1. Click Phone Numbers under System Configuration.
2. Double-click the default configuration.
3. On the Regional Dial Plan tab, click Dial Plan.

CIC/Lync Server Integration Administrator’s Guide 35
Click Add, and then add a dial plan entry with the following information:
In this field… Specify
Input Pattern +13175559XXX (some pattern to identify numbers for Lync-only users)
Class SIP
Standardized Number
+13175559XXX
Display String +13175559XXX
Edit Base +13175559XXX
Click Add Group and select the line group (for example, Lync LG) that you created earlier.
Click OK.
In the list of dial plan entries, move the new entry above the ?@Z entry. Click OK.
Use the simulator to test the dial plan entry (+13175559123).
For more information, see the Interaction Administrator help.
Click OK twice.
Note: You can edit the Display String field to format the string that appears in the company directory in the CIC client.

CIC/Lync Server Integration Administrator’s Guide 36
Association of Lync and CIC client calls Lync sends the CIC client an event that a new call was added. If the Lync client does not send that event in less than 1200 ms, the association is not made and the call is not answerable from the CIC client. The timeout is now configurable by setting a server parameter.
Configure Lync interaction timeout The default timer is set to 2500 milliseconds (2.5 seconds). If your environment has significant latency or if you are experiencing problems with auto-answer, you may want to increase the timeout.
1. Open Interaction Administrator.
2. Click Server Parameters.
3. Right-click in the area on the right and click New.
4. Type LyncInteractionCorrelationTimeout in the name box.
5. Enter the increased wait time in milliseconds. The default is 2500 (2.5 seconds), so you want to set it higher than 2500.

CIC/Lync Server Integration Administrator’s Guide 37
Chapter 5: Configuring stations in Interaction Administrator This chapter describes the following configuration tasks in Interaction Administrator:
Configure the global SIP station settings that the individual SIP stations inherit.
Create a station for each user who uses a Lync endpoint as a Customer Interaction Center station.
Configure the global SIP station Interaction Administrator propagates the global SIP station configuration to the individual station configurations that use the <Use Global SIP Station Setting> option. Therefore, changes to the global SIP station affect those individual stations.
Note: For sites using phones from different manufacturers: The global SIP station is a configuration object that, by default, is referred to by many stations. Changes to the global SIP station affect all stations that refer to it. You can set the global SIP station for only one manufacturer. If your site uses a mixture of phone manufacturers, such as Lync and Polycom, then the global SIP station should only be referred by the stations of one of those manufacturers. For example, if your global SIP station is set to Polycom, then the stations created for Lync endpoints should have the multiple “Use Global SIP Station Settings” check boxes cleared.
Follow these steps on the IC server to configure the global SIP station.
1. In Interaction Administrator, click Stations to expand the group.
2. Click Default Station.
3. Double-click Configuration.

CIC/Lync Server Integration Administrator’s Guide 38
4. On the Global SIP Station tab, select the SIP line you created in the previous chapter.
5. On the Phone page of the Global SIP Station tab, select Microsoft Lync from the
Manufacturer list.
When you set the Manufacturer setting to Microsoft Lync, Interaction Administrator changes the following settings on the Session page:

CIC/Lync Server Integration Administrator’s Guide 39
Session page setting New value
Call appearances 1
Connection call warm down time 0
Note: For more information about these settings, see the Interaction Administrator Help.
6. Click OK to save the global SIP station configuration for Lync.
Configure station settings Follow these steps for each user to configure individual station settings on the IC server:
1. In Interaction Administrator, click Stations to display the list of stations.
2. Double-click the name of the station to configure.
3. On the Addresses page of the Configuration tab, click Edit next to the Identification Address box to specify the user’s line URI in E.164 format.
Use the same value you specified when you configured the Lync user in Enabling users for Lync Server.
4. Click OK.
5. Under Connection Settings, do the following:
• Click Use the following settings.
• Click Edit next to the Address box to display the Connection SIP Address dialog box:
• Select the Use an alternate format option, and then specify an address
that matches the user’s line URI in Lync (for example, tel:+3175551010).
• Click OK.
Note: By default, the “To” header that is sent to Lync for this station is a combination of this address and the proxy address for the line.
6. The station configuration must use the Lync line as created previously. Your settings should be similar to the following:

CIC/Lync Server Integration Administrator’s Guide 40
7. Click OK to save the settings and return to the Station Configuration dialog box.
Note: The Phone page shows that the Use Global SIP Station Phone Information Settings check box is selected.

CIC/Lync Server Integration Administrator’s Guide 41
Chapter 6: Configuring users for the integration This chapter describes how to enable Lync-enabled CIC users. Lync Server sets the user attributes in Active Directory and CIC reads the attributes to obtain Lync configuration information for each user.
Requirements Before being enabled for the integration, a user must:
Be associated with a Windows NT domain account in their Interaction Administrator user configuration. If there is no domain association, an error dialog appears.
Have an extension specified in their Interaction Administrator user configuration.
Be enabled for Lync Server. To enable a user for Lync Server, use the Microsoft Lync Server Control Panel on the Lync front-end server. For more information about enabling users for Lync Server, see Enabling users for Lync Server.
Configure user settings To configure user settings on the IC server:
1. In Interaction Administrator, click Users under People to display the list of users.
2. Double-click the user name to display the User Configuration dialog box.
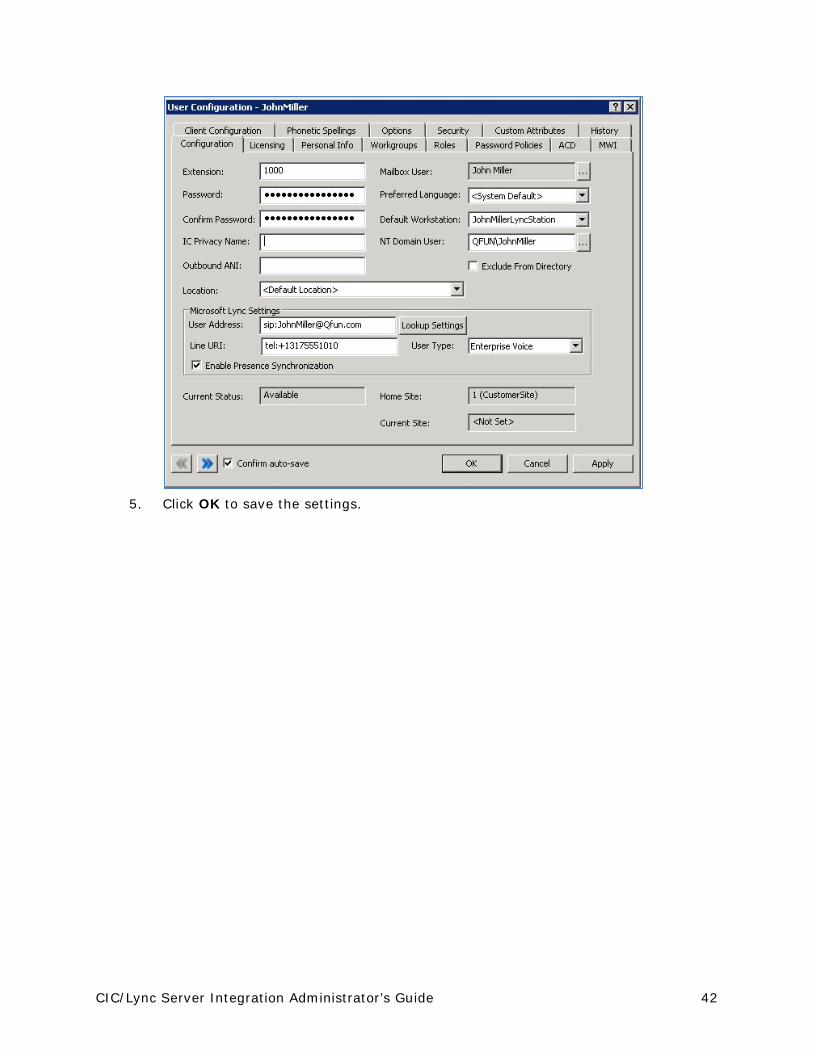
3. Under Microsoft Lync Settings on the Configuration tab, do one of the following:
• Specify the user’s SIP address in the User Address box, and specify the station’s contact address in the Line URI box. The station’s contact address is the same address you specified in the station configuration.
• Click Lookup Settings to auto-fill the Microsoft Lync Settings information with the user’s Windows NT domain information from Active Directory.
4. Select the Enable Presence Synchronization check box.
CIC/Lync Server Integration Administrator’s Guide 42
5. Click OK to save the settings.

CIC/Lync Server Integration Administrator’s Guide 43
Chapter 7: Configuring the merged company directory The merged company directory appears in the CIC client when the Lync-enabled Company Directory view is added. It combines the list of Customer Interaction Center users with the list of Lync users and enables communication between them.
The merged company directory is a server feature that takes Lync contacts from Active Directory and merges them with the list of CIC users. The directory indicates the CIC status and/or Lync presence information for each user, depending on the user type:
For users of this type… The merged company directory displays…
CIC-only users CIC status
Lync-enabled CIC users CIC status and Lync presence
Lync-only users Lync presence
For more information about the user types, see User types.
As the administrator, you can enable and configure the merged company directory to supplement the default CIC company directory.
How the merged directory is created To create the merged company directory, the LDAP Data Manager queries Active Directory at a specified interval to pull in attributes for Lync users. Then, Session Manager merges the Lync contacts with the company directory.
Users must add the Lync-enabled Company Directory view in the CIC client and configure the columns to show the Status Summary column.
Requirements The merged company directory requires the I3_Feature_Lync feature license. You should acquire that license before installing CIC.
Create a user with access to Active Directory The next step is to create a user account with permissions to read Active Directory (access control, workgroups, general directories, view permission, DLAP directory).
Configuration of the merged directory in Interaction Administrator CIC automatically creates an LDAP data source for Lync contacts, as long as the Lync feature license is present. If the license isn’t present when CIC is installed, then manual creation of the data source is required.
The following is a list of the Lync configuration tasks in Interaction Administrator.

CIC/Lync Server Integration Administrator’s Guide 44
Create and/or configure the CIC data source.
Create a contact list source.
Create a user with access to Active Directory.
Create or configure the CIC data source A data source is created automatically if the Lync feature license is present when CIC is installed. If the license is not present at the time of the installation, you need to manually create the data source. See the following procedure to manually create the data source. Otherwise, continue to Configure the data source.
Create a data source If the Lync license wasn’t present when CIC was installed, you will manually create a read-only Active Directory data source in Interaction Administrator.
1. In Interaction Administrator, click IC Data Sources.
2. Right-click under the IC Data Source Name column, and click New.
3. In the Entry Name dialog box, specify a name for the data source, such as Lync Contacts, and click OK.
4. From the Type list, select LDAP, and click Next.
5. Continue to the next section, Configure the data source.
Configure the data source 1. Continue from above or open the data source in Interaction Administrator.
2. In the LDAP Data Source Configuration tab in the IC Data Source Configuration dialog box, specify the information in the following table:
In this field: Type or select:
Subtype Active Directory
Read Only (Select)
Host Name Connection information for the domain where Lync is installed.
Bind DN The distinguished name (DN) used to authenticate the password.
Search DN The path to use when reading users in LDAP.
Port 389 (the standard port for Active Directory)
Password The password used to bind with.

CIC/Lync Server Integration Administrator’s Guide 45
For example:
3. Click Finish if you’re configuring a data source you just added, or click OK if you
are configuring an existing data source.
Create a contact list source Session Manager uses the contact list source to merge Lync contacts into the company directory.
1. In Interaction Administrator, under System Configuration, expand the Contact Data Manager container, and click Contact List Sources.
2. Right-click under the Contact List Source Name column, and click New.
3. In the Entry Name dialog box, type Lync Contacts, and click OK.
Note: If you don’t name the entry Lync Contacts, the merging will not work.

CIC/Lync Server Integration Administrator’s Guide 46
4. In the Contact List Source Configuration dialog box, specify the information in the following table:
In this field: Type or select:
IC Data Source The name of the IC data source that you configured earlier (for example, “Lync Contacts”).
Label The name to display for the contact list in the CIC client (for example, “Lync Contacts”).
Public (Select.) This field indicates that the contact list is public, rather than private.
Has Status (Do not select.) This field indicates whether the data source supports status information.
Driver IC LDAP Contacts
Additional information
Enter the following, where D:\ is the drive where CIC is installed:
SEARCH_FILTER=(msRTCSIP-PrimaryUserAddress=*);ATTRIBUTE_MAPPING_FILE=D:\I3\IC\Resources\lync_map.txt
For example:
5. Click OK.
Disable the merged company directory The merged company directory is enabled when the data source is created. To disable the directory, remove the data source.
CIC/Lync Server Integration Administrator’s Guide 47
Chapter 8: Configuring presence synchronization The integration includes a presence synchronization feature that synchronizes Lync presence information and Customer Interaction Center status information.
The presence synchronization feature requires the installation and configuration of the Lync Presence Integration service.
In Customer Interaction Center, an administrator must configure the service by making changes to an XML configuration file. In future releases, configuration options will be available in Interaction Administrator. The XML configuration is available for advanced users who want to use the service prior to the configuration being available in Interaction Administrator.
Introduction to presence synchronization Presence synchronization is how the Lync Server and the IC server show a user’s status after a change is made. This synchronization can occur from Lync to CIC, or from CIC to Lync, or both. How it actually syncs is configurable.
Due to technical limitations, a user’s status might not always synchronize with Lync the moment a switchover connection is restored. Generally, the service will not try to synchronize on startup. However, if the user is in a workgroup, or if the user’s CIC client reconnects to the IC server after the Lync Presence Integration service reconnects to the IC server, the user’s status should synchronize automatically.
Introduction to configuring presence synchronization This chapter describes how to configure the server to host the service in CIC. It also describes the configuration options that affect the behavior of the synchronization.
There are two procedures to get the service up and running.
1. Prepare the Lync environment by configuring the Lync Trusted Application Server/Lync Trusted Application. The Lync Trusted Application Server/Lync Trusted Application is a Microsoft requirement and a Lync administrator should perform this step. This document provides minimal guidance for performing this procedure because documentation is available from Microsoft.
2. Install and configure the Lync Presence Integration service.
For a recorded webinar on this topic, visit: http://msdn.microsoft.com/en-us/library/lync/hh347300(v=office.14).aspx.
About the Lync trusted application server configuration The Lync Presence Integration service is a Microsoft UCMA (Unified Communications Managed API) trusted application. The following list summarizes this trust relationship.
Lync Server does not challenge trusted applications for authentication.

CIC/Lync Server Integration Administrator’s Guide 48
Lync Server does not throttle trusted applications for SIP transactions, connections, and outgoing VoIP calls.
Trusted applications can impersonate any user and can join conferences without appearing in rosters.
Trusted applications are highly available and resilient.
Application activation is the process where UCMA applications are configured to use Lync Server functionality. Most of the commonly used configuration data exists in Active Directory, the Central Management store, and the computer that hosts the application’s local certificate store.
Activation is necessary to deploy a ready-to-ship application and to test an application during the application development phase.
For more information about trusted applications, and to become familiar with the implications and steps to administer and deploy a UCMA trusted application server, see http://msdn.microsoft.com/en-us/library/lync/hh347291(v=office.14).aspx.
Prerequisites for activation Activation requires the following:
Lync 2013 requires the UCMA 4.0 Runtime.
Skype for Business 2015 requires the UCMA 4.0 or 5.0 Runtime.
Microsoft Lync Server Core Components provide access to PowerShell cmdlets, which are necessary for activating the application. The Core Components also install the binaries necessary to enable a local replica, or copy, of the Central Management Store.
A valid server topology with Microsoft Lync Server and an Active Directory domain controller.
Appropriate permissions and memberships.
To download the UCMA Runtime and Microsoft Lync Server components, see http://www.microsoft.com/en-us/download/details.aspx?id=20958
For more information about activating a trusted application, see http://msdn.microsoft.com/en-us/library/lync/hh347291(v=office.14).aspx
General trusted application activation The following information is a summary of the steps needed to activate a UCMA Trusted Application. For more information about activating a trusted application, see http://msdn.microsoft.com/en-us/library/lync/hh347354(v=office.14).aspx.
All trusted applications require entries in the Microsoft Lync Server topology document to specify the computers on which the application runs, and the trusted service ports required by the trusted applications. In addition, to communicate with Lync Server, an application computer also requires a machine certificate. Lync Server only supports Mutual Transport Layer Security (MTLS) with trusted servers. Optionally, an application can be associated with one or more trusted application endpoints that are bound to SIP URIs in the same way that a user is associated with a SIP URI.
All trusted applications must complete the following steps.
1. Create a pool of trusted application computers in the Lync Server topology.
2. Request or import a certificate for the application computer.
CIC/Lync Server Integration Administrator’s Guide 49
3. Add a trusted service port for the application.
4. Add the application and its port to the list of firewall exceptions.
5. Optionally, create one of more Active Directory contact objects for the application.
6. Optionally, create Active Directory user objects for the application.
All of these steps, except for the firewall exceptions, are discussed in detail on the Microsoft website described earlier in this section. The default name of the trusted application in the XML configuration file is ‘InteractionCenterLyncIntegrationService’. If you choose to name it something else, make sure that you note that in the <lyncFarm> XML attribute in your XML configuration file.
Activate an auto-provisioned application The Lync Presence Integration service is an Auto-Provisioned UCMA application. The following information is a summary of the steps to auto-provision a UCMA application. For a detailed list of steps, see: http://msdn.microsoft.com/en-us/library/lync/hh347300(v=office.14).aspx
You can provision trusted applications at run time in one of these two distinct ways:
Auto-provisioning, which requires a local Central Management Store replica.
Manual provisioning, which does not require a local Central Management Store replica.
The recommended way to provision a UCMA-based application is auto-provisioning. With this style of provisioning, applications can auto-discover, auto-provision, monitor, and react to settings that are relevant in a Microsoft Lync Server environment.
Note: See Create and verify DNS SRV records for configuration steps required for auto-provisioning to work.
To activate an auto-provisioned application:
1. Ensure that the computers on which the application will run are joined to the domain on which Lync Server will run.
2. Install the Central Management Store replication service.
3. Enable the Central Management Store replication.
4. Set the certificate so that the Lync Server topology is aware of the trusted application computer.
For more information, see the Microsoft website described earlier in this section.
Install the Lync Presence Integration Service Note: In the latest version of CIC, the service is 64-bit only. If you installed the Lync Presence Integration Service
in CIC on a 64-bit machine or operating system, the new install automatically updates the service. If you are using the service on a 32-bit machine or operating system, install the service on a 64-bit machine and then uninstall it from the 32-bit machine.
To install the service:
1. Locate and start MicrosoftLyncIntegrationService_64bit.msi
This installation file is available here: https://my.inin.com/products/integrations/Pages/Microsoft-Lync.aspx.

CIC/Lync Server Integration Administrator’s Guide 50
Note: If you have not correctly configured the server with the UCMA Runtime version that is compatible with your Lync deployment, the following error message appears and the install ends: “Microsoft Unified Communications Managed API 3.0 Runtime must be installed before proceeding.”
If there is not a UCMA error, the Destination Folder dialog box appears.
2. Choose the installation destination folder, and then click Next.
The Logging File Path dialog box appears.
3. Specify the path for the log file, and then click Next.
4. Type the port and credential information for the CIC web configuration server, and then click Next.
The Ready to Install IC Integration to Skype for Business dialog box appears.
5. Click Install to begin the service installation.
6. When the installation completes, click Finish.
7. Click Yes to restart the computer, or click No if you plan to restart it later.
Configure the IC server for the Lync Presence Integration Service
1. Using the server/port combination you used for the web configuration, log on to the web administrator to configure the IC server to use with the integration. Example: http://localhost:8084.
The Windows Security dialog box appears.

CIC/Lync Server Integration Administrator’s Guide 51
2. Enter the credentials.
The Integrations Web Configuration Status page appears.
3. Click Config.
4. Click Add Server (or Edit for existing servers).
The Configuration page appears.
5. Specify the Notifier Host and credential information, then select the Microsoft
Skype for Business Integration check box.
6. Click Add (or Apply Changes for existing servers) to complete the IC server configuration.
“The IC server is now configured” message appears.

CIC/Lync Server Integration Administrator’s Guide 52
Lync Presence Integration Service XML configuration Inside the Lync Presence Integration Service installation folder is a sample configuration file named ININIntegrationService–w64r-x-x.exe.config (x-x represents the build number).
This file loads at service start time and controls the presence logic between CIC and Lync. There is a watcher for the config file within the service that detects when changes are made to it. This watcher enables real-time changes in the config file to take effect while the service is running. While most of the configuration options within the XML are noted inside this file, there are a few attributes to point out. Use the sample configuration file as a reference when using this document.
Note: Users must be configured for presence sync in the XML file and in Interaction Administrator. For more information, see Configure user settings.
The following is a list of parameters in the XML configuration file.
Parameter Description
<lyncFarm> The service uses this attribute with UCMA Runtime to indicate which trusted application is attempting to connect to the Lync environment.
ucmaAppId The application that is listed for the preconfigured trusted application in Lync. To obtain the ID, run Get-CsTrustedApplication in Lync Server Management Shell. The shell returns a result in this form: urn:application:[applicationName].
Use the applicationName value from the result as the ucmaAppId.
ucmaUserAgent For the name, you can use anything but you must enclose it in quotes. For example: “Lync Presence Service.”
ucmaAppName This parameter is for future use.
ucmaVersion UCMA version number will be 4 or 5, depending on which version you are running. See Prerequisites for activation.
<profiles> This attribute begins the present logic configuration portion of the XML file. Each profile can have different presence sync behaviors.
<profile> This attribute indicates the start of a profile. A profile includes a scope and a qualifier.
scope = Global / Qualifier = EnterpriseVoice, Rcc, or ImOnly This profile applies if the user does not have a User or Custom profile.
scope = Custom / Qualifier = arbitrary description You can apply a custom profile to a list of users and the profile can include a list of conditions.
All profiles can have multiple augmentation configurations. If all the conditions are met in more than one augmentation configuration, the service uses the configuration with the lowest
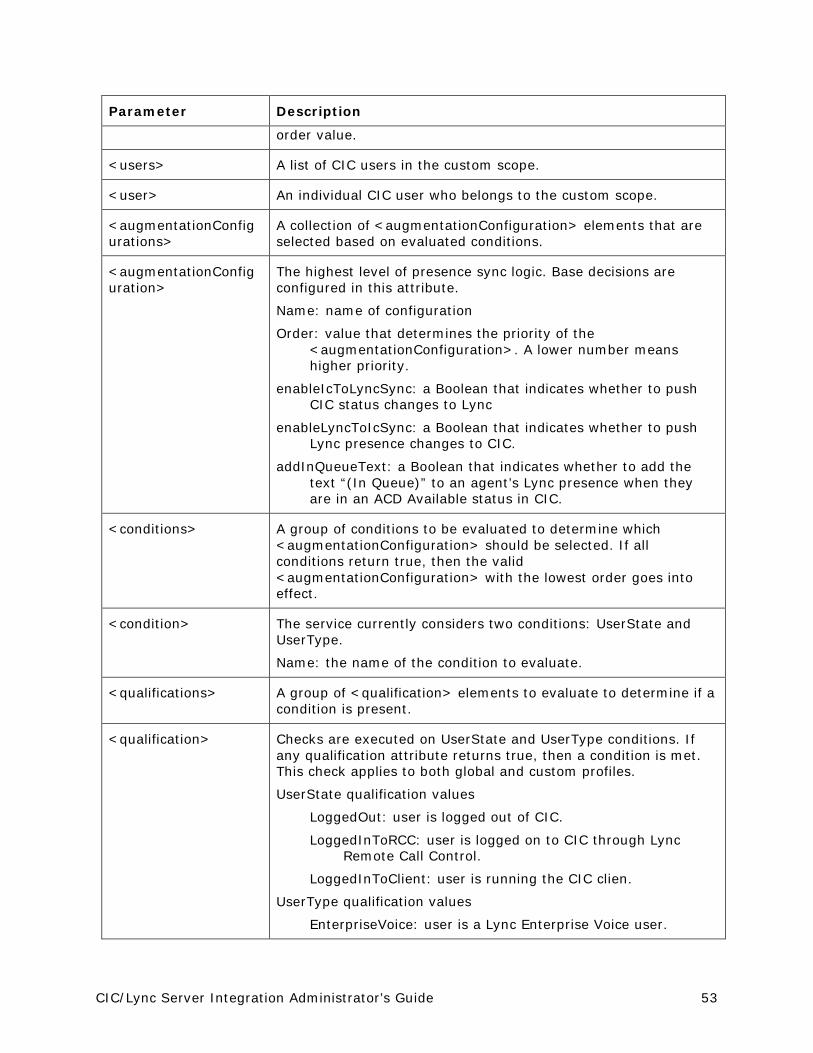
CIC/Lync Server Integration Administrator’s Guide 53
Parameter Description
order value.
<users> A list of CIC users in the custom scope.
<user> An individual CIC user who belongs to the custom scope.
<augmentationConfigurations>
A collection of <augmentationConfiguration> elements that are selected based on evaluated conditions.
<augmentationConfiguration>
The highest level of presence sync logic. Base decisions are configured in this attribute.
Name: name of configuration
Order: value that determines the priority of the <augmentationConfiguration>. A lower number means higher priority.
enableIcToLyncSync: a Boolean that indicates whether to push CIC status changes to Lync
enableLyncToIcSync: a Boolean that indicates whether to push Lync presence changes to CIC.
addInQueueText: a Boolean that indicates whether to add the text “(In Queue)” to an agent’s Lync presence when they are in an ACD Available status in CIC.
<conditions> A group of conditions to be evaluated to determine which <augmentationConfiguration> should be selected. If all conditions return true, then the valid <augmentationConfiguration> with the lowest order goes into effect.
<condition> The service currently considers two conditions: UserState and UserType.
Name: the name of the condition to evaluate.
<qualifications> A group of <qualification> elements to evaluate to determine if a condition is present.
<qualification> Checks are executed on UserState and UserType conditions. If any qualification attribute returns true, then a condition is met. This check applies to both global and custom profiles.
UserState qualification values
LoggedOut: user is logged out of CIC.
LoggedInToRCC: user is logged on to CIC through Lync Remote Call Control.
LoggedInToClient: user is running the CIC clien.
UserType qualification values
EnterpriseVoice: user is a Lync Enterprise Voice user.

CIC/Lync Server Integration Administrator’s Guide 54
Parameter Description
RCC: user is a Lync RCC user.
IMOnly: user is configured as an IM Only user.
The UserType qualification value corresponds to the user setting configured in Chapter 6: Configuring users for the integration.
<presenceMap> A group of <presenceMapping> elements for a particular <augmentationConfiguration>. If a presence change occurs in an <augmentationConfiguration> where there is no <presenceMapping>, no presence change occurs for either direction.
<presenceMapping> The heart of how presence sync is executed within the service. Each <presenceMapping> controls what happens on each system when the service detects presence/status changes. Remember that CIC statuses are reported using a string (for example, Available) and Lync presence values are numeric (for example, 3500). The Lync baseline numeric presence values are listed in the next section. When a CIC status is pushed to Lync, the CIC text Away from Desk is pushed to Lync along with the availability value.
icStatus: the presented CIC status or the CIC status to which to change
lyncPresenceFromIc: the presented Lync presence or the Lync presence to which to change
lyncPresenceToIcStart: a Lync presence value that is used in conjunction with the direction property
lyncPresenceToIcEnd: a Lync presence value that is used in conjunction with the direction property
direction: allows you to specify which service should allow synchronization to the other service.
OneWayToIc: disallows synchronization on CIC status changes. Any presence values between the lyncPresenceToIcStart and lyncPresenceToIcEnd values result in the CIC user having the icStatus status.
OneWayToLync: disallows synchronization on Lync presence changes. CIC status changes are detected when a user changes status to icStatus and Lync presence becomes the lyncPresenceFromIc equivalent.
TwoWay: allows all synchronization.
None: disables the synchronization of this status for the time being.
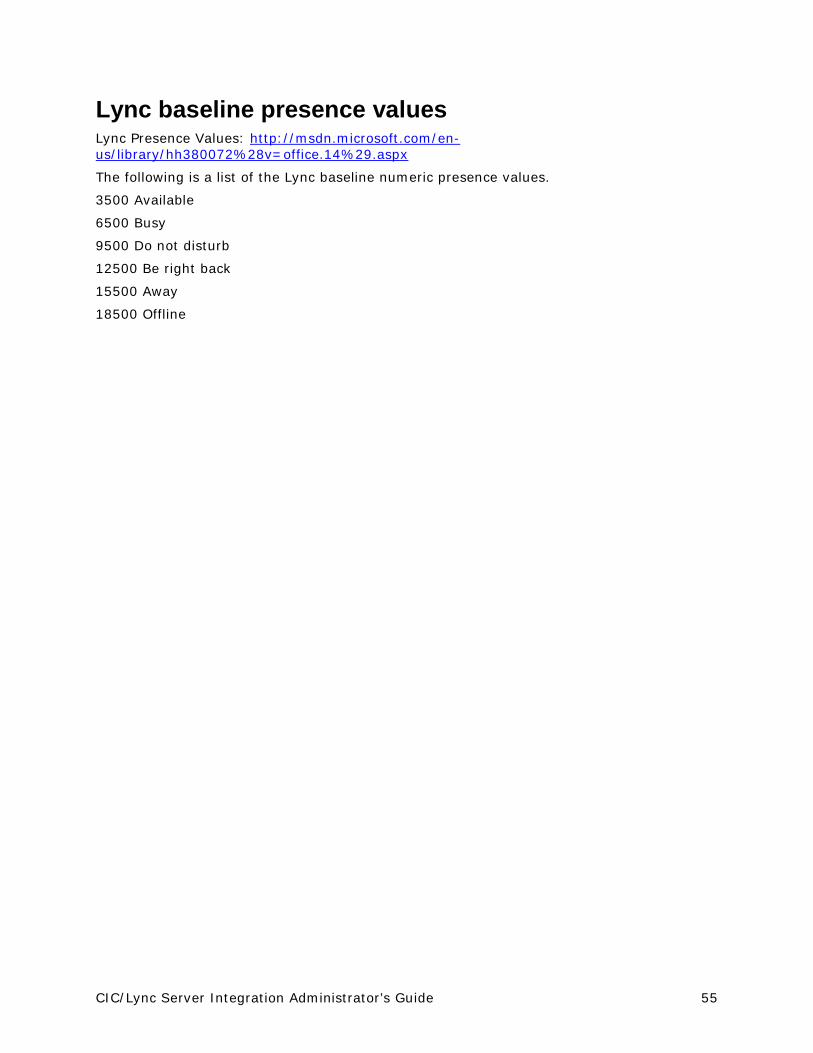
CIC/Lync Server Integration Administrator’s Guide 55
Lync baseline presence values Lync Presence Values: http://msdn.microsoft.com/en-us/library/hh380072%28v=office.14%29.aspx
The following is a list of the Lync baseline numeric presence values.
3500 Available
6500 Busy
9500 Do not disturb
12500 Be right back
15500 Away
18500 Offline

CIC/Lync Server Integration Administrator’s Guide 56
Chapter 9: Configuring Remote Call Control Remote Call Control (RCC) is a feature within Lync Server that offers the ability to make and receive calls on a CIC station using the Microsoft Lync client.
For example, with RCC enabled in Lync, if a CIC station rings, an alert appears in the Lync client to allow the user to answer the call. Or, when a number is clicked in the Lync client, the CIC station can go off-hook in speakerphone mode and dial the number.
RCC allows multiple ways to logons:
Using the RCC station (default)
Using a remote number
RCC must be configured on both the Lync Server and the IC server.
Prerequisites Ensure that all CIC user accounts that will be used with RCC have client licenses enabled.
In addition, enable the RCCServer subsystem on Customer Interaction Center. See the following section.
To use RCC, you must have the I3_FEATURE_LYNC license. The Lync RCC implementation now checks for this license.
Configure IC server for RCC 1. Click Lines container in Interaction Administrator.
2. Create a line to be used for RCC, right click in the lines grid and then click New.
3. In the SIP Line Configuration tab, click Line on the left.
Verify that Line Usage is set to Microsoft Lync Remote Call Control.
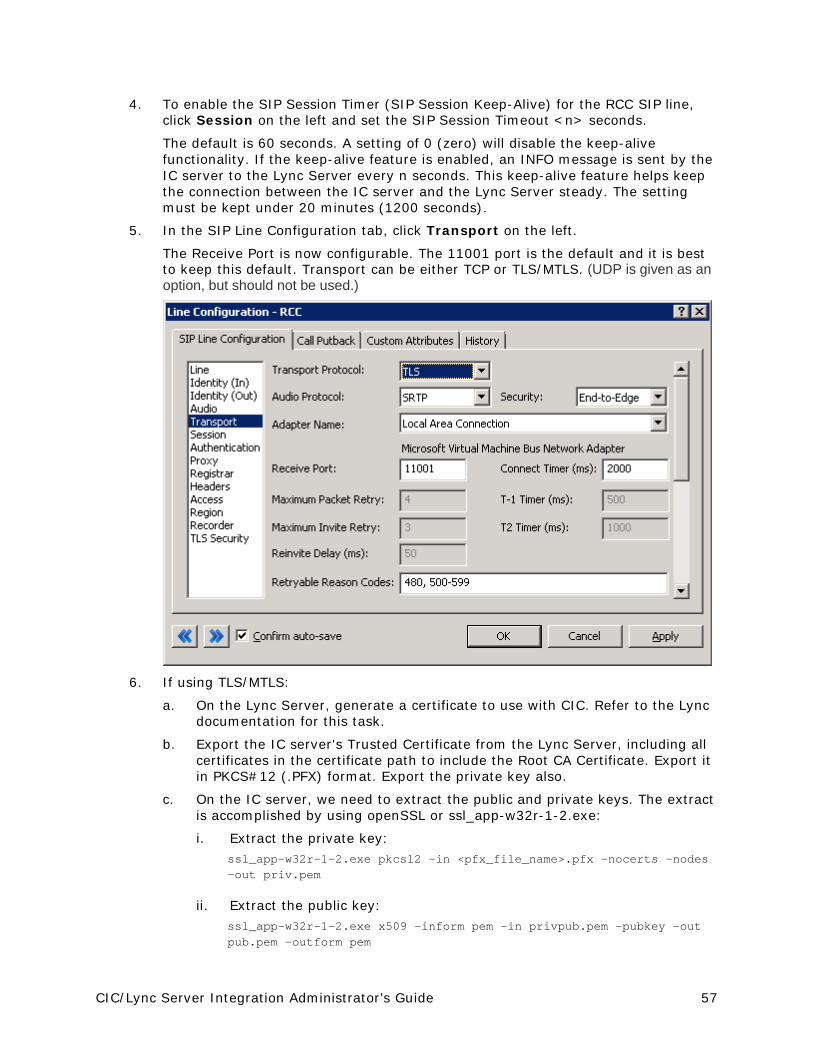
CIC/Lync Server Integration Administrator’s Guide 57
4. To enable the SIP Session Timer (SIP Session Keep-Alive) for the RCC SIP line, click Session on the left and set the SIP Session Timeout <n> seconds.
The default is 60 seconds. A setting of 0 (zero) will disable the keep-alive functionality. If the keep-alive feature is enabled, an INFO message is sent by the IC server to the Lync Server every n seconds. This keep-alive feature helps keep the connection between the IC server and the Lync Server steady. The setting must be kept under 20 minutes (1200 seconds).
5. In the SIP Line Configuration tab, click Transport on the left.
The Receive Port is now configurable. The 11001 port is the default and it is best to keep this default. Transport can be either TCP or TLS/MTLS. (UDP is given as an option, but should not be used.)
6. If using TLS/MTLS:
a. On the Lync Server, generate a certificate to use with CIC. Refer to the Lync documentation for this task.
b. Export the IC server's Trusted Certificate from the Lync Server, including all certificates in the certificate path to include the Root CA Certificate. Export it in PKCS#12 (.PFX) format. Export the private key also.
c. On the IC server, we need to extract the public and private keys. The extract is accomplished by using openSSL or ssl_app-w32r-1-2.exe:
i. Extract the private key: ssl_app-w32r-1-2.exe pkcs12 -in <pfx_file_name>.pfx -nocerts -nodes -out priv.pem
ii. Extract the public key: ssl_app-w32r-1-2.exe x509 -inform pem -in privpub.pem -pubkey -out pub.pem -outform pem
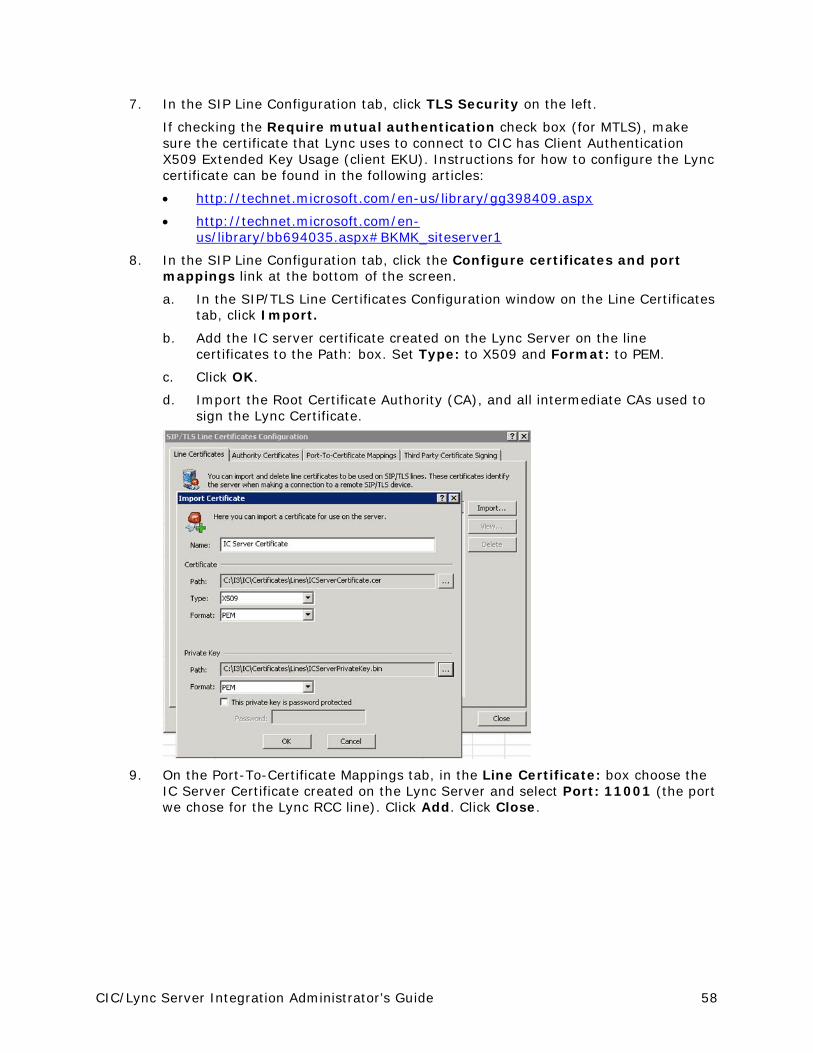
CIC/Lync Server Integration Administrator’s Guide 58
7. In the SIP Line Configuration tab, click TLS Security on the left.
If checking the Require mutual authentication check box (for MTLS), make sure the certificate that Lync uses to connect to CIC has Client Authentication X509 Extended Key Usage (client EKU). Instructions for how to configure the Lync certificate can be found in the following articles:
• http://technet.microsoft.com/en-us/library/gg398409.aspx
• http://technet.microsoft.com/en-us/library/bb694035.aspx#BKMK_siteserver1
8. In the SIP Line Configuration tab, click the Configure certificates and port mappings link at the bottom of the screen.
a. In the SIP/TLS Line Certificates Configuration window on the Line Certificates tab, click Import.
b. Add the IC server certificate created on the Lync Server on the line certificates to the Path: box. Set Type: to X509 and Format: to PEM.
c. Click OK.
d. Import the Root Certificate Authority (CA), and all intermediate CAs used to sign the Lync Certificate.
9. On the Port-To-Certificate Mappings tab, in the Line Certificate: box choose the
IC Server Certificate created on the Lync Server and select Port: 11001 (the port we chose for the Lync RCC line). Click Add. Click Close.
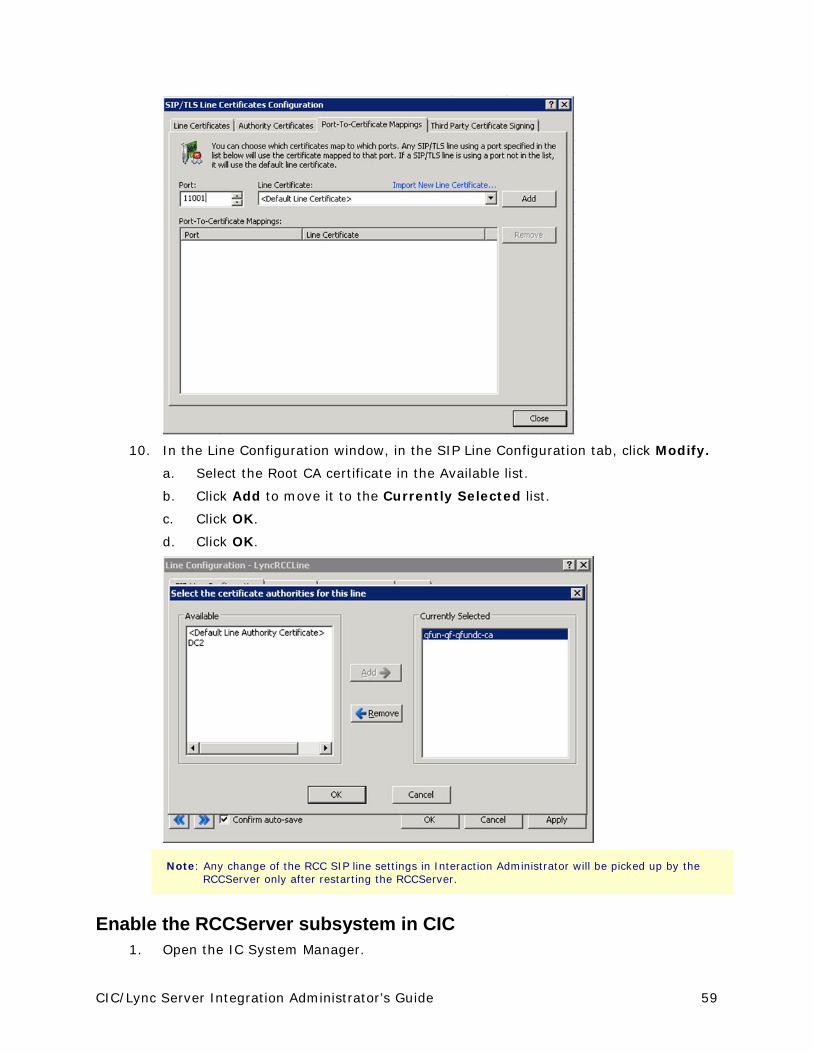
CIC/Lync Server Integration Administrator’s Guide 59
10. In the Line Configuration window, in the SIP Line Configuration tab, click Modify.
a. Select the Root CA certificate in the Available list.
b. Click Add to move it to the Currently Selected list.
c. Click OK.
d. Click OK.
Note: Any change of the RCC SIP line settings in Interaction Administrator will be picked up by the RCCServer only after restarting the RCCServer.
Enable the RCCServer subsystem in CIC 1. Open the IC System Manager.

CIC/Lync Server Integration Administrator’s Guide 60
2. Under View, clear the Disabled Subsystems check box.
3. In the disabled list, locate RCCServer.
4. Double-click RCCServer, then change the startup type to Automatic.
5. Start the RCCServer subsystem.
Configuring Lync Server for RCC This section provides instructions that should work for most implementations of RCC with Customer Interaction Center. For detailed instructions on configuring Lync Server for RCC, refer to Microsoft’s documentation at http://technet.microsoft.com/en-us/library/gg558664.aspx.
This procedure uses the Lync Server Management Shell for most of the RCC configuration for Lync Server. A small part of the configuration is managed through the Lync Server Control Panel.
The configuration consists of these procedures:
Build a trusted application pool.
Configure a trusted application that lives on the pool.
Specify the address of the CIC server.
Narrow the trusted application pool’s IP address to the IC Server (or SIP proxy), and then publish the topology. Each of these procedures is described in the following sections.
Build a trusted application pool A trusted application pool is required to trust the IC Server.
Note: This example is pointing to a single IC server, so it is using the CIC specific information. In a switchover configuration, this pool parameter would point to a Network or Hardware load balancing, which would determine which IC server to use.
Create the pool type by doing one of the following:
1. For a non-switchover environment, enter the following in the Lync Server Management Shell: New-CsTrustedApplicationPool <IC Server FQDN> -Registrar <Lync Pool FQDN> -Site 1 -TreatAsAuthenticated $true -ThrottleAsServer $true -RequiresReplication $false
For a switchover environment, use the command above, but replace <IC Server FQDN> with the SIP proxy FQDN or IP address.
Configure the trusted application Next, configure a trusted application that lives on the pool you built in the previous section so that Lync will trust requests from this server and port combination.
Configure the trusted application by entering this command in the Lync Server Management Shell:
New-CsTrustedApplication -ApplicationID CIC -TrustedApplicationPoolFQDN <IC Server FQDN> -Port 11001 –EnableTcp

CIC/Lync Server Integration Administrator’s Guide 61
Note Make sure that the port is set to match the RCC SIP line port configured in CIC. If you set it to a different port, the IC Server will never hear traffic from Lync. Also, to use TCP include “–EnableTcp” in the command because without “–EnableTCP” Lync sets trusted applications to use TLS. If you are using TLS or MTLS, leave the “-EnableTcp” off of the above line.
Specify the IP address of the IC server At this point, you have configured Lync to trust traffic from the IC server on port 11001. The next step is to tell Lync how to send traffic to the IC server. With OCS, this configuration is accomplished with the Static Routes tab, which was accessible in the user interface, but with Lync, this is managed either through the Lync Server Management Shell or using the Topology Builder. Both methods are described below.
To specify the IP address of the IC server using the Lync Server Management Shell
1. Enter this command in the Lync Server Management Shell: Enable-CsTopology
2. Enter this command to create a static route that matches the IC server’s domain (in this example, rcc.dev2000.com), with a next hop of the IC server and listening port. This step adds the route in a PowerShell variable:
a. For TCP $staticRoute = New-CsStaticRoute –TCPRoute –Destination < CIC Server IP > -Port 11001 –MatchUri rcc.dev2000.com
b. For TLS/MTLS $staticRoute = New-CsStaticRoute -TLSRoute -Destination < CIC Server FQDN > -Port 11001 -MatchUri rcc.dev2000.com -UseDefaultCertificate $true
Note: Don’t be concerned about the URI value and attempting to map it in your domain. You can essentially use any value. This value is used later when configuring a user’s Line Server URI in the User configuration. If MTLS is configured you will need to set up the Certificate Authority.
3. Add the route from the previous step to the routing configuration using this command: Set-CsStaticRoutingConfiguration –Route @{Add=$staticRoute}
4. Enter the following command in the PowerShell to download the current topology so you can narrow the Trusted Application Pool’s IP address list to only the IC server (or SIP proxy). Get-CsTopology –AsXml | Out-File c:\rcc.xml
5. Open the rcc.xml file and manually edit the section Cluster Fqdn=”<IC Server FQDN>” from 0.0.0.0 to the IP address of the IC server, and then edit and save the file.
6. Enter the following command to publish the change and complete the setup: Publish-CsTopology –FileName c:\rcc.xml
Everything should now be configured at the Lync Server level to run RCC with the CIC client.

CIC/Lync Server Integration Administrator’s Guide 62
To specify the address of the IC server using the Topology Builder: 1. Open the Topology Builder and expand the Trusted Application Servers
container.
You should see the trusted application pool that you created in the Lync Server Management Shell.
2. Right-click the pool to display a shortcut menu, and then select Edit Properties.
3. On the General page, select the Limit service usage to selected IP addresses
option button, and then enter the IP address of the IC server (or SIP proxy).
4. Click OK, and then publish the topology for the settings to take effect.
At this point, everything should be configured at the Lync Server level to run RCC with CIC. The next step is to configure a user in Lync to use RCC.
Configure a Lync user to use RCC 1. Open the Lync Server Control Panel and either enable a new user or find an
existing user that you want to configure to use RCC.

CIC/Lync Server Integration Administrator’s Guide 63
2. Double-click the selected user to edit the properties.
3. Under Telephony, select Remote call control.
4. In the Line URI field, specify the station on which the user will log on on the IC server. Use this format, where X is the extension of the station on the IC server: tel:+X
5. In the Line Server URI field, use a format that matches the static route you created earlier.
In the example shown, “rcc.dev2000.com” is the host that matches the static route and “sip:[email protected]” is the entire URI, where “bass” is the name of the IC server (however, it can be anything). The important thing to
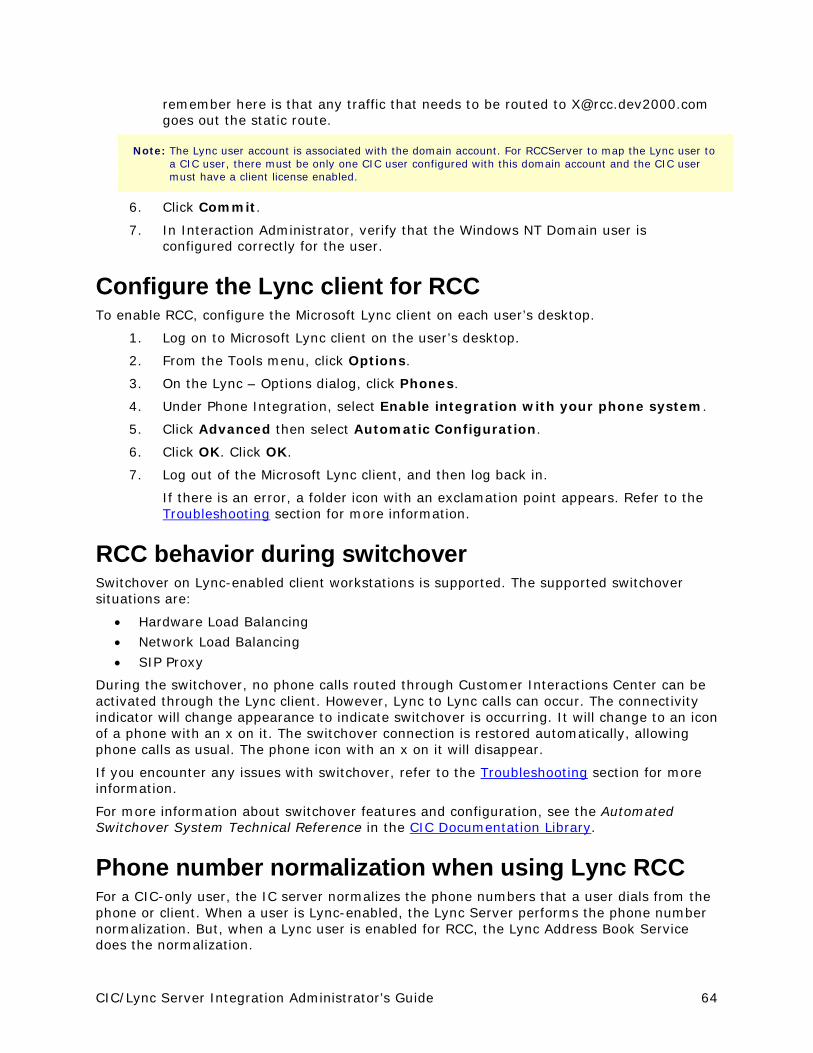
CIC/Lync Server Integration Administrator’s Guide 64
remember here is that any traffic that needs to be routed to [email protected] goes out the static route.
Note: The Lync user account is associated with the domain account. For RCCServer to map the Lync user to a CIC user, there must be only one CIC user configured with this domain account and the CIC user must have a client license enabled.
6. Click Commit.
7. In Interaction Administrator, verify that the Windows NT Domain user is configured correctly for the user.
Configure the Lync client for RCC To enable RCC, configure the Microsoft Lync client on each user’s desktop.
1. Log on to Microsoft Lync client on the user’s desktop.
2. From the Tools menu, click Options.
3. On the Lync – Options dialog, click Phones.
4. Under Phone Integration, select Enable integration with your phone system.
5. Click Advanced then select Automatic Configuration.
6. Click OK. Click OK.
7. Log out of the Microsoft Lync client, and then log back in.
If there is an error, a folder icon with an exclamation point appears. Refer to the Troubleshooting section for more information.
RCC behavior during switchover Switchover on Lync-enabled client workstations is supported. The supported switchover situations are:
• Hardware Load Balancing • Network Load Balancing • SIP Proxy
During the switchover, no phone calls routed through Customer Interactions Center can be activated through the Lync client. However, Lync to Lync calls can occur. The connectivity indicator will change appearance to indicate switchover is occurring. It will change to an icon of a phone with an x on it. The switchover connection is restored automatically, allowing phone calls as usual. The phone icon with an x on it will disappear.
If you encounter any issues with switchover, refer to the Troubleshooting section for more information.
For more information about switchover features and configuration, see the Automated Switchover System Technical Reference in the CIC Documentation Library.
Phone number normalization when using Lync RCC For a CIC-only user, the IC server normalizes the phone numbers that a user dials from the phone or client. When a user is Lync-enabled, the Lync Server performs the phone number normalization. But, when a Lync user is enabled for RCC, the Lync Address Book Service does the normalization.
CIC/Lync Server Integration Administrator’s Guide 65
You should review your organization’s normalization patterns, keeping in mind that all numbers dialed by the RCC-enabled users pass through the Address Book Server before being dialed. Your organization’s normalization pattern is important when you consider how Lync hands off these dial strings to CIC. For more information about this process, see the following:
http://technet.microsoft.com/en-us/library/gg429711.aspx
http://technet.microsoft.com/en-us/library/gg429691.aspx
Troubleshooting Lync Status Sync If you uninstall SU 1 without uninstalling the whole application, the config file (ininintegrationservice-w64r-1-0.exe.config) will not be restored. Without the config file, the service fails to start. To fix this problem,
1. Go to Add or remove programs in the Control Panel.
2. Click IC Integration to Microsoft Lync.
3. Click Repair.
RCC If you saw an error indicator when you logged back in after configuring Microsoft Lync for RCC, follow these troubleshooting suggestions:
You can use the Wireshark application to see if the traffic reaches the CIC server properly. If it does not reach the server, the problem is probably the routing in the Lync Server configuration or the user’s Server URI.
If CIC is receiving the SIP traffic, but rejecting the logon, try:
Restart RCCServer to refresh its Active Directory cache. Or, you can reload RCCServerU.exe using the –reload flag.
Verify that the TEL URI for the user matches a valid CIC station extension and that the station is not in use by another CIC user. If so, Cs_StationInUseByAnotherUser appears in the RCCServer log.
Verify that the CIC user account that corresponds to the Lync user has the domain account configured correctly. If not configured correctly, the account will not be found by RCCServer.
Verify that the CIC user account that corresponds to the Lync user has a valid CIC license applied and enabled. If not, Cs_NoClientLicense appears in the RCCServer log.
Check the RCCServer log for any other clues.
If the RCC connection periodically stops working, it could be that the port is not always being kept open. Create a 5060 listen port that stays open to send back messages.
If it appears that RCC is configured correctly and there is not an error icon in the Microsoft Lync client, verify that the preferred calling device is set up correctly for the user in the Lync client. If a call between Lync RCC and a Remote Station was active during a switchover and the call is disconnected by the Remote Station after the switchover, the RCC user's Lync Client remains "In a Call" status and the RCC phone remains

CIC/Lync Server Integration Administrator’s Guide 66
connected to dead air after the call was disconnected. In this case, the IC Server loses control of the call and the Lync client thinks it still has a call. This problem condition is a limitation of the functionality in the eventuality of a switchover.
The user has to take explicit steps to reset the Lync client status, depending on the Lync client version. Do one of the following:
Close the Lync call notification
Log out of the Lync client, then log on again. If the Lync client lost control of the call but you still can use either the phone or CIC client to control the call, log out of the Lync client and log back in. Typically this behavior is due to the Lync Server losing its connection to RCC. Some Lync implementations do disconnect and reconnect every 8 hours.
If the call is answered from the phone or CIC client, some of the Lync GUI controls are unavailable. This behavior is a limitation of the Lync 2013 client. Use the phone or CIC client to hold the call and then take the call off hold to enable these controls.
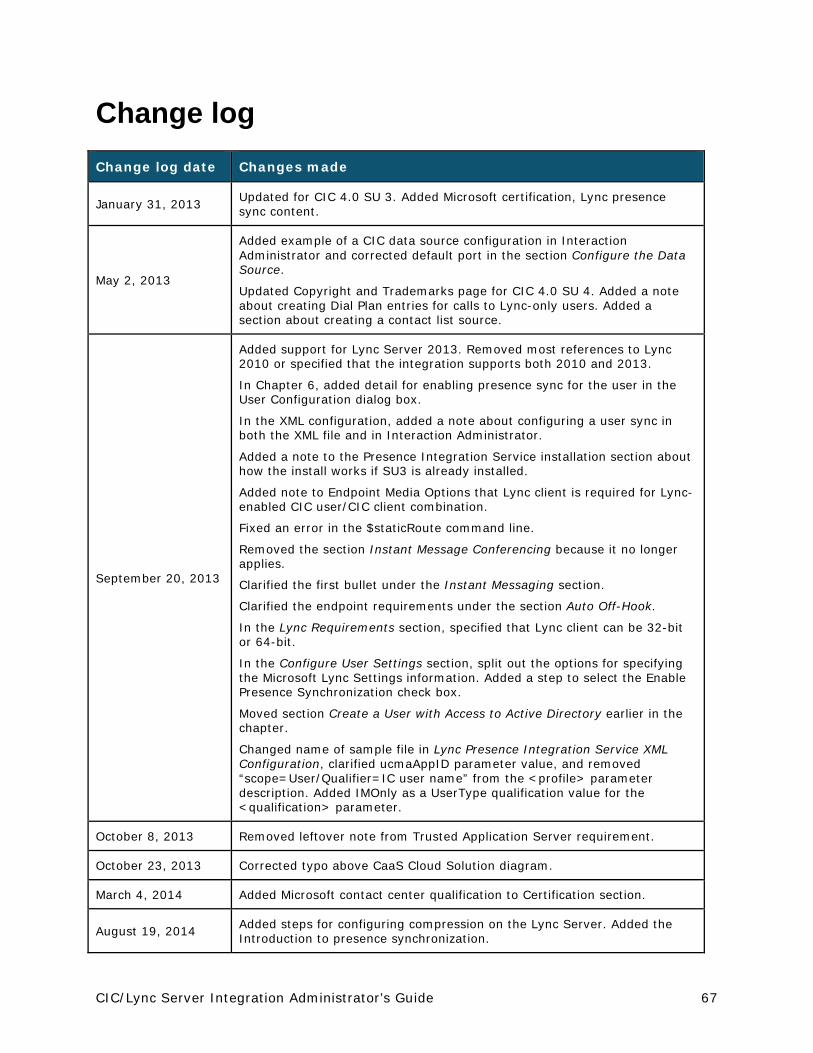
CIC/Lync Server Integration Administrator’s Guide 67
Change log Change log date Changes made
January 31, 2013 Updated for CIC 4.0 SU 3. Added Microsoft certification, Lync presence sync content.
May 2, 2013
Added example of a CIC data source configuration in Interaction Administrator and corrected default port in the section Configure the Data Source.
Updated Copyright and Trademarks page for CIC 4.0 SU 4. Added a note about creating Dial Plan entries for calls to Lync-only users. Added a section about creating a contact list source.
September 20, 2013
Added support for Lync Server 2013. Removed most references to Lync 2010 or specified that the integration supports both 2010 and 2013.
In Chapter 6, added detail for enabling presence sync for the user in the User Configuration dialog box.
In the XML configuration, added a note about configuring a user sync in both the XML file and in Interaction Administrator.
Added a note to the Presence Integration Service installation section about how the install works if SU3 is already installed.
Added note to Endpoint Media Options that Lync client is required for Lync-enabled CIC user/CIC client combination.
Fixed an error in the $staticRoute command line.
Removed the section Instant Message Conferencing because it no longer applies.
Clarified the first bullet under the Instant Messaging section.
Clarified the endpoint requirements under the section Auto Off-Hook.
In the Lync Requirements section, specified that Lync client can be 32-bit or 64-bit.
In the Configure User Settings section, split out the options for specifying the Microsoft Lync Settings information. Added a step to select the Enable Presence Synchronization check box.
Moved section Create a User with Access to Active Directory earlier in the chapter.
Changed name of sample file in Lync Presence Integration Service XML Configuration, clarified ucmaAppID parameter value, and removed “scope=User/Qualifier=IC user name” from the <profile> parameter description. Added IMOnly as a UserType qualification value for the <qualification> parameter.
October 8, 2013 Removed leftover note from Trusted Application Server requirement.
October 23, 2013 Corrected typo above CaaS Cloud Solution diagram.
March 4, 2014 Added Microsoft contact center qualification to Certification section.
August 19, 2014 Added steps for configuring compression on the Lync Server. Added the Introduction to presence synchronization.

CIC/Lync Server Integration Administrator’s Guide 68
August 29, 2014
Added changes required in the transition to CIC 2015 R1, such as updates to product version numbers, system requirements, references to Interactive Intelligence site URLs, and copyright and trademark information.
November 20, 2014 Clarified XML file naming convention.
December 15, 2014 Removed index. Reapplied template. Updated RCC chapter for 2015R2
January 19, 2015 Updated copyright page for 2015 and cloud terminology.
February 25, 2015 Removed reference to the Lync Presence Integration Service configuration file appearing on the Product Information page.
April 1, 2015
Updated 2015 R2 references to R3. Reapplied template and updated copyright page. Replaced in-line graphics with text. Updated documentation to reflect the addition of two CIC client applications, Interaction Desktop and Interaction Connect.
May 18, 2015 Added note in the section “Configure IC servers as IP/PSTN gateways” about Lync-only users placing outbound calls.
June 26, 2015 Updated 2015 R3 references to R4. Added Create and verify DNS SRV records section.
September 10, 2015 Updated prerequisites for activating presence synchronization.
September 16, 2015 Updated 2015 R4 references to 2016 R1. Removed references to retired Interaction Client .NET Edition.
October 27, 2015
Updated presence sync installer and web configuration app with new Interactive Intelligence branding. Replaced Lync 2010 client support with Skype for Business 2015. Added Skype for Business 2015 server support. Fixed typos related to TCP.
November 4, 2015
Removed Lync Server 2010 support. Updated Lync mediation server configuration screenshots and steps to reflect Lync Server 2013 environment. Updated description of LyncInteractionCorrelationTimeout setting.
November 24, 2015 Updated references to CIC Documentation Library to point to http://help.inin.com. Updated 2016 R1 references to 2016 R2.