intermediate & advanced lake solo - paddle
TRANSCRIPT
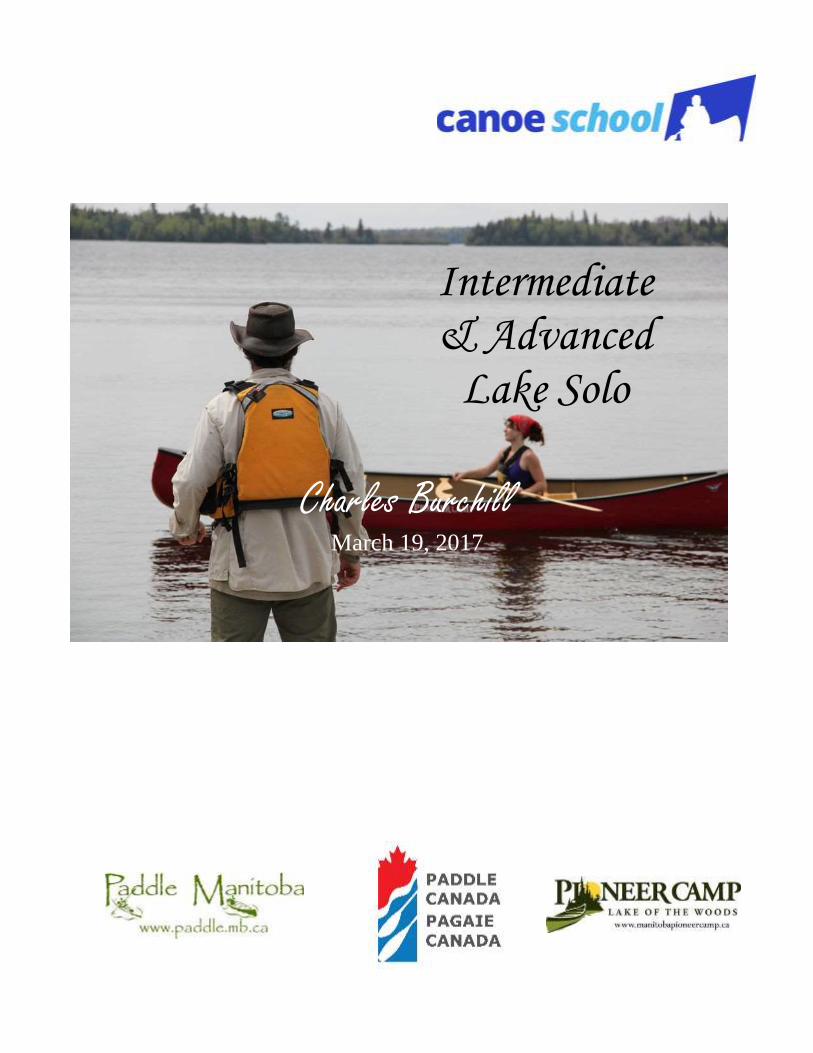
Intermediate & Advanced
Lake Solo
Charles Burchill March 19, 2017

March 22, 2017 ii
This document covers the material required for Paddle Canada Lake Canoe Intermediate
and Advanced Solo Skills courses and was developed based on the Paddle Canada Lake
Canoe Program Manual (6th edition 2013). Some items have been updated in this manual
from the Paddle Canada website 2015. This document should not be used alone but in
conjunction with the PC resource material, program manual, stroke resource manual and
other supporting documentation. It is not a complete resource manual for all conditions,
paddling styles, equipment, or knowledge – there is a brief list of additional resources
available at the end of the document for more information.
This work is licensed under the Creative Commons Attribution-NonCommercial-
NoDerivs 3.0 Unported License. To view a copy of this license, visit
http://creativecommons.org/licenses/by-nc-nd/3.0/ or send a letter to Creative Commons,
444 Castro Street, Suite 900, Mountain View, California, 94041, USA. Charles Burchill
[email protected], the primary author, must be notified of corrections, updates,
changes, and distribution of this document.
Use of any organization, methods, information, or equipment in this document should not
be taken as an endorsement or acceptance by the author or an editor. Individuals using
this document for reference must take responsibility for any use of the material; it is the
responsibility of the individual to determine if they are qualified to take on any outing
and can accurately assess the conditions and their abilities in relation to their own safety..
The author/publisher/editors of this document will accept no responsibility for injury or
loss associated with using information in this publication.
No endorsement or support from Paddle Canada, Manitoba Pioneer Camp or any other
organization identified should be inferred or implied.
Notices/Permission
- Topographic Images: The Atlas of Canada. or GeoBase®, January 2011 © Department of Natural
Resources Canada. All rights reserved (http://atlas.nrcan.gc.ca/site/english/maps/topo/index.html)
- Paddle Canada Canoeing Program © 2010, 2011
- Dave Wooldridge, Ridgewilderness, Parallel
Rescue Solo © 2011 with permission to Paddle
Canada.
- Golden Empire Council, Boy Scouts of America,
Rope image Laid/twisted and Braided. © 2011.
- Canadian Canoe Routes (myccr.com), 2011.
Heading out into open water from a lee shore
- Images of Bill Mason used with permission of the
Mason family.
- Some sailing images with permission from
Solway Dory (http://www.solwaydory.co.uk)
- Canoeing.com – canoe hull shapes and designs.
Permission for use in this document only
- Paul Mason – Bubble Street comic – for use in this publication and MPC course only.

March 22, 2017 iii
Table of Contents Course Outline and Expectations ................................................................................................................... 1
Introduction ................................................................................................................................................................. 1 Aim of Course ............................................................................................................................................................. 1 Assessment of Skills .................................................................................................................................................... 1 Use of Equipment ........................................................................................................................................................ 2 Expectations ................................................................................................................................................................ 2 Course Outline ............................................................................................................................................................. 2
Day 0 – Welcome and Expectations ....................................................................................................................... 2 Day 1 – Initial Tour, Basic Manoeuvres, Risk Management, Rescues ................................................................... 2 Day 2 – Exposure, Map & Compass, Side disp., Circles ........................................................................................ 3 Day 3 – Turns, Running Side Slip, GPS, Weather ................................................................................................. 4 Day 4 – Final Tour and Feedback, Student Slalom ................................................................................................ 4
Core Requirements ...................................................................................................................................................... 5 Minimum Required Safety Equipment ........................................................................................................................ 6 Activity Work Sheets ................................................................................................................................................... 7
Resources...................................................................................................................................................... 11 The Boat .................................................................................................................................................................... 11
Types and Shapes ................................................................................................................................................. 11 Basic Characteristics ............................................................................................................................................ 12 Sailing .................................................................................................................................................................. 17 Lifts, Carries and Portages ................................................................................................................................... 19
In the Boat ................................................................................................................................................................. 23 Sitting and Kneeling Positions ............................................................................................................................. 23 Weighting and Pivot Points .................................................................................................................................. 26 The Loaded Boat .................................................................................................................................................. 28 Into the Wind ........................................................................................................................................................ 29
PFDs .......................................................................................................................................................................... 31 The Paddle ................................................................................................................................................................. 33 Strokes ....................................................................................................................................................................... 36 Manoeuvres (Actually Canoeing) .............................................................................................................................. 50 Slalom Course ........................................................................................................................................................... 56 Musculoskeletal Injuries ............................................................................................................................................ 58
Pre-Paddle Warm-up ............................................................................................................................................ 58 Injuries.................................................................................................................................................................. 59
Accident Prevention & Rescues................................................................................................................................. 62 Risk Management ................................................................................................................................................. 62 First Aid ............................................................................................................................................................... 64 Exposure ............................................................................................................................................................... 65 Canoe Rescues ...................................................................................................................................................... 69 Incident Response................................................................................................................................................. 74
Other Equipment........................................................................................................................................................ 76 Personal ................................................................................................................................................................ 76 Group ................................................................................................................................................................... 76
Emergency Protection (Tarps and other options) ....................................................................................................... 78 Rope and Knots ......................................................................................................................................................... 81 Transporting a Canoe on a Car .................................................................................................................................. 92 Navigation ................................................................................................................................................................. 94
Maps – Topographic ............................................................................................................................................. 94 Compass ............................................................................................................................................................. 101 GPS .................................................................................................................................................................... 104 Other Navigation (hints) ..................................................................................................................................... 107
Weather (Continental North America) ..................................................................................................................... 109 Understanding Waves .............................................................................................................................................. 118 Canoe – A brief history ............................................................................................................................................ 124 Bill Mason, A Canoeing Legacy .............................................................................................................................. 128
Protection of Lakes and Waterways ................................................................................................................... 131 Leave No Trace Principles ....................................................................................................................................... 134 Paddle Canada – Information and Programs ............................................................................................................ 136
Paddle Canada's Mission Statement: .................................................................................................................. 136 Additional Resources ............................................................................................................................................... 139
Books ................................................................................................................................................................. 139 Websites ............................................................................................................................................................. 140 Clubs and Associations....................................................................................................................................... 142
March 22, 2017 iv
Editors and contributors: Charles Burchill <[email protected]>, Eric Gyselman, Chris Milne, Jeremiah
Heinrichs
Charles Burchill I learned how to hold a paddle at a young age while visiting my grandparents' cabin in the
woods of Meadow Lake provincial park, Saskatchewan. Although I do not remember when I
first paddled a canoe my passion was well developed as young teenager when I spent most
of my small income from papers and camp honoraria on a paddle, PFD, and canoe.
My first formal canoe training happened at YMCA Camp Stephens as a camper and
counsellor. I went through the early CRCA (Canadian Recreational Canoeing Association)
paddling program in the mid-1970s. I taught canoeing and wilderness awareness for a City
of Winnipeg camp in the late 1970s and early 80s. I received my Red Cross Small Craft
Safety instructor certification in 1982. In 1999 I received my CRCA Flatwater instructor
certification, and Lake Water instructor in 2008. I was involved with the development of the
Paddle Canada “Style” Canoeing program in 2010/11.
Eric Gyselman My history with canoeing is typical of my generation: family cottage, fleet of boats, vintage canoe. The
canoe was the craft of choice for evening fishing and poking around the backwaters and streams. Over time,
I realized that I was passionate about these simple craft. It just kind of snuck up on me.
I had no formal canoeing instruction. My paddling was strictly learned from experience: “I’m still dry and
going in the right direction; I must be doing something right”. That all changed when I joined Paddle
Manitoba. Cam White was President at the time and Director of Paddle Camp. “You should come out and
try for your Instructor’s Certification” was how he started. Early hesitation on my part quickly gave way to
Cam’s persuasive nature and in May 2007, I found myself on the dock at Pioneer Camp. Well, as it turned
out, I did get my Instructor level that year. With newfound enthusiasm, I began to teach and I took some other courses
in Advanced Canoe Tripping and Moving Water, followed by two years of Mentoring at Canoe School to get my
Instructor Trainers certification. That brings me to this year’s Canoe School and another class of candidates who, like I
was, may be more than a little apprehensive. But relax, you will learn a lot and you will have a tired
smile on your face by the end of the weekend, no matter how it turns out.
Chris Milne Chris’ first love was hiking and backpacking (don’t hold that against him) in central Ontario and in other
places around North America. However he fell in love with the canoe in his mid twenties and has
pursued this means of exploring the wilderness ever since. Chris believes that “the canoe holds in
perfect tension, beauty and functionality”. Chris in an Instructor Trainer in Advanced and Solo Lake
Canoe with Paddle Canada and has been instructing since 2005. He has worked for Pioneer Camp for
the past 7 years.
Jeremiah Heinrichs Jeremiah was born in a canoe. He also happens to be a long standing Canoe School veteran. He was first
certified as a Paddle Canada Instructor in 2005 and has been active in the Manitoba paddling community
ever since. Jeremiah has been an Instructor at Canoe School for the past 6 years. He is now an instructor
Trainer in Advanced Tandem and Solo Lake Canoe with Paddle Canada. Jeremiah’s passion for paddling
(particularly solo) has been contagious in the Pioneer Camp community for years.
Sharon Touchette In 2004 I stepped into a canoe for the first time. With an injured foot and a yearning to be out on an adventure into
nature, I found a group leaving on a five day canoe trip willing to take me along. I had no knowledge of canoeing and
no idea of what I was getting into. Amazed and with wonder, it was on that trip I discovered a passion within myself, a
passion for canoeing that has driven me to want to continue learning and experiencing always more than I already have.
I love to explore and my canoe takes me on magical exploring adventures. I took the first of many courses in 2005 at
Pioneer Camp and in 2011, I reached instructor level. As an instructor, I discovered I am filled with new learning
through my students. My association with Paddle Manitoba and Pioneer Camp has led me through taking courses to
teaching courses, going on trips to leading trips, always finding an experience beyond where I have been only to find
there is still so much more to experience.

March 22, 2017 1
Course Outline and Expectations
Introduction
The Paddle Canada (PC) Lake Canoe Solo Skills Program is designed to provide a solid
foundation of knowledge and skills necessary for advanced lake paddling. The items
chosen for inclusion in the PC Program are of importance to all lake canoeists as they
transfer and expand on the skills and knowledge of the Basic Canoe Skills course to
larger open water environments in a variety of conditions. The program includes: rescues,
introduction to specialized equipment, advanced manoeuvres and strokes, and efficiency
and precision in challenging paddling conditions.
Although the program emphasizes learning boat control and paddling technique
participants will also learn the skills and knowledge to be safe and have fun while
paddling solo. The participant is responsible for taking these skills and applying them in
their own paddling activities. It is vital to understand that to become an accomplished
lake solo paddler requires more than just a course certification.
This course covers the material required for the Paddle Canada Solo Lake Canoe
Introduction through Advanced Solo Skills courses (6th edition 2013). It is a four day
course teaching both paddling skills and theory material.
The course material follows and expands on the existing Paddle Canada Lake Canoeing
manual and should be used as a supporting document rather than a replacement or
substitute.
Aim of Course
The aim of the course is for the participants to develop a high level of solo canoeing
skills for paddling in a variety of open lake conditions and develop an understanding of
the environment, risk management, and leadership skills. By the end of the course
participants will be able to safely plan and paddle solo lake day trips.
Assessment of Skills
Paddling skills will be assessed based on the ability of participants to complete specific
manoeuvres and rescues using appropriate techniques and paddling strokes. Participants
must be able to demonstrate skills paddling on both sides of the canoe as well as show an
understanding of the forces affecting the canoe and the effect of hull shape on canoe
performance. Effective communication with the instructor and other participants both in
the boat and during theory sessions is included in the participant’s assessment;
participants will be expected to provide constructive input into all the sessions, as well as
asking appropriate questions. A skills ‘check-off’ list will be done for each participant.
However, participants will be assessed on an ongoing basis rather than during a formal
testing period. Consistency in paddling ability is important and will contribute
significantly to the overall assessment of each participant. Appropriate selection, use and
treatment of equipment is also included as part of the overall assessment of the student.
March 22, 2017 2
Use of Equipment
During the course, participants will be expected to have in their boats and use all of the
Transport Canada required safety equipment as well as additional items required by the
instructor. PFDs must be worn at all times while on the water. Equipment must be
treated appropriately to protect from damage or undue wear during the course.
Expectations
The instructors have additional expectations beyond the overall aim of the course.
• Foremost, participants will enjoy themselves while learning new skills and
techniques.
• Each day time will be allocated for practicing and asking questions – participants
are encouraged take advantage of this time provided.
Participants will be required to follow an appropriate code of conduct with regard to their
peers, instructors, and students in other courses during the course (e.g. Paddle Canada
Standards of Conduct). They will be expected to follow all of the rules and regulations
for the course location. Participants are expected to arrive on time and be ready to learn
for all sessions. During the sessions they will not be disruptive to other students or people
at the camp.
Course Outline
This outline provides the expected order of activities during the course. However,
changes may need to be made based on weather, equipment, student needs and interests.
Your instructor will notify you of any changes required.
Day 0 – Welcome and Expectations
7:30Welcome & settle into Cabins and Facilities
8:30 On the dock welcome and paddle
9:30 Introduction to course
Instructor Introduction and Background
Introduction of the Candidates
-Hopes and expectations for course
Unfinished paperwork
Introduction to MB Pioneer Camp – eating, facilities, showers, etc…
Day 1 – Initial Tour, Basic Manoeuvres, Risk Management, Rescues
7:30 Early Bird Paddle
8:30 Breakfast (weather)
9:15 Required equipment, safety notes
Introduction to Transport Canada small vessel regulations
Initial paddle tour and review of basic skills – initial skill level assessment
Safe paddling considerations
The Boat – parts review and terminology
Sitting positions – kneeling, alternatives, etc…
Hull shape (displacement hull)

March 22, 2017 3
Basic manoeuvres
Lines – include starting/stopping,
Weight turns
Displacement hull (review and forces on the hull)
Initiation and momentum compared to ‘natural’ turn.
How weighting affects turns
Pivots – include sitting
1:00 Lunch (weather)
2:20 Using the paddle (basics)
Sizing (length, shape, blade size)
Forces and torque
Strokes, (catch, power, follow-through, recovery)
Dynamic & Stationary strokes (theory)
Accident prevention (stay dry)
Game/fun time
Practice time and questions
3:40 Risk management, planning, responsibilities
4:15 Rescues (may be rescheduled if conditions are not favourable),
Canoe-over-Canoe, Parallel rescue
Re-entry from deep water
Tow to shore
6:00 Supper (weather)
7:00 First aid, kits, exposure
Local Canoe History
Resources
Day 2 – Exposure, Map & Compass, Side disp., Circles
7:30 Early Bird Paddle
8:30 Breakfast (weather)
9:15 Boat types (e.g. lake solo) differences refer back to hull shape.
Alternative paddles (quill, bent, sugar island – benefits and limits)
Repair Kits
Manoeuvres (continued)
Side displacement
Maps/Compass (terminology and use)
Manoeuvres (continued)
Turns (turn and continue)
Circles,
Lifts and Carries, portages (finding & following)
1:00 Lunch (weather)
2:20 Knots
Reverse lines (and other)
Additional rescues (may be rescheduled if conditions are not favourable)
Towing, self-rescue, rescue with equipment
Other Equipment
Personal, group, & repair kits
March 22, 2017 4
Sailing (optional)
Practice time and questions
6:00 Supper (weather)
7:00 Mid-course feedback interview, Free Paddle
Understanding and Dealing with Wind and Waves
Paddle Canada programs
Day 3 – Turns, Running Side Slip, GPS, Weather
7:30 Early Bird Paddle
8:30 Breakfast (weather)
9:15 Manoeuvres (continued)
Landings (Turn and stop)
Connected circles
GPS, overview, terminology, use
‘Leave No (minimal) Trace’ – principles and discussion
Weather Knowledge & Forecasting
1:00 Lunch (weather)
2:20 Manoeuvres (continued)
Running Side slips
Putting it together –
Continuous paddling – English Gate
Other cool stuff – Dance – do it all backwards ☺
Slalom requirements
Activity setup
6:00 Supper
7:00 Practice time, check off, questions
Day 4 – Final Tour and Feedback, Student Slalom
7:30 Early Bird Paddle
8:30 Breakfast
Include short tour and basic skills
Assessment
Instructor feedback
Participant feedback
Group discussion
10:30 Slalom course
Demo of skills routine
12:00 Exit Interview.
1:00 Lunch
2:20 Pictures, Goodbye’s
4:00 Departure

March 22, 2017 5
Core Requirements The identified paddling manoeuvres must be attempted on both paddling sides; assessment is on the most proficient side. In the case where there may be two or more directional options, such as when
doing turns, all options must be attempted (inside & outside, both paddling sides). Although strokes are covered in the course the actual use of specific strokes will not be part of the assessment.
Students will be expected to have an understanding of the forces involved to complete paddling skills. Theory and general knowledge are assessed by participation, questions, and input.
Skill Level Comments Skill Level Comments
Safety/Rescue Theory
Canoe over canoe or
parallel rescue
I/A Timed rescue – 1min, multiple capsize,
with day gear. Two canoes
Forces and Torque I/A As related to paddling and manoeuvres
Exit/re-enter deep water I/A Re-entry deep water, unassisted Hull shape I/A Solo canoeing & underwater shape
Shake out or Cap. flip A Optional/attempted – self rescue Boat I/A types, parts, features, specialty
First Aid Kit, Survival
gear
I/A Content – Group, Personal, Wilderness
first aid (needs)
Paddles – types parts I/A
Exposure, Hypothermia I/A Signs, Symptoms, Treatment Leave No Trace, environmental
issues
A Understanding of principles
Required equipment I/A CSA – Small Vessel Regs (include
guided excursions)
Influence on solo canoeing I/A Bill Mason, Omer Stringer
Safe canoeing , Plan I/A Conditions, Limitations Weather I/A Patterns and detection
Group preparations & gear I/A Float plans, group paddling,
communication, responsibilities
Paddle Canada & other local
organizations
I/A Courses, progression
Personal prep & gear I/A
Risk management,
accident prevention
I/A Lake Navigation
Canoe and swim tow I/A 15m Map I/A Basic topographic introduction and use
Throw bag use I/A Compass I/A Orienteering compass, use with map
GPS I/A Basic intro, use – with map/compass
Manoeuvres
Forward Line I/A 50m length 1m corridor Knots
Reverse Line I/A 25m length 1m corridor Basic I/A Bowline, half hitch, truckers
Controlled stop I/A Limited rock/yaw Additional A
Pivots I/A 360° - twice 1m corridor
Circles (Figure 8) I/A 1 canoe length (radius), 2 times General
Turns (inc reverse) I/A Under power – turn 90° and continue Lift and Carry, Portaging I/A Solo - Assistance may be provided
Weight turns I/A Controlled Launch/Exit I/A Wind/waves, rocky shore
Stop Turns/landings I/A Landing, 90° and stop 1x1m Canoe tilts/leans, pitch I/A Sitting positions, significance (hull shape)
Side Displacement I/A 5m length, 50cm corridor, around dock
3m each side.
Wind and Waves I/A How to deal with, weighting, etc…
Running side slip I/A Over 4m 1-2m side slip Wind bound A Discussion, setup
Slalom Course A Setup and complete Tarp setup/emerg. shelters A
Triangular course A 100m in wind, 4m corridor Repair kits A
Sails (optional), Catamaran A Running with wind, 1 & 2 canoes
March 22, 2017 6
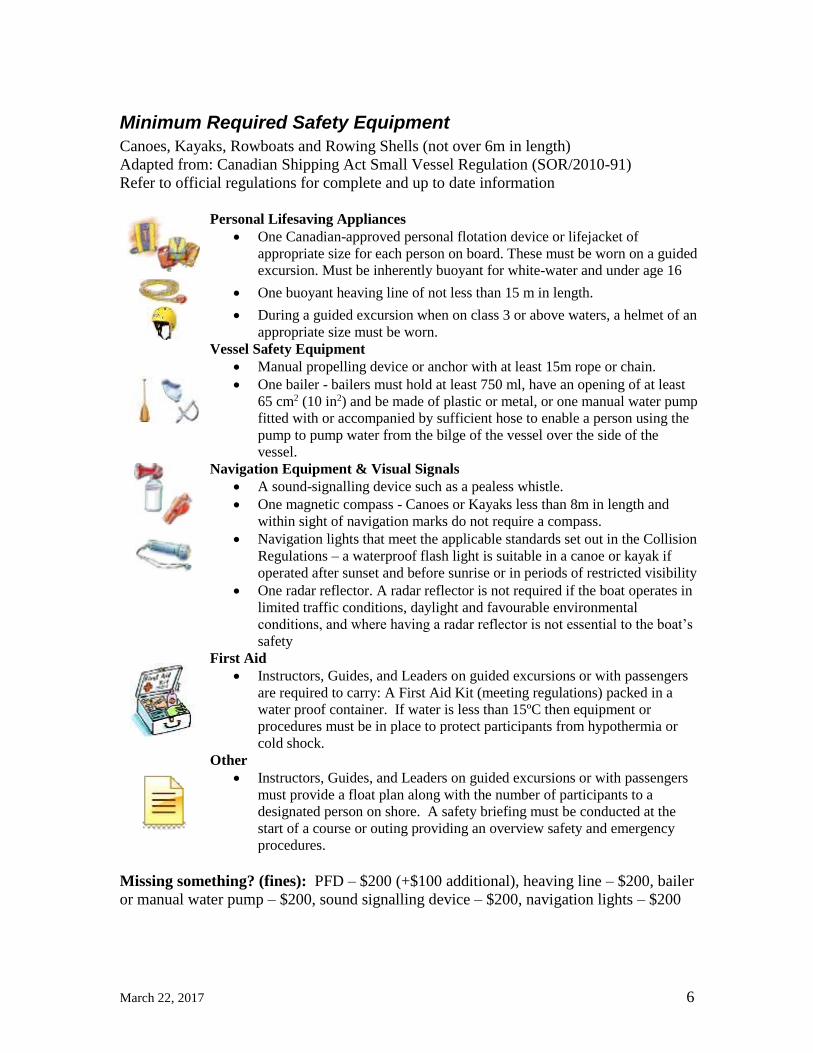
Minimum Required Safety Equipment Canoes, Kayaks, Rowboats and Rowing Shells (not over 6m in length)
Adapted from: Canadian Shipping Act Small Vessel Regulation (SOR/2010-91)
Refer to official regulations for complete and up to date information
Personal Lifesaving Appliances
• One Canadian-approved personal flotation device or lifejacket of
appropriate size for each person on board. These must be worn on a guided
excursion. Must be inherently buoyant for white-water and under age 16
• One buoyant heaving line of not less than 15 m in length.
• During a guided excursion when on class 3 or above waters, a helmet of an
appropriate size must be worn.
Vessel Safety Equipment
• Manual propelling device or anchor with at least 15m rope or chain.
• One bailer - bailers must hold at least 750 ml, have an opening of at least
65 cm2 (10 in2) and be made of plastic or metal, or one manual water pump
fitted with or accompanied by sufficient hose to enable a person using the
pump to pump water from the bilge of the vessel over the side of the
vessel.
Navigation Equipment & Visual Signals
• A sound-signalling device such as a pealess whistle.
• One magnetic compass - Canoes or Kayaks less than 8m in length and
within sight of navigation marks do not require a compass.
• Navigation lights that meet the applicable standards set out in the Collision
Regulations – a waterproof flash light is suitable in a canoe or kayak if
operated after sunset and before sunrise or in periods of restricted visibility
• One radar reflector. A radar reflector is not required if the boat operates in
limited traffic conditions, daylight and favourable environmental
conditions, and where having a radar reflector is not essential to the boat’s
safety
First Aid
• Instructors, Guides, and Leaders on guided excursions or with passengers
are required to carry: A First Aid Kit (meeting regulations) packed in a
water proof container. If water is less than 15ºC then equipment or
procedures must be in place to protect participants from hypothermia or
cold shock.
Other
• Instructors, Guides, and Leaders on guided excursions or with passengers
must provide a float plan along with the number of participants to a
designated person on shore. A safety briefing must be conducted at the
start of a course or outing providing an overview safety and emergency
procedures.
Missing something? (fines): PFD – $200 (+$100 additional), heaving line – $200, bailer
or manual water pump – $200, sound signalling device – $200, navigation lights – $200

March 22, 2017 7
Activity Work Sheets
Although most of the course is practical there are a few hands on skills and activities that
will be completed to help you understand weather patterns, how the canoe moves, and
use of a Map, compass, and GPS. The following couple of pages include some of the
hands on worksheets and activities that will be completed during the weekend.
Weather Patterns:
During the weekend record the following items just before
breakfast, lunch and supper each day.
Air pressure is measured in millibars (mb) and has a typical range of 980-1050 with the
standard set for sea level of 1013.2. A change of more than 1mb/hour is considered ‘fast’
and when dropping expect rain and unstable weather. Remember to adjust for the
sheltered conditions around camp and in the bay when recording wind and waves.
Time
Wind
Speed
&
Direction
Clouds Water State
Bay/Open
Barometric
& Trend
Day 1
Day 2
Day 3

March 22, 2017 8
Hull Shape:
Using the images below and the location of the paddler sketch the shape you think the
hull will be in the water. How would this change with day tripping equipment (20kg)?
Forces:
Using the images below identify the paddle placement and force that will cause the canoe
to go in the direction identified.
1. Centered 2. Near End 3. Near Side 4. Near Side
End
1. Centered 2. Near End 3. Near Side 4. Near Side
End
1. Straight 2. Diagonal 3. Pivot 4. Turn1. Straight 2. Diagonal 3. Pivot 4. Turn
March 22, 2017 9
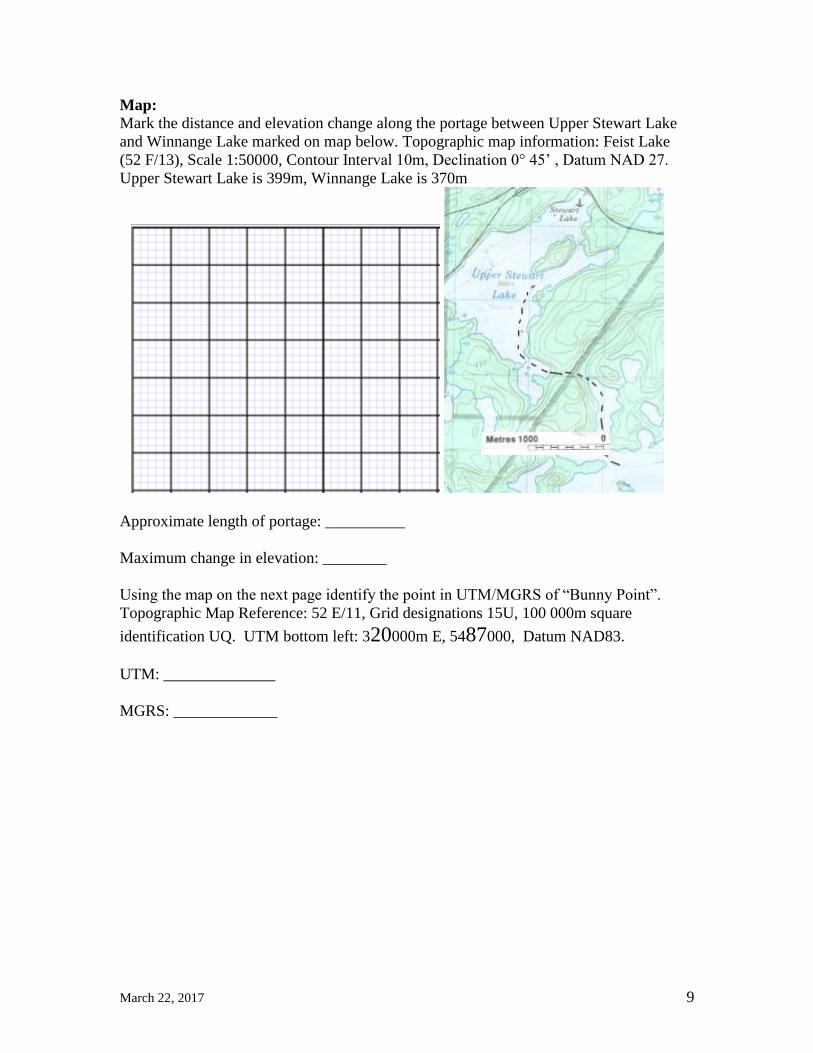
Map:
Mark the distance and elevation change along the portage between Upper Stewart Lake
and Winnange Lake marked on map below. Topographic map information: Feist Lake
(52 F/13), Scale 1:50000, Contour Interval 10m, Declination 0° 45’ , Datum NAD 27.
Upper Stewart Lake is 399m, Winnange Lake is 370m
Approximate length of portage: __________
Maximum change in elevation: ________
Using the map on the next page identify the point in UTM/MGRS of “Bunny Point”.
Topographic Map Reference: 52 E/11, Grid designations 15U, 100 000m square
identification UQ. UTM bottom left: 320000m E, 5487000, Datum NAD83.
UTM: ______________
MGRS: _____________

March 22, 2017 10
Compass:
Read the bearing from “Bunny Point” to the point to west side of Crescent Island and east
side of Silver Fox Island.
Bearing to Crescent Island: __________ Bearing to Silver Fox Island: __________
GPS:
Go to Bunny Point and mark the location with the GPS, how close is your measured point
from the map.
UTM/MGRS: _________________________
Go to the deck of Bill Mason Lodge and mark a point using a GPS. What is bearing and
distance to “Bunny Point” point. Check the bearing using a compass – what is the
difference.
UTM/MGRS: ________________________
Distance: ________________
Compass Bearing: __________ GPS Bearing: _______________
50 51 49 48
95
96
97
98
99
Bunny
Point
March 22, 2017 11
Resources
The Boat
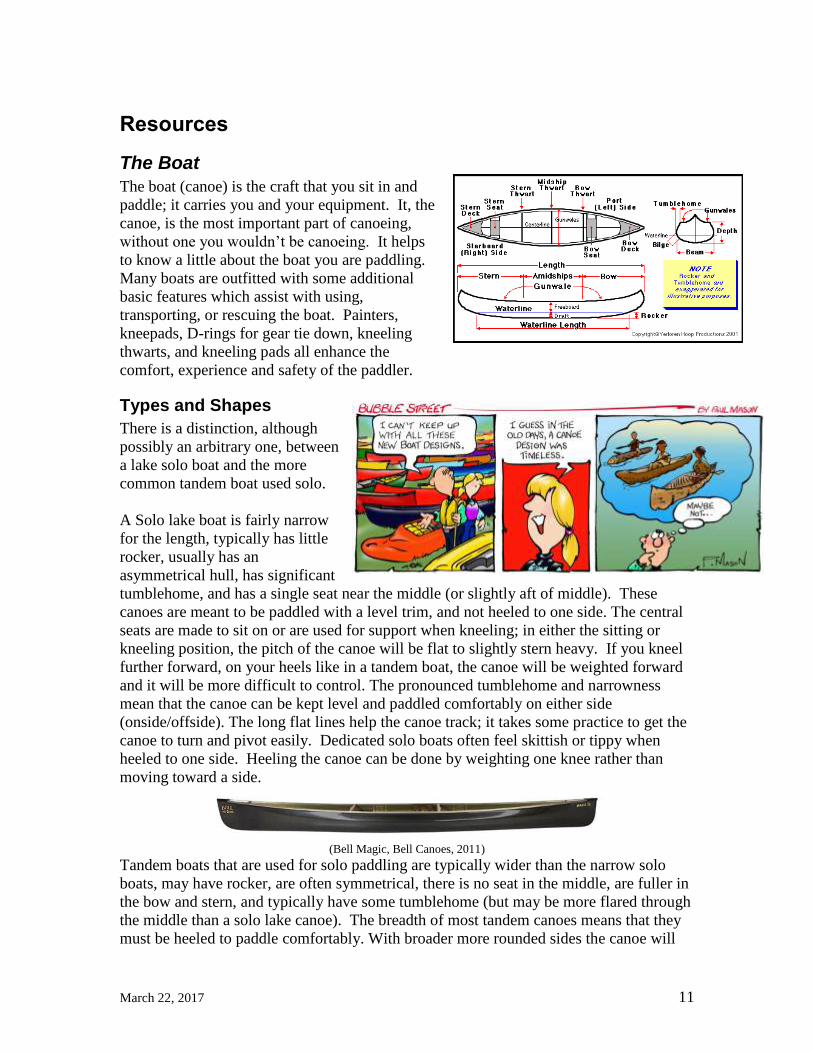
The boat (canoe) is the craft that you sit in and
paddle; it carries you and your equipment. It, the
canoe, is the most important part of canoeing,
without one you wouldn’t be canoeing. It helps
to know a little about the boat you are paddling.
Many boats are outfitted with some additional
basic features which assist with using,
transporting, or rescuing the boat. Painters,
kneepads, D-rings for gear tie down, kneeling
thwarts, and kneeling pads all enhance the
comfort, experience and safety of the paddler.
Types and Shapes
There is a distinction, although
possibly an arbitrary one, between
a lake solo boat and the more
common tandem boat used solo.
A Solo lake boat is fairly narrow
for the length, typically has little
rocker, usually has an
asymmetrical hull, has significant
tumblehome, and has a single seat near the middle (or slightly aft of middle). These
canoes are meant to be paddled with a level trim, and not heeled to one side. The central
seats are made to sit on or are used for support when kneeling; in either the sitting or
kneeling position, the pitch of the canoe will be flat to slightly stern heavy. If you kneel
further forward, on your heels like in a tandem boat, the canoe will be weighted forward
and it will be more difficult to control. The pronounced tumblehome and narrowness
mean that the canoe can be kept level and paddled comfortably on either side
(onside/offside). The long flat lines help the canoe track; it takes some practice to get the
canoe to turn and pivot easily. Dedicated solo boats often feel skittish or tippy when
heeled to one side. Heeling the canoe can be done by weighting one knee rather than
moving toward a side.
(Bell Magic, Bell Canoes, 2011)
Tandem boats that are used for solo paddling are typically wider than the narrow solo
boats, may have rocker, are often symmetrical, there is no seat in the middle, are fuller in
the bow and stern, and typically have some tumblehome (but may be more flared through
the middle than a solo lake canoe). The breadth of most tandem canoes means that they
must be heeled to paddle comfortably. With broader more rounded sides the canoe will

March 22, 2017 12
not feel tippy as it rolled or heeled. The breadth and rocker of the canoe allow the heeled
canoe to turn and pivot easily. You may find tilting the canoe by weighting one knee is
difficult due to the breadth of the canoe.
Canoes are displacement hulls which mean they move through the water, pushing it
aside, rather than on top of the water as in power boats and some sail boats (boats that
speed on top of the water have a 'planing hull’). Archimedes' Principle explains why
canoes float; it states that an object wholly or partially immersed in a fluid will be buoyed
up by a force equal to the weight of the fluid it displaces. In the case of a canoe, the
amount of water displaced is equal to the volume of the canoe under water; the displaced
water weighs exactly the same as the canoe and its load. This is important because no
matter where the load is located in the canoe displaces the same amount of water;
changing the position of the load will change the underwater shape of the hull which may
have dramatic effects on your ability control the canoe.
The speed a canoe can go is governed principally by: 1. power (how strong you are), 2.
frictional resistance (the wetted surface, surface condition, and breadth [of entry]), and 3.
wave creation as you push the canoe through the water. All of these forces need to be
balanced for the particular use of the canoe (see the reference to ‘The Shape of the
Canoe’ http://www.greenval.com/jwinters.html by J. Winters).
Basic Characteristics
Length
The distance from the tip of the stern to the tip of the bow, this simple
measurement has a big impact on performance. Within reasonable canoe lengths,
a longer canoe is faster, tracks a straighter line and provides more carrying
capacity than a shorter one. The trade-off is decreased manoeuvrability: a longer
canoe can’t make the tight turns or respond as quickly as some paddling demands.
But that doesn’t mean a long canoe will be hard to steer–it just might not be the
best choice for things like white-water. For most uses you may find that the
efficiency gained in tracking will outweigh any extra effort required for turning.
Beam
Beam, or width, is measured at the widest part of the
canoe. Most manufacturers provide three measurements:
the gunwale, the waterline and the widest point. The 4”

March 22, 2017 13
waterline accounts for displacement when fully loaded and tells you the most
about performance. A narrow canoe tends to be faster but less stable, whereas a
wider canoe provides more stability at the expense of some efficiency.
Depth
Also measured in three places – bow, stern and center–
depth affects more subtle aspects of paddling. Increasing
depth provides more carrying capacity and freeboard,
allowing the canoe to paddle through waves with more
ease. But it can also make the canoe heavier and less
responsive in wind.
Hull Profile:
The cross-section of a canoe’s hull hints at its true nature on the water. Most fall into one
of four categories:
Flat Bottom
These hulls look just like they sound: the canoe’s belly has
very little curve, making it highly stable on calm water.
This initial stability, however, comes at the expense
of secondary stability. Flat bottomed canoes are vulnerable to wind, waves and
even leaning. Once initial stability is breached, it’s difficult to avoid capsizing.
Round Bottom
Exactly the opposite of the flat bottom, the belly of a round
bottom canoe is extremely curved. Built for speed and
efficiency, they can be difficult to balance in an upright position–
particularly for inexperienced paddlers. In other words, initial stability is poor. In
contrast, when leaned on an edge these canoes are hard to tip over. They feel
tippy, but they’re hard to tip!
Shallow Arch Designed to give paddlers the stability of a flat hull and the
flexibility of a round hull, shallow arches are increasingly
popular. Design varies widely with manufacturer. Some err
toward initial stability with less arch, and others strive to provide more
manoeuvrability. The result is an impressive selection that promises something
for everyone, but it does require research, talking to experts, and even trying
canoes out before purchasing.
Shallow Vee
Another blend of the flat and round hull, the shallow vee
incorporates a v-shape at the bottom of the arch. This creates
decent initial and secondary stability, and improved tracking. It
does, however, result in a higher surface area in the water, which can make the
canoe less efficient.

March 22, 2017 14
Keels
Not a hull category per se, but important to understand. Keels
were originally integrated into canoe designs for structural
purposes; literally to help hold the canoe together. Experts
disagree on whether keels, in general, have a significant impact on
performance keels may make canoes track better but limit
paddling efficiency. There are two types of keels–tee and shoe.
Tee keels are best suited for deeper water and lake paddling. Shoe
keels were designed with a low profile to slide over rocks found in
both shallow and white water and are more commonly used on
river tripping canoes.
Canoe Profile:
For more subtle indications of a canoe’s personality, look to the shape of its sides.
Flare
If they flare out above the waterline, they will resist tipping and
deflect water for a drier ride. Some paddlers find flared canoes
uncomfortable to paddle because it requires reaching out over the
side of the canoe.
Tumblehome If ease and stroke perfection are required, such as in racing, a
canoe may have tumblehome, with the gunwale width smaller
than the waterline width. These canoes don’t deflect water but
are easier to paddle.
Straight Side Design is not limited to flare or tumblehome. Some have
straight sides, which provide no particular benefit or limitation,
and others combine both in the same watercraft.
Additional Elements:
Once you have the basics, pay attention to a few additional characteristics that bend the
rules: rocker, entry line, and fullness.
Rocker
Heavy, moderate or straight line–a canoe with a lot of
rocker will act shorter because less of its belly actually sits
in the water. This means it will have increased
manoeuvrability but will not track well. Canoes designed
with moderate rocker will turn easily and track well. And,
straight line canoes haves no rocker, track extremely well but lack
manoeuvrability.
March 22, 2017 15
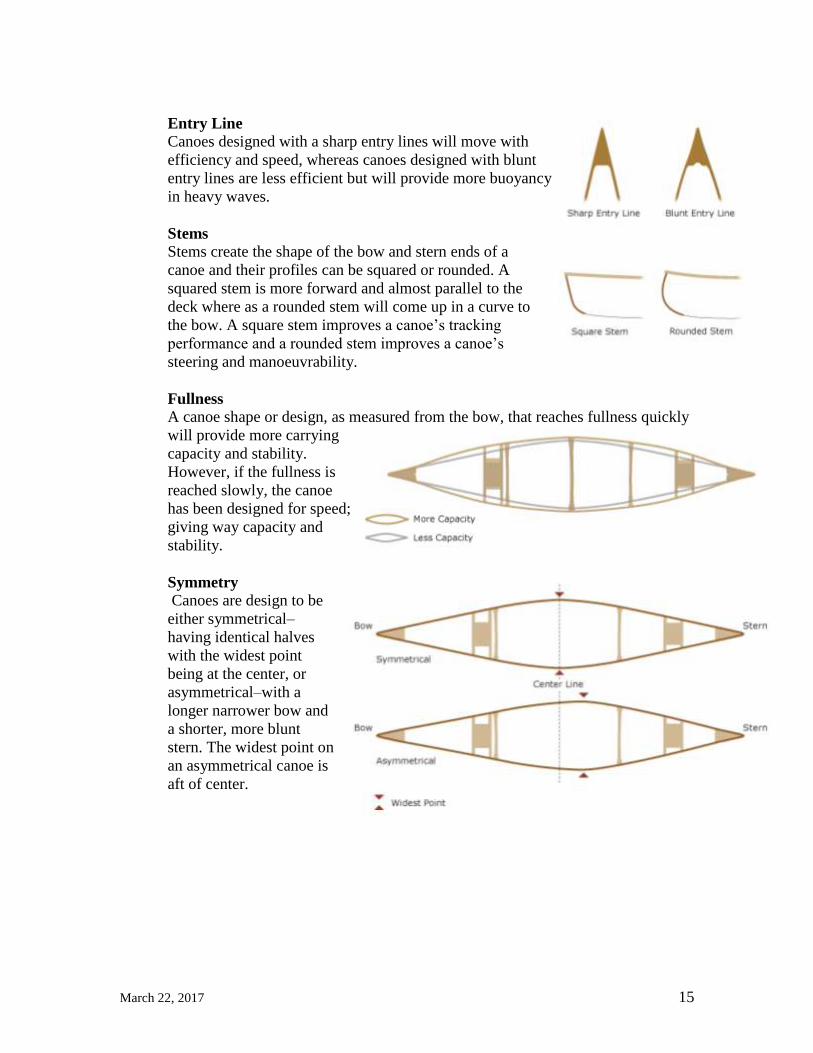
Entry Line
Canoes designed with a sharp entry lines will move with
efficiency and speed, whereas canoes designed with blunt
entry lines are less efficient but will provide more buoyancy
in heavy waves.
Stems
Stems create the shape of the bow and stern ends of a
canoe and their profiles can be squared or rounded. A
squared stem is more forward and almost parallel to the
deck where as a rounded stem will come up in a curve to
the bow. A square stem improves a canoe’s tracking
performance and a rounded stem improves a canoe’s
steering and manoeuvrability.
Fullness
A canoe shape or design, as measured from the bow, that reaches fullness quickly
will provide more carrying
capacity and stability.
However, if the fullness is
reached slowly, the canoe
has been designed for speed;
giving way capacity and
stability.
Symmetry
Canoes are design to be
either symmetrical–
having identical halves
with the widest point
being at the center, or
asymmetrical–with a
longer narrower bow and
a shorter, more blunt
stern. The widest point on
an asymmetrical canoe is
aft of center.

March 22, 2017 16
Hull Material
Canoe Hull Material Comparison Chart (Adapted from ACA Canoeing)
Material Durability Weight Performance Maintenance Cost
Aluminum High Heavy Limited Low Low
Rotomold High Heavy Limited Low Low
Royalex* (ABS) High Moderate Good Low Moderate
Fiberglass Moderate,
repairable
Moderate to
light
Excellent Moderate to
low
Moderate to
high
Innegra/
Basalt (e.g.
TuffStuff)
High Moderate Good Moderate to
low
Moderate to
high
Carbon and/or
Kevlar (e.g.
BlueSteel)
Moderate,
repairable
Light to
ultralight
Excellent Moderate High
Wood Moderate
to low,
restorable
Moderate to
light
Excellent High High
* as of April 2014 PolyOne shut down production of Royalex due to low volume of sales.
Esquif has developed a replacement for Royalex called T-Formex with similar properties,
it has been on the market since 2016. There have been developments in a number of other
products to replace Royalex by various companies. Most of the replacements are
composites that are stiff but resistant to impact (e,g, TuffStuff from NovaCraft which is a
blend of Innegra and basalt cloth). Composite canoes are generally made of multiple
layers, usually of different types of cloth providing a combination of qualities. A number
of companies are making composite canoes with infused gunwales and thwarts, and
without a gel coat, both of which allow for a considerable weight savings.
Cloth Comparison Chart (Adapted from H2O Canoes)
Material * Notes
Fiberglass Common boat cloth, excellent resin retention, easily repairable, structural when saturated
with resin. Inexpensive and easy to obtain. There are multiple kinds of Fiberglass.
Innegra Polypropylene based material with excellent flex, and impact absorption. It does not make
a stiff enough layup so it is ideally combined with another fabric in a blend to share bond
and resilience characteristics. It does not wet out well so vacuum infusion is required.
Thee are several kind of Innegra.
Basalt Earth mineral (basalt rock) resource melted and extruded in to filaments sharing
characteristics similar to Fiberglass and Carbon Fiber. Wets out well with resin.
Aramid Aramid is resistant to tear, impact absorbing and structural when wetted out. Sensitive to
UV degradation. Kevlar and Twaron are brand name products within the Aramid family.
Carbon Carbon Fiber is the most advanced material available for light weight composite
construction. Produces a very stiff layup which may be brittle alone. Elegant aesthetically -
replaces multiple layers of Fiber-glass for structural rigidity. * Only the most common fibers are included – nylon and spectra are also commonly used.

March 22, 2017 17
Finally, there is a difference in the kinds of resins used in composite canoes. The resin is
infused (i.e. soak) into the cloth and then cured to harden into the desired shape. The
two common resins are Epoxy and Vinylester both of which have blends that provide
both durable and flexible results. In both cases a UV inhibitor or gel coat provides
protection from damage from the sun (UV). Although the resins are inherently robust the
main purpose of the resin matrix is to adhere to and transfer the loads to the fibers.
• Epoxy Resin - superior to other resins, it is however the most expensive and
hardest resin to work with. The use of epoxy resins produces the most durable and
resilient canoes. Epoxy also has superior bonding qualities that reduces the
chances of delamination (i.e. the separation of the cloth and resin).
• Epoxy/Vinylester Blend - a blend of the epoxy and vinylester resins that at least
one manufacturer of high performance racing hulls claims is an improvement over
epoxy resin alone.
• Vinylester Resin - the most common resin used in high-volume canoe
production. Sometimes it won't cure if the atmospheric conditions are not right.
Best used with glass, it has typically lower adhesion to other materials (e.g.
Kevlar/carbon). It also has difficulty in bonding dissimilar and already-cured
materials. It is not unusual for repair patches on vinylester resin canoes to
delaminate or peel off. That being said VE resins are used by many highly
respected canoe builders that produce a quality, long lasting, product.
• Polyester Resin - the least expensive resin. Generally, used in very inexpensive
"cottage-grade" canoes. Stay away from canoes made from this type of resin if
you are considering any sort of wilderness tripping.
Sailing
Sailing canoes has a long history, probably as long
as canoes have been around. During the 1860s John
MacGregor built his Rob Roy canoes and sailed
them in Europe, the Baltics, and the Middle East
(see 1000 Miles in the Rob Roy Canoe,
http://www.ibiblio.org/eldritch/jm/TM.HTM).
Sailing canoes were apparently the fastest sailing boats until the introduction of the
planing dinghy in 1927. By 1934 sailing canoes was so well established that the
American Canoe Association officially endorsed canoe
sailing competitions. Unfortunately this course will only
provide a brief introduction to canoe sailing and is limited to
sailing down wind. Sailing canoes properly and safely with
sailing rigs is a topic that is beyond the time available in this
course. If you are interested in sailing canoes start by taking
a course that covers sailing small boats.
Simplest and most common kind of sail is a small tarp or
poncho rigged for running before the wind using a simple
mast such as a paddle or sturdy tent pole and spreading out

March 22, 2017 18
the bottom of the tarp. This can be easily improved on by spreading the top of the tarp
using two poles or adding a cross pole to the mast.
As a solo canoeist you will find it difficult to keep control of
everything when using a simple tarp: deploying the sail, keeping
it spread out, and controlling the canoe. WindPaddletm makes
and sells a fairly simple to use hoop sail that can be setup and
deployed solo.
Rigging a simple sail is fairly straight forward using a small tarp
or poncho and a couple of poles. The most significant problem
you will have is properly stepping the mast – an incorrectly
setup mast can quickly become a liability as it goes over the side
and swamps the canoe. The mast is usually setup on the back side of the bow seat with
guy-lines for support and a base plate on the floor or an additional support across the
gunwales. A second pole is used
to spread the tarp by running it
diagonally across the tarp from
the bottom of the mast and tarp.
The cross piece should be able to
rotate around the mast. A rope is
run from the bottom free corner
so you can control the sail. Use
the paddle as a rudder to control
the canoe. If the paddle is pulling
away from the canoe then switch
sides so the paddle is pushed against the side
of the canoe where it can be held with one
hand, as a lee board.
If you want to sail on a reach (sideways to the
wind direction) or close hauled (into the wind) you will need to add a leeboard and a sail
that can be properly trimmed. A leeboard can be as simple as a paddle set so the blade
stays in the water parallel to the length of the canoe near the mast. You will need to
experiment in light winds to work out the best place for the board but it must be in front
of the centre of effort so the canoe turns into the wind when not ruddering. My
The mainsheet
(rope) should
never be tied to
the canoe but
held so it can be
released quickly
in case a change
of wind or other
emergency.
Some examples of mast steps.

March 22, 2017 19
suggestion is to either build or buy a proper sailing rig for your canoe. You can find
designs and discussions on how to rig a canoe for sailing on the Canoe Sailing Resources
website (http://freepages.genealogy.rootsweb.ancestry.com/~fassitt/canoe_mirror/canoe_sailing.html).
Canoe sailing and dinghy sailing are very similar with one very
significant difference - balance. The canoe is a narrow
featherweight craft that tips easily with a tall mast. As a rule, the
floor is the safest sitting position from which to sail, possibly
moving to the windward gunwale in a freshening breeze, but only
if very comfortable sailing and the canoe is appropriately rigged.
Before sailing anything beyond a downwind direction you should
become familiar with more traditional sail boats.
An alternative to sailing a solo boat is to lash together two canoes making a catamaran.
This will provide a more stable platform for sailing. The two important things to
remember about lashing together two canoes for
sailing downwind are: 1) lash the canoes together
using poles that span both canoes with the canoes
separated by about a meter, 2) the bows of the canoes
should be slightly closer together than the sterns.
Setting up two smaller tarps or spreading one
between both canoes with the masts rigged as above.
When running with the wind on most inland lakes it
is possible to overrun the waves and as the waves
build-up between the canoes they can break over the sides of the canoe, eventually
sinking one of the canoes (or bail). The first time I sailed canoes in this fashion was
across the north end of Shoal Lake in the mid-1970s. We made a lot of miles but we had
to stop several times to empty the canoes since we had lashed the canoes together without
space between each canoe.
Lifts, Carries and Portages
Although we all love to paddle there are times when you will need to move your canoe
and equipment from one place to another out of the water. You need to make sure that
you can lift and move a canoe easily and safely ensuring that there is minimal risk to
either yourself or your equipment.

March 22, 2017 20
Lifts
Canoes can be carried in a different few ways – over your head with one or two people,
on your lap/hip, or underhand. Lifting your canoe is risky and it is the most likely place
that you will inadvertently injure yourself. A canoe is very long for its weight and you
can get into trouble quickly if you are not careful. At all times consider both your skill
and strength. You should be willing to ask for help; it is better to lose a little pride and
then suffer from some injury.
One person Carry: I suggest, if you can, use a solo overhead carry; it is easier to control
the canoe and involves less walking in the bush. Having a proper carrying yoke helps out
and makes a solo carry more comfortable. You should get one that fits you properly, or
customize it so it fits. You might find that a yoke pad or some glued on closed cell foam
will make carrying the canoe more comfortable. A few people use, and swear by, tump
lines; try it out, based on your strength and build it might work or it might not. There are
still a few people that use tied in paddles, I find this method a little disconcerting and
worry about the paddles moving, or hurting myself if I run into problems. Many canoes
only have a straight middle thwart, you should replace this bar with a proper yoke as it is
easy to injure yourself if you are not careful. If you have a solo canoe, without a centre
yoke, consider getting a clip on carrying yoke.
Doing an overhead lift and carries involves appropriate
technique to minimize the risk of injuring yourself. The
following is only a short overview, you can find more complete
directions here:
http://home.cc.umanitoba.ca/~burchil/pm_canoe/flip.html or in
one of the hard copy references at the end of this manual.
Start by standing at the middle of the canoe and decide which way
you will be facing when the canoe ends up on your shoulders. The
hand that will be on the outside will go to the far side of the canoe
during the lift. Let’s assume you will be turning and facing left
when you are finished. Roll the canoe away from yourself and place
the chine against your thighs, pick up the canoe with both hands by
the gunwale. You should be able to ‘bounce’ the canoe off of your
thighs by pushing with your knees and pulling your hands in toward
your waist. Flipping the canoe is just a continuation of this motion.
Push the canoe with your knees so it pops up facing you with the gunwale
on your lap. Reach for the far gunwale with your left hand. Push the canoe
up with your knee, pull with your left hand, and let the canoe slide over
onto your shoulders. The centre yoke should not go above your ears unless
you are using something like a Grumman yoke with large pads. Place your
hands on the inside of the gunwale and start to walk. Periodically drop one
arm to allow your shoulders a rest. Many people tie a line from the front of
the canoe to the back and have it hang about hand level (at your waist).
This allows you to make some adjustments without having to have your

March 22, 2017 21
hands up all the time. I have only used this technique a few times and find that it is just
another loose rope to get caught in the bush.
An alternative way to flip the canoe is to leave the bow (or the stern) on the ground and
flip just one end of the canoe. This is easier on yourself and your canoe then trying to
flip the canoe and then dropping one end on the ground. Once canoe is over your head
walk your hands along the gunwale until your reach the yoke. One important thing to
remember if you are using the Tipi technique is to make sure that the end of the canoe
that is on the ground is fixed in place by someone’s foot, a rock, a tree root, or anything
else that is stable. When using this technique with a pack start at the back of the canoe,
without a pack start at the front – try it both ways and figure out what works for you.
If there is a breeze it should be blowing into your face when the canoe is on the ground,
use the breeze to help ‘blow’ the canoe over your head. If it is windy get help. Before
you start to flip the canoe check your footing and the area around so you will not get
hung up or catch anything with the canoe.
Before starting across a portage, or even before you leave home, check the weight and
balance of the canoe. You should be able to stand/walk without hanging onto the canoe.
Use a throw bag or paddles tied into your canoe to adjust the weight distribution until it is
just right. I regularly walk around my back yard or down the street when I get new
equipment just to make sure I know how it will behave once I am out on a trip.
Tandem Carry: When doing a tandem lift and carry the motion to lift the canoe is the
same except that one person is near the front of the canoe (near the bow seat) and the
other is near the back (either at the stern thwart or seat). Be sure you communicate with
each other about how you are going to lift the canoe and direction you are going to face.
For a spectator it is hilarious to see a couple pick up a canoe and end up as the Dr.
Doolittle Push-me-Pull-you. Once the canoe is up on your shoulder have the person at
the front move forward and put the deck on their shoulder
allowing them to see and lead. Although tandem carries
allow you to share the load it is more difficult to walk down
narrow portage trails – it is a compromise. The two people
should also be roughly the same height and build. If there
is a little difference in height have the taller person walk at
the front.
Hip Lift: If you only have to move the canoe a little way
(really little) you can use a hip or thigh carry. Similar to the
first step in the solo lift above lift the canoe by the gunwale
with the chine on your thighs then shuffle around with the
canoe in this position. Another alternative that people I
know use with light weight solo canoes is to place the
canoe on one shoulder, like a kayak. This works when
there is no centre thwart or yoke for carrying the canoe.

March 22, 2017 22
Portage
Bill Mason once wrote ‘Anyone who says they like portaging is either a liar or crazy’.
He was probably right but if you want to get between lakes and river systems it means
finding and walking a portage. The Paddle Canada Lake courses are all about setting up
day trips which often don’t involve many portages but that possibility still exists so I
thought I would throw in a few thoughts and pointers about getting you to the other side
of a portage with the fewest problems. Whenever you start looking for portage and then
when crossing a portage keep in mind issues of risk management for yourself and your
group. Remember to follow the Leave No Trace concepts trace mentioned near the end
of this manual as well.
Finding a portage trail can be a little tricky when first starting on canoe trips. Portage
trails are often not well marked either at the start or across the height of land. Before you
leave on your trip ask someone familiar with the area, check the guide books, maps, etc…
Look for places that would make sense using your topographic map – the shortest route
without out marshes or wetlands. Most of us don’t want to climb too much or walk
through too much marsh mush. Often portages have a campsite at one end, or nearby,
look for the telltale signs of a camping site.
Before you grab your canoe and head off into the bush take a scouting trip of at least the
first part of the portage. This will confirm that you have actually found a portage and not
an animal trail. Beaver drag lines can be a particular nuisance. Make the first crossing of
the portage with your pack and maybe paddle(s) so you can look around, there’s is
nothing quite as annoying as running into a partially fallen tree with your canoe – not to
mention the increased possibility of getting lost. In unfamiliar areas take a back bearing
on your compass just in case you get disoriented if the trail fades. Make sure all those
annoying loose items are packed away. More things have been forgotten on portages
than anywhere else on a trip.
You may be tempted to try and carry everything can across a portage in one trip, it is
better to take your time and take a couple (or three) trips rather than hurry injure yourself.
Enjoy the walk, smell the roses, see what there is to see. On the first trip over the portage
take note of the footing, loose logs, rocks, and the route.
When walking a wet portage you might be tempted to walk around ‘muddy’ spots.
Before making an alternate route consider why the area is muddy, and how much damage
will be done to the surrounding area by your new trail, and by those that might follow
you. Is it worth adding an extra trail and the associated ecological damage rather than
getting a little mud on your shoes or slightly wet feet (you brought a change of sock
right?). Stay on existing trails.
A few other suggestions
• When meeting someone with a canoe on a portage the canoeist gets the right of
way.
March 22, 2017 23
• When crossing a portage a few times make sure your equipment is set off to the
side of the portage so it does not get in the way, or cause a ‘traffic’ jam.
• Check the take-out and put-in areas of the portage one last time on every crossing
to ensure that nothing has been left behind.
In the Boat
When soloing as kids we were told by our old instructors to kneel in the middle of the
canoe off to one side and that you would get used to it eventually. Unfortunately this is
pretty limiting when you think about it, especially with new boats and paddling
techniques. You were never given an option, this was the way or that was the highway if
you can’t kneel. Canoes are big and there are lots of different styles of boats and places to
sit or kneel. I happen to be a proponent of kneeling because of the additional balance and
control, I also happen to paddle a tandem boat solo (no seat). How you weight the boat
can have huge effects on your ability to paddle and control the canoe. How much weight
is in the boat also makes a big difference. With this last thought I recommend head out
solo with a loaded canoe at least a few times every year. You never know what it is like
to try to paddle a wallowing barge in heavy seas unless you try, you don’t want to try
when you have no other choice. Heeling a canoe is not necessary or required, heeling
provides better access to the water and greater maneuverability (turning), but a trim, flat
running canoe may be more efficient and on the whole less affected by the wind.
The amount a canoe needs to be heeled for optimal control and turning depends on the
canoe profile and amount of rocker. Some canoes do not need to be heeled at all for
normal paddling; others may work best with the gunwale pushed right to the water
surface. It is not necessary, or advantageous, to have a radical heel when paddling. The
best way to determine the amount of heel necessary for the combination of yourself, your
canoe, and equipment is to get out on the water and practice; see what works. To
determine a reasonable heel a new canoe kneel in the chine and slowly tip the canoe, with
most canoes there will be a point that the canoe no longer easily tips (it feels like it
pushes back). This point is a reasonable amount of heel, beyond this there may be some
advantage in turning, less than this point the canoe may ‘run’ straighter. A river boat
with ‘hard’ chines and flared profile may have a ‘straighter’ keel line when heeled then
when flat. A wide rockerless lake canoe with some tumblehome may be more like a
strongly rockered river boat when moderately heeled.
Sitting and Kneeling Positions
When paddling solo in a tandem canoe you typically kneel just back of the middle and
heeled to one side. There are a few kneeling positions that are commonly used:
Low kneel (Canadian)
This is a low kneeling position is a classic form, with body weight back on your
heels. Your knees are together in the chine or bilge of the paddling side with a
slight rotation toward paddling side.
High kneel
This is similar to the low kneel except your weight is high with your body straight
up from your knees. When paddling in this position (and Transverse kneel)

March 22, 2017 24
remember to keep your weight inside the canoe – think of keeping your head over
your belly-button and inside the canoe. Shifting between low and high kneeling
positions is often done to adjust the trim of your canoe during turns.
Spread kneel (three point kneel).
This is the kneeling position to use when you are solo paddling a narrow solo
canoe or in wind and wave conditions. You are leaning against the bow seat or
thwart, using a pedestal saddle or stuff sack, or just supporting your weight with
your knees spread to either side of the canoe. This position allows easy
transitions, cross strokes, and weight transfers on both sides of the canoe. The
centred position provides better stability.
When kneeling on the bottom of the canoe there are a few ways to keep
your knees and ankles from giving out. I generally recommend a large
kneeling or closed cell sleeping pad. Smaller pads just don’t give the
option of moving in the boat when necessary, and strapped on knee pads
become uncomfortable very quickly. A rolled beach towel underneath
your ankles provides support and helps to prevent sore ankles and feet.
Kneeling for extended periods of time can be difficult on knees and ankles.
There are several things that can be done to minimize the stress and pain.
Warm-up, and regular movement, even if it is just periodically changing
from low to high kneeling positions, allows blood circulation and relief. Practice – the
more time you spend practicing (without overuse injury) the easier it becomes. Kneeling
pads – these should be large enough to cover the area that you will be moving in the
canoe and may be composed of thick neoprene, closed cell foam, or
yoga-mats. Kneeling pads should not absorb water and should not be
slippery when wet. Ankle support using a rolled towel or rolled end
of the mat under the ankles is often very helpful. Some people have
kneeling pads made with a ‘lump’ across one end – this is not
recommended because of the variation in kneeling positions. Placing
a thin closed cell foam pad behind your knees can also help.
Unfortunately kneeling is often presented as the only option when
solo paddling. A large stuff sack or day pack full of a sleeping bag or spare clothing
provides a nice saddle with good support while still allowing movement in the canoe.
You will often see kneeling thwarts added to canoes; they are useful when just starting
out. The problem is these thwarts encourage you to stay in one place making the chance
of sore knees and ankles actually worse. The bow seat in many
tandem boats is located in a good position for lake solo paddling and
provides good support. Lake solo boats have a seat situated in pretty
much the right spot for appropriate trim and balance (use it). There is
no golden rule that says you can’t use a seat – sit on it, put one knee
down, put both knees down, do whatever is comfortable. To a degree
you can use baggage and equipment to trim your boat and then sit on
the bow seat with your equipment in the stern compartment. The

March 22, 2017 25
important thing is to understand how the weight changes the shape of the canoe the water.
Bum support is important for keeping comfortable as well. The bow
seat (facing backward) or a kneeling thwart can be used for support; a
stuffed stuff sack can also be used. Becky Mason has long advocated
the use of ‘Saddle Bags’ – foam chips or similar in a waterproofed
stuff sack. A full stuff sack still allows good motion, provides some
support, and conforms to your body and movements. A prayer stool
or meditation bench has been suggested and tried fairly effectively –
they allow the user to kneel like a kneeling thwart but may also be
easily moved.
Paddlers should try a variety of options and use
something that fits their needs and limitations. Supports
and seats help reduce pressure on knees and ankles but
they also limit movement in the canoe. Novice paddlers
usually find seats helpful but as their paddling becomes
more advanced thwarts and seats get in the way.
Remember you can move around the canoe when solo
paddling. When I was first taught how to canoe the
mantra was kneel and stay, this was unfortunate because staying in one place eventually
becomes very tiring and painful. Feel free to move, be free, relax, sit, kneel, lie down,
etc… do whatever works for you. Depending on where you sit or kneel you can change
the hull shape in the water which in turn affects your ability to control the canoe,
changing how the canoe tracks, and the impact of wind and waves.
Paddling Positions – Strengths/Limitations Position Strength Limitations
Kneeling Best power position and greatest possibilities
for movement, body, and boat control.
Difficult to stay in one position. Knee
and ankle injury possible.
Seats Best for comfort and support. May be too high or difficult to get feet
under. Rotation and forward/aft
movement in canoe limited. Difficult to
get and maintain a good edge. Limits
movement in canoe. May not provide the
best connection with the canoe.
Recommend using a lower seat with a
foot brace if necessary.
Kneeling thwart Good power position and connection to canoe. Limits movement in canoe. Pressure on
knees may still lead to injury.
‘Saddle’ bags Good kneeling position. Ability to move in
canoe allows for weight transfers provides
support.
Soft ‘bag’ may not allow good
connection to boat. May be difficult to
move enough. May not provide enough
support.
Pedestal Good power. Provides support and allows body
rotation and contact with boat.
Movement restricted in canoe to location
of Pedestal.
Meditation Bench Good support. Allows good body position and
some movement in canoe.
Moves, difficult to keep in one spot.
Hard to maintain connection with canoe.
Kneeling position may still lead to long
term injuries.

March 22, 2017 26
Weighting and Pivot Points
When solo canoeing in an empty boat you sit or kneel at or just behind the midpoint or
centre of the canoe; your canoe may be heeled (or tipped) to the paddling side. This
position provides the greatest flexibility in controlling the canoe since forces can be
applied both forward and back of the pivot point. When carrying equipment in a tandem
boat I usually sit on the bow seat facing the stern and trim the boat with my equipment
closer to the stern.
Just like understanding the forces involved with paddling strokes it is critical you
understand the underwater shape of the hull as the canoe is heeled and pitched in
different ways. Although you can turn the canoe using the paddle, working with the
forces from the water and hull shape will make manoeuvres easier to complete. It is
important to remember that a canoe is a displacement hull – meaning the amount of water
displaced is equal to the weight in the canoe. Changing the pitch or heel of the canoe will
change the depth in the water as well as the hull shape. You have been told that the
waterline of the canoe is shortened when the canoe is heeled and the apparent rocker is
increased by ‘pulling the ends out of the water’. But remember your canoe is a is a
displacement hull so something has to sink. The maximum draft (depth) of the canoe is
increased basically ‘sticking’ and holding the deeper spot in the water. This makes
turning the canoe easier; an understanding of the actual shape of the canoe in the water
helps with figuring out why the canoe turns faster (better) from some positions. If you
move to one end of the canoe it sinks deeper in the water and lifts the other end out of the
water.
March 22, 2017 27
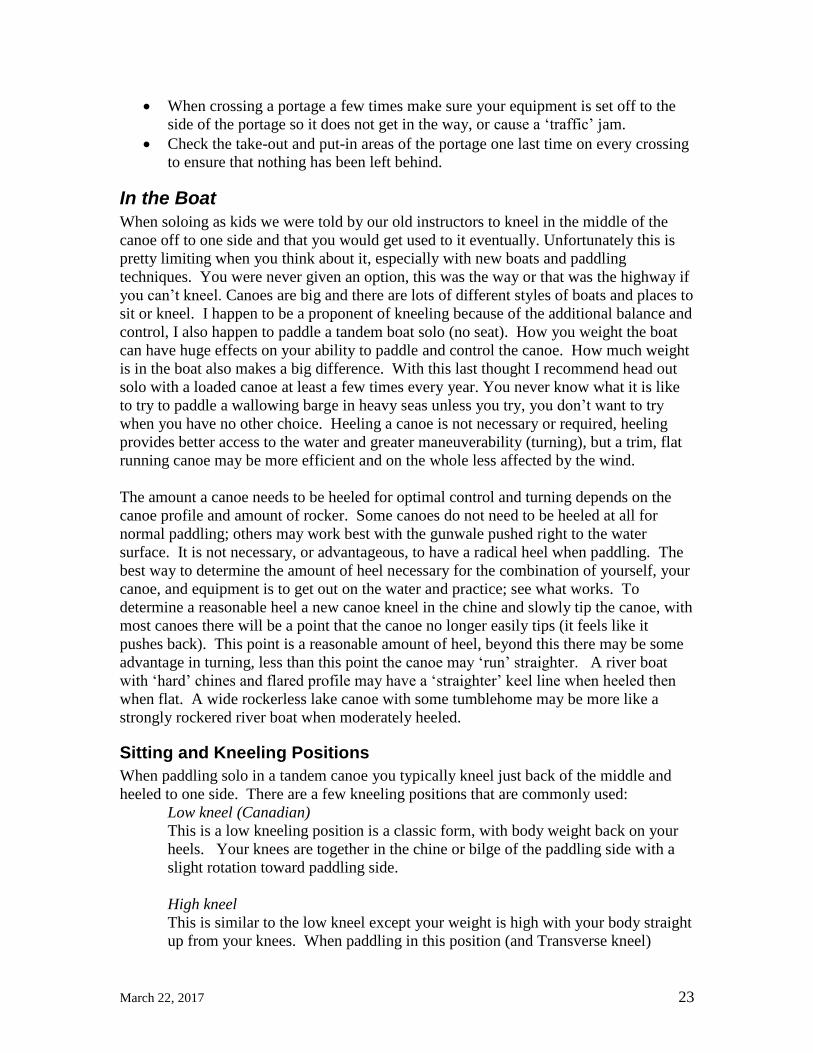
If you ignore all of the other forces on the canoe a non-heeled (flat running) canoe has
equal forces on both sides of the canoe and it will run straight. When you heel your canoe
from near the middle there is a small turning force away from the paddling side –if you
continue to move back slightly the turning force is balanced by the angle of the water
across the non-paddling side and the ‘skeg’ effect of the trailing stem. Moving further
back causes the angle and force to increase and your canoe will naturally turn toward
your paddling side. When your canoe is heeled over and pitched toward the rear a ‘J’ is
often no longer required. The opposite is true when you forward weight your canoe:
there is more force against the paddling side bow and it will turn away from the paddling
side. This is a very simplified description and reality is more complex. You also need to
account for the additional torque from paddling, shape of the leading & trailing stems,
and resistance over the hull but you should get the
idea.
When you move the canoe forward the pivot point
also moves forward with the speed of the boat.
When your canoe is stationary the natural pivot
point will be close to the centre of mass as the
canoe starts to move the pivot point moves
forward as well. This is why a side slip is done
using a running pry that is planted just in front of
your knees. Don’t forget the pivot point will also
move toward the ‘deepest’ point of the canoe.
Working out where all of everything lines up just
takes practice.
It is very helpful to develop or at least understand
the ‘stability curve’ of the canoe you are paddling
in. A canoe with a soft arch hull, rounded chines,
and some tumblehome will feel a little unstable when flat but it will have a similar ‘feel’
as it is rolled on to the side (heeled), and then have a slightly ‘stiffer’ feel when the canoe
starts to flare, just below the tumblehome. There is an excellent article by Nick Schade
of Gullemont Kayaks that describes stability curves and how they should be interpreted.
By understanding the forces on the canoe, the underwater hull shape, and the location of
the pivot point, your weight turns can be controlled through the amount and direction of
the heel as well as the pitch of the boat. You can complete many turning manoeuvres
without paddling by using momentum and subtle weight shifts. Practicing weight turns
will give you an excellent idea of how the canoe will turn naturally as well as the effect
of any momentum in the canoe from prior strokes.
You might ask ‘if the diagram on the prior page is correct why does it appear that weight
turns seem to go randomly in either direction?’ Remember that the force from the water
on the hull is not the only force acting on the canoe. Any existing inertia in the canoe
may overcome the opposing force from the water. This effect is even more pronounced in
a forward weighted canoe where the weighting sticks or holds the front end of the canoe

March 22, 2017 28
in place and pulls the other end of the canoe up allowing it to ‘skid’ freely over the top of
the water. The forces that cause the ‘natural’ turn mentioned above are overwhelmed by
any existing inertia – the canoe will go in the direction initiated.
When paddling any manoeuvre consider the following fundamental components:
Momentum, Initiate, Tilt, Hold (MITH).
Momentum – for any successful manoeuvre the canoe must be moving or have
some momentum to carry it through the move.
Initiate – initiate the move you want to complete (e.g. start the canoe turning with
a sweep or J).
Tilt – at the same point that you initiate the move tilt the canoe (often to the
inside); tilting the canoe allows it to turn freely.
Hold – during the move continue to hold the initial tilt and let the canoe carve.
Generally a canoe that has an initiated turn will continue to turn until something
changes. Levelling the canoe will cause a turn to stop for example.
The Loaded Boat
It is important to get out and paddle in a loaded boat, at least periodically. You will
typically have less control over the boat or it will feel ‘sluggish’. This is not always true
some canoes paddle much better with some additional weight – another reason to
experiment. Where you sit and how you heel the canoe also may need to change. The
same principles apply but you can use your equipment to adjust the weighting in your
canoe – you still want to maintain a relatively trim canoe. With equipment there is less
reason to heel your canoe to reach or access the water. Use the equipment to provide a
neutral heel while still sitting (or kneeling) off to one side.

March 22, 2017 29
Into the Wind
You cannot always anticipate calm days on the water and paddling in the wind opens up a
whole set of challenges for the solo paddler. Wind will play a major factor into how you
adjust the weight in your canoe. A canoe that is weighted slightly more to one end may
be easier to paddle in a straight line but it is more difficult to control in the wind. Once
the wind picks up the less weighted end of the canoe will act as a sail or weathervane.
The resulting effects of the wind on the canoe will look something like this:
(Wind has greater effect on the lighter end than the due to trim that is stern heavy)
If left unchecked, a strong wind will always turn the boat until the heaviest end of the
canoe is upwind and the lightest end of the canoe is downwind. In essence the canoe acts
as a weathervane. When paddling in wind adjust the trim with your body or equipment
for an appropriate trim, minimize or paddle with a neutral heel, and spread your knees to
allow the canoe to roll or move underneath you. Paddling with extra weight (equipment)
in the canoe often makes it easier to paddle in the wind.
Remember with wind there is often waves that need to be dealt with as well – review the
section on waves near the end of this document.
Paddling into a headwind
Keeping the weathervane effect in mind, it is advisable for paddlers to have an even trim
or weight the bow (upwind end of the canoe) slightly heavier than the stern (downwind
end of the canoe) when paddling into a headwind. The wind will have less effect on the
bow of the boat as you travel forward. Without consideration for the waves and
depending on the trim paddling on the up wind side of the canoe may be easier. One
thing to keep in mind when adjusting your trim in this scenario is that waves are often
associated with wind.
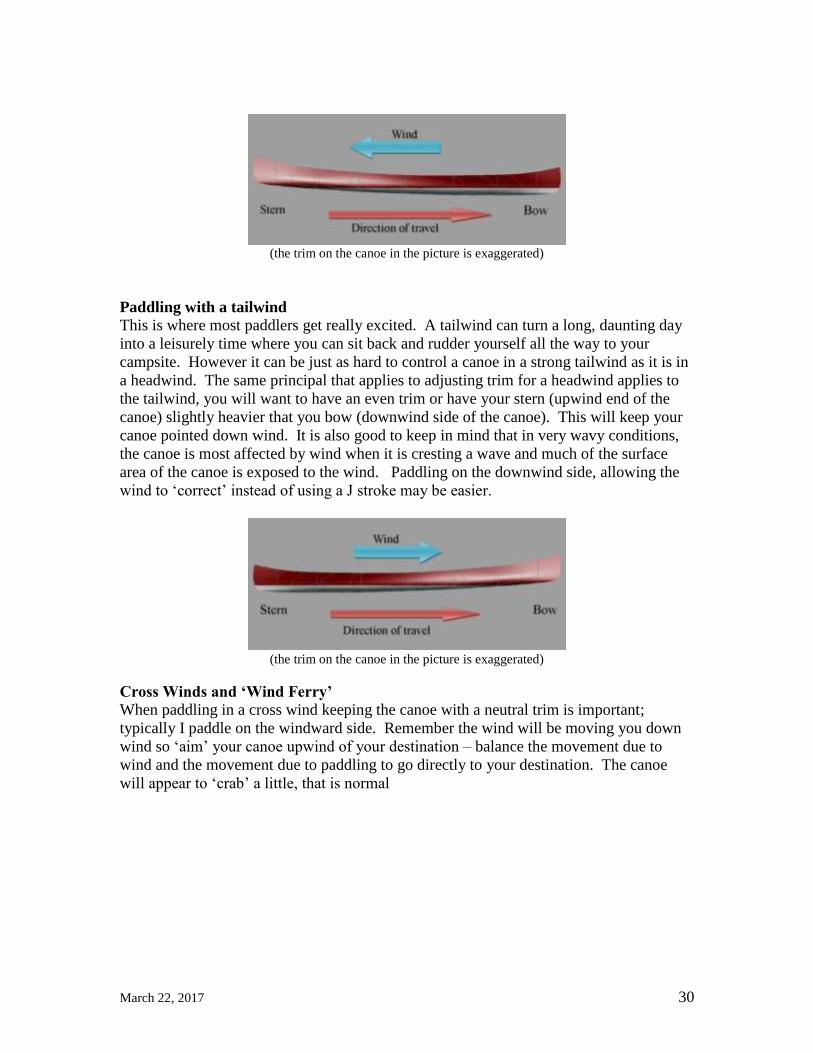
March 22, 2017 30
(the trim on the canoe in the picture is exaggerated)
Paddling with a tailwind
This is where most paddlers get really excited. A tailwind can turn a long, daunting day
into a leisurely time where you can sit back and rudder yourself all the way to your
campsite. However it can be just as hard to control a canoe in a strong tailwind as it is in
a headwind. The same principal that applies to adjusting trim for a headwind applies to
the tailwind, you will want to have an even trim or have your stern (upwind end of the
canoe) slightly heavier that you bow (downwind side of the canoe). This will keep your
canoe pointed down wind. It is also good to keep in mind that in very wavy conditions,
the canoe is most affected by wind when it is cresting a wave and much of the surface
area of the canoe is exposed to the wind. Paddling on the downwind side, allowing the
wind to ‘correct’ instead of using a J stroke may be easier.
(the trim on the canoe in the picture is exaggerated)
Cross Winds and ‘Wind Ferry’
When paddling in a cross wind keeping the canoe with a neutral trim is important;
typically I paddle on the windward side. Remember the wind will be moving you down
wind so ‘aim’ your canoe upwind of your destination – balance the movement due to
wind and the movement due to paddling to go directly to your destination. The canoe
will appear to ‘crab’ a little, that is normal

March 22, 2017 31
Kneeling in the Center with load forward gives better control in any wind (B. Mason)
PFDs
Paddle Canada courses require you to wear a properly fitting and done up and approved
PFD (Personal Floatation Device) or life jacket. It is a good practice to wear a PFD in
any case whether you are on a course or not; try putting a PFD on and doing it up when in
deep water and you will see why. Lifejackets are only mentioned here as a comparison
since they are not comfortable to wear when paddling due to the size and floatation
requirements.
There are two types of approved PFDs:
Inherently buoyant PFD. These PFDs have buoyancy capabilities due to their
construction from unicellular foam or macro cellular elements. Buoyancy must
be 15 ½ pounds or 69 Newtons and are marked for people over 90 pounds.
Almost all adults require only 7 pounds bouncy in the water – the 15 ½ pounds
incorporates a safety factor of 2 for good measure. Although you might find
PFD’s comfortable to sit on – DON’T. Sitting on a PFD breaks down or
‘squishes’ the cellular foam which then has less buoyancy.
Inflatable PFDs. These PFDs are fitted with an oral inflation device and a
manually activated CO2 inflation system. They may only be worn by adults (age
16+) and are not approved for white-water or personal watercraft (jet ski)
operation. There are three types of inflatable PFDs that may be approved: 1.
Vest or Suspender type with 150 Newtons buoyancy. 2. Pouch type with 100
Newtons (this type is considered a two stage donning device). 3. Automatic jacket
type with 150 Newtons buoyancy. This last type is supposed to fill automatically
on contact with water but you should be aware that exposure to extreme humidity
or water washing over the craft may cause premature inflation.
PFDs must be labelled appropriately and have at least the following statement:

March 22, 2017 32
"Approved by Department of Transport Canada" or
"Approved by Canadian Coast Guard, Department of Fisheries and Oceans
Because PFDs are made to be worn and come in many shapes, colours, and sizes you
should choose one that is based on comfort and activity. There is only one way to
confirm that a PFD is going to work for you – try it on and test it both during the activity
and in the water.
Lifejackets come in three different types: SOLAS (Foam filled or Inflatable), Standard
Type, Small Vessel. Generally speaking these are all approved for use on commercial
vessels and must meet one of a series of national or international requirements. Broadly
the requirements include: the colour must be Red, Orange or Yellow, turn an unconscious
victim on their back, and keep their face out of the water.
See the following Transport Canada website for more information: https://www.tc.gc.ca/eng/marinesafety/debs-obs-equipment-lifejackets-information-1324.htm
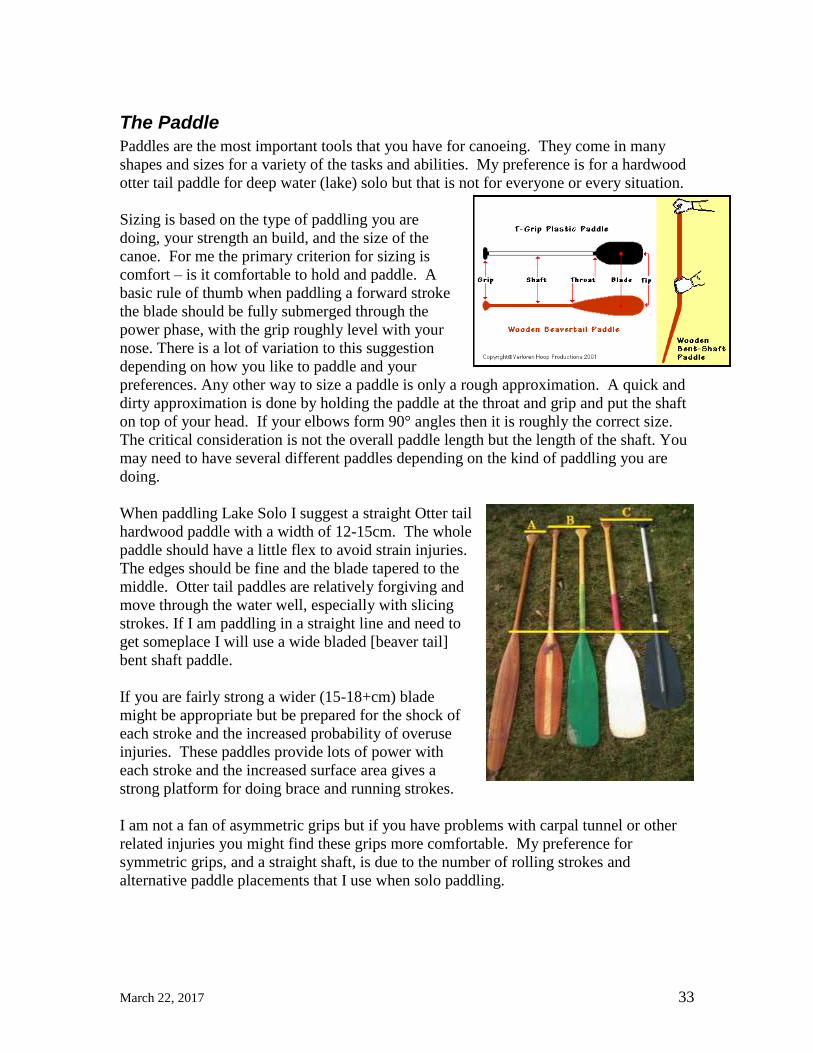
March 22, 2017 33
The Paddle
Paddles are the most important tools that you have for canoeing. They come in many
shapes and sizes for a variety of the tasks and abilities. My preference is for a hardwood
otter tail paddle for deep water (lake) solo but that is not for everyone or every situation.
Sizing is based on the type of paddling you are
doing, your strength an build, and the size of the
canoe. For me the primary criterion for sizing is
comfort – is it comfortable to hold and paddle. A
basic rule of thumb when paddling a forward stroke
the blade should be fully submerged through the
power phase, with the grip roughly level with your
nose. There is a lot of variation to this suggestion
depending on how you like to paddle and your
preferences. Any other way to size a paddle is only a rough approximation. A quick and
dirty approximation is done by holding the paddle at the throat and grip and put the shaft
on top of your head. If your elbows form 90° angles then it is roughly the correct size.
The critical consideration is not the overall paddle length but the length of the shaft. You
may need to have several different paddles depending on the kind of paddling you are
doing.
When paddling Lake Solo I suggest a straight Otter tail
hardwood paddle with a width of 12-15cm. The whole
paddle should have a little flex to avoid strain injuries.
The edges should be fine and the blade tapered to the
middle. Otter tail paddles are relatively forgiving and
move through the water well, especially with slicing
strokes. If I am paddling in a straight line and need to
get someplace I will use a wide bladed [beaver tail]
bent shaft paddle.
If you are fairly strong a wider (15-18+cm) blade
might be appropriate but be prepared for the shock of
each stroke and the increased probability of overuse
injuries. These paddles provide lots of power with
each stroke and the increased surface area gives a
strong platform for doing brace and running strokes.
I am not a fan of asymmetric grips but if you have problems with carpal tunnel or other
related injuries you might find these grips more comfortable. My preference for
symmetric grips, and a straight shaft, is due to the number of rolling strokes and
alternative paddle placements that I use when solo paddling.

March 22, 2017 34
Blade Styles Every paddle manufacturer will have their own names for various paddle blade shape and
there are hundreds of variations between each style. In the end find something that suits
your purposes generally and then go with a shape you like.
This is a standard (normal) paddle. The sides are
straight and the tip is mostly flat but slightly rounded
at the edges. This is the most common kind of
paddle found in most big box stores. Provides a
compromise between a number of uses. May also be
called a scout, freighter, river blade, canoe paddle
This is an all-around paddle with the widest section
toward the rounded tip. This shape of paddle is a
good deep water paddle but provides some shallow
water capabilities. It is good for control strokes but a
little less forgiving than an Otter tail for mistakes.
May also be called a Tripper paddle.
Otter tail paddles are good deep water paddles with
the widest portion part way up the blade and fairly
rounded tip. This is a good shape for long day trips
with high cadence paddling. It will not provide good
power in shallow water. This is a favoured shape of
Canadian Solo style paddlers. Also comes with
names like [Algonquin] guide.
This shape of paddle is a special case of an Otter tail.
It is very long and narrow allowing. The length
provides a lot of surface area for power as well
provides an extended reach for specialty flat water
solo paddling. It is not a good shallow water paddle.
The blade is squared at the tip and expands to the
shoulders of the blade. Generally a narrower blade it
is good for long day trips with high cadence
paddling. Round the tip and it becomes a Willow
style blade.
Short very wide blade with lots of shallow water
surface area. Excellent for braces and power bursts
but can be tiring to use over a long period. May also
be called a Hammerhead. When the blade is a little
longer the name Sugar Island may be used. These
larger sized blades are often used in American
Freestyle Paddling
Standard
Beaver tail
Otter tail
Quill, Special
Lake
Voyageur
Whitewater
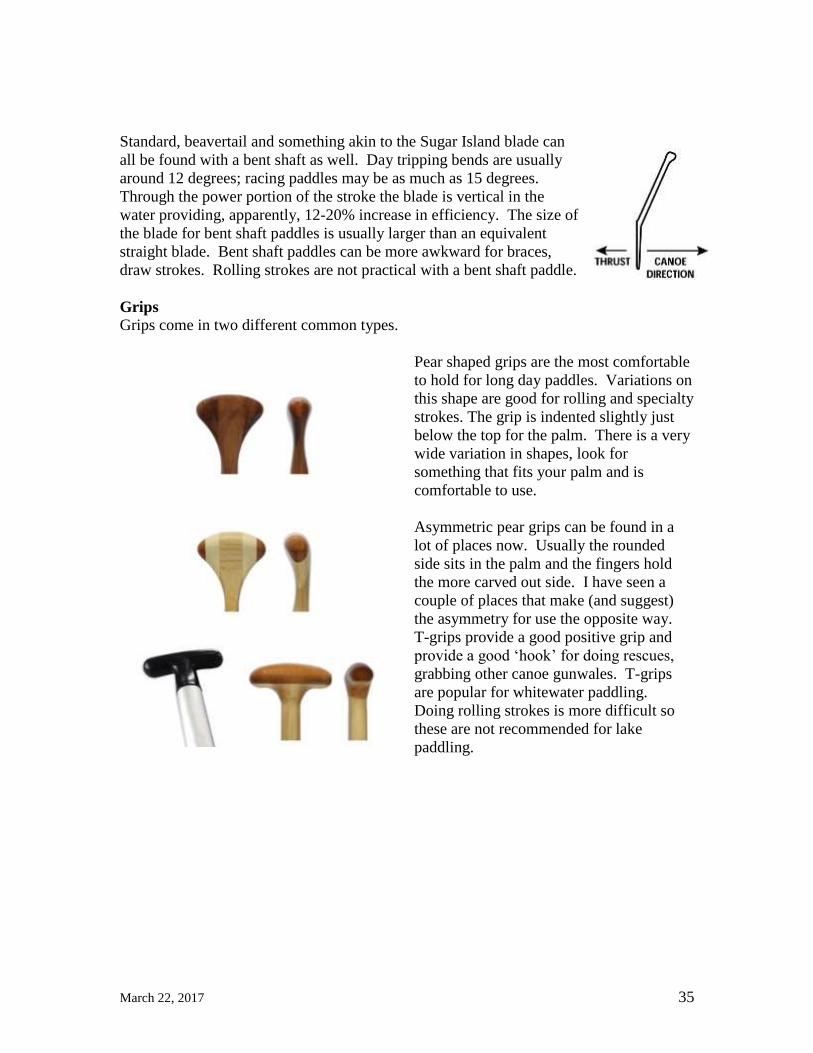
March 22, 2017 35
Standard, beavertail and something akin to the Sugar Island blade can
all be found with a bent shaft as well. Day tripping bends are usually
around 12 degrees; racing paddles may be as much as 15 degrees.
Through the power portion of the stroke the blade is vertical in the
water providing, apparently, 12-20% increase in efficiency. The size of
the blade for bent shaft paddles is usually larger than an equivalent
straight blade. Bent shaft paddles can be more awkward for braces,
draw strokes. Rolling strokes are not practical with a bent shaft paddle.
Grips
Grips come in two different common types.
Pear shaped grips are the most comfortable
to hold for long day paddles. Variations on
this shape are good for rolling and specialty
strokes. The grip is indented slightly just
below the top for the palm. There is a very
wide variation in shapes, look for
something that fits your palm and is
comfortable to use.
Asymmetric pear grips can be found in a
lot of places now. Usually the rounded
side sits in the palm and the fingers hold
the more carved out side. I have seen a
couple of places that make (and suggest)
the asymmetry for use the opposite way.
T-grips provide a good positive grip and
provide a good ‘hook’ for doing rescues,
grabbing other canoe gunwales. T-grips
are popular for whitewater paddling.
Doing rolling strokes is more difficult so
these are not recommended for lake
paddling.
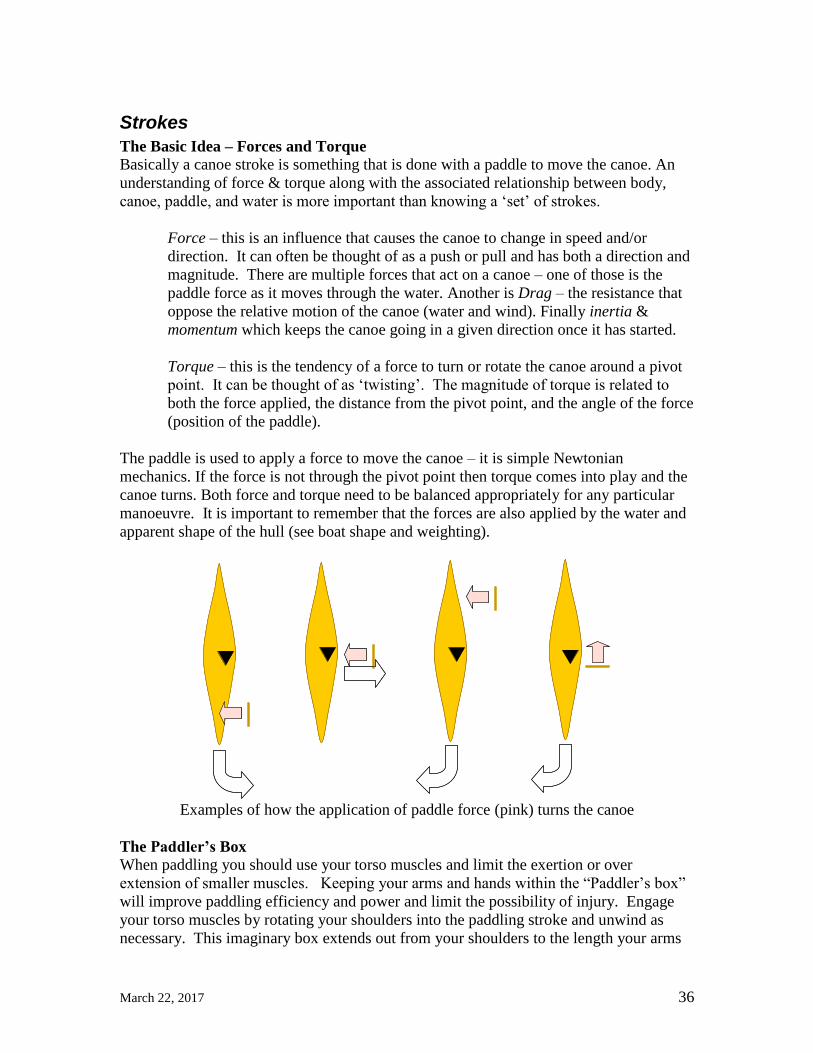
March 22, 2017 36
Strokes
The Basic Idea – Forces and Torque
Basically a canoe stroke is something that is done with a paddle to move the canoe. An
understanding of force & torque along with the associated relationship between body,
canoe, paddle, and water is more important than knowing a ‘set’ of strokes.
Force – this is an influence that causes the canoe to change in speed and/or
direction. It can often be thought of as a push or pull and has both a direction and
magnitude. There are multiple forces that act on a canoe – one of those is the
paddle force as it moves through the water. Another is Drag – the resistance that
oppose the relative motion of the canoe (water and wind). Finally inertia &
momentum which keeps the canoe going in a given direction once it has started.
Torque – this is the tendency of a force to turn or rotate the canoe around a pivot
point. It can be thought of as ‘twisting’. The magnitude of torque is related to
both the force applied, the distance from the pivot point, and the angle of the force
(position of the paddle).
The paddle is used to apply a force to move the canoe – it is simple Newtonian
mechanics. If the force is not through the pivot point then torque comes into play and the
canoe turns. Both force and torque need to be balanced appropriately for any particular
manoeuvre. It is important to remember that the forces are also applied by the water and
apparent shape of the hull (see boat shape and weighting).
Examples of how the application of paddle force (pink) turns the canoe
The Paddler’s Box When paddling you should use your torso muscles and limit the exertion or over
extension of smaller muscles. Keeping your arms and hands within the “Paddler’s box”
will improve paddling efficiency and power and limit the possibility of injury. Engage
your torso muscles by rotating your shoulders into the paddling stroke and unwind as
necessary. This imaginary box extends out from your shoulders to the length your arms

March 22, 2017 37
and down to the water or the boat. It is a misconception to think that this limits you to
paddling in one direction, by rotating your shoulders the box moves. In short you do not
want your hands to be extended [much] above your shoulders or trail behind the line of
your back.
Actual strokes
Although use of specific strokes is not a part of the assessment criteria you should be
familiar with a basic set and be able to modify them to meet your specific needs. This
section will help you ‘talk’ the same language and provides examples of strokes for use
when solo paddling that can be used under various situations.
Each stoke has information on: Purpose – how it moves the canoe, Execution – basic
information on the catch, power phase, follow through, and recovery, Common problems
– where things often go wrong, Related Strokes – strokes that are similar in motion, have
a similar or an opposing effect. See the Paddle Canada resource manual for more
complete information on paddling strokes (http://www.paddlebuzz.ca/assets/images/pdf/strokes_resource_document_june_2012.pdf)
Bow jam / stationary pry
Purpose
The bow jam quickly turns the canoe away from your paddling side.
Execution
This is a static stroke used when the canoe is moving and initiated with a forward
stroke or sweep. It is placed next to the bow of the canoe with the shaft supported
by the gunwale. The blade is sliced forward through the water without any pitch,
the grip hand thumb towards the back of the canoe and outside of the gunwale.
Some people find it easier to plant the blade from above, rather than slicing it
forward. Once the blade is forward under the bow of the canoe the pitch is opened
slightly with the ‘V’ pointing backward or down; the top side of the blade should
be closer to the canoe and the grip hand further out from the bow. The further
forward the jam is placed the faster the turning motion of the canoe. There is a
continuum in the placement of the blade from beside the paddler to under the bow
of the canoe. When the canoe starts to slow down the turning motion can be
assisted by doing a dynamic pry.
Common Problems
Wrong pitch – this is especially problematic when the paddle is planted further
forward. Opening up the pitch too soon will slow the canoe and the canoe might
side slip rather than turn. If the pitch is opened to quickly there will be a sudden
‘lurch’ away from the paddling side which may cause the paddler to fall out of the
canoe if not balanced or prepared appropriately. Holding the paddle too low –
choke up on the shaft, especially in the further forward placements. Watch for
fingers between the gunwale and the paddle shaft (ouch!). Too much pitch on the
blade will slow or stop the canoe.
Related Strokes
Standing or running pry, cross bow draw/cut
Note

March 22, 2017 38
A bow jam can be executed one handed for a cleaver demonstration of skill. A
one handed Jam is completed by holding onto the paddle near the grip with the
shaft hand and placing the blade under the bow of the canoe. As the canoe slows
the jam can be transitioned to a one-handed pry by pulling the shaft hand into the
canoe.
Bow rudder / cut / stationary draw
Purpose
The bow rudder turns the canoe toward your paddling side
Execution
This is a static stroke used when the canoe is moving. It is placed out from the
canoe and supported primarily by the shaft hand. Plant or slice the blade into the
water forward of the paddling position and out from the canoe. The blade should
start perpendicular to the motion of the canoe initially then when it is in place
open the pitch of the blade with the ‘V’ open toward the front. The further
forward the blade is planted the stronger the turning motion on the canoe. There
is a continuum of placements of the blade from beside the paddler to fairly far
forward with the shaft angled. With the blade planted forward and the shaft at an
angle your grip hand thumb should be in your arm pit (Cut).
Common Problems
The most common problem will be placing the blade beside the paddler and
causing the canoe to side slip instead of turn. Opening up the pitch too soon will
cause the canoe to side slip or slow the canoe unnecessarily. If the pitch is
opened too much the canoe will be slowed down rather than turning.
Related Strokes
Standing draw, cut, cross bow draw/cut
Note
Depending on the placement this stroke can also be called a cut when the blade is
forward and the paddle angled 10 to 12 degrees out from the canoe. This is where
the grip hand thumb, if stuck out, would be in your arm pit.
Box
Purpose
The box stroke is used to pivot the canoe.
Execution
Turn your shoulders so you are facing outside the canoe. Choke up on the paddle
shaft. The box stroke is executed by slicing the paddle forward and doing a push
away some distance from the pivot point,
then slicing back through the water and
doing and draw, then slicing back to the
original push location – basically scribing
a rectangle in the water. This motion
repeats. To pivot the opposite direction
reverse the draw/push portions.
Common Problems

March 22, 2017 39
Pushing or drawing toward the pivot point rather than perpendicular to the line of
the canoe. Holding the blade too close to the pivot point may cause a slow or turn
or cartwheel. The draw/push should be equal distance on each side of the pivot
and the same power. Power and distance may be altered a little if you are some
distance from the centre of the canoe as the low end of the canoe will drag more
than the other.
Related Strokes
Circle, draw, pry, sweep.
Note
Some sources use this term for an Indian or rolling J.
Other sources split this into two strokes – inside and outside depending on where
the draw is executed (inside has the draw forward of pivot)
This is a solo canoe stroke.
C stroke
Purpose
The C stroke is used for moving a solo canoe forward maintaining a straight line
correcting for off-side turn, or turning the canoe toward the paddling side.
Particularly when starting and dealing with wind.
Execution
Initiate the stroke with a small draw toward the canoe in front of the pivot point,
rotate the blade so the power face is facing backward and continue with a forward
stroke, finish with a ‘J’. Essentially you want to scribe a ‘C’ with the blade of the
paddle.
Common problems
The initiation pulls toward the pivot point of the canoe rather than the canoe.
Poorly executed ‘J’ portion of the stroke. Power section of the stroke is too long.
Related Strokes
Circle, Canadian, J, Indian
Note
This is a solo stroke. You may find the Indian stroke provides more control.
Canadian
Purpose
The Canadian stroke is used for moving
a canoe forward maintain a straight line
correcting for off side turn, or turning
the canoe toward the paddling side.
Execution
This strokes starts as a ‘normal forward’
stroke. As the blade passes the hip of
the paddler the power face starts to
rotate away from the canoe (similar to a
‘J’). Instead of pushing out and
March 22, 2017 40
removing the blade the Canadian has an underwater recovery with the blade
slicing back past the hip of the canoeist with a slight forward pitch. It should feel
like you are lifting the paddle slightly through the recovery.
Common problems
Not enough rotation of the blade, rarely too much. Lifting the blade instead of
slicing through during the recovery with a slight pitch.
Related Strokes
J, Indian, C, Punch
Circle
Purpose
The circle stroke is used for pivoting the canoe.
Execution
Start with a deep water forward (or reverse) sweep but continue the motion of
rotating the paddle underneath the canoe. The grip hand must be outside of the
canoe and he shaft hand must be choked up significantly to allow the rotated
blade to get under the canoe and to the other side of the pivot point. You may
have to put your shaft hand in the water.
Common problems
All kinds of problems can arise, including falling in the lake.
Related Strokes
Box, draw, pry
Note
This stroke is used in Style canoeing - rarely used in lake paddling this is a
display stroke more than anything. The stroke may be done a small circle from an
upright or high kneel or a large circle under the canoe from a low kneeling
position. This is a solo stroke
Check (stop)
Purpose
Stopping the canoe
Execution
Plant your paddle with the blade perpendicular to the direction of travel in the
water beside the canoe. For additional stopping force initiate the check with a
forward or backward stroke (opposite the direction you are going).
Common problems
Huh!? How could you have a problem with this stroke? The most common
problem is thinking that the canoe will stop going in a straight line. If you want to
stop the canoe in a straight line see section on ‘Controlled stop’ under maneuvers
below.
Stopping when going forward – place the blade of the paddle flat on the surface of
the water well behind you, tap the inside edge of the paddle against the canoe and
slowly weight the paddle with your shaft hand into the water. Once the
momentum of the canoe is mostly killed slice the paddle to your hip and execute
the end of a reverse J. ONLY IF NECESSARY. Alternatively you can execute a
March 22, 2017 41
reverse compound stroke – many people find this much more effective than the
more classic stop above.
Stopping the canoe when going backward involves reaching as far towards the
bow as possible and initiating a forward stroke. Pitching the blade towards the
canoe slightly at the initiation sometimes helps. At the end of the stroke, and only
if necessary, add a slight J or push away to maintain your direction.
Related Strokes
Forward, Reverse, compound reverse
Compound reverse
Purpose
Moving the canoe backward through the water
Execution
Rotate the blade so the grip and thumb is toward you and the blade is
perpendicular to the direction of travel. The upper body and shoulders should be
turned so you are essentially looking behind you. Plant the blade vertical in the
water behind you and pull the blade forward. When you reach your hip rotate the
blade, turning your grip hand away from you, and switch power faces and
continue to push the paddle forward possibly adding a reverse J to the end of the
stroke.
Related Strokes
Reverse, check
Cross bow draw (Cross bow cut, cross running draw)
Purpose
Turn the canoe away from paddling side.
Execution
This is a static cross stroke. A dynamic cross bow stroke is also possible.
Without changing hands move the paddle over the canoe to the non-paddling side.
Plant the blade in the water; this is one of the few static strokes that is not sliced
in from the back, with as little pitch as possible. Open the pitch slowly toward the
bow of the canoe. Like other static draw strokes there is a continuum from a cut,
where the shaft is quite angled forward, to a draw where the paddle is as
perpendicular to the water surface as possible.
Common problems
Reaching across the canoe with an incorrect pitch on the paddle producing a cross
bow pry.
Related Strokes
Draw, bow rudder, Standing draw, cross bow cut, pry, bow jam
Note
This can be a difficult stroke to execute in when solo paddling in a tandem canoe.
When doing a cross bow cut (paddle is angled 10-12 degrees out from canoe),
with the blade forward, the grip hand is braced against the paddling side of your
chest and if you stick your thumb out it will be pointing up.

March 22, 2017 42
Draw
Purpose
Moving the canoe sideways
Execution
This is a dynamic stroke with the paddle blade planted parallel to the length of the
canoe about a straight arm distance out from the canoe with the shoulders rotated
out of the canoe somewhat. The blade is drawn to near the side of the canoe.
Recovery may be one of two forms: 1. in water recovery where the blade is turned
perpendicular to the line of the canoe (grip thumb points out) and slices back to
the starting point. 2. out of water recovery where the paddle slices backward and
out of the water.
Common problems
Stopping the draw too late and having the paddle trapped against the side of the
canoe. Angle or pitch on the blade or the draw so the pull is not directly sideways
(or in the direction you want to go). Poor recovery so the recovery portion moves
the canoe.
Related strokes
Standing draw, pry, standing pry, bow rudder
Forward sweep
Purpose
Turn the canoe away from the paddling side.
Execution
The travel travels in a broad arch around the pivot point from the bow end to the
stern end of the canoe. The initiation is done pushing away from the canoe and
continues in an arc until the follow-through pulls into the back of the canoe.
Sweeps may be done as a full arc or any portion of the arc as required.
Related Strokes
Reverse sweep, forward stroke, pry, standing pry
Forward stroke
Purpose
Move the canoe forward or in gradual turn away from paddling side. This is one
of the ‘basic’ canoeing strokes.
Execution
Plant the blade in the water next to the canoe just in front of your knees; keep the
grip hand outside of the canoe, near and about chin level. Draw the shaft hand
backward and push out with your grip hand while ‘unwinding’ your torso.
Throughout the stoke keep the paddle more or less perpendicular to the water
surface.
Common problems
The two most common problems encountered with this stroke are: 1. not keeping
the paddle perpendicular in the water (basically doing a sweep), and 2. digging
water up a the end of the stroke. This second problem is usually caused by trying
to make the stroke too long.
Related Strokes

March 22, 2017 43
J, forward sweep, Canadian, Punch, Indian
High brace (alternative Righting pry)
Purpose
Stop the canoe from tipping away from the paddling side – gab and pull.
Execution
The plant is similar to a running draw except the hip flick and pull on the paddle
is to provide stable surface for the paddler.
Common problems
Incorrect pitch on the blade causes it to submerge. Not enough pull or support on
the blade. Planting too high and too far out of the canoe.
Related Strokes
Standing draw, righting pry, low brace
Note
If not done correctly, usually too high outside of the paddlers ‘box’, you can
damage your shoulder muscles. Paddlers should be encouraged to use a righting
pry to avoid this problem.
Indian (Silent or Rolling)
Purpose
The Indian stroke is used for moving the canoe forward while correcting for any
off side turn. It may also be used for turning the canoe toward or away from the
paddling side.
Execution
This stroke is similar to the Canadian stroke except the recovery remains in the
water and the power face is switch by rolling the paddle forward near the end of
the recovery.
Common problems
Similar to the Canadian a recovery that is pitched too much or in the wrong
direction will turn the canoe. Generally the recovery portion of this stroke is
deeper with the paddle more vertical. This is a short paddling stroke, one of the
most common problems (along with other related strokes) is making the power
phase too long.
Related Strokes
Canadian, C, J, Northwoods
Note
This is a stroke that allows finesse and control – it is not a power stroke.
J stroke
Purpose
The J stroke is used for moving a canoe forward maintain a straight line
correcting for off side turn, or turning the canoe toward the paddling side.
Execution
The initiation of the stroke is a standard forward stroke. As the paddle passes the
hip the power face is rotated outward and pushed out (or pried off of the
gunwale).

March 22, 2017 44
Common problems
Air “J” this is rotating the paddle with the blade not deep enough in the water so it
is not effective. Not rotating the paddle enough, near the end of the stroke the
thumb on the grip and should be pointed down toward the gunwale.
Related Strokes
Canadian, C, J, Indian, Pitch
Note
When first learning correction strokes it often helps to look at the blade, this
ensures the proper body rotation is being used as well allows you to confirm the
blade stays in the water with a good placement
With most strokes if you hear cavitations, bubbles, splashing, suck, etc.. likely the
stroke is losing significant amount of power and it is not likely doing what you
hope.
Low brace (with hip flick)
Purpose
Prevent or support the canoe from tipping toward the paddling side
Execution
The paddle is extended with the blade parallel over the water with the shaft hand
on top of the shaft and the fingers of the grip hand underneath the grip. Rapidly
pushing down (or slapping) on top of the water with a corresponding pull of the
hips and lower body toward the paddling side to rotate the canoe up.
Common problems
Incorrect pitch on the blade so it sinks or slices into the water. Not doing a ‘hip
flick’ to rotate the canoe upward. This stroke should be quick.
Related Strokes
High brace, surface sweep (low brace turn), sculling low brace
Low brace turn (Surface Sweep)
Purpose
Gradual turn toward the paddling side and/or supporting the canoe to prevent
tipping toward the paddling side.
Execution
This is a static, or partially dynamic, stroke with the canoe moving. Start with the
same hand position as a low brace but slightly behind. Pitch the blade slightly
open towards the front of the canoe and slowly sweep it over the surface and the
canoe will turn to the paddling side.
Common problems
Moving the paddle too quickly.
Related Strokes
Low brace, forward sweep, reverse sweep
Note
This is most often used as a solo stroke
Offside forward
Purpose

March 22, 2017 45
Moving the canoe forward, usually used for initiating forward motion
Execution
This is an off side stroke. To complete the stroke plant the paddle just a head of
your knees with the power face facing backward. The paddle should be basically
perpendicular in the water. Continue to rotate body away from paddling side,
punch grip hand forward. This is a very short stroke. The recovery is in water
slicing the paddle blade forward through the water with the grip thump forward.
Common problems
This is a difficult stroke to complete without winding the torso up through the
stroke.
Related Strokes
Forward stroke
Note
This can be a difficult stroke to execute when paddling solo in a tandem canoe.
See 2x4 Forward Stroke Technique.
One handed pry
Purpose
Used for turning the canoe away from the paddling side.
Execution
Release the grip and shift the shaft hand toward the grip. Let the grip swing out
from the canoe and push the blade and a strong angle under the bow of the canoe
with the blade perpendicular to the surface or with the top slightly pitched into the
canoe.
Common problems
Letting go of the paddle, Poor angle (usually too much) on the blade and lack of
control.
Related Strokes
Bow jam, stationary pry
Note
This is primarily a stroke used for ‘show’ as it is does not have a strong grip on
the paddle and places you in a position with less balance. This is a solo stroke.
Pry (alternative Push away)
Purpose
Used for moving the canoe away from paddling side
Execution
Slice the paddle next to the to the canoe with blade deep and the grip hand thumb
out. The paddle should be perpendicular to the water or slightly under the canoe.
Rotate the blade so it is parallel to the length of the canoe with the grip hand
thumb backward.. Brace the shaft against the gunwale and pull the grip into the
canoe. Rotate the paddle blade back and slice into the canoe – repeat. This is a
short stroke and very powerful stroke. Alternatively you can use a push away
without prying off of the gunwale – the stroke is longer but not nearly as strong.
Common problems

March 22, 2017 46
Getting thumb or fingers caught between the shaft and the gunwale. Choke up on
the paddle shaft to get more leverage.
Related strokes
Bow jam, standing pry, forward sweep
Punch
Purpose
The Punch stroke is used for moving a canoe forward maintain a straight line
correcting for off side turn, or turning the canoe toward the paddling side.
Execution
Described by Becky Mason as "the traditional stroke", involves a quick punch
down toward the gunwale with the grip hand, at the same time twisting the torso
outward, and parallel to the shaft. The grip hand remains in front of the face area.
The blade passes nearly underneath the canoe. The out of water recovery is
followed by a cut starting behind the hip line, which initiates the next stroke. The
stroke appears to defy all the laws of physics we were ever taught but it really
works. The effect is a huge amount of forward power, with very little effort. “Did
you feel the way the paddle is really working like a fulcrum there, punching you
forward?" Punchy, as opposed to 15 feet long and slow.
Common problems
See Canadian and J.
Related Strokes
Canadian, Forward, J
Reverse J
Purpose
The reverse J is used for moving the canoe backward while maintaining a straight
line, or for turning the canoe toward the paddling side.
Execution
Start with a reverse stroke or compound reverse stroke. As the paddle passes
between the hip and knees the blade starts to rotate out, turning the grip hand so
the thumb turns toward your body and drops to your armpit.
Common problems
Not enough rotation or the blade of the paddle is not perpendicular to the surface
of the water.
Related Strokes
J, Reverse, reverse sweep
Reverse sweep
Purpose
Turn the canoe toward the paddling side.
Execution
Starting next to the canoe behind you push out and away from the canoe follow
through in a broad arch until you are pulling in toward the canoe to complete the
arc.
Common problems

March 22, 2017 47
Not providing enough of an arch, initiation does not push out, follow-through
does not pull in.
Related Strokes
Reverse, Standing draw, bow rudder
Reverse stroke
Purpose
Move the canoe backward and/or turn the canoe away from the paddling side
moving backward.
Execution
Slice the paddle in toward the canoe with the blade perpendicular to the line of the
canoe. Push forward with the shaft hand starting with your torso rotated to the
paddling side and shaft elbow bent. Pull back and up on the grip hand at the same
time. This is the reverse motion of the “Punch” stroke.
Common problems
Pitch on the blade; letting the blade drift out from the canoe (Paddle should be
perpendicular in the water with the blade deep or under the canoe).
Related Strokes
Check, forward stroke, compound reverse stroke
Righting pry (see high brace)
Purpose
Used to stop the canoe from tipping away from the paddling side.
Execution
This is the basically the same as the pry stroke except instead of starting as deep
under the canoe the blade starts a little further out and the grip hand is pulled
further into the canoe and down putting significant force on the gunwale as the
blade pushes water up.
Common problems
Starting too deep in the water and not applying enough force downward on the
gunwale, not executing the stroke quickly.
Related Strokes
Pry, high brace
Sculling draw
Purpose
Used for moving the canoe toward the paddling side
Execution
The paddle moves straight through the water parallel to longitudinal line of the
canoe. The blade is pitched open in the direction of the movement drawing the
canoe toward the paddle. When executing this stroke choke up on the paddle and
plant the blade deep. The scull should be done deep allowing for the greatest
movement of the blade with minimal amount of grip/shaft movement.
Common problems
Too much or too little pitch on the blade. Letting the paddle arc through the
stroke rather than moving backward and forward.
March 22, 2017 48
Related Strokes
Draw, sculling pry, pry, sculling low brace
Sculling low brace
Purpose
Used for an ongoing brace or support on the paddling side.
Execution
The paddle is swept back and forth across the top of the water applying downward
pressure. The blade is pitch open, slightly, in the direction of the sweeping
motion..
Common problems
Too much or too little pitch on the blade. The paddle is held too high causing the
brace to become a draw..
Related Strokes
High brace, sculling low brace
Sculling pry
Purpose
Used for moving the canoe away from the paddling side
Execution
Paddle moves straight through the water, parallel to longitudinal line of canoe.
The blade is pitched closed in the direction of the movement. Choke up on the
paddle and place the blade deep, almost under the canoe. Similar to the sculling
draw there should be minimal motion of the paddle above the water surface. This
stroke is used for side displacement but also diagonal lines and pinwheels.
Common problems
Related Strokes
Pry, Push away, Sculling draw, draw.
Standing draw (Running Draw)
Purpose
Used for shifting a moving canoe toward the paddling side.
Execution
This is a static stroke, the canoe must be moving. Plant the paddle with the blade
parallel to the length of the canoe beside your hip with the shaft arm fairly
straight. The grip hand should be out over the water keep the paddle
perpendicular to the water surface. Open a pitch up on the blade toward the front
of the canoe with the ‘V’ pointing toward backward.
Common problems
Opening up the ‘V’ too much slowing and dragging the paddle thought the water.
Planting the blade to far forward or back causing an un-intended turning motion.
Related Strokes
Bow rudder, draw, standing pry, bow jam.
Standing pry (Running Pry)

March 22, 2017 49
Purpose
Used for shifting a moving canoe away from the paddling side
Execution
This is a static stroke, the canoe must be moving. Plant the paddle with the blade
parallel to the length of the canoe beside your hip with the shaft braced against the
gunwale for support. The grip hand should be above the gunwale with the paddle
perpendicular to the water surface. Open a pitch up on the blade toward the back
of the canoe with the ‘V’ pointing toward the front.
Common problems
Opening up the ‘V’ too much slowing and dragging the paddle thought the water.
Planting the blade to far forward, or backward causing un-intended turning
motion.
Related Strokes
Bow jam, pry, push away, standing draw
Stroke Blending – see notes under force/torque. Each of the above strokes has been
provided as a discrete unit for ease of description. When paddling many of these strokes
can be joined together or blended to create combined strokes to meet most situations and
needs.
2 x 4 Forward Stroke Technique
Basically the idea is that by mastering two strokes (onside and offside forward) you can
steer your canoe on any side you want or go straight by playing with the 4 parameters:
boat tilt, stroke length, stroke rate, and shaft angle. This has been described by Andrew
Westwood and has become popular in many teaching circles. Although it is
predominantly identified for moving water with smaller play boats it is a technique that
has been used in lake water environments as well.
March 22, 2017 50
Manoeuvres (Actually Canoeing)
This section of the manual covers a few ways the canoe can moved through the water.
Just as the paddle is used to apply a force to move the canoe you should consider the
same factors when executing a canoe manoeuvre. Consider the forces and torque needed
to move the canoe, and how and where they need to be applied. You will need to locate
the pivot point of the canoe and how the various forces relate to that point throughout a
manoeuvre. Take a look at your body position, will it help or hinder the motion of the
canoe. Review the section on weighting the canoe and how the underwater hull shape
changes.
Corridors and Assessment
When completing any manoeuvre you should consider the corridor and the angle that you
traverse through the corridor. The following are just some terms and thoughts about
those terms.
Corridor
The corridor that a canoe travels during a particular
manoeuvre is the first and most basic assessment
criteria. When you are moving along a straight line, sitting still, or pivoting it is
relatively easy to determine, understand and assess. The corridor is the total
displacement allowed form the ‘normal’ direction of travel, it may be all in one direction
or divided in both directions from the starting point. When executing more complex
manoeuvres it can be more difficult to stay within the correct
corridor. In the line pivot to the right notice the canoe moves
around but the actual line taken by the pivot point is straight.
With line/arc pivots, diagonal or offset lines, running side slips,
and many other manoeuvres it may be helpful to setup multiple
buoys to help keep track of the line you are traveling.
Pitch or Trim
Unwanted pitch is the motion or trim of the canoe from
one end to the other. Canoes that are pitched forward
can be more difficult to control. A very subtle imbalance can be difficult to detect but
cane have significant implications on the way a canoe moves through the water.
PivotPivot
Side Disp.Side Disp.
PitchPitch
CorridorCorridor
March 22, 2017 51
Yaw
Yaw is the rotation around the vertical pivot axis of the
canoe – think of a post going from through the top of
your head and down through the canoe. Problems with yaw may be difficult to spot but
the outcome later in the manoeuvre or routine will be obvious (e.g. outward pointing yaw
in a circle will cause the canoe to spiral out or form a oblong circle with square corners).
It is especially noticeable in connected circles where poor control in the first circle can
completely mess up the second. The amount of unintentional yaw, like the displacement
in a corridor, can be in either or both directions.
Roll
This is the unintentional rocking of your canoe side to side. In most
solo canoeing there should be little unintended roll of the canoe when
executing manoeuvres. Intentionally changing the heel of the canoe is
acceptable.
Combined Corridor and Yaw
During any manoeuvre you must keep track of all of the criteria – the combination of
both corridor and yaw are the most difficult to envision and monitor especially when
scribing an arc or traversing a diagonal or offset line. Remember that an error or out of
line portion of a manoeuvre may not be obvious until something else is really out later in
the routine.
Forward Line (50m, 1m)
Forward straight line 50m in length starting from a stationary position then stopping
smoothly just short of the shore or dock. Watch for small sideways motion or ‘crabbing’
along the line. Setup two posts in line with each other about 2m apart, keeping these
posts inline will help keep you going in a straight line. If you are having trouble going in
a straight line try using less heel and moving back, a little, in the boat. The other
common problem is the paddle is not vertical in the water.
Reverse Line (25m, 1m)
The reverse straight line starts from a stationary position the stopping smoothly 25m out
into the lake. I suggest using a 50m marker so both the forward and reverse lines along
with a controlled stop can be done as one group of manoeuvres. The most common
Arc/CircleArc/Circle
TurnTurn
YawYaw
RollRoll
March 22, 2017 52
problem is a poorly executed reverse J stroke either with the paddle angled (not vertical)
in the water or the J not controlling the canoe (either over correcting or under correcting).
When trying to correct an onside turn use an reverse stroke ending with a draw to the
bow instead of a back sweep – it is more effective. Moving right to the middle of the
canoe and paddling without heel on the canoe will help. Reverse lines are tricky from a
traditional solo position since the stern is somewhat heavy and it becomes like driving a
shopping cart backward.
Controlled stop
A controlled stop means stopping the canoe with minimal side displacement or yaw.
This is an important part of the forward/reverse lines, and turns (stop landings). Patience
is the key to any controlled stops – start the stop far from the pivot point of the canoe and
kill any momentum in the canoe before bring the paddle to your hip.
Stopping from forward motion is often easier if you use less heel and move back in the
boat. Start with a standard reverse stroke but the paddle is initially placed flat on the top
of the water with the palm on top of the grip. Tap the side of the canoe with the blade to
ensure it is close to the canoe. Pitch the blade slightly (10° or less) opened toward the
canoe. Press down the blade slowly dragging the blade under the canoe, the grip hand
must be outside the canoe. One the momentum is gone you can either pull the paddle
forward or slice it forward to your hip and execute a small (very small) reverse J to
control any yaw.
Alternatively you can start the controlled forward stop with a compound reverse stroke.
Because most of us cannot twist far enough around to initiate the stroke behind us there is
some angle (like above) to the blade to help keep the canoe going in a straight line.
Stopping from a reverse line is done by initiating a forward stroke fairly far in front of the
paddler and digging deep. Ensure the paddle is at least vertical or angled slightly under
the canoe. As with the forward stop patience is the key killing most forward momentum
before pulling the paddle to yourself.
Pivots (360°)
Pivots must be done in both directions with the pivot point, individual,
within a fairly narrow corridor (1m). The Paddle Canada course manual
suggests using sweeps to execute pivots, unfortunately with sweeps it can be
very difficult to complete a clean pivot with a sweep stroke. I suggest using
a box or modified box stroke. At Pioneer camp, if the water is deep enough
the space between the docks is just a bit longer than a canoe length and
offers an excellent, but unforgiving, place to practice pivots.
Circles (inside/outside) &
Connected Circles or Figure 8 (2 canoe length diameter)
Circles and connected circles have been included in the same section here as the only
difference, although it is important, is the transition between both circles in the connected
circle.
PivotPivot

March 22, 2017 53
Although it seems counter intuitive to the discussion on the weighting the canoe you get
the more control over the circles by shifting your weight forward for inside circles and
backward with less heel for outside circles. The reason for this opposite weighting is not
to assist with turn but to control the rate of the turn. The weight shift only has to be
subtle, moving from a low kneel to a high kneel for inside circles for example.
Turns (under power – turn 90° and continue)
Turning the canoe, either inside or outside and then continuing.
Outside – sweep, edge & hold, adding a jam or cross running draw (cut) can speed the
turn but with less control then paddle out of turn.
Inside – strong J, edge & hold, forward running draw (cut), paddle out of turn
Weight turns (controlled)
See the discussion under weighting the canoe earlier in this manual. The important thing
to note is a weight turn that is initiated, with the canoe evenly trimmed and edged, will
continue to turn in the initiated direction due to momentum irrespective of the apparent
hull ‘shape’. Weight turns are usually done for show in lake conditions but they do have
a practical purpose. By understanding the existing momentum in the canoe and how the
hull shape can change the movement of the canoe you can become a better safer paddler.
An understanding how the canoe moves will help in waves when your canoe may start to
surf or if you start to paddle in moving water.
5m
Inside(move weight forward)
Outside(move weight back)
Draw
Short J
(almost
push-away)
START/
STOP
External
Reference
Exit
Entrance
5m
Inside(move weight forward)
Outside(move weight back)
Draw
Short J
(almost
push-away)
START/
STOP
External
Reference
Exit
Entrance

March 22, 2017 54
Turns (landings – 90° and stop within 1m of dock)
Turning the canoe, either inside or outside then stopping
within 1m square off of dock or shore line. The critical part
about this is not making the actual turn but stopping the
inertia of the turning canoe; stopping any over rotation, side
displacement, or forward motion.
• Outside – sweep & edge, add jam or cross draw,
stop edge, back paddle and pry. Alternative –
sweep, edge, running back draw, stop edge, pry/back
paddle.
• Inside – back sweep & edge, back paddle, stop edge,
draw.
Side Displacement (8m, 50cm)
May be done with draw and/or pry/push away but there is
much more control using a sculling draw/pry. Constant
speed is required. At the advanced level side displacement
must include going around a dock or other object with ~3m
along each side.
Running side slip (1-2m, 4m)
Reduce amount of heel for either direction, heeling away from the direction of movement
is the most efficient but may not be possible.
On side – running draw planted beside or slightly behind, open, dynamic draw with
rotation into forward stroke, continue forward with J. Optimum heel is to the off side but
this can be difficult in a tandem boat.
Off side – initiate slight turn off side (outside), plant running pry just back of the pivot
point (typically just in front of hip/knees). Slide pry forward if necessary. Dynamic
push/forward stroke if necessary, continue to paddle forward with strong J to stop turning
action.
Course in Wind and Waves (100m, 4m)
This is not a particular manoeuvre but the ability to paddle in wind and waves is an
important skill when paddling in open water (lakes). An understanding of how canoes
Side DisplacementSide Displacement
Running Side
Slip
Running Side
Slip
Inside
Stop Turn
Inside
Stop Turn

March 22, 2017 55
can be weighted paddling in different wind conditions (for example Headwind: bow
heavy paddle on windward; Tailwind: stern heavy paddle on downwind side). Paddling
in the wind should include dealing with waves (see wind & waves section in this manual)
in simple terms the weight should be centred. A 100m (30x30x30m) course within 4m
corridor must be paddled in moderate wind conditions – at least 10km/hr. You must have
confidence while paddling in winds and waves, effectively be able to control the canoe in
varying conditions, and have an understanding of how those conditions alter the canoe’s
performance
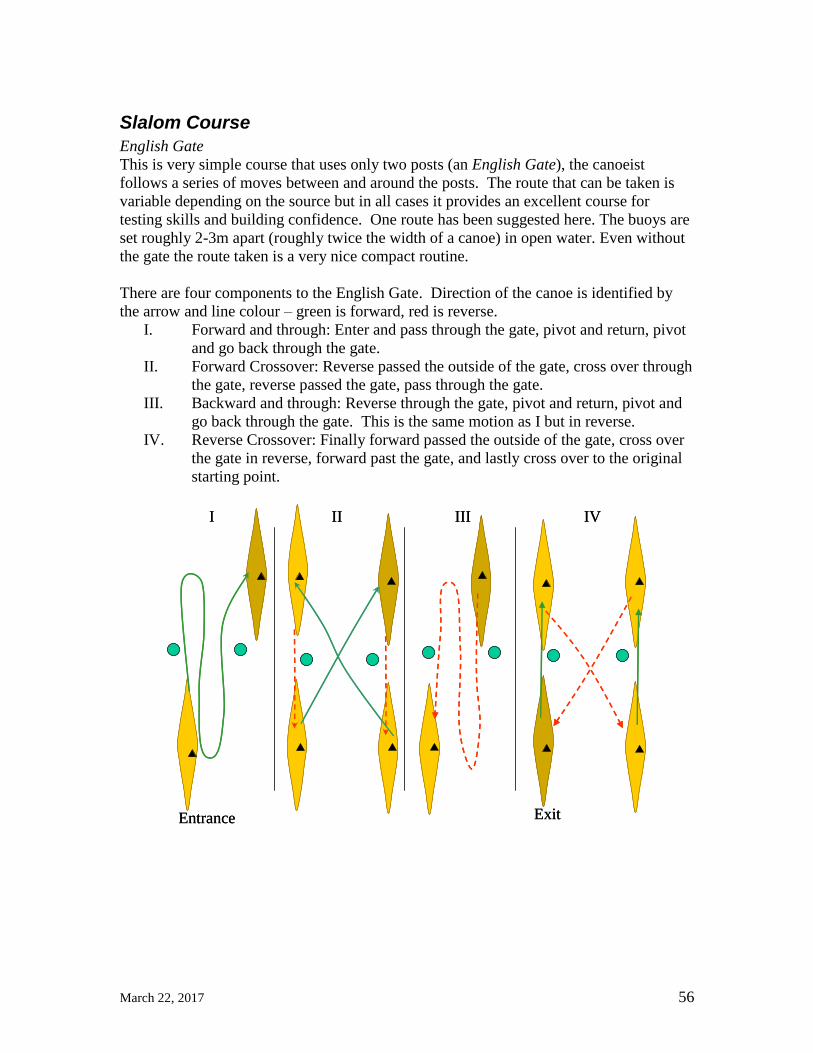
March 22, 2017 56
Slalom Course
English Gate
This is very simple course that uses only two posts (an English Gate), the canoeist
follows a series of moves between and around the posts. The route that can be taken is
variable depending on the source but in all cases it provides an excellent course for
testing skills and building confidence. One route has been suggested here. The buoys are
set roughly 2-3m apart (roughly twice the width of a canoe) in open water. Even without
the gate the route taken is a very nice compact routine.
There are four components to the English Gate. Direction of the canoe is identified by
the arrow and line colour – green is forward, red is reverse.
I. Forward and through: Enter and pass through the gate, pivot and return, pivot
and go back through the gate.
II. Forward Crossover: Reverse passed the outside of the gate, cross over through
the gate, reverse passed the gate, pass through the gate.
III. Backward and through: Reverse through the gate, pivot and return, pivot and
go back through the gate. This is the same motion as I but in reverse.
IV. Reverse Crossover: Finally forward passed the outside of the gate, cross over
the gate in reverse, forward past the gate, and lastly cross over to the original
starting point.
I II III IV
Entrance Exit
I II III IV
Entrance Exit
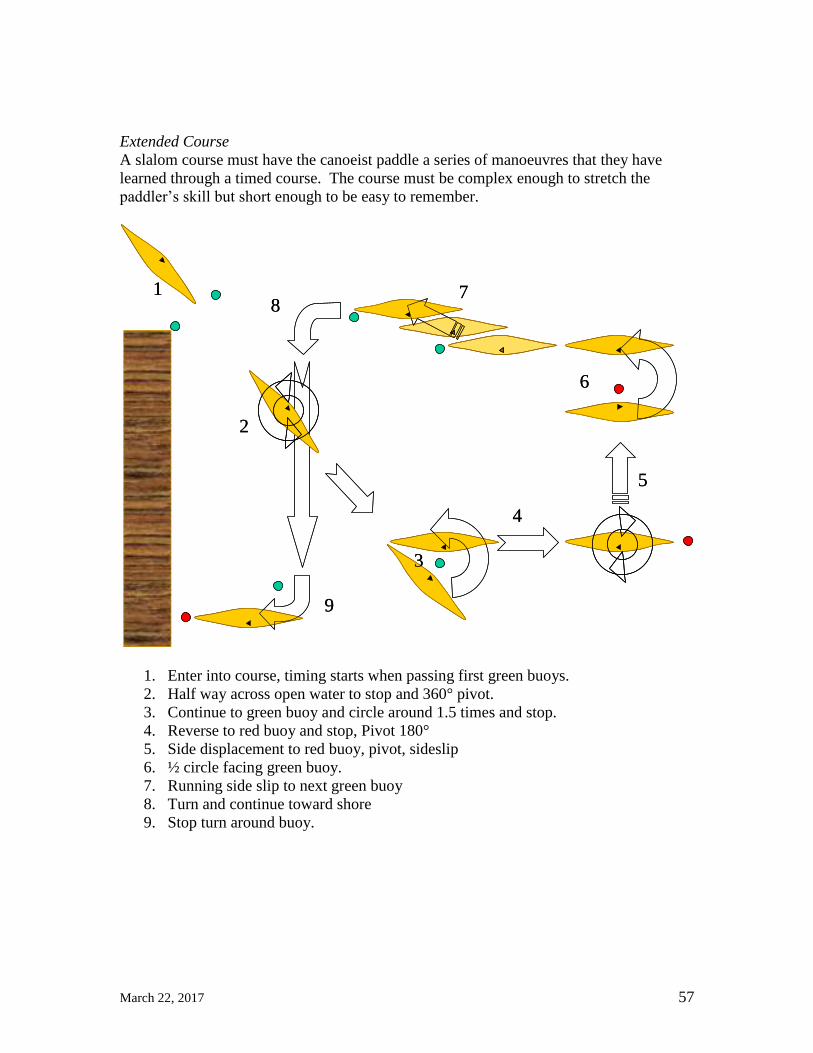
March 22, 2017 57
Extended Course
A slalom course must have the canoeist paddle a series of manoeuvres that they have
learned through a timed course. The course must be complex enough to stretch the
paddler’s skill but short enough to be easy to remember.
1. Enter into course, timing starts when passing first green buoys.
2. Half way across open water to stop and 360° pivot.
3. Continue to green buoy and circle around 1.5 times and stop.
4. Reverse to red buoy and stop, Pivot 180°
5. Side displacement to red buoy, pivot, sideslip
6. ½ circle facing green buoy.
7. Running side slip to next green buoy
8. Turn and continue toward shore
9. Stop turn around buoy.
1
2
3
4
5
6
78
9
1
2
3
4
5
6
78
9

March 22, 2017 58
Musculoskeletal Injuries
Canoeing may seem like a fun, benign sport, but many people are injured during both
recreational and competitive canoeing events each year. There are a number of both
acute and chronic injuries that can occur. You should be aware of these injuries and use
properly paddling techniques to minimize your injury risk.
Although this section focuses on musculoskeletal injuries (muscle, tendon, and skeletal)
injuries during outdoor pursuits also include sun burn, cold injuries, heat stress,
infections, drowning and dehydration. Smaller injuries such as blisters, bruises, and
abrasions should not be ignored since they can lead to problems just as debilitation as a
broken bone.
Pre-Paddle Warm-up
It is critical when paddling, as it is with any sport, to warm up prior to the activity to
avoid injury. You should incorporate exercises and stretches into your paddling and
teaching routine. Contrary to what many people think, the upper body does not do all the
work when paddling – power mostly comes from torso rotation and leg pressure. Make
certain your pre-paddle warm-up works out the entire body. This will make paddling
skills more efficient and will help lessen the chances of getting sprains, back pain, and
injuries. Stretching is a touchy topic but it is generally recognized that stretching before a
workout does not necessarily improve or prevent injuries. Warming up first is the key to
ensure that there is good blood flow and oxygen getting to your muscles. Stretching after
activity when muscles are warm and pliable or even better as an independent workout is
more effective.
How to Warm Up before Paddling
o Try running and cycling. Quads are also used in paddling strokes and rotation of
the upper body so make sure to work out those muscles. Running and cycling are
good, especially for quads; they help in toning muscles, improving strength and
endurance.
o Try jumping jacks or running in place on the shore. Warm-up by elevating your
heart rate and breathing before stepping into the kayak.
o Do push-ups. Push-ups are considered by many seasoned kayakers as the best
way of improving shoulder strength and stability.
o Do some yoga – Paddle Your Own Canoe by Gary and Joanie McGuffin has a
chapter devoted to using yoga like poses to help the warm-up process. The
American Canoe Association Canoeing has an excellent chapter on stretching
specifically for canoeing – including a section on stretching in the boat.
.

March 22, 2017 59
Injuries
Most of the injuries experienced by paddlers are as
a result of poor technique and/or over use. Being
aware of the source and location of injury will help
you avoid problems. Unfortunately there is very
little information on injuries within the recreational
paddling community – most studies focus on
professional or armature competitive activities.
There has been a suggestion by Kyriacos
Eleftheriou (Sports Injury Bulletin) that acute
injuries are much more common in the general
canoeing population possibly due to higher
experience and safety requirements for competitive
athletes.
Overuse or repetitive strain injuries are
common in paddlers where the strain
from the catch is concentrated on the
shoulder, elbow, wrist and lower back.
o Shoulder – The repetitive nature
and forces required to pull the
canoe through the water can cause
both chronic (repetitive strain) as
well as acute injuries (dislocation
and rotator cuff injuries). In both
cases paddling within the
“Paddler’s Box” will minimize the
potential for injury. The repetitive
motion of paddling can cause the tendons to become irritated, weakened, and
inflamed. As a result, the shoulder becomes stiff, weak, and sore. It may also be
difficult to raise the arm above head or lay directly on the affected shoulder
during sleep. If there is a strong ‘jerk’ or pull on the shoulder the muscles and
tendons may tear causing a mild to severe strain.
Vulnerable positions occur when the upper limb is out straight with the hand
above the elbow and the elbow above the height of the shoulder joint. Reaching
up and back is even worse. As paddlers we often get into these vulnerable
positions when performing high braces and sweep strokes.
o Wrist & Elbow – The repetitive motion of moving the paddle can, over time,
lead to overuse injuries of the wrist (carpal tunnel syndrome), forearm
(tenosynovitis) and elbow (lateral epicondylalgia). The injury is typified by numb
or tingling in fingers and/or pain in the wrists, forearm, and elbow.
Table 1: Frequency of injuries
sustained by professional white-
water paddlers
Type of Injury Freq.
Sprains 32%
Tendonitis 20%
Chronic muscular pain 14%
Simple bruises 9%
Infections 8%
Dislocations 3%
Lacerations 2% Kyriacos Eleftheriou, Canoeing injuries &
kayaking injuries, Sports Injury Bulletin.
Musculoskeletal Injury 181 (61.8%)
Shoulder 116 (39.6%)
Back 76 (25.9%)
Wrist/Hand 29 (9.9%)
Elbow 27 (9.2%)
Neck 26 (8.9%)
Leg 16 (5.5%)
Arm 15 (5.1%)
Knee 11 (3.8%)
Ankle 8 (2.7%)
Groin 2 (0.7%) Amanda Haley, and Andrew Nichols, Hawaii Med J. 2009 Aug; 68(7):
162–165 https://www.ncbi.nlm.nih.gov/pmc/articles/PMC2769922/
March 22, 2017 60
The wrist extensor injury (tenosynovitis) in paddlers has been compared with the
tendonitis found in weight lifters who do frequent curls. The injury presents with
forearm pain, which can be elicited by repeated wrist extension performed with a
closed fist.
o Back (lower) – Due to shearing force from paddling on one side lower back pain
is common in canoe paddlers. In one study 15-25% of competitive canoeists
reported lower back pain, the highest incidence being among the Canadian canoe
style group (Kameyama O, Shibano K, Kawakita H, Ogawa R, Kumamoto M.
Medical check of competitive canoeists. J Orthop Sci 1999;4- 4:243-9). In the
same study more than half of the canoeists complained of some kind of back
problem. Mainly this was caused by muscular or ligamentous strain, but
spondylolysis (stress fracture in one of the vertebrae) was seen and prolapsed
discs were also noted. Moving equipment and portaging also leads to significant
stress on the lower back with the same kind of injuries that may be found in
weight lifters.
o Knee – Most canoeists will kneel at times when conditions are rough or when
paddling with inexperienced paddlers. This position provides greater stability and
control over the canoe but it puts pressure on the knee joints. A condition known
as Canoeist’s Knee (prepatella bursitis or housemaid’s knee) is fairly common and
presents as localized pain and swelling at the front of the knee, which is generally
more painful when you press on it, or kneel on it. This condition is an
inflammation of the prepatella bursa which sits in front of the kneecap (patella)
and reduces friction between the patella and the skin.. Bursitis simply means
inflammation of a bursa.
Primary Causes of Injury
o Inexperience – beginners may be more prone to injury because they do not have
the skills or technique to meet the demands of the sport. For example, canoes or
kayaks are tricky to steer and can tip over.
o Poor technique – holding or moving the body incorrectly can put unnecessary
strain on joints, muscles and ligaments.
o Choosing an inappropriate waterway – accidents and injuries are more likely to
happen if you attempt to canoe or kayak in a waterway that is beyond your skill
level or for which you are ill-equipped.
o Overtraining – training too much and too often can lead to a wide range of
overuse injuries, particularly those of the wrist and shoulder.
Injury Avoidance
When paddling keeping your arms and hands within the “Paddlers Box” – inline and
below the line of your shoulders. This means when paddling, especially backward, that
you should not reach behind you but rotate your torso to catch behind you paddling
position.
March 22, 2017 61
Maintain good posture. Sit in a slouched position and try to lift your arms up above your
head. Now do the same with your back in an upright position, feel how much freer the
arm movement is when the back is in a good position. If sitting slouched and lifting your
arms you can feel the shoulder getting rammed into its socket. Now just imagine paddling
for hours sitting in a poor position with the shoulder getting jammed on every stroke and
it becomes easy to see how an injury will quickly become established.
The shoulder is at its most vulnerable if the arm is taken backwards above shoulder level.
Avoid this position. The high brace is a high risk stroke for the shoulder if not performed
correctly. Even if dislocation does not occur rotator cuff muscles can be strained in this
position or a nerve damaged.
One of the most common mistakes that a paddler makes is keeping a overly strong grip
on the paddle, especially on the shaft. This can cause ‘cold fingers’ and sore wrists.
When paddling loosen your grip on the paddle; provide more power though torso
rotation. Think of opening your fingers on recovery of the non-power portion of stroke.
Repetitive strain in the shoulder, wrist and back can be caused by the ‘shock’ from the
catch when using a paddle with a large stiff blade. Switching to a smaller or narrower
blade will relieve some of the pressure.
Although most canoeists have a dominant side where they prefer to paddle it is important
to balance skills and strength – paddle on both sides. It is essential in addition to simple
stretching exercises and conditioning, that particular attention is given to balanced
shoulder development and back. This does not mean that you should get into the habit of
switching sides whenever there are issues but to practice on both sides and keep you
muscle strength balanced. The US Canoe and Kayak Federation also suggests backwards
paddling as an effective training technique, with warm-up and cool-down regimens
including up to 10 minutes of back paddling. If you do paddle backwards make sure you
have an appropriate torso rotation to stay within the Paddling Box.
When moving a canoe or other heavy paddling equipment lift the equipment with your
legs rather than your back.
Understanding of forces and torque to move the canoe through the water is important
both for efficiency of paddling but also reducing injury. Understanding bio-mechanical
requirements of both your body and the ways to move the canoe will make you a better
paddler with a lower likelihood of an injury.
Water conditions such as waves and moving water force you to change paddling
technique as well as work harder. Be aware of the conditions and how you are paddling
and the stress that you are experiencing.
Weather conditions such as wind, cold, and heat increased stress. Paddling in strong
wind, waves, and moving water increases the stress on the muscles and joints.

March 22, 2017 62
Avoidance
Skills
Equipm
ent
Avoidance
Skills
Equipm
ent
Make sure that the equipment that you are using is appropriately sized for you and the kin
of paddling that you are doing. When paddling the grip of the blade should not be raised
above your nose when the blade is fully submerged. Make sure you are wearing
appropriate clothing for the conditions.
Finally keep yourself well rested, hydrated, and nourished.
Accident Prevention & Rescues
Avoiding accidents through risk management is the best way to
deal with unforeseen problems, but knowing what to do when
something does happens is then equally important. Finally
ensuring that you have the proper equipment for meeting potential
problems, together this is known as the Safety Triangle. Having
the knowledge of a skill means nothing unless you know how to
implement it – this involves practice. Over the years I have done
hundreds of rescues but only two or three in an actual emergency,
I was very glad that I had practiced when it was actually needed.
One important facet of accident prevention is ensuring that your equipment is going to
work as expected. At least once each season, and then whenever emergency equipment is
used, you should check the condition and for any wear and tear. This
includes pulling out all of your ropes, reviewing first aid kit content,
testing floatation of both your canoe and PFDs, paddle condition,
bailer (both existence and condition), etc…
Paddling solo does not mean going alone.
Risk Management
Management and understanding of risks is important. There are
sections in this manual already about weather (wind and waves),
paddling skills, required safety equipment, first aid skills, navigation
skills, etc… Starting out with a good base in these areas already
takes you down the road to limiting the risks. Having a realistic
understanding of your own skills and of those around you is also
critical. You should acknowledge that a healthy growth process
involves taking risks and that we should not shy away from facing
these risks. The goal does not need to eliminate all forms of risk, but
to understand risk and minimize the potential for injury.
When planning an outing think about managing and understanding
the risks. This process should be considered prior to any outing as
well as reviewed during the outing so you are prepared for any
emergency situations that could arise. Consider these four elements
as you plan your activity, course, or trip: People, Resources,
Environment and Administrative.

March 22, 2017 63
One of your roles as a leader will be to differentiate between “perceived risks” and
“actual risks”. Often, “perceived risks” are welcome as catalysts for growth and learning,
while “actual risks” have the potential to do harm or injure the participant.
Activity Perceived Risk Opportunity for growth
Paddling in the rain Getting wet and cold,
hypothermia
Realizing that rain is not
dangerous, preparing for adverse
conditions
Tipping the Canoe Drowning, losing gear Familiarized with falling out of a
canoe and learning how to get
back in
Paddling in mild wind and
waves
Drowning, getting
swept away
Paddling endurance, control of
the canoe
Sometimes the line between “perceived and “actual” risk can be blurred. It should go
without saying that you should always move to the side of caution. Also, given the right
circumstances and conditions, a “perceived risk” can quickly turn into an “actual risk”.
Your role as leader is to recognize the difference and the potential transition of perceived
risks and to mitigate the potential of injury from actual risks. Often, actual risks arise
with varying environmental conditions.
Activity Environmental
Factor
Actual Risk Steps Taken to Mitigate Risk
Paddling in the
rain
Cold
temperatures
Hypothermia Ensure participants have good
rain gear and insulating layers.
Carry a dry bag with extra
clothes
Tipping the Canoe Cold water
temperatures
Hypothermia Safe canoeing techniques are
taught by instructor
Students should be familiar
with the effects of cold water
emersion
Paddling in mild
wind and waves
The wind picks
up
Separation
from the group
Lead and sweep canoes are
utilized. The group does not
paddle in conditions that may
be beyond the ability of the
paddlers to negotiate
There are many risks both in the water and on land that you should be aware of as the
leader. Be sure to anticipate them and plan accordingly. It might even be a good idea to
list the risks and how you plan to address them in your trip plan.
A few considerations when you are thinking about heading out on a day trip: Wear a
lifejacket or PFD, File a plan, Be honest, Know the water, Go in a group, Carry proper
equipment, Carry first aid and get training, Don’t overload, Balance your boat (stay low
stay steady), Stay out of flood waters, Stay out of cold water, Stay warm (Hypothermia),
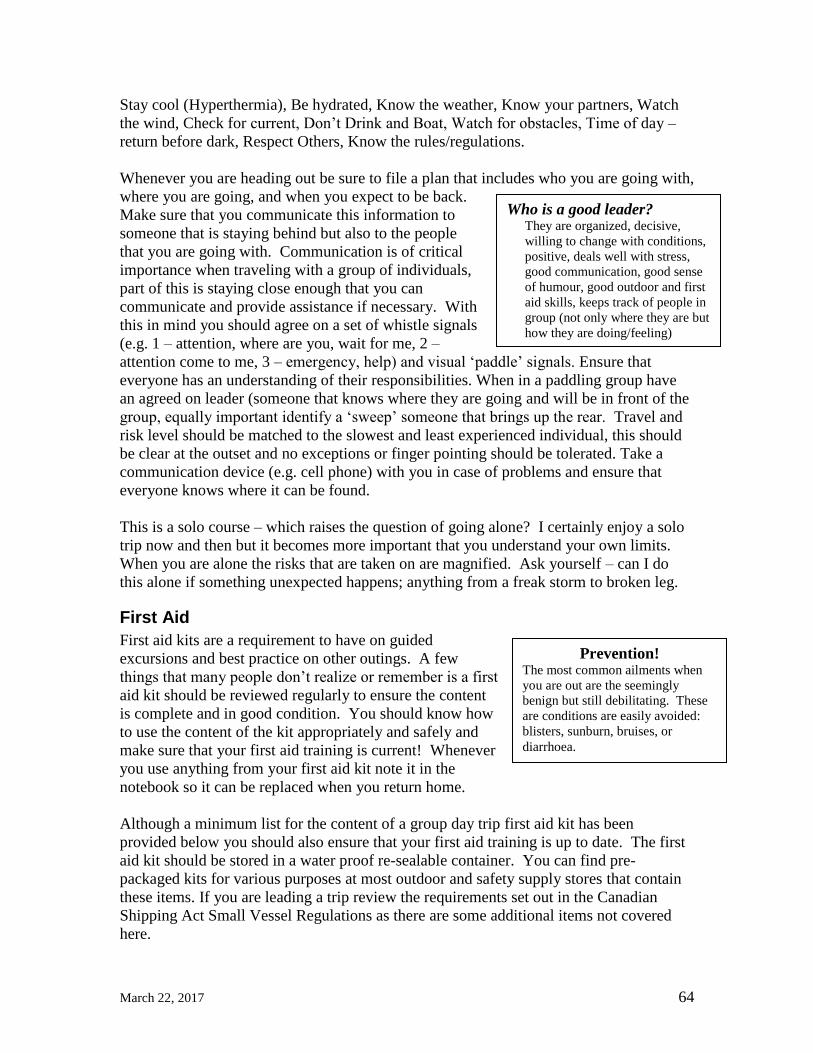
March 22, 2017 64
Stay cool (Hyperthermia), Be hydrated, Know the weather, Know your partners, Watch
the wind, Check for current, Don’t Drink and Boat, Watch for obstacles, Time of day –
return before dark, Respect Others, Know the rules/regulations.
Whenever you are heading out be sure to file a plan that includes who you are going with,
where you are going, and when you expect to be back.
Make sure that you communicate this information to
someone that is staying behind but also to the people
that you are going with. Communication is of critical
importance when traveling with a group of individuals,
part of this is staying close enough that you can
communicate and provide assistance if necessary. With
this in mind you should agree on a set of whistle signals
(e.g. 1 – attention, where are you, wait for me, 2 –
attention come to me, 3 – emergency, help) and visual ‘paddle’ signals. Ensure that
everyone has an understanding of their responsibilities. When in a paddling group have
an agreed on leader (someone that knows where they are going and will be in front of the
group, equally important identify a ‘sweep’ someone that brings up the rear. Travel and
risk level should be matched to the slowest and least experienced individual, this should
be clear at the outset and no exceptions or finger pointing should be tolerated. Take a
communication device (e.g. cell phone) with you in case of problems and ensure that
everyone knows where it can be found.
This is a solo course – which raises the question of going alone? I certainly enjoy a solo
trip now and then but it becomes more important that you understand your own limits.
When you are alone the risks that are taken on are magnified. Ask yourself – can I do
this alone if something unexpected happens; anything from a freak storm to broken leg.
First Aid
First aid kits are a requirement to have on guided
excursions and best practice on other outings. A few
things that many people don’t realize or remember is a first
aid kit should be reviewed regularly to ensure the content
is complete and in good condition. You should know how
to use the content of the kit appropriately and safely and
make sure that your first aid training is current! Whenever
you use anything from your first aid kit note it in the
notebook so it can be replaced when you return home.
Although a minimum list for the content of a group day trip first aid kit has been
provided below you should also ensure that your first aid training is up to date. The first
aid kit should be stored in a water proof re-sealable container. You can find pre-
packaged kits for various purposes at most outdoor and safety supply stores that contain
these items. If you are leading a trip review the requirements set out in the Canadian
Shipping Act Small Vessel Regulations as there are some additional items not covered
here.
Who is a good leader? They are organized, decisive,
willing to change with conditions,
positive, deals well with stress,
good communication, good sense
of humour, good outdoor and first
aid skills, keeps track of people in
group (not only where they are but
how they are doing/feeling)
Prevention! The most common ailments when
you are out are the seemingly
benign but still debilitating. These
are conditions are easily avoided:
blisters, sunburn, bruises, or
diarrhoea.

March 22, 2017 65
I have not included medications (muscle relaxants, stomach and Diarrhoea treatment,
etc…). If you include these items you must ensure that you know how to use them, and
they have not expired. Treatment of other individuals with medications may put you at
some liability. NOTE: Review the requirements set-out in the Small Vessel Regulations
when setting up your first aid kit.
Exposure
There is always a risk of exposure when you are out and about and you should learn to
recognize the symptoms in yourself and others.
Hypothermia
Our normal body temperature is maintained around 37°C, when it starts to fall below
about 35°C you are suffering from hypothermia. Because the water temperatures in
many of the lakes in the Canadian Shield, even in the summer, can be cold watch for
hypothermia whenever there is a capsize. Cool/cold overcast, rainy days are the obvious
times to be concerned but hypothermia can creep up other times as well. Heat loss can
happen through several routes - heat conduction convection, respiration, radiation,
evaporation.
First Aid Kit Suggested Minimum Content
for Small Group Day Trips First Aid Manual
Note book with pencil/patient assessment
form.
Flashlight
Content of kit list
Bandage scissors
Splinter forceps
Assorted safety pins
Resuscitation face shield
Sterile examination gloves (latex free)
Emergency blanket
CPR pocket mask
20cc irrigation syringe
Triangular bandages
Adhesive tape
Stretch and hold wrap
Tensor bandage
Hand sanitizer
Antiseptic wipes
Thermometer
Variety of bandages
Straight
Knuckle
Fingertip
Patch
Wound closure strips
Liquid band aid (spray)
Sterile Gauze dressings
Roll gauze
Non-adherent pads
Gauze pads
Trauma pad
Moleskin & Blister dressing
Tums
Anti-histamine
Re-hydration salts
Water purification (e.g. Aqua-tabs)
Analgesic mediation (non-narcotic)
Vaseline
Sting/bite treatment (e.g. Afterbite)
Antibiotic cream (e.g polysporin)

March 22, 2017 66
Rescue/Examine
Yes No
Responsive?
Shivering?
Yes No
Spontaneous Rewarming(Dry, Insulate, Vapour Barrier, Provide Fuel)
Heat
Optional
Heat
Desirable
Hospital
Respiration?Yes
(Assume
Cardiac Output)
NoVentilate 3 Minues
Pulse?(Check for 60 Seconds)
Yes No
Continue
Ventilation CPR
Heat(If Possible)
Rescue/Examine
Yes No
Responsive?
Shivering?
Yes No
Spontaneous Rewarming(Dry, Insulate, Vapour Barrier, Provide Fuel)
Heat
Optional
Heat
Desirable
Hospital
Respiration?Yes
(Assume
Cardiac Output)
NoVentilate 3 Minues
Pulse?(Check for 60 Seconds)
Yes No
Continue
Ventilation CPR
Heat(If Possible)
Rescue/Examine
Yes No
Responsive?
Shivering?
Yes No
Spontaneous Rewarming(Dry, Insulate, Vapour Barrier, Provide Fuel)
Heat
Optional
Heat
Desirable
Hospital
Respiration?Yes
(Assume
Cardiac Output)
NoVentilate 3 Minues
Pulse?(Check for 60 Seconds)
Yes No
Continue
Ventilation CPR
Heat(If Possible)
Hypothermia Symptoms by Body Temperature
Celsius Fahrenheit Description Symptoms
37 98.6 No hypothermia No hypothermia
Below 35 95 Definition of hypothermia N/A
32 to 35 89.6 to 95 Mild hypothermia
Shivering
Lethargy, apathy, confusion
Rapid heart rate
28 to 32 82.4 to
89.6 Moderate hypothermia
Shivering stops
Increased confusion or delirium
Slowing heart rate; may be come irregular
Below 28 Below 82.4 Severe hypothermia
Coma
Ventricular fibrillation
May appear deceased
20 68 Brain activity stops
After recognizing the signs of hypothermia you must treated it seriously. At the initial
stages the victim should be able to re-warm themselves
by getting them to a warm site, with dry clothing, and
wrapped in a blanket. More serious hypothermia cases
must be evacuated for emergency services. When
moving someone with severe or moderate
hypothermia be gentle as possible since rough
handling or jostling can cause ventricular
fibrillation (abnormal heart rhythms). Keep
the victim horizontal to help maintain blood
pressure and minimize stress on the heart.
Remove wet clothing and blot the person
dry rather than rubbing then wrap
them in dry insulating blankets,
clothing, with a wind/moisture barrier
over top (tarp/vapour barrier). If the
victim is awake and alert give them a
drink with high sugar content (hot
cocoa). If they are moderately or
severely hypothermic, losing
consciousness and aren't able to shiver, apply
external heat sources, if available, to the chest and
armpit areas to aid rewarming.
For more information see: Gordon G. Giesbrecht,
Accidental Hypothermia,
http://www.umanitoba.ca/faculties/kinrec/hlhpri/media/Hypothermia.pdf, or Beyond
Cold Water Boot Camp http://www.beyondcoldwaterbootcamp.com
March 22, 2017 67
Dehydration
Not drinking enough water is probably the number one reason that that people get sick
(nauseous) and have headaches when out on trips. Often dehydration leads to other
complications, especially when it is hot, such as heat exhaustion and heat stroke.
It is especially problematic when the temperature is not very high since people don’t
think about drinking when they are not hot. When you feel thirsty it generally means that
you have waited too long to take a drink. Drink small amounts regularly rather than large
amounts at one time since your body is better able to process and absorb water a bit at a
time. An easy way to tell if you are dehydrated is the colour of your pee. If you
frequently pass clear urine you are doing well, on the other hand if it is a deep yellow
colour with a strong odour then you likely need more fluids. Alcohol and caffeinated
beverages don’t count for re-hydrating!
Hyperthermia
Hyperthermia is a general name given to one of several heat related illnesses including
heat exhaustion, heat cramps, heat stroke. Usually your body can keep your temperature
at about 37°C through sweating but if the temperature is high for long periods or acutely
heat stressed your body may fail to properly regulate its temperature. If someone appears
to be showing the signs or symptoms of any heat related ailment get them out of the sun
(or away from the heat source), provide small amounts of water (as they are often also
dehydrated). In the case of heat stroke seek medical attention, sponge off with cool damp
cloth or shower.
Signs and symptoms of heat related conditions include:
• Heat exhaustion/fatigue: feeling faint, cool wet/clammy skin, weakness,
weakened pulse, lack of co-ordination, giddiness, possibly nauseated.
• Heat cramps: These are painful muscle cramps that are brought on by
overheating.
• Heat stroke: This is a life threatening condition. High body temperature,
hot, dry flushed skin, confusion, delirium, strong rapid pulse.
As with all of the other conditions avoidance is the best practice. Do not overexert
yourself, stay cool, and drink appropriate liquids.
Cleanliness:
Keep your hands clean at least. It is amazing how many people that are fastidious about
washing their hands in the city forget that bacteria and other germs live in the wild as
well - Wash your hands with soap and/or hand sanitizer!
Bee and wasp stings:
Bees, wasps, hornets, yellow jackets all inject venom using a stinger. Bee stingers are
barbed and get stuck on the first sting, the bee usually dies when trying to escape. Wasp
stingers on the other hand come back out allowing wasps to sting multiple times. In both
cases the immediate reaction is to swat the location, unfortunately this often pushes more
venom into the sting. In the case of a bee sting, if you can keep peace of mind, look at

March 22, 2017 68
the location of the sting to see if the stinger is still there and remove it from below the
venom sack by swiping with a fingernail, the edge of a credit card, or knife.
Both bee and wasp stings really hurt and some people will react with a serious allergic
reaction; watch for this. The sting usually produces a burning sensation followed by
redness and swelling that might last some time. Wash the area with soap and water or
use an antiseptic as infections can sometimes occur, place on a cold compress, calamine
lotion, or baking soda plaster. Antihistamine may help reduce swelling and hives if they
appear. If there is the possibility of a serious reaction get medical attention, if the stung
individual knows they have a serious allergy then find out if they require their Epi-Pen
and assist them as necessary.
Avoiding stings is the best practice (the following suggestions are from the US Dept. of
Agriculture & Ontario Health.
• Avoid perfumed soaps, shampoos, and deodorants. Don't wear cologne or
perfume. Avoid bananas and banana-scented toiletries.
• Stay clean as sweat aggravates bees
• Avoid flowers
• Social wasps collect where food (especially sweets or high protein food) is left
out.
• Avoid disturbing likely beehive sites, such as large trees, tree stumps, logs, and
large rocks.
• If a colony is disturbed, run and find cover as soon as possible. Running in a
zigzag pattern may be helpful.
• Never stand still or crawl into a hole or other space with no way out.
• Do not slap at the bees. Swinging or swatting at bees and wasps may cause them
to sting.
• Cover as much of the head and face as possible, without obscuring vision, while
running.
• Once clear of the bees, remove stingers and seek medical care if necessary,
especially if there is a history of allergy to bee venom

March 22, 2017 69
Canoe Rescues
We never really want it to happen but occasionally our canoe will tip over through no
fault of our own; sometimes things just go awry. Just like first aid treatment prevention
is your first order of business don’t go out into situations where you are likely to tip over.
One of the big reasons for not heading out in rough conditions is that doing a rescue will
be very difficult. Along with prevention is knowledge and practice of rescues, the more
you practice both as the rescuer and the victim the better you will get. You might find it
surprising that it is just as important to understand how to be a victim in the water as it is
to be the rescuer.
When approaching a victim in the water talk to them and find out if they are OK, ask if
they need help. Keep communication open and calm, let them know what you are doing
and have them, if possible, involved in the rescue. When doing any kind of canoe rescue
it is important to keep track of where the victims are in the water. Getting whacked by a
canoe or having your fingers crushed between two gunwales is not very much fun. The
other critical point about keeping track of the victims, and having them hold onto the
rescue canoe, is so you don’t blow away. Often a canoe will tip in windy conditions and
at some point both canoes are floating and the victims may still be in the water. The
upright canoes will act as a sail and be blown away.
A major consideration in any rescue is dealing with packs and other baggage. Some
consideration should be made ahead of time with regard to the conditions and rescue
requirements with regard to how equipment is stored in the boat. Unfortunately all of
these techniques involve lifting the canoe in some way and equipment is heavy when
water logged (even if waterproof), it will also catch on the rescuing canoe. It is
important to practice rescues with equipment once you are comfortable with the basic
technique. This of course raises the age-old question about if and how equipment (packs)
should be tied into a canoe. On short lake trips I usually don’t tie packs in, on long hauls
I will run a clipped line through the shoulder straps or grab loops and hook the rope to the
last pack with a carabineer. This will allow the packs to float free but also be easily
disconnected from the swamped canoe. This is a good topic of polite conversation while
sitting around the fire at night.
Canoe over Canoe
The most common technique for pulling a swamped canoe out of the water is to pull the
swamped canoe over top of your upright canoe. With practice it can be quickly even
with larger boats or in rough conditions. There are a number of alternatives that can be
taken at several points in the process – the steps below describe only one technique.
Steps:
• If the water is cold make sure the victim(s) are out of
the water before dealing with the equipment. If the
water is warm then have the victim help you. Ensure
that the victims know where their paddles are and to
hang on to them, or take the paddles and put them in
your canoe.
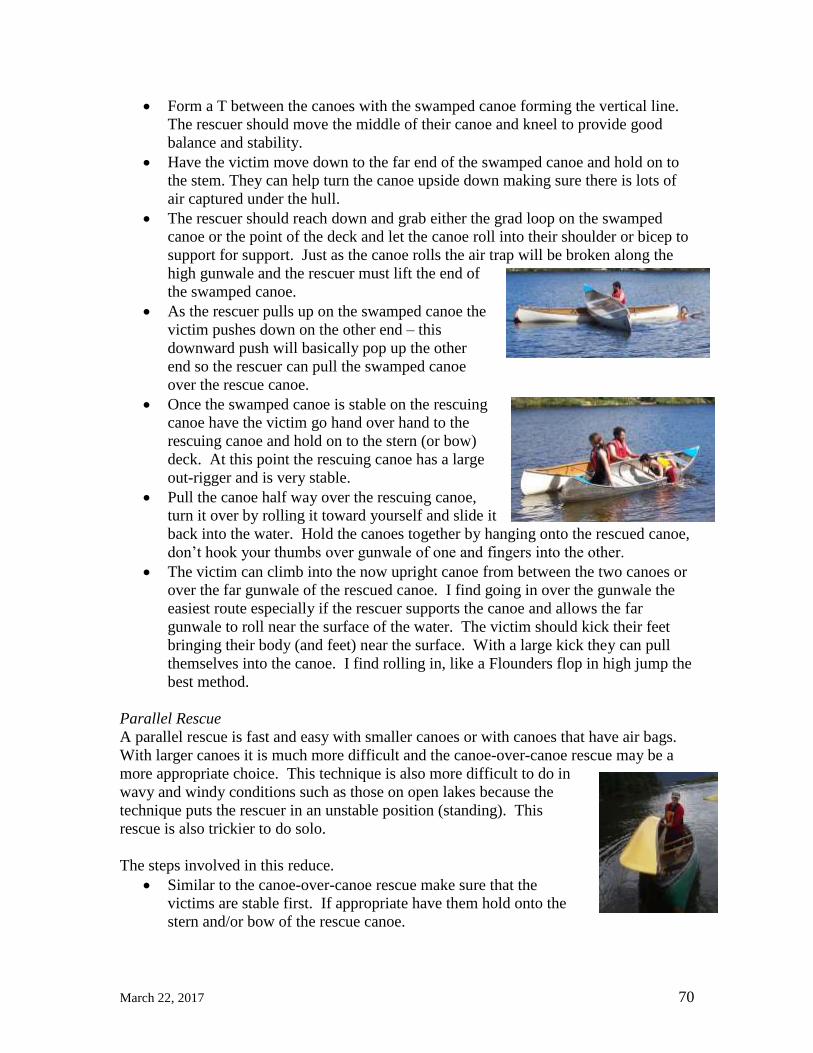
March 22, 2017 70
• Form a T between the canoes with the swamped canoe forming the vertical line.
The rescuer should move the middle of their canoe and kneel to provide good
balance and stability.
• Have the victim move down to the far end of the swamped canoe and hold on to
the stem. They can help turn the canoe upside down making sure there is lots of
air captured under the hull.
• The rescuer should reach down and grab either the grad loop on the swamped
canoe or the point of the deck and let the canoe roll into their shoulder or bicep to
support for support. Just as the canoe rolls the air trap will be broken along the
high gunwale and the rescuer must lift the end of
the swamped canoe.
• As the rescuer pulls up on the swamped canoe the
victim pushes down on the other end – this
downward push will basically pop up the other
end so the rescuer can pull the swamped canoe
over the rescue canoe.
• Once the swamped canoe is stable on the rescuing
canoe have the victim go hand over hand to the
rescuing canoe and hold on to the stern (or bow)
deck. At this point the rescuing canoe has a large
out-rigger and is very stable.
• Pull the canoe half way over the rescuing canoe,
turn it over by rolling it toward yourself and slide it
back into the water. Hold the canoes together by hanging onto the rescued canoe,
don’t hook your thumbs over gunwale of one and fingers into the other.
• The victim can climb into the now upright canoe from between the two canoes or
over the far gunwale of the rescued canoe. I find going in over the gunwale the
easiest route especially if the rescuer supports the canoe and allows the far
gunwale to roll near the surface of the water. The victim should kick their feet
bringing their body (and feet) near the surface. With a large kick they can pull
themselves into the canoe. I find rolling in, like a Flounders flop in high jump the
best method.
Parallel Rescue
A parallel rescue is fast and easy with smaller canoes or with canoes that have air bags.
With larger canoes it is much more difficult and the canoe-over-canoe rescue may be a
more appropriate choice. This technique is also more difficult to do in
wavy and windy conditions such as those on open lakes because the
technique puts the rescuer in an unstable position (standing). This
rescue is also trickier to do solo.
The steps involved in this reduce.
• Similar to the canoe-over-canoe rescue make sure that the
victims are stable first. If appropriate have them hold onto the
stern and/or bow of the rescue canoe.

March 22, 2017 71
• Bring both the canoes parallel to each other and have the rescuing paddler move
to the middle of the rescuing canoe.
• Grab the gunwale of the submerged canoe and roll it facing the rescuing canoe.
• With fingers on the inside of the swamped canoe and hands held at waist height
stand up slowly dragging the swamped canoe up along the rescuing gunwales
allowing the water to drain out.
• Once the water is drained out push the top gunwale out, lean down and gab the
other gunwale.
• Have the victim re-enter the canoe in an manner that is most appropriate for
themselves.
Self-rescue (Splash out, Capistrano flip, swim to shore)
There are three basic self-rescue techniques.
Splash Out
Roll the swamped canoe upright from near the
middle of the canoe (about where you kneel when
soloing). Roll the canoe slowly so the water in
the washes back and forth – you will notice at one
point the water splashes out towards you.
Continue to rock the canoe back and forth
pushing down on the gunwale to allow more
water to splash out with each rock. With a
wooden canoe with some tumblehome and an inwale/outwale it takes about 30
seconds to splash out most of the water. This is a difficult technique in canoes
with a lot of tumblehome and large inwales (e.g. most aluminium canoes).
Canoes with a lot of flare are also more difficult since water tends to flow back in.
An alternative starting point is pushing the bow or stern deck down and away
from you to ‘slosh’ out some of the water first.
Capistrano Flip
Swim under the overturned canoe at the middle (or if there are two of you in the
compartments either side of the centre thwart). Make sure there is as much air
under the canoe as possible. Grab onto the gunwales and push up with a strong
whip kick and throw the canoe over pushing up on one gunwale more than the
other. This is a technique best used with light weight canoes and is easier done
tandem. Having a really buoyant PFD or life jacket also helps. Remember to grab
the upright canoe so it does not blow away.

March 22, 2017 72
With larger canoes using a floating pack (e.g. waterproof pack, dry bag or barrel)
and flipping the canoe from the end or rolling the canoe over the pack is possible.
A canoe with additional floatation bags also makes a self-rescue much easier.
There are two methods I have seeing using a floating pack or barrel:
1. Set one end of the upside down canoe on the floating pack, swim to the
opposite end of the canoe. Tip the canoe to break the seal if necessary, lift and
roll the canoe over. The pack will provide a surface to support the canoe.
2. Position the floating pack, or barrel, beside the canoe at the centre yoke, and tie
a short line to the centre yoke to keep the pack in place. Run another line overtop
of the canoe and pack and tie to the other side of the yoke – pull on the line, over
the pack to roll the canoe over the floating pack. Ray Goodwin has a nice series
of images showing this process:
https://www.facebook.com/ray.goodwin.549/media_set?set=a.101564340003101
65.1073742214.651805164&type=3
Tow a Swimmer
Towing a swimmer is fairly easy – have them hang onto the gunwale just behind you
(solo) and paddle. Remember to keep track of the person in the water in case they let go
or become tired..
Tow a Canoe
Towing a canoe can be done in several ways. The easiest is to hold, or sit on, one of the
painters of the towed canoe and paddle away. You should not tie the two canoes together
in case there are problems. You can also sit on the bow seat (if solo) and drape you leg
into the other canoe and paddle away – this is not really comfortable but it is possible. If
you have a little time and further to go, you should tie a harness on the canoe to be towed.
This is done by running a long rope around the canoe with one and a half wraps around
the bow seat (or bow thwart). Tie the running end to the standing end so the knot is just
under the stem of the towed canoe. This will allow you to pull from the bottom of the
canoe making it more stable and it will pull in a straighter line.
Move a Swamped Canoe
Climb into a swamped canoe and sit on the bottom, it will float full of water although it
will be pretty unstable, and paddle to the shore. I find doing a form of elementary back
stroke pulling with your arms is the best method to move the swamped canoe. Once a
canoe full of water starts moving it will keep moving.
Getting Back In
The ability to get back into an upright canoe is really important when you fall out and
your canoe does not tip, or you when you are successful with doing a self-rescue. It takes
practice to climb in over the gunwale of the canoe near the middle. My preference is to
basically swim into the canoe with my feet outstretched behind me (near the surface),
place my hands on the bottom of the canoe, give a big whip kick and roll into the canoe
over the gunwale. Some people find dragging themselves over the canoe using one of the

March 22, 2017 73
thwarts (or yoke) easier. I am not sure I can provide much advice except to try it out and
find something that works.
A number of people have recommended making a temporary stirrup on the end of a line
and hanging the line over the side of the canoe. This typically has to be done with a
supporting canoe to stop the canoe from rolling over.
A method that has been well documented in the kayaking world is a heel-hook-rescue.
The American Canoe Association has a nice PDF with images demonstrating this
technique from a canoe: http://www.wekanu.com/assets/sei_heel_hook_canoe_rescue.pdf

March 22, 2017 74
Incident Response
As you plan your canoe trip, you should anticipate potential risks to yourself and
participants involved and proactively address them (see Risk Management). However,
even the most careful risk management planning will not guarantee an incident free
paddling course or canoe trip. Remember that your priorities are 1) people, 2) boats, 3)
gear.
The following chart outlines a basic approach to incident response on the water.
When attempting a rescue, paddlers should follow these basic guidelines established by
the Royal Life Saving Society Canada for rescue situations. This is outlined as a “Risk
Ladder” or continuum where the rescuer increases personal risk as he or she moves up
the ladder. This continuum should always be considered when executing a rescue to
ensure that the rescuer or rescue team is not in jeopardy. If involved in a high risk rescue,
make sure the rescue team is prepared and trained to perform an effective and efficient
rescue.
Talk Throw Reach Wade Paddle Swim Tow
Carry Low
Risk
High
Risk
Scene Assessment
Safety
“Is the scene safe to enter?”
-Safety for yourself and the other participants is primary
-Only respond when it is reasonably safe to.
Identify the injured
“Who needs help?”
-Determine who needs attention. There may be several people who
require help
-In cases where there are multiple who need attention, it is often
those making the least amount of noise that require the most help
Determine what happened
“What caused the injuries?”
-This may determine how, or if, you proceed with rescue/ treatment
Rescue (if necessary)
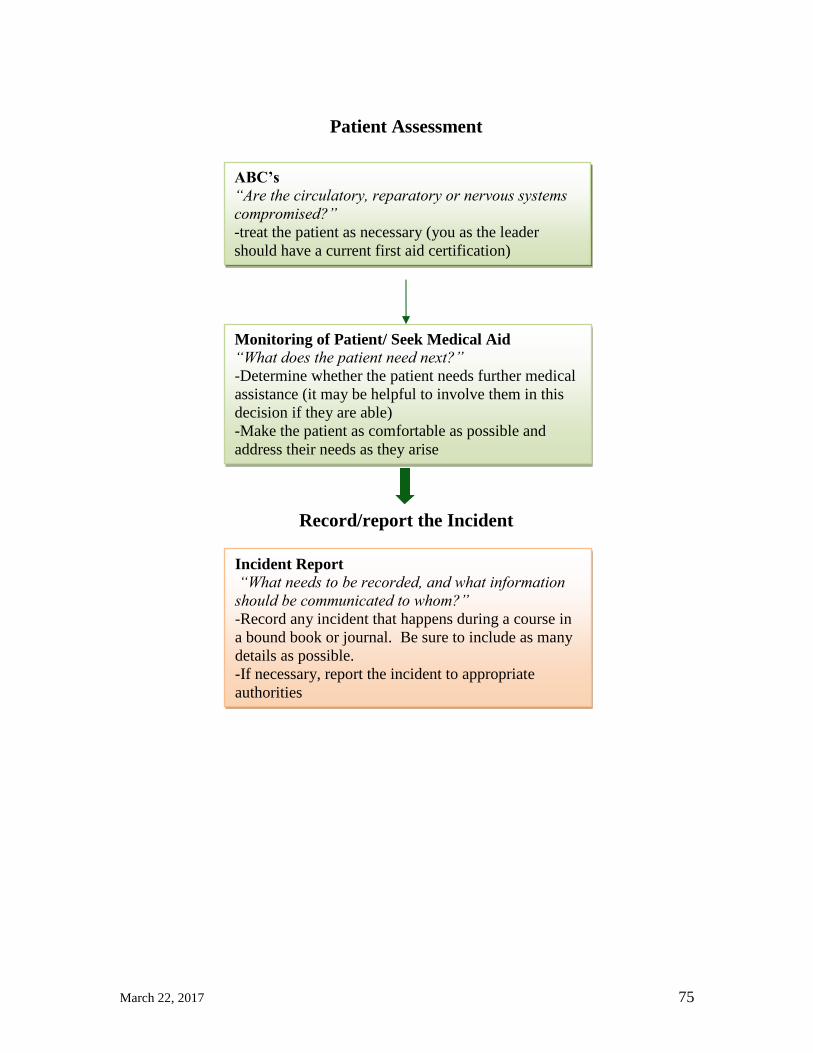
March 22, 2017 75
Patient Assessment
ABC’s
“Are the circulatory, reparatory or nervous systems
compromised?”
-treat the patient as necessary (you as the leader
should have a current first aid certification)
Monitoring of Patient/ Seek Medical Aid
“What does the patient need next?”
-Determine whether the patient needs further medical
assistance (it may be helpful to involve them in this
decision if they are able)
-Make the patient as comfortable as possible and
address their needs as they arise
Record/report the Incident
Incident Report
“What needs to be recorded, and what information
should be communicated to whom?”
-Record any incident that happens during a course in
a bound book or journal. Be sure to include as many
details as possible.
-If necessary, report the incident to appropriate
authorities

March 22, 2017 76
Other Equipment
Personal
Every time you head out for the day you should take a few things along ‘just in case’.
Put together a dry bag/stuff sack with the following items together and then whenever
you head out the door toss the bag in your day pack: ‘Ouch kit’ (small personal first aid),
appropriate clothing, compass, matches (or flint/lighter, fire starter), an energy bar or
two, water (& treatment), whistle, TP, hat, sun screen, spare clothing, rain gear, insect
repellent, a pocket knife, and a fleece or sweater. You might want to include some of the
group items like a small tarp in this list as well if you are solo.
Group
Repair kits
Every once and a while you will need to repair something. Although this is a more
appropriate topic for tripping it deserves a quick note in the Lake courses as well.
• Canoe Kit: Epoxy, duck tape, a piece of fiber glass, fine sandpaper, some hand
rivets, some self-taping screws, multi-tool (with needle nose pliers, and screw
drivers that fit the hardware on your canoe), saw, hammer (back of an axe will do
in a pinch). There are lots of other things but this seems to do the trick.
Paddling.net has a some examples of repair kits:
http://www.paddling.net/guidelines/showArticle.html?718
Cliff Jacobson through Piragis has a short guide on tool kits as well:
http://www.piragis.com/cliffjacobson/cliffjacobsonnotesv42.html
• General Kit: Packs, clothing, tents: Needle (I like to take a curved needle), thread,
nylon patches, wax, some spare webbing, a few buckles, safety pins, buttons, and
other odds and ends. Dental floss is for more than just your teeth. ☺
First Aid Kit
Take one, know how to use it, and where it is stored – see above.
Water treatment: Filters, tablets, boiling
A source of clean water it critical on any wilderness outing.
• At one time I just drank out of the lake with a cup and didn’t worry about what
else I might have been drinking. Now that I have children and have met people
that have caught ‘something’ I am a little more careful.
• I now carry a micro pore filter when I go out as a leader. When there is turbidity
or algae in the water I use a pre-filter to keep the primary ceramic or labyrinth
filter cleaner and lasting longer.
• Often in the evening, if I have a fire, I boil a big pot of water and let it stand
overnight in a covered pot (oh yeah this is a day tripping program, never mind).
• I always throw a few Aquatabs tables in my first aid kit – these work in a 1L
Nalgene water bottle, they are really small and light weight. They do require
30minutes contact time to disinfect the water. There are a number of other non-
iodine treatments out on the market now, read the labels and follow the directions.

March 22, 2017 77
High energy snacks
I strongly suggest having a few high energy snacks or bars in your day pack. Don’t forget
a regular lunch/dinner if you are out for the whole day. If you are gone for the whole day
you might want to take a stove (but that starts to overlap with a tripping course again).
Tarp
I like my large scout tarp. It is light and small enough to carry easily and yet large
enough to protect myself and a few others in a squall. I carry some parachute cord in the
bag with the tarp to assist in setting up.
Light rope
Parachute cord, or twine
Map
A map of the local area should be taken along. A topographic map is the best but local
maps (e.g. park maps) will often meet the needs for day trips. See the navigation section
for more information.
Contact
Cell phone (or equiv), Spot, InReach… – some way to call out for help
Equipment Storage
There has been an ongoing discussion for many years about how, and if, equipment
should be tied into a canoe. The current regulations require equipment to be stored safely
when to boat is in motion but there is flexibility in the interpretation of what this means.
Different areas and conditions may warrant different procedures. For example: on a clear
day with no wind there may be no worry about not securing your gear to the canoe.
However if it turns windy and there is an upset retrieving loose gear that is floating away
will be a problem or some gear may even sink. Gear that is loose may also move around
in the canoe and impair or distract the paddler. On larger lakes tethering packs into canoe
with a line running from one of the thwarts to the last pack stops equipment from floating
away in the case of an upset but it is still easy to move/remove as needed. Unlike moving
water situations where equipment tied in tightly might provide extra floatation lake
conditions this is less of an issue.
.

March 22, 2017 78
Emergency Protection (Tarps and other options)
The start to your day paddle was perfect – early start, beautiful calm morning, great shore
lunch, and a nice nap on a sunny rock. Something odd, a shadow, awakes you from your
slumber. Where did the sun go? Gee, those clouds sure look black. I think I’m going to
get wet. Time for action!
First, you were paying attention in your Advance Solo Skills course, so you do have the
suggested emergency equipment and, yes, you did leave a proper trip plan with a
responsible person so if you have to stay the night, the emergency contacts on your list
will get a phone call to come looking for you. Because you have planned and packed
properly, this is, at worse, and inconvenience.
What action to take? First, assess what is likely to happen when the black cloud gets to
you. Can you see lightening? Can you hear thunder? You remember your lessons on
weather. Is it just black clouds that will dump some rain on you or is it a cold front that
signals the start of several hours of bad weather? Once you can make a reasonable guess
about what is about to happen, you can plan a course of action.
If the black cloud is just a passing event and no lightening is going to accompany the
storm, maybe all you need to do is secure your canoe and gear, don your rain gear (yes,
you did pack it even though the forecast said sunny all day), and find a nice big white
spruce or cedar to lean against to shelter you from the rain. Perhaps a nice a convenient
rock overhang is available. All of these are options for shorter periods of protection. If
you think the storm may be building into something serious, now is the time to take
action before the weather turns. Dig down to the bottom of your pack and find the tarp
that lives there for occasions such as this.
First a few words about tarps in general. They can be anything from a dollar store ‘space’
blanket to a big box store construction-grade blue plastic model to a high end outdoor
wonder designed by an aerospace engineer. They will all keep you dry if set up properly.
However, you often get what you pay for, so make a wise purchase. The tarp alone is not
of much use without cord of some kind, paracord being the standard but any light cordage
will do in a pinch. A good 30-m is about right for the emergency kit. The high end tarps
come with instruction sheets, some the size small telephone books. Follow the
manufacturer’s recommendations. Here, I will concentrate on setting up a basic square
tarp, be it ‘space’ blanket, blue plastic, or outdoor store specialty unit.
Before, you actually start to set up your tarp, you need to pick the right spot. If a storm is
coming, winds will likely be an issue. Look for a sheltered spot close to your canoe.
Since rain may be a problem, don’t pick a low site where water might collect. Rather find
a bit of a knoll or rise where the runoff will go around you. Remember also that you will
likely want some breeze. Bugs can be a real problem right after a rain storm when it’s
warm and damp. If you think you may be forced to spend the night or may need to dry
gear, choose a site where you can build a fire safely in front of your tarp. Don’t forget to
collect firewood before the storm and store it under the tarp to keep it dry.

March 22, 2017 79
The suggestions above would also apply to other situations when you may have to set up
an tarp such as following an accident when someone needs first aid or if you damage
your canoe and can’t continue. Sometimes it’s just nice to set up a tarp for shade if the
weather is really hot or for a little of that ‘homey’ feeling if it’s a bit of a nasty day.
Finally, it’s time to actually set up the tarp. The simplest method is to use a ridge line to
suspend the centerline of the tarp. Tie a ridge line roughly parallel to the ground between
two trees that are at least a few feet further
apart than the width of your tarp. The ridge
line should be at right-angles to the
expected direction of the wind to provide
maximum protection. Ideally, the site
should have no shrubs or undergrowth
within the footprint area of the tarp.
Sometimes this isn’t possible so you can
either work around the undergrowth or do a
little judicious pruning if it doesn’t go
against your ‘Leave no Trace’ conscience. Try to pick two trees that have no other trees
off to the side that might prevent you from pulling your tarp tight. Your first tendency
might be to simply throw your tarp over the rope or worse, tie the center grommets of the
tarp directly to the tree. Bad idea! The independent movement of the trees in the wind
will be constantly pulling your tarp tight and then relaxing it. This is particularly hard on
the tarp. Similarly, if you simply throw the tarp over the rope, the constant movement of
the rope can chafe the tarp or cause it to flap unduly. It is much better to suspend the tarp
from the rope (not obvious in the sketch) at
the center grommets using Prusik knots.
Using a short piece of paracord or
equivalent, tie the Prusik on the main ridge
rope near where either side of the ridge of the
tarp will be tied. Tie the center grommets of
the tarp to the loop on the Prusik. By simply
sliding the Prusik away from the tarp, the
ridge line of the tarp will tighten and form a
nice smooth curve. The beauty of the Prusik knot is it immediately tightens on the ridge
line as soon as you let it go. To adjust it, you simply have to take the strain off the Prusik
and it will loosen allowing you to slide it along the ridge rope loosening or tightening the
tarp. Great knot the Prusik.
Once the ridge of the tarp is set, stake the corners out using sticks as stakes or simply tie
the guy line to a convenient tree or rock. Start with the corners using the taunt line shown
in the knots section of this manual. It is important to tie the taunt line near the stakes at
the corners. Next tie the secondary lines from the corner lines to the intermediate
grommets in the tarp as shown in the sketch. The taunt lines for the secondary lines
should be through the grommets. With this arrangement, the tension of each side of the
tarp can be adjusted by just changing the tension on the stakes with the corner line and
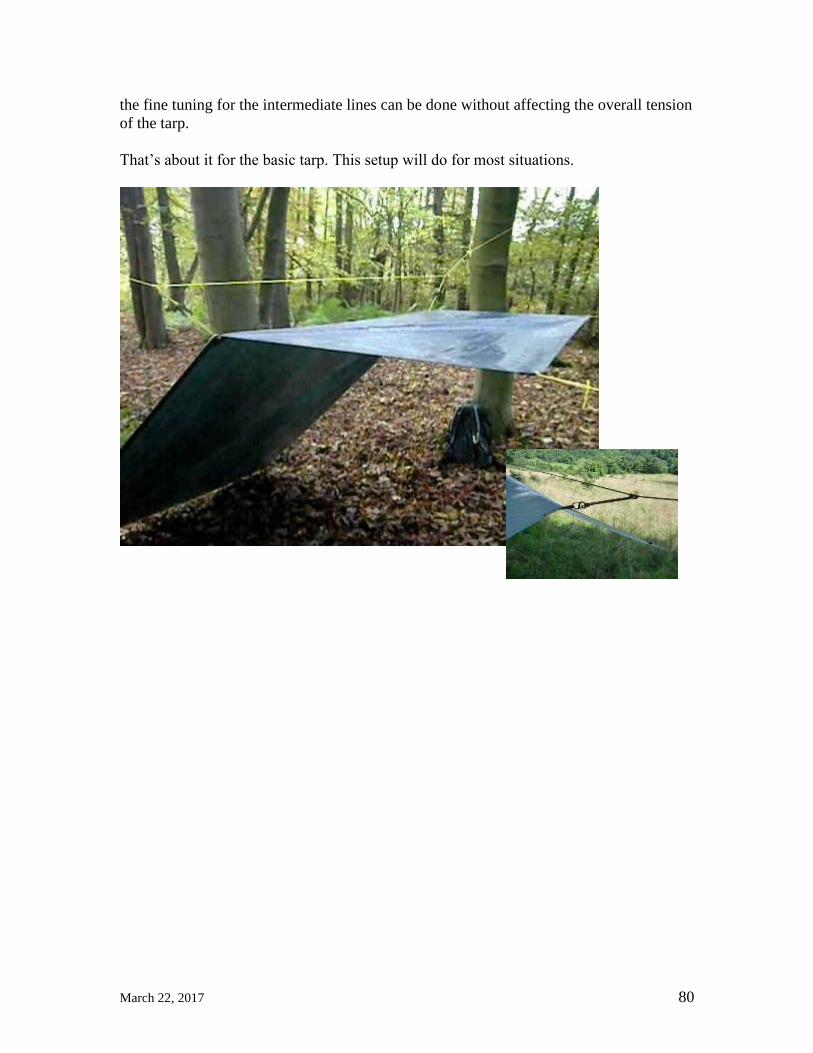
March 22, 2017 80
the fine tuning for the intermediate lines can be done without affecting the overall tension
of the tarp.
That’s about it for the basic tarp. This setup will do for most situations.

March 22, 2017 81
Rope and Knots
You should know a few more knots than the one you use to tie your shoes. Knowing
knots will keep your canoe from blowing away, tie a painter onto the end of your boat,
connect two ropes together, and keep your tent taunt. There are many (many) knots and
just a few have been listed below; check the references for a couple of books and
websites on more knots and related information. When possible use braided rope since it
is easier to handle. Check your ropes regularly for fraying or damage & replace them
often.
Type of Rope:
Twisted or Laid: Most rope is known as twisted rope, or sometimes called laid
rope, which consists of a number of strands of yarn twisted together to make them
more sturdy. Each of these strands may be made up of smaller strands, each of
which is in turn comprised of the basic fibres of the rope spun together. Most rope
is made of three strands, a style of rope known as plain rope.
Braided: The rope is made of an equal number of strands braided in opposite
directions into a circular pattern. They are generally made from nylon, polyester
or polypropylene. Since braided ropes have no lay or inherent twist, they will coil
and uncoil without kinking. There are three main types of braided rope: a solid
braid, a diamond braid with no core, and a diamond braid with a core. Solid braid
rope is extremely strong and cannot be unravelled, even when cut. It is one of the
sturdiest types of rope, but it cannot be spliced. Diamond braid is the simplest
type of braided rope, in which the ends are woven together tightly. Most diamond
braid has a solid core, but some is coreless, in which case it may be spliced
together.
Rope Material:
Cotton, Jutte, and other natural fibre ropes are only mentioned here so you know
they still exist. New synthetic rope materials have many advantages over natural
fibre ropes – stronger, more durable and sometimes cheaper. Nylon, Polyester,
and Polypropylene each have strengths and weaknesses and the material should
be matched to the intended use.

March 22, 2017 82
Material Qualities:
Strength: Nylon is marginally stronger than polyester under constant pressure, but
for shock Nylon is significantly stronger.
Flexibility: Nylon is much more flexible and will stretch when force is applied
suddenly then return to its original length.
Water: Polypropylene is the only rope that floats but it is not as strong as other
types. Nylon absorbs water.
Sunlight: Both nylon and polyester ropes are resistant to sunlight. Polypropylene
is quite susceptible to sun damage.
Abrasion: Polyester deals better with abrasion. Ropes that are used in an abrasive
environment should be checked and replaced regularly irrespective of the
material.
Rot: All three are very resistant to rot and decomposition.
Nylon, polyester, polypropylene are the most common types of ropes used with canoeing.
Polypropylene rope is used for throw ropes since it floats. Be sure to check and replace
all rope regularly as they are susceptible to damage over time.
See the following website for some additional notes on ropes:
http://www.bevisrope.com/rope-info/rope-characteristics
Knots
Many people think of knots as just a ‘tangle of string’ with a name. Knots serve a very
important function in our daily and paddling lives providing everything form keeping our
shoes on to securing our canoes and safety lines. Understanding how to tie various knots
and the purpose they serve is important part of our paddling knowledge. When you tie a
knot make sure you choose the right knot for the situation and trim (or tighten) it
appropriately before use.
Important criteria for knots: 1. Easy to tie, 2. Easy to untie, 3. Does not slip
(unexpectedly), and 4. It does not reduce the strength of the line more than necessary for
the identified purpose.
Yes - knots weaken rope, and in some cases
significantly. Respect the rated working strength for
any rope or cord that you are working with and then
assume that any knot used will reduce the strength
by a further 50%. Dave Richards' Knot Break
Strength vs Rope Break Strength on the National
Speleological Society Website provides some idea
of the reduced rope strength for various knots.
When a knot is combined with a rope that has been
poorly treated, repeatedly tied, or damaged the
strength will be even less.
http://caves.org/section/vertical/nh/50/knotrope-hold.html
Breaking Strength of 7mm Cord
0% 20% 40% 60% 80% 100%
Brk. Str.
Bowline
Fig. 8 end
Fig. 8 bight
Butterfly
Sheet Bend
Fish knot
Dbl Sheet Bnd
Dbl Fish Knot
Kn
ot
Percent Original

March 22, 2017 83
There are a few basic terms that might help when working through the following knot
descriptions or when looking at books or articles on how to tie knots. The end you are
working with is called the working end followed behind that by the working part. The
other part of the rope that may not be in use is the standing part and the very end not be
used is the standing end. Folding the rope back on its self is called a bite. Making a
loop with the rope crossing itself is a loop or crossing turn. Wrapping a rope around an
object is a turn, with two turns called a round turn.
Bowline This knot is used to put a secure loop on the end of a line. 1. Form an overhand loop in
the rope with the running end going over the standing end. 2. Pass the working end
through the back of the loop and around the back of the standing end. 3. Put the working
end back through the original loop and tighten. This knot may slip when repeatedly
loaded, when wet, or when the standing end is not tight so be careful, leave the free end
on the rope as long as the loop and if worried add a half hitch.
1. 2.
1. working end
2. bite
3. loop
4. Standing
end
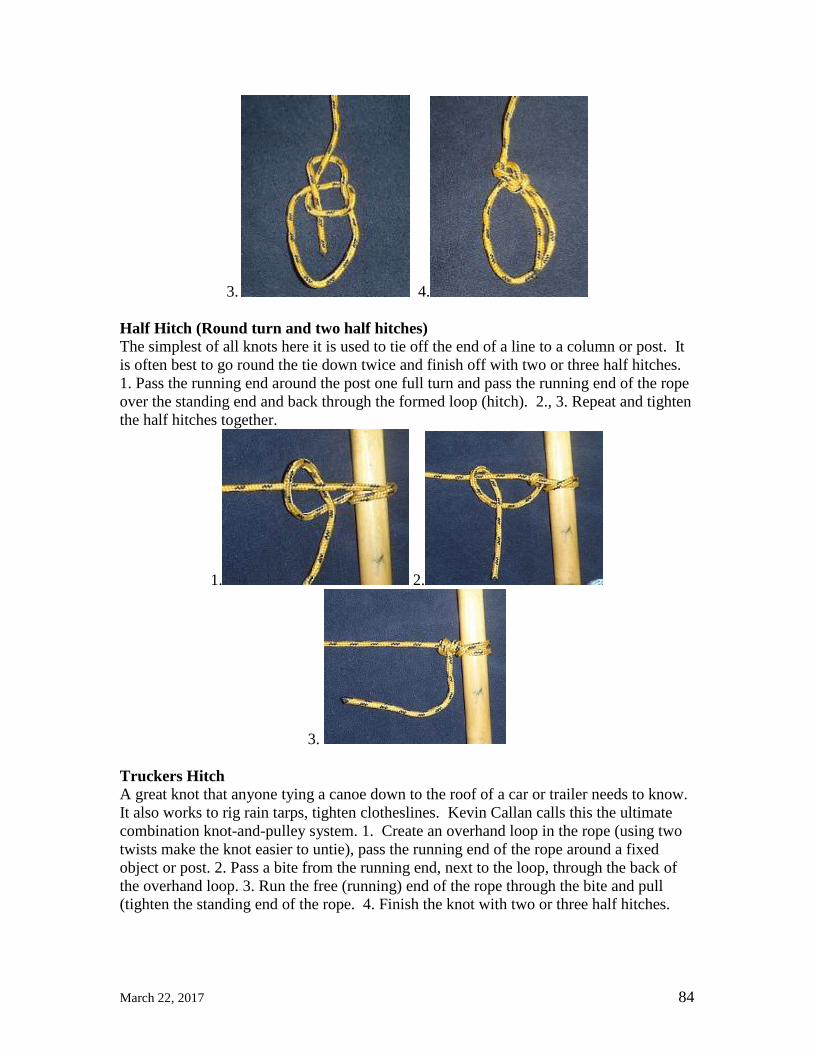
March 22, 2017 84
3. 4.
Half Hitch (Round turn and two half hitches) The simplest of all knots here it is used to tie off the end of a line to a column or post. It
is often best to go round the tie down twice and finish off with two or three half hitches.
1. Pass the running end around the post one full turn and pass the running end of the rope
over the standing end and back through the formed loop (hitch). 2., 3. Repeat and tighten
the half hitches together.
1. 2.
3.
Truckers Hitch A great knot that anyone tying a canoe down to the roof of a car or trailer needs to know.
It also works to rig rain tarps, tighten clotheslines. Kevin Callan calls this the ultimate
combination knot-and-pulley system. 1. Create an overhand loop in the rope (using two
twists make the knot easier to untie), pass the running end of the rope around a fixed
object or post. 2. Pass a bite from the running end, next to the loop, through the back of
the overhand loop. 3. Run the free (running) end of the rope through the bite and pull
(tighten the standing end of the rope. 4. Finish the knot with two or three half hitches.

March 22, 2017 85
1. 2. 3. 4.
Clove Hitch This is a quick and effective way to tie a line to a post or tree. It is effective when the
strain is perpendicular to the post but will loosen when pulled or strained diagonally. 1.
wrap the rope around the post and 2. back over the top. 3. pass the running end under the
last pass over the post and tighten. Alternatively if the top of the post is free by
overlaying two underhand loops, with the second loop on top of the first. Place the loops
over the top of the post and tighten.
1. 2. 3.

March 22, 2017 86
An alternative method for creating a clove hitch in the middle of a rope:
Taunt Line Have you ever set up a tent and wondered how to set out guy lines and tighten them up?
Well this is the solution; an adjustable sliding knot useful for tying tents or tarps to stakes
or trees. The knot can be slid up, or down, and then it binds when under pressure. 1. form
a bite by passing the running end around a post or through a grommet. 2. Loop the rope
twice around the standing end of the rope closer to the post. 3. Loop the running end
around the standing end above the earlier two loops and pass through the loop. 4. Move
the knot and tension the rope.
1. 2. 3.
4.
Sheet Bend This knot was originally made for securing two ropes (called sheets) to sails. It is one of
the most commonly used bends and it can be used to securely bind ropes of different
sizes. 1. Form a bite with one [larger] rope. 2. Pass the running end of the other [smaller]
rope around the back of the bite. 3. Go over the standing end of the smaller rope and
through the larger rope bite. 4. Tighten the knot.
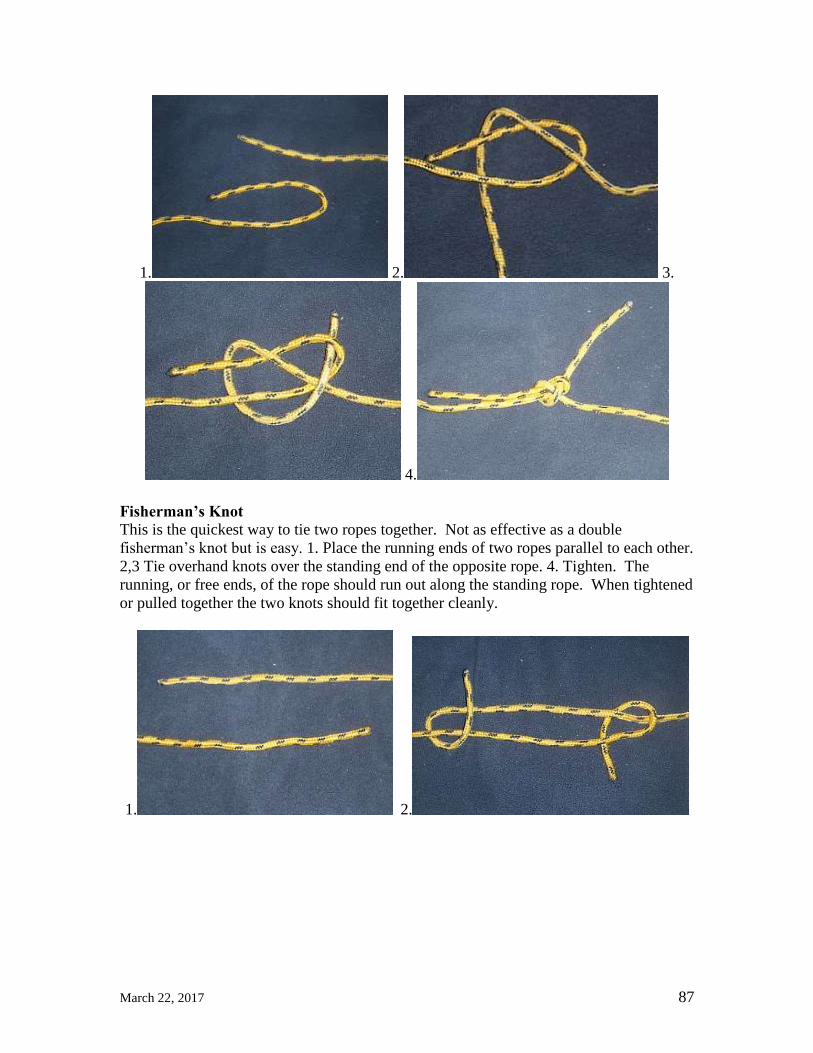
March 22, 2017 87
1. 2. 3.
4.
Fisherman’s Knot This is the quickest way to tie two ropes together. Not as effective as a double
fisherman’s knot but is easy. 1. Place the running ends of two ropes parallel to each other.
2,3 Tie overhand knots over the standing end of the opposite rope. 4. Tighten. The
running, or free ends, of the rope should run out along the standing rope. When tightened
or pulled together the two knots should fit together cleanly.
1. 2.

March 22, 2017 88
3. 4.
Mooring Hitch This is a secure knot that holds well under tension but can be simply released by pulling
on the free end. 1. pass the rope around a post. 2. Form an underhand loop, with the loop
over the standing end of the rope. 3. Pull the standing end up through the loop to form a
bite. 4. Pass a bite made from the running end through the standing end bite. 5. Tighten
the mooring hitch. To release the hitch pull the free (running) end of the rope.
1. 2. 3.
4. 5.
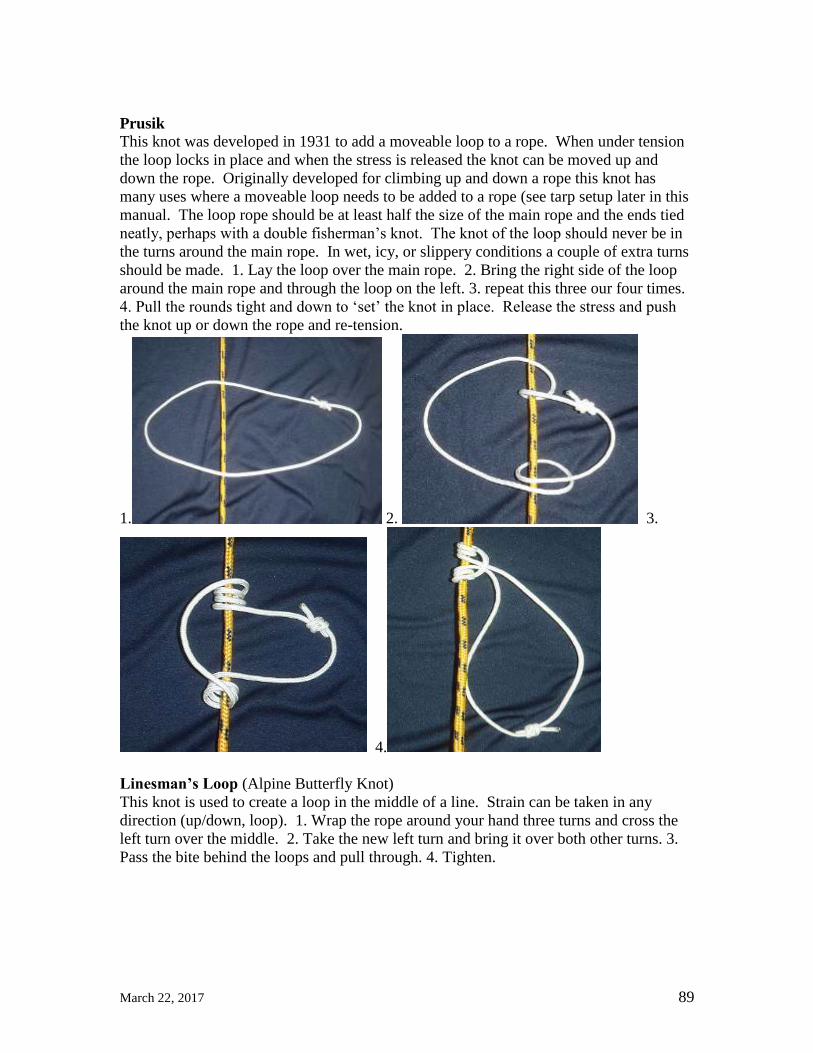
March 22, 2017 89
Prusik This knot was developed in 1931 to add a moveable loop to a rope. When under tension
the loop locks in place and when the stress is released the knot can be moved up and
down the rope. Originally developed for climbing up and down a rope this knot has
many uses where a moveable loop needs to be added to a rope (see tarp setup later in this
manual. The loop rope should be at least half the size of the main rope and the ends tied
neatly, perhaps with a double fisherman’s knot. The knot of the loop should never be in
the turns around the main rope. In wet, icy, or slippery conditions a couple of extra turns
should be made. 1. Lay the loop over the main rope. 2. Bring the right side of the loop
around the main rope and through the loop on the left. 3. repeat this three our four times.
4. Pull the rounds tight and down to ‘set’ the knot in place. Release the stress and push
the knot up or down the rope and re-tension.
1. 2. 3.
4.
Linesman’s Loop (Alpine Butterfly Knot)
This knot is used to create a loop in the middle of a line. Strain can be taken in any
direction (up/down, loop). 1. Wrap the rope around your hand three turns and cross the
left turn over the middle. 2. Take the new left turn and bring it over both other turns. 3.
Pass the bite behind the loops and pull through. 4. Tighten.

March 22, 2017 90
1. 2.
3. 4.
Figure-of-Eight
This knot (also called a Flemish loop) allows you to create a loop at any point in a line.
The loop is easy to make and then check because of its distinctive ‘8’ shape. This is a
strong knot that is unlikely to slip under repeated loading but it can be very difficult to
untie after it has been put under a load. Make sure both lines in the loop are neat and flat
within the knot. 1. Create a bite in the rope and pass it over top, 2. Pass the bite behind
the lines, and back through the loop (in front), and 4. tighten.
1. 2.

March 22, 2017 91
3.
Figure-of-Eight (threaded) A figure of eight can also be made with by tying a figure-of-eight only with the working
end of the rope and then threading the working end back through the knot. This allows
you to create a loop around another fixed object, post, or tree. A figure-of-eight tied on
the end of a line is often used as a stopper.
1. 2.
3. 4.
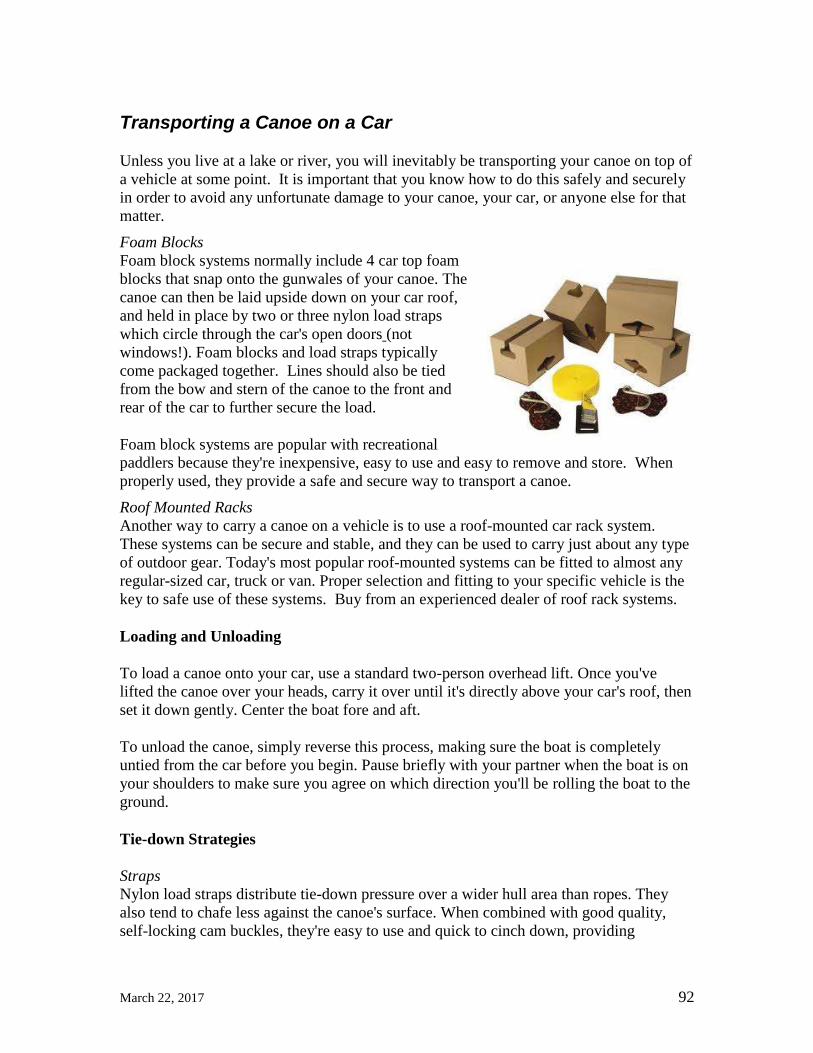
March 22, 2017 92
Transporting a Canoe on a Car
Unless you live at a lake or river, you will inevitably be transporting your canoe on top of
a vehicle at some point. It is important that you know how to do this safely and securely
in order to avoid any unfortunate damage to your canoe, your car, or anyone else for that
matter.
Foam Blocks
Foam block systems normally include 4 car top foam
blocks that snap onto the gunwales of your canoe. The
canoe can then be laid upside down on your car roof,
and held in place by two or three nylon load straps
which circle through the car's open doors (not
windows!). Foam blocks and load straps typically
come packaged together. Lines should also be tied
from the bow and stern of the canoe to the front and
rear of the car to further secure the load.
Foam block systems are popular with recreational
paddlers because they're inexpensive, easy to use and easy to remove and store. When
properly used, they provide a safe and secure way to transport a canoe.
Roof Mounted Racks
Another way to carry a canoe on a vehicle is to use a roof-mounted car rack system.
These systems can be secure and stable, and they can be used to carry just about any type
of outdoor gear. Today's most popular roof-mounted systems can be fitted to almost any
regular-sized car, truck or van. Proper selection and fitting to your specific vehicle is the
key to safe use of these systems. Buy from an experienced dealer of roof rack systems.
Loading and Unloading
To load a canoe onto your car, use a standard two-person overhead lift. Once you've
lifted the canoe over your heads, carry it over until it's directly above your car's roof, then
set it down gently. Center the boat fore and aft.
To unload the canoe, simply reverse this process, making sure the boat is completely
untied from the car before you begin. Pause briefly with your partner when the boat is on
your shoulders to make sure you agree on which direction you'll be rolling the boat to the
ground.
Tie-down Strategies
Straps
Nylon load straps distribute tie-down pressure over a wider hull area than ropes. They
also tend to chafe less against the canoe's surface. When combined with good quality,
self-locking cam buckles, they're easy to use and quick to cinch down, providing

March 22, 2017 93
excellent overall grip without the hassle of lots of knots. When using straps and buckles,
remember to:
• Place some sort of padding directly underneath the buckle (where it makes contact
with the canoe hull). This will help minimize hull damage during transport. Better
straps will have a pad sewn in behind the buckle to protect the canoe.
• Tie off the extra strap directly above the buckle once it's been cinched tight. This
will provide added security in case the buckle releases while the car is moving.
• If using straps with a ratcheting mechanism, be very careful not to over tighten.
Ropes
Only use ropes when straps with cam-buckles are not available. Use appropriate knots
and understand the limitations of the rope that you are using (e.g. nylon rope stretches
and will need to be checked). Knots may slip if not properly finished and should be
checked regularly during any distance travel.
Basic Tie-down Procedures
No matter what type of tie-downs you use, follow
these basic procedures whenever you secure your
canoe to your vehicle:
Use at least four lines or straps to hold the body of
your canoe in place. Two of these lines should run
perpendicular to your car, the other two securing the
canoe ends.
Tie rope or straps from the ends of the canoe to your
car's bumpers or other fastening points. Thread these
lines through a sturdy part of the end of the canoe,
then angle them out in an inverted "V" to both ends
of the closest bumper. Pull them taut and secure them
with reliable knots. Avoid over tightening
Driving With a Canoe on Your Vehicle
It is important to do a safety check before departing
and frequently during your trip. Knots can loosen and ropes can stretch.
Try to move your canoe from side to side. If your car moves instead of your canoe, the
boat is still secure.
Make sure that the boat is centered on the vehicle and that you drive cautiously as the
canoe will be affected by high winds. Keep in mind that this will affect the handling of
your vehicle
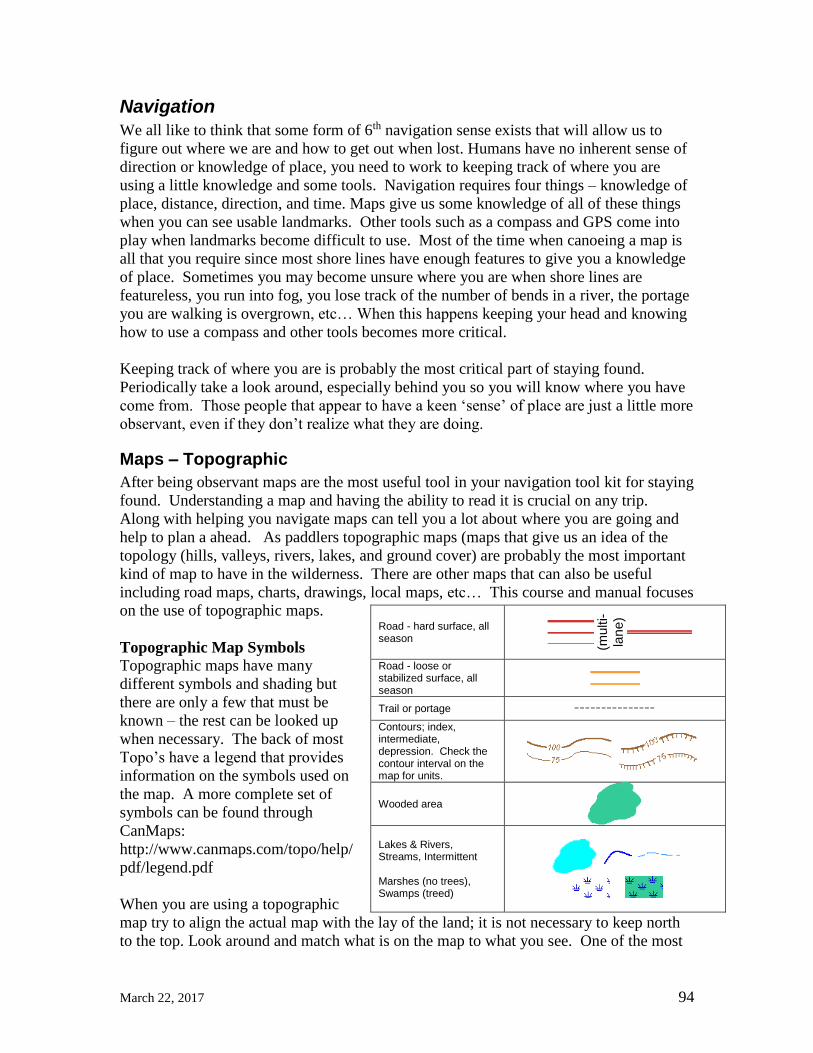
March 22, 2017 94
Navigation
We all like to think that some form of 6th navigation sense exists that will allow us to
figure out where we are and how to get out when lost. Humans have no inherent sense of
direction or knowledge of place, you need to work to keeping track of where you are
using a little knowledge and some tools. Navigation requires four things – knowledge of
place, distance, direction, and time. Maps give us some knowledge of all of these things
when you can see usable landmarks. Other tools such as a compass and GPS come into
play when landmarks become difficult to use. Most of the time when canoeing a map is
all that you require since most shore lines have enough features to give you a knowledge
of place. Sometimes you may become unsure where you are when shore lines are
featureless, you run into fog, you lose track of the number of bends in a river, the portage
you are walking is overgrown, etc… When this happens keeping your head and knowing
how to use a compass and other tools becomes more critical.
Keeping track of where you are is probably the most critical part of staying found.
Periodically take a look around, especially behind you so you will know where you have
come from. Those people that appear to have a keen ‘sense’ of place are just a little more
observant, even if they don’t realize what they are doing.
Maps – Topographic
After being observant maps are the most useful tool in your navigation tool kit for staying
found. Understanding a map and having the ability to read it is crucial on any trip.
Along with helping you navigate maps can tell you a lot about where you are going and
help to plan a ahead. As paddlers topographic maps (maps that give us an idea of the
topology (hills, valleys, rivers, lakes, and ground cover) are probably the most important
kind of map to have in the wilderness. There are other maps that can also be useful
including road maps, charts, drawings, local maps, etc… This course and manual focuses
on the use of topographic maps.
Topographic Map Symbols Topographic maps have many
different symbols and shading but
there are only a few that must be
known – the rest can be looked up
when necessary. The back of most
Topo’s have a legend that provides
information on the symbols used on
the map. A more complete set of
symbols can be found through
CanMaps:
http://www.canmaps.com/topo/help/
pdf/legend.pdf
When you are using a topographic
map try to align the actual map with the lay of the land; it is not necessary to keep north
to the top. Look around and match what is on the map to what you see. One of the most
Road - hard surface, all season
(multi-
lan
e)
Road - loose or stabilized surface, all season
Trail or portage
Contours; index, intermediate, depression. Check the contour interval on the map for units.
Wooded area
Lakes & Rivers, Streams, Intermittent Marshes (no trees), Swamps (treed)
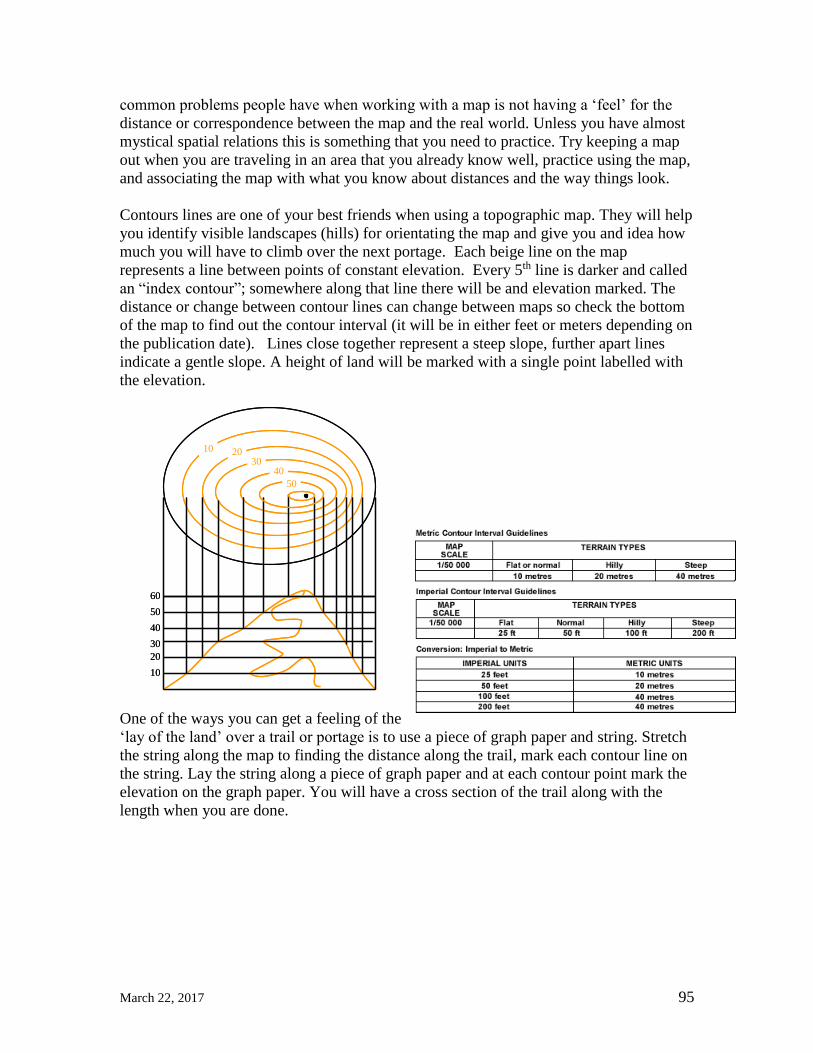
March 22, 2017 95
common problems people have when working with a map is not having a ‘feel’ for the
distance or correspondence between the map and the real world. Unless you have almost
mystical spatial relations this is something that you need to practice. Try keeping a map
out when you are traveling in an area that you already know well, practice using the map,
and associating the map with what you know about distances and the way things look.
Contours lines are one of your best friends when using a topographic map. They will help
you identify visible landscapes (hills) for orientating the map and give you and idea how
much you will have to climb over the next portage. Each beige line on the map
represents a line between points of constant elevation. Every 5th line is darker and called
an “index contour”; somewhere along that line there will be and elevation marked. The
distance or change between contour lines can change between maps so check the bottom
of the map to find out the contour interval (it will be in either feet or meters depending on
the publication date). Lines close together represent a steep slope, further apart lines
indicate a gentle slope. A height of land will be marked with a single point labelled with
the elevation.
One of the ways you can get a feeling of the
‘lay of the land’ over a trail or portage is to use a piece of graph paper and string. Stretch
the string along the map to finding the distance along the trail, mark each contour line on
the string. Lay the string along a piece of graph paper and at each contour point mark the
elevation on the graph paper. You will have a cross section of the trail along with the
length when you are done.
10 2030
40
10
20
30
40
50
60
50
10 2030
40
10
20
30
40
50
60
50

March 22, 2017 96
Portion of Topographic Sheet 52 E11 (Long, MacKinnon, & Cache Islands)
Grid Reference Systems
On all of the topographic maps used in Canada there are two sets of grids marked.
Latitude and Longitude
Latitude
A point north or south of the equator, perpendicular to the lines of
longitude. Latitude is measured in degrees from 0 (equator) to 90 (pole).
One minute of latitude equals one nautical mile. Think of lines of latitude
as a series of hoops around the earth parallel to the equator.
Longitude
This is the distance east or west of the prime meridian measured in degrees.
Lines (meridians) create a geographic grid around the world that meet at
the poles are furthest apart at the equator. The lines give the impression of
a pumpkin.
UTM/MGRS
UTM (Universal Transverse Mercator) grid coordinates are expressed as a distance
within each zone in meters measured from the west, referred to as the "easting", and
from the south, referred to as the "northing”. UTM zones are setup so there is
minimal measurement error across the whole zone with the biggest difference being
0.9996 of the true scale. True scale occurs about 180km on each side of the central
meridian of each zone. MGRS (Military Grid Reference System) is just a special
format for describing UTM co-ordinates in an abbreviated format that follows a
100000 meter grid.

March 22, 2017 97
Co-ordinates are read across the map (start from west), then up the map (start from
south). If you are sharing this information with others you will want to quote the
UTM and/or MGRS grid reference or map ID along with the datum.
(e.g. NAD 83 14U 633826 5518867, or 14U PA 338188).
Grid Reference and marking points
When working with Canadian topographic maps I generally recommend using UTM or
MGRS measurements because distances are easy to measure with a simple metric ruler.
When reading off of Canadian Topographic maps UTM units (meters) are the light blue
numbers running along the sides of the map. When reporting UTM or MGRS numbers
they are typically listed as easting then northing numbers. I find it easy to remember as
9
201911 18171210
1613
8
14 15
21
7
22
!!
!
!!
!
!!
!
!!
!
!!
!
!!
!
!!
!
!!
!
!!
!
!!
!
!!
!
!!
!
!!
!
!!
!
!!
!
!!
!
!!
!
!!
!
!!
!
!!
!
!!
!
!!
!
!!
!
!!
!
!!
!
!!
!
!!
!
!!
!
!!
!
!!
!
!!
!
!!
!
!!
!
!!
!
!!
!
!!
!
!!
!
!!
!
!
!!
!
!!
!
!!
!
!!
!
!!
!
!!
!
!!
!
!!
!
!!
!
!!
!
!!
!
!!
!
!!
!
!!
!
!!
!
!!
!
!!
!
!!
!
!!
!
!!
!
!!
!
!!
!
!!
!
!!
!
!!
!
!!
!
!!
!
!!
!
!!
!
!!
!
!!
!
!!
!
!!
!
!!
!
!!
!
!!
!
!!
!
!!
!
!!
!
!!
!
!!
!
!!
!
!!
!
!!
!
!!
!
!!
!
!!
!
!!
!
!!
!
!!
!
!!
!
!!
!
!!
!
!!
!
!!
!
!!
!
!!
!
!!
!
!!
!
!!
!
!!
!
!!
!
!!
!
!!
!
!!
!
!!
!
!!
!
!!
!
!!
!
!!
!
!!
!
!!
!
!!
!
!!
!
!!
!
!!
!
!!
!
!!
!
!!
!
!
!!
!!
!!
!!
!!
!!
!!
!!
!!
!!
!!
!!
!!
!!
!!
!!
!!
!!
!!
!!
!!
!!
!!
!!
!!
!!
!!
!!
!!
!!
!!
!!
!!
!!
!!
!!
!!
!!
!!
!!
!!
!!
!!
!!
!!
!!
!
!!
!!
!!
!!
!!
!!
!!
!!
!!
!!
!!
!!
!!
!!
!!
!!
!!
!!
!!
!!
!!
!!
!!
!!
!!
!!
!!
!!
!!
!!
!!
!!
!!
!!
!!
!!
!!
!!
!!
!!
!!
!!
!!
!!
!!
!!
!
!!
!
!!
!
!!
!
!!
!
!!
!
!!
!
!!
!
!!
!
!!
!
!!
!
!!
!
!!
!
!!
!
!!
!
!!
!
!!
!
!!
!
!!
!
!!
!
!!
!
!!
!
!!
!
!!
!
!!
!
!!
!
!!
!
!!
!
!!
!
!!
!
!!
!
!!
!
!!
!!
!
!!
!
!!
!
!!
!
!!
!
!!
!
!!
!
!!
!
!!
!
!!
!
!!
!
!!
!
!!
!
!!
!
!!
!
!!
!
!!
!
!!
!
!!
!
!!
!
!!
!
!!
!
!!
!
!!
!
!!
!
!!
!
!!
!
!!
!
!!
!
!!
!
!!
!
!!
!
!!
!
!!
!
!!
!
!!
!
!!
!
!!
!
!!
!
!!
!
!!
!
!!
!
!!
!
!!
!
!!
!
!!
!
!!
!
!!
!
!!
!
!!
!
!!
!
!!
!
!!
!
!!
!
!!
!
!!
!
!!
!
!!
!
!!
!
!!
!
!!
!
!!
!
!!
!
!!
!
!!
!
!!
!
!!
!
!!
!
!!
!
!!
!
!!
!
!!
!
!!
!
!!
!
!!
!
!!
!
!!
!
!!
!
!!
!
!!
!
!!
!
!!
!
!!
!
!!
!
!!
!
!!
!
!!
!
!!
!
!!
!
!!
!
!!
!
!!
!
!!
!
!!
!
!!
!
!!
!
!!
!
!!
!
!!
!
!!
!
!!
!
!!
!
!!
!
!!
!
!!
!
!!
!
!!
!
!!
!
!!
!
!!
!
!!
!
!!
!
!!
!
!!
!
!!
!
!
!!
!
!!
!
!!
!!
!
!!
!
!!
!
!!
!
!! !
! ! !
! ! !
! ! !
! ! !
! ! !
! ! !
! ! !! ! !
! ! !! ! ! ! ! ! ! ! ! ! ! ! ! ! !
! ! !! ! !
! ! !
! ! !
! ! !
! ! !
! ! !
! ! !
! ! !
! !!
!!
!
!!
!
!!
!
!!
!
!!
!
!!
!
!!
!
!!
!
!!
!
!!
!
!!
!
!!
!
!!
!
!!
!
!!
!
!!
!
!!
!
!!
!
! !!
! ! !
! ! !
! ! !
! ! !
! ! !! ! !
! ! ! ! ! ! ! ! ! ! ! !! ! !
! ! !! ! !
! ! !
! ! !
! ! !
! ! !
!!
!
!!
!
!!
!
!!
!
!!
!
!!
!
!!
!
!!
!
!!
!
!!
!
!!
!!
!!
!!
!
!!
!
!!
!
!!
!
!!
!
!!
!
!!
!
!!
!
!!
!
!!
!
!!
!
!!
!
!!
!
!!
!
!!
!
!!
!
! ! !
! ! !
! ! !
! ! !! ! !
! ! ! ! ! ! ! ! !! ! !
! ! !
! ! !
! ! !
! ! !
!!
!
!!
!
!!
!
!!
!
!!
!
!!
!
!!
!
!!
!
!!
!
!!
!
!!
!
!!
!
!!
!!!
!
!!
!
!!
!
! ! !
! ! !
! ! !! ! ! ! ! !
! ! !
! ! !
! !!
!!
!
!!
!
!
! ! !
!!
!
!!
!
!!
!
!!
!
!!
!
!!
!
!!
!
130°0'0"W160°0'0"W
120°0'0"W 110°0'0"W 100°0'0"W
90°0'0"W
90°0'0"W 80°0'0"W 70°0'0"W
60°0'0"W 40°0'0"W 20°0'0"W
50°0
'0"N
50°0
'0"N
60°0
'0"N
60°0
'0"N
70°0
'0"N
40°0
'0"N
150°0
'0"W
20°0
'0"W
V
U
95°W100°W
55°N
60°N
V
U
V
U
95°W100°W
55°N
60°N
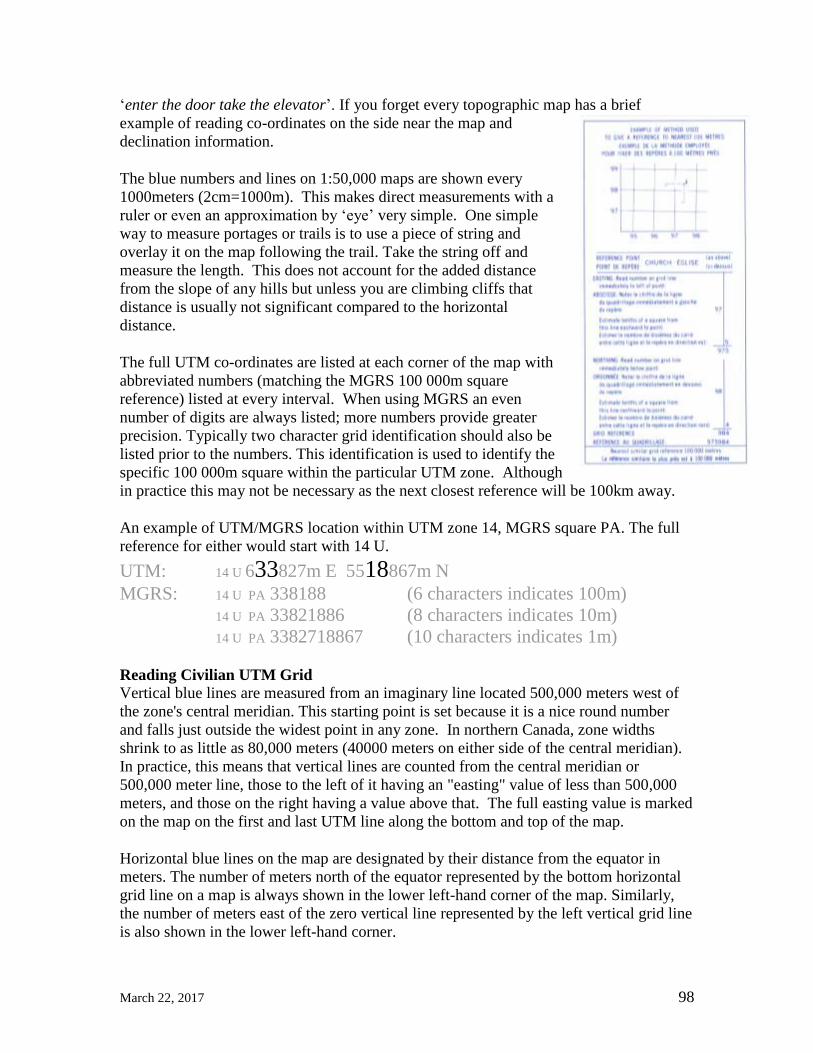
March 22, 2017 98
‘enter the door take the elevator’. If you forget every topographic map has a brief
example of reading co-ordinates on the side near the map and
declination information.
The blue numbers and lines on 1:50,000 maps are shown every
1000meters (2cm=1000m). This makes direct measurements with a
ruler or even an approximation by ‘eye’ very simple. One simple
way to measure portages or trails is to use a piece of string and
overlay it on the map following the trail. Take the string off and
measure the length. This does not account for the added distance
from the slope of any hills but unless you are climbing cliffs that
distance is usually not significant compared to the horizontal
distance.
The full UTM co-ordinates are listed at each corner of the map with
abbreviated numbers (matching the MGRS 100 000m square
reference) listed at every interval. When using MGRS an even
number of digits are always listed; more numbers provide greater
precision. Typically two character grid identification should also be
listed prior to the numbers. This identification is used to identify the
specific 100 000m square within the particular UTM zone. Although
in practice this may not be necessary as the next closest reference will be 100km away.
An example of UTM/MGRS location within UTM zone 14, MGRS square PA. The full
reference for either would start with 14 U.
UTM: 14 U 633827m E 5518867m N
MGRS: 14 U PA 338188 (6 characters indicates 100m)
14 U PA 33821886 (8 characters indicates 10m)
14 U PA 3382718867 (10 characters indicates 1m)
Reading Civilian UTM Grid Vertical blue lines are measured from an imaginary line located 500,000 meters west of
the zone's central meridian. This starting point is set because it is a nice round number
and falls just outside the widest point in any zone. In northern Canada, zone widths
shrink to as little as 80,000 meters (40000 meters on either side of the central meridian).
In practice, this means that vertical lines are counted from the central meridian or
500,000 meter line, those to the left of it having an "easting" value of less than 500,000
meters, and those on the right having a value above that. The full easting value is marked
on the map on the first and last UTM line along the bottom and top of the map.
Horizontal blue lines on the map are designated by their distance from the equator in
meters. The number of meters north of the equator represented by the bottom horizontal
grid line on a map is always shown in the lower left-hand corner of the map. Similarly,
the number of meters east of the zero vertical line represented by the left vertical grid line
is also shown in the lower left-hand corner.

March 22, 2017 99
If a given point on a map is positioned exactly at the intersection of a vertical and
horizontal line, its location may be read off simply from the map margins. Its full
designation or its "coordinates" would include the zone number, followed by the easting
and northing values. On a 1,000-metrer grid, these coordinates might read: Zone 14 U
357000 5476000. The values of the first vertical and horizontal lines appearing in the
southwest corner of the map are given in full. The other grid lines are numbered in an
abbreviated fashion matching the MGRS grid.
Few points, however, are conveniently located at grid
intersections. Usually the point to be described (such as in the
figure to the right) is somewhere between lines. In this case,
it is necessary to measure or estimate the distance to the
nearest vertical line to the west and to the nearest horizontal
line to the south and to add these metric values to the grid
values given at the margin. Since each grid represents 1000
it is generally fairly easy to estimate but you can also use a
roamer for more accurate measurements.
As in the above example, if a point is located 400 meters east
of the vertical line of 357 000, and 200 meters north of the
horizontal line of 5476000, its coordinates would be: Zone 14
357400 5476200. With these three numbers, any point on the
northern hemisphere can be unmistakably identified.
The civilian system of designating UTM Grid coordinates is
straightforward however it does require the use of large and
somewhat cumbersome figures. To get around this, military
map-makers have developed a somewhat different system consisting of a combination of
letter and numbers, the Military Grid Reference System.
This material updated from The Universal Transverse Mercator Grid, Department of Energy, Mines and Resources Canada, Surveys and Mapping Branch, Ottawa, © 1969, The Queen‘s Printer. See: http://maps.nrcan.gc.ca/topo101/index_e.php
Reading Military Grid Reference System
If there is no possible confusion about the map sheet on which the
reference falls, the Military Grid Reference System (MGRS)
provides a very quick and easy method of referencing. As previously
mentioned, topographic maps carry a rectangular grid with numbers
in the margin identifying the horizontal and vertical lines. On large-
scale maps (1/50 000 and larger) each number consists of two digits
To arrive at a map reference for the church shown in the figure, we
would first note the numbering of the lines that form the west and
south of the square by noting eastings then northings. The designation of the square
containing the church would be 9194.

March 22, 2017 100
To give a reference for the church itself, we must imagine the
square divided into 100 smaller squares (ten by ten). Then we
estimate by eye that the church is six tenths of the way
between lines 91 and 92, and four tenths of the way between
lines 94 and 95. Using these figures, we can quote the easting
as being 916 and the northing as 944. By convention these are
combined into a reference of 916944.
Even more precision can be obtained by using a roamer (a
small transparent card graduated with units of the proper scale) as shown to the left. With
the roamer, the reference can now be given as 91559435. Note that the reference always
has an even number of digits, the first half representing the easting, the second half the
northing.
The Military Grid Reference System is convenient, but unfortunately reference numbers
repeat themselves every 100 000 meters (100 km or about 62 miles). Therefore a method
has been devised to identify the 100 000-metre squares by letters which are printed in
blue on the face of all NTS maps and on the left side. This is particularly important in the
case of medium- and small-scale maps (1/250 000 and smaller), as unlettered references
are ambiguous on a single map. The identifying letters (two of them) are always given
before the numbers.
Here the church would be at UQ916944. This
reference is still not unique, but the same reference
does not occur again for about 2900 km. For most
purposes this is sufficiently unambiguous. If a
reference is required that is unique in the world, one
must look in the margin of the map for the Grid
Zone Designation. The zone number is followed by a letter which gives the general area
north or south of the equator in bands of 8 degrees. Therefore the unique designation of
the church if it were in the Ottawa area would be 15 U UQ916944.
This material updated from The Universal Transverse Mercator Grid, Department of Energy, Mines and Resources Canada, Surveys and Mapping Branch, Ottawa, © 1969, The Queen‘s Printer. See: http://maps.nrcan.gc.ca/topo101/index_e.php
Map Scale This is the ratio of map space to ‘real’ space. Typical scales for topographic maps in
Canada are 1:50,000 (1cm=500m), 1:250,000 (1cm=2500m). There are other scales
available but they are typically special purpose maps (e.g. 1:20,000 for Riding Mountain
National Park). Scale is a relative measure: Larger scale maps show greater detail but
less of the earth; Smaller scale maps show more of the earth but less detail.
Datum
On each topographic map you should find an indication of the ‘Datum’ for the map. It
seems pretty esoteric but this is something that you should check and account for
especially when transferring points to or from a GPS, or giving co-ordinates to someone

March 22, 2017 101
else. Current Canadian Topographic maps will all be based on the North American
Datum 83 (NAD83) but some older maps may be in NAD27 – the difference can cause
difficulties in finding things like portages. In Manitoba and north-western Ontario the
difference can be over 200m north/south.
Compass
Although you can pretty much get away with using just a map
when canoeing there are times that landmarks are difficult to see
(e.g. when walking a portage) and a compass can be a really
handy tool.
There are two types of compass that you will often find in
outdoor stores. A base plate or orienteering compass is the most
common and the type described in this manual. You may also find compasses called
lensatic, geologist, or military compass. The claim is you can get much better accuracy
when taking bearing readings from this second type of compass, which is may be true
when using high end compasses, but transferring information to/from a map is usually
much more difficult.
How does a magnetic compass work? The earth has a magnetic field that generally runs
in a north-south direction. The compass itself has a magnetic needle balanced inside that
aligns with the earths’ magnetic field (north/south). This provides a constant direction
and allows you to measure direction by counting the number of degrees off of this line.
When using a magnetic compass remember that there are things that will attract the
magnetic needle or disrupt the earth’s magnetic field. Most things that are steel or iron
such as a knife, belt buckle, batteries, or car engine will cause problems When traveling
in areas with iron ore deposits you can often come across significant magnetic anomalies
– be aware that this might happen and adjust as necessary.
Using a Compass (base plate or Orienteering)
• Hold the compass level, at waist height, with the
direction of travel arrow pointed in the direction you
want to go, or at a known land mark. Align yourself
and the compass so they are pointing (facing) the
same direction. Make sure there is nothing metallic
near the compass.
• Turn the rotating case until the red end of the needle is inside the orienting arrow.
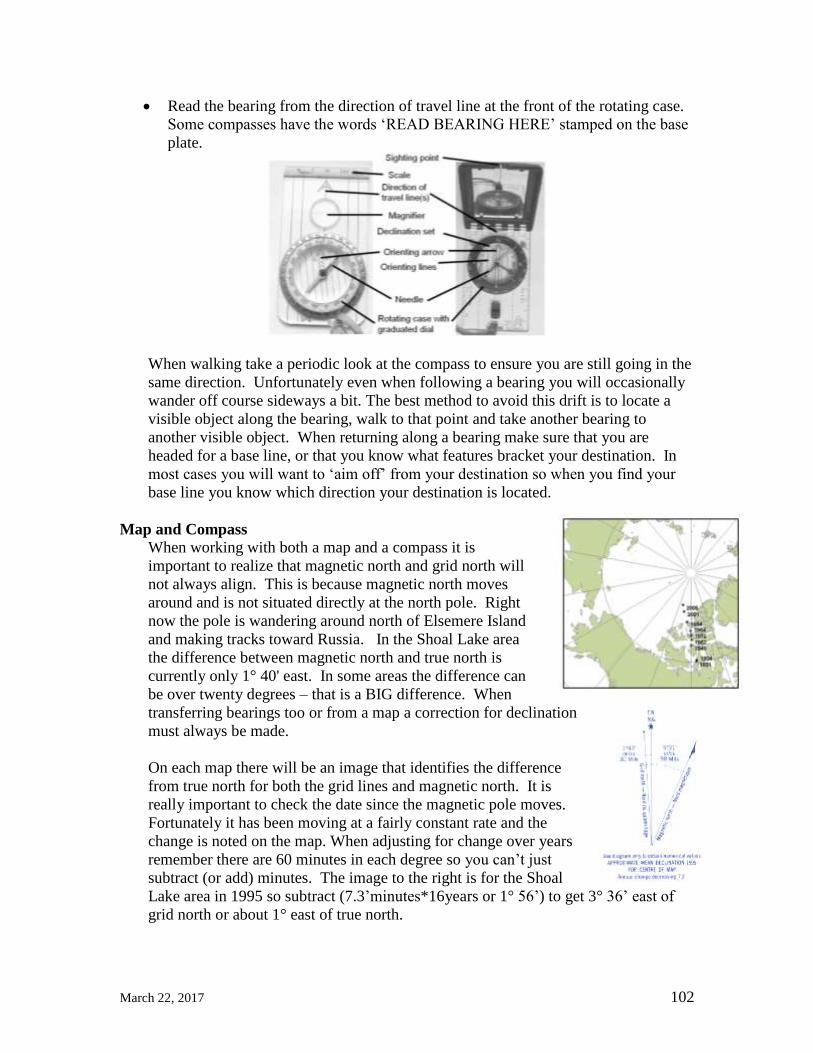
March 22, 2017 102
• Read the bearing from the direction of travel line at the front of the rotating case.
Some compasses have the words ‘READ BEARING HERE’ stamped on the base
plate.
When walking take a periodic look at the compass to ensure you are still going in the
same direction. Unfortunately even when following a bearing you will occasionally
wander off course sideways a bit. The best method to avoid this drift is to locate a
visible object along the bearing, walk to that point and take another bearing to
another visible object. When returning along a bearing make sure that you are
headed for a base line, or that you know what features bracket your destination. In
most cases you will want to ‘aim off’ from your destination so when you find your
base line you know which direction your destination is located.
Map and Compass
When working with both a map and a compass it is
important to realize that magnetic north and grid north will
not always align. This is because magnetic north moves
around and is not situated directly at the north pole. Right
now the pole is wandering around north of Elsemere Island
and making tracks toward Russia. In the Shoal Lake area
the difference between magnetic north and true north is
currently only 1° 40' east. In some areas the difference can
be over twenty degrees – that is a BIG difference. When
transferring bearings too or from a map a correction for declination
must always be made.
On each map there will be an image that identifies the difference
from true north for both the grid lines and magnetic north. It is
really important to check the date since the magnetic pole moves.
Fortunately it has been moving at a fairly constant rate and the
change is noted on the map. When adjusting for change over years
remember there are 60 minutes in each degree so you can’t just
subtract (or add) minutes. The image to the right is for the Shoal
Lake area in 1995 so subtract (7.3’minutes*16years or 1° 56’) to get 3° 36’ east of
grid north or about 1° east of true north.

March 22, 2017 103
If you want to avoid all of that calculation there is a real time declination
determination calculator that NRC has put on the web at:
http://geomag.nrcan.gc.ca/apps/mdcal-eng.php. Mark the declination adjustment in
pencil (remember it changes) on your map each spring.
Some compasses have a declination correction screw. This can make life really easy
if you always stay on one map – set it at the start of the year and don’t worry.
Unfortunately you if you move about you need to remember to re-set the declination
adjustment every time you move to a new location.
Transferring a bearing between Map and Compass.
Map (grid) to Compass (magnetic)
• Line up the side of the compass between your current position and the
position you want to reach. Make sure the direction of travel arrow is pointed
to the position you want to reach.
• Turn the rotating case until the orienting lines are parallel to the grid lines on
the map and the orienting arrow is pointed to the top (north) of the map.
• Remove the compass from the map and adjust for the declination. If the
declination is east then subtract the declination correction.
Compass (magnetic) to Map (grid)
• Take a bearing from your current position to a known map location or
landmark.
• Adjust for the declination. If the declination is east then add the declination
correction.
• Place the front corner of the compass on the landmark and rotate the base
plate until the orienting lines run parallel to the grid lines on the map. With a
pencil draw a line using the side of the compass through your current point.
Repeat the process with one or two more landmarks to triangulate your
position.
Easy ways to remember which way to correct for declination:
• Map to compass, east is least.

March 22, 2017 104
• Empty sea, add water (Map To Compass, Add West)
• Use a compass with a declination adjustment feature (just don’t forget to
re-set)
• Some people pencil in a magnetic north grid on the map before leaving
home.
Triangulation I don’t often use this in real life but it is an important tool to stick in your belt if you
have a general idea where you are compared to some easily visible landmarks – a
hill, the point of an island or bay, microwave/cell tower, etc… By taking a bearing
to two known points and drawing lines back from those points where the lines
intersect on the map is your location.
GPS
Using GPS is pretty easy. 1. Check to see how much of the sky you can see, the more the
better. 2. Turn on the GPS receiver and let it sit for a while to get a fix. 3. Read the co-
ordinates. This section provides an overview of the GPS system, terminology, some
jargon, and a little on usage.
Theory
GPS, or Global Positioning System, is the common name given to several space based
satellite navigation systems, the most widely used and known is the American
NAVSTAR. When most of us think or hear GPS we think of a hand held receiver these
are only the smallest end user component of the system. The system as a whole also
includes at least 24 satellites and a number of known ground stations that all work in
concert.
In very general terms all of the satellites ‘know’ exactly where they in space relative to
each other and to the ground based stations. Each satellite transmits a radio signal with a
time stamp and some information on the location of the satellite (this is a GPS sentence).
Using this information your small receiver can calculate where exactly it is located on the
surface of the earth through something called trilateration. If the GPS receiver can only
‘see’ one satellite the distance (time) to the satellite is known (e.g. somewhere in a
20,000km circle) , with two satellites the GPS can narrow things down a bit by finding
where the two distance circles overlap (still a really big area). With three satellites the
point at which all of the circles overlap is the location. With four satellites a rough
elevation can be calculated. Most current GPS receivers will use more than the minimum
of satellites at the same time to provide an over determined solution.
Three Satellites

March 22, 2017 105
Considering the satellites are 20,000km above the surface of the earth it is pretty
impressive that the basic accuracy is usually within 10-15m. This accuracy can be
improved by using a Wide Area Augmentation System (WAAS) taking the accuracy
down to 3-5m.
The final determined location is not perfect; there is always some level of error associated
with the final point. This error comes from a few sources and understanding these
sources will help if you want to improve the location estimate. There is some error
caused by the signal travelling through the atmosphere and a little because there is
possibly some ‘wobble’ in the satellite orbit and clock accuracy. These are things that we
can’t do anything about ourselves but the WAAS can help correct.
There are some sources of error that we can adjust for by understanding the limitations of
the signal and how locations are calculated. The radio signals that are used by GPS are
relatively weak and are blocked by anything containing water, metal or rock. In a very
basic sense if you can see the sky you should be able to get a signal. Buildings, trees, and
cliffs all block the signal so move to where you have a better sky
view. The other significant cause of error is the arrangement of the
satellites in the sky. If the satellites are all clumped together then
getting a good location is often a problem. If the satellites are spread
out over the sky it is easier to get a good location. Since the satellites
move at 2.6km/second wait a bit and the constellation arrangement
will improve. Because the GPS needs to receive a whole sentence
from each Satellite the first fix or location that the receiver gets after
turning it on may not be the best. Wait a while, sometimes 15 or 20
minutes will be required, for more information to be collected from
more satellites to obtain the ‘best’ possible solution. The system was made specifically to
work in all kinds of weather; if it is raining or snowing hard enough to cause a significant
degradation to the signals then you probably have much worse things to worry about.
Getting a pin point within 10m is pretty impressive but when we are canoeing with our
maps and compasses getting even within 100m should be enough for most purposes.
You might hear people talking about the American government adding a random error in
the signals. This degradation was called Selective Availability (SA) and was turned off
at midnight May 1, 2000 at the direction of President Bill Clinton.
Datums
Under the maps section we looked at datums and why they might be important. When
working with a GPS receiver the default datum is WGS84 (which is basically the same as
NAD83). If you are using only a GPS by itself which datum you set is generally not
important since the whole system references back to its base system. If you are working
with a map and GPS or someone else is giving you co-ordinates then the Datum in your
GPS must be set to match the source.
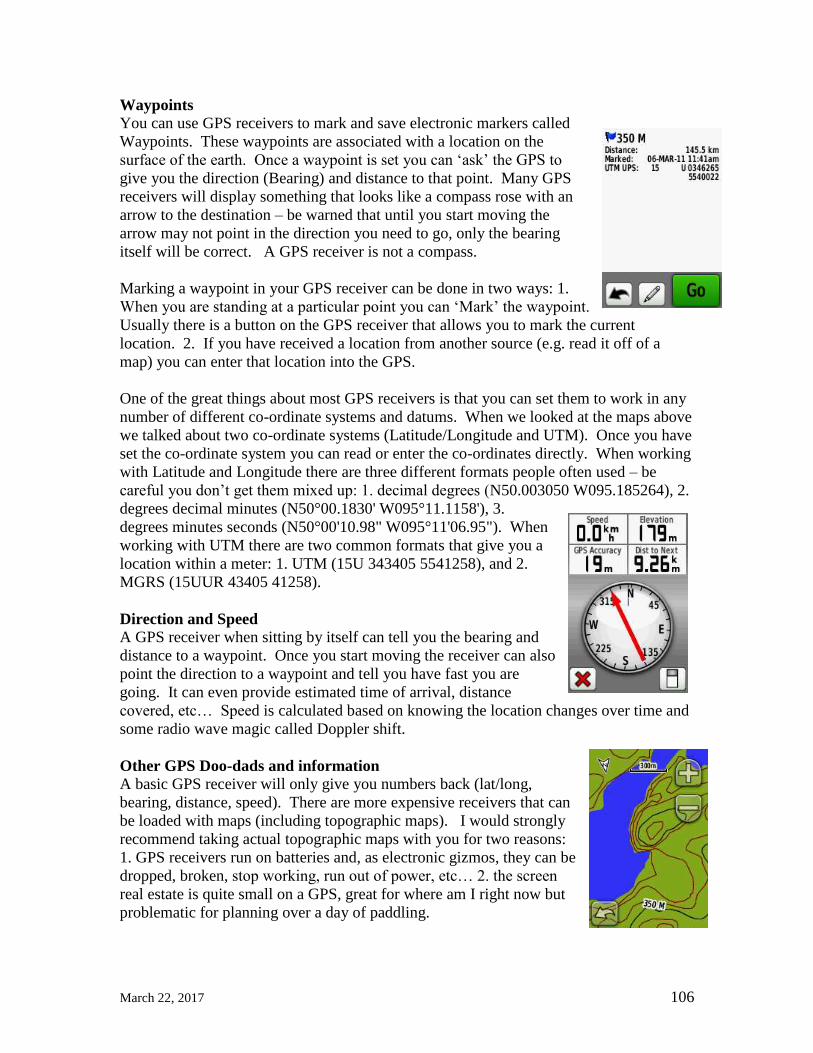
March 22, 2017 106
Waypoints
You can use GPS receivers to mark and save electronic markers called
Waypoints. These waypoints are associated with a location on the
surface of the earth. Once a waypoint is set you can ‘ask’ the GPS to
give you the direction (Bearing) and distance to that point. Many GPS
receivers will display something that looks like a compass rose with an
arrow to the destination – be warned that until you start moving the
arrow may not point in the direction you need to go, only the bearing
itself will be correct. A GPS receiver is not a compass.
Marking a waypoint in your GPS receiver can be done in two ways: 1.
When you are standing at a particular point you can ‘Mark’ the waypoint.
Usually there is a button on the GPS receiver that allows you to mark the current
location. 2. If you have received a location from another source (e.g. read it off of a
map) you can enter that location into the GPS.
One of the great things about most GPS receivers is that you can set them to work in any
number of different co-ordinate systems and datums. When we looked at the maps above
we talked about two co-ordinate systems (Latitude/Longitude and UTM). Once you have
set the co-ordinate system you can read or enter the co-ordinates directly. When working
with Latitude and Longitude there are three different formats people often used – be
careful you don’t get them mixed up: 1. decimal degrees (N50.003050 W095.185264), 2.
degrees decimal minutes (N50°00.1830' W095°11.1158'), 3.
degrees minutes seconds (N50°00'10.98" W095°11'06.95"). When
working with UTM there are two common formats that give you a
location within a meter: 1. UTM (15U 343405 5541258), and 2.
MGRS (15UUR 43405 41258).
Direction and Speed A GPS receiver when sitting by itself can tell you the bearing and
distance to a waypoint. Once you start moving the receiver can also
point the direction to a waypoint and tell you have fast you are
going. It can even provide estimated time of arrival, distance
covered, etc… Speed is calculated based on knowing the location changes over time and
some radio wave magic called Doppler shift.
Other GPS Doo-dads and information
A basic GPS receiver will only give you numbers back (lat/long,
bearing, distance, speed). There are more expensive receivers that can
be loaded with maps (including topographic maps). I would strongly
recommend taking actual topographic maps with you for two reasons:
1. GPS receivers run on batteries and, as electronic gizmos, they can be
dropped, broken, stop working, run out of power, etc… 2. the screen
real estate is quite small on a GPS, great for where am I right now but
problematic for planning over a day of paddling.

March 22, 2017 107
If you move more than about 300km or have left the GPS receiver turned off for a long
period (e.g. a month) then it will not know where it is or the time. In these situations it
might take a while (e.g. 15minutes) for the GPS receiver to find satellites, listen to their
whole sentences, and calculate a location fix. If the GPS receiver has been turned on
recently and it has not moved very much since the last time it was used getting a locked
on fix generally takes much less time (e.g. 30 seconds).
Remember GPS receivers run on batteries so you will likely want to bring some extras.
Typically when I am out wandering (paddling) around in the wilderness I turn on the
GPS occasionally if I need to find out where I am or mark a waypoint. Between those
times I use my map and compass which allows me to maximize my battery life so the
GPS will work when I really need it.
Other Navigation (hints)
If you are really lost – don’t wander around. You filed a plan (right?), someone will
come to find you when you are late returning. Occasionally you will end up a little
disoriented and just need some help (don’t count on your intuition unless you want to
walk in circles). Remember the first advice above, periodically take a look around,
sometimes just stopping and taking a rest, eating a snack, and thinking about what you
noticed before will help you orient yourself.
If you know there is a large baseline or handrail (like a river)
in a certain direction you can use some environmental
references for working out direction.
• In the northern hemisphere if you point the hour hand
on your watch toward the sun the half-way point to 12
is roughly south. The error can be pretty substantial
depending on the time of year, daylight savings time,
which side of the time zone you are in, etc… but if the
baseline is big enough it might not matter.
• Push a stick into the ground in a sunny clear location. Mark the top of the stick
periodically and see where the top of the shadow
moves. Knowing that the sun rises in the east (west
shadow) and sets in the west (east shadow) you can
fairly easily create an east-west line over time.
• If the moon is in a crescent phase simply draw an
imaginary line through the tips of its "horns" down
to the horizon. The point where it touches is roughly
South for the northern hemisphere. This is a pretty
crude measure but, again, if you baseline is big it
might just get you to a point you recognize. Personally I would strongly suggest
staying put (don’t walk around) in the dark.
• Use the North Star or Pole Star to determine the direction. Unfortunately the Pole
Star is not very bright and can be difficult to find. Fortunately it does not move
around and there are a few markers that point where to look. The Big Dipper,
Little Dipper, and Cassiopeia are helpful when looking for the Pole Star.

March 22, 2017 108
o Find the Big Dipper in the sky. Follow the
edge of the cup 5 times its length toward a
medium bright star on the end of the little
dipper handle. You have found the North Star,
which is virtually north.
o To double check that it’s really the North
Star, locate Cassiopeia. The North Star resides
halfway between Cassiopeia and the Big
Dipper.
If you want to find your Latitude all you need to do is measure the angle formed
between the horizon and the polestar. Using your Latitude and Longitude you can
generate a sky map with the TAU Astronomy Club Website
(http://astroclub.tau.ac.il/skymaps/monthly/index.php)
• There are a few other stories out there about ways to find general directions –
these are all pretty unreliable and are greatly affected by local conditions. Sea
breezes (some very large lakes) blow into the land in the afternoon and at night it
blows back to the sea. In the north, near the tree line, branches on the stunted
trees are often smaller or sheared off on the north/north west side. Moss and
lichens grow more richly on the north side of the tree (rock) where there is more
moisture (really don’t count on this).

March 22, 2017 109
Environment Canada Surface Analysis Chart
Weather (Continental North America)
When out canoeing it is important to keep track of the weather. Watching the clouds,
feeling the wind, and noticing temperature change can tell you a lot about what kinds of
weather are coming. If you have a barometer (either on your GPS or your watch)
keeping track of the change in pressure including the rate of change is also useful. Before
leaving on any outing you should have an idea of what the weather will be like during the
day – listen to the radio, check with Environment Canada, get a forecast. Even if the
weather looks like it will be ‘good’ be prepared for a change. There are a few little
verses that can provide some hints for what is coming as well.
To begin with it is important to know something about why weather happens. Weather,
simply put, is the local and current state of the atmosphere – is it sunny, rainy, windy,
etc… It is driven by differences in air density due to moisture and temperature between
once place and another. Pretty simple right!? Weather forecasting is trying to figure out
what the weather will in the future by understanding what causes weather to change – it is
not quite as easy.
On a global (or even continental scale) weather is driven by a small number of factors.
1. The sun warms the earth, 2. Air flows (wind) between warm and cold or high and low
pressure areas, 3. The rotation of earth modifies how the air flows.
The air forms into large ‘masses’ that do not mix well on a continental scale. Over the
middle and north of the continent cooler high pressure masses form and warmer lower
pressure masses form over the water. Air does flow from higher pressure areas to lower
pressure & where these air masses meet there is a region of significant weather change
called a front. Typically whole air masses
moves from west to east. Air pressure is
typically measured in millibars(mb) which
have a typical range 980-1050. The normal sea
level pressure is 1013.23(mb). In SI units the
equivalent is a hectopascal or 100 pascals (just
in case you hear that word). Environment
Canada reports kilopascals (kPa) or 1000
pascals with a range of 98-105.
Due to the rotation of the earth air flowing into
a low pressure area will cycle around in a
counter clockwise direction (in the northern
hemisphere). This is important to remember
since changing unstable weather is often
associated with low pressure systems and
keeping track of these lower pressure systems
will help with forecasting weather over the next day, or possibly two.

March 22, 2017 110
Fronts Cold Fronts
Cold fronts are formed at the leading edge of cooler air usually in association with
a high pressure air mass. These fronts move fairly quickly (750km/day) and
squeeze underneath the air mass that they are pushing causing it to rise. There is
a sharp change in weather often with showers or thunderstorms forming. After
the front passes high pressure areas are typically associated with dryer clearing
weather.
Look for cirrus, cirrostratus, and cumulonimbus as the front approaches, generally
in fairly quick succession. The cumulonimbus clouds often form thundershowers
that are followed by light showers and clearing with west or north-west winds
after the front passes.
Warm Fronts
Warm fronts are formed on the leading edge of warmer lighter air masses. They
are usually slower moving (500km/day) and come with longer periods of cloud
and rain. They push up slowly over higher pressure air and form extensive cloud
cover and precipitation. After the front passes expect little change in temperature
and continued light precipitation.
Look for broad slowly increasing cloud cover in the order cirrus, cirrostratus,
altostratus, nimbostratus, and then stratus with fog possibly forming.
Occasionally in the summer cumulonimbus clouds also form indicating more
violent weather. Generally precipitation starts as the front approaches and
continues as it passes.
Occluded and Stationary Fronts
Just to make life more interesting the world will throw some curve balls. Cold
fronts will often catch up to warm fronts creating what is called an occluded front
which is usually associated with gusty unpredictable and possibly violent weather.
These fronts are generally associated with a mature slow moving low pressure
system. The passage of an occluded front usually means a dryer air mass is on its
way. Stationary fronts can also happen, basically the weather stalls and you keep
getting the same thing…
With a little bit of knowledge you can sometimes figure out what weather might be
coming your way later in the day or the next day. Beyond the next day you might want to
just guess. Not any one factor works all the time but put a few of them together over the
period of a day you might do pretty well at impressing your friends.
Knowing the Low
Low pressure systems (often approaching as warm fronts) tend to have stronger
associated winds than the lighter more fickle high pressure winds. As a paddler you
should be more interested in the less pleasant weather associated with warm fronts and
low pressure systems.

March 22, 2017 111
To figure out where you are in relation to a low, put your back to the wind and point your
left hand straight out; your hand points to the nearest low. This is also known as Buys
Ballot's Law. Knowing that weather patterns tend to move west to east; if the low is
west then unsettled weather will be on its way – often you will have a few days of
‘weather’. You might want to check a few times during the day to see where the low
might be tracking.
If you have a barometric pressure monitor (or barometric altimeter) it can help predict
changes in weather as well. Since we are not climbing in Manitoba or NW Ontario use
your barometer for watching the weather instead of elevation. High and low pressure
values by themselves are not really that useful but a change can say a lot. If there is a
dramatic change, especially decreasing, watch out for more violent weather. The more
rapid and extreme the pressure change over a few hours, the more extreme the weather
change. This is particularly true when barometric pressure changes are associated with
wind changes. If the pressure is changing by more than 1 mb/hour with a downward
tendency expect stormy weather. If you see an upward and quick change, storminess is
moving out and clearing may be coming in the very near future although it may be quite
windy.
Typical Wind and Pressure Patterns (modified from Tim Herd) Wind
Direction
Barometric
Pressure (mb)
Pressure
Tendency
Weather Indications
SW to NW 1010-1023 Steady Fair with slight temperature changes for 24-48 hours
SW to NW 1019-1023 Rising
rapidly
Fair, followed by precipitations within 48 hours
SW to NW 1023 & above Falling
slowly
Slowly rising temperature and fair next 48 hours
S to SE 1019-1023 Falling
slowly
Precipitation within 24 hours
S to SE 1019-1023 Falling
rapidly
Increasing wind, precipitation within 12-24 hours.
SE to NE 1019-1023 Falling
slowly
Precipitation within 12-18 hours
SE to NE 1016 & below Falling
slowly
Precipitation continues 24-48 hours
SE to NE 1016 & below Falling
rapidly
Precipitation, with high wind, followed by clearing
within 36 hours, and in winter, by colder temperatures.
E to NE 1019 & above Falling
slowly
Summer: light wind, no rain for several days. Winter:
precipitation within 24 hours.
E to NE 1019 & above Falling
rapidly
Summer: rain probably within 12-24 hours. Winter:
precipitation with increasing winds.
S to SW 1016 & below Rising
slowly
Clearing within a few hours, then fair for several days.
S to E 1009 & below Falling
rapidly
Severe storm imminent, clearing within 24 hours
followed by colder in winter.
E to N 1009 & below Falling
rapidly
Severe gale and heavy precipitation; in winter
followed by colder temperatures
Toward W 1009 & below Rising
rapidly
Clearing, colder.

March 22, 2017 112
Watch the clouds
Cirrus clouds, those high altitude wispy things, are your long-range forecasters. Keep an
eye on them if you see these gradually thickening and forming cirro-stratus or ‘mackerel
skies’ you have a warm front on the way with a lower pressure system. Tie this in with
the wind direction and pressure change and you are getting somewhere.
Cumulus clouds, or "fair-weather clouds," are the middle range of cloud which are
characteristically white, fluffy, and lend themselves to imaginary shape-shifting. These
are the happy-go-lucky clouds of the trade winds and high-pressure systems. If
uncomplicated by further development, a parade of these simple cumulus clouds against a
blue sky, absent of any cirrus or cirro-cumulus background, is a good indicator of decent
or calm weather ahead
Cumulo-nimbus clouds result when cumulus clouds build up into the shape of a
blacksmith's anvil. The heat of a summer day often causes morning's innocent cumulus
fluff-balls to develop into towering anvils with white tops and very dark lower edges
(squall lines) by late afternoon. The good news is that cumulo-nimbus developments tend
to be very localized, though potentially extremely powerful in their vicinity. Because of
their tremendous height from top to bottom, you can spot them a long way off on the
water.
Red Sky at night sailors delight (breaking clouds to the west with sun below)
Know your Clouds Clouds form when warm moisture carrying air moves upward through the troposphere
and cools down causing the moisture to precipitate out into water droplets. The upward
movement may be caused by several things: a cooler air mass undercutting a warm air
mass, a warm air mass pushing up over a cooler mass, motion of air and wind over a
rough terrain, convective currents over an unevenly heated surface. Upward movement
next to mountains also happens but that is not really a significant feature here in north-
western Ontario.
Clouds form in four very broad families based on the height of the cloud base and upward
air movement – low, middle, high, and convective. Convective clouds are formed by
convective currents, those that gliders like to use, rising from the ground level. The bases
of convective clouds overlap the low and middle level clouds. Clouds within these four
families are named for their appearance and the approximate height of their bases. The
names are derived from combinations of the Latin words cirrus (curl or lock of hair),
stratus (stretched out or layered), cumulus (heap), alto (middle), and nimbus (rain).

March 22, 2017 113
Canada Cloud Chart (2010)
March 22, 2017 114
Cloud Types & Meaning The descriptions on the clouds and cloud types are based primarily from the Environment
Canada Cloud Chart (2010).
High Clouds Cirrus Clouds – 6-12km
Delicate; detached, stringy bands; isolated tufts; mare’s
tales. If they drift slowly or stay still, fair weather
indicated. Moving rapidly, followed by more clouds, foul
weather
Cirrocumulus – 6-12km
Ringlet heap; ‘mackerel sky’, Often appearing as
extensive sheets. Often seen on the fringes of low
pressure systems. No shadows. Changeable weather
Cirrostratus – 6-12km
White, thin sheet; may cover sky completely or appear in
bands.. May form a halo around sun or moon. Usually
indicates a large weather system and a change in weather
within 24 hours. Rain when they thicken
Midlevel Clouds Altocumulus – 2-6km
Lumpy pattern of flat, globular masses; white or grayish.
Often forming bands across the sky. Often in larger
group, closely packed with edges unclear. If in domed
shape, a thunderstorm is possible. Small, isolated patches
likely mean good weather. If thickens into solid bank and
moves from south or west expect rain within 12 hours.
Altostratus – 2-6km
Thick sheet; grey or blue/grey. White spot in region of
moon or sun but no halo. There is no shadow cast by
objects on the ground. Often progress from Cirrostratus..
Thickening may mean rain

March 22, 2017 115
Lower Clouds Stratocumulus – near surface to 2km
Large globular masses or rolls of dark clouds with a flat
bottom. May evolve from Cumulus clouds that have lost
form. May cover whole sky but blue patches often
present. May precede or follow a storm and rain from
these clouds alone is not intense.
Stratus – surface to 450m
Low, uniform; indefinite shape with little internal air
movement. Gives a hazy appearance. May become fog
on water’s surface. Often present during a light steady
rain or drizzle. When formed at ground level this is fog.
Nimbostratus – near surface to 2km
Dark, dense, thick covering entire sky that blocks sun
completely; no shape, ragged edges. Steady all day
rainfall
Cumulus – 450m-3km (Convective clouds)
Upper edges curved, lower edges flat; clean, detached
fluffy puff balls with defined base. Flattened tops indicate
stable air mass above limiting growth. When black or
grey, possible thunderstorm. If they grow in elevation,
they may develop into cumulonimbus. Small isolated
patches indicate good weather
Cumulonimbus – 450m-3km (convective Clouds
Possibly the most dangerous Thunderstorm clouds. High
vertical development; anvil top. Storm, weak or strong.
Expect strong winds and heavy rain. Passes quickly, over
a relatively small area of the earth’s surface
Cumulonimbus Mammatus
Subsiding or sinking air causes these bulging structures to
form on the bottom of cumulonimbus clouds. Although
typically harmless the parent cloud may produce severe
weather.

March 22, 2017 116
Fog
When visibility drops below 1km at ground level you have fog, at this distance keeping
track of where you are on lakes can be difficult. The formation of a fog layer occurs when
a moist air mass is cooled to its saturation point (dew point): cold water and relatively
warm air often create fog, or warm water and colder air, a drop in temperature with high
humidity can cause fog. Generally fog will only form when there is little or no wind.
Fog often forms early in the morning and will burn off before lunch. Fog can be
disorienting and it is easy to get lost, being lost in the fog is no laughing matter. Keep
close to the shore or don’t go out. Use a compass or GPS to ensure you keep moving in
an appropriate direction.
Thunderstorms, lightning.
You should always watch and understand the weather that is coming and get to shore
before bad weather forms. When there is a risk of lightning keep away from lone trees
and open areas (outcrops/hills), stay low crouching with your feet together on a mat or
sitting on your pack. More lightning fatalities occur from current traveling across the
ground than from a direct strike so minimize the chance of being part of the ground
current. The time between a flash and thunder gives you an idea of the distance of the
storm (count seconds and divide by 5 to get miles, divide by 3 for km). A distance of at
least 10km (30 seconds) is a reasonably safe distance when seeing a flash. You should
wait for at least 30 minutes after the last flash is seen or thunder is heard before heading
out again. Most lightning experts agree, either the sound of thunder or seeing lightning,
no matter how far away, means you should take shelter.
Wind
Wind forms from the movement of air from high pressure areas to lower pressure areas.
The strength and direction can provide a lot of information about the local weather, and
what might be coming. As paddlers it is important to understand the interaction of the
wind on the water, forming waves, and how the canoe can act as a sail and be blown
around. Larger bodies of water can even create wind based on the temperature differential
between the water and the land. Onshore during the day, off shore in the evening and
night, these winds are not typically very strong.
Before setting out from a shore you should check if your
are on the windward or lee side of the land. When on the
lee side the wind is blowing off shore and it is often
difficult to tell how strong the wind is and how large the
waves will be out on the lake. When leaving a lee shore
check the wind by looking, and listening, to the wind as it
flows through the trees above you. Do not plan to make
open crossings from this situation because by the time you
realize that it might be stronger than you expect it will often
be too late and at best you can expect is to rough it out, at
worst, well... When on the windward side you will have
the full force of the wind and waves. It is difficult to launch and land in these conditions.

March 22, 2017 117
When there are windy conditions, or you expect wind, plan to paddle where there is
protection, if not from the wind at least from the waves. Islands and the lee side of
shallow water help break up the waves.
Estimating Speed (Beaufort Scale) In 1805 Francis Beaufort, a British Navel officer, introduced a scale from 0 -12 for
measuring the speed of the wind at sea. He used everyday terms for each level of his
scale. It is now used to describe the effect of wind on the surface of the water as well as
on a range of everyday objects on the land – from smoke to flags, trees and roof tiles.
Since it uses common everyday items it is a useful tool for estimating the speed of the
wind which will help you decide if you should head out and the potential size of the
waves. The following table is for general information you should decide on the
conditions yourself based on experience if it is safe to paddle.
Beaufort Scale Wind Speed Conditions Surface
KM/H * MPH Knots
0 Calm 0-1 0 0 Smoke rises vertically. Water surface is like a mirror.
Nice paddling. Calm
1 Light Air 1-5 1-3 0.8-2.6 Smoke drifts. Ripples on the water without foam crests. Calm
2 Slight
Breeze 6-11 4-7 3.5-6.1
Leaves rustle, weather vanes move, wind felt on face.
Small wavelets without breaking crests. Smooth
3 Gentle
Breeze 12-19 8-12 7.0-10.4
Light flags unfurl, leaves and twigs on trees move steadily
Large wavelets some scattered white horses. Solo paddling
becomes difficult. Smooth
4 Moderate
Breeze 20-28 13-18 11.3-15.6
Small branches move, loose dust and paper fly about.
Small waves frequent white caps,. Inexperienced should
stay on shore. Tandem paddling becomes difficult. Slight
5 Fresh
Breeze 29-38 19-24 16.5-20.9
Leafy shrubs and trees sway. Moderate waves, many white
caps. Very difficult to paddle tandem, rescues will be very
difficult. Limit for most canoeists. Moderate
6 Strong
Breeze 39-49 25-31 21.7-26.9
Big branches move, wind pulls umbrellas. Large waves,
many white caps. White foam forms and some spray off of
the waves. Small craft warnings issued. Limit for most
kayaks.
Rough
7 High Wind 50-61 32-38 27.8-33.0
Trees sway, walkers push into the wind. Large waves,
white foam forms and blown in streaks. Communication is
difficult.
Very Rough
8 Gale 62-74 39-46 33.9-40.0 Twigs break off trees, walking is hard.. Very large waves,
crests break into spindrift. High
9 Strong Gale 75-88 47-54 40.8-46.9 Shingles, slates, and branches are blown off. Slight
building damage. Very high
10 Storm 89-102 55-63 47.8-54.7 Serious building damage trees uprooted Very high
11 Violent
Storm 103-117 64-72 55.6-62.6 Widespread damage, wild storm. Very high
12 Hurricane 117> 73> 63.4> Violent destruction of buildings & vehicles Very high
Coping with wind Adjust canoe trim either by shifting packs or changing paddling positions. Keeping the
canoe trim or slightly weighted into the wind helps, most of the weight should still be
centred into the canoe allowing the ends to ride up and over waves. Care must be taken
when using canoes that have high sides or bow/stern decks which will catch the wind and
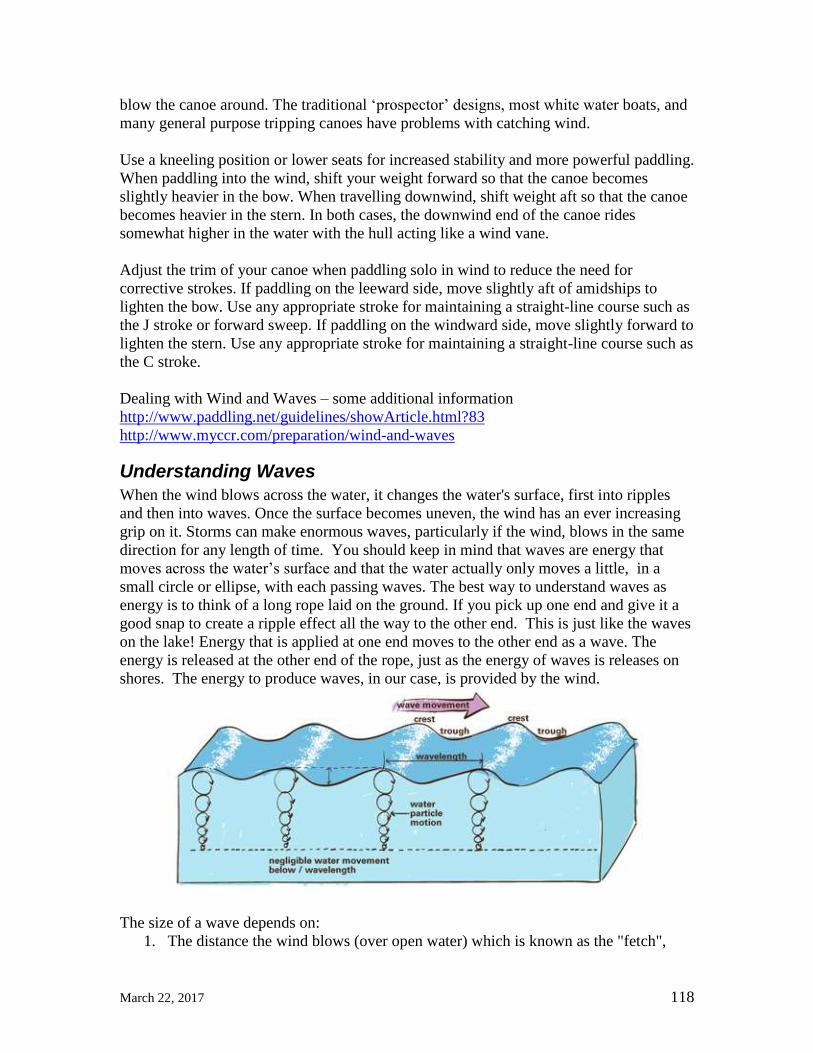
March 22, 2017 118
blow the canoe around. The traditional ‘prospector’ designs, most white water boats, and
many general purpose tripping canoes have problems with catching wind.
Use a kneeling position or lower seats for increased stability and more powerful paddling.
When paddling into the wind, shift your weight forward so that the canoe becomes
slightly heavier in the bow. When travelling downwind, shift weight aft so that the canoe
becomes heavier in the stern. In both cases, the downwind end of the canoe rides
somewhat higher in the water with the hull acting like a wind vane.
Adjust the trim of your canoe when paddling solo in wind to reduce the need for
corrective strokes. If paddling on the leeward side, move slightly aft of amidships to
lighten the bow. Use any appropriate stroke for maintaining a straight-line course such as
the J stroke or forward sweep. If paddling on the windward side, move slightly forward to
lighten the stern. Use any appropriate stroke for maintaining a straight-line course such as
the C stroke.
Dealing with Wind and Waves – some additional information
http://www.paddling.net/guidelines/showArticle.html?83
http://www.myccr.com/preparation/wind-and-waves
Understanding Waves
When the wind blows across the water, it changes the water's surface, first into ripples
and then into waves. Once the surface becomes uneven, the wind has an ever increasing
grip on it. Storms can make enormous waves, particularly if the wind, blows in the same
direction for any length of time. You should keep in mind that waves are energy that
moves across the water’s surface and that the water actually only moves a little, in a
small circle or ellipse, with each passing waves. The best way to understand waves as
energy is to think of a long rope laid on the ground. If you pick up one end and give it a
good snap to create a ripple effect all the way to the other end. This is just like the waves
on the lake! Energy that is applied at one end moves to the other end as a wave. The
energy is released at the other end of the rope, just as the energy of waves is releases on
shores. The energy to produce waves, in our case, is provided by the wind.
The size of a wave depends on:
1. The distance the wind blows (over open water) which is known as the "fetch",

March 22, 2017 119
2. The length of time the wind blows, and
3. The speed of the wind.
Undeveloped waves, usually from a short fetch, recent wind or shallow(ish) water,
generally have a shorter wave length and are typically fairly steep. The wind will
continue to add energy and as waves develop eventually approaching the speed of the
wind. As deep water waves ‘mature’ they become more rounded with a longer
wavelength. These long waves are called swells. Except on large deep lakes swells are
not often seen in our area. When approaching shallower water (the shore) waves will
become steeper because they start to ‘drag’ along the bottom. This drag causes the
bottom to slow down and the top to start to lean forward; the wave length is shortened at
the same time. Steep waves will begin to topple over on themselves forming breakers
when the steepness approaches an angle of 1:7. Waves start to drag when the water is
shallower than half the wave length.
An idea of deep water wave height and wave length based on wind speed and fetch.
Wind 2km Fetch 5km Fetch 10km Fetch
km/hr m/s Height Length period s Height Length period s Height Length period s
5 1.39 0.02 0.27 0.61 0.02 0.31 0.70 0.03 0.41 0.76
10 2.78 0.05 0.67 0.97 0.08 1.07 1.22 0.11 1.44 1.41
15 4.17 0.09 1.09 1.18 0.14 1.77 1.54 0.19 2.46 1.83
20 5.56 0.13 1.48 1.35 0.21 2.50 1.78 0.28 3.48 2.14
25 6.94 0.17 1.87 1.49 0.27 3.11 1.96 0.38 4.51 2.39
30 8.33 0.21 2.22 1.6 0.34 3.78 2.13 0.47 5.44 2.6
35 9.72 0.26 2.61 1.7 0.41 4.43 2.28 0.57 6.37 2.77
40 11.11 0.31 3.00 1.8 0.48 5.05 2.41 0.66 7.26 2.94
Measurements: wind as meters/second, height in meters, length in meters, period as seconds.
The numbers in the above table are for fully developed waves in open water with several
hours of constant wind. Shorter periods of time might produce smaller steeper waves
with shorter periods. As the waves approach the shore or shallow water they will become
steeper (breaking), with shorter wave lengths.
The calculations were based on: USGS Fetch and Depth limited wave calculations
http://woodshole.er.usgs.gov/staffpages/csherwood/sedx_equations/RunSPMWave.html
and http://wiki.answers.com/Q/How_do_you_calculate_wavelength_without_velocity

March 22, 2017 120
Just too really confuse things the lakes that we generally paddle on have islands and bays
which cause waves to refract and reflect. This can cause choppy appearing surfaces due
to waves going in several directions. To make matters worse often these reflected and
refracted waves can get together to form high steep peaks – it very difficult to paddle in
this kind of mess.
Although water only moves a little with the passage of each wave over a long period of
wind water can pile up by being pushed by the wind and by air pressure across the large
lake. This feature is often referred to as wind set-up and can raise the water level on
larger lakes (Lake Winnipeg for example) fairly substantially – especially if the lake is
relatively shallow so there is less reverse flow along the bottom. Once the wind dies
down the water will flow back as a long wave called a seiche (French meaning “to sway
back and forth”), this wave will slosh back and forth across the lake raising and dropping
the water level until it settles at an equilibrium. This long wave is often confused with
tides (seiche tide) on larger lakes. Although this type of event will usually not be noticed
on smaller lakes it is important to remember when beaching on shallow shore lines of
large lakes since the water level can rise and fall on both sides of the lake for some time

March 22, 2017 121
after a sustained wind or strong weather system passes; if you are not wary your boats
can float away.
Wave Parts
The crest is the highest part of the wave and the trough is the lowest. The distance
between the crest and the trough is the wave height. The distance from crest to crest is the
wave length. The period of a wave is the time it takes for each crest to pass a certain
point.
• STILL-WATER LINE - The level of the lake if it were flat without any
waves.
• CREST - The highest part of the wave above the still-water line.
• TROUGH - The lowest part of the wave below the still-water line.
• WAVE HEIGHT - The vertical distance between the crest and the trough.
• WAVE LENGHTH - The horizontal distance between each crest or each
trough.
• WAVE STEEPNESS - The ratio of wave height to wavelength is the
wave's steepness.
• WAVE PERIOD - The time it takes for two successive waves to pass a
particular point. For example, it you are standing on a pier and start a
stopwatch as the crest of a wave passes and then stop the stopwatch as the
crest of the next wave passes, you have measured the wave period.
• WAVE FREQUENCY - The number of waves that pass a particular point
in a given time period.
• APMLITUDE - The amplitude is equal to one-half the wave height or the
distance from either the crest or the trough to the still-water line.
More information on waves:
http://www.waterencyclopedia.com/Tw-Z/Waves.html
http://en.wikipedia.org/wiki/Wind_wave
http://www.seafriends.org.nz/oceano/waves.htm

March 22, 2017 122
Paddling in Waves
When it is windy with significant waves the best advice is to stay ashore. If you are out
in waves remember that they will become steeper and break near the shore or in places
where the water is shallower (shoals), watch for this as you approach or leave the shore.
Always check the wind conditions before heading out across a lake or a bay, even if the
fetch is not great (e.g. 1km) since waves can come up un-noticed from off shore winds.
Another problematic area is where wind waves are pushed into current coming out from a
river, the opposition between the two create large steep breaking and inconsistent or
erratic waves.
It can be tricky paddling in waves as they push the canoe around a lot. Even small
breaking waves can easily swamp a canoe. Keep paddling – with your paddle in the
water you have a chance to brace and the paddle may act as an out-rigger. Keep your
trim appropriate, riding a little light in the bow makes going into waves a little more
stable and easier to control, but the canoe is more affected by the wind. Kneel for better
balance and limit the amount of heel. You should plan extra time if you need to cross
large areas of open water or long exposed shore lines. This gives you the opportunity to
wait out bad conditions without fretting and lets you enjoy the break.
Wave length is almost as important to understand as the height of the wave. Watch the
length of the waves and if they are about the length of your boat or shorter you will need
to be careful since that is the point that you can be pushed into leading (or following
waves) or ‘take air’ off of the top of the waves. When paddling in waves some people
suggest that you should quarter into or with the waves. This may be important with
shorter waves since it provides a longer perceived wave length and less chance of surfing
and/or reduces the chance of the bow or stern submerging under oncoming waves. The
problem with quartering the waves is keeping control of the canoe, every time you go up
or come down from a wave the canoe will tend to slide off of the wave and be pushed
broadside; you will need to work hard at keeping control.
I find that padding in trailing winds is difficult and stressful because you cannot see what
is coming and turning to look can make you particularly unstable. Waves can lift up the
back end of the canoe and you will ‘surf’ into the wave in front if the wavelength is about
the length of the canoe. The other complicating factor are those circles mentioned earlier
– when running with the wind the top of the wave gives you a little forward push, the
bottom backward push. When coming off the top of a wave the stern is being pushed
forward and the bow backward making control very difficult since the canoe will ‘want’
to turn broadside. Alternatively trying to paddle up the back side of a wave can slow the
canoe; the canoe may even start to slide back or wallow and a wave could overcome the
stern. Having the bow or stern submerged is unlikely in a solo canoe since the weight is
typically close to the middle – a greater concern is sliding off of the wave and being
broadsided.
Paddling broadside to breaking waves is perhaps the most difficult position to be in; if
you must head out try pick a route into or with the wind and wind ferry in the direction
you need to go. In large non-breaking swells it is not as problematic since as the canoe

March 22, 2017 123
will just ride up and down, like a cork. You still need to be careful and allow the canoe
to roll, to some degree, underneath you and when you approach the shore or shallow
areas be prepared for shorter, taller, breaking waves. If you are broadside to waves that
are about 1 to 1.5 times the width of your canoe you are in very difficult situations even if
the waves are not breaking since the time you have to react (adjust) to keep your centre
over the boat, is very short. Bracing is typically done up on the top of the oncoming wave
(Upwind).
Landing or launching in large breaking waves can be a tricky adventure. In all cases
rocky and steep shorelines should be avoided if at all possible. When landing don’t hurry
and don’t panic, look for a sheltered stretch, inlet, or island without breakers.
Determining the size of breakers against the shore is difficult; sometimes it is just guess
work and luck. Proceed with caution and let the most experienced paddler land first so
they can help the rest of the group. When launching – wait! Remember you have left a
trip plan and you have spare equipment and food in case of emergency. In both cases
land and launch perpendicular to the shore since waves will easily overwhelm the canoe
if you let it go broadside.
Landing in the steep shorter wavelength waves often found on smaller lakes (e.g. Shoal
Lake) is difficult, the following is what I have found to work on beaches and shallow
shores (remember rocky steep shores should be avoided). You need to be quick and
willing to get wet since you must step out as you approach the shore so a following wave
cannot overcome the boat. If possible follow the crest of a wave into the shore to give
you the best depth possible but avoid surfing. Surfing into the shore can be hard to
control and you can easily bottom out the front of the boat in the trough causing you to go
broadside and tumble. Just as the water becomes shallow enough to step out ship your
paddle, push up on the gunwales and step over the side of the canoe, quickly move
forward and pull the boat up through the surf zone as the next wave pushes the canoe
forward. The advantage of a shallow shore or beach is the boat can float up to a position
that you can stand in the water. Timing is everything and it requires practice!
See the following site for more information on paddling in waves and wind:
http://paddling.net/guidelines/showArticle.html?83
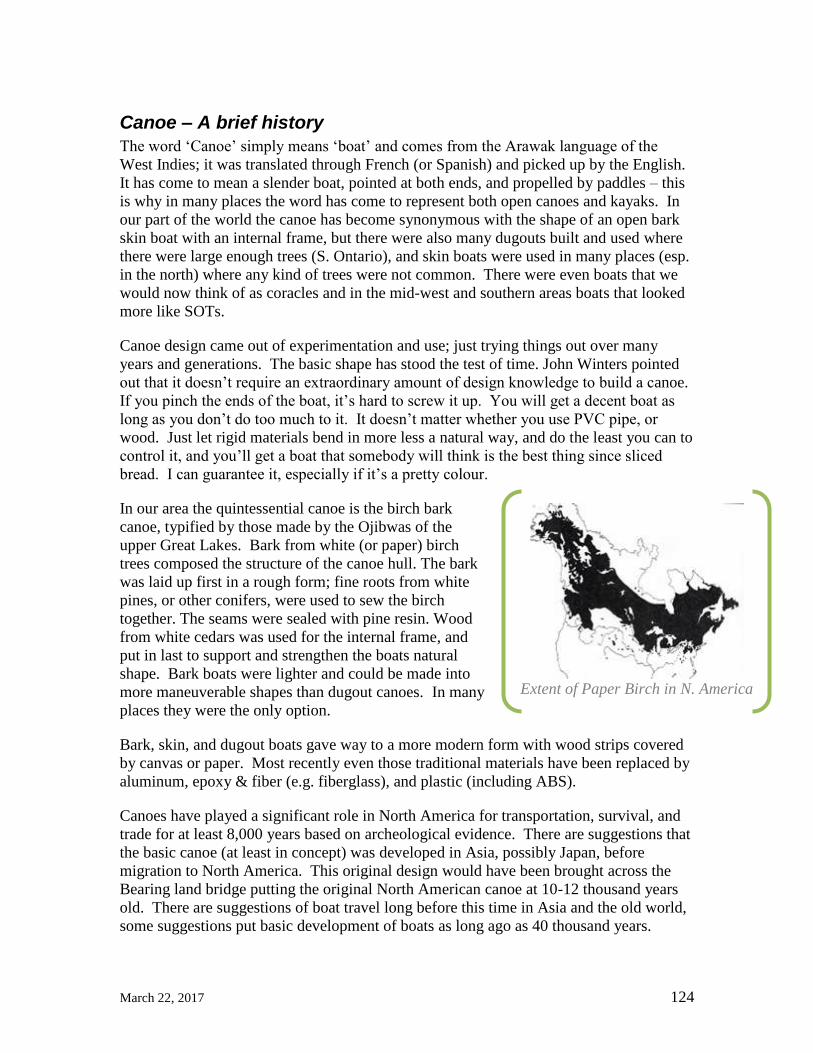
March 22, 2017 124
Canoe – A brief history
The word ‘Canoe’ simply means ‘boat’ and comes from the Arawak language of the
West Indies; it was translated through French (or Spanish) and picked up by the English.
It has come to mean a slender boat, pointed at both ends, and propelled by paddles – this
is why in many places the word has come to represent both open canoes and kayaks. In
our part of the world the canoe has become synonymous with the shape of an open bark
skin boat with an internal frame, but there were also many dugouts built and used where
there were large enough trees (S. Ontario), and skin boats were used in many places (esp.
in the north) where any kind of trees were not common. There were even boats that we
would now think of as coracles and in the mid-west and southern areas boats that looked
more like SOTs.
Canoe design came out of experimentation and use; just trying things out over many
years and generations. The basic shape has stood the test of time. John Winters pointed
out that it doesn’t require an extraordinary amount of design knowledge to build a canoe.
If you pinch the ends of the boat, it’s hard to screw it up. You will get a decent boat as
long as you don’t do too much to it. It doesn’t matter whether you use PVC pipe, or
wood. Just let rigid materials bend in more less a natural way, and do the least you can to
control it, and you’ll get a boat that somebody will think is the best thing since sliced
bread. I can guarantee it, especially if it’s a pretty colour.
In our area the quintessential canoe is the birch bark
canoe, typified by those made by the Ojibwas of the
upper Great Lakes. Bark from white (or paper) birch
trees composed the structure of the canoe hull. The bark
was laid up first in a rough form; fine roots from white
pines, or other conifers, were used to sew the birch
together. The seams were sealed with pine resin. Wood
from white cedars was used for the internal frame, and
put in last to support and strengthen the boats natural
shape. Bark boats were lighter and could be made into
more maneuverable shapes than dugout canoes. In many
places they were the only option.
Bark, skin, and dugout boats gave way to a more modern form with wood strips covered
by canvas or paper. Most recently even those traditional materials have been replaced by
aluminum, epoxy & fiber (e.g. fiberglass), and plastic (including ABS).
Canoes have played a significant role in North America for transportation, survival, and
trade for at least 8,000 years based on archeological evidence. There are suggestions that
the basic canoe (at least in concept) was developed in Asia, possibly Japan, before
migration to North America. This original design would have been brought across the
Bearing land bridge putting the original North American canoe at 10-12 thousand years
old. There are suggestions of boat travel long before this time in Asia and the old world,
some suggestions put basic development of boats as long ago as 40 thousand years.
Extent of Paper Birch in N. America

March 22, 2017 125
(Attributed: D. Gordon E. Robertson)
The most romanticised period started shortly after the French explorers and fur traders
arrived in North America during the 17th century. They adopted the canoe for navigating
rivers and lakes. The canoe was used to open up vast tracks of land for trade and
exploration. Alexander Mackenzie, David Thompson, and Lewis and Clark used this
style of canoe while traveling across the continent. Until the late 19th century, the birch
bark canoe was the fastest way to cross vast inland areas. When many of us talk about the
use of the canoe for trade and travel we think about the Voyageur. The Voyageur and
Coureur de Bois period was a relatively short time period starting sometime in the late
1600s or early 1700s when fur trading companies started actively traveling into the
‘wilderness’. The end of the voyageur era was marked by the completion of the Canadian
Pacific rail line and the closure of Fort William as a rendezvous point in 1892.
The zenith of canoe popularity was probably in the early 1900s with companies such as
Old Town, Peterborough, and Chestnut building wood-and-canvas canoes. During this
time other materials were experimented with including paper. The invention of
continuous sheet paper, for printing, allowed companies such as Waters & Sons of Troy
(New York) to build boats with a seamless hull. Wet paper was stretched over a form
and glued then sanded; the process was repeated until the hull was of sufficient strength.
These canoes were popular in the north eastern United States. Paper racing shells were
highly competitive during the late 19th century.
Although canoes were originally a means of transport, with industrialization they became
popular for recreation and sports. John MacGregor popularized canoeing through his
books, and in 1866 founded the Royal Canoe Club in London and in 1880 the American
Canoe Association. The Canadian Canoe Association was founded in 1900, and the
British Canoe Union in 1936. Paddle Canada (originally Canadian Recreational Canoe
Association) was late into this field having been formed in 1971.
Flatwater canoeing was a demonstration sport at the 1924 Paris Olympics and became an
Olympic discipline at the 1936 Berlin Olympics. The International Canoe Federation was
formed in 1946 and is the umbrella organization of all national canoe organizations
worldwide.
March 22, 2017 126
Just after WW II Grumman Aircraft corp. was looking for something to build and
company executive William Hoffman used the aircraft aluminum and forming techniques
to build canoes. This was the advent of the artificial skin canoes. Aluminium was
relatively light, had become common and easy to use, and most importantly it did not
decompose. It did have some downsides – they were noisy and cold, were not inherently
buoyant, and sheet metal had limitations on how it could be formed. Aluminum canoes
did last and are still manufactured and used today.
A little later (1950s) Fiberglass canoes started to appear. Before this time the resins used
were just too brittle to make a boat that would last. The first actual fiberglass was made
by accident at Corning Glass by Dale Kleist who was trying to weld together two glass
blocks to make a vacuum-tight seal when a jet of compressed air inadvertently hit a
stream of molten glass. The resulting spray of fine glass fibers turned out to be a
significant finding. On an equal weight basis, a strand of fiberglass is actually stronger
than a strand of steel. Other lighter stronger fibers have been developed over time that
have, in part, replaced fiberglass: Kevlar developed by Dupont in 1965 was available
commercially by the late 1970s; carbon fiber was developed Royal Aircraft
Establishment in 1963 but was not really extensively used until the later 20th century.
There are a number of other fibers that are used alone or in combination in cloth used in
composite canoes (e.g. Innegra, basalt, Spectra, Nylon). With Royalex being
discontinued a number of companies have started working with a variety of fibers in an
attempt to develop a material that is useful in similar conditions. Fiber canoes are light
and strong and replaced aluminum as the most popular building materials at the low and
high end of the field.
Plastic composites entered the canoeing field sometime in the late 1960s. ABS (brand
name Royalex developed by Uniroyal) is a composite material, comprising an outer layer
of vinyl and hard acrylonitrile butadiene styrene plastic (ABS) and an inner layer of ABS
foam, bonded by heat treatment. ABS canoes are more expensive than aluminium or
traditionally molded (roto-molded) polyethylene hulls. The material is heaver and less
suited for high-performance paddling than fiber canoes. The significant benefit to ABS is
the material can be bent, folded and generally abused with minimal hull damage. Unlike
aluminum ABS canoes tend to slide over rocks this feature, along with shape memory,
makes these canoes popular in whitewater and canoe tripping. As of April 2014 Royalex
is no longer being made, Esquif has started to produce a similar material called T-
Formex.
Today, the canoe remains a symbol of Canadian identity. It provides people with a sense
of wilderness and an image of the routes and lives of the past. It also serves as a symbol
of navigation, alliance, grandure and territorial expansion. In 1935, Canada's first silver
dollar was made for circulation. The reverse of the silver dollar was a modern design
showing an Indian and a voyageur paddling a canoe by the islet on which there are two
wind-swept trees. In the canoe are bundles of goods; the bundle at the right has HB,
representing the Hudson's Bay Company. There are vertical lines in the background
represent the northern lights.

March 22, 2017 127
The canoe carried aboriginal people for thousands of years, followed then
by the explorers and the missionaries and the engineers and the
surveyors….until in modern times it gives us the gift of freedom. The canoe
is a vehicle that carries you into pretty exciting places, not only into
whitewater but into the byways and off-beaten places….You are removed
entirely from the mundane aspects of ordinary life. You’re witnessing first
hand beauty and peace and freedom – especially freedom….Flirtation with
the wilderness is contact with truth, because the truth is in nature….I like
to identify myself with something that is stable and enduring. Although
[nature] is in a state of flux, it is enduring. It is where reality is. I
appreciate the canoe for its gifts in that direction. - Kirk Wipper
Further Reading:
Raffan, James. Bark, Skin and Cedar. Harper Collins Pub. Ltd. 1999.
Roberts, Kenneth G and Philip Shakleton. The Canoe. Macmillan of Canada. 1983
Canoe types, All About Canoes (canoe.ca)
http://www.canoe.ca/AllAboutCanoes/canoe_types.html
The Canoe (McGill University Digital exhibitions & collections)
http://digital.library.mcgill.ca/nwc/history/12.htm
History of the Canoe (by Ray Klebba's White Salmon Boat Works)
http://www.raysdreamboats.com/canoehistory.asp
Recreational Canoeing in Canada: Its History and Hazards, Canadian Geographic.
https://www.canadiangeographic.ca/sites/cgcorp/files/images/web_articles/magazine/ja12
/recreational_canoeing_web.pdf

March 22, 2017 128
Bill Mason, A Canoeing Legacy Born 1929 in Winnipeg Manitoba, Died October 29, 1988 at Meech Lake
“He is a man enthralled with the sheer joy of
guiding a canoe through challenging rapids in the
early spring, awestruck by the beauty of nature as
seen over the bow of a canoe silently traversing a
mirror-smooth lake in the early morning…” –Pierre
Trudeau (October 18, 1919 – September 28, 2000)
Bill Mason was an award winning naturalist, artist, film
maker, author and canoeist. Throughout his adult life and afterward he has had a
profound influence on canoeing across Canada and around the world. His skills, methods,
and techniques were adopted by many Canadian Canoe and Youth Camps, canoe clubs,
wilderness expedition companies, and other canoeing organizations. He canoed all of his
life, ranging widely over the wilderness areas of Canada and the United States. He
brought canoeing to life for me during the 1970s and 80s through his books, films, and
artwork.
Bill was heavily influenced by his experiences at Pioneer Camp both in his love for the
wilderness and canoeing, and his Christians belief and ethics. "Pioneer Camp has been
the greatest single influence on my life. When I say Pioneer Camp, I mean both the place
and the people. I went to camp as a fifteen-year-old with a natural love of the wilderness,
canoeing and a fairly basic knowledge of God. It was camp where all these aspects of my
life first took off and never came down. My memories of how my counsellors shared
their knowledge of Jesus Christ, canoeing, the wilderness and all that goes with it are
very vivid…” 1
His interest in teaching and sharing his canoeing experiences and passions also started
with Pioneer Camp. Over the early 1950s he developed the Pioneer Camp Canoeing
program, the canoeing skills and techniques developed taught at this time carried him
forward through the rest of his life. His first film Wilderness Treasure was about a
Pioneer Camp canoe trip. “…I thought the ultimate thing for me to make a film on, of
course, is a canoe. Well, it would be a canoe trip because I'd been going to Pioneer
Camps for years as a camper and then as a counsellor…it was just the canoe trip!”2
My first introduction to Bill Mason was as a child, in the early 1970s, in grade school.
Our class had been talking about the Great Lakes and our teacher brought in a National
Film Board film called The Rise and Fall of the Great Lakes. I have to admit it was not
until I re-watched the film as an adult that I realized that the film was not about canoeing.
Bill was not the star of the film but it did bring solo canoeing to life for me and made me
search out more of Bill Mason’s work.
Although I had been taught canoeing by many talented people over the years the gift of
Bill Mason’s book Path of the Paddle for a birthday present shortly after it was published
was probably one of biggest influences on my canoeing. This book pulled together and
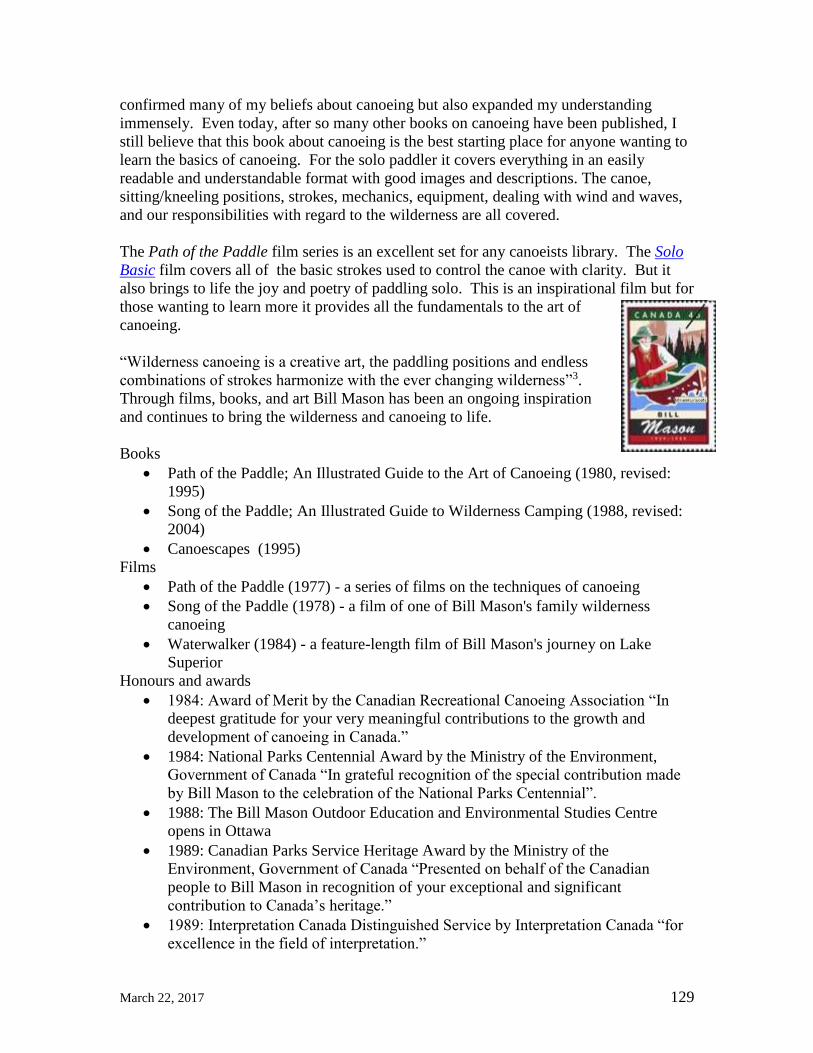
March 22, 2017 129
confirmed many of my beliefs about canoeing but also expanded my understanding
immensely. Even today, after so many other books on canoeing have been published, I
still believe that this book about canoeing is the best starting place for anyone wanting to
learn the basics of canoeing. For the solo paddler it covers everything in an easily
readable and understandable format with good images and descriptions. The canoe,
sitting/kneeling positions, strokes, mechanics, equipment, dealing with wind and waves,
and our responsibilities with regard to the wilderness are all covered.
The Path of the Paddle film series is an excellent set for any canoeists library. The Solo
Basic film covers all of the basic strokes used to control the canoe with clarity. But it
also brings to life the joy and poetry of paddling solo. This is an inspirational film but for
those wanting to learn more it provides all the fundamentals to the art of
canoeing.
“Wilderness canoeing is a creative art, the paddling positions and endless
combinations of strokes harmonize with the ever changing wilderness”3.
Through films, books, and art Bill Mason has been an ongoing inspiration
and continues to bring the wilderness and canoeing to life.
Books
• Path of the Paddle; An Illustrated Guide to the Art of Canoeing (1980, revised:
1995)
• Song of the Paddle; An Illustrated Guide to Wilderness Camping (1988, revised:
2004)
• Canoescapes (1995)
Films
• Path of the Paddle (1977) - a series of films on the techniques of canoeing
• Song of the Paddle (1978) - a film of one of Bill Mason's family wilderness
canoeing
• Waterwalker (1984) - a feature-length film of Bill Mason's journey on Lake
Superior
Honours and awards
• 1984: Award of Merit by the Canadian Recreational Canoeing Association “In
deepest gratitude for your very meaningful contributions to the growth and
development of canoeing in Canada.”
• 1984: National Parks Centennial Award by the Ministry of the Environment,
Government of Canada “In grateful recognition of the special contribution made
by Bill Mason to the celebration of the National Parks Centennial”.
• 1988: The Bill Mason Outdoor Education and Environmental Studies Centre
opens in Ottawa
• 1989: Canadian Parks Service Heritage Award by the Ministry of the
Environment, Government of Canada “Presented on behalf of the Canadian
people to Bill Mason in recognition of your exceptional and significant
contribution to Canada’s heritage.”
• 1989: Interpretation Canada Distinguished Service by Interpretation Canada “for
excellence in the field of interpretation.”
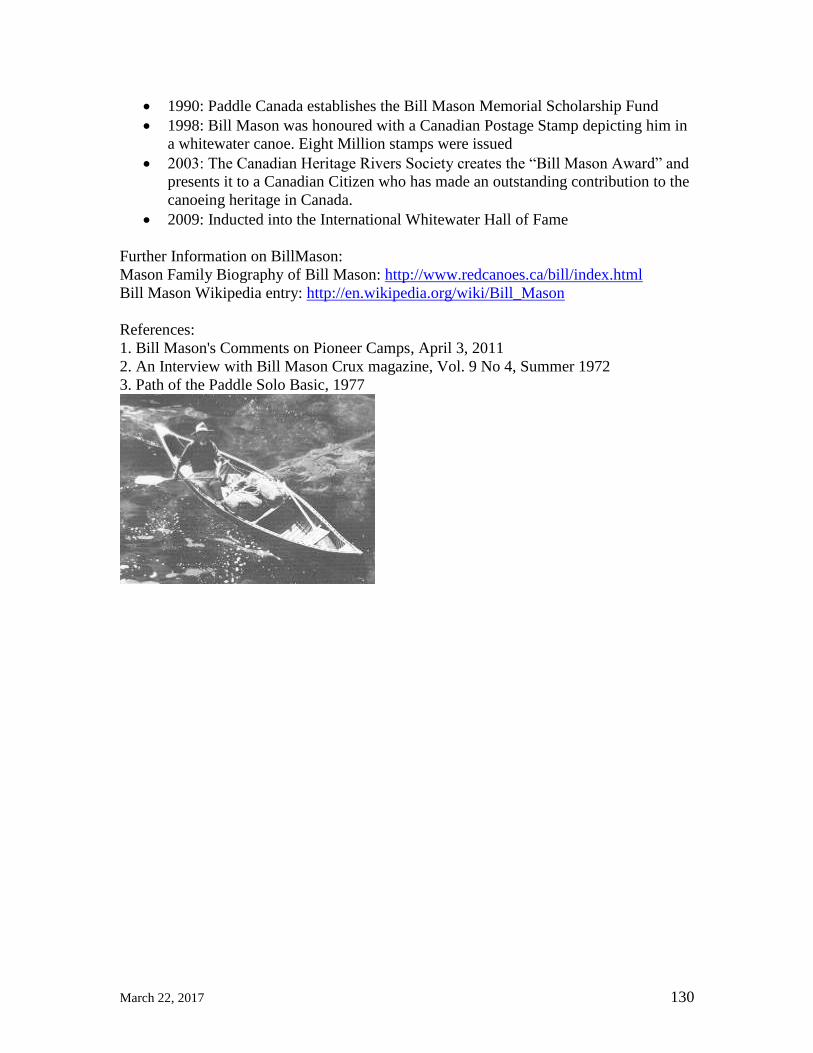
March 22, 2017 130
• 1990: Paddle Canada establishes the Bill Mason Memorial Scholarship Fund
• 1998: Bill Mason was honoured with a Canadian Postage Stamp depicting him in
a whitewater canoe. Eight Million stamps were issued
• 2003: The Canadian Heritage Rivers Society creates the “Bill Mason Award” and
presents it to a Canadian Citizen who has made an outstanding contribution to the
canoeing heritage in Canada.
• 2009: Inducted into the International Whitewater Hall of Fame
Further Information on BillMason:
Mason Family Biography of Bill Mason: http://www.redcanoes.ca/bill/index.html
Bill Mason Wikipedia entry: http://en.wikipedia.org/wiki/Bill_Mason
References:
1. Bill Mason's Comments on Pioneer Camps, April 3, 2011
2. An Interview with Bill Mason Crux magazine, Vol. 9 No 4, Summer 1972
3. Path of the Paddle Solo Basic, 1977

March 22, 2017 131
Protection of Lakes and Waterways
Canoeists, as a group, have a responsibility to protect the lakes and waterways we use for
our sport and enjoyment. In some cases, this is a legal requirement through Federal,
Provincial, and local authorities. But generally, we have a moral obligation to ensure that
we and those we paddle with ‘do no harm’ to the waters and land we use. Some of these
principals are covered in other sections of this manual (ex. ‘Leave not Trace’ principals).
This section will deal more specifically with the legally mandated requirements.
All of the Federal, Provincial, and local regulations covering lakes and waterways would
make a substantial pile. Jurisdictions and authorities are complicated. The following is
only a brief and certainly not comprehensive listing of Acts and Regulations but the list
will include the major pieces of legislation affecting canoeists in Manitoba. While the
legal documentation is complex, canoeists can be reasonably comfortable in knowing that
if they follow basic common sense, treat the environment with respect, and learn practical
advice such as ‘Leave not Trace’ principals, they are unlikely to violate any legal statutes,
regulations, or by-laws.
The first major hurdle is deciding which legislative authority has responsibility for what.
The Federal Government has responsibility for sea coast and marine fisheries, navigation
and shipping, international treaties or interprovincial regulations, federal works and
undertakings, Indians and lands reserved for Indians, and canals, harbours, rivers and lake
improvements. Big list! Provincial Governments administer activities completely within
their provincial boundaries. So, resource management such as freshwater fisheries and
mining development are handled by the provinces. Smaller list but still daunting! Local
governments are generally restricted to regulating local activities such as land
development (through zoning), licensing private campgrounds, etc. So how does this
really work and what do you need to know.
Federal Legislation
The majority of the Federal Legislation that affects lakes and waterways lies in 3 major
pieces of legislation and 1 international treaty: 1. The Canadian Environmental Protection Act: In its simplest form, this Act lays out what
humans can and cannot do with respect to potential impacts on the environment. Think of it as the law that keeps us from polluting ourselves to death. It is a large and comprehensive act but think of it as the single most important piece of Canadian legislation that protects the environment. (http://www.gov.pe.ca/law/statutes/pdf/e-09.pdf).
2. Fisheries Act: The Fisheries Act does for fish and other aquatic life what the Environmental Protection Act does for the environment. It lays out what humans can and cannot do to the animal and plant life in marine and freshwaters in Canada. Note that the Federal Government has delegated authority for the management of freshwater fish to the Provinces but has not done so in the 3 Territories. This is why you buy a Provincial fishing licence. Again, most of what is in the Act is common sense and if you treat aquatic life with respect, you are unlikely to contravene this Act. (http://laws-lois.justice.gc.ca/eng/acts/F-14/).

March 22, 2017 132
3. Navigable Waters Protection Act: An interesting Canadian invention, this Act. Basically, it regulates what can and cannot be done on ‘navigable waters’. What is a ‘navigable water’? Well, the Act defines it as “a canal and any other body of water created or altered as a result of the construction of any work”. This means that if humans intend to alter a body of water, they need permission from the Federal Government. This is a surprisingly powerful piece of legislation that has been in the news lately. Proposed changes may alter the perceived effectiveness of the Act, at least as seen by environmental groups. (the Act: http://laws-lois.justice.gc.ca/eng/acts/n-22/index.html ; some of the concerns and controversy: http://www.paddlingcanada.com/latest-news/enviro-blog/327-navigable-waters-protection-act-nwpa.html and http://www.cwf-fcf.org/en/resources/online-articles/news/issues/canadas-navigable-waters.html).
4. International Boundary Waters Treaty: This is joint agreement between Canada and the United States that defines how the 2 countries will deal with trans-boundary waters. Rivers that flow across the border and lakes that straddle border plus waters affected by the actions of the other country are included. Most of the act is straight forward but interestingly, it has been used for some environmental issues such as acid rain. Canada argued that US air pollution contravened parts of this act when the fallout acidified Canadian lakes. (http://laws-lois.justice.gc.ca/eng/acts/I-17/).
While many more pieces of Federal legislation have roles in regulating lakes and
waterways, these are the main players. Have a look at one or two of the Acts, you might
find it interesting to see how a senior government views the environment.
Provincial Legislation
The Province of Manitoba has taken the lead in Canada by bringing together various
components of other Departments under the Department of Water Stewardship. This
novel approach allows Manitoba to deal with water and water resources all within one
Department. Their webpage, http://www.gov.mb.ca/waterstewardship/licensing/acts.html,
lists in excess of 20 Acts and Regulations that apply to rivers and lakes. These include
everything from fishing regulations to water use and licensing to water district licensing.
Essentially, the Province’s responsibility is to practically manage the water and water
resources in Manitoba. While this is certainly an oversimplification, it is sufficient for the
discussion here.
Local Governments
Local governments including cities, towns, and municipalities have the most limited legal
impact on lakes and rivers. They are primarily the providers of services and, as such,
must adhere to the legislation of higher levels of government (Federal and Provincial).
That being said, they do have the authority for some local licensing and regulation
particularly of businesses. So, if you are thinking of using the services of a local business,
it may be wise to check with the local government to make sure they are licenced and are
operating legally where you will be paddling.
What if?
Legislation is designed to accomplish goals, in this case environmental protection and
resource management. The idea is to have wild places and pristine wilderness for

March 22, 2017 133
Canadians to enjoy for this and future generations. But we do live in an industrialized
highly economic country. The environment and wilderness areas are constantly under
pressure. Not everyone sees canoe country when they look at a forest. What to do if you
become aware of problem.
If you suspect a violation of existing law has taken place, contact the proper authorities.
Sometimes this takes a bit of effort because the law and jurisdictional responsibility is not
always obvious. The local Provincial Conservation office is a good place to start. These
folks know their region and they know the law. If the issue is immediate or potentially
criminal, contact the local RCMP. What about less immediate but larger environmental
issues? First, pay attention. Read and learn about the issue. Nothing kills good intentions
faster than misinformation. Get other paddlers involved through organizations like Paddle
Manitoba and Paddle Canada. They have members that can help. Manitoba is fortunate to
have many organizations that can help. Try the local chapter of Canadian Parks and
Wilderness Society, the Manitoba Eco-Network, or Nature Manitoba National
organizations like The Sierra Club of Canada, The David Suzuki Foundation, or
Greenpeace Canada may provide help or solutions (websites listed at the end of this
document). If you think the problem is with the legislation itself, your Federal Member of
Parliament or your Provincial Member of the Legislative Assembly needs to hear from
you.
You now have a basic understanding of how various Acts and Regulations by 3 levels of
government affect lakes and waterways. Not completely comprehensive but certainly the
major items are covered. You also have a list of actions you can take if you see a
potential violation of existing laws or if you think political or environmental activism is
the solution.

March 22, 2017 134
Leave No Trace Principles
Leave No Trace (LNT) Canada is a national non-profit
organization dedicated to promoting and inspiring
responsible outdoor recreation through education, research
and partnerships. Leave No Trace builds awareness,
appreciation and respect for our wildlands. Paddle Canada
is a partner member with Leave No Trace Canada.
The Leave No Trace Principles of outdoor ethics form the
framework of Leave No Trace's message:
1. Plan Ahead and Prepare o Know the regulations and special concerns for the area you'll visit.
o Prepare for extreme weather, hazards, and emergencies.
o Schedule your trip to avoid times of high use.
o Visit in small groups. Split larger parties into groups of 4-6.
o Repackage food to minimize waste.
o Use a map and compass to eliminate the use of marking paint, rock cairns
or flagging.
2. Travel and Camp on Durable Surfaces o Durable surfaces include established trails and campsites, rock, gravel, dry
grasses or snow.
o Protect riparian areas by camping at least 70 meters from lakes and
streams.
o Good campsites are found, not made. Altering a site is not necessary.
o In popular areas:
▪ Concentrate use on existing trails and campsites.
▪ Walk single file in the middle of the trail, even when wet or
muddy.
▪ Keep campsites small. Focus activity in areas where vegetation is
absent.
o In pristine areas:
▪ Disperse use to prevent the creation of campsites and trails.
▪ Avoid places where impacts are just beginning.
3. Dispose of Waste Properly o Pack it in, pack it out. Inspect your campsite and rest areas for trash or
spilled foods. Pack out all trash, leftover food, and litter.
o Deposit solid human waste in catholes dug 15 to 20 centimeters deep at
least 70 meters from water, camp, and trails. Cover and disguise the
cathole when finished.
o Pack out toilet paper and hygiene products.
o To wash yourself or your dishes, carry water 70 meters away from streams
or lakes and use small amounts of biodegradable soap. Scatter strained
dishwater.

March 22, 2017 135
4. Leave What You Find o Preserve the past: examine, but do not touch, cultural or historic structures
and artifacts.
o Leave rocks, plants and other natural objects as you find them.
o Avoid introducing or transporting non-native species.
o Do not build structures, furniture, or dig trenches.
5. Minimize Campfire Impacts o Campfires can cause lasting impacts to the backcountry. Use a lightweight
stove for cooking and enjoy a candle lantern for light.
o Where fires are permitted, use established fire rings, fire pans, or mound
fires.
o Keep fires small. Only use sticks from the ground that can be broken by
hand.
o Burn all wood and coals to ash, put out campfires completely, then scatter
cool ashes.
6. Respect Wildlife o Observe wildlife from a distance. Do not follow or approach them.
o Never feed animals. Feeding wildlife damages their health, alters natural
behaviours, and exposes them to predators and other dangers.
o Protect wildlife and your food by storing rations and trash securely.
o Control pets at all times, or leave them at home.
o Avoid wildlife during sensitive times: mating, nesting, raising young, or
winter.
7. Be Considerate of Others o Respect other visitors and protect the quality of their experience.
o Be courteous. Yield to other users on the trail.
o Step to the downhill side of the trail when encountering pack stock.
o Take breaks and camp away from trails and other visitors.
o Let nature's sounds prevail. Avoid loud voices and noises
More information on Leave No Trace Canada can be found on their website:
http://www.leavenotrace.ca/

March 22, 2017 136
Paddle Canada – Information and Programs
In 1971, Paddle Canada (formerly the Canadian Recreational Canoeing Association) was
formed to help co-ordinate the efforts of non-competitive canoeing and kayaking across
Canada. The long term goals of the association included the development of standard
skill sets for safe and enjoyable recreational canoeing and kayaking. By examining many
avenues including existing programs, current trends and growth trends, Paddle Canada's
first success was the creation of a national program for Canoeing. National standards for
Sea and River Kayak and Stand-Up Paddleboard have also been developed as those
activities have grown in popularity among recreational paddlers.
Paddle Canada currently represents over 2,200 instructor members. Through members
and programs Paddle Canada has been able to successfully and consistently deliver the
message of safe and enjoyable paddling to more than 50,000 paddlers annually.
Further information about Paddle Canada, its programs, and mandate can be found on
their website: www.paddlecanada.com
Paddle Canada's Mission Statement:
To promote recreational paddling instruction, safety and environmental awareness
to all Canadians.
The Four Priorities of Paddle Canada are: 1. Public awareness and membership 2. Engaging youth in paddling skills and safety 3. Instruction and skill development 4. Partnerships with similar organizations
Paddle Canada Programs
• PaddleSmart
• Canoeing
o Waterfront program
o Canoeing Basics
o Lake Canoe
o Moving Water
o Canoe Tripping
o Canoe Poling
o Coastal Canoeing
o Big Canoe Program
o Style Canoeing
• Sea Kayaking
• River Kayaking
• Stand Up Paddleboard
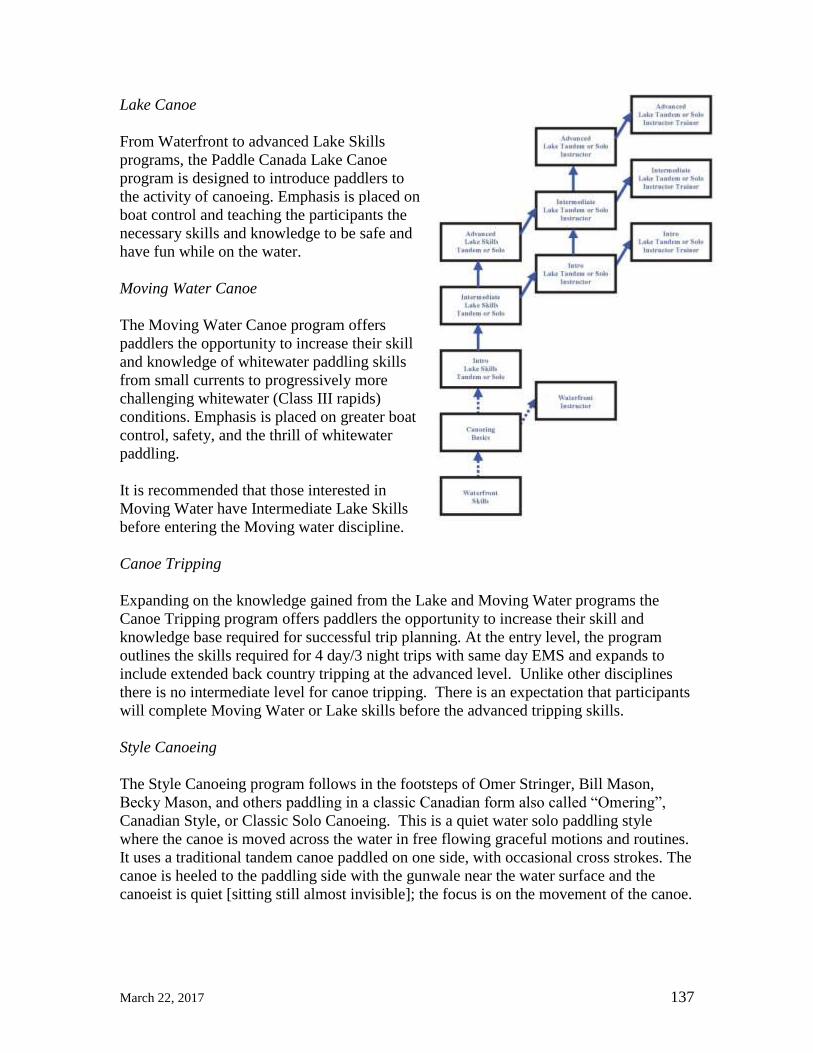
March 22, 2017 137
Lake Canoe
From Waterfront to advanced Lake Skills
programs, the Paddle Canada Lake Canoe
program is designed to introduce paddlers to
the activity of canoeing. Emphasis is placed on
boat control and teaching the participants the
necessary skills and knowledge to be safe and
have fun while on the water.
Moving Water Canoe
The Moving Water Canoe program offers
paddlers the opportunity to increase their skill
and knowledge of whitewater paddling skills
from small currents to progressively more
challenging whitewater (Class III rapids)
conditions. Emphasis is placed on greater boat
control, safety, and the thrill of whitewater
paddling.
It is recommended that those interested in
Moving Water have Intermediate Lake Skills
before entering the Moving water discipline.
Canoe Tripping
Expanding on the knowledge gained from the Lake and Moving Water programs the
Canoe Tripping program offers paddlers the opportunity to increase their skill and
knowledge base required for successful trip planning. At the entry level, the program
outlines the skills required for 4 day/3 night trips with same day EMS and expands to
include extended back country tripping at the advanced level. Unlike other disciplines
there is no intermediate level for canoe tripping. There is an expectation that participants
will complete Moving Water or Lake skills before the advanced tripping skills.
Style Canoeing
The Style Canoeing program follows in the footsteps of Omer Stringer, Bill Mason,
Becky Mason, and others paddling in a classic Canadian form also called “Omering”,
Canadian Style, or Classic Solo Canoeing. This is a quiet water solo paddling style
where the canoe is moved across the water in free flowing graceful motions and routines.
It uses a traditional tandem canoe paddled on one side, with occasional cross strokes. The
canoe is heeled to the paddling side with the gunwale near the water surface and the
canoeist is quiet [sitting still almost invisible]; the focus is on the movement of the canoe.
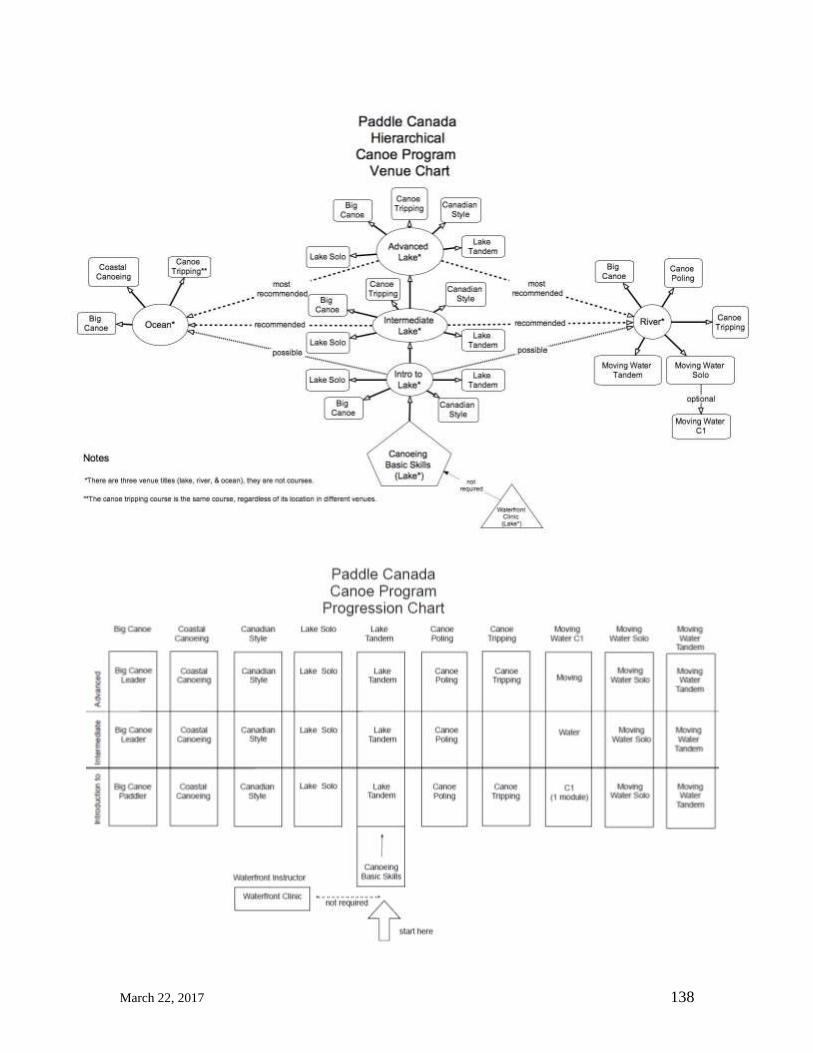
March 22, 2017 138

March 22, 2017 139
Additional Resources
Books
Canoeing
American National Red Cross [The]. Canoeing. The American National Red Cross, 1977
Callan, Kevin. The Happy Camper; An Essential Guide to Life Outdoors. Boston Mills
Press, 2005
Canadian Recreational Canoeing Association. Canoeing Instructor’s Resource Manual.
Ed. Douglas Gifford. Canadian Recreational Canoeing Association. 2004
Dean, Misao. Inheriting A Canoe Paddle. University of Toronto Press.2013
Glaros, Lou, and Charlie Wilson. Freestyle Canoeing Contemporary Paddling Technique.
Menasha Ridge Press, 1994 (second printing 1996)
Goodwin, Ray. Canoeing. Pesda Press. 2011.
Gray, Daniel A. Canoeing for Everyone. Morris Books Publishing, LLC. 2009
Jacobson, Cliff. Basic Essentials; Canoeing third edition. A Falcon Guide, Morris Book
Pub., 2007
Kesselheim, Alan S. The Wilderness Paddler's Handbook Ragged Mountain Press., 2001
MacGregor, J. A Thousand Miles in the Rob Roy Canoe on Rivers and Lakes of Europe,
1892. (http://www.ibiblio.org/eldritch/jm/TM.HTM)
MacGregor, Roy. Canoe Country, The Making of Canada. Vintage Canada. 2016
*Mason, Bill. Path of the Paddle; An Illustrated Guide to the Art of Canoeing. Van
Nostrand Reinhold Ltd, 1980
Mason, Bill. Song of the Paddle; An Illustrated Guide to Wilderness Camping. Key
Porter Books, 1988
*McGuffin, Gary & Joannie. Paddle your own Canoe; An Illustrated Guide to the Art of
Canoeing Boston Mills Press, 1999
Neuzil, Mark and Norman Sims. Canoes: A Natural History in North America. Univ Of
Minnesota Press. 2016
Paddle Canada, Paddle Canada Lake Program Manual (draft). Ed. Brian Johnston. Paddle
Canada 2010.
Raffan, James. Bark, Skin and Cedar Exploring the Canoe in Canadian Experience.
HarperCollins, 1999
Ray, Slim. The Canoe Handbook. Stackpole Books, 1992
Roberts, Harry. Basic Essentials; Canoe Paddling third edition rev. by Steve Salins. A
Falcon Guide, Morris Book Pub., 2007
Roberts, Kenneth G, & Philip Shackleton. The Canoe. Macmillan of Canada. 1983
Rutstrum, Calvin. North American Canoe Country Macmillan Pub, 1964
Westwood, Andrew. Canoeing; The Essential Skills and Safety The Heliconia Press,
2007
Winters, John, The Shape of the Canoe. John Winters (contact Green Valley Boat
Works), 2005
Exposure
Giesbrecht, Gordon G., James A. Wilkerson. Hypothermia Frostbite and other Cold
Injuries. The Mountaineers. 2006
March 22, 2017 140
Fitness
Blahnik, Jay. Full-Body Flexibility 2nd Ed.. Human Kinetics. 2011
Navigation
Featherstone, Steve. Outdoor Guide to Using Your GPS. Creative Publishing
International. 2004
Seidman, David, Paul Cleveland, The Essential Wilderness Navigator
How to Find Your Way In the Great Outdoors. Ragged Mountain Press. 2001
Natural Resources Canada. Topographic Maps the Basics. Natural Resources Canada
2010
(http://www.nrcan.gc.ca/sites/www.nrcan.gc.ca/files/earthsciences/pdf/topo101/pdf/m
apping_basics_e.pdf) Pamphlet
Knots
Pawson, Des. Knots and Splices. PRC Publishing Ltd. 2001
Kavanagh, James. Outdoor Knots. Waterford Press 2010. Pamphlet
Sherry, John E. Pro-Knot ™, Best Rope Knots. 2011. Pamphlet
Walbridge, Charlie. The Nuts 'N' Bolts Guide to the American Canoe Association's Knots
for Paddlers. Menasha Ridge Press; First edition. 1995
Weather
Environment Canada, Cloud Chart (Catalogue no. En56-134/1999E), Environment
Canada, 2010
Herd, Tim. Discover Nature in the Weather. Stackpole Books, 2001
Websites
Canoeing
Charles goes Canoeing – some eclectic information
(http://home.cc.umanitoba.ca/~burchil/pm_canoe/)
Canadian Canoe Routes (http://www.myccr.com/)
Canoe Sailing Resources 2010
(http://freepages.genealogy.rootsweb.ancestry.com/~fassitt/canoe_mirror/canoe_sailing.html)
Canoeing.com (http://www.canoeing.com/)
John Winters Page (http://www.greenval.com/jwinters.html)
Nick Schade of Guillemot Kayaks, Kayak Stability
(http://www.guillemot-kayaks.com/guillemot/information/kayak_design/kayak_stability)
Paddle Manitoba (http://www.paddle.mb.ca/)
Small Vessel Regulation (http://laws-lois.justice.gc.ca/eng/regulations/SOR-2010-91/)
Contraventions Regulations (Part II) (http://www.laws-
lois.justice.gc.ca/eng/regulations/SOR-96-313/page-4.html
Compliance Guide For Human-Powered Non-Pleasure Vessels - TP 15204. TP 15204.
Transport Canada.
http://www.tc.gc.ca/media/documents/marinesafety/TP15204E.PDF

March 22, 2017 141
Rolf Kraiker, CCR Forum Discussion on Canoe Physics.
(http://www.myccr.com/SectionForums/viewtopic.php?f=20&t=3469)
Navigation
Atlas of Canada (Topographic Maps) http://atlas.gc.ca/toporama/en/index.html
QGIS (GIS software) http://www.qgis.org/en/site/
GeoGratis (PDF/TIF of Topographic Maps) (http://www.geogratis.gc.ca)
GPS Terms and Jargon
(http://home.cc.umanitoba.ca/~burchil/mantario/gps/terms_jargon.pdf)
GPS Information (http://gpsinformation.net/)
GPS Utility (http://www.gpsu.co.uk/)
Manitoba Land Initiative (http://web2.gov.mb.ca/mli/)
Online Declination Calculator (http://geomag.nrcan.gc.ca/apps/mdcal-eng.php)
Paddle Manitoba Ripple 2007
(https://paddlemb.clickonce.ca/files/ripple/archive/Ripple_fall_07.pdf)
Paddle Manitoba Ripple 2008
(http://paddlemb.clickonce.ca/files/ripple/archive/Ripple_winter_08.pdf)
Topographic Maps the Basics
(http://www.nrcan.gc.ca/sites/www.nrcan.gc.ca/files/earthsciences/pdf/topo101/pdf/m
apping_basics_e.pdf)
Knots
Knots by Grog (http://www.animatedknots.com/index.php)
NETKNOTS (http://www.netknots.com/html/paddling_knots.html)
Weather
Mare’s Tails and Mackerel Skies (http://www.landfallnavigation.com/mares.html)
Coping with Wind, Canoeing (http://www.paddling.net/guidelines/showArticle.html?83)
Risk Exposure
Cold Water Boot Camp (http://www.coldwaterbootcamp.com/)
Beyond Cold Water Boot Camp (http://www.beyondcoldwaterbootcamp.com/)
Web based videos Canoe Dance, Karen Knight (https://www.youtube.com/watch?v=fMyTTjKV-1U)
Canoe Strokes and Control (http://www.youtube.com/watch?v=MhrQ8yDnnm4 )
Canoe Paddling – Canadian Style (http://www.youtube.com/watch?v=_4RJAeP7pDI )
Canoe Paddling Basics – (http://www.youtube.com/watch?v=lYiWydC8TjA )
Canoe Rescues – (http://www.youtube.com/watch?v=6GgdT5uUUes)
Classic Solo Canoeing – Becky Mason
Going Sideways Solo (http://home.cc.umanitoba.ca/~burchil/pm_canoe/side_slip.html)
Kanuballet 2 (http://www.youtube.com/watch?v=aqIZAeUCsm0&feature=related)
Kanuballet (http://www.youtube.com/watch?v=ncGoZoQDDbY)
Sculling a canoe (http://www.youtube.com/watch?v=MhrQ8yDnnm4)
Solo Pivots (http://home.cc.umanitoba.ca/~burchil/pm_canoe/pivot/index.html)
Weight turns (http://home.cc.umanitoba.ca/~burchil/pm_canoe/landing.html#weight)

March 22, 2017 142
Clubs and Associations
Paddling and Outdoor
Paddle Canada (http://www.paddlecanada.com)
Paddle Manitoba (http://www.paddle.mb.ca)
Nature Manitoba (http://www.naturemanitoba.ca/)
Manitoba Pioneer Camp (http://www.manitobapioneercamp.ca/)
Leave no Trace Canada (http://www.leavenotrace.ca/home)
Environmental Advocacy
The Canadian Parks and Wilderness Society - http://www.cpaws.org/
The Sierra Club of Canada - http://www.sierraclub.ca/
The David Suzuki Foundation - http://www.davidsuzuki.org/
The Manitoba Eco-Network - http://mbeconetwork.org/
Greenpeace Canada - http://www.greenpeace.org/canada/