internet ordering trophynut ordersystem troop by girl ordering
DESCRIPTION
Internet Ordering TrophyNut OrderSystem Troop by Girl Ordering. TABLE OF CONTENTS. General InformationPage 3 Log InPage 5 Reviewing Troop InfoPage 6 Adding ACH DataPage 8 Adding GirlsPage 10 Adding Girl OrdersPage 12 Assigning OrdersPage 17 - PowerPoint PPT PresentationTRANSCRIPT

1
Internet OrderingTrophyNut OrderSystem
Troop by Girl Ordering

2
TABLE OF CONTENTSGeneral Information Page 3Log In Page 5Reviewing Troop Info Page 6Adding ACH Data Page 8Adding Girls Page 10Adding Girl Orders Page 12Assigning Orders Page 17Reviewing Troop Orders Page 20
Report Page 21Delivery Ticket Page 23Edit Order Page 25
Adding Magazine Data Page 26Submitting Orders Page 27Delivery Schedule Page 28Payment Entry Page 29Boothing Page 31Troop Reports Page 36
Recognition Report Page 37Final Report Page 38
Quick Search & Messages Page 39

To access - Log on to www.trophynutorders.com
This TrophyNut Order System Welcome Screen will appear.
1. Click on the 2012-2013 Order System.
NOTE: You can also access the following from this screen:
•Clip Art•Nutrition Facts (click on the item and it will show you a picture of the can or box and nutrition values)•Link to www.nutsforknowledge.com
3

To go back to trophynutorders.com
, click Trophy Nut Order System (TNOS)
4

2. Then enter the User ID (your email address) and the
Password that was provided by Council
and press enter5

6
Reviewing Troop Info
Your Service Unit Fall Chair will add your troop #, email, user ID, and password. Optionally, they
may enter your contact information as well. When you
log in for the first time, check to make sure that all data is
correct.
To edit any data, click “Edit” (we will cover the delivery site and
time information on a later page of this manual).

7
Reviewing Troop Info
Edit any data that needs revising; you can even customize
your password if you choose.
When finished editing, click “Update” to save your changes.
8
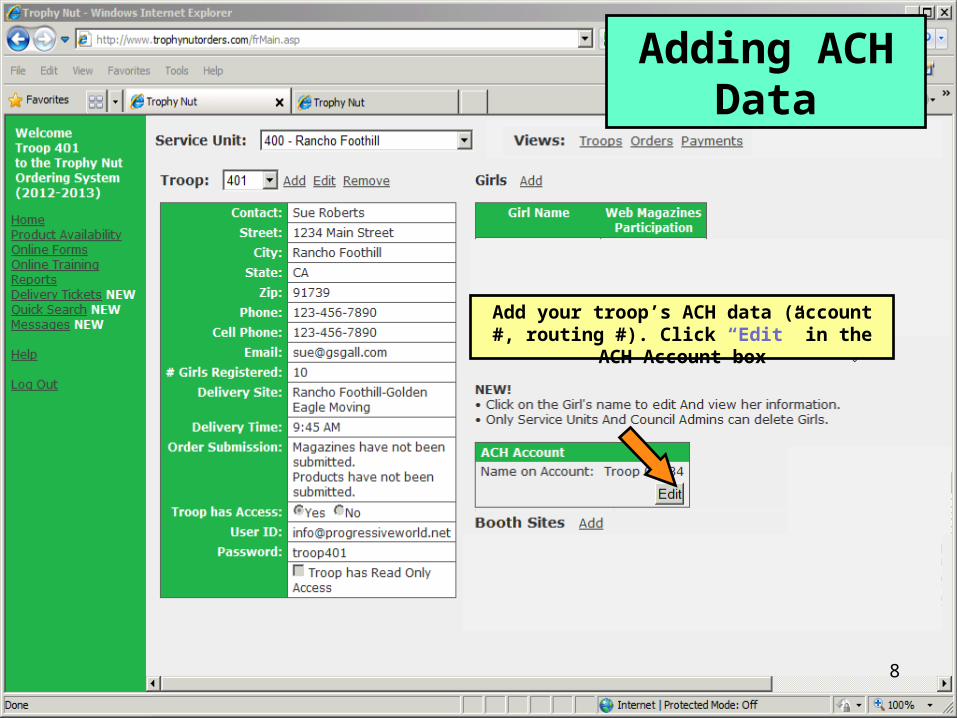
Add your troop’s ACH data (account #, routing #). Click “Edit” in the ACH
Account box
Adding ACH Data

9
Troop 401Troop 401
Adding ACH Data
Enter the name on the account (troop #), the account number and routing number, as printed
on the check.
Be sure to double check your entries to ensure your account info is accurate so there are no issues processing your ACH Debit. Then click “Save”.
(After you save, your account info will convert to asterisks for security)

Please make sure you enter this information for accurate
Reports!!!
10
To Add a Girl click “Add”
Adding Girls

If this girl is participating in Online (Web) Magazine sales, please
check the box
2. Recognitions are automatically calculated based on units sold;
however, if the girl sent 12+ valid emails through the QSP Online Program,
the patch will need to be manually entered (at the end of program, see
timeline in Troop guide)3. Make sure to click “Add” at the bottom of the page (you may have to scroll down) to
include this girl in your troop list
11
1. Enter the girl’s name (first and last name)
Adding Girls

12
Adding Girl Orders
Click “Orders” under Views from the home page to place Product
Orders

13
Click “Add” to add an order (initial order for a girl, initial booth sale
order, allocate additional or booth orders to a girl…)
Adding Girl Orders

14
To enter the Initial Order, select Initial Order. The troop number will already be selected. Select the Girl from the drop down, then enter her age group (Daisy,
Brownie, etc.). Finally, enter her product order.
NOTE: Gift of Caring is shown in TNOS as Care To Share. Also, if the girl’s name is not listed in the drop down menu, you can “Add” her at this time. And remember: Each
troop’s order should be in full cases (see page 20)
Enter the girl’s Direct Sale orders. Note: because of the way TNOS is programmed, you will need to double the number of subscriptions sold to
properly calculate the 2 units per subscription.
To order the Initial Booth Order, select it and enter the order.
Be sure to click “Add” when done entering (may need to scroll to bottom of screen).
NOTE: once all girl orders are entered and the troop has submitted their order, it cannot be changed. Contact your SUFC immediately so she can unsubmit your order. Pay
attention to deadlines in your Troop Guide.
Adding Girl Orders

A girl’s order can also be added by selecting her
from the list.
15
Adding Girl Orders

To enter a girl’s initial order, click on Order Summary. The page will expand to
reveal the “Add” link (with orders entered, it will show those orders). It will take you to same screen as shown
on page 14).Once you have entered the order and
have clicked “Add”, you will be returned to this screen.
Also on this page, you can view the Payment Summary (click on the text,
and the data will be revealed); Choose Recognitions (for when you need to
enter that she earns the online patch), and view what recognitions she has
earned (based on Initial and any additional sales).
If any changes are made, be sure to click “Update.” 16
Adding Girl Orders

Assigning Orders.To assign additional product to a
girl (cupboard or booth), click “Add”. If you notice later you have made an error in how a product is allocated you can
remove the order and re-enter it (except during times when
troops are set to “read only”)
Note: once Council has submitted the Initial Order, no changes can be made to a girl’s initial order and this product cannot be re-
allocated to another girl, used in a troop to troop transfer, or used
in a cupboard exchange.
Assigning Orders
17

1. Make sure Assign Booth/Cupboard Orders is
checked
2. Choose Additional or Booth.(Additional means the girl made the sale
and is financially responsible for the product. Booth means that only the
troop is financially responsible.)
3. Choose the girl that you are applying the product to and
then enter the items to apply.
Note: you cannot allocate (assign) more than the available units of
each variety. Once allocated, product cannot be
“unallocated” and assigned to another girl, used for troop to
troop transfers, or exchanges at a cupboard.
18
Assigning Orders

Assigning Orders.You will then see this screen which
will show all orders including assigned orders as well as any units still not
applied (allocated).
19
Assigning Orders

As a troop’s Initial Order needs to be ordered in FULL CASES (a combination of the girls’ orders plus any additional product ordered), there are two ways you can determine how many more of each variety to order to make it a full case. We refer to this as “rounding up” (but, in some instances, it may be “rounding down” to the nearest full case, the additional items can then be picked up at a cupboard). The first option is by reviewing a report – select “Reports” from the menu at left. The second option is displaying the “Delivery Tickets,” also at the menu at left.
First, viewing the Report…
20
Reviewing Troop Orders

Select the “Products Ordered By Troop” report.
21
Reviewing Troop Orders

1. Select “Combined” to get all product ordered by troop2. Click “Run Report”
You will then see a list of your girls and their orders, by variety (If you entered an initial booth order, you will see these as Unassigned Products. The grand totals of each
variety should be in multiples of 12 (12, 24, 36, etc.)
22
Reviewing Troop Orders

Or, by selecting “Delivery Tickets” from the menu at the left, you will see this screen.
Select “By Troop” to get a delivery ticket for your troop (you can also print one for each girl for when they pick up from you).
23
Reviewing Troop Orders

This report will show you the cases ordered and how many “extra” units have been ordered. “Extra” units shows ONLY if there are cans in excess of a full case.
In this instance, the troop has 2 full cases of Butter Toffee Peanuts, plus 3 additional cans. This troop will either want to add 9 more cans of BTP to their order OR remove the 3 cans from their order and pick them up later at the cupboard.
24
Reviewing Troop Orders

If you need to edit an existing order click on the
“Order ID” #
(Remember: once the Initial Order has been submitted it cannot be edited (you can go back to add magazine sales, however) – see
page 26. Other types of orders also cannot be edited once saved)
Cupboard OrdersAny orders that you pick up from a
cupboard will be listed here. In order for the recognitions to be chosen
automatically for the girls, these products including any initial booth
orders will have to be allocated (applied) to the girls within a troop.
Cupboard orders are NOT entered by the troop, but by the cupboard staff at the
time of pick up. 25
Reviewing Troop Orders

26
Adding Magazine
Data
Direct Sale (paper) magazine orders should be entered at the same time as you enter a girl’s Initial Nut Order (see pages 12-16 of this manual, as well as your Troop Guide for
deadlines).
(However, if you do not, you can come back to the girl’s initial order and add the data provided you have not clicked “Submit Magazines” or that troops have been made “read
only”).
Online (Web) magazine orders will be entered at the conclusion of the Fall Program, as per the deadline shown in your Troop Guide’s timeline.
For both, select “Orders” from the Views menu, then select the girl whose order you need to enter. Select her Initial Order Order ID# (allocated/assigned product all begins with a C,
Initial Order does not).
Enter the number of magazines subscriptions sold and dollar amount of each. Note: because of the way TNOS is programmed, you will need to double the number
of subscriptions sold to properly calculate the 2 units per subscription.
Be sure to click “Update” to save your entry.

There are two buttons at the top for Submitting Magazine and ProductOrders.
Do not use these buttons until you are sure you have entered ALL girl Initial Orders, Initial Booth Order, and, after recording online (web) magazine sales, Magazine Order information. Once these buttons are pressed, your troop will no longer be able to enter orders (you can still assign/allocate nut product, though).
If for some reason this has been done prematurely, the service unit or council can change the status of the troop (up until a deadline passes).
Submitting Orders
27

28
Depending on how deliveries are handled in your Service Unit, your SU Fall Chair may have already entered the location and time information for you, or they may let troops select their own times.
You can select the location and time for your troop by going to your Home screen and selecting “Edit” and then selecting your location and then a time (inset).
Click “Update” when done.
Delivery Schedule

Payment Entry
2. Click here to add new payment 1. Click on
“Payments” under Views from
the Troop “home” page
On this screen, too, you will see any girl payments as well as any council payments made.
Also, if a girls name is in bold, she still owes the troop money. Put your cursor over her name to find out how much.
29

Payment Entry
Record payments made by the girl to the troop (only council will record payments from the troop to the council). Choose Girl Payment from the
drop down box (it is the default setting) and then choose the girl.
Add the necessary payment information including the amount
paid.
30

31
To select a booth site, click “Add”. Remember, round 1 is “home SU” only; your SU Fall Chair will remove you from any booths outside your Service Unit area.
Boothing

32
Depending on your computer settings, you may need to scroll to the right to see all fields, as we have in
this sample. Select a location from the first drop down, then a time from the second… then click Submit to reserve your booth site.
Boothing

33
After you have submitted your booth request, it will
show on your “home” page. You can then select another booth (remember the limits per round; see your Troop
Guide).
If you need to remove yourself from a selected booth, click “Remove” to
remove it from your schedule.
Boothing

Boothing
Among the various reports available to view, print, or
download in to Excel is “Booths By Troop”.
By choosing this report, you will get a list of all booths you have signed up for.
34

Click “Run Report” to run the report. In this example, we had only selected one booth, but you would see each that you signed up for. You will want to bring a copy of this report to each booth to have on hand.
35
Boothing
36
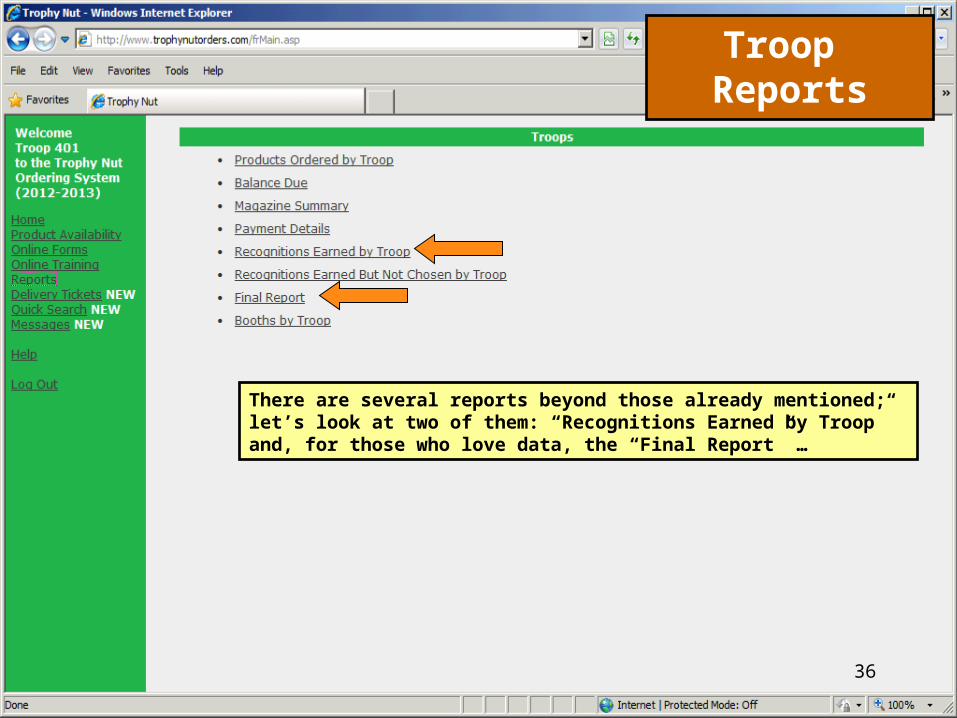
There are several reports beyond those already mentioned; let’s look at two of them: “Recognitions Earned by Troop” and, for those who love data, the “Final Report” …
Troop Reports

37
To generate the recognitions report, simply click Run Report. This shows you what each girl earned (1 is earned, 0 is not earned) and, in the last row, how many of each reward item you should receive from your Service Unit (Movie tickets are not calculated by the system; council will determine if a troop’s PGA meets the requirement).
Troop Reports

The Final Report for Troops will provide the number of units sold, percent/item, retail cost, gross sales and
total troop proceeds.
38
Troop Reports

Use this option to search for a Girl’s Information, Troop
Information or Order Details
Quick Search & Messages
The Messaging feature allows you to send messages to
Troops/Girls internally, the Troop leader will be notified of a new message upon log-
in
39

Using the Quick Search option, you may search for either a
Girl or Order by Number
40
Quick Search & Messages

To compose a message, first click the Compose button. A
record of messages sent/received will be added above so you can keep track of what and when you sent a
message. Any unread messages will be in bold
until opened.
41
Quick Search & Messages

To compose a message, select from the drop down menu
whether you would like this message to go to Council, to your Service Unit, and/or a
Troop or Troops in your Service Unit, enter your
subject and message, and send!
42
Quick Search & Messages