contents · contents introduction ... install grid infrastructure ... oracle 11g client on windows...
TRANSCRIPT
Author – A.Kishore
http://www.appsdba.info
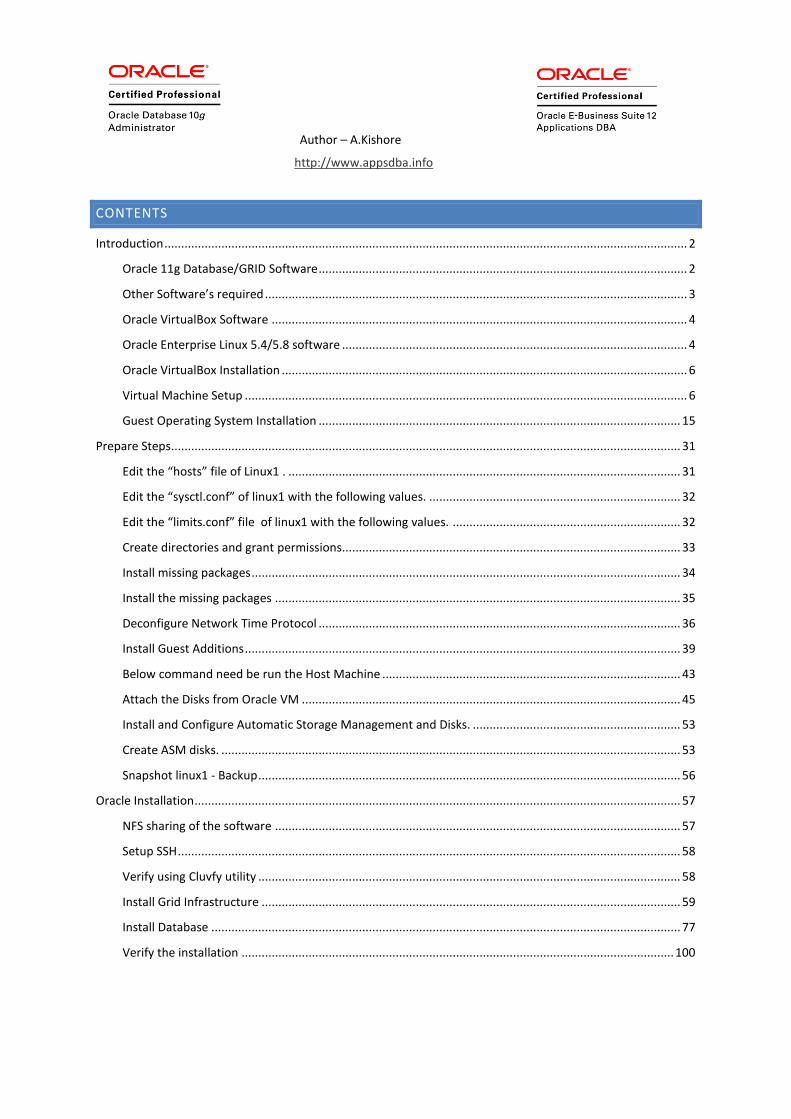
CONTENTS
Introduction ............................................................................................................................................................ 2
Oracle 11g Database/GRID Software .............................................................................................................. 2
Other Software’s required .............................................................................................................................. 3
Oracle VirtualBox Software ............................................................................................................................ 4
Oracle Enterprise Linux 5.4/5.8 software ....................................................................................................... 4
Oracle VirtualBox Installation ......................................................................................................................... 6
Virtual Machine Setup .................................................................................................................................... 6
Guest Operating System Installation ............................................................................................................ 15
Prepare Steps........................................................................................................................................................ 31
Edit the “hosts” file of Linux1 . ..................................................................................................................... 31
Edit the “sysctl.conf” of linux1 with the following values. ........................................................................... 32
Edit the “limits.conf” file of linux1 with the following values. .................................................................... 32
Create directories and grant permissions..................................................................................................... 33
Install missing packages ................................................................................................................................ 34
Install the missing packages ......................................................................................................................... 35
Deconfigure Network Time Protocol ............................................................................................................ 36
Install Guest Additions .................................................................................................................................. 39
Below command need be run the Host Machine ......................................................................................... 43
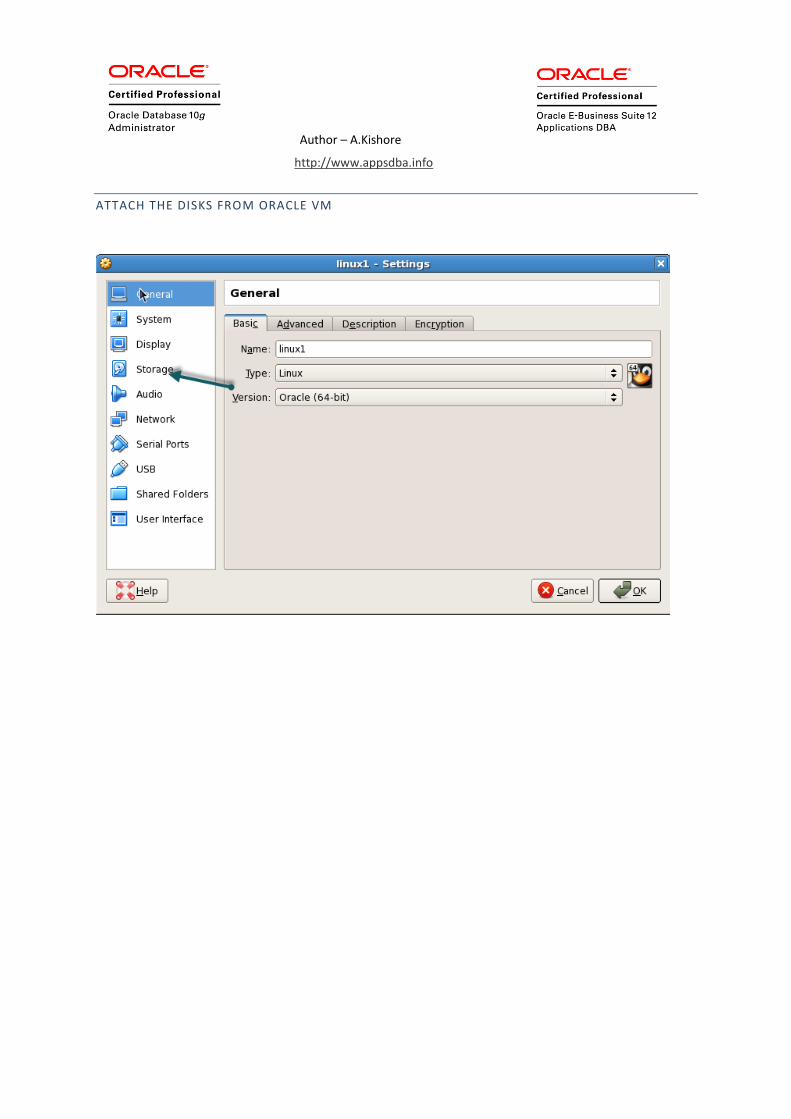
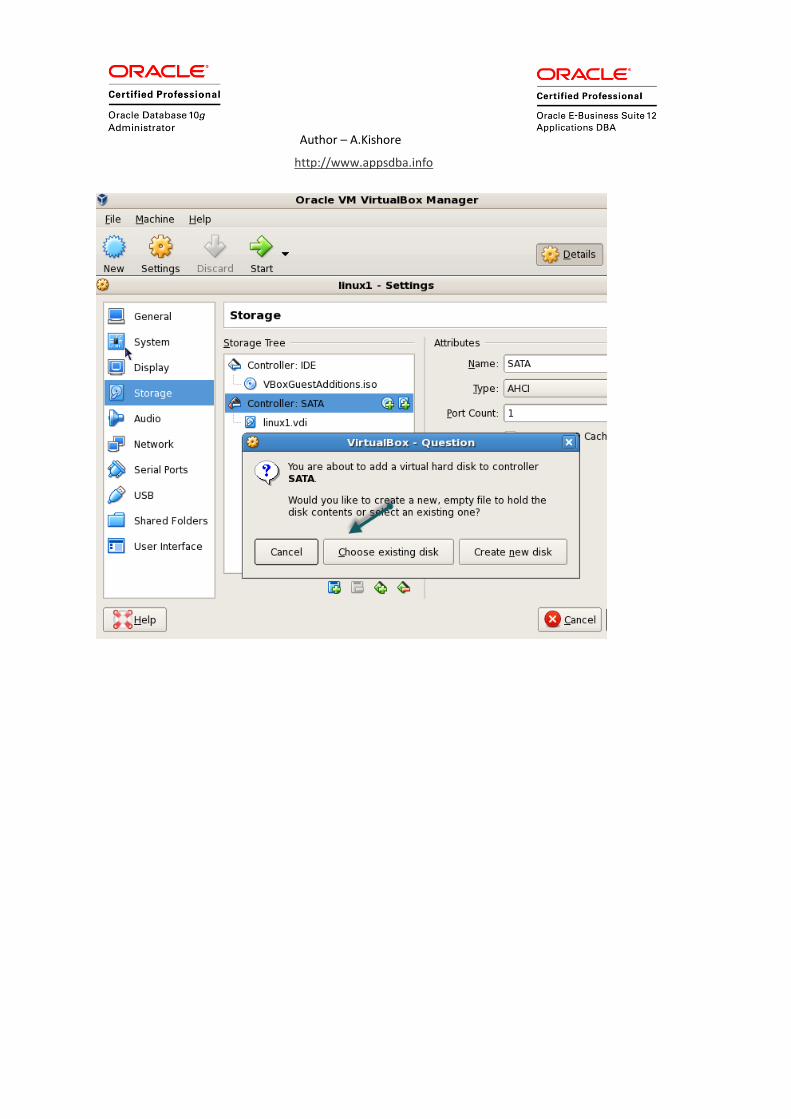
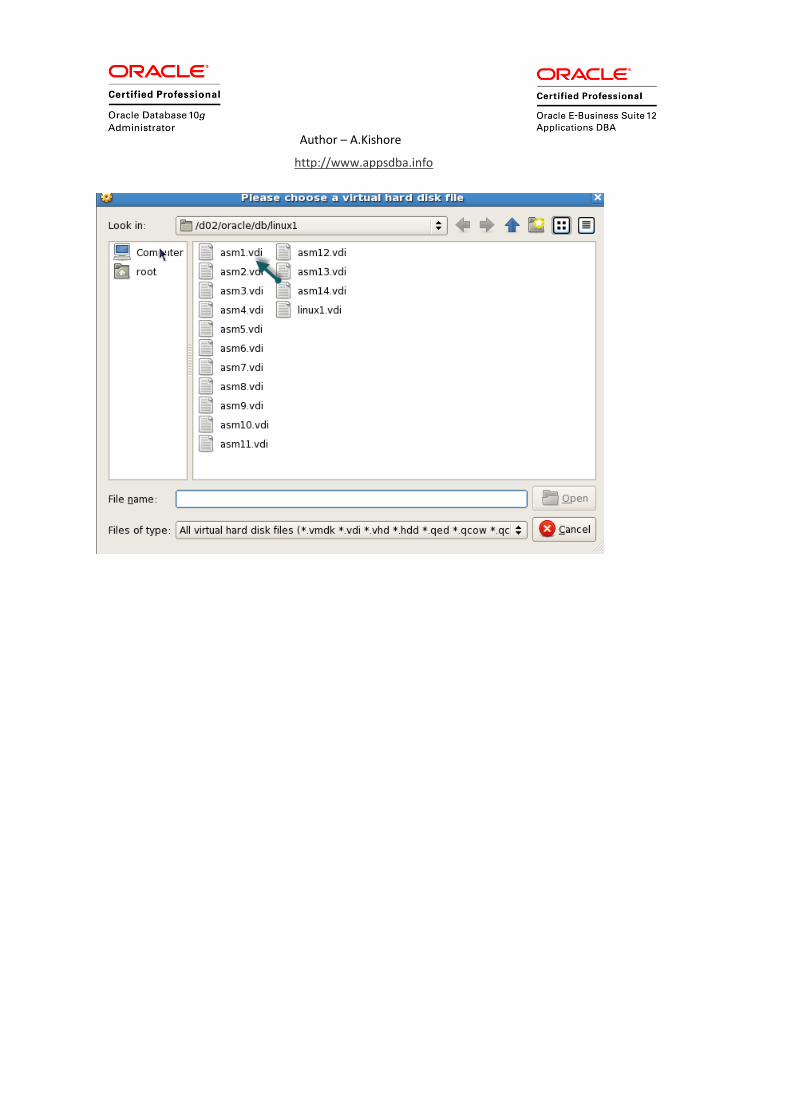
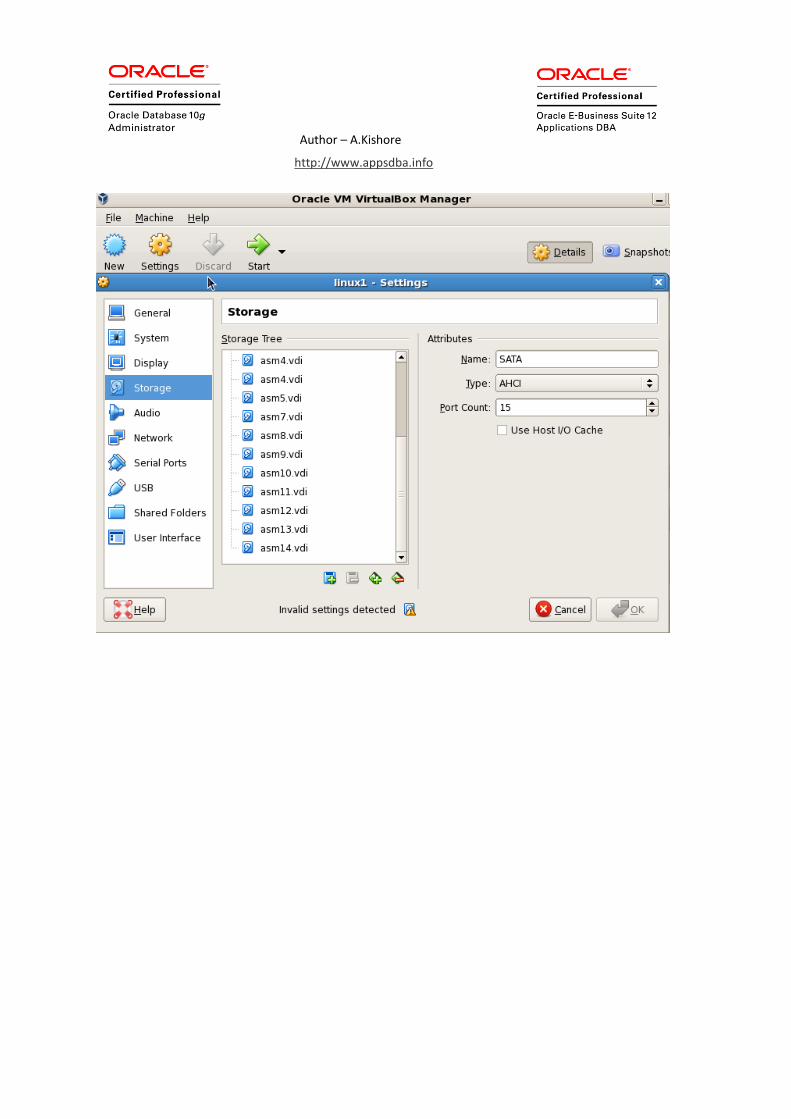
Attach the Disks from Oracle VM ................................................................................................................. 45
Install and Configure Automatic Storage Management and Disks. .............................................................. 53
Create ASM disks. ......................................................................................................................................... 53
Snapshot linux1 - Backup .............................................................................................................................. 56
Oracle Installation ................................................................................................................................................. 57
NFS sharing of the software ......................................................................................................................... 57
Setup SSH ...................................................................................................................................................... 58
Verify using Cluvfy utility .............................................................................................................................. 58
Install Grid Infrastructure ............................................................................................................................. 59
Install Database ............................................................................................................................................ 77
Verify the installation ................................................................................................................................. 100

Author – A.Kishore
http://www.appsdba.info
INTRODUCTION
Here is my setup, I have 16 GB Desktop with Linux installed and with 250 SSD on which the
installation was done. I have created 1 VMs using Oracle Virtual Machine
ORACLE 11G DATABASE/GRID SOFTWARE
11.2.0.1 Database Software from OTN
http://www.oracle.com/technetwork/database/enterprise-edition/downloads/112010-linx8664soft-
100572.html
Linux /Windows Desktop
16 GB RAM / 250 SSD
LINUX1 - Linux 5.8
4 GB RAM
Author – A.Kishore
http://www.appsdba.info
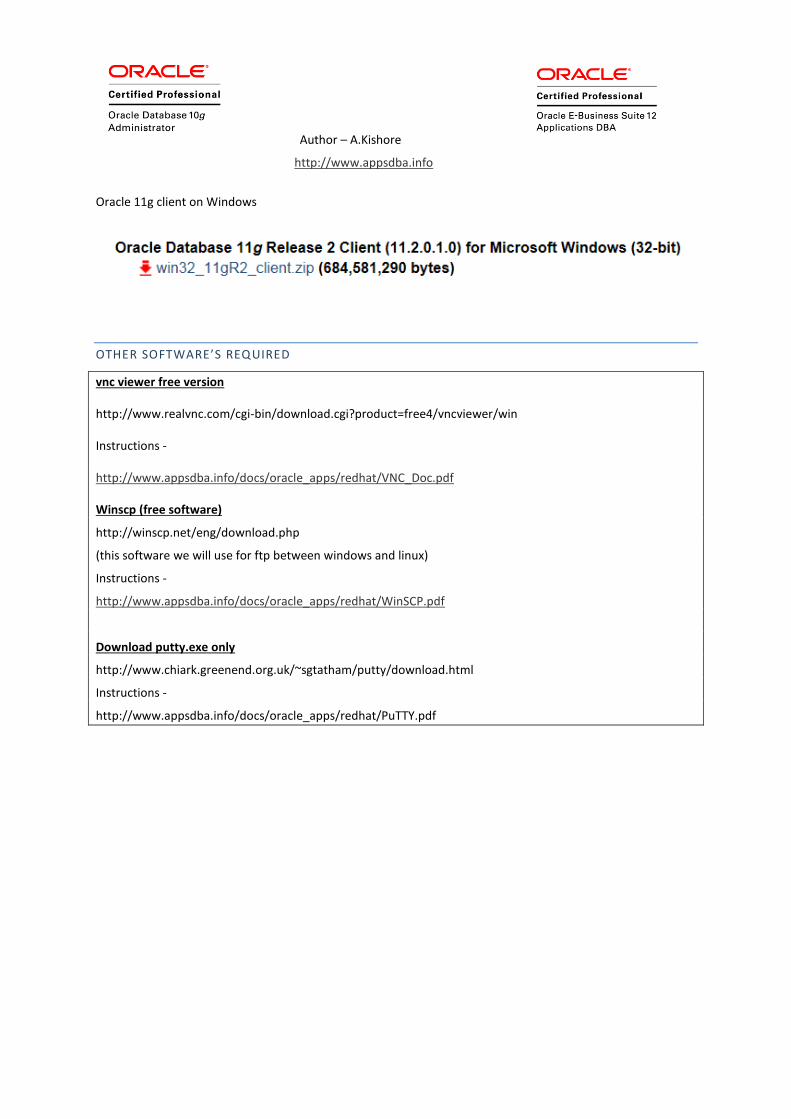
Oracle 11g client on Windows
OTHER SOFTWARE’S REQUIRED
vnc viewer free version
http://www.realvnc.com/cgi-bin/download.cgi?product=free4/vncviewer/win
Instructions -
http://www.appsdba.info/docs/oracle_apps/redhat/VNC_Doc.pdf
Winscp (free software)
http://winscp.net/eng/download.php
(this software we will use for ftp between windows and linux)
Instructions -
http://www.appsdba.info/docs/oracle_apps/redhat/WinSCP.pdf
Download putty.exe only
http://www.chiark.greenend.org.uk/~sgtatham/putty/download.html
Instructions -
http://www.appsdba.info/docs/oracle_apps/redhat/PuTTY.pdf
Author – A.Kishore
http://www.appsdba.info
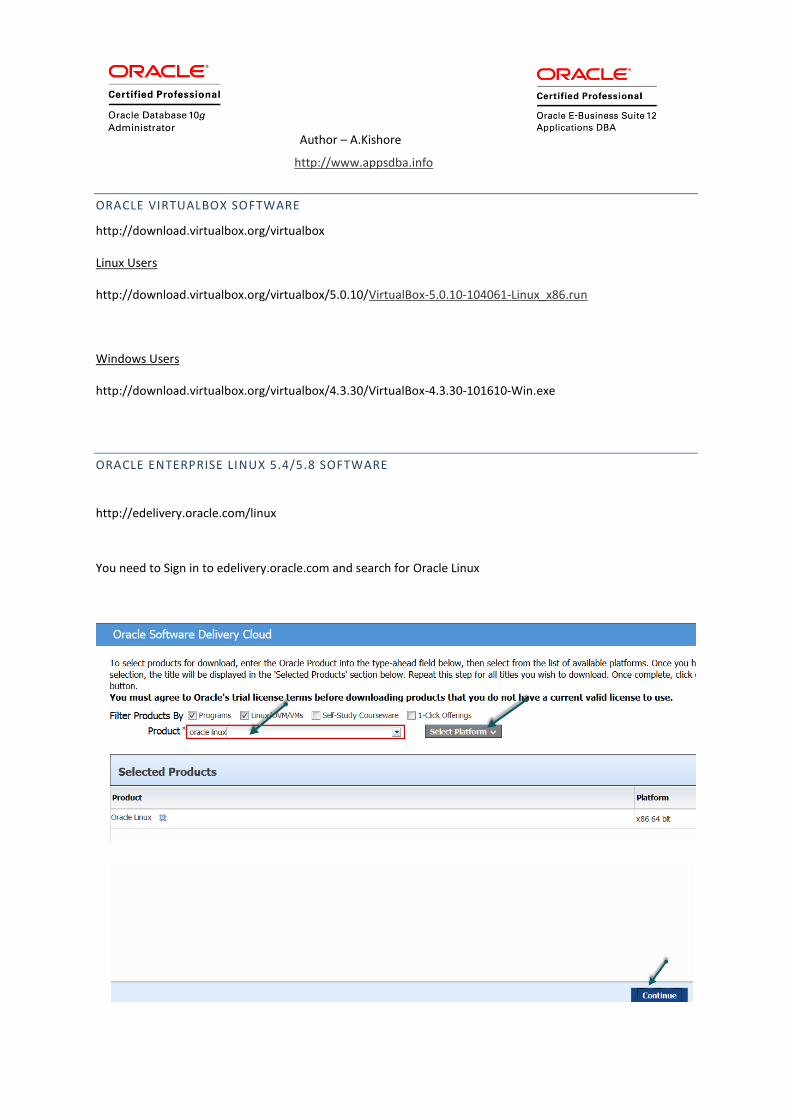
ORACLE VIRTUALBOX SOFTWARE
http://download.virtualbox.org/virtualbox
Linux Users
http://download.virtualbox.org/virtualbox/5.0.10/VirtualBox-5.0.10-104061-Linux_x86.run
Windows Users
http://download.virtualbox.org/virtualbox/4.3.30/VirtualBox-4.3.30-101610-Win.exe
ORACLE ENTERPRISE LINUX 5.4/5.8 SOFTWARE
http://edelivery.oracle.com/linux
You need to Sign in to edelivery.oracle.com and search for Oracle Linux

Author – A.Kishore
http://www.appsdba.info
Select Oracle Linux 5.8
Select the DVD version – V17794-01.zip
Note:, you need to burn them using the image option available with your cd-writer software
Refer: http://www.petri.co.il/how_to_write_iso_files_to_cd.htm
Author – A.Kishore
http://www.appsdba.info
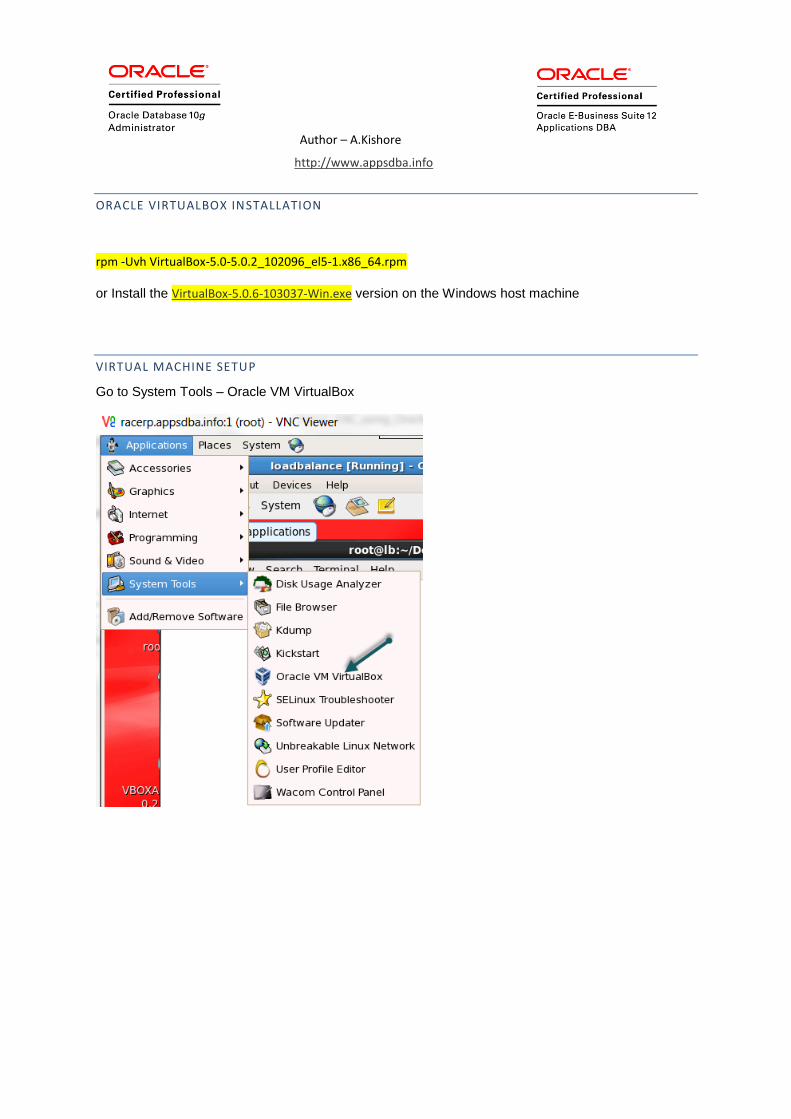
ORACLE VIRTUALBOX INSTALLATION
rpm -Uvh VirtualBox-5.0-5.0.2_102096_el5-1.x86_64.rpm
or Install the VirtualBox-5.0.6-103037-Win.exe version on the Windows host machine
VIRTUAL MACHINE SETUP
Go to System Tools – Oracle VM VirtualBox
Author – A.Kishore
http://www.appsdba.info
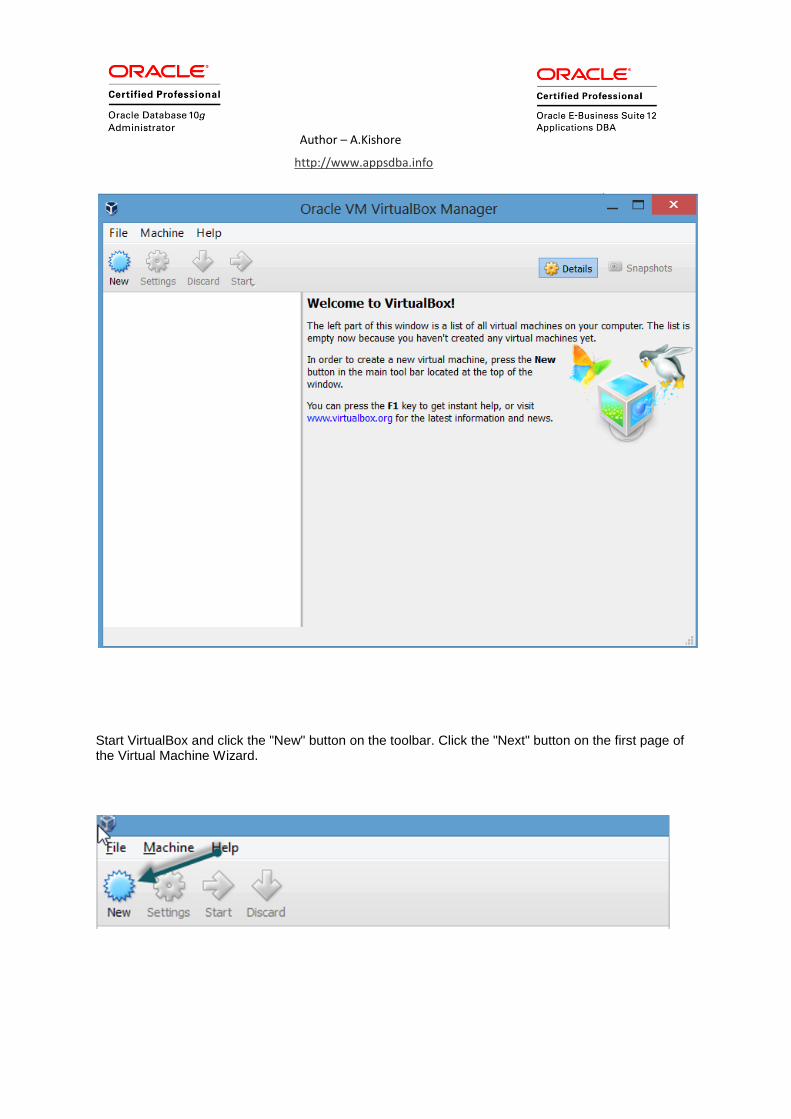
Start VirtualBox and click the "New" button on the toolbar. Click the "Next" button on the first page of the Virtual Machine Wizard.
Author – A.Kishore
http://www.appsdba.info
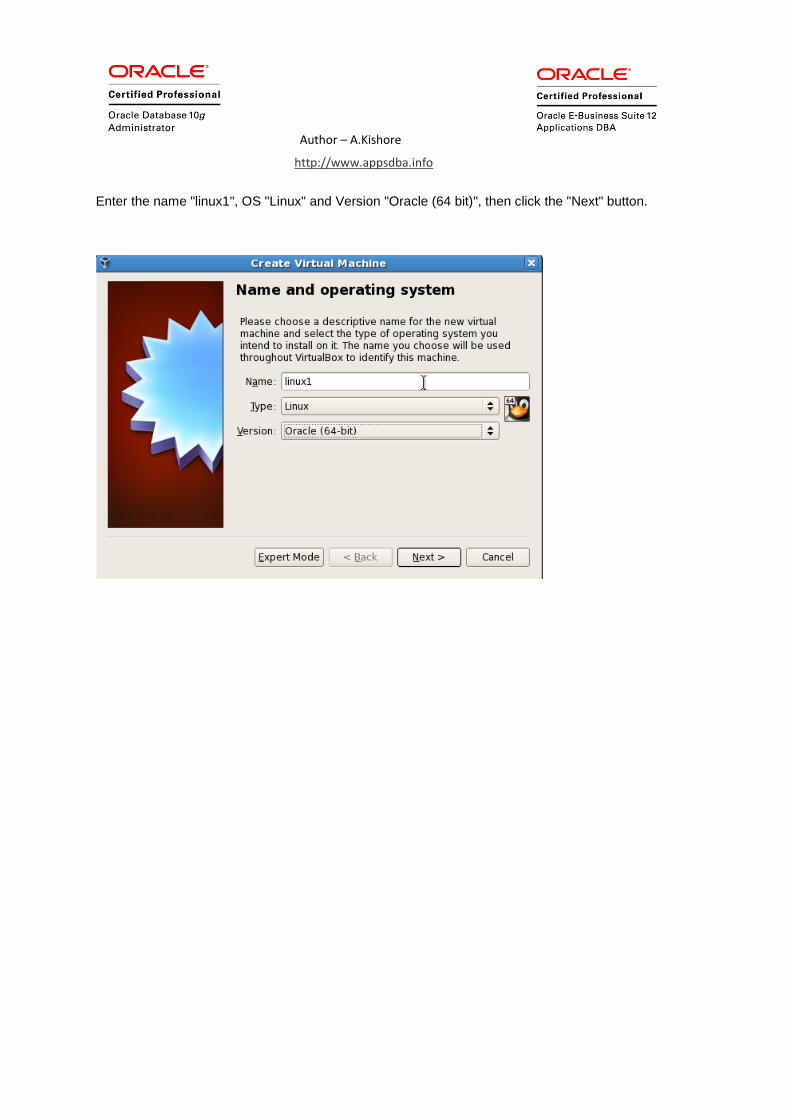
Enter the name "linux1", OS "Linux" and Version "Oracle (64 bit)", then click the "Next" button.
Author – A.Kishore
http://www.appsdba.info
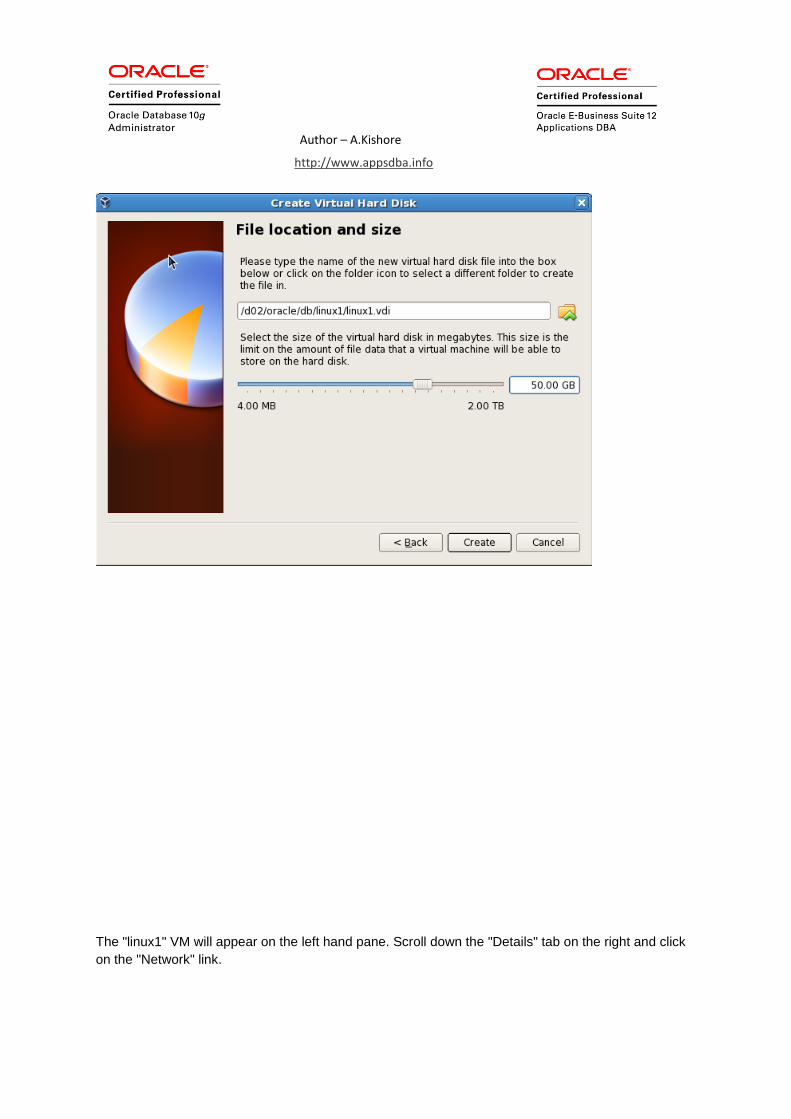
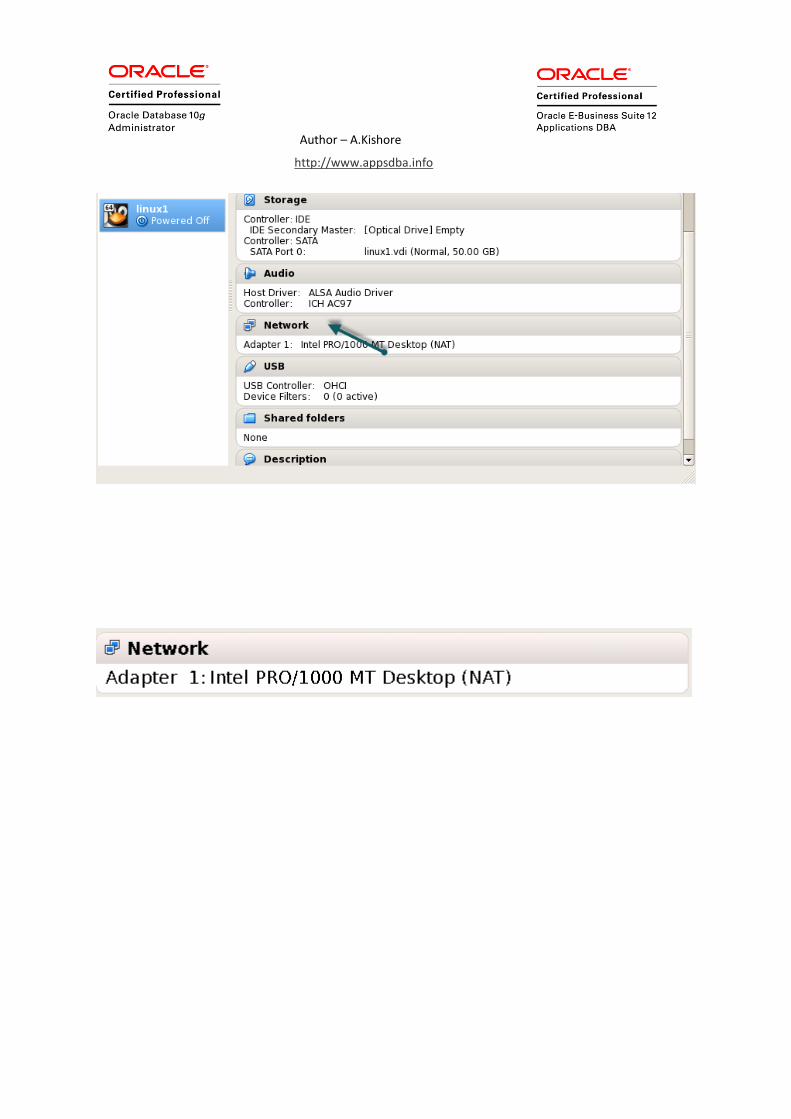
The "linux1" VM will appear on the left hand pane. Scroll down the "Details" tab on the right and click
on the "Network" link.
Author – A.Kishore
http://www.appsdba.info
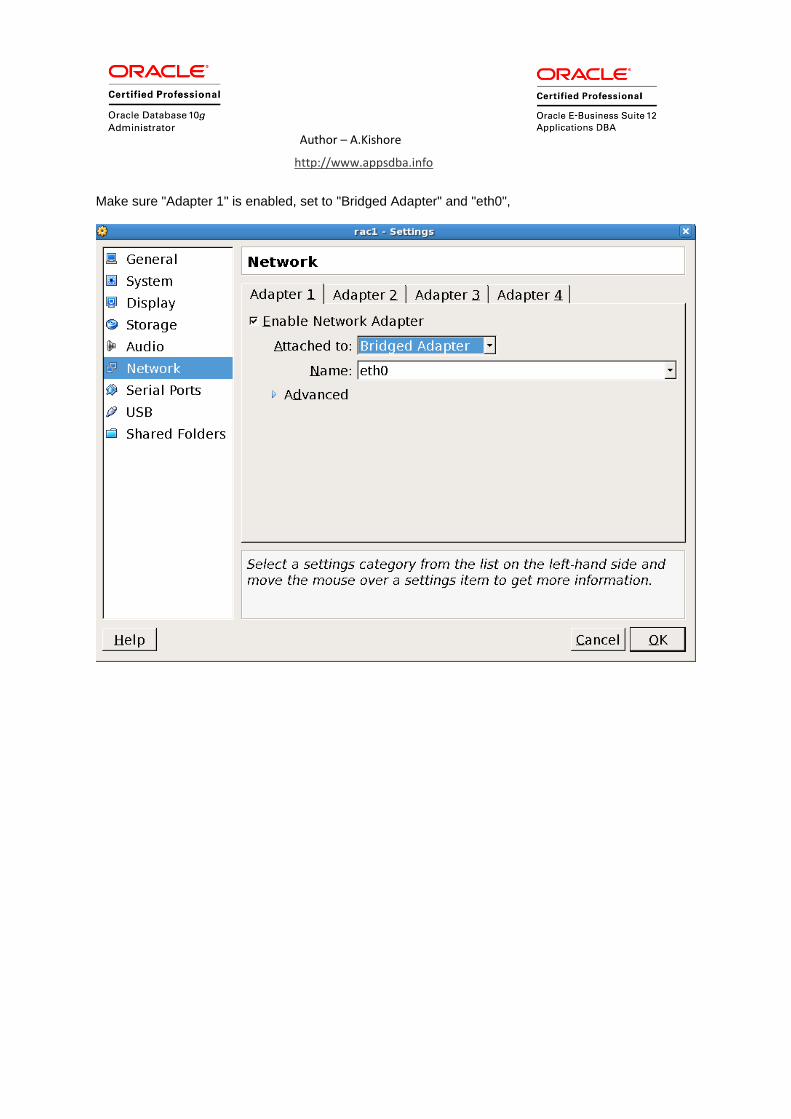
Make sure "Adapter 1" is enabled, set to "Bridged Adapter" and "eth0",
Author – A.Kishore
http://www.appsdba.info
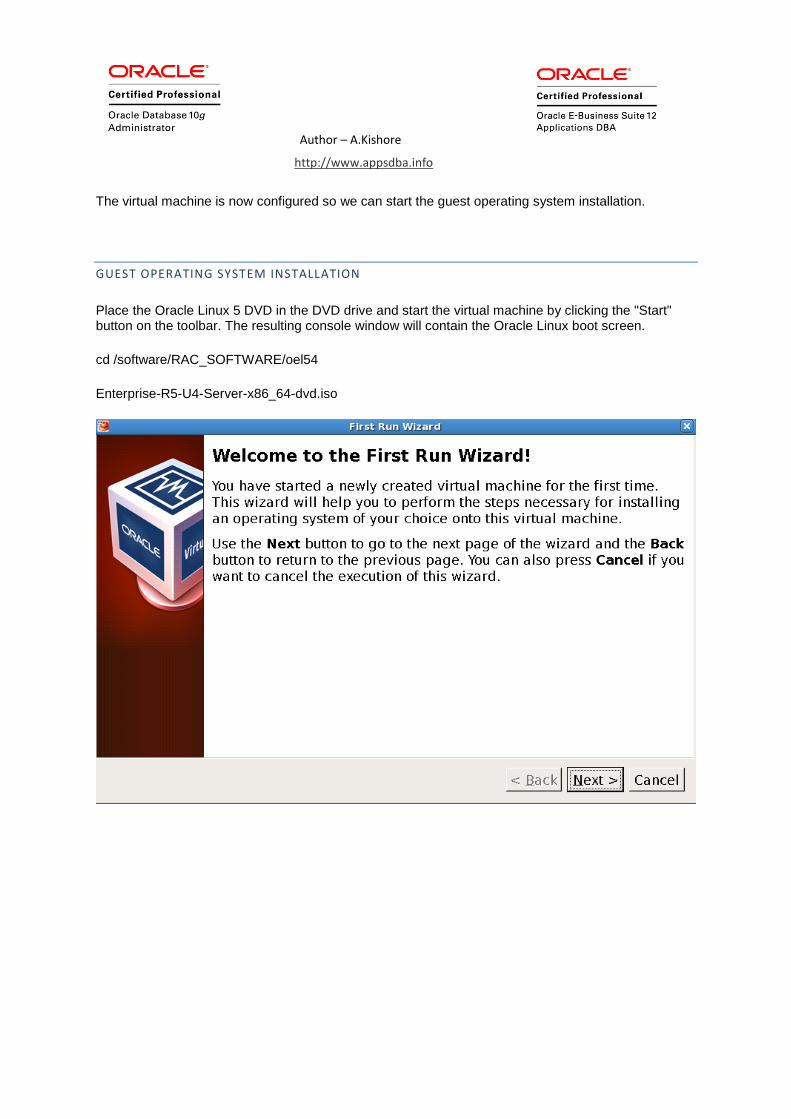
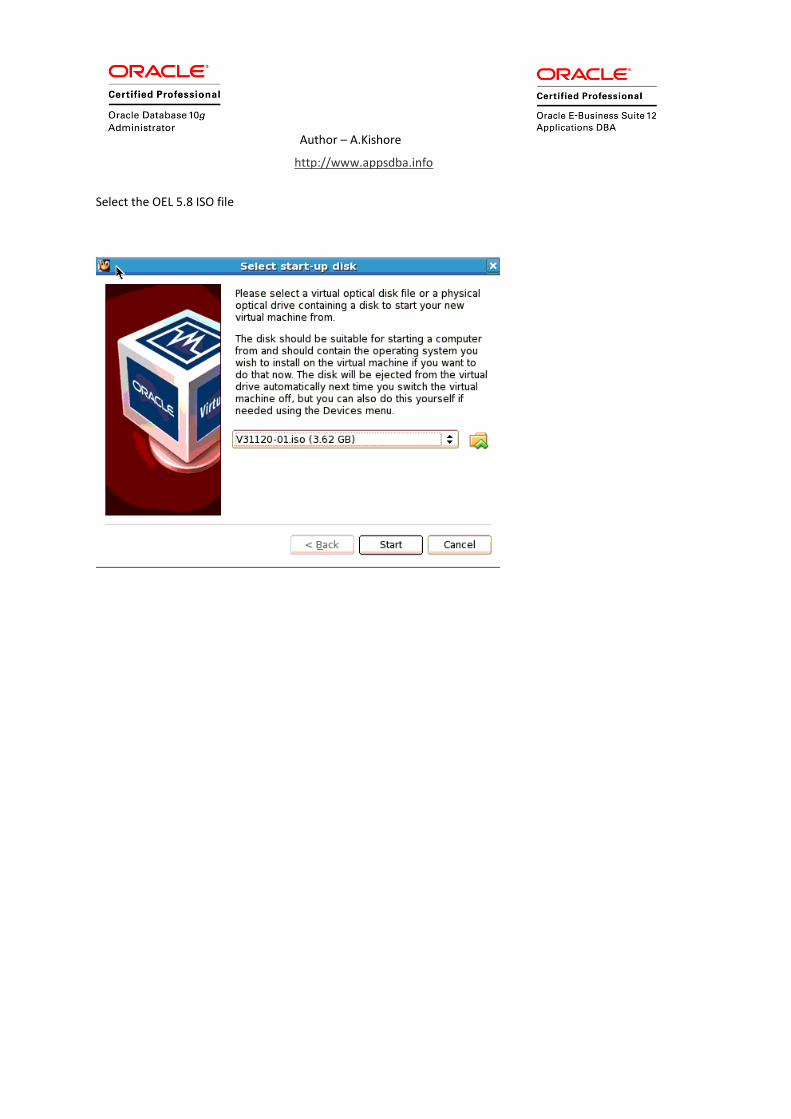
The virtual machine is now configured so we can start the guest operating system installation.
GUEST OPERATING SYSTEM INSTALLATION
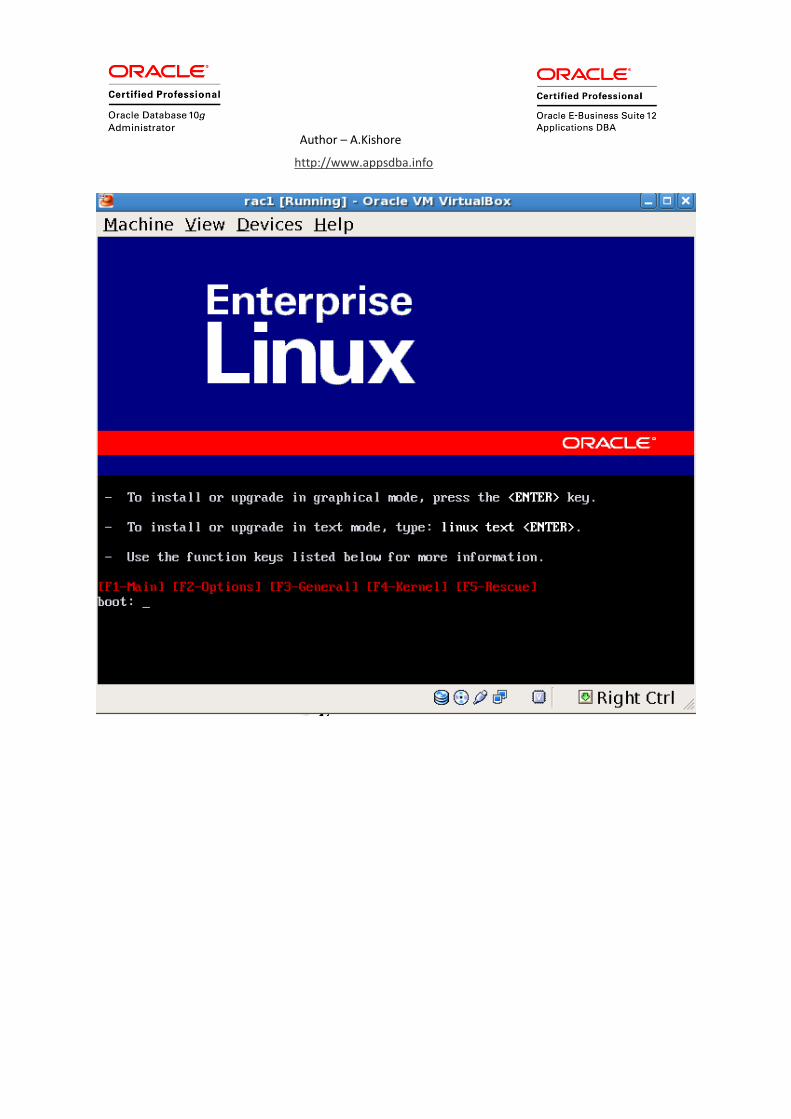
Place the Oracle Linux 5 DVD in the DVD drive and start the virtual machine by clicking the "Start" button on the toolbar. The resulting console window will contain the Oracle Linux boot screen.
cd /software/RAC_SOFTWARE/oel54
Enterprise-R5-U4-Server-x86_64-dvd.iso

Author – A.Kishore
http://www.appsdba.info
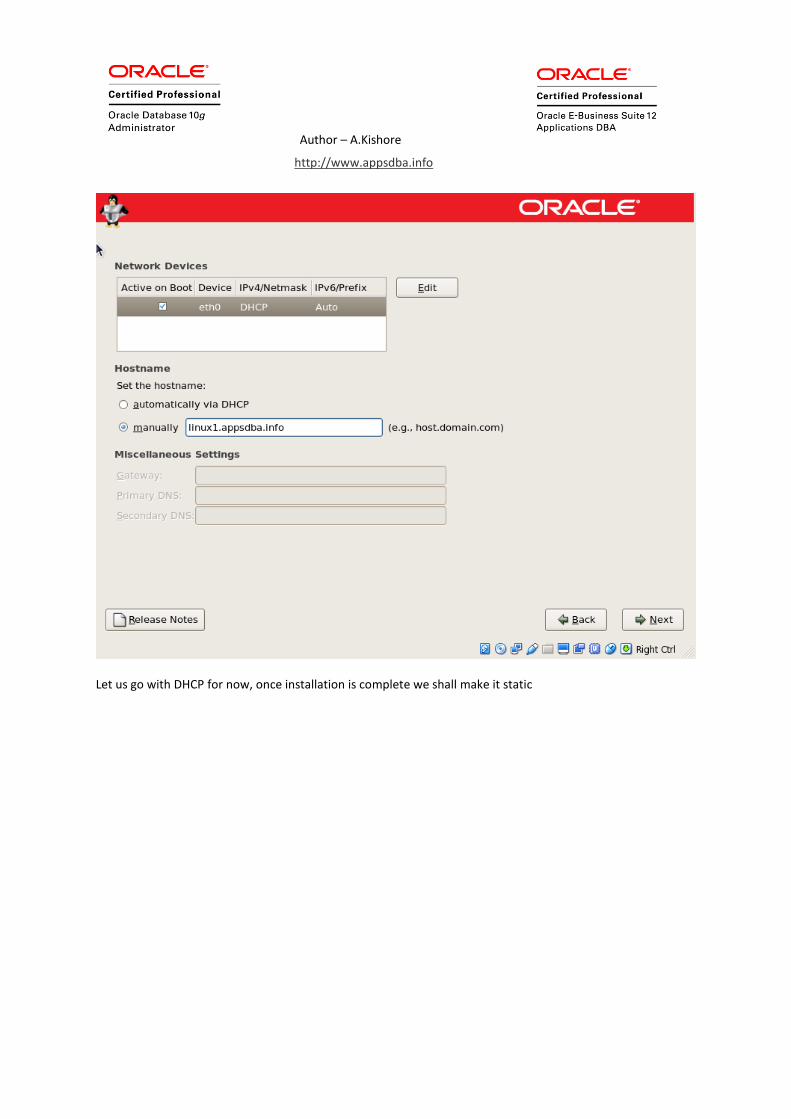
Let us go with DHCP for now, once installation is complete we shall make it static
Author – A.Kishore
http://www.appsdba.info
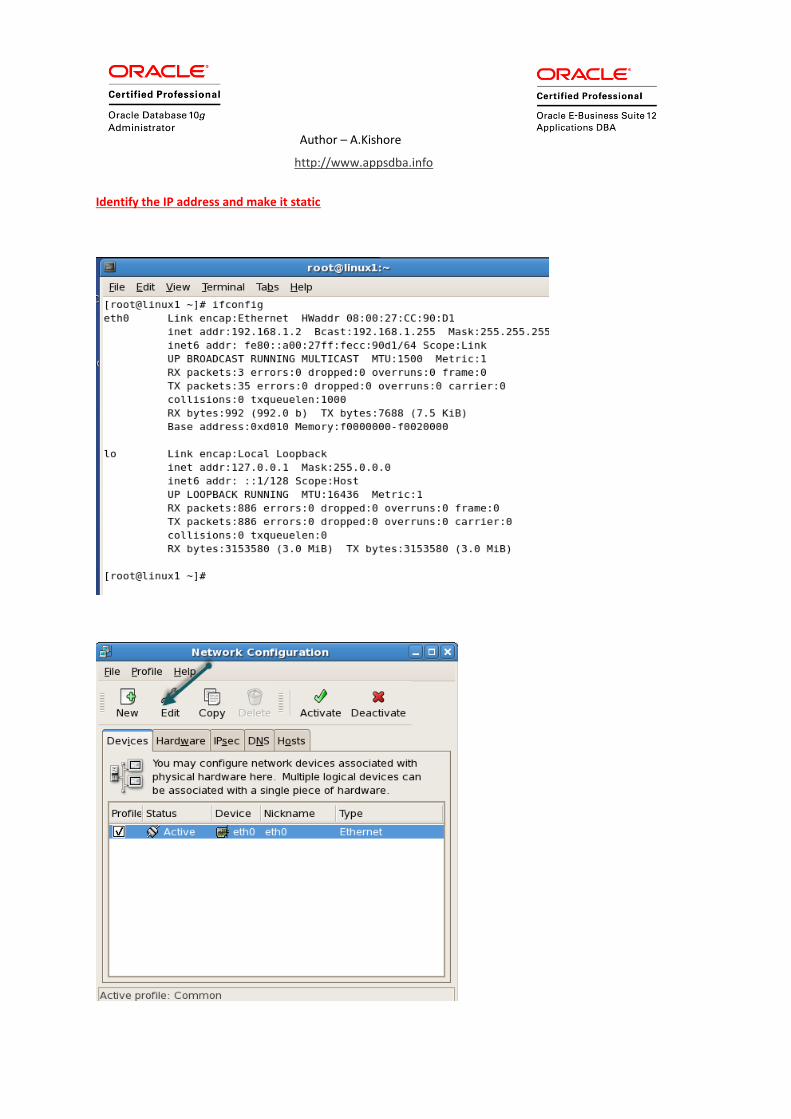
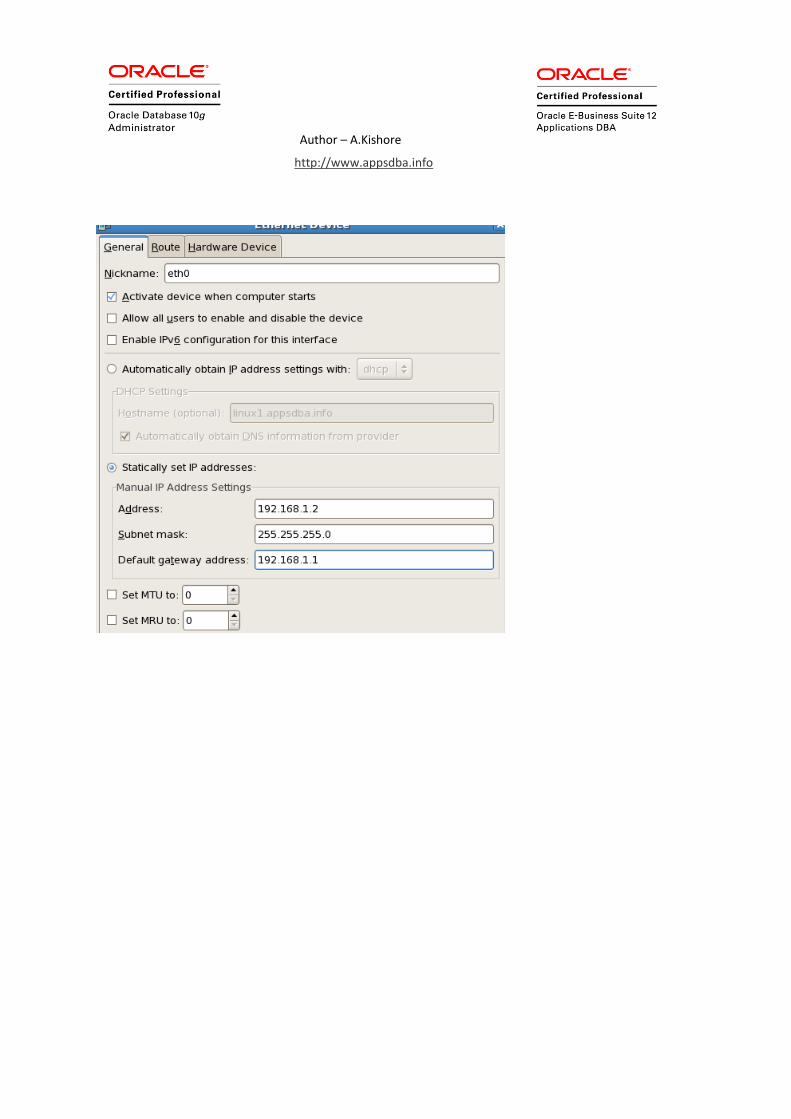
Identify the IP address and make it static
Author – A.Kishore
http://www.appsdba.info
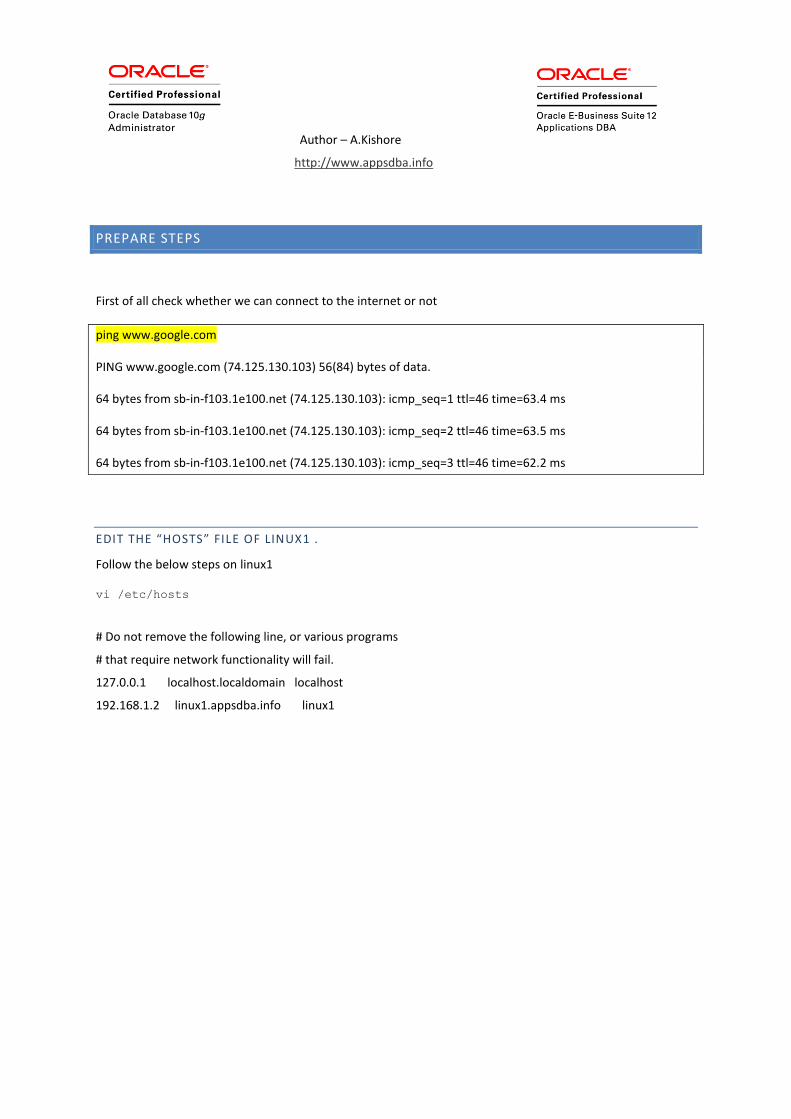
PREPARE STEPS
First of all check whether we can connect to the internet or not
ping www.google.com
PING www.google.com (74.125.130.103) 56(84) bytes of data.
64 bytes from sb-in-f103.1e100.net (74.125.130.103): icmp_seq=1 ttl=46 time=63.4 ms
64 bytes from sb-in-f103.1e100.net (74.125.130.103): icmp_seq=2 ttl=46 time=63.5 ms
64 bytes from sb-in-f103.1e100.net (74.125.130.103): icmp_seq=3 ttl=46 time=62.2 ms
EDIT THE “HOSTS” FILE OF LINUX1 .
Follow the below steps on linux1
vi /etc/hosts
# Do not remove the following line, or various programs
# that require network functionality will fail.
127.0.0.1 localhost.localdomain localhost
192.168.1.2 linux1.appsdba.info linux1
Author – A.Kishore
http://www.appsdba.info
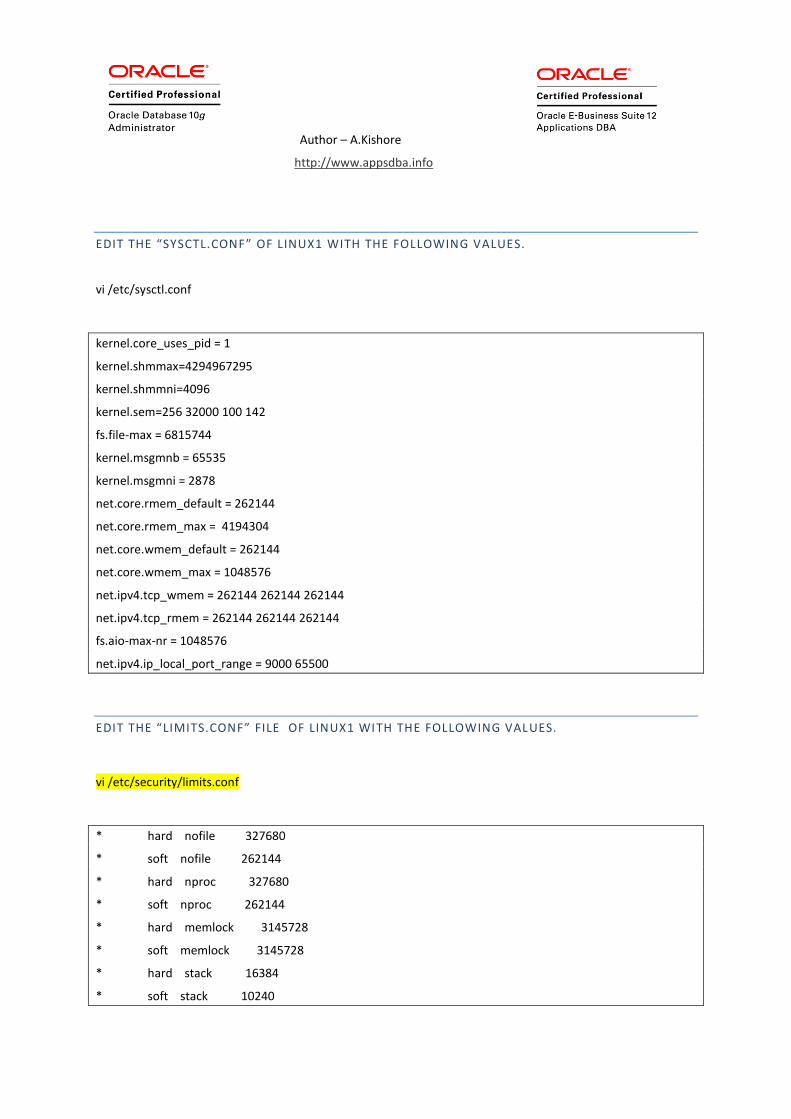
EDIT THE “SYSCTL.CONF” OF LINUX1 WITH THE FOLLOWING VALUES.
vi /etc/sysctl.conf
kernel.core_uses_pid = 1
kernel.shmmax=4294967295
kernel.shmmni=4096
kernel.sem=256 32000 100 142
fs.file-max = 6815744
kernel.msgmnb = 65535
kernel.msgmni = 2878
net.core.rmem_default = 262144
net.core.rmem_max = 4194304
net.core.wmem_default = 262144
net.core.wmem_max = 1048576
net.ipv4.tcp_wmem = 262144 262144 262144
net.ipv4.tcp_rmem = 262144 262144 262144
fs.aio-max-nr = 1048576
net.ipv4.ip_local_port_range = 9000 65500
EDIT THE “LIMITS.CONF” FILE OF LINUX1 WITH THE FOLLOWING VALUES.
vi /etc/security/limits.conf
* hard nofile 327680
* soft nofile 262144
* hard nproc 327680
* soft nproc 262144
* hard memlock 3145728
* soft memlock 3145728
* hard stack 16384
* soft stack 10240
Author – A.Kishore
http://www.appsdba.info
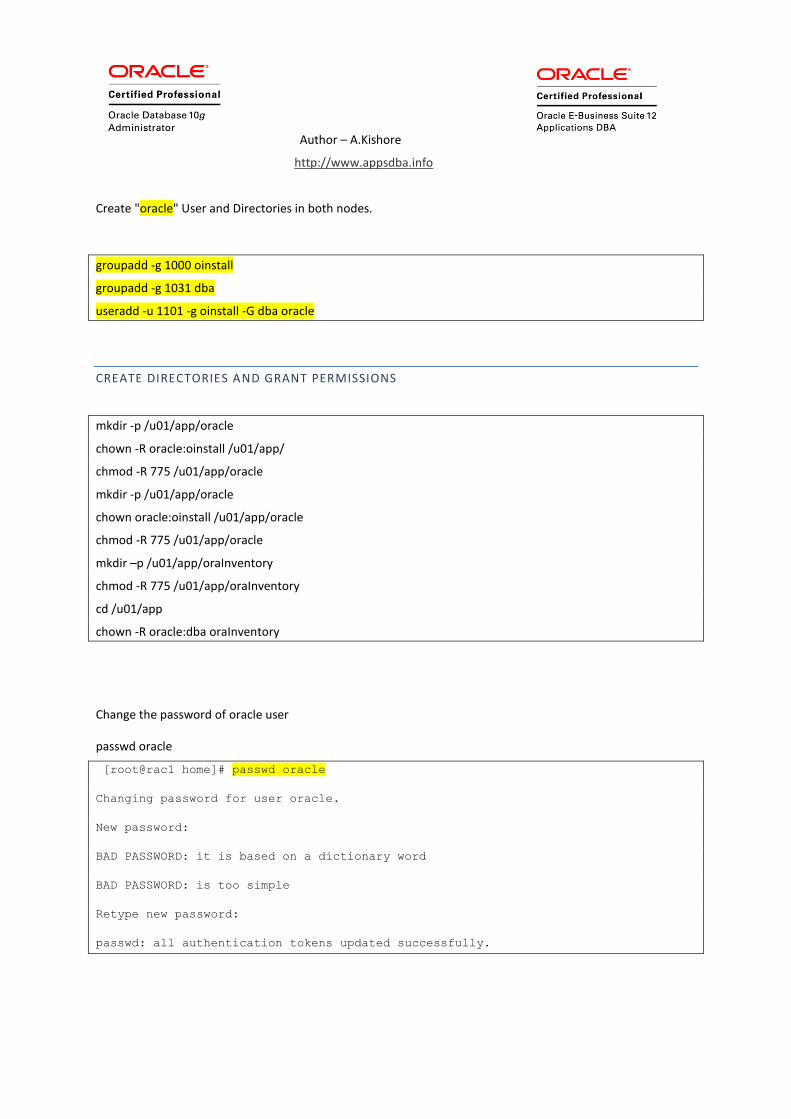
Create "oracle" User and Directories in both nodes.
groupadd -g 1000 oinstall
groupadd -g 1031 dba
useradd -u 1101 -g oinstall -G dba oracle
CREATE DIRECTORIES AND GRANT PERMISSIONS
mkdir -p /u01/app/oracle
chown -R oracle:oinstall /u01/app/
chmod -R 775 /u01/app/oracle
mkdir -p /u01/app/oracle
chown oracle:oinstall /u01/app/oracle
chmod -R 775 /u01/app/oracle
mkdir –p /u01/app/oraInventory
chmod -R 775 /u01/app/oraInventory
cd /u01/app
chown -R oracle:dba oraInventory
Change the password of oracle user
passwd oracle
[root@rac1 home]# passwd oracle
Changing password for user oracle.
New password:
BAD PASSWORD: it is based on a dictionary word
BAD PASSWORD: is too simple
Retype new password:
passwd: all authentication tokens updated successfully.
Author – A.Kishore
http://www.appsdba.info
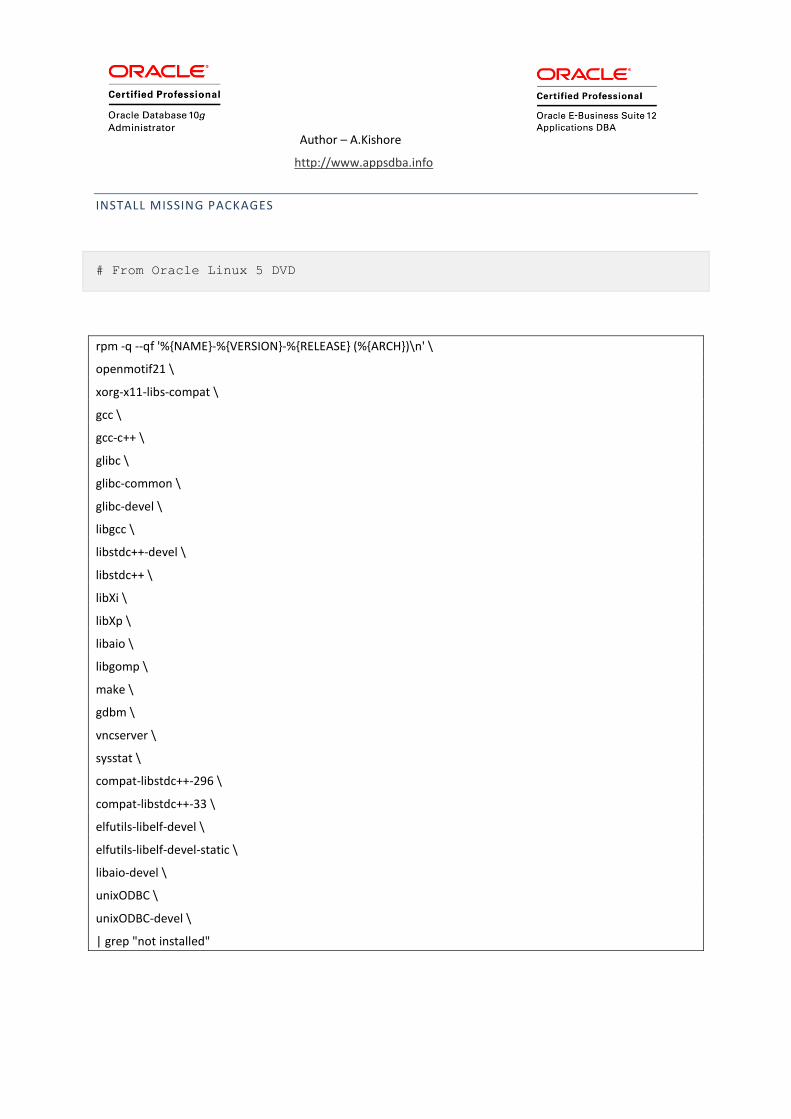
INSTALL MISSING PACKAGES
# From Oracle Linux 5 DVD
rpm -q --qf '%{NAME}-%{VERSION}-%{RELEASE} (%{ARCH})\n' \
openmotif21 \
xorg-x11-libs-compat \
gcc \
gcc-c++ \
glibc \
glibc-common \
glibc-devel \
libgcc \
libstdc++-devel \
libstdc++ \
libXi \
libXp \
libaio \
libgomp \
make \
gdbm \
vncserver \
sysstat \
compat-libstdc++-296 \
compat-libstdc++-33 \
elfutils-libelf-devel \
elfutils-libelf-devel-static \
libaio-devel \
unixODBC \
unixODBC-devel \
| grep "not installed"
Author – A.Kishore
http://www.appsdba.info
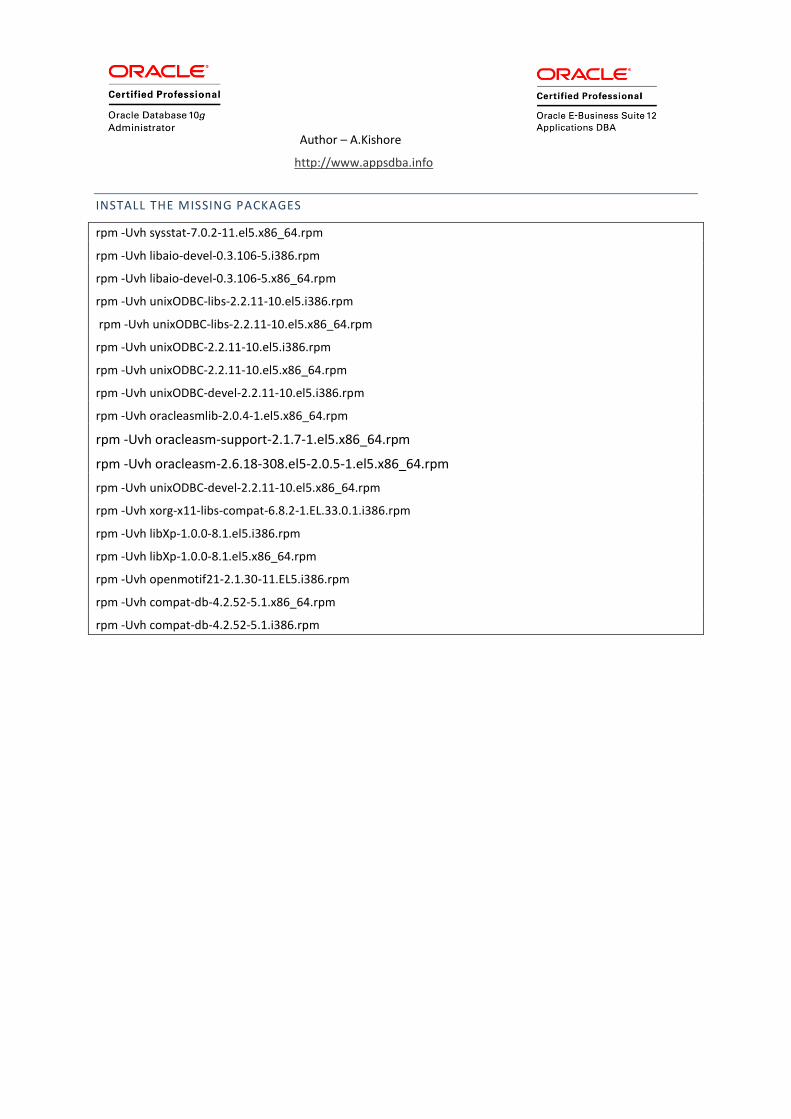
INSTALL THE MISSING PACKAGES
rpm -Uvh sysstat-7.0.2-11.el5.x86_64.rpm
rpm -Uvh libaio-devel-0.3.106-5.i386.rpm
rpm -Uvh libaio-devel-0.3.106-5.x86_64.rpm
rpm -Uvh unixODBC-libs-2.2.11-10.el5.i386.rpm
rpm -Uvh unixODBC-libs-2.2.11-10.el5.x86_64.rpm
rpm -Uvh unixODBC-2.2.11-10.el5.i386.rpm
rpm -Uvh unixODBC-2.2.11-10.el5.x86_64.rpm
rpm -Uvh unixODBC-devel-2.2.11-10.el5.i386.rpm
rpm -Uvh oracleasmlib-2.0.4-1.el5.x86_64.rpm
rpm -Uvh oracleasm-support-2.1.7-1.el5.x86_64.rpm
rpm -Uvh oracleasm-2.6.18-308.el5-2.0.5-1.el5.x86_64.rpm
rpm -Uvh unixODBC-devel-2.2.11-10.el5.x86_64.rpm
rpm -Uvh xorg-x11-libs-compat-6.8.2-1.EL.33.0.1.i386.rpm
rpm -Uvh libXp-1.0.0-8.1.el5.i386.rpm
rpm -Uvh libXp-1.0.0-8.1.el5.x86_64.rpm
rpm -Uvh openmotif21-2.1.30-11.EL5.i386.rpm
rpm -Uvh compat-db-4.2.52-5.1.x86_64.rpm
rpm -Uvh compat-db-4.2.52-5.1.i386.rpm

Author – A.Kishore
http://www.appsdba.info
DECONFIGURE NETWORK TIME PROTOCOL
Either configure NTP, or make sure it is not configured so the Oracle Cluster Time Synchronization Service
(ctssd) can synchronize the times of the RAC nodes. If you want to deconfigure NTP do the following.
Below steps will disable NTP - we have followed below steps only
# service ntpd stop
Shutting down ntpd: [ OK ]
# chkconfig ntpd off
# mv /etc/ntp.conf /etc/ntp.conf.orig
# rm /var/run/ntpd.pid
Run the below command or reboot the node1
sysctl -p
Author – A.Kishore
http://www.appsdba.info
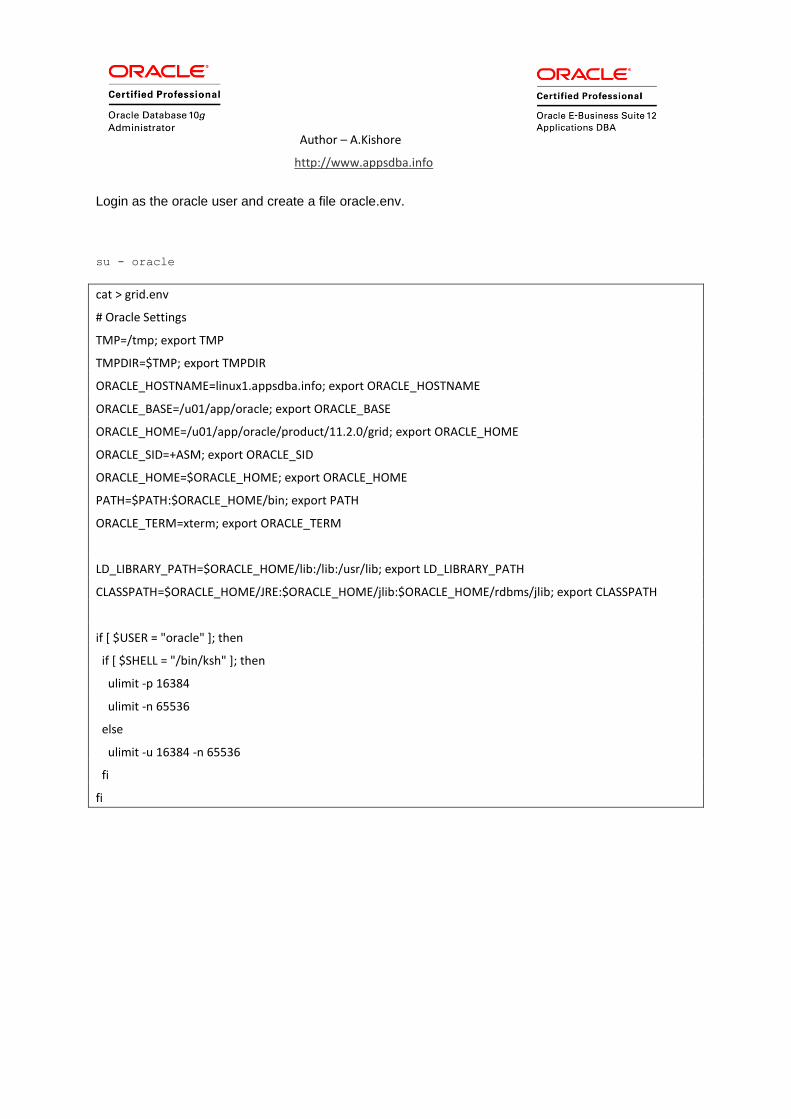
Login as the oracle user and create a file oracle.env.
su - oracle
cat > grid.env
# Oracle Settings
TMP=/tmp; export TMP
TMPDIR=$TMP; export TMPDIR
ORACLE_HOSTNAME=linux1.appsdba.info; export ORACLE_HOSTNAME
ORACLE_BASE=/u01/app/oracle; export ORACLE_BASE
ORACLE_HOME=/u01/app/oracle/product/11.2.0/grid; export ORACLE_HOME
ORACLE_SID=+ASM; export ORACLE_SID
ORACLE_HOME=$ORACLE_HOME; export ORACLE_HOME
PATH=$PATH:$ORACLE_HOME/bin; export PATH
ORACLE_TERM=xterm; export ORACLE_TERM
LD_LIBRARY_PATH=$ORACLE_HOME/lib:/lib:/usr/lib; export LD_LIBRARY_PATH
CLASSPATH=$ORACLE_HOME/JRE:$ORACLE_HOME/jlib:$ORACLE_HOME/rdbms/jlib; export CLASSPATH
if [ $USER = "oracle" ]; then
if [ $SHELL = "/bin/ksh" ]; then
ulimit -p 16384
ulimit -n 65536
else
ulimit -u 16384 -n 65536
fi
fi
Author – A.Kishore
http://www.appsdba.info
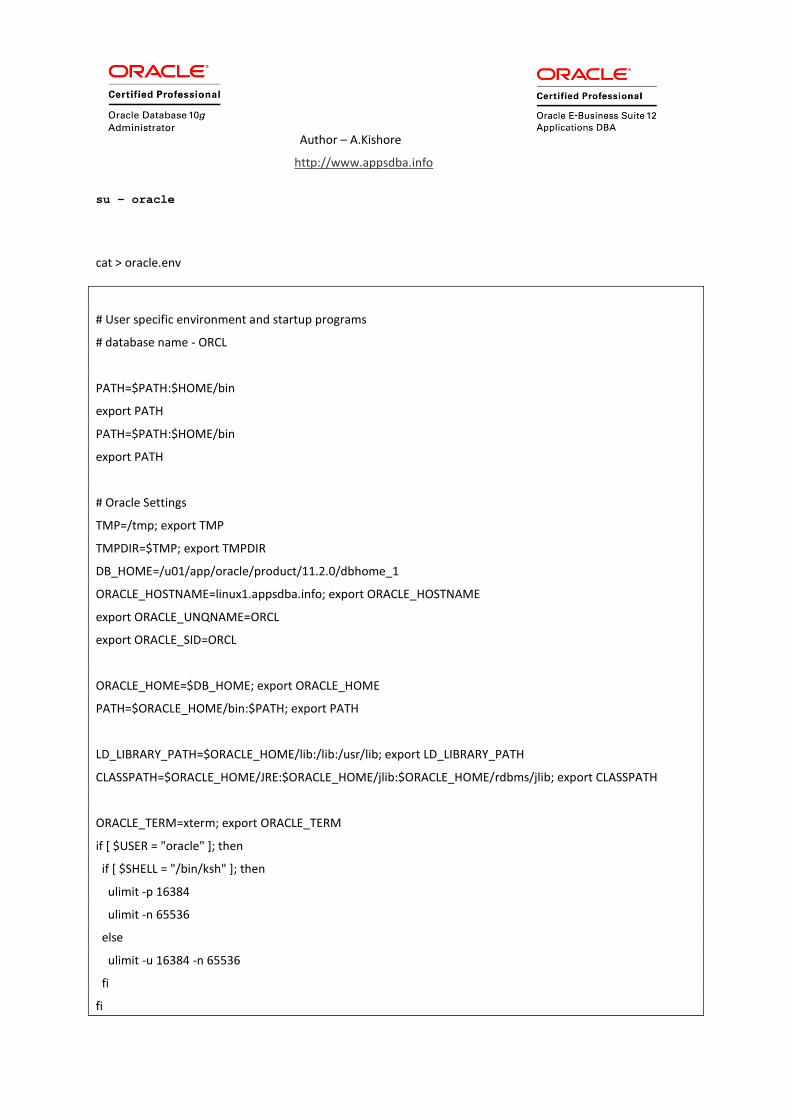
su – oracle
cat > oracle.env
# User specific environment and startup programs
# database name - ORCL
PATH=$PATH:$HOME/bin
export PATH
PATH=$PATH:$HOME/bin
export PATH
# Oracle Settings
TMP=/tmp; export TMP
TMPDIR=$TMP; export TMPDIR
DB_HOME=/u01/app/oracle/product/11.2.0/dbhome_1
ORACLE_HOSTNAME=linux1.appsdba.info; export ORACLE_HOSTNAME
export ORACLE_UNQNAME=ORCL
export ORACLE_SID=ORCL
ORACLE_HOME=$DB_HOME; export ORACLE_HOME
PATH=$ORACLE_HOME/bin:$PATH; export PATH
LD_LIBRARY_PATH=$ORACLE_HOME/lib:/lib:/usr/lib; export LD_LIBRARY_PATH
CLASSPATH=$ORACLE_HOME/JRE:$ORACLE_HOME/jlib:$ORACLE_HOME/rdbms/jlib; export CLASSPATH
ORACLE_TERM=xterm; export ORACLE_TERM
if [ $USER = "oracle" ]; then
if [ $SHELL = "/bin/ksh" ]; then
ulimit -p 16384
ulimit -n 65536
else
ulimit -u 16384 -n 65536
fi
fi
Author – A.Kishore
http://www.appsdba.info
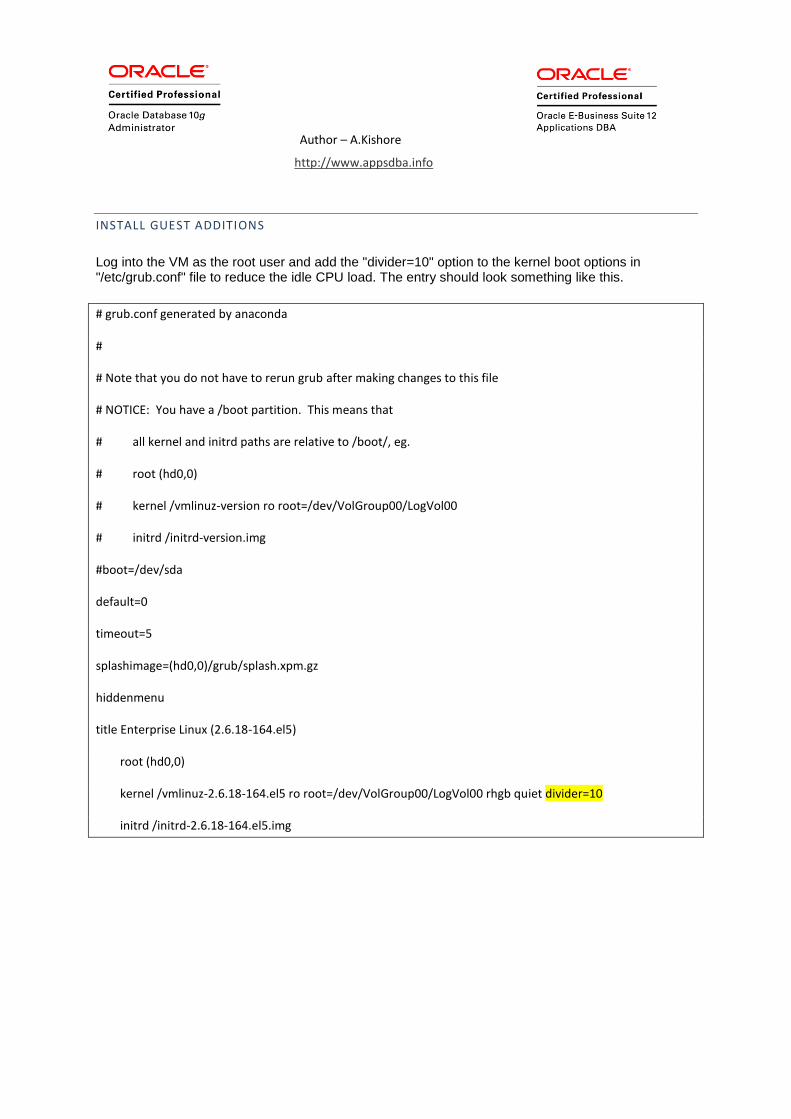
INSTALL GUEST ADDITIONS
Log into the VM as the root user and add the "divider=10" option to the kernel boot options in "/etc/grub.conf" file to reduce the idle CPU load. The entry should look something like this.
# grub.conf generated by anaconda
#
# Note that you do not have to rerun grub after making changes to this file
# NOTICE: You have a /boot partition. This means that
# all kernel and initrd paths are relative to /boot/, eg.
# root (hd0,0)
# kernel /vmlinuz-version ro root=/dev/VolGroup00/LogVol00
# initrd /initrd-version.img
#boot=/dev/sda
default=0
timeout=5
splashimage=(hd0,0)/grub/splash.xpm.gz
hiddenmenu
title Enterprise Linux (2.6.18-164.el5)
root (hd0,0)
kernel /vmlinuz-2.6.18-164.el5 ro root=/dev/VolGroup00/LogVol00 rhgb quiet divider=10
initrd /initrd-2.6.18-164.el5.img
Author – A.Kishore
http://www.appsdba.info
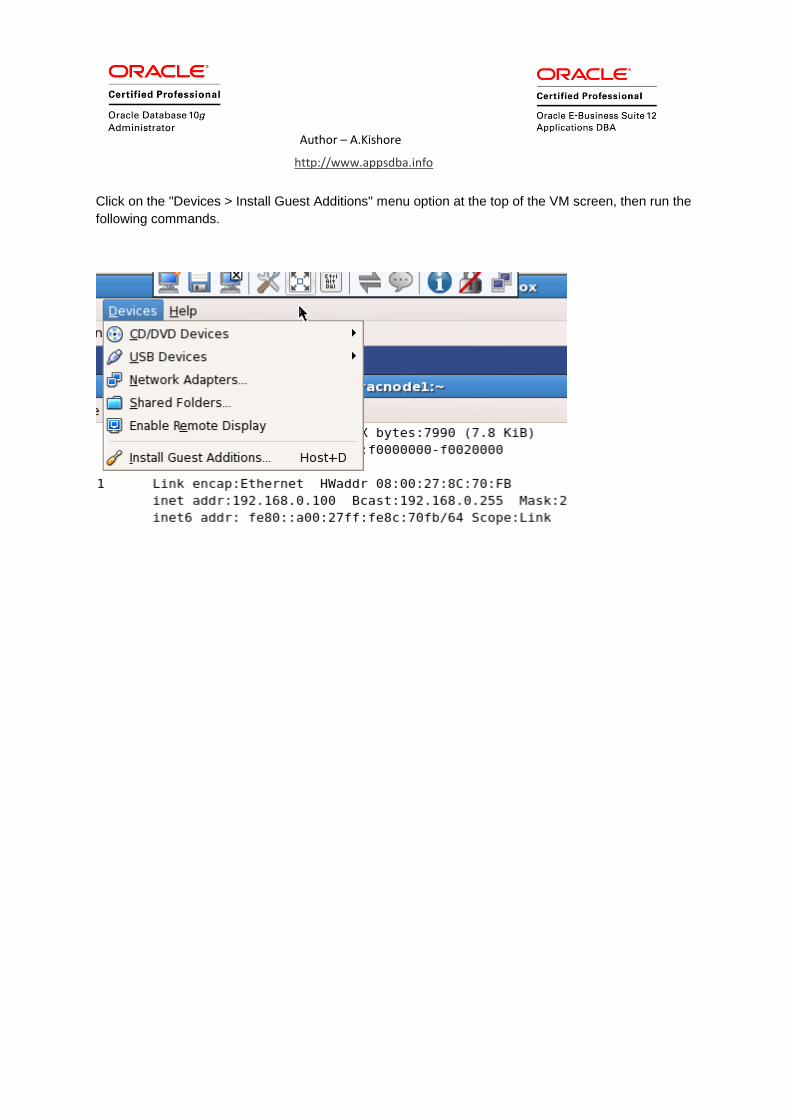
Click on the "Devices > Install Guest Additions" menu option at the top of the VM screen, then run the
following commands.
Author – A.Kishore
http://www.appsdba.info
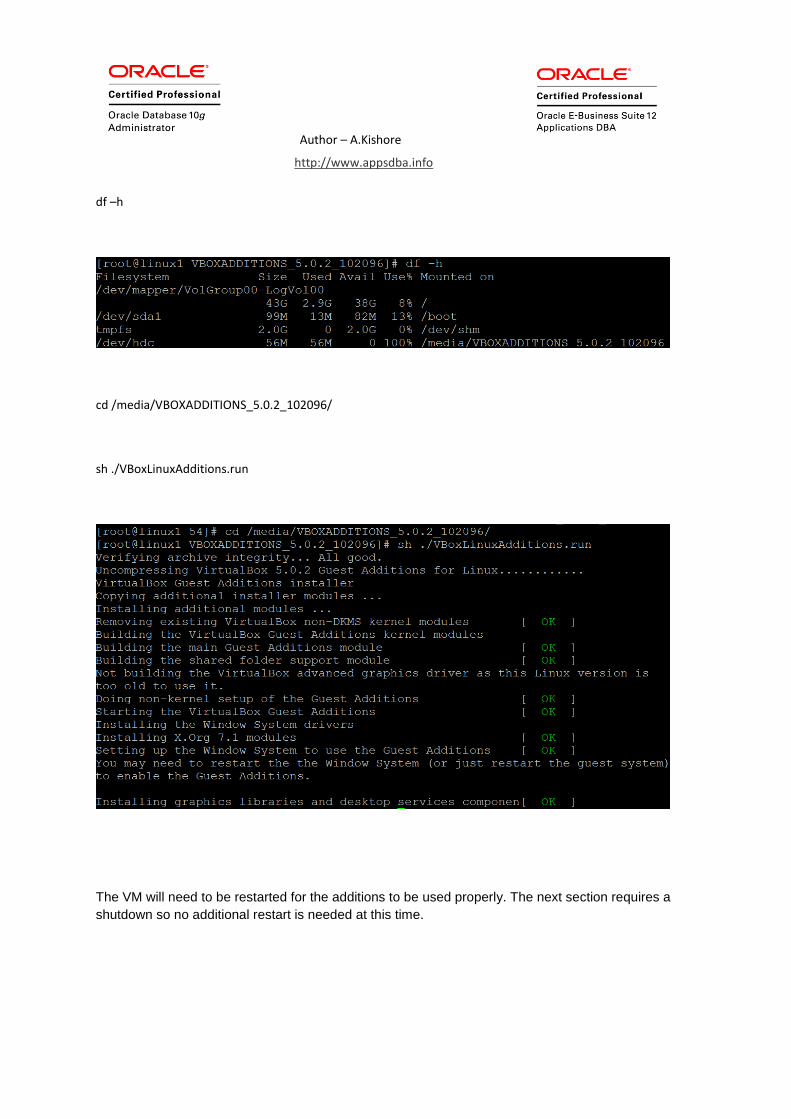
df –h
cd /media/VBOXADDITIONS_5.0.2_102096/
sh ./VBoxLinuxAdditions.run
The VM will need to be restarted for the additions to be used properly. The next section requires a
shutdown so no additional restart is needed at this time.
Author – A.Kishore
http://www.appsdba.info
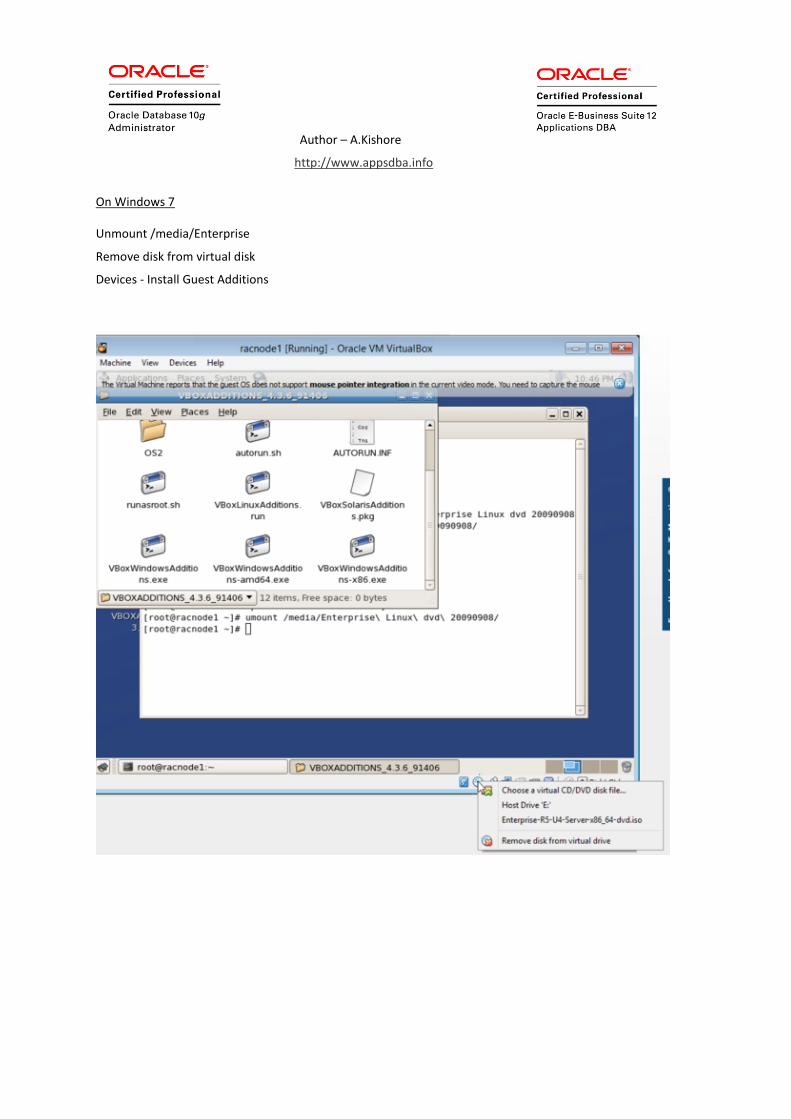
On Windows 7
Unmount /media/Enterprise
Remove disk from virtual disk
Devices - Install Guest Additions
Author – A.Kishore
http://www.appsdba.info
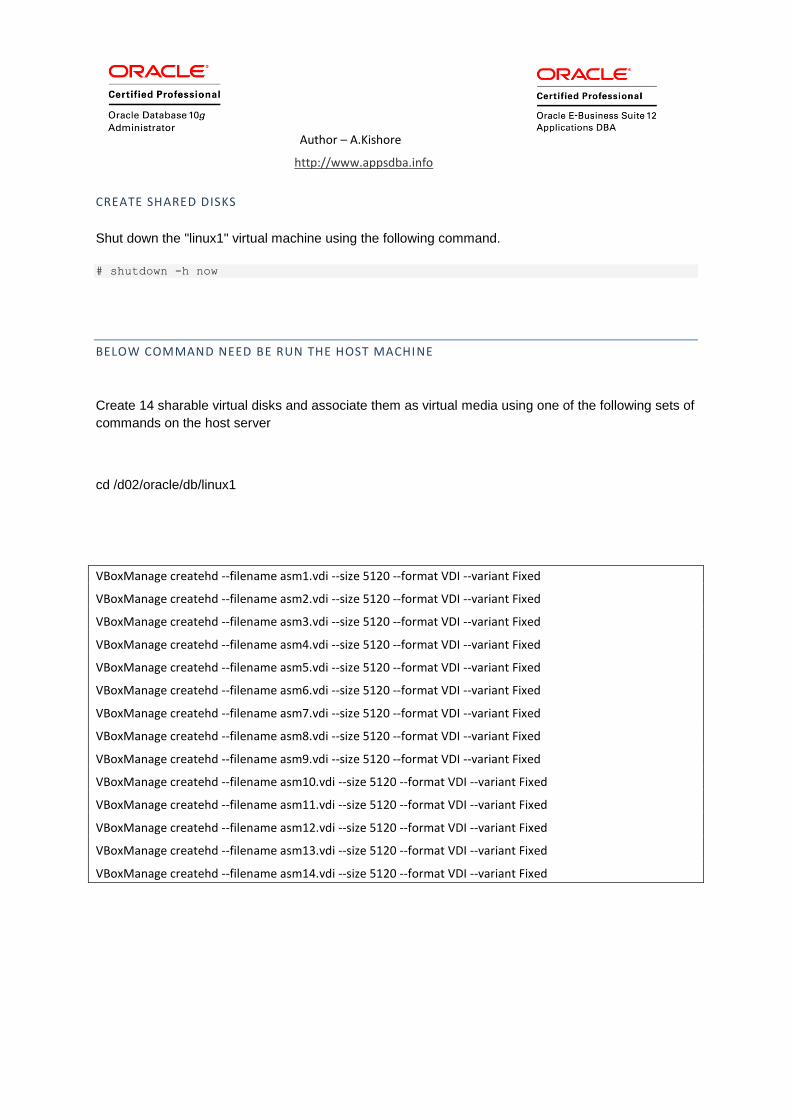
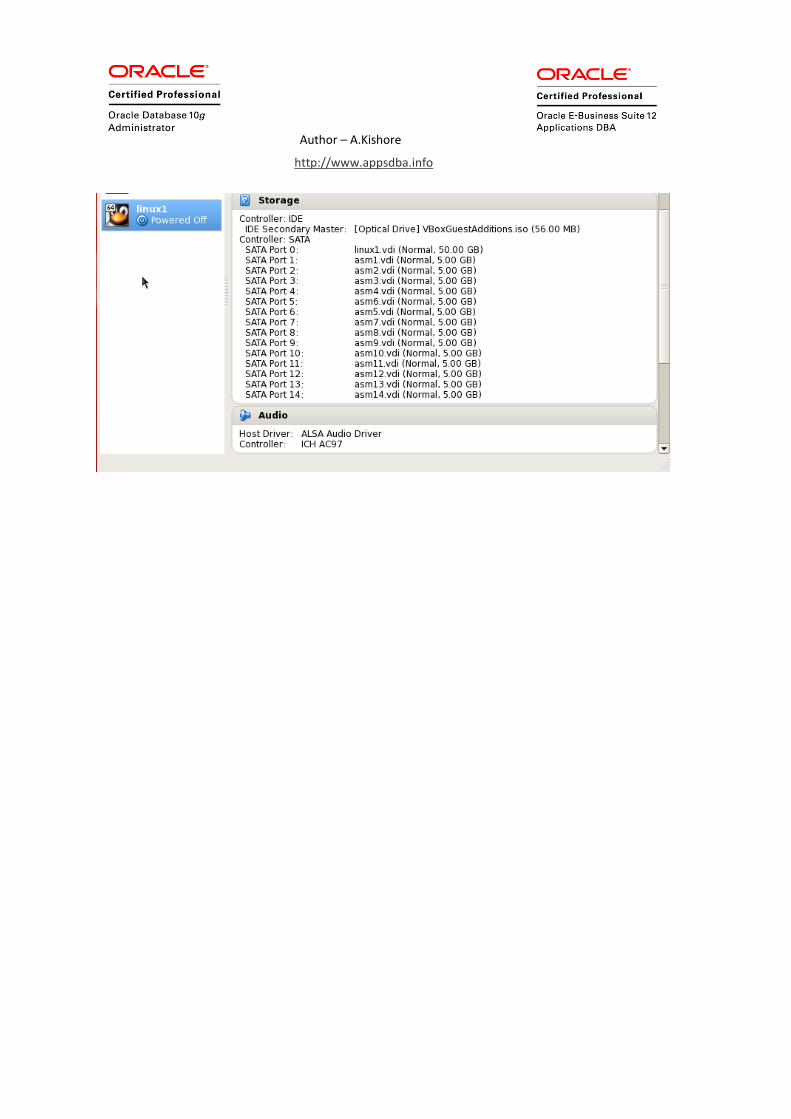
CREATE SHARED DISKS
Shut down the "linux1" virtual machine using the following command.
# shutdown -h now
BELOW COMMAND NEED BE RUN THE HOST MACHINE
Create 14 sharable virtual disks and associate them as virtual media using one of the following sets of
commands on the host server
cd /d02/oracle/db/linux1
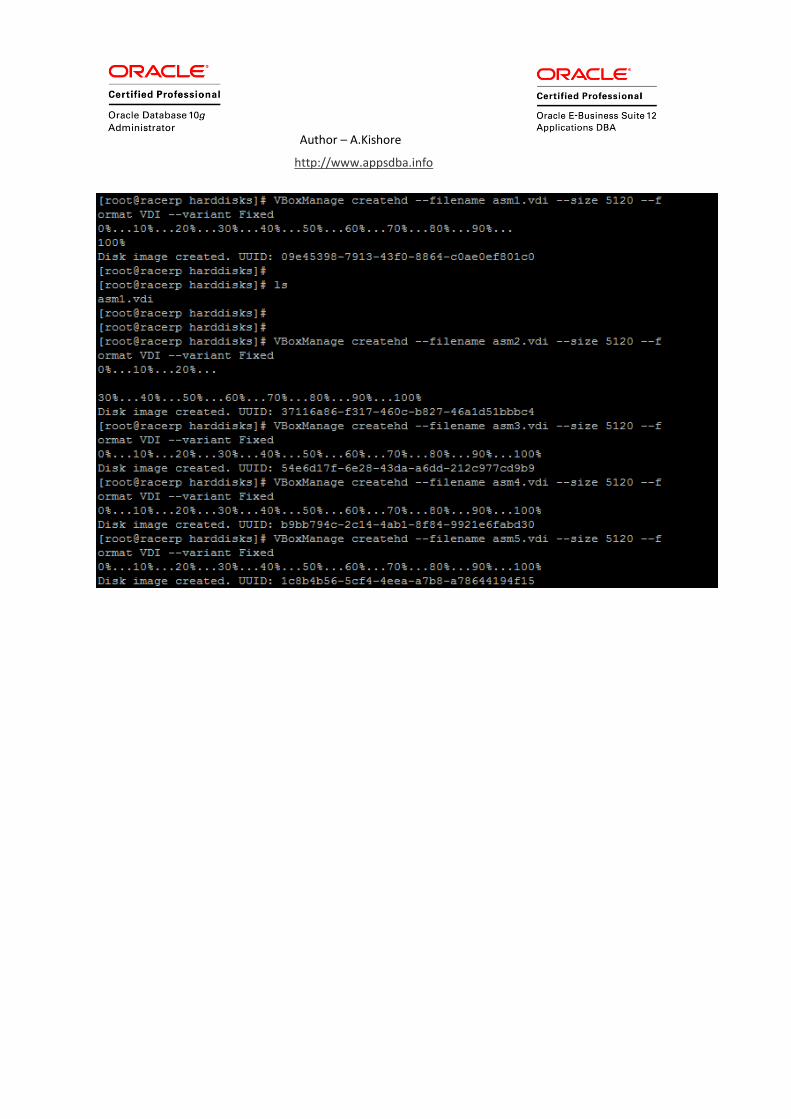
VBoxManage createhd --filename asm1.vdi --size 5120 --format VDI --variant Fixed
VBoxManage createhd --filename asm2.vdi --size 5120 --format VDI --variant Fixed
VBoxManage createhd --filename asm3.vdi --size 5120 --format VDI --variant Fixed
VBoxManage createhd --filename asm4.vdi --size 5120 --format VDI --variant Fixed
VBoxManage createhd --filename asm5.vdi --size 5120 --format VDI --variant Fixed
VBoxManage createhd --filename asm6.vdi --size 5120 --format VDI --variant Fixed
VBoxManage createhd --filename asm7.vdi --size 5120 --format VDI --variant Fixed
VBoxManage createhd --filename asm8.vdi --size 5120 --format VDI --variant Fixed
VBoxManage createhd --filename asm9.vdi --size 5120 --format VDI --variant Fixed
VBoxManage createhd --filename asm10.vdi --size 5120 --format VDI --variant Fixed
VBoxManage createhd --filename asm11.vdi --size 5120 --format VDI --variant Fixed
VBoxManage createhd --filename asm12.vdi --size 5120 --format VDI --variant Fixed
VBoxManage createhd --filename asm13.vdi --size 5120 --format VDI --variant Fixed
VBoxManage createhd --filename asm14.vdi --size 5120 --format VDI --variant Fixed
Author – A.Kishore
http://www.appsdba.info
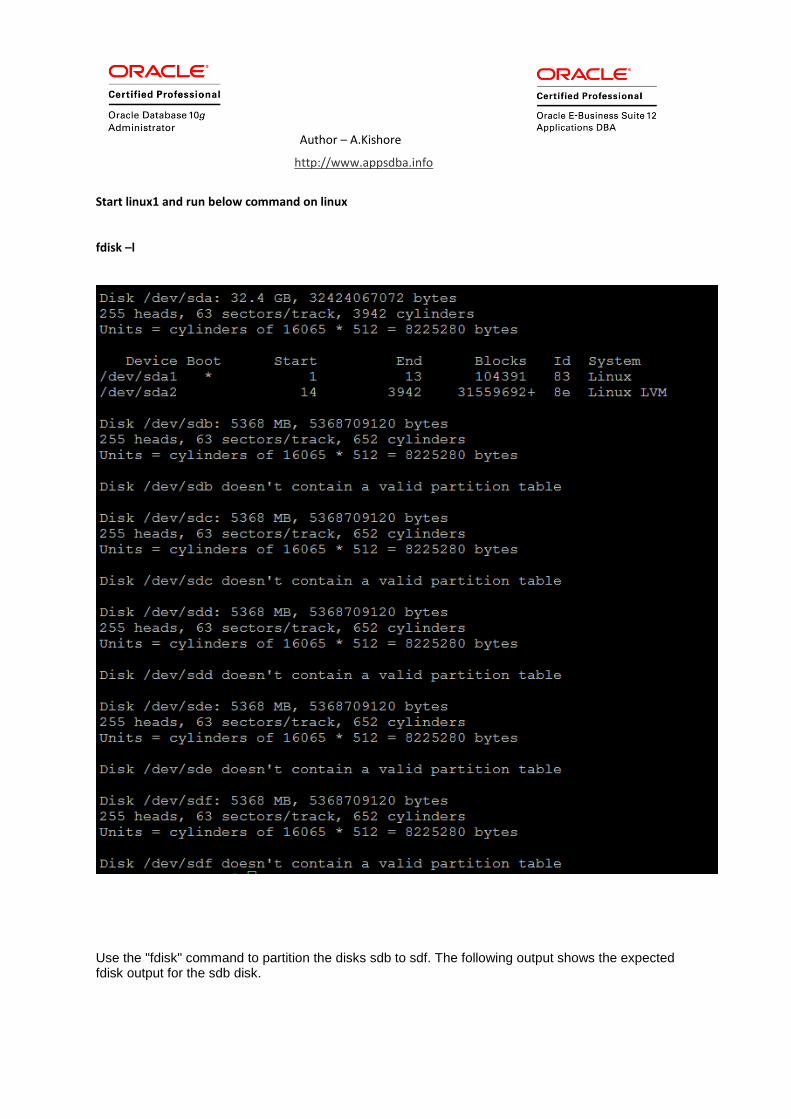
Start linux1 and run below command on linux
fdisk –l
Use the "fdisk" command to partition the disks sdb to sdf. The following output shows the expected fdisk output for the sdb disk.
Author – A.Kishore
http://www.appsdba.info
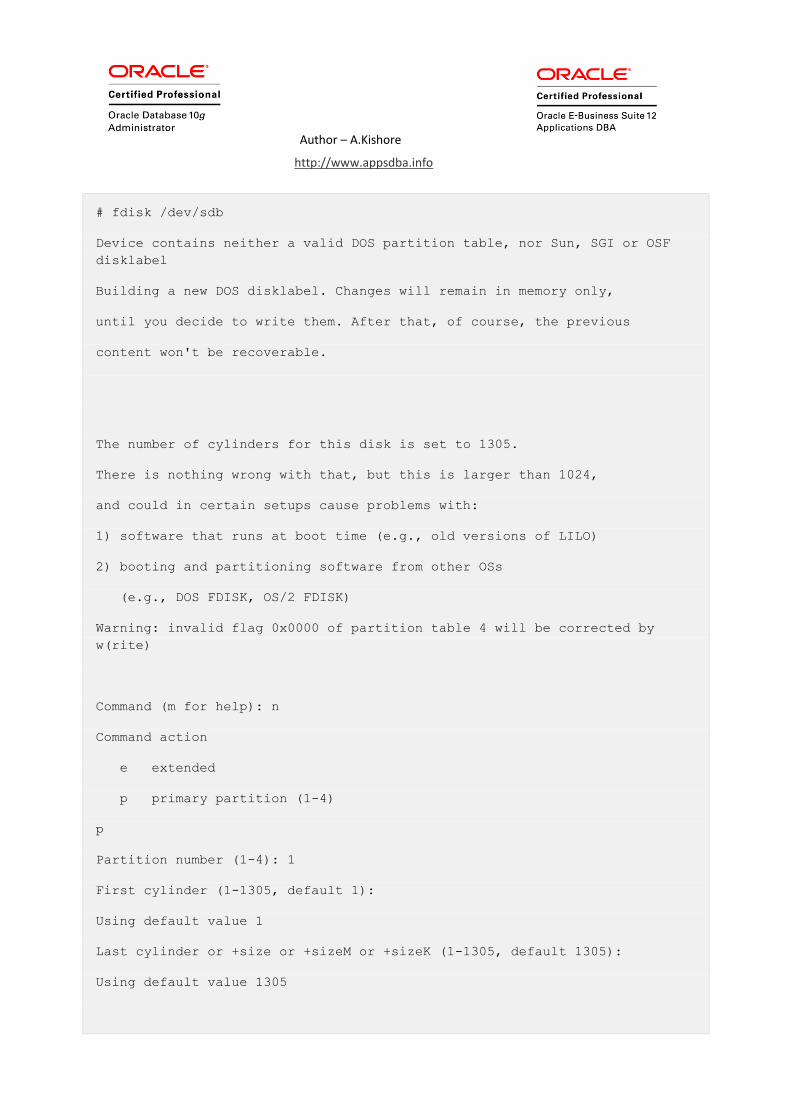
# fdisk /dev/sdb
Device contains neither a valid DOS partition table, nor Sun, SGI or OSF
disklabel
Building a new DOS disklabel. Changes will remain in memory only,
until you decide to write them. After that, of course, the previous
content won't be recoverable.
The number of cylinders for this disk is set to 1305.
There is nothing wrong with that, but this is larger than 1024,
and could in certain setups cause problems with:
1) software that runs at boot time (e.g., old versions of LILO)
2) booting and partitioning software from other OSs
(e.g., DOS FDISK, OS/2 FDISK)
Warning: invalid flag 0x0000 of partition table 4 will be corrected by
w(rite)
Command (m for help): n
Command action
e extended
p primary partition (1-4)
p
Partition number (1-4): 1
First cylinder (1-1305, default 1):
Using default value 1
Last cylinder or +size or +sizeM or +sizeK (1-1305, default 1305):
Using default value 1305
Author – A.Kishore
http://www.appsdba.info
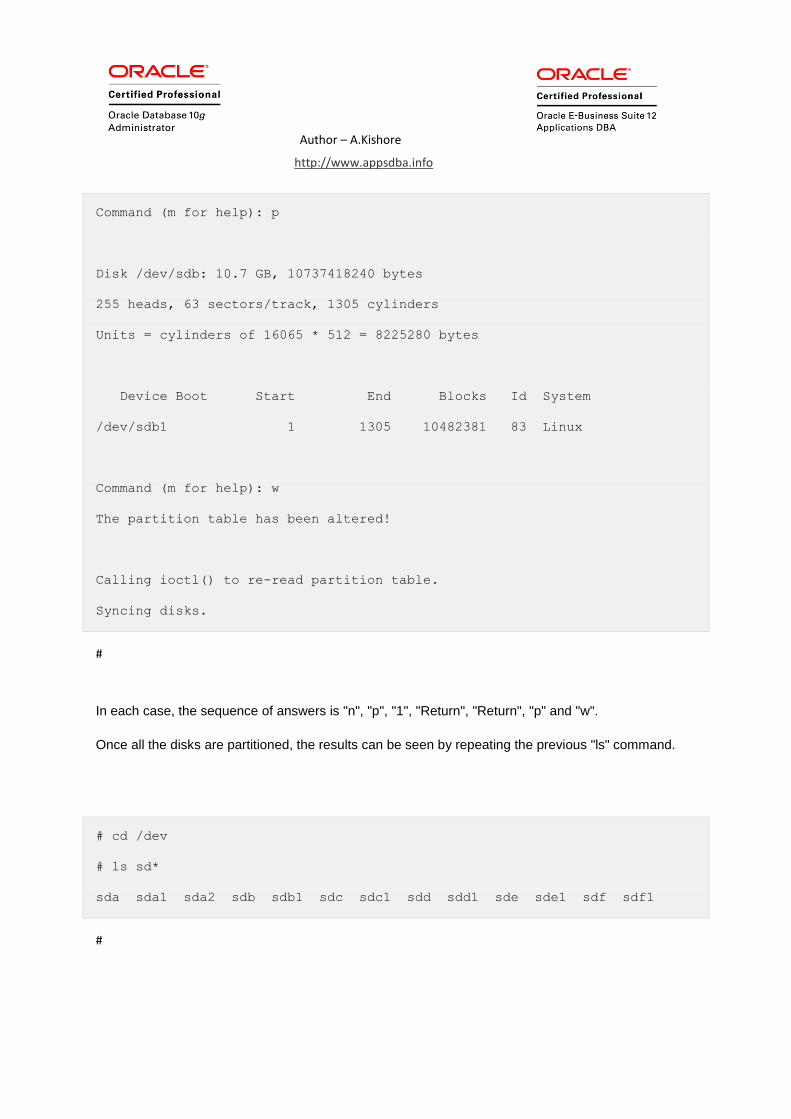
Command (m for help): p
Disk /dev/sdb: 10.7 GB, 10737418240 bytes
255 heads, 63 sectors/track, 1305 cylinders
Units = cylinders of 16065 * 512 = 8225280 bytes
Device Boot Start End Blocks Id System
/dev/sdb1 1 1305 10482381 83 Linux
Command (m for help): w
The partition table has been altered!
Calling ioctl() to re-read partition table.
Syncing disks.
#
In each case, the sequence of answers is "n", "p", "1", "Return", "Return", "p" and "w".
Once all the disks are partitioned, the results can be seen by repeating the previous "ls" command.
# cd /dev
# ls sd*
sda sda1 sda2 sdb sdb1 sdc sdc1 sdd sdd1 sde sde1 sdf sdf1
#
Author – A.Kishore
http://www.appsdba.info
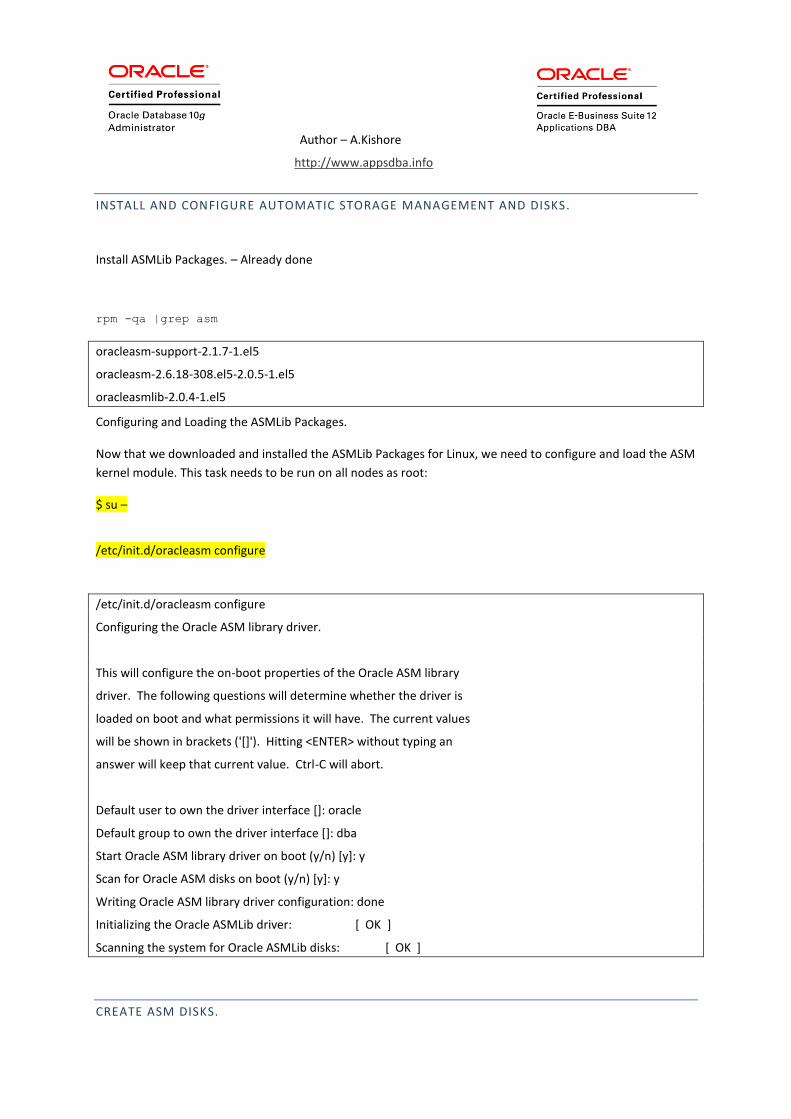
INSTALL AND CONFIGURE AUTOMATIC STORAGE MANAGEMENT AND DISKS.
Install ASMLib Packages. – Already done
rpm -qa |grep asm
oracleasm-support-2.1.7-1.el5
oracleasm-2.6.18-308.el5-2.0.5-1.el5
oracleasmlib-2.0.4-1.el5
Configuring and Loading the ASMLib Packages.
Now that we downloaded and installed the ASMLib Packages for Linux, we need to configure and load the ASM
kernel module. This task needs to be run on all nodes as root:
$ su –
/etc/init.d/oracleasm configure
/etc/init.d/oracleasm configure
Configuring the Oracle ASM library driver.
This will configure the on-boot properties of the Oracle ASM library
driver. The following questions will determine whether the driver is
loaded on boot and what permissions it will have. The current values
will be shown in brackets ('[]'). Hitting <ENTER> without typing an
answer will keep that current value. Ctrl-C will abort.
Default user to own the driver interface []: oracle
Default group to own the driver interface []: dba
Start Oracle ASM library driver on boot (y/n) [y]: y
Scan for Oracle ASM disks on boot (y/n) [y]: y
Writing Oracle ASM library driver configuration: done
Initializing the Oracle ASMLib driver: [ OK ]
Scanning the system for Oracle ASMLib disks: [ OK ]
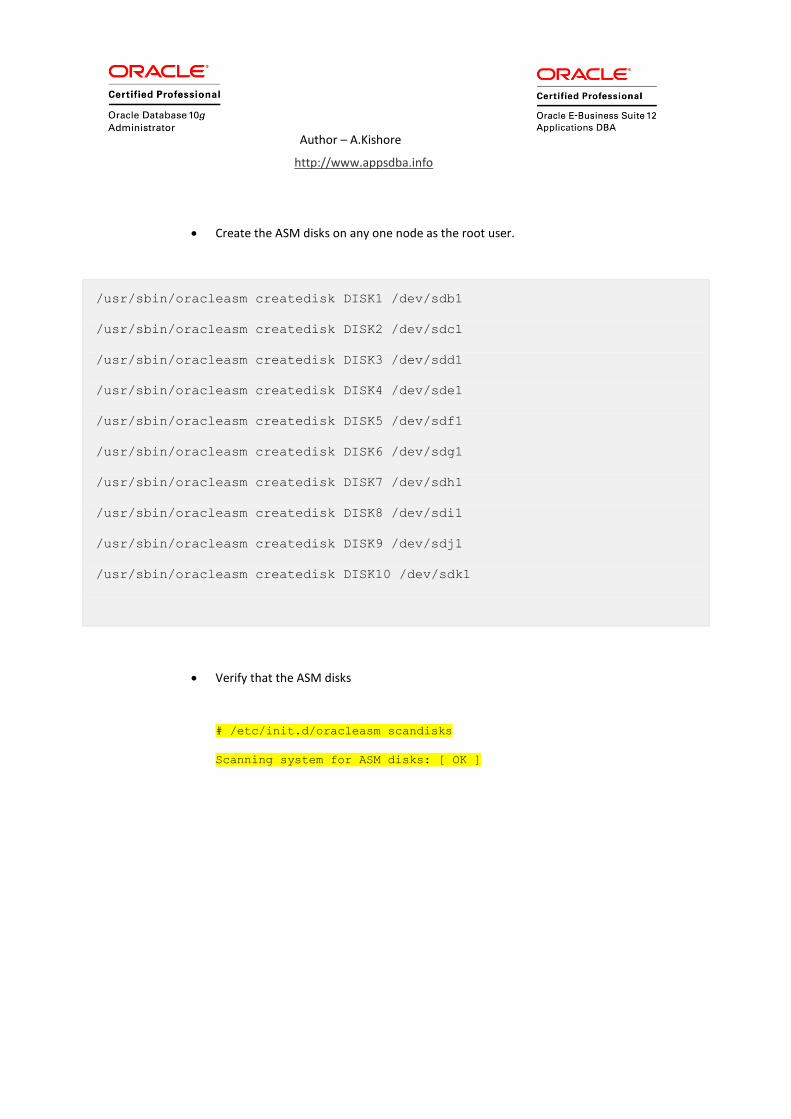
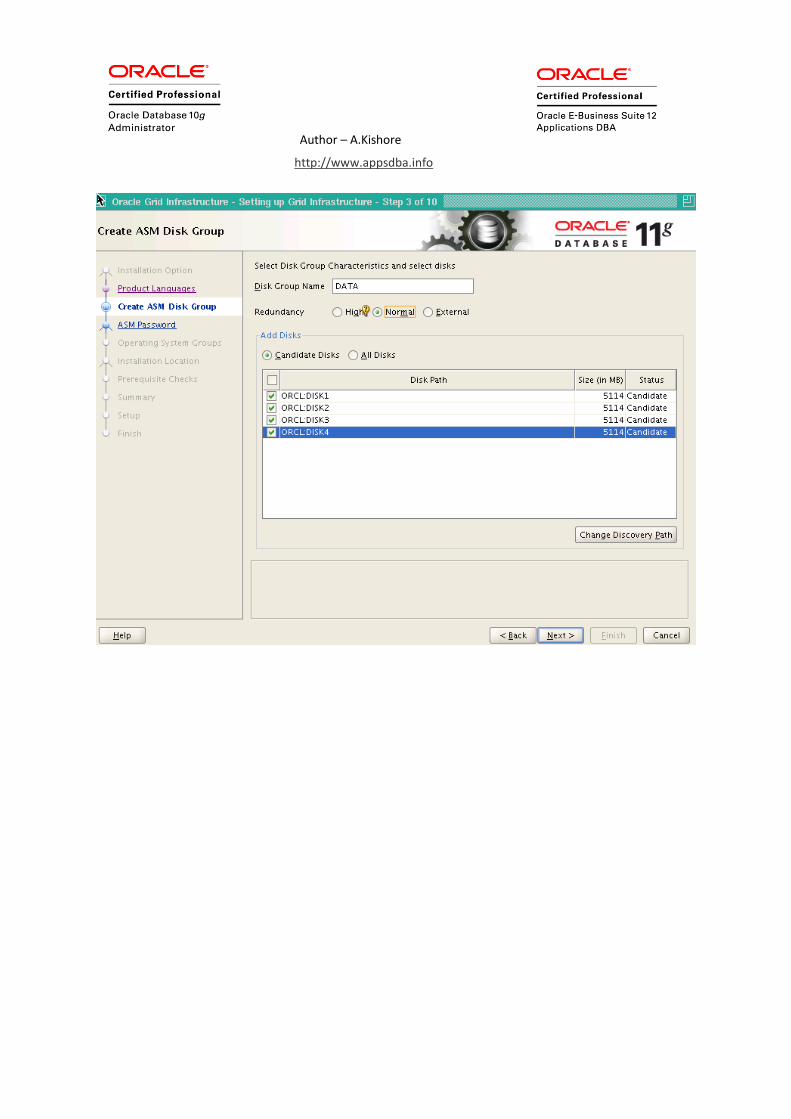
CREATE ASM DISKS.
Author – A.Kishore
http://www.appsdba.info
Create the ASM disks on any one node as the root user.
/usr/sbin/oracleasm createdisk DISK1 /dev/sdb1
/usr/sbin/oracleasm createdisk DISK2 /dev/sdc1
/usr/sbin/oracleasm createdisk DISK3 /dev/sdd1
/usr/sbin/oracleasm createdisk DISK4 /dev/sde1
/usr/sbin/oracleasm createdisk DISK5 /dev/sdf1
/usr/sbin/oracleasm createdisk DISK6 /dev/sdg1
/usr/sbin/oracleasm createdisk DISK7 /dev/sdh1
/usr/sbin/oracleasm createdisk DISK8 /dev/sdi1
/usr/sbin/oracleasm createdisk DISK9 /dev/sdj1
/usr/sbin/oracleasm createdisk DISK10 /dev/sdk1
Verify that the ASM disks
# /etc/init.d/oracleasm scandisks
Scanning system for ASM disks: [ OK ]

Author – A.Kishore
http://www.appsdba.info
We can see the disk are now visible to ASM using the "listdisks" command.
# /usr/sbin/oracleasm listdisks
DISK1
DISK2
DISK3
DISK4
DISK5
DISK6
DISK7
DISK8
DISK9
DISK10
Author – A.Kishore
http://www.appsdba.info
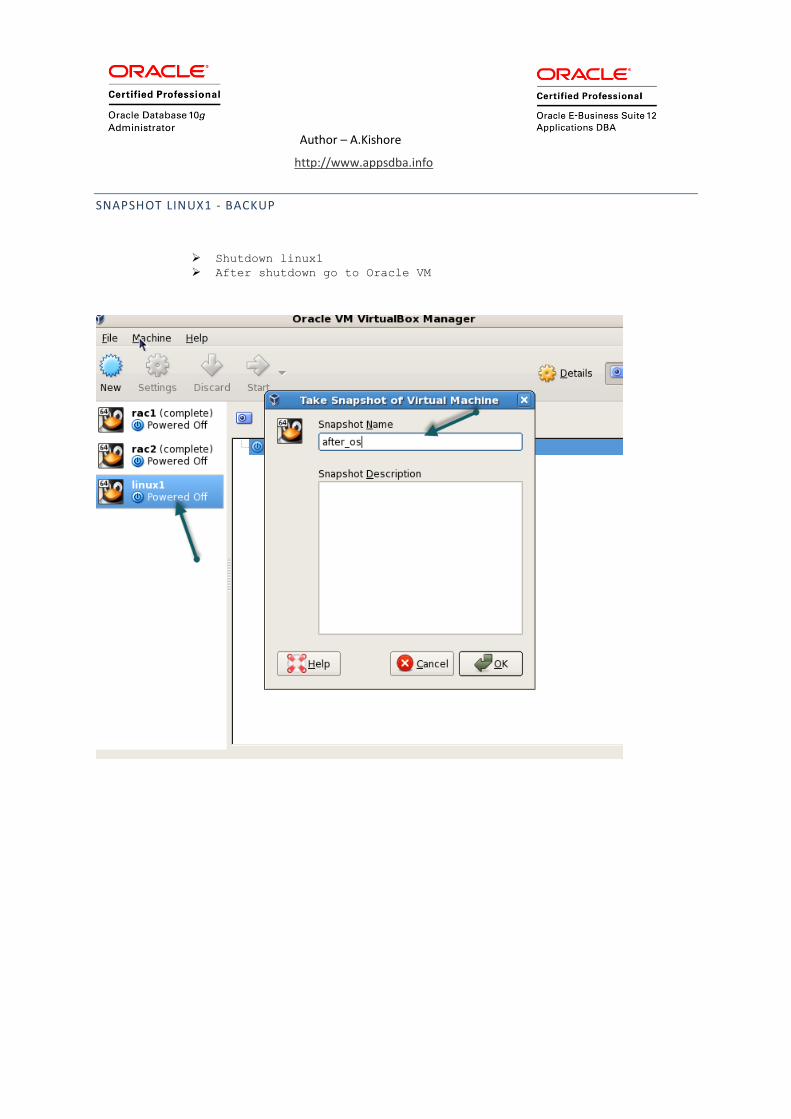
SNAPSHOT LINUX1 - BACKUP
Shutdown linux1
After shutdown go to Oracle VM
Author – A.Kishore
http://www.appsdba.info
ORACLE INSTALLATION
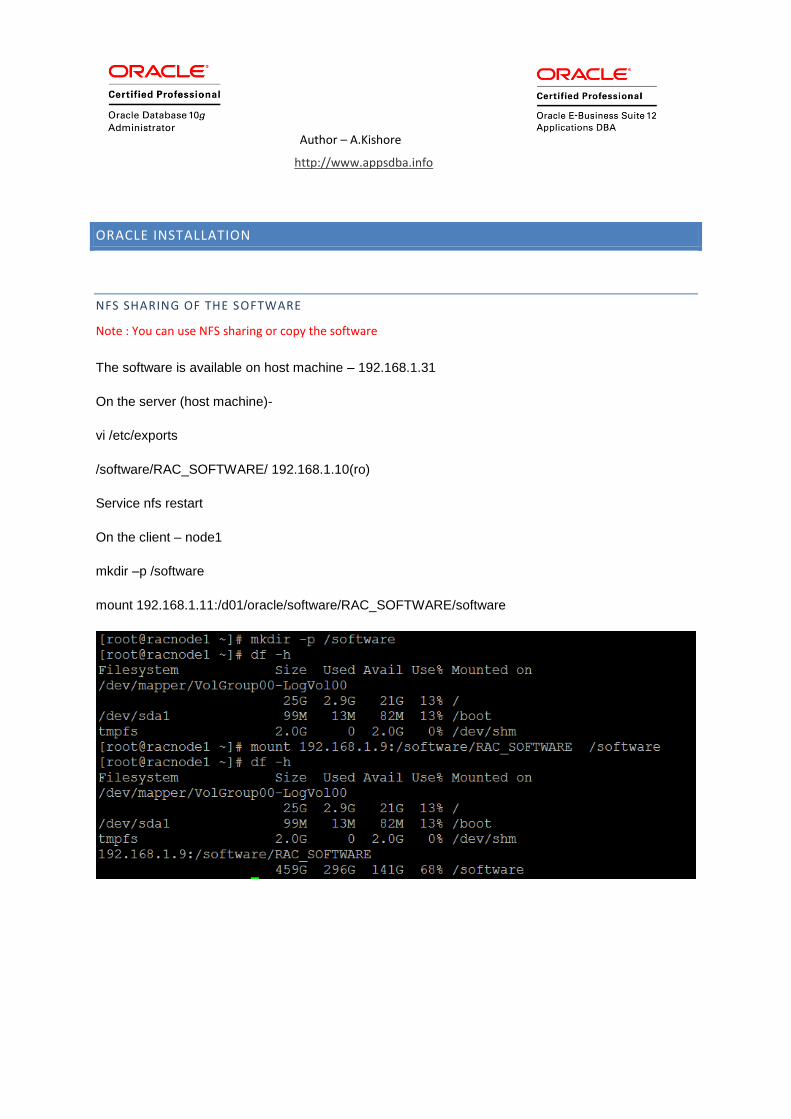
NFS SHARING OF THE SOFTWARE
Note : You can use NFS sharing or copy the software
The software is available on host machine – 192.168.1.31
On the server (host machine)-
vi /etc/exports
/software/RAC_SOFTWARE/ 192.168.1.10(ro)
Service nfs restart
On the client – node1
mkdir –p /software
mount 192.168.1.11:/d01/oracle/software/RAC_SOFTWARE/software
Author – A.Kishore
http://www.appsdba.info
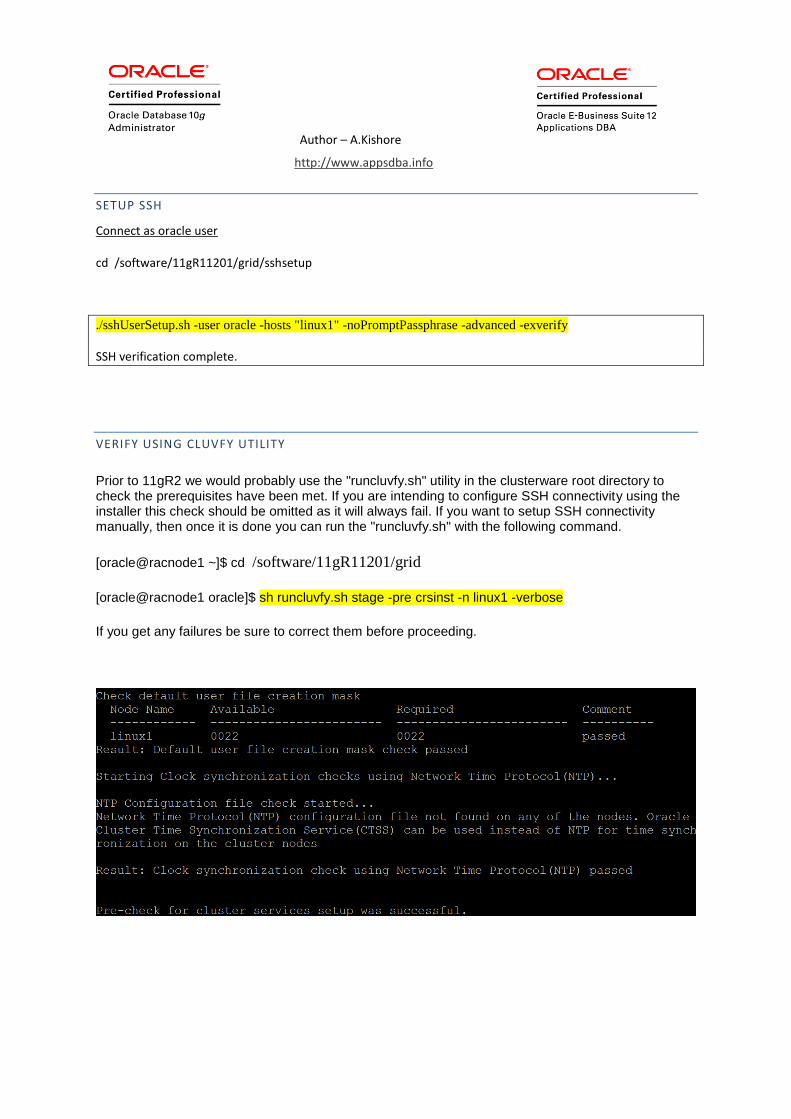
SETUP SSH
Connect as oracle user
cd /software/11gR11201/grid/sshsetup
./sshUserSetup.sh -user oracle -hosts "linux1" -noPromptPassphrase -advanced -exverify
SSH verification complete.
VERIFY USING CLUVFY UTILITY
Prior to 11gR2 we would probably use the "runcluvfy.sh" utility in the clusterware root directory to check the prerequisites have been met. If you are intending to configure SSH connectivity using the installer this check should be omitted as it will always fail. If you want to setup SSH connectivity manually, then once it is done you can run the "runcluvfy.sh" with the following command.
[oracle@racnode1 ~]$ cd /software/11gR11201/grid
[oracle@racnode1 oracle]$ sh runcluvfy.sh stage -pre crsinst -n linux1 -verbose
If you get any failures be sure to correct them before proceeding.
Author – A.Kishore
http://www.appsdba.info
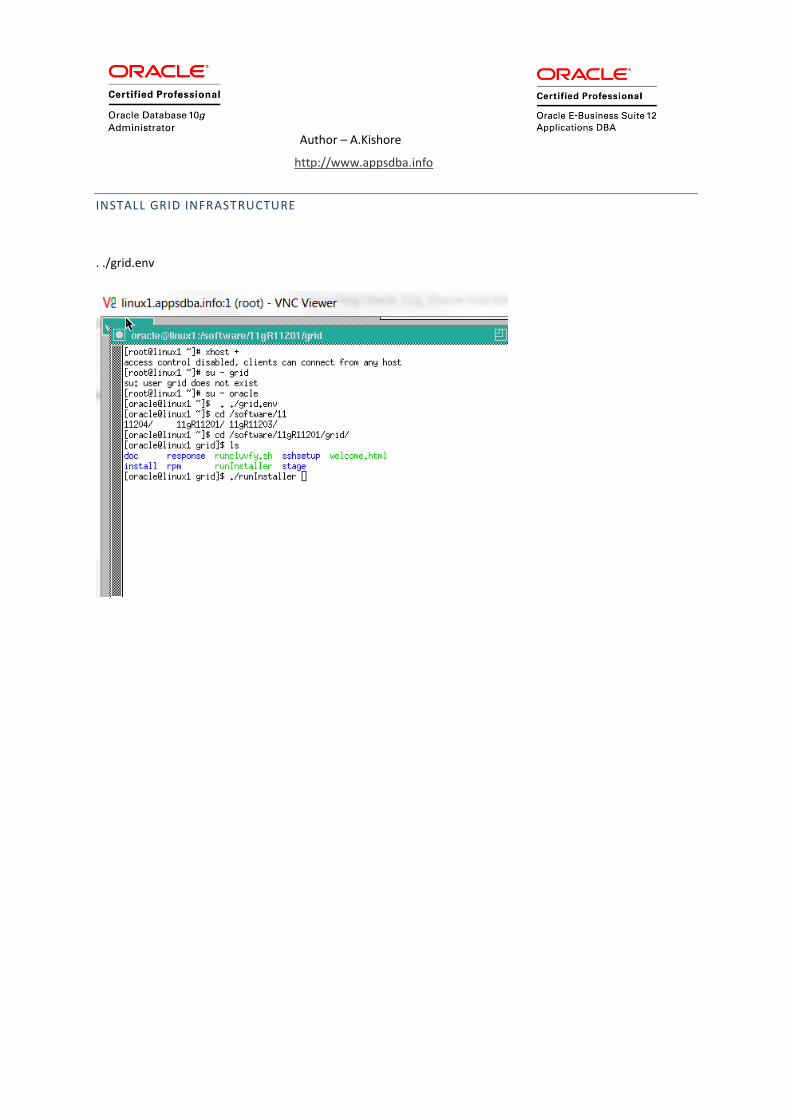
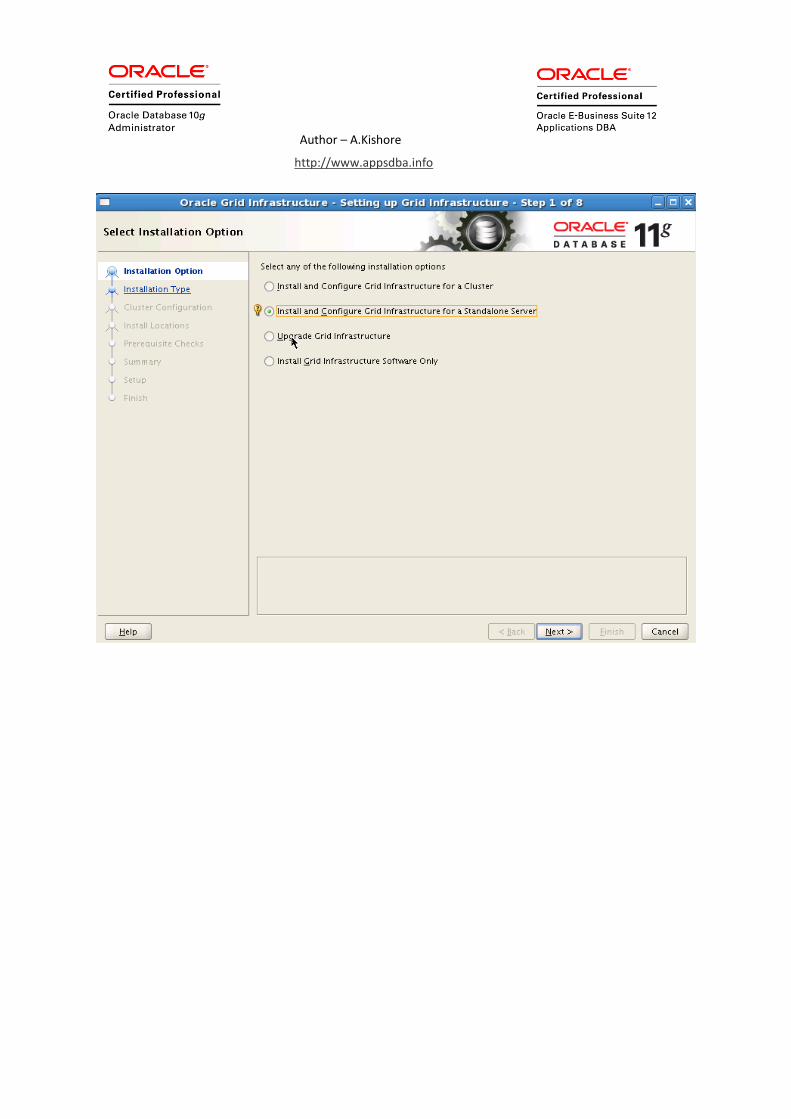
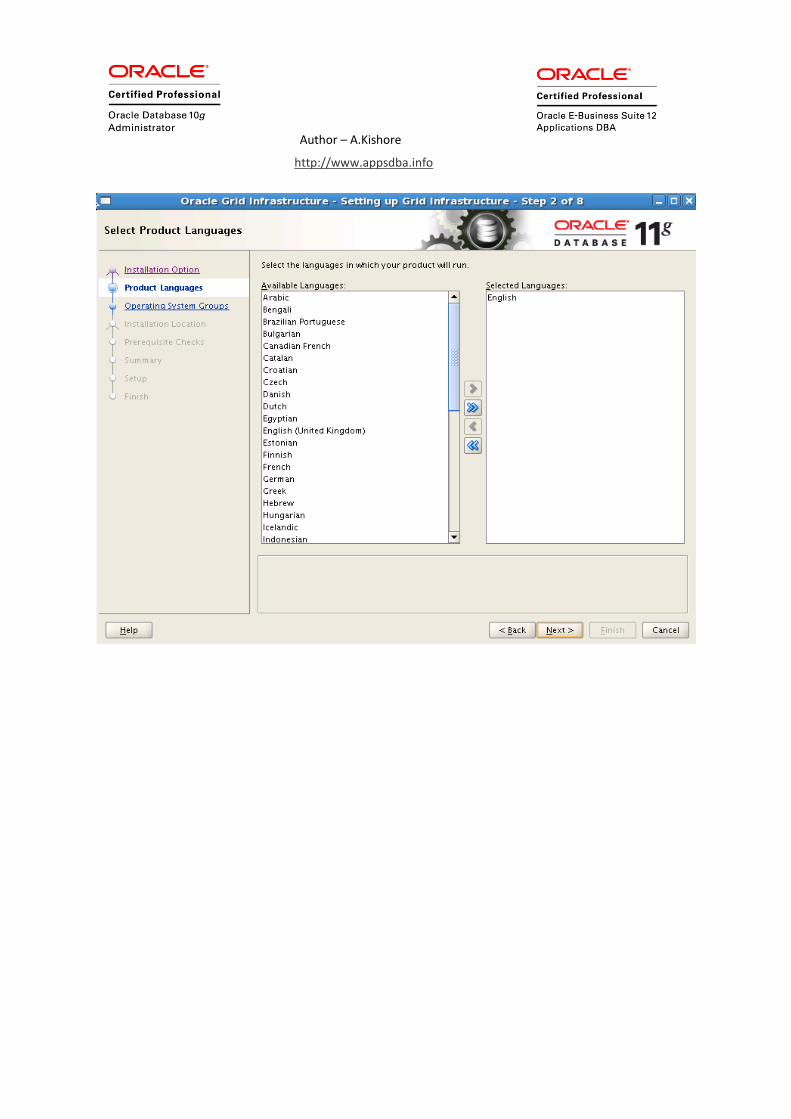
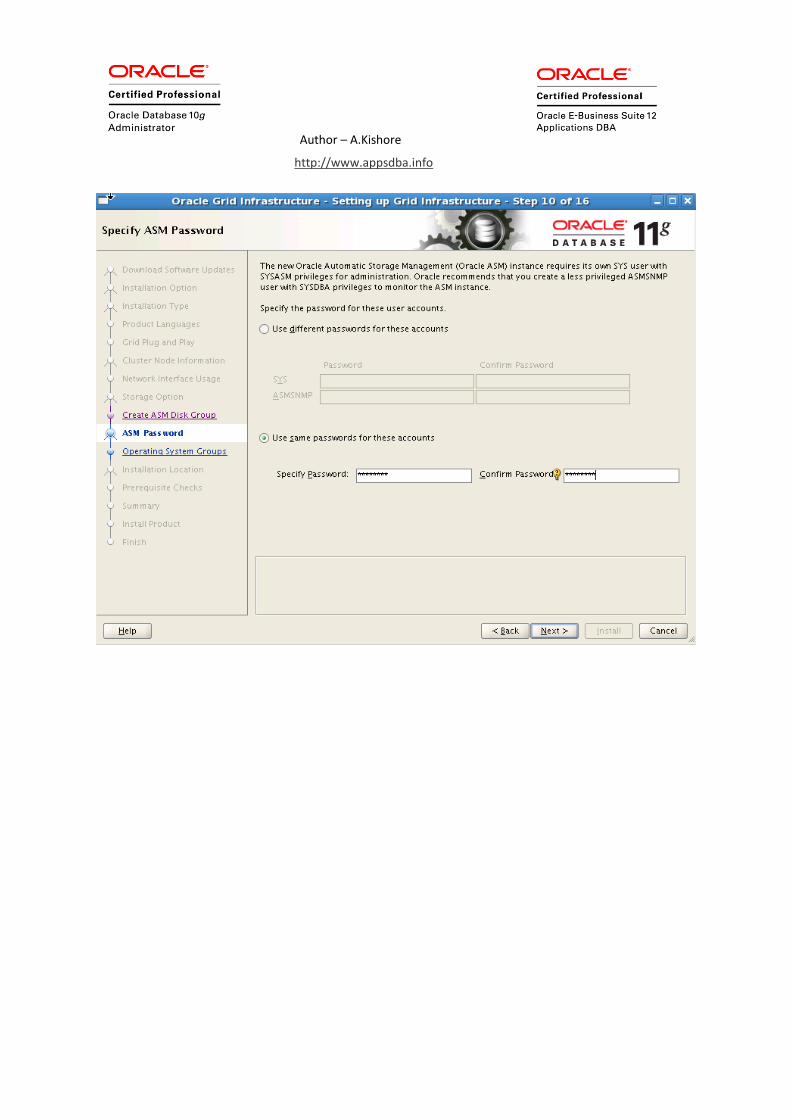
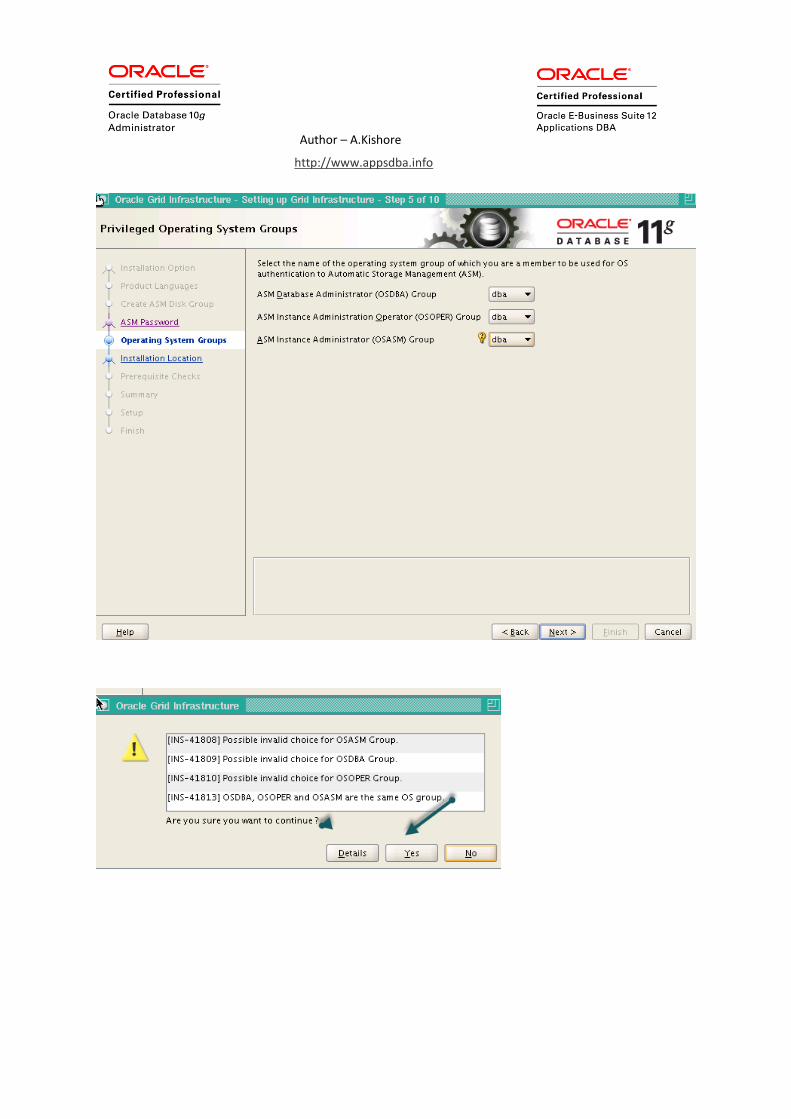
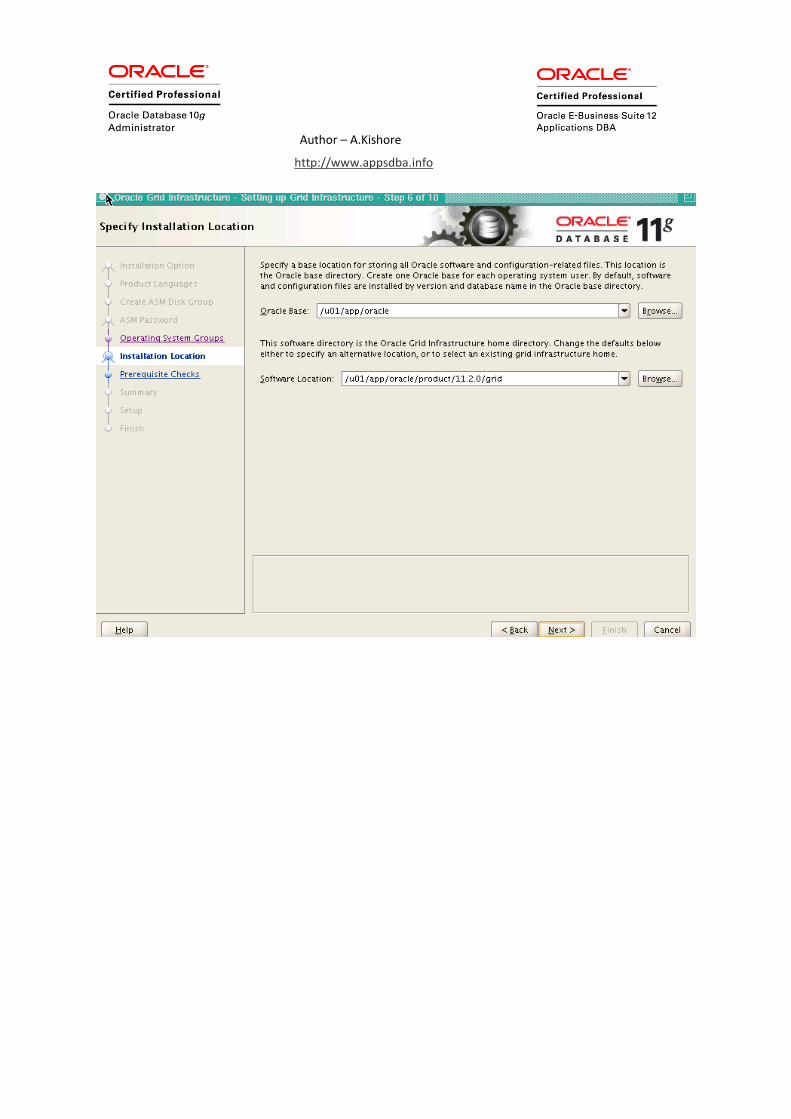
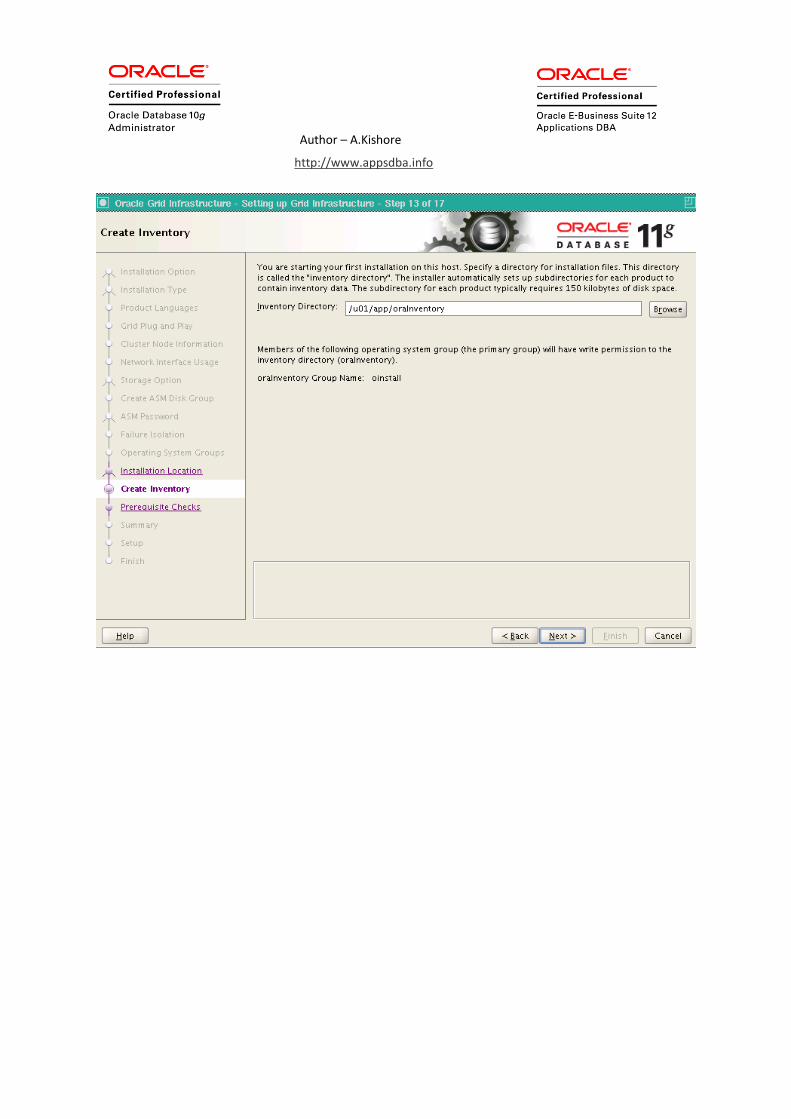
INSTALL GRID INFRASTRUCTURE
. ./grid.env

Author – A.Kishore
http://www.appsdba.info
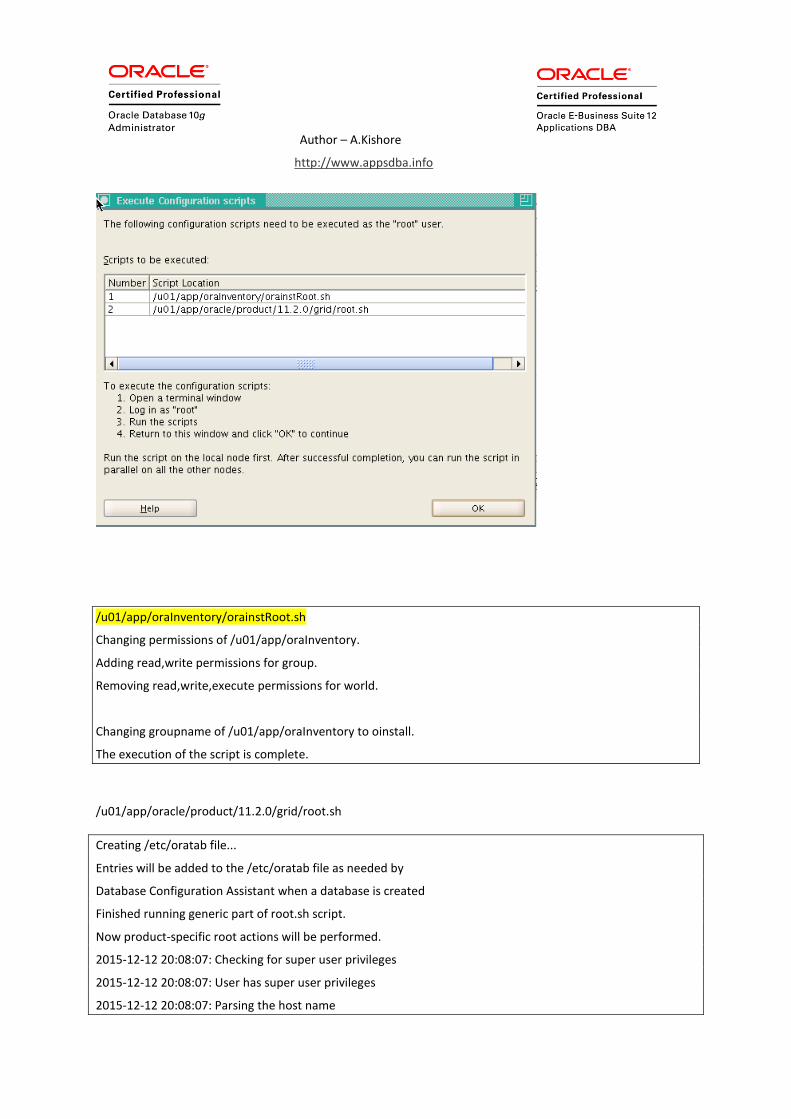
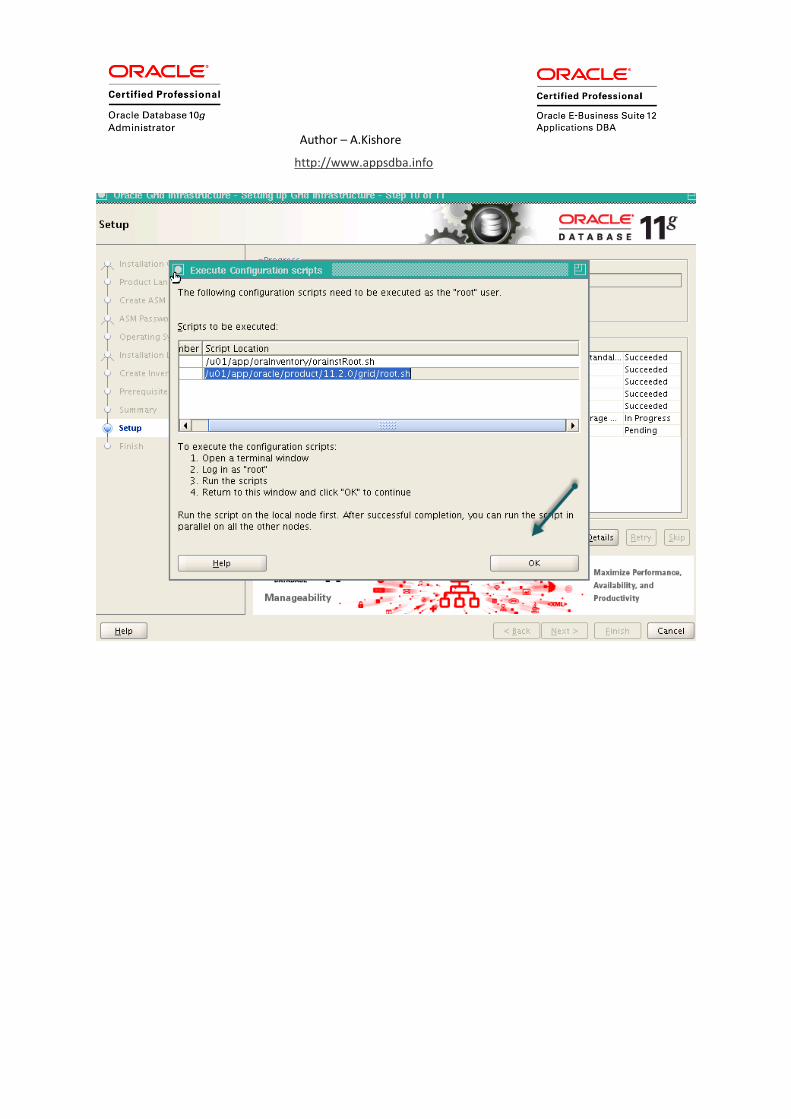
/u01/app/oraInventory/orainstRoot.sh
Changing permissions of /u01/app/oraInventory.
Adding read,write permissions for group.
Removing read,write,execute permissions for world.
Changing groupname of /u01/app/oraInventory to oinstall.
The execution of the script is complete.
/u01/app/oracle/product/11.2.0/grid/root.sh
Creating /etc/oratab file...
Entries will be added to the /etc/oratab file as needed by
Database Configuration Assistant when a database is created
Finished running generic part of root.sh script.
Now product-specific root actions will be performed.
2015-12-12 20:08:07: Checking for super user privileges
2015-12-12 20:08:07: User has super user privileges
2015-12-12 20:08:07: Parsing the host name
Author – A.Kishore
http://www.appsdba.info
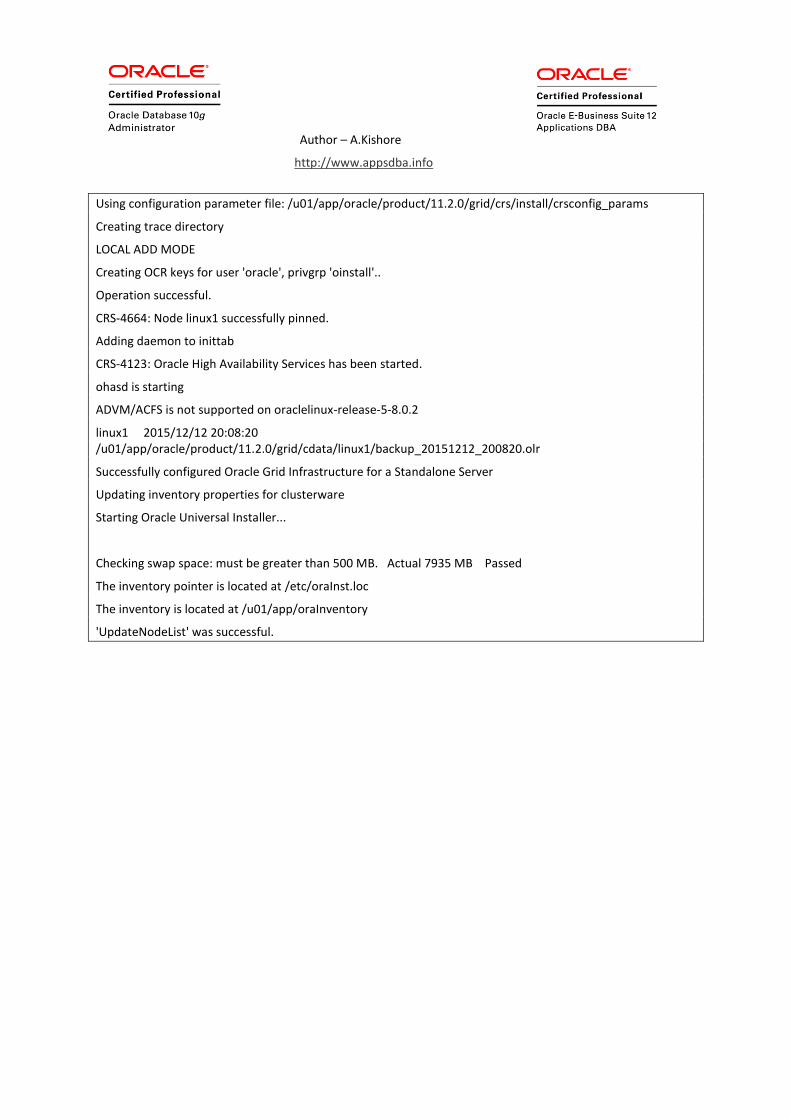
Using configuration parameter file: /u01/app/oracle/product/11.2.0/grid/crs/install/crsconfig_params
Creating trace directory
LOCAL ADD MODE
Creating OCR keys for user 'oracle', privgrp 'oinstall'..
Operation successful.
CRS-4664: Node linux1 successfully pinned.
Adding daemon to inittab
CRS-4123: Oracle High Availability Services has been started.
ohasd is starting
ADVM/ACFS is not supported on oraclelinux-release-5-8.0.2
linux1 2015/12/12 20:08:20 /u01/app/oracle/product/11.2.0/grid/cdata/linux1/backup_20151212_200820.olr
Successfully configured Oracle Grid Infrastructure for a Standalone Server
Updating inventory properties for clusterware
Starting Oracle Universal Installer...
Checking swap space: must be greater than 500 MB. Actual 7935 MB Passed
The inventory pointer is located at /etc/oraInst.loc
The inventory is located at /u01/app/oraInventory
'UpdateNodeList' was successful.
Author – A.Kishore
http://www.appsdba.info
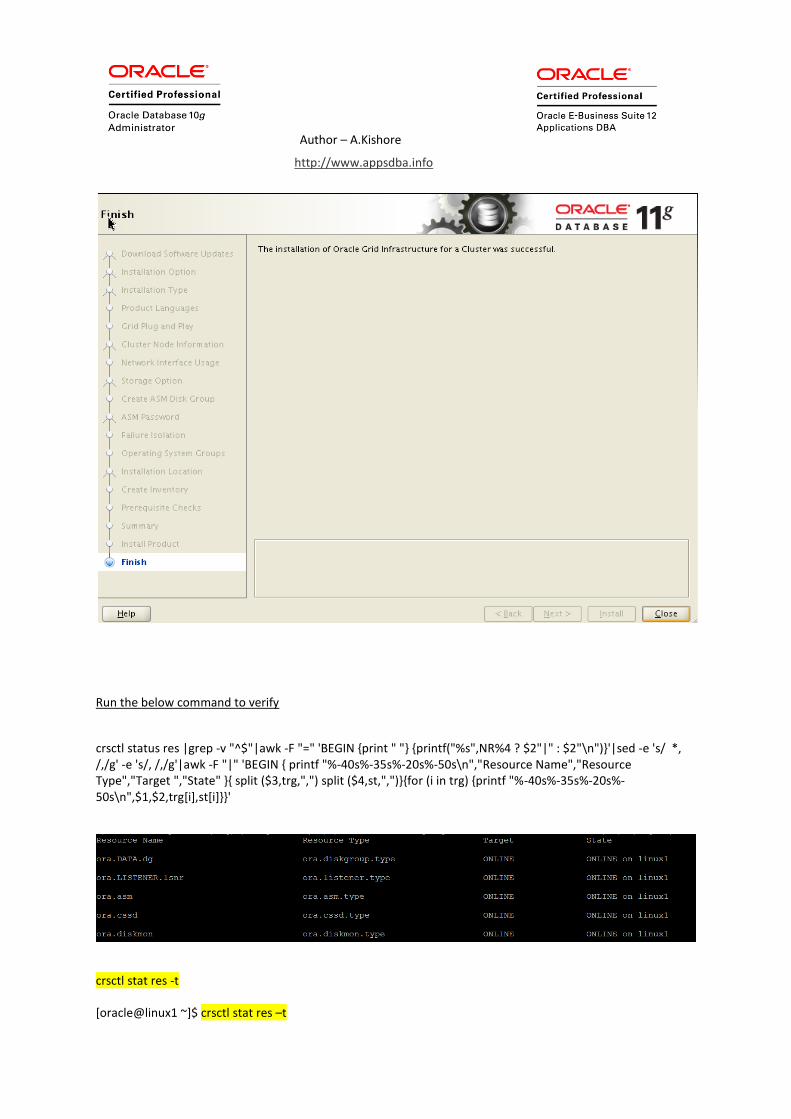
Run the below command to verify
crsctl status res |grep -v "^$"|awk -F "=" 'BEGIN {print " "} {printf("%s",NR%4 ? $2"|" : $2"\n")}'|sed -e 's/ *, /,/g' -e 's/, /,/g'|awk -F "|" 'BEGIN { printf "%-40s%-35s%-20s%-50s\n","Resource Name","Resource Type","Target ","State" }{ split ($3,trg,",") split ($4,st,",")}{for (i in trg) {printf "%-40s%-35s%-20s%-50s\n",$1,$2,trg[i],st[i]}}'
crsctl stat res -t
[oracle@linux1 ~]$ crsctl stat res –t
Author – A.Kishore
http://www.appsdba.info
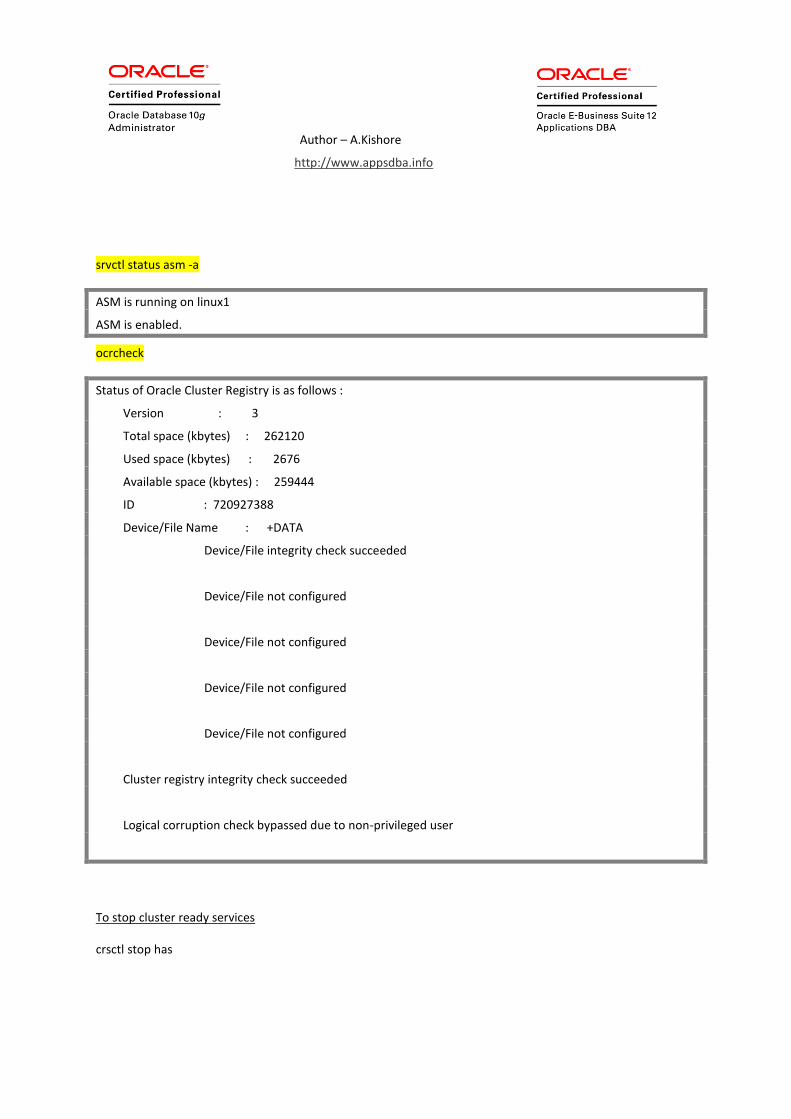
srvctl status asm -a
ASM is running on linux1
ASM is enabled.
ocrcheck
Status of Oracle Cluster Registry is as follows :
Version : 3
Total space (kbytes) : 262120
Used space (kbytes) : 2676
Available space (kbytes) : 259444
ID : 720927388
Device/File Name : +DATA
Device/File integrity check succeeded
Device/File not configured
Device/File not configured
Device/File not configured
Device/File not configured
Cluster registry integrity check succeeded
Logical corruption check bypassed due to non-privileged user
To stop cluster ready services
crsctl stop has
Author – A.Kishore
http://www.appsdba.info
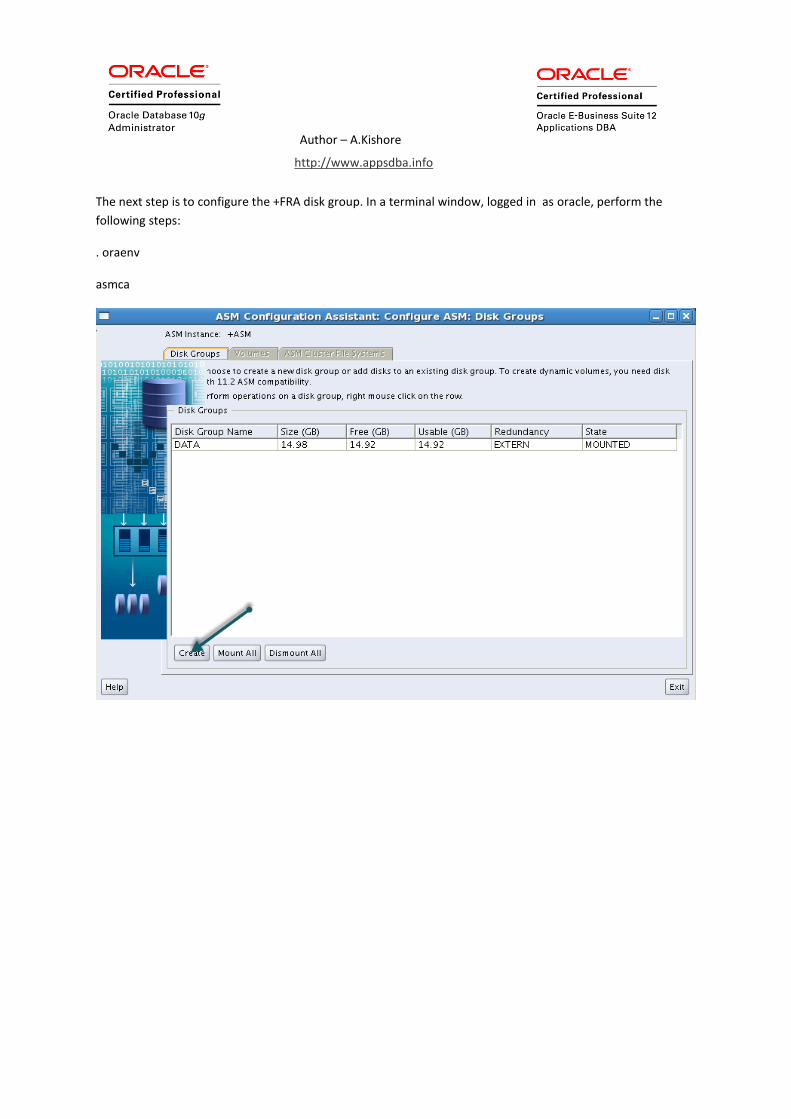
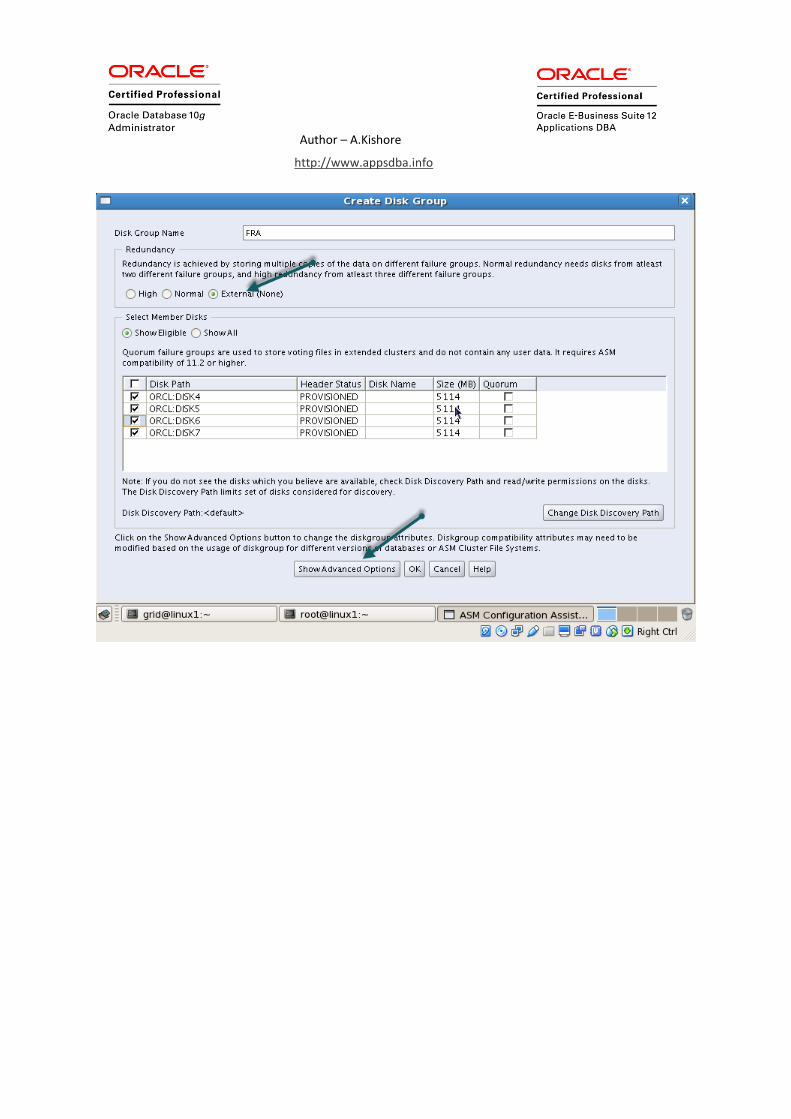
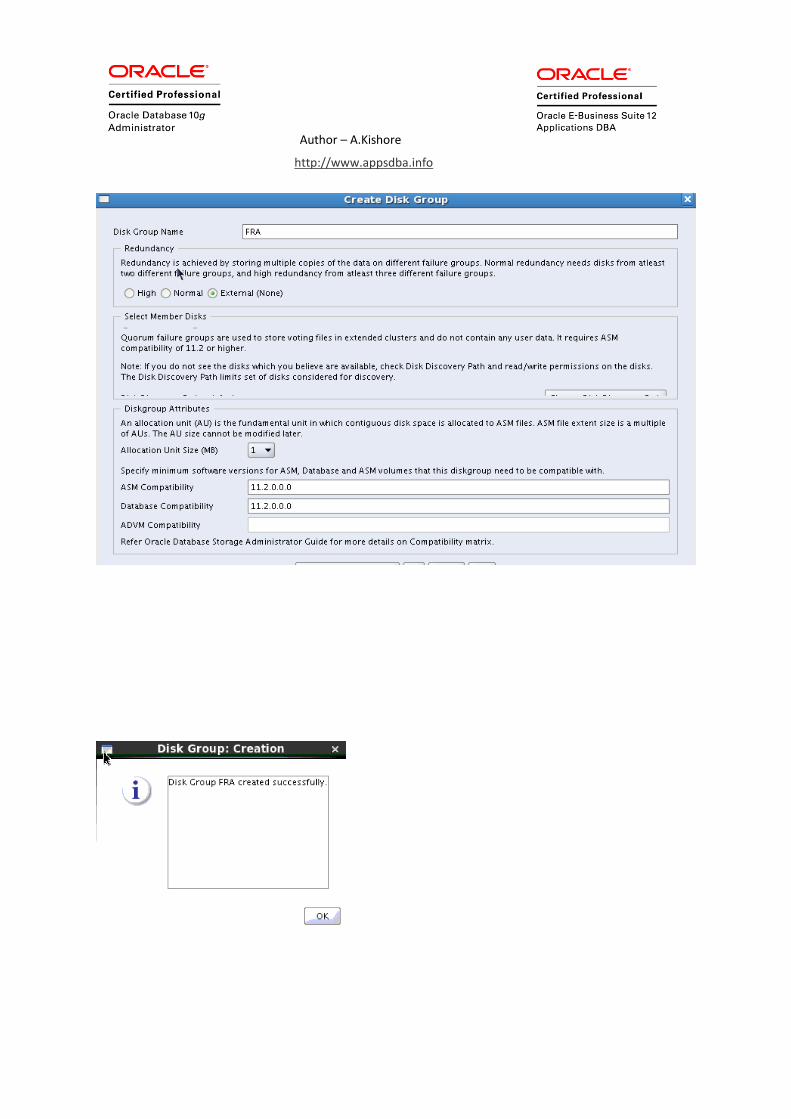
The next step is to configure the +FRA disk group. In a terminal window, logged in as oracle, perform the
following steps:
. oraenv
asmca

Author – A.Kishore
http://www.appsdba.info
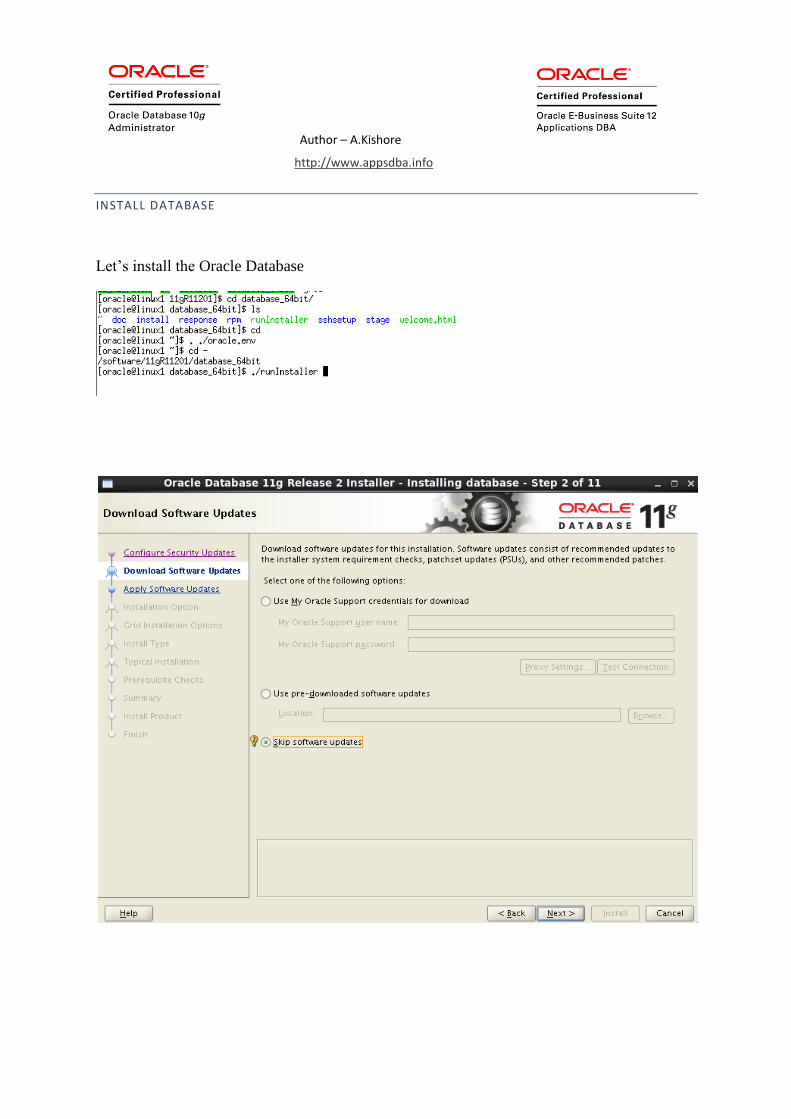
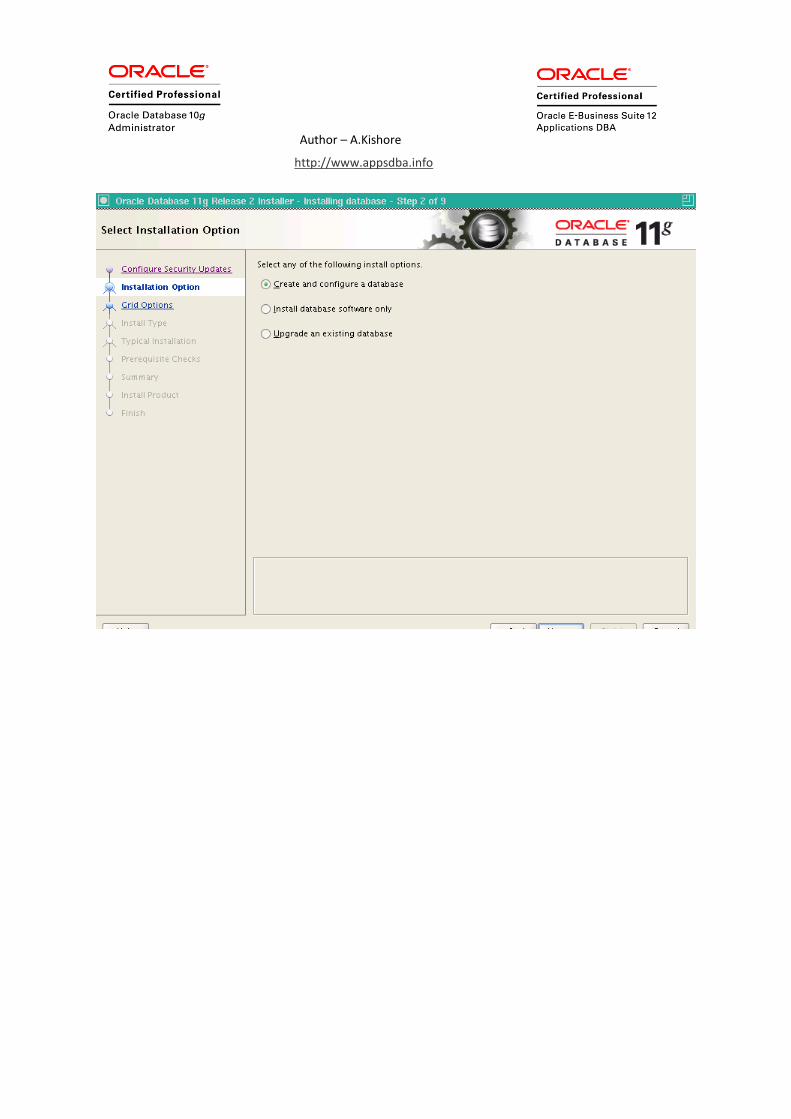
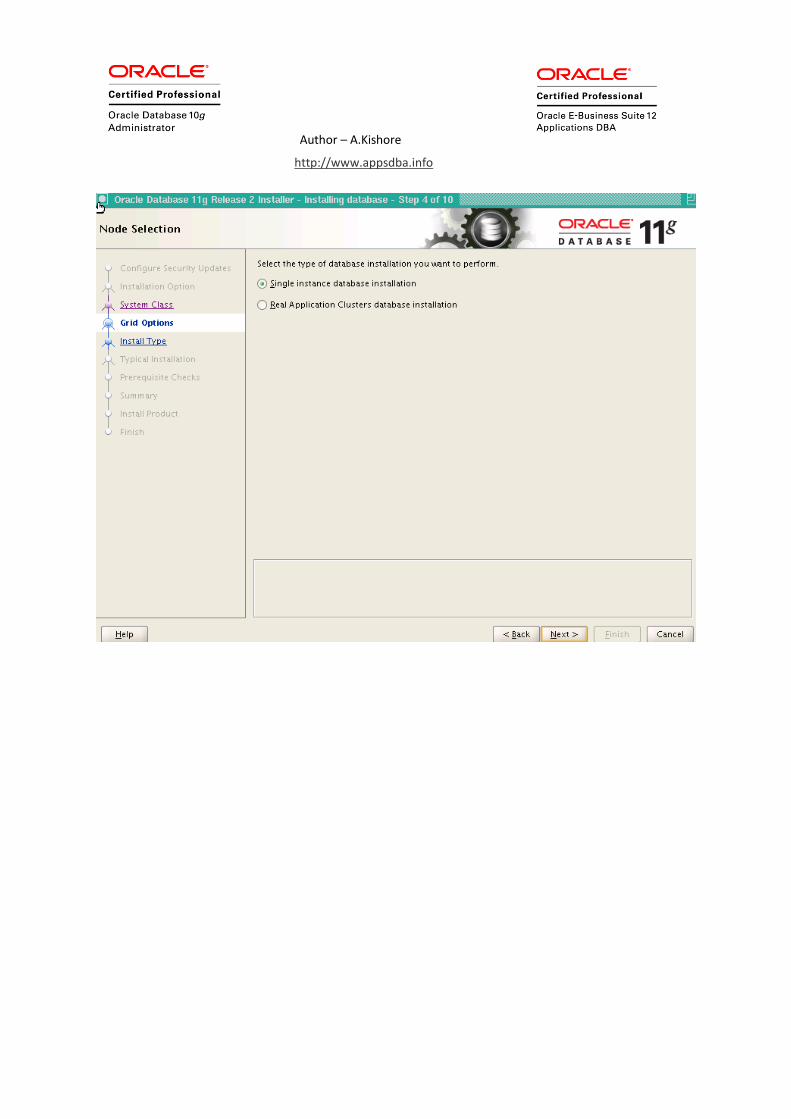
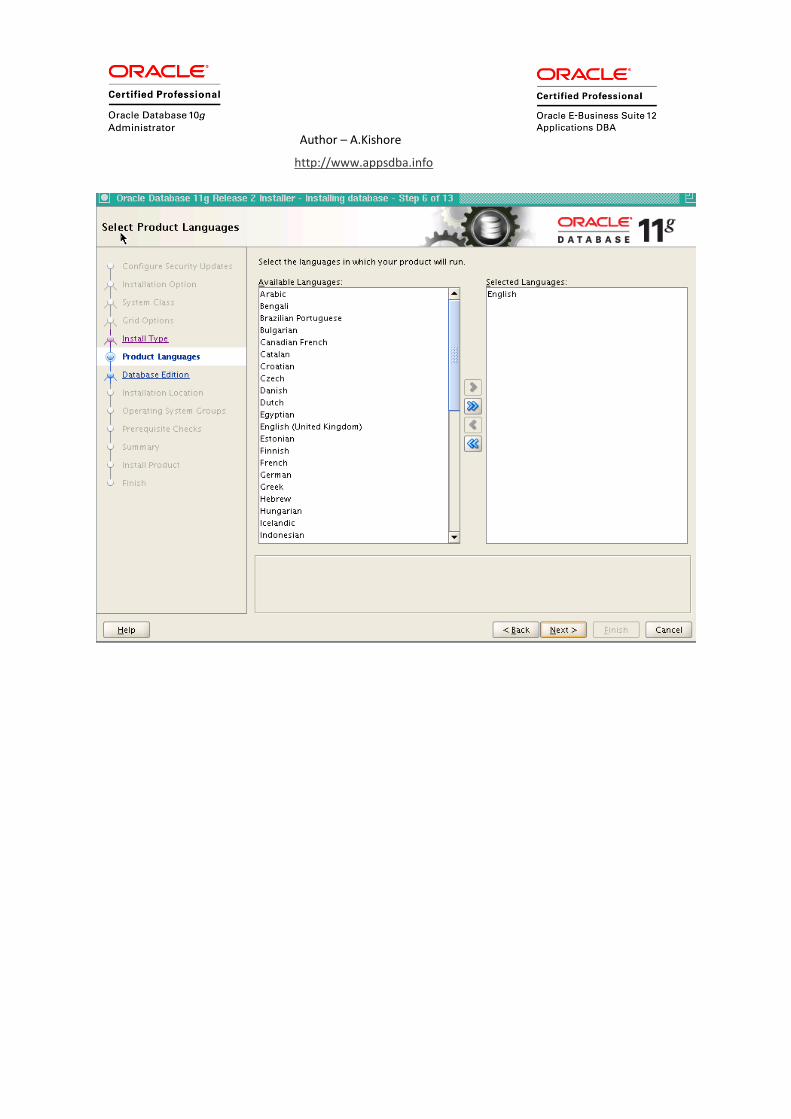
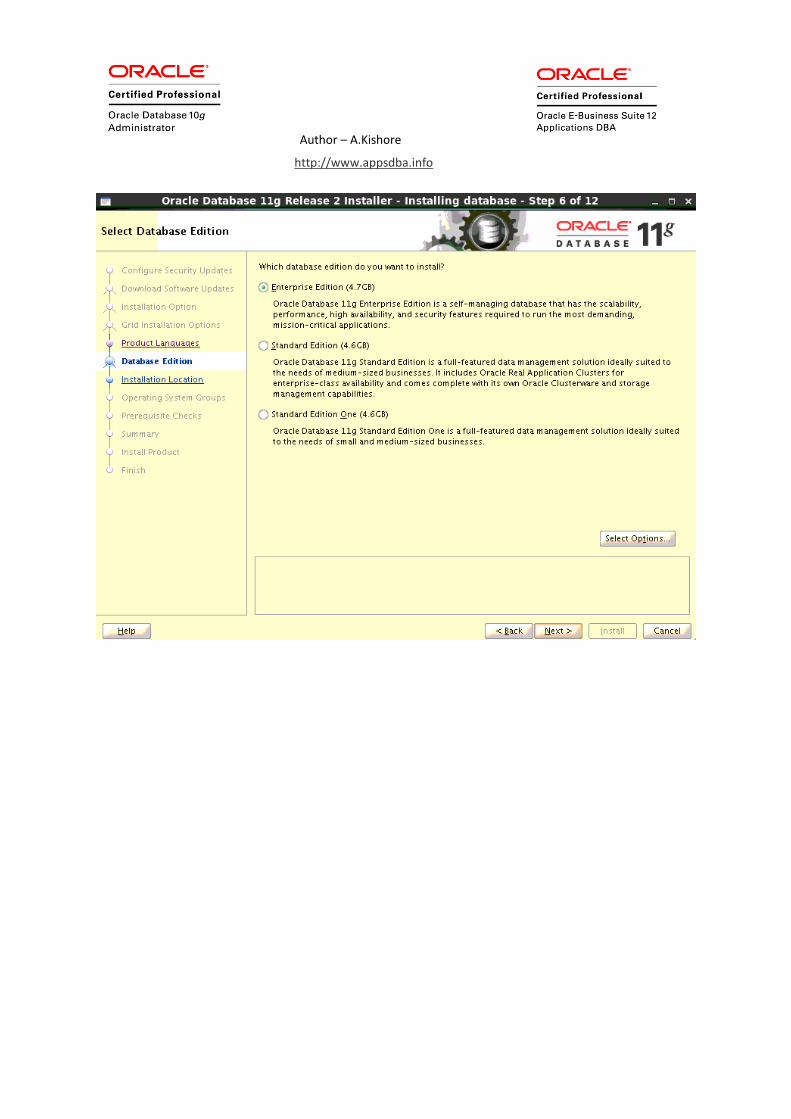
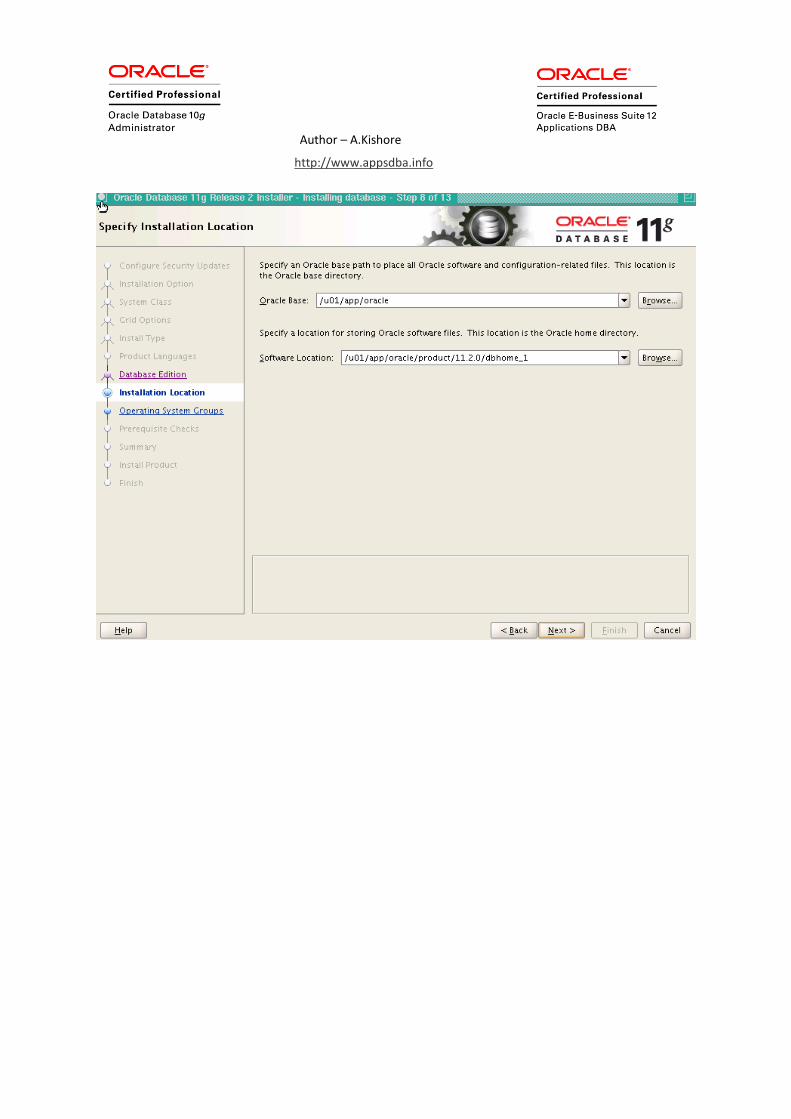
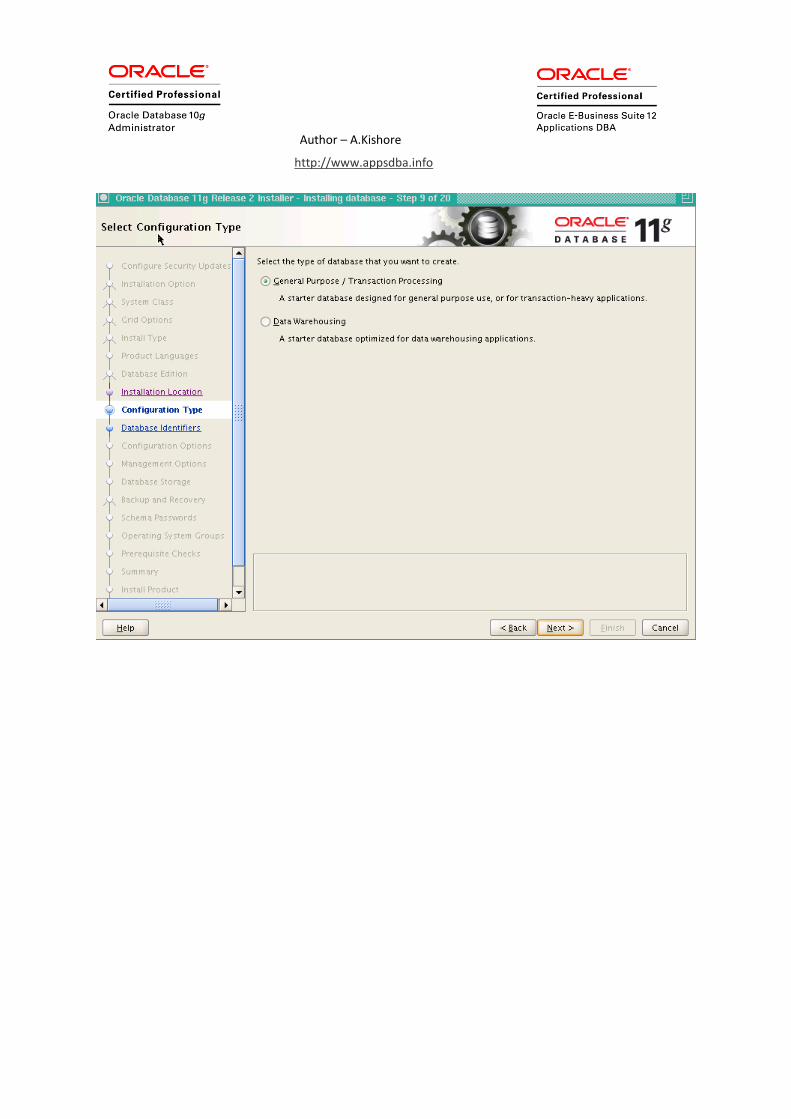
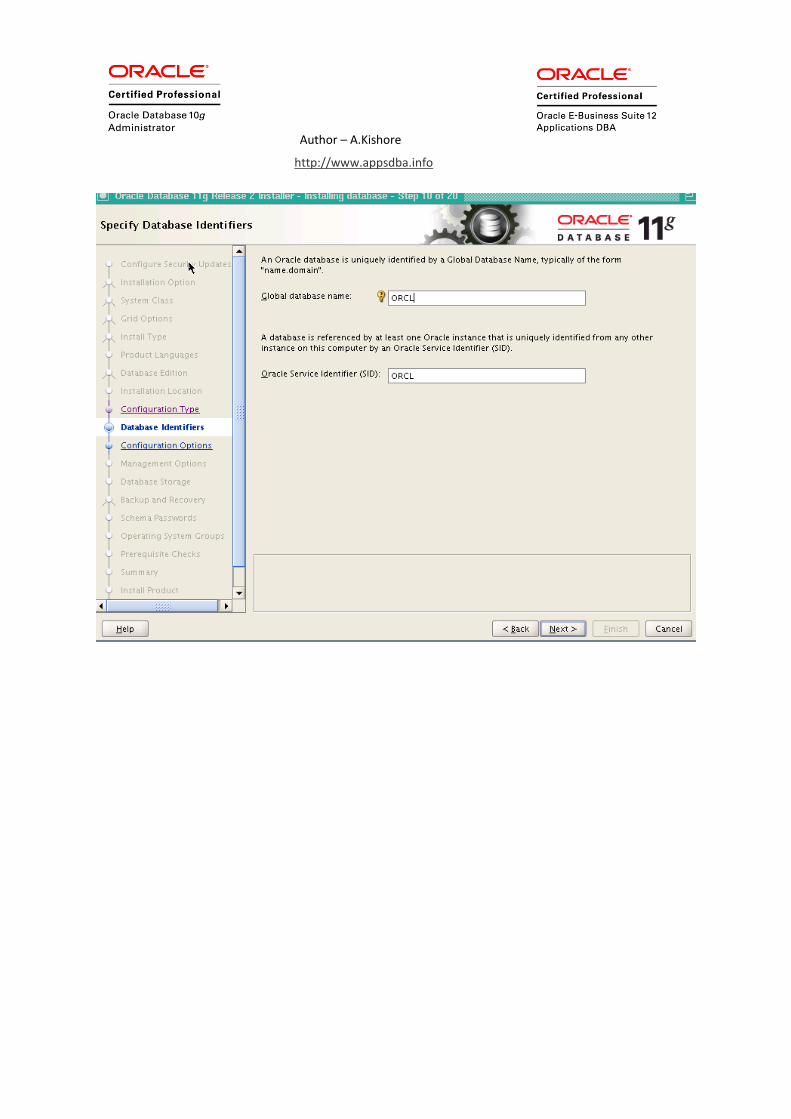
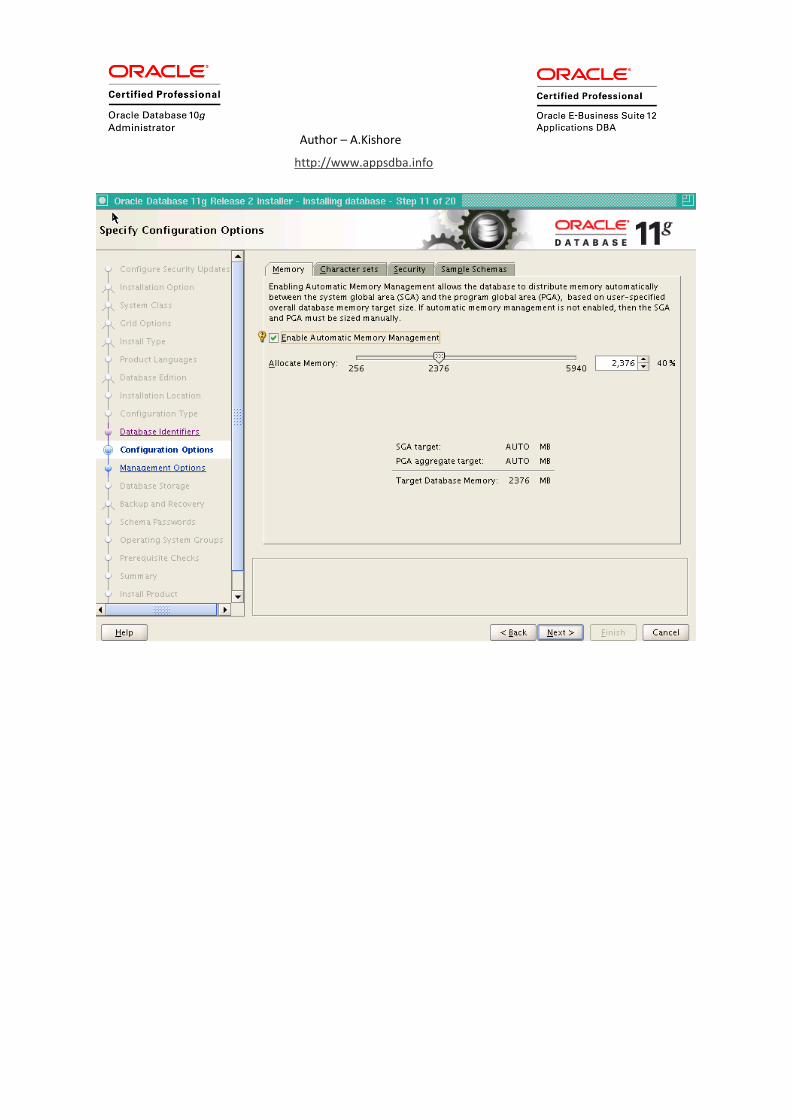
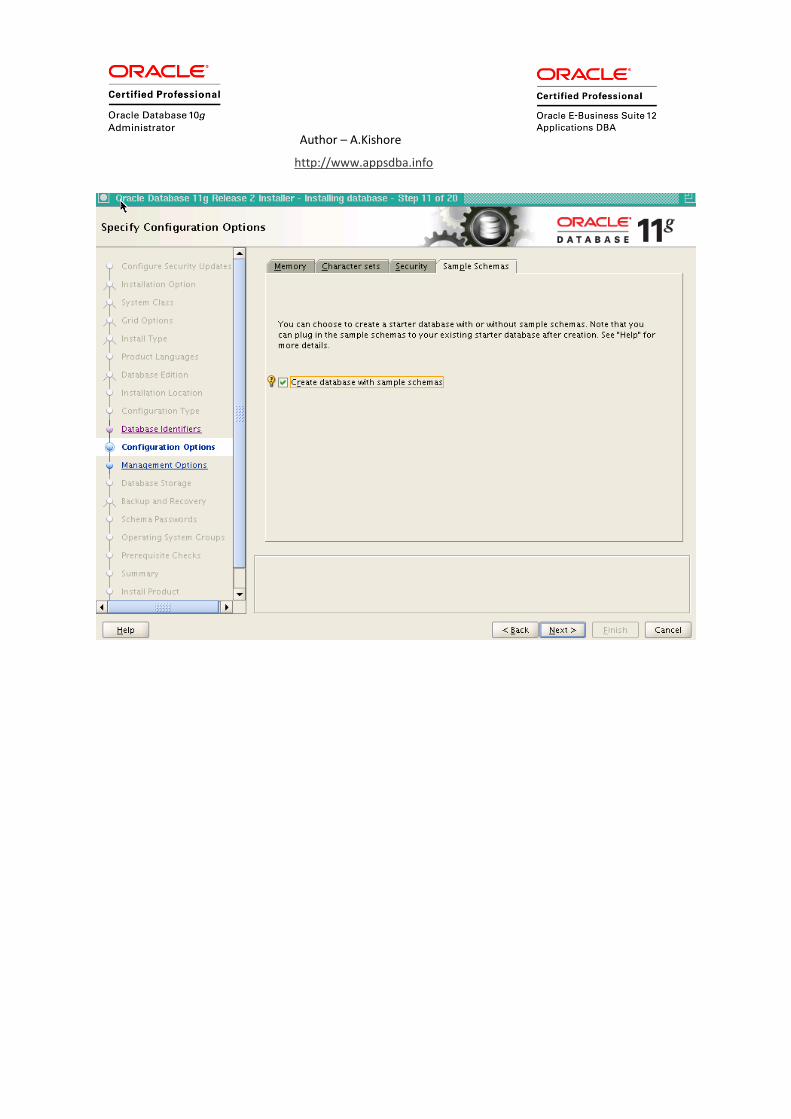
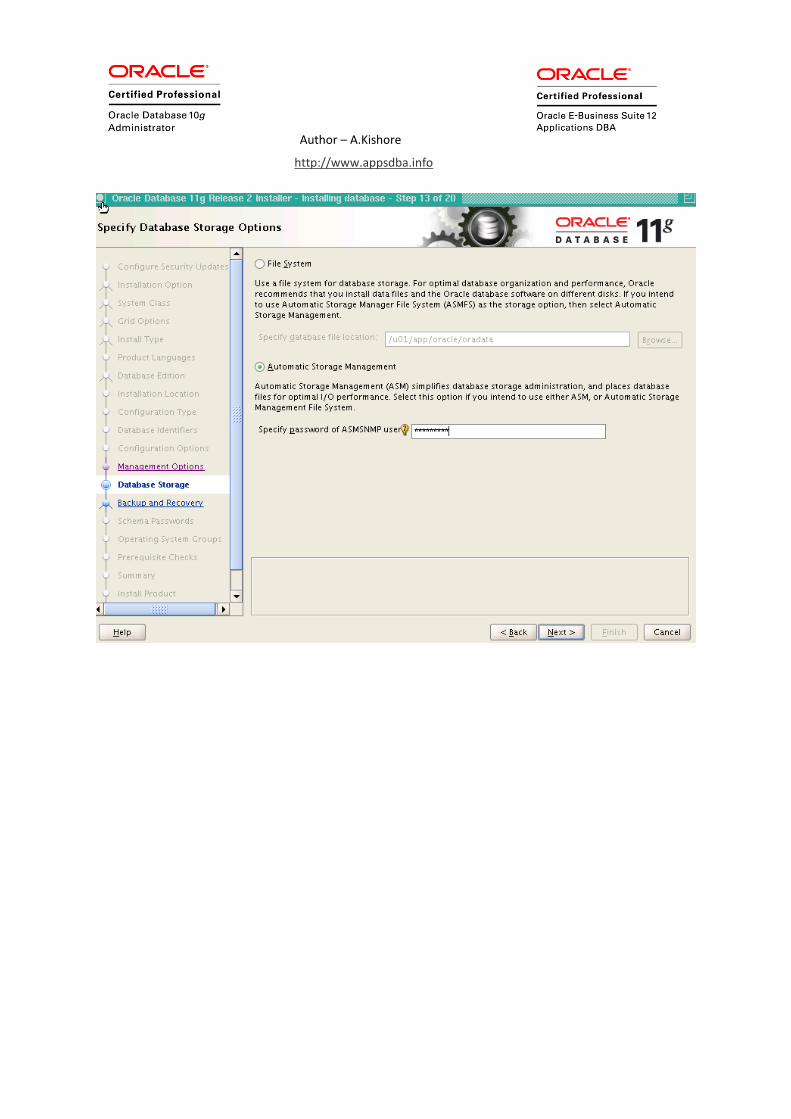
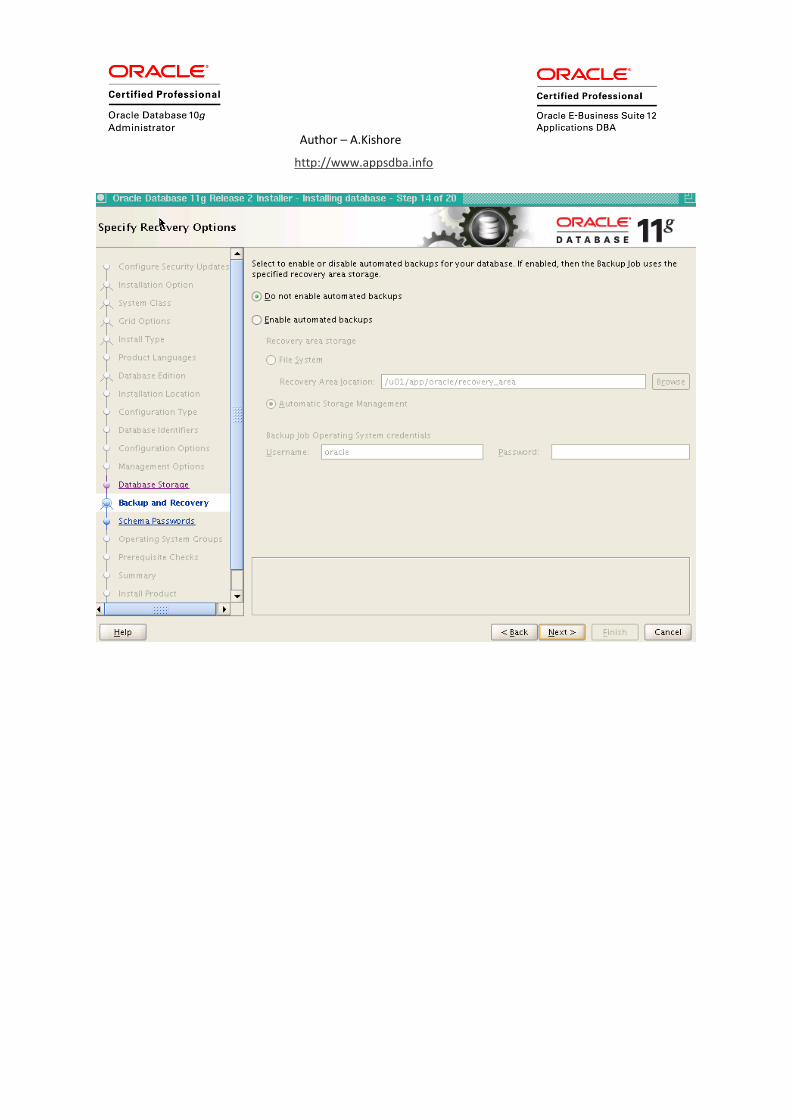
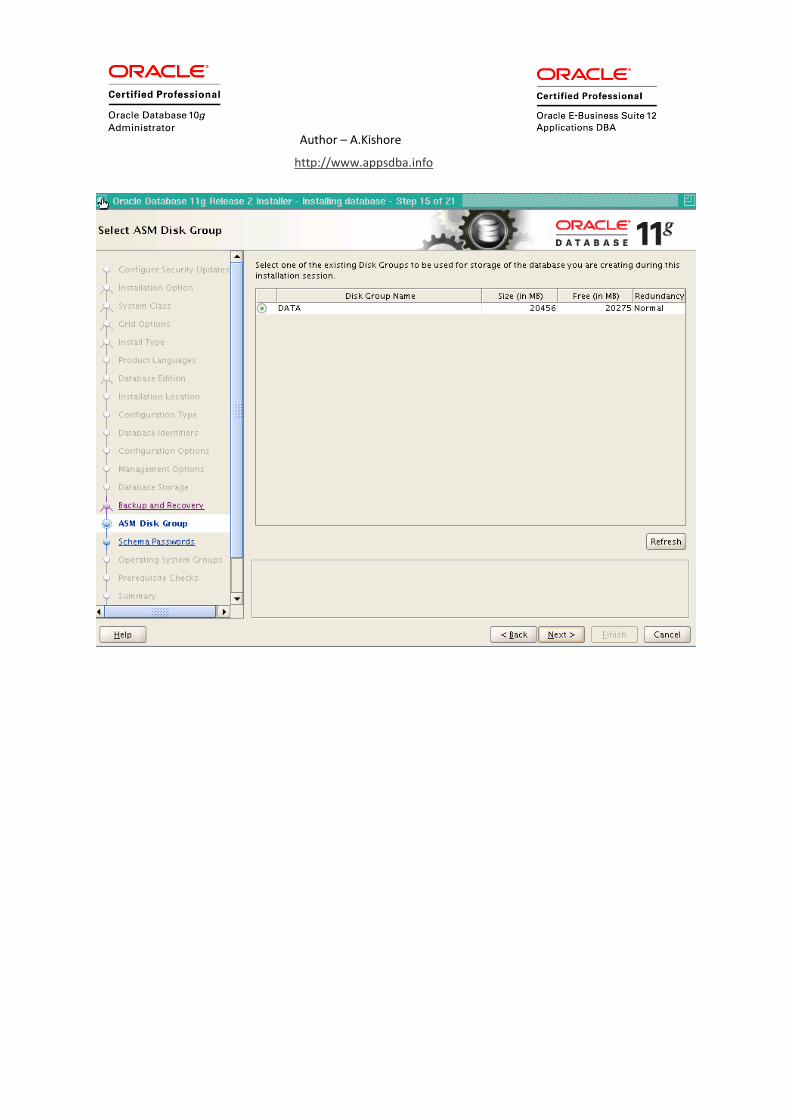
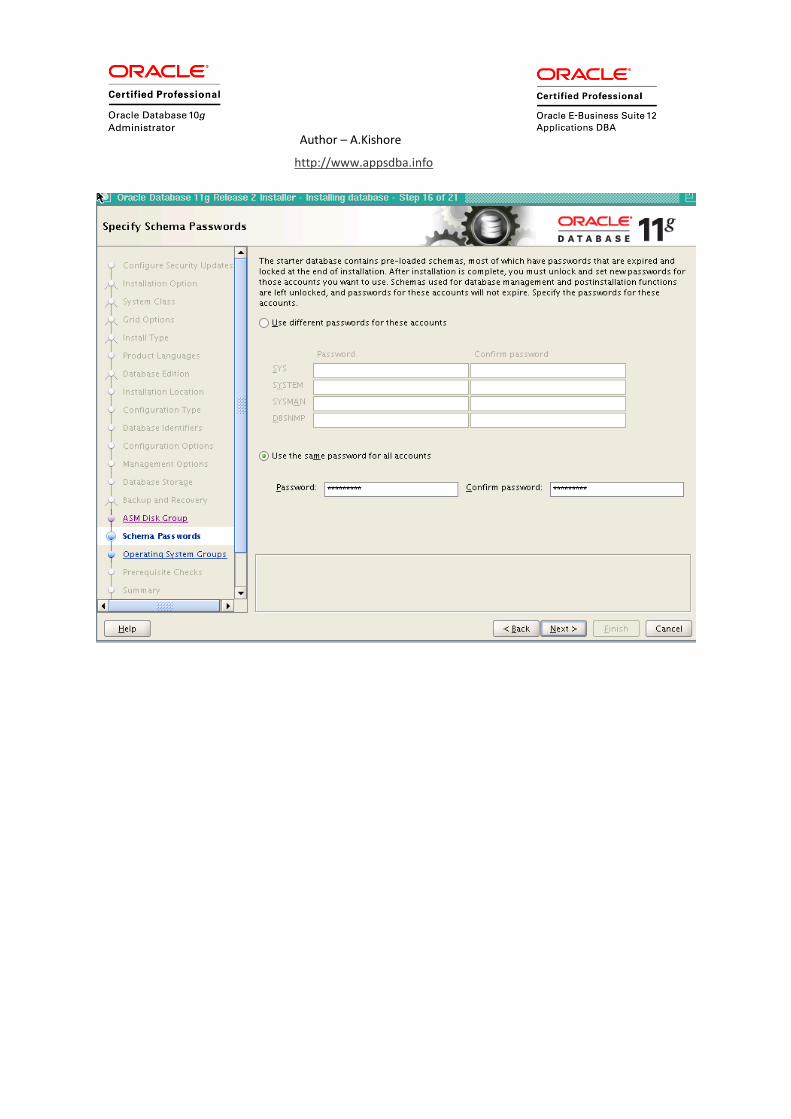
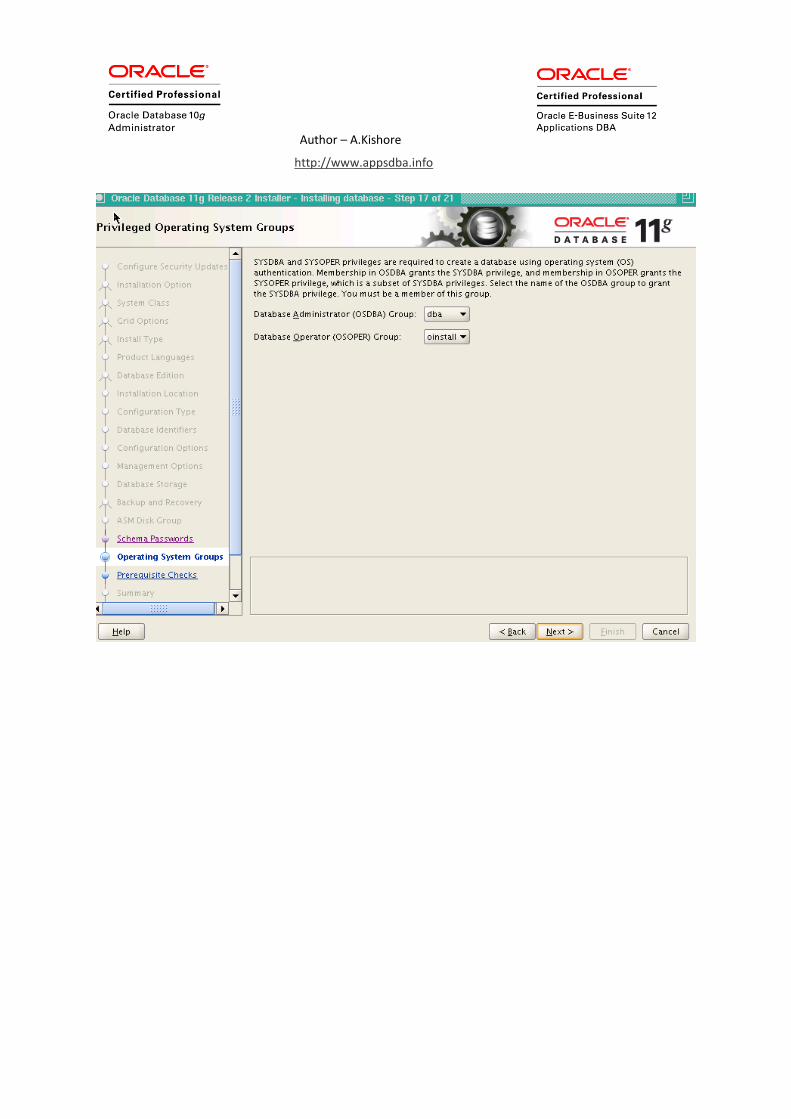
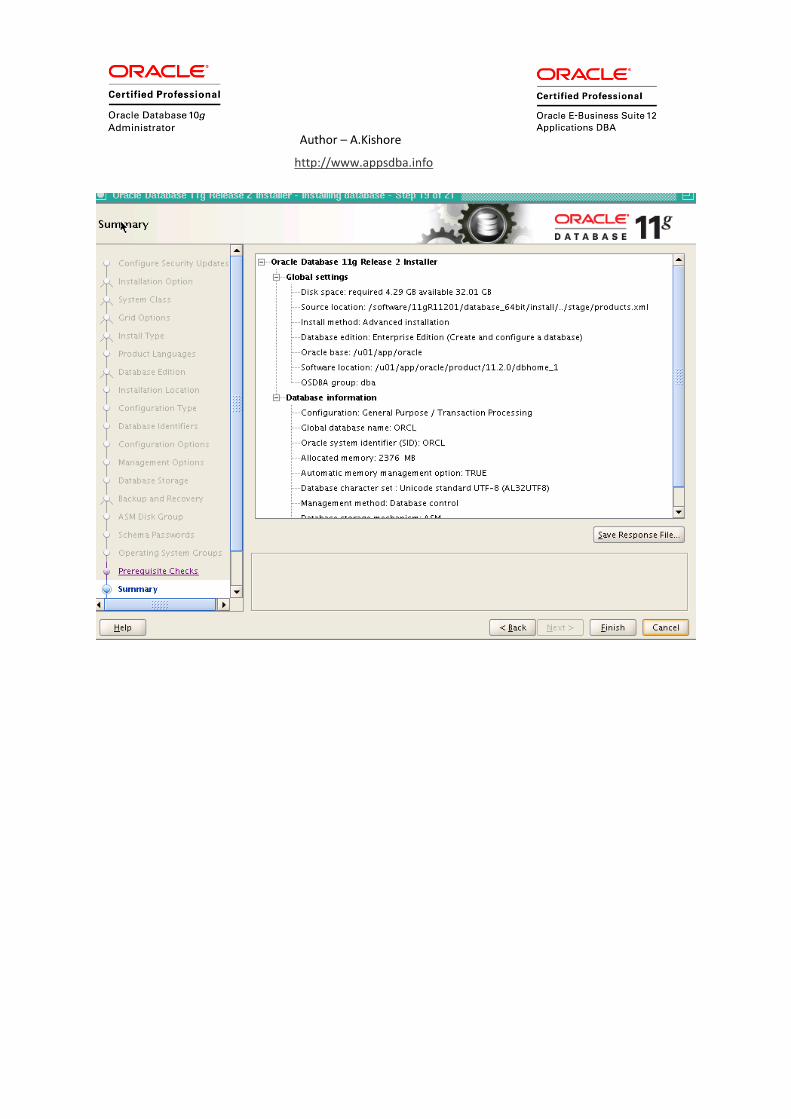
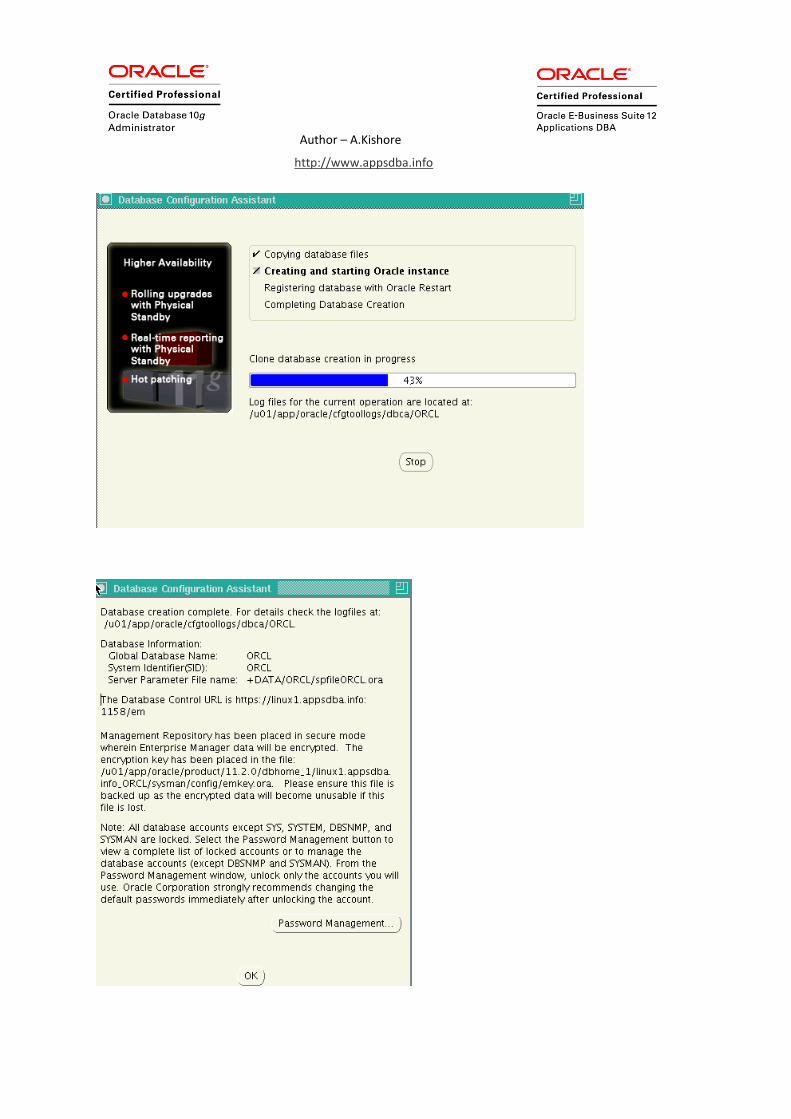
INSTALL DATABASE
Let’s install the Oracle Database


Author – A.Kishore
http://www.appsdba.info
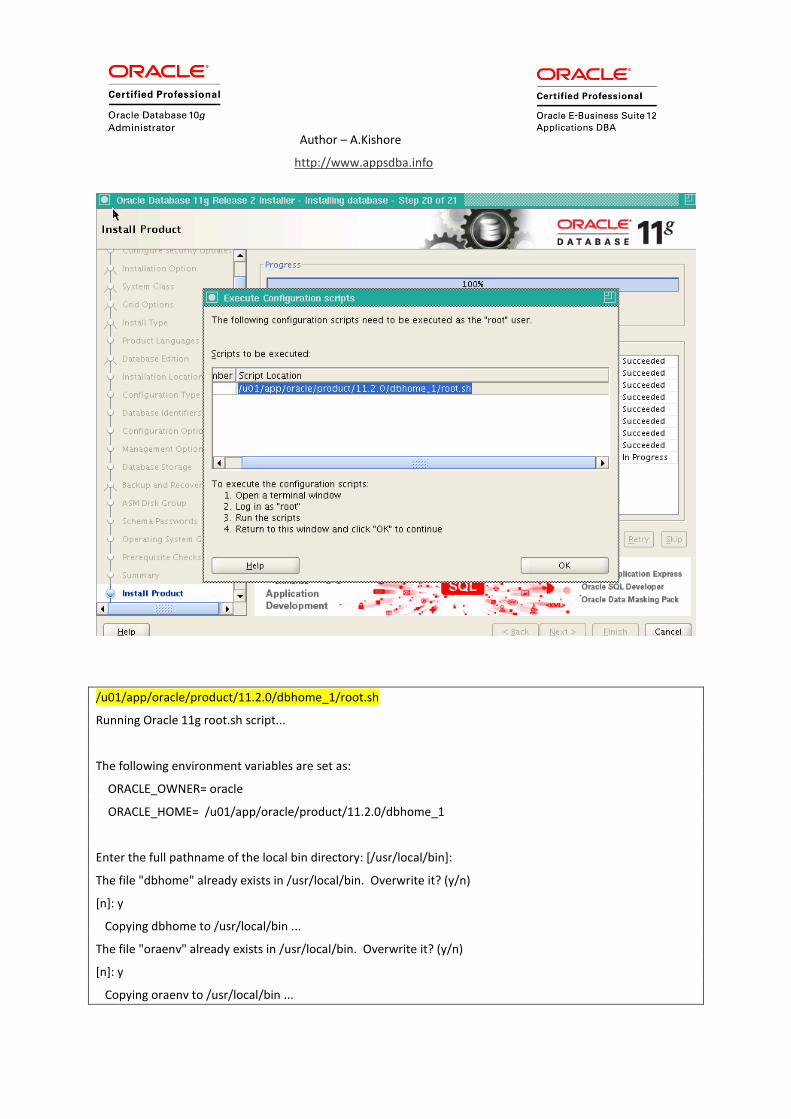
/u01/app/oracle/product/11.2.0/dbhome_1/root.sh
Running Oracle 11g root.sh script...
The following environment variables are set as:
ORACLE_OWNER= oracle
ORACLE_HOME= /u01/app/oracle/product/11.2.0/dbhome_1
Enter the full pathname of the local bin directory: [/usr/local/bin]:
The file "dbhome" already exists in /usr/local/bin. Overwrite it? (y/n)
[n]: y
Copying dbhome to /usr/local/bin ...
The file "oraenv" already exists in /usr/local/bin. Overwrite it? (y/n)
[n]: y
Copying oraenv to /usr/local/bin ...
Author – A.Kishore
http://www.appsdba.info
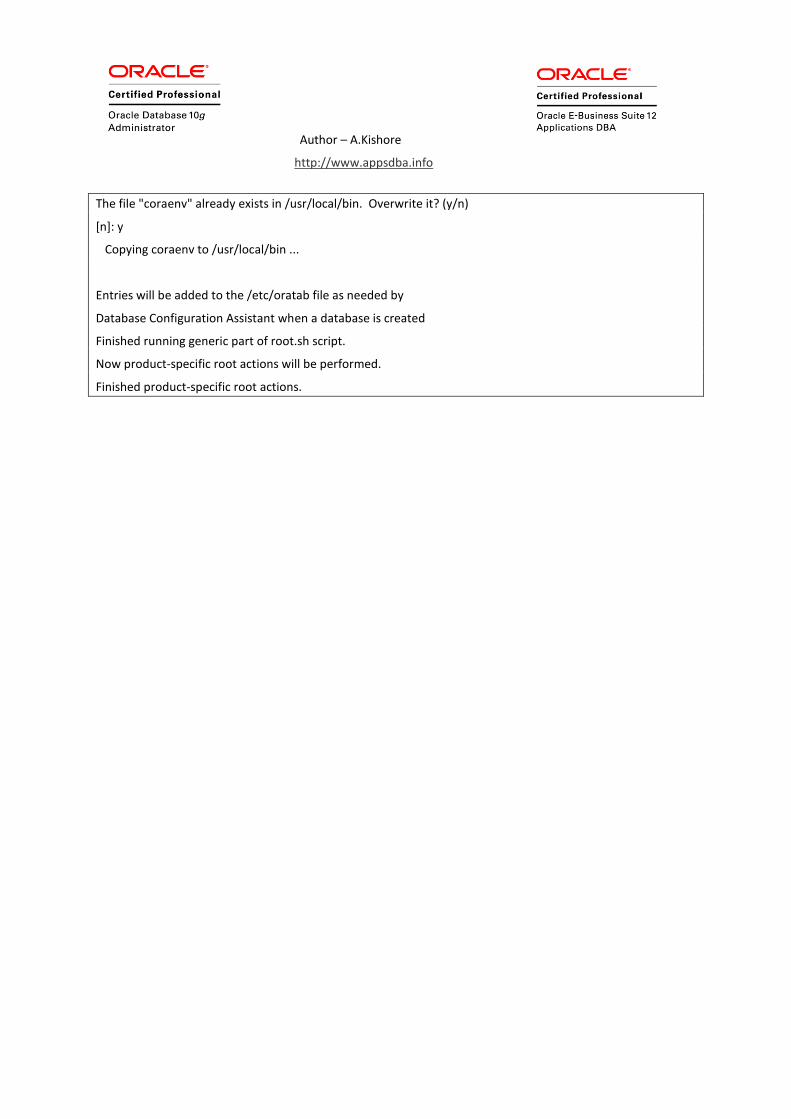
The file "coraenv" already exists in /usr/local/bin. Overwrite it? (y/n)
[n]: y
Copying coraenv to /usr/local/bin ...
Entries will be added to the /etc/oratab file as needed by
Database Configuration Assistant when a database is created
Finished running generic part of root.sh script.
Now product-specific root actions will be performed.
Finished product-specific root actions.

Author – A.Kishore
http://www.appsdba.info
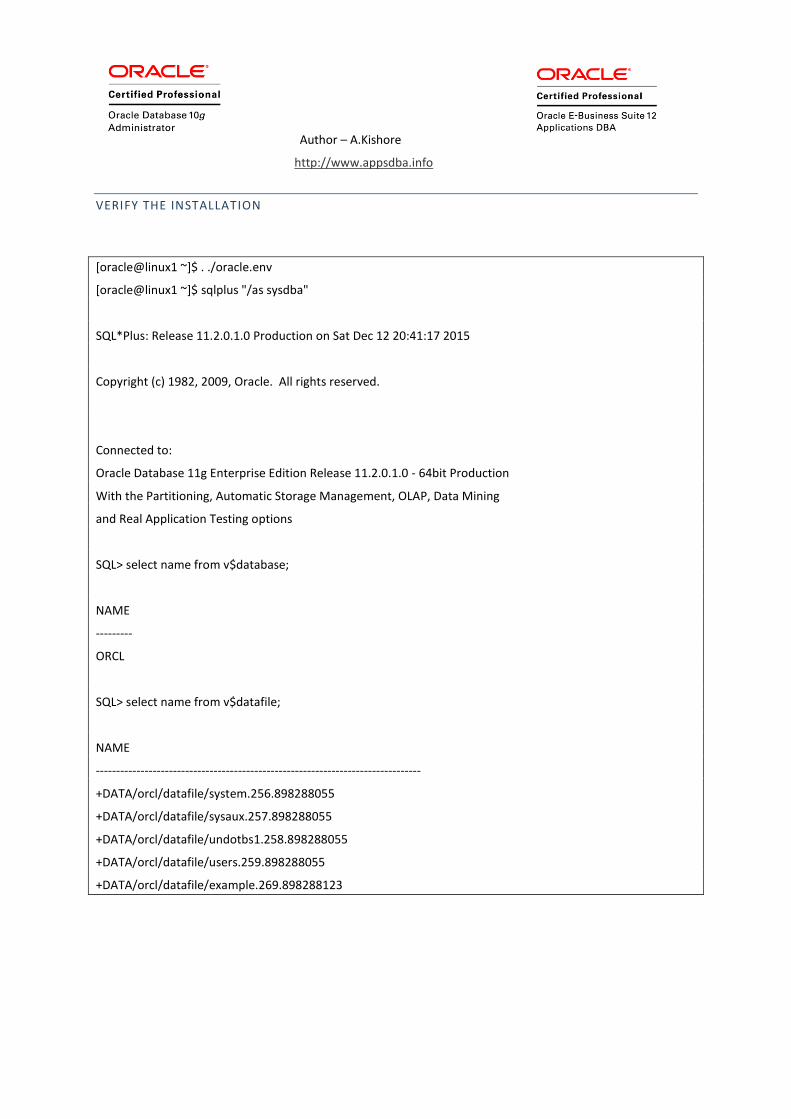
VERIFY THE INSTALLATION
[oracle@linux1 ~]$ . ./oracle.env
[oracle@linux1 ~]$ sqlplus "/as sysdba"
SQL*Plus: Release 11.2.0.1.0 Production on Sat Dec 12 20:41:17 2015
Copyright (c) 1982, 2009, Oracle. All rights reserved.
Connected to:
Oracle Database 11g Enterprise Edition Release 11.2.0.1.0 - 64bit Production
With the Partitioning, Automatic Storage Management, OLAP, Data Mining
and Real Application Testing options
SQL> select name from v$database;
NAME
---------
ORCL
SQL> select name from v$datafile;
NAME
--------------------------------------------------------------------------------
+DATA/orcl/datafile/system.256.898288055
+DATA/orcl/datafile/sysaux.257.898288055
+DATA/orcl/datafile/undotbs1.258.898288055
+DATA/orcl/datafile/users.259.898288055
+DATA/orcl/datafile/example.269.898288123