introduction to dell sc series: part 1 - amazon s3 · 3 hands-on lab manual | introduction to dell...
TRANSCRIPT

1 Hands-on Lab Manual | Introduction to Dell SC Series: Part 1 | DS01-DSM1
© 2016 Dell Inc. All rights reserved. Dell EMC and the Dell EMC logo are trademarks of Dell Inc. in the United States and/or
other jurisdictions. All other marks and names mentioned herein may be trademarks of their respective companies.
Introduction to Dell SC Series: Part 1
Dell Storage Hands-on Lab
Estimated completion time: 30 minutes
Audience
The audience for this document is technical professionals who wish to learn more about administrative tasks of Dell™ SC Series storage.
Reminder: This is a virtualized lab environment running GA (Generally Available) versions of SCOS (Storage Center Operating System) 7.1 and Dell Storage Manager (DSM) 2016 R2 software. Since the hardware is virtualized, performance may be slower than labs using physical hardware. Please be patient. Some of the steps in this lab will take longer to execute than it would normally take in a typical production environment.
What is demonstrated in this lab?
This lab will take you through a day in the life of an SC Series administrator using the Dell Storage Manager (DSM) interface.
In this lab you will:
1. Provision a volume and map to a server 2. Expand a volume 3. See thin provisioning in action 4. See Data Progression (tiered storage) in action 5. Create snapshot profiles 6. Recover data 7. Configure Data Reduction (deduplication and compression) 8. Configure volume Quality of Service for performance
Setup
The lab begins with logging into DSM.
1. On the desktop, click the Dell Storage Manager Client icon.

2 Hands-on Lab Manual | Introduction to Dell SC Series: Part 1 | DS01-DSM1
2. Provide the credentials (if necessary) for your lab station, using em.mydemo.local for the Host/IP, and click Log in.
3. Once logged in, if the Dell Storage Client does not automatically connect to both of the Storage Center arrays (they will appear with a red circular X if they are disconnected), you may need to reconnect them manually:
a. Highlight any disconnected array. For example, SC73900 Demo Array 01 or SC73902 Demo Array 02 within the navigation tree.
b. From within the Summary pane, click on Reconnect to Storage Center c. The Hostname or IP Address field should already be populated with the management IP address of the
array, so you should not need to change it: (Default IP Addresses: SN73900=172.20.0.100 or SN73902=172.20.0.200)
d. For the User Name, fill in “Admin” (without the quotes, case sensitive) e. For the Password, fill in “password” (without the quotes, case sensitive) f. Click OK to reconnect the Storage Center array
4. On the bottom left, click Storage, expand Storage Centers, and select SC73900 Demo Array 01. At the top, choose the Storage tab and from the middle pane, expand Servers. Drill down into the folder named Standalone Servers and select the server DSM-Landing. Notice this server object has been pre-created.
5. Examine the Server HBAs section.

3 Hands-on Lab Manual | Introduction to Dell SC Series: Part 1 | DS01-DSM1
Notice the server HBA is an iSCSI connection to the SC Series array. The Servers section in the tree provides views to all of the information about connectivity between volumes and hosts. Presently, there are some existing lab volumes mapped to the host, so the next steps is to provision additional storage.
Create and map a new volume
1. In the middle pane, expand the Volumes object, and select the StandardVolumes folder. Right-click this folder and choose Create Volume.

4 Hands-on Lab Manual | Introduction to Dell SC Series: Part 1 | DS01-DSM1
2. Enter the following information and click OK. a. Name: Volume1 b. Size: 5 GB c. Volume Folder: StandardVolumes d. Snapshot Profiles: Daily (default profile) e. Server: Click Change to select DSM-Landing and click OK. f. Storage Profile: Use the default profile named Recommended (All Tiers)

5 Hands-on Lab Manual | Introduction to Dell SC Series: Part 1 | DS01-DSM1
Format the volume within Windows
1. In the left Storage navigation pane, click the blue circular refresh icon (if necessary) to see the new volume created.

6 Hands-on Lab Manual | Introduction to Dell SC Series: Part 1 | DS01-DSM1
2. In the middle pane, select the Volume1 created in the prior steps, and select the Statistics tab. Notice that statistics information is not available for this volume because this volume will not consume any capacity until data is written to it.
3. To open Disk Management, right-click the Windows Start menu and select Disk Management.
7 Hands-on Lab Manual | Introduction to Dell SC Series: Part 1 | DS01-DSM1
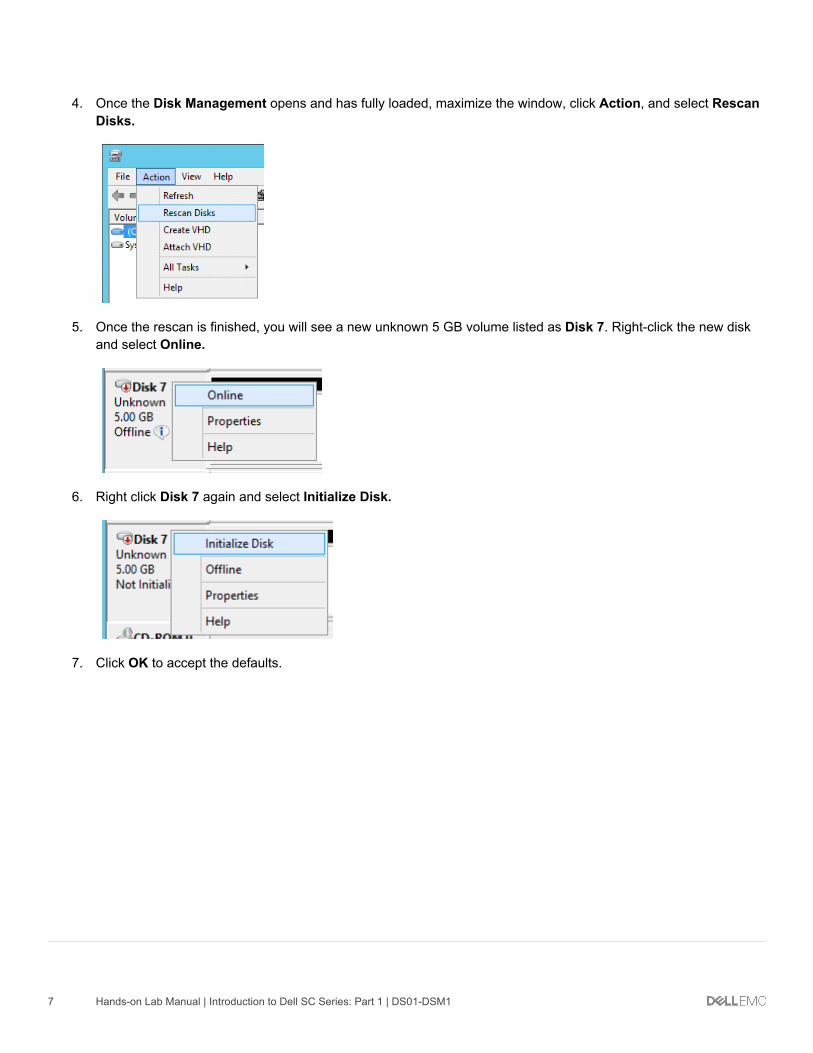
4. Once the Disk Management opens and has fully loaded, maximize the window, click Action, and select Rescan Disks.
5. Once the rescan is finished, you will see a new unknown 5 GB volume listed as Disk 7. Right-click the new disk and select Online.
6. Right click Disk 7 again and select Initialize Disk.
7. Click OK to accept the defaults.

8 Hands-on Lab Manual | Introduction to Dell SC Series: Part 1 | DS01-DSM1
8. To format the newly created disk, right-click the Unallocated space, and select New Simple Volume.
9. To accept all defaults, click Next (approximately four times). On the final window of the wizard, click Finish to create and format the new volume, and wait for the formatting complete.
10. Minimize the Disk Management window and switch back to the Dell Storage Manager Client. Under Volumes, select the recently created volume named Volume1 and select the Statistics tab.
11. In the upper-left corner of the Storage pane, click the blue circular arrow icon to refresh the volume statistics.

9 Hands-on Lab Manual | Introduction to Dell SC Series: Part 1 | DS01-DSM1
Notice that only about 14.5 MB of data was written into Tier1 RAID10 as a result of formatting the drive, even though the total capacity of the drive is 5 GB. This is thin provisioning in action. Remember that with thin provisioning, storage is only consumed when blocks are written.
Next, we will copy some data to this volume to observe storage tiering.
12. On the desktop, double-click the 1GB Data folder to open it, and copy the test0.rtf file from this folder to the newly formatted New Volume (H:) drive. If administrator permissions are required, click Continue.
13. Go back to the Dell Storage Manager client. In the upper-left corner of the Storage pane, click the blue circular arrow icon to refresh the volume statistics. Notice once again the data was written to Tier1 RAID10.
10 Hands-on Lab Manual | Introduction to Dell SC Series: Part 1 | DS01-DSM1
Change the storage profile of a volume
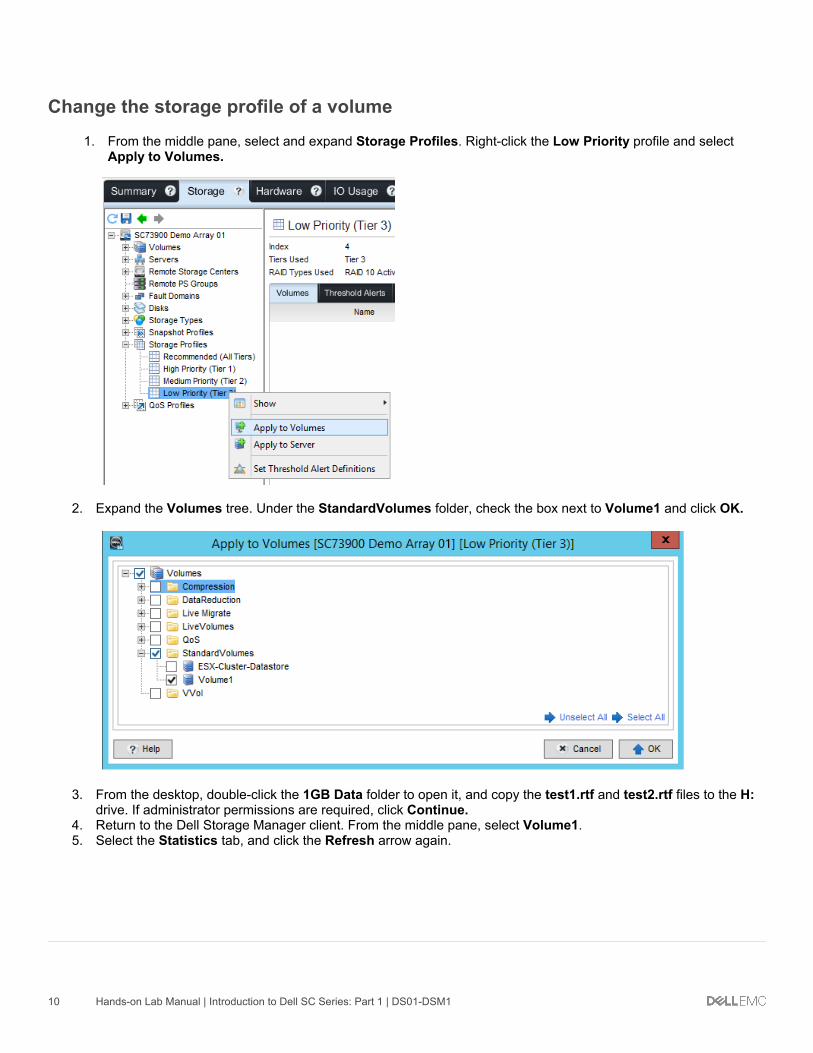
1. From the middle pane, select and expand Storage Profiles. Right-click the Low Priority profile and select Apply to Volumes.
2. Expand the Volumes tree. Under the StandardVolumes folder, check the box next to Volume1 and click OK.
3. From the desktop, double-click the 1GB Data folder to open it, and copy the test1.rtf and test2.rtf files to the H: drive. If administrator permissions are required, click Continue.
4. Return to the Dell Storage Manager client. From the middle pane, select Volume1. 5. Select the Statistics tab, and click the Refresh arrow again.

11 Hands-on Lab Manual | Introduction to Dell SC Series: Part 1 | DS01-DSM1
Notice that this time, the data was written to tier 3, RAID 10. Also, observe the total volume space consumed. The takeaway here is that SC Series arrays allow you to dynamically change tiers and RAID levels of a volume on the fly.
Notice the Actual Space consumed on the volume. Only the data written by the drive formatting and file copy operations is actually consumed from the SC Series pool of available capacity. Note that the numbers on your lab system may vary slightly from the screenshot.
6. Revert the Volume1 back to the Recommended storage profile. In DSM client, expand Storage Profiles, right-click Recommended, and select Apply to Volumes.
7. Expand the Volumes tree and check the box next to Volume1 to select it. Click OK.

12 Hands-on Lab Manual | Introduction to Dell SC Series: Part 1 | DS01-DSM1
Expand a volume
1. Using the DSM client, click the Storage tab. In the middle pane, expand the volumes tree to locate Volumes1. Right-click Volumes1 and select Expand Volume.

13 Hands-on Lab Manual | Introduction to Dell SC Series: Part 1 | DS01-DSM1
2. Expand the volume with a new size of 20 GB and click OK.

14 Hands-on Lab Manual | Introduction to Dell SC Series: Part 1 | DS01-DSM1
3. Review the volume properties to see that the volume size is now 20 GB.
Notice that only the Configured Space has increased, and the Actual Space consumed remains the same. Although the total capacity presented to the operating system increased, since the operating system has not written to any additional blocks, the actual storage consumption has not changed.
4. Minimize the DSM client and navigate back to Disk Management. From the Action menu, click Rescan Disks. After the rescan completes, the disk shows 15 GB of unallocated space.

15 Hands-on Lab Manual | Introduction to Dell SC Series: Part 1 | DS01-DSM1
5. Right-click the H: Drive, select Extend Volume, and accept all the defaults (Next, Next, Finish).
6. Navigate to the DSM client. Select Volume1 from the middle pane. Select the Statistics tab and refresh the view to show the total volume space consumed.
Note that even though you have added 15 GB of capacity to the volume, due to thin provisioning, the volume space and disk space consumed has not increased.

16 Hands-on Lab Manual | Introduction to Dell SC Series: Part 1 | DS01-DSM1
Take a snapshot of a volume
1. From the DSM client, select Volume1 from the middle pane. Right-click the volume and choose Create Snapshot.

17 Hands-on Lab Manual | Introduction to Dell SC Series: Part 1 | DS01-DSM1
2. Set the Expire Time to 2 hours. For Description, enter Created for patching, and click OK.

18 Hands-on Lab Manual | Introduction to Dell SC Series: Part 1 | DS01-DSM1
3. Click the Snapshots tab and note the snapshot size, description, and state for the snapshot.
4. Select the Statistics tab. Click the refresh arrow icon to refresh the view, and view the Volume Space and Disk Space - Snapshot (frozen) data results.
Behind the scenes: Notice that the colors have changed to indicate that the data has been frozen to become snapshot data. Within a few minutes (dependent on system activity), the On-Demand Data Progression becomes triggered by the snapshot and migrates the frozen data. This frozen read-only data has been converted to RAID 5 on tier 1 to conserve disk space. Note that you may need to refresh a few times while waiting.

19 Hands-on Lab Manual | Introduction to Dell SC Series: Part 1 | DS01-DSM1
5. In the middle navigation pane, click Storage Types and highlight the Assigned – Redundant – 512 KB page pool to view the allocation of storage between the tiers and RAID levels.
Distribution of data between the tiers and RAID levels is handled automatically by the Data Progression algorithms.
6. Open Windows Explorer and delete the three files from the H: Drive. Do not delete the files from the 1GB Data folder on the desktop.

20 Hands-on Lab Manual | Introduction to Dell SC Series: Part 1 | DS01-DSM1
Recover files from a snapshot
1. Navigate back to the DSM client. Under the Storage tab > Volumes tree, select Volume1 and choose the Snapshots tab. Right-click the snapshot with the description, Created for patching, and select Create Volume from Snapshot.

21 Hands-on Lab Manual | Introduction to Dell SC Series: Part 1 | DS01-DSM1
2. Leave the Name set to the default. Click Change to the right of Server.

22 Hands-on Lab Manual | Introduction to Dell SC Series: Part 1 | DS01-DSM1
3. Select the DSM-Landing server to map the view volume to, and select OK.
4. Review the summary screen and click OK.

23 Hands-on Lab Manual | Introduction to Dell SC Series: Part 1 | DS01-DSM1
5. Navigate back to Disk Management. From the Action menu, select Rescan Disks.

24 Hands-on Lab Manual | Introduction to Dell SC Series: Part 1 | DS01-DSM1
6. Right-click Disk 8 and select Online. Perform another Rescan Disks. After the rescan completes, the drive letter of I: should be assigned to the disk. If no drive letter is assigned, right-click the New Volume space and select Change Drive Letter and Paths to assign a drive letter of I: to the volume.
7. Navigate back to the DSM client and select the View of Volume1 1 volume. Click the Statistics tab. To refresh the view, click the blue circular refresh icon. Notice that only a small amount of Snapshot Space is consumed to present this recovery volume back to the server. This consumption is the new disk signature being written by Windows. With view and recovery volumes, only blocks that are changed consume storage. When looking at a view volume, you will notice that the consumption bar color has changed to indicate that some data is shared with a parent volume. The very small 3 MB worth of delta changes, as shown below, is the only data consumed at the array level.

25 Hands-on Lab Manual | Introduction to Dell SC Series: Part 1 | DS01-DSM1
8. Open Windows Explorer and copy the files from the I: drive back to the H: drive. If prompted, click Continue.
You have just successfully recovered files from a snapshot.

26 Hands-on Lab Manual | Introduction to Dell SC Series: Part 1 | DS01-DSM1
9. Navigate to the DSM client, select the Volume1 disk, select the Statistics tab, and click the Refresh arrow icon.
Notice the new data compared to frozen data. Data written after the snapshot will be shown as a different color to signify that it is active data written after the last snapshot was taken.

27 Hands-on Lab Manual | Introduction to Dell SC Series: Part 1 | DS01-DSM1
Enable data reduction (compression and deduplication)
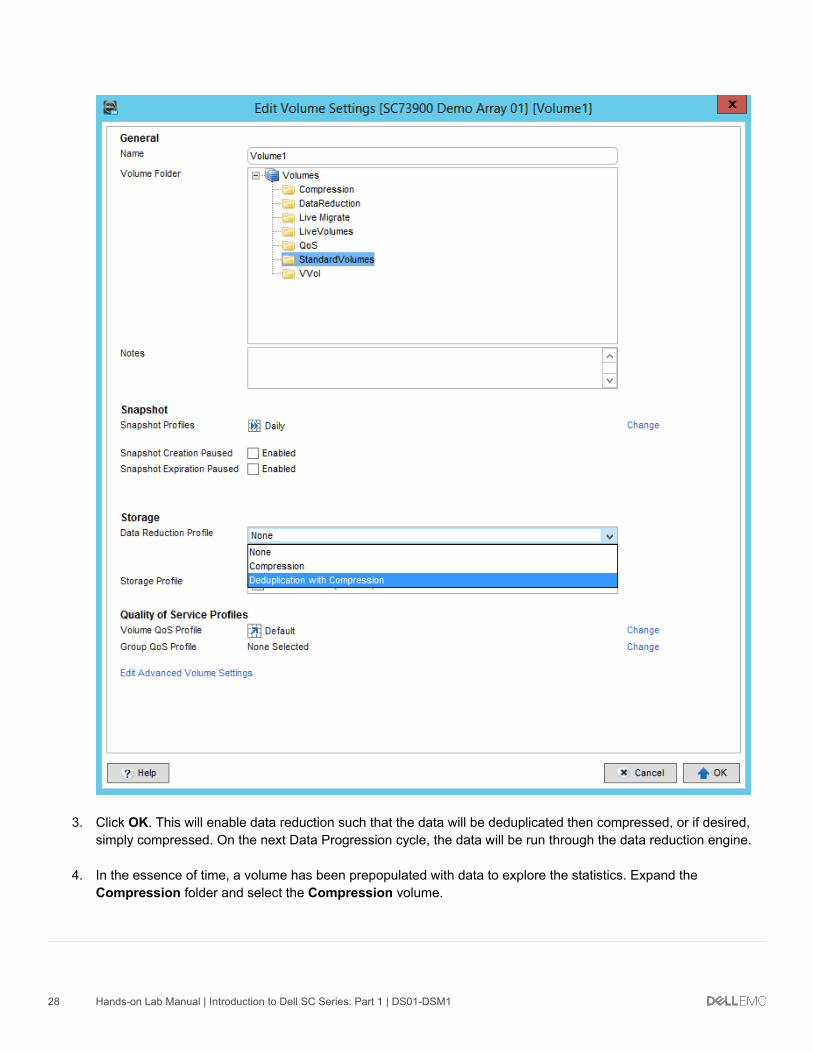
1. Right-click Volume1 and select Edit Settings.
2. For the Data Reduction Profile, select Deduplication with Compression.
28 Hands-on Lab Manual | Introduction to Dell SC Series: Part 1 | DS01-DSM1
3. Click OK. This will enable data reduction such that the data will be deduplicated then compressed, or if desired, simply compressed. On the next Data Progression cycle, the data will be run through the data reduction engine.
4. In the essence of time, a volume has been prepopulated with data to explore the statistics. Expand the Compression folder and select the Compression volume.

29 Hands-on Lab Manual | Introduction to Dell SC Series: Part 1 | DS01-DSM1
Note that since the example data is composed of highly compressible text documents, the data reduction savings results in a significant reduction.
5. To view the compression savings globally within the array, from the navigation pane, expand Storage Types, and select the Assigned – Redundant – 512 KB pool. At the bottom of the Summary pane, the total savings are broken down into two categories for both compression alone, and deduplication with compression.

30 Hands-on Lab Manual | Introduction to Dell SC Series: Part 1 | DS01-DSM1
Use volume Quality of Service
With virtualized storage that uses shared resources, such as SC Series arrays, volume QoS allows administrators to limit the disruption that may be caused by what the industry has dubbed the noisy neighbor. Volume QoS allows hard limits of IOPS or MBps, or a load equalizer, to be enabled on volumes to ensure fairness, such that one volume cannot monopolize disk resources or bandwidth.
1. To begin, minimize DSM client, and double-click the QoS workload.icf file on the desktop to open Iometer.
2. When Iometer opens, click the green flag button. When prompted to save the results, click Cancel. The workload will begin.

31 Hands-on Lab Manual | Introduction to Dell SC Series: Part 1 | DS01-DSM1
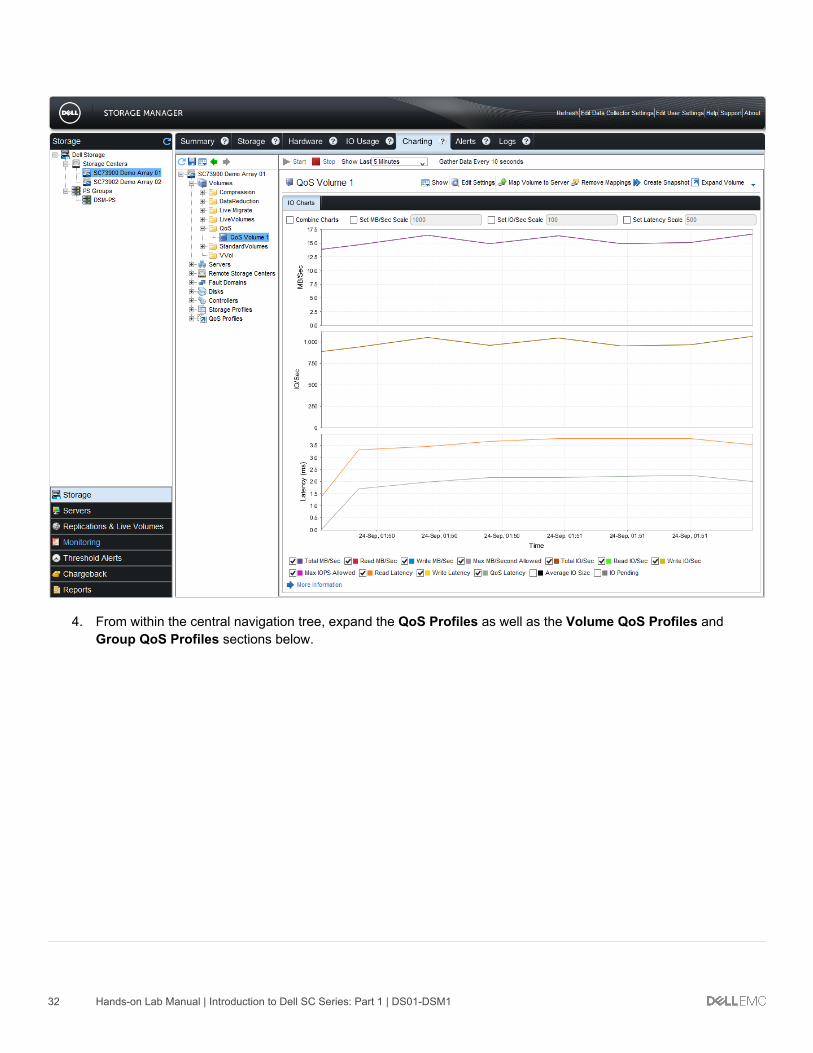
3. Switch back to the DSM client, click the Charting tab, expand the QoS volume folder, and select the volume named QoS Volume 1. This displays the real-time performance statistics of the volume.
32 Hands-on Lab Manual | Introduction to Dell SC Series: Part 1 | DS01-DSM1
4. From within the central navigation tree, expand the QoS Profiles as well as the Volume QoS Profiles and Group QoS Profiles sections below.

33 Hands-on Lab Manual | Introduction to Dell SC Series: Part 1 | DS01-DSM1
5. To create a QoS profile to limit this volume, right-click the Volume QoS Profiles and select Create QoS Profile.
6. When the window opens, enter the following information and click OK. a. Name: 250 IO QoS Volume Profile b. Relative Priority: Low [50] c. Limit by IOPS: checked

34 Hands-on Lab Manual | Introduction to Dell SC Series: Part 1 | DS01-DSM1
d. Max IO/sec Allowed: 250
7. To apply this new profile to the volume, right-click the 250 IO QoS Volume Profile, and select Apply to Volumes.

35 Hands-on Lab Manual | Introduction to Dell SC Series: Part 1 | DS01-DSM1
8. Select QoS Volume 1 and click OK.
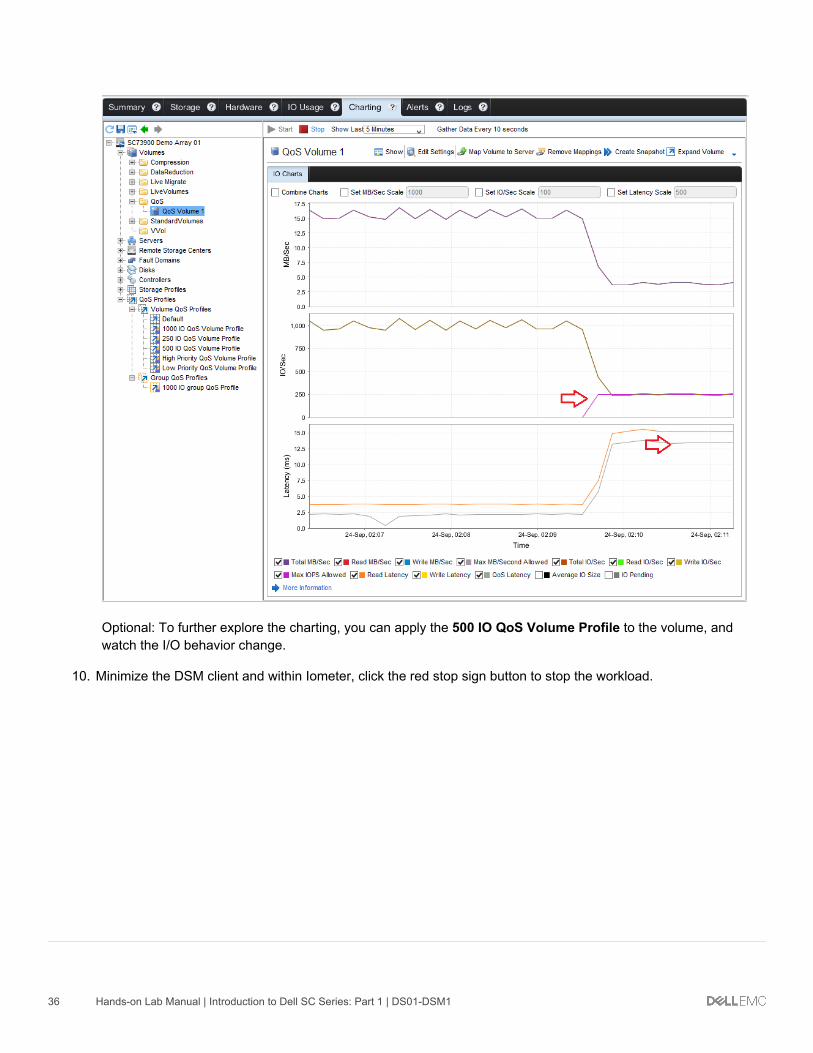
9. Select the QoS Volume 1 from the Volumes tree to view its performance statistics.
The charts now have two new lines for examination. Within the IO/Sec section, the new purple line indicates that there is a Max IOPS Allowed set on the volume, limiting it to 250 IOPS. The gray line added to the Latency section indicates the amount of artificially injected latency. In other words, in order to slow the workload, the array had to add approximately 12.5 ms of latency to each I/O to slow the workload to enforce the limit. In this case, the actual time it took to process the I/O is 2.5 ms (15–12.5 ms), but with the added injected latency, the I/Os are completing in 15 ms.
36 Hands-on Lab Manual | Introduction to Dell SC Series: Part 1 | DS01-DSM1
Optional: To further explore the charting, you can apply the 500 IO QoS Volume Profile to the volume, and watch the I/O behavior change.
10. Minimize the DSM client and within Iometer, click the red stop sign button to stop the workload.

37 Hands-on Lab Manual | Introduction to Dell SC Series: Part 1 | DS01-DSM1
Lab complete
You have successfully managed storage for the SC Series array using the Dell Storage Manager client interface.