introduction to gedmatch - dnaadoption.com practice exercises ... that were tested and what was...
TRANSCRIPT

Introduction to GEDmatch
Using GEDmatch
Use of this document signifies your agreement to the Web Site Agreement, Privacy, Statement and Terms of Use
of DNAGedcom and DNAAdoption. This content is copyrighted by DNAAdoption.
Benefits of GEDmatch (Why should I upload my results to GEDmatch?)
Do yourself a favor: Upload today
As soon as you get your test results, immediately upload the raw data, as explained in this course. It
will take some weeks for the data to be processed and available for all of the optional searches.
However, in a day, you should be able to do one-to-one searches. For example, if you have a relative
who is on GEDmatch, get their kit number and run a one-to-one search. It’s to everyone’s benefit to
take advantage of this opportunity.
Lesson written and formatted by Susan MacLaughlin and Diane Harman-Hoog
Layout and Design by Mesa Foard
© 2015 DNAAdoption.com
Objective:
Compare your DNA test results with a large database of results from multiple testing companies.
Tools: GEDmatch.com website; raw autosomal DNA data from AncestryDNA,
Family Tree DNA, and/or 23andme.
Exercises: Practice Exercises throughout the lesson help you apply what you’re learning.
Relative Roadmap: Your Journey with Autosomal DNA
GEDmatch enables you to compare your autosomal DNA data with other testers' data, regardless of which company processed your sample.
GEDmatch provides the only way to see and compare your AncestryDNA data.
Using GEDmatch, you may find additional “DNA relatives“ whom you had not previously identified.

Relative Roadmap: Your Journey with Autosomal DNA
© DNAAdoption.com Introduction to GEDmatch 2
Introduction to GEDmatch
GEDmatch (pronounced JED-match) is a free, "do-it-yourself" genomics website that allows DNA testers to
upload their raw data from Family Tree DNA (FTDNA), 23andMe and AncestryDNA in order to compare their
autosomal DNA (atDNA) with a large database of data that has been voluntarily uploaded by other testers. The
website address is http://www.gedmatch.com
GEDmatch is a free, non-profit utility website that is not affiliated with any of the DNA testing companies. It is
staffed by a team of dedicated volunteers. In order to maintain and upgrade its services, GEDmatch offers a
$5/month subscription add-on called Tier 1. This add-on provides subscribers with additional search capabilities.
GEDmatch uses a slightly different algorithm to compare DNA data than that used by the “big three” testing
companies. So, with GEDmatch you may discover additional matches, including contact information for some
matches. The algorithm also gives you different views of the comparisons, which may help you begin to separate
your matches along maternal and paternal lines. Stay tuned to learn more.
What is Raw Data?
Register with GEDmatch
GEDmatch requires registration to enter the website. Log in and continue.
Raw data sounds like it could be the saliva you sent in to be tested. It is not. Raw data is the
computer generated file of information about your DNA. It contains a list of the locations of the
bits of your DNA that were tested and what was found at each location. This file can be
downloaded from your DNA testing company and uploaded to GEDmatch.

Relative Roadmap: Your Journey with Autosomal DNA
© DNAAdoption.com Introduction to GEDmatch 3
Your GEDmatch Home Page (Main Menu)
When you log in, your home page will look something like this. Your name and email address appear in the
upper left under Your Log-in Profile.
Let’s take a tour of the page.
Relative Roadmap: Your Journey with Autosomal DNA
© DNAAdoption.com Introduction to GEDmatch 4
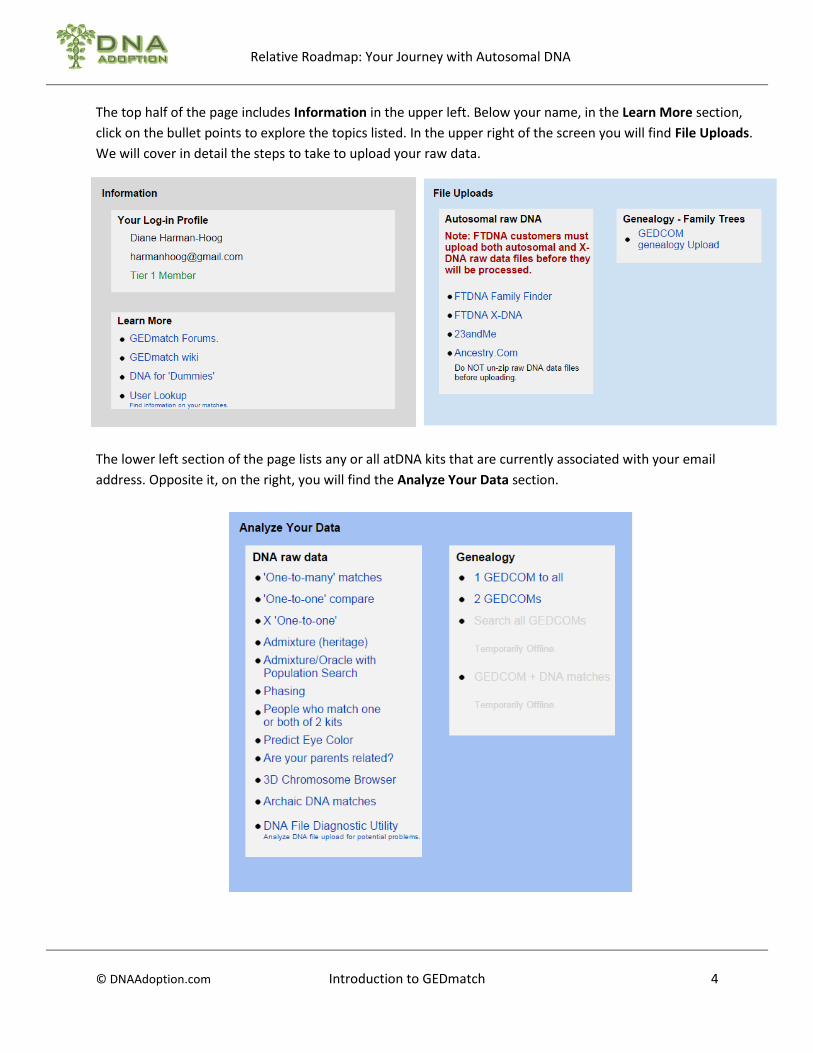
The top half of the page includes Information in the upper left. Below your name, in the Learn More section,
click on the bullet points to explore the topics listed. In the upper right of the screen you will find File Uploads.
We will cover in detail the steps to take to upload your raw data.
The lower left section of the page lists any or all atDNA kits that are currently associated with your email
address. Opposite it, on the right, you will find the Analyze Your Data section.

Relative Roadmap: Your Journey with Autosomal DNA
© DNAAdoption.com Introduction to GEDmatch 5
Note that Diane’s profile shows that she is a Tier 1 Member (green text). Tier 1 is an extra analysis area that was
added by GEDmatch at the end of 2014. You get access to it by subscribing to the site for $10 per month. Tier I
Utilities appear in the lower right. More details will follow later in this course.
GEDmatch Process Now that you understand how GEDmatch.com is organized, you are ready to take advantage of all that
GEDmatch has to offer. The process is straightforward. Follow these three steps.
How to Download and Upload Your Raw Data Go to the top of the opening GEDmatch page for good instructions on working with your raw data files.
For example, click on Ancestry.com.
1. Download your raw data from the testing company
2. Upload your raw data to GEDmatch.com
3. Analyze your data using GEDmatch utilities
Relative Roadmap: Your Journey with Autosomal DNA
© DNAAdoption.com Introduction to GEDmatch 6
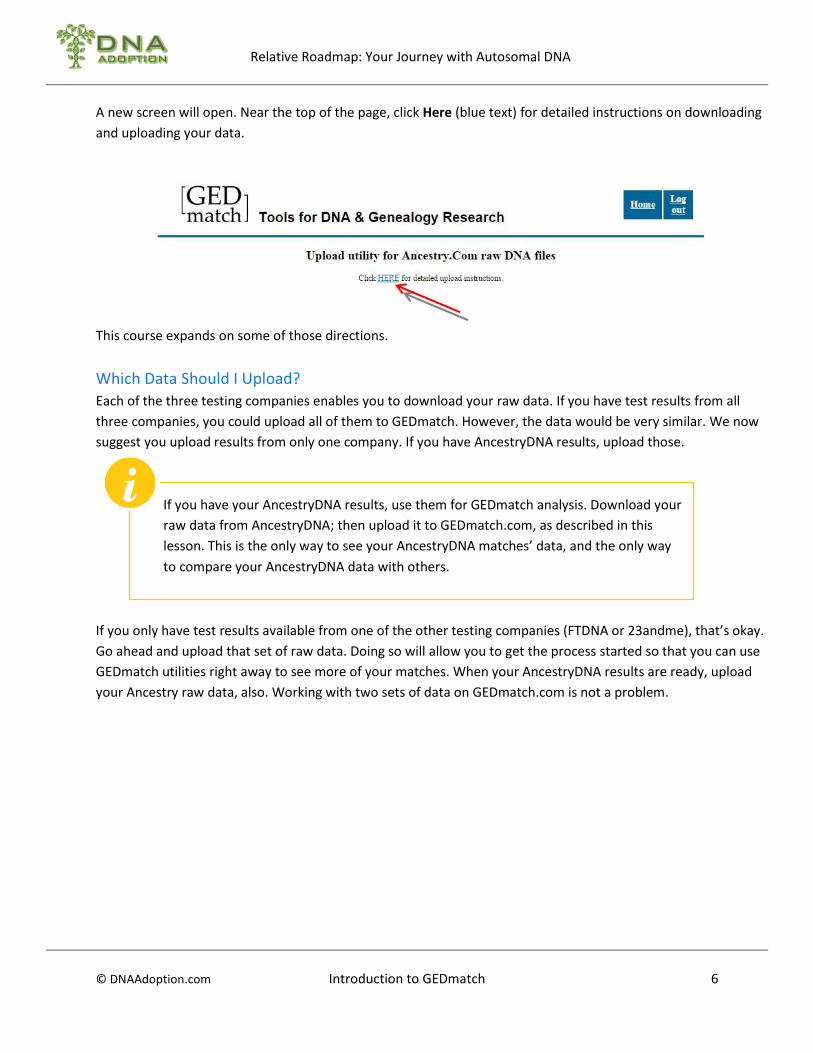
A new screen will open. Near the top of the page, click Here (blue text) for detailed instructions on downloading
and uploading your data.
This course expands on some of those directions.
Which Data Should I Upload? Each of the three testing companies enables you to download your raw data. If you have test results from all
three companies, you could upload all of them to GEDmatch. However, the data would be very similar. We now
suggest you upload results from only one company. If you have AncestryDNA results, upload those.
If you only have test results available from one of the other testing companies (FTDNA or 23andme), that’s okay.
Go ahead and upload that set of raw data. Doing so will allow you to get the process started so that you can use
GEDmatch utilities right away to see more of your matches. When your AncestryDNA results are ready, upload
your Ancestry raw data, also. Working with two sets of data on GEDmatch.com is not a problem.
If you have your AncestryDNA results, use them for GEDmatch analysis. Download your
raw data from AncestryDNA; then upload it to GEDmatch.com, as described in this
lesson. This is the only way to see your AncestryDNA matches’ data, and the only way
to compare your AncestryDNA data with others.

Relative Roadmap: Your Journey with Autosomal DNA
© DNAAdoption.com Introduction to GEDmatch 7
AncestryDNA Raw Data
Log in to your Ancestry account. Click on the DNA tab and then on Your DNA Home Page. On the right of the
page, you will see a button with a little gear and Settings. Click on it; this will take you to your settings page.
In the right hand panel of the Settings page you will see Actions. Click on Get Started to download your raw
data.

Relative Roadmap: Your Journey with Autosomal DNA
© DNAAdoption.com Introduction to GEDmatch 8
A form will open in a new window. Enter your password and click Confirm.
An email will be sent to you. Follow the directions in the email to download your data. Save the files to your
download folder or to another folder on your PC. Pat yourself on the back! You have downloaded your
AncestryDNA raw data.
Now it’s time to upload the raw data to GEDmatch.com. Click on Ancestry.Com to begin.
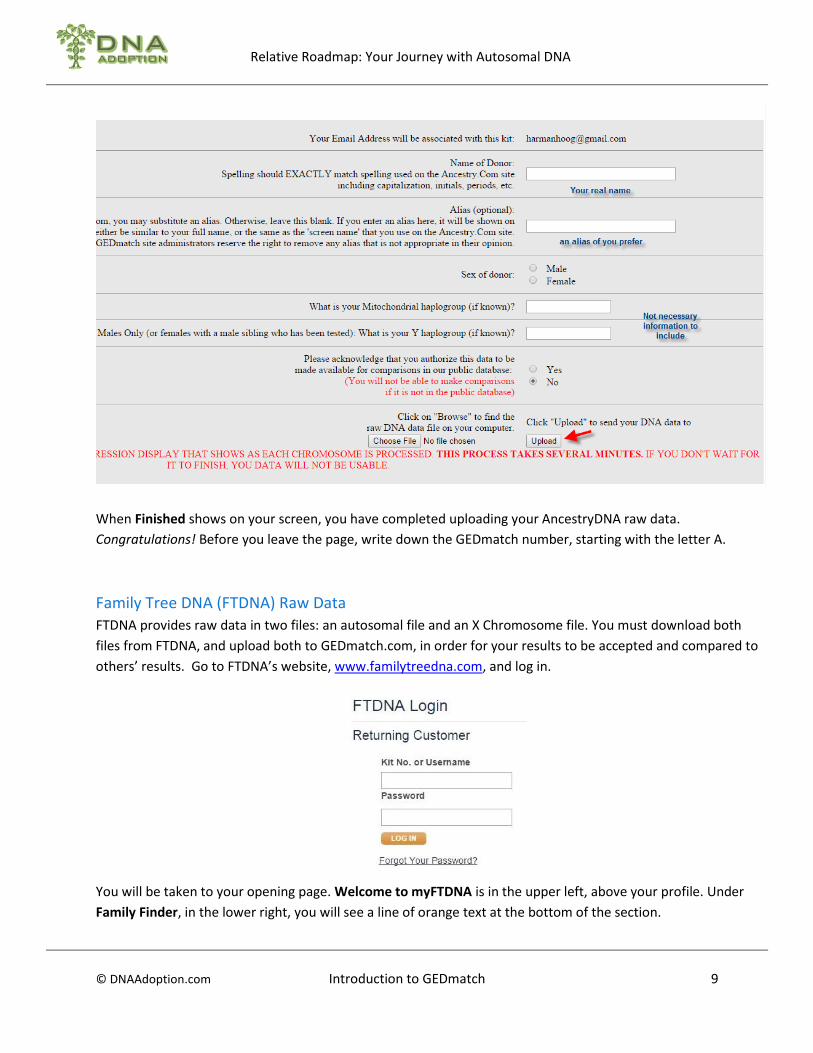
Fill in the form, following the instructions (in blue). Check Yes to allow your data to be compared with others’.
Browse your PC for the raw DNA file name. Choose the file and click Upload to send your raw data to GEDmatch.
Wait patiently while each chromosome number (1, 2, 3, etc.) appears on the screen as it completes processing.
Be sure to wait for all of the data to process before you leave the screen.
Relative Roadmap: Your Journey with Autosomal DNA
© DNAAdoption.com Introduction to GEDmatch 9
When Finished shows on your screen, you have completed uploading your AncestryDNA raw data.
Congratulations! Before you leave the page, write down the GEDmatch number, starting with the letter A.
Family Tree DNA (FTDNA) Raw Data FTDNA provides raw data in two files: an autosomal file and an X Chromosome file. You must download both
files from FTDNA, and upload both to GEDmatch.com, in order for your results to be accepted and compared to
others’ results. Go to FTDNA’s website, www.familytreedna.com, and log in.
You will be taken to your opening page. Welcome to myFTDNA is in the upper left, above your profile. Under
Family Finder, in the lower right, you will see a line of orange text at the bottom of the section.

Relative Roadmap: Your Journey with Autosomal DNA
© DNAAdoption.com Introduction to GEDmatch 10
Click on Download Raw Data.
You will download two files, one at a time. First, click on Build 36 Autosomal Raw Data. Save this file “as is”
(do not open it) to your download folder or other folder on your PC. Make a note of where it is stored. Second,
click on Build 36 X Chromosome Raw Data. Save this file to the same folder on your PC.
Congratulations! You have downloaded your FTDNA raw data!
Now upload the two files from your PC to GEDmatch, one at a time.

Relative Roadmap: Your Journey with Autosomal DNA
© DNAAdoption.com Introduction to GEDmatch 11
Begin by clicking on FTDNA Family Finder on the GEDmatch opening page.
This form opens. Follow the instructions below (in blue). Check Yes to allow your data to be compared with
others’. Browse your PC for the autosomal raw DNA file name; it will begin with ffo and end in .gz. Choose this
file and click Upload to send your raw data to GEDmatch.
Relative Roadmap: Your Journey with Autosomal DNA
© DNAAdoption.com Introduction to GEDmatch 12
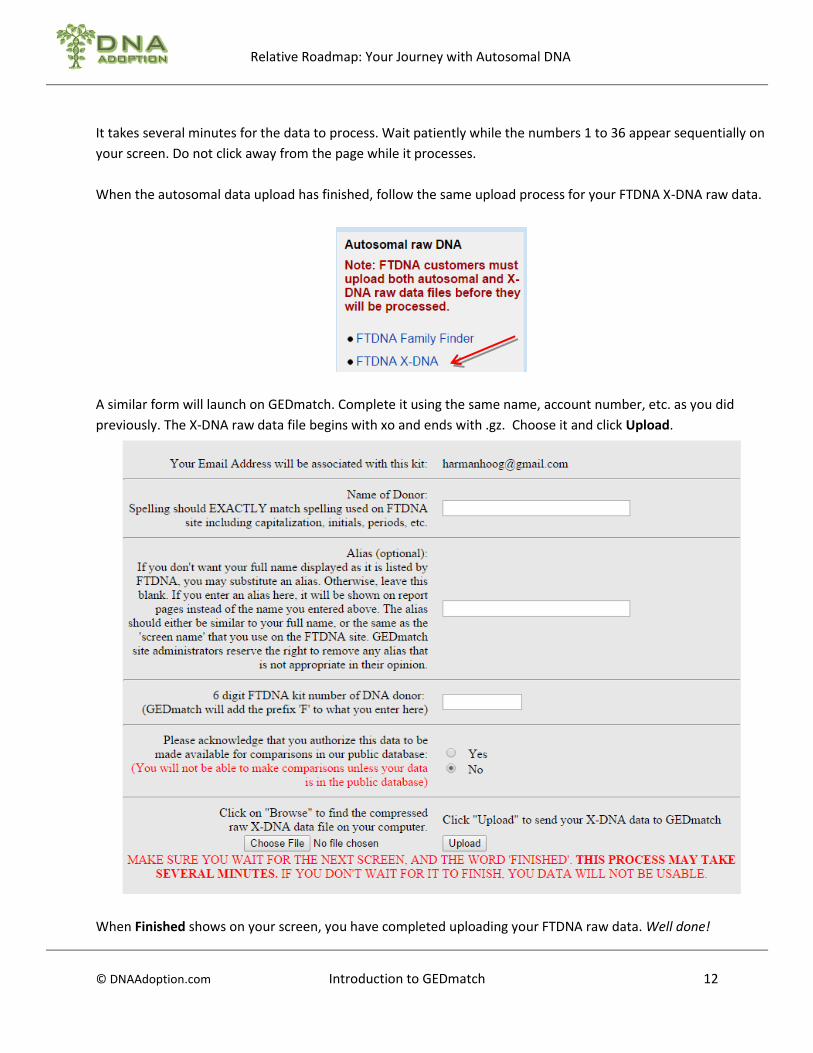
It takes several minutes for the data to process. Wait patiently while the numbers 1 to 36 appear sequentially on
your screen. Do not click away from the page while it processes.
When the autosomal data upload has finished, follow the same upload process for your FTDNA X-DNA raw data.
A similar form will launch on GEDmatch. Complete it using the same name, account number, etc. as you did
previously. The X-DNA raw data file begins with xo and ends with .gz. Choose it and click Upload.
When Finished shows on your screen, you have completed uploading your FTDNA raw data. Well done!

Relative Roadmap: Your Journey with Autosomal DNA
© DNAAdoption.com Introduction to GEDmatch 13
23andme Raw Data
Sign in to your account at www.23andme.com.
Click on the down-arrow (inverted triangle) next to your name. Select Browse Raw Data from the drop-down
menu.
When you open that you will see a page that looks kind of like a calendar. In the top right corner you will see a
Download link. Click on Download.

Relative Roadmap: Your Journey with Autosomal DNA
© DNAAdoption.com Introduction to GEDmatch 14
Fill out this form, following the instructions below (in blue).
Then click Download Data at the bottom right of the form to download a raw data file to your PC.
Go to GEDmatch.com (log in if your session has expired), and click on 23andme.

Relative Roadmap: Your Journey with Autosomal DNA
© DNAAdoption.com Introduction to GEDmatch 15
Fill in the form. Check Yes to allow your data to be compared with others’. Browse your PC for the raw DNA file
name; it will end in .zip. Choose this file and click Upload to send your raw data to GEDmatch.
It takes several minutes for the data to process. Wait patiently while the numbers 1, 2, 3 and so on appear on
your screen. Do not click away from the page while it processes.
When Finished shows on your screen, you have completed uploading your 23andme raw data. Well done!
Before you leave this page, write down the GEDmatch number, starting with the letter M.

Relative Roadmap: Your Journey with Autosomal DNA
© DNAAdoption.com Introduction to GEDmatch 16
Analyze Your Data
One-to-many – This is the most common way to analyze your data. Enter your GEDmatch number (kit number).
Set the cMs in both blanks to 5 cM for the first round. (The ISOGG tables use this as a baseline for determining
relationship predictions. Or, use our Combined Prediction Chart. )
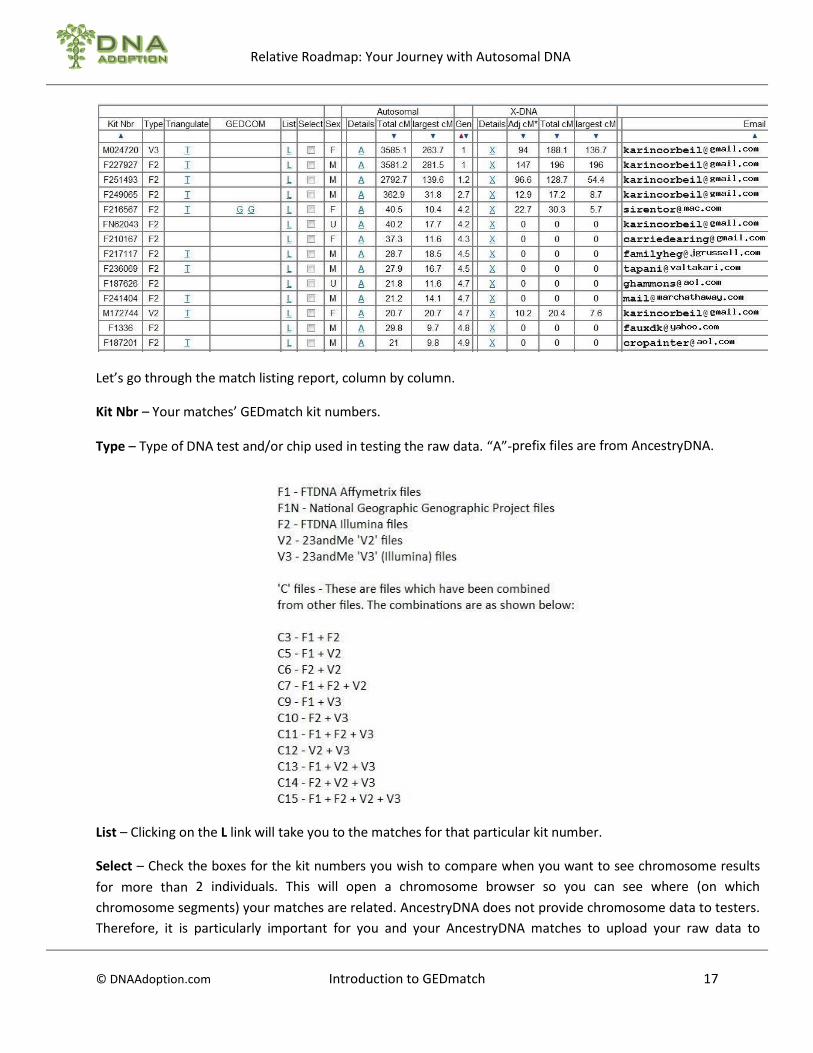
Click Display Results, and GEDmatch gives you a table with up to 1,500 your of matches in it. The table below is
a truncated version of a very long table (multiple pages). Be sure that in this exercise you copy a couple of the
kits numbers to use in other exercises so you do not have to rerun this report.
Relative Roadmap: Your Journey with Autosomal DNA
© DNAAdoption.com Introduction to GEDmatch 17
Let’s go through the match listing report, column by column.
Kit Nbr – Your matches’ GEDmatch kit numbers.
Type – Type of DNA test and/or chip used in testing the raw data. “A”-prefix files are from AncestryDNA.
List – Clicking on the L link will take you to the matches for that particular kit number.
Select – Check the boxes for the kit numbers you wish to compare when you want to see chromosome results
for more than 2 individuals. This will open a chromosome browser so you can see where (on which
chromosome segments) your matches are related. AncestryDNA does not provide chromosome data to testers.
Therefore, it is particularly important for you and your AncestryDNA matches to upload your raw data to
Relative Roadmap: Your Journey with Autosomal DNA
© DNAAdoption.com Introduction to GEDmatch 18
GEDmatch. Check the kits that you want included in your comparison, then select the Chromosome option in
the top part of the page to run the analysis.
Sex – Male or Female match. This could be important when a male has X matches because we then know that
the connection must be through his mother, as males only receive their X-DNA from their mother.
Under the Autosomal heading
Details – “A” – This link will take you to a page that shows you where exactly (on which chromosome, location
and length) you match this person. It will be similar to the chromosome browser at FTDNA or the IBDData.csv
that you can download from “Family Inheritance: Advanced” at 23andMe.
Total cMs – Total CentiMorgans (across all chromosomes) of your match.
Largest cM – Longest length of match in CentiMorgans on one specific chromosome.
Gen – Estimated number of generations going back to a common ancestor for you and your match. We must
stress that the speculation at GEDmatch may be too generous.
Under the X chromosome heading
Details – “X” – This link will take you to a page that shows you exactly where on the X chromosome (location and
length) you match this person.
Adj. cM – GEDmatch’s best guess. Remember, the X chromosome is inherited and passed down differently.
Females inherit their X from both their mother and father; males inherit their X from their mother’s only.
Total cMs – Total CentiMorgans of your X match.
Largest cM – Longest length of CentiMorgans on the X chromosome.
Email – Email address of your match.
We loosely define CentiMorgans (cMs) as a unit of measurement. For our purposes,
cMs can be considered a unit for measuring genetic linkage. cM is a linear relationship
but not strictly inches or centimeters. First you have base pairs: each is a single
position on your DNA strand. CentiMorgans has to do with how likely a particular
position is to recombine. Gaye Tannenbaum’s analogy is mile markers vs. exits.
CentiMorgans are exits. On some stretches of road (chromosome) they are close
together (base pairs = mile markers), and on other stretches of road they are far apart.
Relative Roadmap: Your Journey with Autosomal DNA
© DNAAdoption.com Introduction to GEDmatch 19
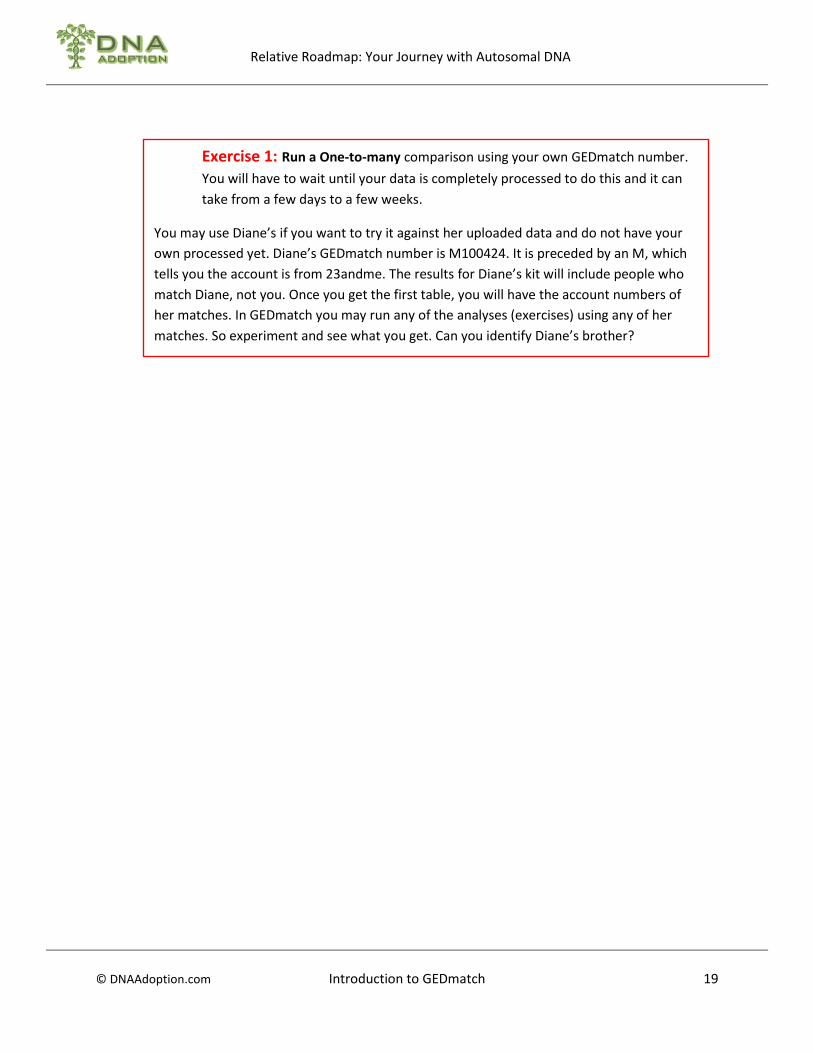
Exercise 1: Run a One-to-many comparison using your own GEDmatch number.
You will have to wait until your data is completely processed to do this and it can
take from a few days to a few weeks.
You may use Diane’s if you want to try it against her uploaded data and do not have your
own processed yet. Diane’s GEDmatch number is M100424. It is preceded by an M, which
tells you the account is from 23andme. The results for Diane’s kit will include people who
match Diane, not you. Once you get the first table, you will have the account numbers of
her matches. In GEDmatch you may run any of the analyses (exercises) using any of her
matches. So experiment and see what you get. Can you identify Diane’s brother?
Now put a check mark next to several matches and go to the options above the report and
try them all. These are all different presentations of data. The one I use the most often is
the Chromosome option. This is data you can eventually put into a spreadsheet as you will
learn in later classes.

Relative Roadmap: Your Journey with Autosomal DNA
© DNAAdoption.com Introduction to GEDmatch 20
One-to-One Compare
When you want to compare just two kits, choose One-to-one Compare from the Analyze Your Data list.
Example: Let’s say you find two matches who both have overlaps with you on one chromosome. But you need to
find out if these two matches match each other. Your goals are to:
Find your matches at FTDNA, 23andMe or GEDmatch
See where there are segment overlaps with other matches Analyze the other matches to see it they match each other
If so, then you and your matches share a common ancestor.
One-to-one analysis is immediately available. You can use it while your results are being fully processed by
GEDmatch. So if you are a hurry to see how you match with a particular person, and you know the kit
number, you can run this comparison now. Click on One-to-one Compare and a page will open where you
can enter two different kit numbers to compare:
Relative Roadmap: Your Journey with Autosomal DNA
© DNAAdoption.com Introduction to GEDmatch 21
X One-to-One Compare
This is the same as the One-to-one Compare but only on the X chromosome.
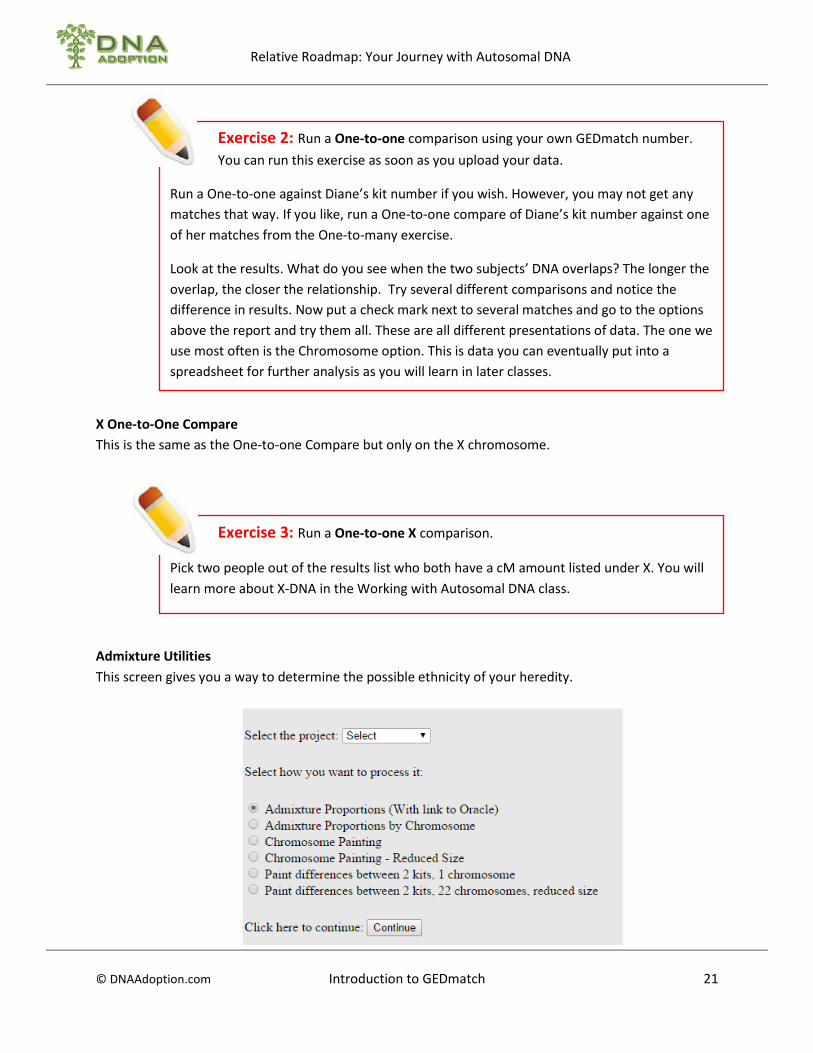
Admixture Utilities
This screen gives you a way to determine the possible ethnicity of your heredity.
Exercise 2: Run a One-to-one comparison using your own GEDmatch number.
You can run this exercise as soon as you upload your data.
Run a One-to-one against Diane’s kit number if you wish. However, you may not get any
matches that way. If you like, run a One-to-one compare of Diane’s kit number against one
of her matches from the One-to-many exercise.
Look at the results. What do you see when the two subjects’ DNA overlaps? The longer the
overlap, the closer the relationship. Try several different comparisons and notice the
difference in results. Now put a check mark next to several matches and go to the options
above the report and try them all. These are all different presentations of data. The one we
use most often is the Chromosome option. This is data you can eventually put into a
spreadsheet for further analysis as you will learn in later classes.
Exercise 3: Run a One-to-one X comparison.
Pick two people out of the results list who both have a cM amount listed under X. You will
learn more about X-DNA in the Working with Autosomal DNA class.
Relative Roadmap: Your Journey with Autosomal DNA
© DNAAdoption.com Introduction to GEDmatch 22
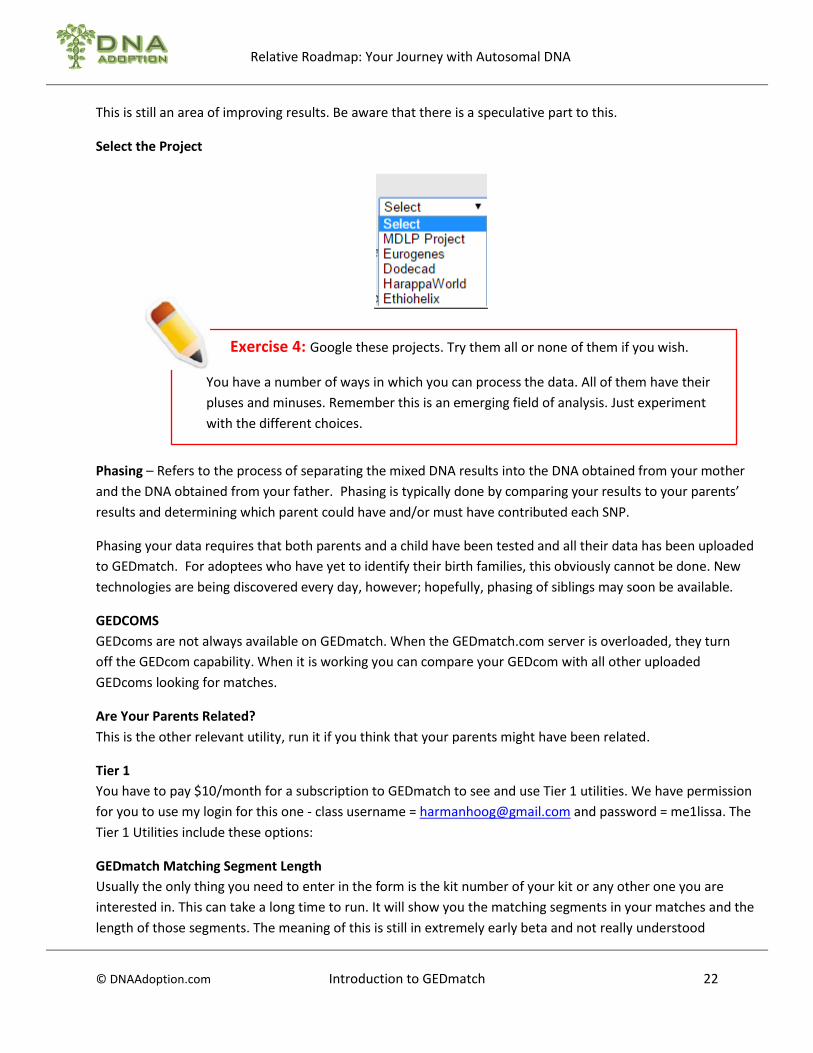
This is still an area of improving results. Be aware that there is a speculative part to this.
Select the Project
Phasing – Refers to the process of separating the mixed DNA results into the DNA obtained from your mother
and the DNA obtained from your father. Phasing is typically done by comparing your results to your parents’
results and determining which parent could have and/or must have contributed each SNP.
Phasing your data requires that both parents and a child have been tested and all their data has been uploaded
to GEDmatch. For adoptees who have yet to identify their birth families, this obviously cannot be done. New
technologies are being discovered every day, however; hopefully, phasing of siblings may soon be available.
GEDCOMS
GEDcoms are not always available on GEDmatch. When the GEDmatch.com server is overloaded, they turn
off the GEDcom capability. When it is working you can compare your GEDcom with all other uploaded
GEDcoms looking for matches.
Are Your Parents Related?
This is the other relevant utility, run it if you think that your parents might have been related.
Tier 1
You have to pay $10/month for a subscription to GEDmatch to see and use Tier 1 utilities. We have permission
for you to use my login for this one - class username = [email protected] and password = me1lissa. The
Tier 1 Utilities include these options:
GEDmatch Matching Segment Length
Usually the only thing you need to enter in the form is the kit number of your kit or any other one you are
interested in. This can take a long time to run. It will show you the matching segments in your matches and the
length of those segments. The meaning of this is still in extremely early beta and not really understood
Exercise 4: Google these projects. Try them all or none of them if you wish.
You have a number of ways in which you can process the data. All of them have their
pluses and minuses. Remember this is an emerging field of analysis. Just experiment
with the different choices.
Relative Roadmap: Your Journey with Autosomal DNA
© DNAAdoption.com Introduction to GEDmatch 23
Relationship Tree Projection
No one seems to know just what this means or how you use it yet.
Lazurus
If you have sufficient information on close ancestors you may be able to reconstruct a chromosome profile for
an ancestor. Most adoptees will not have it.
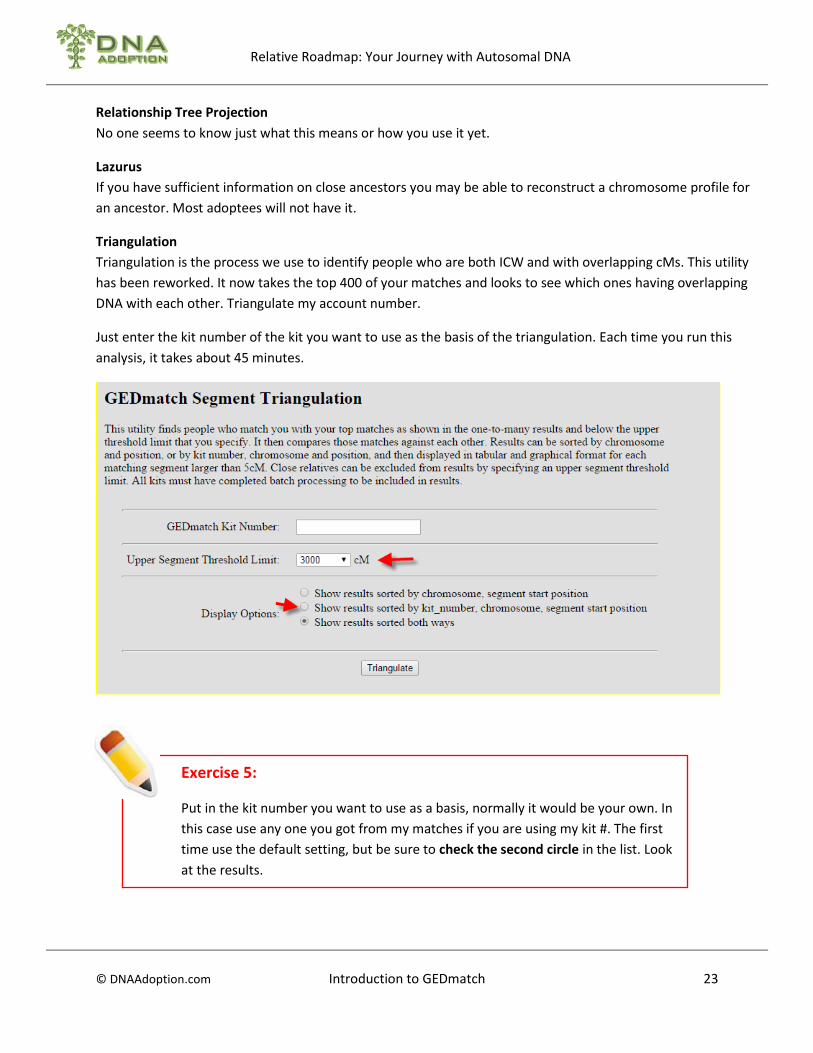
Triangulation
Triangulation is the process we use to identify people who are both ICW and with overlapping cMs. This utility
has been reworked. It now takes the top 400 of your matches and looks to see which ones having overlapping
DNA with each other. Triangulate my account number.
Just enter the kit number of the kit you want to use as the basis of the triangulation. Each time you run this
analysis, it takes about 45 minutes.
Exercise 5:
Put in the kit number you want to use as a basis, normally it would be your own. In
this case use any one you got from my matches if you are using my kit #. The first
time use the default setting, but be sure to check the second circle in the list. Look
at the results.
Relative Roadmap: Your Journey with Autosomal DNA
© DNAAdoption.com Introduction to GEDmatch 24
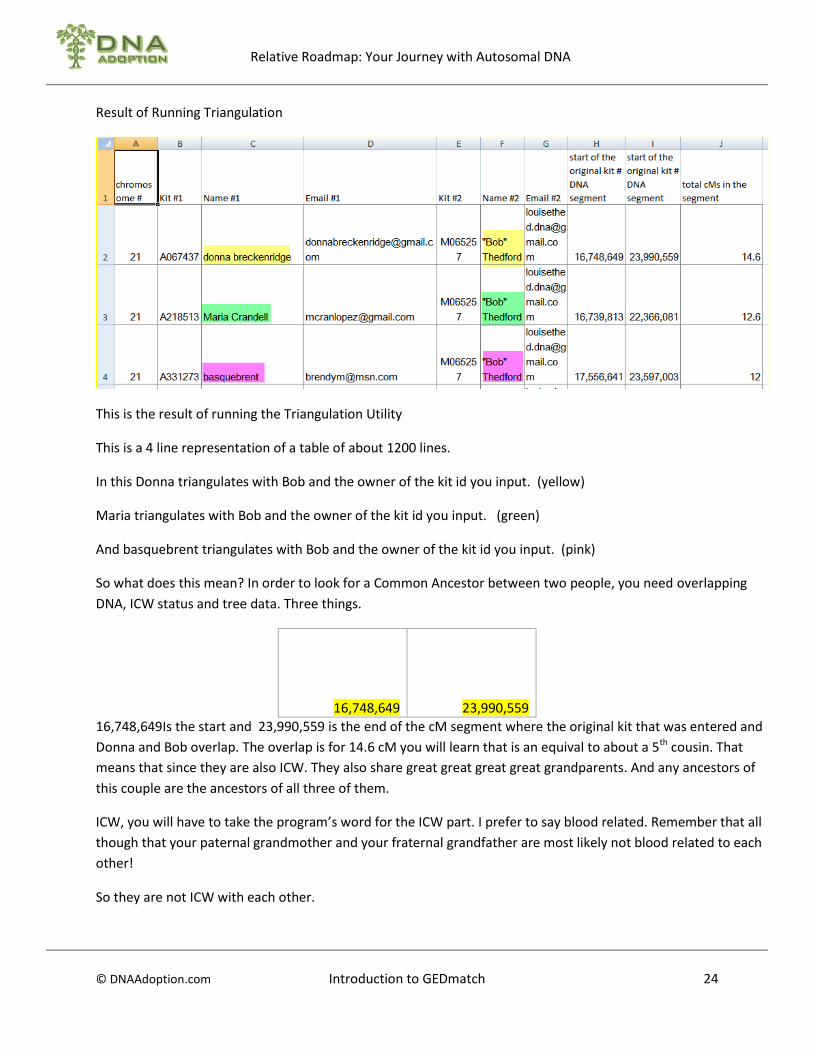
Result of Running Triangulation
This is the result of running the Triangulation Utility
This is a 4 line representation of a table of about 1200 lines.
In this Donna triangulates with Bob and the owner of the kit id you input. (yellow)
Maria triangulates with Bob and the owner of the kit id you input. (green)
And basquebrent triangulates with Bob and the owner of the kit id you input. (pink)
So what does this mean? In order to look for a Common Ancestor between two people, you need overlapping
DNA, ICW status and tree data. Three things.
16,748,649 23,990,559
16,748,649Is the start and 23,990,559 is the end of the cM segment where the original kit that was entered and
Donna and Bob overlap. The overlap is for 14.6 cM you will learn that is an equival to about a 5th cousin. That
means that since they are also ICW. They also share great great great great grandparents. And any ancestors of
this couple are the ancestors of all three of them.
ICW, you will have to take the program’s word for the ICW part. I prefer to say blood related. Remember that all
though that your paternal grandmother and your fraternal grandfather are most likely not blood related to each
other!
So they are not ICW with each other.

Relative Roadmap: Your Journey with Autosomal DNA
© DNAAdoption.com Introduction to GEDmatch 25
There are two sides to a DNA helix. The addresses on both sides are the same. One side is from the paternal side
of your family and the other side is from the maternal side of your family. Unless you know of someone who is
tested on one side and whether they are paternal or maternal. The other factor that might be a tip is ethnicity.
So if you know one side of your family is all Italian that might help.
Definitions-
Overlapping DNA segments – DNA segments where the ending and starting numbers show that the
centrimorgans overlap with each other. A very small match is probably not going to prove useful, but
longer ones are a clue. The longer they are, the closer the relationship
ICW – people that the testing company or the interpreter of raw data says are blood related.
Both ICW with overlapping DNA – they have common ancestors
That is what triangulation is all about. You then proceed wherever possible to try to find these common
ancestors.
If this is being run against your kit #, they are also your common ancestors and you now have the start of your
very own tree. For an adoptee this can be a thrilling moment.
.
You can save these tables into a spread sheet. Open the spread sheet. Highlight the table if you checked the
“show results sorted by kit_number, chromosome, segment start position” option. Put your cursor in the middle
of the table and use CtrlA this will highlight all the data, then CtrlC will copy it onto the clipboard. (For Macs
replace Ctrl with the Apple Key in the instructions.
Go to your spreadsheet and put your cursor in the top left cell. CtrlV pastes the data into your spreadsheet and
you can then save it.
Thank you for taking this class. I hope it gets you started in evaluating your results.
A full explanation of our Triangulation Methodology is located on http://dnaadoption.com under Getting
Started. This class is intended as only an introduction to get you started.
In the meantime, there is a lot to read about DNA and lots of resources on the same website.
Good luck in your hunt.
Exercise 5:
Change the Upper Segment Threshold Limit. Observe what it does
Now try it with one of the kit numbers you observed in the triangulation results. The
results are different. Why?