introduction to hyperion planning - epm marshall · confidential page 3 2/15/2016 1 introduction...
TRANSCRIPT

Introduction to Hyperion Planning
11.1.2.3
Author: Brian Marshall
Creation Date: 6/19/2013
Last Updated: 2/15/2016 2:53:00 PM
Version: 1.0

Confidential Page 2 2/15/2016
Table of Contents 1 INTRODUCTION ..................................................................................................................................... 3
2 CREATING YOUR FIRST PLANNING APPLICATION ................................................................................... 3
2.1 PREREQUISITES ............................................................................................................................................. 3 2.2 MANAGING PLANNING DATA SOURCES ............................................................................................................. 4 2.3 CREATING THE PLANNING APPLICATION ............................................................................................................. 8 2.4 OPENING THE PLANNING APPLICATION ............................................................................................................ 11
3 MANAGING DIMENSIONS .................................................................................................................... 12
3.1 OPENING THE DIMENSIONS SECTION ............................................................................................................... 12 3.2 THE ACCOUNT DIMENSION ........................................................................................................................... 13
3.2.1 Adding Child Account Members .................................................................................................... 13 3.2.2 Adding Sibling Account Members ................................................................................................. 14 3.2.3 Adding a Member to One Plan Type ............................................................................................. 15
3.3 THE ENTITY DIMENSION ............................................................................................................................... 16 3.3.1 Adding Entity Members ................................................................................................................ 16
3.4 THE PERIOD DIMENSION .............................................................................................................................. 17 3.4.1 Modifying Data Storage for a Member ........................................................................................ 17
3.5 THE SCENARIO DIMENSION ........................................................................................................................... 18 3.6 THE VERSION DIMENSION ............................................................................................................................. 19 3.7 THE YEAR DIMENSION .................................................................................................................................. 19 3.8 ADDING A DIMENSION ................................................................................................................................. 20
3.8.1 Creating the Dimension ................................................................................................................ 20 3.8.2 Moving Dimension Members ........................................................................................................ 21
4 DEPLOYING THE APPLICATION ............................................................................................................. 23
4.1 CREATING THE ESSBASE APPLICATION.............................................................................................................. 23 4.2 REFRESHING THE ESSBASE APPLICATION .......................................................................................................... 25
5 PLANNING FORMS ............................................................................................................................... 27
5.1 OPENING THE FORMS SECTION ....................................................................................................................... 27 5.2 CREATING A FORM ...................................................................................................................................... 28 5.3 OPENING AND USING FORMS ........................................................................................................................ 32
6 BUSINESS RULES .................................................................................................................................. 34
6.1 CALCULATION MANAGER .............................................................................................................................. 34 6.1.1 Creating a Business Rule ............................................................................................................... 34 6.1.2 Deploying Rules to Planning ......................................................................................................... 37
7 PLANNING TASK LISTS .......................................................................................................................... 38
7.1 OPENING THE TASK LIST MANAGEMENT SECTION .............................................................................................. 38 7.2 CREATING A TASK LIST .................................................................................................................................. 39
8 SECURITY ............................................................................................................................................. 43
8.1 PROVISIONING USERS .................................................................................................................................. 43 8.2 DIMENSION SECURITY .................................................................................................................................. 44 8.3 ASSIGNING ACCESS TO DIMENSIONS ............................................................................................................... 45 8.4 ASSIGNING ACCESS TO FORMS ....................................................................................................................... 47 8.5 ASSIGNING ACCESS TO TASK LISTS .................................................................................................................. 49

Confidential Page 3 2/15/2016
1 Introduction The purpose of this document is to walk an existing Essbase administrator through the process of creating and managing a Hyperion Planning application. This document will provide step-by-step instructions through-out the process of creating the application, modifying dimensions, creating forms, creating task lists, and managing security.
2 Creating Your First Planning Application The best way to learn Planning is to start from scratch so that you can better understand the application from the ground up.
2.1 Prerequisites Before getting started, there are several pre-requisites for creating a Planning Application. First, an environment to work with is necessary. This document covers Planning version 11.1.2.3, so access to an environment with Planning installed and configured properly will allow you to follow the screenshots and steps provided. If no 11.1.2.3 environment is available, Oracle offers the new Rapid Deployment of Hyperion Planning 11.1.2.3. Oracle has all of the documentation and software available here: http://docs.oracle.com/cd/E40248_01/epm.1112/epm_planning_rapid_deploy/epm_planning_rapid_deploy.html Once an environment is available, databases are necessary. Planning requires two different databases: Relational (Oracle or SQL Server) and Essbase. The latter of the two just requires a username and password with access to create new Essbase applications. The former requires that you create a new relational database and provide a username and password with access to this application. While this document is using a Rapid Deployment of Hyperion Planning, the relational database used in the examples is SQL Server 2008 R2. The following is a quick check-list of the necessary items for creating your first Hyperion Planning Application:
Hyperion Planning 11.1.2.3 Installed and configured A relational database with all of the proper connection information necessary including a
username, password, server name, and any other required information An Essbase server with all of the proper connection information necessary including a
username, password, and server name The admin account to your Hyperion Workspace environment A consultant to tell you how much better they could have created your first Planning
Application

Confidential Page 4 2/15/2016
2.2 Managing Planning Data Sources While the databases may be configured and ready, they must be defined as a data source in Planning. To create this data source, follow these steps:
1. Log into workspace using an admin account.
2. Click Navigate Administer Planning Administration.

Confidential Page 5 2/15/2016
3. Click on Manage Data Source.
4. Click on the green plus sign to create a data source.
5. Enter a name of the data source for Data Source Name.

Confidential Page 6 2/15/2016
6. Enter the connection information for the previously configured relational database (this sample uses SQL Server, but both Oracle and DB2 are also supported).
7. Click Validate and ensure that the connection is successful:
8. Enter the connection information for the previously configured Essbase server (notice that it
is not necessary to enter specific Essbase application or database information).

Confidential Page 7 2/15/2016
9. Click Validate and ensure that the connection is successful.
10. Click Save and a confirmation message will be displayed.
11. The new data source should appear in the list:

Confidential Page 8 2/15/2016
2.3 Creating the Planning Application Now that the data source has been created, the actual Planning application can be created. To create a Planning application, follow these steps:
1. While in Planning Administration, click Manage Applications:
2. Click on the green plus sign to create a new Planning application.

Confidential Page 9 2/15/2016
3. Select the data source created in the prior section of this document for Data Source. 4. Enter a name for the Planning application (note that there is an 8 character limit) for
Application. 5. Select General for Application Type. 6. Select Planning for Shared Services Project.
7. Click Next. 8. Select 12 Months for Based Time Period. 9. Select 2012 for First Fiscal Year. 10. Enter 2 for Number of Fiscal Years. 11. Select January for Fiscal Year First Month. 12. Select Even Distribution for Weekly Distribution. 13. Select Yes for “All Years” parent.
14. Click Next. 15. Select No for Will your application support multiple currencies?.
16. Click Next.

Confidential Page 10 2/15/2016
17. Un-check the box for Plan Type 3. 18. Enter names for Plan Type 1 and Plan Type 2 (note that there is an 8 character limit).
19. Click Next. 20. Ensure that all of your settings are correct.
21. Click Create. 22. Wait while the application is created.
23. Click OK once the application has been created successfully.
24. The newly created application will be available.

Confidential Page 11 2/15/2016
2.4 Opening the Planning Application Once the Planning application has been created, the application can be opened. To open the newly created Planning Application, follow these steps:
1. Click Navigate Planning Planning Application Name (in this case, Demo).
2. The newly created Planning application should be opened to a blank list of forms in a new
Workspace tab.
If the Planning application does not appear in the list, the application list may need to be refreshed. To refresh the list of application, follow these steps:
1. Click Navigate Applications Refresh.
2. Attempt to open the Planning application again.

Confidential Page 12 2/15/2016
3 Managing Dimensions Planning has six default dimensions and additional dimensions can be added. The dimensions section of Planning is where dimensions can be added and members for each of those dimensions are managed.
3.1 Opening the Dimensions section To open the Dimensions section of Planning, follow these steps:
1. After opening the Planning application, click on the Dimensions option on the bottom left corner.
2. The dimensions section of Planning will be displayed.

Confidential Page 13 2/15/2016
3.2 The Account Dimension The account dimension is a required dimension for Planning. Much like an Essbase account dimension, a Planning account dimension has additional properties for each member such as account type and time balance.
3.2.1 Adding Child Account Members
By default, the account dimension is created but has no members. To create new members in the account dimension, follow these steps:
1. After opening the dimension section of Planning, the account dimension should be the default dimension being modified.
2. Click on the Account member in the member list and click on the add child member button to add a new child to the Account dimension.
3. Enter Revenue for Name.
4. Click Save and the member will be added to the dimension.

Confidential Page 14 2/15/2016
3.2.2 Adding Sibling Account Members
1. While still in the dimension section of Planning, click on the newly created Revenue account and click on the add sibling member button to add a new sibling to the Revenue member.
2. Enter Expense for Name. 3. Select Expense for Account Type (note that Variance Reporting automatically changed to
Expense).
4. Click Save and the member will be added to the dimension.

Confidential Page 15 2/15/2016
3.2.3 Adding a Member to One Plan Type
1. While still in the dimension section of Planning, click on the newly created Expense account and click on the add sibling member button to add a new sibling to the Expense member.
2. Enter Product Sales for Name. 3. Un-check the box for Demo1 to ensure that only Demo2 will contain this dimension (note
that Source Plan Type automatically changed to Demo2).
4. Click Save and the member will be added to the dimension.

Confidential Page 16 2/15/2016
3.3 The Entity Dimension Like the account dimension, the entity dimension is a required dimension for Planning. The entity dimension has the option for currency selection (only applicable in Currency Planning Applications) and will be used in Process Management (the name for workflow in Planning).
3.3.1 Adding Entity Members
By default, the entity dimension is created but has no members. To create new members in the entity dimension, follow these steps:
1. After opening the dimension section of Planning, select Entity from the Dimension drop-down.
2. Click on the Entity member in the member list and click on the add child member button to add a new member to the Entity dimension.

Confidential Page 17 2/15/2016
3. Enter Demo Entity for Name.
4. Click Save and the member will be added to the dimension.
3.4 The Period Dimension The period dimension is another required dimension that is pre-built in Planning. In this instance, the dimension is seeded with members based on the settings chosen during the initial Planning application creation process. Depending on the requirements of time for the application, this dimension may need additional levels or hierarchies.
3.4.1 Modifying Data Storage for a Member
At a minimum, this dimension should be modified to dynamically calculate. To change the period dimension to calculate dynamically, follow these steps:
1. Open the Period dimension in the dimension section of Planning. 2. Expand YearTotal and click on the Q1 member and click on the edit member button.

Confidential Page 18 2/15/2016
3. Select Dynamic Calc for Data Storage.
4. Click Save and the dimension member properties will be updated. 5. Repeat these steps for the remaining three quarters and the YearTotal member.
3.5 The Scenario Dimension The Scenario dimension is another required dimension in Planning. This dimension is responsible for determining what time periods are available for data entry in Planning, making this dimension very important. Each scenario that is created must have a Start Period, Start Year, End Period, and End Year to determine the range of values available for data entry. To change the properties of the already created Current scenario, follow these steps:
1. Open the Scenario dimension in the dimension section of Planning. 2. Click on the Current member and click on the edit member button.

Confidential Page 19 2/15/2016
3. Select FY13 for Start Yr.
4. Click Save.
3.6 The Version Dimension The Version dimension is another required dimension in Planning. Like the Scenario dimension, the Version dimension is determines what members are available for data entry. The default for a version is Standard Bottom-Up. In a bottom-up version, data must be entered at the leaf level. The other option is Standard Target which allows for data to be entered at upper levels.
3.7 The Year Dimension The Year dimension is the final required dimension in Planning (for non-currency applications). The year dimension will be pre-seed with the years defined during the application creation. In the case of this demo application, the first year was specified as FY12 and the number of years was specified as two. As a result, two members were added: FY12 and FY13. It is very important to note that members can be added only in a forward direction and once added cannot be deleted. While there are methods around this limitation, modification of the relational repository would be required and un-supported.

Confidential Page 20 2/15/2016
3.8 Adding a Dimension While some applications could be implemented with only the required dimensions, many applications will require additional custom dimensions. Much like the year dimension however, dimensions cannot be deleted. Again, there is a method to remove dimensions if accidentally created, but modification of the relational repository would be required and un-supported.
3.8.1 Creating the Dimension
Dimensions can be added to any combination of plan types in Planning. Dimensionality is often the biggest differentiator between two plan types in Planning. To add a dimension to a plan type, follow these steps:
1. Open the dimension section of Planning. 2. Click on the green plus sign.
3. Enter Product for Name.

Confidential Page 21 2/15/2016
4. Un-check the box for Demo1 to ensure that only Demo2 will contain this dimension.
5. Click Save. 6. Click OK to confirm the creation of the dimension.
3.8.2 Moving Dimension Members
Once the new dimension has been created, members must be added. During the process of managing dimensions, whether they are new or existing, member are often moved. To move members in Planning, follow these steps:
1. Open the newly created Product dimension in the dimension section of Planning. 2. Add four new members to the dimension: Product1, Product2, Product3, and All Products.

Confidential Page 22 2/15/2016
3. Click on Product1 and click on the cut button.
4. Click on All Products and click on the paste button.
5. Click OK to confirm that Product1 will become a child of All Products.
6. Repeat the steps above until all three products are children of All Products.

Confidential Page 23 2/15/2016
4 Deploying the Application Thus far, all of the changes made to the Planning application have been entirely in the relational repository and the Essbase application does not yet exist. Each time changes are made to the meta-data in Planning, Essbase must be refreshed.
4.1 Creating the Essbase Application Before Essbase can be refreshed, it must first be create. To create the Essbase application, follow these steps:
1. While in the Planning application in Workspace, click Administration Application Create Database.
2. Check the box for Database.

Confidential Page 24 2/15/2016
3. Click Create and click Create again to confirm that Create Database should only be done one time for a Planning application.
4. The deploy process will build the Essbase application and databases. Once the process has completed, click Finish.
5. Log into EAS to verify that the Essbase application and databases were created properly.

Confidential Page 25 2/15/2016
4.2 Refreshing the Essbase Application Now that the Essbase application has been created, it can be refreshed. To refresh the Essbase application, follow these steps:
1. While in the Planning application in Workspace, click Administration Application Refresh Database.
2. Check the box for Database.
3. Click Refresh and click Refresh again to complete the refresh.

Confidential Page 26 2/15/2016
4. The deploy process will update the Essbase application and databases. Once the process has completed, click Finish.

Confidential Page 27 2/15/2016
5 Planning Forms Perhaps the single most beneficial feature of Planning is Web Forms. Planning Web Forms allow for the creation of web-based and Excel-based data entry forms that are easy to deploy and modify. These forms can be created by power users and data can be entered by any user. Forms will often remove the need for any Excel data input templates that may exist in an Essbase-only environment.
5.1 Opening the Forms section Planning forms can be accessed by users from Workspace and Smart View, but they can only be created in Workspace. To open the forms section, follow these steps:
1. Open the Forms section of Planning by clicking the Forms option on the left.
2. The Forms section of Planning will be displayed.
Confidential Page 28 2/15/2016
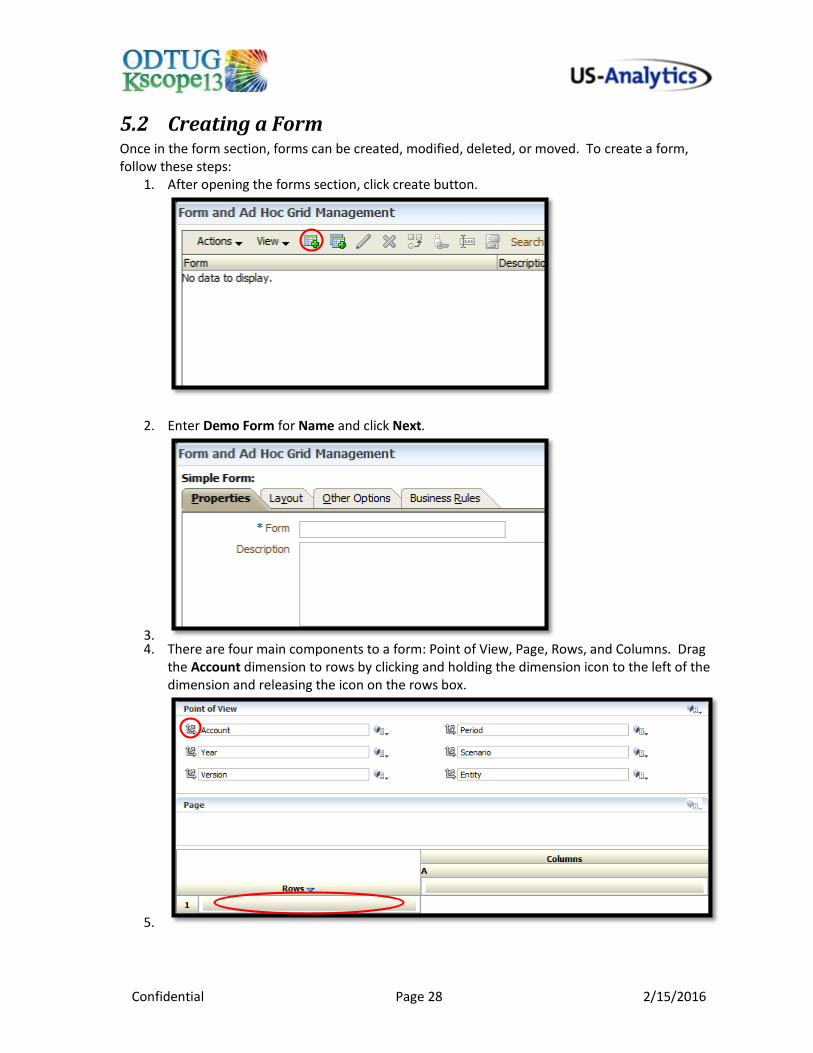
5.2 Creating a Form Once in the form section, forms can be created, modified, deleted, or moved. To create a form, follow these steps:
1. After opening the forms section, click create button.
2. Enter Demo Form for Name and click Next.
3. 4. There are four main components to a form: Point of View, Page, Rows, and Columns. Drag
the Account dimension to rows by clicking and holding the dimension icon to the left of the dimension and releasing the icon on the rows box.
5.

Confidential Page 29 2/15/2016
6. Drag the Period dimension to columns by clicking and holding the dimension icon to the left of the dimension and releasing the icon on the columns box.
7. Drag the Year dimension to the page by clicking and holding the dimension icon to the left of the dimension and releasing the icon on the page box.
8. Drag the Entity dimension to the page by clicking and holding the dimension icon to the left of the dimension and releasing the icon on the page box.

Confidential Page 30 2/15/2016
9. Members in the Point of View can have one and only one selection. Click on the member selection icon to the right of the Scenario dimension to select the member.
10. Click on Current scenario, click Add, and click OK.
11. 12. Repeat these steps for the Version (select BU_Version_1), Account (select Revenue and
Expense) and Entity (select Demo Entity) dimensions.

Confidential Page 31 2/15/2016
13. Click on the member selection button for the Year dimension. 14. Right-click All Years member and select Level 0 Descendants and click OK to ensure that the
form does not need to be updated each time years are added.
15. Click on the member selection button for the Period dimension. 16. Right-click on the YearTotal member and select Descendants (inc) and click OK to add all of
the periods and quarters to the columns of the report.

Confidential Page 32 2/15/2016
17. The grid layout should match the following.
18. Click Save and click Finish to complete the form creation process.
5.3 Opening and Using Forms Once a form has been created, open the form to verify the output. To open and use a form, follow these steps:
1. Open the forms section of Planning and click Demo Form on the left.

Confidential Page 33 2/15/2016
2. Once the form opens, the following should be true: a. All of the cells are read-only (grey) b. The Scenario and Version dimensions are not selectable. c. The Year and Entity dimensions are selectable. d. All descendants of the YearTotal member are on rows.
3. 4. Click on the down-arrow next to the FY12 member and select the FY13 member.
5. Click on the submit button to refresh the form with the new member selections.
6. Note that the cells are now available for write-back (white).

Confidential Page 34 2/15/2016
6 Business Rules Business Rules are essentially calculation scripts in Essbase that allow for user input, but do not necessarily require user input. Business Rules and calculation scripts can both be added to forms so that they run when the form is saved or are available to the users to be run easily. Business Rules can also use the Point of View selections from a form during execution.
6.1 Calculation Manager As of version 11.1.2.2 of Planning, the only method of creating a Business Rule is Calculation Manager. Calculation Manager is the unified product for managing calculations across both Planning and Essbase.
6.1.1 Creating a Business Rule
To create a business rule in calculation manager, follow these steps: 1. After logging into Workspace, click Navigate Administrator Calculation Manager.
2. Expand Planning, expand Demo, expand Demo1, right-click on Rules and click New.

Confidential Page 35 2/15/2016
3. Enter Demo Business Rule for name and click OK.
4. Drag the Script object from the New Objects menu to the area between Begin and End.
5. The script will be added to the rule designer.
Confidential Page 36 2/15/2016
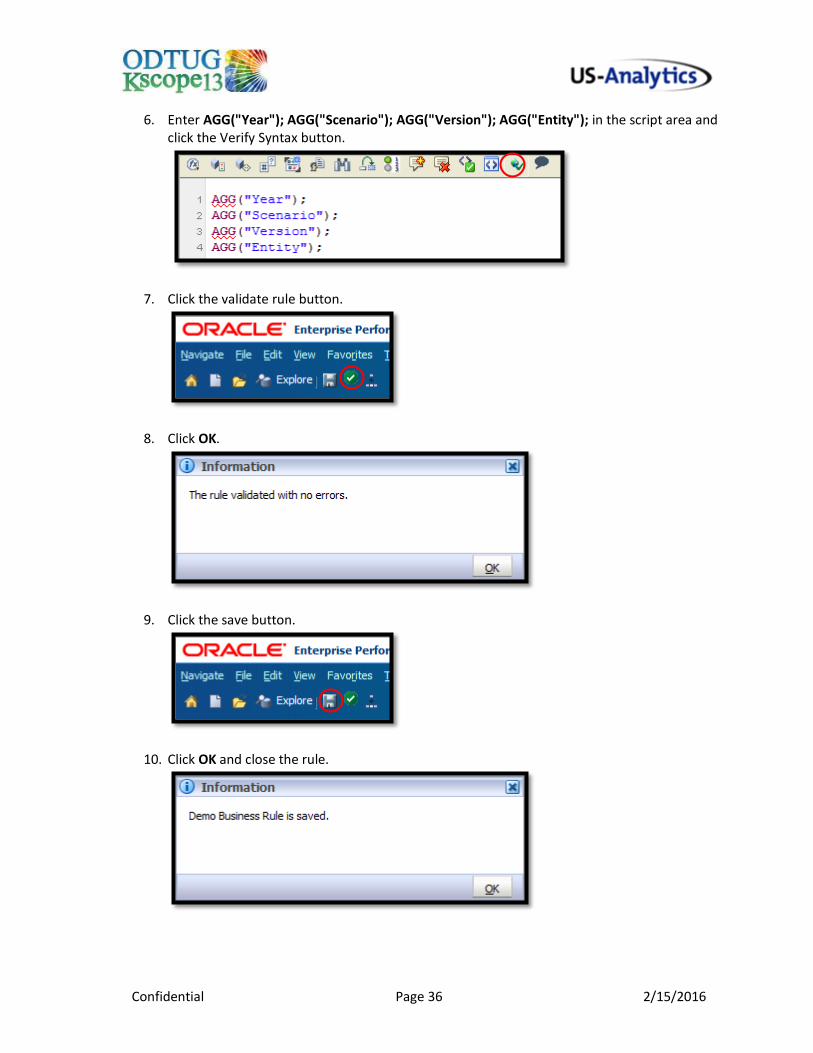
6. Enter AGG("Year"); AGG("Scenario"); AGG("Version"); AGG("Entity"); in the script area and click the Verify Syntax button.
7. Click the validate rule button.
8. Click OK.
9. Click the save button.
10. Click OK and close the rule.

Confidential Page 37 2/15/2016
6.1.2 Deploying Rules to Planning
Once the rule has been creating in calculation manager, it is not yet available in the Planning application and must first be deployed. To deploy a rule to the Planning application, follow these steps:
1. Once the new rule has been created, it may not immediately be displayed in calculation manager. Right-click on Rules and click Refresh to make the rule visible.
2. Once the rule is visible, right-click on the rule and click Deploy to make it available in Planning.
3. Once the rule has been deployed, click OK and it will be available in the Planning application.

Confidential Page 38 2/15/2016
7 Planning Task Lists Tasks Lists in Planning provide users a guided path through the plan process. Each item on a task list can have a due date and specific instructions for the user. Task types include Descriptive, Forms, Business Rules, URL (for external sites or FR), and others.
7.1 Opening the Task List Management section Like forms, task lists can be accessed by users from Workspace and Smart View, but they can only be created in Workspace. To access the Task List Management section of Planning, follow these steps:
1. Open the Forms section of Planning by clicking the Forms option on the left.
2. The Task List Management section of Planning will be displayed.

Confidential Page 39 2/15/2016
7.2 Creating a Task List Once in the task list management section, task lists can be created, modified, deleted, or moved. To create a task list, follow these steps:
1. After opening the task list management section, click green plus sign.
2. Enter Demo Task List for the name of the task list to be created and click OK.
3. Click on the newly created task list and click the edit task list button.

Confidential Page 40 2/15/2016
4. The new task list will have no tasks by default. Click the add child button.
5. Enter Task Parent for Task.
6. Click Save and the task will be added. 7. Click on the newly added task and click the add child button.

Confidential Page 41 2/15/2016
8. Enter Demo Form for Task. 9. Select Form for Type. 10. Click on the green plus sign to choose a form.
11. 12. Select Demo Form from the form list and click OK.
13. Click Save and the task will be added.

Confidential Page 42 2/15/2016
14. Expand Task Parent, click on the newly created task, and click the add sibling button.
15. Enter Run Business Rule for Task. 16. Select Business Rule for Type. 17. Select Demo Business Rule for Business Rules.
18. Select Save and click OK.

Confidential Page 43 2/15/2016
8 Security Planning has a very flexible security configuration. As with the rest of the EPM system, each user must be provisioned in Shared Services. The access in the provision section of Shared Services ranges from View User with the least amount of permissions to Administrator with the most. Once a user is provisioned in Shared Services, the Planning application can then apply additional permissions on individual Planning objects (dimension, forms, task lists, etc.).
8.1 Provisioning Users This portion of the guide assumes that a user has already been created in Shared Services (Planner1). To provision users for Planning, follow these steps:
1. Open the provisioning for the Planner1 account in Shared Services. 2. Expand the Planning application group. 3. Expand the Demo Planning application. 4. Add the Planner role and click OK.

Confidential Page 44 2/15/2016
8.2 Dimension Security In Planning, the Account, Entity, Version, and Scenario dimensions and any custom-defined dimensions can have security applied. The Period and Year dimensions cannot have security applied as the ability to write data back to these members is controlled by the configuration of the Scenario. Apply Security Each dimension has an option to Apply Security that determines if the dimension is available for security assignment. To enable or disable security for a dimension, follow these steps:
1. Open the dimension section of Planning and select the Product dimension. 2. Click Product and click the edit member button.
3. Check or un-check the Apply Security box.
4. Click OK and the security will be changed for the dimension.

Confidential Page 45 2/15/2016
8.3 Assigning Access to Dimensions For each dimension with the Apply Security setting enabled, access must be assigned. Security access in Planning has three options for dimension members and forms: Read, Write, and None. There are four options for task lists: Assign, Manage, Manage and Assign, or None. For dimension members, five additional properties are available: member, children, children (inclusive), descendants, and descendants (inclusive). In this demo application, the four securable dimensions will need to have access assigned. For the account dimension, Planner1 will be assigned only the write access to the Revenue member. Because each of the other dimensions in the Demo application only have one member, write access will be assigned to each of those members. To assign access to dimensions, follow these steps:
1. Open the dimension section of Planning. 2. Click the Revenue member and click the assign access button.
3. Click the green plus sign to assign access to a user.

Confidential Page 46 2/15/2016
4. Click on Planner1, select Write for Type of Access, and click Add.
5. Click OK and click Close.
6. The user will be added to the list. Click Close.
7. Planner1 will now have access to the Revenue. 8. Follow these steps for the members in Entity, Scenario, and Version.

Confidential Page 47 2/15/2016
8.4 Assigning Access to Forms Like dimensions, forms have access assignment. Each form can have individual security or folders containing forms can be secured. To assign access to a form, follow these steps:
1. Open the forms section of Planning. 2. Select the Demo Form and click the assign access button.
3. Click the green plus sign to assign access to a user.
4. Click on Planner1, select Write for Type of Access, and click Add.

Confidential Page 48 2/15/2016
5. Click OK and click Close.
6. The user will be added to the list. Click Close.
7. Planner1 will now have access to the Demo Form.

Confidential Page 49 2/15/2016
8.5 Assigning Access to Task Lists Like dimensions and forms, task lists have access assignment. To assign access to a task list, follow these steps:
1. Open the task list management section of Planning. 2. Select the Demo Task List and click the assign access button.
3. Click the green plus sign to assign access to a user.
4. Click on Planner1, select Assigned for Type of Access, and click Add.

Confidential Page 50 2/15/2016
5. Click OK and click Close.
6. The user will be added to the list. Click Close.
7. Planner1 will now have access to the Demo Task List.