introduction to media production assignment c chapter 9 besa sheqiri besa11/ layering and collagge
Post on 19-Dec-2015
215 views
TRANSCRIPT

Introduction to media production
Assignment C
Chapter 9
Besa Sheqiri
http://www.student.bth.se/~besa11/
Layering and Collagge

The first thing I did for this exercise was to create a new document. I clicked on File > New.Then I changed the width and height to 12 and 10 and the resolution to 72. Also I left the color space in RGB mode. I Change the name of the document to double- exposure.I decided to use the images provided (http://wiki.digital-foundations.net/index.php?title=Chapter_9_Sandbox).
Exercise 01

Then I opened the images called hand01 and hand02 in Photoshop and copied and pasted them in the new document that I made earlier. In the new document they were pasted as layers.I then clicked on Edit > Free Transform. This I did to scale the hand, to bring it to position, to make the right placing and to make it fit.
When I positioned both layers (hand01 and hand02) I use the Layer Blending Mode pull-down menu of the Layers panel to choose Multiply. I chose Multiply for the top layer, which is named Hand02. I leave the layer called hand01 in “Normal mode”. Using the Multiply blending mode allows us to see the two images together even though they are not photographed together. Double exposure is created in the area where the two images overlap.


Exercise 02 The first thing I did on exercise 02 was to click on the Crop Tool in the Tools panel. I Entered 6 inches to the Width box and 9 inches into the Height box and 72 in the Resolution box. In the new frame I included only the area of where the images overlap.
The I clicked Add Adjustments to layers and chose Hue/Saturation.In the Hue/Saturation dialog box I checked the Colorize button and used the Hue slider to chose the color Cyan. I played a little with different colorizations until I felt satisfied with one.


Exercise 03 First I saved the file I've been working on as exquisite-corpse.psd. Then I opened all of the documents that I am using for this exercise ( arm.psd, back.psd, ear.psd, head.psd, shoes.psd, and torso.psd) In order to view all of my images I clicked on the Window> Arrange > Float All in Windows, and then Window> Arrange > Tile.
The image beside shows how my photoshop screen looked when I viewed all my images at once.

I move all images into the exquisite-corpse document . Also I rename all of the layers. I changed the left arm and right arm by using Edit> Transform >Flip Vertical for each arm. Then for the left arm Edit > Transform > Flip Horizontal.
These tools mentioned above and the move tool are the tools I mainly used for this exercise. I scaled and repositioned all of the images of the exquisite corpse and placed them in to a certain order. I held down Shift and clicked on the last layer in the order. Then I went on clicking on the Layers panel pull-down menu and chose New Group from Layers. I named the new group corpse.
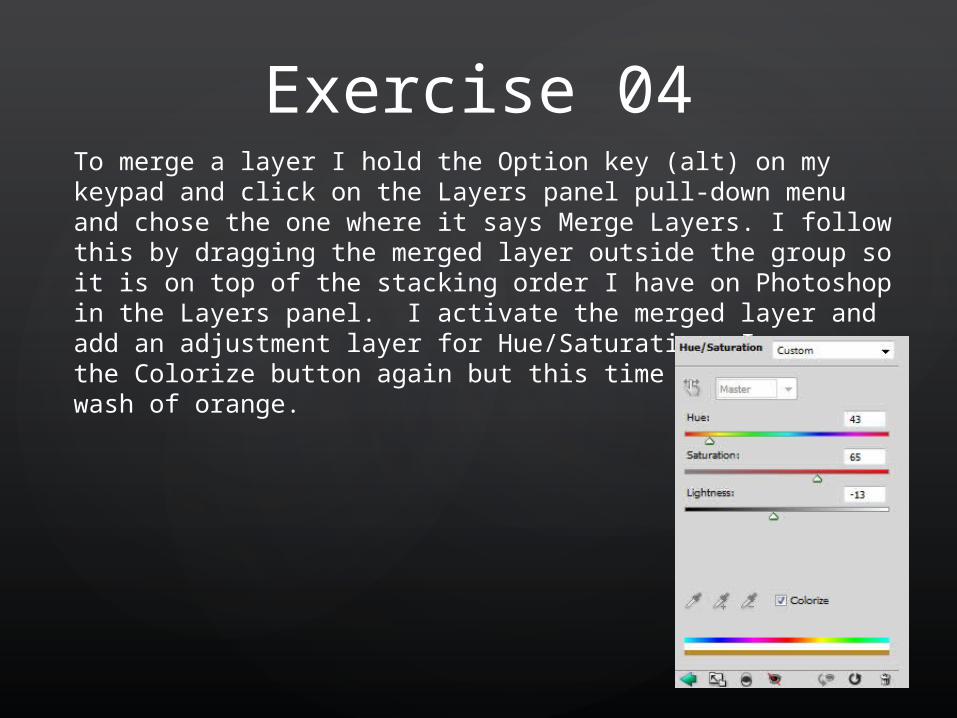
Exercise 04To merge a layer I hold the Option key (alt) on my keypad and click on the Layers panel pull-down menu and chose the one where it says Merge Layers. I follow this by dragging the merged layer outside the group so it is on top of the stacking order I have on Photoshop in the Layers panel. I activate the merged layer and add an adjustment layer for Hue/Saturation. I press the Colorize button again but this time for adding a wash of orange.

I went on to apply the clipping mask by pressing down the Option key (alt) while clicking on the line between the adjustment layer and the merged layer. When a figure showed up I clicked on my mouse. This created a clipping mask between the adjustment layer and the merged layer. This made the adjustment layer to only affect the merged layer and the background picture( double exposure) appeared of the color cyan again. The clipping mask is the simplest method of masking. I use the Blending Mode-pull down menu once again, this time to set the mode to Linear Light and also change the layer opacity from 100 % to just 50%. The reason I decreased the opacity is because I wanted to be able to see through the image on the layer and blend the two layers, and this enables that.My final image ”exquisite-corpse”


Besa Sheqiri
http://www.student.bth.se/~besa11/