introduction to medical assisting - u.s. career institute
TRANSCRIPT

Introduction to Medical AssistingInstruction Pack 5 Lessons 26-28
Explore the possibilities 0203902LB05A-32
®®


PACK 5
Introduction toMedical Assisting
Lesson 26—Minor Surgical ProceduresLesson 27— Preparing and
Administering MedicationsLesson 28—Comprehensive Practicum

No part of this document may be reproduced or transmitted in any form or by any means, electronic or mechanical, for any purpose, without the express written permission of U.S. Career Institute.
Copyright © 2010-2012, Weston Distance Learning, Inc. All Rights Reserved. 0203902LB05A-32
For more information contact:
U.S. Career InstituteFort Collins, CO • 1-800-347-7899
www.uscareerinstitute.edu
Acknowledgments
AuthorsLeslie BallentineBrian Kaufman
Academic Content EditorMerry Perry
EditorBridget Tisthammer
Editorial StaffRachel Metzgar
Design/LayoutConnie HunsaderD. Brent HausemanSandy Petersen

0203902LB05A-32 i
Table of ContentsLesson 26—Minor Surgical Procedures
Step 1 Learning Objectives for Lesson 26 . . . . . . . . . . . . . . . . . . . . . . . . . . . . . . . . . . . . . . . . . . . . 1Step 2 Lesson Preview . . . . . . . . . . . . . . . . . . . . . . . . . . . . . . . . . . . . . . . . . . . . . . . . . . . . . . . . . . . 2Step 3 Surgical Asepsis . . . . . . . . . . . . . . . . . . . . . . . . . . . . . . . . . . . . . . . . . . . . . . . . . . . . . . . . . . . 2Step 4 Practice Exercise 26-1 . . . . . . . . . . . . . . . . . . . . . . . . . . . . . . . . . . . . . . . . . . . . . . . . . . . . . . 4Step 5 Review Practice Exercise 26-1 . . . . . . . . . . . . . . . . . . . . . . . . . . . . . . . . . . . . . . . . . . . . . . . 4Step 6 Instruments Used in Minor Surgery . . . . . . . . . . . . . . . . . . . . . . . . . . . . . . . . . . . . . . . . . . 4 Forceps . . . . . . . . . . . . . . . . . . . . . . . . . . . . . . . . . . . . . . . . . . . . . . . . . . . . . . . . . . . . . . . . . . 5 Scissors . . . . . . . . . . . . . . . . . . . . . . . . . . . . . . . . . . . . . . . . . . . . . . . . . . . . . . . . . . . . . . . . . . 6 Scalpels . . . . . . . . . . . . . . . . . . . . . . . . . . . . . . . . . . . . . . . . . . . . . . . . . . . . . . . . . . . . . . . . . . 6 Retractors . . . . . . . . . . . . . . . . . . . . . . . . . . . . . . . . . . . . . . . . . . . . . . . . . . . . . . . . . . . . . . . . 7 Probes . . . . . . . . . . . . . . . . . . . . . . . . . . . . . . . . . . . . . . . . . . . . . . . . . . . . . . . . . . . . . . . . . . . 7 Curettes . . . . . . . . . . . . . . . . . . . . . . . . . . . . . . . . . . . . . . . . . . . . . . . . . . . . . . . . . . . . . . . . . 7 Care of Surgical Instruments . . . . . . . . . . . . . . . . . . . . . . . . . . . . . . . . . . . . . . . . . . . . . . . . 7Step 7 Surgical Supplies . . . . . . . . . . . . . . . . . . . . . . . . . . . . . . . . . . . . . . . . . . . . . . . . . . . . . . . . . . 7 Surgical Draping . . . . . . . . . . . . . . . . . . . . . . . . . . . . . . . . . . . . . . . . . . . . . . . . . . . . . . . . . . 8 Gauze . . . . . . . . . . . . . . . . . . . . . . . . . . . . . . . . . . . . . . . . . . . . . . . . . . . . . . . . . . . . . . . . . . . 8 Solutions . . . . . . . . . . . . . . . . . . . . . . . . . . . . . . . . . . . . . . . . . . . . . . . . . . . . . . . . . . . . . . . . . 8 Suturing Materials . . . . . . . . . . . . . . . . . . . . . . . . . . . . . . . . . . . . . . . . . . . . . . . . . . . . . . . . 9 Needles . . . . . . . . . . . . . . . . . . . . . . . . . . . . . . . . . . . . . . . . . . . . . . . . . . . . . . . . . . . . . . . . . . 9 Dressings . . . . . . . . . . . . . . . . . . . . . . . . . . . . . . . . . . . . . . . . . . . . . . . . . . . . . . . . . . . . . . . . 9 Bandages . . . . . . . . . . . . . . . . . . . . . . . . . . . . . . . . . . . . . . . . . . . . . . . . . . . . . . . . . . . . . . . . 9Step 8 Preparing for Surgery—Prepping the Patient . . . . . . . . . . . . . . . . . . . . . . . . . . . . . . . . . 10 Informed Consent . . . . . . . . . . . . . . . . . . . . . . . . . . . . . . . . . . . . . . . . . . . . . . . . . . . . . . . . 10 Before the Operation . . . . . . . . . . . . . . . . . . . . . . . . . . . . . . . . . . . . . . . . . . . . . . . . . . . . . . 11Step 9 Preparing for Surgery—Prepping the Room . . . . . . . . . . . . . . . . . . . . . . . . . . . . . . . . . . 11 Virtual Lab 26-1 Set up Minor Surgical Tray . . . . . . . . . . . . . . . . . . . . . . . . . . . . . . . . . 12Step 10 Practice Exercise 26-2 . . . . . . . . . . . . . . . . . . . . . . . . . . . . . . . . . . . . . . . . . . . . . . . . . . . . . 12Step 11 Review Practice Exercise 26-2 . . . . . . . . . . . . . . . . . . . . . . . . . . . . . . . . . . . . . . . . . . . . . . 14Step 12 Anesthetics . . . . . . . . . . . . . . . . . . . . . . . . . . . . . . . . . . . . . . . . . . . . . . . . . . . . . . . . . . . . . . 14Step 13 Minor Surgical Procedures . . . . . . . . . . . . . . . . . . . . . . . . . . . . . . . . . . . . . . . . . . . . . . . . . 14 Excision of Lesions . . . . . . . . . . . . . . . . . . . . . . . . . . . . . . . . . . . . . . . . . . . . . . . . . . . . . . . 15 Incision . . . . . . . . . . . . . . . . . . . . . . . . . . . . . . . . . . . . . . . . . . . . . . . . . . . . . . . . . . . . . . . . . 16 Suturing . . . . . . . . . . . . . . . . . . . . . . . . . . . . . . . . . . . . . . . . . . . . . . . . . . . . . . . . . . . . . . . . 16 Electrocautery . . . . . . . . . . . . . . . . . . . . . . . . . . . . . . . . . . . . . . . . . . . . . . . . . . . . . . . . . . . 17 Chemical Tissue Destruction . . . . . . . . . . . . . . . . . . . . . . . . . . . . . . . . . . . . . . . . . . . . . . . 17 Cryosurgery . . . . . . . . . . . . . . . . . . . . . . . . . . . . . . . . . . . . . . . . . . . . . . . . . . . . . . . . . . . . . 17 Laser Surgery . . . . . . . . . . . . . . . . . . . . . . . . . . . . . . . . . . . . . . . . . . . . . . . . . . . . . . . . . . . 18Step 14 Postoperative Procedures . . . . . . . . . . . . . . . . . . . . . . . . . . . . . . . . . . . . . . . . . . . . . . . . . . 19 Care of the Operating Room . . . . . . . . . . . . . . . . . . . . . . . . . . . . . . . . . . . . . . . . . . . . . . . . 19 Wound Healing . . . . . . . . . . . . . . . . . . . . . . . . . . . . . . . . . . . . . . . . . . . . . . . . . . . . . . . . . . 19

ii 0203902LB05A-32
Dressing the Wound . . . . . . . . . . . . . . . . . . . . . . . . . . . . . . . . . . . . . . . . . . . . . . . . . . . . . . 21 Bandaging . . . . . . . . . . . . . . . . . . . . . . . . . . . . . . . . . . . . . . . . . . . . . . . . . . . . . . . . . . . . . . 21 Changing a Sterile Dressing . . . . . . . . . . . . . . . . . . . . . . . . . . . . . . . . . . . . . . . . . . . . . . . 22 Removing Sutures . . . . . . . . . . . . . . . . . . . . . . . . . . . . . . . . . . . . . . . . . . . . . . . . . . . . . . . . 22 Virtual Lab 26-2 Remove Sutures . . . . . . . . . . . . . . . . . . . . . . . . . . . . . . . . . . . . . . . . . . . 22 Outpatient Documentation . . . . . . . . . . . . . . . . . . . . . . . . . . . . . . . . . . . . . . . . . . . . . . . . 23Step 15 Practice Exercise 26-3 . . . . . . . . . . . . . . . . . . . . . . . . . . . . . . . . . . . . . . . . . . . . . . . . . . . . . 23Step 16 Review Practice Exercise 26-3 . . . . . . . . . . . . . . . . . . . . . . . . . . . . . . . . . . . . . . . . . . . . . . 26Step 17 Lesson Summary . . . . . . . . . . . . . . . . . . . . . . . . . . . . . . . . . . . . . . . . . . . . . . . . . . . . . . . . . 26Step 18 Mail-in Quiz 26 . . . . . . . . . . . . . . . . . . . . . . . . . . . . . . . . . . . . . . . . . . . . . . . . . . . . . . . . . . 27 Mail-in Quiz 26 . . . . . . . . . . . . . . . . . . . . . . . . . . . . . . . . . . . . . . . . . . . . . . . . . . . . . . . . . . 27 Endnotes . . . . . . . . . . . . . . . . . . . . . . . . . . . . . . . . . . . . . . . . . . . . . . . . . . . . . . . . . . . . . . . . 34
Lesson 27—Preparing and Administering MedicationsStep 1 Learning Objectives for Lesson 27 . . . . . . . . . . . . . . . . . . . . . . . . . . . . . . . . . . . . . . . . . . . . 1Step 2 Lesson Preview . . . . . . . . . . . . . . . . . . . . . . . . . . . . . . . . . . . . . . . . . . . . . . . . . . . . . . . . . . . 2Step 3 How Do Drugs Get Delivered? . . . . . . . . . . . . . . . . . . . . . . . . . . . . . . . . . . . . . . . . . . . . . . . 3 Oral Medication . . . . . . . . . . . . . . . . . . . . . . . . . . . . . . . . . . . . . . . . . . . . . . . . . . . . . . . . . . . 3 Buccal and Sublingual Medications . . . . . . . . . . . . . . . . . . . . . . . . . . . . . . . . . . . . . . . . . . 4 Transdermal Medication . . . . . . . . . . . . . . . . . . . . . . . . . . . . . . . . . . . . . . . . . . . . . . . . . . . 4 Topical Medication . . . . . . . . . . . . . . . . . . . . . . . . . . . . . . . . . . . . . . . . . . . . . . . . . . . . . . . . 4 Rectal and Vaginal Medications . . . . . . . . . . . . . . . . . . . . . . . . . . . . . . . . . . . . . . . . . . . . . 4 Inhalers . . . . . . . . . . . . . . . . . . . . . . . . . . . . . . . . . . . . . . . . . . . . . . . . . . . . . . . . . . . . . . . . . 5 Parenteral Medication . . . . . . . . . . . . . . . . . . . . . . . . . . . . . . . . . . . . . . . . . . . . . . . . . . . . . 5 Implants . . . . . . . . . . . . . . . . . . . . . . . . . . . . . . . . . . . . . . . . . . . . . . . . . . . . . . . . . . . . . . . . . 5 Pumps . . . . . . . . . . . . . . . . . . . . . . . . . . . . . . . . . . . . . . . . . . . . . . . . . . . . . . . . . . . . . . . . . . . 5Step 4 Calculating Dosage . . . . . . . . . . . . . . . . . . . . . . . . . . . . . . . . . . . . . . . . . . . . . . . . . . . . . . . . 5 Systems for Dosage Measurement . . . . . . . . . . . . . . . . . . . . . . . . . . . . . . . . . . . . . . . . . . . 6 Doing the Math . . . . . . . . . . . . . . . . . . . . . . . . . . . . . . . . . . . . . . . . . . . . . . . . . . . . . . . . . . . 7 Doses for Children . . . . . . . . . . . . . . . . . . . . . . . . . . . . . . . . . . . . . . . . . . . . . . . . . . . . . . . . . 9Step 5 Practice Exercise 27-1 . . . . . . . . . . . . . . . . . . . . . . . . . . . . . . . . . . . . . . . . . . . . . . . . . . . . . 11Step 6 Review Practice Exercise 27-1 . . . . . . . . . . . . . . . . . . . . . . . . . . . . . . . . . . . . . . . . . . . . . . 14Step 7 Administering Medicines . . . . . . . . . . . . . . . . . . . . . . . . . . . . . . . . . . . . . . . . . . . . . . . . . . 15 Doctor’s Orders . . . . . . . . . . . . . . . . . . . . . . . . . . . . . . . . . . . . . . . . . . . . . . . . . . . . . . . . . . 15 Administration Guidelines . . . . . . . . . . . . . . . . . . . . . . . . . . . . . . . . . . . . . . . . . . . . . . . . . 16 Documentation Guidelines . . . . . . . . . . . . . . . . . . . . . . . . . . . . . . . . . . . . . . . . . . . . . . . . . 18 Adverse Reactions and Errors—When Something Goes Wrong . . . . . . . . . . . . . . . . . . 18Step 8 Administration Routes Without Injection . . . . . . . . . . . . . . . . . . . . . . . . . . . . . . . . . . . . 19 Oral Medication . . . . . . . . . . . . . . . . . . . . . . . . . . . . . . . . . . . . . . . . . . . . . . . . . . . . . . . . . . 19 Virtual Lab 27-1 Obtain and Administer Oral Medication . . . . . . . . . . . . . . . . . . . . . . 19 Transdermal Medications . . . . . . . . . . . . . . . . . . . . . . . . . . . . . . . . . . . . . . . . . . . . . . . . . . 20 Topical Medication . . . . . . . . . . . . . . . . . . . . . . . . . . . . . . . . . . . . . . . . . . . . . . . . . . . . . . . 20 Virtual Lab 27-2 Demonstrate Eye Drop Instillation . . . . . . . . . . . . . . . . . . . . . . . . . . . 21

0203902LB05A-32 iii
Virtual Lab 27-3 Demonstrate Ear Drop Instillation . . . . . . . . . . . . . . . . . . . . . . . . . . . 21 Rectal and Vaginal Medications . . . . . . . . . . . . . . . . . . . . . . . . . . . . . . . . . . . . . . . . . . . . 21Step 9 Practice Exercise 27-2 . . . . . . . . . . . . . . . . . . . . . . . . . . . . . . . . . . . . . . . . . . . . . . . . . . . . . 22Step 10 Review Practice Exercise 27-2 . . . . . . . . . . . . . . . . . . . . . . . . . . . . . . . . . . . . . . . . . . . . . . 25Step 11 The Injection Route . . . . . . . . . . . . . . . . . . . . . . . . . . . . . . . . . . . . . . . . . . . . . . . . . . . . . . . 25 Equipment . . . . . . . . . . . . . . . . . . . . . . . . . . . . . . . . . . . . . . . . . . . . . . . . . . . . . . . . . . . . . . 25 Injection Angle of Entry . . . . . . . . . . . . . . . . . . . . . . . . . . . . . . . . . . . . . . . . . . . . . . . . . . . 26 Virtual Lab 27-4 Administer an Intradermal Injection . . . . . . . . . . . . . . . . . . . . . . . . . 27 Virtual Lab 27-5 Administer a Subcutaneous Injection . . . . . . . . . . . . . . . . . . . . . . . . . 28 Virtual Lab 27-6 Administer an Intramuscular Injection . . . . . . . . . . . . . . . . . . . . . . . 30 Virtual Lab 27-7 Administer an Intramuscular Injection by Z-track Method . . . . . . . 30 Syringe Disposal . . . . . . . . . . . . . . . . . . . . . . . . . . . . . . . . . . . . . . . . . . . . . . . . . . . . . . . . . 31 Patient Education: The Responsibility of the Medical Assistant . . . . . . . . . . . . . . . . . . 32Step 12 Practice Exercise 27-3 . . . . . . . . . . . . . . . . . . . . . . . . . . . . . . . . . . . . . . . . . . . . . . . . . . . . . 32Step 13 Review Practice Exercise 27-3 . . . . . . . . . . . . . . . . . . . . . . . . . . . . . . . . . . . . . . . . . . . . . . 37Step 14 Lesson Summary . . . . . . . . . . . . . . . . . . . . . . . . . . . . . . . . . . . . . . . . . . . . . . . . . . . . . . . . . 37Step 15 Mail-in Quiz 27 . . . . . . . . . . . . . . . . . . . . . . . . . . . . . . . . . . . . . . . . . . . . . . . . . . . . . . . . . . 38 Mail-in Quiz 27 . . . . . . . . . . . . . . . . . . . . . . . . . . . . . . . . . . . . . . . . . . . . . . . . . . . . . . . . . . 38 Endnotes . . . . . . . . . . . . . . . . . . . . . . . . . . . . . . . . . . . . . . . . . . . . . . . . . . . . . . . . . . . . . . . . 46
Lesson 28—Comprehensive PracticumPracticum Instructions . . . . . . . . . . . . . . . . . . . . . . . . . . . . . . . . . . . . . . . . . . . . . . . . . . . . . . . . . . . . . 1 Part I: Administrative Skills . . . . . . . . . . . . . . . . . . . . . . . . . . . . . . . . . . . . . . . . . . . . . . . . 1 Part II: Clinical Skills . . . . . . . . . . . . . . . . . . . . . . . . . . . . . . . . . . . . . . . . . . . . . . . . . . . . . 11 Mail-in Quiz 28 . . . . . . . . . . . . . . . . . . . . . . . . . . . . . . . . . . . . . . . . . . . . . . . . . . . . . . . . . . 17
Answer KeyAnswer Key—Lesson 26 . . . . . . . . . . . . . . . . . . . . . . . . . . . . . . . . . . . . . . . . . . . . . . . . . . . . . . . . . . . . 1 Practice Exercise 26-1 . . . . . . . . . . . . . . . . . . . . . . . . . . . . . . . . . . . . . . . . . . . . . . . . . . . . . . 1 Practice Exercise 26-2 . . . . . . . . . . . . . . . . . . . . . . . . . . . . . . . . . . . . . . . . . . . . . . . . . . . . . . 2 Practice Exercise 26-3 . . . . . . . . . . . . . . . . . . . . . . . . . . . . . . . . . . . . . . . . . . . . . . . . . . . . . . 3Answer Key—Lesson 27 . . . . . . . . . . . . . . . . . . . . . . . . . . . . . . . . . . . . . . . . . . . . . . . . . . . . . . . . . . . . 7 Practice Exercise 27-1 . . . . . . . . . . . . . . . . . . . . . . . . . . . . . . . . . . . . . . . . . . . . . . . . . . . . . . 7 Practice Exercise 27-2 . . . . . . . . . . . . . . . . . . . . . . . . . . . . . . . . . . . . . . . . . . . . . . . . . . . . . . 9 Practice Exercise 27-3 . . . . . . . . . . . . . . . . . . . . . . . . . . . . . . . . . . . . . . . . . . . . . . . . . . . . . 11

iv 0203902LB05A-32

Lesson 26Minor Surgical Procedures
0203902LB05A-26-32 26-1
Step 1 Learning Objectives for Lesson 26
When you have completed the instruction in this lesson, you will be trained to do the following:
Comply with the principles of surgical asepsis to assist in minor surgery.
Categorize and defi ne the instruments and supplies used in minor surgery.
Describe the proper use of each instrument and supply used in minor surgery.
Reconstruct the procedures to prepare the patient for minor surgery, including documentation requirements, scheduling, preoperative instructions, physical preparation and post-operative care.
Relate the importance of documentation and obtaining a signed consent form for the surgical procedure.
Describe how to prepare skin for a surgical site and describe minor surgical procedures.
Specify the preparation of a minor surgical tray using the virtual lab.
Describe pre-operative setup and post-operative clean up of the operating room.
Categorize different anesthetizing agents that are used for minor surgeries.
Integrate the rules and guidelines for medical assistants to assist with minor surgeries.
Construct the steps to assist with suturing a laceration.
Organize the procedure to remove sutures using the virtual lab.
26-2 0203902LB05A-26-32
Introduction to Medical Assisting
Step 2 Lesson Preview
Cost cutting is a major medical consideration. Because of that, minor surgeries performed in a doctor’s offi ce or clinic are becoming increasingly popular. When the attending medical professionals are well trained, office surgery is a safe and economical alternative to hospitals.
As a trained medical assistant, you may have an opportunity to assist a physician with minor surgery. This lesson will familiarize you with the minor surgical procedures and techniques that you may participate in, probably after you have gained some clinical experience in the fi eld.
We’ll begin by discussing sterility in the operating room. You’ll learn the long-established principles that keep detrimental organisms from entering the patient’s body during surgery.
You’ll examine the equipment and supplies used in minor surgery. Then we’ll discuss the medical assistant’s role in preparing the patient for surgery, including obtaining the patient’s consent. We’ll also discuss preparing the operating room.
Lastly, you’ll explore the different kinds of surgery in which an MA is likely to assist, from wound cleaning and suturing to cryosurgery! As you know, maintaining asepsis after the procedure is just as important as the prep work, so you’ll learn post-op procedures, including cleanup, post-op patient care and documentation of the surgery. By the end of the lesson, you’ll have a working knowledge of minor surgery and the role of the medical assistant in providing safe, effi cient offi ce and clinic surgical procedures.
Step 3 Surgical Asepsis
You know from previous lessons that asepsis means sterility. So you can probably imagine that surgical asepsis is sterility in the surgical setting. Specifi cally, surgical asepsis is a series of principles designed to keep detrimental microorganisms from entering the body during surgery. This means that surgery must be performed with sterilized equipment in a sterilized environment. Aseptic techniques are procedures used to achieve asepsis.
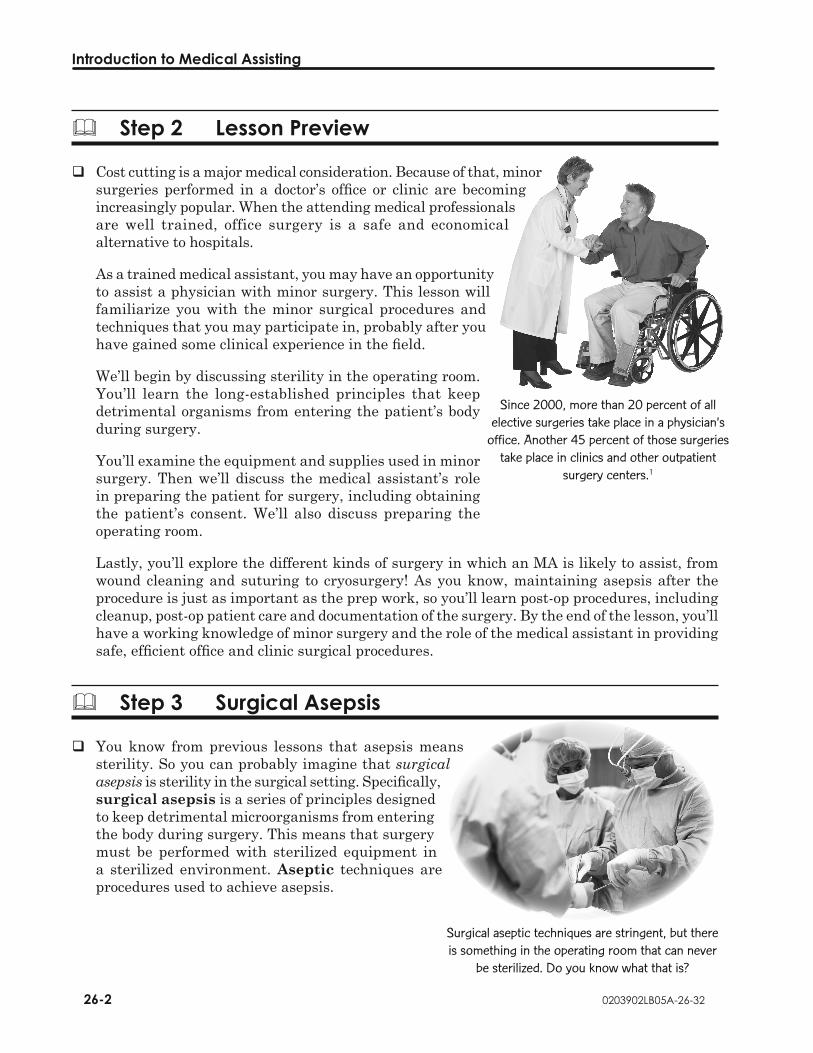
Since 2000, more than 20 percent of all elective surgeries take place in a physician’s
office. Another 45 percent of those surgeries take place in clinics and other outpatient
surgery centers.1
Surgical aseptic techniques are stringent, but there is something in the operating room that can never
be sterilized. Do you know what that is?

0203902LB05A-26-32 26-3
Lesson 26—Minor Surgical Procedures
The one major component of surgery that can’t be sterilized is skin. The patient’s own body, as well as the hands of the surgeon, can’t be sterilized. Microorganisms live on the skin. Surgery involving any incision provides an opening to those organisms. The patient’s skin must be washed and treated with an antiseptic across the area of the incision.
To further minimize the risk, the surgeon and medical assistant must wash and glove their hands using the surgical techniques you learned in Steps to Take 7-1 and 7-2 in Procedure Guide 1. Take a moment to review these now before we move on. Also review Steps to Take 7-3, Remove Gloves, as this is an important part of maintaining an aseptic environment as well.
Surgical equipment and the surgery room itself must be sterilized to achieve surgical asepsis. Since microorganisms can’t be seen, you should assume that they’re present—and that they’re a danger. The critical concerns of any surgery are the sterility of the instruments, the patient’s skin and the surgical team. To maintain sterility, the following basic rules must be followed.
If you touch a sterile object with a nonsterile object, the sterile object is no longer sterile. Only use sterile objects to touch sterile objects.
If you can’t see it, it isn’t sterile. Keep the sterile fi eld—the area where sterile instruments and supplies are staged—in plain sight. If you must turn away, cover the fi eld with a sterile towel.
Only the area above the waist is sterile. If you drop your hands below waist level, they are no longer sterile. Anything that falls on the fl oor is nonsterile.
Sterile equipment and supplies should be kept in the middle of the sterile fi eld. Anything outside the sterile fi eld should be considered nonsterile.
Don’t pass nonsterile items over a sterile fi eld.
When handling liquids, don’t pour directly onto the sterile fi eld. Spills pick up microorganisms. Pour liquid into a bowl or onto a dressing with a waterproof wrapper. Do not let the bottle that holds the liquid touch either the bowl or the dressing.
Don’t sneeze, talk or cough when facing the sterile fi eld.
If you are wearing a sterile gown, everything behind your fi eld of vision or below the waist of the gown is considered nonsterile.
Maintaining surgical asepsis will ensure a safe environment for your patients. Before we move on to the subject of surgical instruments take the following Practice Exercise to help you remember the basic rules of asepsis.

26-4 0203902LB05A-26-32
Introduction to Medical Assisting
Step 4 Practice Exercise 26-1
For questions 1 through 8, write T for true or F for false next to each rule given below.
1. If you touch a sterile object with a nonsterile object, the sterile object is still sterile. You can use nonsterile objects to touch sterile objects. _____
2. If you can’t see it, it isn’t sterile. Keep the sterile fi eld—the area where sterile instruments and supplies are staged—in plain sight. If you must turn away, cover the fi eld with a sterile towel. _____
3. Only the area above the arms is sterile. If you drop your hands below hip level, they are no longer sterile. Anything that falls on the fl oor is sterile. _____
4. Sterile equipment and supplies should not be kept in the middle of the sterile fi eld. Anything entering the sterile fi eld should be considered nonsterile. _____
5. Don’t pass nonsterile items over a sterile fi eld. _____
6. When handling liquids don’t pour directly onto the sterile fi eld. Spills pick up microorganisms. Pour liquid into a bowl or onto a dressing with a waterproof wrapper. Do not let the bottle that holds the liquid touch either the bowl or the dressing. _____
7. Don’t sneeze, talk or cough anywhere in the treatment area. _____
8. If you are wearing a sterile gown, everything behind your fi eld of vision or below the knees of the gown is considered nonsterile. _____
Step 5 Review Practice Exercise 26-1
Review your answers with the Answer Key at the back of this instruction pack. Correct any mistakes you may have made.
Step 6 Instruments Used in Minor Surgery
In this segment, we’ll discuss the different instruments and their purpose. Surgical instruments can be made of metal, plastic or rubber. These instruments are used to cut, scrape, stitch or hold skin in place. In Lesson 8, you were introduced to all of the medical equipment used in the offi ce setting. You’ll recognize those here as we review only the instruments you will use in minor surgery.

0203902LB05A-26-32 26-5
Lesson 26—Minor Surgical Procedures
Forceps
Forceps are used to grab, pull or pinch tissue or other instruments during surgery. Some are shaped like scissors and held by the ring-handles. Others are shaped like tweezers and held by the thumb and forefi nger. Some have ratchet-stops in the handles so they can be locked into position.
Hemostatic forceps have narrow, slender jaws so they can clamp blood vessels. Hemostasis means “control of bleeding.” Hemostatic forceps achieve hemostasis. Two examples of hemostatic forceps are Kelly forceps and mosquito forceps. The latter are for smaller blood vessels.
Foerster forceps are designed to hold the suturing needle used to stitch wounds. This kind of forceps has strong jaws to grip the needle. The jaws may have a groove in the middle to keep the needle in place. Needle holders come in varying lengths.
Foerster sponge forceps and Bozeman forceps are used to hold sterile squares of gauze called sponges. During surgery, these sponges are used to clean up excess blood. These forceps can also be used to transfer other sterile items on the operating tray. Dressing forceps are used to pick up gauze squares or dressings for transfer or for disposal. The names of these forceps illustrate a point: surgical instruments are often named after the function they perform or the person who invented them.
Tissue forceps are used to grasp tissue after an incision has been made. These forceps don’t have ring-handles so they’re
sometimes called thumb forceps. Tissue forceps may have teeth that can grasp skin with a pincer grip without damaging the tissue.
Needle holders
Kelly and mosquito forceps
Baby Alligator ear forceps
Tissue forceps
Dressingforceps
Foerster sponge forceps
Bozeman forceps

26-6 0203902LB05A-26-32
Introduction to Medical Assisting
Splinter forceps are used to remove foreign materials from wounds. They are also used to put gauze into wounds. Splinter forceps are usually thumb forceps in varying shapes. The sharp tip helps remove even the tiniest foreign objects.
Some forceps have curvedtips. Tenaculum forceps
have long handles made to grasp tissue during surgery. Towel clamps are used to hold drapes in place during the operation.
Biopsy forceps have a long, narrow stem with a cutting instrument at the end. Biopsy forceps can pass through an endoscope and take a tiny sample of tissue for testing.
Scissors
Scissors are ring-handled tools with two fl at blades pivoting on an axis pin. In surgery, they’re used to cut skin and muscle tissue, as well as bandages and other dressings. Some scissors have a sharp upper blade and a blunt lower blade. The lower blade can slide under a bandage, next to the skin, without injuring the patient.
Scalpels
A scalpel is a surgical knife. A scalpel has a straight handle with various removable blades. Some scalpels come in a single disposable unit. Different shaped blades are available for various procedures. An incision is a cut made with a scalpel. Incisions may be the initial cut in a surgery or they may lance the skin to ensure drainage.
Tenaculumforceps
Biopsyforceps
Splinter forceps
Surgical scissors
Metzenbaumscissors
Scalpels and blades
Towel clamp

0203902LB05A-26-32 26-7
Lesson 26—Minor Surgical Procedures
Retractors
Some of the instruments we’ve discussed so far are used to hold tissues together. Sometimes, though, tissues need to be held open. A retractor is an instrument used to hold a fl ap of tissue or an incision open so that the doctor can see beneath. Some retractors have smooth tips and some are toothed. Some are self-locking. Others need a medical assistant to hold them in place.
Probes
A probe is an instrument used to palpate inside an incision. Probes can also be used to test the depth of a cavity during surgery. They can also help locate foreign objects in a wound.
Curettes
A curette is a scraping instrument. A curette has a handle, stem and a looped end that does the actual scraping. For example, ear curettes remove earwax. Uterine curettes scrape fetal tissue from the uterus.
Care of Surgical Instruments
Some surgical instruments are disposable. These instruments come sterilized. After surgery, they are simply thrown away. As you are well aware, scalpels and needles are disposed of in a sharps container to avoid injuring anyone. Suture material is also disposed of in the sharps container, since the needle is often still attached. By contrast, reusable instruments are durable, but they have to be cleaned and sterilized.
Turn now to Procedure Guide 1, Steps to Take 8-1, to review the steps to care for surgical instruments. You may also want to review Virtual Lab 8-1, Use an Autoclave and Steps to Take 8-2, Ultrasonic Cleaning.
Step 7 Surgical Supplies
In the previous segment, we discussed surgical instruments. Next we’ll review the supplies used in minor surgical procedures, including surgical draping, gauzes, cleaning solutions, suture materials, dressings and bandages.
Probe
Ear curettes
ALM retractor

26-8 0203902LB05A-26-32
Introduction to Medical Assisting
Surgical Draping
Surgical draping is the placement of sterile materials on and around the patient to bracket the sterile fi eld. Some physicians now use disposable draping made of paper. After the paper draping frames the site, a clear incisional drapeis placed over the site. The incisional drape may have an adhesive back that keeps it in place.
Some surgical drapes are fenestrated—they have a custom opening that fi ts exactly over where an incision is to be made. Fenestrated drapes may be made of cloth or paper.
Gauze
Gauze squares—also known as sponges—come in a variety of sizes, from 2” × 2” to 4” × 4”. They come in sterile packs of two. They may be made of plain gauze or they may have a cotton pad backing for extra absorbency. They are used to clean and prepare skin for surgery, for padding and for cleaning and covering wounds.
As you have learned, one type of gauze, called a wick, comes in narrow lengths stored in bottles and is used to pack an open wound. Because the wick is sterile, it must be removed from the bottle with sterile forceps and cut to length with sterile scissors.
Solutions
Medical assistants use a number o f different solutions in the operating room. Sterile water is used to dilute medication. Sterile saline solutions are used to clean wounds. Liquid soaps are used to scrub up before operations and to clean and prep the patient’s skin at the operation site. Betadine (providone-iodine) is an antiseptic frequently painted on the skin prior to surgery. If Betadine is to be used, make sure the patient is not allergic to iodine.
Fenestrated surgical drape
Gauze
Betadine is painted over the surgical site to minimize the danger of pathogens entering the incision.

0203902LB05A-26-32 26-9
Lesson 26—Minor Surgical Procedures
Suturing Materials
Stitches used to close an incision or wound are called sutures. During surgery, the medical assistant tears open the suture material package and empties the suture material onto the sterile fi eld, avoiding contamination. Suture materials come in varying sizes. The finest (narrowest) suture material, called 6-0, is the kind most often used in offi ce-based surgeries.
Suture materials are usually non-absorbable. Absorbable sutures are made of organic materials so they can decompose naturally and don’t have to be removed. They are generally used for deep tissue layers. Non-absorbable suture materials are made from silk, rayon and other materials. These sutures must be removed after the wound is healed, usually in6 to 10 days.
Sometimes, only a small amount of tension is necessary to keep the edges of a wound sealed. In these cases, adhesive strips can be used instead of traditional sutures.
Needles
Suture needles often come swaged—fused to the suture material. The needles are often curved to assist in suturing while causing the least amount of damage to the skin. Needles are held with a needle holder, rather than with the gloved hand. This keeps the needle rigid, avoiding accidental injury. After use, the needle and unused attached materials should be disposed of in a sharps container.
Dressings
After a wound is closed, dressings are sometimes applied to the wound. Dressings are gauze patches that may be covered with medication. For example, gauze may be smeared with an ointment to help prevent infection. Some types of dressings have a special surface to prevent them from sticking to the wound when the dressing is changed.
Bandages
A bandage is a nonsterile material that is applied over a dressing and wound in order to keep the dressing in place. Some bandages are gauze. Custom shaped or tubular bandages are designed to fi t in hard to cover places like elbows or over appendages. Elastic bandages are also used to provide pressure.
Suture removal kit
Suture material
Gauze dressing

26-10 0203902LB05A-26-32
Introduction to Medical Assisting
Now that you’ve been introduced to the equipment and supplies that medical assistants need in the operating room, we’ll turn our attention to preparing for surgery.
Step 8 Preparing for Surgery—Prepping the Patient
If the patient is having a planned procedure, she will have time to make necessary preparations, such as making any special dietary changes ordered by the doctor, scheduling time off from work and purchasing special supplies she’ll need post-op. Prior planning can also include contacting the insurance company for authorization and to arrange payment.
Not every minor surgery can be planned. For example, a patient might suffer a laceration that needs immediate attention. Either way, the medical assistant must follow protocol to inform and prepare the patient for what is to come.
If the patient is receiving treatment for an accident, the MA must determine how the wound occurred, in case special medication such as a tetanus shot is necessary. The MA must also determine the patient’s allergies and fi nd out what OTC and prescribed drugs the patient is currently taking.
If the minor surgery is planned, the MA should instruct the patient on dietary considerations. For example, the procedure might require that the patient not eat or drink for several hours before the surgery. In addition, the MA can prepare the patient for any medication needed for post-operative care. For example, some procedures require the patient to take antibiotics afterward to prevent infections. Special supplies, such as crutches or a brace, might be necessary. These considerations often fall under the medical assistant’s job description, depending on the offi ce or clinic.
Informed Consent
In addition to planning for the surgery, the MA must get the patient’s consent. For all surgical procedures, the patient must sign a written, informed consent form. As you know, an informed consent form specifi es the procedure and explains in straightforward terms what will occur. The form also lists alternatives and possible adverse outcomes. This form is not just a “rubber stamp.” Knowing the alternatives and consequences constitutes an informed consent. Before the patient signs the form, the MA or the physician can also answer the patient’s questions about the procedure.
The informed consent form also covers the costs of the procedures. The MA will occasionally bring the offi ce bookkeeper in to discuss payment options during the consent discussion, though fi nancing itself is not part of the consent form.

0203902LB05A-26-32 26-11
Lesson 26—Minor Surgical Procedures
Before the Operation
It may be your duty to prepare the area of the body where the operation will be performed. As mentioned earlier in the lesson, skin cannot be sterilized. It is possible to minimize micro-organisms at the surgery site, however. This is accomplished by washing the site, shaving the area (if necessary), rinsing and drying. Then, you will paint antiseptic on the skin. You should always wear sterile gloves while preparing the patient’s skin.
For each subsequent step, from washing to shaving to rinsing and drying, you should start where the incision will be made and work outward. Apply the antiseptic with 4” × 4” gauze or sterile swabs. Allow the skin prep solution to air dry—do not blot dry with gauze.
Then, you’ll “frame” the surgical site using the draping materials we discussed earlier. If the draping is not fenestrated, the doctor will make a cut in the incision draping at the site of the actual surgery. Drapes may bracket the incision site, held in place by towel clamps or adhesive tape.
Step 9 Preparing for Surgery—Prepping the Room
To prepare the room for surgery, you’ll gather the instruments and supplies and prepare the surgery tray. Planning for the surgery begins with surgery cards—3 × 5 cards that list the equipment, supplies and instruments necessary. Some physicians store this information in computer fi les to be printed out in advance of the procedure. The computer will have a separate printout for each procedure, discussing the needs of the procedure in great detail, including the physician’s glove size, preoperative procedures, postoperative procedures and special requirements for both the surgeon and the patient. Both printouts and surgery cards are wonderful resources for medical assistants preparing for a surgery.
You’ve explored some aspects of pre-op room preparation. Now it’s time to actually do it! Walk through the steps to prepare the treatment room using your Procedure Guide 5.
Steps to Take 26-1 Prepare Treatment Room1. Turn to Steps to Take 26-1 in your Procedure Guide 5.
2. Read the Steps to Take to prepare a treatment room for a minor surgical procedure.
3. Review this procedure until you can describe the procedure without reading the steps.
Now turn to Virtual Lab CD 5 to examine the surgical tray setup in detail.
A framed surgical site

26-12 0203902LB05A-26-32
Introduction to Medical Assisting
Virtual Lab 26-1 Set up Minor Surgical Tray
1. Take out your Virtual Lab CD 5 and place it in the CD drive of your computer. (Most libraries offer free use of computers if you do not have one.)
2. At the Main Menu, select the Minor Surgical Procedures Lab. This will take you to the Minor Surgical Procedures menu.
3. Next, select Set up Minor Surgical Tray. This will bring up the instructional video about setting up the surgical tray.
4. Follow along with Virtual Lab 26-1 in your Procedure Guide Supplement 5 as you watch the video. Note that the text in the Procedure Guide often provides additional information than is shown in the virtual lab.
5. Review this procedure and watch the virtual lab until you can outline the procedure without reading the steps or watching the lab.
In the next segment, we’ll discuss anesthetics, the various minor surgeries an MA might assist with and postoperative procedures. But fi rst, use the following Practice Exercise to review what you’ve learned so far.
Step 10 Practice Exercise 26-2
For questions 1 through 8, answer the question or complete the sentence using the space provided.
1. The basic principles of sterile surgery are called ______________ _____________.
2. A surgical instrument that clamps tissues together is called a _____________.
3. ____________ —a surgical instrument used to make an incision.
4. _________________ forceps are small, narrow forceps used to clamp small blood vessels.
5. Four inch squares of gauze used to clean up blood during surgery are sometimes called ________________.
6. ____________________________ means “control of bleeding.”
7. ____________________ forceps are made to clamp tissues during surgery.
8. A(n) ________________ needle comes fused to suture materials.

0203902LB05A-26-32 26-13
Lesson 26—Minor Surgical Procedures
For questions 9 and 10, choose the best answer from the choices provided.
9. Which of the following information is NOT on an informed consent form? _____a. Alternative treatment optionsb. Financing alternativesc. Plain-language explanation of the procedured. Potential adverse reactions
10. Which of the following is NOT likely to be a part of the MA’s preoperative protocol for a planned minor surgery? _____a. Explore the cause of the wound and assess tetanus status.b. Identify dietary considerations to prepare for surgery.c. Identify postoperative special equipment needs.d. Provide a list of post-op medications the patient will need.
For questions 11 through 28, label each instrument below in the space provided.
11. ____________________________________
12. ____________________________________
13. ____________________________________
14. ____________________________________
15. ____________________________________
16. ____________________________________
17. ____________________________________
18. ____________________________________
19. ____________________________________
20. ____________________________________
21. ____________________________________
22. ____________________________________
23. ____________________________________

26-14 0203902LB05A-26-32
Introduction to Medical Assisting
24. ____________________________________
25. ____________________________________
26. ____________________________________
27. ____________________________________
28. ____________________________________
Step 11 Review Practice Exercise 26-2
Check your answers with the Answer Key at the back of this instruction pack. Correct any mistakes you may have made.
Step 12 Anesthetics
As you know from your pharmacology lesson, an anesthetic is any substance that causes a loss of feeling. When a doctor performs minor surgery, the patient needs protection from the pain involved in the procedure. Anesthetics can be inhaled, injected or applied topically.
The most common anesthetics used in minor offi ce surgery are injected into the subcutaneous tissues. Nerves are temporarily prevented from sending sensations to the brain, preventing pain due to the surgery. These anesthetics include Xylocaine, Novocain and Carbocaine. In addition, the anesthetic may also include epinephrine, a vasoconstrictor that acts locally to control bleeding. Anesthetics with epinephrine should not be used on extremities (fi ngers, toes, nose) because the constricting action can damage the tissues. When preparing an anesthetic injection, the MA should always bring the vial of requested medication to the operating room so that the physician can triple-check the medication before the injection.
Some anesthetics are topical—applied directly to the site, either by spray or liquid. For example, physicians use ethyl chloride to freeze the skin for a few seconds to allow the doctor to pierce or lance the skin. If the doctor is giving a patient a deep injection, he may use the spray to take the sting out of the shot!
Step 13 Minor Surgical Procedures
So far, we’ve talked about equipment and supplies, preparation and patient education. Now let’s talk about the operations themselves! Medical assistants can participate in each of the following minor surgical procedures. In fact, the MA will have a series of specifi c responsibilities. Depending on the doctor’s preference, the medical assistant may work sterile or nonsterile.

0203902LB05A-26-32 26-15
Lesson 26—Minor Surgical Procedures
When working nonsterile, the MA may not touch anything within the sterile fi eld. The medical assistant will have plenty to do, however! Some of your tasks might include the following:
Tie the back of the surgeon’s gown. Remember—the back of the gown is nonsterile.
Obtain additional supplies if they are needed.
Speak to the patient, offering support and reassurance.
Adjust the lighting.
Adjust the doctor’s mask and glasses.
Wipe sweat from the doctor’s face.
Hold the container to receive a biopsy sample.
When working sterile, the MA may be sterile and gloved for simple procedures. Or the medical assistant may be in gown and gloves. An MA working sterile may:
Hand instruments to the doctor.
Hold a retractor.
Use a sterile suction catheter or sterile gauze sponges to clear blood from the surgical site.
Prepare the suture material for the doctor.
Let’s look at each of the minor surgical procedures an MA can assist in.
Excision of Lesions
A lesion is a skin irregularity. Irregularities like moles or skin tags are “dry.” That is, they don’t contain fl uid. To remove a lesion, the doctor performs an excision. Remember that excision means “cutting out.”
It’s standard procedure to send a sample of the skin irregularity for testing to ensure that the irregularity doesn’t signal a bigger problem. The physician will take a small biopsy sample and store it in a bottle containing formalin, a tissue preservative. The MA holds the bottle, cap removed and the doctor places the sample in the bottle. After surgery, the labeled bottle is sent to a cytology lab for analysis.

26-16 0203902LB05A-26-32
Introduction to Medical Assisting
Incision
An abscess is a localized, self-contained collection of pus, usually the result of the body’s own immune system responding to a foreign body. Because the pus creates pressure on the surrounding tissues, the abscess may be painful.
Sometimes if an oil duct becomes clogged it may cause a cyst. The cyst may become infected. Cysts are surrounded by a membrane and must be completely removed. Prior to removal, the cyst sac may have to be lanced and drained of sebum—the oily secretion of the sebaceous gland—so that it doesn’t spatter the sterile fi eld during removal.
Incision and drainage (I&D) involves cutting into an infected area and allowing the pus or sebum to drain out under controlled conditions. Sometimes the liquid is collected and sent for examination. The patient’s wound may be treated with oral antibiotics or antibiotic cream. After the abscess or cyst is cut into, the wound is not sutured. A small, lanced abscess will heal by itself. Larger abscesses may need to continue to drain, which allows healing from the inside out. If the skin closes too soon, the fl uids will collect and cause pressure again and the abscess will reform.
If a cyst needs to be lanced and drained, it will be removed entirely after the lancing. Again, no suturing is necessary. The skin will close and heal on its own.
Suturing
Not every wound closes on its own, however. A laceration is a medical term for a “cut.” Some lacerations need to be sutured. There are four general signs that indicate suturing maybe necessary.
1. If the edges of the wound are far apart rather than close together, the wound may need sutures.
2. If the wound is bleeding and the bleeding can’t be controlled, sutures may stop the fl ow.
3. If the laceration is located on a part of the body that moves, risking reopening of the wound, sutures will protect the treated laceration.
4. If the laceration is deep, extending into underlying muscle tissues, it may require sutures.
Let’s turn to Procedure Guide 5 to explore how suturing is accomplished.

0203902LB05A-26-32 26-17
Lesson 26—Minor Surgical Procedures
Steps to Take 26-2 Assist with Suturing a Laceration1. Turn to Steps to Take 26-2 in your Procedure Guide 5.
2. Read the Steps to Take to assist the physician in suturing a laceration.
3. Review the procedure until you can describe the procedure without reading the steps.
Electrocautery
Electrocautery—also called electrosurgery—involves cutting or destroying tissue with a concentrated electric current. Electrocautery is used to remove skin tags and warts that don’t require a living tissue sample for biopsy. Electrocautery has an advantage over excision— bleeding is controlled because blood vessels are sealed by the current.
Electrocautery is accomplished with a handheld device with a tip that applies the current to the patient’s skin tissue. The device might run on batteries or be connected to a wall power-source. Since the device uses electric current, it should be inspected for frayed wires before use. Any electrical equipment is a potential fi re hazard, so fl ammable solutions such as alcohol and ethyl chloride should not be used in the area while the electrocautery is being performed.
After the procedure, the treated tissues will slough—die and separate from the healthy tissue. The patient should be warned that for the fi rst week or so, the sloughing tissue will have an unpleasant odor. The patient may need dressing on the affected area, depending on the location. Electrocautery is becoming rare as the use of cryosurgery increases.
Chemical Tissue Destruction
Chemical tissue destruction is similar to electrocautery in that tissues are destroyed and blood vessels cauterized. Instead of electrical current, however, chemical tissue destruction utilizes silver nitrate on the end of an applicator stick to seal friable (easily broken) blood vessels. For example, the doctor may treat frequent nosebleeds by using silver nitrate inside the nostrils.
Cryosurgery
Cryosurgery refers to the destruction of tissues by freezing. The most common way to conduct cryosurgery is to apply liquid nitrogen to tissues. Some areas of the body heal faster when the tissue is destroyed by freezing rather than by burning (cautery).
Liquid nitrogen is created by compressing nitrogen gas under cold temperatures. The liquid is volatile (unstable) and must be handled very carefully. Liquid nitrogen is usually kept in a canister in the doctor’s offi ce and transferred to the operating room in a thermos.
Cryosurgery

26-18 0203902LB05A-26-32
Introduction to Medical Assisting
Some cryosurgery is performed using nitrous oxide, which is less volatile than liquid nitrogen. Nitrous oxide is not as cold as liquid nitrogen, so patients experience less pain. However, because nitrous oxide isn’t as cold, it’s less effective in tissue destruction.
Though cryosurgery is used to extract cataracts, remove anal lesions and treat throat lesions, it is most commonly used to remove warts. The procedure consists of applying the liquid nitrogen directly to the skin with a probe. Nitrous oxide is applied from a tank through a cryogun that uses a disposable tip to administer the treatment. As with electrocautery, the treated tissues slough. An unpleasant odor and local discomfort may result. The doctor may suggest a dressing and antibiotic ointment while the treated area heals.
Laser Surgery
Laser is actually an acronym: light amplifi cation by stimulated emission of radiation. In the doctor’s offi ce, a laser creates a concentrated light that can destroy tissue. Lasers are used in surgery to burn or remove tissues or to cauterize blood vessels. The fi rst medical uses of lasers focused on the eyes, but they are now used for many procedures throughout the entire body.
Lasers are potentially hazardous light. The physician, patient and MA must wear protective goggles to prevent retina damage. A warning sign should be posted on the operating room door when the laser is in use.
Other laser-related hazards include the following:
Lasers can “vaporize” tissues. Those in the operating room should avoid inhaling those vapors.
As with electrocautery, a fi re hazard exists. Equipment should be inspected in advance. Flammable liquids should be removed from the operating fi eld.
If the patient has been prepped with a fl ammable product, the patient’s skin should be dry before the laser is used.
Sterile water should be available in the event of an accidental fi re.
Because of the variety of hazards, medical assistants are limited in their ability to assist in laser surgery. Your state may require that medical assistants undergo specifi c training on the type of laser the physician uses.

0203902LB05A-26-32 26-19
Lesson 26—Minor Surgical Procedures
Step 14 Postoperative Procedures
The operation is successful. The procedures are complete. What’s next for the medical assistant? From cleaning the operating room to postoperative care of the patient, the medical assistant has important responsibilities. In this segment, we’ll discuss those responsibilities, beginning with the care of the operating room.
Care of the Operating Room
After minor surgery is performed, the medical assistant may be required to care for the room and equipment. Surgical instruments are delicate and must be handled by a professional. Needles and other biohazards must be disposed of in a safe manner. After donning gloves, gown and goggles, the medical assistant may perform some or all of the following tasks:
Dispose of all drapes and covers. When appropriate, use a biohazard waste receptacle.
Remove all needles and blades from the operating fi eld using forceps. Dispose of used instruments in a sharps container.
Place instruments in a plastic soak bin.
Dispose of all used gloves and gauze in a biohazard waste receptacle.
Sanitize Mayo equipment tray and all other operating surfaces, including the operating table, doctor’s stool, countertops, sink and stationary equipment.
Disinfect all surfaces and allow to air dry.
Wound Healing
Like the old saying says, time heals all wounds. But all wounds aren’t the same. Wounds vary by type. Wounds also vary by how far along in the healing process they are. And fi nally, wounds vary by how well the healing process succeeds. Understanding each of these three variables will help you to fully understand the healing process.
Let’s begin by reviewing wounds by type. As you learned in Lesson 7, there are fi ve basic types of wounds. One of them does not involve penetration of the skin. This type of wound is called a closed wound, or contusion. A contusion is the result of trauma that damages the underlying tissues, but leaves the skin intact. If you’ve ever had a bruise, you know what a contusion is!
One task MAs perform is offering support to patients.

26-20 0203902LB05A-26-32
Introduction to Medical Assisting
Open wounds are those that involve tearing of the skin. Lacerations are deep, uneven tears. This type of wound is often more diffi cult to suture. Incisions are deep, even tears. This kind of wound is often intentional—the physician may make an incision during a procedure, for example. Punctures are deep cuts with a small entry point. Because of that small entry point, punctures may bleed less than other open wounds. Finally, abrasions are accidental wounds that tear back the skin’s surface without damaging the subcutaneous layer.
All wounds need to heal. Suturing a wound holds the wound in place, but there is a biological process that must follow. This process happens in three phases. The first phase, called the inflammatory response, lasts for three to four days. Blood vessels contract, slowing the bleeding. Blood platelets begin to bind the wound by forming a natural glue. Fibrin is released, collecting red blood cells into a clot that will become a scab. Under the scab, the edges of the wound will begin to pull together.
The second phase of wound healing is called proliferation. This phase lasts from 5 to 20 days. Tissue continues to contract under the scab. Clean, shallow cuts usually heal completely by the end of this phase.
The third phase of wound healing is called remodeling. If the wound is serious enough, a thick protein material called collagen forms into scar tissue. Scar tissue is stronger than skin, but it has no blood supply and it’s not as elastic as skin.
A fi nal way to regard the process of wound healing is to examine the results of the healing process. Wounds that heal by primary intention see very little scarring. The edges of the wound seal evenly and eventually disappear. Wounds that heal by secondary intention heal by granulation—the fi lling up of the wound with granulated tissue from the bottom up. This kind of healing can leave a large, obvious scar. Wounds that heal by tertiary intention are kept open for a while to avoid infection. Once cleaned or drained, the wound is sutured. Like secondary intention wounds, tertiary intention wounds have a greater chance of scarring.
laceration
Inflamed wound
laceration
Scar
Abrasion
Laceration

0203902LB05A-26-32 26-21
Lesson 26—Minor Surgical Procedures
Dressing the Wound
Dressing a wound has two purposes. First, the dressing provides a direct application of medicine to the affected area. Second, the dressing absorbs drainage. When placing a dressing on a wound, the MA should be certain to choose a dressing large enough to completely cover the wound. The dressing should be placed directly on the wound, rather than placed off-center and slid into place. And, the dressing and wound should be treated as a sterile fi eld to avoid infections. Finally, the MA may wish to tape the dressing in place. This last step does not require gloves, as the dressing already covers the wound when the tape is applied.
Bandaging
After placing dressing over a wound, the wound should be bandaged. Follow these basic guidelines to cover the dressing with a protective bandage:
Bandages should be snug but comfortable. If they are too tight, they will restrict circulation and inhibit wound healing.
The bandage should be secure enough to endure normal activity.
The bandaged area should be in its normal position before being bandaged. Skin surfaces shouldn’t touch under the bandage to avoid scarring that keeps skin surfaces connected.
Bandages should be wrapped from the distal point of the dressing to the proximal point. This means beginning the wrap from the furthest part from the body’s center, toward the body. For example, from the ankle to the knee or the wrist to the elbow. This promotes circulation and results in a more secure wrap.
As you learned in Lesson 7, there are several methods of bandage wrapping. They include the circular turn, the spiral turn, the spiral reverse, the fi gure-8 and the recurrent turn. We will briefl y review those here.
The circular turn wraps the bandage several times around a fi xed position, like a wrist, anchoring the bandage.
A spiral turn is used to wrap the straight part of an appendage, moving from the distal to the proximal point in a spiral.
A similar wrap is the reverse spiral, which starts like a spiral turn, but then comes back down the other way to provide a more secure wrap. This sort of wrap provides more padding and protection, since it uses more bandaging.
The fi gure-8 turn works best on joints, like ankles or knees. The bandage starts with a circular turn then proceeds in a fi gure-8 to brace and cover the bending joint.
Finally, the recurrent turn is used for appendages or extremities like an amputation. The bandage is folded back and forth across the dressing and anchored with circular turns.
Finally, you’ll use clips to hold the end of the bandage in place.

26-22 0203902LB05A-26-32
Introduction to Medical Assisting
Changing a Sterile Dressing
Some wounds require that the dressing be changed and fresh medication applied as healing progresses. Use the principles of surgical asepsis when you change sterile dressings and always wear gloves.
The fi rst step in changing a sterile dressing is to remove the old one. Tape may be pulled off, but it should be pulled in the direction of the incision, so as not to reopen the wound. Cut bandages free using scissors, but be careful not to go near the incision to prevent the wound from accidentally reopening. If the dressing sticks because of dried blood or fl uids, soak the dressing with sterile water or saline solution to work the dressing free. After the wound is uncovered, the physician will inspect the wound. At this time, change gloves to avoid contaminating the wound with bacteria from the old bandage.
Finally, redress and bandage the wound as directed by the doctor.
Removing Sutures
Eventually, non-absorbable sutures used to hold the edges of a wound together must be removed. The wound is not completely healed when this occurs. If sutures are left too long, they are more diffi cult to remove and can cause unnecessary skin marks and even scarring. The MA often performs the removal of sutures. To learn the basics, we will turn to another virtual lab!
Virtual Lab 26-2 Remove Sutures
1. Take out your Virtual Lab CD 5 and place it in the CD drive of your computer. (Most libraries offer free use of computers if you do not have one.)
2. At the Main Menu, select the Minor Surgical Procedures lab. This will take you to the Minor Surgical Procedures menu.
3. Next, select Remove Sutures. This will bring up the instructional video about removing sutures.
4. Follow along with Virtual Lab 26-2 in your Procedure Guide Supplement 5 as you watch the video. Note that the text in the Procedure Guide often provides additional information than is shown in the virtual lab.
5. Review this procedure and watch the virtual lab until you can explain the procedure without reading the steps or watching the lab.

0203902LB05A-26-32 26-23
Lesson 26—Minor Surgical Procedures
Outpatient Documentation
It’s almost impossible to overemphasize the importance of documentation. Every procedure must be logged, annotated and initialed. This includes minor surgery, dressing changes, wound cleaning and any instructions given to the patient. It also includes progress notes on the wound healing process. This duty is usually the responsibility of the medical assistant.
Congratulations! You’re nearly fi nished with this lesson. But fi rst, review the material you’ve covered so far with the following Practice Exercise.
Step 15 Practice Exercise 26-3
For questions 1 through 10, choose the best answer from the choices provided.
1. _____ is a vasoconstrictor found in some injectable anesthetics.a. Xylocaineb. Novocainc. Epinephrine d. Ethyl chloride
2. A(n) _____ is a dry skin irregularity that can be excised without prior lancing.a. cystb. abscessc. lesiond. laceration
3. A(n) _____ is a clogged oil duct that needs to be completely removed.a. cystb. abscessc. lesiond. laceration
4. Which of the following is NOT a nonsterile duty of a medical assistant in the operating room? _____a. Speak to the patient, offering support and reassurance.b. Adjust the lighting.c. Adjust the doctor’s mask and glasses.d. Hand instruments to the doctor.

26-24 0203902LB05A-26-32
Introduction to Medical Assisting
5. Which of the following situations requires incision? _____a. Lesionb. Abscessc. Lacerationd. Electrocautery
6. Which of the following involves the destruction of tissue by freezing? _____a. Electrocauteryb. Laser surgeryc. Cryosurgeryd. Suturing
7. Which method of bandage wrapping would you likely use on an ankle? _____a. Circle turnb. Spiral turnc. Figure-8d. Reverse spiral
8. What part of the postoperative supplies holds the medication? _____a. Bandageb. Dressingc. Sutured. Tape
9. Which of the following is a hazard of laser surgery? _____a. Splash and spatter pathogen transmissionb. Ear damagec. Laser inhalationd. Eye damage
10. When a wound remodels, scar tissue is formed out of a protein called _____.a. collagenb. septumc. pusd. endoplasm

0203902LB05A-26-32 26-25
Lesson 26—Minor Surgical Procedures
For questions 11 through 15, answer the question using the space provided.
11. What 7 steps will you follow to prepare a treatment room for minor surgery?____________________________________________________________________________________________________________________________________________________________________________________________________________________________________________________________________________________________________________________________________________________________________________________________________________________________________________________________________________________________________________________________________________________________________________________________________________________________________________________________________________________________________________________________________________________________________________________________________________
12. List the 11 steps in preparing a minor surgical tray.__________________________________________________________________________________________________________________________________________________________________________________________________________________________________________________________________________________________________________________________________________________________________________________________________________________________________________________________________________________________________________________________________________________________________________________________________________________________________________________________________________________________________________________________________________________________________________________________________________________________________________________________________________________________
13. Describe how to remove sutures.__________________________________________________________________________________________________________________________________________________________________________________________________________________________________________________________________________________________________________________________________________________________________________________________________________________________________________________________________________________________________________________________________________________________________

26-26 0203902LB05A-26-32
Introduction to Medical Assisting
14. When assisting the physician during a surgical procedure, how can you ensure that liquid antiseptics remain sterile?________________________________________________________________________________________________________________________________________________________________________________________________________________________________________________________________________________________________________________________
15. Sit down with a friend or family member and explain to them what you’ll do to assist the physician when suturing a laceration.
Step 16 Review Practice Exercise 26-3
Check your answers with the Answer Key at the back of this instruction pack. Correct any mistakes you may have made.
Step 17 Lesson Summary
This lesson focused on minor surgery that occurs in doctors’ offi ces and clinics. Many patients opt to have their surgery done outside of a hospital setting. The medical assistant has an important role in this kind of surgery.
The principles of surgical asepsis help keep minor surgery safe by providing a sterile environment for surgical procedures. There are various instruments that a medical assistant is likely to encounter, including those that clamp tissues (forceps), those that pull tissues back (retractors), those that cut (scalpels and scissors) and those that explore (probes). Along with sterile instruments, a wide array of supplies are used in surgery.
Preoperative preparation includes patient education and consent, as well as the physical preparation of the patient. Your duties will also include preparing the operating room and surgical instrument tray.
You can assist in many common minor surgical procedures, including excisions, incisions, suturing, cryosurgery, laser surgery and chemical tissue destruction.
One of your postoperative responsibilities is to clean the operating room. More importantly, you will attend to patient postoperative concerns such as wound healing, dressings, bandages and the removal of sutures.
And, as always, you must remember to document all of the procedures just mentioned in the patient’s records. This lesson covered some advanced procedures that you may not be involved in right away as you begin your new career. But because of the foundation you are building now through this course, when you are ready to train and assist in clinical procedures, you’ll already be half-way there!

0203902LB05A-26-32 26-27
Lesson 26—Minor Surgical Procedures
Step 18 Mail-in Quiz 26
Follow the steps to complete the quiz.
a. Be sure you’ve mastered the instruction and the Practice Exercises that this quiz covers.
b. Mark your answers on your quiz. Remember to check your answers with the lesson content.
c. When you’ve fi nished, transfer your answers to the Scanner Answer Sheet included. Use only blue or black ink on your Scanner Answer Sheet.
d. Important! Please fi ll in all information requested on your Scanner Answer Sheet or when submitting your quiz online.
e. Submit your answers to the school via mail, fax or, to receive your grade immediately, submit your answers online at www.uscareerinstitute.edu.
Mail-in Quiz 26
For questions 1 through 40, choose the best answer from the choices provided. Each question is worth 2.5 points.
1. Long, narrow forceps used to clamp off large veins and arteries during surgery are called _____ forceps.a. Mosquito b. Dressingc. Kellyd. Bozeman
2. _____ —a surgical instrument that separates tissues during an operation.a. Forcepsb. Scalpelc. Retractord. Probe
3. _____ —a surgical instrument used to explore a wound or cavity.a. Forcepsb. Scalpelc. Retractord. Probe

26-28 0203902LB05A-26-32
Introduction to Medical Assisting
4. _____ surgical drapes have an opening in the location of the operating site.a. Asepticb. Fenestratedc. Ventilatedd. Prepared
5. _____ forceps pick out foreign material from a wound or laceration.a. Splinterb. Foersterc. Bozemand. Kelly
6. _____ forceps have a cutting instrument at the end to collect tissue samples.a. Splinterb. Foersterc. Bozemand. Biopsy
7. Some physicians have switched from 3” × 5” surgery cards to _____ for preoperative preparation.a. laminated wall chartsb. computer fi lesc. informed consent formsd. “framed” draping
8. A swaged needle may be _____ to minimize damage to the skin.a. curvedb. fused to absorbable suturingc. fused to non-absorbable suturingd. capped
9. Which step comes fi rst in preparing a patient’s skin for surgery? _____a. Shaving the siteb. Washing the sitec. Rinsing the sited. Disinfecting the site

0203902LB05A-26-32 26-29
Lesson 26—Minor Surgical Procedures
10. When preparing a patient’s skin for surgery, the MA should always _____.a. ask for consentb. shave the areac. wear glovesd. consult the PDR
11. Which surgical supply holds the medication? _____a. Bandageb. Dressingc. Drapingd. Sutures
12. Which of the following is NOT a solution that would be found in the sterile fi eld of an operating room during electrocautery? _____a. Sterile waterb. Sterile saline solutionc. Iodine-based antisepticsd. Isopropyl alcohol
13. Which of the following is NOT a sterile duty of a medical assistant in the operating room? _____a. Obtain additional supplies.b. Hold a tissue forceps.c. Prepare suture material.d. Hand instruments to the doctor.
14. A(n) _____ is a concentration of pus that pressures surrounding tissues.a. cystb. abscessc. lesiond. laceration
15. Which method of bandage wrapping would you likely use if the injury needs more padding and protection? _____a. Circle turnb. Spiral turnc. Figure-8d. Reverse spiral

26-30 0203902LB05A-26-32
Introduction to Medical Assisting
16. Which method of bandage wrapping would you likely use to wrap an amputation site? _____a. Circle turnb. Spiral turnc. Figure-8d. Recurrent turn
17. A wound healed by secondary intention heals by _____ that will form scar tissue.a. granulationb. suturingc. electrocauteryd. remodeling
18. Which of the following is a closed wound? _____a. Incisionb. Puncturec. Contusiond. Abrasion
19. Which of the following wound types has a small entry wound that inhibits bleeding? _____a. Incisionb. Puncturec. Contusiond. Abrasion
20. A wound that is kept open until it can be cleaned and heals with scar potential is said to heal with _____ intention.a. primary b. secondaryc. tertiaryd. quadernary
21. The stage of wound healing in which most minor cuts are completely healed is called _____.a. infl ammatory responseb. proliferationc. remodelingd. tertiary response

0203902LB05A-26-32 26-31
Lesson 26—Minor Surgical Procedures
22. The fi rst few days of wound healing are called the _____.a. infl ammatory responseb. proliferationc. remodelingd. tertiary response
23. The death of tissue, followed by the gradual dropping off of the dead cells is called _____.a. proliferationb. remodelingc. sheddingd. sloughing
24. Liquid nitrogen is used in _____.a. cryosurgeryb. laser surgeryc. chemical tissue destructiond. electrocautery
25. When changing an old bandage and dressing, the MA should _____.a. wear the same sterile gloves throughout the procedureb. pull adhesive tape off away from the incision so as not to reopen the woundc. cut bandages free with suture scissorsd. remove old dressings that stick by soaking with saline solution
26. A(n) _____ specifi es the procedure and explains in straightforward terms what will occur. The form also lists alternatives and possible adverse outcomes. It also covers the cost of the procedure.a. surgery cardb. informed consent formc. release formd. patient chart
27. Knowing the alternatives and consequences of a procedure constitutes _____.a. preoperative preparationb. patient educationc. a consent discussiond. an informed consent

26-32 0203902LB05A-26-32
Introduction to Medical Assisting
28. When should the medical assistant or doctor answer patients’ questions about a procedure? _____a. After the procedureb. Right before the procedurec. Before the patient signs the formd. After the patient signs the form
29. Part of preparing the room for surgery involves _____.a. hand washing and glovingb. preparing the surgery trayc. documenting the surgeryd. placing instruments in a plastic soak bin
30. Information on surgery cards does NOT include _____.a. equipment, supplies and instrumentsb. the informed consent formc. the needs of the procedure in great detail, including preoperative
procedures, postoperative procedures and special requirements for both the surgeon and the patient
d. the physician’s glove size
31. _____ means the “loss of feeling.”a. Anesthesiab. Paralysisc. Plegiad. Hemostasis
32. Any substance that causes a loss of feeling is called a(n) _____.a. paralyzerb. anestheticc. hemostatind. plegistic
33. Substances that cause a loss of feeling can be _____.a. administered the night before the procedureb. applied transdermallyc. inhaled, injected or applied topicallyd. prepared in the supply room

0203902LB05A-26-32 26-33
Lesson 26—Minor Surgical Procedures
34. _____ are injected into the subcutaneous tissues right before a surgical procedure.a. Vasoconstrictors, combined with a depressantb. Some antibioticsc. Transdermal injectionsd. Most common anesthetics
35. Substances that cause a loss of feeling work by _____.a. paralyzing the tissues around the surgical siteb. cutting off the blood fl ow to the surgical site, thus preventing pain
signals from reaching the brainc. temporarily preventing nerves from sending sensations to the braind. freezing the muscles around the surgical site, thus preventing pain
signals from reaching the brain
36. The drug _____ is a vasoconstrictor that acts locally to control bleeding. It should not be used on extremities because the constricting action can damage the tissues.a. Epinephrineb. Xylocainec. Novocaind. Carbocaine
37. When preparing an injection for pain numbing, the MA should always _____.a. bring the syringe of requested medication to the operating room so
that the physician can remain sterileb. fi ll the syringe in the operating room so that the medication remains sterilec. bring the vial of requested medication to the operating room so she
can triple-check the medication before giving it to the doctord. bring the vial of requested medication to the operating room so that
the physician can triple-check the medication before the injection
38. Nonsterile duties of the MA may include _____.a. tying the back of the surgeon’s gown, using a sterile suction catheter
or sterile gauze sponges to clear blood from the surgical site and preparing the suture material for the doctor
b. obtaining additional supplies, speaking to the patient, adjusting the lighting and adjusting the doctor’s mask and glasses
c. wiping sweat from the doctor’s face, holding the container to receive a biopsy sample, handing instruments to the doctor and holding a retractor
d. tying the back of the surgeon’s gown, handing instruments to the doctor, holding a retractor and preparing the suture material for the doctor

26-34 0203902LB05A-26-32
Introduction to Medical Assisting
39. When working sterile, the MA may _____.a. prepare the suture material for the doctor, hand instruments to the
doctor, wipe sweat from the doctor’s face and hold the container to receive a biopsy sample
b. use a sterile suction catheter or sterile gauze sponges to clear blood from the surgical site, obtain additional supplies, speak to the patient and adjust the lighting
c. use a sterile suction catheter or sterile gauze sponges to clear blood from the surgical site, tie the back of the surgeon’s gown, hand instruments to the doctor and hold a retractor
d. use a sterile suction catheter or sterile gauze sponges to clear blood from the surgical site, prepare the suture material for the doctor, hand instruments to the doctor and hold a retractor
40. After minor surgery is performed, the medical assistant may be required to care for the room and equipment. The fi rst thing she should do is _____.a. dispose of all drapes and covers. When appropriate, use a biohazard
waste receptacleb. place instruments in a plastic soak binc. disinfect all surfaces and allow to dryd. document the patient’s condition, including dressing changes, wound
cleaning and any instructions given to the patient
Endnotes1 “Problems of Offi ce Surgery.” 25 Sept. 2006 <http://www.senate.state.ny.us/Docs/surgery.htm>.

0203902LB05A-26-32 26-35
Lesson 26—Minor Surgical Procedures
Congratulations
Don’t wait for your quiz results to continue with Lesson 27.
CongratulationsYou’ve completed Lesson 26.

26-36 0203902LB05A-26-32
Introduction to Medical Assisting

Lesson 27Preparing and Administering Medications
0203902LB05A-27-32 27-1
Step 1 Learning Objectives for Lesson 27
When you have completed the instruction in this lesson, you will be trained to do the following:
Identify the various routes of drug administration.
Calculate medication dosages using the ratio and proportion methods.
Discuss the factors involved when calculating children’s dosages.
Explain the proper procedure to carry out a verbal order.
Summarize the 14 guidelines to follow when administering a medication.
Defend the procedure of triple checking medications prior to administration by using the “Six Rights.”
Discuss the documentation requirements when medications are administered and when errors occur.
Illustrate how to apply a transdermal patch medication properly and identify the precautions when applying this type of patch medication.
Relate the steps to properly apply topical medication and administer oral medication.
Explain the proper procedures to instill eye drops and ear drops.
Specify the types of rectal and vaginal medications and clarify the proper positioning of rectal medications.
Identify the parts of a syringe and the different kinds and sizes of syringes.
Describe how to withdraw medication from an ampule and a vial.
Identify the tissue layers and sites of injection for intradermal, intramuscular and subcutaneous injections.
Defend the use of different length and gauge needles and different angles of needle entry to administer various medications in specifi c injection sites.
Explain how to administer intradermal, subcutaneous and intramuscular injections using the virtual lab.

27-2 0203902LB05A-27-32
Introduction to Medical Assisting
Identify the various sites for administering insulin injections and instruct patients to self-administer insulin injections.
Explain the steps to administer an intramuscular injection by Z-track method using the virtual lab.
Relate how to properly discard a used syringe and needle.
Describe administration and educational concerns related to immunizations.
Explain how and why the medical assistant informs patients, or the responsible party for a minor, in writing and verbally, of the risks and benefi ts of immunizations before they are administered.
Discuss the importance of patient education regarding medications.
Step 2 Lesson Preview
It’s hard to imagine a time when we didn’t know the basics of human anatomy. Believe it or not, it was only 400 years ago that Dr. William Harvey published his ground- breaking research proving that the heart pumps blood through a circulatory system. From there, it wasn’t long until Robert Boyle and Sir Christopher Wren were experimenting with a syringe-like device made of a quill attached to a bladder. They used this “clyster” to inject opium and other substances into a dog.1The modern-day pump syringe was invented in the early 1700s by Dominique Anel. He used the syringe to suction and clean the battle wounds of French soldiers. Since then, physicians and researchers refi ned the syringe until it looked more like a sleek medical tool and less like an instrument of torture.
In your pharmacology lesson you learned that the mission of drug therapy is to deliver the right drug in the right amount at the right time to the right place in the body to have a positive effect. In this lesson we’ll answer the question, “What is the right amount?” Drugs must be taken in the proper amount to be effective and safe. How are those amounts calculated? What are the standard measurements used? You’ll be able to answer these questions when you examine dosages.
A hypodermic needle attached to a syringe, made of silver and glass.

0203902LB05A-27-32 27-3
Lesson 27—Preparing and Administering Medications
In addition to the right dosage, you must consider the delivery method. There are many ways to administer medications to your patients. What are the different ways patients take drugs? What are the pros and cons of each method? What is the medical assistant’s role in applying prescribed medications? We’ll explore these questions throughout the lesson.
By the end of this lesson, you’ll understand the hows and whys of medication preparation and administration. This knowledge will be an important part of your training to become a medical assistant! Let’s begin by looking at delivery methods.
Step 3 How Do Drugs Get Delivered?
There are three ways that drugs are handled in the doctor’s offi ce. They are prescribed, dispensed or administered. You know that a prescribed drug is purchased by the patient at a pharmacy after the doctor has given him a prescription. When a drug is dispensed, it’s given to the patient in the offi ce to be taken later. When the patient takes a drug in the offi ce or clinic, the drug is administered.
In the following lesson segments, we’ll talk about how drugs are administered and how a doctor calculates the proper amount of a drug to administer. These two topics are interrelated, because the dosage—the amount of a drug given to a patient—will depend on the way the drug is administered.
This material is important to you as a medical assistant. Most states allow an MA to prepare and administer medications under the supervision of a doctor. What are the ways drugsare administered?
In this segment, we’ll look at drug routes—the different ways drugs are administered to patients. There are a variety of reasons for choosing one drug route over another. Different drug routes provide different rates of absorption. For example, oral medications take longer to absorb than inhaled medications. Also, the patient’s physical and mental state must be considered. Obviously, a patient under sedation can’t take an oral medication. And some patients don’t like needles. A third factor governing administration is the characteristics of the drug itself. For example, digestive enzymes destroy insulin, so it can’t be taken orally. Let’s look at the common drug routes, and learn about the pros and cons of each method.
Oral Medication
Oral medication is taken through the mouth and distributed through the gastrointestinal system. There are several forms of oral medications to choose from. Tablets are solid discs of medication. Capsules are oblong-shaped, gelatin tubes fi lled with powdered medication. Caplets are capsule-shaped tablets. A solution is a powdered medication that is dissolved in water and swallowed. Syrup is a concentrated solution mixed with sugar or a sugar substitute. A suspension is an insoluble medication contained in a liquid—milk of magnesia for example. Elixirs were originally medicines dissolved in alcohol. Since many elixirs are prepared for children, they are now made with and without alcohol.

27-4 0203902LB05A-27-32
Introduction to Medical Assisting
Sometimes, oral medications are coated to allow for specialized distribution. They may be enteric coated with a material that won’t break down until it reaches the intestine, avoiding an upset stomach. Some capsules have tiny, coated doses inside that enter the bloodstream at different rates, allowing for time-release.
Buccal and Sublingual Medications
Some medications taken by mouth can bypass the gastrointestinal system. Buccal administration means placing the medication between the cheek and gum until it’s absorbed through the vascular oral mucosa. Sublingual administration means placing the medication under the tongue until it dissolves and is absorbed through the oral mucosa membrane. This is how nitroglycerin tablets—used for the treatment of angina—are administered. These methods allow for quick absorption. In addition, some topical medications, used in the treatment of sore throats, are held in the mouth and then spit out, rather than swallowed.
Transdermal Medication
A transdermal medication is put in a patch that is placed on the skin. The medication is absorbed slowly over a period of time—usually three days. A common example of a transdermal is the nicotine patch. Patients trying to quit smoking receive nicotine to help with withdrawal symptoms. Each successive patch contains less nicotine until the body is fi nally able to do without. Patches are also used to administer birth control.
Topical Medication
A topical medication is designed to be applied to the surface of the body. This can include the skin, eyes, ears, nails or mucous membranes. Topical medications can have a local or systemic effect. Many of the drug routes described here are considered topical, as opposed to enteral—through the GI system—and parenteral—through the circulatory system.
Rectal and Vaginal Medications
Medications can be administered either rectally or vaginally either by ointment or by suppository—a medicine with a glycerin or cocoa butter base that is dissolved by body heat and absorbed. A suppository is useful when the patient’s symptoms include vomiting, making oral medications impractical, or if the infection or condition is in the area where the suppository is inserted.

0203902LB05A-27-32 27-5
Lesson 27—Preparing and Administering Medications
Inhalers
An inhaler uses an aerosol vapor, gas or spray to shoot medication directly into the respiratory system. This can be accomplished either through the nose or mouth, using a mask or nebulizer. One common example is medication used for asthma. Inhaled medication is absorbed quickly, but it is most often used as a local medication, rather than a systemic one.
Parenteral Medication
Parenteral medications are given by injection, either into body tissue or directly into a vein. The word parenteral means “beyond the intestine.” We will cover parenteral delivery techniques later in the lesson. The chief advantage of parenteral medication is quick absorption.
Implants
Implant medications are inserted beneath the skin surgically. Once there, they release a steady dose of medication over a long period of time. One common example is Norplant, a contraceptive. The advantage of the implant is that, unlike oral birth control, you can’t forget to take it.
Pumps
One last drug route to discuss is the pump, a miniature device that administers a continuous fl ow of medication. For example, diabetics who don’t want to constantly monitor their blood sugar use the pump to provide a steady supply of insulin. Pumps can be attached to an intravenous drip. New technology even allows miniature pumps to be implanted surgically.
Now that we’ve discussed delivery methods, let’s learn how to calculate the right amount—the dosage.
Step 4 Calculating Dosage
Many modern medicines come in what’s known as unit dose medication—pre-measured doses of a drug. A USP unit is the standard unit of dosage for a medication according to the United States Pharmacopeia. Today’s drugs are more powerful than ever and mistakes in medication are all too common. (See boxed information.) So it’s important for you to understand how dosage is determined so you can protect your patients from accidental overdose.
The inhaled medicine expands the breathing passages, making respiration easier.

27-6 0203902LB05A-27-32
Introduction to Medical Assisting
Dosage ErrorsA recent report estimated that more than 1.5 million Americans are affected each year by errors, either in the prescription, dosage or the administration of drugs. Of these errors, more that 58 percent are dosage errors!2 Errors are so common that hospital patients suffer a mistake per day on average. The cost of treating these mistakes comes to more than 3.5 billion dollars a year.3
Albert Wu, a drug safety expert at Johns Hopkins University notes, “Everyone in the health care system has to wake up and take this more seriously.”
Systems for Dosage Measurement
When talking about dosages, you need to know what measurement system is being used. There are two basic systems for measuring the amount of a drug being administered—the metricsystem and the household system.
The Metric System
The metric system is used worldwide, particularly in the scientifi c fi eld. It is based on the decimal system, with units based on multiples of 10. To understand the system, it will be helpful to review the common prefi xes. Units feature a prefi x, followed by a measurement. For example, the prefi x milli means one thousandth of a unit. A meter is a measurement of length, a little over a yard long. Thus, a millimeter is a thousandth of a meter.
The chart below lists common metric prefi xes and measurements:
Prefi x Meaningmilli one thousandthcenti one hundredthdeci one tenthdeka tenhecto one hundredkilo one thousand
Unit Type of MeasurementMeter lengthLiter volumeGram mass/weight

0203902LB05A-27-32 27-7
Lesson 27—Preparing and Administering Medications
A liter is about 1.05 quarts. A hectoliter would be a hundred liters, or about 105 quarts. A kilogram is 1,000 grams. A centimeter is one hundredth of a meter (less than an inch).
Household Measurements
Household measurements are less precise than metric measurements—they get their name because they are used in the home, not the doctor’s offi ce. Because some patients are unfamiliar with the metric system, the medical assistant should be familiar with both measurement systems and be prepared to use either one. The chart below lists some common household measurements:
Common Measurement Equivalent3 teaspoons 1 tablespoon2 tablespoons 1 ounce8 ounces 1 cup2 cups 1 pint2 pints 1 quart4 cups 1 quart4 quarts 1 gallon
Doing the Math
In order to understand how doses are calculated, it will fi rst be necessary to understand some mathematical concepts. The fi rst concept is ratio—defi ning the relationship between two components. To illustrate a ratio, let’s look at a common one that might have helped make your breakfast—cinnamon sugar. Cinnamon sugar is made with granulated sugar and cinnamon spice. But that information won’t be enough to make a tasty batch. You need to know how much cinnamon to mix in with the sugar. The relationship of cinnamon to sugar is called the ratio. For every one part of cinnamon, there must be 12 parts of granulated sugar. This ratio can be expressed as a quotient (1 to 12) or a fraction (1/12th) or as a decimal (.08333, which is 1 divided by 12).
But knowing the ingredients and the ratio still isn’t enough information. Do you want a cup of cinnamon sugar or ten gallons? Our second important concept is proportion—the relation between a part with regard to size or number. The proportion will help you convert a ratio into a recipe (or, in the case of medicines, a dosage). To understand this, let’s look at the way a proportion equation compares ratios.
3:8 = 6:16
This equation claims that 3 relates to 8 like 6 relates to 16. Is that true? One way to check is to multiply the means and the extremes. The means are the two inner numbers in the proportion equation—in this case, 8 and 6. The extremes are the two outer numbers—3 and 16. If the proportion is true, then the product of the means will equal the product of the extremes. In this case:
8 × 6 = 48 and 3 × 16 = 48

27-8 0203902LB05A-27-32
Introduction to Medical Assisting
The product of the means and the product of the extremes are equal, so the proportion is true.
Now, let’s continue our cinnamon sugar example. Suppose we have six cups of granulated sugar, and we want to know how much cinnamon sugar to add. The equation will look like this:
1:12 = x: 6 cups
In this case, x stands for cinnamon. We’re asking the question, if the ratio is 1 to 12, and we have six cups of sugar, how much cinnamon will we need to maintain the proper proportion? Let’s multiply the products of the means and the extremes:
12x = 6 cups
We did this by multiplying the means (the two inner numbers) 12 and x to get 12x. Then we multiplied the extremes (the two outer numbers) 1 and 6. Now we have changed our proportion into a simple algebra formula. Dividing both sides of the equation by 12, we fi nd that:
x = 6 cups 12
x = .5 cup
We have to add a half-cup of cinnamon to our 6 cups of granulated sugar to maintain our 1 to 12 ratio.
The Proportional Method for Calculating Dosages
Now let’s get out of the kitchen and into the doctor’s offi ce. Suppose your doctor has ordered 2000 USP units of a medication to be given by syringe. On hand, you have a solution of the drug with 3000 USP units per milliliter. How much should you give the patient? Let’s start by setting up a proportion equation.
On Hand Medication: Unit = Dose Ordered: Amount to be Given
3000 units: milliliter (mL) = 2000 units: x
By multiplying the means and the extremes, we can convert this proportion into an algebraic equation:
3000x = 2000 mL
or, x = .667 mL
So you will give the patient .667 mL of the medication.
Let’s look at another example. The doctor has prescribed 400 mg of a medicine. On hand, you have tabs that are 200 mg each. How many tabs should you give the patient?
On Hand Medication: Unit = Dose Ordered: Amount to be Given
200:1 = 400: x

0203902LB05A-27-32 27-9
Lesson 27—Preparing and Administering Medications
Now multiply the means and the extremes to fi nd that:
200x = 400
x = 2
Using the supply of the drug on hand, you will give two tabs to the patient. Notice that the fi rst example involved a liquid and the second example involved a solid. This method of calculation works, no matter what drug route the doctor selects.
Doses for Children
Children do not develop at the same rate, so dosages must vary according to the individual. In the past, doctors used a guide called the Young’s, Clark’s and Fried’s rules to calculate dosages as a percentage of adult dosages, but it’s inaccurate to simply estimate dosages based on age—children are not just “little adults.” They have different physiologies and different weight to body surface area ratios—both important factors in dosage calculations.
Today, doctors may prescribe according to a formula and nomogram (a graph) to calculate the precise dosage based on the body surface area (BSA). Using the nomogram, a straight line is drawn from the child’s height to the child’s weight. The nomogram, which looks a little like a slide ruler, will give a corresponding body surface area.
For example, if a normal adult should get 100 mL of a pain reliever, how much should a 35-inch, 30 lb child get? The child has a BSA of .6. The average adult has a BSA of 1.7. Our proportion equation looks like this:
.6 : 1.7 = x : 100 mL
By multiplying the means and the extremes, we fi nd that:
1.7 x = .6 × 100 mL
1.7 x = 60 mL
x = 35.29 mL
Our toddler should get 35.29 mL of the pain reliever, using the BSA method.
A more common method of calculating children’s dosages is to use the child’s body-weight in kilograms. Although not as accurate as a nomogram, it is less cumbersome to use and only requires one measurement (weight) to calculate the dosage.
A nomogram is used to calculate pediatric dosages.

27-10 0203902LB05A-27-32
Introduction to Medical Assisting
Here’s how this method works. A kilogram is 2.2 pounds. Let’s suppose that the doctor prescribes a pain reliever at 11 mg/kg/day in three equal doses. That means that for every kilogram of weight, our patient gets 11 mg per day, divided into three doses. Our patient weighs 55 pounds. First, you must convert pounds to kilograms:
Pounds : Kilograms Pounds/Kilograms
2.2 : 1 = 55 : x
2.2 x = 55
x = 25 kilograms
Our toddler weighs 25 kilograms. Now, we want to convert the doctor’s orders into a daily dosage.
mg medicine : Kilogram Patient Dose : Patient’s Weight
11 : 1 = x : 25
x = 275 mg
Now let’s divide that into three equal doses:
275/3 = 91.67
Our toddler gets three doses per day of 91.67 mg per dose.
You can see how complicated calculating dosages can become! It’s important that you familiarize yourself with metric prefixes and units of measurement. And, you must understand ratios and proportions in order to convert a doctor’s prescription into a safe and effective dose of medicine.
In the next segment, we’ll take a look at the actual administration of drugs using different drug routes. We will practice these techniques using a series of virtual labs. But fi rst, review what you’ve learned so far with the following Practice Exercise.

0203902LB05A-27-32 27-11
Lesson 27—Preparing and Administering Medications
Step 5 Practice Exercise 27-1
For questions 1 through 10, choose the best answer from the choices provided.
1. Which drug route involves putting a dose of medicine between the cheek and gums? _____a. Buccalb. Implantc. Sublinguald. Oral
2. Which drug route uses a gas or spray? _____a. Implantb. Inhalerc. Orald. Sublingual
3. What is the main advantage of administering medicine through a patch? _____a. Speed of absorptionb. You get different levels of medication, as needed.c. Targeted distributiond. You can’t forget to take the medication.
4. The prefi x “centi” means _____.a. one thousandthb. one hundredthc. tend. one hundred
5. The prefi x “deka” means _____.a. one hundredthb. one tenthc. tend. one hundred

27-12 0203902LB05A-27-32
Introduction to Medical Assisting
6. Using household measurements, four cups equals one _____.a. pintb. quartc. gallond. liter
7. The doctor has prescribed 600 mg of a medicine. On hand, you have tabs that are 200 mg each. How many tabs should you give the patient? _____a. Twob. Threec. One and a halfd. Six
8. A graph used to calculate body surface area is called a _____.a. parenteralb. nomogramc. ratiod. proportion
9. In the proportion 6 : 10 = 3 : 5 the extremes are _____.a. 6 and 10b. 10 and 3c. 3 and 5d. 6 and 5
10. In the proportion 6 : 10 = 3 : 5 the means are _________.a. 6 and 10b. 10 and 3c. 3 and 5d. 6 and 5

0203902LB05A-27-32 27-13
Lesson 27—Preparing and Administering Medications
For questions 11 through 13, calculate the correct medication dosages based on the information given.
11. Dr. Moore has ordered 1000 USP units of an antibiotic to be given to Mindy Maxwell, an adult, by injection. You have the antibiotic in a solution of 2000 USP units per mL. Using the proportional method of calculation, determine how much medication you will give Mindy.
On Hand Medication : Unit = Dose Ordered : Amount to be Given
___________________ : mL = ______________ : ___________________
_________ x = ____________ mL
x = __________ mL
Mindy Maxwell should receive ________ mL of the antibiotic.
12. Dr. Hansen has ordered a pain reliever for Tommy, a 9-year-old child. Tommy’s BSA is .8. Assuming that a normal adult with a BSA of 1.7 would receive 300 mL of this medication, determine how much medication you will give Tommy.
Child’s BSA : Adult’s BSA = Child’s Dose : Adult’s Dose
____________ : ____________ = x : _____________ mL
_________x = ______ × ____ _____ mL
_________x = _________ mL
x = ________ mL
Tommy should receive ________ mL of the pain reliever.

27-14 0203902LB05A-27-32
Introduction to Medical Assisting
13. Dr. Marino has ordered an antibiotic for Jesse, a 12-year-old, at 5 mg/kg/day in two equal doses. Jesse weighs 95 lbs. Using the body-weight method, determine how much antibiotic Jesse should receive in each dose.
First, convert Jesse’s weight from pounds to kilograms:
Pounds : Kilogram = Pounds : Kilogram
______ : ______ = ________: x
______x = _______
x = _________ kg
Then, using Jesse’s weight in kilograms, convert the doctor’s orders into a daily dosage:
mg medicine : Kilogram = Patient Dose : Patient’s Weight
______ mg : ______ = x : _______ kg
x = ________ × ___________
x = ________ mg
Now, divide by the number of doses per day:
________ mg/_____ doses per day = ________ mg per dose, _____ times per day
Jesse will receive ______ doses per day, with ______ mg in each dose.
Step 6 Review Practice Exercise 27-1
Check your answers with the Answer Key at the back of this instruction pack. Correct any mistakes you may have made.

0203902LB05A-27-32 27-15
Lesson 27—Preparing and Administering Medications
Step 7 Administering Medicines
So far, we’ve examined the common drug routes and looked at dosage calculation. In the next two segments, we’ll look at the actual administration of drugs. We’ll look at safe, effective practices. We’ll discuss how to document what you do. And you will get a chance to use virtual labs to watch the procedures discussed in this lesson.
Doctor’s Orders
The administration of medicine begins with the doctor. The doctor decides the medication and the drug route. If the doctor writes a prescription, the patient will go to a pharmacy to have it fi lled. In some cases, the doctor will dispense medication in the offi ce or clinic. This order may be a single order, the administration of a single dose of medicine. Or the doctor may ask for a stat order, the immediate administration of a medicine.
THEODORA WAGNER, M.D. WAGNER CLINIC
ROSSTOWN, IL 66618
For ____________________________________________ Date ___________
Rx:
May substitute? ________________________________ Refi lls: __________
Physician Name: _______________________________ DEA #: _________
F. Karkonen 1/11/08
Lexxel® 5 mg30PO QD
T.A. Wagner, M.D. (on file)
The doctor’s orders might be written on the patient’s records, or they might be a verbal order—a VO. If you, as a medical assistant are given a verbal order, you should repeat the order back to be certain that you correctly understood the order. Then, write the order down on the patient’s records for the provider to countersign later.
A routine or standing order refers to a medication administered on a regular basis to patients who come to the offi ce or clinic to receive that medication. For example, a patient may require monthly vitamin injections. Standing orders are good for as long as twelve months.

27-16 0203902LB05A-27-32
Introduction to Medical Assisting
Administration Guidelines
The following guidelines should always be followed when preparing and administering medicines, regardless of the drug route or medium. You should be familiar with all of these guidelines, and put these principles into practice at all times.
1. Always practice medical asepsis.
2. Work in a clean, well-lit environment with suffi cient work space.
3. Always check for allergies on the patient’s chart before administering medication.
4. Practice the “Six Rights” of drug administration. (See boxed material.)
5. Only administer drugs that are ordered by a medical professional who is licensed to do so.
6. Never administer medications if questions remain about the order.
7. Be familiar with any drug you administer. If necessary, research the drug in the PDR.
8. If the drug’s color, consistency or odor make it suspect, do NOT administer the drug.
9. If the physician gives a VO, write down the information. Do NOT trust the administration of a drug to memory.
10. Check any drug for an expiration date before administering it.
11. If you prepare a drug for administration, you should administer it yourself. Do not leave the medicine unattended. Dividing the task creates an opportunity for error.
12. When pouring a liquid medicine, set the measuring device on a fl at surface and observe the scale at eye level to ensure correct measurement. Measure at the meniscus—the outer surface of the liquid, which will have a concave shape due to surface tension. There should be no bubbles in liquid medication.
13. If dispensing the medication requires removing a cap, place the cap rim-up on a clean surface. Do not contaminate the cap by placing it rim-down.
14. Carefully follow all procedural steps for whatever type of medicine you are preparing.

0203902LB05A-27-32 27-17
Lesson 27—Preparing and Administering Medications
The “Six Rights” of Medicine AdministrationThe six “rights” are a list of actions developed for a medical assistant who is about to administer medication. This list will allow the MA to “triple check” her work and avoid the kind of errors that harm patients with incorrect medications or dosages.
The Right Patient Before administering any medication be certain that you have the right patient. In a hospital, the patient will have an identification bracelet. In the office or clinic, call the patient by name to ensure the patient’s identity.
The Right Drug To ensure that you are administering the correct drug, compare the written medical order or your notes for a VO to the label on the medicine. Triple check the drug—once when you select the drug from the storage area, once when you remove it from its container, and once more when you return the medication or dispose of the empty container.
The Right Route The medication must use the correct drug route to have the desired action. If parenteral injection is used, this means selecting the proper needle length to reach the desired tissue. We will discuss this in depth later in the lesson.
The Right Dose Safe, effective medication demands the correct dose to achieve the desired action. Too little of a medication can be ineffective. Too much can be harmful. If the dose on hand is not the dose ordered by the doctor, use the proportion method explained earlier in the lesson to determine the amount of medication needed. Have at least one other person verify your calculations to eliminate mistakes.
The Right Time The right time refers to the interval between doses. Failure to maintain the proper interval will result in an improper level of medication in the blood.
The Right Documentation Documentation is a vital communication between the medical assistant and the doctor. It’s a permanent written record of medication given to any patient.

27-18 0203902LB05A-27-32
Introduction to Medical Assisting
Documentation Guidelines
Once a medication has been administered, the medical assistant must document the information on the patient’s records. The record must include the date and time of the administration, the name of the drug, the dosage and the drug route, as well as patient data such as blood pressure, respiration and pulse. If there were any unusual reactions or complications arising from the administration of the drug, they should be recorded as well. Finally, the person administering the medication must sign the notes.
This information can be recorded in progress notes or on a medications fl owchart. Either way, the information should not be recorded until after the medication has been administered. A patient may refuse medication, in which case the doctor must be notifi ed and the reason for refusal must be recorded.
Adverse Reactions and Errors—When Something Goes Wrong
Any patient can have an adverse reaction to a medication. Patients are not always aware of their allergies, and might have no reason to expect a negative reaction. If the reaction is mild, it often occurs after leaving the offi ce or clinic.
Severe reactions usually happen immediately. Most adverse reactions occur from parenteral injections, not oral medication. The medical assistant must observe the patient and be prepared to respond to adverse reactions, including informing the doctor of any possible concerns. To ensure that this happens, the patient should be instructed to stay in the doctor’s offi ce for at least 15 minutes after a shot is administered.
The warning signs of an adverse reaction include hives, redness or itching at the site of the injection. These symptoms can progress to more dangerous symptoms like anaphylaxis. If a reaction occurs, ask the patient to lie down, which improves blood circulation. Take the patient’s pulse and blood pressure. Monitor the patient’s breathing. If the reaction is severe, the pulse will be rapid, the blood pressure will drop and the patient may have trouble breathing. Don’t leave the patient alone. Call for help and ask for the prescribing doctor.
The procedures listed in this lesson, along with the principles established in the “Six Rights” of medication administration, are designed to minimize errors. However, people are human, and human beings make mistakes. The most important thing to remember about errors is to report them as soon as they occur. Then monitor the patient to ensure that there is no adverse reaction to the error. Thankfully, most errors do not result in long-lasting harm to the patient.
Errors must be documented in the patient’s records, and the person who made the error must sign them. This information must include the date and time of the error, the nature of the error and a thorough account of the symptoms suffered by the patient. In addition, an incident report must be fi lled out and reviewed by the risk management specialist in the offi ce or clinic. This will allow management to review procedures and recommend changes to prevent further errors.

0203902LB05A-27-32 27-19
Lesson 27—Preparing and Administering Medications
The most common drug route is through the mouth.
Step 8 Administration Routes Without Injection
In this segment, we’ll look at each of the drug routes, and note the important techniques associated with each type of medication. We’ll also use virtual labs and your Procedure Guide Supplement 5 to learn and observe these same techniques. This section will focus on administration that a trained medical assistant is allowed to do. Implants, for example, are a minor surgical procedure, and would not be part of the MA’s duties.
Oral Medication
We’ll begin our look at the actual administration of medication with the most common drug route—oral medication. Because tablets, capsules and liquids are so easy to use, most doctors prescribe rather than administer these medications. Still, you should know how to prepare the various kinds of oral medication.
Oral medication is absorbed in the gastrointestinal system. Most oral medication comes in the form of a tablet or capsule, though liquids are available for children and adults who have trouble swallowing pills.
Preparing oral medication differs, depending on whether the medication is solid or liquid. To prepare solid medications pour the medication from the container into the container cap until you have the correct dosage. Then, pour the medication from the cap into a plastic or paper medication cup for the patient. Replace the cap on the container and return the medication to the storage cabinet.
Let’s practice this concept by viewing a virtual lab.
Virtual Lab 27-1 Obtain and Administer Oral Medication
1. Take out your Virtual Lab CD 5 and place it in the CD drive of your computer. (Most libraries offer free use of computers if you do not have one.)
2. At the Main Menu, select the Preparing and Administering Medications lab. This will take you to the Preparing and Administering Medications Menu.
3. Next, select Obtain and Administer Oral Medication. This will bring up the instructional video about dispensing oral medications.
4. Follow along with Virtual Lab 27-1 in your Procedure Guide Supplement 5 as you watch the video. Note that the text in the Procedure Guide often provides additional information than is shown in the virtual lab.
5. If possible, practice this procedure and watch the virtual lab until you can perform the procedure without reading the steps or watching the lab.

27-20 0203902LB05A-27-32
Introduction to Medical Assisting
The preparation of liquid medication requires a few additional steps. You may recall that some liquid medicines are a suspension—solid medication suspended in a liquid. It is especially important to shake suspensions before dispensing them in order to ensure a uniform dose.
Another consideration in the administration of liquid medicines is measuring the dose. The medical assistant should pour the correct dosage into a plastic measuring cup or draw it with an eyedropper. If the liquid is poured into a measuring cup, be certain to set the cup on a fl at surface. Pour the correct dosage, careful to look at eye level. Remember, the liquid’s surface will be curved. The lowest point of that surface, the meniscus, is the proper place to read the level.
Take a moment to read Steps to Take 27-1 and compare it with the virtual lab you just completed. Note any differences between administering solid and liquid oral medicines.
Steps to Take 27-1 Obtain and Administer Liquid Oral Medication 1. Turn to Steps to Take 27-1 in your Procedure Guide 5.
2. Read the Steps to Take to obtain and administer a liquid oral medication.
3. Review the procedure until you can describe the procedure without reading the steps.
Transdermal medication, topical medication and rectal/vaginal medications are rarely administered in the offi ce or clinic. Still, the medical assistant should know the proper techniques for administering each.
Transdermal Medications
Before applying a transdermal patch, you must always remove any old patch. Be careful not to touch the inside of the old patch to avoid inadvertently absorbing any remaining medication. Fold the sticky sides of the patch together, and discard.
To prepare an area for the patch, clip any hair, but do not shave. Try to place the new patch in a different area than the previous patch. Patches can be applied to the upper arms, chest or back. Gently wash and dry the target area. Then apply the new patch.
Topical Medication
Topical medications such as ointments and creams are occasionally administered in the offi ce or clinic. Always begin administration by washing your hands. Then gently wash the patient’s affected area. If the skin area is broken, use proper aseptic techniques, including gloves. If the target area is to be bandaged, apply the medication to the bandage, not the skin. If applying the medication directly to the skin, apply it with a clean tongue blade or a fresh cotton swab.
Patches can be applied to the upper arm, chest or back.

0203902LB05A-27-32 27-21
Lesson 27—Preparing and Administering Medications
Other topical medications include eye and ear drops. These are often administered in the offi ce or clinic, and as a medical assistant, you will surely have opportunities to perform these topical applications. Let’s look at two virtual labs that will prepare you for this task.
Virtual Lab 27-2 Demonstrate Eye Drop Instillation
1. Take out your Virtual Lab CD 5 and place it in the CD drive of your computer. (Most libraries offer free use of computers if you do not have one.)
2. At the Main Menu, select the Preparing and Administering Medications lab. This will take you to the Preparing and Administering Medications menu.
3. Next, select Demonstrate Eye Drop Instillation. This will bring up the instructional video about instilling eye drops.
4. Follow along with Virtual Lab 27-2 in your Procedure Guide Supplement 5 as you watch the video. Note that the text in the Procedure Guide often provides additional information than is shown in the virtual lab.
5. If possible, practice this procedure and watch the virtual lab until you can perform the procedure without reading the steps or watching the lab.
Virtual Lab 27-3 Demonstrate Ear Drop Instillation
1. Take out your Virtual Lab CD 5 and place it in the CD drive of your computer. (Most libraries offer free use of computers if you do not have one.)
2. At the Main Menu, select the Preparing and Administering Medications lab. This will take you to the Preparing and Administering Medications menu.
3. Next, select Demonstrate Ear Drop Instillation. This will bring up the instructional video about instilling ear drops.
4. Follow along with Virtual Lab 27-3 in your Procedure Guide Supplement 5 as you watch the video. Note that the text in the Procedure Guide often provides additional information than is shown in the virtual lab.
5. If possible, practice this procedure and watch the virtual lab until you can perform the procedure without reading the steps or watching the lab.
Rectal and Vaginal Medications
A patient who is vomiting might not be able to keep down oral medication. In such a case, the doctor may recommend rectal medication, which can be in the form of a liquid, cream or suppository. Suppositories are usually refrigerated. When administering a rectal suppository, either the MA or the patient must insert the suppository past the sphincter so that it isn’t eliminated immediately. A lubricant can be used to assist the process, though the lubricant must be water-based, not petroleum-based.

27-22 0203902LB05A-27-32
Introduction to Medical Assisting
Vaginal medications are also available as suppositories or as ointments. Vaginal suppositories are much easier to administer and will probably not require a lubricant. Some birth control medications, such as spermicide, are also administered vaginally.
Before we dive into the study of administering medications by injection, review the information you’ve learned in the last few sections with the following Practice Exercise.
Step 9 Practice Exercise 27-2
For questions 1 through 10, answer the question or complete the sentence using the space provided.
1. The administration of a single dose of medicine is called a _________________ _________________.
2. A stat order is ______________________________________________________________.
3. A routine or standing order refers to _____________________________________________________________________________________________________________________.
4. In three words or less, summarize each of the 14 administration guidelines that medical assistants should follow when preparing and administering medications. 1. __________________________________________________________________________ 2. __________________________________________________________________________ 3. __________________________________________________________________________ 4. __________________________________________________________________________ 5. __________________________________________________________________________ 6. __________________________________________________________________________ 7. __________________________________________________________________________ 8. __________________________________________________________________________ 9. __________________________________________________________________________10. __________________________________________________________________________11. __________________________________________________________________________12. __________________________________________________________________________13. __________________________________________________________________________14. __________________________________________________________________________

0203902LB05A-27-32 27-23
Lesson 27—Preparing and Administering Medications
5. The lowest surface point of a liquid, which has a concave shape due to surface tension, is called the _________________.
6. In three words, list each of the “Six Rights” of administering medication.1. __________________________________________________________________________2. __________________________________________________________________________3. __________________________________________________________________________4. __________________________________________________________________________5. __________________________________________________________________________6. __________________________________________________________________________
7. What fi ve pieces of information must the MA document in the patient’s records whenever she administers a medication? 1. __________________________________________________________________________2. __________________________________________________________________________3. __________________________________________________________________________4. __________________________________________________________________________5. __________________________________________________________________________
8. Where in the patient’s records is this information recorded?
____________________________________________________________________________
9. A mild reaction to a medication will usually occur __________________ _________________ ________________ ___________ _______________________, but a severe reaction usually happens ______________________________________.
10. What is the most important thing to remember about medication errors? __________ _______________ _________________ _____________________________

27-24 0203902LB05A-27-32
Introduction to Medical Assisting
For questions 11 through 25, write the corresponding letter of each administration route from the following word bank that would be used for the drug forms listed. Some drug forms may have more than one administration route, and administration routes may be used more than once.
Administration Routesa. Oral b. Transdermal c. Buccal d. Topicale. Inhaler f. Rectal g. Vaginal h. Sublinguali. Implant j. Pump k. Injection
Drug Forms:
11. _____ Aspirin tablet
12. _____ Antibacterial ointment
13. _____ Ear drops
14. _____ Throat lozenge
15. _____ Nitroglycerin
16. _____ Suppository
17. _____ Asthma vapor medication
18. _____ Cold capsule
19. _____ Birth control
20. _____ Insulin
21. _____ Suspension
22. _____ Nicotine patch
23. _____ Cough syrup
24. _____ Eye drops
25. _____ Flu shot

0203902LB05A-27-32 27-25
Lesson 27—Preparing and Administering Medications
Step 10 Review Practice Exercise 27-2
Check your answers with the Answer Key at the back of this instruction pack. Correct any mistakes you may have made.
Step 11 The Injection Route
Parenteral injections are a common offi ce or clinic procedure. There are advantages to injections, including the ability to bypass the gastrointestinal system, the speed of absorption and the accuracy and consistency of medication levels available because of that speed. Medications like insulin can’t be delivered orally, because insulin is made inactive by gastrointestinal e nzymes.
Because giving an injection is a learned skill, injections are often given at the doctor’s offi ce or at the clinic by an experienced professional. Before we view the virtual labs associated with parenteral medication, let’s review the equipment that makes this kind of medication possible.
Equipment
The most important piece of equipment in administering injections is the syringe. The syringe is the needle and plunger assembly that delivers the medicine. There are many types of syringes, but they share certain parts. The tip is the small hole where the needle is inserted, and through which the medicine will fl ow. The needle is a hollow metal tube of varying length, sharp enough to pierce the skin. The barrel of the syringe is the tube the MA holds when giving the injection. Inside the barrel is a plunger, which forces the medicine out through the tip and into the needle when the plunger is pushed. The MA pushes the plunger at the fl at end, called the fl ange.
Medication used in injections may be stored in several ways. It may be stored in an ampule—a small glass fl ask with a fragile top that breaks free under pressure. A vial is a small glass bottle with a rubber stopper through which the needle draws medication. Some syringes even come prefi lled with a standard dose of medication.
The needles themselves vary according to the needs of the injection. Some injections go skin deep, others go down into the muscle tissue. Needles have two variables. The lumen is the needle’s opening. (Remember—needles are hollow.) The size of the lumen is called the needle’s gauge. Needles also vary by length. A longer needle is necessary, for example, to get down into muscle tissue. The slanted end of the needle is called the bevel. The bevel allows the needle to come to a point for easier insertion into the skin.
Now that you know the parts of a syringe, let’s turn to Procedure Guide 5 to review the procedure to withdraw medication using a syringe.
Lumen
Bevel
Needle
Tip
Needle Hub
Barrel
Plunger
Flange
Shaft
The parts of a syringe

27-26 0203902LB05A-27-32
Introduction to Medical Assisting
Steps to Take 27-2 Withdraw Medication from an Ampule 1. Turn to Steps to Take 27-2 in your Procedure Guide 5.
2. Read the Steps to Take to withdraw medication from an ampule.
3. Review the procedure until you can describe the procedure without reading the steps.
Not all injection medications come from ampules. Next, read Steps to Take 27-3 in your Procedure Guide 5 to learn how to withdraw medication from a vial.
Steps to Take 27-3 Withdraw Medication from a Vial 1. Turn to Steps to Take 27-3 in your Procedure Guide 5.
2. Read the Steps to Take to withdraw medication from a vial.
3. Review the procedure until you can describe the procedure without reading the steps.
Injection Angle of Entry
Choosing the proper needle depends on the angle of entry into the skin. There are three primary angles of entry, including intradermal, subcutaneous and intramuscular.
Intradermal Injections
Intradermal injections are administered at a 10 degree angle to ensure that the medication stays in the dermal layer. Intradermal injections are often used for allergy tests. A small amount of a suspected allergen is injected just below the skin with the bevel of the needle facing up. The fl uid forms a small bubble called a wheal. If the wheal swells, the patient is allergic to the suspected allergen. Common sites for intradermal injections include the upper arm, inner forearm, upper back below the shoulder blades and the pectoral area of the chest. Let’s look at another virtual lab to put this information into practice! Many allergies can be diagnosed by
using an intradermal injection.

0203902LB05A-27-32 27-27
Lesson 27—Preparing and Administering Medications
Virtual Lab 27-4 Administer an Intradermal Injection
1. Take out your Virtual Lab CD 5 and place it in the CD drive of your computer. (Most libraries offer free use of computers if you do not have one.)
2. At the Main Menu, select the Preparing and Administering Medications lab. This will take you to the Preparing and Administering Medications menu.
3. Next, select Administer Intradermal Injection. This will bring up the instructional video about performing an intradermal injection.
4. Follow along with Virtual Lab 27-4 in your Procedure Guide Supplement 5 as you watch the video. Note that the text in the Procedure Guide often provides additional information than is shown in the virtual lab.
5. Review this procedure and watch the virtual lab until you can explain the procedure without reading the steps or watching the lab.
Subcutaneous Injections
Subcutaneous injections are given at a 45 degree angle, into the layer of fatty tissue just below the skin. This kind of injection is given when the medication might irritate muscle tissue or a slower rate of absorption is desired. Some vaccinations and insulin injections are administered using this method of injection. Common injection sites have plenty of fatty tissue, including the abdomen, the top of the legs and the back just below the shoulder blades.
Subcutaneous injections are administered into fatty tissue, not into blood vessels. To avoid blood vessels, the injection should be aspirated: Before injecting, the plunger should be pulled back a little to ensure the needle hasn’t found a vessel. If the needle is in a vessel, blood will enter the syringe. Intradermal injections do not need to be aspirated, since large blood vessels at the skin’s surface are visible and can be avoided. Let’s watch another virtual lab to put these concepts into practice.
Subcutaneous injection sites must have a layer of fatty tissue.

27-28 0203902LB05A-27-32
Introduction to Medical Assisting
Virtual Lab 27-5 Administer a Subcutaneous Injection
1. Take out your Virtual Lab CD 5 and place it in the CD drive of your computer. (Most libraries offer free use of computers if you do not have one.)
2. At the Main Menu, select the Preparing and Administering Medications lab. This will take you to the Preparing and Administering Medications menu.
3. Next, select Administer a Subcutaneous Injection. This will bring up the instructional video about performing a subcutaneous injection.
4. Follow along with Virtual Lab 27-5 in your Procedure Guide Supplement 5 as you watch the video. Note that the text in the Procedure Guide often provides additional information than is shown in the virtual lab.
5. Review this procedure and watch the virtual lab until you can explain the procedure without reading the steps or watching the lab.
Insulin: A Special Kind of InjectionPatients with Type I diabetes must take insulin two or three times a day by injection. That is too many injections to give in the office or clinic. A diabetic with Type I must learn to test his glucose levels and self-administer injections without the assistance of a doctor or MA.
The doctor will prescribe the proper dosage; an amount arrived at with considerable effort and observation. Thereafter, the patient is responsible for making injections. Insulin is administered subcutaneously, usually in the upper arms or legs, abdomen or buttocks. Patients must rotate injection sites often.
The medical assistant may be called upon to instruct the patient in insulin injection procedures. Most diabetics use two types of insulin. Regular insulin is clear and works within one half to one hour after injection. The effects of long-acting insulin, a cloudy substance, can last all day. Both insulins are administered in one dose. Regular insulin should be drawn up in the syringe first, followed by the long-acting insulin so there is no chance that any of the long-acting insulin can contaminate the vial of regular insulin. More serious problems can occur if the regular insulin is contaminated than the long-lasting insulin.
Occasionally, there can be too much insulin in the blood stream. This is called insulin reaction. Patients must be taught the symptoms of insulin reaction, which include rapid breathing, cold skin, sweating, dizziness, headaches and extreme hunger, and take prompt action by ingesting sugar or glucose.
While instructing a patient on the proper technique for insulin injection, the MA must also instruct the patient on the dangers of insulin reaction and the proper response.
Glucose test kit

0203902LB05A-27-32 27-29
Lesson 27—Preparing and Administering Medications
Intramuscular injections require skill to avoid damaging nerves,
blood vessels and tissue.
Intramuscular Injections
Intramuscular injections are given straight down into the muscle tissue, requiring a long, fairly wide needle to reach and penetrate the muscle. This sort of injection has a quick absorption. The intramuscular site should be chosen according to the amount of medication being delivered. A small muscle can’t absorb a large volume of medication. After the injection has been made, gently massaging the area helps the muscle absorb the medication.
Like the subcutaneous injection, the intramuscular injection must be aspirated to be certain that the injection is not going directly into a blood vessel.
One common site for intramuscular injections is the deltoid muscle of the upper arm. The site provides comfort and modesty for the patient. Because the deltoid is small, it should be chosen for injections of 1 mL or less. It does not require as long or thick a needle as other sites. However, children should not be given injections in this site. The deltoid of a child is too small.
A second common site is the dorsogluteal site. This is a deep injection site requiring a long, thick needle. Injections in the gluteus maximus must be made in the upper portion of the buttock to avoid striking the sciatic nerve or blood vessels. This site can absorb up to 3 mL of fl uid.
A third common site is the ventrogluteal site. This site, on the side of the hip, has few nerves or large blood vessels. This is the least used of the intramuscular sites.
Let’s take a closer look at intramuscular injections.The three main places where insulin injections are given
deltoiddorso-gluteal
ventrogluteal

27-30 0203902LB05A-27-32
Introduction to Medical Assisting
Virtual Lab 27-6 Administer an Intramuscular Injection
1. Take out your Virtual Lab CD 5 and place it in the CD drive of your computer. (Most libraries offer free use of computers if you do not have one.)
2. At the Main Menu, select the Preparing and Administering Medications lab. This will take you to the Preparing and Administering Medications menu.
3. Next, select Administer Intramuscular Injection. This will bring up the instructional video about administering an injection to a muscle.
4. Follow along with Virtual Lab 27-6 in your Procedure Guide Supplement 5 as you watch the video. Note that the text in the Procedure Guide often provides additional information than is shown in the virtual lab.
5. Review this procedure and watch the virtual lab until you can explain it without reading the steps or watching the lab.
Some medications can be irritating to the skin. An MA may use either the air-lock or the Z-track method of preventing medication from leaking back into the subcutaneous tissue. The air-lock method involves taking in a small amount of air with the medication. When the injection is made, the air will rise above the liquid and go in last, creating an air-lock that keeps the medication from leaking.
To accomplish the Z-track method, the medical assistant slides the skin of the target site to the side and holds it in place while the injection is made. After the medication is administered, the MA waits ten seconds and then removes the needle followed by immediately releasing the skin. The skin slides back laterally, blocking the needle path and preventing leakage.
Learning to stop the leakage associated with intramuscular injections is an important skill. Let’s take a closer look at the Z-track method of injection.
Virtual Lab 27-7 Administer an Intramuscular Injection by Z-track Method
1. Take out your Virtual Lab CD 5 and place it in the CD drive of your computer. (Most libraries offer free use of computers if you do not have one.)
2. At the Main Menu, select the Preparing and Administering Medications lab. This will take you to the Preparing and Administering Medications menu.
3. Next, select Administer an Intramuscular Injection by Z-track Method. This will bring up the instructional video about administering an injection to a muscle using the Z-track method.
4. Follow along with Virtual Lab 27-7 in your Procedure Guide Supplement 5 as you watch the video. Note that the text in the Procedure Guide often provides additional information than is shown in the virtual lab.
5. Review this procedure and watch the virtual lab until you can explain it without reading the steps or watching the lab.

0203902LB05A-27-32 27-31
Lesson 27—Preparing and Administering Medications
Immunizations
One special kind of injection is the immunization, also called vaccination. Experienced clinical medical assistants can administer immunizations in doctors’ offi ces and clinics. You learned about immunizations in a previous lesson, so we’ll discuss only administration of vaccines here.
Immunizations, or vaccinations, are doses of vaccines that stimulate the body to add antibodies to the immune system to help fi ght diseases. They can be either live attenuated vaccines or inactivated vaccines. Live attenuated vaccines, which scientists create in a laboratory using live viruses or bacteria, are more effective than inactivated vaccines and usually work with only one dose. Inactivated vaccines are made from viruses or bacteria that are no longer alive. The closer in nature an inactivated vaccine is to its harmful origins, the more effective it will be.4
Children, teens and even adults are immunized according to the vaccination schedules shown in the Patient Exam lesson. The child and adolescent charts of most vaccines list a number, or footnote, after the vaccine name. These numbers refer you to the footnotes at the bottom of the page that provide additional, important details about the timing of vaccines.
Vaccines can be given via oral, intranasal, transdermal, puncture or injection routes. As with any medications, there is some risk involved with vaccinations. Common negative reactions include tenderness and swelling at the injection site, a rash or fever. Yet myths about immunizations persist. Some believe that the vaccines cause SIDS (Sudden Infant Death Syndrome) or autism, though no link between immunization and these conditions can be shown scientifi cally by U.S. researchers. Some believe that the diseases that vaccines are meant to cure have been eradicated, but the fact is, these diseases still exist. Though in rare cases, vaccines can cause severe allergic reactions, even seizures, the risk associated with these adverse reactions is less than the risk associated with the disease the vaccines are meant to prevent.
Because of these myths and the recent rise in lawsuits based on vaccine administration, parents must be educated about each vaccine and its possible side effects before their children receive the immunization. It’s important to have the parent acknowledge in writing that he has read the information and gives permission for the child to have the vaccine. This protects you, the doctor and the facility should any legal issues arise. Also, the child’s vaccination record should be maintained meticulously and retained throughout the child’s life.
Syringe Disposal
There is a health risk associated with the handling of used syringes. Anyone who is exposed to the used syringe will be in danger of contamination. Special steps are required when disposing of used syringes to ensure that others aren’t infected with diseases ranging from hepatitis B and syphilis to Rocky Mountain spotted fever and HIV.
As you know, used syringes must be disposed of in rigid, puncture-resistant sharps containers, manufactured for that purpose. Do not recap a needle before disposing of it—most contaminations happen when recapping is attempted! If the sharps container is used and disposed of safely, the risk of syringe contamination is greatly reduced.
As you’ve seen, injections can be an excellent method of drug delivery, but only when they’re done correctly.

27-32 0203902LB05A-27-32
Introduction to Medical Assisting
Patient Education: The Responsibility of the Medical Assistant
Of all the medical assistant’s responsibilities regarding the preparation and administration of drugs, the most important may be educating the patient. For a drug to be used safely and effectively, the recommended dosage must be followed. Unfortunately, many patients follow the “more is better” notion. Others have fast-paced lifestyles that make it diffi cult to maintain the intervals between doses.
But maintaining a consistent and proper level of medication in the bloodstream is critical to the success of any drug treatment. Educating patients is the key to enlisting their enthusiastic cooperation in their own therapy.
Let’s wrap up this lesson with a Practice Exercise.
Step 12 Practice Exercise 27-3
For questions 1 through 6, choose the best answer from the choices provided.
1. The slanted part of a syringe’s needle is called a(n) _____.a. ampuleb. bevelc. gauged. lumen
2. The needle’s gauge and length can vary based on the _____.a. size of the bevelb. amount of medication to be injectedc. type of tissue and the injection sited. the depth of the dermal layer
3. Which of the following injections does NOT need to be aspirated? _____a. Intramuscularb. Subcutaneousc. Intradermald. Z-track

0203902LB05A-27-32 27-33
Lesson 27—Preparing and Administering Medications
4. Most contamination accidents during syringe disposal occur when _____.a. placing the needle in sharps containersb. recapping the needlec. detaching the needled. syringes are placed in open trash containers
5. The correct response to insulin reaction is _____.a. a shot of insulinb. a sugar-free dietc. an immediate intake of sugar or glucosed. consistent exercise
6. A method used to ensure that you have not penetrated a blood vessel is called _____.a. aspirationb. air-lockc. Z-trackd. intramuscular
7. Label the syringe diagram below.
Lumen
Bevel
Needle
Tip
Needle Hub
Barrel
Plunger
Flange
Shaft

27-34 0203902LB05A-27-32
Introduction to Medical Assisting
For questions 8 through 10, identify the sites of injection, the layer of tissue the medication is administered to, the type of needle and angle of insertion of each type of injection, and explain why that specifi c needle and angle are used.
8. IntradermalInjection sites: ______________________________________________________Layer of tissue: _____________________________________________________Type of needle: ______________________________________________________Angle of insertion: ___________________________________________________Reason for needle type and angle: __________________________________________________________________________________________________________
9. SubcutaneousInjection sites: ______________________________________________________Layer of tissue: _____________________________________________________Type of needle: ______________________________________________________Angle of insertion: ___________________________________________________Reason for needle type and angle: __________________________________________________________________________________________________________
10. IntramuscularInjection sites: _______________________________________________________Layer of tissue: ______________________________________________________Type of needle: ______________________________________________________Angle of insertion: ___________________________________________________Reason for needle type and angle: __________________________________________________________________________________________________________

0203902LB05A-27-32 27-35
Lesson 27—Preparing and Administering Medications
For questions 11 through 12, answer the following questions using the space provided.
11. In fi ve words or less, summarize each step to properly withdraw medication from an ampule. 1. __________________________________________________________________________ 2. __________________________________________________________________________ 3. __________________________________________________________________________ 4. __________________________________________________________________________ 5. __________________________________________________________________________ 6. __________________________________________________________________________ 7. __________________________________________________________________________ 8. __________________________________________________________________________ 9. __________________________________________________________________________10. __________________________________________________________________________11. __________________________________________________________________________12. __________________________________________________________________________13. __________________________________________________________________________
12. Describe how the Z-track injection method differs from the basic intramuscular injection. ________________________________________________________________________________________________________________________________________________________________________________________________________________________________________________________________________________________________________________________________________________________________________________________________________________________________________________________________________________________________________________________________________________________________________________________________________________________________________________

27-36 0203902LB05A-27-32
Introduction to Medical Assisting
For questions 13 through 20, choose the best answer from the choices provided.
13. Immunizations and insulin are usually administered _____.a. subcutaneouslyb. into musclec. intradermallyd. into a blood vessel
14. Vaccines created in a laboratory using live viruses or bacteria are called _____.a. live attenuatedb. activec. passive acquiredd. inactivated
15. Vaccines that are made from viruses or bacteria that are no longer alive are called _____.a. live attenuatedb. activec. passive acquiredd. inactivated
16. There is _____ scientifi c evidence that immunization can cause SIDS and autism.a. someb. littlec. a lot ofd. no
17. In rare cases, vaccinations can cause _____.a. autismb. epilepsyc. AIDSd. an allergic reaction
18. Parents must receive written information about a vaccine before it is administered and sign a release authorizing administration of the vaccine. This is due to _____.a. an increase in SIDS deathsb. our litigious societyc. common reactions such as swelling and tenderness at the injection sited. the dangers of vaccines

0203902LB05A-27-32 27-37
Lesson 27—Preparing and Administering Medications
19. Often patients subscribe to the _____ theory when taking medications.a. “take it when you feel bad”b. “fi t the dosage into my schedule”c. “it’s the doctor’s job, not mine”d. “more is better”
20. What is the best way to enlist the patient’s cooperation in maintaining a consistent and proper level of medication? _____a. Call him the fi rst few days to remind him.b. Have the patient sign a release form.c. Educate the patient.d. Humor the patient and do it his way.
Step 13 Review Practice Exercise 27-3
Check your answers with the Answer Key at the back of this instruction pack. Correct any mistakes you may have made.
Step 14 Lesson Summary
In this lesson, you were introduced to drug dosages, drug routes and methods of administering drugs. Dosages are measured using the mathematic principles of ratio and proportion. The dosage size depends, in part, on the method of delivery—the drug route. Drug routes include transdermal, topical, buccal, sublingual, rectal, vaginal, inhaler, oral, implant, pumps and parenteral medications.
Parenteral medication is delivered through a syringe. Shots are classifi ed by their angle of entry and by the location of administration, including intradermal, subcutaneous and intramuscular. You watched demonstrations of parenteral delivery, and are well versed on the procedure for each. You’re ready to begin your hands-on training in your new career!
You’ve made it! You’ve stayed the course, and you have reached your goal! Take the following quiz to test your knowledge of the material in this lesson. Then, when you’re ready, move on to Lesson 28—your fi nal exam! You’re on your way to a profi table, enjoyable and important new career. And as you enter the working world of a medical assistant, keep in touch and let us know how you’re doing.
Good luck on the exam!

27-38 0203902LB05A-27-32
Introduction to Medical Assisting
Step 15 Mail-in Quiz 27
Follow the steps to complete the quiz.
a. Be sure you’ve mastered the instruction and the Practice Exercises that this quiz covers.
b. Mark your answers on your quiz. Remember to check your answers with the lesson content.
c. When you’ve fi nished, transfer your answers to the Scanner Answer Sheet included. Use only blue or black ink on your Scanner Answer Sheet.
d. Important! Please fi ll in all information requested on your Scanner Answer Sheet or when submitting your quiz online.
e. Submit your answers to the school via mail, fax or, to receive your grade immediately, submit your answers online at www.uscareerinstitute.edu.
Mail-in Quiz 27
For questions 1 through 25, choose the best answer from the choices provided. Each question is worth 2.5 points.
1. Which drug route involves putting a dose of medicine under the tongue? _____a. Buccalb. Implantc. Sublinguald. Oral
2. Which drug route uses medication delivered in a cocoa butter base for easy melting? _____a. Topicalb. Sublingualc. Implantsd. Rectal
3. Which drug route does NOT use the mouth as a point of entry? _____a. Transdermalb. Buccalc. Sublinguald. Oral
0203902LB05A-27-32 27-39
Lesson 27—Preparing and Administering Medications
4. If you require three parts of ingredient A to every one part of ingredient B, the ratio between the two ingredients is expressed by _____.a. 3 : 1b. 1/3c. 3x :1 mLd. 3 × 1
5. Is the following proportion valid? 4:1 = 8:3 _____a. Yesb. No
6. Two dekagrams is how many grams? _____a. 200 gb. .2 gc. 20 gd. .02 g
7. _____ is a metric measurement for liquid.a. Literb. Gramc. Meterd. Kilo
8. Using household measurements, two tablespoons equals a(n) _____.a. teaspoonb. pintc. ounced. cup
9. In the proportion 5 : 10 = 2 : 4, the extremes are _____.a. 5 and 4b. 5 and 10c. 5 and 2d. 10 and 2

27-40 0203902LB05A-27-32
Introduction to Medical Assisting
10. In the proportion 5 : 10 = 2 : 4, the product of the extremes is _____.a. 9b. 12c. 1/2d. 20
11. When dosing for children, dosages must vary according to the individual because _____.a. it is calculated as a percentage of an adult doseb. some children take medications better than othersc. the dose is based on the child’s date of birthd. children do not develop at the same rate
12. Which of the following is the most accurate tool for measuring a child’s dosage? _____a. The Young’s, Clark’s and Fried’s rulesb. A nomogramc. The child’s body weightd. A formula used in combination with a nomogram
13. A nomogram calculates the precise dosage based on the _____ of a child.a. body surface areab. heightc. weightd. symptoms
14. The proper procedure to carry out a VO involves _____.a. repeating the order back to be certain that you correctly understoodb. having a second person available to act as a witness of the orderc. writing down the order on the patient’s records for the provider to
countersign laterd. repeating the order back, then immediately writing it down on the
patient’s chart

0203902LB05A-27-32 27-41
Lesson 27—Preparing and Administering Medications
15. Which of the following choices is NOT one of the fourteen guidelines you should always follow when administering medication? _____a. Practice the “Six Rights” of drug administration.b. Never administer medications if questions remain about the order.c. Be familiar with any drug you administer. If necessary, research the
drug in the PDR.d. If the physician gives a VO, carry it out as soon as possible, then write
down the information in the patient’s chart.
16. You must check your work three times before administering a drug because _____.a. this will allow you to avoid the kind of errors that harm patients with
incorrect medications or dosagesb. all drugs have an expiration date that is found on the drug’s labelc. all drugs become poisonous when they have passed their expiration
date and must be disposed of properly d. drug inventories in the clinic must be rotated so that the oldest drugs
are dispensed before newer batches
17. The warning signs of an adverse reaction include _____.a. rapid pulse, decreased blood pressure and trouble breathingb. respiratory failurec. seizuresd. hives, redness or itching at the site of the injection
18. When administering an oral medication, remember to _____.a. pour the medication into a med cup before giving to the patientb. calculate the dosage using an adult nomogramc. look up any drugs in Young’s, Clark’s and Fried’s rules that are
unfamiliar to youd. check the drug’s label twice for the expiration date
19. When removing an old transdermal patch, protect yourself from inadvertently absorbing any remaining medication by _____.a. having the patient remove the old patchb. being careful not to touch the inside of the old patchc. only applying patches to sites that are easy to reachd. rolling the patch into a tube before disposal

27-42 0203902LB05A-27-32
Introduction to Medical Assisting
20. When applying a topical ointment, _____.a. if the skin area is broken, use proper aseptic techniques, including glovesb. if the target area is to be bandaged, apply the medication to the skin, not
the bandagec. if applying the medication directly to the skin, apply it with a gloved fi ngerd. cut the hair in the affected area fi rst
21. Assist patient to supine position. Instruct patient to tilt the head back and turn head toward the affected organ. Place the heel of the hand holding the dropper against the patient’s forehead and over the organ to be medicated. Without touching any part of the organ with the dropper, gently drop the prescribed number of drops into the appropriate site. These are some of the procedures to follow when _____.a. administering ear dropsb. taking a tympanic temperaturec. administering eye dropsd. administering nose drops
22. Assist patient into lateral position with affected organ positioned upward. Put on gloves. Draw appropriate amount of medicine into the dropper. Pull the auricle of the organ up and back. Place hand holding the dropper against the patient’s head. Gently drop the correct number of drops into the appropriate site. Do not touch any part of the organ with the dropper. These are some of the steps to _____.a. administer ear dropsb. take a tympanic temperaturec. administer eye dropsd. administer nose drops

0203902LB05A-27-32 27-43
Lesson 27—Preparing and Administering Medications
23. How do you keep air out of the syringe when withdrawing medication from a vial? _______a. First, draw up an amount of air into the syringe that will be equal to the
amount of medicine that you plan to withdraw from the vial. After the needle is in the vial, slowly fi ll the barrel of the syringe with the prescribed amount of medicine. Be careful not to have any dead air space left in the barrel before you remove the needle from the vial. To remove air bubbles, hold the syringe vertically with the needle up. Tap the outside of the barrel with your fi nger next to the air bubble. When it moves to the top, use the syringe plunger to gently expel it from the unit into the vial.
b. First, draw up an amount of air into the syringe that will be equal to the amount of medicine that you plan to withdraw from the vial. After the needle is in the vial, slowly inject the air from the syringe into the vial. Keeping the needle in the solution, fi ll the barrel of the syringe with the prescribed amount of medicine. Be careful not to have any dead air space left in the barrel after you have removed the needle from the vial. To remove air bubbles, hold the syringe horizontally with the needle away from you. Tap the outside of the barrel with your fi nger next to the air bubble. When it moves to the top, use the syringe plunger to gently expel it from the unit into the vial.
c. First, draw up an amount of air into the syringe that will be equal to the amount of medicine that you plan to withdraw from the vial. After the needle is in the vial, slowly inject the air from the syringe into the vial. Keeping the needle in the solution, fi ll the barrel of the syringe with the prescribed amount of medicine. Be careful not to have any dead air space left in the barrel before you remove the needle from the vial. To remove air bubbles, hold the syringe vertically with the needle up. Tap the outside of the barrel with your fi nger next to the air bubble. When it moves to the top, use the syringe plunger to gently expel it from the unit into the vial.
d. First, draw up an amount of air into the syringe that will be equal to the amount of medicine that you plan to withdraw from the vial. After the needle is in the vial, slowly fi ll the barrel with the air from the vial. Moving the needle into the solution, fi ll the barrel of the syringe with the prescribed amount of medicine. Be careful not to have any dead air space left in the barrel before you remove the needle from the vial. To remove air bubbles, hold the syringe vertically with the needle up. Tap the outside of the barrel with your fi nger next to the air bubble. When it moves to the top, use the syringe plunger to gently expel it from the unit into the vial.
24. A(n) _____ is the small bubble under the skin caused by an intradermal injection.a. whealb. lumenc. noduled. ampule

27-44 0203902LB05A-27-32
Introduction to Medical Assisting
25. Vaccines made in a laboratory using live pathogens are _____ than a vaccine made from dead pathogens, and _____.a. more effective, require a booster shot in six monthsb. less effective, require more than one dosec. more effective, can usually be administered in one dosed. less effective, can usually be administered in one dose
For questions 26 through 29, match the type of injection to the angle at which it must be administered. Some answers may not be used, and others may be used more than once. Each question is worth 2.5 points.
26. _____ Intradermal
27. _____ Subcutaneous
28. _____ Intramuscular
29. _____ Insulin
For questions 30 through 33, match the term related to diabetes treatment with its description. All answers will be used once. Each question is worth 2.5 points.
30. _____ Long-acting insulin
31. _____ Glucose
32. _____ Regular insulin
33. _____ Self-administered injection
For questions 34 through 37, answer a for True and b for False in response to the following statements regarding patient education. Each question is worth 2.5 points.
34. Parents must sign a written authorization before their child is given a vaccination. _____
35. Patient education is a responsibility that should be shared by the physician and the nurse. _____
36. Maintaining a consistent level of medication in the bloodstream is critical to the success of any drug treatment. _____
37. The easiest way to have patients comply with a drug regimen is to have them take all of their medication for the day in one dose in the morning. _____
a. 90b. 10c. 30d. 45
a. Works within one half to one hour after injectionb. Administered as an anecdote to insulin reactionc. Administered in one dose and can last all dayd. Administered subcutaneously

0203902LB05A-27-32 27-45
Lesson 27—Preparing and Administering Medications
For questions 38 through 40, read the scenario, then choose the MA’s best course of action from the choices provided. Each question is worth 2.5 points.
38. While waiting for the doctor to see Mr. Hammond, Darrell wrote in Mr. Hammond’s chart that he administered 50 mg of an analgesic locally. He compared his notes to the doctor’s orders only to discover that the order was for 500 mg. What should he do? _____a. Darrell should leave the dosage as 50 mg in the chart, but sneak into Mr.
Hammond’s treatment room and administer another 450 mg of medication.b. Darrell should inform the doctor immediately that he administered
the incorrect dosage, and record the correction in the chart. He will await the doctor’s instructions on how to proceed. Darrell will also need to fi le an incident report.
c. Darrell should immediately administer another 450 mg to Mr. Hammond, then just add a zero to the 50 in the chart so no one will be able to tell that a mistake was made.
d. Darrell should fi rst administer the missing 450 mg of medication to Mr. Hammond, then inform the physician and correct the chart notes. He will also complete an incident report.
39. After double-checking Ronald’s chart for allergies, Maria administered 475 mg IM (intramuscular) of cloxacillin to Ronald for a staph infection. After the injection, she asked Ronald to stay for 15 minutes so they could rule out an adverse reaction. The site began turning red and puffy, and Ronald said the site was itching. Ronald began gasping for breath. What should Maria do? _____a. Maria should ask Ronald to lie down, then go fi nd the prescribing doctor.b. Maria should write Ronald’s symptoms in his patient chart, noting
that he is allergic to penicillin.c. Maria should have Ronald lie down, then take his pulse and blood
pressure and check his breathing. She should use the intercom or a cell phone to call the prescribing doctor to the room.
d. Maria should have Ronald lie down, then take his temperature, pulse, respirations and blood pressure. She should note all of this in the chart, then go fi nd the prescribing doctor.

27-46 0203902LB05A-27-32
Introduction to Medical Assisting
40. Which of the “Six Rights” did Maria ignore that caused Ronald’s reaction to the medication? _____a. The right drug. Maria should never give a penicillin based medication
to a patient.b. The right dose. Maria must have given Ronald too much medication to
cause the severe reaction.c. The “Six Rights” would not help in this situation. Maria should have
asked the doctor to administer any penicillin medications.d. The “Six Rights” would not help in this situation. Ronald was probably
not aware that he was allergic to penicillin because it’s not noted in his chart.
Endnotes1 Derricott, Jon. Section 1: history of injecting and needle exchange. Mario Lap Drugtext Foundation. 1999. Web. 12 Mar 2010.2 “Commonly Studied Medication Errors as Causes of Adverse Drug Events (ADEs): Percent of ADEs for Each Cause.”
Agency for Healthcare Research and Quality. n.d. Web. 19 Sept 2006. 3 Kaufman, Marc. “Medication Errors Harming Millions, Report Says.” Washington Post.com. 21 July 2006. Web.
19 Sept. 2006.4 Moini, Jahangir. The Pharmacy Technician: A Comprehensive Approach. Thomson Delmar: New York, 2005. p. 383.

0203902LB05A-27-32 27-47
Lesson 27—Preparing and Administering Medications
Congratulations
Don’t wait for your quiz results to continue with Lesson 28.
CongratulationsYou’ve completed Lesson 27.

27-48 0203902LB05A-27-32
Introduction to Medical Assisting

Lesson 28Comprehensive Practicum
0203902LB05A-28-32 28-1
The questions in this practicum are designed to place you in the medical offi ce—making decisions and answering questions that you will be expected to know as a professional medical assistant. You will apply all of the knowledge and skills that you have learned in the Introduction to Medical Assisting Course.
This practicum will assess competency in two general areas and is weighted as follows:
Area of focus Proportion of exam questions Proportion of exam scoreAdministrative Skills 50 percent 50 percentClinical Skills 50 percent 50 percent
Good luck!
Practicum Instructions
Follow the steps to complete the quiz.
a. Be sure you’ve mastered the instruction and the Practice Exercises that this quiz covers.
b. Mark your answers on your quiz. Remember to check your answers with the lesson content.
c. When you’ve fi nished, transfer your answers to the Quiz Cover Sheet. Use only blue or black ink.
d. Important! Please fi ll in all information requested on your Quiz Cover Sheet or when submitting your quiz online.
e. Submit your quiz to the school.

28-2 0203902LB05A-28-32
Introduction to Medical Assisting
Part I: Administrative SkillsShort answer questions are worth 2 points each.Fill-in are worth 1 point each.Multiple choice questions are worth .5 point each.Electronic Health Record is worth 9 points.
Short Answer
For items 1 through 10, answer each item as directed. Each item is worth 2 points.
1. When you arrive each morning, what seven duties are your fi rst priority?____________________________________________________________________________________________________________________________________________________________________________________________________________________________________________________________________________________________________________________________________________________________________________________________________________________________________________________________________________________
2. A patient arrives at the offi ce for an appointment. Unfortunately, he’s shown up a day early. When you tell him this, he becomes angry and insists he has the right day. He wants to see the doctor as he planned to. What should you do when dealing with an angry visitor? ____________________________________________________________________________________________________________________________________________________________________________________________________________________________________________________________________________________________________________________________________________________________________________________________________________________________________________________________________________________
As you’re reviewing fi les, patients begin to arrive. You quickly remind yourself of a few important communication concepts to prepare yourself for your fi rst contact with patients.
3. Describe four key mistakes to avoid when listening to a patient or coworker.____________________________________________________________________________________________________________________________________________________________________________________________________________________________________________________________________________________________________________________________________________________________________________________________________________________________________________________________________________________

0203902LB05A-28-32 28-3
Lesson 28—Comprehensive Practicum
4. What are the fi ve steps (ROLES) you can take to become a more active listener? Answer very briefl y.____________________________________________________________________________________________________________________________________________________________________________________________________________________________________________________________________________________________________________________________________________________________________________________________________________________________________________________________________________________
5. What methods of instruction might you use for a patient who learns best with the verbal/auditory style?________________________________________________________________________________________________________________________________________________________________________________________________________________________________________________________________________________________________________________________
6. Why is verbal communication so important in the medical offi ce?______________________________________________________________________________________________________________________________________________________________________________________________________________________________________________________________________________________________________________________________________________________________________________________________________
7. In what phase of the patient interview would you ask the patient why he is visiting the doctor?__________________________________________________________________________________________________________________________________________________________________________________________________________________________________________
8. Why is confi dentiality important in the medical fi eld?__________________________________________________________________________________________________________________________________________________________________________________________________________________________________________

28-4 0203902LB05A-28-32
Introduction to Medical Assisting
9. The medical professional must complete fi ve requirements before a patient can give informed consent. What are they?____________________________________________________________________________________________________________________________________________________________________________________________________________________________________________________________________________________________________________________________________________________________________________________________________________________________________________________________________________________
10. Rewrite the following names in alphabetical order.Spencer, Gene C.Smith, Gary H.Soloman, Idris H.Smith, Jerry P.Schettler, Robin A.S’oleil, Francois M.Schmidt, Lorri L.Schetler, Mary C.________________________________________________________________________________________________________________________________________________________________________________________________________________________________________________________________________________________________________________________________________________________________________________________________________________________________________________________________________________________________________________________________________________________________________________________________________________________________________________
Fill-in
For items 11 through 15, provide the term(s) as directed. Each item is worth 1 point.
11. What does cardiomegaly mean? _____________________________________________
12. What is the root word for kidney? ___________________________________________
13. What does the suffi x /osis mean? ____________________________________________
14. What does osteomalacia mean? _____________________________________________
15. Make the word cervix plural. _______________________________________________

0203902LB05A-28-32 28-5
Lesson 28—Comprehensive Practicum
Multiple choice
For items 16 through 47, choose the best answer from the choices provided. Each question is worth 1/2 point.
16. Glands are classifi ed regarding _____.a. how the material that the gland produces is secretedb. which layer contains the pigmentc. how they developed in the skind. how they are produced
17. Sudoriferous glands are also called _____.a. poresb. pili glandsc. endocrine glandsd. exocrine glands
18. The stratum germinativum produces epidermal epithelial cells through _____.a. simple cell divisionb. specifi c gravityc. special sense organsd. spondylolysis
19. The skeletal system is composed of three major components: _____a. osseous tissue, cartilage and ligamentsb. bone, cartilage and lipidsc. bone, calices and ligamentsd. osseous tissue, cartilage and lipids
20. The _____ tonsils lie at the base of the tongue in the anterior wall of the oropharynx.a. palatineb. adenoidc. pharyngeald. lingual
21. The largest artery in the body where the major arteries arise is the _____.a. arterioleb. aortac. apexd. ascites

28-6 0203902LB05A-28-32
Introduction to Medical Assisting
22. The spleen is not responsible for _____.a. fi ltering bloodb. producing lymphocytes in the fetusc. storing plateletsd. saving iron
23. The _____ is not a part of the anatomy of the large intestine.a. defecationb. haustrumc. cecumd. rectum
24. The test used to detect colon cancer is _____.a. a barium enemab. basophil degranulationc. an Addisd. bile solubility
25. Finger-like projections extending into the epidermis are _____.a. dermal papillaeb. the papillary layerc. vasculard. phagocytes
26. Stage II of labor is complete with _____.a. delivery of the placentab. the appearance of true uterine contractionsc. vaginal delivery of the neonated. all of the above
27. The right and left lobes of the thyroid gland lie on either side of the _____.a. esophagusb. thoraxc. xiphoid processd. trachea

0203902LB05A-28-32 28-7
Lesson 28—Comprehensive Practicum
28. Another word for the breakdown of fats and proteins to produce glucose in the liver is _____.a. glomerulonephritisb. gluconeogenesisc. glycogenolysisd. glycolysis
29. The structures in the CNS are connected and lie in the _____.a. cranial vault and the spinal canalb. cranial vault and the medulla oblongatac. cranial nerves and the spinal nervesd. cranial nerves and the spinal canal
30. The _____ gives eyes their color.a. pupilb. retinac. irisd. lens
31. The three structures of the internal ear are the _____.a. colloid, vestibule and semicircular canalsb. colloid, vestigial organ and semicircular canalsc. cochlea, vestibule and semicircular canalsd. cochlea, vestibule and semilunar canals
32. The olfactory nerves are located in the roof of the _____.a. mouthb. inferior vena cavac. maxillad. nasal cavity
33. A virus needs _____ to supply ATP for energy or proteins to build body parts.a. interferonb. a cellc. chemotaxisd. heat

28-8 0203902LB05A-28-32
Introduction to Medical Assisting
34. Antibodies bind with _____.a. a specifi c antigenb. any antigenc. a specifi c antipyreticd. any antipyretic
35. Macrophages that develop from WBCs are related to _____.a. lymphocytes and RBCsb. lymphocytes and REFc. myelocytes and WBCsd. lymphocytes and myelocytes
36. If a patient is a walk-in, without a scheduled appointment, you should _____.a. ignore the patient until he leavesb. politely ask him to leave and call for an appointment at a later datec. not provide him the same courtesy as a scheduled patientd. greet him and ask the purpose of his visit
37. A visitor’s log is _____.a. the list of appointments a physician can see in one dayb. only used in the “open offi ce hours” systemc. a list of patients who did not show up for their appointmentsd. a record of all patients and non-employees who visit the offi ce
38. Pharmaceutical or medical supply representatives may be scheduled to see the physician if _____.a. the facility’s policies on sales people permits itb. they bring lunch for the entire staffc. they come after patient hours onlyd. they promise to not stay more than 10 minutes
39. When you create an appointment schedule for the doctor, _____.a. avoid scheduling appointments too early or too lateb. try to schedule appointments in blocksc. consider travel time when making out of offi ce appointmentsd. all of the above

0203902LB05A-28-32 28-9
Lesson 28—Comprehensive Practicum
40. The wave-scheduling system _____.a. has two to four patients scheduled at the beginning of each hourb. has two or more patients scheduled at any given time throughout the dayc. schedules patients with similar problems booked consecutivelyd. assigns each patient a specifi c block of time for the type of
appointment he is coming in for
41. During telephone triage, you must _____.a. have insight into others’ feelings and behaviorsb. evaluate the urgency of a medical situation and prioritize treatmentc. assess the severity of the patient’s condition over the phoned. ask six basic questions
42. Medicaid is a healthcare program that _____.a. was created in 1965 by Congress to provide funding for medical care
for persons who work for the governmentb. was designed under Title 19 of the Americans with Disabilities Actc. is federally funded but managed by each stated. all of the above
43. _____ is the United States’ largest insurance program.a. CHAMPVAb. Medicaidc. Medicared. Managed care
44. PPO stands for _____.a. prospective payment optionsb. preferred provider organizationc. primary privacy optionsd. primary physician organization
45. UCR stands for _____.a. Uncommon Costs Registerb. Uniform Cost Ratec. Usual, Customary and Reasonabled. Unnecessary Costs in the Region

28-10 0203902LB05A-28-32
Introduction to Medical Assisting
46. If an offi ce accepts assignment with Medicare that means _____.a. Medicare and Medicaid can assign patients to themb. it is acceptable for Medicare and Medicaid patients to see physicians
in that clinicc. the physician agrees to follow Medicare’s fee scheduled. Both a and b
47. DRGs are _____.a. drug-related diagnosesb. diagnostic-related groupsc. digital readouts of medical codesd. none of the above
Use the New Patient Information form provided for Rhonda White to create a new electronic health record in Practice Fusion. Provide a print screen to show your instructor that you can create an EHR. (Item 48 is worth 6 points, and item 49 is worth 3 points.)
Hudson Medical ClinicPATIENT INFORMATIONLast Name: White Home Phone: 970-555-2661 Work Phone: 970-555-
4154First Name: Rhonda MI:
JaneAddress: 2019 Robinson Road
DOB: 10/17/1945 Sex: F City: Mytown State: CO ZIP: 80009E-mail Address:[email protected]
Marital Status: Single
Insurance Information: Insurance Company Name: Desert Medical Group (PPO)Insurance holder name:Rhonda J. White
Effective date of insurance: 01-01-20XX to 12-31-20XX
Insurance holder DOB: Same as above
Home phone: Same as above Work Phone: Same as above
Copay Amount: $20 Address: Same as above
State: Same asabove
ZIP: Same as above
Employer’s Name: Mac Automo-tive
Policy #: 333779214 Group #: MA5974
48. Provide a print screen of the Patient Basic Information for Rhonda White.
49. Provide a print screen of the Patient Insurance Information for Rhonda White.

0203902LB05A-28-32 28-11
Lesson 28—Comprehensive Practicum
Part II: Clinical SkillsFor items 50 through 75, choose the best answer from the choices provided. Each item is worth 1 point.
50. An otoscope is used to _____.a. test hearingb. clean out the ear canalc. visualize the ear canald. administer ear drops
51. To maintain sterility, an MA should _____.a. not wear jewelryb. use touch equipment with glovesc. allow family into the surgical aread. clean equipment after use
52. When instilling ear drops the MA should _____.a. warm the solutionb. chill the solutionc. check the label of solution three times, just like other medicationsd. a and c
53. When instilling eye drops the MA should _____.a. instill drops directly onto the eyeballb. instill drops with the patient’s eyes closedc. ask the patient to hold her eyelid opend. instill drops into the exposed conjunctival sac
54. Patients scheduled for a sigmoidoscopy should be instructed to _____.a. eat a light dinner and breakfastb. take a non-prescription laxative the night beforec. limit food, but drink any kind of liquid they desired. expect an enema fi rst thing upon arrival at the doctor’s offi ce
55. The top number in a blood pressure ratio is called the _____ measurement.a. diastolicb. metabolicc. systolicd. anabolic

28-12 0203902LB05A-28-32
Introduction to Medical Assisting
56. Blood pressure is measured by listening using a sphygmomanometer and a stethoscope. The listening method of examination is called _____.a. percussionb. auscultationc. observationd. palpation
57. A blood pressure cuff that is too small for an arm will result in _____.a. an abnormally high readingb. an abnormally low readingc. inability to hear a BPd. hearing irregular beats
58. Hypertension is a(n)_____.a. irregular pulse heard while taking the BPb. abnormally low BPc. abnormally high BPd. blood pressure that is diffi cult to hear
59. The pulse that the MA generally takes on an infant is called the _____ pulse.a. brachialb. femoralc. carotidd. apical
60. When the pulse is irregular it is recommended that the MA take it _____.a. at the apical siteb. for 15 secondsc. at the radial sited. for 60 seconds
61. The most common site for an MA to take an adult’s pulse is the _____ artery.a. brachialb. femoralc. radiald. carotid

0203902LB05A-28-32 28-13
Lesson 28—Comprehensive Practicum
62. The normal adult respiratory rate range is _____ respirations per minute.a. 30-60b. 12-20c. 18-30d. 10-15
63. An activity that can affect the results of an oral temperature is _____ just prior to taking the temperature.a. chewing gumb. lying downc. getting the doctor’s billd. both a and b
64. A medical assistant should wash her hands _____.a. between patientsb. after assisting with a procedurec. before giving a medicationd. all of the above
65. When instructing a patient for a spirometry test it is important to tell him to _____.a. sit back and relax for the best resultsb. take many short, shallow breaths for best resultsc. take a deep breath and exert as much effort as possibled. breathe in and out of the mouthpiece
66. A spirometry test measures _____.a. cardiac outputb. lung capacityc. pulse irregularitiesd. oxygen levels
67. The acronym _____ will help you remember the early signs of cancer in adults.a. CHILDRENb. CANCERc. CAUTIONd. SIGNS

28-14 0203902LB05A-28-32
Introduction to Medical Assisting
68. The C in the early signs of cancer acronym for adults stands for _____.a. Change in wart or moleb. Change in bowel and bladder habitsc. Continued, unexplained weight lossd. Both b and c
69. One symptom in the acronym used to spot early signs of cancer in children includes _____.a. indigestion or diffi culty swallowingb. nagging cough or hoarsenessc. recurrent fevers not due to infectionsd. both a and b
70. When giving an intramuscular injection it is important to hold the syringe/needle unit at a ____ degree angle.a. 45b. 90c. 10d. 75
71. To remove air bubbles from the medication you have drawn up in a syringe you _____.a. cap the needle, lay the syringe on the counter and roll it back and forthb. turn the syringe upside down to move the air bubblec. cap the needle and lay the unit down for 5 minutesd. tap the side of the syringe with your fi nger and push the plunger up
slightly to expel the air bubbles as they rise
72. After giving an injection the MA should massage the site with all but which of the following meds? _____a. Antibioticsb. Insulin and blood thinnersc. Pain medicationsd. Vitamin B12

0203902LB05A-28-32 28-15
Lesson 28—Comprehensive Practicum
73. When performing an EKG it is important to apply the leg leads with the tabs pointing in which direction? _____a. Upwardsb. Downwardsc. Towards the centerd. Outward to the sides
74. If the patient has applied a body lotion or oil to her skin on the day of her EKG what can the MA do to ensure a good contact with the leads? _____a. Reschedule the procedure and instruct her not to apply lotion next time.b. Proceed with the procedure and take your chances on getting a good tracing.c. Send the patient to the restroom and instruct her to use soap and
water to wash her arms, legs and chest before proceeding.d. Use an alcohol swab to cleanse the tab sites.
75. When assisting the physician with a Pap smear the MA should gather which of the following? _____a. Lubricant, gloves, speculum, swabs, light source, lab requisition, sonograph,
specimen bottleb. Slide or specimen bottle, lubricant, gloves, speculum, swabs, light source, consent formc. Light source, lab requisition, slide or specimen bottle, lubricant, gloves, speculum,
swabs, drapesd. All of the above
For questions 76 through 79, determine the tasks that you can perform as a medical assistant in a physical therapy setting. Write “Yes” next to the tasks you can perform and write “No” next to the tasks you can’t perform. For the tasks that you can’t perform, write in the professional who is responsible for that task. Each question is worth 1 point.
76. Administer a localized muscle relaxant in John Bennett’s lumbar region. _______________________________
77. Perform goniometry on a stroke victim’s limbs and report your fi ndings to the physical therapist. ______________________________
78. Ask the pharmacy to give Jenny’s mother a local antibiotic for the sutures on Jenny’s leg.______________________________
79. Determine the length of time that Mr. Jensen should keep a chemical hot pack on his left knee. ______________________________

28-16 0203902LB05A-28-32
Introduction to Medical Assisting
For the following items, read each scenario and determine whether each technique was performed correctly or not. If not, explain what part of the technique the healthcare professional performed incorrectly, and how he or she should fi x the problem. Each item is worth 4 points.
80. Daniel provides home health care for Mr. Watson. One day, a candle in the bathroom catches a towel on fi re and quickly spreads. Daniel rushes to the kitchen and grabs the fi re extinguisher. He pulls the pin and breaks the seal. Daniel points the fi re extinguisher nozzle at the base of the fi re and squeezes the handle. He then lifts the nozzle and aims it at the candle, delivering several blasts directly at the source of the fi re.
81. Marcy needs to take her patient’s radial pulse. First, she washes her hands. She then introduces herself and explains the procedure to the patient. She places the patient into position and places her arm palm down. Next, Marcy fi nds the patient’s pulse on the wrist above the base of the thumb. Marcy applies a slight pressure with her fi rst two fi ngers. She counts beats for one minute and documents the procedure.
82. Carol needs to assist her patient, a paraplegic, into a sitting position in his wheelchair. She washes her hands. Next, she helps the patient into his wheelchair and ensures his feet are in the footrests. She makes sure his knees are bent at a 90-degree angle and sees that his calves aren’t touching the chair. She helps the patient move backward so his buttocks and back rest against the back of his wheelchair.
83. Abby needs to transfer Arnold with a gait belt. She helps him sit on the edge of the bed. Facing Arnold, Abby secures the gait belt around his waist and buckles it. She threads the tongue of the belt through the buckle with the teeth, and pulls the tongue of the belt through the other side of the buckle. Once buckled, she turns the belt to the side. She puts her fi rst two fi ngers on the inside of the belt and tightens it. Next, Abby places her arms around Arnold’s waist and grabs the belt behind Arnold’s back from underneath. With two fi ngers between the belt and the patient, Abby lifts Arnold. As Abby lifts, Arnold falls forward, and the bed slides back, causing both Abby and Arnold to stumble.
84. Teresa’s patient, Marcia, suffers from epilepsy. One day, Marcia was walking to the restroom when she fell to the fl oor and began to convulse. Teresa rushed to her side and moved an end table out of the way so Marcia wouldn’t injure herself. Teresa then held Marcia’s arms at her side to avoid any additional injury. She turned Marcia’s head to the side to prevent her from choking on her saliva. After Marcia’s convulsive stage, Teresa helped Marcia up and allowed her to rest in bed, while providing support and reassurance.

0203902LB05A-28-32 28-17
This Space for Instructor Use
1. Fill in your student ID and your course code below.
STUDENT ID NUMBER COURSE CODE
2. Be sure your name and address are fi lled in below.3. Transfer your answers to this cover sheet.
NAME
ADDRESS
CITY STATE ZIP
U.S. Career Institute2001 Lowe StreetFort Collins, CO 80525
MA-02
For School Use Only: Grade: ___________
Introduction to Medical AssistingMail-in Quiz 28
Fold on dotted line
1. ____________________________________________________________________________________________________________________________________________________________________________________________________________________________________________________________________________________________________________________________________________________________________________________________________________________________________________________________________________________
2. ____________________________________________________________________________________________________________________________________________________________________________________________________________________________________________________________________________________________________________________________________________________________________________________________________________________________________________________________________________________

28-18 0203902LB05A-28-32
Introduction to Medical Assisting
3. ____________________________________________________________________________________________________________________________________________________________________________________________________________________________________________________________________________________________________________________________________________________________________________________________________________________________________________________________________________________
4. ____________________________________________________________________________________________________________________________________________________________________________________________________________________________________________________________________________________________________________________________________________________________________________________________________________________________________________________________________________________
5. ________________________________________________________________________________________________________________________________________________________________________________________________________________________________________________________________________________________________________________________
6. ______________________________________________________________________________________________________________________________________________________________________________________________________________________________________________________________________________________________________________________________________________________________________________________________________
7. __________________________________________________________________________________________________________________________________________________________________________________________________________________________________________
8. __________________________________________________________________________________________________________________________________________________________________________________________________________________________________________

0203902LB05A-28-32 28-19
Lesson 28—Comprehensive Practicum
9. ____________________________________________________________________________________________________________________________________________________________________________________________________________________________________________________________________________________________________________________________________________________________________________________________________________________________________________________________________________________
10. ________________________________________________________________________________________________________________________________________________________________________________________________________________________________________________________________________________________________________________________________________________________________________________________________________________________________________________________________________________________________________________________________________________________________________________________________________________________________________________
11. ______________________________________________________________________________
12. ______________________________________________________________________________
13. ______________________________________________________________________________
14. ______________________________________________________________________________
15. ______________________________________________________________________________
16. _____
17. _____
18. _____
19. _____
20. _____
21. _____
22. _____
23. _____

28-20 0203902LB05A-28-32
Introduction to Medical Assisting
24. _____
25. _____
26. _____
27. _____
28. _____
29. _____
30. _____
31. _____
32. _____
33. _____
34. _____
35. _____
36. _____
37. _____
38. _____
39. _____
40. _____
41. _____
42. _____
43. _____
44. _____
45. _____
46. _____
47. _____
48. Provide print screen
49. Provide print screen
50. _____
51. _____
52. _____
53. _____
54. _____
55. _____
56. _____
57. _____
58. _____
59. _____
60. _____
61. _____
62. _____
63. _____
64. _____
65. _____
66. _____
67. _____
68. _____
69. _____
70. _____
71. _____
72. _____
73. _____
74. _____
75. _____

0203902LB05A-28-32 28-21
Lesson 28—Comprehensive Practicum
76. ______________________________
77. ______________________________
78. ______________________________
79. ______________________________
80. __________________________________________________________________________
__________________________________________________________________________
__________________________________________________________________________
__________________________________________________________________________
__________________________________________________________________________
81. __________________________________________________________________________
__________________________________________________________________________
__________________________________________________________________________
__________________________________________________________________________
__________________________________________________________________________
82. __________________________________________________________________________
__________________________________________________________________________
__________________________________________________________________________
__________________________________________________________________________
__________________________________________________________________________
83. __________________________________________________________________________
__________________________________________________________________________
__________________________________________________________________________
__________________________________________________________________________
__________________________________________________________________________
84. __________________________________________________________________________
__________________________________________________________________________
__________________________________________________________________________
__________________________________________________________________________
__________________________________________________________________________

28-22 0203902LB05A-28-32
Introduction to Medical Assisting
CongratulationsCongratulationsYou’ve completed Lesson 28and the Introduction to Medical Assisting Course.

Answer KeyIntroduction to Medical Assisting, Pack 5, Lessons 26-28
0203902LB05A-AK-32 AK-1
Answer Key—Lesson 26
Practice Exercise 26-1
1. If you touch a sterile object with a nonsterile object, the sterile object is still sterile. You can use nonsterile objects to touch sterile objects. F. If you touch a sterile object with a nonsterile object, the sterile object is no longer sterile. Only use sterile objects to touch sterile objects.
2. If you can’t see it, it isn’t sterile. Keep the sterile fi eld—the area where sterile instruments and supplies are staged—in plain sight. If you must turn away, cover the fi eld with a sterile towel. T
3. Only the area above the arms is sterile. If you drop your hands below hip level, they are no longer sterile. Anything that falls on the fl oor is sterile. F. Only the area above the waist is sterile. If you drop your hands below waist level, they are no longer sterile. Anything that falls on the fl oor is nonsterile.
4. Sterile equipment and supplies should not be kept in the middle of the sterile fi eld. Anything entering the sterile fi eld should be considered nonsterile. F. Sterile equipment and supplies should be kept in the middle of the sterile fi eld. Anything outside the sterile fi eld should be considered nonsterile.
5. Don’t pass nonsterile items over a sterile fi eld. T
6. When handling liquids, don’t pour directly onto the sterile fi eld. Spills pick up microorganisms. Pour liquid into a bowl or onto a dressing with a waterproof wrapper. Do not let the bottle that holds the liquid touch either the bowl or the dressing. T
7. Don’t sneeze, talk or cough anywhere in the treatment area. F. Don’t sneeze, talk or cough when facing the sterile fi eld.
8. If you are wearing a sterile gown, everything behind your fi eld of vision or below the knees of the gown is considered nonsterile. F. If you are wearing a sterile gown, everything behind your fi eld of vision or below the waist of the gown is considered nonsterile.

AK-2 0203902LB05A-AK-32
Answer KeyIntroduction to Medical Assisting
Practice Exercise 26-2
1. The basic principles of sterile surgery are called surgical asepsis.
2. A surgical instrument that clamps tissues together is called a forceps.
3. Scalpel —a surgical instrument used to make an incision.
4. Mosquito forceps are small, narrow forceps used to clamp small blood vessels.
5. Four inch squares of gauze used to clean up blood during surgery are sometimes called sponges.
6. Hemostasis means “control of bleeding.”
7. Tenaculum forceps are made to clamp tissues during surgery.
8. A swaged needle comes fused to suture materials.
9. Which of the following information is NOT on an informed consent form? b. Financing alternatives
10. Which of the following is NOT likely to be a part of the MA’s preoperative protocol for a planned minor surgery? a. Explore the cause of the wound and assess tetanus status.
11. Baby alligator ear forceps
12. Needle holder
13. Foerster sponge forceps
14. Bozeman forceps
15. Tissue forceps
16. Dressing forceps
17. Splinter forceps
18. Tenaculum forceps
19. Towel clamp

0203902LB05A-AK-32 AK-3
Answer KeyPack 5—Introduction to Medical Assisting
20. Biopsy forceps
21. Surgical scissors
22. Scalpels and blades
23. Metzenbaum scissors
24. ALM retractor
25. Probe
26. Ear curettes
27. Suture removal kit
28. Suture material
Practice Exercise 26-3
1. c. Epinephrine is a vasoconstrictor found in some injectable anesthetics.
2. A c. lesion is a dry skin irregularity that can be excised without prior lancing.
3. A a. cyst is a clogged oil duct that needs to be completely removed.
4. Which of the following is NOT a nonsterile duty of a medical assistant in the operating room? d. Hand instruments to the doctor.
5. Which of the following situations requires incision? b. Abscess
6. Which of the following involves the destruction of tissue by freezing? c. Cryosurgery
7. Which method of bandage wrapping would you likely use on an ankle? c. Figure-8
8. What part of the postoperative supplies hold the medication? b. Dressing
9. Which of the following is a hazard of laser surgery? d. Eye damage
10. When a wound remodels, scar tissue is formed out of a protein called a. collagen.

AK-4 0203902LB05A-AK-32
Answer KeyIntroduction to Medical Assisting
11. What 7 steps will you follow to prepare a treatment room for minor surgery?
1. Check all treatment room supplies prior to procedure.
2. Adjust lighting. Replace bulbs and batteries as necessary.
3. Check function of all electrical instruments such as electrocautery unit, electric exam table, other electrical instruments.
4. Be sure physician stool is available.
5. Adjust Mayo stand height for appropriate doctor.
6. Arrange nonsterile supplies on side counter in order of use.
a. Sutures, bandages, dressings, ointments, tape
b. Pathology container with preservative for biopsy, as needed
c. Lab requisition, if needed
7. Waste receptacles should be nearby.
12. List the 11 steps in preparing a minor surgical tray.
1. Wash hands.
2. Sanitize and disinfect Mayo stand.
3. Place wrapped surgical tray on Mayo stand.
4. Open outer wrapper, keeping your body away from the edges of the sterile fi eld.
5. Put on sterile gloves. Now you must keep your hands above waist level.
6. Continue to open inner wrap of instrument packs.
7. Arrange instruments and supplies in order of use.
8. Recheck for accuracy.
9. Remove gloves. Pour skin antiseptic into container on tray, if physician desires.
10. Cover with sterile drape.
11. Draw up local anesthetic or other medications as ordered by physician.

0203902LB05A-AK-32 AK-5
Answer KeyPack 5—Introduction to Medical Assisting
13. Describe how to remove sutures.
1. Wash hands.
2. Identify the patient and explain the procedure.
3. Obtain physician’s approval that sutures are ready to be removed.
4. Open suture removal kit.
5. Put on sterile gloves.
6. Using thumb forceps, carefully pick up one knot of a suture. Pull gently upward toward the suture line.
7. Use suture scissors to cut one side of the suture as close as possible to the skin.
8. Repeat procedure with each suture, noting the number of sutures removed. Place them on a sterile gauze sponge.
9. Examine the suture line to be certain all sutures have been removed.
10. Apply Betadine solution to the area with sterile q-tip or gauze sponge.
11. Apply dry dressing, if ordered.
12. Remove gloves and dispose of all biohazardous materials.
13. Explain wound care and provide written instructions to the patient.
14. Wash hands.
15. Document the procedure.

AK-6 0203902LB05A-AK-32
Answer KeyIntroduction to Medical Assisting
14. When assisting the physician with a surgical procedure, how can you ensure that liquid antiseptics remain sterile? When I pour the liquid, I’ll fi rst pour a small amount from the bottle into a trashcan to sterilize the lip of the bottle. Then I’ll pour the amount needed into a sterile bowl on the surgical tray.
15. Sit down with a friend or family member and explain to them what you’ll do to assist the physician when suturing a laceration. Make sure you included the following in your explanation:
1. Reassure and support patient. Explain the procedure.
2. Wash hands. Put on gloves.
3. Assess severity of wound and its cause.
a. Ask about general health conditions
b. Ask about any known allergies, record.
c. Inquire as to her last tetanus booster, record.
d. Soak wound in antiseptic solution, as ordered.
e. Clean and dry the wound. Apply pressure with sterile gauze if bleeding continues.
f. Position patient comfortably, lying on exam table.
4. Prepare sterile laceration repair tray. Notify physician.
5. Remove the sterile cover from the surgical tray while the doctor is putting on sterile gloves.
6. Assist with placement of the stool and spotlight adjustment. Position Mayo stand for physician convenience.
7. Assist as needed during the skin prep and draping.
a. When pouring the antiseptic solution, remember to fi rst pour a small amount into waste receptacle to sterilize the edge of the bottle. Then pour a small amount into the sterile container on the surgical tray, being careful not to touch any part of the sterile fi eld.
8. Assist with drawing up local anesthetic, as needed.
a. MA holds the vial of medication upside down while physician with-draws the appropriate dose.
9. Apply clean gloves to protect yourself or sterile gloves if physician wants you to assist with the procedure.

0203902LB05A-AK-32 AK-7
Answer KeyPack 5—Introduction to Medical Assisting
10. Provide emotional support to patient, as needed.
11. When physician selects appropriate suture material, open the chosen packet, dropping the inner suture pack onto sterile fi eld without touching any part of the sterile fi eld.
12. At end of suturing, cleanse wound, as ordered.
13. Apply dressing/bandage, as ordered.
14. Dispose of biohazardous waste materials appropriately.
15. Review postoperative instructions as provided by physician with the patient.
16. Remove gloves.
17. Wash hands.
18. Document the procedure.
Answer Key—Lesson 27
Practice Exercise 27-1
1. Which drug route involves putting a dose of medicine between the cheek and gums? a. Buccal
2. Which drug route uses a gas or spray? b. Inhaler
3. What is the main advantage of administering medicine through a patch? d. You can’t forget to take the medication.
4. The prefi x “centi” means b. one hundredth.
5. The prefi x “deka” means c. ten.
6. Using household measurements, four cups equals one b. quart.
7. The doctor has prescribed 600 mg of a medicine. On hand, you have tabs that are 200 mg each. How many tabs should you give the patient? b. Three
8. A graph used to calculate body surface area is called a b. nomogram.
9. In the proportion 6 : 10 = 3 : 5 the extremes are d. 6 and 5.
10. In the proportion 6 : 10 = 3 : 5 the means are b. 10 and 3.

AK-8 0203902LB05A-AK-32
Answer KeyIntroduction to Medical Assisting
11. Dr. Moore has ordered 1000 USP units of an antibiotic to be given to Mindy Maxwell, an adult, by injection. You have the antibiotic in a solution of 2000 USP units per mL. Using the proportional method of calculation, determine how much medication you will give Mindy.
On Hand Medication: Unit = Dose Ordered: Amount to be Given 2000 : mL = 1000 units : x 2000x = 1000 mL x = .5 mL Mindy Maxwell should receive .5 mL of the antibiotic.
12. Dr. Hansen has ordered a pain reliever for Tommy, a 9-year-old child. Tommy’s BSA is .8. Assuming that a normal adult with a BSA of 1.7 would receive 300 mL of this medication, determine how much medication you will give Tommy.
Child’s BSA : Adult’s BSA = Child’s Dose : Adult’s Dose .8 : 1.7 = x : 300 mL 1.7x = .8 × 300 mL 1.7x = 240 mL x = 141.18 mL Tommy should receive 141.18 mL of the pain reliever.
13. Dr. Marino has ordered an antibiotic for Jesse, a 12-year-old, at 5 mg/kg/day in two equal doses. Jesse weighs 95 lbs. Using the body-weight method, determine how much antibiotic Jesse should receive in each dose.
First, convert Jesse’s weight from pounds to kilograms:
Pounds : Kilogram = Pounds : Kilogram 2.2 : 1 = 95 : x 2.2x = 95 x = 43.18 kg
Then, using Jesse’s weight in kilograms, convert the doctor’s orders into a daily dosage:
mg medicine : Kilogram = Patient Dose : Patient’s Weight 5 mg : 1 = x : 43.18 kg x = 5 × 43.18 x = 215.9 mg
Now, divide by the number of doses per day: 215.9 mg / 2 doses per day = 107.95 mg per dose, 2 times per day Jesse will receive 2 doses per day, with 107.95 mg in each dose.
0203902LB05A-AK-32 AK-9
Answer KeyPack 5—Introduction to Medical Assisting
Practice Exercise 27-2
1. The administration of a single dose of medicine is called a single order.
2. A stat order is the immediate administration of a medicine.
3. A routine or standing order refers to a medication administered on a regular basis to patients who come to the offi ce or clinic to receive that medication.
4. In three words or less, summarize each of the 14 administration guidelines that medical assistants should follow when preparing and administering medications. Your summaries should describe the following concepts:
1. Always practice medical asepsis.
2. Work in a clean, well-lit environment with suffi cient work space.
3. Always check for allergies on the patient’s chart before administering medication.
4. Practice the “Six Rights” of drug administration. (See boxed material.)
5. Only administer drugs that are ordered by a medical professional who is licensed to do so.
6. Never administer medications if questions remain about the order.
7. Be familiar with any drug you administer. If necessary, research the drug in the PDR.
8. If the drug’s color, consistency or odor make it suspect, do NOT administer the drug.
9. If the physician gives a VO, write down the information. Do NOT trust the administration of a drug to memory.
10. Check any drug for an expiration date before administering it.
11. If you prepare a drug for administration, you should administer it yourself. Do not leave the medicine unattended. Dividing the task creates an opportunity for error.
12. When pouring a liquid medicine, set the measuring device on a fl at surface and observe the scale at eye level to ensure correct measure-ment. Measure at the meniscus—the outer surface of the liquid, which will have a concave shape due to surface tension. There should be no bubbles in liquid medication.
13. If dispensing the medication requires removing a cap, place the cap rim-up on a clean surface. Do not contaminate the cap by placing it rim-down.
14. Carefully follow all procedural steps for whatever type of medicine you are preparing.
AK-10 0203902LB05A-AK-32
Answer KeyIntroduction to Medical Assisting
5. The lowest surface point of a liquid, which has a concave shape due to surface tension is called the meniscus.
6. In three words, list each of the “Six Rights” of administering medication. The Right PatientThe Right DrugThe Right RouteThe Right DoseThe Right TimeThe Right Documentation
7. What fi ve pieces of information must the MA document in the patient’s records whenever she administers a medication? 1. the date and time of the administration2. the name of the drug3. the dosage and the drug route4. patient data such as blood pressure, respiration and pulse5. any unusual reactions or complications arising from the administration of
the drug.
8. Where in the patient’s records is this information recorded? Progress notes or medication fl owchart
9. A mild reaction to a medication will usually occur after leaving the offi ce or clinic, but a severe reaction usually happens immediately.
10. What is the most important thing to remember about medication errors? To report them immediately
11. a. Oral Aspirin tablet
12. d. Topical Antibacterial ointment
13. d. Topical Ear drops
14. a. Oral d. Topical Throat lozenge
15. d. Topical h. Sublingual Nitroglycerin
16. f. Rectal g. Vaginal Suppository
17. d. Topical e. Inhaler Asthma vapor medication
18. a. Oral Cold capsule
19. a. Oral b. Transdermal g. Vaginal i. Implant Birth control

0203902LB05A-AK-32 AK-11
Answer KeyPack 5—Introduction to Medical Assisting
20. j. Pump k. Injection Insulin
21. a. Oral Suspension
22. b. Transdermal d. Topical Nicotine patch
23. a. Oral Cough syrup
24. d. Topical Eye drops
25. k. Injection Flu shot
Practice Exercise 27-3
1. The slanted part of a syringe’s needle is called a b. bevel.
2. The needle’s gauge and length can vary based on the c. type of tissue and the injection site.
3. Which of the following injections does NOT need to be aspirated? c. Intradermal.
4. Most contamination accidents during syringe disposal occur when b. recapping the needle.
5. The correct response to insulin reaction is c. an immediate intake of sugar or glucose.
6. A method used to ensure that you have not penetrated a blood vessel is called a. aspiration.
7. Label the syringe diagram below.
Lumen
Bevel
Needle
Tip
Needle Hub
Barrel
Plunger
Shaft

AK-12 0203902LB05A-AK-32
Answer KeyIntroduction to Medical Assisting
8. Intradermal
Injection sites: the upper arm, inner forearm, upper back below the shoulder blades and the pectoral area of the chest
Layer of tissue: the dermal layer
Type of needle: 1mL TB syringe, 25-27gauge 1/2-5/8” needle
Angle of insertion: 10 degree
Reason for needle type and angle: to ensure that the medication stays in the dermal layer
9. Subcutaneous
Injection sites: sites that have plenty of fatty tissue, including the abdomen, the top of the legs and the back just below the shoulder blades
Layer of tissue: the layer of fatty tissue just below the skin
Type of needle: 3mL syringe, 25 gauge 5/8”needle
Angle of insertion: 45 degree
Reason for needle type and angle: This kind of injection is given when the medication might irritate muscle tissue or a slower rate of absorption is desired.
10. Intramuscular
Injection sites: the deltoid muscle of the upper arm, the dorsogluteal site and the ventrogluteal site on the side of the hip
Layer of tissue: the muscle layer
Type of needle: 3mL syringe, 23 gauge 1” needle
Angle of insertion: 90 degrees
Reason for needle type and angle: A long, fairly wide needle is needed to reach and penetrate the muscle. Allows quick absorption. The angle used is to reach the muscle through the epidermal layers.

0203902LB05A-AK-32 AK-13
Answer KeyPack 5—Introduction to Medical Assisting
11. In fi ve words or less, summarize each step to properly withdraw medication from an ampule. Your summaries should describe the following concepts:
1. Prepare a syringe and needle unit for use. Inspect the syringe. Make sure the needle is fi rmly attached.
2. Inspect the ampule to see if any medicine is trapped in the stem. If so, tap the stem gently to make the medicine return to the base of the ampule.
3. Cover the stem with sterile gauze.
4. Grasp fi rmly over the scored part of the stem and break off the stem, pushing it away from your body. Set the open ampule down.
5. Discard the gauze and stem in sharps container.
6. Place the syringe and needle in your dominant hand. Remove the needle cover. Do not pull air into the syringe.
7. Hold the open ampule between your thumb and index fi nger.
8. Insert the needle into the medicine in the open ampule.
9. Fill the barrel of the syringe with the amount of medicine prescribed.
10. Remove the needle from the ampule. Hold the syringe toward the light and check for air bubbles. If necessary, remove air bubbles by tapping against the syringe and expelling the bubbles as they rise to the top.
11. Recheck that the amount of medicine is correct.
12. Replace the sheath over the needle.
13. Dispose of ampule in sharps container.

AK-14 0203902LB05A-AK-32
Answer KeyIntroduction to Medical Assisting
12. Describe how the Z-track injection method differs from the basic intramuscular injection.
Using the Z-track method, you pull the skin laterally away from the intended injection site and hold it in place there. After giving the injection the skin returns to its natural position, which blocks any medication from migrating to other tissues. With the basic method, the injection puncture is not sealed, so medication can migrate to other tissues as it’s absorbed.
13. Immunizations and insulin are usually administered a. subcutaneously.
14. Vaccines created in a laboratory using live viruses or bacteria are called a. live attenuated.
15. Vaccines that are made from viruses or bacteria that are no longer alive are called d. inactivated.
16. There is d. no scientifi c evidence that immunization can cause SIDS and autism.
17. In rare cases, vaccinations can cause d. an allergic reaction.
18. Parents must receive written information about a vaccine before it is administered and sign a release authorizing administration of the vaccine. This is due to b. our litigious society.
19. Often patients subscribe to the d. “more is better” theory when taking medications.
20. What is the best way to enlist the patient’s cooperation in maintaining a consistent and proper level of medication? c. Educate the patient.