introduction to oxy-acetylene welding
TRANSCRIPT

TRADE OF
Pipefitting
PHASE 2
Module 2
Thermal Processes
UNIT: 2
Introduction to Oxy-Acetylene Welding

Produced by
In cooperation with subject matter expert:
Finbar Smith
© SOLAS 2014

Module 2– Unit 2
Pipefitting Phase 2
Introduction to Oxy-Acetylene Welding
Revision 2.0 September 2014
Table of Contents Unit Objective ........................................................................................................... 1 Learning Outcome .................................................................................................... 2 1.0 Oxy-Acetylene Welding for Pipefitting .................................................. 3
1.1 Pipe Fitters uses of Oxy-Acetylene ......................................................... 3 1.2 Advantages and Disadvantages of Oxy-Acetylene Welding ................ 3
2.0 Identifying Oxy-Acetylene Welding Equipment ................................... 4 2.1 Gas Cylinders .............................................................................................. 4 2.2 Pressure Regulators .................................................................................... 4 2.3 Hoses ........................................................................................................... 5 2.4 Flame Arrestors .......................................................................................... 6 2.5 Welding Torches ........................................................................................ 6 2.6 Economiser ................................................................................................. 6
3.0 Hazards and Safety Precautions for Oxy-Acetylene Welding ............. 7 3.1 Oxy-Acetylene Welding Safety ................................................................. 7 3.2 Blowpipes .................................................................................................... 7 3.3 Backfire ........................................................................................................ 8 3.4 Fluxes ........................................................................................................... 8 3.5 Protective Clothing .................................................................................... 8 3.6 Welding, Cutting Drums and Containers ............................................... 8 3.7 Ventilation ................................................................................................... 8 3.8 Fire ............................................................................................................... 9
4.0 Assembling Oxy-Acetylene Welding Equipment .................................. 10 4.1 Equipment Assembly ................................................................................ 10 4.2 Step-by-Step Instruction ........................................................................... 11
5.0 The Oxy-Acetylene Flame ........................................................................ 13 5.1 Properties of the Acetylene Flame .......................................................... 13 5.2 Adjusting an Acetylene Flame .................................................................. 14 5.3. Shut Down .................................................................................................. 15
6.0 Welding Nozzles and their Uses .............................................................. 16 6.1 Nozzle Size.................................................................................................. 16 6.2 Nozzle Selection and Working Gas Pressures ....................................... 16
7.0 Welding Techniques .................................................................................. 18 7.1 The Leftward Technique of Gas Welding .............................................. 18 7.2 The Rightward Technique of Gas Welding ........................................... 19
Exercises ..................................................................................................................... 21 Sample Questions ...................................................................................................... 21 Additional Resources ................................................................................................ 22

Module 2– Unit 2
Pipefitting Phase 2
1
Introduction to Oxy-Acetylene Welding
Revision 2.0 September 2014
Unit Objective There are seven Units in Module 2. Unit 1 focuses on Introduction to Thermal Process and safety, Unit 2; Introduction to Oxy-acetylene welding, Unit 3; Manual Metal Arc welding, Unit 4; Metal Active Gas welding, Unit 5; Tungsten Active Gas welding, Unit 6; Oxy-fuel cutting and Unit 7 Plasma arc cutting.
In this unit you will be introduced to oxy-acetylene welding and the safety precautions required when using oxy-acetylene equipment.
Module 2 Thermal Processes
Unit 1 Introduction to
Thermal Processes and Safety
Unit 2 Introduction to Oxy-Acetylene
Welding
Unit 3 Manual Metal Arc
Welding
Unit 5 Tungsten Active
Gas Shielded Welding
Unit 4 Metal Active Gas
Welding
Unit 6 Oxy-Fuel Cutting
Unit 7 Plasma Arc
Cutting

Module 2– Unit 2
Pipefitting Phase 2
2
Introduction to Oxy-Acetylene Welding
Revision 2.0 September 2014
Learning Outcome By the end of this unit each apprentice will be able to:
Describe the applications of oxy-acetylene welding in the pipefitting trade and the type of materials that are suitable for joining using this process
Identify and state the function of common items on oxy-acetylene welding, brazing, cutting and heating equipment
Identify and describe the safety precautions to be observed when using oxyacetylene welding equipment
Set up and assemble oxyacetylene welding station and check for leakage
Describe the correct lighting up and shutting down procedure
Describe the different sizes of welding nozzles and explain their uses
Describe the different types of welding flame and welding techniques
Complete welding exercises as required

Module 2– Unit 2
Pipefitting Phase 2
3
Introduction to Oxy-Acetylene Welding
Revision 2.0 September 2014
1.0 Oxy-Acetylene Welding for Pipefitting
1.1 Pipe Fitters uses of Oxy-Acetylene Pipefitters use oxy-acetylene as a heat source for many different types of functions:
Brazing and soldering plumbing pipes
Welding heavier mild steel pipes
Cutting of mild steel plate and pipes
Source of heating to apply thermal shock to seized components
1.2 Advantages and Disadvantages of Oxy-Acetylene Welding
Advantages of Oxy-Acetylene Welding It's easy to learn.
The equipment is cheaper than most other types of welding rigs (e.g. TIG welding)
Oxy-acetylene can be used on sites which have no power supply
The equipment is more portable than most other types of welding rigs (e.g. TIG welding)
Oxy-acetylene equipment can also be used to "flame-cut" large pieces of material.
Disadvantages of Oxy-Acetylene Welding Oxy-acetylene weld lines are much rougher in appearance than other
kinds of welds, and require more finishing if neatness is required.
Oxy-acetylene welds have large heat affected zones (areas around the weld line that have had their mechanical properties adversely affected by the welding process)
There are safety issues with oxy-acetylene as there is a naked flame present which does not exist with electrical forms of welding.
Key Learning Points Uses of Oxy-acetylene
Advantages and disadvantages of Oxy-acetylene

Module 2– Unit 2
Pipefitting Phase 2
4
Introduction to Oxy-Acetylene Welding
Revision 2.0 September 2014
2.0 Identifying Oxy-Acetylene Welding Equipment
2.1 Gas Cylinders Leakage around the spindle of the cylinder valve will be revealed by hissing and in the case of fuel gases, by a smell. Tighten the gland nut on the cylinder valve slightly with a spanner (clockwise) and test with 1 % solution of Teepol® HB7 or equivalent solution, in water. If still leaking, do not use the cylinder but label and return it. Never use a flame when testing for leaks.
Oxygen bottle colour = black and has right hand thread.
Acetylene bottle colour = maroon and has left hand thread.
Gas Cylinder
2.2 Pressure Regulators Some parts of this illustration are labelled. It is important to learn the names of these equipment components.
Two Stage Regulators
Key Learning Points Oxy-acetylene welding; cylinder identification/colour, valves/taps,
pressure gauges, connector threads i.e. left and right hand

Module 2– Unit 2
Pipefitting Phase 2
5
Introduction to Oxy-Acetylene Welding
Revision 2.0 September 2014
Always treat a pressure regulator as a precision instrument. Do not expose it to knocks, jars or sudden pressure surges caused by the rapid opening of the cylinder valve. Always open the cylinder valve slowly and smoothly using the special Spindle Key. Periodically check the bullnose seating on the pressure regulator. If the seating is damaged, it will leak gas. The pressure regulator should be replaced immediately.
Never use a pressure regulator with other than the gas for which it was designed. Release pressure using the pressure adjustment screw when shutting down, after cylinder valves have been closed and pressure in the hose has been released.
If gauge pointers do not return to zero when the pressure is released, the mechanism is faulty and the regulator should be replaced.
If the regulator "creeps" (passes gas when the pressure adjustment screw is released, or builds up on the low pressure side when the blowpipe valve is shut) it should be replaced. Do not attempt to repair regulators.
2.3 Hoses It is always recommended to buy and use fitted hoses. Factory fitted hose offers the customer the additional advantage of a ‘gas system’ which has been assembled and tested on a closely monitored production line to BS 1389.
Hoses should be fitted with the correct end connections attached by permanent clips.
Do not expose hoses to heat, traffic, slag, sparks, oil, grease, or sharp edges of metal. Test for leakage at working pressure by immersing in water; leaks may be repaired by cutting out a faulty section of hose and inserting an approved coupling. Never use copper couplings with acetylene. Doing so could permit the formation of copper acetylide. Worn ends should be cut back and re-fitted with hose connectors using permanent clips.
In general, do not fit more than two or three couplings in a length of hose. Consider replacing the hose entirely as parts are likely to be perished or damaged.
Ensure hoses are not wrapped around cylinders when stored or in use.
The hose check valve is an automatic safeguard, incorporating a spring-loaded non-return valve. Its purpose is to inhibit oxygen and fuel gases mixing in the

Module 2– Unit 2
Pipefitting Phase 2
6
Introduction to Oxy-Acetylene Welding
Revision 2.0 September 2014
hoses. The hose check valve has reduced the incidence of backfeeding in which oxygen contaminates fuel gas hose or vice versa. It is essential to ensure that your welding and cutting equipment is protected, as far as possible, against backfeeding which may cause extensive damage to hoses and regulators in the event of a flashback.
2.4 Flame Arrestors Flame traps are designed to give automatic protection to personnel and equipment against the hazard of mixed gas explosions in gas welding or cutting equipment. The explosion (flashback) can occur when backfeeding of gases has taken place. A mixture of gases is then present in either the oxygen or fuel gas hose and if the operator fails to purge the hoses sufficiently, a flashback can occur when the blowpipe is ignited.
Flashback can be avoided by adhering to recommended operating procedures and the use of flame traps does not enable the operator to ignore good operating practices.
It is recommended that approved flame traps are installed in both the oxygen and the fuel gas lines immediately downstream of the pressure regulator
2.5 Welding Torches Once the gases having been reduced in pressure by the gas regulators are fed through suitable hoses to the welding torch. Each gas can be controlled by a valve on the torch. The two gases mix in the torch and after they are ignited they burn at the nozzle. Different size nozzles are used depending on the thickness of material to be welded. See section 6 for more information on welding nozzles.
2.6 Economiser The Economiser is used to save oxygen and fuel gas when the welding or cutting torch is not being used. When the torch is rested on the lever rod of the gas saver the flame is automatically extinguished. To relight, remove torch from the lever rod and pass it over the pilot light which instantly ignites to its pre-determined flame
Economiser gas saver
Note: There should be no smoky flame on shut-off. Although a slight snap is normal, a loud bang indicates that the economiser valves need to be adjusted to ensure that the fuel gas stream is shut off before the Oxygen.

Module 2– Unit 2
Pipefitting Phase 2
7
Introduction to Oxy-Acetylene Welding
Revision 2.0 September 2014
3.0 Hazards and Safety Precautions for Oxy-Acetylene Welding
3.1 Oxy-Acetylene Welding Safety When welding:
Always wear protective clothing, i.e. flame retardant overalls.
Always wear the correct eye goggles.
Always have the spindle key in the acetylene cylinder valve.
Always keep cylinders secured in an upright position.
Always check for leaks with a soapy solution, NEVER with a naked flame.
Never carry out makeshift repairs on welding equipment.
Never allow oil or grease to come in contact with oxygen equipment.
Never weld an enclosed vessel, i.e. petrol / oil drums until they have been thoroughly cleaned.
Never work in an enclosed vessel on your own and always leave the cylinders outside. If working in an enclosure vessel, adequate ventilation should be provided and fire fighting equipment should be available.
In the event of a serious flashback or backfire plunge the blowpipe in a bucket of cold water, leaving the oxygen running to prevent water entering the blowpipe.
Should the hoses become damaged, turn off the supply of gas at the cylinder and inform your instructor.
Don’t forget, this equipment, if misused or damaged, can be dangerous. If in any doubt seek assistance and clarification from your instructor.
3.2 Blowpipes Gas leaks can be detected by 1% Teepol® or proprietary leak detection solutions or hissing and, in the case of fuel gases, also by smell. Leaks at the head nut or welding nozzle should be cured by cleaning the seat with a soft cloth. If the leak continues, the blowpipe should be replaced. Do not carry out blowpipe repairs.
Key Learning Points Hazards; volatility, fire, explosion, accidental/careless use of the
torch, flashback, gas leaks,
Dangers of working in confined spaces, poor ventilation, possibility of burns/asphyxiation etc.

Module 2– Unit 2
Pipefitting Phase 2
8
Introduction to Oxy-Acetylene Welding
Revision 2.0 September 2014
3.3 Backfire For a variety of reasons e.g. incorrect operating conditions, nozzle blockage etc. the flame may backfire into the blowpipe. Usually the flame can be re-lit immediately.
In a small number of instances the flame may continue to burn inside the blowpipe, a condition called sustained backfire. This can be recognised by a roaring, rushing sound and the body of the blowpipe will become very hot. Rapid action is necessary to prevent permanent damage to the blowpipe, Close the blowpipe oxygen valve, then the blowpipe acetylene valve and allow the blowpipe to cool - it can be plunged into a bucket of water. Check the nozzle for tightness, check gas pressures on the pressure regulators, purge the hoses and if everything looks correct, begin the lighting up procedure,
If sustained backfire recurs, the nozzle or blowpipe or both require replacement.
3.4 Fluxes Fluxes must only be used in a well ventilated area.
3.5 Protective Clothing Goggles should be worn at all times whilst welding and cutting and should conform to the Protection of Eyes Regulations. Leather or suitable protective clothing should be worn for heavy cutting or welding. The feet should be protected from sparks, slag or falling off-cuts.
3.6 Welding, Cutting Drums and Containers Welding or cutting drums, containers or tanks which have held flammable liquids or gases can be dangerous, even though they are supposed to be clean and free from explosive vapour or liquids. BOC will advise you on suitable precautions.
Do not weld hollow vessels before establishing that confined air is properly vented; hollow metal parts should be drilled to prevent explosions caused by heat.
3.7 Ventilation In a confined space, ensure that there is a suction fan to give adequate ventilation (a fume hood, at the source of fumes, is the best method); DO NOT USE OXYGEN OR AN AIR BLOWER and always post a trained helper outside for emergencies. Test all equipment for leaks before entering and remove the equipment outside during periods when it is not in use and on completion of daily work. The welding of brass or galvanised materials should be carried out in well ventilated areas and if the work is likely to be prolonged suitable breathing apparatus should be worn.
When cutting painted or galvanised steel, unless ventilation is very good, fume extraction should be installed at the point of cutting. In some cases it may be necessary to wear a respirator as well.

Module 2– Unit 2
Pipefitting Phase 2
9
Introduction to Oxy-Acetylene Welding
Revision 2.0 September 2014
3.8 Fire Take care that there is no combustible material within reach of sparks; sparks from cutting may travel as far as 10 metres (35 feet) along a floor. Ensure that sparks and falling slag do not fall over the cylinder or hoses. If necessary protect anything in the neighbourhood of the work with sheet metal guards or fibreglass sheets down to the floor - tarpaulins do not give sufficient protection. Where it is necessary to work close to combustible material, keep fire fighting apparatus handy and post a man at the scene of the work for at least half-an-hour after the work has finished. In dusty or gassy atmospheres consult the responsible official in charge before starting work.
Clothing should be free from grease and preferably made of wool which is not so readily flammable. Goggles, collars, combs, buttons, etc., of flammable material should not be worn.

Module 2– Unit 2
Pipefitting Phase 2
10
Introduction to Oxy-Acetylene Welding
Revision 2.0 September 2014
4.0 Assembling Oxy-Acetylene Welding Equipment
4.1 Equipment Assembly
Oxy-Acetylene Welding and Cutting Equipment Assembly
Key Learning Points How to safely assemble a set of Oxy-acetylene equipment for
welding.
Step by step procedure for lighting an oxy-acetylene flame

Module 2– Unit 2
Pipefitting Phase 2
11
Introduction to Oxy-Acetylene Welding
Revision 2.0 September 2014
4.2 Step-by-Step Instruction CDXGS31\GenServ31\AT175AU\dswmedia\video setupoxytorch.mpg
1. Equipment assembly: Ensure that the equipment is assembled correctly as in section 4.1 above.
2. Check equipment: First, make sure that the gas flow from both the oxygen and the acetylene cylinders is turned off tightly. The two cylinders are secured in an upright position. This is usually on a wheeled trolley. Look at the hose pressure and cylinder pressure gauges on top of each cylinder. Both gauges on each cylinder should read zero. If both gauges do not read zero, turn the main cylinder valve on the top of the cylinder clockwise, to close it completely. Then you must purge the system of any gas.
3. Purge the system: To purge the system, make sure the main cylinder valve is closed tightly. Pick up the torch handle and note that it has two hoses attached. One hose supplies acetylene, the other oxygen. Turn the oxygen regulator under the gauges clockwise, and open the oxygen valve on the handle. This will purge any gas that may still be in the system and the gauges should both drop back to zero. Repeat this procedure with the acetylene cylinder.
4. Install the torch handle: The torch handle is the connection between the hoses and the working tips. It consists of a body and two taps. It’s used for both welding, Brazing and heating. Different attachments are connected to the handle to enable cutting. Examine the connections. One connection is marked “OX”, and is for the oxygen hose. The other is marked “AC”, and is for the acetylene hose.
5. Connect the hoses: As a further safety precaution, you’ll find the oxygen connector is right hand thread and the acetylene connector is a left hand thread.
6. Install the correct tip: Welding tips come in sizes that are stamped with a number. Number one is the smallest tip. The larger the number, the larger the tip and the greater the heat that it will provide. Select the tip size suitable for the task and screw it onto the end of the torch handle. Hold the torch handle in your hand, so that you can comfortably adjust the oxygen and acetylene taps. Position the tip so that it faces away from you. Gently tighten the tip-securing fitting.
7. Adjust the pressure of the gas flow: You are now ready to adjust the gas pressure for heating. Look at the two valves on the torch handle. The valve next to the oxygen hose controls the flow of oxygen to the tip. Close it tightly clockwise. The valve next to the acetylene hose controls the flow of acetylene to the tip. Also, close it tightly clockwise.

Module 2– Unit 2
Pipefitting Phase 2
12
Introduction to Oxy-Acetylene Welding
Revision 2.0 September 2014
8. Turn on the gases: Now that you’re ready to use the torch, turn the main valve on the top of each cylinder counter-clockwise half a turn to open the valve. The needle on the cylinder pressure gauge will rise to show you the pressure in the cylinder. Turn the oxygen regulator handle clockwise until the needle in the gauge registers 2-5 PSI. Turn the acetylene regulator handle clockwise until the needle in the gauge registers 2-5 PSI. This is your working pressure for welding light plate.
9. Check the area: Before you light the torch, check the area you’re working in to make sure there are no flammable materials or fluids nearby. Workmates should also be clear of the area. The welding flame is not only extremely hot; it also produces dangerous ultra violet rays, which will damage your eyes. It is absolutely vital that you are wearing the right safety gear: gloves and tinted goggles or face mask. So put them on and adjust them comfortably.
10. Ignite the torch: Now you are ready to ignite the torch with the striker. The tip of the torch must be pointing downwards away from your body and away from the gas cylinders. Turn the acetylene valve on the torch handle slightly towards the ‘ON’ position. You should hear the gas hissing. Hold the striker against the tip of the torch with the lighter cup between the torch and you. Flick the striker to create the spark that will ignite the gas at the tip of the torch. Open the acetylene valve slowly until the sooty smoke produced by the torch disappears. Then slowly open the oxygen valve on the torch handle.
11. Adjust the flame: As you open the oxygen valve, you will see the color of the flame change. The pure acetylene flame is yellow, and it will change to blue as you add the oxygen. Continue to open the oxygen valve until you can observe a small, sharp blue cone in the center of the torch flame. This is the “neutral”, you can now adjust to the desired flame, for the task you are doing. ( Welding, brazing ) (See section 5)
Module 2– Unit 2
Pipefitting Phase 2
13
Introduction to Oxy-Acetylene Welding
Revision 2.0 September 2014
5.0 The Oxy-Acetylene Flame
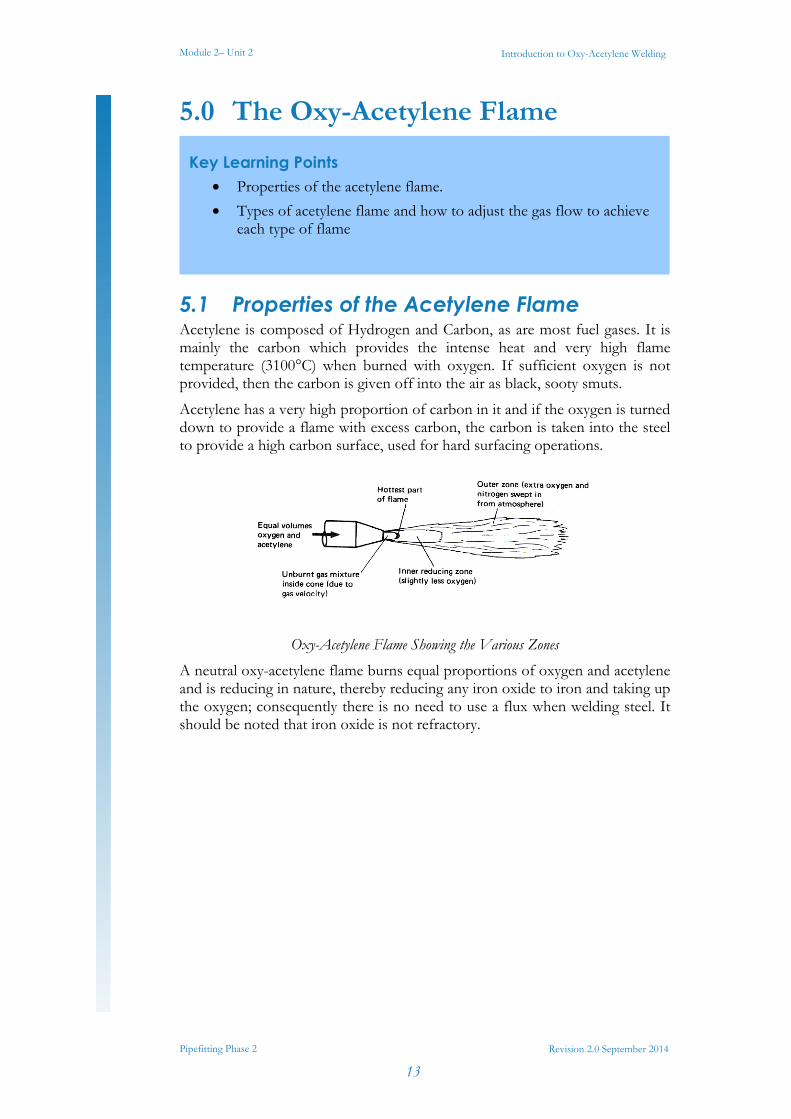
5.1 Properties of the Acetylene Flame Acetylene is composed of Hydrogen and Carbon, as are most fuel gases. It is mainly the carbon which provides the intense heat and very high flame temperature (3100°C) when burned with oxygen. If sufficient oxygen is not provided, then the carbon is given off into the air as black, sooty smuts.
Acetylene has a very high proportion of carbon in it and if the oxygen is turned down to provide a flame with excess carbon, the carbon is taken into the steel to provide a high carbon surface, used for hard surfacing operations.
Oxy-Acetylene Flame Showing the Various Zones
A neutral oxy-acetylene flame burns equal proportions of oxygen and acetylene and is reducing in nature, thereby reducing any iron oxide to iron and taking up the oxygen; consequently there is no need to use a flux when welding steel. It should be noted that iron oxide is not refractory.
Key Learning Points Properties of the acetylene flame.
Types of acetylene flame and how to adjust the gas flow to achieve each type of flame

Module 2– Unit 2
Pipefitting Phase 2
14
Introduction to Oxy-Acetylene Welding
Revision 2.0 September 2014
5.2 Adjusting an Acetylene Flame There are three distinct types of flame using acetylene as the fuel gas and these are achieved by varying the proportions of acetylene gas in relation to the proportion of oxygen gas at the welding nozzel:
1. Neutral Flame This flame burns equal quantities of oxygen and acetylene. (In practice, it is advisable to have the slightest possible acetylene haze at the cone tip to begin with.)
Neutral Flame-Cone Tip Hottest Part Approx. 3100°C
2. Carburising Flame This flame has an excess of acetylene which results in a carbon-rich zone extending around and beyond the cone. Note: Both the Neutral and Carburising flames are reducing in
nature.
Carburising Flame
3. Oxidising Flame This flame has an excess of oxygen which results in an oxygen-rich zone just beyond the cone. This flame is obtained by setting to neutral and then turning the fuel gas down.
Oxidising Flame

Module 2– Unit 2
Pipefitting Phase 2
15
Introduction to Oxy-Acetylene Welding
Revision 2.0 September 2014
5.3. Shut Down When you have finished the job, you will need to shut down the equipment. Turn off the acetylene valve on the torch handle. This will extinguish the flame. Turn off the oxygen valve on the torch handle. Next, remove your safety goggles or mask and your welding gloves. Turn the main cylinder valve clockwise on the top of both gas cylinders. Now open the two valves on the torch handle to “bleed” the system. Turn both the oxygen and acetylene regulator handles counter-clockwise until they are loose. Close both valves on the torch handle. Put the handle and tips away and return the gas cylinders and their hoses to their proper storage area.

Module 2– Unit 2
Pipefitting Phase 2
16
Introduction to Oxy-Acetylene Welding
Revision 2.0 September 2014
6.0 Welding Nozzles and their Uses
6.1 Nozzle Size For a given welding torch, the NOZZLE OUTLET SIZE has a much greater influence on governing the flame size than changing the gas pressures on adjusting the control valves.
The manufacturers of gas welding equipment have adopted various methods of indicating nozzle sizes, such as:
By the approximate consumption of each gas per hour.
By the nozzle outlet bore size (orifice diameter).
By a reference number corresponding to a metal thickness range which may be welded with a specific nozzle.
Whatever the method employed for indicating nozzle sizes there is a definite relationship between the sizes of welding nozzles and the metal thicknesses.
Manufacturer’s recommendations should always be followed with regard to nozzle sizes and gas pressures for a particular application.
6.2 Nozzle Selection and Working Gas Pressures
As the thickness of the work increases, the flame will be required to supply more heat. This is made possible by increasing the nozzle size and the regulator gas pressures (in accordance with manufacturers’ instructions).
If you try to weld thick metal with a small nozzle by increasing the gas pressure, there comes a point where the flame leaves the end of the nozzle. This indicates that the pressure is too high, resulting in a very noisy flame. It is much better to work with a 'soft' flame, which is obtained by using the correct nozzle size and pressure settings.
At the other extreme, if you try to weld with a nozzle that is too large for the work, by reducing the supply of gas at the blowpipe valves instead of changing to a smaller nozzle, then small explosions will occur at the nozzle. This is because the gas tends to build up round the nozzle in small bubbles. These small explosions indicate that the gas pressure is too low.
The table below lists typical nozzle sizes and gas pressures for oxyacetylene welding. Always consult the manufacturer’s information, as this information can vary slightly with different makes of blowpipe.
Key Learning Points How nozzle sizes are differentiated
Working pressure; adjustment of the gas flow to given levels

Module 2– Unit 2
Pipefitting Phase 2
17
Introduction to Oxy-Acetylene Welding
Revision 2.0 September 2014
Typical Nozzle Sizes and Gas Pressures for Oxyacetylene Welding
Note: Gas consumption data is merely for rough estimating purposes. It will vary greatly on the material being welded and the particular skill level of the operator.

Module 2– Unit 2
Pipefitting Phase 2
18
Introduction to Oxy-Acetylene Welding
Revision 2.0 September 2014
7.0 Welding Techniques
When you have mastered the technique of lighting the blowpipe and adjusting the neutral flame correctly, you will be ready to practise the different techniques of gas welding. This will usually involve some practice, under supervision, on scrap pieces of material.
7.1 The Leftward Technique of Gas Welding The first stage is to deposit a straight bead of weld on a single piece of material and then, when you have perfected this, to practise joining two pieces. The ultimate aim is to achieve a standard of weld quality that will enable you to produce the required test pieces, if you want to become a qualified welder.
The leftward method of gas welding is used for welding steel plate up to 5 mm in thickness. It can also be used for welding non-ferrous metals.
When the blowpipe is held in the right hand, the weld travels from right to left, with the filler rod in front of the nozzle (Error! Reference source not found.). The inner cone of the flame, which should be in the neutral condition for welding mild steel, is held close to the metal but not touching it.
The Leftward Technique of Gas Welding
Key Learning Points The leftward technique of gas welding
The rightward technique of gas welding

Module 2– Unit 2
Pipefitting Phase 2
19
Introduction to Oxy-Acetylene Welding
Revision 2.0 September 2014
For the best welding conditions, the blowpipe and filler rod should be held at approximately the angles shown in Error! Reference source not found.. The nozzle is given either circular or slight side-to-side movements in order to obtain good and even fusion at the sides of the weld.
To commence welding by this technique, play the flame on the start of the joint until a molten pool is formed. Welding then proceeds by filler rod being fed or dipped into the molten pool. The rod is melted by this dipping action and not by the flame itself.
Do not hold the filler rod continuously in the molten pool, as this could prevent the heat of the flame and thus the molten pool from reaching the lower parts of the weld joint, resulting in possible lack of fusion.
7.2 The Rightward Technique of Gas Welding As the plates get thicker, different edge preparations are employed. These different edge preparations are shown in Error! Reference source not found.. Notice that as the plate gets more than 4 mm thick, it is recommended that another technique, the rightward technique, is used.
Edge Preparations for Different Thicknesses of Plate. Above 13mm thickness, plate can be bevelled and welded from both sides.
These days it is more usual to use one of the arc welding processes on materials above 4 mm thickness, but the rightward method is handy to know. Some welding courses include it, and a brief description is given here.
The rightward technique is shown in Error! Reference source not found.. Some of the advantages of this method on thicker plate are as follows:
1. It is faster and uses less filler rod, so it is less expensive. 2. There is less expansion and therefore less contraction. 3. The flame remains over the deposited metal, giving an annealing
action.

Module 2– Unit 2
Pipefitting Phase 2
20
Introduction to Oxy-Acetylene Welding
Revision 2.0 September 2014
4. A better view of the molten pool is obtained, allowing for greater control of the welding operation.
Gas welding can be used for positional welding (welding in the vertical and overhead positions). These notes cover the flat position only, as you will need to perfect this technique thoroughly before you can learn positional welding.
The Rightward Technique of Gas Welding

Module 2– Unit 2
Pipefitting Phase 2
21
Introduction to Oxy-Acetylene Welding
Revision 2.0 September 2014
Exercises Select appropriate nozzle and set correct flame – deposit a series of
bead welds with and without filler rod on mild steel plate
Set up equipment and produce welds on mild steel plate and pipe as specified on Exercise Nos. 2.2.2a and 2.2.2b
Sample Questions Q1: An oxyacetylene gauge set has: (Tick one box only)
1. Right hand thread
2. A cylinder pressure gauge
3. A cylinder pressure and working pressure gauge
4. A gas flow gauge

Module 2– Unit 2
Pipefitting Phase 2
22
Introduction to Oxy-Acetylene Welding
Revision 2.0 September 2014
Additional Resources
Title Author Ref. Code The Induction Book, “Code of Behaviour & Health & Safety Guidelines”
SOLAS
Basic Welding and Fabrication W Kenyon ISBN 0-582-00536-L
Fundamentals of Fabrication and Welding Engineering
FJM Smith ISBN 0-582-09799-1
Workshop processes, practices and materials, 3rd edition, Elsevier Science & Technology
Black, Bruce J 2004
ISBN-13: 9780750660730
New Engineering Technology Lawrence Smyth & Liam Hennessy ISBN 086 1674480
Videos:
Understanding welding fumes
Welder on Site…Be Aware (Vocam)
Powered hand tool safety (Vocam)
Industrial Ergonomics (Vocam) Available from:
Vocam Ireland
Circle Organisation Ltd
Friar Street, Thurles, Co Tipperary, Ireland
Tel: +353 504 24666

Castleforbes House Castleforbes Road
Dublin 1