introduction to scratchvijaya/ssrvm/dokuwiki/media/scratch_1.pdf · in scratch, each picture like...
TRANSCRIPT

2
mAi
Moz: Marathi and Malayalam. Good to see that you are learning more languages. Tejas: Moz, does the computer understand the languages that we speak?Moz: No. It understands only a few special languages of its own. These are called programming languages. Also, the number of words and the sentences that it understands are limited. Jyoti: Can you explain how?
Tejas and Jyoti: Ok.Use these instructions to make Tejas do an activity.
Tejas and Jyoti first discuss the limited instructions that they have. They decide on an activity for Tejas - “Drawing a square”. They write a sequence of step by step instructions, for the activity.
Moz: Yes. Suppose Tejas understands only the following 5 statements. 1. Move forward N steps, (N can be any number from 1 to 100). 2. Change direction to north. 3. Change direction to south. 4. Change direction to east. 5. Change direction to west.
In this lesson you will learn:How to program using Scratch.Usage of commands in Scratch under ‘motion’, ‘pen’ and ‘sound’ blocks.
Lesson3Introduction to Scratch

3
1. Turn to your left.2. Take 10 steps from where you are in a straight line.3. Turn to your left.4. Take 10 steps from where you are in a straight line.5. Turn to your left.6. Take 10 steps from where you are in a straight line.7. Turn to your left.8. Take 10 steps from where you are in a straight line.
Then they convert these movements into the limited instructions. Jyoti gives Tejas the instructions. Tejas holds down a chalk piece to see what happens with the limited instructions.
N
E
S
W1
Change direction to north.Move forward 10 steps.
2 Change direction to west.Move forward 10 steps.
3Change direction to south.Move forward 10 steps.
4Change direction to east.Move forward 10 steps.
4
CONCEPTS
Moz: Scratch is an activity which you can use to give instructions that the computer understands. You will see that these instructions are similar to those above, given to Tejas by Jyoti. Such a sequence of instructions is called a Program.
Tejas: Which activity do we use to give the instructions?
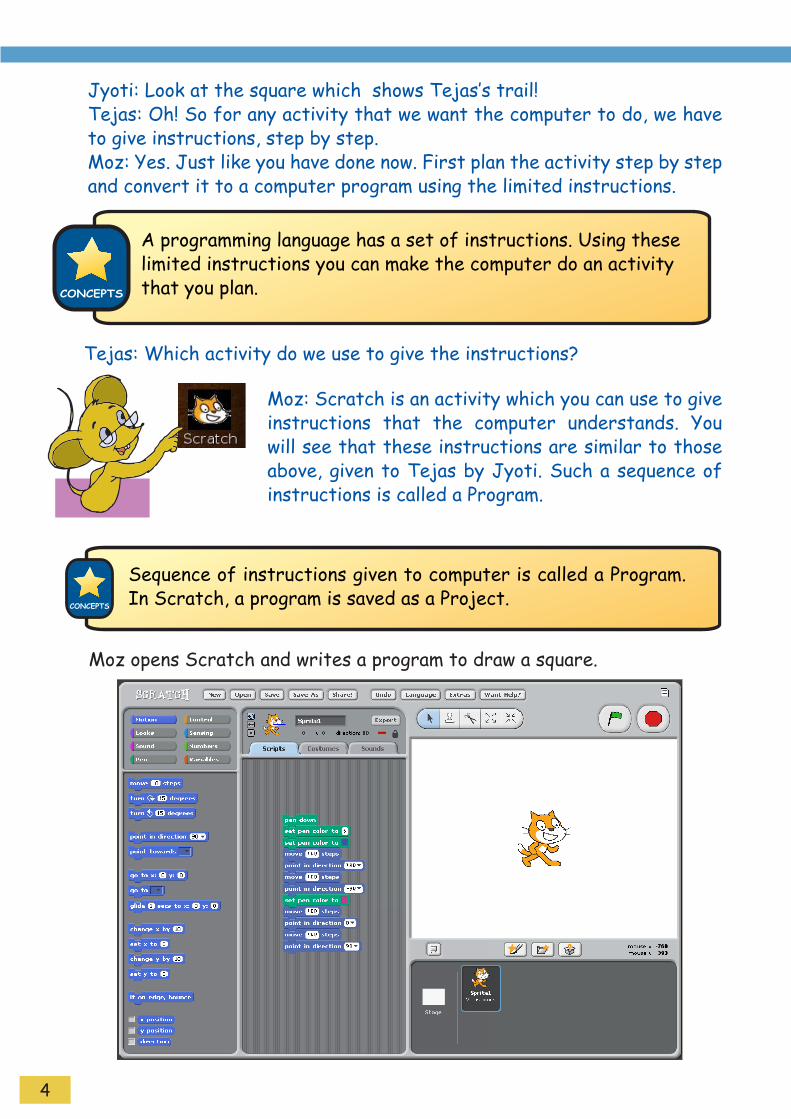
Moz opens Scratch and writes a program to draw a square.
Jyoti: Look at the square which shows Tejas’s trail!Tejas: Oh! So for any activity that we want the computer to do, we have to give instructions, step by step.Moz: Yes. Just like you have done now. First plan the activity step by step and convert it to a computer program using the limited instructions.
A programming language has a set of instructions. Using these limited instructions you can make the computer do an activity that you plan.
Sequence of instructions given to computer is called a Program. In Scratch, a program is saved as a Project.CONCEPTS

5
Info
Jyoti: Moz, How do we make the computer follow these instructions?
Moz: Yes. In Scratch, each picture like this cat is called a Sprite.
Jyoti: Oh! Look the cat is moving and a trail of the cat is shown.
Moz [points to the stage area]: This area where the Sprite moves is called the stage. The computer follows the step by step instructions to give the output.
Moz double clicks on block of instructions. The cat moves and a square is drawn.
Stage The Stage is where you see your stories, games, and animations come to life.

6
Info
Tejas: Is this where we write the instructions?Moz: Correct. This is called Scripts area. The sequence of step by step instructions are given here.Jyoti: And the Sprite performs all the instructions step by step on the Stage!Moz: Yes. This is called running the program.
Scripts areaScript is the set of step wise instructions that you give to the Sprite to do a particular task. Scripts area is the place where you write the Script for the Sprite. Script is also called a program. Each instruction is also called a command.
Scripts area
CONCEPTS
A computer carries out the instructions of a program, one by one in the given sequence. This is called running or execution of a program.

7
Jyoti (points to the Blocks Palette): Are these the instructions that the computer understands?Moz: Yes. Notice that there are many ways to make the Sprite move and turn.
Tejas: All the movement related instructions are listed when we select the Motion Block.Moz: Good observation. Related instructions are grouped together in a Block. You can find the various types of instructions in the Blocks Palette.
SKILLS
Motion block has instructions to make the Sprite move, such as number of steps to take, direction of motion, etc.,
Blocks Palette
8
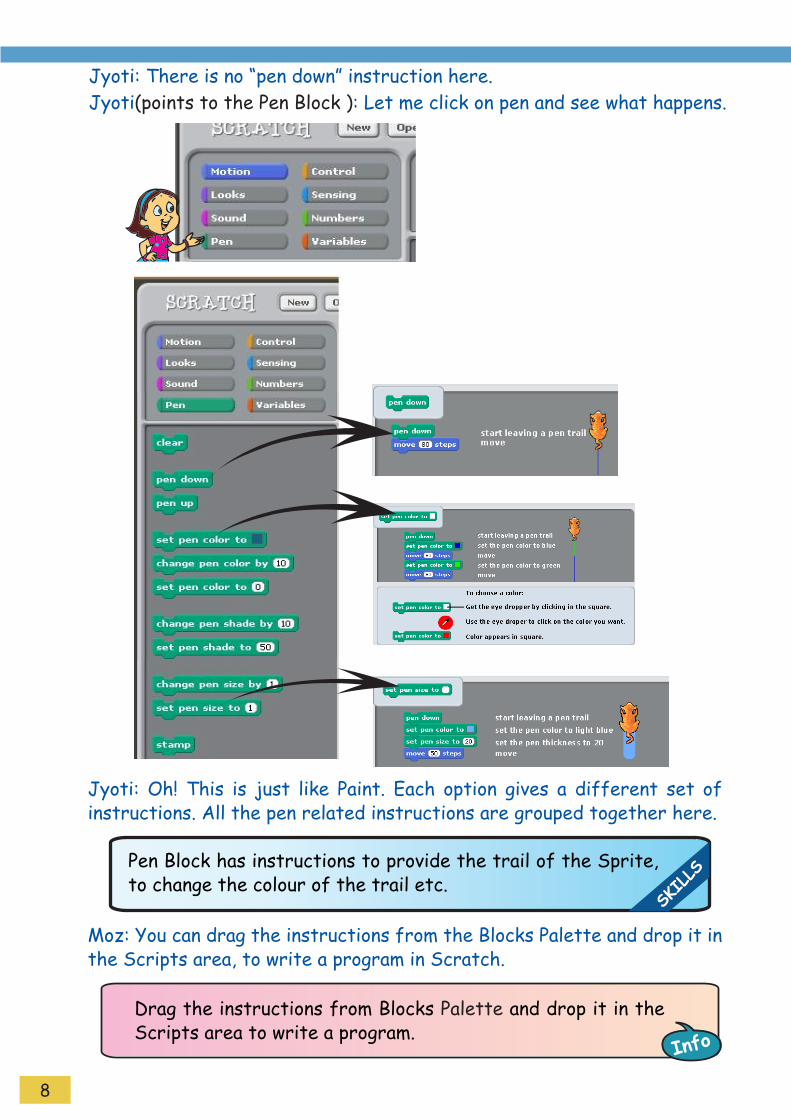
Jyoti: Oh! This is just like Paint. Each option gives a different set of instructions. All the pen related instructions are grouped together here.
Moz: You can drag the instructions from the Blocks Palette and drop it in the Scripts area, to write a program in Scratch.
SKILLS
Pen Block has instructions to provide the trail of the Sprite, to change the colour of the trail etc.
Jyoti: There is no “pen down” instruction here. Jyoti(points to the Pen Block ): Let me click on pen and see what happens.
Info
Drag the instructions from Blocks Palette and drop it in the Scripts area to write a program.
9
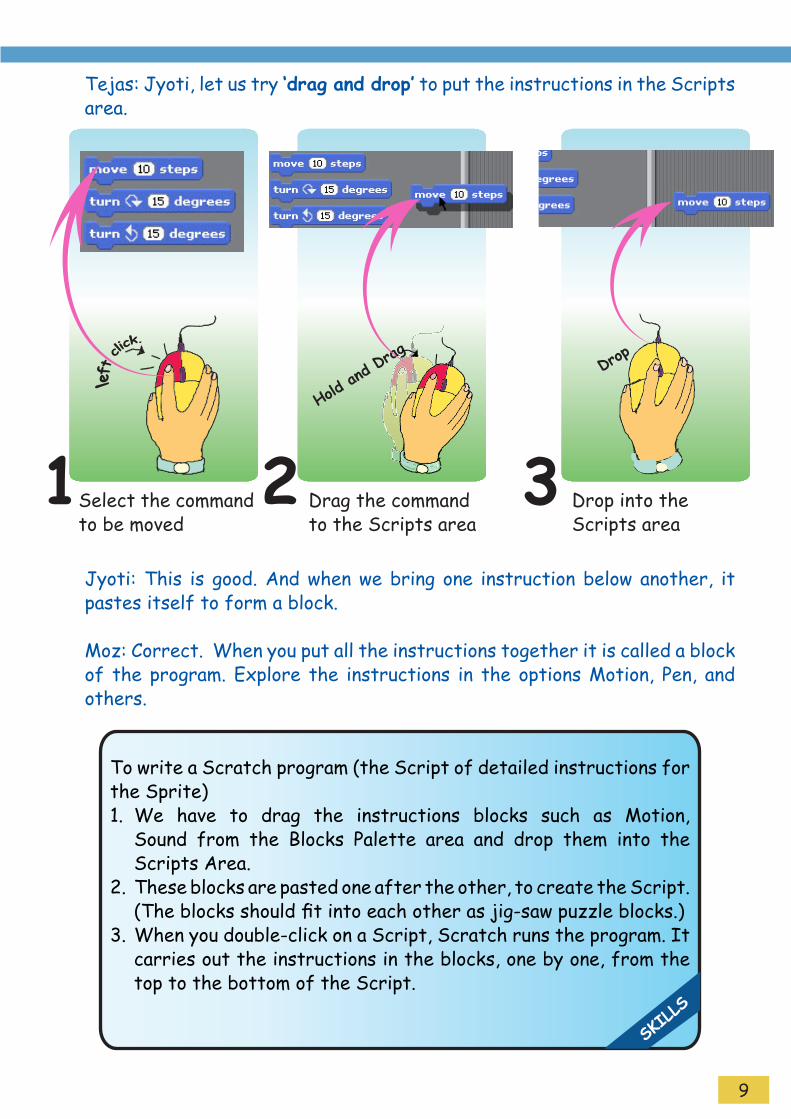
Tejas: Jyoti, let us try ‘drag and drop’ to put the instructions in the Scripts area.
Jyoti: This is good. And when we bring one instruction below another, it pastes itself to form a block.
Moz: Correct. When you put all the instructions together it is called a block of the program. Explore the instructions in the options Motion, Pen, and others.
Select the command to be moved
Drag the command to the Scripts area
Drop into the Scripts area
SKILLS
To write a Scratch program (the Script of detailed instructions for the Sprite)
We have to drag the instructions blocks such as Motion, 1. Sound from the Blocks Palette area and drop them into the Scripts Area.These blocks are pasted one after the other, to create the 2. Script. (The blocks should fit into each other as jig-saw puzzle blocks.)When you double-click on a Script, Scratch runs the program. It 3. carries out the instructions in the blocks, one by one, from the top to the bottom of the Script.
Hold a
nd Dra
gDro
p
1 2 3
10
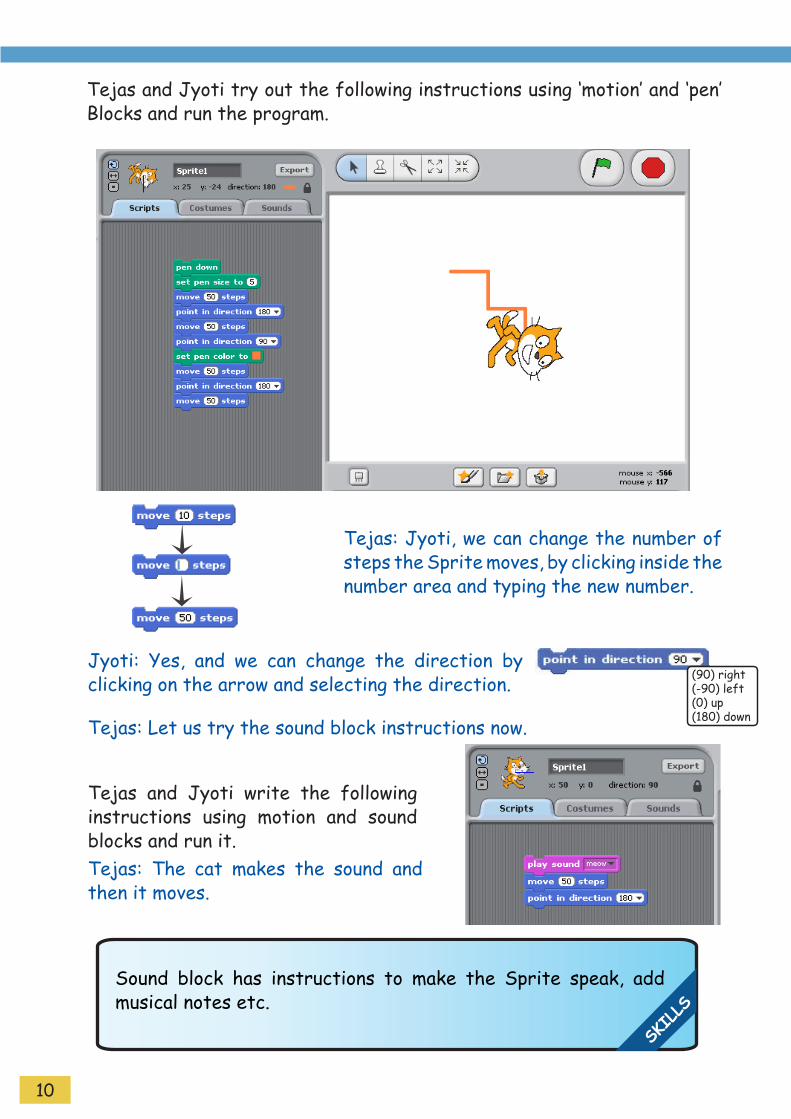
Tejas: Jyoti, we can change the number of steps the Sprite moves, by clicking inside the number area and typing the new number.
Jyoti: Yes, and we can change the direction by clicking on the arrow and selecting the direction.
Tejas: Let us try the sound block instructions now.
Tejas: The cat makes the sound and then it moves.
SKILLS
Sound block has instructions to make the Sprite speak, add musical notes etc.
(90) right(-90) left(0) up(180) down
Tejas and Jyoti write the following instructions using motion and sound blocks and run it.
Tejas and Jyoti try out the following instructions using ‘motion’ and ‘pen’ Blocks and run the program.
11
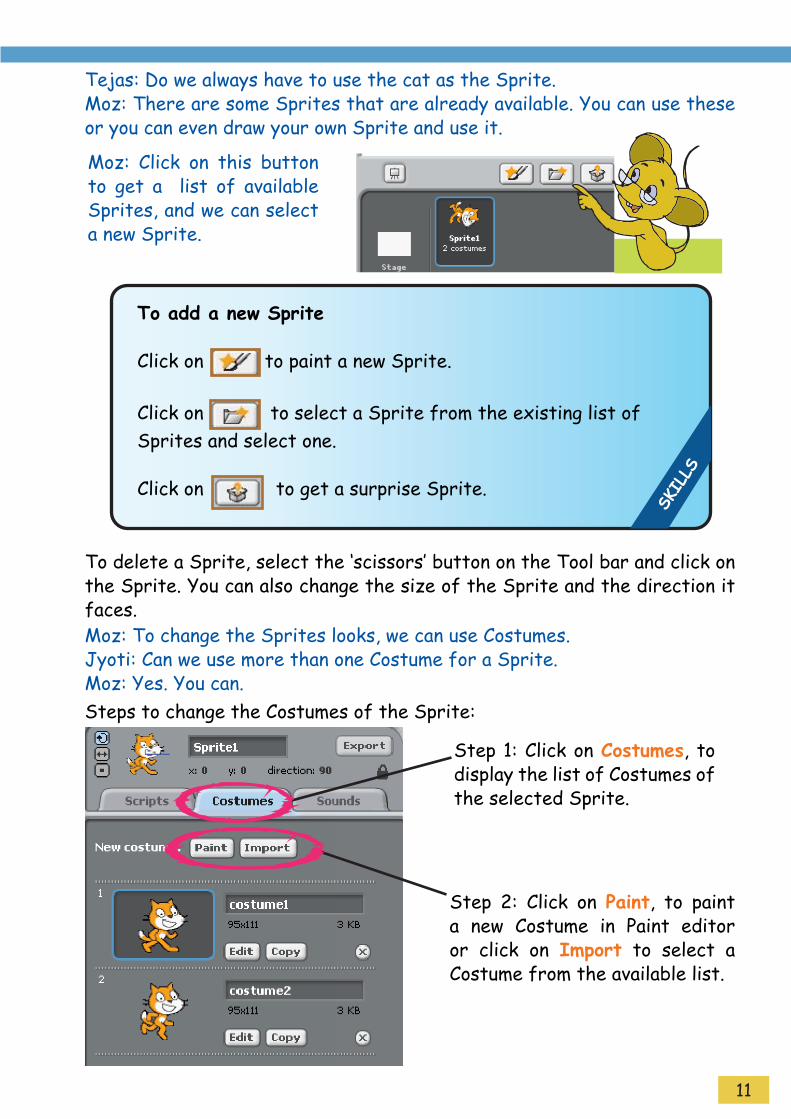
Moz: Click on this button to get a list of available Sprites, and we can select a new Sprite.
Tejas: Do we always have to use the cat as the Sprite.Moz: There are some Sprites that are already available. You can use these or you can even draw your own Sprite and use it.
SKIL
LS
To add a new Sprite
Click on to paint a new Sprite.
Click on to select a Sprite from the existing list of Sprites and select one.
Click on to get a surprise Sprite.
To delete a Sprite, select the ‘scissors’ button on the Tool bar and click on the Sprite. You can also change the size of the Sprite and the direction it faces.
Steps to change the Costumes of the Sprite:
Step 1: Click on Costumes, to display the list of Costumes of the selected Sprite.
Step 2: Click on Paint, to paint a new Costume in Paint editor or click on Import to select a Costume from the available list.
Moz: To change the Sprites looks, we can use Costumes.Jyoti: Can we use more than one Costume for a Sprite. Moz: Yes. You can.

12
The selected Costume will be added to the existing Costume list.
Step 3: Open a folder to select a Costume of your choice.
Step 4: Costumes inside the selected folder are displayed. Select the required Costume.

13
Tejas: How can we use these Costumes in our program?Moz: Go to the ‘looks’ block. Here you can find the instructions to change the Costumes.
To change the Costume you can use Switch to Costume (select the Costume from the drop down list) or the Next Costume commands.
Jyoti: This is fun. Let us use the instructions in Motion, Pen, Costume and Sound and make some programs.Tejas and Jyoti write the instructions and run the program.

14
Tejas: That was fun. Jyoti: Can we make the Sprite repeat the actions? Moz: Yes, you can. You can also control the way the script is executed. Next time we will explore these features of Scratch. Chin chinaki...
Learning
Outcome
After you have studied this lesson,
you will be able to:
Describe the function of a
programing language.
Use Sprite and Stage to write
basic Scratch programs (Projects).
Write programs in Scratch using
commands under Motion, Pen,
Looks and Sound blocks.
Jyoti: We can also make the Sprite speak. It appears as a call out across the Costume.

15
1. Circle the correct option.
a) In Scratch, the character which moves on the Stage is called a ________. i. Sprite ii. Script iii. Command
b) Under what block do you find the instructions to change the Costume of a Sprite?
i. Motion ii. Looks iii. Sound
c) command can be found under the ________________ block.
i. Looks ii. Sound iii. Motion
d) What will the Sprite do when you run the given below program?
i. Move 10 stepsii. Say ‘Hello’ iii. Move 10 steps and say ‘Hello’
e) To see the trail of the Sprite when it moves, we use____________ command.
i. pen up ii. pen down iii. next costume
f) In Scratch, the Sprite moves on the __________ when you run a program.
i. Stage ii. Canvas iii. Command
WORKSHEETSLevel III Lesson 3
16
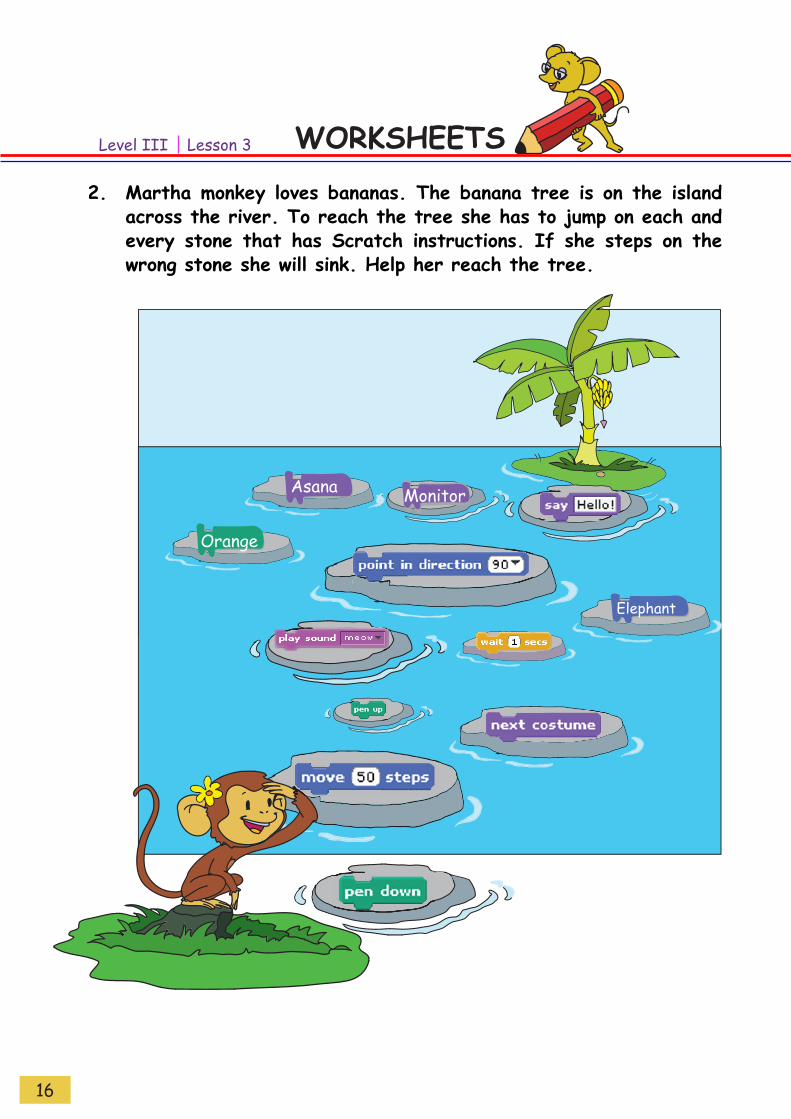
Martha monkey loves bananas. The banana tree is on the island 2. across the river. To reach the tree she has to jump on each and every stone that has Scratch instructions. If she steps on the wrong stone she will sink. Help her reach the tree.
WORKSHEETSLevel III Lesson 3
Orange
Monitor
Elephant
Asana
17
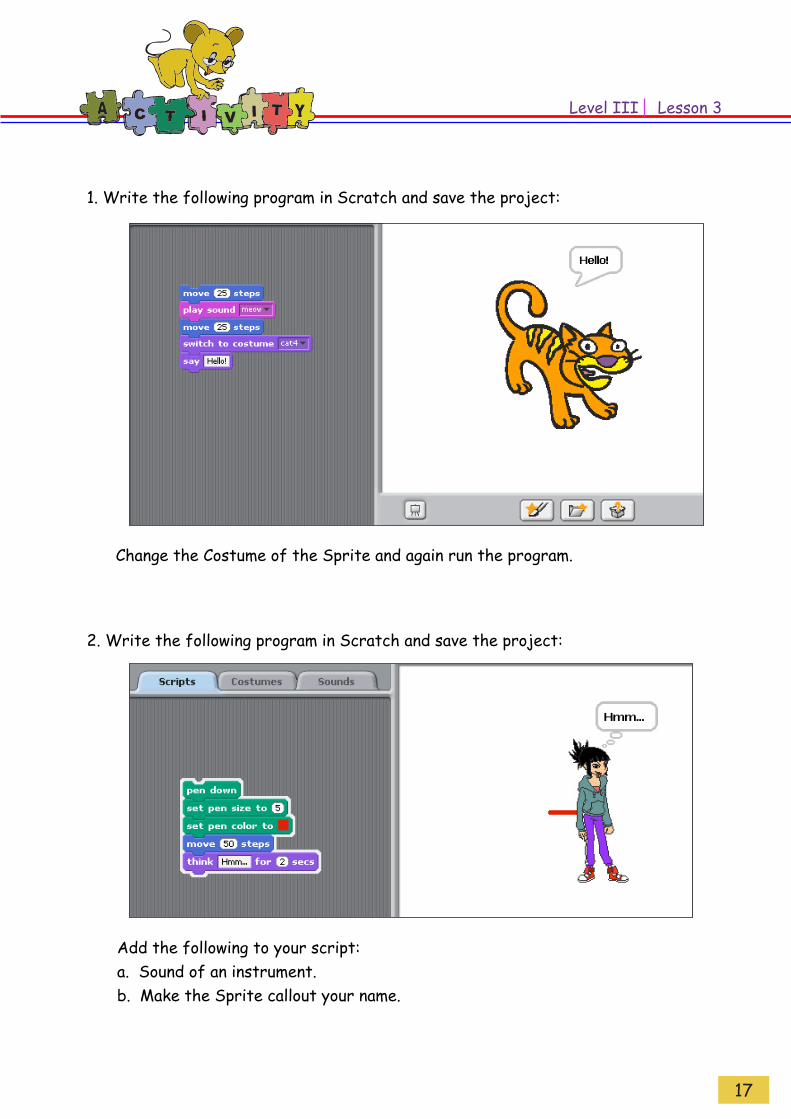
1. Write the following program in Scratch and save the project:
2. Write the following program in Scratch and save the project:
Change the Costume of the Sprite and again run the program.
Add the following to your script:a. Sound of an instrument.b. Make the Sprite callout your name.
Level III Lesson 3
18
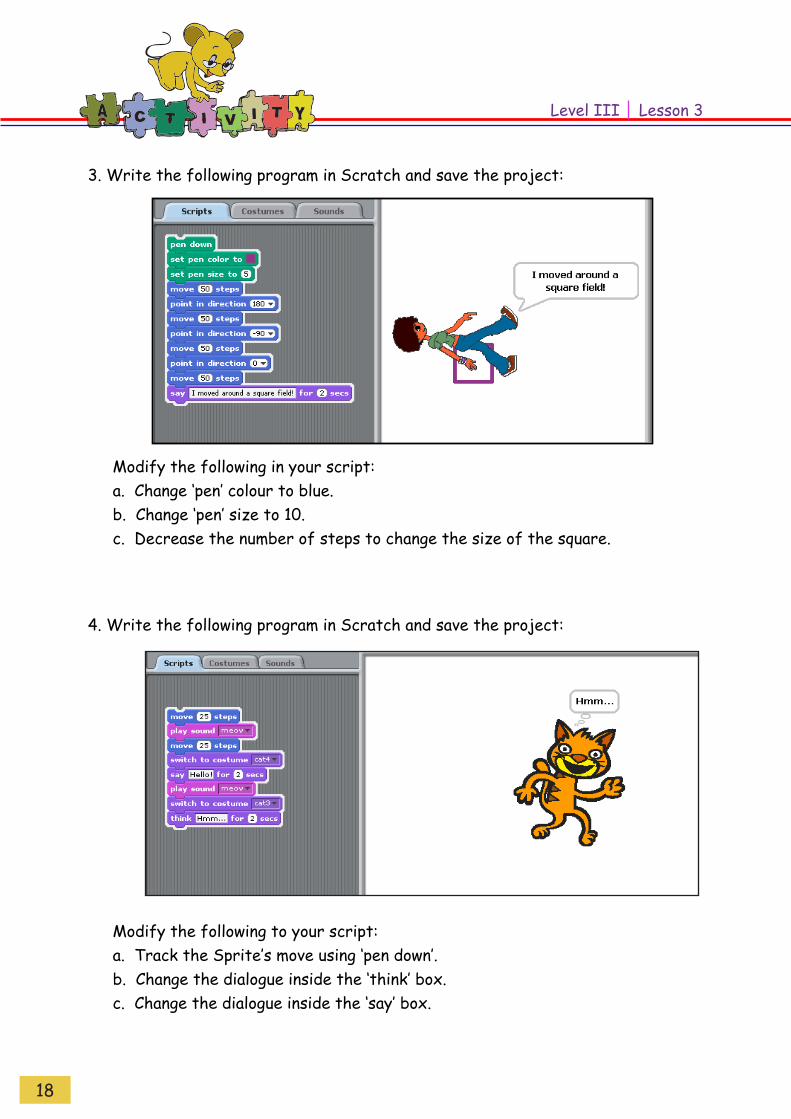
4. Write the following program in Scratch and save the project:
Modify the following to your script:a. Track the Sprite’s move using ‘pen down’.b. Change the dialogue inside the ‘think’ box. c. Change the dialogue inside the ‘say’ box.
3. Write the following program in Scratch and save the project:
Modify the following in your script:a. Change ‘pen’ colour to blue.b. Change ‘pen’ size to 10.c. Decrease the number of steps to change the size of the square.
Level III Lesson 3
19
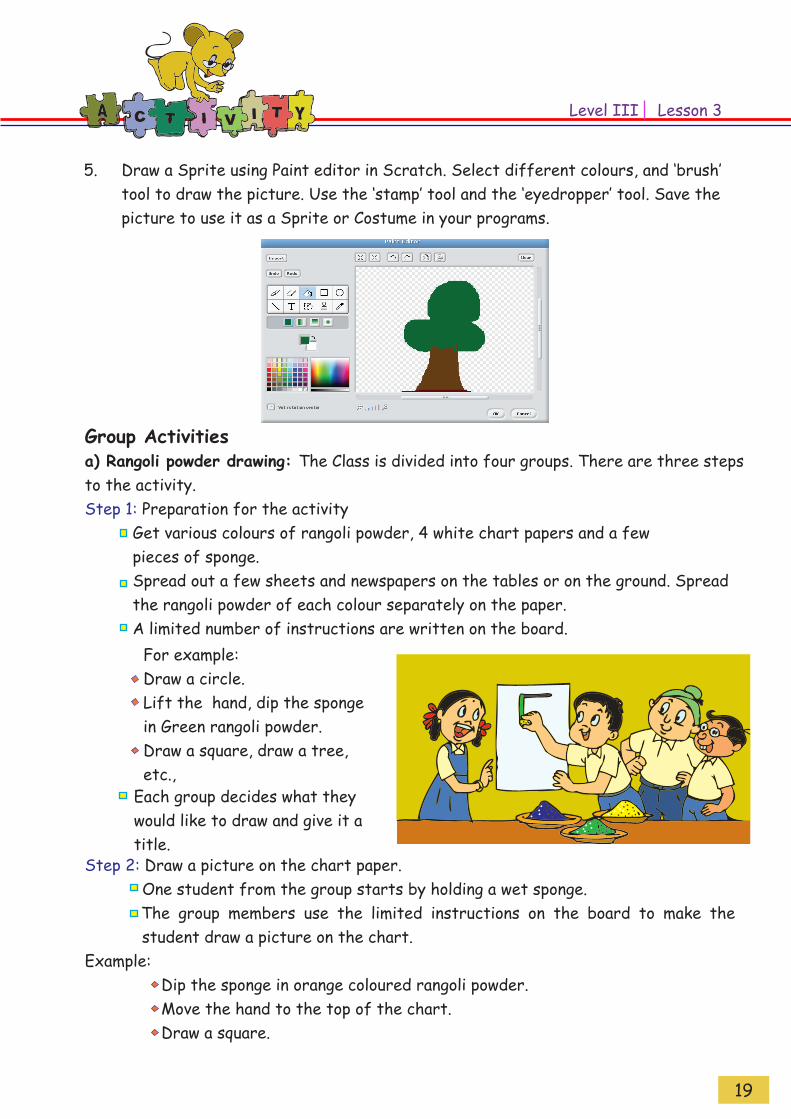
Draw a Sprite using Paint editor in Scratch. Select different colours, and ‘brush’ 5. tool to draw the picture. Use the ‘stamp’ tool and the ‘eyedropper’ tool. Save the picture to use it as a Sprite or Costume in your programs.
a) Rangoli powder drawing: The Class is divided into four groups. There are three steps to the activity.Step 1: Preparation for the activity Get various colours of rangoli powder, 4 white chart papers and a few pieces of sponge. Spread out a few sheets and newspapers on the tables or on the ground. Spread the rangoli powder of each colour separately on the paper. A limited number of instructions are written on the board.
For example: Draw a circle.Lift the hand, dip the sponge in Green rangoli powder. Draw a square, draw a tree, etc.,
Each group decides what they would like to draw and give it a title.
Step 2: Draw a picture on the chart paper. One student from the group starts by holding a wet sponge. The group members use the limited instructions on the board to make the student draw a picture on the chart.Example: Dip the sponge in orange coloured rangoli powder. Move the hand to the top of the chart. Draw a square.
Group Activities
Level III Lesson 3
20
Step 3: Display the chart Write the title of the drawing. Display the chart on the class display board. Finally compare your instructions with the instructions available in Scratch.
All the students become robots. The teacher gives a sequence of instructions such as move hands and legs, forward, right, left, up, down, backward. These can be merged with sing a song, jump, laugh, dance etc.
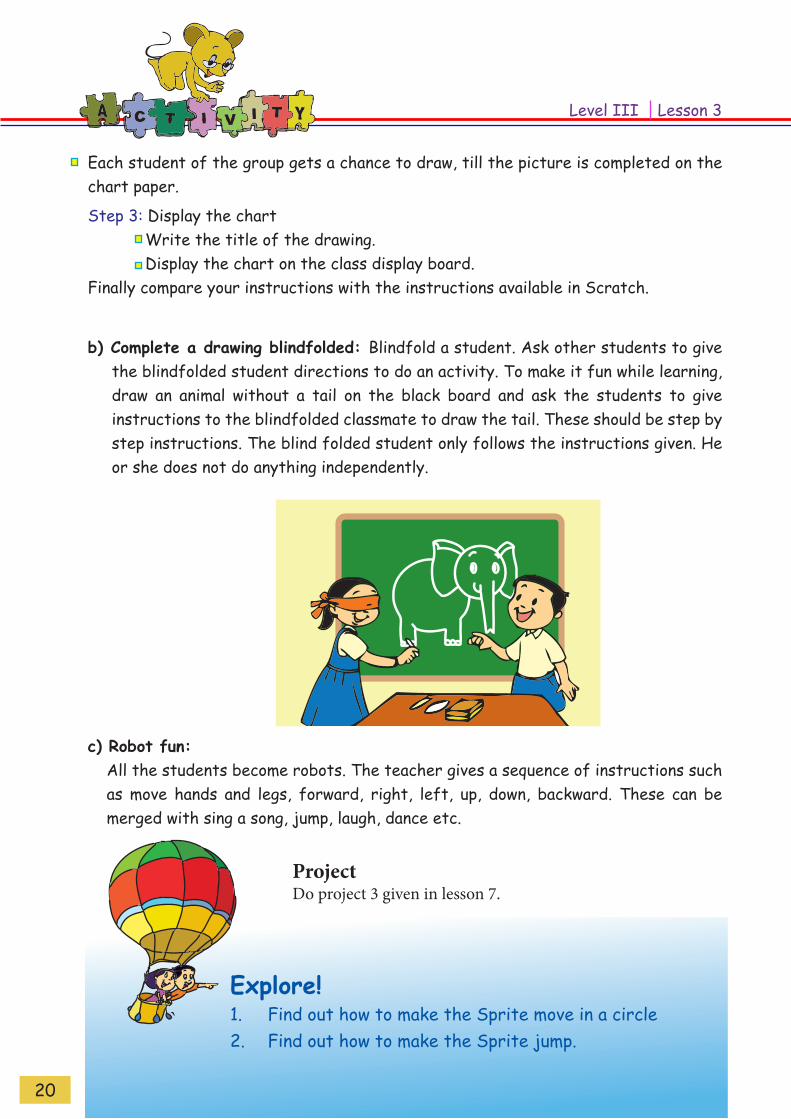
b) Complete a drawing blindfolded: Blindfold a student. Ask other students to give the blindfolded student directions to do an activity. To make it fun while learning, draw an animal without a tail on the black board and ask the students to give instructions to the blindfolded classmate to draw the tail. These should be step by step instructions. The blind folded student only follows the instructions given. He or she does not do anything independently.
c) Robot fun:
Explore!Find out how to make the Sprite move in a circle1. Find out how to make the Sprite jump.2.
Each student of the group gets a chance to draw, till the picture is completed on the chart paper.
Level III Lesson 3
ProjectDo project 3 given in lesson 7.

21
Teacher’sCornerBegin the class by playing a game. Blindfold one student and ask the other students to give directions to do an activity. For example, pick up a piece of chalk from the table and write something on the blackboard. You can also draw a picture of an animal and ask a student to draw its tail. Note that the other students give directions for the activity. Explain that doing the activity requires giving step by step instructions. Just as we follow the instructions, the computer also needs instructions from us to do the activity. What we call step by step instructions, is called programming in computer language.Encourage the students to discuss what a particular object is called in their mother tongue. You will come across a variety of names for that object. Ask the students to imagine that they are visiting their friend’s grandparents, who do not understand their language. How will they communicate with them? The students might say that they will use non-verbal signs to convey what they are saying or take help from their friend. Inform the students, that just as you need to learn a few words of the language to communicate in the new region, you need to learn the language of the computer.Mention that there are several programming languages. For now, they will learn one language of the computer, called Scratch. Explain that the Sprite is like your blind folded friend, who needs proper instructions from you to do the activity. Demonstrate how the Sprite can be instructed to move 20 steps and change directions. Ask the students if they want the Sprite to make a sound as it does the activity. Import the sounds and add it from the stack of blocks. [Ensure that the speakers are connected]. You may also show them how to introduce a callout to make the Sprite speak or think something. Let the students provide the dialogue for the Sprite. Ask the students if they want a different Sprite. Show them how to get the new Sprite or create a Sprite using the Paint editor. You can ask the students to explore the ‘options’ on their own and figure out how to change the background. Explain that the Sprite sounds and backgrounds are stored in sub-folders. The names of the sub-folders convey their contents. Revise the concept of folders and sub-folders. Ask questions such as “What would happen if the sub-folders were not used and all the contents were placed in a single folder?” Encourage students to think and reason out the necessity of organising files into folders.Explain that the instructions are placed in the appropriate blocks. For example, all the instructions about ‘pen down’ are in the block called ‘pen’. Similarly, all the instructions for ‘sound’ are in the block called ‘sound’. Demonstrate the use of pen down and write a script to draw a square. Explain that the instructions given to the Sprite is called a script. The output is saved as a project in the appropriate folder. Summarize the lesson and ask the students to write their projects. You can write some projects and ask students to make changes to it and observe what happens. You can ask them to write a story about it.You can end the class by asking students to do an exercise where students move their hands in the different directions --- forward, right, left, up, down, back. Change the sequence of directions and make the game enjoyable. [If there are space constraints, ask them to move their neck instead of hands.]
Further Reading : http://scratch.mit.edu
Level IIILesson 3