introduction to the use of the cms modx
TRANSCRIPT

This document has been translated by machine
WebUnifrAvenue de l'Europe 20CH - 1700 Fribourg project
www.unifr.ch/webunifrT : +41 26 / 300 [email protected]
INTRODUCTION TO THE USE OF THE CMS MODX
1. INTRODUCTION ................................................................................................................ 2
1.1 What is a CMS ...................................................................................................................................................... 2 1.2 Features of Unifr websites..................................................................................................................................... 2
2. ACCESS TO THE MANAGEMENT INTERFACE ............................................................. 6 2.1 Connection to the MODx Manager ........................................................................................................................ 6 2.2 Granting of access rights ....................................................................................................................................... 6 2.3 Presentation of the management interface ........................................................................................................... 6
2. EDITING PAGES ............................................................................................................... 8 2.1 Create a new web page ........................................................................................................................................ 8 2.2 Publish, make a page invisible or delete it ............................................................................................................ 9 2.3 Move a web page ................................................................................................................................................ 10 2.4 Duplicate a page ................................................................................................................................................. 10 2.5 Empty the MODx cache ...................................................................................................................................... 11
3. CONTENT EDITING ......................................................................................................... 11
3.1 Editing text with the text editor ............................................................................................................................ 11 3.2 Create links with the text editor ........................................................................................................................... 13 3.3 Adding content to a page .................................................................................................................................... 15 3.4 Main content elements ........................................................................................................................................ 15 3.5 Settings of content elements ............................................................................................................................... 17
4. WORK ON THE LAYOUT ................................................................................................ 17
4.1 responsive Web Design and Layouts .................................................................................................................. 17 4.2 Add a layout ........................................................................................................................................................ 18 4.3 Move the elements of a page .............................................................................................................................. 19
5. IMAGE MANAGEMENT................................................................................................... 21
5.1 Adding a banner to a page .................................................................................................................................. 21 5.2 Adding an image to a page ................................................................................................................................. 23 5.3 Use your own images .......................................................................................................................................... 24 5.4 Upload an image into the Media Browser ........................................................................................................... 26
6. DOCUMENT MANAGEMENT ......................................................................................... 27
6.1 Upload a document into the Media Browser ....................................................................................................... 28 6.2 Embedding a document in a page ...................................................................................................................... 29 6.3 Properly manage the file directory....................................................................................................................... 30
7. MANAGEMENT OF MULTILINGUAL SITES .................................................................. 32
7.1 Create a page translation .................................................................................................................................... 32 7.2 Redo a translation ............................................................................................................................................... 33
8. ANCILLARY DOCUMENTS ............................................................................................ 34

This document has been translated by machine
Webunifr, Introduction to MODx CMS, April 2019 2 / 34
1. INTRODUCTION This introductory course is intended for all UNIFR webpublishers who wish to familiarize themselves with the MODx CMS management interface and acquire the basic knowledge necessary to use the tool. After this course, webpublishers will be able to autonomously modify existing content of a website, publish or replace images and documents.
Participation in the introductory course is optional but recommended for webpublishers who have little experience with the use of a CMS or who are taking on this task for the first time.
On the other hand, all UNIFR webpublishers are invited to review the content of this course and exercise the procedures described therein. This is a mandatory prerequisite for participation in the deepening course.
1.1 WHAT IS A CMS This is the abbreviation for Content Management System. In concrete terms, a CMS is a computer program that facilitates the creation and maintenance of a website by offering page templates, a predefined graphic and typographical universe, and different types of content.
The advantage of a CMS is that it allows a separation of content and form. Thus webpublishers can focus on content (texts, documents, images) without having to worry aboutform (visual identity, typography, colours). Visual appearance management, which requires in-depth technical knowledge, is entirely centralized with administrators.
UNIFR has chosen the MODx CMS for the management of all its public and institutional websites.
1.2 FEATURES OF UNIFR WEBSITES The pages of UNIFR sites are all based on the same presentation line and have some invariable fields.
Global navigation
Clicking on QUICK ACCESS opens at the very top of the page, which will be the same for all websites, allowing direct access to the main central services and all faculties.

This document has been translated by machine
Webunifr, Introduction to MODx CMS, April 2019 3 / 34
The identity
This area includes the official logo of the University, as well as the name of the department, department or information unit from which the website originates.
The main navigation
The main navigation is the first level of navigation. It is specific to each website.
Secondary navigation
Secondary navigation consists of the second and third levels of navigation. It is contextual and varies depending on where you are on the website.
Some landing pages do not require secondary navigation. It is then possible to disable this zone (see below: page templates).

This document has been translated by machine
Webunifr, Introduction to MODx CMS, April 2019 4 / 34
The content area
It is in this area that the webpublisher's field of intervention is mainly limited. At a minimum, the content area contains a title and text, or even a banner image and other content elements. We will also see that it can be divided into several columns according to needs.
The Footer
The footer (or footer) on a blue background, is specific to each website and allows you to repeat an invariable content on all the pages of a site. In principle it contains a sitemap and the unit's contact data, but other configurations are possible.

This document has been translated by machine
Webunifr, Introduction to MODx CMS, April 2019 5 / 34
The home page
The home page has a special layout with a number of mandatory elements and a content area divided into three columns. This arrangement is subject to a few rules that apply to all UNIFR sites. These rules will be discussed in the in-depth course.
Visual identity and colours
The visual identity (colours, layout, typography) is strictly the same for all UNIFR sites. The only variation that occurs is a color code that differs according to the faculties. This colour code is an aid to user orientation. It is therefore in principle binding for all organizational units. The different faculty colors are as follows:
Faculty of Theology Faculty of Arts Faculty of Law
Faculty of Eco Science Faculties of Science Interfaculty
Central services
Responsive Webdesign
UNIFR websites behave in a "responsive" way, i.e. the layout of pages and content automatically adapts to the devices
(traditional computers, tablets, smartphones) on which they are consulted. This technology uses the notion of layouts and boxes that will react according to the width of the screen on which the web page is read.

This document has been translated by machine
Webunifr, Introduction to MODx CMS, April 2019 6 / 34
2. ACCESS TO THE MANAGEMENT INTERFACE
2.1 CONNECTION TO THE MODX MANAGER The connection to the website management interface is done via a browser by completing the website URL with the termination/manager.
Example: your website has the URL www3.unifr.ch/uniguest
Access to the MODx Manager will be via the URL www3.unifr.ch/uniguest/manager
Then click on Login eAccount to be able to identify yourself using your UNIFR user account (SwitchAAI Interface).
For work in the MODx Manager it is strongly recommended to use the Chrome browser . The use of any other browser (Firefox, Internet Explorer or Safari)
is strongly discouraged. If you do not have Chrome on your personal computer, your IT representative can help you install it.
2.2 GRANTING OF ACCESS RIGHTS The management of access rights to the MODx Manager is centralized at UNICOM. If you are responsible for modifying the contents of a website but do not have the necessary access, please make an access request to [email protected].
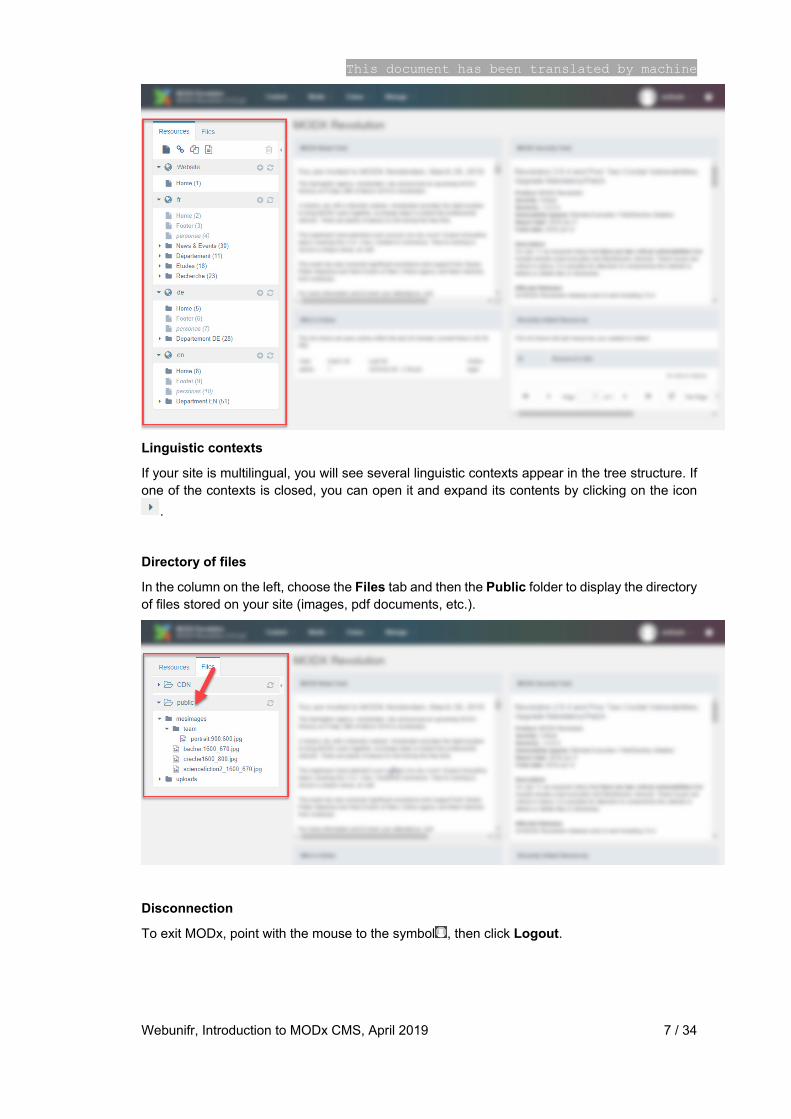
2.3 PRESENTATION OF THE MANAGEMENT INTERFACE Site Tree Structure
In the column on the left, choose the Resources tab to display the complete tree structure of your website.
This document has been translated by machine
Webunifr, Introduction to MODx CMS, April 2019 7 / 34
Linguistic contexts
If your site is multilingual, you will see several linguistic contexts appear in the tree structure. If one of the contexts is closed, you can open it and expand its contents by clicking on the icon
.
Directory of files
In the column on the left, choose the Files tab and then the Public folder to display the directory of files stored on your site (images, pdf documents, etc.).
Disconnection
To exit MODx, point with the mouse to the symbol , then click Logout.

This document has been translated by machine
Webunifr, Introduction to MODx CMS, April 2019 8 / 34
2. EDITING PAGES
2.1 CREATE A NEW WEB PAGE Place the mouse cursor on the top page in which the new web page is to be created. Right-click and select Create Document.
Enter a title in the Title field. The latter will be displayed by the browser when viewing the page and used as a criterion by search engines such as Google.
Prefer short and bearer securities. Avoid a title such as "about our service" that will not help
your page to be referenced. Also avoid abbreviations and acronyms.
The Resource Alias field can be filled in with a text that will be used to form the path to the web page. If no text is entered, the system will generate an alias automatically. It may be modified at a later date.
Be careful not to use special characters, accented characters and spaces in the alias name. If
the title of your page contains accents and an alias has been generated automatically, it is strongly recommended to modify the alias later in order to delete these accents.

This document has been translated by machine
Webunifr, Introduction to MODx CMS, April 2019 9 / 34
If necessary, enter a shorter alternative title in the Title Menu field. This is the title that will be displayed in the website navigation. Recommended if the page title is very long.
Select a page template from the Uses Template menu, from the Full, Home or Sidebar options (other available templates are not relevant for content pages).
The page template will define the basic framework of your new page.
Full house
This model generates a frame that occupies the full width available and without secondary navigation.
Sidebar
This template generates a framework divided into two areas, with a content area on the right and an area where the secondary navigation menu is displayed on the left.
Home
Reserved for the home page of your site.
2.2 PUBLISH, MAKE A PAGE INVISIBLE OR DELETE IT To publish a page, the Published option must be checked. Until the page is published, it will not be accessible to your visitors and will not appear in the navigation, despite the fact that you can view it as an editor.

This document has been translated by machine
Webunifr, Introduction to MODx CMS, April 2019 10 / 34
To publish a page while keeping this page invisible in navigation, the Hide From Menus option can be checked. In this case, the visitor must have a direct link to the page in order to be able to consult it.
To delete a page, right-click on the page in question in the tree structure and select Delete.
The deletion operation is reversible. It can be cancelled by right-clicking on the page in question in the tree structure and selecting Undelete.
2.3 MOVE A WEB PAGE To move a page in the tree structure, simply select the web page, hold down the left mouse button and drag the web page to the destination folder.
2.4 DUPLICATE A PAGE To duplicate a page, right-click on the page in question in the tree structure and select Duplicate. The page is then duplicated with all its content.
This document has been translated by machine
Webunifr, Introduction to MODx CMS, April 2019 11 / 34
Consider duplicating when preparing several pages with a similar content structure. Indeed, it is much faster to duplicate an existing page and adapt the contents than to create a blank page and add content.
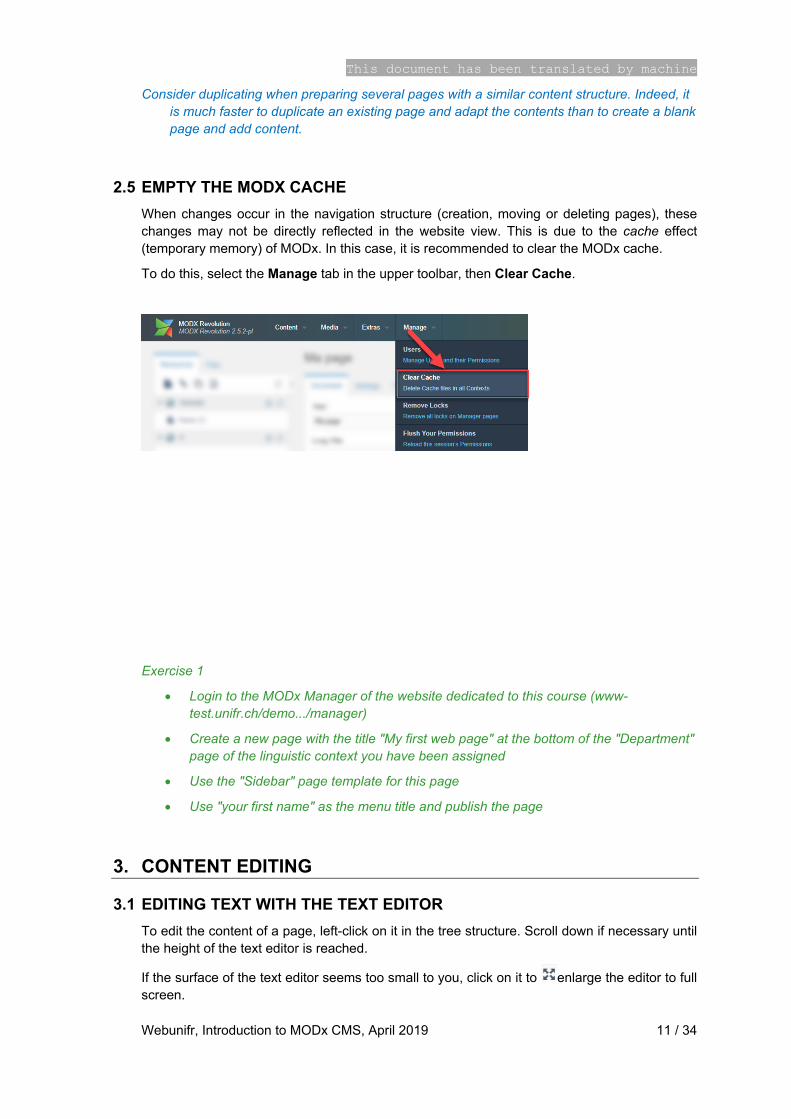
2.5 EMPTY THE MODX CACHE When changes occur in the navigation structure (creation, moving or deleting pages), these changes may not be directly reflected in the website view. This is due to the cache effect (temporary memory) of MODx. In this case, it is recommended to clear the MODx cache.
To do this, select the Manage tab in the upper toolbar, then Clear Cache.
Exercise 1
• Login to the MODx Manager of the website dedicated to this course (www-test.unifr.ch/demo.../manager)
• Create a new page with the title "My first web page" at the bottom of the "Department" page of the linguistic context you have been assigned
• Use the "Sidebar" page template for this page
• Use "your first name" as the menu title and publish the page
3. CONTENT EDITING
3.1 EDITING TEXT WITH THE TEXT EDITOR To edit the content of a page, left-click on it in the tree structure. Scroll down if necessary until the height of the text editor is reached.
If the surface of the text editor seems too small to you, click on it to enlarge the editor to full screen.

This document has been translated by machine
Webunifr, Introduction to MODx CMS, April 2019 12 / 34
The options available to format your text are reduced. Thus, it is not possible to change the font, size or color of a text. This restriction is deliberate and ensures consistency of form on all UNIFR websites.
The predefined styles, available in Formats, offer very attractive formatting.
Headers styles are intended to mark a text as a title and define its size.
Infobox styles allow you to highlight a particularly important paragraph by adding a background color. Please observe the optional colour code here.
Alignment styles are used to define the alignment of paragraphs. The standard alignment of the texts is on the left. In specific cases, it is possible to center a text or align it on the right. Justified alignment is not possible.

This document has been translated by machine
Webunifr, Introduction to MODx CMS, April 2019 13 / 34
When importing text from a Word document by copy/paste, foreign formats can be imported and may cause editing problems or block the editor. It is imperative in this case to clean up the intrusive formatting. For that we can:
1. Use the Paste as text button to paste the text into the editor;
2. Use the Clear formatting command to remove all unnecessary formatting.
For editors who are comfortable with HTML code, the button switches to HTML mode and changes the code.
3.2 CREATE LINKS WITH THE TEXT EDITOR To create a hyperlink within a text, first select the text in question in the editor. Then click on the
button .
The Url field will allow you to define the target of the link.
• For a link to another internal page on your site, search for the name of the page in question in the Search field and select the target page
• For a link to an external site, enter the full URL

This document has been translated by machine
Webunifr, Introduction to MODx CMS, April 2019 14 / 34
• For a link to a PDF document, select the PDF file to display by clicking on ( see below Embedding a document in a page)
The Target field will allow you to define the link opening behavior.
• For all internal links, leave the option on None; the link will open in the same browser window;
• For external links, change the option to New Window, if you want the link to open in a new browser window. This option is not recommended in most cases.
The Class field will allow you to define the graphic style of the hyperlink and make it more visible to the user. Among the many classes, only the classes marked in blue are relevant for editors.
• Class Link for a single link without symbol. The link is automatically positioned on a new line.
• Class =>Link for a link to an internal page of your site. The link is automatically
positioned on a new line. Also suitable for a list of links.
• Class External link for a link to a page external to your site. The link is automatically
positioned on a new line.
• Class Download for a link to a document to download (PDF or other). The link is
automatically positioned on a new line
• Class Inline link for a link within a text
• Class Inline link right after for a link to a subpage inside a box, an invitation to
consult additional information.

This document has been translated by machine
Webunifr, Introduction to MODx CMS, April 2019 15 / 34
3.3 ADDING CONTENT TO A PAGE To add content to a page, for example in the case of a new blank page, it is necessary to click on +Add Content, then select an item from the list of available items.
Clicking on Save will save the new web page.
Clicking on View will open a preview of the web page in a new browser tab.
3.4 MAIN CONTENT ELEMENTS The complete list of content elements available in MODx is described in the MODx Lexicon (see online documentation https://www3.unifr.ch/webunifr/doc).
We simply describe below the most common content elements and their context of use.

This document has been translated by machine
Webunifr, Introduction to MODx CMS, April 2019 16 / 34
Element - Title
Used to place a title or subtitle in a content page. Not for use on the home page.
Element - Rich Text
Used to place text in a content page and format it
Element - Table
Used only to present data in a table or matrix format.
Not used for text layout. Do not use on the homepage.
Box 1 - Infobox
Used to highlight or make the user aware of important information within the page, or in the right-hand context column of a standard page. Cannot be used for long text content (prefer Richtext element)
Box 2 - Teaser box
Used to highlight, promote on the homepage or detail subpages in a landing page. Not used to put the focus in the middle of text content (prefer a Box 1), nor to place long texts
Box 3 - Visual teaser box
Used to detail subpages in a landing page or to promote or highlight in the contextual sidebar. Not used to put the focus in the middle of text content (prefer a Box 1), nor to place long texts.

This document has been translated by machine
Webunifr, Introduction to MODx CMS, April 2019 17 / 34
3.5 SETTINGS OF CONTENT ELEMENTS Most content elements have specific parameters that can be modified by calling the Settings displayed by a gearwheel at the top right of each element.
Warning: Settings are contextual and may vary depending on the content elements. Depending on the use cases, you can configure it:
• The background color of an element
• The size of an element
• The spacing of an element from the previous or next element
• The target link to which an element should lead
• The scrolling speed of an element.
Exercise 2
• Insert a title and text in the content of the previously created page. Place a link in the content to the top page "Department". Make sure that this link is marked in blue and preceded by a small arrow.
4. WORK ON THE LAYOUT
4.1 RESPONSIVE WEB DESIGN AND LAYOUTS UNIFR websites behave in a "responsive" way, i.e. the layout of pages and content automatically adapts to the devices (traditional computers, tablets, smartphones) on which they are accessed.
This mechanism is based on a grid system that structures the layout of each page. In desktop mode, the grid can have the shape of several columns arranged next to each other. In tablet or smartphone mode, the columns will adapt to the available screen width and possibly rearrange vertically.

This document has been translated by machine
Webunifr, Introduction to MODx CMS, April 2019 18 / 34
It is important to think about the grid of a web page before placing content on it. To build this grid, MODx provides Layouts or content layouts. Layouts are containers that define the structure of the page and its responsive behavior, and can then host content elements.
By default, a new web page contains a single layout that occupies the entire available width.
Another frequently used grid is the arrangement on two columns 2/3 + 1/3 which allows for example to distinguish between main and secondary content.
Depending on specific needs, more complex grids can also be built.
4.2 ADD A LAYOUT In a newly created page, a default layout is automatically added. It occupies the entire available width. Depending on the layout needs, it is possible to add additional layouts.
Click on + Add Layout to do this. The following layouts are available:

This document has been translated by machine
Webunifr, Introduction to MODx CMS, April 2019 19 / 34
Layout 1/1
Only one column in the content area. This is the default layout to use in most cases.
Layout 2/3 + 1/3
Typically used to create an arrangement with a main content column and a contextual secondary column.
Layout 1/2 + 1/2
Used to order boxes into two equally wide columns or to align text with a large image.
Layout 1/3 + 1/3 + 1/3 + 1/3
Used to order boxes into three columns of equal width.
Layout 1/4 + 1/4 + 1/4 + 1/4 + 1/4 + 1/4
Used to order boxes into four columns of equal width.
Layout 1/4 + 3/4
Use in rare cases, for example to align a small image on the left with a text on the right.
Layout 3/4 + 1/4
Use in rare cases, for example to align a text with a small image on the right.
4.3 MOVE THE ELEMENTS OF A PAGE Within a page, it is possible to move layouts in relation to each other, but also to move content elements from one layout to another.
To move a layout, simply use the "Move Up" and "Move Down" arrows visible to the right of "Layout Settings".

This document has been translated by machine
Webunifr, Introduction to MODx CMS, April 2019 20 / 34
To move a content item, use drag and drop:
1. position the mouse cursor in the upper part of the element to be moved
2. click on the element, hold down the button, and move the element to its new position
3. do not release the mouse button until the pointer has reached its target.

This document has been translated by machine
Webunifr, Introduction to MODx CMS, April 2019 21 / 34
5. IMAGE MANAGEMENT
The MODx Manager provides two content elements to publish an image inside a page. They do not have the same use.
Media - Banner Image
Used to place an image as a banner in a landing page or content page. The image will automatically be resized and cropped to match the banner format.
Media - Image
Used to place an illustration image within the text content. The image will automatically be resized according to the available width but not cropped. It is possible to place a link on the image.
Theoretically, it is also possible to add images via the text editor. However, this solution is absolutely forbidden as it may cause distortion of the image in responsive mode.
5.1 ADDING A BANNER TO A PAGE Click on + Add Content, then select the Banner Image item.
A banner is always placed first in your page (before the title and before the text). So choose
the +Add Content button at the top of the page.
From the Banner Image element, the insertion of an existing image is done by clicking on Choose. The other options Upload, From URL and drop an image here should not be used.

This document has been translated by machine
Webunifr, Introduction to MODx CMS, April 2019 22 / 34
Then select in the upper left corner the directory from which the image should be inserted.
• The public directory contains all the files (images, PDF, etc.) in use on your website. These files are public and are indexed in the Google search engine. In this folder and its subfolders, you can load new images (see below Load an image into the Media Browser)
• The CDN directory contains a collection of images made available centrally by UNIFR. You can freely use these images for your web pages. The CDN directory is read-only. You cannot upload new images there. Its content is managed by the web office.
Then browse the directory structure to the location where the image to be inserted is located.
In the case of a CDN image, open the banner subfolder > 1600x670.
Double-click on the desired image.

This document has been translated by machine
Webunifr, Introduction to MODx CMS, April 2019 23 / 34
The image is then added to the Banner Image element
5.2 ADDING AN IMAGE TO A PAGE Click on + Add Content, then select the Image item.
An image is never placed first in your page. Use the Image Banner for this.
Proceed as described in the previous chapter to insert an image into the content element.
To place a link on the image, specify the target of the link in the Link field. If the link is to lead to another page on your site, enter the name of the page in question in the field.
To resize the image, call the Settings (toothed wheel at the top right) of the Image element and specify a percentage reduction in the Width field.

This document has been translated by machine
Webunifr, Introduction to MODx CMS, April 2019 24 / 34
A comment can be associated with an image. It will be read by reading systems for the visually impaired.
5.3 USE YOUR OWN IMAGES It is of course possible to use your own images to illustrate your website. However, some technical specifications and guidelines related to the content of the images must be respected.
Technical specifications :
• JPG or PNG format
• Image size less than 500 KB
• Banner size: 1600 x 670 pixels
• Box image size: 800 x 335 pixels
• Size of people's photos: 500 x 500 pixels (square ratio)
• File name without special characters, accents or spaces
If the original image does not meet these specifications, it will be necessary to reduce and/or re-cut it using an image editing tool.

This document has been translated by machine
Webunifr, Introduction to MODx CMS, April 2019 25 / 34
For image editing, we recommend the online tool PIXLR X:
ttps://pixlr.com/x/
Guidelines for choosing images
• Focus on photographs
• Waive low quality images
• Focus on horizontal formats and topics
• No overprinted texts (for banners)
• No graphics (for banners)
• No logos (for banners)
• No white background
• Clarify the copyright of images

This document has been translated by machine
Webunifr, Introduction to MODx CMS, April 2019 26 / 34
5.4 UPLOAD AN IMAGE INTO THE MEDIA BROWSER If your image meets the criteria listed below, you will need to upload it to your file directory in order to use it on one or more pages.
To do this, select the Media tab in the upper toolbar, then select Media Browser.
In the public directory, select the sub-folder in which the image will be uploaded. Right-click on the sub-folder name and choose Upload Files.
Use the Choose file(s) button to fetch the image to upload from your workstation.
Check that the image file name does not contain any special characters, accents or spaces.
Confirm the upload by clicking on Upload.
A maximum of 100 images can be loaded simultaneously.

This document has been translated by machine
Webunifr, Introduction to MODx CMS, April 2019 27 / 34
The image is then uploaded and placed in the sub-folder that has been specified as the target. It can now be inserted into a page via the procedure described in the previous chapter.
To create subfolders in the public directory, select the top folder in which a subfolder should be created. Right-click on the top folder and choose Create Directory Here.
The sub-folder name must not contain any special characters, accents or spaces.
Exercise 3
• Insert an image as a banner in the previously created page. Choose the image from the CDN collection.
6. DOCUMENT MANAGEMENT
For a correct publication of documents on your website, it is also important to respect some technical specifications.

This document has been translated by machine
Webunifr, Introduction to MODx CMS, April 2019 28 / 34
Technical specifications for documents:
• Preferred PDF format
• ZIP format for file packets
• Maximum recommended size 3 MB per document
• No video files (.mp4, . mov, . mpeg, etc.)
• File name without special characters, accents or spaces
6.1 UPLOAD A DOCUMENT INTO THE MEDIA BROWSER If your document meets the criteria listed below, you will need to upload it to your file directory in order to use it on one or more pages.
To do this, select the Media tab in the upper toolbar, then select Media Browser.
In the public directory, select the sub-folder in which the document will be stored. Or, if necessary, create a new subfolder.
Right-click on the sub-folder name and choose Upload Files.
Use the Choose file(s) button to pick up the file to download on your workstation.
Check that the filename does not contain any special characters, accents or spaces.
Confirm the download by clicking on Upload.
A maximum of 100 documents can be loaded simultaneously.

This document has been translated by machine
Webunifr, Introduction to MODx CMS, April 2019 29 / 34
The file is then downloaded and dropped into the sub-folder that has been specified as the target.
6.2 EMBEDDING A DOCUMENT IN A PAGE The most common way to publish a document in a page is to create a link to it using the text editor. Care should also be taken to use short and meaningful catchphrase text and to make the link sufficiently visible by applying the appropriate style.
Open the page in which the document is to be integrated. Add a Rich Text element or use a Rich Text element already present on the page.
Enter a significant teaser text, for example "Download the program" and select this text. Then
click on the button .
In the Url field select the PDF file to integrate by clicking on

This document has been translated by machine
Webunifr, Introduction to MODx CMS, April 2019 30 / 34
Then browse the public directory to the location where the file to be inserted is located.
Double-click on the desired file.
In the Target field, change the option on New Window if necessary, in order to force the document to open in a new browser window.
In the Class field select the Download option to apply the appropriate style to the link.
6.3 PROPERLY MANAGE THE FILE DIRECTORY The file directory is the data center of your website and it is important to respect some rules to ensure a good long-term management of its contents.
1. Structure the file directory into several sub-folders (e. g. by document type: publications, flyers, study plan, etc.) or by chronology)
2. Separate folders containing documents from those containing images
3. Avoid special characters, accents and spaces in file names and folder names at all costs
4. Never rename or move a folder whose documents are published on the pages (broken link)
5. Never rename a document that is published on a page (broken link)
6. Store only public documents in the directory (all documents will be indexed by Google)
7. Regularly delete documents that are no longer published on your pages

This document has been translated by machine
Webunifr, Introduction to MODx CMS, April 2019 31 / 34
Exercise 4
• Create a sub-folder named after your first name in the public directory. Submit a PDF document in this folder. Publish this PDF document in the previously created page.

This document has been translated by machine
Webunifr, Introduction to MODx CMS, April 2019 32 / 34
7. MANAGEMENT OF MULTILINGUAL SITES
If your site is available in several language versions, each language is materialized by a linguistic context in the MODx tree.
Each page of a language version is logically linked with its counterparts in the other languages. The links can be viewed in the languages tab at the top right. This allows you to move directly from one page to another.
7.1 CREATE A PAGE TRANSLATION MODx allows you to quickly create page translations by duplicating the entire original page.
From the original page, select the translation language in the languages tab, then Create Translation.

This document has been translated by machine
Webunifr, Introduction to MODx CMS, April 2019 33 / 34
The original page is then fully duplicated and placed in the linguistic context of the specified language.
Then simply edit the new page in question and translate the title, menu text and content. The layout does not have to be redone. Don't forget to publish the page once it has been translated.
To use this mechanism effectively, it is necessary to fully finalize a page in the source
language, before translating it into the target languages. Indeed, if changes occur later in the original page, they will not be reflected on the target language pages.
7.2 REDO A TRANSLATION It is not possible to create a second translation of a page that has already been translated. In this case, the Create Translation option is not available on the original page.
To recreate a translation of the page, for example if substantial changes have been made to the original page, then proceed as follows.
From the original page, select the translation language in the languages tab, then Unlink.

This document has been translated by machine
Webunifr, Introduction to MODx CMS, April 2019 34 / 34
This operation will cancel the logical link between the original page and the translated page.
Then delete the page to be translated in the target language tree.
From the original page, proceed with the new translation by choosing the Create Translation option now available.
Exercise 5
• Translate the page previously created into each of the other language versions available on the site.
8. ANCILLARY DOCUMENTS
MODx Lexicon: Reference guide for the use of MODx content elements
Campusviews MODx: how to display lists of people and courses
News & agenda modules: how to use the management modules
Writing recommendations for the web: a practical guide for web publishers
Personas WebUnifr: checklist to identify and understand your target audience
To download the documents: https://www3.unifr.ch/webunifr/doc