introduction to zoomtext mac · web viewderek bove, doug hacker, tim lalor, rebecca white and our...
TRANSCRIPT

ZoomText Mac
User Guide
CopyrightsZoomText MacCopyright © 2013, Algorithmic Implementations, Inc. All Rights Reserved.ZoomText Mac User GuideCopyright © 2013, Algorithmic Implementations, Inc. All Rights Reserved.Unauthorized copying, duplicating, selling or otherwise distributing this software or documentation is a violation of Federal Copyright Law. No part of this publication can be reproduced, transmitted, stored in a retrieval system, or translated into any language in any form by any means without the express written consent of Algorithmic Implementations, Inc. (d.b.a. Ai Squared).
CreditsDerek Bove, Doug Hacker, Tim Lalor, Rebecca White and our Canadian friends
TrademarksZoomText and ZoomText Mac are registered trademarks of Algorithmic Implementations, Inc.Mac is a registered trademark of Apple Corporation.
Ai Squared, P.O. Box 669, Manchester Center, VT 05255
2

Software License AgreementIMPORTANT - Read this carefully before using this product. ALGORITHMIC IMPLEMENTATIONS, INC. (D.B.A. AI SQUARED) IS WILLING TO LICENSE THE ENCLOSED SOFTWARE TO YOU ONLY IF YOU ACCEPT ALL OF THE TERMS IN THIS LICENSE AGREEMENT. IF YOU DO NOT AGREE TO THESE TERMS, LICENSOR WILL NOT LICENSE THIS SOFTWARE TO YOU, AND IN THAT CASE YOU SHOULD RETURN THIS PRODUCT PROMPTLY, INCLUDING THE PACKAGING, CD-ROM, AND ALL WRITTEN MATERIALS, TO THE PLACE OF PURCHASE FOR A FULL REFUND.
Ownership of the Software1. The enclosed Licensor software program
("Software") and the accompanying written materials are owned by Licensor and are protected by United States copyright laws, by laws of other nations, and by international treaties.
Grant Of License2. The licenses granted in this Section 2 are
subject to the terms and conditions set forth in this Software License Agreement:
3

(a) Subject to Section 2(b), you may install and use the Software on a single computer; OR install and store the Software on a storage device, such as a network server, used only to install the Software on your other computers over an internal network, provided you have a license for each separate computer on which the Software is installed and run. Except as otherwise provided in Section 2(b), a license for the Software may not be shared, installed or used concurrently on different computers.
(b) For a "Single-User" product license, the Software may be installed and activated on up to three computers. While the Software may be activated on three computers, use of the collective installations is restricted to one user at any given time. Simultaneous use by more than one user violates this license agreement.
(c) You agree that Ai Squared, or a legal representative of Ai Squared may audit your use of the Software for compliance with these terms at any time, upon reasonable notice. In the event that such audit reveals any use of the Software by you other than in full compliance with the terms of this Agreement, you shall reimburse Ai Squared for all reasonable expenses related to such audit in addition to any other liabilities you may incur as a result of such non-compliance.
(d) Mandatory Product Activation. The license 4

rights granted under this Agreement may be limited to the first thirty (30) days after you first install the Software unless you supply information required to activate your licensed copy in the manner described during the activation sequence of the Software. You may need to activate the Software through the use of the Internet or telephone; toll charges may apply. There are technological measures in this Software that are designed to prevent unlicensed or illegal use of the Software. You agree that Ai Squared may use those measures and you agree to follow any requirements regarding such technological measures. You may also need to reactivate the Software if you modify your computer hardware or alter the Software. Product activation is based on the exchange of information between your computer and Ai Squared. None of this information contains personally identifiable information nor can it be used to identify any personal information about you or any characteristics of your computer configuration.
Restrictions on Use and Transfer3. You may not copy the Software, except that (1)
you may make one copy of the Software solely for backup or archival purposes, and (2) you may transfer the Software to a single hard disk provided you keep the original solely for backup or archival purposes. You may not copy the written materials.
5

4. Other than with respect to an "Evaluation" version of the Software, you may permanently transfer the Software and accompanying written materials (including the most recent update and all prior versions) if you retain no copies and the transferee agrees to be bound by the terms of this Agreement. Such a transfer terminates your license. You may not rent or lease the Software or otherwise transfer or assign the right to use the Software, except as stated in this paragraph. You may not sell or transfer any Evaluation version of the Software.
5. You may not reverse engineer, decompile, or disassemble the Software.
Limited Warranty6. Licensor warrants that the Software will
perform substantially in accordance with the accompanying written materials for a period of 90 days from the date of your receipt of the Software. Any implied warranties on the Software are limited to 90 days. Some states do not allow limitations on duration of an implied warranty, so the above limitation may not apply to you.
6

7. Licensor disclaims all other warranties, either express or implied, including but not limited to implied warranties of merchantability, fitness for a particular purpose, and non-infringement, with respect to the software and the accompanying written materials. This limited warranty gives you specific legal rights. You may have others, which vary from state to state.
8. Licensor's entire liability and your exclusive remedy shall be, at licensor's choice, either (a) return of the price paid or (b) replacement of the software that does not meet licensor's limited warranty and which is returned to licensor with a copy of your receipt. Any replacement Software will be warranted for the remainder of the original warranty period or 30 days, whichever is longer. These remedies are not available outside the United States of America.
9. This Limited Warranty is void if failure of the Software has resulted from modification, accident, abuse, or misapplication.
10. In no event will licensor be liable to you for damages, including any loss of profits, lost savings, or other incidental or consequential damages arising out of your use or inability to use the software. Because some states do not allow the exclusion or limitation of liability for consequential or incidental damages, the above limitation may not apply to you.
7

11. This Agreement is governed by the laws of the State of Vermont.
12. If you have any questions concerning this Agreement or wish to contact Licensor for any reason, please write: Ai Squared, P.O. Box 669, Manchester Center, VT 05255 or call (802) 362-3612.
13. U.S. Government Restricted Rights. The Software and documentation are provided with Restricted Rights. Use, duplication, or disclosure by the Government is subject to restrictions set forth in subparagraph (c)(1) of The Rights in Technical Data and Computer Software clause at DFARS 252.227-7013 or subparagraphs (c)(1)(ii) and (2) of Commercial Computer Software - Restricted Rights at 48 CFR 52.227-19, as applicable. Supplier is Ai Squared, P.O. Box 669, Manchester Center, VT 05255.
Table of Content
8

sIntroduction to ZoomText Mac.............................13The Basics....................................13Feature Set..................................14System Requirements..................18Installing......................................18Via CD......................................18Downloading from the Internet 19Installation...............................20Security Settings......................28
First Launch.................................32Trial Period...................................35Activation.....................................37Preparing to Activate ZoomText................................................39
9

Activating.................................40
10

Manual Activation....................45Activating ZoomText on Multiple Computers...............................46
Registration.................................49Quick Launch Menu......................52Preferences..................................59Magnification...........................60Enhancements.........................61Speech.....................................63Tracking...................................64Mouse......................................66About.......................................68
Magnification Settings. 70Adjusting Magnification Level......70Font Smoothing............................73
11
Image Sharpening........................74Zoom Window Types....................74Gesture Zooming.........................78
Speech Features..........81Focus Echo...................................81Mouse Echo..................................84WebReader..................................87
Screen Enhancements. .94Screen Colors...............................94Pointer.........................................98Cursor........................................100Focus.........................................103
12

Tracking Settings.......106Tracking Items and Events on Screen........................................108Center Tracking.........................110Mouse Pointer Settings..............112
Miscellaneous............115About ZoomText........................115Launching Automatically............118Updating ZoomText...................119Hotkeys......................................122WebReader Hotkeys:.............124WebReader Navigation Commands:............................125
Uninstalling................................126Restoring Defaults.....................127
13

14
Multi-Monitor Support................128Getting More Help......................129
15

Introduction to ZoomText MacThe Basics
ZoomText is a powerful computer access solution designed for the visually impaired. Through a combination of magnification and enhancements to colors, pointers and cursors, ZoomText makes using the computer fun and enjoyable, even when you have a visual impairment. Now you will be able to see everything on the computer screen, providing you with complete access to applications, documents, email and the Internet.
16

ZoomText is designed for users of all ages and skill levels. With a precise mix of power and simplicity, ZoomText provides total independence at home, school and in the workplace.Feature Set
ZoomText is an advanced screen magnification program that enlarges and enhances everything on the computer screen. ZoomText includes the following features:
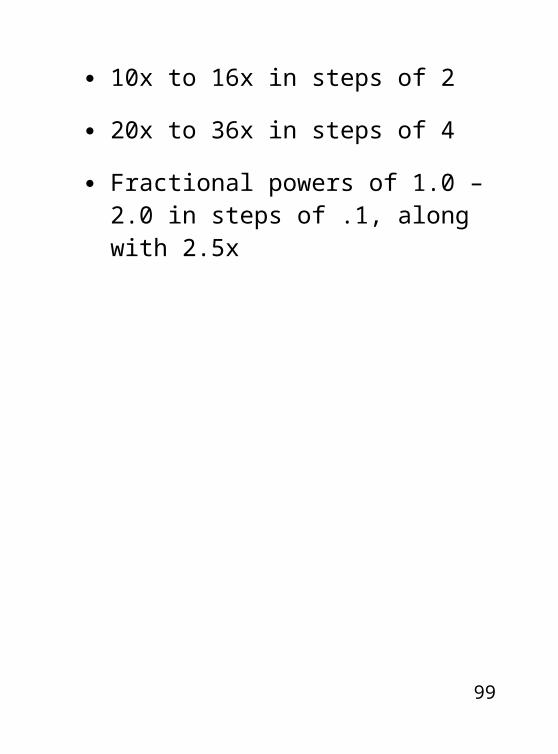
Flexible Magnification Full range of magnification levels up to 36x. Levels include: 2x to 8x in steps of 1, 10x to 16x in steps of 2, and 20x to
17

36x in steps of 4. For those who just need a little boost of magnification, there are fractional powers of 1.0 – 2.0 in steps of .1, along with 2.5x.
Font Smoothing High definition smoothing of text for added legibility.
Image Sharpening Our custom smoothing techniques display images sharper at every magnification level.
Echo Features With Mouse and Focus Echo, listen to on-screen information being read aloud right through your computer's speakers. This audio feedback is extremely helpful and you can reduce
18
eyestrain by giving your eyes a rest.
WebReader Read busy webpages or any text you've placed in your clipboard with ease. WebReader presents information in a special environment where the text has been reformatted for a clean viewing and reading experience.
TrackingAs you move the mouse, type text, and navigate menus, dialogs and other program controls, the zoom window automatically scrolls around to keep what you’re trying to see in view.
19
Zoom Windows Two different ways to magnify the screen: Full Screen and Lens. Choose the one that best suits your needs.
Enhanced Screen Colors Innovative color controls improve screen clarity and reduce eyestrain. Special effects include a selection of two-color modes, reverse video and invert brightness.
Customizable System Pointers and Cursors Adjusting the size and color of the mouse pointer and text cursor make them much easier to see and follow on screen.
20

Focus Enhancements Colorful locators are drawn around whatever item is “in focus”. This makes navigating application menus, dialogs and other application controls much easier and faster.
21

System Requirements
The following hardware and software is required to run ZoomText:
Mac OS X Version 10.8 (Mountain Lion) or later
2 GB memory
For a full hardware list, please go to our website.
22

InstallingVia CD
If you’ve received a trial CD or have purchased the product and would like to install via the included CD, simply insert it into your Mac’s CD/DVD drive, open it, and double click on the black and yellow Z icon.
Downloading from the Internet
Don’t have a CD/DVD drive or prefer to download your software from the Internet? No problem! Just head over to our website and
23

download the free 30-day trial software. The download is the same whether you’re just trying out ZoomText or you’ve already purchased a serial number and are ready to run the final product.Once the file has been downloaded, double click to start the installation process. NOTE: The download will be a .zip file, so you may have to expand it in order to run ZoomText. Once you do that, you’ll see a file named “ZoomTextInstaller.pkg” – double click this file to start the installation process.
24

Installation
Whether you downloaded over the Internet or inserted a CD, the installer will launch and you will see the following screen:
25

Click the Continue button. You’ll now be on a screen displaying the Software License Agreement:
26

You can scroll down and read this; when you’re ready click the Continue button. Another screen pops up asking you to agree to the terms of the license:
27

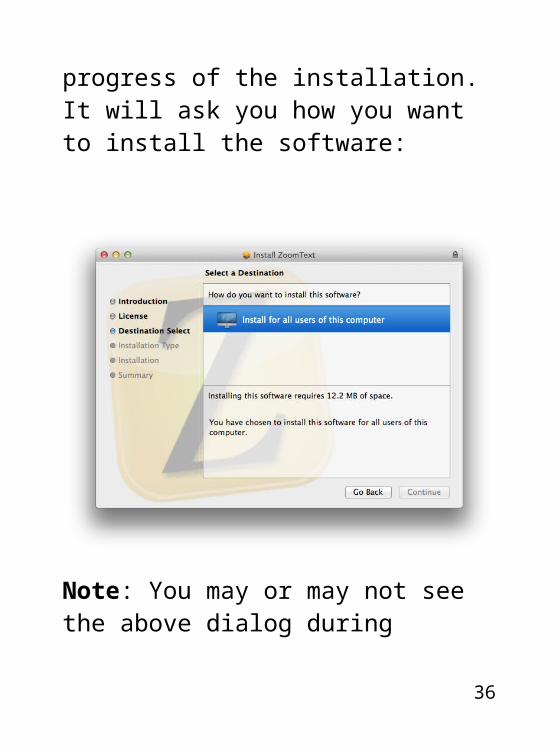
Installation cannot proceed until you click the Agree button. Once you do this, installation begins. A series of message boxes will appear on screen, alerting you to the progress of the installation. It will ask you how you want to install the software:
28
Note: You may or may not see the above dialog during installation, depending on your system configuration. You’ll find out how much space the install will take up:
29

During the installation process, you will need to enter your computer’s password. If you do not have administrative rights on this machine, you will need to find the person who does and get them to enter their password to finish the installation:
30

After you input your password, click the Install Software button. A few seconds later, you’ll see a dialog letting you know that the installation was successful:
31
Click the Close button to finish the installation process. You can now launch ZoomText! One way to do this is to open the Spotlight Search by pressing COMMAND + SPACEBAR and type in ZoomText. Press Enter; ZoomText will start up and your screen will now be magnified.
32

Security Settings
In order for ZoomText to track and follow the actions you take on a computer running the Mavericks (10.9) operating system, you must adjust your Security settings in System Preferences. The first time you launch ZoomText, you will receive an alert from “ZoomTextAccessibility”:
33

Click the Open System Preferences button; the Security & Privacy dialog will now be displayed. In order to make any changes, you’ll first need to click on the padlock icon in the lower left hand corner of this window:
34

After clicking the padlock icon you will be asked to enter in your administrator password. Note that if you’re running at a higher magnification level, this prompt may be outside of your view because ZoomText is currently unable to track on-screen information:
35
Type in your password and click the Unlock button.
36

Under the list labeled “Allow the apps below to control your computer”, you’ll see an entry called “ZoomTextAccessibility”. Click the checkbox next to this
item:
37

Close this window by clicking the red X button in the upper left hand corner, or pressing COMMAND + W. Now that you’ve enabled this setting, ZoomText will be able to track on screen events, and the Cursor and Focus Enhancements will now function as well.
First Launch
When ZoomText starts up, it changes your display to show a magnified view of the normal screen. By default, the screen is magnified at 2x, but you can adjust this to whatever size you need by
38

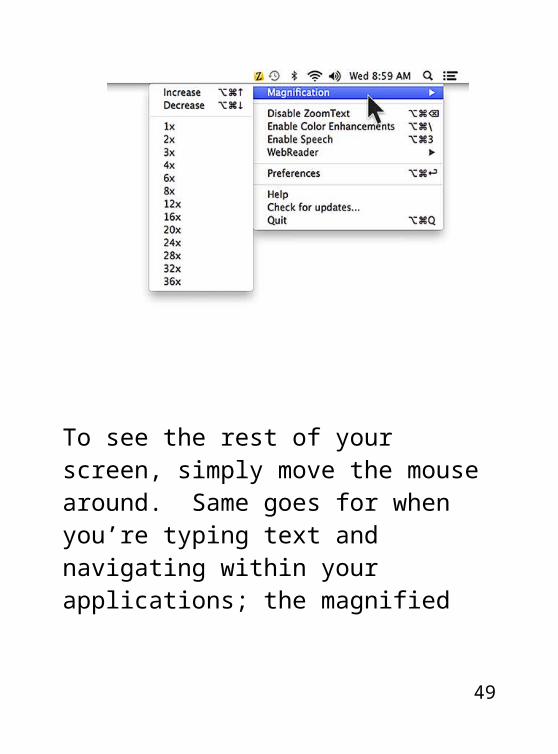
going to the Quick Launch menu:
To see the rest of your screen, simply move the mouse around. Same goes for when you’re typing text and navigating within your
39

applications; the magnified view automatically moves around with you.Note that in the Quick Launch, you can also disable ZoomText, turn on color enhancements, enable or disable speech, launch WebReader, bring up the Preferences Pane (where you have complete access to all of ZoomText’s features as well as activate your product), access the Help System, check for program updates, or quit the program entirely.By default, ZoomText will not start automatically each time you log into your computer. If you’d like it to, open your Preferences Pane and check the “Start after login”
40

checkbox in the lower left-hand corner:
To learn more about each of ZoomText’s features, see the Table of Contents and click on any topics that you are interested in.
41

Trial Period
We know you’ll love ZoomText from the first launch, but we want to make sure you have plenty of time to try it before you buy.We offer a 30-day risk free trial available for downloading online or we can send you a trial CD. Call us at (800) 859-0270 or +1 (802) 362-3612 if you’d like a CD mailed to you.Each time you launch ZoomText in trial mode, we’ll let you know how many more days you have remaining:
42

Once your 30-day period is up, you will need to purchase a serial number to continue using the product. You can either call us at one of the phone numbers listed above, or simply click the Buy Now
43

button in the About tab to purchase online. Activation
ZoomText contains product activation technology designed to eliminate unauthorized use of the product, without imposing a burden on legitimate users. Product activation is a simple, straightforward and anonymous process that takes just a few seconds to complete when performed over the Internet. After you install ZoomText, you have up to 30 days to activate the software. Until you do, ZoomText will run as a trial. You can activate immediately after installation or anytime during the 30-day trial
44

period. All features are available during the trial period, so you have full use of the software. When the trial period expires you must activate ZoomText to continue using it.During the 30-day trial period, each time you start ZoomText, the About tab is displayed. Within this
45

window, you will how many more days you have remaining on your trial:
When you’re ready to purchase, call us at (800) 859-0270 or +1 (802) 362-3612 or you can simply click the Buy Now button that appears in the About tab. Once you purchase ZoomText, you are provided with a serial number that will convert your trial into a licensed copy. When you have obtained a serial number, simply click on the Enter Serial Number button to begin the activation process.
46

Preparing to Activate ZoomText
To activate ZoomText, you will need your serial number. Your serial number can be found various ways, as described below.
On the ZoomText CD sleeve On the side of the ZoomText
product box On the back of the ZoomText
User Guide Note: If you purchased ZoomText from Ai Squared's online store, your serial number will be included in your purchase confirmation email and is displayed on screen as soon as the purchase is complete.
47
Activating
As soon as you have your ZoomText serial number, click the Enter Serial Number button in the About tab. You will be prompted to enter your 25-digit serial number:
48
Note: You can copy the serial number from your confirmation email and paste it here. We’ll parse out the fields for you.
49

The Activate button becomes available as soon as you have entered in your serial number. Assuming all goes correctly with the serial number entry, if you are connected to the Internet, your serial number and system code are automatically passed to the Ai Squared activation server for validation. An activation code is then passed back to your computer, activating your ZoomText license. This process takes just a few seconds to complete. If all worked well, you’ll be taken back to the About tab, your serial number is now listed, and you’ll be asked to register your product:
50

If you made a mistake entering your serial number, you will be alerted after you click the Activate button with an error message on screen:
51

Double check the serial number – there’s probably just a mistyped character in there. Click the Go Back button to correct any errors. If you continue to get this error message and are entering the serial number correctly, simply call us at (800) 859-0270 or +1 (802) 362-3612 option #3.
52

Manual Activation
If you are not connected to the Internet, you’ll receive a “ZoomText Activation Error” message on screen:
53
Not to worry, you can activate your copy manually. You just need to call us at (866) 331-1233 or +1 (802) 362-3612 option #3 and our support team can handle this for you. They will ask you for your serial number and system code (which are displayed on the error message screen) and then will supply you with your Activation Code. Our support team is here Monday – Friday from 9:00 AM to 5:00 PM Eastern Time.
Activating ZoomText on Multiple Computers You can install and activate ZoomText on up to three
54

computers (in accordance with the ZoomText Software License Agreement). We provide multiple activations to accommodate individuals that use more than one computer, such as a home computer, a work computer and a laptop computer. While ZoomText may be installed on up to three computers, use of the collective installations is restricted to one user at any given time. If you have reached your activation limit and try to activate that serial number on another computer, you will receive the following error message during activation:
55

If you feel that you have received this message in error, please contact our support team at +1 (802) 362-3612 option #3.
56

Registration
To ensure that you get the most out of ZoomText and to protect your product license, we recommend that you register right after you complete product activation. Why register? You become eligible for technical support, low-cost upgrades, and you can choose to receive our email newsletter, which provides information about new product releases, special offers, and helpful ZoomText tips and tricks. And don't worry, when registering with Ai Squared, your personal information is always held in the strictest confidence. Ai Squared does not share customer information with other
57

organizations, so you’ll never receive unwanted solicitations from 3rd parties.Simply click the Register Your Product button in the About tab
after you activate:58
You will be taken to our website where you can register in a few minutes:
59

60

Quick Launch Menu
Now that you’re up and running, you want to jump right in and see what ZoomText has to offer! We have placed the most commonly used features in the Quick Launch menu. Just click on the small black and yellow Z in the upper right side of your Apple Menu Bar to see what you can adjust without ever bringing up a toolbar or interrupting your work:
61

From here, you can adjust your magnification level either by choosing the exact level you’d like or by simply increasing or decreasing by one step at a time:
ZoomText gives you visual feedback when you change magnification by temporarily displaying a message on screen
62

that indicates your current magnification level:
Notice that increasing and decreasing by one step (as well as a few other items in the Quick Launch menu) have “hotkeys” associated with them – these are keyboard combinations that can save you even more time. If an action has a corresponding hotkey, the keystrokes that generate the
63

action are listed to the right of the item in the Quick Launch menu. We will cover those in more detail in the Hotkeys section.From the Quick Launch, you can also quickly disable ZoomText if it’s already running – this doesn’t quit the program but will turn off magnification along with any enhancements you have selected. Think of it like an on/off switch. If ZoomText is currently disabled, the Quick Launch menu changes to give you the option to enable. You can also turn color enhancements on and off from the Quick Launch. By default, turning color enhancements on will enable the scheme “Invert Brightness”
64

which dramatically improves contrast on screen:
You may want to turn color enhancements off when looking at images on screen in order to view them in real colors.
65

You can enable and disable speech quickly and open the new WebReader tool - either by pulling in the content from your active browser tab, the content from your clipboard, or you can just open the reading window:
There are many more features within ZoomText – to explore them all, simply choose Preferences. You’ll see a dialog box with six different tabs on the left: Magnification, Enhancements,
66
Speech, Tracking, Mouse, and About:
For complete information about everything you see in the Preferences Pane, head over to the Preferences section of the User Guide.
67

Now back to the Quick Launch menu – there’s still a few more things you can do there! You can pull up the Help System, check for program updates or quit the ZoomText program.The great thing about quitting ZoomText is the next time you start it up, all of your settings remain exactly how you left them. No need to save as default, the program simply does it for you automatically.
Preferences
The Quick Launch menu provides an easy way to access the essentials. The remaining features
68

are available via the Preferences Pane – which you can access on that Quick Launch menu or by pressing the hotkey: COMMAND + OPTION + RETURN (ENTER).There are six key sections in the Preferences Pane: Magnification, Enhancements, Speech, Tracking, Mouse and About. Let’s go through each one.
69
Magnification
In the Magnification tab, you can adjust your zoom level, change how the screen is magnified, and configure Gesture Zooming:
70

For more detailed information, please see the Magnification chapter of the User Guide.
Enhancements
In the Enhancements tab, you can adjust each of ZoomText’s enhancements: Screen Colors, Pointer, Cursor, and Focus:
71

For more detailed information, please see the Screen Enhancements chapter of the User Guide.
72

Speech
In the Speech tab, you can tweak settings for both Focus and Mouse Echo as well as adjust your global speech settings:
73

For more detailed information, please see the Speech chapter of the User Guide.
Tracking
As you move the mouse, type text, and navigate menus, dialogs and other program controls, the zoom window automatically scrolls around to keep what you’re trying to see in view. This behavior is driven by ZoomText's tracking options, which allow you to choose the items that you want ZoomText to track (when they become active). In the Tracking tab of the Preferences Pane, you can choose
74

which items or actions ZoomText tracks:
For more detailed information, please see the Tracking chapter of the User Guide.
75

Mouse
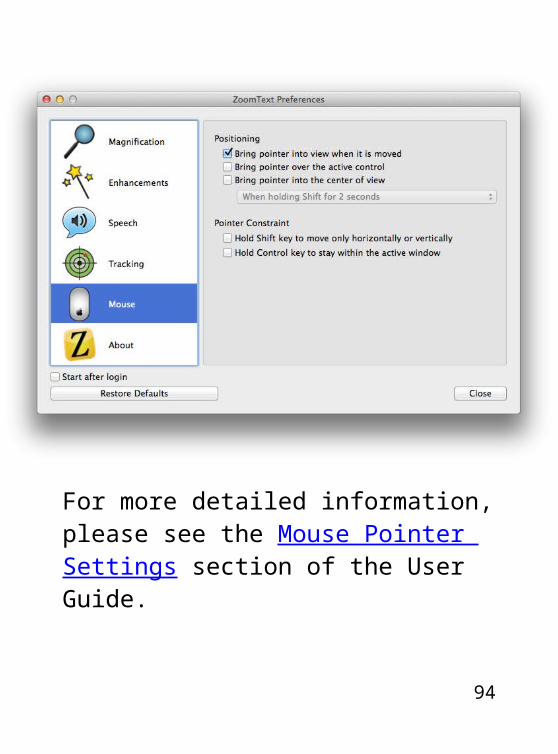
The Mouse navigation options make it easy to explore and move about the screen. With Positioning, the mouse pointer is always brought into view when you need it. With Pointer Constraint, you can limit mouse pointer movement to horizontal or vertical directions, or within the active window.You can adjust these settings in the Mouse tab of the Preferences Pane:
76

For more detailed information, please see the Mouse Pointer Settings section of the User Guide.
77

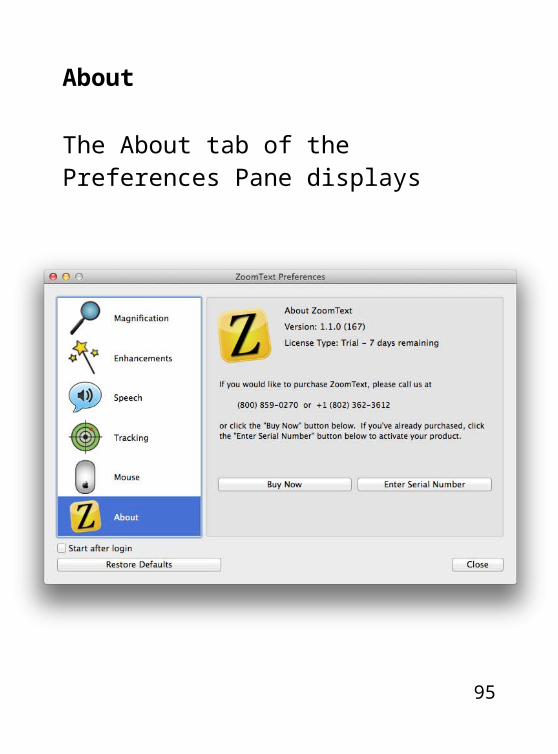
About
The About tab of the Preferences Pane displays pertinent information about your copy of ZoomText:
78

If you’re still running in trial mode, this is where you can see how many days are remaining in your 30-day trial. You can also go here to purchase your own copy or enter your serial number. If you’ve activated your copy of ZoomText already, here is where you can reference your serial number. After activation, you can also register your copy to gain access to support, low cost upgrades, and more.
79

80

Magnification SettingsZoomText lets you zoom in up to 36x so you can see everything on screen easily and comfortably.
Adjusting Magnification Level
Magnification runs from 1x to 36x in the following increments:
2x to 8x in steps of 1 10x to 16x in steps of 2 20x to 36x in steps of 4 Fractional powers of 1.0 – 2.0 in
steps of .1, along with 2.5x81

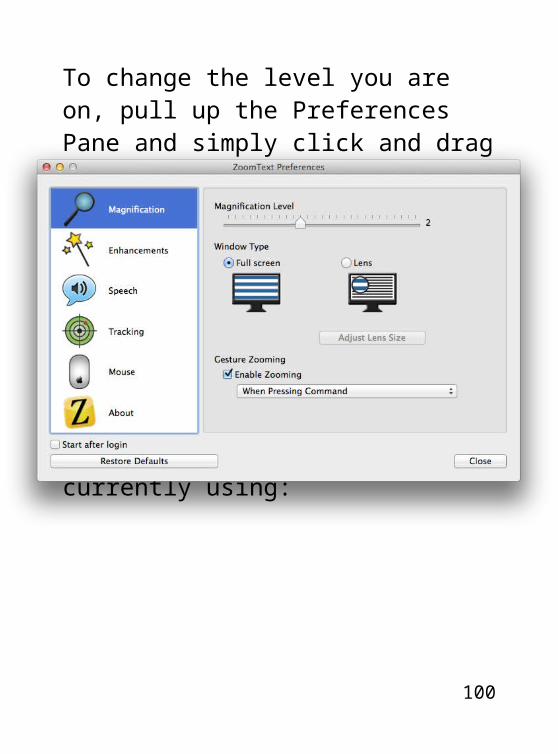
To change the level you are on, pull up the Preferences Pane and simply
click and drag the slider or click anywhere in the Magnification Level bar:
82
Magnification changes on screen immediately, with a visual indication both at the end of the slider and in the middle of the screen to let you know which level you are currently using:
You can also use the following hotkey combinations to change magnification settings:
83

COMMAND + OPTION + UP ARROW will increase magnification
COMMAND + OPTION+ DOWN ARROW will decrease magnification
Font Smoothing
With other screen magnifiers, including OS X’s built-in solution called Zoom, the clarity of text is degraded in the magnified view. As a result, text on screen is blurry and very difficult to read.With ZoomText’s font smoothing technology, you’ll see amazingly clear text at all magnification levels. All types and sizes of text are displayed with high-definition clarity, in all of your applications.
84

ZoomText's font smoothing is always turned on - there's nothing special you need to do to ensure your text looks as crisp as possible, we take care of that for you.
Image Sharpening
Our custom smoothing techniques display images sharper at every magnification level.ZoomText's image sharpening is always turned on - there's nothing special you need to do to ensure your icons and other pictures looks as crisp as possible, we take care of that for you.
85

Zoom Window Types
ZoomText allows you to magnify either the entire screen or just a portion, whatever works best for you. Under Window Type, you can choose either Full screen or Lens:
86

When you’re in full screen mode, your entire screen is magnified. To see the rest of your screen, simply move your mouse around the screen and the view changes automatically.
87

When using Lens mode, you will see a small rectangle on screen – think of this as an electronic magnifying glass. Screen magnification is limited to what appears under the lens. Move your mouse around and your lens moves with you. If you’d like to change the size of your Lens, use the hotkey: COMMAND + OPTION + L. You will see the Lens now has handles on each corner and the rest of your screen is dimmed:
88

Simply click and drag on any of the black dots that are in each corner and the middle of each side until you are happy with the lens size:
89

Pressing Escape or clicking the Cancel button discards any changes you have made and returns you to your computer without changing the Lens size. Press the Resize button when you’re happy with the change. You’ll see that your lens is now the size you changed it to. You can also change the lens size with the arrow keys on your keyboard. Use the arrow keys to move the focus to the dot you’d like to adjust and then holding down Shift, use the arrow keys once more to make the lens larger or smaller.
90

Gesture Zooming
91

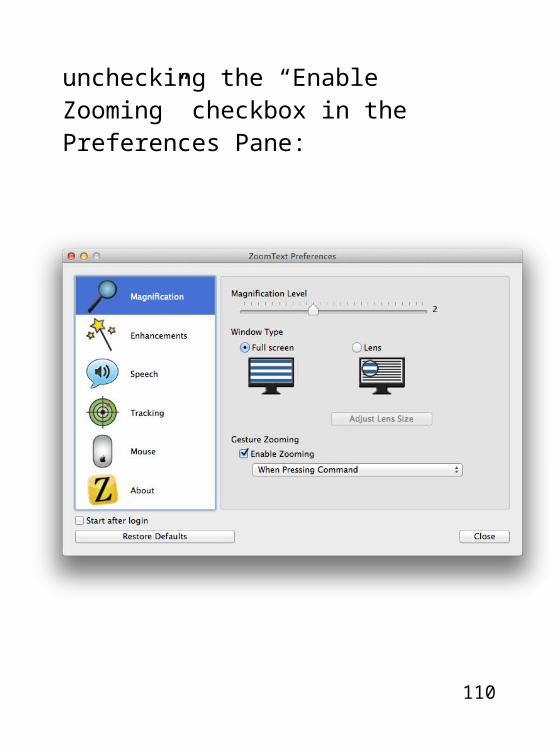
Gesture Zooming allows you to adjust your magnification level invoking a “gesture” on your mouse or trackpad in conjunction with a key of your choosing. Gesture Zooming is enabled by default, but you can choose to disable it by unchecking the
92

“Enable Zooming” checkbox in the Preferences Pane:
Gesture Zooming works only when
you make a two-finger swipe up or 93
down PLUS hold down a key. Your options are: Shift, Control, Option, and Command. For example, when enabled, holding down the Command key and performing a two-finger swipe down decreases magnification; holding down the Command key and performing a two-finger swipe up increases magnification.
94
Speech FeaturesZoomText Mac now includes speech and reading support for on-screen text, webpages, or your clipboard contents. Each of the speech features are described below.
Focus Echo
Focus Echo speaks on-screen items as you navigate and use your applications. Text information from the current active control, text fields, menu items, or buttons will now be automatically read aloud.
95

To toggle Focus Echo on or off, go to the Speech tab of the ZoomText Preferences Panel:
1.Open the ZoomText Preferences Panel (COMMAND + OPTION + RETURN (ENTER)).
2.Click the Speech tab on the left.3.Check or uncheck the box next
to “Focus Echo” depending on your preference:
96

You can alternatively use the hotkey COMMAND + OPTION + 4 to toggle Focus Echo on and off. If you’d like to stop ZoomText from speaking, just press the CONTROL key. You can adjust how much detail is spoken aloud for these items in the ZoomText Preferences Panel. You have a choice of how much is read aloud:
Labels Only: Item labels only are spoken.
Labels and Context: Item labels, control type, and accelerator key (if applicable) are all spoken.
97

Mouse Echo
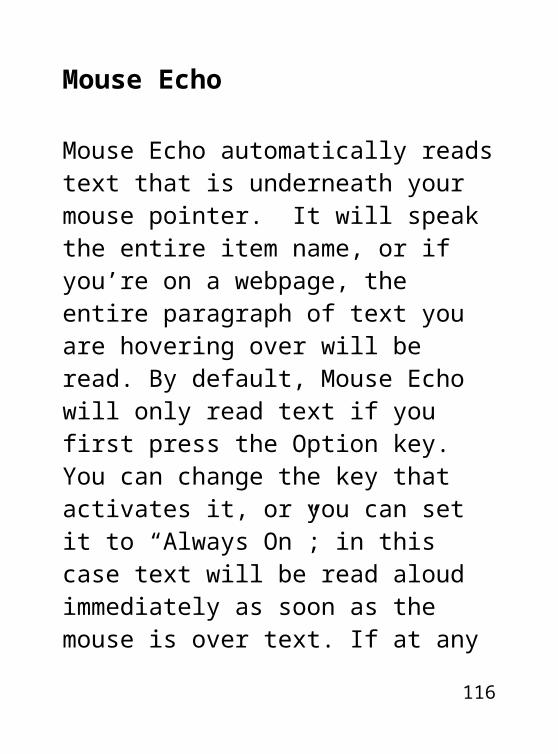
Mouse Echo automatically reads text that is underneath your mouse pointer. It will speak the entire item name, or if you’re on a webpage, the entire paragraph of text you are hovering over will be read. By default, Mouse Echo will only read text if you first press the Option key. You can change the key that activates it, or you can set it to “Always On”; in this case text will be read aloud immediately as soon as the mouse is over text. If at any time you’d like to interrupt Mouse Echo, just press the CONTROL key.To toggle Mouse Echo on or off, go to the Speech tab of the ZoomText Preferences Panel:
98
1.Open the ZoomText Preferences Panel (COMMAND + OPTION + RETURN (ENTER)).
2.Click the Speech tab on the left.3.Check or uncheck the box next
to “Mouse Echo” depending on your preference:
99
You can alternatively use the hotkey COMMAND + OPTION + 3 to toggle Mouse Echo on and off.You can also adjust your Mouse Echo settings in the ZoomText Preferences Panel:
Always On: Words are spoken as soon as the mouse pointer moves over them.
When Pressing Shift: Words are spoken only when the Shift key is pressed while the mouse pointer is over text.
When Pressing Command: Words are spoken only when the Command key is pressed while the mouse pointer is over text.
When Pressing Option: Words are spoken only when
100

the Option key is held down and the mouse pointer moves over them.
WebReader
WebReader makes it easy to read busy webpages or any text you’ve placed in the clipboard. It presents the information in a special environment where the text has been reformatted for a clean viewing and reading experience. Text is presented either in full-screen or windowed mode, with customizations for text size, font, line spacing, and a wide range of color and voice options:
101

WebReader automatically extracts just the essential information from online articles, making the content much easier to consume. It will automatically read through all of the content, or you can choose to
102

manually read by word, sentence, or paragraph. As reading occurs, each sentence and spoken word is highlighted so you can follow along. If you don't need to follow along visually, feel free to go about and do other things on your computer; WebReader will continue to read until it reaches the end of the document.Here are the steps to read content from the web:
1.Open the webpage that you wish to read.
2.On the ZoomText Quick Launch Menu, choose “WebReader” and then “Read from Browser”:
103
Alternatively, you can press the hotkey COMMAND + OPTION + R to automatically pull content from the open browser tab (this hotkey is only supported in Safari and Chrome).
3.To start and stop reading, click the Play/Pause button on the WebReader toolbar or just press SPACEBAR.
4.To exit WebReader, click the red “X” or use the hotkey COMMAND + W.
104

If you’ve read several articles in a row, the hotkey COMMAND + LEFT/RIGHT ARROW will let you navigate between them. WebReader isn’t just for the web! You can also read content that you place into the clipboard. Here’s how you do it:
1.Select the text you’re interested in reading with the keyboard or mouse.
2.Press COMMAND + C to copy the text to the Clipboard.
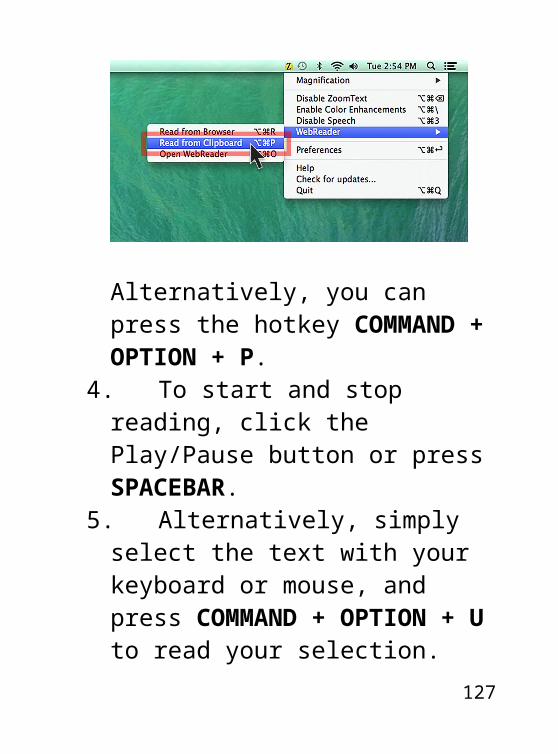
3.On the ZoomText Quick Launch Menu, choose “WebReader” then “Read from Clipboard”:
105

Alternatively, you can press the hotkey COMMAND + OPTION + P.
4.To start and stop reading, click the Play/Pause button or press SPACEBAR.
5.Alternatively, simply select the text with your keyboard or mouse, and press COMMAND + OPTION + U to read your selection.
6.To exit WebReader, click the red “X” or use the hotkey COMMAND + W.
106

Let’s say you want to read an entire email or maybe a whole document! There’s an even easier way to do this:
1.Open the item you would like to read.
2.Press COMMAND + OPTION + G. This will automatically select all text within the active application window, and WebReader begins reading.
3.To start and stop reading, click the Play/Pause button or press SPACEBAR.
To exit WebReader, click the red “X or use the hotkey COMMAND + W.
107

Screen EnhancementsZoomText’s screen enhancements greatly improve the clarity of everything on your computer.
Screen Colors
Screen Colors allow you to change the appearance of all colors on screen. To access this feature, you can toggle this enhancement on and off by going to the Quick Launch menu or by pressing the hotkey COMMAND + OPTION + \. You can customize further by going to the Preferences Pane (COMMAND + OPTION + ENTER
108

(RETURN)) and clicking on the
Enhancements tab:There are seven high-contrast color modes that will greatly improve the clarity on screen: Invert Brightness, Reverse Video,
109
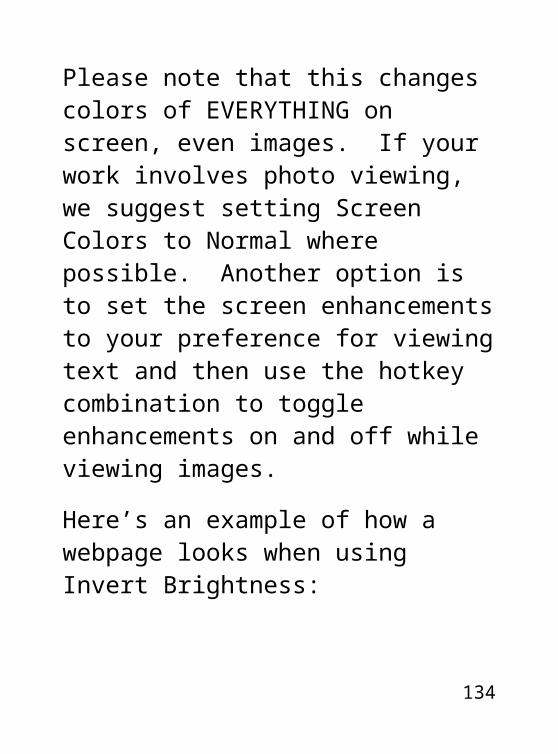
Black on White, White on Black, Blue on Beige, Yellow on Black, and Yellow on Blue. You can access these options by clicking on the dropdown next to Scheme under Screen Colors.In addition, you can apply a Temperature Effect to each of the color enhancements, even the Normal color. Dragging the Warmth slider to the left will make colors appear cooler (blue hues), while dragging to the right makes colors appear warmer (red hues). These controls allow you to fine tune the colors on screen until you find what works best for your eye condition. Please note that this changes colors of EVERYTHING on screen,
110

even images. If your work involves photo viewing, we suggest setting Screen Colors to Normal where possible. Another option is to set the screen enhancements to your preference for viewing text and then use the hotkey combination to toggle enhancements on and off while viewing images.Here’s an example of how a webpage looks when using Invert Brightness:
111

This scheme is especially helpful when you’re working with text – minimizing the glaring white background really helps you to be able to work longer and more comfortably on the computer.
112

Pointer
Pointer Enhancements make it easy to locate and follow the mouse pointer. To access this feature, simply bring up the Preferences Pane (COMMAND +
113

OPTION + RETURN (ENTER)) and click on the Enhancements tab:There are a number of options to choose from under Pointer. You can change the color (Normal, Red, Green, Blue, or Yellow), size (Normal, Large, or Extra Large), locator type (Off, Circle, or Crosshair), and choose when to display the locator (Always, or when pressing a variety of keys).Here is an example of a Large Blue Pointer with a Circle Locator, which is much easier to see and find on screen than the default mouse pointer:
114

With ZoomText, you’ll see smooth pointers and locators, so no matter what magnification level you are using, your enhancements remain perfectly clear.
Cursor
Cursor Enhancements make it easy to locate and follow the text cursor. To access this feature, simply bring up the Preferences
115
Pane (COMMAND + OPTION + RETURN (ENTER)) and click on the Enhancements tab:
You can choose from a variety of preset cursor enhancement
116

schemes: Blue Wedge, Green Circle, or Red Frame.Here is an example using Blue Wedge in a Pages document, making the blinking text cursor much easier to see:
117

Prefer not to have Cursor Enhancements on? Simply choose Off under the Cursor Scheme menu.
Focus
Focus Enhancements make it easy to locate and follow the control focus when you tab and arrow key through menus, dialogs and other application controls. To access this feature, simply bring up the Preferences Pane (COMMAND + OPTION + RETURN (ENTER)) and click on the Enhancements tab:
118

You can choose from two preset focus enhancement schemes: Red Frame or Thick Green Underline.Here is an example that shows the Red Frame enhancement in the ZoomText Menu:
119

Prefer not to have Focus Enhancements on? Simply choose Off under the Focus Scheme menu.
120

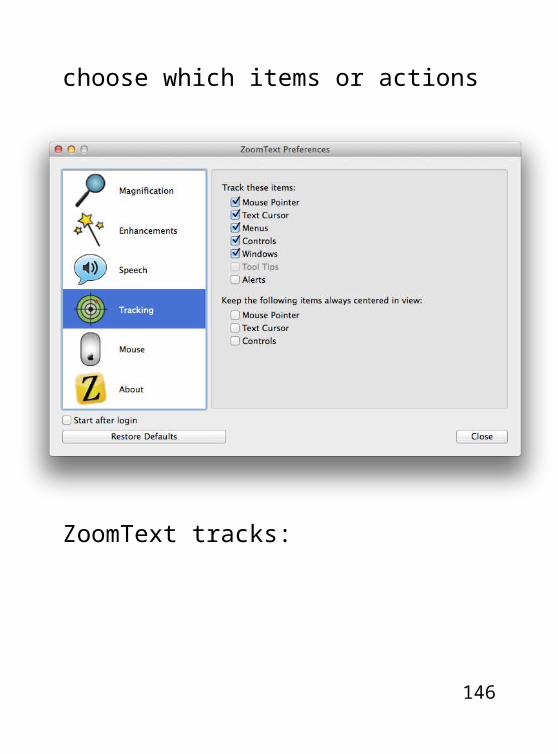
Tracking SettingsAs you move the mouse, type text, and navigate menus, dialogs and other program controls, the zoom window automatically scrolls around to keep what you’re trying to see in view. This behavior is driven by ZoomText's tracking options, which allow you to choose the items that you want ZoomText to track (when they become active). In the Tracking tab of the Preferences Pane, you can choose which items or actions ZoomText tracks:
121

122
Tracking Items and Events on Screen
ZoomText has the ability to track a wide range of events and items that appear on screen. All of the available items can be reviewed in
123

the Preferences Pane by clicking on the Tracking tab:You’ll see a list of what can be tracked under the heading “Track these items:”. Here is a description of each item in this list:
Mouse Pointer: Tracks whenever you move the mouse pointer.
Text Cursor: Tracks whenever you input text on screen.
Menus: Tracks whatever menu item is currently highlighted.
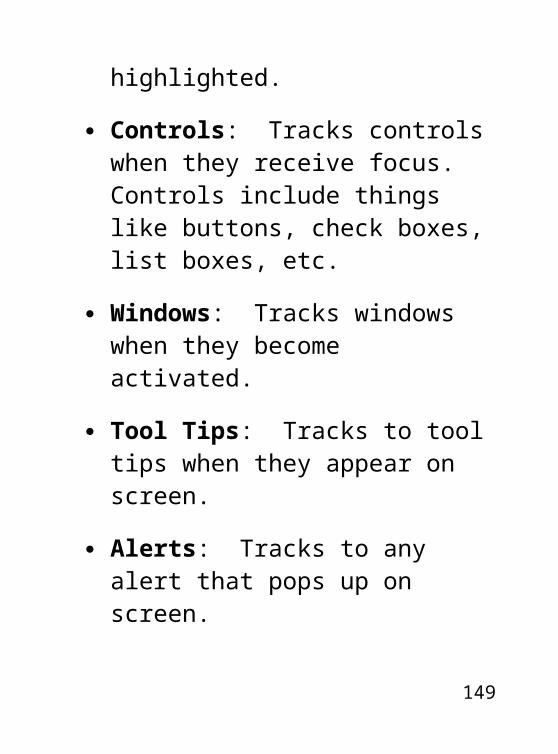
Controls: Tracks controls when they receive focus. Controls include things like buttons, check boxes, list
124

boxes, etc. Windows: Tracks windows
when they become activated. Tool Tips: Tracks to tool tips
when they appear on screen. Alerts: Tracks to any alert that
pops up on screen.By default, ZoomText will track the Mouse Pointer, Text Cursor, Menus, Controls and Windows. These are all items or actions that we feel you will always want to see on screen. If you ever want to disable tracking on a certain item, simply uncheck the box next to it. Same goes for enabling other forms of tracking – just check the box next to the desired item and ZoomText will track accordingly.
125

Center Tracking
You can also decide to keep certain items always centered in your view: Mouse Pointer, Text Cursor, and Controls. When you choose to keep things always in the center, the zoom window scrolls as needed to keep the desired object in the center of view.
126
By default, center tracking is disabled, but you can adjust these settings in the Preferences Pane by clicking on the Tracking tab:
127

Mouse Pointer Settings
The Mouse navigation options make it easy to explore and move about the screen. You can access all of these settings by bringing up the Preferences Pane (COMMAND
128

+ OPTION + RETURN (ENTER)) and clicking on the Mouse tab:With Positioning, the mouse pointer is always brought into view when you need it. With Pointer Constraint, you can limit mouse pointer movement to horizontal or vertical directions, or within the active window. By default, the pointer is brought into view only when it’s moved. But you can also choose to automatically have the mouse pointer brought to menu items and dialog controls as soon as they receive focus. Additionally, you can choose to have the mouse pointer brought into view whenever you press a key – we give you the option of pressing Shift, Command
129

or Control for two seconds. This is nice if you find yourself frequently losing the mouse pointer.Pointer constraints help you to keep that mouse pointer exactly where you want it. You can choose to have the mouse pointer move only horizontally or vertically when you hold down the Shift key. You can also keep the mouse pointer just in the active window when you hold down the Control key. These are ways to minimize radical movement by the mouse and losing your place in your work.You can easily enable and disable any of the options above by checking and unchecking the respective checkboxes.
130
131

MiscellaneousLearn about some odds and ends as well as some advanced settings.
About ZoomText
If you’re ever curious what your ZoomText version is, how many days are left in your trial, or want to register your product, head over to the About tab of the Preferences Pane:
132

When you’re still in trial mode, you’ll see how many days you have remaining on your 30-day trial. When you’re ready to buy, you can do so by clicking on the Buy Now button – if you have already made
133
a purchase, click on the Enter Serial Number button to activate your product.If you’ve already activated your copy of ZoomText, your serial number will be displayed in this window:
134

You’ll also be given the option to register your copy of ZoomText, giving you access to support, low cost upgrades, and more.
135

Launching Automatically
By default, ZoomText will not automatically launch after you log into your computer. If you would like it to, pull up the Preferences Pane and place a checkmark next to “Start after login” that you’ll see in the lower left-hand corner:
136

Updating ZoomText
Periodically, Ai Squared will publish updates to ZoomText in order to add new functionality or correct behavior. Your copy of ZoomText will automatically check for updates once per day. If an update is found, ZoomText will allow you to download, automatically install, and then launch the update.When ZoomText finds an available update you’ll see the following dialog box:
137

You may click the Skip This Version button if you’d prefer not to install the recent update. If you click the Remind Me Later button, ZoomText will wait 24 hours before asking you again if you would like to update.Simply click the Install Update button to begin the download process:
When the download is complete you’ll see the following dialog box:
138

Click the
Install and Relaunch button and your copy of ZoomText will be updated to the current version.You can manually check for updates at anytime by choosing “Check for updates…” from the ZoomText Quick Launch menu.
Hotkeys
Hotkeys are key combinations that execute ZoomText commands without having to pull up the
139

Preferences Pane or use the Quick Launch menu. Here is a complete list of all hotkeys for ZoomText:
Increase Magnification: COMMAND + OPTION + UP ARROW
Decrease Magnification: COMMAND + OPTION+ DOWN ARROW
Show Preferences: COMMAND + OPTION + RETURN (ENTER)
Disable/Enable ZoomText: COMMAND + OPTION + DELETE
Toggle Color Enhancements:COMMAND + OPTION + \
140

Adjust Lens Size:COMMAND + OPTION + L
Toggle Speech Output: COMMAND + OPTION+ 3
Toggle Focus Echo: COMMAND + OPTION + 4
Toggle Mouse Echo: COMMAND + OPTION + 5
Quiet Command (Stop Speech): CONTROL
Quit ZoomText:COMMAND + OPTION + Q
WebReader Hotkeys:
Open WebReader: COMMAND + OPTION + O
141
Toggle Reading (Play/Pause): SPACEBAR
Read from Browser: COMMAND + OPTION + R
Read from Clipboard: COMMAND + OPTION + P
Read Entire Application: COMMAND + OPTION + G
Read Selected Text: COMMAND + OPTION + U
Adjust Speech Rate: CONTROL + COMMAND + UP/DOWN ARROW KEYS
Exit WebReader: COMMAND + W
142

WebReader Navigation Commands:
Previous Word: OPTION + LEFT
Next Word: OPTION + RIGHT
Previous Sentence: LEFT
Next Sentence: RIGHT
Previous Paragraph: UP
Previous Article: COMMAND + LEFT
143

Next Article: COMMAND + RIGHT
Beginning of Document: CONTROL + HOME
End of Document: CONTROL + END
Uninstalling
Should you ever need to uninstall, simply drag your ZoomText icon from the Applications folder to the trash. NOTE: Each machine is granted only one 30-day trial period. Deleting the application will not produce a new trial period.
144
Restoring Defaults
If you’d like to revert back to the original settings, there’s a very easy way to do so. Just navigate to the Preferences Pane (COMMAND + OPTION + RETURN (ENTER)) and click on the Restore Defaults button that you will see in the lower left-hand corner:
145
146

Multi-Monitor Support
ZoomText does not currently support using multiple monitors at the same time. You will need to disable your additional displays before ZoomText will run.If you plug in a second monitor while running ZoomText or attempt to start ZoomText with a second monitor attached to your machine, you’ll see the following message:
147

Simply unplug the additional monitor(s) and restart ZoomText.Getting More Help
Support for ZoomText is always free, even if you’re just running the free trial. Our support team is top notch and well known in our industry for its superiority.Give our support team a call Monday through Friday from 9:00 AM to 5:00 PM Eastern Time at +1 (802) 362-3612 and choose option #3. You can also email them at [email protected]. Even when we’re not here in the office, we offer a wide range of tools at your disposal: free webinars (live and recorded), tips
148
and tricks on video, our blog, the knowledge base, and a user forum.
149