invisalign treatment monitoring & finishing · introduction this guide is intended to help the...
TRANSCRIPT

Invisalign® Treatment Monitoring & Finishing Tips & Techniques Guide to Help Doctors Achieve Ideal Patient Outcomes

Introduction
This Guide is intended to help the Invisalign practitioner address monitoring and finishing issues that may arise between receipt of aligners from Align to the completion of treatment. For a more comprehensive understanding of how to prevent these issues—please be sure to view the archived ATE Program: Managing Aligner Tracking Issues: Tips and Techniques for Keeping Treatment on Course presented by Dr. Doug Brandt The solutions in this Guide are considerations collected from your peers. These have not all been tested in clinical trials, but rather are tips and techniques from Invisalign-experienced colleagues

Finishing Treatment
Roots Tipped
Aligner Does Not Fit At All
Black Triangles Aligners Not Seating
Residual Crowding
Aligner Too Retentive
Tooth Not Rotating
Residual Spacing
Aligner “Popping” Off
Tooth Not Extruding
Posterior Open Bite
Attachments Not Engaging
Root Movement Not Occurring
Premature Occlusal Contacts
Unplanned Intrusion Occurring
Treatment Management Issues Covered in this Guide
Attachments Debonding
During the Treatment
Aligner Not Retentive

Using This Guide
To provide you with easy navigation and links to learn more, the following two components are included within this document:
1. Document Outline: An easy way to jump to a topic you want to see specifically—is to use the outline panel to the LEFT. By clicking on any topic in this outline—it will jump you to the first page of that topic’s content. Please note several sections have more than one page.

Using This Guide
To provide you with easy navigation and links to learn more, the following two components are included within this document:
2. “Learn More” Star: Jump easily to more information, instructions guides and help resources when you see the “star.”
Click on the link in the document and it will show you more without leaving the page you are viewing in the resource guide

Key Considerations for Using Invisalign Effectively
It’s helpful to understand some key concepts about Invisalign aligners and tooth movement before you begin to use this guide. When monitoring treatments, from time to time your patient’s teeth may not track to plan. In these instances, it is good to generally keep in mind that this occurs for two fundamental reasons:
1. Insufficient Space
2. Insufficient Force

Insufficient Space
Teeth cannot collide into others to reach ideal tooth
position

Insufficient Space
May Be Due To:
• Insufficient IPR
• Effect of insufficient force system/points of contact in the aligner and/or attachment
• Treatment plan that limits the success of creating space required

Changing the Invisalign Clinical Protocols in Your ClinCheck® Treatment Plan
NOTES: If a doctor requests to remove or change a default attachment (for rotations, extrusions or anterior intrusion anchorage) that has been automatically placed according to the Invisalign Clinical Protocols, the tooth/teeth will be identified as blue or black and may require additional clinical skills and close monitoring.

Teeth need space to move
If interproximal contacts are too tight: 1. Tooth will not move
2. Incomplete seating of the aligner will occur
3. Active Forces increase

Insufficient FORCE
Incomplete seating of aligner means less points of contact with the tooth and subsequently unexpressed force
Are the necessary forces & points of contact present to ensure movement?
Sufficient force relies on sufficient aligner contact with tooth or attachment

Insufficient FORCE
May Be Due To:
• Doctor’s treatment plan – includes (blue/black) movements programmed that at times, benefit from additional techniques
• Lack of correct attachment-to-aligner engagement
• Insufficient time for the movement to express
Tooth Movement Assessment (TMA) Information in patient’s ClinCheck treatment plan that provides guidance in identifying more significant movements present.

During Routine Care Appointments:
Have patients arrive with the previous aligner stage 1
By having patients arrive with the previously worn aligner stage, you can evaluate and compare any fit or tracking concerns that may arise.
Review 2 Current aligner is a good fit 1. IPR Instructions (and
record amount preformed on form (kept in chart)
2. Condition and engagement of attachments
3. Evaluate for tight contacts with unwaxed floss and relieve with finishing strips if present
Compare to ClinCheck Treatment Plan 3
Check actual results versus ClinCheck treatment plan every 4-8 stages

Monitoring Aligner Fit
Good fit • Aligners are seating well
over the teeth
• No visible gaps or rocking
• All attachments are engaged properly
Poor Fit
Good Fit

Perform & Document IPR
.2 .2 .2
.2 .2 .1
• Perform IPR as recommended
• Print copy of form for patient’s chart
• Document amount

Monitoring Attachments
Standard attachment does NOT have full contact with
attachment well
Rub articulating paper over standard attachments to help
in evaluate attachment engagement

Monitoring Interproximal Contacts
Evaluate for tight contacts with unwaxed floss and relieve with finishing strips if present

Using your best diagnostic and treatment planning tool(s) to help you stay on course

During the Treatment Period

Attachments Debonding
Root Cause
Contaminated bond surface or not isolated
Solution
Replace under better isolation
Prevention
Use of bonding material and bonding agent not designed for attachment use
Replace using the attachment template and bonding materials designed for Invisalign attachments
The Invisalign Attachment Kit may be ordered through the Align Store
More Information on Attachments including video and guide for placing attachments: http://learn.invisalign.com/attachments
Recommended Attachment Composite Materials: https://s3.amazonaws.com/learn-invisalign/docs/us/survey_and_testing.pdf
Clean (pumice) the teeth and isolate

Attachments Debonding
Root Cause Solution Prevention
Bonding to porcelain or gold crowns
Bonding to porcelain or gold can be difficult. Use a bonding products that minimizes failures for these surfaces or use a sand blaster
Review your ClinCheck plan to see if teeth with crowns or veneers have attachments and plan accordingly

Attachments not Engaging (1st Aligner)
Root Cause Solution
Excess composite Rebond the attachment using less composite and remove excess material

Optimized Attachments
Active Surface
* Difference in shape between the aligner and the bonded attachment.
Active surface must be in contact with the aligner

Attachments not engaging (during treatment period)
Root Cause Solution
Lack of engagement, probably teeth are not moving according to the aligner
Remove and re bond the attachment
More information on re-bonding attachments mid-treatment: http://learn.invisalign.com/attachments
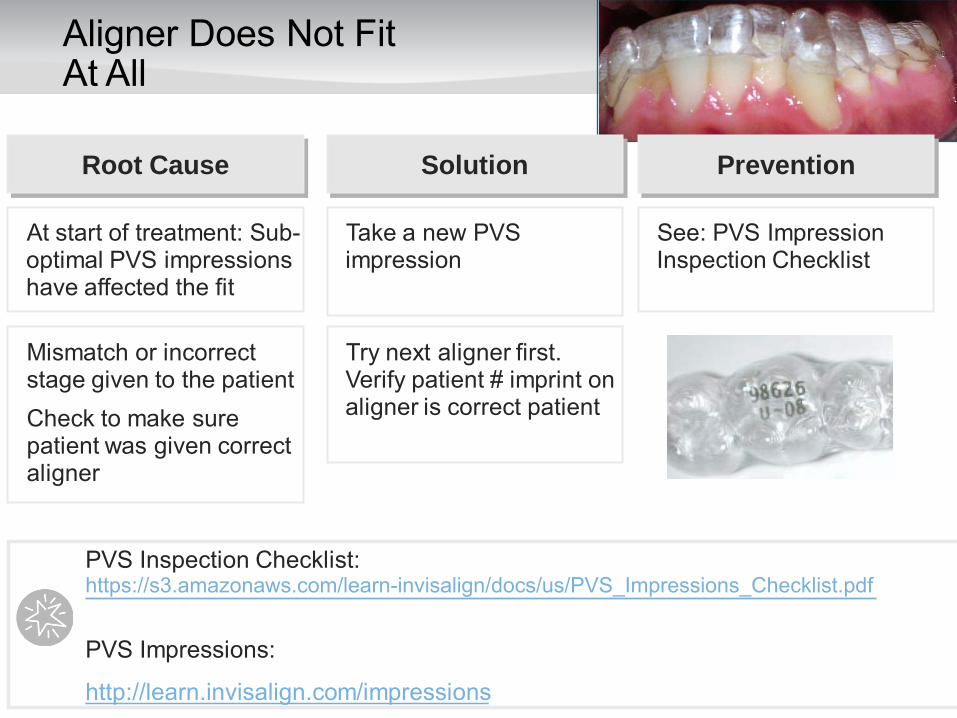
Aligner Does Not Fit At All
Root Cause
Mismatch or incorrect stage given to the patient Check to make sure patient was given correct aligner
Solution
Try next aligner first. Verify patient # imprint on aligner is correct patient
At start of treatment: Sub-optimal PVS impressions have affected the fit
Take a new PVS impression
PVS Inspection Checklist: https://s3.amazonaws.com/learn-invisalign/docs/us/PVS_Impressions_Checklist.pdf PVS Impressions:
http://learn.invisalign.com/impressions
Prevention
See: PVS Impression Inspection Checklist

Aligner Is Not a Good Fit
Root Cause
“Tracking” issue—where teeth are not moving or tracking as planned
Solution
Teeth do not move as planned based on two primary causes:
1. Insufficient space 2. Insufficient force
Determine which factor seems to be the most likely cause to further identify the solution
Prevention
Review information available in ClinCheck software thoroughly before starting each treatment. IPR instructions help identify where collisions & binding are likely to occur. The Tooth Movement Assessment identifies teeth where increased forces from additional techniques may be required

Aligner Popping Off
Root Cause
At the start of treatment: sub-optimal initial PVS impression
Solution
Ask the patient to frequently “bite“ to help seating and engagement. “Chewies” provide assistance in aligner seating. If no improvement, send a new impression (Midcourse/Progress)
Movements programmed into the aligner for expansion not occurring
“Chewies” by Glenroe Technologies
Take a new PVS impression
PVS Impressions: http://learn.invisalign.com/impressions

Aligner Too Retentive
Root Cause
Divergent path of insertion due to severely tipped, crowded or flarred teeth
Solution
Trim away aligner in undercut region with trimming bur Trim the distal of the terminal molars
Prevention
Position of teeth affects aligner path of insertion/ removal. Seat aligner starting with area of greatest crowding or undercut
Too many attachments Refrain from adding additional attachments outside of the Invisalign Clinical Protocols
Smooth the edges of the attachments

Aligners Not Retentive
Root Cause
Short clinical crowns without undercuts (common with teens)
Solution
Use Detail Pliers to create retentive dimples for retention
Prevention
Add posterior attachments (during ClinCheck review) when short clinical crowns are present
Detail Pliers: https://s3.amazonaws.com/learn-invisalign/docs/us/detailpliers.pdf

Tooth Not Rotating
Root Cause
Amount of rotation required falls in the blue/black range (see TMA) where additional techniques may be required for full de-rotation
Solution
Buttons & elastic technique Invisalign Detail Pliers to assist with minor movements
Prevention
Buttons & Elastics: http://learn.invisalign.com/buttonsTooth Movement Assessment Form: https://s3.amazonaws.com/learn-invisalign/docs/us/ToothAssessment.pdfDetail Pliers: https://s3.amazonaws.com/learn-invisalign/docs/us/detailpliers.pdf
Change ClinCheck treatment plan to remove blue/black movements and/or change treatment goal. May result in a compromised ClinCheck treatment plan

Tooth Not Rotating
Root Cause
Variation in bone biology or tooth morphology ( i.e. peg laterals where the surface contact of the aligner against the tooth is small)
Solution
Buttons & elastics Extend wear time of aligner stage Use Invisalign Detail Pliers to assist with minor movements
Prevention
Binding contacts (Insufficient Space)
Evaluate for tight contacts on teeth that are trying to rotate with unwaxed floss and relieve with finishing strips
Always monitor contacts with unwaxed floss during treatment whether IPR was prescribed or not

Tooth Not Rotating
Root Cause
Lack of overjet; teeth have no place to move without interference from the opposing arch
Solution
Wait for teeth to move out of the way in the opposing arch and re-evaluate progress
Prevention
Have team member use highlighter on patient’s aligner packaging as a visible reminder IPR is planned at that stage
Insufficient amount of IPR preformed in prior appointments
IPR: http://learn.invisalign.com/IPR
1. Perform recommended amount of IPR
2. Measure IPR 3. Record IPR in chart

Tooth Not Rotating
Root Cause
Attachment not optimally engaged (slightly)
Solution
Have patient bite into cotton rolls/ chewies frequently to help seating and engagement
Prevention
Attachment not optimally engaged (significantly)
• Use button & elastic to facilitate movement
• Submit new impression (Midcourse/Progress)
• Re-bond attachment using current aligner; Be aware movement is 1+ stages off . Address with Refinement
“Chewies” by Glenroe Technologies

Tooth Not Rotating
Root Cause
Insufficient wear time (Patient Compliance)
Solution
• Extend wear time • Schedule patient for
more frequent visits • Show patient pre
treatment stage for motivation
• Help patient understand any additional costs or fees that may occur for lengthy extensions to the treatment duration
Prevention
• Use Assist/Teen options offering Compliance Indicators if you anticipate this might be a concern
• Look for signs during treatment period: • Isn’t wearing aligners
during routine appointments
• Aligners very “clean” • Reschedules or
misses appointments often

Tooth Not Extruding
Root Cause
Amount of extrusion required falls in the blue/black range (see TMA) where additional techniques may be required
Solution
• Buttons & elastic technique
• Fixed sectional appliances
• TADs
Prevention
Consider relative extrusion vs. absolute extrusion in treatment plan to create the appearance of vertical changes
Buttons & Elastics for Extrusion: https://s3.amazonaws.com/learn-invisalign/docs/us/auxillarytech_extrusion.pdf
Tooth Movement Assessment: https://s3.amazonaws.com/learn-invisalign/docs/us/ToothAssessment.pdf

Tooth Not Extruding
Root Cause
Attachment not optimally engaged (slightly)
Solution
Have patient bite into cotton rolls/ chewies frequently to help seating and engagement
Prevention
Attachment not optimally engaged (significantly)
• Use button & elastic to facilitate movement
• Submit Progress Impressions/MCC (product specific)
• Re-bond attachment using current aligner; Be aware movement is 1+ stages off. Address with Refinement
“Chewies” by Glenroe Technologies

Unplanned Intrusion
Root Cause Solution Prevention
Inadequate IPR (insufficient space), causing aligner to squeeze tooth apically
• Evaluate M-D space and any binding contacts with unwaxed floss and relieve with finishing strips
• Buttons & elastics to extrude & get tooth back on track
Make sure sufficient interproximal space is present during rotations and extrusions
Buttons & Elastics: http://learn.invisalign.com/buttonsIPR: http://learn.invisalign.com/IPR

Incomplete Root Movements
Root Cause
Amount of root movement falls in the blue/black range (see TMA) where additional techniques may be required
Solution
• Buttons & elastic technique
• Fixed sectional appliances
• TADs
Prevention
Buttons & Elastics: http://learn.invisalign.com/buttons TMA: https://s3.amazonaws.com/learn-invisalign/docs/us/ToothAssessment.pdf
Change ClinCheck treatment plan to remove blue/black movements and/or change treatment goal. May result in a compromised ClinCheck treatment plan

Incomplete Root Movements
Root Cause
Insufficient undercut area for aligner to grab the tooth
Solution
Add attachments in Refinement as close to center of rotation of tooth as possible to upright the teeth
Prevention
Skeletal component of expansion
Expansion via buccal segment uprighting is more likely to be successful than bodily expansion of the entire segment
Request buccal uprighting in Refinement to remove bodily movements

Incomplete Root Movements: Crossbite
Root Cause Solution
• Extend wear time • Add buttons and
elastics
Not enough time for movement to express due to variation in bone biology, tooth morphology or patient compliance
Buttons & Elastics: http://learn.invisalign.com/buttons

Finishing Treatment

Black Triangles
Root Cause
Unwanted tip between two teeth causing contact point to be occlusal
Solution
Upright the teeth with Refinement or additional techniques (buttons & elastics or fixed appliances)
Prevention
Pay special attention to anterior incisors with worn incisal edges. A request to “level” incisal edges can create unwanted tip in your ClinCheck treatment plan. Consider doing some enamel re-contouring pre PVS impressions
Buttons & Elastics: http://learn.invisalign.com/buttons

Black Triangles
Root Cause
Due to shape of teeth, position of teeth, or lack of papilla once teeth are aligned
Solution
• IPR and move contact point gingivally and then close the space with Refinement or Detail Pliers
• Restore • Connective tissue graft
Prevention
Evaluate shapes of anterior teeth (especially when significant crowding & rotations exists). Inform patient before tx starts of the possibility. Be aware of the potential of black triangles in ClinCheck review, but note the simulated gingiva may not always accurately represent the patient’s gingiva.
IPR: http://learn.invisalign.com/IPR

Root Cause
Roots not moving
Solution
Buttons and elastics
BEFORE
BUTTONS AND C CHAIN
AFTER
Buttons & Elastics: http://learn.invisalign.com/buttons
Roots Tipped

Premature Occlusal Contacts
Root Cause
All tooth movements planned during the treatment period were not fully expressed
Solution
• Use Refinement to move teeth out of contact
• Re-mount models & equilabrate
Prevention
Review your ClinCheck treatment plan to ensure it provides sufficient OJ and anterior coupling
Doctor’s ClinCheck treatment plan (i.e. minimal/no OJ). See Posterior Openbite.
• Use Refinement to move teeth out of contact
• Re-mount models & equilabrate
ClinCheck Review Tips: http://learn.invisalign.com/clincheck
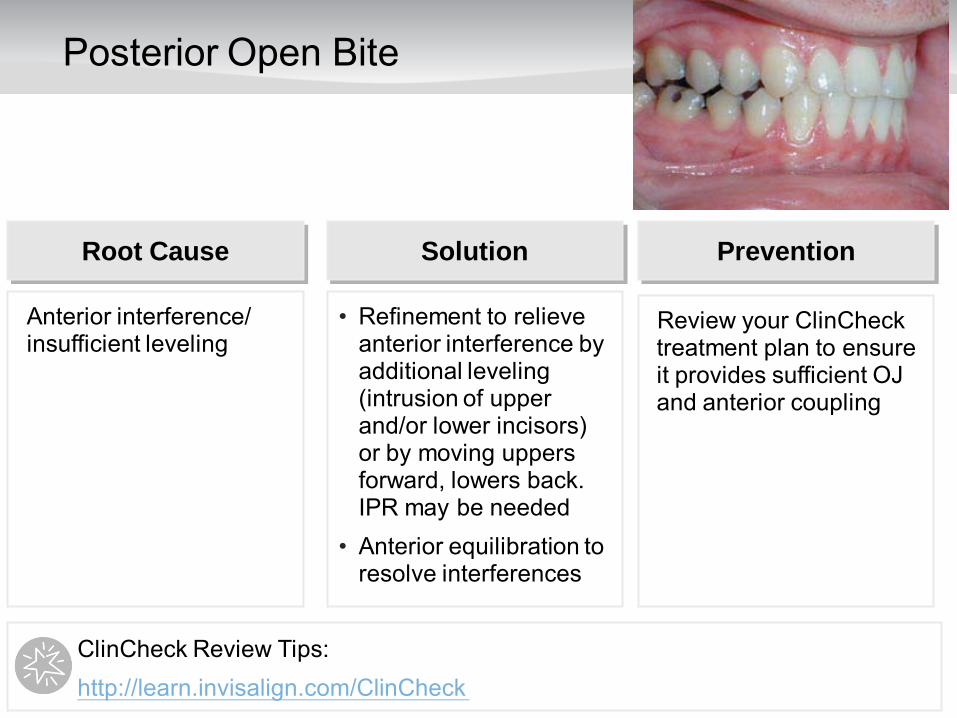
Posterior Open Bite
Root Cause
Anterior interference/ insufficient leveling
Solution
• Refinement to relieve anterior interference by additional leveling (intrusion of upper and/or lower incisors) or by moving uppers forward, lowers back. IPR may be needed
• Anterior equilibration to resolve interferences
Prevention
Review your ClinCheck treatment plan to ensure it provides sufficient OJ and anterior coupling
ClinCheck Review Tips: http://learn.invisalign.com/ClinCheck

Posterior Open Bite
Root Cause
Transient intrusion of the posterior due to aligner material on the occlusal surface
Solution
Cut out premolar to molar region of aligners/ retainer to allow for settling of the posterior
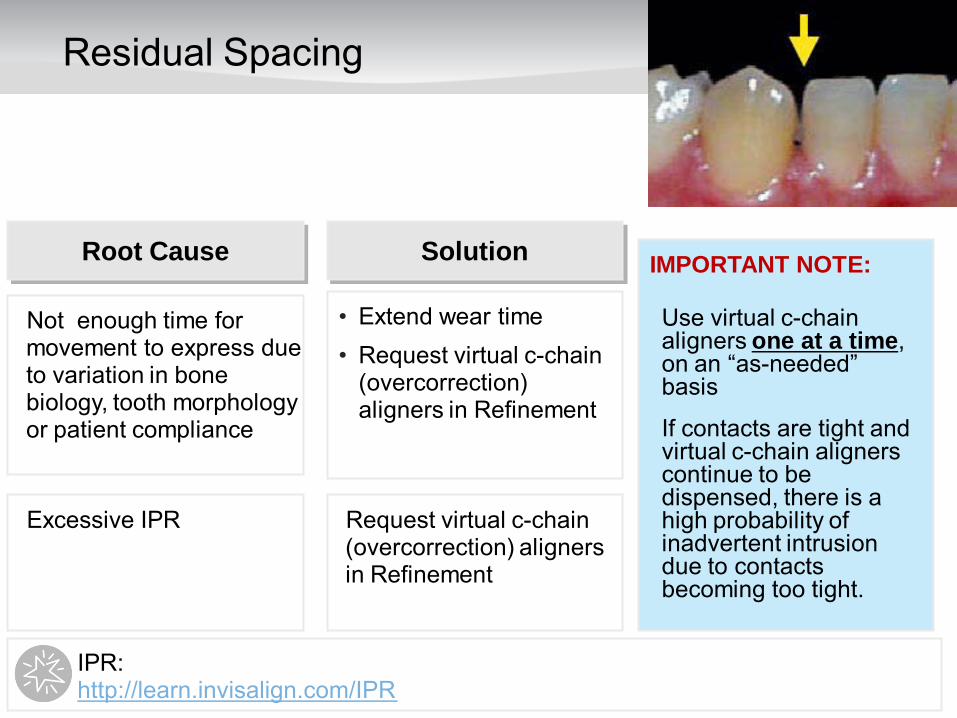
Residual Spacing
Root Cause Solution
• Extend wear time • Request virtual c-chain
(overcorrection) aligners in Refinement
Excessive IPR Request virtual c-chain (overcorrection) aligners in Refinement
IMPORTANT NOTE:
Use virtual c-chain aligners one at a time, on an “as-needed” basis
If contacts are tight and virtual c-chain aligners continue to be dispensed, there is a high probability of inadvertent intrusion due to contacts becoming too tight.
Not enough time for movement to express due to variation in bone biology, tooth morphology or patient compliance
IPR: http://learn.invisalign.com/IPR

Residual Spacing
Root Cause
Residual space present in the doctor’s ClinCheck treatment plan when there’s no space to retract the teeth due to lack of overjet/tooth size discrepancy
Solution
• Restore • Request IPR in
opposing arch with Refinement to close spaces
Prevention
Review your ClinCheck treatment plan closely paying special attention to comments provided by the technician
ClinCheck Review Tips: http://learn.invisalign.com/ClinCheck

Residual Spacing
Root Cause
IPR ledge makes contact appear open (may be subgingival)
Solution
Remove ledge with IPR, close space with Refinement
Prevention
• Smooth parallel lines with IPR is the goal
• Stage IPR later during the treatment
• Use hand strips to do the IPR
IPR: http://learn.invisalign.com/IPR

Residual Crowding
Root Cause
Not enough time for movement to express due to variation in bone biology, tooth morphology or patient compliance
Solution
• Extend wear time • Use Detail Plier to
apply additional pressure points help correct minor in/out movements
Prevention
Always monitor interproximal contacts to ensure teeth have space to move
Detail Pliers: https://s3.amazonaws.com/learn-invisalign/docs/us/detailpliers.pdf

Residual Crowding
Root Cause
Lack of OJ; Lower crowding can’t be resolved because lower teeth are contacting upper teeth (interarch interference)
Solution
Move interference out of the way with Refinement
Insufficient IPR preformed Resolve remaing crowding with Refinement
Prevention
During the treatment period
• Perform recommended amount of IPR
• Measure IPR • Record IPR in chart
IPR: http://learn.invisalign.com/IPR
Plan a different staging proclining upper and lower

Prevent Relapse
Don’t forget retention Vivera™ can accommodate fixed lingual wire retainers