ios/android touch lcd gsm alarm system ls-gsm-215
TRANSCRIPT
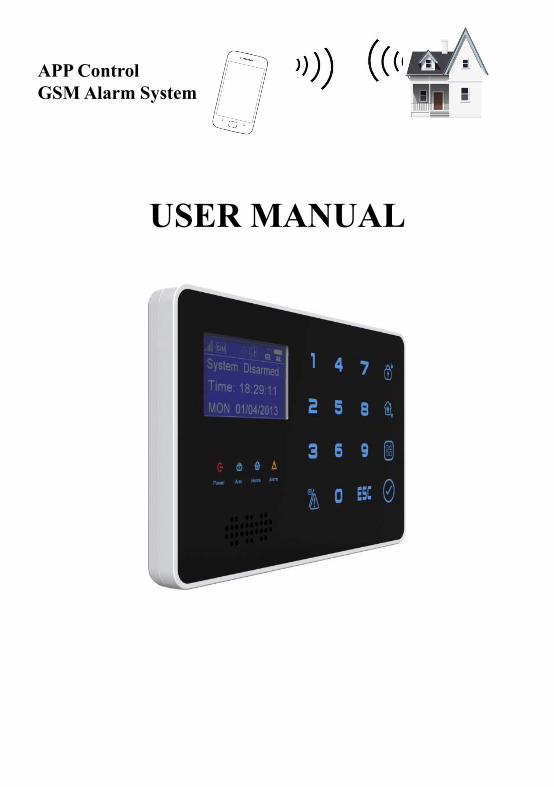
APPControlGSMAlarm System
USER MANUAL
Foreword
Dear Users,
Thanks for choosing our alarm system. For better operation of the system, please read the
instruction manual carefully before using.
After reading, please keep the manual carefully for future reference.
The product, including but not limited to granted or pending patents, is under protection of the
patent laws of PRC or other countries.
We reserve the rights for modification of the specification or price of the product.
1. Safety Directions:
Read the following security precaution measures to prevent any personal injury or damage to the
product, while making the best of its function.
Working power: AC=100~240V, DC=12V 1A
To avoid the damage of the control unit caused by wrong connection, installation shall be
performed by professionals.
Please don’t press the touch keyboard of the control unit heavily.
Please don’t use the product in damp environment.
Please don’t use the product under inflammable and explosive conditions.
Keep the surface of the product clean and dry.
Maintain proper ventilation.
2. Brief introduction:
The GSM Alarm System is a new security protection solution,includes multi-functions and ultra low cost
and high reliable, special for residential areas, business areas, commercial areas, house,
office,factory,industrial areas and other variety applications. It based on wireless GSM communication
network, integrated LCD menu display and high performance GSM module and imported STC
microprocessor inside, with innovative and experienced functions and features to meet the requires and
potential demands in the worldwide markets.
What you need is one 2G SIM card which supports call ID function.
3. Standard Packing List:
Control Unit X1
Wireless Remote Controls X 2
Wireless Magnetic Door Sensor X1
Wireless PIR Motion Sensor X1
Wired Mini Siren (110dB) X1
AC/DC Power Adapter X1
User Manual X1

Optional Accessories:
(Wireless Sensors & Wired sensors both available)
PIR Motion Sensor, Glass Break Sensor, Magnetic Window/door Gap Sensor, Magnetic Steel Scrolling
Door Sensor, Temperature Sensor, Smoke Sensor, Gas Detector, Photoelectric Beams, Ir Barriers etc.
4. Features
4.1 The Advantages1) GSM Frequency: Quad-Band 850/900/1800/1900Mhz;
2) Support 2 groups to Timely arm or disarm the system from Monday to Sunday,.For example, choose
Monday and Tuesday to arm on 8:30a.p and 17:30p.m., the rest days are disarm;
3) Support armed delay to give you enough time to go out the home, the delay time is editable by user
from 1-99 seconds;
4) 6 ways to arm/disarm the system : via remote controller, wireless keypad, SMS , calling, password on
host,phone APP;
5) 6 arm modes :real time arm by remote controller, outgoing delay arm, at home stay arm,timely arm,
telephone remote arm, SMS arm;
6) Support wireless siren;
7) Code pairing for up to 8 wireless remote controls;
8) Can preset 1 group alarm receiving center phone number (SMS also available for option);
9) Can preset 8 groups personal phone numbers (SMS phone number also available for option);
10) The control host can automatically record all the information of 80 alarm events + 99 remote controller
arm/disarm operating events;
11) It is compatible with common international Ademco Contact ID alarm communication protocol.
12) Switch on or off 2 output reply by SMS or telephone or alarm.
13) It use TI Military grade CPU process chip to work with high Stable and durable capacity.
4.2 Functions & Features14) 128X64 dot matrix LCD display in multi languages. The built-in calendar is convenient for date
checking;
15) Equips with 40 wireless zones and 6 wired zones;
16) 20 Alarm records for owner review;
17) Two-way intercom are available with high dB and high voice quality;
18) Simple and Unique operating, LCD displays the entire setup menu;
19) Built-in 23 kinds of alarm locations Programming:Emergency Alarm/PIR Alarm/Door Alarm/Window
Alarm/Gas Alarm/Smoke Alarm/Glass Alarm/Vibration Alarm/Perimeter Alarm//Water
Alarm/Temperature Alarm/Tamper Alarm/Fire Alarm/Medical Help/Garage Alarm/Kitchen Alarm/Front
Door Alarm/Backdoor Alarm/Side Door Alarm/Hall Alarm/Studyroom /Bedroom Alarm/Other Room;
20) Various programming functions for zones: Real time, Delay ,Doorbell, 24Hours , Partial Armed(At
House or Stay) are available ;
21) Automatically send SMS alert and dial to the pre-set cell phone when any sensor had been triggered;
22) Standby internal rechargeable battery which can last 30 hours;
23) The external power failure & recovery SMS alert function is available;
24) It is compatible with 2262 and 1527 wireless IC, Learning code to pair or add more wireless sensors
through wireless way.;
25) Priority of alarm: If there is a alarm while calling, no matter incoming or outgoing, the control unit will
hang up calling and dial the alarm phone immediately.
5. Physical Layout5.1 Control Unit physical layout
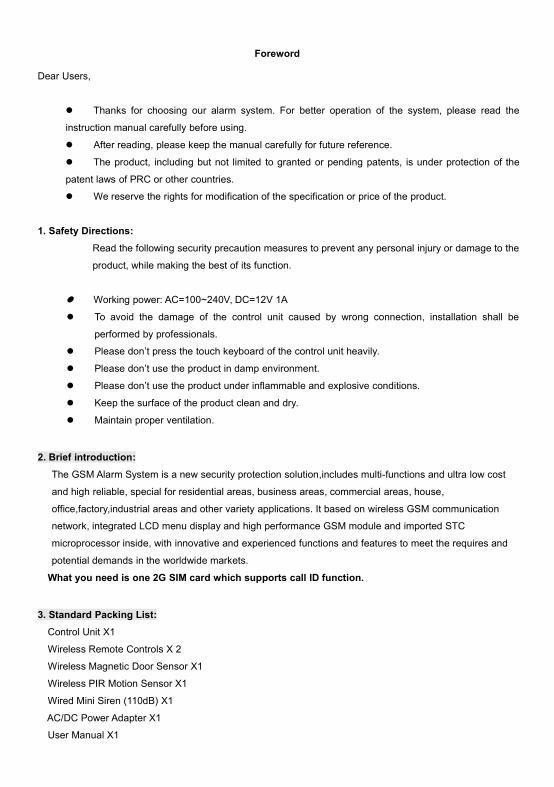
Control unit Front schematic diagram:
Control unit back schematic diagram:
Interface Description
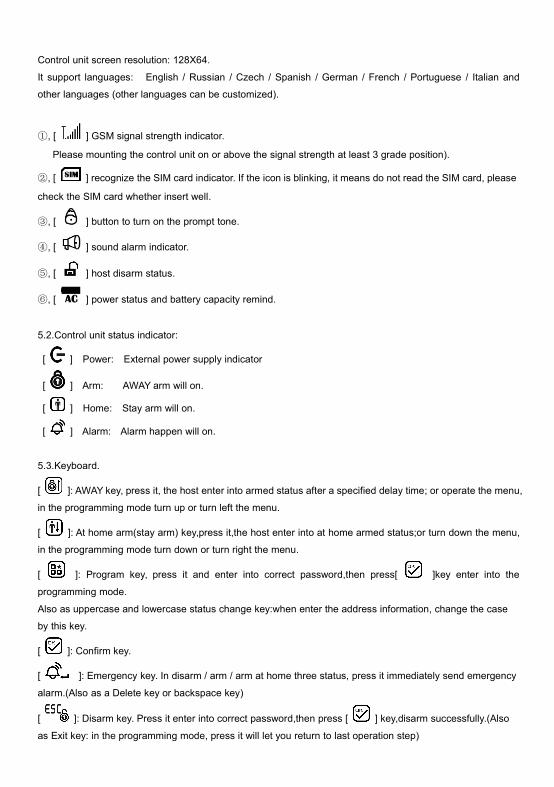
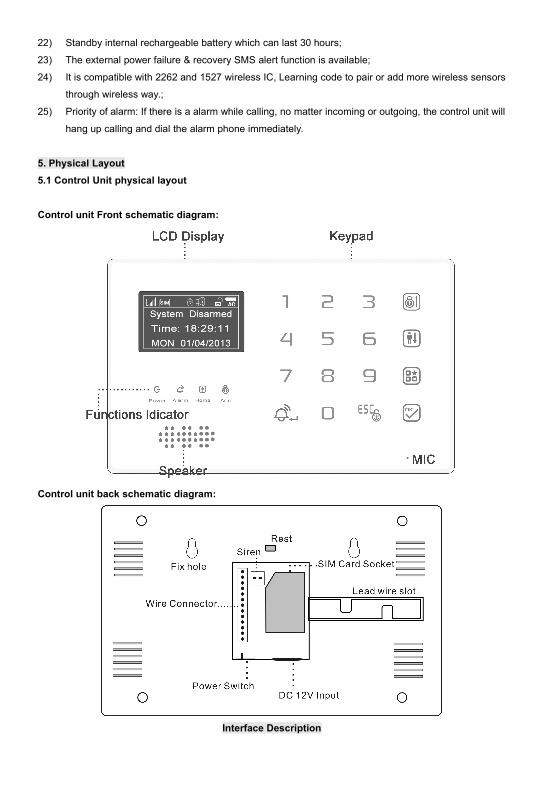
Control unit screen resolution: 128X64.
It support languages: English / Russian / Czech / Spanish / German / French / Portuguese / Italian and
other languages (other languages can be customized).
①, [ ] GSM signal strength indicator.
Please mounting the control unit on or above the signal strength at least 3 grade position).
②, [ ] recognize the SIM card indicator. If the icon is blinking, it means do not read the SIM card, please
check the SIM card whether insert well.
③, [ ] button to turn on the prompt tone.
④, [ ] sound alarm indicator.
⑤, [ ] host disarm status.
⑥, [ ] power status and battery capacity remind.
5.2.Control unit status indicator:
[ ] Power: External power supply indicator
[ ] Arm: AWAY arm will on.
[ ] Home: Stay arm will on.
[ ] Alarm: Alarm happen will on.
5.3.Keyboard.
[ ]: AWAY key, press it, the host enter into armed status after a specified delay time; or operate the menu,
in the programming mode turn up or turn left the menu.
[ ]: At home arm(stay arm) key,press it,the host enter into at home armed status;or turn down the menu,
in the programming mode turn down or turn right the menu.
[ ]: Program key, press it and enter into correct password,then press[ ]key enter into the
programming mode.
Also as uppercase and lowercase status change key:when enter the address information, change the case
by this key.
[ ]: Confirm key.
[ ]: Emergency key. In disarm / arm / arm at home three status, press it immediately send emergency
alarm.(Also as a Delete key or backspace key)
[ ]: Disarm key. Press it enter into correct password,then press [ ] key,disarm successfully.(Also
as Exit key: in the programming mode, press it will let you return to last operation step)

Connect 2 channel output relays,each
channel max support 250VAC,5A / 125VAC
10A / 30VDC 5A
5.4 Control unit interface:
1
----------Brown Zone 46( 6th wire zone input, NC/NO optional by programming;)
----------White Zone 45 (5th wire zone input, NC/NO optional by programming;)
----------Yellow Zone 44 (4th wire zone input, NC/NO optional by programming;)
----------Purple Zone 43 (3rd wire zone input, NC/NO optional by programming;)
----------Green Zone 42 (2nd wire zone input, NC/NO optional by programming ;)
----------Blue Zone 41 (1st wire zone input, NC/NO optional by programming;)
----------Black GND (Negative of 12V power supply for wire detector;)
----------Red + 12V (Positive of 12V power supply for wire detector;)
----------Red sk1+
----------Blue sk1-
----------Red sk2+
----------Gray sk2-
10
6. How to Startup the Control Unit
It is important to startup the control unit correctly, which may affect the regular operation and the service life of
itself.
Step1: Disconnect the control unit with power supply, for it is prohibited to operate the control unit in power on
status;
Step2: Install the SIM card;
Step3: Connect the 12V power adapter of the control unit. The control unit shall enter into self-checking
status and show the startup information.The SIM card icon will flick 5-20seconds,then begin to search the
GSM network around it.
A. If it find GSM network, the signal indicator will show you, and the SIM card icon stop to flick.
B. If 20s later, the SIM card icon still flick, you need to re-start the control unit. after 10s later. Repeated
power on/off operations in a short will reduce its service life.
Step4: After the control unit registered successfully on the network, turn on the battery switch.
Step5: Check whether the GSM signal grade is more than 3 bars, for weak signal may affect the regular
operation of the control unit.
7. Settings of the Control Unit
Enter into system setting status
Only when you enter into the system setting status, you can begin to operate all the steps.
Please follow below way to enter into the setting:
In system disarmed status, press[ ]key,the screen will ask you input 6 digits password (factory default is
666666),then press again [ ] key to confirm.The control unit enter into setting status,the status indicator

shall be on and show you setting menu.
At that time, [ ]key is for turning the menu up and left,[ ]is for turning the menu down and right
respectively.
(Note: ① After enter the setting,behind the top settings,the first number indicates the total number of the
menu item, the second number indicates the number of selection, white ground with blue letters indicate the
currently selected operations;
② the following " " meas press [ ] key to enter the next menu).
7.1.System Settings
①Set Date and Time and Week
A. Set Date
Settings 12-1
System Set
Phone NO.
Recording
Settings 5-1
Set Time
Key Tone
Set Program Psd
Settings 3-1
Set Date
Date:01/01/13
After enter into system setting, please choose " System Set " ,press [ ] key,then choose"Set
Time”,press [ ] key again,enter into date setting(3-1).
Behind the Date is Month/Date/Year,the flashing decline line means to be edited digits. After you edit one
digit,it will jumper to next one automatically;
You can also choose date by key[ ]/[ ],edit finished,press [ ] key to save.
B. Set Time
Settings 3-1
Set Date
Date:05/30/13
Settings 3-2
Set Time
Time:12:00:00
After enter into Date setting,press [ ] key,it will automatically enter into Time setting(3-2).
Behind the Time is minute/second, (24-hour clock),the flashing decline line means to be edited digits. After
you edit one digit,it will jumper to next one automatically;
You can also choose time by key[ ]/[ ],edit finished , press [ ] key to save.
C. Set Week

Settings 3-3
Set Week
Week:MON TUE WED
THU FRI SAT SUN
Settings 3-2
Set Time
Time:10:57:01
After enter into Time setting(3-2),press [ ] key,it will automatically enter into Week setting(3-3).
Please choose by key[ ]/[ ], press [ ] key to save, and return to last grade menu.
Note: If the host turn off in a long time,will make the clock chip backup battery is exhausted.When the clock
battery use out, turn off the host and restart it, the system time will be Jan 1 2014 or Jan 1 2000. Now it
means you need to change to a new clock battery (battery type:CR1220).
②. Set Key Tone On/Off
Settings 5-2
Set Time
Key Tone
Set Program Psd
Settings 5-2
Key Tone
CLOSE DIDI
After enter into ‘System Set”, choose “Key Tone”,press [ ] key, enter into key tone
setting.Press[ ]/[ ]to choose close or open the key tone.
If you choose"CLOSE",when you press the host keyboard,the host do not sound “Di”,and after exit program
mode, the icon [ ] on the screen will disappear.
If you choose"DIDI",when you press the host keyboard,the host do sound “Di”,and after exit program mode,
the icon [ ] on the screen will appear.
③.Change Program Password
Settings 3-1
Set Program Psd
Enter old Psd
------
Settings 5-3
Set Time
Key Tone
Set Program Psd
Settings 3-3
Set Program Psd
Enter new Psd
------
Settings 3-2
Set Program Psd
Enter new Psd
------A
fter enter into"System Set",choose“Set Program Psd”,press [ ] key,enter into password
change.Change the password need input old password first, press [ ] key to input new password.
Note: a、3-2 & 3-3 means please input 2 times new password.
b、This password is program password(Factory default is 666666).
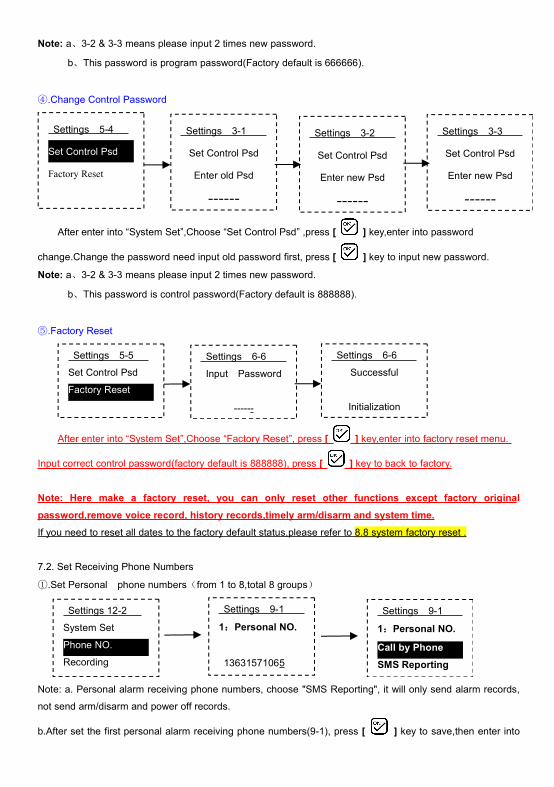
④.Change Control Password
Settings 3-1
Set Control Psd
Enter old Psd
------
Settings 5-4
Set Control Psd
Factory Reset
Settings 3-3
Set Control Psd
Enter new Psd
------
Settings 3-2
Set Control Psd
Enter new Psd
------
After enter into “System Set”,Choose “Set Control Psd” ,press [ ] key,enter into password
change.Change the password need input old password first, press [ ] key to input new password.
Note: a、3-2 & 3-3 means please input 2 times new password.
b、This password is control password(Factory default is 888888).
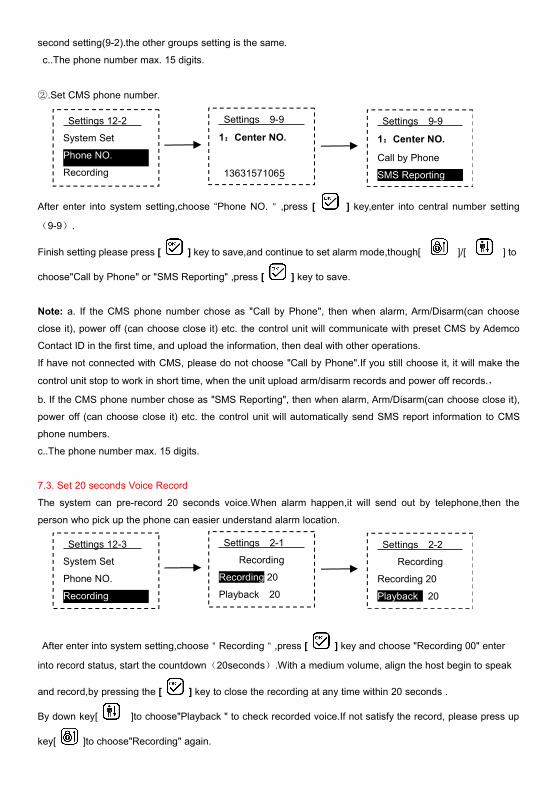
⑤.Factory Reset
Settings 6-6
Input Password
------
Settings 5-5
Set Control Psd
Factory Reset
Settings 6-6
Successful
Initialization
After enter into “System Set”,Choose “Factory Reset”, press [ ] key,enter into factory reset menu.
Input correct control password(factory default is 888888), press [ ] key to back to factory.
Note: Here make a factory reset, you can only reset other functions except factory original
password,remove voice record, history records,timely arm/disarm and system time.
If you need to reset all dates to the factory default status,please refer to 8.8 system factory reset .
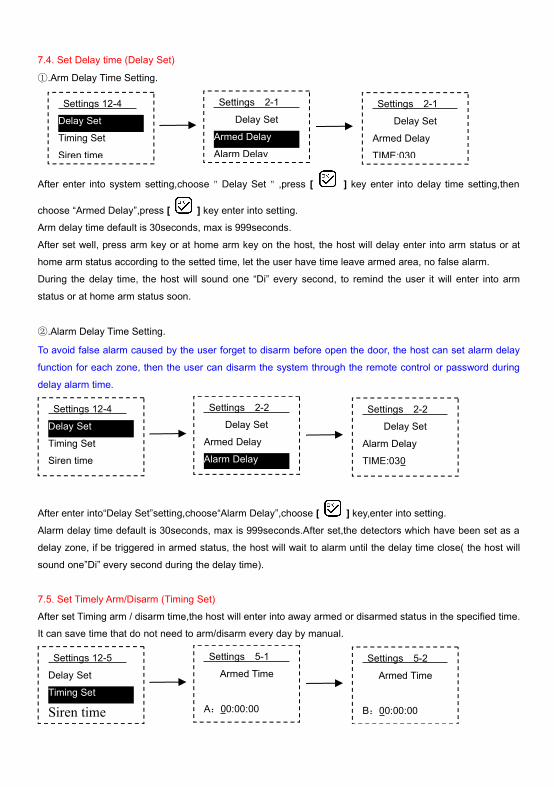
7.2. Set Receiving Phone Numbers
①.Set Personal phone numbers(from 1 to 8,total 8 groups)
Settings 12-2
System Set
Phone NO.
Recording
Settings 9-1
1:Personal NO.
13631571065
Settings 9-1
1:Personal NO.
Call by Phone
SMS Reporting
Note: a. Personal alarm receiving phone numbers, choose "SMS Reporting", it will only send alarm records,
not send arm/disarm and power off records.
b.After set the first personal alarm receiving phone numbers(9-1), press [ ] key to save,then enter into
second setting(9-2).the other groups setting is the same.
c..The phone number max. 15 digits.
②.Set CMS phone number.
Settings 12-2
System Set
Phone NO.
Recording
Settings 9-9
1:Center NO.
13631571065
Settings 9-9
1:Center NO.
Call by Phone
SMS Reporting
After enter into system setting,choose “Phone NO." ,press [ ] key,enter into central number setting
(9-9).
Finish setting please press [ ] key to save,and continue to set alarm mode,though[ ]/[ ] to
choose"Call by Phone" or "SMS Reporting" ,press [ ] key to save.
Note: a. If the CMS phone number chose as "Call by Phone", then when alarm, Arm/Disarm(can choose
close it), power off (can choose close it) etc. the control unit will communicate with preset CMS by Ademco
Contact ID in the first time, and upload the information, then deal with other operations.
If have not connected with CMS, please do not choose "Call by Phone".If you still choose it, it will make the
control unit stop to work in short time, when the unit upload arm/disarm records and power off records.,
b. If the CMS phone number chose as "SMS Reporting", then when alarm, Arm/Disarm(can choose close it),
power off (can choose close it) etc. the control unit will automatically send SMS report information to CMS
phone numbers.
c..The phone number max. 15 digits.
7.3. Set 20 seconds Voice Record
The system can pre-record 20 seconds voice.When alarm happen,it will send out by telephone,then the
person who pick up the phone can easier understand alarm location.
Settings 12-3
System Set
Phone NO.
Recording
Settings 2-1
Recording
Recording 20
Playback 20
Settings 2-2
Recording
Recording 20
Playback 20
After enter into system setting,choose"Recording",press [ ] key and choose "Recording 00" enter
into record status, start the countdown(20seconds).With a medium volume, align the host begin to speak
and record,by pressing the [ ] key to close the recording at any time within 20 seconds .
By down key[ ]to choose"Playback " to check recorded voice.If not satisfy the record, please press up
key[ ]to choose"Recording" again.
7.4. Set Delay time (Delay Set)
①.Arm Delay Time Setting.
Settings 12-4
Delay Set
Timing Set
Siren time
Settings 2-1
Delay Set
Armed Delay
Alarm Delay
Settings 2-1
Delay Set
Armed Delay
TIME:030
After enter into system setting,choose"Delay Set" ,press [ ] key enter into delay time setting,then
choose “Armed Delay”,press [ ] key enter into setting.Arm delay time default is 30seconds, max is 999seconds.
After set well, press arm key or at home arm key on the host, the host will delay enter into arm status or at
home arm status according to the setted time, let the user have time leave armed area, no false alarm.
During the delay time, the host will sound one “Di” every second, to remind the user it will enter into arm
status or at home arm status soon.
②.Alarm Delay Time Setting.
To avoid false alarm caused by the user forget to disarm before open the door, the host can set alarm delay
function for each zone, then the user can disarm the system through the remote control or password during
delay alarm time.
Settings 12-4
Delay Set
Timing Set
Siren time
Settings 2-2
Delay Set
Armed Delay
Alarm Delay
Settings 2-2
Delay Set
Alarm Delay
TIME:030
After enter into“Delay Set”setting,choose“Alarm Delay”,choose [ ] key,enter into setting.
Alarm delay time default is 30seconds, max is 999seconds.After set,the detectors which have been set as a
delay zone, if be triggered in armed status, the host will wait to alarm until the delay time close( the host will
sound one”Di” every second during the delay time).
7.5. Set Timely Arm/Disarm (Timing Set)
After set Timing arm / disarm time,the host will enter into away armed or disarmed status in the specified time.
It can save time that do not need to arm/disarm every day by manual.
Settings 12-5
Delay Set
Timing Set
Siren time
Settings 5-1
Armed Time
A:00:00:00
Settings 5-2
Armed Time
B:00:00:00

Settings 5-3
Disarm Time
A:00:00:00
Settings 5-4
Disarm Time
B:00:00:00
Settings 5-5
Timing Date
1 2 3 4 5 6 7
* * * * *
After enter into system setting,choose"Timing Set", press [ ] key to set the first group of timely arm
time(5-1).When you finish the set,press [ ] key to save then enter into second group setting(5-2).As the same way to operate the following timely disarm time setting (5-3. 5-4) and timely date setting (5-5).
①.5-1 & 5-2 is 2 groups for timely arm time. When the clock go to setted time, the host will automatically enter
into away armed status. When the time is 00:00:00, the timely setting do not work.
②.5-3 & 5-4 is 2 groups for timely disarm time. When the clock go to setted time, the host will automatically
enter into disarmed status.
③.5-5 is for arm date choose,1-7 means from Monday to Sunday, and only the digits with “* ” in below
can .execute the above timely arm/disarm.
a.By key[ ]/[ ]to choose the date for timely arm/disarm, after chose, there will be a flick line
below the date digits.
b.Press [ ] key to confirm the choose, a "*" will appear below the digits. Press 2 times [ ] key, "*"
disappear, means you cancel the choose.
7.6. Set Siren Sound Time (Siren time)
Settings 12-6
Delay Set
Timing Set
Siren time
Settings 5-1
Siren Time
Time: 03
After enter into system setting,choose"Siren time",press [ ] key to enter into setting.
Note: The siren sound time is default as 3 minutes. It max. support 99 minutes.
7.7. Set Remote Controller
Settings 12-7
Remote Set
Network Set
Zone Attribute
Settings 2-1
Remote Set
Arm/Disarm Beep
NO YES
Settings 2-2
Remote Set
EMERG Ringing
NO YES
① Open /Close the remote controller beep.(Arm/Disarm Beep)(2-1)
The unit comes with siren warning prompts, when the user press the remote control to arm / disarm, the host
will let the siren sound, so that the user can hear in remote distance, whether the host has been properly
controlled. The siren warning prompt factory default is off. We recommend that when you install and use it,
please adjust according to the actual need.
How to change siren prompt: choose 12-7 ( Remote Set), press [ ] key enter into 2-1, then
by[ ]/[ ]key to choose NO or Yes, press [ ] key to save.
②.Set remote control sound or not when SOS alarm happen (EMERG Ringing)(2-2)
The factory default is “NO”,when you use it,please adjust according to the actual need.
Set way:Choose 12-7(Remote Set),press 2 times of [ ] key,enter into MERG Ringing(2-2), though
key[ ]/[ ]to choose NO or Yes,press [ ] key to save.
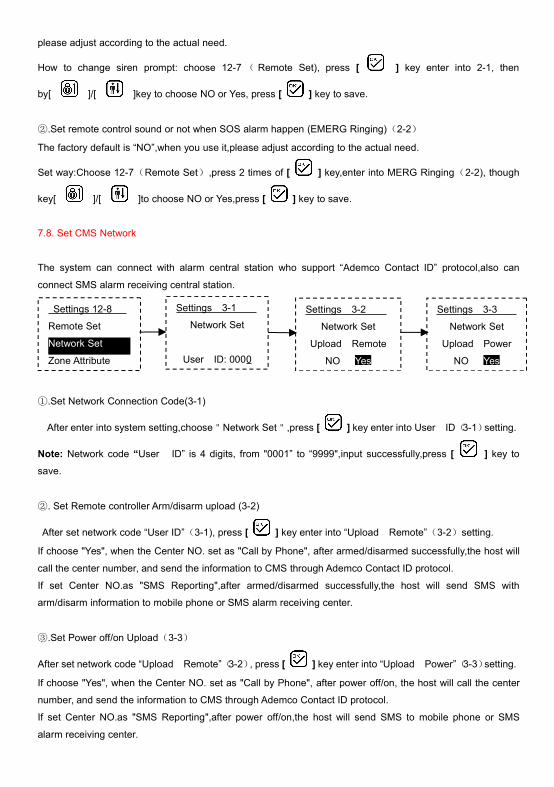
7.8. Set CMS Network
The system can connect with alarm central station who support “Ademco Contact ID” protocol,also can
connect SMS alarm receiving central station.
Settings 12-8
Remote Set
Network Set
Zone Attribute
Settings 3-1
Network Set
User ID: 0000
Settings 3-2
Network Set
Upload Remote
NO Yes
Settings 3-3
Network Set
Upload Power
NO Yes
①.Set Network Connection Code(3-1)
After enter into system setting,choose"Network Set",press [ ] key enter into User ID(3-1)setting.
Note: Network code “User ID” is 4 digits, from "0001” to “9999",input successfully,press [ ] key tosave.
②. Set Remote controller Arm/disarm upload (3-2)
After set network code “User ID”(3-1), press [ ] key enter into “Upload Remote”(3-2)setting.
If choose "Yes", when the Center NO. set as "Call by Phone", after armed/disarmed successfully,the host will
call the center number, and send the information to CMS through Ademco Contact ID protocol.
If set Center NO.as "SMS Reporting",after armed/disarmed successfully,the host will send SMS with
arm/disarm information to mobile phone or SMS alarm receiving center.
③.Set Power off/on Upload(3-3)
After set network code “Upload Remote”(3-2), press [ ] key enter into “Upload Power”(3-3)setting.
If choose "Yes", when the Center NO. set as "Call by Phone", after power off/on, the host will call the center
number, and send the information to CMS through Ademco Contact ID protocol.
If set Center NO.as "SMS Reporting",after power off/on,the host will send SMS to mobile phone or SMS
alarm receiving center.

7.9. Set Zone Attribution (Zone Attribute)
Settings 12-9
Remote Set
Network Set
Zone Attribute
Settings 7-1
Zone Attribute
Zone NO: 01
Settings 7-2
Zone 01:(4)
Zone Type
Door Bell
① Choose defense zone(7-1)
Press[ ]key to cancel original information and respectively input 2digits defence number,from
01~46.Press [ ] key enter into next menu "Zone Type".
②.Set Defense Zone Type(7-2)
After enter into "Zone Type" press up-key[ ]/down-key[ ]to choose the type.
The system have set up four types of defense: the first line of defense (Normal Zone), the second line of
defense (Home Zone, 24Hour Standoff, Door Bell).
The first line of defense (Normal Zone): refers to the criminals crime intruder the first detection area (such as
doors, windows, etc.), usually by wireless door sensor, wireless curtain infrared detector, infrared barrier and
outdoor PIR motion sensor etc.
The second line of defense (Stay Zones/ Home Zone): refers to the criminals committing the crime of burglary,
a second intruder detection area (such as living room, hallway, restroom etc.), usually by wireless wide-angle
infrared detector consists of.
24 hours defense (24Hour Standoff): refers to the monitoring of the status at any time in the day to prevent
detection area (such as emergency help, medical aid, gas leak, fire alarm, water leakage alarms, etc.),
generally including the emergency button, wireless gas detector, wireless smoke detector, water detector etc.
Doorbell (Door Bell): refers to the 24 hours, all day monitoring.Once there is a trigger it will beep three
ding-dong sound, the host do not alarm. When the detector set as doorbell zone attribute. It will not go to
the next option, but skip to the next zone setting.
Settings 7-3
Zone 02:(1)
Alarm Type
Emergency Alarm
Settings 7-4
Zone 02:
Delay Zone
NO Yes
Settings 7-5
Zone 02:
Bypass Zone
NO Yes
③.Choose the alarm type(7-3)
After enter into menu "Alarm Type", through up-key[ ]/down-key[ ]to choose Corresponding
alarm type, press [ ] key to save and enter into next menu "Delay Zone"setting..
For the convenience of users to distinguish the alarm condition,the system have set 10 kinds of Alarm Type:
Emergency Alarm、PIR Alarm、Door Alarm、Window Alarm、GAS Alarm、Smoke Alarm、Glass Alarm、Vibration
Alarm、Perimeter Alarm、/Water Alarm/Temperature Alarm/Tamper Alarm/Fire Alarm/Medical Help/Garage
Alarm/Kitchen Alarm/Front Door Alarm/Backdoor Alarm/Side Door Alarm/Hall Alarm/Study room/Bedroom
Alarm/Other Room.
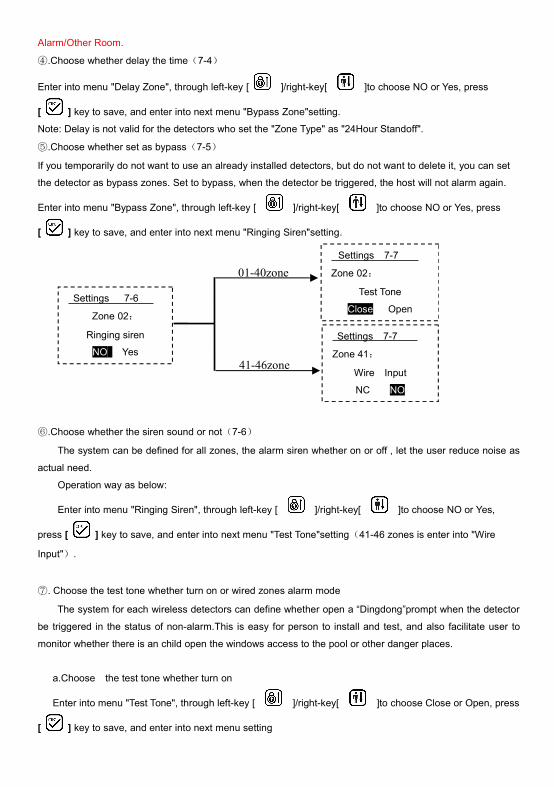
④.Choose whether delay the time(7-4)
Enter into menu "Delay Zone", through left-key [ ]/right-key[ ]to choose NO or Yes, press
[ ] key to save, and enter into next menu "Bypass Zone"setting.Note: Delay is not valid for the detectors who set the "Zone Type" as "24Hour Standoff".
⑤.Choose whether set as bypass(7-5)
If you temporarily do not want to use an already installed detectors, but do not want to delete it, you can set
the detector as bypass zones. Set to bypass, when the detector be triggered, the host will not alarm again.
Enter into menu "Bypass Zone", through left-key [ ]/right-key[ ]to choose NO or Yes, press
[ ] key to save, and enter into next menu "Ringing Siren"setting.
Settings 7-7
Zone 02:
Test Tone
Close Open
41-46zone
Settings 7-6
Zone 02:
Ringing siren
NO YesSettings 7-7
Zone 41:
Wire Input
NC NO
01-40zone
⑥.Choose whether the siren sound or not(7-6)
The system can be defined for all zones, the alarm siren whether on or off , let the user reduce noise as
actual need.
Operation way as below:
Enter into menu "Ringing Siren", through left-key [ ]/right-key[ ]to choose NO or Yes,
press [ ] key to save, and enter into next menu "Test Tone"setting(41-46 zones is enter into "Wire
Input").
⑦. Choose the test tone whether turn on or wired zones alarm mode
The system for each wireless detectors can define whether open a “Dingdong”prompt when the detector
be triggered in the status of non-alarm.This is easy for person to install and test, and also facilitate user to
monitor whether there is an child open the windows access to the pool or other danger places.
a.Choose the test tone whether turn on
Enter into menu "Test Tone", through left-key [ ]/right-key[ ]to choose Close or Open, press
[ ] key to save, and enter into next menu setting
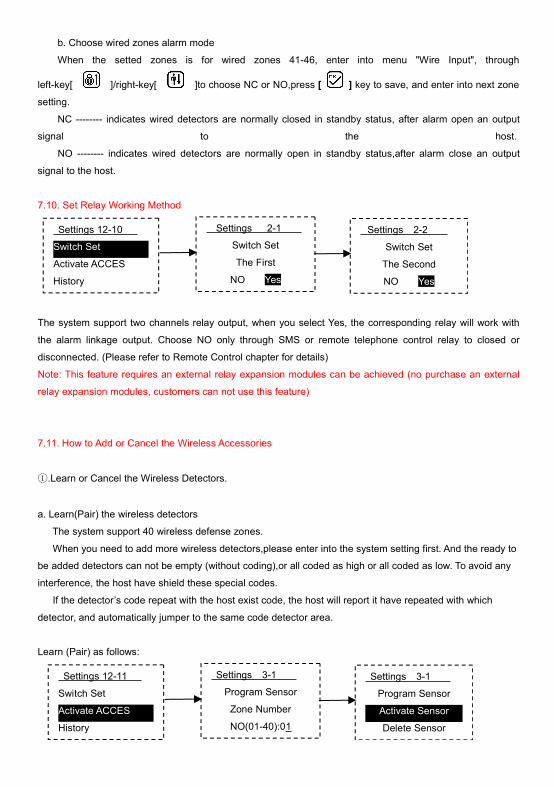
b. Choose wired zones alarm mode
When the setted zones is for wired zones 41-46, enter into menu "Wire Input", through
left-key[ ]/right-key[ ]to choose NC or NO,press [ ] key to save, and enter into next zone
setting.
NC -------- indicates wired detectors are normally closed in standby status, after alarm open an output
signal to the host.
NO -------- indicates wired detectors are normally open in standby status,after alarm close an output
signal to the host.
7.10. Set Relay Working Method
Settings 12-10
Switch Set
Activate ACCES
History
Settings 2-1
Switch Set
The First
NO Yes
Settings 2-2
Switch Set
The Second
NO Yes
The system support two channels relay output, when you select Yes, the corresponding relay will work with
the alarm linkage output. Choose NO only through SMS or remote telephone control relay to closed or
disconnected. (Please refer to Remote Control chapter for details)
Note: This feature requires an external relay expansion modules can be achieved (no purchase an external
relay expansion modules, customers can not use this feature)
7.11. How to Add or Cancel the Wireless Accessories
①.Learn or Cancel the Wireless Detectors.
a. Learn(Pair) the wireless detectors
The system support 40 wireless defense zones.
When you need to add more wireless detectors,please enter into the system setting first. And the ready to
be added detectors can not be empty (without coding),or all coded as high or all coded as low. To avoid any
interference, the host have shield these special codes.
If the detector’s code repeat with the host exist code, the host will report it have repeated with which
detector, and automatically jumper to the same code detector area.
Learn (Pair) as follows:
Settings 12-11
Switch Set
Activate ACCES
History
Settings 3-1
Program Sensor
Zone Number
NO(01-40):01
Settings 3-1
Program Sensor
Activate Sensor
Delete Sensor
Settings 3-1
Program Sensor
Trigger Sensor
00000000000000
Settings 3-1
Program Sensor
Trigger Again
3120001210201
Settings 3-1
Program Sensor
Trigger Again
Learn Success
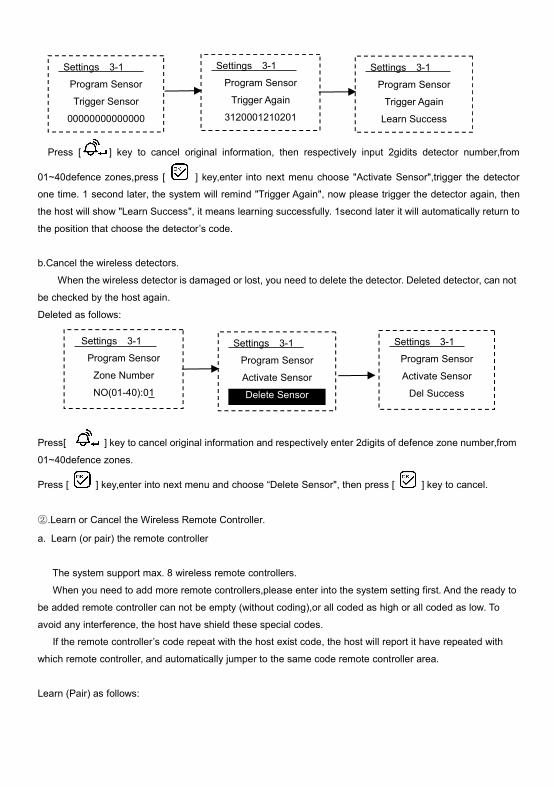
Press [ ] key to cancel original information, then respectively input 2gidits detector number,from
01~40defence zones,press [ ] key,enter into next menu choose "Activate Sensor",trigger the detector
one time. 1 second later, the system will remind "Trigger Again", now please trigger the detector again, then
the host will show "Learn Success", it means learning successfully. 1second later it will automatically return to
the position that choose the detector’s code.
b.Cancel the wireless detectors.
When the wireless detector is damaged or lost, you need to delete the detector. Deleted detector, can not
be checked by the host again.
Deleted as follows:
Press[ ] key to cancel original information and respectively enter 2digits of defence zone number,from
01~40defence zones.
Press [ ] key,enter into next menu and choose “Delete Sensor", then press [ ] key to cancel.
②.Learn or Cancel the Wireless Remote Controller.
a. Learn (or pair) the remote controller
The system support max. 8 wireless remote controllers.
When you need to add more remote controllers,please enter into the system setting first. And the ready to
be added remote controller can not be empty (without coding),or all coded as high or all coded as low. To
avoid any interference, the host have shield these special codes.
If the remote controller’s code repeat with the host exist code, the host will report it have repeated with
which remote controller, and automatically jumper to the same code remote controller area.
Learn (Pair) as follows:
Settings 3-1
Program Sensor
Zone Number
NO(01-40):01
Settings 3-1
Program Sensor
Activate Sensor
Delete Sensor
Settings 3-1
Program Sensor
Activate Sensor
Del Success

Settings 12-11
Switch Set
Activate ACCES
History
Settings 3-1
Program Sensor
Zone Number
NO(01-40):01
Settings 3-2
Activate Remote
Remote Number
NO(01-08):01
Choose "Activate ACCES",press [ ] key,enter into 3-1 Program Sensor menu, press down-key[ ]
enter into 3-2 Activate Remote menu.Press[ ]key to cancel original information,then respectively input
2gidits remote controller number,from 01~08defence zones,press [ ] key,enter into next menu.
Settings 3-2
Activate Remote
Activate Remote
Delete Remote
Settings 3-2
Activate Remote
Trigger Sensor
000000000000000
Settings 3-2
Activate Remote
Trigger Again
32101210212211
Settings 3-2
Activate Remote
Trigger Again
Learn Success
Choose "Activate Sensor", trigger the remote controller one time. 1 second later, the system will remind
"Trigger Again", now please trigger the remote controller again, then the host will show "Learn Success", it
means learning successfully. 1second later it will automatically return to the position that choose the remote
controller’s code.
b. Cancel the remote controller
When the remote controller is damaged or lost, you need to delete the remote controller. Deleted remote
controller, can not be checked by the host again.
Deleted as follows:
Press [ ] key to cancel original information and respectively enter 2digits of remote controller
number,from 01~08defence zones.
Press [ ] key,enter into next menu and choose “Delete Remote", then press [ ] key to cancel.
③. Set Wireless Siren Control Code.
Settings 3-2
Activate Remote
Remote Number
NO(01-08):01
Settings 3-2
Activate Remote
Activate Remote
Delete Remote
Settings 3-2
Activate Remote
Activate Remote
Del Success
Settings 3-1
Program Sensor
Zone Number
NO(01-40):01
Settings 12-11
Switch Set
Activate ACCES
History
Settings 3-2
Activate Remote
Remote Number
NO(01-08):01
Settings 3-3
Wireless
Siren Code
Settings 3-3
Wireless
Siren Code
00000000
Settings 3-3
Wireless
Siren Code
Settings 3-3
Wireless
Siren Code
Settings 3-3
Wireless
Siren Code
21201201
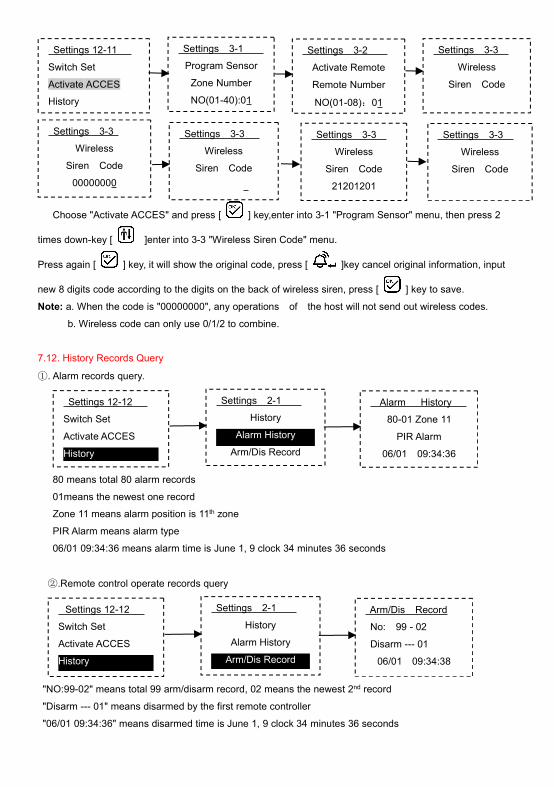
Choose "Activate ACCES" and press [ ] key,enter into 3-1 "Program Sensor" menu, then press 2
times down-key [ ]enter into 3-3 "Wireless Siren Code" menu.
Press again [ ] key, it will show the original code, press [ ]key cancel original information, input
new 8 digits code according to the digits on the back of wireless siren, press [ ] key to save.
Note: a. When the code is "00000000", any operations of the host will not send out wireless codes.
b. Wireless code can only use 0/1/2 to combine.
7.12. History Records Query
①. Alarm records query.
Settings 12-12
Switch Set
Activate ACCES
History
Settings 2-1
History
Alarm History
Arm/Dis Record
Alarm History
80-01 Zone 11
PIR Alarm
06/01 09:34:36
80 means total 80 alarm records
01means the newest one record
Zone 11 means alarm position is 11th zone
PIR Alarm means alarm type
06/01 09:34:36 means alarm time is June 1, 9 clock 34 minutes 36 seconds
②.Remote control operate records query
Settings 12-12
Switch Set
Activate ACCES
History
Settings 2-1
History
Alarm History
Arm/Dis Record
Arm/Dis Record
No: 99 - 02
Disarm --- 01
06/01 09:34:38
"NO:99-02" means total 99 arm/disarm record, 02 means the newest 2nd record
"Disarm --- 01" means disarmed by the first remote controller
"06/01 09:34:36" means disarmed time is June 1, 9 clock 34 minutes 36 seconds

Note: Above program operations finished,please press [ ] key to exit the programming status. If not
any operation, 30seconds later the host will automatically exit.
8 System Operations
8.1 System DisarmThe system disarm is to let the unit not in the status of alert.
A. Normal disarm after armed;
B. In order to stop the host making alarm. After disarmed, the Normal Zones and Home Zones will not work
except the 24-hour Standoff zone and the Doorbell Zone.
You can set disarm as follow:
①.disarm by the host keyboard
Press “ ” key on the host, the LCD screen will ask “Input Password”,then input 6 digits control
password,press “OK” key,the host will prompt “System Disarmed”and the LCD screen show “System
Disarmed”, it means Disarmed successfully.
②.disarm by remote controller
Press once[ ]key on the remote controller, the host will prompt“System Disarmed”and the LCD
screen show “System Disarmed”, it means Disarmed successfully.
③.disarm by SMS(Please refer to Remote Control Part)
④.disarm by telephone(Please refer to Remote Control Part)
8.2. System Away Arm
System away arm means that the host be armed wholly: when there is no person at home, it is required to
detect all the armed range with all the detectors on. When any detection source (such as intruder of thief, fire
or gas leakage) trigger the detectors, the system will make alarm immediately.
You can set away arm as follow:
①.Arm by the host keyboard
Press[ ]key on the host, the host will enter into delay status,and sound one “Hua” every 1 second,
after the delay close,the host prompt“System Armed”,and the LCD screen show"System Armed", it means
away armed successfully.
②.Arm by remote controller
Press once[ ]key on the remote controller, the host will prompt“System Armed”and the LCD screen
show “System Armed”, it means away armed successfully.
③.Arm by SMS(Please refer to Remote Control Part)
④.Arm by telephone(Please refer to Remote Control Part)
8.3. System At Home Arm

“At Home Arm” means the host be armed partly: when there is someone at home, for safety reason, need to
enable some of the detectors (such as door, window, balcony or perimeter etc.) and disable the others.
You can set at home arm as follow:
①.Arm by the host keyboard
Press[ ]key on the host, the host will enter into delay status,and sound one “Hua” every 1 second,
after the delay close,the host prompt“System Armed”,and the LCD screen show"Home Armed",it means at
home armed successfully.
②.Arm by remote controller
Press once[ ]key on the remote controller, the host will prompt“Home Armed”and the LCD screen show
“Home Armed”, it means at home armed successfully.
8.4. Answer Alarm
Once the host makes alarm, the siren shall sound and send SMS or dial the preset phone numbers
automatically to make voice alarm(SMS first, calling second). If nobody pick up the phone, the host shall turn
to dial the left phones automatically until dialing all the preset phones three times circularly.
If someone pick up the phone, he/she can hear the alarm voice message first. At that time, press the keys on
the phone (or mobile phone) to operate various functions: After operations finished, the host will not call other
phone numbers again.
Hang up directly: Just the same as nobody pick up the phone calling, the host shall dial all the preset phones
three times circularly.
Press [1] key: After operate successfully, the user will hear “System Armed” voice, the host is away armed
and stop to alarm.
Press [2] key: After operate successfully, the user will hear “System Disarmed” voice, the host disarmed and
stop to alarm.the main unit shall stop alarm, and disarm without dialing again.
Press [3] key: The host close the siren and listen the site for 30s. If you want to listen more time,press[3] to
continue . Identify whether there is abnormal sound at home or any thief have intruder in.
Press [4] key: Enable the function of intercom on site for 30s.Press [5] key: After operate successfully, you will hear one sound of water droplet, to open the first relay
control.
Press [6] key: After operate successfully, you will hear one sound of water droplet, to close the first relay
control.
Press [7] key: After operate successfully, you will hear one sound of water droplet, to open the second relay
control.
Press [8] key: After operate successfully, you will hear one sound of water droplet, to close the second relay
control.
Press [9] key: After operate successfully, you will hear the pre-recorded voice message.

Press [*] key: After operate successfully, the siren will sound.
Press [#] key: After operate successfully, the host hang up.
8.5. Remote Control in Distance
① Telephone Control.
By phone (mobile phone) call the SIM card phone number inside the host, you will hear "Please enter
password", enter the correct password (control password 888888, when you enter a digit you will hear one
water droplet sound to confirm this operation means successfully), then the host continue to prompt "Press 1
to Arm; press 2 to Disarm; press 3 to Monitor; press 4 to Talk back". If incorrect password is entered, you will
hear "Input error, please re-enter" the voice prompt; if entered incorrectly three times, the host directly hang
up.
After enter into remote control,press the phone keys to operate (which is the same as pick up the alarm
phone calling).
②.SMS control
a. Arm
Send SMS “control password + arm” to the host, if successful,the host will reply:“0000, system
armed,Host Add:No.68 Rongshu Road,Baoan District,Shenzhen,01/06/2013 15:37:00”.
b.Disarm
Send SMS “control password + disarm” to the host, if successful,the host will reply:“0000, system
disarmed,Host Add:No.68 Rongshu Road,Baoan District,Shenzhen,01/06/2013 15:37:00”.
c.Open the first relay switch
Send SMS “control password + switch1open” to the host, if successful,the host will reply:“0000,Open
First Switch Success”.
d.Close the first relay switch
Send SMS “control password + switch1close” to the host, if successful,the host will reply:“0000,Close
First Switch Success”.
e.Open the second relay switch
Send SMS “control password + switch2open” to the host, if successful,the host will reply:“0000,Open
Second Switch Success”.
f.Close the second relay switch
Send SMS “control password + switch2close” to the host, if successful,the host will reply:“0000,Close
Second Switch Success”.
g. Check the host status
Send SMS “control password + check” to the host, if successful,the host will reply:“0000,system armed,
signal:30,Host Add:No.68 Rongshu Road,Baoan District,Shenzhen,01/06/2013 15:37:00”
h.Check operation command
If forget the operation command, the user can send“control password+cx”to the host to check the operation
command.After the host receive this SMS, it will reply SMS:

“Control instruction:
System Armed:******arm
System Disarmed:******disarm
Inquires the system state:******check
Open the first group switch:******s1open
Close the first group switch:******s1close
Open the second group switch:******s2open
Open the second group switch:******s2close
“******” on behalf of your password”
Note: (1) All commands are in lowercase letters.
(2) If the host do not reply to messages, the operation is not successful, please check whether the
password or command error. If the operation is successful, do not reply, please check the SIM card whether
there is sufficient balance.
8.6 Emergency Help
There are some accidents happening at home, such as old people or children get sick, who need first-aid; the
fire breaks out at home, or ruffians invade into house to rob and so on, emergency help is desired. At that
time, just press[ ]key on the control unit / [ ] key on the remote controller or the wireless emergency
key, the alarm system shall make alarm via dialing the preset phones automatically.
Remote controller: press [ ] key on the remote controller once.
The control unit: press[ ]emergency key on the keyboard of the control unit
8.7 System Self-checking
Although being used every day, the system shall be maintained and inspected periodically, to ensure its
stability, reliability and security. Normally, the control unit shall be inspected wholly every three month, and the
detectors shall be inspected every one month, at least once every three months.
Control Unit Inspection:
1. Whether the unit can be armed/ disarmed normally.
2. Whether the unit can dial to make alarm normally.
3. Whether the unit can receive the signal of the detector, and whether the backup battery is normal.
Detector Inspection:
1. Trigger the detector by hand to check whether it can make alarm normally.
2. Inspect all the batteries of the detectors to check whether they are under voltage.
3. Test the transmission function of the wireless detector to check whether it can communicate with the
control unit.
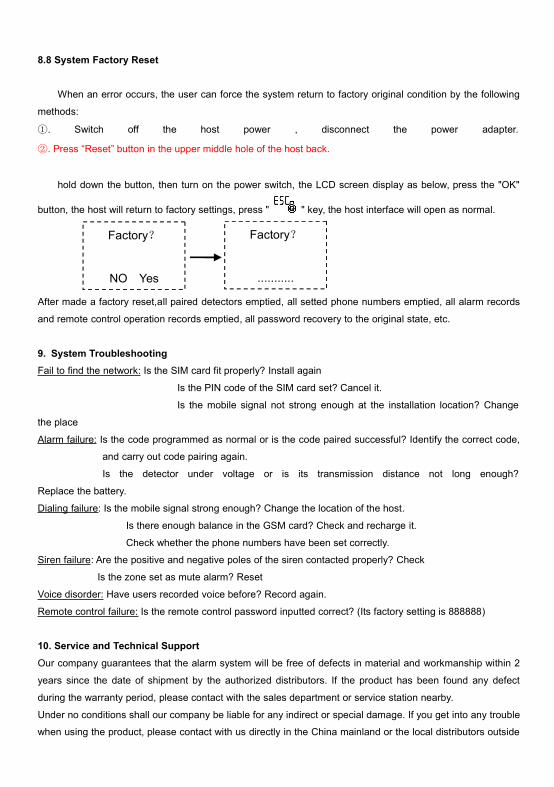
8.8 System Factory Reset
When an error occurs, the user can force the system return to factory original condition by the following
methods:
①. Switch off the host power , disconnect the power adapter.
②. Press “Reset” button in the upper middle hole of the host back.
hold down the button, then turn on the power switch, the LCD screen display as below, press the "OK"
button, the host will return to factory settings, press " " key, the host interface will open as normal.
Factory?
...........
Factory?
NO Yes
After made a factory reset,all paired detectors emptied, all setted phone numbers emptied, all alarm records
and remote control operation records emptied, all password recovery to the original state, etc.
9. System TroubleshootingFail to find the network: Is the SIM card fit properly? Install again
Is the PIN code of the SIM card set? Cancel it.
Is the mobile signal not strong enough at the installation location? Change
the place
Alarm failure: Is the code programmed as normal or is the code paired successful? Identify the correct code,
and carry out code pairing again.
Is the detector under voltage or is its transmission distance not long enough?
Replace the battery.
Dialing failure: Is the mobile signal strong enough? Change the location of the host.
Is there enough balance in the GSM card? Check and recharge it.
Check whether the phone numbers have been set correctly.
Siren failure: Are the positive and negative poles of the siren contacted properly? Check
Is the zone set as mute alarm? Reset
Voice disorder: Have users recorded voice before? Record again.
Remote control failure: Is the remote control password inputted correct? (Its factory setting is 888888)
10. Service and Technical Support
Our company guarantees that the alarm system will be free of defects in material and workmanship within 2
years since the date of shipment by the authorized distributors. If the product has been found any defect
during the warranty period, please contact with the sales department or service station nearby.
Under no conditions shall our company be liable for any indirect or special damage. If you get into any trouble
when using the product, please contact with us directly in the China mainland or the local distributors outside
PRC.
You can visit our website to get the address of our service centers
Thanks for your support.
11. Appendix:
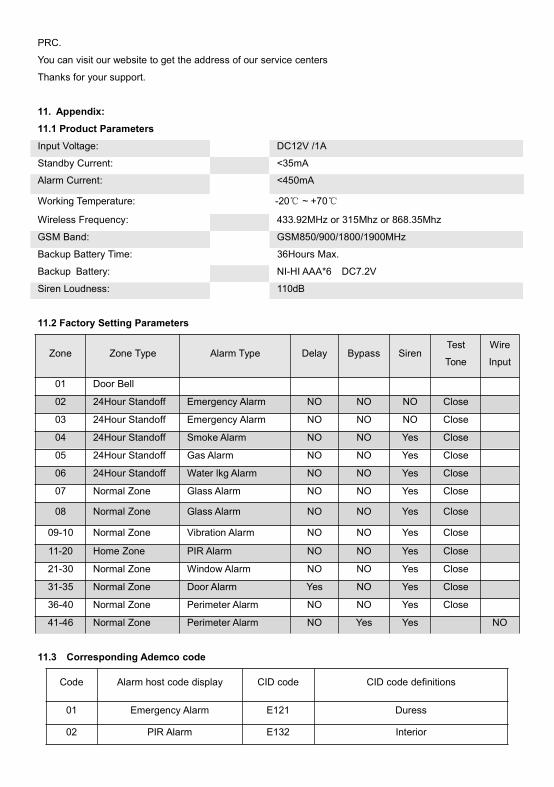
11.1 Product Parameters
Input Voltage: DC12V /1A
Standby Current: <35mA
Alarm Current: <450mA
Working Temperature: -20℃ ~ +70℃
Wireless Frequency: 433.92MHz or 315Mhz or 868.35Mhz
GSM Band: GSM850/900/1800/1900MHz
Backup Battery Time: 36Hours Max.
Backup Battery: NI-HI AAA*6 DC7.2V
Siren Loudness: 110dB
11.2 Factory Setting Parameters
Zone Zone Type Alarm Type Delay Bypass SirenTest
Tone
Wire
Input
01 Door Bell
02 24Hour Standoff Emergency Alarm NO NO NO Close
03 24Hour Standoff Emergency Alarm NO NO NO Close
04 24Hour Standoff Smoke Alarm NO NO Yes Close
05 24Hour Standoff Gas Alarm NO NO Yes Close
06 24Hour Standoff Water lkg Alarm NO NO Yes Close
07 Normal Zone Glass Alarm NO NO Yes Close
08 Normal Zone Glass Alarm NO NO Yes Close
09-10 Normal Zone Vibration Alarm NO NO Yes Close
11-20 Home Zone PIR Alarm NO NO Yes Close
21-30 Normal Zone Window Alarm NO NO Yes Close
31-35 Normal Zone Door Alarm Yes NO Yes Close
36-40 Normal Zone Perimeter Alarm NO NO Yes Close
41-46 Normal Zone Perimeter Alarm NO Yes Yes NO
11.3 Corresponding Ademco code
Code Alarm host code display CID code CID code definitions
01 Emergency Alarm E121 Duress
02 PIR Alarm E132 Interior
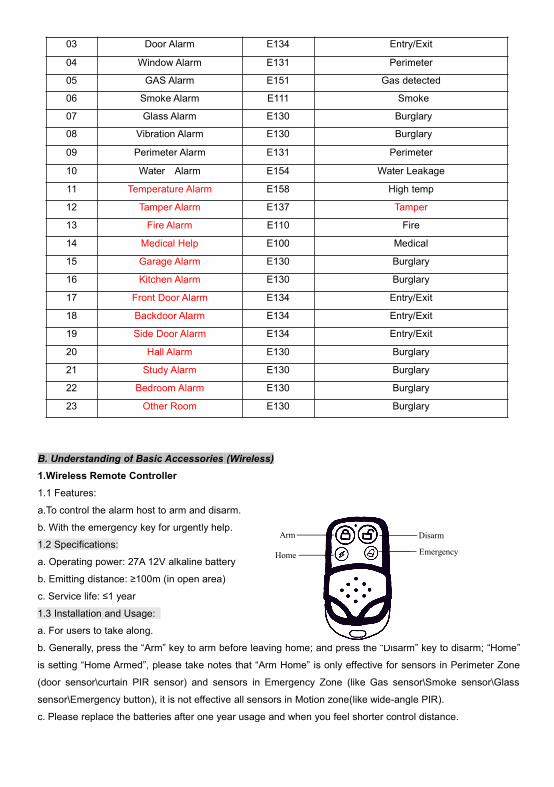
03 Door Alarm E134 Entry/Exit
04 Window Alarm E131 Perimeter
05 GAS Alarm E151 Gas detected
06 Smoke Alarm E111 Smoke
07 Glass Alarm E130 Burglary
08 Vibration Alarm E130 Burglary
09 Perimeter Alarm E131 Perimeter
10 Water Alarm E154 Water Leakage
11 Temperature Alarm E158 High temp
12 Tamper Alarm E137 Tamper
13 Fire Alarm E110 Fire
14 Medical Help E100 Medical
15 Garage Alarm E130 Burglary
16 Kitchen Alarm E130 Burglary
17 Front Door Alarm E134 Entry/Exit
18 Backdoor Alarm E134 Entry/Exit
19 Side Door Alarm E134 Entry/Exit
20 Hall Alarm E130 Burglary
21 Study Alarm E130 Burglary
22 Bedroom Alarm E130 Burglary
23 Other Room E130 Burglary
B. Understanding of Basic Accessories (Wireless)
1.Wireless Remote Controller
1.1 Features:
a.To control the alarm host to arm and disarm.
b. With the emergency key for urgently help.
1.2 Specifications:
a. Operating power: 27A 12V alkaline battery
b. Emitting distance: ≥100m (in open area)
c. Service life: ≤1 year
1.3 Installation and Usage:
a. For users to take along.
b. Generally, press the “Arm” key to arm before leaving home; and press the “Disarm” key to disarm; “Home”
is setting “Home Armed”, please take notes that “Arm Home” is only effective for sensors in Perimeter Zone
(door sensor\curtain PIR sensor) and sensors in Emergency Zone (like Gas sensor\Smoke sensor\Glass
sensor\Emergency button), it is not effective all sensors in Motion zone(like wide-angle PIR).
c. Please replace the batteries after one year usage and when you feel shorter control distance.
Emergency
Arm
Home
Disarm

Wireless Intelligent Door Sensor
Features:
a. Generally set as Perimeter zone.
b. If any door or window is opened, it will transmit the alarm signals to the alarm host.
Specifications:
a. Operating power: 23A 12V alkaline battery
b. Frequency: 433MHZ
c. Emitting distance: ≥100m (in open area)
d. Service life: ≤1 year
e. Alarm Distance: <2cm
Installation and Usage
a. Fix the part of magnet onto the door frame in a position of 1.6m above the ground to prevent any children
from bumping onto it
b. Fix the part of emitting onto the door frame, make sure to keep the part of magnet and part of emitting in
parallel, the space between the two parts shall be less than 10mm
c. Upon the working light flashes frequently in Green, please replace the batteries
Wireless Wide-angle PIR Motion Sensor
Features:
a. Mainly monitor and control indoor space, generally set as Motion zone.
b. When human body enters into electing area, the sensor will transmit alarm signals to the alarm host.
Specifications:
a. Operating power: 9V alkaline battery
b. Emitting distance: ≥100m (in open area)
c. Service life: ≤1 year
e. Detecting distance: 110° 10×10m
Working Light
Lens
Wall
Wall
Wall
1.Install the bracket
2.Fix the PIR by pushingIt downwards
3.Keep the switch”on”
Working Light
SOS button
Installation and Usage
a. Fix the bracket on suitable wall surface or in wall corner at a distance of 2~2.4m above the ground;
b. Open the sensor shell to connect the batteries well and adjust jumper line (short circuit “5S”: The sensor
will detect once every 5 seconds; short circuit “5MIN”: The sensor will detect once every 5 minutes;
Suggestion: short circuit “5S” for testing and “5MIN” for normal use;
a. Connect the sensors battery ,shut the shell.
b. Fix the sensor onto the bracket;
c. Upon the working light flashes frequently in yellow, please replace the batteries.
Wireless Indoor Siren
Features:
Work with alarm host, wireless receiving alarm signals, spot alarming with sound and flash
With power plug, usually for indoor use.
Specifications:
Operating Power: 100~240VAC
Receiving Distance:≥100 M(In open area)
Installation and Usage:
Plug the wireless siren into suitable indoor power socket
Suggestion: Generally around 1.8M from the ground
C. Understanding of Optional Accessories (Wireless)
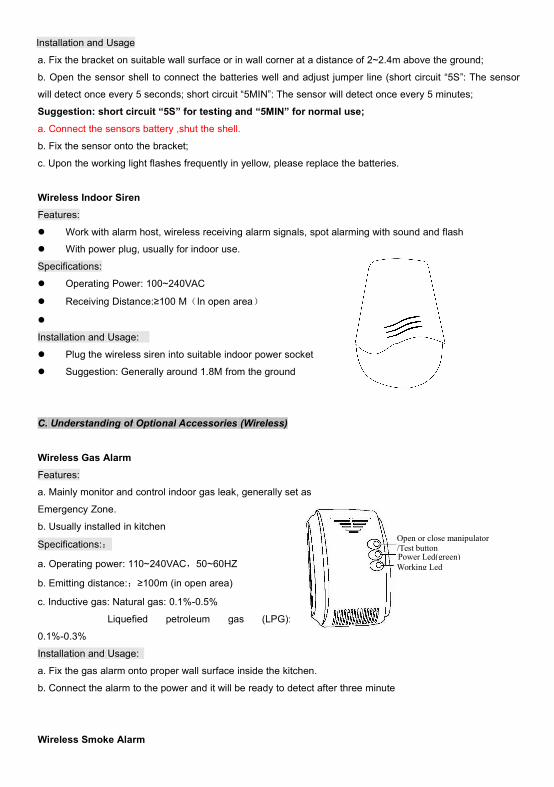
Wireless Gas Alarm
Features:
a. Mainly monitor and control indoor gas leak, generally set as
Emergency Zone.
b. Usually installed in kitchen
Specifications::
a. Operating power: 110~240VAC,50~60HZ
b. Emitting distance::≥100m (in open area)
c. Inductive gas: Natural gas: 0.1%-0.5%
Liquefied petroleum gas (LPG):
0.1%-0.3%
Installation and Usage:
a. Fix the gas alarm onto proper wall surface inside the kitchen.
b. Connect the alarm to the power and it will be ready to detect after three minute
Wireless Smoke Alarm
Open or close manipulator/Test buttonPower Led(green)Working Led

Features:
a. Mainly monitor and control indoor fire risks, generally set as
Emergency Zone.
b. Replace the batteries for every 1 or 2 year.
c. Usually installed on the ceilings of living room and aisles.
Specifications:
a. Operating power: 9V alkaline battery
b. Emitting distance: ≥100m (in open area)
c. Service life: ≤1 year
d. Monitoring range: 20m
Wireless Outdoor Siren
Features:
a. Nice, exquisite and waterproof
b. Micro-computer controlling, steady performance and high-class quality
c. Study to at most 10 piece of wireless alarm host
d. With inbuilt charging circuit and back up accumulators, automatic AC power and DC power transformation
e. Low standby power consumption, self-inspection of lower battery voltage, automatic charging Wall hanging
installation
Specifications:
a . Operating power: 110~240VAC, 50Hz
b . Static power consumption: ≤40 mA
c. Working power consumption: ≤450 mA
d .The maximum alarm sound with flash: 3 Minutes
a . Receiving distance: ≥100M(In open area)
b. Alarming volume: ≥105db
Speaker of
alarming
Fixed screw hole
Hanging hole
Flashing
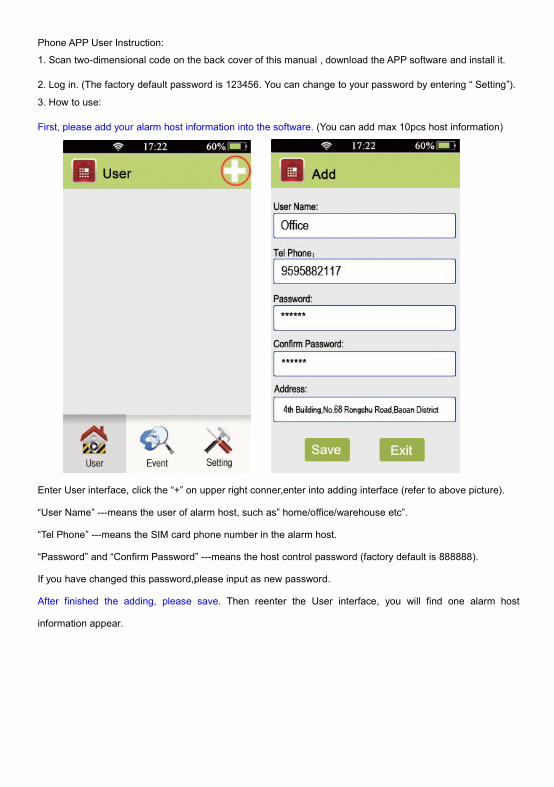
Phone APP User Instruction:
1. Scan two-dimensional code on the back cover of this manual , download the APP software and install it.
2. Log in. (The factory default password is 123456. You can change to your password by entering “ Setting”).
3. How to use:
First, please add your alarm host information into the software. (You can add max 10pcs host information)
Enter User interface, click the “+” on upper right conner,enter into adding interface (refer to above picture).
“User Name” ---means the user of alarm host, such as” home/office/warehouse etc”.
“Tel Phone” ---means the SIM card phone number in the alarm host.
“Password” and “Confirm Password” ---means the host control password (factory default is 888888).
If you have changed this password,please input as new password.
After finished the adding, please save. Then reenter the User interface, you will find one alarm host
information appear.
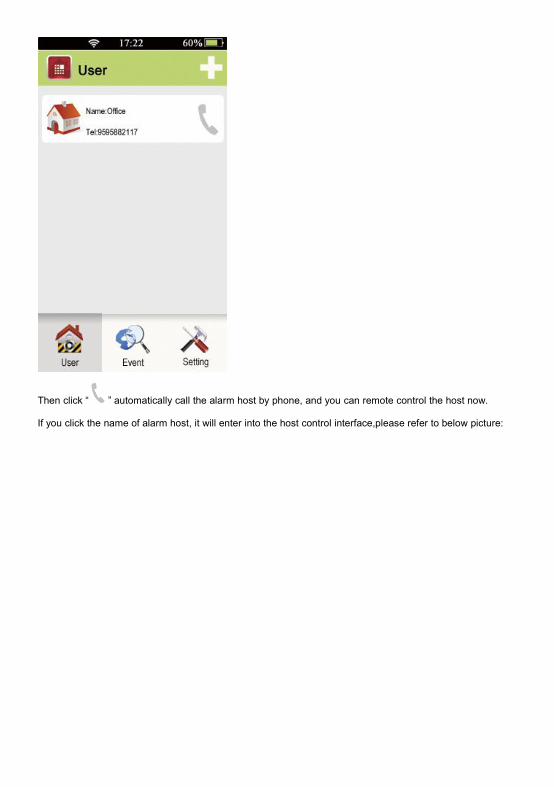
Then click “ ” automatically call the alarm host by phone, and you can remote control the host now.
If you click the name of alarm host, it will enter into the host control interface,please refer to below picture:

Now you can control devices by your heart.