ip office · 1.1 what's new ... 2.5 replying to messages ... if you have ip office phone...
TRANSCRIPT

15-604067 Issue 07b - (15 May 2010)
Embedded Voicemail Mailbox UserGuide
IP Office

Embedded Voicemail Mailbox User Guide Page 215-604067 Issue 07b (15 May 2010)IP Office
© 2010 AVAYA All Rights Reserved.
NoticesWhile reasonable efforts have been made to ensure that the information inthis document is complete and accurate at the time of printing, Avayaassumes no liability for any errors. Avaya reserves the right to make changesand corrections to the information in this document without the obligation tonotify any person or organization of such changes.
Documentation disclaimerAvaya shall not be responsible for any modifications, additions, or deletionsto the original published version of this documentation unless suchmodifications, additions, or deletions were performed by Avaya.
End User agree to indemnify and hold harmless Avaya, Avaya's agents,servants and employees against all claims, lawsuits, demands and judgmentsarising out of, or in connection with, subsequent modifications, additions ordeletions to this documentation, to the extent made by End User.
Link disclaimerAvaya is not responsible for the contents or reliability of any linked Web sitesreferenced within this site or documentation(s) provided by Avaya. Avaya isnot responsible for the accuracy of any information, statement or contentprovided on these sites and does not necessarily endorse the products,services, or information described or offered within them. Avaya does notguarantee that these links will work all the time and has no control over theavailability of the linked pages.
WarrantyAvaya provides a limited warranty on this product. Refer to your salesagreement to establish the terms of the limited warranty. In addition, Avaya’sstandard warranty language, as well as information regarding support for thisproduct, while under warranty, is available to Avaya customers and otherparties through the Avaya Support Web site: http://www.avaya.com/support.Please note that if you acquired the product from an authorized Avaya reselleroutside of the United States and Canada, the warranty is provided to you bysaid Avaya reseller and not by Avaya.
LicensesTHE SOFTWARE LICENSE TERMS AVAILABLE ON THE AVAYA WEBSITE,HTTP://SUPPORT.AVAYA.COM/LICENSEINFO/ ARE APPLICABLE TO ANYONEWHO DOWNLOADS, USES AND/OR INSTALLS AVAYA SOFTWARE,PURCHASED FROM AVAYA INC., ANY AVAYA AFFILIATE, OR AN AUTHORIZEDAVAYA RESELLER (AS APPLICABLE) UNDER A COMMERCIAL AGREEMENTWITH AVAYA OR AN AUTHORIZED AVAYA RESELLER. UNLESS OTHERWISEAGREED TO BY AVAYA IN WRITING, AVAYA DOES NOT EXTEND THISLICENSE IF THE SOFTWARE WAS OBTAINED FROM ANYONE OTHER THANAVAYA, AN AVAYA AFFILIATE OR AN AVAYA AUTHORIZED RESELLER, ANDAVAYA RESERVES THE RIGHT TO TAKE LEGAL ACTION AGAINST YOU ANDANYONE ELSE USING OR SELLING THE SOFTWARE WITHOUT A LICENSE. BYINSTALLING, DOWNLOADING OR USING THE SOFTWARE, OR AUTHORIZINGOTHERS TO DO SO, YOU, ON BEHALF OF YOURSELF AND THE ENTITY FORWHOM YOU ARE INSTALLING, DOWNLOADING OR USING THE SOFTWARE(HEREINAFTER REFERRED TO INTERCHANGEABLY AS “YOU” AND “ENDUSER”), AGREE TO THESE TERMS AND CONDITIONS AND CREATE ABINDING CONTRACT BETWEEN YOU AND AVAYA INC. OR THE APPLICABLEAVAYA AFFILIATE (“AVAYA”).
Avaya grants End User a license within the scope of the license typesdescribed below. The applicable number of licenses and units of capacity forwhich the license is granted will be one (1), unless a different number oflicenses or units of capacity is specified in the Documentation or othermaterials available to End User. "Designated Processor" means a singlestand-alone computing device. "Server" means a Designated Processor thathosts a software application to be accessed by multiple users. "Software"means the computer programs in object code, originally licensed by Avayaand ultimately utilized by End User, whether as stand-alone products orpre-installed on Hardware. "Hardware" means the standard hardwareoriginally sold by Avaya and ultimately utilized by End User.
License typesDesignated System(s) License (DS). End User may install and use each copyof the Software on only one Designated Processor, unless a different numberof Designated Processors is indicated in the Documentation or other materialsavailable to End User. Avaya may require the Designated Processor(s) to beidentified by type, serial number, feature key, location or other specificdesignation, or to be provided by End User to Avaya through electronic meansestablished by Avaya specifically for this purpose.
CopyrightExcept where expressly stated otherwise, no use should be made of materialson this site, the Documentation(s) and Product(s) provided by Avaya. Allcontent on this site, the documentation(s) and the product(s) provided byAvaya including the selection, arrangement and design of the content isowned either by Avaya or its licensors and is protected by copyright and otherintellectual property laws including the sui generis rights relating to theprotection of databases. You may not modify, copy, reproduce, republish,upload, post, transmit or distribute in any way any content, in whole or inpart, including any code and software. Unauthorized reproduction,transmission, dissemination, storage, and or use without the express writtenconsent of Avaya can be a criminal, as well as a civil, offense under theapplicable law.
Third Party Components Certain software programs or portions thereof included in the Product maycontain software distributed under third party agreements ("Third PartyComponents"), which may contain terms that expand or limit rights to usecertain portions of the Product ("Third Party Terms"). Information regardingdistributed Linux OS source code (for those Products that have distributed theLinux OS source code), and identifying the copyright holders of the ThirdParty Components and the Third Party Terms that apply to them is availableon the Avaya Support Web site: http://support.avaya.com/Copyright.
Preventing toll fraud"Toll fraud" is the unauthorized use of your telecommunications system by anunauthorized party (for example, a person who is not a corporate employee,agent, subcontractor, or is not working on your company's behalf). Be awarethat there can be a risk of toll fraud associated with your system and that, iftoll fraud occurs, it can result in substantial additional charges for yourtelecommunications services.
Avaya fraud interventionIf you suspect that you are being victimized by toll fraud and you needtechnical assistance or support, call Technical Service Center Toll FraudIntervention Hotline at +1-800-643-2353 for the United States and Canada.For additional support telephone numbers, see the Avaya Support Web site:http://support.avaya.comSuspected security vulnerabilities with Avaya products should be reported toAvaya by sending mail to: [email protected].
TrademarksAvaya and Aura are trademarks of Avaya, Inc.The trademarks, logos and service marks (“Marks”) displayed in this site, thedocumentation(s) and product(s) provided by Avaya are the registered orunregistered Marks of Avaya, its affiliates, or other third parties. Users arenot permitted to use such Marks without prior written consent from Avaya orsuch third party which may own the Mark. Nothing contained in this site, thedocumentation(s) and product(s) should be construed as granting, byimplication, estoppel, or otherwise, any license or right in and to the Markswithout the express written permission of Avaya or the applicable third party.Avaya is a registered trademark of Avaya Inc. All non-Avaya trademarks arethe property of their respective owners.
Downloading documentsFor the most current versions of documentation, see the Avaya Support Website: http://www.avaya.com/support
Contact Avaya SupportAvaya provides a telephone number for you to use to report problems or toask questions about your product. The support telephone number is1-800-242-2121 in the United States. For additional support telephonenumbers, see the Avaya Web site: http://www.avaya.com/support

Embedded Voicemail Mailbox User Guide Page 315-604067 Issue 07b (15 May 2010)IP Office
Contents
ContentsEmbedded Voicemail User1.
..................................................................... 71.1 What's New
..................................................................... 81.2 Summary of Mailbox Options
Using Embedded Voicemail2...................................................................... 122.1 Accessing your Mailbox and Messages
..................................................................... 122.2 Default Mailbox Controls
..................................................................... 132.3 Listening to Your Messages
..................................................................... 142.4 Forwarding a Message
..................................................................... 142.5 Replying to Messages
..................................................................... 152.6 Voicemail Email
Changing Your Settings3...................................................................... 183.1 Changing the Mailbox Access Code
..................................................................... 193.2 Changing your Greeting
..................................................................... 193.3 Transfer Options
..................................................................... 203.4 Record Your Name
Visual Voice4................................................................................25Index


Embedded Voicemail Mailbox User Guide Page 515-604067 Issue 07b (15 May 2010)IP Office
Embedded Voicemail User
Chapter 1.


Embedded Voicemail Mailbox User Guide Page 715-604067 Issue 07b (15 May 2010)IP Office
Embedded Voicemail User: What's New
1. Embedded Voicemail User1.1 What's NewHere is a list of new features that have been added to IP Office Embedded Voicemail. Note that for existing systems, theaddition of new features that use prompts requires the prompt set of existing Embedded Voicemail installations to beupgraded. Refer to the IP Office Embedded Voicemail Installation Manual.
IP Office 5.0· Dial by Name
Use of dial by name is supported by embedded voicemail auto attendants. To be included in the names listed andreachable by callers, you must record a mailbox name .
IP Office 4.2· Forward a message or message alert to Email
You can have notification of new messages sent to your email address. The notification can be a simple alert to tellyou that you have a message or a copy of the voicemail message.
IP Office 4.0· Enhanced options when listening to messages
When a message is being played you can now skip to the next message, rewind or fast forward for approximately 5seconds.
· Forward a messageA message can be forwarded to one or many mailboxes.
· Reply to a messageIf a CLI is available you can reply to a message to either an internal or external number.
· Choice of transfer optionsUp to 3 breakout numbers can be set up. When callers are directed to your mailbox they can either leave amessage or choose to be transferred to one of three numbers.
· Fax TransferA fax transfer action can be set within IP Office Manager. If a transfer action has been set, on detecting a fax tonethe auto attendant will route the call to the fax transfer destination. For more information, see your systemadministrator.
· Visual VoiceUsers can access their mailbox using a soft key programmed for visual voice. A display menu provides the user withoptions to listen to messages, send messages, change their greetings and password. Access to visual voice isgranted by the system administrator using IP Office Manager. The visual voice feature is not available on alltelephones. Please refer to the telephone guide for more information.
20
15
13
14
14
19
24

Embedded Voicemail Mailbox User Guide Page 815-604067 Issue 07b (15 May 2010)IP Office
1.2 Summary of Mailbox OptionsHere is a summary of the options that are available when you have logged into your mailbox from your own extension orremotely.
· Unless you choose to save a message, it is automatically deleted 24 hours after it is played. To save a message while itis playing, press 5.

Embedded Voicemail Mailbox User Guide Page 915-604067 Issue 07b (15 May 2010)IP Office
Embedded Voicemail User: Summary of Mailbox Options


Embedded Voicemail Mailbox User Guide Page 1115-604067 Issue 07b (15 May 2010)IP Office
Using Embedded Voicemail
Chapter 2.

Embedded Voicemail Mailbox User Guide Page 1215-604067 Issue 07b (15 May 2010)IP Office
2. Using Embedded Voicemail2.1 Accessing your Mailbox and MessagesThe method below is the default method available to all users to access their own mailbox. If you have IP Office PhoneManager or an Avaya digital telephone you may be able to access your mailbox using them. Refer to the user guide forPhone Manager or the telephone.
Your system administrator can also configure other methods of access including access to your mailbox from other phonesand access to hunt group mailboxes.
To log in to your mailbox:
1.Dial *17 from your own extension.
2.If your mailbox has an access code set, you will be prompted to enter it. Enter you access code.
3.You will hear a prompt telling you how many messages you have. The voicemail system will start playing your newmessages.
Once you have accessed your mailbox, you can use the following controls:
Press Action
1 Play old messages.
2 Play saved messages.
3 Edit mailbox greeting. For more information, see Changing your Greeting .
4 Delete current message.
5 Save current message.
*04 Change mailbox access code. For more information, see Changing the Mailbox AccessCode .
*05 Record your name .
*4 Hear Help Prompts.
8 Exit.
IMPORTANT Once a new message has been listened to, it is marked as 'old' and is automatically deleted after 24 hours. If you do notwant the message deleted, you must mark it as 'saved' by pressing 5 whilst listening to the message.
2.2 Default Mailbox ControlsYou can use the following IP Office dialing short codes to control your mailbox. These are default system features whichcan be changed or altered by your system administrator.
For users with Avaya telephones that include programmable buttons, your system administrator can also assign thesefunctions to the buttons.
· *18: Turn Voicemail OnCauses calls to go to voicemail when you are busy or do not answer. If the extension to which you forward yourcalls does not answer calls will also go to voicemail.
· *19: Turn Voicemail OffSwitches the above feature off.
· *48: Voicemail Ringback OnIf ringback is on, when you have new messages, the voicemail system will ring you following the completion of anycall.
· *49: Voicemail Ringback OffSwitches the above feature off.
19
18
20

Embedded Voicemail Mailbox User Guide Page 1315-604067 Issue 07b (15 May 2010)IP Office
Using Embedded Voicemail: Default Mailbox Controls
2.3 Listening to Your MessagesWhen you log in to your mailbox you are automatically played any new messages. After a message has been played it ismarked as being an old message. Old messages are automatically deleted after 24 hours.
When you listen to any of your messages you have the following options:
· Press 4 to delete the message.
· Press 5 to save the message.
· Press 6 to forward the message. See Forwarding a Message .
· Press 7 to repeat the last message.
· Press 8 to exit voicemail.
· Press 9 to skip to the next message.
· Press * to rewind the message a few seconds.
· Press # to advance the message a few seconds.
· Press ** to return the call. See Replying to Messages .
To listen to an old message
1.Log in to your mailbox.
2.Press 1 to listen to your old messages. You can save the message by pressing 5.
To save a message
1.Press 5 when listening to a new or old message.
14
14

Embedded Voicemail Mailbox User Guide Page 1415-604067 Issue 07b (15 May 2010)IP Office
2.4 Forwarding a MessageYou can forward a message to a different mailbox or to several mailboxes at the same time. If you forward a message youcan add a comment to the start of the message.
To forward a message:
1.When you are listening to a message, press 6.
2.(Optional) Press 3 to add a comment at the start of the message. You are prompted to record your comment afterthe tone. Record your comment and press # to finish recording. You are prompted for the forwarding addresses.See step 4.
3.Press 2 to forward the message.
4.Enter the extension number to forward the message to and press #.
· If you want to send the message to more than one mailbox enter each mailbox extension number separated bya #.
5.Press # to finish addressing and forward the message.
2.5 Replying to MessagesYou can call the person who left a message in your mailbox. Both internal and external callers can be called back. A callcan only be placed if the CLI was available when the message was left.
To reply to a voice message
1.While you listen to a message, press **. If a CLI was received when the message was left, a call will be placed onthat CLI.

Embedded Voicemail Mailbox User Guide Page 1515-604067 Issue 07b (15 May 2010)IP Office
Using Embedded Voicemail: Replying to Messages
2.6 Voicemail EmailFor IP Office 4.2+ (excluding Small Office Edition), Embedded Voicemail supports Voicemail Email functions. You can havenotification of new messages sent to your email address. The notification can be a simple alert to tell you that you have amessage or a copy of the voicemail message if required.
· Email Address/Enabling Voicemail Email FunctionsBefore you can use the email options, your system administrator must enter your email address into the IP Officeconfiguration. Otherwise you hear the message 'Email is not enabled on this mailbox' whenever you try to use anemail option. Your system administrator can tell you whether your voicemail system has been configured to useemail.
To switch on email notificationYou can set up your mailbox so that any messages received in future are forwarded to your email address. The messagesare not stored in your voicemail mailbox.
1.Log in to your mailbox.
2.Select the required type of email notification.
· For a email alert press *02.
· To have the message forwarded to your email, press *01.
To forward a message to emailIf you are listening to a message you can send the message to your email either whilst listening to it or immediately afterit has been played.
1.During or immediately after playing a message, press 6.
2.Press 1. The message is forwarded to your email address.
To switch off email notificationIf you have chosen any of the email notification options, you can switch them off from your telephone.
1.Log into your mailbox.
2.Press *03. You hear a confirmation message to tell you that the option is now turned off.

Embedded Voicemail Mailbox User Guide Page 1615-604067 Issue 07b (15 May 2010)IP Office

Embedded Voicemail Mailbox User Guide Page 1715-604067 Issue 07b (15 May 2010)IP Office
Changing Your Settings
Chapter 3.

Embedded Voicemail Mailbox User Guide Page 1815-604067 Issue 07b (15 May 2010)IP Office
3. Changing Your Settings3.1 Changing the Mailbox Access CodeYou can set an access code for your mailbox. This access code will be requested whenever you access the mailbox tocollect messages. When set the access code must be between 4 and 15 digits in length.
Setting and changing a mailbox access code can be done by your system administrator. You can also do it yourselfthrough the mailbox.
When changing your access code:
· Enter least four digits. If you enter less than four numbers you will be prompted to enter a longer code.
· Do not set an obvious code, for example:
· Do not match your extension number.
· Do not use a sequence of digits, for example 1234.
· Do not use the same repeated digit, for example 1111.
To change your access code
1.Log in to your mailbox.
· If your mailbox already has an access code set, you will be prompted to enter it. Enter your access code.
2.Press *04 to change your access code.
3.Enter your current access code and press #. If you have no current access code just press #.
4.Enter your new access code followed by #.
5.Re-enter your new access code followed by #.The access code will now be changed.
· The system will prompt you if the codes do not match or is not acceptable. It will also confirm the change ofaccess code if successful.
To remove an existing access code
1.Log in to your mailbox.
2.Press *04 to change your access code.
3.Enter your current access code and press #.
4.When you are asked to enter your new access code, press #.
5.When you are asked to re-enter your access code, press #. Your access code will have been removed.
Embedded Voicemail Mailbox User Guide Page 1915-604067 Issue 07b (15 May 2010)IP Office
Changing Your Settings: Changing the Mailbox Access Code
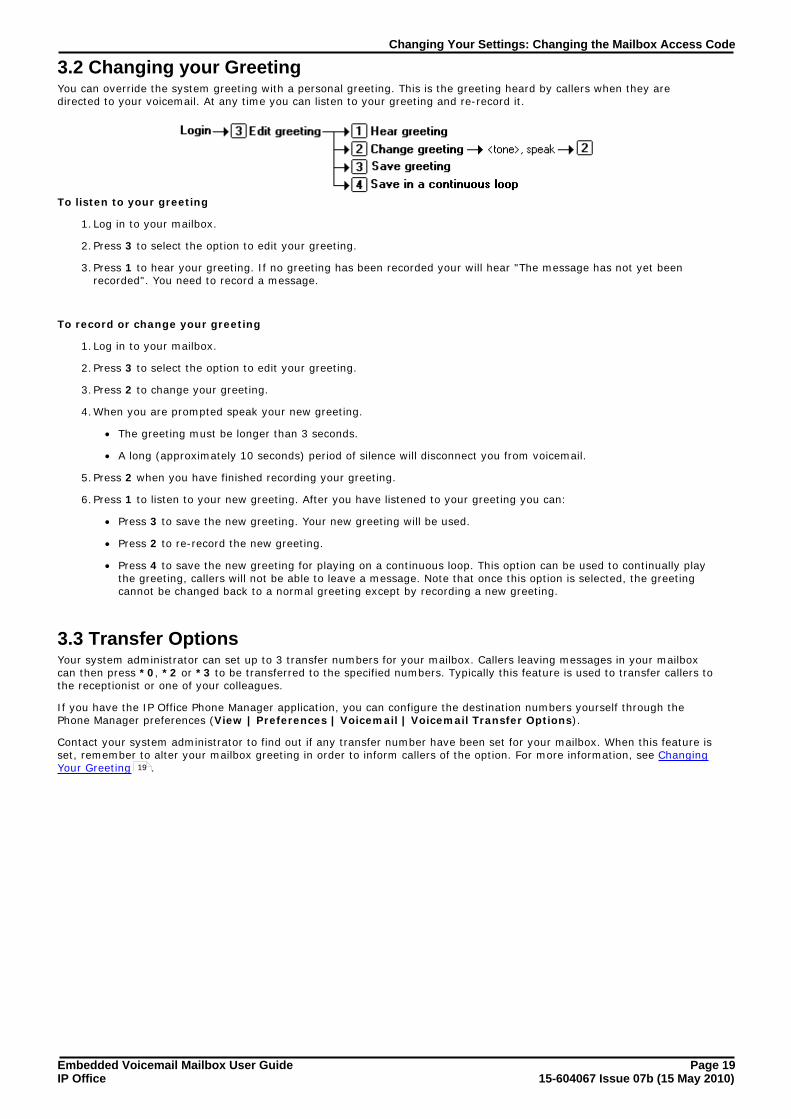
3.2 Changing your GreetingYou can override the system greeting with a personal greeting. This is the greeting heard by callers when they aredirected to your voicemail. At any time you can listen to your greeting and re-record it.
To listen to your greeting
1.Log in to your mailbox.
2.Press 3 to select the option to edit your greeting.
3.Press 1 to hear your greeting. If no greeting has been recorded your will hear "The message has not yet beenrecorded". You need to record a message.
To record or change your greeting
1.Log in to your mailbox.
2.Press 3 to select the option to edit your greeting.
3.Press 2 to change your greeting.
4.When you are prompted speak your new greeting.
· The greeting must be longer than 3 seconds.
· A long (approximately 10 seconds) period of silence will disconnect you from voicemail.
5.Press 2 when you have finished recording your greeting.
6.Press 1 to listen to your new greeting. After you have listened to your greeting you can:
· Press 3 to save the new greeting. Your new greeting will be used.
· Press 2 to re-record the new greeting.
· Press 4 to save the new greeting for playing on a continuous loop. This option can be used to continually playthe greeting, callers will not be able to leave a message. Note that once this option is selected, the greetingcannot be changed back to a normal greeting except by recording a new greeting.
3.3 Transfer OptionsYour system administrator can set up to 3 transfer numbers for your mailbox. Callers leaving messages in your mailboxcan then press *0, *2 or *3 to be transferred to the specified numbers. Typically this feature is used to transfer callers tothe receptionist or one of your colleagues.
If you have the IP Office Phone Manager application, you can configure the destination numbers yourself through thePhone Manager preferences (View | Preferences | Voicemail | Voicemail Transfer Options).
Contact your system administrator to find out if any transfer number have been set for your mailbox. When this feature isset, remember to alter your mailbox greeting in order to inform callers of the option. For more information, see ChangingYour Greeting .19

Embedded Voicemail Mailbox User Guide Page 2015-604067 Issue 07b (15 May 2010)IP Office
3.4 Record Your NameYou can record your name if required. Your name recording is then used for the Dial by Name feature supported byEmbedded Voicemail auto attendants that let callers enter the name of the user they require.
To record or change your greeting
1.Log in to your mailbox.
2.Press *05 to select the option to record your name.
3.Press 1 to hear your current name recording.
4.Press 2 to record your name. .
5.When you are prompted speak your name. The maximum length that can be recorded is 5 seconds.
6.Press 2 when you have finished recording your name.
7.Press 1 to listen to your new name recording. After you have listened you can:
· Press 3 to save the new recording.
· Press 2 to record the new name again.

Embedded Voicemail Mailbox User Guide Page 2115-604067 Issue 07b (15 May 2010)IP Office
Changing Your Settings: Record Your Name


Embedded Voicemail Mailbox User Guide Page 2315-604067 Issue 07b (15 May 2010)IP Office
Visual Voice
Chapter 4.

Embedded Voicemail Mailbox User Guide Page 2415-604067 Issue 07b (15 May 2010)IP Office
4. Visual VoiceVisual Voice allows you to access your voicemail mailbox using the display menu of your phone rather than followingspoken mailbox prompts.
To use Visual Voice, your system maintainer must either add a Visual Voice button to your phone or set the MESSAGESbutton to use Visual Voice.
· Visual Voice is supported on most Avaya desk phones supported by IP Office subject to a suitable display. On otherphones, the button can be used for mailbox access using voice prompts and for direct to voicemail transfer during acall.
· On T3 phones, the Visual Voice button goes direct to the Listen function of Visual Voice. To access the full set ofVisual Voice functions use Menu > Settings > Voicemail Settings.
Visual Voice ControlsThe arrangement of options on the screen will vary depending on the phone type and display size.
· Listen Access your own voicemail mailbox. When pressed the screen will show the number of New, Old and Savedmessages. Select one of those options to start playback of messages in that category. Use the options below
· ListenPlay the message.
· PausePause the message playback.
· DeleteDelete the message.
· SaveMark the message as a saved message.
· Call Call the message sender if a caller ID is available.
· CopyCopy the message to another mailbox. When pressed as number ofadditional options are displayed.
· Message Record and send a voicemail message to another mailbox or mailboxes.
· Greeting Change the main greeting used for callers to your mailbox. If no greeting has been recorded then the defaultsystem mailbox greeting is used.
· Email This option is only shown if you have been configured with an email address for voicemail email usage in the IPOffice configuration. This control allows you to see and change the current voicemail email mode being used fornew messages received by your voicemail mailbox. Use Change to change the selected mode. Press Done whenthe required mode is displayed. Possible modes are:
· Password Change the voicemail mailbox password. To do this requires entry of the existing password.
· Voicemail Switch voicemail coverage on/off.
Using the Visual Voice Button for Voicemail TransferIf pressed when you have a call is connected, the MESSAGE button allows entry of an extension number for direct tovoicemail transfer of the connected call.

Embedded Voicemail Mailbox User Guide Page 2515-604067 Issue 07b (15 May 2010)IP Office
Index
IndexCChanging
Mailbox Access Code 18Your Greeting Message 19
DDefault Mailbox Access 12
Delete Message 13
Eemail alert 15email notification 15
FFast Forward message 13
Forwarding 14
GGreeting Message 19
HHear Help Prompts 12, 19
MMailbox Access 12
Mailbox Access Code 18Mailbox Controls 12Messages 12
PPhone Manager 12
RReception Transfer 19Reply 14Rewind Message 13
Ringback 12
SSave Message 13Set
Voicemail Reception 19
Skip Message 13
TTurn Voicemail Off 12Turn Voicemail On 12
VVoicemail 12
Voicemail Reception 19
Voicemail Ringback Off 12Voicemail Ringback On 12
YYour Mailbox 12


Embedded Voicemail Mailbox User Guide Page 2715-604067 Issue 07b (15 May 2010)IP Office

Embedded Voicemail Mailbox User Guide Page 2815-604067 Issue 07b (15 May 2010)IP Office
Performance figures and data quoted in this document are typical, and must bespecifically confirmed in writing by Avaya before they become applicable to anyparticular order or contract. The company reserves the right to make alterationsor amendments to the detailed specifications at its discretion. The publication of
information in this document does not imply freedom from patent or otherprotective rights of Avaya or others.
All trademarks identified by the ® or ™ are registered trademarks or trademarks,respectively, of Avaya Inc. All other trademarks are the property of their
respective owners.
This document contains proprietary information of Avaya and is not to bedisclosed or used except in accordance with applicable agreements.
© 2010 Avaya Inc. All rights reserved.