iphone tips - the olli at uci blog
TRANSCRIPT

1
iPhone Tips and Secrets Workshop Handout Copyright © 2013 Jake Jacobs
General Topics are either:
Basics (san serif font) or tips from Jake’s iPhone Tips (serif font).
Basics
Button basics
To turn off or restart iPhone, press and hold the On/Off button for a few seconds, then drag the slider to confirm.
To turn off the screen but still receive calls, press On/Off once.
Press the Home button to return to the home screen.
To quickly switch between recently used apps, double-click the Home button and tap an app icon (multitasking bar). You can swipe right-to-left on the multitasking bar to see previously running apps.
Volume Up/Down buttons on the left side control ringer, music and phone audio volume.
The Ring/Silent switch turns off the ringer and other sounds from the speaker.
The microphone and speaker are on the bottom of the phone, so try to avoid placing fingers there.
Basics
Settings
Some apps have their settings stored here, others are set from within the app.
Settings is where all the iPhone housekeeping data is kept, all in one handy place.
Tap the Settings icon on your home screen.
The first setting is the Airplane Mode. It turns on/off your phone capabilities, cellular data, Wi-Fi and Bluetooth all at once.
If you want your phone and cellular data off but your Wi-Fi on (such as when at home, to preserve battery, or in a foreign country), tap the Wi-Fi icon and turn it back on.
Sounds is where you can set the vibrate mode, ringtones, and various alert tones, lock sound, and keyboard clicks.
Other settings: Do Not Disturb; Brightness & Wallpaper: Privacy -> Location Services; General (explore them); Auto-Lock, Passcode Lock.
Tip #88 - 3/10/2013
Organize your apps
If the dock or a page is full, you must
When you start accumulating many apps on your iPhone, after a
while you need to start organizing them. Here is a basic strategy:
1. Choose the four apps that you use the most and want to get to
most often. Place those four app icons into your dock area at the
bottom of your home screen. The dock area is always present no
matter what home screen you are located on. I have chosen
Phone, Mail, Calendar, and HanDBase as my four most used
apps.
2. Fill up the slots in your primary home screen with all the apps
that you use very frequently. On the left you see the ones that I
have chosen.
In my second home screen (not shown) I have placed the apps and
some folders that I use the next most frequently.
Ring/Silent Volume Up/Down
speaker
On/Off Sleep
mic
Home button

2
create a vacancy by moving an app icon out
before you can put a new one in.
3. In my third home screen, on the left, I have placed many apps
into various folders.
I have labeled each folder with a description of the type of apps to
be found therein.
In subsequent pages I have mixtures of folders and app icons.
Remember, if you forget where you placed an app but you
remember its name, you can always use Spotlight Search. When
you find the app, you can open it directly in Spotlight Search. It
will also show you what folder it's in.
Here's how to relocate app icons on your home screen. Hold your
finger on any app icon until they all start to jiggle. Then you can
drag the icon to a different page or into a folder or drag an icon
out of the folder. Tap the home button to stop the jiggling and
return to normal.
Tip #18 - 7/4/2012
A Better Battery Charge Display
Display the percentage of remaining battery life next to the
battery icon on the upper right corner of the iPhone screen (e.g.,
57%).
To do this, tap Settings -> General -> Usage -> Battery Usage ->
Battery Percentage -> On. A numerical percentage helps you
check the battery condition more accurately, as opposed to
suddenly being surprised by a red battery icon (20 percent).
Tip #22 - 7/18/2012
Home Screen Date Display
Did you notice that the little icon for the built-in Calendar app
shows the day of the week and today's date? Just take a look.
Tip #9 - 5/27/2012
Shortcut to Search
Home Button Escape Sequence
App
Home screen
Primary Home screen
Spotlight Search
In Spotlight Search, You can now see in
which folder each found app is located .
Swiping to the right, or tapping the home button, from your
primary home screen pulls up the Spotlight Search window,
where you can search in Contacts, apps, e-mails, Calendar entries
and media that match the word you enter.
But the Spotlight Search screen is also a shortcut to your Safari
search default and Wikipedia. The last two search items for any
search result are always "Search Web" and "Search Wikipedia,"
saving you the time it takes to open browsers or apps.
Find an app on your iPhone by name, in case you forgot where
you placed it (shows the folder, too).
In Spotlight Search, select which apps are searched and what
order they're displayed: go to Settings -> General -> Spotlight
Search. Tap each app in the list to toggle it ON or OFF. Use the
slider to the right of each app to move it up or down the list.
Tip #36 - 9/5/2012
Lock the Screen Orientation
Locking the screen in portrait orientation is great when reading in
the prone position. Simply double-click the home button, swipe
left to right on the multitasking bar and the Music controls will
show up. Then tap the orientation icon to lock or unlock.

3
Tip #37 - 9/9/2012
Summary of All Your Notifications
with one Finger Swipe
In Settings -> Notifications you can also
change the order in which the notifications
appear. To do this tap the Edit button and
then slide the little sliders on the right of
each notification item up-and-down to
change the order. Then tap Done.
The Notification Center lets you know about missed messages,
email, phone calls, Calendar events, weather, and more. New
notifications appear on top of the screen.
Swipe down from the top of the screen to see a summary of
recent notifications. Swipe from the bottom up to dismiss the
Notification Center.
Customize what apps appear in the Notification Center. Go to
Settings -> Notifications, select each app and turn ON or OFF
whether you want the app to be in the Notification Center or not.
Tip #19 - 7/8/2012
Scientific Calculator
When using the built-in Calculator app, to access scientific
functions, rotate the iPhone to landscape orientation.
You can go back and forth between the basic calculator and the
scientific calculator without reentering the intermediate value
shown on the display. So if you normally use the basic Calculator
but occasionally need a scientific function, you can switch to
scientific, execute the function, and then return to the basic
calculator to complete your calculations.
Copy the result of a calculation to paste it into another app.
Paste a number into the calculator to do a calculation on it.
Tip #65 12/16/2012
New Google Maps App
Read what David Pogue has to say in the
NY Times about the new Google Maps app
"The must-have features are all here: spoken driving directions, color-coded real-time traffic conditions, vector-based maps (smooth at any size). But the new app also offers some incredibly powerful, useful features that Apple’s app lacks.
"Street View, of course, lets you see a photograph of a place, and even “walk” down the street in any direction. Great for checking out a neighborhood before you go, scoping out the parking situation or playing “you are there” when you read a news article.
"Along with driving directions, Google Maps gives equal emphasis to walking directions and public transportation options.
"This feature is brilliantly done. Google Maps displays a clean, step-by-step timeline of your entire public transportation adventure. If you ask for a route from Westport, Conn., to the Empire State Building, the timeline says: “4:27 pm, Board New Haven train toward Grand Central Terminal.” Then it shows you the names of the actual train stops you’ll pass. Then, “5:47 pm, Grand Central. Get off and walk 2 min.” Then, “5:57 pm, 33rd St: Board the #6 Lexington Avenue Local towards Brooklyn Bridge.” And so on.”
Tip #76 1/27/2013
Running out of memory?
If a particular app is using lots of
memory and you find you are not using
that app, then delete it or delete some of
the data—pictures, videos, music,
books—to free up memory.
If you fear your iPhone is approaching the limits of its storage
capacity, head on over to Settings -> General -> Usage, and start
surveying your worst offenders. (Be patient. It may take a few
seconds to download the storage data.) Clicking on an app name
will provide a bit more detail — specifically, the footprint of the
document and data files associated with the app. You’ll also see a
button to delete the app entirely.

4
Tip #89 3/13/2013
Unstick a stuck app
Note: this will not delete the app; it
merely resets it.
If your Mail or Safari app (or any other app, for that matter) stops
working or seems unresponsive or slow, first try turning On and
Off Airplane Mode.
But if that doesn't fix the problem, then try stopping the app: Tap
the home key quickly twice and you'll see at the bottom of the
screen the four most recently used apps. Hold any one until they
all start to jiggle.
You will see a little red circle to the left of each icon with a dash
line. Identify the app you want to terminate and tap its red circle.
This will stop the app in its tracks. Tap the home button to stop
the jiggling and return to normal.
Then open the app again and verify the app now functions
properly.
Phone
Basics and Tip #29 - 8/12/2012
Phone
To answer a call while using an iPhone earphone, press the earphone center button once. Press it again to end your call.
Make a call: tap a phone number in Favorites, Recents, Contacts, an email, a text message, web page—, or almost anywhere in iPhone— to make a call.
Or open the Phone app and tap the Keypad button to dial manually. You can also listen to voice mail in the Phone app.
To silence an incoming call, press the On/Off button once (phone continues to ring for the caller).
To send a call directly to voicemail, press On/Off twice.
You can Open other apps when on a call: press Home and the app’s icon.
Tip #41 - 9/19/2012
Text Reply to Incoming Calls
You can reply to incoming calls with a preset or custom text
message or you can create a reminder. When you an incoming
call is ringing, slide up the little phone icon in the lower right
corner and choose your option.
Tip #33 - 8/26/2012
"Smart" Phone Numbers
To enter a semicolon in a phone number in
Contacts, on the telephone pad press the
+*# button on the lower left and then select
wait.
For example if the local phone number for
an international phone card is 800 555-
1234 and the international number is 011
123 456-7890 then the phone number in the
Contact phone number field would be 714
555-1234;0111234567890
In Contacts, you can put an international phone card number into
a phone number field followed by a semi-colon followed by the
international phone number to be called.
When you call this number, the iPhone will dial the local phone
number for your international phone card and stop and wait.
When the phone card service answers and you hear the prompt for
the number to be called, tap the dial button and the iPhone will to
continue to tone dial the international number. You can put in
multiple waits for access codes, or whatever.
You can also use this technique for entering log-on codes and
passwords. But be mindful of security if you sync on the iCloud.

5
Tip #41 - 9/19/2012, Tip #63 12/9/2012 & Basics
FaceTime
During a video call, tap the Camera icon to switch to the rear camera and share your surroundings.
Select someone from your Contacts and tap the FaceTime button to start a video call with another iPhone user or an iPad, iPod touch, or Mac user. Or while you’re on a voice call, tap FaceTime to begin a video call.
FaceTime is now available over cellular, not just Wi-Fi, and is
available currently only between any two of the following: iPhone
4, iPhone 4S, iPhone 5 and the new iPad and iPad Mini.
Tip #55 - 11/11/2012
Fix a Poor Phone or Wi-Fi Signal
Have you ever been in an area where you are positive that there is
signal, but you are getting nothing?
Go to Settings. Turn Airplane Mode ON to disable your cellular
data. Once it's ON, turn it OFF again. This will restart it and will
many times find your cellular signal again.
Turning OFF and ON Wi-Fi can sometimes fix a poor Wi-Fi
connection issue.
Keyboard and Editing
Basics and Tip #70 -
1/6/2013, Tip #26 - 8/1/2012
Intelligent keyboard
You can select a word by double-tapping it, and select more or less text by dragging
the grab points. Quadruple-tap to select a
paragraph (You have to tap four times
rather quickly on the same spot). Then tap
cut, copy or paste.
To copy text from web pages, email, or text messages, touch and hold to select the text, then tap Copy.
iPhone automatically corrects and suggests words as you type. So if you tap a wrong letter, just keep typing. To accept the suggested word, tap the space bar. Or tap the “x” or near it, to ignore the suggestion.
The keyboard automatically inserts apostrophes in contractions.
If you tap the space bar twice, it adds a period.
Touch and hold 123 then slide your finger to a digit or symbol. When you let go, the alpha keyboard will return.
Double-tap a word to look it up in the dictionary.
Cut, copy, paste and undo. Tap the text you want to edit, or touch and
hold to bring up the magnifying glass. To fine-tune the placement of
the cursor exactly where you want, simply rock or roll—don't
slide—your finger left or right until the cursor is exactly where
you want it to be.
Tip #67 - 12/26/2012
Quickly delete text
Holding down the keyboard delete key starts deleting text to the
left quickly after a second and then starts deleting (multiple)
words at a time after another few seconds.
Tip #4 - 5/6/2012, Tip #78 - 2/3/2013
Some Keyboard Shortcuts
° hold the zero 0
§ hold the ampersand &
… hold the period .
« » „ “ ” hold the quotes "
- ‒ — • hold the hyphen -
Caps lock: double-tap the caps key (up arrow) and it will turn
blue, indicating caps lock is on. Tap again to turn off.
Touch and hold a letter or other character to reveal a list of special
characters. For example hold the letter "a" to see and select from
aàáäæã or hold $ to see and select from ¥€$¢£
You can explore the keyboard yourself but in case you haven't,
here are some of the more useful symbols that you can insert in
your text.

6
Tip #6 - 5/14/2012
Where is the Undo Key?
Have you ever made a mistake typing, deleting, cutting, or pasting
and wondered how to undo it? Here’s what you do:
• Hold the iPhone firmly in one hand and shake it.
• Tap the Undo button.
You can have multiple levels of Undo and Redo, both with
dictation and keyboard typing. It is quite a comprehensive
system.
Tip #11 - 5/31/2012
Warp Speed Access to Top of List
There is an easy way to scroll up to the top of a long list: tap the
time display at the top of the screen. It will scroll you to the
beginning at mach speed. The trick works for Music, Contacts,
email, websites, and many other apps.
Tip #14 - 6/17/2012
Scrolling Through a List
Scroll through the Contacts list on your iPhone by either…
• flicking your finger up or down on the list, or
• tapping on one of the letters on the alphabet bar running down
the right side of the screen to jump to contacts beginning with that
letter. But sometimes it is hard to tap on the exact letter that you
want.
If you hold your finger on the alphabet bar and then slide or
roll up or down, you can quickly find the starting letter. You will
advance one letter at a time with each finger movement.
Then you'll be able to scroll through your Contacts using the
finger flick. This also works with most other apps that have
alphabetical lists, such as Music and third-party apps.
Tip #12 - 6/5/2012
Personal Keyboard Shortcuts
For example
• when I type ty I get Thank you very
much or
• when I type bc I get because or
• when I type jg I get my email address
• when I type bcc I get Be kind. Please
remove my email address. Use BCC
when forwarding. Say no to spammers
and computer viruses.
Create your own personal dictionary, including shortcuts for
each word. So your keyboard not only autocorrects, but knows
exactly what you want to say as you type. In Settings, tap General
-> Keyboard -> Shortcuts. Tap the + key, then add a new phrase
and assign an optional shortcut to it.
You can create shortcuts for any words, names, numbers or
phrases you use regularly.
When the keyboard displays a suggested word or phrase, to accept
it into the text, merely tap the spacebar. Or to reject it, tap the
suggested word popup box or anywhere on the screen to close the
suggestion box thereby retain the word the way you typed it.
If you typed an incorrectly spelled word, dismiss the correction;
the word will be underlined in red. If you tap the underlined word,
and then tap Suggest, you'll get a list of suggested words. Tap the
correct word if it appears in the list.

7
Contacts
Basics
Contacts
Contacts is where all your addresses, phone numbers, email addresses are stored for use by the phone, email, messaging and FaceTime.
• In the list view, you can search. Scroll through the list by sliding your finger on alphabet on the right.
• Tap on a phone number, you to call it. • Tap on an email address to go to a new blank email message
ready to fill out. • Tap on an address to display the location on a map. Tap on the
car icon for directions. • Touch and hold a field to select an option to Copy that field.
If you scroll to the bottom of the contract you have further choices:
• Tap Send Message and you will be given a choice of phone number and addresses to use.
• Tap Share and you can send an email or message containing a file (e.g., Jake Jacobs.vcf) with the contact data attached. The recipient can tap it to create a new contact or add to an existing one.
• Tap FaceTime to make a free video call to another iPhone or iOS device.
• Tap Add to Favorites to add to your Phone’s favorites.
Tip #60 - 11/28/2012
How many Contacts do I have?
You can find out how many entries are in your Contacts. In
your Contacts list, tap the Z or the # in the lower right corner of
the alphabetic scrollbar and swipe to the very last entry. There
you'll see a count of how many entries are in your Contacts.
Tip #38 - 9/12/2012
Picture Your Contact
For each entry in your Contacts you can attach a photo. Then
any time you receive an email or a phone call from that person,
their picture will show up on the email or on your screen when the
phone is ringing.
To attach a picture to a contact, select the contact and tap Edit.
Then tap the Add Photo square at the upper left. Now select Take
Photo or Choose Photo. If you're near the person, you can take
their picture. Or you might already have their picture in your
Photos app—perhaps
(1) you took their picture at an earlier date or
(2) they emailed you a picture or
(3) they texted you a picture or
(4) you captured their picture from a webpage or Facebook.
Tip #2 - 4/28/2012
Custom Contact Labels
In Contacts you can create custom labels for phone numbers,
email addresses and some other fields. And once you create these
custom labels, they're available to use for all your contacts.
Here is a sample of custom labels I created for Best Buy. I created
labels for local cities. I can use these labels for any contract, not

8
merely the first one you assigned it to.
To create a custom label in a Contact, tap Edit, then tap on the
label field. Then scroll to the bottom of the list where it says Add
Custom Label.
You can create labels such as
His (as in His Mobile Phone)
Hers
Service
Emergency
Summer Home.
This may not work if you use Microsoft Exchange to sync Outlook.
Tip #7 - 5/18/2012
Assign Contacts to Multiple Groups
There is only one copy of each contact in
the iPhone, and each is stored in the "All
Contact" group. When you select a group
you are filtering the All Contacts group to
show you only the contacts in that group.
WARNING: in the iPhone if you delete
ANY occurrence of a contact it will delete
all occurrences of that contact.
If you create a number of Groups in your Contacts, then you can
assign each contact to one or more groups. For example, you
could have a contact who
• is a friend, and
• is in your bridge club, and
• is also a doctor.
So you could have
• a “Friends” group,
• a “Bridge” group, and
• a “Doctors” group,
and you could assign your bridge playing doctor friend into all
three groups.
Note: in the iPhone you can insert a new contact in a particular
group by selecting only that group before you create the new
contact.
But there are other things you cannot do from the iPhone: you
cannot …
• add new groups
• place a contact into multiple groups
• move a contact from one group to another
• assign a contact from an email attachment, such as a .vcf file
into a particular group.
You have to do these operations from within your PC Contact
program such as Outlook or in iCloud. In Outlook, you can move
or copy any contact into any other group or groups, by selecting
and dragging. If you delete a contact from any group—other than
the All Contacts group—you will delete only from that group; the
contact will remain in all the other groups. If you delete from the
All Contacts group it will delete all occurrences.

9
Siri and Dictation
Basics, Tip #101 - 4/24/2013
Dictation
• If and when you dictate something that Siri
doesn't understand, scroll back up and find the
text you dictated.
• Tap on the chat bubble and you'll notice that
you can now edit what Siri heard. Make your
corrections accordingly.
• Tap the blue Done button and Siri will rethink
what you have corrected and output what will
hopefully be a correct or more accurate result.
Any time the keyboard pops up and you are connected to the internet, you can dictate instead of type.
Just tap on the microphone icon to the left of the spacebar and dictate an email, message, note, contact or calendar entry. You can speak just about anything that you can enter by typing.
Siri. Ask Siri to make a call, respond to text messages, get directions, schedule reminders and meetings, and much more.
With the screen on, press and hold the Home button. If you’re using a headset, press and hold the center button. After the tone, speak naturally. Siri will listen and then answer.
Tip #41 - 9/19/2012
Ask Siri ….
Ask Siri about sports, restaurants, movies, making reservations, or
launch an app.
Remember, when you hold the home button to bring up Siri, if
you tap the little circle i on the right, Siri will list all the apps she
can help you with. And if you tap on any one of them you will get
a list of examples, such as “Show me email from Joe Smith”
Tip #20 - 7/11/2012, Tip #81 2/13/2013,
Tell Siri Who You Are and Your
Relationships
Here is the payoff: When you ask Siri to
call my wife's cell or call my brother-in-law
at work, she will carry out your request
with no questions asked. (Of course if you
have two brothers-in-law, Siri will ask you
which one you want to call. in that case just
use his name, call Randy Smith.)
If you want to ask Siri to call my wife or call my brother-in-law
then you must tell Siri who you are and how people in your
Contacts are related to you.
First, create an entry in your Contacts list for yourself. You need
this because this is where all of your relationships are going to be
stored.
Once you've entered yourself as a contact, you can tell Siri who
you are. Go to: Settings -> Mail, Contacts, Calendars ->
Contacts -> My Info and then select your own entry in Contacts.
From now on, Siri will know who you are when you use the
pronoun my, as in call my wife or call my brother-in-law.
Then, to associate various contacts with yourself, you can tell Siri,
for example,
“Beverly Jacobs is my wife”
“Randy Smith is my brother-in-law”
Or you can enter this information manually in your own Contact
entry.
In the contact, tap Edit, scroll to the bottom and tap add field.
Then enter the additional data into the desired field.

10
Tip #50 - 10/24/2012
Capitalizing Words when Dictating
And don't forget you can say words like
"comma," "period," "colon," "semicolon,"
"question mark, "new line" to add
punctuation.
When using dictation on iPhone 4S or 5, here is what to say to
capitalize words:
"Cap" Makes the next word capitalized.
"All caps" MAKES the next word uppercase.
"Caps on ... Caps off" Makes the Next Words Title Case.
"All caps on ... All caps off" MAKES THE NEXT WORDS ALL
UPPERCASE.
Tip #83 - 2/24/2013
Have your iPhone read selected text
to you
You can select text in an email or website or book and have it
read to you, out loud. Wow!
To enable this feature on your iPhone go to Settings -> General -
> Accessibility -> Speak Selection -> ON. You can also select the
Dialect, Speaking Rate and if you would like, the words to be
highlighted as they are spoken.
Then open any text-based app (like Mail, Notes or a web page)
and select any amount of text. When you do, you will notice that
the contextual menu that usually offers you the Copy and Paste
options, now also provides you with a new Speak option.
Tap on it and your iPhone will start reading the selected text to
you, even highlighting every word as it is spoken (if you enabled
that option in Settings).
The one downside is once it starts speaking the text, it is tricky to
stop it. So if you accidentally hit this button instead of the Cut,
Copy or Paste button, for example, you may find yourself in an
embarrassing situation where your phone is reading the selection
out loud for the entire room to hear. You can stop it by selecting
at least one word and then tapping on Pause in the contextual
menu.
Calendar
Basics
Calendar
You can keep one or more calendars on your iPhone. View your calendar by the day, by the month, or as a list. Rotate your iPhone to landscape and you’ll see (almost) an entire week.
Tap + to add an entry to your Calendar. Select start date and time, end date and time, Repeat, and Alert.
If you tap on a date in an email or website, you can automatically add the event to your calendar.

11
Tip #19 - 7/8/2012
Calendar Week
View
When using the Calendar you can see your upcoming
appointments in a handy "week" view. Simply rotate the iPhone
to landscape orientation. With iPhone 5 you can see an entire
week, whereas in the older iPhones, you see about 3½ days.
Tip #21 - 7/14/2012
How to Manage Birthdays in Your
Calendar
If you are sharing your Calendar with your
partner on another iPhone the birthdays
will not show up to clutter the Calendar on
the other iPhone.
Here is a way to have someone's birthday appear in your
Calendar every year. And if you have Siri, how to quickly look
up somebody's birthday.
Enter a person's birthday in your Contacts (rather than setting up a
repeating event in your Calendar). This automatically will put it
into your Calendar every year.
Here is how you add a birthday to any contact. In Contacts:
• go to the person's Contact entry
• tap on the Edit button in the upper right-hand corner
• go down to the bottom and tap on Add field
• scroll down to Birthday and enter the date. If you don't know or
want to enter the year just turn the year dial to the four dashes.
From now on, every year this birthday will show up automatically
in your Calendar, next to a little gift-wrapped box icon.
Tip #5 - 5/10/2012
Share Your Partner’s Calendar
Be sure to select Settings -> Mail,
Contacts, Calendars -> Calendars ->
Default Calendar -> your calendar in
iCloud, not in On My Phone.
If you use Outlook, in iTunes set Calendar
to Sync with Outlook. See: http://www.macworld.com/article/1163189/syncing_icloud_ with_windows_and_outlook.html#lsrc.mod_rel
To set up calendar sharing: http://support.apple.com/kb/PH2690
If your partner also has an iPhone and you sync your Calendar on
iCloud, you can view each other's calendars on your iPhones.
You can set this up so that each partner can read the other's
calendar, but cannot modify it.
In your iPhone Calendar, you will see both calendars
simultaneously on one window in all views. You easily can turn
either calendar on or off so that you will see only yours, or only
your partner's. Any change you make to your Calendar will show
up in your partner's iPhone Calendar, as soon as you have internet
access.
Here you see in actual example from my Calendar. My entries are
shown in blue and my wife’s entries are in red.
To implement shared calendars, you must set up two separate
iCloud accounts and sync your respective calendars to the iCloud.
(You will want to share one iCloud account for the App Store so
that you can share apps without having to buy them twice. But for
syncing Calendars, Contacts and other built-in apps that you will
want to keep separate, use different Apple IDs.)
To set up iCloud on a PC: http://www.apple.com/icloud/setup/pc.html
After you do this, go to Settings -> iCloud -> Calendar -> ON.
12
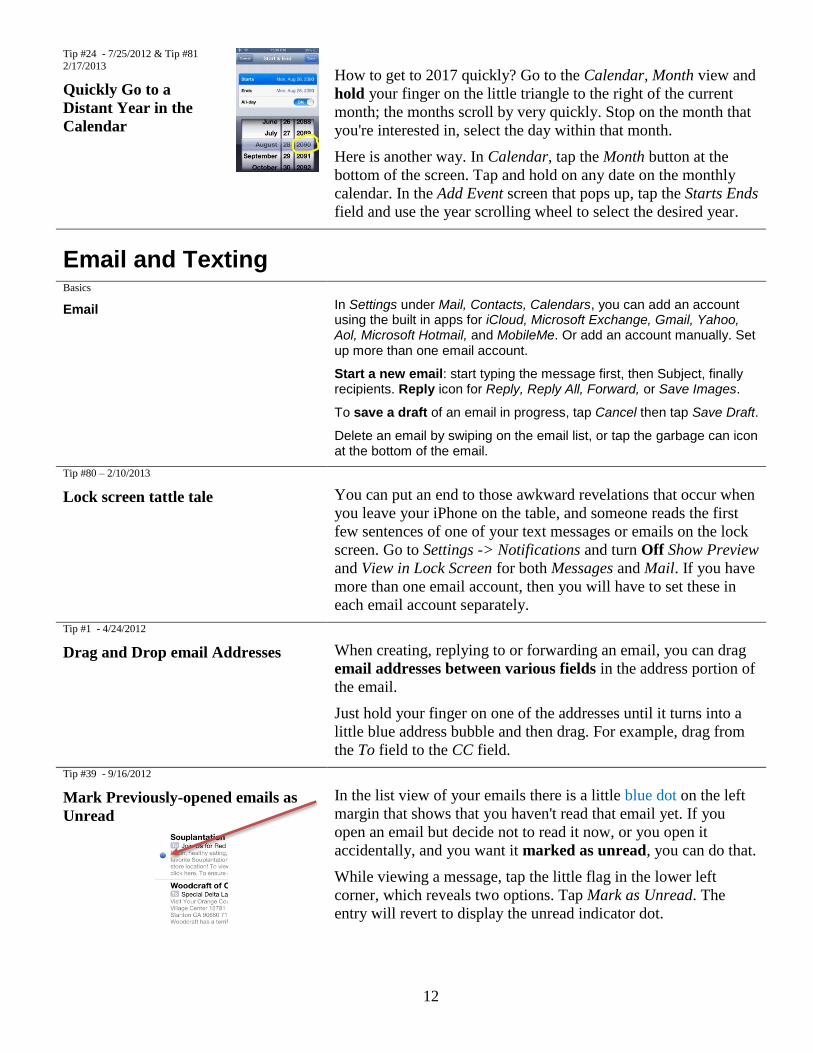
Tip #24 - 7/25/2012 & Tip #81
2/17/2013
Quickly Go to a
Distant Year in the
Calendar
How to get to 2017 quickly? Go to the Calendar, Month view and
hold your finger on the little triangle to the right of the current
month; the months scroll by very quickly. Stop on the month that
you're interested in, select the day within that month.
Here is another way. In Calendar, tap the Month button at the
bottom of the screen. Tap and hold on any date on the monthly
calendar. In the Add Event screen that pops up, tap the Starts Ends
field and use the year scrolling wheel to select the desired year.
Email and Texting
Basics
In Settings under Mail, Contacts, Calendars, you can add an account using the built in apps for iCloud, Microsoft Exchange, Gmail, Yahoo, Aol, Microsoft Hotmail, and MobileMe. Or add an account manually. Set up more than one email account.
Start a new email: start typing the message first, then Subject, finally recipients. Reply icon for Reply, Reply All, Forward, or Save Images.
To save a draft of an email in progress, tap Cancel then tap Save Draft.
Delete an email by swiping on the email list, or tap the garbage can icon at the bottom of the email.
Tip #80 – 2/10/2013
Lock screen tattle tale
You can put an end to those awkward revelations that occur when
you leave your iPhone on the table, and someone reads the first
few sentences of one of your text messages or emails on the lock
screen. Go to Settings -> Notifications and turn Off Show Preview
and View in Lock Screen for both Messages and Mail. If you have
more than one email account, then you will have to set these in
each email account separately.
Tip #1 - 4/24/2012
Drag and Drop email Addresses
When creating, replying to or forwarding an email, you can drag
email addresses between various fields in the address portion of
the email.
Just hold your finger on one of the addresses until it turns into a
little blue address bubble and then drag. For example, drag from
the To field to the CC field.
Tip #39 - 9/16/2012
Mark Previously-opened emails as
Unread
In the list view of your emails there is a little blue dot on the left
margin that shows that you haven't read that email yet. If you
open an email but decide not to read it now, or you open it
accidentally, and you want it marked as unread, you can do that.
While viewing a message, tap the little flag in the lower left
corner, which reveals two options. Tap Mark as Unread. The
entry will revert to display the unread indicator dot.

13
Tip #57 - 10/18/2012
Deleting Emails in List View
You can delete unwanted emails en masse rather than deleting
one at a time. In your Inbox, simply tap the Edit button and check
off the emails you want to delete and then tap Delete. You can
also Move or Mark multiple emails this way.
Tip #58 - 11/21/2012
Quote a fragment within a reply in
You can reply with a selected subset of a received email instead
of the entire original message. To achieve this, select the portion
of text you want to quote. Then just tap the reply button and the
selected fragment will be appended at the end of the email.
Tip #35 - 9/2/2012
Create stuff from an email
To create a Contact from an email:
Go to the top of the email, tap the name
you’d like to save from the From:, Cc:
or To: field.
You’ll see a new Contact form appear
with the name and email fields
completed. Edit or add more details if
you have them, then tap the Create New
Contact button. Or you can Add to
Existing Contact.
To create a Calendar event from email:
Open the email with the event information, look for the date and
time—which should be “hyperlinked” in blue automatically by
your iPhone—and tap it.
Tap the Create Event button from the pop-up window that
appears.
Next, you’ll see a calendar event with the salient details from the
email filled in. Edit the event or add more information (such as
the location or a reminder; you can copy from the email and paste
into the Calendar), then tap the Done button. You’re just created
a new event in your Calendar!
You could instead tap Show in Calendar to see if you’re free
during that time slot, or Copy to copy the date and time to the
iPhone’s clipboard.
Tip #8 - 5/23/2012
Batch email Lists
Important: When you send
the email you will see a
popup warning that says
"Invalid Address." Just
ignore it and tap Send.
iPhone's email does not support batch email lists. But you can get
around this by creating a contact with a single email "address"
that has all the recipients in your "Batch email list" listed in one,
long text string. Separate each email address with a comma, with
no spaces in between. For example:
[email protected],[email protected],[email protected], …
Create one Contact called "Batch email list" (use whatever name
you want to assign to each batch email list). Then copy and paste
the string of email addresses—similar to the example above—into
the notes field of the Contact. I use the notes field because you
can't type commas in the email address field, and it is much
easier to edit in the notes field. Then select the entire list from
the notes field and paste it into the blank email address field.
Every time you need to edit or add anything to your batch email
list, edit it in the notes field first, and then copy and paste it into
the email address field.

14
Tip #42 - 9/26/2012
Resume Draft emails
An email you are composing can be saved in the Drafts folder by
tapping on the red Cancel button, then tapping on the Save Draft
option when prompted. Here’s how to quickly access a saved
email Draft on your iPhone:
Tap and hold on the Compose button (the little square with the
pencil inside). It will magically open a list of saved Drafts so you
can continue composing unfinished or unsent emails.
Tip #51 - 10/21/2012
Custom Email Signatures for Each
Account
Not only can have a custom sound for each email account. You
can also customize the signature for each email account:
Settings -> Mail, Contacts, Calendars -> scroll down to Signature
-> Per Account.
Tip #43 - 9/30/2012
Avoid "Premature email Release"
Alternatively, if you are editing a Reply All
email, and you don't want to have to reenter
all of the recipients, you can blank out the
Subject line. The iPhone will not Send this
email out without prompting you for a
Subject line, so you have a chance to
Cancel rather than Send prematurely.
Have you ever sent a partially composed email to someone
because you accidentally hit the Send button? It's a logistic
headache to straighten this out: you have to find the sent email,
copy the body text, paste it into a new email, write an apology,
finish composing the email, etc.
Here is how to avoid all that: blank out all recipient fields (To:,
Cc:, and Bcc: all empty) before composing the email. That way
the Send button will be grayed out and hence non-responsive.
When you are ready to send, only then fill out the recipient fields
and tap Send.
Tip #87 - 3/6/2013
Change email quote level
Even if you only select a word or two, the
level for the entire paragraph will be
changed.
The email quote level are those vertical lines to the left of
the text. Sometimes when you're forwarding email, those
lines can be annoying and you would like to get rid of
them before forwarding the email. Or perhaps you would
like to add one or more quote levels for emphasis (as I
have here).
To change the quote level, select somewhere in the paragraph.
Tap the right arrow from the pop-up options until you see the
words Quote Level. Tap on it and choose either Increasing or
Decreasing to change the quote level of your selected text.
Tip #46 - 10/10/2012
Some New Email Features in iOS 6
• On a Gmail account, if you tap the little
file box icon at the middle bottom of the
screen, it will archive the email rather
than delete it. To delete the email, hold the
file box icon and choose Delete Message.
You can disable the archive feature in
Settings -> Mail, Contacts, Calendars ->
Gmail -> Archive Messages -> OFF.
• If you have more than one email account, you can assign a
different sound alert for each email account.
Settings -> Notifications -> Mail -> select the email account ->
New Mail Sound.
• You can reorder your email accounts in Mailboxes: select
Edit, Then slide the little handles on the right up-or-down to put
your most used email account at the top.
• When you begin entering a recipient's email address, recently
used addresses appear in a list to save you time. Some of these
can be wrong or annoying. To remove them from the recents list,
tap the little blue right-arrow and select Remove From Recents.
15
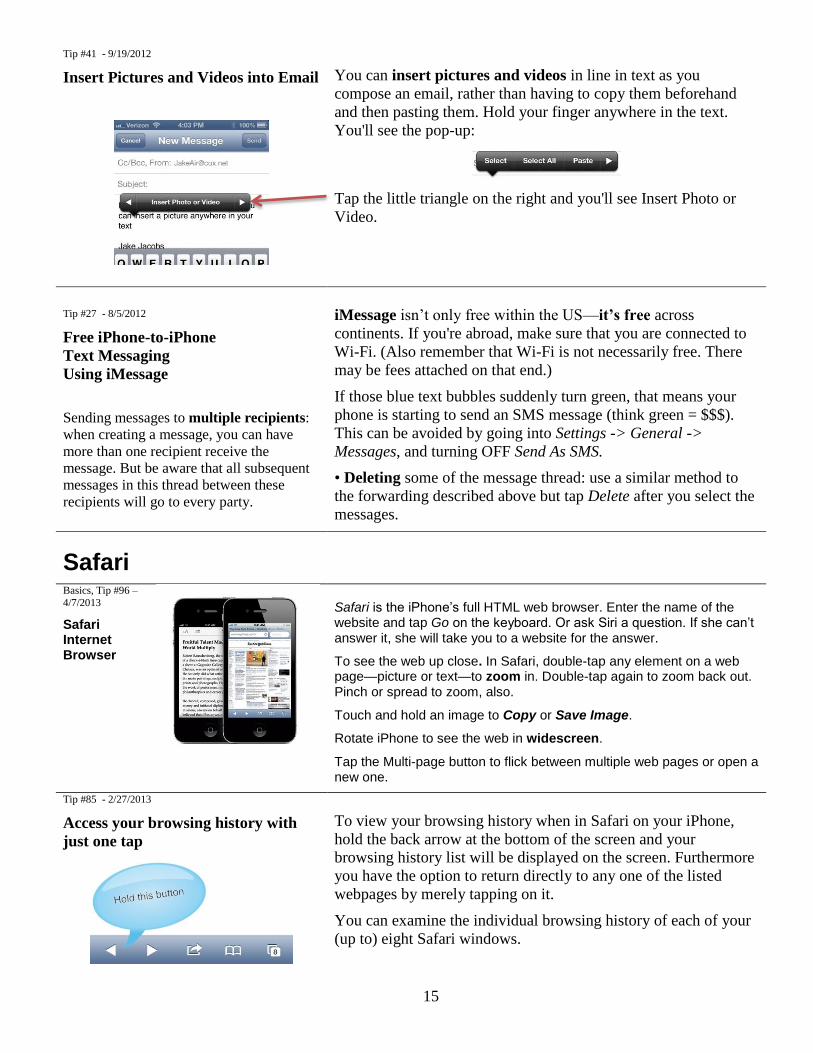
Tip #41 - 9/19/2012
Insert Pictures and Videos into Email
You can insert pictures and videos in line in text as you
compose an email, rather than having to copy them beforehand
and then pasting them. Hold your finger anywhere in the text.
You'll see the pop-up:
Tap the little triangle on the right and you'll see Insert Photo or
Video.
Tip #27 - 8/5/2012
Free iPhone-to-iPhone
Text Messaging
Using iMessage
Sending messages to multiple recipients:
when creating a message, you can have
more than one recipient receive the
message. But be aware that all subsequent
messages in this thread between these
recipients will go to every party.
iMessage isn’t only free within the US—it’s free across
continents. If you're abroad, make sure that you are connected to
Wi-Fi. (Also remember that Wi-Fi is not necessarily free. There
may be fees attached on that end.)
If those blue text bubbles suddenly turn green, that means your
phone is starting to send an SMS message (think green = $$$).
This can be avoided by going into Settings -> General ->
Messages, and turning OFF Send As SMS.
• Deleting some of the message thread: use a similar method to
the forwarding described above but tap Delete after you select the
messages.
Safari
Basics, Tip #96 –
4/7/2013
Safari Internet Browser
Safari is the iPhone’s full HTML web browser. Enter the name of the website and tap Go on the keyboard. Or ask Siri a question. If she can’t answer it, she will take you to a website for the answer.
To see the web up close. In Safari, double-tap any element on a web page—picture or text—to zoom in. Double-tap again to zoom back out. Pinch or spread to zoom, also.
Touch and hold an image to Copy or Save Image.
Rotate iPhone to see the web in widescreen.
Tap the Multi-page button to flick between multiple web pages or open a new one.
Tip #85 - 2/27/2013
Access your browsing history with
just one tap
To view your browsing history when in Safari on your iPhone,
hold the back arrow at the bottom of the screen and your
browsing history list will be displayed on the screen. Furthermore
you have the option to return directly to any one of the listed
webpages by merely tapping on it.
You can examine the individual browsing history of each of your
(up to) eight Safari windows.

16
Tip #49 - 10/21/2012
Search for a Word or Phrase within a
Web Page in Safari
Do not tap the Search button at the
bottom right corner of the keyboard;
that will take you to a Google search.
Start typing the word or phrase in the search field and then scroll
down to the bottom of the list to On This Page.
Then tap Find [Your word or phrase]. The word or phrase will be
highlighted in bright yellow. Then tap the next or previous arrow
button to locate the occurrence of the word or phrase that you
want to find.
Tip #15 - 6/20/2012
Easy Read Web Pages
Before…. and after….
Often web pages are not easy to read on the iPhone because the
font is too small and the page is cluttered with links and sidebars.
Here is where the Reader button in Safari is very useful. Notice
that sometimes in the URL entry field at the top of the web page
there is a gray Reader button. If
you tap this Reader button, the
body text of the web page will be
opened in a new, uncluttered, easy
to read, large text window.
See the little gray Reader button
just below the time 7:10 AM?
Tapping it will turn this screen into
the screen shown here. After you
tap the Reader button you'll see the
screen above. Now isn't that easier
to read?
Tip #16 - 6/24/2012
Quick Access to a Favorite Website
In this screen capture, the AlaskaAir icon
on the left is the app. The Alaska Air icon
on the right is a link to their website,
created using the method described above.
If the linked webpage has an associated
icon, it will automatically be displayed on
the icon button, as shown here.
You can add a shortcut icon to a website on any home screen
page. It will look just like any app icon.
In Safari, tap the Go To button (the little rectangle at the bottom
with the arrow coming out of it ) and then tap Add to Home
Screen.
If you want to move the icon to another page, hold any icon until
they all jiggle, and drag any icon to any home screen page, just
like you would for any other app icon.
When you tap on the icon you'll be taken directly to the website in
Safari.
Tip #61 - 12/2/2012
Tap and Hold Links for URL and
Options
While browsing through Safari, you are often faced with links you
would like to click and investigate further. However, you don't
want to lose the page you are currently on.
When you are faced with this situation, instead of simply clicking
through the link, hold your finger down on the link. When you
do this, you are presented with four or five options: Open, Open

17
in New Page, Add to Reading List, Save Image (only if it's an
image link) and Copy.
Click on Open in New Page and the page will be opened in a
separate window allowing you to continue where you left off!
Pretty handy!
This feature is so smart that if you tap on a link to an app in the
App Store it will present you with yet a different set of
options: Open in "App Store," Save Image and Copy.
And If you've got misgivings about opening a questionable link
on a web page in Safari, when you tap and hold that link, the top
of the pop-up will also show you the URL hiding there.
iBooks
Tip #34 - 8/29/2012
Find Word Definitions Easily
You can access the built-in dictionary in most apps that let you
select a word. Simply double tap a word—in an email, web page,
iBooks, and so on—and you'll find a pop-up option for Define.
If you want to look up a word that isn't already displayed on your
iPhone, you can go to the built in Notes app and type in the word.
Then double tap to get the definition.
Tip #30 - 8/15/2012
Save PDFs in iBooks
The iPhone offers handy “Quick Look” functionality for viewing
PDF attachments in an email, but what’s even cooler is that you
can auto-save them into iBooks and then access and view them
from iBooks, even off-line.
Simply tap and hold on the PDF icon and you’ll see the option to
Open in iBooks. Tap this, and the PDF will be imported into, and
be available to view in, iBooks from then on.
Tip #32 - 8/22/2012
Manual? What Manual?
You can also read the iPhone User
Guide in Safari by going to the
bookmark icon at the bottom and
tapping on iPhone User Guide. But you
will have to be on-line to access it.
The iPhone comes with a very complete users guide. In fact if
you read it, you probably wouldn't need this handout!
Tap the bookmarks icon at the bottom of the Safari screen and
select the iPhone User Guide.
Or go to iBooks -> Store -> Search, and type "iPhone user
guide." Download it and it will be placed into your iBooks library
for you to reference anytime you want; you don't have to be
online once you download it.
Tip #52 - 10/21/2012
New features in iBooks 3: Scroll and
Copy
The new Apple iBooks version 3 has a number of improvements,
two of which I have described below.
• Scroll - You can now choose between the old page turning (flick
left or right) like a normal book or scrolling smoothly up-and-
18
down.
To select the scroll option, click on the small and large AA icon at
the top of the screen, tap Themes and then select Scroll.
• Copy - You can now select and copy text to be pasted into your
term paper, an email or a note. Copy works like copy anywhere
on the iPhone: double tap to select a word, quadruple tap to select
a paragraph, or slide the selection handles. Then tap the Copy
button. Where you paste it is up to you!
Camera
Basics, Tip #98 – 4/14/2013
Camera Basics
Adjust focus and exposure by tapping anyone or anything on the screen.
To take a picture, tap the camera icon or press either volume button. Pictures are placed into your Camera Roll in the Photos app.
To record HD video, set the switch to Video, then tap the record button. Tap it again to stop recording.
Tip #10 - 5/31/2012
Quick Camera Access
If you need to take a picture quickly without stopping to enter
your password or even swiping the slide to unlock button, do this:
when the lock screen is displayed, slide up the camera icon at the
bottom right side of the screen. It takes you directly to the camera.
Tip #79 & 79B - 2/6/2013
Some uses for the iPhone camera
My daughter, Rachel, responded to my list
of uses for the iPhone camera with a whole
bunch of other ideas that I thought I would
share with you:
Think I've done all of these and more:
• mom's clothes to help her complete her
wardrobe,
• plants in my friends' gardens that I'd like
to show my gardener,
• screenshots of partially solved games in
order to start over & find a better solution
based on the partial one
• medicines we're taking
• books we lend out (or books at friends
that I want to buy
• same for music with Shazam or
Soundhound screenshots
• other people's class notes, HW
assignments, etc.
• screenshots of street directions for when I
Having a camera built into a phone offers some interesting
synergisms. Here are some of the applications I have thought of.
• At a lecture or at school, take a picture of the whiteboard or
PowerPoint slide.
• Take a picture of a label for a product you want to buy at the
store. You can also email or text this picture to your spouse who
currently shopping is at the store.
• While shopping at a store, take a picture of a product that you
think your spouse might be interested in, and email or text it to
them.
• Take a picture of a product defect to include into your irate
email to the manufacturer or seller.
• When you park your car, either on the street or in a parking lot,
take a picture of the surroundings, the floor and aisle number of
the parking garage or a landmark, that will help you find your car
again. (I forgot to do that last week and I still haven't found my
car!)
• Take a picture of a funny cartoon or sign and email it to a friend
(but please don't email it to me; I get enough of that crap).
• When shopping for an accessory to your home—e. g., furniture,
rug, lamp, AK-47—take a picture of the room into which is going
to be placed.
• Take a picture of a person who's image you want to insert into
your Contacts.
• Take a picture of a product or object that you may later want to

19
might not have internet action later on
• finding the right cable / accessory for
something.
Also good for:
• price comparing
• matching fabrics (although you have to be
careful about the color differences)
• quick copies of important documents
(especially ones you have to hand over
temporarily)
• and of course record keeping for
insurance purposes • i.e., jewelry, other
property
• getting rid of an annoying person on the
street.
purchase or try to make yourself.
• Take a picture of text and then use an app such as Ricoh's free
ImageToText to convert it to editable text.
• If you ever get into a fender bender, use your camera to take
pictures of the damage to the vehicles, and the other driver's
license and insurance information.
• Take pictures of the packaging of a product before you take it
out of the carton. That way, if you have to return it, you will know
how to repack it the same way it was shipped.
• Take pictures of a product that you're disassembling, so that you
later know how to reassemble it without having left over "extra
parts" when you're done.
• Don't forget the built in 180° panorama feature that's part of iOS
6.0. With it, you can take a wide swath picture of an entire scene.
With only two such 180° pictures, you can fully capture an entire
locale, room or site.
• If you're having some remodeling done, take a picture of the
bare walls before they put the drywall up. That way you'll know
what is going on inside the walls, such as plumbing, wiring, studs,
braces, and so on. Tip #3 - 5/3/2012
Remote Control Camera Shutter
Release
You can place the iPhone on a solid surface, stand or bean bag and when you're ready to take the picture, press and release either volume button on the headphone cable, so it won't jostle the iPhone or disturb the subject of a close-up.
Attention photographers: Wow! A remote control camera
shutter release. And it comes with the iPhone. Free!
The volume-up or the volume-down button on the side of the
phone will function as a shutter release button, an alternative to
the screen shutter button icon. Any of these “buttons” can jostle
the camera, creating a blurry image.
But did you know that you can use the headphone cable
volume-up or volume-down button as a shutter release?
Tip #13 - 6/10/2012
Take a Snapshot of Your iPhone
Screen
The screenshot feature allows you to take a snapshot of anything
on the iPhone screen and save the screen image to your photo
Camera Roll.
When your screen has something you want to preserve, simply tap
the home button and the On/Off (Sleep) switch at the same time.
You can then treat it like any other picture, to edit, crop, email, or
download to your computer.
Some uses of the screenshot feature:
• If you get an error message on your phone and you want to show
it to somebody to help you diagnose it, take a screenshot.
• When reading a book, listening to a podcast, watching a video or
listening to a soundtrack, the iPhone usually remembers where
you were if you stop in the middle and come back later. But not
always. As a precaution, take a screenshot—with the timeline
showing—just prior to leaving the app in question.
• If a company emails you a coupon that you want to be able to
find readily, take a screenshot and you'll know that it's in your
camera roll.

20
Tip #41 - 9/19/2012
Panoramic picture
mode in Camera
Camera -> Options -> Panorama lets you pan left-to-right and
the iPhone will automatically and magically create a panoramic
picture for you.
Here's an example of a 180° panorama from San Pedro.
Security
Tip #17 - 6/28/2012
Emergency Info on Your Lock-
screen
This is the photo editor I used for the
example: Photo Editor by Aviary
Many of us had created—on our older mobile phones—an ICE
(In Case of Emergency) contact, as recommended by emergency
responders. But with password security on the iPhone, the first
responders will not be able to gain access to your ICE contacts
because they cannot unlock your phone.
To solve this, on your lock screen wallpaper image, add text that
contains your emergency information. So anyone turning on the
phone will be able to see your ICE information.
This can also provide information to a good Samaritan who finds
your lost phone, and may expedite its return to you.
To add the text to your wallpaper picture, use any photo editing
app on the iPhone. Or type your info into Notes and take a screen
shot.
Tip #28 - 8/11/2012
Help Finding a Lost iPhone
Losing your iPhone can be a traumatic experience. But
circumstances needn't be so dire with the help of iCloud and the
iPhone's built-in GPS—if you've made the proper preparations.
After you've set up iCloud, go to Settings -> iCloud and enable
Find My iPhone. Once signed up, you can track your iPhone (on
another device) on a map. From there, you can remotely force the
phone to play a loud sound, lock down the phone, have it display
an alert message, or even wipe its memory.
Music
Basics
iTunes Store, Music, iTunesU
Download the free Apple app iTunesU and then get many free and purchased complete college level courses.
Access the iTunes Store by tapping the iTunes icon.
Search the store for music, movies, TV shows, music videos, and more.
Browse, purchase, and download from the store directly to your iPhone. Tap any item to hear or see a preview.
Play your songs with the built in Music app (formerly called iPod).

21
Basics
Song and video controls
While playing music or watching a movie, tap anywhere on the screen to bring up the controls. Tap again to hide them.
From the Lock screen, double-click the Home button to quickly access your audio controls.
You can use other features of the iPhone (except have a phone conversation) while the music plays in the background. You can put the iPhone to sleep.
Tip #56 - 11/14/2012
Three Magic Buttons on your iPhone
Earphone Cable
When listening to music on iPhone ear buds,
• single tap the middle button of the control pod cable from the
right-ear starts or stops music.
• double tap the middle button to skip to the next song.
• triple tap to listen to the previous song.
If the phone rings while you're listening to music, the middle
button will mute the music and answer the phone. Then later, it
will hang up the phone and resume playing the music.
The upper and lower buttons surrounding the middle button
control the volume.
And keep in mind, the cable pod has a built-in microphone. So
you don't have to hold the phone up to your mouth while you're
talking on the phone using your earphones.
Tip #73, 73b - 1/16/2013
Speaker "amplifier" in your palm
The iPhone's speaker is at the bottom, to the right of where the
charger cable plugs in. If you're listening to a video or music
without ear buds, it is sometimes hard to hear the speaker. So if
you cradle the phone in your palm as shown this photo, then the
sound will be reflected off of your palm and directed towards you.
For further amplification simply put your iPhone in a cup, glass,
or bowl (make sure there is no soup or water in it!!!)
Tip #44 - 10/3/2012
Wake Up and Go to Sleep with Your
Favorite Music
Wake up to your favorite song
Apple updated the Clock app to give the
alarm functionality a boost. No longer
do you have to wake up to one of your
ringtones. Instead, you can pick any
song in your library.
In the Clock app, tap Alarm -> Edit ->
[+] -> Sound -> Pick a song.
Sleep timer for your music
If you listen to music on your iPhone before going to sleep, you
can set the Music app to stop playing after a desired period of
time.
To set the sleep timer, launch the built-in Clock app. Select the
Timer function. Set the amount of time you'd like to listen to your
music before the music stops: tap on the When Timer Ends button
and you'll be brought to a page where you're able to select a
particular alarm that is played when the timer ends. Scroll down
and tap on Stop Playing. Tap Set and then tap Start to begin
timing. Start your music and sweet dreams.

22
Tip #93 - 3/27/2013
Turn the screen off to conserve the
battery when listening to music
If you listen to music on your iPhone, you don't need the
screen. The iPhone screen backlight discharges your battery quite
rapidly. So tap on the on/off/standby button on the top right to
turn off the screen. The music will continue to play.
This is also the case if you are using a navigation program such as
Google Maps. If you don't need to constantly look at the map, put
the phone in standby. The voice commands will continue to be
generated, giving you verbal guidance.
Photos
Basics
Photos
Tap the Photos icon on the Home screen to see your pictures.
Flick right or left to move between images.
Double-tap or pinch to zoom.
Tap once to bring up the onscreen controls. Tap Edit to modify a photo (rotate, enhance, remove red eye, or crop), share it, copy it, print it, assign it to a contact, and more.
Tip #66 - 12/19/2012
Photo Stream
About Photo Stream
When Photo Stream is turned on, photos
you take on iPhone (as well as any other
photos added to your Camera Roll) appear
in your photo stream after you leave the
Camera app and iPhone is connected to the
Internet via Wi-Fi. These photos appear in
the My Photo Stream album on iPhone and
on your other devices set up with Photo
Stream.
Note: Although deleted photos are
removed from photo streams on your
devices, the original photos remain in the
Camera Roll album on the device they
originated from. Photos saved to a device
or computer from a photo stream are also
not deleted. To delete photos from Photo
Stream, you need iOS 5.1 or later on
iPhone and your other iOS devices.
Excerpt From: Inc, Apple. “iPhone User
Guide For iOS 6.” Apple Inc., 2012.
iBooks. This material may be protected by
copyright.
With Photo Stream, a feature of iCloud, photos you take on
iPhone automatically appear on your other devices set up with
Photo Stream, including your Mac or PC. Photo Stream also lets
you share select photos with friends and family, directly to their
devices or on the web.
Turn on Photo Stream:
Go to Settings > iCloud > Photo Stream.
Photos added to your photo stream from your other iCloud
devices also appear in My Photo Stream. iPhone and other iOS
devices can keep up to 1000 of your most recent photos in My
Photo Stream. Your computers can keep all your Photo Stream
photos permanently.
Note: Photo Stream photos don’t count against your iCloud
storage.
Manage photo stream contents: In a photo stream album, tap Edit.
• Save photos to iPhone: Select the photos, then tap Save.
• Share, print, copy, or save photos to your Camera Roll
album: Select the photos, then tap Share.
• Delete photos: Select the photos, then tap Delete.
Plagiarizing directly from the iPhone User Guide For iOS 6.
See support.apple.com/kb/HT4486.” Check out this book on the
iBookstore: https://itunes.apple.com/us/book/iphone-user-guide-
for-ios-6/id563272542?mt=11

23
Tip #86 - 3/3/2013
Sharing photos using Photo Stream
With Shared Photo Streams, you can share just the photos you
want with just the people you choose. Select photos directly from
the iPhone Photos app. Enter email addresses of the people you’d
like to share with (or add new photos to a Shared Photo Stream
you’ve already created). The recipients will receive an email with
a link that allows them to view your Photo Stream album.
In Settings -> iCloud -> Photo Stream, turn On My Photo Stream
and Shared Photo Streams.
For the remainder of today's tip, I am plagiarizing directly from
the iPhone iOS 6 Users Guide:
“Create a shared photo stream: Tap Photo Stream, then tap +. To
invite other iOS 6 or OS X Mountain Lion users to subscribe to
your shared photo stream, enter their email addresses. To post the
photo stream on iCloud.com, turn On Public Website. Name the
album, then tap Create.
Add photos to a shared photo stream:
Select a photo, tap the "send to" icon, tap Photo Stream, then
select the shared photo stream. To add several photos from an
album, tap Edit, select the photos, then tap Share.
Delete photos from a shared photo stream:
Tap the shared photo stream, tap Edit, select the photos, then tap
Delete.
Edit a shared photo stream:
Tap Photo Stream, then tap the > in the blue circle. You can
• Rename the photo stream
• Add or remove subscribers, and resend an invitation
• Create a public website, and share the link
• Delete the photo stream”
Excerpt From: Inc, Apple. “iPhone User Guide For iOS 6.” Apple
Inc., 2012. iBooks.
Tip #69 - 1/2/2013
Print from your iPhone
And on a different but related topic, some
HP printers, including my HP Officejet Pro
8600 Plus, also support eprint which lets
you print from anywhere in the world by
emailing to your printer. It will print any
email you send to the printer including
picture attachments.
Your iPhone can print from print-enabled apps, photos, websites
and emails via your own local Wi-Fi using AirPrint.
First you will need an AirPrint enabled printer. I use an HP
Officejet Pro 8600 Plus, but many companies make AirPrint
enabled printers. Then, on the iPhone, open an application like
Safari, Mail or Photos that support AirPrint. Select the content
that you want to print, tap the send-to icon, and choose the option
to print. Select your printer and press Print.
24
Other things
Tip #99 - 4/17/2013 Do Not Disturb
For the curious:
Ring/Silent switch and Do Not Disturb
really do perform different functions.
Closely examine the names to comprehend
the difference. With the switch in the silent
position, the phone won't generate any
sound which would disturb others. Do Not
Disturb makes sure the phone doesn't
disturb you. However, there is an exception
to DND: if the screen is unlocked, none of
the above applies: calls come through and
notifications notify, with all of the
attendant ringing, screen lighting, and
vibrating. In other words: the phone won't
disturb you, because if the screen is
unlocked, your attention is on the phone
anyway. Your significant other sleeping
next to you may still be disturbed by all of
this, though.
Use the Do Not Disturb setting to silence calls, alerts, and
notifications, when the iPhone is locked. You will not be
disturbed by vibrate or the screen glare either. The Do Not
Disturb function sends calls immediately to voicemail.
To enable, tap Settings -> Do Not Disturb. When Do Not Disturb
is on, a "moon" icon will appear in the status bar.
But what if you enabled Do Not Disturb and forgot to disable it in
the morning? That's easily remedied. You can schedule—on a
daily basis—when Do Not Disturb is enabled and when it is
disabled. I have mine set to enable at 11 PM and disable at 7 AM.
To make changes to your Do Not Disturb settings, tap Settings ->
Notifications -> Do Not Disturb. These are the options:
Scheduled: Automatically enable Do Not Disturb daily between
the hours you specify.
Allow Calls From: Allow calls from Everyone, No One, your
Favorites, or specific Contact Groups stored on your device or
your iCloud account. You can create a special group (perhaps call
it "DND Exceptions") in your Contacts and place only those
people that you want to allow to bypass Do Not Disturb.
(Remember, you can only create and edit groups on your
computer, not on the iPhone. And Contact entries can be placed in
more than one group.)
Repeated Calls: If enabled, when someone calls you twice within
three minutes, the call will not be silenced.
Tip #100 - 4/21/2013 Want larger text?
Here's how to enlarge text size throughout iOS on iPhone:
Settings -> General -> Accessibility -> Large Text.
Here you can choose the text size you'd like.
You'll now notice that the text in apps such as Messages, Mail,
Contacts, Calendar and Notes operate in the selected text size.
The lists may not be in larger text but the individual entries in the
application will be.
Built-in apps
Basics
Compass
The built in compass shows directions based on either magnetic north or true north. Also shows your location in latitude/longitude. (True north is where the axis of rotation pierces the pole. Magnetic north is where the magnetic pole is located, near the 75° parallel above Canada.)

25
Basics
Clock
The built-in Clock is four apps in one:
World Clock, multiple time zones
Alarm, multiple
Stopwatch
Timer (shown)
Basics
Reminders
Can set a reminder for a date and time, or when you reach or leave a location, such as home, work, Bob’s house. You can search for a word or string.
Basics
Notes
Type in random notes. Most recent on top; cannot sort. You can search for a word or string.
Basics
Weather
Forecasts for locations of your choice.
I prefer the free app TWC (The Weather Channel), shown here.
Basics
Voice Memos
Record a memo, thought, conversation or other audio event.
Then share the voice memo by email or message.
You can even edit out stuff you don’t want in the voice memo.
Basics
Stocks
Follow all of your stocks and mutual funds at any time.
Customize the list to only those securities you want to follow.
Basics
Newsstand
Organize your magazine and newspaper app subscriptions. Newsstand apps appear on the shelf and as new issues become available.
Basics
iCloud
iCloud stores your music, photos, apps, Calendars, Contacts, documents, and more. It’s seamlessly integrated into your apps and wirelessly pushes your content to all your devices.
You can manage your iPhone built-in apps on all of your devices: PC, iPhone, and iPad. Any changes you make in one device will be updated in the other(s).
Download and install the iCloud program onto your PC.
Then on the iPhone, tap the Settings icon and choose iCloud to turn on the apps that you want to share with your PC and other devices on iCloud: Mail, Calendars, Contacts, Reminders, Safari, Notes, Passbook, Photo Stream, Documents & Data, and Find My iPhone.
#102 last tip - iPhone Tips IndexedBasicH 25.docx

26
Notes: