iqcs user guide
TRANSCRIPT

Module 7: Training and Nomination Administration June 2021
Page 1
IQCS User Guide
MODULE 7: TRAINING AND NOMINATION ADMINISTRATION
OVERVIEW Welcome to the Training and Nomination Administration module. In this module, we will discuss the training and nomination functions included in the Incident Qualifications and Certification System (IQCS) and how they can be used to streamline the logistics of scheduling course sessions, nominating and prioritizing responders for sessions, and recording course session results. This includes how to create a course session, course session enrollment, responder training records, training administration, and nominating and prioritizing responders.
IQCS users are not allowed to enter, edit, or remove their own data on any pages, with the exception of experience records, in the IQCS application.
New June 2021 • Minor updates to content and formatting.

Module 7: Training and Nomination Administration June 2021
Page 2
TABLE OF CONTENTS Overview .................................................................................................................................................................................... 1
Training Administration ................................................................................................................................................... 4
Using Course Sessions ........................................................................................................................................................ 4
Active Courses ........................................................................................................................................................................ 5
Creating a Course Session ................................................................................................................................................ 6
Course Session Security ........................................................................................................................................................ 6
Instructions – Course Session Security Groups ................................................................................................. 7
Instructions – Creating a Course Session .................................................................................................................. 8
Nomination Workflow .................................................................................................................................................... 10
Instructions – Managing Facilities and Instructors ....................................................................................... 11
Expense Tab ........................................................................................................................................................................ 12
Instructions – Expense .............................................................................................................................................. 12
Student Enrollment ........................................................................................................................................................... 12
Rapid Session Administration ..................................................................................................................................... 14
Instructions – Rapid Session Administration ................................................................................................... 14
Course Session Enrollment ........................................................................................................................................... 15
Instructions – Course Session Enrollment ........................................................................................................ 15
Group Enrollment ............................................................................................................................................................. 16
Instructions – Group Enrollment .......................................................................................................................... 16
Instructions – Updating Session Attendance......................................................................................................... 17
Updating a Course Session ............................................................................................................................................. 18
Instructions – Updating a Course Session .............................................................................................................. 18
Completing a Course Session ........................................................................................................................................ 19
Instructions – Completing a Course Session ......................................................................................................... 19
Correcting a Course Session Enrollment Status .............................................................................................. 20
Awarding Credit for Attending a Course ................................................................................................................ 20
Manually Crediting Course Completion ................................................................................................................... 20
Instructions - Manually Crediting Course Completion ...................................................................................... 22
View Responder Training Records ........................................................................................................................... 23
Instructions - Responder Training Summary ....................................................................................................... 23
Instructions - Responder Summary .......................................................................................................................... 23

Module 7: Training and Nomination Administration June 2021
Page 3
Instructor Tables ................................................................................................................................................................ 24
Adding Instructors to the Instructor Table ............................................................................................................ 25
Instructions - Adding Instructors to the Instructor Table .......................................................................... 25
Course Instructor Histories .......................................................................................................................................... 26
Instructions – Course Instructor History ........................................................................................................... 26
Viewing Instructor History ........................................................................................................................................... 27
Instructions –Instructor History ........................................................................................................................... 27
Managing the Facilities Table ...................................................................................................................................... 28
Instructions – Managing the Facilities Table ......................................................................................................... 28
Managing the Vendor Table .......................................................................................................................................... 30
Instructions – Managing the Vendor Table ............................................................................................................ 30
Training Nomination ........................................................................................................................................................ 31
Responder Records .......................................................................................................................................................... 31
Instruction - Submitting a Training Nomination ................................................................................................. 32
Nominee Details .................................................................................................................................................................. 35
Instructions - Unit Level Prioritization .................................................................................................................... 36
Final Prioritization ............................................................................................................................................................ 37
Priority by Unit .................................................................................................................................................................. 38
Enroll, Waitlist, and No Action Checkboxes ........................................................................................................... 39
Process for Final Priority Session Enrollment ...................................................................................................... 40
Instructions – Summary Listing ............................................................................................................................. 40
Training Administration Related Reports ............................................................................................................ 41

Module 7: Training and Nomination Administration June 2021
Page 4
TRAINING ADMINISTRATION IQCS has a built-in training function designed to simplify the logistics related to scheduling training course sessions and recording the results of those sessions. This includes selecting instructors and facilities for each training session; enrolling selected responders in course sessions; creating tent cards, name tags, and certificates; and documenting the results of training.
The advantage to using session administration is that the course completion will be automatically credited to the responder’s competencies and training record. This eliminates the need for the users to manually input the course completion credit.
USING COURSE SESSIONS Course session management is utilized in IQCS by creating a course session from an active course, rostering students manually or through the nomination process, and completing the session. When students are enrolled into a session, their Responder Training page is updated to reflect enrollment. When the course session is complete, enrollment status is changed to Complete in the responder’s training records and the competency(ies) are awarded.
You should never create a course session if you did not host the course. If a responder in your unit completed a course that has not been documented in IQCS, then add the completion of the course in the responder’s training record.

Module 7: Training and Nomination Administration June 2021
Page 5
ACTIVE COURSES If you want to use IQCS session management, a course will have to be defined on the course table as active.
All National Wildfire Coordinating Group (NWCG) courses and many agency-specific courses are loaded in the course table in IQCS. Information specific for each course as described in the NWCG Standards for Course Delivery, PMS 901-1 is held in the Course table.
A Course Status of Active denotes an active course. An inactive course is one that is no longer in use. You cannot create a session for an inactive course.

Module 7: Training and Nomination Administration June 2021
Page 6
CREATING A COURSE SESSION The training officer or course coordinator schedules a course session in IQCS by adding a course session for an active course. The system will automatically assign a session number upon saving.
Each session number is unique to that particular course. It is associated with the specific start and end dates of a particular offering. You should note the session number assigned for future use and tracking.
When you create a course session, accept the status of Active. Students can only be enrolled in active sessions.
COURSE SESSION SECURITY There may be times when you want to allow a group of users access to modify a course session that you created. For instance, you could create a security group for a regional training center whose employees may all need access to all courses held at their facility.

Module 7: Training and Nomination Administration June 2021
Page 7
INSTRUCTIONS – COURSE SESSION SECURITY GROUPS Follow the directions below to create and populate the Course Session Security Group.
1. Navigate to Training Administration > Course Sessions > Course Session Security Group.
2. Add a New Value. Select the tab to add your group. This is not the same group that is created in the Responder Administrative section of IQCS. This group is only for those users with security access to a course session.
3. Group ID. Enter your desired name for the group. The Group ID field is up to six (6) characters long.
4. Group Members. Select to add the group members. Only IQCS users with an EmplID assigned to their account can be included.
To add this group to a course session Authorized Session Access, follow the following process.
1. Navigate to Training Administration > Course Sessions > Course Sessions. 2. Search for and select course session. 3. Enter the Group ID and select the Populate List From Group Button. 4. Select the Save button.

Module 7: Training and Nomination Administration June 2021
Page 8
INSTRUCTIONS – CREATING A COURSE SESSION
To create a course session, follow the process below.
1. Navigate to Training Administration > Course Sessions > Course Sessions. 2. Select the Add New Value tab. 3. Course Code: Enter the without a hyphen (e.g. S230) for the course you are creating a
course session for or use the Look Up feature to select from a list of all courses. 4. Select the Add button. 5. Session Status: Accept the default of Active.
• Active. Active course sessions can be managed by users with access. 6. Session Administration: Accept the check in the checkbox.
• When checked, the session’s enrollment, instructors, reports, certificates, etc. are managed in IQCS. Responder training records and competency records updated.
• If the box is not checked, responders cannot be enrolled nor will competency records or training records be updated.
7. Select the Nomination Workflow check box if you want to use the training nomination process built into IQCS for this course session (see the next section of this document to learn about nomination workflow).
• When checked, this indicates the session is included as a choice in the nomination workflow.
• If the box is not checked, the session will not show up in the list of courses for which a responder can be nominated.
8. Rescheduled: Select the box if you are changing session information. • Check the Rescheduled box only if you change session information, such as dates or
times, so you know you have made changes to the original information. When you select this check box and save the page, the system changes the letter code in the student training record to RSC (reschedule).
9. The Within Area box indicates the intent to have courses taught to the local area students. 10. Start Date and End Date: Enter a start and end date for the course session.
• If you change the date or time of the session after your initial save, you will have to change the date and time on both the Session Information tab and on the Location/Instructor tab. If you do not change the date and time in both places you will get a Cut Session error message.
11. Start Time and End Time: Enter start and end time for the course session 12. Duration: Is automatically populated from the Course table and is editable. The duration
unit defaults to ‘Hour’, which is the most commonly used value. Duration can be changed to other units of measure.
13. Min Students/Session and Max Students/Session: Enter the values that fit your session. The values of 1 and 999 have been set in the Course table in order to give the most flexibility to the system.
14. Vendor ID: If a vendor offers the course, enter the Vendor ID in.
Module 7: Training and Nomination Administration June 2021
Page 9
15. Course Coordinator ID -Look up and select the course coordinator or enter the EmplID of the course coordinator.
16. Course Offer Level: Select the level (coverage) of the course. 17. Sponsor Unit ID: Enter the unit id of the office sponsoring the training. 18. Enter or look up the Nomination Deadline and the Nomination Notification Date when
the course uses the nomination process. 19. Pre-work Due Date: Enter or look up the when the session has pre-work required. 20. Enter a Security Group ID or any EmpIDs who have session access into the Course Session
Security area. • IQCS applies security to session management. Only those individuals with
designated access will be able to make changes to session data, including enrollment, dates, and session completion. These individuals are: session creator, course coordinator, and those identified under authorized session access.
21. Select the Save button. 22. Note the Session ID Number that was created for the session after you saved the course
session.

Module 7: Training and Nomination Administration June 2021
Page 10
NOMINATION WORKFLOW The Nomination Workflow is a process by which IQCS is utilized to manage enrollment requests, multiple levels of prioritization, and a final enrollment roster for an active course session.
To use the nominate process, the Nomination Workflow check box must be selected when you are creating a course session. This indicates the session is included as a choice in the nomination workflow. If the box is not checked, the session will not show up in the list of courses for which a responder can be nominated.
It is important to remember that the identified Max and Min Students/Session field does affect the Nomination Workflow process. If the number of enrollment requests exceeds the identified Max Students/Session number, during the final prioritization process, the system will automatically wait-list students who have been selected but exceed the max. The system will advise the user with the following warning message:
Warning - The number of students enrolled in this session exceeds the maximum number of students specified for the session on the Course Session Table. This is a warning message only.
A user will not get the above message using Rapid Session Enrollment or Course Session Enrollment.

Module 7: Training and Nomination Administration June 2021
Page 11
Selecting Facilities and Instructors Instructions
After you create a course session, you can assign facilities and instructors to that course session.
INSTRUCTIONS – MANAGING FACILITIES AND INSTRUCTORS Follow the directions below to assign facilities and instructors to a course session.
1. Navigate to Training Administration > Course Sessions > Course Sessions. 2. Search for and select course session. 3. Select the Location, Instructor Tab 4. In the Training Location section:
a. Use the Look Up feature to select the facility where the training will be held. The facility name will appear in the block next to the facility code. For facility contact information, select the Training Facility Address link. This information is held on the Facility Table.
b. The Training Room hyperlink will appear if rooms have been identified on the Facilities Table. Select the room where the training will be held. Note. Training rooms with adequate seating will appear in the list.
i. Select OK. The page will return to the Location, Instructor tab. 5. Vendor ID. Use the Look Up feature to select the Vendor ID when an instructor is a
through a vendor. Vendor information is stored in the Vendor Table. 6. Instructor ID. Use the Look Up on the Instructor ID field and select an instructor.
• Only instructors who are identified on the Instructor Table for the course will be listed. See the Adding Instructors section.
• To search for an instructor, enter as much information as you have to narrow the search.

Module 7: Training and Nomination Administration June 2021
Page 12
• Only one instructor can be selected at a time. Select the + button to add more instructors to the session (the type of instructor, lead or unit, is designated on the Instructor Table but can be edited at this location).
7. Select the Save button.
EXPENSE TAB You can use the Expense tab to include Part II of NWCG Nomination Form. Part II is the agreement to collect funds.
INSTRUCTIONS – EXPENSE Follow the directions below to use the Expense Tab to add Part II of the NWCG Form.
1. Choose the Expense Tab 2. Enter or look up Tuition 3. Box will populate with Tuition 4. Leave this field blank if you do not do any type of tuition reimbursement
STUDENT ENROLLMENT Enrolling students in a course session in IQCS and maintaining session enrollment information will develop and maintain the course training roster. You will not have to update a responder’s record individually for courses managed within IQCS. When the session is completed, those students who successfully completed a course will have the competency for the course added to their training record then posted to their master record.

Module 7: Training and Nomination Administration June 2021
Page 13
There are multiple pathways to enroll students and maintain rosters in sessions.
• Rapid Session Administration displays minimal information about the responder but allows the user to enroll several responders rapidly and to easily view a list of responders enrolled.
• Course Session Enrollment displays the most information about the responder. • Group Enrollment allows user to define a Group and enroll them all at once into a session.
Session enrollment allows you to select from all responders in the database. Clicking on the magnifying glass will return the first 300 records. Obtaining basic information about your students, such as EmplID and Unit ID, is favorable for this function.
When you are enrolling courses, you should limit enrollments to under 75 students. The PeopleSoft functionality limits the success of completing large sessions.

Module 7: Training and Nomination Administration June 2021
Page 14
RAPID SESSION ADMINISTRATION Rapid Session Administration provides the capability to enroll many students in a session quickly. This screen also allows you to see a list of students assigned to the course session.
INSTRUCTIONS – RAPID SESSION ADMINISTRATION Follow the directions below to enroll students with Rapid Enrollment.
1. Navigate to Training Administration > Student Enrollment > Rapid Session Administration.
2. Search and select course session. 3. Type in or look up the responder’s EmplID. 4. Attendance Status will default to Enrolled. Change this if necessary. 5. Using the + button will allow you to add more students to the session. Repeat this step if
entering multiple students. 6. Once all students are enrolled, click on the Prerequisite Checking button. IQCS will check
and verify that each student meets the requirements. • If the student meets the prerequisites, the Prerequisites Met box will be checked. • If there are no course or competency prerequisites for the course, you will see a
dialog box confirming that there are no prerequisites for the course. 7. Select Save.
You will receive a warning if you enroll a student who has already taken the course. This does not prevent you from enrolling the student. IQCS will also warn you if a student is already enrolled in another session for the same dates.
Do not use Complete on the Rapid Session Enrolment page. Complete is only used at the Session Setup page. Use the Go to Course Session Setup link to transfer to the Course Session page where you initially set up the course session.

Module 7: Training and Nomination Administration June 2021
Page 15
COURSE SESSION ENROLLMENT An alternate method for enrolling students is the Course Session Enrollment, which provides more details about each student. However, this method should be used sparingly as it is difficult to see everyone who is enrolled in one view.
INSTRUCTIONS – COURSE SESSION ENROLLMENT Follow the directions below to enroll students using Course Session Enrollment.
1. Navigate to Training Administration > Student Enrollment > Course Session Enrollment.
2. Search and select course session. 3. EmplID. Type in or look up the responder’s EmplID. 4. The Enrollment/Attendance field will default to Enrolled, and
the Letter Code will display CON for "Confirmed." 5. The Status Date is automatically populated with today’s date. 6. Trn Reason: Select the Trn Reason dropdown menu and select the appropriate training
reason. 7. Prerequisite Checking: Select the Prerequisite Checking button. If the student meets the
prerequisites, the Prerequisites Met box will be checked. A Notes button will appear. The Notes button will display a message explaining whether or not the prerequisite courses and competencies have been met for this responder.
8. Select OK to return to the Course Session Enrollment. 9. Use the + button to add more students to the session. 10. Select Save once you are finished enrolling students.

Module 7: Training and Nomination Administration June 2021
Page 16
You can use the Go to Course Session Setup link to transfer to the Course Session page where you initially set up the course session.
GROUP ENROLLMENT Allows user to define a Group and enroll them all at once into a session. See the Responder Administration Module for instructions on creating a group.
INSTRUCTIONS – GROUP ENROLLMENT Follow the directions below to enroll students using groups.
1. Navigate to Training Administration > Student Enrollment > Group Enrollment. 2. Search for and select the desired course session. 3. Unit ID: Search for and select the Unit ID you will work with. 4. Group ID: Search for and select the Group ID of an existing group. 5. Load Students: Select Load Students. 6. Students assigned to the group will be enrolled into the course. 7. The Enrollment/Attendance field will default to Enrolled, and
the Letter Code will display CON for "Confirmed." 8. Status Date is automatically populated with today’s date. 9. Prerequisite Checking: Select the Prerequisite Checking button.
• If the student meets the prerequisites, the Prerequisites Met box will be checked. • If there are no course or competency prerequisites for the course, you will see a
dialog box confirming that there are no prerequisites for the course. 10. Select the Save button.
You can use the Go to Course Session Setup link to transfer to the Course Session page where you initially set up the course session.
Module 7: Training and Nomination Administration June 2021
Page 17
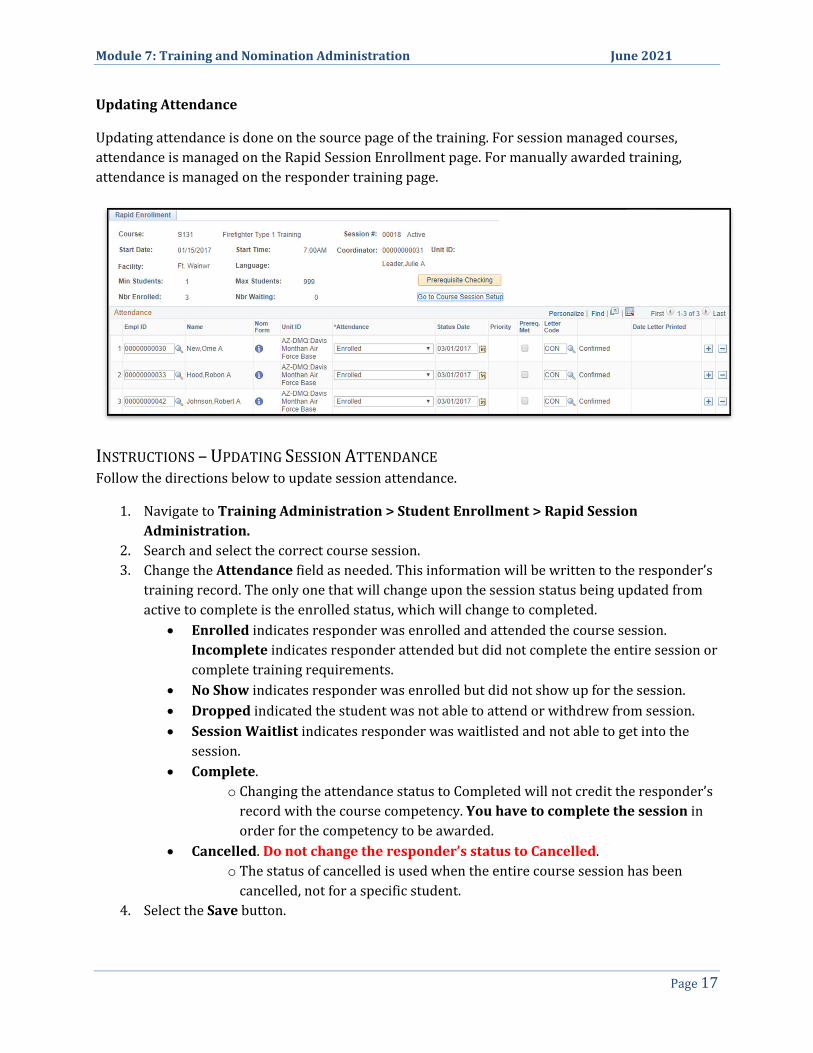
Updating Attendance
Updating attendance is done on the source page of the training. For session managed courses, attendance is managed on the Rapid Session Enrollment page. For manually awarded training, attendance is managed on the responder training page.
INSTRUCTIONS – UPDATING SESSION ATTENDANCE Follow the directions below to update session attendance.
1. Navigate to Training Administration > Student Enrollment > Rapid Session Administration.
2. Search and select the correct course session. 3. Change the Attendance field as needed. This information will be written to the responder’s
training record. The only one that will change upon the session status being updated from active to complete is the enrolled status, which will change to completed.
• Enrolled indicates responder was enrolled and attended the course session. Incomplete indicates responder attended but did not complete the entire session or complete training requirements.
• No Show indicates responder was enrolled but did not show up for the session. • Dropped indicated the student was not able to attend or withdrew from session. • Session Waitlist indicates responder was waitlisted and not able to get into the
session. • Complete.
o Changing the attendance status to Completed will not credit the responder’s record with the course competency. You have to complete the session in order for the competency to be awarded.
• Cancelled. Do not change the responder’s status to Cancelled. o The status of cancelled is used when the entire course session has been
cancelled, not for a specific student. 4. Select the Save button.

Module 7: Training and Nomination Administration June 2021
Page 18
UPDATING A COURSE SESSION There are times when the course session will have to be updated to new course date/time, location, course coordinator, instructors, etc. Updating this information is easily done but can only be accomplished by individuals with security access to the session. These individuals are the: session creator, course coordinator, and those identified under authorized session access.
INSTRUCTIONS – UPDATING A COURSE SESSION
To update information on an already existing course session, follow the process below.
1. Navigate to Training Administration > Course Sessions > Course Sessions. 2. Search and select course session. 3. Make changes to the appropriate field(s). The following highlights important information
when changing specific fields. • Session Status
o Active. Course session is active can be managed by users with access. o Cancelled. Course session has been cancelled. Result of session created incorrectly
or course session was cancelled for other reasons. o Completed. Course session has been completed. Competencies will be awarded.
• Start Date and an End Date o If you change the date or time of the session after your initial save, you will have to
change the date and time on both the Session Information tab and on the Location/Instructor tab. If you do not change the date and time in both places you will get a Cut Session error message.
• Start Time and End Time o If you change the date or time of the session after your initial save, you will have to
change the date and time on both the Session Information tab and on the Location/Instructor tab. If you do not change the date and time in both places you will get a Cut Session error message.
• Rescheduled o Check the Rescheduled box only if you change session information, such as dates or
times, so you know you have made changes to the original information. When you select this check box and save the page, the system changes the letter code in the student training record to RSC (reschedule).
• Course Session Security o IQCS applies security to session management. Only those individuals with
designated access will be able to make changes to session data, including enrollment, dates, and session completion. These individuals are: session creator, course coordinator, and those identified under authorized session access.
4. Save button.

Module 7: Training and Nomination Administration June 2021
Page 19
COMPLETING A COURSE SESSION Before completing the course session, you must ensure that the session roster is correct. Competencies will be awarded to those students who successfully completed the course and information will be added to the responder’s training record.
INSTRUCTIONS – COMPLETING A COURSE SESSION
To complete an existing course session, follow the process below.
1. Navigate to Training Administration > Course Sessions > Course Sessions. 2. Search and select course session. 3. Once you are sure that the student roster and enrolment is correct, change the Session
Status to Complete. This will complete the session and award the competency for each student who attended the course session.
4. Select the Save button.
You can view the responder's record to verify the course completion information has been posted. Upon completion of the course session, Course Session Costs can be updated.
The update to the responder’s training record and the awarding of the competency is an automatic process when a session is set to Complete. If the session roster is not correct after completing the course, the session will have to be reset to Active and the corrective action done to the session or to the responder enrollment status on the Rapid Session Enrollment page. When the session is set to Active the enrollment status of all the responders will be set to the state they were at before the course was complete. Any awarded competencies will be removed from the responders record until the session is set to Complete.

Module 7: Training and Nomination Administration June 2021
Page 20
CORRECTING A COURSE SESSION ENROLLMENT STATUS
Use the process below to correct a status of a responder in a completed course session.
1. Navigate to Training Administration > Student Enrollment > Rapid Session Administration.
2. Search and select correct course session. 3. Set the session back to Active
1. This will put all responders back to the status they held prior to the session being completed. Generally, this will be Enrolled.
2. For any responder that was in a status of Complete, the awarded competency will be removed from their competency page and their training page will have a status of enrolled.
4. Go to the view course session enrollment page 5. Update the attendance status of the responder. For example, Enrolled to Dropped or
Incomplete to Enrolled. Do not use Complete on the Rapid Session Enrolment page. Complete is only used at the Session Setup page.
6. Go to the course session setup and set the session back to Complete. 7. This will put all enrolled responders back to complete, award any competencies, and
update the training page. The corrected action on responder(s) enrollment status will be applied and any corresponding actions on the training page and competency page will be updated.
AWARDING CREDIT FOR ATTENDING A COURSE There are two ways to give a responder credit for having attended a course:
• Session Administration. Create a course session, enroll students, and complete the session. • Do not create a course session if you did not host the course session. If a responder
in your unit completed a training that has not been documented in IQCS, then add the completion manually at the Responder Training page.
• Manually Crediting. Adding the completed training to the responder's training record on
the Responder Training page.
MANUALLY CREDITING COURSE COMPLETION If a course is not managed via course session in IQCS but a responder has documentation that they have completed a course that is applicable to a position qualification, then his or her training record will have to manually updated.
Remember that account managers will not have to manually update a responder's record for courses managed within IQCS via course session.
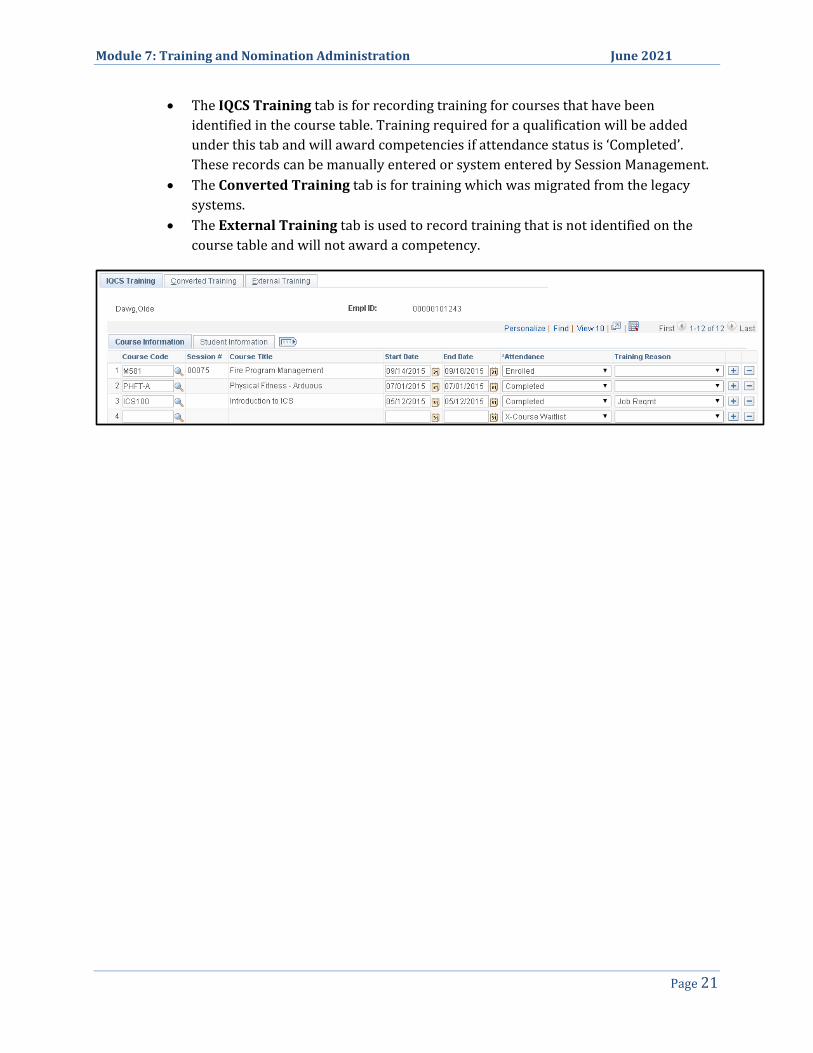
Most training will be added under the default IQCS Training tab.
Module 7: Training and Nomination Administration June 2021
Page 21
• The IQCS Training tab is for recording training for courses that have been identified in the course table. Training required for a qualification will be added under this tab and will award competencies if attendance status is ‘Completed’. These records can be manually entered or system entered by Session Management.
• The Converted Training tab is for training which was migrated from the legacy systems.
• The External Training tab is used to record training that is not identified on the course table and will not award a competency.

Module 7: Training and Nomination Administration June 2021
Page 22
INSTRUCTIONS - MANUALLY CREDITING COURSE COMPLETION
To update manually award training to a responder that was not managed by session administration in IQCS, follow the process below.
1. Navigate to Qualification Management> Competency Management > Responder Training.
2. Search and select responder. • Once you have selected a responder, the training page will appear with the
responder’s data and their attendance (Enrolled, Completed, Failed, etc.) record for each course.
3. Select the tab that you will be entering training information under. • Most training will be added under the default IQCS Training tab.
4. Select the plus (+) button to add a new row. 5. Enter or look up the Course Code; Session number will not be entered. 6. Enter or select the start and end dates for the course. 7. Change Attendance to Completed if you have a training certificate on file. 8. Training Reason. Not a required field but is for tracking purposes only. 9. Select the Save button.
If the course has competencies associated with it, the responder’s competency record will be automatically credited with the competencies.

Module 7: Training and Nomination Administration June 2021
Page 23
VIEW RESPONDER TRAINING RECORDS You can confirm a responder's completed training by navigating to the Responder Training Summary or to the Responder Summary pages.
INSTRUCTIONS - RESPONDER TRAINING SUMMARY
To view a responder’s training history, follow the process below.
1. Navigate to Training Administration > Student Enrollment > Responder Training Summary.
2. Search and select responder. 3. This screen will show a summary for all training for a responder. This is a read-only screen.
INSTRUCTIONS - RESPONDER SUMMARY
To view a responder’s training history, follow the process below.
1. Navigate to Qualification Management > Competency Management > Responder Summary.
2. Enter or look up the responder’s record that you would like to review. 3. This screen will show the summary history for a responder. This is an information only
screen. Select the Training Summary tab to view a responder’s training summary history.

Module 7: Training and Nomination Administration June 2021
Page 24
INSTRUCTOR TABLES To select the correct instructor while setting up a course session, the instructor will have to be present on the Instructor Table. Entering instructors in the Instructor Table and then identifying them at the session allows users to:
• Manage information about internal and external instructors. • Track instructor history. • Find instructors for specific courses. • Track instructor costs and areas of expertise. • Compare instructor requirements for a course against an instructor’s competency profile.

Module 7: Training and Nomination Administration June 2021
Page 25
ADDING INSTRUCTORS TO THE INSTRUCTOR TABLE Entering your instructors in the instructor table and then identifying them at the session allows users to:
• Enter information about internal and external instructors. • Track instructor history. • Find instructors for specific courses. • Track instructor costs and areas of expertise. • Compare instructor requirements for a course against an instructor’s competency
profile.
INSTRUCTIONS - ADDING INSTRUCTORS TO THE INSTRUCTOR TABLE
To add a responder to the instructor table and identify the courses eligible to instruct, follow the process below.
1. Navigate to Training Administration > Training Details > Instructors. 2. Select the Add a New Value Tab. 3. Search and select responder. 4. Select Add. 5. The Internal/External field will auto-fill with “Internal.” This means the individual is
an employee internal to the IQCS system. 6. The Vendor ID, School Code, and School Name fields are grayed out. These fields will
only be accessed when the instructor is a non-employee (external) that can be associated with school or vendor.
7. Use the Per Unit Cost field when an external instructor charges for instruction. This cost will be added to the course costs.
8. Fill out the Area of Expertise field. 9. Enter autobiographical information in the free-form Description box. 10. Select the Contact Information link. Phone and e-mail information will appear if the
instructor’s account manager has entered it. 11. Select the Qualification tab. 12. Enter the Course Code and hit the Tab key. The Competencies Match Analysis box will
appear if all competencies have been met. You may add an instructor to the instructor table without matching the competencies.
13. Select the Instructor Level from the dropdown menu and select the appropriate level.
Note: For definition of Unit, Level and Coach Instructors, refer IQCS Glossary. Coach is listed as Trainer/Coach per NWCG definition.
14. Select the Save button.

Module 7: Training and Nomination Administration June 2021
Page 26
COURSE INSTRUCTOR HISTORIES
IQCS will track course sessions taught by an instructor in the instructor’s individual record.
• Course Instructor History. View the instructors that have taught a specific course. • Instructor History. View all the course sessions an instructor has taught and details
concerning those course sessions.
INSTRUCTIONS – COURSE INSTRUCTOR HISTORY
Use the steps below to view the course instructor history. This view allows you access to all instructors who have taught a specific course.
1. Navigate to Training Administration > Training Details > Course Instructor History.
2. Enter or select the course code/title. 3. On the Course Information tab, you will view the summary of the instructor(s), which
includes: EmplID, Name, Agency, Organization ID, State, Instruction Level, Vendor Name, and session/course start date.
4. On the Session Information tab, you can view the specifics of the different course sessions: Session Start Date, Course Session Number, Training Facility, and Course Coordinator.

Module 7: Training and Nomination Administration June 2021
Page 27
VIEWING INSTRUCTOR HISTORY Any course taught by an instructor identified on the Course Session Location, Instructor page will be added automatically to this Instructor History page when that session is marked as “Completed” and saved.
INSTRUCTIONS –INSTRUCTOR HISTORY
To add previously taught courses to an instructor's training history, follow the process below.
1. Navigate to Training Administration > Training Details > Instructor History. 2. Search and select responder (instructor). 3. Select the + button to add a new record. A new row appears that includes blank
fields. 4. Enter the course code (without hyphens) in the Course Nbr field. The system will
put the course title in the Description field and close the Course Nbr field to editing. 5. Select the Instructor Level from the dropdown list. 6. Select the default Times Taught of “1”. 7. Enter the Session Start Date in the next field. 8. Select the Session Detail tab. Or select the Expand button to expand the two visible
tabs into one single row. 9. Enter the rest of the relevant information. (Session # may not be applicable since
the session may not have been administered through IQCS). Do not use a session number unless the instructor actually taught that specific session.
10. Once you have all the data entered correctly, select the Save button. 11. Instructor history will appear on the responder master record.
Once you enter field information and advance to the next field, you can no longer edit the previous field. If you made a mistake in a field and it is no longer editable, delete the row by selecting the minus button on the far right of the row and begin again.

Module 7: Training and Nomination Administration June 2021
Page 28
MANAGING THE FACILITIES TABLE There are over 300 facilities in the Facility Table. Do a search before adding a new one to ensure you are not duplicating any data (narrow the search by selecting the state). Also, since there are so many facilities, it is recommended you keep track of the facility codes you create.
INSTRUCTIONS – MANAGING THE FACILITIES TABLE
To add or edit training facility information at the Facilities Table, follow the process below.
1. Navigate to Training Administration > Training Details > Training Facilities. 2. Select the Add a New Value tab. 3. Enter up to six characters to designate your training facility. This will become the Facility
Code you use for searches. It is recommended that you follow the naming conventions of the facilities that are entered into IQCS. Examples of facility codes include “GBTR” for Great Basin Training Center or “NDSU” for North Dakota State University.
4. Select the ADD button. 5. Select the business unit (usually, it is NWCG0). 6. Facility Name: Enter the facility name in the Description field 7. Short Description: Enter a short name of no more than 10 characters. 8. Location Code-Enter location code to populate address.
OR
9. Edit Address: If Location Code is not used, select the link and enter the address of the training facility Mail Drop ID-Enter Mail Drop if used.
10. Select the OK button. 11. Contacts and Equipment tab: Enter the name of the contact person for that facility. 12. Vendor ID: If a vendor operates the facility, enter the (the vendor will have to appear on
the Vendor Table before entering it here). 13. Phone Type: From the dropdown menu enter the phone number for the contact at that
facility. You may add an additional phone numbers by clicking on the + button.

Module 7: Training and Nomination Administration June 2021
Page 29
14. Equipment/Materials Available - Enter the equipment and materials available in each room.
15. Select the Training Rooms Tab 16. Enter the following optional information: Room code, room name, building number, floor
number, costs. 17. Maximum Number of Students: Enter the maximum number of students for the room. 18. Room Active: The checkbox is automatically checked. In order to select this room at the
course session screen, this box must be checked. 19. Select the + button to add a row in the Training Rooms box to add more rooms. 20. Fixed Equipment/Materials: Under this section, look up and select the Equipment
Code to list equipment available in that room. Enter additional equipment by selecting the + button.
21. Select the Directions tab: Enter directions to find the training facility in the free-form field. 22. Select the Save button.
The equipment/materials codes are in the Equipment Table. The information entered thus far includes course materials that are available through the Great Basin Cache and the Publications Management system. If you charge for the use of materials, you may enter this information. You can track the actual costs of training using the Training Administration capabilities in IQCS. This information could also be useful if a vendor operates the facility and you want a list of the available training assets.

Module 7: Training and Nomination Administration June 2021
Page 30
MANAGING THE VENDOR TABLE You may contract/rent facilities from known sources or vendors on a regular basis to conduct training course sessions. You can enter information about these vendors into the Vendor Table. You can associate external instructors with these vendors.
INSTRUCTIONS – MANAGING THE VENDOR TABLE
To add or edit vendor information, follow the process below.
1. Navigate to Training Administration > Training Details > Vendors. 2. Search for a vendor or Select the Add a New Value tab. 3. Vendor ID: Enter an ID of six characters or fewer. 4. Select the Add button. 5. Vendor Description: Enter a description of up to 30 characters. 6. Short Description: Enter a short name of up to 10 characters. 7. Vendor Type: Select a type from the drop down list. 8. Accounts Payable Vendor ID: Enter an ID for accounts payable. 9. Select the Address tab. 10. Per Unit Cost: Enter the unit cost and select the Cost Unit. 11. Edit Address: Select the edit address link and enter the address of the vendor. 12. Select the OK button. 13. Enter comments about the vendor (optional). 14. Select the Save button.
To view the Vendor Contacts
1. Navigate to Training Administration > Training Details > Vendor Contacts. 2. Search for a vendor ID 3. Accept the Contact # sequentially (1, 2, 3, etc.). 4. Enter the name of the contact, title, and contact type. 5. Phone Type: Select the type from the dropdown menu and enter the phone number. 6. Select the Save button.
Remember, any information you add or edit for a vendor changes the data in the system for everyone. Use good judgment when adding/editing vendor information.

Module 7: Training and Nomination Administration June 2021
Page 31
TRAINING NOMINATION Only active course sessions that have the Nomination Workflow box checked will be available for the Nomination Workflow process.
A training officer or nomination coordinator can submit nominations for any responder whom they have been identified as the Training Officer or Alternate Training Officer on the responder's Job Data page.
Approval of the nomination by the supervisor is performed before the nomination is entered into IQCS. Once approved, the training officer then enters nominees from their unit for active course sessions. Once nominations have been submitted, the local, zone, geographic area, and national procedures for prioritization of students can take place.
The course coordinator at the agency or facility hosting the session can then enroll the prioritized nominees in the course.
The training officer will access the Training Nomination component. Selecting the Request Training Enrollment link launches the Search page for courses with active sessions.
The following tasks need to be completed before a nomination is submitted:
• The responder's record needs to be updated and complete. • The training officer (or alternate training officer) listed on the
responder's record needs to be the one submitting the nomination.
RESPONDER RECORDS The Training Officer field on the Job Data page must be filled out correctly. A mass change of the training officer can be done on the Responder Administration > Unit Summary page. For example, this would be done if a new training officer were hired for a unit.
The Unit ID field must be defined for each responder. The prioritization process sorts the nominations by Unit ID.
It is highly recommended that you verify and update the responder’s contact information fields on the Personal Data pages (such as business e-mail and phone numbers). These fields populate the student roster report, course contact list, tuition billing report, and several other training reports. The populated address on the Nomination Form is the address associated with the Location Code on the Job Data page.

Module 7: Training and Nomination Administration June 2021
Page 32
INSTRUCTION - SUBMITTING A TRAINING NOMINATION Follow the directions below to submit a training nomination.
1. Navigate to Training Nomination > Training and Development > Request Training Enrollment.
2. Select one of the four hyperlink options to search for a course session. The selected Course Search page will appear.
3. Enter the search criteria and select the Search button. A list of available sessions will be displayed by date. If active sessions are available for the selected search criteria, then a blue hyperlink will be displayed.
4. Select View Available Sessions. 5. Select the desired session number in the left-hand column. Only course sessions that have
the Nomination Workflow box checked will be available. Make sure you select the correct session. Reference your Training Center’s web page (if available) to verify the session number.

Module 7: Training and Nomination Administration June 2021
Page 33
6. Select the check boxes next to the names for the employees you want to submit nominations for or select the Select All button to nominate every student.
7. Select the Continue button. 8. The next page allows you to make comments for each employee you nominated. These
comments will carry forward throughout the nomination and enrollment process. These comments will assist training officers/coordinators in selecting employees for a course. You may add reasons why the student needs this course in the Comment field.

Module 7: Training and Nomination Administration June 2021
Page 34
9. When you have completed your comments, select the Submit button. You can also select the hyperlink Return to Select Employees to nominate other employees.
10. You will now see that the submitted training enrollment request was successful. Select OK. 11. To verify the nominations, navigate to Training Nomination > Training and
Development > View Training Request Status.

Module 7: Training and Nomination Administration June 2021
Page 35
NOMINEE DETAILS Once nominations have been made, training officers (local training officers, zone training coordinators, etc.) can go the Prioritize Trainee Nominee page and prioritize their nominees.
Remember that training officers complete the prioritization of their unit’s nominees by a predetermined date according to the unit’s procedures.
Levels of prioritization • Includes last person who took prioritization
action • Last priority level with numbers will transfer to
Summary Listing.
Enter final remarks
Delete trainee nomination

Module 7: Training and Nomination Administration June 2021
Page 36
INSTRUCTIONS - UNIT LEVEL PRIORITIZATION Follow the directions below to do unit level prioritization.
1. Navigate to Training Nomination > Training and Development > Prioritize Trainee Nominees.
2. Enter the information for the desired course in the Search by field. 3. Select Search. 4. Select Course Session. The Prioritize Trainee Nominees page is shown. 5. You can view information about the course coordinator and the facility by clicking the
hyperlinks in the Course Session Information box. 6. Enter the Unit priority next to each name for your unit. As each level prioritizes their
nominees, duplicate unit priority numbers can occur. By the end of the prioritization process, a priority number MUST appear at each level for each nominee.
a. Level 1: Sub-Unit Training officer b. Level 2: Unit Training Officer c. Level 3: Zone Training Officer d. Level 4: Geographic Area Training Officer e. Level 5: National and/or Outside Geographic Area Training Officer
7. The last level of priority that is set will be transferred to the Summary Listing page. For example, if the highest level of priority set is Geographic Area, then the information in Geographic Area will be transferred to the Summary Listing page.
8. Once the nominees have been prioritized, select Save.
Alternate Method for having Unit Training Officers prioritize their nominees:
1. Select the Excel Spreadsheet icon. 2. The spreadsheet file can then be saved in a folder and sent as an email attachment or
mailed to the unit’s training officers to prioritize and send back to the nomination coordinator.
Module 7: Training and Nomination Administration June 2021
Page 37
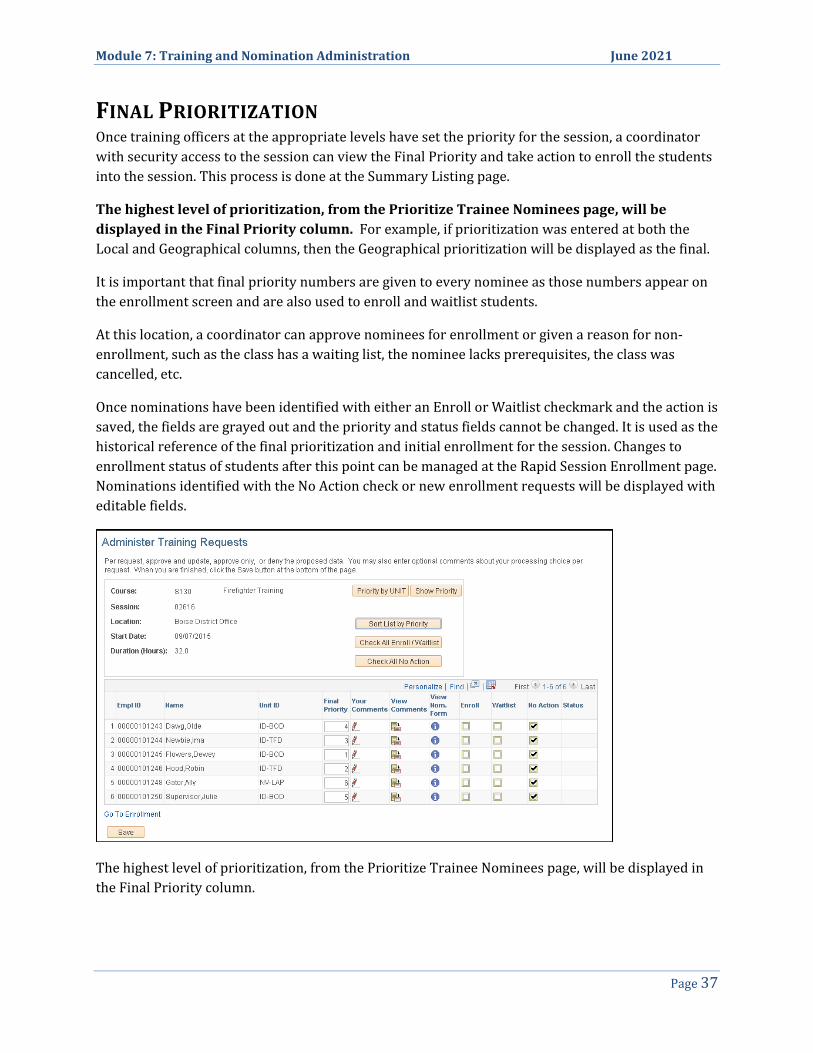
FINAL PRIORITIZATION Once training officers at the appropriate levels have set the priority for the session, a coordinator with security access to the session can view the Final Priority and take action to enroll the students into the session. This process is done at the Summary Listing page.
The highest level of prioritization, from the Prioritize Trainee Nominees page, will be displayed in the Final Priority column. For example, if prioritization was entered at both the Local and Geographical columns, then the Geographical prioritization will be displayed as the final.
It is important that final priority numbers are given to every nominee as those numbers appear on the enrollment screen and are also used to enroll and waitlist students.
At this location, a coordinator can approve nominees for enrollment or given a reason for non-enrollment, such as the class has a waiting list, the nominee lacks prerequisites, the class was cancelled, etc.
Once nominations have been identified with either an Enroll or Waitlist checkmark and the action is saved, the fields are grayed out and the priority and status fields cannot be changed. It is used as the historical reference of the final prioritization and initial enrollment for the session. Changes to enrollment status of students after this point can be managed at the Rapid Session Enrollment page. Nominations identified with the No Action check or new enrollment requests will be displayed with editable fields.
The highest level of prioritization, from the Prioritize Trainee Nominees page, will be displayed in the Final Priority column.

Module 7: Training and Nomination Administration June 2021
Page 38
PRIORITY BY UNIT Priority by Unit displays responders for just your local unit. Sort the Priority by Unit list by selecting any of the column headers.
Show Priority will show all units with nominees. Sort the Show Priority list by selecting any of the column headers.
If a Unit ID, zone, geographical area, etc., does not prioritize a nominee at the last level that numbers are entered, there will be no priority number moved from the Prioritize Training Nominee page to the Summary Listing page. This will be an indication that a particular entity did not follow through with prioritization.
Priority numbers can still be added to those nominees on the Summary Listing page. If no one has been enrolled or wait-listed in Summary Listing, you can readjust the priorities (only with authorization of all players in the prioritization process) to take those nominees into consideration.
Once action has been taken on nominees in Summary Listing, their priorities cannot be changed. New blank priorities can be filled in later with a priority number and action taken. It is important that priority numbers be given to every nominee as those numbers appear on the enrollment screen. These numbers are used to fill vacancies with wait-listed nominees in priority order.
Module 7: Training and Nomination Administration June 2021
Page 39
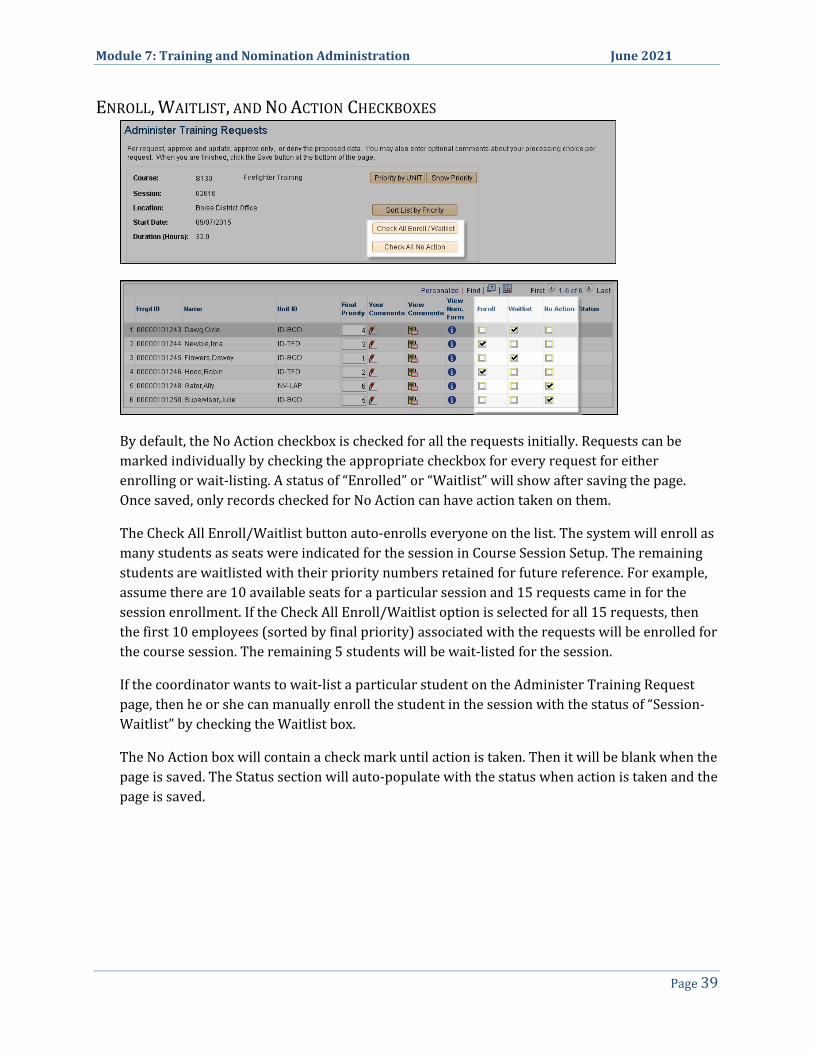
ENROLL, WAITLIST, AND NO ACTION CHECKBOXES
By default, the No Action checkbox is checked for all the requests initially. Requests can be marked individually by checking the appropriate checkbox for every request for either enrolling or wait-listing. A status of “Enrolled” or “Waitlist” will show after saving the page. Once saved, only records checked for No Action can have action taken on them.
The Check All Enroll/Waitlist button auto-enrolls everyone on the list. The system will enroll as many students as seats were indicated for the session in Course Session Setup. The remaining students are waitlisted with their priority numbers retained for future reference. For example, assume there are 10 available seats for a particular session and 15 requests came in for the session enrollment. If the Check All Enroll/Waitlist option is selected for all 15 requests, then the first 10 employees (sorted by final priority) associated with the requests will be enrolled for the course session. The remaining 5 students will be wait-listed for the session.
If the coordinator wants to wait-list a particular student on the Administer Training Request page, then he or she can manually enroll the student in the session with the status of “Session-Waitlist” by checking the Waitlist box.
The No Action box will contain a check mark until action is taken. Then it will be blank when the page is saved. The Status section will auto-populate with the status when action is taken and the page is saved.

Module 7: Training and Nomination Administration June 2021
Page 40
PROCESS FOR FINAL PRIORITY SESSION ENROLLMENT Nomination Coordinators can use the process below to view the final prioritization and take action for enrollment for a course session.
INSTRUCTIONS – SUMMARY LISTING Follow the directions below to view and take action on the final prioritization.
1. Navigate to Training Nomination > Training and Development > Summary Listing. 2. Search and select the correct course session. 3. Select Show Priority or Priority by Unit buttons to view the Nomination Priorities page.
From this page, you can create an Excel spreadsheet by clicking on the yellow grid icon. 4. The final priority for each student is automatically carried over from the Prioritize Training
Nominee page. The highest level of prioritization will be displayed in the Final Priority column and is editable. It is important that final priority numbers are given to every nominee as those numbers appear on the enrollment screen and is also used to enroll and waitlist students
5. Select the Edit icon under Your Comments column to enter or view comments for a nominee.
6. Select View Comments for the nominee to read the previous comments made by the training officer.
7. The View Nom. Form icon will display the completed Nomination Request Form for the nominee.
8. Enroll column checkbox. If selected the nominee will be enrolled into the course session. 9. Waitlist column checkbox. If selected the nominee will be waitlisted for the course session. 10. No Action column checkbox. All records will initially be checked as No Action. This will not
enroll or waitlist a trainee into the course. 11. The Status column will be updated automatically once the process is saved and completed. 12. Select the Save button. 13. Select the Go to Enrollment hyperlink to go the Rapid Session Administration page. You
can change the enrollment status on the Course Session Enrollment or on the Rapid Session Enrollment pages.
Once nominations have been identified with either an Enroll or Waitlist checkmark and the action is saved, the fields are grayed out and the priority and status fields cannot be changed. It is used as the historical reference of the final prioritization and initial enrollment for the session. Changes to enrollment status of students after this point will can be managed at the Rapid Session Enrollment page. Nominations identified with the No Action check or new enrollment requests will be displayed with editable fields.

Module 7: Training and Nomination Administration June 2021
Page 41
TRAINING ADMINISTRATION RELATED REPORTS The following reports may assist a user in the management of training in IQCS. For a full list of reports available in IQCS and directions on how to run reports, or specifics on a report, please refer to the Reports Module.
Reports > Training > Admin Report Number Training Count C106 Training Schedule C110 Course Awarded Comps C118 Course Equivalents C119 Number Courses Offered C140 Course List C402
Reports > Training > Instructors Report Number Qualified Instructors C144
Reports > Training > Course Sessions Report Number Training Roster C126
Sign-In Sheet C200
Tent Cards/Name Tags C210 - C211
NWCG Training Certificate C232
Mailing Labels C221 Reports > Training > Responders Report Number
License and Certificate C11
Fitness/RT130 Expiration C26
Expiring Recurrent Training C048
Courses Taken/Not Taken C170
Training Assessment C401 Reports > Positions Report Number Position Qualification Criteria C94