iricell customer training modules name - · pdf fileiricell customer training modules...
TRANSCRIPT
iRICELL Complete Urinalysis Training Guide Page 1 of 187 Beckman Coulter Ver 2.1 (July 2017) Technical Training
iRICELL Customer Training Modules
Name_________________________
This document is not intended to replace the information in your Instrument Instructions for Use Manual (IFU). Information in the Instructions for Use Manual supersedes information in any
other manual.

iRICELL Complete Urinalysis Training Guide Page 2 of 187 Beckman Coulter Ver 2.1 (July 2017) Technical Training
WARNINGS AND PRECAUTIONS
READ ALL PRODUCT MANUALS AND CONSULT WITH BECKMAN COULTER-TRAINED PERSONNEL BEFORE ATTEMPTING TO OPERATE INSTRUMENT. BECKMAN COULTER, INC. URGES ITS CUSTOMERS TO COMPLY WITH ALL NATIONAL HEALTH AND SAFETY STANDARDS SUCH AS THE USE OF BARRIER PROTECTION. THIS MAY INCLUDE, BUT IT IS NOT LIMITED TO, PROTECTIVE EYEWEAR, GLOVES AND SUITABLE LABORATORY ATTIRE WHEN OPERATING OR MAINTAINING THIS OR ANY OTHER AUTOMATED LABORATORY EQUIPMENT.
TRADEMARKS
The iChem®VELOCITY and iQ®200 Series system are trademarks of Iris Diagnostics Division of IRIS International, Inc. All other trademarks are the property of their respective owners Beckman Coulter and the stylized logo are trademarks of Beckman Coulter, Inc. and are registered with the USPTO. IRIS is a trademark of Iris International, Inc. and is registered with the USPTO All other trademarks, service marks, products or services are trademarks or registered trademarks of their respective holders.
Made in USA

iRICELL Complete Urinalysis Training Guide Page 3 of 187 Beckman Coulter Ver 2.1 (July 2017) Technical Training
REVISION STATUS
iRICELL Customer Training
Revision1.3 Release (Nov 2015) Software release 7.0 (and higher) Presented December 2015, Miami, Florida
Revision2.0 Release (June 2017) Software release 7.0 (and higher) Presented November 2016, Miami, Florida

iRICELL Complete Urinalysis Training Guide Page 4 of 187 Beckman Coulter Ver 2.1 (July 2017) Technical Training
iRICELL Complete Urinalysis Training Guide Page 5 of 187 Beckman Coulter Ver 2.1 (July 2017) Technical Training
TABLE OF CONTENTS –
Section 1- Routine Operations
Module Page
Package Inserts 7
Software Overview 13
Daily Maintenance 27
VELOCITY Consumables (QC Configuration) 37
Processing Quality Control 43
QC Statistics 53
Sample Analysis 61
Auto-Release and Result Verification 73
Importing and Exporting Results 93
Section 2- Maintenance
Sample Flow component Identification 103
Weekly and Monthly Maintenance 115
Quarterly and As Needed Maintenance 123
Troubleshooting 131
Shutdown and Restart 141
Section 3-Additional Topics
Body Fluids 149
Sample Analysis 2 161
Security Access 169
Traceability 177
View Log 183

iRICELL Complete Urinalysis Training Guide Page 6 of 187 Beckman Coulter Ver 2.1 (July 2017) Technical Training

iRICELL Complete Urinalysis Training Guide Page 7 of 187 Beckman Coulter Ver 2.1 (July 2017) Technical Training
ICHEM VELOCITY STRIPS PACKAGE INSERTS
OBJECTIVES
Given an iChemVELOCITY Strip package insert be able to:
Locate what specific tests are based on
Locate sensitivity of specific tests
Locate and describe the limitations of specific tests
Why Is It Important?
The iChemVELOCITY Strips are manufactured for use only with the iChemVELOCITY Urine Chemistry system and are intended for use exclusively by healthcare professionals. These qualitative or semi-quantitative measurements can be used along with other diagnostic tools in the evaluation of renal, urinary, and metabolic disorders.
Resources
iChemVELOCITY Package insert

iRICELL Complete Urinalysis Training Guide Page 8 of 187 Beckman Coulter Ver 2.1 (July 2017) Technical Training

iRICELL Complete Urinalysis Training Guide Page 9 of 187 Beckman Coulter Ver 2.1 (July 2017) Technical Training
INFORMATION/PRACTICE
The iChemVELOCITY strip package inserts are laid out in the following order:
Intended Use: The iChemVELOCITY Strips are manufactured for use only with the iChemVELOCITY Urine
Chemistry system and are intended for use exclusively by healthcare professionals. These
qualitative or semi-quantitative measurements can be used along with other diagnostic tools in
the evaluation of renal, urinary, and metabolic disorders.
Principle of the tests and chemical composition of each pad:
Precautions
Storage and Stability of the strips
Specimen collection and preparation
Procedure
Follow the directions in the system’s IFU. The system will automatically read each analyte
and the results are displayed or printed as soon as they are available.

iRICELL Complete Urinalysis Training Guide Page 10 of 187 Beckman Coulter Ver 2.1 (July 2017) Technical Training
Quality Control
Clinical performance of the iChemVELOCITY Strips should be confirmed regularly using
IRISpec Urine Chemistry Controls CA/CB/CC. Each individual laboratory should establish its
own guidelines for acceptable clinical performance. Follow Local, State and Federal
guidelines concerning quality controls.
Limitations of the procedure which include:
Expected Values
Sensitivity
Performance Characteristics
Limitations
Technical Support
References
Method Comparison
The performance of the iChemVELOCITY was compared with commercially available
urinalysis systems. Urine samples were from a hospital or a commercial laboratory. Samples
with concentrations covering the entire assay reporting range were tested. The urinalysis
systems used provided semi-quantitative and/or qualitative results with the exception of
glucose and SG, where quantitative results were provided.
Precision
Within-run precision – Three levels of target analyte concentrations for each assay
(negative, first positive level and highest positive level) were tested 3 times each for 20 runs.
The exact % agreement with expected results is shown
Day to day precision – Three levels of target analyte concentrations for each assay
(negative, first positive level and highest positive level) were tested over 20 non-consecutive
days. The exact % agreement with expected results is shown.
Congratulations, you have finished this module! Continue to the Skill on the next page

iRICELL Complete Urinalysis Training Guide Page 11 of 187 Beckman Coulter Ver 2.1 (July 2017) Technical Training
SYSTEM OVERVIEW SKILL CHECK
Using an iChemVELOCITY Strip package insert answer the following questions:
1. Ascorbic Acid is based on what method test?_______________________________
2. Which type of bacteria is not detected in the Nitrite test?______________________________
3. What color does the blood pad change to based on the peroxidase effect of hemoglobin and
myoglobin?________________________________________________________________
4. What is the sensitivity of Protein? ________________________________
5. What is the sensitivity of Ascorbic Acid?____________________________
6. What is the sensitivity of Bilirubin?________________________________
7. What is the sensitivity of Leukocytes Esterase?_____________________________
8. Ascorbic Acid can interfere with the following at what concentration?
a. Blood_____________________________
b. Bilirubin____________________________
c. Nitrite______________________________
d. Glucose_____________________________
e. Ketone______________________________

iRICELL Complete Urinalysis Training Guide Page 12 of 187 Beckman Coulter Ver 2.1 (July 2017) Technical Training

iRICELL Complete Urinalysis Training Guide Page 13 of 187 Beckman Coulter Ver 2.1 (July 2017) Technical Training
SOFTWARE OVERVIEW
OBJECTIVES
Given an operating iRICELL Complete Urinalysis System:
Log On and Log Off the APUI
Be able to identify the iRICELL System Software
Why Is It Important?
This module introduces the basics of the iRICELL Complete Urinalysis System. A basic software overview allows identification of the general parts of the operating system known as the APUI (Analysis Processor User Interface and help identify common screen elements useful for efficient navigation. The introduction to System HELP shows how to access the information contained in the IFUs.
Resources
iRICELL System
iChemVELOCITY IFU
iQ IFU

iRICELL Complete Urinalysis Training Guide Page 14 of 187 Beckman Coulter Ver 2.1 (July 2017) Technical Training

iRICELL Complete Urinalysis Training Guide Page 15 of 187 Beckman Coulter Ver 2.1 (July 2017) Technical Training
I
NFORMATION/PRACTICE
Logoff/Logon to the APUI (Analysis Processing User Interface)
In order to process patient samples, you must log on. Both an Operator ID and a Password are required. The system administrator will assign these to you in the lab. For classroom purposes, use BCI as the Operator ID and bci (lower case) as the Password. Both the Operator ID and Password are case-sensitive.
Step Action
1 Select the Logoff button at the top right of the Instrument screen.
NOTE
Until someone is logged on, the Specimens, Work List, and Instrument
buttons are inactive.
The operator field will display
2
Select the Logon button then choose the user name: BCI (case sensitive) in the Identifier field using the drop down browser on the right side of the field to display and select the user name.
3
Type in the Password: bci (case sensitive)
NOTE: Neither the Operator ID “BCI” nor the password “bci” are present in the system. Upon installation, Operator IDs and Passwords must be set up.
4 Select .

iRICELL Complete Urinalysis Training Guide Page 16 of 187 Beckman Coulter Ver 2.1 (July 2017) Technical Training
iRICELL Software
The iRICELL User Interface Software is composed of three main screens:
Instrument screen
Work List /Found List screens (used to search; toggle between both lists)
Specimens screen
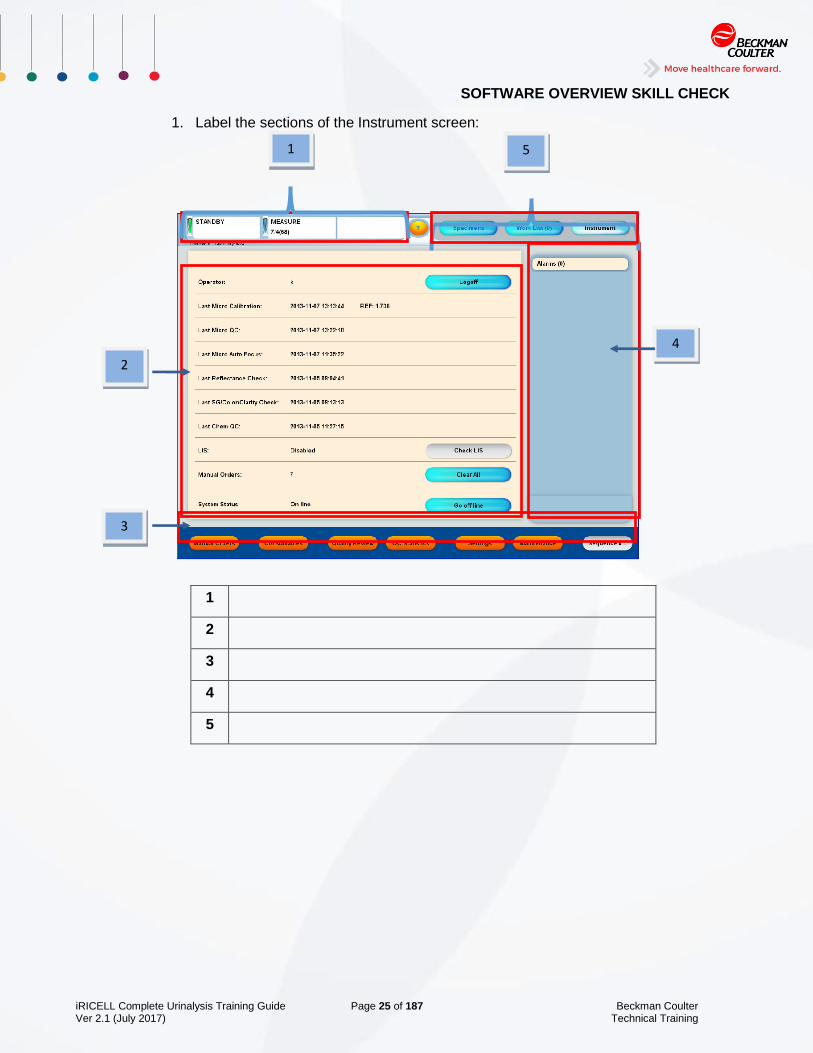
Instrument Screen
Number Description Number Description
1 Status Area 4 Screen Level Function Area
2 View Selector Area 5 Task Level Information Area
3 Information Pane
5
4
3
1
2
iRICELL Complete Urinalysis Training Guide Page 17 of 187 Beckman Coulter Ver 2.1 (July 2017) Technical Training
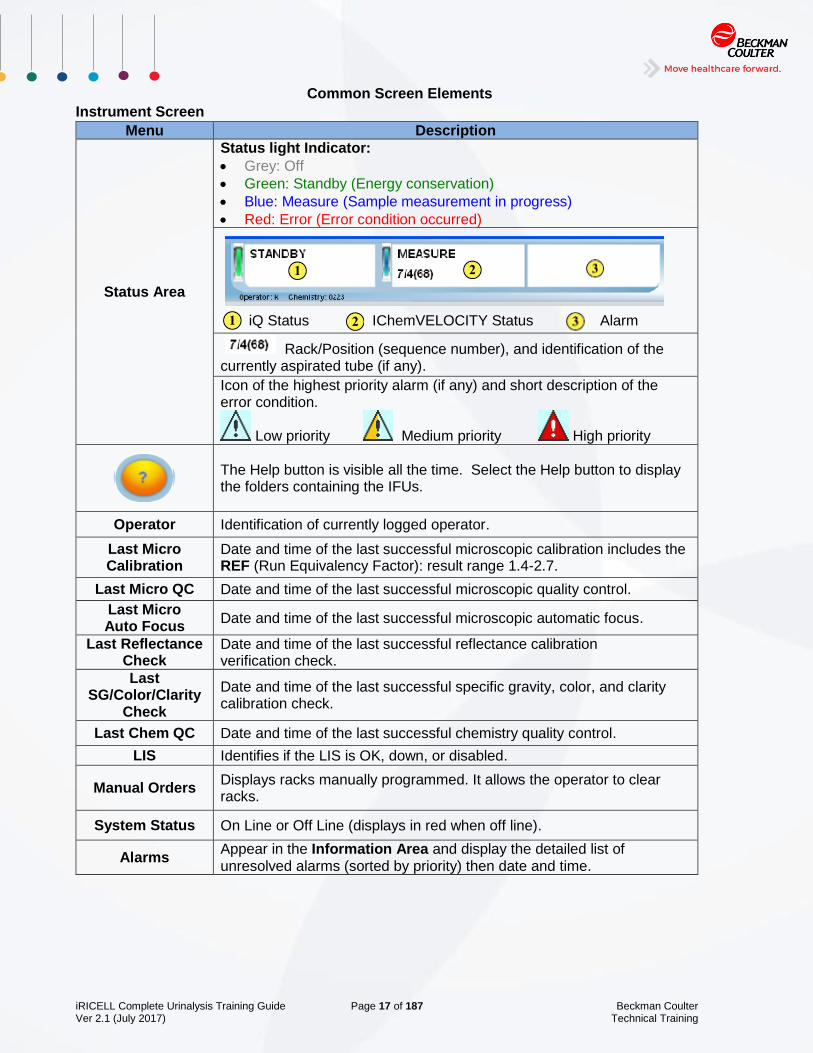
Common Screen Elements
Instrument Screen
Menu Description
Status Area
Status light Indicator:
Grey: Off
Green: Standby (Energy conservation)
Blue: Measure (Sample measurement in progress)
Red: Error (Error condition occurred)
iQ Status
IChemVELOCITY Status
Alarm
Rack/Position (sequence number), and identification of the currently aspirated tube (if any).
Icon of the highest priority alarm (if any) and short description of the error condition.
Low priority Medium priority High priority
The Help button is visible all the time. Select the Help button to display the folders containing the IFUs.
Operator Identification of currently logged operator.
Last Micro Calibration
Date and time of the last successful microscopic calibration includes the REF (Run Equivalency Factor): result range 1.4-2.7.
Last Micro QC Date and time of the last successful microscopic quality control.
Last Micro Auto Focus
Date and time of the last successful microscopic automatic focus.
Last Reflectance Check
Date and time of the last successful reflectance calibration verification check.
Last SG/Color/Clarity
Check
Date and time of the last successful specific gravity, color, and clarity calibration check.
Last Chem QC Date and time of the last successful chemistry quality control.
LIS Identifies if the LIS is OK, down, or disabled.
Manual Orders Displays racks manually programmed. It allows the operator to clear racks.
System Status On Line or Off Line (displays in red when off line).
Alarms Appear in the Information Area and display the detailed list of unresolved alarms (sorted by priority) then date and time.

iRICELL Complete Urinalysis Training Guide Page 18 of 187 Beckman Coulter Ver 2.1 (July 2017) Technical Training
Screen Level Functions
Button Function
Access to Manual Orders screen: Used when LIS is not available or when manual program is needed.
Access to view the consumables window to monitor and track consumable usage (traceability) or to identify the lot numbers for chemistry strips and chemistry QC.
View and manage QC results and calibration history.
Use to view, print, or save (external media) QC files including the Levey-Jennings charts which are plotted by QC lot number.
Access to user-defined instrument settings such as: Operator Accounts, Lab Information, System Configuration etc. IMPROTANT: Prior to making any changes in Settings please contact a Beckman Coulter Representative.
Access to various maintenance procedures such as: Reflectance Check, Chemistry Service, Auto Strip Counter Override, Backup, Restore, System Info, Tallies, Errors, Shutdown, Restart, Defragment, and Check Disk.
Each sample run on the system is assigned a sequence number. Use the screen to enter the next sequence number to be used or reset the sequence number back to number 1.

iRICELL Complete Urinalysis Training Guide Page 19 of 187 Beckman Coulter Ver 2.1 (July 2017) Technical Training
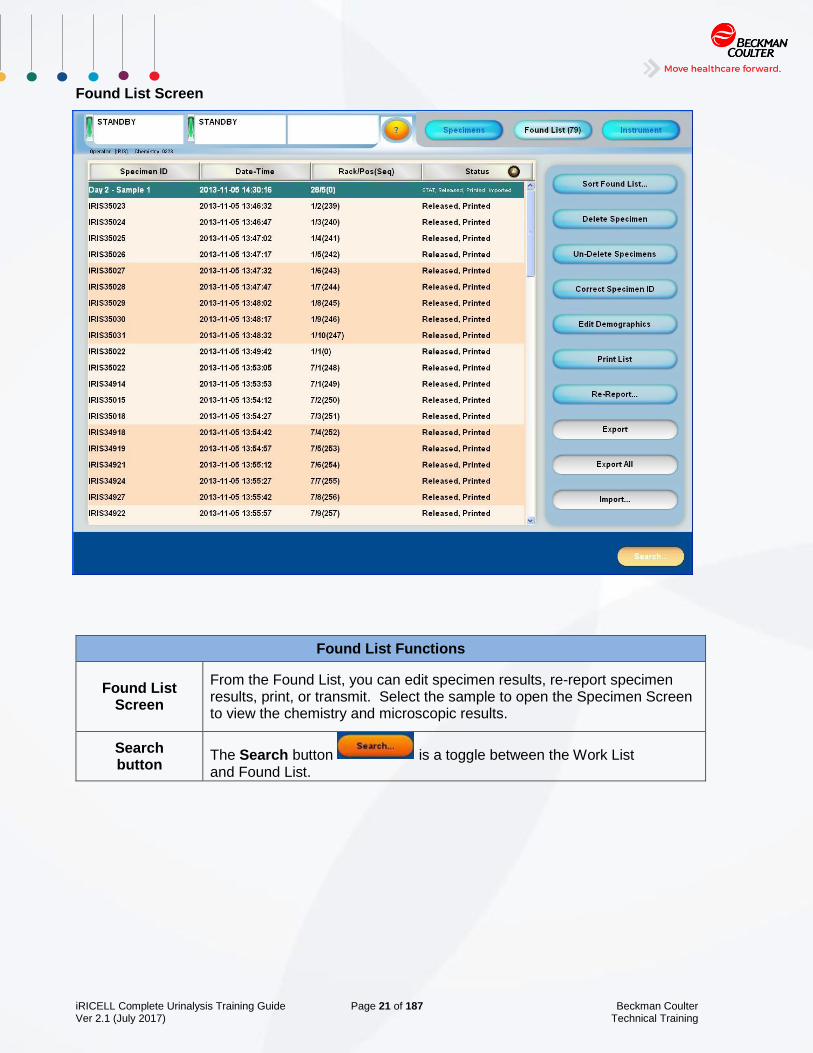
Work List Screen
Work List Functions
Work List Screen
The Work List contains only unreleased results. It displays the Specimen ID, date and time the sample was processed, rack and tube position numbers, sequence number, and the status of each specimen results.
While On Line
An operator can:
Sort the Work List
Delete a specimen
Un-delete a specimen
Print the Work List
Correct/Modify the Specimen ID
Edit patient demographics
Review and release sample results
Search button
Select the Search button from the Work List to view samples in the Found List. See the next page for search options.

iRICELL Complete Urinalysis Training Guide Page 20 of 187 Beckman Coulter Ver 2.1 (July 2017) Technical Training
Search Screen
Search screen
Select the Search button from the Work List to make selections to view samples in the Found List by:
Specimen ID
Sequence number
Operator ID
Date/time range
Patient demographics
Patient location
Specimen awaiting transmission
Specimen already released
Incomplete samples
iRICELL Complete Urinalysis Training Guide Page 21 of 187 Beckman Coulter Ver 2.1 (July 2017) Technical Training
Found List Screen
Found List Functions
Found List Screen
From the Found List, you can edit specimen results, re-report specimen results, print, or transmit. Select the sample to open the Specimen Screen to view the chemistry and microscopic results.
Search button
The Search button is a toggle between the Work List and Found List.

iRICELL Complete Urinalysis Training Guide Page 22 of 187 Beckman Coulter Ver 2.1 (July 2017) Technical Training
Instruction for Use (IFU)
All graphics including screens and printouts are for illustration purposes only and must not be
used for any other purpose.
Step Action
1 Select the System HELP icon . An Open Help File window will display.
2
From the Look in window, select Desktop from the drop down menu. Locate and open the folder label Ops Manual.
Choose the desired IFU (VELOCITY or iQ), then click Open. For this exercise, select IChemVELOCITY IFU.
The selected IFU displays in a separate window.
NOTE Help is a PDF version of the IFU (Instructions for Use)
3 Select the Search icon.
4 Type System Status Lights in the search area and select search.

iRICELL Complete Urinalysis Training Guide Page 23 of 187 Beckman Coulter Ver 2.1 (July 2017) Technical Training
5
Use the help topic located in the previous step to fill in the chart below:
System Status Light On Meaning
The iChemVELOCITY is in
The iChemVELOCITY has
The iChemVELOCITY has
The iChemVELOCITY is in
The iChemVELOCITY has
All lights blinking simultaneously
The main power switch
5 Select the X in the upper right corner to close Help.
6 Using steps 1 and 2 above if needed, access the iQ IFU.
7 From the iQ IFU navigation pane open Chapter 2, Operations Principles using the + sign.
8 Select the topic “Microscopic Particle Identification.”
9
Using the Auto-Classification Categories fill in the chart below:
Category Abbreviation
Non-squamous epithelial cells
UNCX
WBCC
Yeast
SQEP
Unclassified Casts
10 Close Help.
Congratulations, you have finished this module! Continue to the Skill on the next page

iRICELL Complete Urinalysis Training Guide Page 24 of 187 Beckman Coulter Ver 2.1 (July 2017) Technical Training
iRICELL Complete Urinalysis Training Guide Page 25 of 187 Beckman Coulter Ver 2.1 (July 2017) Technical Training
SOFTWARE OVERVIEW SKILL CHECK
1. Label the sections of the Instrument screen:
1
2
3
4
5
1
2
4
3
5

iRICELL Complete Urinalysis Training Guide Page 26 of 187 Beckman Coulter Ver 2.1 (July 2017) Technical Training
2. Identify the following
3. What screen are samples that require review placed? _____________
4. How does the operator switch from the Found List to the Work List?

iRICELL Complete Urinalysis Training Guide Page 27 of 187 Beckman Coulter Ver 2.1 (July 2017) Technical Training
DAILY MAINTENANCE
OBJECTIVES
Given an operational iRICELL Complete Urinalysis System and using the IFU be able to:
Empty and Clean the iChemVELOCITY strip waste container
Discard liquid waste (if applicable)
Clean the Sample Transport Module on both the iChemVELOCITY and iQ200
Clean the optional Load and Unload trays (if applicable)
Clean iChemVELOCITY and iQ200 instrument surfaces
Add chemistry strips and desiccant to the iChemVELOCITY
Check Lamina and Wash Solution, change if needed
Why Is It Important?
Maintenance should be performed to ensure optimal system performance. Performing the daily maintenance procedures will ensure your system has an adequate amount of supplies and reagents for processing patient samples. It is recommended to process QC to verify system performance before processing patient samples.
Resources
iChemVELOCITY IFU
iQ IFU
Alcohol wipes
1:10 dilution of Iris System Cleanser
DI water
Paper towles/guaze

iRICELL Complete Urinalysis Training Guide Page 28 of 187 Beckman Coulter Ver 2.1 (July 2017) Technical Training

iRICELL Complete Urinalysis Training Guide Page 29 of 187 Beckman Coulter Ver 2.1 (July 2017) Technical Training
INFORMATION/PRACTICE
DAILY MAINTENANCE ON iChemVELOCITY
Empty and clean strip waste container
The strip waste container should be emptied and cleaned at least daily. High volume labs should empty and clean their strip waste container after every 300 strips.
Step Action
1 Open the waste container door.
2 Remove the waste container and discard used test strips according to local regulations.
3 Clean the waste container with alcohol or mild detergent and then rinse with tap water.
4 Thoroughly dry the waste container.
5 Reinstall the waste container.
6 Close the waste container door.
Discard liquid waste (NOT NEEDED IN CLASS)
Step Action
1 Remove the drain bottle cap and tubing from the drain bottle.
2 Discard the liquid waste according to local regulations.
3 Clean the drain bottle with a mild detergent and water and then rinse with tap water.
4 Insert the drain tube into the drain bottle and tighten the cap.

iRICELL Complete Urinalysis Training Guide Page 30 of 187 Beckman Coulter Ver 2.1 (July 2017) Technical Training
Cleaning the Sample Transport Module (STM)
Step Action
1 Moisten paper towels with Iris System Cleanser diluted 1:10.
2 Wipe the STM to remove any deposits.
3 Clean under the belts and the pulleys. Do not excessively stretch belts or pulleys.
4 Wipe again using distilled water.
5 Wipe dry.
Cleaning the instrument surfaces
Step Action
1 Moisten paper towels with Iris System Cleanser diluted 1:10.
2 Wipe the exterior surfaces of the analyzer to remove any deposits.
3 Wipe again using distilled water.
4 Wipe dry.

iRICELL Complete Urinalysis Training Guide Page 31 of 187 Beckman Coulter Ver 2.1 (July 2017) Technical Training
Loading Urine Chemistry Strips
Step Action
1 Rotate the strip loader to unlock position and pull out from the analyzer.
2 Remove and discard the old desiccant and replace with the new desiccant.
3
Fully extend the strip loader and tilt it at a 45-degree angle.
Load the urine chemistry strips inside the Test Strip Loader as indicated on the Test Strip Loader (Iris logo facing the back of the instrument).
4
Retract the strip loader, and then shake the loader lightly so that the chemistry strips are straight.
Insert the strip loader inside the analyzer, and rotate the strip loader counter clockwise to the lock position. The chemistry strips drop inside the strip provider module, and the strip provider module will tumble to place the strips in the flat position using a quick consistent rotation.
NOTES: Load 5 days of strips (up to 300 strips maximum) by loading up to 100 strips at a time.
The strip provider module chamber can hold a maximum of 300 strips
Remove and replace one desiccant pouch with each strip load (or strip loading event) or when the
SPM is opened (i.e. strip jam or SPM maintenance). Any existing strips must be replaced with new
strips whenever the SPM is opened.
A strip loading event is defined as loading up to 300 strips in the SPM chamber by filling the strip
loader with up to 100 strips at a time and turning the strips to drop into the SPM chamber.
Allow the chamber to empty completely before adding new strips.
Desiccant and strips must be removed and replaced with each strip load completion.
CAUTION: Do not leave the test strips in the module for more than 5days. Strips exposed to the air
for too long can cause erroneous results.

iRICELL Complete Urinalysis Training Guide Page 32 of 187 Beckman Coulter Ver 2.1 (July 2017) Technical Training
Check Wash Solution / Replace if needed
The iChemVELOCITY Wash Solution comes packaged with the filters (one per bottle). Replace the Wash Solution Filter with each bottle. The instrument will display a message when empty. The Wash Solution has a 90 day open stability.
Step Action
1 Visually inspect the volume of the Wash Solution. If low, proceed with remainder of steps.
NOTE Wear fresh gloves when changing the Wash Solution filter.
2 Make sure the system is in Standby mode as indicated on the top left of the Instrument screen.
3 Remove the cap of the old Wash Solution bottle.
4 Remove the old filter by grasping the tube above the filter and pulling the filter straight off and discard according to local regulations.
5 Remove the new filter from its package and push straight onto the tubing of the Wash Solution cap. The filter only fits with the narrow section attaching into the tube.
6 Insert the tubing with the new filter into the new Wash Solution container and tighten the cap.
NOTE Do not mix the contents of the bottle.
7 Discard old container and old filter according to your local regulations.
DAILY MAINTENANCE ON iQ 200
Cleaning the instrument surfaces
Step Action
1 Moisten paper towels with Iris System Cleanser diluted 1:10.
2 Wipe the exterior surfaces of the analyzer to remove any deposits.
3 Wipe again using distilled water.
4 Wipe dry.

iRICELL Complete Urinalysis Training Guide Page 33 of 187 Beckman Coulter Ver 2.1 (July 2017) Technical Training
Cleaning the Sample Transport Module (STM)
Step Action
1 Moisten paper towels with Iris System Cleanser diluted 1:10.
2 Wipe the STM to remove any deposits.
3 Clean under the belts and the pulleys. Do not excessively stretch belts or pulleys.
4 Wipe again using distilled water.
5 Wipe dry.
Check Lamina Solution / Replace if needed
iQ Lamina is a buffered, isotonic solution containing proprietary laminar flow stabilizers, bacteriostatic agents, fungicidal agents, and preservatives. It is used to hydrodynamically position the flow of specimen within the focal depth of the lens of the microscope and to ensure streamlined flow by rinsing and wetting all fluidic components. This product may be stored at room temperature. The iQ Lamina open stability is good until date on bottle.
Step Action
1 Visually inspect the volume of the Lamina solution. If low, proceed with remainder of steps.
NOTE Wear fresh gloves when changing the Lamina Solution filter.
2 Remove the cap from the new container.
3 Remove the cap of the old container.
4 Attach the cap connected to the instrument to the new container.
NOTE The green filter located at the end of the tubing needs to be replaced every 4th bottle. A new filter comes with each box of Lamina containers. Best practice is to change the filter when loading the first bottle of a new case.
NOTE Do not mix the contents of the bottle.
5 Discard old container and old filter according to local regulations.

iRICELL Complete Urinalysis Training Guide Page 34 of 187 Beckman Coulter Ver 2.1 (July 2017) Technical Training
Wash Cycle
A wash cycle should be performed at the beginning of each workday to prevent accumulation of residue in the fluidic system. Iris System Cleanser must be used to clean the sample lines and the flowcell.
Congratulations, you have finished this module! Continue to the Skill on the next page.
NOTE: If Cleanser is run as part of the Control rack, this procedure does
not need to be performed separately.
In class, we will perform this procedure when we run controls

iRICELL Complete Urinalysis Training Guide Page 35 of 187 Beckman Coulter Ver 2.1 (July 2017) Technical Training
DAILY MAINTENANCE SKILL CHECK
1. How often is the requirement for changing the filter for the following:
iChem Wash ___________________
iQ Lamina______________________
2. Record the maintenance performed for the iChemVELOCITY in the table below:
Maintenance Procedures for iChemVELOCITY Initials
Daily Maintenance
Empty and Clean Waste Container
Clean STM (Sample Transport Module)
Clean Optional Load and Unload Trays
Clean Instrument Surfaces
Check Wash Solution and Replace if Needed
3. Record the maintenance performed for the iQ200 in the table below:
Maintenance Procedures for iQ200 Initials
Daily Maintenance
Clean STM (Sample Transport Module)
Clean Optional Load and Unload Trays
Clean Instrument Surfaces
Check Lamina Solution and Replace if Needed

iRICELL Complete Urinalysis Training Guide Page 36 of 187 Beckman Coulter Ver 2.1 (July 2017) Technical Training

iRICELL Complete Urinalysis Training Guide Page 37 of 187 Beckman Coulter Ver 2.1 (July 2017) Technical Training
CONSUMABLES (QC CONFIGURATION)
OBJECTIVES
By completion of this exercise, be able to:
Set up a new lot of Chemistry QC
Set up a new lot of Chemistry Strips
Restart the instrument to save the changes to system configuration
Why Is It Important?
To avoid unnecessary troubleshooting and ensure the most reliable results, the system should contain the most current information for supplies used on the system.
Resources
iChemVELOCITY IFU
CA/CB/CC package insert
CA/CB/CC Control lot number and expiration date

iRICELL Complete Urinalysis Training Guide Page 38 of 187 Beckman Coulter Ver 2.1 (July 2017) Technical Training

iRICELL Complete Urinalysis Training Guide Page 39 of 187 Beckman Coulter Ver 2.1 (July 2017) Technical Training
I
NFORMATION/PRACTICE
Step Action
NOTE
iChemVELOCITY Quality Control information requires input into the software.
Note: The iQ Quality Control information is embedded in the barcode of the corresponding material.
1
Select Go Off line from the Instrument screen.
The following message will appear:
Any specimens currently being analyzed will be completed. The rack (if any) will be ejected.
Continue going Off Line?
Select Yes to confirm message.
2
From the Screen Level Function Area, select the Consumables button
to access the Consumables window:
3 From the Consumables window, select the Chemistry QC button
.
4
Enter the Test Strip Lot ID of the Chemistry strips located on the bottle of strips. Then, use the drop down box to access a calendar to enter the Expiration date.

iRICELL Complete Urinalysis Training Guide Page 40 of 187 Beckman Coulter Ver 2.1 (July 2017) Technical Training
NOTE: Expiration dates are YYYY/MM/DD. When inputting the expiration date in the software, choose the last day for the month in which it expires.
5 Select the Next button in the bottom left corner to access the first chemistry control level.
6 In the field for Control Name (Position 8), type in CA.
7 Enter the Lot Number located on the bottle of CA, and input the expiration date.
8
NOTE: In class, do not make any changes to the control ranges.
To fill in the lower and upper limits for each particle, use the drop down buttons only. Control limits are found in the package insert located in the IRISpec CA/CB/CC control box.
9 Select the Next button and repeat for CB (Position 9) and CC (Position 10) controls.
10 Once CA, CB, and CC lot numbers and expiration numbers have been entered in the system, select OK to confirm the entries and OK again to close the Consumables window.
NOTE It is recommended to restart the system when any changes are made to configurations.
11 Go to the Maintenance button and select the Restart button
. Once system restarts, log on using your Identifier and Password.

iRICELL Complete Urinalysis Training Guide Page 41 of 187 Beckman Coulter Ver 2.1 (July 2017) Technical Training
CONSUMABLE (QC CONFIGURATION) SKILL CHECK
1. What is the first step to put in new lot number for iChemVELOCITY strips and QC?
a. Select Chemistry QC
b. Go off line
c. Enter lot number and expiration date
d. Select the Work List button
2. Do you have to input QC information for the iQ controls? Why or Why not?
___________________________________________________________________________
___________________________________________________________________________
_____________________________________________
3. When changes are made to the configuration, what must be done?
a. Shutdown the system
b. Log Off and On
c. Nothing
d. Restart the system

iRICELL Complete Urinalysis Training Guide Page 42 of 187 Beckman Coulter Ver 2.1 (July 2017) Technical Training

iRICELL Complete Urinalysis Training Guide Page 43 of 187 Beckman Coulter Ver 2.1 (July 2017) Technical Training
QUALITY CONTROL
OBJECTIVES
Given an operating iRICELL Complete Urinalysis System, access to the System Help, and package inserts from control products, be able to:
Describe proper storage and handling for IRISpec™ CA/CB/CC
Describe proper storage and handling for iQ Control/Focus
Use the IFUs for procedures to run the various controls
Process the various controls
Access the control data (results), select various controls
Review control results: data and graphs
Recognize flagged results
Why Is It Important?
Understanding how to store, handle, and use the control products available ensures reporting out the most accurate results possible to the clinician.
Resources
iRICELL Complete Urinalysis System
Control package inserts for Control products for processing
iChemVELOCITY IFU
iQ IFU
IriSpec Controls
iQ Auto Focus and Controls
Control Racks

iRICELL Complete Urinalysis Training Guide Page 44 of 187 Beckman Coulter Ver 2.1 (July 2017) Technical Training

iRICELL Complete Urinalysis Training Guide Page 45 of 187 Beckman Coulter Ver 2.1 (July 2017) Technical Training
INFORMATION/PRACTICE
Control Storage and Handling
Obtain the product insert sheets for each control and answer these questions on proper storage and handling:
IRISpec CA/CB/CC controls
Store refrigerated at _______ºC.
Yes or No: The CA/CB/CC controls should be mixed. YES NO
Remove CA/CB/CC from the refrigerator and pour an aliquot from each bottle into a separate tube. (3mL). Return tightly capped control bottles to the refrigerator _____________________.
Allow aliquots to warm to room temperature and protect from ______________.
Controls must be run within _______.
The open stability of CA/CB/CC controls is ______days.
True or False: CA/CB/CC controls should be pipetted into the tubes.
IRIS iQ Control/Focus
Store iQ Focus and iQ Positive control at _______ºC.
Store iQ Negative controls at ____________ ºC.
True or False: iQ Positive control and Focus material should be shaken before use.
True or False: iQ Negative should be shaken before use.
Focus and Daily controls should be processed every ______hours.

iRICELL Complete Urinalysis Training Guide Page 46 of 187 Beckman Coulter Ver 2.1 (July 2017) Technical Training
Analyzing Commercial Controls on the iChemVELOCITY
Step Action
1
Using the iChemVELOCITY control rack, pour (DO NOT PIPETTE; DO NOT SHAKE) 3mL of CA/CB/CC in positions 8, 9, and 10 respectively.
Position Insert color
Volume Contents
8
3 mL CA
Control
9
3 mL CB
Control
10
3 mL CC
Control
2 Store rack out of light and allow material to warm to room temperature.
3
Load the control rack on the right hand side of the sampler with the open end of the rack facing the instrument (as seen in the picture above).
NOTE: Position 10, which has the CC control, should be all the way to the right.
Analyzing Commercial Controls for the iQ200
Step Action
1 Bring Control and Focus material to room temperature.
2 Hold the bottle of iQ Focus Material upside down and give five hard sharp shakes followed by five gentle inversions. Let sit one minute until air bubbles are dispersed. Repeat this step with the iQ Positive control. NOTE: Do not mix the iQ Negative Control.
3 Fill a tube with 3mL of Iris System Cleanser and place into position 1 of the iQ control rack.
4 Fill two tubes with 3mL of Iris Diluent and place in positions 2 and 3 of the same iQ Control rack.
NOTE DO NOT put anything in position 4.
5 Fill a tube labeled with a Focus barcode label with 6mL of properly mixed Focus material and place in position 5 of the same iQ Control rack.

iRICELL Complete Urinalysis Training Guide Page 47 of 187 Beckman Coulter Ver 2.1 (July 2017) Technical Training
6 Fill a labeled (Positive Control Barcode) tube with 3mL of properly mixed Positive control material and place in position 6 of the same iQ control rack.
7 Fill a labeled (Negative Control Barcode) tube with 3 mL of Negative control material (DO NOT MIX) and place in position 7 of the same iQ control rack.
8 Load the control rack onto the right side of the iQ sampler, and press the Start button on the iQ.
NOTE If the iQ control results are out of range, repeat using fresh aliquots of both iQ Positive and iQ Negative Controls.
Viewing/Reviewing Control Results
Step Action
1 When control testing is complete, the results will automatically print (if it is set up in settings for QC to release to printer).
2 From the Instrument screen, locate the Last QC field. If all of the results are within acceptable range, the date and time will display. If any QC material failed, the Last QC field will display (--) accompanied with a specific alarm related to control failure.
3
To see the individual QC runs from the Instrument screen, select the Quality Review
button . The Quality Review is displayed.
4
To see the QC report for a specific material, highlight the desired ID and click the Re-
report button . You can also double click on the desired ID to open the Re-Report destination screen.
Ensure the Current Row is selected, and Screen is selected as the destination. Select
OK .
NOTE The iQ Series QC report consists of Control name, operator identifier, analysis time stamp, lot ID, expiration date, and status (pass/fail). The report will also indicate the results for the count, lower and upper limit of acceptance, and status (Pass/Fail).

iRICELL Complete Urinalysis Training Guide Page 48 of 187 Beckman Coulter Ver 2.1 (July 2017) Technical Training
5
To remove a QC result from statistical data, highlight the result and select the Remove
button . A comment window will display with the users id allowing a comment to be added to the removed result.
TRY THIS NOW.
NOTE: In order to remove a QC result, the user must be logged in with Manager status.
6
To restore a removed QC result, highlight the result, and select the Restore button
Restore the QC you removed in the previous step.
NOTE If controls fail but do not display on the Quality Review screen, check the Work List screen. ANY specimen with a Flag will be placed on the Work List
Manually Printing Control Data
Step Action
1
To manually print an individual QC run, from the Instrument screen, select the Quality
Review button . The Quality Review is displayed.
3 Double click on the desired QC run or highlight and select the Re-Report button
.
4 From the Re-Report destination screen, select Current Row.
5 Change the destination from Screen to Printer and select OK.
NOTE You may also print from the QC report page by selecting the Print List button.
Auto Print Set Up for Controls (Optional)
Step Action
1 From the Instrument screen, select Go off line .
3 Select the Settings button .
4 Select the QC button .
5
Choose Printer for both of the following options:
On microscopic control completion, automatically send to
On Chemistry control completion, automatically send to

iRICELL Complete Urinalysis Training Guide Page 49 of 187 Beckman Coulter Ver 2.1 (July 2017) Technical Training
6 Select OK .
Congratulations, you have finished this module! Continue to the Skill on the next page

iRICELL Complete Urinalysis Training Guide Page 50 of 187 Beckman Coulter Ver 2.1 (July 2017) Technical Training

iRICELL Complete Urinalysis Training Guide Page 51 of 187 Beckman Coulter Ver 2.1 (July 2017) Technical Training
QUALITY CONTROL SKILL CHECK
1. On what screen(s) can an operator see the status of both the iChemVELOCITY and iQ
controls?__________________________
2. From the Instrument screen, how do you know if the controls did not
pass?_________________________
3. Yes or No: Can patient samples be processed if controls did not pass?
4. Show facilitator how to remove and restore a QC result.
5. True or False: If iQ negative control fails, it is OK to just run the negative control again.
6. What Quality Control material is used on the iChemVELOCITY?
_____________ , _____________ , and _____________.
7. What Quality Control material is used on the iQ?
______________________________________

iRICELL Complete Urinalysis Training Guide Page 52 of 187 Beckman Coulter Ver 2.1 (July 2017) Technical Training

iRICELL Complete Urinalysis Training Guide Page 53 of 187 Beckman Coulter Ver 2.1 (July 2017) Technical Training
QC STATISTICS
OBJECTIVES
Given an operating iRICELL Complete Urinalysis System access to System Help, be able to:
Locate QC statistics Screen
Locate QC files for specific QC Lot Number
Print QC statistics
Save QC statistics
Why Is It Important?
Understanding how to store, handle and use the control products available ensures reporting the most accurate results possible to the clinician. Knowing how to review and output control results is an important follow-up to control processing. It allows recognition of shifts or trends in QC that might indicate control or instrument problems.
Resources
iRICELL System
iChemVELOCITY and iQ200 Operator Manual

iRICELL Complete Urinalysis Training Guide Page 54 of 187 Beckman Coulter Ver 2.1 (July 2017) Technical Training

iRICELL Complete Urinalysis Training Guide Page 55 of 187 Beckman Coulter Ver 2.1 (July 2017) Technical Training
NFORMATION/PRACTICE
QC Statistics Screen
Lot number are located in the upper left hand box.
IQ Controls are listed first with the most current lot number at the top.
iChemVELOCITY are listed second with the most current lot number at the top.
Search by specific date and time, in the upper right hand corner input the From and To date and time and select the Do Search button.

iRICELL Complete Urinalysis Training Guide Page 56 of 187 Beckman Coulter Ver 2.1 (July 2017) Technical Training
iChemVELOCITY Statistics
Each type/lot specific report contains the control identifier, report time stamp, lot number, and
expiration date.
Chemistry QC chart indicates when chemistry strip lot changes occurred.
Chemistry QC chart does not display SD, Mean, and Target lines.
The next section is the Levey-Jennings chart (L-J chart), which lasts indefinitely for the
current lot number. All previous QC and patient results are subject to a first-in, first-out basis
after 10,000 patient and QC records are reached.
Below the L-J chart is a list of each point on the chart with its status. Printing this list on the
same date every month will provide the laboratory with complete documentation of QC
activity.
IQ Statistics
• Each type/lot specific report contains the control identifier, report time stamp, lot number,
mean value, standard deviation, Coefficient of Variation, minimum and maximum counted
values, target value, and the upper and lower acceptable limits.
• The next section is the Levey-Jennings chart (L-J chart), which lasts indefinitely for the
current lot number. All previous QC and patient results are subject to a first-in, first-out basis
after 10,000 patient and QC records are reached.
• Below the L-J chart is a list of each point on the chart with its status. Printing this list on the
same date every month will provide the laboratory with complete documentation of QC
activity
QC results can be saved for long term storage in HTML format, which can be opened and saved on
virtually any computer.

iRICELL Complete Urinalysis Training Guide Page 57 of 187 Beckman Coulter Ver 2.1 (July 2017) Technical Training
PRINTING QC STATISTICS
Step Action
1 From the Instrument screen, select Go off line .
2 Select the button.
3 Select the most recent iChemVELOCITY or iQ Control lot number
4 For classroom purposes leave the date range at the default
5 Select Print
SAVING QC STATISTICS
Step Action
1 From the Instrument screen, select Go off line .
2 Select the button.
3 Select the most recent iQ or iChemVELOCITY control lot number
4 For classroom purposes leave the date range as the default
5 Insert removable media CD or Flashdrive
6 Select the Save…Button

iRICELL Complete Urinalysis Training Guide Page 58 of 187 Beckman Coulter Ver 2.1 (July 2017) Technical Training
Congratulations, you have finished this module! Continue to the Skill on the next page
7
Select my computer
8
Choose the destination corresponding to removable media flash drive or CD
Note: If saving to a flash drive select the (E) drive. If saving to a CD select the (D) drive
9 Remove removable media

iRICELL Complete Urinalysis Training Guide Page 59 of 187 Beckman Coulter Ver 2.1 (July 2017) Technical Training
QC STATISTICS SKILL CHECK
1. Show facilitator the saved QC statistic file.
2. In what Format is QC statistics saved?
a. Excel b. HTML c. PDF D. CSV
3. The Levey-Jennings chart (L-J chart), lasts _____________ for the current lot number. All
previous QC and patient results are subject to a first-in, first-out basis after _________ patient and
QC records are reached.
4. How often should QC statistics be saved or printed for complete QC documentation?
a) Daily
b) Weekly
c) Monthly
d) At end of lot number

iRICELL Complete Urinalysis Training Guide Page 60 of 187 Beckman Coulter Ver 2.1 (July 2017) Technical Training
iRICELL Complete Urinalysis Training Guide Page 61 of 187 Beckman Coulter Ver 2.1 (July 2017) Technical Training
SAMPLE ANALYSIS
OBJECTIVES
Given an operating iRICELL Complete Urinalysis System, access to System Help, and urine specimens, be able to:
State the aspiration volume for sampling
Identify the different types of racks
Identify approved tube types
Process bar coded samples
Manually add a test order
Process a diluted sample
Why Is It Important?
The iRICELL System is a quantitative or qualitative, multi-parameter, automated urinalysis analyzer for in vitro diagnostic use in screening patient populations found in clinical laboratories. Running samples is a daily task that occupies much of your time in the lab. Learning how to process samples efficiently on the iRICELL System saves you time.
Resources
iRICELL System
Urine specimens
Barcode labels
Sample Racks

iRICELL Complete Urinalysis Training Guide Page 62 of 187 Beckman Coulter Ver 2.1 (July 2017) Technical Training

iRICELL Complete Urinalysis Training Guide Page 63 of 187 Beckman Coulter Ver 2.1 (July 2017) Technical Training
INFORMATION/PRACTICE
Sample Tube
The following table identifies the validated sample tubes that can be used on the system:
Body Fluids
Iris Plastic Body Fluid Tubes ONLY
10 mL Conical bottom tubes
(PN 800-3215)
NOTE: Do not attempt to run body fluids using other tubes. Improper tubes could cause the system to create a “Short Sample” flag. In addition, it is possible that your specimen could adhere to the walls of the tubes that have not been approved by Iris Diagnostics..

iRICELL Complete Urinalysis Training Guide Page 64 of 187 Beckman Coulter Ver 2.1 (July 2017) Technical Training
Specimen Information
Notes
1 Use only fresh urine specimens, as defined in CLSI (Clinical and Laboratory Standards Institute) GP16-A3 Urinalysis and Collection, Transportation, and Preservation of Urine Specimen, Good Laboratory Practices and the Laboratory’s Procedure Manuals.
2 Collect urine in clean and/or sterile containers. If a specimen is not processed within an hour after collection, cap the container tightly and store 2-8 °C. Bring the specimen to room temperature before testing.
3
Mix specimen well before testing
Do NOT add disinfectant or detergent to the specimen
Keep specimens out of direct sunlight
Do NOT centrifuge urine specimens
4
Sample Volume:
iChemVELOCITY alone requires 2 ml.
iQ200 Series alone requires 3 mL.
Specimen volume for analysis by both the automated chemistry system and the iQ200 series should be at least 4 mL.
NOTE: 1 mL is dead volume.
5
Hematuria:
iChemVELOCITY: use a manual method for chemistry results.
iQ200: Iris Diagnostics recommends that dilutions be performed on grossly bloody, heavy mucoid or very dense specimens, and short samples, in order to avoid clogging the specimen filter.
Very Dense or Viscous Specimens:
Very viscous or very dense specimens may cause flow errors or clogs and require dilutions before being run on the iQ200 Series.
DO NOT run diluted specimens on the iChemVELOCITY.

iRICELL Complete Urinalysis Training Guide Page 65 of 187 Beckman Coulter Ver 2.1 (July 2017) Technical Training
Running Specimens with Barcodes
Obtain specimens and barcode labels from your facilitator. This section assumes bidirectional LIS download.
Step Action
1
Load barcoded samples into a patient rack with the barcode showing through the opening of the rack as shown below:
2 Verify the system is in Standby.
3 Place the rack on the iChemVELOCITY sampler area with the barcodes facing the instrument, and the rack positioned to the back of the sampler area.
4 The system will automatically move the rack forward to the sample aspiration area. Once the samples are aspirated on the iChemVELOCITY, they will transfer to the iQ and be processed.
5 Verify the systems change from Standby to Measure.
6 Once samples are finished processing, remove the rack from the unload area of the iQ.

iRICELL Complete Urinalysis Training Guide Page 66 of 187 Beckman Coulter Ver 2.1 (July 2017) Technical Training
Running Samples without Barcodes
Step Action
1 Obtain non-barcoded specimen(s).
2 From the Instrument screen, select the Manual Orders button . The Manual Order screen is displayed.
3
From the Manual Order screen, select the rack number to be used by clicking the button next to the corresponding number.
NOTE: The screen defaults to the 0 rack; however, there is NO rack 0. If samples are programmed using the default, the specimens will have an ID_ERROR.
4
Enter the specimen information corresponding to the specimen position:
Specimen Identifier: Type in Specimen ID found on tube
Fluid Type: Select URN from the drop down menu
Dilution Code – Select 0 from the drop down menu
Work Order: Select RUN from the drop down menu
5 Select the OK button to save the programming.
6 Place the sample in the assigned rack and position.
7 Verify that the samples are processing by making sure the status changes on the iChemVELOCITY and iQ from Standby to Measure.
8 Do not take action at this time for any samples with error (alarms). We will review results later.
iRICELL Complete Urinalysis Training Guide Page 67 of 187 Beckman Coulter Ver 2.1 (July 2017) Technical Training
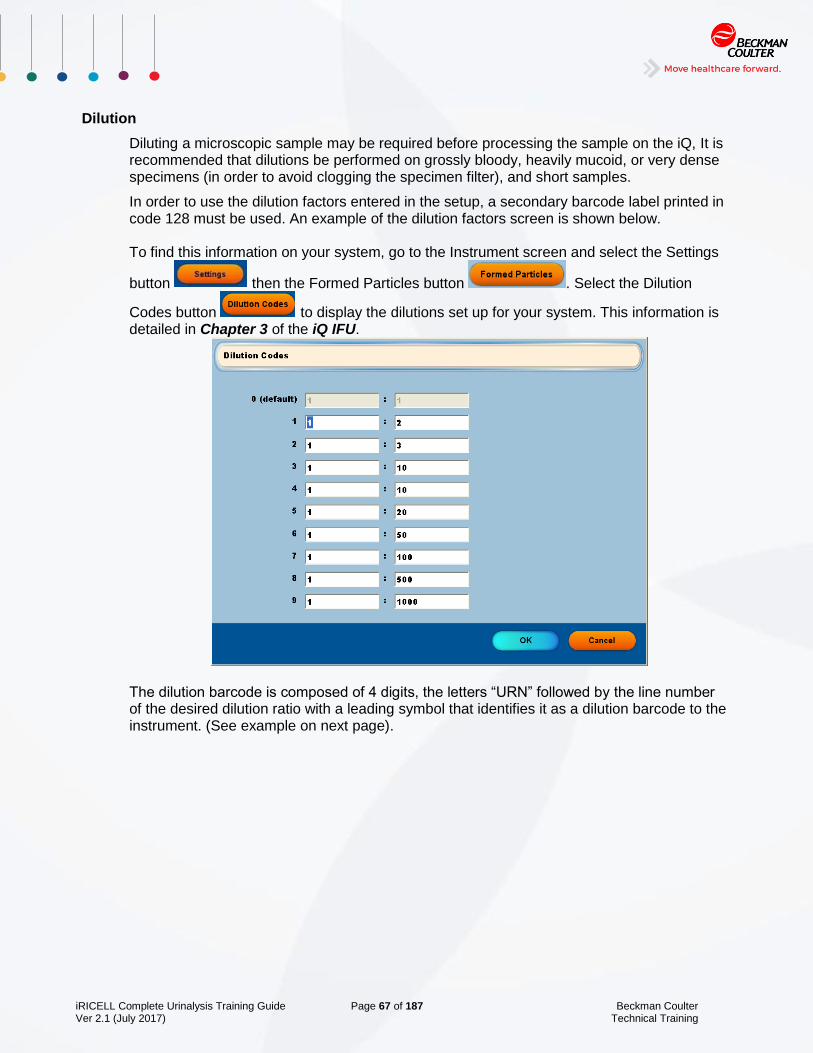
Dilution
Diluting a microscopic sample may be required before processing the sample on the iQ, It is recommended that dilutions be performed on grossly bloody, heavily mucoid, or very dense specimens (in order to avoid clogging the specimen filter), and short samples.
In order to use the dilution factors entered in the setup, a secondary barcode label printed in code 128 must be used. An example of the dilution factors screen is shown below. To find this information on your system, go to the Instrument screen and select the Settings
button then the Formed Particles button . Select the Dilution
Codes button to display the dilutions set up for your system. This information is detailed in Chapter 3 of the iQ IFU.
The dilution barcode is composed of 4 digits, the letters “URN” followed by the line number of the desired dilution ratio with a leading symbol that identifies it as a dilution barcode to the instrument. (See example on next page).

iRICELL Complete Urinalysis Training Guide Page 68 of 187 Beckman Coulter Ver 2.1 (July 2017) Technical Training
The chemistry portion of a dilution should be run UNDILUTED using an ORANGE rack (23) on the iChemVELOCITY. This rack is specially labeled so that it will not be processed by the iQ200 and will skip the iQ sampling station and be transferred automatically to the unloading station for retrieval.
Step Action
Note Utilize the two identically labeled tubes. One will have the UNDILUTED sample (for the iChemVELOCITY) and one empty tube for making the dilution.
1
Place the labeled undiluted patient tube in the dilution rack.
2 Load the dilution rack containing the undiluted sample onto the sampler of the iChemVELOCITY.
3 Using the dilution code screen, select the appropriate dilution label. FOR CLASSROOM PURPOSES ONLY, use any of the dilution labels.
4
Fix the desired dilution barcode label on the second empty tube as indicated below.
NOTE: The Dilution rack (numbered 23) must be used to run samples that will need dilution for microscopy on the iQ200 after being processed on the iChemVELOCITY

iRICELL Complete Urinalysis Training Guide Page 69 of 187 Beckman Coulter Ver 2.1 (July 2017) Technical Training
5 Prepare the desired dilution using sample taken from your undiluted specimen and Iris Diluent. (For classroom purposes you do not need to physically make a dilution).
6 Load the dilution tube into a regular patient rack (NOT THE DILUTION RACK).
7
Load the rack on the iQ module directly and press the Start button on the front of the instrument to run the sample.
NOTE: Ensure that the iChemVEOCITY has run the Chemistry before running the dilution.
8 Once the diluted sample is complete, the results from the undiluted chemistry specimen will automatically consolodate with the results from the dilution tube and a collated report will be produced.
NOTE
There will be a dilution indicator in the heading of the report
1:X= where X would be the dilution based on the label you placed on the sample tube.
NOTE If there are no flags present, the results will automatically be released and printed out.
NOTE If there are flags present, you must review and accept the results from the Work List before it prints out. DO NOT review any samples at this time.
.

iRICELL Complete Urinalysis Training Guide Page 70 of 187 Beckman Coulter Ver 2.1 (July 2017) Technical Training

iRICELL Complete Urinalysis Training Guide Page 71 of 187 Beckman Coulter Ver 2.1 (July 2017) Technical Training
SAMPLE ANALYSIS SKILL CHECK
1. What is the minimum volume required to run a sample on:
iChemVELOCITY only__________________
iQ200 only___________________
Both________________________
2. What rack number is the default for Manual Orders? ____________
3. What does the number after the URN on a dilution label indicate?
_________________________________________________________
4. What racks are used and what is placed in each rack when performing a dilution?
_______________________________________________
_______________________________________________

iRICELL Complete Urinalysis Training Guide Page 72 of 187 Beckman Coulter Ver 2.1 (July 2017) Technical Training

iRICELL Complete Urinalysis Training Guide Page 73 of 187 Beckman Coulter Ver 2.1 (July 2017) Technical Training
AUTO RELEASE AND RESULT VERIFICATION
OBJECTIVES
At the completion of this module, be able to:
Understand Microscopic Analysis Process
Understand Auto-Particle Recognition (APR)
Understand Particle Verification Range (PVR)
Understand Edit Free Release
Understand Auto Release exceptions
Know when a microscope confirmation is needed
Understand Bacterial Grading
Why Is It Important?
For specimens with severely abnormal/pathologic particles, a trained operator may visually
confirm the identification of the particles based on their morphological detail as displayed on
the screen. The images presented for operator review are sufficient so that a trained
operator can easily recognize the particle images. In cases requiring visual review, all the
particle images are sorted and displayed in the auto-classified categories, which enhances
the verification process. While the classification of particles is computer-aided, human
judgment should still be exercised.
NOTE Images should only be reclassified if the edit will change the clinical
significance of the result.
Resources
iChemVELOCITY IFU
iQ IFU
iQ Image Encyclopedia
Specimen Results

iRICELL Complete Urinalysis Training Guide Page 74 of 187 Beckman Coulter Ver 2.1 (July 2017) Technical Training

iRICELL Complete Urinalysis Training Guide Page 75 of 187 Beckman Coulter Ver 2.1 (July 2017) Technical Training
INFORMATION/PRACTICE
iQ 200 Microscopic Analysis Process:
1. Digital Image Capture 2. Particle Detection 3. Feature Extraction 4. Particle Classification 5. Quantitative Result Report
1 Digital Image Capture
The strobe light flashes 24 times/second
The sample passes through the flowcell surrounded by iQ Lamina
The Digital (Charge Coupling Device, CCD) camera captures 500 frames per sample
2 Particle Detection
Each frame is analyzed for the presence of particles
Each individual particle is isolated, the edge of each object is traced and its size is identified

iRICELL Complete Urinalysis Training Guide Page 76 of 187 Beckman Coulter Ver 2.1 (July 2017) Technical Training
3 Feature Extraction (Inputs)
Each isolated particle is analyzed for specific features (size, contrast, shape, and texture)
Features of each particle are converted to numerical values by a series of algorithms
4 Particle Classification (Outputs)
Auto-Particle Recognition (APR) is a type of computerized neural network that has been “trained” to classify urine particles
There are 12 auto-classifications with 26 subclassifications (subclassifications are used by the operator to further classify particles)
Classifies particles by matching the particle numerical values with the auto-classifications hard coded values
Neural network trained using over 26,000 particle images
Classifications as follows:
- RBC=Red Blood Cells - WBC=White Blood Cells - WBCC=White Blood Cell Clump - SQEP=Squamous Epithelial - NSE=Non-Squamous Epithelial - HYAL=Hyaline Cast - UNCC=Unclassified Cast
- BACT=Bacteria - SPERM=Sperm - MUCOUS=Mucous - UNCX=Unclassified
Crystal (CRYS is previous terminology)
- BYST=Yeast (YST is previous terminology)
iRICELL Complete Urinalysis Training Guide Page 77 of 187 Beckman Coulter Ver 2.1 (July 2017) Technical Training
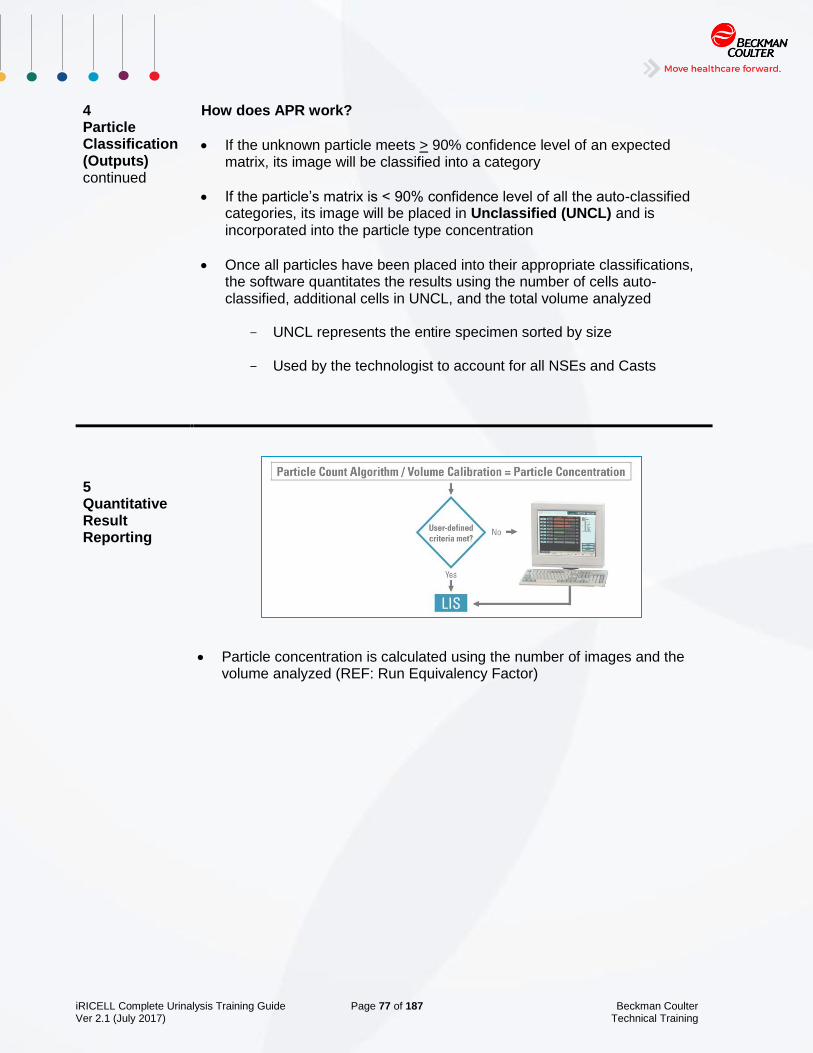
4 Particle Classification (Outputs) continued
How does APR work?
If the unknown particle meets > 90% confidence level of an expected matrix, its image will be classified into a category
If the particle’s matrix is < 90% confidence level of all the auto-classified categories, its image will be placed in Unclassified (UNCL) and is incorporated into the particle type concentration
Once all particles have been placed into their appropriate classifications, the software quantitates the results using the number of cells auto-classified, additional cells in UNCL, and the total volume analyzed
- UNCL represents the entire specimen sorted by size
- Used by the technologist to account for all NSEs and Casts
5 Quantitative Result Reporting
Particle concentration is calculated using the number of images and the
volume analyzed (REF: Run Equivalency Factor)

iRICELL Complete Urinalysis Training Guide Page 78 of 187 Beckman Coulter Ver 2.1 (July 2017) Technical Training
Results Review
Specimen screen
Chapter 3 iQ page 68
NOTE: Chemistry and Microscopy results are consolidated onto one screen
Chemistry
Results
Microscopic
Results
Microscopic
Review
Indicator

iRICELL Complete Urinalysis Training Guide Page 79 of 187 Beckman Coulter Ver 2.1 (July 2017) Technical Training
Resulting with Edit Free Release
Auto Release algorithm
Reporting can be configured to match the lab’s current method
Allows each lab to establish their own range to release results obtained by the APR
RBC, WBC, and SQEPS are released based on user defined Particle Verification Range (PVR). The table below is an example:
Particle Min Abn Threshold Max
RBC 2 3 20
WBC 5 6 9
SQEPS 5 6 20
All other particles are released using a series of decision trees
Particle Verification Range (PVR)
Employs an intuitive method for verification of particle classification
Minimizes on screen verification
Color indicator Meaning
Results are below the minimum verification value and are accepted as normal
Results are within the particle verification range and need to be reviewed by the operator
Results are above the maximum verification value and are accepted as abnormal
Edit Free Release Process
Results
Auto
Release
Auto
Release
Review
Results

iRICELL Complete Urinalysis Training Guide Page 80 of 187 Beckman Coulter Ver 2.1 (July 2017) Technical Training
Linearity Exceeded
If the “Review when Linearity is Exceeded” is enabled:
o The range indicator for the particle exceeding linearity is displayed in yellow and requires an operator verification
If the “Review when Linearity is Exceeded” is NOT enabled:
o The range indicator for the particle exceeding linearity will be displayed in red
All particles are calculated in μL, but result reporting can be configured to match the current method being used
Linear range = 0-1000/μL for all particles
μL results are converted automatically when High Power Field (HPF) and/or Low Power Field (LPF) are selected in settings
o HPF = μL/5.5 (range = 0-182/HPF) o LPF = μL x 2.9 (range = 0-2900/LPF)

iRICELL Complete Urinalysis Training Guide Page 81 of 187 Beckman Coulter Ver 2.1 (July 2017) Technical Training
Results Review
Specimen screen
Chapter 3 iQ page 68
Main Area Displays the following information
Particle Shows the short name of the particle category
Concentration Shows the particle concentration
Information
Area
Specimen ID and patient demographics (if enabled)
Date/Time of specimen aspiration by the iQ
Rack/Position and sequence number
Dilution ratio (1:1 is the default which represents no dilution)
Red blood cells section and dysmorphic RBCs (if enabled)
URINE CULTURE INDICATOR CHECKLIST-provides information that a urine culture is recommended. Indicators include Nitrite and Leukocyte Esterase results (when connected to the IChemVELOCITY or iChem100), Bacteria, WBC results and All Small Particles (ASP) count for the microscopy
Chemistry results
Comment, if entered by the operator
Active/cleared flag, if any

iRICELL Complete Urinalysis Training Guide Page 82 of 187 Beckman Coulter Ver 2.1 (July 2017) Technical Training
Button Function
Select to classify all particles in the specimen as amorphous.
Opens a window for 3 options:
ALL ART-classifies all the particles in the specimen as artifact
Separate chemistry and microscopy results
Edit chemistry results (this option is hidden unless Detailed Audit trail is enabled)
Use to enter a single line comment that will be transmitted to the
LIS.
Turbo Edit on the iQ Series is a statistical sampling procedure that reduces the number of images shown. Turbo Edit is not recommended with software version 7.0 or higher. When the text inside the orange Turbo Edit button is white, turbo edit is enabled; to go back to full edit mode (recommended) use the Turbo Edit button. (Black Text) and ALL particles are available for review in Full Edit mode.
Select Edit to review images from the first particle category displayed in the Results screen. If the Auto-Release function was enabled, the first category needing to be reviewed by the operator is displayed in yellow The Edit button can be also used to edit chemistry results. If the
Detailed Audit Trail is enabled, the operator initials that made the
changes will be in the audit trail section of the chemistry report.
Restores the particle classifications to the original instrument
classifications and current instrument settings
Skips the displayed specimen results to display the next available
specimen on the Work List/Found List
Is available when the operator has made edits. Use when edits
need to be saved without having to accept the results and the
operator wants to exit the specimen screen without losing edits
made

iRICELL Complete Urinalysis Training Guide Page 83 of 187 Beckman Coulter Ver 2.1 (July 2017) Technical Training
Verifying Results in Yellow
The Work List displays all samples not auto-released. Select the sample to view the sample in the Specimen screen
Selecting the Edit button from the specimen screen will automatically open the first category that is yellow for that sample
Saves the results after sample verification
If the Review Flag button was used, the Accept button clears the
specimen’s flags and transmits the specimen results to the LIS
and/or the printer if all specimen auto-release criteria are met
If there was an ID Error flag, the Accept button allows for the ID
to be corrected
If the Delete Flag button was used, the Accept button deletes the
specimen results as displayed with no review
When seen in the lower left portion of this screen, the Next button
will display additional particles if there are more than can fit on
one screen. The Back button would move you back to the
previous display, if needed.

iRICELL Complete Urinalysis Training Guide Page 84 of 187 Beckman Coulter Ver 2.1 (July 2017) Technical Training
Specific particle screen
Verifying Results in Yellow
NOTE: Once a category has been opened for review, the particle range indicator will no longer be yellow from the specimen screen
Reclassify when it will be clinically significant
Use the Back and Next buttons to continue reviewing particles classified in yellow for the sample being reviewed
Once all particles and grading are verified, select the Accept button to release and print the sample results.
Category
Concentration

iRICELL Complete Urinalysis Training Guide Page 85 of 187 Beckman Coulter Ver 2.1 (July 2017) Technical Training
Particle Review/ Reclassify Process (yellow categories)
50% Rule:
o If you open a particle category and more than 50% of the particles have been classified correctly, then agree with the results and continue with the next yellow category
o If you open a particle category and 50% or more of the particles have
been classified incorrectly, then disagree with the results and reclassify the particles as another category or place it into the artifact category (“art it out”)
Always Reclassify: o UNCX (unclassified crystal)
o NSE (non-squamous epithelial) and UNCC (unclassified cast) will
cause UNCL (unclassified) to turn yellow for review
o UNCL-check for the following (NO 50% rule):
Renal epithelial Transitional epithelial Casts
NOTE: Refer to the Memory Joggers for additional information
Microscope Required
The presence of four elements require a manual microscopic review for ID and confirmation: 1. Oval Fat Bodies- confirm using polarized light microscopy
2. Fat- confirm using polarized light microscopy 3. Trichomonas- confirm presence of flagella by motility (wet mount required
for proper identification) 4. Any cellular cast to ID the cell type if the cell type is questionable

iRICELL Complete Urinalysis Training Guide Page 86 of 187 Beckman Coulter Ver 2.1 (July 2017) Technical Training
Bacterial Grading
Automatic Bacteria Grading and Auto-classification
o APR will identify bacteria >3 microns in size as isolated images
o Bacteria <3 microns in size are too small to be automatically identified by APR and require an operator to identify and grade
o When automatic bacteria grading is enabled, the particle button and range indicators for bacteria are grey
o When automatic bacteria grading is enabled and, if any urine culture indicator (LEU, NIT, WBC, BACT, ASP) is abnormal, a message “Urine Culture Recommended” is sent to the LIS
Manual classification of Bacteria category
o If automatic bacteria grading is NOT enabled, the range indicators are displayed in green or red
o There are two ways to verify results, and it is directly related to the presence/absence of bacteria. Using the Urine Culture Indicator Checklist, one or more abnormal particles/chemistries indicate the possible presence of bacteria. Abnormal results are distinguished in red and have an H
Absence Presence
Verification of presence of bacteria for manual bacteria grading: o Verify that the auto-classified particle images (bacteria
category) match the categories they are displayed within o Manually grade bacteria based on what is observed within the
backgrounds of the WBC, WBCC, SQEP, and MUCS classifications. The visual quantitation is the same as what is done under the manual microscope and can be reported as Present/Absent or Few/Moderate/Many
NOTE: Refer to the Bacterial Grading Memory Jogger for more information.

iRICELL Complete Urinalysis Training Guide Page 87 of 187 Beckman Coulter Ver 2.1 (July 2017) Technical Training
Flags Flags will STOP the specimen from being Auto Released. Shown below are some examples of flags seen on the system. Additional information on flags can be found in the Appendix of the iQ IFU
Specimen flags include:
High concentration flag
Possible Amorphous flag
Sperm Present flag
Sperm Previous Sample
Chemistry flags include:
CHEMSTRANSLATE
Chem CONFIRM
CHEM N/A (Processing Failure)
CHEM N/A (Processing not complete)
No wash
Strip deviate Instrument Errors:
Motor errors for SPM, SCS and STM (iQ and iChemVELOCITY)
Instrument Flags:
ID errors (iQ and iChemVELOCITY)
Short Sample (iQ and iChemVELOCITY)
Flow (iQ)
Image Acquisition (iQ)
Light fluctuation (iQ)
Sequential flag when Short Sample, Flow, Image Acquisition, and/or Light fluctuation flag appear in 3 consecutive specimens
Note: A Sequential Flag can be remedied by processing an iQ QC rack using Cleanser, Diluent, and Focus
Pop-up Messages
Used as a way for the system to get the operator’s attention for certain conditions when the user has selected the Accept button on the results screen. The operator must acknowledge the pop-up in order to proceed
Potential Carryover
Chem/Micro Correlation
Bacteria Present
Minimum to Auto-Classify Overridden

iRICELL Complete Urinalysis Training Guide Page 88 of 187 Beckman Coulter Ver 2.1 (July 2017) Technical Training
Edit Chemistry Results
Chemistry results can be edited if required. This feature is only available when the Detailed Audit Trail feature is enabled

iRICELL Complete Urinalysis Training Guide Page 89 of 187 Beckman Coulter Ver 2.1 (July 2017) Technical Training
Result Verification
Edit Results
Step Action
1
Run one barcoded sample
Run one non-barcoded sample
Run one dilution
2 From the Work List screen, select the first sample by double clicking on the specimen row to open the Specimen screen
Select the Edit button to display the first yellow category (needs review).
If greater than 50% (refer to memory jogger) of the particles are categorized correctly, skip to step 7.
If 50%or more (refer to memory jogger) of the particles DO NOT belong in the category and need to be reclassified, continue with next step.
6
From the right hand pane, select the desired re-categorized particle type (i.e WBC), then select the individual particles that need to be moved to that category.
In the example below, the category being displayed are RBCs. The reclassification category is WBC and the first image (blue box) has been moved to the WBCs.

iRICELL Complete Urinalysis Training Guide Page 90 of 187 Beckman Coulter Ver 2.1 (July 2017) Technical Training
7
Once the reclassification is complete, select the original category name button in the top left corner. (i.e. RBC in the above example).
NOTE: To reclassify all particles on the screen, select the desired particle (i.e.
WBC), and press the Next button .
NOTE: If the original category name is not selected, the system will automatically classify the particles based on what is selected (i.e. WBC) when the Next button is used.
8
Select the Next button .
If the number of particles exceeds the space on the screen, selecting the Next button navigates to an additional particle screen(s) until all particles are viewed
Once particles are viewed, choose the Next button to go to the next yellow category (needs review)
9 Select the Accept button from the Specimen screen when the verification is complete on a sample.
10 Repeat steps 1 - 8 for each specimen to verify.
IMPORTANT Do not use the Back button to exit the Results screen or after reclassification of an entire category has been made. This can lead to unexpected results including loss of data or loss of a category.

iRICELL Complete Urinalysis Training Guide Page 91 of 187 Beckman Coulter Ver 2.1 (July 2017) Technical Training
RESULT VERIFICATION SKILL CHECK
1. When reviewing specimens, after opening the sample to display the specimen screen what is the next step?
a. Hit the accept button
b. Hit Redo
c. Hit Turbo Edit
d. Hit Edit
2. True or False: A specimen that has a Chem N/A will not be auto released.
3. Yes or No: You open up the WBC category, and it has 40 images in it. Of the 40 images,
10 images are not WBCs. Should these images be reclassified?
4. What does the Turbo Edit Button do and why should it not be used?
_____________________________________________________
_____________________________________________________
5. In what case would you use the Turbo Edit Button?
______________________________________________________
______________________________________________________

iRICELL Complete Urinalysis Training Guide Page 92 of 187 Beckman Coulter Ver 2.1 (July 2017) Technical Training
iRICELL Complete Urinalysis Training Guide Page 93 of 187 Beckman Coulter Ver 2.1 (July 2017) Technical Training
IMPORTING AND EXPORTING RESULTS
OBJECTIVES
Given an operating iRICELL System, be able to:
Import results from a CD into the iRICELL
Export results from the iRICELL onto a CD
Why Is It Important?
The system can import specimen results that have been previously generated on the same or different instrument of the same model from a CD. Specimen results can be exported for storage or for training purposes.
Resources
iChemVELOCITY IFU
iQ IFU
Blank CD
Esoteric CD

iRICELL Complete Urinalysis Training Guide Page 94 of 187 Beckman Coulter Ver 2.1 (July 2017) Technical Training

iRICELL Complete Urinalysis Training Guide Page 95 of 187 Beckman Coulter Ver 2.1 (July 2017) Technical Training
INFORMATION/PRACTICE
Importing Results
Step Action
1 From the Instrument screen, select Go off line .
2 Place the Esoteric CD in the CD drive. A CD drive pop up window may appear displaying an “Archive” folder on the CD in the drive. This may take a few minutes to appear.
3 If the archive folder displays,select the red X in the upper right corner to close the window, if not move to next step.
4 Select the Work List button on the top right of the screen to navigate to the Work List.
5 Select the Import button located on the lower right of the screen.
6 Verify the D:/ drive is displayed on the Import Source field of the Select Import Source pop up window.
7 Select OK . A list of all the results on the Esoteric CD will appear on the Select Specimens to Import screen.
NOTE: This may take a few minutes.
8
Highlight all of the samples.
NOTE: Select the first sample, scroll down to the last sample, hold the Shift key on the keyboard, and left click the mouse. All results should now be highlighted.
9
Select OK .
NOTE: The import may take a few minutes. The Import Status window will display:
Number of results to be imported
Number of results successfully imported
Number of results that failed import
10 Click OK when the importing is complete.

iRICELL Complete Urinalysis Training Guide Page 96 of 187 Beckman Coulter Ver 2.1 (July 2017) Technical Training
Locating imported samples
1 From the Work List screen, select the Search button .
2 Select the Clear button to clear any previous search selections.
3 Check the Show released specimens only checkbox.
4 Select the Today button in the Date-Time area.
TIP: To only view the imported samples, a time frame may also be needed, based around the time the import was performed.
5 Select OK . All the results from the Esoteric CD will display on the Found List.
6
Remove the Esoteric CD from the CD drive.
NOTE: You may see a pop up after removing the CD. Select the red X to close the pop up window.

iRICELL Complete Urinalysis Training Guide Page 97 of 187 Beckman Coulter Ver 2.1 (July 2017) Technical Training
Exporting Results
Step Action
1 Place a external media (CD or Flash Drive) into the computer.
2 If a CD drive pop up window displays, verify “Take no action” option is
highlighted and select OK .
3 Select the Export All button to display the Select Export Destination pop up window.
4
In the Select Export Destination field, select the desired external media.
D:/ for CDs
E:/ for flash drive
NOTE: The window will also display the space required for storing the data.
5
Select OK .
NOTE: The import may take a few minutes. The Export Status window will display:
Number of results to be exported
Number of results successfully exported
Number of results that failed export
6 Select OK when export is complete.
NOTE: When export is complete, the OK button will turn blue and the CD drive will open.
7 Remove and label the external media as Esoteric.
NOTE: If two students are working on the instrument, complete exercise
individually, so that each student has a copy of the Esoteric CD for their lab.

iRICELL Complete Urinalysis Training Guide Page 98 of 187 Beckman Coulter Ver 2.1 (July 2017) Technical Training
Reviewing imported samples for training
Step Action
1 From the Found List screen, select the first sample by double clicking on the specimen row to open the Specimen screen
2
Hit the turbo edit button and the redo button, to re-review the sample.
There should now be categories in Yellow; if not, the turbo edit and redo buttons were not selected.
3 Select the Edit button to display the first yellow category (needs review).
4 Review and accept
Repeat steps 1-4 for each sample on the list

iRICELL Complete Urinalysis Training Guide Page 99 of 187 Beckman Coulter Ver 2.1 (July 2017) Technical Training
IMPORTING AND EXPORTING SKILL CHECK
1. Show facilitator imported samples.
2. Show facilitator exported CD.
3. Prior to importing or exporting ensure the instrument is ______________________
4. Can exported samples be viewed on any computer? ________________________

iRICELL Complete Urinalysis Training Guide Page 100 of 187 Beckman Coulter Ver 2.1 (July 2017) Technical Training

iRICELL Complete Urinalysis Training Guide Page 101 of 187 Beckman Coulter Ver 2.1 (July 2017) Technical Training
SECTION 2- MAINTENANCE AND TROUBLESHOOTING

iRICELL Complete Urinalysis Training Guide Page 102 of 187 Beckman Coulter Ver 2.1 (July 2017) Technical Training

iRICELL Complete Urinalysis Training Guide Page 103 of 187 Beckman Coulter Ver 2.1 (July 2017) Technical Training
SAMPLE FLOW/ COMPONENT IDENTIFICATION
OBJECTIVES
Given an operating iRICELL Complete Urinalysis System, be able to:
Identify components of the iChemVELOCITY
Identify component of the iQ200
Why Is It Important?
Knowledge of instrument functions will enable you to operate the system more efficiently and may help you when troubleshooting situations arise. Using the correct racks and sample containers will help you avoid related errors, alarms, or flags.
Resources
iChemVELOCITY IFU
iQ IFU

iRICELL Complete Urinalysis Training Guide Page 104 of 187 Beckman Coulter Ver 2.1 (July 2017) Technical Training

iRICELL Complete Urinalysis Training Guide Page 105 of 187 Beckman Coulter Ver 2.1 (July 2017) Technical Training
INFORMATION/PRACTICE
The iRICELL system INFORMATION/PRACTICE consists of two instruments. The system is designed to always have the specimen analyzed by the Chemistry analyzer first. The chemistry results transmit directly to the APUI. The microscopy and chemistry results are consolidated at the time the patient identification barcode is read by the iQ. This allows the two results to be viewed on the Specimen screen at one time for ease of results verification.
iQ for Microscopic Analysis & iChemVELOCITY for Chemistry Analysis
Component Function
1 SampleTransport Module (STM)
Moves the racks from the load station (right side of the instrument), to the pipetting station (barcode reader), and then to the unload station (left side of the instrument).
2 Barcode Readers
Located inside the instrument facing the pipetting station. The barcode scanner reads the sample barcodes and will query the LIS or the instrument PC for sample programming to either skip/run based on sample requirements.
3 Sample Bridge
Connection between the iChemVELOCITY and the iQ systems. Sample racks are transferred automatically from the chemistry system to the microscopic system. When the chemistry and iQ systems are connected, the samples must complete their analysis on the chemistry system before being placed on the iQ. If only microscopy is being performed, then place the sample directly on the iQ side.

iRICELL Complete Urinalysis Training Guide Page 106 of 187 Beckman Coulter Ver 2.1 (July 2017) Technical Training
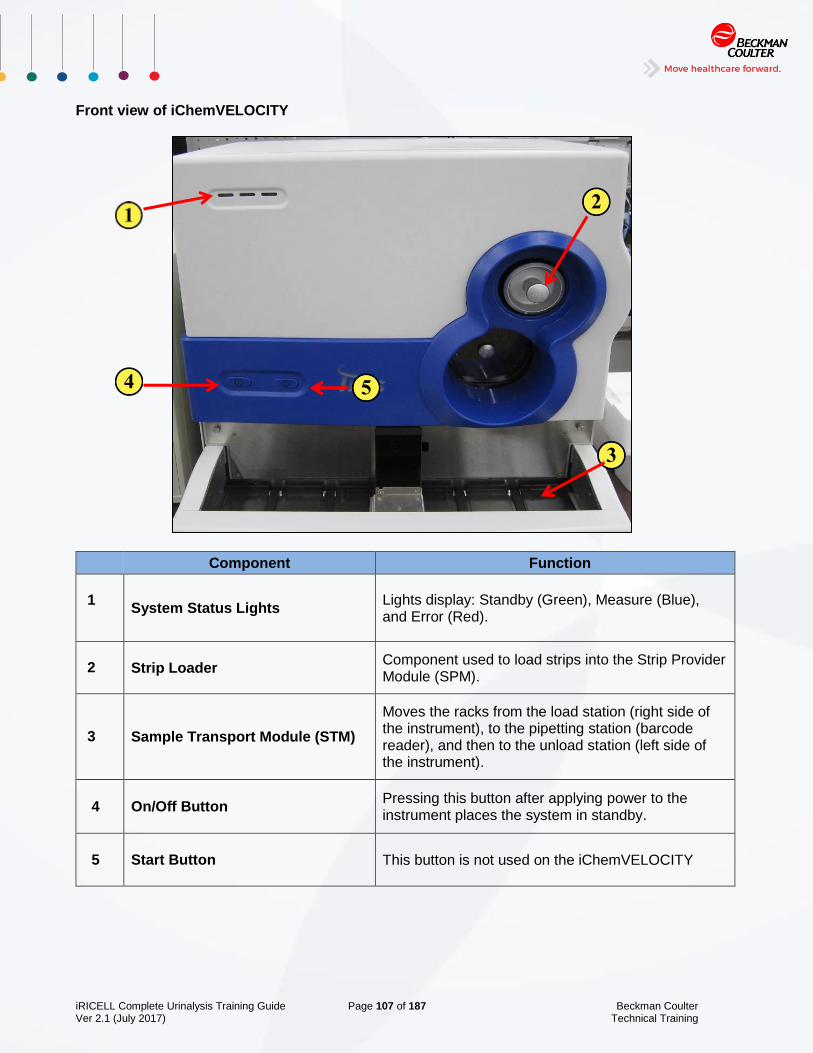
iRICELL Complete Urinalysis Training Guide Page 107 of 187 Beckman Coulter Ver 2.1 (July 2017) Technical Training
Front view of iChemVELOCITY
Component Function
1
System Status Lights Lights display: Standby (Green), Measure (Blue), and Error (Red).
2 Strip Loader
Component used to load strips into the Strip Provider Module (SPM).
3 Sample Transport Module (STM)
Moves the racks from the load station (right side of the instrument), to the pipetting station (barcode reader), and then to the unload station (left side of the instrument).
4 On/Off Button Pressing this button after applying power to the instrument places the system in standby.
5 Start Button This button is not used on the iChemVELOCITY

iRICELL Complete Urinalysis Training Guide Page 108 of 187 Beckman Coulter Ver 2.1 (July 2017) Technical Training
iChemVELOCITY Chemistry Theory
The system produces quantitative results for specific gravity, semi-quantitative or qualitative results for glucose, blood, leukocyte esterase, bilirubin, urobilinogen, pH, protein, ketones, ascorbic acid, nitrites, color, and clarity.
Component Function
1 Strip Provider Module (SPM)
Strip Loader (top)-Holds 300 strips maximum with an on-board stability of five days. The strips will be delivered from the strip loader to the SPM (bottom). When the sampler detects the presence of a test tube, a test strip is delivered facing up to the Strip Conveyor System.
2
Strip Conveyor System (SCS) (below strip reader module)
Moves the test strips through 8 light reading positions every 15 seconds: The strips go through a loading, dosing and eight reading positions.
3 Strip Reader Module (SRM)
Measures the color of each pad of the chemistry test strips at different incubation times and uses the information to obtain the analytes semi-quantitative concentrations.
4 Specific Gravity, Color, and Clarity Module (CGM)
Specific gravity is obtained using a refractometer. Color and Clarity are obtained from a flowcell using white light, color sensor to detect the color of the sample, and the amplitude of light scattered within the flowcell to determine clarity of the sample.

iRICELL Complete Urinalysis Training Guide Page 109 of 187 Beckman Coulter Ver 2.1 (July 2017) Technical Training
5 Fluidics
Consists of a Sample Probe that mixes the specimen inside the sample tube. The Wash Station is used to rinse the inside and outside of the sample probe and to discard wash solution. There is 1 pump that aspirates and dispenses sample, and 2 pumps are used to wash and clean the fluidics system. A 7 liter wash container supplies the iChemVELOCITY wash solution. A 125 mL reservoir also supplies the system.
6 Waste (not pictured) Strip disposal into waste container and liquid waste disposal
either in a drain or waste container.
Chemistry: Sample Processing Overview
Strip Provider Module (SPM)
places the strip on the
Strip Conveyer System (SCS)
Sample aspirated
Specific Gravity, Color, Clarity
Module (CGM) Analysis
Color Reaction
detected and measured by
Strip Reader Module (SRM)
Sample dispensed on strip
Results sent to
Host Computer

iRICELL Complete Urinalysis Training Guide Page 110 of 187 Beckman Coulter Ver 2.1 (July 2017) Technical Training
iQ 200 Microscopic Theory
The system produces quantitative or qualitative counts of all formed sediment elements present in urine including cells, casts, crystals and organisms. The system pipettes specimen from sample tubes, collects images from the samples using digital image capture of particles presented in a flow microscope, and performs image processing to isolate individual particles.
Component Function
1 Pipetting Station
Located in the front of the system. The pipettor mixes the sample by delivering an air bolus and then aspirates approximately 1 mL of sample. NOTE: Urine run on the iRICELL system should not be used for any other testing.
2 Optic System
Consists of: Strobe lamp, Microscope, CCD camera, and Flowcell. The strobe lamp is attached to the microscope. The strobe lamp flashes are synchronized with the CCD camera. Each picture captured represents the view of a small quantity of sample. Each of the pictures represents a precisely measured volume of un-centrifuged specimen present in the flowcell under magnification.
3 Fluidics Composed of iQ Lamina container and 3 peristaltic pumps that aspirate and circulate the sample surrounded by the iQ lamina through the instrument, into the flowcell, and then to waste.
4 Waste (not pictured)
The waste pump discards the fluids into a drain or waste container.

iRICELL Complete Urinalysis Training Guide Page 111 of 187 Beckman Coulter Ver 2.1 (July 2017) Technical Training
iQ 200 Analysis Process Recoginition (APR)
1 Digital Image
Capture
2 Particle
Detection
3 Feature
Extraction
4
Particle Classification
5 Quantitative
Result Reporting
Congratulations, you have finished! Continue to the Skill Check.

iRICELL Complete Urinalysis Training Guide Page 112 of 187 Beckman Coulter Ver 2.1 (July 2017) Technical Training

iRICELL Complete Urinalysis Training Guide Page 113 of 187 Beckman Coulter Ver 2.1 (July 2017) Technical Training
SAMPLE FLOW SKILL CHECK
Use the Analyzer Component CheckList below.
Get numbered tabs from the facilitator.
Place the numbered tabs on the correct components. Please work with your partner.
When you are finished, call a facilitator to check your work.
1. STM 10. SRM
2. Barcode Reader 11. CGM
3. Sample Bridge 12. SCS
4. Strip Loader 13. Pipetting Station
5. Status Lights 14. Optic System
6. On/Off Switch 15. Fluidic System (Pumps)
7. Start Button (iQ) 16. Sample Filter
8. Strip Waste Container Door 17. Wash Station
9. SPM

iRICELL Complete Urinalysis Training Guide Page 114 of 187 Beckman Coulter Ver 2.1 (July 2017) Technical Training

iRICELL Complete Urinalysis Training Guide Page 115 of 187 Beckman Coulter Ver 2.1 (July 2017) Technical Training
WEEKLY & MONTHLY MAINTENANCE
OBJECTIVES
Given an operational iRICELL System and IFUs, be able to:
Clean the Strip Provider Module (SPM)
Clean the CGM
Clean the Wash Station Bath
Clean the Strip Conveyor System
Perform Calibration on the iQ
Perform Backup
Why Is It Important?
Performing routine maintenance including cleaning and calibrations will keep your instrument in optimal operating condition.
Resources
iChemVELOCITY IFU
iQ IFU
Blank CD

iRICELL Complete Urinalysis Training Guide Page 116 of 187 Beckman Coulter Ver 2.1 (July 2017) Technical Training

iRICELL Complete Urinalysis Training Guide Page 117 of 187 Beckman Coulter Ver 2.1 (July 2017) Technical Training
INFORMATION/PRACTICE
WEEKLY MAINTENANCE FOR ICHEMVELOCITY
Step Action
1 Locate the Weekly Maintenance section in the iChemVELOCITY IFU.
2 Follow the procedure to Clean the Strip Provider Module.
NOTES
SPM cleaning procedure is to be performed on a weekly basis based on throughput:
200 samples or less a day – Clean once per week
Greater than 200 samples a day – Clean two times per week
Greater than 500 samples per day – Clean daily
Remove old desiccant and replace with new desiccant when the SPM is opened.
Remove any remaining strips inside the SPM and replace with new strips after cleaning the SPM.
DO NOT use any liquids inside the SPM. Using Iris Cleaner or wet towel/tissue inside the Strip Provider Module will affect the results of the test strips
3
Locate and Follow the procedure for Cleaning the Color Clarity Module (CGM).
NOTE: This process required the use of 20 strips.
NOTE: For Classroom purposes do not run controls.
When performing this procedure in the laboratory running controls at the end of the procedure is required.
iRICELL Complete Urinalysis Training Guide Page 118 of 187 Beckman Coulter Ver 2.1 (July 2017) Technical Training
Delete ID Errors
Delete ID Errors from the Work List caused by the rack used to clean the Specific Gravity, Color, Clarity Module.
Step Action
1 Select the Work List button .
2 Select a sample with an ID error, and then select the Delete Specimen
button .
3 Select OK to the message.
4 Repeat steps 2-4 for each of the 20 samples that were used in the previous exercise.
NOTE To select multiple lines, you can hold the Shift key on the keyboard and left click the mouse on the last file you want to take an action on. All results should now be selected (highlighted in blue).
MONTHLY MAINTENANCE FOR ICHEMVELOCITY
Step Action
1 Locate the Monthly Maintenance section in the iChemVELOCITY IFU.
2 Follow the procedure for Cleaning the Wash Station Bath.
NOTE DO NOT insert the cotton swab inside the wash tube. Cotton particles may clog the tubing connectors.
3 Follow the procedure for Cleaning the Strip Conveyor System.
NOTE
Procedure is to be performed on a monthly basis based on throughput:
200 samples or less a day – Clean once per month
Greater than 200 samples a day – Clean two times per month
NOTE For classroom purposes only leave Strip Conveyor System out of the system overnight to dry.

iRICELL Complete Urinalysis Training Guide Page 119 of 187 Beckman Coulter Ver 2.1 (July 2017) Technical Training
IQ200 MONTHLY MAINTENANCE
iQ Calibration
Step Action
1
Using a iQ control rack, load the following material:
Pos Insert color Vol Contents Barcode
1 Gray 3 mL Iris System Cleanser No
2 Gray 3 mL Iris Diluent No
3 Gray 3 mL Iris Diluent No
4 Leave this position empty
5 Blue 6 mL iQ Focus Yes
2 Load on the iQ200 sampler, and press the Start button on the iQ.
3 Ensure the Focus passed.
4 Ensure the system is in Standby before continuing.
5 Load one 16X100 mm tube with the iQ calibrator barcode label.
6
Place the barcoded calibrator tube in position 1 of the iQ calibration rack.
NOTE: Picture above shows the front and back of the rack.
7 Verify the iQ calibrator has warmed to room temperature. Hold the bottle upside down and give five hard sharp shakes followed by five gentle inversions.
8 Let the bottle sit one minute to allow air bubbles to disperse
9 Fill ten 16X100mm tubes with 4 mL of iQ calibrator including the barcoded calibrator tube in position 1 of the calibration rack
10 Place the non-barcoded tubes in position 2-10 of the iQ calibration rack.
11 Load the rack onto the right side of the iQ sampler.
12 Press the Start button on the iQ.

iRICELL Complete Urinalysis Training Guide Page 120 of 187 Beckman Coulter Ver 2.1 (July 2017) Technical Training
Perform a backup
Backup includes Instrument configuration, results, and QC data
Step Action
1 From the Instrument screen, select the Go off line button
.
2 Select the Maintenance button .
3 Open the CD drive, load a blank CD-R into the drive, and close the CD drive.
4 When the Backup Dialog pop-up message appears, select or verify the “take no action” options is highlighted. Select OK.
5
From the Maintenance screen, select the Backup button and
select OK .
NOTE: This step can take several minutes. The Backup Dialog Box displays progress.
6 When the Backup process is complete, select OK .
7
The CD drive will open automatically when the process is complete.
Remove the CD, close the CD drive, and select OK to exit the Maintenance screen.
8
Label the backup CD with the date and the software version. NOTE: The software version can be located by selecting the System Info button
from the Maintenance screen.
Congratulations, you have finished! Continue to the Skill Check

iRICELL Complete Urinalysis Training Guide Page 121 of 187 Beckman Coulter Ver 2.1 (July 2017) Technical Training
WEEKLY & MONTHLY MAINTENANCE SKILL CHECK
Record the maintenance performed for the iChemVELOCITY in the table below:
Maintenance Procedures for iChemVELOCITY Initials
Weekly Maintenance
Clean Strip Provider Module
Clean CGM
Monthly Maintenance
Clean Wash Station Bath
Clean Strip Conveyor System
Record the maintenance performed for the iQ200 in the table below:
Maintenance Procedures for iQ200 Initials
Monthly Maintenance
Calibration
1. Why is the orange dilution rack used for the weekly maintenance of the CGM?
_________________________________________________________
_________________________________________________________

iRICELL Complete Urinalysis Training Guide Page 122 of 187 Beckman Coulter Ver 2.1 (July 2017) Technical Training

iRICELL Complete Urinalysis Training Guide Page 123 of 187 Beckman Coulter Ver 2.1 (July 2017) Technical Training
QUARTERLY AND AS NEEDED MAINTENANCE
OBJECTIVES
Given an operating iRICELL System, be able to:
Perform Reflectance CalChek
Perform Specific Gravity, Color, Clarity CalCheck
Flush the Waste Line
Clean the Sample Tube Detectors
Clean the Barcode Reader Windows
Clean the Optical Sensors on the Sample Transport Module
Clean the Rinse/Waste Bath
Clean the Sample Filter
Replace Wash Solution (if needed)
Replace Lamina Solution (If needed)
Why Is It Important?
Performing “As Needed Maintenance” procedures will help keep your instrument up and running to avoid unscheduled service calls.
Resources
iChemVELOCITY IFU
iQ IFU

iRICELL Complete Urinalysis Training Guide Page 124 of 187 Beckman Coulter Ver 2.1 (July 2017) Technical Training

iRICELL Complete Urinalysis Training Guide Page 125 of 187 Beckman Coulter Ver 2.1 (July 2017) Technical Training
INFORMATION/PRACTICE
iChemVELOCITY Quarterly Maintenance
Reflectance CalChek
Step Action
1 Select the Maintenance button .
2 Select the Reflectance Check button .
Note The system will display a series of six screens.
3
Follow the instructions on each of the screens.
NOTE: Make sure to put the SPM back together again after removing strips.
IMPORTANT: Do forget to load the reflectance strips found in the supplied iChemVELOCITY CalChek kit
4 From the Instrument screen, verify the Reflectance Check passed or check the print out.
5 Notify facilitator if the Reflectance Check fails.
Specific Gravity, Color, and Clarity CalChek
Step Action
1 Remove the tubes from the iChemVELOCITY CalChek kit.
2 Gently invert the tubes one or two times to mix the solution.
3
Remove the caps from each tube and place the tubes in the blue CalChek Calibration rack in the positions listed below:
Verify the barcodes on tubes 1, 4, and 8 are visible in the open slit.

iRICELL Complete Urinalysis Training Guide Page 126 of 187 Beckman Coulter Ver 2.1 (July 2017) Technical Training
CalChek rack
Pos Contents Value Bar-code
1 Specific Gravity CalChek solution 1.002+/- 0.003
Yes
2 Specific Gravity CalChek solution 1.030+/- 0.005
No
3 Specific Gravity CalChek solution 1.060+/- 0.005
No
4 Color CalChek solution Colorless Yes
5 Color CalChek solution Straw No
6 Color CalChek solution Normal yellow
No
7 Color CalChek solution Normal amber
No
8 Clarity CalChek solution Slightly cloudy
Yes
9 Clarity CalChek solution Cloudy No
10 Clarity CalChek solution Turbid No
4 Load the Calibration rack on the iChemVELOCITY sampler.
5
When the calibration rack completes, verify it is successful. The date/time of the new SG/Color/Clarity CalChek will be displayed on the Instrument screen and on the print out.
NOTE: The measured values are compared to acceptable ranges stored in the system. If the results are within range, the CalChek is verified and found acceptable. You can also check the results using the Quality
Review button .
6 Notify the facilitator immediately if the CalChek failed.

iRICELL Complete Urinalysis Training Guide Page 127 of 187 Beckman Coulter Ver 2.1 (July 2017) Technical Training
As Needed Maintenance
Step Action
1 Using the iChemVELOCITY and iQ IFU, locate the as needed maintenance procedures.
2 Perform the following As Needed Maintenance Procedures:
3
Clean the Sample Tube Detectors (Both)
Clean the Barcode Reader Windows (Both)
Clean the Optical Sensors on the Sample Transport Module (Both)
Flush the Waste Line (VELOCITY)
Clean Sample Filter (Use Procedure 2) (iQ)
Clean the Rinse/Waste Bath (iQ)
Congratulations, you have finished! Continue to the Skill Check

iRICELL Complete Urinalysis Training Guide Page 128 of 187 Beckman Coulter Ver 2.1 (July 2017) Technical Training

iRICELL Complete Urinalysis Training Guide Page 129 of 187 Beckman Coulter Ver 2.1 (July 2017) Technical Training
MAINTENANCE SKILL CHECK
Record the maintenance performed for the iChemVELOCITY in the table below:
Maintenance Procedures for iChemVELOCITY Initials
Quarterly Maintenance
Perform Specific Gravity, Color, Clarity, CalChek
Perform Reflectance Check
As Needed Maintenance
Clean Sample Tube Detector
Clean the Barcode Reader Window
Clean the Optical Sensors on the Sample Transport Module
Replace Wash Solution and Filter
Flush the Waste Line
Record the maintenance performed for the iQ200 in the table below:
Maintenance Procedures for iQ200 Initials
As Needed Maintenance
Clean Sample Tube Detector
Clean Barcode Reader Window
Clean the Optical Sensors on the Sample Transport Module
Replace Lamina Solution and Filter
Clean the Rinse/Waste Bath
Clean the Sample Filter

iRICELL Complete Urinalysis Training Guide Page 130 of 187 Beckman Coulter Ver 2.1 (July 2017) Technical Training
iRICELL Complete Urinalysis Training Guide Page 131 of 187 Beckman Coulter Ver 2.1 (July 2017) Technical Training
TROUBLESHOOTING
OBJECTIVES
At the completion of this module, the learner will understand:
Principles of Troubleshooting
Instrument screen and Chemistry and Hardware flags
Resources for troubleshooting failed Focus, QC, and Calibration
Why Is It Important?
This information will help you in the event you need to troubleshoot a sample, reagent, or instrument issue.
Resources
iChemVELOCITY IFU
iQ IFU

iRICELL Complete Urinalysis Training Guide Page 132 of 187 Beckman Coulter Ver 2.1 (July 2017) Technical Training
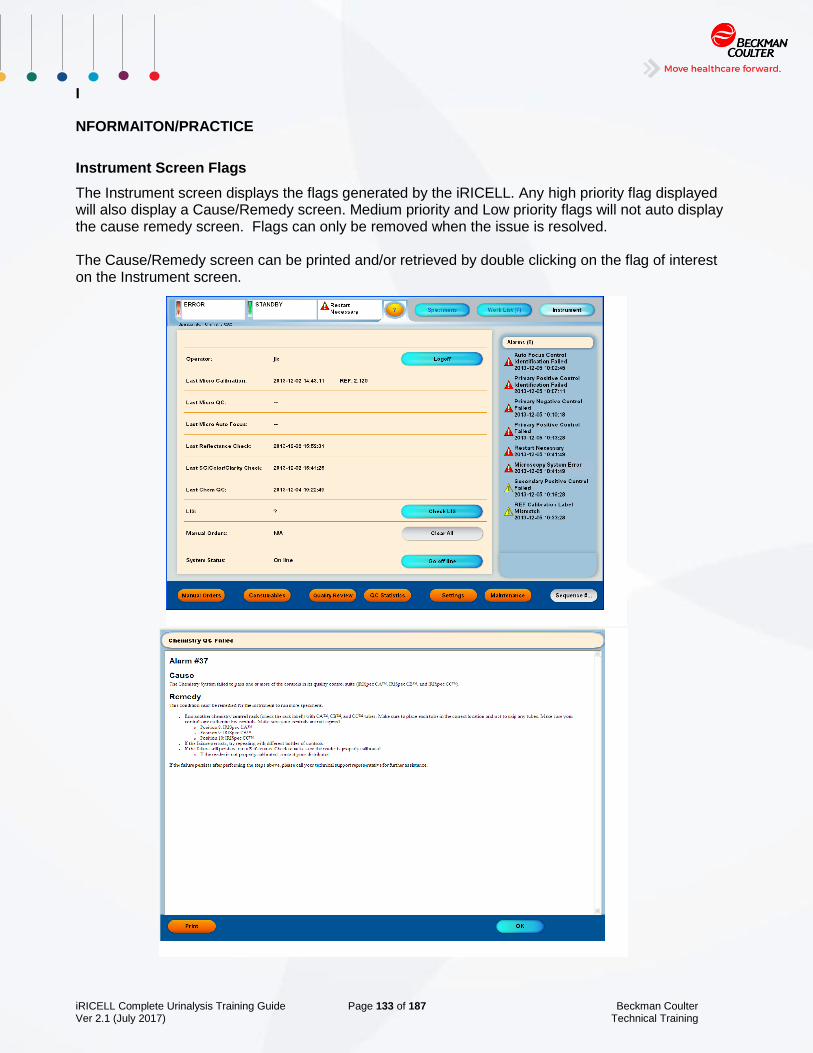
iRICELL Complete Urinalysis Training Guide Page 133 of 187 Beckman Coulter Ver 2.1 (July 2017) Technical Training
I
NFORMAITON/PRACTICE
Instrument Screen Flags
The Instrument screen displays the flags generated by the iRICELL. Any high priority flag displayed will also display a Cause/Remedy screen. Medium priority and Low priority flags will not auto display the cause remedy screen. Flags can only be removed when the issue is resolved. The Cause/Remedy screen can be printed and/or retrieved by double clicking on the flag of interest on the Instrument screen.

iRICELL Complete Urinalysis Training Guide Page 134 of 187 Beckman Coulter Ver 2.1 (July 2017) Technical Training
iQ Hardware Errors
Hardware alarms generated by the iQ Series will be displayed on the Instrument screen as specific alarm numbers and as a Microscopy System Error as well as a red status light on the front of the iQ. Specific error locations and descriptions can be viewed by clicking the Maintenance button
, then selecting the Errors button . Check the information in the Detail for specific part failure information.
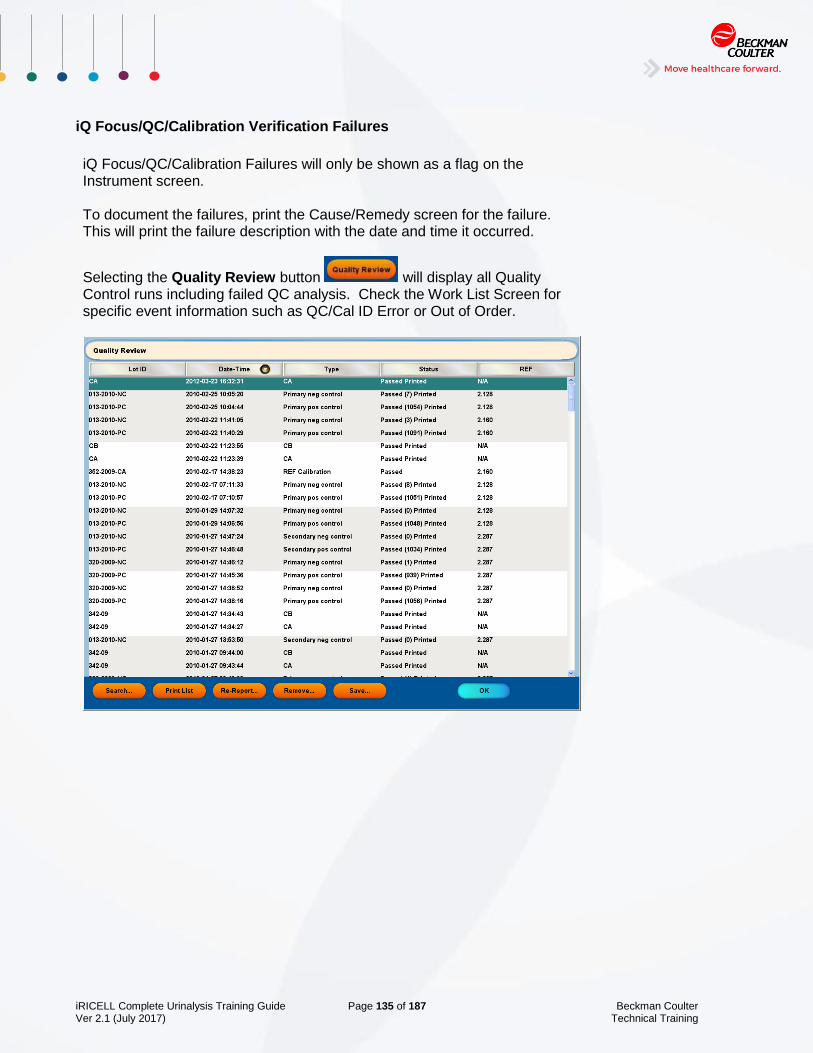
iRICELL Complete Urinalysis Training Guide Page 135 of 187 Beckman Coulter Ver 2.1 (July 2017) Technical Training
iQ Focus/QC/Calibration Verification Failures
iQ Focus/QC/Calibration Failures will only be shown as a flag on the Instrument screen. To document the failures, print the Cause/Remedy screen for the failure. This will print the failure description with the date and time it occurred.
Selecting the Quality Review button will display all Quality Control runs including failed QC analysis. Check the Work List Screen for specific event information such as QC/Cal ID Error or Out of Order.

iRICELL Complete Urinalysis Training Guide Page 136 of 187 Beckman Coulter Ver 2.1 (July 2017) Technical Training
Chemistry Analyzer Flags
There are some flags specific to chemistry testing that appear on the reports. These flags will cause the sample to be flagged and show the exact chemistry flags that cause the issue. These flags include “Chem N/A” and “No Sample”. If any of these flags are obtained, the chemistry should be rerun.
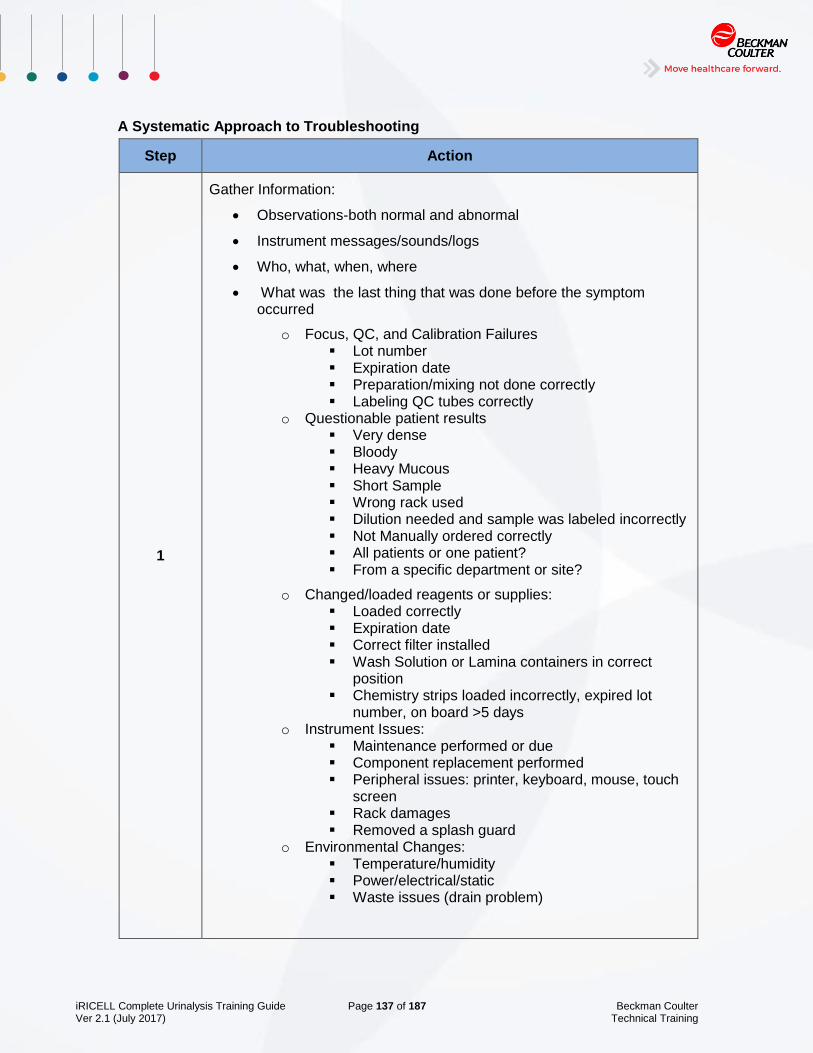
iRICELL Complete Urinalysis Training Guide Page 137 of 187 Beckman Coulter Ver 2.1 (July 2017) Technical Training
A Systematic Approach to Troubleshooting
Step Action
1
Gather Information:
Observations-both normal and abnormal
Instrument messages/sounds/logs
Who, what, when, where
What was the last thing that was done before the symptom occurred
o Focus, QC, and Calibration Failures Lot number Expiration date Preparation/mixing not done correctly Labeling QC tubes correctly
o Questionable patient results Very dense Bloody Heavy Mucous Short Sample Wrong rack used Dilution needed and sample was labeled incorrectly Not Manually ordered correctly All patients or one patient? From a specific department or site?
o Changed/loaded reagents or supplies: Loaded correctly Expiration date Correct filter installed Wash Solution or Lamina containers in correct
position Chemistry strips loaded incorrectly, expired lot
number, on board >5 days o Instrument Issues:
Maintenance performed or due Component replacement performed Peripheral issues: printer, keyboard, mouse, touch
screen Rack damages Removed a splash guard
o Environmental Changes: Temperature/humidity Power/electrical/static Waste issues (drain problem)

iRICELL Complete Urinalysis Training Guide Page 138 of 187 Beckman Coulter Ver 2.1 (July 2017) Technical Training
2
Identify the symptom:
Develop a clear statement about the issue
What is common?
What is unique?
Intermittent or Reproducible?
What is the easiest and least expensive to check?
3
Investigate/Isolate the issue?
Further segregate the issue through testing
Use a systems approach
Narrow down by ruling out.
4
Devise a Plan and test:
Perform identified corrective action
o Repeat controls, calibrators, CalChecks
o Perform Maintenance if needed
o Remove Strip Jams
o Remove obstacle
5
Verify the repair:
Verify system performance
Resolved – resume operations
Unresolved- Revise plan

iRICELL Complete Urinalysis Training Guide Page 139 of 187 Beckman Coulter Ver 2.1 (July 2017) Technical Training
TROUBLESHOOTING SKILL CHECK
Using the troubleshooting section and in the iChemVELOCITY and iQ200 operator manual answer the following questions:
1. What can cause an alarm 41 on the iChemVELOCITY, and what are some remedies? ____________________________________________________________________
____________________________________________________________________
__________________________________________________
2. What can cause an alarm 40 on the iChemVELOCITY, and what are some remedies? ____________________________________________________________________
____________________________________________________________________
__________________________________________________
3. What can cause an Alarm 5 on the iQ200, and what are the remedies? ____________________________________________________________________
____________________________________________________________________
__________________________________________________
4. What can cause an Alarm 7 on the iQ200, and what are the remedies? ____________________________________________________________________
____________________________________________________________________
____________________________________________________________________
5. What can cause an Alarm 25 on the iQ200, and what are the remedies ____________________________________________________________________
____________________________________________________________________
__________________________________________________

iRICELL Complete Urinalysis Training Guide Page 140 of 187 Beckman Coulter Ver 2.1 (July 2017) Technical Training

iRICELL Complete Urinalysis Training Guide Page 141 of 187 Beckman Coulter Ver 2.1 (July 2017) Technical Training
SYSTEM SHUTDOWN AND RESTART
OBJECTIVES
Given an operational iRICELL System, be able to:
Shut down the iRICELL System
Restart the iRICELL System in proper sequence
Why Is It Important?
The system may need to be shut down and restarted during troubleshooting or as directed by Technical Support.
Following the proper procedures will help avoid damage to the instrument or corruption of the system’s database.
Resources
iChemVELOCITY IFU
iQ IFU

iRICELL Complete Urinalysis Training Guide Page 142 of 187 Beckman Coulter Ver 2.1 (July 2017) Technical Training

iRICELL Complete Urinalysis Training Guide Page 143 of 187 Beckman Coulter Ver 2.1 (July 2017) Technical Training
NFORMATION/PRACTICE
Shutting down the System
Step Action
1
From the Instrument screen, select Go off line .
The following message will appear:
Any specimens currently being analyzed will be completed. The rack (if any) will be ejected.
Continue going Off Line?
Select Yes to confirm message.
2 Select the Maintenance button .
3
Select the Shutdown button . The following message will appear:
Do you want to shut down the instrument?
Select Yes.
4
When the computer shutdown is complete, the computer will automatically turn off. (You do not have to press the power button).
Turn off the microscopy module by pressing the green On/Off button on the left front of the iQ.
Then, press the On/Off button on the left front of the iChemVELOCITY.
NOTE For Classroom purpose, you do not need to turn off the main power switch of the instruments that are located on the back of the instrument; however, You may need to do so at the direction of a Beckman Coulter representative.

iRICELL Complete Urinalysis Training Guide Page 144 of 187 Beckman Coulter Ver 2.1 (July 2017) Technical Training
Restarting the System
Step Action
1 Restart the computer by pressing the On/Off button on the front of the PC.
2
When the Instrument screen is displayed,
Power on the chemistry module by pressing the green On/Off on the front of the iChemVELOCITY.
Power on the microscopy module by pressing the green On/Off button on the left front on the iQ.
3
Log on to the system.
NOTE: The system will automatically initialize, and the system will be
On Line.

iRICELL Complete Urinalysis Training Guide Page 145 of 187 Beckman Coulter Ver 2.1 (July 2017) Technical Training
SHUTDOWN AND RESTART SKILL CHECK
1. In what order should the iRICELL System be put into shutdown?
a. iQ>>iChemVELOCITY >>Computer
b. iChemVELOCITY>>iQ>>Computer
c. Computer>>iQ>>iChemVELOCITY
2. In what order should the iRICELL System be turned back on?
a. iQ>>iChemVELOCITY >>Computer
b. iChemVELOCITY>>iQ>>Computer
c. Computer>>iQ>>iChemVELOCITY
d. Computer>>iChemVELOCITY>>iQ

iRICELL Complete Urinalysis Training Guide Page 146 of 187 Beckman Coulter Ver 2.1 (July 2017) Technical Training

iRICELL Complete Urinalysis Training Guide Page 147 of 187 Beckman Coulter Ver 2.1 (July 2017) Technical Training
ADDITIONAL TOPICS

iRICELL Complete Urinalysis Training Guide Page 148 of 187 Beckman Coulter Ver 2.1 (July 2017) Technical Training

iRICELL Complete Urinalysis Training Guide Page 149 of 187 Beckman Coulter Ver 2.1 (July 2017) Technical Training
BODY FLUIDS
OBJECTIVES
Given an operating iRICELL System, be able to:
Run Body Fluid Controls
Run Body Fluid Background
Run Body Fluid Samples
Why Is It Important?
The iRICELL System has an optional iQ Body Fluids Module that creates a workflow solution for processing body fluid samples. Performing manual body fluid counts is a daily task that can occupy much of your time in the lab. Learning how to process body fluids efficiently on the iRICELL System saves you time.
Resources
iQ IFU

iRICELL Complete Urinalysis Training Guide Page 150 of 187 Beckman Coulter Ver 2.1 (July 2017) Technical Training

iRICELL Complete Urinalysis Training Guide Page 151 of 187 Beckman Coulter Ver 2.1 (July 2017) Technical Training
INFORMATION/PRACTICE Theory of Operation
The iQ Series System auto-identifies, processes, and identifies images from specimens that are loaded into specific body fluid racks. Body Fluids specimens are prepared by splitting the specimens into two aliquots. One aliquot is mixed with iQ ® Body Fluids Lysing Reagent and the other is mixed with Iris Diluent. The two aliquots are prepared differently because successful analysis relies on subjecting one aliquot to selective cell lysis. Selective lysis is a chemical process that destroys red blood cells’ membrane causing the membrane to burst and releasing its contents into the solution. The iQ Body Fluids Module reports the total number of cells in each of the two aliquots. The cells from the diluted aliquot are called "Total Cells”, and the cells from the lysed aliquot are called “Nucleated Cells” because the RBCs have been destroyed. The difference between the "Total Cells" and the "Nucleated Cells" represents the number of RBCs in the specimen. The lower linearity is Zero, and the upper linearity of 10,000 cells/ul , but is extended with the Extended Linearity Procedure.
CSF samples are to have a minimum of 1:5 dilution
Serous Fluids (e.g. Peritoneal, Pericardial, etc..) need to have a minimum of 1:20 dilution
Body Fluid Start Up Procedure
In order to run Body Fluids, the Body Fluid CD must be in the system.
Step Action
1 Place the Body Fluid Module CD in the CD drive.
2 From the Instrument screen, select Go off line .
3 Select the Maintenance button .
4 Select the Restart button.
5 When the Main Screen appears, log on using User ID and Password.
6 Select Manual Order and verify that racks 25,26,and 27 are listed
NOTE
There are three area that change when Body Fluids are enabled.
Manual order screen – Additional racks listed
Settings – Formed Particle Button changes to Fluid Type
Work List/Found List – Additional Column Type

iRICELL Complete Urinalysis Training Guide Page 152 of 187 Beckman Coulter Ver 2.1 (July 2017) Technical Training
Body Fluid Controls
Step Action
1 Warm body fluid controls to room temperature.
2 Place 3 unlabeled conical bottom tubes in position 2, 3, and 4 of the Body Fluid QC (BFQC) rack.
3 Place barcodes on the tubes in positions 3 and 4 with the level of control to be tested.
4 Pour 1.25 mL of Iris Diluent into the tube in Position 2.
5 Pipette 1.0 mL of iQ Body Fluid Lysing Reagent into the tube in position 3.
6 Pipette 1.0 mL of Iris Diluent into the tube in Position 4.
7
To mix iQ Controls:
Hold vial horizontally between the palm back and forth for 20-30 seconds
Mix by rapid inversion
8 Pipette 250 µL of control into both tubes in positions 3 and 4.
9 Tap gently to mix tubes 3 and 4.
10
Place the BFQC rack on the iQ system and press Start button.
NOTE: It is recommended to run well-mixed body fluid control material IMMEDIATELY after performing the dilutions.
11 To review BF Controls, select the Work List button to locate the controls in the Work List.
12 Select the control to be reviewed, and select the Specimens button to navigate to the Specimen screen.
13 Review and edit the results in the same manner as a body fluid patient specimen by moving all artifacts into the designed ART classification.
14 Click the Accept button .
NOTE: If the BF QC fails, a yellow flag will be displayed on the Instrument screen, and body fluid specimens will not be allowed to run.
15 Repeat steps 2-14 for the next level of control until both levels of control have been processed.

iRICELL Complete Urinalysis Training Guide Page 153 of 187 Beckman Coulter Ver 2.1 (July 2017) Technical Training
Body Fluid Background
A reagent background check must be performed weekly using the reagents straight with the same type of barcoding as the QC. It is run to ensure that the system reagents have not been contaminated.
Step Action
1 Warm lysing reagent to room temperature.
2 Place 3 unlabeled conical bottom tubes in positions 2, 3, and 4 of the Body Fluid QC (BFQC) rack.
3
Place Background barcodes on the tubes in positions 3 and 4 with the level of control to be tested.
NOTE: The Background barcodes used can be found in the Body Fluid Controls set.
4 Pour 1.25 mL of Iris Diluent into the tube in Position 2.
5 Pipette 1.25 mL of iQ Body Fluid Lysing Reagent into the tube in Position 3.
6 Pipette 1.25 mL of Iris Diluent into the tube in Position 4.
7 Place the BFQC rack on the iQ system and press the Start button.
8 To review reagent background count, select the Work List button to locate the background in the Work list.
9 Select the control to be reviewed, and click the Specimens button to navigate to the Specimen screen.
10 Review and edit the results in the same manner as a body fluid patient specimen.
11 Click the Accept button .
NOTE: Edited background passes if there are ≤ 3 particles/µL.
NOTE: Each specimen is run on its own Body Fluids rack while operating in
the iQ Body Fluids Module mode. Use racks 25, 26, and 27 for running
samples.

iRICELL Complete Urinalysis Training Guide Page 154 of 187 Beckman Coulter Ver 2.1 (July 2017) Technical Training
Processing Patient Samples
Step Action
1 Choose Body Fluid Racks 25, 26, or 27.
2 Place patient barcode labels along with appropriate dilution labels.
3
Choose the appropriate dilution using dilution chart below:
4
Use BF Conical tubes in the following sequence:
Position Material
1 1.25 mL of Iris Diluent (optional).
2 1.25 mL of Iris Diluent.
3 Pipette appropriate amount of Lyse based on desired dilution.
4 Pipette appropriate amount of Diluent based on desired dilution.
5 1.25 mL of Iris Diluent (optional or following turbid, bloody, or extremely viscous body fluid samples).

iRICELL Complete Urinalysis Training Guide Page 155 of 187 Beckman Coulter Ver 2.1 (July 2017) Technical Training
5 Place the appropriate amount of BF sample in positions 3 and 4.
NOTE
Always add the correct amount of lysing reagent or diluent to the tube first. It is very important to add the specimen to the lysing reagent or diluent not vice versa. Specimens that are added directly to empty tubes can adhere to the wall of the tube which can impede them from mixing properly into solution. For the same reason, it is important not to apply the specimen to the wall of the tube above the solution.
6 Tap gently to mix tubes 3 and 4.
7 Place the BF sample rack on the iQ and press the Start button.

iRICELL Complete Urinalysis Training Guide Page 156 of 187 Beckman Coulter Ver 2.1 (July 2017) Technical Training
Body Fluid Results Verifying
The iQ Body Fluids Module initially classifies particles based on their size which streamlines the editing process. After editing is complete, a report quantifying the number of RBCs and the number of Nucleated Cells in the fluid specimen is created.
Even though the iQ Body Fluids Module initially counts the number of Nucleated Cells and Total Cells, the module calculates and reports the number of RBCs by subtracting the number of cells in the lysed aliquot (in which the RBCs are destroyed) from the number of cells in the diluted aliquot.
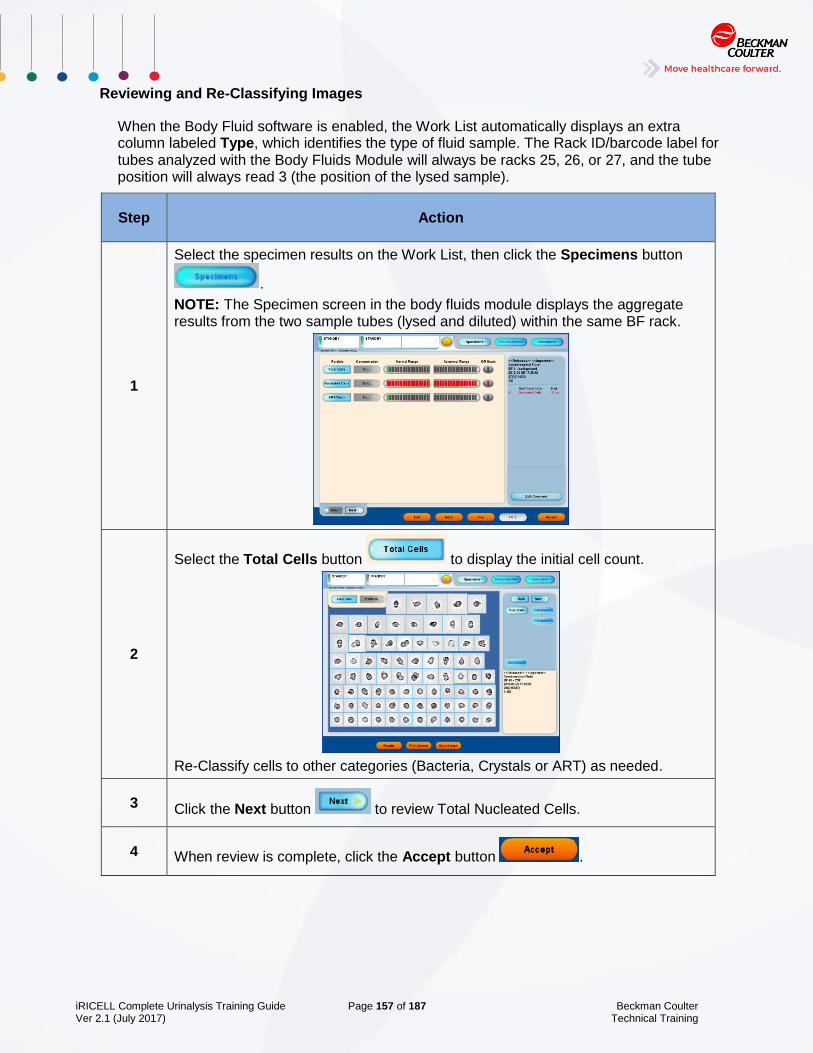
iRICELL Complete Urinalysis Training Guide Page 157 of 187 Beckman Coulter Ver 2.1 (July 2017) Technical Training
Reviewing and Re-Classifying Images
When the Body Fluid software is enabled, the Work List automatically displays an extra column labeled Type, which identifies the type of fluid sample. The Rack ID/barcode label for tubes analyzed with the Body Fluids Module will always be racks 25, 26, or 27, and the tube position will always read 3 (the position of the lysed sample).
Step Action
1
Select the specimen results on the Work List, then click the Specimens button
.
NOTE: The Specimen screen in the body fluids module displays the aggregate results from the two sample tubes (lysed and diluted) within the same BF rack.
2
Select the Total Cells button to display the initial cell count.
Re-Classify cells to other categories (Bacteria, Crystals or ART) as needed.
3 Click the Next button to review Total Nucleated Cells.
4 When review is complete, click the Accept button .

iRICELL Complete Urinalysis Training Guide Page 158 of 187 Beckman Coulter Ver 2.1 (July 2017) Technical Training

iRICELL Complete Urinalysis Training Guide Page 159 of 187 Beckman Coulter Ver 2.1 (July 2017) Technical Training
BODY FLUIDS SKILL CHECK
1. Show facilitator processed Body Fluid Quality Control results.
2. In the table below, identify each position’s contents in a Body Fluid rack:
Position 1
Position 2
Position 3
Position 4
Position 5
3. True or False: A special sample tube is required to process body fluid samples.

iRICELL Complete Urinalysis Training Guide Page 160 of 187 Beckman Coulter Ver 2.1 (July 2017) Technical Training

iRICELL Complete Urinalysis Training Guide Page 161 of 187 Beckman Coulter Ver 2.1 (July 2017) Technical Training
SAMPLE ANALYSIS 2
OBJECTIVES
Given an operating iRICELL System, be able to:
Split chemistry and microscopy results and rerun
Split chemistry and microscopy results and rerun using manual programming
Merge and consolidate IDs
Why Is It Important?
When a dilution barcode is missing or not properly attached to the specimen, it may cause the chemistry and microscopy results to be separated.
This process is also helpful when you do not have enough specimen to run through both the chemistry and microscopy side of the system. In this situation, the chemistry portion is run on the undiluted sample while the microscopy portion can be processed using a dilution to bring the volume up to the minimum.
Resources
iChemVELOCITY IFU
iQ IFU

iRICELL Complete Urinalysis Training Guide Page 162 of 187 Beckman Coulter Ver 2.1 (July 2017) Technical Training

iRICELL Complete Urinalysis Training Guide Page 163 of 187 Beckman Coulter Ver 2.1 (July 2017) Technical Training
INFORMATION/PRACTICE
Splitting Results and Rerunning from the Work List
Step Action
1 Process a diluted sample. Refer to Sample Analysis if needed.
2 From the Worklist double click on the desired Specimen ID to navigate to the Specimen screen for that sample.
3 From the Specimen screen, select the Other… button (on lower right of screen).
4 Select the option Separate microscopy and chemistry results from window.
5 Select OK .
6
In the information area the following message will appear: “Select accept to separate the chemistry and microscopy”. Select the
Accept button .
7 The results should be back on the Work List screen.
8 The chemistry and microscopy results should be separated with two entries for the sample.
9 Highlight the microscopy portion of the sample.
10 Select the Delete Specimen button from the task pane.
11 Select Yes to pop-up message.
12 Rerun the diluted portion of the sample on the iQ by placing the patient rack on the right side of the iQ and pressing the Start button.
13 When complete, verify the results matched up with the existing chemistry results.
14 Review and release.

iRICELL Complete Urinalysis Training Guide Page 164 of 187 Beckman Coulter Ver 2.1 (July 2017) Technical Training
Splitting Results and Rerunning from the Found List
Step Action
1
From the Work List screen, select the Search button to find the Specimen ID used in the previous exercise.
NOTE: The Work List changes to the Found List when a search is performed. It converts back to the Work List when the Search button is selected again.
2 Split the Chemistry and Microscopy results (use previous exercise as reference if needed).
NOTE
If the specimen does not have two entries, refresh to Found List screen by following steps below:
a Select the Search button to return to Work List screen
b Select the Search button again
c Type in the Specimen ID, and select the Today button
d Select OK
3 Delete the Microscopy results (use previous exercise as reference if needed).
4
Manually program the sample using the following information: Sample Identifier: Patient ID Fluid Type: URN Dilution: Select the appropriate dilution for the sample (based on the dilution label used) Work Order: RUN
5 Place the diluted specimen into the corresponding position of the selected rack WITH THE BARCODE FACING AWAY FROM THE SYSTEM.
6 Place the rack on the iQ and press the Start button.
7 When completed, verify the results matched up correctly.
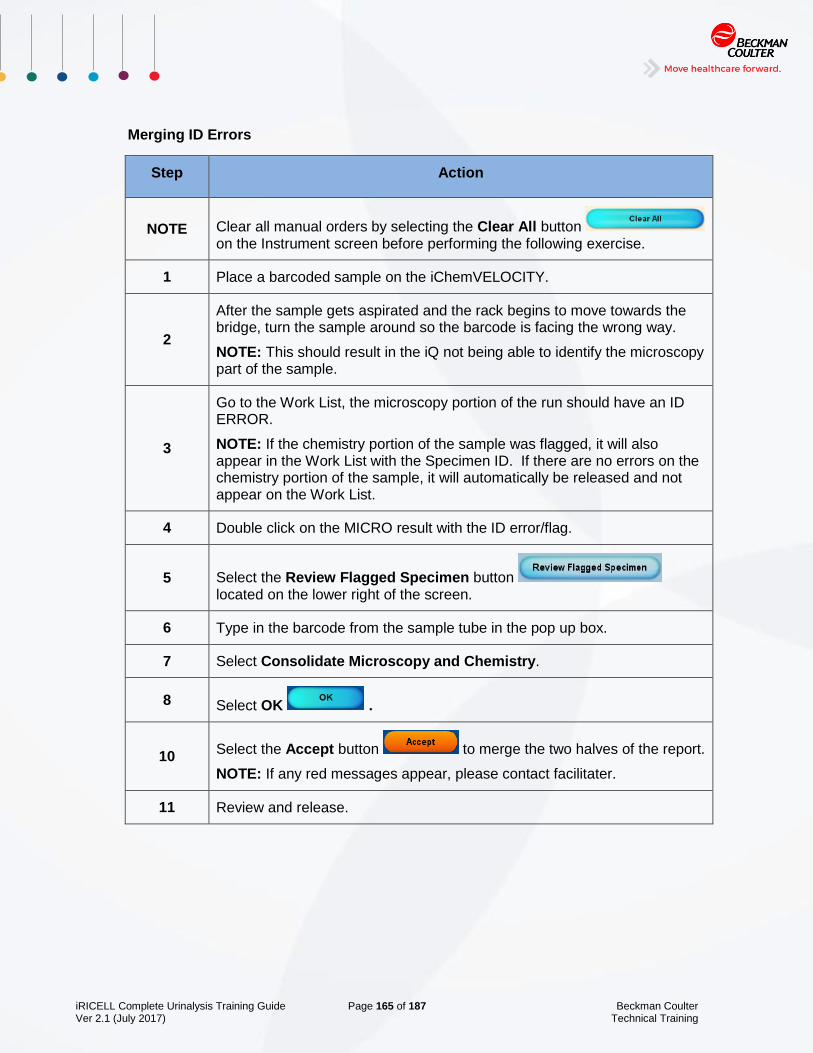
iRICELL Complete Urinalysis Training Guide Page 165 of 187 Beckman Coulter Ver 2.1 (July 2017) Technical Training
Merging ID Errors
Step Action
NOTE Clear all manual orders by selecting the Clear All button on the Instrument screen before performing the following exercise.
1 Place a barcoded sample on the iChemVELOCITY.
2
After the sample gets aspirated and the rack begins to move towards the bridge, turn the sample around so the barcode is facing the wrong way.
NOTE: This should result in the iQ not being able to identify the microscopy part of the sample.
3
Go to the Work List, the microscopy portion of the run should have an ID ERROR.
NOTE: If the chemistry portion of the sample was flagged, it will also appear in the Work List with the Specimen ID. If there are no errors on the chemistry portion of the sample, it will automatically be released and not appear on the Work List.
4 Double click on the MICRO result with the ID error/flag.
5 Select the Review Flagged Specimen button located on the lower right of the screen.
6 Type in the barcode from the sample tube in the pop up box.
7 Select Consolidate Microscopy and Chemistry.
8 Select OK .
10 Select the Accept button to merge the two halves of the report.
NOTE: If any red messages appear, please contact facilitater.
11 Review and release.

iRICELL Complete Urinalysis Training Guide Page 166 of 187 Beckman Coulter Ver 2.1 (July 2017) Technical Training

iRICELL Complete Urinalysis Training Guide Page 167 of 187 Beckman Coulter Ver 2.1 (July 2017) Technical Training
SAMPLE ANALYSIS 2 SKILL CHECK
1. Show facilitator the merged samples you ran.
2. List the steps necessary to separate Chemistry and Microscopy results.
a. _____________________________________
b. _____________________________________
c. _____________________________________
d. _____________________________________
e. _____________________________________
3. Explain how you would run a dilution if you do not have any dilution labels available.
_________________________________________________
_________________________________________________

iRICELL Complete Urinalysis Training Guide Page 168 of 187 Beckman Coulter Ver 2.1 (July 2017) Technical Training

iRICELL Complete Urinalysis Training Guide Page 169 of 187 Beckman Coulter Ver 2.1 (July 2017) Technical Training
SECURITY ACCESS
OBJECTIVES
At the completion of this module, be able to:
Create a new user
Delete users
Why Is It Important?
By creating privileges, you will help decide the levels of security access for those working with you based on their laboratory responsibilities.
Resources
iChemVELOCITY IFU
iQ IFU

iRICELL Complete Urinalysis Training Guide Page 170 of 187 Beckman Coulter Ver 2.1 (July 2017) Technical Training

iRICELL Complete Urinalysis Training Guide Page 171 of 187 Beckman Coulter Ver 2.1 (July 2017) Technical Training
INFORMATION/PRACTICE
Creating a new user
Step Action
1 From the Instrument screen, select the Logon button .
2 Select BCI from the identifier drop-down menu.
3 In the password window, type in bci and select OK .
NOTE: Identifier and passwords are case sensitive.
4
Select Go Off line .
The following message will appear:
Any specimens currently being analyzed will be completed. The rack (if any) will be ejected.
Continue going Off Line?
Select Yes to confirm message.
5 From the Screen Level Function Area, select the Settings button
.
6
Select the Operator Accounts button to display the Operators Accounts window.
NOTE: The Operator Accounts screen displays the list of authorized users and their privilege level (Technologist or Manager).

iRICELL Complete Urinalysis Training Guide Page 172 of 187 Beckman Coulter Ver 2.1 (July 2017) Technical Training
7
Select the New button to display the New Operator Account screen:
Note Operator identifiers and passwords are both case sensitive.
8 Type the new operator identification in the Operator Identifier field
NOTE: The follow characters cannot be used [ ] ‘ or spaces.
9 Select the corresponding button to assign access level (Technologist or Manager).
10 Type the new operator password in the Password field and in the Confirm password field.
11 Select OK to add the new operator to the Operator Accounts screen.
12 Select OK to validate the new operator entry and close the screen.
13 Log on to the system using the operator level just created and explore the software.
14 Using the steps above, create another operator with a Tech level.

iRICELL Complete Urinalysis Training Guide Page 173 of 187 Beckman Coulter Ver 2.1 (July 2017) Technical Training
Deleting a User
The currently logged operator cannot delete his/her own user account
Step Action
1 From the Operators Accounts screen, select the operator to be deleted, and
click the Delete button .
2
The following message will appear:
“Really delete the selected operator account?”.
Select Yes to delete the selected operator from the user list.
3 Select OK to validate the deletion and close the screen.
Congratulations, you have finished! Continue to the Skill Check.

iRICELL Complete Urinalysis Training Guide Page 174 of 187 Beckman Coulter Ver 2.1 (July 2017) Technical Training

iRICELL Complete Urinalysis Training Guide Page 175 of 187 Beckman Coulter Ver 2.1 (July 2017) Technical Training
SECURITY ACCESS SKILL CHECK
1. Show facilitator the operators set up.
2. Show facilitator how to delete an operator.

iRICELL Complete Urinalysis Training Guide Page 176 of 187 Beckman Coulter Ver 2.1 (July 2017) Technical Training
iRICELL Complete Urinalysis Training Guide Page 177 of 187 Beckman Coulter Ver 2.1 (July 2017) Technical Training
TRACEABILTY
OBJECTIVES
At the completion of this module, be able to:
Add a consumable to traceability
Update a consumable
Why Is It Important?
This feature allows you to keep track of the system consumables and to verify when a specific lot was in use by the system.
Resources
iChemVELOCITY IFU
iQ IFU

iRICELL Complete Urinalysis Training Guide Page 178 of 187 Beckman Coulter Ver 2.1 (July 2017) Technical Training

iRICELL Complete Urinalysis Training Guide Page 179 of 187 Beckman Coulter Ver 2.1 (July 2017) Technical Training
INFORMATION/PRACTICE
Consumables tracking data are stored in the system for patient specimens currently stored or up to
18 months, whichever is greater. In order for the system to purge consumables tracking data, the
related patient data must be purged from the database. The system maintains 10,000 patient results
in the database.
This function provides usage tracking for the following consumables automatically:
iChemVELOCTY
Controls CA CB’ CC
Calibration CalChek Strips CalChek Liquid Reagents
iQ200
Controls and Focus Auto-Focus Primary Positive Primacy Negative Secondary Positive Secondary Negative Level 1 (Body Fluids) Level 2 (Body Fluids)
Calibration iQ Calibrator
The following consumables DO NOT automatically go into traceability. In order to electronically track
them they will need to manually entered into traceability:
iChem Test Strips
iChem Wash solution
iQ Lamina
Body Fluid lysing agent
Iris Diluent
Iris System Cleanser

iRICELL Complete Urinalysis Training Guide Page 180 of 187 Beckman Coulter Ver 2.1 (July 2017) Technical Training
Adding a New Consumable
Step Action
1 From the instrument screen, go off-line.
2 Select Traceability.
3 Select Add.
4
Fill in the following information:
Name:
Lot Number:
Expiration:
Note: The start date and time are automatically filled.
5 Select OK to return to the Consumables window.
Updating a New Consumable
Step Action
1 From the instrument screen, go off-line
2 Select Traceability
3 Select Consumable to update
4 Edit the fields, as needed
5 Select Update.
6 Select OK to return to the Consumables window.

iRICELL Complete Urinalysis Training Guide Page 181 of 187 Beckman Coulter Ver 2.1 (July 2017) Technical Training
TRACEABILTY SKILL CHECK
1. Is it necessary to put all consumables into traceability manually?
YES NO
2. What consumables do not automatically go into traceability?
a. CA/CB/CC controls
b. iQ Controls
c. iQ Calibrator
d. iChemVELOCITY Strips
‘

iRICELL Complete Urinalysis Training Guide Page 182 of 187 Beckman Coulter Ver 2.1 (July 2017) Technical Training

iRICELL Complete Urinalysis Training Guide Page 183 of 187 Beckman Coulter Ver 2.1 (July 2017) Technical Training
VIEW LOG
OBJECTIVES
At the completion of this module, be able to:
Save settings
Understand when to restore settings
Why Is It Important?
Settings are saved in a log each time they are created, modified, or deleted. The log records the date/time and the operator who made the changes. This includes changes made to Chemistry QC such as expirations date made via the Instrument > Consumables > Chemistry QC
Resources
iChemVELOCITY IFU
iQ IFU

iRICELL Complete Urinalysis Training Guide Page 184 of 187 Beckman Coulter Ver 2.1 (July 2017) Technical Training

iRICELL Complete Urinalysis Training Guide Page 185 of 187 Beckman Coulter Ver 2.1 (July 2017) Technical Training
INFORMATION/PRACTICE
View Log saves any changes made to settings only
Step Action
1 From the Instrument screen, select Go off line
2 Go into the Setting Screen.
3
From the Settings Screen, click the View Log button. The Settings Log screen is
displayed
4 Click on a the View Log file you wish to export
5 Click on the Save as button a Windows screen is displayed
6 Select the destination where the setting change will be saved, the default is the Logs
folder.
7
For this exercise, access the Desktop, create a folder and name it “View Log”, and
change the name of the file to ‘iRICELL view log MMDDYYYY”, then click the Save
Button.
8 Restore the View Log backup you just created
9 Click the button a Windows screen is displayed.
10 Select the source where the setting change was saved, in this case, the folder on the
instrument Desktop
11 Select the file you saved earlier, and then click the Open button. The View Log file
will be restored to its previous state.
12 For classroom purposes delete the file you created earlier

iRICELL Complete Urinalysis Training Guide Page 186 of 187 Beckman Coulter Ver 2.1 (July 2017) Technical Training

iRICELL Complete Urinalysis Training Guide Page 187 of 187 Beckman Coulter Ver 2.1 (July 2017) Technical Training
VIEW LOG SKILL CHECK
1. Show facilitator the saved View Log
2. The View Log in the iRICELL software contains backups in a first in first out format (FIFO) of 100 files. TRUE FALSE
3. What is the difference between a Backup and view log file?
a. Backup saves everything and view log only saves the settings
b. Nothing both are same, allows operator to save information from two different screens
c. View log saves everything and backup saves on the settings
d. View log saves settings, QC lot numbers and REF value only.
4. When you save a view log in goes into what extension?
a. CSV
b. SLF
c. HTML
d. XML