irmx for windows user's guide - tenasys.com€¦ · 4 startup explains how to start irmx for...
TRANSCRIPT
TenAsys Corporation 1600 NW Compton Drive, Suite 104 Beaverton, OR 97006 (503) 748-4720 FAX: (503) 748-4730 www.tenasys.com
10003-1 November 2005
iRMX† for Windows† User’s Guide

November 2005Copyright ©2001 by TenAsys Corporation.
All rights reserved.TenAsys, INtime, and iRMX are registered trademarks of TenAsys Corporation. † All other trademarks, registered trademarks, service marks, and trade names are the property of their
respective owners.

iii
Before you beginThis guide describes iRMX† for Windows† INtime add-on, an extension for Windows NT†, Windows 2000†, and Windows XP† that provides the tools you need to create and run real-time (RT) applications—robust, high-performance applications with predictable responses to external events.
This book is for software designers, programmers, engineers, and those with a knowledge of programming who need to understand the operation of the iRMX for Windows.
This guide assumes that you know how to develop programs for Windows NT and understand RT system concepts.
About this guide
Contents
Chapter/appendix Description1 Introduction Overviews iRMX for Windows software solutions2 Installation Explains how to install and uninstall iRMX for
Windows software.3 Configuration Explains how to configure iRMX for Windows
software.4 Startup Explains how to start iRMX for Windows
software.5 Operational overview Explains how to run iRMX for Windows software.6 Getting acquainted with the
operating systemExplains how to use the iRMX for Windows development environment to create iRMX for Windows applications.
7 Where to go from here Recommends other documentation from the iRMX product set.
8 Windows real-time extension Explains how to use Windows real-time extensions to access iRMX objects managed by the iRMX Nucleus.
9 Development environments Describes the three development environments for iRMX application development.
10 Porting existing iRMX and Windows code to iRMX for Windows
Describes the method to port existing iRMX and Windows 3.1 applications to iRMX for Windows

iRMX for Windows User’s Guide
iv
Notational conventionsThis manual uses the following conventions:
• Although the name of the software product described in this guide is iRMX for Windows INtime add-on, it is referred to as iRMX for Windows or iRMX.
• Screen text and syntax strings appear in this font.
• All numbers are decimal unless otherwise stated.
• Bit 0 is the low-order bit. If a bit is set to 1, the associated description is true unless otherwise stated.
Notes indicate important information about the product.Tips indicate alternate techniques or procedures that you can use to save time or better understand the product.The globe indicates a World Wide Web address.l
Cautions indicate situations that may result in damage to data or hardware.This includes situations that may cause damage to hardware via electro-static discharge (ESD).Warnings indicate situations that may result in physical harm to you or the hardware.
11 Other iRMX for Windows information
Provides iRMX for Windows information not covered elsewhere in this guide.
A Directory structure Lists the key directories created when you install iRMX for Windows.
B Peripheral support Lists tables of jumper configurations for your hardware so it can run the iRMX for Windows OS.
C Error messages Lists and describes error messages.D iRMX for Windows default
configurationLists the pre-configured options in the software definition file, used to generate the iRMX for Windows loadable job.
E Creating an iRMX System Device (:SD:) in an iRMX for Windows System
Lists the steps needed to assign the secondary IDE device or a SCSI adapter to the iRMX OS. Shows how to make this iRMX-managed device the iRMX System Device (:SD:)
F Creating an iRMX for Windows XP Embedded System
Describes the process to add INtime and iRMX for Windows components to a Windows XP Embedded system.
Chapter/appendix Description

Before you begin
v
Where to get more information
About iRMX for WindowsYou can find out more about iRMX for Windows from these sources:
• Release Notes (Readme.rtf): Lists features and issues that arose too late to include in other documentation. This file resides on the Installation CD.
• World Wide Web: TenAsys maintains an active site on the World Wide Web. The site contains current information about the company and locations of sales offices, new and existing products, contacts for sales, and technical support information. You can also send e-mail to TenAsys using the web site ([email protected]). Requests for sales, service, and technical support information will receive prompt response.
When sending e-mail for technical support, please include information about both the hardware and software, plus a detailed description of the problem, including how to reproduce it.
To access the TenAsys web site, enter this URL in your web browser:http://www.tenasys.com
• Other: If you purchased your TenAsys product from a third-party vendor, you can contact that vendor for technical support.
About related TenAsys productsINtime real-time extension to Windows software: For information about this product, see:
• The INtime Software: Overview Guide included with this product.
• The INtime Help file, installed as part of this product.

iRMX for Windows User’s Guide
vi

vii
ContentsChapter 1 Introduction.
Running Windows and the iRMX OS on the same system ................................................... 1.iRMX for Windows components ........................................................................................... 2.
INtime Real-Time Extension to Windows..................................................................... 2.iRMX upper layers......................................................................................................... 2.NT file driver ................................................................................................................. 2.iRMX Windows console................................................................................................ 3.iNA/RMX-NET ............................................................................................................. 3.Spider Debugger ............................................................................................................ 3.Windows components .................................................................................................... 3.Real-time extension ....................................................................................................... 4.Windows support ........................................................................................................... 5.
File access .............................................................................................................................. 5.iRMX system device (:SD:)........................................................................................... 6.Networking .................................................................................................................... 6.File and device drivers................................................................................................... 7.
Loadable file and device drivers............................................................................ 7.System configuration ............................................................................................................. 7.
Multiprocessor System Support..................................................................................... 8.Differences relative to older versions of iRMX for Windows............................................... 8.
Chapter 2 Installation.Requirements ......................................................................................................................... 11.Before you begin.................................................................................................................... 11.Running the Setup program ................................................................................................... 11.
Chapter 3 Configuration.Configuring iRMX for Windows software ............................................................................ 13.
Default configuration..................................................................................................... 13.Running the INtime Configuration Utility............................................................................. 13.
INtime Configuration Panel........................................................................................... 14.INtime Kernel Configuration......................................................................................... 15.Advanced Settings—New Section Name ...................................................................... 16.Parameter Properties ...................................................................................................... 17.iRMX for Window Configuration ................................................................................. 18.INtime Device Manager................................................................................................. 19.
Other INtime Configuration Utility Applets.......................................................................... 20.Chapter 4 Startup.
Starting iRMX for Windows itself......................................................................................... 21.Starting iRMX applications ................................................................................................... 24.
Manual ........................................................................................................................... 24.Logon ............................................................................................................................. 25.Startup ............................................................................................................................ 25.Autoload......................................................................................................................... 25.

iRMX for Windows User’s Guide
viii
Chapter 5 Operational overview.Customizing the OS............................................................................................................... 27.
Logging on..................................................................................................................... 27.Networking Capabilities ........................................................................................................ 27.Using iRMX Networking Services ........................................................................................ 28.Accessing DOS-formatted diskettes from the iRMX prompt................................................ 28.
Using a Windows Hard Drive from the iRMX Prompt ................................................. 29.Preparing iRMX for Windows for Shutdown................................................................ 30.
Chapter 6 Getting acquainted with the operating system.Logging On and Off............................................................................................................... 33.
Logging On to the Operating System ............................................................................ 33.Logging Off ........................................................................................................................... 34.
Moving the Cursor ......................................................................................................... 34.Bell Warning .................................................................................................................. 34.Terminal Characteristics ................................................................................................ 35.
Managing Files ...................................................................................................................... 36.Creating a Simple Data File........................................................................................... 37.
Displaying the Contents of Files............................................................................................ 37.Copying to New Files ............................................................................................................ 38.Replacing Existing Files ........................................................................................................ 39.Concatenating Files................................................................................................................ 39.
Renaming Files .............................................................................................................. 40.Deleting Files ......................................................................................................................... 40.
Using Devices ................................................................................................................ 41.Device Names ........................................................................................................................ 41.
Switching Diskettes ....................................................................................................... 42.Using the Online Command Help.......................................................................................... 42.Using Online iRMX Manuals ................................................................................................ 43.
Chapter 7 Where to go from here.Chapter 8 Windows real-time extension.
NTX Windows API................................................................................................................ 49.RTE System Calls .................................................................................................................. 49.
RQEGetRmxStatus Call (ntxGetRtStatus NTX equivalent).......................................... 51.Library for RTE Interfaces............................................................................................. 51.RTE Files ....................................................................................................................... 52.
RTE Demonstration ............................................................................................................... 52.Example: Running the iRMX Demonstration Program................................................. 53.Example: Running the Windows RTE Demonstration Program ................................... 54.
Chapter 9 Development environments.Application Development Strategies ..................................................................................... 55.Developing a Ring 0 iRMX application under iRMX for Windows ..................................... 56.
Using Intel OMF386 Tools ............................................................................................ 56.Developing a Ring 3 iRMX application under Windows...................................................... 57.
Using Microsoft Developer Studio, Version 6 (MSVC 6.0).......................................... 57.General tab............................................................................................................. 57.Debug tab............................................................................................................... 58.C++ tab (General category) ................................................................................... 59.

Contents
ix
C/C++ tab (Listing Files category ......................................................................... 60.C/C++ tab (Preprocessor category) ....................................................................... 61.Link tab (General category)................................................................................... 62.Link tab (Customize category) .............................................................................. 63.Link tab (Debug category)..................................................................................... 64.Link tab (Input category) ...................................................................................... 65.Link tab (Output category) .................................................................................... 66.
Debugging an iRMX application (Ring 0 or Ring 3) ............................................................ 66.Spider command ............................................................................................................ 66.
Using SDM ............................................................................................................................ 67.Enabling SDM/SDB ...................................................................................................... 68.Breaking to the SDM Debug Monitor ........................................................................... 68.
Chapter 10 Porting existing iRMX and Windows code to iRMX for Windows.iRMX Code............................................................................................................................ 71.
Creating a Descriptor for Mapped Physical Memory.................................................... 72.Windows Code....................................................................................................................... 73.Issues moving from iRMX for Windows 3 R2.14 to the latest iRMX for Windows product 73.
Chapter 11 Other iRMX for Windows information.rqv_copy_data system call..................................................................................................... 75.Priority Level ......................................................................................................................... 76.Invisible Files......................................................................................................................... 76.Windows NT File Driver ....................................................................................................... 76.Using the iRMX Windows Console ...................................................................................... 77.Use of INtime/iRMX for Windows TCP/IP stack ................................................................. 78.
iNA960/iRMX-NET support ......................................................................................... 78.Useful INtime/iRMX for Windows tools .............................................................................. 79.
RfwConStart .................................................................................................................. 79.Windows-hosted Spider Debugger ................................................................................ 80.INtex INtime Explorer ................................................................................................... 81.INtime Loader................................................................................................................ 82.INtime Configuration Utility ......................................................................................... 82.INtime Help ................................................................................................................... 83.INtime Device Configuration ........................................................................................ 83.
Useful INtime applications .................................................................................................... 84.Graphical Jitter............................................................................................................... 84.Serial Driver................................................................................................................... 84.Access to iRMX-controlled IDE and SCSI devices ...................................................... 85.Time, Time of Day, and Time Stamp Issues .................................................................. 85.Enhanced Date and Time commands............................................................................. 86.Accessing a Printer from iRMX for Windows .............................................................. 87.Latest TCP/IP Stack and Socket Calls documentation .................................................. 87.Latest C Library functions ............................................................................................. 87.Latest PCIBUS Library functions.................................................................................. 87.PCIBUS utility............................................................................................................... 87.Adding New Runtime Configuration Parameters to INtime.ini .................................... 87.

iRMX for Windows User’s Guide
x
Appendix A Directory structure.Appendix B Peripheral support.
How To Use This Appendix .................................................................................................. 91.Modifications to Serial Controller Boards............................................................................. 91.
Comptrol Rocketport 550 Serial Controller (PCI)......................................................... 92.Comptrol Hostess 550 Serial Controller........................................................................ 92.DigiBoard DigiCHANNEL PC/4, PC/8, and PC/16 Controllers................................... 92.
Appendix C Error messages.Appendix D iRMX for Windows default configuration.
Human Interface Configuration ..................................................................................... 98.Application Loader Configuration................................................................................. 98.Extended I/O System Configuration.............................................................................. 98.Basic I/O System Configuration .................................................................................... 99.Device Drivers Configuration........................................................................................ 99.
Appendix E Creating an iRMX System Device (:SD:) in an iRMX for Windows System.SCSI Interface........................................................................................................................ 101.Secondary IDE controller ...................................................................................................... 101.Using Device Manager .......................................................................................................... 102.Disabling the Secondary IDE Drive: ..................................................................................... 103.Configuration Changes using Regedit ................................................................................... 104.Installation ............................................................................................................................. 105.
Configuration steps ........................................................................................................ 106.Reboot the system using the Windows Shutdown/Restart command.................................... 107.Test your iRMX application autostart mechanism ................................................................ 107.
Appendix F Creating an iRMX for Windows XP Embedded System.Creating an iRMX for Windows XP embedded System ....................................................... 109.
Configuring your system to build iRMX tragets ........................................................... 109.Creating the Target Image.............................................................................................. 112.
Glossary. .............................................................................................................................................................. 119.Index. ................................................................................................................................................................... 137.

Contents
xi
FiguresFigure 1-1. iRMX for Windows............................................................................................................................. 3.Figure 1-2. Making a real-time extension call from a Windows application ........................................................ 4.Figure 1-3. Using Windows NT file driver to access Windows files from an iRMX application......................... 6.Figure 3-1. Configuration utility: Component menu ............................................................................................. 14.Figure 3-2. Configuration utility: INtime Kernel Configuration........................................................................... 15.Figure 3-3. Advanced Settings—New Section Name ........................................................................................... 16.Figure 3-4. Parameter Properties ........................................................................................................................... 17.Figure 3-5. iRMX for Window Configuration....................................................................................................... 18.Figure 3-6. INtime Device Manager...................................................................................................................... 19.Figure 4-1. Windows XP/2000 Services applet showing iRMX for Windows and INtime Services.................... 22.Figure 4-2. Windows XP/2000 Services Applet Properties display ...................................................................... 23.Figure 5-1. INtime/iRMX for Windows Shutdown/Restart Mechanism............................................................... 30.Figure 7-1. Recommended documentation roadmap for new users ...................................................................... 46.Figure 7-2. Recommended documentation roadmap for experienced users.......................................................... 47.Figure 8-1. iRMX Real-time Extensions Demo Program Menu Display.............................................................. 53.Figure 8-2. Windows Real-time extensions Demo Program Menu Display.......................................................... 54.Figure 9-1. General tab .......................................................................................................................................... 57.Figure 9-2. Debug tab ............................................................................................................................................ 58.Figure 9-3. C++ tab (General category)................................................................................................................ 59.Figure 9-4. C/C++ tab (Listing Files category....................................................................................................... 60.Figure 9-5. C/C++ tab (Preprocessor category)..................................................................................................... 61.Figure 9-6. Link tab (General category) ............................................................................................................... 62.Figure 9-7. Link tab (Customize category)............................................................................................................ 63.Figure 9-8. Link Tab (Debug category) ................................................................................................................ 64.Figure 9-9. Link tab (Input category) ................................................................................................................... 65.Figure 9-10. Link tab (Outut category)................................................................................................................. 66.Figure 11-1. iRMX Windows console ................................................................................................................... 77.Figure 11-2. RfwConStart...................................................................................................................................... 79.Figure 11-3. Windows-hosted Spider Debugger.................................................................................................... 80.Figure 11-4. INtex INtime Explorer ...................................................................................................................... 81.Figure 11-5. INtime Loader ................................................................................................................................... 82.Figure 11-6. INtime Help....................................................................................................................................... 83.Figure 11-7. INtime Graphical Jitter...................................................................................................................... 84.Figure E-1. Device Manager Invocation............................................................................................................... 102.Figure E-2. Device Manager Secondary IDE Channel Disable Operation............................................................ 103.Figure E-3. Run Invocation ................................................................................................................................... 104.Figure E-4. Regedit Invocation.............................................................................................................................. 105.Figure E-5. Regedit INtimeRMXSDService Parameter Modifications................................................................. 105.

iRMX for Windows User’s Guide
xii
TablesTable 6-1. CLI Commands..................................................................................................................................... 36.Table 8-1. Supported RTE system calls ................................................................................................................. 50.Table B-1. HOSTESS 550 Terminal Controller .................................................................................................... 92.Table B-2. PC/4 I/O Addresses.............................................................................................................................. 93.Table B-3. PC/8 I/O Addresses.............................................................................................................................. 93.Table D-1. Human Interface Configuration ........................................................................................................... 98.Table D-2. Application Loader Configuration....................................................................................................... 98.Table D-3. EIOS Options....................................................................................................................................... 98.Table D-4. Basic I/O System Configuration .......................................................................................................... 99.Table D-5. Device Drivers Options ...................................................................................................................... 99.

1
1Chapter 1
IntroductionThe iRMX† for Windows OS provides a set of powerful extensions to Windows. With it you can develop Windows† applications that incorporate the preemptive, priority-based multitasking and real-time response of the iRMX OS.
With iRMX for Windows:
• Microsoft† Windows runs concurrently with the iRMX OS on the same microprocessor and shares the same console.
• Existing Windows application programs run with no modification.
• Existing iRMX application programs run under iRMX for Windows with no modification while maintaining real-time performance.
• Windows application programs access iRMX objects such as data mailboxes and segments, to communicate directly with iRMX application programs.
• Windows application programs map iRMX memory into their address space so that Windows and iRMX applications can share memory.
• iRMX programs access files on Windows-controlled mass storage devices.
Running Windows and the iRMX OS on the same systemMicrosoft Windows XP and its ancestors (Windows 2000 and Windows NT) are full-featured, general purpose operating systems that use the power of Intel architecture CPUs to provide a powerful computing platform for commercial front- and back-office applications. Windows, the predominate OS in these environments, is driven by the customer base into the industrial and factory floor arena. Microsoft has developed the Windows XP Embedded derivative of their commercial OS to better serve this new market segment. Despite all the rich features and abundance of application software, Windows itself still lacks the robustness, determinism, and real-time capabilities needed by industrial control applications. The iRMX for Windows OS provides these missing robust, deterministic, and real-time capabilities.
The iRMX for Windows OS loads from Windows. Upon initialization, it sets up a separate execution environment, takes over the CPU and, finally, encapsulates all of Windows into a single, lowest priority iRMX task. The tasking model of the iRMX OS now determines what tasks run, i.e. the highest priority ready task is always the running task. If any real-time tasks are ready to run, they preempt lower priority tasks (including the lowest priority task that encapsulated all of Windows and its execution environment), handle all the associated real-time activity until done, and then allow the Windows task to resume running. In essence, Windows becomes the iRMX idle task.

iRMX for Windows User’s Guide
2
iRMX for Windows componentsThe iRMX for Windows OS consists of a number of components.
INtime Real-Time Extension to WindowsThe INtime† Real-Time Extension to Windows consists of a number of iRMX and Windows components:
• INtime kernel:
• The iRMX nucleus, kernel, embedded C-Library, iM low-level monitor, and the System Debug Monitor (SDM) layers, collectively known as the INtime kernel.
• Windows Encapsulation Subsystem (the real-time part of the OS Encapsulation Mechansim (OSEM)).
• Windows NT extension (NTX) interface subsystem.
• Loadable OS-aware System Debugger (SDB).
• Windows services and drivers that support INtime and iRMX for Windows:
• RTIF Windows driver (includes the Windows side of OSEM).
• Windows Extension (NTX) interface DLL.
• Windows Extension (RTE) interface DLL.
• Windows support services (such as the IO server, Time Sync server, and so on).
• Microsoft Visual Studio development environment (purchased separately from Microsoft).
• INtime kernel-hosted TCP/IP stack and NIC drivers.
iRMX upper layersThe iRMX Upper Layers (IOS, EIOS, Application Loader, Human Interface, and UDI) load as a set of first and second level jobs on the INtime kernel. These layers interface with the iRMX nucleus and kernel exactly as they do in the native iRMX product, thus providing a binary compatible environment for existing iRMX and iRMX for Windows applications. Device drivers included with the IOS layer include the standard bit bucket, stream, COM1/COM2 drivers, and the Windows Console driver. Other drivers can be added as Loadable Device Drivers.
NT file driverThe iRMX file driver uses the RTIO INtime Windows service to provide standard file I/O to mass storage devices controlled by Windows. This Windows NT file driver loads on the INtime kernel as an iRMX application. Other iRMX file drivers such as the Named File driver can load under the iRMX for Windows OS to manage files on native iRMX devices

Chapter 1: Introduction
3
such as a SCSI drive, or an IDE drive controlled by the secondary IDE interface chip which has been removed from Windows control.
iRMX Windows consoleThe iRMX Windows Console driver loads the Windows Console application when a unit is attached. The Console application runs in raw mode, and so can run iRMX applications such the the AEDIT text editor and the Human Interface CLI.
iNA/RMX-NETThe only iNA jobs supported in iRMX for Windows are the idec43n.job and idec43e.job which require the Locsoft Ruby Network adapter Network adapter or Allnet ALL0111 Network adapter (sold separately). Using this hardware/iNA job combination, you can sysload the iRMX-NET Remote File Driver and File Server jobs to provide ISO networking interoperability with other iRMX-NET and DOS OpenNet systems.
Spider DebuggerThe iRMX Spider command launches the Windows-hosted Spider Debugger to debug iRMX applications. iRMX nucleus/kernel/C-library applications can be loaded and debugged using the Spider Debugger launched either from iRMX or from Windows. iRMX I/O applications can only be debugged using the Spider Debugger if launched from the iRMX command line using the Spider command.
Figure 1-1. iRMX for Windows
iRMX applications INtime applications
iRMX upper layers Embedded C library
INtime API
low-priority surrogate tasks
low-priority iRMX task
RTE
OSEM
iRMX kernel/nucleus
Windows NTX/RTE
applications/services
OSEM
NTX/RTE DLL
Windows componentsThe iRMX for Windows OS provides a mechanism that allows Windows threads and processes to access iRMX objects. This allows Windows applications to communicate efficiently with iRMX applications using objects such as semaphores, data mailboxes,
iRMX for Windows User’s Guide
4
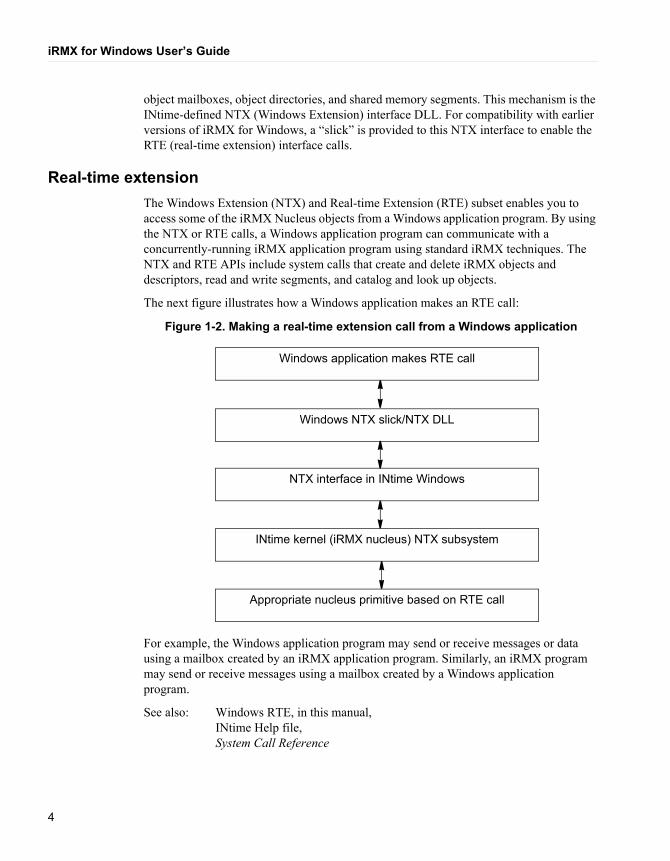
object mailboxes, object directories, and shared memory segments. This mechanism is the INtime-defined NTX (Windows Extension) interface DLL. For compatibility with earlier versions of iRMX for Windows, a “slick” is provided to this NTX interface to enable the RTE (real-time extension) interface calls.
Real-time extensionThe Windows Extension (NTX) and Real-time Extension (RTE) subset enables you to access some of the iRMX Nucleus objects from a Windows application program. By using the NTX or RTE calls, a Windows application program can communicate with a concurrently-running iRMX application program using standard iRMX techniques. The NTX and RTE APIs include system calls that create and delete iRMX objects and descriptors, read and write segments, and catalog and look up objects.
The next figure illustrates how a Windows application makes an RTE call:
Figure 1-2. Making a real-time extension call from a Windows application
Appropriate nucleus primitive based on RTE call
INtime kernel (iRMX nucleus) NTX subsystem
NTX interface in INtime Windows
Windows NTX slick/NTX DLL
Windows application makes RTE call
For example, the Windows application program may send or receive messages or data using a mailbox created by an iRMX application program. Similarly, an iRMX program may send or receive messages using a mailbox created by a Windows application program.
See also: Windows RTE, in this manual, INtime Help file, System Call Reference

Chapter 1: Introduction
5
Windows supportiRMX for Windows supports the graphical environment of Windows. Windows can be used as an operator interface for real-time iRMX tasks. Use the Windows NTX or RTE API to communicate with iRMX applications using iRMX objects from a Windows application. Windows provides a powerful interface and development facility for iRMX real-time applications. Windows XP, Windows 2003, Windows 2000, and their Win32 applications are supported.
File accessThe Windows and iRMX file systems are inherently different. However, a file driver provided with the iRMX for Windows OS allows Windows and iRMX application programs to share files.
The Windows NT file driver enables iRMX application programs to access files on a Windows local storage device. These drives can either be DOS or NTFS file systems controlled by Windows.
Let’s assume you want to attach to the c: directory from the iRMX console. By default, :SD: points to C:\Program Files\INtime\rmx directory. To assign an iRMX logical name to the Windows C:\ drive, simply type the following:
ad c: as w nt
The logical name :w: now points to the Windows C: drive. Likewise, to establish an iRMX logical name for the C:\Windows\System32 directory, type the following:
ad c:/Windows/System32 as q nt
Finally, if the Windows path name has embedded spaces, put that part of the pathname in quotes. For example: ad c:/”Program Files”/INtime/Projects as p nt.
See also: attachdevice command, Command Reference

iRMX for Windows User’s Guide
6
The next figure illustrates how file requests are carried out by the I/O System.
Figure 1-3. Using Windows NT file driver to access Windows files from an iRMX application
Windows I/O system
Windows RTIO server that makes NTX calls to communicate with the Windows NT file driver
Windows NT file driver
iRMX I/O system
iRMX application making I/O system calls to access files on a Windows drive
iRMX system device (:SD:)The iRMX system device (:SD:) is established when installing the iRMX for Windows software. By default, it is the Windows directory <INtime Install Path>/rmx. The iRMX for Windows EIOS Job attaches this “device” as :SD:. If installed in the default location on the C: drive, the full pathname is C:\Program Files|INtime\rmx. This pathname does not adhere to the standard bootname criteria (maximum of 14 characters – no spaces). Therefore, the installation process stores this full pathname in a registry setting and configures the NT File driver to read this pathname when it is loaded. When the NT File Driver is loaded from Windows when iRMX for Windows starts up, it reads the SD boot path from the registery, copies it into an iRMX segment, and catalogs the segment in the Root Job's Object Directory as SDPATH. The name SDPATH is placed in the iRMX boot segment RQBOOTED. The I/O system has been changed to recognize SDPATH as a virtual boot device and to look in the SDPATH segment for the full pathname of the actual boot device. This method is independent of the presence of Windows networking.
NetworkingiRMX for Windows supports both Windows and iRMX networking. Windows networking includes Internet Protocol (TCP/IP) and NetBEUI. Windows networking uses its own NIC. iRMX networking includes Internet Protocol (TCP/IP) and iNA/iRMX-NET. iRMX

Chapter 1: Introduction
7
networking uses its own NIC. NIC cards cannot be shared between Windows and iRMX. Given these features, the following capabilities are supported:
• Windows and iRMX applications that communicate on the network run unchanged when they run within the same system.
• iRMX-NET networking support provides iRMX applications with connections to computers running the DOS and UNIX OSs and OpenNet.
See also: Network jobs, i*.job, System Configuration and Administration, Introduction, Network User's Guide and Reference
File and device driversThe iRMX for Windows software includes preconfigured file drivers and device drivers that can be loaded dynamically.
Loadable file and device drivers
These drivers allow you to write procedures to invoke and interface to additional custom, random access, and terminal hardware.
See also: Loadable file and device drivers, Driver Programming Concepts and System Configuration and Administration
System configurationiRMX for Windows is preconfigured to run in the Windows environment, however you may change some aspects of the OS for a particular application. Certain parts of the OS are loadable, including loadable file and device drivers and loadable jobs.
You load these elements into the system with the sysload command in the :config:loadinfo file. Loadable device drivers allow you to write procedures to invoke and interface to additional custom, random access, and terminal hardware. Loadable file drivers enable you to include custom file drivers.
Load-time configuration is also supported. The INtime Configuration utility can be used to define and manipulate runtime parameters that end up in a memory-resident intime.ini file (equivalent to the rmx.ini file in standard iRMX). As layers of the OS boot, they read entries from this memory-resident file. The “Advanced” button on the INtime Kernel Configuration Applet of the INtime Configuration utility allows you to define and manage entries that match settings preconfigured into iRMX for Windows, defined in your iRMX application.
See also: Loadable jobs and drivers, System Configuration and Administration, Loadable device drivers, Driver Programming Concepts, Physical device names, Command Reference,

iRMX for Windows User’s Guide
8
Multiprocessor System SupportINtime 3.X runs on Multiprocessor Systems in one of two ways:
• INtime shares CPU 0 with Windows (default case)
• INtime runs alone on CPU (n – 1) where n is the number of CPUs in the system. Please see the INtime Release Notes for information on how to dedicate the last CPU in the system to INtime.
This means that iRMX for Windows likewise supports multiprocessor systems and will run on the CPU on which INtime is running.
Differences relative to older versions of iRMX for Windows • Windows Multithreading is fully supported. This means that a Windows thread can
block waiting at an iRMX object while the rest of Windows and all its system and other application threads continue to operate.
• iRMX tasks no longer make ROM BIOS or DOS calls (No RQE_DOS_REQUEST system call).
• Windows applications cannot directly access files on a native iRMX storage device.
• Windows and iRMX OSs running on the same system cannot share a single network controller (NIC).
• iRMX applications cannot be remotely invoked from a DOS or Windows environment.
• The rmx.ini file described in various on-line iRMX manuals is not used in the iRMX for Windows software. Instead, the INtime Configuration utility can be used to define and manipulate runtime parameters that end up in a memory-resident intime.ini file (equivalent to the rmx.ini file in standard iRMX.
• iRMX formatted diskettes can not be accessed using the Windows-managed floppy drive. The only way to access an iRMX-formatted diskette is to use a floppy drive attached to an iRMX-managed SCSI controller.
• The iRMX time-of-day clock is automatically synchronized with the Windows time-of-day clock.
See also: Time of Day and File Time discussion in Chapter 10 of this document.
• File Creation/Deletion
The NT File Driver does not actually cause a file on the Windows file system to be created until the file is opened. So, a sequence of rq_a_create_file followed by rq_a_delete_connection on the returned file connection will result in an E_FNEXIST error, since no file had ever been created on the Windows file system. If you wish to
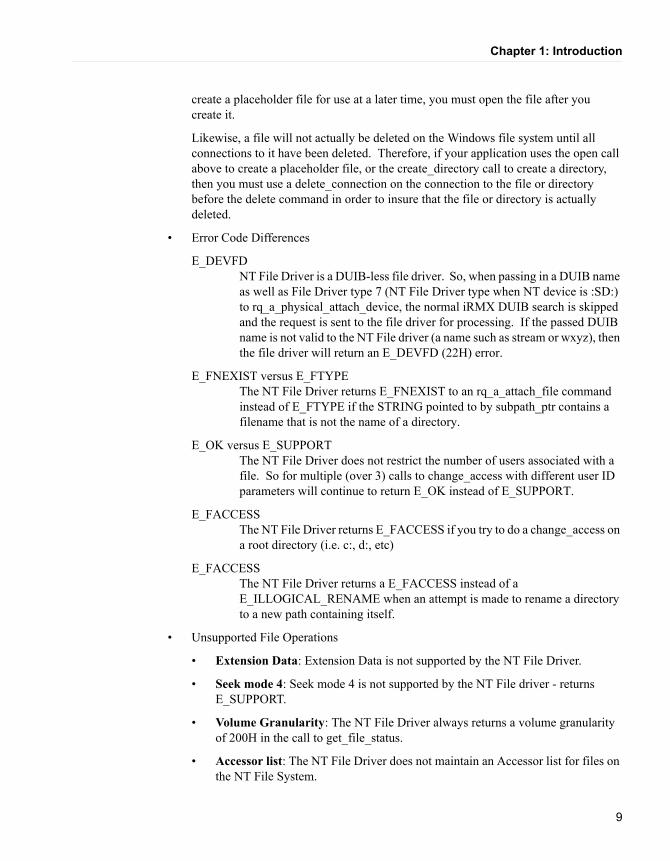
Chapter 1: Introduction
9
create a placeholder file for use at a later time, you must open the file after you create it.
Likewise, a file will not actually be deleted on the Windows file system until all connections to it have been deleted. Therefore, if your application uses the open call above to create a placeholder file, or the create_directory call to create a directory, then you must use a delete_connection on the connection to the file or directory before the delete command in order to insure that the file or directory is actually deleted.
• Error Code Differences
E_DEVFD NT File Driver is a DUIB-less file driver. So, when passing in a DUIB name as well as File Driver type 7 (NT File Driver type when NT device is :SD:) to rq_a_physical_attach_device, the normal iRMX DUIB search is skipped and the request is sent to the file driver for processing. If the passed DUIB name is not valid to the NT File driver (a name such as stream or wxyz), then the file driver will return an E_DEVFD (22H) error.
E_FNEXIST versus E_FTYPE The NT File Driver returns E_FNEXIST to an rq_a_attach_file command instead of E_FTYPE if the STRING pointed to by subpath_ptr contains a filename that is not the name of a directory.
E_OK versus E_SUPPORT The NT File Driver does not restrict the number of users associated with a file. So for multiple (over 3) calls to change_access with different user ID parameters will continue to return E_OK instead of E_SUPPORT.
E_FACCESS The NT File Driver returns E_FACCESS if you try to do a change_access on a root directory (i.e. c:, d:, etc)
E_FACCESS The NT File Driver returns a E_FACCESS instead of a E_ILLOGICAL_RENAME when an attempt is made to rename a directory to a new path containing itself.
• Unsupported File Operations
• Extension Data: Extension Data is not supported by the NT File Driver.
• Seek mode 4: Seek mode 4 is not supported by the NT File driver - returns E_SUPPORT.
• Volume Granularity: The NT File Driver always returns a volume granularity of 200H in the call to get_file_status.
• Accessor list: The NT File Driver does not maintain an Accessor list for files on the NT File System.

iRMX for Windows User’s Guide
10
• Rename HI Command limitations
• Case change only rename: You cannot use the rename HI command to do the following:
rename JUNK to junk
• Case command: The case HI command does not work on files managed by the NT File Driver.
11
2Chapter 2
InstallationThis chapter explains how to install your iRMX for Windows software on a Windows system.
Requirements• A PC that contains a Pentium or higher microprocessor, with a minimum speed of
133MHz.
• A minimum 128MB of DRAM.
• A minimum 4GB of disk space.
• One of these:
• Windows XP with any Service Pack.
• Windows XP Embedded.
• Windows 2000 with any Service Pack.
• Windows 2003 with any Service Pack.
Before you begin• Ensure that you are logged on with Administrator privileges.
• Exit all programs prior to installing iRMX for Windows software.
• If your system has a previously installed version of INtime software (INtime 3.01 or earlier), make sure that the INtime kernel and its Windows Services are not running.
Use the Add/Remove Programs Applet in the Windows control Panel to uninstall this earlier version of iRMX for Windows and INtime (uninstalled in this order).
Running the Setup programTo install iRMX for Windows software:
1. Insert the iRMX for Windows software CD-ROM into the CD-ROM drive. The Installation program automatically starts and the welcome screen displays.
If you’ve disabled the automatic start feature on your system, select:
Start>Settings>Control Panel>Add/Remove Programs

iRMX for Windows User’s Guide
12
Use the Browse function to locate the file rfw3302.msi on the iRMX for Windows software CD-ROM.
The Installation program checks the system for the presence of INtime or iRMX for Windows software. If INtime 3.02 or later software is missing, the Installation program directs you to install it from the iRMX for Windows CD. If incompatible versions of INtime or iRMX for Windows are detected, the Installation program directs you to uninstall this incompatible software prior to installing INtime 3.02 and iRMX for Windows 3.R3.02.
2. Verify/install the proper version of INtime software on your system:
• If INtime 3.02 or later software does not exist on your system, the Installation program informs you of this fact and exits. Invoke the INtime 3.X MSI file on the iRMX for Windows CD and the instructions presented by the INtime 3.X installation program. You will be required to reboot the the system after the Intime installation is complete.
• If an older version of INtime software exists on the system, remove the older version by using the Add/Remove Programs applet to uninstall this version of INtime. If an earlier version of iRMX for Windows is also see using the Add/Remove Programs applet, uninstall it first followed by uninstalling INtime. Then use Add/Remove Programs to install the INtime MSI file on the iRMX for Windows CD.
3. Install the iRMX for Windows software.
Once the INtime 3.02 or later is present/detected on the system, the installation program finds the INtime installation directory and creates a <INtime Install Path>\rfw directory such as C:\Program Files\INtime\rfw. It also creates the standard iRMX directories in the <INtime Install Path>\rmx directory such as C:\Program Files\INtime\rmx\sys386, C:\Program Files\INtime\rmx\util386, etc.
As part of the installation process, you will be shown the Release Notes for this product which contains:
• Information about this release that occurred after other documentation was complete.
• Issues that require special attention to ensure that INtime software runs properly.
You may find it useful to print these Release Notes for future reference.
Once iRMX for Windows 3 R3.02 is installed, you can start it as directed in Chapter 4 of this manual.

13
3Chapter 3
ConfigurationiRMX for Windows software provides the flexibility to meet a variety of iRMX for Windows application requirements that you set using configuration options available in the INtime Configuration utility. This chapter describes the INtime Configuration utility and its iRMX for Windows extensions.
Chapter 7
Configuring iRMX for Windows software
Default configurationBy default, the Install program configures iRMX for Windows software to:
• Require manual start up for INtime and iRMX for Windows services.
• Install INtime and iRMX for Windows software files in the <INtime Install Path>\ and <INtime Install Path>\rmx directories.
• Access INtime application wizards, their components, and Help files from the directory appropriate for the version of Microsoft Developer Studio installed on your system.
• When started, bring up two iRMX users, one in an iRMX for Windows console, and the other on COM1.
Running the INtime Configuration UtilityThe INtime Configuration Utility consists of a set of Applets that configure different parts of Intime and iRMX for Windows. You can access this utility using any of these methods:
• Start>Control Panel>INtime
• Start>INtime>INtime Configuration
• Using the INtime Icon in the System Tray (bottom right hand corner of your Windows display screen). This most convenient method is as follows:
Right click the INtime Icon, and then left click INtime Configuration. The INtime Configuration Panel displays, as shown at right.

iRMX for Windows User’s Guide
14
INtime Configuration PanelFigure 3-1. Configuration utility: Component menu
When you start the INtime Configuration Utility, a list of components is display as shown in Figure 3-1 above. For detailed information, select the Help button on the display. To configure the iRMX for Windows portion of you system, we will focus mainly on the Local Kernel and iRMX for Windows components.

Chapter 3: Configuration
15
INtime Kernel ConfigurationFigure 3-2. Configuration utility: INtime Kernel Configuration
Use the Slider to select the amount of Windows physical memory to reserve for INtime/iRMX for Windows (allocated, locked down, and given to the INtime/iRMX for Windows OS for management and use by its applications). A minimum of 16 Megabytes is recommended for iRMX for Windows application development.
If you need OS Extensions, double click on the OS Extensions Kernel Parameter and specify the number of reserved OS Extension slots you need.
If you wish to use COM1 or COM2 as the SDM debug channel, select the Debugger Baud Rate and Debugger COM Port using the Dropdown boxes. Make sure you reserve this COM port for INtime use using the Reserve for INtime check boxes.
Likewise, if you are using any of the COM ports in your iRMX for Windows applications, reserve them for INtime use using the Reserve for INtime check boxes.

iRMX for Windows User’s Guide
16
If your iRMX applications require any configuration parameters that previously we placed on the rmx.ini file, use the Advanced button to add these ini file parameters to the INtime memory-based INtime.ini file.
Advanced Settings—New Section NameFigure 3-3. Advanced Settings—New Section Name
After selecting the Advanced Button, the Advanced Settings Panel is displayed. To add an new section (what is identified in the rmx.ini file as [section name], select New Section and enter the section name. Do Not include the brackets [ ] around the name.
After entering the name, select OK.
Select the Section just entered from the Dropdown box.

Chapter 3: Configuration
17
Parameter PropertiesFigure 3-4. Parameter Properties
After specifying the desired Section in which to add a new parameter, select Add and then file out the Parameter Name, Value, and value type using the Parameter Properties popup.
After specifying the desired Section in which to edit an existing parameter, highlight the parameter and select Edit. Change the Value to meet your requirements.

iRMX for Windows User’s Guide
18
iRMX for Window ConfigurationFigure 3-5. iRMX for Window Configuration
Complete these tasks on the iRMX tab:
• Specify the startup mode for iRMX for Windows.
• Specify whether you want to use the iRMX Line Printer Service.
• Specify the Windows name of the printer to be used by the Line Printer Service. Use either the local device name (i.e. LPT1), or the UNC name of a network printer (i.e. \\compaq1300\CanonBJ100)
• Specify the number of Windows Consoles to use as iRMX HI consoles.
• Select the COM channels to use as iRMX HI consoles.
• Specify the maximum amount of memory to be given to iRMX for Windows. The minimum amount is 8 MBytes and the maximum amount is the current amount given to INtime. Be aware that if you set the maximum amount to the amount given to INtime, then it is possible for iRMX applications to consume all this memory, leaving none for Windows applications such as the Spider Debugger, INtime Explorer and

Chapter 3: Configuration
19
INScope to load their INtime components. TenAsys recommends you set this maximum amount to at least 2 MBytes less than the allowed maximum. See also: Chapter 2, User Attributes Files, in the iRMX System Configuration and Administration manual for information on setting minimum and maximum memory limits for individual iRMX users.
INtime Device ManagerFigure 3-6. INtime Device Manager
The INtime Device Manager is used to select those devices in the system that need to be managed by INtime/iRMX for Windows drivers and then allows control of these devices to be “passed” to INtime, or be “passed” back to Windows. Devices that share the same interrupt as shown in the left panel must either ALL be owned by INtime, or ALL be owned by Windows. If collisions exist on your PC hardware, you will need to change PCI cards around until you find a combination where the desired INtime devices have unique interrupts or share an interrupt with another INtime device. You other option is to disable a Windows device that is sharing an interrupt with a device that you want to “pass” to INtime. See the Help Menu for additional details.

iRMX for Windows User’s Guide
20
Other INtime Configuration Utility AppletsOther Applets in the INtime Configuration Utility are useful as follows:
• AutoLoad: Start INtime Applications listed there automatically at INtime start time
• Development Tools: Select the version of Microsoft Tools to which to add the INtime Wizards, On-Line help, etc
• Realtime Network: Configure the INtime/iRMX for Windows TCP/IP Stack and have it started at INtime start time. You can also load the INtime/iRMX for Windows TCP/IP from the iRMX side either from the Command Line, or from :CONFIG:loadinfo.
• USB Interfaces: Configures the INtime/iRMX for Windows USB Stack and have it started from the INtime side.
• Miscellaneous: Allows you to set up the Windows system for Auto Login.

21
4Chapter 4
Startup
Starting iRMX for Windows itselfYou can configure the iRMX for Windows Operating System to manually load once Windows starts, or to automatically load as part of Windows initialization.
To start iRMX for Windows manually, you have two options:
• Service Applet in the Windows Control Panel
• Start iRMX for Windows Shortcut in the iRMX for Windows Program Group
Invoke the Services Applet as follows:
• Select: Start>Settings>Control Panel>Administrative Tools>Services
• Once the Services Applet is running, you can find the desired INtime iRMX for Windows Service and start it (See Figure 4-1)
Invoke the Start iRMX for Windows Shortcut as follows:
• Select: Start>Programs>iRMX for Windows>Start iRMX for Windows
To set up iRMX for Windows to start automatically, you have two options:
• Service Applet in the Windows Control Panel
• iRMX for Windows Applet in the INtime Control Panel
Invoke the Services Applet as follows:
• Select: Start>Settings>Control Panel>Administrative Tools>Services
• Once the Services Applet is running, you can find the desired INtime iRMX for Windows Service and set it up for automatic startup.
Invoke the iRMX for Windows Applet in the INtime Control Panel
• Select: INtime Icon in System Tray>INtime Configuration>iRMX for Windows
• Set iRMX for Windows to start Automatically (See Figure 3-5)
In either case, starting the iRMX for Windows Service will automatically start all other INtime Services required by the iRMX for Windows OS.
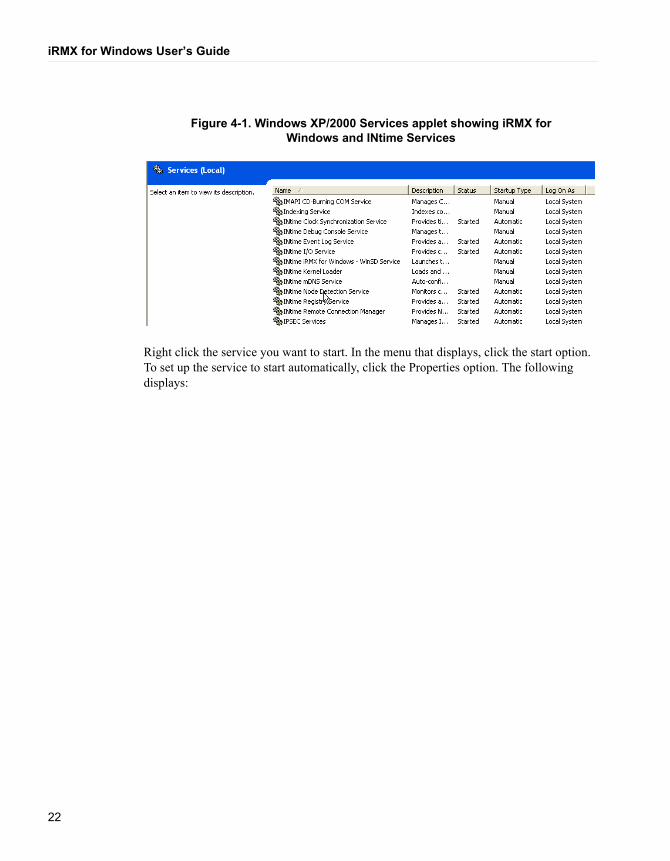
Figure 4-1. Windows XP/2000 Services applet showing iRMX for Windows and INtime Services
iRMX for Windows User’s Guide
22
Right click the service you want to start. In the menu that displays, click the start option. To set up the service to start automatically, click the Properties option. The following displays:

Figure 4-2. Windows XP/2000 Services Applet Properties display
Chapter 4: Startup
23
Using the Startup Type pulldown menu, select Automatic and then click OK. The service automatically starts when the system reboots.
The iRMX for Windows OS requires these services:
• INtime Kernel
• INtime I/O
• INtime Clock Synchronization
• INtime iRMX for Windows Service
iRMX for Windows User’s Guide
24
Setting the iRMX for Windows Service to start automatically in either the Services Applet or the INtime Configuration utility will cause all the required Services to also start in their proper order.
Starting iRMX applicationsUnder the iRMX for Windows OS, you can start iRMX applications using these methods:
• Manual
• Logon
• Startup
The following sections describe each method.
For additional information about loading iRMX applications, see the following:
• Chapters 25–33 of the iRMX System Concepts PDF file (concepts.pdf)
• Chapters 1 and 2 of the iRMX Command Reference PDF file (cmd_ref.pdf)
• Chapter 3 of the iRMX System Configuration and Administration PDF file (sysconf.pdf)
All of these online manual files reside in the <iRMX for Windows Install Path>/Manuals directory.
Manual• Command line: From an iRMX HI console, you can invoke a program by typing its
name, as long as the program resides in either the local directory, or in one of the directories in the iRMX search path. The search order is as follows:
Logical name Full pathname:PROG: :HOME:prog:UTILS: :SD:util386:UITL286: :SD:util286:SYSTEM: :SD:sys386:LANG: :SD:lang286
The program stays active until it exits of its own accord, or until deleted by pressing Control-C.
• Background: From the iRMX HI console, you can invoke a program in background mode using the CLI Background command. The program remains active until it either exits of its own accord, is killed by the jobdelete command, or the user logs off.

Chapter 4: Startup
25
• Debug: From the iRMX HI console, you can invoke a program using the debug command. This causes a break to the System Debug Monitor from which you can debug the program in static fashion. The program stays active until deleted using the g284:1c CLI restart command from the debugger, or until released by the debugger to terminate normally.
• Spider: From the iRMX HI console, you can invoke the iRMX Spider command to load an debug an iRMX application. This causes the Windows-based Spider Debugger to launch from which you can debug the program in a tasking fashion. The program remains until terminated from within the Spider Debugger, or until released by the debugger to terminate normally.
• Sysload: From the iRMX HI console, you can invoke a program as a child of the Human Interface job using the sysload command. The program remains active until either it exits of its own accord, is killed either by the killjob command or using the unload (-u) option of the sysload command.
Because programs loaded using the sysload command survive user logoff/logon activities, the sysload method of loading programs is the preferable means of loading iRMX applications as part of a runtime, deployed system.
LogonWhen a user logs in on an iRMX HI console, the submit file :prog:r?logon is invoked. You can add background or sysload command invocations in this batch file to start iRMX applications at login time. You can also directly invoke application programs from the batch file as desired. Application persistence (i.e. how long the program runs) again depends on how it is invoked.
StartupWhen an iRMX for Windows system initializes, the batch file :config:loadinfo is submitted for execution. You can add sysload command invocations in this batch file to start iRMX applications at startup time.
This is the most common way to autostart iRMX applications as part of an iRMX for Windows system.
AutoloadYou can add an iRMX application to the Autoload list of applications in this section of the INtime Configuration Utility. Be sure to make iRMX for Windows a dependency for your applications specified here.

iRMX for Windows User’s Guide
26

27
5Chapter 5
Operational overview
Customizing the OSYou can cause parts of your application to be loaded at iRMX for Windows boot time using the sysload command from the :config:loadinfo file. You can also choose to launch your application from the iRMX command line. Additionally, by adding/modifying parameters in the memory-resident intime.ini file using the INtime Configuration Utility (See Figures 3-3 and 3.4), you can enhance the performance of your application system.
After you install the OS, you may want to modify the default configuration to match your application. Some of the defaults you can change include:
• System memory configuration
• User IDs and memory requirements
• Terminal configuration
• Loadable jobs (including network jobs)
• Loadable device drivers
• Interrupt response
See also: Loadinfo file parameters, System Configuration and Administration
Logging onFor instructions on how to log on the iRMX operating systems, see Chapter 6.
Networking CapabilitiesiRMX for Windows enables Windows and the iRMX OS to have simultaneous access to network services. This support for both Windows and the iRMX OS provides a variety of capabilities:
• Each OS (Windows and iRMX) controls its own NIC.
• Windows and iRMX applications that communicate on the network thus run unchanged when they run on the same processor.
• Windows files can be accessed from a remote iRMX-NET file consumer without a dedicated file server.
• iRMX-NET networking support provides connections to computers running the iRMX, DOS and UNIX operating systems.

iRMX for Windows User’s Guide
28
• TCP/IP networking support provides access to other operating systems through TCP/IP, FTP, or TELNET.
• NFS networking support provides access to remote files on other operating systems.
Using iRMX Networking ServicesAfter you have installed iRMX for Windows, you can connect your system to a network. Before you try to establish connection to a network, ensure that:
• The appropriate supported network interface controller (NIC) board for use by the iRMX software is installed.
• The Windows driver for the iRMX-owned NIC is either not installed or is disabled.
• The Ethernet cable is connected.
• iRMX for Windows is running.
• For ISO networking:
• The appropriate iNA 960 job for your network interface controller (NIC) is loaded and running.
• The iRMX-NET LAN is set up and ready to accept nodes.
• For TCP/IP networking:
• The NIC driver for the iRMX-controlled TCP/IP NIC is loaded and running.
• The Loopback driver for the iRMX TCP/IP stack is loaded and running.
• The IP, RawIP, UDP and TCP jobs and optionally the NFS jobs are loaded and running.
• The TCP/IP stack configuration files are set up.
See also: Network jobs, System Configuration and Administration;
Using the Network, Supported Hardware, Network User’s Guide and Reference;
Installing and Starting TCP/IP, TCP/IP for the iRMX Operating System.
Accessing DOS-formatted diskettes from the iRMX promptLog on to the iRMX OS using an iRMX HI console (serial or Windows).
Before any diskette may be used by the iRMX OS, you must attach the diskette drive to the OS and assign it a logical name. Logical names are surrounded with colons to differentiate them from other device or file names.
See also: Creating and Using Logical Names, Command Reference

Chapter 5: Operational overview
29
To attach DOS diskette drive A:, enter:
ad a: as :f: nt <CR>
See also: attachdevice, Command Reference
Drive A: is now attached with the iRMX logical name :f:. Obtain a directory listing of the DOS-formatted diskette in drive A: by entering:
dir :f: <CR>
The directory listing displays in regular iRMX fashion.
See also: dir, Command Reference
Once you complete your use of the DOS floppy, and especially before removing it from the floppy drive, you must detach the diskette drive.
To detach DOS diskette drive A:, enter:
dd :f: <CR>
See also: detachdevice, Command Reference
Always detach and reattach diskette drives when changing iRMX-formatted diskettes; otherwise data may be corrupted.
See also: Switching Diskettes, Command Reference
Using a Windows Hard Drive from the iRMX PromptLog on to the iRMX OS using an iRMX HI console (Serial or Windows).
To access the Windows drive that is attached as the iRMX System Device, enter:
dir :sd: <CR>
To access any other Windows drive, you must attach the drive to the OS and assign it a logical name. Logical names are surrounded with colons to differentiate them from other device or file names.
See also: Creating and Using Logical Names, Command Reference
To attach the Windows drive C:, enter:
ad c: as :w: nt <CR>
See also: attachdevice, Command Referenc
The Windows C drive is now attached and you can access it as :w: from the iRMX OS. Use the logical name :w: just as any other iRMX logical name.
See also: Logical names, Command Reference

iRMX for Windows User’s Guide
30
Likewise, to establish an iRMX logical name for the C:\Windows\System32 directory, type the following:
ad C:/Windows/System32 as q nt <CR>
Finally, if the Windows path name has embedded spaces, put that part of the pathname in quotes. For example:
ad C:/”Program Files”/INtime/Projects as p nt <CR>
Preparing iRMX for Windows for Shutdown Before turning the system power off, prepare the iRMX for Windows system for system shutdown. This preparation, which you can do if you are logged on as a Super user, flushes data to the disk and not to internal buffers.
1. From an iRMX HI console, execute the shutdown command as follows:
- shutdown wait=0 <CR>
After the shutdown preparation is complete, this message displays on the terminal from which the shutdown command was issued:
*** SHUTDOWN COMPLETED ***
2. Exit the iRMX Console using one of these options:
A. If you wish to reboot INtime/iRMX for Windows only, leaving Windows running, use the INtime Icon in the System tray to stop followed by start, or restart INtime. If iRMX for Windows is running, stopping INtime in this way will stop iRMX for Windows. Restarting INtime will not restart iRMX for Windows unless you have it set for autostart (see Chapter 4).
Figure 5-1. INtime/iRMX for Windows Shutdown/Restart Mechanism

Chapter 5: Operational overview
31
B. If you wish to shutdown or restart Windows, use the Start>Shutdown button.
See also: shutdown, Command Reference

iRMX for Windows User’s Guide
32

33
6Chapter 6
Getting acquainted with the operating systemThis chapter explains how to perform some basic operations with the iRMX OS. It covers these topics:
• Logging on and off
• Moving the cursor
• Managing files
• Using devices
• Using the on-line help facility
See also: The Human Interface (HI), The Command Line Interpreter (CLI), and Understanding the File System, System Concepts; Chapter 1, Command Reference
Logging On and Off
Logging On to the Operating SystemIf your terminal is configured as a static terminal, you do not need to log on to the system. The system prompt is displayed and you may begin entering commands. If you use a dynamic terminal, you must log on to the system.
When the HI initializes a dynamic terminal, it displays a prompt for the user logon name, which is not case-sensitive. When you enter a name, the HI prompts for a password. The password is case-sensitive, and is not displayed when you enter it. The prompts look like this:
Logon: Password:
If you have been assigned a user name and password by a system manager, enter these at the prompts. Otherwise, there are two user names defined for all iRMX systems. One is Super, the system manager, with user ID 0. The default password for Super is passme. Super has special privileges with regard to file access and command usage. The other user is World, with user ID 65535. World is the default user on iRMX systems, and requires no password. Simply press <CR> at the password prompt.
When you enter a valid user name and the correct password, the HI places you in a home working directory: for example, /user/world. Then it displays the CLI sign-on message. This is the default message:

iRMX for Windows User’s Guide
34
iRMX HI CLI Vx.y: user = <ID> Copyright years Intel Corporation All Rights Reserved
The sign-on message displays your user ID. When you log on to the system, the HI creates your interactive job and starts the CLI. The CLI executes the logon file, :prog:r?logon, which contains a set of submit commands. These commands are automatically invoked whenever you log on.
The :prog:r?logon file, and any file with a name that contains r?, is a hidden file. It does not show up in a normal directory listing. The :prog:r?logon file is unique for each user, though many user files can be very similar. You can customize your file by adding commands to it. After processing all the commands in the logon file, the CLI issues a dash (-) prompt. You can now enter commands or invoke application programs.
See also: Hidden files, Command Reference; submit and logoff commands, Command Reference; Logon, static, and dynamic terminals, System Configuration and Administration
Logging OffLogging off of a dynamic terminal frees the terminal for other users, and frees the memory pool used by your interactive job.
Enter the logoff command to log off. Whenever you log off, the CLI searches for the logoff file, :prog:r?logoff, and invokes the commands in it. You can customize this file by adding commands to it.
Moving the CursorTable 6.1 lists the line-editing and cursor-movement keys supported by the CLI, along with other characters that have meaning for the CLI and HI.
Bell WarningOn some systems, when you attempt an invalid action the CLI line-editor beeps the terminal bell. For example, it beeps if you:
• Type <Up-Arrow> to move the cursor up when you have not previously entered commands (there is no history buffer).
• Type <Down-Arrow> to move the cursor down when you are on the last line of the history buffer.
• Type <Right-Arrow> to move the cursor right beyond the line limit.

Chapter 6: Getting acquainted with the operating system
35
Terminal CharacteristicsThe CLI executes on a wide variety of terminals. It uses the :config:termcap file to identify terminals and define keys used for special functions, such as cursor movement and line-editing. Each terminal is assigned a terminal name in the file. To change terminal types, use the set command and specify a terminal name from the file. To add a terminal or change terminal characteristics, edit the :config:termcap file.
See also: Terminal definition file, System Configuration and Administration; set command, Command Reference

Table 6-1. CLI Commands
Key Function<Right-Arrow> Moves the cursor one place to the right.<Left-Arrow> Moves the cursor one place to the left.<Up-Arrow> Replaces the current command line with the previous
command line.<Down-Arrow> Replaces the current command line with the next
command line.<Home> Moves the cursor in the direction of the last arrow key
used. After <Right-Arrow> or <Left-Arrow>, <Home> moves to the end or beginning of the line. After <Up-Arrow> or <Down-Arrow>, <Home> moves to the first or last command in the history buffer.
<Del> or <Backspace> Deletes one character to the left of the cursor.<DelCh>
(<Ctrl-F>)
Deletes the character on which the cursor is positioned; usually configured to <Ctrl-F>.
<DelR>
(<Ctrl-A>)
Deletes all characters to the right of and including the cursor location: usually configured to <Ctrl-A>.
<DelL>
(<Ctrl-X>)
Deletes all characters to the left of the cursor; usually configured to <Ctrl-X>.
<Esc> Executes the entire command line, regardless of the cursor position.
<CR> Executes from the beginning of the command to the cursor. Everything to the right of the cursor is ignored.
<Ctrl-C> Aborts the current foreground command and returns control to the CLI.
& An ampersand designates the next line as a command continuation line.
iRMX for Windows User’s Guide
36
Managing FilesOne of the main commands to manage files is the copy command. Use it for:
• Creating a new file
Chapter 6: Getting acquainted with the operating system
37
• Displaying the contents of files at the console screen
• Copying one or more files to new files
• Copying data from one file and overwriting data in another file
• Appending data from one or more files to the end of data in another file
• Concatenating multiple files into a single file
The examples that follow show you how to use these techniques. They also illustrate the general use of the to, over, and after parameters common to many iRMX commands. The syntax for the commands used in these sections is typically:
command infile [to|over|after] outfile options
Creating a Simple Data FileUse the copy command to create data files. You do this by redirecting keyboard input to a file. To create a file called alpha under your :$: working directory and write two lines of data into the file, enter:
-copy :ci: to alpha <CR> aaaaa <CR> bbbbb <CR> <Ctrl-Z>
The HI responds:
:ci: copied to alpha
The command does not prompt you for the data lines; you simply begin entering data after you press <CR> at the end of the command line. The <Ctrl-Z> entry writes an end-of-file mark at the end of your input (but not into the file you are copying), to inform the copy command that there is no more data to be copied.
After you enter the last line of data, you must press <CR> before you enter <Ctrl-Z> to insert an end-of-file. Otherwise, the <Ctrl-Z> will be ignored.
If the file already exists, this message and query appear:
alpha, already exists, OVERWRITE?
Enter y to overwrite the file, or n to cancel the command.
Displaying the Contents of FilesTo display a file's contents on the screen, enter:
-copy alpha <CR>

iRMX for Windows User’s Guide
38
The HI responds:
aaaaa bbbbb alpha copied to :co:
This example uses the default preposition to and default output file :co:, which means that the command copies the output to the console screen.
To halt the scrolling of a displayed list, press these control keys:
<Ctrl-S> Stops the data from scrolling off the screen until you press <Ctrl-Q>.
<Ctrl-W> Puts the terminal into scrolling mode. In this mode, output stops after a single screen of data appears. Entering another <Ctrl-W> displays the next screen of data. <Ctrl-Q> exits this mode.
<Ctrl-T> Similar to <Ctrl-W> except output stops after each line.
<Ctrl-Q> Resumes scrolling of listed data until the end-of-file is reached or you enter <Ctrl-C>.
<Ctrl-C> Cancels listing of the data and returns control to the HI, which prompts for a new command.
Copying to New FilesYou can copy multiple files with one copy command. The files are copied in the same sequence you specify in the input list and output list on the command line. To copy files a1, a2, and a3 to files b1, b2, and b3 respectively, enter this command:
-copy a1, a2, a3 to b1, b2, b3 <CR>
The HI responds:
a1 copied to b1 a2 copied to b2 a3 copied to b3
You can also use wildcards when copying files. If the files a1, a2, and a3 are the only files in the directory that begin with the character a, you can use this command to perform the same operation:
-copy a* to b* <CR>
The HI responds:
a1 copied to b1 a2 copied to b2 a3 copied to b3

Chapter 6: Getting acquainted with the operating system
39
Replacing Existing FilesUse either the rename command or the copy command's over preposition to update existing files.
To copy new data over an existing file, first create a file named temp, then enter:
-copy temp over alpha <CR>
The HI responds:
temp copied over alpha
You can also use the to preposition, but you get a warning message:
-copy temp to alpha <CR>
The HI responds like this, and you reply with y:
alpha, already exists, OVERWRITE? y <CR> temp copied to alpha
You now have two copies of the same new data; one in the temp file and one in the alpha file. If you use the over preposition in a rename command instead of the copy command, the temp file is deleted automatically when rename is executed.
Concatenating FilesConcatenation is combining a number of files by appending them in sequence into a single file. Use the copy command to concatenate files by specifying the after preposition or by specifying multiple input pathnames and a single output pathname. (If the output pathname is a directory, concatenation does not occur).
Use the after preposition as follows:
-copy b,c,d after a <CR>
The HI responds:
b copied after a c copied after a d copied after a -
To concatenate all four files into a new file called all, enter:
-copy a,b,c,d to all <CR>
The HI responds:
a copied to all b copied after all c copied after all d copied after all

iRMX for Windows User’s Guide
40
In this last example, file a is copied to all and the remaining input files are automatically appended to the end of all.
You can also concatenate files displayed on the screen. To list files named alpha, beta, and gamma to the default file :co: (the output device, or screen), enter:
-copy alpha,beta,gamma <CR>
The HI responds:
aaaaa aaaaa alpha copied to :co: bbbbb bbbbb beta copied after :co: ggggg gamma copied after :co:
Renaming FilesTo change the name of file alpha to the new name omega, where omega does not already exist, enter:
-rename alpha to omega <CR>
The HI responds:
alpha renamed to omega -
The alpha pathname is automatically deleted from the system when the rename command executes.
You can rename lists of files to new pathnames. When using the rename command, you must always have a one-for-one match of pathnames between the old file list and the new list of names.
You can also use the over preposition with rename. The primary purpose of over is to move data from one named file and overwrite the data in another existing file. This use of the over preposition matches the action of the over preposition in the copy command, with one important distinction: rename automatically deletes the input file when the command is executed.
Deleting FilesTo delete files alpha, beta, and key from the system, enter this command:
-delete alpha,beta,key <CR>
The HI responds:

Chapter 6: Getting acquainted with the operating system
41
alpha, deleted beta, deleted key, does not exist
The error message for the key file tells you one of three things:
• There is a spelling error in the name of the file.
• The file does not exist.
• The file exists in a different directory than where you are currently working.
Using DevicesThe list below shows which kinds of devices you can communicate with and the types of files supported on those devices.
Terminals Use terminals to communicate with the HI. You can also write programs that read from and write to terminals. Terminals are accessed as physical files.
Disks Disks provide permanent storage for programs and data. You can communicate with hard disks and diskette drives. During format, backup, restore, and diskverify operations, disks are treated as physical files. Other operations can access named files.
RAM disk A RAM disk provides an area of memory that acts like a secondary storage device in the system. The RAM disk creates a disk image within your memory and provides faster access to your files than a physical disk. It is similar to a physical disk in all aspects except that it does not provide permanent storage. If there is a power failure, the system fails for some reason, or you turn the power off, the data on the RAM disk is lost.
Tapes Tapes provide a quick and convenient method of backing up hard disks. You can use tape drives only for backing up and restoring files using the backup and restore commands. The OS does not support tape drives for any other uses.
See also: File types, Introducing the iRMX Operating Systems
Device NamesExcept for devices attached by the system as a result of the system configuration, you must attach a device with the attachdevice command before using it. In the attachdevice command, you specify a physical device name that defines device characteristics. Device names are provided for standard configurations. In a custom configuration you may define new device types (and names) or remove standard ones. You can also use the sysload command with a loadable device driver to add new device types.
For terminal devices, you also specify physical device names in the lock, unlock, and connect commands.

iRMX for Windows User’s Guide
42
See also: sysload, attachdevice, Command Reference
Switching DiskettesWhen you remove an iRMX-formatted diskette from the drive and then access the drive device, any connections to files on that device are deleted. Any logical names that represent files on the volume are no longer valid. The names remain cataloged in the directories, but they do not represent valid connections.
See also: Creating Logical Names for Devices, Command Reference
To maintain your data in usable form, detach a diskette before you remove it, and then attach a new diskette before you use it. Use this procedure:
1. Before removing the first diskette, invoke the detachfile command to detach the files, or use the force parameter in the detachdevice command.
2. Remove the first diskette and insert the replacement diskette.
3. Invoke the attachdevice command (or the alias ad) to gain access to the new diskette.
If you are using the Windows-managed a: drive to access a DOS-format floppy Diskette, Windows itself monitors floppy change out, so the detach/attach operation described above is not required but recommended.
Using the Online Command HelpUse the command help at the iRMX prompt to obtain information about most iRMX commands. You can get help by typing:
help command_list [to|over|after outpath_list] [q] [p = num]
Where:
command_list One or more command names for which you want help. Separate command names with commas. Wildcards are permitted.
to|over|after outpath_list Writes the help file to the specified file(s) rather than to the screen. If you specify multiple help files and one output file, the output is appended.
q(uery) Prompts for permission to display each help file.
p(agelength) = num The maximum number of lines in the output page.
See also: help command, Command Reference

Chapter 6: Getting acquainted with the operating system
43
Using Online iRMX ManualsThe iRMX for Windows OS provides a complete set of iRMX manuals online in Adobe Acrobat format. The manuals are installed in the <iRMX Install Path>\manuals directory.
If you do not already have the Adobe Acrobat reader on your system, go to this URL and download it:
http://www.adobe.com/support/products/acrreader.html
Follow the instructions to download the Reader.
After you install the Reader you can access the files (Portable Document Format files) directly from their location on your hard disk. There is also a shortcut in the Start>Programs>iRMX for Windows program group for each manual.

iRMX for Windows User’s Guide
44

45
7Chapter 7
Where to go from hereYou can take several paths through the documentation. The figures that follow offer suggestions.
Figure 7-1 on page 46 displays the recommended order for new users. New users means that you’re new to the iRMX OS.
If you’ve developed application programs with the iRMX OS, browse through Introducing the iRMX Operating Systems.
Figure 7-2 on page 47 displays the recommended order for experienced users.
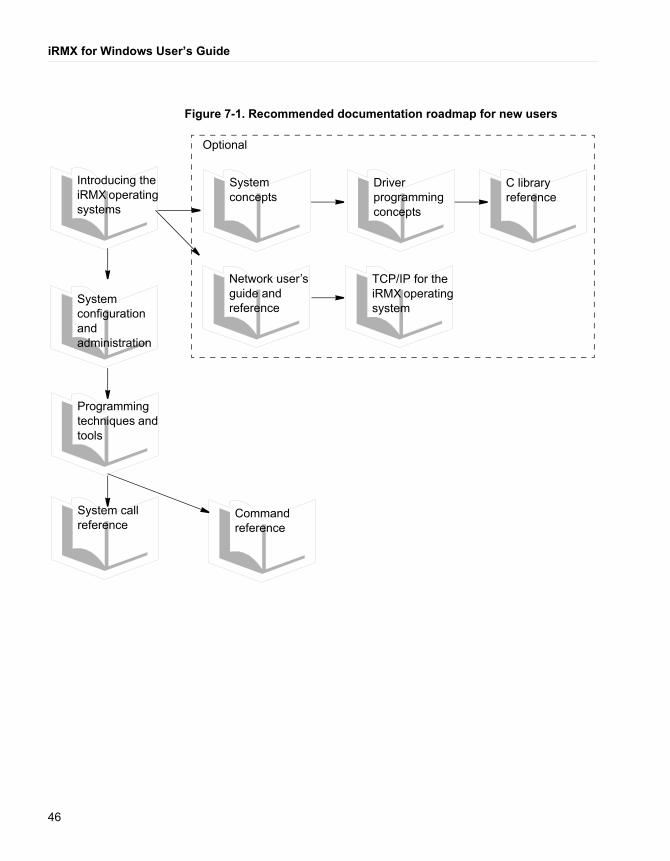
Introducing the iRMX operating systems
System configuration and administration
Programming techniques and tools
System call reference
System concepts
Driver programming concepts
C library reference
TCP/IP for the iRMX operating system
Command reference
Figure 7-1. Recommended documentation roadmap for new users
Optional
Network user’s guide and reference
iRMX for Windows User’s Guide
46

iRMX for Windows installation, configuration, and programming concepts
Figure 7-2. Recommended documentation roadmap for experienced users
Introducing the iRMX operating systems
System concepts
Command reference
Programming techniques and tools
System call reference
System configuration and administration
Driver programming concepts
TCP/IP for the iRMX operating system
Network user’s guide and reference
C library reference
Compiler manuals
Soft-Scope online help
System debugger reference
Optional
Optional
Chapter 7: Where to go from here
47

iRMX for Windows User’s Guide
48
49
8Chapter 8
Windows real-time extension The Windows Real-time Extension (NTX and RTE) enables Windows application programs to access iRMX objects managed by the iRMX nucleus. Not all iRMX Nucleus system calls are supported by the NTX and RTE APIs.
NTX Windows APIThe NTX API was developed as part of the INtime Real-Time Extension to Windows. With this API, Windows threads can communicate with RT tasks in an INtime/iRMX for Windows environment.
For a detailed description of these calls, see the following in the INtime Help file.
1. Invoke the Help file, located in this directory:
Select Start>Programs>INtime>INtime Help
2. Go to this topic:
Using INtime Software>RT Kernel System Calls
3. Select a category of your choice, then select NTX calls. These calls have ntx… in their name.
RTE System CallsEarlier versions of iRMX for Windows used the RTE system calls described in this chapter to communicate between DOS and/or Windows applications and iRMX applications that run on the same CPU. A Windows RTE LIB, provided in this version of iRMX for Windows, translates RTE calls to NTX calls. This allows for easier migration of Windows applications from the old iRMX for Windows OS to the current INtime-based iRMX for Windows OS.
If you have existing Windows code that makes RTE calls, you must first port the application to use Win32. If you wish, you can leave your rte calls in the application, or you can switch over to use NTX calls with the same functionality. If writing your Windows Application from scratch, TenAsys recommends that you use NTX calls in your Win32 application.
The next table lists RTE calls supported under Windows.
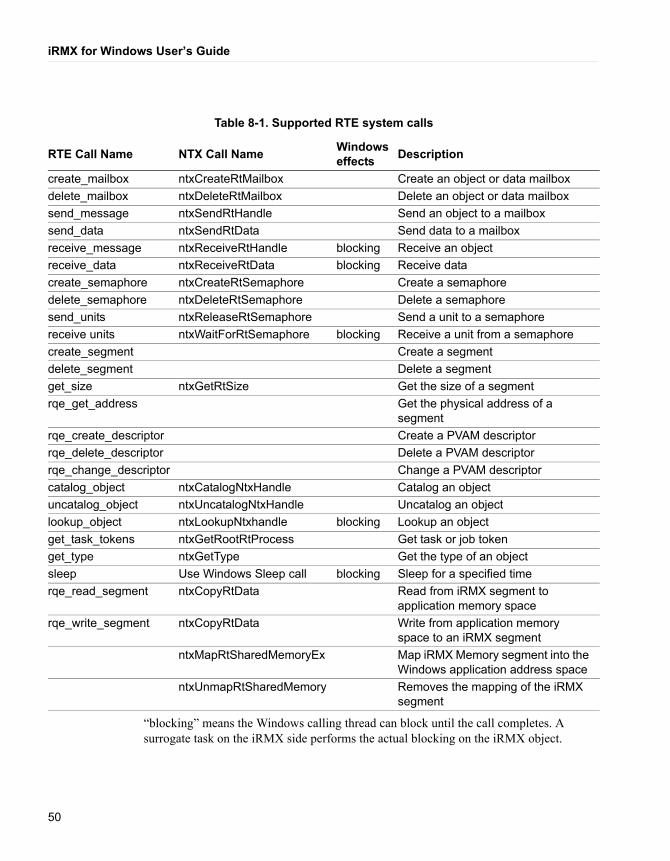
Table 8-1. Supported RTE system calls
RTE Call Name NTX Call Name Windows effects Description
create_mailbox ntxCreateRtMailbox Create an object or data mailboxdelete_mailbox ntxDeleteRtMailbox Delete an object or data mailboxsend_message ntxSendRtHandle Send an object to a mailboxsend_data ntxSendRtData Send data to a mailboxreceive_message ntxReceiveRtHandle blocking Receive an objectreceive_data ntxReceiveRtData blocking Receive datacreate_semaphore ntxCreateRtSemaphore Create a semaphoredelete_semaphore ntxDeleteRtSemaphore Delete a semaphoresend_units ntxReleaseRtSemaphore Send a unit to a semaphorereceive units ntxWaitForRtSemaphore blocking Receive a unit from a semaphorecreate_segment Create a segmentdelete_segment Delete a segmentget_size ntxGetRtSize Get the size of a segmentrqe_get_address Get the physical address of a
segment rqe_create_descriptor Create a PVAM descriptor rqe_delete_descriptor Delete a PVAM descriptor rqe_change_descriptor Change a PVAM descriptor catalog_object ntxCatalogNtxHandle Catalog an object uncatalog_object ntxUncatalogNtxHandle Uncatalog an object lookup_object ntxLookupNtxhandle blocking Lookup an object get_task_tokens ntxGetRootRtProcess Get task or job tokenget_type ntxGetType Get the type of an object sleep Use Windows Sleep call blocking Sleep for a specified time rqe_read_segment ntxCopyRtData Read from iRMX segment to
application memory space rqe_write_segment ntxCopyRtData Write from application memory
space to an iRMX segmentntxMapRtSharedMemoryEx Map iRMX Memory segment into the
Windows application address spacentxUnmapRtSharedMemory Removes the mapping of the iRMX
segment
iRMX for Windows User’s Guide
50
“blocking” means the Windows calling thread can block until the call completes. A surrogate task on the iRMX side performs the actual blocking on the iRMX object.

Chapter 8: Windows real-time extension
51
These RTE calls are no longer supported from a Windows application:
• create_region
• delete_region
• send_control
• receive_control
Generally, the RTE system calls allow a Windows application program to manipulate iRMX objects such as semaphores, mailboxes, segments, and object directories, and to communicate with iRMX tasks.
iRMX objects created by Windows applications are managed by the INtime Distributed Services Manager (DSM), and are deleted when the creating Windows application terminates.
Except for pointer parameters, the syntax and semantics of the parameters for all RTE system calls—except rqe_read_segment and rqe_write_segment—are the same as the iRMX nucleus system calls of the same name. The RTE system calls can return condition codes not returned by their nucleus counterparts.
See also: System call descriptions, System Call Reference
All pointer parameters in these calls must be flat model 32-bit pointers. These pointers are 32 bit offsets within the 4-Gbyte virtual address space of the Windows application making the call.
RQEGetRmxStatus Call (ntxGetRtStatus NTX equivalent)Use RQEGetRmxStatus RTE to check if the iRMX OS is loaded. Use this call before any other RTE calls to ensure that RTE services are available. Unpredictable results occur if RTE calls are called when iRMX is not present.
If iRMX is loaded and running, the call returns E_OK; if not present or available, the call returns E_EXIST.
See also: RQEGetRmxStatus, System Call Reference
Library for RTE InterfacesiRMX for Windows includes the rte.lib library file that provides streamlined RTE interfaces to Windows programs. These RTE calls map to the NTX.DLL which, in turn, routes the call to the INtime (iRMX) kernel. NTX.DLL DLL loads when the iRMX for Windows OS boots.
The rte.lib file resides in this location:
<INtime install path>/nt/lib/rte.lib

iRMX for Windows User’s Guide
52
RTE FilesThe C header file rte.h, located in <INtime install path>/nt/include//rte.h, contains the function prototypes for the RTE calls. The rmxerr.h C header file, located in <INtime install path>/nt/include/rmxerr.h, contains the error codes returned by RTE calls
See also: <iRMX install path>/rmx386/demo/rte/src/readme.txt file for information about the iRMX demo program that corresponds to the Windows RTE demo. Ignore the DOS RTE demo described there.
RTE DemonstrationThe RTE demonstration programs show how you can create your own application programs to run under either the Windows or the iRMX OS, and subsequently port them between the OSs.
The demonstration programs include:
• A menu-driven iRMX program which communicates via nucleus system calls with objects available to the Windows program.
The source code and executable resides in this directory:
<iRMX install path>/rmx386/demo/rte/obj
• A Windows program which enables you to exercise the RTE system calls.
The source code and executable resides in this directory:
<INtime install path>/projects/RteDemo
Both programs create, send, and delete iRMX objects, data, and so on. The iRMX program makes iRMX system calls; the Windows program makes RTE calls. To see how the RTE system calls are invoked, examine the demonstration program source code.

Chapter 8: Windows real-time extension
53
Example: Running the iRMX Demonstration ProgramTo start the demonstration, go to this directory and run the iRMX demo program:
<iRMX install path>/rmx386/demo/rte/obj
The program displays this menu:Figure 8-1. iRMX Real-time Extensions Demo Program Menu Display
DOS/iRMX Real Time Extensions Demo Program =============================================
1. Mailboxes (Objects) Functions
2. Mailboxes (data) Functions
3. Semaphore Functions
4. Segment Functions
5. Descriptor Functions
6. Data Transfer Functions
7. Display Help on above functions
8. Exit (terminate program)
Enter option <1 to 8> :-
You may invoke any of the functions listed in the menu above. To manipulate iRMX objects, follow the directions that display as you move from menu to menu.

iRMX for Windows User’s Guide
54
Example: Running the Windows RTE Demonstration ProgramTo start the demonstration:
1. Invoke the Windows Explorer:
Start>Programs>Accessories>Windows Explorer
2. Select the RteDemo.exe program in this directory, then double-click. The demo program displays:
Figure 8-2. Windows Real-time extensions Demo Program Menu Display
To manipulate iRMX objects, follow the directions that display as you move from menu to menu. Use this application concurrently with the iRMX version. For example, create under iRMX, access under Windows, delete under Windows, and so on.

55
9Chapter 9
Development environments iRMX for Windows software provides these iRMX application development environments:
• Develop iRMX Ring 0 applications under the iRMX for Windows OS using OMF386 tools.
For example, iC386 or PL/M386 compilers compile source code developed using the aedit text editor running under the iRMX HI CLI in a Windows Console.
• Develop iRMX Ring 0 applications under Windows using OMF386 tools.
For example, iC386 or PL/M386 compilers compile source code developed using the aedit text editor running in a Windows Console.
• Develop iRMX Ring 3 applications within the Integrated Development Environment (IDE) provided by Microsoft Developer Studio V6.0 using Microsoft Visual C.
Regardless of the environments used, you compile and link the application with appropriate iRMX interface libraries, then you can debug the application using Windows-hosted Spider Debugger.
Application Development StrategiesAn iRMX for Windows application, by definition, consists of both a Windows application and an iRMX application.
When designing an iRMX for Windows Application, you must first decide what parts of your application will run on the Windows OS, and what parts will run on the iRMX for Windows OS. This partitioning effort should adhere to the following criteria:
• If a particular function has no real-time requirements, place it in the Windows application.
• If a particular function has critical, real-time requirements, place it in the iRMX application.
• If a particular function can meet either set of requirements, place it in the Windows application.
Once the application is thus partitioned, you must next decide on the development tools you will use to generate the application. For the Windows application, Microsoft Visual C/C++ V6.0 is the recommended development tool set. Visual Basic as well as the Visual Studio.Net are also options.

iRMX for Windows User’s Guide
56
For the iRMX application you have two choices:
• Use the OMF386 Intel toolset (i.e. ASM386, iC386, and/or PL/M386, BND386, etc). This toolset produces Ring 0 code.
• Use Microsoft Visual C/C++ V6.0 or Visual Studio.Net (you can write iRMX applications only in C, not C++). Microsoft tools produce Ring 3 code.
The iRMX for Windows OS can handle each equally well.
Developing a Ring 0 iRMX application under iRMX for Windows
This is the native iRMX development environment. The iRMX Programming Techniques Manual describes this environment fully. The iRMX Make utility can manage the generation of your iRMX application. The required header files and interface libraries reside in these directories:
:SD:Intel/include :SD:Intel/Lib :SD:rmx386/inc :SD:rmx386/lib
Using Intel OMF386 ToolsThe following directory contains a number of sample programs compiled using the Intel OMF386 tool chain:
<iRMX install path>\rmx386\Demo
The required header files and interface libraries are found in these directories:
<iRMX install path>\Intel/include <iRMX install path>\Intel/Lib <iRMX install path>\rmx386/inc <iRMX install path>\rmx386/lib
Supported tools include: PLM386, iC386, ASM386, BND386, MAP386, and LIB386.

Chapter 9: Development environments
57
Developing a Ring 3 iRMX application under Windows
Using Microsoft Developer Studio, Version 6 (MSVC 6.0)The <iRMX install path>\rmx386\Demo\MSVC directory includes a few flat model sample programs that are compiled using the Microsoft Developer Studio (MSVC 6.0). Each subdirectory under the MSVC directory is a separate workspace for Developer Studio.
Proper generation of iRMX applications using MSVC 6.0 requires that the following settings be made for each project in the Microsoft Developer Studio under the Project/Settings pulldown menu (leave all other settings at their default values):
General tab
Figure 9-1. General tab
Ensure that you selected “Not Using MFC” in the Microsoft Foundation Class combo box.

iRMX for Windows User’s Guide
58
Debug tabFigure 9-2. Debug tab
The Debug tab is not needed for iRMX applications. If you are debugging the Windows portion of an iRMX for Windows application, use the “program arguments” edit box to give any required arguments to your application.
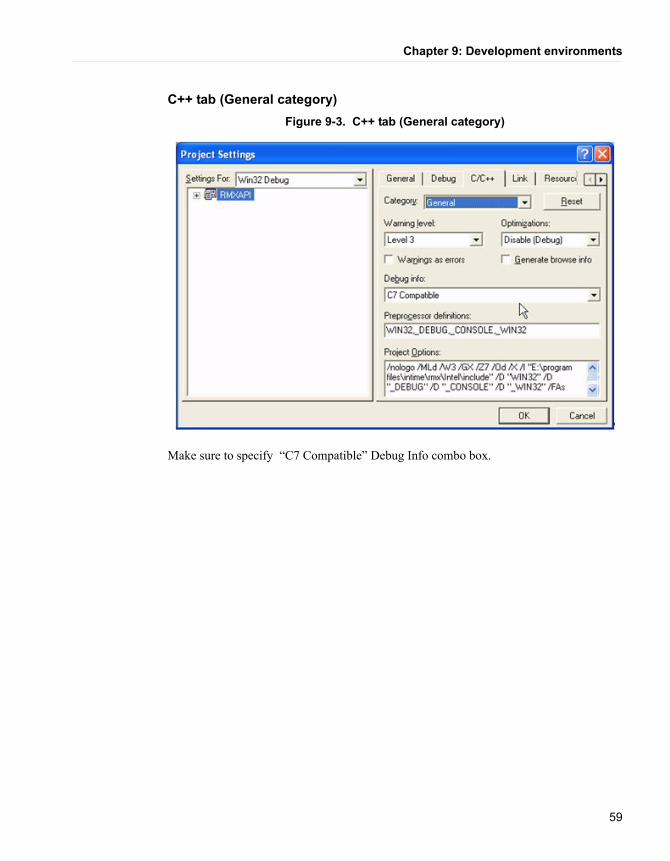
Chapter 9: Development environments
59
C++ tab (General category)Figure 9-3. C++ tab (General category)
Make sure to specify “C7 Compatible” Debug Info combo box.

iRMX for Windows User’s Guide
60
C/C++ tab (Listing Files categoryFigure 9-4. C/C++ tab (Listing Files category
To have a listing file, specify which type using the “Listing file type” combo box.

Chapter 9: Development environments
61
C/C++ tab (Preprocessor category)Figure 9-5. C/C++ tab (Preprocessor category)
• Make sure you select “Ignore Standard Include Paths”.
• Specify the full pathname for the <iRMX install path>\Intel\include directory in the “Additional include directories” edit box.
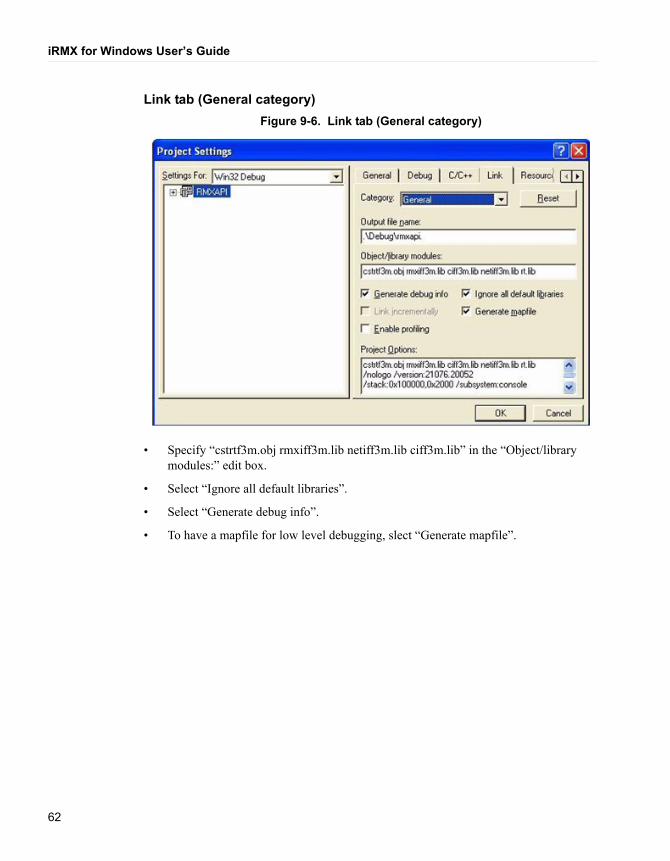
iRMX for Windows User’s Guide
62
Link tab (General category)Figure 9-6. Link tab (General category)
• Specify “cstrtf3m.obj rmxiff3m.lib netiff3m.lib ciff3m.lib” in the “Object/library modules:” edit box.
• Select “Ignore all default libraries”.
• Select “Generate debug info”.
• To have a mapfile for low level debugging, slect “Generate mapfile”.
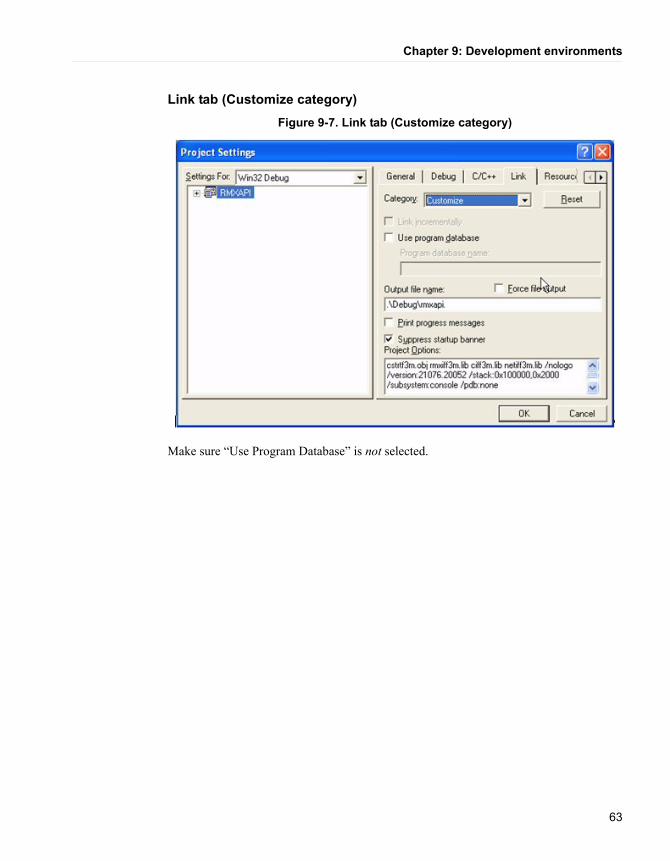
Chapter 9: Development environments
63
Link tab (Customize category)Figure 9-7. Link tab (Customize category)
Make sure “Use Program Database” is not selected.

iRMX for Windows User’s Guide
64
Link tab (Debug category)Figure 9-8. Link Tab (Debug category)
• Select “Debug Info”.
• Select “Microsoft Format”.

Chapter 9: Development environments
65
Link tab (Input category)Figure 9-9. Link tab (Input category)
• Specify cstrtf3m.obj ciff3m.lib netiff3m.lib rmxiff3m.lib rt.lib in the “Object/library modules:” edit box.
• Select “Ignore all default libraries”.
• In the “Additional library paths:” edit box, specify the full pathnames for:
• “<iRMX install path>\Intel\lib”,
• “<iRMX install path>\rmx386\lib”, and
• “<INtime install path>\rt\lib”.

iRMX for Windows User’s Guide
66
Link tab (Output category)Figure 9-10. Link tab (Outut category)
• Specify 0x100000 in the “Reserve:” Stack Allocations edit box.
• Specify 0x2000 in the “Commit:” Stack Allocations edit box.
• Specify 21076 in the “Major” Version Information edit box.
• Specify 20052 in the “Minor” Version Information edit box.
The standard iRMX header files are in the <iRMX install path>\Intel/include directory.
The standard iRMX, C, and network interface libraries are found in the <iRMX install path>\Intel/Lib, and <iRMX install path>\rmx386\lib directories. The INtime interface libraries are found in the <INtime Install Path>\rt\lib directory.
Debugging an iRMX application (Ring 0 or Ring 3)
Spider commandThe syntax and parameter set of the Spider command are as follows:
Spider <iRMX Application Pathname> <Parameters>
where <Parameters> can include one or more of the following:
-d Display Detailed Load Information.

Chapter 9: Development environments
67
-o<Object Directory Size> Specify the number of entries in the loaded job’s object directory (default is 32).
-v<VSEG size, in Megabytes> Specify the VSEG size in Megabytes. Only valid for Ring 3 aplications. Size must be a multiple of 4 Megabytes. (default is 8).
-n<Pool Min> Specify the desired pool min memory of the loaded job. Entry is in C hex notation (i.e. 0x????). (default is 1000H).
-x<Pool Max> Specify the desired pool max memory of the loaded job. Entry is in C hex notation (i.e. 0x????). (default is 0FFFFFFH).
-p<Initial Task Priority> Specify the priority of the loaded jobís initial task. (default is 136).
-a<Arguments for Load File, in quotes> Specify the arguments for the loaded job, within a pair of double quotes (i.e. arg1, arg2, etc.).
For information concerning the Spider Debugger, see the Spider On-Line Help menu.
Using SDMYou may use SDM/SDB to debug your ring 0 or ring 3 iRMX application. SDM is a static debugger, meaning that when you are in the monitor, all iRMX activity is stopped while you single step, look at registers, memory, or iRMX objects using SDB commands.
Earlier versions of iRMX for Windows required a serial port (COM1 or COM2) connected to a terminal or terminal emulator (Windows HyperTerminal applet). The latest iRMX for Windows allows SDM/SDM I/O via either an external terminal or terminal emulator (connected to COM1 or COM2) or using the INtime Debug Console Service under Windows. By default, the INtime Fault Manager owns all hardware traps for INtime applications, and the iRMX Human Interface Default Exception handler owns all the hardware traps for iRMX applications. Before enabling SDM to own the hardware faults, first select which SDM Console you wish to use. If you want SDM to use a serial port (COM1 or COM2), use the INtime Configuration Utility to select the desired COM channel (See Figure 3-2). If you wish to use the INtime Debug Console Service under Windows, start this service using the Services Applet (See Figure 4-1).
In order to use SDM/SDB to handle such hardware faults as General Protection Faults (Interrupt 13), Page Faults (Interrupt 14), and Breakpoints (Interrupt 3), you must change the default hardware fault exception to Break to Monitor mode. This is done using the EnableSDM command.

iRMX for Windows User’s Guide
68
Enabling SDM/SDBThe EnableSDM command is used as follows:
First verify that SDM output is visible on the desired SDM Console by entering
EnableSDM
The message “SDM Monitor Test Message” will be displayed on the active SDM Console (terminal/terminal emulator connected to COM1 or COM2) or the INtime Debug Console Window.
Make sure you can see this message before proceeding.
Next, sysload the EnableSDM command with the break parameter as follows:
sysload :utils:enablesdm break
The message “SDM Monitor Ready: Hit ^D to enter: “ displays on the active SDM Console.
At this point, entering Control-D (^D) on the SDM Console keyboard will cause you to break to the monitor. Likewise, using the iRMX debug command to launch an iRMX application will cause you to break to the monitor at the first instruction of the application. Finally, any hardware trap encountered while running in this mode (SDM Enabled) will cause a break to the monitor.
Once you have completed you debugging activity, you can return the system hardware fault exception handler to its default state by unloading the EnableSDM program. To do this from the iRMX command prompt, type
sysload -u enablesdm
From Windows, you can use the INtime Explorer (INtex) to delete the EnableSDM job.
Both methods will restore the system hardware fault exception handler to its default state, thus disabling SDM.
EnableSDM requires that SDM owns the system hardware interrupts. Therefore, EnableSDM checks for the presence of an active Spider Debugger session and aborts if there is one (i.e. Spider Debugger is running).
Breaking to the SDM Debug MonitorYou can break to the SDM Debug Monitor using any of these methods:
• Type <Ctrl-D> on the SDM Console keyboard. (<Ctrl-B> on either COM1 or COM2 can also be used for backward compatibility reasons).
• From any iRMX HI console, you can use the iRMX debug command.
• You can place an int 3 instruction in the code of an iRMX application and run the application.

Chapter 9: Development environments
69
• Your application tries to execute an instruction that causes a hardware trap.
In the first three methods, you can resume normal operation by entering the system debugger g command at the SDM console. This command exits SDM. In the last method, you must either correct the code causing the hardware fault (usually a very tricky operation) or you can exit the application and return to the HI console command line by entering the system debugger g284:1c command at the SDM console. To reboot the system from SDM, enter the system debugger command o64,fe at the SDM console. Alternatively, you can use a power OFF-then-ON cycle..
In the latest version of iRMX for Windows, the SDB job is a loadable job and will not be present by default. When you start the INtime Debug Console Service, the job is loaded automatically. If you are using terminal/terminal emulator connected to either COM1 or COM2 as you SDM Console and desire SDB services, you will need to load SDB.rta from the <INtime Install Path>\bin directory using either the INtime Loader or the Load Button in the INtime Explorer.

iRMX for Windows User’s Guide
70
71
10Chapter 10 Porting existing iRMX and
Windows code to iRMX for Windows
iRMX CodeThe iRMX portion of an old iRMX for Windows, or standard iRMX application should run as is under the new iRMX for Windows OS except as follows:
1. Code that calls rq_a or rq_s attach_device referring to an EDOS file driver-controlled DOS drive
2. Code that makes TCP/IP socket calls
3. Code that uses create_descriptor to access physical memory outside that managed by the iRMX Free Space Manager
Recompilation and relinking of applications described above is required after making code changes as follows:
1. Use a NT drive name (i.e. c:, d:, etc) and the NT File Driver ID (7) when making a call to rq_a or rq_s attach_device.
2. Use the new sockaddr and sockaddr_in structures in your TCP code and link to the new TCP socket interfaces found in the iRMX C-Library
3. If the physical address being accessed is outside of the 1st 4 Megabytes of physical memory, as well as outside of the memory controlled by the Free Space Manager, before calling create_descriptor, first make a call to rqv_create_segment to create a Virtual Segment (VSEG), and then make a call to rqv_map_physical giving the VSEG token, physical address (on a 4K boundary), and memory size (rounded up to the next 4 KByte boundary). This will cause a Page Table to be created in your system containing the specified physical memory range. You can now use VSEG:offset (offset returned returned by rqv_map_physical) as a pointer to this physical memory. If you wish to create a descriptor to access this physical memory, you need to obtain the linear address of the VSEG:offset pointer and use that in the create_descriptor call as shown in the following code snippet:

iRMX for Windows User’s Guide
72
Creating a Descriptor for Mapped Physical Memory#include <rmx_c.h> #include <stdio.h> #include <stdlib.h>
#define ERR {if (status) { printf("s=%x\n", status); exit(1); }}
#define GetSegmentBase(Vseg) \ ((((DWORD *)buildptr((selector)0xc0, (void near *)((DWORD) (Vseg) &
0xfff8)))[0] >> 16) | \ ((((DWORD *)buildptr((selector)0xc0, (void near *)((DWORD) (Vseg) &
0xfff8)))[1] & 0x000000ff) << 16) | \ (((DWORD *)buildptr((selector)0xc0, (void near *)((DWORD) (Vseg) &
0xfff8)))[1] & 0xff000000))
#define rq_get_memory_handle(Vseg, Offset, Size, Statusp) \ rqe_create_descriptor(GetSegmentBase((Vseg)) + (DWORD)(Offset), (Size), (Statusp))
void main(void) {
TOKEN hV, hRoot, hMem; BYTE * pByte; WORD status; void near* off; DWORD size = 0x1000; int i;
hV = rqv_create_segment((DWORD)0xE0005000, &status); ERR; printf("hV=%x\n", (WORD)hV); hRoot = rq_get_task_tokens((BYTE)3, &status); rq_uncatalog_object(hRoot, "\3JAN", &status); rq_catalog_object(hRoot, hV, "\3JAN", &status); off = rqv_map_physical(hV, (DWORD)0xE0004000,
(DWORD)0x1000, &status); ERR; printf("off=%x\n", off); pByte = buildptr(hV, off);
/*** Get a descriptor to the mapped physical memory ***/
hMem = rq_get_memory_handle(hV, off, size, &status);
for (i = 0; i < 256; i++) {
if ((i % 16) == 0) printf("\n%08x: ", i + 0xe0004000); printf("%02x ", pByte[i]);
} printf("\n\n"); rq_sleep((WORD)100, &status); exit(0);
}

Chapter 10: Porting existing iRMX and Windows code to iRMX for Windows
73
Windows CodeYou will need to port your Windows application from the Win16 API found in Windows 3.1 to the Win32 API found in Windows 2000/XP. In the process, there are some 16 bit segment alignment PRAGMAs which will need to be changed to the appropriate 32 bit packing PRAGMAs. You must use the new rte.h and rmxerr.h or rmx_err.h header files to define/resolve the RTE calls made by your code. These header files should remain in the <INtime Install Path>\nt\include directory with the project settings in MS Developer Studio changed to reflect this additional search path. Finally you must link the libraries rte.lib, ntx.lib, and ntxext.lib with your application. These libraries are located in the <INtime Install Path>\nt\lib directory. Make the necessary settings changes in MS Developer Studio to cause these libraries to be linked to your application.
Issues moving from iRMX for Windows 3 R2.14 to the latest iRMX for Windows product
There are two issues you should be aware of in moving forward from version R 2.14.
The first is that in the latest iRMX for Windows you have the ability to install INtime/iRMX for Windows on Windows systems based on both the Multiprocessor (starting with iRMX for Windows 3 R 3.0) and Uniprocessor HALs. The practical considerations here concern use of interrupts. Formerly IRQ numbers were always allocated in the range of 0 thru 15; this range is now extended for PCI device interrupts which start in APIC mode at level 16. You may have code which derives an interrupt level from an IRQ number; this code must be changed in order to support this feature. The following procedure provides the required IRQ mapping:
PL/M 386:
irq_to_level: PROCEDURE (irq) WORD REENTRANT PUBLIC; DECLARE
irq BYTE;
IF irq < 8 THEN RETURN ((irq * 16) + 8);
ELSE RETURN (((1 + (irq / 8)) * 16) + (irq MOD 8));
END irq_to_level;
iC-386
UINT_16 irq_to_level(UINT_8 irq) {
if (irq < 8) return ((irq * 16) + 8);
else return (((1 + (irq / 8)) * 16) + (irq % 8));
}

iRMX for Windows User’s Guide
74
Secondly, there are internal changes in the latest iRMX for Windows OS which mean that code generated on the new OS can not be executed on an earlier system. Older code can be brought forward, with the exception mentioned above.
Other than that, there are no other design issues to be aware of. You should still carefully qualify your platforms as before for suitability for use with INtime/iRMX for Windows.

75
11Chapter 11
Other iRMX for Windows information
rqv_copy_data system callA new system call, rqv_copy_data, has been added to the product to allow a ring 3 iRMX application to copy the contents of an iRMX segment into its flat address space. This is the most direct way for a ring 3 application to access the contents of segments.
The new system call’s interface procedure is in the <iRMX install path>/rmx386/lib/rmxiff2m.lib library module. The function prototype is in the<iRMX install path>/intel/include/rmx_c.h and rmxc.h header files.
The function prototype for this call is as follows:
void near * _Fparam rqvcopydata( SELECTOR SrcSeg, UINT_32 SrcOffset, SELECTOR DestSeg, UINT_32 DestOffset, UINT_32 MoveCount, UINT_16 far * Status_p
);
Where:
SrcSeg is the TOKEN of the iRMX Segment being copied from. If the source for the copy is memory in the application’s flat address space, this value is (selector) 0..
SrcOffset The offset of the iRMX Segment being copied from. If the source for the copy is memory in the application’s flat address space, this value is the flat pointer to it.
DestSeg The TOKEN of the iRMX Segment being copied to. If the destination for the copy is memory in the application’s flat address space, this value is (selector) 0.
DestOffset The offset of the iRMX Segment being copied to. If the destination for the copy is memory in the application’s flat address space, this value is the flat pointer to it.
MoveCount The amount of data to copy (in bytes).
Status_p A pointer to a 16 bit exception code.

iRMX for Windows User’s Guide
76
Priority LevelWindows runs at priority 254: an iRMX task running at 255 will not execute. This also implies that if any iRMX task running at a priority higher (numerically lower) than 254 is in a tight polling loop, that task will prevent the Windows task from ever executing. If you must poll in an iRMX task, have the task either periodically release the CPU using an rq_sleep call, or run the task round robin with Windows at priority 254.
If you wish to have iRMX programs run round robin with the Windows task, do the following:
• When you create users with the Command Line Interface (CLI), set the maximum task priority at one less than the Windows priority (that is, 253) in the :config:user file. Then those users will share the processor with Windows.
• If you use submit, set the task priority to one less than Windows.
• If you use background, set the task priority to three less than Windows.
• If you use all three, set the task priority to five less than Windows.
See also: User attributes files, System Configuration and Administration
Invisible FilesIn the iRMX OS, hidden files begin with r?. The ? (question mark) character is not valid in a Windows File System file name, therefore iRMX filenames containing a ? are not accessible to Windows.
The NT File driver uses the following convention:
• Files on the iRMX volume that begin with r? are created on the Windows volume without the r?, but with the invisible attribute.
• Files on the Windows volume that have their invisible bits set, appear to the iRMX OS as beginning with r?.
For example, if you copy the file r?login from an iRMX volume to a Windows volume, the file will appear as login with the invisible attribute. Windows invisible files such as boot.ini appear as r?boot.ini when you list them from iRMX using the Windows NT file driver.
Windows NT File DriverThese limitations or behaviors exist for the Windows NT file driver:
• An application that uses the NT file driver can be blocked by a lower-priority task. Assume that a low priority iRMX task (priority = 200) makes a I/O system call to access a Windows file. If a higher-priority task (priority = 141) makes an I/O system call to access a Windows file, it will be blocked until the I/O call from the low

Chapter 11: Other iRMX for Windows information
77
priority task completes. Since this completion effort requires the Windows task to run, other iRMX tasks of any priority can block (preempt) this I/O completion as well. If you must poll in an iRMX task, have the task either periodically release the processor (using an rq_sleep call), or run the task round-robin with Windows at priority 254.
• The Windows NT file driver treats various file access conditions differently than the named file driver. For a list of unexpected condition codes returned by the Windows NT file driver, see the <iRMX install path>/rmx386/readme.txt file.
Using the iRMX Windows ConsoleFigure 11-1. iRMX Windows console
When configured into the system (i.e. one or more of the DUIBs WINCON_0, WINCON_1, WINCON_2, and WINCON_3 are present and enabled in the :CONFIG:terminals file), one or more iRMX Windows Consoles appears when the iRMX for Windows OS loads. Each Console is treated by the Terminal Support Code and Human Interface as if it were modem controlled. This means that if some Windows action deletes the Console, such as using the mouse to click the X button on the Console, the Human Interface User logged on to the Console is logged off, and any iRMX applications currently running as a child of the user are deleted.
If this happens, and you wish to bring the iRMX Windows console back onto the Desktop, use the RFWConStart.Exe applet in the <INtime install path>\rfw directory invoked via Start>Programs>iRMX for Windows>iRMX Console Restart Program. Select which

iRMX for Windows User’s Guide
78
iRMX Windows Console instance you wish to restart and click OK. The iRMX Windows Console will appear on the Desktop and the Human Interface will display its logon prompt.
The INtime Configuration Utility can be used to manage the contents of the :CONFIG:terminals file, thus determining which Human Interface consoles will be started when the iRMX for Windows OS loads (See Figure 3-5). You can also edit this file manually.
Use of INtime/iRMX for Windows TCP/IP stackThe INtime TCP/IP stack is available for iRMX applications to use for TCP, UDP, and ICMP real-time services. The stack requires a separate NIC from the one used by Windows. Supported NICs and their INtime/iRMX drivers are as follows:
Intel EtherExpressPro 100 eepro100 driver
Intel EtherExpressPro 1000 eepro1000 driver
3COM PCI NICs such as the 3C905, 3C59x driver3C590, and related cards
Realtek 8139 NIC rtl8139 driver
NE2000 compatible ISA NICs ne2000 driver
Allnet ALL0111 NIC tulip driver
LocSoft Ruby DEC 21143 NIC tulip driver
The INtime TCP/IP stack is configured using the INtime Configuration Utility, and can be configured to started either manually or automatically. Refer to the INtime help file in the <INtime install path>\help directory or the iRMX TCP/IP for the iRMX OS PDF manual (<iRMX install path>\manuals\tcpip.pdf) for more information.
The iRMX/INtime TCP stack can also be loaded under iRMX using the :CONFIG:tcpstart.csd and :CONFIG:tcp.ini files. The tcpstart.csd submit file can either be invoked manually, or invoked from the :CONFIG:loadinfo file.
Using the iRMX/INtime TCP stack, network applications such as Telnet, NFS, and FTP are provided and fully supported under iRMX for Windows OS.
iNA960/iRMX-NET supportThe iRMX for Windows OS supports iNA960 and iRMX-NET using the Allnet ALL0111 or LocSoft Ruby NIC (based on DEC 21143 NIC chip) and the iRMX IDEC43N.JOB iNA job. To get full iRMX-NET support, invoke the submit file :config:loadrnet.csd. This submit file will first sysload the :SD:rmx386/jobs/idec43n.job,

Chapter 11: Other iRMX for Windows information
79
then the :SD:rmx386/jobs/remotefd.job to provide iRMX-NET client capabilities, and finally the :SD:rmx386/jobs/rnetsrv.job to provide iRMX-NET server capabilities. See the iRMX Network User's Guide and Reference PDF manual (<iRMX Install Path>\manuals\network.pdf) for more information.
If you require iNA960/iRMX-NET services, you cannot use the INtime/iRMX TCP/IP stack as described above. If you also require TCP/IP capabilities, then you must load the iRMX EDL.JOB on top of IDEC43N.JOB, followed by the IP.JOB, RIP.JOB, UDP.JOB, and TCP.JOB, all found in the :SD:rmx386/jobs directory. The submit file :config:tcponina.csd supports loading this iNA/based TCP/IP stack.See the iRMX System Configuration and Administration PDF manual (<iRMX install path>\manuals\sysconf.pdf) and iRMX TCP/IP for the iRMX OS PDF manual for more information on loading the IDEC43N.JOB, EDL.JOB, and TCP/IP stack jobs and configuring them using the SETCONFG command and TCP.INI file from the :CONFIG:loadinfo file.
Useful INtime/iRMX for Windows tools
RfwConStartFigure 11-2. RfwConStart
This Windows application is used to restore an iRMX HI console window on to the Windows desktop. It will only work with those iRMX HI Windows consoles active in the :CONFIG:terminals file. If any of these console windows is deleted, RfwConStart can be used to recreate them.
After invoking RfwConStart (<INtime install path>\bin\rfwconstart.exe), you will see they display shown above. Select the Unit number of the Windows console to restore, and

iRMX for Windows User’s Guide
80
then click on Open Console. The console window will appear with the iRMX login prompt being displayed.
Windows-hosted Spider DebuggerFigure 11-3. Windows-hosted Spider Debugger
The Windows-hosted Spider Debugger is a source level, multitasking debugger that is used to debug iRMX and INtime applications. When activated from Windows, the Spider Debugger downloads SpiderRT, an iRMX/INtime application that acts as its real-time Debug Server to handle breakpoints, single stepping, and other debug functions in a multitasking fashion. Communications between the Spider Debugger and SpiderRT is done using INtime NTX calls in the Spider Debugger, and iRMX Nucleus calls in SpiderRT. Refer to the INtime on-line Help (<INtime Install Path>\help\INtime.hlp) for more information about the Spider Debugger. Also see Chapter 9 of this manual for additional Spider Debugger information.

Chapter 11: Other iRMX for Windows information
81
INtex INtime ExplorerFigure 11-4. INtex INtime Explorer
The INtime Explorer (INtex) (<INtime install path>\bin\intex.exe) is a browser that allows you to look at the INtime/iRMX job tree and the various iRMX objects associated with the iRMX for Windows OS and its current applications. INtex is able to show the state of all tasks in the system, and can show the entire CPU register set of tasks that were suspended because they experienced a hardware fault. Based on this information, INtex can also use this stack frame information to display the code and variables of the application which experienced the hardware fault. Refer to the on-line help provided with the INtex application for more information on the INtime Explorer.
The INtime Explorer downloads an iRMX application (RTINtex.tmp as seen in the job tree above) when it initializes. This real-time View Server gathers the information needed by the Windows side of INtex to display the objects/hierarchy that the user has specified. Communications between INtex and RTINtex.tmp is done using INtime NTX calls in INtex, and iRMX Nucleus calls in RTINtex.tmp.
The INtime Explorer can be launched using the INtime Icon on the system tray or using Start>Programs>INtime>INtime Explorer.

iRMX for Windows User’s Guide
82
INtime LoaderFigure 11-5. INtime Loader
The INtime Loader can be used to load iRMX applications that only make Nucleus, Kernel, and C-Library system calls. You can invoke the INtime Loader using Start>Programs>INtime>RT Application Loader. Once launched, click its Help button for more information on the Loader.
INtime Configuration UtilityThe INtime Configuration Utility is used to configure the INtime/iRMX for Windows OS. Refer to Chapter 3 of this manual and the INtime Help file (<INtime Install Path>\help\INtime.hlp) for more information about the INtime Configuration Utility.

Chapter 11: Other iRMX for Windows information
83
INtime HelpFigure 11-6. INtime Help
The INtime Help file (<INtime Install Path>\help\INtime.hlp) serves as the online documentation for the INtime software. It can be launched via Start>Programs>INtime>Documentation>INtime Help.
INtime Device ConfigurationThe INtime Device Manager enables the user to see the devices in an INtime/iRMX for Windows system and select devices for exclusive INtime/iRMX for Windows usage. (See Figure 3-6 and its associated description).

iRMX for Windows User’s Guide
84
Useful INtime applicationsThere are a few INtime applications that may be useful in an iRMX for Windows system. These applications are described in the sections that follow.
Graphical JitterFigure 11-7. INtime Graphical Jitter
The Graphical Jitter program (<INtime Install Path>\bin\jitter.exe) is useful to show the repeatability of an RT application responding on a regular basis to a kernel clock tick. The RT application reads the Pentium Performance Counter in the CPU on each clock tick, converts it to microseconds, compares it to the expected elapsed time between ticks, (i.e. length of a kernel tick in microseconds) and then shows the results on a Windows display. Over time, the amount of deviation from the norm shown by the Jitter program will be equal to the interrupt latency of the system.
The source to the Graphical Jitter program is in these directories:
<INtime install path>\projects\jitternt (Windows portion) <INtime install path>\ projects\jitterrt (real-time portion)
Serial DriverThe INtime Serial Driver for COM1 and COM2 is a high performance serial driver capable of driving serial data at speeds up to 115200 baud. This is 4X faster than a

Chapter 11: Other iRMX for Windows information
85
corresponding iRMX COM1 or COM2 driver using the Terminal Support Code (TSC). The serial driver source resides in the following directory:
<INtime Install Path>\projects\serialio (serdrvr.c, serdrvr.dsp, etc)
See the readme.txt file in this directory for usage information. Note also that there is an INtime serial application (serialio.c, serialio.dsp, etc) residing in the same directory. This application communicates through the serdrvr driver with a terminal device.
An identical iRMX application resides in this directory:
<iRMX Install Path>\rmx386\demo\MSVC\serialio
Access to iRMX-controlled IDE and SCSI devicesThe iRMX for Windows 3 R3.02 product supports iRMX-control of IDE drives connected to the Secondary IDE Controller in a Windows system. It also supports iRMX-controlled SCSI devices connected to an Adeptec or Symbios SCSI Adapter.
Please refer to the iRMX SD Server Usage Appendix in this manual for information on partitioning, formatting, attaching, and using both IDE and SCSI iRMX-controlled devices as local storage units or as the iRMX system device itself.
Time, Time of Day, and Time Stamp IssuesThere are two kinds of time, GMT-based (UTC) and local time (modified to reflect time zone). Windows refers to these times as system time (GMT-based) and local time (time zone reflecting). All Windows calls, utilities, etc will display any time entity in local time, including file time stamps. In an iRMX for Windows system, the following design considerations were made:
• Windows owns the "Global" or hardware clock.
• The INtime Clock Sync Service synchronizes the iRMX time of day with the Windows system time (GMT-based). Therefore, the iRMX system calls rq_get_time, and the Y2K compliant rqe_time will return system time, which time will always be off by time zone hours from the Windows time.
• It was decided in iRMX for Windows to have an iRMX directory listing using the dir command show the same time stamp date and time values as is shown using the Windows dir command to display the same file.
• It was decided to have the iRMX date and time commands display the same date and time as the Windows date and time commands.
• The C-Library time functions would continue to differentiate between local time and system time based on the current time zone.
• The file :CONFIG:R?ENV will be ignored by all C-Library-based applications.

iRMX for Windows User’s Guide
86
These design considerations led to the following differences in iRMX for Windows as opposed to classic iRMX III:
• An attempt to synchronize the global clock from the iRMX date and time commands is not supported
• The R2.23 date and time commands show local time, not system time (they call the C-library time functions rather than rqe_time)
• The NT file driver converts iRMX time stamping at creation, access, and modify times to their Windows time-stamping values.
• The NT file driver returns Windows time-stamping values to iRMX in local time.
The result of this is that, on an iRMX for Windows system that only accesses disks through the NT file driver, and only uses the iRMX date and time command, there is only one type of time - local time. Likewise, any C-Library application that uses localtime will get the correct "local time".
If your application uses rqe_time or rq_get/set_global_time, you will end up with a second time in the system, i.e. system time.
If you use the named file driver to manage an IDE drive (attached to the secondary IDE controller which has been removed (disabled) from Windows control), or a SCSI drive (connected to the supported Adaptec or Symbios PCI-based SCSI controller), then you will have iRMX system time on the time stamps on these drives, which will vary from the Windows time by time zone hours.
If you use iRMX-NET to access files on a remote system from the iRMX for Windows system, then the time stamps viewed on the remote iRMX system will be different from their Windows counterparts. Likewise, if you view iRMX for Windows files from a remote iRMX system, the time stamps will differ.
So there will always be the possibility of at least 2 times and more if the remote iRMX system has its clock set to some other time (say winter time as opposed to summer time).
Enhanced Date and Time commandsThe iRMX for Windows system requires that the INtime Clock Sync Service runs periodically to synchronize the iRMX time-of-day clock with the Windows time-of-day clock. The Date and Time HI commands now display this Windows-synchronized time (which Windows keeps with Time Zone and Daylight Savings Time corrections applied) instead of the raw GMT time that it did in earlier releases. The rqe_time system call will still give GMT time while the C-Library time functions will give Windows-synchronized time.

Chapter 11: Other iRMX for Windows information
87
Accessing a Printer from iRMX for WindowsA Windows-based Line Printer Service can now be accessed from an iRMX application using the new iRMX lpt1drv driver. This driver (/rmx386/drivers/lpt1drv) offers the LPT1 DUIB for users to attach to via the attachdevice command. Before the driver is loaded, you must first enable the Line Printer Service from Windows using theINtime Configuration Utility, iRMX Tab. On this Tab, you will also specify the Windows name of the printer to be used by the Service. This printer can be a locally connected printer such as LPT1, or the UNC name of a network printer such as \\<System Name>\<Printer Name>. Data sent to the iRMX LPT1 connection will then be transferred to the Windows Line Printer Service via a data mailbox. The Windows Line Printer Service will then use Windows functions to print the data on the Printer associated above with the Service.
Latest TCP/IP Stack and Socket Calls documentationSee the INtime Help and update().rtf files in the <INtime Install Path>\help directory. Any NIC driver listed there as a .rta file has a corresponding .job file in the :sd:rmx386/jobs directory.
Latest C Library functionsSee the INtime Help and update().rtf files in the <INtime Install Path>\help directory.
Latest PCIBUS Library functionsSee the INtime Help and update().rtf files in the <INtime Install Path>\help directory.
PCIBUS utilityThe PCIBUS scan utility (:utils:pcibus) is provided to enable the characteristics of devices on the system PCI buses to be discovered and viewed. If you invoke the command with no parameters, help information on the command's usage will be displayed.
Adding New Runtime Configuration Parameters to INtime.iniRuntime Configuration of an iRMX for Windows system is done via a memory resident INtime.ini file. This file is generated at load time using Registry data found in the HKEY_LOCAL_MACHINE\SOFTWARE\TenAsys\INtime\RTKernelLoader \INTIME.INI Registry Hive.
There are a few Runtime Configuration Parameters from the iRMX III.2.3 RMX.INI file that can be useful in an iRMX for Windows environment. An example is the DDS parameter in the EIOS section of the III.2.3 RMX.INI file. To add a new section and/or parameter to the virtual INtime.ini file, use the Advanced Screen in the INtime Configuration Utility (Start=>Programs=>INtime=>INtime Configuration=>Real-time Kernel=>Advanced). (See Figures 3-2 to 3-4).

iRMX for Windows User’s Guide
88
For example, to add the [EIOS] and DDS=32H parameters, do the following in the Advanced Screen of the INtime Configuration Utility:
Add new Section - EIOS Add Parameter name - DDS Add Value - 32H

89
AAppendix A
Directory structureFollowing are key directories resulting from the installation of the iRMX for Windows OS. The left column lists the directory name (shown hierarchically) and the right column briefly describes the directory’s contents.
Directories Comments:sd: iRMX Install Path intel bin AEDIT, Intel386 utilities include C header files (include files) arpa C include files specific to TCP/IP protocols, e.g., FTP net C include files for networking not specific to TCP/IP netinet C include files specific to TCP/IP protocols, e.g., TCP sys System-related C include files lib C-start objects, C-library interface libraries ndp387 Math coprocessor utilities gen Generation files src C-start objects for ASM lang286 Compiler and utility executable files manuals iRMX Manual Set (PDF files) net iRMX-NET data files rmx386 Readme text files config iRMX configuration files demo Example files (includes source files) asm c MSVC plm rte drivers Loadable device driver files early New but unintegrated software help Help files for iRMX commands inc P/LM 32-bit external declaration and literal files inc16 P/LM 16-bit external declaration and literal files jobs Loadable system jobs lib Interface libraries for OS

iRMX for Windows User’s Guide
90
unsupprt Unsupported software features sys386 Commonly used Intel-provided command files user User directory super Super user :home:directory prog Super user :prog: directory world World user :home:directory prog World user :prog: directory util286 HI utility commands (16-bit) util386 HI utility commands (32-bit) work Temporary work files
Directories Comments

91
BAppendix B
Peripheral supportThis appendix contains tables of jumper configurations for your hardware so it can run the iRMX for Windows OS. Each table lists all the changes you need to make to a particular peripheral board.
How To Use This AppendixTo use the information in this appendix, follow these steps:
1. Locate the section that describes your board:
A. Serial Controller Boards
2. Remove the jumpers listed in the Remove Jumper column of the jumpering table.
3. Install the jumpers listed in the Install Jumper column.
4. Make the changes to the switch settings listed in the switch table if your board has switches. The changes to switch settings are listed in a separate table for each board.
5. Install any required components.
The jumpering changes in this appendix describe the modifications that must be made to the factory-installed jumpers; not the default jumper configuration. Refer to the individual board's hardware reference manual for a list of the factory-installed jumpers.Peripheral Controller Boards.
Modifications to Serial Controller BoardsThese sections contain tables that you need to jumper some non-Intel controller boards. The jumpering changes cover only the changes that must be made to the factory-installed jumpers. If your board has been used in another application, refer to the controller board's installation guide and jumper your board as it was originally jumpered. Then proceed with the modifications described in the tables.
The controller boards are:
• Comptrol Rocketport 550 Serial Controller (PCI)
• Comptrol Hostess 550 Serial Controller (ISA)
• DigiBoard DigiCHANNEL PC/4, PC/8 and PC/16 Controllers (ISA)
iRMX for Windows User’s Guide
92
Comptrol Rocketport 550 Serial Controller (PCI)The iRMX for Windows OS supports 4, 8, and 16 channel Rocketport boards.
These multichannel serial controllers require no jumper changes. All device enumerations are done using PCI bus utilities.
The driver for the board is :sd:rmx386/jobs/r550drv. As in the Hostess 550 driver, supported DUIBs are t550_0, t550_1, …, t550_(n-1) where n is the number of channels on the board.
As in the case of all iRMX-owned PCI devices, you must use the INtime Device Configuration tool to obtain the necessary resources from Windows (unique IRQ, etc) so that the devices enabled for iRMX to use.
Comptrol Hostess 550 Serial ControllerThe iRMX for Windows OS supports 4, 8, and 16 channel HOSTESS 550 serial communications boards. To be compatible with the default ICU definition files for PC Bus systems (base I/O address of 280H and an interrupt level of 5 (58H)), change the switch settings on the Comptrol Hostess 550 board.
See also: The board documentation for the 4- and 16-channel switch settings h550drv.job, System Configuration and Administration
Table B-1. HOSTESS 550 Terminal Controller
HOSTESS 550 Terminal Controller Switch SettingsSwitch 1
Switch 2
5, 3, 1 OFF 8, 7, 6, 4, 2, ON
8, 7, 6, 4, 3, 2, 1 OFF 5 ON
DigiBoard DigiCHANNEL PC/4, PC/8, and PC/16 ControllersThe DigiBoard PC/4, PC/8, and PC/16 boards are 4-channel, 8-channel, and 16-channel, respectively, serial communications boards. Each PC/X board contains jumpers and/or switches that set the I/O addresses of the board's status register and each asynchronous communication element (ACE). An ACE is one serial channel; if it is a PC/4 board, there will be four serial channels (ACE chips) on it.
See also: pcxdrv.job, System Configuration and Administration

Appendix B: Peripheral support
93
In every case except the second PC/16 board, the hardware board number must be set to 0. If you have a second PC/16 board, use the jumpers to set its hardware board number to 1.
Table B-2. PC/4 I/O Addresses
Board Status port Port 0 Port 1 Port 2 Port 30 188 130 138 140 1481 288 150 158 160 1682 208 1B0 1B8 1C0 1C83 308 1D0 1D8 1E0 1E8
Table B-3. PC/8 I/O Addresses
Board Status port 0 1 2 3 4 5 6 70 188 130 138 140 148 150 158 160 1681 288 1B0 1B8 1C0 1C8 1D0 1D8 1E0 1E82 208 230 238 240 240 250 258 260 2683 308 2B0 2B8 2C0 2C0 2D0 2D8 2E0 2E8
The PC/16 board uses PAL chips to set addresses instead of address switches. When ordering the PC/16 board, specify a board number of 0 or 1 and if you want the PICK OS PAL chips. These are available from Digiboard. Consult your PC/16 hardware reference manual for more information.

iRMX for Windows User’s Guide
94

95
CAppendix C
Error messagesSince the iRMX for Windows OS has a number of dependencies, an error logging facility is included to help diagnose and correct startup errors.
Errors can typically occur in the following operations:
• Loading the file driver/driver for the iRMX system device
• Loading the iRMX upper layers
• Attaching the specified device as the iRMX system device
• Establishing connections to various required iRMX directories and files
If any of these errors occur during the startup of the iRMX for Windows OS, a segment is created capable of holding up to 5 error messages and is cataloged in the object directory of the root job as RMX_INIT_ERR. Use INtex to locate the RMX_INIT_ERR segment in the root job's object directory, and display its contents.
Possible error messages and their cause are as follows:
• Windows NT File Driver Initialization Error: <iRMX Error Code in Hex>.
The file driver encountered the specified iRMX or Windows RTIO Server error.
• iRFWit Initialization Error—no RQBOOTED.
The iRMX Upper Layers job could not find the RQBOOTED segment in the root job.
• <Layer> INITIALIZATION ERROR: <iRMX Error Code in Hex>.
The specified system layer failed its initialization with the specified errorcode
The specified system layer failed its initialization with the specified error code. If the iRMX Layer specified is the Human Interface (HI), you can get additional information on the error it you attach a serial terminal or PC terminal emulator to the COM channel configured for use by Soft-Scope. This error information tells you the name of the directory/file which could not be found.

iRMX for Windows User’s Guide
96

97
DAppendix D
iRMX for Windows default configurationThis appendix lists the pre-configured options in the software definition file, used to generate the iRMX for Windows loadable job. If you ported an existing application to iRMX for Windows, you may need to alter it to run within the pre-configured software.
Tables of pre-configured options are provided for these system requirements and sub-systems:
• Human Interface Configuration
• Application Loader Configuration
• Extended I/O System Configuration
• Basic I/O System Configuration
• Device Drivers Configuration

iRMX for Windows User’s Guide
98
Human Interface Configuration
Table D-1. Human Interface Configuration
HI jobs Configured ValueJobs Minimum Memory Jobs Maximum Memory Numeric Processor Extension Used
0H 0FFFFFFFH Yes
Prefixes Configured ValuePrefix : Prefix : Prefix : Prefix : Prefix : Prefix :
PROG: UTILS: UTIL286: SYSTEM: LANG: $:
HI Logical Names Configured ValueName = WORK Name = UTILS Name = UTIL286 Name = LANG Name = RMX Name = INCLUDE
:SD:WORK :SD:UTIL386 :SD:UTIL286 :SD:LANG286 :SD:RMX386 :SD:INTEL/INCLUDE
Application Loader Configuration
Table D-2. Application Loader Configuration
Application Loader Configured ValueAll System Calls Default Memory Pool Size Read Buffer Size
Yes 0500H 01000H
Extended I/O System Configuration
Table D-3. EIOS Options
EIOS Configured ValueRetries on Physical Attachdevice Default IO Job Directory Size
0H 200
Automatic Boot Device Recognition Configured ValueDefault System Device Physical Name C_RMXLogical Names Configured Value
(Device Name, File Driver, Owner's ID)Logical Name = BB Logical Name = Stream
BB, PHYSICAL, 0H STREAM, STREAM, 0H

Appendix D: iRMX for Windows default configuration
99
Basic I/O System ConfigurationTable D-4. Basic I/O System Configuration
BIOS Configured ValueAttach Device Task Priority Timing Facilities Required Timer Task Priority Connection Job Delete Priority Ability to Create Existing Files System Manager ID Common Update Timeout Terminal Support Code Control-Sequence Translation Terminal OSC Controls Tape Support BIOS Pool Minimum BIOS Pool Maximum Global Clock Global Clock Name
129 Yes 129 130 Yes Yes 1000 Yes Yes Yes No 0800H 0FFFFFH None Blank string
Device Drivers Configuration
Table D-5. Device Drivers Options
Driver Configured ValueAT Serial Driver DUIB Name Interrupt Level Base Port Address Reset Character Interrupt Character DUIB Name Interrupt Level Base Port Address Reset Character Interrupt Character
COM1 048H 03F8H 0H 0H COM2 038H 02F8H 0H 0H

iRMX for Windows User’s Guide
100

101
EAppendix E Creating an iRMX System
Device (:SD:) in an iRMX for Windows SystemiRMX SD Server Usage
This Windows Service is used to designate an iRMX-controlled hard disk as the iRMX System Device (:SD:).
The following choices are possible:
• Secondary IDE drive partitions HDC1-HDC4 and HDD1-HDD4. These can be formatted with either a Named or DOS (FAT16) file system.
• SCSI drive partitions 1-4 or an entire SCSI drive. These can be formatted with either a Named or DOS (FAT16) file system.
The installation procedure for the iRMXSDServ Service allows you to specify the Interface (SCSI or Secondary IDE), DUIB (of the target partition/disk), and File Driver (Named or DOS( FAT16)).
SCSI InterfaceThe supported cards are Adaptec 7850 and Symbios 53C8xx. Both of these SCSI Adapters require use of the INtime Device Manager to reserve these devices for INtime use (See Figure 3-6).
Secondary IDE controllerThe iRMX for Windows driver supports one or two hard disks connected to this interface. Since Windows always knows about this Secondary IDE Controller, we simply need to disable it from the Windows point of view before it can be used by the iRMX for Windows driver. This is done using Device Manger under Windows as shown below:

iRMX for Windows User’s Guide
102
Using Device ManagerRight click My Computer in the Start Menu, and then left click Manage
Figure E-1. Device Manager Invocation

Appendix E: Creating an iRMX System Device (:SD:) in an iRMX for Windows System
103
Disabling the Secondary IDE Drive:Expand IDE ATA/ATAPI controllers, Right Click the Secondary IDE Channel, and then left click Disable.
Figure E-2. Device Manager Secondary IDE Channel Disable Operation

iRMX for Windows User’s Guide
104
Configuration Changes using RegeditIf you wish to change the configuration of the INtime iRMX SD Service, go into the Regedit Utility under Windows as follows:
1. Left click Run under the Start Menu
Figure E-3. Run Invocation

Appendix E: Creating an iRMX System Device (:SD:) in an iRMX for Windows System
105
2. Type in "regedit", and then Left Click OK
Figure E-4. Regedit Invocation
3. Make the desired changes to the settings in INtimeRMXSDService registry node to select your device/file driver/SD name:
HKEY_LOCAL_MACHINE\SYSTEM\CurrentControlSet\Services\INtimeRMXSDService
Figure E-5. Regedit INtimeRMXSDService Parameter Modifications
DeviceID 0 specifies Secondary IDE controller 1 specifies Adaptec SCSI controller 2 specifies Symbios SCSI controller
FileDriverID 0 specifies DOS (FAT16) File driver 1 specified Named File driver (both Named 32 and Named48)
SDname Enter the DUIB name of the device/partition you have prepared to be the iRMX System Device. In this example, hdc1 is the DUIB name of partition 1 on the Secondary IDE device 0.
InstallationUsing the Add/Remove Programs Applet in the Windows Control Panel (Start>Control Panel>Add or Remove Programs>Add New Programs) install the INtime iRMX SD

iRMX for Windows User’s Guide
106
Service software (<INtime Install Path>\rfw\iRMXSDInstall.exe). Select the device interface, file driver, and DUIB name as requested during the installation process.
Configuration stepsStart up iRMX for Windows using the INtimeRFWWinSDService
Use Windows Device Manager to
• Set rtdrm as the device driver for the target SCSI adapter
and/or
• Disable the Secondary IDE Controller
From the iRMX console, load the appropriate interface control software
• Submit :config:loadscsi(78XX) for Adaptec Controller
• Submit :config:loadscsi(SYMBIOS) for Symbios Controller
• Submit :config:loadide for Secondary IDE Controller
From the iRMX Console, run rdisk on the target device
• Rdisk gscw5_a2 for SCSI device
• Rdisk hdc0 for device 0 on the Secondary IDE Controller
• Set up the desired partitions on the target drive
From the iRMX Console, attach the target partition with the desired file driver
Attachdevice gscw5_a2 as w named partition 2 of SCSI device 2 using Named File Driver
Attachdevice hdc1 as w dos partition 1 of Device 0 on the Secondary IDE contoller using the DOS File Driver
Attachdevice hdc2 as w named partition 2 of Device 0 on the Secondary IDE contoller using the Named File Driver
From the iRMX Console, format the target partition using the logical name given it using the attachdevice command above
• Format :w:RMXIII Named48 reserve
• Format :w:FAT16
Appendix E: Creating an iRMX System Device (:SD:) in an iRMX for Windows System
107
From the iRMX Console install the necessary files to allow the target device to be the iRMX System device (:SD:) using the logical name given it using the attachdevice command above.
• Submit :config:mkrmxsys(:w:)
If you ARE NOT using the configuration specified during installation of the INtime iRMX SD Service software, from Windows using the regedit registry editor, configure the service by modifying the following values in the HKEY_LOCAL_MACHINE\ SYSTEM\CurrentControlSet\Services\INtimeRMXSDService Node
DeviceID 0 specifies Secondary IDE controller 1 specifies Adaptec SCSI controller 2 specifies Symbios SCSI controller
FileDriverID 0 specifies DOS (Fat16) File driver 1 specifies Named File driver (both Named 32 and Named48)
SDname specifies the DUIB name of partition/disk designated as the iRMX System Device (:SD:)
Reboot the system using the Windows Shutdown/Restart command
Start iRMX for Windows using the INtimeRMXSDService from the Services Applet.
Customize the iRMX for Windows system with your user applications. Specify the applications that you want to be started at boot time by adding them to the :config:loadinfo file.
Test your iRMX application autostart mechanismUsing the Windows Services Applet, set the Start Mode of the INtimeRMXSDService to Automatic and test it.

iRMX for Windows User’s Guide
108

109
FAppendix F
Creating an iRMX for Windows XP Embedded System
Creating an iRMX for Windows XP embedded System
Configuring your system to build iRMX tragets
Prerequisites
1. INtime 3.0 must be installed on the development machine.
2. iRMX for Windows 3 R3.02 must be installed on the development machine.
3. You must have Windows XP Embedded installed on the development machine.
4. A PMQ file from the Target machine (see Embedded XP help)
5. You must Import the INtime and iRMX for Windows SLD files into the Component Database

iRMX for Windows User Guide
110
Invoke the Component Database Manager

Appendix F: Creating an iRMX for Windows XP Embedded System
111
Select Import – and enter pathname for INtime 3.0.sld
Select Import – and enter pathname for RFW.sld

iRMX for Windows User Guide
112
Creating the Target Image1. Invoke the Microsoft Target Designer
2. Create a new configuration
3. Import your target device’s PMQ file.
4. Run a dependency check – you will receive four errors and four corresponding tasks.
5. Run a second dependency check – you should receive one additional error and task.
6. Run a third dependency check to ensure all dependencies are met.
7. Build the image as a base Win XP and test on the target machine to test for Windows configuration errors.
8. ‘Save’ this Target Design as <Target name>- Windows Only.slx (this will serve as a backup point if you wish to create a slightly different Target design based on the same hardware)

Appendix F: Creating an iRMX for Windows XP Embedded System
113
9. ‘Save as’ the Target Design as <Target name>- with iRMX.slx (this will become your working project)
10. Locate the “iRMX for Windows” Component in the Component Browser located on the far left of the Target Designer. Either double-click this component or right click and then select “Add” from the pop-up menu.

iRMX for Windows User Guide
114
11. Run a dependency check. This will yield two errors and two corresponding Tasks.
A. Select the default users to be installed.
B. Select the INtime installation package that you wish to include. (“INtime 3.0 Standard Local” or “INtime 3.0 Complete”)

Appendix F: Creating an iRMX for Windows XP Embedded System
115
12. Configure the initial kernel settings for the target. Locate the INtime 3.0 Kernel component and expand it to expose the Settings Icon. Select the setting icon and you will see entries on the far right of your screen.
You should have at least 8MB (default) for the system.

iRMX for Windows User Guide
116
13. Add any additional iRMX or INtime components that you wish to include.
14. Run a dependency check to ensure all dependencies are met.
If you selected INtime Complete you will need to specify the NIC that you wish to use.
15. You should have no unfulfilled dependencies at this point.

Appendix F: Creating an iRMX for Windows XP Embedded System
117
16. Build the Target Image
17. Copy the files to the target device, boot the Embedded partition (see Windows XP Embedded help for more details)

iRMX for Windows User Guide
118

119
GlossaryAbsolute Address
The physical address that is permanently assigned to a storage location in memory.
Access Control Controlling a user's access to perform selected operations, such as reading or changing, on an object, file, or directory.
Access Rights The bit settings that determine a user's permission to perform operations on an object, file, or directory.
Access Time A factor in measurement of a memory storage device’s operating speed. It is the amount of time required to perform a read operation. More specifically, it is the period of time between which the memory receives a read command signal and the time when the requested data becomes available to the system data bus.
Address A number that identifies the location of a word in memory. Each word in a memory storage device or system has a unique address. Addresses are always specified as a binary number, although octal, hexadecimal, and decimal numbers are often used for convenience.
AL Application Loader loads programs into memory and executes them from an application program.
Alias A symbolic name for an object, file, directory, command, etc.
ANSI (American National Standards Institute) An organization dedicated to advancement of national standards related to product manufacturing.
APIC (Advanced Programmable Interrupt Controller) is a distributed set of devices that make up an interrupt controller. In Intel Architecture and compatible implementations, each part of a system is connected by an APIC bus. One part of the system, the "local APIC," delivers interrupts to the specific processor containing it. The other important part of the system is the I/O APIC. The chipset working with the CPU provides up to eight I/O APICs on a system; they collect interrupt signals from I/O devices and send messages to the local APICs when those devices need to interrupt. Each I/O APIC has an arbitrary number of interrupt inputs (or IRQs). Intel's past and current I/O APICs typically have 24 inputs - others can have as many as 64. See also PIC.
APM 1.1 (Advanced Power Management) A software interface specification that allows operating system device drivers to control the power management functionality of a PC.
Application system
The set of components needed to solve an application problem: your program, other software, and hardware.
Asynchronous Non-synchronous timing. A method in which signals between networked systems are not timed; sending data a character at a time without prior arrangement. An event or device that is not synchronous with CPU timing or another device's timing. See Synchronous.

iRMX for Windows User’s Guide
120
Asynchronous system call
Can run concurrently with the calling task. See Synchronous System Call.
Attributes The set of characteristics and properties that define a given object type.
ATA (AT Bus Attachment) An interface definition for PC peripherals. See IDE.
AU Administrative Unit. An iRMX-NET concept that defines a logical grouping of systems in a network. The systems that share a common set of users
Autotype A convenient method of IDE device detection whereby the system BIOS queries the IDE device to obtain operational parameters. If the device supports autotype, this information is passed to the BIOS where it is used to automatically configure the drive controller.
Background process
A command or program that runs without interaction with the operator, and allows the operator to enter other commands while it is running.
Bind Linking object modules using the BND386 utility.
Binding Letting each task know the locations of the variables and procedures that it uses.
BIOS The Basic I/O System layer of the iRMX OS. This is different from the ROM BIOS stored in ROM on a PC system.
BIOS (Basic Input/Output System) Firmware in a PC-compatible computer that runs when the computer is powered up. The BIOS initializes the computer hardware, allows the user to configure the hardware, boots the operating system, and provides standard mechanisms that the operating system can use to access the PC’s peripheral devices.
BIOS Extension
An object code module that is typically integrated into the FBD or placed into a ROM that is accessible on the peripheral bus (PCI, ISA, etc.) in the address range 0C0000h through 0DFFFFh. BIOS extensions have a pre-defined header format and contain code that is used to extend the capabilities of the System BIOS.
BIOS Image Information contained in the flash boot device in binary file format consisting of initialzation data, setup configuration data, diagnostic sequences, and other instructions necessary to start up a computer and prepare it to load an operating system.
BIOS Recovery
A process whereby an existing, corrupt BIOS image in the flash boot device is overwritten with a new image. Also referred to as a flash recovery.
BIOS Update A process whereby an existing, uncorrupted BIOS image in the flash boot device is overwritten with a new image. Also referred to as a flash update.
Bit A binary digit.
Blocking Two meanings: reading or writing a file in sector-size blocks; a system call waiting at an exchange until a necessary resource or object is available.
Boot The process of starting a computer and loading the operating system from a powered down state (cold boot) or after a computer reset (warm boot). Before the operating system loads, the computer performs a general hardware initialization and resets internal registers.
Boot Block A write-protected 16KB section of the flash boot device located at physical address FFFFC000h to FFFFFFFFh which contains code to perform rudimentary hardware

Glossary
121
intitialization at system power up. The boot block also contains code to recover the BIOS via floppy disk.
Boot Client The system that requests a remote boot from the remote bootserver. Typically, this system does not have mass storage provided by a hard disk or diskette drive, i.e. a diskless system or workstation.
Boot Device The storage device from which the computer boots the operating system.
Bootloadable A program with absolute addresses instead of relocatable addresses.
Bootstrap Starting a computer, which usually clears memory, sets up I/O devices, and loads the OS.
Bootstrap Loader
A program that resides in ROM. When the system is reset, the bootstrap loader receives control, and loads the OS and application software into RAM.
Boot Sequence The order in which a computer searches external storage devices for an operating system to boot. The boot device must be the first in the boot sequence.
Buffer A temporary holding area for memory segments; used for reading and writing data.
Buffer Pool A collection of preallocated buffers that provides quick access to reusable memory.
Buffered Device
An intelligent communications device that has its own CPU. It manages its own character buffers separately from those managed by the Terminal Support Code or Random Access Support Code. See Non-buffered Device.
Byte A group of 8 bits.
Cache A high-speed buffer memory used between the CPU and main memory. Instructions and programs can operate at higher speed if they are in the cache.
Call Gates Redirect flow within a task from one code segment to another. Used to enter the iRMX OS and OS extensions.
CDF Client Definition File. Contains the names and passwords of client systems in a network's Administrative Unit.
Channel A data path.
Checksum Field
A field in the fnode file used to verify disk integrity.
Child Job A job created by another job, called the parent job. Child jobs obtain their resources, such as memory, from their parent job.
Chipset One or more integrated circuits that, along with a CPU, memory, and other peripherals, implements an IBM PC-AT compatible computer. The chipset typically implements a DRAM controller, bus, interface logic, and PC peripheral devices.
CAS (Column Address Strobe) An input signal from the DRAM controller to an internal DRAM latch register specifying the column at which to read or write data. The DRAM requires a column address and a row address to define a memory address. Since both parts of the address are applied at the same DRAM inputs, use of column addresses and row addresses

iRMX for Windows User’s Guide
122
in a multiplexed array allows use of half as many pins to define an address location in a DRAM device as would otherwise be required.
CHS (Cylinders/Heads/Sectors) A specification of disk drive operating parameters consisting of the number of disk cylinders, disk drive read/write heads, and disk sectors.
:ci: Standard logical name for the terminal keyboard, or console input. Each user's :ci: refers to the terminal associated with that user.
CLI Command Line Interpreter, the default initial program; includes commands with optional parameters.
Client, network
A network system that requests and uses resources located at another (remote) network system. Intel's transport protocol is based on the client-server model, in which client jobs request data from server jobs, and server jobs respond to the requests. Sometimes called consumer.
CMOS (Complimentary Metal Oxide Semiconductor) A fast, low power semiconductor RAM used to store system configuration data.
:co: Standard logical name for the terminal screen, or console output. Each user's :co: refers to the terminal associated with that user.
COM Port A bi-directional serial communication port which implements the RS-232 specification.
Command Line Parsing
Retrieving and interpreting the parameters of a command.
COMM engine A networking hardware environment that uses separate boards for the host CPU and LAN controller. The iNA Transport Software runs on the LAN controller and the iRMX-NET runs on the host CPU with iRMX OS.
COMMputer A single-board computer with on-board integrated networking hardware. The COMMputer hosts iRMX-NET, iNA 960, and the iRMX OS.
Composite Object
An object of a new type designated by an extension object.
Concurrent Condition Code
A condition code that is returned as a result of asynchronous processing.
Condition Code
A message returned when an error occurs during execution of a program or system. Same as exception or error code.
Configuration Using the ICU to change attributes about the iRMX III OS. Also loading and modifying :config:, rmx.ini, and loadinfo files. iRMX for Windows does not support ICU-style configuration.
Connection An object, returned by the I/O system whenever a file is created, that represents the bond between a device or file and a program.
Console A specific terminal attached to a system that is used to invoke the Bootstrap Loader.

Glossary
123
Conventional Memory
The first 640 KB of a computer’s total memory capacity. If a computer has no extended memory, conventional memory equals the total memory capacity. In typical computer systems, conventional memory can contain BIOS data, the operating system, applications, application data, and terminate and stay resident (TSR) programs. Also called system memory.
CPU (Central Processing Unit) A semiconductor device which performs the processing of data in a computer. The CPU, also referred to as the microprocessor, consists of an arithmetic/logic unit to perform the data processing, and a control unit which provides timing and control signals necessary to execute instructions in a program.
CPU trap See Hardware Exception.
Current Directory
The iRMX directory that acts as the default when you specify a filename without a preceding pathname. The current directory always has the logical name :$:.
Datagram A connectionless message-delivery mechanism that does not guarantee delivery or the order of delivery.
Data File A file containing programs and data. See Directory File.
Deadlock The impasse resulting when two or more tasks each hold exclusive access to resources needed by the other task(s).
Dedicated Server
A network system used exclusively to provide resources to client systems.
Default The state of all user-changeable hardware and software settings as they are originally configured before any changes are made.
Default Prefix A prefix ID used by default whenever a null prefix is presented to the I/O system.
Descriptor An entry in a descriptor table that contains the physical address, length, and other information about an object, which is viewed by the Nucleus as the token for the object. It is assigned by the iRMX OS when an object is created.
Descriptor Table
A hardware-defined table that contains descriptors, which point to memory. There are three kinds: a global descriptor table (GDT), one or more local descriptor tables (LDT), and an interrupt descriptor table (IDT).
Device Hardware connected to the computer system that is used for reading and writing data, such as terminals, printers, plotters, display tubes, and robots.
Device Driver Software that controls device operation, and provides a system-defined, device-independent interface to the device. Device drivers are implemented at the BIOS level.
Directory File The type of file that contains the disk addresses of associated data files and other directory files. See Data File.
DOS (Disk Operating System) One or more programs which allow a computer to use a disk drive as an external storage device. These programs manage storage and retrieval of data to and from the disk and interpret commands from the computer operator.
Download Sending data from a server system to a workstation or end system.

iRMX for Windows User’s Guide
124
DUIB Device Unit Information Block, a collection of information about a device unit (a device and a controller) that includes its name, granularity, and addresses of device driver routines.
Dynamic Logon Terminal
A terminal configured to service many different operators on a request-by-request basis. Users log on to the system with a name and password. See Static Logon Terminal.
Dynamic Memory Allocation
Memory that is allocated to jobs only when tasks request it. This enables jobs to share memory and change the amount of memory they use as their needs change, using less memory overall. See Static Memory Allocation.
Dynamic User A Human Interface user created by entering a name and password on a dynamic logon system. The user must be defined in the UDF prior to being created at logon.
EIOS The Extended I/O System.
End Point The system at either end of a network communication connection. A network system or node. Also called an end system.
End System See End Point.
Environment The general operating characteristics that are imposed on a computer system.
Error Code Same as a condition code.
Escape Sequence
Characters preceded by an ESC character.
Event A system state change.
Exception Code
Same as a condition code.
Exception Handler
A procedure that corrects certain exceptional conditions, or deletes or suspends the job that caused the error.
Exchange Object
A class of objects used to aid communication, synchronization, and mutual exclusion between tasks. See Mailbox, Port, Region, and Semaphore.
Extended Memory
The RAM address space, in a computer so equipped, above the 1 MB level.
Extension Object
Designates a new type of object. See Composite Object.
External Device
A peripheral or other device connected to the computer from an external location via an interface cable.
FIFO First In, First Out order of operation, meaning that the least recent item added is the first one removed.
File Consumer The iRMX-NET software module that enables a local user to transparently access remote files.

Glossary
125
File Driver Software that the BIOS uses to control file operation. There is a driver for each of the types of files: named, physical, stream, remote, DOS, and EDOS. There are also loadable file drivers, such as NFS and NT.
File Pointer An indicator that marks a connection's current position in a file. The next sequential read or write starts at the pointer. When a file is opened, the pointer is at the beginning of the file.
File Server The iRMX-NET software module that receives requests from remote users.
File System A complete hierarchy of logically related files, including a root directory.
File Tree A hierarchical file structure that reflects the relationships between files.
File Types There are these types of files in the iRMX OS: named, physical, stream, remote, NT, and DOS.
Firmware Software that is permanently fixed onto a memory chip (ROM).
First Level Jobs
Children of the root job: some of the OS layers are first level jobs, and applications can also be first level jobs. Jobs loaded by the INtime Loader become first level jobs. Sysloaded jobs become children of the Human Interface job.
Fixed Disk A hard disk drive or other data storage device having no removable storage medium. Fixed disk storage devices use inflexible disk media and are sealed to prevent data loss due to media surface contamination. Fixed disks generally provide the most storage space for a given cost when compared to semiconductor, tape, and other popular mass storage technologies.
Fixed Updating
Updating done at the same time interval for all devices, with the interval being independent of I/O activity. See Timeout Updating.
Fnode File The file descriptor node file, a file in the BIOS that stores information about named files, such as the file name, location, creation and last modification dates.
GB or GByte (Gigabyte) Approximately one billion (US) or one thousand million (Great Britain) bytes. 2^30 = 1,073,741,824 bytes exactly.
GDT (Global Descriptor Table) The system-wide table containing descriptors that are shared among all jobs in the system.
Global A programming reference that means the same thing throughout the entire program.
Granularity The size of a block of allocated space on a mass storage device.
h (Hexadecimal) A base-16 numbering system using numeric symbols 0 through 9 plus alpha characters A, B, C, D, E, and F as the 16 digit symbols. Digits A through F are equivalent to the decimal values 10 through 15.
H (Hexadecimal) A base-16 numbering system using numeric symbols 0 through 9 plus alpha characters A, B, C, D, E, and F as the 16 digit symbols. Digits A through F are equivalent to the decimal values 10 through 15.
Handshaking Signals that are used to synchronize communications equipment during the set-up period.

iRMX for Windows User’s Guide
126
Hang A condition where the system microprocessor suspends processing operations due to an anomaly in the data or an illegal instruction.
Hardware The physical equipment of a computer system.
Hardware Exception
An error that occurs as the result of a hardware protection feature.
Hardware Interrupt
The point at which external processes enter the computer. In the
iRMX OS, the device that handles hardware interrupts is the 8259A Programmable Interrupt Controller (PIC). In iRMX for Windows, the Advanced Programmable Interrupt Controller (APIC) is also supported.
HI Human Interface, which performs logon and logoff functions, creates jobs, assigns memory, and starts initial programs.
Home Directory
The directory you automatically enter when you log on to the iRMX OS. The system manager assigns your home directory when initially setting up your account. It has the logical name :home:.
Host The CPU board in a computer.
Host Bus The address/data bus that connects the CPU and the chipset.
ICU Interactive Configuration Utility. A screen-oriented utility to help build the OS configuration you want. iRMX for Windows does not provide ICU-level configurability.
IDE (Integrated Drive Electronics) A hard disk drive/controller interface standard. IDE drives contain the controller circuitry at the drive itself, as compared to the location of this circuitry on the computer motherboard in non-IDE systems. IDE drives typically connect to the system bus with a simple adapter card containing a minimum of on-board logic.
IDT Interrupt Descriptor Table, the system-wide table that contains descriptors for the system's interrupt handlers.
Initial Task The first task to execute after creation of a job. Its sole purpose is to initialize the environment for the new job.
Interoperability
The ability of iRMX-NET to share files with other systems besides the iRMX OS.
Interrupt Handler
A procedure that is invoked by hardware to respond to an external asynchronous event (an interrupt). The handler decides how important the interrupt is and either returns to the original task or invokes an interrupt task.
Interrupt Task A task that runs when a specific interrupt occurs.
INT (Interrupt Request) A software-generated interrupt request. IRQ (Interrupt Request) In ISA bus systems, a microprocessor input from the control bus used by I/O devices to interrupt execution of the current program and cause the microprocessor to jump to a special program called the interrupt service routine. The microprocessor executes this special program, which normally involves servicing the interrupting device. When the interrupt

Glossary
127
service routine is completed, the microprocessor resumes execution of the program it was working on before the interruption occurred.
I/O (Input/Output) The communication interface between system components and between the system and connected peripherals.
I/O Job A job that is a child of the EIOS rather than the Nucleus. I/O jobs can use EIOS system calls.
IORS I/O Request/Result Segment, a device driver data structure created to record and control the action taken for each I/O request.
I/O System The layer of an OS that provides input and output functions. The iRMX OS has two: the BIOS and the EIOS.
iRMX TenAsys’ (formerly Intel's) Real-time Multitasking Executive, the OS.
iRMX-NET TenAsys' (formerly Intel's) networking software that provides transparent file access between systems.
ISA (Industry Standard Architecture) A popular microcomputer expansion bus architecture standard. The ISA standard originated with the IBM PC when the system bus was expanded to accept peripheral cards.
ISR (Interrupt Service Routine) A program executed by the microprocessor upon receipt of an interrupt request from an I/O device and containing instructions for servicing of the device.
Job One or more tasks and the resources they need (objects, an object directory, and a memory pool).
Jumper A set of male connector pins on a circuit board over which can be placed coupling devices to electrically connect pairs of the pins. By electrically connecting different pins, a circuit board can be configured to function in predictable ways to suit different applications.
KB or KByte (Kilobyte) Approximately one thousand bytes. 210 = 1024 bytes exactly.
LAN (Local Area Network) An in-house data communications system that connects a number of independent devices.
LBA (Logical Block Addressing) A method the system BIOS uses to reference hard disk data as logical blocks, with each block having a specific location on the disk. LBA differs from the CHS reference method in that the BIOS requires no information relating to disk cylinders, heads, or sectors. LBA can be used only on hard disk drives designed to support it.
LDT Local Descriptor Table, a table that stores descriptors and is managed by the iRMX OS. iRMX for Windows uses a single LDT
LIFO Last In, First Out order of operation, meaning that the last item added is the first one removed.
Local In networking, the specific environment that is directly controlled By a given computer, such as disk drives and printers attached to a system. Local also refers to a user's own system and files, as opposed to those available across a network.
iRMX for Windows User’s Guide
128
Local Environment
The execution environment for a set of tasks. Same as job.
Local Node The node a user is logged into is the local node. All other nodes are remote nodes.
Logical Address
The memory-mapped location of a segment after application of the address offset to the physical address.
Logical Name An identifier (a string of characters, usually bounded on both ends by colons) for a file, directory, device, or remote computer system that the EIOS associates with a particular file connection or device connection. May be either local to a job or global across all jobs.
LRS Loader Result Segment. Records the action taken by Application Loader system calls.
Mailbox An object that a task uses to exchange objects, tokens, or information with other tasks. There are two kinds: data mailboxes and message mailboxes.
MB or MByte (Megabyte) Approximately one million bytes. 2^20 = 1,048,576 bytes exactly.
Media The physical parts that store or transport data, such as a CD-ROM, or the interconnection between devices attached to a LAN (broadband coax, twisted pair, and fiber optics, etc.).
Memory A designated system area to which data can be stored and from which data can be retrieved. A typical computer system has more than one memory area. See Conventional Memory and Extended Memory.
Memory Pool A configurable amount of memory allocated to a job and its children.
MIP The software module that provides an interface between the local CPU board and iNA 960 Transport Software operating on a separate network interface controller (NIC).
Multibus Two bus standards (Multibus I and Multibus II) designed and supported by Intel for multiprocessor systems.
Multiplex To use one structure for more than one function.
Multiprogramming
A technique used to independently run several unrelated applications on a single application system.
Multitasking A type of system that supports the execution of multiple tasks, each of which needs control of the processor to run.
Multiuser A type of system that enables multiple users to log in and perform work as if each were the only user on the system.
Mutual Exclusion
A means of allowing only one task to have access to a shared resource at any given time.
Name Server The iRMX-NET software module that provides the network directory service for local and remote users.
Network A group of independent computer systems that are interconnected for communication.
Network Object
A resource that can be accessed over a network by clients, such as file servers, print servers, or virtual terminal servers.

Glossary
129
NFS Network File Support. NFS enables hosts to share their local resources with remote hosts (clients) in a manner that hides the heterogeneous nature of a network. For example, a server running the iRMX OS may share a specific directory with a client machine running the Unix OS. The client can access the directory using commands and calls that appear to be directed at local resources.
NIC Network Interface Controller.
Node A computer system functioning as the end point in a network. Each node is identified by a network address.
Non-buffered Device
A communications device that must be managed by the host processor board. The Terminal Support Code on the host processor board must manage the character buffers of the non-buffered device. See Buffered Device.
Nonresident User
A user defined either in the system configuration files or with the password command.
Nucleus The basic layer and computational heart of the iRMX OS.
Object Code Output of a BIND (linker) command or of a compiler such as C, PL/M or ASM.
Object Directory
A place in memory where a task can catalog an object under an ASCII name, which can then be used for access instead of the object's token.
Object File A file that contains the binary object code that results from the compilation of a program or procedure.
Object Module The output of a single compilation, a single assembly, or a single invocation of a BIND command.
Object-based A concept that focuses on data structures and the actions performed on them.
Objects Data structures and the operations performed on them. Objects are system building blocks, and include:
Segments Mailboxes Semaphores Regions Jobs, I/O jobs Extension objects Tasks Composite objects Buffer pools Ports Connections Users Heaps
Offset The difference in location of memory-mapped data between the physical address and the logical address.
OMF Object Module Format, the format of linkable modules.
Operating System
The software that manages the hardware and logical resources of a system, including device handling, scheduling, and file management.
OS Extension Operating system extension, a way to add custom functions to a system to meet the needs of the design.

iRMX for Windows User’s Guide
130
OSC Operating System Command: in the context of a terminal driver, a sequence of characters used by an application task or the operator to communicate with the Terminal Support Code.
OSI Reference Model
Open Systems Interconnection Reference Model, a model that defines network architecture with seven layers:
1) Physical 5) Session 2) Data Link 6) Presentation 3) Network 7) Application 4) Transport
Overlays Logically independent subsections of a program, which can be loaded one at a time in the same block of memory by the AL.
Owner The user ID associated with a file.
Packet A group of data bits and control elements that are transmitted across a network as a composite whole.
Parameter A variable that can be assigned a constant value for a specific function.
Parent Directory
The file directory immediately above the current directory.
Parsing a Command
Retrieving and interpreting the parameters of a command.
Partition An area on a block device such as a disk or tape.
Pathname The designation used by the OS to find or specify a file or directory.
PC/AT (Personal Computer/Advanced Technology) A popular computer design first introduced by IBM in the early 1980s.
PCI (Peripheral Connect Interface) A popular microcomputer bus architecture standard.
Peer Equivalent computer systems, software modules, or protocol layers.
Peer-to-Peer Resource Sharing
In networking, an organization where all the nodes can provide resources for each other while also running local applications, so each one is both a server and a client.
Peripheral Device
An external device connected to the system for the purpose of transferring data into or out of the system.
Physical Address
The address or location in memory where data is stored before it is moved as memory remapping occurs. The physical address is that which appears on the computer's address bus when the CPU requests data from a memory address. When remapping occurs, the data can be moved to a different memory location or logical address.
PIC (Programmable Interrupt Controller) An integrated circuit that can resolve simultaneous external interrupt requests and negotiate a sequence of local CPU interrupt requests based on the priorities of the requesting device controllers. In the standard PC architecture, PIC

Glossary
131
is an 8259A or compatible device. Each PIC can route 8 interrupts. In the PC architecture, 2 PICs are connected, giving support to up to 16 interrupts. See also APIC.
Portability Used to describe language processors and software tools that can run on several OSs, often because they use UDI system calls.
Port An object that can send messages to or receive messages from other jobs on local and remote processors. Ports enable message addressing to a given task, and are usually used for ynchronization.
POST (Power On Self Test) A diagnostic routine which a computer runs at power up. Along with other testing functions, this comprehensive test initializes the system chipset and hardware, resets registers and flags, performs ROM checksums, and checks disk drive devices and the keyboard interface.
Priority A number used for scheduling a task relative to other tasks. Priorities range from 0 through 255, with 0 being the highest priority and 255 the lowest.
Program A set of instructions a computer follows to perform specific functions relative to user need or system requirements. In a broad sense, a program is also referred to as a software application, which can actually contain many related, individual programs.
Program State The registers and data used by a program. If the program state is saved during task switching, the OS can restart the program later.
PROM Programmable Read-Only Memory. A memory device in which information can be changed after manufacture, but is then permanent.
Protected Mode
See PVAM.
Protocol Rules for network communications between equivalent (peer) layers in regard to the format and content of the messages exchanged.
PS/2 (Personal System 2) Computers designed with IBM's proprietary bus architecture known as Micro Channel.
Public Files that are available for access by remote users on a network.
PVAM Protected virtual address mode: microprocessor memory management feature that translates virtual addresses to physical memory addresses. It supports 4 Gbytes of physical memory. It also protects the OS from unauthorized modification by application programs, and isolates each user from other users. See Real Address Mode.
RAM (Random Access Memory) Memory in which the actual physical location of a memory word has no effect on how long it takes to read from or write to that location. In other words, the access time is the same for any address in memory. Most semiconductor memories are RAM.
Read-Ahead A method of overlapping I/O operations so that tasks can continue running while the EIOS is transferring information to or from devices. See Write-Behind.
Real Address Mode
The method of execution on an Intel386 or later microprocessor that supports 1 Mbyte of physical memory in RAM or ROM. The iRMX OS does not run in real address mode except

iRMX for Windows User’s Guide
132
for a short time when the system boots up. DOSRMX switches to Virtual 86 mode, a form of real mode, to run DOS and its applications. See PVAM. iRMX for Windows does not provide support for switching into Virtual 86 mode.
Real Mode Address
A memory address composed of two 16-bit values: a segment address and an offset quantity. A real mode address is constructed by shifting a segment address 4 bits to the left and then adding the offset value. A real mode address is a physical address.
Rebooting Resetting the processor without cutting power. Only the contents of static memory remain valid after rebooting.
Region An object that controls access to critical areas, such as a collection of shared data. A region has special deletion and suspension features. Use regions in cases where a section of data must be read and written completely by one task before another can access it.
Register An area typically inside the microprocessor where data, addresses, instruction codes, and information on the status on various microprocessor operations are stored. Different types of registers store different types of information.
Remote In networking, an environment that is not local, or directly controlled by a given computer. For example, disk drives and printers that are attached to another network system are remote disk drives and printers. See Local.
Remote Node In a network, a node other than the local node.
Reset A signal delivered to the microprocessor by the control bus, which causes a halt to internal processing and resets most CPU registers to 0. The CPU then jumps to a starting address vector to begin the boot process.
Resources The data and devices on a server that may be accessed by a client.
Response Time The time it takes between the occurrence of an event or interrupt and the system's response to it.
RFD Remote File Driver is part of the BIOS subsystem and closely parallels the Named File Driver of the local OS.
RMK Low-level kernel upon which the iRMX Nucleus is built.
ROM (Read Only Memory) A broad class of semiconductor memories designed for applications where the ratio of read operations to write operations is very high. Technically, a ROM can be written to (programmed) only once, and this operation is normally performed at the factory. Thereafter, information can be read from the memory indefinitely.
Root Directory The topmost directory in a hierarchical file system.
Root Module An object module that controls the loading of overlays.
Root Object Directory
An object directory for the root job, containing logical names for devices. These objects remain valid until they are detached or the system is reinitialized, and every user has access.
Round-Robin Scheduling
A priority-based time-slicing system of scheduling tasks for processing. Multiple tasks of equal priority are each allotted the same amount of execution time, and alternate running until finished.

Glossary
133
RS-232 A popular asynchronous bi-directional serial communication protocol. Among other things, the RS-232 standard defines the interface cabling and electrical characteristics, and the pin arrangement for cable connectors.
RTC (Real Time Clock) Peripheral circuitry on a computer motherboard which provides a nonvolatile time-of-day clock, an alarm, calendar, programmable interrupt, square wave generator, and a small amount of SRAM. In the NY1210, the RTC operates independently of the system PLL which generates the internal system clocks. The RTC is typically receives power from a small battery to retain the current time of day when the computer is powered down.
Run-time Linking
Letting each program know the locations of the variables and procedures that it uses while the system is actually running.
SBC Single Board Computer.
SBX Single Board Expansion Module.
SDB System Debugger, an OS-aware software debugging tool running in conjunction with SDM.
SDM System Debug Monitor, a software debugging tool.
Sector A device granule (block of allocated space) for disk media.
Segment A contiguous unit of memory addressed by a descriptor. Tasks use segments for purposes such as stacks, data storage, and buffers.
Semaphore An object that is a counter, and provides a very fast method of task synchronization, or can be used for mutual exclusion.
Serial Port A physical connection with a computer for the purpose of serial data exchange with a peripheral device. The port requires an I/O address, a dedicated IRQ line, and a name to identify the physical connection and establish serial communication between the computer and a connected hardware device. A serial port is often referred to as a COM port.
Server, Network
A network system that responds to and provides the resources that are requested and accessed by a client system.
Session In networking, a point-to-point (virtual-circuit) connection between peer systems.
Spokesman In networking, the system that contains the names and addresses of other systems.
Stack An ordered collection of items in memory, into which new items may be inserted or removed. When a program makes a call, data is passed or stored on the program's stack. Stacks are LIFO (last in, first out) meaning that the most recent item added is the first one removed.
Static Logon Terminal
A terminal configured to service one specific user. The logon is invisible to the user. See Dynamic Logon Terminal.
Static Memory Allocation
A memory-allocation method in which memory is allocated to jobs when the system is started, and cannot be freed for other jobs. Thus, the total memory requirement of the

iRMX for Windows User’s Guide
134
system is always the sum of the memory requirements of all jobs. See Dynamic Memory Allocation.
Static User A user that comes up automatically when a static logon system is booted.
Stream File A temporary stream of bytes in memory, which is read on a FIFO basis and destroyed after reading.
String An iRMX string is a character string consisting of 1+n consecutive bytes. The first byte contains the character count. The following n bytes contain the ASCII codes for the characters.
This is different from a C string, which is null terminated: there is no count byte and the string ends at the first byte containing zero.
Subnetwork Synonym for Administrative Unit (AU) used by UNIX and other OSs.
Subtree All the data files and nested directories contained in a directory.
Super User Usually the system administrator; has a user ID of 0 and access to all files and devices on the system.
Synchronous At precisely the same time. An event or device that is in time with the CPU or another device. In networking, a method by which signals between systems are timed, with a pre-arranged number of bits per second being sent across the communications line. See Asynchronous.
Synchronous System Call
A call that must complete before control of the computer is returned to the calling task. See Asynchronous system call.
System All the hardware and software components of a given computer.
System Call A programmatic interface used to manipulate objects or control the computer's actions.
System Manager
The Super user, with an ID of 0, who defines users and systems within an Administrative Unit.
System Memory
See Conventional Memory.
Task System activities that execute instructions and manipulate data. Can be viewed as a simple program that appears to be running on a computer by itself.
Task Priority A value from 0 through 255, with 0 being the highest priority. Used in task scheduling along with the task state.
Task Switching
Temporarily stopping one task and running another. The registers and data (called the program state) of the first task are saved, and it can be resumed later at the same point at which it was interrupted.
TB or TByte (Terabyte) Approximately one thousand billion (US) or one billion (Great Britain) bytes. 2^40 = 1,099,511,627,776 bytes exactly.
TCP Transmission Control Protocol. A transport layer protocol for the Internet. It is a connection-oriented, stream protocol defined by RFC 793.

Glossary
135
TCP/IP Transmission Control Protocol/Internet Protocol. A set of computer networking protocols and applications that enables two or more hosts to communicate. TCP/IP includes a suite of protocols besides TCP and IP; it has been widely adopted as a networking standard.
Telnet A TCP/IP protocol used for remote login between hosts.
Terminal Support Code (TSC)
A set of commands that control terminal modes and operation.
Timeout Updating
Updating done at intervals set individually for each device, with the interval beginning at the end of each I/O operation. See Fixed Updating.
Time-slicing A non-priority-based system of scheduling tasks for processing.
Multiple tasks are each allotted the same amount of execution time, and alternate running until finished.
Token A value representing the logical address and the characteristics of an object. See Descriptor.
Top-down Programming
A programming concept that focuses on control flow, in contrast to object-based programming, which focuses on data structures and the processes performed on them. See Object-based.
Transparency Remote file access that enables the user application to manipulate remote files as if they were local.
Trap See Hardware Exception.
TSC Terminal Support Code, a set of commands that control terminal modes and operation.
UA (User Administration) The iRMX-NET software module that maintains the files used by a system manager when making additions and deletions of users and systems in an iRMX-NET environment.
UDF User Definition File. An iRMX OS file that contains information about valid users of a system. Used by the server system in maintaining the server-based protection scheme.
UDI Universal Development Interface acts as an interface between the OS and the application program.
USB (Universal Serial Bus) A new serial data bus that is intended to eliminate the need for separate serial, parallel, mouse, keyboard, joystick, etc. ports on a PC-compatible. These ports can be conceivably replaced by a few, daisy-chained USB ports, all with identical connectors but capable of much higher throughput, upwards of 12Mbs.
User Used by iRMX to determine access rights to files and systems. A user job is created when an operator logs onto a system to obtain access to the system.
User Job A child job of the HI.
Verified Client A client system verified by a server as a node entitled to access the server.

iRMX for Windows User’s Guide
136
Verified User A dynamically logged-on user. Verification only has meaning when the user is attempting to access remote files using a network.
VGA (Video Graphics Adapter) A popular PC graphics controller and display adapter standard developed by IBM. The standard specifies, among other things, the resolution capabilities of the display device. Display devices meeting the VGA standard must be capable of displaying a minimum resolution of 640 horizontal pixels by 480 vertical pixels with at least 16 screen colors.
Virtual 86 Mode
A form of real mode used by DOSRMX to run DOS and its applications. Not supported in iRMX for Windows.
Virtual Circuit A reliable, connection-oriented message delivery service. A connection through the Transport Layer of the OSI Reference Model that delivers error-free, point-to-point messages in the same sequence as the messages are sent.
Virtual Root Directory
The root directory of a remote server system, as seen from the client system.
VM86 Dispatcher
Allows DOS to run as a task under DOSRMX. Not supported in iRMX for Windows.
Volume The medium used to store information on a device, such as a diskette, tape reel, or hard disk.
Wildcard Character
A character that can substitute for any single character (typically “?”) or any sequence of characters (typically *), providing the ability to specify several files in a single reference.
Write-Behind A method of overlapping I/O operations that enables tasks to continue running while the EIOS is transferring information to or from devices. See Read-Ahead.

137
S A B C D E F G H I J K L M N O P Q R S T U V W X Y Z
IndexSymbols" character 36.$ character 36.& character 36.' character 36./ character 36.<Backspace> key 36.<CR> key 36.<Ctrl-A> keys 36.<Ctrl-C> keys 36., 38.<Ctrl-F> keys 36.<Ctrl-Q> keys 38.<Ctrl-S> keys 38.<Ctrl-T> keys 38.<Ctrl-W> keys 38.<Ctrl-X> key 36.<Del> key 36.<DelCh> key 36.<DelL> key 36.<DelR> key 36.<Down-Arrow> key 36.<Esc> key 36.<Home> key 36.<Left-Arrow> key 36.<Right-Arrow> key 36.<Up-Arrow> key 36.
Aaccess time, defined 119.addresses
defined 119.logical, defined 128.physical, defined 130.real mode, defined 132.
ANSI, defined 119.attachdevice command
switching diskettes 42.with physical device name 41.
autotype, defined 120.
Bbell warning 34.BIOS
defined 120.extension, defined 120.recovery, defined 120.update, defined 120.
bootblock, defined 120.device, defined 121.sequence, defined 121.
byte, configuration 123.
Ccharacters, special 36.chipset, defined 121.CLI (Command Line Interpreter)
function keys 36.prompt 34.sign-on message 33.special characters 36.
command line interpretersee CLI 33.comment character for commands 36.communicating with devices 41.concatenating files 39.configuration
byte, defined 123.configuring
devices 41.connections, device 42.continuation character for commands 36.conventional memory, defined 123.conventions, notational iv.copy command
appending to files 39.example 36., 38., 40.
copying files 38.creating files 37.cursor-movement keys 34., 36.customizing the operating system 27.Cylinders/Heads/Sectors (CHS), defined 122.

iRMX for Windows User’s Guide
138
S A B C D E F G H I J K L M N O P Q R S T U V W X Y Z
Ddefault
file structure 89.user 33.
default configuration 97.delete command 40.deleting files 40.detachdevice command 29.
switching diskettes 42.devices
adding new types 41.communication with 41.disks 41.loadable drivers 41.ram disk 41.tapes 41., 42.terminals 41.
dir command 29.directories
default structure 89.home 33.
disk partitionsattaching DOS 29.
diskettesaccessing DOS 29.attaching DOS 29.changing iRMX-formatted 29.detaching an iRMX 29.
diskscommunication with 41.device types 41.
displaying files 37.dynamic terminals, logging on with 33.
EEDOS file driver limitations 76.e-mail address, RadiSys v.end-of-file mark 37.extended memory, defined 124.extension, BIOS 120.
Ffiles
appending to 39.default structure 89.renaming 40.
function keys, table of 36.
Gg command 69.glossary 119.
HHelp iii.help v.hidden file 76.
Iintime.ini file 7.invisible attribute, DOS 76.invisible files 76.
Jjobs
interactive 34.TCP/IP 28.
jumper changes forComptrol Hostess 550 Serial Controller 92.SBX 586 module 91.
jumpersdefined 127.
Llimitations
EDOS file driver 76.line-editing keys 34., 36.loadinfo file 7.logging off,general 34.logical address, defined 128.logoff command 34.logoff file 34.logon 33.
general procedure 33.home directory 33.iRMX for Windows 27.user ID 34.
Mmemory
conventional, defined 123.extended, defined 124.random access, defined 131.system, defined 134.
modifications to non-Intel controller boards 91.MS-DOS 1.

Index
139
S A B C D E F G H I J K L M N O P Q R S T U V W X Y Z
Nnetwork
connection 28.support 27.
notational conventions iv.
Ooperating system, defined 129.overwriting files with the iRMX OS 39.
Pparameters
HI commands 37.password
case-sensitive 33.PC-DOS 1.physical address, defined 130.physical device names 41.physical files 41.pre-configured options 97.
device drivers 99.memory 98.nucleus 99.
preconfigured options, EIOS 99.prompt, CLI 34.
Rr?logon file 34.RadiSys, contacting v.RAM disk 41.RAM, defined 131.Random Access Memory (RAM), defined 131.README file v.Real Mode Address, defined 132.rename command, example 39., 40.reset, defined 132.rmx.ini file 7., 27.RTE
calls 51.
SSBC 386/2x/3x CPU boards
SDM on the 91.scrolling 38.SDM
on SBC 386/2x/3x CPU boards 91.
SDM Debug Monitor 68.set command 35.shutdown command 30.shutting down iRMX OS 30.sign-on message 33.special characters 36.Super user 33.support iii., v.sysload command 27.system
debug monitor, invoke 68.system memory
defined 134.
Ttapes, device types for 41., 42.technical support v.termcap file 35.terminals
communication with 41.definition file 35.device types for 41.scrolling display 37.
time, access 119.troubleshooting iii., v.turning power off 30.
Uupdates
BIOS, defined 120.URLs, TenAsys v.user ID, logon display of 34.users
experienced 45.new 45.Super 33.
VVGA
defined 136.
Wwildcards, copying files using 38.World user 33.World-Wide Web URLs, TenAsys v.