iso installation guide - amazon s3 installation guide 1 table of contents 3 ... based operating...
TRANSCRIPT

ISO Installation Guide
Version 1.7 Jan 2017

Copyright © 2017 NetLinkz. All Rights Reserved.
No part of this publication may be reproduced, transmitted, transcribed, stored
in a retrieval system, or translated into any language in any form or by any
means without the written permission of NetLinkz as provided by the explicit terms
and conditions of our license agreement.
Basic Rights of Use
Thank you for choosing NetLinkz. Registration of your product is required during
the installation process outlined in this document. Registration of a single product
entitles you to begin using the product for the specific purposes of the product.
Additional licensing might be required to use additional features. For more
information about NetLinkz, visit us at http://www.NetLinkz.com.
Trademarks
Microsoft, Windows, Windows NT, and Vista are registered trademarks of
Microsoft Corporation. Other brand and product names are registered
trademarks or trademarks of their respective holders.
Statement of Conditions
To ensure proper operational function and/or reliability of the product is
maintained, NetLinkz reserves the right to make changes to the product
described within this document, via electronic means or otherwise, without
notice. NetLinkz does not assume any liability that may occur due to the use, or
application of, the product described herein.

Table of Contents
ISO Installation Guide 1
Table of Contents 3
Introduction 4
1. Prepare for Installation 5
2. Create the VM 5
3. Boot the VM 7
3.1 Perform an Unattended Installation 8
3.2 Perform a Custom Installation 10
4. Configure the Link Platform 23
5. Check Network Settings 28
6. Apply Licence Key 30
7. Upload Signed Certificate 32
8. Connect to Link Platform using FQDN 33
9. Check Protocols and Ports Required 34

4
Introduction This guide will describe the installation of the Link Platform in a VirtualBox (VB) Virtual
Machine (VM) or on a Citrix XenServer 6.5. The same principles apply when installing in
other virtualization environments or when using real hardware.
The steps for installing the ISO are:
1. Prepare for Installation
2. Create a VM
3. Boot the VM
4. Configure the Link Platform
5. Check Network Settings
6. Apply License Key
7. Upload Signed Certificate
8. Connect to Link Platform using FQDN
Requirements:
A VM or real machine on which to install the Link Platform from the ISO image
License key
Internet access for Link Platform updates and licensing

5
1. Prepare for Installation The Link Platform is based on the CentOS 6.2 Linux operating system. Selection of
hardware is critical to a successful installation of the platform. It should fulfil the basic
supported hardware requirements of the Linux operating system to avoid complicated
issues such as hardware support through obscure drivers.
If planning on deploying the Link Platform onto VM, then ensure that the hypervisor is
capable of handling CentOS 6.2 Linux as a guest operating system on its virtual
machines.
DO NOT attempt to use any of the CentOS or RedHat Enterprise Linux templates provided
with your virtualization software as these are not specific to the Link Platform. Instead use
the Other Operating System option (or similar) to ensure smooth installation.
We recommend the use of quality hardware platforms specifically built to handle server-
based operating system or hyper-visors to run server-based operating systems. If special
hardware is required/used, ensure the drivers are available for CentOS 6.2 Linux before
proceeding with the purchase.
Finally, perform any relevant hardware consistency checks to ensure that the hardware
platform is stable. A high percentage of problems experienced with installation and
ongoing use of the Platform relate to fundamental hardware problems.
Refer to the installation documentation for CentOS 6.2 Linux for further information.
2. Create the VM This manual uses the VirtualBox version for a Virtual Machine. If using other VM solutions
(e.g., VMware, Citrix XenServer) please refer to their respective user manuals for
additional information.
VM sizing guidelines:
Single User Model - Demonstration 1 CPU; 1 GB RAM; 12 GB storage
Multiuser Production Model – Lite
Used for any two combinations of VPN LP,
Desktop LP or Proxy LP
1 CPU; 4 GB RAM; 50 GB storage
Multiuser Production Model – Standard
Used for running VPN LP, Desktop LP and Proxy
LP concurrently
2 CPU; 8 GB RAM; 50 GB storage
CentOS 6 editions are 100% compatible with RedHat’s Enterprise Linux
6 editions and drivers.

6
When creating a new VM, choose Other as the type and Other/Unknown (64-bit) as the
version.
This applies to Citrix Xenserver as well. Make sure to not use any existing CENTOS 6
templates (both 32 bits and 64 bits), but choose Other Install Media.

7
Make sure that the Ethernet network adapter is bridged to the real network, not NAT'ed
in VirtualBox.
In the VB’s ISO LINK PLATFORM – Settings found under Network, choose Bridged Adapted
in the Attached to dropdown list.
3. Boot the VM When booting the VM on the ISO image, choose an installation method: unattended
with DHCP allocated or custom installation.

8
3.1 Perform an Unattended Installation To perform an unattended installation with DHCP allocation, it is required to set up the
DHCP server on the local network to assign an IP address to the MAC address of the VM's
network adapter.
When booting the VM choose, perform an unattended installation (DHCP allocated).
The Linux kernel will load.

9
A graphical installer will run, click Next when complete.
The machine will reboot.

10
The Link Platform will spend time configuring itself before presenting a Linux console login
prompt.
3.2 Perform a Custom Installation NetLinkz uses CentOS 6.X as the base operating system; therefore, the installation follows
the standard CentOS 6 installation procedures. This guide provides a basic overview of
the installation process. Please refer to the CentOS full installation guide for additional
features available during installation.
To perform a custom installation, it is required to assign manually a static IP address,
netmask, default gateway and DNS servers during the installation process.
The Linux kernel will load.

11
A graphical installer will run, click Next when complete.

12
Select the installation language before clicking Next.

13
Select the appropriate keyboard for the system and click Next.

14
Select Basic Storage Devices before clicking Next.

15
Select the nearest city in your time zone before clicking Next. If the platform will be used
predominately within a single time zone, uncheck System clock uses UTC and set the
local time.

16
Set a strong, secure root user password. This password will be synchronized to the admin
account used to log into the web administrative interface. Retype it to confirm and click
Next.

17
Select Use All Space to make use of all disk space before clicking Next.
18
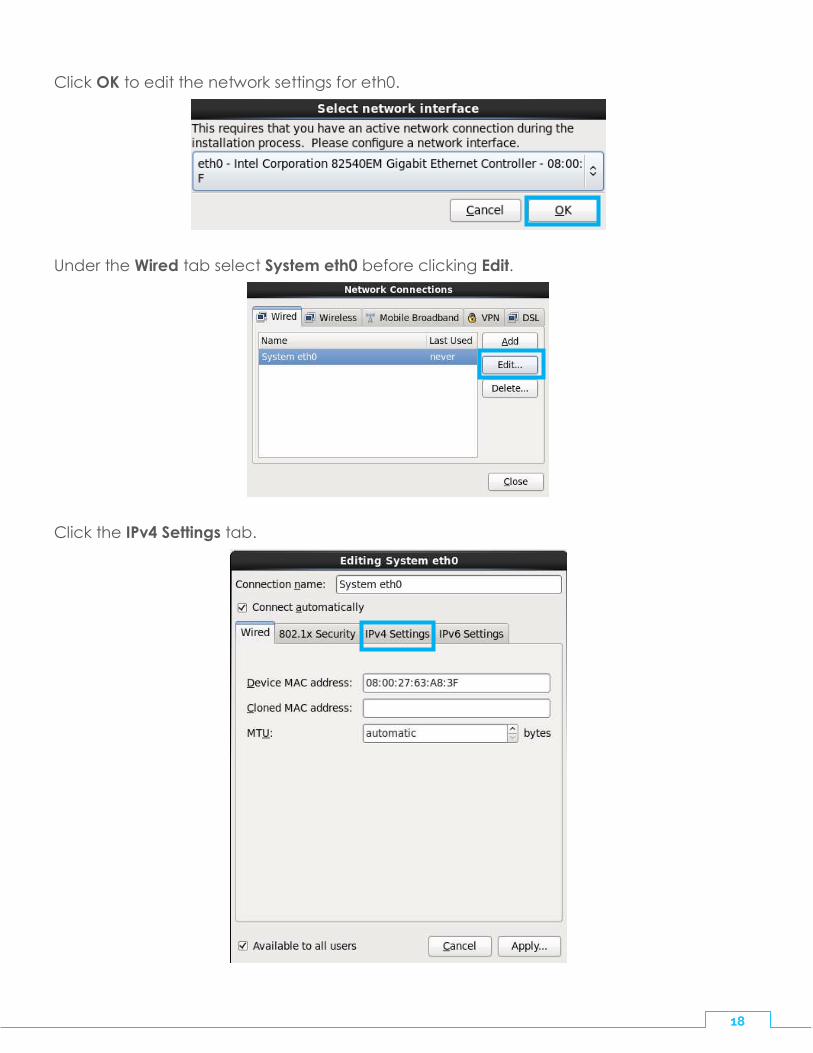
Click OK to edit the network settings for eth0.
Under the Wired tab select System eth0 before clicking Edit.
Click the IPv4 Settings tab.

19
In the Method dropdown menu, select Manual.
Under Addresses, click Add.

20
Enter the Address, Netmask, Gateway, DNS servers (separated by comma) before
clicking Apply.
In Network Connections, click Close.

21
A graphical installer will run and install a number of packages.

22
The machine will reboot.
The Link Platform will spend time configuring itself before presenting a Linux console login
prompt.

23
4. Configure the Link Platform After entering the IP address of the Link Platform in a web browser, a warning will appear
notifying that the connection is untrusted since the certificate is not valid for the URL.
Click I Understand the Risks before clicking Add Exception.

24
Un-check Permanently store this exception before clicking Confirm Security Exception.
When presented with the Link Platform login, use the following credentials:
Username admin
Password
password (or the password manually set during
custom installation)

25
After logging in and seeing the Link Platform landing screen, set the administrator
password.
Click Administration on the side menu, followed by User Manager from the Administration
screen.

26

27
In User Manager, select All Users and click admin.
Set an email address and a secure password if a custom installation was not performed.
If a custom installation was performed, the password was chosen during the installation
process.

28
5. Check Network Settings While logged into the Link Platform, navigate to Network Settings from the Administration
menu.
In Network Settings, check the following information:
Host Name
Gateway
Name Server 1
Name Server 2
Click Save.

29

30
6. Apply Licence Key While logged into the Link Platform, navigate to Licensing from the Administration menu.
In Licensing, click Activate New Licence.
Enter the licence key, and click Activate.

31
Once the licence is activated, licensing details will be displayed.

32
7. Upload Signed Certificate Install a signed certificate that matches the host name of your Link Platform, so users will
not receive a certificate mismatch warning in their browsers. If using Proxy LP, it is
recommended to use a wildcard certificate to cater for multiple host names.
Click Certificate Manager from the Administration menu of the Link Platform.
Click Upload Signed Certificate in Certificate Manager.

33
Click Choose File to open File Explorer to select the certificate off your device before
clicking Upload.
8. Connect to Link Platform using FQDN Ensure that there is an A record for the Link Platform’s host name and IP address in DNS.
Then, connect to the Link Platform from a web browser using the Link Platform's FQDN.
There should be no certificate warnings if the certificate and FQDN match.
Make sure to assign
the certificate by
clicking Assign

34
9. Check Protocols and Ports Required
Client side Firewall rules
Service TCP Egress UDP Egress
Link Connect 443 7718, 7719
Link Desktop 443,7717
Link Mail 110, 143, 443, 587, 993, 995
Link Platform side Firewall rules
Service TCP Ingress TCP Egress UDP Ingress
Link Proxy 443 80, 443
Link Mail 25, 110, 143, 443, 587. 993. 995
25, 80, 443
Link Connect 443 80,443 7718, 7719
Link Desktop 443, 7717 80, 443

Version 1.7 | Jan 2017