ittl 0441 848 - unc registrarregistrar.unc.edu/files/2013/06/query-basics-unc.pdf3 chapter 1...
TRANSCRIPT
Query Basics
Instructor – Michalynn J. Hacker January 11 – 12, 2010
2
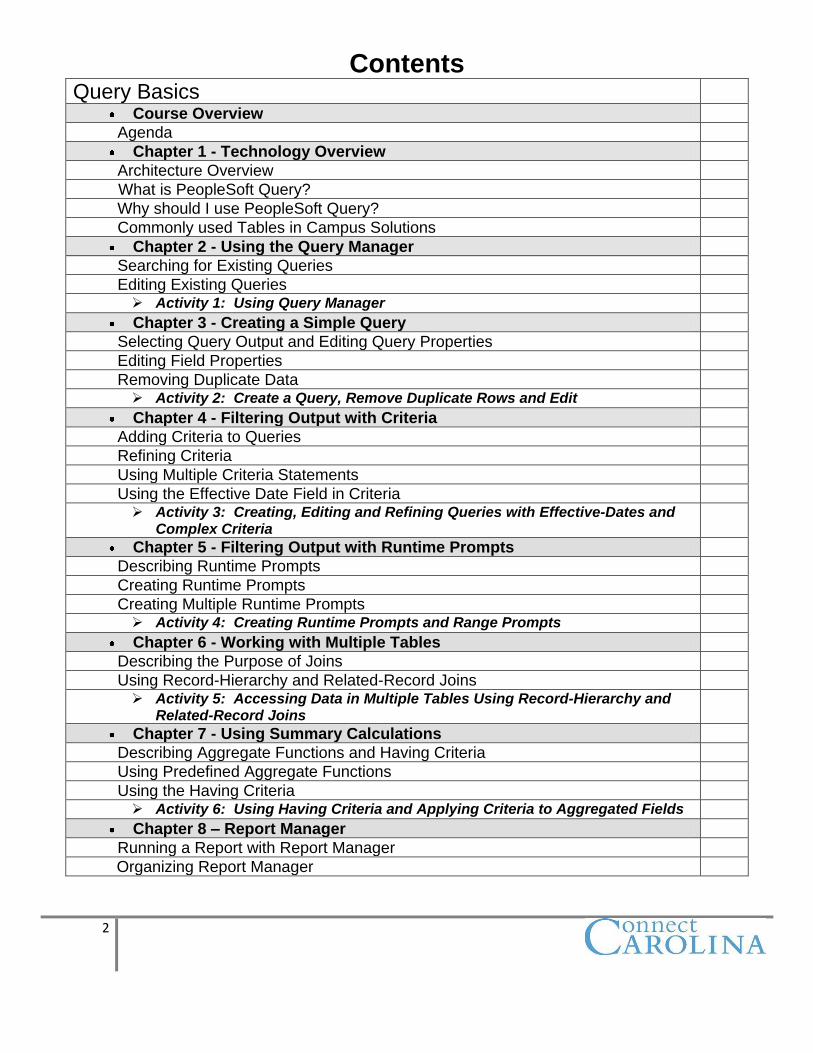
Contents Query Basics
Course Overview
Agenda
Chapter 1 - Technology Overview
Architecture Overview
What is PeopleSoft Query?
Why should I use PeopleSoft Query?
Commonly used Tables in Campus Solutions
Chapter 2 - Using the Query Manager
Searching for Existing Queries
Editing Existing Queries Activity 1: Using Query Manager
Chapter 3 - Creating a Simple Query
Selecting Query Output and Editing Query Properties
Editing Field Properties
Removing Duplicate Data Activity 2: Create a Query, Remove Duplicate Rows and Edit
Chapter 4 - Filtering Output with Criteria
Adding Criteria to Queries
Refining Criteria
Using Multiple Criteria Statements
Using the Effective Date Field in Criteria Activity 3: Creating, Editing and Refining Queries with Effective-Dates and
Complex Criteria
Chapter 5 - Filtering Output with Runtime Prompts
Describing Runtime Prompts
Creating Runtime Prompts
Creating Multiple Runtime Prompts Activity 4: Creating Runtime Prompts and Range Prompts
Chapter 6 - Working with Multiple Tables
Describing the Purpose of Joins
Using Record-Hierarchy and Related-Record Joins Activity 5: Accessing Data in Multiple Tables Using Record-Hierarchy and
Related-Record Joins
Chapter 7 - Using Summary Calculations
Describing Aggregate Functions and Having Criteria
Using Predefined Aggregate Functions
Using the Having Criteria Activity 6: Using Having Criteria and Applying Criteria to Aggregated Fields
Chapter 8 – Report Manager
Running a Report with Report Manager
Organizing Report Manager

3
Chapter 1 Technology Overview
What is PeopleSoft Query? PeopleSoft Query is an end-user reporting tool. You use queries to retrieve information from the database to a web interface. With PeopleSoft Query, you can extract the precise information that you’re looking for by using visual representations of the PeopleSoft database and without writing Structured Query Language (SQL) statements.
Queries are comprised of the following database elements:
Tables (records) Tables are composed of columns and rows. In PeopleSoft databases, tables are built from record definitions (or records for short). Record definitions are used by PeopleSoft Query to represent the tables (example below).
Example of the Course Catalog
4
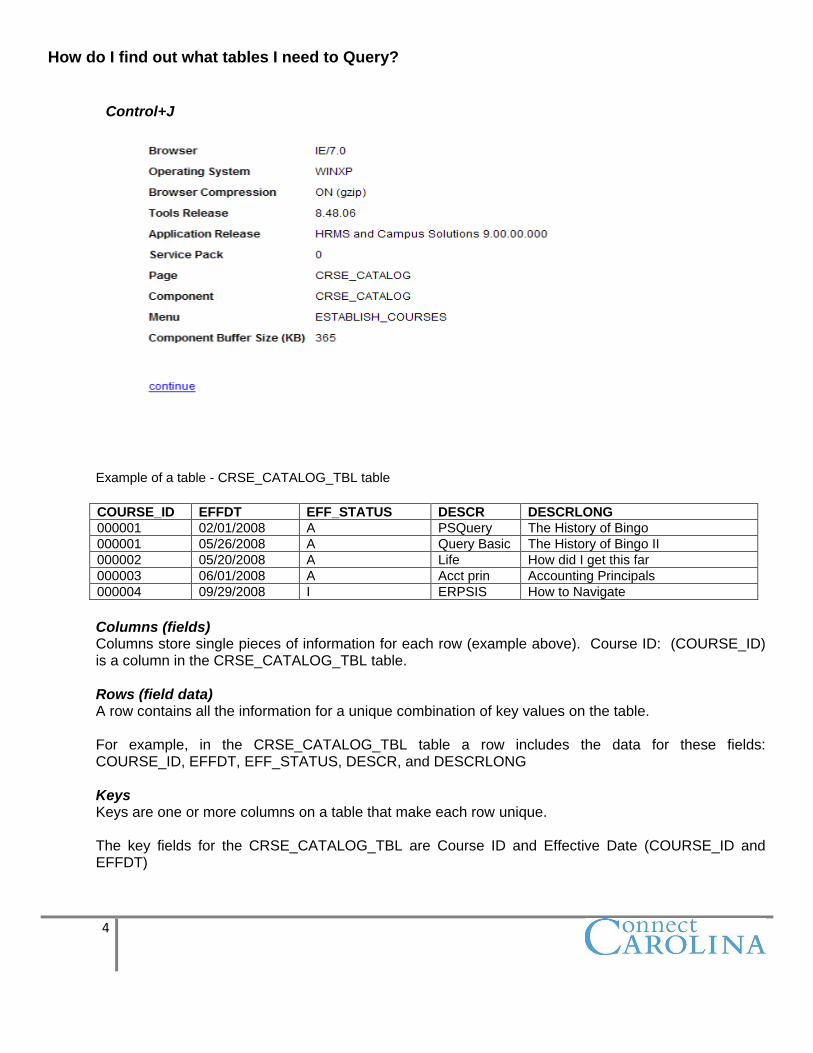
How do I find out what tables I need to Query? Control+J
Example of a table - CRSE_CATALOG_TBL table
COURSE_ID EFFDT EFF_STATUS DESCR DESCRLONG
000001 02/01/2008 A PSQuery The History of Bingo
000001 05/26/2008 A Query Basic The History of Bingo II
000002 05/20/2008 A Life How did I get this far
000003 06/01/2008 A Acct prin Accounting Principals
000004 09/29/2008 I ERPSIS How to Navigate
Columns (fields) Columns store single pieces of information for each row (example above). Course ID: (COURSE_ID) is a column in the CRSE_CATALOG_TBL table.
Rows (field data) A row contains all the information for a unique combination of key values on the table.
For example, in the CRSE_CATALOG_TBL table a row includes the data for these fields: COURSE_ID, EFFDT, EFF_STATUS, DESCR, and DESCRLONG
Keys Keys are one or more columns on a table that make each row unique.
The key fields for the CRSE_CATALOG_TBL are Course ID and Effective Date (COURSE_ID and EFFDT)
5
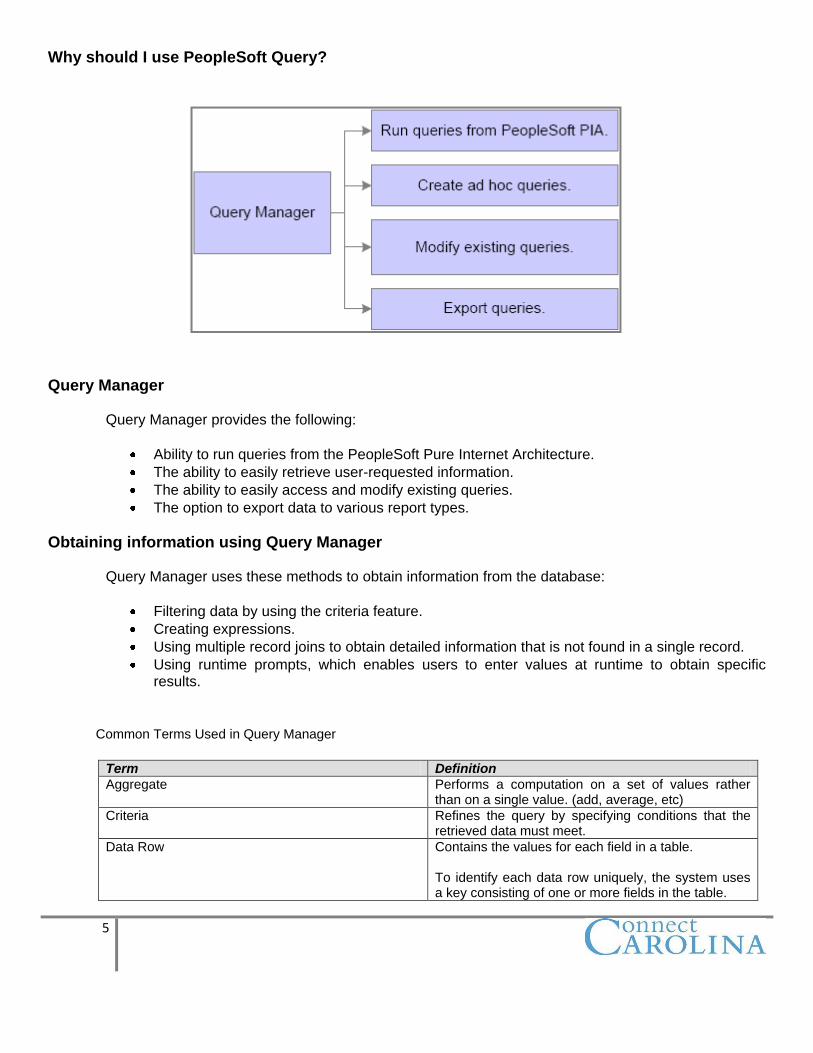
Why should I use PeopleSoft Query?
Query Manager Query Manager provides the following:
Ability to run queries from the PeopleSoft Pure Internet Architecture.
The ability to easily retrieve user-requested information.
The ability to easily access and modify existing queries.
The option to export data to various report types.
Obtaining information using Query Manager Query Manager uses these methods to obtain information from the database:
Filtering data by using the criteria feature.
Creating expressions.
Using multiple record joins to obtain detailed information that is not found in a single record.
Using runtime prompts, which enables users to enter values at runtime to obtain specific results.
Common Terms Used in Query Manager
Term Definition
Aggregate Performs a computation on a set of values rather than on a single value. (add, average, etc)
Criteria Refines the query by specifying conditions that the retrieved data must meet.
Data Row Contains the values for each field in a table. To identify each data row uniquely, the system uses a key consisting of one or more fields in the table.
6
Distinct Removes duplicate rows of data.
Effective Date Dates information in the system giving the capability to have future, current and historical data stored in the database and ready to retrieve with the appropriate security. Example: entering information before it goes into effect.
Expression Calculates a formula that PeopleSoft Query returns as a part of a query. Example: Constant Value Course Type = ACCT
Field Contains the smallest unit of information that you access.
Metadata Information about data.
Primary Key Fields One or more columns on a table that make each row unique from the others.
Record Hierarchy Join A record hierarchy join is a virtual connection between a parent table and a child table.
SQL Accesses and manipulates data in databases.
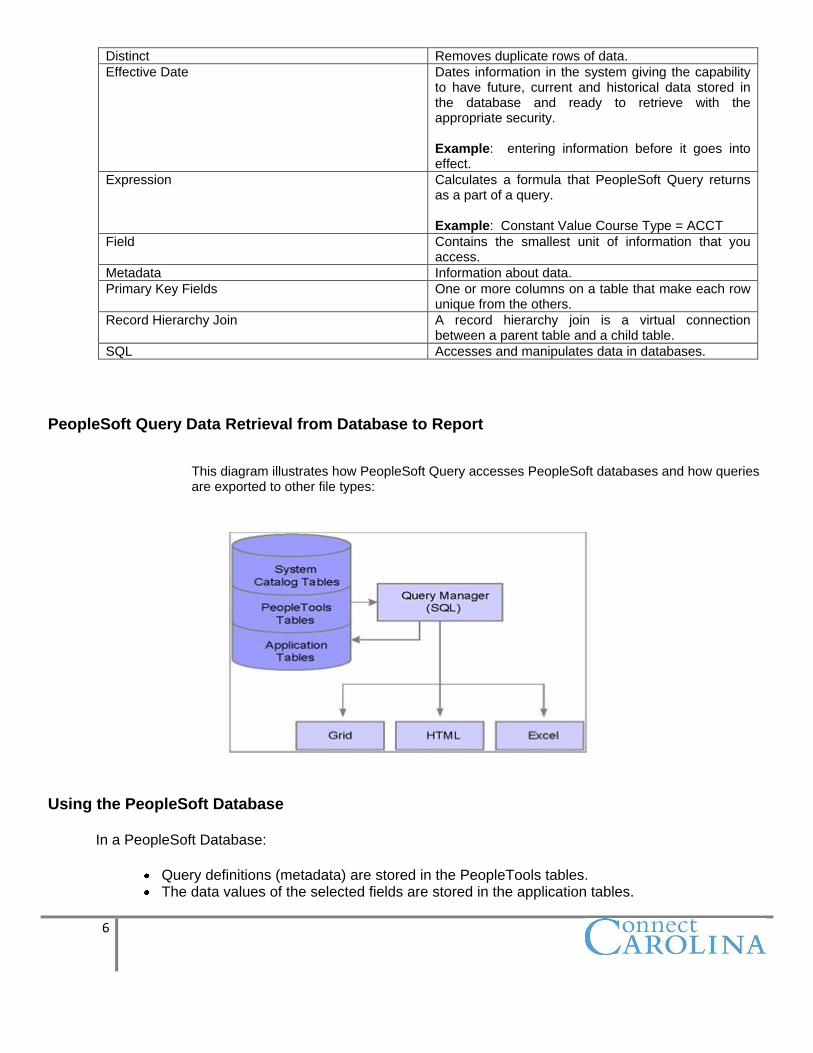
PeopleSoft Query Data Retrieval from Database to Report
This diagram illustrates how PeopleSoft Query accesses PeopleSoft databases and how queries are exported to other file types:
Using the PeopleSoft Database
In a PeopleSoft Database:
Query definitions (metadata) are stored in the PeopleTools tables. The data values of the selected fields are stored in the application tables.
7
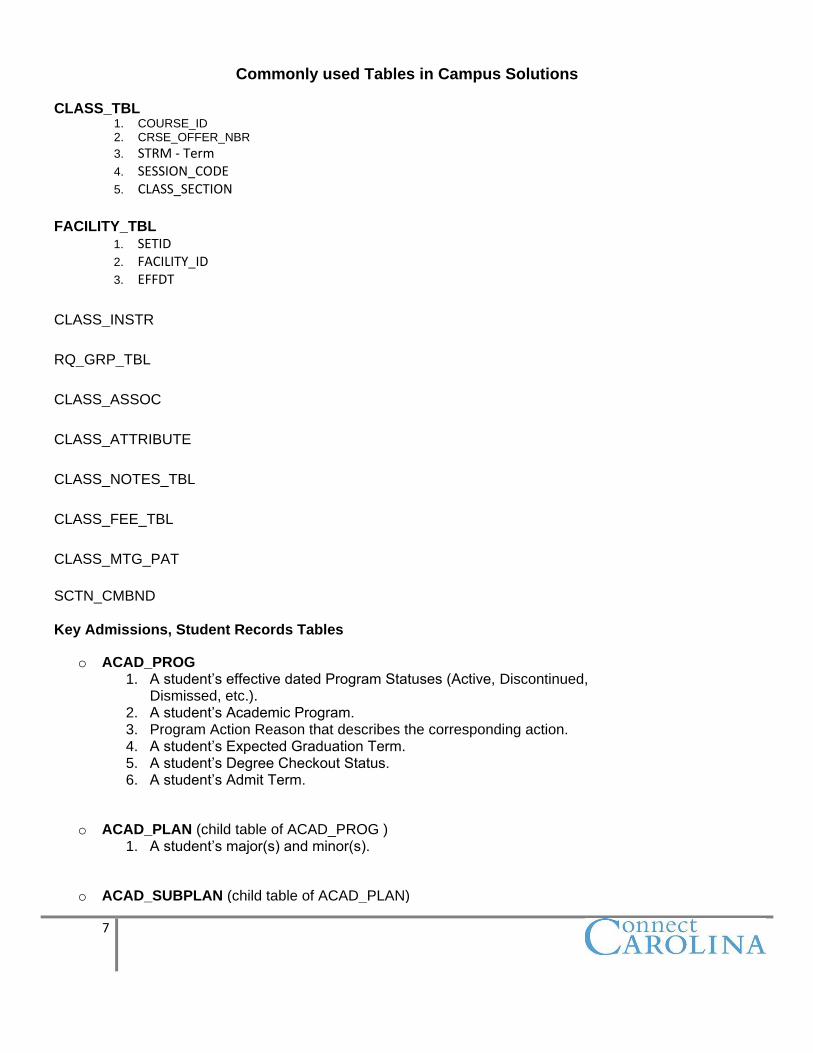
Commonly used Tables in Campus Solutions
CLASS_TBL 1. COURSE_ID 2. CRSE_OFFER_NBR
3. STRM - Term
4. SESSION_CODE
5. CLASS_SECTION
FACILITY_TBL
1. SETID
2. FACILITY_ID
3. EFFDT
CLASS_INSTR
RQ_GRP_TBL
CLASS_ASSOC
CLASS_ATTRIBUTE
CLASS_NOTES_TBL
CLASS_FEE_TBL
CLASS_MTG_PAT
SCTN_CMBND Key Admissions, Student Records Tables
o ACAD_PROG 1. A student’s effective dated Program Statuses (Active, Discontinued,
Dismissed, etc.). 2. A student’s Academic Program. 3. Program Action Reason that describes the corresponding action. 4. A student’s Expected Graduation Term. 5. A student’s Degree Checkout Status. 6. A student’s Admit Term.
o ACAD_PLAN (child table of ACAD_PROG ) 1. A student’s major(s) and minor(s).
o ACAD_SUBPLAN (child table of ACAD_PLAN)
8
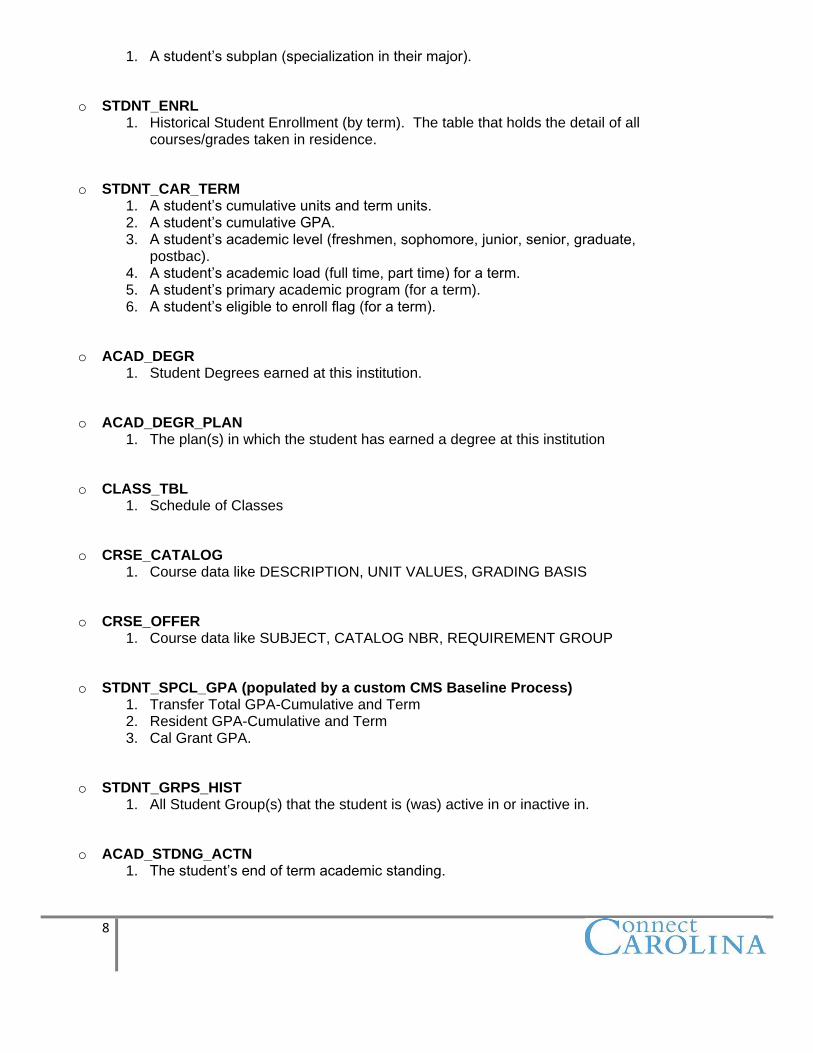
1. A student’s subplan (specialization in their major).
o STDNT_ENRL 1. Historical Student Enrollment (by term). The table that holds the detail of all
courses/grades taken in residence.
o STDNT_CAR_TERM 1. A student’s cumulative units and term units. 2. A student’s cumulative GPA. 3. A student’s academic level (freshmen, sophomore, junior, senior, graduate,
postbac). 4. A student’s academic load (full time, part time) for a term. 5. A student’s primary academic program (for a term). 6. A student’s eligible to enroll flag (for a term).
o ACAD_DEGR 1. Student Degrees earned at this institution.
o ACAD_DEGR_PLAN 1. The plan(s) in which the student has earned a degree at this institution
o CLASS_TBL 1. Schedule of Classes
o CRSE_CATALOG 1. Course data like DESCRIPTION, UNIT VALUES, GRADING BASIS
o CRSE_OFFER 1. Course data like SUBJECT, CATALOG NBR, REQUIREMENT GROUP
o STDNT_SPCL_GPA (populated by a custom CMS Baseline Process) 1. Transfer Total GPA-Cumulative and Term 2. Resident GPA-Cumulative and Term 3. Cal Grant GPA.
o STDNT_GRPS_HIST 1. All Student Group(s) that the student is (was) active in or inactive in.
o ACAD_STDNG_ACTN 1. The student’s end of term academic standing.
9
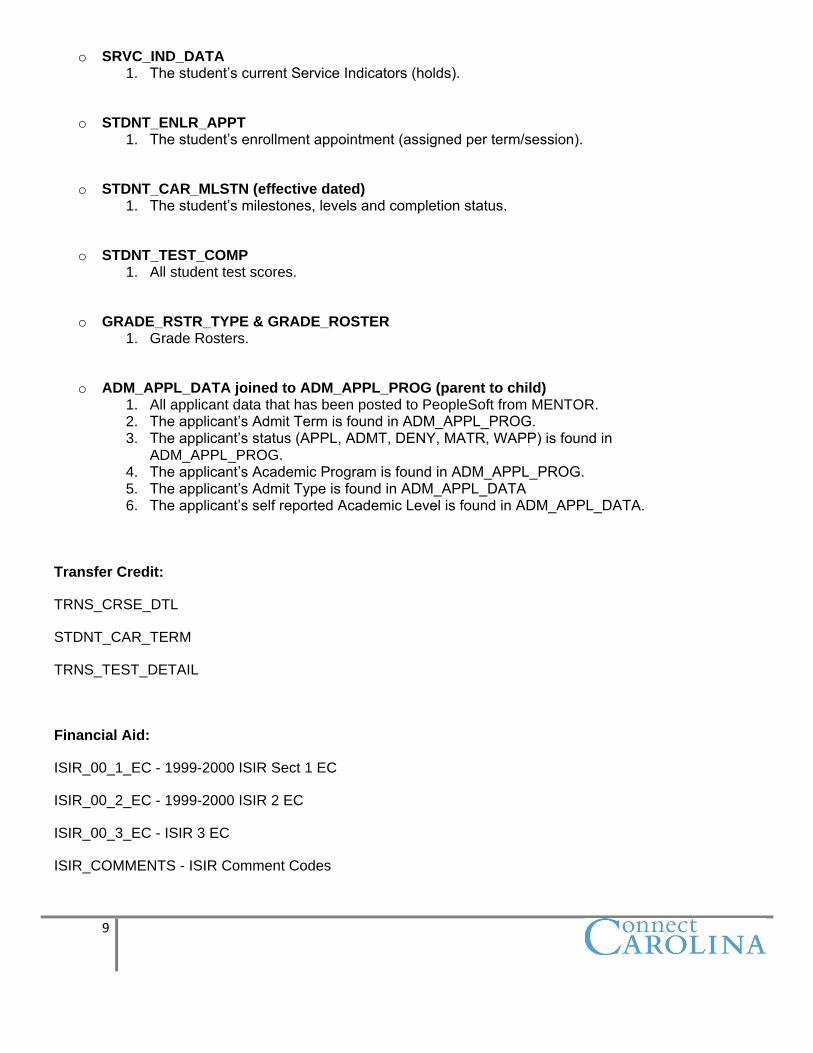
o SRVC_IND_DATA 1. The student’s current Service Indicators (holds).
o STDNT_ENLR_APPT 1. The student’s enrollment appointment (assigned per term/session).
o STDNT_CAR_MLSTN (effective dated) 1. The student’s milestones, levels and completion status.
o STDNT_TEST_COMP 1. All student test scores.
o GRADE_RSTR_TYPE & GRADE_ROSTER 1. Grade Rosters.
o ADM_APPL_DATA joined to ADM_APPL_PROG (parent to child) 1. All applicant data that has been posted to PeopleSoft from MENTOR. 2. The applicant’s Admit Term is found in ADM_APPL_PROG. 3. The applicant’s status (APPL, ADMT, DENY, MATR, WAPP) is found in
ADM_APPL_PROG. 4. The applicant’s Academic Program is found in ADM_APPL_PROG. 5. The applicant’s Admit Type is found in ADM_APPL_DATA 6. The applicant’s self reported Academic Level is found in ADM_APPL_DATA.
Transfer Credit:
TRNS_CRSE_DTL
STDNT_CAR_TERM
TRNS_TEST_DETAIL
Financial Aid:
ISIR_00_1_EC - 1999-2000 ISIR Sect 1 EC
ISIR_00_2_EC - 1999-2000 ISIR 2 EC
ISIR_00_3_EC - ISIR 3 EC
ISIR_COMMENTS - ISIR Comment Codes
10
ISIR_COMMT_TBL - ISIR Comment Descriptions
ISIR_COMPUTED - Computed Data from INAS/DOE
ISIR_CONTROL - ISIR Internals/Control Data
ISIR_PARENT - Fed Parent Application Data
ISIR_STUDENT - Fed Student Application Data
STDNT_FA_TERM - Student Fin Aid Term Table
STDNT_TERM_BDGT - Student Term Budget
STDNT_AWARDS - Student Awards
STDNT_AWRD_ACTV - Student Award Activity
STDNT_AWRD_DISB - Student Award Disbursements
STDNT_DISB_VW1 - Stdnt Disbursement By Term
STDNT_AID_ATRBT - Student Aid Attributes Table
STDNT_FA_TRM_VW - Student Fin Aid Term View
STDNT_PKG_VAR - Student Packaging Variables
STDNT_BGT_IT_VW - Stdnt Bdgt Item Summary Vw
ITEM_TP_FA_AWRD - Item Tp Prompt for Awards
ITEM_TP_FA_DISB - Item Type Disb Plan/Split Cd
ITEM_TP_FA_PKG - Item Tp Prompt for Packaging
SFA_ASG_ELIG - ACG/SMART Eligibility
SFA_ASG_ORG - ACG/SMART Origination Record
SFA_ASG_DSB - ACG/SMART Disbursement
Student Financials:
ITEM_SF
ITEM_LINE
SF_ACCTG_LINE

11
TUIT_CALC_TBL
BILL_HEADER
ITEM_TYPE_TBL
REFUND_HDR
REFUND_DTL
BILL_HEADER_VW
COLLECTION_SF
12
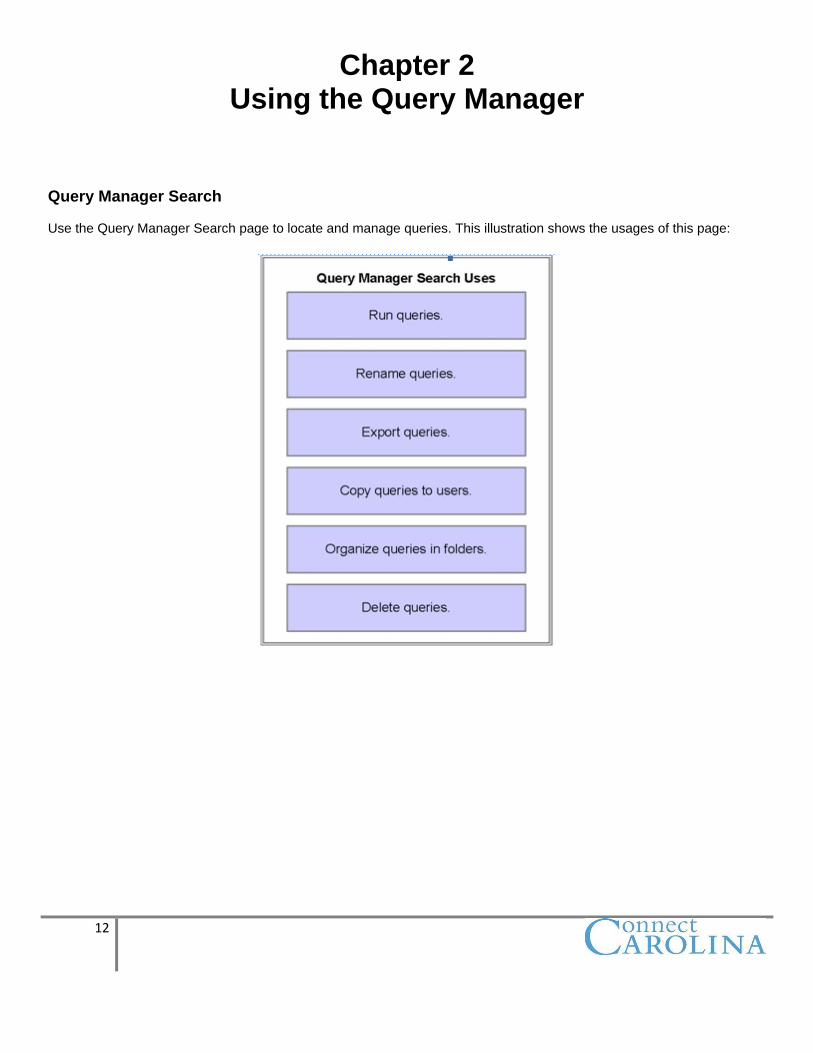
Chapter 2 Using the Query Manager
Query Manager Search Use the Query Manager Search page to locate and manage queries. This illustration shows the usages of this page:
13
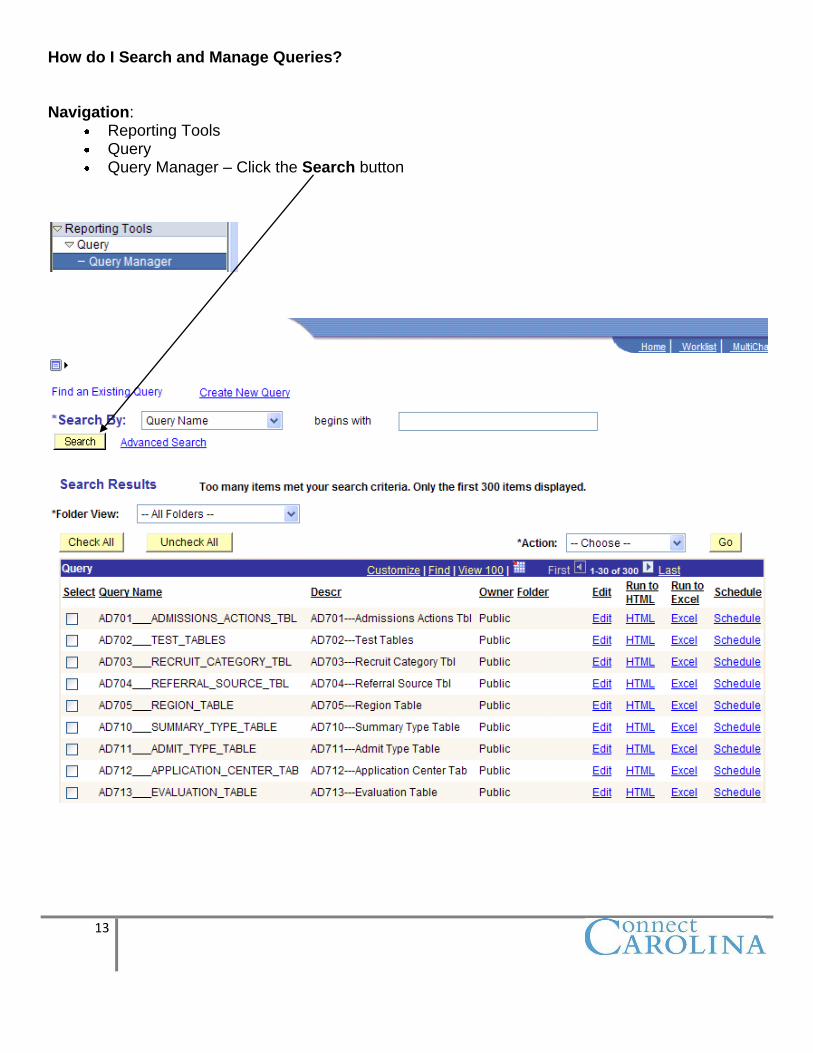
How do I Search and Manage Queries? Navigation:
Reporting Tools Query Query Manager – Click the Search button
14
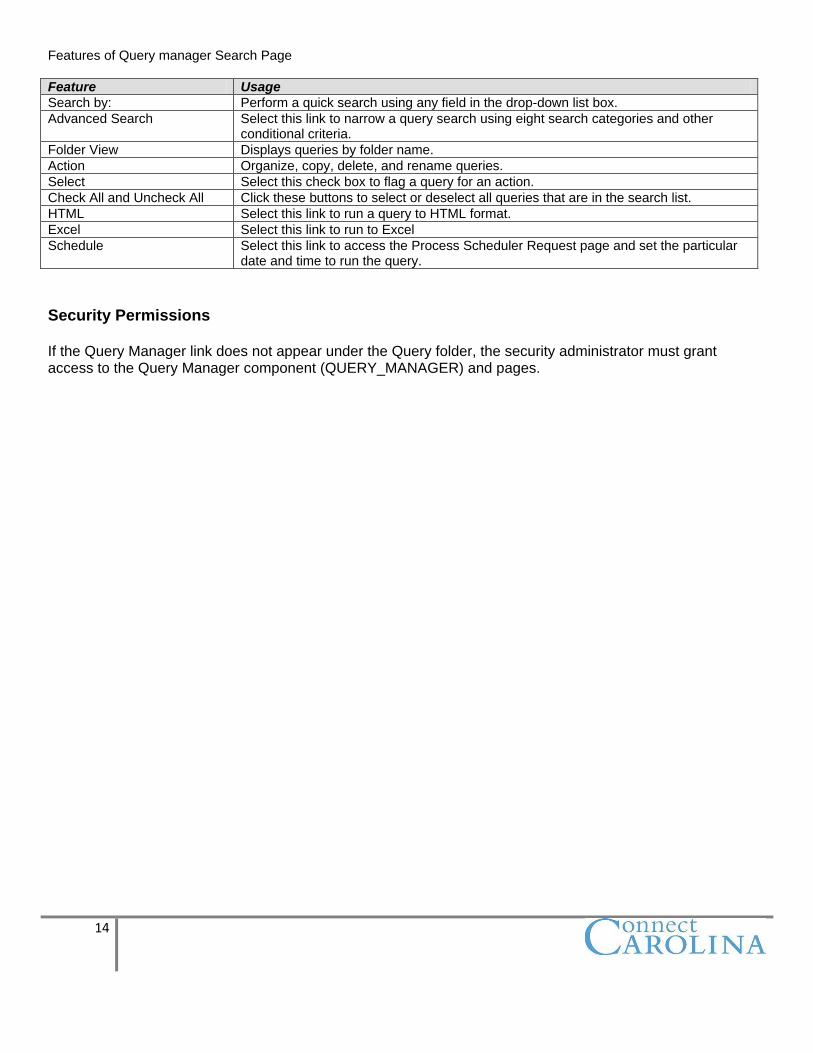
Features of Query manager Search Page
Feature Usage
Search by: Perform a quick search using any field in the drop-down list box.
Advanced Search Select this link to narrow a query search using eight search categories and other conditional criteria.
Folder View Displays queries by folder name.
Action Organize, copy, delete, and rename queries.
Select Select this check box to flag a query for an action.
Check All and Uncheck All Click these buttons to select or deselect all queries that are in the search list.
HTML Select this link to run a query to HTML format.
Excel Select this link to run to Excel
Schedule Select this link to access the Process Scheduler Request page and set the particular date and time to run the query.
Security Permissions If the Query Manager link does not appear under the Query folder, the security administrator must grant access to the Query Manager component (QUERY_MANAGER) and pages.
15
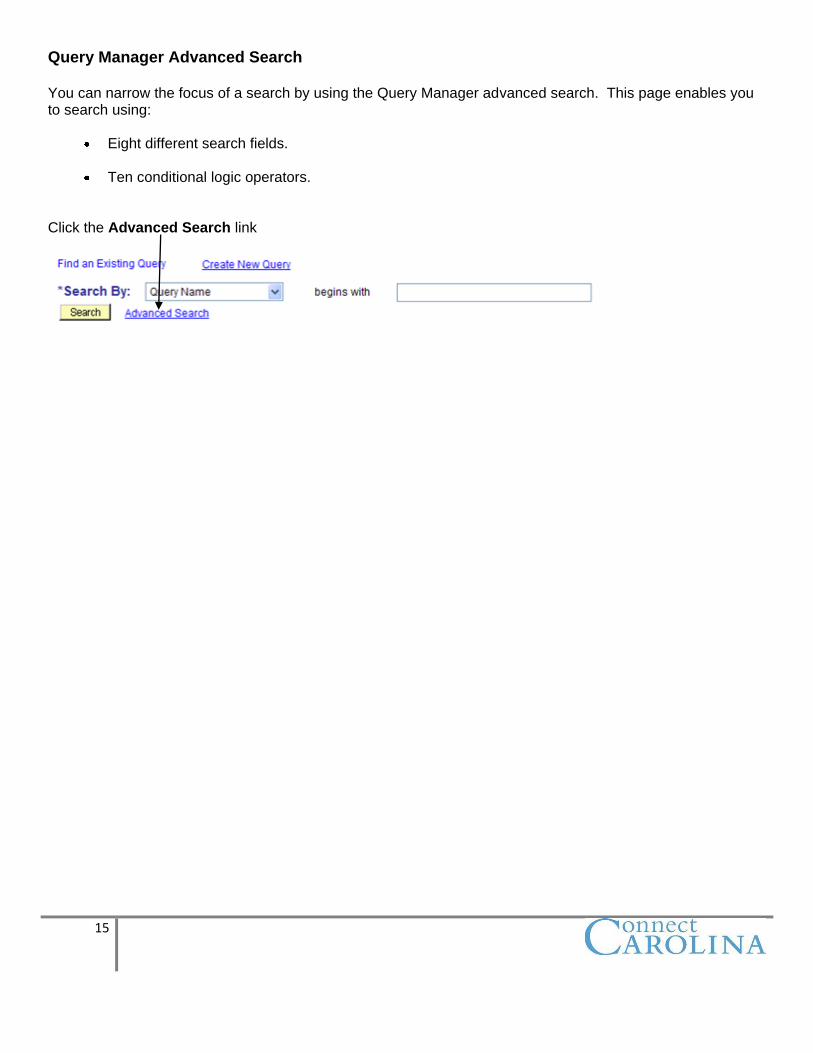
Query Manager Advanced Search You can narrow the focus of a search by using the Query Manager advanced search. This page enables you to search using:
Eight different search fields.
Ten conditional logic operators.
Click the Advanced Search link
16
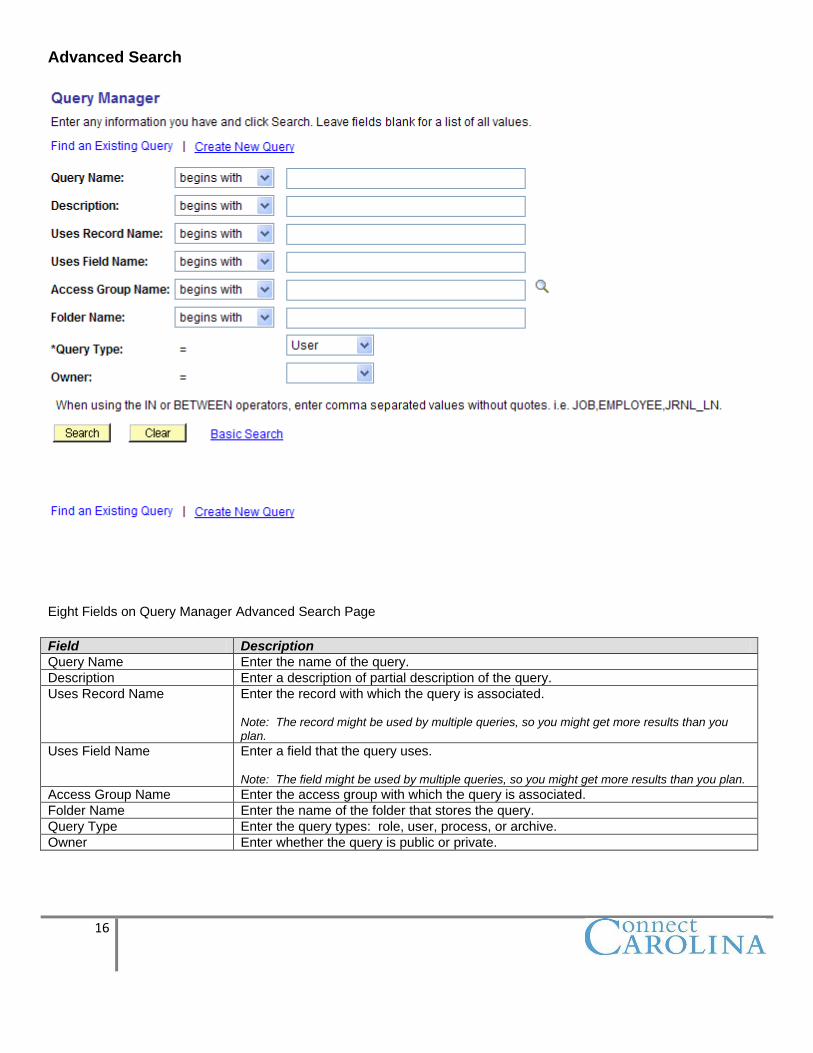
Advanced Search
Eight Fields on Query Manager Advanced Search Page
Field Description
Query Name Enter the name of the query.
Description Enter a description of partial description of the query.
Uses Record Name Enter the record with which the query is associated. Note: The record might be used by multiple queries, so you might get more results than you plan.
Uses Field Name Enter a field that the query uses. Note: The field might be used by multiple queries, so you might get more results than you plan.
Access Group Name Enter the access group with which the query is associated.
Folder Name Enter the name of the folder that stores the query.
Query Type Enter the query types: role, user, process, or archive.
Owner Enter whether the query is public or private.
17
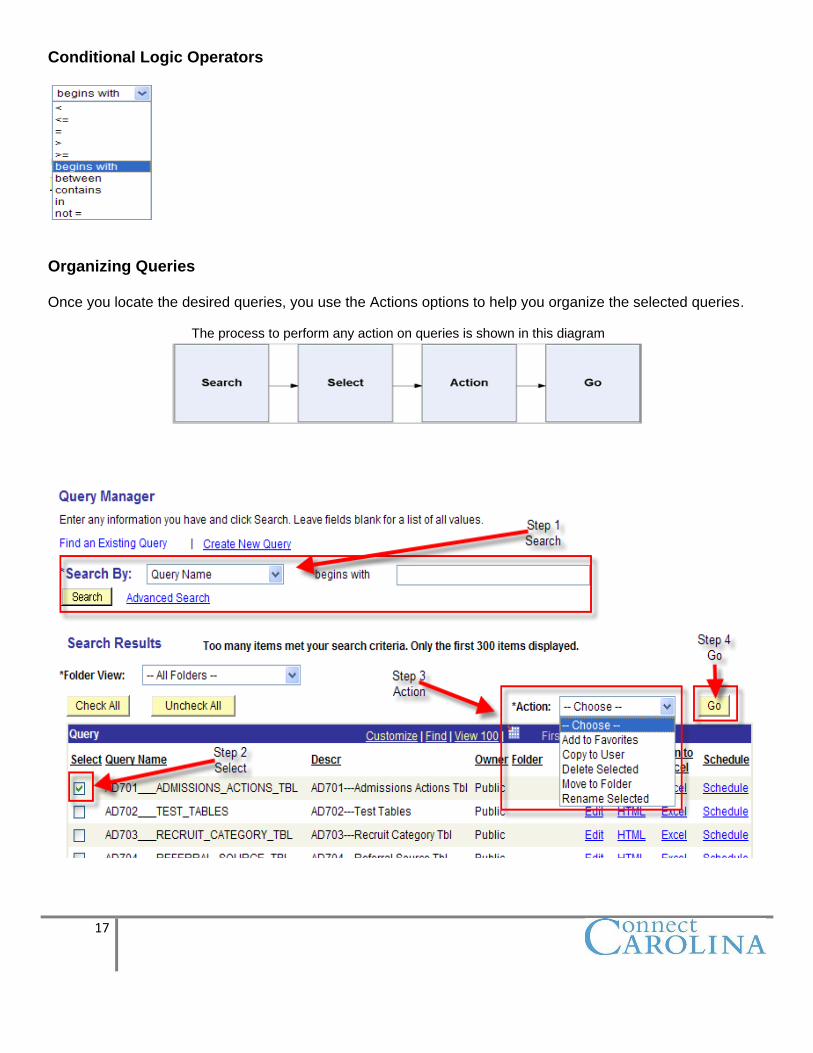
Conditional Logic Operators
Organizing Queries Once you locate the desired queries, you use the Actions options to help you organize the selected queries.
The process to perform any action on queries is shown in this diagram
18
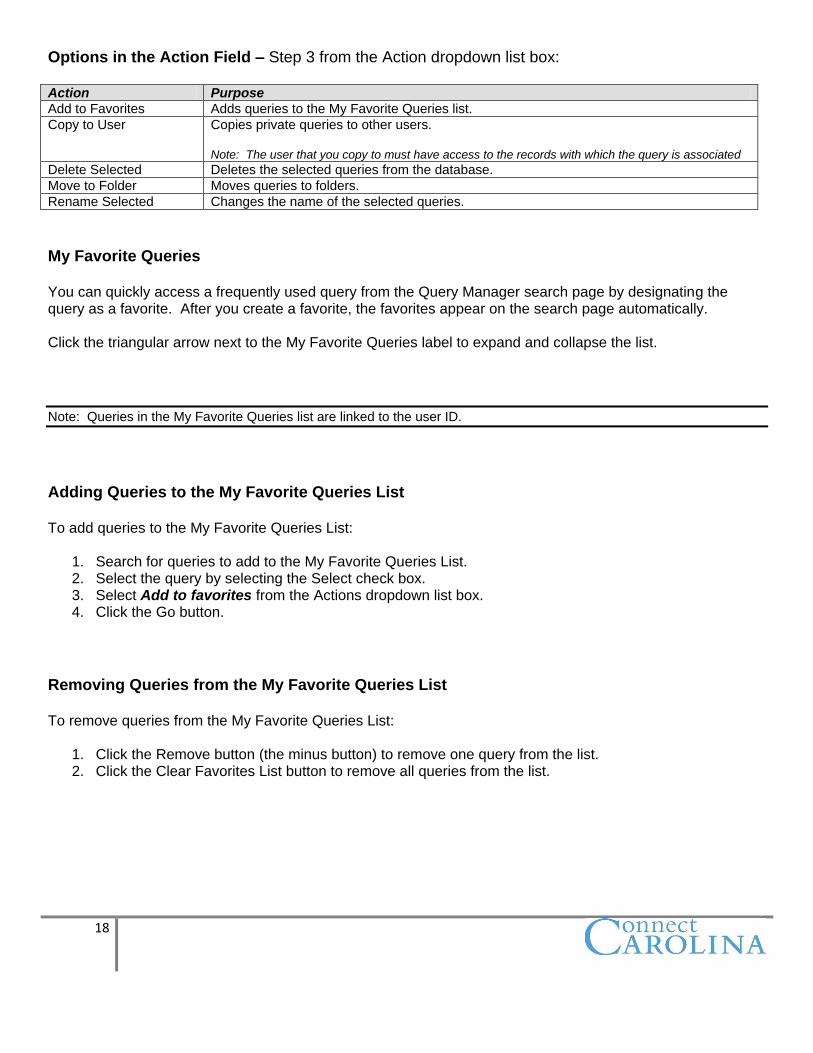
Options in the Action Field – Step 3 from the Action dropdown list box: Action Purpose
Add to Favorites Adds queries to the My Favorite Queries list.
Copy to User Copies private queries to other users. Note: The user that you copy to must have access to the records with which the query is associated
Delete Selected Deletes the selected queries from the database.
Move to Folder Moves queries to folders.
Rename Selected Changes the name of the selected queries.
My Favorite Queries You can quickly access a frequently used query from the Query Manager search page by designating the query as a favorite. After you create a favorite, the favorites appear on the search page automatically. Click the triangular arrow next to the My Favorite Queries label to expand and collapse the list.
Note: Queries in the My Favorite Queries list are linked to the user ID.
Adding Queries to the My Favorite Queries List To add queries to the My Favorite Queries List:
1. Search for queries to add to the My Favorite Queries List. 2. Select the query by selecting the Select check box. 3. Select Add to favorites from the Actions dropdown list box. 4. Click the Go button.
Removing Queries from the My Favorite Queries List To remove queries from the My Favorite Queries List:
1. Click the Remove button (the minus button) to remove one query from the list. 2. Click the Clear Favorites List button to remove all queries from the list.
19
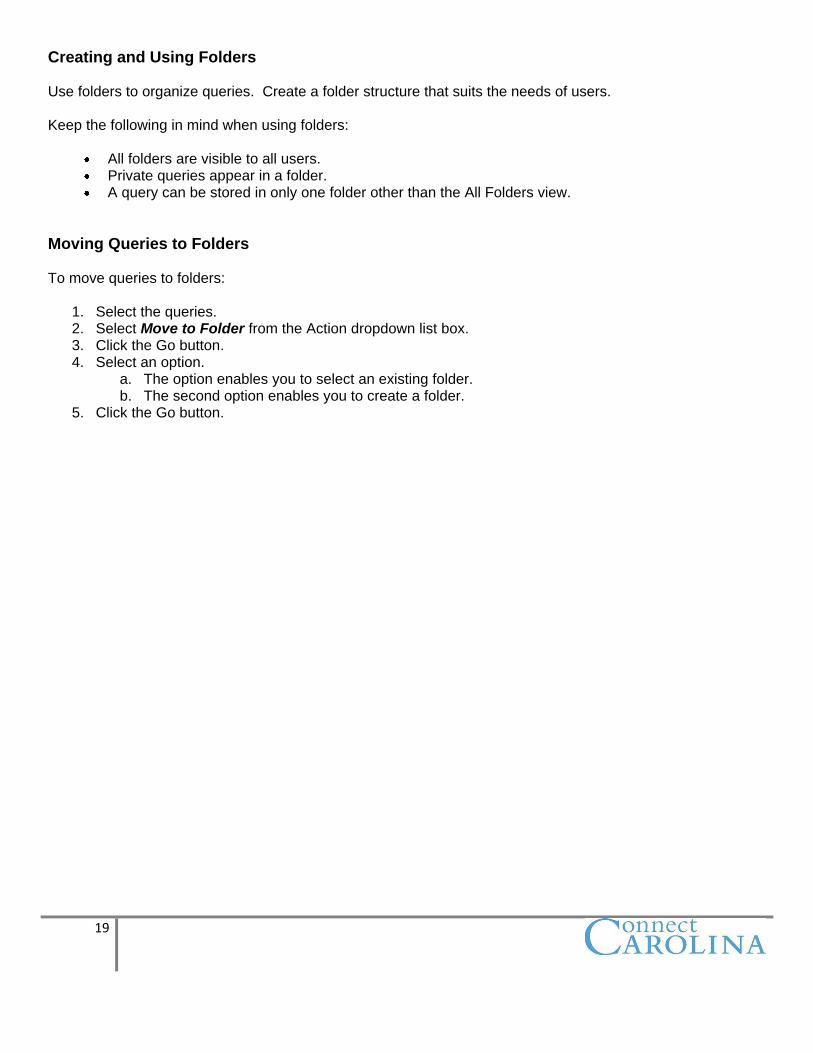
Creating and Using Folders Use folders to organize queries. Create a folder structure that suits the needs of users. Keep the following in mind when using folders:
All folders are visible to all users. Private queries appear in a folder. A query can be stored in only one folder other than the All Folders view.
Moving Queries to Folders To move queries to folders:
1. Select the queries. 2. Select Move to Folder from the Action dropdown list box. 3. Click the Go button. 4. Select an option.
a. The option enables you to select an existing folder. b. The second option enables you to create a folder.
5. Click the Go button.
20
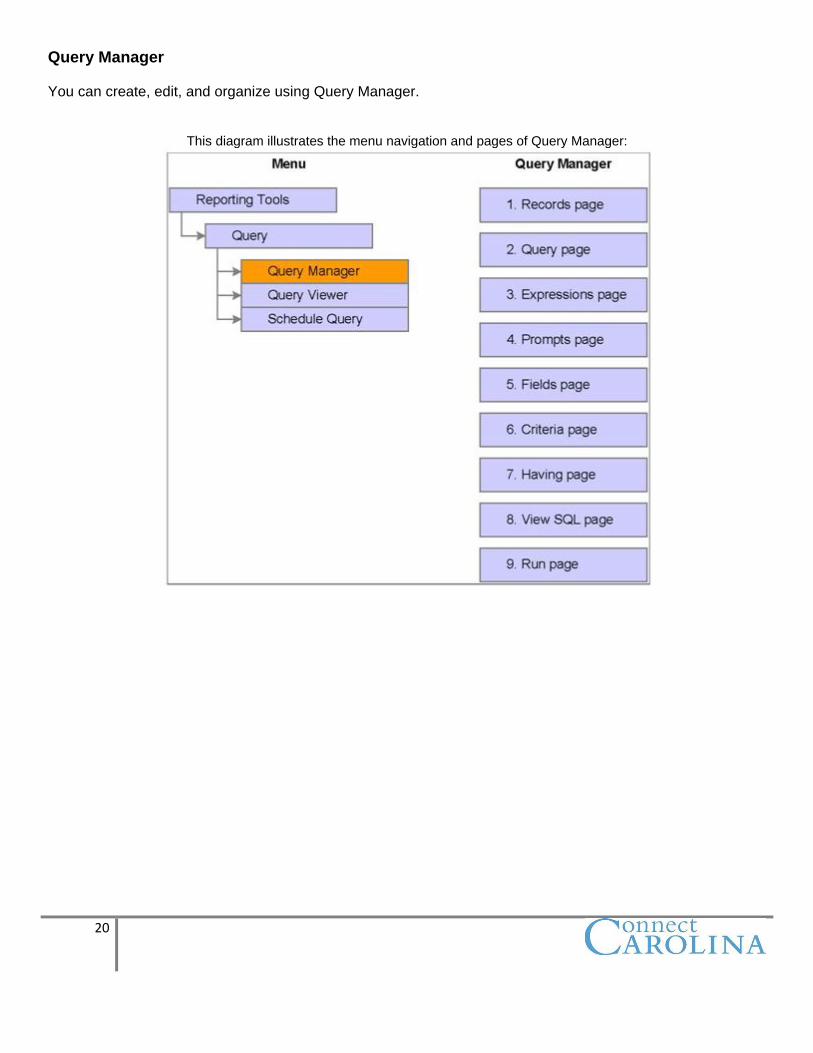
Query Manager You can create, edit, and organize using Query Manager.
This diagram illustrates the menu navigation and pages of Query Manager:
21
Query Manager:
Is browser-based. Is organized to facilitate ease of use. Enables you to create queries that retrieve data without having to know Structured Query Language
(SQL).
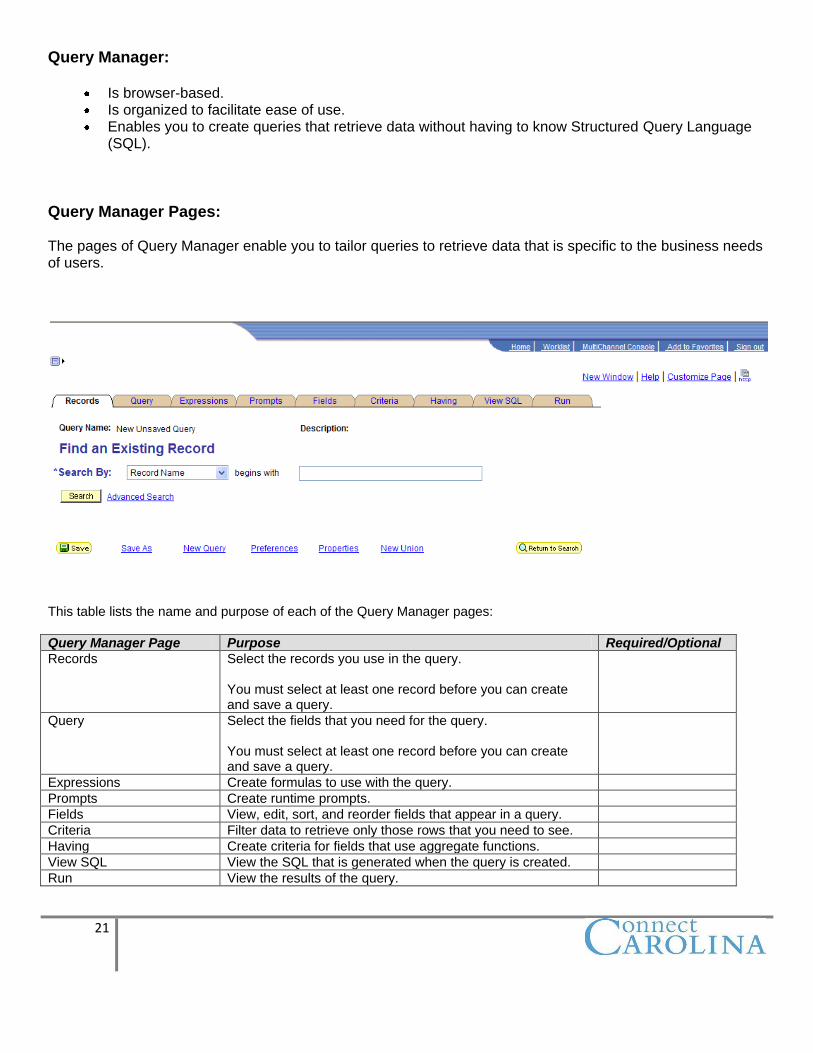
Query Manager Pages: The pages of Query Manager enable you to tailor queries to retrieve data that is specific to the business needs of users.
This table lists the name and purpose of each of the Query Manager pages:
Query Manager Page Purpose Required/Optional
Records Select the records you use in the query. You must select at least one record before you can create and save a query.
Query Select the fields that you need for the query. You must select at least one record before you can create and save a query.
Expressions Create formulas to use with the query.
Prompts Create runtime prompts.
Fields View, edit, sort, and reorder fields that appear in a query.
Criteria Filter data to retrieve only those rows that you need to see.
Having Create criteria for fields that use aggregate functions.
View SQL View the SQL that is generated when the query is created.
Run View the results of the query.
22
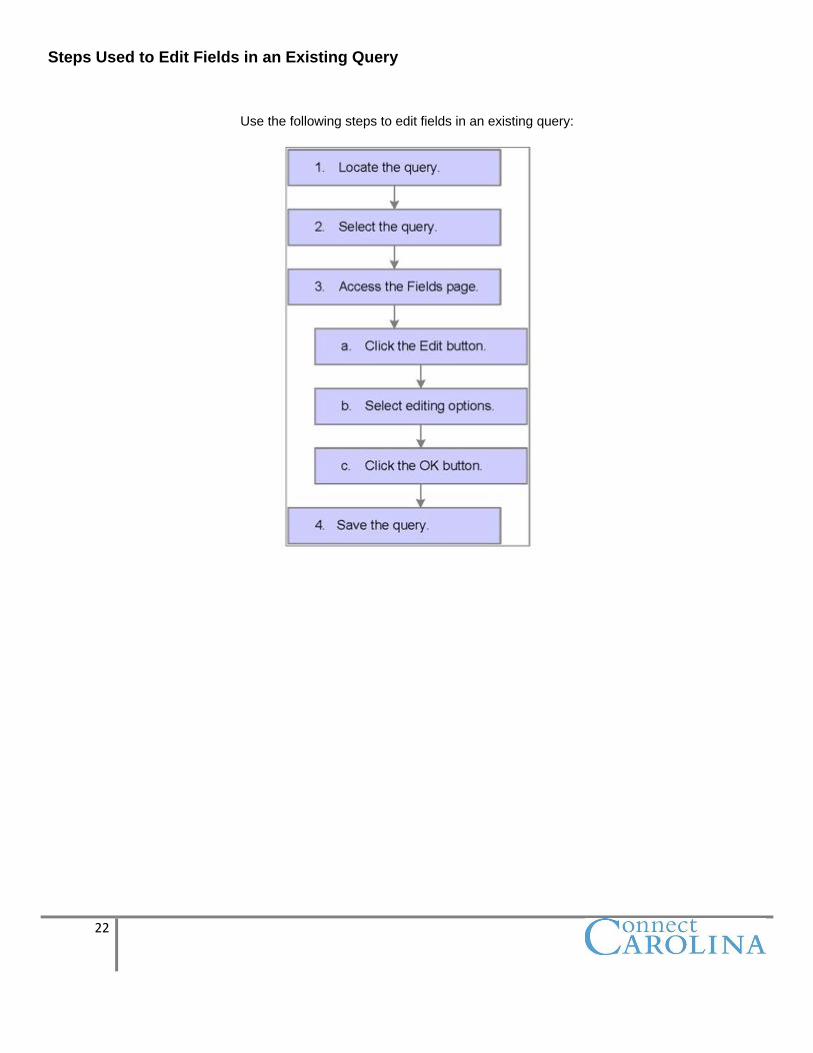
Steps Used to Edit Fields in an Existing Query
Use the following steps to edit fields in an existing query:
23
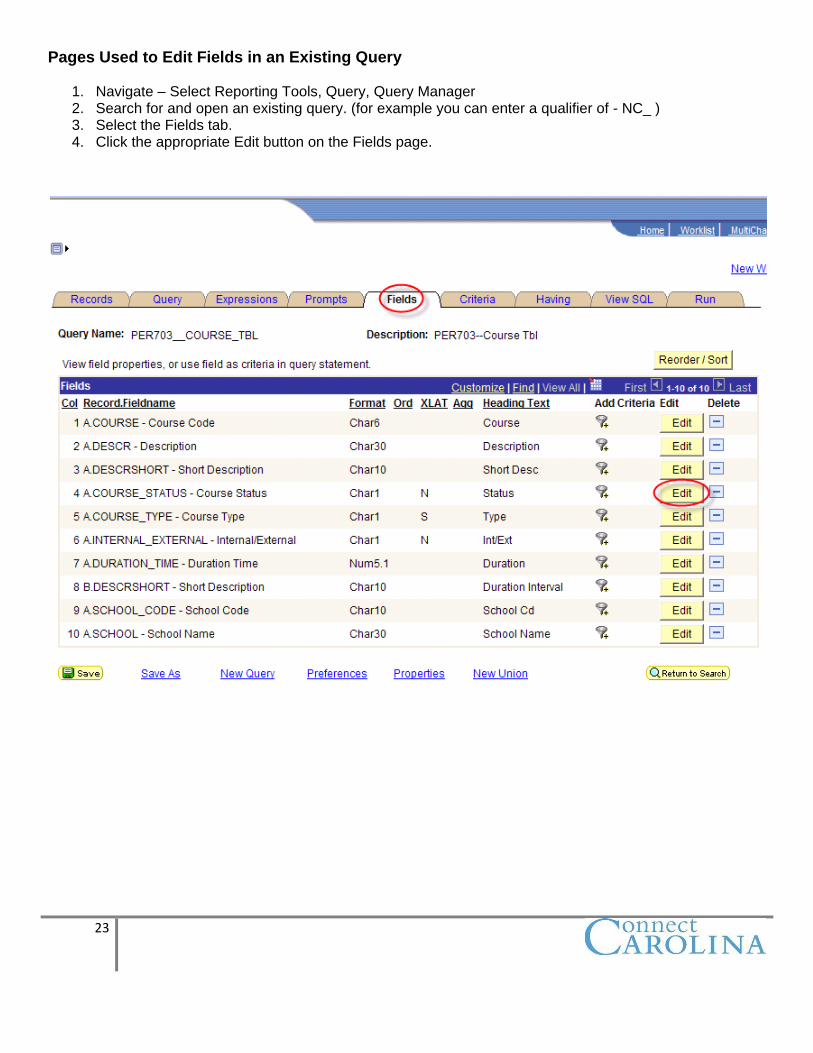
Pages Used to Edit Fields in an Existing Query
1. Navigate – Select Reporting Tools, Query, Query Manager 2. Search for and open an existing query. (for example you can enter a qualifier of - NC_ ) 3. Select the Fields tab. 4. Click the appropriate Edit button on the Fields page.
24
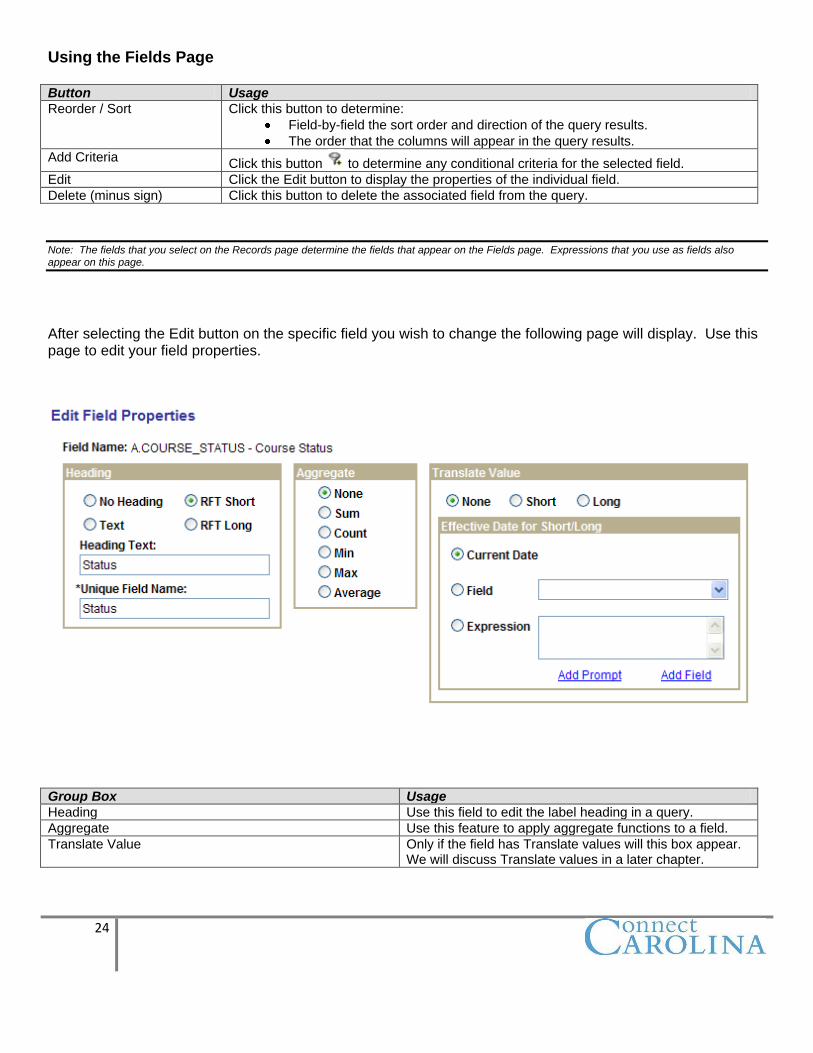
Using the Fields Page Button Usage
Reorder / Sort Click this button to determine:
Field-by-field the sort order and direction of the query results.
The order that the columns will appear in the query results.
Add Criteria Click this button to determine any conditional criteria for the selected field.
Edit Click the Edit button to display the properties of the individual field.
Delete (minus sign) Click this button to delete the associated field from the query.
Note: The fields that you select on the Records page determine the fields that appear on the Fields page. Expressions that you use as fields also appear on this page.
After selecting the Edit button on the specific field you wish to change the following page will display. Use this page to edit your field properties.
Group Box Usage
Heading Use this field to edit the label heading in a query.
Aggregate Use this feature to apply aggregate functions to a field.
Translate Value Only if the field has Translate values will this box appear. We will discuss Translate values in a later chapter.
25
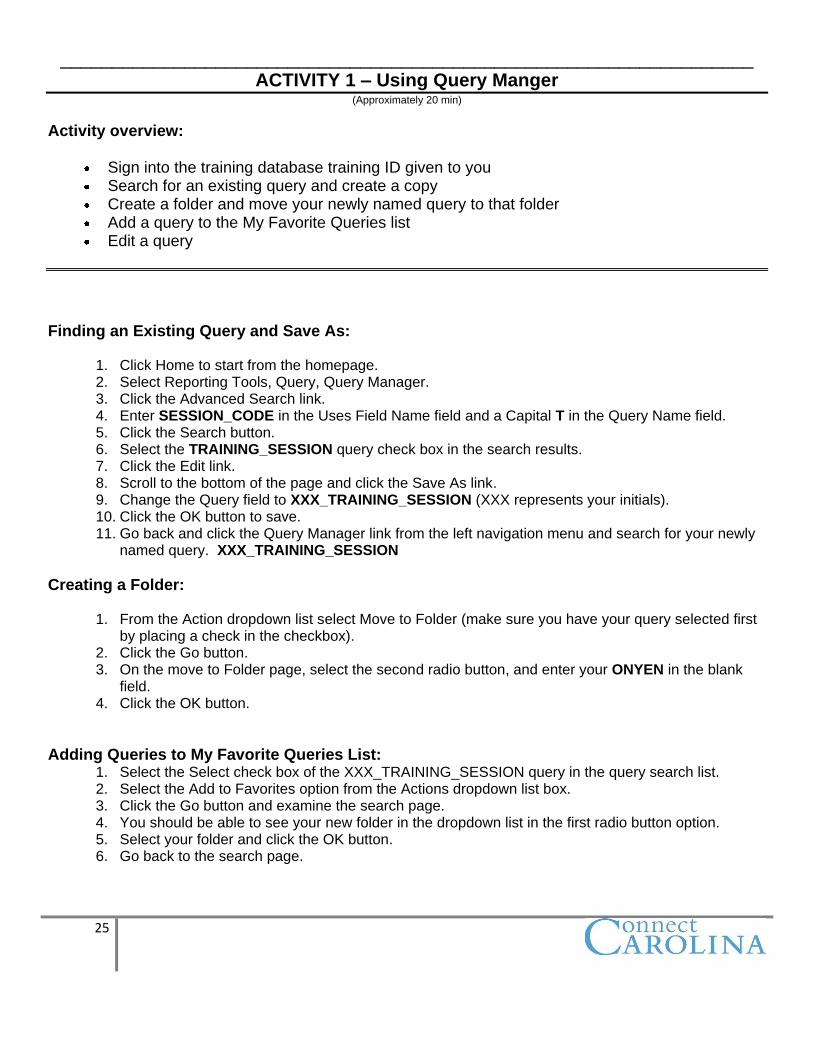
___________________________________________________________________ ACTIVITY 1 – Using Query Manger
(Approximately 20 min)
Activity overview:
Sign into the training database training ID given to you Search for an existing query and create a copy Create a folder and move your newly named query to that folder Add a query to the My Favorite Queries list Edit a query
Finding an Existing Query and Save As:
1. Click Home to start from the homepage. 2. Select Reporting Tools, Query, Query Manager. 3. Click the Advanced Search link. 4. Enter SESSION_CODE in the Uses Field Name field and a Capital T in the Query Name field. 5. Click the Search button. 6. Select the TRAINING_SESSION query check box in the search results. 7. Click the Edit link. 8. Scroll to the bottom of the page and click the Save As link. 9. Change the Query field to XXX_TRAINING_SESSION (XXX represents your initials). 10. Click the OK button to save. 11. Go back and click the Query Manager link from the left navigation menu and search for your newly
named query. XXX_TRAINING_SESSION
Creating a Folder:
1. From the Action dropdown list select Move to Folder (make sure you have your query selected first by placing a check in the checkbox).
2. Click the Go button. 3. On the move to Folder page, select the second radio button, and enter your ONYEN in the blank
field. 4. Click the OK button.
Adding Queries to My Favorite Queries List: 1. Select the Select check box of the XXX_TRAINING_SESSION query in the query search list. 2. Select the Add to Favorites option from the Actions dropdown list box. 3. Click the Go button and examine the search page. 4. You should be able to see your new folder in the dropdown list in the first radio button option. 5. Select your folder and click the OK button. 6. Go back to the search page.

26
Editing a Query: 1. On the Search page search for your query again. 2. Click the Edit link of the XXX_TRAINING_SESSION query in the My Favorite Queries list. 3. Select the Run tab from Query Manager to view the query results. 4. Select the Fields tab to edit the column headings. 5. Click the Edit button of the SESSION_CODE field. 6. Select the Text option from the Edit Field Properties page. 7. Enter Course Session for the Heading Text, and click the OK button. 8. Click the Delete button for the HOLIDAY_SCHEDULE field. 9. Save the query. 10. Select the Run tab to view the results of the XXX_TRAINING_SESSION query.
27
Chapter 3 Creating a Simple Query
Methods to Create a Query You can use either of these two methods to create a query:
Click the Create new Query link on the Query Manager search page. Click the new Query link at the bottom of the pages that are in Query Manger.
Creating a Simple Query To create a simple query:
Access Query Manager, Select a record on the Records page that you want to create a query from Select fields on the Query page. Save and run the query.
28
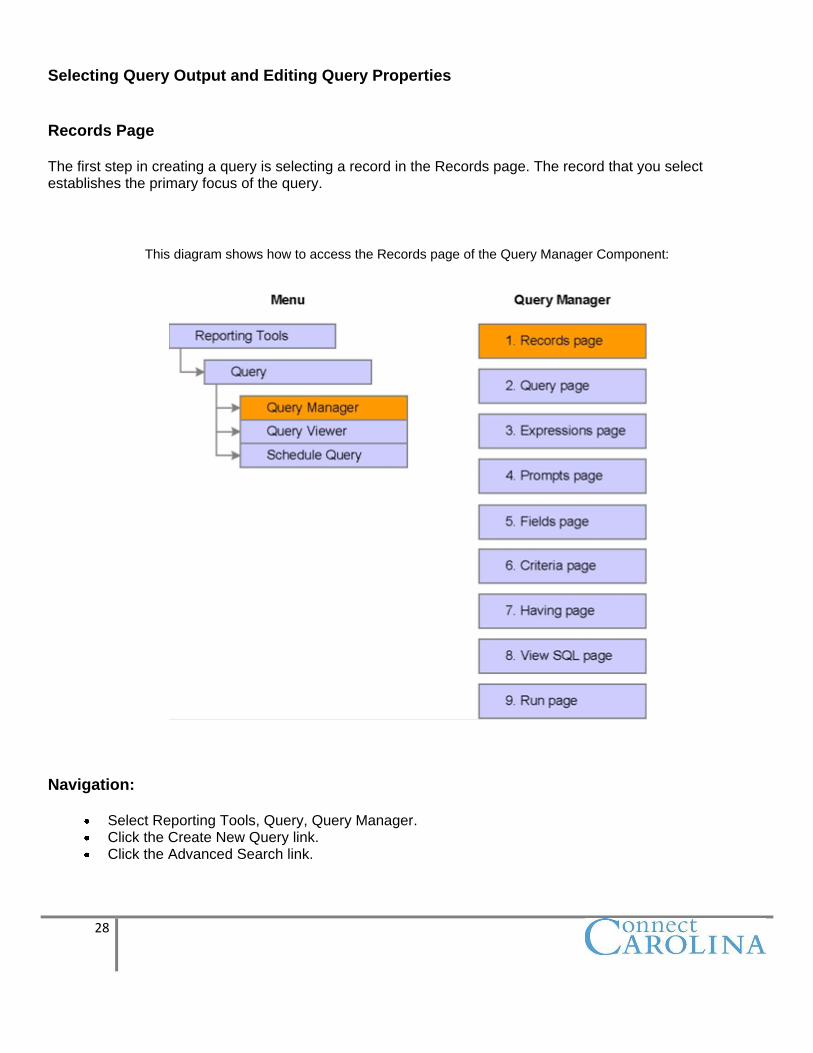
Selecting Query Output and Editing Query Properties Records Page The first step in creating a query is selecting a record in the Records page. The record that you select establishes the primary focus of the query.
This diagram shows how to access the Records page of the Query Manager Component:
Navigation:
Select Reporting Tools, Query, Query Manager. Click the Create New Query link. Click the Advanced Search link.
29
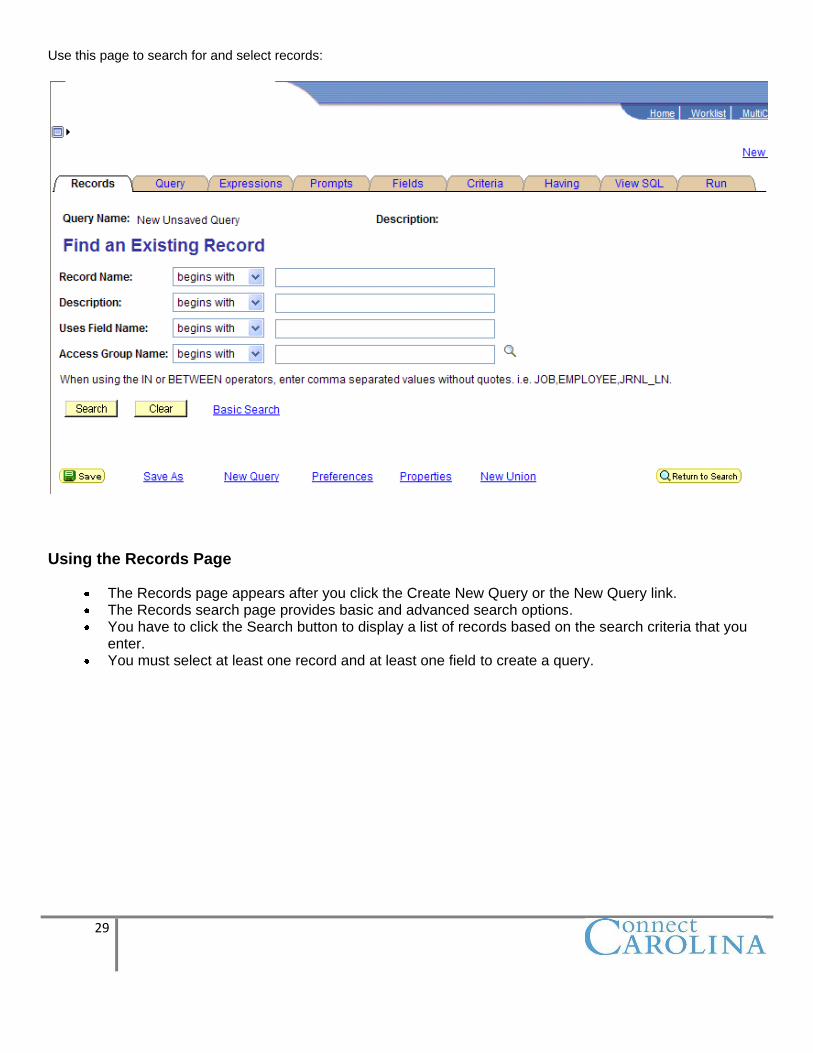
Use this page to search for and select records:
Using the Records Page
The Records page appears after you click the Create New Query or the New Query link. The Records search page provides basic and advanced search options. You have to click the Search button to display a list of records based on the search criteria that you
enter. You must select at least one record and at least one field to create a query.
30
Links and Buttons on the Records Search Page This table explains the links and buttons on the Record basic and advanced search page:
Link or Button Usage
Basic Search Click this link to access the Records basic search page.
Advanced Search Click this link to access the Records advanced search page that offers more fields to use when filtering the search results.
Search Click this button to retrieve results from the entered search criteria.
Clear Click this button to clear any entered criteria from the search fields.
Add Record Click this link to add the record to the new query.
Show Fields Click this link to view the fields prior to selecting a record for the query.
31
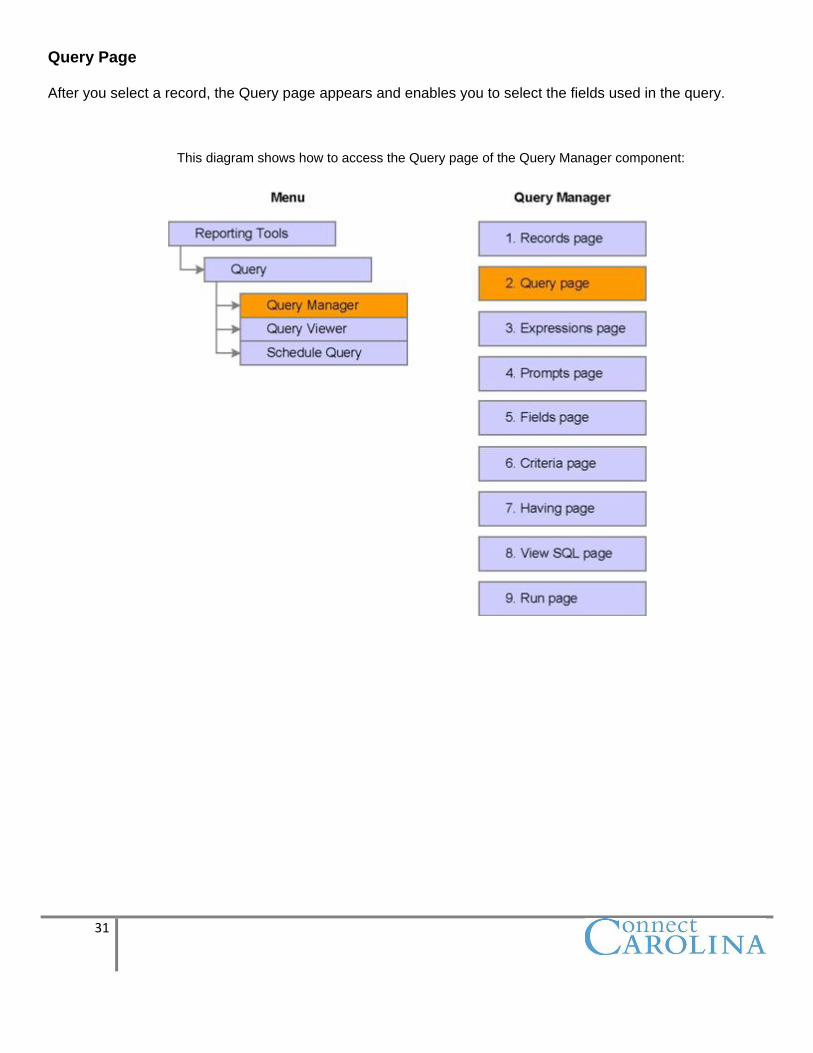
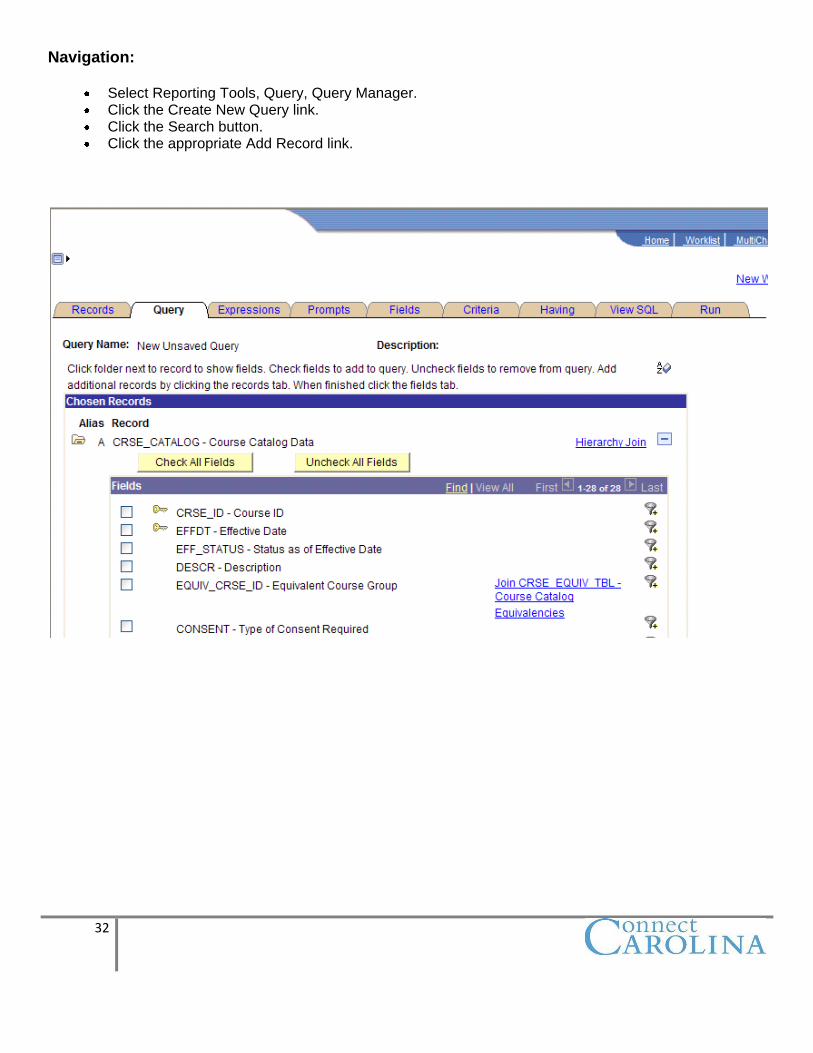
Query Page After you select a record, the Query page appears and enables you to select the fields used in the query.
This diagram shows how to access the Query page of the Query Manager component:
32
Navigation:
Select Reporting Tools, Query, Query Manager. Click the Create New Query link. Click the Search button. Click the appropriate Add Record link.
33
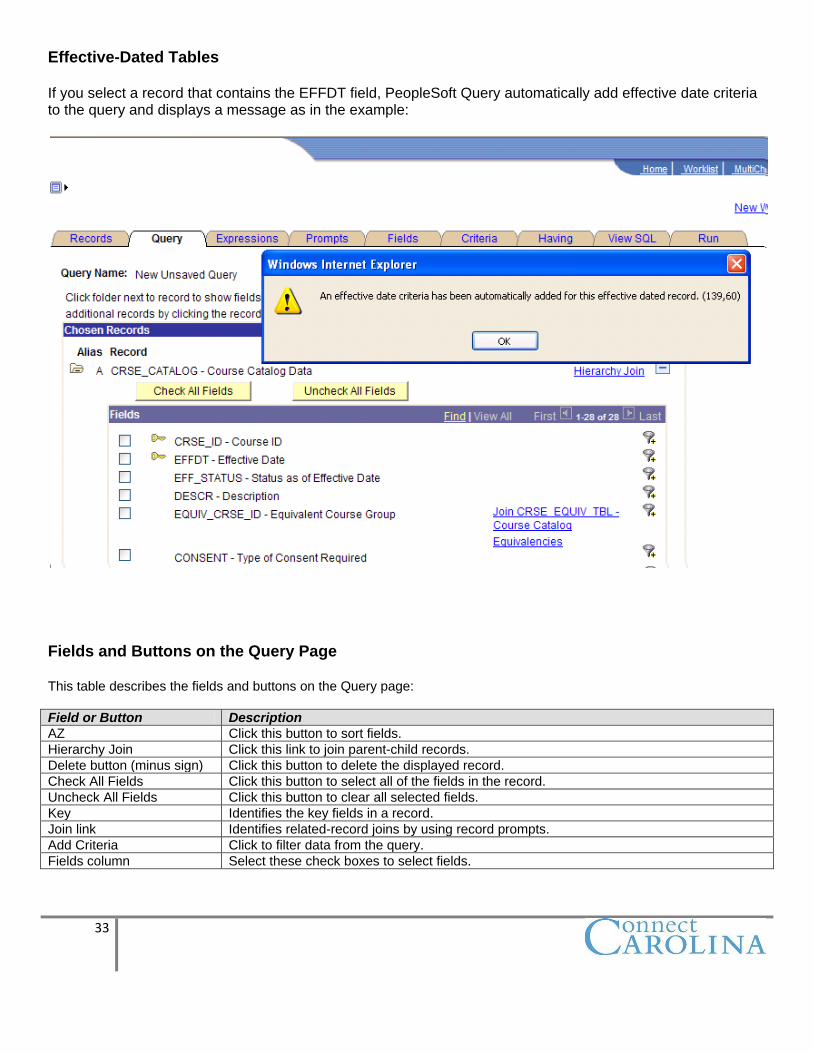
Effective-Dated Tables If you select a record that contains the EFFDT field, PeopleSoft Query automatically add effective date criteria to the query and displays a message as in the example:
Fields and Buttons on the Query Page This table describes the fields and buttons on the Query page:
Field or Button Description
AZ Click this button to sort fields.
Hierarchy Join Click this link to join parent-child records.
Delete button (minus sign) Click this button to delete the displayed record.
Check All Fields Click this button to select all of the fields in the record.
Uncheck All Fields Click this button to clear all selected fields.
Key Identifies the key fields in a record.
Join link Identifies related-record joins by using record prompts.
Add Criteria Click to filter data from the query.
Fields column Select these check boxes to select fields.
34
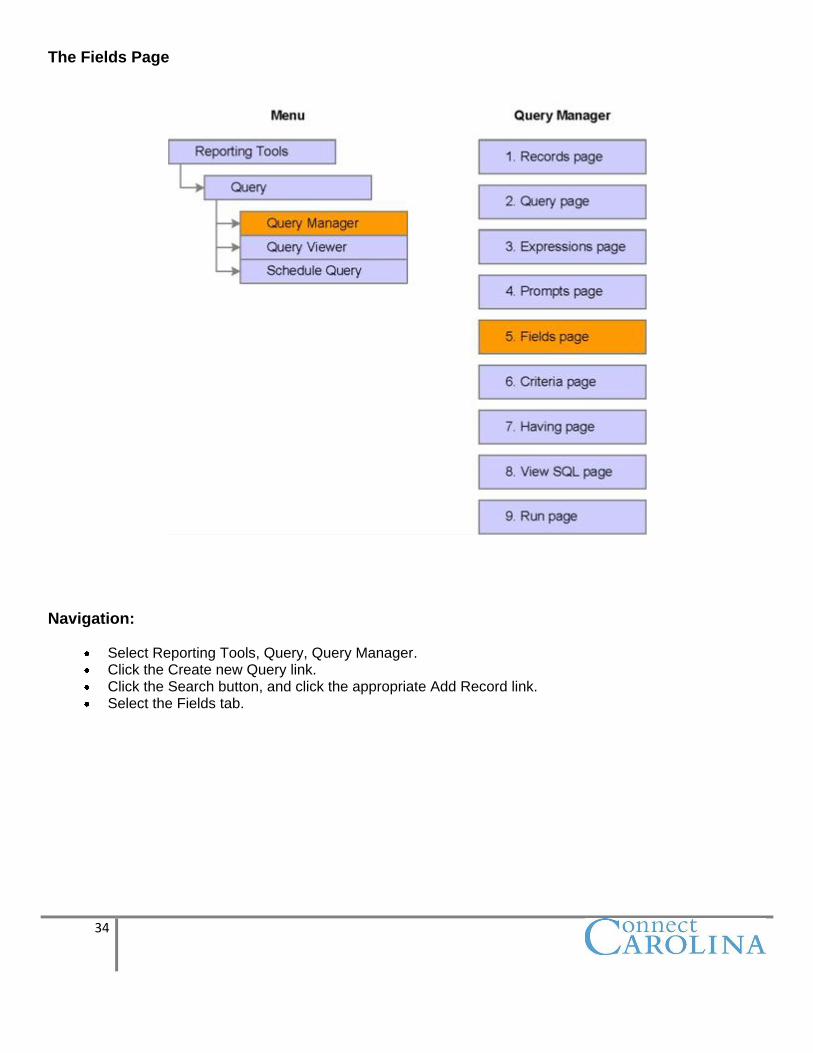
The Fields Page
Navigation:
Select Reporting Tools, Query, Query Manager. Click the Create new Query link. Click the Search button, and click the appropriate Add Record link. Select the Fields tab.
35
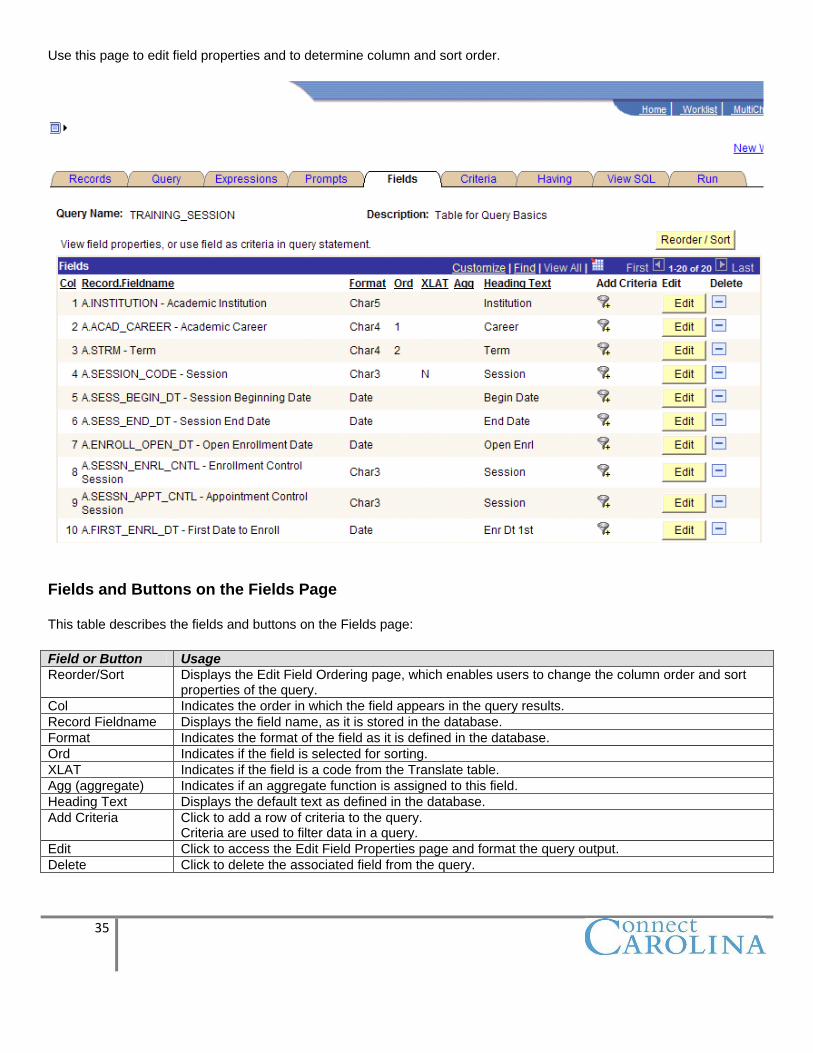
Use this page to edit field properties and to determine column and sort order.
Fields and Buttons on the Fields Page This table describes the fields and buttons on the Fields page:
Field or Button Usage
Reorder/Sort Displays the Edit Field Ordering page, which enables users to change the column order and sort properties of the query.
Col Indicates the order in which the field appears in the query results.
Record Fieldname Displays the field name, as it is stored in the database.
Format Indicates the format of the field as it is defined in the database.
Ord Indicates if the field is selected for sorting.
XLAT Indicates if the field is a code from the Translate table.
Agg (aggregate) Indicates if an aggregate function is assigned to this field.
Heading Text Displays the default text as defined in the database.
Add Criteria Click to add a row of criteria to the query. Criteria are used to filter data in a query.
Edit Click to access the Edit Field Properties page and format the query output.
Delete Click to delete the associated field from the query.
36
Order By Feature The Order By feature places a number next to the field indicating which field is:
A primary sort (1) A secondary sort (2) A descending primary sort (D1), and so on
Note: Descending sort means sorting from Z to A. Ascending sort means sorting from A to Z.
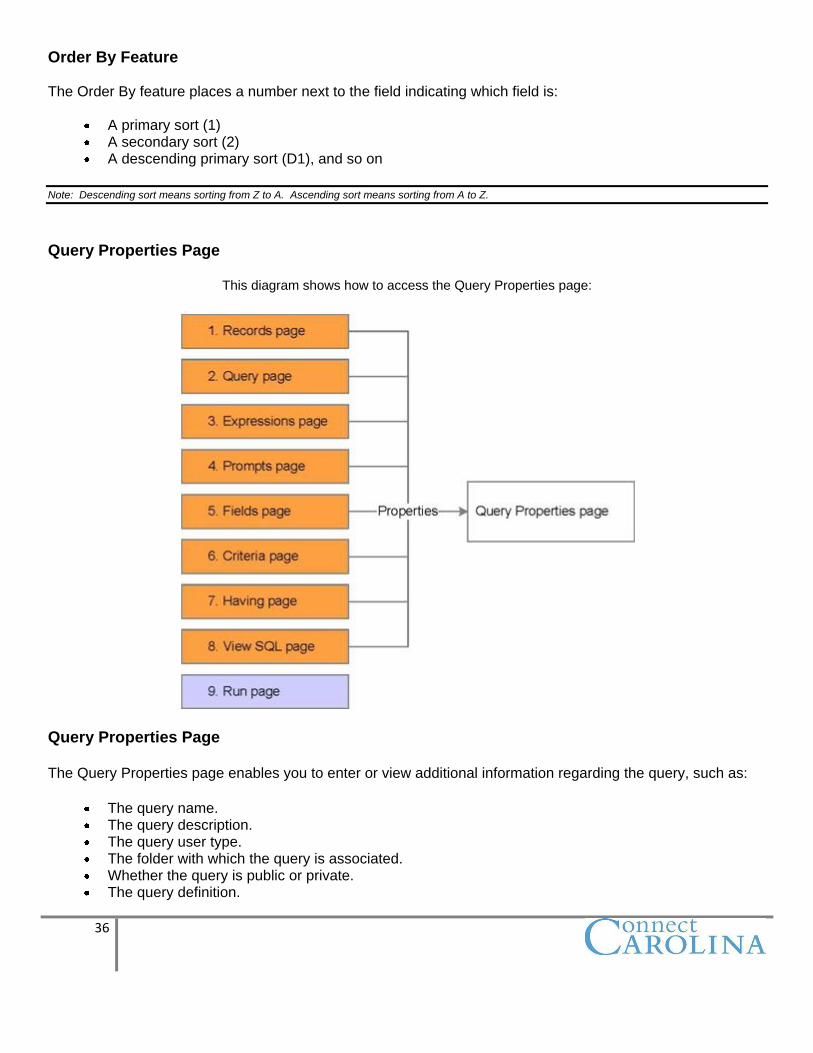
Query Properties Page
This diagram shows how to access the Query Properties page:
Query Properties Page The Query Properties page enables you to enter or view additional information regarding the query, such as:
The query name. The query description. The query user type. The folder with which the query is associated. Whether the query is public or private. The query definition.
37
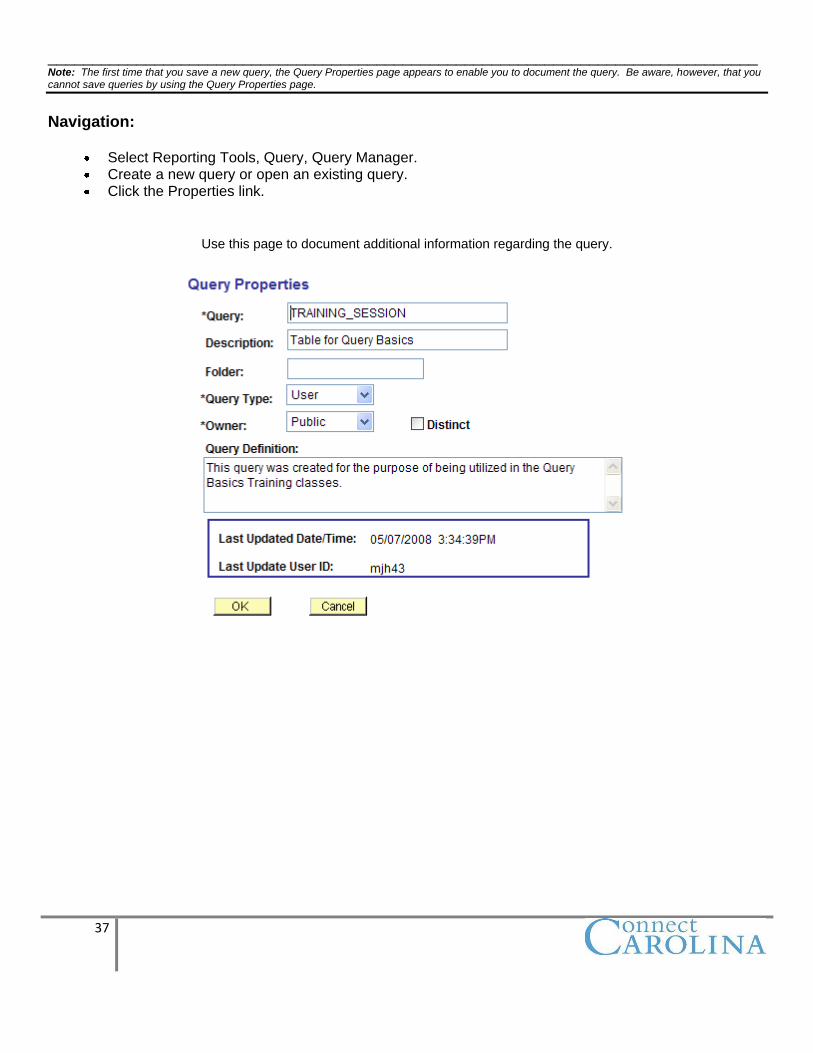
________________________________________________________________________________ Note: The first time that you save a new query, the Query Properties page appears to enable you to document the query. Be aware, however, that you cannot save queries by using the Query Properties page.
Navigation:
Select Reporting Tools, Query, Query Manager. Create a new query or open an existing query. Click the Properties link.
Use this page to document additional information regarding the query.
38
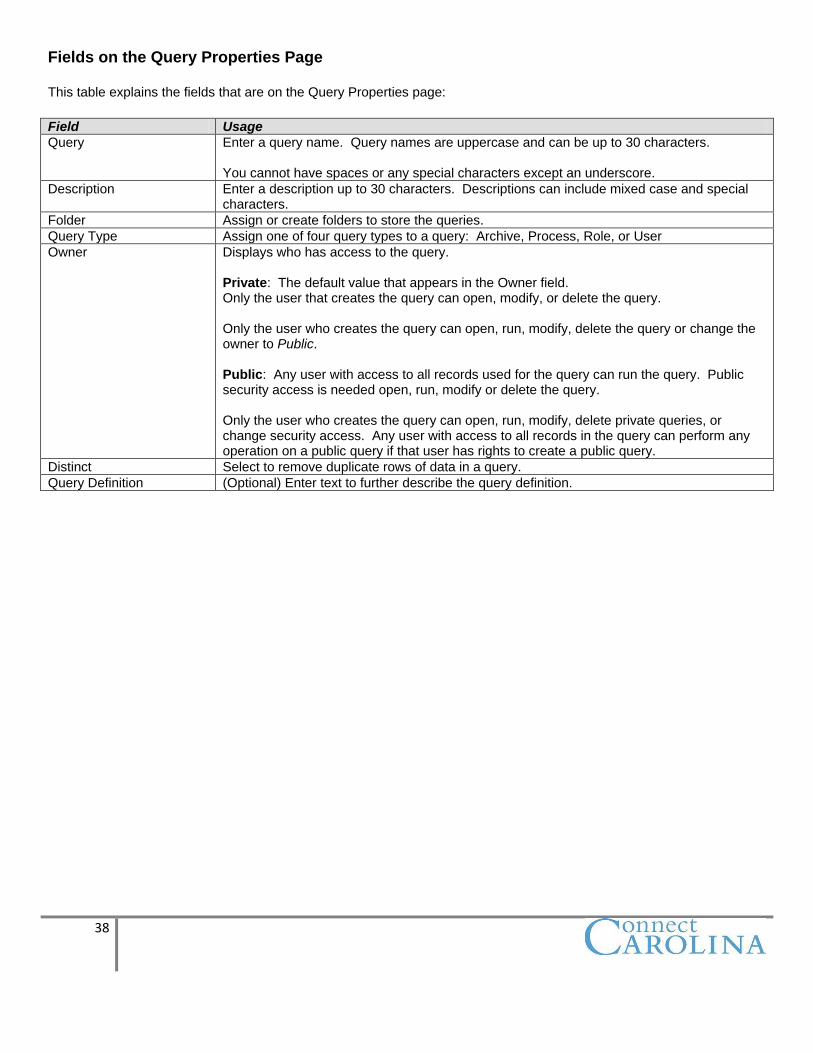
Fields on the Query Properties Page This table explains the fields that are on the Query Properties page:
Field Usage
Query Enter a query name. Query names are uppercase and can be up to 30 characters. You cannot have spaces or any special characters except an underscore.
Description Enter a description up to 30 characters. Descriptions can include mixed case and special characters.
Folder Assign or create folders to store the queries.
Query Type Assign one of four query types to a query: Archive, Process, Role, or User
Owner Displays who has access to the query. Private: The default value that appears in the Owner field. Only the user that creates the query can open, modify, or delete the query. Only the user who creates the query can open, run, modify, delete the query or change the owner to Public. Public: Any user with access to all records used for the query can run the query. Public security access is needed open, run, modify or delete the query. Only the user who creates the query can open, run, modify, delete private queries, or change security access. Any user with access to all records in the query can perform any operation on a public query if that user has rights to create a public query.
Distinct Select to remove duplicate rows of data in a query.
Query Definition (Optional) Enter text to further describe the query definition.
39
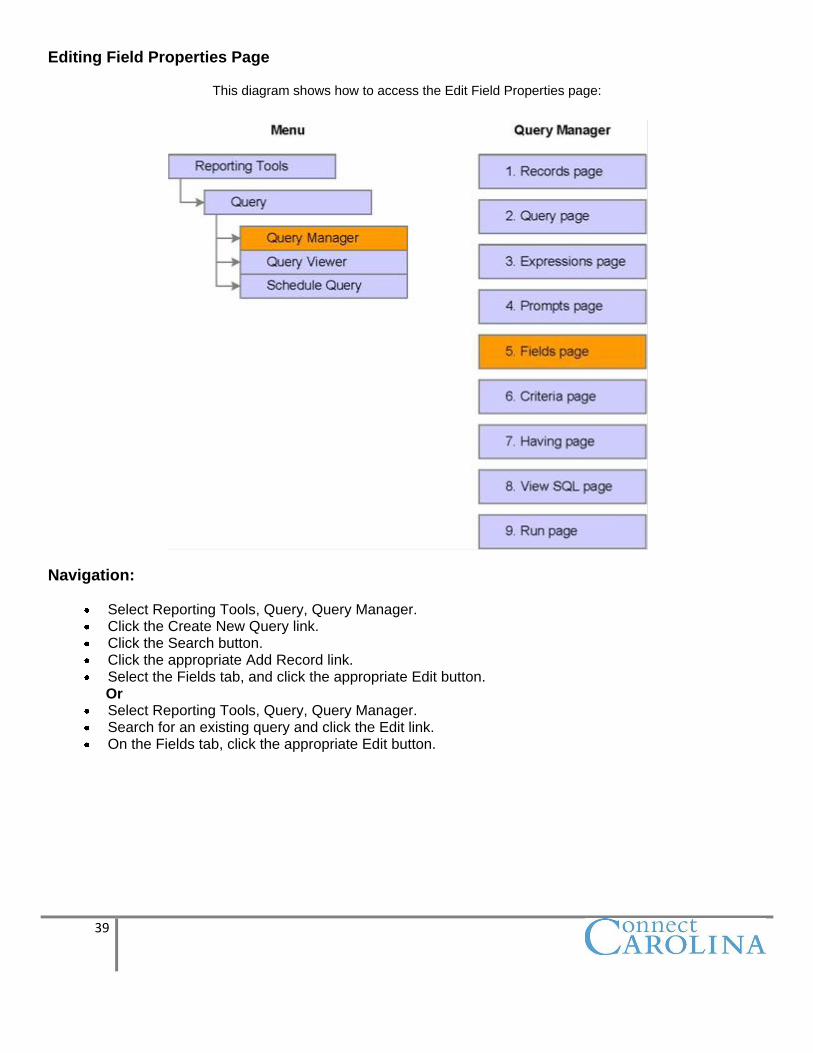
Editing Field Properties Page
This diagram shows how to access the Edit Field Properties page:
Navigation:
Select Reporting Tools, Query, Query Manager. Click the Create New Query link. Click the Search button. Click the appropriate Add Record link. Select the Fields tab, and click the appropriate Edit button.
Or Select Reporting Tools, Query, Query Manager. Search for an existing query and click the Edit link. On the Fields tab, click the appropriate Edit button.
40
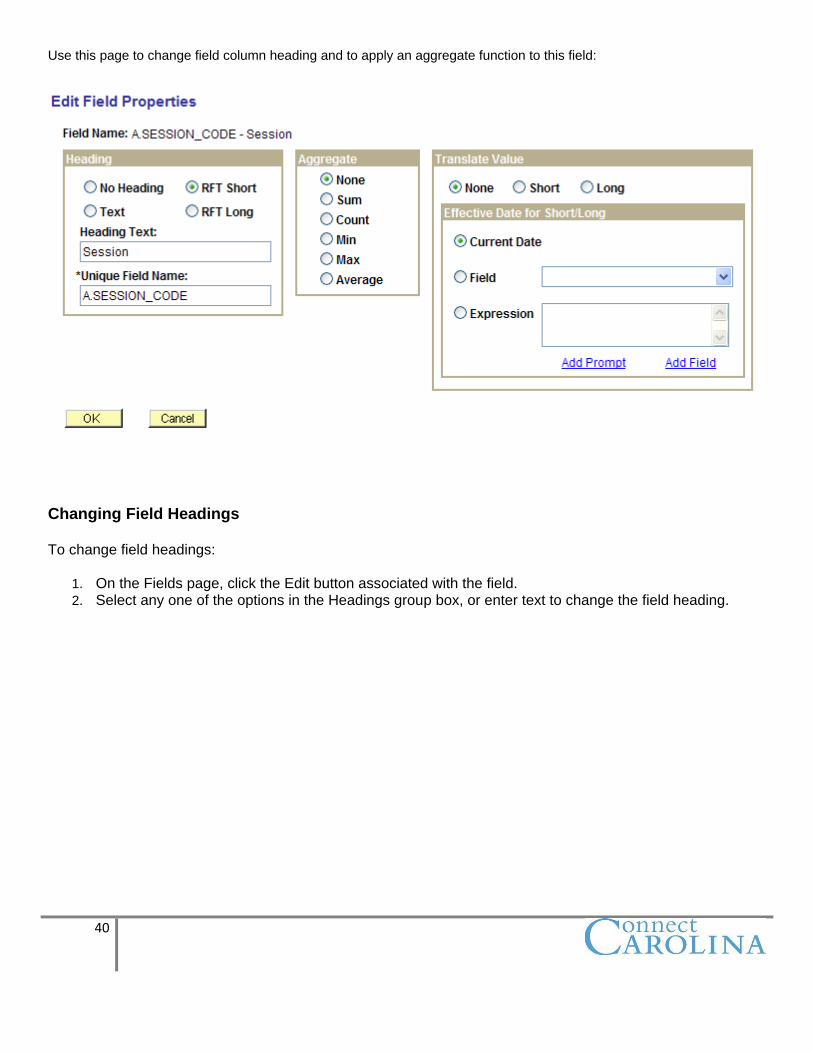
Use this page to change field column heading and to apply an aggregate function to this field:
Changing Field Headings To change field headings:
1. On the Fields page, click the Edit button associated with the field. 2. Select any one of the options in the Headings group box, or enter text to change the field heading.
41
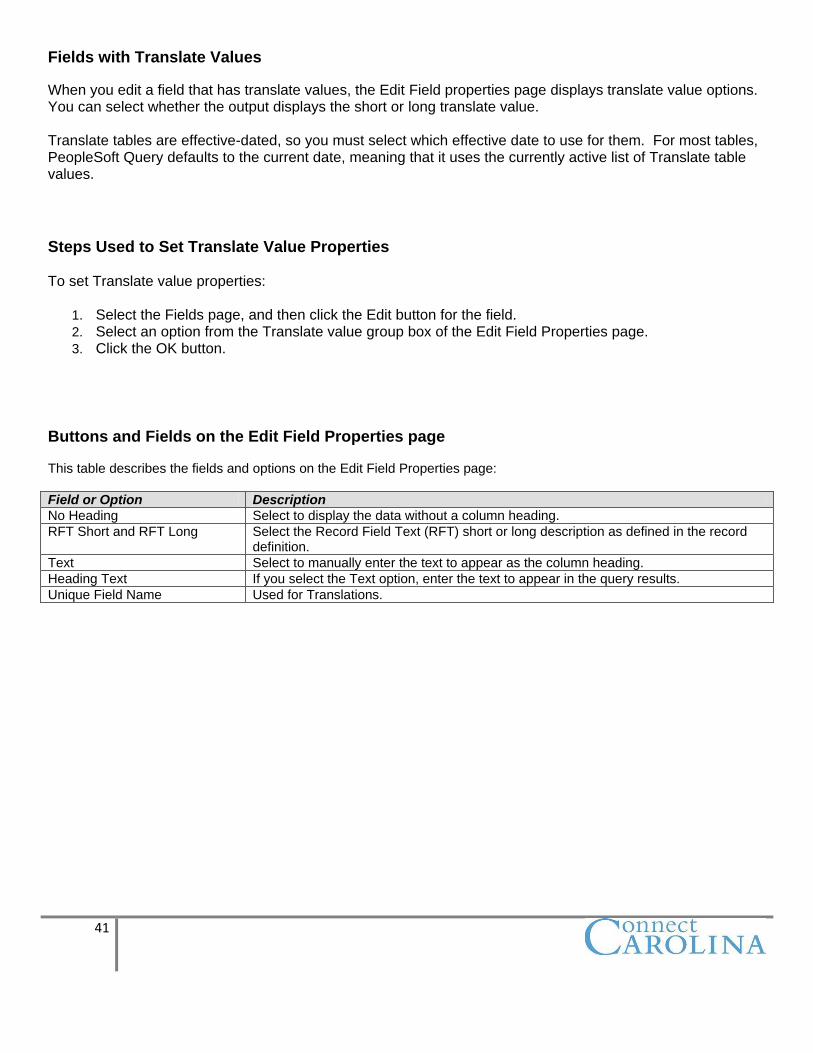
Fields with Translate Values
When you edit a field that has translate values, the Edit Field properties page displays translate value options. You can select whether the output displays the short or long translate value. Translate tables are effective-dated, so you must select which effective date to use for them. For most tables, PeopleSoft Query defaults to the current date, meaning that it uses the currently active list of Translate table values.
Steps Used to Set Translate Value Properties To set Translate value properties:
1. Select the Fields page, and then click the Edit button for the field. 2. Select an option from the Translate value group box of the Edit Field Properties page. 3. Click the OK button.
Buttons and Fields on the Edit Field Properties page This table describes the fields and options on the Edit Field Properties page:
Field or Option Description
No Heading Select to display the data without a column heading.
RFT Short and RFT Long Select the Record Field Text (RFT) short or long description as defined in the record definition.
Text Select to manually enter the text to appear as the column heading.
Heading Text If you select the Text option, enter the text to appear in the query results.
Unique Field Name Used for Translations.
42
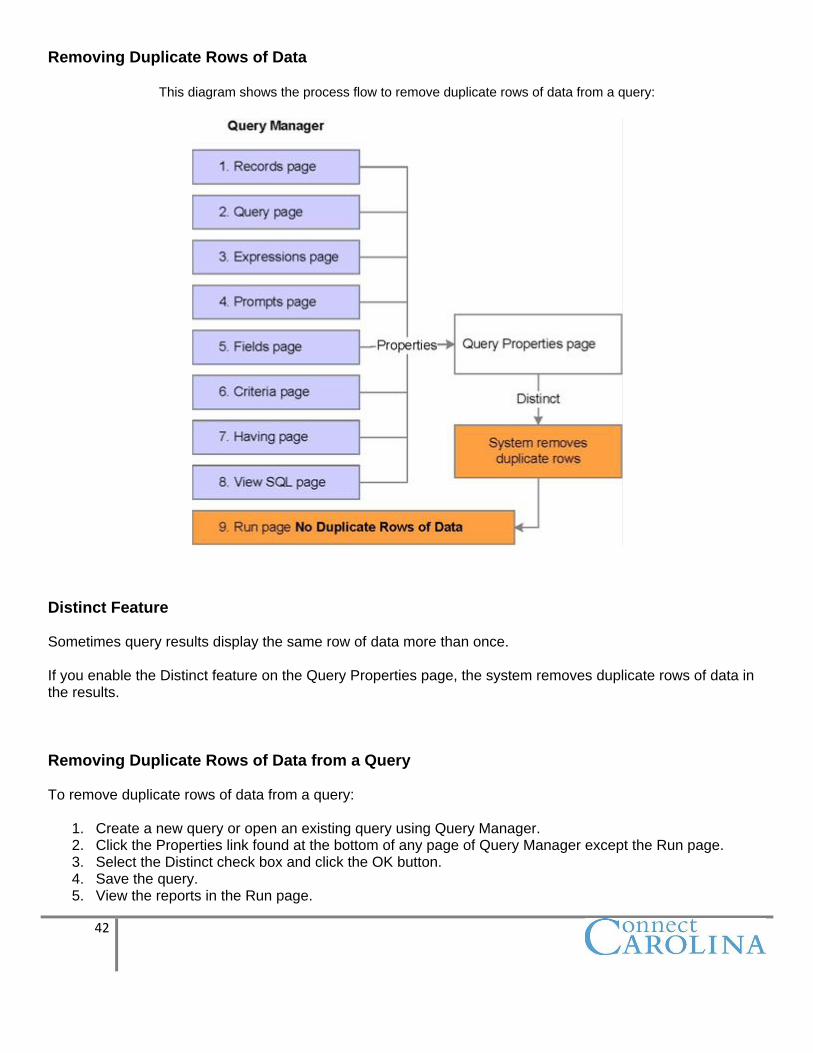
Removing Duplicate Rows of Data
This diagram shows the process flow to remove duplicate rows of data from a query:
Distinct Feature Sometimes query results display the same row of data more than once. If you enable the Distinct feature on the Query Properties page, the system removes duplicate rows of data in the results.
Removing Duplicate Rows of Data from a Query To remove duplicate rows of data from a query:
1. Create a new query or open an existing query using Query Manager. 2. Click the Properties link found at the bottom of any page of Query Manager except the Run page. 3. Select the Distinct check box and click the OK button. 4. Save the query. 5. View the reports in the Run page.
43
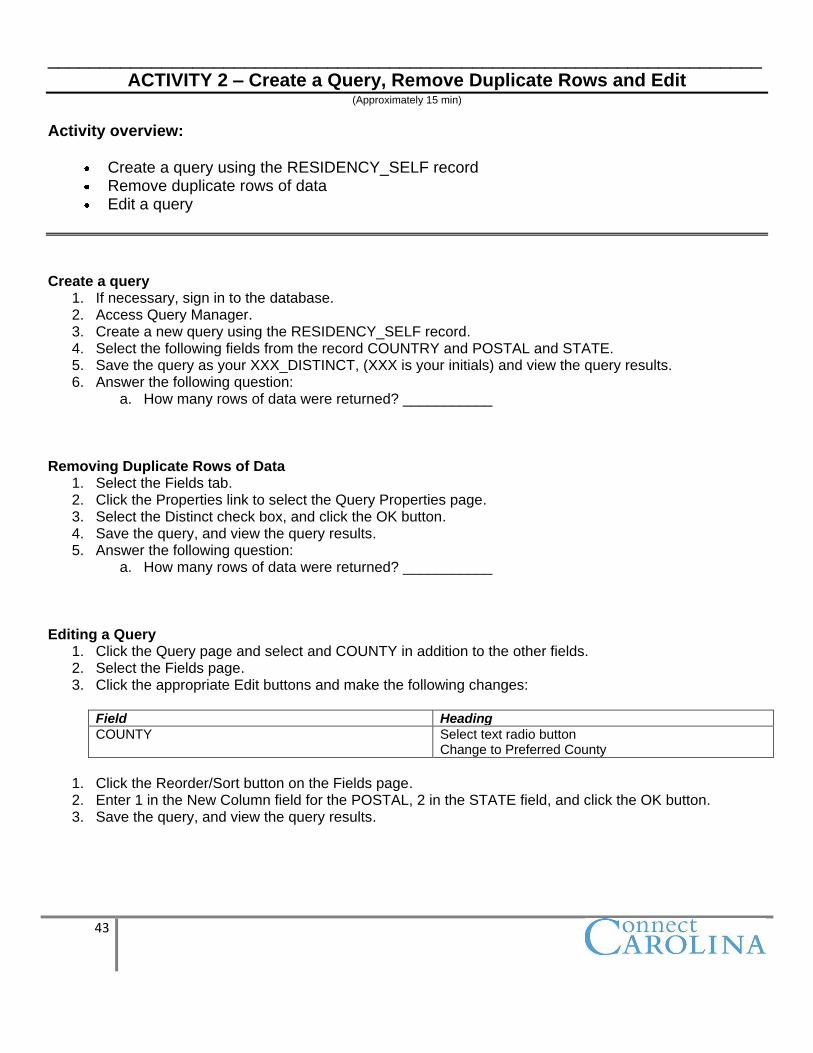
_____________________________________________________________________ ACTIVITY 2 – Create a Query, Remove Duplicate Rows and Edit
(Approximately 15 min)
Activity overview:
Create a query using the RESIDENCY_SELF record Remove duplicate rows of data Edit a query
Create a query
1. If necessary, sign in to the database. 2. Access Query Manager. 3. Create a new query using the RESIDENCY_SELF record. 4. Select the following fields from the record COUNTRY and POSTAL and STATE. 5. Save the query as your XXX_DISTINCT, (XXX is your initials) and view the query results. 6. Answer the following question:
a. How many rows of data were returned? ___________ Removing Duplicate Rows of Data
1. Select the Fields tab. 2. Click the Properties link to select the Query Properties page. 3. Select the Distinct check box, and click the OK button. 4. Save the query, and view the query results. 5. Answer the following question:
a. How many rows of data were returned? ___________ Editing a Query
1. Click the Query page and select and COUNTY in addition to the other fields. 2. Select the Fields page. 3. Click the appropriate Edit buttons and make the following changes:
Field Heading
COUNTY Select text radio button Change to Preferred County
1. Click the Reorder/Sort button on the Fields page. 2. Enter 1 in the New Column field for the POSTAL, 2 in the STATE field, and click the OK button. 3. Save the query, and view the query results.
44
Chapter 4 Filtering Output with Criteria
Applying Criteria to Queries
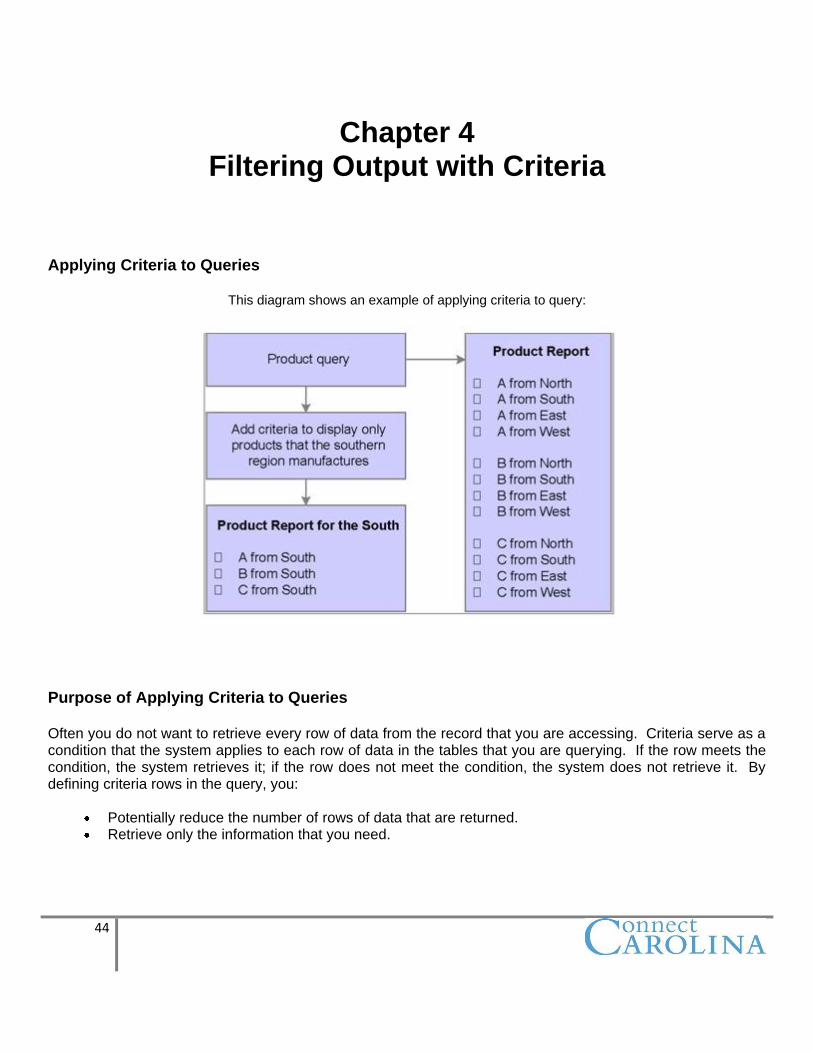
This diagram shows an example of applying criteria to query:
Purpose of Applying Criteria to Queries Often you do not want to retrieve every row of data from the record that you are accessing. Criteria serve as a condition that the system applies to each row of data in the tables that you are querying. If the row meets the condition, the system retrieves it; if the row does not meet the condition, the system does not retrieve it. By defining criteria rows in the query, you:
Potentially reduce the number of rows of data that are returned. Retrieve only the information that you need.
45
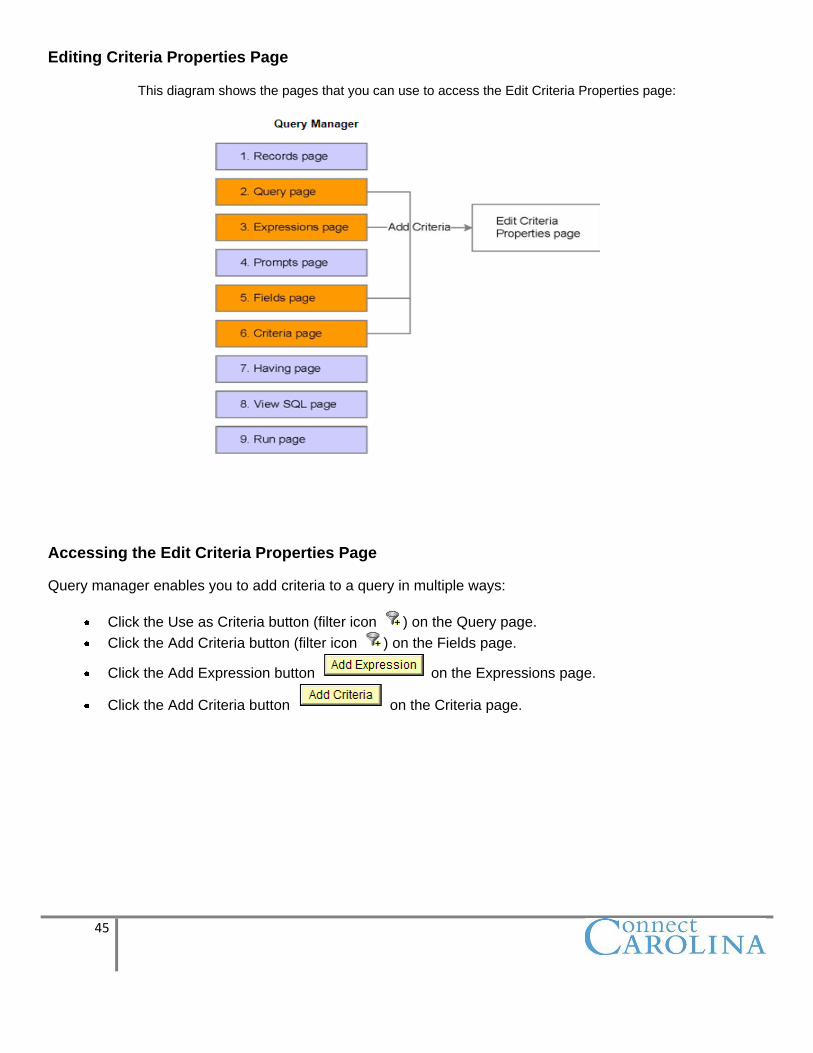
Editing Criteria Properties Page
This diagram shows the pages that you can use to access the Edit Criteria Properties page:
Accessing the Edit Criteria Properties Page
Query manager enables you to add criteria to a query in multiple ways:
Click the Use as Criteria button (filter icon ) on the Query page.
Click the Add Criteria button (filter icon ) on the Fields page.
Click the Add Expression button on the Expressions page.
Click the Add Criteria button on the Criteria page.
46
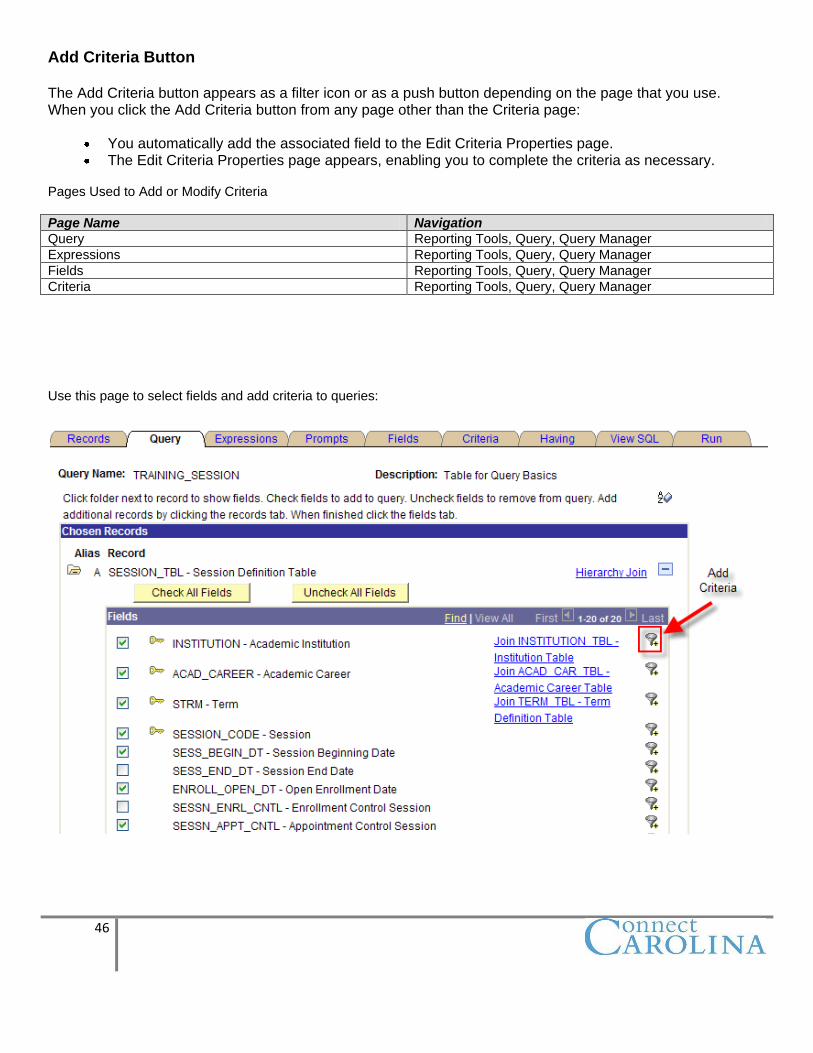
Add Criteria Button The Add Criteria button appears as a filter icon or as a push button depending on the page that you use. When you click the Add Criteria button from any page other than the Criteria page:
You automatically add the associated field to the Edit Criteria Properties page. The Edit Criteria Properties page appears, enabling you to complete the criteria as necessary.
Pages Used to Add or Modify Criteria
Page Name Navigation
Query Reporting Tools, Query, Query Manager
Expressions Reporting Tools, Query, Query Manager
Fields Reporting Tools, Query, Query Manager
Criteria Reporting Tools, Query, Query Manager
Use this page to select fields and add criteria to queries:
47
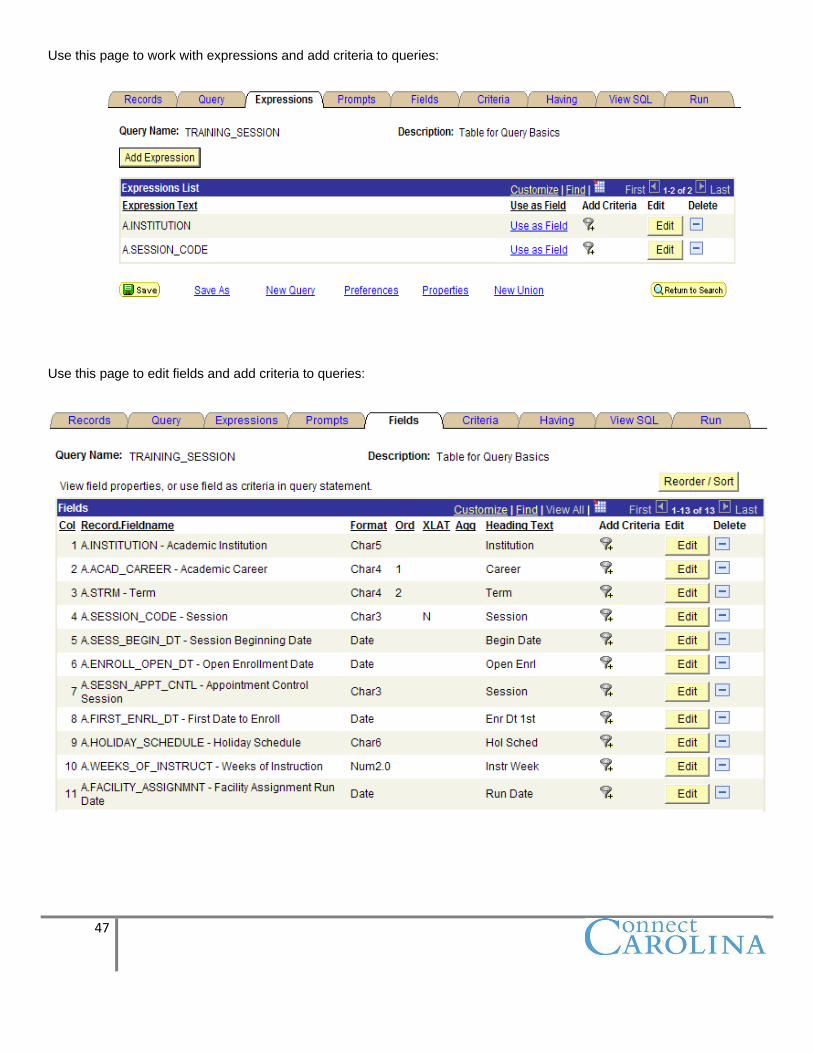
Use this page to work with expressions and add criteria to queries:
Use this page to edit fields and add criteria to queries:
48
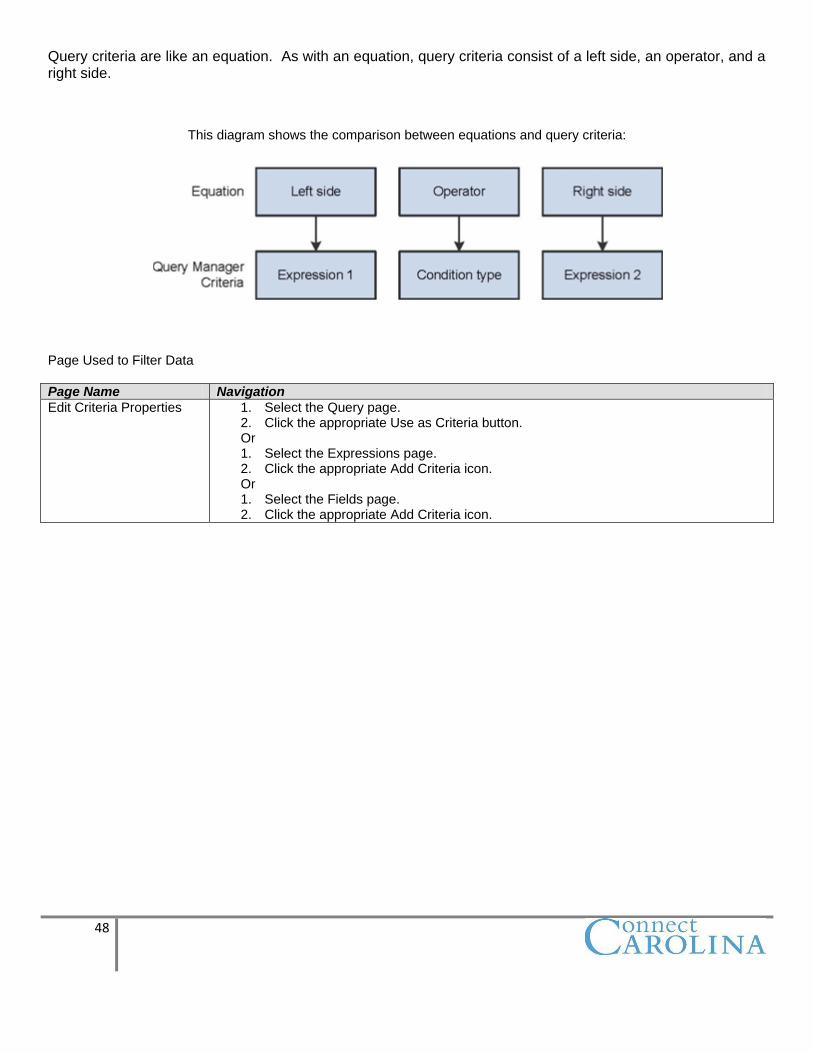
Query criteria are like an equation. As with an equation, query criteria consist of a left side, an operator, and a right side.
This diagram shows the comparison between equations and query criteria:
Page Used to Filter Data
Page Name Navigation
Edit Criteria Properties 1. Select the Query page. 2. Click the appropriate Use as Criteria button. Or 1. Select the Expressions page. 2. Click the appropriate Add Criteria icon. Or 1. Select the Fields page. 2. Click the appropriate Add Criteria icon.
49
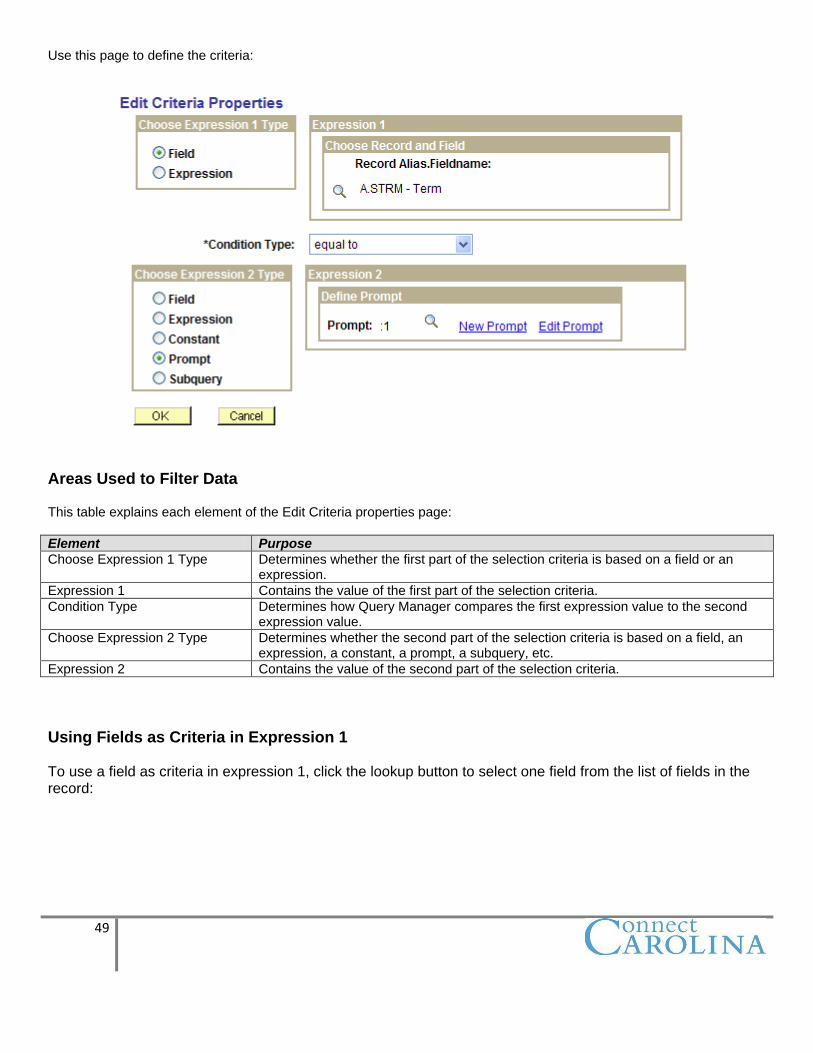
Use this page to define the criteria:
Areas Used to Filter Data This table explains each element of the Edit Criteria properties page:
Element Purpose
Choose Expression 1 Type Determines whether the first part of the selection criteria is based on a field or an expression.
Expression 1 Contains the value of the first part of the selection criteria.
Condition Type Determines how Query Manager compares the first expression value to the second expression value.
Choose Expression 2 Type Determines whether the second part of the selection criteria is based on a field, an expression, a constant, a prompt, a subquery, etc.
Expression 2 Contains the value of the second part of the selection criteria.
Using Fields as Criteria in Expression 1 To use a field as criteria in expression 1, click the lookup button to select one field from the list of fields in the record:

50
Using Expressions as Criteria in Expression 1
To use an expression as criteria in expression 1, use one of the links or the lookup button to search for or edit an existing expression, or create a new expression.
Steps used to Add Criteria
This diagram shows the process flow that you use to add criteria:
51
Using the Edit Criteria properties Page When you use the Criteria Properties page, you should note that:
Clicking Add Criteria button – whether from the Query page, the Fields page, or the Expression page –automatically inserts the associated field or expression in the Expression 1 section of the Edit Criteria Properties page.
The Choose Expression 2 Type field varies depending on the option that you select in the Condition Type field.
The Expression 2 field varies depending on the option that you select in the Choose Expression Type 2 field.

52
Criteria Page
This diagram shows how to access the Criteria page of Query Manager:
Page Used to Enter Selection Criteria for the Query
Page Name Navigation
Criteria 1. Select Reporting Tools, Query, Query Manager. 2. Click the Create New Query link. 3. Search for records, and click the appropriate Add Record link. 4. Select fields on the Query page. 5. Select the Criteria tab.
53
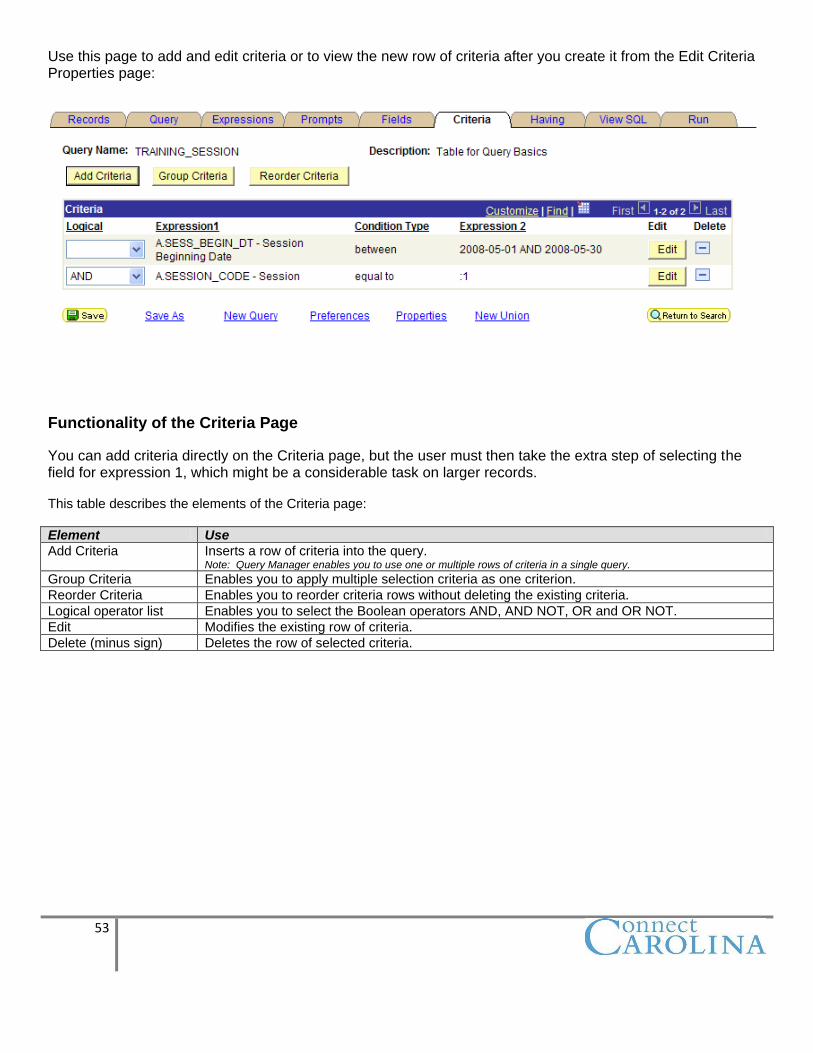
Use this page to add and edit criteria or to view the new row of criteria after you create it from the Edit Criteria Properties page:
Functionality of the Criteria Page
You can add criteria directly on the Criteria page, but the user must then take the extra step of selecting the field for expression 1, which might be a considerable task on larger records. This table describes the elements of the Criteria page:
Element Use
Add Criteria Inserts a row of criteria into the query. Note: Query Manager enables you to use one or multiple rows of criteria in a single query.
Group Criteria Enables you to apply multiple selection criteria as one criterion.
Reorder Criteria Enables you to reorder criteria rows without deleting the existing criteria.
Logical operator list Enables you to select the Boolean operators AND, AND NOT, OR and OR NOT.
Edit Modifies the existing row of criteria.
Delete (minus sign) Deletes the row of selected criteria.
54
Refining Criteria
Condition Types
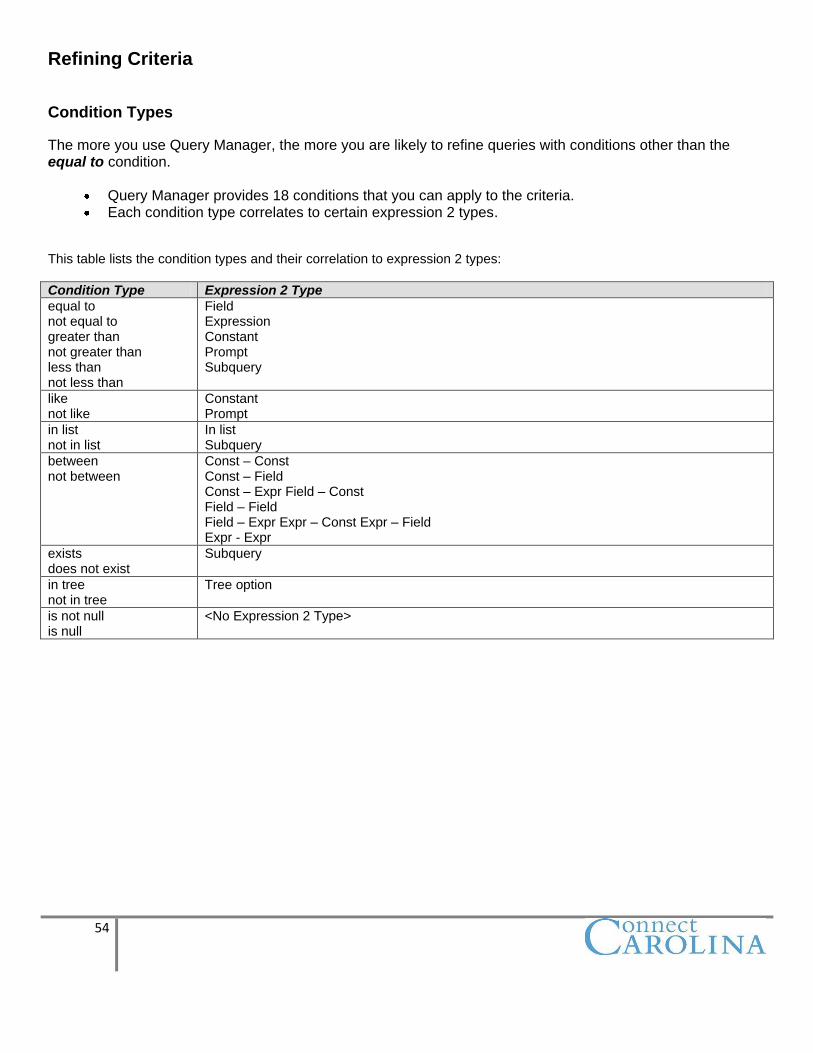
The more you use Query Manager, the more you are likely to refine queries with conditions other than the equal to condition.
Query Manager provides 18 conditions that you can apply to the criteria. Each condition type correlates to certain expression 2 types.
This table lists the condition types and their correlation to expression 2 types:
Condition Type Expression 2 Type
equal to not equal to greater than not greater than less than not less than
Field Expression Constant Prompt Subquery
like not like
Constant Prompt
in list not in list
In list Subquery
between not between
Const – Const Const – Field Const – Expr Field – Const Field – Field Field – Expr Expr – Const Expr – Field Expr - Expr
exists does not exist
Subquery
in tree not in tree
Tree option
is not null is null
<No Expression 2 Type>
55
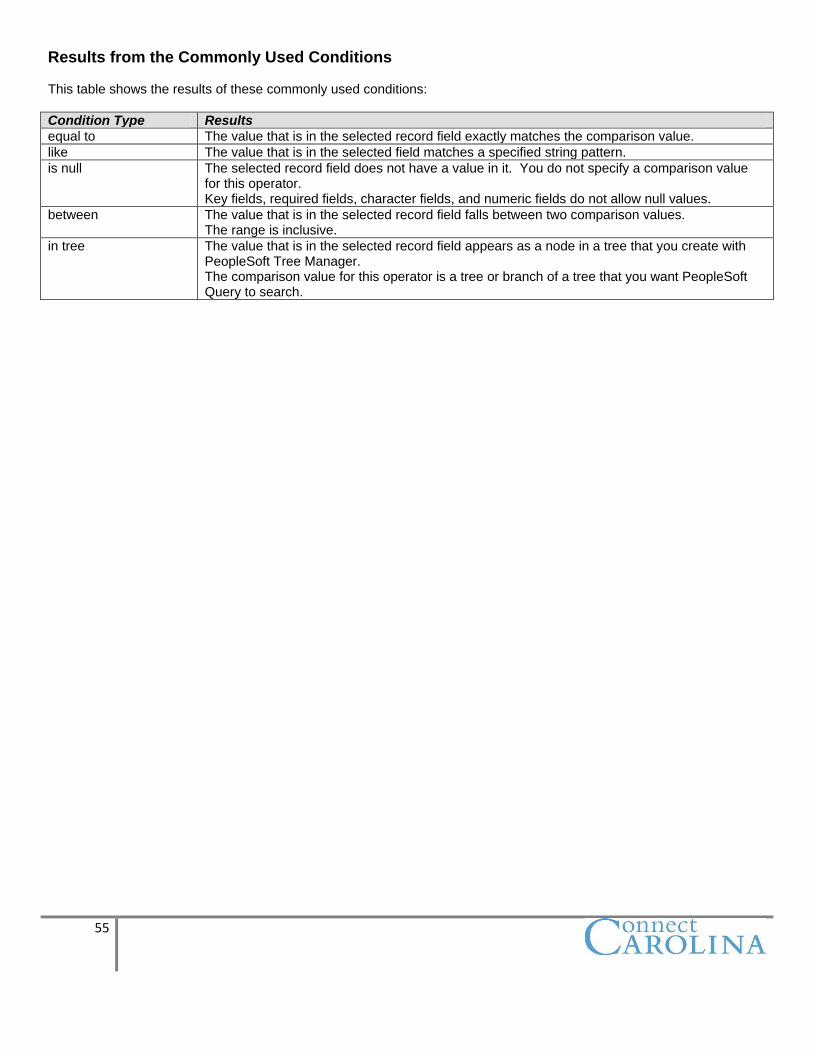
Results from the Commonly Used Conditions This table shows the results of these commonly used conditions:
Condition Type Results
equal to The value that is in the selected record field exactly matches the comparison value.
like The value that is in the selected field matches a specified string pattern.
is null The selected record field does not have a value in it. You do not specify a comparison value for this operator. Key fields, required fields, character fields, and numeric fields do not allow null values.
between The value that is in the selected record field falls between two comparison values. The range is inclusive.
in tree The value that is in the selected record field appears as a node in a tree that you create with PeopleSoft Tree Manager. The comparison value for this operator is a tree or branch of a tree that you want PeopleSoft Query to search.
56
Expression 2 Type
After you select a condition, you then select an expression 2 type. Use these guidelines to choose the appropriate expression 2 type, and specify the expression to which expression 1 type compares:
Expression 2 Type Description
Field Compares to a field within the records selected for this query.
Expression Compares to an expression that you create. PeopleSoft Query evaluates each row with this expression.
Constant Compares to a single fixed value.
Prompt Compares to a prompt that requires the user to enter values when the query runs.
Subquery Compares to a field from another query.
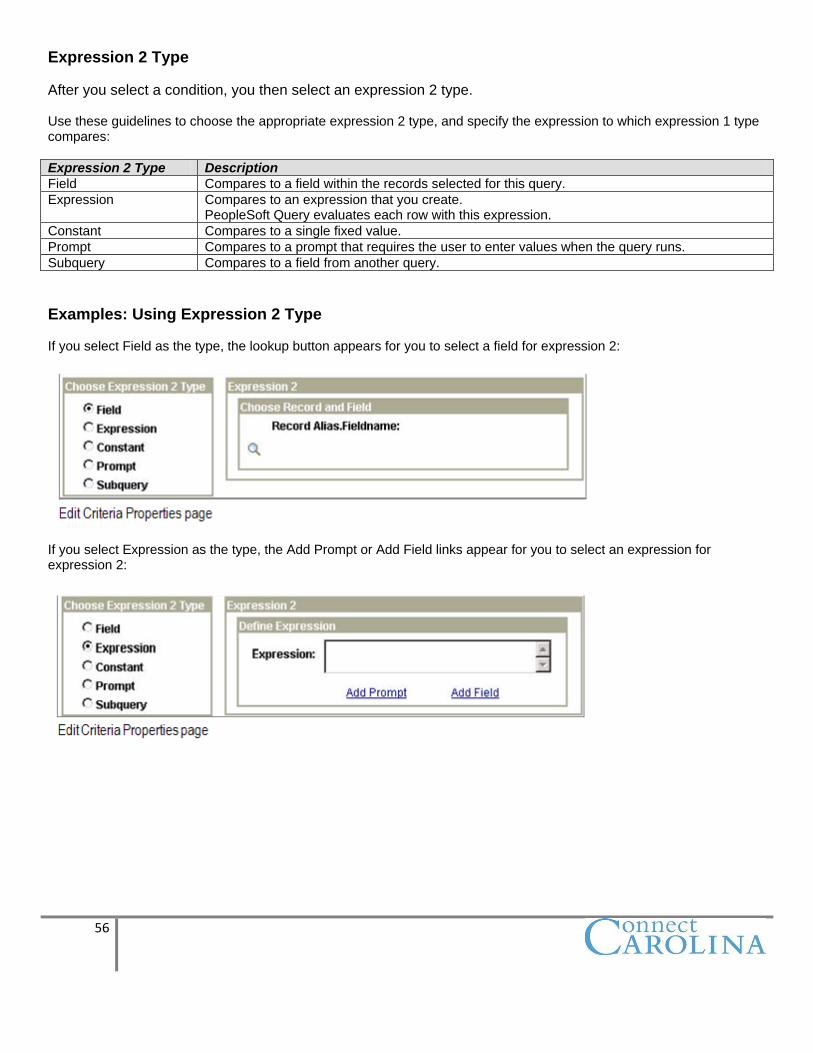
Examples: Using Expression 2 Type If you select Field as the type, the lookup button appears for you to select a field for expression 2:
If you select Expression as the type, the Add Prompt or Add Field links appear for you to select an expression for expression 2:
57
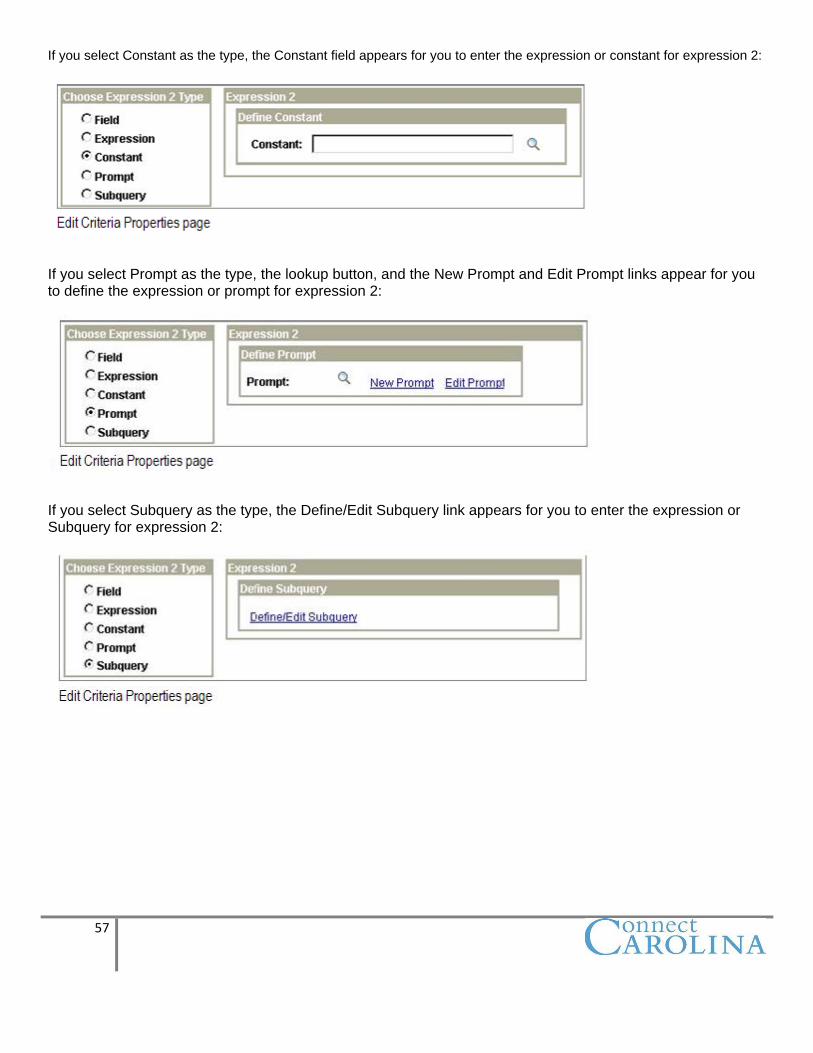
If you select Constant as the type, the Constant field appears for you to enter the expression or constant for expression 2:
If you select Prompt as the type, the lookup button, and the New Prompt and Edit Prompt links appear for you to define the expression or prompt for expression 2:
If you select Subquery as the type, the Define/Edit Subquery link appears for you to enter the expression or Subquery for expression 2:
58
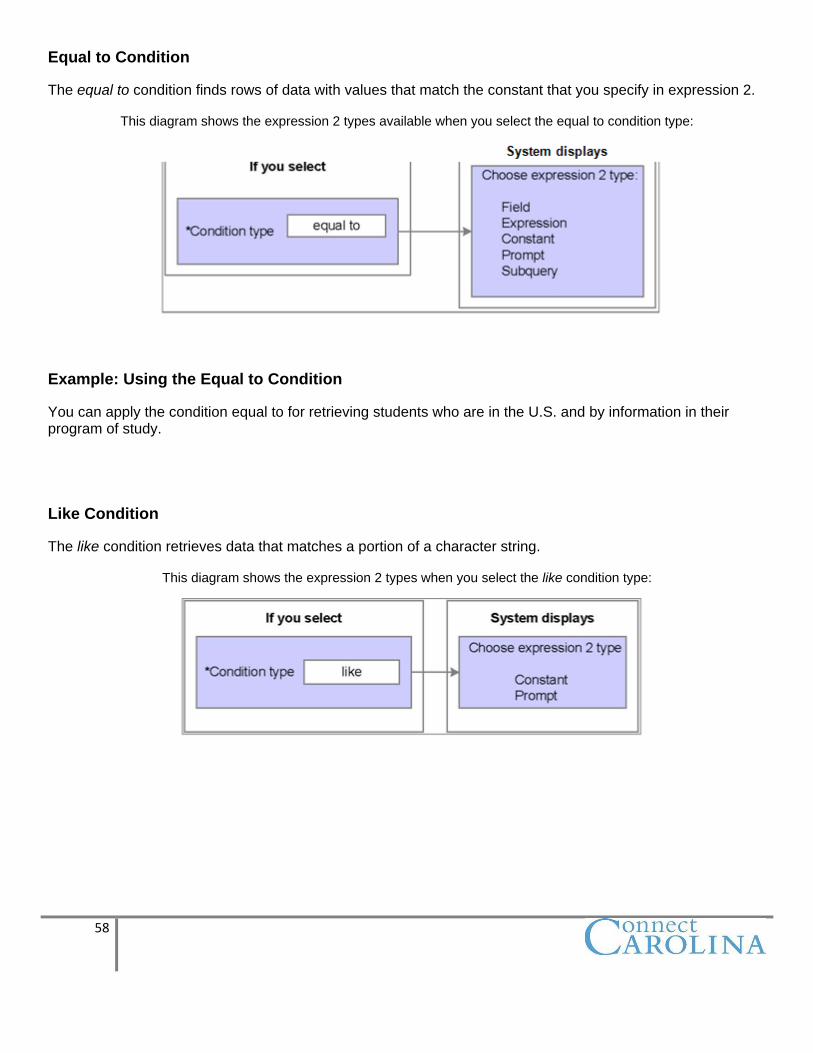
Equal to Condition
The equal to condition finds rows of data with values that match the constant that you specify in expression 2.
This diagram shows the expression 2 types available when you select the equal to condition type:
Example: Using the Equal to Condition
You can apply the condition equal to for retrieving students who are in the U.S. and by information in their program of study.
Like Condition
The like condition retrieves data that matches a portion of a character string.
This diagram shows the expression 2 types when you select the like condition type:
59
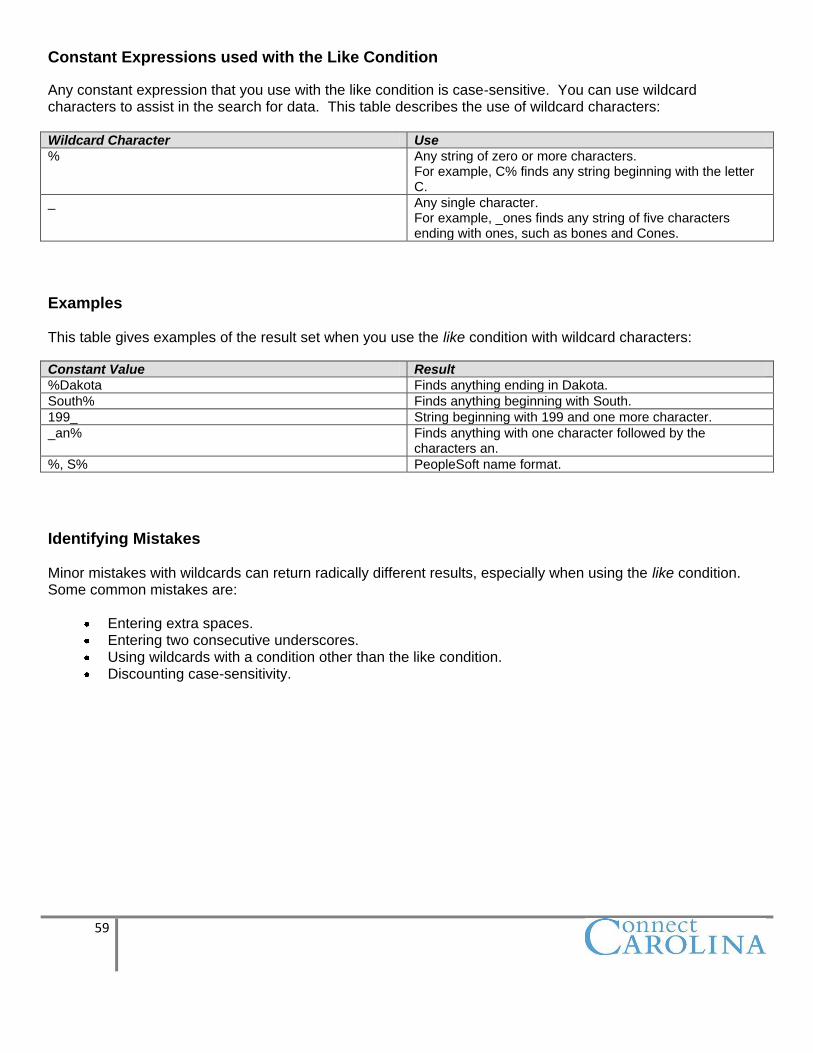
Constant Expressions used with the Like Condition
Any constant expression that you use with the like condition is case-sensitive. You can use wildcard characters to assist in the search for data. This table describes the use of wildcard characters: Wildcard Character Use
% Any string of zero or more characters. For example, C% finds any string beginning with the letter C.
_ Any single character. For example, _ones finds any string of five characters ending with ones, such as bones and Cones.
Examples This table gives examples of the result set when you use the like condition with wildcard characters:
Constant Value Result
%Dakota Finds anything ending in Dakota.
South% Finds anything beginning with South.
199_ String beginning with 199 and one more character.
_an% Finds anything with one character followed by the characters an.
%, S% PeopleSoft name format.
Identifying Mistakes Minor mistakes with wildcards can return radically different results, especially when using the like condition. Some common mistakes are:
Entering extra spaces. Entering two consecutive underscores. Using wildcards with a condition other than the like condition. Discounting case-sensitivity.

60
Is Null Condition You use the is null condition to search for fields that have no value. The fields that PeopleSoft supports for the is null condition type are:
Long character Image Date Time Datetime fields
If you select the is null condition, expression 2 disappears because is null defines the criteria for the second expression.
61
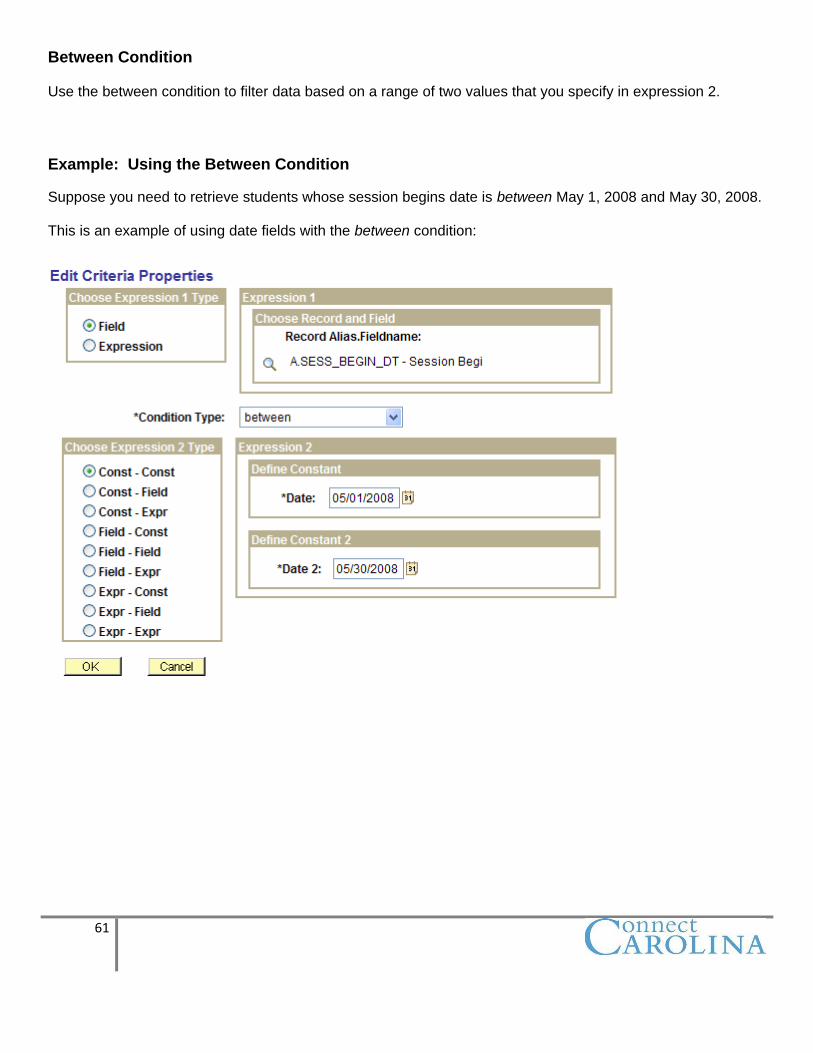
Between Condition Use the between condition to filter data based on a range of two values that you specify in expression 2.
Example: Using the Between Condition
Suppose you need to retrieve students whose session begins date is between May 1, 2008 and May 30, 2008. This is an example of using date fields with the between condition:
62
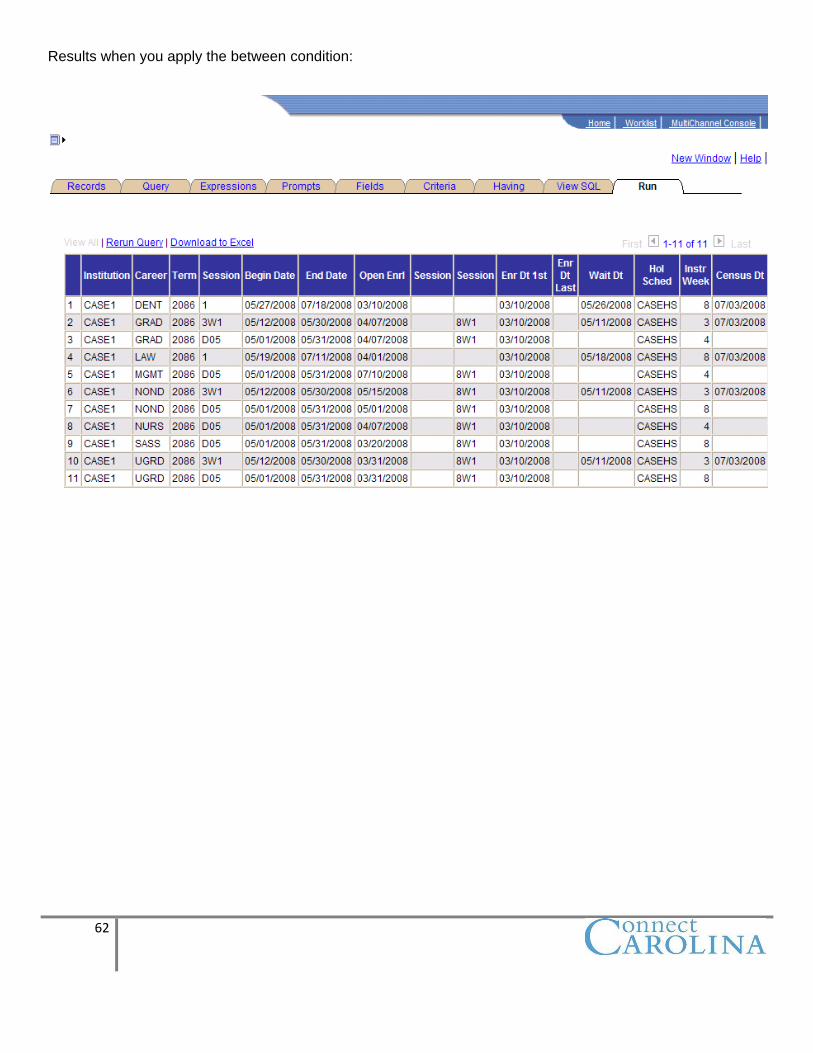
Results when you apply the between condition:
63
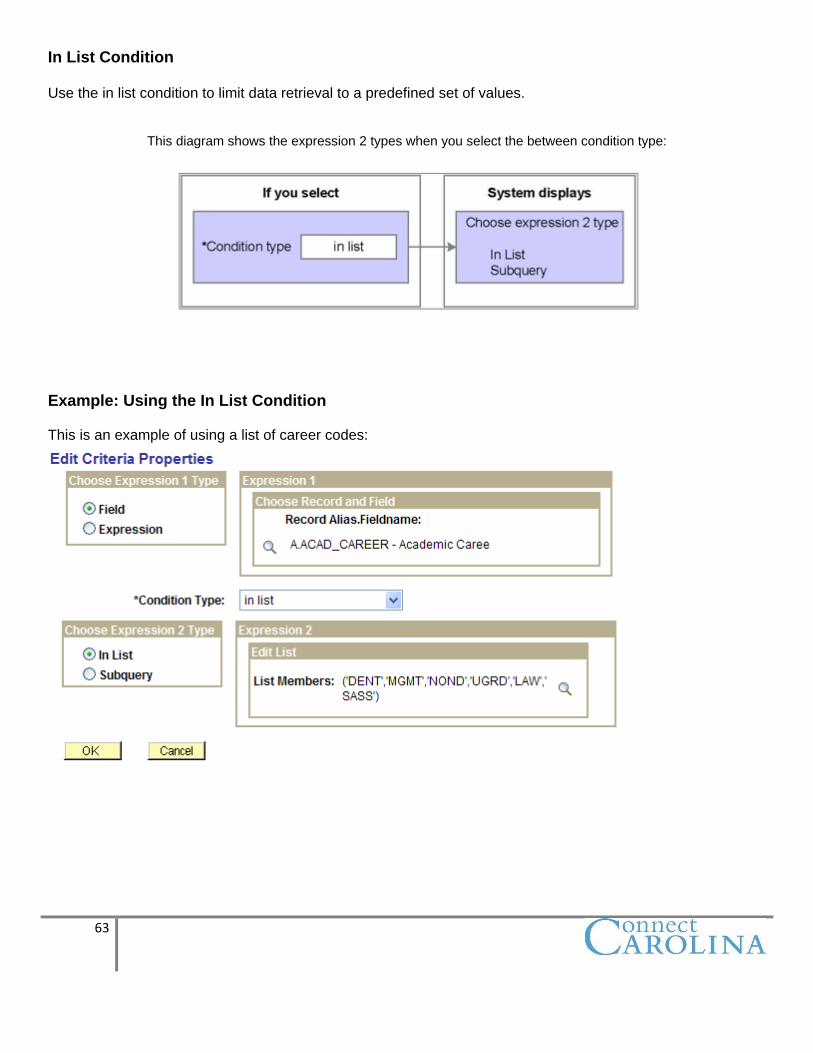
In List Condition Use the in list condition to limit data retrieval to a predefined set of values.
This diagram shows the expression 2 types when you select the between condition type:
Example: Using the In List Condition This is an example of using a list of career codes:
64
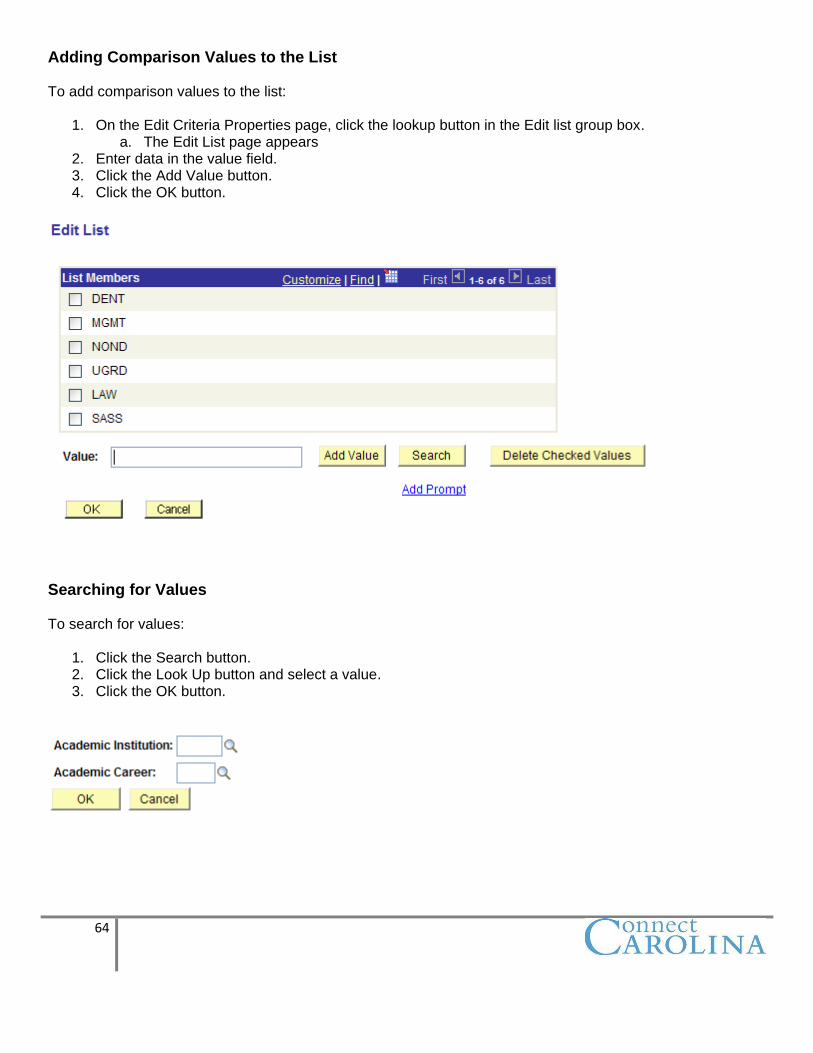
Adding Comparison Values to the List To add comparison values to the list:
1. On the Edit Criteria Properties page, click the lookup button in the Edit list group box. a. The Edit List page appears
2. Enter data in the value field. 3. Click the Add Value button. 4. Click the OK button.
Searching for Values To search for values:
1. Click the Search button. 2. Click the Look Up button and select a value. 3. Click the OK button.
65
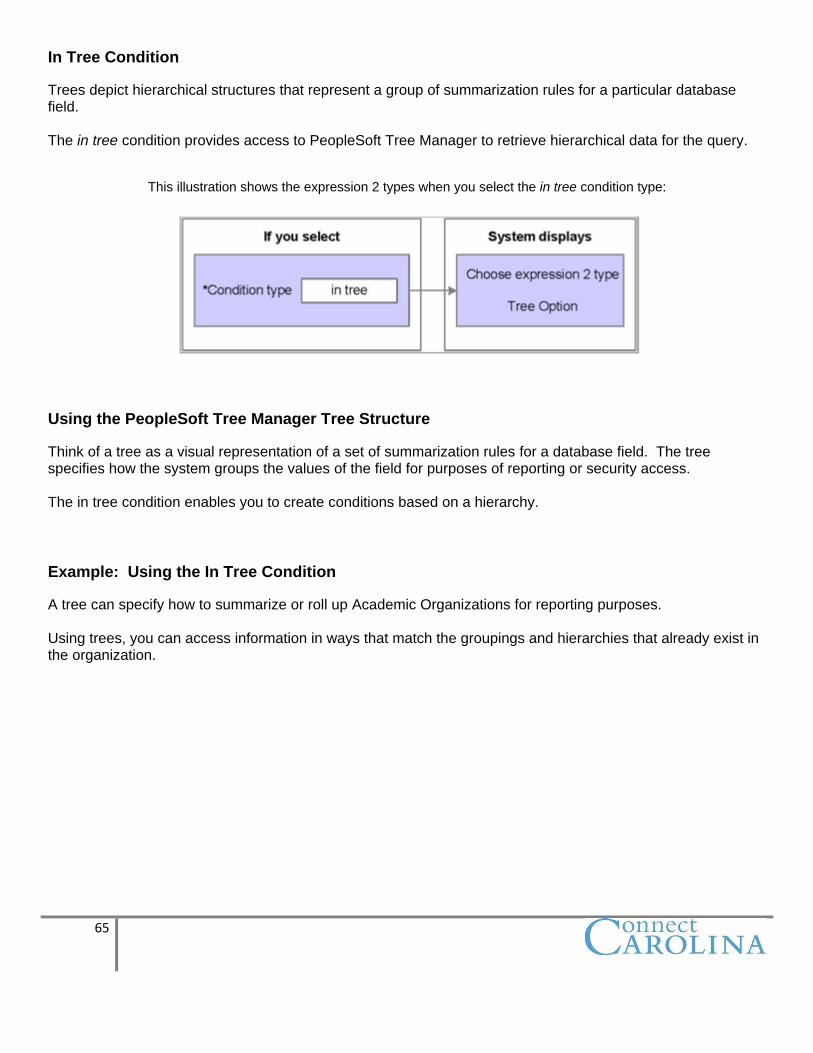
In Tree Condition
Trees depict hierarchical structures that represent a group of summarization rules for a particular database field. The in tree condition provides access to PeopleSoft Tree Manager to retrieve hierarchical data for the query.
This illustration shows the expression 2 types when you select the in tree condition type:
Using the PeopleSoft Tree Manager Tree Structure
Think of a tree as a visual representation of a set of summarization rules for a database field. The tree specifies how the system groups the values of the field for purposes of reporting or security access. The in tree condition enables you to create conditions based on a hierarchy.
Example: Using the In Tree Condition
A tree can specify how to summarize or roll up Academic Organizations for reporting purposes. Using trees, you can access information in ways that match the groupings and hierarchies that already exist in the organization.
66
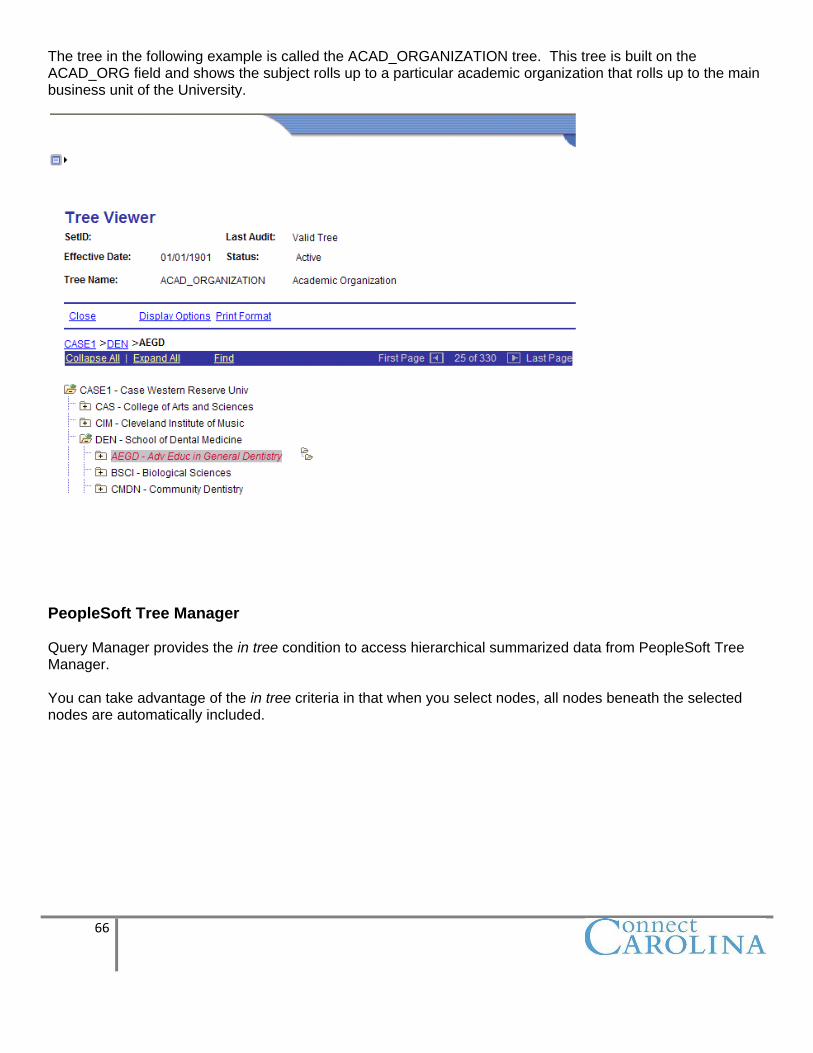
The tree in the following example is called the ACAD_ORGANIZATION tree. This tree is built on the ACAD_ORG field and shows the subject rolls up to a particular academic organization that rolls up to the main business unit of the University.
PeopleSoft Tree Manager Query Manager provides the in tree condition to access hierarchical summarized data from PeopleSoft Tree Manager. You can take advantage of the in tree criteria in that when you select nodes, all nodes beneath the selected nodes are automatically included.
67
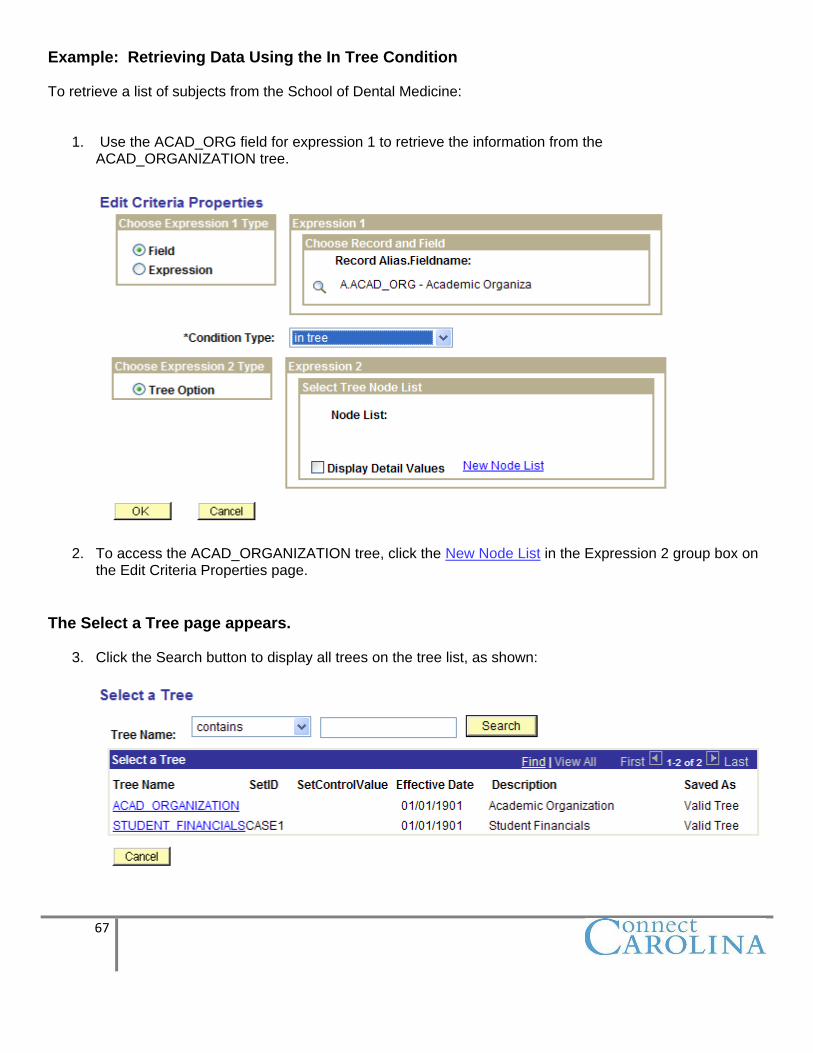
Example: Retrieving Data Using the In Tree Condition To retrieve a list of subjects from the School of Dental Medicine:
1. Use the ACAD_ORG field for expression 1 to retrieve the information from the
ACAD_ORGANIZATION tree.
2. To access the ACAD_ORGANIZATION tree, click the New Node List in the Expression 2 group box on the Edit Criteria Properties page.
The Select a Tree page appears.
3. Click the Search button to display all trees on the tree list, as shown:
68
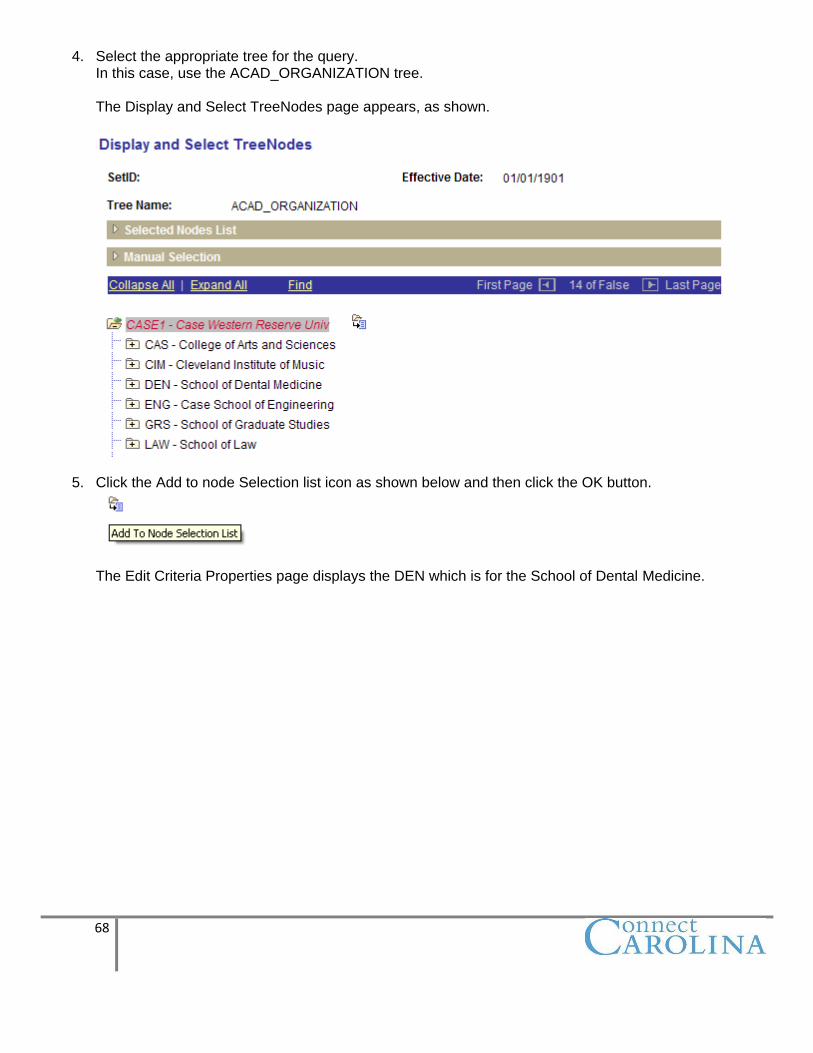
4. Select the appropriate tree for the query. In this case, use the ACAD_ORGANIZATION tree. The Display and Select TreeNodes page appears, as shown.
5. Click the Add to node Selection list icon as shown below and then click the OK button.
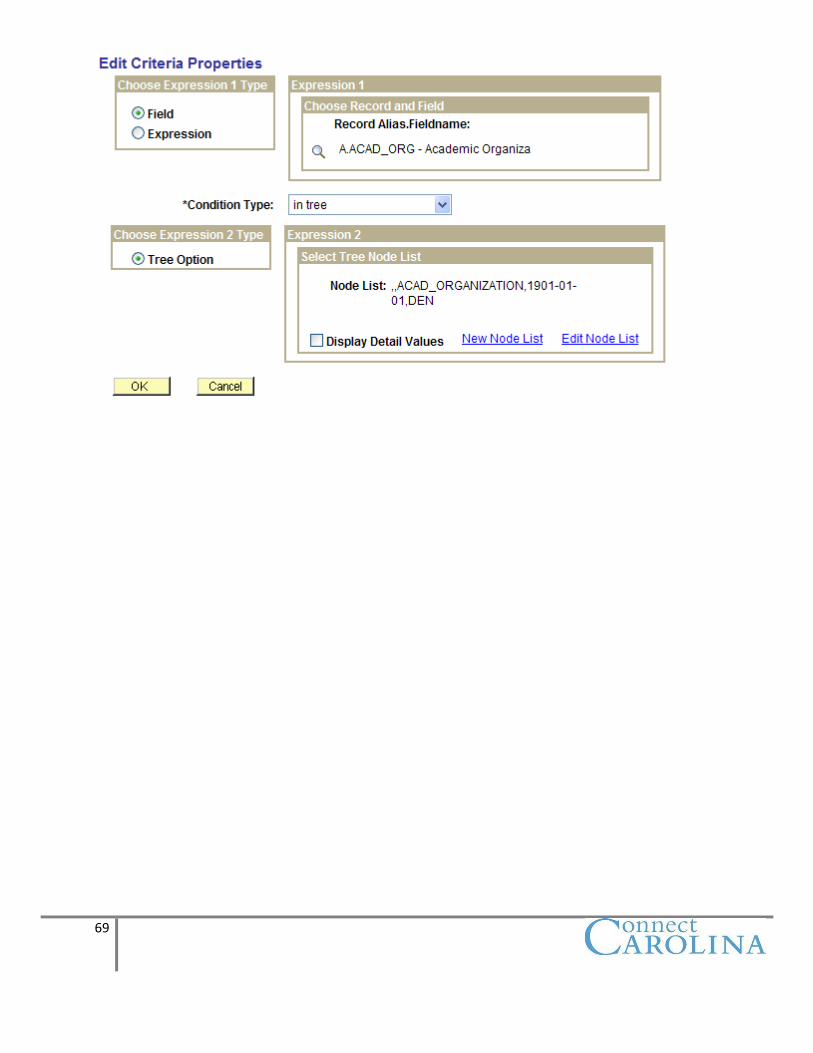
The Edit Criteria Properties page displays the DEN which is for the School of Dental Medicine.
69
70
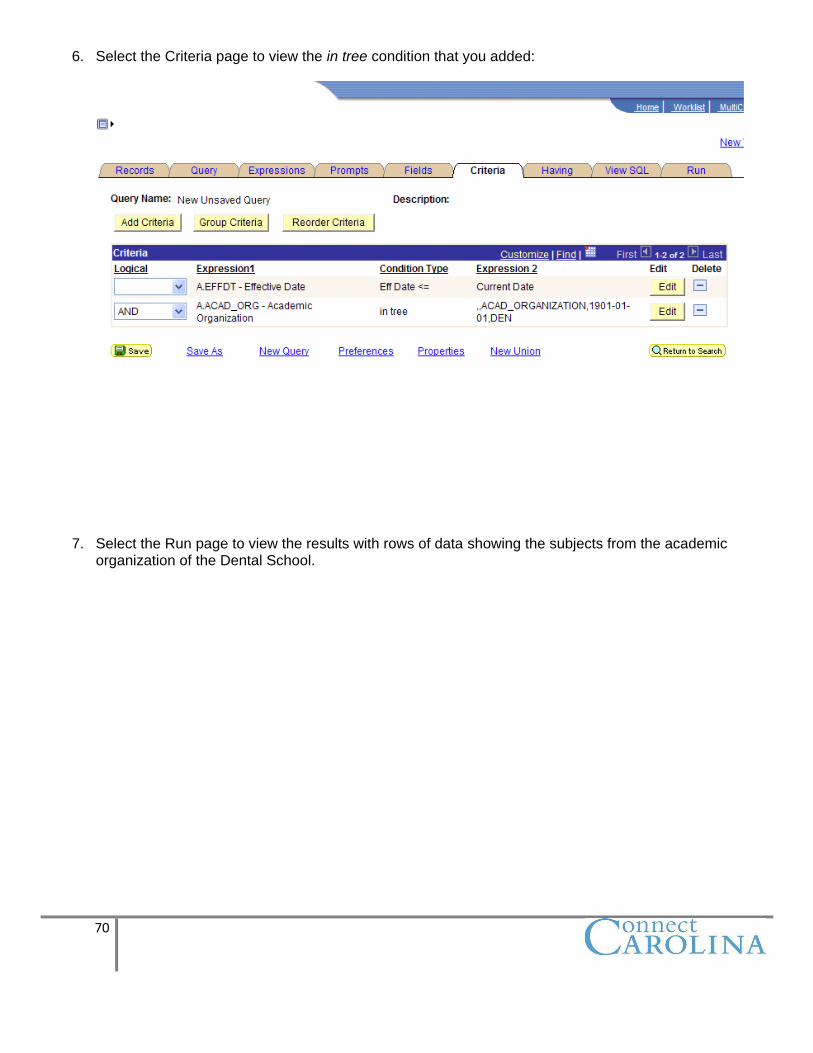
6. Select the Criteria page to view the in tree condition that you added:
7. Select the Run page to view the results with rows of data showing the subjects from the academic
organization of the Dental School.
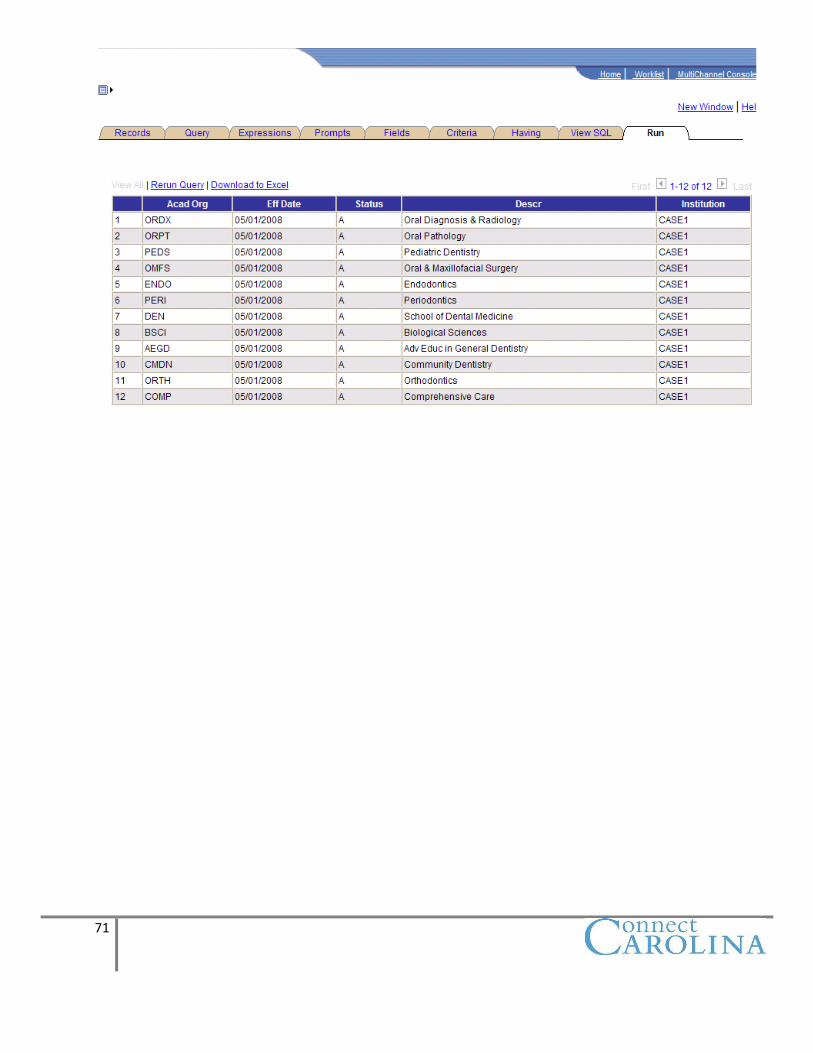
71
72
Using the In Tree and In List Conditions The in tree condition works almost like the in list condition. The differences between using the in tree and in list condition are:
When using the in tree condition, if you add field values to a tree node (for example, you add another subject to the School of Medicine), the values are automatically brought in at runtime.
When using the in list condition, if you decide to add field values (for example, a new instructor or manager starts in the School of Medicine), you must update all the queries with the value.
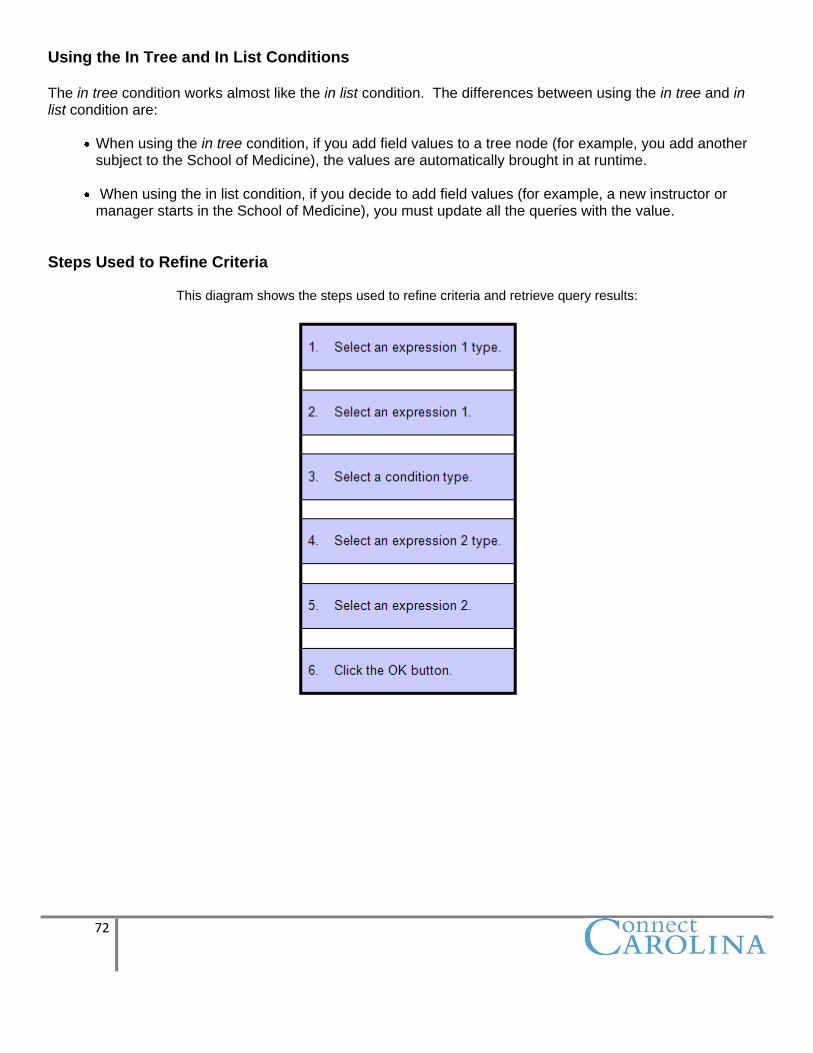
Steps Used to Refine Criteria
This diagram shows the steps used to refine criteria and retrieve query results:
73
Using Multiple Criteria Statements Boolean Expressions There are four types of Boolean expressions available on the Criteria page.
AND AND NOT OR OR NOT
If you add multiple lines of criteria to a query, you must use Boolean operators to specify the way that the system applies each criterion. Boolean Operators This is a list of Boolean operators and example of how you interpret each operator:
AND: Returns only rows that meet the conditions of all criteria.
Use the AND operator to view only international students with a capital D in their names.
AND NOT: Returns only rows that meet the condition that precedes this operator but yet do not meet the condition that follows this operator.
Use AND NOT operator to view only international students except for those who have a capital D in their names.
OR: Returns rows that meet any condition in the criteria.
Use the OR operator to view all international students and all students who have a capital D in their names regardless of their citizenship status.
OR NOT: Returns rows that meet the condition that precedes this operator and rows that do not meet the condition that follows this operator.
Use the OR NOT operator if you want to return all international students and students whose name does not have a capital D regardless of their citizenship status.
Note: The AND NOT and the OR NOT operators are likely to force table scans instead of index reads to pull data. When needed you should use NOT IN or <> for better performance.
74
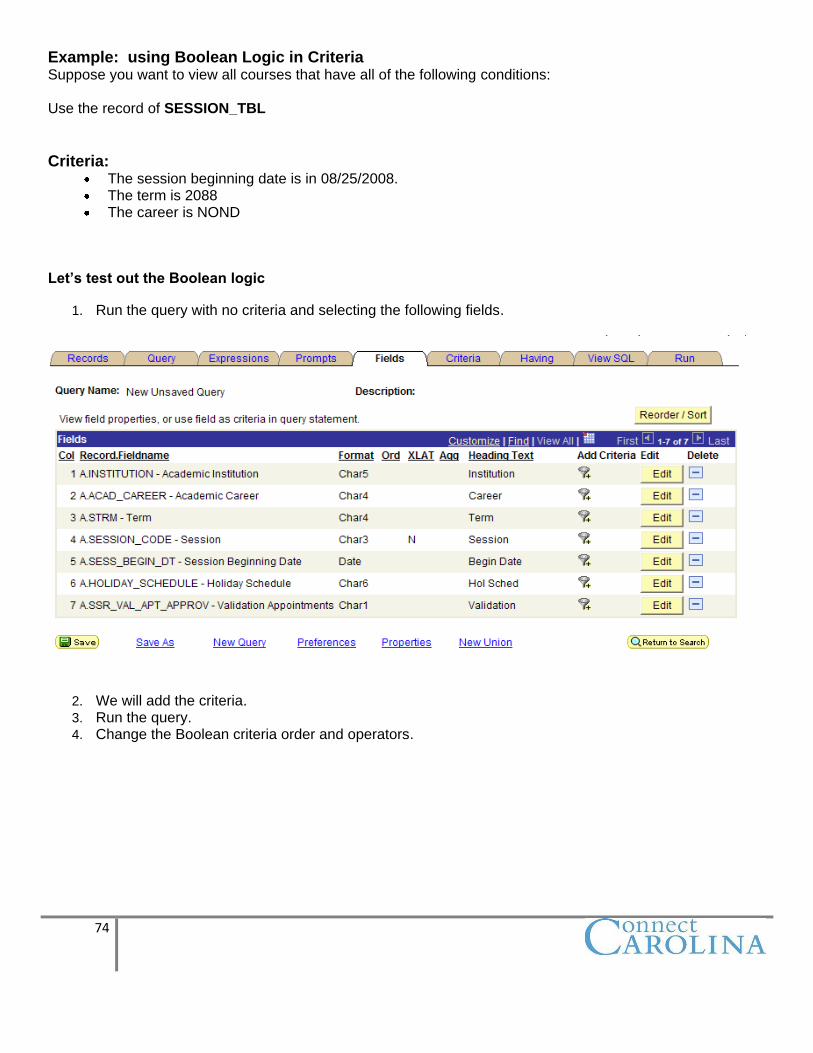
Example: using Boolean Logic in Criteria Suppose you want to view all courses that have all of the following conditions: Use the record of SESSION_TBL
Criteria:
The session beginning date is in 08/25/2008. The term is 2088 The career is NOND
Let’s test out the Boolean logic
1. Run the query with no criteria and selecting the following fields.
2. We will add the criteria. 3. Run the query. 4. Change the Boolean criteria order and operators.
75
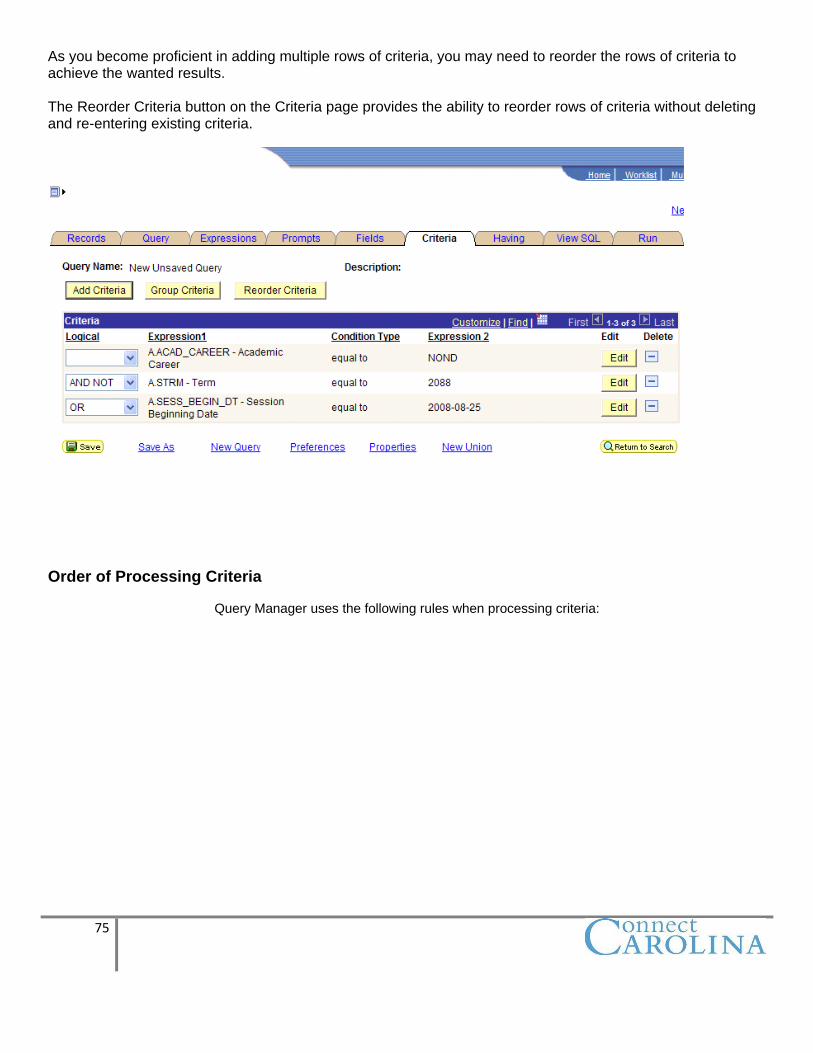
As you become proficient in adding multiple rows of criteria, you may need to reorder the rows of criteria to achieve the wanted results. The Reorder Criteria button on the Criteria page provides the ability to reorder rows of criteria without deleting and re-entering existing criteria.
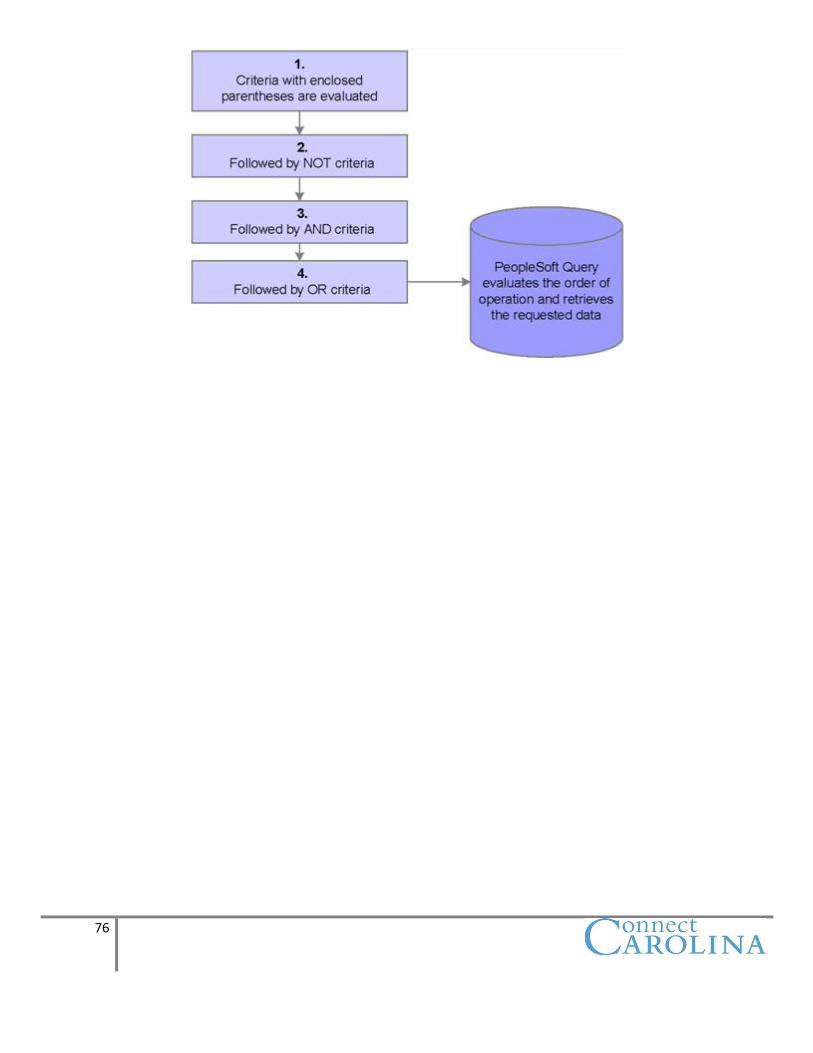
Order of Processing Criteria
Query Manager uses the following rules when processing criteria:
76
77
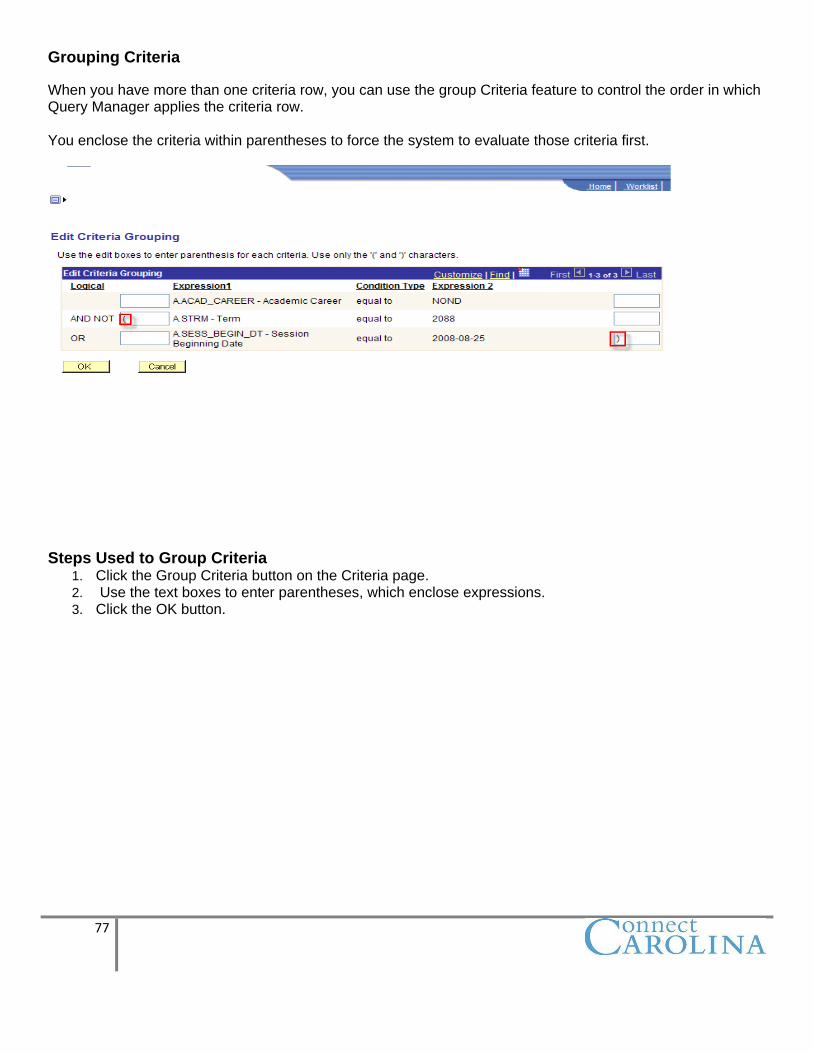
Grouping Criteria
When you have more than one criteria row, you can use the group Criteria feature to control the order in which Query Manager applies the criteria row. You enclose the criteria within parentheses to force the system to evaluate those criteria first.
Steps Used to Group Criteria 1. Click the Group Criteria button on the Criteria page. 2. Use the text boxes to enter parentheses, which enclose expressions. 3. Click the OK button.
78
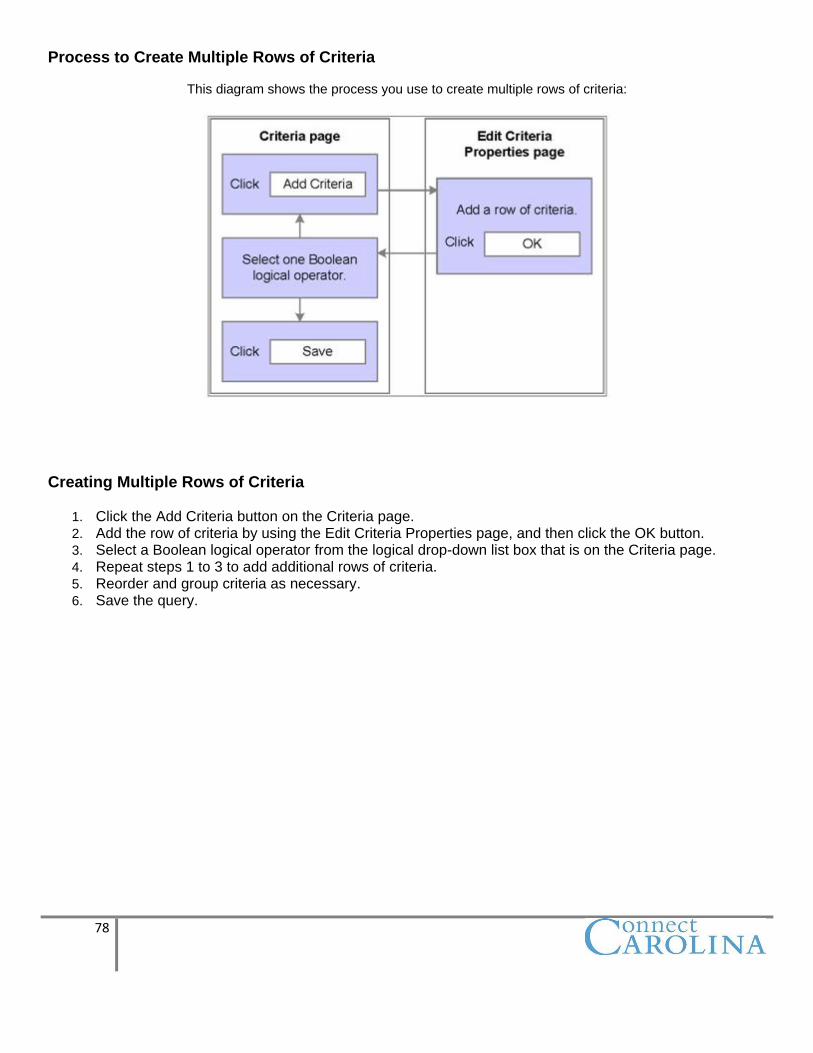
Process to Create Multiple Rows of Criteria
This diagram shows the process you use to create multiple rows of criteria:
Creating Multiple Rows of Criteria
1. Click the Add Criteria button on the Criteria page. 2. Add the row of criteria by using the Edit Criteria Properties page, and then click the OK button. 3. Select a Boolean logical operator from the logical drop-down list box that is on the Criteria page. 4. Repeat steps 1 to 3 to add additional rows of criteria. 5. Reorder and group criteria as necessary. 6. Save the query.
79
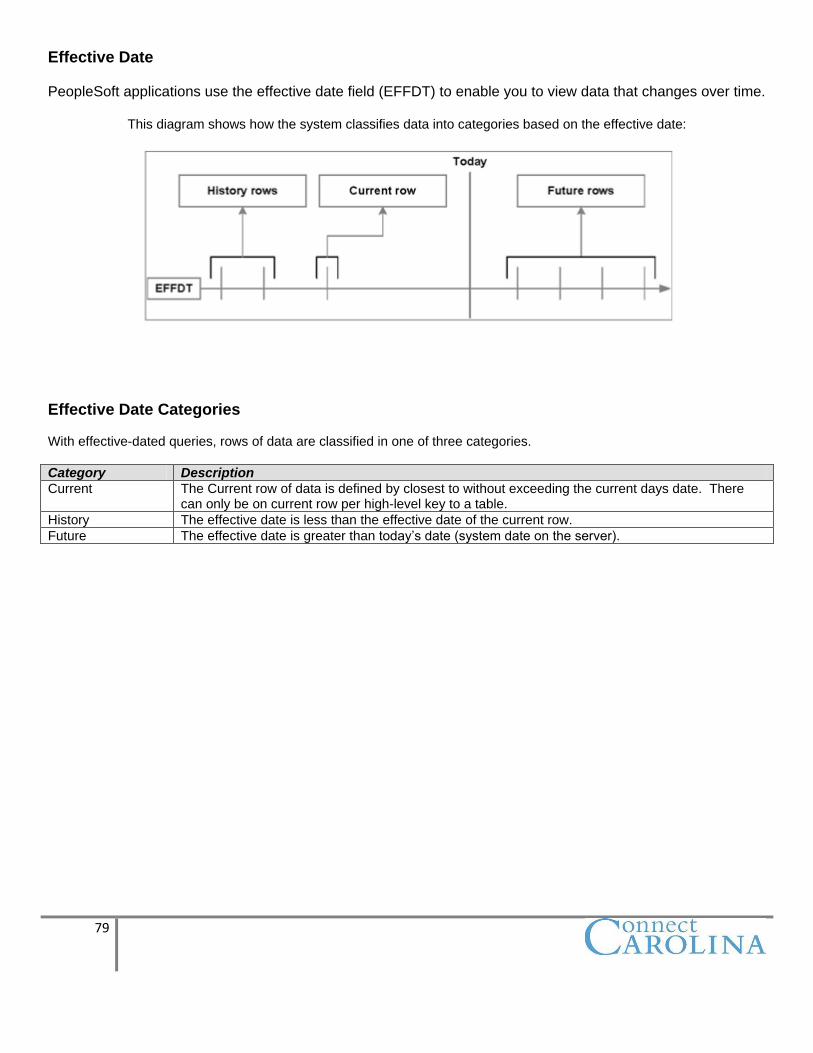
Effective Date PeopleSoft applications use the effective date field (EFFDT) to enable you to view data that changes over time.
This diagram shows how the system classifies data into categories based on the effective date:
Effective Date Categories With effective-dated queries, rows of data are classified in one of three categories.
Category Description
Current The Current row of data is defined by closest to without exceeding the current days date. There can only be on current row per high-level key to a table.
History The effective date is less than the effective date of the current row.
Future The effective date is greater than today’s date (system date on the server).
80
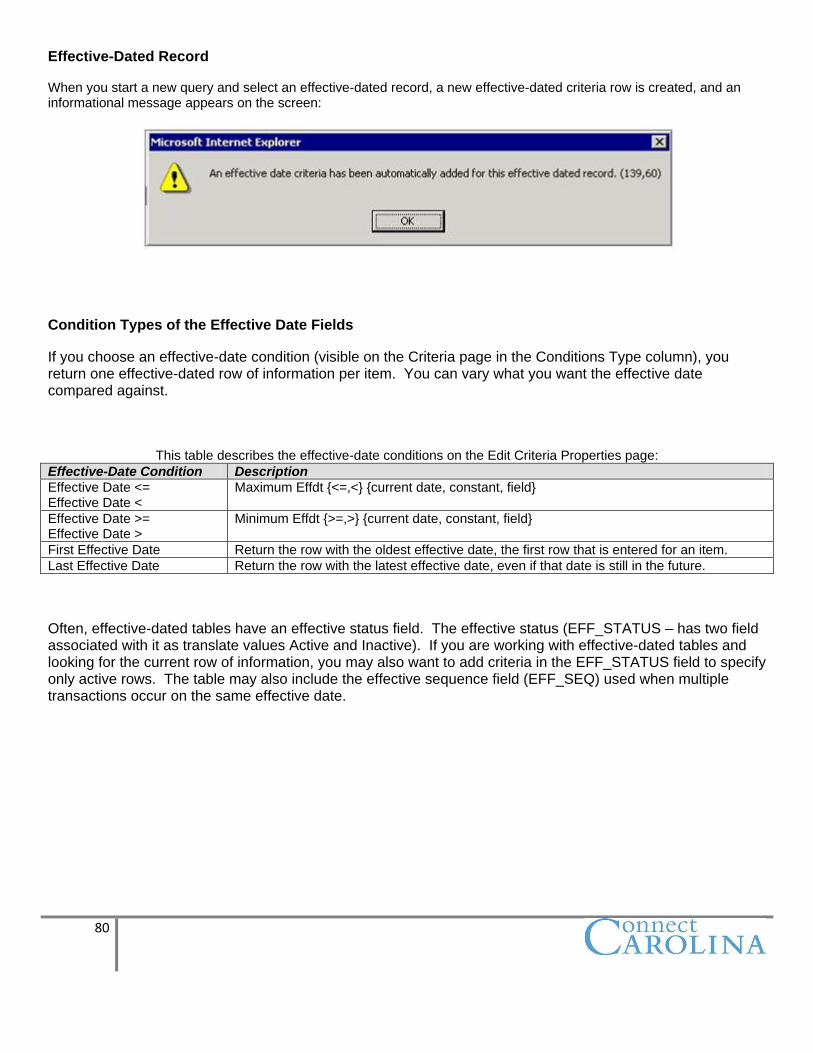
Effective-Dated Record When you start a new query and select an effective-dated record, a new effective-dated criteria row is created, and an informational message appears on the screen:
Condition Types of the Effective Date Fields
If you choose an effective-date condition (visible on the Criteria page in the Conditions Type column), you return one effective-dated row of information per item. You can vary what you want the effective date compared against.
This table describes the effective-date conditions on the Edit Criteria Properties page:
Effective-Date Condition Description
Effective Date <= Effective Date <
Maximum Effdt {<=,<} {current date, constant, field}
Effective Date >= Effective Date >
Minimum Effdt {>=,>} {current date, constant, field}
First Effective Date Return the row with the oldest effective date, the first row that is entered for an item.
Last Effective Date Return the row with the latest effective date, even if that date is still in the future.
Often, effective-dated tables have an effective status field. The effective status (EFF_STATUS – has two field associated with it as translate values Active and Inactive). If you are working with effective-dated tables and looking for the current row of information, you may also want to add criteria in the EFF_STATUS field to specify only active rows. The table may also include the effective sequence field (EFF_SEQ) used when multiple transactions occur on the same effective date.
81
_____________________________________________________________________ ACTIVITY 3 – Creating, Editing and Refining Queries with Effective-Dates and
Complex Criteria (Approximately 25 min)
Activity overview:
Create a query using the ITEM_TYPE_TBL Applying Effective Dates Add criteria Group criteria Apply Boolean logic
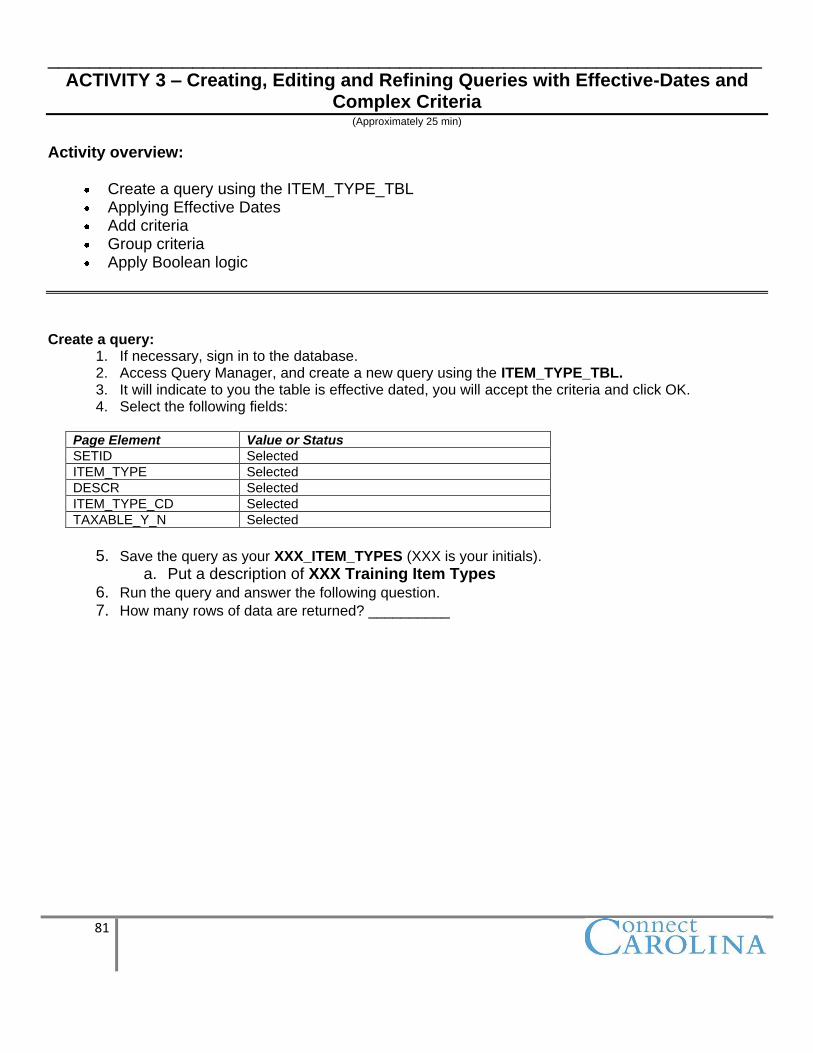
Create a query:
1. If necessary, sign in to the database. 2. Access Query Manager, and create a new query using the ITEM_TYPE_TBL. 3. It will indicate to you the table is effective dated, you will accept the criteria and click OK. 4. Select the following fields:
Page Element Value or Status
SETID Selected
ITEM_TYPE Selected
DESCR Selected
ITEM_TYPE_CD Selected
TAXABLE_Y_N Selected
5. Save the query as your XXX_ITEM_TYPES (XXX is your initials).
a. Put a description of XXX Training Item Types 6. Run the query and answer the following question. 7. How many rows of data are returned? __________
82
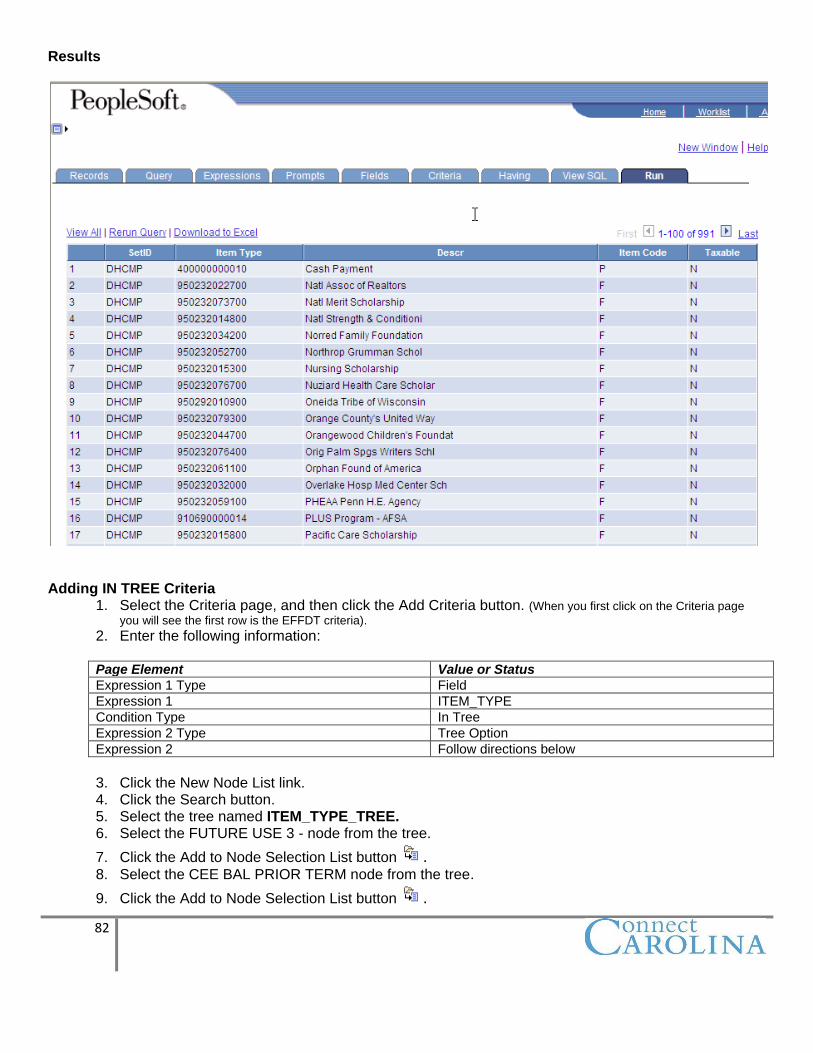
Results
Adding IN TREE Criteria
1. Select the Criteria page, and then click the Add Criteria button. (When you first click on the Criteria page
you will see the first row is the EFFDT criteria).
2. Enter the following information: Page Element Value or Status
Expression 1 Type Field
Expression 1 ITEM_TYPE
Condition Type In Tree
Expression 2 Type Tree Option
Expression 2 Follow directions below
3. Click the New Node List link. 4. Click the Search button. 5. Select the tree named ITEM_TYPE_TREE. 6. Select the FUTURE USE 3 - node from the tree.
7. Click the Add to Node Selection List button . 8. Select the CEE BAL PRIOR TERM node from the tree.
9. Click the Add to Node Selection List button .
83
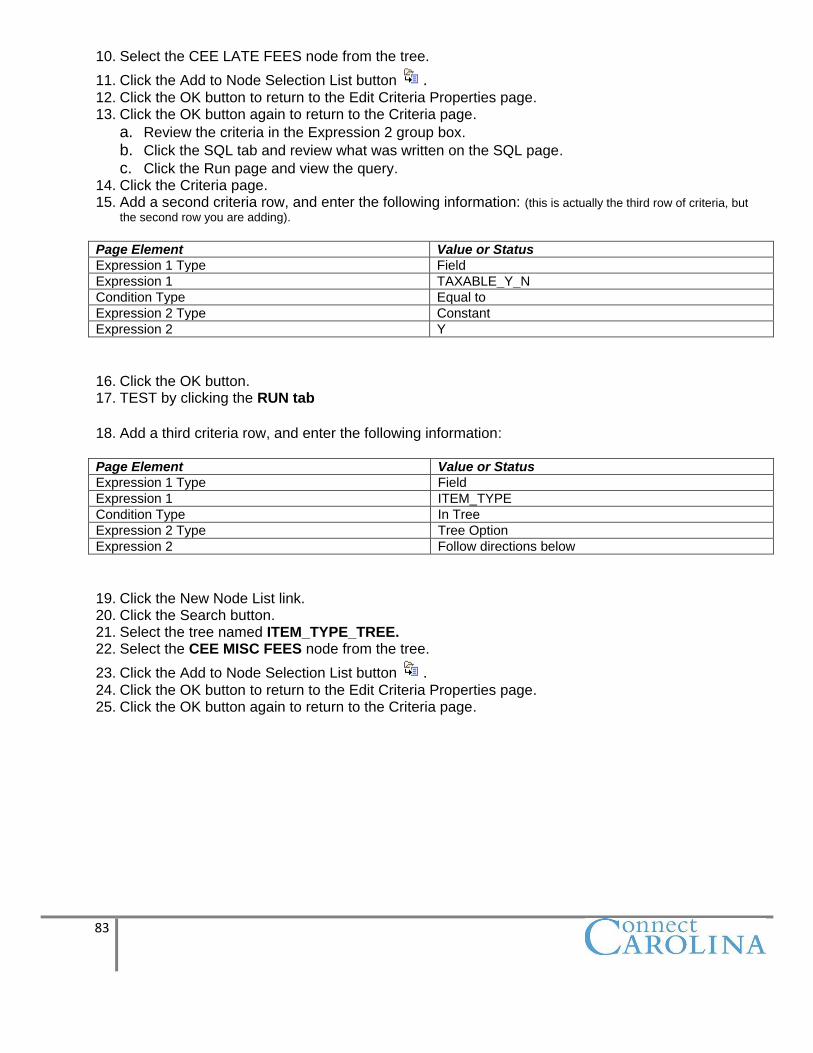
10. Select the CEE LATE FEES node from the tree.
11. Click the Add to Node Selection List button . 12. Click the OK button to return to the Edit Criteria Properties page. 13. Click the OK button again to return to the Criteria page.
a. Review the criteria in the Expression 2 group box. b. Click the SQL tab and review what was written on the SQL page. c. Click the Run page and view the query.
14. Click the Criteria page. 15. Add a second criteria row, and enter the following information: (this is actually the third row of criteria, but
the second row you are adding).
Page Element Value or Status
Expression 1 Type Field
Expression 1 TAXABLE_Y_N
Condition Type Equal to
Expression 2 Type Constant
Expression 2 Y
16. Click the OK button. 17. TEST by clicking the RUN tab 18. Add a third criteria row, and enter the following information: Page Element Value or Status
Expression 1 Type Field
Expression 1 ITEM_TYPE
Condition Type In Tree
Expression 2 Type Tree Option
Expression 2 Follow directions below
19. Click the New Node List link. 20. Click the Search button. 21. Select the tree named ITEM_TYPE_TREE. 22. Select the CEE MISC FEES node from the tree.
23. Click the Add to Node Selection List button . 24. Click the OK button to return to the Edit Criteria Properties page. 25. Click the OK button again to return to the Criteria page.
84
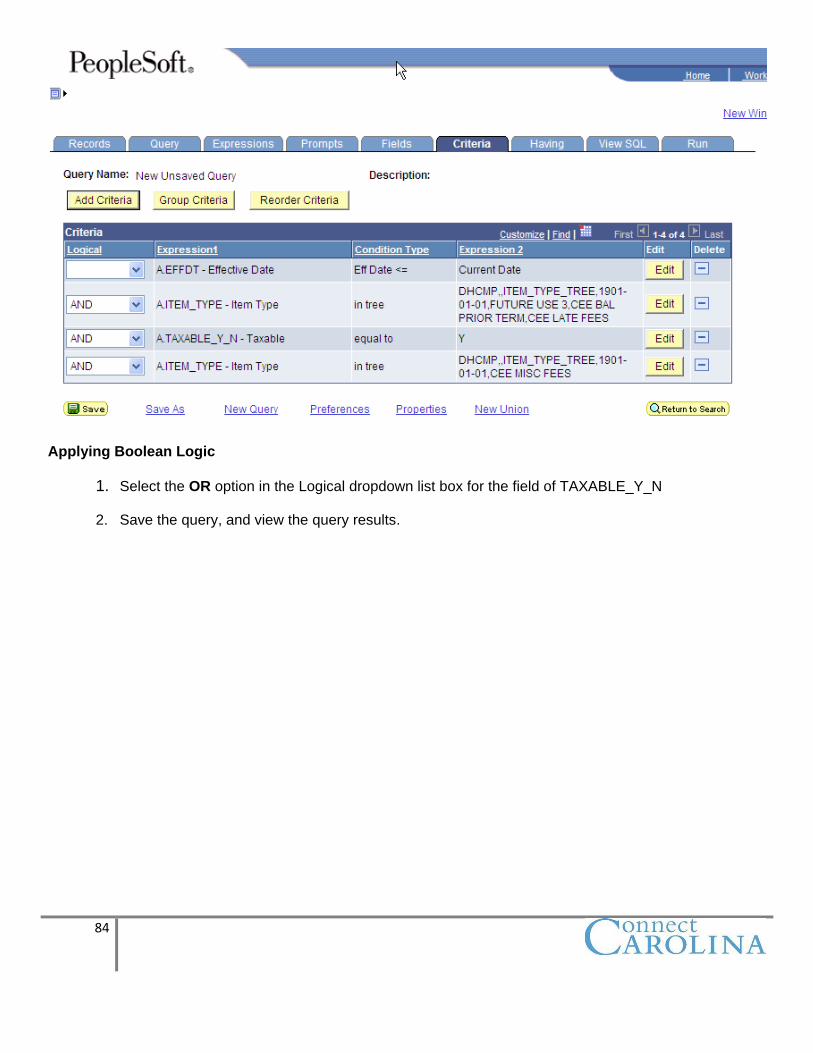
Applying Boolean Logic
1. Select the OR option in the Logical dropdown list box for the field of TAXABLE_Y_N
2. Save the query, and view the query results.
85
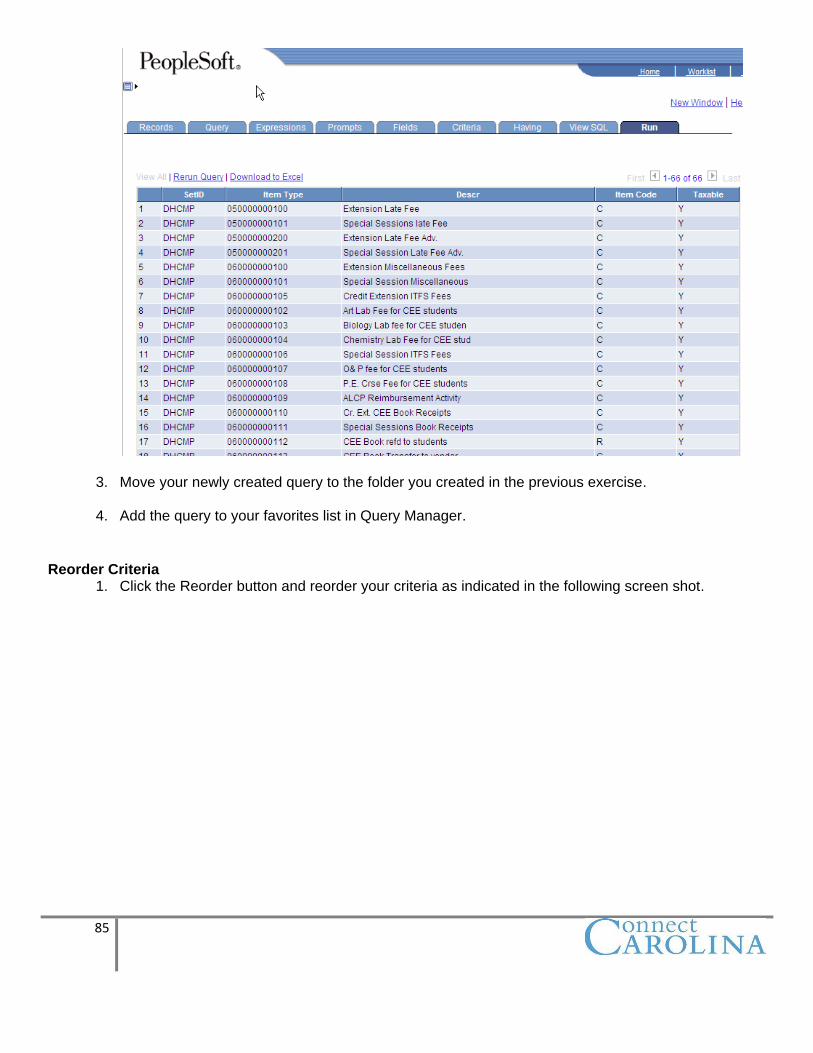
3. Move your newly created query to the folder you created in the previous exercise. 4. Add the query to your favorites list in Query Manager.
Reorder Criteria
1. Click the Reorder button and reorder your criteria as indicated in the following screen shot.
86
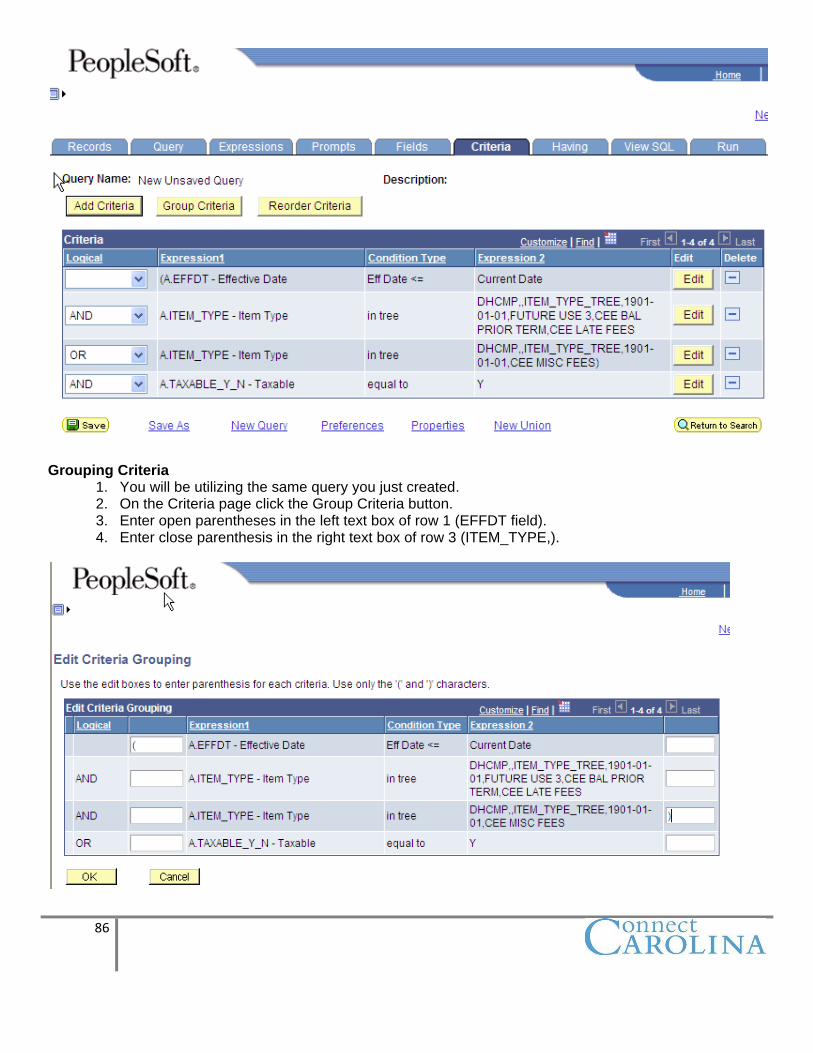
Grouping Criteria
1. You will be utilizing the same query you just created. 2. On the Criteria page click the Group Criteria button. 3. Enter open parentheses in the left text box of row 1 (EFFDT field). 4. Enter close parenthesis in the right text box of row 3 (ITEM_TYPE,).
87
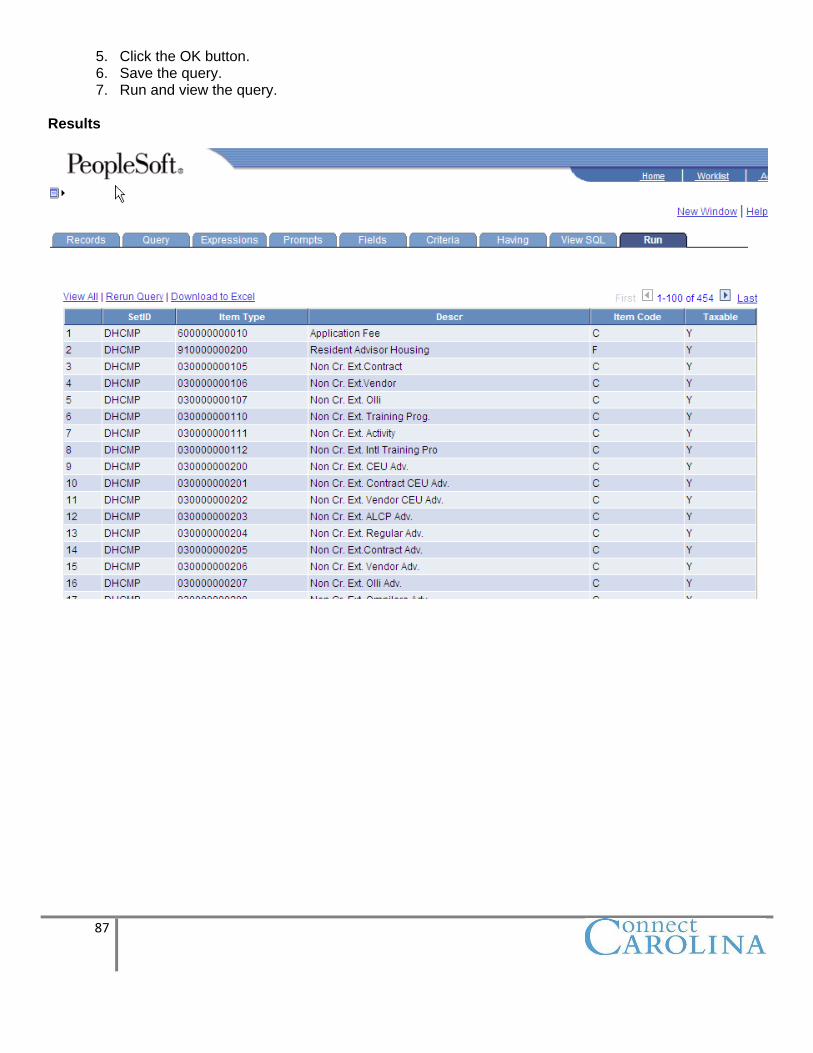
5. Click the OK button. 6. Save the query. 7. Run and view the query.
Results
88
Chapter 5 Filtering Output with Runtime Prompts
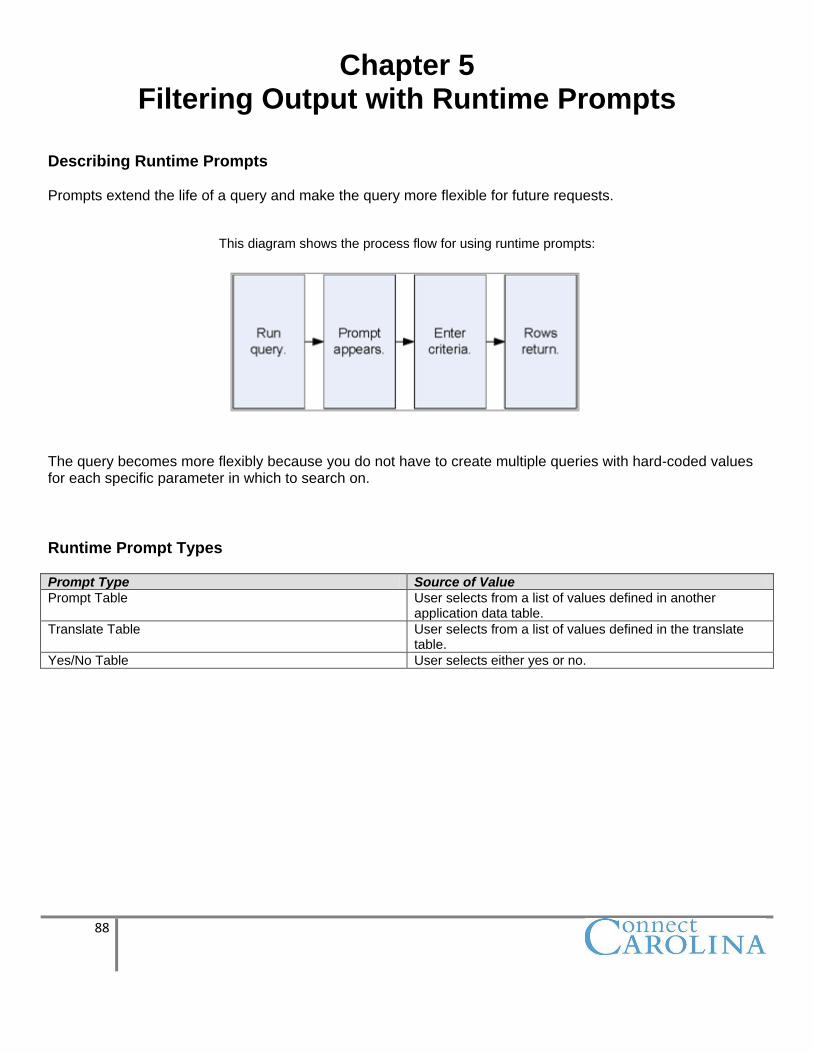
Describing Runtime Prompts Prompts extend the life of a query and make the query more flexible for future requests.
This diagram shows the process flow for using runtime prompts:
The query becomes more flexibly because you do not have to create multiple queries with hard-coded values for each specific parameter in which to search on.
Runtime Prompt Types Prompt Type Source of Value
Prompt Table User selects from a list of values defined in another application data table.
Translate Table User selects from a list of values defined in the translate table.
Yes/No Table User selects either yes or no.
89
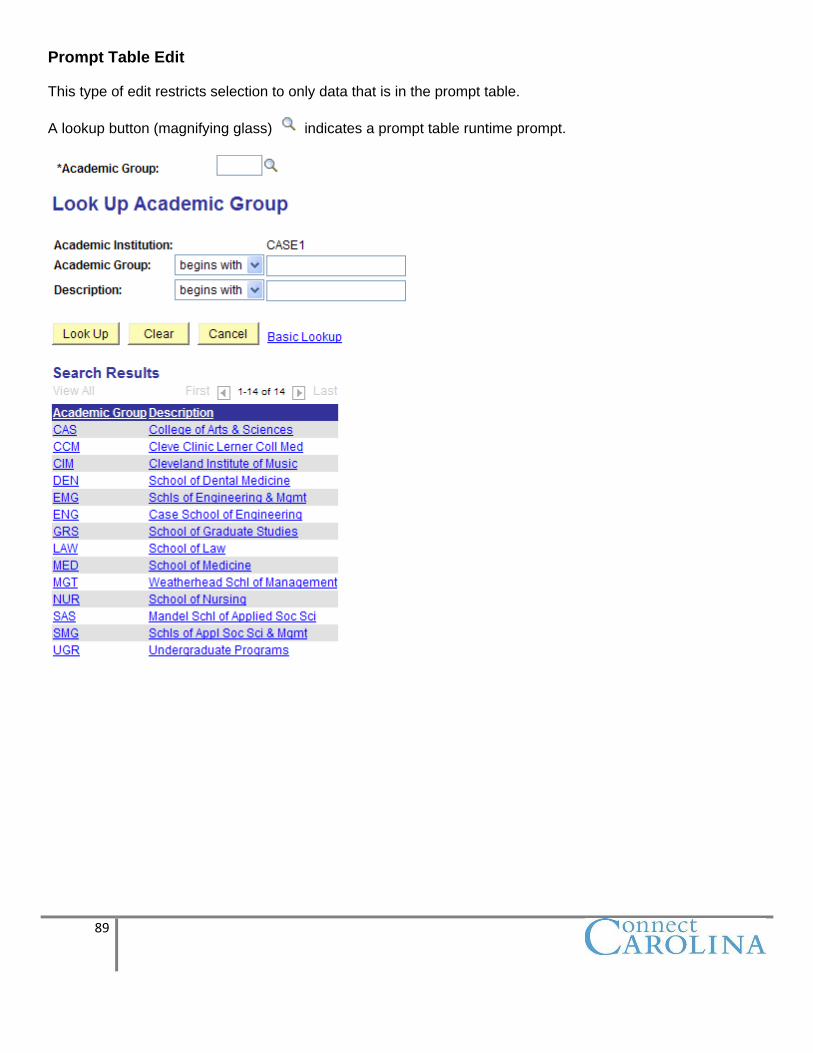
Prompt Table Edit This type of edit restricts selection to only data that is in the prompt table.
A lookup button (magnifying glass) indicates a prompt table runtime prompt.

90
Translate Table Edit This type of edit restricts selection to only data that is in the Translate Table (PSXLATITEM). THE Translate table is a PeopleTools table predefined values that are associated with a particular field. A drop-down list box typically indicates a Translate Table runtime prompt.
The Yes/No Table Edit This type of edit restricts you to selecting yes (Y) or no (N) values.
Runtime Prompt This diagram shows the pages that you can use to access the Edit Prompt Properties page and to add runtime prompts:
There are two locations in which you can access to create runtime prompts:
Prompts page Criteria page
91
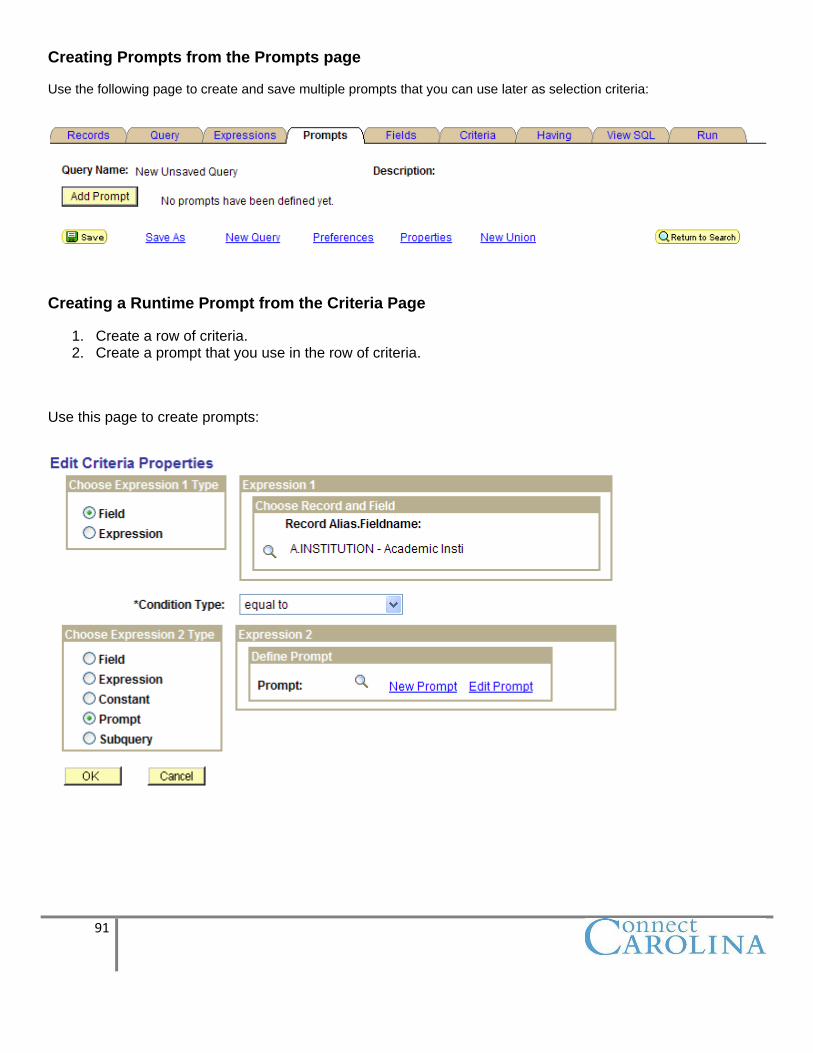
Creating Prompts from the Prompts page Use the following page to create and save multiple prompts that you can use later as selection criteria:
Creating a Runtime Prompt from the Criteria Page
1. Create a row of criteria. 2. Create a prompt that you use in the row of criteria.
Use this page to create prompts:
92
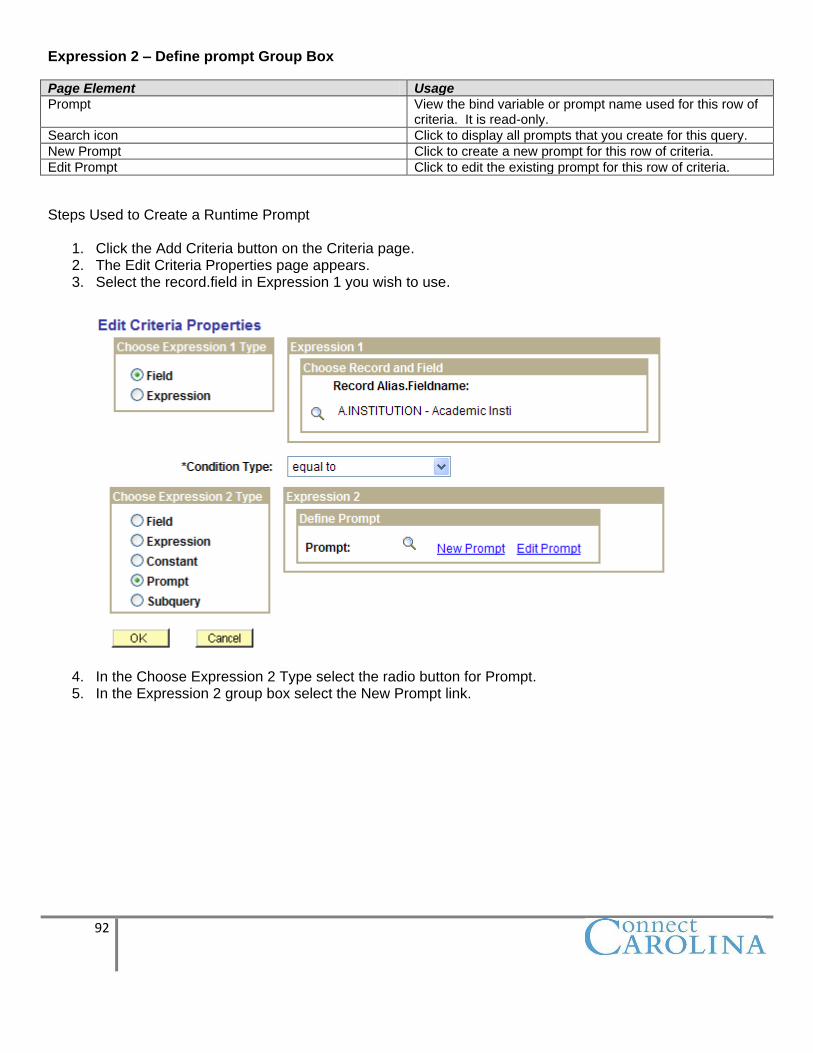
Expression 2 – Define prompt Group Box
Page Element Usage
Prompt View the bind variable or prompt name used for this row of criteria. It is read-only.
Search icon Click to display all prompts that you create for this query.
New Prompt Click to create a new prompt for this row of criteria.
Edit Prompt Click to edit the existing prompt for this row of criteria.
Steps Used to Create a Runtime Prompt
1. Click the Add Criteria button on the Criteria page. 2. The Edit Criteria Properties page appears. 3. Select the record.field in Expression 1 you wish to use.
4. In the Choose Expression 2 Type select the radio button for Prompt. 5. In the Expression 2 group box select the New Prompt link.
93
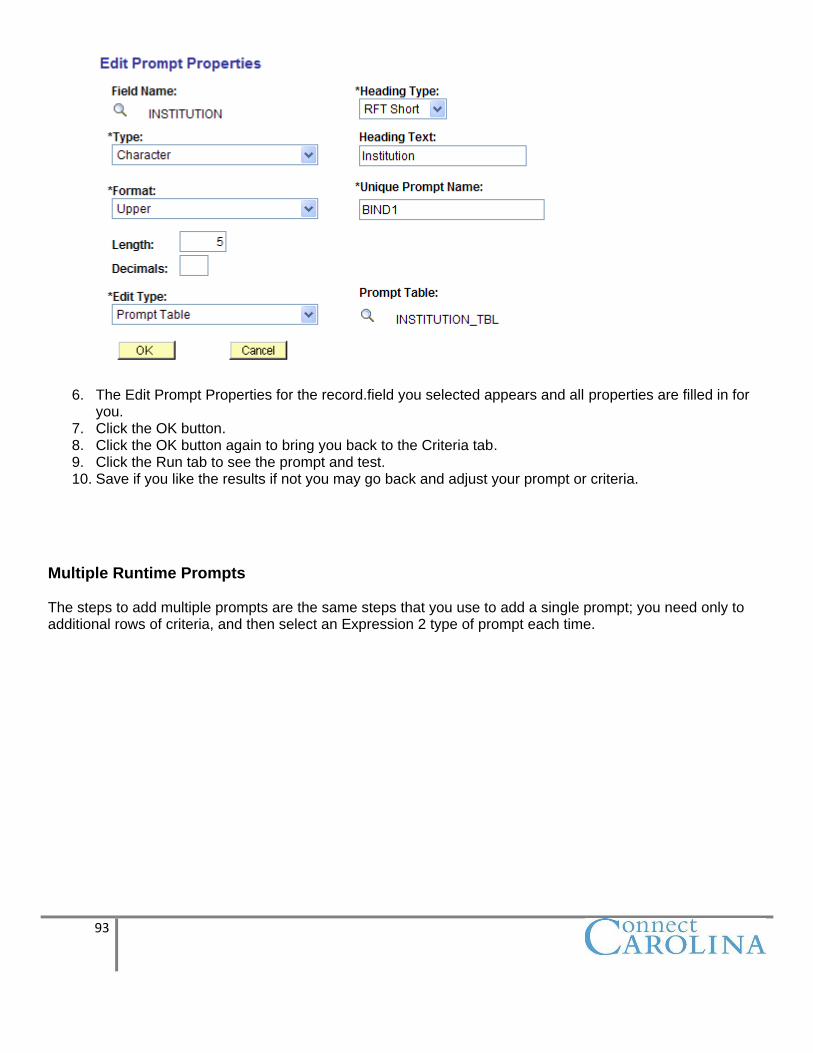
6. The Edit Prompt Properties for the record.field you selected appears and all properties are filled in for you.
7. Click the OK button. 8. Click the OK button again to bring you back to the Criteria tab. 9. Click the Run tab to see the prompt and test. 10. Save if you like the results if not you may go back and adjust your prompt or criteria.
Multiple Runtime Prompts
The steps to add multiple prompts are the same steps that you use to add a single prompt; you need only to additional rows of criteria, and then select an Expression 2 type of prompt each time.
94
_____________________________________________________________________ ACTIVITY 4 – Creating Runtime Prompts and Date Range Prompts
(Approximately 15 min)
Activity overview:
Create a query Add criteria Add a runtime prompt Create a prompt for a date range
Creating a query
1. If necessary sign in to the database.
2. Access the Query Manager, and create a new query using the ADJ_TERM_TBL record.
3. Enter the following information:
Field Heading
ADJUST_REASON Selected Choose text and type in – Adjustment Reason
SESSION_CODE Selected
FROM_DAY Selected
TO_DAY Selected
REFUND_PCT Selected Choose Long name
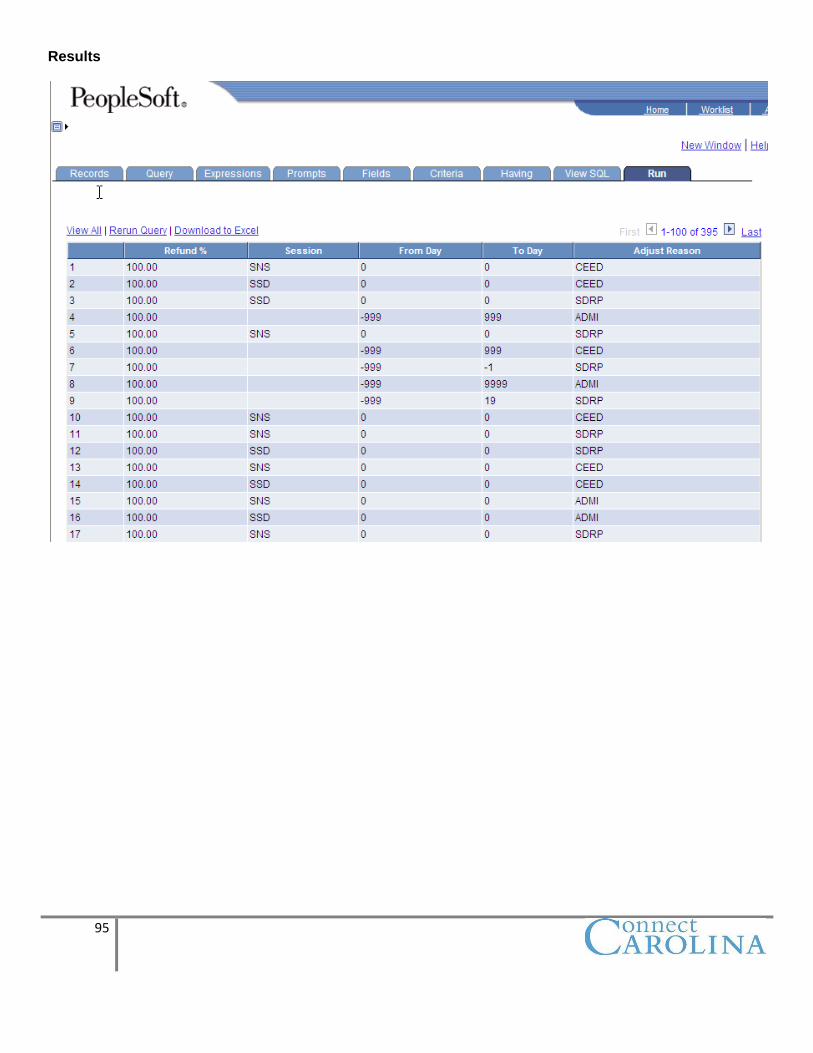
4. Save the query as your XXX_ENROLL_RANGE (XXX is your initials). 5. Type in a Description. 6. Click the dropdown list and select Public query as the type. 7. Run the query. 8. Examine the results. 9. Change REFUND_PCT to be Sort Order by 1 and change the Column/position of REFUND_PCT to
1 and select the checkbox for descending order. 10. Save the query and examine the results.
95
Results
96
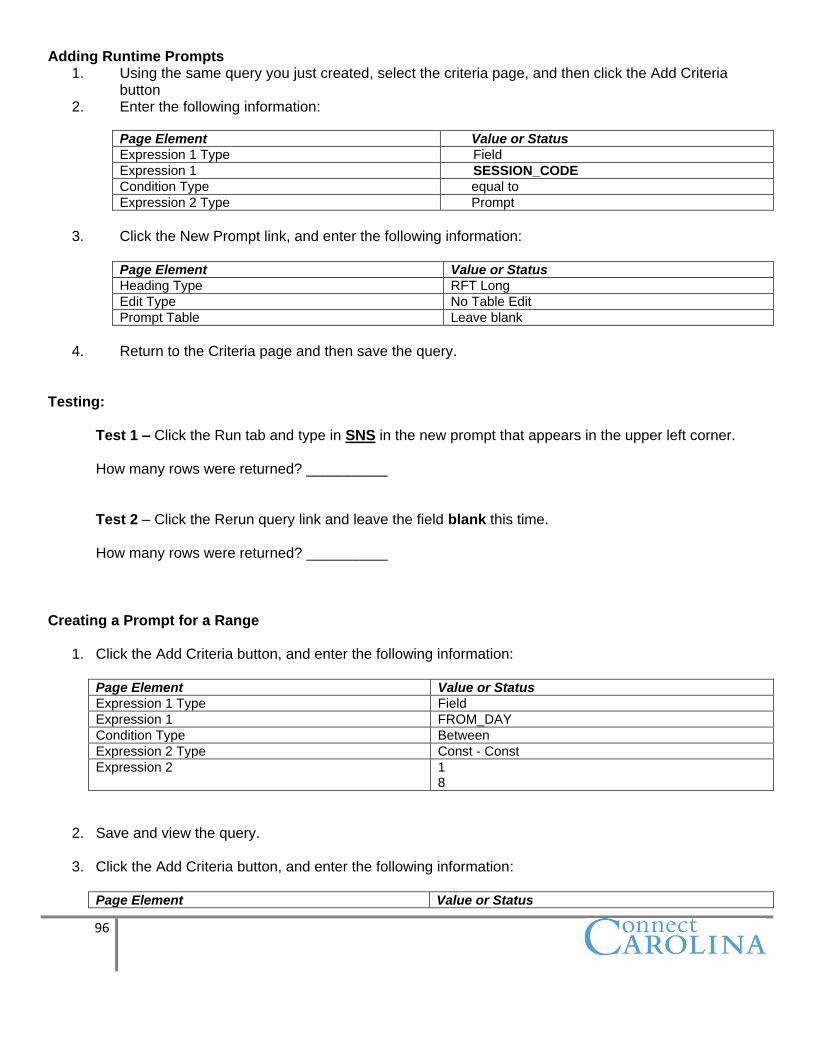
Adding Runtime Prompts 1. Using the same query you just created, select the criteria page, and then click the Add Criteria
button 2. Enter the following information:
Page Element Value or Status
Expression 1 Type Field
Expression 1 SESSION_CODE
Condition Type equal to
Expression 2 Type Prompt
3. Click the New Prompt link, and enter the following information:
Page Element Value or Status
Heading Type RFT Long
Edit Type No Table Edit
Prompt Table Leave blank
4. Return to the Criteria page and then save the query.
Testing:
Test 1 – Click the Run tab and type in SNS in the new prompt that appears in the upper left corner.
How many rows were returned? __________
Test 2 – Click the Rerun query link and leave the field blank this time.
How many rows were returned? __________ Creating a Prompt for a Range
1. Click the Add Criteria button, and enter the following information: Page Element Value or Status
Expression 1 Type Field
Expression 1 FROM_DAY
Condition Type Between
Expression 2 Type Const - Const
Expression 2 1 8
2. Save and view the query.
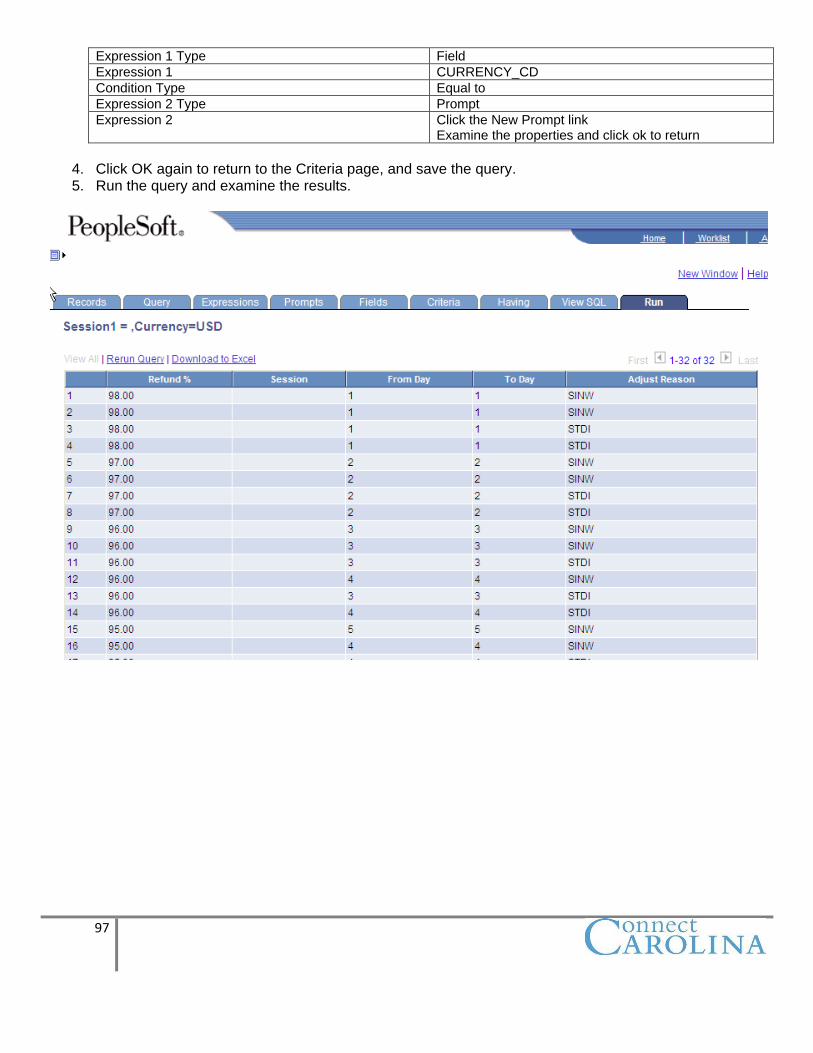
3. Click the Add Criteria button, and enter the following information: Page Element Value or Status
97
Expression 1 Type Field
Expression 1 CURRENCY_CD
Condition Type Equal to
Expression 2 Type Prompt
Expression 2 Click the New Prompt link Examine the properties and click ok to return
4. Click OK again to return to the Criteria page, and save the query. 5. Run the query and examine the results.
98
Chapter 6 Working with Multiple Tables
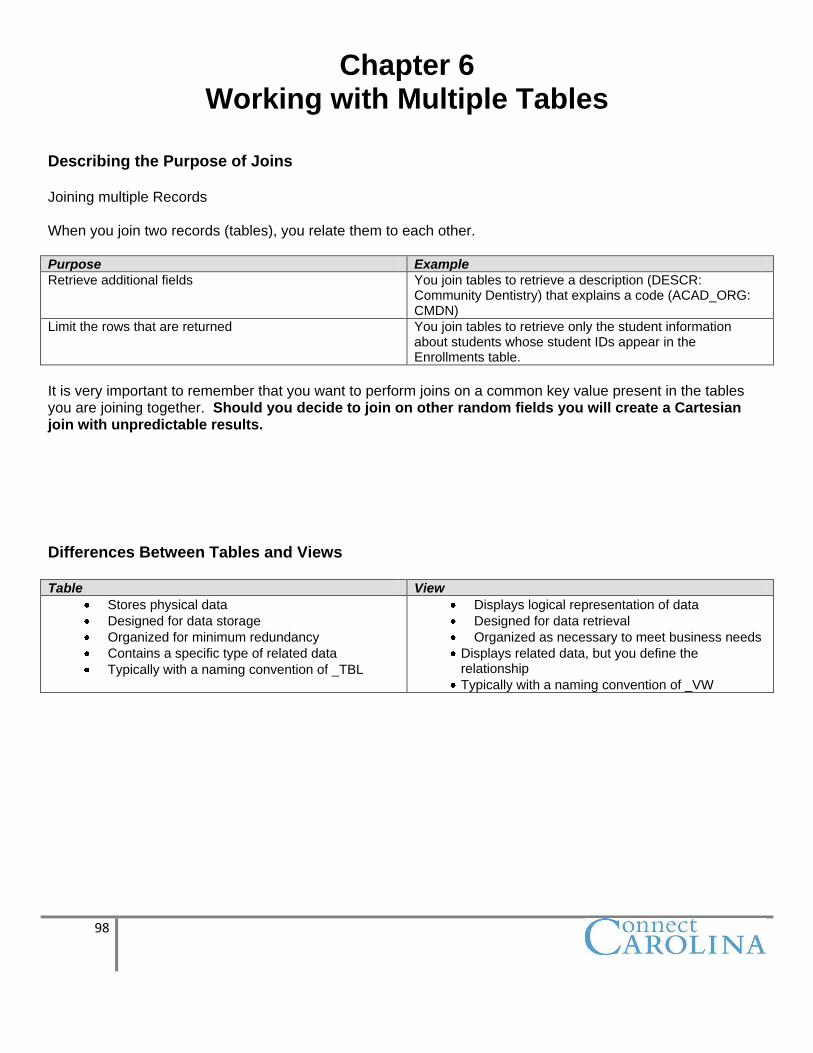
Describing the Purpose of Joins Joining multiple Records When you join two records (tables), you relate them to each other. Purpose Example
Retrieve additional fields You join tables to retrieve a description (DESCR: Community Dentistry) that explains a code (ACAD_ORG: CMDN)
Limit the rows that are returned You join tables to retrieve only the student information about students whose student IDs appear in the Enrollments table.
It is very important to remember that you want to perform joins on a common key value present in the tables you are joining together. Should you decide to join on other random fields you will create a Cartesian join with unpredictable results.
Differences Between Tables and Views Table View
Stores physical data
Designed for data storage
Organized for minimum redundancy
Contains a specific type of related data
Typically with a naming convention of _TBL
Displays logical representation of data
Designed for data retrieval
Organized as necessary to meet business needs
Displays related data, but you define the relationship
Typically with a naming convention of _VW
99
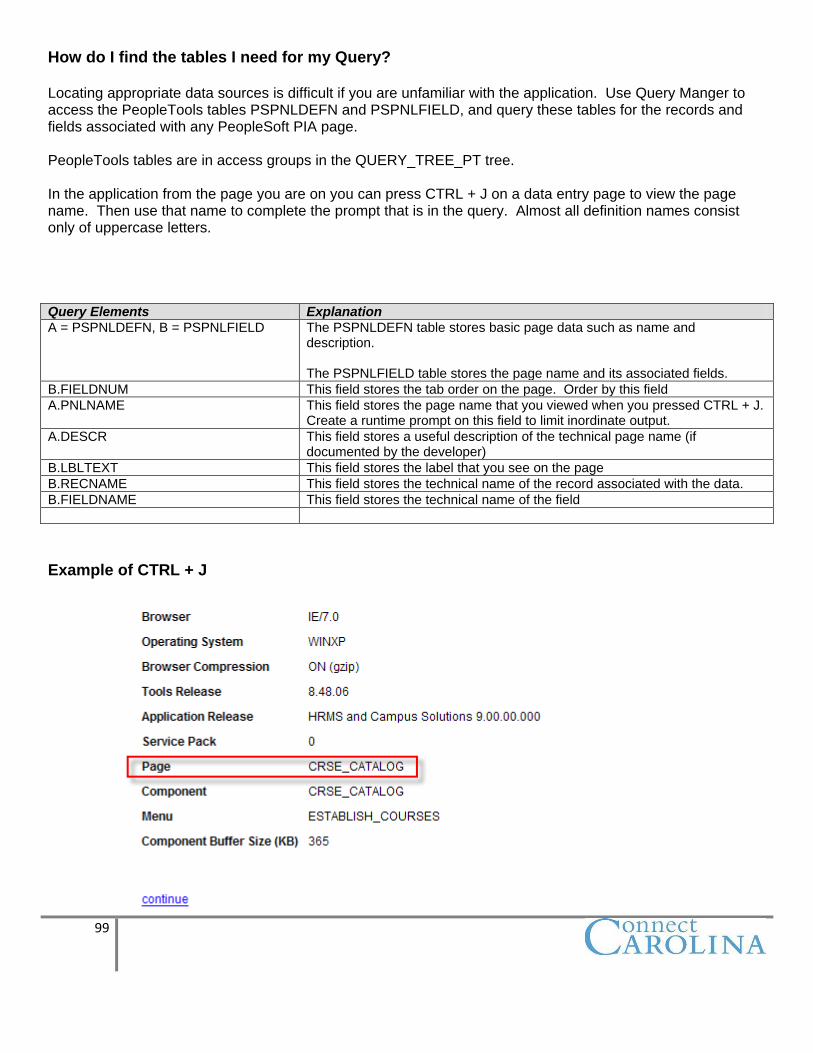
How do I find the tables I need for my Query? Locating appropriate data sources is difficult if you are unfamiliar with the application. Use Query Manger to access the PeopleTools tables PSPNLDEFN and PSPNLFIELD, and query these tables for the records and fields associated with any PeopleSoft PIA page. PeopleTools tables are in access groups in the QUERY_TREE_PT tree. In the application from the page you are on you can press CTRL + J on a data entry page to view the page name. Then use that name to complete the prompt that is in the query. Almost all definition names consist only of uppercase letters. Query Elements Explanation
A = PSPNLDEFN, B = PSPNLFIELD The PSPNLDEFN table stores basic page data such as name and description. The PSPNLFIELD table stores the page name and its associated fields.
B.FIELDNUM This field stores the tab order on the page. Order by this field
A.PNLNAME This field stores the page name that you viewed when you pressed CTRL + J. Create a runtime prompt on this field to limit inordinate output.
A.DESCR This field stores a useful description of the technical page name (if documented by the developer)
B.LBLTEXT This field stores the label that you see on the page
B.RECNAME This field stores the technical name of the record associated with the data.
B.FIELDNAME This field stores the technical name of the field
Example of CTRL + J
100
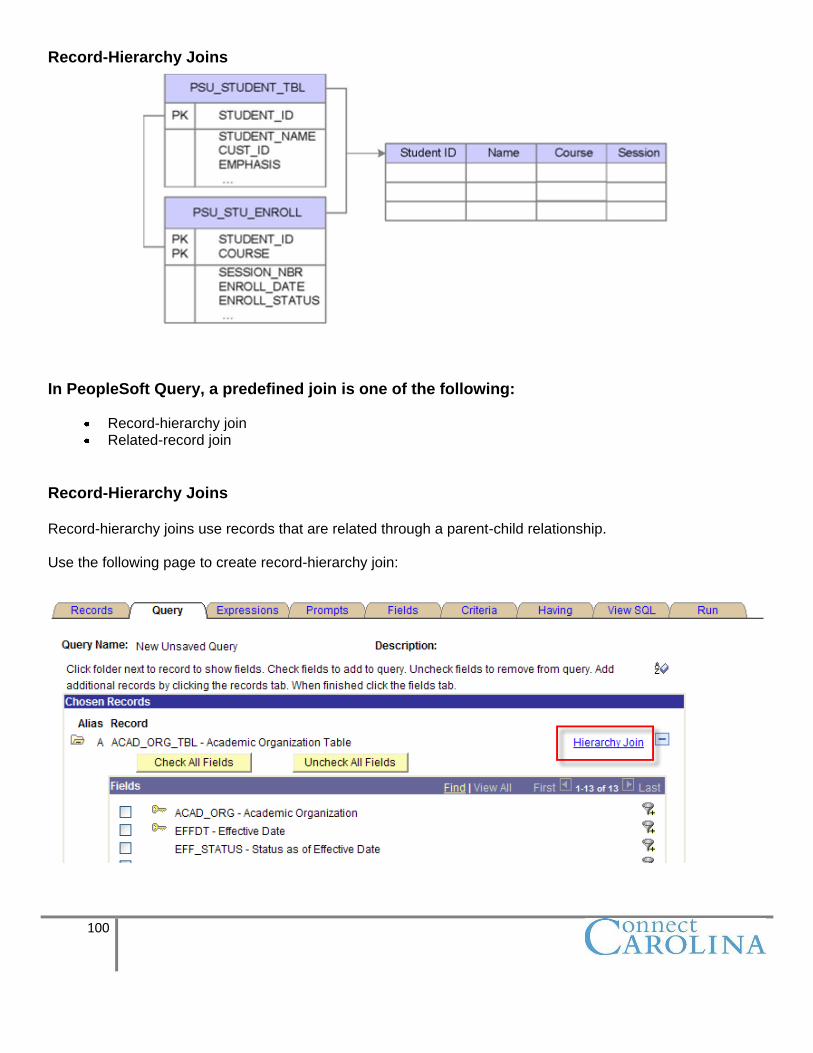
Record-Hierarchy Joins
In PeopleSoft Query, a predefined join is one of the following:
Record-hierarchy join Related-record join
Record-Hierarchy Joins Record-hierarchy joins use records that are related through a parent-child relationship. Use the following page to create record-hierarchy join:
101
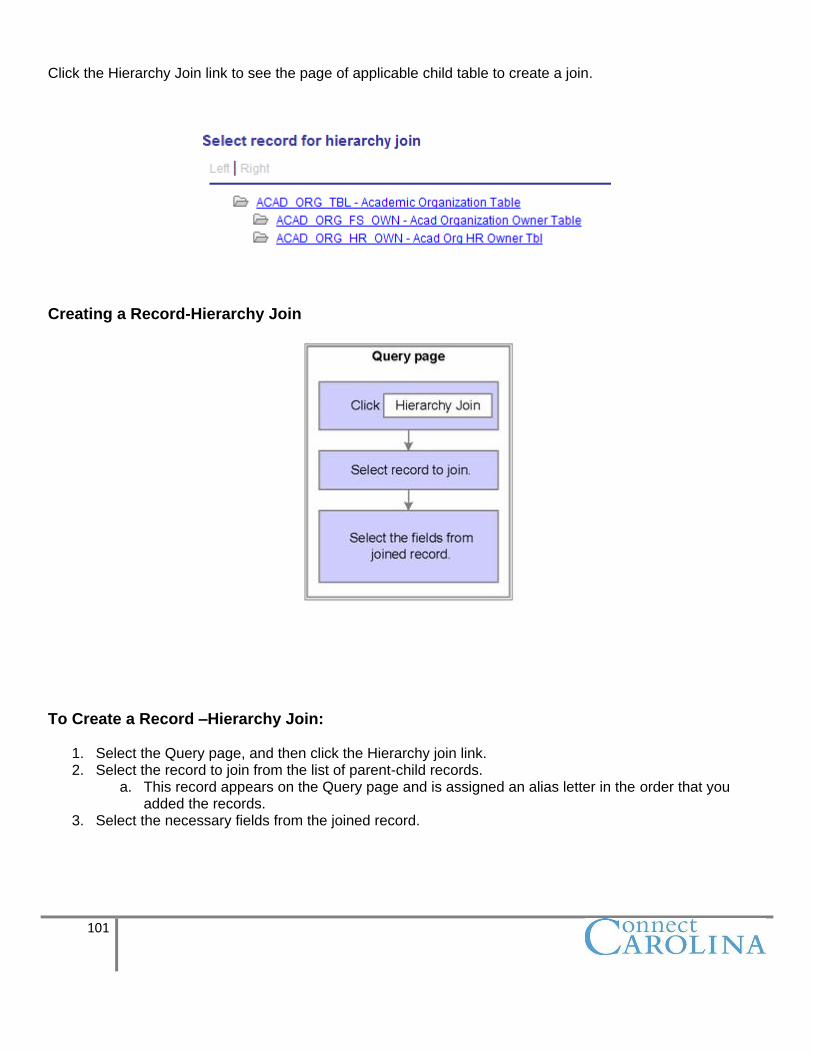
Click the Hierarchy Join link to see the page of applicable child table to create a join.
Creating a Record-Hierarchy Join
To Create a Record –Hierarchy Join:
1. Select the Query page, and then click the Hierarchy join link. 2. Select the record to join from the list of parent-child records.
a. This record appears on the Query page and is assigned an alias letter in the order that you added the records.
3. Select the necessary fields from the joined record.
102
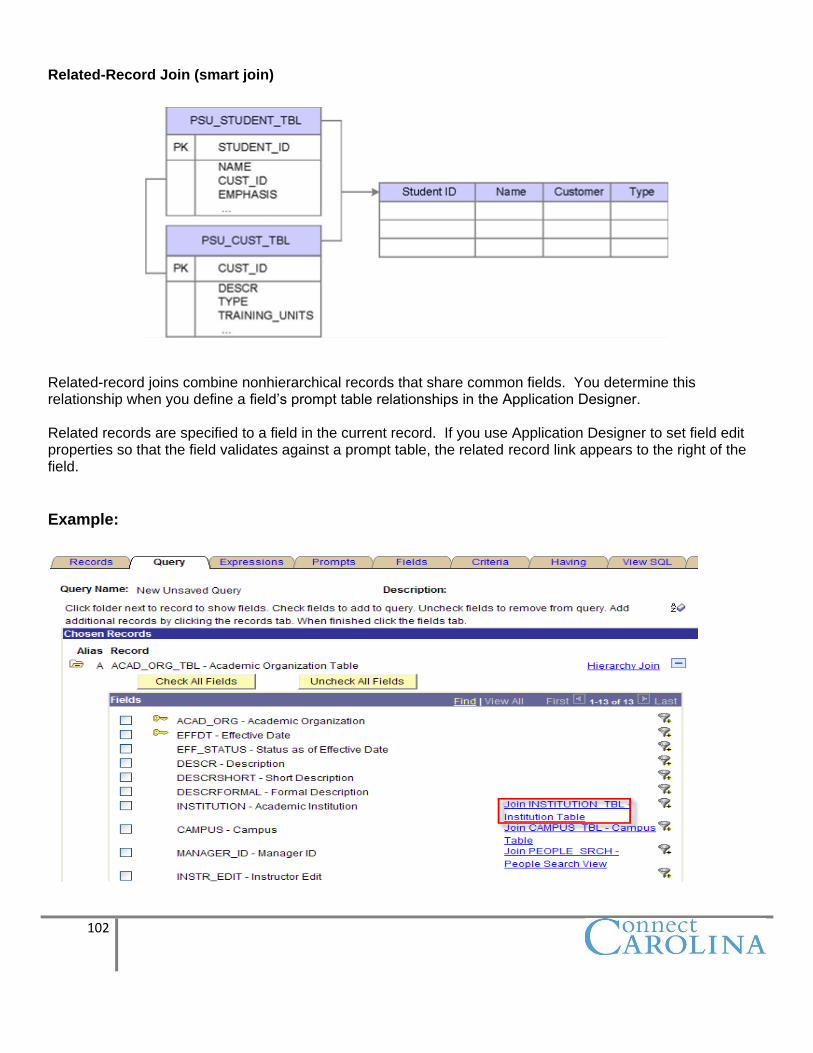
Related-Record Join (smart join)
Related-record joins combine nonhierarchical records that share common fields. You determine this relationship when you define a field’s prompt table relationships in the Application Designer. Related records are specified to a field in the current record. If you use Application Designer to set field edit properties so that the field validates against a prompt table, the related record link appears to the right of the field.
Example:
103
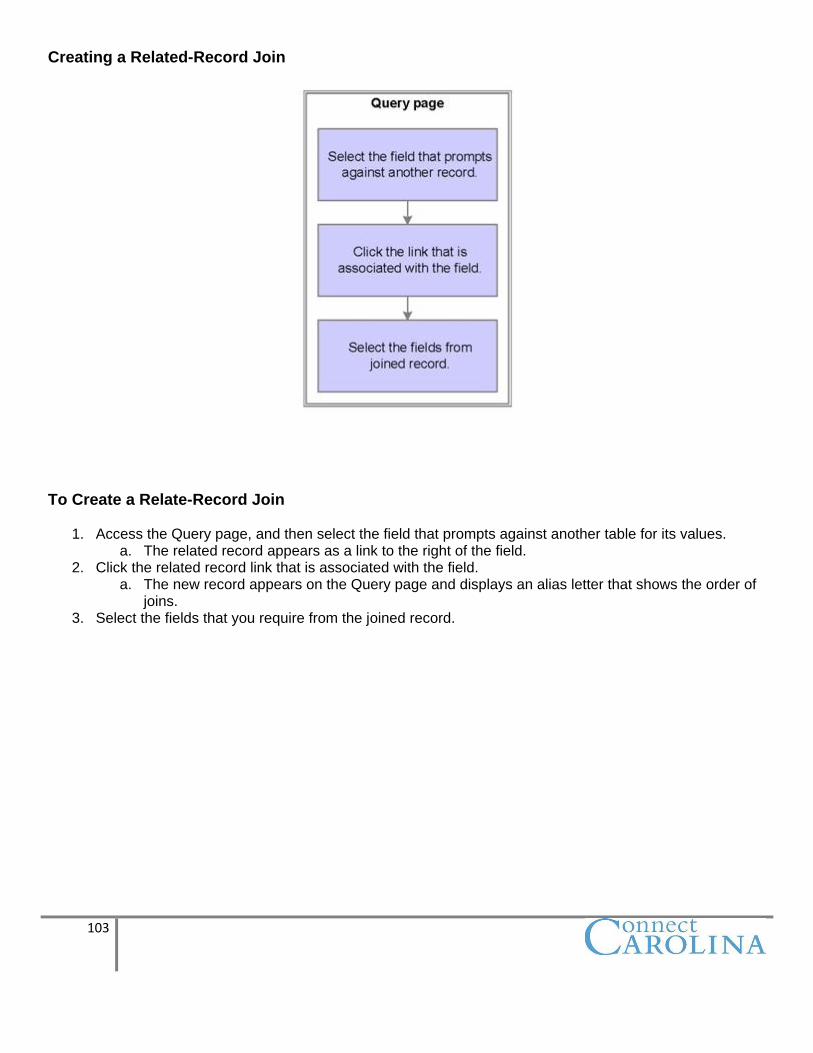
Creating a Related-Record Join
To Create a Relate-Record Join
1. Access the Query page, and then select the field that prompts against another table for its values. a. The related record appears as a link to the right of the field.
2. Click the related record link that is associated with the field. a. The new record appears on the Query page and displays an alias letter that shows the order of
joins. 3. Select the fields that you require from the joined record.
104
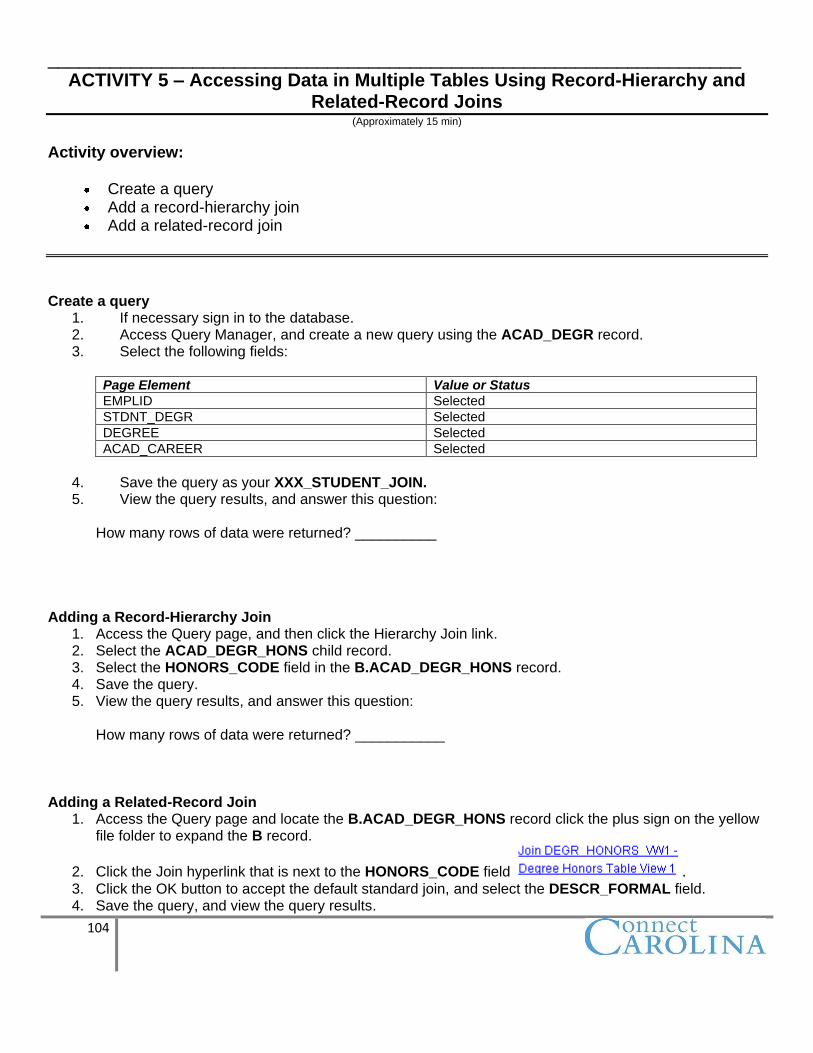
___________________________________________________________________ ACTIVITY 5 – Accessing Data in Multiple Tables Using Record-Hierarchy and
Related-Record Joins (Approximately 15 min)
Activity overview:
Create a query Add a record-hierarchy join Add a related-record join
Create a query
1. If necessary sign in to the database. 2. Access Query Manager, and create a new query using the ACAD_DEGR record. 3. Select the following fields:
Page Element Value or Status
EMPLID Selected
STDNT_DEGR Selected
DEGREE Selected
ACAD_CAREER Selected
4. Save the query as your XXX_STUDENT_JOIN. 5. View the query results, and answer this question:
How many rows of data were returned? __________
Adding a Record-Hierarchy Join
1. Access the Query page, and then click the Hierarchy Join link. 2. Select the ACAD_DEGR_HONS child record. 3. Select the HONORS_CODE field in the B.ACAD_DEGR_HONS record. 4. Save the query. 5. View the query results, and answer this question:
How many rows of data were returned? ___________
Adding a Related-Record Join
1. Access the Query page and locate the B.ACAD_DEGR_HONS record click the plus sign on the yellow file folder to expand the B record.
2. Click the Join hyperlink that is next to the HONORS_CODE field . 3. Click the OK button to accept the default standard join, and select the DESCR_FORMAL field. 4. Save the query, and view the query results.
105
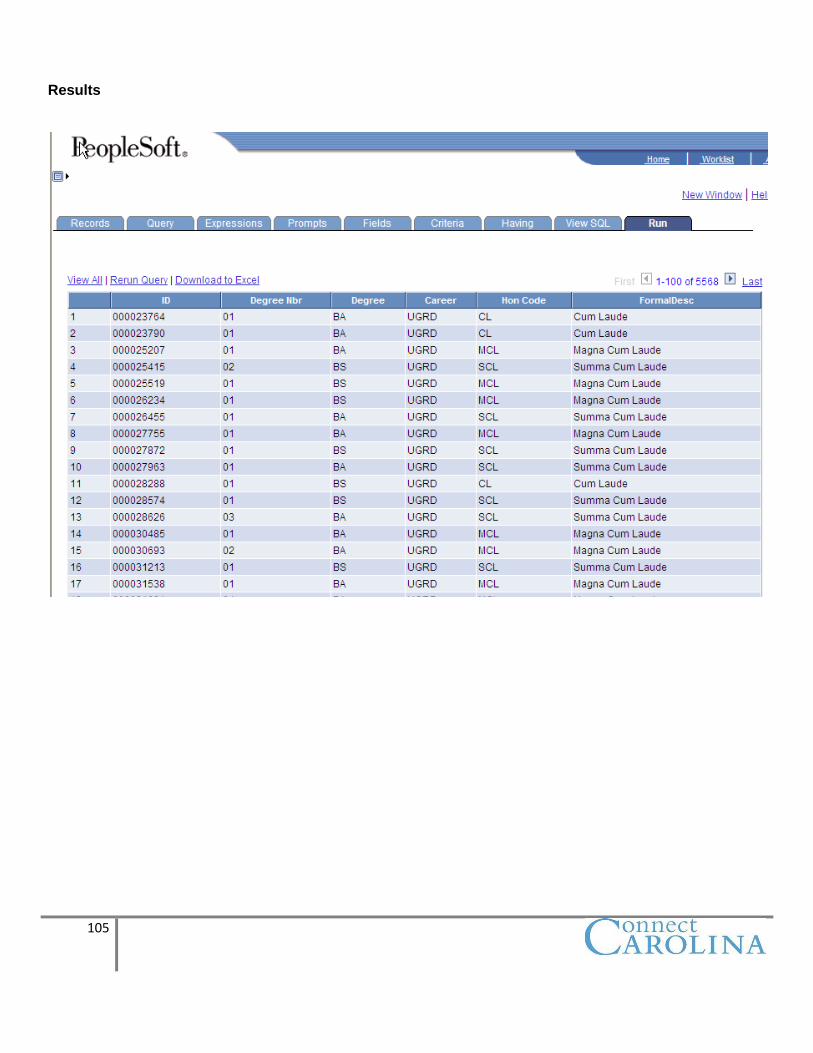
Results

106
Chapter 7 Using Summary Calculations
Describing Aggregate Functions and Having Criteria
Aggregate Functionality and Having Criteria In Query Manager, you use:
Aggregate functions to associate query fields with predefined calculation. Aggregate functions to return a single value for multiple rows of output. The Having page to access fields that use aggregate functions in selection criteria.
Using Aggregate Functions You can use the aggregate function to group data and perform calculations on a field that is within the
group. For instance, instead of viewing all rows of data, you want to view only a count of rows; instead of
viewing the price of each item, you might want to see the average price of all items. Having Criteria When you associate a field with an aggregate, you cannot use that field in selection criteria. Structured
Query Language (SQL) supports the use of aggregate functions in the WHERE clauses, but PeopleSoft applications don’t.
Because the Criteria page corresponds to a SQL statement’s WHERE clause, PeopleSoft Query
provides the Having page. This page enables you to add criteria on the aggregate instead of on the field generating the aggregate. The Having page criteria appear in a SQL statement’s HAVING clause.
107
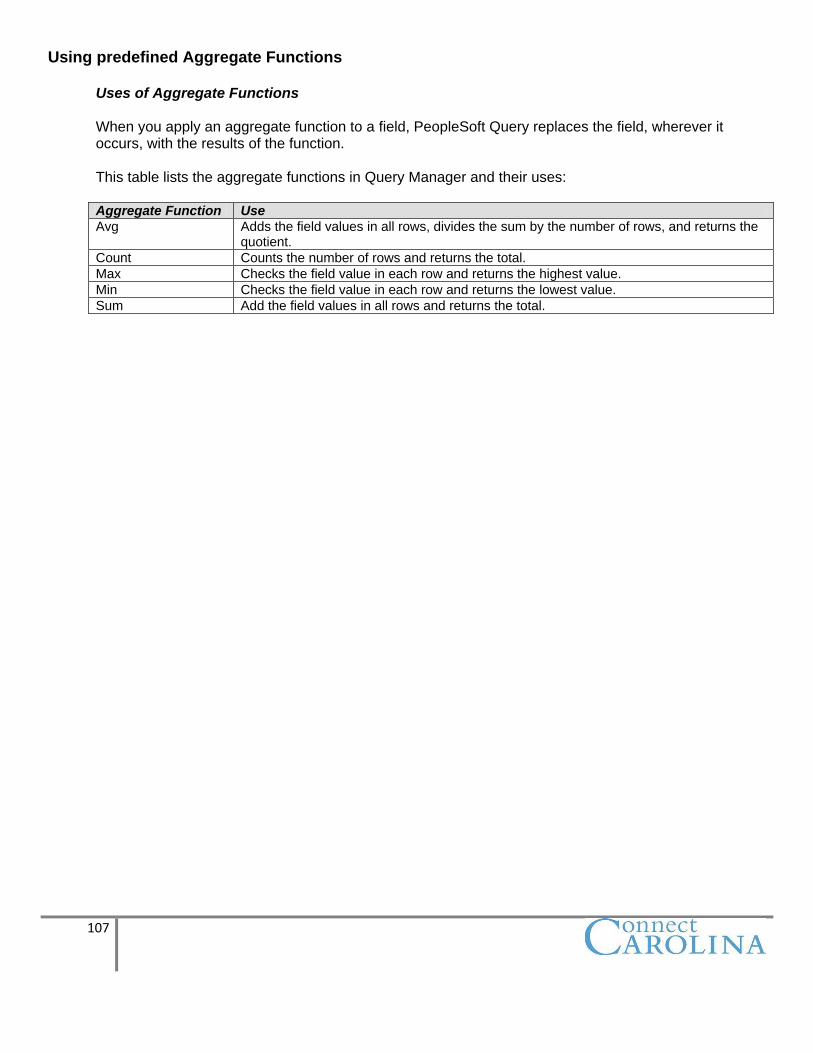
Using predefined Aggregate Functions
Uses of Aggregate Functions When you apply an aggregate function to a field, PeopleSoft Query replaces the field, wherever it
occurs, with the results of the function. This table lists the aggregate functions in Query Manager and their uses:
Aggregate Function Use
Avg Adds the field values in all rows, divides the sum by the number of rows, and returns the quotient.
Count Counts the number of rows and returns the total.
Max Checks the field value in each row and returns the highest value.
Min Checks the field value in each row and returns the lowest value.
Sum Add the field values in all rows and returns the total.
108
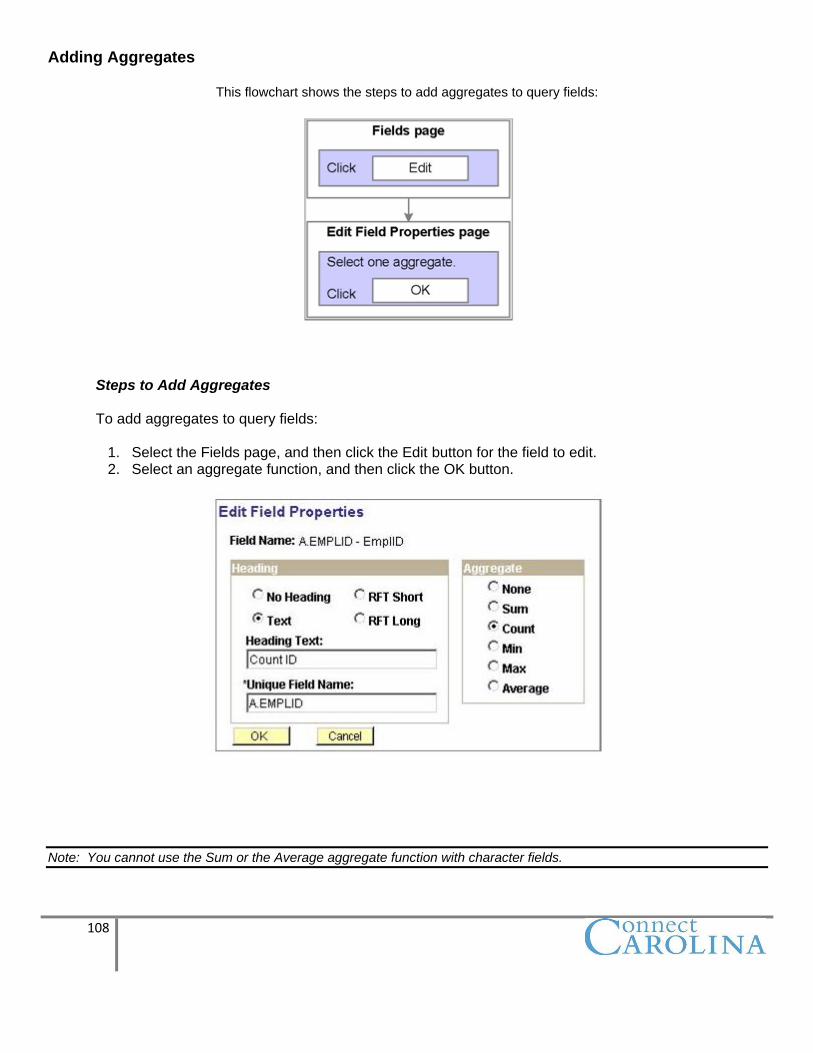
Adding Aggregates
This flowchart shows the steps to add aggregates to query fields:
Steps to Add Aggregates To add aggregates to query fields:
1. Select the Fields page, and then click the Edit button for the field to edit. 2. Select an aggregate function, and then click the OK button.
Note: You cannot use the Sum or the Average aggregate function with character fields.
109
Using the Having Criteria
Having Criteria
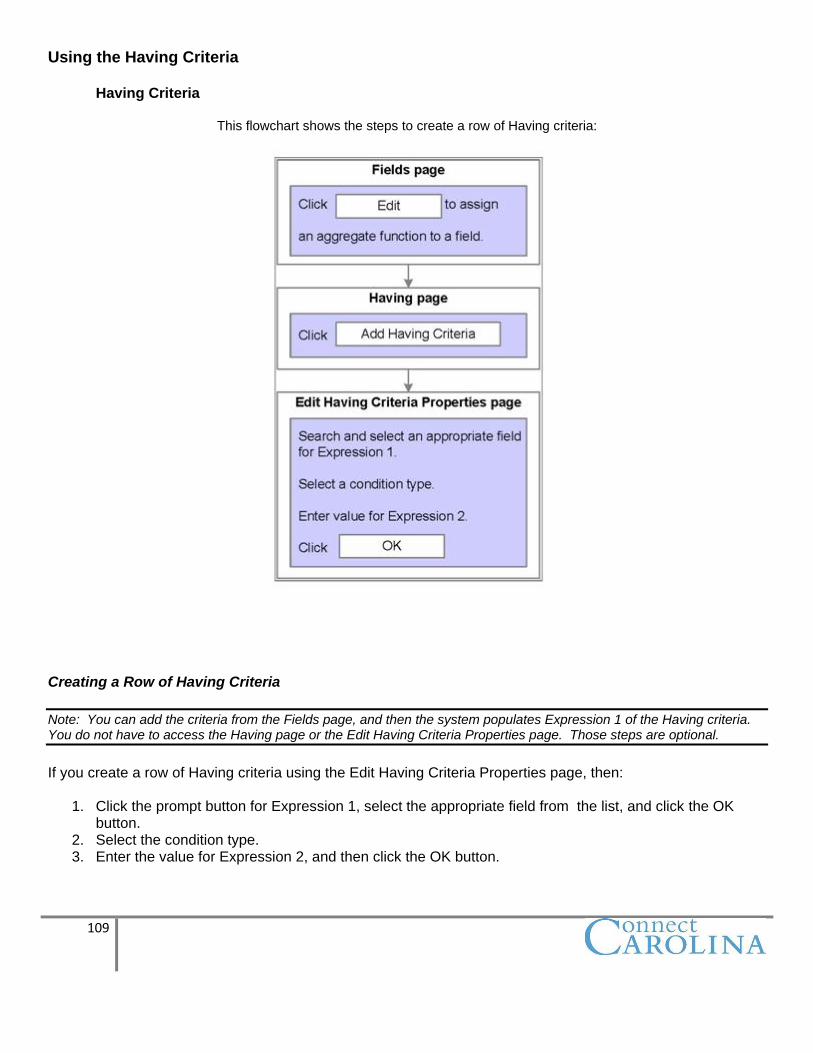
This flowchart shows the steps to create a row of Having criteria:
Creating a Row of Having Criteria
Note: You can add the criteria from the Fields page, and then the system populates Expression 1 of the Having criteria. You do not have to access the Having page or the Edit Having Criteria Properties page. Those steps are optional.
If you create a row of Having criteria using the Edit Having Criteria Properties page, then:
1. Click the prompt button for Expression 1, select the appropriate field from the list, and click the OK button.
2. Select the condition type. 3. Enter the value for Expression 2, and then click the OK button.
110
_____________________________________________________________________ ACTIVITY 6 – Using Having Criteria and Applying Criteria to Aggregated Fields
(Approximately 15 min)
Activity overview:
Create a query Apply the Count aggregate function Apply the Average aggregate function Create a second query Apply the Count aggregate function Insert Having criteria
Creating a query
1. If necessary, sign in to the database. 2. Access Query Manager, and create a new query using the TUIT_CALC_TBL record.
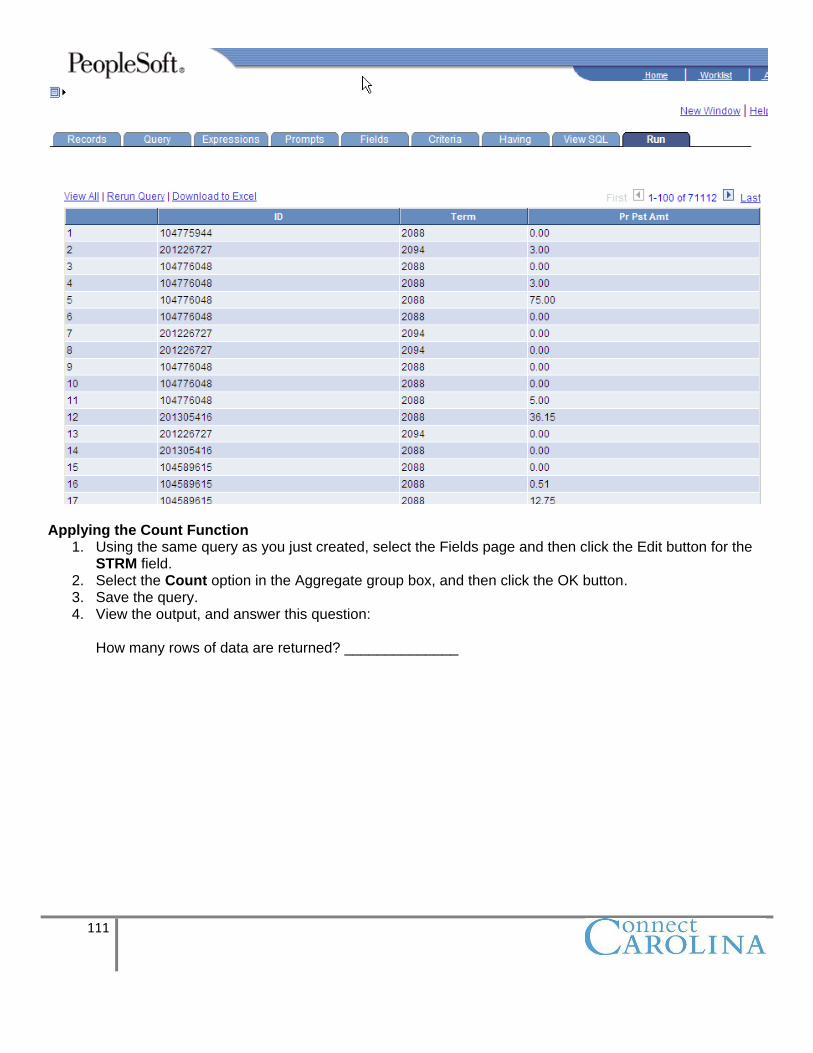
3. Select the EMPLID, STRM and PRE_POST_AMT fields.
4. Save the query as XXX_COUNT (XXX is your INITIALS). 5. View the output, and answer this question.
a. How many rows of data are returned? ______________ Results
111
Applying the Count Function
1. Using the same query as you just created, select the Fields page and then click the Edit button for the STRM field.
2. Select the Count option in the Aggregate group box, and then click the OK button. 3. Save the query. 4. View the output, and answer this question:
How many rows of data are returned? ______________
112
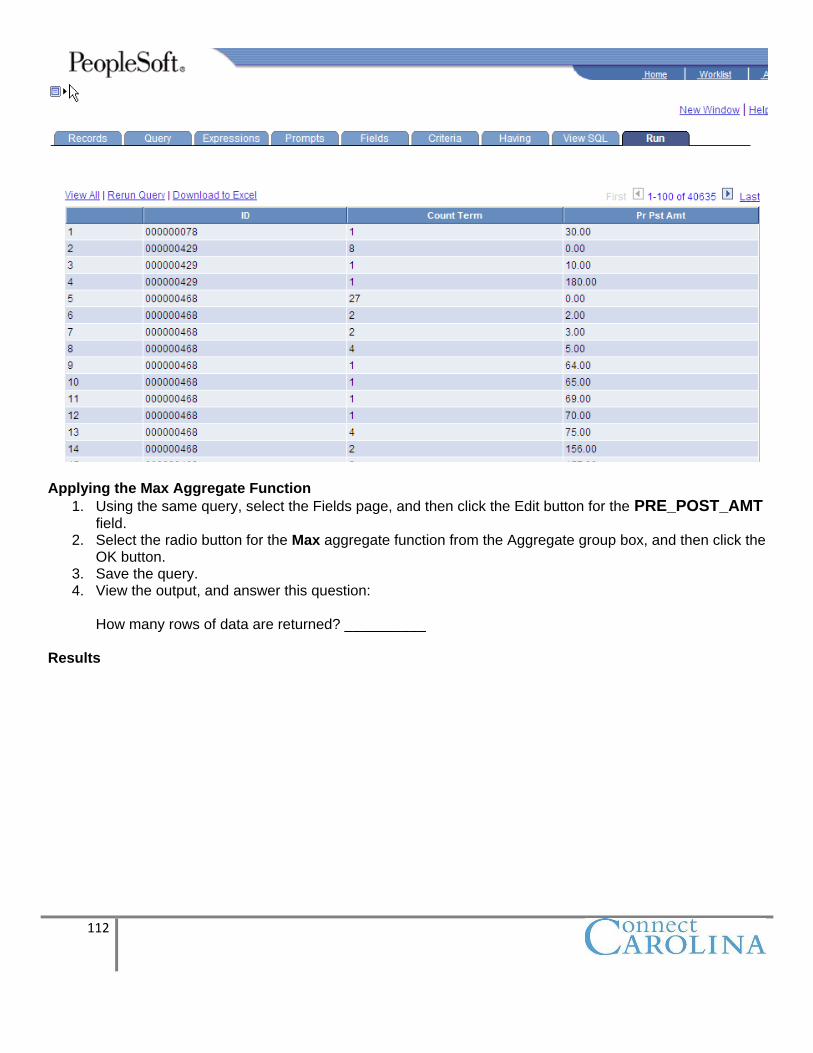
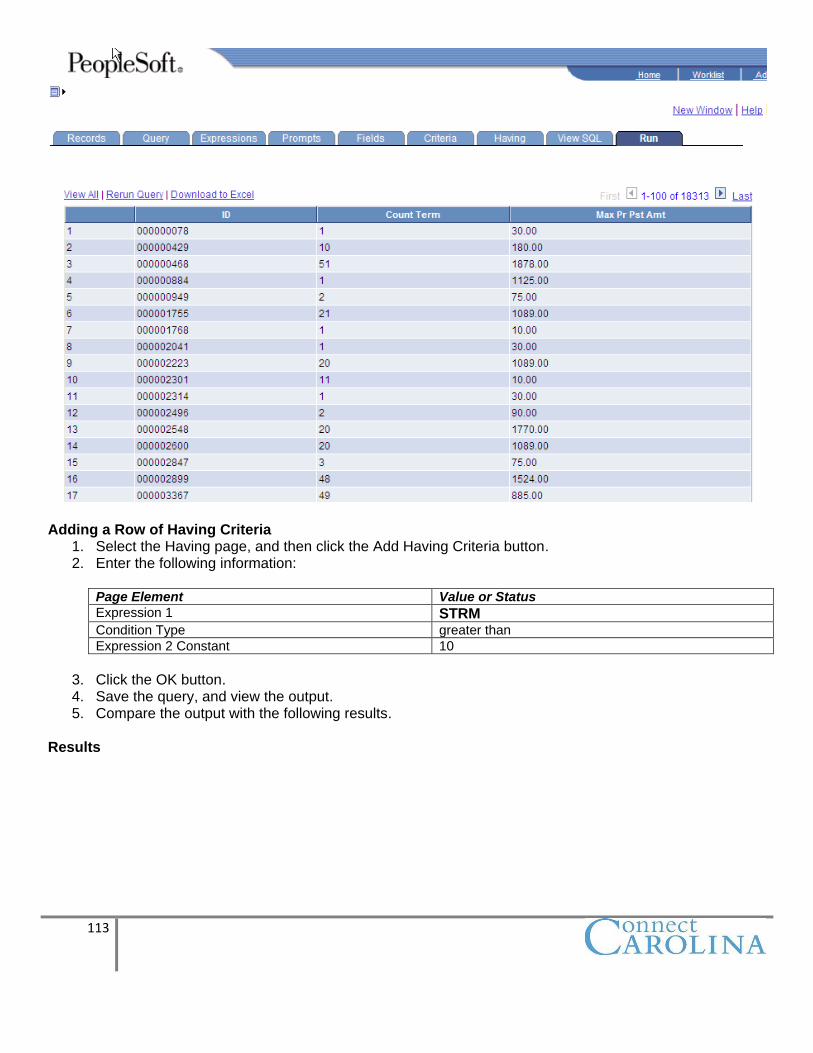
Applying the Max Aggregate Function
1. Using the same query, select the Fields page, and then click the Edit button for the PRE_POST_AMT field.
2. Select the radio button for the Max aggregate function from the Aggregate group box, and then click the OK button.
3. Save the query. 4. View the output, and answer this question:
How many rows of data are returned? __________
Results
113
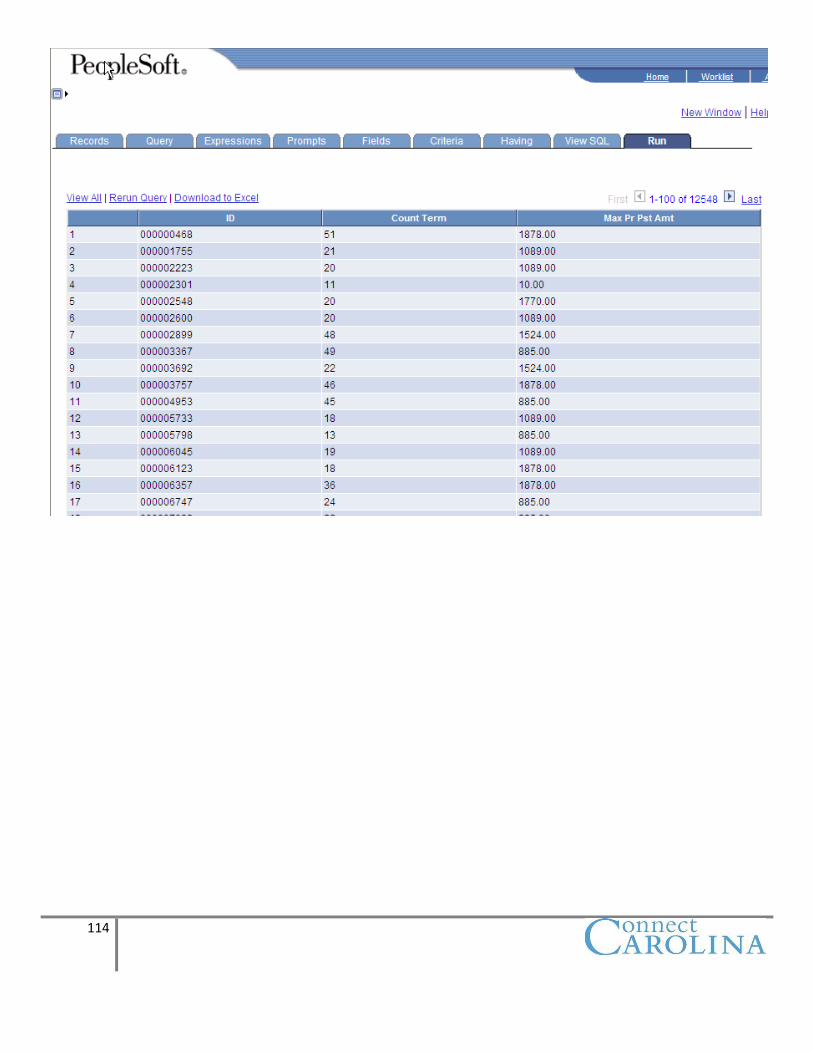
Adding a Row of Having Criteria
1. Select the Having page, and then click the Add Having Criteria button. 2. Enter the following information:
Page Element Value or Status
Expression 1 STRM
Condition Type greater than
Expression 2 Constant 10
3. Click the OK button. 4. Save the query, and view the output. 5. Compare the output with the following results.
Results
114
115
Chapter 8 Query Viewer and Report Manager
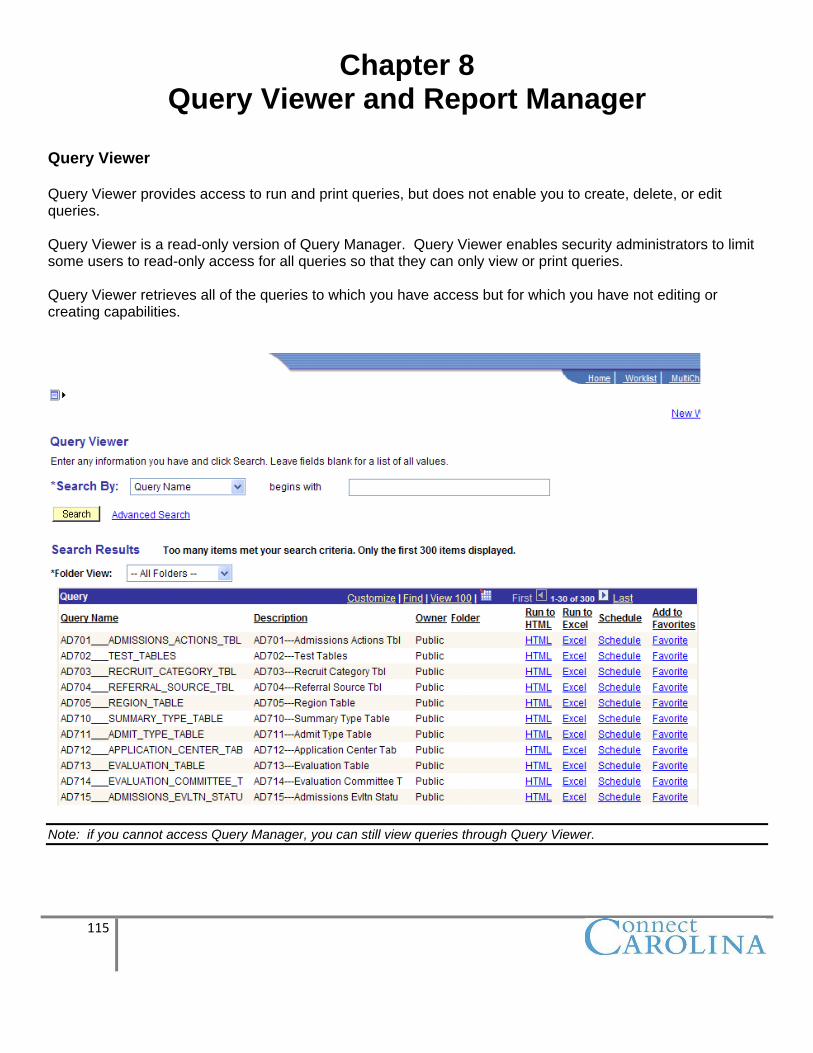
Query Viewer Query Viewer provides access to run and print queries, but does not enable you to create, delete, or edit queries. Query Viewer is a read-only version of Query Manager. Query Viewer enables security administrators to limit some users to read-only access for all queries so that they can only view or print queries. Query Viewer retrieves all of the queries to which you have access but for which you have not editing or creating capabilities.
Note: if you cannot access Query Manager, you can still view queries through Query Viewer.
116
Steps to View a Query Using Query Viewer
1. Select Reporting Tools, Query, Query Viewer. 2. Search for a query. 3. Click the HTML, Excel link to view the output.
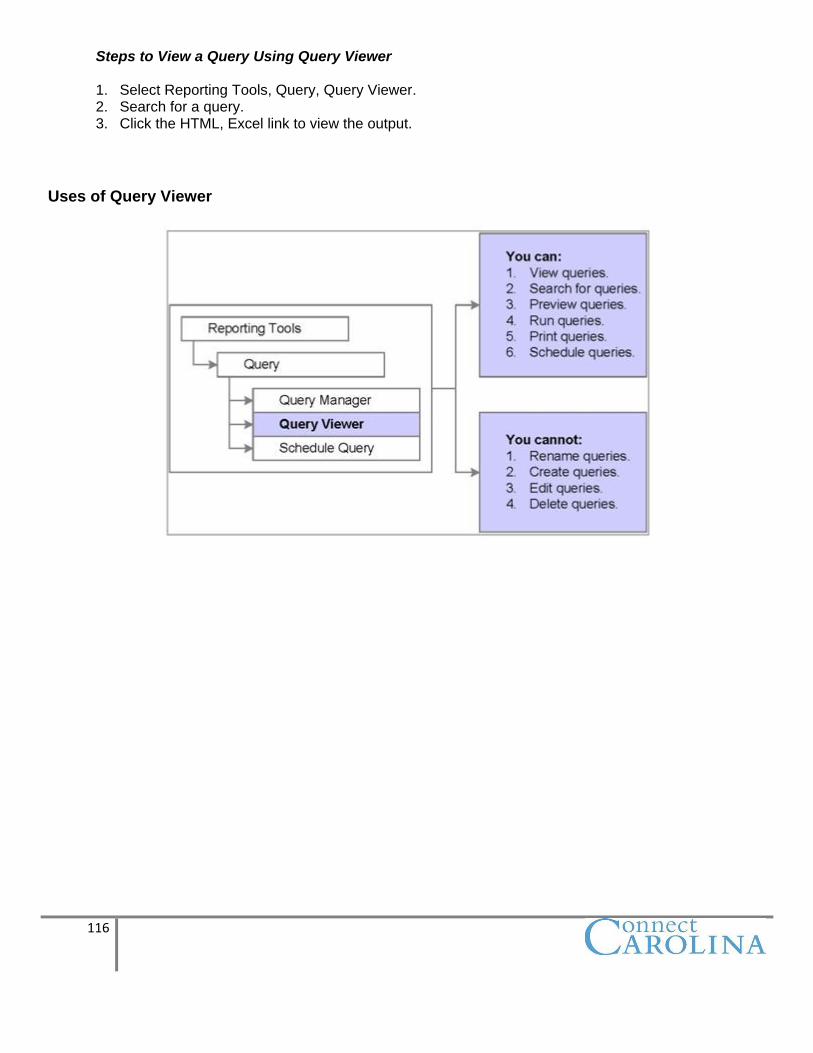
Uses of Query Viewer
117
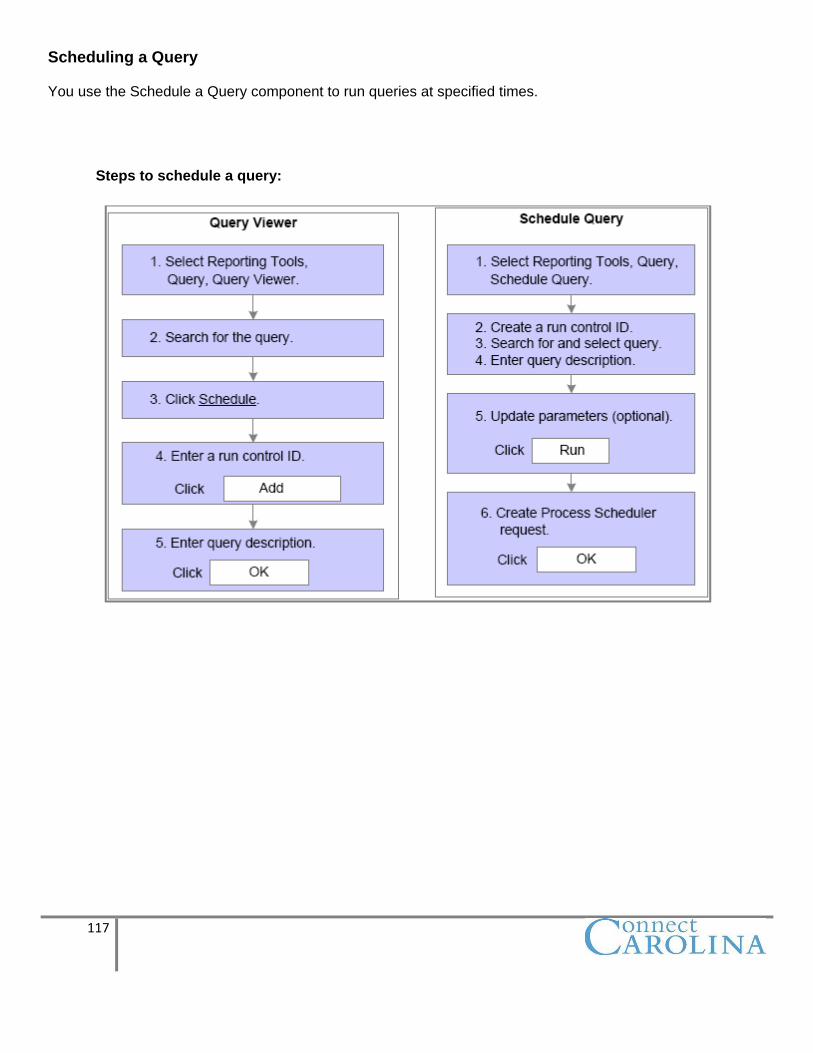
Scheduling a Query You use the Schedule a Query component to run queries at specified times.
Steps to schedule a query:

118
Report Manager
Separate Handout
Congratulations!! You have completed Query Basics