iway application adapter for salesforce user's guide1 introducing the iway application adapter...
TRANSCRIPT
iWay Application Adapter forSalesforce User's GuideVersion 7.0.x and Higher
August 16, 2018

Active Technologies, EDA, EDA/SQL, FIDEL, FOCUS, Information Builders, the Information Builders logo, iWay, iWaySoftware, Parlay, PC/FOCUS, RStat, Table Talk, Web390, WebFOCUS, WebFOCUS Active Technologies, and WebFOCUSMagnify are registered trademarks, and DataMigrator and Hyperstage are trademarks of Information Builders, Inc.
Adobe, the Adobe logo, Acrobat, Adobe Reader, Flash, Adobe Flash Builder, Flex, and PostScript are either registeredtrademarks or trademarks of Adobe Systems Incorporated in the United States and/or other countries.
Due to the nature of this material, this document refers to numerous hardware and software products by theirtrademarks. In most, if not all cases, these designations are claimed as trademarks or registered trademarks by theirrespective companies. It is not this publisher's intent to use any of these names generically. The reader is thereforecautioned to investigate all claimed trademark rights before using any of these names other than to refer to the productdescribed.
Copyright © 2018, by Information Builders, Inc. and iWay Software. All rights reserved. Patent Pending. This manual, orparts thereof, may not be reproduced in any form without the written permission of Information Builders, Inc.

Contents
Preface . . . . . . . . . . . . . . . . . . . . . . . . . . . . . . . . . . . . . . . . . . . . . . . . . . . . . . . . . . . . . . . . . . . . . . . . . 7
Documentation Conventions . . . . . . . . . . . . . . . . . . . . . . . . . . . . . . . . . . . . . . . . . . . . . . . . . . . . . . . . . . . .8
Related Publications . . . . . . . . . . . . . . . . . . . . . . . . . . . . . . . . . . . . . . . . . . . . . . . . . . . . . . . . . . . . . . . . . . 9
Customer Support . . . . . . . . . . . . . . . . . . . . . . . . . . . . . . . . . . . . . . . . . . . . . . . . . . . . . . . . . . . . . . . . . . . . 9
Help Us to Serve You Better . . . . . . . . . . . . . . . . . . . . . . . . . . . . . . . . . . . . . . . . . . . . . . . . . . . . . . . . . . . .9
User Feedback . . . . . . . . . . . . . . . . . . . . . . . . . . . . . . . . . . . . . . . . . . . . . . . . . . . . . . . . . . . . . . . . . . . . . . 12
Information Builders Consulting and Training . . . . . . . . . . . . . . . . . . . . . . . . . . . . . . . . . . . . . . . . . . . . 12
1. Introducing the iWay Application Adapter for Salesforce . . . . . . . . . . . . . . . . . . . . . . . 13
Features of the iWay Application Adapter for Salesforce . . . . . . . . . . . . . . . . . . . . . . . . . . . . . . . . . . .13
Component Information for the iWay Application Adapter for Salesforce . . . . . . . . . . . . . . . . . . . . . 13
Component Information Roadmap. . . . . . . . . . . . . . . . . . . . . . . . . . . . . . . . . . . . . . . . . . . . . . . . . 14
iWay Service Manager. . . . . . . . . . . . . . . . . . . . . . . . . . . . . . . . . . . . . . . . . . . . . . . . . . . . . . . . . . . 14
iWay Explorer. . . . . . . . . . . . . . . . . . . . . . . . . . . . . . . . . . . . . . . . . . . . . . . . . . . . . . . . . . . . . . . . . . .15
iWay Business Services Provider. . . . . . . . . . . . . . . . . . . . . . . . . . . . . . . . . . . . . . . . . . . . . . . . . . 15
2. Installing the iWay Application Adapter for Salesforce . . . . . . . . . . . . . . . . . . . . . . . . . 17
Application Adapter for Salesforce Installation Prerequisites . . . . . . . . . . . . . . . . . . . . . . . . . . . . . . . 17
iWay Application Adapter for Salesforce Installation Files. . . . . . . . . . . . . . . . . . . . . . . . . . . . . 18
Installing the Application Adapter for Salesforce . . . . . . . . . . . . . . . . . . . . . . . . . . . . . . . . . . . . . . . . . 18
3. Configuring and Managing Connections to Salesforce . . . . . . . . . . . . . . . . . . . . . . . . . . 27
Starting iWay Explorer (Java Swing) . . . . . . . . . . . . . . . . . . . . . . . . . . . . . . . . . . . . . . . . . . . . . . . . . . . . .27
Creating a New Configuration . . . . . . . . . . . . . . . . . . . . . . . . . . . . . . . . . . . . . . . . . . . . . . . . . . . . . . . . . .28
Connecting to a New Configuration . . . . . . . . . . . . . . . . . . . . . . . . . . . . . . . . . . . . . . . . . . . . . . . . . . . . .30
Connecting to Salesforce . . . . . . . . . . . . . . . . . . . . . . . . . . . . . . . . . . . . . . . . . . . . . . . . . . . . . . . . . . . . . 31
Creating a New Target. . . . . . . . . . . . . . . . . . . . . . . . . . . . . . . . . . . . . . . . . . . . . . . . . . . . . . . . . . . 31
Connecting to a Target. . . . . . . . . . . . . . . . . . . . . . . . . . . . . . . . . . . . . . . . . . . . . . . . . . . . . . . . . . .34
Modifying, Closing, or Removing a Target. . . . . . . . . . . . . . . . . . . . . . . . . . . . . . . . . . . . . . . . . . .34
4. Creating XML Schemas for Salesforce . . . . . . . . . . . . . . . . . . . . . . . . . . . . . . . . . . . . . . . . .37
XML Schemas for Salesforce Overview . . . . . . . . . . . . . . . . . . . . . . . . . . . . . . . . . . . . . . . . . . . . . . . . . 37
Browsing Salesforce Business Objects . . . . . . . . . . . . . . . . . . . . . . . . . . . . . . . . . . . . . . . . . . . . . . . . . 37
Generating XML Schemas for Salesforce Business Objects . . . . . . . . . . . . . . . . . . . . . . . . . . . . . . . .39
Schema Location. . . . . . . . . . . . . . . . . . . . . . . . . . . . . . . . . . . . . . . . . . . . . . . . . . . . . . . . . . . . . . . 39
iWay Application Adapter for Salesforce User's Guide 3
Null Field Support. . . . . . . . . . . . . . . . . . . . . . . . . . . . . . . . . . . . . . . . . . . . . . . . . . . . . . . . . . . . . . . 47
Using the Upsert Function . . . . . . . . . . . . . . . . . . . . . . . . . . . . . . . . . . . . . . . . . . . . . . . . . . . . . . . . . . . . 48
Prerequisites. . . . . . . . . . . . . . . . . . . . . . . . . . . . . . . . . . . . . . . . . . . . . . . . . . . . . . . . . . . . . . . . . . . 48
Accessing the Upsert Function Using iWay Explorer. . . . . . . . . . . . . . . . . . . . . . . . . . . . . . . . . . 50
5. Creating and Publishing iWay Business Services . . . . . . . . . . . . . . . . . . . . . . . . . . . . . . . 53
Understanding iWay Business Services . . . . . . . . . . . . . . . . . . . . . . . . . . . . . . . . . . . . . . . . . . . . . . . . . 53
Creating iWay Business Services . . . . . . . . . . . . . . . . . . . . . . . . . . . . . . . . . . . . . . . . . . . . . . . . . . . . . . 53
Configuring the Retrieve Function . . . . . . . . . . . . . . . . . . . . . . . . . . . . . . . . . . . . . . . . . . . . . . . . . . . . . . 58
6. Configuring Outbound Messaging and Workflow Rules in Salesforce . . . . . . . . . . . . 61
Outbound Messages and Workflow Rules Overview . . . . . . . . . . . . . . . . . . . . . . . . . . . . . . . . . . . . . . . 61
Creating a Salesforce Outbound Message . . . . . . . . . . . . . . . . . . . . . . . . . . . . . . . . . . . . . . . . . . . . . . .62
Creating a Salesforce Workflow Rule . . . . . . . . . . . . . . . . . . . . . . . . . . . . . . . . . . . . . . . . . . . . . . . . . . . 65
7. Configuring Events for Salesforce . . . . . . . . . . . . . . . . . . . . . . . . . . . . . . . . . . . . . . . . . . . . . 75
Salesforce Events Overview . . . . . . . . . . . . . . . . . . . . . . . . . . . . . . . . . . . . . . . . . . . . . . . . . . . . . . . . . . . 75
Creating an Event Port . . . . . . . . . . . . . . . . . . . . . . . . . . . . . . . . . . . . . . . . . . . . . . . . . . . . . . . . . . . . . . . 76
Using the Default Event Port. . . . . . . . . . . . . . . . . . . . . . . . . . . . . . . . . . . . . . . . . . . . . . . . . . . . . .94
Creating a Channel . . . . . . . . . . . . . . . . . . . . . . . . . . . . . . . . . . . . . . . . . . . . . . . . . . . . . . . . . . . . . . . . . . 95
A. Salesforce Certificate Management . . . . . . . . . . . . . . . . . . . . . . . . . . . . . . . . . . . . . . . . . . . 99
Salesforce Certificate Management Prerequisites . . . . . . . . . . . . . . . . . . . . . . . . . . . . . . . . . . . . . . . . 99
Key Store Management . . . . . . . . . . . . . . . . . . . . . . . . . . . . . . . . . . . . . . . . . . . . . . . . . . . . . . . . . . . . . . 99
Generating the Key Pair. . . . . . . . . . . . . . . . . . . . . . . . . . . . . . . . . . . . . . . . . . . . . . . . . . . . . . . . .100
Generating the Certificate Signing Request. . . . . . . . . . . . . . . . . . . . . . . . . . . . . . . . . . . . . . . . 100
Purchasing the Commercial Certificate From VeriSign or a Similar Certificate Authority. . .100
Importing the Root Certificate and Intermediate Certificate. . . . . . . . . . . . . . . . . . . . . . . . . . 101
Importing the Signed Certificate. . . . . . . . . . . . . . . . . . . . . . . . . . . . . . . . . . . . . . . . . . . . . . . . . 101
Trust Store Management . . . . . . . . . . . . . . . . . . . . . . . . . . . . . . . . . . . . . . . . . . . . . . . . . . . . . . . . . . . . 101
Downloading the Root Certificate and Intermediate Certificate. . . . . . . . . . . . . . . . . . . . . . . 101
Importing the Root Certificate and Intermediate Certificate. . . . . . . . . . . . . . . . . . . . . . . . . . 101
Importing the Client Certificate. . . . . . . . . . . . . . . . . . . . . . . . . . . . . . . . . . . . . . . . . . . . . . . . . . 102
B. Salesforce Batch API . . . . . . . . . . . . . . . . . . . . . . . . . . . . . . . . . . . . . . . . . . . . . . . . . . . . . . . .103
Using the Salesforce Batch API Services . . . . . . . . . . . . . . . . . . . . . . . . . . . . . . . . . . . . . . . . . . . . . . .103
Upsert Operation Support. . . . . . . . . . . . . . . . . . . . . . . . . . . . . . . . . . . . . . . . . . . . . . . . . . . . . . . 106
Contents
4 Information Builders

C. Configuring the Application Adapter for Salesforce in an iWay Environment . . . . 107
Configuring the Application Adapter for Salesforce in iWay Service Manager . . . . . . . . . . . . . . . . 107
Contents
iWay Application Adapter for Salesforce User's Guide 5

Contents
6 Information Builders
Preface
This document is written for system integrators who develop client interfaces betweenSalesforce and other applications. It describes how to use the iWay Application Adapter forSalesforce to integrate business objects with your application server. It is assumed thatreaders understand web technologies and have a general understanding of Microsoft Windowsand UNIX systems.
Note: This Release 7.0.x content is currently being updated to support iWay Release 8.0.xsoftware. In the meantime, it can serve as a reference for your use of iWay Release 8. If youhave any questions, please contact [email protected].
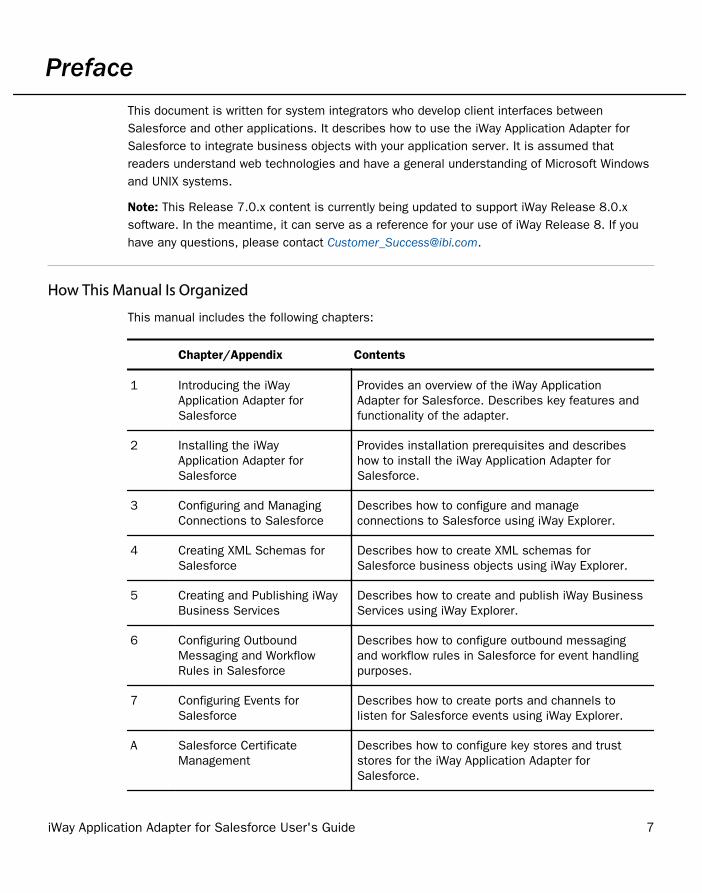
How This Manual Is Organized
This manual includes the following chapters:
Chapter/Appendix Contents
1 Introducing the iWayApplication Adapter forSalesforce
Provides an overview of the iWay ApplicationAdapter for Salesforce. Describes key features andfunctionality of the adapter.
2 Installing the iWayApplication Adapter forSalesforce
Provides installation prerequisites and describeshow to install the iWay Application Adapter forSalesforce.
3 Configuring and ManagingConnections to Salesforce
Describes how to configure and manageconnections to Salesforce using iWay Explorer.
4 Creating XML Schemas forSalesforce
Describes how to create XML schemas forSalesforce business objects using iWay Explorer.
5 Creating and Publishing iWayBusiness Services
Describes how to create and publish iWay BusinessServices using iWay Explorer.
6 Configuring OutboundMessaging and WorkflowRules in Salesforce
Describes how to configure outbound messagingand workflow rules in Salesforce for event handlingpurposes.
7 Configuring Events forSalesforce
Describes how to create ports and channels tolisten for Salesforce events using iWay Explorer.
A Salesforce CertificateManagement
Describes how to configure key stores and truststores for the iWay Application Adapter forSalesforce.
iWay Application Adapter for Salesforce User's Guide 7

Chapter/Appendix Contents
B Salesforce Batch API Provides usage guidelines for the Salesforce BatchAPI, which can be used to generate requests.
C Configuring the ApplicationAdapter for Salesforce in aniWay Environment
Describes how the adapter can be assigned to aniWay Service Manager channel.
Documentation Conventions
The following table describes the documentation conventions that are used in this manual.
Convention Description
THIS TYPEFACE orthis typeface
Denotes syntax that you must enter exactly as shown.
this typeface Represents a placeholder (or variable), a cross-reference, or animportant term. It may also indicate a button, menu item, or dialogbox option that you can click or select.
underscore Indicates a default setting.
Key + Key Indicates keys that you must press simultaneously.
{ } Indicates two or three choices. Type one of them, not the braces.
| Separates mutually exclusive choices in syntax. Type one of them,not the symbol.
... Indicates that you can enter a parameter multiple times. Type onlythe parameter, not the ellipsis (...).
.
.
.
Indicates that there are (or could be) intervening or additionalcommands.
Documentation Conventions
8 Information Builders
Related Publications
Visit our Technical Documentation Library at http://documentation.informationbuilders.com. Youcan also contact the Publications Order Department at (800) 969-4636.
Customer Support
Do you have any questions about this product?
Join the Focal Point community. Focal Point is our online developer center and more than amessage board. It is an interactive network of more than 3,000 developers from almost everyprofession and industry, collaborating on solutions and sharing tips and techniques. AccessFocal Point at http://forums.informationbuilders.com/eve/forums.
You can also access support services electronically, 24 hours a day, with InfoResponseOnline. InfoResponse Online is accessible through our website, http://www.informationbuilders.com. It connects you to the tracking system and known-problemdatabase at the Information Builders support center. Registered users can open, update, andview the status of cases in the tracking system and read descriptions of reported softwareissues. New users can register immediately for this service. The technical support section of http://www.informationbuilders.com also provides usage techniques, diagnostic tips, andanswers to frequently asked questions.
Call Information Builders Customer Support Services (CSS) at (800) 736-6130 or (212)736-6130. Customer Support Consultants are available Monday through Friday between 8:00a.m. and 8:00 p.m. EST to address all your questions. Information Builders consultants canalso give you general guidance regarding product capabilities and documentation. Please beready to provide your six-digit site code number (xxxx.xx) when you call.
To learn about the full range of available support services, ask your Information Buildersrepresentative about InfoResponse Online, or call (800) 969-INFO.
Help Us to Serve You Better
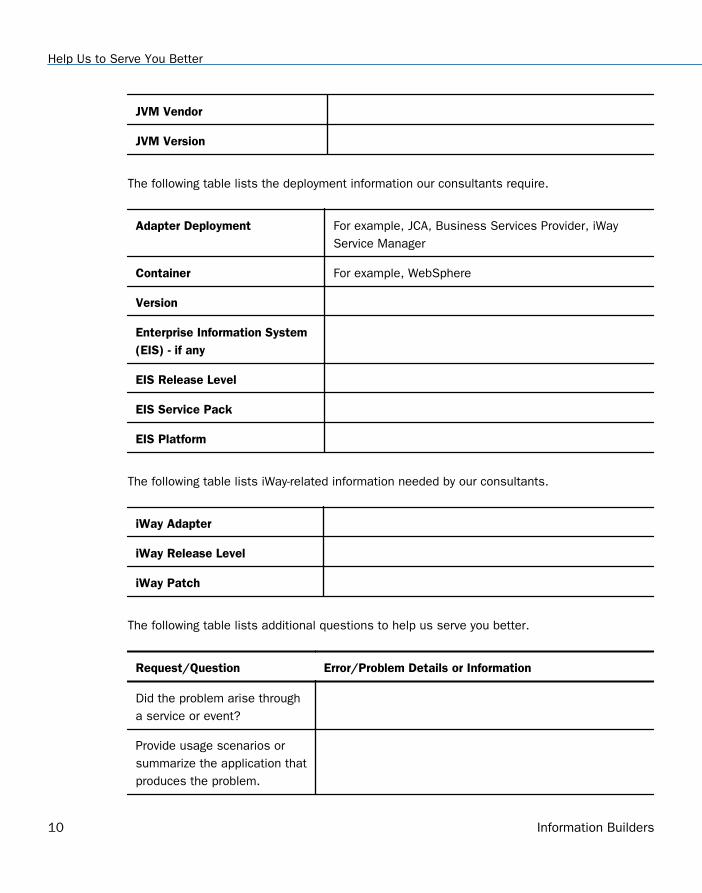
To help our consultants answer your questions effectively, be prepared to providespecifications and sample files and to answer questions about errors and problems.
The following tables list the environment information our consultants require.
Platform
Operating System
OS Version
Preface
iWay Application Adapter for Salesforce User's Guide 9
JVM Vendor
JVM Version
The following table lists the deployment information our consultants require.
Adapter Deployment For example, JCA, Business Services Provider, iWayService Manager
Container For example, WebSphere
Version
Enterprise Information System(EIS) - if any
EIS Release Level
EIS Service Pack
EIS Platform
The following table lists iWay-related information needed by our consultants.
iWay Adapter
iWay Release Level
iWay Patch
The following table lists additional questions to help us serve you better.
Request/Question Error/Problem Details or Information
Did the problem arise througha service or event?
Provide usage scenarios orsummarize the application thatproduces the problem.
Help Us to Serve You Better
10 Information Builders

Request/Question Error/Problem Details or Information
When did the problem start?
Can you reproduce thisproblem consistently?
Describe the problem.
Describe the steps toreproduce the problem.
Specify the error message(s).
Any change in the applicationenvironment: softwareconfiguration, EIS/databaseconfiguration, application, andso forth?
Under what circumstance doesthe problem not occur?
The following is a list of error/problem files that might be applicable.
Input documents (XML instance, XML schema, non-XML documents)
Transformation files
Error screen shots
Error output files
Trace files
Service Manager package to reproduce problem
Custom functions and agents in use
Diagnostic Zip
Transaction log
For information on tracing, see the iWay Service Manager User's Guide.
Preface
iWay Application Adapter for Salesforce User's Guide 11
User Feedback
In an effort to produce effective documentation, the Technical Content Management staffwelcomes your opinions regarding this document. Please use the Reader Comments form atthe end of this document to communicate your feedback to us or to suggest changes that willsupport improvements to our documentation. You can also contact us through our website, http://documentation.informationbuilders.com/connections.asp.
Thank you, in advance, for your comments.
Information Builders Consulting and Training
Interested in training? Information Builders Education Department offers a wide variety oftraining courses for this and other Information Builders products.
For information on course descriptions, locations, and dates, or to register for classes, visitour website (http://education.informationbuilders.com) or call (800) 969-INFO to speak to anEducation Representative.
User Feedback
12 Information Builders
Chapter1 Introducing the iWayApplication Adapter for Salesforce
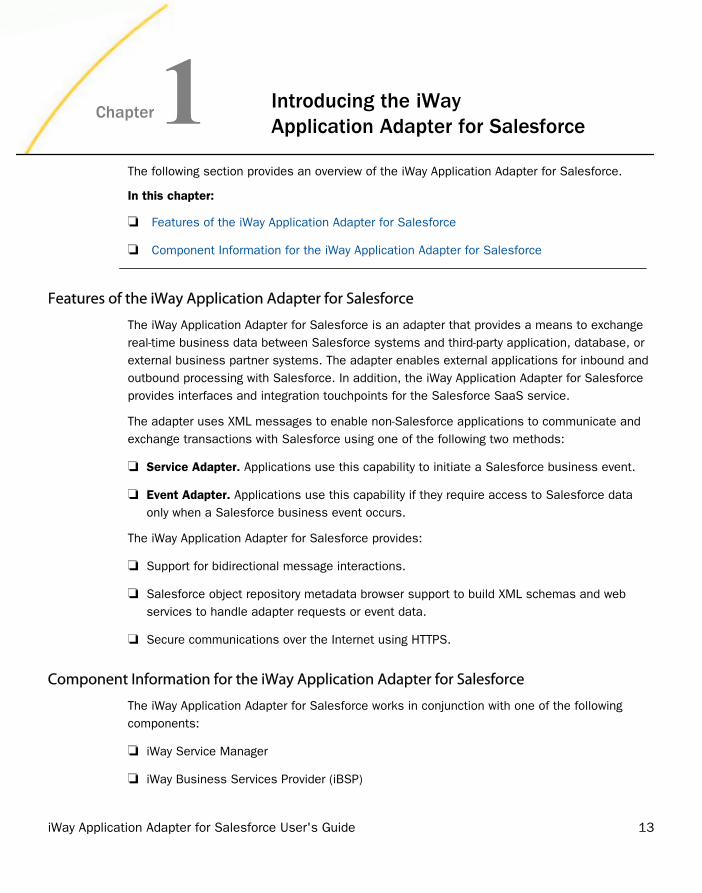
The following section provides an overview of the iWay Application Adapter for Salesforce.
In this chapter:
Features of the iWay Application Adapter for Salesforce
Component Information for the iWay Application Adapter for Salesforce
Features of the iWay Application Adapter for Salesforce
The iWay Application Adapter for Salesforce is an adapter that provides a means to exchangereal-time business data between Salesforce systems and third-party application, database, orexternal business partner systems. The adapter enables external applications for inbound andoutbound processing with Salesforce. In addition, the iWay Application Adapter for Salesforceprovides interfaces and integration touchpoints for the Salesforce SaaS service.
The adapter uses XML messages to enable non-Salesforce applications to communicate andexchange transactions with Salesforce using one of the following two methods:
Service Adapter. Applications use this capability to initiate a Salesforce business event.
Event Adapter. Applications use this capability if they require access to Salesforce dataonly when a Salesforce business event occurs.
The iWay Application Adapter for Salesforce provides:
Support for bidirectional message interactions.
Salesforce object repository metadata browser support to build XML schemas and webservices to handle adapter requests or event data.
Secure communications over the Internet using HTTPS.
Component Information for the iWay Application Adapter for Salesforce
The iWay Application Adapter for Salesforce works in conjunction with one of the followingcomponents:
iWay Service Manager
iWay Business Services Provider (iBSP)
iWay Application Adapter for Salesforce User's Guide 13
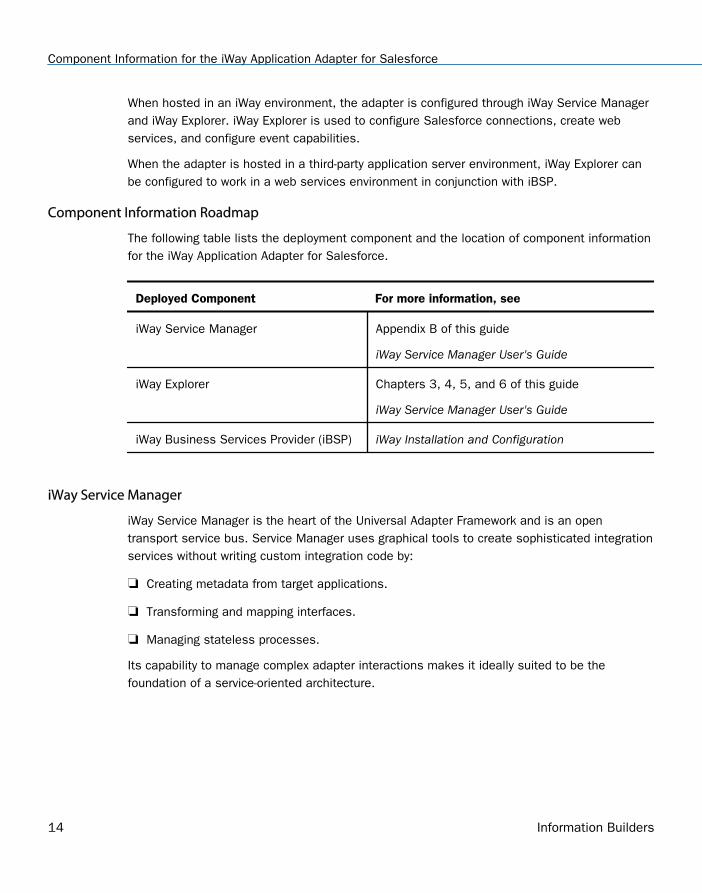
When hosted in an iWay environment, the adapter is configured through iWay Service Managerand iWay Explorer. iWay Explorer is used to configure Salesforce connections, create webservices, and configure event capabilities.
When the adapter is hosted in a third-party application server environment, iWay Explorer canbe configured to work in a web services environment in conjunction with iBSP.
Component Information Roadmap
The following table lists the deployment component and the location of component informationfor the iWay Application Adapter for Salesforce.
Deployed Component For more information, see
iWay Service Manager Appendix B of this guide
iWay Service Manager User's Guide
iWay Explorer Chapters 3, 4, 5, and 6 of this guide
iWay Service Manager User's Guide
iWay Business Services Provider (iBSP) iWay Installation and Configuration
iWay Service Manager
iWay Service Manager is the heart of the Universal Adapter Framework and is an opentransport service bus. Service Manager uses graphical tools to create sophisticated integrationservices without writing custom integration code by:
Creating metadata from target applications.
Transforming and mapping interfaces.
Managing stateless processes.
Its capability to manage complex adapter interactions makes it ideally suited to be thefoundation of a service-oriented architecture.
Component Information for the iWay Application Adapter for Salesforce
14 Information Builders

iWay Explorer
iWay Explorer uses a tree metaphor to introspect the Salesforce system metadata. Theexplorer enables you to create XML schemas and web services for the associated object. Inaddition, you can create ports and channels to listen for events in Salesforce. Externalapplications that access Salesforce through the iWay Application Adapter for Salesforce useeither XML schemas or web services to pass data between the external application and theadapter.
iWay Explorer also exposes the Upsert function. For more information, see Using the UpsertFunction on page 48.
iWay Business Services Provider
iWay Business Services Provider (iBSP) exposes (as web services) enterprise assets that areaccessible from adapters regardless of the programming language or the particular operatingsystem.
iBSP simplifies the creation and execution of web services when running:
Custom and legacy applications.
Database queries and stored procedures.
Packaged applications.
Terminal emulation and screen-based systems.
Transactional systems.
Coupled with a platform and language independent messaging protocol called SOAP (SimpleObject Access Protocol), XML enables application development and integration by assemblingpreviously built components from multiple web services.
1. Introducing the iWay Application Adapter for Salesforce
iWay Application Adapter for Salesforce User's Guide 15

Component Information for the iWay Application Adapter for Salesforce
16 Information Builders
Chapter2 Installing the iWayApplication Adapter for Salesforce
The following section provides installation prerequisites and describes how to install theiWay Application Adapter for Salesforce.
In this chapter:
Application Adapter for Salesforce Installation Prerequisites
Installing the Application Adapter for Salesforce
Application Adapter for Salesforce Installation Prerequisites
The following components must be installed and configured before installing the iWayApplication Adapter for Salesforce:
iWay Service Manager (iSM) Version 7.0.5. For more information, see the iWay Installationand Configuration Guide and the iWay Service Manager User's Guide.
Java Version 1.7.0_75 or higher.
This version of the iWay Application Adapter for Salesforce supports Transport LayerSecurity (TLS) Version 1.1 or higher.
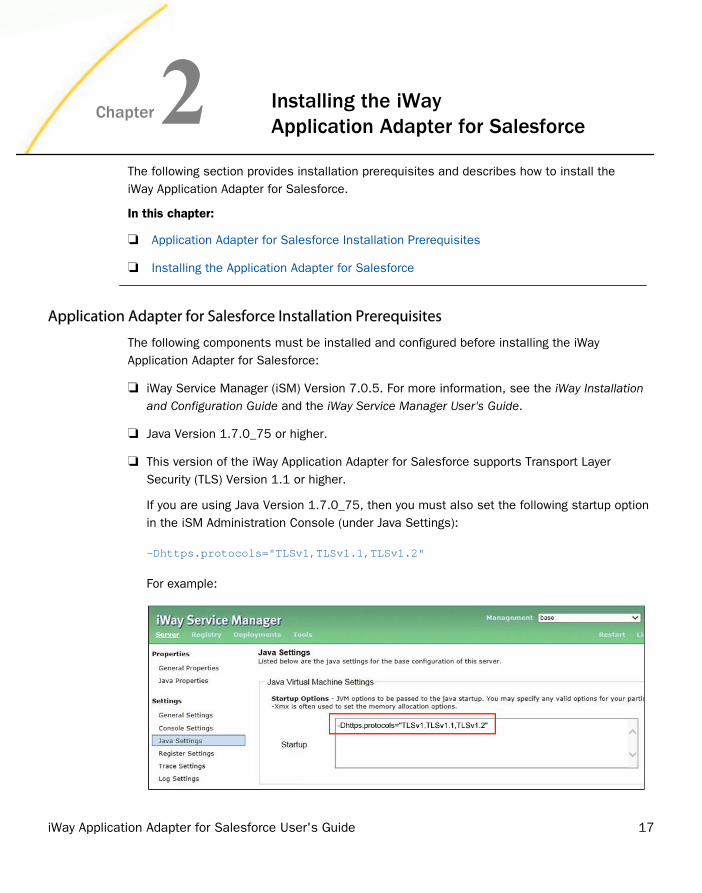
If you are using Java Version 1.7.0_75, then you must also set the following startup optionin the iSM Administration Console (under Java Settings):
-Dhttps.protocols="TLSv1,TLSv1.1,TLSv1.2"
For example:
iWay Application Adapter for Salesforce User's Guide 17
Note: If you are using Java Version 1.8, then this startup option is not required.
Salesforce SaaS service. To purchase the Salesforce SaaS service, go to the followingwebsite:
http://www.salesforce.com
Note: You must also have a Salesforce Enterprise, Unlimited, or Developer Edition accountfor connection purposes. Group and Professional editions do not support the SalesforceAPI.
Public IP address for your system that is recognized as a trusted IP address by Salesforce.
Configured Salesforce user account that is API Enabled and has a password that does notexpire.
Third-party application (Optional).
iWay Application Adapter for Salesforce Installation Files
Ensure that the iwsforce.jar file is available. This Java archive contains the core adapterclasses.
Installing the Application Adapter for Salesforce
This section describes how to install the iWay Application Adapter for Salesforce.
Note: Currently, installing the iWay Application Adapter for Salesforce is a manual process. Inthe next release of iWay Service Manager (iSM), installing the Salesforce adapter will beautomated.
Procedure: How to Install the iWay Application Adapter for Salesforce
To install the adapter:
1. Copy the installation files for the iWay Application Adapter for Salesforce to the followingdirectory:
iway_home\lib
Installing the Application Adapter for Salesforce
18 Information Builders
where:
iway_home
Is the root installation directory for iWay Service Manager (for example, iWay7).
For more information, see iWay Application Adapter for Salesforce Installation Files on page18.
2. Ensure that you have added the public IP address of each server that is used to run iWayService Manager to the Salesforce trusted IP addresses group.
For more information, see How to Add a Public IP Address to the Salesforce Trusted IPAddresses Group on page 19.
Note: You can view your current IP address by executing the ipconfig command from acommand console. However, this may not be the address that your service providerexposes to the Internet. To verify your address, access the following URL:
http://whatismyipaddress.com/
3. Ensure that your Salesforce user account is API Enabled and has a password that doesnot expire.
For more information, see How to Configure Your Salesforce User Account on page 21.
4. If required, obtain your Salesforce security token from the Salesforce setup.
For more information, see How to Obtain a Salesforce Security Token on page 23.
This is only required if you are going to connect to Salesforce from an IP address that isnot included in the Salesforce trusted IP addresses group.
Note: It is strongly recommend that you do not use the Salesforce security token whendefining a target using iWay Explorer.
Procedure: How to Add a Public IP Address to the Salesforce Trusted IP Addresses Group
To add a public IP address to the Salesforce trusted IP addresses group:
1. Log on to the Salesforce web console.
2. Click Setup.
2. Installing the iWay Application Adapter for Salesforce
iWay Application Adapter for Salesforce User's Guide 19
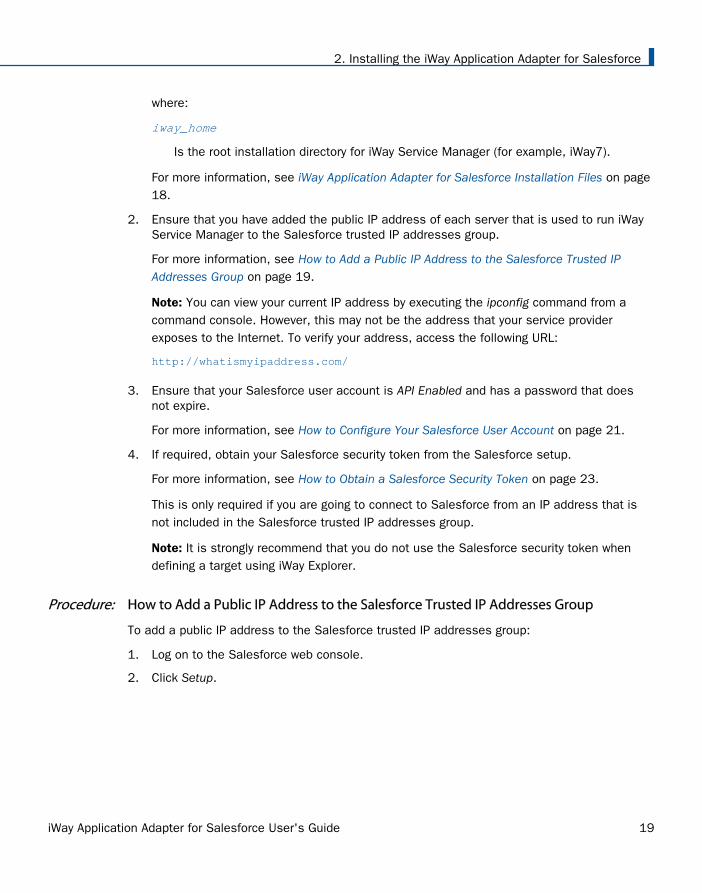
The Personal Setup page opens.
3. In the left pane, expand Security Controls and click Network Access.
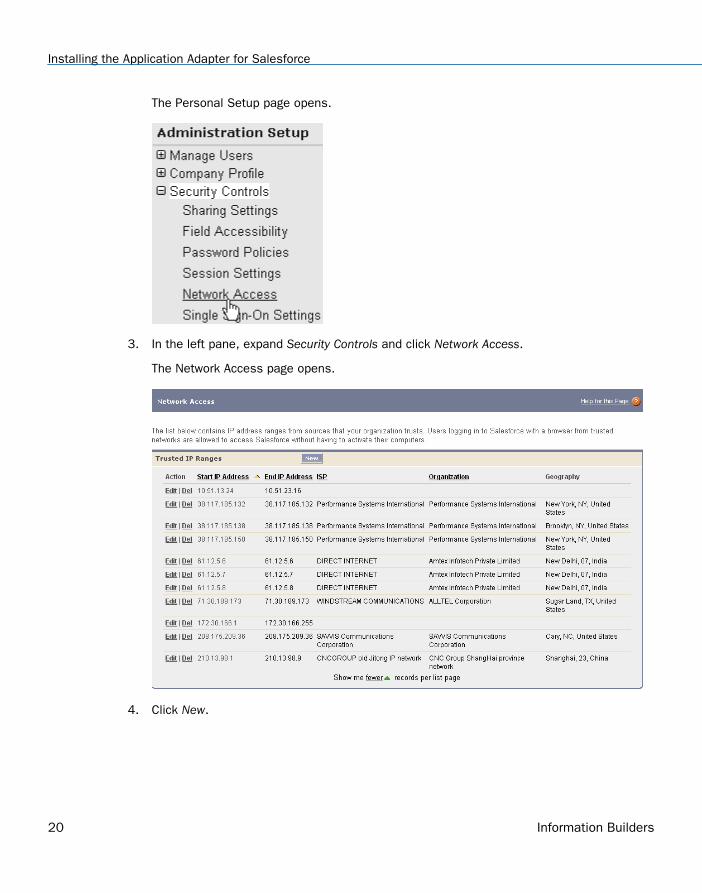
The Network Access page opens.
4. Click New.
Installing the Application Adapter for Salesforce
20 Information Builders
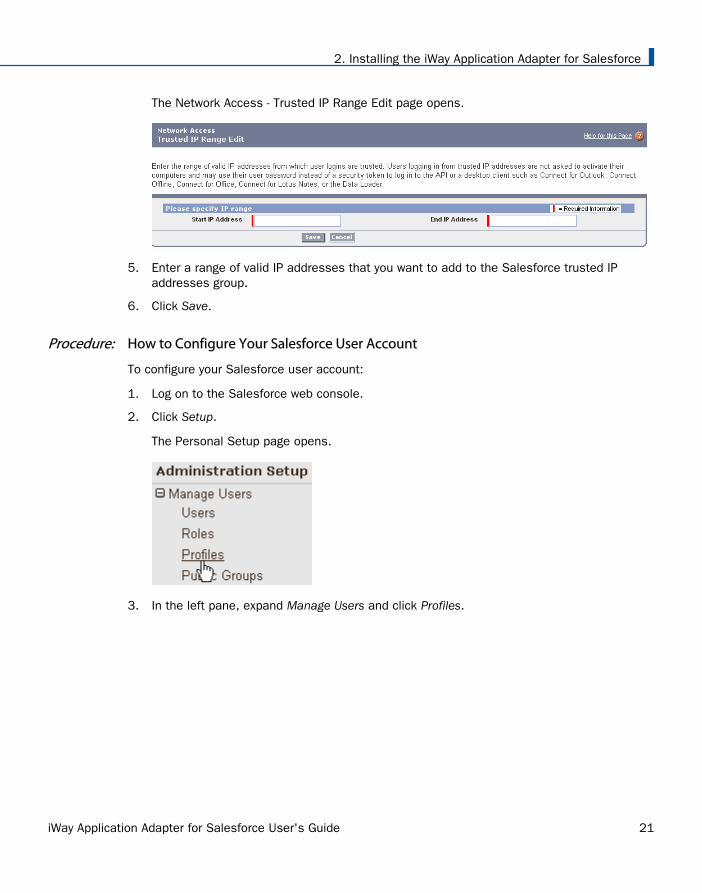
The Network Access - Trusted IP Range Edit page opens.
5. Enter a range of valid IP addresses that you want to add to the Salesforce trusted IPaddresses group.
6. Click Save.
Procedure: How to Configure Your Salesforce User Account
To configure your Salesforce user account:
1. Log on to the Salesforce web console.
2. Click Setup.
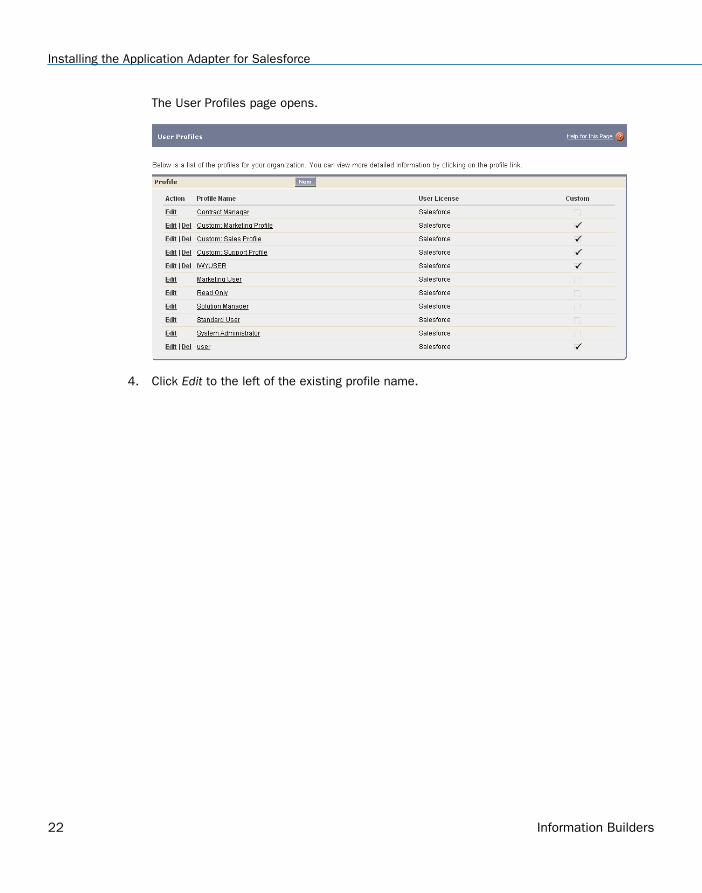
The Personal Setup page opens.
3. In the left pane, expand Manage Users and click Profiles.
2. Installing the iWay Application Adapter for Salesforce
iWay Application Adapter for Salesforce User's Guide 21
The User Profiles page opens.
4. Click Edit to the left of the existing profile name.
Installing the Application Adapter for Salesforce
22 Information Builders

The Profile Edit page opens.
5. Scroll down to the Administrative Permissions section and ensure that the API Enabled andPassword Never Expires options are activated.Note: API access may incur increased usage of your salesforce.com account.
6. Click Save.
Procedure: How to Obtain a Salesforce Security Token
To obtain a Salesforce security token:
1. Log on to the Salesforce web console.
2. Click Setup.
2. Installing the iWay Application Adapter for Salesforce
iWay Application Adapter for Salesforce User's Guide 23

The Personal Setup page opens.
3. In the left pane, expand My Personal Information and click Reset My Security Token.
The Reset Security Token page opens.
4. Click Reset Security Token.
The following page opens.
Your new security token is sent to the email address that is associated with yourSalesforce user account. Note that after you reset your security token, your existingsecurity token is no longer valid.
Installing the Application Adapter for Salesforce
24 Information Builders
2. Installing the iWay Application Adapter for Salesforce
iWay Application Adapter for Salesforce User's Guide 25

Installing the Application Adapter for Salesforce
26 Information Builders

Chapter3 Configuring andManaging Connections to Salesforce
The following section describes how to configure and manage connections to Salesforceusing iWay Explorer.
In this chapter:
Starting iWay Explorer (Java Swing)
Creating a New Configuration
Connecting to a New Configuration
Connecting to Salesforce
Starting iWay Explorer (Java Swing)
This topic describes how to start iWay Explorer.
Procedure: How to Start iWay Explorer
To start iWay Explorer:
1. Ensure iWay Explorer is installed.
For more information on installing and configuring iWay Explorer, see the iWay Installationand Configuration documentation.
2. From the Windows Start menu, select Programs, iWay 7.0 Service Manager, tools, and clickiWay Explorer - SWING.
A status window indicates the loading progress of iWay Explorer. The iWay Explorer windowthen opens.
iWay Application Adapter for Salesforce User's Guide 27
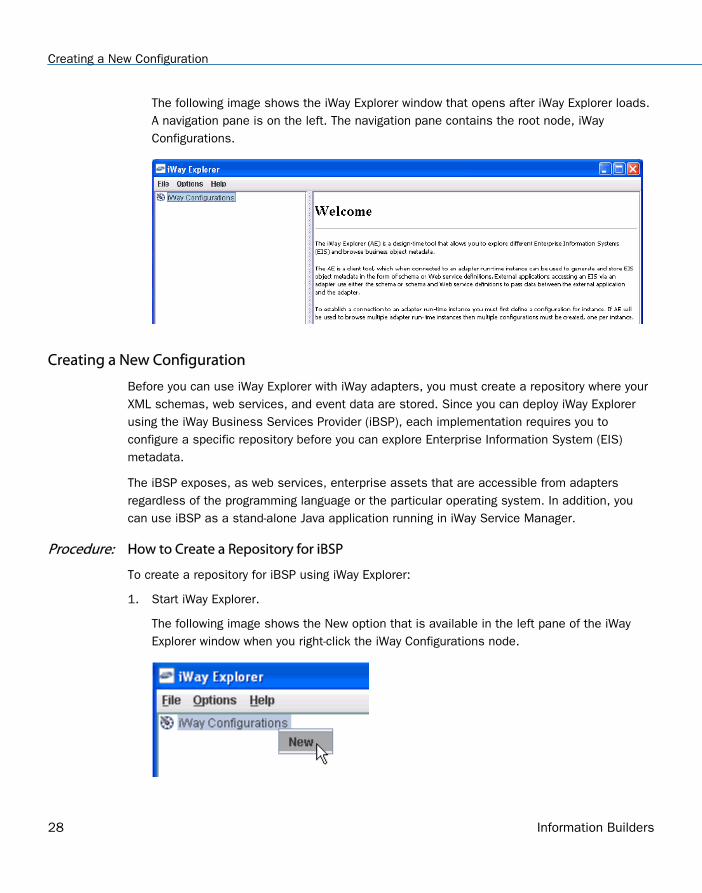
The following image shows the iWay Explorer window that opens after iWay Explorer loads.A navigation pane is on the left. The navigation pane contains the root node, iWayConfigurations.
Creating a New Configuration
Before you can use iWay Explorer with iWay adapters, you must create a repository where yourXML schemas, web services, and event data are stored. Since you can deploy iWay Explorerusing the iWay Business Services Provider (iBSP), each implementation requires you toconfigure a specific repository before you can explore Enterprise Information System (EIS)metadata.
The iBSP exposes, as web services, enterprise assets that are accessible from adaptersregardless of the programming language or the particular operating system. In addition, youcan use iBSP as a stand-alone Java application running in iWay Service Manager.
Procedure: How to Create a Repository for iBSP
To create a repository for iBSP using iWay Explorer:
1. Start iWay Explorer.
The following image shows the New option that is available in the left pane of the iWayExplorer window when you right-click the iWay Configurations node.
Creating a New Configuration
28 Information Builders
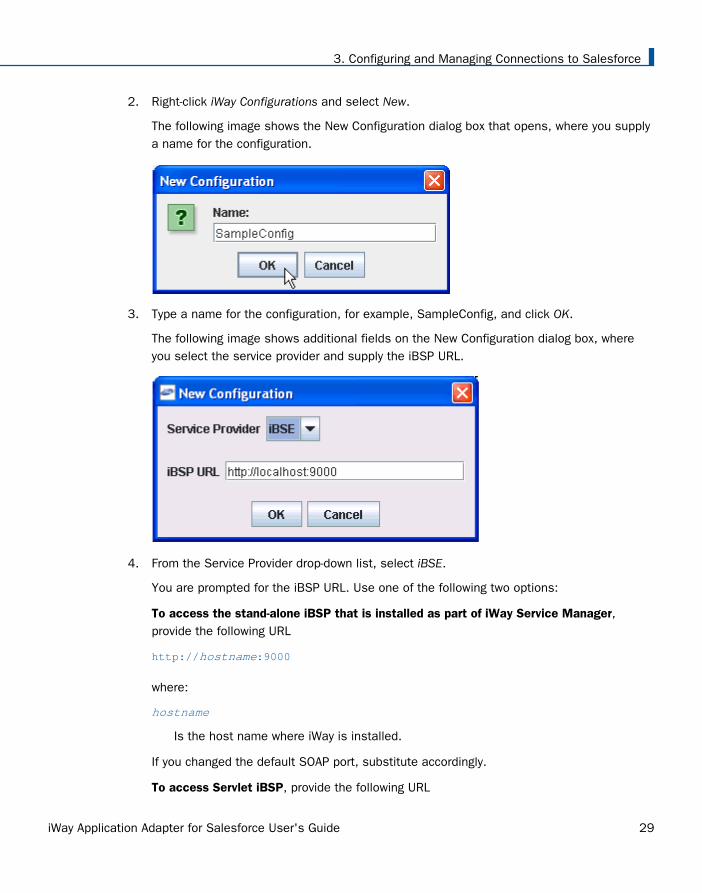
2. Right-click iWay Configurations and select New.
The following image shows the New Configuration dialog box that opens, where you supplya name for the configuration.
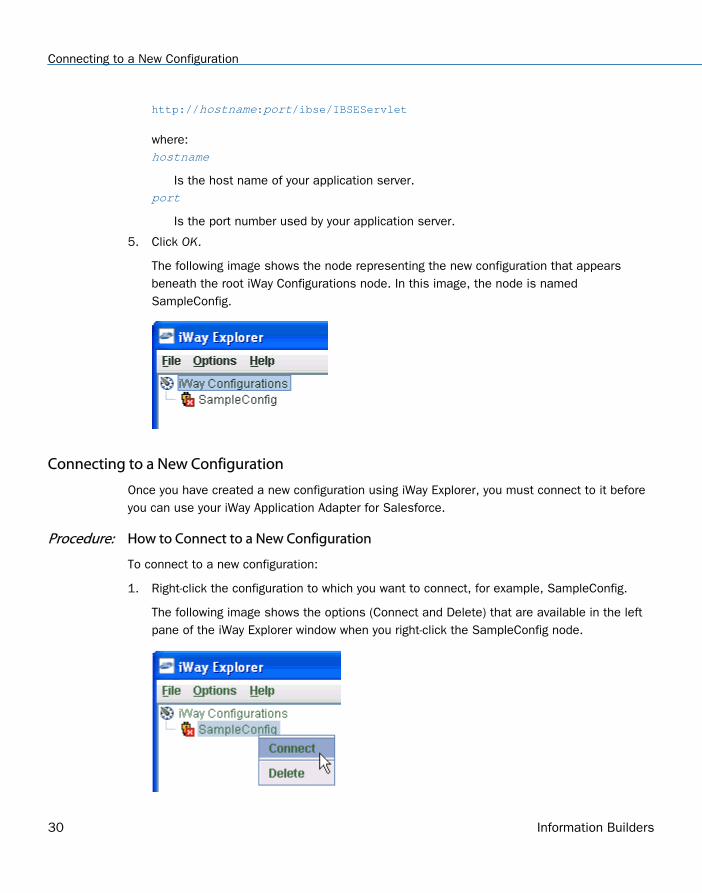
3. Type a name for the configuration, for example, SampleConfig, and click OK.
The following image shows additional fields on the New Configuration dialog box, whereyou select the service provider and supply the iBSP URL.
4. From the Service Provider drop-down list, select iBSE.
You are prompted for the iBSP URL. Use one of the following two options:
To access the stand-alone iBSP that is installed as part of iWay Service Manager,provide the following URL
http://hostname:9000
where:
hostname
Is the host name where iWay is installed.
If you changed the default SOAP port, substitute accordingly.
To access Servlet iBSP, provide the following URL
3. Configuring and Managing Connections to Salesforce
iWay Application Adapter for Salesforce User's Guide 29
http://hostname:port/ibse/IBSEServlet
where:hostname
Is the host name of your application server.port
Is the port number used by your application server.
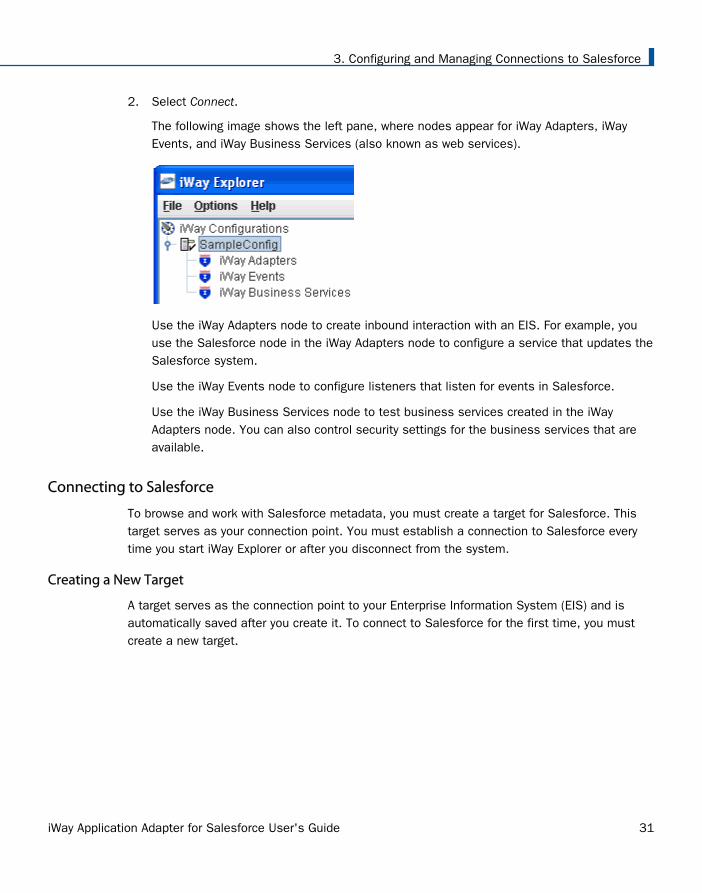
5. Click OK.
The following image shows the node representing the new configuration that appearsbeneath the root iWay Configurations node. In this image, the node is namedSampleConfig.
Connecting to a New Configuration
Once you have created a new configuration using iWay Explorer, you must connect to it beforeyou can use your iWay Application Adapter for Salesforce.
Procedure: How to Connect to a New Configuration
To connect to a new configuration:
1. Right-click the configuration to which you want to connect, for example, SampleConfig.
The following image shows the options (Connect and Delete) that are available in the leftpane of the iWay Explorer window when you right-click the SampleConfig node.
Connecting to a New Configuration
30 Information Builders
2. Select Connect.
The following image shows the left pane, where nodes appear for iWay Adapters, iWayEvents, and iWay Business Services (also known as web services).
Use the iWay Adapters node to create inbound interaction with an EIS. For example, youuse the Salesforce node in the iWay Adapters node to configure a service that updates theSalesforce system.
Use the iWay Events node to configure listeners that listen for events in Salesforce.
Use the iWay Business Services node to test business services created in the iWayAdapters node. You can also control security settings for the business services that areavailable.
Connecting to Salesforce
To browse and work with Salesforce metadata, you must create a target for Salesforce. Thistarget serves as your connection point. You must establish a connection to Salesforce everytime you start iWay Explorer or after you disconnect from the system.
Creating a New Target
A target serves as the connection point to your Enterprise Information System (EIS) and isautomatically saved after you create it. To connect to Salesforce for the first time, you mustcreate a new target.
3. Configuring and Managing Connections to Salesforce
iWay Application Adapter for Salesforce User's Guide 31
Procedure: How to Create a New Target
To create a new target:
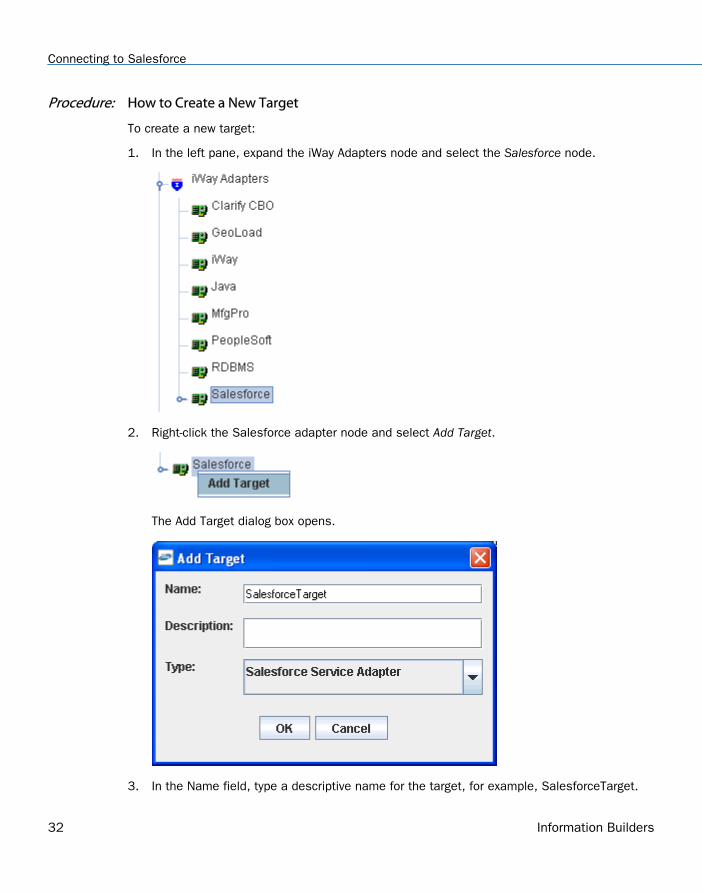
1. In the left pane, expand the iWay Adapters node and select the Salesforce node.
2. Right-click the Salesforce adapter node and select Add Target.
The Add Target dialog box opens.
3. In the Name field, type a descriptive name for the target, for example, SalesforceTarget.
Connecting to Salesforce
32 Information Builders
4. In the Description field, type a brief description for the connection (optional).
5. Select Salesforce Service Adapter from the Type drop-down list.
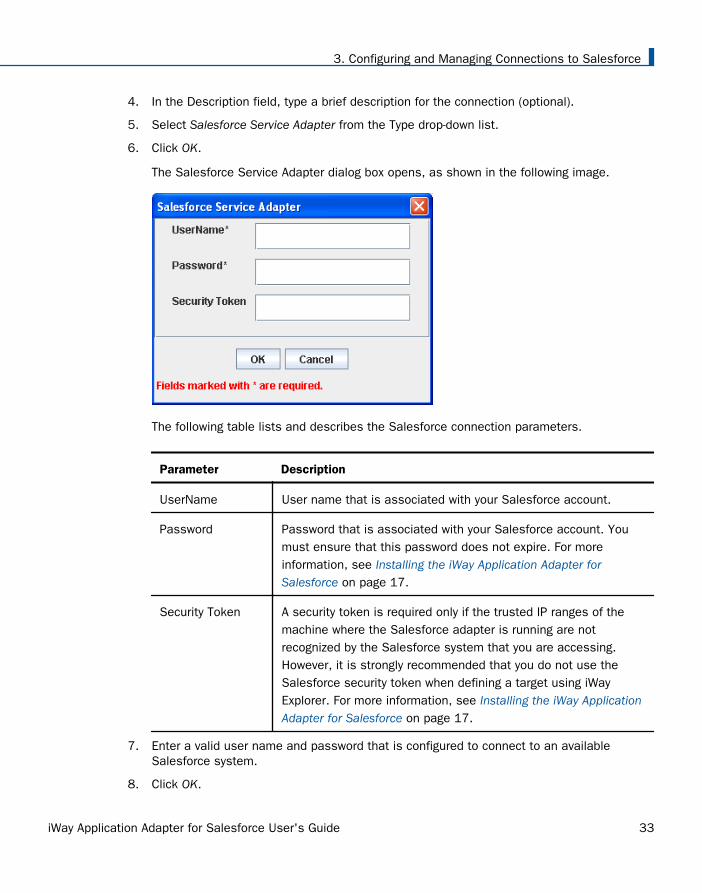
6. Click OK.
The Salesforce Service Adapter dialog box opens, as shown in the following image.
The following table lists and describes the Salesforce connection parameters.
Parameter Description
UserName User name that is associated with your Salesforce account.
Password Password that is associated with your Salesforce account. Youmust ensure that this password does not expire. For moreinformation, see Installing the iWay Application Adapter forSalesforce on page 17.
Security Token A security token is required only if the trusted IP ranges of themachine where the Salesforce adapter is running are notrecognized by the Salesforce system that you are accessing.However, it is strongly recommended that you do not use theSalesforce security token when defining a target using iWayExplorer. For more information, see Installing the iWay ApplicationAdapter for Salesforce on page 17.
7. Enter a valid user name and password that is configured to connect to an availableSalesforce system.
8. Click OK.
3. Configuring and Managing Connections to Salesforce
iWay Application Adapter for Salesforce User's Guide 33
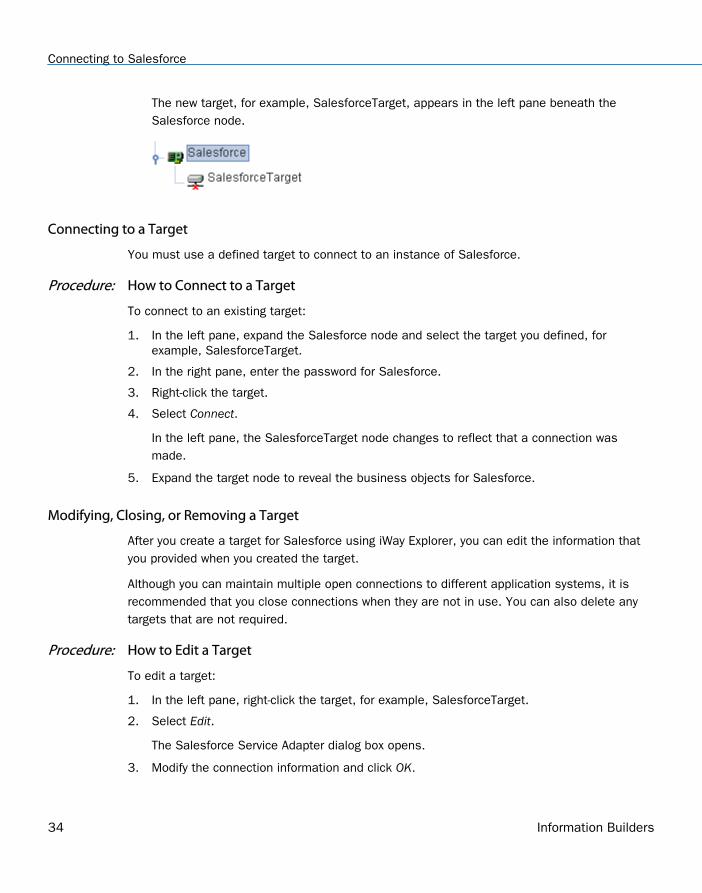
The new target, for example, SalesforceTarget, appears in the left pane beneath theSalesforce node.
Connecting to a Target
You must use a defined target to connect to an instance of Salesforce.
Procedure: How to Connect to a Target
To connect to an existing target:
1. In the left pane, expand the Salesforce node and select the target you defined, forexample, SalesforceTarget.
2. In the right pane, enter the password for Salesforce.
3. Right-click the target.
4. Select Connect.
In the left pane, the SalesforceTarget node changes to reflect that a connection wasmade.
5. Expand the target node to reveal the business objects for Salesforce.
Modifying, Closing, or Removing a Target
After you create a target for Salesforce using iWay Explorer, you can edit the information thatyou provided when you created the target.
Although you can maintain multiple open connections to different application systems, it isrecommended that you close connections when they are not in use. You can also delete anytargets that are not required.
Procedure: How to Edit a Target
To edit a target:
1. In the left pane, right-click the target, for example, SalesforceTarget.
2. Select Edit.
The Salesforce Service Adapter dialog box opens.
3. Modify the connection information and click OK.
Connecting to Salesforce
34 Information Builders
Procedure: How to Disconnect From a Target
To disconnect from a target:
1. In the left pane, right-click the target to which you are connected, for example,SalesforceTarget.
2. Select Disconnect.
The SalesforceTarget node changes to reflect that the connection was terminated.
Procedure: How to Delete a Target
To delete a target:
1. In the left pane, right-click the target to which you are connected, for example,SalesforceTarget.
2. Select Delete.
The SalesforceTarget node is removed from the left pane.
3. Configuring and Managing Connections to Salesforce
iWay Application Adapter for Salesforce User's Guide 35

Connecting to Salesforce
36 Information Builders
Chapter4Creating XML Schemasfor Salesforce
The following section describes how to create XML schemas for Salesforce businessobjects using iWay Explorer.
In this chapter:
XML Schemas for Salesforce Overview
Browsing Salesforce Business Objects
Generating XML Schemas for Salesforce Business Objects
Using the Upsert Function
XML Schemas for Salesforce Overview
The iWay Application Adapter for Salesforce enables the processing of Salesforce businessobjects.
External applications that access Salesforce through the adapter use either XML schemas orweb services to pass data between the external application and the adapter. You can use iWayExplorer to create the required XML schemas and web services.
Salesforce must be installed, configured, and available for client access. iWay Explorer neednot reside on the same system as the application system being accessed, but network accessis required.
Browsing Salesforce Business Objects
After you are connected to Salesforce, iWay Explorer enables you to explore and browsebusiness object metadata.
Procedure: How to Browse Salesforce Business Objects
To browse Salesforce business objects:
1. Connect to a Salesforce target, as described in Configuring and Managing Connections toSalesforce on page 27.
2. In the left pane, expand the target node.
iWay Application Adapter for Salesforce User's Guide 37
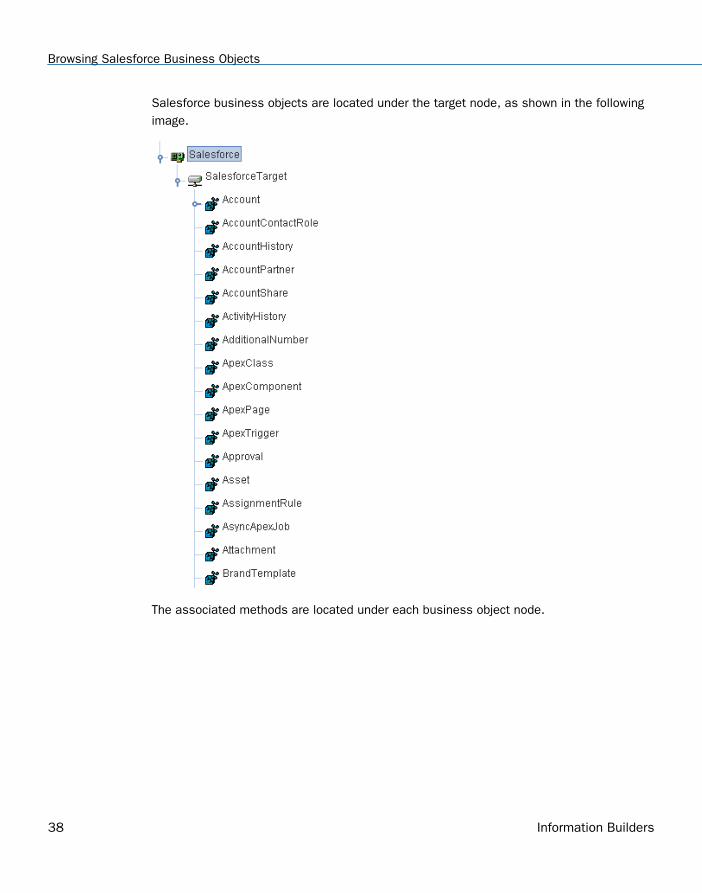
Salesforce business objects are located under the target node, as shown in the followingimage.
The associated methods are located under each business object node.
Browsing Salesforce Business Objects
38 Information Builders
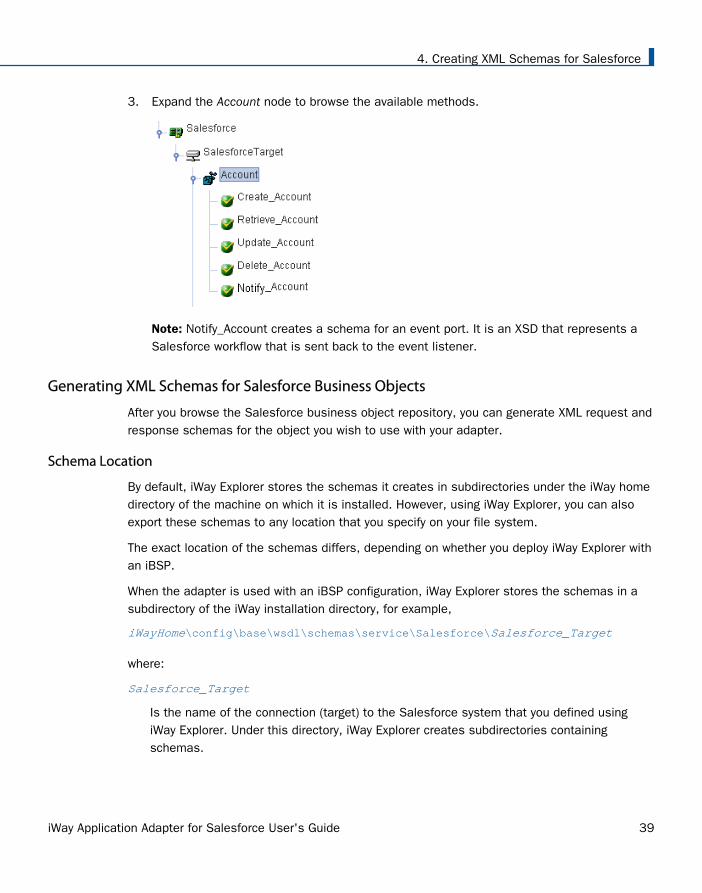
3. Expand the Account node to browse the available methods.
Note: Notify_Account creates a schema for an event port. It is an XSD that represents aSalesforce workflow that is sent back to the event listener.
Generating XML Schemas for Salesforce Business Objects
After you browse the Salesforce business object repository, you can generate XML request andresponse schemas for the object you wish to use with your adapter.
Schema Location
By default, iWay Explorer stores the schemas it creates in subdirectories under the iWay homedirectory of the machine on which it is installed. However, using iWay Explorer, you can alsoexport these schemas to any location that you specify on your file system.
The exact location of the schemas differs, depending on whether you deploy iWay Explorer withan iBSP.
When the adapter is used with an iBSP configuration, iWay Explorer stores the schemas in asubdirectory of the iWay installation directory, for example,
iWayHome\config\base\wsdl\schemas\service\Salesforce\Salesforce_Target
where:
Salesforce_Target
Is the name of the connection (target) to the Salesforce system that you defined usingiWay Explorer. Under this directory, iWay Explorer creates subdirectories containingschemas.
4. Creating XML Schemas for Salesforce
iWay Application Adapter for Salesforce User's Guide 39

Procedure: How to Generate a Schema for a Salesforce Business Object
To generate a schema for a Salesforce business object using iWay Explorer:
1. Connect to a Salesforce target, as described in Configuring and Managing Connections toSalesforce on page 27.
2. Expand a node, for example, Account.
3. Select the Create_Account method under the expanded node.
The XML request and response schemas are automatically generated by iWay Explorer.
4. Click the Request Schema tab in the right pane.
Generating XML Schemas for Salesforce Business Objects
40 Information Builders
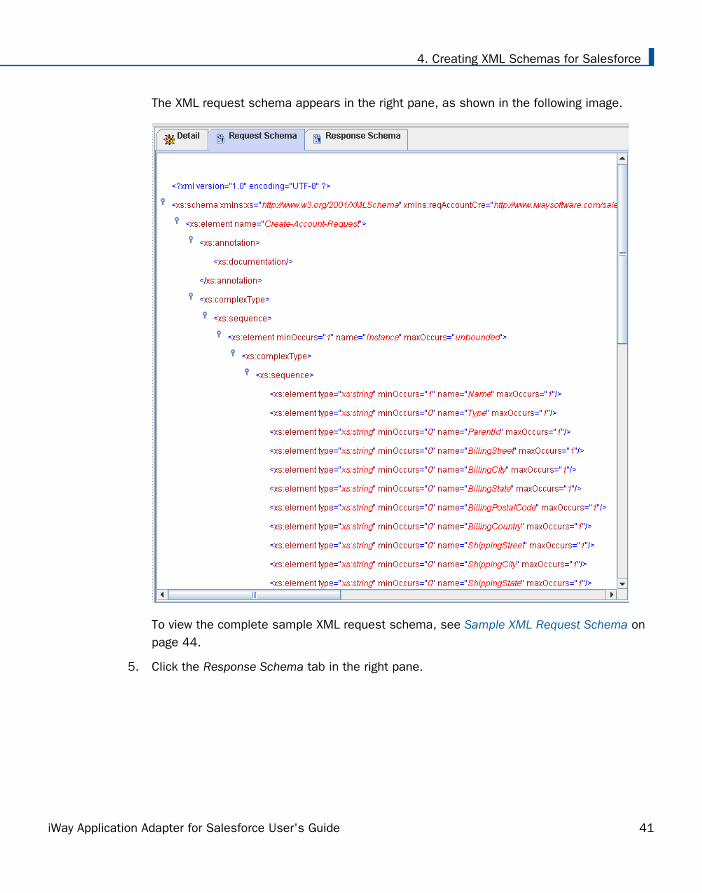
The XML request schema appears in the right pane, as shown in the following image.
To view the complete sample XML request schema, see Sample XML Request Schema onpage 44.
5. Click the Response Schema tab in the right pane.
4. Creating XML Schemas for Salesforce
iWay Application Adapter for Salesforce User's Guide 41
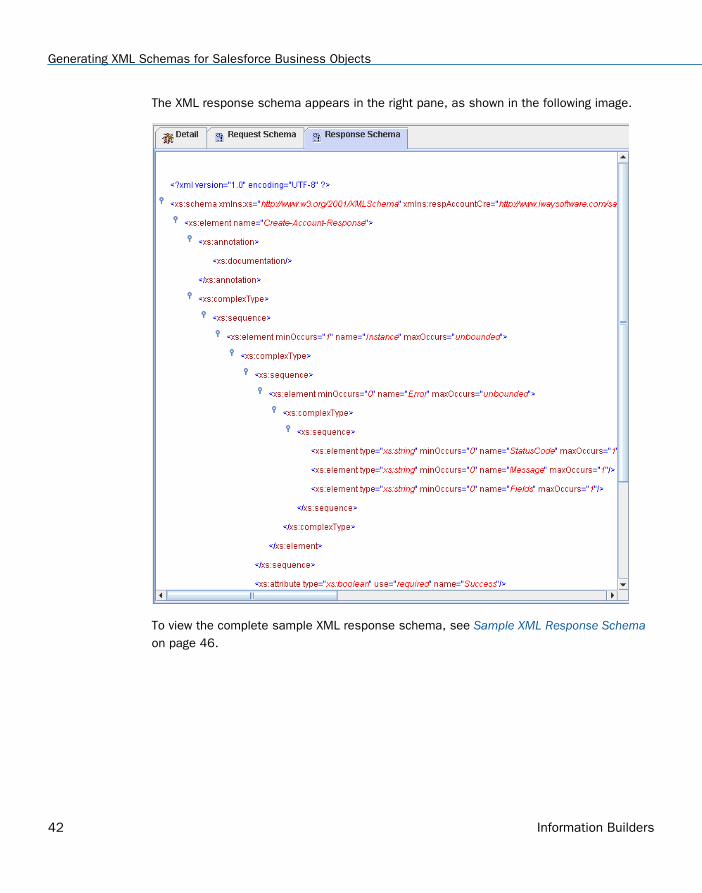
The XML response schema appears in the right pane, as shown in the following image.
To view the complete sample XML response schema, see Sample XML Response Schemaon page 46.
Generating XML Schemas for Salesforce Business Objects
42 Information Builders

6. To export XML schemas, right-click Create_Account in the left pane, and select ExportSchema(s), as shown in the following image.
The Select Export Directory dialog box opens, as shown in the following image.
7. Navigate to a directory on your file system where you want to export the XML schemas.
The file path is displayed in the File Name field.
8. Click OK.
4. Creating XML Schemas for Salesforce
iWay Application Adapter for Salesforce User's Guide 43

The XML request and response schemas are now exported to your local file system. Thefollowing image shows a sample request schema and a sample response schema thathave been exported to a local file system.
Reference: Sample XML Request Schema
The following is a sample XML request schema for the Create_Account method.
<?xml version="1.0" encoding="UTF-8" ?><!-- Generated by the iBSE 2009-03-19T17:16:04Z --> <xs:schema targetNamespace="http://www.iwaysoftware.com/salesforce/CreateAccountRequest" attributeFormDefault="unqualified" xmlns:xs="http://www.w3.org/2001/XMLSchema" xmlns:reqAccountCre="http://www.iwaysoftware.com/salesforce/CreateAccountRequest" elementFormDefault="qualified"><xs:element name="Create-Account-Request"> <xs:annotation> <xs:documentation /> </xs:annotation> <xs:complexType> <xs:sequence>
<xs:element minOccurs="1" name="Instance" maxOccurs="unbounded"> <xs:complexType> <xs:sequence> <xs:element type="xs:string" minOccurs="1" name="Name" maxOccurs="1" /> <xs:element type="xs:string" minOccurs="0" name="Type" maxOccurs="1" /> <xs:element type="xs:string" minOccurs="0" name="ParentId" maxOccurs="1" /> <xs:element type="xs:string" minOccurs="0" name="BillingStreet" maxOccurs="1" /> <xs:element type="xs:string" minOccurs="0" name="BillingCity" maxOccurs="1" />
Generating XML Schemas for Salesforce Business Objects
44 Information Builders
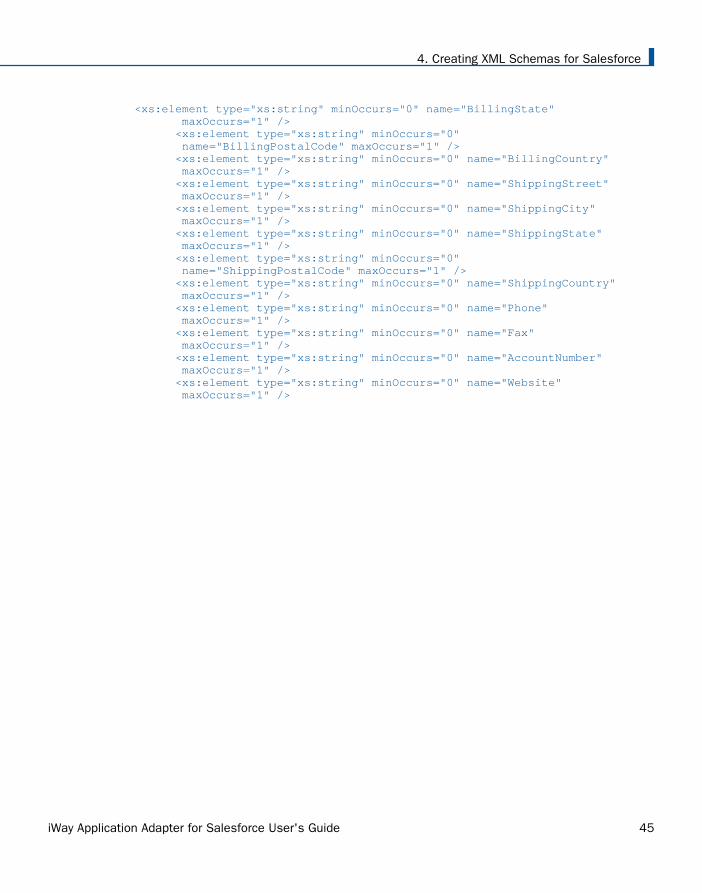
<xs:element type="xs:string" minOccurs="0" name="BillingState" maxOccurs="1" /> <xs:element type="xs:string" minOccurs="0" name="BillingPostalCode" maxOccurs="1" /> <xs:element type="xs:string" minOccurs="0" name="BillingCountry" maxOccurs="1" /> <xs:element type="xs:string" minOccurs="0" name="ShippingStreet" maxOccurs="1" /> <xs:element type="xs:string" minOccurs="0" name="ShippingCity" maxOccurs="1" /> <xs:element type="xs:string" minOccurs="0" name="ShippingState" maxOccurs="1" /> <xs:element type="xs:string" minOccurs="0" name="ShippingPostalCode" maxOccurs="1" /> <xs:element type="xs:string" minOccurs="0" name="ShippingCountry" maxOccurs="1" /> <xs:element type="xs:string" minOccurs="0" name="Phone" maxOccurs="1" /> <xs:element type="xs:string" minOccurs="0" name="Fax" maxOccurs="1" /> <xs:element type="xs:string" minOccurs="0" name="AccountNumber" maxOccurs="1" /> <xs:element type="xs:string" minOccurs="0" name="Website" maxOccurs="1" />
4. Creating XML Schemas for Salesforce
iWay Application Adapter for Salesforce User's Guide 45

<xs:element type="xs:string" minOccurs="0" name="Sic" maxOccurs="1" /> <xs:element type="xs:string" minOccurs="0" name="Industry" maxOccurs="1" /> <xs:element type="xs:decimal" minOccurs="0" name="AnnualRevenue" maxOccurs="1" /> <xs:element type="xs:int" minOccurs="0" name="NumberOfEmployees" maxOccurs="1" /> <xs:element type="xs:string" minOccurs="0" name="Ownership" maxOccurs="1" /> <xs:element type="xs:string" minOccurs="0" name="TickerSymbol" maxOccurs="1" /> <xs:element type="xs:string" minOccurs="0" name="Description" maxOccurs="1" /> <xs:element type="xs:string" minOccurs="0" name="Rating" maxOccurs="1" /> <xs:element type="xs:string" minOccurs="0" name="Site" maxOccurs="1" /> <xs:element type="xs:string" minOccurs="0" name="OwnerId" maxOccurs="1" /> <xs:element type="xs:string" minOccurs="0" name="CustomerPriority__c" maxOccurs="1" /> <xs:element type="xs:string" minOccurs="0" name="SLA__c" maxOccurs="1" /> <xs:element type="xs:string" minOccurs="0" name="Active__c" maxOccurs="1" /> <xs:element type="xs:double" minOccurs="0" name="NumberofLocations__c" maxOccurs="1" /> <xs:element type="xs:string" minOccurs="0" name="UpsellOpportunity__c" maxOccurs="1" /> <xs:element type="xs:string" minOccurs="0" name="SLASerialNumber__c" maxOccurs="1" />
<xs:element type="xs:date" minOccurs="0" name="SLAExpirationDate__c" maxOccurs="1" /> </xs:sequence> </xs:complexType> </xs:element> </xs:sequence> </xs:complexType></xs:element></xs:schema>
Reference: Sample XML Response Schema
The following is a sample XML response schema for the Create_Account method.
Generating XML Schemas for Salesforce Business Objects
46 Information Builders
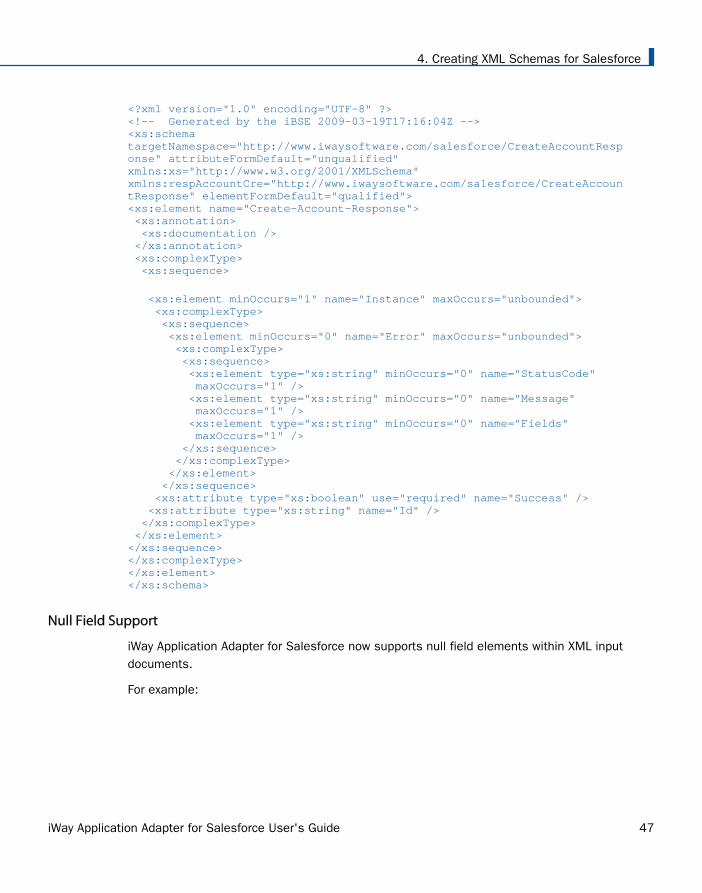
<?xml version="1.0" encoding="UTF-8" ?><!-- Generated by the iBSE 2009-03-19T17:16:04Z --><xs:schema targetNamespace="http://www.iwaysoftware.com/salesforce/CreateAccountResponse" attributeFormDefault="unqualified" xmlns:xs="http://www.w3.org/2001/XMLSchema" xmlns:respAccountCre="http://www.iwaysoftware.com/salesforce/CreateAccountResponse" elementFormDefault="qualified"><xs:element name="Create-Account-Response"> <xs:annotation> <xs:documentation /> </xs:annotation> <xs:complexType> <xs:sequence>
<xs:element minOccurs="1" name="Instance" maxOccurs="unbounded"> <xs:complexType> <xs:sequence> <xs:element minOccurs="0" name="Error" maxOccurs="unbounded"> <xs:complexType> <xs:sequence> <xs:element type="xs:string" minOccurs="0" name="StatusCode" maxOccurs="1" /> <xs:element type="xs:string" minOccurs="0" name="Message" maxOccurs="1" /> <xs:element type="xs:string" minOccurs="0" name="Fields" maxOccurs="1" /> </xs:sequence> </xs:complexType> </xs:element> </xs:sequence> <xs:attribute type="xs:boolean" use="required" name="Success" /> <xs:attribute type="xs:string" name="Id" /> </xs:complexType> </xs:element></xs:sequence></xs:complexType></xs:element></xs:schema>
Null Field Support
iWay Application Adapter for Salesforce now supports null field elements within XML inputdocuments.
For example:
4. Creating XML Schemas for Salesforce
iWay Application Adapter for Salesforce User's Guide 47
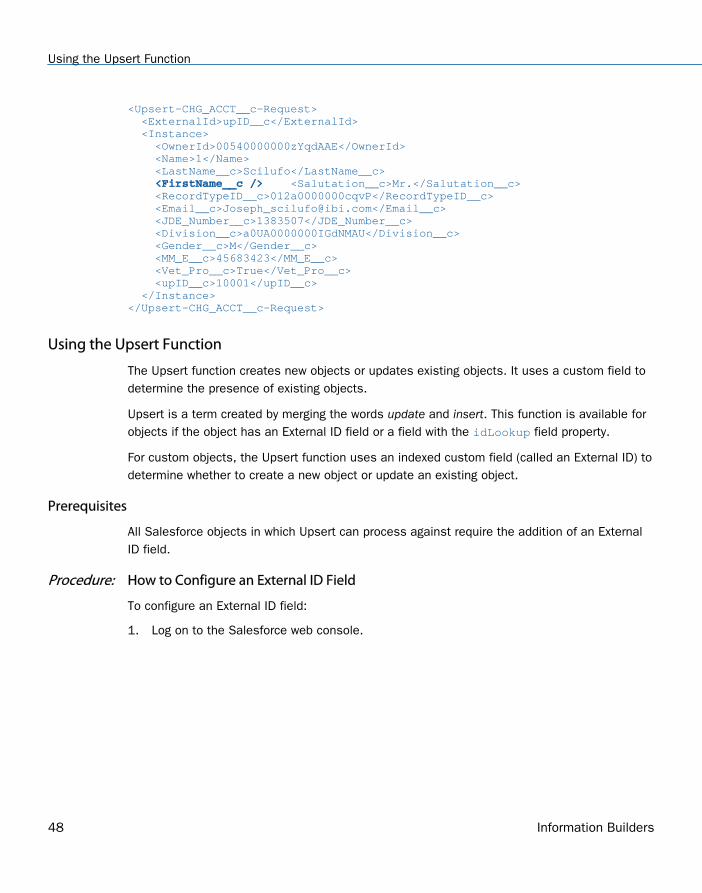
<Upsert-CHG_ACCT__c-Request> <ExternalId>upID__c</ExternalId> <Instance> <OwnerId>00540000000zYqdAAE</OwnerId> <Name>1</Name> <LastName__c>Scilufo</LastName__c> <FirstName__c /> <Salutation__c>Mr.</Salutation__c> <RecordTypeID__c>012a0000000cqvP</RecordTypeID__c> <Email__c>[email protected]</Email__c> <JDE_Number__c>1383507</JDE_Number__c> <Division__c>a0UA0000000IGdNMAU</Division__c> <Gender__c>M</Gender__c> <MM_E__c>45683423</MM_E__c> <Vet_Pro__c>True</Vet_Pro__c> <upID__c>10001</upID__c> </Instance></Upsert-CHG_ACCT__c-Request>
Using the Upsert Function
The Upsert function creates new objects or updates existing objects. It uses a custom field todetermine the presence of existing objects.
Upsert is a term created by merging the words update and insert. This function is available forobjects if the object has an External ID field or a field with the idLookup field property.
For custom objects, the Upsert function uses an indexed custom field (called an External ID) todetermine whether to create a new object or update an existing object.
Prerequisites
All Salesforce objects in which Upsert can process against require the addition of an ExternalID field.
Procedure: How to Configure an External ID Field
To configure an External ID field:
1. Log on to the Salesforce web console.
Using the Upsert Function
48 Information Builders
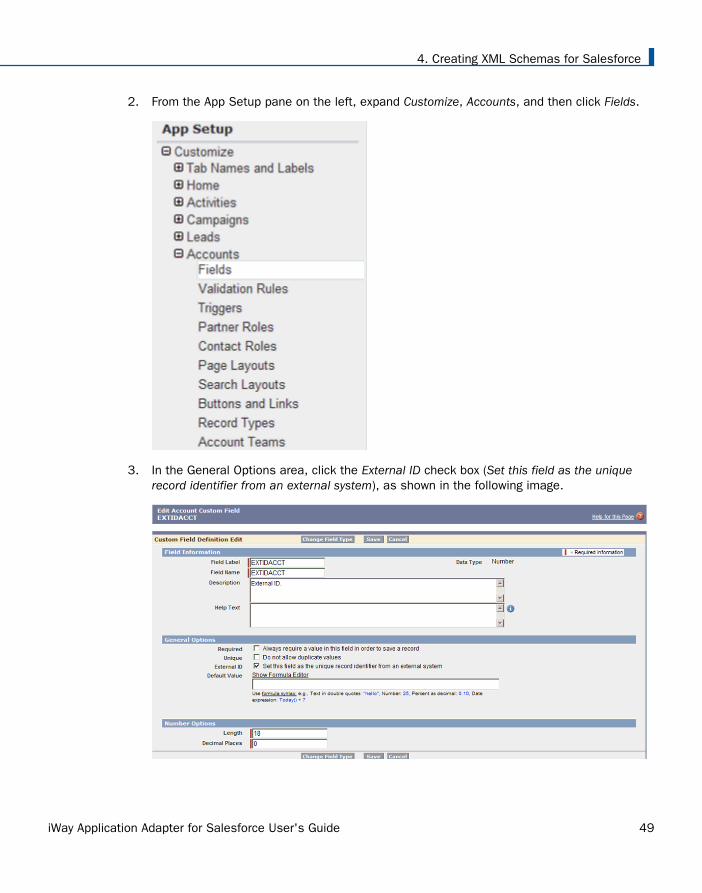
2. From the App Setup pane on the left, expand Customize, Accounts, and then click Fields.
3. In the General Options area, click the External ID check box (Set this field as the uniquerecord identifier from an external system), as shown in the following image.
4. Creating XML Schemas for Salesforce
iWay Application Adapter for Salesforce User's Guide 49
4. Click Save.
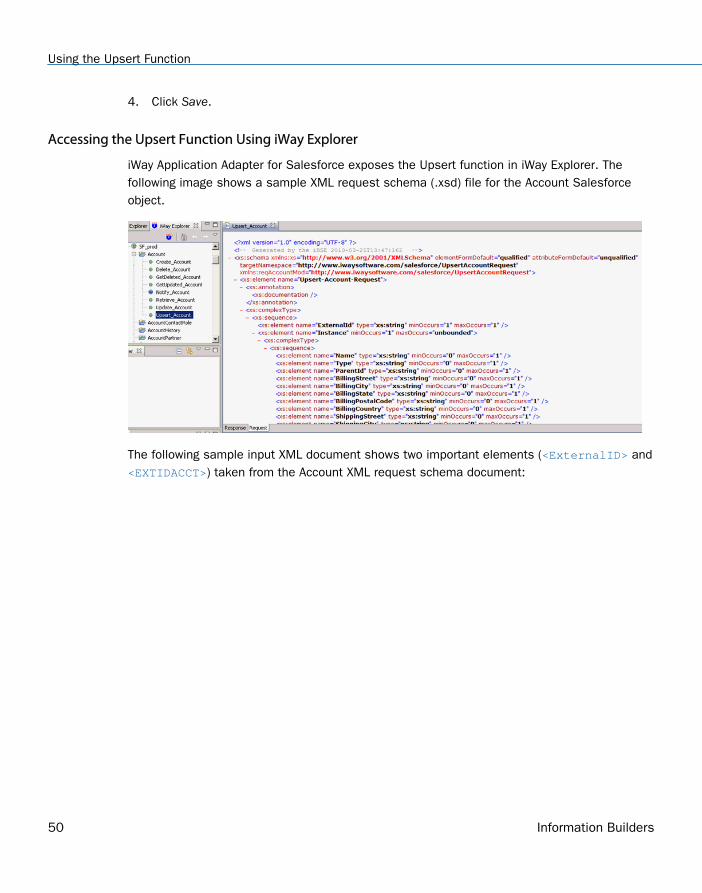
Accessing the Upsert Function Using iWay Explorer
iWay Application Adapter for Salesforce exposes the Upsert function in iWay Explorer. Thefollowing image shows a sample XML request schema (.xsd) file for the Account Salesforceobject.
The following sample input XML document shows two important elements (<ExternalID> and<EXTIDACCT>) taken from the Account XML request schema document:
Using the Upsert Function
50 Information Builders
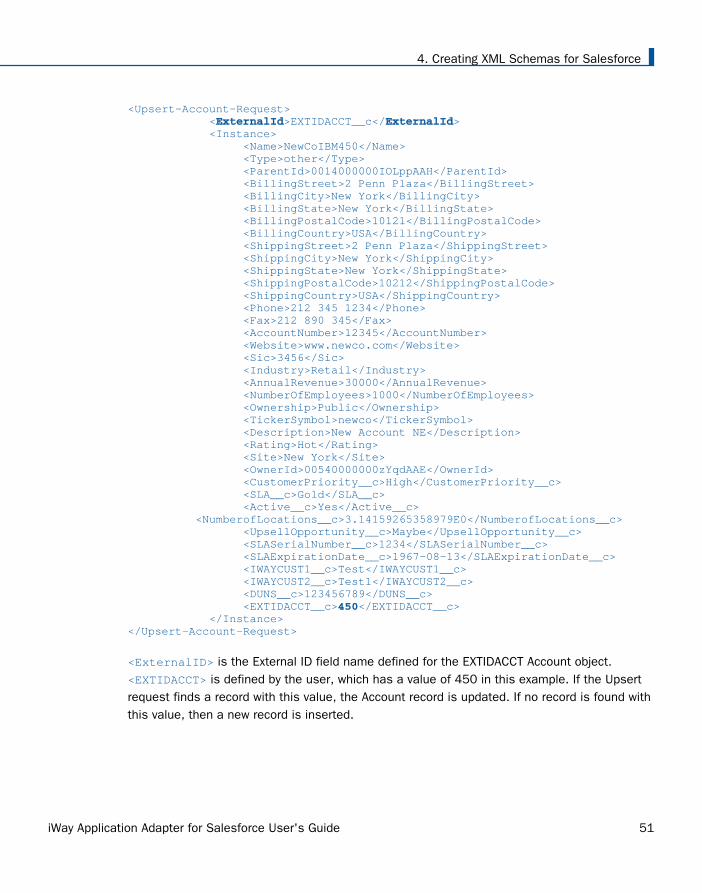
<Upsert-Account-Request> <ExternalId>EXTIDACCT__c</ExternalId> <Instance> <Name>NewCoIBM450</Name> <Type>other</Type> <ParentId>0014000000IOLppAAH</ParentId> <BillingStreet>2 Penn Plaza</BillingStreet> <BillingCity>New York</BillingCity> <BillingState>New York</BillingState> <BillingPostalCode>10121</BillingPostalCode> <BillingCountry>USA</BillingCountry> <ShippingStreet>2 Penn Plaza</ShippingStreet> <ShippingCity>New York</ShippingCity> <ShippingState>New York</ShippingState> <ShippingPostalCode>10212</ShippingPostalCode> <ShippingCountry>USA</ShippingCountry> <Phone>212 345 1234</Phone> <Fax>212 890 345</Fax> <AccountNumber>12345</AccountNumber> <Website>www.newco.com</Website> <Sic>3456</Sic> <Industry>Retail</Industry> <AnnualRevenue>30000</AnnualRevenue> <NumberOfEmployees>1000</NumberOfEmployees> <Ownership>Public</Ownership> <TickerSymbol>newco</TickerSymbol> <Description>New Account NE</Description> <Rating>Hot</Rating> <Site>New York</Site> <OwnerId>00540000000zYqdAAE</OwnerId> <CustomerPriority__c>High</CustomerPriority__c> <SLA__c>Gold</SLA__c> <Active__c>Yes</Active__c> <NumberofLocations__c>3.14159265358979E0</NumberofLocations__c> <UpsellOpportunity__c>Maybe</UpsellOpportunity__c> <SLASerialNumber__c>1234</SLASerialNumber__c> <SLAExpirationDate__c>1967-08-13</SLAExpirationDate__c> <IWAYCUST1__c>Test</IWAYCUST1__c> <IWAYCUST2__c>Test1</IWAYCUST2__c> <DUNS__c>123456789</DUNS__c> <EXTIDACCT__c>450</EXTIDACCT__c> </Instance></Upsert-Account-Request>
<ExternalID> is the External ID field name defined for the EXTIDACCT Account object.<EXTIDACCT> is defined by the user, which has a value of 450 in this example. If the Upsertrequest finds a record with this value, the Account record is updated. If no record is found withthis value, then a new record is inserted.
4. Creating XML Schemas for Salesforce
iWay Application Adapter for Salesforce User's Guide 51

Using the Upsert Function
52 Information Builders

Chapter5 Creating andPublishing iWay Business Services
This section describes how to create and publish iWay Business Services using iWayExplorer.
In this chapter:
Understanding iWay Business Services
Creating iWay Business Services
Configuring the Retrieve Function
Understanding iWay Business Services
iWay Explorer provides web developers with a simple, consistent mechanism for extending thecapabilities of the iWay Application Adapter for Salesforce. The iWay Business ServicesProvider (iBSP) exposes functionality as web services. It serves as a gateway to heterogeneousback-end applications and databases.
A web service is a self-contained, modularized function that you can publish and access acrossa network using open standards. It is the implementation of an interface by a component andis an executable entity. For the caller or sender, a web service can be considered as a "blackbox" that may require input and delivers a result. Web services integrate within an enterpriseas well as across enterprises on any communication technology stack, whether asynchronousor synchronous, in any format.
After you browse the Salesforce business object repository and create an XML schema for theobject, you can generate an iWay Business Service for the object you wish to use with youradapter.
Creating iWay Business Services
This section describes how to create iWay Business Services.
Procedure: How to Create iWay Business Services
To create iWay Business Services:
1. Connect to a Salesforce target, as described in Configuring and Managing Connections toSalesforce on page 27.
2. In the left pane, expand the target node.
iWay Application Adapter for Salesforce User's Guide 53
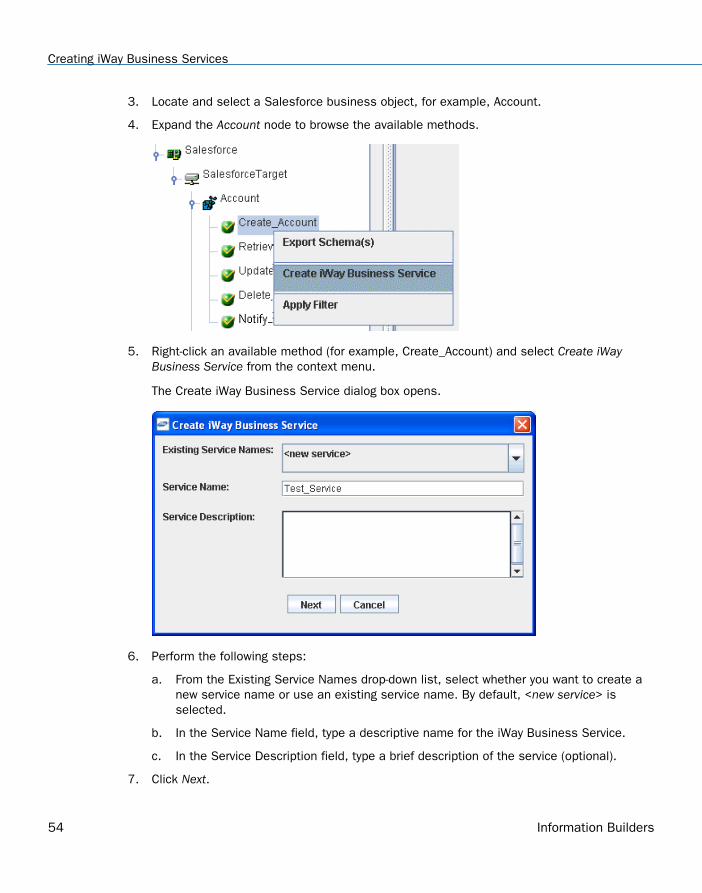
3. Locate and select a Salesforce business object, for example, Account.
4. Expand the Account node to browse the available methods.
5. Right-click an available method (for example, Create_Account) and select Create iWayBusiness Service from the context menu.
The Create iWay Business Service dialog box opens.
6. Perform the following steps:
a. From the Existing Service Names drop-down list, select whether you want to create anew service name or use an existing service name. By default, <new service> isselected.
b. In the Service Name field, type a descriptive name for the iWay Business Service.
c. In the Service Description field, type a brief description of the service (optional).
7. Click Next.
Creating iWay Business Services
54 Information Builders
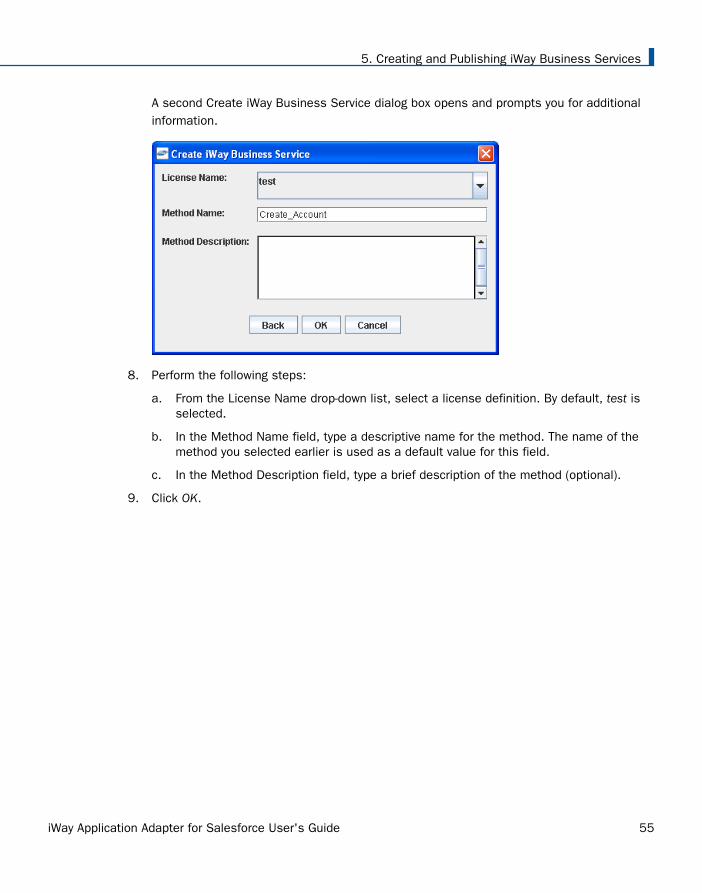
A second Create iWay Business Service dialog box opens and prompts you for additionalinformation.
8. Perform the following steps:
a. From the License Name drop-down list, select a license definition. By default, test isselected.
b. In the Method Name field, type a descriptive name for the method. The name of themethod you selected earlier is used as a default value for this field.
c. In the Method Description field, type a brief description of the method (optional).
9. Click OK.
5. Creating and Publishing iWay Business Services
iWay Application Adapter for Salesforce User's Guide 55
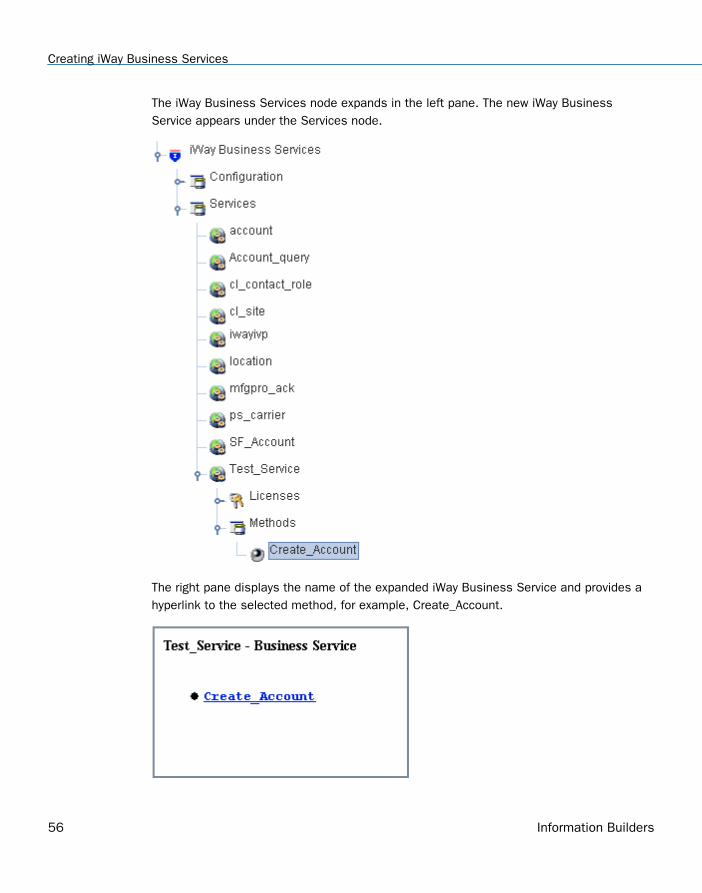
The iWay Business Services node expands in the left pane. The new iWay BusinessService appears under the Services node.
The right pane displays the name of the expanded iWay Business Service and provides ahyperlink to the selected method, for example, Create_Account.
Creating iWay Business Services
56 Information Builders
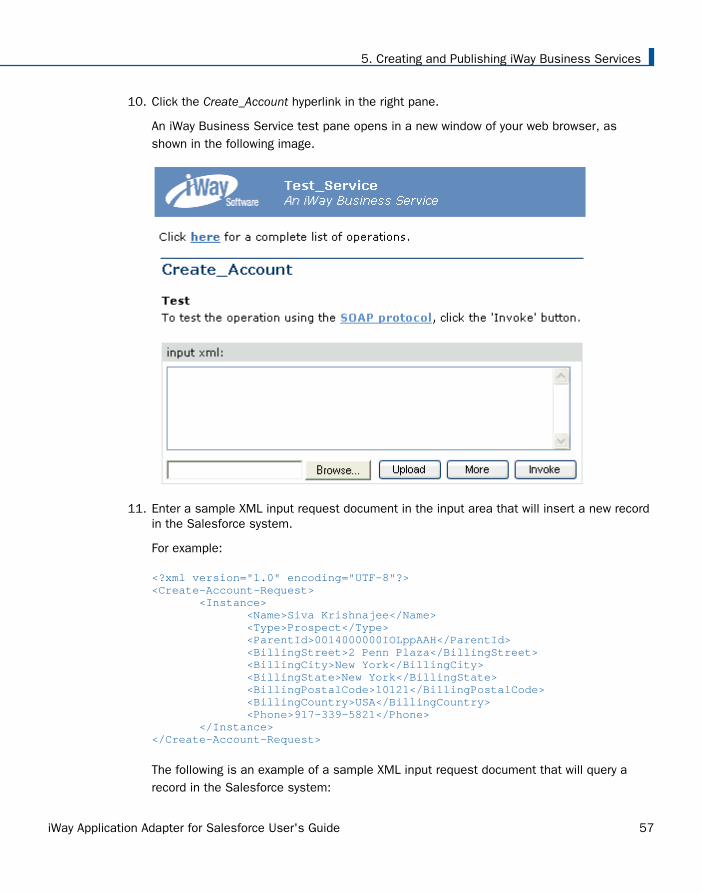
10. Click the Create_Account hyperlink in the right pane.
An iWay Business Service test pane opens in a new window of your web browser, asshown in the following image.
11. Enter a sample XML input request document in the input area that will insert a new recordin the Salesforce system.
For example:
<?xml version="1.0" encoding="UTF-8"?><Create-Account-Request> <Instance> <Name>Siva Krishnajee</Name> <Type>Prospect</Type> <ParentId>0014000000IOLppAAH</ParentId> <BillingStreet>2 Penn Plaza</BillingStreet> <BillingCity>New York</BillingCity> <BillingState>New York</BillingState> <BillingPostalCode>10121</BillingPostalCode> <BillingCountry>USA</BillingCountry> <Phone>917-339-5821</Phone> </Instance></Create-Account-Request>
The following is an example of a sample XML input request document that will query arecord in the Salesforce system:
5. Creating and Publishing iWay Business Services
iWay Application Adapter for Salesforce User's Guide 57
<?xml version="1.0" encoding="UTF-8"?><Retrieve-Account-Request> <ByQuery> <Name>Siva Krishnajee</Name> </ByQuery></Retrieve-Account-Request>
12. Click Invoke.
The test response appears in the web browser.
Configuring the Retrieve Function
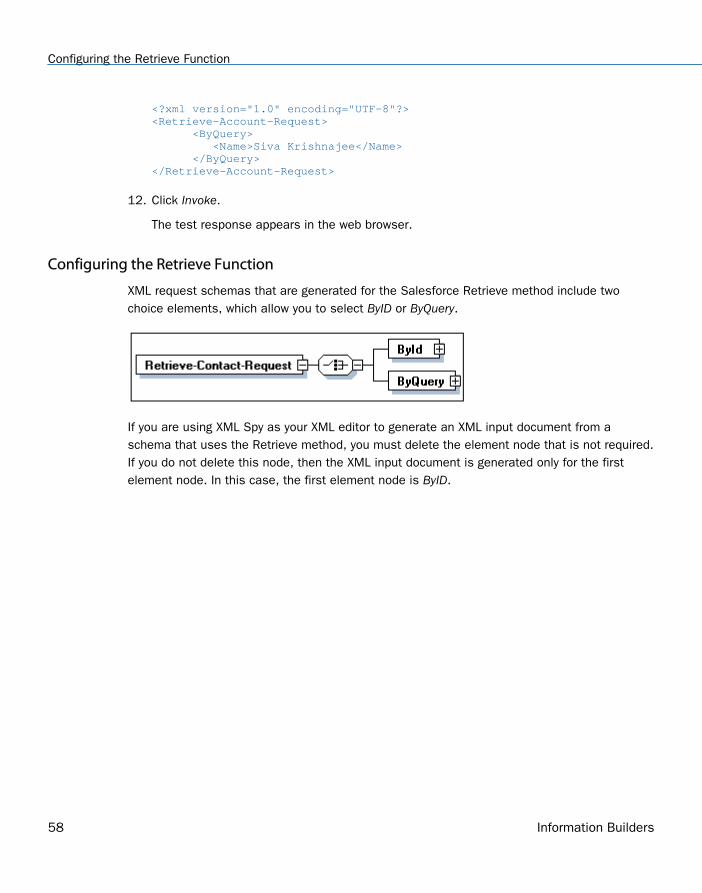
XML request schemas that are generated for the Salesforce Retrieve method include twochoice elements, which allow you to select ByID or ByQuery.
If you are using XML Spy as your XML editor to generate an XML input document from aschema that uses the Retrieve method, you must delete the element node that is not required.If you do not delete this node, then the XML input document is generated only for the firstelement node. In this case, the first element node is ByID.
Configuring the Retrieve Function
58 Information Builders
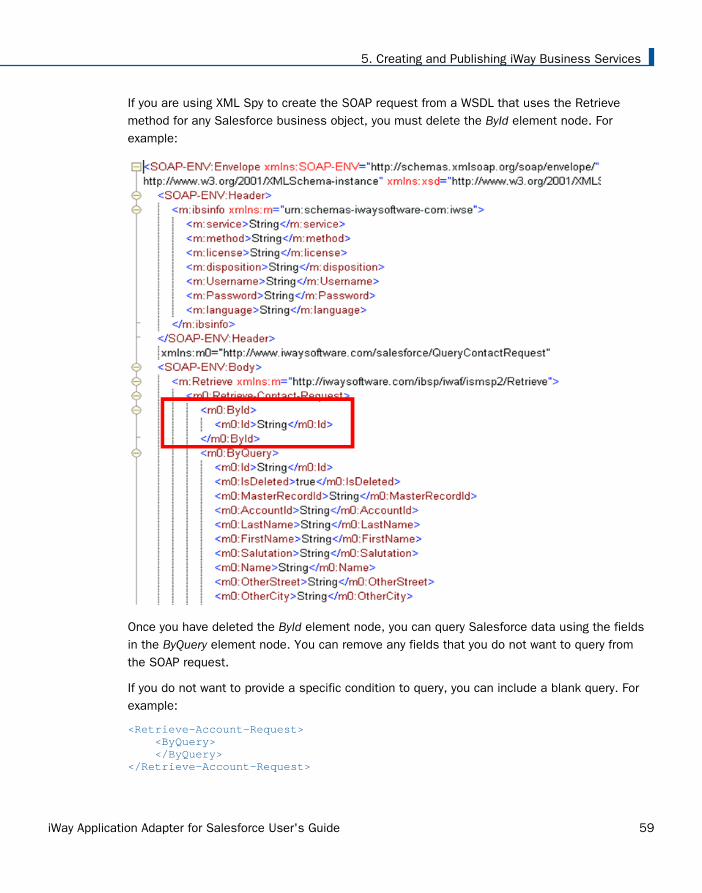
If you are using XML Spy to create the SOAP request from a WSDL that uses the Retrievemethod for any Salesforce business object, you must delete the ById element node. Forexample:
Once you have deleted the ById element node, you can query Salesforce data using the fieldsin the ByQuery element node. You can remove any fields that you do not want to query fromthe SOAP request.
If you do not want to provide a specific condition to query, you can include a blank query. Forexample:
<Retrieve-Account-Request> <ByQuery> </ByQuery></Retrieve-Account-Request>
5. Creating and Publishing iWay Business Services
iWay Application Adapter for Salesforce User's Guide 59

If the SOAP request includes the ByQuery element node without a specified query condition,this is considered to be qualified. All of the data will be returned for that Salesforce businessobject.
Configuring the Retrieve Function
60 Information Builders
Chapter6 Configuring OutboundMessaging and Workflow Rules inSalesforce
This section describes how to configure outbound messaging and workflow rules inSalesforce for event handling purposes.
In this chapter:
Outbound Messages and Workflow Rules Overview
Creating a Salesforce Outbound Message
Creating a Salesforce Workflow Rule
Outbound Messages and WorkflowRules Overview
In a Salesforce system, outbound messages and workflow rules must be configured to enableevent handling for the iWay Application Adapter for Salesforce.
The concept of outbound messaging is part of the workflow rule functionality in Salesforce.Workflow rules can be configured to look for specified field changes (for example, a newaccount or changes to an existing order). As a result, an automatic action is triggered where anoutbound message is sent.
Outbound messages send SOAP messages over HTTP or HTTPS to a designated channel whenthey are triggered by a workflow rule.
Salesforce Considerations for Outbound Messaging
If the channel is unavailable, messages remain in a queue until sent successfully, or untilthey are 24 hours old. After 24 hours, messages are dropped from the queue.
If a message cannot be delivered, the interval between retries increases exponentially, upto a maximum of two hours between retries.
Messages are retried independent of their order in the queue. This may result in messagesbeing delivered out of order.
iWay Application Adapter for Salesforce User's Guide 61
You cannot build an audit trail using outbound messaging. While each message should bedelivered at least once, it may be delivered more than once. Also, it may not be delivered atall if delivery cannot be achieved within 24 hours. Finally, the source object may changeafter a notification is sent but before it is delivered, so the channel will only receive thelatest data, not any intermediate changes.
Creating a Salesforce Outbound Message
The following procedures describe how to create an outbound message, view outboundmessages, and track outbound message status using the Salesforce web console.
Procedure: How to Create an Outbound Message
To create an outbound message using the Salesforce web console:
1. Log on to the Salesforce web console.
2. Click Setup.
The Personal Setup page opens.
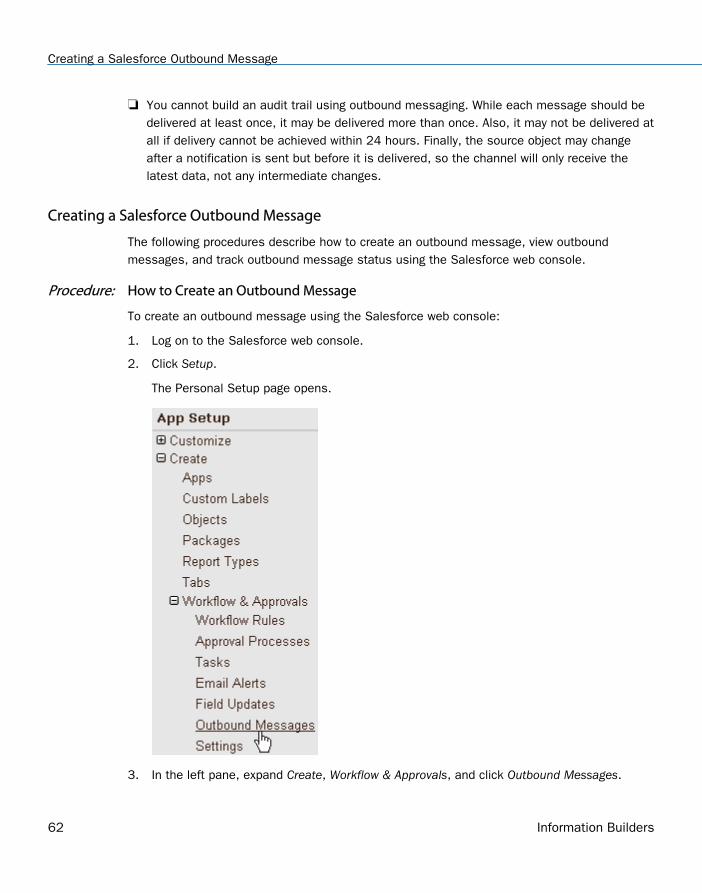
3. In the left pane, expand Create, Workflow & Approvals, and click Outbound Messages.
Creating a Salesforce Outbound Message
62 Information Builders
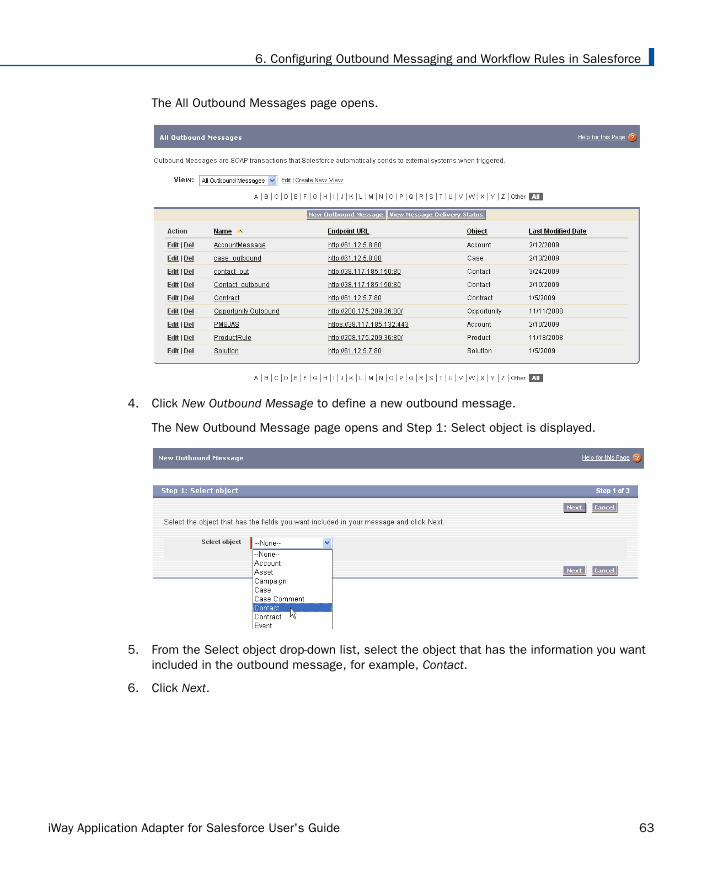
The All Outbound Messages page opens.
4. Click New Outbound Message to define a new outbound message.
The New Outbound Message page opens and Step 1: Select object is displayed.
5. From the Select object drop-down list, select the object that has the information you wantincluded in the outbound message, for example, Contact.
6. Click Next.
6. Configuring Outbound Messaging and Workflow Rules in Salesforce
iWay Application Adapter for Salesforce User's Guide 63
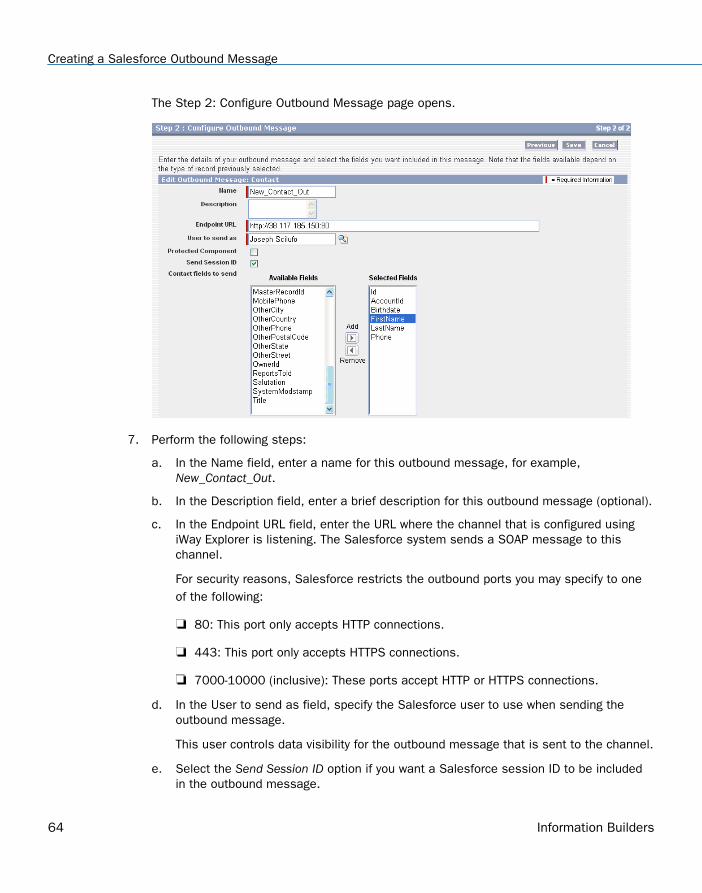
The Step 2: Configure Outbound Message page opens.
7. Perform the following steps:
a. In the Name field, enter a name for this outbound message, for example,New_Contact_Out.
b. In the Description field, enter a brief description for this outbound message (optional).
c. In the Endpoint URL field, enter the URL where the channel that is configured usingiWay Explorer is listening. The Salesforce system sends a SOAP message to thischannel.
For security reasons, Salesforce restricts the outbound ports you may specify to oneof the following:
80: This port only accepts HTTP connections.
443: This port only accepts HTTPS connections.
7000-10000 (inclusive): These ports accept HTTP or HTTPS connections.
d. In the User to send as field, specify the Salesforce user to use when sending theoutbound message.
This user controls data visibility for the outbound message that is sent to the channel.
e. Select the Send Session ID option if you want a Salesforce session ID to be includedin the outbound message.
Creating a Salesforce Outbound Message
64 Information Builders
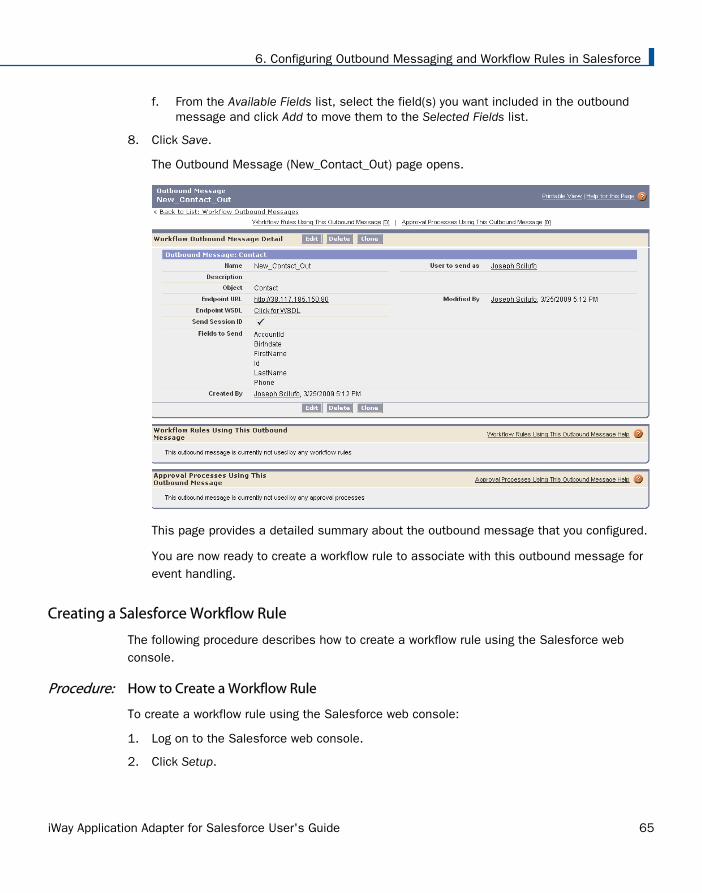
f. From the Available Fields list, select the field(s) you want included in the outboundmessage and click Add to move them to the Selected Fields list.
8. Click Save.
The Outbound Message (New_Contact_Out) page opens.
This page provides a detailed summary about the outbound message that you configured.
You are now ready to create a workflow rule to associate with this outbound message forevent handling.
Creating a Salesforce Workflow Rule
The following procedure describes how to create a workflow rule using the Salesforce webconsole.
Procedure: How to Create a Workflow Rule
To create a workflow rule using the Salesforce web console:
1. Log on to the Salesforce web console.
2. Click Setup.
6. Configuring Outbound Messaging and Workflow Rules in Salesforce
iWay Application Adapter for Salesforce User's Guide 65
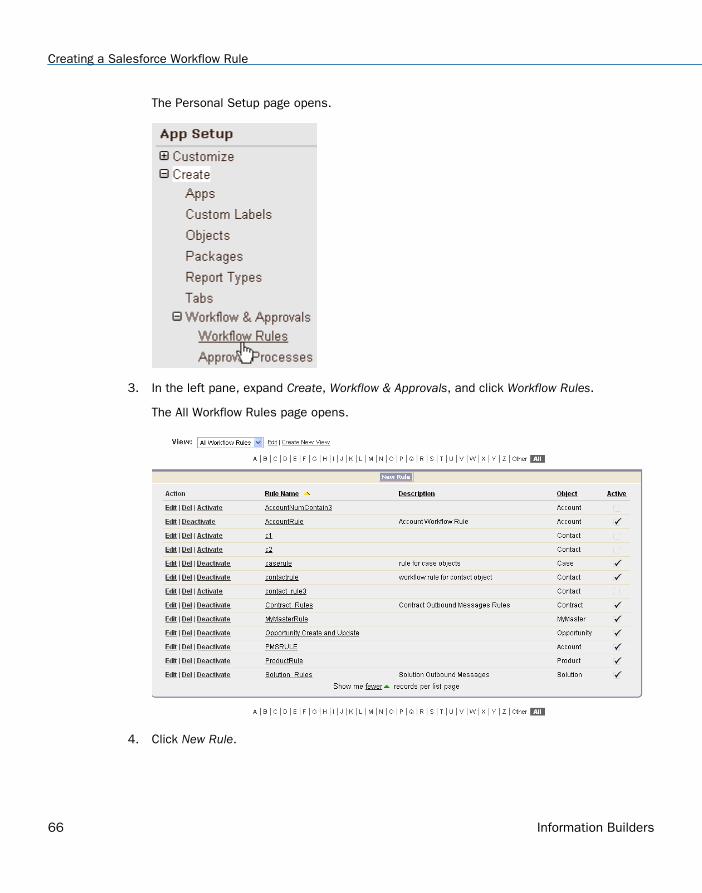
The Personal Setup page opens.
3. In the left pane, expand Create, Workflow & Approvals, and click Workflow Rules.
The All Workflow Rules page opens.
4. Click New Rule.
Creating a Salesforce Workflow Rule
66 Information Builders
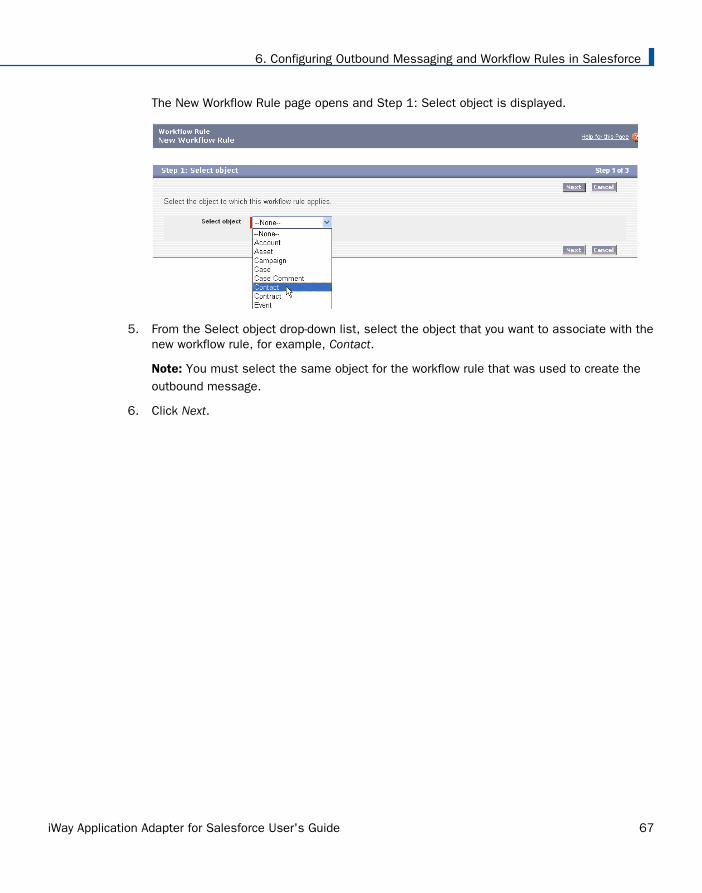
The New Workflow Rule page opens and Step 1: Select object is displayed.
5. From the Select object drop-down list, select the object that you want to associate with thenew workflow rule, for example, Contact.
Note: You must select the same object for the workflow rule that was used to create theoutbound message.
6. Click Next.
6. Configuring Outbound Messaging and Workflow Rules in Salesforce
iWay Application Adapter for Salesforce User's Guide 67
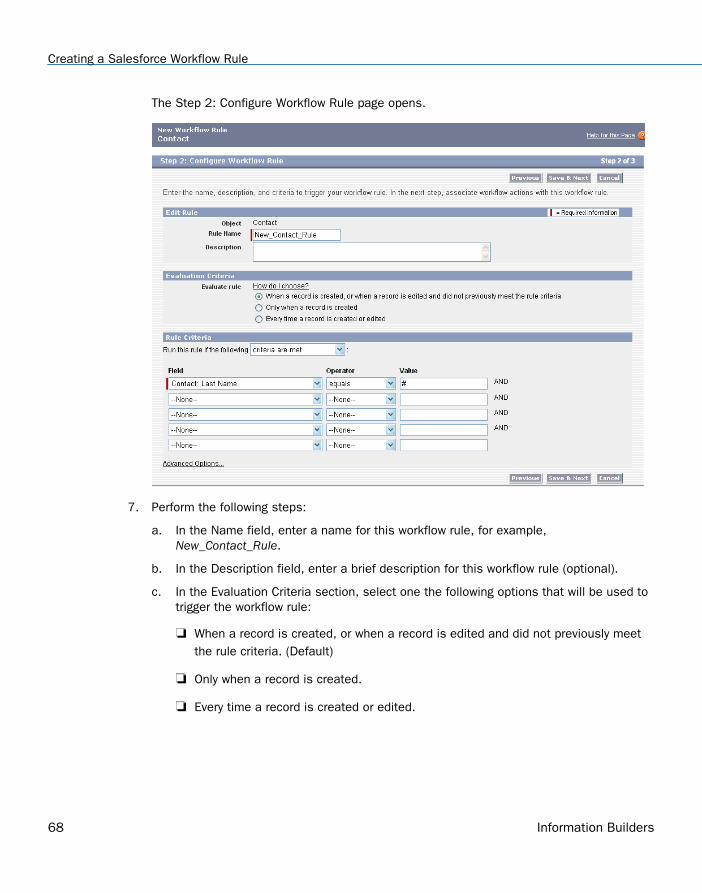
The Step 2: Configure Workflow Rule page opens.
7. Perform the following steps:
a. In the Name field, enter a name for this workflow rule, for example,New_Contact_Rule.
b. In the Description field, enter a brief description for this workflow rule (optional).
c. In the Evaluation Criteria section, select one the following options that will be used totrigger the workflow rule:
When a record is created, or when a record is edited and did not previously meetthe rule criteria. (Default)
Only when a record is created.
Every time a record is created or edited.
Creating a Salesforce Workflow Rule
68 Information Builders
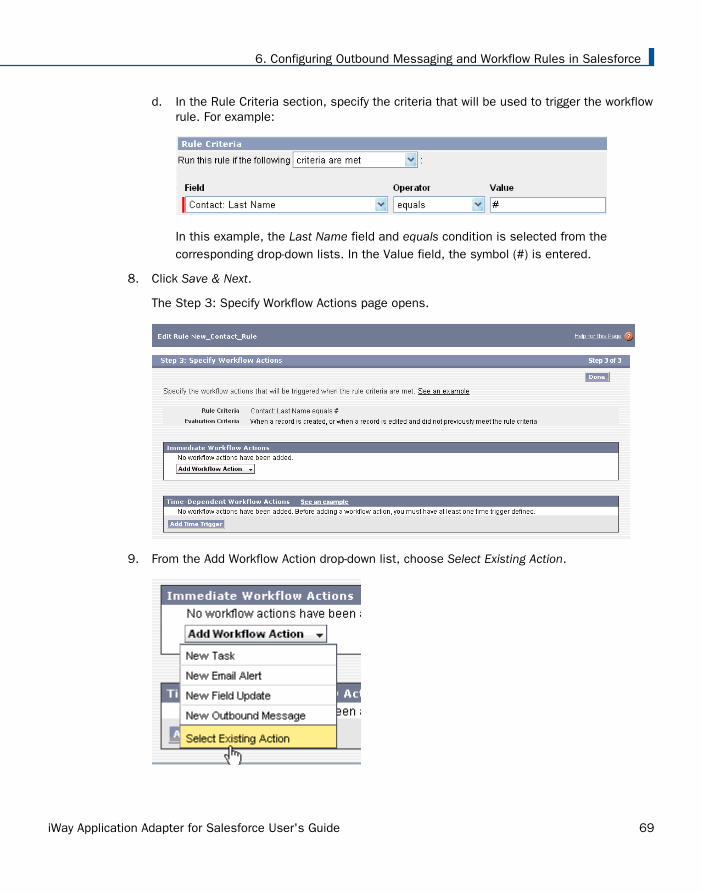
d. In the Rule Criteria section, specify the criteria that will be used to trigger the workflowrule. For example:
In this example, the Last Name field and equals condition is selected from thecorresponding drop-down lists. In the Value field, the symbol (#) is entered.
8. Click Save & Next.
The Step 3: Specify Workflow Actions page opens.
9. From the Add Workflow Action drop-down list, choose Select Existing Action.
6. Configuring Outbound Messaging and Workflow Rules in Salesforce
iWay Application Adapter for Salesforce User's Guide 69
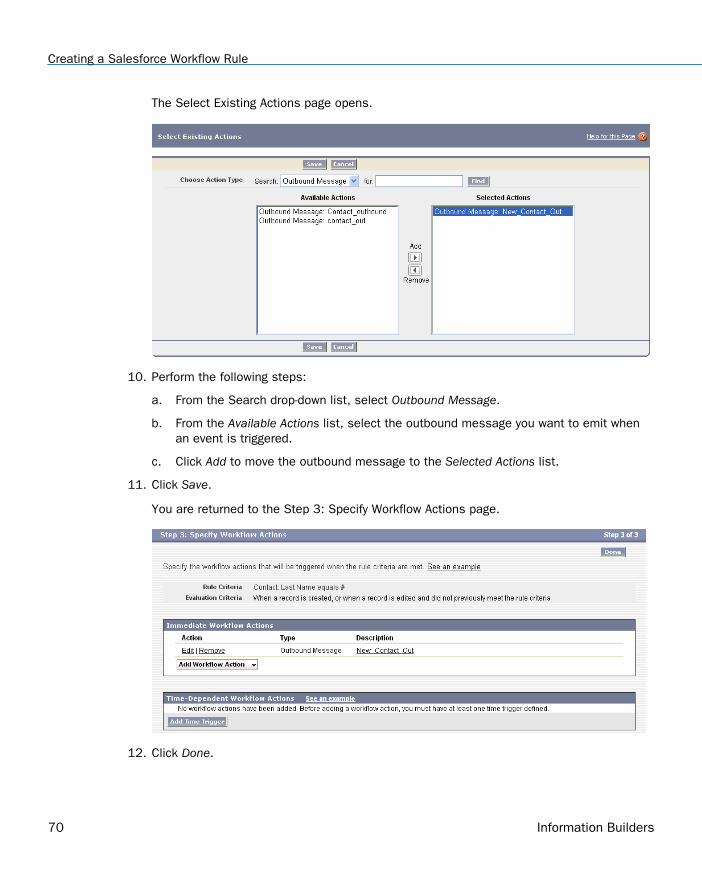
The Select Existing Actions page opens.
10. Perform the following steps:
a. From the Search drop-down list, select Outbound Message.
b. From the Available Actions list, select the outbound message you want to emit whenan event is triggered.
c. Click Add to move the outbound message to the Selected Actions list.
11. Click Save.
You are returned to the Step 3: Specify Workflow Actions page.
12. Click Done.
Creating a Salesforce Workflow Rule
70 Information Builders
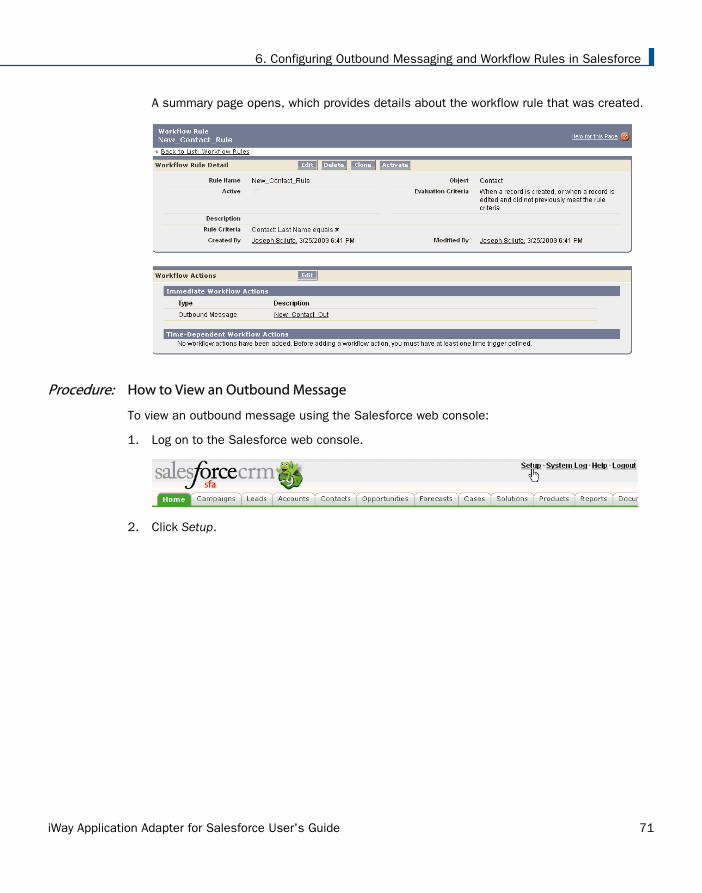
A summary page opens, which provides details about the workflow rule that was created.
Procedure: How to View an Outbound Message
To view an outbound message using the Salesforce web console:
1. Log on to the Salesforce web console.
2. Click Setup.
6. Configuring Outbound Messaging and Workflow Rules in Salesforce
iWay Application Adapter for Salesforce User's Guide 71
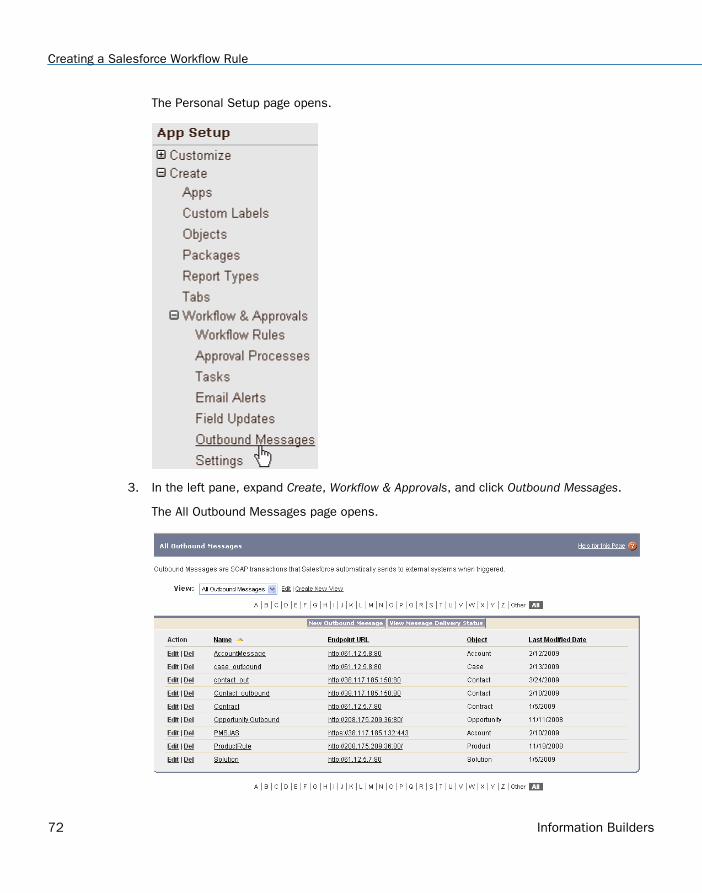
The Personal Setup page opens.
3. In the left pane, expand Create, Workflow & Approvals, and click Outbound Messages.
The All Outbound Messages page opens.
Creating a Salesforce Workflow Rule
72 Information Builders
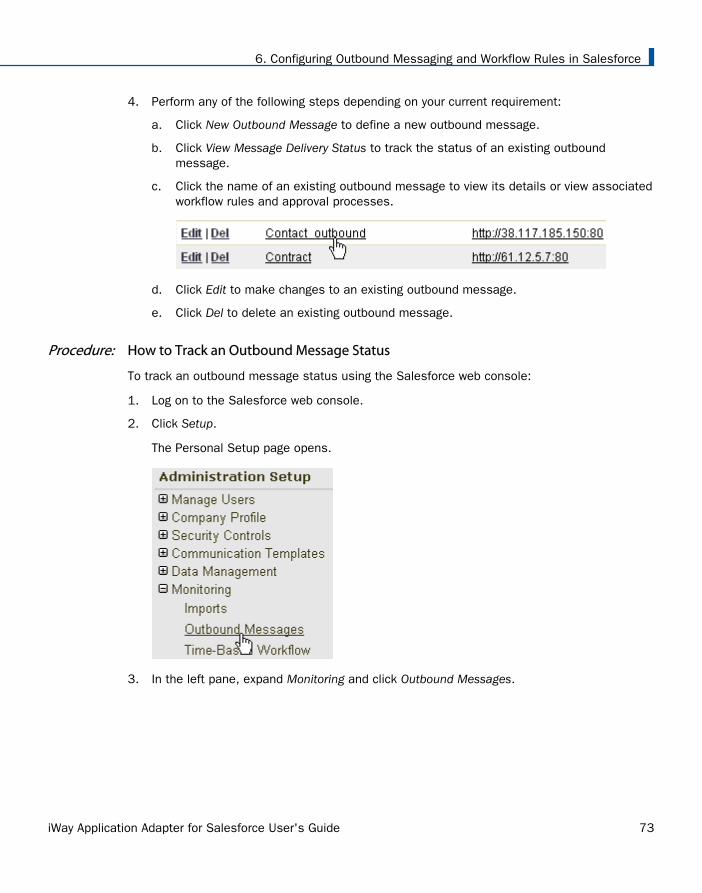
4. Perform any of the following steps depending on your current requirement:
a. Click New Outbound Message to define a new outbound message.
b. Click View Message Delivery Status to track the status of an existing outboundmessage.
c. Click the name of an existing outbound message to view its details or view associatedworkflow rules and approval processes.
d. Click Edit to make changes to an existing outbound message.
e. Click Del to delete an existing outbound message.
Procedure: How to Track an Outbound Message Status
To track an outbound message status using the Salesforce web console:
1. Log on to the Salesforce web console.
2. Click Setup.
The Personal Setup page opens.
3. In the left pane, expand Monitoring and click Outbound Messages.
6. Configuring Outbound Messaging and Workflow Rules in Salesforce
iWay Application Adapter for Salesforce User's Guide 73
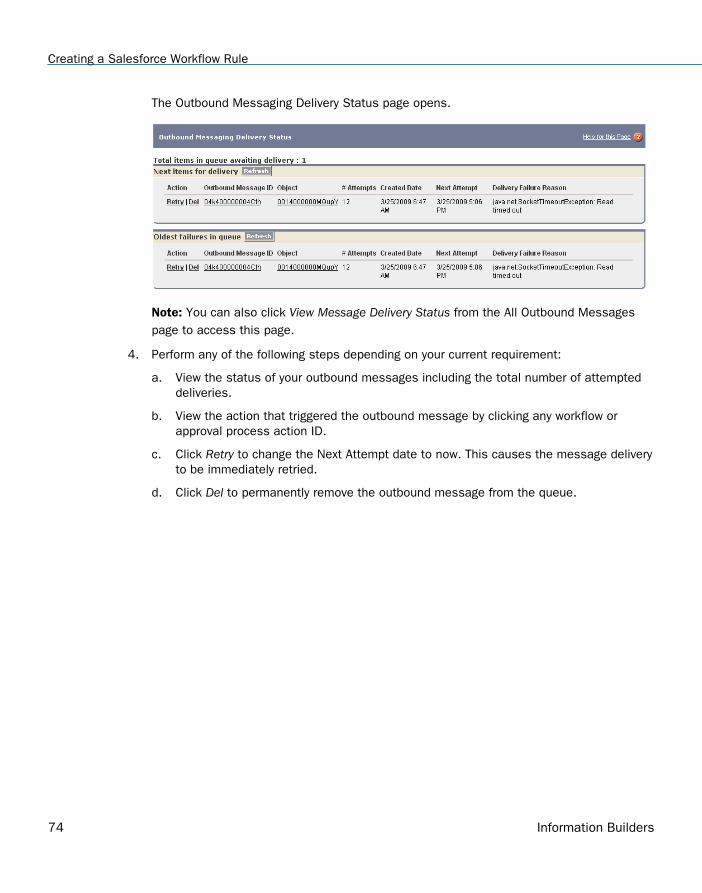
The Outbound Messaging Delivery Status page opens.
Note: You can also click View Message Delivery Status from the All Outbound Messagespage to access this page.
4. Perform any of the following steps depending on your current requirement:
a. View the status of your outbound messages including the total number of attempteddeliveries.
b. View the action that triggered the outbound message by clicking any workflow orapproval process action ID.
c. Click Retry to change the Next Attempt date to now. This causes the message deliveryto be immediately retried.
d. Click Del to permanently remove the outbound message from the queue.
Creating a Salesforce Workflow Rule
74 Information Builders
Chapter7Configuring Eventsfor Salesforce
This section describes how to use iWay Explorer to connect to Salesforce and listen forevents.
In this chapter:
Salesforce Events Overview
Creating an Event Port
Creating a Channel
Salesforce Events Overview
Events are generated as a result of activity on an application system. You can use events totrigger an action in your application.
The iWay Application Adapter for Salesforce supports event handling through the Salesforceimplementation of outbound messages and workflow rules. Outbound messages send SOAPmessages over HTTP or HTTPS to a designated channel when they are triggered by a workflowrule. Workflow rules are used to schedule and execute workflow actions when records meetspecified criteria.
For more information, see Configuring Outbound Messaging and Workflow Rules in Salesforceon page 61.
To create an iWay event, you must create a port and a channel using iWay Explorer. Thefollowing is a description of how ports and channels work.
Port. A port associates a particular business object exposed by an adapter with a particulardisposition. A disposition defines the protocol and location of the event data. The portdefines the end point of the event consumption. For more information, see Creating anEvent Port on page 76.
Channel. A channel represents configured connections to particular instances of back-endor other types of systems. A channel binds one or more event ports to a particular listenermanaged by an adapter. For more information, see Creating a Channel on page 95.
iWay Application Adapter for Salesforce User's Guide 75

Creating an Event Port
The following procedures describe how to create an event port using iWay Explorer.
When you use iWay Explorer with an iWay Business Services Provider (iBSP) implementation,the following port dispositions are available:
File. The File disposition uses a file URL to specify the destination file name or directorywhere the event document will be written. During run time, the destination file name mayrequire indexing to avoid overwriting.
iBSP. The iBSP disposition enables an event to launch a business service method.
MSMQ. The Microsoft Message Queue disposition supports public and private queues.
JMSQ. The JMSQ disposition allows an event to be enqueued to a JMS queue.
SOAP. The SOAP disposition allows an event to launch a business service specified by aWSDL file. A SOAP action is optional; "" is the default value.
HTTP. The HTTP disposition uses an HTTP URL to specify an HTTP end point to which theevent document is posted.
MQSeries. The MQSeries disposition enables an event to be enqueued to an MQSeriesqueue. Both queue manager and queue name may be specified.
Procedure: How to Create an Event Port for the File Disposition
To create an event port for File:
1. Click the iWay Events node.
2. In the left pane, expand the Salesforce node.
Creating an Event Port
76 Information Builders
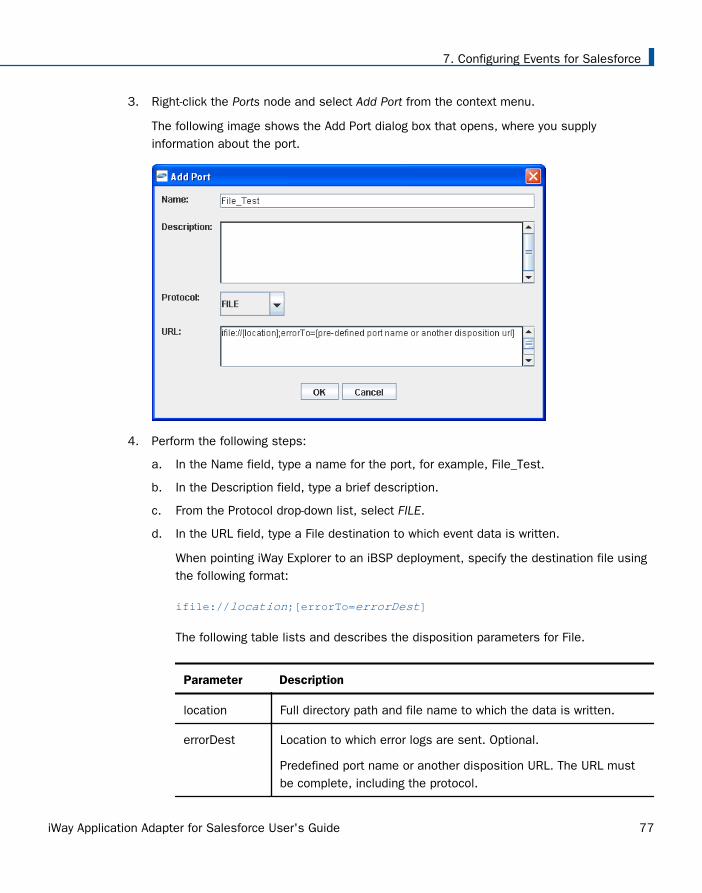
3. Right-click the Ports node and select Add Port from the context menu.
The following image shows the Add Port dialog box that opens, where you supplyinformation about the port.
4. Perform the following steps:
a. In the Name field, type a name for the port, for example, File_Test.
b. In the Description field, type a brief description.
c. From the Protocol drop-down list, select FILE.
d. In the URL field, type a File destination to which event data is written.
When pointing iWay Explorer to an iBSP deployment, specify the destination file usingthe following format:
ifile://location;[errorTo=errorDest]
The following table lists and describes the disposition parameters for File.
Parameter Description
location Full directory path and file name to which the data is written.
errorDest Location to which error logs are sent. Optional.
Predefined port name or another disposition URL. The URL mustbe complete, including the protocol.
7. Configuring Events for Salesforce
iWay Application Adapter for Salesforce User's Guide 77

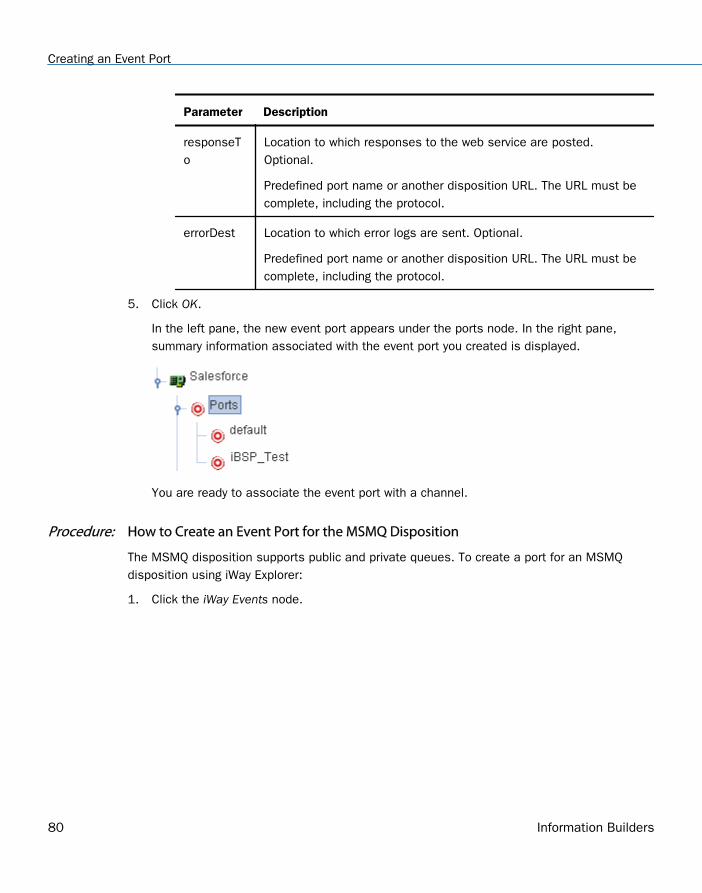
5. Click OK.
In the left pane, the new event port appears under the ports node. In the right pane,summary information associated with the event port you created is displayed.
You are ready to associate the event port with a channel.
Procedure: How to Create an Event Port for the iBSP Disposition
The iBSP disposition enables an event to launch an iWay Business Services method. To createa port for an iBSP disposition using iWay Explorer:
1. Click the iWay Events node.
2. In the left pane, expand the Salesforce node.
3. Right-click the Ports node and select Add Port from the context menu.
Creating an Event Port
78 Information Builders

The following image shows the Add Port dialog box that opens, where you supplyinformation about the port.
4. Perform the following steps:
a. In the Name field, type a name for the port, for example, iBSP_Test.
b. In the Description field, type a brief description.
c. From the Protocol drop-down list, select iBSE.
d. In the URL field, enter an iBSP destination using the following format:
ibse:svcName.mthName;[responseTo=responseTo];[errorTo=errorDest]
The following table lists and describes the disposition parameters for iBSP.
Parameter Description
svcName Name of the service created with iBSP.
mthName Name of the method created for the web service.
7. Configuring Events for Salesforce
iWay Application Adapter for Salesforce User's Guide 79
Parameter Description
responseTo
Location to which responses to the web service are posted.Optional.
Predefined port name or another disposition URL. The URL must becomplete, including the protocol.
errorDest Location to which error logs are sent. Optional.
Predefined port name or another disposition URL. The URL must becomplete, including the protocol.
5. Click OK.
In the left pane, the new event port appears under the ports node. In the right pane,summary information associated with the event port you created is displayed.
You are ready to associate the event port with a channel.
Procedure: How to Create an Event Port for the MSMQ Disposition
The MSMQ disposition supports public and private queues. To create a port for an MSMQdisposition using iWay Explorer:
1. Click the iWay Events node.
Creating an Event Port
80 Information Builders
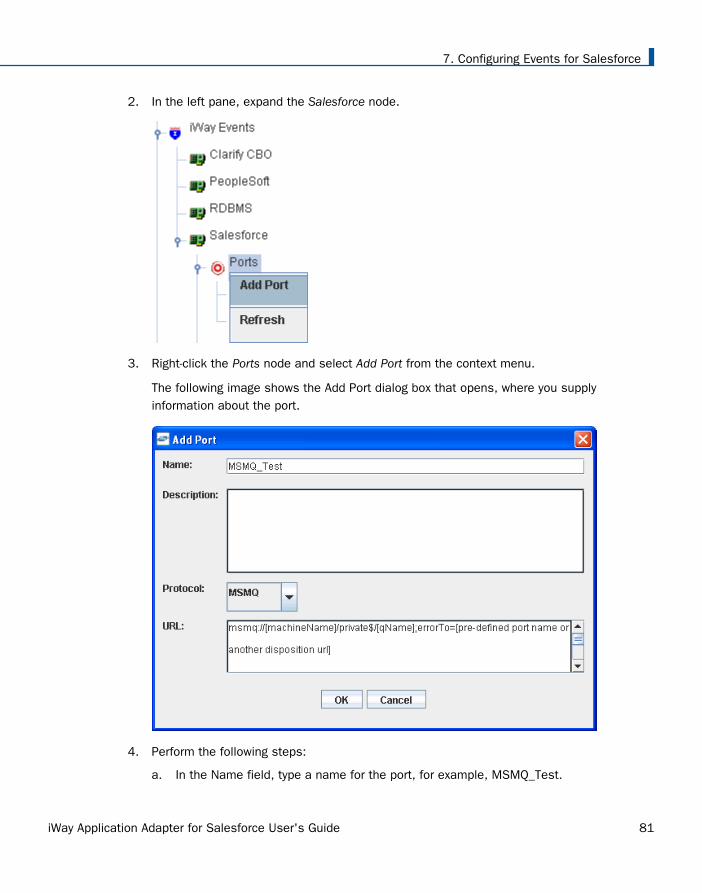
2. In the left pane, expand the Salesforce node.
3. Right-click the Ports node and select Add Port from the context menu.
The following image shows the Add Port dialog box that opens, where you supplyinformation about the port.
4. Perform the following steps:
a. In the Name field, type a name for the port, for example, MSMQ_Test.
7. Configuring Events for Salesforce
iWay Application Adapter for Salesforce User's Guide 81
b. In the Description field, type a brief description.
c. From the Protocol drop-down list, select MSMQ.
d. In the URL field, enter an MSMQ destination in the format:
msmq://host/private$/qName;[errorTo=errorDest]
The following table lists and describes the disposition parameters for MSMQ.
Parameter Description
host Name of the host on which the Microsoft Queuing system runs.
queueType Type of queue. For private queues, enter Private$.
Private queues are queues that are not published in ActiveDirectory. They appear only on the local computer that containsthem. Private queues are accessible only by Message Queuingapplications that recognize the full path name or format name ofthe queue.
qName Name of the queue in which messages are placed.
errorTo Location where error documents are sent. Predefined port nameor another full URL. Optional.
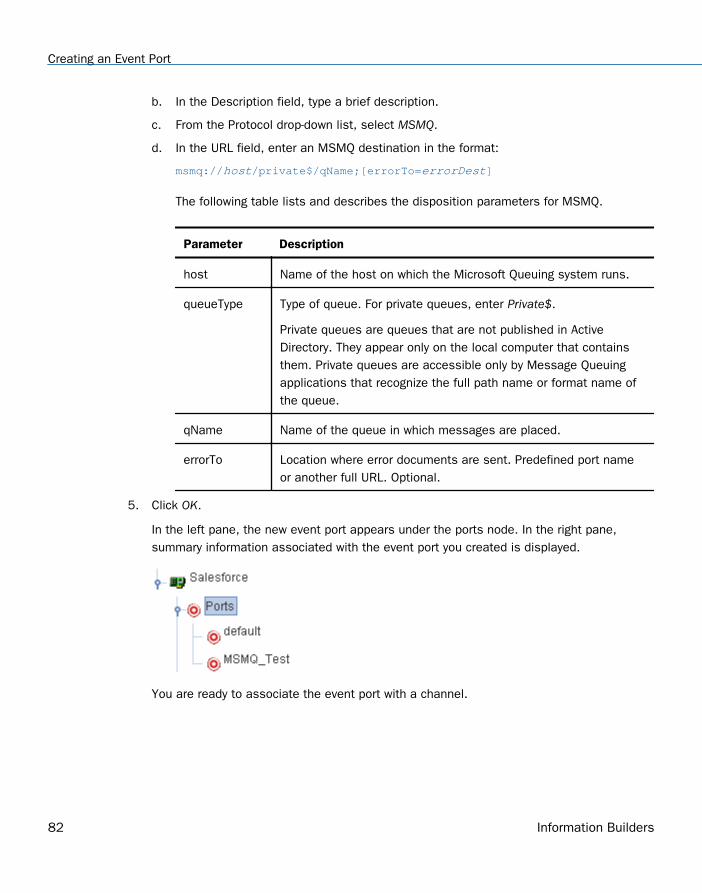
5. Click OK.
In the left pane, the new event port appears under the ports node. In the right pane,summary information associated with the event port you created is displayed.
You are ready to associate the event port with a channel.
Creating an Event Port
82 Information Builders
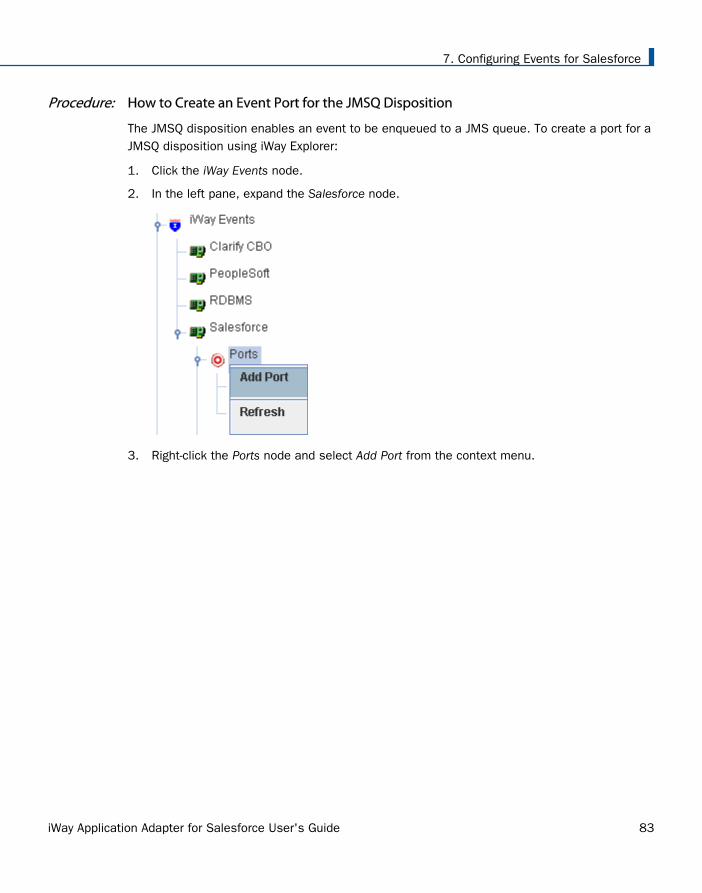
Procedure: How to Create an Event Port for the JMSQ Disposition
The JMSQ disposition enables an event to be enqueued to a JMS queue. To create a port for aJMSQ disposition using iWay Explorer:
1. Click the iWay Events node.
2. In the left pane, expand the Salesforce node.
3. Right-click the Ports node and select Add Port from the context menu.
7. Configuring Events for Salesforce
iWay Application Adapter for Salesforce User's Guide 83

The following image shows the Add Port dialog box that opens, where you supplyinformation about the port.
4. Perform the following steps:
a. In the Name field, type a name for the port, for example, JMSQ_Test.
b. In the Description field, type a brief description.
c. From the Protocol drop-down list, select JMSQ.
d. In the URL field, enter a JMS destination.
When pointing iWay Explorer to an iBSP deployment, use the following format:
jmsq:myQueueName@myQueueFac;jndiurl=[myurl];jndifactory=[myfactory];user=[user];password=[xxx];errorTo=[pre-defined port name or another disposition url]
The following table lists and describes the parameters for the disposition.
Parameter Description
queue JNDI name of a queue to which events are emitted.
Creating an Event Port
84 Information Builders

Parameter Description
ConnectionFactory
Resource that contains information about the JMS Server.
jndiurl URL to use to contact the JNDI provider. The syntax of this URLdepends on which JNDI provider is being used. This valuecorresponds to the standard JNDI property,
java.naming.provider.url
jndifactory JNDI context.INITIAL_CONTEXT_FACTORY provided by the JNDIservice provider.
user Valid user name required to access a JMS server.
password Valid password required to access a JMS server.
errorTo Location where error documents are sent. A predefined port nameor another full URL. Optional.
5. Click OK.
In the left pane, the new event port appears under the ports node. In the right pane,summary information associated with the event port you created is displayed.
You are ready to associate the event port with a channel.
Procedure: How to Create an Event Port for the SOAP Disposition
To create a port for a SOAP disposition using iWay Explorer:
1. Click the iWay Events node.
7. Configuring Events for Salesforce
iWay Application Adapter for Salesforce User's Guide 85
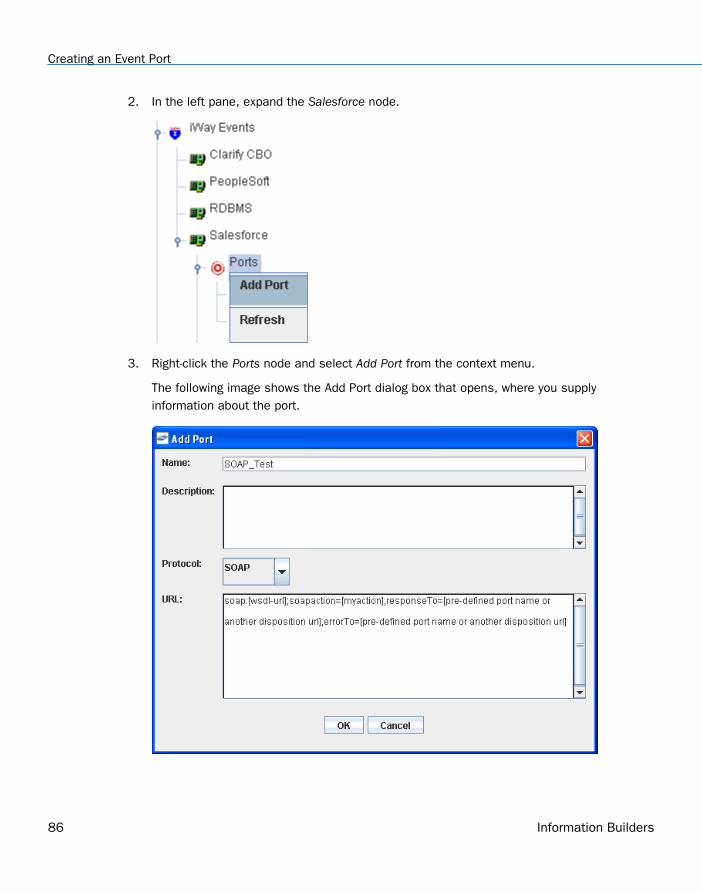
2. In the left pane, expand the Salesforce node.
3. Right-click the Ports node and select Add Port from the context menu.
The following image shows the Add Port dialog box that opens, where you supplyinformation about the port.
Creating an Event Port
86 Information Builders
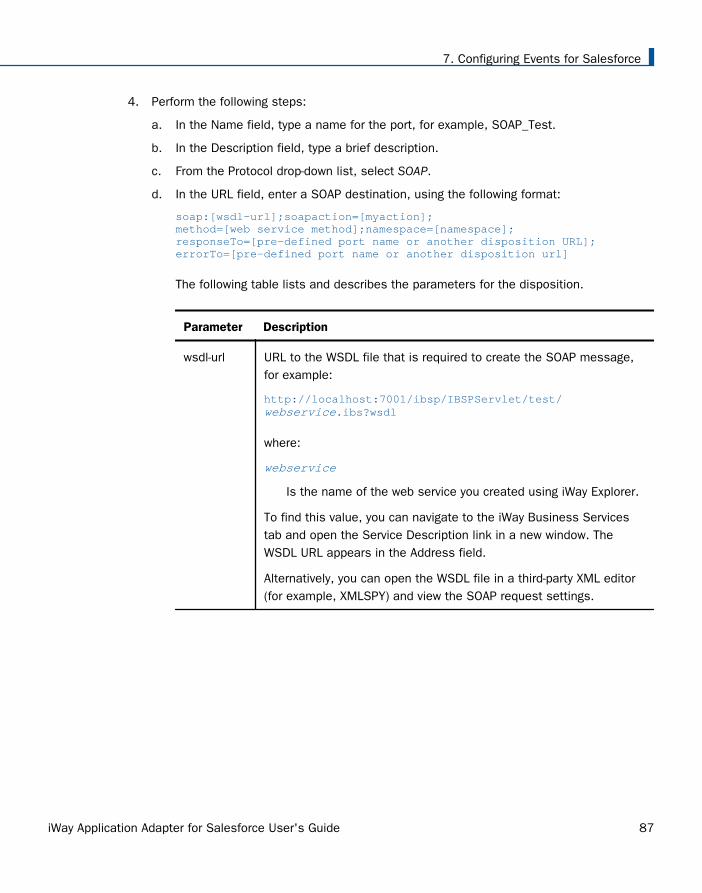
4. Perform the following steps:
a. In the Name field, type a name for the port, for example, SOAP_Test.
b. In the Description field, type a brief description.
c. From the Protocol drop-down list, select SOAP.
d. In the URL field, enter a SOAP destination, using the following format:
soap:[wsdl-url];soapaction=[myaction];method=[web service method];namespace=[namespace];responseTo=[pre-defined port name or another disposition URL];errorTo=[pre-defined port name or another disposition url]
The following table lists and describes the parameters for the disposition.
Parameter Description
wsdl-url URL to the WSDL file that is required to create the SOAP message,for example:
http://localhost:7001/ibsp/IBSPServlet/test/ webservice.ibs?wsdl
where:
webservice
Is the name of the web service you created using iWay Explorer.
To find this value, you can navigate to the iWay Business Servicestab and open the Service Description link in a new window. TheWSDL URL appears in the Address field.
Alternatively, you can open the WSDL file in a third-party XML editor(for example, XMLSPY) and view the SOAP request settings.
7. Configuring Events for Salesforce
iWay Application Adapter for Salesforce User's Guide 87
Parameter Description
soapaction Method that is called by the SOAP disposition. For example:
webservice.method@test@@
where:
webservice
Is the name of the web service you created using iWay Explorer.
method
Is the method being used.
test
Is the license that is being used by the web service.
This value can be found by navigating to the iWay Business Servicestab, opening the Service Description link in a new window, andperforming a search for soapAction.
You can also open the WSDL file in a third-party XML editor (forexample, XML Spy) and view the SOAP request settings to find thisvalue.
method Web service method you are using. Value is found in the WSDL file.
namespace
XML namespace you are using. Value is found in the WSDL file.
responseTo
Location to which responses are posted. Can be a predefined portname or another URL. Optional.
The URL must be complete, including the protocol.
errorTo Location where error documents are sent. A predefined port name oranother full URL. Optional.
5. Click OK.
Creating an Event Port
88 Information Builders
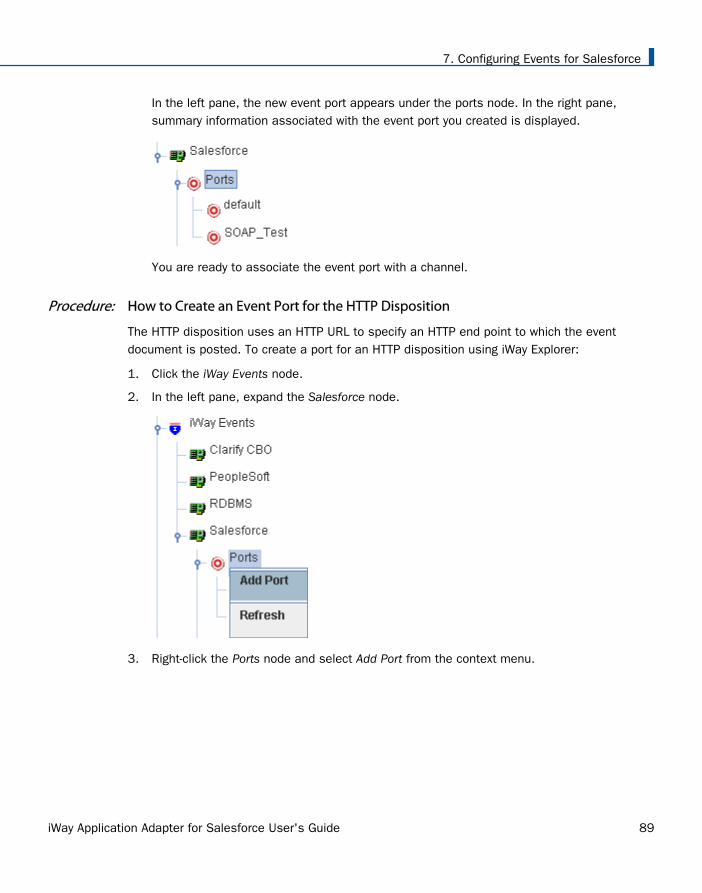
In the left pane, the new event port appears under the ports node. In the right pane,summary information associated with the event port you created is displayed.
You are ready to associate the event port with a channel.
Procedure: How to Create an Event Port for the HTTP Disposition
The HTTP disposition uses an HTTP URL to specify an HTTP end point to which the eventdocument is posted. To create a port for an HTTP disposition using iWay Explorer:
1. Click the iWay Events node.
2. In the left pane, expand the Salesforce node.
3. Right-click the Ports node and select Add Port from the context menu.
7. Configuring Events for Salesforce
iWay Application Adapter for Salesforce User's Guide 89
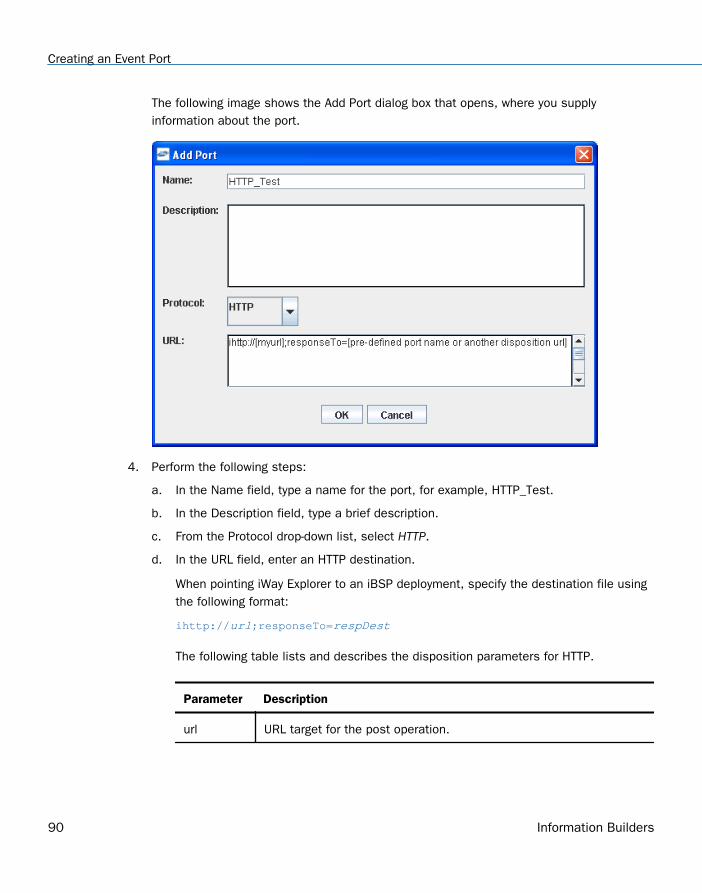
The following image shows the Add Port dialog box that opens, where you supplyinformation about the port.
4. Perform the following steps:
a. In the Name field, type a name for the port, for example, HTTP_Test.
b. In the Description field, type a brief description.
c. From the Protocol drop-down list, select HTTP.
d. In the URL field, enter an HTTP destination.
When pointing iWay Explorer to an iBSP deployment, specify the destination file usingthe following format:
ihttp://url;responseTo=respDest
The following table lists and describes the disposition parameters for HTTP.
Parameter Description
url URL target for the post operation.
Creating an Event Port
90 Information Builders

Parameter Description
respDest Location to which responses are posted. A predefined port name oranother full URL. Optional.
The URL must be complete, including the protocol.
host Name of the host on which the web server resides.
port Port number on which the web server is listening.
uri Universal resource identifier that completes the URL specification.
5. Click OK.
In the left pane, the new event port appears under the ports node. In the right pane,summary information associated with the event port you created is displayed.
You are ready to associate the event port with a channel.
Procedure: How to Create an Event Port for the MQSeries Disposition
The MQSeries disposition enables an event to be enqueued to an MQSeries queue. Bothqueue manager and queue name may be specified. To create a port for an MQSeriesdisposition using iWay Explorer:
1. Click the iWay Events node.
7. Configuring Events for Salesforce
iWay Application Adapter for Salesforce User's Guide 91
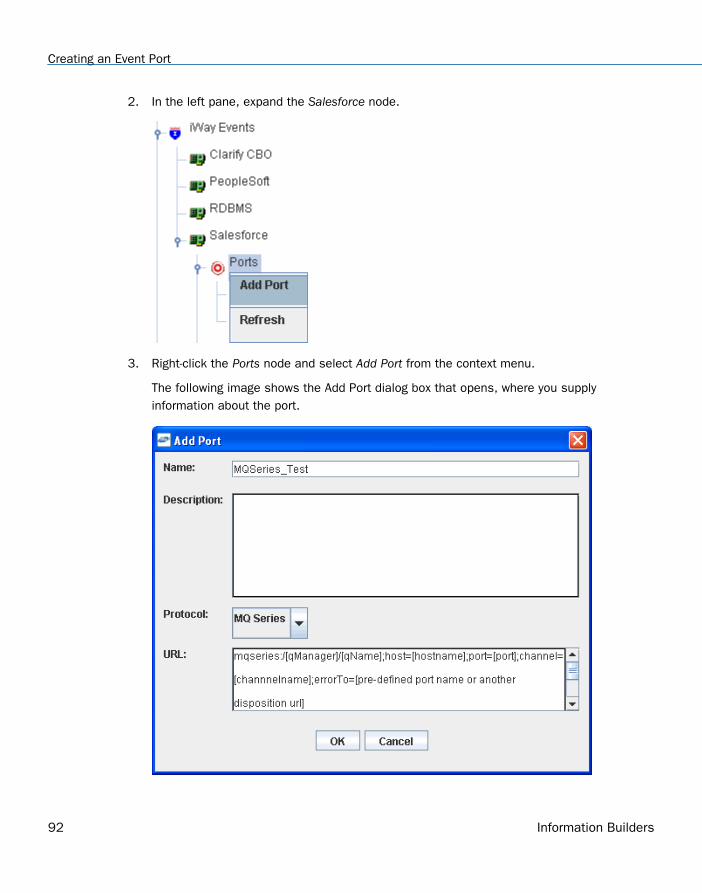
2. In the left pane, expand the Salesforce node.
3. Right-click the Ports node and select Add Port from the context menu.
The following image shows the Add Port dialog box that opens, where you supplyinformation about the port.
Creating an Event Port
92 Information Builders
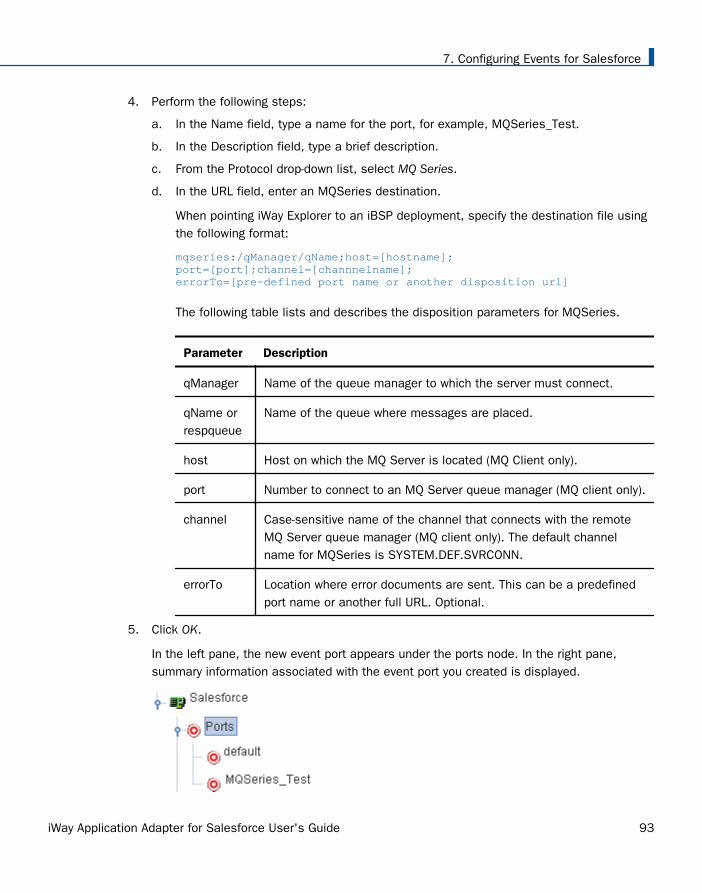
4. Perform the following steps:
a. In the Name field, type a name for the port, for example, MQSeries_Test.
b. In the Description field, type a brief description.
c. From the Protocol drop-down list, select MQ Series.
d. In the URL field, enter an MQSeries destination.
When pointing iWay Explorer to an iBSP deployment, specify the destination file usingthe following format:
mqseries:/qManager/qName;host=[hostname];port=[port];channel=[channnelname];errorTo=[pre-defined port name or another disposition url]
The following table lists and describes the disposition parameters for MQSeries.
Parameter Description
qManager Name of the queue manager to which the server must connect.
qName orrespqueue
Name of the queue where messages are placed.
host Host on which the MQ Server is located (MQ Client only).
port Number to connect to an MQ Server queue manager (MQ client only).
channel Case-sensitive name of the channel that connects with the remoteMQ Server queue manager (MQ client only). The default channelname for MQSeries is SYSTEM.DEF.SVRCONN.
errorTo Location where error documents are sent. This can be a predefinedport name or another full URL. Optional.
5. Click OK.
In the left pane, the new event port appears under the ports node. In the right pane,summary information associated with the event port you created is displayed.
7. Configuring Events for Salesforce
iWay Application Adapter for Salesforce User's Guide 93
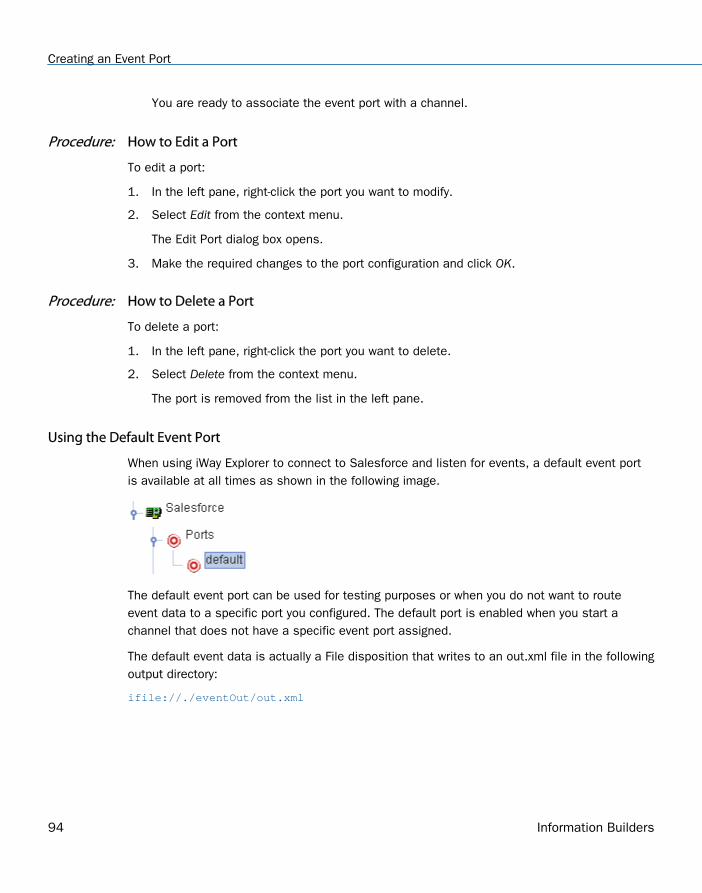
You are ready to associate the event port with a channel.
Procedure: How to Edit a Port
To edit a port:
1. In the left pane, right-click the port you want to modify.
2. Select Edit from the context menu.
The Edit Port dialog box opens.
3. Make the required changes to the port configuration and click OK.
Procedure: How to Delete a Port
To delete a port:
1. In the left pane, right-click the port you want to delete.
2. Select Delete from the context menu.
The port is removed from the list in the left pane.
Using the Default Event Port
When using iWay Explorer to connect to Salesforce and listen for events, a default event portis available at all times as shown in the following image.
The default event port can be used for testing purposes or when you do not want to routeevent data to a specific port you configured. The default port is enabled when you start achannel that does not have a specific event port assigned.
The default event data is actually a File disposition that writes to an out.xml file in the followingoutput directory:
ifile://./eventOut/out.xml
Creating an Event Port
94 Information Builders
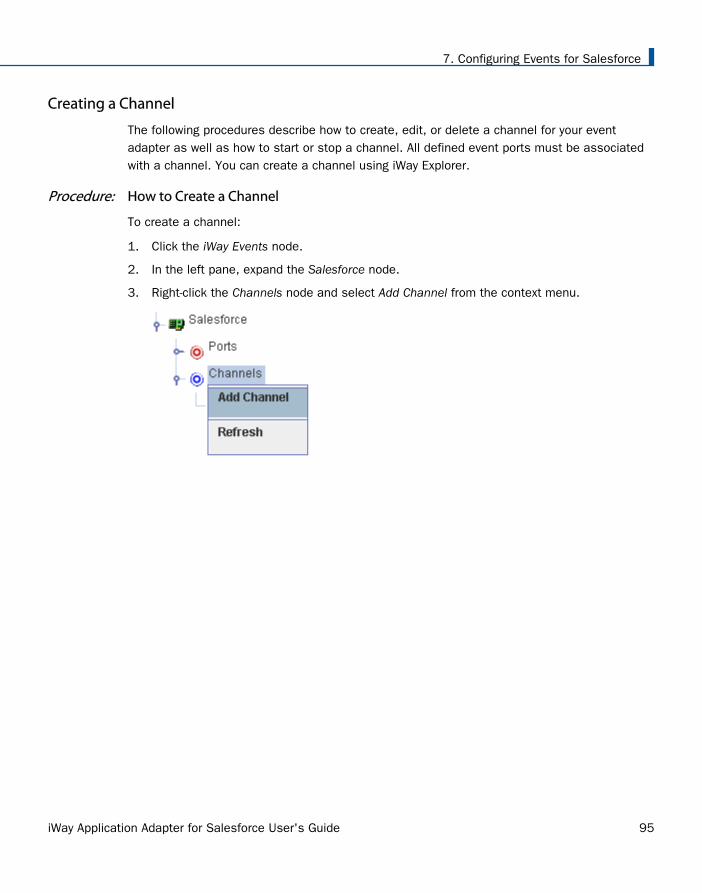
Creating a Channel
The following procedures describe how to create, edit, or delete a channel for your eventadapter as well as how to start or stop a channel. All defined event ports must be associatedwith a channel. You can create a channel using iWay Explorer.
Procedure: How to Create a Channel
To create a channel:
1. Click the iWay Events node.
2. In the left pane, expand the Salesforce node.
3. Right-click the Channels node and select Add Channel from the context menu.
7. Configuring Events for Salesforce
iWay Application Adapter for Salesforce User's Guide 95

The Add Channel dialog box opens, where you supply information about the channel.
4. Perform the following steps:
a. In the Name field, type a name for the channel, for example, HTTP.
b. In the Description field, type a brief description.
c. From the Protocol drop-down list, select HTTP Listener.
Note: For the current release, only the HTTP protocol is supported.
d. From the Available Ports area, select a port you want to assign to this channel andclick the right arrow to move it to the Selected Ports area.
5. Click Next.
Creating a Channel
96 Information Builders

The Salesforce Event Adapter dialog box opens, where you must select an availablelistener type (HTTP or HTTPS) and provide values for the required parameters accordingly.
Note: For demonstration purposes, this procedure uses the HTTP listener as an example.If you want to use HTTPS, you must configure certificate management for the iWayApplication Adapter for Salesforce before you configure an HTTPS listener. For moreinformation on configuring certificates, see Salesforce Certificate Management on page99.
6. From the Listener Type drop-down list, select HTTP.
7. Type 80 in the Listener Port field.
Note: Ensure that port 80 is accessible to the Internet from your system. This port is usedto indicate where Salesforce will send the outbound message.
8. If client authentication is required, select the Client Authentication check box (optional).
9. Click OK.
The channel you created is added beneath the Channels node in the left pane. In the rightpane, a table summarizes the information associated with the channel. You are ready tostart the channel to listen for events.
7. Configuring Events for Salesforce
iWay Application Adapter for Salesforce User's Guide 97
10. In the left pane, right-click the channel and select Start.
The channel you created is now active.
a. To stop the channel at any time, right-click the channel.
b. Select Stop.
Procedure: How to Edit a Channel
To edit a channel:
1. In the left pane, right-click the channel you want to modify.
2. Select Edit from the context menu.
The Edit Channel dialog box opens.
3. Make the required changes to the channel configuration and click OK.
Procedure: How to Delete a Channel
To delete a channel:
1. In the left pane, right-click the channel you want to delete.
2. Select Delete from the context menu.
The channel is removed from the list in the left pane.
Creating a Channel
98 Information Builders
AppendixASalesforce CertificateManagement
The iWay Application Adapter for Salesforce supports services and events. For securityreasons, Salesforce provides HTTPS support for services. Events support HTTPS andclient authentication. The key store that is provided is used for HTTPS support and atrust store is used for client authentication.
In this appendix:
Salesforce Certificate Management Prerequisites
Key Store Management
Trust Store Management
Salesforce Certificate Management Prerequisites
Before you configure certificate management for the iWay Application Adapter for Salesforce,you must first perform the following steps:
1. Create a new directory for stored files.
2. Configure this new directory as the current directory.
For example:
D:\certificate
3. Ensure that the Keytool is included in the PATH environment variable.
The Keytool is located in the following directory:
<JDK_HOME>\bin\
Key Store Management
This section describes how to generate the keypair and generate the certificate signingrequest.
Note: In this section, iWay Software is used as an example for demonstration purposes. Youmust use the appropriate information that corresponds to your company or organization.
iWay Application Adapter for Salesforce User's Guide 99

Generating the Key Pair
Use the following command to generate the key pair:
D:\certificate>keytool -genkey -v -alias iwaysoftware -validity 365 -keyalg RSA -keypass iwaysoft -keystore iway.jks -storepass iwaysoft
What is your first and last name? [Unknown]: www.iwaysoft.com
What is the name of your organizational unit? [Unknown]: iwaysoft
What is the name of your organization? [Unknown]: iwaysoft
What is the name of your City or Locality? [Unknown]: New York
What is the name of your State or Province? [Unknown]: New York
What is the two-letter country code for this unit? [Unknown]: US
Is CN=www.iwaysoft.com, OU=iwaysoft, O=iwaysoft, L=New York, ST=New York, C=US correct? [no]: yes
Generating the Certificate Signing Request
Use the following command to generate the certificate signing request:
D:\certificate>keytool -certreq -alias iwaysoftware -file iwaysoft -keystore iway.jks -storepass iwaysoft
Purchasing the Commercial Certificate From VeriSign or a Similar Certificate Authority
You must purchase the commercial certificate from VeriSign or a similar Certificate Authority(CA).
The following is a link to the VeriSign website that you can use:
http://www.verisign.com/ssl/buy-ssl-certificates/index.html
Note: For a list of approved Certificate Authorities, it is recommended that you check withSalesforce.
Key Store Management
100 Information Builders

Importing the Root Certificate and Intermediate Certificate
Once you receive the commercial certificate in the mail with the signed certificate, use thefollowing command to import the root certificate:
D:\certificate>keytool -import -trustcacerts -alias verisign_root_ca -file verisign_trial_root.cer -keystore iway.jks -storepass iwaysoft
When prompted regarding trust, enter Yes. Then import the intermediate certificate using thefollowing command:
D:\certificate>keytool -import -trustcacerts -alias verisign_intermediate_ca -file verisign_trial_intermediate_ca.cer -keystore iway.jks -storepass iwaysoft
Importing the Signed Certificate
Copy the signed certificate from the mail and paste it into a new empty file that has a .CERextension. Use the following command to ensure that the alias is the same as the one that isused during the key generation:
D:\certificate>keytool -import -alias iwaysoftware -file iwaysoft.cer -keystore iway.jks -storepass iwaysoft
Trust Store Management
This section describes how to configure trust store management.
Downloading the Root Certificate and Intermediate Certificate
Download the client certificate (sfdc-client.cert) from Salesforce website.
Download the intermediate certificate (for example, verisignclass3ca.cer) and the rootcertificate (for example, verisignintermediateca.cer) according to the client certificate.
Importing the Root Certificate and Intermediate Certificate
Use the following command to import the root certificate:
D:\ certificate>keytool -import -alias verisign_root_ca -file verisignclass3ca.cer -keystore truststore.jks -storepass iwaysoft
Use the following command to import the intermediate certificate:
D:\ certificate>keytool -import -alias verisign_intermediate_ca -file verisignintermediateca.cer -keystore truststore.jks -storepass iwaysoft
A. Salesforce Certificate Management
iWay Application Adapter for Salesforce User's Guide 101
Importing the Client Certificate
Before you import the client certificate, verify that the alias is compliant to the certificate.aliaskey, which is defined in the Salesforce adapter configuration file (LocalStrings.properties). Thedefault is salesforce.
Use the following command to import the client certificate:
D:\certificate>keytool -import -alias salesforce -file sfdc-client.cert -keystore truststore.jks -storepass iwaysoft
Depending on your environment, the following error may be generated during the importprocess:
keytool error: java.lang.Exception: Input not an X.509 certificate.
As a workaround, you must transform the client certificate format to a Base64 encoded binaryformat.
Note: Before you continue, make sure that the root certificate is installed.
Perform the following steps:
1. On a Windows platform, change the file extension to .CER and double-click the file.
The Open dialog box is displayed.
2. Select Install Certificate.
3. Open Internet Explorer.
4. From the menu bar, click Tools and select Internet Options from the context menu.
The Internet Options dialog box opens.
5. Click the Content tab.
6. In the Certificates area, click the Certificates button.
The Certificates dialog box opens.
7. Select the certificate you imported previously.
8. Click Export and select Base 64 encoded binary X.509.
9. Import this format using the following command:
D:\certificate>keytool -import -alias salesforce -file sfdc-client.cert -keystore truststore.jks -storepass iwaysoft
Trust Store Management
102 Information Builders
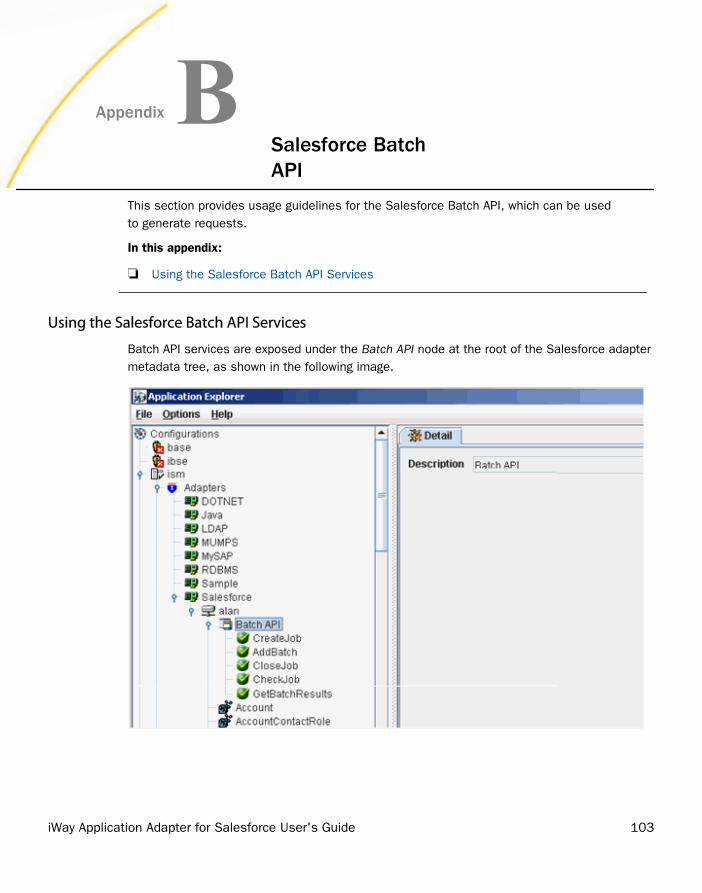
AppendixBSalesforce BatchAPI
This section provides usage guidelines for the Salesforce Batch API, which can be usedto generate requests.
In this appendix:
Using the Salesforce Batch API Services
Using the Salesforce Batch API Services
Batch API services are exposed under the Batch API node at the root of the Salesforce adaptermetadata tree, as shown in the following image.
iWay Application Adapter for Salesforce User's Guide 103
Procedure: How to Use the Salesforce Batch API
To use the Salesforce Batch API:
1. Create a job using <Create-Job-Request>.
For example:
<Create-Job-Request location="BatchAPI/CreateJob"> <jobInfo> <operation>insert</operation> <object>Contact</object> <contentType>CSV</contentType> </jobInfo></Create-Job-Request>
2. Remove the job ID from the response document and record it.
For example:
<Create-Job-Response> <jobId>750A00000004QzSIAU</jobId></Create-Job-Response>
3. Add a CSV batch file to the job.
All records in this file must have the same type (for example, Contact) and the first line inthe file must specify the field names that are used in the file. For more information aboutthe format of the CSV batch file, see the Salesforce Bulk API documentation.
The following is an example of a CSV batch file:
FirstName,LastName,Department,Birthdate,DescriptionTom1,Jones1,Marketing,1940-06-07Z,Branding guru on the West CoastIan1,Dury1,R&D,,World-renowned expert in fuzzy logic
4. Reference the full name of the CSV batch file to be uploaded and the job ID in the batchrequest.
For example:
<Add-Batch-Request location="BatchAPI/AddBatch"> <file>C:/temp/data.csv</file> <jobId>750A00000004QzSIAU</jobId></Add-Batch-Request>
The response contains a batch ID, which can be used for future reference:
<Add-Batch-Response> <batchId>751A00000004SExIAM</batchId></Add-Batch-Response>
5. Once all batches have been added to the job, the job must be closed using <Close-Job-Request>.
Using the Salesforce Batch API Services
104 Information Builders
For example:
<Close-Job-Request location="BatchAPI/CloseJob"> <jobId>750A00000004QzSIAU</jobId></Close-Job-Request>
The status of a job can be queried at any time using <Check-Job-Request>.
For example:
<Check-Job-Request location="BatchAPI/CheckJob"> <jobId>750A00000004QzSIAU</jobId></Check-Job-Request>
The response contains information about the job as a whole and all of its associatedbatches.
For example:
<Check-Job-Response> <jobInfo> <id>750A00000004QzSIAU</id> <operation>insert</operation> <object>Contact</object> <createdById>005A0000000U8BSIA0</createdById> <createdDate>2010-04-14T16:38:16.000Z</createdDate> <systemModstamp>2010-04-14T16:41:49.000Z</systemModstamp> <state>Closed</state> <concurrencyMode>Parallel</concurrencyMode> <contentType>CSV</contentType> <numberBatchesQueued>0</numberBatchesQueued> <numberBatchesInProgress>0</numberBatchesInProgress> <numberBatchesCompleted>1</numberBatchesCompleted> <numberBatchesFailed>0</numberBatchesFailed> <numberBatchesTotal>1</numberBatchesTotal> <numberRecordsProcessed>2</numberRecordsProcessed> <numberRetries>0</numberRetries> <apiVersion>18.0</apiVersion> </jobInfo><batchInfoList> <batchInfo> <id>751A00000004SExIAM</id> <jobId>750A00000004QzSIAU</jobId> <state>Completed</state> <createdDate>2010-04-14T16:40:33.000Z</createdDate> <systemModstamp>2010-04-14T16:40:35.000Z</systemModstamp> <numberRecordsProcessed>2</numberRecordsProcessed> </batchInfo> </batchInfoList></Check-Job-Response>
6. Once a batch is complete, the results can be downloaded to a CSV file using <Get-Batch-Request>.
B. Salesforce Batch API
iWay Application Adapter for Salesforce User's Guide 105
For example:
<Get-Batch-Request location="BatchAPI/GetBatchResults"> <jobId>750A00000004QzSIAU</jobId> <batchId>751A00000004SExIAM</batchId> <file>c:/temp/out.csv</file></Get-Batch-Request>
The CSV file will contain one line for each record in the batch input file. Each line willspecify the ID of the affected record and its status.
For example:
"Id","Success","Created","Error""003A0000008kYUVIA2","true","true","""003A0000008kYUWIA2","true","true",""
Upsert Operation Support
The Salesforce Batch API supports the Upsert operation, which is used to create new recordsand update existing records in a database table.
The following is an example of a job request that specifies the Upsert operation:
<Create-Job-Request location="BatchAPI/CreateJob"> <jobInfo> <operation>upsert</operation> <object>CHG_ACCT__c</object> <externalIdFieldName>upID__c</externalIdFieldName> <contentType>XML</contentType> </jobInfo></Create-Job-Request>
The following is an example of a reference to the input XML file to be uploaded and the job IDin the batch request:
<Add-Batch-Request location="BatchAPI/AddBatch"> <file>C:\CHG_BATCH_UPSERT\BATCHAPI_XML_INPUT.xml</file> <jobId>750400000008TItAAM</jobId></Add-Batch-Request>
Using the Salesforce Batch API Services
106 Information Builders
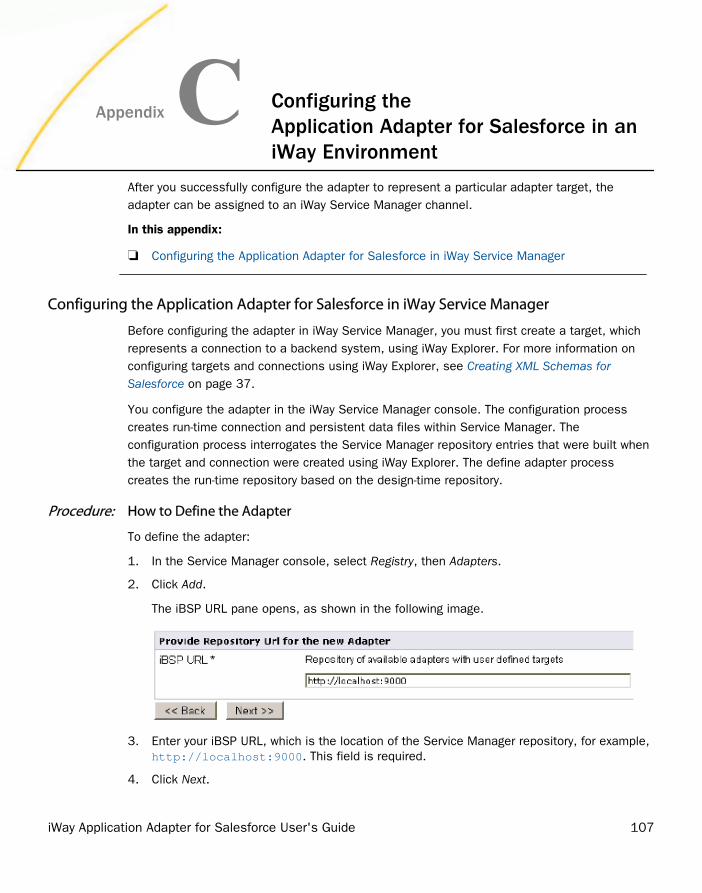
AppendixC Configuring theApplication Adapter for Salesforce in aniWay Environment
After you successfully configure the adapter to represent a particular adapter target, theadapter can be assigned to an iWay Service Manager channel.
In this appendix:
Configuring the Application Adapter for Salesforce in iWay Service Manager
Configuring the Application Adapter for Salesforce in iWay Service Manager
Before configuring the adapter in iWay Service Manager, you must first create a target, whichrepresents a connection to a backend system, using iWay Explorer. For more information onconfiguring targets and connections using iWay Explorer, see Creating XML Schemas forSalesforce on page 37.
You configure the adapter in the iWay Service Manager console. The configuration processcreates run-time connection and persistent data files within Service Manager. Theconfiguration process interrogates the Service Manager repository entries that were built whenthe target and connection were created using iWay Explorer. The define adapter processcreates the run-time repository based on the design-time repository.
Procedure: How to Define the Adapter
To define the adapter:
1. In the Service Manager console, select Registry, then Adapters.
2. Click Add.
The iBSP URL pane opens, as shown in the following image.
3. Enter your iBSP URL, which is the location of the Service Manager repository, for example,http://localhost:9000. This field is required.
4. Click Next.
iWay Application Adapter for Salesforce User's Guide 107

An adapter selection pane opens, as shown in the following image.
5. From the Adapter drop-down list, select an adapter, for example, Salesforce, then clickNext.
6. From the Target drop-down list, select a target you configured for the adapter in iWayExplorer, then click Next.
The connection information associated with the target selected is displayed.
a. Select whether to return an error document when an error occurs.
b. Select whether an adapter connection will be reused between executes.
c. Review the connection information you specified in iWay Explorer. You can change orupdate any information.
7. Click Next.
8. Provide a name and, optionally, a description, for the adapter, and click Finish.
The adapter appears in the adapters list.
Configuring the Application Adapter for Salesforce in iWay Service Manager
108 Information Builders
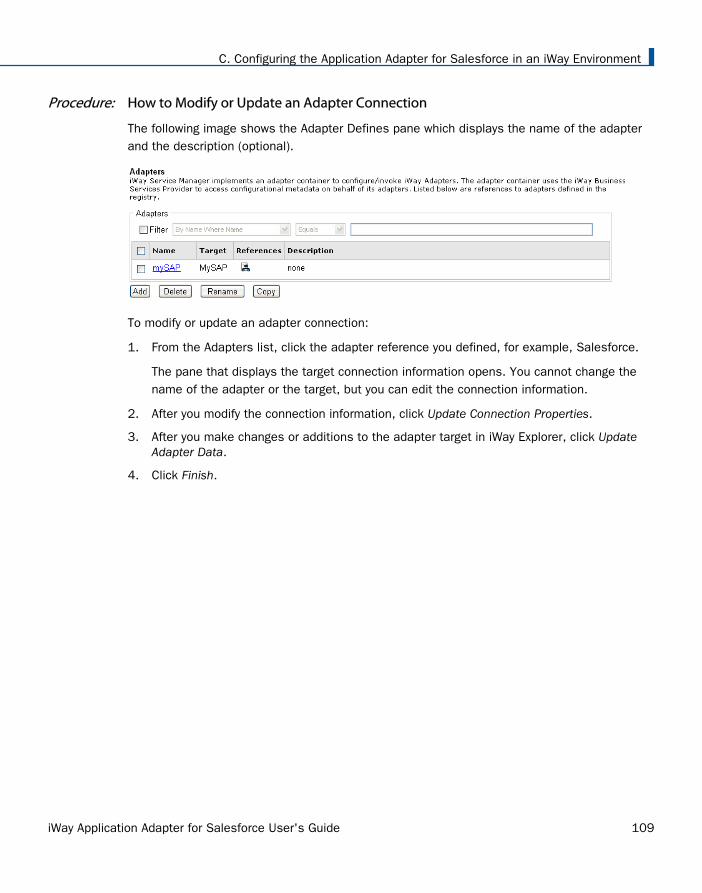
Procedure: How to Modify or Update an Adapter Connection
The following image shows the Adapter Defines pane which displays the name of the adapterand the description (optional).
To modify or update an adapter connection:
1. From the Adapters list, click the adapter reference you defined, for example, Salesforce.
The pane that displays the target connection information opens. You cannot change thename of the adapter or the target, but you can edit the connection information.
2. After you modify the connection information, click Update Connection Properties.
3. After you make changes or additions to the adapter target in iWay Explorer, click UpdateAdapter Data.
4. Click Finish.
C. Configuring the Application Adapter for Salesforce in an iWay Environment
iWay Application Adapter for Salesforce User's Guide 109

Configuring the Application Adapter for Salesforce in iWay Service Manager
110 Information Builders
FeedbackCustomer success is our top priority. Connect with us today!
Information Builders Technical Content Management team is comprised of many talentedindividuals who work together to design and deliver quality technical documentation products.Your feedback supports our ongoing efforts!
You can also preview new innovations to get an early look at new content products andservices. Your participation helps us create great experiences for every customer.
To send us feedback or make a connection, contact Sarah Buccellato, Technical Editor,Technical Content Management at [email protected].
To request permission to repurpose copyrighted material, please contact Frances Gambino,Vice President, Technical Content Management at [email protected].
Information Builders, Inc.Two Penn PlazaNew York, NY 10121-2898
iWay Application Adapter for Salesforce User'sGuideVersion 7.0.x and Higher
DN3502261.0418