januarylfebruary 2005 - ceramic arts network · boxes of bisque test tiles on hand for this...
TRANSCRIPT


JanuarylFebruary 2005 • PotteryMaking Illustrated 1

TABLE OF CONTENTS
Features14Making a Covered Casserole
by Leon RoloffGreat throwing ideas, one beautiful casserole
20 Creating Indian Bottlesby Gaylon DingierA combination of building techniques that can be ŀLJLJƭƛŜŘ to many forms
29 Exploring the Use of Commercial Glazesby Lisa Bare CulpThree ways to add depth to your glazes
32Wood Ash: Preparing for Glazesby Kathy ChamberlinClean wood ash enhances your glaze palette
36 Designing with Wax Resistby Marj PeelerAchieve intricate glaze designs
"Indian Bottle," 18 inches (46 centimeters) in height, stoneware, by Gaylon Dingier.
2 PotteryMaking Illustrated • January/February 2005

Departments4 Fired Up Try Something New!
by Tim Frederich
6 Ask PMI Bisque Firing Temperature
8 Getting Started Building with Coilsby Snail Scott
10 Spare Parts Sandersby Mel Jacobson
12 Beyond Basics Sieving Ceramic Materialsby |ohn Toki
38 Kids Korner Canopic Jarby Jennifer Wankoff
40 Off the Shelf Basic Pottery Booksby Sumi von Dassow
42 In the Mix Simple Cone 6 Glazes
On the Cover:Leon Roloff takes a break from throwing a casserole dish.
Photo Credit:Thomas Michael Alleman
Vase, 11 inches (28 centimeters) in height, stoneware with wax-resist decoration, by Marj Peeler.
48 The Peephole
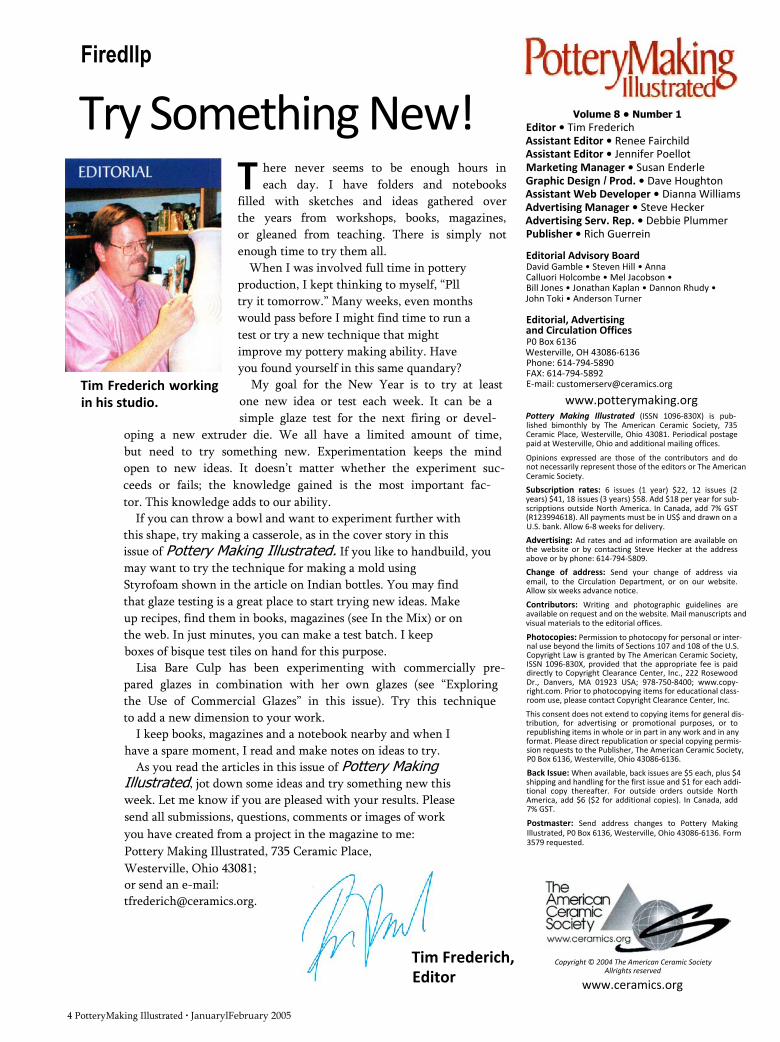
Tim Frederich working in his studio.
Firedllp
Try Something New!here never seems to be enough hours in each day. I have folders and notebooks
filled with sketches and ideas gathered over the years from workshops, books, magazines, or gleaned from teaching. There is simply not enough time to try them all.
When I was involved full time in pottery production, I kept thinking to myself, “Pll try it tomorrow.” Many weeks, even months would pass before I might find time to run a test or try a new technique that might improve my pottery making ability. Have you found yourself in this same quandary?
My goal for the New Year is to try at least one new idea or test each week. It can be a simple glaze test for the next firing or devel
oping a new extruder die. We all have a limited amount of time, but need to try something new. Experimentation keeps the mind open to new ideas. It doesn’t matter whether the experiment succeeds or fails; the knowledge gained is the most important factor. This knowledge adds to our ability.
If you can throw a bowl and want to experiment further with this shape, try making a casserole, as in the cover story in this issue of Pottery Making Illustrated. If you like to handbuild, you may want to try the technique for making a mold using Styrofoam shown in the article on Indian bottles. You may find that glaze testing is a great place to start trying new ideas. Make up recipes, find them in books, magazines (see In the Mix) or on the web. In just minutes, you can make a test batch. I keep boxes of bisque test tiles on hand for this purpose.
Lisa Bare Culp has been experimenting with commercially prepared glazes in combination with her own glazes (see “Exploring the Use of Commercial Glazes” in this issue). Try this technique to add a new dimension to your work.
I keep books, magazines and a notebook nearby and when I have a spare moment, I read and make notes on ideas to try.
As you read the articles in this issue of Pottery Making Illustrated, jot down some ideas and try something new this week. Let me know if you are pleased with your results. Please send all submissions, questions, comments or images of work you have created from a project in the magazine to me:Pottery Making Illustrated, 735 Ceramic Place,Westerville, Ohio 43081; or send an e-mail: [email protected].
Volume 8 • Number 1 Editor • Tim Frederich Assistant Editor • Renee Fairchild Assistant Editor • Jennifer Poellot Marketing Manager • Susan Enderle Graphic Design I Prod. • Dave Houghton Assistant Web Developer • Dianna Williams Advertising Manager • Steve Hecker Advertising Serv. Rep. • Debbie Plummer Publisher • Rich Guerrein
Editorial Advisory BoardDavid Gamble • Steven Hill • Anna Calluori Holcombe • Mel Jacobson •Bill Jones • Jonathan Kaplan • Dannon Rhudy • John Toki • Anderson Turner
Editorial, Advertising and Circulation OfficesP0 Box 6136Westerville, OH 43086-6136 Phone: 614-794-5890 FAX: 614-794-5892 E-mail: [email protected]
www.potterymaking.orgPottery Making Illustrated (ISSN 1096-830X) is published bimonthly by The American Ceramic Society, 735 Ceramic Place, Westerville, Ohio 43081. Periodical postage paid at Westerville, Ohio and additional mailing offices.Opinions expressed are those of the contributors and do not necessarily represent those of the editors or The American Ceramic Society.Subscription rates: 6 issues (1 year) $22, 12 issues (2 years) $41, 18 issues (3 years) $58. Add $18 per year for sub- scripptions outside North America. In Canada, add 7% GST (R123994618). All payments must be in US$ and drawn on a U.S. bank. Allow 6-8 weeks for delivery.Advertising: Ad rates and ad information are available on the website or by contacting Steve Hecker at the address above or by phone: 614-794-5809.Change of address: Send your change of address via email, to the Circulation Department, or on our website. Allow six weeks advance notice.Contributors: Writing and photographic guidelines are available on request and on the website. Mail manuscripts and visual materials to the editorial offices.Photocopies: Permission to photocopy for personal or internal use beyond the limits of Sections 107 and 108 of the U.S. Copyright Law is granted by The American Ceramic Society, ISSN 1096-830X, provided that the appropriate fee is paid directly to Copyright Clearance Center, Inc., 222 Rosewood Dr., Danvers, MA 01923 USA; 978-750-8400; www.copy- right.com. Prior to photocopying items for educational classroom use, please contact Copyright Clearance Center, Inc.This consent does not extend to copying items for general distribution, for advertising or promotional purposes, or to republishing items in whole or in part in any work and in any format. Please direct republication or special copying permission requests to the Publisher, The American Ceramic Society, P0 Box 6136, Westerville, Ohio 43086-6136.Back Issue: When available, back issues are $5 each, plus $4 shipping and handling for the first issue and $1 for each additional copy thereafter. For outside orders outside North America, add $6 ($2 for additional copies). In Canada, add 7% GST.Postmaster: Send address changes to Pottery Making Illustrated, P0 Box 6136, Westerville, Ohio 43086-6136. Form 3579 requested.
Copyright © 2004 The American Ceramic Society Allrights reserved
www.ceramics.org
4 PotteryMaking Illustrated • JanuarylFebruary 2005
T
Tim Frederich, Editor

January/February 2005 • PotteryMaking Illustrated 5

Ask PMI
Bisque Firing TemperatureKey to SuccessEXPERT ANSWERS Many potters talk
about firing to different bisque
temperatures. What temperature/cone number should I be firing to and at what heating rate?—D.G.
One of the most misunderstood
..and varied steps in making pottery is bisque firing. You aren’t the first to ask, “To what cone should I bisque fire?”
Ron Roy, a Canadian potter and glaze expert, has been very vocal in his opinion that the longer one bisque fires, the better. It is essential to fire long and slow to allow the release of natural organic materials and gases from the clay body. Fast bisque firing closes the pores in the clay body and traps foreign material. That “stuff” will come out of the clay during the glaze firing and cause many of the glaze faults that potters experience (pinholes, blisters, etc.).
The ingredients in your clay body also will determine the bisque temperature. Clay bodies with more organic materials (such as sulfur and carbon) not only need a longer firing, but may need to reach a higher temperature to completely burn out the organic materials.
The bisque-fire temperature or cone number depends on the type of work being fired and the production process. Soft bisque absorbs a great deal of water, and with it, glaze chemicals. Hard bisque doesn’t absorb as much and a thicker glaze is needed to allow enough adhesion to the clay body.
Potters doing low-temperature work often bisque fire in the Cone 04-03 range to tighten and strengthen the body. Industry does the same thing—high-temperature bisque and low-temperature glaze firing. This can save you money, since you can pack the kiln tighter during bisque firing, then do a faster glaze firing at a lower temperature.
Bisque fire temperatures can range from Cone 012 to Cone 03. Soft bisque (Cone 012-010) can be fragile and requires care in handling during the glazing process.
For production work, consistency is vital. Fire your bisque the same way, to the same cone, every time. Keep the glazes at the same thickness from piece to piece and fire them for the same amount of time. Count the seconds to time how long each pot is dipped in the glaze especially when layering glazes.
How long should you fire? Years ago, the standard was to fire one hour on low, one hour on medium, then close the kiln and fire on high to the desired cone number. Nowadays, many leave the kiln on low for several hours with the lid cracked, then turn the kiln to medium for several hours with the lid closed before going to high if needed. Fuel-fired kilns may require smaller, more frequent temperature increments.
Firing fast with the kiln on high will probably use the same amperage as a kiln being on low for several hours. It is the total amount of fuel or power to fire the load that is important. Lost work from glaze flaws, or cracked pots occurring because of a fast firing all become a waste of fuel and money. Slow, careful bisque firing will give you far more successful pieces in the end. If glaze and/or clay problems do occur, the bisque temperature and the rate of increase are the first thing to inspect.
It is up to you to test your clay, talk to your supplier and gather information so that you can make an informed decision about what bisque temperature you need to reach, and the correct duration of firing time.
—Tim Frederich and Mel Jacobson
ASK PMISend your questions to :
Ask PMI Pottery Making Illustrated
PO Box 6136 * Westerville, Ohio 43086 e-mail: [email protected]
Although we can't respond to every inquiry, questions used in the magazine will be
selected based on interest for our readers.
6 PotteryMaking Illustrated • JanuarylFebruary 2005


Getting Started by Snail Scott
Building with Coils (Part I)ou can build almost any
form imaginable, from delicate pottery to huge sculptures, with coils.
There are several ways to form coils, but the most widely used is the simplest: Taking a lump of clay, squeezing it into a sausage shape and rolling it on a tabletop. Rolling a basic coil is easy to do with a little practice.
If you’ve never rolled a coil before, you may find it difficult to achieve a truly round coil. If you’re having trouble getting round coils, go slowly. Try not to bear down too forcefully, and try to use your whole hand from your fingertips all the way to your wrist. Another technique you might find helpful is rolling the coil from a different starting point with each pass, either by picking up the coil and moving it or by shifting the position of your hands.
It’s important to maintain an even thickness over the length of the coil. To get an even coil, move your hands back and forth the full length of the coil. When a coil becomes too long to roll in one piece, break it into shorter lengths and continue one at a time.
Finally, try not to overwork the clay. When learning to roll coils, there’s a tendency to make them too small, overworking the clay
Making a coil can be easy.1 Use your whole hand to roll out the coil.2 Squeezing clay into a coil can produce varying thicknesses, sometimes desirable for sculpture.3 You also can extrude the coil.4 Different-sized dies allow you to extrude the coil needed for a particular project.5 Size your coils to accommodate the pot you are making.
8 PotteryMaking Illustrated • JanuarylFebruary 2005
BASIC TECHNIQUES and causing the coils to dry out and crack.
Using an extruder is another way to produce perfectly round and consistent coils quite rapidly. Specially shaped coils also are feasible with an extruder, allowing you to make coils that can interlock from one layer to the next. One drawback to using coils made with an extruder is that they may not be as plastic as rolled coils; rolling is very much like wedging, in that it aligns the particles of clay and forces out air bubbles.
Not all applications require a round coil. For work that is intended to be curved and even walled, a round coil can be helpful in keeping consistency throughout the piece. But for sculpture, a rough hand-formed or flattened coil may serve as well and save time.
Nor do all applications require coils with a consistent thickness. In many cases, the coil can be roughly the same thickness as the intended final thickness of the piece. For larger work, it is helpful to make oversized coils that can be flattened to create greater height from each course of coils laid on the piece. Manipulating the coil by pinching after it is in place allows you to change the thickness and the shape of the piece.
When learning to make coils, it’s important to remember that a surefire trick for one person may not work for another. Practice and experiment with different hand positions and techniques to help decide which method works best for you.
See Part 2 in the March /April issue.
Snail Scott is a potter who frequently contributes to the clayart listserv, www.ceramics.org/clayart. She can be reached by e-mail: [email protected].
Y


f you’re equipping a studio, one of the most
valuable tools to have on hand is a sander.A small vertical belt sander purchased
inexpensively from any hardware store can help you make ribs and trimming tools. The sander will pay for itself in no time.
To make a simple drum sander, attach a drill chuck to the shaft of a wall-mounted electric motor. Then buy rubber-backing drums, available in a variety of sizes and grits, depending on your need, to fit into the drill chuck.
Spare Parts by Mel lacobson
Sanders
Shaping a throwing rib with a belt sander.
Basic throwing tools are easy to make with a belt sander. A 45°-angle cutoff stick made from scrap wood is a good start; use bamboo and the tool will last
seemingly forever. It’s easy to make ribs for specific shapes and special purposes.Getting a sharp edge on
wood or metal tools is also easy with a belt or drum sander, and will cut the time and effort needed to shape or sharpen a tool. Keep a variety of grit sizes so they
can be quickly changed for fast removal of material or for final polishing of an edge.
With proper use, sanders can be a safe, efficient and economical way to make tools for the studio.
A vertically mounted drum sander, with a small table attached, makes work easy.
A D V A N C E D R A K U T E C H N I Q U E SA collection of articles and information published in Ceramics Monthly dealing with raku. Written by and about artists and experts, these articles cover a wide range of techniques, mate- rials, equipment and recipes. In addition to articles, you’ll find a selection of raku-related questions and answers, as well as suggestions from readers over the past 20 years.
Order code CA24 I Price $28.9.5
R A K UIn this book author John Mathieson discusses the clays and glazes that are suitable for raku. He also examines kilns and burners, and firing and post-firing reduction. Along the way he takes a look at the work that is being done in this field by an international group of artists.Co-published with A&C Black, London
Order code G075 | Price $26.95
P O T T E R Y M A K I N G T E C H N I Q U E SThis book provides you with some of the most popular out-of-print techniques published in Pottery Making Illustrated since the first issue was published as a supplement to Ceramics Monthly in 1997. You’ll find dozens of techniques, tips and projects on wheel throwing, handbuilding, finishing and firing - all presented in an easy-to- understand, step-by-step format.
Order code CA23 1 Price $28.95
B A R R E L , P I T , A N D S A G G A R F I R I N GThis Ceramics Monthly Handbook reflects the growing interest in pit firing and related techniques. The articles included here were carefully selected to illustrate the wide range of approaches to barrel, pit and saggar firing. Works ranging from wheel-throwm and coil-built pots to complex sculpture are tied together by a similarity in the firing process.
Order code CA17 | Price $28.95
Ribs and cutoff tools made
with a sander.Mel Jacobson, moderator of clay art, can be reached at: [email protected].
ORDER ONLINESee our complete collection at www.ceramics.org/publications or call us at {614) 794-5890
10 PotteryMaking Illustrated • JanuarylFebruary 2005
ITOOLS

January/February 2005 • PotteryMaking Illustrated 11

Beyond Basics by John Toki
Sieving Ceramic MaterialsADVANCED TECHNIQUES
This sieve is excellent for large quantities of liquid glaze or slip. Turning the handle rotates brushes that efficiently force material through the screen. It is available with removable screens ranging in mesh size from 10-200. Notice the gloves worn for safety.
If you want greater con
trol over your finished ware, be sure your studio is equipped with a variety of sieves.
You can use a sieve to filter debris from a dry or liquid glaze or slip; remove particles that clog spray guns and airbrushes; eliminate clear surface blotches caused by large frit particles; smooth lumps in low-fire casting slip caused by talc or clay;
Suggested Sieve Sizes
and prevent surface bumps caused by feldspar as it emerges at high firing temperatures or second firings.
Routine sieving of glazes and slips prevents problems such as glaze settling, unevenly fired colors, crazing, crawling, surface peeling, and glaze pitting. These problems may be caused by contamination from large or hard particles from chemicals like frits, zinc oxide, wol- lastonite, clays and gums. Or they may be the result of clumping caused by poor manufacturing or improper storage in a damp studio or warehouse. Whatever the case, sieving glazes and slips creates a homogenous mixture that helps prevent these problems.
Although you can sieve glazes either dry or suspended in liquid, sieving liquid is preferable. It’s
Project Mesh Reason to SieveGlaze 50-80 Eliminates lumps, evens brushstrokesUnderglaze 60-80 Evenly blends clays, gums, stains,
oxides, colorants Engobes, Slips 30-60 Removes lumps when refiningLow-Fire Casting Slip 30 Removes lumps and debrisPorcelain Slip 80-100 Improves consistencyDry Chemicals 8-I00 Removes chunks formed by moisture
during manufacturing. Refines particle size for many chemicals. *
*Wollastonite, zinc oxide, borax, some feldspars and frits.
faster and eliminates problems with dust. When blending or refining glaze or body stains, dry sieving is preferable. Dry sieving also is recommended when you’re making base glazes, underglazes or engobes, or when the glaze batch you’re making is too large to store over time as a liquid.
John Toki is a ceramics artist, teacher and ceramics supplier in Berkeley, California. He can be reached at Leslie Ceramics Supply:(510) 524-7363.
Top: A small test sieve is handy for processing tiny quantities of materials and glazes, and fits over pint jars.Middle: An economical plastic framed sieve (available in different mesh sizes) is also good for sieving glazes in small quantities. A flexible rubber rib is recommended to force the material through so no damage will occur to the screen.Bottom: A durable metal frame sieve is more expensive but has a longer service life; also available in multiple mesh sizes.
PotteryMaking Illustrated • JanuarylFebruary 2005

JanuarylFebruary 2005 • PotteryMaking Illustrated 13

Great throwing ideas, one beautiful casserole
ne of your first pots was probably a bowl. And if you can throw a bowl, you’re on your way to
making a covered casserole, which is simply two bowls inverted over one another.
Though simple conceptually, throwing a covered casserole will take considerably more skill than throwing your first bowl. You’ll need to center the clay perfectly in order to form the gallery— the platform where the lid rests. You’ll need practice to judge how far to stretch the lid before it starts to sag. And you’ll need an aesthetic eye to decide how each part should relate to the others in size and shape, and to the casserole as a whole. Mastering these details will help you create a finished casserole as beautiful as it is functional.
Before you start, you need to make key decisions about the way the lid and casserole fit together, what clay you’ll use, and how you’ll finish the casserole. For my covered casserole, I opted to use a gallery in the rim of the bottom section to support the lid. This classic
Continued on page 18
O

THROWING THE BOTTOM SECTION
eigh out your clay, center it on
the wheel, open and raise the walls, and finish the rim and the gallery for the lid. Take a measurement of the exact diameter of the outside edge of the gallery rim. I throw the parts for my casseroles on 12-inch- diameter bats allowing for easy removal of the forms without any distortion.
1 Center the clay fairly low (curved dark line), then open the centered clay (light
line) using your fingers. Push down and pull outward, bracing your hands against each other for support.
2Lift the clay, using pressure between the fingers of each hand, and move it upward
and outward into the bowl shape. Leave the rim slightly thicker than the wall in preparation for adding the gallery. At this point the bottom should be about 5/8 inch thick.
3Compress the bottom to about inch thick with the flat part of your fingers or
a rib to prevent “S” cracks. Remove any excess water with a damp sponge. Split the rim with your index finger and change the wall direction so the gallery does not protrude into the bowl. Refine the final form and remove any excess clay from the bottom outside edge of the casserole. You can now measure the gallery’s diameter with calipers or a ruler.
eigh out your clay, center it on
the wheel and proceed to throw the form for the lid. It may require some practice to develop the correct size mass of centered clay in relationship to the final diameter of the lid. Over time, you will learn to throw with less water. Using your fingertips to make a minimum amount of drag on the clay allows you to compress and extend the clay farther out without it collapsing.
Your fingers should work together to form the near horizontal lip on the lid.Be careful that this lip does not become too thin.
1 Center the clay fairly low (curved dark line), open the centered clay (light line),
and move the clay upward and outward to make a very shallow bowl form. The walls should be thick at this point to allow enough clay to be pulled up and out to form the lid.
2Continue pulling the shallow bowl form. As the walls become increasingly horizon
tal, be careful to leave a broad enough base for support. Notice that the inside of the form is concave and not flat.
3Establish the final form by altering the rim so that the outer part is almost hori
zontal. This strengthens the form to help prevent warping and serves the aesthetic function of making the lid appear to continue through the gallery to the bottom section of the casserole (see page 17). Use the measurement that you made for the gallery to measure the outside diameter of the lid so there will be a snug fit.
THROWING THE LID
While forming the gallery with your left index finger, use the locked fingers of your right hand to support the clay.
JanuarylFebruary 2005 • PotteryMaking Illustrated 15
W
W
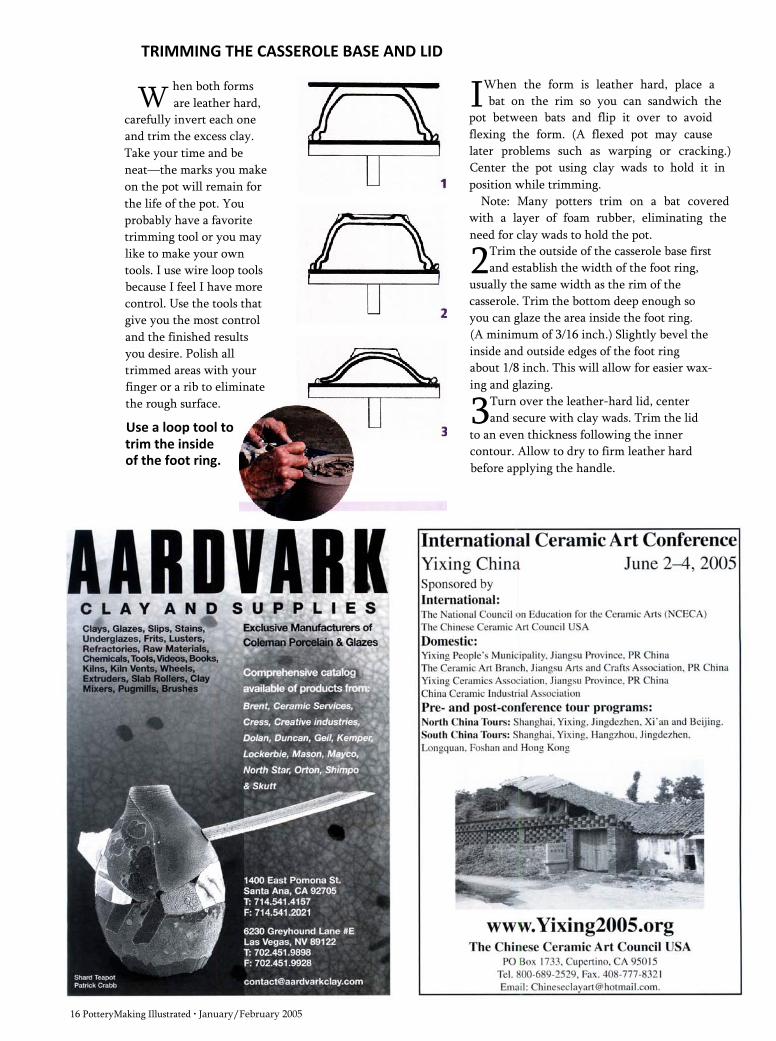
TRIMMING THE CASSEROLE BASE AND LID
hen both forms are leather hard,
carefully invert each one and trim the excess clay. Take your time and be neat—the marks you make on the pot will remain for the life of the pot. You probably have a favorite trimming tool or you may like to make your own tools. I use wire loop tools because I feel I have more control. Use the tools that give you the most control and the finished results you desire. Polish all trimmed areas with your finger or a rib to eliminate the rough surface.
Use a loop tool to trim the inside of the foot ring.
IWhen the form is leather hard, place a bat on the rim so you can sandwich the
pot between bats and flip it over to avoid flexing the form. (A flexed pot may cause later problems such as warping or cracking.) Center the pot using clay wads to hold it in position while trimming.
Note: Many potters trim on a bat covered with a layer of foam rubber, eliminating the need for clay wads to hold the pot.
2Trim the outside of the casserole base first and establish the width of the foot ring,
usually the same width as the rim of the casserole. Trim the bottom deep enough so you can glaze the area inside the foot ring.(A minimum of 3/16 inch.) Slightly bevel the inside and outside edges of the foot ring about 1/8 inch. This will allow for easier waxing and glazing.
3Turn over the leather-hard lid, center and secure with clay wads. Trim the lid
to an even thickness following the inner contour. Allow to dry to firm leather hard before applying the handle.
16 PotteryMaking Illustrated • January/February 2005
W

nce the pot has reached firm leather hard, it is time to apply your handles. You can either pull or extrude (or a
combination of both) handles for the casserole and lid. When ready to apply, score and slip the area of attachment and add the handles. Pay attention to the center of the lid and the handle placement. You can keep a container of slip from your throwing bucket, with some vinegar added, for use in attaching handles. After adding the handles, cover the pots with plastic so they will dry slowly. This may be overkill, but my handles never break off during drying or firing.
ISide handles These handles are extruded using a die design
based on the cross section of a pulled handle. The ends are cut at an angle. The locations of the two handles are marked on the casserole, then scored and attached with slip.
2Tendril top handles This handle uses the same die as the side
handles. A 6-inch section is pulled into a gradual taper about 10-12 inches in length. The inch or so of clay that was held while pulling is cut away at an angle. The thick end is attached with slip to a scored area about 1 ½ inches from the center of the lid. Loop the handle over a couple of times before securing the thin end with slip. You also can use a bisque stamp to reinforce the joint or for decoration.
3Strap handles Using an extrusion die just slightly larger than
the one for the side handles, extrude and pull a strap handle about 9 inches in length. Attach the thick end with slip and loop the handle just high enough for easy finger access. Using the extra clay at the end of the strap handle, add a couple decorative folds and attach to the lid. Note how the outer curve of the lid appears to continue through the gallery to the base.
The base end of the handle has been attached and the tendril han
dle is being formed. Be sure toget the main component
centered on the lid.
JanuarylFebruary 2005 • PotteryMaking Illustrated 17
SIDE AND TOP HANDLES
o

bodies with a wide variety of firing ranges that will work. You may want to ask your ceramic supplier for recommendations. Finally, be sure the glazes you use are food safe. Most commercial glazes include this information on their labels. If you are making your own glazes, you should have them tested.
The finished casserole is dried slowly and bisque fired. Look for Part 2 in the next issue, in which Leon will present his Cuerda Seca decoration for glazing the casserole.
Leon Roloff taught high-school ceramics for 35 years and has been retired from teaching for nearly 11 years. You can e-mail comments to Leon: [email protected].
form makes it relatively
easy to get a good fit. Leaving
the gallery and the rim of the lid unglazed
allows you to fire the two pieces together. This prevents warping and helps maintain a tight, accurate fit.
The clay body you select should be durable enough for oven use. In this case, I picked a commercially made stoneware clay that fires to Cone 10 in reduction, but there are many clay
Casserole, 7½ inches (19 centimeters) in diameter, stoneware, tendril handle with "Cuerda Seca" decoration, fired to Cone 10.
18 PotteryMaking Illustrated • January/February 2005

January/February 2005 • PotteryMaking Illustrated 19

Finished Indian bottle, 18 inches (46 centimeters) in height.
y pursuit of unique bottle forms took an unusual twist when a friend with an interest
in American Indian culture mentioned that Indians believe they can sense spirits within rocks. After a good deal of trial and error, I found a way to make Indian images or “spirits” within ceramic vessels shaped to resemble bottles or the smooth stones of riverbeds— my own version of Indian bottles and stones.
This process involves hand-
building, throwing and sculpture
techniques, but starts with making a
simple mold made from Styrofoam to
make the smooth, stoneshaped vessel. Styrofoam
molds can be made from new sheets of foam bought at a lumberyard, thick foam salvaged from construction sites, or appliance packaging. For the Indian bottle created here, I found thin pieces and glued them together.
Making the MoldDraw an outline of the bottle onto
the foam and cut to size. Glue the foam pieces together with a hot glue gun to make a solid block, and following the outline drawn on top, saw out the oval. After trimming the block, you can shape the final stone using a rasp and finish the form by smoothing with an electric sander.
Do this outside the studio to make cleanup fast and easy. If you notice cracks during this finishing process, simply fill them in with spackling compound. After the compound dries, sand the surface again. The mold should be reasonably smooth.
When finished sanding, wipe off the dust with a damp cloth and paint the mold with a fast-drying latex primer. It usually takes two or three coats to seal the mold completely. At this point, the mold is ready for use as a form for shaping a clay slab.
CAUTION: To protect your health, always wear a dust mask when shaping and sanding the Styrofoam.
Making the FormRoll out a slab of clay slightly
larger than the foam model. If you don’t have a slab roller, a rolling pin will work just as well. Place a piece of plastic wrap on the clay and lay the mold on the plastic wrap. Lift the clay, plastic wrap and mold, and flip so the clay will collapse over the
A combination of building techniques that can be applied to many formsBy Gaylon Dingier
20 PotteryMaking Illustrated • January/February 2005
M

top half of the mold. Carefully push down the clay and trim off the excess so its edge is even with the center line on the side of the mold. You may find that using a ruler or a small board is helpful.
After the clay sits on the form for a period of time (depending on temperature and humidity), it can be pulled from the mold. The plastic wrap sticks only to the clay and is easily removed. The clay should be slightly pliable, but stiff. If it’s too flexible (not leather hard), put it back on the mold before removing the plastic wrap and let dry a little longer. If it’s too dry, it may shrink and crack, so experiment to find the right consistency for your clay body.
When firm, put the first half of the mold in an airtight plastic bag until you are ready to start the next step. Repeat the above procedure for the
other side of the mold and keep both parts in airtight bags so they don’t dry out.
NOTE: I usually cover two or three molds with clay so I have several pieces under construction at the same time. While one bottle is drying, I can work on another.
Making the FaceThis is the most difficult and
time-consuming part of the project. Each face is sculpted separately inside the first bottle half, using Native American themes in hair and dress. Studying old photos from the 1800s is a great way to get ideas, clothing and themes for accurate renditions. It can take several hours—sometimes longer—to model the face, including beads, hair, feathers and clothing.
For this project, I chose a deep, round bottle so the face would be in high relief off the back wall. Start the face by using the pinch- pot method and then cut a slab that can be attached to provide height. Score both surfaces, apply slip, push the two pieces together and smooth out the seams. After you have made the face form, check the size in relationship to the bottle and sketch facial proportions onto the clay. You can wad up plastic bags inside the face for support. A spray bottle or mister is perfect for keeping the clay moist. If the clay begins to feel dry, give the piece a light spray of water.
1 Draw the outline of the bottle onto the foam. Cut the blocks to size and glue them together to make a solid block using a hot glue gun.
2 Following the outline, saw out the oval shape. Finish the form using a rasp and smooth with an electric sander. Paint with a latex primer to seal the mold.3 Roll out the slab of clay slightly larger than the foam mold on canvas. Place a piece of plastic wrap on the clay and place the mold on the plastic wrap.4 Use the canvas to help flip the mold so the clay will collapse around it. Push the clay down and trim off the excess following the center line of the mold.5 After the clay becomes leather hard, pull the mold up. The plastic wrap sticks to the clay but not the mold.
JanuarylFebruary 2005 • PotteryMaking Illustrated 21
BUILDING THE FORM
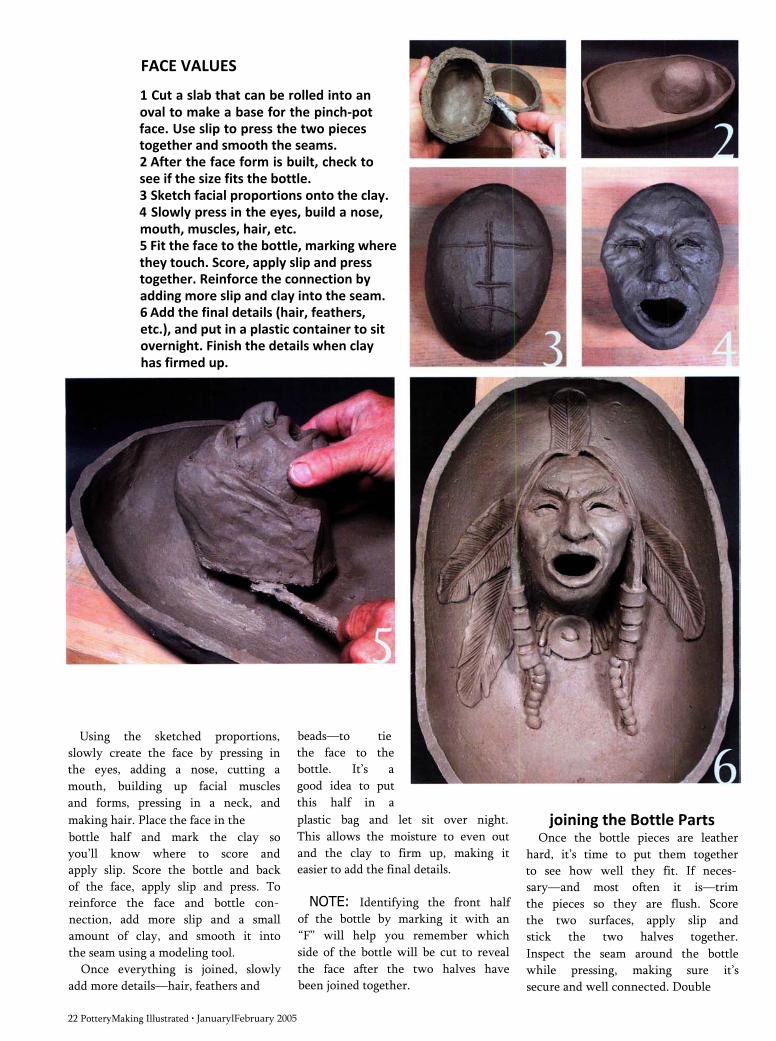
FACE VALUES1 Cut a slab that can be rolled into an oval to make a base for the pinch-pot face. Use slip to press the two pieces together and smooth the seams.2 After the face form is built, check to see if the size fits the bottle.3 Sketch facial proportions onto the clay.4 Slowly press in the eyes, build a nose, mouth, muscles, hair, etc.5 Fit the face to the bottle, marking where they touch. Score, apply slip and press together. Reinforce the connection by adding more slip and clay into the seam.6 Add the final details (hair, feathers, etc.), and put in a plastic container to sit overnight. Finish the details when clay has firmed up.
Using the sketched proportions, slowly create the face by pressing in the eyes, adding a nose, cutting a mouth, building up facial muscles and forms, pressing in a neck, and making hair. Place the face in the bottle half and mark the clay so you’ll know where to score and apply slip. Score the bottle and back of the face, apply slip and press. To reinforce the face and bottle connection, add more slip and a small amount of clay, and smooth it into the seam using a modeling tool.
Once everything is joined, slowly add more details—hair, feathers and
joining the Bottle PartsOnce the bottle pieces are leather
hard, it’s time to put them together to see how well they fit. If necessary—and most often it is—trim the pieces so they are flush. Score the two surfaces, apply slip and stick the two halves together. Inspect the seam around the bottle while pressing, making sure it’s secure and well connected. Double
beads—to tiethe face to the bottle. It’s a good idea to put this half in a plastic bag and let sit over night. This allows the moisture to even out and the clay to firm up, making it easier to add the final details.
NOTE: Identifying the front half of the bottle by marking it with an “F” will help you remember which side of the bottle will be cut to reveal the face after the two halves have been joined together.
22 PotteryMaking Illustrated • JanuarylFebruary 2005

check to be sure one side didn’t separate while the other side was pressed. To make the connection even stronger, you can smooth the seams together with a wood modeling tool and add a coil of clay down the seam. Blend the coil of clay into the surface, then tap the seam with a small wooden paddle to compact the clay and to reshape the form if necessary.
The NeckIt is a good idea to handbuild or
throw several bottle necks/tops and keep them in an airtight plastic box, spraying them occasionally to keep from drying out. With this supply, you can easily test several necks on a bottle until one looks right. (If the bottle doesn’t have a neck, I refer to the piece as an Indian “stone.”) Place the neck on the bottle, mark the outside and inside edge to show exact placement and cut the hole. Trim the bottom of the neck so it will fit onto the hole in the bottle. Score and slip, press together firmly and smooth into the bottle, using your fingers and wooden tools both inside and out.
The WindowWhile working on the bottle, try
to think about the window or hole shape that will reveal the face inside. Often the shape of the bottle will determine the shape of the window. Cut a small hole in the front to see where the face is located, then enlarge the window until it frames the face nicely, using a wooden tool to smooth the edge.
In order to make a concave recess that frames and reveals more of the face, and holds inlaid turquoise-colored tiles, draw a ring on the front of the bottle and cut it out. To make it concave, turn the
clay ring around and rejoin it to the bottle. If you want to make the ring more concave, use your hands to stretch the clay. You may have to spray the piece with water to make it more pliable if it has dried
too much. The cut out ring is fitted and stretched to match the hole, scored, brushed with slip, and reattached to the bottle. You can use a spoon to smooth the curve in the concave opening.
JanuarylFebruary 2005 • PotteryMaking Illustrated

1 Put the two halves together, making sure to score and slip. Knead and smooth the seams. Add clay down the seam, smooth and blend for reinforcement. 2 Use a wooden paddle to tap the seam and reshape the bottle form.3 Place a neck on the bottle, marking the edges for exact placement and cut a hole. Score and slip the bottle and neck, and press together. Smooth the seams. 4 Cut a hole in the front of the bottle, enlarging it until it frames the face. Smooth the edge with a wooden tool.
NOTE: Using this mold process leaves a seam on the inside of the wall that’s visible through the window. Cleaning up this seam with your fingers or a tool enhances the appearance of the bottle.
Adding Colored TilesFor your inlaid colored porcelain
tiles, draw a ring in the concave sur
face. Cut slits inside this ring, spray with water to soften the clay and slowly depress the clay using a modeling tool. Cut the slits in sections, depressing and progressing around the ring. Don’t stretch the clay too fast. If necessary, add pieces of clay to weak depressed areas. Cut out small boxes in the depression where the porcelain tiles will be inlaid.
1 Cut out the front making a clay ring, and flip over to use as a concave recess. 2 Smooth the inside seam. 3 Stretch the ring to make it concave. Score, slip, and reattach to the bottle. 4 Smooth the curve of the concave opening.
24 PotteryMaking Illustrated • January/February 2005
FINISHING THE FORM
CREATING A DECORATIVE RING

“Turouoise” Tiles To make the turquoise tiles, mix
120 grams of wet porcelain with 1 gram of cobalt oxide and 1 gram of green chromium oxide. These are metal oxides, so be careful when handling. If you increase the oxides slightly, the colors will be more intense. Knead the wet clay and oxides together until mixed thor-
JanuarylFebruary 2005 • PotteryMaking Illustrated 25

■
1 Draw a ring around the window for the inlaid turquoise. While cutting slits in sections, depress the ring.2 Thoroughly mix the porcelain and oxides. Roll a slab and cut into small tiles.3 Draw small boxes in the depression. Score and slip the boxes and add the turquoise until the ring is filled. The porcelain will swell after firing and look like turquoise.
oughly. You can even force the mixture through a screen several times to ensure it is uniform. Failure to mix well may cause white porcelain spots to show up in the finished tiles.
When you’re satisfied with its uniformity, roll out the porcelain and cut into tiles. Trim and press the tiles into the scored and slipped boxes. Use a small tool to clean up around the tile design. When fired, the porcelain seems to swell and round itself off slightly.
Place the tiles until the ring is filled. Using a variety of sizes and spaces makes for a more interesting design. To finish the bottle, fill dents and scratches with clay, smooth rough areas, burnish with a spoon and, in general, clean up the look of the finished piece. Oh yes, one more thing . . . add your signature!
Color and FireLet the bottle dry slowly and even
ly in a plastic bag. As the bottle dries, continue to smooth and sand surfaces that need attention. After allowing the bottle to air dry completely, bisque fire very slowly. I have had many bottles burst where the walls were too thick and too damp (usually where the face was attached). You can stain the bottles after they have been bisqued, though the stain does not cover up the porcelain like a glaze. Cover the entire piece with stain and wipe off the excess.
If you do glaze the pieces, a matt glaze will give the bottles a stonelike
26 PotteryMaking Illustrated • January/February 2005
MAKING TURQUOISE TILES

SPIRITS IN THE STONES
ike Bacon, a scholar of Native American culture, says there’s a strong connection
between Native Americans and nature. Though they share a common belief in “The Great Spirit,” Native Americans also believe the world is filled with other spirits associated with natural and supernatural phenomenon, such as the wind, tree, and rocks. These spirits, they believe, have powers that can be passed on to other objects or human beings.
Native Americans use the term “medicine” to
refer to an object that they believe has control over natural or magical forces, such as a lock of hair, dirt or a feather. Not all medicine is protective or healing, however. Some woodland tribes, says Bacon, would break their pottery at the end of winter to chase away evil spirits and start anew in the spring.
For many Native Americans, rocks represent age, eternity and wisdom. Gaylon Dingler’s Indian bottles and stones were designed to honor the spirit and culture of Native Americans.
patina. Shiny glazes don’t yield the same natural look. You also can use the porcelain by itself, with no stains, to create white inlay that resembles bones or flint. You should experiment with porcelain and coloring stains to see what combinations might be useful.
Use Your ImaginationFoam shapes may help you create
a variety of difficult ceramic forms. For example, you can make any shape by covering the foam form with plastic wrap and draping it with clay. Or you can press or paddle slabs of clay over the form, sometimes leaving gaps between the strips or covering completely. You must let the clay stiffen, but not to the point that it shrinks so much that the clay splits. After the clay stiffens, you can cut it into pieces, take the mold out, and put the parts back together using slip, creating your own design. This foam form technique offers potters new ways to make ceramic compositions and creations—creations like my Indian bottles and stones. •
Gaylon Dingier is a retired art teacher residing in Tyler; Texas.He can be reached by e-mail: [email protected].
JanuarylFebruary 2005 • PotteryMaking Illustrated 27
M

28 PotteryMaking Illustrated • January/February 2005

"Fish Bowl," matt white glaze over commercial glazes, fired to Cone 6.
Three ways to add depth to your glazesBy Lisa Bare Culp
s a potter and in-home instructor for 10 years,
I’ve always mixed my own glaze, or relied on
other professionals who mix dry glazes to my specifications. Recently, an idea for a single pot challenged me to experiment with commercially made glazes. The outcome has been succesful with vibrant new color selections, time savings and the convenience of readily available glazes screened for toxicity—all this without compromising my workspace or my standards.
What changed my thinking on commercially prepared glazes was my desire to introduce bold new colors into my work. I envisioned a piece with contrasting matt black-and- white slip surfaces offset against a single area glazed in vibrant red. My local supplier recommended a food- safe, nontoxic red glaze, Mayco’s Stroke &c Coat Cone 06.
Early ExperimentsEarly tests resulted in pieces with
dramatic and beautiful contrasts
between my porcelain slips and the red glaze. In one test, I used Stroke & Coat SC-73 Candy Apple Red, to highlight areas of bisqueware. In another, I used SC-74 Hot Tamale. Sometimes I applied the glaze with a big brush in a single, expressive stroke. Other times, I squeezed the colors from a slip trailer and a turkey baster.
After these loose applications, I dipped the entire piece in my usual Cone 6 glazes. Because of their gum content, the commercial glazes resisted my glazes slightly, making the
bold strokes of color come through vividly. Stroke edges were blended and their colors softly striking against the Cone 6 palette. The outcome was as satisfying technically as it was aesthetically; I was satisfied with the melt (Stroke & Coat is a glaze, not an underglaze), the color and the absence of pinholing or other major flaws at Cone 6.
A New Tool Further experiments with sgraffito,
layering, mixing with slip and stoneware glazes, and multiple
January/February 2005 • PotteryMaking Illustrated 29
A
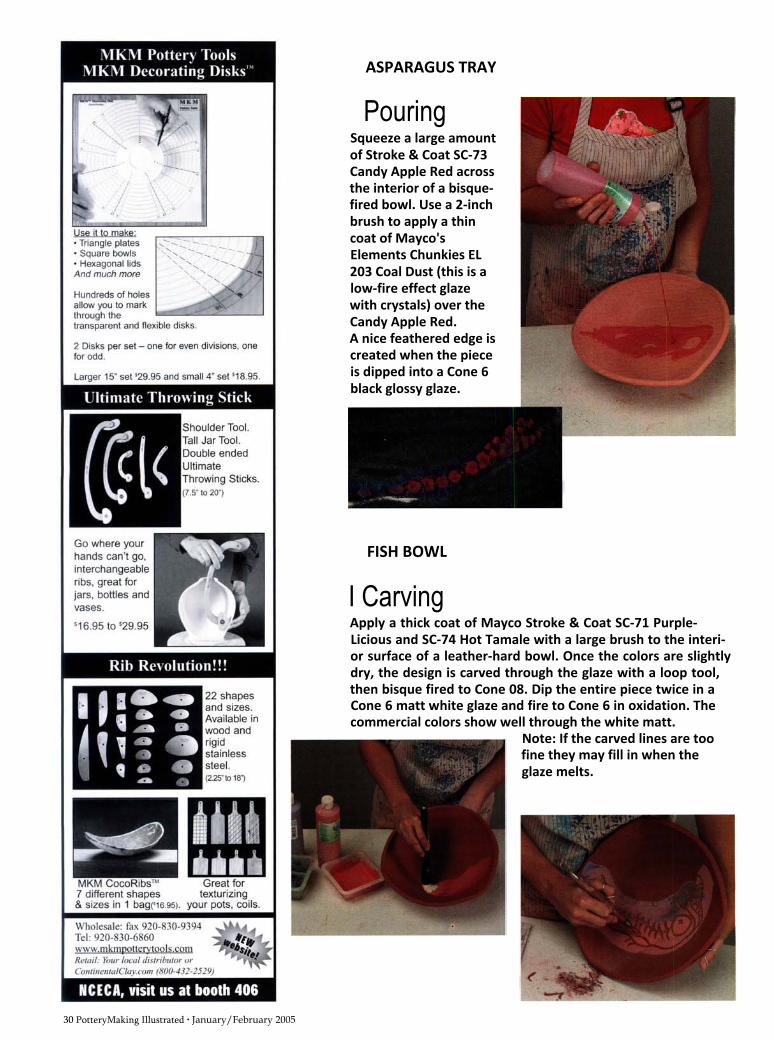
Squeeze a large amount of Stroke & Coat SC-73 Candy Apple Red across the interior of a bisque- fired bowl. Use a 2-inch brush to apply a thin coat of Mayco's Elements Chunkies EL 203 Coal Dust (this is a low-fire effect glaze with crystals) over the Candy Apple Red.A nice feathered edge is created when the piece is dipped into a Cone 6 black glossy glaze.
FISH BOWL
I CarvingApply a thick coat of Mayco Stroke & Coat SC-71 Purple- Licious and SC-74 Hot Tamale with a large brush to the interior surface of a leather-hard bowl. Once the colors are slightly dry, the design is carved through the glaze with a loop tool, then bisque fired to Cone 08. Dip the entire piece twice in a Cone 6 matt white glaze and fire to Cone 6 in oxidation. The commercial colors show well through the white matt.
Note: If the carved lines are too fine they may fill in when the glaze melts.
30 PotteryMaking Illustrated • January/February 2005
ASPARAGUS TRAY
Pouring

firings have opened up commercial glazes as a new artistic tool—albeit an unexpected one—to share with students. They have learned the importance of experimenting with new surfaces, new materials, combining techniques and achieving balance with different kinds of material.
If you’d like to experiment with commercially prepared glazes, I’ve included three of my projects for you to try.
Mixing my own recipes will always be an important part of
understanding the science behind the art of pottery making. But successfully integrating commercial glazes in the mix is just one more way to pursue the function and beauty of ceramics.
Lisa Bare Culp is a potter residing in Columbus, Ohio. She specializes in ceramic restoration (see www.bareclay.com) and can be reached at: [email protected].
JanuarylFebruary 2005 • PotteryMaking Illustrated 31
On a heavily textured, bisque-fired piece, apply a Cone 6 porcelain black slip as a stain, wiping off the high spots with a damp sponge.Use a 2-inch brush to apply Stroke & Coat SC- 71 Purple-Licious to the high spots with a dry brush technique. Next, dry brush Mayco's Stroke & Coat Red SC-74 Hot Tamale and SC-27 Sour Apple onto the interior. Apply a thick coat of the red glaze in isolated areas to obtain a bright color.Apply wax resist to the interior surface of the piece and allow to dry. Dip the entire piece in a Cone 6 blue glaze.Below: "Gear Dish," slab- built stoneware.
LayeringGEAR DISH

Wood Ash:Preparing for Glazes
Clean wood ash enhances your glaze paletteby Kathy Chamberlin
Early in my career, I experimented with the use of ash in glazes and on surfaces to mimic some of the effects of
wood firing in a high-fired gas kiln. Wood ash contains soda and potash, soluble alkaline compounds that can irritate or burn your skin, so I made considerable efforts to wash the ash to remove its caustic hazards.
At the time, I found I didn’t have the patience, knowledge or resources for proper ash preparation. Recently, I started experimenting again with hardwood, softwood and vegetable ash, and I’ve developed a simple way
to prepare ash for the glazing process. You can follow this method to prepare wood ash for your glazes and decoration.
Use ash in your glazes that call for wood ash or apply it over the top of a glaze surface immediately after glazing (while still damp). It is a
good idea to test your ash glazes and application
methods when using

The Five Steps to Clean Ash
1 Gather wood ash from a wood stove or fireplace. Use a galvanized bucket for safety in case there are still hot embers.
Be sure the ash is from a fire in which only wood has been burned, not trash.
2Once the ash is totally cold, sieve and discard the remaining charcoal and wood debris. Use a metal mesh strainer—a metal
window screen works well—and collect the ash in an enamel or plastic bucket for rinsing with water.
3Using a plastic or enamel bucket, rinse the sieved ash in water. When adding water, the ash solution shrinks and loses
volume. I try to prepare a lot of ash at one time. Use large containers and try to do this step outside or in a garage where water is available.
4Most of the ash will settle to the bottom of the containers. The water is poured off and the ash is rinsed again, 3-4 times.
Leave the ash to separate or settle itself from the water for a few days. The water will evaporate or can be poured off leaving a solid mass of dry ash. To speed the drying process, spread the ash out on newsprint or cloth and place it in the sun.
5Once the ash has dried, it needs final screening through a sieve. I have found 80 mesh works best for me to prepare the ash for
my use in and on glazes. Store the ash in covered containers until ready for use.
Safety tip: Wear plastic gloves to protect your hands. When beginning to rinse the ash, the liquid is very caustic and can bum your skin. Protect yourself against inhaling the ash dust by wearing a face mask or respirator.
JanuarylFebruary 2005 • PotteryMaking Illustrated 33
CLEANING WOOD ASH
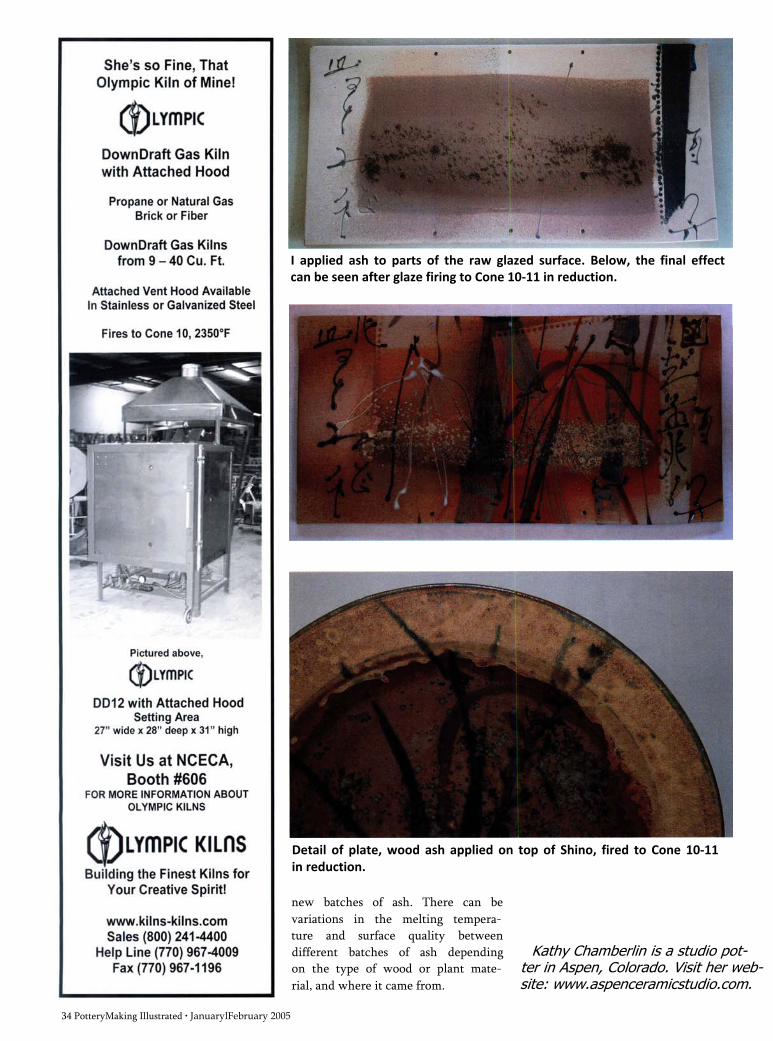
I applied ash to parts of the raw glazed surface. Below, the final effect can be seen after glaze firing to Cone 10-11 in reduction.
Detail of plate, wood ash applied on top of Shino, fired to Cone 10-11 in reduction.
new batches of ash. There can be variations in the melting temperature and surface quality between different batches of ash depending on the type of wood or plant material, and where it came from.
Kathy Chamberlin is a studio potter in Aspen, Colorado. Visit her website: www.aspenceramicstudio.com.
34 PotteryMaking Illustrated • JanuarylFebruary 2005

JanuarylFebruary 2005 • PotteryMaking Illustrated 3 5

Achieve intricate glaze designsby Marj Peeler
laze and wax don’t mix—how fortunate for potters! Wax resist serves a variety of practical purposes—from keeping the bottom of a pot from sticking to the kiln shelf to allowing
you to fire the bottom and lid of a covered pot together—anywhere you want to repel glaze.
You can use wax resist for artistic purposes, too. Some potters like to splatter wax on the bisque before dipping it into the glaze, hoping an appealing, free form design will emerge from the kiln. Others like to use a well- thought-out design when decorating with wax resist. This process will leave bare clay lines contrasting with the glazed areas, which can be spectacular with the right
combination of clay and glaze color. The range of designs is practically unlimited.
The ProcessYou’ll need a few basic materials to place the design
on the pot. Wax resist that is clear when dry can be hard to see when applied to bisqueware. Add a few drops of food coloring to the wax to help solve this problem. You’ll also need a selection of brushes—a brush with long, narrow bristles that works well for painting thin lines, and others of varying size and thickness, depending on your design and the size of the lines.
TIP: You can use hot water and liquid soap to remove most of the wax from your brushes. I’ve found that using a little lacquer thinner on the brush after washing it in water removes any remaining residue.
Your design can be simple, complex, abstract or realistic, all depending on your ability, inspiration and the
A sample of the materials needed for the wax-resist technique.
Plan and sketch your design before starting the project.
36 PotteryMaking Illustrated • JanuarylFebruary 2005
G
PREPARING YOUR DESIGN

APPLYING YOUR DESIGN
Using a banding wheel, draw the design on the pot with a pencil.
Carefully cover the pencil lines with the wax resist.
After glazing the pot, clean away the excess glaze with a tool.
surface you’re covering. The geometric design used for this project was based on a circle, which was divided into eight equal parts. You’ll improve your chance of success by planning and sketching before placing your design on the pot.
Place your pot on a banding wheel and carefully draw your design with a pencil. The pencil lines will burn out during firing. Divide the design into eight parts and draw lines from the center to each of the eight points. Draw in the other lines needed to complete the design.
Slowly and carefully, using the narrow pointed brush, paint the wax resist over the pencil lines. You may need some practice to gain control over this technique. Try working on some blank paper before attempting it on the pot.
CAUTION: If you make a mistake, you need to rebisque the pot and start over. The wax soaks into the surface of the ware and can only be removed by firing it again. If you do not want to refire, you might try to work the mistake into the design.
Round pot, white low-fire clay with wax- resist design, fired to Cone 05.
After the wax resist has dried, apply the glaze by dipping, brushing or spraying. You may need to apply several coats to obtain the correct thickness for the glaze surface, depending on the density of your bisqueware.
TIP: If small particles of glaze adhere to the waxed areas, carefully remove them using the end of a wooden tool or toothpick. You might try using a Q-tip to clean these areas. I usually wet the cotton tip slightly when doing this step.
Fire the pot to the appropriate temperature for your clay and glazes. Glazes that tend to flow when fired should be avoided when using this wax-resist technique. •
Marj Peeler lives in Indiana and has worked in clay for 51 years, owning a pottery for 30 years.
JanuarylFebruary 2005 • PotteryMaking Illustrated 37
GLAZING YOUR DESIGN

Kid’s Korner by Jennifer Wankoff
Canopic JarLESSON PLAN A s part of
their religious rituals, Ancient Egyptians used an elaborate process called mummification to preserve their dead. Part of that process was creating canopic jars to store the organs of the deceased for burial. The jars were made in the image of the four protective spirits of the four organs that were placed in the jars—Hapi (baboon) for the lungs; Duamutefla (jackal) for the stomach; Imseti (human) for the liver; and Qebehsenuef (falcon) for the intestines. Hieroglyphs were often used to mark the jars. Using pinch, coil and modeling techniques, and referencing images of one of the four spirits, students will create their own canopic jars. •
Jennifer Wankoff teaches for the Claymobile in Philadelphia, PA, a mobile ceramic art program of The Clay Studio (www.the-
claystudio.org), which brings classes to schools and local organization.
BUILDING THE BODY
Techniques/Skills:building with coil and pinch techniques, slipping and scoring, smoothing a surface, and paddling form to perfect shape.
Materials/Supplies:low-fire terra cotta clay, plastic forks, plastic knives, slip, canvas, wooden modeling tools, wooden spoons, images of canopic jars made during the new kingdom and late period of ancient Egypt.
I38 PotteryMaking Illustrated • JanuarylFebruary 2005
1 Create a 4-inch tall pinch pot with a flat bottom.
2Roll coils and add to the pinch pot to make it taller. Secure coils by
slipping and scoring.
3Using fingers or wooden tools, smooth the exterior of the pot
where the coils join together. Continue to add coils until the pot is 9 inches high.
4Once the pot is the desired height, create a shoulder for the pot by
placing shorter coils closer to the center of the pot, continuing to slip and score and smooth out lines. Once the body of the pot is finished, perfect the shape by paddling the outside of the form with a wooden spoon.

Create a pinch pot with an opening slightly larger than
the opening of the jar. This pinch pot turned upside down will serve as the head/lid for the form.
Mold features of the chosen animal/person into the inverted pinch pot by pushing into the form from the inside and outside creating depressions and protrusions. Students also may add bits of clay for details.
Students may decorate completed forms with underglazes. Using a technique similar to sgraffito, students will scratch into the wet clay and underglaze, and mark their jars with hieroglyphs.
National Standards for Arts Education
Developed by the Consortium of National Arts Education Associations, the National Standards for Arts Education outlines basic arts learning outcomes integral to the K-12 education of American students. These standards should be followed by art educators when designing art curricula and instruction for all grade levels. To learn more and to see how this lesson plan relates to them, please see www.potterymaking.org.
JanuarylFebruary 2005 • PotteryMaking Illustrated 39
BUILDING THE HEAD/LID
Off The Shelf by Sumi von Dassow
Basic Pottery BooksYou probably won’t find one book with everything you need to know about the basics of making pottery, but you probably won’t need a vast library, either.
Whether you’re just starting out or you’ve been pursuing ceramics for years, your library needs a few books to give you creative ideas and technical answers to questions about materials and processes. The
following recently published books all contain information useful to ceramics artists at all skill levels.
BOOK REVIEWS
Teach Yourself Potteryby John Gale (McGraw-Hill Books, Lincolnwood, IL 2001)
This rather thin book in a “Teach Yourself” series is a surprisingly complete overview of the process of making functional pottery, including forming, decorating and firing. Although its premise— that you can learn to make pottery without guidance from an instructor—may be unrealistic,
the book itself has accurate if cursory descriptions of slab building, throwing and trimming. There’s also a nicely illustrated description of casting and mold making.
The book covers surface decoration and glazes as well. The discussion of decoration covers carved and impressed decoration, and the use of colored slip. The discussion on glazes not only reviews the major materials and types, but also discusses application. The few recipes included probably will be of little help to beginners.
Finally, the key discussion of firing covers electric kilns, kiln furniture, cones, firing cycles, packing bisque and glaze loads, and touches on reduction, raku and sawdust firings.
This book is a fine introduction to the subject for any beginning to intermediate ceramics artist.
The Complete Potterby Steve Mattison (Barron's Educational Series, Inc., Hauppauge, NY 2003)
Although this is a basic book about pottery, it isn’t for beginners. This is a larger, abundantly illustrated book covering the gamut of
clay work, including functional and decorative vessels as well as sculptural work.
Its breadth dwarfs the information basic potters need. And its comprehensive illustration makes it hard to make sense of the techniques illustrated. The opening chapters cover clay preparation, types of ware, and types of clay clearly and concisely. The chapter on forming techniques covers it all, from design and inspiration, to preparing clay, to forming methods. Throwing is explained and shown, including throwing in sections, throwing and altering,and trimming. There’s even __________________a discussion about large- scale ceramics, and installation methods required for sculptures and murals.
The chapter on decorating begins with design and inspiration, describing impressed, inlaid and sprigged decoration, and various ways of using slip.Although glaze materials and pigments are explored and a few basic glaze recipes are given, theemphasis is on glaze application. A chapter also is dedicated to a variety of kilns and firing methods. The book concludes with health and safety information, and a glossary.
Pottery: The Essential Manualby Doug Wensley (Crowood Press Ltd., Ramsbury, Marlborough, UK 2002)
If the previous books were too heavy with information, or too light, this one is just right. The presentation is straightforward, linear and illustrated with just enough pictures to inform without causing confusion.
After a brief introduction and a chapter describing and defining clay, the author pres-
40 PotteryMaking Illustrated • JanuarylFebruary 2005

ents a very simple project as an initiation to the making and firing process. The next chapters cover preparing clay, design and layout of a studio/workshop, including tools and equipment. A chapter on hand- building presents pinch, slab and coil projects, and the next chapter on the potter’s wheel combines plenty of photographs with enough text to explain centering, throwing and turning (trimming) basic forms.
The chapter on decoration covers the use of slips, glazes, underglazes, colored clay and much more. It’s followed by “unconventional methods” including sprigging, casting and the use of paper clay to name a few. The glaze chapter explains glaze materials in more technical detail than the other books, and encourages experimentation by combining materials, but includes no usable recipes. The text concerning firing offers technical information such as the chemistry of firing in addition to basic information on loading, firing, cooling, types of kilns and more.
If you like to read, and you are interested in more technical information about clay and pottery, then this book is for you.
Sumi von Dassow teaches pottery at the Washington Heights Center for the Traditional Arts in Lakewood, Colorado. She can be reached by e-mail: [email protected].
JanuarylFebruary 2005 • PotteryMaking Illustrated 41

In The Mix
Simple Cone 6 GlazesRECIPES These glazes
were used on the ware featured in Creating Plates and Bowls Using Glass Molds (PMI Nov/Dec 2004) and were contributed by Lou Roess. All of the glazes are Cone 6 and fired in an oxidation atmosphere. We recommend that you make small batches to test on your clay body and in your kiln. As we all know, results will vary depending on location, type and condition of the kiln and differences in raw materials.
STRONTIUM BLUE BRONZECone 6, Oxidation
Lithium Carbonate.................. 1.00%Strontium Carbonate...............20.00Nepheline Syenite................... 60.00Ball Clay................................... 10.00Silica (Flint) ............................ 9.00
100.00%Add:Cobalt Carbonate...................... 0.15%Copper Carbonate..................... 4.00%
Note: The above glaze is a variation of Pinnell’s Bronze Green and usually has a matt surface. It is not
Stoneware plate, with Naragon White glaze over Blue Green glaze, fired to Cone 6 in oxidation. The crackle effect was an unexpected but pleasant surprise.
Stoneware plate, with Naragon White glaze over Blue Green glaze, fired to Cone 6 in oxidation. The butterfly area was waxed before the Narragon White glaze was applied.
a food safe glaze but would work well on the outside of functional forms or on sculpture.
NARAGON WHITECone 6, Oxidation
Dolomite ................................. 4.00%Gerstley Borate or
Ferro Frit 3134 .................... 26.00Whiting ................................... 6.00Kona F-4 Feldspar .................. 31.00EPK
(Edgar Plastic Kaolin) .... 8.00Silica (Flint) ............................ 25.00
100.00%Add:Zircopax................................... 12.00%Bentonite ................................ 2.00%
Note: This has a glossy, opaque surface. The color appears whiter when placed on a white clay body.
BLUE GREENCone 6, Oxidation
Gerstley Borate........................ 22.00%Strontium Carbonate............... 4.00Whiting..................................... 11.00Custer Feldspar.........................38.00Silica (Flint) ............................. 25.00
100.00%Add:Cobalt Carbonate.........................0.50%Chrome Oxide............................ 1.00%Bentonite .....................................2.00%
Note: This glaze has a glossy surface and the color can be mottled in appearance.
Stoneware vase, with Strontium Blue Bronze glaze, fired to Cone 6 in oxidation.
42 PotteryMaking Illustrated • JanuarylFebruary 2005
TipApply one, two and three layers of glaze to a test tile. Fire and attach the tile to the glaze bucket for a permanent record of application thickness.
JanuarylFebruary 2005 • PotteryMaking Illustrated 43

ow thick should I apply my glazes? Lou applies these glazes by either dipping or pouring. You
also can brush or spray these glazes. Application thickness will affect color and surface quality. Pay attention to the thickness of your glaze (specific gravity) in the bucket. Try to keep the glaze consistent for each glazing session. Usually, most glazes should have the consistency of a medium to heavy cream. You can use a simple test of quickly dipping your hand into the stirred glaze. Examine the glaze coat as you withdraw your hand and try to maintain the same thickness each time you glaze.
You also can use small, bisque test tiles dipped into the glaze. When the coating of glaze begins to dry, scratch the surface with the edge of your fingernail to check the thickness of the application.
Overlap glazes on a test tile with the combinations you like to use, fire and attach to the glaze bucket.This is a simple reminder of how to apply glazes to your pottery for the results desired.
Detail of plate on page 43, showing Naragon White over Blue Green. In the butterfly area, wax resist was used.
Lou Roess is a potter living in Colorado. You can reach her by e-mail: [email protected] PotteryMaking Illustrated • January/February 2005
HGLAZE APPLICATION TIPS

January/February 2005 • PotteryMaking Illustrated 45

46 PotteryMaking Illustrated • January/February 2005

JanuarylFebruary 2005 • PotteryMaking Illustrated 47

The Peephole
TIPS & TIDBITS
And the Survey Says . . .Recently released results from a nationwide survey by the Craft Emergency Relief Fund reveal interesting information about artists’ status and needs.
• Craft artists’ business incomes are generally modest. The median reported annual gross craft sales in 2003 were $53,000, but median net earnings were only $8,000
• Most craft artists (60%) operate their businesses with some debt. Just over half said much or most of their business debt has been financed with credit cards
• Nearly 2/3 of professional craft artists say market demand has been steady or growing over the past 2 years
• Professional craft artists report the MOST GROWTH from retail sales in their own studio or showrooms and the biggest sales declines from wholesale craft shows
• Only 1/4 of the respondents have reserves to carry their businesses and families for 6 months or more if their business was interrupted
• 4 in 10 of all respondents said that their formal education adequately prepared them for their craft careers
The Crafts Emergency Relief Fund (CERF) worked with 31 organizations that forwarded the survey to their constituents. A total of 1,650 craft artists in 49 states participated in the survey and focus group conversations. The research is available on CERF’s website: www.craftemergency.org.
Out and About
Potter or Songwriter?Maydelle, Texas, potter (and musician)
David Hendley treated his audience to a healthy dose of the Blues at the Texas Clay
Festival. Hendley performed his original song “The Cobalt Blues” before
beginning his demonstration.
Another suggestion for B. D. and the small studio space (Ask PMI Nov/Dec 2004) would be to place the kiln on a sturdy set of casters. It can be rolled into the open space as far as the cord will allow when ready to fire, and out of the way when not in use.—Marsha Koenig
Dayton, Ohio, pottery team (and subscribers) Kevin Tunstall and Enid Tangemann (T&T Pottery) are seen here marketing their wares at Winterfair in Columbus, OH. Look for an article on using extruders by Tunstall and Tangemann in an upcoming issue of Pottery Making Illustrated.
Have you used a technique published in PMI? If yes, we would love to see images of your finished project.
Maybe you would like to submit an image of what you are up to, a comment, quote or even a tip for
this page. Send your contribution with SASE to
The Peephole Pottery Making Illustrated
735 Ceramic Place Westerville OH 43081
or e-mail: [email protected]
Submissions will not be returned without proper postage.
48 PotteryMaking Illustrated • JanuarylFebruary 2005
HIDE A KILN
Photo by Dee Buck

