java lecture 5 awt - itsp | warringtonbear.warrington.ufl.edu/koehler/cgs6305/java5.pdf ·...
TRANSCRIPT

JavaLecture 5
AWT
Abstract Windows Toolkit:
A Java window is a set of nested components, starting from the outermostwindow down to the smallest user interface (UI) component.
Peers:
Peers are native GUI components (native to the platform). When a Javaprogram creates and displays a Java AWT component, that componentactually creates and displays a native component (called a peer). Thus,under Windows 95, a windows 95 button, or dialog, etc. is generated.Under Solaris a Motif peer and under Macintosh, a Macintosh peer.
Components include seeable things such as:
windows
menu bars
buttons
text fields
and non-seeable things like
containers
which can include other components. Containers have layout managers that dealwith positioning and shaping of components.
The nesting of components within containers within other components creates ahierarchy for painting and event passing.
Major components:
Containers: Containers are generic AWT components that can containother components, including other containers. The most common form ofcontainer is the panel, which represents a container that can be displayedon screen. Applets are a form of panel (in fact, the "Applet" class is asubclass of the "Panel" class).
Canvases: A canvas is a simple drawing surface. Although you can drawon panels, (as you've been doing all along), canvases are good for paintingimages or other graphics operations.
UI components: These can include buttons, lists, simple popup menus,checkboxes test fields, and other typical elements of a user interface.

Window construction components: These include windows, frames,menu bars, and dialogs. These are listed separately from the other UIcomponents because you'll use these less often--particularly in applets. Inapplets, the browser provides the main window and menu bar, so you don'thave to use these. Your applet may create a new window, however, oryou may want to write your own Java application that uses thesecomponents.
Here’s a hierarchy:
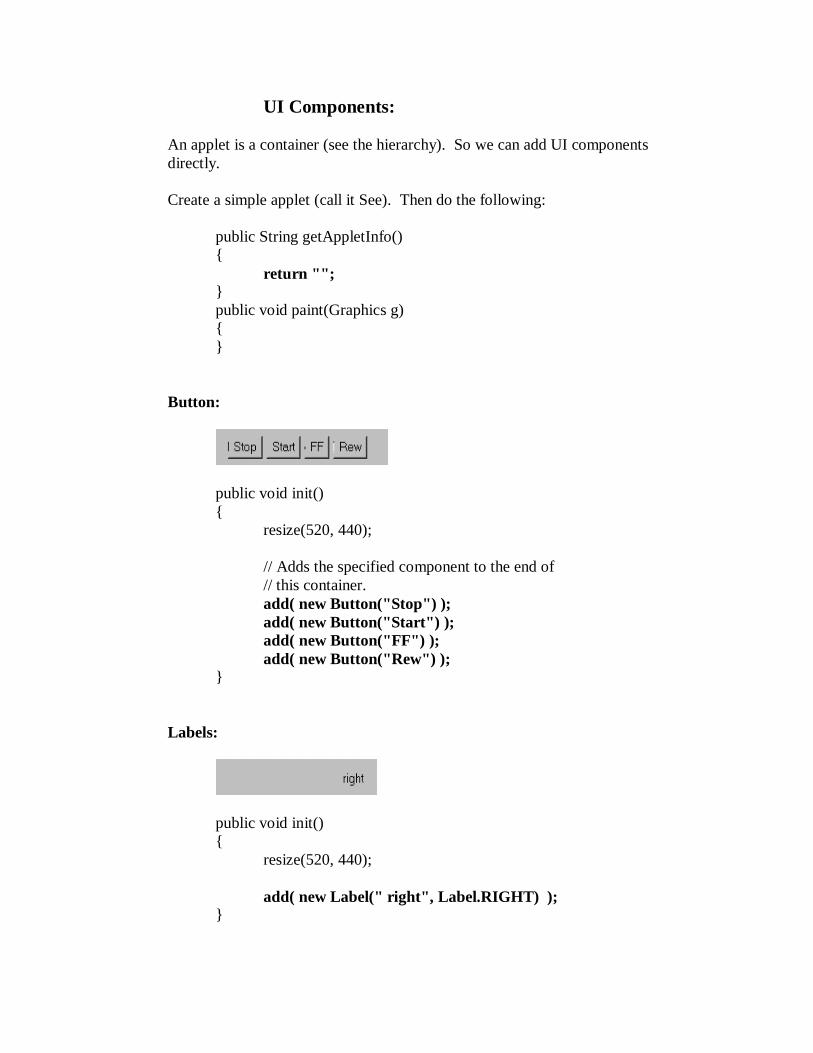
UI Components:
An applet is a container (see the hierarchy). So we can add UI componentsdirectly.
Create a simple applet (call it See). Then do the following:
public String getAppletInfo(){
return "";}public void paint(Graphics g){}
Button:
public void init(){
resize(520, 440);
// Adds the specified component to the end of// this container.add( new Button("Stop") );add( new Button("Start") );add( new Button("FF") );add( new Button("Rew") );
}
Labels:
public void init(){
resize(520, 440);
add( new Label(" right", Label.RIGHT) );}
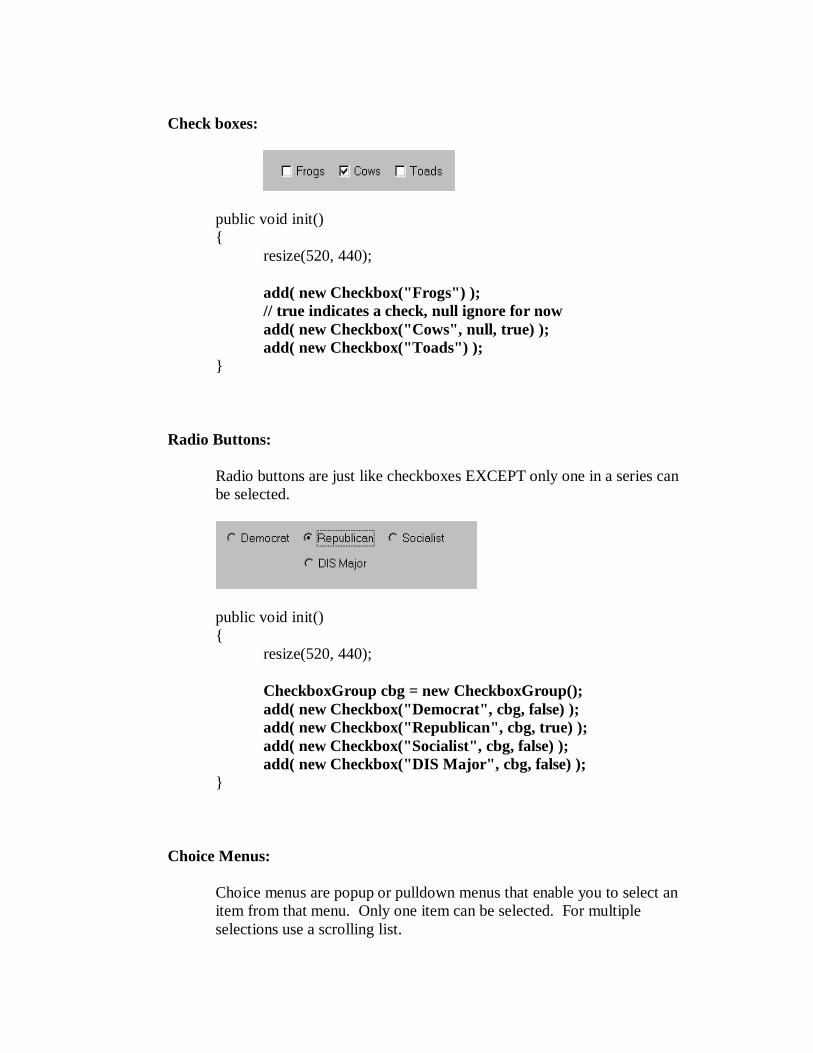
Check boxes:
public void init(){ resize(520, 440);
add( new Checkbox("Frogs") );// true indicates a check, null ignore for nowadd( new Checkbox("Cows", null, true) );add( new Checkbox("Toads") );
}
Radio Buttons:
Radio buttons are just like checkboxes EXCEPT only one in a series canbe selected.
public void init(){
resize(520, 440);
CheckboxGroup cbg = new CheckboxGroup();add( new Checkbox("Democrat", cbg, false) );add( new Checkbox("Republican", cbg, true) );add( new Checkbox("Socialist", cbg, false) );add( new Checkbox("DIS Major", cbg, false) );
}
Choice Menus:
Choice menus are popup or pulldown menus that enable you to select anitem from that menu. Only one item can be selected. For multipleselections use a scrolling list.

public void init(){ resize(520, 440);
Choice c = new Choice();c.addItem("New");c.addItem("Open");c.addItem("Close");c.addItem("Exit");
// now add the menuadd(c);
}
There are several menu functions:
getItem(int i) Returns ith string item.
countItem() Number of items in list.
getSelectedIndex() Returns selected position number.
getSelectedItem() Returns selected position item.
select(int i) Selects ith item.
select(String s) Selects item s.
Text Fields:
Enables user to enter text.
public void init(){

resize(520, 440);
// whole text field, including prompt, is 30 bytes longadd(new TextField("Enter your name", 30) );
}
Text Areas:
Enables user to enter large amounts of text.
Here's the code:
public void init(){
resize(520, 440);
// 10 rows 30 columnsadd( new TextArea(10, 30) );
}
Scrolling Lists:
A scrolling lists contains many items. You can restrict selection to oneitem (exclusive) or multiple (nonexclusive).
.

Here's the code:
public void init(){
resize(520, 440);
List m = new List(5, true); // true = multiple selections
m.addItem("Democrat");m.addItem("Republican");m.addItem("Socialist");m.addItem("Ardvark");m.addItem("Cow");m.addItem("MBA");m.addItem("DIS Major");add( m );
}

Panels and Layouts:
In Visual C++ we had to tell where exactly UI components went by pixelpositions. Since Java runs on so many platforms, we need something moreflexible. Java has layout managers, insets and hints that each component canprovide for helping lay out the screen.
Two things determine the eventual layout:
The order the component were added to the panel
The panel's layout manager. Each panel can have its own layout manager.
There are five different types of layout managers. Each has a different basicstrategy for laying-out components. We discuss each in turn with examples.Here’s a brief description.
BorderLayout A container is divided into regions: north and southor east and west, and center.
CardLayout The visibility of a set of components gets controlledwith this layout. This is like a deck of cards or astack of tabbed folders.
FlowLayout A container’s components fill the container fromright to left, then top to bottom.
GridLayout A container divides its components into a grid.
GridBagLayout This allows for complex layouts.
Various containers have default layout managers. They are:
Container nullPanel FlowLayoutWindow BorderLayoutDialog BorderLayoutFrame BorderLayout
FlowLayout:
Components are added one at a time, row by row. If a componentwon't fit on the current row, it goes to the next. You can specifythe alignment too.

This is the default layout (with CENTERED). Here's how it worksin code.
public void init(){
resize(520, 440);
this.setLayout( new FlowLayout(FlowLayout.LEFT,10, 20) ); // horizontal & vertical pixel gap
CheckboxGroup cbg = new CheckboxGroup();add( new Checkbox("Democrat", cbg, false) );add( new Checkbox("Republican", cbg, true) );add( new Checkbox("Socialist", cbg, false) );add( new Checkbox("DIS Major", cbg, false) );
}

Grid Layout:
With a grid, you portion off the panel area into rows and columnsand place a component in a cell.
public void init(){
resize(520, 440);
// two row and two columnsthis.setLayout( new GridLayout(2, 2, 10, 20) );
CheckboxGroup cbg = new CheckboxGroup();add( new Checkbox("Democrat", cbg, false) );add( new Checkbox("Republican", cbg, true) );add( new Checkbox("Socialist", cbg, false) );add( new Checkbox("DIS Major", cbg, false) );
}
GridBagLayout:
This is the most versatile layout. You can create a grid of arbitrarysize and use it to create components within the grid of arbitrarysize. Each component that resides in a container that is using aGridBagLayout has an associated GridBagConstraints instance thatspecifies how the component is laid out. Components may spanmore than one grid cell and can even overlap.
Here's an example:

and for a different sized window:
and the code is below. First some background onGridBagConstraints. This is a separate class. Each componentadded to the container with a GridBagLayout has aGridBagConstraints object. The typical code sequence goes asfollows:
GridBagLayout gbl = new GridBagLayout();GridBagConstraints gbc = new GridBagConstraints();setLayout(gbl);…// set constraints…gbl.setConstraints( component, gbc);add(component);
A GridBagConstraints object has several variables that the user cancontrol. They are:
Variable Default value Values Means

anchor CENTER CENTER, EAST,NORTH,NORTHEAST,NORTHWEST,SOUTH,SOUTHEAST,SOUTHWEST,WEST
Where to anchor a componentwithin its grid cells
fill NONE BOTH,HORIZONTAL,VERTICAL,NONE
The manner in which thecomponent fills the grid cellsit occupies.
gridxgridy
RELATIVE RELATIVE orinteger x, y positionin the grid
The position of thecomponent’s upper left-handgrid cell.
gridwidthgridheight
11
RELATIVE,REMAINDER, orinteger valuesrepresenting thewidth and height ingrid cells
The number of grid cells inboth horizontal and verticaldirections allotted for thecomponent. Whether or not acomponent fills its grid cellsdepends on the fill attribute.
ipadxipady
00
Integer valuesrepresenting thenumber of pixels
Internal padding that increasesthe components preferred size.Negative values are allowed,which reduces thecomponent’s preferred size.
insets (0,0,0,0) An Insets object External padding between theedges of the component andedges of its grid cells.Negative values are allowed,which causes the componentsto extend beyond the gridcells.
weightxweighty
0.00.0
Double valuesrepresentingweighting given toa component’s gridcells relative toother componentsin the same row orcolumn.
How extra space is consumedby the component’s grid cells.Whether or not a componentfills its grid cells depends onthe fill attribute. Values mustbe positive.
import java.awt.*;import java.util.*;

public class Test extends Frame {
// a helper methodprotected void makebutton(
String name,GridBagLayout gb,GridBagConstraints c)
{Button b = new Button(name);// Sets the constraints for the specified// component in this layout.gb.setConstraints(b, c);add( b );
}
// ConstructorTest(){
// constructor for Framesuper("GridBag Test");
// Layout & FontGridBagLayout gb = new GridBagLayout();GridBagConstraints c = new GridBagConstraints();setLayout( gb );setFont( new Font("Helvitica", Font.PLAIN, 14));
// This field is used when the component's// display area is larger than the component's// requested size. It determines whether to// resize the component, and if so, how.// GridBagConstraint.BOTH: Make the component// fill its display area entirely.c.fill = GridBagConstraints.BOTH;
// This field specifies how to distribute extra// vertical space. The grid bag layout manager// calculates the weight of a row to be the// maximum weightx of all the components in// a row. If the resulting layout is smaller// vertically than the area it needs to fill,// the extra space is distributed to each row// in proportion to its weight. A row that has// weight 0 receives no extra space.
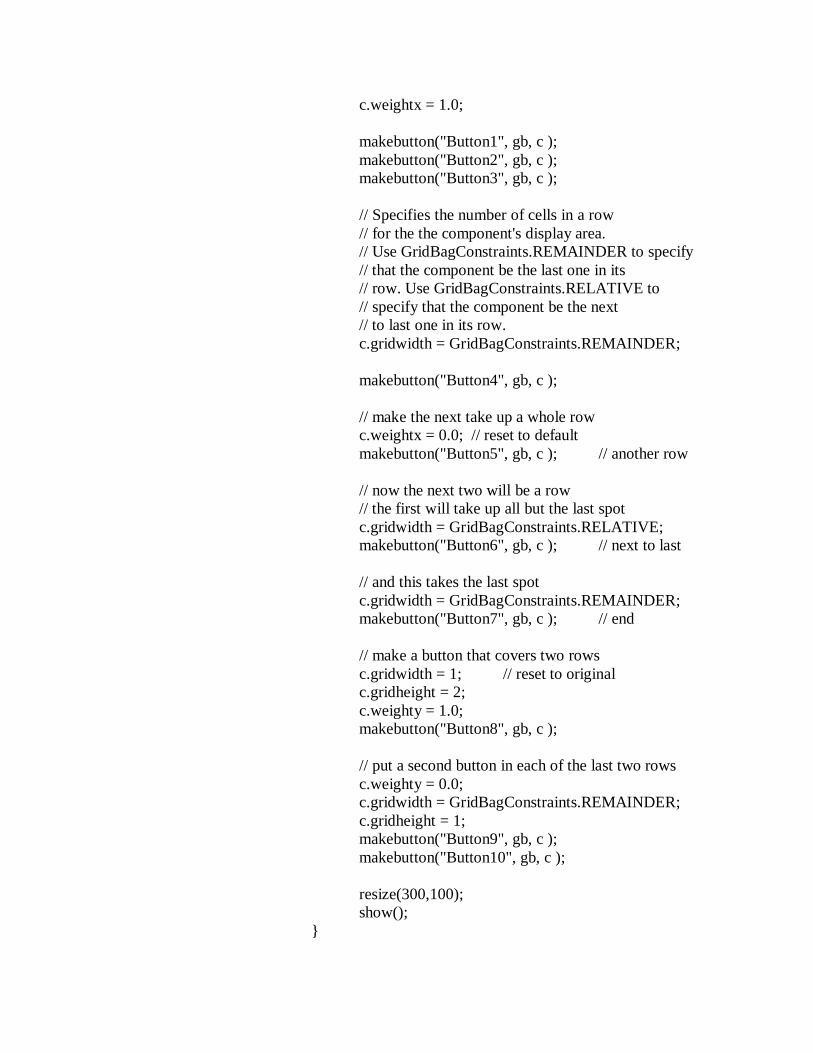
c.weightx = 1.0;
makebutton("Button1", gb, c );makebutton("Button2", gb, c );makebutton("Button3", gb, c );
// Specifies the number of cells in a row// for the the component's display area.// Use GridBagConstraints.REMAINDER to specify// that the component be the last one in its// row. Use GridBagConstraints.RELATIVE to// specify that the component be the next// to last one in its row.c.gridwidth = GridBagConstraints.REMAINDER;
makebutton("Button4", gb, c );
// make the next take up a whole rowc.weightx = 0.0; // reset to defaultmakebutton("Button5", gb, c ); // another row
// now the next two will be a row// the first will take up all but the last spotc.gridwidth = GridBagConstraints.RELATIVE;makebutton("Button6", gb, c ); // next to last
// and this takes the last spotc.gridwidth = GridBagConstraints.REMAINDER;makebutton("Button7", gb, c ); // end
// make a button that covers two rowsc.gridwidth = 1; // reset to originalc.gridheight = 2;c.weighty = 1.0;makebutton("Button8", gb, c );
// put a second button in each of the last two rowsc.weighty = 0.0;c.gridwidth = GridBagConstraints.REMAINDER;c.gridheight = 1;makebutton("Button9", gb, c );makebutton("Button10", gb, c );
resize(300,100);show();
}

public static void main(String args[]){
Test t = new Test();}
}
BorderLayout:
Border layouts work on a geographical basis. A border layout laysout a container using members named "North", "South", "East","West", and "Center". The components get laid out according totheir preferred sizes and the constraints of the container's size. The"North" and "South" components may be stretched horizontally;the "East" and "West" components may be stretched vertically; the"Center" component may stretch both horizontally and vertically tofill any space left over.
Here is an example of five buttons in an applet laid out using theBorderLayout layout manager:
public void init(){
resize(520, 440);
setLayout(new BorderLayout());
add("North", new Button("North"));add("South", new Button("South"));add("East", new Button("East"));add("West", new Button("West"));
add("Center", new Button("Center"));}
CardLayout:
A layout manager for a container that contains several "cards".Only one card is visible at a time, allowing the application to flipthrough the cards.

Handling User Interface Actions and Events
There are now two approaches to handling events – the old way found in Java1.02 and earlier, called inheritance based, and the new way (Java 1.1 and newer)called delegation based.
Inheritance Based (version 1.02 and earlier):
There are two inheritance-based approaches to handling events:
Override an event-handling method
Components have several methods that respond to events. Some are:
setSize component has been resized
setbounds component resized or moved
paint component needs to be painted
update erase then repaint
setLocation component moved to x,y location
layout component needs to be laid-out
validate if valid, lay out
You can override these directly (as we have seen before with paint).
Propogate events
Whenever a propagated event takes place, handleEvent( Event) is called.The routine can handle the event or propagate it to its container (i.e. thecontainer’s handleEvent is invoked). Here’s some typical code:
public boolean handleEvent(Event event) {if (event.target == startButton && event.id == Event.ACTION_EVENT) {
startButton_Clicked(event);return true;
}

if (event.target == peopleLabel3D && event.id == event.MOUSE_DOWN) {peopleLabel3D_MouseDown(event);return true;
}if (event.target == papersLabel3D && event.id == Event.MOUSE_DOWN) {
papersLabel3D_MouseDown(event);return true;
}if (event.target == browseLabel3D && event.id == Event.MOUSE_DOWN) {
browseLabel3D_MouseDown(event);return true;
}if (event.target == searchLabel3D && event.id == Event.MOUSE_DOWN) {
searchLabel3D_MouseDown(event);return true;
}// if we return false, the container will deal with it – usually best to// give the superclass a chance firstreturn super.handleEvent(event);
}
java.awt.Component also invokes a number of convenience routines –since handleEvent could get nasty looking. Some are:
action an action event
mouseUp mouse up event
mouseDown mouse down event
mouseDrag mouse drag event
mouseMove mouse move
mouseExit mouse exited component
mouseEnter mouse entered component
keyUp key up
keyDown key down
gotFocus component has focus
lostFocus component lost focus

Here’s an example. To intercept an action by a UI component we need anaction() method.
public boolean action( Event e, Object arg)
The second argument is specific to each component. For example, aButton UI will have the button's label. A choice menu returns the selecteditem.
Here's an example:
public void init(){
resize(520, 440);
add( new Button("Red") );add( new Button("Blue") );add( new Button("Green") );add( new Button("White") );add( new Button("Black") );
}
public boolean action(Event e, Object o){
if ( e.target instanceof Button )changeColor( (String)o );
return true;}
void changeColor(String back ){
if ( back.equals("Red"))setBackground(Color.red);
else if ( back.equals("Blue"))setBackground(Color.blue);
else if ( back.equals("Green"))setBackground(Color.green);
else if ( back.equals("White"))setBackground(Color.white);
else if ( back.equals("Black"))setBackground(Color.black);
repaint();}

You may also determine which component was activated by the following test:
if ( e.target.equals( component )) {}
Here component is the reference of the actual component. That means thecomponent must be a member variable like:
Button B1;
which would result in the test:
if ( e.target.equals( B1 )) {}
Event Modifiers: An Event object has a modifiers field that can be tested forvarious values. Some masks are HOME, PGUP, RIGHT, CTRL_MASK, etc. Ifev is an event object, you could do tests like
If ( ev.modifiers & Event.CTRL_MASK ) // ctrl is being held down

Delegation Based (version 1.1 and Higher):
The inheritance-based method has some shortcomings.
1. A component had to be extended to add a handler. This could lead to avery large inheritance tree.
2. Subtle bugs could easily creep in. If a handleEvent didn’t handle anevent (like a mouseUp) and also didn’t let its superclass try, themouseUp event could go unhandled.
3. Events can only be routed to a superclass or the container containingthe component handling the event. This is a very limited routing.
4. HandleEvent gets giant switch statements – a real mess.
In the new delegation model, events are generated by event sources. Listenerscan register to be notified of particular events from particular sources. Any objectcan be “delegated” to implement the listener interface.
A program that implements this model has three pieces of code.
1. In the class that handles the event, the class must either extend a classthat implements a listener interface) or it must implement a listenerinterface itself. Thus, we will see either something like
Public class Myclass implements ActionListener {
or
class OnlyDateDigits extends KeyListener {
2. At least one component has to register as a listener. For example
dateField = new TextField();dateField.setFont(new Font("Dialog", Font.PLAIN, 12));dateField.addKeyListener( new OnlyDateDigits() );add(dateField);
3. Finally, code that handles the action must be present. For example inclass OnlyDateDigits:
public void keyPressed(KeyEvent e )
{if (e.getKeyChar() >= '0' &&
e.getKeyChar() <= '9' ) return;if (e.getKeyChar() >= 'a' &&
e.getKeyChar() <= 'z' ) {e.consume();return;
}if (e.getKeyChar() >= 'A' &&
e.getKeyChar() <= 'Z' ) {e.consume();return;
}switch( e.getKeyChar() ) {case '~':case '!':case '@':case '#':case '$':case '%':case '^':case '&':case '*':case '(':case ')':case '_':case '+':case '`':case '-':case '=':case ' ':case '{':case '}':case '|':case '[':case ']':case '\\':case ':':case '"':case ';':case '\'':case '<':case '>':case '?':case ',':case '.':
e.consume();break;
}}
Here’s an example where we implement a listener:
import java.applet.*;import java.awt.*;import java.awt.event.*;
public class Beeper extends Applet implements ActionListener{
Button b;
public void init(){
setLayout(new BorderLayout());b = new Button("Click");add("Center", b);b.addActionListener(this);
}
public void actionPerformed(ActionEvent e){
Toolkit.getDefaultToolkit().beep();}
}