java nat ed documentation
TRANSCRIPT


P a g e | 1
Intentio Nigeria Limited www.intentio-ng.com
Congratulations on the wise decision you just made to participate in the Intentio JAVAnated Program.
JAVAnated is a 2-week practical java training program targeted to all those interested in either
programming or a programming career.
Mobile phones applications, hardware control software, web-based applications (e.g. hi5.com), stand-
alone applications running on all operating systems are just a minute fraction of what the Java
programming language does. Due to its versatility, market value and strength, java is an ideal
programming language for everyone to learn.
This material is designed to give you a very candid introduction to the exciting world of logic building,
object-oriented programming, java itself and database concepts. The book is divided into sections and
comes with a CD-ROM containing a softcopy of this book itself and all necessary software needed to get
you up and running on your own.
The good news is that java is not difficult as word-of-mouth claims it is and we make no assumptions on
your computer background. While we acknowledge that little experience in programming will be an
advantage, training will be handled as if we are being introduced to computers.
Make best use of the two weeks, you’ll be glad you did.
All the best!
Ife Martins

P a g e | 2
Intentio Nigeria Limited www.intentio-ng.com
TABLE OF CONTENTS
Section 1.0: Grasping The Language ............................................................................................................................. 4
1.1 Programming Languages ..................................................................................................................................... 4
1.2 Object-Oriented Programming ........................................................................................................................... 5
1.3 Java Development Tools ...................................................................................................................................... 6
1.3.1 A word or two about the NetBeans IDE ................................................................................................. 7
1.4 Java Basics ......................................................................................................................................................... 10
1.4.1 Definitions & Basic Concepts ................................................................................................................ 10
1.4.2 Data Types ............................................................................................................................................ 11
1.4.3 Operators ............................................................................................................................................. 13
1.4.4 Strings ................................................................................................................................................... 14
1.4.5 Comments ............................................................................................................................................ 15
1.4.6 Escape Characters ................................................................................................................................ 15
1.5 Sample Java Application .................................................................................................................................... 16
1.6 Expressions, Statements and Blocks ................................................................................................................. 19
1.7 Arrays ................................................................................................................................................................ 20
1.8 Control Flow Statements ................................................................................................................................... 21
1.8.1 The for Statement ................................................................................................................................ 22
1.8.2 The if/else Statement ........................................................................................................................... 22
1.8.3 The switch Statement ........................................................................................................................... 23
1.9 Exception Handling Statements ........................................................................................................................ 24
1.10 Casting ............................................................................................................................................................. 25
1.11 Classes ............................................................................................................................................................. 26
1.11.1 Creating Classes .................................................................................................................................. 26
1.11.2 Creating Objects ................................................................................................................................. 27
1.11.3 The Class Body .................................................................................................................................... 27
1.11.4 Declaring Member Variables .............................................................................................................. 28
1.11.5 Defining Methods ............................................................................................................................... 28
1.11.6 The This Keyword ............................................................................................................................... 31
1.11.7 Providing Constructors for Your Classes............................................................................................. 31
1.11.8 Inheritance ......................................................................................................................................... 32
1.12 Interfaces ......................................................................................................................................................... 35
1.13 Packages .......................................................................................................................................................... 36

P a g e | 3
Intentio Nigeria Limited www.intentio-ng.com
1.14 Java.IO Package ............................................................................................................................................... 36
1.15 Applets............................................................................................................................................................. 40
Section 2.0: Swinging it ............................................................................................................................................... 42
2.1 Introduction to Swing ........................................................................................................................................ 42
2.1.1 Creating an Application ........................................................................................................................ 42
2.1.2 Creating an Interface ............................................................................................................................ 43
2.1.3 Creating a Component ......................................................................................................................... 44
2.1.4 Adding Components to a Container ..................................................................................................... 44
2.1.5 Working With Components .................................................................................................................. 44
2.2 Layout Management ......................................................................................................................................... 47
2.2.1 Absolute Positioning ............................................................................................................................. 47
2.3 Event Handling .................................................................................................................................................. 48
2.3.1 Event Listeners ..................................................................................................................................... 48
2.3.2 Setting Up Components ....................................................................................................................... 49
2.3.3 Event-Handling Methods ...................................................................................................................... 49
2.3.4 Working with Methods in Action Events .............................................................................................. 50
2.4 Project ............................................................................................................................................................... 51
Section 3.0: Database Reality .................................................................................................................................... 54
3.1 Introduction to Database .................................................................................................................................. 54
3.1.1 Working with a Database ..................................................................................................................... 54
3.1.2 The Students Database ......................................................................................................................... 54
3.2 SQL ..................................................................................................................................................................... 57
3.3 JDBC ................................................................................................................................................................... 58
3.3.1 What is JDBC ......................................................................................................................................... 58
3.3.2 Database Drivers .................................................................................................................................. 58
3.3.3 JDBC Classes ......................................................................................................................................... 60
3.3.4 Retrieving Data From a Database Using SQL ........................................................................................ 61
3.3.5 Writing Data to a Database Using SQL ................................................................................................. 62
3.4 Project .................................................................................................................................................................... 63

P a g e | 4
Intentio Nigeria Limited www.intentio-ng.com
1.0 GRASPING THE LANGUAGE
Objective
At the end of this section, you will:
- Be well at home with the basics of Java as it relates to Object Oriented Programming
- Be able to compile and execute java programs using the Windows Command Prompt.
- Be able to create classes, objects, methods, variables, implement interfaces, import packages...
1.1 PROGRAMMING LANGUAGES
Most computer programs today are written in a high-level language, such as Java, VB, C, C++, or FORTRAN. A programming language is considered high level if its statements resemble English-language statements. For example, all of the languages just mentioned have some form of an "if" statement, which says, "if a certain condition holds, then take a certain action."
Computer scientists have invented hundreds of high-level programming languages, although relatively few of these have been put to practical use. Some of the widely used languages have special features that make them suitable for one type of programming application or another. COBOL (COmmon Business-Oriented Language), for example, is still widely used in commercial applications. FORTRAN (FORmula TRANslator) is still preferred by some engineers and scientists. C and C++ are still the primary languages used by operating system programmers.
In addition to having features that make them suitable for certain types of applications, high-level languages use symbols and notation that make them easily readable by humans. For example, arithmetic operations in Java make use of familiar operators such as "+" and "-" and "/," so that arithmetic expressions look more or less the way they do in algebra. Thus, to take the average of two numbers, you might use the expression:
(a + b) / 2
Source code translators come in two varieties. An interpreter translates a single line of source code directly into machine language and executes the code before going on to the next line of source code. A compiler translates the entire source code program into executable object code, which means that the object code can then be run directly without further translation.
There are advantages and disadvantages to both approaches. Interpreted programs generally run less efficiently than compiled programs, because they must translate and execute each line of the program before proceeding to the next line. If a line of code is repeated, an interpreter would have to translate the line each time it is encountered. By contrast, once compiled, an object program is just executed without any need for further translation. It is also much easier to refine compiled code to make it run more efficiently. But interpreters are generally quicker and easier to develop and provide somewhat better error messages when things go wrong. Some languages that you may have heard of, such as BASIC, LISP, and Perl, are mostly used in interpreted form, although compilers are also available for these languages. Programs written in COBOL, FORTRAN, C, C++, and Pascal are compiled. As we will see in the next section, Java programs use both compilation and interpretation in their translation process.
Java has become one of the most important languages for Web and Internet applications.

P a g e | 5
Intentio Nigeria Limited www.intentio-ng.com
1.2 OBJECT-ORIENTED PROGRAMMING.
As the name object-oriented implies, objects are key to understanding object-oriented technology. You can look around you now and see many examples of real-world objects: your dog, your desk, your television set, your bicycle. These real-world objects share two characteristics: they all have state and they all have behaviour. For example, dogs have state (name, colour, breed, hungry) and dogs have behaviour (barking, fetching, and slobbering on your newly cleaned slacks). Bicycles have state (current gear, current pedal cadence, two wheels, number of gears) and behaviour (braking, accelerating, slowing down, changing gears). Software objects are modelled after real-world objects in that they too have state and behaviour. A software object maintains its state in variables and implements its behaviour with methods. An object is a software bundle of variables and related methods. You can represent real-world objects using software objects. You might want to represent real-world dogs as software objects in an animation program or a real-world bicycle as a software object within an electronic exercise bike. However, you can also use software objects to model abstract concepts. For example, an event is a common object used in GUI window systems to represent the action of a user pressing a mouse button or a key on the keyboard. Everything that the software object knows (state) and can do (behaviour) is expressed by the variables and methods within that object. A software object that modelled your real-world bicycle would have variables that indicated the bicycle's current state: its speed is 10 mph, its pedal cadence is 90 rpm, and its current gear is the 5th gear. These variables and methods are formally known as instance variables and instance methods to distinguish them from class variables and class methods. Encapsulation Encapsulating related variables and methods into a neat software bundle is a simple yet powerful idea that provides two primary benefits to software developers:
Modularity--The source code for an object can be written and maintained independently of the source code for other objects. Also, an object can be easily passed around in the system. You can give your bicycle to someone else and it will still work.
Information hiding--An object has a public interface that other objects can use to communicate with it. But the object can maintain private information and methods that can be changed at any time without affecting the other objects that depend on it. You don't need to understand the gear mechanism on your bike in order to use it.
Messages A single object alone is generally not very useful and usually appears as a component of a larger program or application that contains many other objects. Through the interaction of these objects, programmers achieve higher order functionality and more complex behaviour. Your bicycle hanging from a hook in the garage is just a bunch of titanium alloy and rubber; by itself the bicycle is incapable of any activity. The bicycle is useful only when another object (you) interacts with it (starts pedalling). Software objects interact and communicate with each other by sending messages to each other. When object A wants object B to perform one of B's methods, object A sends a message to object B. Sometimes the receiving object needs more information so that it knows exactly what to do--for example, when you want to change gears on your bicycle, you have to indicate which gear you want. This information is passed along with the message as parameters. Three components comprise a message: 1. The object to whom the message is addressed (Your Bicycle) 2. The name of the method to perform (change gears) 3. Any parameters needed by the method (lower gear) These three components are enough information for the receiving object to perform the desired method. No other information or context is required.

P a g e | 6
Intentio Nigeria Limited www.intentio-ng.com
Necessity of Messages
An object's behaviour is expressed through its methods, so (aside from direct variable access) message
passing supports all possible interactions between objects.
Objects don't need to be in the same process or even on the same machine to send and receive messages
back and forth to each other.
1.3 JAVA DEVELOPMENT TOOLS
The tools for developing applications can be split into two broad categories:
1. Java Development Kit (JDK)
The JDK is a set of command-line programs for creating, compiling and running java applications. It contains
primary programs for compiling (javac.exe), running (java.exe) and building (jar.exe) java programs. The JDK runs
in the command prompt environment (For Windows users: Start – All Programs – Accessories – Command
Prompt). To use this tool, you create and save your java program using a notepad (figure 1.1) then you compile and
run it using the Command prompt (figure 1.2) after installing the JDK on your computer.
Figure 1.1 Figure 1.2
2. Integrated Development Environment (IDE)
An IDE is a sophisticated development tool that simplifies the creation and running of applications. It comprises of
a graphical user interface complete with icons, menu bars, tool bars amongst others for various functions such as
creating, compiling, running and building applications. Advantages of using an IDE over a JDK are as follows:
Code assistance so that you don’t necessarily have to cram keywords, methods etc
With the click of a button, your program can be compiled, run or built without knowing the underlying
code for it.
Helps eliminate syntax errors.
Ease of debugging i.e. locating and removing errors.
IDEs for java programs include JBuilder, JCreator, Eclipse, NetBeans etc. Specifically, we will be making use of the
NetBeans 5.5 IDE.
Note: To build a java program means to turn it into an executable file (.jar file) that can run on its own without a
java tool like the JDK or IDE. This is similar to how you run programs on your computers.

P a g e | 7
Intentio Nigeria Limited www.intentio-ng.com
1.3.1 A word or two about the NetBeans 5.5 IDE
The NetBeans 5.5 IDE will be used in place of the JDK for our applications. The following is a summarized
introduction to it.
Launching the NetBeans 5.5 IDE
From your Start menu, launch the NetBeans IDE by navigating to the NetBeans 5.5 Folder in the all programs menu
(Figure 1.3). The IDE appears as follows (Figure 1.4) upon loading.
Figure 1.3 Figure 1.4
NetBeans Menus
The Menu bar contains a number of items amongst which are the following of interest to us.
File Menu
New Project – for creating new projects. From the New Project window, Select General and Java
Application from the categories and projects list respectively then click the Next Button (figure 1.5). The
New Java Application window appears (figure 1.6), enter a name for the project and click the Browse
button to select a location for your project which then becomes your default path for subsequent
projects. The Project Folder is automatically created within the Location selected above. This is where files
relating to this project are automatically located. Click the Finish button.

P a g e | 8
Intentio Nigeria Limited www.intentio-ng.com
Figure 1.5 Figure 1.6
New File – for creating new files within a project.
Open Project – for opening existing projects. Navigate to the Project folder and click on the “open project
folder” button. Alternatively, click on the open folder icon on the toolbar or press ctrl+shift+O.
Open File – for opening existing files. Navigate to the project folder then the “src” folder and select the
file.
Set Main Project – where you have more than one project, you use this option to set the main project.
Build Menu
Build Main Project – for building a java project such that it becomes an executable (jar) file.
Compile File – for compiling a java file
Run Menu
Run Main Project – runs the main class indicated when the project was being created.
Run File – for running java files
Notes
1. An IDE project is a group of Java source files and its associated information about what belongs on the classpath, how to build and run the project, and so forth. The IDE stores project information in a project folder which includes a build script and properties file that control the build and run settings. In the IDE, you always work inside of a project.
2. Always note the containing directory for Projects during creation for ease of reference.
3. Where you have more than one project folder, remember to always set the right project for each file
you intend to create. This is done by following the File Menu – Set Main Project then selecting from
the list of projects.
4. A project can contain any number of java files
5. For each Project Folder, you have a number of folders out of which we’re interested in these:
Build – contains the classes of the java files after compilation.

P a g e | 9
Intentio Nigeria Limited www.intentio-ng.com
Dist – contains the executable (.jar) file of the project after it is built.
Src – contains the java files.
NetBeans Windows
A number of windows are open by default when you launch the NetBeans application. Few of them are described
below though.
Note that a window can be closed if not needed and also be opened by going through the Window menu and
selecting the desired one.
Projects Window
The Projects window is the main entry point to your project sources. It shows a logical view of important
project contents such as Java packages and Web pages. You can right-click any project node to access a
pop-up menu of commands for building, running, and debugging the project, as well as opening the
Project Properties dialog box.
Files Window
The Files window shows a directory-based view of your projects, including files and folders that are not
displayed in the Projects Window. From the Files window, you can open and edit your project
configuration files, like the project build script and properties file. You can also view build outputs like
compiled classes, JAR files, WAR files, and generated Javadoc documentation.
Navigator Window
The Navigator window is a tool that displays information about the java source files in the currently opened project. You can view source elements either as a simple list or as an inheritance tree. By default, the Navigator window is located in the lower lefthand corner of the IDE's workspace below the Projects, Files, and Runtime windows.
Source Editor
The Source Editor is a full-featured text editor that is integrated with the GUI Builder, Projects window, compiler, and debugger. The Source Editor is automatically opened when a new and editable object is created from the available templates in the IDE. It can also be opened by double-clicking the node of an editable object in the Projects window.
Favourites Window
The Favourites window lets you access any location on your computer. This is handy for accessing files and directories that are outside of your project directories. The Favorites window does not know anything about project classpath and membership, so none of the project-related commands like Compile File are available in the Favourites window.

P a g e | 10
Intentio Nigeria Limited www.intentio-ng.com
1.4 JAVA BASICS
1.4.1 Definitions and Basic Concepts
Algorithms
Any computing problem can be solved by executing a series of actions in a specific order. A procedure for solving a
problem in terms of
1. the actions to execute and 2. the order in which these actions execute
is called an algorithm.
Variables
An object stores its state in variables.
Definition: A variable is an item of data named by an identifier.
You must explicitly provide a name and a type for each variable you want to use in your program. The variable's name must be a legal identifier -- an unlimited series of Unicode characters that begins with a letter. You use the variable name to refer to the data that the variable contains. The variable's type determines what values it can hold and what operations can be performed on it. To give a variable a type and a name, you write a variable declaration, which generally looks like this: type name
In addition to the name and type that you explicitly give a variable, a variable has scope. The section of code where the variable's simple name can be used is the variable's scope. The variable's scope is determined implicitly by the location of the variable declaration, that is, where the declaration appears in relation to other code elements.
Variable Names
A program refers to a variable's value by the variable's name. For example, when it displays the value of the largestByte variable. A name, such as largestByte, that's composed of a single identifier, is called a simple name. Simple names are in contrast to qualified names, which a class uses to refer to a member variable that's in another object or class.
In the Java programming language, the following must hold true for a simple name:
1. It must be a legal identifier. An identifier is an unlimited series of Unicode characters that begins with a letter, currency sign ($) or underscore (_). It cannot start with a number.
2. It must not be a keyword, a boolean literal (true or false), or the reserved word null. 3. It must be unique within its scope. A variable may have the same name as a variable whose
declaration appears in a different scope. In some situations, a variable may share the same name as another variable if it is declared within a nested block of code.
Scope
A variable's scope is the region of a program within which the variable can be referred to by its simple name. Secondarily, scope also determines when the system creates and destroys memory for the variable. Scope is

P a g e | 11
Intentio Nigeria Limited www.intentio-ng.com
distinct from visibility, which applies only to member variables and determines whether the variable can be used from outside of the class within which it is declared. Visibility is set with an access modifier.
The location of the variable declaration within your program establishes its scope and places it into one of these four categories:
member variable
local variable
method parameter
exception-handler parameter
A member variable is a member of a class or an object. It is declared within a class but outside of any method or constructor. A member variable's scope is the entire declaration of the class. However, the declaration of a member needs to appear before it is used when the use is in a member initialization expression.
You declare local variables within a block of code. In general, the scope of a local variable extends from its declaration to the end of the code block in which it was declared.
Parameters are formal arguments to methods or constructors and are used to pass values into methods and constructors. The scope of a parameter is the entire method or constructor for which it is a parameter.
Exception-handler parameters are similar to parameters but are arguments to an exception handler rather than to a method or a constructor. The scope of an exception-handler parameter is the code block between { and } that follow a catch statement.
1.4.2 Data Types
Every variable must have a data type. A variable's data type determines the values that the variable can contain and the operations that can be performed on it.
The Java programming language has two categories of data types: primitive and reference. A variable of primitive type contains a single value of the appropriate size and format for its type: a number, a character, or a boolean value. For example, an integer value is 32 bits of data in a format known as two's complement, the value of a char is 16 bits of data formatted as a Unicode character, and so on.
The following table lists, by keyword, all of the primitive data types supported by Java, their sizes and formats, and a brief description of each.
Keyword Description Size/Format
(integers)
byte Byte-length integer 8-bit two's complement
short Short integer 16-bit two's complement
int Integer 32-bit two's complement
long Long integer 64-bit two's complement

P a g e | 12
Intentio Nigeria Limited www.intentio-ng.com
(real numbers)
float Single-precision floating point 32-bit IEEE 754
double Double-precision floating point 64-bit IEEE 754
(other types)
char A single character 16-bit Unicode character
boolean A boolean value (true or false) true or false
Table 1.1: Primitive Data Types
You can put a literal primitive value directly in your code. For example, if you need to assign the value 4 to an integer variable you can write this:
int anInt = 4;
The digit 4 is a literal integer value. Here are some examples of literal values of various primitive types:
Literal Data Type
178 int
8864L long
37.266 double
37.266D double
87.363F float
26.77e3 double
' c ' char
true boolean
false boolean
Table 1.2: Examples of Literal Values and Their Data Types
Generally speaking, a series of digits with no decimal point is typed as an integer. You can specify a long integer by
putting an 'L' or 'l' after the number. 'L' is preferred as it cannot be confused with the digit '1'. A series of
digits with a decimal point is of type double. You can specify a float by putting an 'f' or 'F' after the number. A literal character value is any single Unicode character between single quote marks. The two boolean literals are simply true and false.

P a g e | 13
Intentio Nigeria Limited www.intentio-ng.com
1.4.3 Operators
Arithmetic Operators
The Java programming language supports various arithmetic operators for all floating-point and integer numbers. These operators are + (addition), - (subtraction), * (multiplication), / (division), and % (modulo).
The following table summarizes the binary arithmetic operations in the Java programming language.
Operator Use Description
+ op1 + op2 Adds op1 and op2
- op1 - op2 Subtracts op2 from op1
* op1 * op2 Multiplies op1 by op2
/ op1 / op2 Divides op1 by op2
% op1 % op2 Computes the remainder of dividing op1 by op2
Table 1.3
Relational and Conditional Operators
A relational operator compares two values and determines the relationship between them. For example, != returns true if the two operands are unequal. This table summarizes the relational operators:
Operator Use Returns true if
> op1 > op2 op1 is greater than op2
>= op1 >= op2 op1 is greater than or equal to op2
< op1 < op2 op1 is less than op2
<= op1 <= op2 op1 is less than or equal to op2
== op1 == op2 op1 and op2 are equal
!= op1 != op2 op1 and op2 are not equal
Table 1.4
Assignment Operators
You use the basic assignment operator, =, to assign one value to another. a = 5; b = a + 5;

P a g e | 14
Intentio Nigeria Limited www.intentio-ng.com
The Java programming language also provides several shortcut assignment operators that allow you to perform an arithmetic, shift, or bitwise operation and an assignment operation all with one operator. Suppose you wanted to add a number to a variable and assign the result back into the variable, like this: i = i + 2;
You can shorten this statement using the shortcut operator +=, like this: i += 2;
The two previous lines of code are equivalent.
The following table lists the shortcut assignment operators and their lengthy equivalents:
Operator Use Equivalent to
+= op1 += op2 op1 = op1 + op2
-= op1 -= op2 op1 = op1 - op2
*= op1 *= op2 op1 = op1 * op2
/= op1 /= op2 op1 = op1 / op2
%= op1 %= op2 op1 = op1 % op2
&= op1 &= op2 op1 = op1 & op2
|= op1 |= op2 op1 = op1 | op2
^= op1 ^= op2 op1 = op1 ^ op2
<<= op1 <<= op2 op1 = op1 << op2
>>= op1 >>= op2 op1 = op1 >> op2
>>>= op1 >>>= op2 op1 = op1 >>> op2
Table 1.5
1.4.4 Strings
A String (the S is in uppercase) is often created from a string literal--a series of characters enclosed in double quotes (“”). For example, when it encounters the following string literal, the Java platform creates a String object
whose value is Welcome to NACOSS. "Welcome to NACOSS"
A String variable is declared as follows: String name An example is as follows below: String str = "I school in Nigeria";
String Arithmetic The + operator has a double life outside the world of mathematics. It can concatenate two or more strings. Concatenate means to link two things together. An example is shown below:
String firstName = “Raymond”;

P a g e | 15
Intentio Nigeria Limited www.intentio-ng.com
System.out.println(“Everybody loves “ + firstName);
These two lines result in the display of the following text:
Everybody loves Raymond
The + operator combines strings, other objects, and variables to form a single string. In the preceding example, the literal “Everybody loves” is concatenated to the value of the String object firstName. Working with the concatenation operator is easy in Java because of the way the operator can handle any variable type and object value as if it were a string. If any part of a concatenation operation is a String or a string literal, all elements of the operation will be treated as if they were strings:
System.out.println(4 + “ score and “ + 7 + “ years ago”);
This produces the output text: 4 score and 7 years ago, as if the integer literals 4 and 7 were strings.
1.4.5 Comments One of the most important ways to improve the readability of your program is to use comments. Comments are information included in a program strictly for the benefit of humans trying to figure out what’s going on in the program. The Java compiler ignores comments entirely when preparing a runnable version of a Java source file. The two most important of the three kinds of comments you can use in Java are discussed below: The first way to add a comment to a program is to precede it with two slash characters (“//”). Everything from the slashes to the end of the line is considered a comment and is disregarded by a Java compiler, as in the following statement: int creditHours = 3; // set up credit hours for course If you need to make a comment that takes up more than one line, you can begin it with the text “/*” and end it with the text “*/”. Everything between these two delimiters is considered a comment, as in the following:
/* This program occasionally deletes all files on your hard drive and renders it completely unusable when you press the Save button. */
1.4.6 ESCAPE CHARACTERS In java, the backslash (\) is used as an escape character for specific functions. Examples are as follows:
Character Description
\n new line
\t tab
\’ ‘
\” “
\\ \
Table 1.6

P a g e | 16
Intentio Nigeria Limited www.intentio-ng.com
1.5 SAMPLE JAVA APPLICATION: UNDERSTANDING THE JAVA SYNTAX
The following java application will be used to illustrate the following basics of java programming: - how to write a simple java program using the notepad. - how to save java files - how to compile and run java programs using the JDK 1.6 and the NetBeans 5.5 IDE.
CASE 1: Using the JDK 1.6
Creating the Program The following code sample should be entered into a notepad.
//this is a simple java program
class SimpleProgram {
public static void main (String[]args) {
System.out.println("I am a java programmer");
}
}
Saving the File Save the file using the .java extension thus, the following file is saved as SimpleProgram.java. In Java, all code must reside inside a class. By convention, the name of that class should match the name of the file that holds the program. You should also make sure that the capitalization of the filename matches the class name. The reason for this is that Java is case sensitive. At this point, the convention that filenames correspond to class names may seem arbitrary. However, this convention makes it easier to maintain and organize your programs.
Compiling and Running the Program To compile the SimpleProgram.java program, execute the compiler, javac, specifying the name of the source file on the command line, as shown here and press enter:
javac SimpleProgram.java
Figure 1.7
Note: the preceding path must correspond to that where your program is stored. In this case, mine is stored in a path that corresponds to c:\users\Adebayo\Documents\students
To actually run the program, you must use the Java interpreter, java. To do so, pass the class name SimpleProgram as a command-line argument, as shown here and press enter:
java SimpleProgram
Figure 1.8

P a g e | 17
Intentio Nigeria Limited www.intentio-ng.com
When the program is run, the following output is displayed:
I am a java programmer.
Figure 1.9
When Java source code is compiled, each individual class is put into its own output file named after the class and using the .class extension. This is why it is a good idea to give your Java source files the same name as the class they contain—the name of the source file will match the name of the .class file. When you execute the Java interpreter as just shown, you are actually specifying the name of the class that you want the interpreter to execute. It will automatically search for a file by that name that has the .class extension. If it finds the file, it will execute the code contained in the specified class.
Explanation of the SimpleProgram Line by Line The First Line: This is a comment. Like most other programming languages, Java lets you enter a remark into a program’s source file. The contents of a comment are ignored by the compiler. Instead, a comment describes or explains the operation of the program to anyone who is reading its source code.
The Second Line: This line uses the keyword class to declare that a new class is being defined. SimpleProgram is the name of the class. The class definition begins with the opening curly brace ({) and ends with the closing curly brace (}). The elements between the two braces are members of the class. The Third line: This line begins the main( ) method. This is the line at which the program will begin executing. All Java applications begin execution by calling main( ) so you must have one for any program you wish to run. The Fourth line: This defines a method for displaying text in a command prompt i.e. it tells the system to display the string “I am a java programmer” on the command line. All statements in Java end with a semicolon (;). The Fifth & Sixth Lines: The first } in the program ends main( ), and the last } ends the SimpleProgram class definition.
Java is case sensitive. Forgetting this can cause you serious problems. For example, if you accidentally type Main instead of main, or PrintLn instead of println, the preceding program will be incorrect. Furthermore, although the Java compiler will compile classes that do not contain a main( ) method, it has no way to execute them. So, if you had mistyped main, the compiler would still compile your program. However, the Java interpreter would report an error because it would be unable to find the main( ) method. CASE 2: Using the NetBeans 5.5 IDE to develop the SimpleProgram.java application
Create a project folder first as explained in section 1.3.1. From the file menu, select the New File option. The New
File window appears (figure 1.10) from which you select the category (in this case, Java Classes) and type of java
file (in this case, Empty Java File). Click the next button to proceed to another window where you just type in the
name of the java file (figure 1.11). Click the Finish button.

P a g e | 18
Intentio Nigeria Limited www.intentio-ng.com
Figure 1.10 Figure 1.11
Type in the code into the right frame called an editor or Source editor (figure 1.12). To compile and run the
program, simply follow any of the options as below:
1. Simply Right-Click the Editor and select the Run File option. (figure 1.13)
OR
2. From the Run Menu, select the Run File option then Run filename or just press Shift+f6 (figure 1.14)
The output appears in the OUTPUT Window at the bottom as in figure 1.15
Figure 1.12 Figure 1.13
Figure 1.14 Figure 1.15

P a g e | 19
Intentio Nigeria Limited www.intentio-ng.com
1.6 EXPRESSIONS, STATEMENTS, AND BLOCKS
Variables and operators are basic building blocks of programs. You combine literals, variables, and operators to
form expressions - segments of code that perform computations and return values. Certain expressions can be
made into statements -complete units of execution. By grouping statements together with curly braces { and }, you
create blocks of code.
Expressions
Expressions perform the work of a program. Among other things, expressions are used to compute and to assign
values to variables and to help control the execution flow of a program. The job of an expression is twofold: to
perform the computation indicated by the elements of the expression and to return a value that is the result of the
computation.
An expression is a series of variables, operators, and method calls (constructed according to the syntax of the
language) that evaluates to a single value.
When operators of equal precedence appear in the same expression, a rule must govern which is evaluated first. All binary operators except for the assignment operators are evaluated in left-to-right order. Assignment operators are evaluated right to left.
Statements
Statements are roughly equivalent to sentences in natural languages. A statement forms a complete unit of
execution. The following types of expressions can be made into a statement by terminating the expression with a
semicolon (;):
Assignment expressions
Any use of ++ or --
Method calls
Object creation expressions
These kinds of statements are called expression statements. Here are some examples of expression statements:
aValue = 8933.234; //assignment statement
aValue++; //increment statement
System.out.println(aValue); //method call statement
Integer integerObject = new Integer(4); //object creation statement
In addition to these kinds of expression statements, there are two other kinds of statements. A declaration
statement declares a variable. You've seen many examples of declaration statements.
double aValue = 8933.234; // declaration statement
A control flow statement regulates the order in which statements get executed. The for loop and the if
statement are both examples of control flow statements.
Blocks
A block is a group of zero or more statements between balanced braces and can be used anywhere a single
statement is allowed. The following listing shows a block from a program containing a single statement:
if (testscore >= 90) {
grade = 'A';
}

P a g e | 20
Intentio Nigeria Limited www.intentio-ng.com
1.7 ARRAYS An array is a collection of variables of the same type, referred to by a common name. In Java, arrays can have one or more dimensions, although the one-dimensional array is the most common. Arrays are used for a variety of purposes because they offer a convenient means of grouping together related variables. For example, you might use an array to hold a record of the daily high temperature for a month, a list of stock price averages, or a list of your collection of programming books. To declare a one-dimensional array, you will use this general form:
type array-name[ ] = new type[size];
Here, type declares the base type of the array. The base type determines the data type of each element contained in the array. The number of elements that the array will hold is determined by size. Since arrays are implemented as objects, the creation of an array is a two-step process. First, you declare an array reference variable. Second, you allocate memory for the array, assigning a reference to that memory to the array variable. Thus, arrays in Java are dynamically allocated using the new operator. Here is an example. The following creates an int array of 4 elements and links it to an array reference variable named sample. int sample[] = new int[4];
This declaration works just like an object declaration. The sample variable holds a reference to the memory allocated by new. This memory is large enough to hold 4 elements of type int. As with objects, it is possible to break the preceding declaration in two. For example: int sample[];
sample = new int[4];
In this case, when sample is first created, it is null, because it refers to no physical object. It is only after the second statement executes that sample is linked with an array. An individual element within an array is accessed by use of an index. An index describes the position of an element within an array. In Java, all arrays have zero as the index of their first element. Because sample has 4 elements, it has index values of 0 through 3. To index an array, specify the number of the element you want, surrounded by square brackets. Thus, the first element in sample is sample[0], and the last element is sample[3]. For example, the following program loads sample with the numbers 11, 34, 67, 100. // Demonstrate a one-dimensional array.
class ArrayDemo {
public static void main(String args[]) {
int sample[] = new int[4];
sample[0] = 11;
sample[1] = 34;
sample[2] = 67;
sample[3] = 100;
System.out.println("First element equals " + sample[0]);
System.out.println("Second element equals " + sample[1]);
System.out.println("Third element equals " + sample[2]);
System.out.println("Fourth element equals " + sample[3]);
}
}

P a g e | 21
Intentio Nigeria Limited www.intentio-ng.com
The output from the program is shown here: First element equals 11
Second element equals 34
Third element equals 67
Fourth element equals 100
Arrays can be initialized when they are created. The general form for initializing a one-dimensional array is shown here: type array-name[ ] = { val1, val2, val3, ... , valN };
Here, the initial values are specified by val1 through valN. They are assigned in sequence, left to right, in index order. Java automatically allocates an array large enough to hold the initializers that you specify. There is no need to explicitly use the new operator. Thus, the sample array example can be rewritten as:
int [] sample = {11,34,67,100};
Note: Arrays have a specific property length which gives the size of the array. Thus, to determine the size of an array, you simply use the form: array-name.length.
Using the example above we could determine the size of the array by using
sample.length
which returns 10.
1.8 CONTROL FLOW STATEMENTS
The Java programming language provides several control flow statements, which are listed in the following table.
Statement Type Keyword
looping while, do-while , for
decision making if-else, switch-case
exception handling try-catch-finally, throw
branching break, continue, label:, return
Table 1.7
In the sections that follow, you will see the following notation to describe the general form of a control flow
statement:
control flow statement details {
statement(s);
}
Technically, the braces, { and }, are not required if the block contains only one statement. However, we
recommend that you always use { and }, because the code is easier to read and it helps to prevent errors when
modifying code.

P a g e | 22
Intentio Nigeria Limited www.intentio-ng.com
1.8.1 The for Statement
The for statement provides a compact way to iterate over a range of values. The general form of the for
statement can be expressed like this:
for (initialization; termination; increment) {
statement
}
The initialization is an expression that initializes the loop - it's executed once at the beginning of the loop.
The termination expression determines when to terminate the loop. This expression is evaluated at the top of
each iteration of the loop. When the expression evaluates to false, the loop terminates. Finally, increment is
an expression that gets invoked after each iteration through the loop. All these components are optional. In fact,
to write an infinite loop, you omit all three expressions:
for ( ; ; ) { // infinite loop
...
}
Often for loops are used to iterate over the elements in an array, or the characters in a string. The following
sample, ForDemo , uses a for statement to iterate over the elements of an array and print them:
public class ForDemo {
public static void main(String[] args) {
int[] arrayOfInts = { 32, 87, 3, 589, 12, 1076,
2000, 8, 622, 127 };
for (int i = 0; i < 5; i++)
System.out.println(arrayOfInts[i] + "");
}
}
The output of the program is: 32 87 3 589 12. Note that you can declare a local variable within the initialization expression of a for loop. The scope of this
variable extends from its declaration to the end of the block governed by the for statement so it can be used in the
termination and increment expressions as well. If the variable that controls a for loop is not needed outside of the
loop, it's best to declare the variable in the initialization expression. The names i, j, and k are often used to control
for loops; declaring them within the for loop initialization expression limits their life-span and reduces errors.
1.8.2 The if/else Statements
The if statement enables your program to selectively execute other statements, based on some criteria. For
example, suppose that your program prints debugging information, based on the value of a boolean variable
named DEBUG. If DEBUG is true, your program prints debugging information, such as the value of a variable x.
Otherwise, your program proceeds normally. A segment of code to implement this might look like this:
if (DEBUG) {
System.out.println("DEBUG: x = " + x);
}
This is the simplest version of the if statement: The block governed by the if is executed if a condition is true.
Generally, the simple form of if can be written like this:
if (expression) {
statement(s);
}

P a g e | 23
Intentio Nigeria Limited www.intentio-ng.com
What if you want to perform a different set of statements if the expression is false? You use the else statement for
that. Consider another example. Suppose that your program needs to perform different actions depending on
whether the user clicks the OK button or another button in an alert window. Your program could do this by using
an if statement along with an else statement:
. . .
// response is either OK or CANCEL depending
// on the button that the user pressed
. . .
if (response == OK) {
// code to perform OK action
} else {
// code to perform Cancel action
}
The else block is executed if the if part is false. Another form of the else statement, else if, executes a
statement based on another expression. An if statement can have any number of companion else if
statements but only one else. Following is a program, IfElseDemo, that assigns a grade based on the value of
a test score: an A for a score of 90% or above, a B for a score of 80% or above, and so on:
public class IfElseDemo {
public static void main(String[] args) {
int testscore = 76;
char grade;
if (testscore >= 90) {
grade = 'A';
} else if (testscore >= 80) {
grade = 'B';
} else if (testscore >= 70) {
grade = 'C';
} else if (testscore >= 60) {
grade = 'D';
} else {
grade = 'F';
}
System.out.println("Grade = " + grade);
}
}
The output from this program is: Grade = C
You may have noticed that the value of testscore can satisfy more than one of the expressions in the
compound if statement: 76 >= 70 and 76 >= 60. However, as the runtime system processes a compound if
statement such as this one, once a condition is satisfied, the appropriate statements are executed (grade =
'C';), and control passes out of the if statement without evaluating the remaining conditions.
1.8.3 The switch Statement
Use the switch statement to conditionally perform statements based on an integer expression. Following is a
sample program, SwitchDemo, that declares an integer named month whose value supposedly represents the

P a g e | 24
Intentio Nigeria Limited www.intentio-ng.com
month in a date. The program displays the name of the month, based on the value of month, using the switch
statement:
public class SwitchDemo {
public static void main(String[] args) {
int month = 8;
switch (month) {
case 1: System.out.println("January"); break;
case 2: System.out.println("February"); break;
case 3: System.out.println("March"); break;
case 4: System.out.println("April"); break;
case 5: System.out.println("May"); break;
case 6: System.out.println("June"); break;
case 7: System.out.println("July"); break;
case 8: System.out.println("August"); break;
case 9: System.out.println("September"); break;
case 10: System.out.println("October"); break;
case 11: System.out.println("November"); break;
case 12: System.out.println("December"); break;
}
}
}
The switch statement evaluates its expression, in this case the value of month, and executes the appropriate
case statement. Thus, the output of the program is: August. Of course, you could implement this by using an if
statement as follows:
int month = 8;
if (month == 1) {
System.out.println("January");
} else if (month == 2) {
System.out.println("February");
}
. . . // and so on
Deciding whether to use an if statement or a switch statement is a judgment call. You can decide which to use,
based on readability and other factors. An if statement can be used to make decisions based on ranges of values
or conditions, whereas a switch statement can make decisions based only on a single integer value. Also, the
value provided to each case statement must be unique.
Another point of interest in the switch statement is the break statement after each case. Each break
statement terminates the enclosing switch statement, and the flow of control continues with the first statement
following the switch block. The break statements are necessary because without them, the case statements
fall through. That is, without an explicit break, control will flow sequentially through subsequent case
statements.
1.9 EXCEPTION HANDLING STATEMENTS
The Java programming language provides a mechanism known as exceptions to help programs report and handle
errors. When an error occurs, the program throws an exception. What does this mean? It means that the normal
flow of the program is interrupted and that the runtime environment attempts to find an exception handler--a
block of code that can handle a particular type of error. The exception handler can attempt to recover from the
error or, if it determines that the error is unrecoverable, provide a gentle exit from the program.

P a g e | 25
Intentio Nigeria Limited www.intentio-ng.com
Three statements play a part in handling exceptions:
The try statement identifies a block of statements within which an exception might be thrown.
The catch statement must be associated with a try statement and identifies a block of statements that can
handle a particular type of exception. The statements are executed if an exception of a particular type occurs
within the try block.
The finally statement must be associated with a try statement and identifies a block of statements that are
executed regardless of whether or not an error occurs within the try block.
Here's the general form of these statements:
try {
statement(s);
} catch (exceptiontype name) {
statement(s);
} finally {
statement(s);
}
1.10 CASTING Casting is the process of producing a new value that has a different type than its source. Although the concept of casting is reasonably simple, the usage is complicated by the fact that Java has both primitive types (such as int, float, and boolean) and object types (String, Point, ZipFile, and the like). This section discusses two forms of cast and conversions:
1.10.1 Converting Primitive Types to Objects and Vice-Versa One thing you can’t do under any circumstance is cast from an object to a primitive data type, or vice versa. Primitive types and objects are very different things in Java, and you can’t automatically cast between the two. As an alternative, the java.lang package includes classes that correspond to each primitive data type: Float,
Boolean, Byte, and so on. Most of these classes have the same names as the data types, except that the class names begin with a capital letter (Short instead of short, Double instead of double, and the like). Also two classes have names that differ from the corresponding data type: Character is used for char variables, and Integer is used for int variables. Using the classes that correspond to each primitive type, you can create an object that holds the same value. The following statement creates an instance of the Integer class with the integer value 7801:
Integer dataCount = new Integer(7801);
After you have an object created in this manner, you can use it as you would any object (although you cannot change its value). When you want to use that value again as a primitive value, there are methods for that, as well. For example, if you wanted to get an int value from a dataCount object, the following statement would be apt:
int newCount = dataCount.intValue(); // returns 7801
1.10.2 Converting String to Numeric Data Type A common translation you need in programs is converting a String to a numeric type, such as an integer. When you need an int as the result, this can be done by using the parseInt() class method of the Integer, Float etc class. The String to convert is the only argument sent to the method, as in the following example: String pennsylvania = “65000”;
int penn = Integer.parseInt(pennsylvania);

P a g e | 26
Intentio Nigeria Limited www.intentio-ng.com
String val = “23.5”;
Float newVal = Float.parseFloat(val);
The following classes can be used to work with objects instead of primitive data types: Boolean, Byte, Character, Double, Float, Integer, Long, Short, and Void. These classes are commonly referred to as object wrappers because they provide an object representation that contains a primitive value.
1.11 CLASSES
Definition: A class is defined via the class keyword and the name of the class, as in the following example: class Parent {
// body of the class
}
1.11.1 Creating Classes
To illustrate classes, we will develop a class that encapsulates information about vehicles, such as cars, vans, and trucks. This class is called Vehicle, and it will store three items of information about a vehicle: the number of passengers that it can carry, its fuel capacity, and its average fuel consumption (in miles per gallon). The first version of Vehicle is shown next. It defines three instance variables: passengers, fuelcap, and mpg. Notice that Vehicle does not contain any methods. Thus, it is currently a data-only class. (Subsequent sections will add methods to it.)
class Vehicle {
int passengers; // number of passengers
int fuelcap; // fuel capacity in gallons
int mpg; // fuel consumption in miles per gallon
}
A class definition creates a new data type. In this case, the new data type is called Vehicle. You will use this name to declare objects of type Vehicle. Remember that a class declaration is only a type description; it does not create an actual object. Thus, the preceding code does not cause any objects of type Vehicle to come into existence. To actually create a Vehicle object, you will use a statement like the following:
Vehicle minivan = new Vehicle(); // create a Vehicle object called minivan
After this statement executes, minivan will be an instance of Vehicle. Thus, it will have “physical” reality. For the moment, don’t worry about the details of this statement. Each time you create an instance of a class, you are creating an object that contains its own copy of each instance variable defined by the class. Thus, every Vehicle object will contain its own copies of the instance variables passengers, fuelcap, and mpg. To access these variables, you will use the dot (.) operator. The dot operator links the name of an object with the name of a member. The general form of the dot operator is shown here: object.member Thus, the object is specified on the left, and the member is put on the right. For example, to assign the fuelcap variable of minivan the value 16, use the following statement:
minivan.fuelcap = 16;
In general, you can use the dot operator to access both instance variables and methods. Here is a complete program that uses the Vehicle class: /* A program that uses the Vehicle class.
Call this file VehicleDemo.java

P a g e | 27
Intentio Nigeria Limited www.intentio-ng.com
*/
class Vehicle {
int passengers; // number of passengers
int fuelcap; // fuel capacity in gallons
int mpg; // fuel consumption in miles per gallon
}
// This class declares an object of type Vehicle.
class VehicleDemo {
public static void main(String args[]) {
Vehicle minivan = new Vehicle();
int range;
// assign values to fields in minivan
minivan.passengers = 7; minivan.fuelcap = 16;
minivan.mpg = 21;
// compute the range assuming a full tank of gas
range = minivan.fuelcap * minivan.mpg;
System.out.println("Minivan can carry " + minivan.passengers +" with a range of " +
range);
}
}
The output from this program is: Minivan can carry 7 with a range of 336
1.11.2 Creating Objects
In the preceding programs, the following line was used to declare an object of type Vehicle: Vehicle minivan = new Vehicle(); This declaration performs two functions. First, it declares a variable called minivan of the class type Vehicle. This variable does not define an object. Instead, it is simply a variable that can refer to an object. Second, the declaration creates a physical copy of the object and assigns to minivan a reference to that object. This is done by using the new operator. The new operator dynamically allocates (that is, allocates at run time) memory for an object and returns a reference to it. This reference is, more or less, the address in memory of the object allocated by new. This reference is then stored in a variable. Thus, in Java, all class objects must be dynamically allocated. The two steps combined in the preceding statement can be rewritten like this to show each step individually: Vehicle minivan; // declare reference to object
minivan = new Vehicle(); // allocate a Vehicle object
The first line declares minivan as a reference to an object of type Vehicle. Thus, minivan is a variable that can refer to an object, but it is not an object, itself. At this point, minivan contains the value null, which means that it does not refer to an object. The next line creates a new Vehicle object and assigns a reference to it to minivan. Now, minivan is linked with an object. 1.11.3 The Class Body
The class body follows the class declaration and is embedded within curly braces { and }. The class body contains
declarations for all instance variables and class variables (known collectively as member variables) for the class. In
addition, the class body contains declarations and implementations for all instance methods and class methods
(known collectively as methods) for the class.

P a g e | 28
Intentio Nigeria Limited www.intentio-ng.com
1.11.4 Declaring Member Variables
A class's state is represented by its member variables. You declare a class's member variables in the body of the
class. Typically, you declare a class's variables before you declare its methods, although this is not required.
classDeclaration {
member variable declarations
method declarations
}
To declare variables that are members of a class, the declarations must be within the class body, but not
within the body of a method. Variables declared within the body of a method are local to that method.
Local Variables
Within the body of the method you can declare more variables for use within that method. These variables are
local variables and live only while control remains within the method. This method declares a local variable i that
it uses to iterate over the elements of its array argument.
Class LocVar {
int[] arrayOfInts = { 32, 87, 3, 589, 12, 1076,};
void doIteration() {
for (int i = 0; i < 5; i++){
System.out.println(arrayOfInts[i] + “”);
}
}
The i exists only within the method doIteration() so it is local to it hence the name local variable.
1.11.5 Defining Methods In Java, a method definition has four basic parts:
The name of the method
A list of parameters
The type of object or primitive type returned by the method
The body of the method The first two parts of the method definition form the method’s signature. Furthermore, you define a class's methods in the body of the class for which the method implements some behaviour. Typically, you declare a class's methods after its variables in the class body although this is not required. Here’s what a basic method definition looks like: returnType methodName(type1 par1, type2 par2, type3 par3 ...) {
// body of the method
}
The returnType is the primitive type or class of the value returned by the method. It can be one of the primitive types, a class name, or void if the method does not return a value at all. The method’s parameter list is a set of variable declarations separated by commas and set inside parentheses. These parameters become local variables in the body of the method, receiving their values when the method is called. You can have statements, expressions, method calls on other objects, conditionals, loops, and so on inside the body of the method. Unless a method has been declared with void as its return type, the method returns some

P a g e | 29
Intentio Nigeria Limited www.intentio-ng.com
kind of value when it is completed. This value must be explicitly returned at some exit point inside the method, using the return keyword. Returning a Value from a Method
You declare a method's return type in its method declaration. Within the body of the method, you use the
return operator to return the value. Any method that is not declared void must contain a return statement.
The Stack class declares the isEmpty method, which returns a boolean:
public boolean isEmpty() {
if (items.size() == 0)
return true;
else
return false;
}
The data type of the return value must match the method's return type; you can't return an Object type from a
method declared to return an integer. The isEmpty method returns either the boolean value true or false,
depending on the outcome of a test. A compiler error results if you try to write a method in which the return value
doesn't match the return type.
A Method's Name
Java supports method name overloading so that multiple methods can share the same name. For example,
suppose you are writing a class that can render various types of data (strings, integers, and so on) to its drawing
area. You need to write a method that knows how to render each data type. In other languages, you have to think
of a new name for each method, for example, drawString, drawInteger, drawFloat, and so on. In Java,
you can use the same name for all of the drawing methods but pass a different type of parameter to each method.
So, in your data rendering class, you can declare three methods named draw, each of which takes a different type
of parameter:
class DataRenderer {
void draw(String s) {
. . .
}
void draw(int i) {
. . .
}
void draw(float f) {
. . .
}
}
Passing Information into a Method
It is possible to pass one or more values to a method when the method is called. A value passed to a method is called an argument. Inside the method, the variable that receives the argument is called a parameter. Parameters are declared inside the parentheses that follow the method’s name. The parameter declaration syntax is the same as that used for variables. A parameter is within the scope of its method, and aside from its special task of receiving an argument, it acts like any other local variable.

P a g e | 30
Intentio Nigeria Limited www.intentio-ng.com
An argument is a value that is passed to a method when it is invoked. A parameter is a variable defined by
a method that receives the value of the argument.
A method can be made to return through the use of the return statement. If the method has a void return type, it will also return when its closing curly brace is reached. Non-void methods must return a value, so returning by reaching the closing curly brace is not an option.
When you write your method, you declare the number and type of the arguments required by that method. You
declare the type and name for each argument in the method signature. For example, the following is a method
that computes the area of a square or rectangle:
double computeArea(double length, double breadth) {
double Area; //declare variable
Area = (length * breadth);
return Area;
}
This method has a return type of double hence the variable to be returned (Area) is also of the same data type. The method also takes two arguments: the length and breadth of double-precision floating point numbers.
As with this method, the set of arguments to any method is a comma-separated list of variable declarations where each variable declaration is a type/name pair:
type name
As you can see from the body of the computeArea method, you simply use the argument name to refer to the
argument's value.
Calling Methods
To call a method that has been defined within a class, you simply refer to the name of the method with it’s
required arguments if any. If the calling method is within the same class as the defined method (as seen in the
simpleCalc project where the doAddition() is called), you simply call the method directly as below where
arguments are required and a case where they are no required:
Methodname(argument1,…);
Methodname();
Where the calling method is in a different class to where it was defined, you use the dot notation as in:
Object.methodname(argument1,argument2,…);
Object.methodname();
The example below calls the methods computeArea (return type) and showResult (void
method) using an object of the class. The bodies of both methods are shown in bold:
//class with the defined methods
class doArea {
double Area; //declare variable
//method with return type to compute area
double computeArea(double length, double breadth) {
Area = (length * breadth);

P a g e | 31
Intentio Nigeria Limited www.intentio-ng.com
return Area;
}
//void method (no return type) to show result
void showResult() {
System.out.println("The Area is " + Area);
}
}
//main class
class mainClass {
public static void main(String[]args) {
doArea obj = new doArea(); //create object of the doArea class
//invoke or call the methods
obj.computeArea(10.5,20.5);
obj.showResult();
}
}
The output from this program is: The Area is 215.25
1.11.6 The this Keyword
In the body of a method definition, there are times you might need to refer to the object to which the method belongs. This can be done to use that object’s instance variables and to pass the current object as an argument to another method. To refer to the object in these cases, use the this keyword where you normally would refer to an object’s name. The this keyword refers to the current object, and you can use it anywhere a reference to an object might appear: in dot notation, as an argument to a method, as the return value for the current method, and so on.
1.11.7 Providing Constructors for Your Classes
All Java classes have constructors that are used to initialize a new object of that type. A constructor has the same name as the class. For example, the name of the Stack class's constructor is Stack, the name of the Rectangle class's constructor is Rectangle, and the name of the Thread class's constructor is Thread. For example, a public class SimpleCalc has a constructor defined for it as below: public class SimpleCalc {
public SimpleCalc() {
constructor body;
}
Java supports name overloading for constructors so that a class can have any number of constructors, all of which
have the same name. Following is another constructor that could be defined by RevCon. The constructors are
shown in bold:
class RevCon {
String a,b;
//First constructor with a single parameter
RevCon(String a) {

P a g e | 32
Intentio Nigeria Limited www.intentio-ng.com
this.a = a; //note the use of this to differentiate the two variables
System.out.println("My name is " + a);
}
//Second constructor with double parameter
RevCon (String a, String b) {
this.a = a;
System.out.println("My names are " + a + " " + b);
}
public static void main(String[]args) {
//create object using the first constructor
RevCon re = new RevCon("Adebayo");
//create object using the second constructor
RevCon nu = new RevCon("Adebayo", "Adegbembo");
}
}
The output from this program is: My name is Adebayo My names are Adebayo Adegbembo
Both constructors share the same name, RevCon, but they have different parameter lists. The compiler
differentiates these constructors based on the number of parameters in the list and their types.
Typically, a constructor uses its arguments to initialize the new object's state. When creating an object, choose the
constructor whose arguments best reflect how you want to initialize the new object.
Based on the number and type of the arguments that you pass into the constructor, the compiler can determine
which constructor to use. The compiler knows that when you write the following code, it should use the
constructor that requires a single string argument:
new RevCon("Adebayo");
Similarly, when you write the following code, the compiler chooses the double-argument constructor or the
default constructor:
RevCon("Adebayo", "Adegbembo");
When writing your own class, you don't have to provide constructors for it. The default constructor is
automatically provided by the runtime system for any class that contains no constructors. The default provided by
the runtime system doesn't do anything. So, if you want to perform some initialization, you will have to write some
constructors for your class.
1.11.8 INHERITANCE
Inheritance is one of the three foundation principles of object-oriented programming because it allows the creation of hierarchical classifications. Using inheritance, you can create a general class that defines traits common to a set of related items. This class can then be inherited by other, more specific classes, each adding those things that are unique to it. In the language of Java, a class that is inherited is called a superclass. The class that does the inheriting is called a subclass. Therefore, a subclass is a specialized version of a superclass. It inherits all of the variables and methods defined by the superclass and adds its own, unique elements.

P a g e | 33
Intentio Nigeria Limited www.intentio-ng.com
Inheritance Basics Java supports inheritance by allowing one class to incorporate another class into its declaration. This is done by using the extends keyword. Thus, the subclass adds to (extends) the superclass. Let’s begin with a short example that illustrates several of the key features of inheritance. The following program creates a superclass called TwoDShape, which stores the width and height of a two-dimensional object, and a subclass called Triangle. Notice how the keyword extends is used to create a subclass. // A simple class hierarchy.
// A class (super class) for two-dimensional objects.
class TwoDShape {
double width;
double height;
void showDim() {
System.out.println("Width and height are " +
width + " and " + height);
}
}
// A subclass of TwoDShape for triangles.
class Triangle extends TwoDShape { //Triangle inherits TwoDShape String style;
//Triangle can refer to the members of TwoDShapeas if they were part of Triangle as in this method double area() { return width * height / 2;
}
void showStyle() { //method
System.out.println("Triangle is " + style);
}
}
//main class
class Shapes {
public static void main(String args[]) {
Triangle t1 = new Triangle();
Triangle t2 = new Triangle();
t1.width = 4.0;
t1.height = 4.0; //All members of Triangle are available to Triangle objects, even those inherited fromTwoDShape. t1.style = "isosceles";
t2.width = 8.0;
t2.height = 12.0;
t2.style = "right";
System.out.println("Info for t1: ");
t1.showStyle();
t1.showDim();
System.out.println("Area is " + t1.area());
System.out.println();
System.out.println("Info for t2: ");
t2.showStyle();
t2.showDim();
System.out.println("Area is " + t2.area());
}
}
The output from this program is shown here: Info for t1:
Triangle is isosceles
Width and height are 4.0 and 4.0
Area is 8.0
Info for t2:

P a g e | 34
Intentio Nigeria Limited www.intentio-ng.com
Triangle is right
Width and height are 8.0 and 12.0
Area is 48.0
Here, TwoDShape defines the attributes of a “generic” two-dimensional shape, such as a square, rectangle, triangle, and so on. The Triangle class creates a specific type of TwoDShape, in this case, a triangle. The Triangle class includes all of TwoDObject and adds the field style, the method area( ), and the method showStyle( ). A description of the type of triangle is stored in style, area( ) computes and returns the area of the triangle, and showStyle( ) displays the triangle style. Because Triangle includes all of the members of its superclass, TwoDShape, it can access width and height inside area( ). Also, inside main( ), objects t1 and t2 can refer to width and height directly, as if they were part of Triangle. Even though TwoDShape is a superclass for Triangle, it is also a completely independent, stand-alone class. Being a superclass for a subclass does not mean that the superclass cannot be used by itself. For example, the following is perfectly valid.
TwoDShape shape = new TwoDShape();
shape.width = 10;
shape.height = 20;
shape.showDim();
Of course, an object of TwoDShape has no knowledge of or access to any subclasses of TwoDShape. The general form of a class declaration that inherits a superclass is shown here: class subclass-name extends superclass-name { // body of class }
You can specify only one superclass for any subclass that you create. Java does not support the inheritance of multiple superclasses into a single subclass. (This differs from C++, in which you can inherit multiple base classes. Be aware of this when converting C++ code to Java.) You can, however, create a hierarchy of inheritance in which a subclass becomes a superclass of another subclass. Of course, no class can be a superclass of itself. A major advantage of inheritance is that once you have created a superclass that defines the attributes common to a set of objects, it can be used to create any number of more specific subclasses. Each subclass can precisely tailor its own classification. For example, here is another subclass of TwoDShape that encapsulates rectangles.
// A subclass of TwoDShape for rectangles.
class Rectangle extends TwoDShape {
boolean isSquare() {
if(width == height) return true;
return false;
}
double area() {
return width * height;
}
}
The Rectangle class includes TwoDShape and adds the methods isSquare( ), which determines if the rectangle is square, and area( ), which computes the area of a rectangle.

P a g e | 35
Intentio Nigeria Limited www.intentio-ng.com
1.12 INTERFACES
An interface defines a protocol of communication between two objects. An interface definition is comprised of a
declaration and a body. The interface body contains declarations, but no implementations, for a set of methods.
An interface might also contain constant definitions. A class that implements an interface must implement all the
methods declared in the interface. An interface name can be used anywhere a type can be used.
Interfaces look a lot like classes; they are declared in much the same way and can be arranged into a hierarchy. However, you must follow certain rules for declaring interfaces. To create a new interface, you declare it like this:
interface Expandable { // ... }
This declaration is, effectively, the same as a class definition, with the word interface replacing the word class.
Inside the interface definition, you have methods and variables.
To declare a class that implements an interface, include an implements clause in the class declaration. Your class can implement more than one interface (the Java platform supports multiple inheritance for interfaces), so
the implements keyword is followed by a comma-separated list of the interfaces implemented by the class.
class Intfc implements ActionListener {
//…
}
The example below defines an interface and a class that implements the interface. The interface method (without
implementation) and implemented method are shown in bold.
//define the interface
interface showMsg {
public void showStr(); //note that this method has no body
}
//implementing class
class Intfc implements showMsg {
public void showStr(){ //the method’s body is defined
System.out.println("My name is Adebayo.");
}
public static void main (String[]args) {
Intfc nu = new Intfc();
nu.showStr();
}
}
The output from this program is shown here: My name is Adebayo.

P a g e | 36
Intentio Nigeria Limited www.intentio-ng.com
1.13 PACKAGES
Definition: A package is a collection of related classes and interfaces providing access protection and namespace
management.
The classes and interfaces that are part of the Java platform are members of various packages that bundle classes
by function: fundamental classes are in java.lang, classes for reading and writing (input and output) are in
java.io, classes for buttons, labels and co are in javax.swing, and so on. You can put your classes and
interfaces in packages, too.
To use a class or an interface that's in a different package, you have three choices:
Use the fully qualified name of the class or the interface. An example is shown below:
javax.swing.JLabel label = new javax.swing.JLabel(“Name”);
javax.swing.JButton btn = new javax.swing.JButton(“Click”);
Import the class or the interface. In which case, you can then refer to the name of the exact class
anywhere within the class without the need for its full name:
import javax.swing.JLabel;
import javax.swing.JButton;
class abc {
JLabel label = new JLabel(“Name”);
JButton btn = new JButton(“Click”);
//…
}
Import the entire package of which the class or the interface is a member. You use the wildcard (*)
character for this enabling the use of any containing classes within the package as below.
import javax.swing.*;
class abc {
JLabel label = new JLabel(“Name”);
JButton btn = new JButton(“Click”);
//…
}
Importing packages must be done before the definition of classes. In other words, the import statements
must come before any class is defined.
1.14 JAVA.IO PACKAGE
The java.io package is responsible for handling input and output of data called streams in java programs. Java programs perform I/O through streams. Streams carry something from one place to another. A stream is a path traveled by data in a program. An input stream sends data from a source into a program, and an output stream sends data from a program to a destination. A stream is linked to a physical device by the Java I/O system. All streams behave in the same manner, even if the actual physical devices they are linked to differ. Thus, the same I/O classes and methods can be applied to any type of device. For example, the same methods that you use to write to the console can also be used to write to a disk file.

P a g e | 37
Intentio Nigeria Limited www.intentio-ng.com
Two types of stream are the Byte and Character streams. Byte streams carry integers with values that range from 0 to 255. A diverse assortment of data can be expressed in byte format, including numerical data, executable programs, Internet communications, and bytecode—the class files run by a Java virtual machine. In fact, every kind of data imaginable can be expressed using either individual bytes or a series of bytes combined with each other. Character streams are a specialized type of byte stream that handles only textual data. Specifically, any kind of data that involves texts should make use of character streams and this include text files, web pages etc. Process The basic process for using streams (reading and writing) is as follows:
Reading Information From Streams First, create an object that is associated with the data source from which you intend to read: FileInputStream obj = new FileInputStream(“filename”); //for byte streams FileReader obj = new FileReader(“filename”); //for character streams Where filename is the name of the file from which you want to read. Next, you invoke the read() method of the object to read information from the stream: obj.read(); Lastly, call the close() method of the object. obj.close();
Writing Information to Streams First, create an object that is associated with the data’s destination i.e. for which you intend to send the info. FileOutputStream obj = new FileOutputStream(“filename”); //for byte streams FileWriter obj = new FileWriter(“filename”); //for character streams Where filename is the name of the file you’re writing to. Next, you invoke the write() method of the object to write the information as in: obj.write(info); Lastly, call the close() method of the object: obj.close(); Note: You could specify the full path for the filename. When specifying a path string in java using a Windows system, you should use double backslashes as the compiler mistakes the single backslash for an escape character. Thus, the path “c:\Users\Adebayo\Documents\file.java” is written as “c:\\users\\Adebayo\\Documents\\file.java”.
1.14.1 Exception Handling in java.io A number of exceptions can occur while working with the java.io package thus, all io statements must be enclosed within try-catch blocks. These exceptions are subclasses of the IOEXception class and include FileNotFoundException which is thrown when a program attempts to read from a file that cannot be located, EOFException implies End-Of-File Exception and it is thrown when the end of a file being read via an input stream is reached unexpectedly. 1.14.2 Byte Streams These are streams used to write binary data such as sounds, images and any form of data as they can all be expressed in bytes individually or collectively. File Input Stream To read bytes from a stream, you use the FileInputStream constructor to create an object of the class. The constructor takes one string argument which is the path or filename of the data source (file from which you want to read). Note that the byte returns as an integer and when the end of the file is reached, it returns an integer of -1 (minus 1). The read() method of the object is enclosed within a loop so that it keeps returning the bytes until the last one is read as in the example below:

P a g e | 38
Intentio Nigeria Limited www.intentio-ng.com
import java.io.*; //imports the java.io package and containing classes
class readByte {
public static void main (String[]args) {
try{
//create object of the FileInputStream with the filename that is to be read
FileInputStream obj = new FileInputStream("cell.gif");
int data = 0; //define and initialize a variable for the bytes to be read
while (data != -1) { //while the end of the file has not been reached
data = obj.read(); //read the byte stream and return as an integer
if (data == -1){ break;} //if end of file reached, break out
System.out.print(data + "\t"); //output the result
}
obj.close();
} catch (IOException ie) {
System.out.println("Error Somewhere");
}
}
}
File Output Stream A file output stream can be created with the FileOutputStream(String) constructor. The usage is the same as the FileInputStream(String) constructor, so you can specify a path along with a filename. You have to be careful when specifying the file associated with an output stream. If it’s the same as an existing file, the original will be wiped out when you start writing data to the stream. You can create a file output stream that appends data after the end of an existing file with the FileOutputStream(String, boolean) constructor. The string specifies the file, and the Boolean argument should equal true to append data instead of overwriting existing data as in: FileOutputStream obj = new FileOutputStream(“filename”, true); The write(int) method is then used on the object to write the bytes to the stream followed by a call to close() when finished as in the example below: import java.io.*;
class writeByte {
public static void main(String[]args) {
//create the bytes to be written
int [] data = {1,2,3,4,5,6,7,8,9,10};
try {
FileOutputStream obj = new FileOutputStream("writeByte.doc");
for (int i=0; i<data.length; i++) { //loop through until the array is exhausted
obj.write(data[i]); //write each array member
}
obj.close();
} catch (IOException ie) {
System.out.println("Data cannot be written");
}
}
}

P a g e | 39
Intentio Nigeria Limited www.intentio-ng.com
1.14.3 Character Streams Character streams are used to work with texts represented by Unicode – an international character set where every character has a corresponding numeric value. For example, character: a = 97; A = 65; space = 32 etc Reading Text Files The FileReader is the main class for reading character streams. First, you create an object of this class using its constructor FileReader(String) which associates it with the data source similar to reading byte streams as in: FileReader obj = new FileReader(filename). Next, you loop through the contents of the file until it returns a numeric value of -1 meaning the end of the file has been reached. Then you call the object’s close method to cap up the process. The example below reads the contents of the source file and displays it in the output window. import java.io.*; //import the package
class readChar {
public static void main(String[]args) {
try {
FileReader fr = new FileReader("readChar.java"); //create object of the class
int dat = 0; //define integer variable for the returning characters
while (dat != -1) { //loop tru until the end of the file is reached
dat = fr.read();
/*a character stream's read() method returns an integer representing its position
In the Unicode character set so you must cast it into character before displaying it*/
System.out.print((char)dat + "");
}
fr.close();
} catch (IOException ie) {
System.out.println(ie.getMessage());}
}
}
Writing Text Files This is done using the FileWriter(String) constructor. The usage is the same as the FileReader(String) constructor, so you can specify a path along with a filename as the data destination. You can also append data after the end of an existing file with the FileWriter(String, boolean) constructor. The string specifies the file, and the Boolean argument should equal true to append data instead of overwriting existing data as in: FileWriter obj = new FileWriter(“filename”, true); The write(int) method is then used on the object to write the bytes to the stream followed by a call to close() when finished. The example below writes the character equivalence of the integer array into a file alphabet.txt: import java.io.FileWriter;
import java.io.IOException;
class writeChar {
public static void main(String[]args) throws IOException {
char [] nac = {'N','A','C','O','S','S'};
FileWriter fw = new FileWriter("ReadMe.txt");
for (int i=0; i<nac.length; i++) {
fw.write(nac[i]);
}
fw.close();
}
}

P a g e | 40
Intentio Nigeria Limited www.intentio-ng.com
1.15 APPLETS.
Applets are small programs that are designed for transmission over the Internet and run within a browser. Because Java’s virtual machine is in charge of executing all Java programs, including applets, applets offer a secure way to dynamically download and execute programs over the Web.
Applets do not have a main( ) method. Unlike the programs shown earlier in this book, applets do not begin execution at main( ). In fact, most applets don’t even have a main( ) method. Instead, an applet begins execution when the name of its class is passed to a browser or other applet-enabled program. After you have entered the source code for applet, you compile in the same way that you have been compiling programs. However, running applet involves a different process. There are two ways in which you can run an applet: inside a browser with a special development tool that displays applets. The tool provided with the standard Java JDK is called appletviewer, and we will use it to run the applets developed in this module. Of course, you can also run them in your browser, but the appletviewer is much easier to use during development. To execute an applet (in either a Web browser or the appletviewer), you need to write a short HTML text file that contains the appropriate APPLET tag. Here is the HTML file that will execute an applet called SimpleApplet:
<applet code="SimpleApplet" width=200 height=60>
</applet>
The width and height statements specify the dimensions of the display area used by the applet. To execute SimpleApplet with an applet viewer, you will execute this HTML file. For example, if the preceding HTML file is called StartApp.html, then the following command line will run SimpleApplet:
C:\>appletviewer StartApp.html
Although there is nothing wrong with using a stand-alone HTML file to execute an applet, there is an easier way. Simply include a comment near the top of your applet’s source code file that contains the APPLET tag. If you use this method, the SimpleApplet source file looks like this: import java.awt.*;
import java.applet.*;
/*
<applet code="SimpleApplet" width=200 height=60>
</applet>
*/
public class SimpleApplet extends Applet {
public void paint(Graphics g) {
g.drawString("Java makes applets easy.", 20, 20);
}
}
Now you can execute the applet by passing the name of its source file to appletviewer. For example, this command line will now display SimpleApplet. C:>appletviewer SimpleApplet.java
The window produced by SimpleApplet, as displayed by appletviewer, is shown in the following illustration:

P a g e | 41
Intentio Nigeria Limited www.intentio-ng.com
Figure 1.16
When using appletviewer, keep in mind that it provides the window frame. Applets run in a browser will not have a visible frame. Let’s review an applet’s key points:
All applets are subclasses of Applet.
Applets do not need a main( ) method.
Applets must be run under an applet viewer or a Java-compatible browser.
User I/O is not accomplished with Java’s stream I/O classes. Instead, applets use the interface provided by the AWT.

P a g e | 42
Intentio Nigeria Limited www.intentio-ng.com
2.0 SWINGING IT
Objective
At the end of this section, you will be able to:
- Build a graphical user interface using the JFrame, JTextField, JButton and JLabels
- Make your program respond to events such as displaying text when a button is pressed.
- Project: Build a simple calculator
2.1 INTRODUCTION TO SWING
The Java class library includes a set of packages called Swing that enable Java programs to offer graphical user
interfaces and collect user input with the mouse, keyboard, and other input devices. The Swing components are all
part of the javax.swing package. Below are some of its components and descriptions:
JLabel Displays uneditable text or icons.
JTextField Enables user to enter data from the keyboard. Can also be used to display editable or uneditable text.
JButton Triggers an event when clicked with the mouse.
JCheckBox Specifies an option that can be selected or not selected.
JComboBox Provides a drop-down list of items from which the user can make a selection by clicking an item or possibly by typing into the box.
JList Provides a list of items from which the user can make a selection by clicking on any item in the list. Multiple elements can be selected.
JPanel Provides an area in which components can be placed and organized. Can also be used as a drawing area for graphics.
2.1.1 Creating an Application Swing enables you to create a Java program with an interface that uses the style of the native operating system, such as Windows or Solaris, or two styles, Ocean and Metal, that are unique to Java. Each of these styles is called a look and feel because it describes both the appearance of the interface and how its components function when they are used. Swing components are part of the javax.swing package, a standard part of the Java class library. To use a Swing class, you must make it available with an import statement or use a catchall statement such as the following:
import javax.swing.*;
Two other packages used with graphical user interface programming are java.awt, the Abstract Windowing Toolkit (AWT), and java.awt.event, event-handling classes that handle user input. When you use a Swing component, you work with objects of that component’s class. You create the component by calling its constructor and then calling methods of the component as needed for proper setup. All Swing components are subclasses of the abstract class JComponent, which includes methods to set the size of a component, change the background color, define the font used for any displayed text, and set up ToolTips—explanatory text that appears when you hover your mouse over the component for a few seconds.

P a g e | 43
Intentio Nigeria Limited www.intentio-ng.com
Before components can be displayed in a user interface, they must be added to a container, a component that can hold other components. Swing containers, which often can be placed in other containers, are subclasses of java.awt.Container. This class includes methods to add and remove components from a container, arrange components using an object called a layout manager, and set up borders around the edges of a container.
2.1.2 Creating an Interface The first step in creating a Swing application is to create a class that represents the graphical user interface. An object of this class serves as a container that holds all the other components to be displayed. In many projects, the main interface object is either a simple window (the JWindow class) or a more specialized window called a frame (the JFrame class). A window is a container that can be displayed on a user’s desktop. A simple window does not have a title bar; Maximize, Minimize, or Close buttons; or other features you see on most windows that open in a graphical operating system. In Swing, windows that do have these features are called frames. In a graphical environment such as Windows or Mac OS, users expect to have the ability to move, resize, and close the windows of programs that they run. The main place a simple window, rather than a frame, turns up is when programs are loading—there is sometimes a title screen with the program’s name, logo, and other information. One way to create a graphical Swing application is to make the interface a subclass of JFrame, as in the following class declaration:
public class SimpleCalc extends JFrame {
// ...
}
The constructor of the class should handle the following tasks:
Call a superclass constructor to give the frame a title and handle other setup procedures.
Set the size of the frame’s window, either by specifying the width and height in pixels or by letting Swing choose the right size.
Decide what to do if a user closes the window.
Display the frame. The JFrame class has two constructors: JFrame() and JFrame(String). One sets the frame’s title bar to the specified text, and the other leaves the title bar empty. You also can set the title by calling the frame’s
setTitle(String) method. The size of a frame can be established by calling the setSize(int, int) method with the width and height as arguments. The size of a frame is indicated in pixels, so if you called setSize(650, 550), the frame would take up most of a screen at 800 * 600 resolution. Another way to set the size of a frame is to fill the frame with the components it will contain and then call the frame’s pack() method. This resizes the frame based on the size of the components inside it. If the size of the frame is bigger than it needs to be, pack() shrinks it to the minimum size required to display the components. If the frame is too small (or the size has not been set at all), pack() expands it to the required size. Frames are invisible when they are created. You can make them visible by calling the frame’s setVisible(boolean)
method with the literal true as an argument. If you want a frame to be displayed when it is created, call one of these methods in the constructor. You also can leave the frame invisible, requiring any class that uses the frame to make it visible by calling setVisible(true). (To hide a frame, call setVisible(false).) When a frame is displayed, the default behavior is for it to be positioned in the upper-left corner of the computer’s desktop. You can specify a different location by calling the setBounds(int, int, int, int) method. The first two arguments to this method are the (x,y) position of the frame’s upper-left corner on the desktop. The last two arguments set the width and height of the frame. The following class represents a 300 by 300 frame with “Simple Calculator” in the title bar:
public class SimpleCalc extends javax.swing.JFrame {
public SimpleCalc () {
super(“Simple Calculator”);
setSize(300, 300);
setVisible(true);

P a g e | 44
Intentio Nigeria Limited www.intentio-ng.com
}
}
Every frame has Maximize, Minimize, and Close buttons on the title bar at the user’s control—the same controls present in the interface of other software running on your system. The normal behavior when a frame is closed is for the application to keep running. When a frame serves as a program’s main graphical user interface, this leaves a user with no way to stop the program. To change this, you must call a frame’s setDefaultCloseOperation() method with one of four static variables of the JFrame class as an argument:
EXIT_ON_CLOSE—Exit the application when the frame is closed.
DISPOSE_ON_CLOSE—Close the frame, remove the frame object from memory, and keep running the application.
DO_NOTHING_ON_CLOSE—Keep the frame open and continue running.
HIDE_ON_CLOSE—Close the frame and continue running. To prevent a user from closing a frame at all, add the following statement to the frame’s constructor method:
setDefaultCloseOperation(JFrame.DO_NOTHING_ON_CLOSE);
If you are creating a frame to serve as an application’s main user interface, the expected behavior is probably EXIT_ON_CLOSE, which shuts down the application along with the frame.
2.1.3 Creating a Component Creating a graphical user interface is a great way to get experience working with objects in Java because each interface component is represented by its own class. To use an interface component in Java, you create an object of that component’s class. You already have worked with the container classes JFrame and JWindow.
2.1.4 Adding Components to a Container Before you can display a user interface component such as a button in a Java program, you must add it to a container and display that container. To add a component to a container, call the container’s add(Component)
method with the component as the argument (all user interface components in Swing inherit from
java.awt.Component).
The simplest Swing container is a panel (the JPanel class). The following example creates a button and adds it to a panel:
JButton quit = new JButton(“Quit”);
JPanel panel = new JPanel();
panel.add(quit);
2.1.5 Working With Components Swing offers more than two dozen different user interfaces. All Swing components share a common superclass, javax.swing.JComponent, from which they inherit several methods you will find useful in your own programs. The setEnabled(boolean) method determines whether a component can receive user input (an argument of true) or is inactive and cannot receive input (false). Components are enabled by default. Many components change in appearance to indicate when they are not presently usable—for instance, a disabled JButton has light gray borders and gray text. If you want to check whether a component is enabled, you can call the isEnabled()
method, which returns a boolean value. The setVisible(boolean) method works for all components the way it does for containers. Use true to display a component and false to hide it. There also is a Boolean isVisible()
method. The setSize(int, int) method resizes the component to the width and height specified as arguments, and
setSize(Dimension) uses a Dimension object to accomplish the same

P a g e | 45
Intentio Nigeria Limited www.intentio-ng.com
thing. For most components, you don’t need to set a size—the default is usually acceptable. To find out the size of a component, call its getSize() method, which returns a Dimension object with the dimensions in height and width instance variables. As you will see, similar Swing components also have other methods in common, such as setText() and getText() for text components and setValue() and getValue() for components that store a numeric value. Buttons
One of the simplest components to employ is JButton, the class that represents clickable buttons. In most programs, buttons trigger an action—click Install to begin installing software, click a send button to send an email and so on. A Swing button can feature a text label, a graphical icon, or a combination of both. Constructors you can use for buttons include the following:
JButton(String)—A button labeled with the specified text
JButton(Icon)—A button that displays the specified graphical icon
JButton(String, Icon)—A button with the specified text and graphical icon
The following statements create three buttons with text labels:
JButton btnAdd = new JButton(“+”);
JButton btnSub = new JButton(“Minus”);
Image Icons
Swing supports the use of graphical ImageIcon objects on buttons and other components in which a label can be provided. An icon is a small graphic that can be placed on a button, label, or other user interface element to identify it—such as a garbage can or recycling bin icon for deleting files, folder icons for opening and storing files, and the like. An ImageIcon object can be created by specifying the filename of a graphic as the only argument to the constructor. The following example loads an icon from the graphics file calc.gif and creates a JButton with the icon as its label:
ImageIcon calculate = new ImageIcon(“calc.gif”);
JButton button = new JButton(calculate);
Labels
A label is a user component that holds text, an icon, or both. Labels, which are created from the JLabel class, often are used to identify the purpose of other components on an interface. They cannot be directly edited by a user. To create a label, you can use the following constructors:
JLabel(String)—A label with the specified text
JLabel(String, int)—A label with the specified text and alignment
JLabel(String, Icon, int)—A label with the specified text, icon, and alignment
The alignment of a label determines how its text or icon is aligned in relation to the area taken up by the window. Three static class variables of the SwingConstants interface are used to specify alignment: LEFT, CENTER, and RIGHT. The contents of a label can be set with setText(String) or setIcon(Icon) methods. You also can retrieve these things with getText() and getIcon() methods. The following statements create three labels with left, center, and right alignment, respectively:
JLabel label1 = new JLabel(“Number”, SwingConstants.LEFT);
JLabel lblName = new JLabel(“Name: “, SwingConstants.CENTER);
JLabel dateLabel = new JLabel(“Date: “, SwingConstants.RIGHT);

P a g e | 46
Intentio Nigeria Limited www.intentio-ng.com
Text Fields
A text field is a location on an interface where a user can enter and modify text using the keyboard. Text fields are represented by the JTextField class, and each can handle one line of input. Constructors for text fields include the following:
JTextField()—An empty text field
JTextField(int)—A text field with the specified width
JTextField(String, int)—A text field with the specified text and width
A text field’s width attribute has relevance only if the interface is organized in a manner that does not resize components. The following statements create an empty text field with default width, an empty text field that has enough space for roughly 60 characters and a text field of the same size with the starting text “Enter your name here”:
JTextField txtName = new JTextField(); JTextField txtName1 = new JTextField(60);
JTextField txtName2 = new JTextField(“Enter Your name here”, 60);
The setEditable(boolean) method determines whether a text component can be edited (true) or not (false).
There’s also an isEditable() method that returns a corresponding boolean value. The setText(String)
method changes the text to the specified string, and the getText() method returns the component’s current text as a string. Another method retrieves only the text that a user has highlighted in the getSelectedText()
component.
Standard Dialog Boxes
The JOptionPane class offers several methods that can be used to create standard dialog boxes: small windows that ask a question, warn a user, or provide a brief, important message. When you delete files, a dialog box might pop up to make sure that you really want to do that. An example is shown below:
Figure 2.1
These windows are an effective way to communicate with a user without the overhead of creating a new class to represent the window, adding components to it, and writing eventhandling methods to take input. All these things are handled automatically when one of the standard dialog boxes offered by JOptionPane is used. The four standard dialog boxes are as follows:
ConfirmDialog—Asks a question, with buttons for Yes, No, and Cancel responses
InputDialog—Prompts for text input
MessageDialog—Displays a message
OptionDialog—Comprises all three of the other dialog box types
Each of these dialog boxes has its own show method in the JOptionPane class.
o Message Dialog Boxes

P a g e | 47
Intentio Nigeria Limited www.intentio-ng.com
A message dialog box is a simple window that displays information, as shown in the figure below: A message dialog box can be created with a call to the showMessageDialog(Component, Object)
method. The Component argument specifies the container that should be considered to be the parent of the dialog box, and this information is used to determine where the dialog window should be displayed. If null is used instead of a container, or if the container is not a JFrame object, the dialog box will be centered onscreen. Preferably, null is used. The second argument, Object, can be a string, a component, or an Icon object. If it’s a string, that text will be displayed in the dialog box. If it’s a component or an Icon, that object will be displayed in place of a text message. Unlike the other dialog boxes, message dialog boxes do not return any kind of response value. You also can create a message dialog box by calling the showMessageDialog(Component, Object,
String, int) method. The first two arguments are the same as the shorter method call, and the last two are the following:
The title to display in the dialog box title bar
One of five class constants describing the type of dialog box: ERROR_MESSAGE, INFORMATION_MESSAGE, PLAIN_MESSAGE, QUESTION_MESSAGE, or WARNING_MESSAGE
The following statement creates a message dialog box (figure 2.2) using this method:
JOptionPane.showMessageDialog(null,
“Record inserted”,
“Insert update”,
JOptionPane. INFORMATION_MESSAGE,);
Figure 2.2
2.2 LAYOUT MANAGEMENT
Layout management is the process of determining the size and position of components. By default, each container
has a layout manager -- an object that performs layout management for the components within the container.
Components can provide size and alignment hints to layout managers, but layout managers have the final say on
the size and position of those components.
2.2.1 Absolute Positioning Absolute positioning is the best form of Layout for positioning components as it involves simple mathematical calculations. The steps involved are as follows: First, you set the layout of the container to null after calling its getContentPane() method. An example is
as shown below for a Container cont.
Container cont = getContentPane();
cont.setLayout(null);
Next, declare an Insets object using the container object as below:
Insets ins = cont.getInsets();
Insets are used to determine the amount of space around the container itself. The Insets class includes values for the top, bottom, left, and right insets, which are then used when the container itself is drawn.

P a g e | 48
Intentio Nigeria Limited www.intentio-ng.com
This is followed by determining the exact positions for the components by calling the setBounds(int,int,int,int) method. The arguments are integer values for the left, top, width and height of the component relative to the container it is to be added to. Mostly, we use the left and top values of the
container’s inset as in ins.left, ins.top. The statement below sets the size and position for a JTextField txtValue
Container cont = getContentPane();
cont.setLayout(null);
Insets ins = cont.getInsets();
JTextField txtValue = new JTextField();
txtValue.setBounds(ins.left,ins.top,100,30);
This implies that the text field should be positioned 0 pixels from the left of the container, 0 pixels from the top with a width 100 and height 30.
Lastly, you add the component to the container using the container’s add() method. Using the previous example, to add the JTextField txtValue to the Container object cont, you use the statement:
Cont.add(txtValue);
2.3 EVENT HANDLING Normally, a user interacts with an application's GUI to indicate the tasks that the application should perform. For example, when you write an e-mail in an e-mail application, clicking the Send button tells the application to send the e-mail to the specified e-mail addresses. GUIs are event driven. When the user interacts with a GUI component, the interaction known as an event drives the program to perform a task. Some common events (user interactions) that might cause an application to perform a task include clicking a button, typing in a text field, selecting an item from a menu, closing a window and moving the mouse. The code that performs a task in response to an event is called an event handler and the overall process of responding to events is known as event handling. 2.3.1 Event Listeners If a class wants to respond to a user event under the Java event-handling system, it must implement the interface that deals with the events. These interfaces are called event listeners. Each listener handles a specific kind of event. The java.awt.event package contains all the basic event listeners, as well as the objects that represent specific events. These listener interfaces are the most useful:
ActionListener—Action events, which are generated by a user taking an action on a component, such as a click on a button
AdjustmentListener—Adjustment events, which are generated when a component is adjusted, such as when a scrollbar is moved
FocusListener—Keyboard focus events, which are generated when a component such as a text field gains or loses the focus
ItemListener—Item events, which are generated when an item such as a check box is changed
KeyListener—Keyboard events, which occur when a user enters text on the keyboard
MouseListener—Mouse events, which are generated by mouse clicks, a mouse entering a component’s area, and a mouse leaving a component’s area
MouseMotionListener—Mouse movement events, which track all movement by a mouse over a component
WindowListener—Window events, which are generated by a window being maximized, minimized, moved, or closed
A class can implement as many listeners as needed. The following class is declared to handle both action and text events:

P a g e | 49
Intentio Nigeria Limited www.intentio-ng.com
public class Suspense extends JFrame implements
ActionListener,
TextListener {
// ...
}
To use these classes in your programs, you can import them individually: Import java.awt.event.ActionListener,
import java.awt.event.TextListener or use an import statement with a wildcard to make the entire package
available: import java.awt.event.*;
2.3.2 Setting Up Components When you make a class an event listener, you have set up a specific type of event to be heard by that class. However, the event won’t actually be heard unless you follow up with a second step: A matching listener must be added to the component. That listener generates the events when the component is used. After a component is created, you can call one of the following methods on the component to associate a listener with it:
addActionListener()—JButton, JCheckBox, JComboBox, JTextField, JRadioButton, and JMenuItem components
addFocusListener()—All Swing components
addItemListener()—JButton, JCheckBox, JComboBox, and JRadioButton components
addKeyListener()—All Swing components
addMouseListener()—All Swing components
addMouseMotionListener()—All Swing components
addTextListener()—JTextField and JTextArea components
addWindowListener()—JWindow and JFrame components
Modifying a component after adding it to a container is an easy mistake to make in a Java program. You must add listeners to a component and handle any other configuration before the component is added to any containers; otherwise, these settings are disregarded when the program is run.
The following example creates a JButton object and associates an action event listener with it:
JButton btnAdd = new JButton(“Add”);
btnAdd.addActionListener(this);
All the listener adding methods take one argument: the object that is listening for events of that kind. Using this indicates that the current class is the event listener. You could specify a different object, as long as its class implements the right listener interface. 2.3.3 Event-Handling Methods When you associate an interface with a class, the class must handle all the methods contained in the interface. In the case of event listeners, each of the methods is called automatically by the windowing system when the corresponding user event takes place. The ActionListener interface has only one method: actionPerformed(). All classes that implement ActionListener must have a method with the following structure:
public void actionPerformed(ActionEvent event) {
// handle event here
}
If only one component in your program’s graphical user interface has a listener for action events, you will know that this actionPerformed() method only is called in response to an event generated by that component.

P a g e | 50
Intentio Nigeria Limited www.intentio-ng.com
If more than one component has an action event listener, you must use the ActionEvent object to figure out which component was used and act accordingly in your program. This object can be used to discover details about the component that generated the event. ActionEvent and all other event objects are part of the java.awt.event
package and subclasses of the EventObject class. Every event-handling method is sent an event object of some kind. The object’s getSource() method can be used to determine the component that sent the event, as in the following example:
public void actionPerformed(ActionEvent event) {
Object source = evt.getSource();
}
The object returned by the getSource() method can be compared with components by using the == operator. The following statements can be used within the body of an actionPerformed() method to handle user clicks on buttons named addButton and clearButton:
if (source == addButton) {
addProgram();
}
if (source == clearButton) {
clearRecords();
}
The addProgram() method is called if the addButton object generated the event, and the clearRecords()
method is called if the clearButton button generated the event. Many event-handling methods call a different method for each kind of event or component. This makes the event-handling method easier to read. In addition, if there is more than one event-handling method in a class, each one can call the same methods to get work done.
2.3.4 Working with Methods in Action Events Action events occur when a user completes an action using components such as buttons, check boxes, menu items, text fields, and radio buttons. A class must implement the ActionListener interface to handle these events. In addition, the addActionListener() method must be called on each component that should generate an action event—unless you want to ignore that component’s action events. The actionPerformed(ActionEvent) method is the only method of the ActionListener interface. It takes the following form:
public void actionPerformed(ActionEvent event) {
// ...
}
In addition to the getSource() method, you can use the getActionCommand() method on the ActionEvent
object to discover more information about the event’s source. By default, the action command is the text associated with the component, such as the label on a button. You also can set a different action command for a component by calling its setActionCommand(String) method. The string argument should be the action command’s desired text. For example, the following statement creates a button and gives it the action command “Add Numbers”:
JButton addButton = new JButton(“Add”);
addButton.setActionCommand(“Add Numbers”);

P a g e | 51
Intentio Nigeria Limited www.intentio-ng.com
2.4 PROJECT We build a simple calculator for addition, subtraction, multiplication, division and clear functions as shown below
Figure 2.3
//import required packages
import java.awt.*;
import javax.swing.JFrame;
import javax.swing.JLabel;
import javax.swing.JTextField;
import javax.swing.JButton;
import java.awt.event.ActionEvent;
import java.awt.event.ActionListener;
public class SimpleCalc extends JFrame implements ActionListener {
//declare container
Container c;
//declare JLables
JLabel label1 = new JLabel("Number 1:");
JLabel label2 = new JLabel("Number 2");
//declare JButtons
JButton addButton = new JButton("+");
JButton minusButton = new JButton("-");
JButton timesButton = new JButton("*");
JButton divideButton = new JButton("/");
JButton clearButton = new JButton("C");
//declare JTextFields
JTextField value1 = new JTextField();
JTextField value2 = new JTextField();
JTextField answer = new JTextField();
public SimpleCalc() { //open Constructor
setTitle("A Simple Calculator");
setSize(300,200);
setDefaultCloseOperation(JFrame.EXIT_ON_CLOSE);
answer.setEnabled(false); //make the answer textfield unedittable
//register event listeners
addButton.addActionListener(this);
minusButton.addActionListener(this);
timesButton.addActionListener(this);

P a g e | 52
Intentio Nigeria Limited www.intentio-ng.com
divideButton.addActionListener(this);
clearButton.addActionListener(this);
//start Absolute positioning
c = getContentPane();
Insets i = c.getInsets();
c.setLayout(null);
//position the components using the left,top,width,height integers
answer.setBounds(i.left,i.top,285,30);
label1.setBounds(i.left+5,i.top+40,70,30);
label2.setBounds(i.left+5,i.top+75,70,30);
value1.setBounds(i.left+80,i.top+40,50,30);
value2.setBounds(i.left+80,i.top+75,50,30);
addButton.setBounds(i.left+5,i.top+110,50,30);
minusButton.setBounds(i.left+60,i.top+110,50,30);
timesButton.setBounds(i.left+115,i.top+110,50,30);
divideButton.setBounds(i.left+170,i.top+110,50,30);
clearButton.setBounds(i.left+225,i.top+110,50,30);
//add the components to the container
c.add(answer);
c.add(label1);
c.add(label2);
c.add(value1);
c.add(value2);
c.add(addButton);
c.add(minusButton);
c.add(divideButton);
c.add(timesButton);
c.add(clearButton);
setVisible(true); //make the JFrame visible
} //close constructor
public void actionPerformed(ActionEvent ac) { //handle event method
Object ob = ac.getSource();
//call appropriate methods depending on buttons clicked
if (ob==addButton) { doAddition();}
if (ob==minusButton) { doSubtraction();}
if (ob==timesButton) { doTimes();}
if (ob==divideButton) { doDivision();}
if (ob==clearButton) { doClear();}
}
//handle addition method
void doAddition() {
Float fl1 = Float.parseFloat(value1.getText());

P a g e | 53
Intentio Nigeria Limited www.intentio-ng.com
//convert Strings to decimal numeric values
Float fl2 = Float.parseFloat(value2.getText());
Float ans = fl1 + fl2;
answer.setText(""+ans);
}
//handle subtraction method
void doSubtraction() {
Float fl1 = Float.parseFloat(value1.getText());
//convert Strings to decimal values
Float fl2 = Float.parseFloat(value2.getText());
Float ans = fl1 - fl2;
answer.setText(""+ans);
}
//handle multiplication method
void doTimes() {
Float fl1 = Float.parseFloat(value1.getText());
//convert Strings to decimal values
Float fl2 = Float.parseFloat(value2.getText());
Float ans = fl1 * fl2;
answer.setText(""+ans);
}
//handle division method
void doDivision() {
Float fl1 = Float.parseFloat(value1.getText());
//convert Strings to decimal values
Float fl2 = Float.parseFloat(value2.getText());
Float ans = fl1 / fl2;
answer.setText(""+ans);
}
//handle clear method
void doClear() {
answer.setText("");
}
public static void main(String[]args) { //main method
SimpleCalc simp = new SimpleCalc();
}
}

P a g e | 54
Intentio Nigeria Limited www.intentio-ng.com
3.0 DATABASE REALITY
Objective
At the end of this section, you will be able to:
- Create a database using Microsoft Office Access - Understand the basics of SQL - Understand JDBC, use the Jdbc-Odbc driver to connect your database (datasource) to the Jdbc
application. - Project: Build a Jdbc application that retrieves records from a database, inserts records into a database,
deletes from a database and update a database.
3.1 INTRODUCTION TO DATABASE
A database is an organized collection of data. There are many different strategies for organizing data to facilitate easy access and manipulation. A database management system (DBMS) provides mechanisms for storing, organizing, retrieving and modifying data for many users.
Today's most popular database systems are relational databases (a database that stores data in tables). A language called SQL (Structured Query Language) is the international standard language used almost universally with relational databases to perform queries (i.e., to request information that satisfies given criteria) and to manipulate data.
Some popular relational database management systems (RDBMSs) are Microsoft Access, Microsoft SQL Server, Oracle, Sybase, IBM DB2, Informix, PostgreSQL and MySQL.
3.1.1 Working with a Database
A relational database consists of tables. Tables are themselves composed of rows and columns in which values are stored.
3.1.2 The Students Database
These section overviews relational databases in the context of a sample students database we created for this section.
The database consists of one table: personal. The students table consists of six columns that maintain each student’s matriculation number, first name, last name, sex, age, state.
Building the database:
Launch Microsoft Office Access (Figure 3.1) from the start menu or Windows explorer button by choosing Microsoft Office from the programs menu and then Microsoft Office Access 2007. Your screen should look similar to Figure 3.2.

P a g e | 55
Intentio Nigeria Limited www.intentio-ng.com
Figure 3.1 Figure 3.2
Click on the blank database icon, navigate to the folder you want to store the file using the folder icon, enter a name for the database in the text field (in this case, students) and click on the create button as shown in figure 3.3 below:
Figure 3.3
You should get a view showing 2 rows and 2 columns respectively as below
Figure 3.4

P a g e | 56
Intentio Nigeria Limited www.intentio-ng.com
To rename the column titles and add more columns, you simply double-click the existing column titles, type the desired title and press Enter. This adds the title and adds another column for which you type another title. When you’re done, your table should resemble figure 3.0 below
Figure 3.5
To save the table, click on the Save icon and enter a name (in this case, personal) in the text field that appears then click ok to save (figure 3.6). Your table view should then reflect the name of the table as in figure 3.7
Figure 3.6
Figure 3.7
Populating the personal table
The Matric_No column cannot be edited by default as it contains unique integer values called auto-numbers. What this means is that the numbers are auto-incremented(For each row inserted in this table, the Matric_No value is increased by 1 automatically to ensure that each row has a unique student. It is called the table’s primary key) for each record (row) so that no two records (row) can have the same Matric_No just like no two students should have the same matriculation number.

P a g e | 57
Intentio Nigeria Limited www.intentio-ng.com
To type in records, simply click in the field below the First_Name and type in the value then press the tab key to move to the next. Do this to add two records then save the table.
Figure 3.8
3.2 SQL
One of the biggest obstacles faced by database programmers is the wide variety of database formats in use, each with its own proprietary method of accessing data. To simplify using relational database programs, a standard language called SQL (Structured Query Language) has been introduced. This language erases the need to learn different database-querying languages for each database format. MS Access, Microsoft SQL Server, mySQL, Oracle and most popular database formats support SQL. Below are some basic SQL keywords, statements and their descriptions:
SQL Keyword Description
SELECT Retrieves data from one or more tables.
FROM Tables involved in the query. Required in every SELECT.
WHERE Criteria for selection that determine the rows to be retrieved, deleted or updated. Optional in a SQL query or a SQL statement.
INSERT Insert rows into a specified table.
DELETE Delete rows from a specified table.
UPDATE Update rows in a specified table.
SQL Statement Description SELECT first_name, last_name
FROM personal
Retrieves the first and last names from the personal table
SELECT * FROM personal WHERE
matric_no=2
Retrieves all (*) the records (matric no, first name, last name, sex, age, state) from the personal table of the student whose matric number is 2.
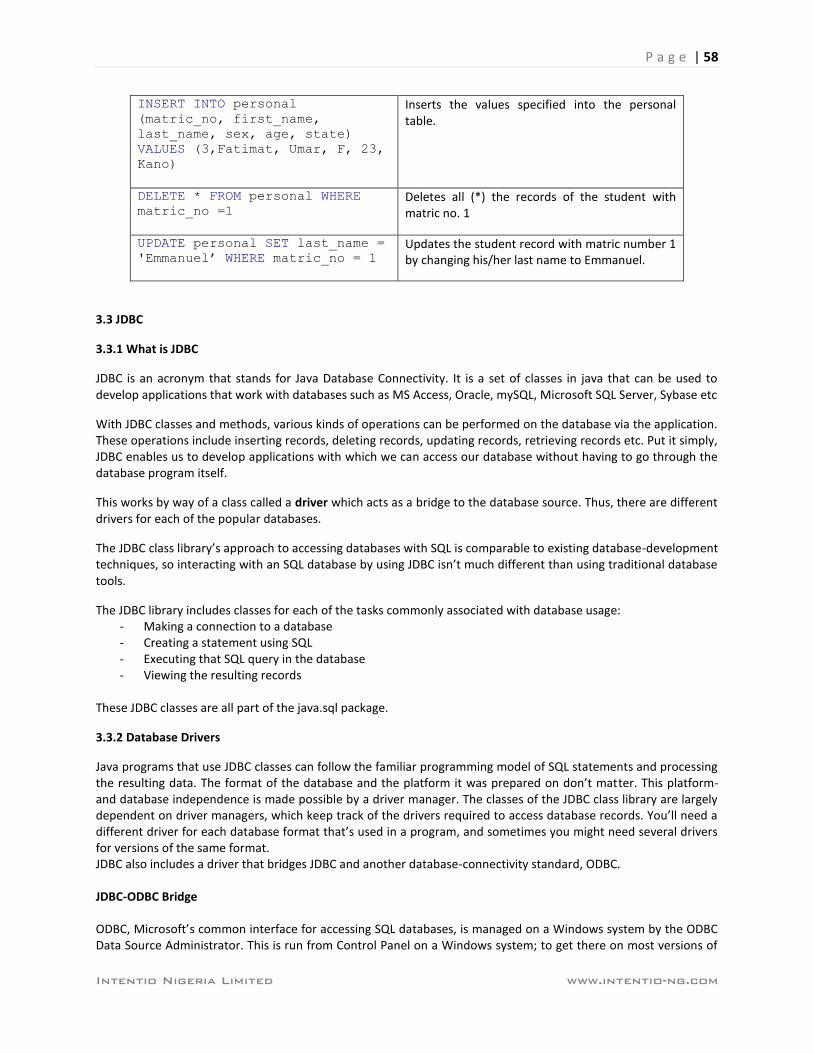
P a g e | 58
Intentio Nigeria Limited www.intentio-ng.com
INSERT INTO personal
(matric_no, first_name,
last_name, sex, age, state)
VALUES (3,Fatimat, Umar, F, 23,
Kano)
Inserts the values specified into the personal table.
DELETE * FROM personal WHERE
matric_no =1
Deletes all (*) the records of the student with matric no. 1
UPDATE personal SET last_name =
'Emmanuel’ WHERE matric_no = 1
Updates the student record with matric number 1 by changing his/her last name to Emmanuel.
3.3 JDBC
3.3.1 What is JDBC
JDBC is an acronym that stands for Java Database Connectivity. It is a set of classes in java that can be used to develop applications that work with databases such as MS Access, Oracle, mySQL, Microsoft SQL Server, Sybase etc
With JDBC classes and methods, various kinds of operations can be performed on the database via the application. These operations include inserting records, deleting records, updating records, retrieving records etc. Put it simply, JDBC enables us to develop applications with which we can access our database without having to go through the database program itself.
This works by way of a class called a driver which acts as a bridge to the database source. Thus, there are different drivers for each of the popular databases.
The JDBC class library’s approach to accessing databases with SQL is comparable to existing database-development techniques, so interacting with an SQL database by using JDBC isn’t much different than using traditional database tools.
The JDBC library includes classes for each of the tasks commonly associated with database usage: - Making a connection to a database - Creating a statement using SQL - Executing that SQL query in the database - Viewing the resulting records
These JDBC classes are all part of the java.sql package.
3.3.2 Database Drivers
Java programs that use JDBC classes can follow the familiar programming model of SQL statements and processing the resulting data. The format of the database and the platform it was prepared on don’t matter. This platform- and database independence is made possible by a driver manager. The classes of the JDBC class library are largely dependent on driver managers, which keep track of the drivers required to access database records. You’ll need a different driver for each database format that’s used in a program, and sometimes you might need several drivers for versions of the same format. JDBC also includes a driver that bridges JDBC and another database-connectivity standard, ODBC. JDBC-ODBC Bridge ODBC, Microsoft’s common interface for accessing SQL databases, is managed on a Windows system by the ODBC Data Source Administrator. This is run from Control Panel on a Windows system; to get there on most versions of

P a g e | 59
Intentio Nigeria Limited www.intentio-ng.com
Windows, click Start, Settings, Control Panel, ODBC Data Sources. On Windows XP, choose Start, Control Panel, Performance and Maintenance in Category View or Start, Control Panel in Classic View and then choose Administrative Tools, Data Sources (ODBC). On Windows Vista, click on the Windows Explorer button, choose Control Panel then choose Administrative Tools, Data Sources (ODBC). Using the JDBC-ODBC Bridge: connecting to an ODBC data source
Connecting to the Students datasource Open Control Panel from Windows Explorer then choose Administrative tools and then DataSources (ODBC)
The ODBC Data Source Adminstrator box opens and here, you will associate the database that’ll be used for the java application with the jdbc-odbc driver.
Click on the Drivers tab to view the list of ODBC drivers on your system. You’ll find that Microsoft Access and a host of others are supported as shown below.
Figure 3.9
In the ODBC Data Source Administrator, click the User DSN tab to see a list of datasources that are available. To add a new one associated with student.accdb (or your own database), click the Add button, choose an ODBC driver (specific to the one in which your database was created), and then click the Finish button as below.
Figure 3.10 A Setup window opens that you can use to provide a name, short description, and other information
about the database. Click the Select button to find and choose the database file. The figure below shows the Setup window used to set up student.accdb as a data source in the ODBC Data Source Administrator.

P a g e | 60
Intentio Nigeria Limited www.intentio-ng.com
Figure 3.11 After a database has been associated with an ODBC data source, working with it in a Java program is relatively easy if you are conversant with SQL. 3.3.3 JDBC Classes The first task in a JDBC program is to load the driver (or drivers) that will be used to connect to a data source. A driver is loaded with the Class.forName(String) method. Class, part of the java.lang package, can be used to load classes into the Java interpreter. The forName(String) method loads the class named by the specified string. A ClassNotFoundException can be thrown by this method.
All programs that use an ODBC data source use sun.jdbc.odbc.JdbcOdbcDriver, the JDBC-ODBC bridge driver included with Java. Loading this class into a Java interpreter requires the following statement:
Class.forName(“sun.jdbc.odbc.JdbcOdbcDriver”);
After the driver has been loaded, you can establish a connection to the data source by using the DriverManager class in the java.sql package. The getConnection(String, String, String) method of DriverManager can be used to set up the connection. It returns a reference to a Connection object representing an active data connection. The three arguments of this method are as follows:
A name identifying the data source and the type of database connectivity used to reach it
A username
A password The last two items are needed only if the data source is secured with a username and a password. If not, these arguments can be null strings (“”). The name of the data source is preceded by the text jdbc:odbc: when using the JDBCODBC bridge, which indicates the type of database connectivity in use. The following statement could be used to connect to a data source called student_db with no username and password:
Connection con = DriverManager.getConnection(“jdbc:odbc:student_db”, “”, “”);
After you have a connection, you can reuse it each time you want to retrieve or store information from that connection’s data source. The getConnection() method and all others called on a data source throw SQLException errors if something goes wrong as the data source is being used. SQL has its own error messages, and they are passed along as part of SQLException objects.

P a g e | 61
Intentio Nigeria Limited www.intentio-ng.com
3.3.4 Retrieving Data from a Database Using SQL An SQL statement is represented in Java by a Statement object. Statement is an interface, so it can’t be instantiated directly. However, an object that implements the interface is returned by the createStatement() method of a Connection object, as in the following example:
Statement st = con.CreateStatement();
After you have a Statement object, you can use it to conduct an SQL query by calling the object’s executeQuery(String) method. The String argument should be an SQL query that follows the syntax of that language. The following is an example of an SQL query that could be used on the personal table of the Student.accdb database:
SELECT * FROM personal WHERE Matric_No=2”
This SQL query retrieves several fields for each record in the database for which the Matric number equals 2. The following Java statement executes that query on a Statement object named st:
ResultSet set = st.executeQuery(
“SELECT * FROM personal WHERE Matric_No=2”;
If the SQL query has been phrased correctly, the executeQuery() method returns a ResultSet object holding all the records that have been retrieved from the data source. When a ResultSet is returned from executeQuery(), it is positioned at the first record that has been retrieved. The following methods of ResultSet can be used to pull information from the current record:
getDate(String)—Returns the Date value stored in the specified field name (using the Date class in the java.sql package, not java.util.Date)
getDouble(String)—Returns the double value stored in the specified field name
getFloat(String)—Returns the float value stored in the specified field name
getInt(String)—Returns the int value stored in the specified field name
getLong(String)—Returns the long value stored in the specified field name
getString(String)—Returns the String stored in the specified field name These are just the simplest methods available in the ResultSet interface. The methods you should use depend on the form that the field data takes in the database, although methods such as getString() and getInt() can be more flexible in the information they retrieve from a record. You also can use an integer as the argument to any of these methods, such as getString(5), instead of a string. The integer indicates which field to retrieve (1 for the first field, 2 for the second field, and so on). An SQLException is thrown if a database error occurs as you try to retrieve information from a resultset. You can call this exception’s getSQLState() and getErrorCode() methods to learn more about the error. After you have pulled the information you need from a record, you can move to the next record by calling the next() method of the ResultSet object. This method returns a false Boolean value when it tries to move past the end of a resultset. Normally, you can move through a resultset once from start to finish, after which you can’t retrieve its contents again. When you’re finished using a connection to a data source, you can close it by calling the connection’s close() method with no arguments.

P a g e | 62
Intentio Nigeria Limited www.intentio-ng.com
3.3.5 Writing Data to a Database Using SQL
You could write a program that asks a user to enter an SQL query and then displays the result. The java.sql package also supports another way to create an SQL statement: a prepared statement. A prepared statement, which is represented by the PreparedStatement class, is an SQL statement that is compiled before it is executed. This enables the statement to return data more quickly and is a better choice if you are executing an SQL statement repeatedly in the same program. To create a prepared statement, call a connection’s prepareStatement(String) method with a string that indicates the structure of the SQL statement. To indicate the structure, you write an SQL statement in which parameters have been replaced with question marks.
Here’s an example for a connection object called con:
PreparedStatement ps = con.prepareStatement(“SELECT * FROM
personal WHERE Matric_No=?”);
Here’s another example with more than one question mark:
PreparedStatement ps = con.prepareStatement(
"insert into personal values (?,?,?,?,?,?)");
The question marks in these SQL statements are placeholders for data. Before you can execute the statement, you must put data in each of these places using one of the methods of the PreparedStatement class. To put data into a prepared statement, you must call a method with the position of the placeholder followed by the data to insert. For example, to put the string “Adebayo” in the first prepared statement, call the setString(int, String) method:
ps.setString(1, “Adebayo”);
The first argument indicates the position of the placeholder, numbered from left to right. The first question mark is 1, the second is 2, and so on. The second argument is the data to put in the statement at that position. The following methods are available amongst others:
setDate(int, Date)—Inserts a Date object (from the java.sql package) at the indicated position.
setDouble(int, double)—Inserts a double value at the indicated position.
setFloat(int, float)—Inserts a float value at the indicated position.
setInt(int, int)—Inserts an int value at the indicated position.
setLong(int, long)—Inserts a long value at the indicated position.
setShort(int, short)—Inserts a short value at the indicated position.
setString(int, String)—Inserts a String value at the indicated position.

P a g e | 63
Intentio Nigeria Limited www.intentio-ng.com
3.4 PROJECT We build an application for retrieving, inserting, deleting from and updating a Microsoft Office Access database. The GUI of the application is as shown below:
Figure 3.12
//declare the necessary packages import java.awt.*; import java.awt.event.*; import javax.swing.*; import java.sql.*; public class StudentApp extends JFrame implements ActionListener{ //declare container Container c; //create JLabels JLabel lblMatricNo = new JLabel("Matric No."); JLabel lblLastName = new JLabel("Last Name"); JLabel lblFirstName = new JLabel("First Name"); JLabel lblAge = new JLabel("Age"); JLabel lblSex = new JLabel("Sex"); JLabel lblState = new JLabel("State"); //create JTextFields JTextField txtMatricNo = new JTextField(); JTextField txtFirstName = new JTextField(); JTextField txtLastName = new JTextField(); JTextField txtAge = new JTextField(); JTextField txtSex = new JTextField(); JTextField txtState = new JTextField(); //create JButtons JButton btnRetrieve = new JButton("Retrieve"); JButton btnInsert = new JButton("Insert"); JButton btnDelete = new JButton("Delete"); JButton btnUpdate = new JButton("Update"); JButton btnClear = new JButton("Clear"); public StudentApp(){ //open constructor super("Student Application"); setSize(500,350); setDefaultCloseOperation(JFrame.EXIT_ON_CLOSE);

P a g e | 64
Intentio Nigeria Limited www.intentio-ng.com
//start Absolute positioning c = getContentPane(); c.setLayout(null); Insets i = c.getInsets(); //position the components using the left,top,width,height integers lblMatricNo.setBounds(i.left+5,i.top+5,100,30); lblFirstName.setBounds(i.left+5,i.top+40,100,30); lblLastName.setBounds(i.left+5,i.top+75,100,30); lblSex.setBounds(i.left+5,i.top+110,100,30); lblAge.setBounds(i.left+5,i.top+145,100,30); lblState.setBounds(i.left+5,i.top+180,100,30); txtMatricNo.setBounds(i.left+110,i.top+5,50,30); txtFirstName.setBounds(i.left+110,i.top+40,100,30); txtLastName.setBounds(i.left+110,i.top+75,100,30); txtSex.setBounds(i.left+110,i.top+110,100,30); txtAge.setBounds(i.left+110,i.top+145,100,30); txtState.setBounds(i.left+110,i.top+180,100,30); btnRetrieve.setBounds(i.left+5,i.top+220,100,30); btnInsert.setBounds(i.left+110,i.top+220,100,30); btnDelete.setBounds(i.left+215,i.top+220,100,30); btnUpdate.setBounds(i.left+320,i.top+220,100,30); btnClear.setBounds(i.left+160,i.top+255,100,30); //add actionlisteners for the buttons btnRetrieve.addActionListener(this); btnInsert.addActionListener(this); btnDelete.addActionListener(this); btnUpdate.addActionListener(this); btnClear.addActionListener(this); //add the components to the container c.add(lblMatricNo); c.add(txtMatricNo); c.add(lblFirstName); c.add(txtFirstName); c.add(lblLastName); c.add(txtLastName); c.add(lblAge); c.add(txtAge); c.add(lblSex); c.add(txtSex); c.add(lblState); c.add(txtState); c.add(btnRetrieve); c.add(btnInsert); c.add(btnDelete); c.add(btnUpdate); c.add(btnClear); setVisible(true); } //close constructor public void actionPerformed(ActionEvent ac) { Object ob = ac.getSource();

P a g e | 65
Intentio Nigeria Limited www.intentio-ng.com
//handle method for retrieving records if (ob==btnRetrieve) { try { Class.forName("sun.jdbc.odbc.JdbcOdbcDriver"); Connection con = DriverManager.getConnection("jdbc:odbc:student_db","",""); PreparedStatement pr = con.prepareStatement("select * from personal where Matric_No=?"); pr.setString(1,txtMatricNo.getText()); ResultSet rs = pr.executeQuery(); while (rs.next()) { txtMatricNo.setText(rs.getString(1)); txtFirstName.setText(rs.getString(2)); txtLastName.setText(rs.getString(3)); txtSex.setText(rs.getString(4)); txtAge.setText(rs.getString(5)); txtState.setText(rs.getString(6)); } } catch (SQLException sq) { JOptionPane.showMessageDialog(null,"Error Retrieving","Retrieve Update",1); } catch (Exception er) { JOptionPane.showMessageDialog(null,er.getMessage(),"Retrieve Update",1);} } //handle method for inserting records if (ob==btnInsert) { try { Class.forName("sun.jdbc.odbc.JdbcOdbcDriver"); Connection con = DriverManager.getConnection("jdbc:odbc:student_db","",""); PreparedStatement pr = con.prepareStatement("insert into personal values (?,?,?,?,?,?)"); pr.setString(1,txtMatricNo.getText()); pr.setString(2,txtFirstName.getText()); pr.setString(3,txtLastName.getText()); pr.setString(4,txtSex.getText()); pr.setString(5,txtAge.getText()); pr.setString(6,txtState.getText()); pr.executeUpdate(); JOptionPane.showMessageDialog(null,"Record inserted","Insert Update",1); } catch (SQLException sq) { JOptionPane.showMessageDialog(null,"Error Inserting","",2); } catch (Exception er) { JOptionPane.showMessageDialog(null,er.getMessage(),"Insert Update",1);} } //handle method for deleting records if (ob==btnDelete) { try { Class.forName("sun.jdbc.odbc.JdbcOdbcDriver"); Connection con = DriverManager.getConnection("jdbc:odbc:student_db","",""); PreparedStatement pr = con.prepareStatement("delete from personal where Matric_No=?"); pr.setString(1,txtMatricNo.getText()); pr.executeUpdate(); JOptionPane.showMessageDialog(null,"Record deleted","Delete Update",1);

P a g e | 66
Intentio Nigeria Limited www.intentio-ng.com
} catch (SQLException sq) { JOptionPane.showMessageDialog(null,"Error Inserting","",2); } catch (Exception er) { JOptionPane.showMessageDialog(null,er.getMessage(),"Update",1);} } //handle method for updating records if (ob==btnUpdate) { try { Class.forName("sun.jdbc.odbc.JdbcOdbcDriver"); Connection con = DriverManager.getConnection("jdbc:odbc:student_db","",""); PreparedStatement pr = con.prepareStatement("update personal set First_Name=?,Last_Name=?,Age=?,Sex=?,State=? where Matric_No=?"); pr.setString(1,txtFirstName.getText()); pr.setString(2,txtLastName.getText()); pr.setString(3,txtSex.getText()); pr.setString(4,txtAge.getText()); pr.setString(5,txtState.getText()); pr.setString(6,txtMatricNo.getText()); pr.executeUpdate(); JOptionPane.showMessageDialog(null,"Record updated","Update",1); } catch (SQLException sq) { JOptionPane.showMessageDialog(null,"Error updating","",2); } catch (Exception er) { JOptionPane.showMessageDialog(null,er.getMessage(),"Update",1);} } //handle method for clearing records if (ob==btnClear) { txtMatricNo.setText(""); txtFirstName.setText(""); txtLastName.setText(""); txtSex.setText(""); txtAge.setText(""); txtState.setText(""); } } //close actionperformed public static void main(String[]args) { //main method for running application StudentApp nu = new StudentApp(); } } //close class