java swing tutorial
TRANSCRIPT
Java Swing Tutorial
What is Swings in java ? A part of The JFC Swing Java consists of: - Look and feel Accessibility Java 2D Drag and Drop, etc Compiling & running programs If you do not explicitly add a GUI component to a container, the GUI component will not be displayed
when the container appears on the screen.
Swing, which is an extension library to the AWT, includes new and improved components that enhance the look and functionality of GUIs. Swing can be used to build Standalone swing gui Apps as well as Servlets and Applets. It employs a model/view design architecture. Swing is more portable and more flexible than AWT.
Swing Model/view design: The "view part" of the MV design is implemented with a component object and the UI object. The "model part" of the MV design is implemented by a model object and a change listener object.
Swing is built on top of AWT and is entirely written in Java, using AWT's lightweight component support. In particular, unlike AWT, t he architecture of Swing components makes it easy to customize both their appearance and behavior. Components from AWT and Swing can be mixed, allowing you to add Swing support to existing AWT-based programs. For example, swing components such as JSlider, JButton and JCheckbox could be used in the same program with standard AWT labels, textfields and scrollbars. You could subclass the existing Swing UI, model, or change listener classes without having to reinvent the entire implementation. Swing also has the ability to replace these objects on-the-fly.
100% Java implementation of componentsPluggable Look & FeelLightweight componentsUses MVC Architecture
Model represents the data View as a visual representation of the data Controller takes input and translates it to changes in data
Three parts Component set (subclasses of JComponent) Support classes Interfaces

In Swing, classes that represent GUI components have names beginning with the letter J. Some examples are JButton, JLabel, and JSlider. Altogether there are more than 250 new classes and 75 interfaces in Swing — twice as many as in AWT.
Java Swing class hierarchy
The class JComponent, descended directly from Container, is the root class for most of Swing's user interface components.
Swing contains components that you'll use to build a GUI. I am listing you some of the commonly used Swing components. To learn and understand these swing programs, AWT Programming knowledge is not required.
Java Swing Examples
Below is a java swing code for the traditional Hello World program.
Basically, the idea behind this Hello World program is to learn how to create a java program, compile and run it. To create your java source code you can use any editor( Text pad/Edit plus are my favorites) or you can use an IDE like Eclipse.
import javax.swing.JFrame; import javax.swing.JLabel;
//import statements //Check if window closes automatically. Otherwise add suitable code public class HelloWorldFrame extends JFrame {
public static void main(String args[]) {

new HelloWorldFrame();}HelloWorldFrame() {
JLabel jlbHelloWorld = new JLabel("Hello World");add(jlbHelloWorld);this.setSize(100, 100);// pack();setVisible(true);
}
Output
JPanel is Swing's version of the AWT class Panel and uses the same default layout, FlowLayout. JPanel is descended directly from JComponent. JFrame is Swing's version of Frame and is descended directly from that class. The components added to the frame are referred to as its contents; these are managed by the contentPane. To add a component to a JFrame, we must use its contentPane instead. JInternalFrame is confined to a visible area of a container it is placed in. It can be iconified , maximized and layered. JWindow is Swing's version of Window and is descended directly from that class. Like Window, it uses BorderLayout by default. JDialog is Swing's version of Dialog and is descended directly from that class. Like Dialog, it uses BorderLayout by default. Like JFrame and JWindow,JDialog contains a rootPane hierarchy including a contentPane, and it allows layered and glass panes. All dialogs are modal, which means the currentthread is blocked until user interaction with it has been completed. JDialog class is intended as the basis for creating custom dialogs; however, some of the most common dialogs are provided through static methods in the class JOptionPane. JLabel , descended from JComponent, is used to create text labels. The abstract class AbstractButton extends class JComponent and provides a foundation for a family of button classes, includingJButton. JTextField allows editing of a single line of text. New features include the ability to justify the text left, right, or center, and to set the text's font. JPasswordField (a direct subclass of JTextField) you can suppress the display of input. Each character entered can be replaced by an echo character. This allows confidential input for passwords, for example. By default, the echo character is the asterisk, *. JTextArea allows editing of multiple lines of text. JTextArea can be used in conjunction with class JScrollPane to achieve scrolling. The underlying JScrollPane can be forced to always or never have either the vertical or horizontal scrollbar; JButton is a component the user clicks to trigger a specific action.

JRadioButton is similar to JCheckbox, except for the default icon for each class. A set of radio buttons can be associated as a group in which only one button at a time can be selected. JCheckBox is not a member of a checkbox group. A checkbox can be selected and deselected, and it also displays its current state. JComboBox is like a drop down box. You can click a drop-down arrow and select an option from a list. For example, when the component has focus, pressing a key that corresponds to the first character in some entry's name selects that entry. A vertical scrollbar is used for longer lists. JList provides a scrollable set of items from which one or more may be selected. JList can be populated from an Array or Vector. JList does not support scrolling directly, instead, the list must be associated with a scrollpane. The view port used by the scroll pane can also have a user-defined border. JList actions are handled using ListSelectionListener. JTabbedPane contains a tab that can have a tool tip and a mnemonic, and it can display both text and an image. JToolbar contains a number of components whose type is usually some kind of button which can also include separators to group related componentswithin the toolbar. FlowLayout when used arranges swing components from left to right until there's no more space available. Then it begins a new row below it and moves from left to right again. Each component in a FlowLayout gets as much space as it needs and no more. BorderLayout places swing components in the North, South, East, West and center of a container. You can add horizontal and vertical gaps betweenthe areas. GridLayout is a layout manager that lays out a container's components in a rectangular grid. The container is divided into equal-sized rectangles,and one component is placed in each rectangle. GridBagLayout is a layout manager that lays out a container's components in a grid of cells with each component occupying one or more cells, called its display area. The display area aligns components vertically and horizontally, without requiring that the components be of the same size. JMenubar can contain several JMenu's. Each of the JMenu's can contain a series of JMenuItem 's that you can select. Swing provides support forpull-down and popup menus. Scrollable JPopupMenu is a scrollable popup menu that can be used whenever we have so many items in a popup menu that exceeds the screen visible height.
1. Java JFrame class example

JFrame
The components added to the frame are referred to as its contents; these are managed by the contentPane. To add a component to a JFrame, we must use its contentPane instead.JFrame is a Window with border, title and buttons. When JFrame is set visible, an event dispatching thread is started. JFrame objects store several objects including a Container object known as the content pane. To add a component to a JFrame, add it to the content pane.
JFrame Features
It’s a window with title, border, (optional) menu bar and user-specified components.It can be moved, resized, iconified.It is not a subclass of JComponent. Delegates responsibility of managing user-specified components to a content pane, an instance of JPanel.
Centering JFrame's
By default, a Jframe is displayed in the upper-left corner of the screen. To display a frame at a specified location, you can use the setLocation(x, y) method in the JFrame class. This method places the upper-left corner of a frame at location (x, y).
The Swing API keeps improving with abstractions such as the setDefaultCloseOperation method for the JFrame
Crating a JFrame Window
Step 1: Construct an object of the JFrame class.
Step 2: Set the size of the Jframe.
Step 3: Set the title of the Jframe to appear in the title bar (title bar will be blank if no title is set).
Step 4: Set the default close operation. When the user clicks the close button, the program stops running.
Step 5: Make the Jframe visible.
How to position JFrame on Screen?
frame.setLocationRelativeTo( null );
JFrame Source Code
import java.awt.*; import java.awt.event.*; import javax.swing.*;
public class JFrameDemo {

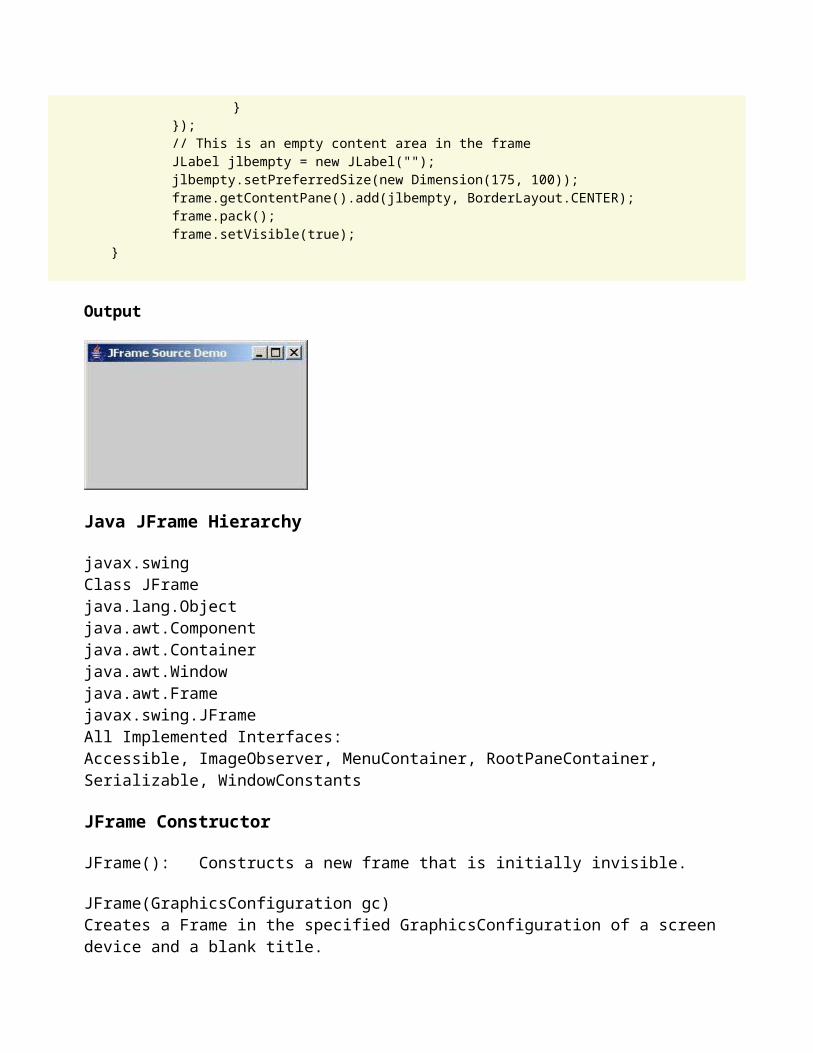
public static void main(String s[]) {JFrame frame = new JFrame("JFrame Source Demo");// Add a window listner for close buttonframe.addWindowListener(new WindowAdapter() {
public void windowClosing(WindowEvent e) {System.exit(0);
}});// This is an empty content area in the frameJLabel jlbempty = new JLabel("");jlbempty.setPreferredSize(new Dimension(175, 100));frame.getContentPane().add(jlbempty, BorderLayout.CENTER);frame.pack();frame.setVisible(true);
}
Output
Java JFrame Hierarchy
javax.swingClass JFramejava.lang.Objectjava.awt.Componentjava.awt.Containerjava.awt.Windowjava.awt.Framejavax.swing.JFrameAll Implemented Interfaces: Accessible, ImageObserver, MenuContainer, RootPaneContainer, Serializable, WindowConstants
JFrame Constructor
JFrame(): Constructs a new frame that is initially invisible.
JFrame(GraphicsConfiguration gc)Creates a Frame in the specified GraphicsConfiguration of a screen device and a blank title.
JFrame(String title): Creates a new, initially invisible Frame with the specified title.
JFrame(String title, GraphicsConfiguration gc)Creates a JFrame with the specified title and the specified GraphicsConfiguration of a screen device.
2. Java JInternalFrame class exampleJInternalFrame
Java Swing Tutorial Explaining the JInternalFrame class. A JInternalFrame is confined to a visible area of a container it is placed in. JInternalFrame a top level swing component that has a contentpane.
It can be iconified -- in this case the icon remains in the main application container. It can be maximized -- Frame consumes the main application It can be closed using standard popup window controls It can be layered
JInternalFrame Source Code import javax.swing.JInternalFrame; import javax.swing.JDesktopPane; import javax.swing.JMenu; import javax.swing.JMenuItem; import javax.swing.JMenuBar; import javax.swing.JFrame; import java.awt.event.*; import java.awt.*; public class JInternalFrameDemo extends JFrame {
JDesktopPane jdpDesktop;static int openFrameCount = 0;public JInternalFrameDemo() {
super("JInternalFrame Usage Demo");// Make the main window positioned as 50 pixels from each edge of the// screen.int inset = 50;Dimension screenSize = Toolkit.getDefaultToolkit().getScreenSize();setBounds(inset, inset, screenSize.width - inset * 2,
screenSize.height - inset * 2);// Add a Window Exit ListeneraddWindowListener(new WindowAdapter() {
public void windowClosing(WindowEvent e) {System.exit(0);
}
});// Create and Set up the GUI.jdpDesktop = new JDesktopPane();// A specialized layered pane to be used with JInternalFramescreateFrame(); // Create first windowsetContentPane(jdpDesktop);setJMenuBar(createMenuBar());// Make dragging faster by setting drag mode to OutlinejdpDesktop.putClientProperty("JDesktopPane.dragMode", "outline");
}protected JMenuBar createMenuBar() {
JMenuBar menuBar = new JMenuBar();JMenu menu = new JMenu("Frame");menu.setMnemonic(KeyEvent.VK_N);JMenuItem menuItem = new JMenuItem("New IFrame");menuItem.setMnemonic(KeyEvent.VK_N);menuItem.addActionListener(new ActionListener() {
public void actionPerformed(ActionEvent e) {createFrame();
}});menu.add(menuItem);menuBar.add(menu);return menuBar;
}protected void createFrame() {
MyInternalFrame frame = new MyInternalFrame();frame.setVisible(true);// Every JInternalFrame must be added to content pane using JDesktopPanejdpDesktop.add(frame);try {
frame.setSelected(true);} catch (java.beans.PropertyVetoException e) {}
}public static void main(String[] args) {
JInternalFrameDemo frame = new JInternalFrameDemo();frame.setVisible(true);
}class MyInternalFrame extends JInternalFrame {
static final int xPosition = 30, yPosition = 30;public MyInternalFrame() {
super("IFrame #" + (++openFrameCount), true, // resizabletrue, // closabletrue, // maximizabletrue);// iconifiable
setSize(300, 300);// Set the window's location.setLocation(xPosition * openFrameCount, yPosition
* openFrameCount);}
}

Output
Java JInternalFrame Hierarchyjavax.swingClass JInternalFrame java.lang.Object|+--java.awt.Component|+--java.awt.Container|+--javax.swing.JComponent|+--javax.swing.JInternalFrameAll Implemented Interfaces: Accessible, ImageObserver, MenuContainer, RootPaneContainer, Serializable, WindowConstants
JInternalFrame Constructor

JInternalFrame()Creates a non-resizable, non-closable, non-maximizable, non-iconifiable JInternalFrame with no title.
JInternalFrame(String title)Creates a non-resizable, non-closable, non-maximizable, non-iconifiable JInternalFrame with the specified title.
JInternalFrame(String title, boolean resizable)Creates a non-closable, non-maximizable, non-iconifiable JInternalFrame with the specified title and resizability.
JInternalFrame(String title, boolean resizable, boolean closable)Creates a non-maximizable, non-iconifiable JInternalFrame with the specified title, resizability, and closability.
JInternalFrame(String title, boolean resizable, boolean closable, boolean maximizable)Creates a non-iconifiable JInternalFrame with the specified title, resizability, closability, and maximizability.
JInternalFrame(String title, boolean resizable, boolean closable, boolean maximizable, boolean iconifiable)Creates a JInternalFrame with the specified title, resizability, closability, maximizability
3. Java JWindow class exampleJWindow
Java Swing Tutorial Explaining the JWindow Component. JWindow is Swing's version of Window and is descended directly from that class. Like Window, it uses BorderLayout by default. Almost all Swing components are lightweight except JApplet, JFrame, JDialog, and JWindow.
JWindow Source Code public class JWindowDemo extends JWindow {
private int X = 0;private int Y = 0;public JWindowDemo() {
setBounds(60, 60, 100, 100);addWindowListener(new WindowAdapter() {
public void windowClosing(WindowEvent e) {System.exit(0); // An Exit Listener

}});// Print (X,Y) coordinates on Mouse ClickaddMouseListener(new MouseAdapter() {
public void mousePressed(MouseEvent e) {X = e.getX();Y = e.getY();System.out.println("The (X,Y) coordinate of window is ("
+ X + "," + Y + ")");}
});addMouseMotionListener(new MouseMotionAdapter() {
public void mouseDragged(MouseEvent e) {setLocation(getLocation().x + (e.getX() - X),
getLocation().y + (e.getY() - Y));}
});setVisible(true);
}public static void main(String[] args) {
new JWindowDemo();}
Output
Java JWindow Hierarchyjavax.swingClass JWindow java.lang.Objectjava.awt.Componentjava.awt.Containerjava.awt.Window
All Implemented Interfaces: Accessible, ImageObserver, MenuContainer, Serializable Direct Known Subclasses: BasicToolBarUI.DragWindow, Dialog, Frame, JWindow
JWindow Constructor

Window(Frame owner)Constructs a new invisible window with the specified Frame as its owner.
Window(Window owner)Constructs a new invisible window with the specified Window as its owner.
Window(Window owner, GraphicsConfiguration gc)Constructs a new invisible window with the specified window as its owner and a GraphicsConfiguration of a screen device.
4. Java JLabel class exampleJLabels
Java Swing Tutorial Explaining the JLabel Component. JLabel, descended from JComponent, is used to create text labels. A JLabel object provides text instructions or information on a GUI — display a single line of read-only text, an image or both text and image. We use a Swing JLabel when we need a user interface component that displays a message or an image.JØLabels Provide text instructions on a GUI lRead-only text lPrograms rarely change a label's contents lClass JLabel (subclass of JComponent)
JLabel Source Code import java.awt.GridLayout; Import java.awt.event.WindowAdapter; import java.awt.event.WindowEvent; import javax.swing.JLabel; import javax.swing.JPanel; import javax.swing.JFrame; import javax.swing.ImageIcon;
public class JlabelDemo extends JPanel {
JLabel jlbLabel1, jlbLabel2, jlbLabel3;public JlabelDemo() {
ImageIcon icon = new ImageIcon("java-swing-tutorial.JPG","My Website");
// Creating an Icon

setLayout(new GridLayout(3, 1));// 3 rows, 1 column Panel having Grid LayoutjlbLabel1 = new JLabel("Image with Text", icon, JLabel.CENTER);// We can position of the text, relative to the icon:jlbLabel1.setVerticalTextPosition(JLabel.BOTTOM);jlbLabel1.setHorizontalTextPosition(JLabel.CENTER);jlbLabel2 = new JLabel("Text Only Label");jlbLabel3 = new JLabel(icon); // Label of Icon Only// Add labels to the Paneladd(jlbLabel1);add(jlbLabel2);add(jlbLabel3);
}public static void main(String[] args) {
JFrame frame = new JFrame("jLabel Usage Demo");frame.addWindowListener(new WindowAdapter() {
// Shows code to Add Window Listenerpublic void windowClosing(WindowEvent e) {
System.exit(0);}
});frame.setContentPane(new JlabelDemo());frame.pack();frame.setVisible(true);
}
Output
Java JLabel Hierarchyjavax.swingClass JLabeljava.lang.Objectjava.awt.Componentjava.awt.Containerjavax.swing.JComponentjavax.swing.JLabel

All Implemented Interfaces: Accessible, ImageObserver, MenuContainer, Serializable, SwingConstants Direct Known Subclasses: BasicComboBoxRenderer, DefaultListCellRenderer, DefaultTableCellRenderer, DefaultTreeCellRenderer
JLabel Constructor
JLabel(): Creates a JLabel instance with no image and with an empty string for the title.
JLabel(Icon image): Creates a JLabel instance with the specified image.
JLabel(Icon image, int horizontalAlignment)Creates a JLabel instance with the specified image and horizontal alignment.
JLabel(String text): Creates a JLabel instance with the specified text.
JLabel(String text, Icon icon, int horizontalAlignment)Creates a JLabel instance with the specified text, image, and horizontal alignment.
JLabel(String text, int horizontalAlignment)Creates a JLabel instance with the specified text and horizontal alignment.
5. Java JButton class exampleJButton
Java Swing Tutorial Explaining the JButton Component. The abstract class AbstractButton extends class JComponent and provides a foundation for a family of button classes, including JButton. A button is a component the user clicks to trigger a specific action.
There are several types of buttons in Java, all are subclasses of AbstractButton.
command buttons: is created with class JButton. It generates ActionEvent. toggle buttons: have on/off or true/false values. check boxes: a group of buttons. It generates ItemEvent. radio buttons: a group of buttons in which only one can be selected. It generates ItemEvent.
JButton Source Code import java.awt.event.ActionEvent; import java.awt.event.ActionListener; import java.awt.event.KeyEvent;

import java.net.URL; import javax.swing.AbstractButton; import javax.swing.ImageIcon; import javax.swing.JButton; import javax.swing.JFrame; import javax.swing.JPanel;
public class JButtonDemo extends JPanel implements ActionListener {
protected static JButton jbnLeft, jbnMiddle, jbnRight;public JButtonDemo() {
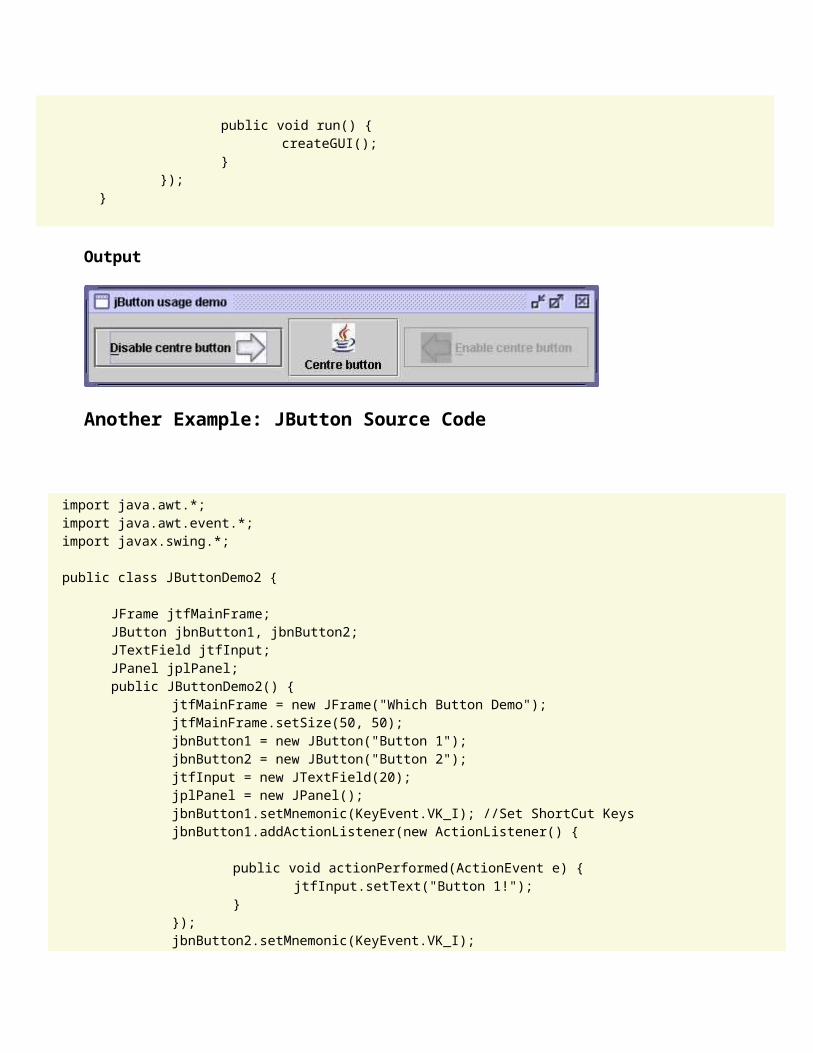
// Create Icons that can be used with the jButtonsImageIcon leftButtonIcon = createImageIcon("rightarrow.JPG");ImageIcon middleButtonIcon = createImageIcon("java-swing-tutorial.JPG");ImageIcon rightButtonIcon = createImageIcon("leftarrow.JPG");jbnLeft = new JButton("Disable centre button", leftButtonIcon);jbnLeft.setVerticalTextPosition(AbstractButton.CENTER);jbnLeft.setHorizontalTextPosition(AbstractButton.LEADING);jbnLeft.setMnemonic(KeyEvent.VK_D);// Alt-D clicks the buttonjbnLeft.setActionCommand("disable");jbnLeft.setToolTipText("disable the Centre button."); // Adding Tool
// tipsjbnMiddle = new JButton("Centre button", middleButtonIcon);jbnMiddle.setVerticalTextPosition(AbstractButton.BOTTOM);jbnMiddle.setHorizontalTextPosition(AbstractButton.CENTER);jbnMiddle.setMnemonic(KeyEvent.VK_M);// Alt-M clicks the buttonjbnMiddle.setToolTipText("Centre button");jbnRight = new JButton("Enable centre button", rightButtonIcon);// Use the default text position of CENTER, TRAILING (RIGHT).jbnRight.setMnemonic(KeyEvent.VK_E);// Alt-E clicks the buttonjbnRight.setActionCommand("enable");jbnRight.setEnabled(false);// Disable the Button at creation time// Listen for actions on Left and Roght ButtonsjbnLeft.addActionListener(this);jbnRight.addActionListener(this);jbnRight.setToolTipText("Enable the Centre button.");// Add Components to the frame, using the default FlowLayout.add(jbnLeft);add(jbnMiddle);add(jbnRight);
}public void actionPerformed(ActionEvent e) {
if ("disable".equals(e.getActionCommand())) {jbnMiddle.setEnabled(false);jbnLeft.setEnabled(false);jbnRight.setEnabled(true);
} else {jbnMiddle.setEnabled(true);jbnLeft.setEnabled(true);jbnRight.setEnabled(false);
}}

// Returns an ImageIcon, or null if the path was invalid.protected static ImageIcon createImageIcon(String path) {
URL imgURL = JButtonDemo.class.getResource(path);if (imgURL != null) {
return new ImageIcon(imgURL);} else {
System.err.println("Couldn't find image in system: " + path);return null;
}}// Create the GUI and show it.private static void createGUI() {
JFrame.setDefaultLookAndFeelDecorated(true);// Create and set up the frame.JFrame frame = new JFrame("jButton usage demo");frame.setDefaultCloseOperation(JFrame.EXIT_ON_CLOSE);// Create and set up the content pane.JButtonDemo buttonContentPane = new JButtonDemo();buttonContentPane.setOpaque(true); // content panes must be opaqueframe.getRootPane().setDefaultButton(jbnLeft);frame.setContentPane(buttonContentPane);// Display the window.frame.pack();frame.setVisible(true);
}public static void main(String[] args) {
javax.swing.SwingUtilities.invokeLater(new Runnable() {
public void run() {createGUI();
}});
}
Output
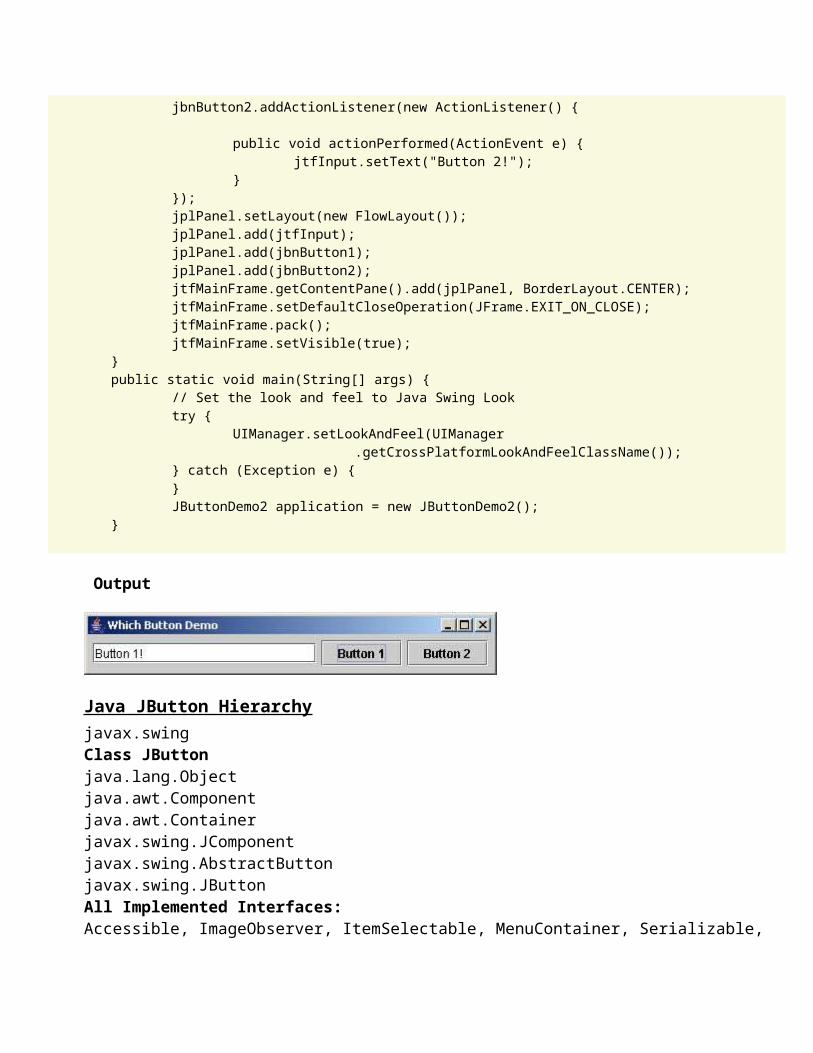
Another Example: JButton Source Code
import java.awt.*; import java.awt.event.*; import javax.swing.*;
public class JButtonDemo2 {

JFrame jtfMainFrame;JButton jbnButton1, jbnButton2;JTextField jtfInput;JPanel jplPanel;public JButtonDemo2() {
jtfMainFrame = new JFrame("Which Button Demo");jtfMainFrame.setSize(50, 50);jbnButton1 = new JButton("Button 1");jbnButton2 = new JButton("Button 2");jtfInput = new JTextField(20);jplPanel = new JPanel();jbnButton1.setMnemonic(KeyEvent.VK_I); //Set ShortCut KeysjbnButton1.addActionListener(new ActionListener() {
public void actionPerformed(ActionEvent e) {jtfInput.setText("Button 1!");
}});jbnButton2.setMnemonic(KeyEvent.VK_I);jbnButton2.addActionListener(new ActionListener() {
public void actionPerformed(ActionEvent e) {jtfInput.setText("Button 2!");
}});jplPanel.setLayout(new FlowLayout());jplPanel.add(jtfInput);jplPanel.add(jbnButton1);jplPanel.add(jbnButton2);jtfMainFrame.getContentPane().add(jplPanel, BorderLayout.CENTER);jtfMainFrame.setDefaultCloseOperation(JFrame.EXIT_ON_CLOSE);jtfMainFrame.pack();jtfMainFrame.setVisible(true);
}public static void main(String[] args) {
// Set the look and feel to Java Swing Looktry {
UIManager.setLookAndFeel(UIManager.getCrossPlatformLookAndFeelClassName());
} catch (Exception e) {}JButtonDemo2 application = new JButtonDemo2();
}
Output
Java JButton Hierarchyjavax.swingClass JButton java.lang.Objectjava.awt.Componentjava.awt.Containerjavax.swing.JComponentjavax.swing.AbstractButtonjavax.swing.JButtonAll Implemented Interfaces: Accessible, ImageObserver, ItemSelectable, MenuContainer, Serializable, SwingConstants Direct Known Subclasses: BasicArrowButton, MetalComboBoxButton
JButton Constructor
JButton(): Creates a button with no set text or icon.
JButton(Action a): Creates a button where properties are taken from the Action supplied.
JButton(Icon icon): Creates a button with an icon.
JButton(String text): Creates a button with text.
JButton(String text, Icon icon): Creates a button with initial text and an icon.
6. Java JTextField class exampleJTextField
Java Swing Tutorial Explaining the JTextField Component. JTextField allows editing/displaying of a single line of text. New features include the ability to justify the text left, right, or center, and to set the text's font. When the user types data into them and presses the Enter key, an action event occurs. If the program registers an event listener, the listener processes the event and can use the data in the text field at the time of the event in the program. JTextField is an input area where the user can type in characters. If you want to let the user enter multiple lines of text, you cannot use Jtextfield's unless you create several of them. The solution is to use JTextArea, which enables the user to enter multiple lines of text.
JTextField Source Code
// A program to demonstrate the use of JTextFields's

//Import Statements import javax.swing.*; import java.awt.*; import java.awt.event.*;
public class JTextFieldDemo extends JFrame {
//Class DeclarationsJTextField jtfText1, jtfUneditableText;String disp = "";TextHandler handler = null;//Constructorpublic JTextFieldDemo() {
super("TextField Test Demo");Container container = getContentPane();container.setLayout(new FlowLayout());jtfText1 = new JTextField(10);jtfUneditableText = new JTextField("Uneditable text field", 20);jtfUneditableText.setEditable(false);container.add(jtfText1);container.add(jtfUneditableText);handler = new TextHandler();jtfText1.addActionListener(handler);jtfUneditableText.addActionListener(handler);setSize(325, 100);setVisible(true);
}//Inner Class TextHandlerprivate class TextHandler implements ActionListener {
public void actionPerformed(ActionEvent e) {if (e.getSource() == jtfText1) {
disp = "text1 : " + e.getActionCommand();} else if (e.getSource() == jtfUneditableText) {
disp = "text3 : " + e.getActionCommand();}JOptionPane.showMessageDialog(null, disp);
}}//Main Program that starts Executionpublic static void main(String args[]) {
JTextFieldDemo test = new JTextFieldDemo();test.setDefaultCloseOperation(JFrame.EXIT_ON_CLOSE);
} }// End of class TextFieldTest
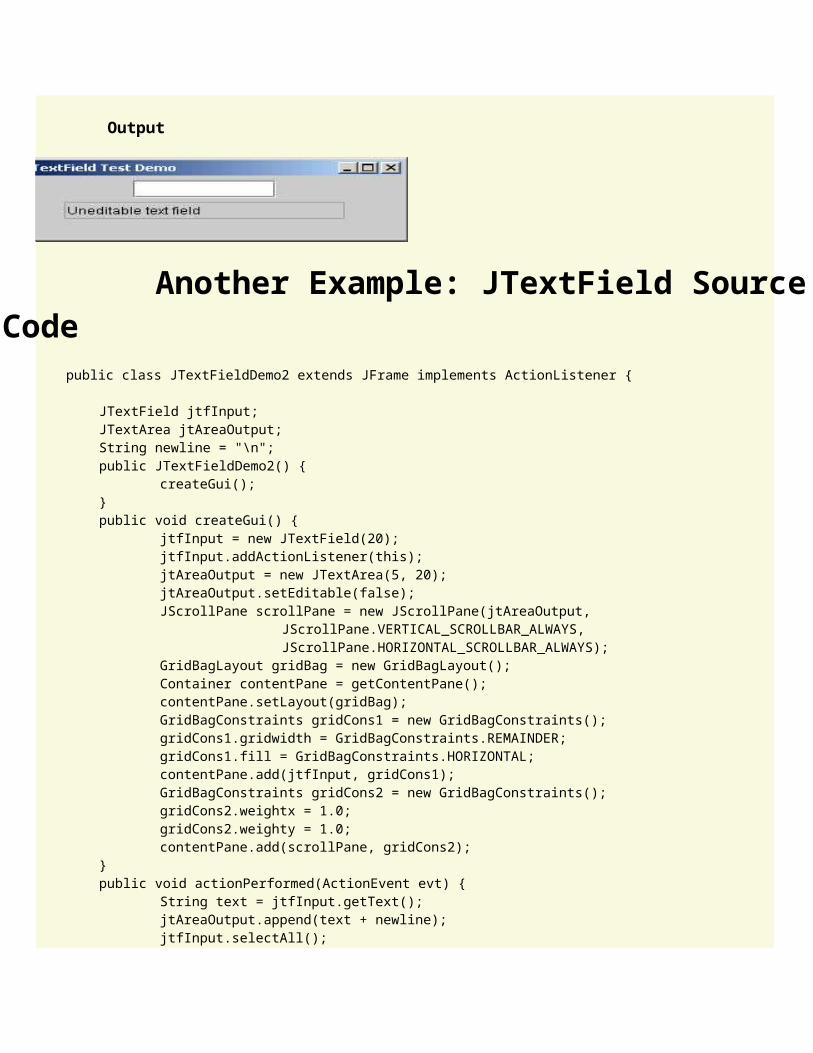
Output

Another Example: JTextField Source Code public class JTextFieldDemo2 extends JFrame implements ActionListener {
JTextField jtfInput;JTextArea jtAreaOutput;String newline = "\n";public JTextFieldDemo2() {
createGui();}public void createGui() {
jtfInput = new JTextField(20);jtfInput.addActionListener(this);jtAreaOutput = new JTextArea(5, 20);jtAreaOutput.setEditable(false);JScrollPane scrollPane = new JScrollPane(jtAreaOutput,
JScrollPane.VERTICAL_SCROLLBAR_ALWAYS,JScrollPane.HORIZONTAL_SCROLLBAR_ALWAYS);
GridBagLayout gridBag = new GridBagLayout();Container contentPane = getContentPane();contentPane.setLayout(gridBag);GridBagConstraints gridCons1 = new GridBagConstraints();gridCons1.gridwidth = GridBagConstraints.REMAINDER;gridCons1.fill = GridBagConstraints.HORIZONTAL;contentPane.add(jtfInput, gridCons1);GridBagConstraints gridCons2 = new GridBagConstraints();gridCons2.weightx = 1.0;gridCons2.weighty = 1.0;contentPane.add(scrollPane, gridCons2);
}public void actionPerformed(ActionEvent evt) {
String text = jtfInput.getText();jtAreaOutput.append(text + newline);jtfInput.selectAll();
}public static void main(String[] args) {
JTextFieldDemo2 jtfTfDemo = new JTextFieldDemo2();jtfTfDemo.pack();jtfTfDemo.addWindowListener(new WindowAdapter() {
public void windowClosing(WindowEvent e) {System.exit(0);
}});jtfTfDemo.setVisible(true);
}
Output
Java JTextField Hierarchyjavax.swingjava.lang.Objectjava.awt.Componentjava.awt.Containerjavax.swing.JComponentjavax.swing.text.JTextComponentjavax.swing.JTextFieldAll Implemented Interfaces: Accessible, ImageObserver, MenuContainer, Scrollable, Serializable, SwingConstants Direct Known Subclasses: DefaultTreeCellEditor.DefaultTextField, JFormattedTextField, JPasswordField
JTextField Constructor
JTextField(): Constructs a new TextField.
JTextField(Document doc, String text, int columns)Constructs a new JTextField that uses the given text storage model and the given number of columns.
JTextField(int columns): Constructs a new empty TextField with the specified number of columns.
JTextField(String text): Constructs a new TextField initialized with the specified text.
JTextField(String text, int columns): Constructs a new TextField initialized with the specified text and columns.
7. Java JPasswordField class exampleJPasswordField
Java Swing Tutorial Explaining the JPasswordField Component. JPasswordField (a direct subclass of JTextField) you can suppress the display of input. Each character entered can be replaced by an echo character. This allows confidential input for passwords, for example. By default, the echo character is the asterisk, *. When the user types data into them and presses the Enter key, an action event occurs. If the program registers an event listener, the listener processes the event and can use the data in the text field at the time of the event in the program. If you need to provide an editable text field that doesn’t show the characters the user types – use the JPasswordField class.
JPasswordField Source Code
public class JPasswordFieldDemo {
public static void main(String[] argv) {final JFrame frame = new JFrame("JPassword Usage Demo");JLabel jlbPassword = new JLabel("Enter the password: ");JPasswordField jpwName = new JPasswordField(10);jpwName.setEchoChar('*');jpwName.addActionListener(new ActionListener() {
public void actionPerformed(ActionEvent e) {JPasswordField input = (JPasswordField) e.getSource();char[] password = input.getPassword();if (isPasswordCorrect(password)) {
JOptionPane.showMessageDialog(frame,"Correct password.");
} else {JOptionPane.showMessageDialog(frame,
"Sorry. Try again.", "Error Message",JOptionPane.ERROR_MESSAGE);
}}
});JPanel jplContentPane = new JPanel(new BorderLayout());jplContentPane.setBorder(BorderFactory.createEmptyBorder(20, 20,
20, 20));jplContentPane.add(jlbPassword, BorderLayout.WEST);jplContentPane.add(jpwName, BorderLayout.CENTER);frame.setContentPane(jplContentPane);frame.addWindowListener(new WindowAdapter() {
public void windowClosing(WindowEvent e) {System.exit(0);
}});frame.pack();frame.setVisible(true);
}private static boolean isPasswordCorrect(char[] inputPassword) {
char[] actualPassword = { 'h', 'e', 'm', 'a', 'n', 't', 'h' };if (inputPassword.length != actualPassword.length)
return false; // Return false if lengths are unequalfor (int i = 0; i < inputPassword.length; i++)
if (inputPassword[i] != actualPassword[i])return false;
return true;}
Output
Java JPasswordField Hierarchyjavax.swingClass JPasswordFieldjava.lang.Objectjava.awt.Componentjava.awt.Containerjavax.swing.JComponentjavax.swing.text.JTextComponentjavax.swing.JTextFieldjavax.swing.JPasswordFieldAll Implemented Interfaces: ImageObserver, MenuContainer, Serializable, Accessible, Scrollable, SwingConstants
JPasswordField Constructor
JPasswordField()Constructs a new JPasswordField, with a default document, null starting text string, and 0 column width.
JPasswordField(Document doc, String txt, int columns)Constructs a new JPasswordField that uses the given text storage model and the given number of columns.
JPasswordField(int columns): Constructs a new empty JPasswordField with the specified number of cols.
JPasswordField(String text)Constructs a new JPasswordField initialized with the specified text.
JPasswordField(String text, int columns)Constructs a new JPasswordField initialized with the specified text and columns.
8. Java JTextArea class exampleJTextArea
Java Swing Tutorial Explaining the JTextArea Component. JTextArea allows editing of multiple lines of text. JTextArea can be used in conjunction with class JScrollPane to achieve scrolling. The underlying JScrollPane can be forced to always or never have either the vertical or horizontal scrollbar.
JTextArea Source Code
import java.awt.*; import java.awt.event.*; import javax.swing.*;
public class JTextAreaDemo extends JFrame implements ActionListener {
JTextField jtfInput;JTextArea jtAreaOutput;String newline = "\n";public JTextAreaDemo() {
createGui();}public void createGui() {
jtfInput = new JTextField(20);jtfInput.addActionListener(this);jtAreaOutput = new JTextArea(5, 20);jtAreaOutput.setCaretPosition(jtAreaOutput.getDocument()
.getLength());jtAreaOutput.setEditable(false);JScrollPane scrollPane = new JScrollPane(jtAreaOutput,
JScrollPane.VERTICAL_SCROLLBAR_ALWAYS,JScrollPane.HORIZONTAL_SCROLLBAR_ALWAYS);
GridBagLayout gridBag = new GridBagLayout();Container contentPane = getContentPane();contentPane.setLayout(gridBag);GridBagConstraints gridCons1 = new GridBagConstraints();gridCons1.gridwidth = GridBagConstraints.REMAINDER;gridCons1.fill = GridBagConstraints.HORIZONTAL;contentPane.add(jtfInput, gridCons1);GridBagConstraints gridCons2 = new GridBagConstraints();gridCons2.weightx = 1.0;gridCons2.weighty = 1.0;contentPane.add(scrollPane, gridCons2);
}public void actionPerformed(ActionEvent evt) {
String text = jtfInput.getText();jtAreaOutput.append(text + newline);jtfInput.selectAll();
}public static void main(String[] args) {
JTextAreaDemo jtfTfDemo = new JTextAreaDemo();jtfTfDemo.pack();jtfTfDemo.addWindowListener(new WindowAdapter() {
public void windowClosing(WindowEvent e) {System.exit(0);
}});jtfTfDemo.setVisible(true);
}
Output
Java JTextArea Hierarchyjavax.swingClass JTextArea java.lang.Objectjava.awt.Componentjava.awt.Containerjavax.swing.JComponentjavax.swing.text.JTextComponentjavax.swing.JTextFieldAll Implemented Interfaces: Accessible, ImageObserver, MenuContainer, Scrollable, Serializable, SwingConstants Direct Known Subclasses: DefaultTreeCellEditor.DefaultTextField, JFormattedTextField, JPasswordField
JTextArea Constructor
JTextArea(): Constructs a new TextArea.
JTextArea(Document doc): Constructs a new JTextArea with the given document model, and defaults for all of the other arguments (null, 0, 0).
JTextArea(Document doc, String text, int rows, int columns)Constructs a new JTextArea with the specified number of rows and columns, and the given model.
JTextArea(int rows, int columns):Constructs a new empty TextArea with the specified number of rows and columns.
JTextArea(String text): Constructs a new TextArea with the specified text displayed.
JTextArea(String text, int rows, int columns)Constructs a new TextArea with the specified text and number of rows and columns.

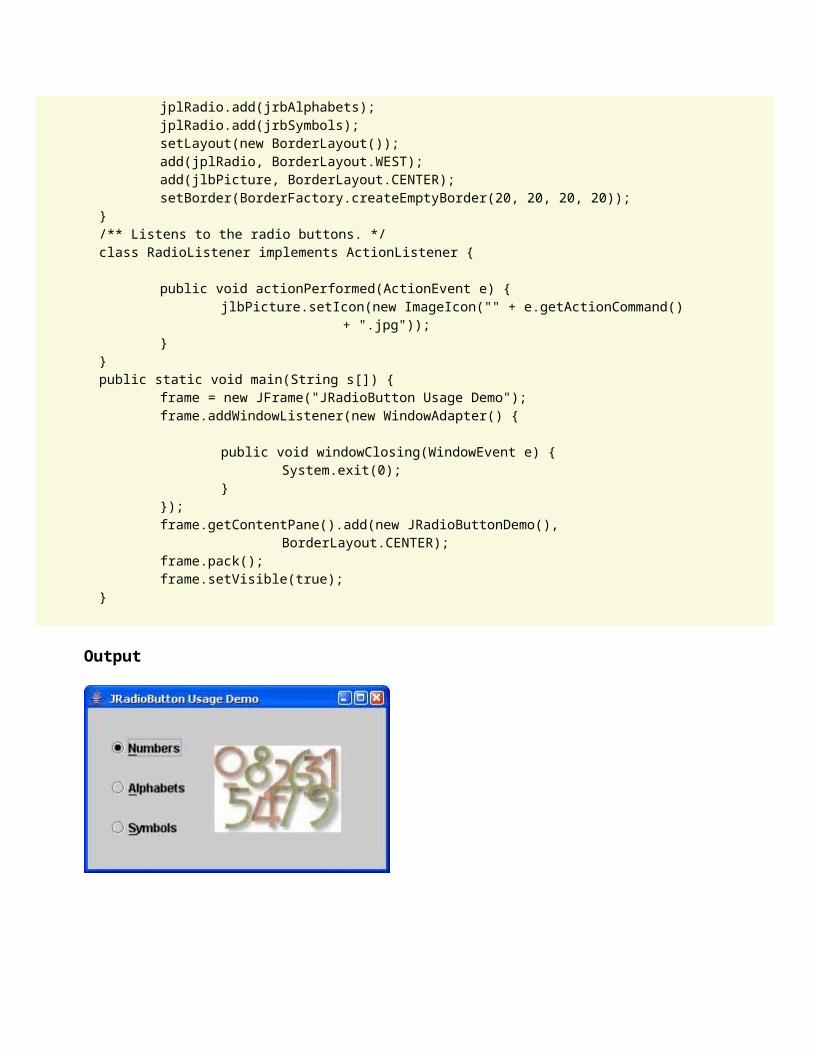
9. Java JRadioButton class exampleJRadioButton
Java Swing Tutorial Explaining the JRadioButton Component. JRadioButton is similar to JCheckbox, except for the default icon for each class. A set of radio buttons can be associated as a group in which only one button at a time can be selected.
JRadioButton Source Code
import java.awt.*; import java.awt.event.*; import javax.swing.*;
public class JRadioButtonDemo extends JPanel {
static JFrame frame;JLabel jlbPicture;RadioListener myListener = null;public JRadioButtonDemo() {
// Create the radio buttons and assign Keyboard shortcuts using// MnemonicsJRadioButton jrbNumbers = new JRadioButton("Numbers");jrbNumbers.setMnemonic(KeyEvent.VK_N);jrbNumbers.setActionCommand("numbers");jrbNumbers.setSelected(true);JRadioButton jrbAlphabets = new JRadioButton("Alphabets");jrbAlphabets.setMnemonic(KeyEvent.VK_A);jrbAlphabets.setActionCommand("alphabets");JRadioButton jrbSymbols = new JRadioButton("Symbols");jrbSymbols.setMnemonic(KeyEvent.VK_S);jrbSymbols.setActionCommand("symbols");// Group the radio buttons.ButtonGroup group = new ButtonGroup();group.add(jrbNumbers);group.add(jrbAlphabets);group.add(jrbSymbols);// Register an action listener for the radio buttons.myListener = new RadioListener();jrbNumbers.addActionListener(myListener);jrbAlphabets.addActionListener(myListener);jrbSymbols.addActionListener(myListener);// Set up the picture labeljlbPicture = new JLabel(new ImageIcon("" + "numbers" + ".jpg"));// Set the Default ImagejlbPicture.setPreferredSize(new Dimension(177, 122));// Put the radio buttons in a column in a panelJPanel jplRadio = new JPanel();jplRadio.setLayout(new GridLayout(0, 1));

jplRadio.add(jrbNumbers);jplRadio.add(jrbAlphabets);jplRadio.add(jrbSymbols);setLayout(new BorderLayout());add(jplRadio, BorderLayout.WEST);add(jlbPicture, BorderLayout.CENTER);setBorder(BorderFactory.createEmptyBorder(20, 20, 20, 20));
}/** Listens to the radio buttons. */class RadioListener implements ActionListener {
public void actionPerformed(ActionEvent e) {jlbPicture.setIcon(new ImageIcon("" + e.getActionCommand()
+ ".jpg"));}
}public static void main(String s[]) {
frame = new JFrame("JRadioButton Usage Demo");frame.addWindowListener(new WindowAdapter() {
public void windowClosing(WindowEvent e) {System.exit(0);
}});frame.getContentPane().add(new JRadioButtonDemo(),
BorderLayout.CENTER);frame.pack();frame.setVisible(true);
}
Output
Java JRadioButton Hierarchyjavax.swingClass JRadioButtonjava.lang.Objectjava.awt.Componentjava.awt.Containerjavax.swing.JComponent

javax.swing.AbstractButtonjavax.swing.JToggleButtonjavax.swing.JRadioButtonAll Implemented Interfaces: Accessible, ImageObserver, ItemSelectable, MenuContainer, Serializable, SwingConstants
JRadioButton Constructor
JRadioButton(): Creates an initially unselected radio button with no set text.
JRadioButton(Action a): Creates a radiobutton where properties are taken from the Action supplied.
JRadioButton(Icon icon): Creates an initially unselected radio button with the specified image but no text.
JRadioButton(Icon icon, boolean selected): Creates a radio button with the specified image and selection state, but no text.
JRadioButton(String text): Creates an unselected radio button with the specified text.
JRadioButton(String text, boolean selected): Creates a radio button with the specified text and selection state.
JRadioButton(String text, Icon icon)Creates a radio button that has the specified text and image, and that is initially unselected.
JRadioButton(String text, Icon icon, boolean selected)Creates a radio button that has the specified text, image, and selection state.
10. Java JCheckBox class exampleJCheckBox
Java Swing Tutorial Explaining the JCheckBox Component. JCheckBox is not a member of a checkbox group. A checkbox can be selected and deselected, and it also displays its current state.
JCheckBox Source Code
import java.awt.*;

import java.awt.event.*; import javax.swing.*;
public class JCheckBoxDemo extends JPanel {
//Four accessory choices provide for 16 different combinationsJCheckBox jcbChin;
JCheckBox jcbGlasses; JCheckBox jcbHair; JCheckBox jcbTeeth;
/* The image for each combination is contained in a separate image file whose name indicates the accessories. The filenames are "geek-XXXX.gif" where XXXX can be one * of the following 16 choices. */
StringBuffer choices; JLabel jlbPicture; CheckBoxListener myListener = null; public JCheckBoxDemo() {
// Add an item listener for each of the check boxes. // This is the listener class which contains business logic myListener = new CheckBoxListener(); // Create check boxes with default selection true jcbChin = new JCheckBox("Chin"); jcbChin.setMnemonic(KeyEvent.VK_C);
//Alt+C Checks/Unchecks the check Box jcbChin.setSelected(true); jcbChin.addItemListener(myListener); jcbGlasses = new JCheckBox("Glasses"); jcbGlasses.setMnemonic(KeyEvent.VK_G);
//Alt+G Checks/Unchecks the check Box jcbGlasses.setSelected(true); jcbGlasses.addItemListener(myListener); jcbHair = new JCheckBox("Hair"); jcbHair.setMnemonic(KeyEvent.VK_H);
//Alt+H Checks/Unchecks the check Box jcbHair.setSelected(true); jcbHair.addItemListener(myListener);
jcbTeeth = new JCheckBox("Teeth"); jcbTeeth.setMnemonic(KeyEvent.VK_T);
//Alt+T Checks/Unchecks the check Box jcbTeeth.setSelected(true); jcbTeeth.addItemListener(myListener);
// Indicates what's on the geek.

choices = new StringBuffer("cght");//Default Image has all the parts.
// Set up the picture label jlbPicture = new JLabel(new ImageIcon("geek-" +
choices.toString().trim() + ".gif")); jlbPicture.setToolTipText(choices.toString().trim());
// Put the check boxes in a column in a panel JPanel jplCheckBox = new JPanel(); jplCheckBox.setLayout(new GridLayout(0, 1)); //0 rows, 1 Column jplCheckBox.add(jcbChin); jplCheckBox.add(jcbGlasses); jplCheckBox.add(jcbHair); jplCheckBox.add(jcbTeeth);
setLayout(new BorderLayout()); add(jplCheckBox, BorderLayout.WEST); add(jlbPicture, BorderLayout.CENTER); setBorder(BorderFactory.createEmptyBorder(20,20,20,20)); }
//Listens to the check boxes events class CheckBoxListener implements ItemListener { public void itemStateChanged(ItemEvent e) { int index = 0; char c = '-'; Object source = e.getSource(); if (source == jcbChin) { index = 0; c = 'c'; } else if (source == jcbGlasses) { index = 1; c = 'g'; } else if (source == jcbHair) { index = 2; c = 'h'; } else if (source == jcbTeeth) { index = 3; c = 't'; }
if (e.getStateChange() == ItemEvent.DESELECTED) c = '-';
choices.setCharAt(index, c); jlbPicture.setIcon(new ImageIcon("geek-"
+ choices.toString().trim() + ".gif")); jlbPicture.setToolTipText(choices.toString()); } }
public static void main(String s[]) { JFrame frame = new JFrame("JCheckBox Usage Demo"); frame.addWindowListener(new WindowAdapter() { public void windowClosing(WindowEvent e) {

System.exit(0); } });
frame.setContentPane(new JCheckBoxDemo()); frame.pack(); frame.setVisible(true); }
Output
11. Java JComboBox class exampleJComboBox
Java Swing Tutorial Explaining the JComboBox Component. JComboBox is like a drop down box — you can click a drop-down arrow and select an option from a list. It generates ItemEvent. For example, when the component has focus, pressing a key that corresponds to the first character in some entry's name selects that entry. A vertical scrollbar is used for longer lists.
JComboBox Source Code
import java.awt.*; import java.awt.event.*; import javax.swing.*;
public class JComboBoxDemo extends JPanel {

JLabel jlbPicture;public JComboBoxDemo() {
String[] comboTypes = { "Numbers", "Alphabets", "Symbols" };// Create the combo box, and set 2nd item as DefaultJComboBox comboTypesList = new JComboBox(comboTypes);comboTypesList.setSelectedIndex(2);comboTypesList.addActionListener(new ActionListener() {
public void actionPerformed(ActionEvent e) {JComboBox jcmbType = (JComboBox) e.getSource();String cmbType = (String) jcmbType.getSelectedItem();jlbPicture.setIcon(new ImageIcon(""
+ cmbType.trim().toLowerCase() + ".jpg"));}
});// Set up the picturejlbPicture = new JLabel(new ImageIcon(""
+ comboTypes[comboTypesList.getSelectedIndex()] + ".jpg"));jlbPicture.setBorder(BorderFactory.createEmptyBorder(10, 0, 0, 0));jlbPicture.setPreferredSize(new Dimension(177, 122 + 10));// Layout the demosetLayout(new BorderLayout());add(comboTypesList, BorderLayout.NORTH);add(jlbPicture, BorderLayout.SOUTH);setBorder(BorderFactory.createEmptyBorder(20, 20, 20, 20));
}public static void main(String s[]) {
JFrame frame = new JFrame("JComboBox Usage Demo");frame.addWindowListener(new WindowAdapter() {
public void windowClosing(WindowEvent e) {System.exit(0);
}});frame.setContentPane(new JComboBoxDemo());frame.pack();frame.setVisible(true);
}
Output

Another Example: JComboBox Source Code
import java.awt.*; import java.awt.event.*; import javax.swing.*; import javax.swing.border.*; import java.util.*; import java.text.*;
public class DateComboBoxDemo extends JPanel {
static JFrame frame;JLabel jlbResult;String datePattern_Current;public DateComboBoxDemo() {
String[] datePatterns = { "dd MMMMM yyyy", "dd.MM.yy", "MM/dd/yy","yyyy.MM.dd G 'at' hh:mm:ss z", "EEE, MMM d, ''yy","h:mm a", "H:mm:ss:SSS", "K:mm a,z","yyyy.MMMMM.dd GGG hh:mm aaa" };
datePattern_Current = datePatterns[0];// Set up the UI for selecting a pattern.JLabel jlbHeading = new JLabel(
"Enter Date pattern /Select from list:");JComboBox patternList = new JComboBox(datePatterns);patternList.setEditable(true);patternList.setAlignmentX(Component.LEFT_ALIGNMENT);patternList.addActionListener(new ActionListener() {
public void actionPerformed(ActionEvent e) {JComboBox jcmbDates = (JComboBox) e.getSource();String seletedDate = (String) jcmbDates.getSelectedItem();datePattern_Current = seletedDate;showDateinLabel();
}});// Create the UI for displaying result
JLabel jlbResultHeading = new JLabel("Current Date/Time",JLabel.LEFT);
jlbResult = new JLabel(" ");jlbResult.setForeground(Color.black);jlbResult.setBorder(BorderFactory.createCompoundBorder(
BorderFactory.createLineBorder(Color.black), BorderFactory.createEmptyBorder(5, 5, 5, 5)));
// Lay out everythingJPanel jpnDate = new JPanel();jpnDate.setLayout(new BoxLayout(jpnDate, BoxLayout.Y_AXIS));jpnDate.add(jlbHeading);jpnDate.add(patternList);JPanel jpnResults = new JPanel();jpnResults.setLayout(new GridLayout(0, 1));jpnResults.add(jlbResultHeading);jpnResults.add(jlbResult);setLayout(new BoxLayout(this, BoxLayout.Y_AXIS));jpnDate.setAlignmentX(Component.LEFT_ALIGNMENT);jpnResults.setAlignmentX(Component.LEFT_ALIGNMENT);add(jpnDate);add(Box.createRigidArea(new Dimension(0, 10)));add(jpnResults);setBorder(BorderFactory.createEmptyBorder(10, 10, 10, 10));showDateinLabel();
} // constructor/** Formats and displays today's date. */public void showDateinLabel() {
Date today = new Date();SimpleDateFormat formatter = new SimpleDateFormat(
datePattern_Current);try {
String dateString = formatter.format(today);jlbResult.setForeground(Color.black);jlbResult.setText(dateString);
} catch (IllegalArgumentException e) {jlbResult.setForeground(Color.red);jlbResult.setText("Error: " + e.getMessage());
}}public static void main(String s[]) {
frame = new JFrame("JComboBox Usage Demo");frame.addWindowListener(new WindowAdapter() {
public void windowClosing(WindowEvent e) {System.exit(0);
}});frame.setContentPane(new DateComboBoxDemo());frame.pack();frame.setVisible(true);
}

Output
Java JComboBox Hierarchyjavax.swingClass JComboBox java.lang.Objectjava.awt.Componentjava.awt.Containerjavax.swing.JComponentjavax.swing.JComboBoxAll Implemented Interfaces: Accessible, ActionListener, EventListener, ImageObserver, ItemSelectable, ListDataListener, MenuContainer, Serializable
JComboBox Constructor
JComboBox(): Creates a JComboBox with a default data model.
JComboBox(ComboBoxModel aModel)Creates a JComboBox that takes it's items from an existing ComboBoxModel.
JComboBox(Object[] items): Creates a JComboBox that contains the elements in the specified array.
JComboBox(Vector items): Creates a JComboBox that contains the elements in the specified Vector.
12.Java JList class exampleJList
Java Swing Tutorial Explaining the JList Component. JList provides a scrollable set of items from which one or more may be selected. JList can be populated from an Array or Vector. JList does not support scrolling directly—instead, the list must be associated with a scrollpane. The view port used by the scrollpane can also have a user-defined border. JList actions are handled using ListSelectionListener.

JList Source Code
import javax.swing.*; import javax.swing.event.ListSelectionEvent; import javax.swing.event.ListSelectionListener; import java.awt.*; import java.awt.event.*;
pu public class JListDemo extends JFrame {
JList list;String[] listColorNames = { "black", "blue", "green", "yellow",
"white" };Color[] listColorValues = { Color.BLACK, Color.BLUE, Color.GREEN,
Color.YELLOW, Color.WHITE };Container contentpane;public JListDemo() {
super("List Source Demo");contentpane = getContentPane();contentpane.setLayout(new FlowLayout());list = new JList(listColorNames);list.setSelectedIndex(0);list.setSelectionMode(ListSelectionModel.SINGLE_SELECTION);contentpane.add(new JScrollPane(list));list.addListSelectionListener(new ListSelectionListener() {
public void valueChanged(ListSelectionEvent e) {contentpane.setBackground(listColorValues[list
.getSelectedIndex()]);}
});setSize(200, 200);setVisible(true);
}public static void main(String[] args) {
JListDemo test = new JListDemo();test.setDefaultCloseOperation(JFrame.EXIT_ON_CLOSE);
}
Output

Java JList Classjavax.swing Class Class JList java.lang.Objectjava.awt.Componentjava.awt.Containerjavax.swing.JComponentjavax.swing.JListAll Implemented Interfaces: Accessible, ImageObserver, MenuContainer, Scrollable, Serializable
JList Constructor
JList(): Constructs a JList with an empty model.
JList(ListModel dataModel): Constructs a JList that displays the elements in the specified, non-null model.
JList(Object[] listData): Constructs a JList that displays the elements in the specified array.
JList(Vector listData): Constructs a JList that displays the elements in the specified Vector.
13. Java JTabbedPane class exampleJTabbedPane
Java Swing Tutorial Explaining the JTabbedPane Component. A JTabbedPane contains a tab that can have a tool tip and a mnemonic, and it can display both text and an image.
The shape of a tab and the way in which the selected tab is displayed varies by Look and Feel.
JTabbedPane Source Code import javax.swing.JTabbedPane; import javax.swing.ImageIcon; import javax.swing.JLabel; import javax.swing.JPanel; import javax.swing.JFrame; import java.awt.*; import java.awt.event.*;

public class JTabbedPaneDemo extends JPanel {
public JTabbedPaneDemo() {ImageIcon icon = new ImageIcon("java-swing-tutorial.JPG");JTabbedPane jtbExample = new JTabbedPane();JPanel jplInnerPanel1 = createInnerPanel("Tab 1 Contains Tooltip and Icon");jtbExample.addTab("One", icon, jplInnerPanel1, "Tab 1");jtbExample.setSelectedIndex(0);JPanel jplInnerPanel2 = createInnerPanel("Tab 2 Contains Icon only");jtbExample.addTab("Two", icon, jplInnerPanel2);JPanel jplInnerPanel3 = createInnerPanel("Tab 3 Contains Tooltip and Icon");jtbExample.addTab("Three", icon, jplInnerPanel3, "Tab 3");JPanel jplInnerPanel4 = createInnerPanel("Tab 4 Contains Text only");jtbExample.addTab("Four", jplInnerPanel4);// Add the tabbed pane to this panel.setLayout(new GridLayout(1, 1));add(jtbExample);
}protected JPanel createInnerPanel(String text) {
JPanel jplPanel = new JPanel();JLabel jlbDisplay = new JLabel(text);jlbDisplay.setHorizontalAlignment(JLabel.CENTER);jplPanel.setLayout(new GridLayout(1, 1));jplPanel.add(jlbDisplay);return jplPanel;
}public static void main(String[] args) {
JFrame frame = new JFrame("TabbedPane Source Demo");frame.addWindowListener(new WindowAdapter() {
public void windowClosing(WindowEvent e) {System.exit(0);
}});frame.getContentPane().add(new JTabbedPaneDemo(),
BorderLayout.CENTER);frame.setSize(400, 125);frame.setVisible(true);
}
Output

JTabbedPane question
When I use a JTabbedPane and want to listen to which tab is being clicked, which listerner should I use?
Answer: ChangeListener
Java JTabbedPane Hierarchyjavax.swingClass JTabbedPane java.lang.Objectjava.awt.Componentjava.awt.Containerjavax.swing.JComponentjavax.swing.JTabbedPaneAll Implemented Interfaces: Accessible, ImageObserver, MenuContainer, Serializable, SwingConstants
JTabbedPane Constructor
JTabbedPane()Creates an empty TabbedPane with a default tab placement of JTabbedPane.TOP.
JTabbedPane(int tabPlacement)Creates an empty TabbedPane with the specified tab placement of either: JTabbedPane.TOP, JTabbedPane.BOTTOM, JTabbedPane.LEFT, or JTabbedPane.RIGHT.
JTabbedPane(int tabPlacement, int tabLayoutPolicy)Creates an empty TabbedPane with the specified tab placement and tab layout policy.
14. Java JToolBar class exampleJToolbar
Java Swing Tutorial Explaining the JToolBar Component. A JToolbar contains a number of components whose type is usually some kind of button which can also include separators to group related components within the toolbar. The toolbar can be docked against any of the four edges of a container (panel or a frame). A toolbar can also be made to float.
Toolbars uses BoxLayout, which arranges components in one horizontal row/ vertical column. This layout manager does not force each component to have the same height or width; instead, it uses their preferred height or width, and attempts to align them. You can adjust the resulting alignment by calling class Component's methods setAlignmentX() and/or setAlignmentY() on each component.
import javax.swing.JToolBar;
import javax.swing.JButton; import javax.swing.ImageIcon; import javax.swing.JFrame; import javax.swing.JTextArea; import javax.swing.JScrollPane; import javax.swing.JPanel; import javax.swing.JTextField; impor t java.awt.*; import java.awt.event.*; public class JToolBarDemo extends JFrame {
protected JTextArea textArea;protected String newline = "\n";public JToolBarDemo() {
super("ToolBarDemo");// Create the toolbar.JToolBar jtbMainToolbar = new JToolBar();// setFloatable(false) to make the toolbar non movableaddButtons(jtbMainToolbar);// Create the text areatextArea = new JTextArea(5, 30);JScrollPane jsPane = new JScrollPane(textArea);// Lay out the content pane.JPanel jplContentPane = new JPanel();jplContentPane.setLayout(new BorderLayout());jplContentPane.setPreferredSize(new Dimension(400, 100));jplContentPane.add(jtbMainToolbar, BorderLayout.NORTH);jplContentPane.add(jsPane, BorderLayout.CENTER);setContentPane(jplContentPane);
}public void addButtons(JToolBar jtbToolBar) {
JButton jbnToolbarButtons = null;// first buttonjbnToolbarButtons = new JButton(new ImageIcon("left.gif"));jbnToolbarButtons.setToolTipText("left");jbnToolbarButtons.addActionListener(new ActionListener() {
public void actionPerformed(ActionEvent e) {displayInTextArea("This is Left Toolbar Button Reporting");
}});jtbToolBar.add(jbnToolbarButtons);// 2nd buttonjbnToolbarButtons = new JButton(new ImageIcon("right.gif"));jbnToolbarButtons.setToolTipText("right");jbnToolbarButtons.addActionListener(new ActionListener() {
public void actionPerformed(ActionEvent e) {displayInTextArea("This is right Toolbar Button Reporting");
}});jtbToolBar.add(jbnToolbarButtons);jtbToolBar.addSeparator();// 3rd buttonjbnToolbarButtons = new JButton(new ImageIcon("open.gif"));
jbnToolbarButtons.setToolTipText("open");jbnToolbarButtons.addActionListener(new ActionListener() {
public void actionPerformed(ActionEvent e) {displayInTextArea("This is open Toolbar Button Reporting");
}});jtbToolBar.add(jbnToolbarButtons);// 4th buttonjbnToolbarButtons = new JButton(new ImageIcon("save.gif"));jbnToolbarButtons.setToolTipText("save");jbnToolbarButtons.addActionListener(new ActionListener() {
public void actionPerformed(ActionEvent e) {displayInTextArea("This is save Toolbar Button Reporting");
}});jtbToolBar.add(jbnToolbarButtons);// We can add separators to group similar componentsjtbToolBar.addSeparator();// fourth buttonjbnToolbarButtons = new JButton("Text button");jbnToolbarButtons.addActionListener(new ActionListener() {
public void actionPerformed(ActionEvent e) {displayInTextArea("Text button");
}});jtbToolBar.add(jbnToolbarButtons);// fifth component is NOT a button!JTextField jtfButton = new JTextField("Text field");jtfButton.setEditable(false);jtfButton.addActionListener(new ActionListener() {
public void actionPerformed(ActionEvent e) {displayInTextArea("TextField component can also be placed");
}});jtbToolBar.add(jtfButton);
}protected void displayInTextArea(String actionDescription) {
textArea.append(actionDescription + newline);}public static void main(String[] args) {
JToolBarDemo jtfToolbar = new JToolBarDemo(); // Extends Frame.jtfToolbar.pack();jtfToolbar.addWindowListener(new WindowAdapter() {
public void windowClosing(WindowEvent e) {System.exit(0);
}});jtfToolbar.setVisible(true);
}

Output
Java JToolBar Hierarchyjavax.swingClass JToolBar java.lang.Objectjava.awt.BorderLayoutAll Implemented Interfaces: LayoutManager, LayoutManager2, Serializable
JToolBar Constructor
JToolBar(): Creates a new tool bar; orientation defaults to HORIZONTAL.
JToolBar(int orientation): Creates a new tool bar with the specified orientation.
JToolBar(String name): Creates a new tool bar with the specified name.
JToolBar(String name, int orientation): Creates a new tool bar with a specified name and orientation.
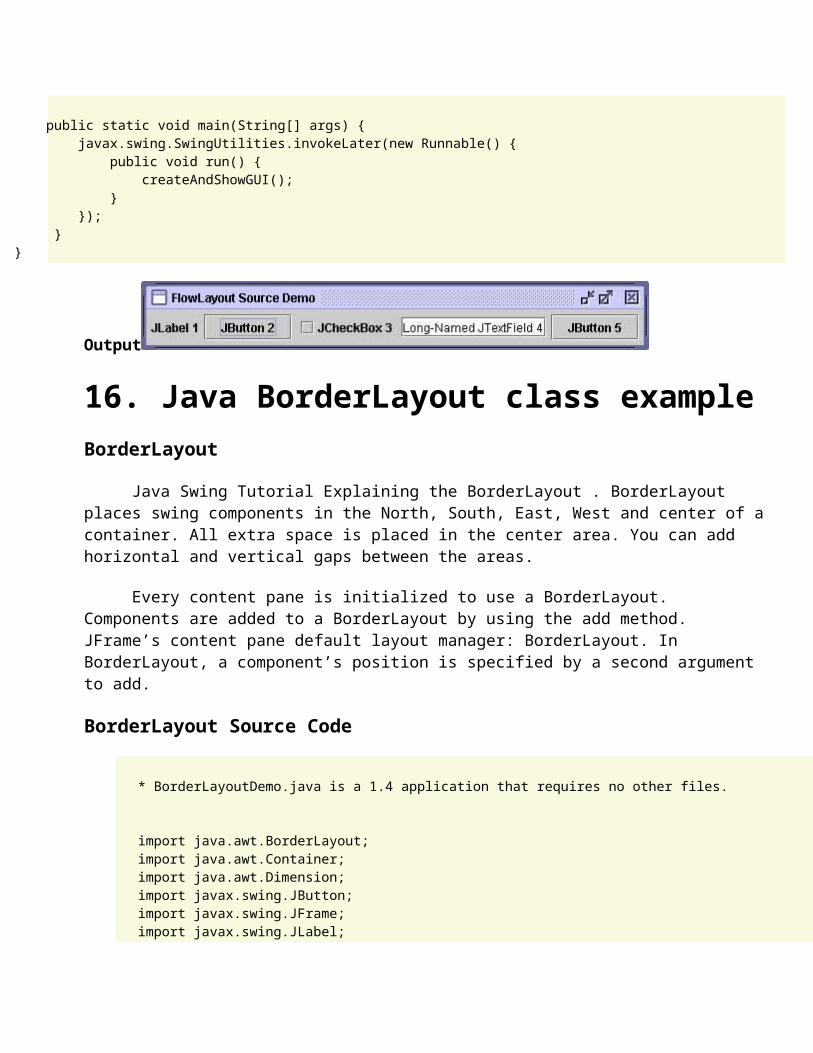
15. Java FlowLayout class exampleFlowLayout
Java Swing Tutorial Explaining the FlowLayout. FlowLayout when used arranges swing components from left to right until there's no more space available. Then it begins a new row below it and moves from left to right again. Each component in a FlowLayout gets as much space as it needs and no more.
FlowLayout Source Code
import java.awt.ComponentOrientation; import java.awt.Container; import java.awt.Dimension; import java.awt.FlowLayout;

import javax.swing.JButton; import javax.swing.JCheckBox; import javax.swing.JFrame; import javax.swing.JLabel; import javax.swing.JTextField;
public class FlowLayoutDemo { public static boolean RIGHT_TO_LEFT = false;
public static void addComponents(Container contentPane) { if (RIGHT_TO_LEFT) { contentPane.setComponentOrientation( ComponentOrientation.RIGHT_TO_LEFT); } contentPane.setLayout(new FlowLayout());
contentPane.add(new JLabel("JLabel 1")); contentPane.add(new JButton("JButton 2")); contentPane.add(new JCheckBox("JCheckBox 3")); contentPane.add(new JTextField("Long-Named JTextField 4")); contentPane.add(new JButton("JButton 5")); }
private static void createAndShowGUI() { JFrame.setDefaultLookAndFeelDecorated(true);
JFrame frame = new JFrame("FlowLayout Source Demo") { public Dimension getMinimumSize() { Dimension prefSize = getPreferredSize(); return new Dimension(100, prefSize.height); } }; frame.setDefaultCloseOperation(JFrame.EXIT_ON_CLOSE);
//Set up the content pane and components in FlowLayout addComponents(frame.getContentPane());
frame.pack(); frame.setVisible(true); }
public static void main(String[] args) { javax.swing.SwingUtilities.invokeLater(new Runnable() { public void run() { createAndShowGUI(); } }); }}
Output
16. Java BorderLayout class exampleBorderLayout
Java Swing Tutorial Explaining the BorderLayout . BorderLayout places swing components in the North, South, East, West and center of a container. All extra space is placed in the center area. You can add horizontal and vertical gaps between the areas.
Every content pane is initialized to use a BorderLayout. Components are added to a BorderLayout by using the add method. JFrame’s content pane default layout manager: BorderLayout. In BorderLayout, a component’s position is specified by a second argument to add.
BorderLayout Source Code
* BorderLayoutDemo.java is a 1.4 application that requires no other files.
import java.awt.BorderLayout; import java.awt.Container; import java.awt.Dimension; import javax.swing.JButton; import javax.swing.JFrame; import javax.swing.JLabel;
public class BorderLayoutDemo { public static boolean RIGHT_TO_LEFT = false;
public static void addComponentsToPane(Container contentPane) {// Use BorderLayout. Default empty constructor with no horizontal and vertical // gaps contentPane.setLayout(new BorderLayout(5,5)); if (!(contentPane.getLayout() instanceof BorderLayout)) { contentPane.add(new JLabel("Container doesn't use BorderLayout!")); return; }
if (RIGHT_TO_LEFT) { contentPane.setComponentOrientation( java.awt.ComponentOrientation.RIGHT_TO_LEFT); }
JButton jbnSampleButtons = new JButton("Button 1 (PAGE_START)"); contentPane.add(jbnSampleButtons, BorderLayout.PAGE_START);
jbnSampleButtons = new JButton("Button 2 (CENTER)"); jbnSampleButtons.setPreferredSize(new Dimension(200, 100)); contentPane.add(jbnSampleButtons, BorderLayout.CENTER);
jbnSampleButtons = new JButton("Button 3 (LINE_START)"); contentPane.add(jbnSampleButtons, BorderLayout.LINE_START);

jbnSampleButtons = new JButton("Long-Named Button 4 (PAGE_END)"); contentPane.add(jbnSampleButtons, BorderLayout.PAGE_END);
jbnSampleButtons = new JButton("5 (LINE_END)"); contentPane.add(jbnSampleButtons, BorderLayout.LINE_END); }
private static void createAndShowGUI() { JFrame.setDefaultLookAndFeelDecorated(true);
JFrame frame = new JFrame("BorderLayout Source Demo"); frame.setDefaultCloseOperation(JFrame.EXIT_ON_CLOSE);
//Set up the content pane and add swing components to it addComponentsToPane(frame.getContentPane());
frame.pack(); frame.setVisible(true); }
public static void main(String[] args) { javax.swing.SwingUtilities.invokeLater(new Runnable() { public void run() { createAndShowGUI(); } }); }
output

17. Java GridLayout class exampleGridLayout
Java Swing Tutorial Explaining the GridLayout. GridLayout is a layout manager that lays out a container's components in a rectangular grid. The container is divided into equal-sized rectangles, and one component is placed in each rectangle.
GridLayout Source Code
import java.awt.*; import javax.swing.*;
public class GridLayoutDemo { public final static boolean RIGHT_TO_LEFT = false;
public static void addComponentsToPane(Container contentPane) { if (RIGHT_TO_LEFT) { contentPane.setComponentOrientation( ComponentOrientation.RIGHT_TO_LEFT); }// Any number of rows and 2 columns contentPane.setLayout(new GridLayout(0,2));
contentPane.add(new JLabel("JLabel 1")); contentPane.add(new JButton("JButton 2")); contentPane.add(new JCheckBox("JCheckBox 3")); contentPane.add(new JTextField("Long-Named JTextField 4")); contentPane.add(new JButton("JButton 5")); }
private static void createAndShowGUI() { JFrame.setDefaultLookAndFeelDecorated(true);
JFrame frame = new JFrame("GridLayout Source Demo"); frame.setDefaultCloseOperation(JFrame.EXIT_ON_CLOSE);
//Set up the content pane and components in GridLayout addComponentsToPane(frame.getContentPane());
frame.pack(); frame.setVisible(true); }
public static void main(String[] args) { javax.swing.SwingUtilities.invokeLater(new Runnable() { public void run() { createAndShowGUI(); } }); }

Output
Java GridLayout Hierarchyjavax.swingClass GridLayoutjava.lang.Objectjava.awt.GridLayoutAll Implemented Interfaces: LayoutManager, Serializable
GridLayout Constructor
GridLayout(): Creates a grid layout with a default of one column per component, in a single row.
GridLayout(int rows, int cols): Creates a grid layout with the specified number of rows and columns.
GridLayout(int rows, int cols, int hgap, int vgap): Creates a grid layout with the specified number of rows and columns.
18. Java GridBagLayout class exampleGridBagLayout
Java Swing Tutorial Explaining the GridBagLayout. GridBagLayout is a layout manager that lays out a container's components in a grid of cells with each component occupying one or more cells, called its display area. The display area aligns components vertically and horizontally, without requiring that the components be of the same size.
GridBagLayout Source Codeimport java.awt.*;

import javax.swing.JButton;import javax.swing.JComboBox;import javax.swing.JFrame;import javax.swing.JTextField;
public class GridBagLayoutDemo {
public static void addComponentsToPane(Container pane) {
JButton jbnButton; pane.setLayout(new GridBagLayout()); GridBagConstraints gBC = new GridBagConstraints(); gBC.fill = GridBagConstraints.HORIZONTAL;
jbnButton = new JButton("Button 1"); gBC.weightx = 0.5; gBC.gridx = 0; gBC.gridy = 0; pane.add(jbnButton, gBC); JTextField jtf = new JTextField("TextField 1"); gBC.gridx = 2; gBC.gridy = 0; jtf.setEditable(false); pane.add(jtf, gBC);
jbnButton = new JButton("Button 3"); gBC.gridx = 2; gBC.gridy = 0; pane.add(jbnButton, gBC);
jbnButton = new JButton("Button 4"); gBC.ipady = 40; //This component has more breadth compared to other buttons gBC.weightx = 0.0; gBC.gridwidth = 3; gBC.gridx = 0; gBC.gridy = 1; pane.add(jbnButton, gBC);
JComboBox jcmbSample = new JComboBox(new String[]{"ComboBox 1", "hi", "hello"}); gBC.ipady = 0; gBC.weighty = 1.0; gBC.anchor = GridBagConstraints.PAGE_END; gBC.insets = new Insets(10,0,0,0); //Padding gBC.gridx = 1; gBC.gridwidth = 2; gBC.gridy = 2; pane.add(jcmbSample, gBC); }
private static void createAndShowGUI() {
JFrame.setDefaultLookAndFeelDecorated(true); JFrame frame = new JFrame("GridBagLayout Source Demo"); frame.setDefaultCloseOperation(JFrame.EXIT_ON_CLOSE);

//Set up the content pane. addComponentsToPane(frame.getContentPane());
frame.pack(); frame.setVisible(true); }
public static void main(String[] args) { javax.swing.SwingUtilities.invokeLater(new Runnable() { public void run() { createAndShowGUI(); } }); }}
Output
After Expanding the Frame

GridBagLayout Class
javax.swingClass GridBagLayoutjava.lang.Objectjava.awt.GridBagLayoutAll Implemented Interfaces: LayoutManager, LayoutManager2, Serializable
GridBagLayout Constructor
GridBagLayout(): Creates a grid bag layout manager..
19. Java JMenu class exampleJMenu
Java Swing Tutorial Explaining the JMenuBar Component. Swing provides support for pull-down and popup menus. A JMenubar can contain several JMenu 's. Each of the JMenu 's can contain a series of JMenuItem 's that you can select.
How Menu's Are Created?
1. First, A JMenubar is created2. Then, we attach all of the menus to this JMenubar.3. Then we add JMenuItem 's to the JMenu 's.4. The JMenubar is then added to the frame. By default, each JMenuItem added to a JMenu is enabled—that is, it can beselected. In certain situations, we may need to disable a JMenuItem. This is done by calling setEnabled(). The setEnabled() method also allows components to be enabled.
JMenu Source Code
import java.awt.*; import java.awt.event.*; import javax.swing.JMenu; import javax.swing.JMenuItem;

import javax.swing.JCheckBoxMenuItem; import javax.swing.JRadioButtonMenuItem; import javax.swing.ButtonGroup; import javax.swing.JMenuBar; import javax.swing.KeyStroke; import javax.swing.ImageIcon; import javax.swing.JPanel; import javax.swing.JTextArea; import javax.swing.JScrollPane; import javax.swing.JFrame;
//Used Action Listner for JMenuItem & JRadioButtonMenuItem //Used Item Listner for JCheckBoxMenuItem public class JMenuDemo implements ActionListener, ItemListener {
JTextArea jtAreaOutput;JScrollPane jspPane;public JMenuBar createJMenuBar() {
JMenuBar mainMenuBar;JMenu menu1, menu2, submenu;JMenuItem plainTextMenuItem, textIconMenuItem, iconMenuItem, subMenuItem;JRadioButtonMenuItem rbMenuItem;JCheckBoxMenuItem cbMenuItem;ImageIcon icon = createImageIcon("jmenu.jpg");mainMenuBar = new JMenuBar();menu1 = new JMenu("Menu 1");menu1.setMnemonic(KeyEvent.VK_M);mainMenuBar.add(menu1);// Creating the MenuItemsplainTextMenuItem = new JMenuItem("Menu item with Plain Text",
KeyEvent.VK_T);// can be done either way for assigning shortcuts// menuItem.setMnemonic(KeyEvent.VK_T);// Accelerators, offer keyboard shortcuts to bypass navigating the menu// hierarchy.plainTextMenuItem.setAccelerator(KeyStroke.getKeyStroke(
KeyEvent.VK_1, ActionEvent.ALT_MASK));plainTextMenuItem.addActionListener(this);menu1.add(plainTextMenuItem);textIconMenuItem = new JMenuItem("Menu Item with Text & Image",
icon);textIconMenuItem.setMnemonic(KeyEvent.VK_B);textIconMenuItem.addActionListener(this);menu1.add(textIconMenuItem);// Menu Item with just an ImageiconMenuItem = new JMenuItem(icon);iconMenuItem.setMnemonic(KeyEvent.VK_D);iconMenuItem.addActionListener(this);menu1.add(iconMenuItem);menu1.addSeparator();// Radio Button Menu items follow a seperatorButtonGroup itemGroup = new ButtonGroup();rbMenuItem = new JRadioButtonMenuItem(
"Menu Item with Radio Button");rbMenuItem.setSelected(true);rbMenuItem.setMnemonic(KeyEvent.VK_R);

itemGroup.add(rbMenuItem);rbMenuItem.addActionListener(this);menu1.add(rbMenuItem);rbMenuItem = new JRadioButtonMenuItem(
"Menu Item 2 with Radio Button");itemGroup.add(rbMenuItem);rbMenuItem.addActionListener(this);menu1.add(rbMenuItem);menu1.addSeparator();// Radio Button Menu items follow a seperatorcbMenuItem = new JCheckBoxMenuItem("Menu Item with check box");cbMenuItem.setMnemonic(KeyEvent.VK_C);cbMenuItem.addItemListener(this);menu1.add(cbMenuItem);cbMenuItem = new JCheckBoxMenuItem("Menu Item 2 with check box");cbMenuItem.addItemListener(this);menu1.add(cbMenuItem);menu1.addSeparator();// Sub Menu follows a seperatorsubmenu = new JMenu("Sub Menu");submenu.setMnemonic(KeyEvent.VK_S);subMenuItem = new JMenuItem("Sub MenuItem 1");subMenuItem.setAccelerator(KeyStroke.getKeyStroke(KeyEvent.VK_2,
ActionEvent.CTRL_MASK));subMenuItem.addActionListener(this);submenu.add(subMenuItem);subMenuItem = new JMenuItem("Sub MenuItem 2");submenu.add(subMenuItem);subMenuItem.addActionListener(this);menu1.add(submenu);// Build second menu in the menu bar.menu2 = new JMenu("Menu 2");menu2.setMnemonic(KeyEvent.VK_N);mainMenuBar.add(menu2);return mainMenuBar;
}public Container createContentPane() {
// Create the content-pane-to-be.JPanel jplContentPane = new JPanel(new BorderLayout());jplContentPane.setLayout(new BorderLayout());// Can do it either way
// to set layoutjplContentPane.setOpaque(true);// Create a scrolled text area.jtAreaOutput = new JTextArea(5, 30);jtAreaOutput.setEditable(false);jspPane = new JScrollPane(jtAreaOutput);// Add the text area to the content pane.jplContentPane.add(jspPane, BorderLayout.CENTER);return jplContentPane;
}/** Returns an ImageIcon, or null if the path was invalid. */protected static ImageIcon createImageIcon(String path) {
java.net.URL imgURL = JMenuDemo.class.getResource(path);if (imgURL != null) {
return new ImageIcon(imgURL);} else {

System.err.println("Couldn't find image file: " + path);return null;
}}private static void createGUI() {
JFrame.setDefaultLookAndFeelDecorated(true);// Create and set up the window.JFrame frame = new JFrame("JMenu Usage Demo");frame.setDefaultCloseOperation(JFrame.EXIT_ON_CLOSE);JMenuDemo app = new JMenuDemo();frame.setJMenuBar(app.createJMenuBar());frame.setContentPane(app.createContentPane());frame.setSize(500, 300);frame.setVisible(true);
}public void actionPerformed(ActionEvent e) {
JMenuItem source = (JMenuItem) (e.getSource());String s = "Menu Item source: " + source.getText()
+ " (an instance of " + getClassName(source) + ")";jtAreaOutput.append(s + "\n");jtAreaOutput.setCaretPosition(jtAreaOutput.getDocument()
.getLength());}public void itemStateChanged(ItemEvent e) {
JMenuItem source = (JMenuItem) (e.getSource());String s = "Menu Item source: "
+ source.getText()+ " (an instance of "+ getClassName(source)+ ")"+ "\n"+ " State of check Box: "+ ((e.getStateChange() == ItemEvent.SELECTED) ? "selected"
: "unselected");jtAreaOutput.append(s + "\n");jtAreaOutput.setCaretPosition(jtAreaOutput.getDocument()
.getLength());}// Returns the class name, no package infoprotected String getClassName(Object o) {
String classString = o.getClass().getName();int dotIndex = classString.lastIndexOf(".");return classString.substring(dotIndex + 1); // Returns only Class name
}public static void main(String[] args) {
javax.swing.SwingUtilities.invokeLater(new Runnable() {
public void run() {createGUI();
}});
}
Output