javafx - oracle · available through the java 8 apis for javafx. the javafx 3d graphics apis...
TRANSCRIPT

JavaFXWorking with JavaFX Graphics
Release 8
E50627-01
March 2014
In this tutorial, you learn how to use the graphics features (3D, canvas, and imageOps) that are available through the JavaFX APIs.

JavaFX Working with JavaFX Graphics, Release 8
E50627-01
Copyright © 2008, 2014, Oracle and/or its affiliates. All rights reserved.
Primary Author: Cindy Castillo
Contributing Author: Scott Hommel
Contributor: John Yoon, Chien Yang
This software and related documentation are provided under a license agreement containing restrictions on use and disclosure and are protected by intellectual property laws. Except as expressly permitted in your license agreement or allowed by law, you may not use, copy, reproduce, translate, broadcast, modify, license, transmit, distribute, exhibit, perform, publish, or display any part, in any form, or by any means. Reverse engineering, disassembly, or decompilation of this software, unless required by law for interoperability, is prohibited.
The information contained herein is subject to change without notice and is not warranted to be error-free. If you find any errors, please report them to us in writing.
If this is software or related documentation that is delivered to the U.S. Government or anyone licensing it on behalf of the U.S. Government, the following notice is applicable:
U.S. GOVERNMENT END USERS: Oracle programs, including any operating system, integrated software, any programs installed on the hardware, and/or documentation, delivered to U.S. Government end users are "commercial computer software" pursuant to the applicable Federal Acquisition Regulation and agency-specific supplemental regulations. As such, use, duplication, disclosure, modification, and adaptation of the programs, including any operating system, integrated software, any programs installed on the hardware, and/or documentation, shall be subject to license terms and license restrictions applicable to the programs. No other rights are granted to the U.S. Government.
This software or hardware is developed for general use in a variety of information management applications. It is not developed or intended for use in any inherently dangerous applications, including applications that may create a risk of personal injury. If you use this software or hardware in dangerous applications, then you shall be responsible to take all appropriate failsafe, backup, redundancy, and other measures to ensure its safe use. Oracle Corporation and its affiliates disclaim any liability for any damages caused by use of this software or hardware in dangerous applications.
Oracle and Java are registered trademarks of Oracle and/or its affiliates. Other names may be trademarks of their respective owners.
Intel and Intel Xeon are trademarks or registered trademarks of Intel Corporation. All SPARC trademarks are used under license and are trademarks or registered trademarks of SPARC International, Inc. AMD, Opteron, the AMD logo, and the AMD Opteron logo are trademarks or registered trademarks of Advanced Micro Devices. UNIX is a registered trademark of The Open Group.
This software or hardware and documentation may provide access to or information on content, products, and services from third parties. Oracle Corporation and its affiliates are not responsible for and expressly disclaim all warranties of any kind with respect to third-party content, products, and services. Oracle Corporation and its affiliates will not be responsible for any loss, costs, or damages incurred due to your access to or use of third-party content, products, or services.

iii
Contents
Preface ................................................................................................................................................................. v
About This Tutorial..................................................................................................................................... vAudience....................................................................................................................................................... vDocumentation Accessibility ..................................................................................................................... vRelated Documents ..................................................................................................................................... vConventions ................................................................................................................................................. vi
Part I Getting Started with JavaFX 3D Graphics
1 Overview
Sample of 3D Graphics Use Cases .......................................................................................................... 1-13D Feature in JavaFX 2.x Releases........................................................................................................... 1-2
2 Shape3D
Pre-defined Shapes .................................................................................................................................... 2-1User-Defined Shapes ................................................................................................................................. 2-3
3 Camera
Perspective Camera .................................................................................................................................... 3-1Field of View .........................................................................................................................................3-2Clipping Planes ....................................................................................................................................3-2Y-down versus Y-up ............................................................................................................................3-3Sample Code Using PerspectiveCamera ..........................................................................................3-3
4 SubScene
Creating a SubScene .................................................................................................................................. 4-1Sample Use of SubScene .......................................................................................................................... 4-1
5 Light
Creating and Using Light.......................................................................................................................... 5-1

iv
6 Material
7 Picking
Creating a PickResult Object ................................................................................................................... 7-1Methods for the PickResult Object......................................................................................................... 7-1Sample Use of PickResult ........................................................................................................................ 7-2
8 Building a 3D Sample Application
Prepare for this Tutorial ............................................................................................................................ 8-1Create the Project........................................................................................................................................ 8-2Create the Scene.......................................................................................................................................... 8-2Set Up the Camera...................................................................................................................................... 8-3Build the Axes ............................................................................................................................................. 8-4Build the Molecule..................................................................................................................................... 8-6Add Camera Viewing Controls................................................................................................................ 8-7
Part II JavaFX Canvas
9 Working with the Canvas API
Overview ...................................................................................................................................................... 9-1Drawing Basic Shapes ............................................................................................................................... 9-1Applying Gradients and Shadows.......................................................................................................... 9-3Interacting with the User .......................................................................................................................... 9-5Creating a Simple Layer System ............................................................................................................. 9-7
Part III JavaFX Image Ops
10 Using the Image Ops API
Overview of the Image Ops API .......................................................................................................... 10-1Reading Pixels From Images ................................................................................................................. 10-1Writing Pixels to Images ........................................................................................................................ 10-4Writing Images with Byte Arrays and PixelFormats ........................................................................ 10-6Creating a Snapshot ................................................................................................................................ 10-9
Part IV Source Code for the Graphics Tutorials
A MSAAApp Code
MSAAApp.java.......................................................................................................................................... A-1
B 3D MoleculeSampleApp Code
Xform.java ................................................................................................................................................... B-1buildMolecule() ......................................................................................................................................... B-4handleMouse() ........................................................................................................................................... B-6handleKeyboard()...................................................................................................................................... B-8

v
Preface
This preface gives an overview about this tutorial and also describes the document accessibility features and conventions used in this tutorial - Working with JavaFX Graphics.
About This TutorialThis tutorial gives an introduction to the JavaFX graphics technology and contains the following parts:
■ Getting Started with JavaFX 3D Graphics
■ Using the Image Ops API
■ Working with the Canvas API
Each chapter provides information about the available APIs for the JavaFX graphics features. Code samples and applications are also included to illustrate how to use the APIs.
AudienceThis document is intended for JavaFX developers.
Documentation AccessibilityFor information about Oracle's commitment to accessibility, visit the Oracle Accessibility Program website at http://www.oracle.com/pls/topic/lookup?ctx=acc&id=docacc.
Access to Oracle SupportOracle customers have access to electronic support through My Oracle Support. For information, visit http://www.oracle.com/pls/topic/lookup?ctx=acc&id=info or visit http://www.oracle.com/pls/topic/lookup?ctx=acc&id=trs if you are hearing impaired.
Related DocumentsFor more information, see the following documents in the JavaFX documentation set:
■ Getting Started with JavaFX
vi
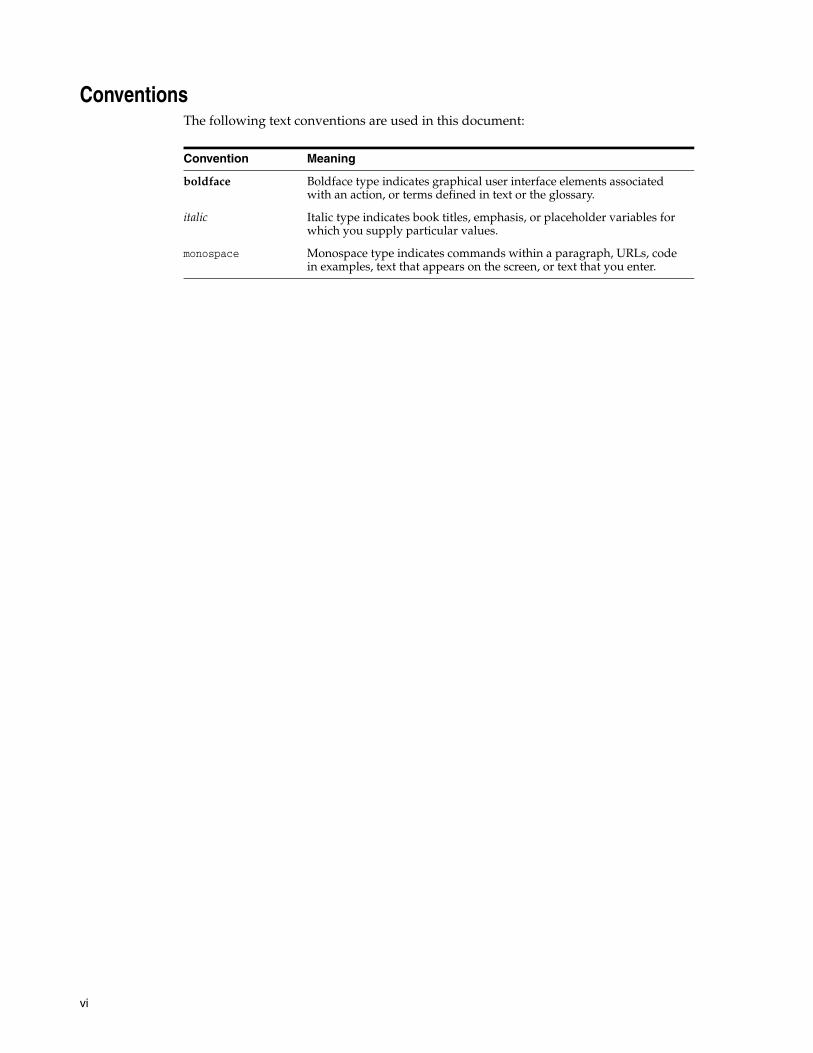
ConventionsThe following text conventions are used in this document:
Convention Meaning
boldface Boldface type indicates graphical user interface elements associated with an action, or terms defined in text or the glossary.
italic Italic type indicates book titles, emphasis, or placeholder variables for which you supply particular values.
monospace Monospace type indicates commands within a paragraph, URLs, code in examples, text that appears on the screen, or text that you enter.

Part IPart I Getting Started with JavaFX 3D Graphics
The JavaFX 3D Graphics section contains the following chapters that discuss the available 3D features. It also steps you through building a sample application using some of those features:
■ Overview
■ Shape3D
■ Camera
■ SubScene
■ Light
■ Material
■ Picking
■ Building a 3D Sample Application


1
Overview 1-1
1Overview
This chapter provides an overview of the JavaFX 3D graphics features currently available through the Java 8 APIs for JavaFX.
The JavaFX 3D graphics APIs provide a general purpose three-dimensional graphics library for the JavaFX platform. You can use 3D geometry, cameras, and lights to create, display, and manipulate objects in 3D space.
It is assumed that you have an intermediate level of Java and JavaFX knowledge. Download the Java Development Kit (JDK) 8 release from http://www.oracle.com/technetwork/java/javase/downloads/. JDK 8 includes the JavaFX APIs, which includes the 3D graphics features.
Sample of 3D Graphics Use CasesFigure 1–1 shows a snapshot of the JavaFX 3D application example that was demonstrated at the JavaOne 2012 keynote session. It was built as a proof of concept on an early prototype of JavaFX SDK with added 3D Mesh, Camera, and Lighting support. You can view it at http://www.youtube.com/embed/AS26gZrYNy8?rel=0 web site.
Figure 1–1 JavaFX 3D Application Sample

3D Feature in JavaFX 2.x Releases
1-2 JavaFX Working with JavaFX Graphics
A sampling of other JavaFX 3D graphics use cases are as follows:
■ Inventory and Process Visualization
■ Scientific and Engineering Visualization
■ 3D Charting
■ Mechanical CAD and CAE
■ Medical Imaging
■ Product Marketing
■ Architectural Design and Walkthroughs
■ Advanced User Experience
■ Mission Planning
■ Training
■ Entertainment
3D Feature in JavaFX 2.x ReleasesIn the JavaFX 2.x releases, it is possible to create two-dimensional objects and transform them in 3D space. You can subclass the Group class to create your own custom group and set the transform sub-matrices to anything you want. You are able to simulate the behavior of transform groups of other 3D content concentration packages, such as Maya and 3D Studio Max, because you can customize which sub-matrices are part of that transform group. See Applying Transformations in JavaFX to learn more about this transformation feature.
Example 1–1 shows a sample code that creates a Group subclass, Xform, that has a translation, a pivot, three rotations, a scale, and the inverse pivot.
Example 1–1 3D Transforms Code Sample
public class XformWithPivot extends Group { public Translate t = new Translate(); public Translate p = new Translate(); public Translate ip = new Translate(); public Rotate rx = new Rotate(); { rx.setAxis(Rotate.X_AXIS); } public Rotate ry = new Rotate(); { ry.setAxis(Rotate.Y_AXIS); } public Rotate rz = new Rotate(); { rz.setAxis(Rotate.Z_AXIS); } public Scale s = new Scale(); public XformWithPivot() { super(); getTransforms().addAll(t, p, rz, ry, rx, s, ip); }}
The Xform subclass is created from Group because groups are originally designed for two-dimensional (2D) UI layout. The pivot of a node is recalculated under certain conditions for 2D UI layout, but if you subclass group and create Xform, as shown in Example 1–1 and use those new transforms, it bypasses the 2D UI layout.
Although, 2D UI pivot recalculation is very desirable for UI controls in a 2D layout, it is not something you would want in a 3D layout. The pivot point is recomputed as the
3D Feature in JavaFX 2.x Releases
Overview 1-3
center of the Node's layout bounds and so any change to the layout bounds will cause the pivot point to change, which ends up automatically moving your object. So, for a Group node, any change to its children, including position, geometry, effect, orientation, or scale, will cause the group’s layout bounds to change. This will automatically move the object in unintended ways, when it comes to 3D layout, but in desirable ways when it comes to 2D. So, in a 3D layout, you definitely want to bypass the automatic pivot recomputation.
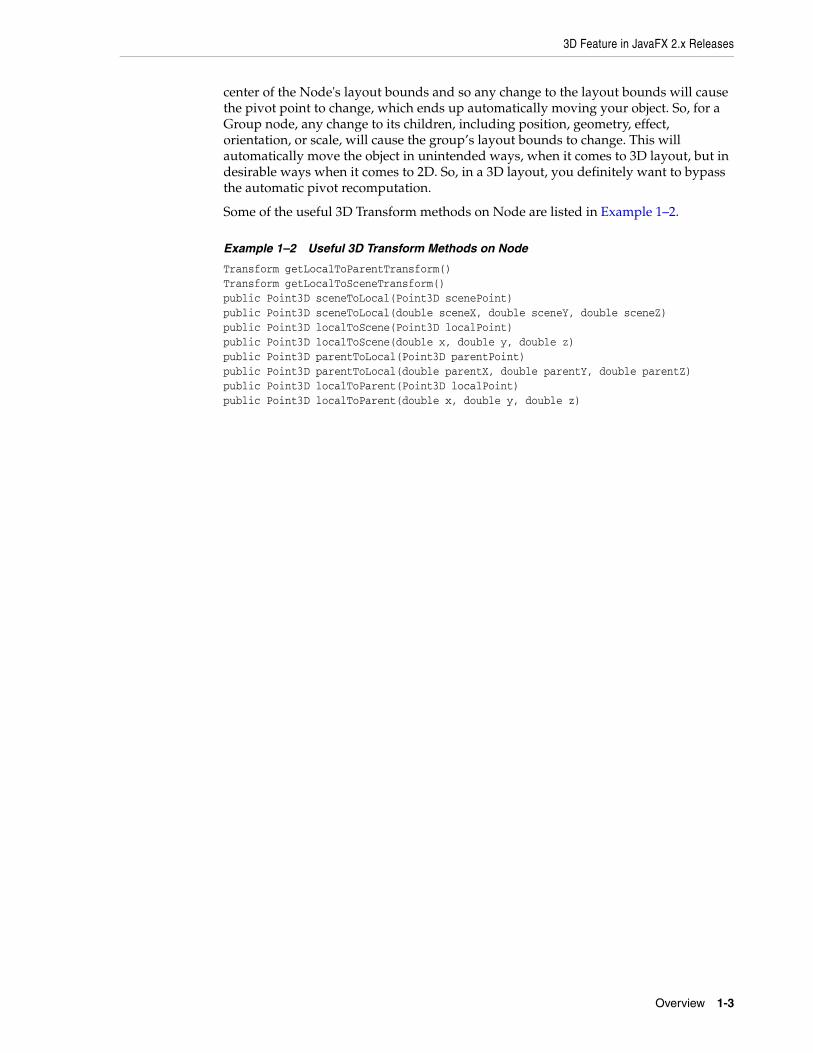
Some of the useful 3D Transform methods on Node are listed in Example 1–2.
Example 1–2 Useful 3D Transform Methods on Node
Transform getLocalToParentTransform()Transform getLocalToSceneTransform()public Point3D sceneToLocal(Point3D scenePoint)public Point3D sceneToLocal(double sceneX, double sceneY, double sceneZ)public Point3D localToScene(Point3D localPoint)public Point3D localToScene(double x, double y, double z)public Point3D parentToLocal(Point3D parentPoint)public Point3D parentToLocal(double parentX, double parentY, double parentZ)public Point3D localToParent(Point3D localPoint)public Point3D localToParent(double x, double y, double z)

3D Feature in JavaFX 2.x Releases
1-4 JavaFX Working with JavaFX Graphics

2
Shape3D 2-1
2Shape3D
This chapter gives information about the Shape3D API that is available with the JavaFX 3D Graphics library.
There are two types of 3D shapes:
■ Pre-defined Shapes
■ User-Defined Shapes
Pre-defined ShapesThe pre-defined 3D shapes are provided to make it easier for you to quickly create 3D objects out-of-the-box. These shapes include boxes, cylinders, and spheres. Sample usages are shown in Figure 2–1.
Figure 2–1 Pre-defined Shapes

Pre-defined Shapes
2-2 JavaFX Working with JavaFX Graphics
Example 2–1 shows the Shape3D class hierarchy. It includes the MeshView class, which defines a surface with the specified 3D mesh data. Also included are the Box, Cylinder, and Sphere subclasses.
Example 2–1 Shape3D Class Hierarchy
java.lang.Object javafx.scene.Node javafx.scene.shape.Shape3D javafx.scene.shape.MeshView javafx.scene.shape.Box javafx.scene.shape.Cylinder javafx.scene.shape.Sphere
Use the following information to create the pre-defined shapes:
■ To create a Box object, specify the dimensions of width, height, and depth.
Box myBox = new Box(width, height, depth);
■ To create a Cylinder object, specify the radius and height.
Cylinder myCylinder = new Cylinder(radius, height);Cylinder myCylinder2 = new Cylinder(radius, height, divisions);
■ To create a Sphere object, specify the radius.
Sphere mySphere = new Sphere(radius);Sphere mySphere2 = new Sphere(radius, divisions);
Example 2–2 shows lines of code that demonstrate the use of the predefined 3D shapes.
Example 2–2 Sample Usage of Predefined 3D Shapes
... final PhongMaterial redMaterial = new PhongMaterial(); redMaterial.setSpecularColor(Color.ORANGE); redMaterial.setDiffuseColor(Color.RED); final PhongMaterial blueMaterial = new PhongMaterial(); blueMaterial.setDiffuseColor(Color.BLUE); blueMaterial.setSpecularColor(Color.LIGHTBLUE);
final PhongMaterial greyMaterial = new PhongMaterial(); greyMaterial.setDiffuseColor(Color.DARKGREY); greyMaterial.setSpecularColor(Color.GREY);
final Box red = new Box(400, 400, 400); red.setMaterial(redMaterial); final Sphere blue = new Sphere(200); blue.setMaterial(blueMaterial); final Cylinder grey = new Cylinder(5, 100); grey.setMaterial(greyMaterial);...

User-Defined Shapes
Shape3D 2-3
User-Defined ShapesExample 2–3 shows the JavaFX Mesh class hierarchy, which contains the TriangleMesh subclass. Triangle mesh is the most typical kind of mesh used in 3D layouts.
Example 2–3 Mesh Class Hierarchy
java.lang.Object javafx.scene.shape.Mesh (abstract) javafx.scene.shape.TriangleMesh
The TriangleMesh contains separate arrays of points, texture coordinates, and faces that describe a triangulated geometric mesh. Smoothing groups are used to group triangles that are part of the same curved surface. Triangles that are in different smoothing groups form hard edges.
Use the following steps to create a TriangleMesh instance:
1. Create a new instance of a triangleMesh.
mesh = new TriangleMesh();
2. Define the set of points, which are the vertices of the mesh.
float points[] = { … };mesh.getPoints().addAll(points);
3. Describe the texture coordinates for each vertex.
float texCoords[] = { … };mesh.getTexCoords().addAll(texCoords);
4. Using the vertices, build the Faces, which are triangles that describe the topology.
int faces[] = { … };mesh.getFaces().addAll(faces);
5. Define the smoothing group to which each face belongs.
int smoothingGroups[] = { … };mesh.getFaceSmoothingGroups().addAll(smoothingGroups);
Smoothing group adjusts the normal on the vertices for the face to either be smooth or faceted. If every single face has a differing smoothing group, then the mesh will be very faceted. If every single face has the same smoothing group, then the mesh will look very smooth.

User-Defined Shapes
2-4 JavaFX Working with JavaFX Graphics

3
Camera 3-1
3Camera
This chapter describes the Camera API that is included with the JavaFX 3D Graphics features.
The camera is now a node that can be added to the JavaFX scene graph and thus allows you to move the camera around in a 3D UI layout. This is different from the 2D layout where the camera remained in one position.
In the JavaFX scene coordinate space, the default camera’s projection plane is at Z=0 and camera coordinate system is as follows:
• X-axis points to the right
• Y-axis points down
• Z-axis points away from the viewer or into the screen.
Perspective CameraJavaFX provides a perspective camera for rendering a 3D scene. This camera defines a viewing volume for a perspective projection. The viewing volume can be changed by changing the value of the fieldOfView property.
Example 3–1 shows the two constructors for creating a Perspective Camera:
Example 3–1 Constructors for PerspectiveCamera
PerspectiveCamera()
PerspectiveCamera(boolean fixedEyeAtCameraZero)
The latter constructor is a new constructor in JavaFX 8 and allows you to control the camera position with the specified fixedEyeAtCameraZero flag so that it renders what the camera would see in a 3D environment.
The following constructor should be used for 3D graphics programming:
PerspectiveCamera(true);
When the option fixedEyeAtCameraZero is set to true, a PerspectiveCamera is constructed with its eye position fixed at (0, 0, 0) in its coordinate space, regardless of the change in the dimension of the projection area or window resize.
When the fixedEyeAtCameraZero is set to the default value of false, the coordinate system defined by the camera has its origin in the upper left corner of the panel. This mode is used for 2D UI controls rendered with a perspective camera, but is not useful for most 3D graphics applications. The camera is moved when the window is resized, for example, to maintain the origin in the upper left corner of the panel. That is exactly

Perspective Camera
3-2 JavaFX Working with JavaFX Graphics
what you want for a 2D UI layout, but not in a 3D layout. So, it is important to remember to set the fixedEyeAtCameraZero property to true when you are doing 3D graphics to transform or move the camera around.
To create a camera and add it to the scene, use the following lines of code:
Camera camera = new PerspectiveCamera(true); scene.setCamera(camera);
Use the following code to add a camera to the scene graph.
Group cameraGroup = new Group(); cameraGroup.getChildren().add(camera); root.getChildren().add(cameraGroup);
To rotate the camera and move the cameraGroup, use the following lines of code:
camera.rotate(45); cameraGroup.setTranslateZ(-75);
Field of ViewThe camera’s field of view can be set as follows:
camera.setFieldOfView(double value);
The larger the field of view, the more perspective distortion and size differences increase.
■ Fisheye lenses have a field of view of up to 180 degrees and beyond.
■ Normal lenses have a field of view between 40 and 62 degrees.
■ Telephoto lenses have a field of view of 1 (or less) degrees to 30 degrees.
Clipping PlanesYou can set the near clipping plane of the Camera in the local coordinate system as follows:
camera.setNearClip(double value);
To set the far clipping plane of the Camera in the local coordinate system, use the following:
camera.setFarClip(double value);
Setting the near or far clipping planes determines the viewing volume. If the near clipping plane is too great, it will basically start clipping the front of the scene. If it is too small, then it will start clipping the back of the scene.
The clipping planes need to be set so that enough of the scene can be seen. But the viewing range should not be set so large that a numerical error is encountered. If the near clipping plane is too large a value, the scene starts getting clipped. But if the near clipping plane too small, a different kind of visual artifact will appear due to a value being too close to zero. If the far clipping plane is too large a value, a numerical error is also encountered, especially if the near clipping plane is too small a value.
Tip: Don't set the near clipping value to a smaller value than is needed or the far clipping value to a larger value than is needed because strange visual artifacts may start appearing.

Perspective Camera
Camera 3-3
Y-down versus Y-up Most 2D graphics coordinate systems (including UI) have Y increasing as you go down the screen. This is true of PhotoShop, JavaFX, and Illustrator. Basically most 2D packages work this way. Many 3D graphics coordinate systems typically have Y increasing as you move up the screen. Some 3D graphics coordinate systems have Z increasing as you move up, but most have Y increasing as you move up the screen.
Y down versus Y up are both correct in their own context. In JavaFX, the camera's coordinate system is Y-down, which means X axis points to the right, Y axis is pointing down, Z axis is pointing away from the viewer or into the screen.
If you want to think of a 3D scene as Y-up, you could create an Xform node, called root3D, under root, as shown in Example 3–2. You set its rx.setAngle property to 180 degrees, basically turning it upside down. Then, add your 3D elements to your root3D node and put your camera under root3D.
Example 3–2 Create Xform node, root3D
root3D = new Xform();root3D.rx.setAngle(180.0);root.getChildren().add(root3D);root3D.getChildren().add(...); // add all your 3D nodes here
You can also create an Xform node called cameraXform and put it under the root, as shown in Example 3–3. You turn it upside down, and put your camera under the cameraXform.
Example 3–3 Create a cameraXform Node
Camera camera = new PerspectiveCamera(true);Xform cameraXform = new Xform();root.getChildren().add(cameraXform);cameraXform.getChildren().add(camera);cameraXform.rz.setAngle(180.0);
An even better way, with subtle difference on the camera node, is to add a 180 degree rotation to the camera. The rotation used is not the one provided for you because you want to avoid the auto pivoting. In Example 3–4, the camera is turned 180 degrees and it is then added to the camera as a child of cameraXform. The subtle difference is that the cameraXform retains very pristine values and in its default position, everything is zeroed out, including the translations and rotations.
Example 3–4 Create cameraXform and Rotate
Camera camera = new PerspectiveCamera(true);Xform cameraXform = new Xform();root.getChildren().add(cameraXform);cameraXform.getChildren().add(camera);Rotate rz = new Rotate(180.0, Rotate.Z_AXIS);camera.getTransforms().add(rz);
Sample Code Using PerspectiveCameraThe Simple3DBoxApp sample, shown in Example 3–5, creates a 3D box and uses a perspective camera for rendering the scene. This sample application is part of the Ensemble 8 Samples that you can download from the JavaFX Demos and Samples section at http://www.oracle.com/technetwork/java/javase/downloads/.

Perspective Camera
3-4 JavaFX Working with JavaFX Graphics
The MSAAApp.java application also gives an example of how to use the Camera API.
Example 3–5 3D Box Sample Application
package simple3dbox; import javafx.application.Application;import javafx.scene.Group;import javafx.scene.Parent;import javafx.scene.PerspectiveCamera;import javafx.scene.Scene;import javafx.scene.SubScene;import javafx.scene.paint.Color;import javafx.scene.paint.PhongMaterial;import javafx.scene.shape.Box;import javafx.scene.shape.DrawMode;import javafx.scene.transform.Rotate;import javafx.scene.transform.Translate;import javafx.stage.Stage; public class Simple3DBoxApp extends Application { public Parent createContent() throws Exception { // Box Box testBox = new Box(5, 5, 5); testBox.setMaterial(new PhongMaterial(Color.RED)); testBox.setDrawMode(DrawMode.LINE); // Create and position camera PerspectiveCamera camera = new PerspectiveCamera(true); camera.getTransforms().addAll ( new Rotate(-20, Rotate.Y_AXIS), new Rotate(-20, Rotate.X_AXIS), new Translate(0, 0, -15)); // Build the Scene Graph Group root = new Group(); root.getChildren().add(camera); root.getChildren().add(testBox); // Use a SubScene SubScene subScene = new SubScene(root, 300,300); subScene.setFill(Color.ALICEBLUE); subScene.setCamera(camera); Group group = new Group(); group.getChildren().add(subScene); return group; }
@Override public void start(Stage primaryStage) throws Exception { primaryStage.setResizable(false); Scene scene = new Scene(createContent()); primaryStage.setScene(scene); primaryStage.show(); }
/** * Java main for when running without JavaFX launcher

Perspective Camera
Camera 3-5
*/ public static void main(String[] args) { launch(args); }}

Perspective Camera
3-6 JavaFX Working with JavaFX Graphics

4
SubScene 4-1
4SubScene
This chapter gives information about the use of SubScene API in JavaFX.
The SubScene node is a container for content in a scene graph. It is a special Node for scene separation. It can be used to render part of the scene with a different camera. You can use a SubScene node if you want to have Y-up for 3D objects and Y-down for 2D UI objects in your layout.
Some of the possible SubScene use cases are:
■ overlay for UI controls (needs a static camera)
■ Underlay for background (static or updated less frequently)
■ “Heads-up” display
■ Y-up for your 3D objects and Y-down for your 2D UI.
Creating a SubSceneExample 4–1 shows the two constructors for creating a new instance of a SubScene node in your application.
Example 4–1 SubScene Constructors
// // Creates a SubScene for a specific root Node with a specific size.//public SubScene(Parent root, double width, double height)
// // Constructs a SubScene consisting of a root, with a dimension of width and // height, specifies whether a depth buffer is created for this scene and // specifies whether scene anti-aliasing is requested.
public SubScene(Parent root, double width, double height, boolean depthBuffer, SceneAntialiasing antiAliasing)Once you have created a SubScene, you can modify it by using the available methods to specify or obtain the height, root node, width, background fill of the SubScene, the type of camera used to render the SubScene, or whether the SubScene is anti-aliased.
Sample Use of SubSceneThe CreateSubScene() method, shown in Example 4–2, illustrates how to use the second SubScene constructor listed above. This method is part of the MSAAApp.java sample application which is listed in Appendix A.

Sample Use of SubScene
4-2 JavaFX Working with JavaFX Graphics
Example 4–2 Code Sample Using SubScene
...SubScene msaa = createSubScene("MSAA = true", cylinder2, Color.TRANSPARENT, new PerspectiveCamera(), true);......private static SubScene createSubScene(String title, Node node, Paint fillPaint, Camera camera, boolean msaa) { Group root = new Group(); PointLight light = new PointLight(Color.WHITE); light.setTranslateX(50); light.setTranslateY(-300); light.setTranslateZ(-400); PointLight light2 = new PointLight(Color.color(0.6, 0.3, 0.4)); light2.setTranslateX(400); light2.setTranslateY(0); light2.setTranslateZ(-400); AmbientLight ambientLight = new AmbientLight(Color.color(0.2, 0.2, 0.2)); node.setRotationAxis(new Point3D(2, 1, 0).normalize()); node.setTranslateX(180); node.setTranslateY(180); root.getChildren().addAll(setTitle(title), ambientLight, light, light2, node); SubScene subScene = new SubScene(root, 500, 400, true, msaa ? SceneAntialiasing.BALANCED : SceneAntialiasing.DISABLED); subScene.setFill(fillPaint); subScene.setCamera(camera); return subScene; }
The 3D Cubes and Xylophone samples that are available in the Graphics 3D section of the Ensemble 8 samples set also illustrate the use of the SubScene API. You can download the Ensemble 8 samples from the JavaFX Demos and Samples section of http://www.oracle.com/technetwork/java/javase/downloads/.

5
Light 5-1
5Light
This chapter describes the Light API included in the JavaFX 3D graphics library.
Light is now also defined as a node in the scene graph. A default light is provided if the set of active lights contained in the scene is empty. Each light contains a set of affected nodes. If a set of nodes is empty, all nodes on the scene (or subscene) are affected. If a Parent node is in that set of nodes, then all of its children are also affected.
Light interacts with the geometry of a Shape3D object and its material to provide rendering result. Currently, there are two types of light sources:
■ AmbientLight - a light source that seems to come from all directions.
■ PointLight - a light source that has a fixed point in space and radiates light equally in all directions away from itself.
Example 5–1 shows the Light Class Hierarchy.
Example 5–1 Light Class Hierarchy
javafx.scene.Node javafx.scene.LightBase (abstract) javafx.scene.AmbientLight javafx.scene.PointLight
Creating and Using LightTo create point light and add it to the Scene, do the following:
PointLight light = new PointLight(); light.setColor(Color.RED); Use the following to add light to the scene graph:
Group lightGroup = new Group(); lightGroup.getChildren().add(light); root.getChildren().add(lightGroup);
Rotate the light 45 degrees with the following line of code:
light.rotate(45);
To move the lightGroup and have light moves with it, use something similar to the following code.
lightGroup.setTranslateZ(-75);

Creating and Using Light
5-2 JavaFX Working with JavaFX Graphics
The setTranslateZ() method sets the value of the property translateZ, which is set to -75 in the example code above. This value will be added to any translation defined by the transforms ObservableList and layoutZ.
Example 5–2 shows a code snippet taken from the MSAAApp.java application, which illustrates how to use the PointLight API.
Example 5–2 MSAAApp.java Code Snippet Using PointLight API
... PointLight light = new PointLight(Color.WHITE); light.setTranslateX(50); light.setTranslateY(-300); light.setTranslateZ(-400); PointLight light2 = new PointLight(Color.color(0.6, 0.3, 0.4)); light2.setTranslateX(400); light2.setTranslateY(0); light2.setTranslateZ(-400); AmbientLight ambientLight = new AmbientLight(Color.color(0.2, 0.2, 0.2)); node.setRotationAxis(new Point3D(2, 1, 0).normalize()); node.setTranslateX(180); node.setTranslateY(180); root.getChildren().addAll(setTitle(title), ambientLight, light, light2, node);...

6
Material 6-1
6Material
This chapter describes the Material class of the JavaFX 3D Graphics library.
The Material class contains a set of rendering properties. Example 6–1 shows the Material class hierarchy and that the PhongMaterial class is sub-classed from the Material class.
Example 6–1 Material Class Hierarchy
java.lang.Object javafx.scene.paint.Material (abstract) javafx.scene.paint.PhongMaterial
The PhongMaterial class provides definitions of properties that represent a form of Phong shaded material:
■ Diffuse color
■ Diffuse map
■ Specular map
■ Specular color
■ Specular power
■ Bump map or normal map
■ Self-illumination map
Materials are shareable among multiple Shape3D nodes.
Example 6–2 shows how to create a PhongMaterial object, set its diffuseMap properties, and use the material for a shape.
Example 6–2 Working with Material
//Create MaterialMaterial mat = new PhongMaterial();Image diffuseMap = new Image("diffuseMap.png");Image normalMap = new Image("normalMap.png");
// Set material propertiesmat.setDiffuseMap(diffuseMap);mat.setBumpMap(normalMap);mat.setSpecularColor(Color.WHITE);
// Use the material for a shapeshape3d.setMaterial(mat);

6-2 JavaFX Working with JavaFX Graphics
The MSAAApp.java application and buildMolecule() method show how the PhongMaterial API is used. Both are available in the appendices sections.
7
Picking 7-1
7Picking
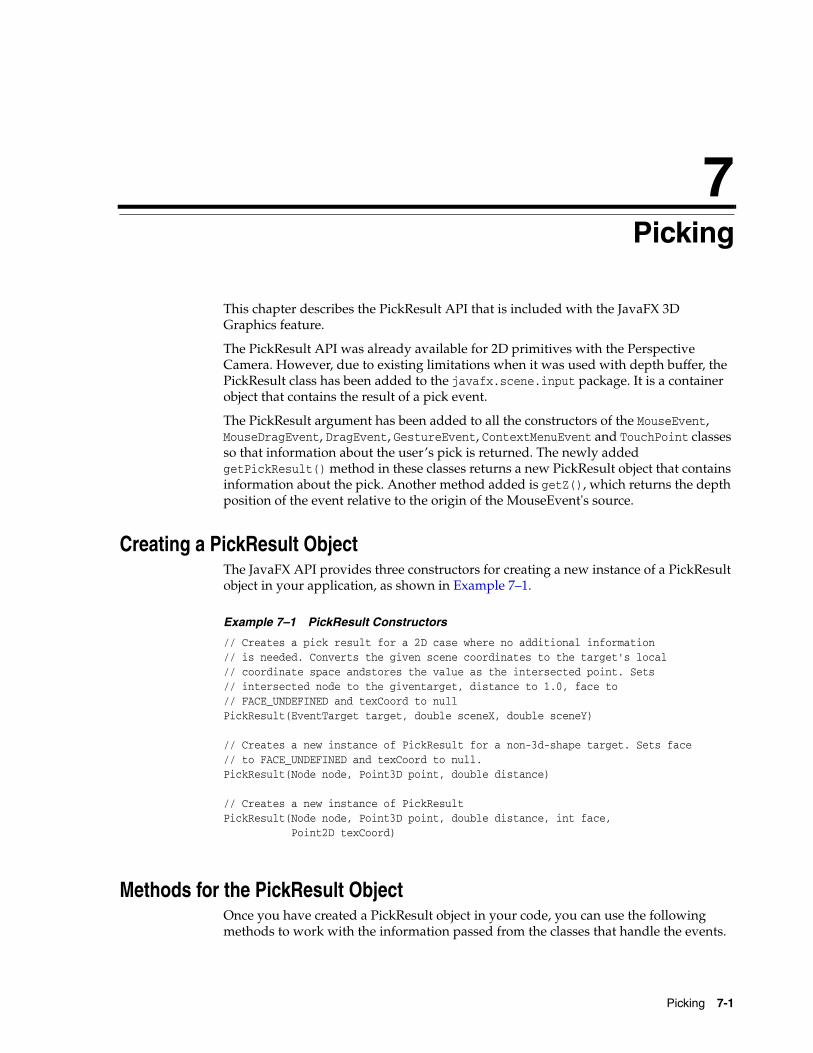
This chapter describes the PickResult API that is included with the JavaFX 3D Graphics feature.
The PickResult API was already available for 2D primitives with the Perspective Camera. However, due to existing limitations when it was used with depth buffer, the PickResult class has been added to the javafx.scene.input package. It is a container object that contains the result of a pick event.
The PickResult argument has been added to all the constructors of the MouseEvent, MouseDragEvent, DragEvent, GestureEvent, ContextMenuEvent and TouchPoint classes so that information about the user’s pick is returned. The newly added getPickResult() method in these classes returns a new PickResult object that contains information about the pick. Another method added is getZ(), which returns the depth position of the event relative to the origin of the MouseEvent's source.
Creating a PickResult ObjectThe JavaFX API provides three constructors for creating a new instance of a PickResult object in your application, as shown in Example 7–1.
Example 7–1 PickResult Constructors
// Creates a pick result for a 2D case where no additional information// is needed. Converts the given scene coordinates to the target's local// coordinate space andstores the value as the intersected point. Sets // intersected node to the giventarget, distance to 1.0, face to // FACE_UNDEFINED and texCoord to nullPickResult(EventTarget target, double sceneX, double sceneY)
// Creates a new instance of PickResult for a non-3d-shape target. Sets face// to FACE_UNDEFINED and texCoord to null.PickResult(Node node, Point3D point, double distance)
// Creates a new instance of PickResultPickResult(Node node, Point3D point, double distance, int face, Point2D texCoord)
Methods for the PickResult ObjectOnce you have created a PickResult object in your code, you can use the following methods to work with the information passed from the classes that handle the events.
Sample Use of PickResult
7-2 JavaFX Working with JavaFX Graphics
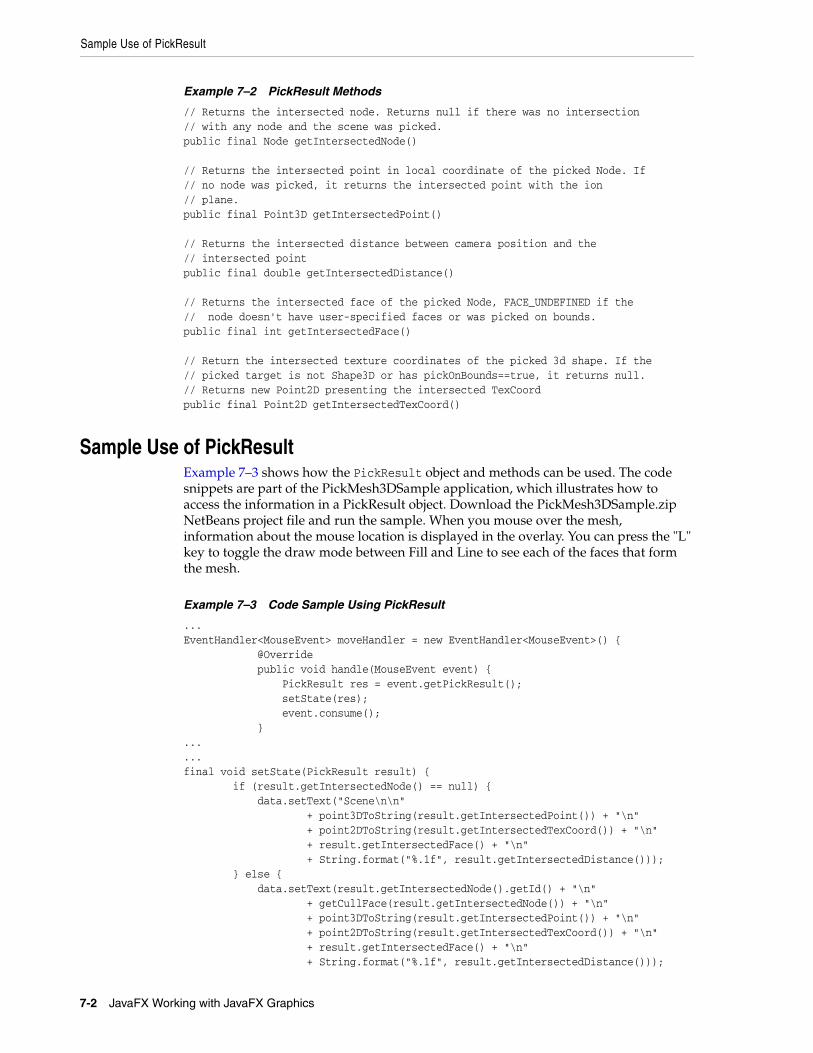
Example 7–2 PickResult Methods
// Returns the intersected node. Returns null if there was no intersection// with any node and the scene was picked.public final Node getIntersectedNode()
// Returns the intersected point in local coordinate of the picked Node. If// no node was picked, it returns the intersected point with the ion // plane.public final Point3D getIntersectedPoint()
// Returns the intersected distance between camera position and the // intersected pointpublic final double getIntersectedDistance()
// Returns the intersected face of the picked Node, FACE_UNDEFINED if the// node doesn't have user-specified faces or was picked on bounds.public final int getIntersectedFace() // Return the intersected texture coordinates of the picked 3d shape. If the// picked target is not Shape3D or has pickOnBounds==true, it returns null. // Returns new Point2D presenting the intersected TexCoordpublic final Point2D getIntersectedTexCoord()
Sample Use of PickResult Example 7–3 shows how the PickResult object and methods can be used. The code snippets are part of the PickMesh3DSample application, which illustrates how to access the information in a PickResult object. Download the PickMesh3DSample.zip NetBeans project file and run the sample. When you mouse over the mesh, information about the mouse location is displayed in the overlay. You can press the "L" key to toggle the draw mode between Fill and Line to see each of the faces that form the mesh.
Example 7–3 Code Sample Using PickResult
...EventHandler<MouseEvent> moveHandler = new EventHandler<MouseEvent>() { @Override public void handle(MouseEvent event) { PickResult res = event.getPickResult(); setState(res); event.consume(); }......final void setState(PickResult result) { if (result.getIntersectedNode() == null) { data.setText("Scene\n\n" + point3DToString(result.getIntersectedPoint()) + "\n" + point2DToString(result.getIntersectedTexCoord()) + "\n" + result.getIntersectedFace() + "\n" + String.format("%.1f", result.getIntersectedDistance())); } else { data.setText(result.getIntersectedNode().getId() + "\n" + getCullFace(result.getIntersectedNode()) + "\n" + point3DToString(result.getIntersectedPoint()) + "\n" + point2DToString(result.getIntersectedTexCoord()) + "\n" + result.getIntersectedFace() + "\n" + String.format("%.1f", result.getIntersectedDistance()));

Sample Use of PickResult
Picking 7-3
} }......

Sample Use of PickResult
7-4 JavaFX Working with JavaFX Graphics

8
Building a 3D Sample Application 8-1
8Building a 3D Sample Application
This chapter provides the steps to build a simple application, MoleculeSampleApp, that uses some of the JavaFX 3D graphic features that were discussed earlier in this document.
The steps in this tutorial chapter use the NetBeans 7.4 IDE to help you develop the MoleculseSampleApp application.
The following file and appendix sections are included for this tutorial:
■ MoleculeSampleApp.zip - the completed NetBeans project for the MoleculeSampleApp application.
■ Xform.java - method that declares the Xform class.
■ buildMolecule() - creates the 3D water molecule object.
■ handleMouse() and handleKeyboard() - allow you to use the mouse and keyboard to manipulate the camera’s view in the scene.
This chapter contains the following sections.
■ Prepare for this Tutorial
■ Create the Project
■ Create the Scene
■ Set Up the Camera
■ Build the Axes
■ Build the Molecule
■ Add Camera Viewing Controls
Prepare for this TutorialUse the following requirement and recommendation before continuing with this tutorial:
1. (Required) Ensure that your system meets the system requirements listed in the Certified System Configurations page, which is linked from the Java SE download page at http://www.oracle.com/technetwork/java/javase/downloads/.
The JavaFX Graphics Support section provides a list of graphics cards that support the JavaFX 3D feature. A supported graphics card is required to successfully run the finished JavaFX 3D sample application you build in this tutorial.

Create the Project
8-2 JavaFX Working with JavaFX Graphics
2. (Recommended) Download and install NetBeans IDE 7.4. It is used in this tutorial to build the JavaFX 3D sample application.
Create the ProjectUse NetBeans IDE 7.4 and the following steps to create the MoleculeSampleApp JavaFX project.
1. From the NetBeans IDE File menu, choose New Project.
2. In the New Project wizard, choose the JavaFX application category and JavaFX Application project. Click Next.
3. Type MoleculeSampleApp for the Project Name. Enter the path for the Path Location text field or click Browse to navigate to the folder you want to use for this project.
4. Click Finish.
When you create a JavaFX project, NetBeans IDE provides a Hello World source code template as a starting point. You will replace that template source code in the next sections.
Create the SceneCreate the scene that will hold your molecule UI layout.
1. First, copy the contents of Xform.java and save it to a file Xform.java file in the moleculesampleapp source folder of the moleculesampleapp project.
This file contains the source code for the Xform sub-class that is derived from the Group class. Using the Xform node prevents the automatic recalculation of the position of a group node’s pivot when the children of the group node is changed in a 3D UI layout. The Xform node allows you to add your own types of transforms and rotation. The file contains a translation component, three rotation components, and a scale component. Having the three rotation components is helpful when changing rotation values frequently, such as in changing the angle of the camera in the scene.
2. If not already opened in the IDE editor, open the MoleculeSampleApp.java file that was created with the project creation. Replace the import statements at the top of the file with the import statements shown in Example 8–1.
Example 8–1 Replacement Import Statements
import javafx.application.Application;import javafx.scene.*;import javafx.scene.paint.Color;import javafx.stage.Stage;
3. Replace the rest of the body of the code in MoleculeSampleApp.java with the lines of code shown in Example 8–2. The code creates a new scene graph with an Xform as its node.
Example 8–2 Replacement Body of Code
/** * MoleculeSampleApp */public class MoleculeSampleApp extends Application {

Set Up the Camera
Building a 3D Sample Application 8-3
final Group root = new Group(); final Xform world = new Xform(); @Override public void start(Stage primaryStage) { Scene scene = new Scene(root, 1024, 768, true); scene.setFill(Color.GREY); primaryStage.setTitle("Molecule Sample Application"); primaryStage.setScene(scene); primaryStage.show(); } /** * The main() method is ignored in correctly deployed JavaFX * application. main() serves only as fallback in case the * application can not be launched through deployment artifacts, * e.g., in IDEs with limited FX support. NetBeans ignores main(). * * @param args the command line arguments */ public static void main(String[] args) { launch(args); }}4. Press Ctrl+S to save the file.
Set Up the CameraSet up the camera in a hierarchy of Group class with Xform instances. Perform the translation and rotation on the camera to change its default location.
1. Add the following lines of code, shown in bold below, so that they appear after the declaration statement for the world object, as shown in Example 8–3.
These lines of code create an instance of a perspectiveCamera and three instances of the public class Xform, which extends the Group class. The Xform class is defined in the Xform.java file you added to your NetBeans project in the previous section of this document.
Example 8–3 Add Variables for the Camera
final Group root = new Group(); final Xform world = new Xform(); final PerspectiveCamera camera = new PerspectiveCamera(true); final Xform cameraXform = new Xform(); final Xform cameraXform2 = new Xform(); final Xform cameraXform3 = new Xform(); private static final double CAMERA_INITIAL_DISTANCE = -450; private static final double CAMERA_INITIAL_X_ANGLE = 70.0; private static final double CAMERA_INITIAL_Y_ANGLE = 320.0; private static final double CAMERA_NEAR_CLIP = 0.1; private static final double CAMERA_FAR_CLIP = 10000.0; 2. Copy the lines of code for the buildCamera() method, shown in Example 8–4. Add
them right after the lines for variable declarations.

Build the Axes
8-4 JavaFX Working with JavaFX Graphics
The buildCamera() method sets the camera to have the view upside down instead of the default JavaFX 2D Y-down. So the scene is viewed as a Y-up (Y-axis pointing up) scene.
Example 8–4 Add the buildCamera() Method
private void buildCamera() { root.getChildren().add(cameraXform); cameraXform.getChildren().add(cameraXform2); cameraXform2.getChildren().add(cameraXform3); cameraXform3.getChildren().add(camera); cameraXform3.setRotateZ(180.0); camera.setNearClip(CAMERA_NEAR_CLIP); camera.setFarClip(CAMERA_FAR_CLIP); camera.setTranslateZ(CAMERA_INITIAL_DISTANCE); cameraXform.ry.setAngle(CAMERA_INITIAL_Y_ANGLE); cameraXform.rx.setAngle(CAMERA_INITIAL_X_ANGLE); }
3. In the start() method, add the call to the buildCamera() so that it appears as shown in bold in Example 8–5
Example 8–5 Add Method Call to buildCamera()
public void start(Stage primaryStage) {
buildCamera(); 4. Set the camera in the scene by copying the line of code shown in bold in
Example 8–6 and adding it to the end of the start() method.
Example 8–6 Set the Camera in the Scene
primaryStage.show();
scene.setCamera(camera);
5. Save the file with Ctrl+S.
Build the AxesAdd the 3D axes that you will use to build this molecule. The Box class is used to create the axes and the PhongMaterial is used to set the specular and diffused colors. By default in JavaFX, the Y-axis is down.
Per the usual convention, the X-axis is shown in the color red, Y-axis is shown in green, and Z-axis in blue.
1. Add the following import statements shown in Example 8–7 to the top of the source file.
Example 8–7 Add Two Additional Import Statements
import javafx.scene.paint.PhongMaterial;import javafx.scene.shape.Box;
2. Add the following variable declaration statement, shown in Example 8–8.

Build the Axes
Building a 3D Sample Application 8-5
Example 8–8 Add a Variable for the Axes
private static final double AXIS_LENGTH = 250.0;
3. Copy the following declaration shown in bold in Example 8–9 and add it to just after the line where root is declared.
Example 8–9 Create the axisGroup
final Group root = new Group();final Xform axisGroup = new Xform();
4. Add the buildAxes() method shown in Example 8–10 to after the buildCamera() method.
Example 8–10 Add buildAxes() Method
private void buildAxes() { final PhongMaterial redMaterial = new PhongMaterial(); redMaterial.setDiffuseColor(Color.DARKRED); redMaterial.setSpecularColor(Color.RED); final PhongMaterial greenMaterial = new PhongMaterial(); greenMaterial.setDiffuseColor(Color.DARKGREEN); greenMaterial.setSpecularColor(Color.GREEN); final PhongMaterial blueMaterial = new PhongMaterial(); blueMaterial.setDiffuseColor(Color.DARKBLUE); blueMaterial.setSpecularColor(Color.BLUE); final Box xAxis = new Box(AXIS_LENGTH, 1, 1); final Box yAxis = new Box(1, AXIS_LENGTH, 1); final Box zAxis = new Box(1, 1, AXIS_LENGTH); xAxis.setMaterial(redMaterial); yAxis.setMaterial(greenMaterial); zAxis.setMaterial(blueMaterial); axisGroup.getChildren().addAll(xAxis, yAxis, zAxis); axisGroup.setVisible(true); world.getChildren().addAll(axisGroup); }5. Add the call to buildAxes() method, as shown in bold in Example 8–11.
Example 8–11 Add Call to buildAxes() Method
buildCamera(); buildAxes();
6. Compile and run the project by right-clicking the MoleculeSampleApp node in the project window and choose Run. A window appears with the 3D axes, as shown in Figure 8–1.

Build the Molecule
8-6 JavaFX Working with JavaFX Graphics
Figure 8–1 The 3D Axes
Build the MoleculeIn this section, you build the molecule UI. This is where you use the Xform class and 3D features, such as PhongMaterial, Sphere, and Cylinder. The Xform class is also used.
1. To declare the moleculeGroup Xform, copy the line of code shown in bold in Example 8–12. Paste it after the axisGroup variable.
Example 8–12 Declare the moleculeGroup Xform
final Xform axisGroup = new Xform(); final Xform moleculeGroup = new Xform();
2. Add the following import statements for the classes used in the buildMolecule() method:
Example 8–13 Add Import Statements for build Molecule()
import javafx.scene.shape.Cylinder; import javafx.scene.shape.Sphere; import javafx.scene.transform.Rotate;
3. Add the following statement, shown in bold, for the HYDROGEN_ANGLE variable used in the buildMolecule() method:
Example 8–14 Add Import Statements for build Molecule()
private static final double AXIS_LENGTH = 250.0; private static final double HYDROGEN_ANGLE = 104.5;

Add Camera Viewing Controls
Building a 3D Sample Application 8-7
4. Copy the body of code for the buildMolecule() method and paste it after the buildAxes() method in the MoleculeSampleApp.java file.
5. In the start() method, add the call to the buildMolecule() method so that it appears as shown in bold in Example 8–15.
Example 8–15 Add the Call to the buildMolecule() Method
buildCamera();buildAxes();buildMolecule();
6. Now run the project and you should see something similar to Figure 8–2.
Figure 8–2 The Water Molecule 3DModel
7. Turn off the visibility of the axes by modifying the visible property to false, as shown in Example 8–16. Run the MoleculeSampleApp again to see the running application without the axes shown.
Example 8–16 Set visible Property to false
axisGroup.setVisible(false);
Add Camera Viewing ControlsThe handleMouse() and handleKeyboard() methods allow you to see the different camera views. The source has been provided for you to demonstrate the use of the mouse and the keyboard keys to manipulate the camera’s view in the scene.

Add Camera Viewing Controls
8-8 JavaFX Working with JavaFX Graphics
1. Add the declaration for variables that are used in the handleMouse() and handleKeyboard() source code you are about to add. Copy the code shown in Example 8–17 and paste after the line for the HYDROGEN_ANGLE declaration.
Example 8–17 Add Variables Used
private static final double CONTROL_MULTIPLIER = 0.1; private static final double SHIFT_MULTIPLIER = 10.0; private static final double MOUSE_SPEED = 0.1; private static final double ROTATION_SPEED = 2.0; private static final double TRACK_SPEED = 0.3; double mousePosX; double mousePosY; double mouseOldX; double mouseOldY; double mouseDeltaX; double mouseDeltaY;
2. Copy the import statements used in the handleMouse() and handleKeyboard() methods, as shown in Example 8–18. Paste them at the top of the MoleculeSampleApp.java file.
Example 8–18 Add the Import Statements
import javafx.event.EventHandler;import javafx.scene.input.KeyEvent;import javafx.scene.input.MouseEvent;
3. Copy the lines of code for the handleMouse() and the handleKeyboard() methods from the 3D MoleculeSampleApp Code Appendix. Add them after the buildMolecule() method in the MoleculeSampleApp.java file.
4. In the start() method, add the calls to the handleKeyboard() and handleMouse() methods that you just added. Copy the lines of code shown in bold in Example 8–19 and paste them after the scene.setFill(Color.GREY) line.
Example 8–19 Add Method Calls
Scene scene = new Scene(root, 1024, 768, true); scene.setFill(Color.GREY); handleKeyboard(scene, world); handleMouse(scene, world);
5. Save the file.
6. Compile and run the project. Use the following mouse or keyboard strokes to get the different views.
■ Hold the left mouse button and drag the mouse right or left and up or down to rotate the camera view of the model around the axes.
■ Hold the right mouse button and drag the mouse to the left to move camera view away from the model. Drag the mouse to the right to move the camera view closer to the molecule model.
■ Press Ctrl+Z to return the model to its initial position.
■ Press Ctrl+V to show and hide the molecule from view.
■ Press Ctrl+X to show and hide the axes.

Part IIPart II JavaFX Canvas
Part II contains the following chapter:
■ Working with the Canvas API


9
Working with the Canvas API 9-1
9Working with the Canvas API
This chapter explores the JavaFX Canvas API, featuring code examples that you can compile and run. Use the links on the Source Code for the Graphics Tutorials page to download the examples as NetBeans IDE projects.
OverviewThe JavaFX Canvas API provides a custom texture that you can write to. It is defined by classes Canvas and GraphicsContext in the javafx.scene.canvas package. Using this API involves creating a Canvas object, obtaining its GraphicsContext, and invoking drawing operations to render your custom shapes on screen. Because the Canvas is a Node subclass, it can be used in the JavaFX scene graph.
Drawing Basic ShapesThe BasicOpsTest project (shown in Figure 9–1) creates a Canvas, obtains its GraphicsContext, and draws some basic shapes to it. Lines, ovals, round rectangles, arcs, and polygons are all possible using methods of the GraphicsContext class. Download the BasicOpsTest.zip file for the complete BasicOpsTest NetBeans project.
Figure 9–1 Drawing Shapes on a Canvas
Example 9–1 Drawing Some Basic Shapes on a Canvas
package canvastest;

Drawing Basic Shapes
9-2 JavaFX Working with JavaFX Graphics
import javafx.application.Application;import javafx.scene.Group;import javafx.scene.Scene;import javafx.scene.canvas.Canvas;import javafx.scene.canvas.GraphicsContext;import javafx.scene.paint.Color;import javafx.scene.shape.ArcType;import javafx.stage.Stage; public class BasicOpsTest extends Application { public static void main(String[] args) { launch(args); } @Override public void start(Stage primaryStage) { primaryStage.setTitle("Drawing Operations Test"); Group root = new Group(); Canvas canvas = new Canvas(300, 250); GraphicsContext gc = canvas.getGraphicsContext2D(); drawShapes(gc); root.getChildren().add(canvas); primaryStage.setScene(new Scene(root)); primaryStage.show(); }
private void drawShapes(GraphicsContext gc) { gc.setFill(Color.GREEN); gc.setStroke(Color.BLUE); gc.setLineWidth(5); gc.strokeLine(40, 10, 10, 40); gc.fillOval(10, 60, 30, 30); gc.strokeOval(60, 60, 30, 30); gc.fillRoundRect(110, 60, 30, 30, 10, 10); gc.strokeRoundRect(160, 60, 30, 30, 10, 10); gc.fillArc(10, 110, 30, 30, 45, 240, ArcType.OPEN); gc.fillArc(60, 110, 30, 30, 45, 240, ArcType.CHORD); gc.fillArc(110, 110, 30, 30, 45, 240, ArcType.ROUND); gc.strokeArc(10, 160, 30, 30, 45, 240, ArcType.OPEN); gc.strokeArc(60, 160, 30, 30, 45, 240, ArcType.CHORD); gc.strokeArc(110, 160, 30, 30, 45, 240, ArcType.ROUND); gc.fillPolygon(new double[]{10, 40, 10, 40}, new double[]{210, 210, 240, 240}, 4); gc.strokePolygon(new double[]{60, 90, 60, 90}, new double[]{210, 210, 240, 240}, 4); gc.strokePolyline(new double[]{110, 140, 110, 140}, new double[]{210, 210, 240, 240}, 4); }}As shown in Example 9–1, the Canvas is instantiated with a width of 300 and a height of 250. Its GraphicsContext is then obtained with a call to canvas.getGraphicsContext2D(). After that, a number of basic drawing operations are carried out by invoking methods such as strokeLine, fillOval, strokeArc, and fillPolygon.

Applying Gradients and Shadows
Working with the Canvas API 9-3
Applying Gradients and ShadowsThe next example (CanvasTest project) tests more of the GraphicsContext methods by drawing a custom shape, along with some gradients and shadows. The final result appears as shown in Figure 9–2. Download the CanvasTest.zip file for the complete CanvasTest NetBeans project
Figure 9–2 Drawing Shapes, Gradients, and Shadows
The code for this example is organized so that each drawing operation is carried out in its own private method. This allows you to test out different features by simply invoking (or commenting out) the methods of interest. Just keep in mind that in terms of learning the Canvas API, the code to focus on is the underlying calls to the Canvas or GraphicsContext objects.
There are five main parts to this pattern.
First, the position of the Canvas is set at coordinates(0,0). This is done by invoking the code in Example 9–2, which applies a translation transformation to the underlying Canvas object.
Example 9–2 Moving the Canvas
private void moveCanvas(int x, int y) { canvas.setTranslateX(x); canvas.setTranslateY(y);}
You can pass in other values as parameters to move the Canvas to a new location. The values that you pass in will be forwarded to the setTranslateX and setTranslateY methods, and the Canvas will move accordingly.
Applying Gradients and Shadows
9-4 JavaFX Working with JavaFX Graphics
Next, the primary shape (which looks like the capital letter "D") is drawn on screen. This is done with a bezier curve, invoked through the bezierCurveTo method of the GraphicsContecxt object.
Example 9–3 Drawing a Bezier Curve (Capital "D") On Screen
private void drawDShape() { gc.beginPath(); gc.moveTo(50, 50); gc.bezierCurveTo(150, 20, 150, 150, 75, 150); gc.closePath();}
You can experiment with this shape by changing the parameter values. The bezierCurveTo will stretch and pull the shape as you do.
After that, a red and yellow RadialGradient provides the circular pattern that appears in the background.
Example 9–4 Drawing a RadialGradient
private void drawRadialGradient(Color firstColor, Color lastColor) { gc.setFill(new RadialGradient(0, 0, 0.5, 0.5, 0.1, true, CycleMethod.REFLECT, new Stop(0.0, firstColor), new Stop(1.0, lastColor))); gc.fill();}
Here, the setFill method of the GraphicsContext accepts a RadialGradient object as its parameter. Again, you can experiment with different values, or pass in different colors as you prefer.
A LinearGradient colors the custom "D" shape, from blue to green:
Example 9–5 Drawing a LinearGradient
private void drawLinearGradient(Color firstColor, Color secondColor) { LinearGradient lg = new LinearGradient(0, 0, 1, 1, true, CycleMethod.REFLECT, new Stop(0.0, firstColor), new Stop(1.0, secondColor)); gc.setStroke(lg); gc.setLineWidth(20); gc.stroke();}
This code sets the stroke of the GraphicsContext to use the LinearGradient, then renders the pattern with gc.stroke().
And finally, the multi-colored drop shadow is provided invoking applyEffect on the GraphicContext object.
Example 9–6 Adding a DropShadow
private void drawDropShadow(Color firstColor, Color secondColor, Color thirdColor, Color fourthColor) { gc.applyEffect(new DropShadow(20, 20, 0, firstColor)); gc.applyEffect(new DropShadow(20, 0, 20, secondColor)); gc.applyEffect(new DropShadow(20, -20, 0, thirdColor)); gc.applyEffect(new DropShadow(20, 0, -20, fourthColor));

Interacting with the User
Working with the Canvas API 9-5
}
As shown in Example 9–6, this effect is applied by creating a DropShadow object with a specified color, which gets passed to the applyEffect method of the GraphicsContext object.
Interacting with the UserIn the following demo (project CanvasDoodleTest) a blue square appears on screen, which will slowly be erased as the user drags the mouse across its surface. Download the CanvasDoodleTest.zip file for the complete CanvasDoodleTest NetBeans project
Figure 9–3 Interacting with the User
You have already seen how to create basic shapes and gradients, so the code in Example 9–7 focuses only on the portions responsible for interacting with the user.
Example 9–7 Interacting with the User
...
private void reset(Canvas canvas, Color color) { GraphicsContext gc = canvas.getGraphicsContext2D(); gc.setFill(color); gc.fillRect(0, 0, canvas.getWidth(), canvas.getHeight());} @Override public void start(Stage primaryStage) { ... final GraphicsContext gc = canvas.getGraphicsContext2D(); ...
Interacting with the User
9-6 JavaFX Working with JavaFX Graphics
// Clear away portions as the user drags the mouse canvas.addEventHandler(MouseEvent.MOUSE_DRAGGED, new EventHandler<MouseEvent>() { @Override public void handle(MouseEvent e) { gc.clearRect(e.getX() - 2, e.getY() - 2, 5, 5); } }); // Fill the Canvas with a Blue rectnagle when the user double-clicks canvas.addEventHandler(MouseEvent.MOUSE_CLICKED, new EventHandler<MouseEvent>() { @Override public void handle(MouseEvent t) { if (t.getClickCount() >1) { reset(canvas, Color.BLUE); } } });...
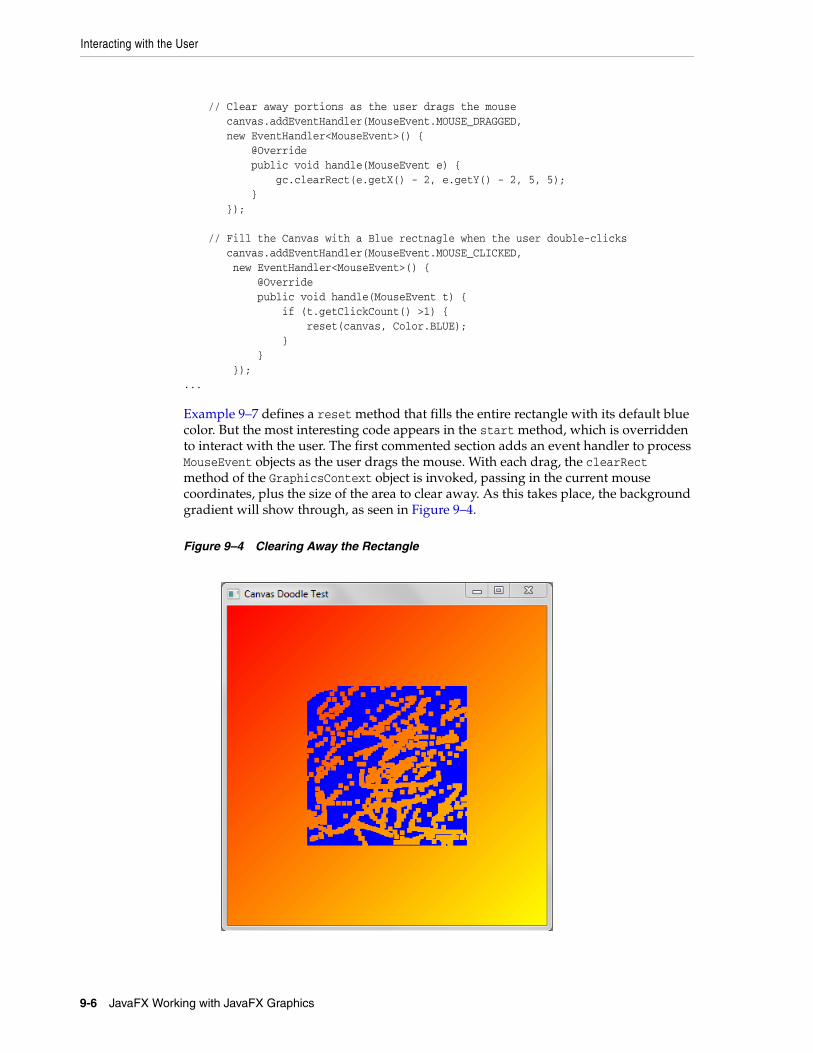
Example 9–7 defines a reset method that fills the entire rectangle with its default blue color. But the most interesting code appears in the start method, which is overridden to interact with the user. The first commented section adds an event handler to process MouseEvent objects as the user drags the mouse. With each drag, the clearRect method of the GraphicsContext object is invoked, passing in the current mouse coordinates, plus the size of the area to clear away. As this takes place, the background gradient will show through, as seen in Figure 9–4.
Figure 9–4 Clearing Away the Rectangle

Creating a Simple Layer System
Working with the Canvas API 9-7
The remaining code simply counts the number of clicks, and resets the blue square to its original state if the user double-clicks the mouse.
Creating a Simple Layer SystemYou can also instantiate multiple Canvas objects, and use them to define a simple layer system. Switching layers therefore becomes a matter of selecting the desired Canvas and writing to it. (A Canvas object is completely transparent, and shows through until you draw on parts of it.)
This final demo (LayerTest project) defines such a system by adding creating two Canvas objects, placed directly on top of each other. As you click on the screen, a colored circle will appear on the layer that is currently selected. You can change layers by using the ChoiceBox at the top of the screen. Circles added to layer 1 will be green. Circles added to layer 2 will be blue. Download the LayerTest.zip file for the complete LayerTest NetBeans project
Figure 9–5 Creating a Simple Layer System
The GUI for this demo uses a BorderPane to manage its components. A ChoiceBox is added to the top, and the two Canvas objects are added to a Panel which is then added to the center of the screen.
Example 9–8 Creating and Adding the Layers
...
private void createLayers(){ // Layers 1&2 are the same size layer1 = new Canvas(300,250); layer2 = new Canvas(300,250); // Obtain Graphics Contexts gc1 = layer1.getGraphicsContext2D(); gc1.setFill(Color.GREEN); gc1.fillOval(50,50,20,20); gc2 = layer2.getGraphicsContext2D(); gc2.setFill(Color.BLUE); gc2.fillOval(100,100,20,20);

Creating a Simple Layer System
9-8 JavaFX Working with JavaFX Graphics
} ...
private void addLayers(){ // Add Layers borderPane.setTop(cb); Pane pane = new Pane(); pane.getChildren().add(layer1); pane.getChildren().add(layer2); layer1.toFront(); borderPane.setCenter(pane); root.getChildren().add(borderPane);} ...User interaction is accomplished by adding an event handler directly to each layer. Clicking on the Canvas will generate a MouseEvent, which when received, will draw a circle at the current mouse location.
Example 9–9 Adding Event Handlers
private void handleLayers(){ // Handler for Layer 1 layer1.addEventHandler(MouseEvent.MOUSE_PRESSED, new EventHandler<MouseEvent>() { @Override public void handle(MouseEvent e) { gc1.fillOval(e.getX(),e.getY(),20,20); } });
// Handler for Layer 2 layer2.addEventHandler(MouseEvent.MOUSE_PRESSED, new EventHandler<MouseEvent>() { @Override public void handle(MouseEvent e) { gc2.fillOval(e.getX(),e.getY(),20,20); } }); }
Because both layers are placed directly on top of each other, only the topmost Canvas will process the mouse clicks. To move a specific layer to the front of the stack, simply select it from the ChoiceBox component at the top of the screen.
Example 9–10 Selecting a Layer
private void createChoiceBox(){ cb = new ChoiceBox(); cb.setItems(FXCollections.observableArrayList( "Layer 1 is GREEN", "Layer 2 is BLUE")); cb.getSelectionModel().selectedItemProperty(). addListener(new ChangeListener(){ @Override public void changed(ObservableValue o, Object o1, Object o2){ if(o2.toString().equals("Layer 1 is GREEN")){ layer1.toFront(); }else if(o2.toString().equals("Layer 2 is BLUE")){ layer2.toFront(); } }

Creating a Simple Layer System
Working with the Canvas API 9-9
}); cb.setValue("Layer 1 is GREEN"); }
As shown in Example 9–10, a ChangleListener is registered on the ChoiceBox, and brings the selected layer to the foreground by invoking toFront() on the appropriate Canvas. Layer selection will become even more apparent as you switch layers after adding lots of blue and green circles. You will be able to tell (from looking at the circle edges) which layer has been moved to the front. Figure 9–6 and Figure 9–7 show what this looks like.
Figure 9–6 Selecting Layer 1
Figure 9–7 Selecting Layer 2
The ability to select layers is common in software applications, such as image manipulation programs. And because each Canvas object is a Node, you are free to apply all the standard transformations and visual effects that you would on other components.

Creating a Simple Layer System
9-10 JavaFX Working with JavaFX Graphics

Part IIIPart III JavaFX Image Ops
Part III contains the following chapter:
■ Using the Image Ops API


10
Using the Image Ops API 10-1
10Using the Image Ops API
This chapter introduces you to Image Ops, an API that enables you to read and write raw pixels within your JavaFX applications.
You will learn how to read pixel from images, write pixels to images, and create snapshots.
Overview of the Image Ops APIThe Image Ops API consists of the following classes/interfaces in the javafx.scene.image package:
■ Image: Represents a graphical image. This class provides a PixelReader for reading pixels directly from an image.
■ WritableImage: A subclass of Image. This class provides a PixelWriter for writing pixels directly to an image. A WritableImage is initially created empty (transparent) until you write pixels to it.
■ PixelReader: Interface that defines methods for retrieving pixel data from an Image or other surface that contains pixels.
■ PixelWriter: Interface that defines methods for writing pixel data to a WritableImage or other surface that contains writable pixels.
■ PixelFormat: Defines the layout of data for a pixel of a given format.
■ WritablePixelFormat: A subclass of PixelFormat, representing a pixel format that can store full colors. It can be used as a destination format to write pixel data from an arbitrary image.
The following sections demonstrate this API with examples that you can compile and run.
Reading Pixels From ImagesYou may already be familiar with the javafx.scene.image.Image class, which (along with ImageView) is used in JavaFX applications that display images. The following example demonstrates how to display an image by loading the JavaFX logo from oracle.com and adding it to the JavaFX scene graph.
Example 10–1 Loading and Displaying an Image
package imageopstest; import javafx.application.Application;import javafx.scene.Scene;

Reading Pixels From Images
10-2 JavaFX Working with JavaFX Graphics
import javafx.scene.layout.StackPane;import javafx.stage.Stage;import javafx.scene.image.Image;import javafx.scene.image.ImageView; public class ImageOpsTest extends Application { @Override public void start(Stage primaryStage) { // Create Image and ImageView objects Image image = new Image("http://docs.oracle.com/javafx/" + "javafx/images/javafx-documentation.png"); ImageView imageView = new ImageView(); imageView.setImage(image); // Display image on screen StackPane root = new StackPane(); root.getChildren().add(imageView); Scene scene = new Scene(root, 300, 250); primaryStage.setTitle("Image Read Test"); primaryStage.setScene(scene); primaryStage.show(); } public static void main(String[] args) { launch(args); }}Running this program will produce the image shown in Figure 10–1.
Figure 10–1 Displaying an Image
Now, let’s modify this code to read Color information directly from the pixels. You can do this by invoking the getPixelReader() method, and then using the getColor(x,y) method of the returned PixelReader object to obtain the pixel’s color at the specified coordinates.
Reading Pixels From Images
Using the Image Ops API 10-3
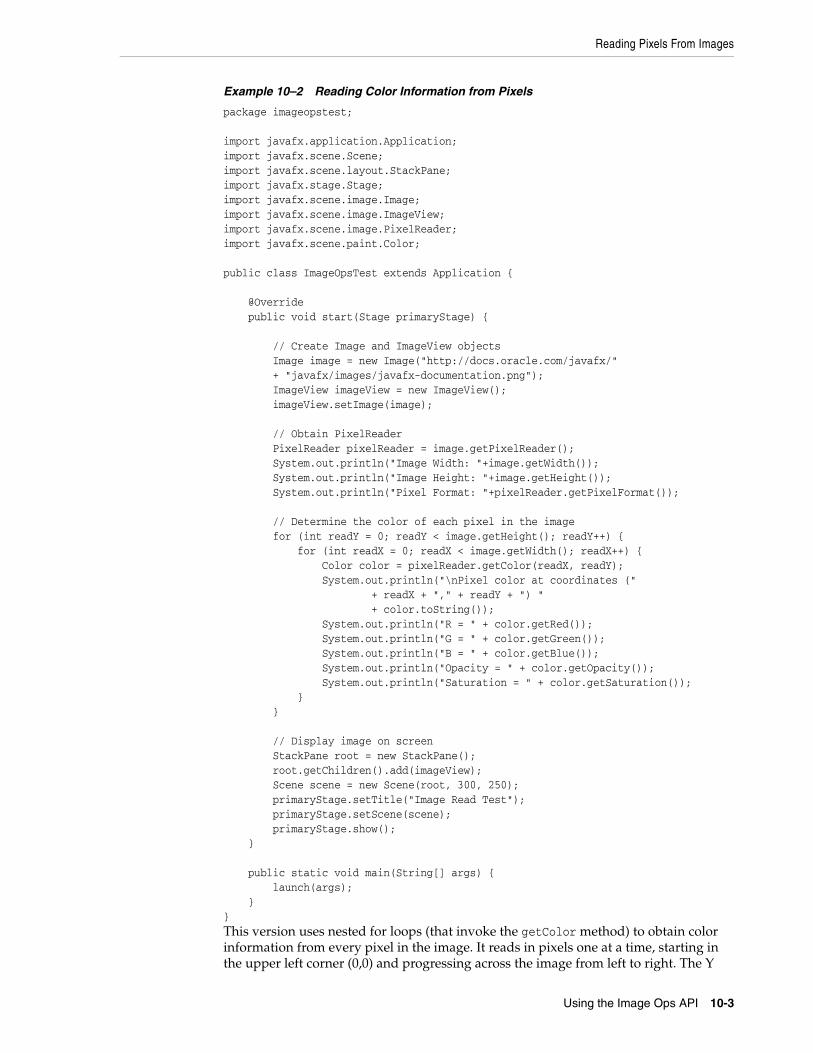
Example 10–2 Reading Color Information from Pixels
package imageopstest; import javafx.application.Application;import javafx.scene.Scene;import javafx.scene.layout.StackPane;import javafx.stage.Stage;import javafx.scene.image.Image;import javafx.scene.image.ImageView;import javafx.scene.image.PixelReader;import javafx.scene.paint.Color; public class ImageOpsTest extends Application { @Override public void start(Stage primaryStage) { // Create Image and ImageView objects Image image = new Image("http://docs.oracle.com/javafx/" + "javafx/images/javafx-documentation.png"); ImageView imageView = new ImageView(); imageView.setImage(image); // Obtain PixelReader PixelReader pixelReader = image.getPixelReader(); System.out.println("Image Width: "+image.getWidth()); System.out.println("Image Height: "+image.getHeight()); System.out.println("Pixel Format: "+pixelReader.getPixelFormat()); // Determine the color of each pixel in the image for (int readY = 0; readY < image.getHeight(); readY++) { for (int readX = 0; readX < image.getWidth(); readX++) { Color color = pixelReader.getColor(readX, readY); System.out.println("\nPixel color at coordinates (" + readX + "," + readY + ") " + color.toString()); System.out.println("R = " + color.getRed()); System.out.println("G = " + color.getGreen()); System.out.println("B = " + color.getBlue()); System.out.println("Opacity = " + color.getOpacity()); System.out.println("Saturation = " + color.getSaturation()); } } // Display image on screen StackPane root = new StackPane(); root.getChildren().add(imageView); Scene scene = new Scene(root, 300, 250); primaryStage.setTitle("Image Read Test"); primaryStage.setScene(scene); primaryStage.show(); } public static void main(String[] args) { launch(args); }}This version uses nested for loops (that invoke the getColor method) to obtain color information from every pixel in the image. It reads in pixels one at a time, starting in the upper left corner (0,0) and progressing across the image from left to right. The Y

Writing Pixels to Images
10-4 JavaFX Working with JavaFX Graphics
coordinate increments only after an entire row has been read. Information about each pixel (color values, opacity and saturation values etc.) is then printed to standard output, proving that the read operations are working correctly.
... // beginning of output omitted
Pixel color at coordinates (117,27) 0x95a7b4ff
R = 0.5843137502670288
G = 0.6549019813537598
B = 0.7058823704719543
Opacity = 1.0
Saturation = 0.17222220767979304
Pixel color at coordinates (118,27) 0x2d5169ff
R = 0.1764705926179886
G = 0.3176470696926117
B = 0.4117647111415863
Opacity = 1.0
Saturation = 0.5714285662587809
... // remainder of output omitted
You may be tempted to try modifying the color of each pixel and writing that to the screen. But keep in mind that Image objects are read-only; to write new data, you need an instance of WritableImage instead.
Writing Pixels to ImagesNow let’s modify this demo to brighten each pixel, then write the modified result to a WritableImage object.
Example 10–3 Writing to a WritableImage
package imageopstest; import javafx.application.Application;import javafx.scene.Scene;import javafx.scene.layout.StackPane;import javafx.stage.Stage;import javafx.scene.image.Image;import javafx.scene.image.ImageView;import javafx.scene.image.PixelReader;import javafx.scene.image.PixelWriter;import javafx.scene.paint.Color;import javafx.scene.image.WritableImage; public class ImageOpsTest extends Application { @Override public void start(Stage primaryStage) { // Create Image and ImageView objects Image image = new Image("http://docs.oracle.com/javafx/" + "javafx/images/javafx-documentation.png"); ImageView imageView = new ImageView();

Writing Pixels to Images
Using the Image Ops API 10-5
imageView.setImage(image); // Obtain PixelReader PixelReader pixelReader = image.getPixelReader(); System.out.println("Image Width: "+image.getWidth()); System.out.println("Image Height: "+image.getHeight()); System.out.println("Pixel Format: "+pixelReader.getPixelFormat()); // Create WritableImage WritableImage wImage = new WritableImage( (int)image.getWidth(), (int)image.getHeight()); PixelWriter pixelWriter = wImage.getPixelWriter(); // Determine the color of each pixel in a specified row for(int readY=0;readY<image.getHeight();readY++){ for(int readX=0; readX<image.getWidth();readX++){ Color color = pixelReader.getColor(readX,readY); System.out.println("\nPixel color at coordinates ("+ readX+","+readY+") " +color.toString()); System.out.println("R = "+color.getRed()); System.out.println("G = "+color.getGreen()); System.out.println("B = "+color.getBlue()); System.out.println("Opacity = "+color.getOpacity()); System.out.println("Saturation = "+color.getSaturation()); // Now write a brighter color to the PixelWriter. color = color.brighter(); pixelWriter.setColor(readX,readY,color); } } // Display image on screen imageView.setImage(wImage); StackPane root = new StackPane(); root.getChildren().add(imageView); Scene scene = new Scene(root, 300, 250); primaryStage.setTitle("Image Write Test"); primaryStage.setScene(scene); primaryStage.show(); } public static void main(String[] args) { launch(args); }}This version creates a WritableImage initialized to the same width and height as the JavaFX logo. After obtaining a PixelWriter (for writing pixel data to the new image), the code invokes the brighter() method (to lighten the shade of the current pixel’s color), then writes the data to the new image by invoking pixelWriter.setColor(readX,readY,Color).
Figure 10–2 shows the result of this process.

Writing Images with Byte Arrays and PixelFormats
10-6 JavaFX Working with JavaFX Graphics
Figure 10–2 A Brighter Logo, Stored in a WritableImage Object
Writing Images with Byte Arrays and PixelFormatsThe demos so far have successfully obtained and modified pixel colors, but the code was still relatively simple (and not necessarily optimal), compared to what the API is capable of. Example 10–4 creates a new demo that writes pixels a rectangle at a time, using a PixelFormat to specify how the pixel data is stored. This version also displays the image data on a Canvas, instead of an ImageView. (See Working with the Canvas API for more information about the Canvas class.)
Example 10–4 Writing Rectangles to a Canvas
package imageopstest; import java.nio.ByteBuffer;import javafx.application.Application;import javafx.scene.Group;import javafx.scene.Scene;import javafx.scene.canvas.Canvas;import javafx.scene.canvas.GraphicsContext;import javafx.scene.effect.DropShadow;import javafx.scene.image.PixelFormat;import javafx.scene.image.PixelWriter;import javafx.scene.paint.Color;import javafx.stage.Stage; public class ImageOpsTest extends Application { // Image Data private static final int IMAGE_WIDTH = 10; private static final int IMAGE_HEIGHT = 10; private byte imageData[] = new byte[IMAGE_WIDTH * IMAGE_HEIGHT * 3]; // Drawing Surface (Canvas) private GraphicsContext gc;

Writing Images with Byte Arrays and PixelFormats
Using the Image Ops API 10-7
private Canvas canvas; private Group root; public static void main(String[] args) { launch(args); } @Override public void start(Stage primaryStage) { primaryStage.setTitle("PixelWriter Test"); root = new Group(); canvas = new Canvas(200, 200); canvas.setTranslateX(100); canvas.setTranslateY(100); gc = canvas.getGraphicsContext2D(); createImageData(); drawImageData(); primaryStage.setScene(new Scene(root, 400, 400)); primaryStage.show(); } private void createImageData() { int i = 0; for (int y = 0; y < IMAGE_HEIGHT; y++) { int r = y * 255 / IMAGE_HEIGHT; for (int x = 0; x < IMAGE_WIDTH; x++) { int g = x * 255 / IMAGE_WIDTH; imageData[i] = (byte) r; imageData[i + 1] = (byte) g; i += 3; } } } private void drawImageData() { boolean on = true; PixelWriter pixelWriter = gc.getPixelWriter(); PixelFormat<ByteBuffer> pixelFormat = PixelFormat.getByteRgbInstance(); for (int y = 50; y < 150; y += IMAGE_HEIGHT) { for (int x = 50; x < 150; x += IMAGE_WIDTH) { if (on) { pixelWriter.setPixels(x, y, IMAGE_WIDTH, IMAGE_HEIGHT, pixelFormat, imageData, 0, IMAGE_WIDTH * 3); } on = !on; } on = !on; } // Add drop shadow effect gc.applyEffect(new DropShadow(20, 20, 20, Color.GRAY)); root.getChildren().add(canvas); }}

Writing Images with Byte Arrays and PixelFormats
10-8 JavaFX Working with JavaFX Graphics
Figure 10–3 Writing Pixels to a Canvas
This demo does not read data from an existing image; it creates a new WritableImage object entirely from scratch. It draws several rows of multi-colored 10x10 rectangles, the color data for which is stored in an array of bytes representing the RGB values of each pixel.
Of particular interest are the private methods createImageData and drawImageData. The createImageData method sets the RGB values for the colors that appear in each 10x10 rectangle:
Example 10–5 Setting the RGB Values for Pixels
...private void createImageData() { int i = 0; for (int y = 0; y < IMAGE_HEIGHT; y++) { System.out.println("y: "+y); int r = y * 255 / IMAGE_HEIGHT; for (int x = 0; x < IMAGE_WIDTH; x++) { System.out.println("\tx: "+x); int g = x * 255 / IMAGE_WIDTH; imageData[i] = (byte) r; imageData[i + 1] = (byte) g; System.out.println("\t\tR: "+(byte)r); System.out.println("\t\tG: "+(byte)g); i += 3; } }}...This method sets the R and G values for each pixel of the rectangle (B is always 0). These values are stored in the imageData byte array, which holds a total of 300

Creating a Snapshot
Using the Image Ops API 10-9
individual bytes. (There are 100 pixels in each 10x10 rectangle, and each pixel has R, G, and B values, resulting in 300 bytes total).
With this data in place, the drawImageData method then renders the pixels of each rectangle to the screen:
Example 10–6 Rendering the Pixels
private void drawImageData() { boolean on = true; PixelWriter pixelWriter = gc.getPixelWriter(); PixelFormat<ByteBuffer> pixelFormat = PixelFormat.getByteRgbInstance(); for (int y = 50; y < 150; y += IMAGE_HEIGHT) { for (int x = 50; x < 150; x += IMAGE_WIDTH) { if (on) { pixelWriter.setPixels(x, y, IMAGE_WIDTH, IMAGE_HEIGHT, pixelFormat, imageData, 0, IMAGE_WIDTH * 3); } on = !on; } on = !on; }}Here, the PixelWriter is obtained from the Canvas, and a new PixelFormat is instantiated, specifying that the byte array represents RGB values. The pixels are then written an entire rectangle at a time by passing this data to the PixelWriter’s setPixels method.
Creating a SnapshotThe javafx.scene.Scene class also provides a snapshot method that returns a WritableImage of everything currently shown in your application’s scene. When used in conjunction with Java’s ImageIO class, you can save the snapshot to the filesystem.
Example 10–7 Creating and Saving a Snapshot
package imageopstest; import java.io.File;import java.io.IOException;import java.nio.ByteBuffer;import javafx.application.Application;import javafx.embed.swing.SwingFXUtils;import javafx.scene.Group;import javafx.scene.Scene;import javafx.scene.canvas.Canvas;import javafx.scene.canvas.GraphicsContext;import javafx.scene.effect.DropShadow;import javafx.scene.image.PixelFormat;import javafx.scene.image.PixelWriter;import javafx.scene.image.WritableImage;import javafx.scene.paint.Color;import javafx.stage.Stage;import javax.imageio.ImageIO; public class ImageOpsTest extends Application { // Image Data private static final int IMAGE_WIDTH = 10;

Creating a Snapshot
10-10 JavaFX Working with JavaFX Graphics
private static final int IMAGE_HEIGHT = 10; private byte imageData[] = new byte[IMAGE_WIDTH * IMAGE_HEIGHT * 3]; // Drawing Surface (Canvas) private GraphicsContext gc; private Canvas canvas; private Group root; public static void main(String[] args) { launch(args); } @Override public void start(Stage primaryStage) { primaryStage.setTitle("PixelWriter Test"); root = new Group(); canvas = new Canvas(200, 200); canvas.setTranslateX(100); canvas.setTranslateY(100); gc = canvas.getGraphicsContext2D(); createImageData(); drawImageData(); Scene scene = new Scene(root, 400, 400); primaryStage.setScene(scene); primaryStage.show(); //Take snapshot of the scene WritableImage writableImage = scene.snapshot(null); // Write snapshot to file system as a .png image File outFile = new File("imageops-snapshot.png"); try { ImageIO.write(SwingFXUtils.fromFXImage(writableImage, null), "png", outFile); } catch (IOException ex) { System.out.println(ex.getMessage()); } } private void createImageData() { int i = 0; for (int y = 0; y < IMAGE_HEIGHT; y++) { System.out.println("y: " + y); int r = y * 255 / IMAGE_HEIGHT; for (int x = 0; x < IMAGE_WIDTH; x++) { System.out.println("\tx: " + x); int g = x * 255 / IMAGE_WIDTH; imageData[i] = (byte) r; imageData[i + 1] = (byte) g; System.out.println("\t\tR: " + (byte) r); System.out.println("\t\tG: " + (byte) g); i += 3; } } System.out.println("imageData.lengthdrawImageData: " + imageData.length); } private void drawImageData() { boolean on = true; PixelWriter pixelWriter = gc.getPixelWriter();

Creating a Snapshot
Using the Image Ops API 10-11
PixelFormat<ByteBuffer> pixelFormat = PixelFormat.getByteRgbInstance(); for (int y = 50; y < 150; y += IMAGE_HEIGHT) { for (int x = 50; x < 150; x += IMAGE_WIDTH) { if (on) { pixelWriter.setPixels(x, y, IMAGE_WIDTH, IMAGE_HEIGHT, pixelFormat, imageData, 0, IMAGE_WIDTH * 3); } on = !on; } on = !on; } // Add drop shadow effect gc.applyEffect(new DropShadow(20, 20, 20, Color.GRAY)); root.getChildren().add(canvas); }}
The change to be aware of is the following modification to the start method, as shown in Example 10–8:
Example 10–8 The Modified Start Method
... Scene scene = new Scene(root, 400, 400);primaryStage.setScene(scene);primaryStage.show(); //Take snapshot of the sceneWritableImage writableImage = scene.snapshot(null); // Write snapshot to file system as a .png imageFile outFile = new File("imageops-snapshot.png");try { ImageIO.write(SwingFXUtils.fromFXImage(writableImage, null), "png", outFile);} catch (IOException ex) { System.out.println(ex.getMessage());}...As you can see, invoking scene.snapshot(null) creates a new snapshot and assigns it to the newly constructed WritableImage. Then (with the help of ImageIO and SwingFXUtils) this image is written to the file system as a.png file.

Creating a Snapshot
10-12 JavaFX Working with JavaFX Graphics

Part IVPart IV Source Code for the Graphics Tutorials
The following tables list the demo applications in this document with their associated source code files.
3D Graphics Samples
Canvas Samples
Chapter Source Files NetBeans File
Shapes MSAAApp.java .MoleculeSampleApp.zip
Camera MSAAApp.java .
SubScene MSAAApp.java .
Light MSAAApp.java
Materials MSAAApp.java
buildMolecule()
MoleculeSampleApp.zip.
3D Sample Application Xform.java
buildMolecule()
handleMouse()
handleKeyboard()
MoleculeSampleApp.zip
Chapter Source File NetBeans Files
Canvas -- BasicOpsTest.zip
CanvasDoodleTest.zip
CanvasTest.zip
LayerTest.zip


A
MSAAApp Code A-1
AMSAAApp Code
This appendix lists the source code for the MSAAApp.java sample application.
MSAAApp.java demonstrates Multi-sample Anti-Aliasing (MSAA) technique using the JavaFX Shapes3D, Camera, Light, and SubScene APIs.
MSAAApp.java/* * Copyright (c) 2013, 2014 Oracle and/or its affiliates. * All rights reserved. Use is subject to license terms. * * This file is available and licensed under the following license: * * Redistribution and use in source and binary forms, with or without * modification, are permitted provided that the following conditions * are met: * * - Redistributions of source code must retain the above copyright * notice, this list of conditions and the following disclaimer. * - Redistributions in binary form must reproduce the above copyright * notice, this list of conditions and the following disclaimer in * the documentation and/or other materials provided with the distribution. * - Neither the name of Oracle nor the names of its * contributors may be used to endorse or promote products derived * from this software without specific prior written permission. * * THIS SOFTWARE IS PROVIDED BY THE COPYRIGHT HOLDERS AND CONTRIBUTORS * "AS IS" AND ANY EXPRESS OR IMPLIED WARRANTIES, INCLUDING, BUT NOT * LIMITED TO, THE IMPLIED WARRANTIES OF MERCHANTABILITY AND FITNESS FOR * A PARTICULAR PURPOSE ARE DISCLAIMED. IN NO EVENT SHALL THE COPYRIGHT * OWNER OR CONTRIBUTORS BE LIABLE FOR ANY DIRECT, INDIRECT, INCIDENTAL, * SPECIAL, EXEMPLARY, OR CONSEQUENTIAL DAMAGES (INCLUDING, BUT NOT * LIMITED TO, PROCUREMENT OF SUBSTITUTE GOODS OR SERVICES; LOSS OF USE, * DATA, OR PROFITS; OR BUSINESS INTERRUPTION) HOWEVER CAUSED AND ON ANY * THEORY OF LIABILITY, WHETHER IN CONTRACT, STRICT LIABILITY, OR TORT * (INCLUDING NEGLIGENCE OR OTHERWISE) ARISING IN ANY WAY OUT OF THE USE * OF THIS SOFTWARE, EVEN IF ADVISED OF THE POSSIBILITY OF SUCH DAMAGE. */ package msaa; import javafx.application.Application;import static javafx.application.Application.launch;import javafx.application.ConditionalFeature;import javafx.application.Platform;
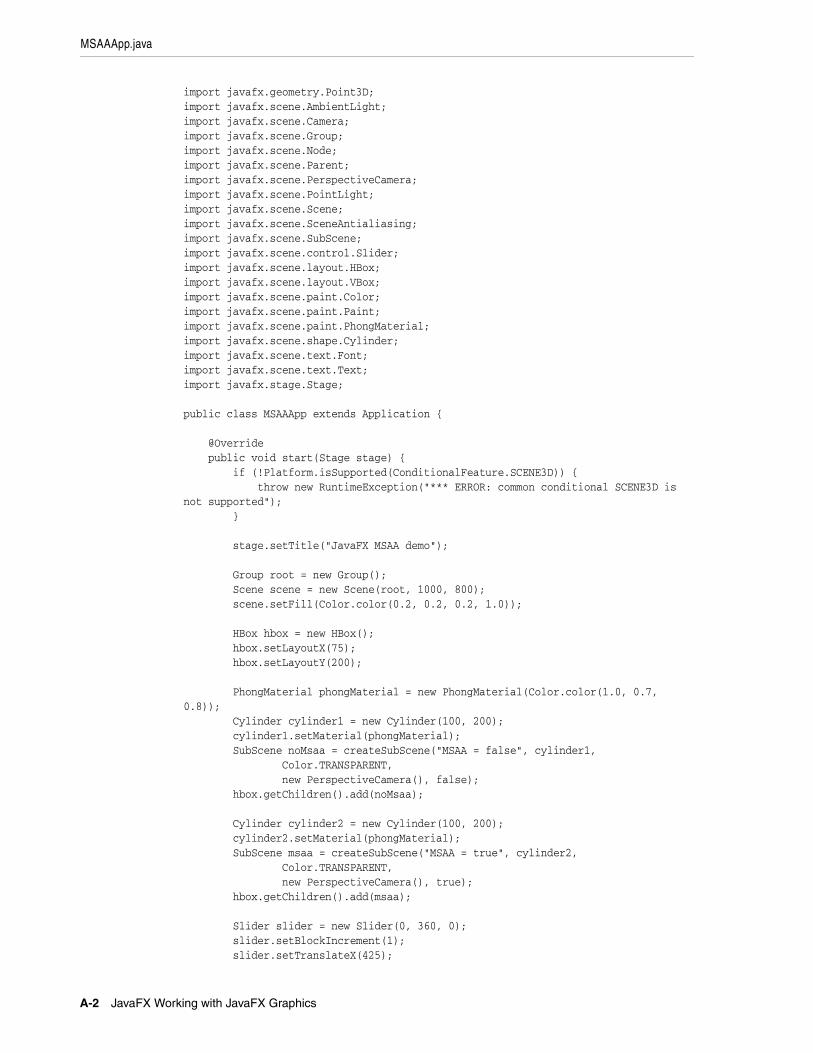
MSAAApp.java
A-2 JavaFX Working with JavaFX Graphics
import javafx.geometry.Point3D;import javafx.scene.AmbientLight;import javafx.scene.Camera;import javafx.scene.Group;import javafx.scene.Node;import javafx.scene.Parent;import javafx.scene.PerspectiveCamera;import javafx.scene.PointLight;import javafx.scene.Scene;import javafx.scene.SceneAntialiasing;import javafx.scene.SubScene;import javafx.scene.control.Slider;import javafx.scene.layout.HBox;import javafx.scene.layout.VBox;import javafx.scene.paint.Color;import javafx.scene.paint.Paint;import javafx.scene.paint.PhongMaterial;import javafx.scene.shape.Cylinder;import javafx.scene.text.Font;import javafx.scene.text.Text;import javafx.stage.Stage; public class MSAAApp extends Application { @Override public void start(Stage stage) { if (!Platform.isSupported(ConditionalFeature.SCENE3D)) { throw new RuntimeException("*** ERROR: common conditional SCENE3D is not supported"); } stage.setTitle("JavaFX MSAA demo"); Group root = new Group(); Scene scene = new Scene(root, 1000, 800); scene.setFill(Color.color(0.2, 0.2, 0.2, 1.0)); HBox hbox = new HBox(); hbox.setLayoutX(75); hbox.setLayoutY(200); PhongMaterial phongMaterial = new PhongMaterial(Color.color(1.0, 0.7, 0.8)); Cylinder cylinder1 = new Cylinder(100, 200); cylinder1.setMaterial(phongMaterial); SubScene noMsaa = createSubScene("MSAA = false", cylinder1, Color.TRANSPARENT, new PerspectiveCamera(), false); hbox.getChildren().add(noMsaa); Cylinder cylinder2 = new Cylinder(100, 200); cylinder2.setMaterial(phongMaterial); SubScene msaa = createSubScene("MSAA = true", cylinder2, Color.TRANSPARENT, new PerspectiveCamera(), true); hbox.getChildren().add(msaa); Slider slider = new Slider(0, 360, 0); slider.setBlockIncrement(1); slider.setTranslateX(425);

MSAAApp.java
MSAAApp Code A-3
slider.setTranslateY(625); cylinder1.rotateProperty().bind(slider.valueProperty()); cylinder2.rotateProperty().bind(slider.valueProperty()); root.getChildren().addAll(hbox, slider); stage.setScene(scene); stage.show(); } private static Parent setTitle(String str) { final VBox vbox = new VBox(); final Text text = new Text(str); text.setFont(Font.font("Times New Roman", 24)); text.setFill(Color.WHEAT); vbox.getChildren().add(text); return vbox; } private static SubScene createSubScene(String title, Node node, Paint fillPaint, Camera camera, boolean msaa) { Group root = new Group(); PointLight light = new PointLight(Color.WHITE); light.setTranslateX(50); light.setTranslateY(-300); light.setTranslateZ(-400); PointLight light2 = new PointLight(Color.color(0.6, 0.3, 0.4)); light2.setTranslateX(400); light2.setTranslateY(0); light2.setTranslateZ(-400); AmbientLight ambientLight = new AmbientLight(Color.color(0.2, 0.2, 0.2)); node.setRotationAxis(new Point3D(2, 1, 0).normalize()); node.setTranslateX(180); node.setTranslateY(180); root.getChildren().addAll(setTitle(title), ambientLight, light, light2, node); SubScene subScene = new SubScene(root, 500, 400, true, msaa ? SceneAntialiasing.BALANCED : SceneAntialiasing.DISABLED); subScene.setFill(fillPaint); subScene.setCamera(camera); return subScene; } /** * @param args the command line arguments */ public static void main(String[] args) { launch(args); }}

MSAAApp.java
A-4 JavaFX Working with JavaFX Graphics

B
3D MoleculeSampleApp Code B-1
B3D MoleculeSampleApp Code
This appendix lists source code used to build the 3D MoleculeSampleApp application that is built in Building a 3D Sample Application:
■ Xform.java
■ buildMolecule()
■ handleMouse()
■ handleKeyboard()
Xform.java/* * Copyright (c) 2013, 2014 Oracle and/or its affiliates. * All rights reserved. Use is subject to license terms. * * This file is available and licensed under the following license: * * Redistribution and use in source and binary forms, with or without * modification, are permitted provided that the following conditions * are met: * * - Redistributions of source code must retain the above copyright * notice, this list of conditions and the following disclaimer. * - Redistributions in binary form must reproduce the above copyright * notice, this list of conditions and the following disclaimer in * the documentation and/or other materials provided with the distribution. * - Neither the name of Oracle nor the names of its * contributors may be used to endorse or promote products derived * from this software without specific prior written permission. * * THIS SOFTWARE IS PROVIDED BY THE COPYRIGHT HOLDERS AND CONTRIBUTORS * "AS IS" AND ANY EXPRESS OR IMPLIED WARRANTIES, INCLUDING, BUT NOT * LIMITED TO, THE IMPLIED WARRANTIES OF MERCHANTABILITY AND FITNESS FOR * A PARTICULAR PURPOSE ARE DISCLAIMED. IN NO EVENT SHALL THE COPYRIGHT * OWNER OR CONTRIBUTORS BE LIABLE FOR ANY DIRECT, INDIRECT, INCIDENTAL, * SPECIAL, EXEMPLARY, OR CONSEQUENTIAL DAMAGES (INCLUDING, BUT NOT * LIMITED TO, PROCUREMENT OF SUBSTITUTE GOODS OR SERVICES; LOSS OF USE, * DATA, OR PROFITS; OR BUSINESS INTERRUPTION) HOWEVER CAUSED AND ON ANY * THEORY OF LIABILITY, WHETHER IN CONTRACT, STRICT LIABILITY, OR TORT * (INCLUDING NEGLIGENCE OR OTHERWISE) ARISING IN ANY WAY OUT OF THE USE * OF THIS SOFTWARE, EVEN IF ADVISED OF THE POSSIBILITY OF SUCH DAMAGE. */ package moleculesampleapp;

Xform.java
B-2 JavaFX Working with JavaFX Graphics
import javafx.scene.Group;import javafx.scene.transform.Rotate;import javafx.scene.transform.Scale;import javafx.scene.transform.Translate; public class Xform extends Group { public enum RotateOrder { XYZ, XZY, YXZ, YZX, ZXY, ZYX } public Translate t = new Translate(); public Translate p = new Translate(); public Translate ip = new Translate(); public Rotate rx = new Rotate(); { rx.setAxis(Rotate.X_AXIS); } public Rotate ry = new Rotate(); { ry.setAxis(Rotate.Y_AXIS); } public Rotate rz = new Rotate(); { rz.setAxis(Rotate.Z_AXIS); } public Scale s = new Scale();
public Xform() { super(); getTransforms().addAll(t, rz, ry, rx, s); }
public Xform(RotateOrder rotateOrder) { super(); // choose the order of rotations based on the rotateOrder switch (rotateOrder) { case XYZ: getTransforms().addAll(t, p, rz, ry, rx, s, ip); break; case YXZ: getTransforms().addAll(t, p, rz, rx, ry, s, ip); break; case YZX: getTransforms().addAll(t, p, rx, rz, ry, s, ip); // For Camera break; case ZXY: getTransforms().addAll(t, p, ry, rx, rz, s, ip); break; case ZYX: getTransforms().addAll(t, p, rx, ry, rz, s, ip); break; } }
public void setTranslate(double x, double y, double z) { t.setX(x); t.setY(y); t.setZ(z); }
public void setTranslate(double x, double y) { t.setX(x); t.setY(y); }

Xform.java
3D MoleculeSampleApp Code B-3
// Cannot override these methods as they are final: // public void setTranslateX(double x) { t.setX(x); } // public void setTranslateY(double y) { t.setY(y); } // public void setTranslateZ(double z) { t.setZ(z); } // Use these methods instead: public void setTx(double x) { t.setX(x); } public void setTy(double y) { t.setY(y); } public void setTz(double z) { t.setZ(z); }
public void setRotate(double x, double y, double z) { rx.setAngle(x); ry.setAngle(y); rz.setAngle(z); }
public void setRotateX(double x) { rx.setAngle(x); } public void setRotateY(double y) { ry.setAngle(y); } public void setRotateZ(double z) { rz.setAngle(z); } public void setRy(double y) { ry.setAngle(y); } public void setRz(double z) { rz.setAngle(z); }
public void setScale(double scaleFactor) { s.setX(scaleFactor); s.setY(scaleFactor); s.setZ(scaleFactor); }
// Cannot override these methods as they are final: // public void setScaleX(double x) { s.setX(x); } // public void setScaleY(double y) { s.setY(y); } // public void setScaleZ(double z) { s.setZ(z); } // Use these methods instead: public void setSx(double x) { s.setX(x); } public void setSy(double y) { s.setY(y); } public void setSz(double z) { s.setZ(z); }
public void setPivot(double x, double y, double z) { p.setX(x); p.setY(y); p.setZ(z); ip.setX(-x); ip.setY(-y); ip.setZ(-z); }
public void reset() { t.setX(0.0); t.setY(0.0); t.setZ(0.0); rx.setAngle(0.0); ry.setAngle(0.0); rz.setAngle(0.0); s.setX(1.0); s.setY(1.0); s.setZ(1.0); p.setX(0.0); p.setY(0.0); p.setZ(0.0); ip.setX(0.0);

buildMolecule()
B-4 JavaFX Working with JavaFX Graphics
ip.setY(0.0); ip.setZ(0.0); }
public void resetTSP() { t.setX(0.0); t.setY(0.0); t.setZ(0.0); s.setX(1.0); s.setY(1.0); s.setZ(1.0); p.setX(0.0); p.setY(0.0); p.setZ(0.0); ip.setX(0.0); ip.setY(0.0); ip.setZ(0.0); }
public void debug() { System.out.println("t = (" + t.getX() + ", " + t.getY() + ", " + t.getZ() + ") " + "r = (" + rx.getAngle() + ", " + ry.getAngle() + ", " + rz.getAngle() + ") " + "s = (" + s.getX() + ", " + s.getY() + ", " + s.getZ() + ") " + "p = (" + p.getX() + ", " + p.getY() + ", " + p.getZ() + ") " + "ip = (" + ip.getX() + ", " + ip.getY() + ", " + ip.getZ() + ")"); }}
buildMolecule()/* * Copyright (c) 2013, 2014 Oracle and/or its affiliates. * All rights reserved. Use is subject to license terms. * * This file is available and licensed under the following license: * * Redistribution and use in source and binary forms, with or without * modification, are permitted provided that the following conditions * are met: * * - Redistributions of source code must retain the above copyright * notice, this list of conditions and the following disclaimer. * - Redistributions in binary form must reproduce the above copyright * notice, this list of conditions and the following disclaimer in * the documentation and/or other materials provided with the distribution.

buildMolecule()
3D MoleculeSampleApp Code B-5
* - Neither the name of Oracle nor the names of its * contributors may be used to endorse or promote products derived * from this software without specific prior written permission. * * THIS SOFTWARE IS PROVIDED BY THE COPYRIGHT HOLDERS AND CONTRIBUTORS * "AS IS" AND ANY EXPRESS OR IMPLIED WARRANTIES, INCLUDING, BUT NOT * LIMITED TO, THE IMPLIED WARRANTIES OF MERCHANTABILITY AND FITNESS FOR * A PARTICULAR PURPOSE ARE DISCLAIMED. IN NO EVENT SHALL THE COPYRIGHT * OWNER OR CONTRIBUTORS BE LIABLE FOR ANY DIRECT, INDIRECT, INCIDENTAL, * SPECIAL, EXEMPLARY, OR CONSEQUENTIAL DAMAGES (INCLUDING, BUT NOT * LIMITED TO, PROCUREMENT OF SUBSTITUTE GOODS OR SERVICES; LOSS OF USE, * DATA, OR PROFITS; OR BUSINESS INTERRUPTION) HOWEVER CAUSED AND ON ANY * THEORY OF LIABILITY, WHETHER IN CONTRACT, STRICT LIABILITY, OR TORT * (INCLUDING NEGLIGENCE OR OTHERWISE) ARISING IN ANY WAY OUT OF THE USE * OF THIS SOFTWARE, EVEN IF ADVISED OF THE POSSIBILITY OF SUCH DAMAGE. */ //// This buildMolecule file contains the buildMolecule() method that is used in // the MoleculeSampleApp application that you can build using the Getting Started // with JavaFX 3D Graphics tutorial.// private void buildMolecule() { final PhongMaterial redMaterial = new PhongMaterial(); redMaterial.setDiffuseColor(Color.DARKRED); redMaterial.setSpecularColor(Color.RED); final PhongMaterial whiteMaterial = new PhongMaterial(); whiteMaterial.setDiffuseColor(Color.WHITE); whiteMaterial.setSpecularColor(Color.LIGHTBLUE); final PhongMaterial greyMaterial = new PhongMaterial(); greyMaterial.setDiffuseColor(Color.DARKGREY); greyMaterial.setSpecularColor(Color.GREY); // Molecule Hierarchy // [*] moleculeXform // [*] oxygenXform // [*] oxygenSphere // [*] hydrogen1SideXform // [*] hydrogen1Xform // [*] hydrogen1Sphere // [*] bond1Cylinder // [*] hydrogen2SideXform // [*] hydrogen2Xform // [*] hydrogen2Sphere // [*] bond2Cylinder Xform moleculeXform = new Xform(); Xform oxygenXform = new Xform(); Xform hydrogen1SideXform = new Xform(); Xform hydrogen1Xform = new Xform(); Xform hydrogen2SideXform = new Xform(); Xform hydrogen2Xform = new Xform();
Sphere oxygenSphere = new Sphere(40.0); oxygenSphere.setMaterial(redMaterial);

handleMouse()
B-6 JavaFX Working with JavaFX Graphics
Sphere hydrogen1Sphere = new Sphere(30.0); hydrogen1Sphere.setMaterial(whiteMaterial); hydrogen1Sphere.setTranslateX(0.0);
Sphere hydrogen2Sphere = new Sphere(30.0); hydrogen2Sphere.setMaterial(whiteMaterial); hydrogen2Sphere.setTranslateZ(0.0);
Cylinder bond1Cylinder = new Cylinder(5, 100); bond1Cylinder.setMaterial(greyMaterial); bond1Cylinder.setTranslateX(50.0); bond1Cylinder.setRotationAxis(Rotate.Z_AXIS); bond2Cylinder.setRotate(90.0);
Cylinder bond1Cylinder = new Cylinder(5, 100); bond2Cylinder.setMaterial(greyMaterial); bond2Cylinder.setTranslateX(50.0); bond2Cylinder.setRotationAxis(Rotate.Z_AXIS); bond2Cylinder.setRotate(90.0);
moleculeXform.getChildren().add(oxygenXform); moleculeXform.getChildren().add(hydrogen1SideXform); moleculeXform.getChildren().add(hydrogen2SideXform); oxygenXform.getChildren().add(oxygenSphere); hydrogen1SideXform.getChildren().add(hydrogen1Xform); hydrogen2SideXform.getChildren().add(hydrogen2Xform); hydrogen1Xform.getChildren().add(hydrogen1Sphere); hydrogen2Xform.getChildren().add(hydrogen2Sphere); hydrogen1SideXform.getChildren().add(bond1Cylinder); hydrogen2SideXform.getChildren().add(bond2Cylinder); hydrogen1Xform.setTx(100.0); hydrogen2Xform.setTx(100.0); hydrogen2SideXform.setRotateY(HYDROGEN_ANGLE);
moleculeGroup.getChildren().add(moleculeXform);
world.getChildren().addAll(moleculeGroup);}
handleMouse()/* * Copyright (c) 2013, 2014 Oracle and/or its affiliates. * All rights reserved. Use is subject to license terms. * * This file is available and licensed under the following license: * * Redistribution and use in source and binary forms, with or without * modification, are permitted provided that the following conditions * are met: * * - Redistributions of source code must retain the above copyright * notice, this list of conditions and the following disclaimer. * - Redistributions in binary form must reproduce the above copyright * notice, this list of conditions and the following disclaimer in * the documentation and/or other materials provided with the distribution. * - Neither the name of Oracle nor the names of its * contributors may be used to endorse or promote products derived

handleMouse()
3D MoleculeSampleApp Code B-7
* from this software without specific prior written permission. * * THIS SOFTWARE IS PROVIDED BY THE COPYRIGHT HOLDERS AND CONTRIBUTORS * "AS IS" AND ANY EXPRESS OR IMPLIED WARRANTIES, INCLUDING, BUT NOT * LIMITED TO, THE IMPLIED WARRANTIES OF MERCHANTABILITY AND FITNESS FOR * A PARTICULAR PURPOSE ARE DISCLAIMED. IN NO EVENT SHALL THE COPYRIGHT * OWNER OR CONTRIBUTORS BE LIABLE FOR ANY DIRECT, INDIRECT, INCIDENTAL, * SPECIAL, EXEMPLARY, OR CONSEQUENTIAL DAMAGES (INCLUDING, BUT NOT * LIMITED TO, PROCUREMENT OF SUBSTITUTE GOODS OR SERVICES; LOSS OF USE, * DATA, OR PROFITS; OR BUSINESS INTERRUPTION) HOWEVER CAUSED AND ON ANY * THEORY OF LIABILITY, WHETHER IN CONTRACT, STRICT LIABILITY, OR TORT * (INCLUDING NEGLIGENCE OR OTHERWISE) ARISING IN ANY WAY OUT OF THE USE * OF THIS SOFTWARE, EVEN IF ADVISED OF THE POSSIBILITY OF SUCH DAMAGE. */
//// The handleMouse() method is used in the MoleculeSampleApp application to// handle the different 3D camera views. // This method is used in the Getting Started with JavaFX 3D Graphics tutorial.// private void handleMouse(Scene scene, final Node root) { scene.setOnMousePressed(new EventHandler<MouseEvent>() { @Override public void handle(MouseEvent me) { mousePosX = me.getSceneX(); mousePosY = me.getSceneY(); mouseOldX = me.getSceneX(); mouseOldY = me.getSceneY(); } }); scene.setOnMouseDragged(new EventHandler<MouseEvent>() { @Override public void handle(MouseEvent me) { mouseOldX = mousePosX; mouseOldY = mousePosY; mousePosX = me.getSceneX(); mousePosY = me.getSceneY(); mouseDeltaX = (mousePosX - mouseOldX); mouseDeltaY = (mousePosY - mouseOldY);
double modifier = 1.0;
if (me.isControlDown()) { modifier = CONTROL_MULTIPLIER; } if (me.isShiftDown()) { modifier = SHIFT_MULTIPLIER; } if (me.isPrimaryButtonDown()) { cameraXform.ry.setAngle(cameraXform.ry.getAngle() - mouseDeltaX*modifierFactor*modifier*ROTATION_SPEED); // cameraXform.rx.setAngle(cameraXform.rx.getAngle() + mouseDeltaY*modifierFactor*modifier*ROTATION_SPEED); // - } else if (me.isSecondaryButtonDown()) { double z = camera.getTranslateZ(); double newZ = z + mouseDeltaX*MOUSE_SPEED*modifier; camera.setTranslateZ(newZ); } else if (me.isMiddleButtonDown()) {

handleKeyboard()
B-8 JavaFX Working with JavaFX Graphics
cameraXform2.t.setX(cameraXform2.t.getX() + mouseDeltaX*MOUSE_SPEED*modifier*TRACK_SPEED); // - cameraXform2.t.setY(cameraXform2.t.getY() + mouseDeltaY*MOUSE_SPEED*modifier*TRACK_SPEED); // - } } }); // setOnMouseDragged } //handleMouse
handleKeyboard()/* * Copyright (c) 2013, 2014 Oracle and/or its affiliates. * All rights reserved. Use is subject to license terms. * * This file is available and licensed under the following license: * * Redistribution and use in source and binary forms, with or without * modification, are permitted provided that the following conditions * are met: * * - Redistributions of source code must retain the above copyright * notice, this list of conditions and the following disclaimer. * - Redistributions in binary form must reproduce the above copyright * notice, this list of conditions and the following disclaimer in * the documentation and/or other materials provided with the distribution. * - Neither the name of Oracle nor the names of its * contributors may be used to endorse or promote products derived * from this software without specific prior written permission. * * THIS SOFTWARE IS PROVIDED BY THE COPYRIGHT HOLDERS AND CONTRIBUTORS * "AS IS" AND ANY EXPRESS OR IMPLIED WARRANTIES, INCLUDING, BUT NOT * LIMITED TO, THE IMPLIED WARRANTIES OF MERCHANTABILITY AND FITNESS FOR * A PARTICULAR PURPOSE ARE DISCLAIMED. IN NO EVENT SHALL THE COPYRIGHT * OWNER OR CONTRIBUTORS BE LIABLE FOR ANY DIRECT, INDIRECT, INCIDENTAL, * SPECIAL, EXEMPLARY, OR CONSEQUENTIAL DAMAGES (INCLUDING, BUT NOT * LIMITED TO, PROCUREMENT OF SUBSTITUTE GOODS OR SERVICES; LOSS OF USE, * DATA, OR PROFITS; OR BUSINESS INTERRUPTION) HOWEVER CAUSED AND ON ANY * THEORY OF LIABILITY, WHETHER IN CONTRACT, STRICT LIABILITY, OR TORT * (INCLUDING NEGLIGENCE OR OTHERWISE) ARISING IN ANY WAY OUT OF THE USE * OF THIS SOFTWARE, EVEN IF ADVISED OF THE POSSIBILITY OF SUCH DAMAGE. */ //// The handleKeyboard() method is used in the MoleculeSampleApp application to // handle the different 3D camera views. // This method is used in the Getting Started with JavaFX 3D Graphics tutorial.//
private void handleKeyboard(Scene scene, final Node root) {
scene.setOnKeyPressed(new EventHandler<KeyEvent>() { @Override public void handle(KeyEvent event) { switch (event.getCode()) { case Z: cameraXform2.t.setX(0.0); cameraXform2.t.setY(0.0); cameraXform.ry.setAngle(CAMERA_INITIAL_Y_ANGLE); cameraXform.rx.setAngle(CAMERA_INITIAL_X_ANGLE);

handleKeyboard()
3D MoleculeSampleApp Code B-9
break; case X: axisGroup.setVisible(!axisGroup.isVisible()); break; case V: moleculeGroup.setVisible(!moleculeGroup.isVisible()); break; } // switch } // handle() }); // setOnKeyPressed } // handleKeyboard()

handleKeyboard()
B-10 JavaFX Working with JavaFX Graphics