joanne podowski, ian varley · joanne podowski, ian varley typesetting : ... paint yer dragon ......
TRANSCRIPT

1

2

1
EDITOR-IN-CHIEF: Steve Jackson & Ian Livingstone
EDITOR: Marc Gascoigne
PRODUCTION MANAGER: Martin Clement
PASTUE-UP: Susan McLoughlin, David Oliver,
Joanne Podowski, Ian Varley
TYPESETTING: Julie Weaving
COVER ILLUSTRATION: John Blanche © 1986
INTERIOR ILLUSTRATION: Tony Ackland, David
Andrews, Trevor Hammond, Pete Martin
ADVERTISING: Ivor Chomacki
PHOTOGRAPHS: Charles Elliott
PUBLISHED BY: Games Workshop Ltd, Enfield
Chambers, 16–18 Low Pavement, Nottingham, NG1
7DL. Tel: (0602) 586108
Those of you who read last issue’s editorial will have noticed that Warlock has
moved to a new design dungeon in Nottingham, not far from the castle. Games
Workshop has now entirely relocated to the Midlands, and the only remnants in
the capital are the shop in Hammersmith, and the two of us! This means that,
unless we manage to perfect a Teleport Spell in time, commuting 320 miles to
work and back every day is a little impractical. So what of our editorial duties?
For some months now, we have been watching a studious little creature labouring
industriously on Games Workshop and Fighting Fantasy projects. This creature
has a S K I L L of 20 (when armed with a word-processor) and a S T A M I N A of 36, as
shown by such monumental works as Out Of The Pit and Judge Dredd – The
Role-Playing Game. The choice has been an easy one; it is at last time to honour
the noble creature with a well-deserved reward for his toils. And so it is decreed.
Amidst a fanfare of trumpets. the Games Workshop herald now makes his
announcement: “Arise noble Sir Marc of the Gascoigne. Henceforth shall ye be
known as Editor of Warlock magazine!”
We, of course, will never leave Warlock magazine – we shall always be here as
Editors-in-Chief, watching over the best gamebook magazine in the universe. We
are sure Marc will take Warlock to new heights, and he has already been suggest-
ing exciting new ideas to make your favourite magazine even better. We’re sure
that YOU, the readers, will join with us in wishing Marc every success in his new
job. May his S T A M I N A never fail!
Best wishes,
Pst! Steve, it’s Marc here. Can I just tell them what’s in this issue? Yes but make it quick? O.K.
Well, we’ve got a great solo adventure front the amazing Graeme Davis for Fighting Fantasy &
D&D, just to keep all the ‘serious’ gamers quiet! The Warlock interviews Joe Dever (euughh!);
John Blanche tells us how he paints his brilliant fantasy pictures (wow!); and there’s a chance
to win a complete set of signed FF books too (amazing!). Hope you enjoy this issue and I’ll/
That’s enough! – Steve & Ian
ISSUE 10 JUNE/JULY
CONTENTS
Livingstone on Trial! Bet that caught your attention! Actually it’s only Ian talking about his new gamebook!
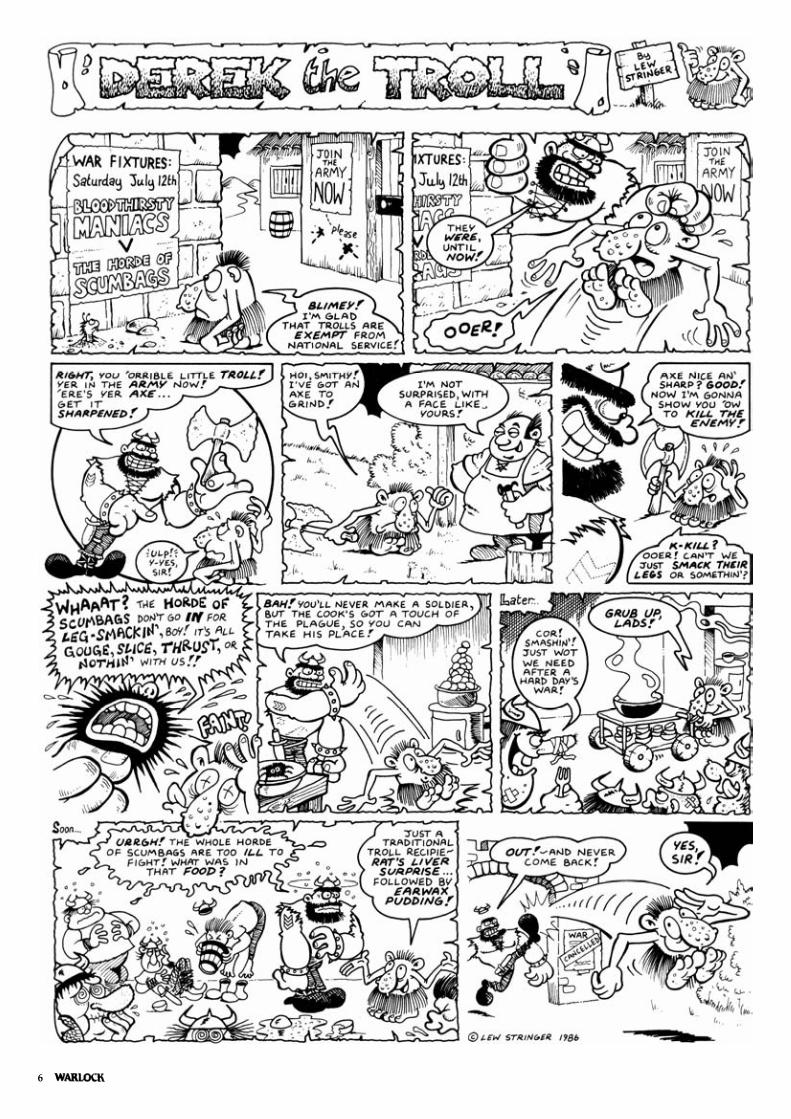
Derek the Troll Ooerr! Derek gets draughted!
Arcane Archive What, a load of new game- books to be reviewed? Never fear – here’s Paul Cockburn to the rescue!
Derek’s Quill Our great and noble master takes a well-deserved rest while Derek attempts to ans- wer your letters.
Arkenor & Max Ian McDonald’s world comes to an end!
Paint Yer Dragon Rick Priestley gets tooled up
Out Of The Pit An awesome array of awful adversaries to amaze even the most ‘ardened adventurer!
Sheer Artistry The Warlock has his portrait drawn by John Blanche
More Monster Conversions Graeme Davis returns for more gamebook monster-swapping
Conventionally Speaking Just what does happen at a games convention?
Dicing With Death The Warlock takes his life in his hands by interviewing the infamous Joe Dever
Rogue Mage Something new – a solo adven- ture for both Fighting Fantasy and Dungeons & Dragons, by the nearly-legendary Graeme Davis
Take That! Unarmed Combat in FF by Jeremy Adamson
4
6
7
10
12
14
16
18
20
21
22
24
43

Please mention Warlock when replying to advertisements 2

Please mention Warlock when replying to advertisements 3

4
Which is one way of saying that we’d like to present Ian Livingstone talking about his new book, Trial Of Fighting Fantasy Champions!
When Ian wrote Deathtrap Dungeon as the sixth book in the Fighting Fantasy series, way back at the end of 1983, no-one could have predicted that it would become the most popular gamebook of them all. When the idea for the book first came to him, it was nothing more than a simple dungeon adventure. By the time the book was released it had grown in stature to such an extent that it had become the ultimate dun-geon, a veritable deathtrap which would test the skill of adventurers like nothing had ever done before. As a result, of course, it became the most popular gamebook ever, and even now Deathtrap Dungeon still heads most adventurers’ favourite gamebook lists. So how on Titan do you follow that, Ian?
There was no doubt at all that all of you wanted a sequel to DD. The floods of letters from Warlock read-ers and gamebook fans around the world asking, nay, demanding that Puffin release a follow-up forthwith were proof of that. Finally, in January 1985 I could stand it no longer! ‘Right, all you foolish adventurers,’ I thought to myself, ‘you want to go back to Deathtrap Dungeon! Well now you can . . . but this time you’ll never get out!!’
The first stage was to work on a way of getting you back to Deathtrap Dungeon in the first place. It would have been too easy to just start you off in Fang again, so I decided to be a little subtler. You may not be aware of it, but nasty Baron Sukumvit has a brother, the evil Lord Carnuss, who dwells on a small isolated island south of Fire Island and Allansia’s Skull Coast. Always jealous of his brother’s fame, Carnuss now plans to send his own champion to the Baron’s rede-signed Trial of Champions. Sukumvit has publicly declared that no-one will get through his new labyrinth; Carnuss is determined to make him eat his words by sending a warrior of sufficient mettle to win through to the other side and emerge victorious. And guess who this warrior is going to be?
Before you can be selected as his champion, how-ever, you have to prove you are worthy of the task, by competing in Carnuss’ gladiatorial arena. The inspi-ration for this section came from the gladiatorial games of the Romans, and in particular a very famous book about them called ‘For Those About To Die’, by P. P. Mannix. A glimpse of the cover will show you one of the enjoyable tasks that await you in the games – walking blindfold around the arena, whirling a ball and chain around your head, hoping you make con-tact with your unseen opponents before they make contact with you. I can confidently predict that you will not like this section one little bit, and you will very quickly come to curse the name of Lord Carnuss!
If you win through the games, you journey to Fang and the ‘fun’ begins – and if you thought the first sec
tion was difficult you’ll not want to play through the Trial of Champions itself. The whole layout has been changed so drastically that no-one will recognise any of it – so there’ll be no cheating from anyone who has already played Deathtrap Dungeon. The tasks you have to perform are also very different – even more so because you are not actually told what you have to do to get out the other side! I personally think it’s the best gamebook I’ve ever written, and I have a feeling a few of you might agree with me too, if you ever get through it!
My next gamebook is provisionally entitled Crypt Of The Necromancer, or The Howling Tunnels; I can’t decide which – what do the Warlock readers prefer? It is set on the southern edge of the Moonstone Hills, near the small town of Chalice, where very strange things have been happening. I can’t tell you more than that without giving the whole game away, except that it will be released around January 1987. Before this, hopefully this Autumn, Casket Of Souls will have finally burst onto an unsuspecting world. It has been a long time coming to fruition, but I think you are really going to like this one. Iain McCaig has laboured for nearly two years on the full colour illust-rations. They are quite simply the best fantasy paint-ings I’ve seen, and make the wait very worthwhile. The book has developed from a quest to more like an illustrated short story, though it does still have the game element. In other words, you don’t have to solve the puzzles to enjoy the book, though it will be a lot more satisfying if you do. Until then, all that remains is far me to wish you happy adventuring, and may your LUCK roll never fail you!
– as told to Marc Gascoigne at Birmingham Dragonmeet.

5
CAN YOU WIN THE
If you have already read the opposite page, you will know all about Ian Livingstone’s latest Fighting Fantasy book, Trial of Champions. Everyone who has seen it so far reckons the book – a sequel to the amazingly popular Deathtrap Dungeon – to be the great man’s finest work, so the Warlock thought a few of you might just like to win a copy of it when it steams hot off the presses in mid-June.
Our brave and fearless master got on the old crystal ball and consulted with several minions of the unholy Puffin Lord, and between them they came up with the following prize compet-ition, which none of you will want to miss out on!
All you have to do . . .
. . . is work out the answers to the eleven cryptic questions which are listed below. They are all taken from Fighting Fantasy gamebooks, though s ome answers may be a little easier than others.
1. In which book will you find Aakor, Bhor-ket and Demonspawn? 2. Yaztromo’s Tower is situated close to which colourful river? 3. You and the crew of the starship Travel-ler might meet the Rain Lord here. 4. Where would you meet Throm the Bar-barian? 5. Possessed by the foul Gonchong, it rules over Fire Island. 6. The might of the alien Arcadian Empire
is being resisted by which secret Earth organisation? 7. Just who is the Titanium Cyborg? 8. What was the name of the magical blade stolen by Ikuru, Master of Shadows? 9. Zanbar Bone has a nick-name. What is it? 10. This star system is home to the smugglers of Satophil-d. 11. Which elf’s aid is invaluable in defeating the Snow Witch?
Once you have eleven answers, take the first letter of each of them. Juggle them around a bit until you have a word or two words which spell a villain’s name, and send this answer to us. You do not need to send us the answers to the questions.
The first entries pulled out of the Warlock’s batte red old pointy hat after the closing date will win the following fantabulous prizes:
FIRST PRIZES 2 complete sets of Fighting Fantasy gamebooks, including the very latest one, Trial Of Champions, each signed by Steve Jackson and Ian Livingstone!!
SECOND PRIZES 30 copies of Trial Of Champions, signed by Ian Livingstone!!
RUNNER-UP PRIZES 50 Fighting Fantasy posters plus 50 T-shirt transfers!!
Send your answer to: TRIAL OF CHAMPIONS, WARLOCK MAGAZINE,
GAMES WORKSHOP DESIGN STUDIO, ENFIELD CHAMBERS,
16-18 LOW PAVEMENT, NOTTINGHAM NG1 7DL.
Your entries must reach us by Monday, July 28th . Please remember to include your name, age and full address; we’d also like you to tell us the name of the shop where you bought this copy of Warlock. So get your thinking helmets on, and get those entries in . . . just think, a complete set of signed FF books . . . maybe I should enter myself . . .
6

7
You know, it’s amazing the roles you can
imagine yourself into these days! Once
upon a time, you could only be an adven-
turer – a boring old adventurer. Times
have changed! I mean, take a look at this
month’s batch of books – you can be a
samurai, a gladiator, an inmate at Col-
ditz, a Chicago gangster – even a Gaul in
50 B.C.! In fact, as Derek pointed out to
me just the other day, it seems like you
can be just anyone you want to be in
gamebooks these days – except a Troll! I
guess no-one wants to be like you, Derek,
do they? Mind you, I don’t think Derek
much wants to be a Troll either, judging
by the amount of time he spends playing
gamebooks!
Let’s have a look at who he’s been pre-
tending to be this time . . .
SWORD OF
THE SAMURAI
Mark Smith &
Jamie Thomson
Puffin, £l.95
What’s this? The slime beast writing
another Fighting Fantasy book? Is he try-
ing to take over the world? I dunno, no-
one ever asks me to write a book . . .
except Shredded Wheat . . . sniff sniff!
(Aha! So those were your doing , were
they Cockburn! I think I’d better keep an
eye on you! – The Warlock. )
Anyway, we’d better see what the
Deadly Duo have done with this. Draw-
ing from their experience with the ‘Ninja’
books, Min Smith and the Beast have
returned to the Far East for this adven-
ture, which falls halfway between a stan-
dard FF book and one of their more com-
plicated Way of the Tiger efforts. A few
special rules cover samurai skills (you
pick one from a selection of skills, which
you may be able to use at a vital point of
the adventure).
The plot goes pretty much like this: you
are a young samurai warrior, with a dangerous mission to recover the Singing
Sword. The Shogun needs the sword to
control his kingdom, but it has been sto-len by Ikuru, Master of Shadows – and
the nobles are beginning to revolt, while bandits and invaders are running across
the land. The only help you are going to get is the seal of the Shogun, to help you
pass through the parts of his Kingdom
which are still loyal.
Ikuru lives in the Pit of Demons, sur-
rounded by mighty guardians. Along the way, there are means by which you can
attract a motley assortment of allies, who will
help you in your battle against these guardians, Frustratingly, this can mean
that you do your appointed task too well, getting through to the Master of
Shadow’s lair without the right allies – and then you quickly find yourself being
thrashed by his demon guardians without
any chance to win! Derek, who didn’t want any smelly allies anyway, is still
playing this book, trying to get through to the end . . .
This has lots of nice atmosphere and
fabulous monsters, and some very good illustrations by Alan Langford, but it’s
not a good gamebook. Back to the swamp, JT, and better luck next time.
TRIAL OF
CHAMPIONS
Ian Livingstone
Puffin, £1.95
The master returns! This says ‘Ian Livingstone’ on the cover and means it –
none of your ‘Steve & Ian presents’ rub-bish here-and, furthermore, this book
returns to the scene of Deathtrap Dun-geon, possibly the most popular FF book
ever.
But don’t think that makes it easy . . . The Dungeon has been completely
restocked with traps and monsters by that murderous creep Baron Sukumvit – and
before you can even get into it you must
first survive the gladiatorial games of the Baron’s equally nasty brother, Lord Car-
nuss.
Hang on a minute, though, how did we
end up here in the first place? The book starts after you meet with a small accident
. . . the ship on which you left Port
Blacksand was rammed and sunk by Cap-tain Bartella’s slaver-pirates, and you
ended up in the engine room, pulling an oar. But Bartella doesn’t plan to keep
you; he sells you to Lord Carnuss, who
wants a gladiator to enter his brother’s new maze. So, you are taken to the Arena
of Death with 41 other slaves, and that’s where the fun really starts.
Only one of you will survive; all the
Paul Cockburn, ably assisted by Derek the Troll, takes a leisurely
look at the latest gamebooks.

8
other slaves will die in the selection pro-
cess for the right to enter the mare. The
cell mates with whom you share bread
and gruel disappear one by one. First
there’s the foot race, leaping over burn-
ing coals carrying a heavy pack, then the
fight with the Bonecrusher (a really gross
new monster), and when there is only one
man left in the cell with you, you are told
that only one of you will be allowed to
leave the cell in the morning!
And so it goes on. The climax to this
first part is a really spooky fight when all
you have is a spiked ball on the end of a
chain – and a blindfold! You may not like
this bit at all, but it’s very well done, and
if you can survive this part you probably
stand a good chance of making it through
to the end. When you have outlasted all
the others, you are taken to Fang to enter
the Trial of Champions. Some terrible
monsters and fiendish traps await you
here, and it will be only the very best who
survive. But if you are the lucky one, then
you’ll have the chance to take revenge on
Lord Carnuss, and maybe set yourself up
for the next adventure in this series . . .
because, yes, Mr Livingstone has left
himself plenty of room for another
sequel! Let’s just hope we don’t have to
wait another three years for it – though he
may have a hard job coming up with
another book as good as this one!
ASTERIX TO THE RESCUE Knight Books, £4.95
Now this is a gamebook with a difference!
Not only do you get your gamebook with
its numbered passages, but there are also
several ‘props’ included in tire plastic
pack: a disc representing a bag of coins. a
translator, a map, a password scroll,
three ‘magic potions’, cards representing
Asterix and Obelix and a dice with these
two and Dogmatix shown twice each.
Now what has this lot got to do with an
adventure gamebook, you ask? Well, the
various props are useful devices for hid-
ing the mechanics of the route through
the book.
Take the bag of coins (not literally,
Derek, you stupid troll – look, you can’t
even spend it! – give it back!). If you come
to a passage where you have to spend
money, you rotate the disc to show the
number of coins you have spent through a
window, Through another window on the
back you can then see the next numbered
passage. The infamous magic potions are
used as ‘lives’; you have three chances to
succeed in your mission, but when the
potion runs out, you have failed.
The props aren’t important, and it might seem that they don’t make up for the fact that this book costs 2 ½ times the normal price of most gamebooks, but they do add a certain charm to owning the book. As for the adventure itself, it’s fairly easy (probably because the book has to appeal to Asterix fans of all ages), but you can expect to have a lot of fun before you reach the end. The Romans are incredibly stupid – of course! – and they let you off the hook most often. Some of the choices you have to make are fairly simple or arbitrary, and there isn’t too much mindless violence, which might spoil it for some of you, but the trick is to enjoy the descriptions of the places and the people, and the jokes!
And what is the story? Well, that stupid druid, Getafix, has been kidnapped again, and Caesar has him in Rome, try-ing to sweat the secret of the magic potion from him. All you have to do is to journey to Rome and rescue him – and make it back in time for the banquet, of course. No problem!
I can guarantee that Asterix fans will love this book, despite its rather high price. Gamebook fans may find if a little easy, and possibly lacking in the usual blood and guts, but that’s their fault. We loved it!
CHICAGO GANGSTERS and ESCAPE FROM COLDITZ Clive Gifford Virgin Books, £l.99
Some people seem to think that ‘Real-life Gamebooks’ are going to be the next big thing in the solo adventure world. Well, if that’s true then Derek promises to have a bath! Judging by these two, we can safely forget about ‘Real-life Gamebooks’ altogether. Chicago Gangsters appears to be the first of this new series, if only because it has an introduction by the author. The other, Escape From Colditz, simply leaps in at paragraph 1 without tell-ing you who you are, why you are of the notorious prison camp or anything! Any-way, Derek and I put on our best pin-stripe suits, picked up our violin cases, and shimmied on down to Chicago, in full expectation of a really wild time – how wrong we were!
You play a young punk from the coun-try who arrives in gangster city, intent on making a name for yourself. Pretty soon you fall in with the Gucciano clan, a vic-ious bunch of nasties who seem deter-mined to use you to bump off a selection of the city’s top people. However, you quickly realise that you ought to be bumping off the Guccianos if you want to make any headway in this city. If you can team up with the right people and make the right moves, you can wipe out the clan
and reign supreme as the best gangster in Chicago.
At least, that’s what it says. In reality the path is all but impossible, as you are

9
given very few real opportunities to use your skills or your brain-things just seem to happen to you for no particular reason. Despite the pretty maps included at vari-ous sections of the text, the actual layout of the city is very confusing, and you tend to get to the same places no matter which direction you walk in! I can’t actually think of anything to recommend in this book at all, and Derek actually refused to eat his copy in disgust.
What’s worse is that the second book is even poorer than the first one! This time you are an inmate of the famous German prison, during World War II. Actually, you must assume this, as the book doesn’t tell you – you simply start the book by waking up in a solitary confinement cell. It isn’t until much later that you find out your name is Hughes, and that you used to be a pilot! As you wander around the castle thinking of a way to escape, you run into other inmates, who you occasionally are said to have met before, even if you’ve only just started playing the book! There are terrible jumps between loca-tions too – one moment you’re walking in the gardens, the next you’re sat in the canteen having just finished your dinner! This is all very well, but what if you didn’t want to go and eat? The author of these books obviously doesn’t know what
‘choices’ mean.
Both these books, and especially Escape From Colditz, could have been really special, for their subject matter could have made wonderful gamebooks. However, these books are badly written, presented and illustrated, and do not deserve a single moment of your time, let alone any of your cash. In fact, the person writing in with the best reason for wanting these books can have our set (just mark your letters ‘Bleaagh!’).
THE LAST INVASION: 1066 Simon Farrell & Jon Sutherland Grafton, £1.95
. . . And then, just as you’re really begin-ning to despair about the gamebook world, along comes a book like this, which makes up for all the Chicago Gangsters and the Escape From Col-ditzes. It doesn’t have many new ideas, it is only averagely written, and in places could do with more action, but when compared to the previous two attempts at gamebooks it is a positive breath of fresh air.
Again, the subject is a real one, but this time it’s a little historically based, dealing with the invasion of Britain by William the Conqueror in 1066. You play Hugh deBouard, the son of a Norman noble who nevertheless lives in England. (No, Derek, not your brother Norman! This one’s a Frenchman not a Troll. Mind you, I guess there are some similarities . . . ) As Edward the Confessor, the previous king, lies dying in London, you must work out where your loyalties really lie and decide whether you are to follow William or the new King Harold. In fact, the best tactics seem to be to blow with the wind, swap-ping sides whenever you feel like. Derek liked this bit – he never could make up his mind about anything!
While you are involving yourself in the intrigues of the Saxon or Norman courts, of course, old William is preparing to launch his invasion, which takes place exactly as recorded in the history books. I think I would have liked to have been given the chance of stopping the invasion and changing the course of history a little,
but with the system used in this book you can’t actually do that (probably a good job too – if William had been beaten off you probably wouldn’t be here now, reading this gamebook!). Instead the book gives you the sense of being caught up in history, playing a quite major role in shaping events that have affected so much.
The authors have obviously done their research, but in general the book doesn’t read like a history book – it’s far more interesting than that! Some gamebook fans may not adjust to its peculiarly ‘seri-ous’ tone, and it could perhaps do with a few more battles (there’s only really Stamford Bridge and the Battle of Hast-ings to whet the appetite of more violent readers), but this is made up for in other ways.
I’m still not so sure that real life gamebooks are a particularly wonderful idea, but The Last Invasion: 1066 is not at all bad. Even better, you can show this one to your teacher and she won’t bat you round the head for reading a silly gamebook! Read this and you’ll probably take in more about William the Con-queror than you ever would reading some boring old history book. Even Derek knows who King Harold is now (what’s that Derek? You’ve got another brother called Harold? I give up!!).

10
Dear Warlock,
Why do the spots on Derek the Troll’s
nose keep moving?
Yours sincerely,
David Burton,
Bestwood, Nottingham.
●●●● Well, David, thats a very intrestin’ kwes-
tion, that is. Ive wundred about this very
fakt for along time now, and doo yu kno, Ive
no idea wy this happens. Its pritty strange, I
can tell yu, havin’ spots move about on yor
nows all the time. Mind yu, I wunce knew a
gobblin whoose nows was alwaze runnin’, so
havin’ a few moovin spots is nuthin com-
paired to that is it? Lets open anutha letter –
Crikey! Wots this??
●●●● Ooer! Ide better not show this to the
Warlok, or heel go spare! He’s such a grum-
pie old mizery he dont like peeple chalenjing
him. And he reely hates that stymie old
Jamie Tomsun – last week I cant him stik-
king pins in a life-size doll of Jamie – until I
notissed it was the reel Jamie Tomsun becos
it was skreeming and yelling! Ide better do
something with this befor the Warlok sees it
. . .
That’s better. Now, wot else do we have here? Aha, another letter asking a kwestion!
Dear Warlock, Be kind to us poor, ignorant mortals!
How about a bit of info on fantasy boardgames for those of us who want to share our abiding passion with other, lesser beings, but who don’t aspire to the high ranking post of being all-seeing, all-know-ing gamemasters?
Yours ingratiatingly, Lady Arthur the Coward (alias Ursula
Clarke) Bury St. Edmunds, Suffolk
●●●● Oh deer! Looks like Im going to have to go and ask the Warlok a kwestion. I’ll just call him. WAAAAARRRRI,OKKK!! OHH WAAAAARRRRI,OKKKK!!
���� What’s going on here Derek, why are you shouting like that! Anymore shouting from you and I’ll turn you into a Troll! ●●●● But I am a Troll, Master Warlok.
���� We’ll soon see about that, you disgusting little subhuman! Now, where’s this letter that wants answering? Aha, here it is! Ahem-hem (just putting on my letter-answering voice).
Well, Ursula, thank you for your letter about an introduction to fantasy boardgames. It seems you are not alone in wanting one, as I have also heard from Denby Hill of Doncaster, and Philip Larsen of Le Vesinet, in France, who both want to know more about boardgames and begin-ners’ role-playing games. I will get the new boy, Gascoigne, working on just such an article for next issue; it’s about time he did some work around here! Now, while I’m
here, Derek, is there anything else which needs an answer? ●●●● Ooer! I don’t know yet, sir Warlok, I’ve only just started sorting then them all. I’ll just get the next one for you to look at, o miyty Warlok.
Dear Warlock, I was digging my old dusty issues of War-
lock out of my rusty chest one day (I had to hack the lock off the chest with my sword because a powerful sorceress, disguised as my mum, had cast a lock spell on the chest!), when I noticed issue 1 of Warlock was just lying thereon top of the pile staring straight at me, mysteriously opened at pages 6 and 7 – The Land of Allansia. As I looked at the map I noticed it was quite old, as the Temple of Vatos in the Desert of Skulls had not yet been discovered, neither had the Snow Witch’s cavern in the Icefinger Mountains, or even Scorpion Swamp! So, here I am, writing to you, the Warlock, for a new map of Allansia to be published in future issue.
Yours wonderingly, N. Craven, Grimsby, Humberside.
●●●● Well, young man, I can reveal that there is to be a new map of Allansia included in Titan – The World Of Fighting Fantasy, which Puffin will be releasing just as soon as that lazy wretch Gascoigne finishes editing it. More than that, the book will include a map of the whole world of Fighting Fantasy, including the rest of the continent next to Kakhabad, and the mysterious third conti-nent of Khul, where you will find places like Scorpion Swamp, the Inland Sea, and the strange land of Hachiman! I think you’ll just have to wait a little while longer – though it might be possible to print a few sneak pre-views from it before it is released-if anyone else out there wants to see them, of course!
Dear high and mighty Warlock, I totally agree with John Mitchell who
wrote in issue 9. This persecution of Derek the Troll must stop. He is not an eyesore. In fact my sister and I both think he is the cutest of all the assorted nasties who infest Games Workshop. I would also like to become the second member of John’s Not So Royal Society For The Prevention Of Cruelty To Trolls.
Yours Trollishly, Barnaby Warne, Stratford-on-Avon, Warks.
PS For all you slimey snails still stuck in the Maze of Zagor, here’s the way out: Go s t ra ig h t o n , th e n r i g h t , r i g h t ag a i n a t th e c ro s s road s , and th en . . . uh -oh , I ’ m l o s t ! ! !? ?
���� Phew! Got that Spell of Confusion on you just in time! We really can’t allow arrogant adventurers like young Barnaby here to give away the secret which has baffled so many people for so many years, now can we?
And since you like Trolls so much, I’ve decided to show you the truth about them, by sending Derek round to your house for a week’s holiday. Pretty soon you’ll be sick of scraping slimy gunge off the carpet, wiping slurpy stains off the settee and sweeping the lumpy bits out of his bed every morning! Your whole house will reek from his bad breath, his smelly feet and the stench of all
Ooer! Booted out of the armie just for cookin’ sum of my favrit food, and now that
grumpee old Warlock has stomped off in a sulk, leavin’ me to sort owt the postbag!
Crumbs – look as the syze of it – its taller than me! Ooh! ‘ang on – puff! grunt! – wile I
get sum boxes to – pant! wheeze! – stan don. There! Just clime up to the top . . . and
caref ‘ly . . . reech out and . . . grab the furst letta . . . Gotcha! Now wot does this say? Ooer! Its
about me!

11
the insects which live in his hair. Ugghh! Then you’ll see what we have to put up with here!! Oh Derek, stop looking at me with those big sad eyes like that; I’m sending you away for a week – won’t that be fun? No? How dare you be so ungrateful? Oh all right then, stay here at the castle then. (Curses! There must be some way to get rid of the lit-tle creep without hurting his feelings!)
Dear Warlock,
I hope for your sake that you’ve given
Ruth Pracy a least one thousand gold pieces
after writing such an excellent adventure
(‘The Floating City’) in issue 8. If not, I will
personally cut you down with my trusty
sword!
Yours violently,
Thomas Turpin,
Hastings, East Sussex.
���� Derek, could you deal with this one
please?
●●●● What? Sorry, oh marvillus one, I was
just playing a gaym with sum of my fleas. All
yu have to do is take a few fleas, put them in
yor . . .
���� DEREK! Will you answer this letter
please before I make your head and your
bottom swap places!!
●●●● Ooer!! That dusn’t sownd much fun.
Well, Tomas, yu can put yor sord away
becos the Warlok (silly old fool) has asked
Roof Prazy to do us anotha part of her mas-
sive epic adventurr, of wich Flotting City
was only part one. Wotch this space for more
deetales. How wos that, oh Warlok?
���� That was dreadful, Derek. If a job’s
worth doing, never give it to a Troll, as my
dear old mother used to say. Go on, you
pathetic little reptile, get out my sight, while
I answer a few more of these letters.
Dear Warlock,
Do you think that the Grand Wizard
(may his wands never fail and his grimoire
remain sacrosanct!) in all his great wisdom
and benevolence, could have a word with
those slackers in the Bright Ideas Depart-
ment (you know, the ones who play dice
behind the racks of flayed scribes of a work-
day morning) and consider producing some
binders, so that in future I’ve a decent place
to keep my Warlocks?
Thoughtfully yours,
S.U. Macklerm
(alias The Man With Dreadful
Handwriting)
Sneinton, Nottingham.
���� Binders now is it? Are you man-things
never satisfied! Well, your most humble ser-
vant will see what he can do – how many of
you out there want a Warlock binder? I
don’t know – they’ll want a Small Ads page
next!
Dear Warlock,
How about a page for readers to adver-
tise, swap and sell unwanted games, mod-
els, books, etc?
Yours,
Clive The Gangee,
Craggen Rock,
Allansia
���� Ho-hum! Alright, hands up all those
who want binders and a Small Ads page?
Dear Warlock,
Now look ye here Old Warlock! Your
story of gremlins in issue 7 had me in
stitches. Yet after careful inspection of
Steve Jackson’s book Kharé – Cityport of
Traps I found a gremlin hiding in the pic-
tures to references 66 and 122. In fact, I
found him all over the place.
Continuing to search the book, I found
the good saga and scholar at reference 336.
In the picture I found that the top shelf was
hiding some ‘White Dwarf’ magazines, and
on the third shelf down a book about some-
one called ‘Jackson’. This was all very
crafty, but what sage in his right mind would
carry White Dwarf around with him?
The same book had more surprises in
store. This old John Blanche is great with
detail! – at reference 89, I hesitate to think
what the dog is doing at the foot of the
statue! Yours croakingly, Anthony Fenton-Jones Ashlead, Surrey
���� You’re right! Well spotted, young Anthony. Actually, I’ve had lots of letters recently pointing out various secret books and people hidden amongst the illustrations in Fighting Fantasy books. Next issue I’ve decided to give a complete list of all of them – so if you’ve spotted any recently, write in and tell me about them. Anything would be better than getting a letter like this one . . .
Dear Warlock, Did you know that the `Giver of Sleep’ in
The Warlock of Firetop Mountain is of the wrong design. In flight, the head should be horizontal to gain maximum penetration through the rib-cage. In fact the arrow illus-trated should be used for hunting boars and the like, whose rib-cage is vertically con-tracted.
Yours opinionatedly, Guy Berresford, Stafford.
���� There’s no answer to that! And finally, here is an important
announcement. In last issue’s adventure, Fortress Throngard, reference 42 didn’t have an exit! Sorry about that, folks. Of course, if you were psychic you would have known that you should have gone to refer-ence 47. I do hope this little mistake didn’t ruin your enjoyment of the adventure.
If you want to write to the Warlock, could you please also tell me which gamebook you hated the most, and what your favourite article in Warlock is. This is the address to send your letters to:
The Warlock’s Quill, Warlock Magazine, Games Workshop Design Studio, Enfield Chambers, 16–18 Low Pavement, Nottingham NG1 7DL.
Dear Warlock,
Whilst glancing at Warlock 9 the other
day, my attention was drawn to the
Omens & Auguries section, and in par-
ticular the picture on the cover of the new
gamebook, Clive Gifford’s Escape From
Colditz. I was amazed to see that the pic-
tures of the two escapees were copies of
Biggles, from Biggles & The Black Peril
by Captain W.E. Johns (I am sure the all-
knowing Warlock has heard of Biggles).
I enclose two copies of the pictures to
confirm my discovery. Does the intrepid
Biggles fly again in adventure gamebooks?
Yours quizically,
Tony Lansdowne.
���� For this outstanding feat of observa-
tion, Tony wins this issue’s Orb Of Merit,
and copies of the two new Fatemaster
books. Chocks away, Ginger!

12

13

14
ollowing my article in the last issue, the Warlock has commanded that I should reveal more of my guarded secrets treasures of knowledge built up
over millennia of designing, collecting and painting fan-tasy models. No one in their right mind ever argues with the Warlock, so this time I have selected a few choice topics especially for readers interested in modelling techniques and converting metal miniatures.
Firstly, let me kick off by saying that everybody who paints and collects metal miniatures is, to some extent, a modeller. All models require trimming with a sharp knife and/or files, and may need fixing to a base for dis-play. I have heard rumours that there are some sickly, degenerate creatures who buy and paint models, but never bother to trim mould-lines or flash, and refuse stubbornly to undercoat before painting. I cringe to think of the finished result of such uncaring behaviour!
Similarly, I am constantly being told that people aren’t interested in attempting even the most rudimentary of modelling tasks. I don’t believe this for a minute! What happened to the spirit of endeavour that gave us space travel, satellite communications and shrink-wrapped cheese? Every Citadel figure designer started off bend-ing metal arms into new poses, swapping weapons and changing heads – even the experts had to make a begin-ning sometime. Modelling should not be thought of as easy, it does require a degree of talent – but nothing beyond the scope of anyone who already paints. A few tools are essential, but these are inexpensive and easy to obtain. Some readers will already have a selection of tools, but for those new to the hobby I’m going to describe the various items and their use.
Work area
The area you use for painting will also do for modelling. You should find a good solid work surface such as a sturdy tabletop, sit on a comfortable chair, and try to ensure everything is at a comfortable height. Always make sure you have a good layer of newspaper over the surface, with a piece of board or stiff card at hand to use as a cutting-board. Keep the general area as tidy and clean as possible – there is nothing so frustrating as los-ing the model you are working on under a pile of dis-carded chip wrappers and mouldering food. The work area must be well lit: during the daytime it should receive good natural light, and you will need to supple-ment this with a desk type spot light for evening work.
Knife
You will need a good modelling knife – this is your number one essential modelling tool and there is no way of substituting anything else or doing without. It doesn’t matter which of the commercially-available knives you
choose; all do the job equally well. At this point I must stress how important it is to take care with all modelling tools, especially knives. It is easy to cut yourself if you are careless, and for this reason modelling should remain a prerogative of older, more sensible readers. Make all cuts away from your body, always support the item on the table, and never apply too much pressure to the blade or it will snap.
Pliers
A small pair of pliers will enable you to reposition arms or legs, turn heads or make minor adjustments to a figure’s posture. Metal figures are, to some extent, quite bendable, being made from a mixture of lead and tin cal-led ‘white metal’. Pliers are much better than fingers when it comes to bending this material, as you have much finer control and a greater degree of leverage. Ordinary small pliers will do, but those with a long nose are better, as they are specially made for fine work.
To avoid damaging the soft metal, wrap the arm (or whatever) with apiece of tissue. Now grip the limb at the point where you want to move it, and gently bend to the position required. Only practice will tell you exactly how far you can bend the metal before the metal snaps. I’m afraid you must be prepared for the odd mistake, so practice on a few old figures first.
Epoxy glue
Epoxy glue comes in 2 parts, a resin and a hardener, which are mixed together to produce a fast-setting and extremely efficient glue. ‘Araldite Rapide’ is good, but other brands can be used to equal effect. Mix small
F

15
amounts at a time (figures aren’t very big) in accordance with the instructions on the packaging. Tinfoil makes a good disposable tray, and matchsticks are recom-mended for mixing an application.
Glue is very useful stuff-for one thing you can stick back all those arms you’ve broken off by ‘over-bending’ figures with your pliers! Slottabased figures can be attached to their separate base by this glue, and it is the best fixative for all multipart kits. Before gluing two metal surfaces, it is a good idea to roughen them – just cut a few nicks in the metal with your knife. This provides a rough surface for the glue to grip, and makes the bond stronger. Pieces likely to come apart should ideally be ‘pinned’, which I will describe below.
Saw
A small hacksaw enables you to efficiently remove limbs, hands, heads or completely cut a figure in two. Special modellers’ or jewellers’ saws are best, because ordinary hacksaw blades are rather thick and will remove too much metal. Knives shouldn’t be used for heavy work like this as the blades will snap, which is not only expensive but also dangerous. It is important to support the model whilst cutting. Many modellers use a vice, but this is only really necessary for larger models such as dragons or other monsters. If you are going to use a vice, place tissue padding where the vice grips the casting to avoid damaging it. Generally speaking, a firm surface and a steady hand will suffice so long as you take care.
Pin vice
The name of this particular tool has always struck me as somewhat inappropriate in that it is neither a pin nor a vice. In fact it is no more than a small hand drill which is twirled between the fingers to give a drilling action. The bit can be changed and various sizes can be used, a 1mm bit being most suitable for our purposes. A pin vice is not an essential item for basic modelling, but it is one of the most useful things you can buy and I would recommend anyone who is serious about modelling to get one – they are quite cheap and can be had for a little over a pound in most good hobby shops. A pin vice is used, quite sim-ply, to bore holes in metal; a steady hand is needed but the process is easy. So, I hear you ask, who wants to bore a hole in a model? Well, if you are going to swap heads, arms, hands or other major features, you’ll find it is not enough to just glue the new pieces in place. No matter how careful you are, the bit will always drop off sooner or later – unless you ‘pin’ it.
Pinning
Pinning a new head, arm or hand in position will ensure that the new bit stays put. You will need all of the basic modelling tools described above, plus wire (a piece of a pin or paper-clip will do, though copper wire from model
shops is better). If your pliers lack a cutting edge you’ll also need wire cutters.
Let’s imagine that you have a model fighter brandishing a sword, but you want a model with an axe. First you’ll need to find a suitable transplant donor, a model bran-dishing an axe-this might be an old model or another model you are using for ‘spares’. Proceed as follows:
1– Separate the hand from the arm of both models. You might be able to do this with your knife, but if the metal is thick a saw is better.
2– Drill a hole into the arm stump of your fighter and into the hand bearing the axe.
3– Cut a piece of wire of about the length of the drill holes. 3-4mm is usual, but the actual depth of bores will depend on the figure itself.
4– Mix a little epoxy and dab the mixture into the arm hole. Holding the model firmly, press the wire into the hole. Because the metal is soft you should be able to press the wire in quite firmly, where it will hold until the glue is set.
5– Once the glue is set make sure the wire is firm and that the hand will fit comfortably onto it. If the wire is loose re-glue it, if too long shorten it.
6– Mix a little more glue and fix the hand into the desired position, press firmly into place as before, and let the whole thing dry. Excess glue can be trimmed with your knife. The conversion is now complete.
The same techniques are used to swap heads, torsos, complete arms, or to fix on additional items such as backpacks, water-bottles and so on. More ambitious conversions can take the form of creating your own multi-headed, multi-limbed chaos beasts, using bits of old models to make something new and original. If you are very skillful you can even model new heads directly onto the wire pin-but once you can do that you are well on your way to becoming a designer.
Next time I have promised to reveal more of the secrets of fine painting as learned by watching over the shoul-ders of the Citadel mages. However, I would hope to be given the opportunity to disclose more on modelling in a future article, including tips on using modelling putty and making your own monsters and adventurers.

16
EXO-BEAST by Paul Conway
SKILL: 10 STAMINA: 11 Number of Attacks: 2 Habitat: Dungeons, Deserts, Wilderness Number Encountered: 1 to 3 (roll one die and halve the result) Type: Humanoid Reaction: Hostile Intelligence: Average
The Exo-beast is a peculiar being, typically found roaming dark, underground pas-sages, or wandering the fringes of deserts and wilderness in small hunting packs look-ing for prey. Basically humanoid in nature, it derives its peculiar name from the hard, armoured exo-skeleton which covers most of its body. The Exo-beast stands just under two metres in height, and is quite strong and muscular in build. Its left hand is like that of a normal human, but its right is a large, crab-like pincer.
In combat the Exo-beast will usually use this pincer in conjunction with a vicious curved scimitar. If it wins an attack round, roll one die. A 6 indicates that it has grab-bed its opponent with this pincer, crushing for 4 points of damage to the victim’s
S T A M I N A instead of tire usual 2. For this reason, Exo-beast warriors are much feared wherever they are encountered.
It is not known where or how the Exo-beast evolved, but in some scholarly circles it is believed to be the result of some evil sorcer-ous experiment in cross-breeding. Over the centuries many mages aligned to the Forces of Evil have tampered with Nature in attempting to produce the perfect warrior. and it is very possible that one such experi-ment resulted in the creation of a race of Exo-beasts, which appear to possess all the best features of an ore, a crab and a triceratops! It they did indeed come from such a source, the unknown wizard who spawned them did a very good job, for the Exo-beast can live for a very long time. If it doesn’t die in combat, the Exo-beast will live until it is between 60 and 70 years old. All its bodily functions slow down and it enters a short period of hibernation which lasts around ten days, during which time its bony armoured skin cracks, to reveal fresh skin beneath. The Exo-beast rises phoenix-like from its sleep, with its skin pink and raw. This hardens over the next fifteen days, during which time the Exo-beast has S K I L L 7 S T A M I N A 6, until it is as hard as it ever was. An individual Exo-beast can regenerate itself like this up to around a dozen times, giving some creatures a life-span in excess of 800 years!
SNAKESPAWN by P. Chare
SKILL: 10 STAMINA: 18 Number of Attacks: 2 Habitat: Demonic Plane, anywhere their victim is Number Encountered: 1 Type: Demon Reaction: Hostile Intelligence: High
The utterly vile Demon Princes who rule over the Infernal Abyss are a vindictive bunch who rarely fight fair. If one of their more important servants on the Earthly
After last issue’s special deathtest, The Ring of Seven Terrors, we return to our usual format, presenting a selection of new nasties for use with Fighting Fantasy. As always, the creatures we present here can be used in adventures designed for the Fighting Fantasy multi-player game, or substituted for others in the gamebooks you play. Do write and tell us whether you prefer this format, or the more involved monsters – plus-adventure presentation.
All the following creatures are most likely to be found in a dungeon setting, where they can be relied on to present a very tough challenge to even the bravest adven-turers. We start with a rather unpleasant race that seem guaranteed to become a recurring nightmare from now on . . .

17
Plane is unfortunately killed by some brave adventurer out righting wrongs, they don’t just tear up their plans and throw them in file demonic equivalent of a waste-bin. Instead they become violently vengeful, demand that ‘justice’ he done. and send forth a Snakespawn.
These grisly beings are horrific in appear-ance. having a snake’s body and tail, and a four-armed human upper half, and typically carrying at terrifying array of jagged-edged weapons. Unlike most monsters with more than one attack, Snakespawn are actually able to deliver two strikes when fighting a single adventurer, as well as when they are fighting a group of adversaries. In any attack round, their opponent must roll up two Attack Strengths. If he beats one he is able to injure his demonic opponent; if he wins against the other attack he has only held the thing off for another round.
Even worse, Snakespawn have a powerful poisonous sting at the end of their tails, which they will strike if both their attacks get through, causing an extra 3 points of damage unless their opponent can Test their Luck. It a Snakespawn’s physical form is killed on tire Earthly Plane, its spirit will be sent back to the Abyss, front where it can never return.
GREMOLL by Simon New man
SKILL: 8 STAMINA: 6 Habitat: Dungeons, Ruins, Marshes, Wilderness Number Encountered: 1 to 6 Type: Humanoid Reaction: Unfriendly–Hostile Intelligence: High
These nightmarish creatures resemble nothing so much as giant humanoid newts. They are tall and thin, coloured a sickly green all over and standing near to two and a half metres high, but their most noticeable features are their sinister bulbous eyes
which conceal an intelligence well in excess of that of humans. They are not a populous race, and as a result hide themselves away from civilisation in dark and shadowy places, their favourite habitat being semi-stagnant underground rivers. However, they are natural carnivores, and (heir appe-tites sometimes get in the way of their better judgements.
They are not strong creatures, and will not fight it they can help it, but when the feed-ing frenzy hits them they are more likely to make suicidal rushes at potential prey. Nor-mally, however, they prefer to sneak up behind a victim and throttle them with long, clammy fingers, waiting until they are unconscious before dragging them back to their lair to cat. It is a peculiar quirk of these strange creatures that makes them delay eating a meal until they have told it in graphic detail just how it is going to be pre-pared. As a result most of their victims die of fright well before they are sliced and cooked!
SHADOW FIEND by Neil Sylvester
SKILL: 11 STAMINA: 13 Habitat: Dungeons, Ruins, Caves Number Encountered: 1 Type: Undead Reaction: Hostile Intelligence: High
Here comes an adventurer, creeping warily down a dungeon passage, his way lit only by the flickering flame of his lantern. The shadows dance as he treads carefully on; in every corner, it seems, strange beasts are hiding, waiting to strike. He gives a start, perhaps, as his own shadow rears up the wall next to him, before relaxing again, eluding himself for being so nervous. Then the Shadow Fiend strikes!
Rearing up, it strikes for the adventurer’s throat with two dark hands with a touch as cold as midnight. If it makes a hit the Fiend has caught hold, causing two points of dam-age. In every round after this, its victim must win the combat to stop the Fiend from choking away 2 more points. The Fiend’s victim can only dislodge the ghastly thing by winning three rounds in a row. To actually damage a shadow Fiend, an adventurer needs to be free of its clutches, and to pos-sess a magical sword, for these creatures are malevolent undead spirits, not living beings!
DROUG by David Pearson
SKILL: 6 STAMINA: 14 Habitat: Dungeons. Caves Number Encountered: 1 to 2 Type: Insect/humanoid Reaction: Unfriendly–Hostile Intelligence: Average
A Droug is an insect-like humanoid, rather like an elongated, upright beetle. They have two pairs of arms, slurry black armoured bodies, and a stump tail tipped with a nasty poisoned sting. They prefer to live in dark, shadowy places away from civilised parts of the world; their large com-pound eyes cannot adjust to daylight too well, and if encountered in open country they will have a S K I L L of 5. They are ter-rified of naked fire, and they will flee from it 4 times out of 6.
In combat a Droug will attack twice, once with a combined assault front its claw-tip-ped hands, and once using its tail. After a normal attack has been resolved, a six-sided dice must be rolled. On s score of 5 or 6 the Droug will sting its opponent for an extra 2 points of damage. Although they are not clever by human standards, they are shrew-der than their insect forbears, and have learnt to use several good tactics in combat. Their favourite appears to be setting two Droug against a single opponent. On a suc-cessful hit, one Droug grasps hold and pin, their opponent down, while the other strikes at him – hitting automatically. To escape the clutches of the Droug holding him, an adventurer must win a combat round against him – though during this time the other Droug will have hit him for bet-ween 2 and 4 extra points of damage!
Droug share the simple desires common to all semi-intelligent humanoids – staying alive, keeping well-fed and warm and slowly amassing a sizable hoard of pretty shining things. They are not especially soci-able creatures, preferring to live in groups no larger than five or six strong, hiding out in colonies tunnelled into cliff faces, or bur-rows deep below the ground.

18
Brilliant fantasy artist John Blanche shows how the cover of this issue was painted from the winning entry in our ‘Paint The Warlock’ competition, revealing a few of the secrets of painting top-class fantasy art along the way.
At last, it can be announced to the world! The winner of the ‘Paint The Warlock’ competition set in Warlock issue 7 way back in November is Alexis Panayiotou, who lives in East Barnet, Herts. His winning entry was chosen, from amongst the many thousands submitted, at a star-studded gala evening at the War-lock’s lofty citadel sometime around New Year. The panel of judges whose unenviable task it was to choose a winner from such a high-class field included noble Lord Azurr, the tyrant of Blacksand; the very strange Poomchukker all the way from Scorpion Swamp; and – of course – the Warlock himself. Troll- about-town Derek was due to be present, but something he’d eaten the day before had upset him so he couldn’t attend (that’ll teach him to try chewing on a dragon’s hind leg – the burns will hurt for weeks. healers say). After several hundredths of a second of deliberation, the Warlock stood up, said “That’s the one, no doubt about it. Looks just like me when I’m in a good mood! Well done the man-thing that drew it!” and strode from the chamber with an embarrassed look on his face! The picture in question was rushed by the grand old wizard’s personal carrier-vulture to the lofty cave where renowned artist John Blanche lived, together with a scroll commanding that he either turn the picture into a true masterpiece, or that he got turned into the back half of a goat. As you can see by looking at the cover of this issue: John wisely chose the former . . .
Before John talks us through the painting of the Warlock’s por-trait from Alexis’ prize-winning entry to the finished article, we thought you ought to know a little more about him. You will all have seen his masterful covers and interior illustrations for Steve Jackson’s wonderful Sorcery series, but John has many other strings to his bow. He started his career as an illustrator after leaving art college in the mid-1960s, and worked for a number of studios. Going freelance in 1976, he quickly made his name in the publishing field, doing work for Dragon’s Dream, Sphere, Paper Tiger, and many others. His best work from this time includes The Prince and the Woodcutter, and the wonderful Tolkien Bestiary, where he worked alongside other artists including Ian Miller (painter of covers for House of Hell and the revised Citadel of Chaos).
He has been an avid collector and painter of metal miniatures for a long time, earning a considerable reputation in hobby circles for his impressively painted figures. It therefore seemed quite natural for Citadel/Games Workshop to approach him, in 1983, to commission the cover of a new game called Warhammer. His involvement with Citadel grew and grew until it became his full-time job, as John is now the Studio Manager of Warlock’s new
home in Nottingham, where he continues to amaze everyone with his breathtaking artwork. Recent examples of this can be seen on the game Cosmic Encounter; McDeath, the latest Warhammer scenario pack; numerous Citadel figure packages; and the stunning cover for the latest Citadel Journal. He is cur-rently working on covers for the new Fighting Fantasy double adventure pack, The Clash of the Princes, as well as numerous Games Workshop projects.
So much for introductions. Let’s now give John the floor, and let him take us through the painting of – The Warlock!
Initial Thoughts
The starting point for any picture after the initial inspiration (or after receiving a basic brief from someone else) is usually to go and try a few rough sketches. These help you to make sense out
of the ideas whizzing around in your head, and to try a few diffe-rent angles on things until you get something you are vaguely happy with. In the case of this particular painting, however, the initial concepts were all provided for me by Alexis’ winning entry (shown here). This provided me with the unique challenge of working someone else’s fully realised ideas up into a finished,
full-colour portrait.
If you compare Alexis’ original with the finished picture on the cover of this magazine, you should notice that I have changed some of the finer details of the Warlock’s pose and background, though the whole picture is still very recognisable as a develop-ment from the original. Although the pose of the original is very
direct, producing a dramatic impact on the eye of the viewer, I felt the whole composition was a little too spread out. Anyone casually looking at the picture would have his or her eyes drawn from the face, over to the magic staff, across to the flash of magic
The winning entry from Alexis Panayiotou

19
opposite, down to the base where it strikes home, and so on.
There is no single focus to the picture, and as a result it felt to me
like it wanted making more direct.
So, when I put together my first working drawings of the War-
lock, I brought his hands across in front of his body, which
brought the focus back to his face, creating a rather strange
atmosphere as the grimacing sorcerer stares out at you. I also
made him point directly out at you, the viewer, which is another
simple trick for grabbing someone’s attention and focusing it on
the parts I want them to look at. After all, this is the Warlock’s
own magazine – people ought to give him all the attention he
wants!
Once I had roughed out the pose I wanted, the next step was to
prepare a detailed pencil tracing of the figure, adding every
detail of his hair, clothes, and so on. I played around with all of
these, until I was certain that the Warlock was exactly right. This
tracing was then transferred to a professional artist’s line board,
onto which I was going to paint the finished picture.
The Background
Once the outline was down, the next step was to cut a ‘mask’
from plastic film, which was carefully laid over the figure. This
allowed me to paint the background in without covering the
central figure with paint! The background was initially painted
using an air-brush, which is actually nothing more than a sophis-
ticated paint sprayer, delivering a very fine sheen of paint or ink
over the whole picture. I chose a vivid red background, which I
feel contrasts very nicely with the blue and purple which Alexis
had dressed the Warlock in.
I used inks for the main areas of colour, as these give brighter,
more vivid colours. The disadvantage to using them is that they
are translucent (partially see-through) and so they have to be
built up in lots of layers, which can take some time. In the case
of the red background of this particular picture, overall layers of
yellow were sprayed onto the board first, followed by layers of
orange, red and purple, to create the gradually darkening effect.
The glowing rocks around the base of the picture (added by me
because I thought the Warlock ought to be standing on some-
thing!) were put on using acrylic paints. These have recently
become popular for painting miniatures, but there are ideally
suited to highlighting ink washes because they have a very fine
pigmentation (with no ghastly lumps!). Once I was finally satis-
fied with the background, the mask was very carefully peeled off
to reveal the bare white card in the shape of the Warlock
beneath!
The Warlock Revealed!
Now the fun really started in earnest! It is very hard for me to accurately describe a process which has taken the best part of 20 years’ continual practice to achieve, but basically the portrait of
the Warlock was built up using varying layers of ink washes, sub-tle shading, acrylic highlighting and so on (all using only the very best sable brushes, of course). Each individual section of the figure had to be dealt with separately, making this part of the process long-winded and sometimes rather tedious. To achieve the very best results you need great powers of concentration, a
very steady hand, and lots and lots of patience.
After about a day and a half of solid graft, endless mugs of tea and a lot of loud background music to inspire me, the Warlock’s grim visage sat before my very eyes, scowling at me just like the real one does every morning! What a way to spend one’s Bank Holiday Monday, but I think it was definitely worth it! A few
final touches with white ink to super-highlight the swirls of smoke and the flashes of magical lightning, and he was ready for public viewing.
Now it’s finished, and printed up there on the front of this magazine, there’s really only one thing left to do, and that is to say ‘Thank-you’ to young Alexis for providing me with such a
good illustration to work from, and that I you – and Alexis, of course – like it as much as I do.
What do you think of John’s cover, Derek?

20
by Graeme Davis
In Warlock 9, I published some notes on adapting monsters from
other gamebook series to Fighting Fantasy. Here are a few more,
covering some series that I missed out last time.
If you want to convert a Fighting Fantasy monster for use with some
other system, of course, all you have to do is reverse the process
given in the notes. You can even convert between two other sys-
tems simple by converting tram the first system to Fighting Fantasy
and then from Fighting Fantasy to the second system! I’ve used
Fighting Fantasy as the ‘base system’, since it is the most popular
gamebook system, and it also has a set of group adventure rules,
which is what these articles are aimed at – of course, there’s nothing
to stop you using converted monsters in solo adventures you write
yourself (but do remember that if you try to make money out of
them you will be breaking copyright laws).
Cretan Chronicles
This series uses Might and Protection attributes in combat; the first
reflects offensive skill and the second defensive skill. You can get a
usable S K I L L score by averaging the two scores and subtracting 2.
Weapons and armour are also reflected in the Might and Protection
scores – you can take these adjustments out before converting if you
like, but remember that the Fighting Fantasy S K I L L score does
reflect equipment its well as ability.
Finding a S T A M I N A score is a bit more of a problem, as the Cretan
Chronicles system is very different from Fighting Fantasy in this
respect. It’s probably best to derive a S T A M I N A score from the S K I L L
score, using the procedure at the end of this article.
Sagard the Barbarian
This system looks a bit more complicated than Fighting Fantasy but
in fact there are only two statistics, Level and Hit Points, which cor-
respond to S K I L L and S T A M I N A respectively.
Level can be 0–5. It is difficult to get a precise S K I L L score from this,
but the following table will give you something workable:
Level Skill
0 1–3 (roll one die, halve the result)
1 4–6 (as above, then add 3)
2 7–8 (equal chance of either)
3 9
4 10–11 (equal chance of either)
5 12+ (roll one die – on a roll of 6, roll
another die and add 12)
Hit Points can be divided by 2 to give a S T A M I N A score, but in some
cases (especially high-level monsters) you may prefer to take the
Hit Point score as it is – or even add a point or two.
Skyfall
This system has Expertise and Vitality attributes, which are equiva-
lent to S K I L L and S T A M I N A respectively.
The Expertise score can he used as it stands for a Fighting Fantasy
S K I L L score, although this may make some of the monsters a little
too tough. It you think a monster is too powerful, feel free to sub-
tract a point or two.
The Vitality score, too, can be used as it stands to give a S T A M I N A
score.
One feature of the Skyfall system is that damage can vary according
to the monster’s weapon or attack form. A sword does 2 points of
damage, the same as it does in Fighting Fantasy, so you can either
ignore this completely, or you can have each weapon doing the
same damage in FF as it does in Skyfall. Be careful, though – some
monsters can do up to 5 points of damage on a successful hit!
Tolkien Quest
The monsters in this system have three attributes – Offensive Bonus
(OB), Defensive Bonus (DB), and Endurance Points (EP).
OB and DB together serve the same function as S K I L L . To find a
S K I L L score, use (OB + DB) x 2 + 1, subject to a minimum value
of 1 for OB+DB.
EP serve the function of S T A M I N A points, but they tend to vary
more from individual to individual in the Tolkien Quest system.
One way to get a usable S T A M I N A score is to take the average of all
values of EP for a particular type of monster (you can get a quick
index of a monster’s appearances from the MERP Stats Table in the
back of the book) and divide by 3, rounding fractions down. Alterna-
tively, you can derive a S T A M I N A score from the skill score, using
the procedure below.
Deriving a STAM INA score from a SK IL L score
Several systems present problems in calculating S T A M I N A score.
In the notes on Tunnels & Trolls in the last article, I suggested that
the S T A M I N A score will usually be about twice the S K I L L score.
While this is OK for adventurers, it often makes monsters turn out
too powerful. Since I wrote that, I’ve gone over the monsters in Out
of the Pit, and on the basis of that I’ve compiled the following table.
The figure in the Modifier column should be added to the S K I L L
score to give the S T A M I N A score – but don’t be afraid to amend this
further if you’re not satisfied with the results it gives.
Score on Modifier Score on Modifier
2 dice 2 Dice
2 –4 8 +l
3 –3 9 +2
4 –2 10 +3
5–6 –1 II +4
7 0 12 +5
If the S K I L L score is more than 12, you may instead use S K I L L +
Modifier + score on one die = S T A M I N A .

21
Have you ever been to a games convention? If not, read on and we’ll tell you how much fun they are!
Up until recently, there were only two ways you could get to go to a games convention. Either you lived right in the centre of London, or you had the world’s best parents who were so nice they would drive you hundreds of miles just to play a few games! Quite obviously, not all the gamers in the UK live in central London, and surely no-one’s got parents that nice?
Well all that has changed, with the introduction of things called Regional Dragonmeets, which are organised every month in different parts of the country by Games Work-shop. The first one this year was in Manchester in March, and the photos on this page come from the most recent (at the time of writing), which was held in the New Imperial Hotel in Birmingham, on the 5th of April. Other Dragon-meets are set for the 10th of May, in London, and the 8th of June, in Sheffield, with more to be finalised nearer the date.
So what actually happens at these conventions, I hear you ask? Well, quite a lot more than you thought, actually. To start with, there are always a dozen or so trade stands, including the utterly vile Games Workshop Mail Order Trolls, which will satisfy anyone with money burning holes in their chainmail. Many companies use conventions as excuses to give new products a big launch, so you’ll always find a few brand new games making their first appearances at a convention.
Once you’ve spent all your return bus-fare on games and figures you didn’t actually need but thought you ought to have, there are still plenty of things to do. There are demonstration games, where game designers show off their new games, maybe even playtest some which are still being developed. Even better are the participation games, where you can play all those weird rolegames you’ve always wanted to have a go at. There are live role-playing displays, where a bunch of complete and utter loonies dress up as adventurers and monsters and smash the hell out of each other all afternoon.
There are panel discussions and slide shows about figure painting, game design and magazines like Warlock and White Dwarf. Games personalities like Steve Jackson, Ian Livingstone, Rick Priestley and even your humble editor, Marc Gascoigne, are around all day to answer questions or just to chat. Add to this painting competitions, the regular Games Workshop vs. Citadel Miniatures Dragonmeet Quiz, and much, much more, and you’ve got a day full of the best in gaming entertainment.
If there’s a convention in your area, why not pop along and enjoy yourself? Who knows – you may even meet the War-lock himself there!
For more information about Regional Dragonmeets and Games Day see the adverts in Warlock and White Dwarf.

22
The Warlock takes his life in his hands, and goes and gibbers with Joe Dever about his early years, the Lone Wolf saga, and his ghastly revulsion–inspiring alter-ego Judge Death.
Well, sitting around in an opulent throne-room at the top of a gravity-defying tower doing nothing all day can be pretty boring sometimes, can’t it? Occasionally even I feel the need for a bit of inhuman company and a chin-wag. One day recently I was moping around the dun-geons, in a bit of a sulk because I hadn’t turned anyone into anything recently (not even that execrable gout of sputum Thomson – I must be losing my touch), when I suddenly thought of a way of entertaining myself for a few hours. Without a second thought I flapped over to old Judge Death’s hovel on the back of my personal car-rier-vulture for a chat. What a mistake!
How did you first become interested in fantasy gami ng, and how did this interest develop, oh deathless one ?
I think my interest began when I was about seven years old . . .
You mean, you actually had a childhood? You weren’t pulled fully-formed from the spawning vats?
Er . . . yes. Anyway, I was a fan of a comic strip called ‘The Rise and Fall of the Trigan Empire’ which appeared in a magazine called Look & Learn. I remember building armies of Airfix Roman soldiers, and converting their spears into laser rifles, and my friends and I used to fight battles with them and pretend to be characters from the comic strip. This was long before the advent of fantasy games as we know them today.
One Christmas I was given a book called ‘WarGames’ by Donald Featherstone, and our games began to get a bit more sophisticated. We started to use dice in our bat-tles, instead of marbles and tennis balls which we used to throw at the figures.
So to you wargaming was really just an excuse to co m-mit mindless violence upon an army of innocent sol-diers? Perhaps I ought to take it up . . .
In my early teens I used to play wargames most weekends, and I was also a keen fan of Michael Moor-cock’s Hawkmoon novels which were then being pub-lished for the first time, and of course Tolkien’s The Lord of the Rings and The Hobbit, which I was reading at school.
Which writer, do you think, best captures the spiri t of the fantasy you create, and who would you recommend to new players just discovering the hobby?
My work has mostly been influenced by J.R.R. Tolkien, Michael Moorcook and Robert E. Howard. The detail and history of Middle-earth inspired me to create my own world of Magnamund, and the excitement and pace of the Moorcock and Howard novels have certainly influ-enced my approach to writing. I’d strongly recommend their books to anyone who has just discovered role-playing or solo fantasy adventuring.
You always seem to be spouting off about the qualit y of solo adventures these days. What do you consider to be the most important aspect of a good solo adventure?
It’s got to be EXCITING! To my mind, any adventure that lacks excitement isn’t really an adventure at all. Also, I think a good way of judging the merit of any solo gamebook is to see how long the author can maintain the excitement and pace of the adventure. Many are tempted into the trap of pitting the reader against an endless stream of monsters whenever inspiration starts to flag, and slip into what I call the “Open the door, kill the monster, close the door” syndrome. A couple of years ago this might have been acceptable, but person-ally I feel that gamebook fans now want and deserve better than that.
My post-bag is always crammed with letters from rea d-ers complaining about the subject matter of their favourite gamebooks. Of all the major themes – fant asy, science fiction, horror, etc – which do you most en joy?
Fantasy is by far and away my favourite . . . *crunch!* squeal!* . . . Having spent the better part of eight years developing . . . *gnash!*slurp!* . . . the world of Mag-namund, I suppose it’s only natural . . . *mmm!*slob-ber!* . . . that I should find writing fantasy the most com-fortable of all the gamebook themes . . . *aah!*grunt!*
(I feel it necessary to point out here that Joe was a little occupied sucking the innards out of a small furry animal via its ears at this point, so his attention wasn’t really concentrated on his answers. However, l persevered ...)
Do you consider solo adventuring a riskier and more skillful business than group rolegaming? What advan -tages do the two methods of play have over each oth er?
I feel that in many ways the two are comparable. Both rely heavily on the creative skill of the author or Dun-geon Master for the basic challenge of the adventure, yet in both cases the enjoyment derived from the adven-ture is dependent on how well the player interprets information he or she receives. The big advantages of group role-playing are the fun that can be had when players interact during a game, and the greater choice of options available in any given situation. Group games score over solos when players interact during a game, and the greater choice of options available in any given situation. Solos score over group games when it comes to practicality as few of us have the time or opportunity to organise group games at a moment’s notice.
Crikey! There were a few long words in that lot, Jo e; that snack must have really woken you up! Let’s get

23
down to some really in-depth stuff now. . . Many of our more experienced players complain that combat and magic are treated too simply. Do you agree?
I think it boils down to a question of realism versus playability.
What?
Realism versus playability. For example, in a hand-to-hand combat with weapons there are many factors that will determine the final outcome – the strength and dexterity of the combatants, their weapons, their armour, morale, wounds, positions, intelligence, wis-dom, training, encumberment; even the size and time of their last meal could affect their performance . . .
Your last meal has obviously affected your perfor-mance.
The question is where do you draw the line, which fac-tors do you consider and which do you ignore in order to determine a result, bearing in mind that the more factors you decide to keep as essential will slow down the game and reduce its playability? Yet a system that is too sim-ple can be just as dull. Say, for example, you have a sys-tem where the strengths and weaknesses of the fighters are ignored and a result is merely obtained on the toss of a coin or the roll of a dice, you’ll find that all sense of realism is soon lost and combat, which should be an exciting part of the game, becomes boring. A good sys-tem is one that achieves a balance between realism and playability.
Ahh! The old ‘realism versus playability’ ploy agai n, eh? You know, Joe – or may l call you Revolting? – the thing I admire most about gamebook writers is their abili ty to create all kinds of weird and wonderful monsters. D o you have any advice for our contributors to ‘Out of the Pit’?
One method I use to create new creatures is to start with the premise that they are shaped by their environment, that their physical appearance has evolved and changed to enable them to survive in their natural habitat. As much as polar bears would be out of place in the Sahara Desert, so too would a warm-blooded, thick skinned, giant worm in a fantasy ice-land. Then I consider food chains – what does it prey upon, and who or what preys upon it? Then come special abilities and special weak-nesses. By asking yourself questions of this sort you’ll find that you can start to build up a composite picture of a creature that hopefully is not only an original creation, but one that is also believable.
Gazing into your crystal ball for a moment, do you foresee any new developments in the world of gamebooks, or has the hobby reached the limit of it s possibilities?
Not only in the UK, but all over the world, gamebooks have now reached a phenomenal level of popularity, and consequently I feel sure that two things will start to happen. Firstly, all the book publishers who have in the past dismissed gamebooks as a fad, akin to skateboards and deely-bobbers, will now be scrambling to climb aboard the gamebook bandwagon. Secondly, those publishers and writers who have established them-selves at the top of the gamebook hobby will be the first to develop new types of gamebooks and book-format rolegames. This will benefit gamebook fans in two ways: increased competition will raise the standard of traditional format gamebooks giving readers more vari-ety and better value for money, and the gamebook for
mat itself will expand to encompass new developments such as multi-player adventures, books with a boardgame element, historically-based solos, and more sophisticated puzzle books.
As a highly moral, responsible citizen, what do you think of the worries voiced by some parents about t he effects of a number of gamebooks on younger readers ?
I am a parent myself, and I feel it’s only natural that parents should be concerned that the moral and emo-tional well-being of their children is not placed at risk by what they watch on TV, see at the cinema, or read in books. Fortunately, though, it seems that common sense still rules for the vast majority of parents have rec-ognized the positive aspects of fantasy games and books. They encourage literacy, decision-making, deduction and intelligent reasoning, but above all they are a harmless and very enjoyable creative pastime. I think it’s rather sad that some adults have chosen to attack a hobby which, in most cases, they know very lit-tle about.
Now, oh slimy one, be very careful how you answer t his question! What do you think of Warlock magazine?
I think it has steadily improved since Games Workshop took over publication and began covering all aspects of the hobby. One thing I would really like to see is Warlock establishing a yearly award, similar to the White Dwarf/ Games Day Awards, where readers can vote for their favourite books, writers, artists, etc, as I think it will help to foster higher standards within the gamebook frater-nity. There is always room for improvement and if War-lock strives to be impartial, informative and most of all a fun magazine, I feel that it will continue to grow in popu-larity and achieve its aim as the forum for gamebook fans.
Last question, thank goodness. The highly sophisti-cated young people who read Warlock have come to know you as ‘Judge Death’. Is this a gross exaggera tion on the part of that insipid morass of quivering sli me known as Jamie Thomson, or are the rumours about ‘Castle Death’ true?
It all began when Jamie learned from my publisher that I prefer to write at night, that I usually begin at around midnight and work through to dawn. I think it must have given him the wrong impression, for early one morning he arrived unexpectedly at ‘Chez Mort’ (my ancestral home), his porcine body festooned with cloves of garlic. I distinctly remember the wild look in his eyes as through foam-flecked lips he began to rant, “Go back to Transylvania, vile Prince of Darkness!”
I tried to reason with him, but my pleas fell on deaf ears (three of them to be precise, which hadn’t been swept after dinner the night before) and in desperation I was forced to call down a flood of Crypt Spawn to chase him away from the estate. Occasionally he sends wraith-like minions to spy on me while I’m working in my laborat-ory, but ever since that fateful morning I have been spared further visits from ‘The Vile-thong’ himself.
For which you must be truly grateful, I would imagi ne, as are we for being given the opportunity to see ju st what goes on in that brain of yours. Thanks Joe, it was . . . interesting.
Next issue: Your roving reporter, The Warlock, sets a pack of hellhounds on Andrew Chapman and interviews the result. Watch this space for details!

24
Rescued from certain death . . . for a fate worse than death!
Graeme Davis presents a gripping solo adventure for both
Fighting Fantasy and Dungeons & Dragons.
t was a bad idea from the start. Even though you were penniless and starving, you should have known better than to try stealing from a fat merchant. Fat mer-
chants get fat by making very, very sure that no-one gets away with stealing from them. You stand silently in the courtroom, thinking about the injustice of life in general. When you came in from your last adventure laden with gold and gems, you were everybody’s friend. When the money ran out, no-one wanted to know you. Now you’ll either hang or lose your right hand – a death sentence in either case. An adventurer shouldn’t die on the end of a rope or starve as a crippled beggar.
The brooding silence is broken unexpectedly as a thin, robed man with a short, tangled heard rises to his feet in the public gallery. The court stirs in surprise.
‘The court recognises the Guild of Magicians,’ says the magistrate, with a hint of unease in his voice.
‘May it please the court,’ says the wizard in a surpris-ingly powerful voice. ‘The Guild requests the life and per-son of this prisoner.’
Your heart sinks. Just when you thought things couldn’t get any worse. No-one knows what happens to prisoners claimed by the Magicians’ Guild, but you can make a few guesses. They might grind your liver up for one of their potions, or sell your soul to a demon – sud-denly the idea of hanging doesn’t seem so bad.
‘The request is granted,’ intones the magistrate. ‘The prisoner is to be conveyed to the Magicians’ Guild under escort.’ A murmur runs through the court as the guards lead you out . . .
‘Well, you might look a little more cheerful,’ says the wizard when you are delivered to the Guildhouse. ‘I offer you a chance of life.’ He chuckles at your look of suspi-cion, and carries on.
‘Just over a century ago, there was a wizard in this Guild whose name was Galthazzeth. His interest was in making magical crossbreeds, but he went too far and tap-ped the very root of Chaos. He was expelled from the Guild. Now we have discovered that he has occupied an abandoned mine in the edge of the mountains, whore he is breeding an army of his abominations, to conquer the land and avenge himself on the Guild.
‘His lair is well guarded, and none of the wizards sent to deal with him have returned. Perhaps a warrior may have a better chance. Your life is already forfeit, so you have nothing to lose – and a chance to regain life and free-dom. What do you say?’
You eye the wizard with distrust.
‘And if I double-cross you and make a run for it?’ you ask. The wizard laughs, rather unpleasantly.
‘We have ways of tracking people magically,’ he says. ‘And some of our preparations require ingredients, such as human hearts taken still beating from the donor’s body . . .’ His voice trails off significantly.
‘You give me little choice,’ you say. ‘Where is this Galthazzeth?’
‘You will he given full directions,’ smiles the wizard, ‘once you have equipped yourself.’
I

25
INTRODUCTION
This issue’s exciting solo adventure is suitable for use with both the standard Fighting Fantasy rules, and the popular Dungeons & Dragons system. You may play using either set of rules. We have, as usual, included the rudiments of the Fighting Fantasy rules; you will also need 2 ordinary dice, a pencil and an eraser. To play it with the Dungeons & Dragons rules you will require the Basic Set (Set 1), a pencil and an eraser.
USING DUNGEONS & DRAGONS
RULES
If you are using the Dungeons & Dra-gons rules, you should roll up a first or second level Fighter, according to the rules given in the Basic Set. Equip him or her with a sword and a shield (which style you choose is up to you, deter-mined of course by your initial money roll); you also have a back-pack, which holds a small supply of food and drink for your trip. In the text which follows, all special D&D material will be pre-sented thus – D&D: various special rules.
Recovering Hit Points Towards the end of your adventure, as you near your goal, you may find that your Hit Points are falling dangerously low. There are two ways of restoring them.
POTIONS: The kind members of the Magicians’ Guild have given you three doses of a Potion of Healing, which you may take at any time during your adventure to restore 2–7 Hit Points (see p43 of the Dungeon Master’s Manual).
PROVISIONS: The food and drink you have been given is good for five sepa-rate meals. When the text tells you, you may sit and rest, and cat one portion of your Provisions. Eating a meal restores 4 Hit Points. Remember that you have a long way to go, so use your Provisions wisely!
USING FIGHTING FANTASY RULES
Before embarking upon the quest against Galthazzeth, you will need to know more about yourself. You should first of all roll to determine your initial S K I L L , S T A M I N A and L U C K scores. There is an Adventure Sheet here which you can use to record the details of your quest.
SKILL: This reflects your swordsman-ship and general fighting expertise. Roll one die; add 6 to this number and enter the total in the S K I L L box on the Adventure Sheet.
STAMINA: Your general health and fitness, your determination and your will to survive are all reflected in this score. Roll two dice; add 12 to the number rolled and enter this total in the S T A M I N A box.
LUCK: This simply indicates how naturally lucky you are. Luck – and magic – are facts of life in the fantasy kingdoms you are about to explore! Roll one die, then add 6 to this number. This is your L U C K score; you should record it in the appropriate box on the sheet.
As you’ll soon see, your S K I L L , S T A M I N A and L U C K scores will change constantly during an adventure. You should keep accurate record of these scores, and for this reason you are advised to write in the boxes or to keep an eraser handy. However, you must never rub out your Initial scores. You may be awarded additional S K I L L , S T A M I N A or L U C K points, but these must never exceed your Initial scores.

26
You have in your possession a sword and shield, and a back-pack stocked with a few provisions (food and drink) for the trip.
Fighting Battles On Your Quest You will often come across paragraphs which instruct you to fight a creature of some sort. You should resolve the bat-tle in the following way:
First record the creature’s S K I L L and S T A M I N A scores in the first vacant Monster Encounter Box on your Adventure Sheet. The scores for each creature are given each time you have an encounter. The sequence of combat is then: 1. Roll the two dice once for the
creature. Add its S K I L L , score. This total is the creature’s Attack Strength.
2. Roll the two dice once for your-self. Add the number rolled to your current S K I L L score. This total is your Attack Strength.
3. If your Attack Strength is higher than that of the creature, you have wounded it. Go straight on to Step 4. If the creature’s Attack Strength is higher than yours, it has wounded you. Go straight to Step 5. If both scores are the same, you have managed to avoid each others blows – start the next Attack Round by going to Step 1 above.
4. You have wounded the creature; subtract 2 points from its S T A M I N A score. You may use your L U C K here to do additional damage if you wish, as described below. Go on to Step 6.
5. The creature has wounded you; subtract 2 points from your own S T A M I N A score. Again you may use L U C K at this stage.
6. Make the appropriate adjustments to either the creature’s or your own S T A M I N A scores (and maybe your L U C K score too, if you used it).
7. Begin the next Attack Round, by returning to Step 1.
This sequence continues until the S T A M I N A score of either you or the cre-ature you are fighting has been reduced to zero (death).
Fighting More Than One Creature If you come across more than one crea-ture in a particular encounter, the instructions will tell you how to handle the battle. Sometimes you will treat them as a single monster; at other times you may fight each one in turn. You’ll just have to wait and see what happens!
Luck and Its Uses At various times during your adven-ture, either in battles or when you come across situations in which you could be lucky or unlucky (details of these will be given in the encounter itself), you may call on your luck for help to make the outcome more favourable. But beware! Using L U C K is a risky business and if you are unlucky the results could be disastrous.
TESTING YOUR LUCK: Roll two dice. If the number rolled is equal to, or less than, your current L U C K score, you have been lucky and the result will go in your favour. If the number rolled is higher than your current L U C K score, you have been unlucky, and you will be penalised.
Each time you Test your Luck you must subtract one point from your cur-rent L U C K score. Thus you will soon realise that the more you rely on your luck, the more risky this will become.
USING LUCK IN BATTLES: You know now how to Test your Luck. However, in battles you always have the option of using your L U C K either to inflict a more serious wound on a crea-ture you have just hit, or to minimise the effects of a wound the creature has just inflicted on you.
If you have just wounded your oppo-nent, you may Test your Luck as described above. If you are lucky, you have inflicted a severe wound and may take an extra 2 points from the crea-ture’s S T A M I N A score. However, if you are unlucky, the wound was a mere graze and you must restore 1 point to the creature’s S T A M I N A (i.e. instead of scoring 2 points of S T A M I N A damage you do only 1).
If the creature has just wounded you, you may Test your Luck to try and minimise the wound. If you are lucky you have managed to avoid the full damage of the blow. Restore 1 point of the 2 you should have taken. If you are unlucky, you have taken a more serious blow. Subtract 1 extra S T A M I N A point.
Remember that you must subtract 1 point from your own L U C K score each time you Test your Luck.
Restoring Skill, Stamina & Luck SKILL: Your S K I L L score will not change much during your adventure. Occasionally, a location may give instructions to increase or decrease your S K I L L score. A Magic Weapon may increase your S K I L L , but remember that only one weapon can be used at a time! You cannot claim 2 S K I L L bonuses for carrying two Magic Weapons. Your S K I L L score can never exceed its Initial value unless specifi-cally instructed. Drinking the Potion of Skill (see later) will restore your S K I L L to its Initial level.
STAMINA: Your S T A M I N A score will change a lot during your adventure as you fight deadly adversaries and under-take arduous tasks. As you near your goal, your S T A M I N A level may be dangerously low and battles may be particularly risky, so be careful!
Your back-pack contains enough Pro-visions for five meals. You may rest and eat only when the options allow you to, and you may eat only one meal at a time. Eating a meal restores 4 S T A M I N A points. Remember that you have a long way to go, so use your Provisions wisely!
Remember also that your S T A M I N A score may never exceed its Initial value. Drinking the Potion of Strength (see later) will restore your S T A M I N A to its Initial level at any time.
LUCK: Additions to your L U C K score are awarded throughout the adventure when you have been particularly lucky. As with S K I L L and S T A M I N A , Your L U C K score may never exceed its Initial value. Drinking the Potion of Fortune (see below) will restore your L U C K to its Initial level, and increase your Initial L U C K by 1 point.
Magic Potions Before you leave on your quest, the wizard offers you the choice of one of three bottles of magical potion, which he says will aid you in your quest. You may choose to take one of the following potions:
A Potion of Skill – restores S K I L L points. A Potion of Strength – restores S T A M I N A
points. A Potion of Fortune – restores L U C K
points and adds 1 to Initial L U C K score.
The potion may be taken at any time during your adventure; you don’t need
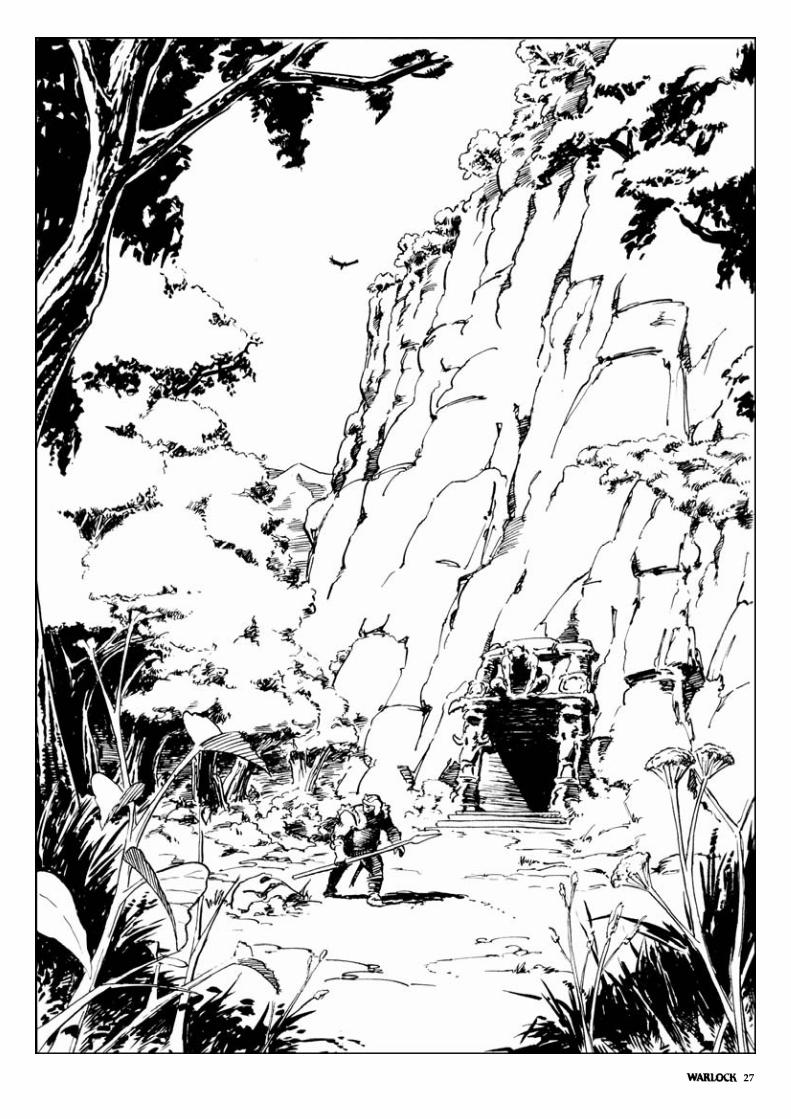
27

28
a special instruction to take it. The drink will restore the appropriate characteristic to its Initial level (and add 1 to it, too, if you take the Potion of Fortune). Each vial of potion holds enough for two measures. In other words, you may restore the same characteristic twice during the adventure.
THE QUEST BEGINS
Now you are equipped and ready for what lies ahead. The wizard walks with you to the gates of the town. He points to the foothills of the mountains, sev-eral days’ walk away, and wishes you good luck. You make a few final adjust-ments to your backpack, set your face in a grim expression, and start walking.
Go to 1.
1 Following the directions you were given by the Magicians’ Guild, you trek too many days through scrubland and then thick forest, until you draw close to the clearing in which the entrance to Galthazzeth’s underground lair can be found. A cliff face rises perhaps 200 feet above the forest, to the first of the plateaus which fringe the mountains. From the edge of the clearing you peer cautiously out at the dark entrance to the mine.
FF: Test your Luck; D&D: Save as if versus Poison.
If you are lucky (i.e. you make it) turn to 194.
If you are unlucky (i.e. you don’t make it) go to 69.
2 You walk cautiously up to the statue. As you approach, you see that its eyes are made of two large rubies which sparkle in the half-light.
If you wish to take the gems, turn to 101.
If you examine the racks of imple-ments, go to 57.
To examine the brazier, turn to 154.
3 You manage to loosen one stone a lit-tle, when suddenly you are struck from behind by a jet of flame – FF: lose 2 S T A M I N A ; D&D: lose 2 Hit Points. You spin around, to see that the brazier has just ignited itself!
If you carry on prising the stones free, go to 109.
If you stop and examine the brazier, go to 48.
4 You have no option but to fight Galth-azzeth. GALTHAZZETH FF: S K I L L 10
S T A M I N A 15 D&D: AC 9, HD 5,
HP 18, Damage 1–4 If the sorcerer wins two consecutive
rounds of combat, go to 28. If you win the battle, turn to 174.
5 Finally the Scitalis dies. Looking around the room, you find that not all the treasure was an illusion – among the bones of past victims you find a jewel-led sword and two gems worth 25 gold pieces each. The sword is magical, adding 1 point to your attack chance in combat (FF and D&D).
There are no other exits, so you must go back down the passage to 42 and choose another route.
6 From your hiding-place, you can hear Galthazzeth shouting orders in a lan-guage that you can’t understand. Even though the spell failed, your attempt to cast it has given your position away. You grip your sword tightly and stand up, backing against the wall as the Antmen and Zombies close in on you. You are heavily outnumbered, and your position looks desperate.
Roll two six-sided dice. If the result is 5 or less, turn to 179. If the result is 6 or more, turn to 39.
7 You follow Galthazzeth as he limps through the doorway into a smaller cavern. This chamber is furnished with more work-benches, arranged round three sides of a large rectangular stone tank. As you enter, the wizard is doing something with the equipment on one of the benches. A blue-green spark leaps from the apparatus to the tank, and the yellow-brown substance in the tank begins to stir.
‘My children will protect me!’ cackles the mad mage, limping out of the chamber down another passage.
Before you can follow him, the sub-stance in the tank rears up almost into a pillar, and shoots out a tentacle at you. CLONE SLIME FF: S K I L L 4
S T A M I N A 30 D&D: AC 8, HD 3
HP 24, Damage 1–3 Resolve three rounds of combat,
then turn to 196.
8 This seems to be some kind of store room. It is littered with all kinds of debris, but it is not occupied.
If you search the debris, turn to 21. If you shut the door and carry on
East round the corner, turn to 42. If you shut the door and go back to
the west, turn to 170.
9 You shout a war-cry and lunge at the spectral figure. Do you have a magic weapon?
If you have, turn to 27. If not, turn to 133.
10 The last few Antmen scuttle away from your sword, chattering agitatedly. You and Galthazzeth are left facing each other across the wreckage. The wizard raises one hand to cast a spell.
If you have a spear or dagger, turn to 148.
If not, turn to 187.
11 You decide to leave it alone, and go out of the room. Go back to 8 and make another choice.
12 You head south along the passage. After a few paces, you come to a door in the east wall. From the door, you can just make out a crossroads further south.
If you open the door, turn to 75. If you carry on to the crossroads,
turn to 112.
13 Your weapon hits Galthazzeth before he can finish casting his spell, and a bolt of blue energy goes crashing harmlessly into the floor. You draw your sword and close with the wizard before he can case another spell.
Turn to 4, deducting FF: 2 points from Galthazzeth’s S T A M I N A ; D&D: 3 from Galthazzeth’s Hit Points.
14 The passage carries on into the dark-ness. After several yards you come to a door in the east wall.
If you open the door, turn to 75.

29
If you continue up the corridor, turn to 198.
If you go back to the crossroads and try another way, turn to 112.
15 The stairs lead down to a short passage, which ends in a wooden door. You open the door, and find yourself in a room. There are two Antmen in the room. You have surprised them, and close with the first before it can use its acid spray. Fight the Antmen one at a time. ANTMAN 1 FF: S K I L L 6
S T A M I N A 8 ANTMAN 2 FF: S K I L L 6
S T A M I N A 7 D&D: AC 7, HD 1,
HP 8, 7, Damage 1–6 If you win, turn to 182.
16 At last the Goblin Shaman dies. A swift search of the body yields a few items of interest – 7 gold pieces, a small leather flask, and a scroll. The flask contains a blue, fizzing liquid which smells vag-uely of fish. There is enough in the flask for two draughts – if you drink the liquid at any time during the adventure, keep a note of where you are and turn to 177 to see what happens. The scroll, to your surprise, is written in the human tongue, and seems to be a spell called ‘Firestorm’. There is nothing else of interest in the room. What will you do now?
Go out through the north door? Turn to 20.
Or you can go back to the crossroads at 112 and choose another direction.
17 As you dodge away from the animated whip, a door flies open. Into the room strides a huge and ugly Goblin wearing tattered ceremonial robes. This must he the Shaman who serves the temple as a priest. It barks a few words in the Goblin tongue, and the whip strikes again. WHIP FF: S K I L L 9
S T A M I N A – D&D: AC 3, HD 2, HP –, Damage 2–5
(hits on it do no damage) Resolve this round of combat, then
turn to 145.
18 The wizard skips away from your sword, and makes a gesture with one hand. Do you have an amethyst amulet?
If you have, turn to 90. If not, turn to 129.
19 The door swings open to reveal a room strewn with rubbish and crude furni-ture. There are three Goblins in the room – one snatches out a sword and charges at you with a barking cry, while the other two jump to their weapons.
If you stay in the doorway, turn to 85.
If you advance into the room, turn to 94.
20 You go through the north door, into a large room. It seems to be some kind to temple – there is a statue of a vicious and powerful-looking Goblin, about two metres tall, at the far end, and in front of the statue is an unlit iron brazier. On either side of the brazier stand racks of whips and knives. There is another door in the south wall of the room.
If you have already defeated the Goblin Shaman, turn to 84.
If not, turn to 2.
21 FF: Test your Luck; D&D: Save as if versus Poison.
If you are lucky, turn to 33. If you are unlucky, turn to 51.
22 You carry on down the tunnel. Galth-azzeth was heading for something important, or perhaps for a way out – and you want to find out what it is. After a little way, you come to a com-plex network of caves and passages, like a maze.
Turn to 110.
23 The amethyst in the amulet glows a bright purple. As the light from the stone falls on the pile of loot, the gold and gems fade away, and you see a large, brightly-coloured snake in their place. You have heard legends of the Scitalis, or Treasure Snake, which uses illusions of treasure to attract victims. The snake doesn’t seem to realise that you have penetrated its illusion – it remains perfectly still, waiting for you
to come closer. If you attack, turn to 122. If you decide to leave it alone, go
back to 42, and choose another route.
24 You find nothing of interest among the debris. Leave the room, go back to 42 and choose another route.
25 You have surprised the Antman, and you close with it before it can use its acid spray. ANTMAN FF: S K I L L 7
S T A M I N A 7 D&D: AC 6, HD 1, HP 7, Damage 1–6
If you win, turn to 62.
26 The Giant Beetle is busy eating, and doesn’t seem to be taking much notice as you warily approach it.
FF: Roll 2 dice; if the result is less than or equal to your S K I L L score, you have wounded it and may remove 2 points from its S T A M I N A ; if not, your sword skids harmlessly off its tough carapace.
D&D: You may have one automa-tic strike at the Giant Beetle, before it drops its meal and defends itself. GIANT BEETLE FF: S K I L L 9
S T A M I N A 16 D&D: AC 3, HD 2,
HP 14, Damage 2–7 If you win, turn to 61.
27 You lash out at the Ghost with your magic sword. Resolve one round of combat. GHOST FF: S K I L L 9
S T A M I N A 8 D&D: AC 7, HD 2,
HP 10, Damage 1–3 If you win the round, go to 67. If the ghost wins the round, turn to
126.
28 Roll one six-sided die.
If the score is 1 or 2 turn to 81. If the score is 3 or 4 turn to 113. If the score is 5 or 6 turn to 18.
29 You wait for a few seconds, then move quietly behind another bench.
FF: Test your Luck; D&D: roll your Dexterity or less on a d20.
If successful, go to 184. If unsuccessful, go to 152.
30 No more slime emerges – you have finally defeated the Clone Slime. You take a lantern from one of the benches

30
and throw it into the tank for good mea-sure. Now to get that wizard!
You run down the tunnel after Galthazzeth; turn to 167.
31 The wizard sees you the instant before you throw your weapon, and makes a pass with one hand. The air in front of him becomes solid, like ice, and your weapon bounces harmlessly off.
Turn to 105.
32 You hit the door with your shoulder. It doesn’t open, but one of its planks whips round and hits you back! FF: Lose 2 S T A M I N A points; D&D: Lose 2 Hit Points. The door is an Imitator, able to take any form it chooses. It flows into a roughly humanoid shape and attacks you. IMITATOR FF: S K I L L 9
S T A M I N A 8 D&D: AC 5, HD 2, HP 9, Damage 1–3
If you win, turn to 121.
33 Amongst the rubbish, you find a beaut-iful amulet of gold, set with amethyst.
If you pick it up, turn to 131. If you leave it alone, turn to 11.
34 ‘Pah!’ spits the Ghost. ‘Just because I’m dead doesn’t mean I’m completely stupid! Do you really expect me to believe that?’ What will you do now?
Attack the Ghost? Turn to 9. Run away? Turn to 170. Or you can go back to 147 and choose
another story.
35 The staircase leads up to a small, empty chamber. There is a door in the north wall, and a passage leads in from the east.
If you go down the passage, turn to 99.
If you open the door, turn to 168.
36 As you come round the corner, you see someone crouching in front of a door a few yards ahead. He seems to be pick-ing the lock, and it looks like he didn’t hear you coming.
If you attack him, turn to 143. If you speak to him, turn to 132. If you keep quiet and watch, turn to
124.
37 The whip drops to the floor as the Gob-lin Shaman dies. A swift search of the body yields a few objects of interest – 7 gold pieces, a small leather flask and a scroll. The flask contains a blue, fizzing liquid which smells vaguely of fish – there is enough for two draughts. If you drink from the flask during the course of the adventure, make a note of your place and turn to 177 to find out what it does. The scroll, to your surprise, seems to be written in a human tongue – it carries the instructions for a spell called ‘Firestorm’. The two gems in the statue’s eyes can now be prised free – they are worth 25 gold pieces each. What will you do now?
Look in the Shaman’s room? Turn to 78.
Or you can go back to the crossroads at 112 and try another direction.
38 As the smoke and dust clear, you can see that the spell has worked. Everywhere there is wrecked equip-ment and dead or dying Antmen. A few Zombies still shuffle about, ignoring the devastation. You climb shakily to your feet – you were never trained in magic and the spell has left you men-tally exhausted. FF: Lose 2 S T A M I N A points, but gain 1 L U C K point for cast-ing the spell successfully; D&D: Lose 1 Hit Point. Galthazzeth clambers from the ruins of a workbench, glowering at you. He raises one hand to cast a spell.
If you have a spear or dagger, turn to 148.
If not, turn to 187.
39 The small crowd of Antmen parts slightly, and four Zombies come lum-bering towards you. Do you have any object inscribed with a G-rune?
If you have, turn to 130. If not, turn to 185.
40 You twist to one side, and the bolt of fire just misses you. You can smell your armour scorching as it grazes our shoul-der, but you are unharmed. You leap upon the Goblin Shaman before it can cast another spell. GOBLIN SHAMAN FF: S K I L L 6
S T A M I N A 6 D&D: AC 6, HD 1, HP 8, Damage 1–4
If the Goblin Shaman wins two con-secutive rounds of combat without your striking a blow, turn to 88.
If you win, turn to 16.
41 Amongst the debris are the remains of several bodies. You manage to find a total of 20 gold pieces. Leave the room, go back to 42 and choose another route.
42 You head east to the corner, and turn north. After a few yards a passage leads off to the east; the northern passage ends in a door after a few yards.
If you head cast along the side-pas-sage, turn to 165.
If you carry on north, turn to 52. Or you can go back to 103 and
choose another way.
43 GOBLIN FF: S K I L L 6
S T A M I N A 6 D&D: AC 7, HD 1, HP 5, Damage 1–3
If you defeat the Goblin, you are able to proceed into the mine. A quick search turns up a spear, a dagger, and a bronze medallion bearing a G-rune. You see with revulsion that the snack you interrupted consists of part of a human arm. You enter the mine.
Turn to 112.
44 Shaking with mental effort, you try to follow the words on the scroll. A strange power begins to well up inside you, but you trip up over a complex set of words and symbols – after all you were not trained as a wizard. The power turns inward, and seems to explode inside your brain. You have lost the spell; roll one six-sided die to find how much S T A M I N A (FF) or Hit Points (D&D) you have lost. If you are still alive, turn to 6.

31
45 You are not quick enough to avoid the energy-bolt. Roll one six-sided die to find how many S T A M I N A points (FF) or Hit Points (D&D) you lose. If you are still alive, turn to 4 and continue the combat.
46 You just manage to dodge the mandi-bles of an immense Giant Beetle. It may have missed you this time, but it’s certainly going to have another try. GIANT BEETLE FF: S K I L L 9
S T A M I N A 16 D&D: AC 3, HD 2,
HP 14, Damage 2–7 If you defeat the Beetle, turn to 61.
47 The door opens onto a passage heading south-west.
If you do down the passage, turn to 108.
If you press on northwards, turn to 83.
48 You look closely at the brazier, but you can’t see anything unusual.
If you carry on prising the gems free, turn to 109.
If you decide to leave them alone, go back to the crossroads at 112 and choose another way.
49 You burst through the door into a small room occupied by two Goblins. They move to attack you with shrill barking cries. GOBLIN 1 FF: S K I L L 5
S T A M I N A 6 GOBLIN 2 FF: S K I L L 5
S T A M I N A 5 D&D: AC 6, HD l,
HP 6, 5, Damage 1–3 Each goblin will have a separate
attack on you in each combat round, but you must choose which of the two you will attack. Attack your chosen goblin as in a normal battle. Throw for your attack against the other goblin as well; if you beat him the Goblin is not wounded, but you have avoided its
attack. Of course, if it hits you, it will have wounded you in the normal way.
If you win, turn to 118.
50 You hit the icy water with a shock, and start to swim to the other side. You have barely swum a couple of strokes when something rises from the water in front of you – a monstrous crossbreed with a human face, the body of an Octopus and two tentacles, each grip-ping a weapon! You must fight the thing, but you must reduce your chance of hitting by 2 points-you are not used to fighting while treading water. MAN-OCTOPUS FF: S K I L L 6
S T A M I N A 7 D&D: AC 7, HD 2, HP 6, Damage 1–3
If you win, you can reach the other side of the gorge and follow Galthaz-zeth down the tunnel – turn to 114.
51 You find nothing of interest or value.
Go back to 8 and make another choice.
52 The passage continues for a short while, before ending in a door.
Do you want to open the door? Turn to 32.
Listen at the door before you open it? Go to 63.
Or you can go back to 42 and choose another option.
53 You warily try the door. It isn’t locked – the bandit must have succeeded in picking it. As you push open the door, a pair of huge chitinous mandibles shoots out at you!
FF: Roll two dice. If the result is less than or equal to your S K I L L score, turn to 46.
D&D: Roll a d20. If it’s less than or equal to your Dexterity score, go to 46.
If you fail to make either roll, go to 164.
54 It seems to be the trigger point for some kind of mechanism, but despite fiddling with it for some time you can’t make it do anything.
Leave the room by heading north to 20.
Or east and returning to the crossroads at 112.
55 You shout a war-cry and leap up spec-tacularly from your hiding place, hop-ing to make the most of the element of surprise.
FF: Roll two dice; if the result is less than or equal to your S K I L L score, turn to 86.
D&D: Roll your Dexterity or less on a d20 to go to 86.
If you fail either roll, go to 195 instead.
56 The spell is too strong for you! FF: Roll one die; if the score is 1–4 lose 1 S K I L L point; if it is 5 or 6, lose 2 S K I L L Points! D&D: Roll a d6; on a 1–4 lose 1 Hit Point; on a 5 or 6 lose 2 Hit Points!
Turn to 4 to continue the combat.
57 You shudder as you gaze at the racks of whips and knives, your mind luridly imagining the obscene sacrifices for which they must have been used. Sud-denly, before your amazed eyes, a whip from one of the racks rises up into the air and begins to strike at you! WHIP FF: S K I L L 9
S T A M I N A – D&D: AC 3, HD 2, HP –, Damage 2–5
(hits on it do no damage) Resolve one round of combat, then
go straight to 145.
58 You look closely at the brazier, and notice with a shudder that at least some of the ashes are of burnt human bones!
FF: Roll your S K I L L or less on two dice to go to 157.
D&D: Roll your Dexterity or less on a d20 to go to 157.
If you fail to make either roll, go instead to 186.
59 You stretch your reflexes to the limit to beat the wizard to the first blow. As your sword strikes home, a bolt of blue energy boils harmlessly into the air – he has lost the spell he was trying to cast!
Turn to 4, deducting FF: 2 points from Galthazzeth’s S T A M I N A ; D&D: 3 from Galthazzeth’s Hit Points.
60 You leap out onto the bridge and charge headlong towards the wizard. He croaks in fear, and limps off down a tunnel on the other side. The ropes of the bridge creak and groan as you tear across, but you make it safely to the other side!
Turn to 114.
61 The monstrous Beetle finally collapses! You catch your breath, clean the vile thing’s green blood from your sword, and quickly search the room. FF: Test your Luck; D&D Save as if versus Poison.

32

33
If you make the roll, go straight to 41. If not, go instead to 24.
62 What will you do?
Listen at the door? Turn to 180. Open the door? Turn to 106. Go back and try the side-passage?
Turn to 198. Go back to the crossroads and try
another way? Turn to 112.
63 You put your car to the door to listen, and you are taken completely by sur-prise when one of the planks of the door whips round and hits you. FF: Lose 2 S T A M I N A points; Mb: Lose 1 Hit Point. The ‘door’ lurches forward, and flows into a roughly humanoid shape to attack you – it is an Imitator, a cunning shape changing monster. IMITATOR FF: S K I L L 9
S T A M I N A 8 D&D: AC 5, HD 2, HP 9, Damage 1–3
If you win, turn to 121.
64 You hear muffled shuffling and scrabbling noises.
Go back to 124 and choose again.
65 The goblins have small change worth 3 gold pieces between them. Each of them is wearing an iron pendant which bears a double-axe symbol, and one has a pair of bone dice.
If you search the room, turn to 181. If you go through the north door,
turn to 20. Or you can go back to the crossroads
at 112 and choose another way.
66 You prop the body against the door and push. The door swings open, but before the body can fall to the floor. It is seized by a huge Giant Beetle and dragged into the room.
It you go into the room and attack the beetle, turn to 26.
Alternatively, go back to 42 and pick another route.
67 The Ghost howls in pain as your magic sword wounds it. FF: Reduce its S T A M I N A score by 2 points; D&D: Lower its Hit Points by 2.
‘No!’ it screams. ‘Stop!’ If you stop, turn to 172. If you press your attack, turn to 192.
68 You follow the map through a winding labyrinth of passages and small caverns. The maze is very complex, and despite the map you find yourself in a
dead end. You groan as you realise that you must have taken a wrong turning somewhere-and now you’re lost!
FF: Test your Luck: D&D: Save as if versus Poison.
If you make it, turn to 193. If you are unlucky, return to the top
of this entry. If your L U C K is 2 or less (FF), or if
you don’t make your saving throw four times (D&D), turn to 160
69 You enter the tunnel cautiously, but a shuffling behind you warns you that you have been spotted. You turn to see a Goblin with a spear charging you – it must have been hiding outside when you came in.
Turn to 43.
70 The passage opens out into a huge rocky chamber, littered with rubble, a broken wooden cart, and other debris. A brief search turns up nothing of interest. There is a door in the north wall.
If you leave through the north door, turn to 103.
Or you can go back to the crossroads at 112 and try another direction.
71 You press one of the Goblins’ pendants into the hollow. The double-axe sym-bol glows briefly, and then a section of the wall wings open!
Turn to 125.
72 After a little way, the passage widens into a room. There is a door in the far wall, but it is guarded by an Antman warrior.
FF: Roll two dice; if the result is less than or equal to your S K I L L score, go to 25.
D&D: Roll your Dexterity or under to go to 25.
If you don’t make either roll, turn to 97.
73 A bolt of fire erupts from the Goblin’s fingertips and streaks across the room at you!
FF: Test your Luck; D&D: roll your Dexterity or less on a d20.
If successful, go to 40. If unsuccessful, go to 169.
74 The maze is very complex, twisting and turning all over the place. Without a map you soon become hopelessly lost.
FF: Test your Luck: D&D: Save as if versus Poison.
If you are successful, turn to 193. If you are not, go to the start of this
entry again. If your L U C K reaches 2 (FF), or if
you fail your saving throw four times (D&D) you must turn to 160.
75 Roll a six-sided dice.
If the result is 1 or 6, the door flies open with a crash – go to 19.
If your score anything else, the door stays firmly shut and you bruise your shoulder – lose 1 S T A M I N A point (FF) or 1 Hit Point (D&D). You can try to open the door again, by returning to the start of this entry; continue up the corridor by turning to 198; or go back to the crossroads at 112.
76 You realise that you are heavily out-numbered, and you stake your life on a desperate gamble. If you can get close enough to Galthazzeth without being noticed, you might be able to kill him and get away in the resulting confusion. You duck behind a pile of crates, hardly daring to breathe. After a few seconds you go from the crates to a bench in a crouching run.
FF: Test your Luck; D&D: Roll your Dexterity or less on a d20.
If you are successful, turn to 29. If you are not, turn to 152.
77 The door opens onto a short passage, from which a spiral staircase leads upwards.
To go up the staircase, turn to 35. Or you can go back to 182 and
choose another option.
78 This small room is littered with gnawed bones – at least some of which are human – and various other pieces of foul-smelling rubbish. There is nothing of interest here – go back to the cross-roads at 112 and choose another way.
34
79 While you were fighting, two more dis-gusting Slime Figures have emerged from the tank. Reduce the Clone Slime’s S T A M I N A by 10 (FF); Hit Points by 8 (D&D). You must fight both figures at once, as you did the last pair. SLIME FIGURE 1 FF: S K I L L 3
S T A M I N A 5 SLIME FIGURE 2 FF: S K I L L 3
S T A M I N A 5 D&D: AC 9, HD 1,
HP 5, 5, Damage 1–2 If you defeat them, turn to 175
80 Finally the Ghost breaks down into a mist and dissipates. You carry on down the passage.
Turn to 199.
81 A bolt of blue energy screams from the wizard’s fingertips, and you throw yourself to one side.
FF: Roll two dice. If the result is equal to your S K I L L score or less, turn to 139.
D&D: Roll a d20. If it is equal or less than your Dexterity, go to 139.
If not, turn to 45.
82 You hit one of the Galthazzeths, and it vanishes-the real one must be some-where else. You lose FF: 2 S T A M I N A points; D&D: 1 Hit Point, as the others hit you. If there is only one Galthazzeth left, turn to 4 and continue the combat. If there is more than one Galthazzeth left, turn to 129 and continue the com-bat.
83 You follow the passage for a long way. After a while, it begins to slope upwards. Finally it turns to the west, and as you turn the corner you see a pale, glowing figure hovering in the passage. It begins to float towards you.
If you attack, turn to 9. If you run away, turn to 170 and
make another choice. If you just slay still, turn to 147.
84 As yon approach the statue, you see that its eves are made of rubies which glint invitingly in the half-light.
If you try to take the gems, turn to 3. If you examine the brazier, turn to
58. Or you can leave and go back to the
crossroads at 112.
85 The first Goblin attacks you. GOBLIN FF: S K I L L 6
S T A M I N A 5 D&D: AC 7, HD 1,
HP 5, Damage 1–4 After the first combat round, the
other Goblins will have armed them-selves, but since you are standing in the doorway they will only be able to attack you one at a time. GOBLIN 2 FF: S K I L L 5
S T A M I N A 6 GOBLIN 3 FF: S K I L L 5
S T A M I N A 5 D&D: AC 7, HD 1,
HP 6, 5, Damage 1–3 each If you kill all three goblins, turn to
155.
86 Galthazzeth’s hand moves even more swiftly than your sword, and your blow glances off an invisible wall of force, leaving the wizard unharmed.
Turn to 105.
87 ‘Liar!’ moans the Ghost. ‘The fiend employs no human servants!’ What will you do now?
Attack the Ghost? Turn to 9.
Run away? Turn to 170. Or you can go back to 147 and try
another story.
88 The Goblin Shaman dodges away from your sword for a few seconds – enough to cast a spell. A bolt of fire streaks towards you.
FF: Test your Luck: D&D: roll a d20 against Your Dexterity.
If you are lucky or make the roll, turn to 40.
If you are unlucky, turn to 169.
89 You look carefully at the brazier, but you can see nothing unusual about it.
If you decide to prise the gems free from the statue, turn to 109.
If you decide to leave them alone, go back to the crossroads at 112 and choose another way.
90 For a brief instant, you see four identi-cal Galthazzeths before you! Then the stones on your amulet glow purple, and as the purple light strikes them, three of the wizards vanish, leaving only one – the real one. Go back to 4 and continue the combat, but note that Galthazzeth will not use this spell again.
91 The door opens onto a large rocky chamber, littered with rubble, a broken cart, and other debris. A brief search turns up nothing of interest. There is an opening in the west wall, leading to a passage west.
If you follow the passage west, turn to 112.
If you leave through the north door and head cast, turn to 42.
If you (cave through the north door and head west, turn to 170.
If you go back into the passage and try the door on the other side, turn to 8.
92 Haste makes your throw go wild, and you can only dodge aside as a bolt of blue energy screams towards you.
FF: Test your Luck: D&D: roll a d20 against your Dexterity.
If you are lucky and make the roll, turn to 139.
It you are unlucky, turn to 45.
93 You try to retrace your route.
FF: roll 2 dice; it the result is less than or equal to your S K I L L score, go to 200.
D&D: Roll a d20; if the result is less than or equal to your Intelligence, go to 200.
If you do not make either roll, turn to 153.
94 The first Goblin engages you while the other two hastily arm themselves with a couple of long and very nasty looking daggers. GOBLIN 1 FF, S K I L L 5
STAMINA 5 D&D: AC7, HD 1, HP 5, Damage 1–3
After one round of combat, the others will be able to attack you too. GOBLIN 2 FF: S K I L L 5
S T A M I N A 5 GOBLIN 3 FF: S K I L L 5
S T A M I N A 4 D&D: AC 7, HD 1,
HP 5, 4, Damage 1–3 each FF: Each Goblin has one attack
against you in each combat round. You must choose which one you are going to fight. Roll for your Attack Strength against the others in the normal way,

35
but when yours is higher they are not wounded – you have just evaded their blows for this round. When a Goblin’s Attack Strength is higher than yours, of course, you are wounded as normal.
If you win, go to 155.
95 You search the room thoroughly, but find nothing beyond an awful lot of dust and insects. You may either leave via the door in the north wall (20), or via the cast wall (return to 112).
96 The chest contains 12 gold pieces, a filthy, foul-smelling package of sack-ing, and a potion in a small vial.
FF: The bottle holds a Potion of Fortune, holding two doses. D&D: The bottle holds two doses of a Potion of Healing.
If you wish to open the package go to 176.
If not, return to 155.
97 The Antman has seen you, and it whips its abdomen to fire a spray of acid at you.
FF: Calculate Attack Strengths as usual – if your Attack Strength is higher, the Amman is not wounded, but you have managed to avoid the acid spray. If the Antman’s Attack Strength is higher, the acid spray has hit you. Test your Luck. If you are lucky, the spray has not hit your eyes, but you must still lose 1 Point of S T A M I N A . If you are unlucky, the spray has hit your eyes – you lose 2 points of S K I L L and 2 points of S T A M I N A . Once you have resolved this attack, you can close with the Antman and carry on with the fight as normal.
D&D: Treat the Antman’s spray as a missile weapon attack, delivered as if by a 2 HD monster. If you are hit by the acid spray, make a saving throw against Breath Weapon. If you fail the saving throw, sonic of the acid has hit your eves: you lose 2 Hit Points and attack at –1 (this will be cured, along with your Hit Point loss, the next time you drink a Potion of Healing). If you make the
saving throw, you still lose 2 Hit Points from acid burns. Once you have resol-ved this attack, you can close with the Antman and carry on with the fight as normal. ANTMAN 1 FF: S K I L L 6
S T A M I N A 8 D&D: AC 6, HD 1, HP 7, Damage 1–4
If you win, go to 62.
98 You jump up from your hiding-place and throw your weapon at Galthaz-zeth.
FF: Roll two dice. If the result is equal to your S K I L L score or less, go to 31. If you fail, go instead to 116.
D&D: Make an attack on Galthaz-zeth as normal. He is AC 9. If you hit him, go to 31. If not, go to 116.
99 The passage leads east for some way, then turns south. After several yards, there is a door in the west wall. You can see that the passage carries on for some way beyond, finally turning east.
If you follow the passage south and east, go to 183.
If you open the door, go to 47. Or you can retrace your steps and go
north – go to 83.
100 You hear nothing. Go back to 182 and
make another choice.
101 You try to prise the two rubies from the statue’s head. Roll one six-sided die.
If the result is 1–3, go to 137. If the result is 4-6, go to 189.
102 You go to take the stone, but before you reach the centre of the chamber you are alerted by a dragging sound behind you. You turn, sword in hand, to face Galthazzeth’s last guardian – and behold a truly sickening sight. The body of a giant slug, fully six feet thick and fifteen long, bears on the front two blubbery. distorted faces, only just rec-ognisable as human. Beneath each face is a thrashing, spike-tipped tentacle, which lashes out at you. SLITHERING FF: S K I L L 10 HORROR (each tentacle)
S T A M I N A 14 Each tentacle/head combination
will have a separate attack on you in each combat round, but you may only attack the thing once. Roll for two Attack Strengths, just as if you were fighting two creatures at once, but remember that if your second Attack Strength is higher than the monster’s second Attack Strength, you have merely evaded its second attack, and not wounded it a second time. It can, of
course, wound you twice in a round if both its Attack Strengths are higher than yours.
D&D: AC 8. HD 3, HP 15, Damage 1–6/1–6 (2 attacks)
If you win, go to 149.
103 You are in an east–west passage.
If you go east, go to 183. If you go west, go to 170. Or you can retrace your steps to the
crossroads at 112.
104 You dive to one side as the brazier erupts in a gout of flame. Roll one six-sided die and halve the result, rounding fractions up – this is the number of FF: S T A M I N A points/D&D: Hit Points that you lose.
Go to 138.
105 Before you can launch another attack, the wizard vanishes, reappearing at the other side of the chamber. The Antmen and Zombies surround you as you back against the wall. You are heavily out-numbered, and your position looks desperate.
Roll two six-sided dice. If the result is 5 or less, go to 179.
If the result is 6 or more, go to 39.
106 The door opens onto a room occupied by a couple of Antmen warriors. They were alerted by the sound of your recent fight, and as you open the door they fire two jets of acid at you.
FF: Calculate Attack Strengths as normal: if your Attack Strength is higher, the Antmen are not wounded, but you have evaded the acid spray. If either of the Antmen rolls a higher Attack Strength than you, you have been hit by a jet of acid. Test your Luck. If you are lucky, you lose 1 S T A M I N A point. If you are unlucky, some of the acid has gone in your eyes – lost 2 S K I L L points and 2 S T A M I N A points. Once you have resolved the acid attack, you can close with the Antmen and fight them normally, one at a time.
D&D: Treat the Antmens’ spray as a single missile attack by a 2HD mons-ter. If you are hit by the spray, make a saving throw against breath weapon. If you fail the saving throw, some of the acid goes in your eyes – you lose 2 Hit Points and attack at –2 (this will be cured, along with any Hit Point loss, the next time you drink a Potion of Heal-ing). If you make the saving throw, you still lose 2 Hit Points from acid burns. Once you have resolved the acid attack, you can close with the Antmen and fight them normally, one at a time. ANTMAN 1 FF: S K I L L 6

36
S T A M I N A 7 ANTMAN 2 FF: S K I L L 6
S T A M I N A 8 D&D: AC 7, HD 1,
HP 8, 7, Damage 1–4 If you win, go to 182.
107 You are a fraction too slow – a bolt of blue energy comes screaming at you when you are just a few feet away from the mage!
FF: Roll two dice. If the result is less than or equal to your S K I L L score, turn to 139; if not go instead to 45.
D&D: Roll a d20. If you score less than or equal to your Dexterity, go to 139; if not, turn to 45 instead.
108 You walk down the passage for a little way before it opens out into a north–south passage.
If you go north along the new pas-sage, turn to 72.
If you go south along this new pas-sage, turn to 12.
Or you can retrace your steps and head north along the other passage – turn to 83.
109 Nothing more happens – the flame must have been a one-shot trap. You prise the stones free with little trouble – they are worth 25 gold pieces each. A quick search convinces you that there is nothing more to be seen here.
Go back to the crossroads at 112 and choose another way.
110 You wander through the maze, trying to keep track of where you are. FF: Test your Luck; D&D: Roll a d20 against your Intelligence.
If you make the roll, turn to 193. If you are unlucky, turn to 74.
111 As you come round the corner, a man leaps out at you. He must have heard you coming. You have no option but to fight him. BANDIT FF: S K I L L 6
S T A M I N A 7 D&D: AC 5, HD 1, HP 7, Damage 1–6
If you win, turn to 162.
112 You arrive at a crossroads. The south-ern passage leads out of the caves, but you have not yet completed your quest and you remember the sinister warning you had from the Guild
If you go north, turn to 14. If you go east, turn to 70. If you go west, turn to 166.
113 Galthazzeth makes a gesture with one hand, and a sickly green glow sur-rounds your head. You grit your teeth and fight with all your willpower as the spell tries to sap your strength.
FF: Roll two dice. If the result is equal to your S K I L L score or less, turn to 190.
D&D: Make a save versus Magic Wand. If you succeed, go to 190.
If you fail either of these rolls, turn to 56.
114 The wizard is not far down the tunnel when you catch up with him. In his pre-sent state, badly wounded and too exhausted to cast spells, he is no match for you, and you kill him easily. (FF: Add 2 L U C K points for finally slaying the mad mage.) Searching his body, you find a scroll, a dagger, and a flask containing one draught of (FF) Potion of Skill/(D&D) Potion of Healing.
If you read the scroll, turn to 188. If not, turn to 22.
115 You hear two voices, talking in the barking, snarling tongue of Goblins.
If you open the door, turn to 49. Alternatively, you can go back to the
crossroads at 112 and try another way.
116 Your throw misses, but Galthazzeth and his minions are now alerted to your presence.
Turn to 105.
117 Make a note of anything you pick up on your record sheet. You can only carry one spear. You may be able to throw a spear or dagger at an opponent before closing for hand-to-hand combat; the text will tell you when you can do this. You may also rest and cat a portion of your provisions here, if you wish.
Turn to 155.
118 What will you do next?
Search the bodies? Turn to 65. Search the room? Turn to 181. Go through the door? Turn to 20. Or you can go back to the crossroads
at 112 and choose another route.
119 You are too heavily outnumbered for a straight fight; you need some way to even the odds. You duck behind a pile of crates, and take the scroll out of your pack. You are no wizard, and the writ-ing on the scroll is complicated, but you start to read it. You hope that the spell will work.
Roll two six-sided dice. It the result is 7 or less, turn to 150 If the result is 8 or more, turn to 44.
120 The ropes of the bridge are beginning to give – you may just be able to get across before the whole thing collapses.
FF: Roll two dice. If the result is equal to your S K I L L score or less, turn to 60.
D&D: Roll a d20. It the score is less than or equal to your Dexterity go to 60.
If you fail either roll, turn to 178.
121 Having killed the Imitator, you can see that the passage stretches further northwards into the distance. As you walk along the passage, you can see that it widens out at the end, and there is a glimmer of light beyond.
Turn to 146.
122 Even though you have seen through its illusion, the Scitalis is a dangerous opponent. If it scores a hit on you, it will wrap a coil around you and crush for (FF) 2 S T A M I N A points of damage/ (D&D) 1–3 damage. If you win the fol-lowing round, you have escaped from the coils, but not wounded the snake. If the snake wins the round, it will con-strict again for 2 S T A M I N A points 1–3 Hit Points. You can only wound the Scitalis by winning a combat round when you are free of its coils. SCITALIS FF: S K I L L 8
S T A M I N A 10 D&D: AC 4, HD 2,
HP 14, Damage 1–3 (see above)
If you win, turn to 5.
123 You follow the passage a little way before coming to a door. You listen at the door, but here nothing, and open the door cautiously. It opens onto another north–south passage.
If you head north along this new pas

37

38
sage, turn to 83. If you head south along this new pas-
sage, turn to 171.
124 The man is so intent on his work that he doesn’t notice you. After a few sec-onds, he stands up and goes through the door, closing it behind him. An instant later, you hear sounds of fight-ing from behind the door, followed by a shattering scream and then silence. What is behind that door?
If you go to see what has happened, turn to 151.
If you listen at the door, turn to 64. Or you can retrace your steps and go
back to 42.
125 You step through the door into a small room. The floor is littered with gnawed bones – some of them human. it seems – and outer foul-smelling rubbish. There is a door in the north wall. You take little interest in this, however, for seated on a crude bunk is a huge and very ugly Goblin clad in tattered cere-monial robes and chewing on what is visibly the remains of a human arm! It leaps to it s feet as you enter, barking a few words in the Goblin tongue.
FF: Roll two dice. If the result is equal to your S K I L L score or less, turn to 197.
D&D: Roll a d20. It you roll less than or equal to your Dexterity, turn to 197.
If you don’t make either roll, turn to 73.
126 Your sword misses the glowing spectral figure, but surprisingly it makes no move to attack you.
‘Stop!’ it moans. If you halt your attack, turn to 172. If you strike again, turn to 192.
127 You follow the map through a labyrinth of passages and caverns. As you twist and turn through the maze, you realise that you would quickly have become lost without the map.
Turn to 193.
128 You are taken completely by surprise as the brazier erupts in a gout of flame. Roll one six-sided die to see how many S T A M I N A points/Hit Points you lose.
If you are still alive, turn to 138.
129 Suddenly, there are four Galthaz-zeths standing before you.
FF: Resolve on e r oun d of com-bat, as if you were fighting a single opponent with a S K I L L score of 10. If you lose, lose 2 S T A M I N A points and
start another round. If you win, Test your Luck.
If you are lucky, turn to 159. If you are unlucky, turn to 82.
D&D: In the next round you are attacked by four Galthazzeths, each with identical characteristics. As soon as you score a hit on one, roll a d4.
On a 1, turn to 159; otherwise go to 82.
130 You prepare to sell your life dearly as the Zombies shamble forward. Sud-denly, they stop in their tracks, wheel round and lurch away from you, push-ing through the chittering crowd of Antmen.
Turn to 179.
131 Make a note of it on your Adventure Sheet.
Go back to 8 and make another choice.
132 As you call to him, the man spins round, whipping out a dagger and throwing it at you in one smooth motion.
FF: His attack strength is 13; gen-erate an attack strength for yourself. If your attack strength is higher, you dodge the dagger successfully, but you do not wound the man. If his attack strength is higher, the dagger hits you and you lose 2 S T A M I N A points.
D&D: The man throws a dagger at you, attacking as a 2HD opponent, for 1–4 damage if it hits. The man charges you with his sword drawn-you have no option but to fight him. BANDIT FF: S K I L L 6
S T A M I N A 7 D&D: AC 5, HD 1, HP 7, Damage 1–6
If you win, turn to 162.
133 Your weapon passes through the ghostly figure as if it were mist. The Ghost laughs in a moaning voice.
‘I’m already dead,’ it howls. ‘How
can you kill me? Put away your weapon.’
If you do as it says, turn to 172. If you run away, go back to 170 and
choose another direction.
134 You hear nothing.
Go back to 183 and make another choice.
135 You try to remember how you got here in the first place.
FF: Test your Luck; D&D: Roll a d20 against your Intelligence.
If you make the roll, turn to 200. If you are unlucky, return to the top
of this entry. If your L U C K is 2 or less (FF), or if
you fail the roll four times, turn to 160.
136 You are in a north–south corridor.
If you go north, turn to 198. If you go south, turn to 112.
137 You manage to loosen one gem a little, but suddenly you are struck across the back-lose 2 S T A M I N A points (FF); 2 Hit Points (D&D).
You turn to see a whip, hovering in mid-air! It strikes at you .again. WHIP FF: S K I L L 9
S T A M I N A – D&D: AC 3, HD 2, HP –, Damage 2–5
(hits on it do no damage) Resolve one round of combat, then
turn to 17.
138 At almost the same moment, the door flies open and into the room strides a huge and ugly Goblin clad in tattered ceremonial robes. This must be the Shaman who serves the temple as a priest. It raises one hand, and before your eyes a whip lifts itself off one of the racks and strikes at you. WHIP FF: S K I L L 9
S T A M I N A – D&D: AC 3, HD 2, HP –, Damage 2–5
(hits on it do no damage) Resolve one round of combat, then
turn to 145.
139 You avoid the worst of the energy-bolt, but it grazes your shoulder as you dive away. Roll one six-sided die.
If the result is 1–4, lose 1 S T A M I N A point (FF)/1 Hit Point (D&D).
If the result is 5-6, lose 2 S T A M I N A points (FF)/2 Hit Points (D&D).
Turn to 4 and continue the combat.

39
140 The sight of the goblin’s grisly delicacy fills you with nausea. For the next battle only, FF: reduce your S K I L L score by one/D&D: fight at –1.
Turn back to 155 and choose again.
141 If you don’t want to face the beetle,
there’s nothing for it but to go back to 42 and try another route.
142 There is more treasure here than you could ever carry, but a pocketful of gems will be enough to make you rich when you gel out of here. You reach forward to pick some up. Suddenly, the pile of treasure rears up and you find yourself wrapped in the coils of a brightly-coloured snake – lose 2 S T A M I N A points (FF); 2 Hit Points (D&D), as it squeezes you. This is the Scitalis or Treasure Snake, which lures prey with a magical illusion of treasure and you are its next victim! SCITALIS FF: S K I L L 8
S T A M I N A 10 D&D: AC 4. HD 2,
HP 14, Damage 1–3 If you win the first round and hit
the snake, the snake is not wounded, but you have escaped front its coils. If you lose, you are still trapped and the snake constricts again for 2 S T A M I N A points/2 Hit Points. You cannot wound the snake unless you are free of its coils.
If you win, turn to 5.
143 Your first attack hits automatically, but then the man wheels round and defends himself. BANDIT FF: S K I L L 6
S T A M I N A 5 D&D: AC 5. HD 1, HP 7, Damage 1–6
If you win, turn to 162.
144 You reach the chamber a second too late, and watch helplessly as the rope bridge crashes down into the water. Galthazzeth limps off down a tunnel, cackling gleefully. The gorge is too wide to jump – the only war across is to jump in, swim the river, and climb the other side. The water looks dark and uninviting, but you grit your teeth and prepare to jump.
Turn to 50.
145 The Whip strikes al you again. If the roll indicates that you have hit it, you have not wounded the Whip – it has simply not hit you. WHIP FF: S K I L L 9
S T A M I N A – D&D: AC 3, HD 2, HP –, Damage 2–5
(hits on it do no damage) Your only chance is to attack the Goblin Shaman. GOBLIN SHAMAN FF: S K I L L 6
S T A M I N A 6 D&D: AC 6, HD 1, HP 8, Damage 1–4
While you are fighting the Goblin Shaman, the Whip will also attack you once per round.
If you win, turn to 37.
146 The passage opens out into a small, unlit room. Your lantern throws mul-ti-coloured reflections onto the walls and ceiling from a huge pile of gold and gems in the middle of the room.
If you have an amethyst amulet, turn to 23.
If not, turn to 156.
147 The Ghost hovers a few feet in front of you. If makes no move to attack.
‘Why are you here?’ it asks in a thin, moaning voice. If you say that you have been sent by
the Magicians’ Guild to kill Galthaz-zeth, turn to 158.
If you say that Galthazzeth hits sent you to check the security of this sec-tion, turn to 87.
If you say that you are a travelling dagger salesman who wandered in out of the rain, turn to 34.
148 You hurl your weapon, praying that it will hit him in time to disrupt his spell-casting.
FF: Roll two dice. If the result is equal to your sK I L L score or less, turn to 13.
D&D: Roll a d20. If you get less than or equal to your Dexterity score, go to 13.
If you fail the roll, turn to 92 instead.
149 The last of Galthazzeth’s abominations lies dead, oozing nasty silvery mucus onto the floor. You pick up the touchstone carefully, and a feeling of warmth and power spreads through you. (FF: Roll one die and add the result to your L U C K score). With the stone in your pack, you set off through the maze.
If you have a map, turn to 93. If not, turn to 135.
150 Almost shaking with concentration, you read the words from the scroll. As you read, you feel it great power well-ing up inside you, until you feel as if you are going to explode. As you reach the last syllable, a great sheet of flame leaps from your hand, and rips through
the cavern laboratory with a deafening thunderclap!
Turn to 38.
151 Through the door is a broad, low room, filled with rotting debris. In the midst of the debris is a Giant Beetle, chewing on the body of the man you saw. It makes no move to attack you, being preoccupied with its meal.
If you attack the Beetle, turn to 26. If you don’t want to attack, turn to 141.
152 You jump as a voice whispers in your ear. ‘I can see you, adventurer!’ it says. You look round, but there is no-one near you. You are about to carry on when Galthazzeth suddenly appears a few feet in front of you. You stand up to attack him, but he vanishes again, and you find yourself surrounded by a chit-tering crowd of Antmen. Sword in hand, you back against the wall . . .
Roll two six-sided dice. If the result is 5 or less, turn to 179. If the result is 6 or more, turn to 39.
153 You follow the maze as best you can, but you must take a wrong turning somewhere, for you find yourself in a dead end.
FF: Test your Luck. If you are lucky go to 200; otherwise go to 135.
D&D: Make a roll against your Intel-ligence on a d20. If you make it, turn to 200; if not, go to 135 instead.
154 You look closely at the brazier, and you notice with a shudder that al least some of the ashes are of human bones.
FF: Roll two dice. If the result is equal to your S K I L L score or less, turn to 104.
D&D: Roll a d20 against your Dexterity. If you succeed go to 104.
If you fail either roll, turn to 128.

40
155 Looking around the room, you see that a small chest lies partly hidden under a bench, and against one wall is a rack holding three spears and two swords.
If you examine the chest, turn to 96. If you pick up any of the spears, turn
to 117. If you leave the room, turn to 136.
156 You stand for a moment, dazzled by the sight of so much treasure. There are no other doors in the room, and no sign of the treasure’s owner.
If you investigate the hoard, turn to 142.
If you ignore it, go back to 42 and choose another way.
157 You dive to one side as the brazier erupts in a gout of flame. Roll one six-sided die and halve the result, rounding tractions up – this is the number of S T A M I N A points (FF)/Hit Points (D&D) you lose.
Turn to 89.
158 ‘Then we are allies,’ moans the Ghost, ‘for Galthazzeth caused my death. If you kill him, my soul will he free to go to its rest. Now listen to what I tell you.’
Turn to 173.
159 Three of the Galthazzeths vanish – you must have hit the real one! (FF: Add 1 L U C K point).
Return to 4 and continue the combat – remembering to reduce his stats by the appropriate amount for his wound.
160 You wander, hopelessly lost, through the maze of caverns and passages, eventually to die a slow and painful death by starvation. You have failed in your mission.
161 The door opens onto an empty room, from which a passage leads south-wards. You can see an opening in the east wall, a door in the east wall beyond the opening, and, at the very limit of your vision, a crossroads.
If you go to the crossroads, turn to 112.
It you go through the opening in the cast wall, turn to 123
If you try to open the door in the east wall, turn to 75.
Or you can go back to 182 and choose another option.
162 The bandit lies dead at your feet. You search the body and discover that he has a sword, two daggers and enough
food for two meals. What will you do now?
Open the door? Turn to 53. Push the bandit’s body through the
door first? Turn to 66. Or you can go back to 42 and choose
another route.
163 You search the room carefully, and find a shallow, carved depression in one wall. Do you have a double-axe pendant?
If you have, turn to 71. If not, turn to 54.
164 The jaws belong to a giant beetle – lose 2 S T A M I N A points (FF)/2 Hit Points (D&D) as they close round you and crush your ribs. The beetle lifts you off your feet, and its jaws continue to crush the life out of you. Roll for one round of combat: GIANT BEETLE FF: S K I L L 9
S T A M I N A 16 D&D: AC 3, HD 2,
HP 14, Damage 2–7 If you win the first round, the bee-
tle is not wounded; you have merely escaped from its jaws. If the beetle wins the round, you are still trapped, and its jaws crush you for another 2 S T A M I N A
points (FF)/another 2 Hit Points (D&D). You must get free from the beetle’s jaws before you can attack it.
If you win, turn to 61.
165 You head east along the passage, which turns north after a few yards.
FF: Test your Luck; if you are lucky, turn to 36. If not, turn to 111.
D&D: Roll a d20. If the score is less than or equal to your Dexterity, turn to 36; if not, turn instead to 111.
166 After a few yards, the passage ends in a door.
If you open the door, turn to 49. If you listen at the door, turn to 115. Or you can go back to the crossroads
at 112 and try another way.
167 You follow the tunnel into a hug, torch-lit cavern. The chamber is divided in two by a shallow gorge, through which runs a dark, sluggish river. The gorge is spanned by a rope bridge, and as you enter you see Galthazzeth on the other side, sawing at the support ropes with his dagger.
FF: Test your Luck: If you are lucky, turn to 120.
D&D: Make a roll against your Dexterity using a d20. If you suc-ceed, turn to 120.
If you fail either roll, turn to 144.
168 You find yourself in a huge cavern, fur-nished with work-benches and arrays of strange apparatus. A number of Antmen are lending the apparatus – they are smaller and paler than those you have met before, and you guess that they must be workers rather than soldiers. As well as the Antmen there are human figures, dressed in rags and shuffling about the cavern fetching and carrying. As one approaches you see that it is a Zombie – perhaps one of the other adventurers the Magicians’ Guild has sent here! There is another human form in the cave – a lean, robed man who goes from bench to bench, super-vising the Antmen. This must by Galthazzeth.
If you have a scroll, turn to 119. If not, turn to 76.
169 You try to dodge the bolt of fire, but you are too slow. Roll one six-sided die to see how many S T A M I N A points/Hit Points you lose. If you are still alive, you must attack the Goblin Shaman before it can cast another spell. GOBLIN SHAMAN FF: SKILL 6
STAMINA 6 D&D: AC 6, HD l, HP 8, Damage 1–4
If the Goblin Shaman wins two con-secutive rounds of combat without, turn to 88.
If you win, turn to 16.
170 You head west along the passage. After a few paces it turns north, and you walk for a long way until you come to a door in the west wall.
If you open the door, turn to 47. If you ignore it and continue north,
turn to 83. Alternatively you can retrace your
steps and head east – turn to 183.
171 You head south along the passage. After a little way, it turns east, and you can see door in either wall. The door in the south wall is closest to you. Beyond the doors, the passage turns north.

41
If you open the south door, turn to 91.
If you open the north door, turn to 8. If you carry on round the corner,
turn to 42.
172 ‘Brave adventurer,’ the Ghost moans, ‘I can guess your mission here. It makes us allies, for Galthazzeth caused my death, and my soul cannot rest while he lives. Now listen to what I say . . .’
Turn to 173.
173 ‘Galthazzeth’s power lies in a touchstone, ’ the Ghost continues. ‘He keeps it at the heart of a maze, guarded by his most terrible creation. The Antmen call this monstrosity The Thing Too Horrible To Mention, but that’s al l I could find out before I was ki lled. You must go through the maze to find the touchstone – Galthazzeth must hate a map of the maze some-where, but I don’t know where. I wish you well, adventurer – may you succeed w here I fai led. ’’
The Ghost fades away before your eves. You thank the gods of chase that coo decided to listen to it. (FF: Add 1 L U C K point).
Turn to 199.
174 You are beginning to wonder whether the wizard will ever die, when he drops to the floor with a groan. You raise your sword to strike the final blow, but he vanishes. You curse and look around the cavern, just in time to see him limping down a passage on the other side. You plunge after him, determined to finish him off.
Turn to 7.
175 Is the Clone Slime still alive?
If it is, it produces two more slime figures – turn to 79 and fight them.
If not, turn to 30.
176 The package contains a rotting and heavily chewed human lower leg, so small that it probably came from a child.
FF: Roll three dice. If the result is equal to your S T A M I N A score or less, turn to 155 and choose another option. If the result is greater than your current S T A M I N A score, turn to 140.
D&D: Make a save versus Poison. If you make it go to 155; if not, turn to 140.
177 Roll two six-sided dice. The result is the number of S T A M I N A points (FF)/Hit Points (D&D) that the potion restores
to you. Note that the potion cannot raise your score above its Initial level. Now turn back to where you were.
178 You leap onto the bridge and charge at the wizard. He scrambles to his feet and limps off down a tunnel. When you are about halfway across, the bridge gives way with a rending crash. You jump clear of the wreckage, into the water below.
Turn to 50.
179 The Antmen click and chitter to each other for a few seconds. They are work-ers – unarmed, and smaller than the soldiers – and they are clearly unsure about taking you On, even though you are heavily outnumbered. While they are indecisive, you seize the initiative, and throw yourself on them with a war-cry. Perhaps you can cut your way out and make a run for it. Fight the massed Antmen as one creature. WORKER FF: SKILL 8 ANTMEN STAMINA 12
D&D: AC 6, HD 2, HP 12, Damage 1–4
If you win, turn to 10.
180 You hear a clicking, cluttering sound from beyond the door.
Go back to 62 and choose again.
181 The room is unfurnished, and feature-less except for a door in the east wall, leading back to the crossroads, and a door in the north wall.
FF: Roll two dice. If the result is less than or equal to your S K I L L , turn to 163; if not, go instead to 95.
D&D: Roll against your Wisdom on a d20. If you make it, go to 163; if not turn to 95.
182 This room is empty. The only feature is a door in the west wall, and another in the south wall.
If you listen at the west door, turn to 100.
If you open the west door, turn to 77. If you search the dead Antmen, turn
to 191. If you leave through the south door,
turn to 161.
183 After a few yards, you come to a door in the north wall of the passage. You can see that a little further on, the pas-sage turns northwards.
If you listen at the door, turn to 134. If you open the door, turn to 8. If you carry on round the corner,
turn to 42. Or you can retrace your steps to 170.
184 You are now almost within reach of Galthazzeth.
If you have a spear or a dagger, turn to 98. If not, turn to 55.
185 FF: Fight the Zombies two at a time. Each Zombie of the pair fighting you will have a separate attack on you in each combat round, but you must decide which of the two you will attack. Attack your chosen Zombie as in a nor-mal battle. Throw for your Attack Strength against the other Zombie as normal. If your Attack Strength is higher, it is not wounded-you will sim-ply have evaded its blow. Of course, if its Attack Strength is higher, it will have wounded you in the normal way. As soon as one Zombie is destroyed, another will step in to take its place, until all four are accounted for.
D&D: The Zombies attack in pairs, with another stepping as the pre-vious one falls. ZOMBIE 1 FF: S K I L L 6
S T A M I N A 7 ZOMBIE 2 FF: S K I L L 6
S T A M I N A 6 ZOMBIE 3 FF: S K I L L 6
S T A M I N A 6 ZOMBIE 4 FF: S K I L L 5
S T A M I N A 7 D&D: AC 8, HD 2,
HP 8, 7, 6, 7, Damage 1–6 each If you win, turn to 179
186 You are taken completely by surprise as the brazier erupts in a gout of flame. Roll one die to find out how many S T A M I N A points (FF)/Hit Points (D&D) you lose. If you are still alive, turn to 89.
187 You charge across the room at Galthaz-zeth, hoping to close with him before he can cast a spell.

42
FF: Roll two dice. If the result is equal to your S K I L L score or less, turn to 59. If not, turn to 107.
D&D: Save versus Magic Wand. If you succeed go to 59, otherwise turn to 107.
188 The scroll is a map, showing the rooms and tunnels of Galthazzeth’s lair – you recognise many of the places that you have visited. According to the map, this tunnel leads to a maze-like network of tunnels and chambers. A central chamber is marked with a red star. You quickly plot a route through the maze, and follow it toward the central chamber.
FF: Roll two dice. If the result is equal to your S K I L L score or less, turn to 127. If not, turn to 68.
D&D: Save versus Intelligence using a d20. If you make it go to 127; if not, go to 68 instead.
189 You manage to loosen one stone a lit-tle, when suddenly you are singed from behind by a jet of flame! Lose 2 S T A M I N A points/2 Hit Points. You turn away from the statue, to discover that the brazier has ignited itself.
Turn to 138.
190 You manage to fight off the effects of the spell.
Turn to 4 and continue the combat.
191 Between them, the Antmen have three small gems worth 10 gold pieces each. Each has a shield, painted with an insect-head design, and apparently made from the carapace of some kind of Beetle. If you don’t already have one a shield will give you extra protection (FF: add 1 S K I L L point; D&D: add 1 to your Armour Class) but if you are car-rying a shield you can’t use a spear.
Decide what you will take, then go back to 182 and choose again.
192 You ignore the Ghost’s words, and raise your sword to strike again.
‘So be it, fool!’ moans the Ghost. Now you must fight to the end. GHOST FF: S K I L L 9
S T A M I N A 8 FF: Every time the Ghost hits you,
roll one die. On a roll of one, the Ghost’s chill touch robs you of one point of S K I L L as well as the usual 2 S T A M I N A .
D&D: AC 4, HD 3, HP 8, Damage 1–4
D&D: Every time the Ghost hits you, make a save versus Poison or lose a further Hit Point.
If you win, turn to 80.
193 Your heart lifts as you stumble into a large chamber lined with white marble. On a pillar in the middle of the chamber stands a clear, multi–faceted stone the size of your fist. It glows with a soft inner light, and instinct tells you that you have discovered the source of Galthazzeth’s power. (FF: Add 2 L U C K
points.) Turn to 102.
194 As you are about to approach the tun-nel, you see a Goblin emerge, armed with a spear. You crouch behind a bush and watch as it looks round a clearing, and then settles on a rock and begins to cat something it takes out of a belt pouch.
You seize the advantage of sur-prise, and attack before it can pick up its spear! Your first attack will hit automatically – turn to 43, and reduce the Goblin’s S T A M I N A /Hit Points by 2 when you get there.
195 Haste makes your blow clumsy, and Galthazzeth side-steps your sword eas-ily.
Turn to 105.
196 While you have been busy with the crude tentacle, the Clone Slime has been working on something a little more complex. Two roughly humanoid figures rise to the surface of the tank, and step out to attack you. You must fight both figures at once.
FF: Each wil l have a separate attack on you in each combat round, but you must choose which of the two you will attack. Fight it as in a normal battle. Throw for your Attack Strength against the other as normal. If your Attack Strength is higher, it is not wounded – you will simply have evaded its blow. Of course, if its Attack Strength is higher, it will have wounded you in the normal way.
D&D: The tw o wil l a t tack together . SLIME FIGURE 1 FF: S K I L L 3
S T A M I N A 5 SLIME FIGURE 2 FF: S K I L L 3
S T A M I N A 5 D&D: AC 9, HD 1, HP 5, 5, Damage 1
Reduce the Clone Sl ime’s S T A M I N A or Hit Points by 10.
If you defeat the Slime Figures, turn to 79.
197 You stride across the room, and man-age to attack the Goblin Shaman before it can cast a spell at you. GOBLIN FF: S K I L L 6 SHAMAN S T A M I N A 6
D&D: AC 6, HD 1, HP 8, Damage 1–4
If the Goblin Shaman wins two con-secutive rounds of combat without your striking it, turn to 88.
If you win, turn to 16.
198 After a few yards, you come to a pas-sage, running off to the north-east.
If you follow the side-passage, turn to 123.
If you ignore it and press on north-wards, turn to 72.
199 The passage carries on westward, and opens out into a small, empty chamber. There is a door in the north wall, and a spiral staircase leads downwards from the middle of the chamber.
If you go down the stairs, turn to 15. If you open the door, turn to 168.
200 At last you find your way out of the maze. The rest of the complex is quiet – Galthazzeth’s surviving minions must have fled when you defeated him. After a long trek, you return to the Magicians’ Guild with Galthazzeth’s touchstone, and tell your story.
‘So, the warrior has conquered where the wizard could not,’ smiles the Guildmaster. ‘Our thanks to you. adventurer – and the thanks of a land which will never know how it was saved!’
You shrug and turn to leave. The old goat has certainly changed his tune since you saw him last. He can keep his thanks – you can’t eat, drink or spend pretty words! Muttering a curse on all magicians under your breath, you walk away from the Guildhouse, towards whatever adventure Fate decides to throw at you next . . .

43
by Jeremy Adamson
One thing that is sadly lacking from Fighting Fantasy is unarmed combat. Imagine, for instance, a ‘bar-room brawl’, where – if a weapon were drawn overly hastily – the room would be suddenly full of warriors bashing the heck out of each other, the town militia would flood in, the characters would be arrested and everyone would be thrown in jail. One recent instance, I thought, was the scenario ‘The Tower Of Hades’ (see Warlock 8), in which there were numerous possibilities for a really good brawl! To combat this (no pun intended) I have devised a simple rule for unarmed combat which doesn’t hinder, but indeed complements the existing rules, which already cover armed combat quite admirably. What you do is this . . .
Firstly, an adventurer must determine his or her Unarmed Combat Factor (or UCF for short). This is achieved by comparing their total S K IL L + S T A MIN A on the table below:
S K I L L +S T A M I N A Unarmed Combat Factor 23 and under 1 24 to 33 2 34 and over 3
Example: Player One’s adventurer, ‘Boris’, has a S K IL L score of 12 and a S T A MIN A score of 23. This gives Boris a total UCF of 3.
Player Two’s adventurer, ‘Arlanthe’, has a S K ILL score of 10 and a S T A MIN A Score of 16, giving Arlanthe a UCF of 2.
Combat is now resolved as normal, rolling for Attack Strengths and comparing them to see who has hit whom. However, when a hit is scored, instead of causing 2 points of damage to the injured person’s S T A MIN A , you simply move to the first box on the following chart, and for each hit you take after that, you move along to the next box.
Unarmed Combat Damage Table
HIT BELT SMASH FALL CONCUSSED
Now your UCF comes into play! After a successful hit has been scored against your opponent, if you have a UCF of 1 you must Test your Skill. Using two dice, you must roll less than or equal to your current S K IL L score. If you succeed, your opponent should tick off a box as usual. If, however, the roll is unsuccessful, you have not delivered the blow with enough force to cause any noticeable damage to your opponent! The fight must continue.
If your UCF is 2, combat is undertaken as already described, with no penalties or benefits.
If your UCF is 3, you should Test your Skill after making a successful strike. If you make the roll, you have delivered an extra strong blow, and your poor opponent must tick off two boxes instead of the usual one. If the roll is unsuccess-ful, he or she need only tick off one box, as normal.
Hit, Belt &Smash: These are simply the progressive stages
of damage which gradually build up to cause some injury to the combatant. They carry no penalties (though there will be some nasty bruises left after this fight – see ‘Long Term Effects’ later). Fall: When Fall is reached, the victim is knocked to the ground, and for the next round only anyone attacking him gets 2 added to their Attack Strength (there is also a +2 to any instances where an opponent must Test their Skill to cause damage against their prone adversary). Next round the victim may Test their Skill again to try and get up again. If they succeed they may fight on; if not, they’ll just have to stay on the floor, and may only defend themselves (i.e. if they win an attack round they only hold off the damage without causing any themselves). Concussed: The victim falls unconscious for 1 to 6 hours (roll one die), and quite obviously they are out of the fight until the awake. They can, however, be revived, by some-one pouring a large bucket of cold water over them or slap-ping them round the face, though they will need to rest for 2 to 12 rounds (roll two dice) before rejoining the combat.
Example of Combat Arlanthe trips over Boris one night in the local alehouse, accuses the gruff barbarian of deliberately trying to trip her up, and attacks him! Their weapons were handed in at the door, so they will have to fight unarmed combat. Arlanthe rolls to attack and scores 17 (7 on the dice plus S K IL L 10). Boris rolls a 15 (3 on the dice plus S K IL L 12), and so Arlanthe has the first blow, knocking the hulking oaf back into some tables, sending mugs flying everywhere. Boris ticks off the Hit box of his Damage Table. Next round, Boris wins the attack, with a massive swipe with his right hand. As he has a UCF of 3, he must Test his Skill. Since his S K ILL is 12, he does so automatically, and batters poor Arlanthe for two hits. She ticks off both the Hit and the Belt boxes of her Damage Table. Battling Boris scores another two blows in quick succession, and Arlanthe is suddenly lying uncon-scious in a pool of beer on the floor! The barman drags her body out of the door and throws her into the street – he doesn’t like troublemakers!
Armour in Unarmed Combat If someone attacks an opponent who is wearing Leather armour, they must reduce their UCF by 1 point, to a minimum of 1. An opponent wearing Metal armour, such as chainmail, can only be hit where he has no armour cover-age. Roll one die for where a blow will fall: 1–Head, 2–Chest, 3–Right Arm, 4–Left Arm, 5–Abdomen, 6–Legs. If the area is armoured, no damage is inflicted and unless the person doing the hitting can Test their Skill they will receive a hit themselves, ticking off the next box on their Damage Table!
Mixed Combat When one side is armed and the other isn’t (even if the former only have broken bottles and chair legs!), Games-Masters should use both combat rules, with the weapons causing normal damage, and the unarmed side only caus-ing damage according to the Unarmed Damage Table. If the situation is such that mixed combat is way beyond a GM’s control, however, I recommend that he simply uses the sys-tem portrayed in Deathtrap Dungeon – simply deduct 4 points from the unarmed side’s Attack Strength, and let them fight as normal.
Long Term Effects Anyone who takes any injury in an unarmed combat, from a Hit to fully Concussed, will have a –1 penalty to their S K IL L score until they are healed (by taking a Potion of Strength or Skill, for example, or by having a good night’s sleep). After the initial concussion period of 1 to 6 hours (or shorter if there is someone to revive the victim), the damage rating should be reduced to Smash, and then every two hours reduces to the next category on the Damage Table, until they are healed.

44

Please mention Warlock when replying to advertisements 45

Please mention Warlock when replying to advertisements 46

Please mention Warlock when replying to advertisements 47

Please mention Warlock when replying to advertisements 48

Please mention Warlock when replying to advertisements 49

Please mention Warlock when replying to advertisements 50