john deere 340 and 440 cyclone snowmobiles operate snowmobile on rivers or lakes with out first...
TRANSCRIPT
John Deere 340 and 440 Cyclone
Snowmobiles
OM-M66771 Issue E6
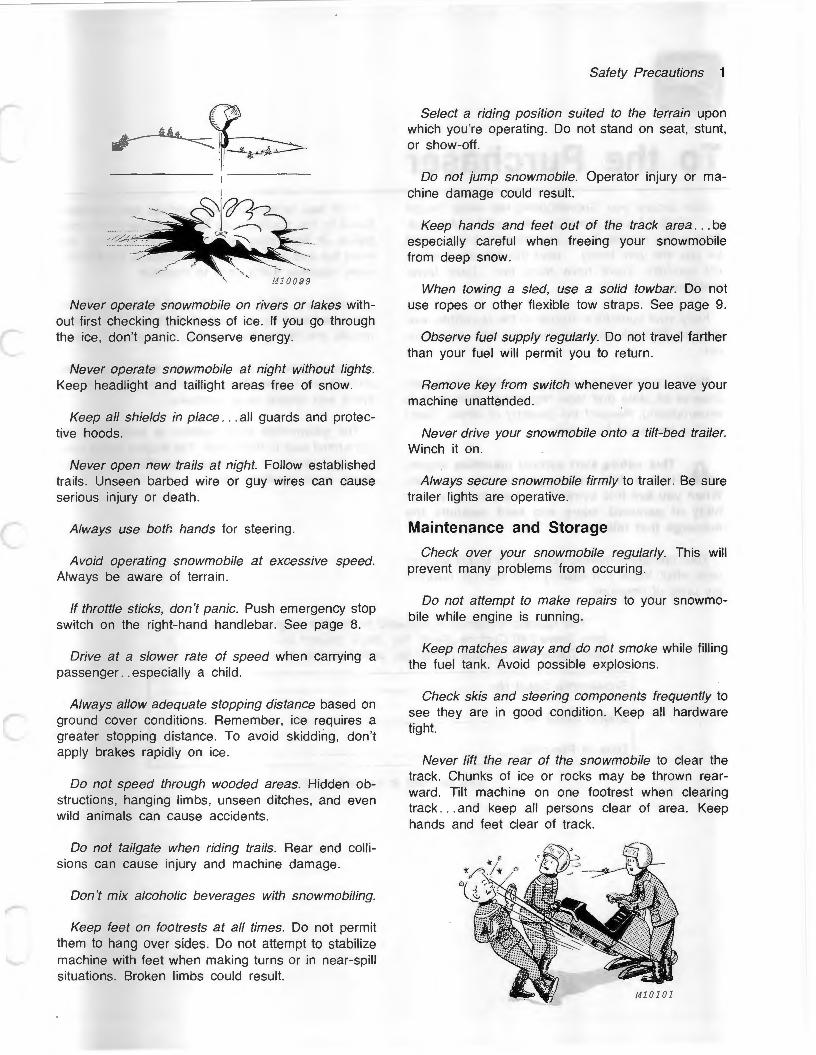
Never operate snowmobile on rivers or lakes without first checking thickness of ice. If you go through the ice, don't panic. Conserve energy.
Never operate snowmobile at night without lights. Keep headlight and taillight areas free of snow.
Keep all shields in place . .. all guards and protective hoods.
Never open new trails at night. Follow established trails. Unseen barbed wire or guy wires can cause serious injury or death.
Always use both hands for steering.
Avoid operating snowmobile at excessive speed. Always be aware of terrain.
If throttle sticks, don 't panic. Push emergency stop switch on the right-hand handlebar. See page 8.
Drive at a slower rate of speed when carrying a passenger .. especially a child .
Always allow adequate stopping distance based on ground cover conditions. Remember, ice requires a greater stopping distance. To avoid skidding, don't apply brakes rapidly on ice.
Do not speed through wooded areas. Hidden obstructions, hanging limbs, unseen ditches, and even wild animals can cause accidents.
Do not tailgate when riding trails. Rear end collisions can cause injury and machine damage.
Don't mix alcoholic beverages with snowmobiling.
Keep feet on footrests at all times. Do not permit them to hang over sides. Do not attempt to stabilize machine with feet when making turns or in near-spill situations. Broken limbs could result.
Safety Precautions 1
Select a riding position suited to the terrain upon which you're operating. Do not stand on seat, stunt, or show-off.
Do not jump snowmobile. Operator injury or machine damage could result.
Keep hands and feet out of the track area . .. be especially careful when freeing your snowmobile from deep snow.
When towing a sled, use a solid towbar. Do not use ropes or other flexible tow straps. See page 9.
Observe fuel supply regularly. Do not travel farther than your fuel will permit you to return.
Remove key from switch whenever you leave your machine unattended.
Never drive your snowmobile onto a tilt-bed trailer. Winch it on.
Always secure snowmobile firmly to trailer. Be sure trailer lights are operative.
Maintenance and Storage
Check over your snowmobile regularly. This will prevent many problems from occuring.
Do not attempt to make repairs to your snowmobile while engine is running.
Keep matches away and do not smoke while filling the fuel tank. Avoid possible explosions.
Check skis and steering components frequently to see they are in good condition. Keep all hardware tight.
Never lift the rear of the snowmobile to clear the track. Chunks of ice or rocks may be thrown rearward. Tilt machine on one footrest when clearing track ... and keep all persons clear of area. Keep hands and feet clear of track.
To the Purchaser Look around you. Snowmobiling has really caught
on . .. it's the fastest growing winter sport in America. Take a few minutes to be sure that it's a safe sport for you and your family ... read this operator's manual carefully. You'll have more fun . .. have fewer problems.
Keep your operator's manual in the re-usable, waterproof Zip-Lock envelope provided with your manual.
Before operating your new snowmobile, check and observe all state and local regulations pertaining to snowmobiling. Respect the property of others. Don't spoil a fine sport for others.
h This safety alert symbol identifies impor.. tant safety messages in this manual.
When you see this symbol, be alert to the possibility of personal injury and read carefully the message that follows.
Your operator's manual contains Sl Metric equivalents which follow immediately after the U.S. customary units of measure.
Your new snowmobile is designed and manufactured to the traditionally high standards of John Deere. It has many quality features to bring you more fun and adventure. It's an efficient, easy-to-operate machine that's easy to maintain.
Right-hand (RH.) and left-hand (L.H.) references are determined by standing at the rear of the snowmobile and facing the direction of forward travel.
When in need of parts or major service, see your John Deere Dealer. Be prepared to provide both machine and engine serial numbers.
The snowmobile serial number is located on the right-hand side of the tunnel. The engine serial number is located on the engine fan housing. Record these serial numbers below .
This operator's manual is prepared for the following snowmobiles: John Deere 340 Cyclone (Serial No. J34FF 070001 M- ) John Deere 440 Cyclone (Serial No. J44FF 070001 M- )
Snowmobile Serial No. ____________ _ ________ _
Engine Serial No. ----------- - ----- - - ----
Date of Purchase -----------------------
(To be filled in by purchaser)
a 3
Contents Page
Safety Precautions . . .. .. . . ... . .. . . . ... . . . .. . . . . ... .. ................. . ...... . . Inside front cover and 1
To the Purchaser . . ... . . . .. .... ... . . . . . . . .... .. ........... . ........ . . . .. . ... .. .. . .. . . . ......... . ... 2
Snowmobile Identification .. ... . . .. .... . . . . . . . . ...... .. ... . . . .. .. . ..... . . . ....... . .... . .. .... . . ...... 4
Controls ................ .. . .. .... .. .. . .. . . ..... .. ... ........... .. ... . . . . . . .. .... ................... 5
Operation .......... . ...... . . . . . . ... . . .. . ..... . ....... ... . .. . . . . ... . .. .. . .. ...... . . . .. . .......... 6- 11
Service Interval Chart ................... . . .. .. ...... .. ..... .. ....... . .. .. .. ... . . . . . ... . ... . . . .... . 12
Maintenance ... ... . . .. .... . . . . . .. . ..... . . . . . . .. . .. . . . ..... .... ..... ... ... . . .. . .. .. ...... .. . .. .. 13-26
Trouble Shooting .... . .. . . . . . .. ... . . .. . . . . . . . . ... . .. . . . . .. . . . . .. . . .... . ... ........... ... . . . . . . .. 27-28
Storage . . . . . . . . . . . . . . . . . . . . . . . . . . . . . . . . . . . . . . . . . . . . . . . . . . . . . . . . . . . . . . . . . . . . . . . . . . . . . . . . . . . . . . . . 29-30
Accessories ......... . . . ... . . .. .. . ... . . .. . . . ..... . . . . . . . . . . . . .. . . .... . . . . . . . . . . .. . . .. ....... . ... 31 -34
Specifications .. . . ... . ...... . . ..... .... .. ... . . ......... . ...... . . .... .... ... . ..... . . . . . . . .. . .. . .. 35-36
A Guide to Safe Snowmobiling .... . . . .. . . .. . . . . ... . . . .... . . . . ... .. . . . .. . . .. . .. . . . .. . . . . ... ... . .. 37-38

Snowmobile Identification
A-Shock Absorbers B-Skis C-Front Bumper
A-Snow Flap B-Rear Bumper C-Stop-Taillight
0-Hood E- Headlight F-Windshield
G-Brake Control H-Seat I - Rear Bumper
John Deere 340 Cyclone Snowmobile (Left Front View)
D-Seat E-Fuel Tank F-Throttle Control
G-Hood H-Ski Handle 1-Ski
John Deere 340 Cyclone Snowmobile (Right Rear View)
J -Hand Grip K-Track L -Pan M-Ski Spring
J -Recoil Start K-Serial Number L-Track
J
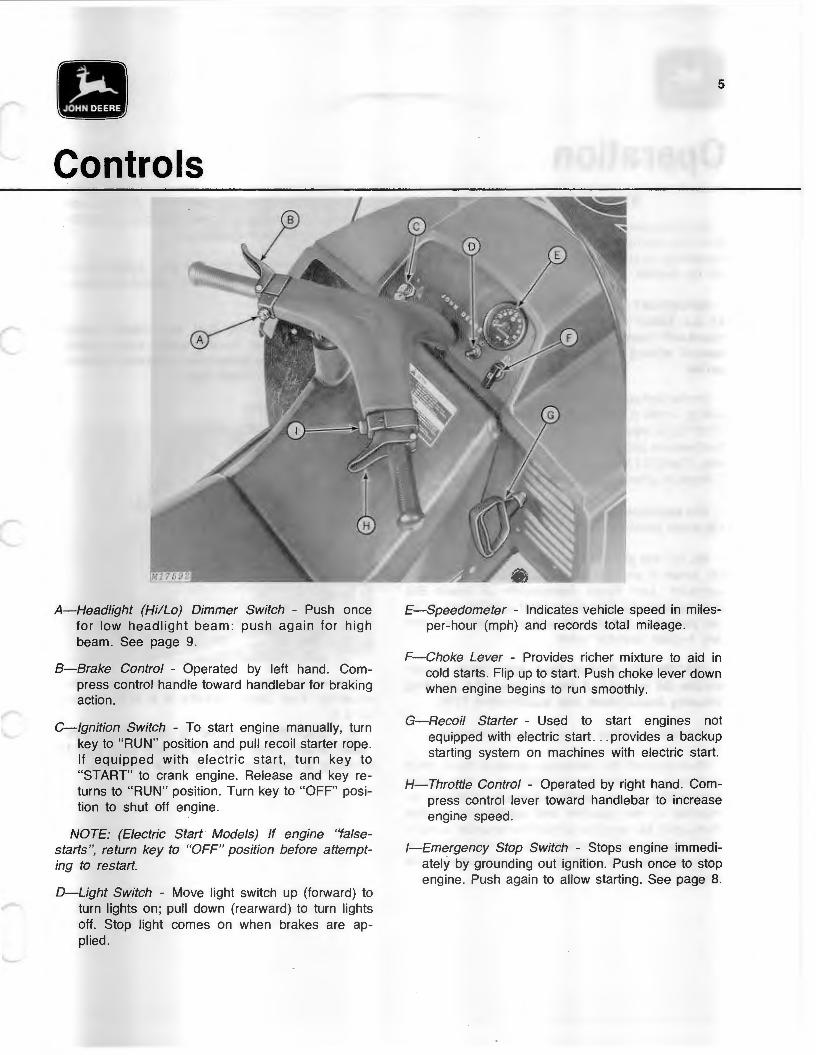
Controls
A-Headlight (Hi/Lo) Dimmer Switch - Push once for low headlight beam: push again for high beam. See page 9.
8-Brake Control - Operated by left hand. Compress control handle toward handlebar for braking action.
C-lgnition Switch - To start engine manually, turn key to " RUN" position and pull recoil starter rope. If equipped with electric start, turn key to "START" to crank engine. Release and key returns to " RUN" position. Turn key to "OFF" position to shut off engine.
NOTE: (Electric Start Models) If engine "falsestarts", return key to "OFF" position before attempting to restart.
O- Ught Switch - Move light switch up (forward) to turn lights on; pull down (rearward) to turn lights off. Stop light comes on when brakes are applied.
5
E- Speedometer - Indicates vehicle speed in milesper-hour (mph) and records total mileage.
F-Choke Lever - Provides richer mixture to aid in cold starts. Flip up to start. Push choke lever down when engine begins to run smoothly.
G- Recoil Starter - Used to start engines not equipped with electric start ... provides a backup starting system on machines with electric start.
H- Throttle Control - Operated by right hand. Compress control lever toward handlebar to increase engine speed.
!-Emergency Stop Switch - Stops engine immediately by grounding out ignition. Push once to stop engine. Push again to allow starting. See page 8.

Operation BREAK-IN PERIOD
Do not exceed 40 mph for the first 25 miles, or force the machine at full throttle in deep snow. An occasional burst of power on hard-packed snow will not be harmful.
IMPORTANT: USE ONLY LEADED GASOLINE AT ALL TIMES with a minimum octane rating of 88, mixed with snowmobile oil in the proper ratio. See special mixing instructions below for break-in period.
For the first tank of fuel used, mix gasoline and oil in a 40 to 1 ratio (1 pint [0.473 I] of oil with 5 U.S. gallons [18.9 I] or 4 Imperial gallons [18.2 1] of gasoline). After this break-in period, mix gasoline and oil in a 50 to 1 ratio (1 pint [0.4731] of oil with 6 U.S. gallons [22.71] Or 5 Imperial gallons [22.7 I] of gasoline.
See specifications on page 36 for United States and Canadian gasoline and oil mixtures.
NOTE: Mix gasoline with John Deere Snowmobile Oil, which is an ashless, 2-cycle oil without metallic additives. John Deere Snowmobile Oil meets BIA (Boating Industry Association) test qualification TCW, test procedure BIA-312-69, and is available in 1-pint and 1-quart "pop-top" cans.
IMPORT ANT: If other than John Deere Snowmobile Oil is used, it should meet BIA (Boating Industry Association) test qualification TCW.
Mix fuel according to the following procedure:
Pour one-half the necessary gasoline into a clean container ... add the required amount of John Deere snowmobile oil and shake vigorously. Add the remainder of the gasoline and agitate the mixture thoroughly. Mix gasoline and oil in a separate container . . . never mix in the snowmobile fuel tank. The John Deere Gasoline Can (TY5027} is ideal for snowmobile use.
Thorough mixing is improved if the oil is at room temperature. Warming is recommended for all oils that do not have the John Deere label.
Gasoline and oil mix that has been stored for any extended length of time (1 week) should be agitated thoroughly.
A CAUTION: Dirty fuel can cause engine failure that could leave you strand
ed . .. this could be dangerous in severe weather. Always use clean, fresh fuel.
Filling Fuel Tank
/
Remove fuel cap. Use a fine screen funnel when refueling . Fuel tank capacity is 8 U.S . gallons (30.3 1).
A CAUTION: Gasoline is dangerous, even when mixed with oil. Avoid fires due to
smoking or careless maintenance practices.
--
Pre-Starting Inspection
.h. CAUTION: Before starting your snow,mo.. bile the first time, read this entire manual
and all decals on your snowmobile. Each time, thereafter, do the following:
1. Wipe the windshield with a clean, damp cloth. Do not scratch it. Do not clean windshield with gasoline, solvents or abrasive cleaners.
2. Check skis, wear rods and all steering components and bolts for wear. Tighten all bolts and replace worn or damaged parts. Check steering for a full righthand and a full left-hand turn.
3. Check track for proper tension.
4. Check throttle and brake controls for freeness of operation and proper adjustment. Be sure the throttle is not "frozen" or "iced" up.
5. Check fuel level. Be sure fuel shut-off valve is open.
6. Start engine and test operation of emergency stop switch, key switch, headlight, dimmer switch, taillight and stop-light.
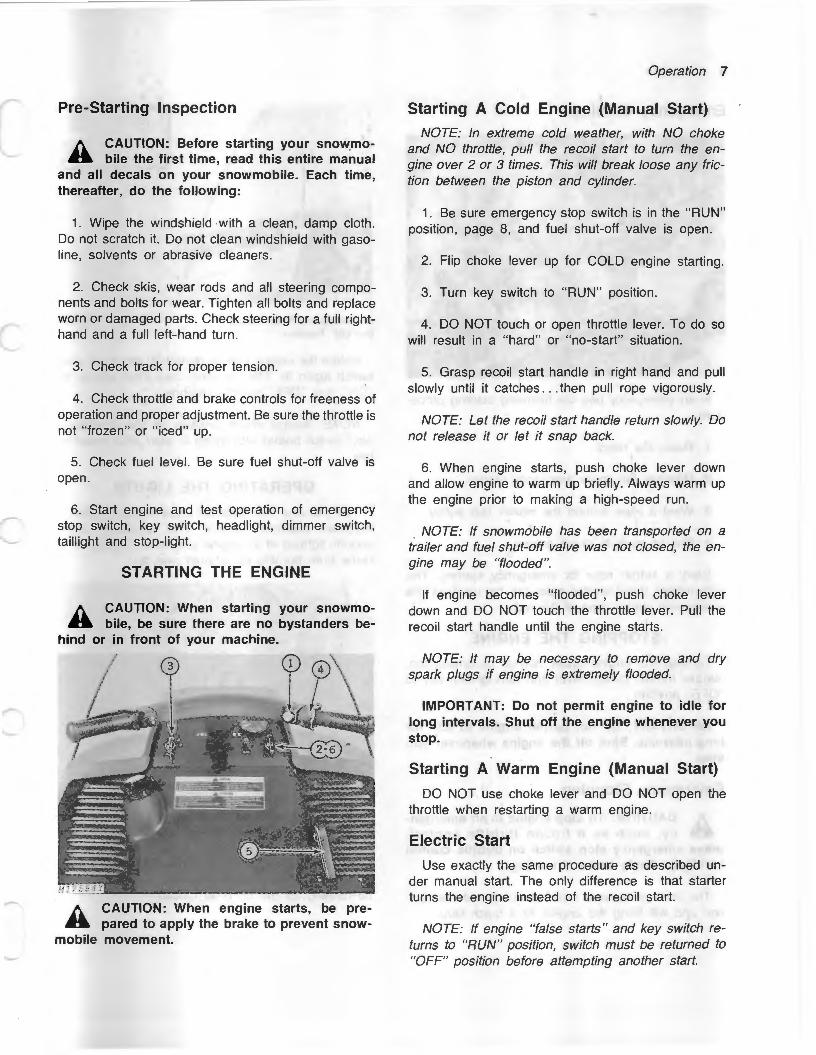
STARTING THE ENGINE
.h. CAUTION: When starting your snowmo.. bile, be sure there are no bystanders be
hind or in front of your machine.
.h. CAUTION: When engine starts, be pre.. pared to apply the brake to prevent snow
mobile movement.
•
Operation 7
Starting A Cold Engine (Manual Start)
NOTE: In extreme cold weather, with NO choke and NO throttle, pull the recoil start to turn the engine over 2 or 3 times. This will break loose any friction between the piston and cylinder.
1. Be sure emergency stop switch is in the " RUN" position, page 8, and fuel shut-off valve is open.
2. Flip choke lever up for COLD engine starting.
3. Turn key switch to " RUN" position.
4. DO NOT touch or open throttle lever. To do so will result in a "hard" or "no-start" situation.
5. Grasp recoil start handle in right hand and pull slowly until it catches ... then pull rope vigorously.
NOTE: Let the recoil start handle return slowly. Do not release it or let it snap back.
6. When engine starts, push choke lever down and allow engine to warm up briefly. Always warm up the engine prior to making a high-speed run.
NOTE: If snowmobile has been transported on a trailer and fuel shut-off valve was not closed, the engine may be "flooded".
If engine becomes "flooded", push choke lever down and DO NOT touch the throttle lever. Pull the recoil start handle until the engine starts.
NOTE: It may be necessary to remove and dry spark plugs if engine is extremely flooded.
IMPORTANT: Do not permit engine to idle for long intervals. Shut off the engine whenever you stop.
Starting A Warm Engine (Manual Start)
DO NOT use choke lever and DO NOT open the throttle when restarting a warm engine.
Electric Start
Use exactly the same procedure as described under manual start. The only difference is that starter turns the engine instead of the recoil start.
NOTE: If engine "false starts" and key switch returns to "RUN" position, switch must be returned to "OFF" position before attempting another start.
8 Operation
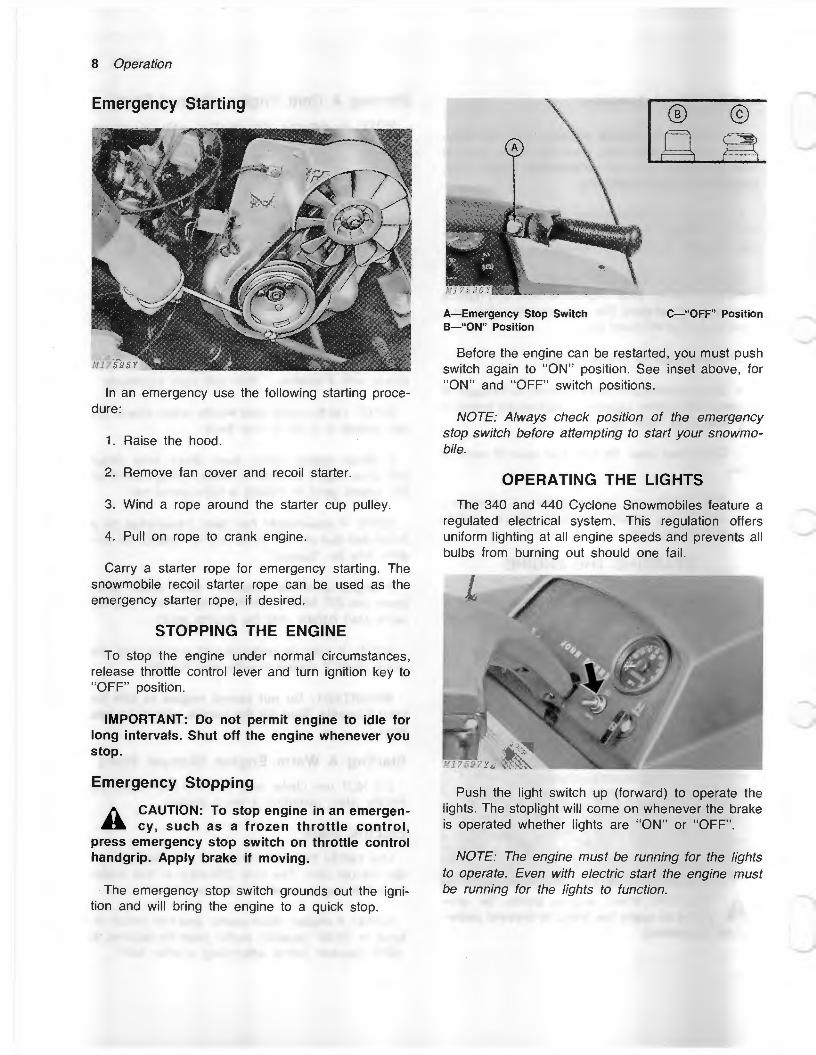
Emergency Starting
In an emergency use the following starting procedure:
1. Raise the hood.
2. Remove fan cover and recoil starter.
3. Wind a rope around the starter cup pulley.
4. Pull on rope to crank engine.
Carry a starter rope for emergency starting. The snowmobile recoil starter rope can be used as the emergency starter rope, if desired.
StOPPING THE ENGINE
To stop the engine under normal circumstances, release throttle control lever and turn ignition key to "OFF" position.
IMPORTANT: Do not permit engine to idle for long intervals. Shut off the engine whenever you stop.
Emergency Stopping
/). CAUTION: To stop engine in an emergen.. cy, such as a frozen throttle control,
press emergency stop switch on throttle control handgrip. Apply brake if moving.
The emergency stop switch grounds out the ignition and will bring the engine to a quick stop.
® ©
A-Emergency Stop Switch 8-"0N" Position
C-"OFF" Position
Before the engine can be restarted, you must push switch again to "ON" position. See inset above, for "ON" and "OFF" switch positions.
NOTE: Always check position of the emergency stop switch before attempting to start your snowmobile.
OPERATING THE LIGHTS
The 340 and 440 Cyclone Snowmobiles feature a regulated electrical system. This regulation offers uniform lighting at all engine speeds and prevents all bulbs from burning out should one fail.
Push the light switch up (forward) to operate the lights. The stoplight will come on whenever the brake is operated whether lights are "ON" or "OFF" .
NOTE: The engine must be running for the lights to operate. Even with electric start the engine must be running for the lights to function.
--
--
Dimming Headlight
M1?598 Y
A-Headlight Dimmer Switch 8-High Beam Position
C-Low Beam Position
The headlight bulb has twin filaments for high or low beam operation.
Push the dimmer switch, mounted on the brake control handgrip, to the low beam position (see inset) to obtain a low headlight beam. Push the switch again to obtain high beam. Low beam should be used as in your automobile when meeting other vehicles.
If one filament of your headlight bulb should fail, the other beam can still be used. Change bulb as soon as possible for most efficient lighting and safety.
See pages 23 and 24 for information on changing headlight bulb , as well as bulbs in the taillight, speedometer and tachometer. Headlight aiming is also explained.
TOWING
Don't try to haul all the equipment necessary for long trips on your snowmobile. Pack it in a sled. The sled is also ideal for giving young children a safe ride.
A CAUTION: Always use a solid towbar. Flexible ropes or pull straps offer less
control on turns and could result in tailgate collisions when stopping. Use a safe, secure tow-pin.
If it becomes necessary to tow a disabled snowmobile, tie the disabled machine's skis securely to the hitch of the tow machine. DO NOT use the rear bumper for towing.
IMPORTANT: Always remove the drive belt from a disabled snowmobile before towing.
Operation 9
OPERATING THE SNOWMOBILE
The 340 and 440 Cyclone Snowmobiles are very easy to operate .. . only three controls are necessary; the handlebars for steering, the throttle for changing speed, and the brake for slowing or stopping.
Remember, your snowmobile was designed to operate in snow. Operating on bare ground will cause rapid wear of track, suspension, skis and wear rods. Even the engine will wear rapidly when operated under dusty conditions.
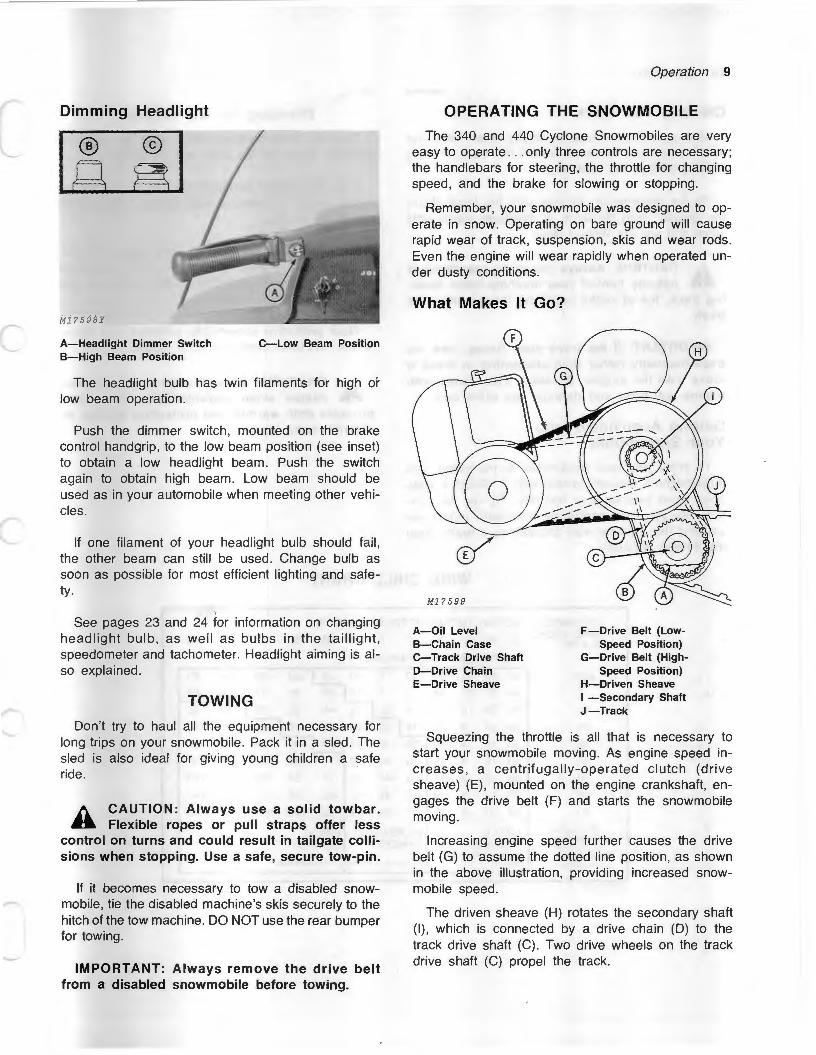
What Makes It Go?
A-Oil Level 8-Chain Case C-Track Drive Shaft D-Drive Chain E-Drive Sheave
F -Drive Belt (LowSpeed Position)
G-Drive Belt (High-Speed Position)
H-Driven Sheave I -Secondary Shaft J-Track
Squeezing the throttle is all that is necessary to start your snowmobile moving. As engine speed increases, a centrifugally-operated clutch (drive sheave) (E), mounted on the engine crankshaft, engages the drive belt (F) and starts the snowmobile moving.
Increasing engine speed further causes the drive belt (G) to assume the dotted line position, as shown in the above illustration, providing increased snowmobile speed.
The driven sheave (H) rotates the secondary shaft (1), which is connected by a drive chain (D) to the track drive shaft (C) . Two drive wheels on the track drive shaft (C) propel the track.
10 Operation
Clearing The Track
After operating in deep or slushy snow, clear the track. Snow and ice could freeze the track, making starting difficult the next time.
Tip the machine on its side until the track clears the ground. Spin the track at moderate speed until snow and ice are thrown clear.
A CAUTION: Always check to see there is nobody behind your machine when clear
ing track. Ice or rocks could be thrown from the track.
IMPORT ANT: If the track does freeze, free the track manually rather than attempting to break it loose with the engine. Breaking track loose with engine will burn and damage the drive belt.
Getting Acquainted with Your Snowmobile
To enjoy your new snowmobile to the fullest, you must become well-acquainted with it. Select a wide open, level area for your first ride. Try out the controls. As you gain confidence and learn more how you and the machine work together as a team, open the throttle gradually.
Dressing for the Weather
To enjoy snowmobiling fully, and to be safe from frostbite, dress for the wind and weather.
Even the mildest temperatures can prove uncomfortable when traveling at high speed ... or if strong winds are blowing.
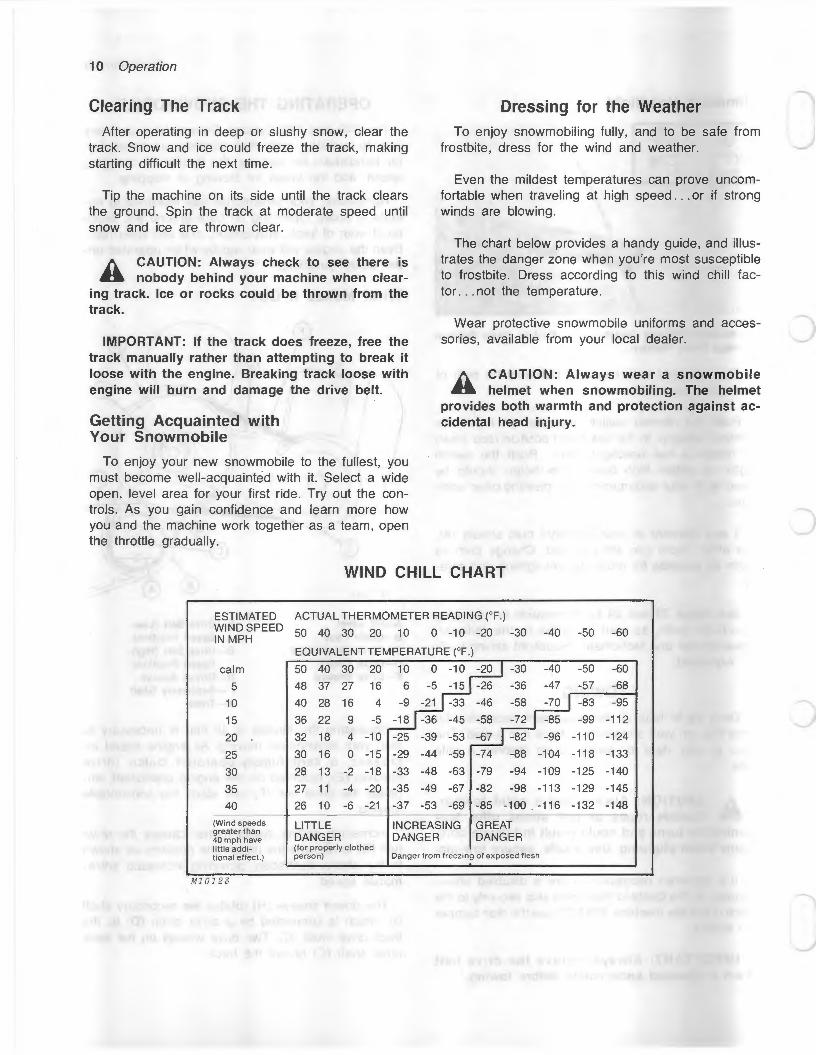
The chart below provides a handy guide, and illustrates the danger zone when you're most susceptible to frostbite. Dress according to this wind chill factor ... not the temperature.
Wear protective snowmobile uniforms and accessories, available from your local dealer.
A CAUTION: Always wear a snowmobile helmet when snowmobiling. The helmet
provides both warmth and protection against accidental head injury.
WIND CHILL CHART
ESTIMATED ACTUAL THERMOMETER READING (°F.) WIND SPEED 50 40 30 20 10 0 -10 -20 -30 -40 -50 -60 IN MPH
EQUIVALENT TEMPERATURE (°F.)
calm 50 40 30 20 ~-30 -40 -50 -60
5 48 37 27 16 -36 -47 -57 -68
10 40 28 16 4 -58 -70 -83 -95
15 36 22 9 -5 -72 -85 -99 -112
20 32 18 4 -10 -25 -39 -53 -67 -82 -96 -110 -124
25 30 16 0 -15 -29 -44 -59 -74 -88 -104 -118 -133
30 28 13 -2 -18 -33 -48 -63 -79 -94 -109 -1 25 -140
35 27 11 -4 -20 -35 -49 -67 -82 -98 -113 -129 -145
40 26 10 -6 -21 -37 -53 -69 -85 -1 00 -116 -132 -148
(Wind speeds LITTLE INCREASING GREAT greater than
DANGER DANGER DANGER 40 mph have littleaddi- (fo r properly c lothed tiona I effect.) person) Danger from freezing of exposed flesh
M10123
c
Getting Acquainted with Your Snowmobile
To enjoy your new snowmobile to the fullest, you must become well-acquainted with it. Select a wide open, level area for your first ride. Try out the controls. As you gain confidence and learn more how you and the machine work together as a team, open the throttle gradually.
Operation 11
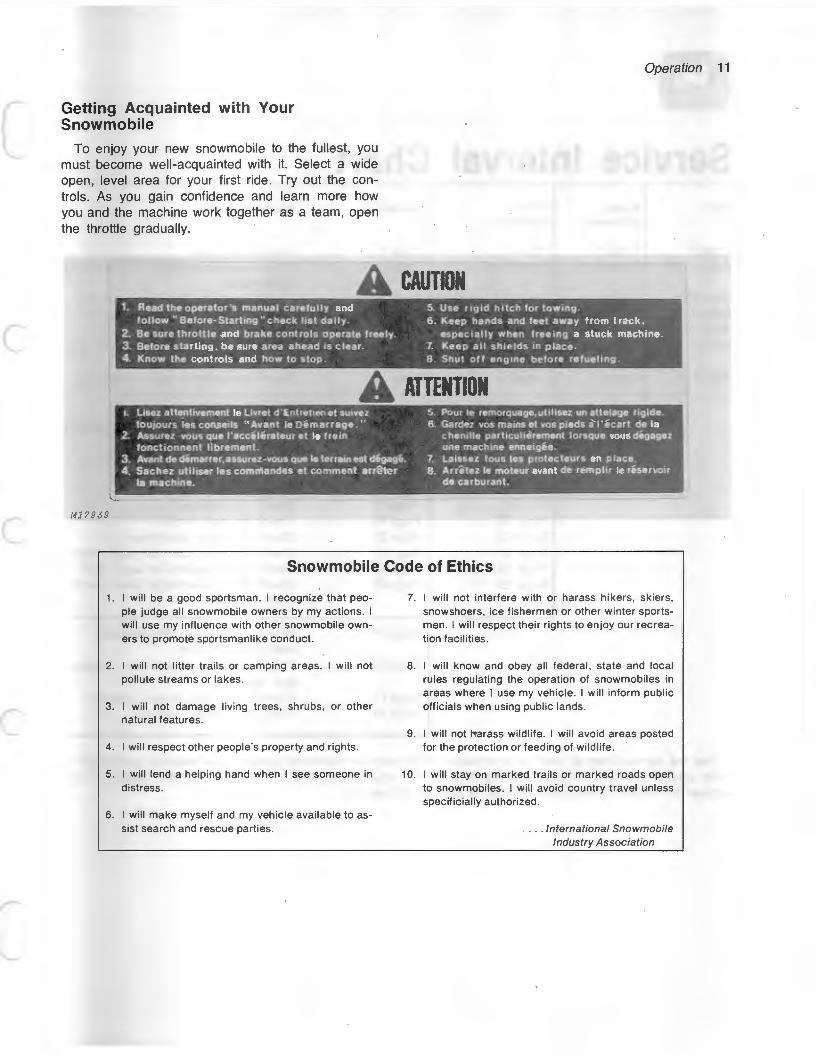
A cAunoN 1. Read the operator's manual carefully and 5. Use rigid hitch for towing.
follow" Before-Starting" check list daily. 6. Keep hands and feet away from track, 2. Be sure throttle and brake controls operate freely. especially when freeing a stuck machine. 3. Before starting, be sure area ahead is clear. 7. Keep all shields in place. 4. Know the controls and how to stop. 8. Shut off engine before refueling.
M17939
Snowmobile Code of Ethics
1. I wi ll be a good sportsman. I recognize that people judge all snowmobile owners by my actions. I will use my influence with other snowmobile owners to promote sportsmanlike conduct.
2. I w il l not litter trails or camping areas. I will not pollute streams or lakes.
3. I will not damage living trees, shrubs, or other natural features.
4. I will respect other people's property and rights.
5. I will lend a helping hand when I see someone in distress.
6. I will make myself and my vehicle available to assist search and rescue parties.
7. I will not interfere with or harass hikers, skiers, snowshoers, ice fishermen or other winter sportsmen. I will respect their rights to enjoy our recreation faci lities.
8. I will know and obey all federal, state and local rules regulating the operation of snowmobiles in areas where I use my vehicle. I will inform public officials when using public lands.
9. I will not llarass wildlife. I will avoid areas posted for the protection or feeding of wildlife.
10. I will stay on marked trai ls or marked roads open to snowmobiles. I will avoid country travel unless specif icially authorized.
. . . International Snowmobile Industry Association

Service Interval Chart Daily
Page 7 . ... . Page 21,22
Weekly (10-Hours)
Monthly (40-Hours)
Annually
Page 7 . . . . . Page 7 . . . . . . . . . . . Page 7 .. .. ..... . Page 21 ,22 .. Page 21 ,22. ...... Page 21 ,22 ...... .
Page 20 . . . . Page 20 . . . . Page 20. . . . . . . . . . Page 20 . . ...... . Page 14 . . . . Page 14 . . . . Page 14. . . . . . . . . . Page 14 ........ . Page 19 . . . . Page 19 .... Page 19......... . Page 19 ... . .... . Page 8 . . . . . Page 8 . . . . . Page 8 . . . . . . . . . . . Page 8 ... . ... . . .
Page 8,9 . . . . Page 8,9 . . . . Page 8,9 . . . . . . . . . Page 8,9 .. .. .. .. .
Page 19 . . . . Page 19. . . . . . . . . . Page 19 .... . ... . Page 16.... Page 16... .. .. ... Page 16 . ... .... . Page 17, 18 . Page17, 18 . . .. :. Page17,1 8 . ..... .
Page 13,14,15,16 . Page 13,14,15,1 6 . Page14 . . ....... . Page14 ... ... . . . Page 22 . . . . . . . . . . Page 22 ... .. ... . Page 18 .. . .. ..... Page18 ... . ... . . Page 23. . . . . . . . . . Page 23 ..... ... . Page 21 . . . . . . . . . . Page 21 .. ... . . . . Page 19 .... . ... . . Page19 .... ... . . Page 25. . ... .. ... Page 25 . . ...... .
Service/Inspection
Clean windshield Check condition of skis and steering components Check track condition and tension Check operation of throttle control Check operation of brake Check operation of emergency stop switch and key switch Check operation of lighting system
Check chain case oil level Check in-line filter for contamination Check drive belt condition
Check carburetor adjustments Check choke lever Check ski alignment Check fan belt tension Check headlight adjustment Check ski wear rods and wear plates Check slide suspension wear bars Check battery electrolyte level (electric start models)
Page 14 . . . . . . . Place a drop of oil on throttle cable end in throttle lever.
Page 26
Page 17 Page 29
Check all components for condition and tightness Service drive and driven sheaves Store snowmobile properly
Use the service interval chart as a reminder of periodic and seasonal services that must be performed to keep your snowmobile running smoothly. Refer to the appropriate page in the "Maintenance" section of this manual for detailed instructions on how to perform the service.
Maintenance NOTE: Be sure to have your dealer perform the free
10-hour check-up as described on the insert sheet at the front of this manual.
This section of your operator's manual describes the adjustments and services that you can perform to keep your snowmoble running smoothly. At times your snowmobile may need service that requires special tools or "know-how" .. . then it is best to contact your John Deere dealer.
SPARK PLUGS
NOTE: The spark plugs used in the John Deere 340 and 440 Cyclone Snowmobiles are Champion N- 1 (John Deere Part No. AM54319).
Removing Spark Plug
A CAUTION: High-energy ignition systems can produce injurious electrical shock.
Always stop engine and remove key from switch before touching or working on any ignition parts. DO NOT hold spark plug, leads or connectors in hand to check for spark.
Stop the engine. Raise the hood and carefully pull spark plug connectors from plugs. Remove plugs.
IMPORTANT: Do not pull on wire to remove connectors. Carefully pull spark plug connectors from plugs.
Checking Spark Plug
New plugs are to be gapped at 0.020 in. (0.508 mm). The high energy system will widen the gap in proportion to hours and miles of use. When plug eventually malfunctions, normal replacement is to be expected.
Plug Appearance
Condition
Tan (Cocoa brown) Black Sooty
White (Very Light Tan)
Possible Cause
Proper fuel mixture, good combustion Poor combustion, over rich fuel mixture Hot Combustion, lean fuel mixture
Plug change is indicated when. 1. Plug appearance is abnormal 2. Engine malfunctions, ie; hard starting, missing.
13
To check for plug spark with capacitor discharge ignition (CDI}, stop the engine. Remove spark plug and reconnect spark plug wire to plug. Lay the plug on the engine shroud. Do not hold the plug or plug wire in your hand. Pull the starter rope and check for spark. Replace plug if necessary.
Installing Spark Plug
Clean the spark plug seating surface on the cylinder head and install plugs. Tighten moderately, being certain spark plug gasket makes good contact with cylinder head. If not, clean carbon from cylinder head threads with a spark plug tap.
Reinstall the spark plug wires and secure the hood.
ADJUSTING CARBURETOR
·IMPORTANT: DO NOT run engine when adjusting carburetor.
The John Deere 340 and 440 Cyclone Snowmobiles are each equipped with a single Mikuni Carburetor. The carburetor is a float-type, fixed main jet carburetor that gives exact metering of the fuel-air mixture. The float in the fuel bowl maintains a constant fuel level in the bowl to assure an adequate fuel supply. The fixed main jet eliminates constant high-speed adjustments. However, altitude and temperature variations may require changes of the main jet.
IMPORTANT: DO NOT at any time run the engine with the air intake silencer removed from the carburetor. To do so will cause the engine to run LEAN and could cause engine failure.
Choke System
A separate choke system is used. The fuel-air mixture for starting is metered through independent jets.
The choke system is opened and dosed by the choke plunger. The choke system is constructed to operate by negative inlet pipe pressure. The throttle valve must be closed when starting the engine, otherwise the fuel-air mixture will be too lean for starting.
14 Maintenance
Setting the Choke Plunger
A-Pilot Air Screw B-Jam Nut C-Adjusting Sleeve
D-Carburetor Throat E-3 O'clock Position
1 . Raise the hood and remove the air intake silencer.
2. Be sure the choke lever on the dash is down.
3. Look in the choke plunger hole at the 3 o'clock position (E) in the carburetor throat (D). The choke plunger should be all the way down in its bore.
NOTE: When the choke lever on the dash is down, the choke plunger should be all the way down in the bore (seated). There should be slight freeplay between the lever and the dash.
4. If necessary loosen jam nut (B) and turn adjusting sleeve (C) clockwise to bring the choke plunger down. Tighten jam nut (B).
IMPORTANT: If the choke plunger is not down tight in the bore, the carburetor will run "RICH" and will affect the main jet system. This could cause a problem when attempting to find the correct main jet for top engine performance.
5. Raise the choke lever and look in the choke plunger hole. The choke plunger should raise enough to expose at least half the hole opening.
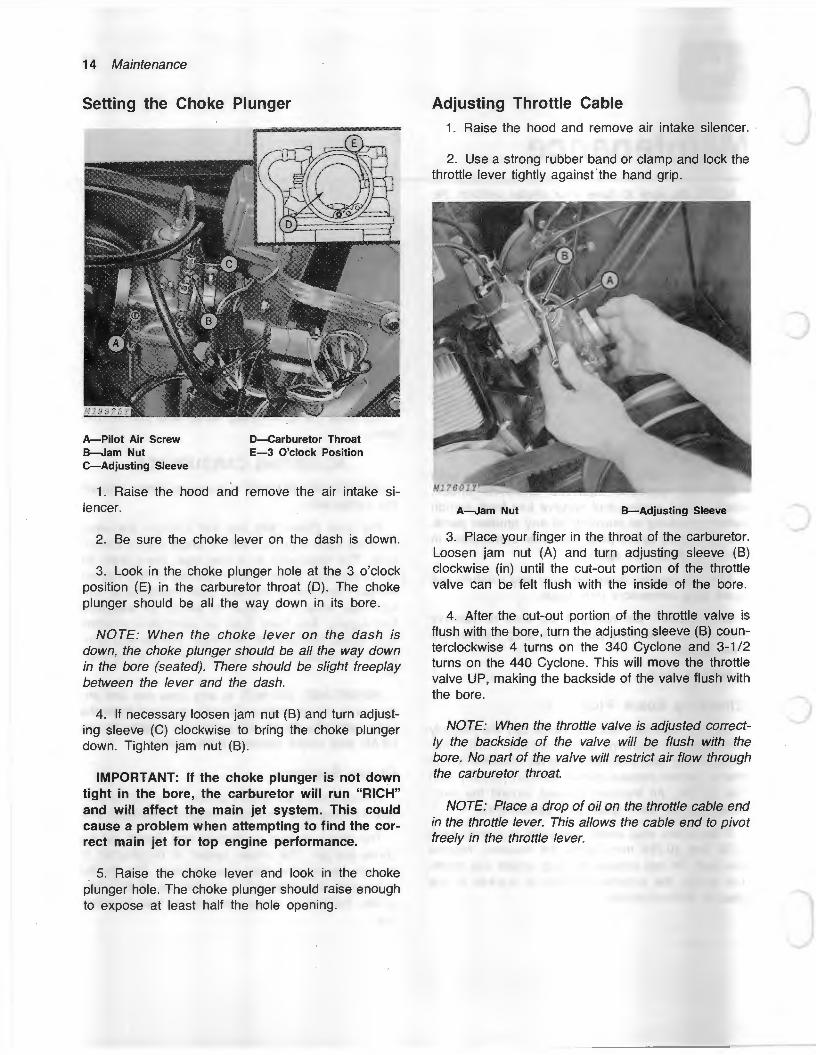
Adjusting Throttle Cable
1. Raise the hood and remove air intake silencer . .
2. Use a strong rubber band or clamp and lock the throttle lever tightly against the hand grip.
A-Jam Nut B-Adjusting Sleeve
3. Place your finger in the throat of the carburetor. Loosen jam nut (A) and turn adjusting sleeve (B) clockwise (in) until the cut-out portion of the throttle valve can be felt flush with the inside of the bore.
4. After the cut-out portion of the throttle valve is flush with the bore, turn the adjusting sleeve (B) counterclockwise 4 turns on the 340 Cyclone and 3-1 /2 turns on the 440 Cyclone. This will move the throttle valve UP, making the backside of the valve flush with the bore.
NOTE: When the throttle valve is adjusted correctly the backside of the valve will be flush with the bore. No part of the valve will restrict air flow through the carburetor throat.
NOTE: Place a drop of oil on the throttle cable end in the throttle lever. This allows the cable end to pivot freely in the throttle lever.
)
-
-
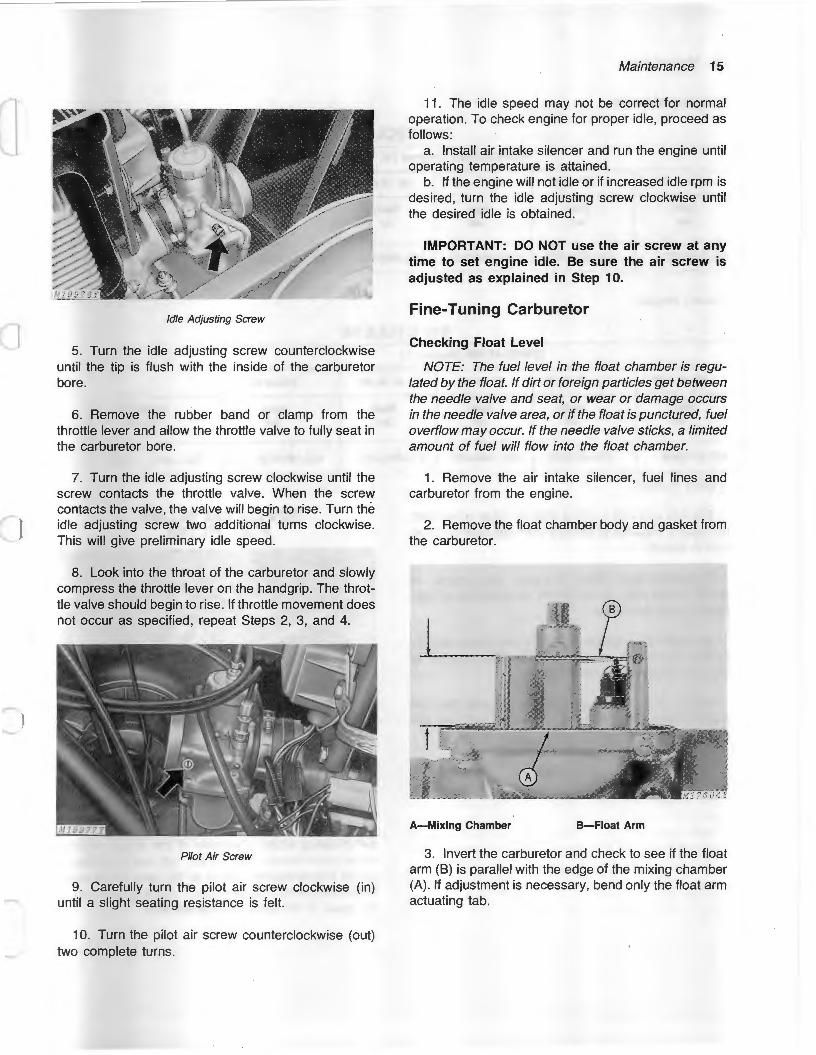
Idle Adjusting Screw
5. Turn the idle adjusting screw counterclockwise until the tip is flush with the inside of the carburetor bore.
6. Remove the rubber band or clamp from the throttle lever and allow the throttle valve to fully seat in the carburetor bore.
7. Turn the idle adjusting screw clockwise until the screw contacts the throttle valve. When the screw contacts the valve, the valve will begin to rise. Turn the idle adjusting screw two additional turns clockwise. This will give preliminary idle speed.
8. Look into the throat of the carburetor and slowly compress the throttle lever on the handgrip. The throttle valve should begin to rise. If throttle movement does not occur as specified, repeat Steps 2, 3, and 4.
Pilot Air Screw
9. Carefully turn the pilot air screw clockwise (in) until a slight seating resistance is felt.
10. Turn the pilot air screw counterclockwise (out) two complete turns.
Maintenance 15
11 . The idle speed may not be correct for normal operation. To check engine for proper idle, proceed as follows:
a. Install air intake silencer and run the engine until operating temperature is attained.
b. If the engine will not idle or if increased idle rpm is desired, turn the idle adjusting screw clockwise until the desired idle is obtained.
IMPORT ANT: DO NOT use the air screw at any time to set engine idle. Be sure the air screw is adjusted as explained in Step 10.
Fine-Tuning Carburetor
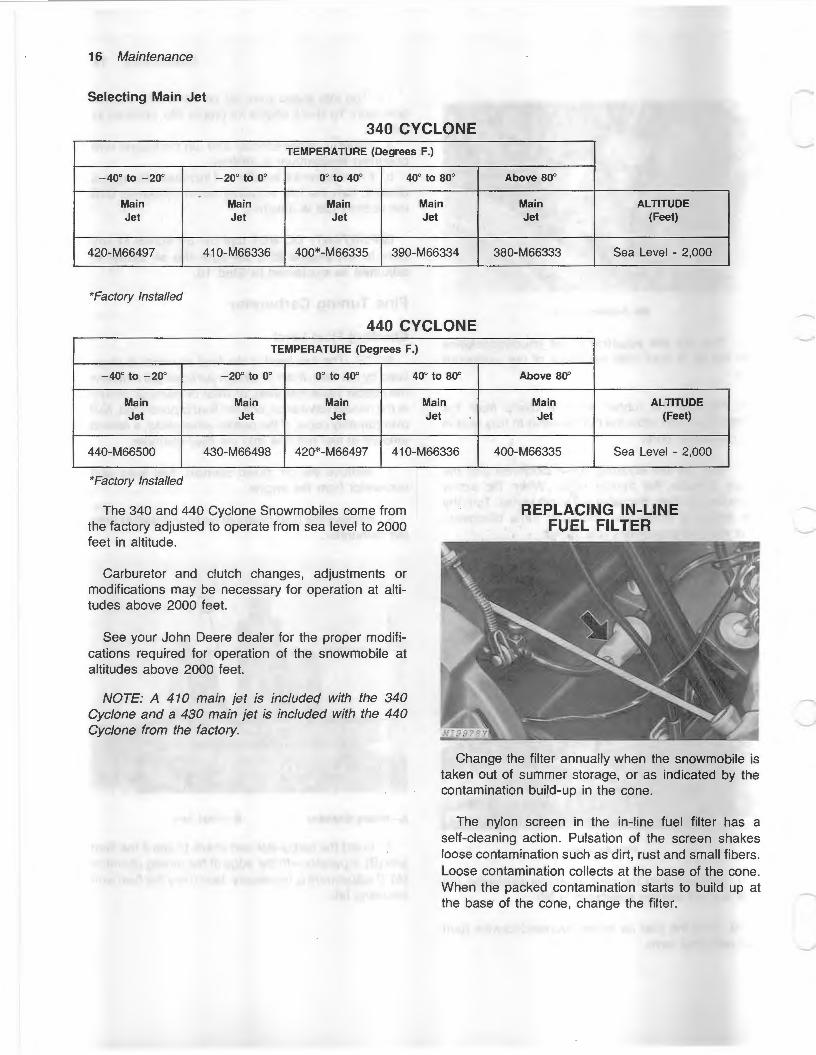
Checking Float Level
NOTE: The fuel level in the float chamber is regulated by the float. If dirt or foreign particles get between the needle valve and seat, or wear or damage occurs in the needle valve area, or if the float is punctured, fuel overflow may occur. If the needle valve sticks, a limited amount of fuel will flow into the float chamber.
1. Remove the air intake silencer, fuel lines and carburetor from the engine.
2. Remove the float chamber body and gasket from the carburetor.
l_
]
A-Mixing Chamber B-Fioat Arm
3. Invert the carburetor and check to see if the float arm (B) is parallel with the edge of the mixing chamber (A). If adjustment is necessary, bend only the float arm actuating tab.
16 Maintenance
Selecting Main Jet
340 CYCLONE TEMPERATURE (Degrees F.)
- 40° to - 20° - 20° to oo 0° to 40° 40° to 80° Above 80°
Main Main Main Main Main ALTITUDE Jet Jet Jet Jet Jet (Feet)
420-M66497 410-M66336 400*-M66335 390-M66334 380-M66333 Sea Level - 2,000
*Factory Installed
440 CYCLONE TEMPERATURE (Degrees F.)
- 40° to - 20° - 20° to oo oo to 40° 40° to soo Above 80°
Main Main Main Main Main ALTITUDE Jet Jet Jet Jet Jet (Feet)
440-M66500 430-M66498 420*-M66497 410-M66336 400-M66335 Sea Level - 2,000
*Factory Installed
The 340 and 440 Cyclone Snowmobiles come from the factory adjusted to operate from sea level to 2000 feet in altitude.
Carburetor and clutch changes, adjustments or modifications may be necessary for operation at altitudes above 2000 feet.
See your John Deere dealer for the proper modifications required for operation of the snowmobile at altitudes above 2000 feet.
NOTE: A 410 main jet is includecj with the 340 Cyclone and a 430 main jet is included with the 440 Cyclone from the factory.
REPLACING IN-LINE FUEL FILTER
Change the filter annually when the snowmobile is taken out of summer storage, or as indicated by the contamination build-up in the cone.
The nylon screen in the in-line fuel filter has a self-cleaning action. Pulsation of the screen shakes loose contamination such as dirt, rust and small fibers. Loose contamination collects at the base of the cone. When the packed contamination starts to build up at the base of the cone, change the filter. -
j
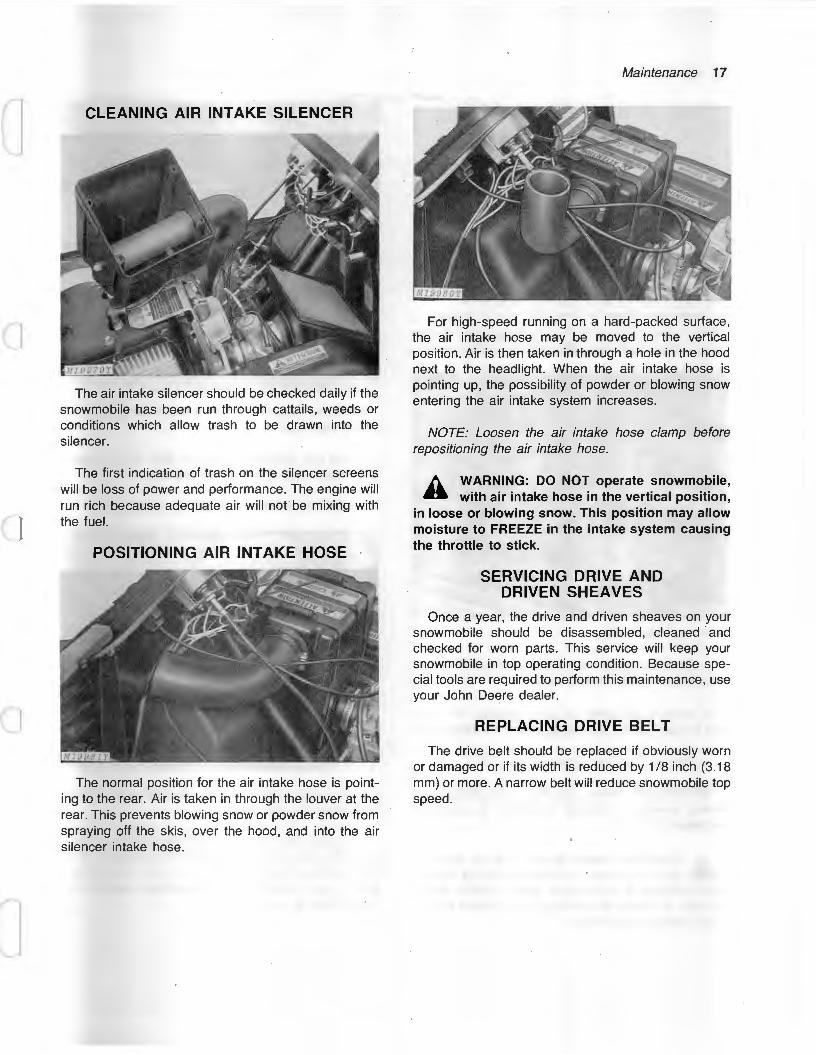
CLEANING AIR INTAKE SILENCER
The air intake silencer should be checked daily if the snowmobile has been run through cattails, weeds or conditions which allow trash to be drawn into the silencer.
The first indication of trash on the silencer screens will be loss of power and performance. The engine will run rich because adequate air will not be mixing with the fuel.
POSITIONING AIR INTAKE HOSE
The normal position for the air intake hose is pointing to the rear. Air is taken in through the louver at the rear. This prevents blowing snow or powder snow from spraying off the skis, over the hood, and into the air silencer intake hose.
Maintenance 17
For high-speed running on a hard-packed surface, the air intake hose may be moved to the vertical position. Air is then taken in through a hole in the hood next to the headlight. When the air intake hose is pointing up, the possibility of powder or blowing snow entering the air intake system increases.
NOTE: Loosen the air intake hose clamp before repositioning the air intake hose.
A WARNING: DO NOT operate snowmobile, with air intake hose in the vertical position,
in loose or blowing snow. This position may allow moisture to FREEZE in the intake system causing the throttle to stick.
SERVICING DRIVE AND DRIVEN SHEAVES
Once a year, the drive and driven sheaves on your snowmobile should be disassembled, cleaned ·and checked for worn parts. This service will keep your snowmobile in top operating condition. Because special tools are required to perform this maintenance, use your John Deere dealer.
REPLACING DRIVE BELT
The drive belt should be replaced if obviously worn or damaged or if its width is reduced by 1/8 inch (3.18 mm) or more. A narrow belt will reduce snowmobile top speed.
18 Maintenance
DRIVE BELT CROSS SECTION
l - l/8" MIN. (28.58 mm)
~l-l/4 " ----l I ( 31. 7 5 mm ) I
M16136 \ I If drive belt wears rapidly, drive and driven
sheaves are probably out of alignment. See your John Deere dealer because a special tool is required to align sheaves.
A belt worn narrow in only one area is caused by trying to free a frozen track with the engine. Always free a frozen track manually prior to starting engine.
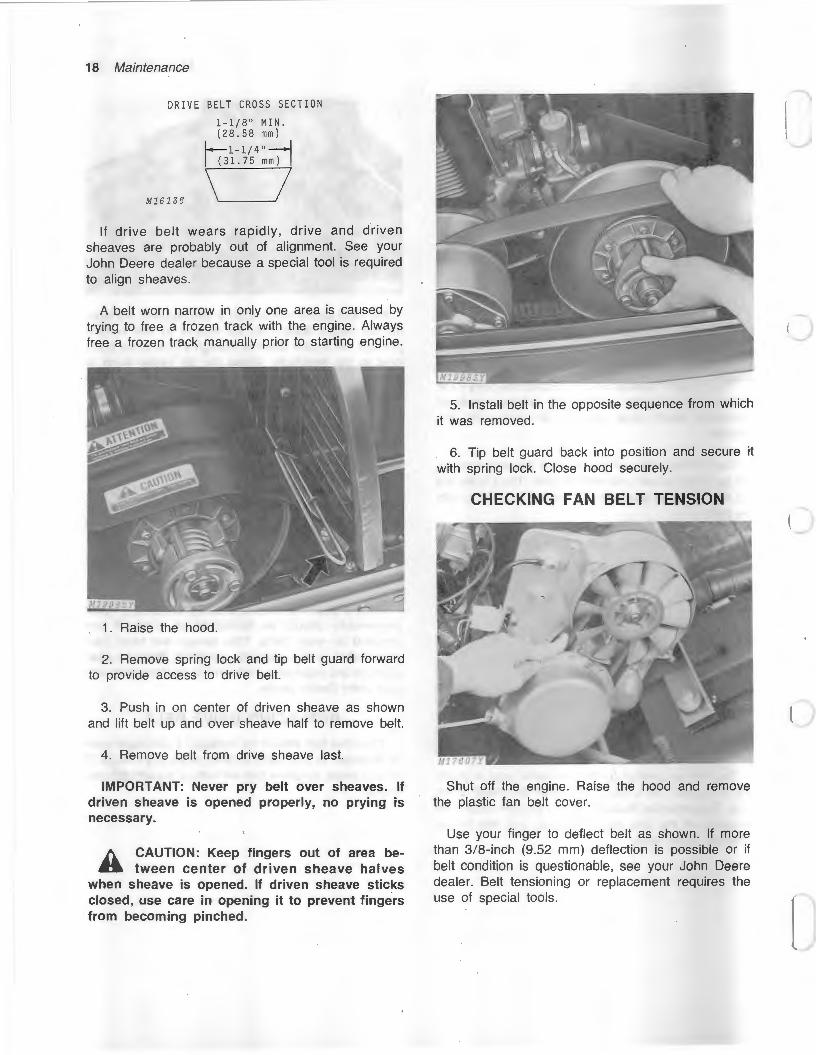
1. Raise the hood.
2. Remove spring lock and tip belt guard forward to provide access to drive belt.
3. Push in on center of driven sheave as shown and lift belt up and over sheave half to remove belt.
4. Remove belt from drive sheave last.
IMPORTANT: Never pry belt over sheaves. If driven sheave is opened properly, no prying is necessary.
r.._ CAUTION: Keep fingers out of area be.. tween center of driven sheave halves
when sheave is opened. If driven sheave sticks closed, use care in opening it to prevent fingers from becoming pinched.
5. Install belt in the opposite sequence from which it was removed.
6. Tip belt guard back into position and secure it with spring lock. Close hood securely.
CHECKING FAN BELT TENSION
Shut off the engine. Raise the hood and remove the plastic fan belt cover.
Use your finger to deflect belt as shown. If more than 3/8-inch (9.52 mm) deflection is possible or if belt condition is questionable, see your John Deere dealer. Belt tensioning or replacement requires the use of special tools.
l
-
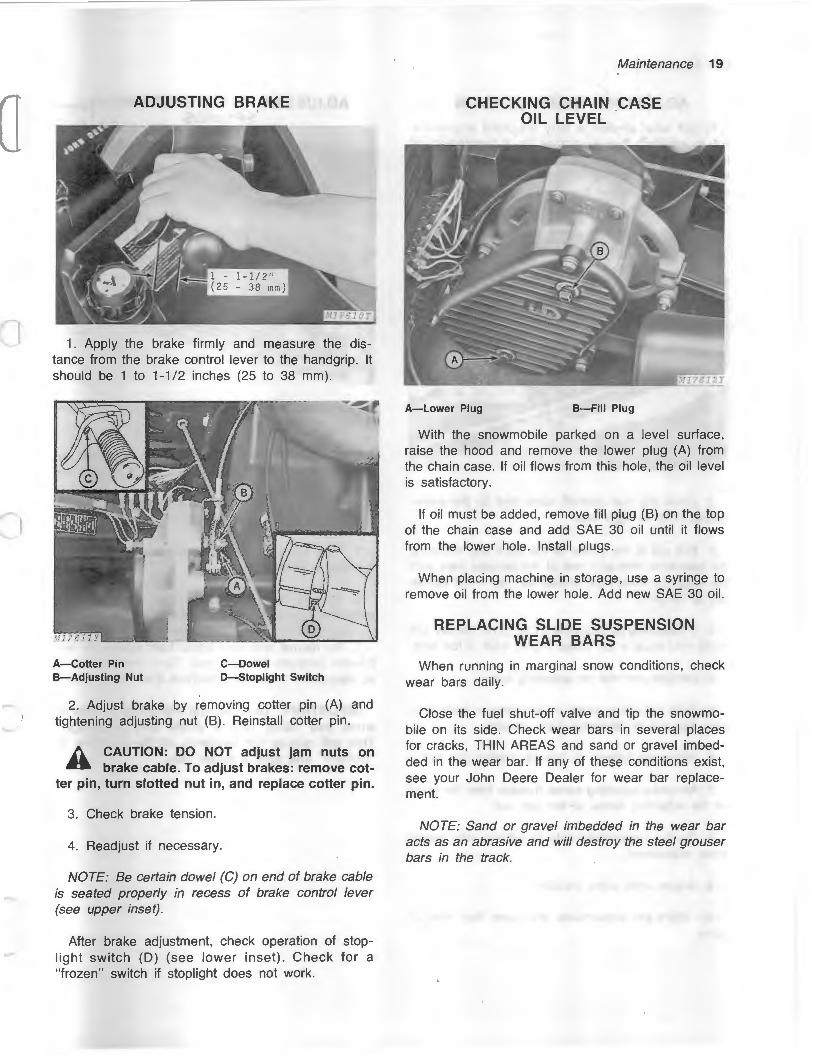
ADJUSTING BRAKE
1. Apply the brake firmly and measure the distance from the brake control lever to the handgrip. It should be 1 to 1-1/2 inches (25 to 38 mm).
A-Cotter Pin B-Adjusting Nut
C-Dowel D-Stoplight Switch
2. Adjust brake by removing cotter pin (A) and tightening adjusting nut (B). Reinstall cotter pin.
A CAUTION: DO NOT adjust jam nuts on brake cable. To adjust brakes: remove cot
ter pin, turn slotted nut in, and replace cotter pin.
3. Check brake tension.
4. Readjust if necessary.
NOTE: Be certain dowel (C) on end of brake cable is seated properly in recess of brake control lever (see upper inset) .
After brake adjustment, check operation of stoplight switch (D) (see lower inset) . Check for a "frozen" switch if stoplight does not work.
Maintenance 19
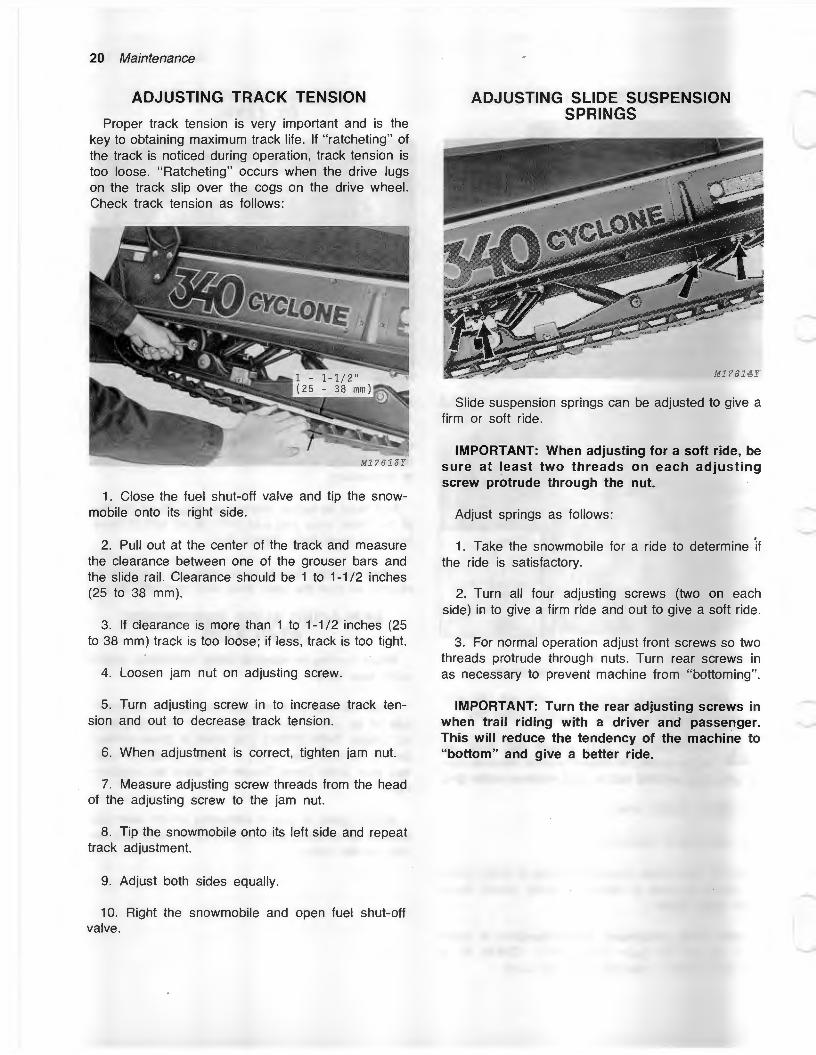
CHECKING CHAIN CASE OIL LEVEL
A- Lower Plug B-Fill Plug
With the snowmobile parked on a level surface, raise the hood and remove the lower plug (A) from the chain case. If oil flows from this hole, the oil level is satisfactory.
If oil must be added, remove fill plug (B) on the top of the chain case and add SAE 30 oil until it flows from the lower hole. Install plugs.
When placing machine in storage, use a syringe to remove oil from the lower hole. Add new SAE 30 oil.
REPLACING SLIDE SUSPENSION WEAR BARS
When running in marginal snow conditions, check wear bars daily.
Close the fuel shut-off valve and tip the snowmobile on its side. Check wear bars in several places for cracks, THIN AREAS and sand or gravel imbedded in the wear bar. If any of these conditions exist, see your John Deere Dealer for wear bar replacement.
NOTE: Sand or gravel imbedded in the wear bar acts as an abrasive and will destroy the steel grouser bars in the track.
20 Maintenance
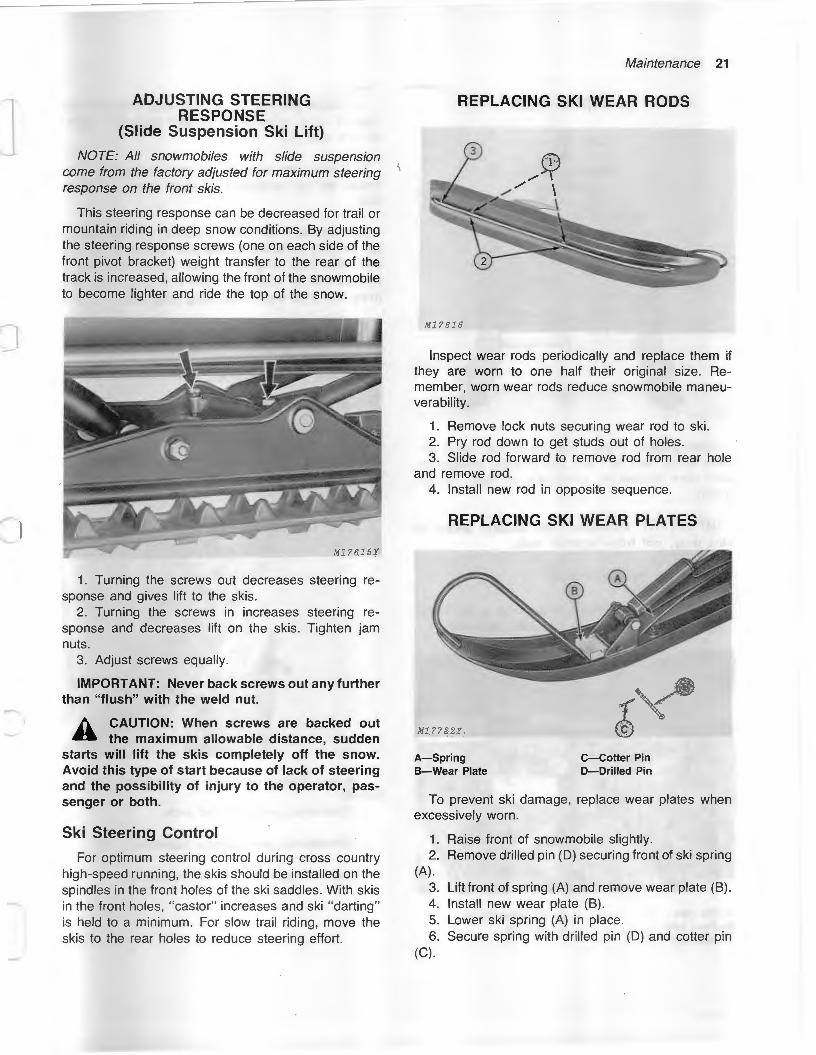
ADJUSTING TRACK TENSION
Proper track tension is very important and is the key to obtaining maximum track life. If "tatcheting" of the track is noticed during operation, track tension is too loose. " Ratcheting" occurs when the drive lugs on the track slip over the cogs on the drive wheel. Check track tension as follows:
1. Close the fuel shut-off valve and tip the snowmobile onto its right side.
2. Pull out at the center of the track and measure the clearance between one of the grouser bars and the slide rail. Clearance should be 1 to 1-1 /2 inches (25 to 38 mm).
3. If clearance is more than 1 to 1-1/2 inches (25 to 38 mm) track is too loose; if less, track is too tight.
4. Loosen jam nut on adjusting screw.
5. Turn adjusting screw in to increase track tension and out to decrease track tension.
6. When adjustment is correct, tighten jam nut.
7. Measure adjusting screw threads from the head of the adjusting screw to the jam nut.
8. Tip the snowmobile onto its left side and repeat track adjustment.
9. Adjust both sides equally.
10. Right the snowmobile and open fuel shut-off valve.
ADJUSTING SLIDE SUSPENSION SPRINGS
Slide suspension springs can be adjusted to give a firm or soft ride.
IMPORTANT: When adjusting for a soft ride, be sure at least two threads on each adjusting screw protrude through the nut.
Adjust springs as follows:
1. Take the snowmobile for a ride to determine 'it the ride is satisfactory.
2. Turn all four adjusting screws (two on each side) in to give a firm ride and out to give a soft ride.
3. For normal operation adjust front screws so two threads protrude through nuts. Turn rear screws in as necessary to prevent machine from "bottoming".
IMPORTANT: Turn the rear adjusting screws in when trail riding with a driver and passenger. This will reduce the tendency of the machine to "bottom" and give a better ride.
-
-
-
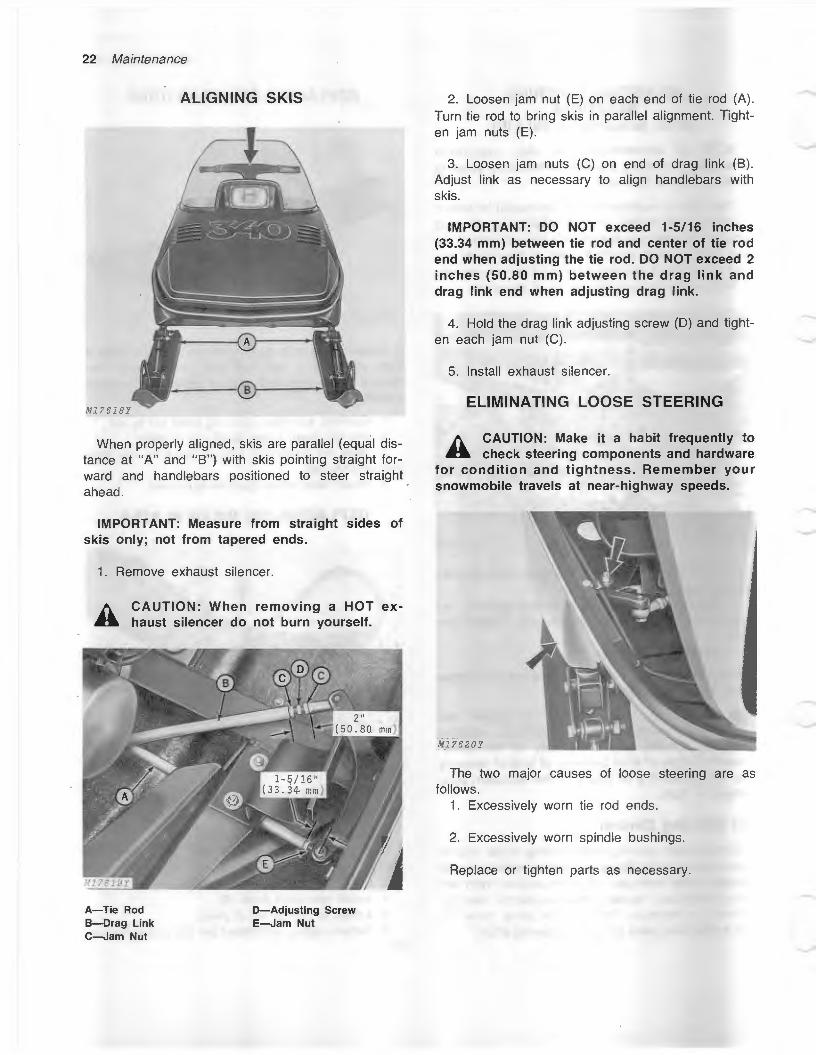
ADJUSTING STEERING RESPONSE
(Slide Suspension Ski Lift)
NOTE: All snowmobiles with slide suspension come from the factory adjusted for maximum steering response on the front skis.
This steering response can be decreased for trail or mountain riding in deep snow conditions. By adjusting the steering response screws (one on each side of the front pivot bracket) weight transfer to the rear of the track is increased, allowing the front of the snowmobile to become lighter and ride the top of the snow.
1. Turning the screws out decreases steering response and gives lift to the skis.
2. Turning the screws in increases steering response and decreases lift on the skis. Tighten jam nuts.
3. Adjust screws equally.
IMPORTANT: Never back screws out any further than "flush" with the weld nut.
/). CAUTION: When screws are backed out .. the maximum allowable distance, sudden
starts will lift the skis completely off the snow. Avoid this type of start because of lack of steering and the possibility of injury to the operator, passenger or both.
Ski Steering Control
For optimum steering control during cross country high-speed running, the skis should be installed on the spindles in the front holes of the ski saddles. With skis in the front holes, "castor" increases and ski "darting" is held to a minimum. For slow trail riding, move the skis to the rear holes to reduce steering effort.
Maintenance 21
REPLACING SKI WEAR RODS
M17616
Inspect wear rods periodically and replace them if they are worn to one half their original size. Remember, worn wear rods reduce snowmobile maneuverability.
1. Remove lock nuts securing wear rod to ski. 2. Pry rod down to get studs out of holes. 3. Slide rod forward to remove rod from rear hole
and remove rod. 4. Install new rod in opposite sequence.
REPLACING SKI WEAR PLATES
M1?722:t
A-Spring 8-Wear Plate
C-Cotter Pin D-Drilled Pin
To prevent ski damage, replace wear plates when excessively worn.
1. Raise front of snowmobile slightly. 2. Remove drilled pin (D) securing front of ski spring
(A). 3. Lift front of spring (A) and remove wear plate (B). 4. Install new wear plate (B). 5. Lower ski spring (A) in place. 6. Secure spring with drilled pin (D) and cotter pin
(C).
22 Maintenance
ALIGNING SKIS
Ml?618Y
When properly aligned, skis are parallel (equal distance at "A" and "B") with skis pointing straight forward and handlebars positioned to steer straight ahead.
IMPORTANT: Measure from straight sides of skis only; not from tapered ends.
1. Remove exhaust silencer.
A CAUTION: When removing a HOT exhaust s ilencer do not burn yourself.
A- Tie Rod B-Drag Link C-Jam Nut
D- Adjusting Screw E- Jam Nut
2. Loosen jam nut (E) on each end of tie rod (A) . Turn tie rod to bring skis in parallel alignment. Tighten jam nuts (E).
3. Loosen jam nuts (C) on end of drag link (B). Adjust link as necessary to align handlebars with skis.
IMPORTANT: DO NOT exceed 1-5/16 inches (33.34 mm) between tie rod and center of tie rod end when adjusting the tie rod. DO NOT exceed 2 inches (50.80 mm) between the drag link and drag link end when adjusting drag l ink.
4. Hold the drag link adjusting screw (D) and tighten each jam nut (C).
5. Install exhaust silencer.
ELIMINATING LOOSE STEERING
A CAUTION: Make it a habit frequently to check steering components and hardware
for condition and tightness. Remember your snowmobile travels at near-highway speeds.
M17620Y
The two major causes of loose steering are as follows.
1. Excessively worn tie rod ends.
2. Excessively worn spindle bushings.
Replace or tighten parts as necessary.
-
Maintenance 23
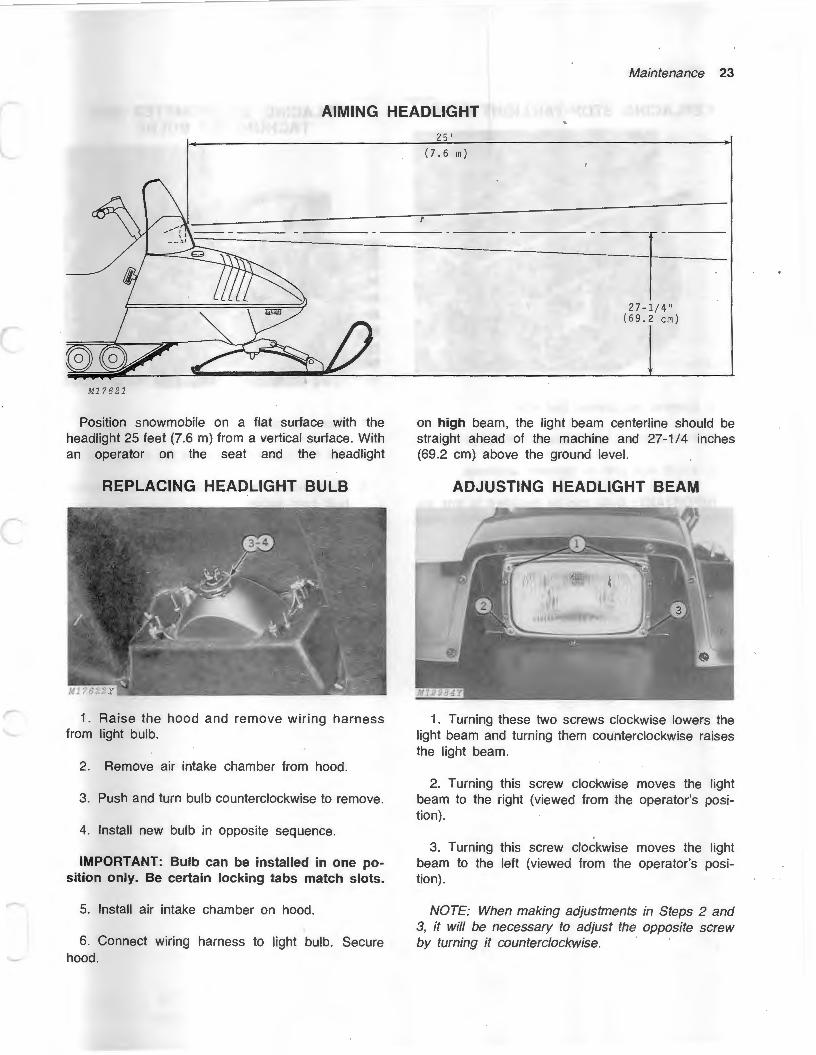
AIMING HEADLIGHT
M17621
Position snowmobile on a flat surface with the headlight 25 feet (7.6 m) from a vertical surface. With an operator on the seat and the headlight
REPLACING HEADLIGHT BULB
1. Raise the hood and remove wiring harness from light bulb.
2. Remove air intake chamber from hood.
3. Push and turn bulb counterclockwise to remove.
4. Install new bulb in opposite sequence.
IMPORTANT: Bulb can be installed in one position only. Be certain locking tabs match slots.
5. Install air intake chamber on hood.
6. Connect wiring harness to light bulb. Secure hood.
25'
(7 .6 m)
F 27 - l/4"
(69.2 em)
on high beam, the light beam centerline should be straight ahead of the machine and 27-1 I 4 inches (69.2 em} above the ground level.
ADJUSTING HEADLIGHT BEAM
1. Turning these two screws clockwise lowers the light beam and turning them counterclockwise raises the light beam.
2. Turning this screw clockwise moves the light beam to the right (viewed from the operator's position).
3. Turning this screw clockwise moves the light beam to the left (viewed from the operator's position).
NOTE: When making adjustments in Steps 2 and 3, it will be necessary to adjust the opposite screw by turning it counterclockwise.
24 Maintenance
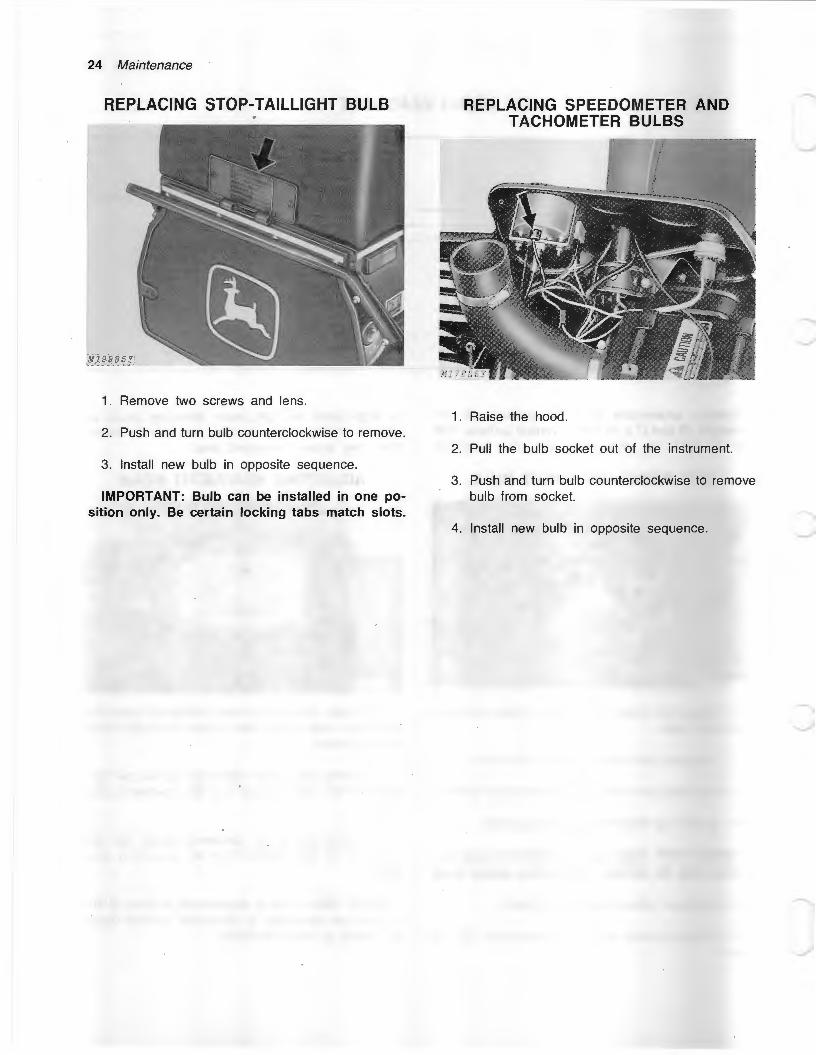
REPLACING STOP-TAILLIGHT BULB
1. Remove two screws and lens.
2. Push and turn bulb counterclockwise to remove.
3. Install new bulb in opposite sequence.
IMPORTANT: Bulb can be installed in one position only. Be certain locking tabs match slots.
REPLACING SPEEDOMETER AND TACHOMETER BULBS
1. Raise the hood.
2. Pull the bulb socket out of the instrument.
3. Push and turn bulb counterclockwise to remove bulb from socket.
4. Install new bulb in opposite sequence.
-
Maintenance 25
SERVICING BATTERY (Electric Start Models Only)
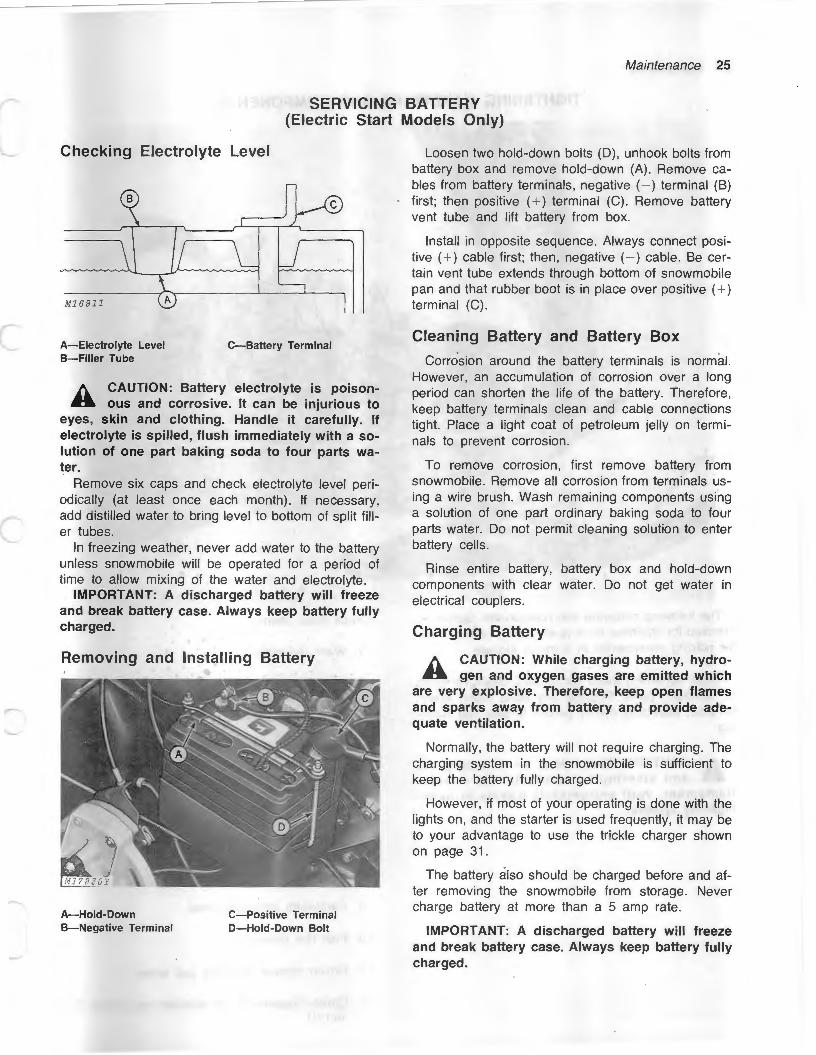
Checking Electrolyte Level
M1 691 1
A-Electrolyte Level B-Filler Tube
C-Battery Terminal
/). CAUTION: Battery electrolyte is poison.. ous and corrosive. It can be injurious to
eyes, skin and clothing. Handle it carefully. If electrolyte is spilled, flush immediately with a solution of one part baking soda to four parts water.
Remove six caps and check electrolyte level periodically (at least once each month). If necessary, add distilled water to bring level to bottom of split filler tubes.
In freezing weather, never add water to the battery unless snowmobile will be operated for a period of time to allow mixing of the water and electrolyte.
IMPORTANT: A discharged battery will freeze and break battery case. Always keep battery fully charged.
Removing and Installing Battery
A- Hold-Down B-Negative Terminal
C- Positive Terminal D- Hold-Down Bolt
Loosen two hold-down bolts (D), unhook bolts from battery box and remove hold-down (A). Remove cables from battery terminals, negative (- ) terminal (B) first; then positive ( + ) terminal (C). Remove battery vent tube and lift battery from box.
Install in opposite sequence. Always connect positive ( + ) cable first; then, negative (- ) cable. Be certain vent tube extends through bottom of snowmobile pan and that rubber boot is in place over positive ( +) terminal (C) .
Cleaning Battery and Battery Box
Corrosion around the battery terminals is normal. However, an accumulation of corrosion over a long period can shorten the life of the battery. Therefore, keep battery terminals clean and cable connections tight. Place a light coat of petroleum jelly on terminals to prevent corrosion.
To remove corrosion, first remove battery from snowmobile. Remove all corrosion from terminals using a wire brush. Wash remaining components using a solution of one part ordinary baking soda to four parts water. Do not permit cleaning solution to enter battery cells.
Rinse entire battery, battery box and hold-down components with clear water. Do not get water in electrical couplers.
Charging Battery
/). CAUTION: While charging battery, hydro.. gen and oxygen gases are emitted which
are very explosive. Therefore, keep open flames and sparks away from battery and provide adequate ventilation.
Normally, the battery will not require charging. The charging system in the snowmobile is sufficient to keep the battery fully charged.
However, if most of your operating is done with the lights on, and the starter is used frequently, it may be to your advantage to use the trickle charger shown on page 31.
The battery also should be charged before and after removing the snowmobile from storage. Never charge battery at more than a 5 amp rate.
IMPORTANT: A discharged battery will freeze and break battery case. Always keep battery fully charged.
26 Maintenance
TIGHTENING HARDWARE AND COMPONENTS
!419986
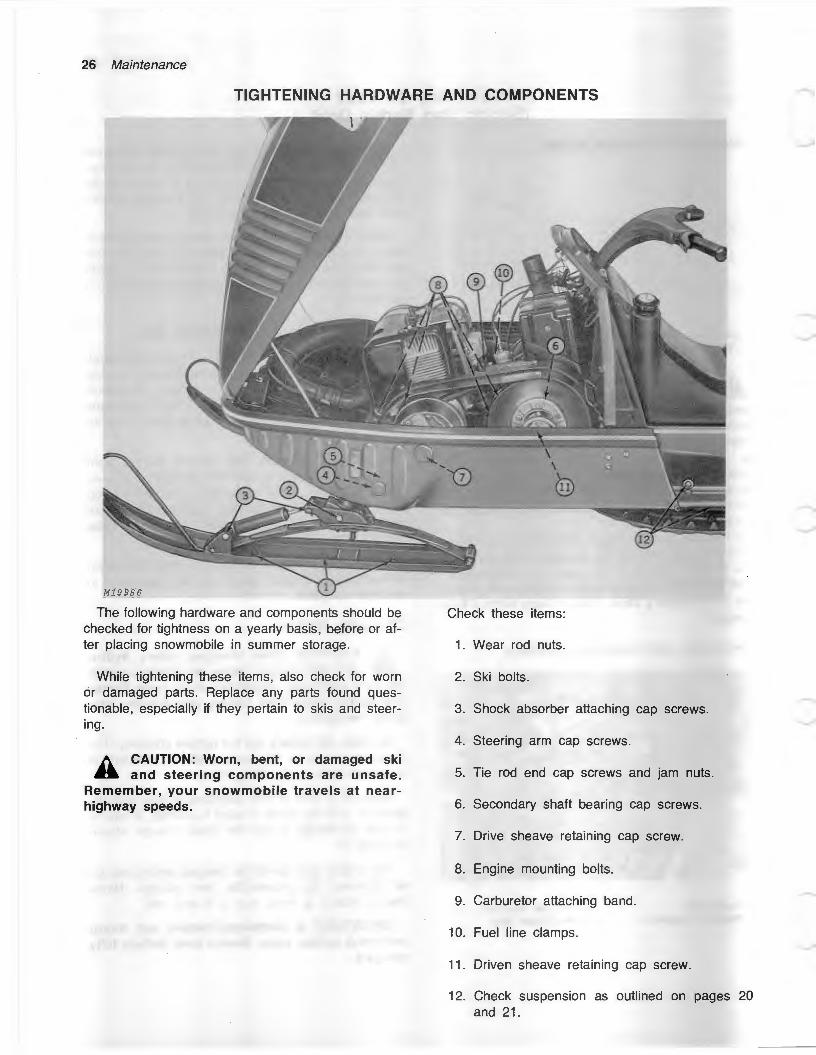
The following hardware and components should be checked for tightness on a yearly basis, before or after placing snowmobile in summer storage.
While tightening these items, also check for worn or damaged parts. Replace any parts found questionable, especially if they pertain to skis and steering.
r.._ CAUTION: Worn, bent, or damaged ski .. and steering components are unsafe.
Remember, your snowmobile travels at nearhighway speeds.
\
@
Check these items:
1. Wear rod nuts.
2. Ski bolts.
3. Shock absorber attaching cap screws.
4. Steering arm cap screws.
5. Tie rod end cap screws and jam nuts .
6. Secondary shaft bearing cap screws.
7. Drive sheave retaining cap screw.
8. Engine mounting bolts.
9. Carburetor attaching band.
10. Fuel line clamps.
11. Driven sheave retaining cap screw.
12. Check suspension as outlined on pages 20 and 21 .

a 27
Trouble Shooting ENGINE
Engine Starts Hard or Will Not Start
Fuel Tank Empty.
Emergency Stop Switch in "OFF Position.
Plugged In-Line Filter in Suction Line. Change in-line filter. See page 16.
Fuel Pump Malfunctioning. See dealer for carburetor service.
Faulty Ignition System. Check all electrical connections. See dealer for ignition system repair.
Ignition Timing Wrong. See dealer for ignition timing.
Engine Lacks Power or Acceleration
Running On One Cylinder. Check spark plugs.
Throttle Cable Improperly Adjusted. Adjust throttle. See page 14.
Improper Fuel Mixture. Drain tank and fill with fuel of proper mixture. See Page 6.
Carburetor Out of Adjustment See pages 13, 14, 15 and 16.
Restricted In-Line Filter. See page16.
Ignition Timing Wrong. See dealer for ignition timing.
IMPORTANT: Prolonged running with a faulty reed valve could cause a siezed piston. An indication of a faulty reed valve is fuel spit-back through the carburetor (popping noise).
Engine Backfires and Runs Unevenly
Ignition Timing Wrong. See dealer for ignition timing.
Engine Overheats
Carburetor Too "Lean." See pages 13, 14, 15 and 16.
Engine Fan Belt Slipping or Broken. See page 18.
Fan Blade(s) Broken Off.
Intake Manifold or Carburetor Gaskets Leaking.
LIGHTS
Stoplight Not Lighting
Bulb Burned Out See page 24.
Stoplight Switch Defective. Stoplight Switch Frozen.
Lights Won't Light
Bulbs Burned Out See pages 23 and 24.
Faulty Light Switch. See dealer.
Loose Electrical Connections. Faulty Lighting Coil.
See dealer.
WINDSHIELD
Windshield Becomes Clouded and Brittle
Fuel or Other Hydrocarbons Cause Windshield to Deteriorate, Become Fogged or Brittle.
Keep fuels and hydrocarbons off windshield. Clean windshield with a damp cloth.
28 Trouble Shooting
ELECTRIC START (Extra Equipment)
Engine Fails to Crank
Key Switch Not Returned to "OFF" Position Prior to Second Starting Attempt.
See page 7. Loose or Corroded Battery Terminals.
See page 25. Faulty Starter Solenoid.
See dealer. Faulty Starter Motor.
See dealer. Battery Discharged.
See page 25.
Battery Will Not Stay Charged
Faulty Lighting Coil. See dealer.
Faulty Regulator or Rectifier. See dealer.
Loose or Corroded Electrical Connections. Battery Defective. Machine Not Operated Long Enough Between Starts.
POWER TRAIN AND CHASSIS
Clutch Does Not Disengage Properly
Engine Idles Too Fast Set Idle at slower speed. See pages 14 and
15. Faulty Clutch (Drive Sheave).
See dealer. Short Drive Belt.
Clutch Engages Too Slowly
Faulty Clutch (Drive Sheave). See dealer.
Stretched or Worn Drive Belt.
Excessive Drive Belt Wear
Driving Snowmobile Long Distances at Clutch Engagement Speed. Drive and Driven Sheaves Misaligned.
See dealer. Freeing Frozen Track With Engine.
Free track manually.
Rapid Track Wear
Operating on Bare Ground. Track Improperly Tensioned.
See page 20. Track Not Adjusted Equally (Side-to-Side) .
See page 20. Track Wearing on One Side.
Track not adjusted equally (side - to-side) or track too loose. See page 20.
SKIS AND STEERING
Loose Steering
Worn Tie Rod Ends. See page 22.
Worn Spindle Bushings. See page 22.
Poor Maneuverability
Worn Ski Wear Rods. See page 21.
Loose Steering Linkage. See page 22.
29
Storage PLACING SNOWMOBILE IN STORAGE
1 . Thoroughly clean your machine with a hose to remove dirt, rocks, or grass from track area. Remove debris from inside console and hood areas.
IMPORTANT: Do not spray water around engine or carburetor. Allow all parts ample time to dry.
2. Clean and polish the hood, pan, and tunnel with .an automotive-type wax. Use an upholstery cleaner on the seat. If metal parts are scratched or bare, touch up these areas with paint. Oil or paint bottom of skis to prevent rust. See your John Deere dealer for matching paint.
3. Check condition of all parts and assemblies so that needed parts may be ordered and installed during the summer months. Check cap screws and components for tightness. See page 26.
4. Siphon fuel from tank. Start engine and run it out of fuel at IDLE SPEED. Close fuel shut-off valve. Check in-line fuel filter for contamination and replace as necessary. See page 16.
5. Remove spark plugs and add 1 teaspoon of John Deere Snowmobile Oil into each spark plug hole.
With plugs removed, pull starter rope six or seven times to properly lubricate cylinder walls. Replace plugs.
6. Remove drive belt and lubricate the drive and driven sheave surfaces with a light grease to prevent corrosion.
7. Change oil in chain case. See page 19.
Support snowmobile so track is off ground. Loosen track adjusting screws to remove tension from track during storage.
8. Disconnect battery (if so equipped) and remove from snowmobile. Bring electrolyte to proper level, clean and charge battery. See page 25. Store in a cool, dry place.
Recharge battery in ventilated area every 30 to 40 days during the summer or keep it charged with AM32400 Battery Trickle Charger. See page 31 .
9. Place a cover over your snowmobile and store it inside if at all possible.
30 Storage
REMOVING SNOWMOBILE FROM STORAGE
1. Check for loose cap screws and components if not done prior to storage. See page 26.
2. Wipe all grease, oil, or other lubricants from drive and driven sheave and reinstall drive belts.
3. Fill fuel tank with properly mixed fuel. See page 6. Open fuel shut-off valve.
4. Check battery electrolyte level, charge it fully and install in snowmobile. See page 25.
5. Check throttle and brake controls for proper adjustment and operation. See pages 14 and 19.
6. Adjust track to proper tension. See page 20.
7. Familiarize yourself once more with all operating and safety suggestions.
8 . Start engine and test operation of emergency stop switch, headlight, dimmer switch, taillight and stoplight.
NOTE: When first starting an electric-start machine use the manual starting method to get fuel to the carburetor. This will prevent battery drain during the initial start.
9. Take the snowmobile on a short ride at slow operating speed. Increase speed as you become assured machine is operating properly.
-
Accessories The following items are all available from your
John Deere Dealer.
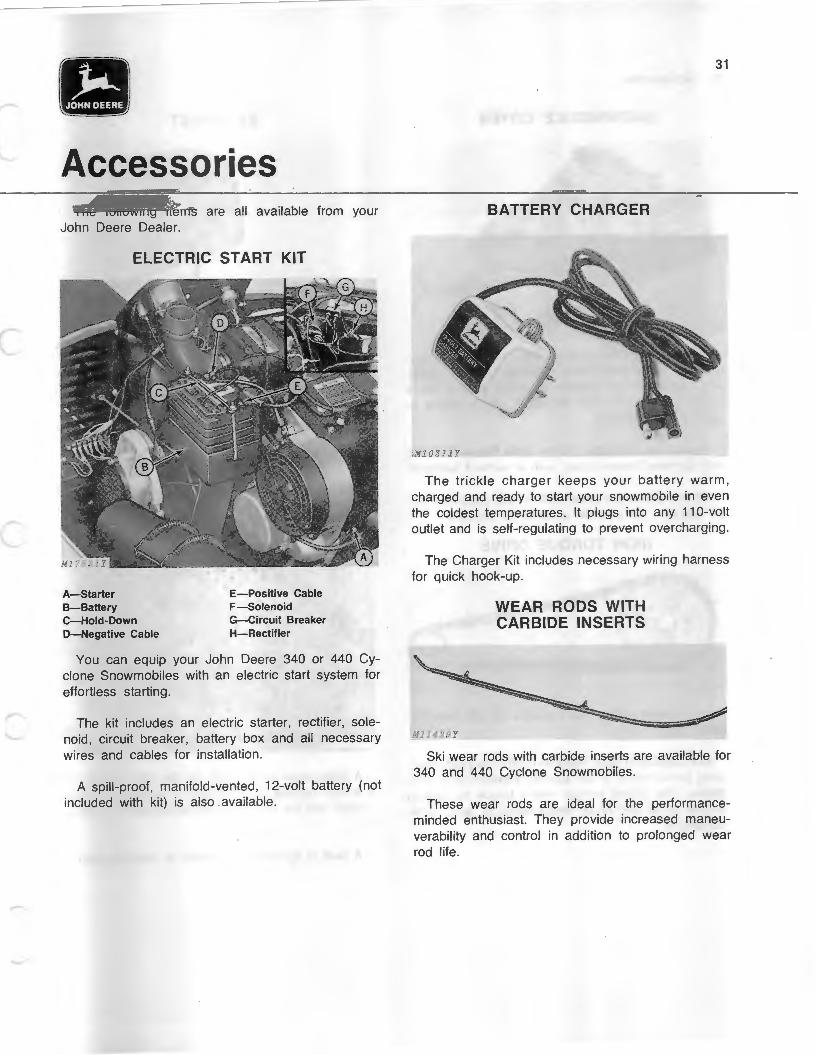
ELECTRIC START KIT
A-Starter B-Battery C-Hold-Down D-Negative Cable
E- Positive Cable F-Solenoid G-Circuit Breaker H-Rectifier
You can equip your John Deere 340 or 440 Cyclone Snowmobiles with an electric start system for effortless starting.
The kit includes an electric starter, rectifier, solenoid , circuit breaker, battery box and all necessary wires and cables for installation.
A spill-proof, manifold-vented, 12-volt battery (not included with kit) is also available.
31
BATTERY CHARGER
M10311Y
The trickl e charger keeps your battery warm , charged and ready to start your snowmobile in even the coldest temperatures. It plugs into any 11 0-volt outlet and is self-regulating to prevent overcharging.
The Charger Kit includes necessary wiring harness for quick hook-up.
M11429Y
WEAR RODS WITH CARBIDE INSERTS
Ski wear rods with carbide inserts are available for 340 and 440 Cyclone Snowmobiles.
These wear rods are ideal for the performanceminded enthusiast. They provide increased maneuverability and control in addition to prolonged wear rod life.
32 Accessories
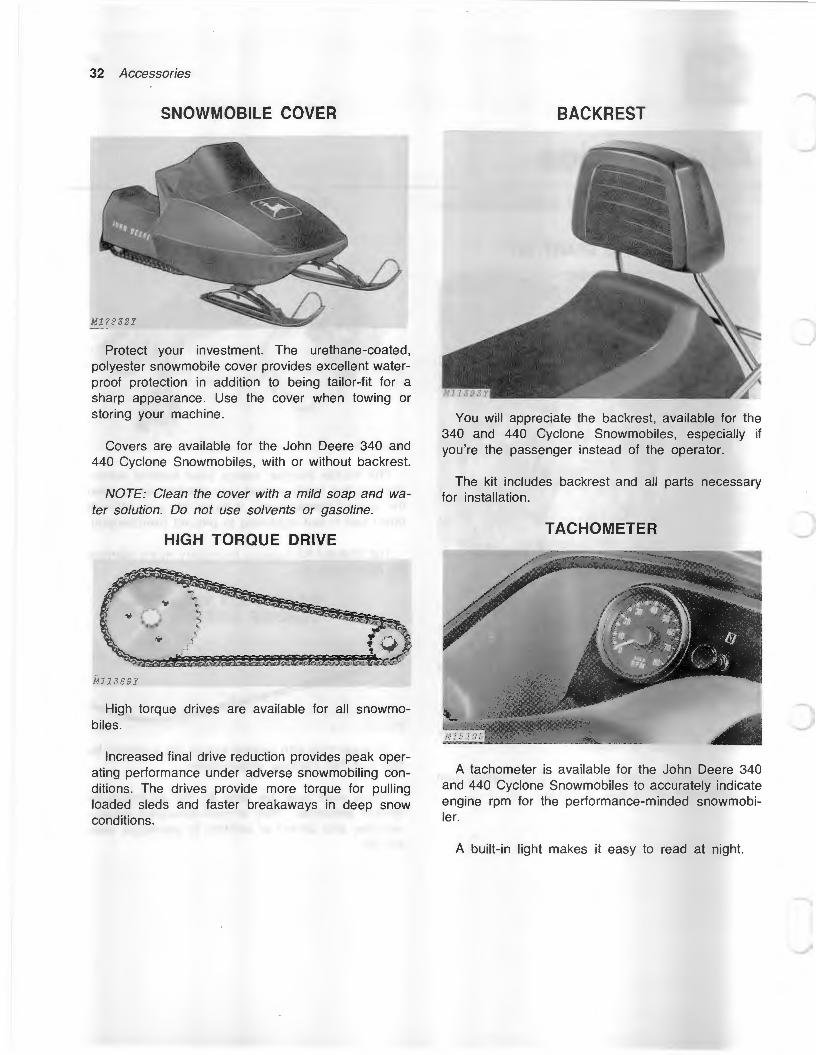
SNOWMOBILE COVER
Protect your investment. The urethane-coated, polyester snowmobile cover provides excellent waterproof protection in addition to being tailor-fit for a sharp appearance. Use the cover when towing or storing your machine.
Covers are available for the John Deere 340 and 440 Cyclone Snowmobiles, with or without backrest.
NOTE: Clean the cover with a mild soap aAd water solution. Do not use solvents or gasoline.
HIGH TORQUE DRIVE
) /
M11389Y
High torque drives are available for all snowmobiles.
Increased final drive reduction provides peak operating performance under adverse snowmobiling conditions. The drives provide more torque for pulling loaded sleds and faster breakaways in deep snow conditions.
BACKREST
You will appreciate the backrest, available for the 340 and 440 Cyclone Snowmobiles, especially if you're the passenger instead of the operator.
The kit includes backrest and all parts necessary for installation.
TACHOMETER
A tachometer is available for the John Deere 340 and 440 Cyclone Snowmobiles to accurately indicate engine rpm for the performance-minded snowmobiler.
A built-in light makes it easy to read at night.
Accessories 33
HOURMETER
This accessory helps you determine when it is time to perform the periodic services necessary to keep your snowmobile running smoothly. It is excellent for persons operating a snowmobile rental service. The hourmeter functions only with electric start-equipped snowmobiles.
The kit comes complete with wiring harness and parts required for installation.
34 Accessories
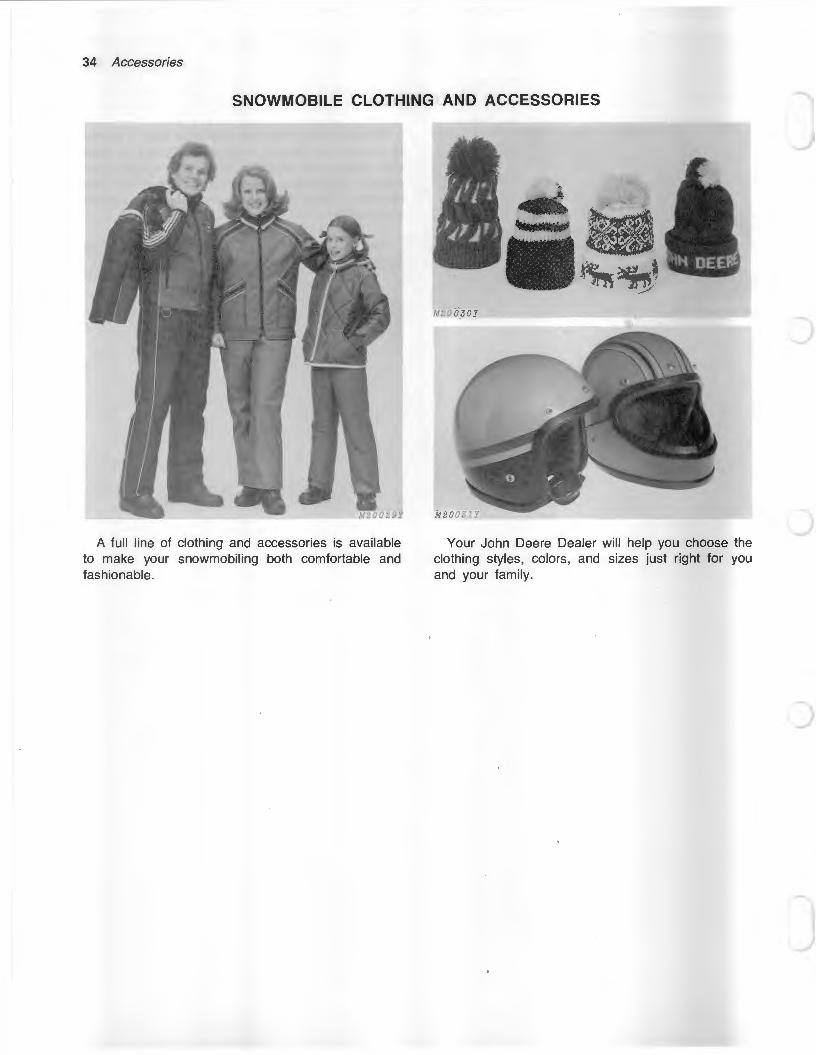
SNOWMOBILE CLOTHING AND ACCESSORIES
A full line of clothing and accessories is available to make your snowmobiling both comfortable and fashionable.
Your John Deere Dealer will help you choose the clothing styles, colors, and sizes just right for you and your family.
)
J
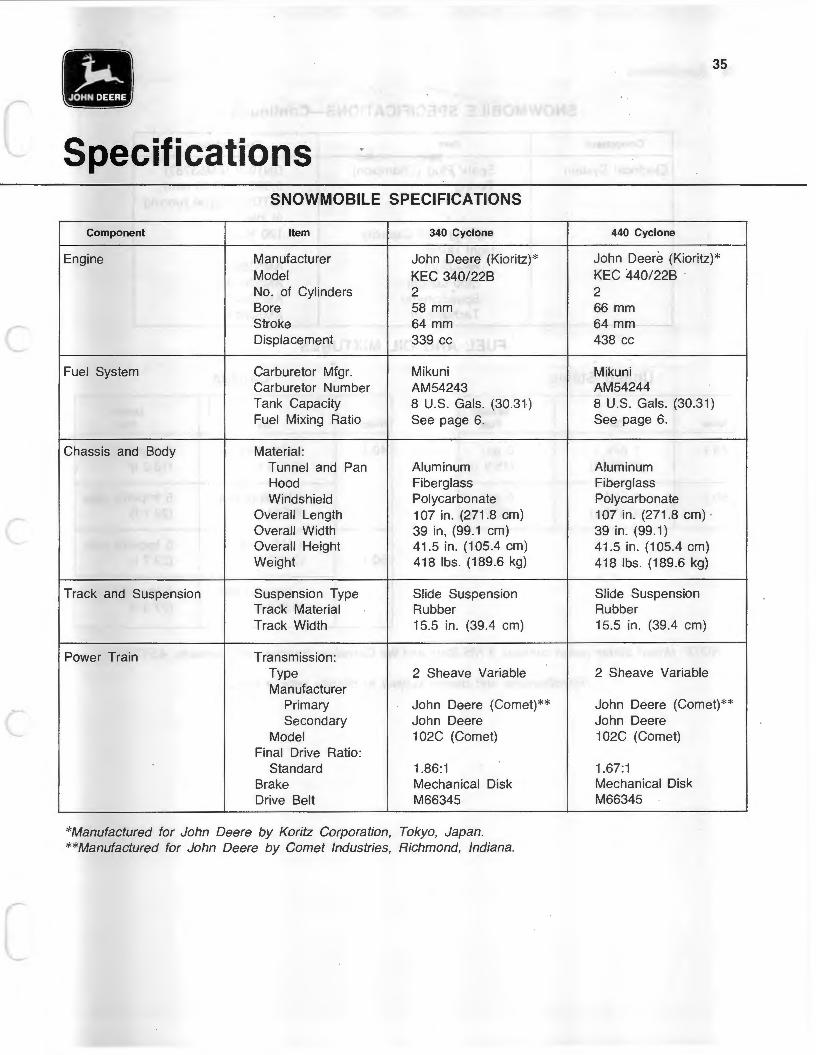
Specifications SNOWMOBILE SPECIFICATIONS
Component
Engine
Fuel System
Chassis and Body
Track and Suspension
Power Train
Item
Manufacturer Model No. of Cylinders Bore Stroke Displacement
Carburetor Mfgr. Carburetor Number Tank Capacity Fuel Mixing Ratio
Material: Tunnel and Pan Hood Windshield
Overall Length Overall Width Overall Height Weight
Suspension Type Track Material Track Width
Transmission : Type Manufacturer
Primary Secondary
Model Final Drive Ratio:
Standard Brake Drive Belt
340 Cyclone
John Deere (Kioritz)* KEC 340/228 2 58 mm 64 mm 339 cc
Mikuni AM54243 8 U.S. Gals. (30.31) See page 6.
Aluminum Fiberglass Polycarbonate 107 in. (271.8 em) 39 in. (99.1 em) 41.5 in. (1 05.4 em) 418 lbs. (189.6 kg)
Slide Suspension Rubber 15.5 in. (39.4 em)
2 Sheave Variable
John Deere (Comet)** John Deere 1 02C (Comet)
1.86:1 Mechanical Disk M66345
*Manufactured for John Deere by Koritz Corporation, Tokyo, Japan. **Manufactured for John Deere by Comet Industries, Richmond, Indiana.
35
440 Cyclone
John Deere (Kioritz)* KEC 440/228 2 66 mm 64 mm 438 cc
Mikuni AM54244 8 U.S. Gals. (30.31) See page 6.
Aluminum Fiberglass Polycarbonate 107 in. (271.8 em) 39 in. (99.1) 41.5 in. (1 05.4 em) 418 lbs. (189.6 kg)
Slide Suspension Rubber 15.5 in. (39.4 em)
2 Sheave Variable
John Deere (Comet)** John Deere 1 02C (Comet)
1.67:1 Mechanical Disk M66345
36 Specifications
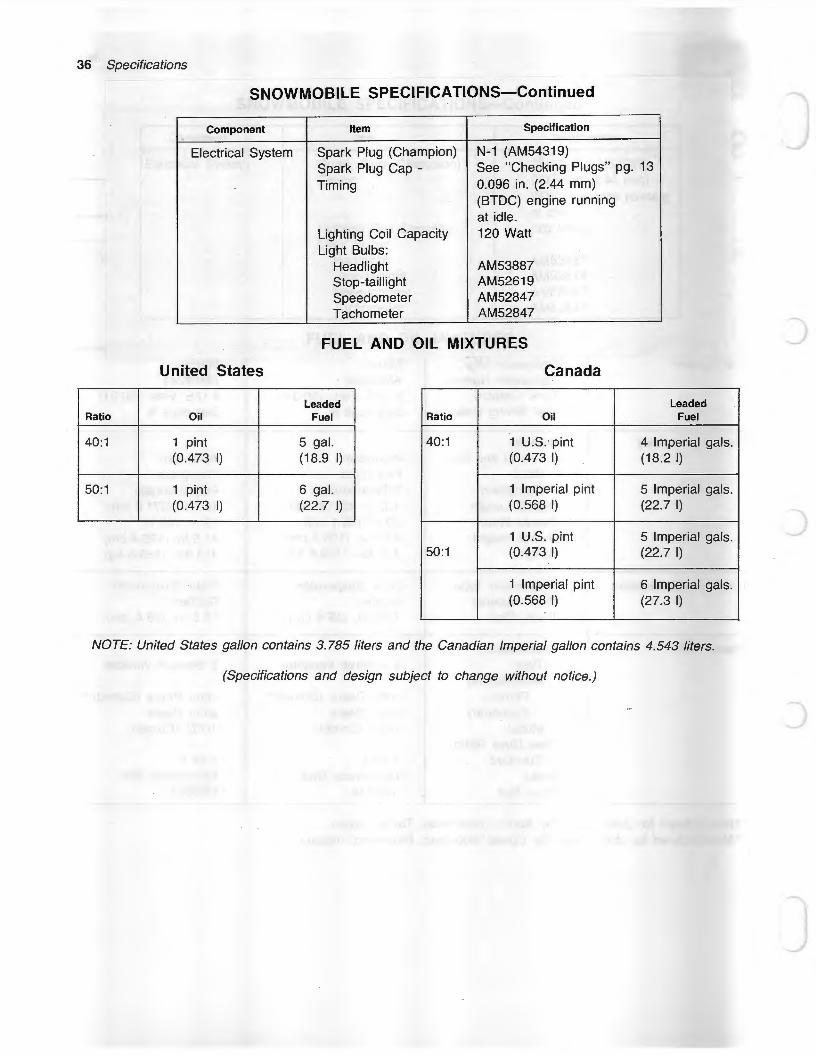
SNOWMOBILE SPECIFICATIONS-Continued
Component Item Specification
Electrical System Spark Plug (Champion) N-1 (AM54319) Spark Plug Cap - See "Checking Plugs" pg. 13
Timing 0.096 in. (2.44 mm) (BTDC) engine running at idle.
Lighting Coil Capacity 120 Watt Light Bulbs:
Headlight AM53887 Stop-taillight AM52619 Speedometer AM52847 Tachometer AM52847
FUEL AND OIL MIXTURES
United States Canada
Leaded Leaded Ratio Oil Fuel Ratio Oil Fuel
40:1 1 pint 5 gal. 40:1 1 U.S.· pint 4 Imperial gals. (0.473 I) (18.9 I) (0.473 I) (1 8.2 I)
50:1 1 pint 6 gal. 1 Imperial pint 5 Imperial gals. (0.473 I) (22.7 I) (0.568 I) (22.7 I)
1 U.S. pint 5 Imperial gals. 50:1 (0.473 I) (22.7 I)
1 Imperial pint 6 Imperial gals. (0.568 I) (27.3 I)
NOTE: United States gallon contains 3.785 liters and the Canadian Imperial gallon contains 4.543 liters.
(Specifications and design subject to change without notice.)
)
37
A Guide to Safe Snowmobiling Snowmobiling has opened up a whole new world
of winter family fun. But like any sport involving machines capable of high speed, there is a certain degree of hazard.
You can significantly reduce, or perhaps even eliminate, the possibility of an accident by being aware of the hazards of improper snowmobiling and by operating your snowmobile in a responsible manner.
The following tips provide a guide to safe snowmobiling. Play it smart . .. play it safe . .. and have fun.
General Safety Tips
Observe all safety precautions contained on the inside front two pages of this operator's manual.
Ask your John Deere Dealer for a free copy of the 12-page "Guide to Safe Snowmobiling."
Respect the property of others. Keep snowmobiling fun for all. Observe the Code of Ethics on page 11.
Join a snowmobile club. If there's none in your area, start one. Keep alert to current and recommended snowmobile legislation. Protect the snowmobiling sport.
Observe all governmental regulations regarding use of streets, highways and railroad right-of-ways. Avoid trespassing on private property . Don 't cut fences.
M1 0100
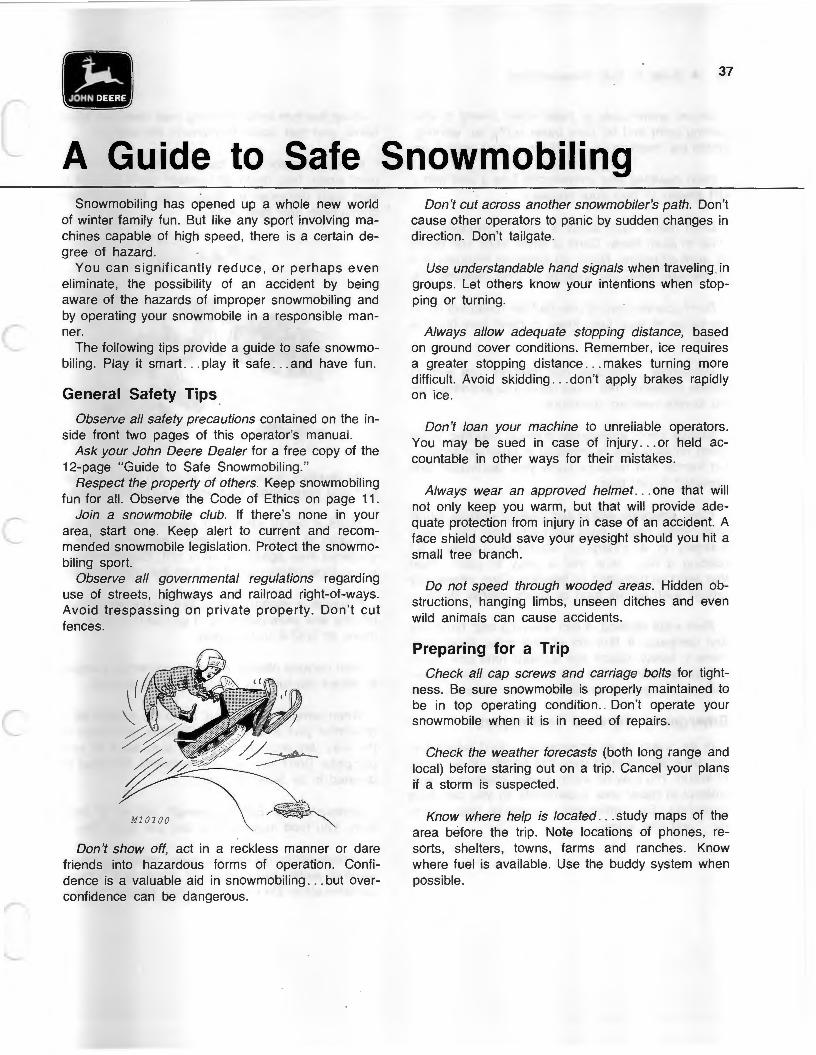
Don't show off, act in a reckless manner or dare friends into hazardous forms of operation. Confidence is a valuable aid in snowmobiling . .. but overconfidence can be dangerous.
Don't cut across another snowmobiler's path. Don't cause other operators to panic by sudden changes in direction. Don't tailgate.
Use understandable hand signals when traveling in groups. Let others know your intentions when stopping or turning.
Always allow adequate stopping distance, based on ground cover conditions. Remember, ice requires a greater stopping distance .. . makes turning more difficult. Avoid skidding ... don't apply brakes rapidly on ice.
Don't loan your machine to unreliable operators. You may be sued in case of injury . .. or held accountable in other ways for their mistakes.
Always wear an approved helmet . .. one that will not only keep you warm, but that will provide adequate protection from injury in case of an accident. A face shield could save your eyesight should you hit a small tree branch.
Do not speed through wooded areas. Hidden obstructions, hanging limbs, unseen ditches and even wild animals can cause accidents.
Preparing for a Trip
Check all cap screws and carriage bolts for tightness. Be sure snowmobile is properly maintained to be in top operating condition. Don't operate your snowmobile when it is in need of repairs.
Check the weather forecasts (both long range and local) before staring out on a trip. Cancel your plans if a storm is suspected.
Know where help is located . .. study maps of the area before the trip. Note locations of phones, resorts, shelters, towns, farms and ranches. Know where fuel is available. Use the buddy system when possible.
38 A Guide to Safe Snowmobiling
Secure snowmobile to trailer when driving to your starting point and be sure trailer lights are working. Winch the machine on the trailer .. . don't drive it on.
Don't overload your snowmobile. Use a sled with a stiff towbar to haul your supplies.
Don't risk a heart attack if your snowmobile gets stuck in deep snow. Carry a small block and tackle for such situations. Never let someone manually pull on the skis while you attempt to drive machine out.
Don't operate beyond one-half the round trip cruising range of your fuel. Keep in mind how far it is home.
Remember ... improper fuel mixtures can lead to engine problems that could leave you stranded during severe weather conditions.
Always carry emergency survival supplies when going on long trips or traveling in unknown territory. Let friends and relatives know your destination and expected arrival time.
Carry adequate eating and cooking utensils (small pans, kettle, plates, cups, etc.) on longer trips. Carry matches in a waterproof container ... candles for building a fire . . . food that is easy to pack . .. food that won 't be damaged by freezing. Carry emergency rations such as dry food or space energy sticks.
Pack extra clothing, a tent, sleeping bag, hand axe and compass. A first aid kit and snow shoes may come in handy. Space age blankets (one side silverfoil) furnish warmth and also can be used as heat reflectors or signaling devices for aerial search parties.
Emergency Survival Techniques
In the event of an emergency . .. don't panic. Relax, think the situation over and decide on a course of action. You may be within a short distance of help. Attempt to repair your snowmobile so you can drive to safety. But rem e mber, conserve your energy ... and stay warm.
Avoid frostbite while servicing your machine. Keep hands and feet active to promote circulation.
Mentally retrace your route. Where was the last point where help could be located? Don't attempt to walk long distances in deep snow. Make yourself comfortable until help arrives.
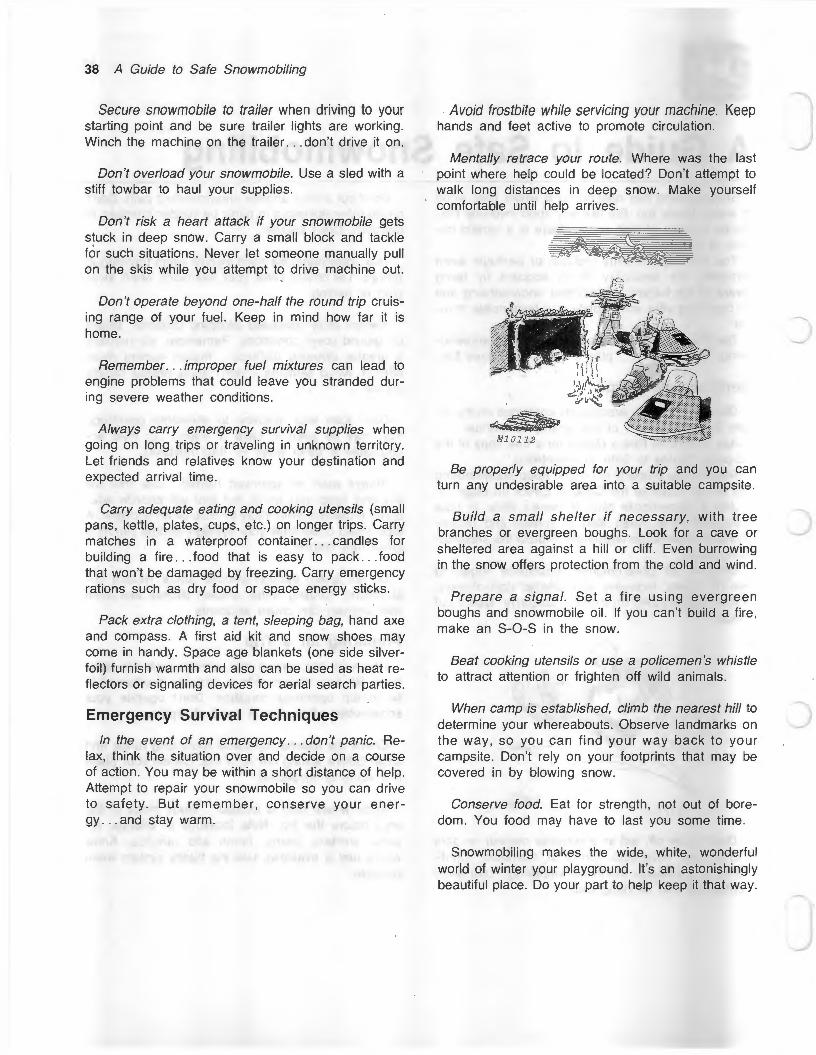
Be properly equipped for your trip and you can turn any undesirable area into a suitable campsite.
Build a small shelter if necessary, with tree branches or evergreen boughs. Look for a cave or sheltered area against a hill or cliff. Even burrowing in the snow offers protection from the cold and wind.
Prepare a signal. Set a fire using evergreen boughs and snowmobile oil. If you can't build a fire, make an S-0-S in the snow.
Beat cooking utensils or use a policemen 's whistle to attract attention or frighten off wild animals.
When camp is established, climb the nearest hill to determine your whereabouts. Observe landmarks on the way, so you can find your way back to your campsite. Don't rely on your footprints that may be covered in by blowing snow.
Conserve food. Eat for strength, not out of boredom. You food may have to last you some time.
Snowmobiling makes the wide , white, wonderful world of winter your playground. It's an astonishingly beautiful place. Do your part to help keep it that way.
)
)
-

39
MEMORANDA

40
MEMORANDA
)
)
-
Safety Precautions /'). CAUTION: A snowmobile is no safer than .. the person operating it. Improper use or
maintenance on the part of the operator can result in injury. To reduce this possibility, follow these safety suggestions.
Preparation
Before starting the engine, read your operator's manual from cover to cover. Knowledge can prevent accidents.
Always operate your throttle and brake controls several times before you start your engine. Stuck or frozen controls could cause serious injury or damage.
Know your controls. Learn how to stop in an emergency.
Know your state, provincial, federal and local laws pertaining to snowmobiling. Respect property of others. Don't spoil this fine winter sport by creating a bad image. See "Code of Ethics" on page 11 .
Never add fuel when smoking or while engine is running. Use a safe gasoline container. Always use fresh, clean fuel of the proper mixture. See page 6.
Wear clothing designed for snowmobiling . .. avoid frostbite. Never wear scarves, loose belts, or clothes that could catch on moving parts or tree limbs.
Always wear eye and headgear protection to guard against injury.
Avoid sun blindness. Wear properly tinted goggles or face shields. Never wear yellow eye protection in the bright sun.
Do not allow anyone to operate snowmobile without proper instructions. Take proper precautions before allowing young operators to drive.
Always use the "buddy system" on long trips. Remember you can drive farther in 30 minutes than you can walk in a day.
Carry adequate tools and repair items for emergency field repairs.
Don't overload your snowmobile . .. use sleds to carry provisions.
Always carry emergency survival supplies when going on long trips. Let friends and relatives know your destination and expected arrival time.
Operation
Give complete and undivided attention to your snowmobile . .. don't be a show-off.
Do not operate snowmobile in crowded areas or steer the machine toward persons.
Do not operate snowmobile too close to avalanche areas, or on other unsafe terrain where spills could occur.
Observe all state, provincial, federal and local regulations, especially those with regard to operating on streets and highways.
When crossing highways (where permitted by law) always stop, look both directions, and cross at a 90-degree angle. Post guards when crossing in groups.
Do not operate snowmobiles on or near railroad tracks. Trains cannot always be heard above sound of snowmobile engine . .. it is difficult to escape from between tracks.
Skiers and snowmobiles don 't mix on the same hillsides. Avoid ski slopes.
n
( )
u