journal msta - cdn.ymaws.com · of chemicals, apparatus, and instruments are illustrative and...
TRANSCRIPT
ournalJA PUBLICATION OF THE MICHIGAN SCIENCE TEACHERS ASSOCIATION
MSTA
ARTICLES
3 Making Science a Part of the School Culture for both students and parents
9 A Case study of a K-12 Long-Term ROV Educational Program
21 The National Geographic Society Geo-Inquiry Process: Putting
Science and Geography Together
CLASSROOM ACTIVITIES
27 Rocks and Minerals Lab Classroom Activity
33 A Comparison of Ionic Compounds – Molarity, Weight
Percent, and the Deliquescence of Lithium Salts
41 I See the Light
48 Exploring Color Changing Lipstick Through Simple
Indicators
SPRING 2020 VOLUME 65.1
FEATURED ACTIVITY
48 Exploring Color Changing Lipstick Through Simple Indicators

2 MSTA Journal | SPRING 2020
Experiments, laboratory activities, demonstrations, and other descriptions of the use of chemicals, apparatus, and instruments are illustrative and directed at qualified teachers. Teachers planning to use materials from MSTA Journal should consider procedures for laboratory and classroom safety to meet their local needs and situation. MSTA Journal cannot assume responsibility for uses made of its published material.
StaffEditor – Chris Chopp Design & Layout – Shawn Detlor
Article SubmissionArticles for publication in the MSTA Journal are invited on a contribution basis and are subject to editorial review. Please submit articles via email to Chris Chopp. Every attempt will be made to publish within a year after approval for publication.
Chris Chopp, MSTA Journal Editor E-mail: [email protected]
Other publications are hereby granted permission to reproduce articles from the MSTA Journal provided the publication and author are properly credited and a copy of the publication is forwarded to the Association for its records. Copyrighted articles are noted, and permission to use them should be requested directly from the authors.
The MSTA Journal is published two times per year and sent to approximately 2,000 MSTA members. Inquiries should be sent to:
MSTA Office, 1390 Eisenhower Place, Ann Arbor, Michigan 48108. Phone (734) 973-0433. Fax (734) 677-2407.
Membership information is available on our website: http://www.msta-mich.org
MS TA BOARD MEMBERSExecutive Director – Robby CramerExecutive Director – Betty CrowderPresident – Holly McGoranImmediate Past President – Brian PetersonSecretary – Sandra YaremaTreasure – Mike KleinParliamentarian – Marlenn MaickiDirectors at Large – Patricia Richardson, Diana Matthews, April HolmanHigher Education Director – June L. Teisan, Ph.DElementary Director – Crystal BrownMiddle School Director – Yonee’ Bryan-KuiphoffHigh School Director – Kristy Butler Curriculum Director – VacantExecutive Editor – VacantJournal Editor – Chris ChoppNewsletter Editor – Crystal BrownHistorian – VacantAwards – Marlenn MaickiMembership Chair - Kathy MirakovitzTechnology Chair – Richard BacalorSpecial Education- Larry KolopajloEvolution Committee – Greg ForbesScience Matters Network – Richard BacalorDirector of Under Represented Groups – Richard Bacalor2021 Conference Chair – Richard Bacalor Assistant Conference Chair – VacantSCECH’s Coordinator- Jennifer Burns
REGIONAL DIRECTORSRegion 1 – Donna HertelRegion 2 – Jenny VanDaeleRegion 3 – Sarah MurphyRegion 4 – Susan TateRegion 5 – Conni CrittendenRegion 6 – Laura RitterRegion 7- Terry GrabillRegion 8-Megan CoonanRegion 9 –Jennifer RichmondRegion 10 –Carolyn MammenRegion 11- Chris PawleyRegion 12 –Jackie HuntoonRegion 13- VacantRegion 14 – Lynn Thomas
STATE ORG ANIZATION REPRESENTATIVESMABT- VacantMAEOE- Rebecca DurlingMCCB-LuAnne ClarkMCTA- Mary Jordan McMasterMDE- Tamara SmolekMDSTA-Erica BallardMEA- Christie Morrison ThomasMESTA- Timothy NeasonMIAAPT- James GellMSELA- Marlenn MaickiMSO- VacantSCST-Sandra YaremaDMAPT-Jeff Conn
ournalJA PUBLICATION OF THE MICHIGAN SCIENCE TEACHERS ASSOCIATION
MSTA

3msta-mich.org | ARTICLES
Making Science a Part of the School Culture for Both Students and ParentsBy Jim McDonald Ph.D, Central Michigan University
INTRODUCTIONScience instruction in schools is very different with the introduction of the Next Generation Science Standards (2013). Parents may feel left behind and unfamiliar with what their child is learning in school. One way that science can become a part of the school culture is having community focused science events. We will discuss three possible events that you could organize for parents and their children that would give them an idea of the change in science instruction but also let them see that science is engaging, presented in a variety of ways, and can be connected to other subjects learned in school.
C OMMUNIT Y FOCUSED SCIENCE EVENT SWhat is a community focused science event? These events are usually informal learning experiences designed to let parents and their school age children experience hands-on activities in a setting such as a school cafeteria. There are no grades or assessments, just a fun and engaging experience for everyone.
A community focused science event can promote parental and community involvement in science education. “By showing an interest in science and making time to explore ideas and conduct simple investigations, parents can have a positive influence on children who may otherwise decide that science is too hard, too abstract, or [too] boring” (Foundation for Family Science, n.d.).
THE BENEFIT S OF C OMMUNIT Y FOCUSED SCIENCE EVENT SScience builds our knowledge and understanding of the world and allows us to create new technology and innovation and drive positive change and conservation.
There are many reasons why learning about science in school is essential. At the core, science provides the answers to many of the questions that young children ask, such as ‘Why is the sky blue?’ and ‘What makes the colors in a rainbow?’ It perfectly complements a child’s natural curiosity. As young children discover the world around them, the more they will learn about and develop a thirst for science.
4 MSTA Journal | SPRING 2020
The benefits of learning science in school early are many. Here are five reasons:
Instills a love of science: In the next decade an estimated 75 percent of jobs in the fastest growing industries will require Science, Technology, Engineering and Mathematics (STEM) skills. As a result, there’s been a strong emphasis on STEM education in schools to prepare students for the future. Science educators are fortunate in that they have a unique opportunity to instill a love of science in the early years, simply by harnessing a child’s natural curiosity. Creating amazing science experiences in school will inspire children to want to learn more and explore on their own.
Develops life-skills: Science helps children develop vital life-skills such as problem-solving, communication and research. A lot of the time, scientific results do not happen immediately and so it also teaches children to be patient and to persevere. Science is one of the most important subjects a child can learn because of its relevance to our lives and its capacity to apply these vital life-skills to everyday activities. These skills help children to generate ideas, make decisions and to use evidence to understand key issues.
Aids literacy and language development: Science experiments provide opportunities to practice writing skills and expand vocabulary through written observations and processes. Often, young learners struggle to incorporate detail into their writing. Scientific reporting mandates thorough observation and encourages learners to write detailed and accurate accounts of what they see in understandable and interesting language, a practice they can apply to all other forms of writing.
Encourages inquiry and critical thinking: Curiosity and science and engineering practices are integral to science education and practice. Through scientific inquiry, the study of science enhances critical thinking skills that can be applied to any area of learning. Critical thinking cultivates curiosity and is essential to understanding and solving problems. It allows children to find meaning in their learning and make real-world connections that impact their lives.
Helps form independent opinions and develop decision-making skills: Science teaches children not to take information for granted. It helps them separate fact from fiction. Children are taught to seek information from multiple sources and to rely on evidence to determine truth. This process provides a solid foundation for them to form independent opinions and make decisions, a skill that will serve them well throughout all facets of their life and academic pursuits.
Eleanor Duckworth, author of The Having of Wonderful Ideas (2006), wrote,
Knowing the right answer requires no decisions, carries no risks and makes no demands …. Any wrong idea that is corrected carries far more depth than if one never had a wrong idea to begin with. You master the idea much more thoroughly if you have considered alternatives, tried to work it out in areas where it didn’t work, and figured out why it was that it didn’t work.
To harness their propensity for curiosity, young children should learn science through first-hand investigative experiences and active involvement. They should ask questions, seek answers, collect data and conduct investigations. This way, science becomes a way of thinking and a platform from which to understand the world.
5msta-mich.org | ARTICLES
POSSIBLE C OMMUNIT Y FOCUSED EVENT IDEASWhat types of events can you provide that have a science focus? Here are three ideas that will provide you with a place to start. These are not meant to be all of the possibilities for planning events for parents and their children, but it will give you some choices to begin your planning process.
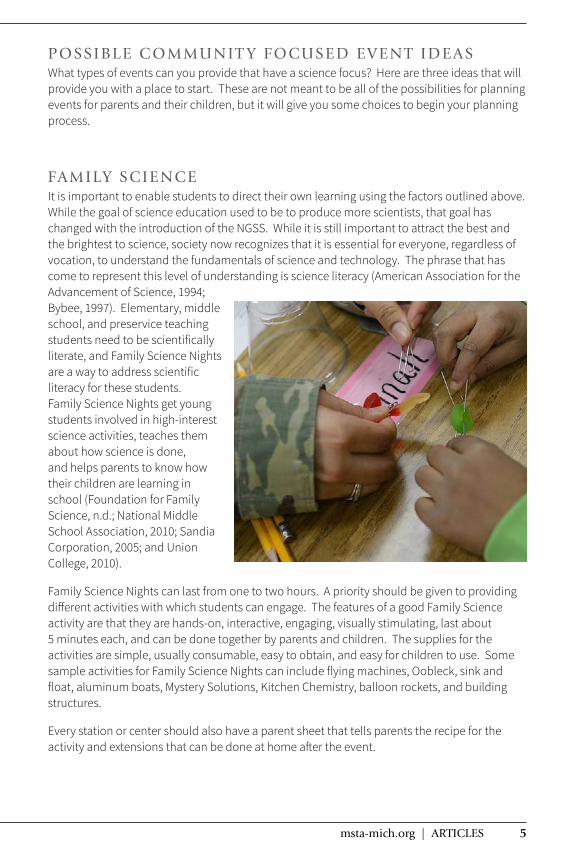
FAMILY SCIENCEIt is important to enable students to direct their own learning using the factors outlined above. While the goal of science education used to be to produce more scientists, that goal has changed with the introduction of the NGSS. While it is still important to attract the best and the brightest to science, society now recognizes that it is essential for everyone, regardless of vocation, to understand the fundamentals of science and technology. The phrase that has come to represent this level of understanding is science literacy (American Association for the Advancement of Science, 1994; Bybee, 1997). Elementary, middle school, and preservice teaching students need to be scientifically literate, and Family Science Nights are a way to address scientific literacy for these students. Family Science Nights get young students involved in high-interest science activities, teaches them about how science is done, and helps parents to know how their children are learning in school (Foundation for Family Science, n.d.; National Middle School Association, 2010; Sandia Corporation, 2005; and Union College, 2010).
Family Science Nights can last from one to two hours. A priority should be given to providing different activities with which students can engage. The features of a good Family Science activity are that they are hands-on, interactive, engaging, visually stimulating, last about 5 minutes each, and can be done together by parents and children. The supplies for the activities are simple, usually consumable, easy to obtain, and easy for children to use. Some sample activities for Family Science Nights can include flying machines, Oobleck, sink and float, aluminum boats, Mystery Solutions, Kitchen Chemistry, balloon rockets, and building structures.
Every station or center should also have a parent sheet that tells parents the recipe for the activity and extensions that can be done at home after the event.
6 MSTA Journal | SPRING 2020
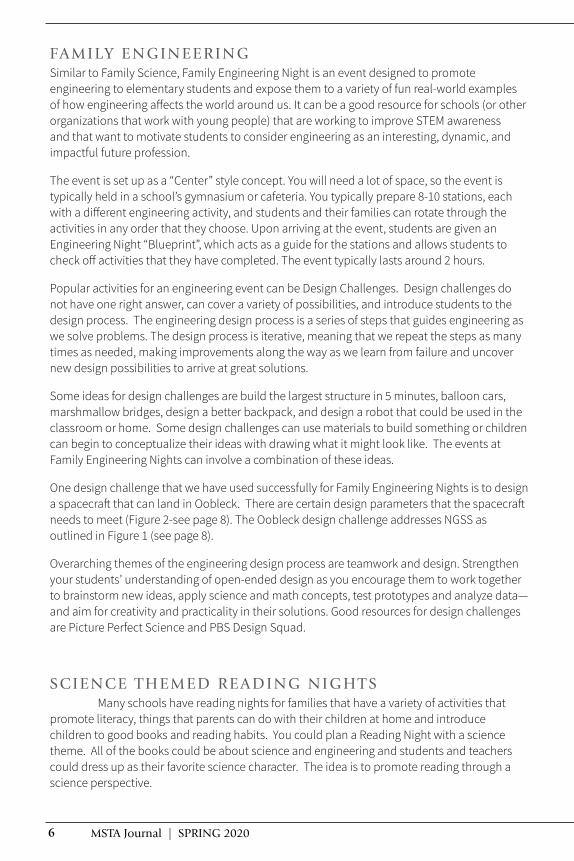
FAMILY ENGINEERINGSimilar to Family Science, Family Engineering Night is an event designed to promote engineering to elementary students and expose them to a variety of fun real-world examples of how engineering affects the world around us. It can be a good resource for schools (or other organizations that work with young people) that are working to improve STEM awareness and that want to motivate students to consider engineering as an interesting, dynamic, and impactful future profession.
The event is set up as a “Center” style concept. You will need a lot of space, so the event is typically held in a school’s gymnasium or cafeteria. You typically prepare 8-10 stations, each with a different engineering activity, and students and their families can rotate through the activities in any order that they choose. Upon arriving at the event, students are given an Engineering Night “Blueprint”, which acts as a guide for the stations and allows students to check off activities that they have completed. The event typically lasts around 2 hours.
Popular activities for an engineering event can be Design Challenges. Design challenges do not have one right answer, can cover a variety of possibilities, and introduce students to the design process. The engineering design process is a series of steps that guides engineering as we solve problems. The design process is iterative, meaning that we repeat the steps as many times as needed, making improvements along the way as we learn from failure and uncover new design possibilities to arrive at great solutions.
Some ideas for design challenges are build the largest structure in 5 minutes, balloon cars, marshmallow bridges, design a better backpack, and design a robot that could be used in the classroom or home. Some design challenges can use materials to build something or children can begin to conceptualize their ideas with drawing what it might look like. The events at Family Engineering Nights can involve a combination of these ideas.
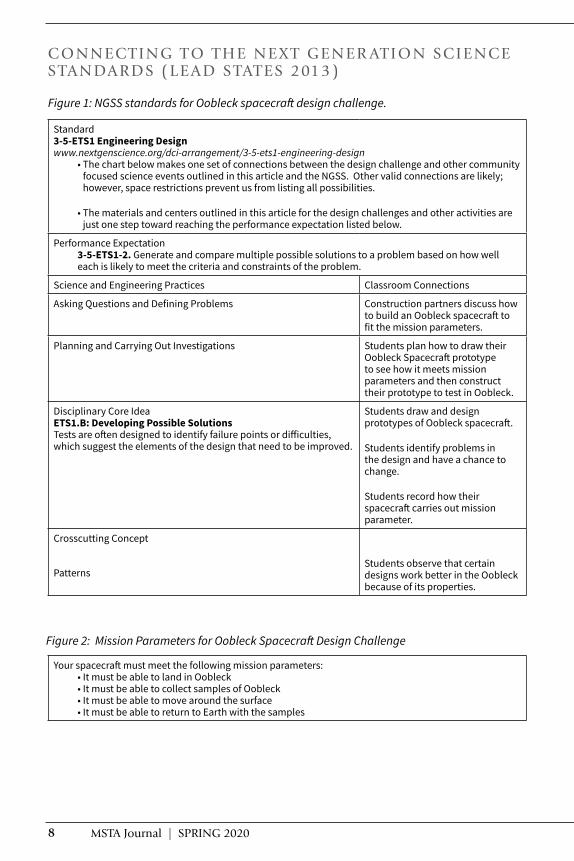
One design challenge that we have used successfully for Family Engineering Nights is to design a spacecraft that can land in Oobleck. There are certain design parameters that the spacecraft needs to meet (Figure 2-see page 8). The Oobleck design challenge addresses NGSS as outlined in Figure 1 (see page 8).
Overarching themes of the engineering design process are teamwork and design. Strengthen your students’ understanding of open-ended design as you encourage them to work together to brainstorm new ideas, apply science and math concepts, test prototypes and analyze data—and aim for creativity and practicality in their solutions. Good resources for design challenges are Picture Perfect Science and PBS Design Squad.
SCIENCE THEMED READING NIGHT S Many schools have reading nights for families that have a variety of activities that promote literacy, things that parents can do with their children at home and introduce children to good books and reading habits. You could plan a Reading Night with a science theme. All of the books could be about science and engineering and students and teachers could dress up as their favorite science character. The idea is to promote reading through a science perspective.
7msta-mich.org | ARTICLES
Part of the event could be science centers as described in the Family Science and Family Engineering events above. This can combine the engagement of science activities with learning about careers and science concepts in a fun and interactive manner. Just a few centers would be enough to get parents and children working together on an investigation or to design something.
C ONCLUSIONHolding community focused science events can promote a culture of science for your school, parents, and students. Parents benefit from finding out what their child is learning in school and gain some insight as to how they can keep their children on track to learn challenging science in the classroom. When a student comes home frustrated because science can be hard and tedious, parents will have information from these school events to help their children stay the course and keep on learning. Parents and children also benefit by getting some ideas of science that they can do at home.
REFERENCESAmerican Association for the Advancement of Science. (1994). Benchmarks for science literacy. Washington, DC:
Author.
Bybee, R. W. (1997). Achieving scientific literacy: From purposes to practices. Portsmouth, NH: Heinemann.
Duckworth, E. (2006). The having of wonderful ideas. New York, NY: Teachers College Press.
Foundation for Family Science (n.d.). Family science. Retrieved from http://integraonline.com/~familyscience.org/mission.html
NGSS Lead States. 2013. Next Generation Science Standards: For States, By States. Washington,
DC: The National Academies Press.
Morgan, E., & Ansberry, K.R. (2007). More picture-perfect science lessons: using children’s
books to guide inquiry, K-4. Arlington, Va.: NSTA Press.
PBS Design Squad. Retrieved at https://pbskids.org/designsquad/
Sandia Corporation. (2005). Family science night. In Adventures in science and knowledge. Retrieved from http://www.sandia.gov/ciim/ASK/html/elementary/familynight.htm
Science Buddies (2010). Teacher tools family science night. Retrieved from http://www.sciencebuddies.org/science-fair-projects/Teacher_Tools_FamilyScienceNight.shtml
Union College (2010). Family science night handbook. Retrieved from http://www.union.edu/academic_depts/kids/family_science_night_handbook/index.php
8 MSTA Journal | SPRING 2020
C ONNECTING T O THE NEXT GENER ATION SCIENCE S TANDARDS (LEAD S TATES 2013)
Standard3-5-ETS1 Engineering Design www.nextgenscience.org/dci-arrangement/3-5-ets1-engineering-design
• The chart below makes one set of connections between the design challenge and other community focused science events outlined in this article and the NGSS. Other valid connections are likely; however, space restrictions prevent us from listing all possibilities.
• The materials and centers outlined in this article for the design challenges and other activities are just one step toward reaching the performance expectation listed below.
Performance Expectation3-5-ETS1-2. Generate and compare multiple possible solutions to a problem based on how well each is likely to meet the criteria and constraints of the problem.
Science and Engineering Practices Classroom Connections
Asking Questions and Defining Problems Construction partners discuss how to build an Oobleck spacecraft to fit the mission parameters.
Planning and Carrying Out Investigations Students plan how to draw their Oobleck Spacecraft prototype to see how it meets mission parameters and then construct their prototype to test in Oobleck.
Disciplinary Core IdeaETS1.B: Developing Possible Solutions Tests are often designed to identify failure points or difficulties, which suggest the elements of the design that need to be improved.
Students draw and design prototypes of Oobleck spacecraft.
Students identify problems in the design and have a chance to change.
Students record how their spacecraft carries out mission parameter.
Crosscutting Concept
PatternsStudents observe that certain designs work better in the Oobleck because of its properties.
Figure 1: NGSS standards for Oobleck spacecraft design challenge.
Figure 2: Mission Parameters for Oobleck Spacecraft Design Challenge
Your spacecraft must meet the following mission parameters:• It must be able to land in Oobleck• It must be able to collect samples of Oobleck• It must be able to move around the surface• It must be able to return to Earth with the samples
9msta-mich.org | ARTICLES
A Case study of a K-12 Long-Term ROV Educational ProgramBy Mark Gleason, PhD Ruth Carol Olsen Laugal and Mike Berenkowski
ABS TR ACTScience Technology Engineering and Math, or as it is known STEM, education can and does play a role in providing people of all ages and backgrounds opportunities to gain a wider understanding of their world. Often STEM activities are only directed at the K-12 audience, and sometimes in college, but the program activities described in this article can be used with people of all ages in many locations. This article will review a case study involving K-12 students that uses an activity that involves designing, then building underwater robots in teams, and then actually driving their team’s underwater robot underwater in a school pool or lake. These small robots are known as a remotely operated vehicle (ROV) and these activities can generate excitement and an interest to explore the world beneath the waves. In this article we will describe the classroom or other public venues of STEM activities using ROVs. Based on research, it can be demonstrated that people of all ages can benefit and learn from using these small robots. During the last fifteen years approximately 40,000 people have attended the programs instructed by the authors while nationwide tens of thousands more have been involved in other similar programs.
Over the past several decades, as it has happened many times, the general public’s interaction with our natural resources has evolved. Instead of the historical increased use of public areas, some years have seen a drop-in visitation to some Parks and other resource areas. However, National Park visitation continues to increase and is often reported to be at over 300 million visits a year. This may result from an increase in foreign visitation to our Parks. Plus, it is worth noting that not all-natural resource sites have the popularity of the National Parks. While both the increase and decrease in visitation experienced by some land agencies can be attributed to a range of reasons, some of these changes may be of concern in the long term.
There have been studies that demonstrated a connection between the growth of modern entertainment technology such as television, video games and internet use to the decline in nationwide Park and nature visitation. The 2006 study indicated that technology is causing a loss of interest in natural areas (Pergams & Zaradic, 2006). At the same time, a popular book by Richard Louv called “Last Child in the Woods-Saving our Children from Nature-Deficit Disorder” describes the changes in how our culture interacts with outdoors from the recent past of a fair amount of outdoor activity to little interaction by the youth of today (Louv, 2005).
Over the past few decades, Public land agencies are beginning to recognize these changes and are acknowledging the usefulness of technology in promoting the resources they are managing as well as providing for the public’s enjoyment. Embracing technology through a connection to educational programs may be one way of addressing this trend of some
10 MSTA Journal | SPRING 2020
members of the public being less interactive with nature and some public lands. STEM educational programing can play a role in promoting natural resources by using technology to demonstrate a method of generating a stronger connection for the least understood and little visited areas of our public lands: the areas found below the surface of the water. These locations are truly little visited and often not understood even by the managers of those resources. In a way this case study demonstrates that it is better to join with, than to fight the increasing interest in technology.
Historically, public land managers recognized that educational programs are one way that they can impact the public’s understanding and enjoyment of cultural and natural resources (Albright, 1985). The public often indicates that they wish to have education be part of their National Park visits (www.npca.org). Today and in past year’s many people express a desire to increase their knowledge or skills while on vacation. Education’s role in promoting the public’s understanding of natural resources can lead to policies that are based in science rather than politics or the pressures from small groups. While the role that technology plays with education in the public’s relationship to natural resources can have both positive and negative impacts, natural resources managers can, and do, use educational programs and related technology to instruct the public as well as to gain their support of public land policies.
There are many scientists and researchers who are very willing to share their studies with an interested public. A world-famous underwater explorer and scientist, Dr. Robert Ballard, the developer of many ROVs, as well as educational programs, wrote about this issue following his exploration of the shipwreck Titanic. He stated, “our Titanic expeditions also demonstrated to the doubters that science and showmanship can make a successful mix. Traditionally, scientists have been interested in science, not publicity. Sometimes it has seemed that they’ve gone out of their way to keep their discoveries from the public. But I believe if you can get the public interested, and get their support, then it’s much easier to raise money for your research.” (Ballard, 1995, p. 268) An important part of the program describe in this article is that a “real” researcher is part of the activities and “real” research equipment in the form an ROV is part of the program.
A C ASE S TUDY OF A K-12 L ONG-TERM ROV EDUC ATIONAL PROGR AMThe following is a case study of a STEM based program for K-12 that can be adapted for other age groups as well as settings. In other words, a public land manager could adapt this program into a Park setting with significant water resources.
It is well established that four-year degrees, particularly in the STEM areas, have been encouraged for students for the past several years. While academic instruction is important, it is also critical to provide students interested in STEM areas with hands-on experience. A four-phase series based on ROVs has been developed to allow students to grow academically while developing hands-on skills. If desired, Phases I, II, and IV can be offered independent of the others.
• Phase I (Middle School) – Introduce ROVs to middle school students: Have the students participate in a hands-on 1.5 to 2 hour introductory workshop where they work in groups
11msta-mich.org | ARTICLES
to design, build, and test basic ROV’s under the guidance of field experts. Additionally, the experts talk to the students about some of the applications for ROV’s and also provide them experience piloting a professional grade ROV. The purpose of this phase is to introduce the students to ROV’s and some very basic skills that are necessary to work with them.
• Phase II (8th Grade or High School) – Provide an ROV enrichment class: The students work in groups for the duration of the ROV class to design, build, test, evaluate, redesign, retest, reevaluate, etc. This experience permits the students to more fully develop the necessary hands-on skills required for working with ROV’s.
• Phase III (Preferably 9th graders or older) – ROV Experienced older students mentor younger students during the Introductory ROV workshop or enrichment class: Interested ROV experienced older students voluntarily share their gained knowledge with the younger students during the workshop. It allows the older students to gain leadership skills, while also serving as a method for maintaining their hands-on skills.
• Phase IV (preferably High School students) – ROV Field experts talk with the students about the education and career paths they have taken to arrive at their current expertise and job: Students often express an interest in a job and explore what it involves. However, they often don’t know that a wide variety of career paths exist to reach their desired goals. By exposing them to field experts, they can get a clearer picture of what the career and its requirements are, as well as potential paths to reach it.
PHASE I ROV WORKSHOP ACTIVIT Y AND PHASE I I I OLDER S TUDENT MENT ORS
Oscoda 6th Grade Workshop DesignPhase I is meant to introduce the students to the field of ROV’s. Initially, the field experts provide a general background on what an ROV is, some of the applications that they are used for, and the basic system components. Under the guidance of the field experts and high school age mentors, the students are then separated into groups of 4 – 5 students and are tasked to design, build, and test a basic ROV. Each group is responsible for the set-up and break-down of their station. Phase III is incorporated into the workshop by having ROV experienced high school student volunteers work with the other students.
The design and building are accomplished using simple materials: PVC pipes, foam, electrical tape, and prebuilt motors wired to thrusters. Testing is performed by connecting the finished ROV to a power source and carrying out simple tasks in a pool (a swimming pool is not required – any water container of appropriate size is acceptable). When time allows, the groups are encouraged to evaluate their ROV’s performance, revise their device, and retest. Ideally, though not necessary, it is beneficial if students also have the opportunity to drive a professional ROV so they can start to gain an understanding of the skills an ROV pilot uses.
Oscoda 6th Grade ROV Workshop ResultsIn a matter of a couple of hours, all of the groups designed, built, and tested an ROV. While most of the ROVs did not perform ideally, the students were able to see that they had

12 MSTA Journal | SPRING 2020
completed the engineering process of design, build and test. Additionally, since the ROV’s were not perfect, the students had the opportunity to work on their critical thinking skills, both individually and as a team, through problem solving, using the building materials in ways they had not previously considered, and determining what questions to ask. They also learned some basic physics as they began to understand the importance of flotation on their ROVs. Several groups made the connection that when the flotation was on the ROV’s bottom, the ROV immediately flipped over when placed in the water. Other groups noticed that if they had too much or too little flotation, they could not get their ROV to operate at neutral buoyancy. In all cases, as soon as they recognized the problem, they adjusted their flotation and successfully deployed their ROVs.
Whenever possible, the field experts stayed in the background to maximize the opportunity for the student mentors to work with the younger students. This provided the mentors the ability to share their expertise, but also exposes them to new ROV problems, thereby growing their knowledge base and expanding their critical thinking skills as they try to help problem solve. It also allowed for the student mentors to improve their communication skills and leadership skills as they offered guidance and encouragement to the groups.
During this workshop, many students realized they know more than they thought, which greatly impacted their confidence as evidenced by the evolving conversations. The younger students’ comments changed from, “I don’t understand how to do this” to “How about if we try…”, or “I don’t want to drive the ROV” to “Can I have a turn now?” The older students became more comfortable offering suggestions and helping the groups troubleshoot their devices. 1
1 Haglund, Jenny (2018, October 9). OAS Students Learn Problem Solving, Teamwork Skills While Building ROV’s. Iosco News, page A1.
PHASE I I 8TH GR ADE/HIGH SC HOOL ROV ENRIC HMENT CL ASS AND PHASE I I I OLDER S TUDENT MENT ORS
Oscoda ROV Enrichment Class DesignPhase II employs ROVs to provide students with the opportunity to develop the hands-on tool skills needed to work in the STEM fields through use of a wide variety of basic tools and instruments. Other opportunities for growth include problem-solving practice, as well as learning how to work both independently and as part of a group. Phase III is an option
13msta-mich.org | ARTICLES
that can be incorporated into the class structure by having ROV experienced high school mentors work with the students.
After a more in-depth discussion of ROVs and their real world applications, groups of 4 – 5 students are formed. These groups must research and design their ROV based on the available parts. Once the design is agreed upon, the students are responsible for determining the task assignments for their ROV build and testing. They are encouraged to base their assignments on the skills of their members and/or a member’s desire to learn and take on a specific skill. As the ROV construction progresses, the students work on their subsystems, testing each, then they combine the systems to determine the interactions between them. Upon build completion, the ROVs are tested in water using basic missions (MATE 2017 competition activities/challenges). 2 After finishing the initial ROV testing, the students are required to evaluate the results, make the appropriate design changes, and then retest the ROV. Upon completion of the project, each student summarizes their experiences and what they learned.
2 MATE Competition Challenges/Activities.
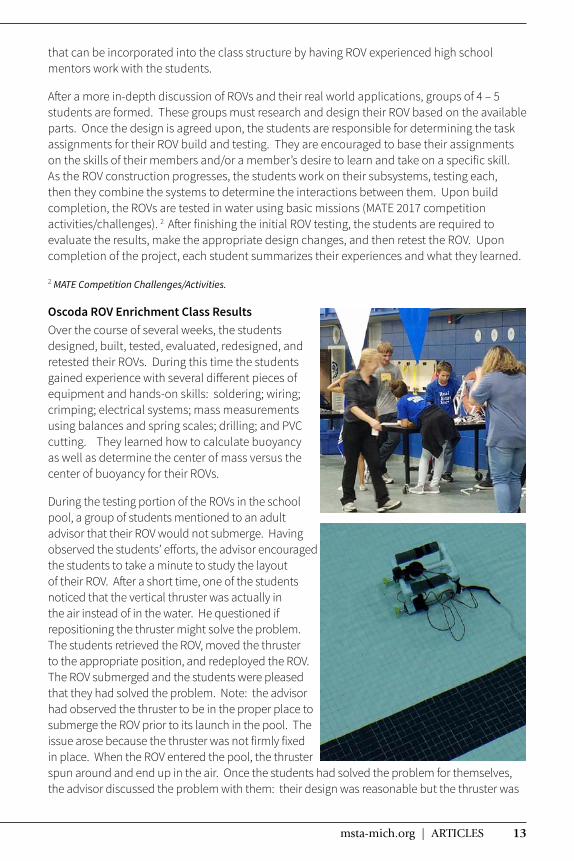
Oscoda ROV Enrichment Class ResultsOver the course of several weeks, the students designed, built, tested, evaluated, redesigned, and retested their ROVs. During this time the students gained experience with several different pieces of equipment and hands-on skills: soldering; wiring; crimping; electrical systems; mass measurements using balances and spring scales; drilling; and PVC cutting. They learned how to calculate buoyancy as well as determine the center of mass versus the center of buoyancy for their ROVs.
During the testing portion of the ROVs in the school pool, a group of students mentioned to an adult advisor that their ROV would not submerge. Having observed the students’ efforts, the advisor encouraged the students to take a minute to study the layout of their ROV. After a short time, one of the students noticed that the vertical thruster was actually in the air instead of in the water. He questioned if repositioning the thruster might solve the problem. The students retrieved the ROV, moved the thruster to the appropriate position, and redeployed the ROV. The ROV submerged and the students were pleased that they had solved the problem. Note: the advisor had observed the thruster to be in the proper place to submerge the ROV prior to its launch in the pool. The issue arose because the thruster was not firmly fixed in place. When the ROV entered the pool, the thruster spun around and end up in the air. Once the students had solved the problem for themselves, the advisor discussed the problem with them: their design was reasonable but the thruster was

14 MSTA Journal | SPRING 2020
not firmly fixed in place. Thus, in addition to their problem-solving practice, the students learned about the need for a prelaunch equipment check, which is done for real world deployment.
The expectation for the groups was to complete 60% of the tasks successfully. The students met this expectation. All teams were able to work together to complete and test their ROVs, demonstrating the students’ perseverance, as they used their problem-solving skills to accomplish their assignments.
Older ROV experienced students were on hand to help the groups with testing. They were able to improve their hands-on skills as well as their communication and leadership skills. The younger students appreciated their time and knowledge. It was a positive experience for all students involved.
Along with the hands-on work, real world applications were discussed with the students. These applications included checking for explosives; invasive species; searching for contraband; water lines; and deep sea exploration. The students were interested to find out that in northeast Michigan, ROVs are also used to study shipwrecks in the Great Lakes.
C ONCERNS T O C ONSIDER:• 8th grade is the minimum age. Younger students do not typically have the required attention
span/stamina/coordination to be able to meet the goals in a timely fashion.• The room layout must be conducive to testing their work. For example, sufficient electrical
outlets for each group.• Each group should have its own tool set containing the needed tools.• It is helpful to have extra adults with relevant experience available to work with students and to talk with them about real world applications with respect to the different skills they are learning.
PHASE IV ROV FIELD EXPER T S TALK WITH S TUDENT SWhen students are trying to determine which career path they would like to follow, it helps to bring in experts to discuss their fields with the students. Speaking to the students about their accomplishments in their career and the path they took to get there helps to broaden the students’ perspectives on how to achieve their goals. Too many times students think they should know “what they want to do when they grow up” and don’t realize that it is acceptable to have a wide variety of interests to explore.
Having an ROV expert speak with the students, especially those interested in STEM careers, can be very helpful:

15msta-mich.org | ARTICLES
• They usually have a combination of academic and hands-on training.• They work a wide variety of jobs in a wide variety of locations.• ROV piloting can be a good path to drone piloting. Skill transfer as fields evolve is critical for
staying employed. Lifelong learning is a must for any career.• The ability to work independently and with a group is important, especially when on a ship
or oil platform.• ROVs are used to support work in numerous fields: everything from archaeology to sewers.• Career setbacks can happen to anyone. Perseverance is key. Don’t give up.
PAS T RESEARC H SUPPOR T S THE USE OF ROVS WITHIN S TEM PROGR AMS. ROV technology has been useful in underwater exploration, research and STEM education. The previously mentioned case studies were designed with students as the main audience. This project, which has had over 40,000 participants, has offered many different programs (which include different ROV activities, as well as observing an ROV) that were incorporated into a number of Great Lakes educational programs at schools, museums and other public events. These case studies were part of one of the authors dissertation research. Over a number of years, ROV programs were connected to teacher in-services at Indiana Dunes National Lakeshore, for college students at NOAA Thunder Bay National Marine Sanctuary, at Clear Lake a US Forest Service camp for young people, and in education programs for adults run by the non-profit SEE-North as well as a number of other locations. The many programs led to the programs that are offered today.
These educational programs provided the hands-on ROV building exercise as well as allowing some audiences to explore underwater using a professionally built ROV controlled or operated from the surface. This ROV, built by VideoRay, can dive down to 500 feet, has two television cameras, lights, a gripper, and three motors to move it through the water. Utilizing both this small ROV and the ROV kits, educational programs were designed and then establish by practice in a pilot program over a period of months during 2004 and 2005 and then revisited in 2006 and continue to this day.
Based on several years of programing, several types of educational programs were designed with multiple partners for audiences of all ages and backgrounds. For example, one program involves young participants being able to operate the ROV while the older participants watch live television from the ROV as an educator explains what was being observed. In part, these ROV programs were modeled after the successful Jason Project programs develop by Dr Ballard (https://nautiluslive.org/people/robert-ballard) (https://www.oceanexplorationtrust.org/our-founder).
Several other locations were established to provide an environment that would generate results that were not impacted by other programs’ variables. During the time that programs were being developed, focus groups were undertaken to gather input on the design of the programs and for the questionnaires. These focus groups were conducted with groups of educators and the information collected was used for development of the questionnaires.
The Surveys included both qualitative and quantitative questions and were given to volunteer participants of the ROV educational programs. During the years that these programs were developed there were approximately 3,000 participants involved in the programs and
16 MSTA Journal | SPRING 2020
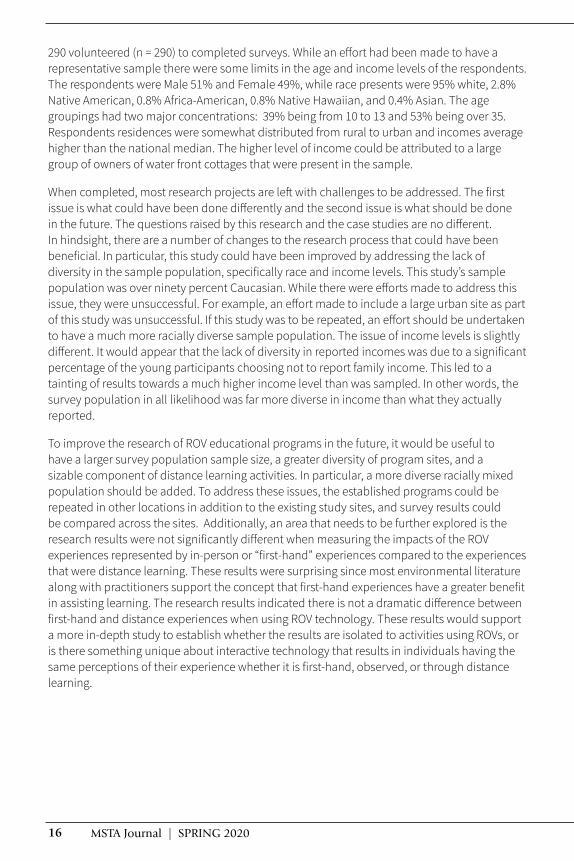
290 volunteered (n = 290) to completed surveys. While an effort had been made to have a representative sample there were some limits in the age and income levels of the respondents. The respondents were Male 51% and Female 49%, while race presents were 95% white, 2.8% Native American, 0.8% Africa-American, 0.8% Native Hawaiian, and 0.4% Asian. The age groupings had two major concentrations: 39% being from 10 to 13 and 53% being over 35. Respondents residences were somewhat distributed from rural to urban and incomes average higher than the national median. The higher level of income could be attributed to a large group of owners of water front cottages that were present in the sample.
When completed, most research projects are left with challenges to be addressed. The first issue is what could have been done differently and the second issue is what should be done in the future. The questions raised by this research and the case studies are no different. In hindsight, there are a number of changes to the research process that could have been beneficial. In particular, this study could have been improved by addressing the lack of diversity in the sample population, specifically race and income levels. This study’s sample population was over ninety percent Caucasian. While there were efforts made to address this issue, they were unsuccessful. For example, an effort made to include a large urban site as part of this study was unsuccessful. If this study was to be repeated, an effort should be undertaken to have a much more racially diverse sample population. The issue of income levels is slightly different. It would appear that the lack of diversity in reported incomes was due to a significant percentage of the young participants choosing not to report family income. This led to a tainting of results towards a much higher income level than was sampled. In other words, the survey population in all likelihood was far more diverse in income than what they actually reported.
To improve the research of ROV educational programs in the future, it would be useful to have a larger survey population sample size, a greater diversity of program sites, and a sizable component of distance learning activities. In particular, a more diverse racially mixed population should be added. To address these issues, the established programs could be repeated in other locations in addition to the existing study sites, and survey results could be compared across the sites. Additionally, an area that needs to be further explored is the research results were not significantly different when measuring the impacts of the ROV experiences represented by in-person or “first-hand” experiences compared to the experiences that were distance learning. These results were surprising since most environmental literature along with practitioners support the concept that first-hand experiences have a greater benefit in assisting learning. The research results indicated there is not a dramatic difference between first-hand and distance experiences when using ROV technology. These results would support a more in-depth study to establish whether the results are isolated to activities using ROVs, or is there something unique about interactive technology that results in individuals having the same perceptions of their experience whether it is first-hand, observed, or through distance learning.
17msta-mich.org | ARTICLES
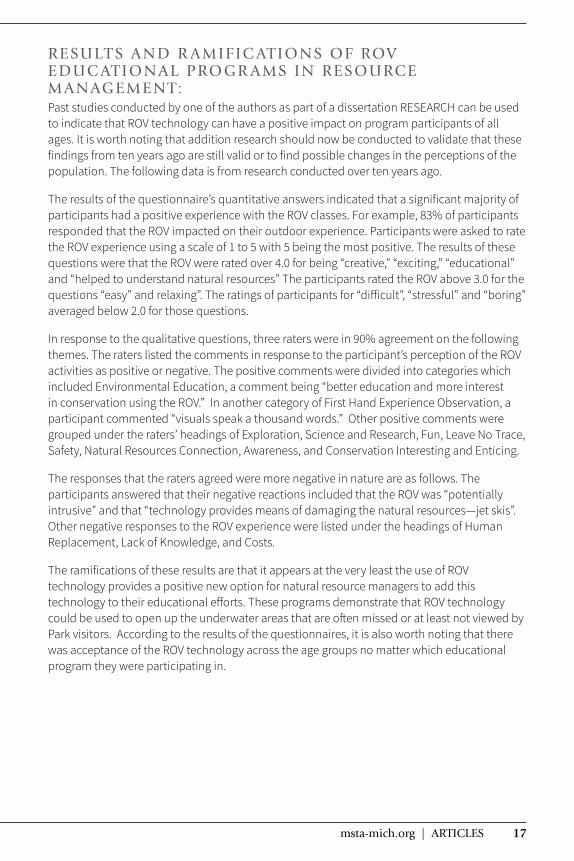
RESULT S AND R AMIFIC ATIONS OF ROV EDUC ATIONAL PROGR AMS IN RESOURCE MANAGEMENT: Past studies conducted by one of the authors as part of a dissertation RESEARCH can be used to indicate that ROV technology can have a positive impact on program participants of all ages. It is worth noting that addition research should now be conducted to validate that these findings from ten years ago are still valid or to find possible changes in the perceptions of the population. The following data is from research conducted over ten years ago.
The results of the questionnaire’s quantitative answers indicated that a significant majority of participants had a positive experience with the ROV classes. For example, 83% of participants responded that the ROV impacted on their outdoor experience. Participants were asked to rate the ROV experience using a scale of 1 to 5 with 5 being the most positive. The results of these questions were that the ROV were rated over 4.0 for being “creative,” “exciting,” “educational” and “helped to understand natural resources” The participants rated the ROV above 3.0 for the questions “easy” and relaxing”. The ratings of participants for “difficult”, “stressful” and “boring” averaged below 2.0 for those questions.
In response to the qualitative questions, three raters were in 90% agreement on the following themes. The raters listed the comments in response to the participant’s perception of the ROV activities as positive or negative. The positive comments were divided into categories which included Environmental Education, a comment being “better education and more interest in conservation using the ROV.” In another category of First Hand Experience Observation, a participant commented “visuals speak a thousand words.” Other positive comments were grouped under the raters’ headings of Exploration, Science and Research, Fun, Leave No Trace, Safety, Natural Resources Connection, Awareness, and Conservation Interesting and Enticing.
The responses that the raters agreed were more negative in nature are as follows. The participants answered that their negative reactions included that the ROV was “potentially intrusive” and that “technology provides means of damaging the natural resources—jet skis”. Other negative responses to the ROV experience were listed under the headings of Human Replacement, Lack of Knowledge, and Costs.
The ramifications of these results are that it appears at the very least the use of ROV technology provides a positive new option for natural resource managers to add this technology to their educational efforts. These programs demonstrate that ROV technology could be used to open up the underwater areas that are often missed or at least not viewed by Park visitors. According to the results of the questionnaires, it is also worth noting that there was acceptance of the ROV technology across the age groups no matter which educational program they were participating in.
18 MSTA Journal | SPRING 2020
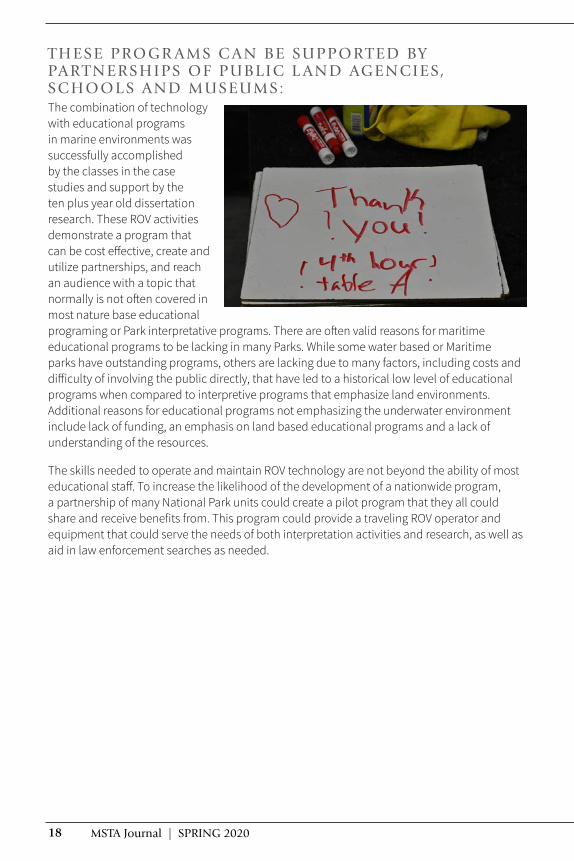
THESE PROGR AMS C AN BE SUPPOR TED BY PAR TNERSHIPS OF PUBLIC L AND AGENCIES, SC HOOL S AND MUSEUMS:The combination of technology with educational programs in marine environments was successfully accomplished by the classes in the case studies and support by the ten plus year old dissertation research. These ROV activities demonstrate a program that can be cost effective, create and utilize partnerships, and reach an audience with a topic that normally is not often covered in most nature base educational programing or Park interpretative programs. There are often valid reasons for maritime educational programs to be lacking in many Parks. While some water based or Maritime parks have outstanding programs, others are lacking due to many factors, including costs and difficulty of involving the public directly, that have led to a historical low level of educational programs when compared to interpretive programs that emphasize land environments. Additional reasons for educational programs not emphasizing the underwater environment include lack of funding, an emphasis on land based educational programs and a lack of understanding of the resources.
The skills needed to operate and maintain ROV technology are not beyond the ability of most educational staff. To increase the likelihood of the development of a nationwide program, a partnership of many National Park units could create a pilot program that they all could share and receive benefits from. This program could provide a traveling ROV operator and equipment that could serve the needs of both interpretation activities and research, as well as aid in law enforcement searches as needed.
19msta-mich.org | ARTICLES
Ready for the Next Generation!
TM
Learn more at cerealcityscience.org
Curriculum Features:Figuring out phenomenon through modelingCommon Core State Standards for ELA and Mathematics integrationTools for formative and summative assessmentTeacher Guide, Student Journals, and Answer KeyMaterials for up to 32 students
Designed for the Next Generation Science Standards,Cereal City Science units engage students in sense-makingof phenomena or designing of solutions through integrated curriculum of physical science, life science, earth science, engineering, and technology. The STEM-based units areequipped with everything needed to implement three-dimensional learning in Kindergarten through MiddleSchool classrooms.
Your partner in science instruction – Cereal City Science supports Kindergarten through Middle School educators with professional learning opportunities including Unit Training, Next Generation Science Exemplar (NGSX),Science Leadership Corps and follow-up “Kit Chats.” Educators are immersed in modeling, scienceconcepts, sense-making, and pedagogicalstrategies in full-day, in-person trainingsand workshops.
20 MSTA Journal | SPRING 2020
What’s YOUR
Element?
TAKE A FIELD TRIP TO THEMICHIGAN SCIENCE CENTER...
FROM YOUR CLASSROOM!
The ECHO program is a virtual learning experience that brings live science demonstrations and activities directly to your students over the Internet. No special hardware is required to bring a virtual visit to your classroom. A connection can simply be made with a computer, webcam, projector and high-speed Internet. All you need to do is click a link and the fun begins!
Virtual Visits Include:
• A 45-minute interactive program• Hands-on materials for 30 students shipped to your school or library• Complimentary tech check prior to program
Reserve an ECHO Program:
To make a reservation or ask any questions about ECHO, please contact our Outreach team at the phone number or email address listed below. Reservations should be made at least four weeks in advance to ensure materials can be shipped to your location.
Contact the MiSci Outreach team at313.577.8400, ext. 474 or email us at [email protected].
SAY HELLO TO ECHO

21msta-mich.org | ARTICLES
The National Geographic Society Geo-Inquiry Process: Putting Science and Geography TogetherBy Jim McDonald, Professor of Science Education, Central Michigan University
I just completed an online National Geographic Society professional development course on the Geo-Inquiry Process. I wanted to share some information with you so that you might use this with your students. You can enroll in National Geographic Society online courses for teachers at https://www.nationalgeographic.org/education/professional-development/courses/
INTRODUCTIONMore than ever, our world is inter-connected and today’s students need to understand how the complex and dynamic human and natural systems interact in order to make smart decisions and function effectively. The study of geography is essential to the comprehension of how our world works.
Bridget Barron and Linda Darling Hammonds state, “Studies have shown a positive impact on learning when students participate in lessons that require them to construct and organize knowledge, consider alternatives, engage in detailed research, inquiry, writing, and analysis, and communicate effectively to audiences” (Barron & Darling-Hammond).
Geography, the study of places and the relationships between people and their environments, seeks to understand where things are, why they are there, and how they develop and change over time. Geography offers students two avenues to understand the world, human and physical geography. Human geography studies cultural, political, technological and social systems, and physical geography studies Earths physical and natural systems.
Geographers, those who study geography, observe the world in spatial terms, and are interested in three basic questions: Where is it? Why is it there? Why care? They seek to describe the world using the knowledge, skills, and tools of the discipline, such as maps, globes, graphs, photography, video, and remote sensing images. These instruments are suited for different purposes and illustrate a range of information including showing patterns, interactions and change over time.
The Geo-Inquiry Process endeavors to help students develop the skills, knowledge, and tools of a geographer. It provides a systematic way to investigate and understand the world through the patterns, processes, and interactions between human and natural systems and then to act on their conclusions.
22 MSTA Journal | SPRING 2020
Susan Engel talks about using children’s curiosity to help them learn new things.
When children want to know something, they’re more likely to learn it and remember it. Babies play longer with toys in which they’ve shown a prior interest and explore these toys more; their interest allows them to learn more than they otherwise would. When older students are intrigued by unexpected or mysterious descriptions in their reading, they’re more likely to remember that content later, and to more deeply understand what they read. (Engel, 2013).
The Geo-Inquiry Process is a five-step method designed to teach the skills necessary to think and reason geographically, and includes asking Geo-Inquiry Questions, acquiring geographic information, organizing and analyzing information, and using the information to answer Geo-Inquiry Questions for informed action. The Geo-Inquiry Process relies on geographic perspective as a foundation, offering students a unique lens to analyze space, place, and the interconnections of systems in our world. Geographic perspective is interdisciplinary and allows for the examination of complex issues at various scales. Think of scale as being the “zoom lens” of geography. The scale can be local, regional, or global. By using a geographic perspective with the Geo-Inquiry Process, students begin to connect complex components, see patterns, and make connections as they look at the world differently in order to make informed predictions, well-reasoned decisions, and take action.
The Five Phases of the Geo-Inquiry Process
Ask: Asking good Geo-Inquiry Questions is at the heart of the Geo- Inquiry Process. These activities can be used to help students develop their skills in asking geographic questions and to give them a chance to explore a variety of local issues or problems. These materials are designed to help students narrow in on a specific topic or issue, and frame and refine their geographic questions into a Geo-Inquiry Question that will drive their project and be the focus of the subsequent phases of the project.
23msta-mich.org | ARTICLES
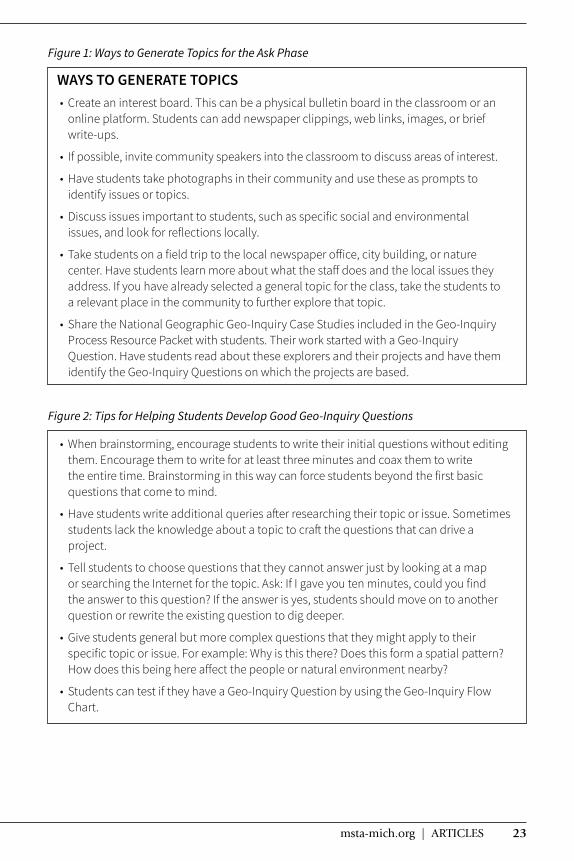
Figure 1: Ways to Generate Topics for the Ask Phase
WAYS TO GENERATE TOPICS• Create an interest board. This can be a physical bulletin board in the classroom or an
online platform. Students can add newspaper clippings, web links, images, or brief write-ups.
• If possible, invite community speakers into the classroom to discuss areas of interest.
• Have students take photographs in their community and use these as prompts to identify issues or topics.
• Discuss issues important to students, such as specific social and environmental issues, and look for reflections locally.
• Take students on a field trip to the local newspaper office, city building, or nature center. Have students learn more about what the staff does and the local issues they address. If you have already selected a general topic for the class, take the students to a relevant place in the community to further explore that topic.
• Share the National Geographic Geo-Inquiry Case Studies included in the Geo-Inquiry Process Resource Packet with students. Their work started with a Geo-Inquiry Question. Have students read about these explorers and their projects and have them identify the Geo-Inquiry Questions on which the projects are based.
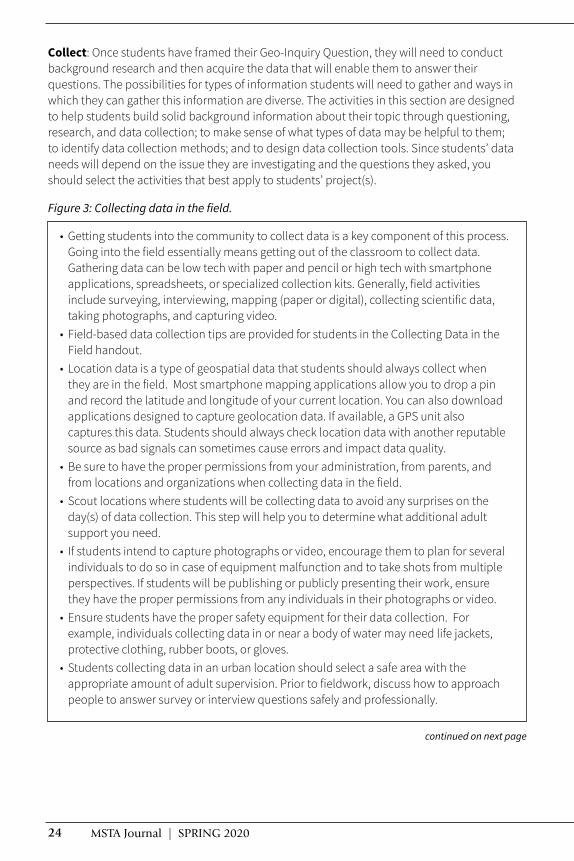
Figure 2: Tips for Helping Students Develop Good Geo-Inquiry Questions
• When brainstorming, encourage students to write their initial questions without editing them. Encourage them to write for at least three minutes and coax them to write the entire time. Brainstorming in this way can force students beyond the first basic questions that come to mind.
• Have students write additional queries after researching their topic or issue. Sometimes students lack the knowledge about a topic to craft the questions that can drive a project.
• Tell students to choose questions that they cannot answer just by looking at a map or searching the Internet for the topic. Ask: If I gave you ten minutes, could you find the answer to this question? If the answer is yes, students should move on to another question or rewrite the existing question to dig deeper.
• Give students general but more complex questions that they might apply to their specific topic or issue. For example: Why is this there? Does this form a spatial pattern? How does this being here affect the people or natural environment nearby?
• Students can test if they have a Geo-Inquiry Question by using the Geo-Inquiry Flow Chart.
24 MSTA Journal | SPRING 2020
Collect: Once students have framed their Geo-Inquiry Question, they will need to conduct background research and then acquire the data that will enable them to answer their questions. The possibilities for types of information students will need to gather and ways in which they can gather this information are diverse. The activities in this section are designed to help students build solid background information about their topic through questioning, research, and data collection; to make sense of what types of data may be helpful to them; to identify data collection methods; and to design data collection tools. Since students’ data needs will depend on the issue they are investigating and the questions they asked, you should select the activities that best apply to students’ project(s).
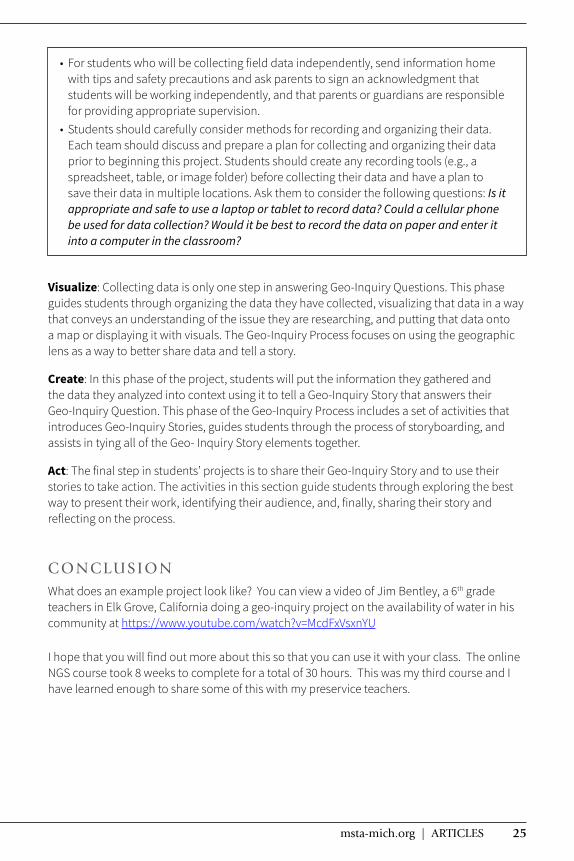
Figure 3: Collecting data in the field.
• Getting students into the community to collect data is a key component of this process. Going into the field essentially means getting out of the classroom to collect data. Gathering data can be low tech with paper and pencil or high tech with smartphone applications, spreadsheets, or specialized collection kits. Generally, field activities include surveying, interviewing, mapping (paper or digital), collecting scientific data, taking photographs, and capturing video.
• Field-based data collection tips are provided for students in the Collecting Data in the Field handout.
• Location data is a type of geospatial data that students should always collect when they are in the field. Most smartphone mapping applications allow you to drop a pin and record the latitude and longitude of your current location. You can also download applications designed to capture geolocation data. If available, a GPS unit also captures this data. Students should always check location data with another reputable source as bad signals can sometimes cause errors and impact data quality.
• Be sure to have the proper permissions from your administration, from parents, and from locations and organizations when collecting data in the field.
• Scout locations where students will be collecting data to avoid any surprises on the day(s) of data collection. This step will help you to determine what additional adult support you need.
• If students intend to capture photographs or video, encourage them to plan for several individuals to do so in case of equipment malfunction and to take shots from multiple perspectives. If students will be publishing or publicly presenting their work, ensure they have the proper permissions from any individuals in their photographs or video.
• Ensure students have the proper safety equipment for their data collection. For example, individuals collecting data in or near a body of water may need life jackets, protective clothing, rubber boots, or gloves.
• Students collecting data in an urban location should select a safe area with the appropriate amount of adult supervision. Prior to fieldwork, discuss how to approach people to answer survey or interview questions safely and professionally.
continued on next page
25msta-mich.org | ARTICLES
• For students who will be collecting field data independently, send information home with tips and safety precautions and ask parents to sign an acknowledgment that students will be working independently, and that parents or guardians are responsible for providing appropriate supervision.
• Students should carefully consider methods for recording and organizing their data. Each team should discuss and prepare a plan for collecting and organizing their data prior to beginning this project. Students should create any recording tools (e.g., a spreadsheet, table, or image folder) before collecting their data and have a plan to save their data in multiple locations. Ask them to consider the following questions: Is it appropriate and safe to use a laptop or tablet to record data? Could a cellular phone be used for data collection? Would it be best to record the data on paper and enter it into a computer in the classroom?
Visualize: Collecting data is only one step in answering Geo-Inquiry Questions. This phase guides students through organizing the data they have collected, visualizing that data in a way that conveys an understanding of the issue they are researching, and putting that data onto a map or displaying it with visuals. The Geo-Inquiry Process focuses on using the geographic lens as a way to better share data and tell a story.
Create: In this phase of the project, students will put the information they gathered and the data they analyzed into context using it to tell a Geo-Inquiry Story that answers their Geo-Inquiry Question. This phase of the Geo-Inquiry Process includes a set of activities that introduces Geo-Inquiry Stories, guides students through the process of storyboarding, and assists in tying all of the Geo- Inquiry Story elements together.
Act: The final step in students’ projects is to share their Geo-Inquiry Story and to use their stories to take action. The activities in this section guide students through exploring the best way to present their work, identifying their audience, and, finally, sharing their story and reflecting on the process.
C ONCLUSIONWhat does an example project look like? You can view a video of Jim Bentley, a 6th grade teachers in Elk Grove, California doing a geo-inquiry project on the availability of water in his community at https://www.youtube.com/watch?v=McdFxVsxnYU
I hope that you will find out more about this so that you can use it with your class. The online NGS course took 8 weeks to complete for a total of 30 hours. This was my third course and I have learned enough to share some of this with my preservice teachers.
26 MSTA Journal | SPRING 2020
RESOURCESNational Geographic Society. “The Geo-Inquiry Process.”
https://www.nationalgeographic.org/education/programs/geo-inquiry/ The Educator Guide and Student Resource Packet on this site provide activities and resources to support the development of quality Geographic Inquiry Questions. Resources referenced above are from the Student Workbook.
Rothstein, Dan and Luz Santana. “Teaching Students to Ask Their Own Questions.” Harvard Education Letter. Vol. 27, no. 5, September/October 2011. http://hepg.org/hel-home/issues/27_5/helarticle/teaching-students-to-ask-their-own-questions_507 Provides guidance on Question Formulation Technique (QFT) when helping students develop questions.
National Geographic Society. “Asking Geographic Questions.” https://www.nationalgeographic.org/geographic-skills/1/ This site outlines the critical geography skill of asking geographic questions at grades 4, 8, and 12, as described by the National Geography Standards.
National Council for Social Studies. “College, Career, and Civic Life: C3 Framework For Social Studies State Standards.” https://www.socialstudies.org/sites/default/files/c3/C3-Framework-for-Social-Studies.pdf The NCSS C3 framework underscores the importance of inquiry and questioning across Social Studies disciplines in Dimension 1 of the Inquiry Arc (pp. 23-27). Appendix A shows examples of geographic inquiry compared to inquiry from other Social Studies disciplines (pp. 66-68). Appendix E provides scholarly rationale for using questioning and inquiry in Social Studies classrooms (pp. 82-91).
NGSS Lead States. “Next Generation Science Standards: For States, By States” (2013). https://www.nextgenscience.org/ The Next Generation Science Standards (NGSS) emphasize student inquiry as a key skill. Appendix F outlines the Science and Engineering Practices central to learning science and engineering at all grade levels and across all topics. The first practice is “asking questions (for scientists) and defining problems (for engineers).”
REFERENCESBarron, Brigid and Linda Darling-Hammond. “Teaching for Meaningful Learning: A Review of Research on
Inquiry-Based and Cooperative Learning.” Edutopia. Retrieved from: https://backend.edutopia.org/sites/default/files/pdfs/edutopia-teaching-for-meaningful-learning.pdf
Engel, Susan. “The Case for Curiosity.” Education Leadership. 70.5 (2013) 36-40. Retrieved from: http://www.ascd.org/publications/educational-leadership/feb13/vol70/num05/The-Case-for-Curiosity.aspx
27msta-mich.org | ACTIVITIES
Rocks and Minerals Lab Classroom ActivityBy Timothy Soules, Eastern Michigan University
I N T R O D U C T I O NThe purpose of this activity is for students to learn about the physical and chemical properties of rocks and minerals, as ways to identify them. In this lesson, students will be exploring specific gravity, scratch tests, and the colors that ultraviolet light brings to certain rocks and minerals. Chemical properties will be determined through characteristic chemical reactions.
For this lesson, students will be utilizing the claim, evidence, reasoning (CER) technique. Students will make a claim such as “I think this mineral is copper.” They will then gather evidence to support their claim such as doing a streak test, or dripping some type of acid onto a rock/mineral, etc. Finally, students will use the knowledge they have discovered through their tests to reason out the identity of the rock/mineral that they have at their station.
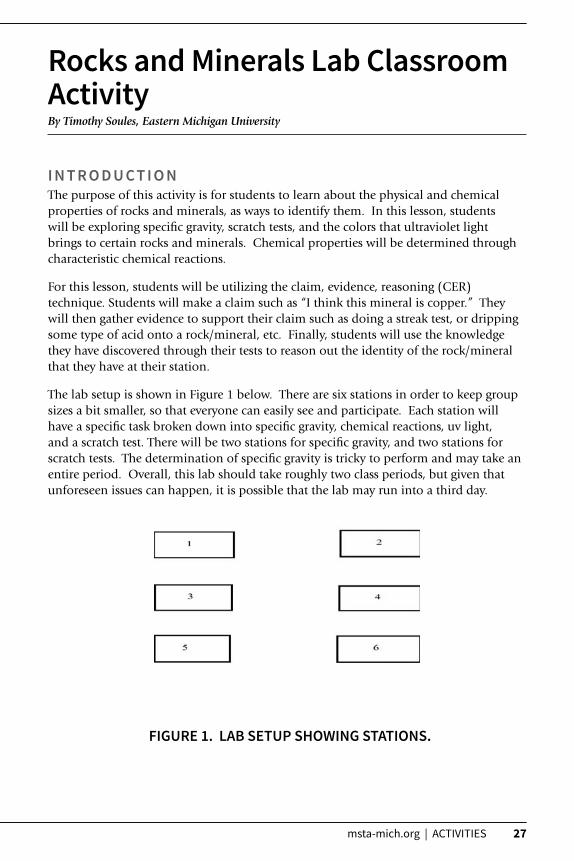
The lab setup is shown in Figure 1 below. There are six stations in order to keep group sizes a bit smaller, so that everyone can easily see and participate. Each station will have a specific task broken down into specific gravity, chemical reactions, uv light, and a scratch test. There will be two stations for specific gravity, and two stations for scratch tests. The determination of specific gravity is tricky to perform and may take an entire period. Overall, this lab should take roughly two class periods, but given that unforeseen issues can happen, it is possible that the lab may run into a third day.
FIGURE 1. LAB SETUP SHOWING STATIONS.
28 MSTA Journal | SPRING 2020
Safety
This lab will be using dangerous chemicals such as nitric acid and hydrochloric acid. Therefore, students will need to wear safety goggles, and need to know how to handle these materials safely. Some of these minerals employed also flake easily, and even though they are not necessarily dangerous, it would be recommended that students wash their hands thoroughly after using them.
L I ST O F M AT E R I A LS
The first lab will be a specific gravity test. Please see reference 1 for the experimental procedure. It involves immersion and displacement of water by the mineral in a graduated cylinder. Hence, the mineral specimen must be small. For this activity, there will be four to five rocks at a station table, as well as a list with the name of each rock and its respective specific gravity. Each student group will test only one mineral and post their results on a class whiteboard. For the specific gravity lab, round one will have students determining this order (highest to lowest specific gravity): basalt, andesite, quartzite, shale, bituminous coal. In the second round, students will determine this order (highest to lowest): gneiss, rock salt, rhyolite, sandstone, and peat.
The second lab will be a scratch test in order to determine the physical property of hardness using the Mohs harness scale (2). Students will use these scratch tools: a penny, a plate of glass, and a steel nail. At this station, each lab member will take turns scratching a mineral on one of the tools to determine its hardness. Next, students will look at the list of minerals to determine the identity of each mineral. This activity will involve the standard ten materials on the Moh’s Hardness Scale. The first station will have gypsum, calcite, quartz, topaz, and corundum. These should be ordered hardest to least hardest as corundum, topaz, quartz, calcite, then gypsum. The second station will include talc, fluorite, apatite, feldspar, and corundum (diamond would be difficult to get). From greatest to least, these should be ordered as corundum, feldspar, apatite, fluorite, and talc.
The third lab will utilize an ultraviolet light to determine mineral identity through its characteristic fluorescence pattern. For this activity, any students handling rocks will need to have uv protective gloves, and glasses to prevent any eye or skin damage. There will be another four minerals to test. Students will use the UV light to determine
Safety goggles, gloves. Pennies, steel nails, glass panes.
Specific gravity:
Beakers, waste container, scale or digital balance, graduated cylinders, water.
Mohs hardness scale minerals:
corundum, topaz, quartz, calcite, gypsum, talc, fluorite, apatite, and feldspar.
A uv light and these fluorescent minerals:
chalceony, hackmanite, scapolite, travertine.
Chemical reactions:
Aragonite, limestone, dolomite.
Nitric acid, hydrochloric acid, water, waste container.
Andesite, basalt, bituminous coal, shale, and quartzite, gneiss, sandstone, rhyolite, rocksalt, and peat.

29msta-mich.org | ACTIVITIES
which rock is which based on the color the rock glows. There will be a sheet with the rock names so once students decide which color a rock is glowing, this will give them the rock name. There will be both rocks easily identifiable as well as rocks that will have the fluorescence a bit more difficult to see. Figure 2 below shows the fluoresence pictures of minerals used.
Apatite Scapolite
Travertine Chalcedony
Hackmanite (short λ uv) Hackmanite (long λ uv)
FIGURE 2: FLUORESENCE EXHIBITED BY FOUR MINERALS
30 MSTA Journal | SPRING 2020
C H E M I C A L P R O P E R T I E SLastly, students will have an acid test lab station which will include limestone, dolomite, aragonite, and copper. Students will test the effect of hydrochloric acid (HCl) on the dolomite, limestone, and aragonite. Therefore, students will have to use there knowledge to determine the difference by the looks and what else they know and see about the mineral. Dolomite is a mineral of the chemical formula CaMg(CO3)2, while aragonite and limestone are polymorphs of the chemical formula CaCO3. When HCl is added to dolomite, a weak reaction occurs, with a few bubbles. However, when small samples of limestone or aragonite, are placed in a beaker containing 6 Molar HCl, a vigorous chemical reaction takes place:
CaCO3(s) + 2 HCl(aq) Ca2+(aq) + 2Cl-(aq) + CO2(g) + H2O(l)
As calcium carbonate dissolves, bubbles of carbon dioxide are evolved. If an aqueous solution of sodium carbonate is added to this solution, a white precipitate of calcium carbonate forms, as shown on the left-side of Figure 3:
Ca2+(aq) + Na2CO3(aq) CaCO3(s) + 2 Na+(aq)
In the second chemical test, students will observe the chemical reaction between nitric acid and a sample of native copper obtained from Michigan’s upper penninsula. The balanced chemical reaction equation is:
Cu(s) + 4 HNO3(l) Cu(NO3)2(aq) + 2 H2O(l) + 2 NO2(g)
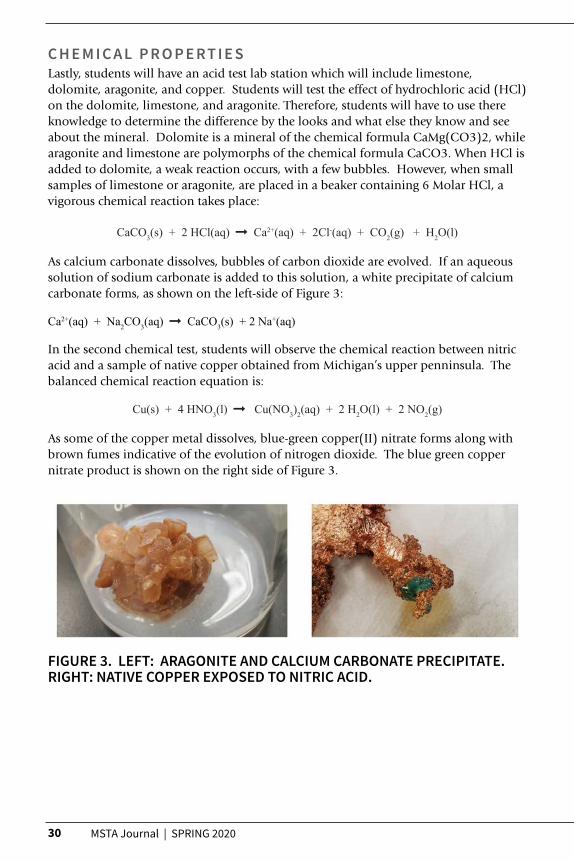
As some of the copper metal dissolves, blue-green copper(II) nitrate forms along with brown fumes indicative of the evolution of nitrogen dioxide. The blue green copper nitrate product is shown on the right side of Figure 3.
FIGURE 3. LEFT: ARAGONITE AND CALCIUM CARBONATE PRECIPITATE. RIGHT: NATIVE COPPER EXPOSED TO NITRIC ACID.
31msta-mich.org | ACTIVITIES
CO N C LU S I O N A C T I V I T Y:For a conclusion activity, each group will share with the class which rocks they thought paired with which listing on the sheets. This will be an class discussion where other groups can confirm that they got a semilar result or disagree and share why and what result they got. This can be a good way for students to collaborate with students as well as explain the reasons they chose the answers they did.
A C K N O W L E D G E M E N TThis paper was part of a requirement for the course Chem 325, Methodology for Secondary Teachers (3 credits). I thank Professor Kolopajlo for his advice on performing this project and in writing this paper.
R E F E R E N C E S1. Determination of specific gravity https://www.minerals.net/resource/property/SpecificGravity.aspx Accessed March 25, 2020.
2. Mohs Hardness Scale. National Park Service https://www.nps.gov/articles/mohs-hardness-scale.htm Accessed March 25, 2020.
2.25
3.75
WMU is one of the 10 Best OnlineMaster’s in Science Education

32 MSTA Journal | SPRING 2020
Whether it’s a biomedical breakthrough or an archaeological discovery, students and professors in Wayne State University’s College of Liberal Arts and Sciences work side by side to change our understanding of the world. WSU gives undergraduates the chance to learn across disciplines, combining the personal experience of a small college with the global advantages of a major research university.
There’s unrivaled opportunity in the heart of Detroit, a city whose history, culture and economic resurgence make it one of the most fascinating places in the world. Join us at Wayne State University and take part in the reinvention of a great American city.
Innovation starts here
MSTA ad.indd 1 2/1/18 9:20 AM
33msta-mich.org | ACTIVITIES
A Comparison of Ionic Compounds – Molarity, Weight Percent, and the Deliquescence of Lithium SaltsBy Courtney Mather, Hayden Cunningham, Mark Benvenuto, University of Detroit Mercy, Detroit, Michigan, Steve Kosmas, Grosse Pointe North High School, Grosse Pointe Woods, Michigan
A B ST R A C TA remarkably simple experiment, or set of experiments, can be performed using lithium salts, sodium salts, and potassium salts. By determining how much water each extracts from air, students can learn a great deal about weight percent of a solution, molarity, and deliquescence of materials. The experiments are safe, easy to perform, and utilize inexpensive materials. They also connect very well with two Michigan K-12 science standards, those concerning release or absorption of energy, and refining the design of a chemical system to produce increased products (HS-PS1-4 and HS-PS1-6).(1)
I N T R O D U C T I O NLiving and working in the Midwest, it may be that not too many Michigan residents have seen local restaurants include a few grains of rice in their salt shakers to prevent the salt from clumping up in moist air. That tends to be a more common practice farther south in the United States, in warmer climates. This ability of table salt to extract water from the air has a name, one not often used in our introductory science and chemistry classes: deliquescence.
Curiously, some salts are highly deliquescent, usually those with lithium cations. Lithium chloride is particularly so. When working with such materials in the laboratory or in a classroom, this can be a bit of a problem, in that such salts have to be kept tightly sealed and kept in some sort of desiccator for long storage periods. Industrially, lithium salts are sometimes used in air handling units to keep the humidity of a large building controlled. The salt can extract moisture from incoming air, making the air in the building less humid. In such cases, the lithium salt – often lithium chloride – can be separated from this water when the solution becomes briny enough.
The deliquescence of lithium salts can be used to set up a remarkably simple set of experiments. Simply weighing out a known amount of lithium chloride and leaving it uninterrupted in an open space will allow it to pull water from the air. Doing so with three samples and placing the three samples in containers with differing amounts of surface area lets students see how quickly, or slowly, the lithium chloride takes water up from the air. The amount of water pulled from the air can be checked at times of the teacher’s choosing, based on the class schedule. Whether one hour, one day, one week, or even longer, some amount of water will be taken up by the lithium chloride, and can easily be measured on a balance.

34 MSTA Journal | SPRING 2020
This comparison of lithium chloride in three different shaped containers can be further expanded. The same set up as that just described can be used for lithium chloride as well as other lithium salts, such as lithium sulfate and lithium nitrate. This allows a comparison of the deliquescence of three different salts, all with lithium as a common ion.
These experiments can be expanded even further, comparing lithium salts to their counterparts with sodium and potassium, namely sodium chloride, sodium sulfate, and sodium nitrate, as well as potassium chloride, potassium sulfate, and potassium nitrate.
Thus, we present here an experiment based on lithium chloride that can be performed in at least three different combinations (and likely more). All permutations are very easy, and suitable for students in almost any grade.
M AT E R I A LS :Equipment:
• Beakers
• Sample vials
• Watch glasses
• Balance (as precise as possible)
Chemicals:
• Lithium chloride
• Lithium sulfate
• Lithium nitrate
• Sodium chloride
• Sodium sulfate
• Sodium nitrate
• Potassium chloride
• Potassium sulfate
• Potassium nitrate
All reactants can be purchased through most scientific supply houses, including Flinn Scientific.
E X P E R I M E N TA L S E T- U P A N D P R O C E D U R E :As mentioned, this experiment can be run in several different combinations, using a number of different salts and taking measurements at various times. Each is discussed here, starting with the simplest version, the comparison of lithium chloride and its deliquescence in three containers that position the lithium chloride in shapes or piles with different surface areas.

35msta-mich.org | ACTIVITIES
L I T H I U M C H LO R I D E A LO N E :1. Pre-weigh a watch glass, a beaker or Erlenmeyer flask, and a thin, cylindrical
sample vial.
2. Measure as accurately as possible 1.00 g of lithium chloride.
3. Place the lithium chloride on the watch glass.
4. Measure a second sample lithium chloride (1.00 g).
5. Place this sample in a small beaker or Erlenmeyer flask.
6. Measure a third sample of lithium chloride (1.00 g).
7. Place this sample in a thin sample vial.
8. Allow each sample to sit in its container, open to the air, for a minimum of an hour or class period (more on this later).
9. Re-weigh each sample.
10. Subtract the starting mass – the piece of glassware and the lithium salt – from the final mass. This provides the mass of water that the salt has extracted from the air.
A comparison of three lithium salts, lithium chloride, lithium sulfate, and lithium nitrate:
11. Repeat steps 1 through 10 for each salt and determine how much water each different salt extracts from the air. An example is shown in Figure 1, using three different size containers, so that surface area is maximized for different trials.
FIGURE 1: LITHIUM CHLORIDE, LITHIUM NITRATE, AND LITHIUM SULFATE SAMPLES, INITIALLY:

36 MSTA Journal | SPRING 2020
Further, a comparison of nine salts. The three just-listed lithium salts, as well as: sodium chloride, sodium sulfate, sodium nitrate, and potassium chloride, potassium sulfate, and potassium nitrate.
Repeat steps 1 through 10 for each salt and determine how much water each of the nine different salts extracts from the air.
T I M I N GPerhaps obviously, different teachers and different classes meet for different periods of time. It requires time for students to weigh out samples of any of the salts mentioned here, and it will require time to precisely re-weigh them at the end of a class. This deliquescence occurs continuously; the salt samples can be weighed during one class, during multiple classes, or throughout longer periods of time, such as a week, or even a semester.
A N A LY S I S A N D CO M P U TAT I O N SThe amount of difference in the mass of each sample can be taken at virtually any time, but at the end of one class period is an obvious place to start. Additionally, masses can be taken at the start of one class period, then the start of a second, or any longer period of time. From these masses, one can determine both the weight percent and molarity of the resulting material.
D E T E R M I N I N G W E I G H T P E R C E N T Oftentimes, the weight percent of a material is computed in terms of a solid solute in a liquid solvent. Thus, the weight percent computation for lithium chloride (or any of the other salts used here) is simply the weight of the dry salt divided by the total mass, as follows:
Wt % = mass salt / mass salt + mass water
While this might be the common way to determine a weight percent, the percent of water can also be computed using the mass of the water as the numerator.
D E T E R M I N I N G M O L A R I T YIn determining molarity of any solution, we tend to think in terms of a known volume of solvent, then some added mass of solid or liquid as a solute. This experiment starts with the material that will be the solute, and changes the amount of solvent over the course of time. Assuming the density of water is 1.00 g/cc, one can use the mass of water extracted from the air as the volume, and thus molarities can be computed over the entire length of time during which masses are taken. The formula:
M = moles solute (LiCl) / L of solution
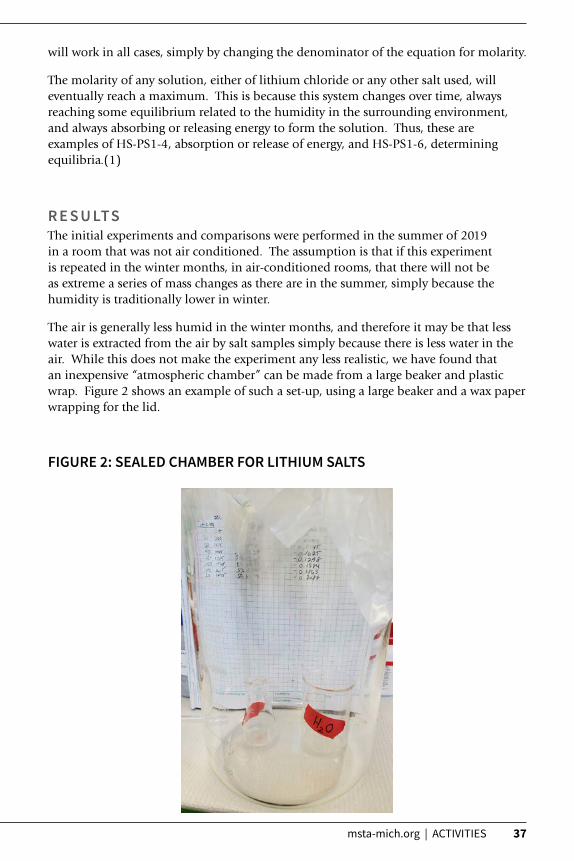
37msta-mich.org | ACTIVITIES
will work in all cases, simply by changing the denominator of the equation for molarity.
The molarity of any solution, either of lithium chloride or any other salt used, will eventually reach a maximum. This is because this system changes over time, always reaching some equilibrium related to the humidity in the surrounding environment, and always absorbing or releasing energy to form the solution. Thus, these are examples of HS-PS1-4, absorption or release of energy, and HS-PS1-6, determining equilibria.(1)
R E S U LTSThe initial experiments and comparisons were performed in the summer of 2019 in a room that was not air conditioned. The assumption is that if this experiment is repeated in the winter months, in air-conditioned rooms, that there will not be as extreme a series of mass changes as there are in the summer, simply because the humidity is traditionally lower in winter.
The air is generally less humid in the winter months, and therefore it may be that less water is extracted from the air by salt samples simply because there is less water in the air. While this does not make the experiment any less realistic, we have found that an inexpensive “atmospheric chamber” can be made from a large beaker and plastic wrap. Figure 2 shows an example of such a set-up, using a large beaker and a wax paper wrapping for the lid.
FIGURE 2: SEALED CHAMBER FOR LITHIUM SALTS
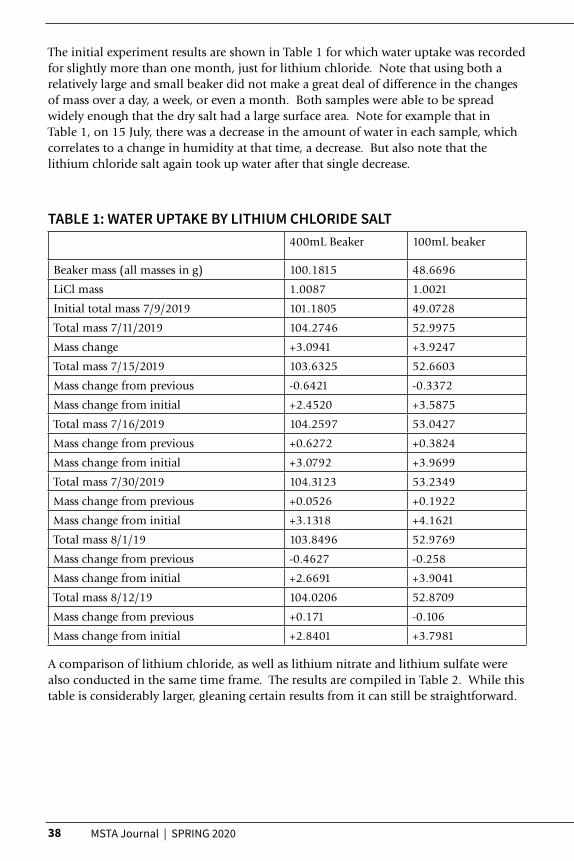
38 MSTA Journal | SPRING 2020
The initial experiment results are shown in Table 1 for which water uptake was recorded for slightly more than one month, just for lithium chloride. Note that using both a relatively large and small beaker did not make a great deal of difference in the changes of mass over a day, a week, or even a month. Both samples were able to be spread widely enough that the dry salt had a large surface area. Note for example that in Table 1, on 15 July, there was a decrease in the amount of water in each sample, which correlates to a change in humidity at that time, a decrease. But also note that the lithium chloride salt again took up water after that single decrease.
TABLE 1: WATER UPTAKE BY LITHIUM CHLORIDE SALT400mL Beaker 100mL beaker
Beaker mass (all masses in g) 100.1815 48.6696
LiCl mass 1.0087 1.0021
Initial total mass 7/9/2019 101.1805 49.0728
Total mass 7/11/2019 104.2746 52.9975
Mass change +3.0941 +3.9247
Total mass 7/15/2019 103.6325 52.6603
Mass change from previous -0.6421 -0.3372
Mass change from initial +2.4520 +3.5875
Total mass 7/16/2019 104.2597 53.0427
Mass change from previous +0.6272 +0.3824
Mass change from initial +3.0792 +3.9699
Total mass 7/30/2019 104.3123 53.2349
Mass change from previous +0.0526 +0.1922
Mass change from initial +3.1318 +4.1621
Total mass 8/1/19 103.8496 52.9769
Mass change from previous -0.4627 -0.258
Mass change from initial +2.6691 +3.9041
Total mass 8/12/19 104.0206 52.8709
Mass change from previous +0.171 -0.106
Mass change from initial +2.8401 +3.7981
A comparison of lithium chloride, as well as lithium nitrate and lithium sulfate were also conducted in the same time frame. The results are compiled in Table 2. While this table is considerably larger, gleaning certain results from it can still be straightforward.

39msta-mich.org | ACTIVITIES
TABLE 2: COMPARISON OF WATER UPTAKE IN SAMPLES OF LICL, LINO3 AND LI2SO4
LiNO3 LiCl Li2SO4
400 mL Beaker
100 mL Beaker
10 mL Beaker
400 mL Beaker
100 mL Beaker
10 mL Beaker
400 mL Beaker
100 mL Beaker
10 mL Beaker
Beaker Mass (masses in g)
157.696 54.633 7.552 142.806 53.227 7.331 149.894 47.576 7.439
Salt Mass 1.009 1.001 1.001 1.004 1.004 1.008 1.007 1.007 1.006
Starting Mass 7/11/19 @ 1215
158.6 55.627 8.538 143.802 54.207 8.324 150.9 48.582 8.433
Mass 7/15/19 @ 1000
161.541 56.718 9.762 147.045 57.37 10.765 151.829 49.511 9.411
Mass change from previous
+2.74 +1.892 +1.2686 +3.084 +3.21 +2.506 +0.971 +0.975 +0.976
Mass change from initial
+2.941 +1.091 +1.224 +3.243 +3.163 +2.441 +0.929 +0.929 +0.978
Mass (g) 7/16/19
162.3 56.437 9.308 147.071 57.216 10.508 151.148 48.829 8.728
Mass change from previous
+0.759 -0.281 -0.454 +0.026 -0.154 -0.257 -0.681 -0.682 -0.683
Mass change from initial
+3.700 +0.8100 +0.77 +3.269 +3.009 +2.184 +0.248 +0.247 +0.295
Mass (g) 7/30/19
162.19 57.0874 10.732 147.5955 57.9188 11.983 151.8265 49.5108 9.4107
Mass change from previous
-0.11 +0.6504 +1.424 +0.5245 +0.7028 +1.475 +0.6785 +0.6818 +0.6827
Mass change from initial
+3.59 +1.4604 +2.194 +3.7935 +3.7118 +3.659 +0.9265 +0.9288 +0.9777
Mass (g) 8/1/19
161.78 56.882 10.6456 147.2309 57.645 11.9089 151.8235 49.5093 9.4096
Mass change from previous
-0.41 -0.2054 -0.0864 -0.3646 -0.2738 -0.0741 -0.003 -0.0015 -0.0011
Mass change from initial
+3.18 +1.255 +2.1076 +3.4289 +3.438 +3.5849 +0.9235 +0.9273 +0.9766
Mass (g) 8/12/19
162.08 56.9581 10.5688 147.4987 57.6696 11.7774 151.827 49.5101 9.41
Mass change from previous
+0.3 +0.0761 -0.0768 +0.2678 +0.0246 -0.1315 +0.0035 +0.0008 +0.0004
Mass change from initial
+3.48 +1.3311 +2.0308 +3.6967 +3.4626 +3.4534 +0.927 +0.9281 +0.977
While Table 2 is rather large, we can note in it that there were increases as well as some decreases in the masses of the salts plus water over the course of time. We did not keep track of humidity within the room, but it can be assumed that decreases in mass correspond to times of lower ambient humidity. What is easy to spot is that over three days, the mass increased significantly, with the lithium salts in some cases pulling greater than their own mass in water from the surrounding air. At each point at which a reading was taken, we have put in bold the change from the initial mass. We continued our observations for a month, but emphasize that this certainly is not required. The time for observations in this experiment can be adjusted to the needs of any teacher’s class.
40 MSTA Journal | SPRING 2020
When the experiment is expanded to include sodium salts and potassium salts with nitrate, chloride, and sulfate anions, it was found that these do not take up water nearly as dramatically as their lithium counterparts do. This does not detract from using those salts as part of a greater experiment. On the contrary, it can be used to initiate a discussion about the differences between the cations, and how they extract water from air.
CO N C LU S I O N SThis has proven to be a very simple, inexpensive experiment that can be expanded in a number of different ways, that can be run using only one salt, that can be run in an isolated chamber, and that can be run with noticeable results in a class period, or over the course of a semester. It can be used to familiarize students with the ideas of both percentage of substances based on mass, as well as with the idea of molarity. In addition, this makes visible the concept of deliquescence, and shows students how water in the air can interact with a substance that to them appears to be inert.
R E F E R E N C EMichigan K-12 Standards Science, November 2015, downloadable as a pdf at: https://www.michigan.
gov/documents/mde/K-12_Science_Performance_Expectations_v5_496901_7.pdf
Explore the natural environment while earning college credit at the CMU Biological Station on Beaver Island in northern Lake Michigan.Opportunities for high school students and science teachers: Students: BIO 100z Introduction to Field Biology July 10-22, 2020High School students, get an introduction to the techniques and methods for field studies in biology. Learn about sampling procedures, interpretation and data analysis that emphasize basic ecological relationships between organisms and their environments. Teachers: Many workshops offered. See se.cmich.edu/CMUBS for more information.
Start your learning adventure with us.CMU Biological Station on Beaver IslandCentral Michigan UniversityJohn Gordon, CMUBS Station [email protected](989)-774-4400se.cmich.edu/CMUBS
CMU Biological StationON BEAVER ISLAND
BiologicalStation
CMU is an AA/EO institution, providing equal opportunity to all persons, including minorities, females, veterans and individuals with disabilities (see cmich.edu/ocrie).
41msta-mich.org | ACTIVITIES
I See the LightBy Larry Kolopajlo and Robin Galler, Eastern Michigan University
I N T R O D U C T I O NLight plays a role in many phenomena that students see every day, but it can also be challenging for students to understand due to its highly conceptual nature. In this paper are presented seven engaging demos and activities that are easy to perform in a middle- or high-school classroom. They are meant to inspire student interest in light-related phenomena and set the stage for more in-depth experiments to follow. Two activities should be performed by a teacher as demos: (1) lighting a match with a blue laser, and (2) the fluorescence of fluorescein. Five more activities are set up as stations that students rotate through: the Crookes radiometer, refraction through clear minerals with a red laser, a refraction column (using a green laser), observing helium spectral lines by using a diffraction grating with a He hollow cathode lamp, and diffraction patterns generated by a DVD with white light. All activities can also be done as teacher demonstrations for students. These experiments can be used to supplement lecture lessons to enhance student understanding of light. The method of Claim, Evidence, and Reasoning (CER) is well suited to this lesson plan. Safety precautions are included with each activity discussed below.
N G S S A L I G N M E N TNGSS Standards: MS-PS4-2, HS-PS4-3
MI Standards: MS-PS4-2, HS-PS4-3
ST U D E N T S TAT I O N SThe teacher should have a room set up as show on the diagram in Figure 1 below. Students are placed in groups of not more than three. In addition, students should have whiteboards. To have all students complete all the activities, it will take two 50-minute periods.

42 MSTA Journal | SPRING 2020
FIGURE 1: STUDENT STATIONS SET UP FOR LIGHT-BASED ACTIVITIES.
C L A I M , E V I D E N C E A N D R E A S O N I N G P E D A G O G Y Claim, evidence, and reasoning (CER) is a strategy that helps students arrive at valid answers to questions (1). In CER, students are confronted with a phenomenon, and make a claim about what will happen. Students then collect evidence through an experiment. Finally, students use their evidence to construct an argument that supports their claim. Student involvement is enhanced by having students use whiteboards to record all CER phases.
D E M O N S T R AT I O N S A N D A C T I V I T I E S1. Can red, green, or blue lasers light a match?
As shown in Figure 2, a high-powered blue laser (445 nm, > 4 mW) can be pointed at a match to set it on fire. Because both direct exposure of eyes to laser light as well as reflections can cause serious eye damage, laser safety glasses (which can be bought for under $10) should be worn by everyone in the room. For these reasons, lasers should never be pointed in the direction of students or teachers. Laser safety is discussed in references 2 and 3. Teachers begin the demonstration by explaining what a laser is. She then connects lasers to the real world by telling students that lasers are employed in Blu-ray players, bar code readers, laser eye surgery, and laser range finders. The demonstration employs the CER framework, and students are provided with whiteboards to record their responses. The lesson begins with the teacher asking students to write a claim as to whether red, green or blue lasers can light a match (pointing the lasers away from the class). Students then observe the

43msta-mich.org | ACTIVITIES
demonstration and collect and record evidence that only the blue laser will cause the match to combust. In the reasoning phase, students discuss their explanations for this phenomenon. Explanations should involve both wavelength (nm) and power (mW). Students can look locate information on laser wavelengths (red between 630-680nm, green at 532 nm, and blue at 445 nm). They may advance the incorrect explanation that the blue laser works because energy of a photon is inversely proportional to its wavelength. However, they should be told to consider power in milliwatts (mW). Students may connect the physics of this experiment to its chemistry by writing one possible chemical equation for the combustion reaction, which happens when the laser heats the matchhead to a temperature near 230° C:
16 KClO3(s) + 3 P4S3(s) 16 KCl(s) + 3 P4O10(s) + 9 SO2(g) + heat
2. Fluorescein and UV light
Fluorescein is a compound that fluoresces when exposed to ultraviolet (uv) light, as shown in Figure 3 below. The teacher asks students to predict what will happen when a solution of fluorescein (yellow colored) is exposed to visible and uv light. The teacher will shine the ultraviolet light on the fluorescein sample, and students will observe a green glow, indicating that light of a different wavelength than the initial uv light is emitted. Students also observe that the glow stops once the uv light is switched off. The teacher then explains that when fluorescein is exposed to uv light (wavelengths below 400 nm), its electrons are excited to higher energy levels. When those excited electrons decay back to more stable lower energy levels, they emit visible (green) light. An important concept about fluorescence is that the emitted light always has a longer wavelength than the excitation light (green vs uv). Because fluorescein can have many harmful health effects (4), it should be kept in a closed plastic test-tube-like bottle. Students should not be in contact with it, and that is why this experiment is a teacher demo. Since some of these experiments
FIGURE 2: A BLUE LASER IGNITES A MATCH.
FIGURE 3: AN IMAGE OF FLUORESCEIN GLOWING UNDER A UV LIGHT.

44 MSTA Journal | SPRING 2020
like this are performed in a dark room, students need to pay attention to where all the equipment and people are, in order to avoid collisions. As an application to the real world, fluorescein is used by geologists to trace the flow of ground water through cave systems. Fluorescence is also a phenomenon exhibited by certain minerals.
3. A Refraction Column
A refraction column comprised of layers of Karo® syrup, water, and mineral oil is made by the teacher. Students will shine a green laser beam through the column at different angles to notice how the light path changes. The different materials in the column have different indexes of refraction, and so the light moves through them at different angles. Some examples of experimental results are shown in Figure 4 below.
FIGURE 4: TWO IMAGES OF A GREEN LASER BEAM THROUGH A REFRACTION COLUMN CONTAINING OIL, WATER, AND KAYRO® SYRUP (TOP TO BOTTOM). ON THE LEFT, A LASER IS REFRACTED AT AN ANGLE BETWEEN THE WATER AND SYRUP LAYERS. ON THE RIGHT, THE LASER BEAM IS REFLECTED AT THE SURFACE BETWEEN THE TOP OIL AND WATER LAYERS.
4. Refraction Through Minerals
In this activity, students shine a red laser beam through a clear mineral like optical quartz. Using minerals with both regular and irregular shapes will give different refraction patterns. The different shapes will cause the light to refract at different angles. Students should use CER method to decide which mineral will produce the greatest number of refractions. They should conclude it will be the irregularly shaped mineral.

45msta-mich.org | ACTIVITIES
FIGURE 5. A RED LASER BEAM SHINING ON A TRANSLUCENT CRYSTAL. ON THE LEFT, THE BEAM IS REFRACTED AND APPEARS ON THE WALL ABOVE. ON THE RIGHT, AFTER MANY INTERNAL REFLECTIONS, DIFFERENT PARTS OF THE CRYSTAL ARE AGLOW.
5. Diffraction Gratings
Students should compare the differing patterns produced on a diffraction grating by white light and a helium hollow cathode lamp. They should see that the helium light has an incomplete spectrum that consists of lines whereas white light will exhibit a continuous full (ROYGBIV) spectrum. In Figure 6 below are shown spectral lines obtained with a helium hollow cathode lamp.
6. DVD versus Blu-Ray
Have students compare a DVD and a Blu-Ray disk (BD), and explain why they exhibit different diffraction patterns when exposed to white light. Students will find that a BD only produces blue light, while the DVD acts as a diffraction grating that resolves all components of white light into a ROYGBIV spectrum. The grooves in a BD are closer together, and the BD is designed to work with blue laser at 405 nm. On the other hand, a DVD has wider grooves and works with a red laser at 650 nm. The BD has a much higher storage capacity as well.
FIGURE 6. ON THE LEFT ARE THREE SPECTRAL LINES RESOLVED WITH A SIMPLE DIFFRACTION GRATING. THE SPECTRUM IS EMITTED FROM A HELIUM HOLLOW CATHODE LAMP SHOWN ON THE RIGHT.

46 MSTA Journal | SPRING 2020
7. Crookes Radiometer
Have students test lasers and lights of various strengths to see how they each move the vanes on the radiometer. Have them compare their results. Using CER students need to answer which light will cause the most movement and why. The alternating black and white surfaces of the vanes should also be considered when constructing an explanation as to why the vanes rotate.
8. Sharing Activity
After the students have completed the station experiments, they should share their data with the class or with another group to compare results and answer each other’s questions. After having performed all these activities, students should better understand natural phenomena involving light, and be motivated to perform future in-depth experiments.
A C K N O W L E D G E M E N TRobing Galler is a preservice student teacher. This assignment was a requirement for Physics 325, Methods of Teaching the Physical Sciences (3 credits). Larry Kolopajlo is a Professor of Chemistry and the instructor for this course.
R E F E R E N C E S1. Nathaniel J.S. Brown, Sam O. Nagashima, Alice Fu, Michael Timms, Mark Wilson. “A Framework for
Analyzing Scientific Reasoning in Assessments. Educational Assessment, 15 (3-4), 2010. 142-174.2. Physics Safety, The American Association of Physics. https://www.aapt.org/Resources/upload/safetypage1-11.pdf Accessed March 26, 2020.3. Laser Safety, The department of Physics and Astronomy, The University of Manchester https://www.staffnet.manchester.ac.uk/physics-and-astronomy/health-and-safety/laser-safety/ Accessed March 26, 2020.4. Fluorescein. Millipore Sigma.
https://www.sigmaaldrich.com/catalog/product/sigma/f7505?lang=en®ion=US Accessed March 26, 2020.
47msta-mich.org | ACTIVITIES
Learn about Michigan’s diverse natural resources, discover trends in their management, and experience activities that bring that knowledge to the classroom by attending this engaging professional development opportunity.
For more information visit:Michigan.gov/ANR
SCECH and University Credits Available
Academy of Natural Resources
$100 Scholarships Available
Now in TWO LocationsANR Classic: July 12 -17, 2020
ANR North (UP): August 2 –7, 2020
Want to teach science and inspire students?NGSS-aligned PBL units that will inspire your students and change the world!
• Project Plans and Supplies
• Real-world Connections
• Cross-curricular Content
• Collaboration Options
• Just-in-Time Professional Development
Get $25 off any projectwith coupon code MSTAROCKSGet started at BlueAppleTeacher.org
Offer expires August 31, 2020.
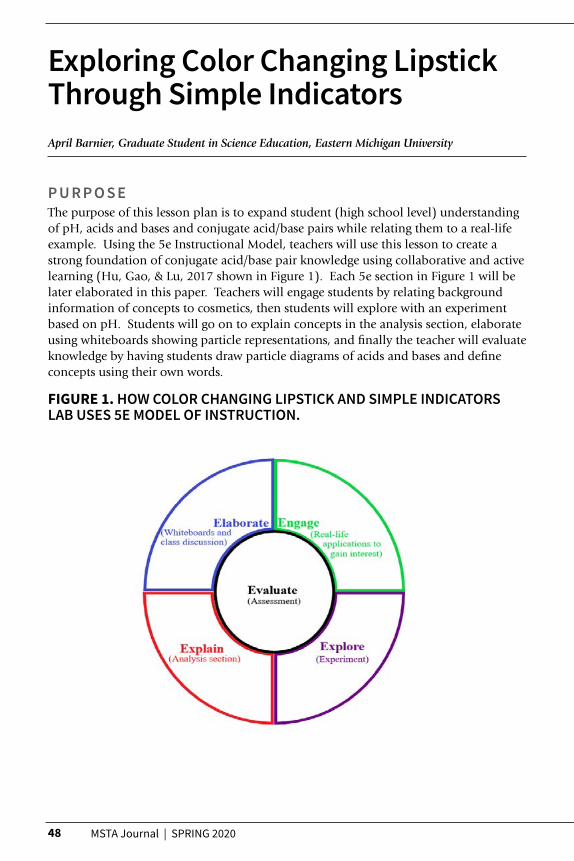
48 MSTA Journal | SPRING 2020
Exploring Color Changing Lipstick Through Simple Indicators April Barnier, Graduate Student in Science Education, Eastern Michigan University
P U R P O S EThe purpose of this lesson plan is to expand student (high school level) understanding of pH, acids and bases and conjugate acid/base pairs while relating them to a real-life example. Using the 5e Instructional Model, teachers will use this lesson to create a strong foundation of conjugate acid/base pair knowledge using collaborative and active learning (Hu, Gao, & Lu, 2017 shown in Figure 1). Each 5e section in Figure 1 will be later elaborated in this paper. Teachers will engage students by relating background information of concepts to cosmetics, then students will explore with an experiment based on pH. Students will go on to explain concepts in the analysis section, elaborate using whiteboards showing particle representations, and finally the teacher will evaluate knowledge by having students draw particle diagrams of acids and bases and define concepts using their own words.
FIGURE 1. HOW COLOR CHANGING LIPSTICK AND SIMPLE INDICATORS LAB USES 5E MODEL OF INSTRUCTION.

49msta-mich.org | ACTIVITIES
B A C KG R O U N DJohnstone’s MPS theory teaches chemistry understanding at three levels – the macro, particle, and symbolic (shown in Figure 2). To be more specific, these can be thought of as the tangible macro level (things that can be seen, heard, touched), the particle representation, which describes the atomic level, and the symbolic which includes the language and symbols of the concept (Johnstone, 1991). The guiding principles behind this strategy of teaching chemistry is to anchor ideas with prior knowledge, and this is done by an engage activity in this lesson. In the engage activity, after reviewing a small amount of vocabulary that students should be familiar with, students explore with a laboratory experiment on color changing lipstick that serves as the macroscopic level representation. This activity will anchor the study of pH, acids and bases, and conjugate acid/base pairs in an exciting lab activity. The color changes in the lipsticks serve as a discrepant event that will force students to question what they know about acids and bases. In the next explain phase, macroscopic knowledge is expanded upon by introducing particle diagrams. Finally, students are asked to explain and elaborate concepts using their own words.
FIGURE 2. THREE LEVELS OF REPRESENTATION IN CHEMISTRY DESCRIBED BY ALEX JOHNSTONE (NOTE: ADAPTED FROM JOHNSTONE, 1991, P.78)
The goal of MPS theory is for students to comprehend chemistry concepts at all three levels of the triangle. Another tool for students to deepen this comprehension is metacognition. Using metacognition when teaching chemistry promotes reflection and the students’ ability to transfer knowledge to other areas by bringing awareness to the students’ own thoughts. This allows student development of understanding and increases problem-solving skills. Through metacognition, students can revise and refine ideas by recognizing how information does or does not fit into their understanding, and identify where more information is needed. Students are more likely to change or modify their own misconceptions through this reflective process, but a guided discovery is needed as most students have not developed this ability (Rickey & Stacey, 2000). Guiding student metacognition is done with modeling thought processes in discussion sections, having students identify what they think in prelab activities, having them explain what they know in post lab activities, and peer discussion. Metacognition is introduced into the lesson by questioning what students think qualifies as chemistry and asking them to use claim-evidence-reasoning (CER) skills. This allows students to identify what they think, the evidence that led them to this claim, and their reasoning for this understanding (McNeil & Martin, 2007). Students are asked to make claims in their analysis and then to cite evidence and explain their reasoning (shown in Figure 3). This also allows the teacher to identify misconceptions and/or errors in reasoning which then can be addressed to further understanding.
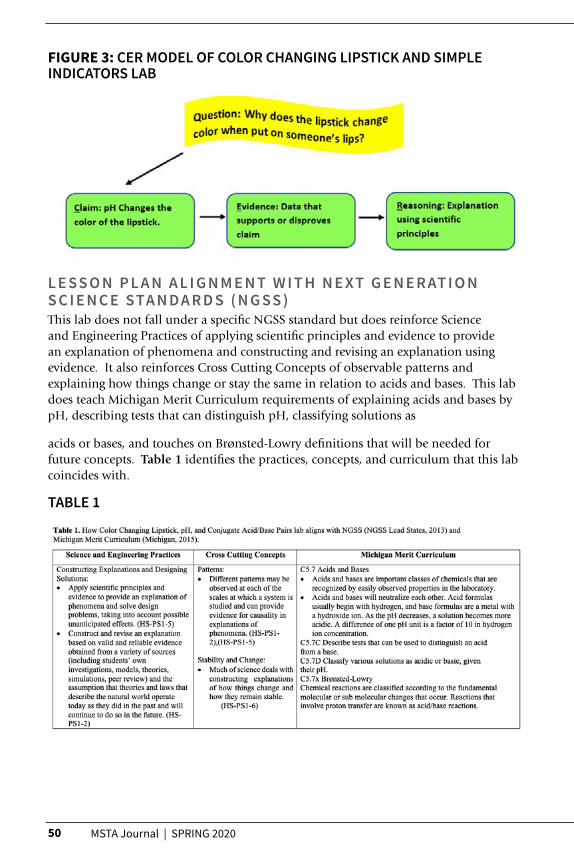
50 MSTA Journal | SPRING 2020
FIGURE 3: CER MODEL OF COLOR CHANGING LIPSTICK AND SIMPLE INDICATORS LAB
L E S S O N P L A N A L I G N M E N T W I T H N E XT G E N E R AT I O N S C I E N C E S TA N D A R D S ( N G S S )This lab does not fall under a specific NGSS standard but does reinforce Science and Engineering Practices of applying scientific principles and evidence to provide an explanation of phenomena and constructing and revising an explanation using evidence. It also reinforces Cross Cutting Concepts of observable patterns and explaining how things change or stay the same in relation to acids and bases. This lab does teach Michigan Merit Curriculum requirements of explaining acids and bases by pH, describing tests that can distinguish pH, classifying solutions as
acids or bases, and touches on Brønsted-Lowry definitions that will be needed for future concepts. Table 1 identifies the practices, concepts, and curriculum that this lab coincides with.
TABLE 1

51msta-mich.org | ACTIVITIES
D E S C R I P T I O N O F 5 E Engage:
The purpose of an engage activity is to allow students to reflect on what they already know and to help students begin to formulate questions about what they don’t understand. To access previous knowledge of pH and demonstrate how red cabbage can be used as a pH indicator, the teacher explains to students that red cabbage contains a pigment (anthocyanin) that changes color when mixed with an acid or base. The teacher shows students the different colors the indicator changes with baking soda, vinegar, and water (Canon & Ong, 2013). The teacher classifies each substance as an acid, base, or neutral. Students are asked to define what an acid and base are, and to classify some common household products into acids and bases on whiteboards to allow active learning, which will improve cognition. The teacher then starts a discussion about lipstick/lip balm. Students discuss what kinds of substances they think are in lipstick, and if there is any chemistry involved in mixing those substances. The teacher then tells students that lipstick has a pH and asks what pH they think the products will be. The discussion is ended by showing students color changing lipstick (picking a color other than pink allows the demonstration of the color change to be seen easier) and asking them what color they think it will look on someone’s lips. The lipstick is then demonstrated to the class. Students are asked if they think an acid or base will promote the color change. The teacher tells the students they will be investigating why the lipstick changes color when it is put on someone’s lips.
Explore:
In this section students will explore why mood lipstick changes color with an experiment. Students will test the lipstick with acids and bases and determine what promotes the color change. Background information is given to students that explains what is happening at the particle level. Students will make connections between the macro concept of pH and particle concept of hydronium and hydroxide ions. Students will later be asked to create a particle diagram that explains macro ideas with these particle concepts.
Explain:
Students explain answers in the analysis section of the lab report using evidence to support their findings. This section should allow students to formulate independent conclusions and to use critical thinking. As students work in groups, teacher explanations should only be utilized when group discussion has been exhausted. This is also where NGSS Science and Engineering Practices of applying scientific principles and evidence to provide an explanation of phenomena (pH) and constructing an explanation using evidence (laboratory results) will be practiced.
Elaborate:
In this section students connect macro ideas of acids and bases to particle level understanding. Students present findings to the class, and discuss evidence that supports their claims. Class discussion will promote positive peer debate and allow students to evaluate their own findings critically. Discussion will also allow students to continue to make connections to content with information shared by peers. NGSS

52 MSTA Journal | SPRING 2020
Science and Engineering Practices of revising an explanation using evidence (laboratory results and peer discussion) will be practiced in this section of the experiment.
Evaluate:
The teacher will evaluate students with a short assessment at the beginning of the next class period. These questions are created so students will reflect on the experiment and anchor the concept of acids and bases and conjugate acid/base pairs. Students are asked to answer questions at the macro and particle understanding levels.
Save the DateMSTA 68th Annual
ConferenceMarch 5-6, 2021
Lansing Center/Radisson Hotel
Visit mstaevents.org

53msta-mich.org | ACTIVITIES
ST U D E N T L A B
CO LO R C H A N G I N G L I P ST I C K A N D S I M P L E I N D I C AT O R S L A B ST U D E N T H A N D O U T
Background InformationCosmetics can cleanse, protect and alter the appearance of external body parts. In the United States there are approximately 12,500 different chemical ingredients approved for use in the manufacture of cosmetics. Lipstick is a product that usually contains oils, pigments, waxes, moisturizers, and emulsifiers (Weisz & Scher, 2018). Lipstick is used by over 80% of women in the United States and even has its own day, July 29 is National Lipstick Day (Calendar at a Glance, 2019).
Color changing lipstick promises a unique color that changes with body chemistry. Most mood lipsticks contain the same chemical, CI 45410 - also known as Red 27, which is clear when dissolved in lipstick, but reacts with lips’ moisture and pH level to cause the color change (Weisz & Scher, 2018).
In 1909 Soren Sorenson created the now ubiquitously used pH scale which provided a common way to measure how acidic or alkaline a substance is. In 1924 Sorenson realized pH of a solution is a negative logarithmic function of the activity of the (hydrogen ions) ions and more correctly it is the negative logarithmic function of the activity of hydronium ions (.
In aqueous solutions, pH can be measured by the concentration of hydronium ions in the solution (Libretexts, 2019).
The pH scale is usually presented with a range between 0-14, with pH values below 7 denoting acidity, and those above 7 indicating basicity. Each one unit of change denotes a ten-fold change in hydronium ion concentration. Therefore, a solution with a pH of 1 is ten times more acidic than a solution having a pH of 2. Moreover, a solution with a pH of 7 is called neutral as the concentration of it is often represented as (called hydroxide ions) ions are the same. Hence, below pH 7 the solution is acidic and contains more ions and above pH 7 the solution is basic and has more ions.
In this experiment, students will study pH by investigating a compound that is commonly used in the cosmetics industry, Red 27. Red 27 (an acid) is also part of a conjugate acid/base pair (shown in Figure 4) that includes Red 28 (a base). Red 27 is clear in color while Red 28 is a dark pink color. An acid that donates/loses a proton turns into its conjugate base, and a base that gains/accepts a proton turns into its conjugate acid. Remember there are several definitions for acids and bases:

54 MSTA Journal | SPRING 2020
• Arrhenius define acids as ionizing in water to give a hydrated proton (indicated as ) while a base ionizes in water to give hydroxide ions (indicated as ).
• In the Brønsted-Lowry definition, acids are proton donors while bases are proton acceptors.
• Lewis acids are electron-pair acceptors and Lewis bases are electron-pair doors (Libretexts, 2019).
FIGURE 4. A. RED 27 MOLECULE ( ADAPTED FROM D&C RED 27, N.D. AND DRAWN IN PAINT 3D). B. RED 28 MOLECULE ( ADAPTED FROM D&C RED 28, N.D. AND DRAWN IN PAINT 3D), RED 27 AND RED 28 SHOWN IN ACID BASE EQUILIBRIUM.
In the Brønsted-Lowry definition of acids and bases, an acid can donate a proton. When an acid gives up its proton, what remains is called the conjugate base of that acid. When a base accepts a proton, the subsequent chemical is called the conjugate acid of that base. So conjugate acids/base pairs differ from each other by a proton. Figure 5 demonstrates how the acid hydrogen fluoride (HF), can dissociate and give up its proton. The fluoride ion () is left, which no longer has a proton, and the fluoride ion can now accept a proton. The fluoride ion can now be considered a base. Hydrogen fluoride is the acid while the fluoride ion is the conjugate base.
FIGURE 5. HYDROGEN FLUORIDE CONJUGATE ACID/BASE PAIR USING SYMBOLIC LANGUAGE ON TOP AND A PARTICLE DIAGRAM BELOW.

55msta-mich.org | ACTIVITIES
E X P LO R E :
Color Changing Lipstick and Simple Indicators Lab Safety:
Safety goggles must always be worn. Avoid contact with acids or bases on skin and/or eyes. Limit the amounts of chemical solutions being used to 1 mL. Wash hands after handling solutions. Do not apply lipstick directly to skin or lips from the lipstick tubes (a cue tip should be used).
Materials:
Mood lipsticks Paintbrushes Cue tips 10 mL glass beakers Filter paper 5 ml graduated cylinder Eye dropper
Acidic Solutions: pH 2 (Rice Vinegar), 5 (Coffee) Basic Solutions: pH 9 (Baking Soda)
Procedure 1:
Work in groups of 2-3,
1. Choose three different mood lipsticks to test.2. Put each mood lipstick on filter paper in three lines at least one inch apart for each
test. 3. Measure 1 mL of rice vinegar and coffee into graduated cylinder with eye dropper
(~ 20 drops). Pour into glass beaker. Test each lipstick with acidic solutions of different pHs. Paint acidic solutions on lipstick lines located on filter paper. Record results after 5 minutes of application of acids. Complete step 4 while waiting.
4. Measure 1mL of baking soda solution into graduated cylinder with eye dropper (~ 20 drops). Pour into glass beaker. Test each lipstick with baking soda solution. Paint basic solutions on lipstick line located on the filter paper. Record results.
5. Dispose of solutions in sink.
Procedure 2:
6. Put lipstick on cue tip and record color.7. Apply lipstick to lips or hand with a cue tip. DO NOT APPLY LIPSTICK DIRECTLY
TO LIPS from lipstick container. Record color of lips or hand before applying lipstick. Apply cue tip with lipstick on lips or hand. Record lip/hand and cue tip color.
8. Complete Analysis section.
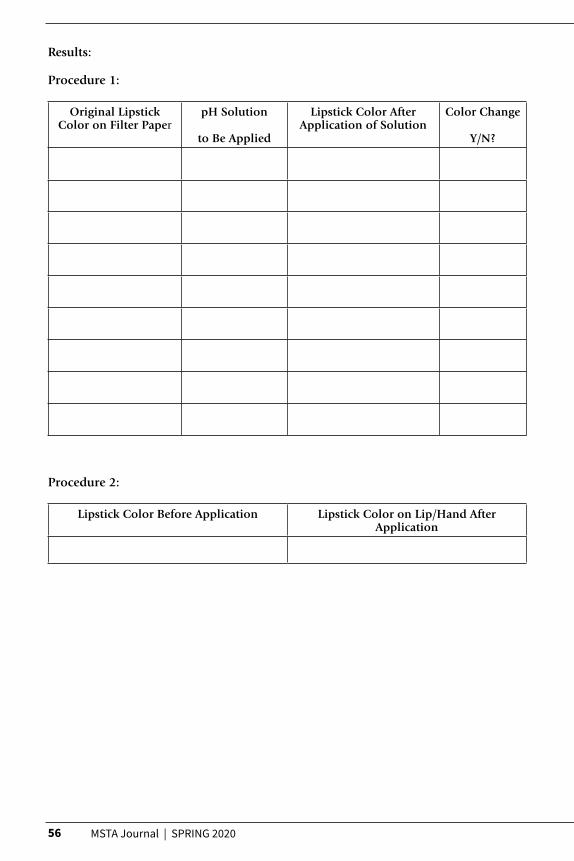
56 MSTA Journal | SPRING 2020
Results:
Procedure 1:
Original Lipstick Color on Filter Paper
pH Solution
to Be Applied
Lipstick Color After Application of Solution
Color Change
Y/N?
Procedure 2:
Lipstick Color Before Application Lipstick Color on Lip/Hand After Application
57msta-mich.org | ACTIVITIES
Elaborate:
Analysis:
1. At what acidic pH did the lipstick change color (provide evidence)?
2. What pH are lips and what is the evidence?
3. At what pH did Red 28 appear?
4. What caused Red 28 to appear?
5. Are mood lipsticks science? State claim, provide evidence, and reasoning for answer.
6. Red 28 is the ________ ________ of Red 27.
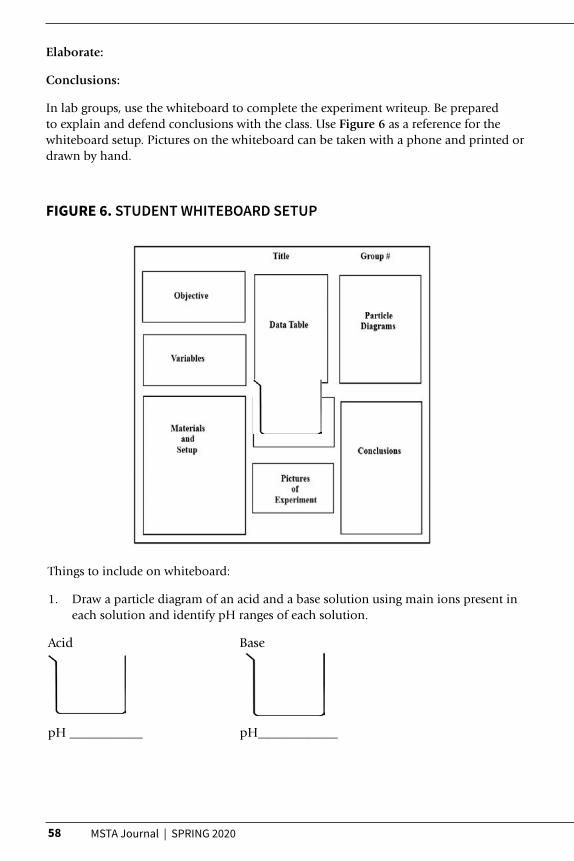
58 MSTA Journal | SPRING 2020
Elaborate:
Conclusions:
In lab groups, use the whiteboard to complete the experiment writeup. Be prepared to explain and defend conclusions with the class. Use Figure 6 as a reference for the whiteboard setup. Pictures on the whiteboard can be taken with a phone and printed or drawn by hand.
FIGURE 6. STUDENT WHITEBOARD SETUP
Things to include on whiteboard:
1. Draw a particle diagram of an acid and a base solution using main ions present in each solution and identify pH ranges of each solution.
Acid Base
pH ___________ pH____________

59msta-mich.org | ACTIVITIES
2. Name 3 acids and 3 bases. Define acids and bases by paraphrasing, no direct quotes.
3. Draw a particle diagram of a neutral solution, identify the pH, and define the solution by paraphrasing, no direct quotes.
pH________
Evaluate:
During the next class period have students answer the following questions individually:
4. How can an acid be turned into its conjugate base? Give an example of an acid/base conjugate pair.
5. Draw a particle diagram of a base using hydronium and/or hydroxide ions.
6. What is the pH of the diagram below?
pH ______________
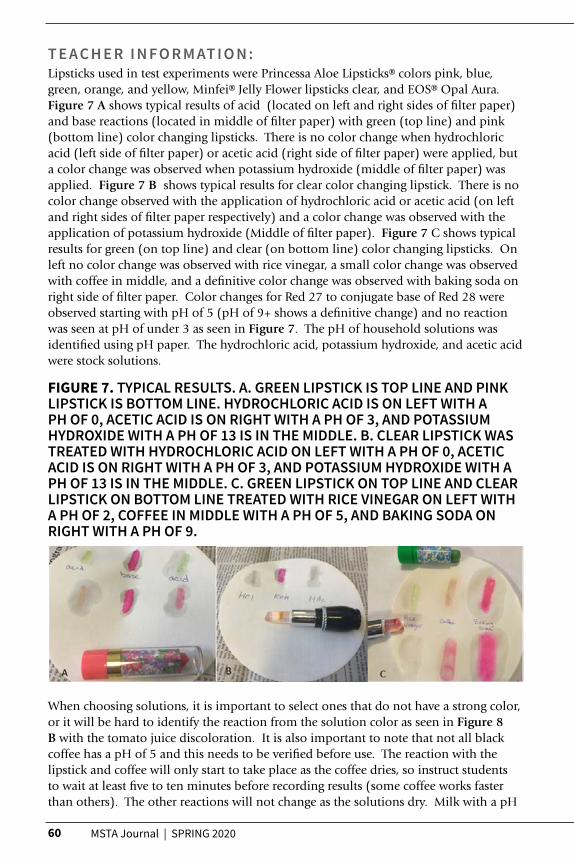
60 MSTA Journal | SPRING 2020
T E A C H E R I N F O R M AT I O N :Lipsticks used in test experiments were Princessa Aloe Lipsticks® colors pink, blue, green, orange, and yellow, Minfei® Jelly Flower lipsticks clear, and EOS® Opal Aura. Figure 7 A shows typical results of acid (located on left and right sides of filter paper) and base reactions (located in middle of filter paper) with green (top line) and pink (bottom line) color changing lipsticks. There is no color change when hydrochloric acid (left side of filter paper) or acetic acid (right side of filter paper) were applied, but a color change was observed when potassium hydroxide (middle of filter paper) was applied. Figure 7 B shows typical results for clear color changing lipstick. There is no color change observed with the application of hydrochloric acid or acetic acid (on left and right sides of filter paper respectively) and a color change was observed with the application of potassium hydroxide (Middle of filter paper). Figure 7 C shows typical results for green (on top line) and clear (on bottom line) color changing lipsticks. On left no color change was observed with rice vinegar, a small color change was observed with coffee in middle, and a definitive color change was observed with baking soda on right side of filter paper. Color changes for Red 27 to conjugate base of Red 28 were observed starting with pH of 5 (pH of 9+ shows a definitive change) and no reaction was seen at pH of under 3 as seen in Figure 7. The pH of household solutions was identified using pH paper. The hydrochloric acid, potassium hydroxide, and acetic acid were stock solutions.
FIGURE 7. TYPICAL RESULTS. A. GREEN LIPSTICK IS TOP LINE AND PINK LIPSTICK IS BOTTOM LINE. HYDROCHLORIC ACID IS ON LEFT WITH A PH OF 0, ACETIC ACID IS ON RIGHT WITH A PH OF 3, AND POTASSIUM HYDROXIDE WITH A PH OF 13 IS IN THE MIDDLE. B. CLEAR LIPSTICK WAS TREATED WITH HYDROCHLORIC ACID ON LEFT WITH A PH OF 0, ACETIC ACID IS ON RIGHT WITH A PH OF 3, AND POTASSIUM HYDROXIDE WITH A PH OF 13 IS IN THE MIDDLE. C. GREEN LIPSTICK ON TOP LINE AND CLEAR LIPSTICK ON BOTTOM LINE TREATED WITH RICE VINEGAR ON LEFT WITH A PH OF 2, COFFEE IN MIDDLE WITH A PH OF 5, AND BAKING SODA ON RIGHT WITH A PH OF 9.
When choosing solutions, it is important to select ones that do not have a strong color, or it will be hard to identify the reaction from the solution color as seen in Figure 8 B with the tomato juice discoloration. It is also important to note that not all black coffee has a pH of 5 and this needs to be verified before use. The reaction with the lipstick and coffee will only start to take place as the coffee dries, so instruct students to wait at least five to ten minutes before recording results (some coffee works faster than others). The other reactions will not change as the solutions dry. Milk with a pH
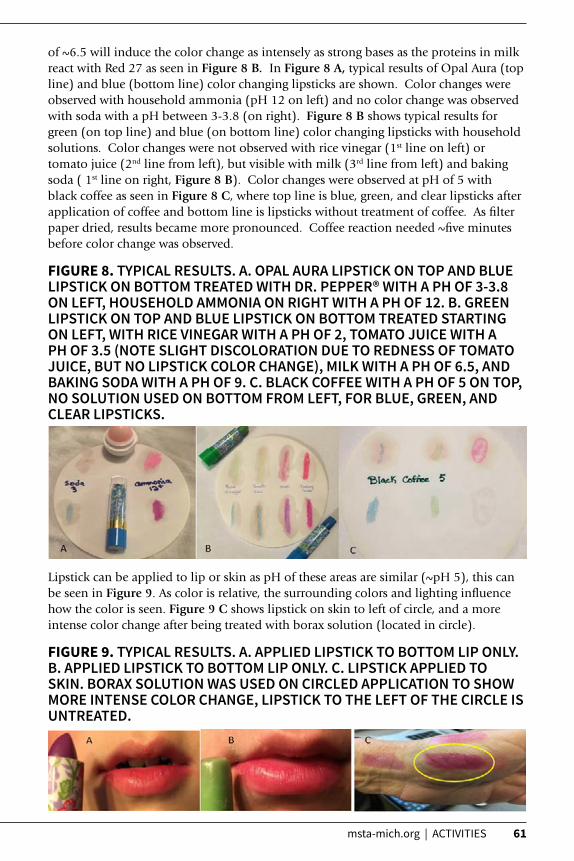
61msta-mich.org | ACTIVITIES
of ~6.5 will induce the color change as intensely as strong bases as the proteins in milk react with Red 27 as seen in Figure 8 B. In Figure 8 A, typical results of Opal Aura (top line) and blue (bottom line) color changing lipsticks are shown. Color changes were observed with household ammonia (pH 12 on left) and no color change was observed with soda with a pH between 3-3.8 (on right). Figure 8 B shows typical results for green (on top line) and blue (on bottom line) color changing lipsticks with household solutions. Color changes were not observed with rice vinegar (1st line on left) or tomato juice (2nd line from left), but visible with milk (3rd line from left) and baking soda ( 1st line on right, Figure 8 B). Color changes were observed at pH of 5 with black coffee as seen in Figure 8 C, where top line is blue, green, and clear lipsticks after application of coffee and bottom line is lipsticks without treatment of coffee. As filter paper dried, results became more pronounced. Coffee reaction needed ~five minutes before color change was observed.
FIGURE 8. TYPICAL RESULTS. A. OPAL AURA LIPSTICK ON TOP AND BLUE LIPSTICK ON BOTTOM TREATED WITH DR. PEPPER® WITH A PH OF 3-3.8 ON LEFT, HOUSEHOLD AMMONIA ON RIGHT WITH A PH OF 12. B. GREEN LIPSTICK ON TOP AND BLUE LIPSTICK ON BOTTOM TREATED STARTING ON LEFT, WITH RICE VINEGAR WITH A PH OF 2, TOMATO JUICE WITH A PH OF 3.5 (NOTE SLIGHT DISCOLORATION DUE TO REDNESS OF TOMATO JUICE, BUT NO LIPSTICK COLOR CHANGE), MILK WITH A PH OF 6.5, AND BAKING SODA WITH A PH OF 9. C. BLACK COFFEE WITH A PH OF 5 ON TOP, NO SOLUTION USED ON BOTTOM FROM LEFT, FOR BLUE, GREEN, AND CLEAR LIPSTICKS.
Lipstick can be applied to lip or skin as pH of these areas are similar (~pH 5), this can be seen in Figure 9. As color is relative, the surrounding colors and lighting influence how the color is seen. Figure 9 C shows lipstick on skin to left of circle, and a more intense color change after being treated with borax solution (located in circle).
FIGURE 9. TYPICAL RESULTS. A. APPLIED LIPSTICK TO BOTTOM LIP ONLY. B. APPLIED LIPSTICK TO BOTTOM LIP ONLY. C. LIPSTICK APPLIED TO SKIN. BORAX SOLUTION WAS USED ON CIRCLED APPLICATION TO SHOW MORE INTENSE COLOR CHANGE, LIPSTICK TO THE LEFT OF THE CIRCLE IS UNTREATED.
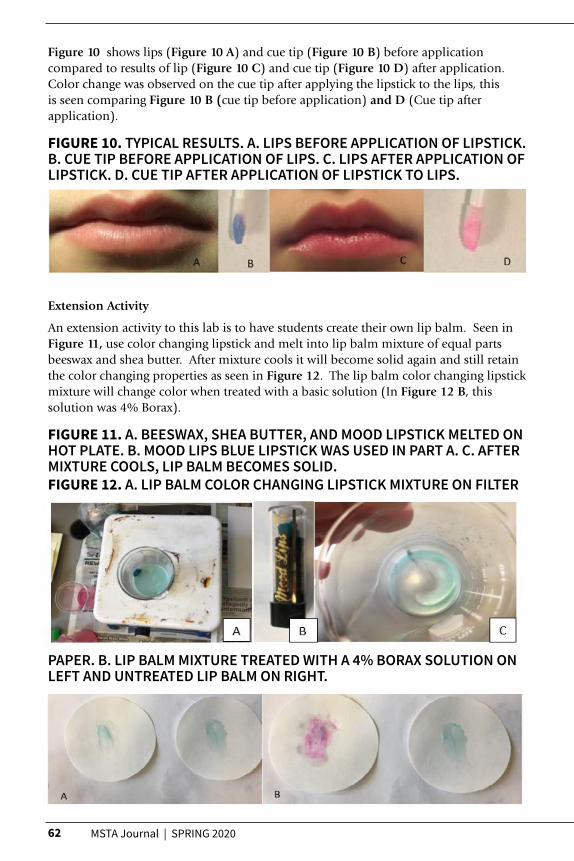
62 MSTA Journal | SPRING 2020
Figure 10 shows lips (Figure 10 A) and cue tip (Figure 10 B) before application compared to results of lip (Figure 10 C) and cue tip (Figure 10 D) after application. Color change was observed on the cue tip after applying the lipstick to the lips, this is seen comparing Figure 10 B (cue tip before application) and D (Cue tip after application).
FIGURE 10. TYPICAL RESULTS. A. LIPS BEFORE APPLICATION OF LIPSTICK. B. CUE TIP BEFORE APPLICATION OF LIPS. C. LIPS AFTER APPLICATION OF LIPSTICK. D. CUE TIP AFTER APPLICATION OF LIPSTICK TO LIPS.
Extension Activity
An extension activity to this lab is to have students create their own lip balm. Seen in Figure 11, use color changing lipstick and melt into lip balm mixture of equal parts beeswax and shea butter. After mixture cools it will become solid again and still retain the color changing properties as seen in Figure 12. The lip balm color changing lipstick mixture will change color when treated with a basic solution (In Figure 12 B, this solution was 4% Borax).
FIGURE 11. A. BEESWAX, SHEA BUTTER, AND MOOD LIPSTICK MELTED ON HOT PLATE. B. MOOD LIPS BLUE LIPSTICK WAS USED IN PART A. C. AFTER MIXTURE COOLS, LIP BALM BECOMES SOLID.FIGURE 12. A. LIP BALM COLOR CHANGING LIPSTICK MIXTURE ON FILTER
PAPER. B. LIP BALM MIXTURE TREATED WITH A 4% BORAX SOLUTION ON LEFT AND UNTREATED LIP BALM ON RIGHT.
If student allergy to lipstick is a concern, white bread can be substituted for student lip/hand part of the lab as it has a pH of Have students wear gloves if allergy is a concern. There are many common household items that can be substituted for acids and bases used in the lab. Table 2 lists a few common items and their pHs that can be used to test color changing lipstick.
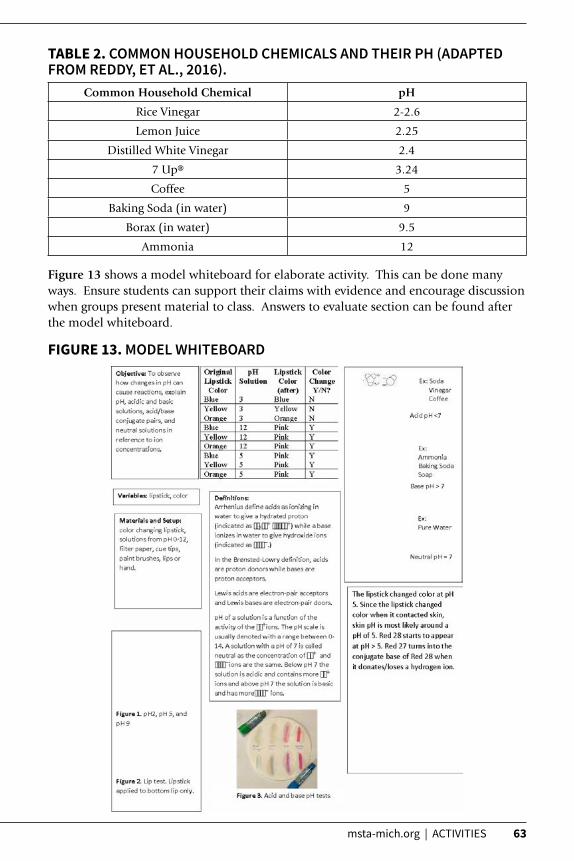
63msta-mich.org | ACTIVITIES
TABLE 2. COMMON HOUSEHOLD CHEMICALS AND THEIR PH (ADAPTED FROM REDDY, ET AL., 2016).
Common Household Chemical pH
Rice Vinegar 2-2.6
Lemon Juice 2.25
Distilled White Vinegar 2.4
7 Up® 3.24
Coffee 5
Baking Soda (in water) 9
Borax (in water) 9.5
Ammonia 12
Figure 13 shows a model whiteboard for elaborate activity. This can be done many ways. Ensure students can support their claims with evidence and encourage discussion when groups present material to class. Answers to evaluate section can be found after the model whiteboard.
FIGURE 13. MODEL WHITEBOARD
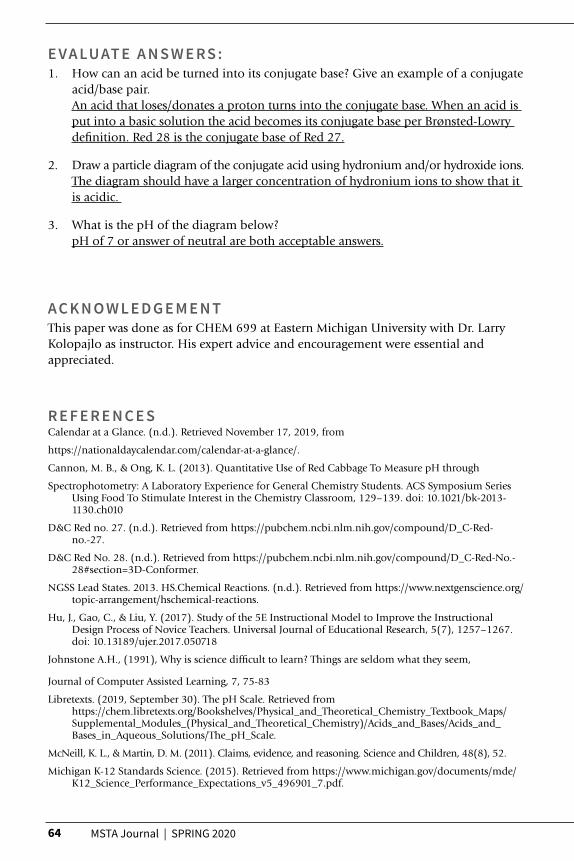
64 MSTA Journal | SPRING 2020
E V A LU AT E A N S W E R S :1. How can an acid be turned into its conjugate base? Give an example of a conjugate
acid/base pair. An acid that loses/donates a proton turns into the conjugate base. When an acid is put into a basic solution the acid becomes its conjugate base per Brønsted-Lowry definition. Red 28 is the conjugate base of Red 27.
2. Draw a particle diagram of the conjugate acid using hydronium and/or hydroxide ions. The diagram should have a larger concentration of hydronium ions to show that it is acidic.
3. What is the pH of the diagram below? pH of 7 or answer of neutral are both acceptable answers.
A C K N O W L E D G E M E N TThis paper was done as for CHEM 699 at Eastern Michigan University with Dr. Larry Kolopajlo as instructor. His expert advice and encouragement were essential and appreciated.
R E F E R E N C E SCalendar at a Glance. (n.d.). Retrieved November 17, 2019, from
https://nationaldaycalendar.com/calendar-at-a-glance/.
Cannon, M. B., & Ong, K. L. (2013). Quantitative Use of Red Cabbage To Measure pH through
Spectrophotometry: A Laboratory Experience for General Chemistry Students. ACS Symposium Series Using Food To Stimulate Interest in the Chemistry Classroom, 129–139. doi: 10.1021/bk-2013-1130.ch010
D&C Red no. 27. (n.d.). Retrieved from https://pubchem.ncbi.nlm.nih.gov/compound/D_C-Red-no.-27.
D&C Red No. 28. (n.d.). Retrieved from https://pubchem.ncbi.nlm.nih.gov/compound/D_C-Red-No.-28#section=3D-Conformer.
NGSS Lead States. 2013. HS.Chemical Reactions. (n.d.). Retrieved from https://www.nextgenscience.org/topic-arrangement/hschemical-reactions.
Hu, J., Gao, C., & Liu, Y. (2017). Study of the 5E Instructional Model to Improve the Instructional Design Process of Novice Teachers. Universal Journal of Educational Research, 5(7), 1257–1267. doi: 10.13189/ujer.2017.050718
Johnstone A.H., (1991), Why is science difficult to learn? Things are seldom what they seem,
Journal of Computer Assisted Learning, 7, 75-83
Libretexts. (2019, September 30). The pH Scale. Retrieved from https://chem.libretexts.org/Bookshelves/Physical_and_Theoretical_Chemistry_Textbook_Maps/Supplemental_Modules_(Physical_and_Theoretical_Chemistry)/Acids_and_Bases/Acids_and_Bases_in_Aqueous_Solutions/The_pH_Scale.
McNeill, K. L., & Martin, D. M. (2011). Claims, evidence, and reasoning. Science and Children, 48(8), 52.
Michigan K-12 Standards Science. (2015). Retrieved from https://www.michigan.gov/documents/mde/K12_Science_Performance_Expectations_v5_496901_7.pdf.

65msta-mich.org | ACTIVITIES
Reddy, A., Norris, D. F., Momeni, S. S., Waldo, B., & Ruby, J. D. (2016). The pH of beverages in the United States. Journal of the American Dental Association (1939), 147(4), 255–263. doi:10.1016/j.adaj.2015.10.019
Rickey, D., & Stacy, A. M. (2000). The role of metacognition in learning chemistry. Journal of Chemical Education, 77(7), 915. doi:10.1021/ed077p915
Weisz, A., Milstein, S. R., Scher, A. L., & Hepp, N. M. (2018). Colouring Agents in Cosmetics. Analysis of Cosmetic Products, 123–157. doi: 10.1016/b978-0-444-63508-2.00007-2

66 MSTA Journal | SPRING 2020
NOTES ______________________________________________________________________________________________________________________________________________________________________________________________________________________________________________________________________________________________________________________________________________________________________________________________________________________________________________________________________________________________________________________________________________________________________________________________________________________________________________________________________________________________________________________________________________________________________________________________________________________________________________________________________________________________________________________________________________________________________________________________________________________________________________________________________________________________________________________________________________________________________________________________________________________________________________________________________________________________________________________________________________________________________________________________________________________________________________________________________________________________________________________________________________________________________________________________________________________________________________________________________________________________________________________________________________________________________________________________________________________________________________________________________________________________________________________________________________________________________________________________________________________________________________________________________________________________________________________________________________________________________________________________________________________________________________________________________________________________________________________________________________________________________________________________________________________________________________________

67msta-mich.org | ACTIVITIES
NOTES ______________________________________________________________________________________________________________________________________________________________________________________________________________________________________________________________________________________________________________________________________________________________________________________________________________________________________________________________________________________________________________________________________________________________________________________________________________________________________________________________________________________________________________________________________________________________________________________________________________________________________________________________________________________________________________________________________________________________________________________________________________________________________________________________________________________________________________________________________________________________________________________________________________________________________________________________________________________________________________________________________________________________________________________________________________________________________________________________________________________________________________________________________________________________________________________________________________________________________________________________________________________________________________________________________________________________________________________________________________________________________________________________________________________________________________________________________________________________________________________________________________________________________________________________________________________________________________________________________________________________________________________________________________________________________________________________________________________________________________________________________________________________________________________________________________________________________________________

1390 EISENHOWER PLACEANN ARBOR, MI 48108
VISIT MSTA-MICH.ORG AND MSTAEVENTS.ORG