jsn dona religion user's guide - joomlashine · depending on your order, you should have a...
TRANSCRIPT
JSN Dona Religion User's Guide
Getting Started
Template Package Installation1. Download the template installation package
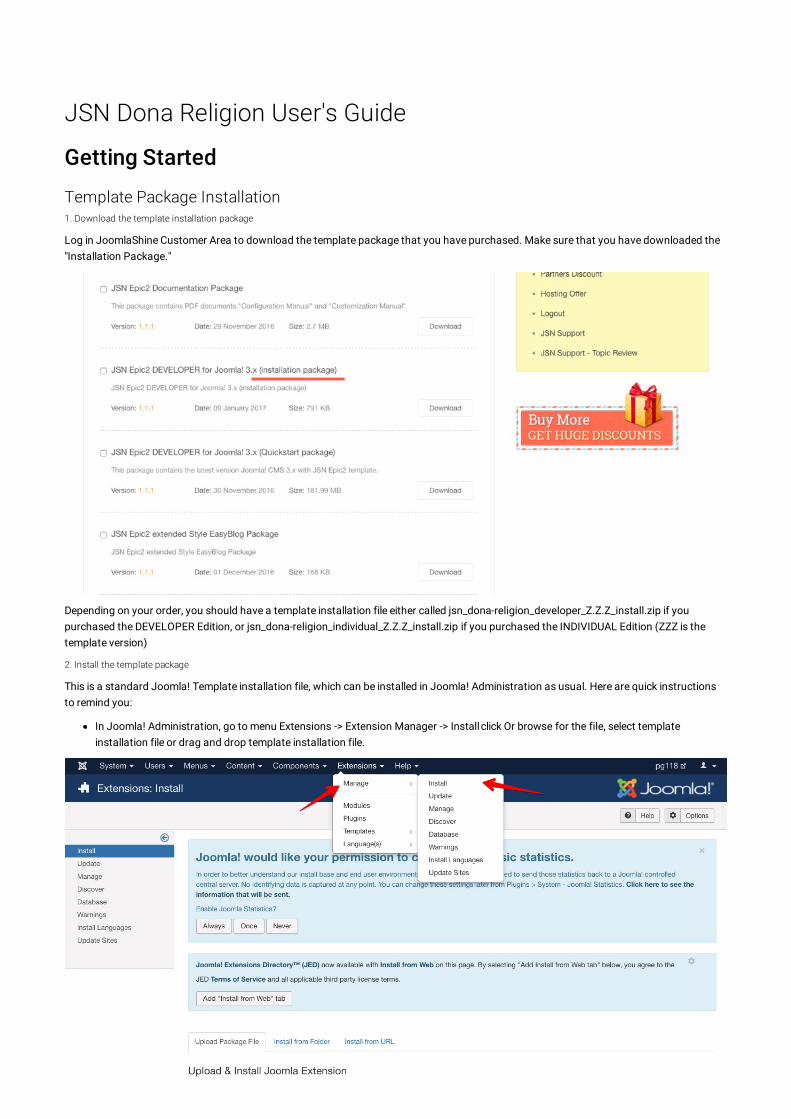
Log in JoomlaShine Customer Area to download the template package that you have purchased. Make sure that you have downloaded the"Installation Package."
Depending on your order, you should have a template installation file either called jsn_dona-religion_developer_Z.Z.Z_install.zip if youpurchased the DEVELOPER Edition, or jsn_dona-religion_individual_Z.Z.Z_install.zip if you purchased the INDIVIDUAL Edition (ZZZ is thetemplate version)
2. Install the template package
This is a standard Joomla! Template installation file, which can be installed in Joomla! Administration as usual. Here are quick instructionsto remind you:
In Joomla! Administration, go to menu Extensions -> Extension Manager -> Install click Or browse for the file, select templateinstallation file or drag and drop template installation file.
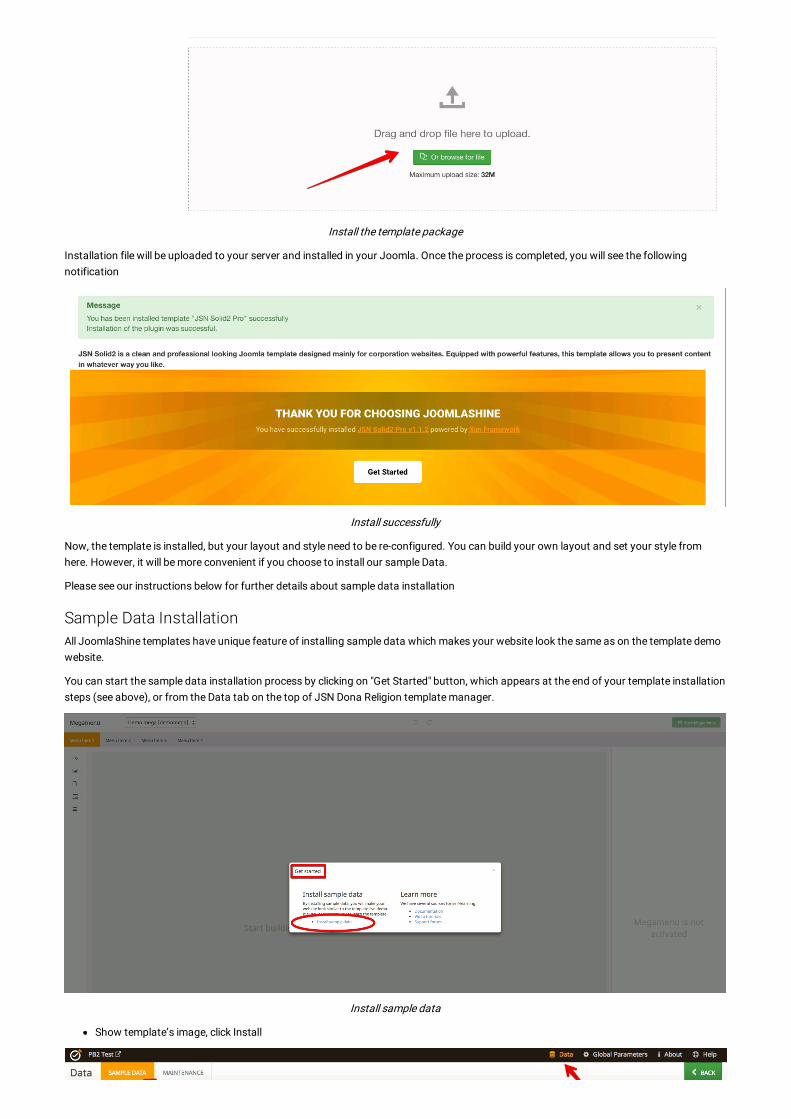
Install the template package
Installation file will be uploaded to your server and installed in your Joomla. Once the process is completed, you will see the followingnotification
Install successfully
Now, the template is installed, but your layout and style need to be re-configured. You can build your own layout and set your style fromhere. However, it will be more convenient if you choose to install our sample Data.
Please see our instructions below for further details about sample data installation
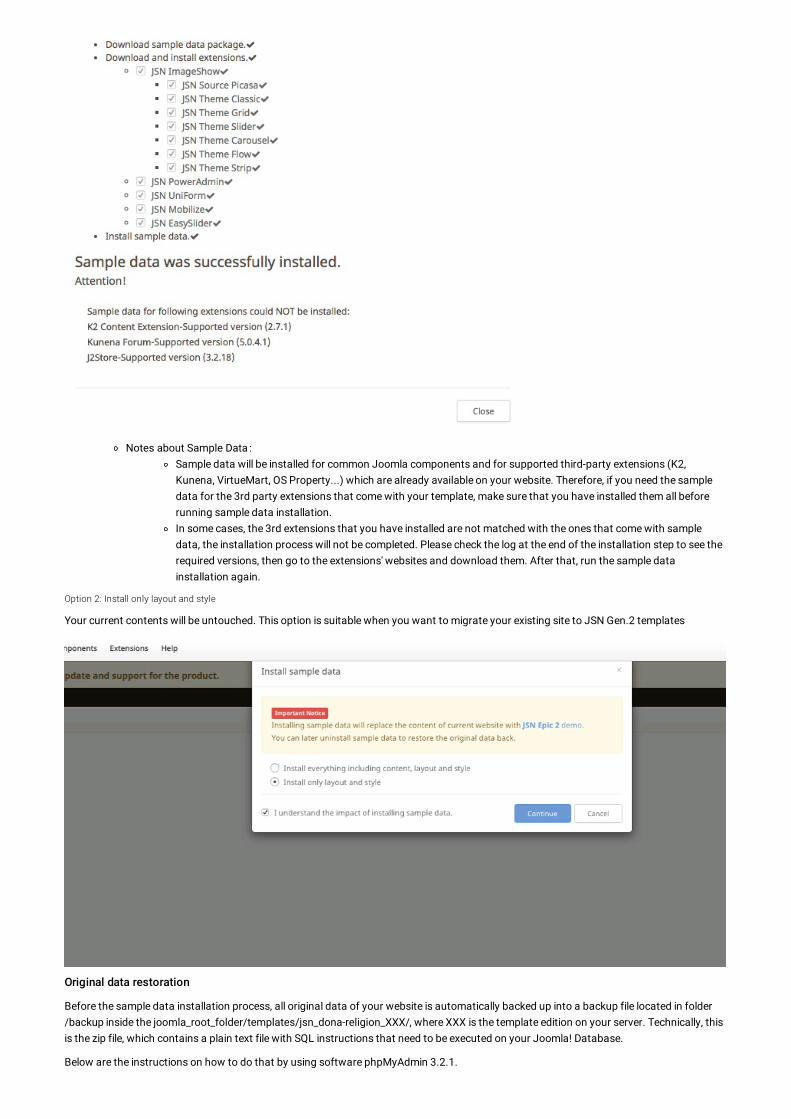
Sample Data InstallationAll JoomlaShine templates have unique feature of installing sample data which makes your website look the same as on the template demowebsite.
You can start the sample data installation process by clicking on "Get Started" button, which appears at the end of your template installationsteps (see above), or from the Data tab on the top of JSN Dona Religion template manager.
Install sample data
Show template’s image, click Install

Window installer
Option 1: Install everything including content, layout and style
Your current contents will be erased. This option is suitable when you build a new website, and current contents are of no importance to you.
1. On page JSN Dona Religion Sample Data Installation follow on-screen instruction to start the process
Download sample data package of the demo website data such as: demo articles, demo menus, demo template settings, etc.Install free versions of JSN extensions: JSN ImageShow, JSN PowerAdmin, JSN Mobilize, JSN EasySlider, JSN PageBuilder 2 andJSN UniForm.Install sample data: this step will check the template version before installing the sample data
2. Click the Finish button to Return to template settings page for further configuration
Notes about Sample Data :Sample data will be installed for common Joomla components and for supported third-party extensions (K2,Kunena, VirtueMart, OS Property...) which are already available on your website. Therefore, if you need the sampledata for the 3rd party extensions that come with your template, make sure that you have installed them all beforerunning sample data installation.In some cases, the 3rd extensions that you have installed are not matched with the ones that come with sampledata, the installation process will not be completed. Please check the log at the end of the installation step to see therequired versions, then go to the extensions' websites and download them. After that, run the sample datainstallation again.
Option 2: Install only layout and style
Your current contents will be untouched. This option is suitable when you want to migrate your existing site to JSN Gen.2 templates
Original data restoration
Before the sample data installation process, all original data of your website is automatically backed up into a backup file located in folder/backup inside the joomla_root_folder/templates/jsn_dona-religion_XXX/, where XXX is the template edition on your server. Technically, thisis the zip file, which contains a plain text file with SQL instructions that need to be executed on your Joomla! Database.
Below are the instructions on how to do that by using software phpMyAdmin 3.2.1.
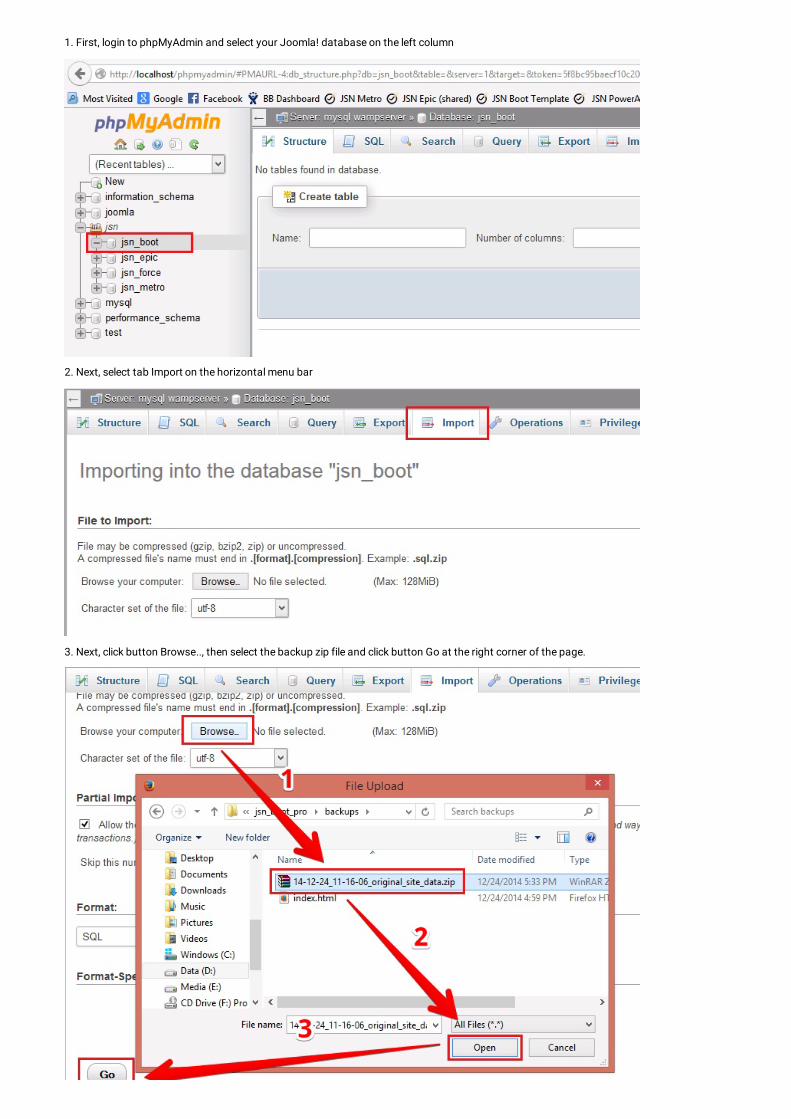
1. First, login to phpMyAdmin and select your Joomla! database on the left column
1. First, login to phpMyAdmin and select your Joomla! database on the left column
2. Next, select tab Import on the horizontal menu bar
3. Next, click button Browse.., then select the backup zip file and click button Go at the right corner of the page.
After script execution, you can get back to your website to check how the original data was restored.
Quickstart InstallationQuickstart package is a fully functional Joomla! package containing the CMS itself, the database, the selected template and all extensionsused in the template.
Once you install the quickstart successfully, you will have a complete website that looks exactly same as our Demo, with all theconfigurations and data that we used on the demo site in one place.
NOTE:
You can NOT install a Quickstart package in Joomla administration. Instead, you will need to upload it to the host, extract allthe files - then click on the URL and follow the instruction there to set up your package.Commercial extensions are not included in a quickstart package, even if you have purchased them. After installing a quickstartpackage, install these extensions and run sample data installation to get the full demo look for these extensions.
Preparation
A template quickstart package downloaded from JSN Customer Area
A hosting Cpanel account or an FPT connection
A MySQL database with a user that has full privileges over this database.
Important notes
For copyright reasons, we use blank thumbnail images instead of demo photos in quickstart packages. You will need to replace themall with your own photo stocks.
Commercial extensions will not be included in the quickstart. You will need to install them separately after the quickstart package hasbeen installed.
In some cases, you will need to update your Joomla version after installing the quickstart package.
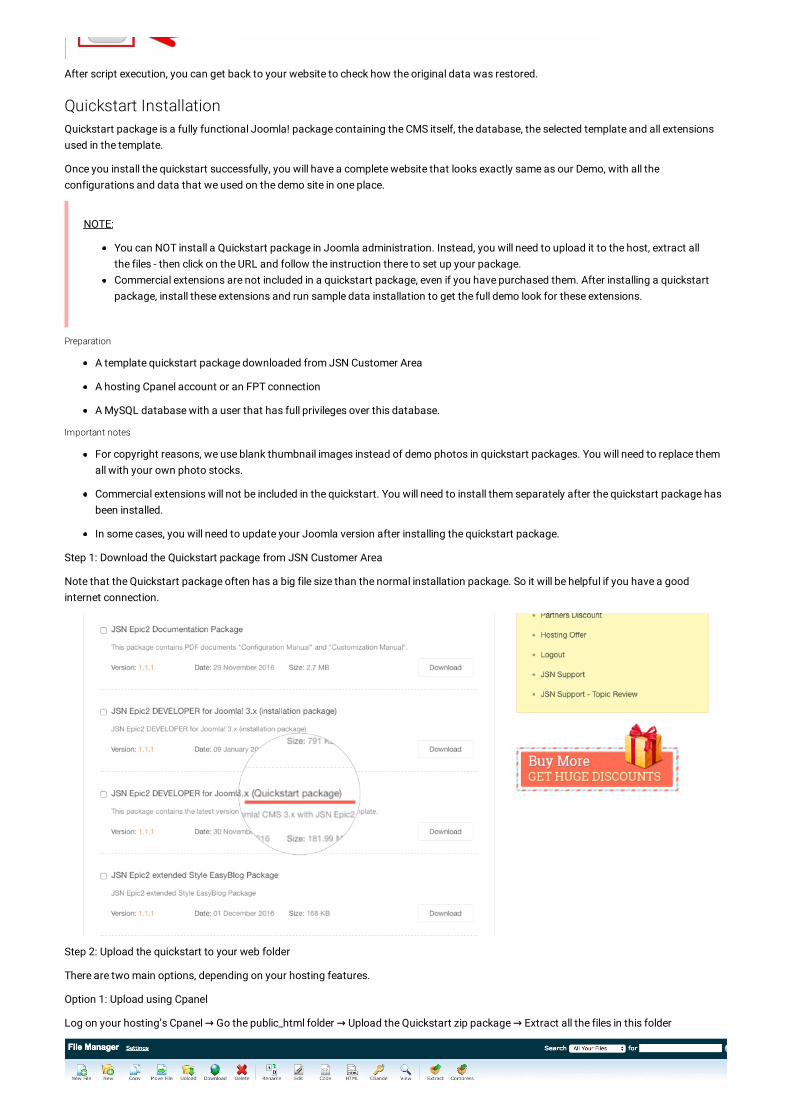
Step 1: Download the Quickstart package from JSN Customer Area
Note that the Quickstart package often has a big file size than the normal installation package. So it will be helpful if you have a goodinternet connection.
Step 2: Upload the quickstart to your web folder
There are two main options, depending on your hosting features.
Option 1: Upload using Cpanel
Log on your hosting’s Cpanel → Go the public_html folder → Upload the Quickstart zip package → Extract all the files in this folder
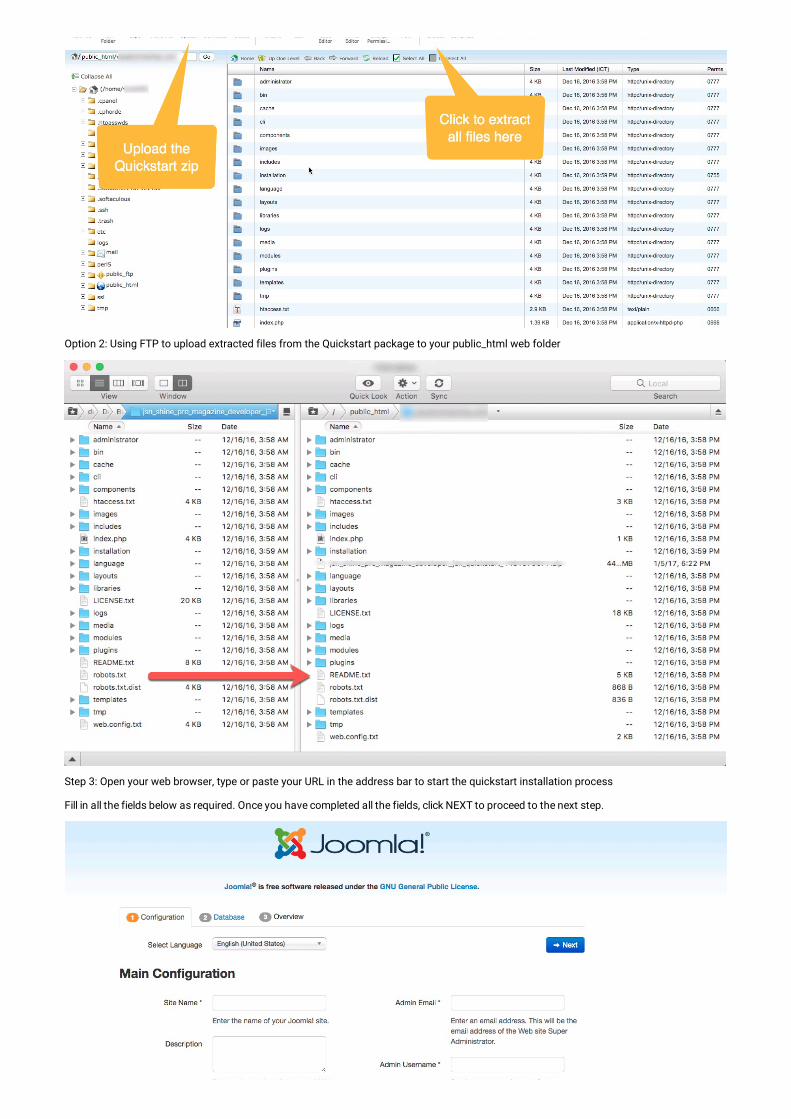
Option 2: Using FTP to upload extracted files from the Quickstart package to your public_html web folder
Step 3: Open your web browser, type or paste your URL in the address bar to start the quickstart installation process
Fill in all the fields below as required. Once you have completed all the fields, click NEXT to proceed to the next step.
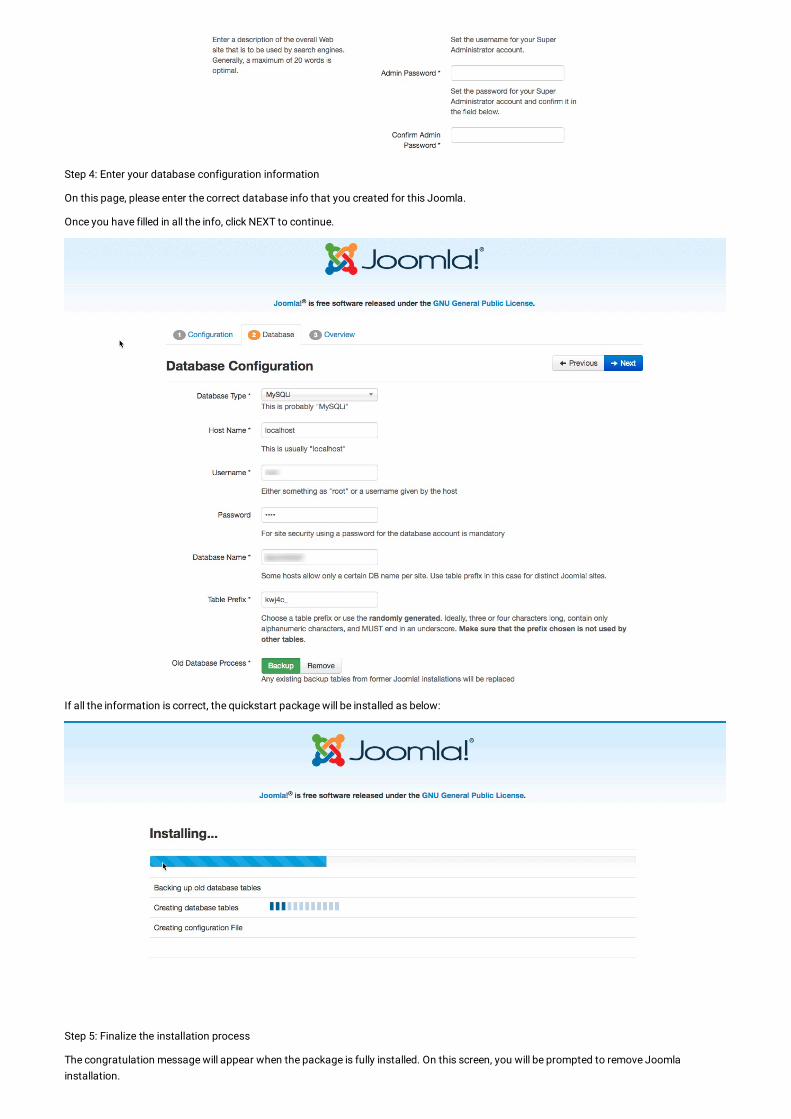
Step 4: Enter your database configuration information
On this page, please enter the correct database info that you created for this Joomla.
Once you have filled in all the info, click NEXT to continue.
If all the information is correct, the quickstart package will be installed as below:
Step 5: Finalize the installation process
The congratulation message will appear when the package is fully installed. On this screen, you will be prompted to remove Joomlainstallation.
installation.
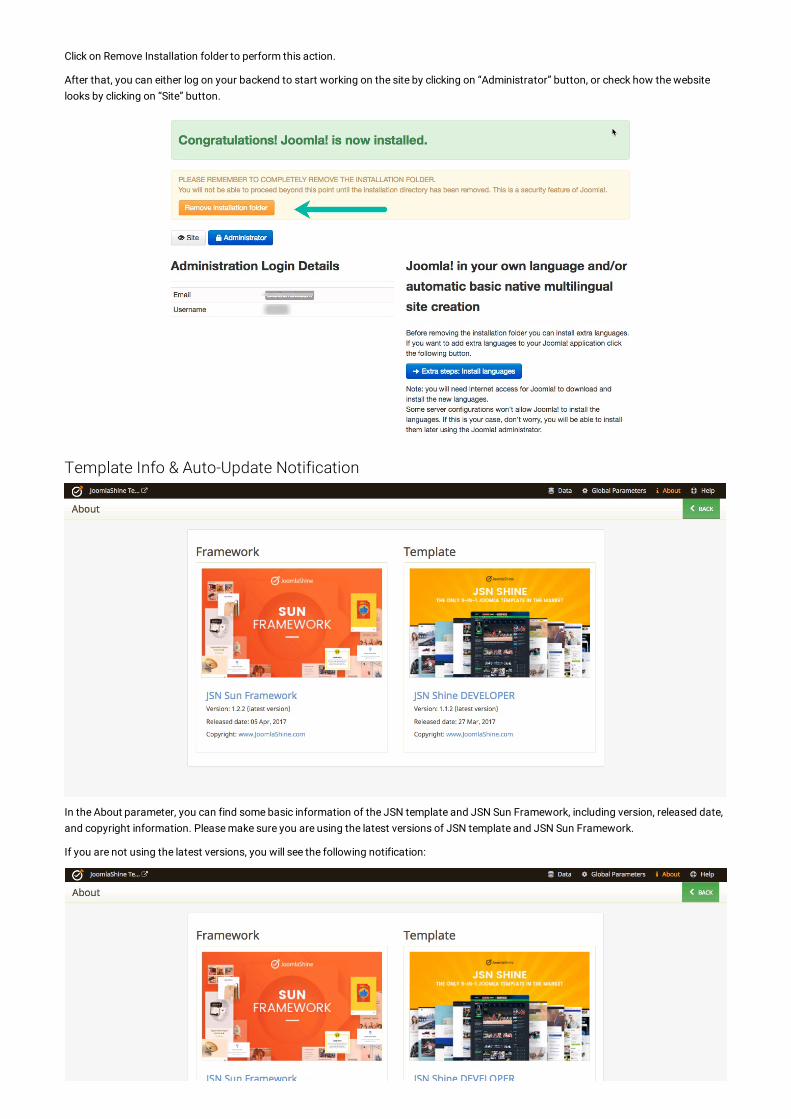
Click on Remove Installation folder to perform this action.
After that, you can either log on your backend to start working on the site by clicking on “Administrator” button, or check how the websitelooks by clicking on “Site” button.
Template Info & Auto-Update Notification
In the About parameter, you can find some basic information of the JSN template and JSN Sun Framework, including version, released date,and copyright information. Please make sure you are using the latest versions of JSN template and JSN Sun Framework.
If you are not using the latest versions, you will see the following notification:
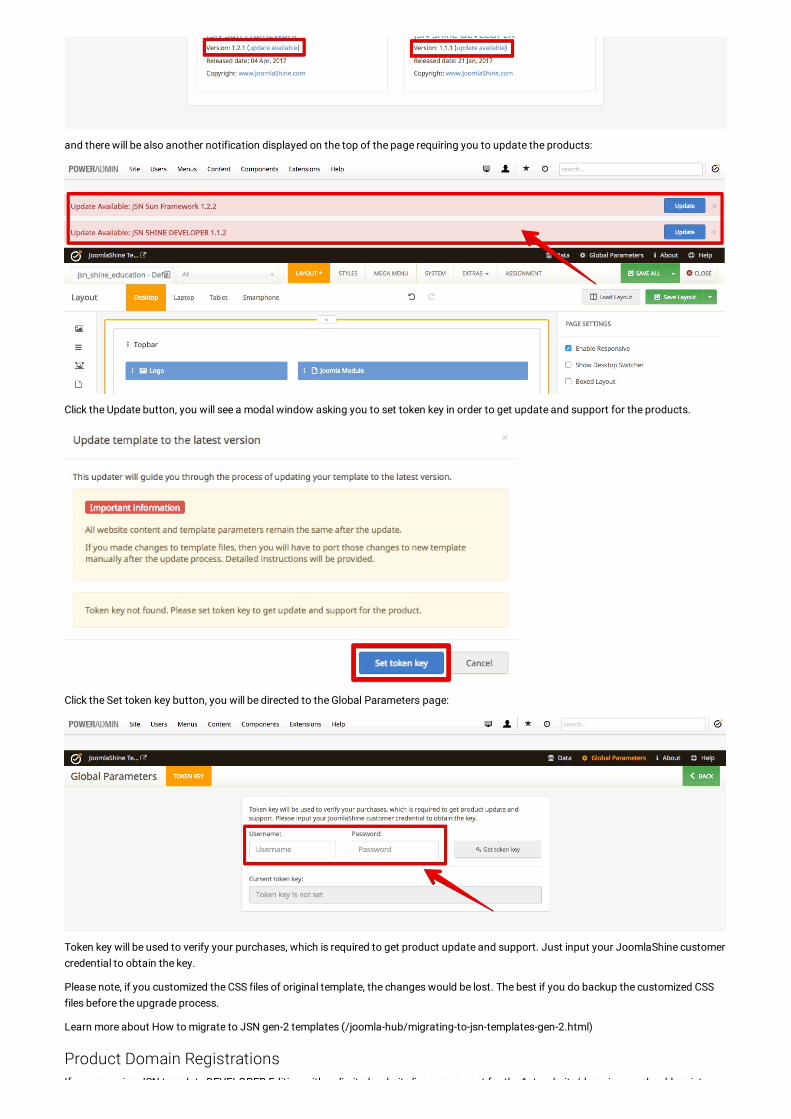
and there will be also another notification displayed on the top of the page requiring you to update the products:
Click the Update button, you will see a modal window asking you to set token key in order to get update and support for the products.
Click the Set token key button, you will be directed to the Global Parameters page:
Token key will be used to verify your purchases, which is required to get product update and support. Just input your JoomlaShine customercredential to obtain the key.
Please note, if you customized the CSS files of original template, the changes would be lost. The best if you do backup the customized CSSfiles before the upgrade process.
Learn more about How to migrate to JSN gen-2 templates (/joomla-hub/migrating-to-jsn-templates-gen-2.html)
Product Domain RegistrationsIf you are using JSN template DEVELOPER Edition with unlimited website licenses, except for the 1st website/domain, you should register
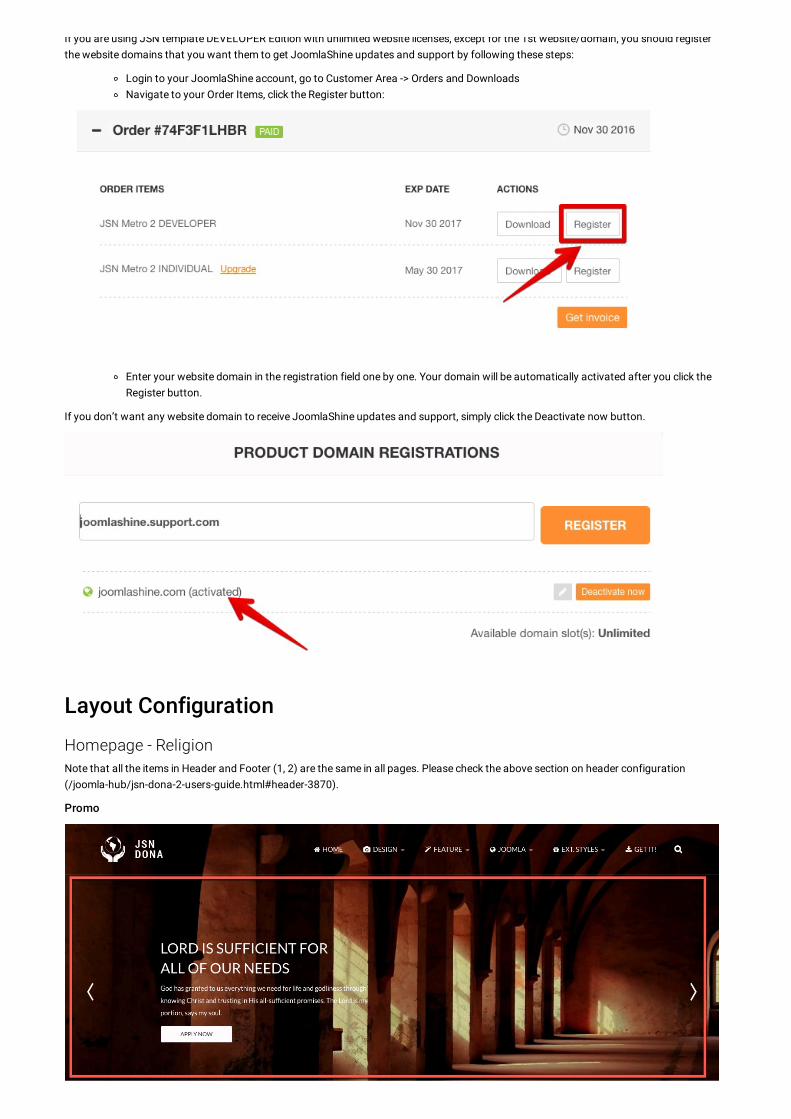
If you are using JSN template DEVELOPER Edition with unlimited website licenses, except for the 1st website/domain, you should registerthe website domains that you want them to get JoomlaShine updates and support by following these steps:
Login to your JoomlaShine account, go to Customer Area -> Orders and DownloadsNavigate to your Order Items, click the Register button:
Enter your website domain in the registration field one by one. Your domain will be automatically activated after you click theRegister button.
If you don’t want any website domain to receive JoomlaShine updates and support, simply click the Deactivate now button.
Layout Configuration
Homepage - ReligionNote that all the items in Header and Footer (1, 2) are the same in all pages. Please check the above section on header configuration(/joomla-hub/jsn-dona-2-users-guide.html#header-3870).
Promo
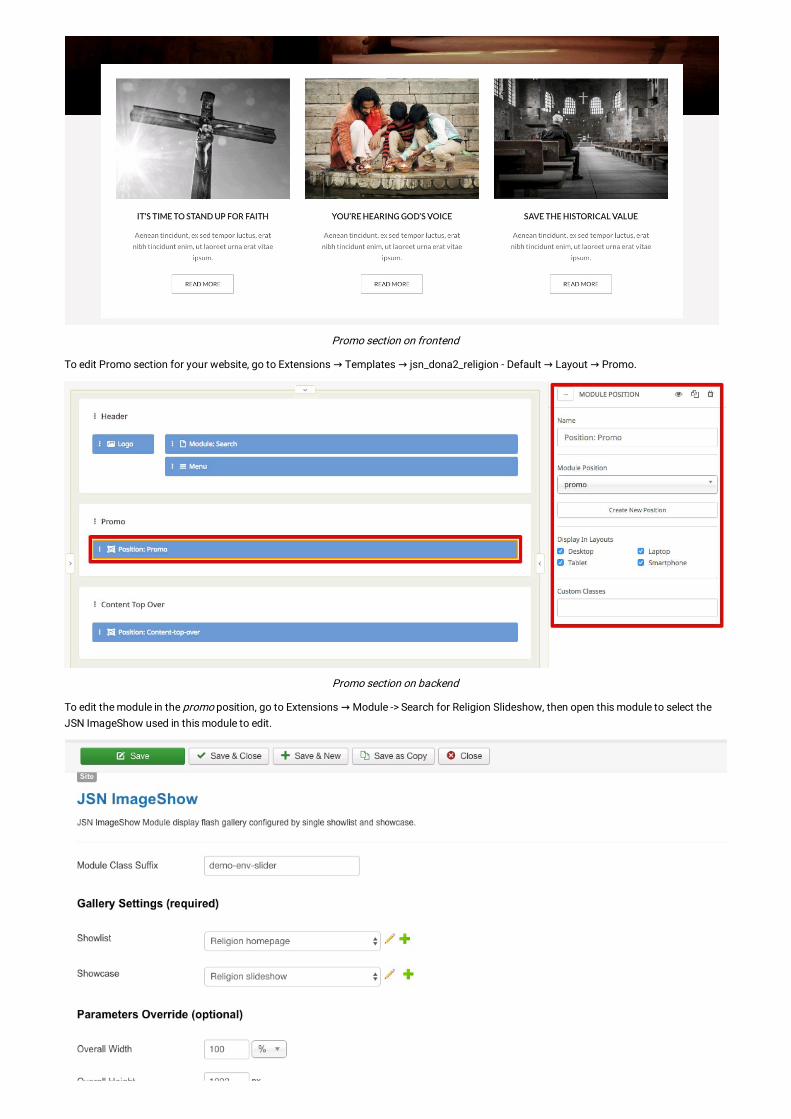
Promo section on frontend
To edit Promo section for your website, go to Extensions → Templates → jsn_dona2_religion - Default → Layout → Promo.
Promo section on backend
To edit the module in the promo position, go to Extensions → Module -> Search for Religion Slideshow, then open this module to select theJSN ImageShow used in this module to edit.
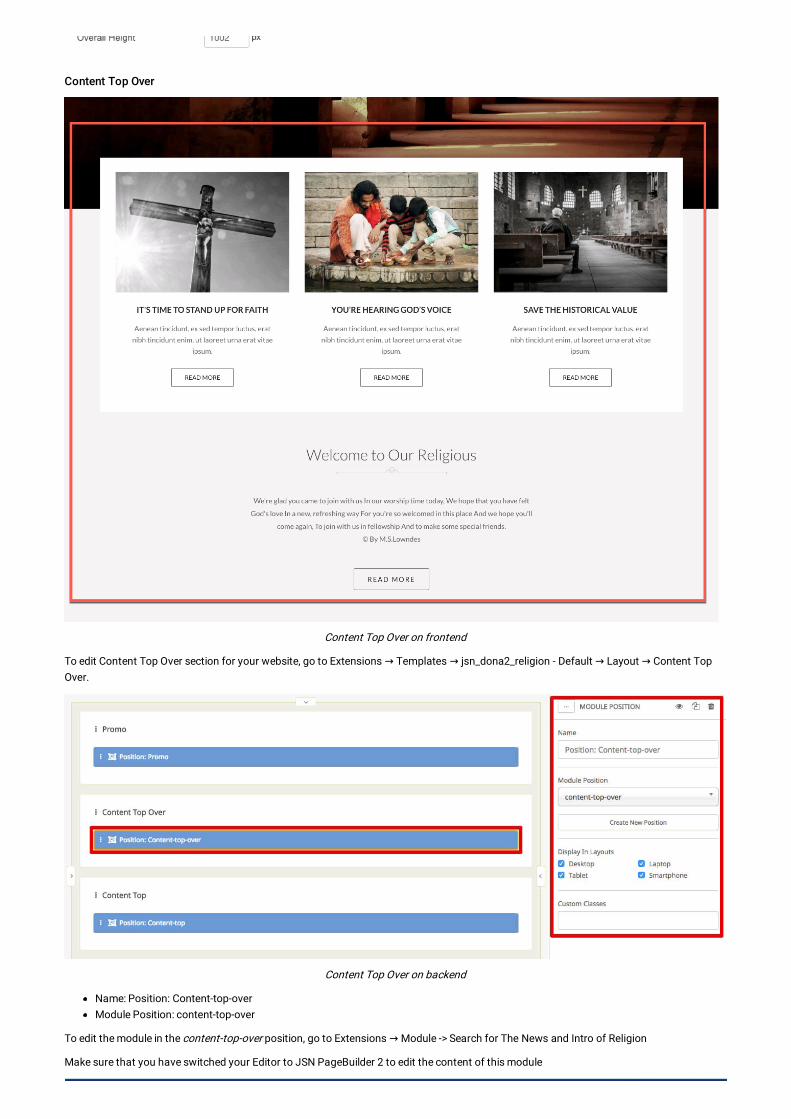
Content Top Over
Content Top Over on frontend
To edit Content Top Over section for your website, go to Extensions → Templates → jsn_dona2_religion - Default → Layout → Content TopOver.
Content Top Over on backend
Name: Position: Content-top-overModule Position: content-top-over
To edit the module in the content-top-over position, go to Extensions → Module -> Search for The News and Intro of Religion
Make sure that you have switched your Editor to JSN PageBuilder 2 to edit the content of this module
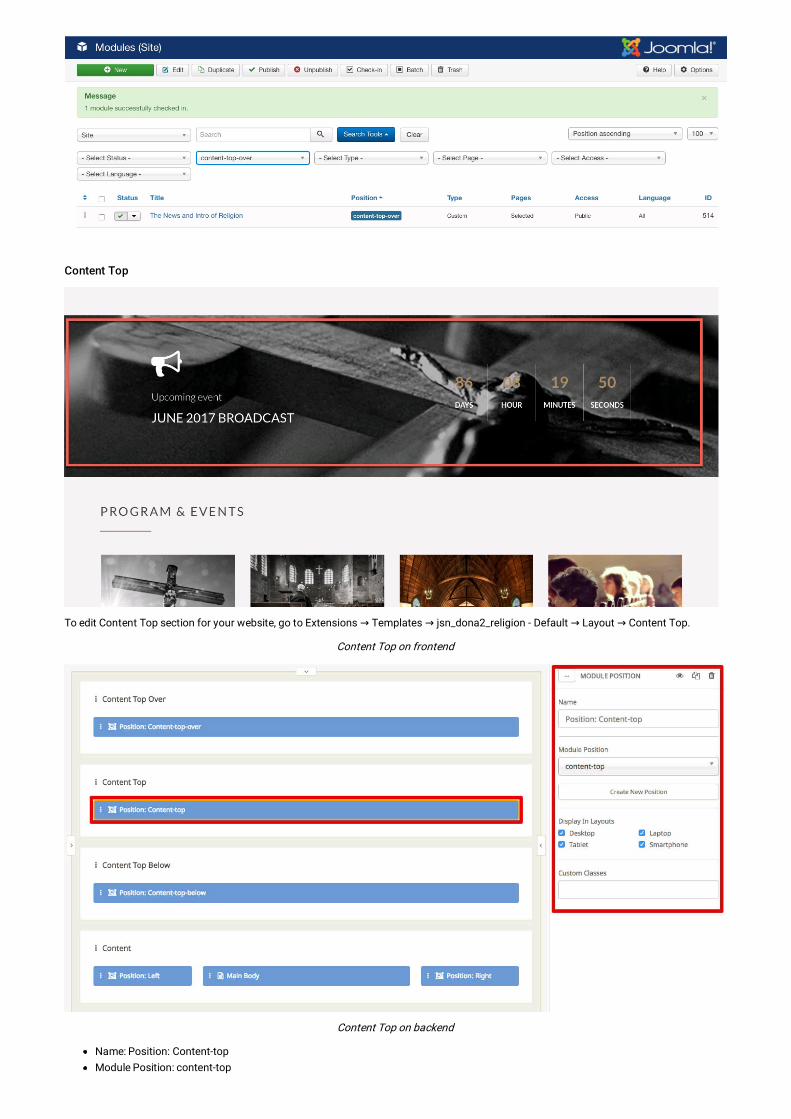
Content Top
To edit Content Top section for your website, go to Extensions → Templates → jsn_dona2_religion - Default → Layout → Content Top.
Content Top on frontend
Content Top on backend
Name: Position: Content-topModule Position: content-top
To edit the module in the content-top position, go to Extensions → Module -> Search for Upcoming event. Make sure that you have switchedyour editor to JSN PageBuilder 2 to edit the module's content:
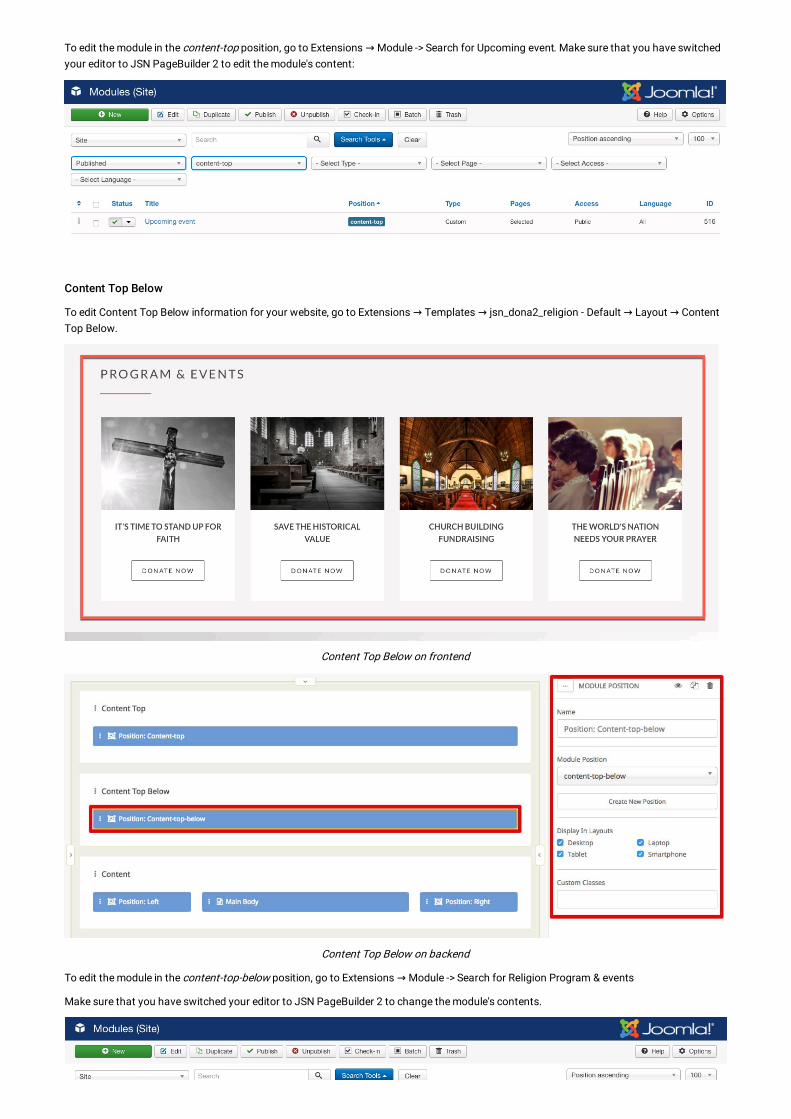
Content Top Below
To edit Content Top Below information for your website, go to Extensions → Templates → jsn_dona2_religion - Default → Layout → ContentTop Below.
Content Top Below on frontend
Content Top Below on backend
To edit the module in the content-top-below position, go to Extensions → Module -> Search for Religion Program & events
Make sure that you have switched your editor to JSN PageBuilder 2 to change the module's contents.

Content Bottom Over
Content Bottom Over on frontend
To edit Content Bottom Over section in the template, go to Extensions → Templates → jsn_dona2_religion - Default → Layout → ContentBottom Over
Content Bottom Over on backend
To edit the module in the content-bottom-over position, go to Extensions → Module → Search for Religion Testimonials.
Make sure that you have switched to JSN PageBuilder 2 to edit the the module's contents:
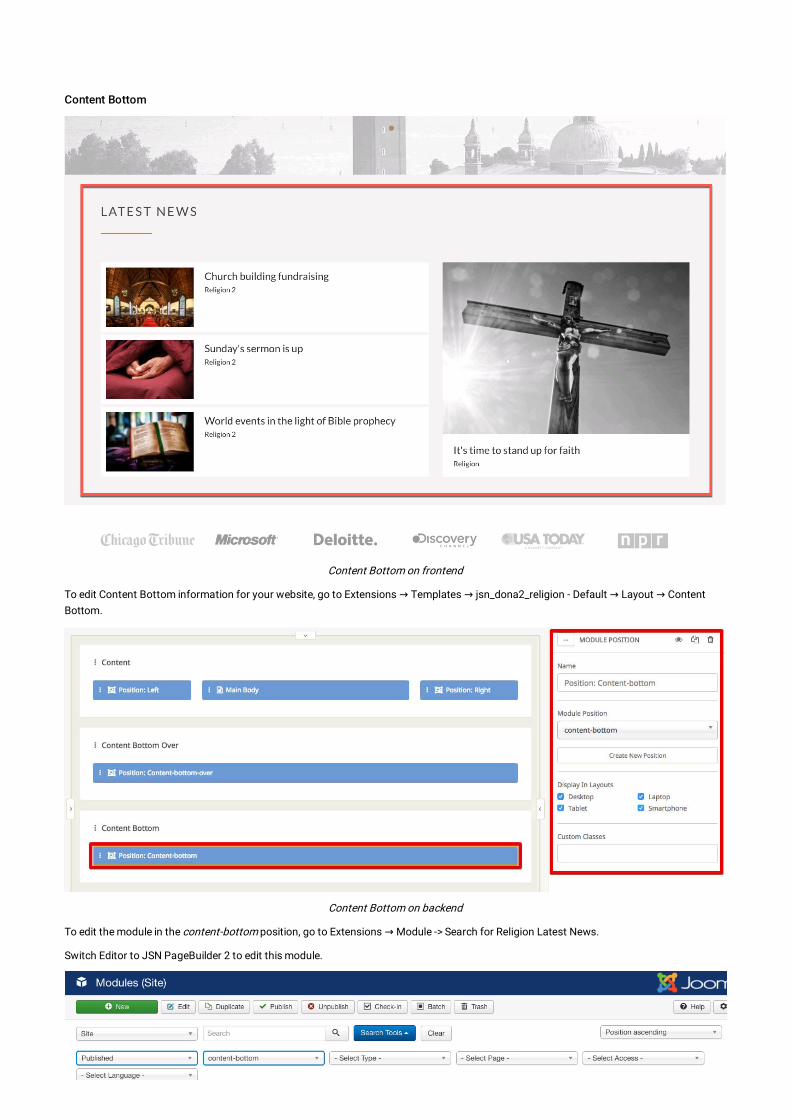
Content Bottom
Content Bottom on frontend
To edit Content Bottom information for your website, go to Extensions → Templates → jsn_dona2_religion - Default → Layout → ContentBottom.
Content Bottom on backend
To edit the module in the content-bottom position, go to Extensions → Module -> Search for Religion Latest News.
Switch Editor to JSN PageBuilder 2 to edit this module.
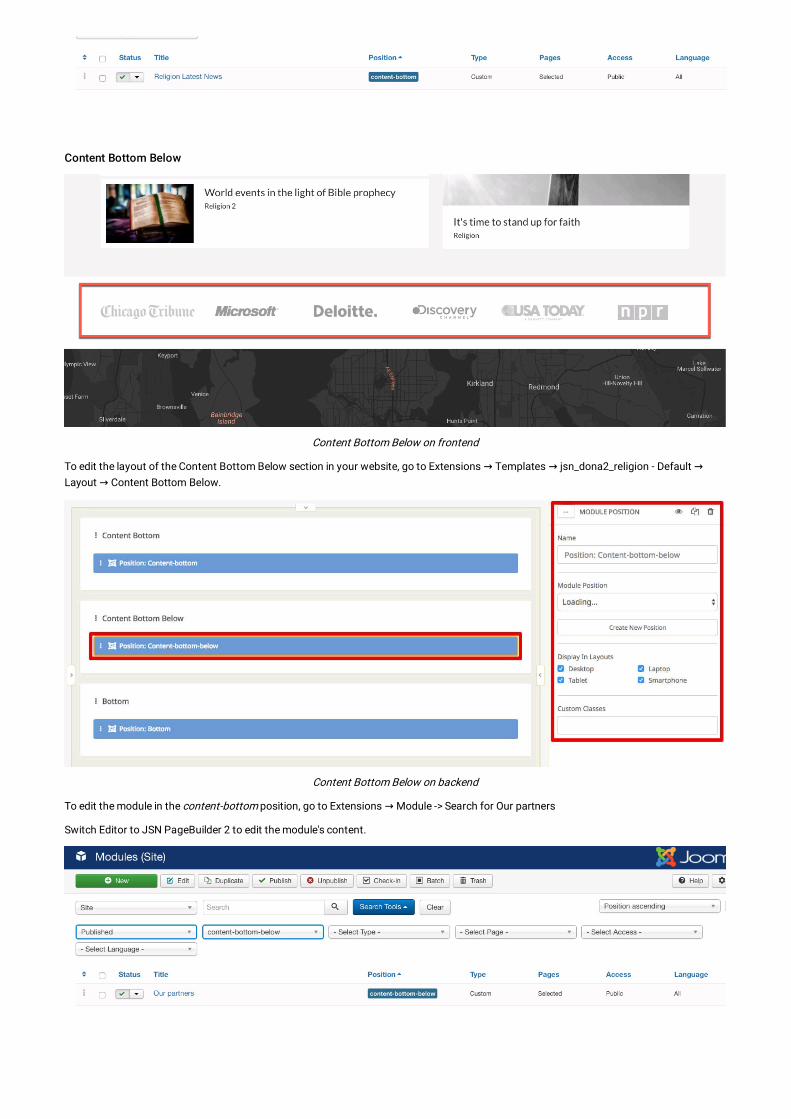
Content Bottom Below
Content Bottom Below on frontend
To edit the layout of the Content Bottom Below section in your website, go to Extensions → Templates → jsn_dona2_religion - Default →Layout → Content Bottom Below.
Content Bottom Below on backend
To edit the module in the content-bottom position, go to Extensions → Module -> Search for Our partners
Switch Editor to JSN PageBuilder 2 to edit the module's content.
Bottom
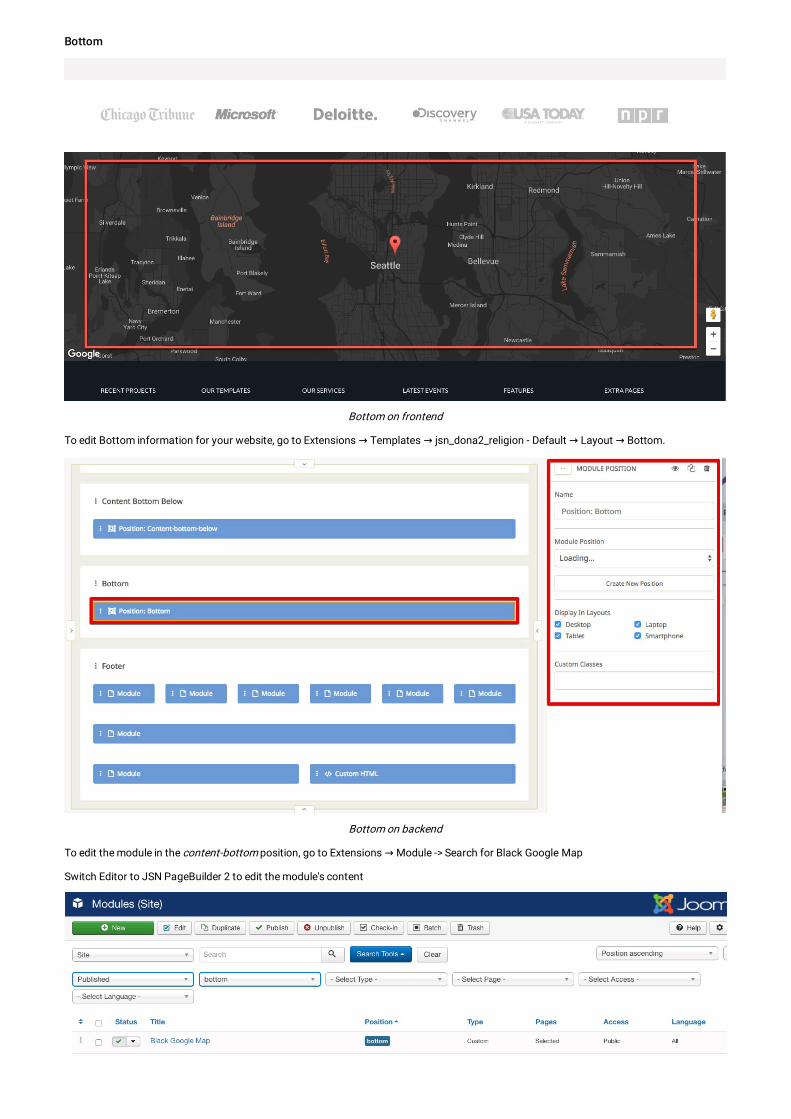
Bottom
Bottom on frontend
To edit Bottom information for your website, go to Extensions → Templates → jsn_dona2_religion - Default → Layout → Bottom.
Bottom on backend
To edit the module in the content-bottom position, go to Extensions → Module -> Search for Black Google Map
Switch Editor to JSN PageBuilder 2 to edit the module's content
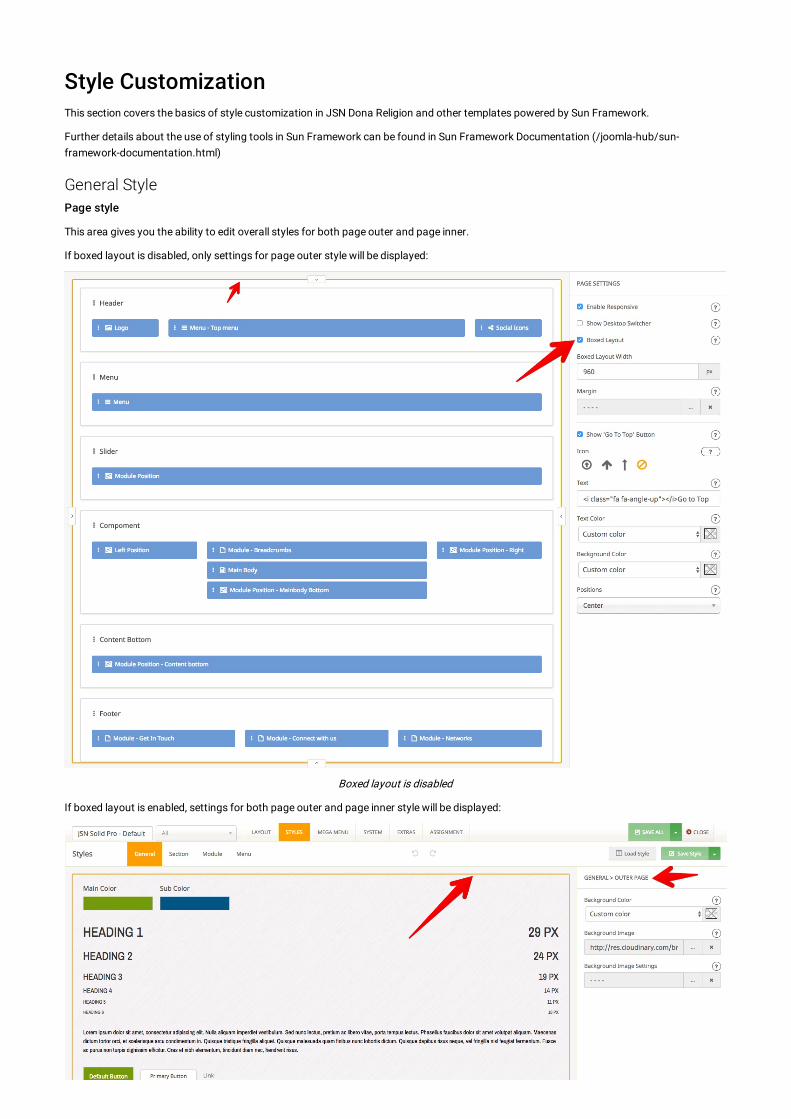
Style CustomizationThis section covers the basics of style customization in JSN Dona Religion and other templates powered by Sun Framework.
Further details about the use of styling tools in Sun Framework can be found in Sun Framework Documentation (/joomla-hub/sun-framework-documentation.html)
General StylePage style
This area gives you the ability to edit overall styles for both page outer and page inner.
If boxed layout is disabled, only settings for page outer style will be displayed:
Boxed layout is disabled
If boxed layout is enabled, settings for both page outer and page inner style will be displayed:
Boxed layout is enabled
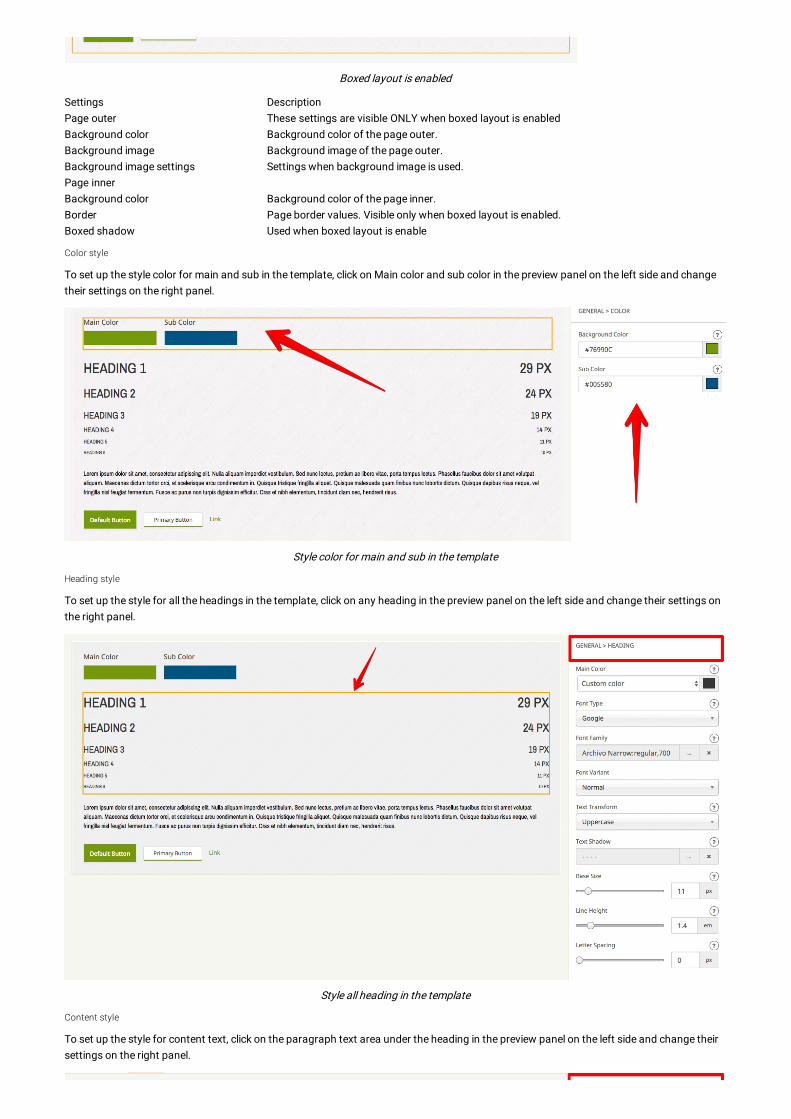
Settings DescriptionPage outer These settings are visible ONLY when boxed layout is enabledBackground color Background color of the page outer.Background image Background image of the page outer.Background image settings Settings when background image is used.Page inner Background color Background color of the page inner.Border Page border values. Visible only when boxed layout is enabled.Boxed shadow Used when boxed layout is enable
Color style
To set up the style color for main and sub in the template, click on Main color and sub color in the preview panel on the left side and changetheir settings on the right panel.
Style color for main and sub in the template
Heading style
To set up the style for all the headings in the template, click on any heading in the preview panel on the left side and change their settings onthe right panel.
Style all heading in the template
Content style
To set up the style for content text, click on the paragraph text area under the heading in the preview panel on the left side and change theirsettings on the right panel.
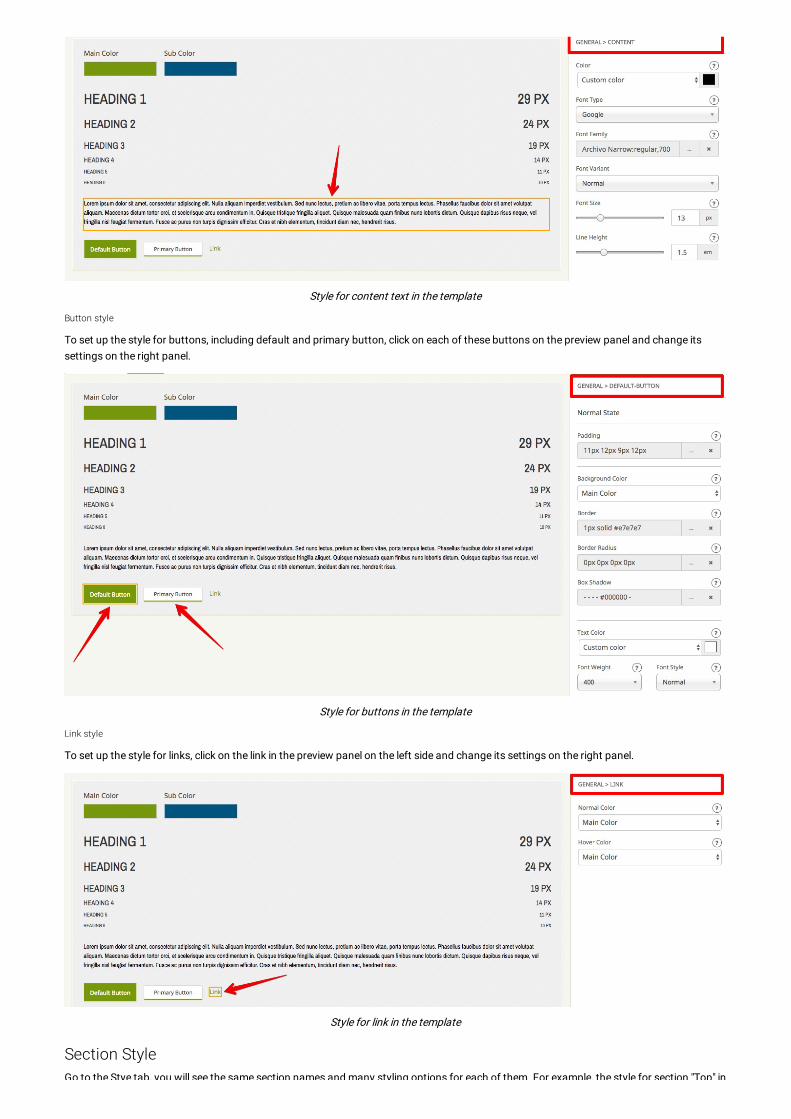
Style for content text in the template
Button style
To set up the style for buttons, including default and primary button, click on each of these buttons on the preview panel and change itssettings on the right panel.
Style for buttons in the template
Link style
To set up the style for links, click on the link in the preview panel on the left side and change its settings on the right panel.
Style for link in the template
Section StyleGo to the Stye tab, you will see the same section names and many styling options for each of them. For example, the style for section "Top" in
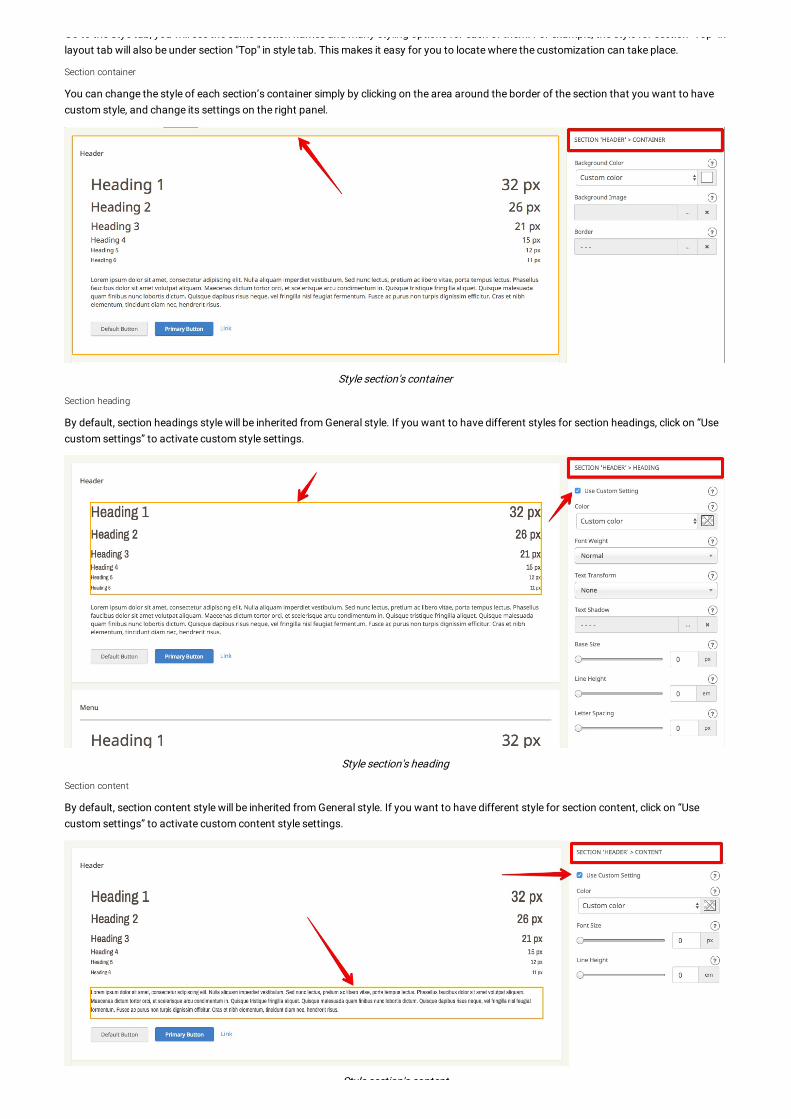
Go to the Stye tab, you will see the same section names and many styling options for each of them. For example, the style for section "Top" inlayout tab will also be under section "Top" in style tab. This makes it easy for you to locate where the customization can take place.
Section container
You can change the style of each section’s container simply by clicking on the area around the border of the section that you want to havecustom style, and change its settings on the right panel.
Style section's container
Section heading
By default, section headings style will be inherited from General style. If you want to have different styles for section headings, click on “Usecustom settings” to activate custom style settings.
Style section's heading
Section content
By default, section content style will be inherited from General style. If you want to have different style for section content, click on “Usecustom settings” to activate custom content style settings.
Style section's content
Style section's content
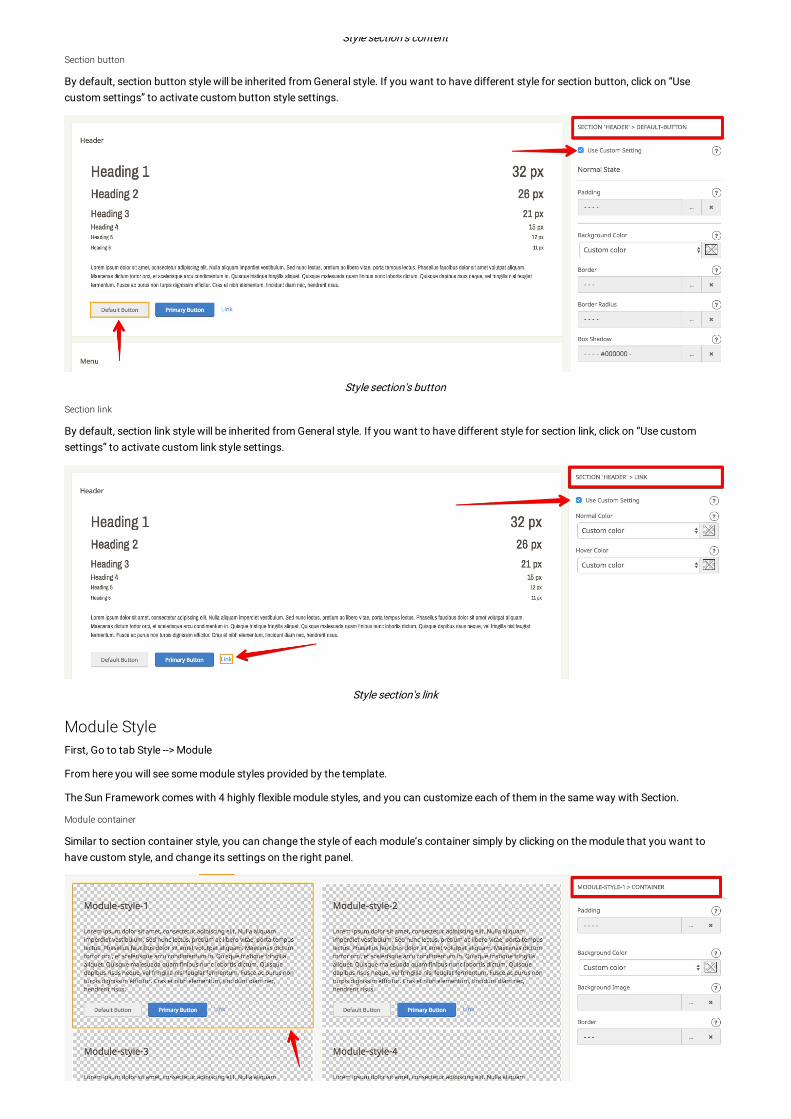
Section button
By default, section button style will be inherited from General style. If you want to have different style for section button, click on “Usecustom settings” to activate custom button style settings.
Style section's button
Section link
By default, section link style will be inherited from General style. If you want to have different style for section link, click on “Use customsettings” to activate custom link style settings.
Style section's link
Module StyleFirst, Go to tab Style --> Module
From here you will see some module styles provided by the template.
The Sun Framework comes with 4 highly flexible module styles, and you can customize each of them in the same way with Section.
Module container
Similar to section container style, you can change the style of each module’s container simply by clicking on the module that you want tohave custom style, and change its settings on the right panel.
Style module's container
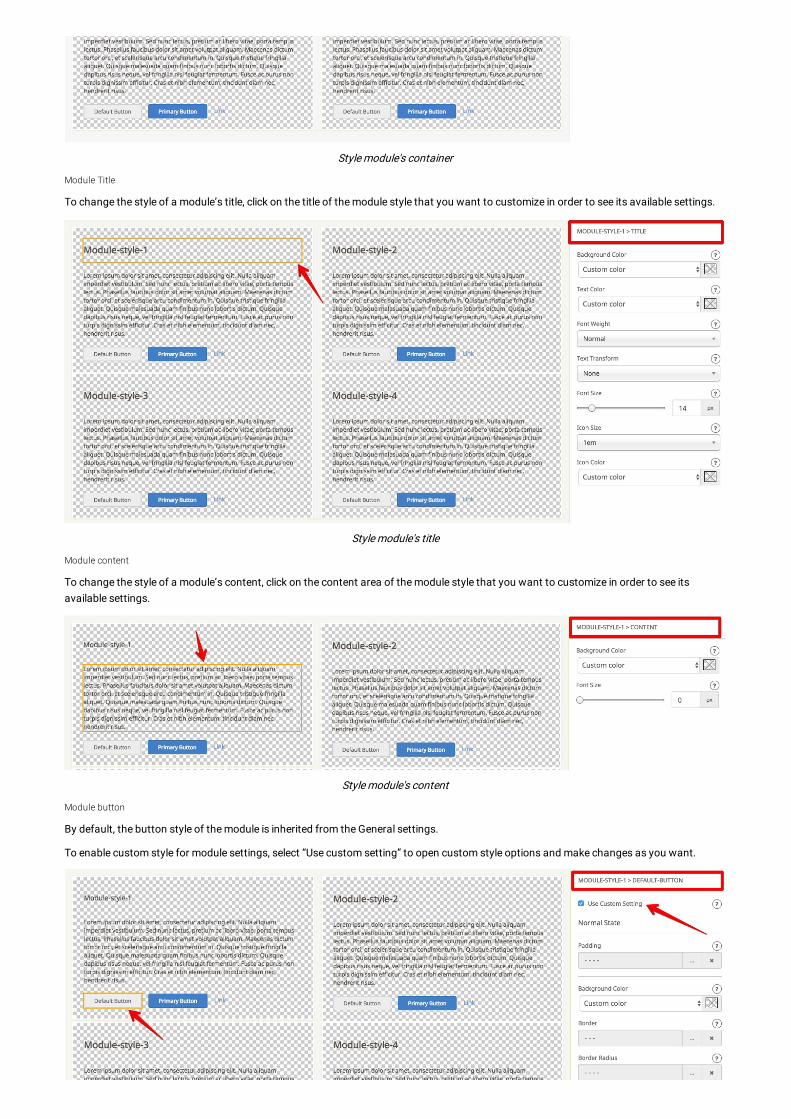
Module Title
To change the style of a module’s title, click on the title of the module style that you want to customize in order to see its available settings.
Style module's title
Module content
To change the style of a module’s content, click on the content area of the module style that you want to customize in order to see itsavailable settings.
Style module's content
Module button
By default, the button style of the module is inherited from the General settings.
To enable custom style for module settings, select “Use custom setting” to open custom style options and make changes as you want.
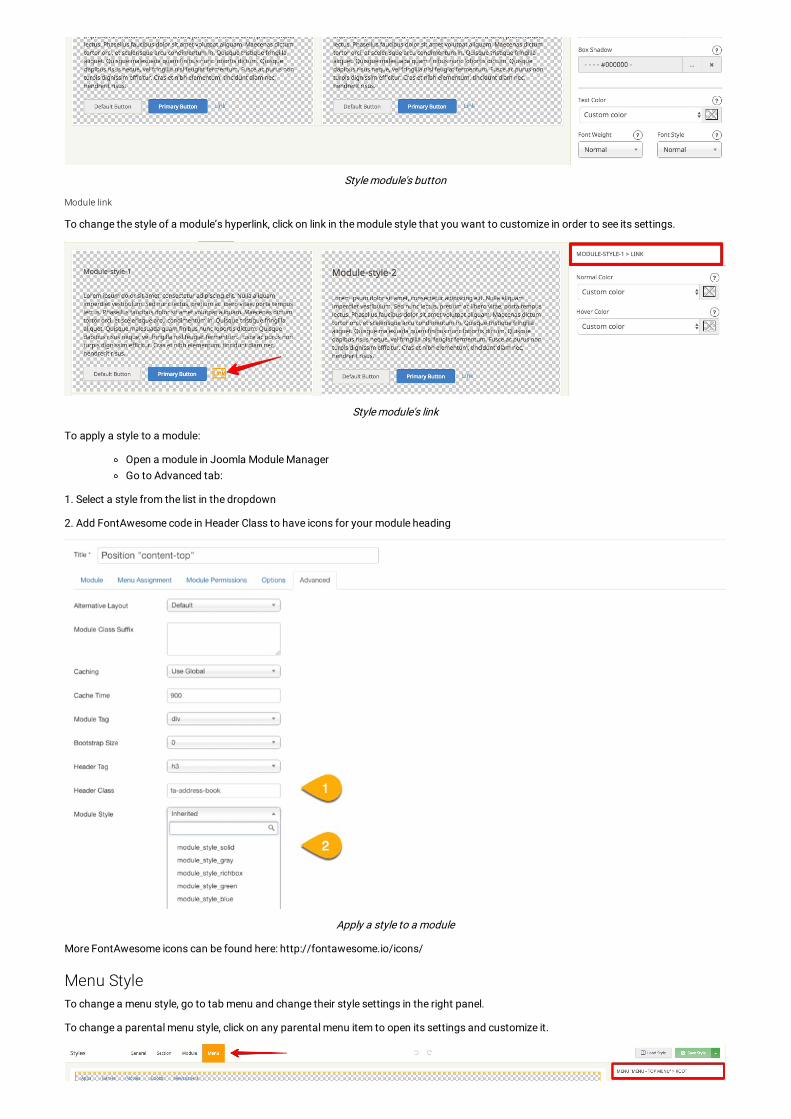
Style module's button
Module link
To change the style of a module’s hyperlink, click on link in the module style that you want to customize in order to see its settings.
Style module's link
To apply a style to a module:
Open a module in Joomla Module ManagerGo to Advanced tab:
1. Select a style from the list in the dropdown
2. Add FontAwesome code in Header Class to have icons for your module heading
Apply a style to a module
More FontAwesome icons can be found here: http://fontawesome.io/icons/
Menu StyleTo change a menu style, go to tab menu and change their style settings in the right panel.
To change a parental menu style, click on any parental menu item to open its settings and customize it.
Style for menu root
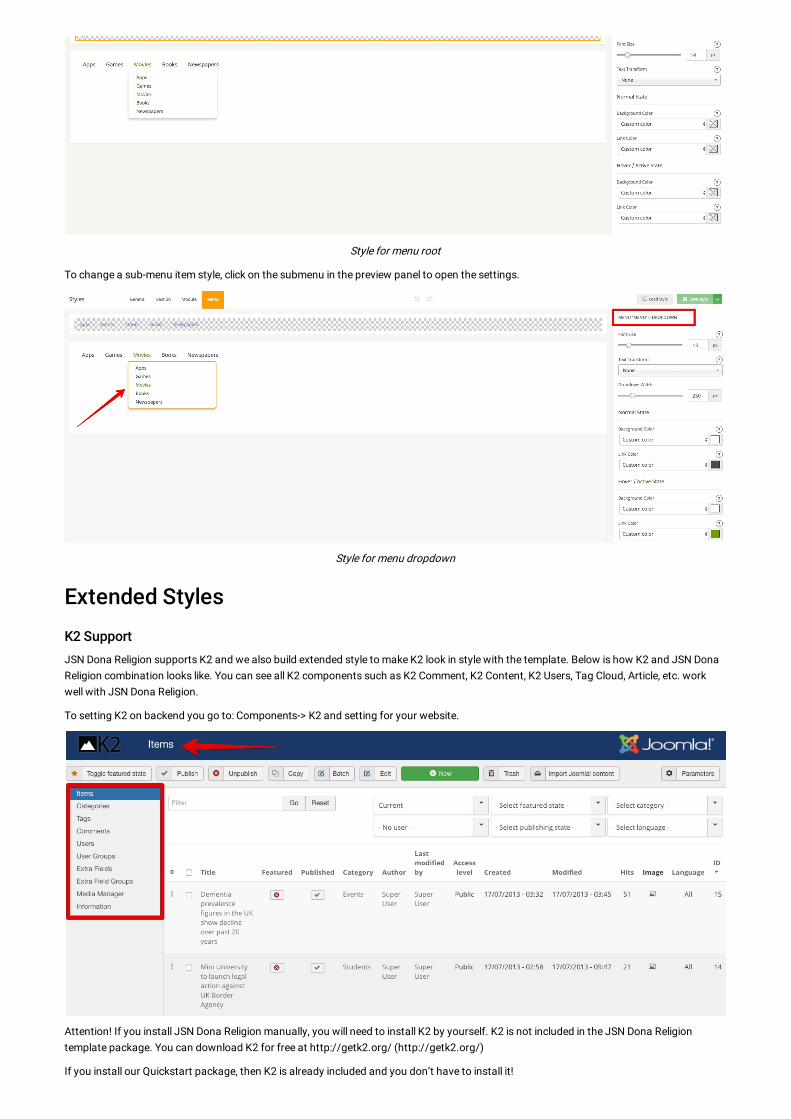
To change a sub-menu item style, click on the submenu in the preview panel to open the settings.
Style for menu dropdown
Extended StylesK2 SupportJSN Dona Religion supports K2 and we also build extended style to make K2 look in style with the template. Below is how K2 and JSN DonaReligion combination looks like. You can see all K2 components such as K2 Comment, K2 Content, K2 Users, Tag Cloud, Article, etc. workwell with JSN Dona Religion.
To setting K2 on backend you go to: Components-> K2 and setting for your website.
Attention! If you install JSN Dona Religion manually, you will need to install K2 by yourself. K2 is not included in the JSN Dona Religiontemplate package. You can download K2 for free at http://getk2.org/ (http://getk2.org/)
If you install our Quickstart package, then K2 is already included and you don’t have to install it!
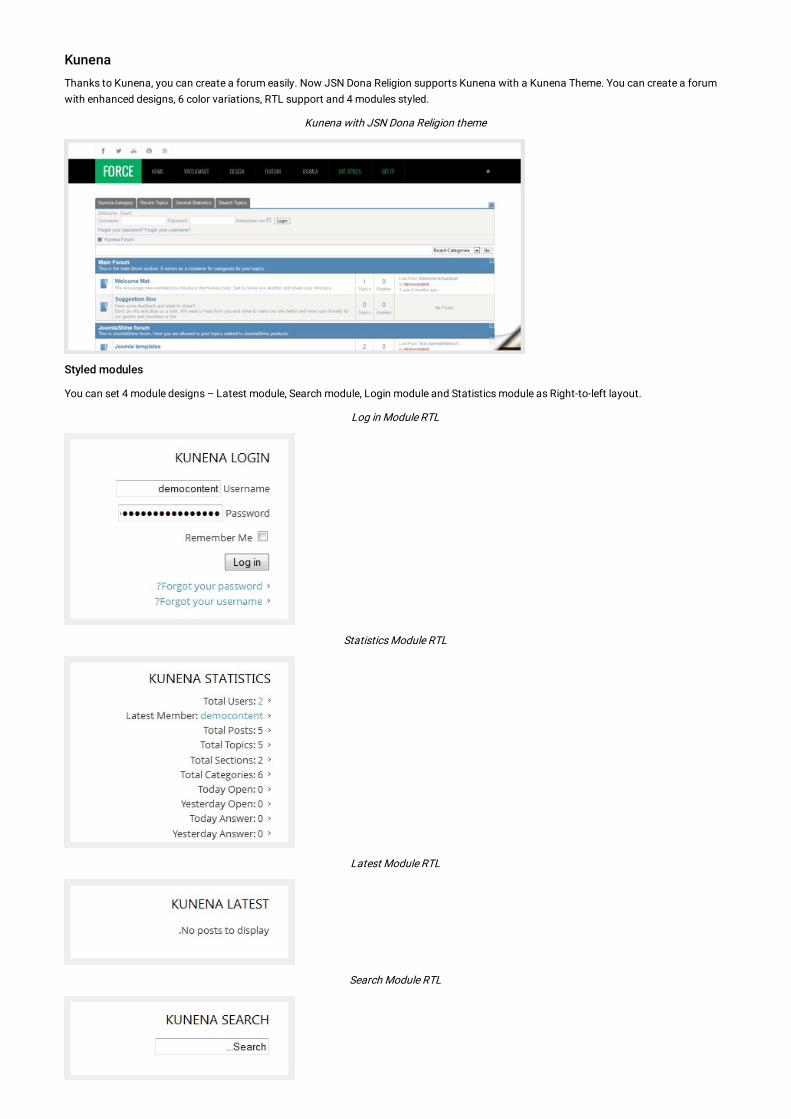
KunenaThanks to Kunena, you can create a forum easily. Now JSN Dona Religion supports Kunena with a Kunena Theme. You can create a forumwith enhanced designs, 6 color variations, RTL support and 4 modules styled.
Kunena with JSN Dona Religion theme
Styled modules
You can set 4 module designs – Latest module, Search module, Login module and Statistics module as Right-to-left layout.
Log in Module RTL
Statistics Module RTL
Latest Module RTL
Search Module RTL
Installation
You install Kunena (http://www.kunena.org/)via Joomla! administratorLog in the Customer Area, (http://www.joomlashine.com/customer-area.html)download JSN Dona Religion theme for Kunena.Unzip file jsn_dona-religion_kunena_unzip_me_first.zip, then copy the folder jsn_dona-religion to the pathjoomla_root\components\com_kunena\templateGo to joomla_root\components\com_kunena\template\jsn_dona-religion\language, copy the file en- Gcom_kunena.tpl_jsn_dona-religion and paste it in the folder joomla_root\components\com_kunena\language\en- GBGo to the website backend -> Component -> Kunena Forum -> Template Manager -> Set JSN Dona Religion as default
Now you have the JSN Dona Religion theme on your website.
Attention!. Kunena is not included in the JSN Dona Religion template package. You can download Kunena freely at http://www.kunena.org/(http://www.kunena.org/)
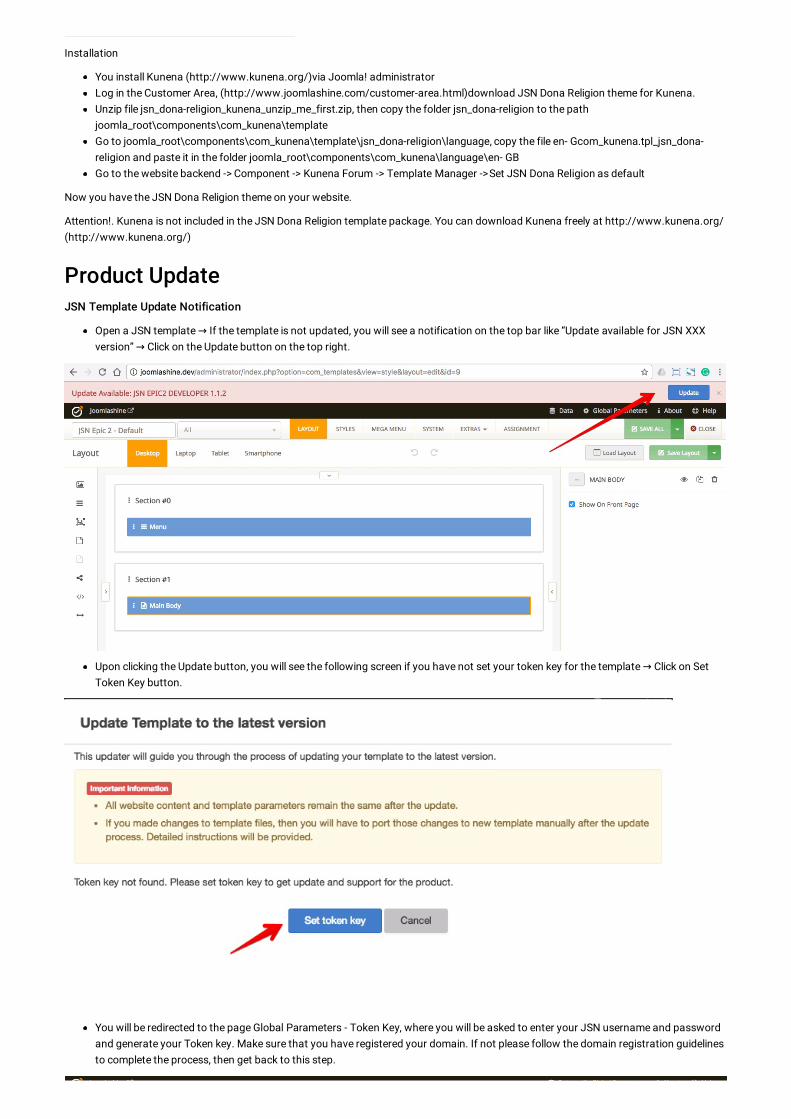
Product UpdateJSN Template Update Notification
Open a JSN template → If the template is not updated, you will see a notification on the top bar like “Update available for JSN XXXversion” → Click on the Update button on the top right.
Upon clicking the Update button, you will see the following screen if you have not set your token key for the template → Click on SetToken Key button.
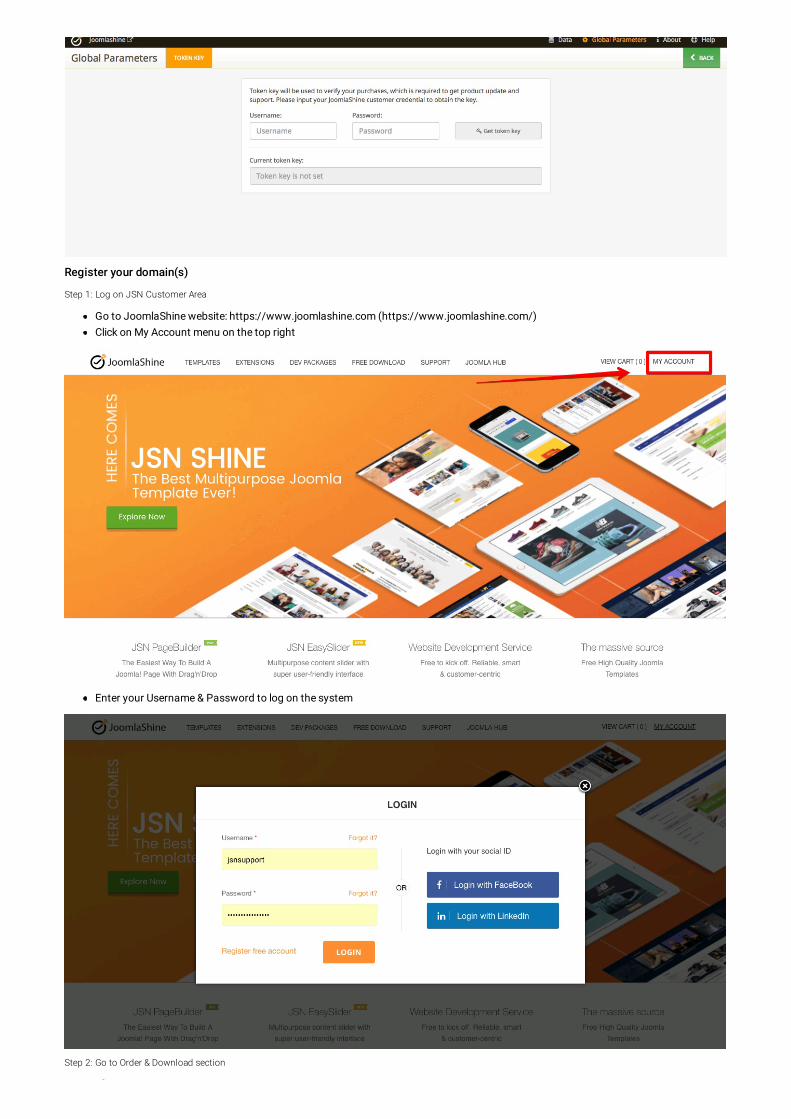
You will be redirected to the page Global Parameters - Token Key, where you will be asked to enter your JSN username and passwordand generate your Token key. Make sure that you have registered your domain. If not please follow the domain registration guidelinesto complete the process, then get back to this step.
Register your domain(s)
Step 1: Log on JSN Customer Area
Go to JoomlaShine website: https://www.joomlashine.com (https://www.joomlashine.com/)Click on My Account menu on the top right
Enter your Username & Password to log on the system
Step 2: Go to Order & Download section
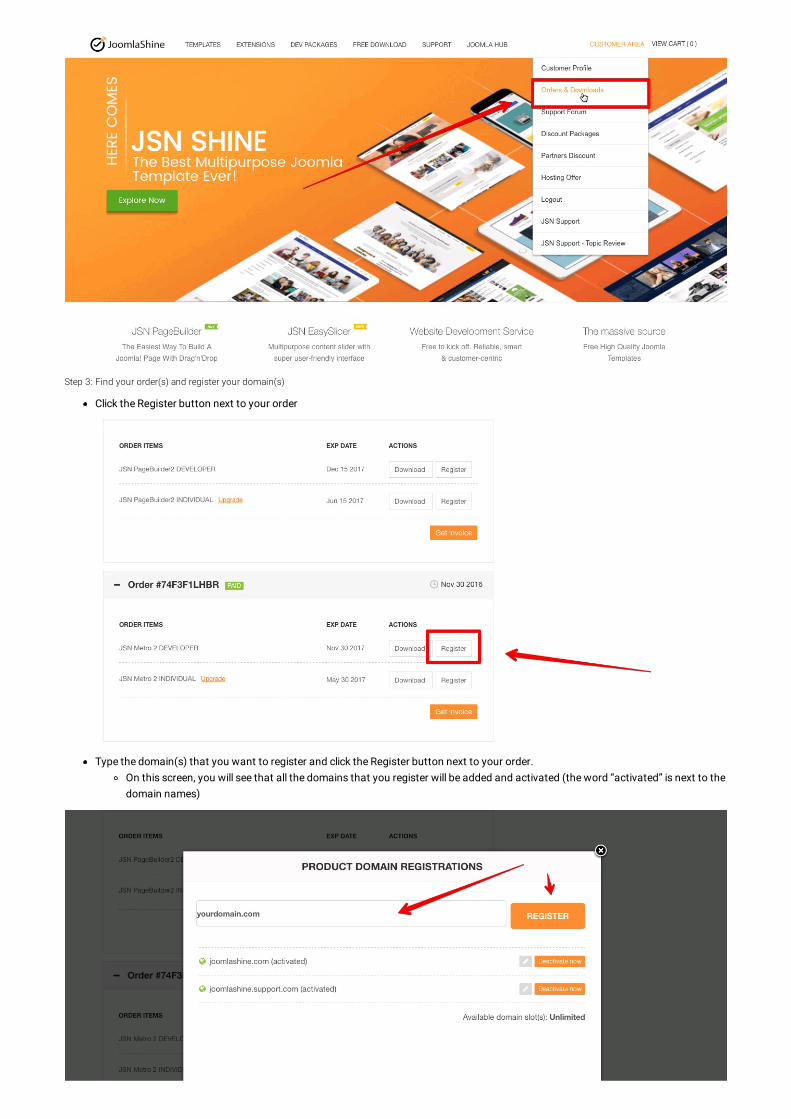
Step 3: Find your order(s) and register your domain(s)
Click the Register button next to your order
Type the domain(s) that you want to register and click the Register button next to your order.On this screen, you will see that all the domains that you register will be added and activated (the word “activated” is next to thedomain names)
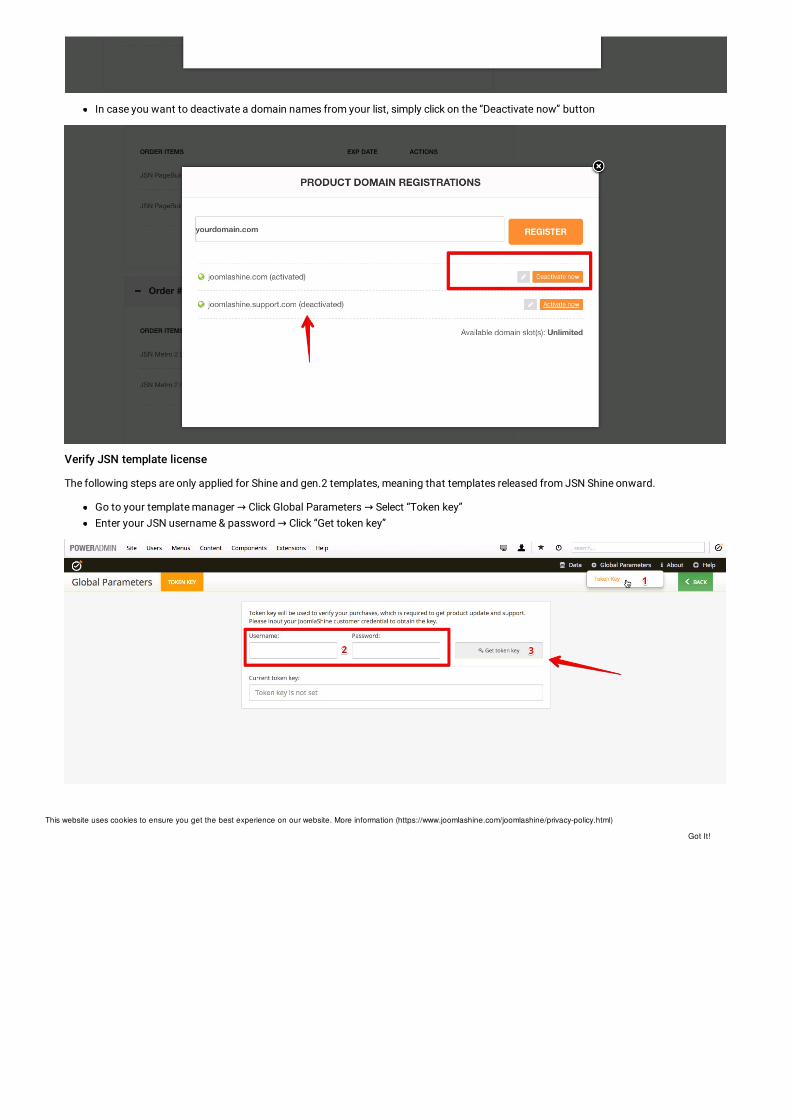
In case you want to deactivate a domain names from your list, simply click on the “Deactivate now” button
Verify JSN template license
The following steps are only applied for Shine and gen.2 templates, meaning that templates released from JSN Shine onward.
Go to your template manager → Click Global Parameters → Select “Token key”Enter your JSN username & password → Click “Get token key”
Got It!
This website uses cookies to ensure you get the best experience on our website. More information (https://www.joomlashine.com/joomlashine/privacy-policy.html)