junior shapes in nature
TRANSCRIPT

How are butterfly wings, peacock feathers, seashells, and lightning alike? They’re all patterns in nature. A pattern is when something repeats itself, like a checkerboard or stripes on a tiger.
Nature is a talented artist! It uses patterns, based in math, in many creations. In this badge, explore patterns found in nature and use math to create your own.
Steps1. Identify symmetry in nature2. Explore bilateral symmetry in nature3. Create nature-inspired art with
circular symmetry4. Find fractals in nature 5. Search for the Fibonacci sequence
PurposeWhen I’ve earned this badge, I’ll know about symmetry, fractals, and the Fibonacci sequence. I’ll have identified and made patterns inspired by nature.
Junior Shapes in Nature
This badge is part of the Math in Nature series of three badges. Junior

Concentric: When circles fit inside
each other and have the same center
point.
Counterclockwise: In the opposite
direction to the way hands on a clock
move around.
Diameter: A straight line running
through the center of a circle that
touches both sides.
Fibonacci sequence: A list of numbers
where each equals the sum of the two
numbers before it. 0, 1, 1, 2, 3, 5, 8, 13,
21, 34, 55…
Fractal: A never-ending pattern that is
repeated at different scales and sizes.
Golden rectangle: A rectangle that can
be cut up into a square and rectangle
similar to the original one.
Line of symmetry: An imaginary line
where something could be folded and
both sides would be reflections.
Midrib: The main vein down the center
of a leaf that’s also its line of symmetry.
Pattern: When something repeats itself,
like a checkerboard, stripes on a tiger, or
a song chorus.
Radius: A straight line from the center
of a circle to the edge.
Ratio: How much you have of one thing
compared to another.
Quadrant: One of four equal parts
created when a horizontal and vertical
line cross.
Similar: In math, figures are similar
when they have the same shape and
sides with the same ratio.
Spiral: A curve that circles around
from a fixed point.
Symmetry: When two or more parts
of an object are identical after a flip
or turn. Bilateral symmetry is when
both sides of one line of symmetry are
identical. Circular or radial symmetry
is when the lines of symmetry go from
the center point of a circle to the edge.
Vein: A line-shaped tube in a leaf that
provides it with structural support and
transports food, water, and minerals.
Words To Know
2 | Junior

Step 1: Identify symmetry in natureWhat do hearts, snowflakes, and butterflies have in common? Symmetry! Symmetry is
like a reflection or mirror image. When something is symmetrical, two or more parts of the
object are identical after a flip or turn. Think of our faces, an acorn, or an apple.
A line of symmetry is an imaginary line where you could make a fold and both sides
would be identical. Some things, like butterflies, have just one line of symmetry. Others,
like snowflakes, have more.
Can you find the lines of symmetry on a butterfly, snowflake, and peacock?
Choices—do one:
Draw symmetry made by nature. Look around for objects in nature that are symmetrical.
When you find something, draw it. Remember not to disturb anything you see and leave
no trace that you’ve been there. If you want, take photos. After, compile what you found in
a symmetry journal. Then, look at your journal and identify the lines of symmetry on each
natural object.
Create a paper snowflake with symmetry. Snowflakes have six lines of symmetry! They’re
based on a hexagon. A hexagon is a shape with six sides and angles. Fold and cut paper to
make your own snowflake. Then cut paper to make other symmetrical designs.
Strike a pose with symmetry. People are part of nature, too! Many people are symmetrical
from left to right. No one is symmetrical from top to bottom. Find a partner and create
mirror images of one another. Take turns striking a pose and making a reflection of your
partner.
Shapes in Nature | 3

Step 2: Explore bilateral symmetry in natureImagine drawing a line from the head to the tail of a tiger, down the middle of a butterfly,
or across some flowers—one line of symmetry would create two symmetrical sides. That’s
called bilateral symmetry. Bi- means “two.” Lateral means “sides.” The line of symmetry
divides the object in two.
Some plants, animals, insects, and even people have bilateral symmetry. Other natural
objects, like spiderwebs or snowflakes, have more than one line of symmetry.
Choices—do one:
Draw or sculpt leaf symmetry. A leaf’s veins move water and glucose (sugar) around the
plant. They come out from the midrib, a large, main vein that runs down the leaf’s center
and is its line of symmetry. Find some leaves: do you see their veins? Can you find the
midrib? Draw or sculpt the leaves. Be sure to show their line of symmetry.
Create butterfly symmetry. Butterfly wings are a colorful example of symmetry. Look at
different kinds of butterflies. Can you find each line of symmetry? Then, make your own
3D butterfly. Shape pipe cleaners or wire to make the frame for your butterfly. Then draw
or create a symmetrical wing design with tissue paper or coffee filters. Attach them to your
frame to build your butterfly.
Make art with human symmetry. As part of nature, people have symmetry, too. Now, make a
life-sized drawing of YOU to explore symmetry. Do you have any parts that aren’t symmetrical?
Are your feet or ears different sizes? Remember that symmetry isn’t perfection. Every aspect
of you makes you special and unique.
4 | Junior

Step 3: Create nature-inspired art with circular symmetryDid you know insects and animals create objects with symmetry? Bees build honeycombs
that are symmetrical. Spiders weave webs that are symmetrical.
Some symmetry, like a spiderweb, is circular or radial. In circular symmetry, the lines of
symmetry go from the center point of a circle to its edge. When circles fit inside each other
and have the same center point, they’re called concentric. When concentric circles are
stacked upon each other, they create a cone.
Circular symmetry can also be found in art. You can
find it in mosaics, paintings, buildings, stained glass,
and so much more. Symmetry helps bring balance to
the composition or layout of the art. You can create
symmetry with colors, shapes, and lines.
Choices—do one:
Make radial art with birdseed. Seeds have different colors and textures you can use
to make edible art for birds. Learn about what the birds in your area like to eat. Create
quadrants on a paper plate. Then design your bird feeder. Fill your design with seed butter
and birdseed. Then hang your feeder or place it somewhere for birds to eat.
Make circular art with natural objects. Many artists use natural materials, like rocks,
sticks, leaves, and other natural objects. Think of crop circles in corn fields and stone
circles, like Stonehenge. You can also use circular symmetry to arrange natural objects. Find
somewhere to create your artwork, either two-dimensional and flat on the ground or three-
dimensional, taking up volume or space. Gather natural objects, like leaves, sticks, shells, or
flower petals. Imagine a circle. Where are the center and lines of symmetry? Where are the
quadrants? Add lines, circles, and layers of symmetrical objects. When you’re done, show
your artwork to other people. And remember that it’s okay if it doesn’t last forever—nature
will move the materials around.
Make art with concentric circles. Ripples from a pebble dropped in a pond, the layers of
an onion, and the growth rings on a tree stump are all concentric circles. Create a piece of art
using concentric circles inspired by nature. Draw them, paint them, cut them, or stack them.
Arrange circles to make something new.
Check out pages 6 and 7
for more information on
circular symmetry.
Shapes in Nature | 5

1. Imagine the circle where you’ll create your design. Will it be on a plate, the ground,
paper, or even in the air?
2. Create a line going across the circle and through the center. That’s your first line of
symmetry! It’s also the circle’s diameter.
3. Make another line going across the circle and through the center, creating four equal
parts. That’s your second line of symmetry! You now have four equal quadrants.
4. Look at each line coming from the center to the edge of the circle. That line is called
a radius.
5. Add smaller circles inside your circle, all with the same center point. When circles
fit inside each other and have the same center point, they’re called concentric.
6. Use your lines of symmetry or concentric circles to design your art work! Add
shapes, lines, and other patterns.
Designing with Circular Symmetry
Diam
eter
Radius
Concentriccircles
Quadrants
Answers: 1—D, starfish; 2—C, rare 4-leaf clover; 3—A, face; 4—F, octopus; 5—B, trillium; 6—E, snowflake
1 2 3 4 5 6
C Division into fourths
D Division into fifths
E Division into sixths
F Division into eights
A Bilateralsymmetry
Match each natural object with its lines of symmetry.
B Division into thirds
6 | Junior

Art and Symmetry
Many cultures have a tradition of making colorful, symmetrical art. For example, have you ever seen a mandala? Mandala is the Sanskrit word (Sanskrit is an ancient language created in South Asia) for circle or center. It’s a symbol for the universe from the Buddhist and
Hindu faiths. It often appears as the sun, moon, or earth. They can be painted, made with mosaic tiles, or even created with natural objects on the ground.
Celtic knots, some African textiles, and some Asian symbols, like Yin and Yang, all use circular symmetry. Many traditional art forms from all over the world use
repeated colors, shapes, and patterns that circle out from a center point.
Shapes in Nature | 7

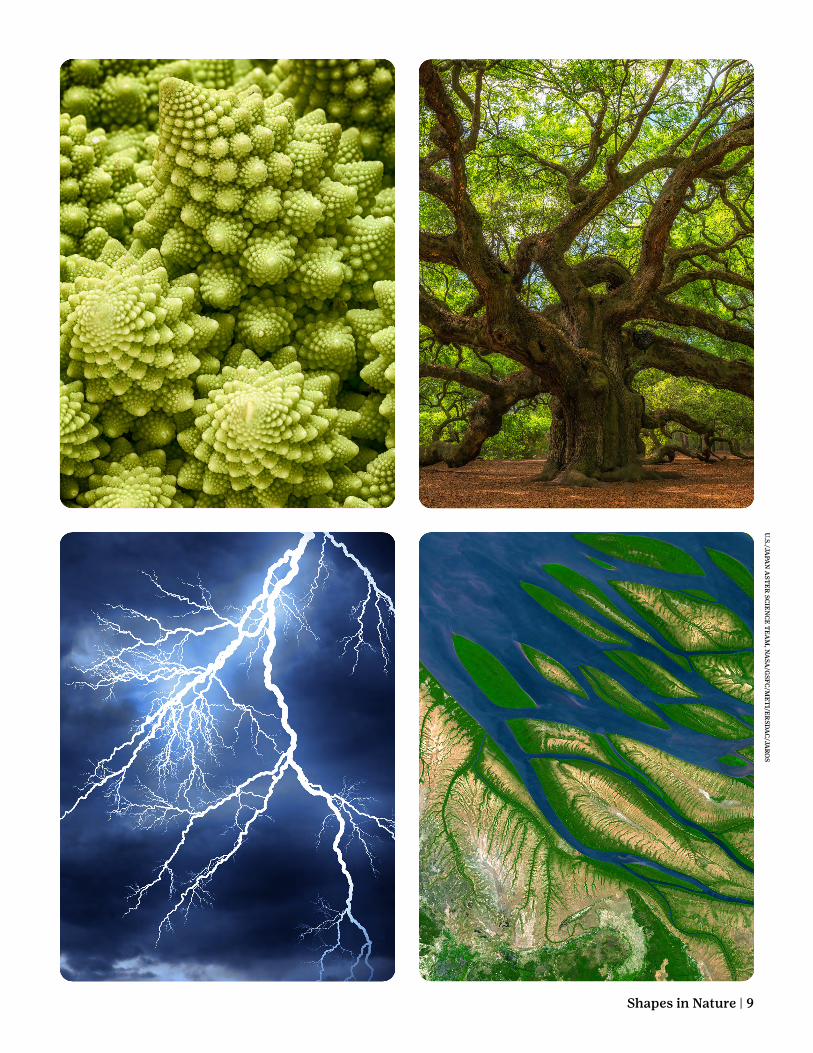
Step 4: Find fractals in natureHave you ever seen a picture of a riverbank from above? Rivers are full of branching patterns.
They kind of look like tree branches, lightning, and even cauliflower. These are all fractals
you can find in nature.
A fractal is a never-ending pattern. It’s repeated again and again in different sizes and
scales. They’re all around you. They’re outdoors, in your home, and even inside of you. You’ve
been seeing, and maybe even eating, them your entire life!
Across nature, you can find fractals in the human body, plants, shells, rivers, mountains,
clouds, and even waterfalls.
Choices—do one:
Search for fractals. Look for fractals in the kitchen, garden, park, grocery store, or
anywhere else. Search in the sky or look at a frosty window. Search through videos, photos,
and books. Write down, draw, or photograph the fractals you find. If you aren’t sure if
something is a fractal, look it up online or in a book. After, organize and look at all the fractals
you found. How are they similar? Did you see the same patterns or shapes in different
objects? Do you see the same fractal at different sizes or scales?
Sculpt tree fractals. Have you noticed that when a big branch grows out of a tree trunk,
a smaller branch grows out of it, and an even smaller branch grows out of that one? That’s
a fractal. You can also make your own tree fractal out of clay. Find a fallen twig and press
it into some clay. Use a tool to add smaller branches. Add even smaller branches to those
branches. Keep going!
⇨ For more fun: Turn the twig horizontally and sculpt to create another fractal. Then
continue to rotate it to create a circular design!
Make a fractal bouquet. All kinds of plants, from flowers to ferns, have fractals. Look up
plants with fractals online or in a book. Use pipe cleaners and beads, paint, or any other craft
supplies to recreate them. Then put them together to create a fractal bouquet!
8 | Junior
U.S
./JAPA
N A
ST
ER
SC
IEN
CE
TE
AM
, NA
SA
/GS
FC
/ME
TI/E
RS
DA
C/JA
RO
S
Shapes in Nature | 9

Step 5: Search for the Fibonacci sequenceA sequence is a list of things in order. The Fibonacci sequence is named after Leonardo
Fibonacci. He was an Italian mathematician who lived 800 years ago and loved numbers. He
saw a number pattern around him in nature.
This is the start of the pattern Fibonacci found: 0, 1, 1, 2, 3, 5, 8, 13, 21, 34, 55. Each number
is the sum of the two before it: 0 + 1 = 1, 1 + 1 = 2, 1 + 2 = 3, 2 + 3 = 5, 3 + 5 = 8, 5 + 8 = 13, and
so on.
The Fibonacci sequence forms a spiral. A spiral is a
curve. It circles around a fixed point. Sometimes, it goes
in both clockwise and counterclockwise directions.
Counterclockwise is moving in the opposite direction to
the hands on a clock. You can see the Fibonacci sequence
and spiral in nature, art, and architecture.
Choices—do one:
Find the Fibonacci sequence in food. Did you know there are some foods with the
Fibonacci spiral? Think of pineapples or artichokes. If you cut open other fruits, like apples,
bananas, or cucumbers, you can find Fibonacci numbers there, too! Look for foods you think
have a Fibonacci spiral. Trace the spirals with your finger. Count them. Is that a Fibonacci
number? Are there any spirals going counterclockwise? Does the object have the same
number of spirals in each direction? Then, have a taste of the Fibonacci food. Maybe you can
make a fruit salad or sauté some vegetables?
Find the Fibonacci sequence in animals. You can find the Fibonacci spiral in bugs and
animals. Think about shells, feathers, tails, and trunks! Read a book or go online to learn
about different animals with the Fibonacci sequence. How many can you find? How does
each animal act? Use what you learn to play charades! Each player can pretend to be a
different animal that has the Fibonacci spiral. Maybe you want to be a ram? Or a snail? Take
turns acting out animals and guessing not just the animal, but what part of them shows the
Fibonacci sequence.
Find the Fibonacci sequence in flowers. You can find the Fibonacci spiral in flowers!
Think of a dandelion or the inside of a sunflower. The petals and seeds are arranged in spiral
after spiral. That’s Fibonacci! Look for plants and flowers that show the Fibonacci spiral.
Choose one or two to draw or paint.
Make sure to return any leaves
or other natural objects to the place
you found them.
10 | Junior

21x21
13x13
8x85x5
3x3
Make a Golden Rectangle
The Fibonacci sequence can be used to create a golden rectangle. The rectangle can be cut up into a square and rectangle similar to the original one. The original rectangle and the smaller rectangle will always have sides with the same ratio.
Here’s how you can create the golden rectangle on a sheet of graph paper:
1. Color in 1 square in the center of a sheet of graph paper.
2. Color in the square to the right with another color.
3. Color in a 2 x 2 block (4 squares) directly above the two squares with a third color.
4. Color in a 3 x 3 block (9 squares) directly to the left of the 2 x 2 and 1 x 1 blocks in a different color.
5. Continue adding boxes, using the pattern of the Fibonacci sequence to tell you the size of the block, and placing them counterclockwise around your design.
6. To make a spiral, use a compass. Put your compass pivot point on the bottom right corner of the right 1x1 square. Set the pencil to touch the top right corner of the 2x2 square.
7. Draw a 1/4 circle (90 degrees) from the top left of 2x2 to the bottom left corner of the 3x3 square (through the 3x3 square).
8. Move your pivot point to the top right corner of the 2x2 square and set your pencil to the top left of the 3x3 square.
9. Draw a 1/4 circle from the top left corner of the 5x5 square (starting where the pencil stopped at the bottom left of the 3x3 square) to the bottom right of the 5x5 square.
10. Repeat and draw your spiral through all the squares of your golden rectangle.
Shapes in Nature | 11

Made possible by a generous grant from Johnson & Johnson.
TM ® & © 2021 Girl Scouts of the United States of America. All rights reserved.
No part of this publication may be reproduced, distributed, or transmitted in any form or by any means, electronic or mechanical methods, including photocopying, recording, or by any information storage or retrieval system, now known or hereinafter invented, without the prior written permission of Girl Scouts of the United States of America (GSUSA), except in the case of brief quotations embodied in critical reviews and certain other noncommercial uses permitted by copyright law. For permissions requests, write to GSUSA at the address below or visit the www.girlscouts.org website to access permission request forms.
First published in 2021 by GSUSA | 420 Fifth Avenue, New York, NY 10018-2798 | www.girlscouts.org
© Stock images courtesy of Adobe Stock
Printed in the United States
12 | Junior

Volunteer’s Guide to Junior Shapes in Nature*
STEP 1: Identify symmetry in nature • 20–30 minutes
Ask: How are hearts, snowflakes, and butterflies alike?
Share: Symmetrical objects have parts that are reflections or mirror images like our faces, an acorn, or an apple. The line of symmetry shows where the sides would be identical—some objects have one line of symmetry while others have more.
Do: Fold a sheet of paper in half and cut out a heart. Open it and show how both sides of the line of symmetry are mirror images. Ask Juniors to identify the lines of symmetry in the photos in Step 1 of the Junior Booklet and brainstorm other symmetrical objects in nature.
Materials: Paper and scissors
Choices—do one:
● Draw symmetry you find in nature. Go outside and have Juniors work in pairs to find natural symmetry and draw or photograph it. As they search, remind them not to disturb anything in nature. Once they’re done, help Juniors to create a journal with their drawings or a slideshow with their photos. Have them share their final journal or slideshow with the troop. If you’re indoors, show a nature video, livestream a nature cam, or have Juniors look out a nearby window to search for natural objects with symmetry.
Materials: Access to an outdoor area OR video player; paper; pencils; colored pencils or markers; stapler; cameras, smartphones, or tablets (optional)
● Create a paper snowflake with symmetry. Explain, “Snowflakes have six lines of symmetry, similar to a hexagon with six sides and angles.” Help them find the lines of symmetry in the photo on page 3 of the Junior Booklet. Then have them make their own: 1) fold a square of paper diagonally into a triangle, 2) fold it two more times (to make six sides and angles), 3) cut into the folds to create a pattern, and 4) unfold the paper. Then have Juniors share their final design. After, challenge Juniors to make other
symmetrical designs with paper. Ask, “How many lines of symmetry are there?” for each creation.
Materials: Paper; scissors
● Strike a pose with symmetry. Ask Juniors to put their hands together and open them like a book to see how they’re mirror images. Have Juniors pair up to mirror each other’s actions: one strikes a pose and the other makes a mirror image. After a few poses, have each pair choose a pose to share with the troop (facing the troop instead of looking at each other). Ask the others to recreate each pose.
Materials: None
STEP 2: Explore bilateral symmetry in nature • 20–30 minutes
Ask: What was your favorite symmetrical object that you saw in nature? How many lines of symmetry did it have?
Share: Some plants, animals, insects, and even people have bilateral symmetry. Bi- means “two.” Lateral means “sides.” When you draw a line from the head to the tail of a tiger, down the middle of a butterfly or across some flowers, both sides would be reflections of each other—that’s bilateral symmetry. The line of symmetry divides the thing in two. Other natural objects, like spiderwebs or snowflakes, have more than one line of symmetry.
Do: Show Juniors the photos in Step 2 of the Junior Booklet. Ask them to find the lines of symmetry and discuss how symmetry creates balance.
Choices—do one:
● Draw or sculpt leaf symmetry. Show the leaves or go outside for Juniors to gather fallen leaves (do not remove leaves from trees or plants). Point out the midrib (the line of symmetry) on a leaf and its veins. Have each Junior: 1) choose a leaf, 2) identify it with a field guide or online resource, 3) gently fold it in half along the midrib, 4) position the half leaf under a piece of paper (off-center so there’s room for its other half ), 5) gently
*Detailed choice activities, meeting tools, and additional resources and materials can be found within the Volunteer Toolkit on my.girlscouts.org.
Tips and ideas to help guide your troop through this badge. This is the first badge in the Math in
Nature badge series. The order of the Math in Nature badges is: 1) Shapes in Nature, 2) Numbers in Nature, and 3) Design with Nature.
JUNIOR • Shapes in Nature | 1

rub over it with a crayon, and 6) draw the missing symmetrical half by adding the leaf margin (edge of the leaf) and veins. When they’re done, have Juniors share their drawings and return the leaves to the outdoors.
Materials: Field guides or research on local trees; leaves OR access to collect leaves; paper; pencils; crayons or colored pencils; modeling clay; tools for sculpting like plastic knives
● Create butterfly symmetry. Look at the photo of a butterfly on page 3 of the Junior Booklet and ask Juniors to find the line of symmetry. Then have each Junior: 1) bend the hook of each of 2 coat hangers down toward the “shoulder,” facing down to create an antenna, 2) wrap a pipe cleaner under the hooks to attach the hangers for the butterfly’s body, 3) bend the wings into any shape they want, making both sides symmetrical, and 4) glue sheets of tissue paper to the edges of the coat hanger wings. While they’re waiting for the glue to dry, Juniors can sketch their symmetrical wing design. Once dry, help them to decorate the wings and trim the excess tissue around the outside of the wings. Finally, ask Juniors to share their symmetrical butterflies with the troop.
Materials: Photos of butterflies; 2 wire coat hangers per Junior; pipe cleaners; tissue paper; white craft glue; markers or watercolor paints; glitter, stickers, or other wing decorations (optional)
● Make art with human symmetry. Have Juniors pair up, with one lying down on the paper and their partner tracing around their right or left side from head to toe. Have pairs switch roles, so each Junior has one half of their body traced on paper. Next, each Junior can draw their other half. Remind them that symmetry isn’t perfection. Encourage them to fill in their outlines with details about themselves. After, have Juniors share their self-portraits, noting what is and isn’t symmetrical.
Materials: Butcher or craft paper big enough for each Junior’s outline; pencils; markers, colored pencils, or crayons
STEP 3: Create nature-inspired art with circular symmetry• 35–45 minutes
Ask: Have you seen art that uses patterns and symmetry in a circle? Or nature that uses symmetry in a circle?
Share: Bees build honeycombs that are symmetrical. Spiders weave webs that are symmetrical. Some symmetry, like a spider web, is circular or radial. That means that, instead of a line down the middle, the lines of symmetry come from the center point of a circle and out to its edge. Symmetry can also be found in art. You can see it in mosaics, paintings, buildings, stained glass, and so much more. Symmetry helps bring balance to the composition of the art. Composition is the layout. You can create symmetry with colors, shapes, and lines.
Do: Look at the photos, “Designing with Circular Symmetry,” and “Art and Symmetry” in the Junior Booklet. Ask Juniors to identify the symmetry and patterns on each piece of art.
Then draw a circle on paper or a whiteboard to show the diameter (the straight line that runs through the center and touches both sides), radius (the line from the center to the edge), and quadrants (four equal parts of a circle). Explain that these are the circle’s lines of symmetry. Finally, draw some circles inside bigger circles to demonstrate concentric circles. Explain, “When circles fit inside each other and have the same center point, they’re called concentric. When concentric circles are stacked upon each other, they create a cone. “ Then have Juniors match the natural objects with their symmetry on page 6 of the Junior Booklet.
Materials: Chart paper or whiteboard and marker
Choices—do one:
● Create radial art with birdseed. Demonstrate how to create quadrants: 1) trace around a plate on a piece of paper, 2) cut out that circle, and 3) fold it in half two times. Have Juniors follow along and draw the quadrants on their plates. Show the seeds you have and then have Juniors: 1) design their bird feeders, 2) spread seed butter on the plates, 3) add seeds, and 4) share their bird feeder designs. If you have a camera, take a photo of each design. Then wrap each bird feeder for Juniors to take home for birds to eat.
Materials: 5–6 varieties of bird seeds (about 3/4 to 1 cup total per Junior); paper plates; rulers; pencils; plastic knives; seed butter (not nut butter); plastic wrap or foil; camera (optional)
● Make circular art with natural objects. Take Juniors outside to gather natural objects from the ground (do not to break anything off of plants). Find a place where Juniors, as a troop or in small groups, can make a circular two-dimensional picture on the ground or a three-dimensional sculpture (with permission). Have Juniors: 1) imagine a circle on the ground and find the center, 2) add natural objects along the outside and lines of symmetry, and 3) add more natural objects to create their design with quadrants. If you have a camera, take a photo of the design(s). Remind Juniors that it’s okay if their creation doesn’t last forever—nature will move the materials around with time.
Materials: Access (and permission) to an outdoor space for gathering natural objects and creating art OR enough sticks, shells, rocks, pebbles, leaves, flower petals, etc. and indoor space; camera (optional)
● Make art with concentric circles. Invite Juniors to brainstorm concentric circles they’ve seen in nature. For example, they may have seen ripples from a pebble dropped in a pond, the layers of an onion, cross-sections of beets, carrots, and hard-boiled eggs, or the growth rings on a tree. Show Juniors the materials you have and ask Juniors to think about what kind of art they can create using concentric circles inspired by natural objects with circular symmetry. They can draw, paint, make a collage, or anything they want. When Juniors
JUNIOR • Shapes in Nature | 2

are finished, ask them to share their art, point out the concentric circles, and tell the troop what natural objects inspired their artwork.
Materials: Construction paper; scissors; pencils; colored pencils or markers; paints and brushes; glue; magazines (optional)
STEP 4: Find fractals in nature • 20 minutes
Ask: Have you ever seen a picture of a riverbank from above? What did it look like?
Share: Rivers are full of branching patterns. They kind of look like tree branches, lightning, and even cauliflower. These are all fractals or never-ending patterns in nature. Fractals are repeated again and again in different sizes. You can find fractals in the human body, plants, shells, rivers, mountains, clouds, and even waterfalls!
Do: Look at the photos on page 9 of the Junior Booklet. Ask Juniors to describe each photo and compare the similarities and differences between them.
Choices—do one:
● Search for fractals. Have Juniors look for fractals in fruit, vegetables, and other foods, in photos or in your meeting space, indoors, outdoors, or somewhere like a grocery store, garden center, or farmer’s market. Have them write down, draw, or photograph any fractals they see, researching when they aren’t sure if something is a fractal. After, have Juniors look carefully at their fractals. Ask, “How are the fractals similar? Did you see the same patterns or shapes in different objects?”
Materials: Paper; pencils; colored pencils; photos or videos of fruit, vegetables, plants, etc. OR access to a grocery store, garden center, farmer’s market, etc.; resource books or laptops, tablets, or smartphones; smartphones with cameras (optional)
● Sculpt tree fractals. Explain, “When a branch splits into smaller branches, their surface areas add up to that of the larger branch. This fractal may help the tree to withstand wind and other weather.” Show Juniors the twigs to choose from or go outside to each gather their own. Have them press their twig into the clay to make an imprint. Then help them to sculpt other tree branches, with larger branches closer to the trunk and smaller branches extending from the smaller ones. Once they’re done, have Juniors share their imprints. Ask questions like, “How was sculpting fractals different from the symmetry in Steps 1 and 2? How are the different patterns alike and different?” Remind Juniors to return their branches to nature. For more fun: Help Juniors to rotate their twig a quarter turn or 90 degrees and sculpt another fractal, repeating until they’ve created a circle.
Materials: Small fallen twigs OR access to collect; modeling clay or dough; plastic knives or sculpting tools
● Make a fractal bouquet. Ask, “Can you think of any plants or flowers that have fractals?” Show Juniors flowers and plants (or photos of them) with fractals. Invite Juniors to create 3–5 fractal flowers with pipe cleaners and beads, like Queen Anne’s lace, roses, zinnias, leaves, and ferns. Have Juniors put their flowers and plants together to create a fractal bouquet and share with the troop.
Materials: Examples or photos of flowers and plants with fractals; pipe cleaners; beads
STEP 5: Search for the Fibonacci sequence • 25 minutes
Ask: As you’ve looked at different kinds of nature throughout the badge, did you find any spirals?
Share: Spirals are another pattern that can be found in nature, like shells and horns, and explained by math and science. In math, a sequence is a list of numbers in a certain order. The Fibonacci sequence is named after Leonardo Fibonacci, a mathematician who lived 800 years ago in Italy, and can be used to explain spirals.
Do: Write the Fibonacci sequence on poster board or the whiteboard: 0, 1, 1, 2, 3, 5, 8, 13, 21, 34, 55… Have Juniors identify the sequence’s pattern before explaining, “Each number is the sum of the two before it: 0 + 1 = 1, 1 + 1 = 2, 1 + 2 = 3, 2 + 3 = 5, 3 + 5 = 8, 5 + 8 = 13, and so on.” Then look at the photos on page 11 and go over “Make a Golden Rectangle” in the Junior Booklet. Help Juniors draw their own golden rectangles with a spiral on graph paper.
Materials: Graph paper; pencils; drawing compasses; colored pencils
Choices—do one:
● Find the Fibonacci sequence in food. Have Juniors work in pairs to identity fruits and vegetables with the Fibonacci spiral. Ask them to count and write down the number of spirals going in a counterclockwise direction (it may help to put a piece of colored tape on each spiral). Then ask them to count the spirals going in a clockwise direction. Next, give each pair a food that shows Fibonacci numbers, such as an apple, orange, or banana cut to reveal the seeds or sections. Have pairs count the numbers of seeds or sections, draw and write down what they find, and share with the troop. Finally, help Juniors make a fruit salad or veggie platter to taste the Fibonacci food.
Materials: Foods with Fibonacci spirals (whole artichokes, pineapples, sunflowers, strawberries, broccoli, cauliflower, etc.); foods with Fibonacci numbers (sliced apples, oranges, cucumbers, bananas, etc.); paper; pencils; knives, cutting boards, paper plates, and forks; tape (optional)
● Find the Fibonacci sequence in animals. Explain, “If you see a snail, curled tail, or trunk, that’s a spiral. If you look carefully at an insect’s body, the ratio of the section is the same as a Fibonacci ratio.” Have Juniors
JUNIOR • Shapes in Nature | 3

research animals to find examples of Fibonacci spirals, numbers, or ratios and make a list. They may want to use a ruler to measure animal features in pictures to look for a Fibonacci ratio. Then play a game of charades where Juniors pretend to be an animal they identified. Troop members should try to guess the animal and what about them represents Fibonacci.
Materials: Reference or nonfiction picture books about animals or laptops, tablets, or smartphones; photos of animals and insects; rulers; paper; pencils
● Find the Fibonacci sequence in flowers. Ask, “Have you ever noticed a Fibonacci spiral in flowers? What about the number of leaves on a plant? Is it a Fibonacci number?” Have Juniors look at flowers and plants (or photos of them) for spirals in seeds, petals, or leaves and for Fibonacci numbers. After they’ve found some examples, have them choose one or two to draw or paint. Have Juniors share their drawings and point out the Fibonacci feature.
Materials: Flowers and plants or photos of flowers and plants; paper; pencils; colored pencils or crayons; watercolor paints and brushes (optional)
TM ® & © 2021 Girl Scouts of the United States of America. All rights reserved. No part of this publication may be reproduced, distributed, or transmitted in any form or by any means, electronic or mechanical methods, including photocopying, recording, or by any information storage or retrieval system, now known or hereinafter invented, without the prior written permission of Girl Scouts of the United States of America (GSUSA), except in the case of brief quotations embodied in critical reviews and certain other noncommercial uses permitted by copyright law. For permissions requests, write to GSUSA at the address below or visit the www.girlscouts.org website to access permission request forms.
JUNIOR • Shapes in Nature | 4