k 5 premium smart control ﺔﻴﺑﺮﻌﻟﺍ k 5 smart control
TRANSCRIPT

K 5 Premium Smart ControlK 5 Smart Control
59689880 (
10/20) Register your productwww.kaercher.com/welcomeEnglish 7
العربية 23

A
2

B
3

C
4
D
E
FG
HI
J4

K
5
L
M
NO
PQ
R5

S
6
T
U
VW
XY
Z AA6

Contents
Safety instructionsRead this safety chapter and these origi-nal instructions before using the device for the first time. Act in accordance with them. Keep the original instructions for future reference or for future owners.
● In addition to the notes in the operating instructions, you also need to take into consideration the general safety regulations and accident prevention guide-lines applicable by law.
● Warnings and information notices attached to the device provide important information for hazard-free operation.
Hazard levels
� DANGER● Indication of an imminent threat of danger that will
lead to severe injuries or even death.
� WARNING● Indication of a potentially dangerous situation that
may lead to severe injuries or even death.
� CAUTION● Indication of a potentially dangerous situation that
may lead to minor injuries.
ATTENTION● Indication of a potentially dangerous situation that
may lead to damage to property.
Protective gear
� CAUTION ● Wear suitable protective clothing and safety goggles to protect yourself from water or dirt backsplash. ● Aerosols can be formed when using high-pressure cleaners. Inhaling aerosols can be harmful for your health. Depending on the application, the use of fully shielded nozzles (e.g. surface cleaners) can signif-icantly lower the emission of aqueous aerosols. De-pending on the environment to be cleaned, wear a suitable respiratory protective mask of class FFP 2 or comparable to protect yourself from inhaling aerosols if the use of a fully shielded nozzle is not possible.
General safety instructions
� DANGER ● Risk of asphyxiation. Keep pack-aging film out of the reach of children.
� WARNING ● Only use the device for its proper use. Take into account the local conditions and beware of third parties, in particular children, when working with the device. ● Persons with reduced physical, sensory or mental capabilities and persons lacking experience and knowledge may only use the appliance if they are properly supervised, have been instructed on use of the appliance safely by a person responsible for their safety, and understand the resultant hazards involved. ● Chil-dren must not operate the device. ● Children must be supervised to prevent them from playing with the appli-ance.
� CAUTION ● Safety devices are provided for your own protection. Never modify or bypass safety de-vices.
Risk of electric shock
� DANGER ● Only connect protection class I de-vices to properly earthed power sources. ● Only con-nect the device to alternating current. The voltage indicated on the type plate must match the voltage of the power source. ● Only operate the device via a fault current protection switch (maximum 30 mA). ● Never touch the mains plug and socket with wet hands. ● The mains plug and coupling of the extension cable must be water tight and may not be placed in water. The coupling may not be on the floor. Use cable drums to ensure that the sockets are at least 60 mm above the floor. ● All live parts in the work area must be protected against water jets.
� WARNING ● Only connect the device to an electrical connection which has been set up by a quali-fied electrician as per IEC 60364-1. ● Check that the mains connection cable with mains plug is undamaged each time before using the device. To avoid any possi-ble danger, a damaged mains connection cable must be immediately replaced by the manufacturer, or the au-thorised customer service department or a qualified electrician. ● Do not damage the power supply and ex-tension cable by running over it, crushing or yanking it or similar. Protect the power supply cable from heat, oil and sharp edges. ● Unsuitable electrical extension ca-bles are dangerous. Only use approved and appropri-ately marked electrical extension cables with a sufficient line cross section when outdoors: 1-10 m : 1.5 mm2, 10-30 m : 2.5 mm2
� CAUTION ● Always fully unwind the extension cable from the cable drum. ● In case of longer breaks in operation and after use, switch off the device at the main switch / device switch and pull the mains plug.
Operation
� DANGER ● Operation in explosive atmos-pheres is prohibited. ● Never suction solvents, liquids containing solvents or undiluted acids. This includes e.g. petrol, paint thinner or heating oil. The spray mist is highly flammable, explosive and poisonous. ● Dam-aged wheels / tyre valves are extremely dangerous. Damaged wheels / tyre valves can be damaged by the high-pressure jet and explode. The first sign of this is discolouration of the tyres. Keep a spray distance of at least 30 cm when cleaning the wheels / tyre valves.
Safety instructions ............................................... 7 KÄRCHER Home & Garden app......................... 8 Environmental protection..................................... 8 Intended use........................................................ 9 Accessories and spare parts ............................... 9 Scope of delivery................................................. 9 Description of the device ..................................... 9 Safety devices ..................................................... 9 Symbols on the device ........................................ 10 Assembly............................................................. 10 Initial Start-Up...................................................... 10 Initial startup ........................................................ 10 Operation............................................................. 11 Transport ............................................................. 12 Storage................................................................ 13 Care and service ................................................. 13 Troubleshooting guide ......................................... 14 Warranty .............................................................. 14 Technical data ..................................................... 15 EU Declaration of Conformity.............................. 15
English 7

� WARNING ● Do not use the device if people without the proper protective clothing are in its reach. ● Do not aim the high-pressure jet at yourself, e.g. to clean clothes or shoes. ● Do not direct the high-pres-sure jet at persons, animals, live electrical equipment or at the device itself. ● Do not spray any objects which contain harmful substances (e.g. asbestos). ● Check the device and the accessories, such as the high-pres-sure hose, high-pressure gun and safety devices, to make sure they are in proper safe and reliable condition before each operation. Do not use the device if it is dam-aged. Replace damaged components immediately. ● Only use high-pressure hoses, control panels and couplings specified by the manufacturer. ● Risk of scalding. When disconnecting the supply or high-pres-sure hose, hot water can leak out of the connections af-ter operation.
� CAUTION ● According to the applicable regu-lations, the appliance may never be used with the drink-ing water network without a system separator. Ensure that the connection to your house water system, with which the high-pressure cleaner is operated, is equipped with a system separator according to EN 12729 type BA. ● Water that has flowed through a system separator is no longer classified as drinkable. ● Never leave the device unsupervised while it is in op-eration. ● Recoil force from the water stream emerging at the high-pressure nozzle acts on the high-pressure gun. Keep proper footing and hold the high-pressure gun and spray lance firmly. ● Accidents or damage due to the device falling over. Before all actions with or on the device, you must make sure that it is stable.
ATTENTION ● Do not operate the device at tem-peratures below 0 °C.
Operation with detergent
� WARNING ● Incorrect use of detergents can cause serious injuries or poisoning.
� CAUTION ● Keep the detergent out of the reach of children. ● Only use the detergents supplied or specified by the manufacturer. The use of other deter-gents or chemicals can impair the safety of the device.
Care and service
� WARNING ● Always pull out the mains plug before all care and maintenance work.
� CAUTION ● Have repair work and work on electrical components carried out by the authorised cus-tomer service only.
ATTENTION ● Do not use acetone, undiluted ac-ids or solvents, as they corrode the materials used on the device.
Transportation
� CAUTION● Risk of accidents and injuries. Take into account the
weight of the device for transportation and storage. See chapter Technical data in the operating instruc-tions.
KÄRCHER Home & Garden appThe device can be controlled by direct operation on the high-pressure gun or via a mobile device equipped with Bluetooth® wireless technology. The KÄRCHER Home & Garden app is required for this.The app also contains:● Installation and initial startup information● Information about the areas of application● Tips & Tricks● FAQ with detailed troubleshooting● Connection to the KÄRCHER Service CentreThe app can be downloaded here:
Trademarks● Bluetooth®wordmarks and logos are registered
trademarks of Bluetooth SIG, Inc. Any use of these trademarks by Alfred Kärcher SE & Co. KG is under license.
● Google Play™ and Android™ are trademarks or registered trademarks of Google Inc.
● Apple® and App store® are trademarks or registered trademarks of Apple Inc.
Environmental protectionThe packing materials can be recycled. Please dispose of packaging in accordance with the en-vironmental regulations.Electrical and electronic appliances contain valu-able, recyclable materials and often components such as batteries, rechargeable batteries or oil, which - if handled or disposed of incorrectly - can
pose a potential danger to human health and the envi-ronment. However, these components are required for the correct operation of the appliance. Appliances marked by this symbol are not allowed to be disposed of together with the household rubbish.
Cleaning work producing in oily waste water, e.g. washing engines, washing undercarriages etc.,
may only be performed at washing stations with an oil separator.
Working with detergents may only be performed on watertight surfaces with connection to the waste
water sewage system. Do not allow detergent to enter waterways or the soil.
Extraction of water from public waterways is not permitted in some countries.
Notes on the content materials (REACH)Current information on content materials can be found at: www.kaercher.de/REACH
8 English
Intended useUse the high-pressure cleaner in private households only.The high-pressure cleaner is intended for cleaning ma-chines, vehicles, buildings, tools, façades, terraces, garden machines etc. using a high-pressure water jet.
Accessories and spare partsOnly use original accessories and original spare parts. They ensure that the appliance will run fault-free and safely.Information on accessories and spare parts can be found at www.kaercher.com.
Scope of deliveryThe scope of delivery for the appliance is shown on the packaging. Check the contents for completeness when unpacking. If any accessories are missing or in the event of any shipping damage, please notify your deal-er.
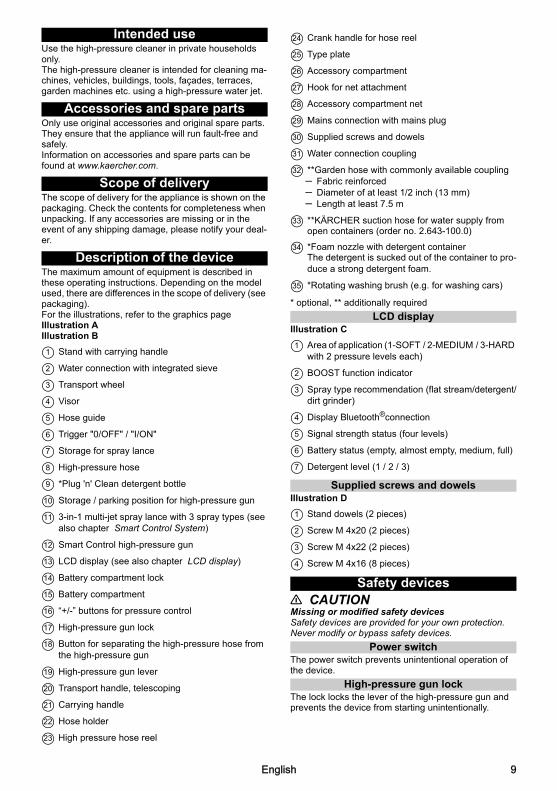
Description of the deviceThe maximum amount of equipment is described in these operating instructions. Depending on the model used, there are differences in the scope of delivery (see packaging).For the illustrations, refer to the graphics pageIllustration AIllustration B
1 Stand with carrying handle
2 Water connection with integrated sieve
3 Transport wheel
4 Visor
5 Hose guide
6 Trigger "0/OFF" / "I/ON"
7 Storage for spray lance
8 High-pressure hose
9 *Plug 'n' Clean detergent bottle
10 Storage / parking position for high-pressure gun
11 3-in-1 multi-jet spray lance with 3 spray types (see also chapter Smart Control System)
12 Smart Control high-pressure gun
13 LCD display (see also chapter LCD display)
14 Battery compartment lock
15 Battery compartment
16 “+/-” buttons for pressure control
17 High-pressure gun lock
18 Button for separating the high-pressure hose from the high-pressure gun
19 High-pressure gun lever
20 Transport handle, telescoping
21 Carrying handle
22 Hose holder
23 High pressure hose reel
24 Crank handle for hose reel
25 Type plate
26 Accessory compartment
27 Hook for net attachment
28 Accessory compartment net
29 Mains connection with mains plug
30 Supplied screws and dowels
31 Water connection coupling
32 **Garden hose with commonly available coupling– Fabric reinforced– Diameter of at least 1/2 inch (13 mm)– Length at least 7.5 m
33 **KÄRCHER suction hose for water supply from open containers (order no. 2.643-100.0)
34 *Foam nozzle with detergent containerThe detergent is sucked out of the container to pro-duce a strong detergent foam.
35 *Rotating washing brush (e.g. for washing cars)
* optional, ** additionally required
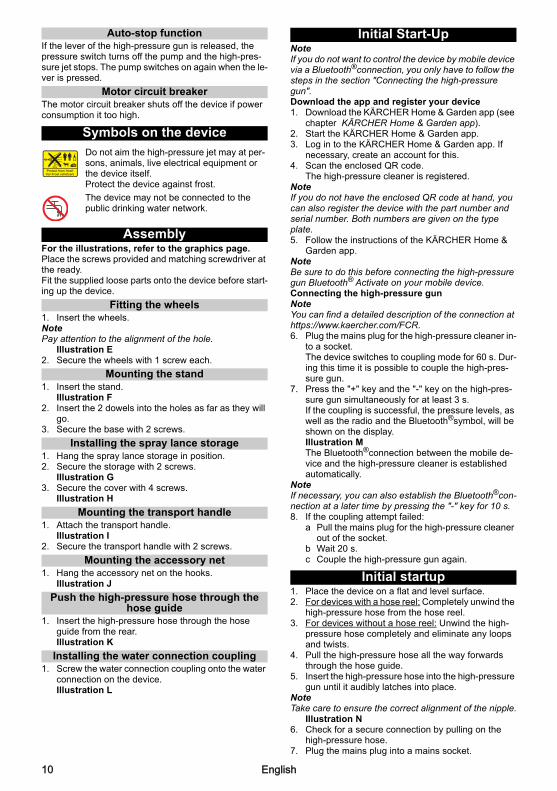
LCD displayIllustration C
1 Area of application (1-SOFT / 2-MEDIUM / 3-HARD with 2 pressure levels each)
2 BOOST function indicator
3 Spray type recommendation (flat stream/detergent/dirt grinder)
4 Display Bluetooth®connection
5 Signal strength status (four levels)
6 Battery status (empty, almost empty, medium, full)
7 Detergent level (1 / 2 / 3)
Supplied screws and dowelsIllustration D
1 Stand dowels (2 pieces)
2 Screw M 4x20 (2 pieces)
3 Screw M 4x22 (2 pieces)
4 Screw M 4x16 (8 pieces)
Safety devices� CAUTIONMissing or modified safety devicesSafety devices are provided for your own protection.Never modify or bypass safety devices.
Power switchThe power switch prevents unintentional operation of the device.
High-pressure gun lockThe lock locks the lever of the high-pressure gun and prevents the device from starting unintentionally.
English 9
Auto-stop functionIf the lever of the high-pressure gun is released, the pressure switch turns off the pump and the high-pres-sure jet stops. The pump switches on again when the le-ver is pressed.
Motor circuit breakerThe motor circuit breaker shuts off the device if power consumption it too high.
Symbols on the device
AssemblyFor the illustrations, refer to the graphics page.Place the screws provided and matching screwdriver at the ready.Fit the supplied loose parts onto the device before start-ing up the device.
Fitting the wheels1. Insert the wheels. NotePay attention to the alignment of the hole.
Illustration E2. Secure the wheels with 1 screw each.
Mounting the stand1. Insert the stand.
Illustration F2. Insert the 2 dowels into the holes as far as they will
go.3. Secure the base with 2 screws.
Installing the spray lance storage1. Hang the spray lance storage in position.2. Secure the storage with 2 screws.
Illustration G3. Secure the cover with 4 screws.
Illustration H
Mounting the transport handle1. Attach the transport handle.
Illustration I2. Secure the transport handle with 2 screws.
Mounting the accessory net1. Hang the accessory net on the hooks.
Illustration J
Push the high-pressure hose through thehose guide
1. Insert the high-pressure hose through the hose guide from the rear.Illustration K
Installing the water connection coupling1. Screw the water connection coupling onto the water
connection on the device.Illustration L
Initial Start-UpNoteIf you do not want to control the device by mobile device via a Bluetooth®connection, you only have to follow the steps in the section "Connecting the high-pressure gun".Download the app and register your device1. Download the KÄRCHER Home & Garden app (see
chapter KÄRCHER Home & Garden app).2. Start the KÄRCHER Home & Garden app.3. Log in to the KÄRCHER Home & Garden app. If
necessary, create an account for this.4. Scan the enclosed QR code.
The high-pressure cleaner is registered.NoteIf you do not have the enclosed QR code at hand, you can also register the device with the part number and serial number. Both numbers are given on the type plate.5. Follow the instructions of the KÄRCHER Home &
Garden app.NoteBe sure to do this before connecting the high-pressure gun Bluetooth® Activate on your mobile device. Connecting the high-pressure gunNoteYou can find a detailed description of the connection at https://www.kaercher.com/FCR.6. Plug the mains plug for the high-pressure cleaner in-
to a socket.The device switches to coupling mode for 60 s. Dur-ing this time it is possible to couple the high-pres-sure gun.
7. Press the "+" key and the "-" key on the high-pres-sure gun simultaneously for at least 3 s. If the coupling is successful, the pressure levels, as well as the radio and the Bluetooth®symbol, will be shown on the display.Illustration MThe Bluetooth®connection between the mobile de-vice and the high-pressure cleaner is established automatically.
NoteIf necessary, you can also establish the Bluetooth®con-nection at a later time by pressing the "-" key for 10 s.8. If the coupling attempt failed:
a Pull the mains plug for the high-pressure cleaner out of the socket.
b Wait 20 s.c Couple the high-pressure gun again.
Initial startup1. Place the device on a flat and level surface.2. For devices with a hose reel: Completely unwind the
high-pressure hose from the hose reel.3. For devices without a hose reel: Unwind the high-
pressure hose completely and eliminate any loops and twists.
4. Pull the high-pressure hose all the way forwards through the hose guide.
5. Insert the high-pressure hose into the high-pressure gun until it audibly latches into place.
NoteTake care to ensure the correct alignment of the nipple.
Illustration N6. Check for a secure connection by pulling on the
high-pressure hose.7. Plug the mains plug into a mains socket.
Do not aim the high-pressure jet may at per-sons, animals, live electrical equipment or the device itself.Protect the device against frost.
The device may not be connected to the public drinking water network.
10 English
Water supplyFor the connection values, see the type plate or chapter Technical data.Observe the water distribution company regulations.
ATTENTIONDamage through contaminated waterContamination in the water can damage the pump and the accessories.KÄRCHER recommends using the KÄRCHER water fil-ter for protection(special accessory, order number 4.730-059).
Connection to the water line
ATTENTIONHose coupling with Aquastop on the water connec-tion of the deviceDamage to the pumpNever use a hose coupling with Aquastop on the water connection of the device.You can use an Aquastop coupling on the tap.1. Plug the garden hose onto the water connection
coupling.2. Connect the garden hose to the water line.3. Open the water tap fully.
Illustration O
Sucking water from open containers
When used with the KÄRCHER suction hose with check valve (special accessory, order number 2.643-100) this high-pressure cleaner is suitable for sucking up surface water, e.g. from rain barrels or ponds (for the maximum suction height see chapter Technical data). The water connection coupling is not required for vacu-uming operation.1. Fill the suction hose with water.2. Screw the suction hose onto the device water con-
nection and hang it in a water source (e.g. water butt).
Vent the device1. Switch the device on "I/ON".2. Unlock the lever of the high-pressure gun.3. Press the lever of the high-pressure gun.
The device switches on.4. Allow the device for run a maximum of 2 minutes un-
til the water escaping from the high-pressure gun is free of air bubbles.
5. Release the lever of the high-pressure gun.6. Lock the lever of the high-pressure gun.
OperationATTENTIONPump running dryDamage to the deviceIf pressure does not build up in the device after 2 min-utes then switch the device off and proceed according to the instructions in chapter Troubleshooting guide.
Smart Control SystemThe "+/-" buttons on the high-pressure gun can be used to select the pressure and detergent dosing levels. The spray type can be changed by turning the 3-in-1 multi jet spray lance.NoteThe sensitivity of materials can vary greatly depending on age and condition. The recommendations are there-fore not binding.
High-pressure operation
ATTENTIONDamage to painted or sensitive surfacesSurfaces can be damaged when the jet is too close to the surface or an unsuitable spray lance is used.Maintain a minimum spray distance of 30 cm when cleaning painted surfaces.Do not clean car tyres, paint or sensitive surfaces such as wood with the dirt grinder.1. Insert the 3-in-1 Multi Jet spray lance and turn it 90°
to fix it in place. Be aware of the orientation!Illustration P
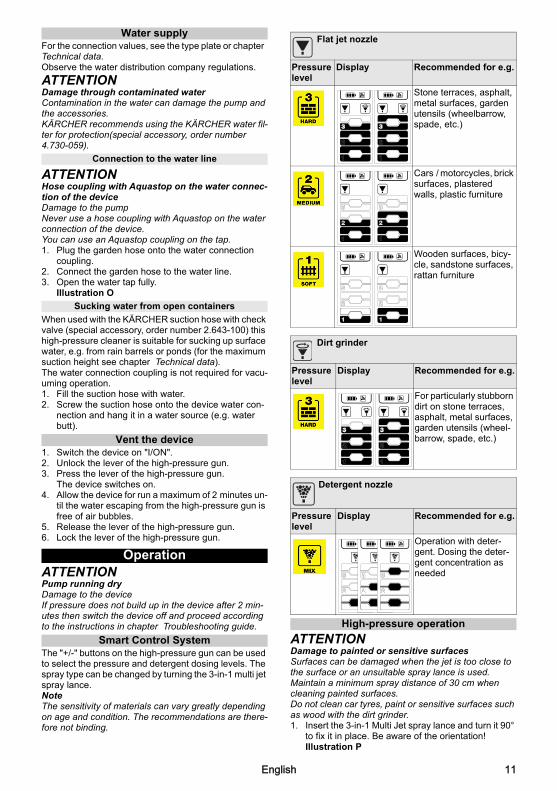
Flat jet nozzle
Pressure level
Display Recommended for e.g.
Stone terraces, asphalt, metal surfaces, garden utensils (wheelbarrow, spade, etc.)
Cars / motorcycles, brick surfaces, plastered walls, plastic furniture
Wooden surfaces, bicy-cle, sandstone surfaces, rattan furniture
Dirt grinder
Pressure level
Display Recommended for e.g.
For particularly stubborn dirt on stone terraces, asphalt, metal surfaces, garden utensils (wheel-barrow, spade, etc.)
Detergent nozzle
Pressure level
Display Recommended for e.g.
Operation with deter-gent. Dosing the deter-gent concentration as needed
English 11

ATTENTIONSpray type change when the lever of the high-pres-sure gun is pressedDamage to the spray lanceLet go of the lever of the high-pressure gun before changing the spray type. 2. Select the spray type. Do this by turning the 3-in-1
Multi Jet spray lance until the required spray display is visible above. Illustration Q
3. Switch the device on ("I/ON").4. Unlock the lever of the high-pressure gun.5. Press the lever of the high-pressure gun.
The device switches on.
Activating the BOOST function
For cleaning stubborn dirt, the BOOST function can be activated for 30 seconds regardless of the pressure lev-el set. This increases the water pressure.1. Hold down the “+” button on the high-pressure gun
until BOOST is highlighted on the LCD display.Illustration RAfter the BOOST function has expired, the device works with the previously set pressure level.
As soon as the display stops flashing, the BOOST func-tion is available again.
Operation with a washing brush
ATTENTIONPaint damageDamage to surfaces through a dirty brushEnsure that the washing brush is free from dirt or other particles before using it.NoteThe device operates at low pressure when using wash-ing brushes. This means that detergent can be mixed with the water.1. Insert the washing brush into the high-pressure gun
and turn by 90° to fasten it.
Operation with detergent
� DANGERFailure to adhere to the safety data sheetIncorrect handling of the detergent can seriously dam-age your healthObserve the safety data sheet of the detergent manu-facturer, in particular the instructions on personal pro-tective equipment.NoteA Plug ‘n’ Clean detergent bottle is required for operat-ing with detergent. KÄRCHER detergent can be pur-chased ready to use in a Plug ‘n’ Clean detergent bottle.1. Remove the cover from the Plug ‘n’ Clean detergent
bottle.2. Plug the detergent bottle into the Plug ‘n’ Clean de-
tergent connection with the opening facing down.Illustration S
3. Turn the 3-in-1 Multi Jet spray lance to the "MIX" cleaning nozzle until the "MIX" LCD on the pressure indicator of the high-pressure gun lights up.The detergent solution is mixed with the water jet during operation.
4. Using the “+/-” buttons of the high-pressure gun, set the desired detergent concentration.
5. You can optionally use the foam nozzle.a Fill the detergent solution into the detergent tank.
Adhere to the dosage specifications on the deter-gent container.
b Connect the foam nozzle to the detergent con-tainer.
c Insert the foam nozzle into the high-pressure gun and turn by 90° to fasten it.Illustration T
Recommended cleaning method
1. Spray the detergent sparingly on the dry surface and let it work for a while (do not let it dry).
2. Rinse off the loosened dirt with the high-pressure jet.
After operation with detergent
1. Pull the Plug ‘n’ Clean detergent bottle out of the mount and close it with the cap before transporting the device lying down.
2. Store the detergent bottle in the holder with the lid facing up.
3. Operate the device for about 30 seconds at deter-gent level 1 to rinse it clean.
Interrupting operation1. Release the lever of the high-pressure gun.
The device switches off when the lever is released. The high pressure in the system is retained.
2. Lock the lever of the high-pressure gun.Illustration U
3. Place the high-pressure gun with the spray lance in the parking position.
4. Switch the device off "0/OFF" during work breaks longer than 5 minutes.
Ending operation
� CAUTIONPressure in the systemInjuries from high-pressure water escaping uncontrolla-blyOnly disconnect the high-pressure hose from the high-pressure gun or the device when the system is fully de-pressurised.1. Release the lever of the high-pressure gun.2. Close the water tap.3. Press the lever of the high-pressure gun for 30 sec-
onds.The pressure remaining in the system is discharged.
4. Release the lever of the high-pressure gun.5. Lock the lever of the high-pressure gun.6. Disconnect the device from the water supply.7. Switch off the device "0/OFF".8. Pull the mains plug out of the socket.
Transport� CAUTIONFailure to observe the weightRisk of injury and damageBe aware of the weight of the device during transporta-tion.
Carrying the device1. Lift and carry the device by the carrying handles.
Pulling the device1. Pull the transport handle out until it audibly latches
into place.2. Pull the device via the transport handle.
Transporting the device in a vehicle1. Before transporting lying down, pull the Plug ‘n’
Clean detergent bottle out of the mount and close it with the cap.
2. Secure the device against slipping and tipping over.
12 English

Storage� CAUTIONFailure to observe the weightRisk of injury and damageBe aware of the weight of the device during storage.
Storing the device1. Place the device on a level surface.2. Disconnect the spray lance from the high-pressure
gun. 3. Press the separation button on the high-pressure
gun and disconnect the high-pressure hose from the high-pressure gun.
ATTENTIONDamage to the high-pressure hoseDamage to the high-pressure hose through incorrect di-rection of rotationObserve the correct direction of rotation of the hose reel when winding on the hose.4. For devices with a hose reel: Use the crank handle
to turn the hose reel anticlockwise and coil up the high-pressure hose.
5. For devices without a hose reel: Store the high-pres-sure hose on the device.
6. Store the mains connection cable and accessories on the device.
Observe the additional instructions before storing the device for a longer period of time, see chapter Care and service.
Frost protection
ATTENTIONDanger of frostIncompletely emptied devices can be destroyed by frost.Completely empty the device and accessories.Protect the device from frost.The following requirements must be satisfied:● The device is disconnected from the water supply.● The high-pressure gun is disconnected from the
high-pressure hose.1. Switch the device on "I/ON".2. Wait for a maximum of 1 minute until no more water
escapes from the high-pressure hose. 3. Switch off the device.4. Store the device in a frost-protected room, together
with all accessories.
Care and service� DANGERDanger of electric shockInjuries due to touching live partsSwitch off the device.Remove the mains plug.The device is maintenance-free, i.e. you do not need to perform any maintenance work.
Clean the sieve in the water connection
ATTENTIONDamaged sieve in the water connectionDamage to the device through contaminated waterCheck the sieve for damage before inserting it in the wa-ter connection.If necessary, clean the sieve in the water connection.1. Remove the water connection coupling.2. Pull the sieve out using flat pliers.3. Clean the sieve under running water.
Illustration V4. Insert the sieve into the water connection.
Replacing the batteries of the high-pressure gun
Two non-rechargeable or rechargeable AAA batteries are required.The batteries are exhausted if nothing or a flashing bat-tery symbol is visible in the display of the high-pressure gun.Illustration W1. Press the locking slide.
Illustration X2. Open the battery compartment.3. Remove the battery.4. Insert new batteries, while paying attention to the
correct alignment of the poles.5. Close the battery compartment.6. Dispose of the used batteries in accordance with
statutory provisions.
English 13

Troubleshooting guideMalfunctions often have simple causes that you can remedy yourself using the following overview. When in doubt, or in the case of malfunctions not mentioned here, please contact your authorised Customer Service.
� DANGERDanger of electric shockInjuries due to touching live partsSwitch off the device.Remove the mains plug.Device not running1. Press the lever of the high-pressure gun.
The device switches on.2. Check that the voltage specified on the type plate
corresponds to the voltage of the power source.3. Check the mains connection cable for damage.4. If the motor is overloaded and the motor circuit
breaker has triggered:a Switch off the device "0/OFF".b Allow the device to cool down for 1 hour.c Switch the device on "I/ON" and resume opera-
tion. Have the device checked by Customer Service if this fault occurs repeatedly.
The device does not start up, the motor buzzesVoltage drop due to a weak mains grid or when using an extension cable1. When switching on, first press the lever on the high-
pressure gun and then switch on the device "I/ON".Device does not reach required pressureThe water supply is too low1. Open the water tap fully.2. Check the water inlet for an adequate flow rate.The sieve in the water connection is dirty.1. Pull the sieve in the water connection out using flat
pliers.2. Clean the sieve under running water.Air is in the device.1. Vent the device:
a Switch on the device without a connected spray lance for a maximum of 2 minutes.
b Press the high-pressure gun and wait until the water escaping from the high-pressure gun is free of air bubbles.
c Connect the spray lance.d Observe the maximum suction height during suc-
tion operation (see chapter Technical data).Strong pressure fluctuations1. Clean the high-pressure nozzle:
a Use a needle to remove dirt from the nozzle drill.b Rinse the high-pressure nozzle from the front
with water.2. Check the water supply volume.Device leaking1. The device leaks a small amount for technical rea-
sons. If the leak is severe, request authorised Cus-tomer Service.
Detergent is not sucked in1. Turn the 3-in-1 Multi Jet spray lance to detergent
nozzle "MIX".2. Check that the Plug ‘n’ Clean detergent bottle is sit-
ting correctly with the opening facing down in the de-tergent connection.
No pressure indicator on the high-pressure gunIllustration Y1. Re-establish the connection to the high-pressure
cleaner, see chapter Initial Start-Up.
BOOST function is not shown on the display and cannot be started via the KÄRCHER Home & Garden appThe device is overheated.1. Check the water supply temperature (for maximum
water inlet temperature, see chapter Technical da-ta).
2. Reduce the water supply temperature to give the motor more cooling.
Error messagesIllustration Z1. Switch off the device "0/OFF".2. Pull the mains plug out of the socket.3. After 20 seconds, insert the mains plug back into the
socket.4. Switch the device on "I/ON".
Have the device checked by Customer Service if this fault occurs repeatedly.
Emergency operationIf the pressure regulation on the high-pressure gun is defective, the high-pressure cleaner works at maximum level.1. Deactivating emergency operation:
a Switch off the device "0/OFF".b Pull the mains plug out of the socket.c After 20 seconds, insert the mains plug back into
the socket.d Switch the device on "I/ON".
Have the device checked by Customer Service if this fault occurs repeatedly.
The high-pressure gun is not working properlyIllustration AAAn internal error has occurred in the electronics of the high-pressure gun. 1. Press the locking slide.
Illustration X2. Open the battery compartment.3. Remove the battery.4. Insert the batteries, paying attention to the correct
alignment of the poles.5. Close the battery compartment.
Have the high-pressure gun checked by Customer Service if this fault occurs repeatedly.
WarrantyThe warranty conditions issued by our relevant sales company apply in all countries. We shall remedy possi-ble malfunctions on your appliance within the warranty period free of cost, provided that a material or manufac-turing defect is the cause. In a warranty case, please contact your dealer (with the purchase receipt) or the next authorised customer service site.(See overleaf for the address)
14 English

Technical data
Subject to technical modifications.
EU Declaration of ConformityWe hereby declare that the machine described below complies with the relevant basic safety and health re-quirements in the EU Directives, both in its basic design and construction as well as in the version placed in cir-culation by us. This declaration is invalidated by any changes made to the machine that are not approved by us.Product: High-pressure cleanerType: 1.324-xxx
Currently applicable EU Directives2000/14/EC2014/53/EU2006/42/EC (+2009/127/EC)2011/65/EU
Harmonised standards usedEN 50581EN 60335-1EN 60335-2-79EN 62233: 2008EN 300 220-2 V3.1.1EN 300 328 V2.1.1
Conformity evaluation procedure used2000/14/EC: Appendix V
Sound power level dB(A)Measured: 90Guaranteed: 93The undersigned act on behalf and under the power of attorney of the company management.
Documentation supervisor:S. ReiserAlfred Kärcher SE & Co. KGAlfred-Kärcher-Str. 28 - 4071364 Winnenden (Germany)Ph.: +49 7195 14-0Fax: +49 7195 14-2212Winnenden, 2020/08/01
K 5 Premium Smart Control
Smart Control
Electrical connection
Voltage V 230-240 230-240
Phase ~ 1 1
Frequency Hz 50 50
Power rating kW 2,1 2,1
Degree of protection IPX5 IPX5
Protection class I I
Power protection (slow-blowing)
A 13 13
Water connection
Feed pressure (max.) MPa 1,2 1,2
Input temperature (max.) °C 40 40
Input amount (min.) l/min 10 10
Suction height (max.) m 0,5 0,5
Device performance data
Operating pressure MPa 12,5 12,5
Max. permissible pressure MPa 14,5 14,5
Water flow rate l/min 7,5 7,5
Maximum flow rate l/min 8,3 8,3
Detergent flow rate l/min 0,3 0,3
High-pressure gun recoil force
N 17 17
Dimensions and weights
Typical operating weight kg 15,8 15,7
Length mm 414 402
Width mm 306 306
Height mm 588 588
Radio module SRD
Frequency MHz 868,7-869,2
868,7-869,2
Transmitting power ERP mW 0,53 0,53
Bluetooth radio module
Frequency GHz 2,45 2,45
Transmitting power ERP mW 6,3 6,3
Determined values in acc. with EN 60335-2-79
Hand-arm vibration value m/s2 0,9 0,9
Uncertainty K m/s2 0,6 0,6
Sound pressure level LpA dB(A) 76 76
Uncertainty KpA dB(A) 3 3
Sound power level LWA + K uncertaintyWA
dB(A) 93 93
Chairman of the Board of Management Director Regulatory Affairs & CertificationH. Jenner S. Reiser
English 15


تذبذب الجهد بسبب ضعف التيار الكهربائي أو في حالة استخدام وصلة لتمديد الكابلات.
عند التشغيل، قم أولاً بضغط الرافعة الخاصة بمسدس الضغط .1”.I/ONالعالي، ثم قم بتشغيل الجهاز “
الجهاز لا يعمل بالضغطالإمداد بالمياه منخفض للغاية
فتح صنبور المياه بالكامل..1قم بفحص الإمداد بالمياه من حيث وجود كمية الإمداد الكافية..2
المصفاة في وصلة المياه متسخة.سحب المصفاة في وصلة المياه باستخدام زردية..1تنظيف المصفاة تحت المياه الجارية..2
يوجد هواء في الجهاز.تهوية الجهاز:.1
a تشغيل الجهاز دون أنبوب نفث موصل لمدة دقيقتين بحدأقصى.
b اضغط على مسدس الضغط العالي، وانتظر حتى تخرج منهالمياه دون فقاعات.
c.توصيل أنبوب النفثd في حالة تشغيل الشفط، قم بمراعاة الحد الأقصى لارتفاع
).البيانات الفنية الشفط (انظر فصل تقلبات شديدة في الضغط
تنظيف فوهة الضغط العالي:.1a.قم بإزالة الاتساخات من ثقوب الفوهة باستخدام إبرةb.شطف فوهة الضغط العالي بالمياه من الأمام
فحص كمية الإمداد بالمياه..2الجهاز يُسرب
وجود تسريب طفيف في الجهاز هو أمر ضروري فنيًا. في حالة .1وجود تسريب كثيف يجب التواصل مع خدمة العملاء المعتمدة.
يجب عدم شفط مواد التنظيف على فوهة مواد التنظيف 1 في 3إدارة أنبوب النفث المتعدد .1
"MIX." موجهة Plug ‘n’ Cleanتأكد من أن فتحة زجاجة مواد التنظيف .2
إلى أسفل ومتصلة بوصلة مواد التنظيف.لا يوجد عرض للضغط بمسدس الضغط العالي
Y صورة إيضاحية إجراء الإقتران مع منظف الضغط العالي مجددا، انظر الفصل .1
. التشغيل الأولي على الشاشة ولا يمكن تشغيلها عبر تطبيق BOOSTلا تظهر وظيفة
KÄRCHER Home & Gardenالجهاز ساخن.
افحص درجة حرارة مدخل الماء (لمعرفة أقصى درجة حرارة .1). البيانات الفنية لمدخل الماء، انظر الفصل
خفض درجة حرارة مدخل الماء لمنح المحرك مزيداً من .2التبريد.
بلاغات الخطأZ صورة إيضاحية
”.OFF/0أطفئ الجهاز “.1سحب قابس الشبكة من المقبس..2 ثانية.20إعادة توصيل القابس في المقبس بعد .3".I/ONتشغيل الجهاز ".4
في حالة تكرار الخطأ لأكثر من مرة، افحص الجهاز من قبل خدمة العملاء.
تشغيل اضطراريعند وجود عطل في تنظيم الضغط بمسدس الضغط العالي، فإن
منظف الضغط العالي سيعمل بأقصى مستوى.إيقاف تفعيل التشغيل الاضطراري:.1
a“ 0أطفئ الجهاز/OFF.”b.سحب قابس الشبكة من المقبسc ثانية.20إعادة توصيل القابس في المقبس بعد d" تشغيل الجهازI/ON."
في حالة تكرار الخطأ لأكثر من مرة، افحص الجهاز من قبل خدمة العملاء.
مسدس الضغط العالي لا يعمل بشكل صحيحAA صورة إيضاحية
طرأ خطأ داخلي في إلكترونيات مسدس الضغط العالي. الضغط على مزلاج القفل..1
X صورة إيضاحيةفتح درج البطارية..2
إخراج البطارية..3إدخال البطاريات مع الحرص على الاتجاه الصحيح للأقطاب..4غلق درج البطارية..5
في حال تكرر الخطأ لأكثر من مرة، يجب فحص الجهاز من قبل خدمة العملاء.
الضمانيسري في كل دولة شروط الضمان التي تضعها شركة التسويق
المتخصصة التابعة لنا. نحن نتولى إصلاح الأخطاء التي قد تطرأ على جهازك خلال فترة الضمان بدون مقابل، عندما يكون سبب هذه
الأعطال ناجم عن عيب في المواد المستخدمة أو في عملية التصنيع. في حالة استحقاق الضمان، توجه من فضلك بقسيمة
الشراء إلى أقرب موزع أو مركز خدمة عملاء معتمد.(العنوان على الصفحة الخلفية)
البيانات الفنية
المواصفات الفنية خاضعة للتعديل.
K 5 Premium
Smart Control
K 5 Smart Control
توصيل الطاقةV230-240230-240الفلطية
11~الطورHz5050التردد
kW2,12,1قدرة التوصيلIPX5IPX5نوع الحمايةIIفئة الحماية
A1313مصهر الشبكة (محمول)وصلة المياه
MPa1,21,2ضغط التدفق (الأقصى)C4040°درجة حرارة التدفق (القصوى)
l/min1010كمية التدفق (الدنيا)m0,50,5مستوى الشفط (الأقصى)
أداء الجهازMPa12,512,5ضغط التشغيل
MPa14,514,5الضغط الأقصى المسموح بهl/min7,57,5كمية الإمداد، المياه
l/min8,38,3كمية الإمداد القصوىl/min0,30,3كمية الإمداد، مواد التنظيف
قوة ارتجاع مسدس الضغط العالي
N1717
الأبعاد الوزنkg15,815,7وزن التشغيل النمطي
mm414402الطولmm306306العرضmm588588الارتفاع
SRDوحدة اللاسلكي -MHz868,7التردد
869,2868,7-869,2
ERPmW0,530,53قدرة الإرسال وحدة بلوتوث لاسلكية
GHz2,452,45الترددERPmW6,36,3قدرة الإرسال
EN 60335-2-79القيم المسجلة وفقًا للمواصفة m/s20,90,9القيمة الاهتزازية لليد والذراع
K قيمة الشك m/s20,60,6LpAdB(A)7676مستوى انبعاث الصوت
KpAdB(A)33قيمة الشك + LWAمستوى قدرة الصوت
KWA قيمة الشكdB(A)9393
العربية 17

إيقاف التشغيل
تنويه�الضغط في النظام
الإصابة بسبب تيار المياه المتدفقة بضغط عالي بشكل غير متحكم به
لا تفصل خرطوم الضغط العالي من مسدس الضغط العالي أو من الجهاز إلا في حالة عدم وجود ضغط في النظام.
تحرير ذراع مسدس الضغط العالي..1أغلق صنبور المياه..2 ثانية.30ضغط ذراع مسدس الضغط العالي لمدة .3
يتم تبديد الضغط المتبقي في الجهاز.تحرير ذراع مسدس الضغط العالي..4قفل ذراع مسدس الضغط العالي..5فصل الجهاز عن مصدر الإمداد بالمياه..6”.OFF/0أطفئ الجهاز “.7سحب قابس الشبكة من المقبس..8
النقلتنويه�
عدم مراعاة الوزنخطر الإصابة وخطر التعرض لأضرار
احرص عند النقل على مراعاة وزن الجهاز.حمل الجهاز
رفع وحمل الجهاز من مقابض الحمل..1سحب الجهاز
سحب مقبض النقل حتى يثبت بصوت مسموع..1سحب الجهاز من مقبض النقل..2
نقل الجهاز في السيارة’ Plug ‘nقبل نقل الجهاز، قم بنزع وصلة زجاجة مواد التنظيف .1
Clean.من مأخذها، وأغلق الغطاء تأمين الجهاز ضد الانزلاق، والانقلاب..2
التخزينتنويه�
عدم مراعاة الوزنخطر الإصابة وخطر التعرض لأضرار
احرص عند التخزين على مراعاة وزن الجهاز.حفظ الجهاز
وضع الجهاز على أرضية مستوية..1فصل أنبوب النفث عن مسدس الضغط العالي. .2ضغط زر الفصل في مسدس الضغط العالي، وافصل خرطوم .3
الضغط العالي من مسدس الضغط العالي. تنبيه
تضرر خرطوم الضغط العاليتضرر خرطوم الضغط العالي بسبب استخدام اتجاه دوران خاطىء
عند اللف، قم بمراعاة اتجاه طنبور الخرطوم. باستخدام ذراع التدوير مع الأجهزة المزودة ببكرة الخرطوم:.4
اليدوي، قم بلف طنبور الخرطوم عكس اتجاه عقارب الساعة، ولف خرطوم الضغط العالي.
قم بتخزين خرطوم الضغط مع الأجهزة بدون بكرة الخرطوم:.5العالي على الجهاز.
قم بحفظ وصلة الكهرباء والملحقات في الجهاز..6قبل فترات التخزين الطويلة، يرجى مراعاة الإرشادات الإضافية،
.العناية والصيانة انظر فصل الحماية من التجمد
تنبيهخطر التجمد
يمكن أن تتلف الأجهزة التي لم يتم تفريغها بشكل كامل تحت تأثير التجمد.
عليك تفريغ الجهاز والملحقات بشكل كامل.عليك حماية الجهاز من التجمد.
يجب القيام بما يلي:فصل الجهاز عن مصدر الإمداد بالمياه.●فصل مسدس الضغط العالي عن خرطوم الضغط العالي.●
".I/ONتشغيل الجهاز ".1انتظر لمدة دقيقة على الأقل لكيلا تخرج أي مياه من خرطوم .2
الضغط العالي. إيقاف الجهاز..3حفظ الجهاز بملحقاته الكاملة في غرفة مؤمنة محمية من .4
التجمد.
العناية والصيانةخطر�
خطر الإصابة بصدمة كهربائيةالإصابة بسبب ملامسة أجزاء موصلة للكهرباء
قم بإغلاق الجهاز.اسحب قابس الشبكة.
الجهاز ليس به أي عيوب، هذا يعني أنه من غير الضروري أن تقوم بأي أعمال صيانة منتظمة.
نظّف المصفاة في وصلة المياه
تنبيهمصفاة متضررة في وصلة المياه
تضرر الجهاز بسبب تلوث المياهقم بفحص المصفاة قبل تركيبها في وصلة المياه من حيث وجود
أضرار بها.عند الحاجة قم بتنظيف المصفاة في وصلة المياه.
نزع الوصلة الخاصة بتوصيل المياه..1سحب المصفاة باستخدام زردية..2تنظيف المصفاة تحت المياه الجارية..3
V صورة إيضاحيةتركيب المصفاة في وصلة المياه..4
استبدال بطاريات مسدس الضغط العالي أو بطاريات قابلة لإعادة الشحن.AAAيُحناج إلى بطاريتين بحجم
تكون البطاريات مُستهلكة في حالة عدم ظهور أي شيء أو ظهور رمز بطارية وامض في شاشة مسدس الضغط العالي.
W صورة إيضاحيةالضغط على مزلاج القفل..1
X صورة إيضاحيةفتح درج البطارية..2إخراج البطارية..3إدخال بطاريات جديدة مع الحرص على الاتجاه الصحيح .4
للأقطاب.غلق درج البطارية..5التخلص من البطاريات المستخدمة طبقا للوائح السارية..6
المساعدة في حالة حدوث خللفي الغالب تكون للاختلالات أسباب بسيطة يمكنك التغلب عليها
ببساطة بالاستعانة بالعرض العام التالي. في حالات الشك أو عند حدوث اختلالات غير مذكورة هنا فيرجى التوجه إلى خدمة العملاء
المعتمدة.خطر�
خطر الإصابة بصدمة كهربائيةالإصابة بسبب ملامسة أجزاء موصلة للكهرباء
قم بإغلاق الجهاز.اسحب قابس الشبكة.
الجهاز لا يعملضغط رافعة مسدس الضغط العالي..1
الجهاز يعمل.التأكد من توافق بيانات الجهد الموجودة على لوحة الطراز مع .2
جهد مصدر التيار.افحص وصلة الكهرباء من حيث وجود أضرار..3في حالة فرط التحميل على المحرك، وتحرير مفتاح حماية .4
المحرك:a“ 0أطفئ الجهاز/OFF.”b.اترك الجهاز لمدة ساعة واحدة ليبردc“ تشغيل الجهازI/ON .والبدء في استعماله ”
في حالة تكرار الخطأ لأكثر من مرة، افحص الجهاز من قبل خدمة العملاء.
الجهاز لا يعمل، المُحرك يُصدر طنين
18 العربية

التشغيل بالضغط العالي
تنبيهتضرر السطح الحساس أو المطلي
تتعرض الأسطح للضرر بسبب المسافة القليلة لشعاع النفث، أو عن طريق اختيار أنبوب نفث غير مناسب.
سم على الأقل في حالة تنظيف الأسطح 30حافظ على مسافة المطلية.
لا تقم بتنظيف إطارات السيارات، أو الطلاء، أو الأسطح الحساسة مثل الخشب باستخدام ساحق الاتساخات.
وثبته بلفه بزاوية 1 في 3أدخل أنبوب الشعاع النفاث المتعدد .1 درجة. يرجى مراعاة التوجيه في هذا الصدد!90قدرها
P صورة إيضاحيةتنبيه
يتغير نوع النفث عند الضغط على ذراع مسدس الضغط العاليتلفيات في أنبوب النفث
قم بتحرير ذراع مسدس الضغط العالي قبل تغيير نوع النفث. -3اختيار نوع النفث. في هذا الصدد ينبغي إدارة أنبوب النفث .2
حتى يكون بيان الشعاع اللازم مرئي في Mulit Jet 1في-الأعلى.
Q صورة إيضاحية").I/ONتشغيل الجهاز (".3فتح رافعة مسدس الضغط العالي..4ضغط رافعة مسدس الضغط العالي..5
الجهاز يعمل.BOOSTتنشيط وظيفة
لمدة BOOSTلتنظيف الأوساخ العنيدة، يمكن تنشيط وظيفة ثانية بغض النظر عن مستوى الضغط المعين. يزداد ضغط الماء 30
جراء ذلك.اضغط مع الاستمرار على الزر "+" الموجود على مسدس .1
.LCD على شاشة BOOSTالضغط العالي حتى يتم عرض R صورة إيضاحية
، يعمل الجهاز مع مستوى BOOSTبعد انتهاء صلاحية وظيفة الضغط المحدد مسبقًا.
بمجرد أن يتوقف البيان في الشاشة عن الوميض، تتُاح وظيفة BOOST.مرة أخرى
التشغيل باستخدام فرشاة الغسل
تنبيهتضرر الطلاء
تضرر السطح بسبب فرشاة الغسل المتسخةتأكد من أن فرشاة الغسل خالية من الاتساخات، أو غير ذلك من
الجزئيات قبل استخدامها.إرشاد
عند استخدام فرشاة الغسل يعمل الجهاز بالضغط المنخفض. وفي هذا الصدد يُمكن خلط مواد التنظيف مع ذلك.
أدخل فرشاة الغسل في مُسدس الضغط العالي وثبته من .1°.90خلال إدارته بزاوية
التشغيل باستخدام مواد تنظيف
خطر�عدم مراعاة صفحة بيانات السلامة
أضرار صحية شديدة بسبب الاستخدام غير المطابق للغرض لمواد التنظيف
احرص على مراعاة منشور بيانات السلامة الصادر عن الجهة الصانعة لمواد التنظيف، ولا سيما إرشادات تجهيزات الحماية
الشخصية.إرشاد
Plug ‘n’ Cleanللتشغيل باستخدام مواد التنظيف يلزم وجود يُمكن شراؤها KÄRCHERلزجاجة مواد التنظيف. مواد التنظيف
.Plug ‘n’ Cleanجاهزة للاستخدام في زجاجة مواد التنظيف .Plug ‘n’ Cleanانزع غطاء زجاجة مواد التنظيف .1اضغط زجاجة مواد التنظيف وفتحتها إلى أسفل في وصلة مواد .2
.Plug ‘n’ Cleanالتنظيف S صورة إيضاحية
" MIX بفوهة مواد التنظيف "1-في-3إدارة أنبوب النفث المتعدد .3باتجاه مؤشر الضغط الخاص بمسدس الضغط العالي حتى
".MIX الخاصة بـ "LCDتومض أثناء التشغيل يتم خلط محلول مواد التنظيف مع شعاع المياه.
يمكن أن يتم ضبط كثافة مواد التنظيف المرغوبة عن طريق .4الأزرار "+/-" بمسدس الضغط العالي.
يمُكن استخدام فوهة الرغوة بشكل اختياري..5a ملء خزان مواد التنظيف بمحلول مواد التنظيف. في هذا
الصدد يجب مراعاة بيانات المعايرة المذكورة على حزمة مواد التنظيف.
b.ربط فوهة الرغوة بخزان مواد التنظيفc أدخل فوهة الرغوة في مُسدس الضغط العالي وثبتها من
°.90خلال إدارتها بزاوية T صورة إيضاحية
طريقة التنظيف الموصى بهارش المنظف باقتصادية على السطح الجاف واتركه ليظهر أثره .1
(لا يجف).اشطف الاتساخات المحررة بتيار الضغط العالي..2
بعد التشغيل مع مواد التنظيف Plugقبل نقل الجهاز، يجب إخراج وصلة قارورة مواد التنظيف .1
‘n’ Clean.من مكانها، ثم غلق الغطاء ضع قارورة مواد التنظيف في مكان الحفظ بحيث يكون الغطاء .2
متجهًا لأعلى.لشطف الجهاز بالمياه النقية، يجب تشغيل الجهاز ما يقارب .3
.1ثانية على درجة مادة التنظيف 30قطع عملية التشغيل
تحرير ذراع مسدس الضغط العالي..1عند تحرير الذراع، يتم غلق الجهاز يتم الحفاظ على الضغط
العالي في النظام.قفل ذراع مسدس الضغط العالي..2
U صورة إيضاحيةأدخل مُسدس الضغط العالي مع أنبوب النفث في موضع .3
الإيقاف. دقائق اغلق 5عند فترات التوقف عن العمل لمدة تزيد عن .4
”.OFF/0الجهاز “
كاشط الأوساخ
مستويات الضغط
موصى بها على سبيل المثالالبيان
للأوساخ العنيدة على وجه الخصوص للاستخدام على
التراسات الحجرية و الأسفلتية وأدوات الحدائق (عربة اليد،
المجرفة، وما إلى ذلك)
فوهة مادة التنظيف
مستويات الضغط
موصى بها على سبيل المثالالبيان
التشغيل باستخدام مادة تنظيف. تعيير جرعة مركز
مادة التنظيف حسب اللزوم
العربية 19

. KÄRCHER Home & Gardenتسجيل الدخول في تطبيق .3يجب إنشاء حساب لهذا إذا لزم الأمر.
المرفق ضوئيًا.QRمسح رمز .4فيتم تسجيل منظف الضغط العالي.
إرشاد المرفق في متناول اليد، فيمكنك تسجيل QRإذا لم يكن لديك رمز
الجهاز برقم الجزء والرقم التسلسلي أيضا. يتواجد كلا الرقمين على لوحة الطراز.
.KÄRCHER Home & Gardenيجب اتباع تعليمات تطبيق .5إرشاد
®بلوتوثتأكد قبل توصيل مسدس الضغط العالي من أنك قد فعًلت على جهازك المحمول.
إقران مسدس الضغط العاليإرشاد
://httpsتجد شرح مفصل حول الاقتران على الموقع www.kaercher.com/FCR.
إدخال قابس منظف الضغط العالي في المقبس..6ثانية. يكون إقران 60يتحول الجهاز إلى وضع الاقتران لمدة
مسدس الضغط العالي خلال هذا الوقت ممكنا.الضغط على الزر "+" والزر "-" بمسدس الضغط العالي في .7
ثوانٍ على الأقل. 3نفس الوقت لمدة إذا كان الاقتران ناجحا، فإن مستويات الضغط وكذلك رمز
ستظهر على الشاشة.®بلوتوثاللاسلكي و M صورة إيضاحية
بين الجهاز المحمول ومنظف الضغط ®اتصال بلوتوثطراز العالي يتم تلقائيا.
إرشادلاحقا أيضا، عن ®اتصال بلوتوثإذا لزم الأمر، يمكنك استخدام
ثوانٍ. 10طريق الضغط على الزر "-" لمدة إذا فشلت محاولة الاقتران:.8
a.يجب سحب قابس منظف الضغط العالي من المقبسb ثانية. 20الانتظار لمدةc.إقران مسدس الضغط العالي مجددا
بدء التشغيلوضع الجهاز على أرضية مستوية..1 فك خرطوم الضغط مع الأجهزة المزودة ببكرة الخرطوم:.2
العالي بالكامل من بكرة الخرطوم. فرد خرطوم الضغط العالي مع الأجهزة بدون بكرة الخرطوم:.3
تماما وحل أي عقد أو إلتفافات.سحب خرطوم الضغط العالي بالكامل إلى الأمام عن طريق .4
مجرى الخرطوم.إدخال خرطوم الضغط العالي في مسدس الضغط العالي .5
حتى يثبت بشكل مسموع.إرشاد
مرُاعاة الاتجاه السليم للوصلة.N صورة إيضاحية
التحقق من التوصيل المضمون عن طريق شد خرطوم الضغط .6العالي.
إدخال قابس الشبكة في المقبس..7الإمداد بالمياه
.البيانات الفنية لمعرفة قيم التوصيل انظر لوحة الصنع أو فصل مرُاعاة تعليمات مؤسسة التزويد بالمياه.
تنبيهالأضرار بسبب المياه الملوثة
الاتساخات في المياه قد تؤدي إلى تضرر المضخة والملحقات. باستخدام فلتر المياه طراز KÄRCHERلتوفير الحماية توصي
KÄRCHER 059-4.730 (الملحقات الخاصة، رقم الطلب.(التوصيل بصنبور المياه
تنبيه بوصلة مياه الجهازAquastopقارنة خرطوم مع جهاز
تضرر المضخة بوصلة مياه Aquastopلا تستخدم أبداً قارنةخرطوم مع جهاز
الجهاز. على حنفية المياه.Aquastopيمكنك استخدام قارنة جهاز
إدخال خرطوم الحديقة في التوصيلة الخاصة بوصلة المياه..1
توصيل خرطوم الحديقة بصنبور المياه..2فتح صنبور المياه بالكامل..3
O صورة إيضاحيةشفط المياه من الخزان المفتوح
باستخدام الضغط العالي يتوائم هذا المنظف للاستخدام مع مع صمام الرجوع (الملحقات KÄRCHERخرطوم الشفط طراز ) وذلك لشفط المياه السطحية، 2.643100الخاصة، رقم الطلب،
مثلًا من براميل الأمطار، أو البرك، (لمعرفة الارتفاع الأقصى للشفط ). البيانات الفنية انظر فصل
عند تشغيل الشفط، لا يلزم وجود وصلة خاصة بوصلة المياه.املأ خرطوم الشفط بالمياه..1أدر خرطوم الشفط من وصلة المياه الخاصة بالجهاز، وتعليقه .2
بأحد مصادر المياه (مثلًا لبرميل المطر).تصريف الهواء من الجهاز
".I/ONتشغيل الجهاز ".1فتح رافعة مسدس الضغط العالي..2ضغط رافعة مسدس الضغط العالي..3
الجهاز يعمل.اترك الجهاز يعمل بحد أقصى لمدة دقيقتين حتى تخرج المياه .4
بدون فقاعات.تحرير رافعة مسدس الضغط العالي..5قفل رافعة مسدس الضغط العالي..6
التشغيلتنبيه
المضخة تدور دون مياهتضرر الجهاز
إذا لم يُكون الجهاز أي ضغط في غضون دقيقتين، قم إذًا بغلق المساعدة في حالة الجهاز، واتبع التعليمات الواردة في فصل
.حدوث خللSmart Controlنظام
يمكن أن يتم عن طريق استخدام الأزرار "+ / -" بمسدس الضغط العالي اختيار درجات الضغط وجرعات مواد التنظيف. يمكن تغيير
.1 في 3المتعدد Multi Jetنوع النفث عن طريق إدارة أنبوب النفث إرشاد
يمكن أن تختلف حساسية المواد بشكل كبير اعتمادًا على العمر الزمني والحالة. وبالتالي فإن التوصيات غير ملزمة.
فوهة نفث مسطح
مستويات الضغط
موصى بها على سبيل المثالالبيان
على سبيل المثال، الشرفات الحجرية والأسفلت والأسطح
المعدنية وأدوات الحدائق (عربة اليد، المجرفة، الخ)
/ دراجات نارية، سياراتأسطح القرميد، الجدران المليسة، أثاث بلاستيكي
للأسطح الخشبية والدراجات ومفروشات من القش
20 العربية

بكرة خرطوم الضغط العالي23
كرنك يدوي لبكرة الخرطوم24
لوحة الطراز25
درج الملحقات26
خطاف لتثبيت الشبكة27
شبكة لدرج الملحقات28
وصلة الشبكة مع قابس الشبكة29
المسامير والخوابير المرفقة30
توصيل وصلة المياه31
**خرطوم الحديقة المزود بطريقة توصيل متداولة32نسيج مقوى– مم)13 بوصة (1/2الحد الأدنى للقطر –م 7.5الحد الأقصى للطول –
لإمداد المياه من الحاويات KÄRCHER**خرطوم شفط 33)100.0-2.643المفتوحة (طلب رقم
*فوهة الرغوة لخزان مواد التنظيف34يتم شفط مواد التنظيف من الخزان، وبذلك تتكون رغوة مواد
تنظيف قوية.
*فرشاة الغسل الدواّرة (مثلاً لتنظيف السيارات)35
ضروري بشكل إضافي **، اختياري *LCDشاشة
C صورة إيضاحية SOFT / 2-MEDIUM / 3-HARD-1مجال الاستخدام (1
بمستويي ضغط لكل منهما)
BOOSTمؤشر وظيفة 2
/ كاشط / مادة تنظيف نوع النفث الذي يُنصح به (نفث مسطح3الأوساخ)
-الإتصال®بلوتوثالبيان 4
درجات)4حالة قوة الإشارة (5
حالة البطارية (فارغة، شبه فارغة، متوسطة، ممتلئة)6
)3/ 2/ 1درجة مادة التنظيف (7
المسامير والخوابير المرفقةD صورة إيضاحية
)2 قاعدة الخابور (عدد1
)2 (عدد M 4x20برغي 2
)2 (عددM 4x22برغي 3
)8 (عددM 4x16برغي 4
تجهيزات السلامةتنويه�
تجهيزات السلامة التالفة أو المتغيرةتجهيزات السلامة تخدم حمايتك.
لا تقم بتغيير أو تجاوز تجهيزات السلامة أبدا.مفتاح الجهاز
مفتاح الجهاز يمنع تشغيل الجهاز دون قصد.قفل مسدس الضغط العالي
القفل يحجب الرافعة، ومسدس الضغط العالي، ويمنع بدء تشغيل الجهاز دون قصد.
وظيفة الإيقاف التلقائيعند تحرير الرافعة مع مسدس الضغط العالي، يوقف مفتاح الضغط المضخة، ويوقف شعاع الضغط العالي. عند الضغط على الذراع،
يتم تشغيل المضخة ثانيةً. مفتاح حماية المحرك
في حالة وجود تيار عالي للغاية، يغُلق مفتاح حماية المحرك الجهاز.
رموز على الجهاز
التركيبللأشكال، انظر صفحة الصور.
إعداد البراغي المُرفقة، والمفك المناسب لذلك.قبل بدء التشغيل يجب بتركيب الأجزاء المرفقة بالجهاز.
تركيب العجلاتإدخال العجلات. .1
إرشاديجب الانتباه إلى توجيه الثقوب.
E صورة إيضاحيةيجب تأمين العجلات ببرغي واحد لكل منهما..2
تركيب القاعدةإدخال القاعدة..1
F صورة إيضاحيةإدخال الخابوران في الثقوب حتى النهاية..2يجب تأمين القاعدة ببرغيين..3
تركيب مكان الحفظ لأنبوب الرشتعليق مكان الحفظ لأنبوب الرش..1تأمين مكان الحفظ ببرغيين..2
G صورة إيضاحية براغي.4تأمين الحاجب باستخدام .3
H صورة إيضاحيةتركيب مقبض النقل
إدخال مقبض النقل..1I صورة إيضاحية
تأمين مقبض النقل ببرغيين..2تركيب شبكة الملحقات
تعليق شبكة الملحقات على الخطافات..1J صورة إيضاحية
دفع خرطوم الضغط العالي عن طريق مجرى الخرطومإدخال خرطوم الضغط العالي من الخلف عن طريق منفذ .1
إدخال الخرطوم.K صورة إيضاحية
تركيب التوصيلات الخاصة بوصلة المياهربط التوصيلات الخاصة بوصلات المياه في موضع وصلات المياه .1
بالجهاز.L صورة إيضاحية
التشغيل الأوليإرشاد
إذا كنت لا ترغب التحكم بالجهاز عن طريق جهازك المحمول عبر ، ما عليك سوى تنفيذ الخطوات الواردة في قسم ®بلوتوثاتصال
"إقران مسدس الضغط العالي".يجب تنزيل التطبيق وتسجيل جهازك
(انظر الفصل KÄRCHER Home & Gardenتنزيل تطبيق .1).KÄRCHER Home & Garden Appتطبيق
.KÄRCHER Home & Gardenبدء تشغيل تطبيق .2
لا توجه شعاع الضغط العالي على الأشخاص، أو الحيوانات، أو أي معدات كهربائية فعالة أو على الجهاز
نفسه.حماية الجهاز من التجمد.
لا يسمح بتوصيل الجهاز مباشرة بشبكة مياه الشرب العامة.
العربية 21

العناية والصيانة
افصل القابس الكهربائي قبل إجراء أي أعمال ● تحذير�للصيانة والعناية.
عليك إجراء أعمال الإصلاح أو الأعمال الأخرى على ● تنويه�القطع الكهربائية من قِبل مركز خدمة معتمدة فقط.
لا تستخدم مادة الأسيتون أو مواد حمضية غير مخففة أو ● تنبيهمواد مذيبة لأن هذه المواد ستضر بالمواد المستخدمة في الجهاز.
الشحن
تنويه�خطر الحوادث والإصابة. عليك مراعاة وزن الجهاز عند عملية ●
في دليل التشغيل.البيانات الفنيةالشحن والتخزين، انظر فصل
KÄRCHER Home & Garden Appتطبيق يمكن تشغيل الجهاز مباشرة إما عن طريق مسدس الضغط العالي
في الأجهزة المحمولة المجهزة بتقنية ®بلوتوثأو عن طريق تحكم & KÄRCHER Homeلاسلكية. فلذلك يُحتاج إلى تطبيق
Garden.يحتوي التطبيق بشكل إضافي على:
معلومات حول التركيب والتشغيل●معلومات حول مجالات الاستخدام●نصائح وحيّل●أسئلة متداولة مع استكشاف الأخطاء وإصلاحها بالتفصيل●KÄRCHERالاتصال بمركز خدمة ●
يمكن تنزيل التطبيق هنا:
علامة تجاريةتُعد الكلمة علامة تجارية والشعارات علامات تجارية ®بلوتوث●
. وأي استخدام لهذه Bluetooth SIG، Incمسجلة أيضا لشركة يتم Alfred Kärcher SE & Co. KGالعلامات من قبِل شركة
بموجب ترخيص. هي ماركات أو علامات تجارية ™أندرويد و ™تطبيقات جوجل●
.Google Incمسجلة لشركة هي ماركات أو علامات تجارية مسجلة ®متجر التطبيقات و ®أبل●
.Apple Incلشركة
حماية البيئةالمواد المستخدمة في التغليف قابلة لإعادة التدوير. يرجى
التخلص من مواد التغليف بطريقة تحافظ على البيئة.تحتوي الأجهزة الكهربائية والإلكترونية على مواد قيّمة قابلة
لإعادة التدوير وغالبًا ما تحتوي كذلك على أجزاء مثل البطاريات، أو المراكمات أو الزيوت والتي قد تشكل خطورة على صحة الإنسان والبيئة في حالة التعامل معها أو إذا تم
التخلص منها بصورة خاطئة. إلا أن هذه الأجزاء ضرورية لتشغيل الجهاز بصورة سليمة. لا يجوز التخلص من الأجهزة المميزة بهذا
الرمز مع النفايات المنزلية.أعمال التنظيف التي يتكون فيها مياه عادمة تحتوي على زيوت،
مثل غسل المُحركات، وغسل الهيكل السفلي، لا يُسمح بإجراؤها إلا في أماكن الغسل المزودة بفاصل للزيت.
لا يُسمح بالعمل باستخدام مواد التنظيف إلا في أماكن العمل غير المنفذة للسوائل مع وجود وصلة بقناة المياه المتسخة. لا
يُسمح بوصول مواد التنظيف إلى المياه أو إلى التربة السطحية.استخدام المياه من مجاري المياه العامة غير مسموح به في
بعض البلدان.)REACHإرشادات حول مواد المحتويات (
تجد المعلومات المُحدثة حول المكونات على الموقع: www.kaercher.de/REACH
الاستخدام المطابق للتعليماتاستخدم منظفات الضغط العالي للاستعمال المنزلي فقط.
منظفات الضغط العالي مخصصة لتنظيف الماكينات والسيارات والمباني والعدد والواجهات والشرفات ومعدات الحدائق وغيرها
وذلك باستخدام الضغط العالي لشعاع المياه.
الملحقات التكميلية وقطع الغياراستخدام الملحقات التكميلية الأصلية وقطع الغيار الأصلية فقط،
والتي تضمن تشغيل الجهاز بشكل آمن وخالٍ من الاختلالات.تجد المعلومات الخاصة بالملحقات التكميلية وقطع الغيار على
.www.kaercher.comالموقع
محتوى التسليممحتوى تسليم الجهاز مصور على العبوة. تأكد من وجود جميع
محتويات العبوة عند فتحها. وفي حالة نقص أية ملحقات تكميلية أو اكتشاف أي تلف بها ناتج عن عملية النقل، يرجى إخطار البائع.
مواصفات الجهازيتم في دليل التشغيل هذا شرح التجهيزات الكاملة. وفقًا للموديل،
ستكون هناك اختلافات في نطاق التوريد (انظر العبوة).الأشكال، انظر صفحة الصور
A صورة إيضاحيةB صورة إيضاحية
قاعدة مع مقبض للحمل1
وصلة المياه مع مصفاة مُركبة2
عجلة النقل3
حاجب4
مجرى الخرطوم5
"OFF" / "I/ON/0أدر مفتاح الجهاز إلى الوضع "6
حفظ أنابيب النفث7
خرطوم الضغط العالي8
*توصيل زجاجة مواد التنظيف9
/ وضع ركن مسدس الضغط العالي حفظ10
أنواع من النفث 3 مزود بـ Multi Jet أنبوب النفث 1 في 113)Smart Control ???? (انظر أيضًا الفصل
Smart Controlمسدس ضغط عالي 12
)LCD ???? (انظر أيضًا الفصل LCDشاشة 13
قفل درج البطارية14
درج البطارية15
أزرار "+/-" لتنظيم الضغط16
قفل مسدس الضغط العالي17
زر فصل خرطوم الضغط العالي من مُسدس الضغط العالي18
ذراع مسدس الضغط العالي19
مقبض النقل، قابل للخلع20
مقبض الحمل21
حامل الخرطوم22
22 العربية

إرشادات السلامةاقرأ فصل السلامة هذا ودليل التشغيل الأصلي
هذا أيضا قبل استخدام الجهاز لأول مرة. ثم تصرف طبقًا لذلك. حافظ على دليل التشغيل
الأصلي للاستخدام لاحقًا أو تسليمه للمالك التالي.عليك إلى جانب الإرشادات الواردة في دليل التشغيل مراعاة ●
القواعد العامة للسلامة والوقاية من الحوادث والتي يحددها المشرع القانوني.
تشير علامات الإرشاد والتحذير الموجودة على الجهاز إلى ●الأرشادات الهامة للتشغيل الآمن.
درجات الخطر
خطر�إشارة إلى خطر مباشر وشيك الحدوث وقد يؤدي إلى إصابات ●
جسدية بالغة أو إلى الوفاة.تحذير�إشارة إلى موقف قد تحفه المخاطر وقد يؤدي إلى إصابات ●
جسدية بالغة أو إلى الوفاة.تنويه�إشارة إلى موقف قد تحفه المخاطر وقد يؤدي إلى إصابات ●
بسيطة.تنبيه
إشارة إلى موقف قد تحفه المخاطر وقد يؤدي إلى حدوث أضرار ● مادية.
معدات الحماية الشخصية
ارتدي ملابس واقية مناسبة ونظارة واقية لحماية ● تنويه�يمكن أن ينشأ هباء ● نفسك من رذاذ الماء والأوساخ المتطايرة.
جوي/أيروسول أثناء استعمال جهاز التنظيف بالضغط العالي. يمكن أن يؤدي استنشاق الهباء الجوي إلى حدوث أضرار صحية. اعتماداً
على نوع الاستخدام، يمكن أن يساعد استعمال فوهات محمية بالكامل (منظف سطحي مثلاً) في تقليل انبعاث الهباء الجوي بشكل كبير. ارتدي تبعا للمكان المراد تنظيفه، قناع واقي للتنفس من فئة
FFP 2 أو ما يعادلها لحماية نفسك من استنشاق الهباء الجوي عندما يكون استخدام فوهة محمية بالكامل غير ممكنا.
تعليمات السلامة العامة
خطر الإختناق. يجب عليك إبعاد أكياس التعبئة ● خطر�والتغليف عن متناول الأطفال.
استخدم الجهاز وفقا للغرض المحدد له فقط. ● تحذير�عليك مراعاة الظروف المحيطة والانتباه عند استخدام الجهاز إلى
يُسمح للأشخاص ● الأشخاص الآخرين وخاصة الأطفال منهم. الذين لديهم قدرات بدنية أو حسية أو عقلية محدودة أو الذين لا
تتوافر لديهم الخبرة والمعرفة الكافية، أن يستخدموا الجهاز بشرط الإشراف عليهم بشكل صحيح، أو إذا تم بعد حصولهم على تعليمات بشأن كيفية الاستخدام الآمن للجهاز من قبل شخص مسؤول عن
لا يُسمح للأطفال ● سلامتهم ومعرفتهم بالمخاطر المرتبطة به. يجب مراقبة الأطفال للتأكد من عدم لعبهم ● بتشغيل الجهار.
بالجهاز.تجهيزات السلامة تخدم حمايتك. لا تقم بتغيير أو ● تنويه�
تجاوز تجهيزات السلامة أبدا.خطر الصعق الكهربائي
بمصادر التيار Iقم بتوصيل أجهزة فئة الحماية ● خطر�قم بتوصيل الجهاز بتيار ● الكهربائي المأرضة بشكل سليم فقط.
متردد فقط. يجب أن يتوافق الجهد الموجود على لوحة الطراز مع استخدم الجهاز عن طريق قاطع الدائرة ● جهد مصدر التيار.لا تلمس القابس ● مللي أمبير حد أقصى). 30الكهربائية فقط (
يجب أن يكون ● الكهربائي والمقبس بأيدي مبتلة بالماء نهائياً.القابس الكهربائي وقارنة كابل التمديد الكهربائي مقاومة ضد الماء ولا يُسمح بوضعهما في الماء. لا يسُمح بوضع القارنة على الأرض.
استخدم بكرات الكابل الكهربائي التي تضمن تواجد القوابس يجب أن تكون ● مم فوق الأرض على الأقل. 60الكهربائية بقدر
جميع الأجزاء الموصلة للتيار الكهربائي في مكان العمل محمية من أشعة الماء.
قم بتوصيل الجهاز بوصلة كهربائية يكون تم شرائها ● تحذير�من متجر متخصص ببيع الأجهزة الكهربائية وفقا لمعيار
IEC 60364-1. ● تأكد قبل كل استخدام للجهاز من عدم وجود تلففي كابل التيار الكهربائي والقابس. عند تعرض كابل التيار الكهربائي
للتلف، يجب استبداله على الفور عن طريق الشركة المصنعة، أو مركز خدمة العملاء المعتمد، أو كهربائي متخصص، وذلك لتجنب أي
لا تقم بإلحاق أضرار أو إتلاف كابل التوصيل الكهربائي ● مخاطر. وكابل التمديد الكهربائي عن طريق الدهس، سحق، الشد أو فعل شيء به من هذا القبيل. قم بحماية كابل التوصيل الكهربائي من
كابلات التمديد الكهربائية غير ● الحرارة، الزيت والحواف الحادة.المناسبة يمكن أن تكون مصدر للخطر. استخدم في الهواء الطلق لذلك كابلات التمديد الكهربائية المرخصة والمميزة ومزودة بمقطع
2مم 2,5 م: 30-10، 2مم 1,5 م: 10-1عرضي للكابل كافي:
فك كابل التمديد الكهربائي دائما بشكل كامل من ● تنويه�يجب عند التوقف عن العمل لفترة ● بكرة الكابل الكهربائي.
استراحة طويلة وبعد الاستخدام إيقاف الجهاز عن طريق المفتاح / مفتاح الجهاز وكذلك فصل القابس الكهربائي أيضا. الرئيسي
التشغيل
يُمنع منعا باتا التشغيل في المناطق القابلة للانفجار. ● خطر�لا تقم بشفط مواد مذيبة أو سوائل تحتوي على مواد مذيبة أو مواد ●
حمضية غير مخففة أبدا. وهذه تشمل على سبيل المثال البنزين، مواد إضافية للألوان أو وقود التدفئة. الرذاذ قابل للاشتعال والانفجار
/صمامات الإطارات تشكل مصدر إطارات السيارات التالفة ● وسام. /صمامات الإطارات يمكن أن خطر على الحياة. إطارات السيارات
تتضرر أو تنفجر عن طريق استخدام شعاع الضغط العالي. أول علامة على ذلك هو تغيير لون الإطار. عليك المحافظة على مسافة
سم على الأقل.من الشعاع عند تنظيف السيارة عن إطارات 30/ صمامات الإطارات. السيارة
لا تستخدم الجهاز بالقرب من تواجد أشخاص ● تحذير�لا توجه شعاع الضغط ● آخرين لا يرتدون ملابس وقاية مناسبة.
لا توجه ● العالي على نفسك مثلا على ملابسك أو حذائك لتنظيفه. شعاع الضغط العالي على الأشخاص، الحيوانات، معدات كهربائية
لا تقوم برش أي أشياء تحتوي على ● فعالة أو على الجهاز نفسه.تأكد قبل كل استخدام من ● مواد ضارة بالصحة (الإسبست مثلا).
أن الجهاز وملحقاته في حالة سليمة وآمنة للتشغيل مثلا خرطوم الضغط العالي، مسدس الضغط العالي وتجهيزات السلامة أيضا. لا تستخدم الجهاز عند وجود تلف فيه. قم بتغيير الأجزاء التالفة فورا.
استخدم خراطيم الضغط العالي والتجهيزات والقارنات التي تنصح ● خطر الاحتراق. عند فصل مدخل الخرطوم أو ● بها الجهة الصانعة.
خرطوم الضغط العالي يمكن أن يخرج ماء ساخن من الوصلات بعد التشغيل.
لا تستخدم الجهاز أبدا بدون قاطع للنظام بشبكة مياه ● تنويه�الشرب وفقا للوائح السارية. تأكد من أن وصلة الشبكة المائية
بمنزلك التي تم توصيلها بجهاز النتظيف بالضغط العالي مزودة الماء التي تمر ● .EN 12729 Typ BAبفاصل للنظام وفقا لمعيار
لا تترك الجهاز ● عن طريق فاصل النظام لا تصلح بعد ذلك للشرب.يتم عن طريق المياه ● دون مراقبة أبدا طالما يكون مشغّلا.
الخارجة من فوهة الضغط العالي توليد قوة ارتدادية بمسدس الضغط العالي. قم بتأمين مكان وقوفك بشكل آمن وامسك
حوادث ● مسدس الضغط العالي وأنبوب الشعاع بشكل ثابت. وأضرار ناجمة عن سقوط الجهاز. يجب عليك ضمان السلامة قبل
إجراء أي عمل على الجهاز أو قبل استخدام الجهاز.لا تستخدم الجهاز عندما تكون درجات الحرارة تحت ● تنبيه
°مئوية. 0التشغيل باستخدام مادة تنظيف
يمكن أن يؤدي استعمال مواد التنظيف غير ● تحذير�الصحيحة إلى حدوث إصابات خطيرة أو إلى حدوث التسمم.
خزّن مواد التنظيف بعيدا عن متناول الأطفال. ● تنويه�استخدم مواد التنظيف الموردة مع الجهاز أو التي تنصح بها الجهة ●
الصانعة فقط. استخدام مواد التنظيف الأخرى أو المواد الكيميائية يمكن أن تضر بسلامة الجهاز.
العربية 23

Register your product and benefit from many advantages.
Registrieren Sie Ihr Produkt und profitieren Sie von vielen Vorteilen.
Enregistrez votre produit et bénéficier de nombreux avantages.
Registre su producto y aproveche de muchas ventajas.
Bewerten Sie Ihr Produkt und sagen Sie uns Ihre Meinung.
Rate your product and tell us your opinion.
Évaluer votre produit et dites-nous votre opinion.
Reseñe su producto y díganos su opinión.
www.kaercher.com/welcome
www.kaercher.com/ser
Alfred Kärcher & Co. KGAlfred-Kärcher-Str. 28-4071364 Winnenden (Germany)Tel.: +49 7195 14-0Fax: +49 7195 14-2212
DANKE!THANK YOU!MERCI! GRACIAS!
!