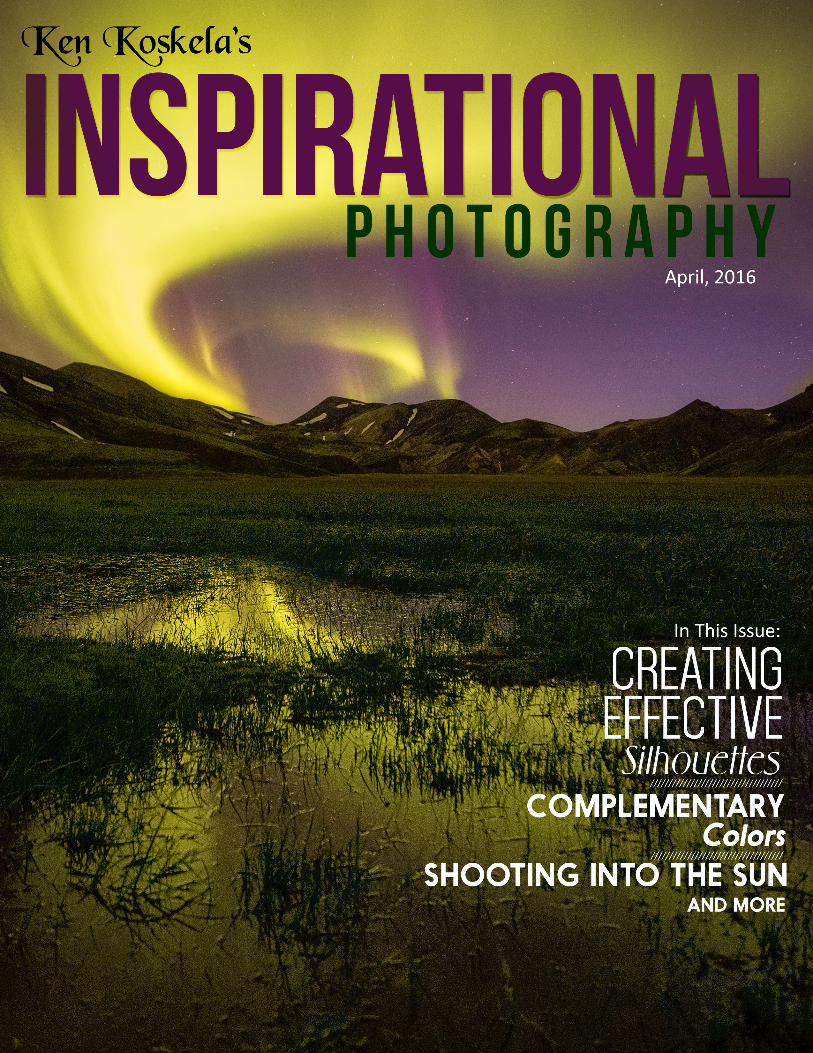
ken koskela's inspirational photography april 2016
DESCRIPTION
Photography magazine dedicated to landscape photography, environmental portraits and travel photography. Information on international photo tours and photography workshops.TRANSCRIPT
1
2
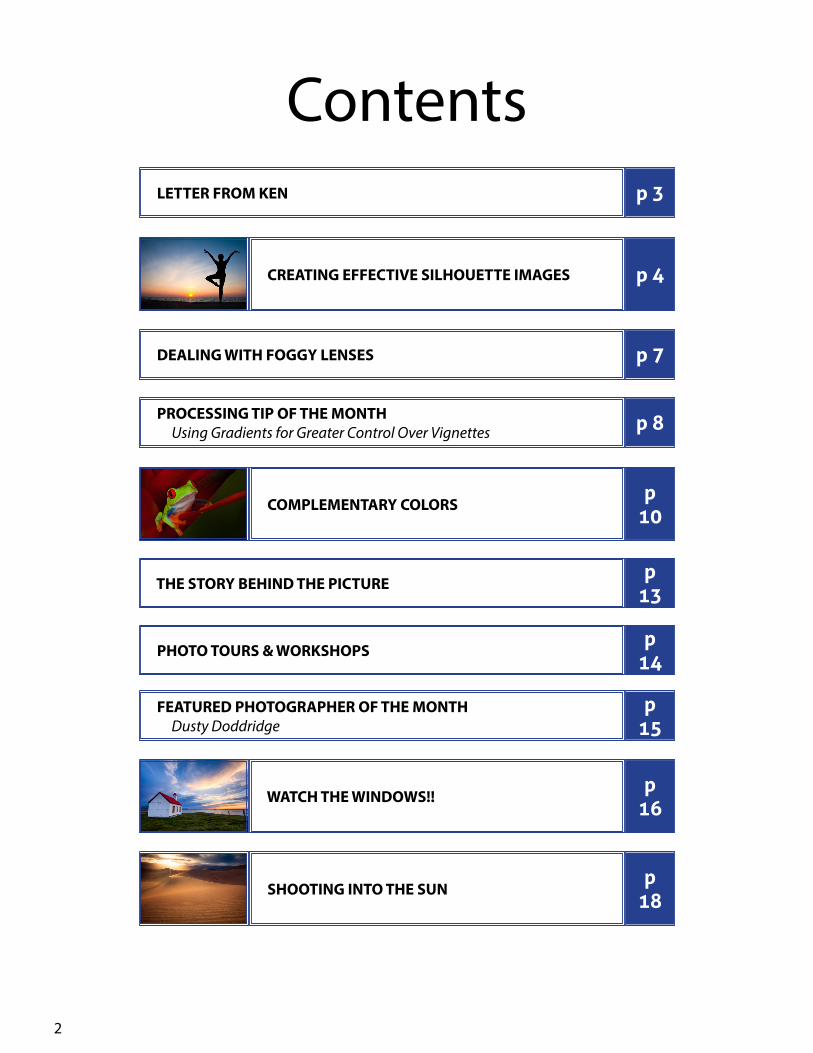
Contents LETTER FROM KEN
THE STORY BEHIND THE PICTURE
DEALING WITH FOGGY LENSES
CREATING EFFECTIVE SILHOUETTE IMAGES
COMPLEMENTARY COLORS
WATCH THE WINDOWS!!
SHOOTING INTO THE SUN
PROCESSING TIP OF THE MONTH Using Gradients for Greater Control Over Vignettes
FEATURED PHOTOGRAPHER OF THE MONTH Dusty Doddridge
PHOTO TOURS & WORKSHOPS
p 3
p 13
p 7
p 4
p 10
p 16
p 18
p 8
p 15
p 14
3
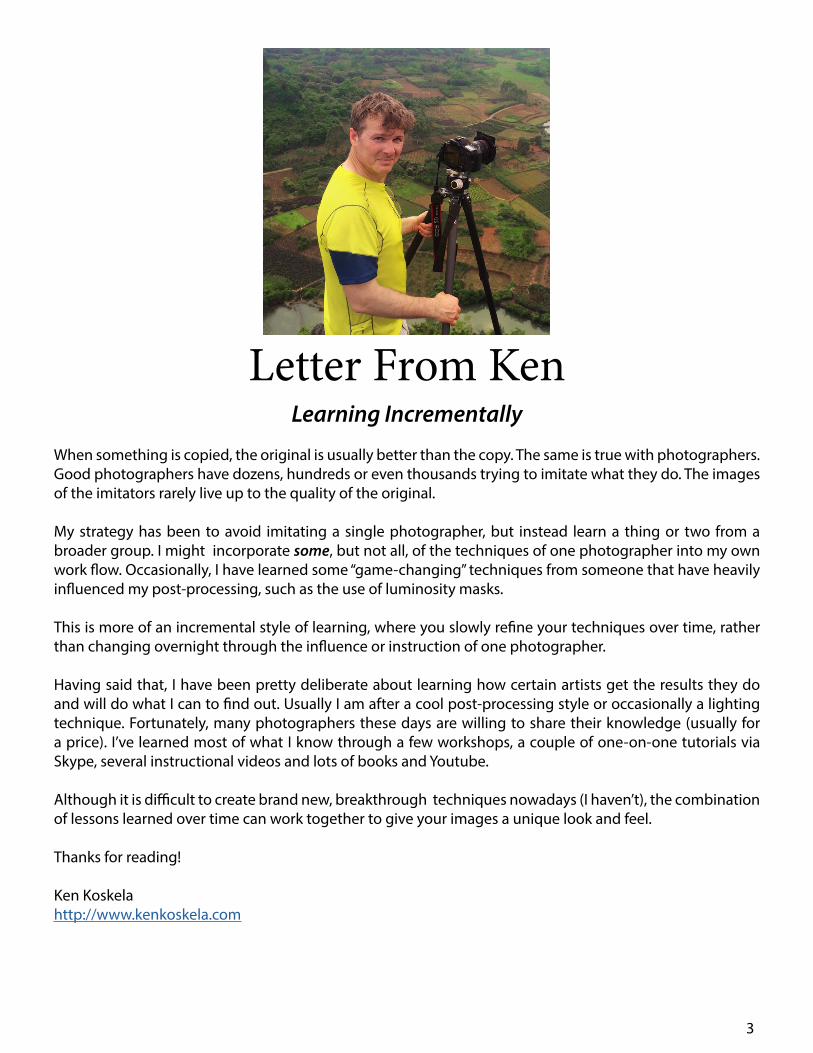
Letter From KenLearning Incrementally
When something is copied, the original is usually better than the copy. The same is true with photographers. Good photographers have dozens, hundreds or even thousands trying to imitate what they do. The images of the imitators rarely live up to the quality of the original.
My strategy has been to avoid imitating a single photographer, but instead learn a thing or two from a broader group. I might incorporate some, but not all, of the techniques of one photographer into my own work flow. Occasionally, I have learned some “game-changing” techniques from someone that have heavily influenced my post-processing, such as the use of luminosity masks.
This is more of an incremental style of learning, where you slowly refine your techniques over time, rather than changing overnight through the influence or instruction of one photographer.
Having said that, I have been pretty deliberate about learning how certain artists get the results they do and will do what I can to find out. Usually I am after a cool post-processing style or occasionally a lighting technique. Fortunately, many photographers these days are willing to share their knowledge (usually for a price). I’ve learned most of what I know through a few workshops, a couple of one-on-one tutorials via Skype, several instructional videos and lots of books and Youtube.
Although it is difficult to create brand new, breakthrough techniques nowadays (I haven’t), the combination of lessons learned over time can work together to give your images a unique look and feel.
Thanks for reading!
Ken Koskelahttp://www.kenkoskela.com
4
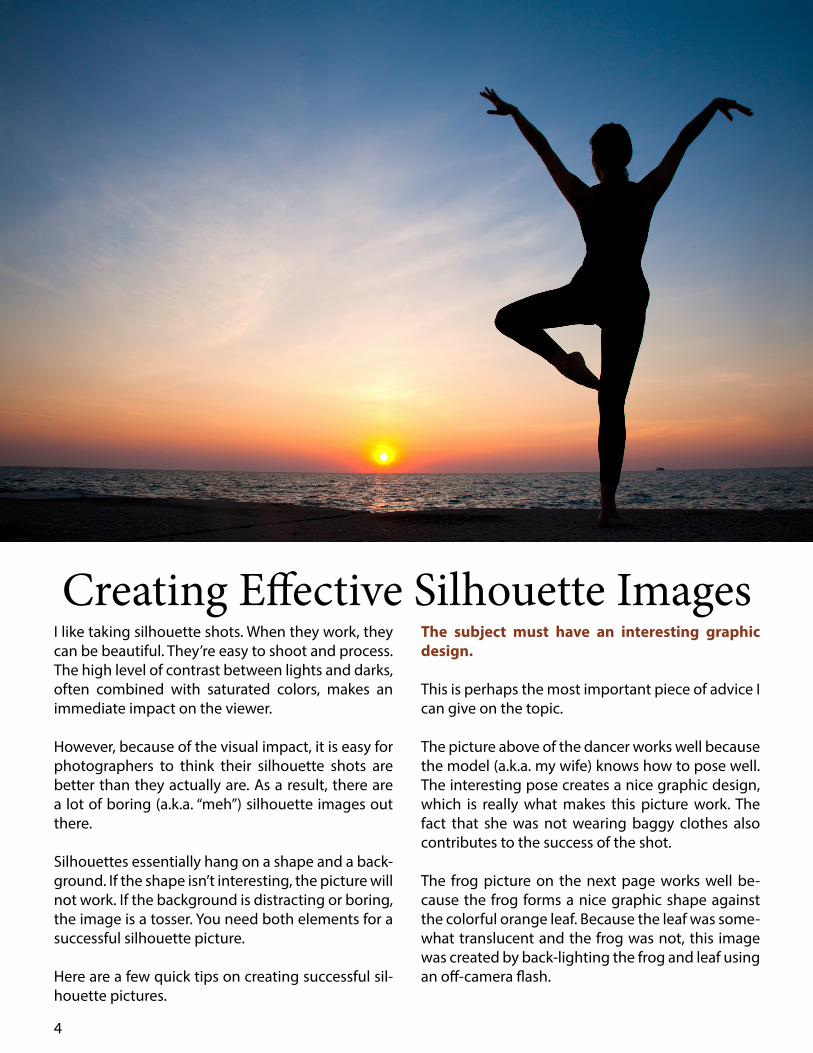
Creating Effective Silhouette ImagesI like taking silhouette shots. When they work, they can be beautiful. They’re easy to shoot and process. The high level of contrast between lights and darks, often combined with saturated colors, makes an immediate impact on the viewer.
However, because of the visual impact, it is easy for photographers to think their silhouette shots are better than they actually are. As a result, there are a lot of boring (a.k.a. “meh”) silhouette images out there.
Silhouettes essentially hang on a shape and a back-ground. If the shape isn’t interesting, the picture will not work. If the background is distracting or boring, the image is a tosser. You need both elements for a successful silhouette picture.
Here are a few quick tips on creating successful sil-houette pictures.
The subject must have an interesting graphic design.
This is perhaps the most important piece of advice I can give on the topic.
The picture above of the dancer works well because the model (a.k.a. my wife) knows how to pose well. The interesting pose creates a nice graphic design, which is really what makes this picture work. The fact that she was not wearing baggy clothes also contributes to the success of the shot.
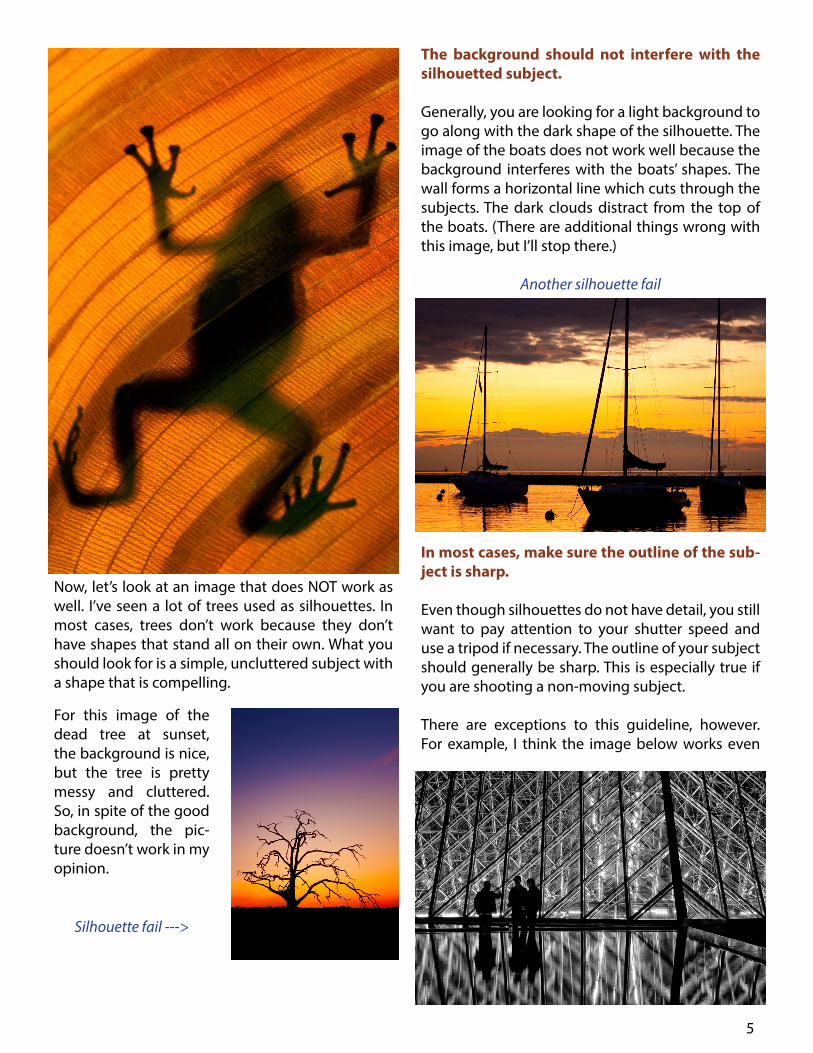
The frog picture on the next page works well be-cause the frog forms a nice graphic shape against the colorful orange leaf. Because the leaf was some-what translucent and the frog was not, this image was created by back-lighting the frog and leaf using an off-camera flash.
5
Now, let’s look at an image that does NOT work as well. I’ve seen a lot of trees used as silhouettes. In most cases, trees don’t work because they don’t have shapes that stand all on their own. What you should look for is a simple, uncluttered subject with a shape that is compelling.
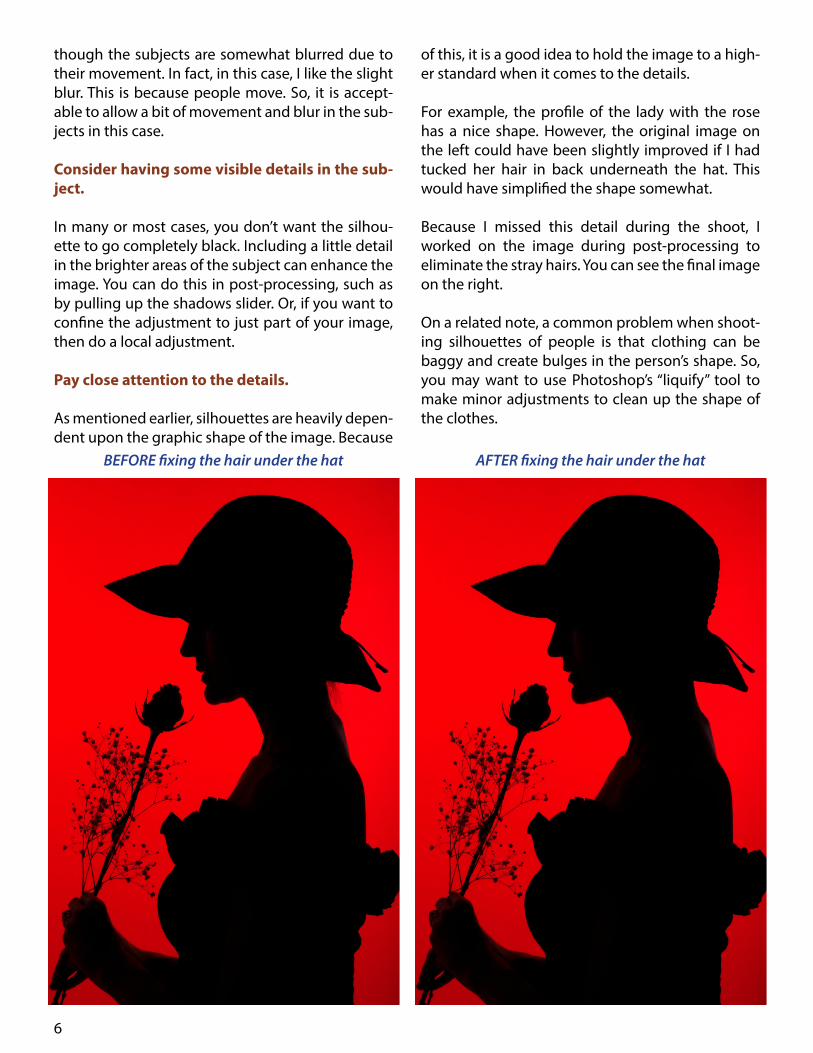
The background should not interfere with the silhouetted subject.
Generally, you are looking for a light background to go along with the dark shape of the silhouette. The image of the boats does not work well because the background interferes with the boats’ shapes. The wall forms a horizontal line which cuts through the subjects. The dark clouds distract from the top of the boats. (There are additional things wrong with this image, but I’ll stop there.)
Another silhouette fail
In most cases, make sure the outline of the sub-ject is sharp.
Even though silhouettes do not have detail, you still want to pay attention to your shutter speed and use a tripod if necessary. The outline of your subject should generally be sharp. This is especially true if you are shooting a non-moving subject.
There are exceptions to this guideline, however. For example, I think the image below works even
For this image of the dead tree at sunset, the background is nice, but the tree is pretty messy and cluttered. So, in spite of the good background, the pic-ture doesn’t work in my opinion.
Silhouette fail --->
6
though the subjects are somewhat blurred due to their movement. In fact, in this case, I like the slight blur. This is because people move. So, it is accept-able to allow a bit of movement and blur in the sub-jects in this case.
Consider having some visible details in the sub-ject.
In many or most cases, you don’t want the silhou-ette to go completely black. Including a little detail in the brighter areas of the subject can enhance the image. You can do this in post-processing, such as by pulling up the shadows slider. Or, if you want to confine the adjustment to just part of your image, then do a local adjustment.
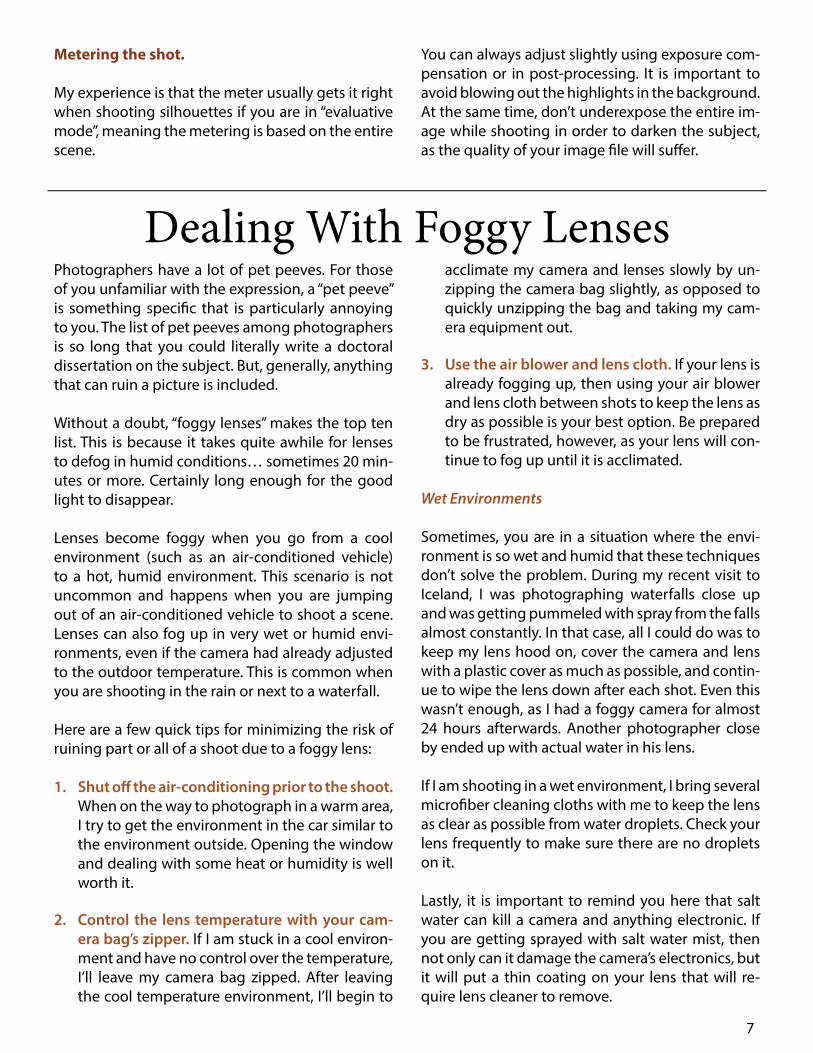
Pay close attention to the details.
As mentioned earlier, silhouettes are heavily depen-dent upon the graphic shape of the image. Because
of this, it is a good idea to hold the image to a high-er standard when it comes to the details.
For example, the profile of the lady with the rose has a nice shape. However, the original image on the left could have been slightly improved if I had tucked her hair in back underneath the hat. This would have simplified the shape somewhat.
Because I missed this detail during the shoot, I worked on the image during post-processing to eliminate the stray hairs. You can see the final image on the right.
On a related note, a common problem when shoot-ing silhouettes of people is that clothing can be baggy and create bulges in the person’s shape. So, you may want to use Photoshop’s “liquify” tool to make minor adjustments to clean up the shape of the clothes.
BEFORE fixing the hair under the hat AFTER fixing the hair under the hat
7
Metering the shot.
My experience is that the meter usually gets it right when shooting silhouettes if you are in “evaluative mode”, meaning the metering is based on the entire scene.
You can always adjust slightly using exposure com-pensation or in post-processing. It is important to avoid blowing out the highlights in the background. At the same time, don’t underexpose the entire im-age while shooting in order to darken the subject, as the quality of your image file will suffer.
Dealing With Foggy LensesPhotographers have a lot of pet peeves. For those of you unfamiliar with the expression, a “pet peeve” is something specific that is particularly annoying to you. The list of pet peeves among photographers is so long that you could literally write a doctoral dissertation on the subject. But, generally, anything that can ruin a picture is included.
Without a doubt, “foggy lenses” makes the top ten list. This is because it takes quite awhile for lenses to defog in humid conditions… sometimes 20 min-utes or more. Certainly long enough for the good light to disappear.
Lenses become foggy when you go from a cool environment (such as an air-conditioned vehicle) to a hot, humid environment. This scenario is not uncommon and happens when you are jumping out of an air-conditioned vehicle to shoot a scene. Lenses can also fog up in very wet or humid envi-ronments, even if the camera had already adjusted to the outdoor temperature. This is common when you are shooting in the rain or next to a waterfall.
Here are a few quick tips for minimizing the risk of ruining part or all of a shoot due to a foggy lens:
1. Shut off the air-conditioning prior to the shoot. When on the way to photograph in a warm area, I try to get the environment in the car similar to the environment outside. Opening the window and dealing with some heat or humidity is well worth it.
2. Control the lens temperature with your cam-era bag’s zipper. If I am stuck in a cool environ-ment and have no control over the temperature, I’ll leave my camera bag zipped. After leaving the cool temperature environment, I’ll begin to
acclimate my camera and lenses slowly by un-zipping the camera bag slightly, as opposed to quickly unzipping the bag and taking my cam-era equipment out.
3. Use the air blower and lens cloth. If your lens is already fogging up, then using your air blower and lens cloth between shots to keep the lens as dry as possible is your best option. Be prepared to be frustrated, however, as your lens will con-tinue to fog up until it is acclimated.
Wet Environments
Sometimes, you are in a situation where the envi-ronment is so wet and humid that these techniques don’t solve the problem. During my recent visit to Iceland, I was photographing waterfalls close up and was getting pummeled with spray from the falls almost constantly. In that case, all I could do was to keep my lens hood on, cover the camera and lens with a plastic cover as much as possible, and contin-ue to wipe the lens down after each shot. Even this wasn’t enough, as I had a foggy camera for almost 24 hours afterwards. Another photographer close by ended up with actual water in his lens.
If I am shooting in a wet environment, I bring several microfiber cleaning cloths with me to keep the lens as clear as possible from water droplets. Check your lens frequently to make sure there are no droplets on it.
Lastly, it is important to remind you here that salt water can kill a camera and anything electronic. If you are getting sprayed with salt water mist, then not only can it damage the camera’s electronics, but it will put a thin coating on your lens that will re-quire lens cleaner to remove.

8
Processing Tip of the MonthUsing Gradients for Greater Control Over Vignettes
Photographers typically use vignettes to darken the outer areas of the image in order to draw atten-tion to the subject. Although the vignette is meant to be subtle, you can see how the darkened corners in the vignetted image above help focus your at-tention on the little girl.
But this article isn’t about vignettes in general. This article is about using multiple gradients to create a more customizable and controllable vignette.
Using the gradient approach allows you to control the direction, size and strength of the vignette on
Without Gradient Vignette
With Gradient Vignette
9
each side independently, whereas the “standard vi-gnette” darkens the outer edges equally, usually in an oval shape.
I will show you how to do this in Lightroom.
First locate Lightroom’s gradient tool and click on it:
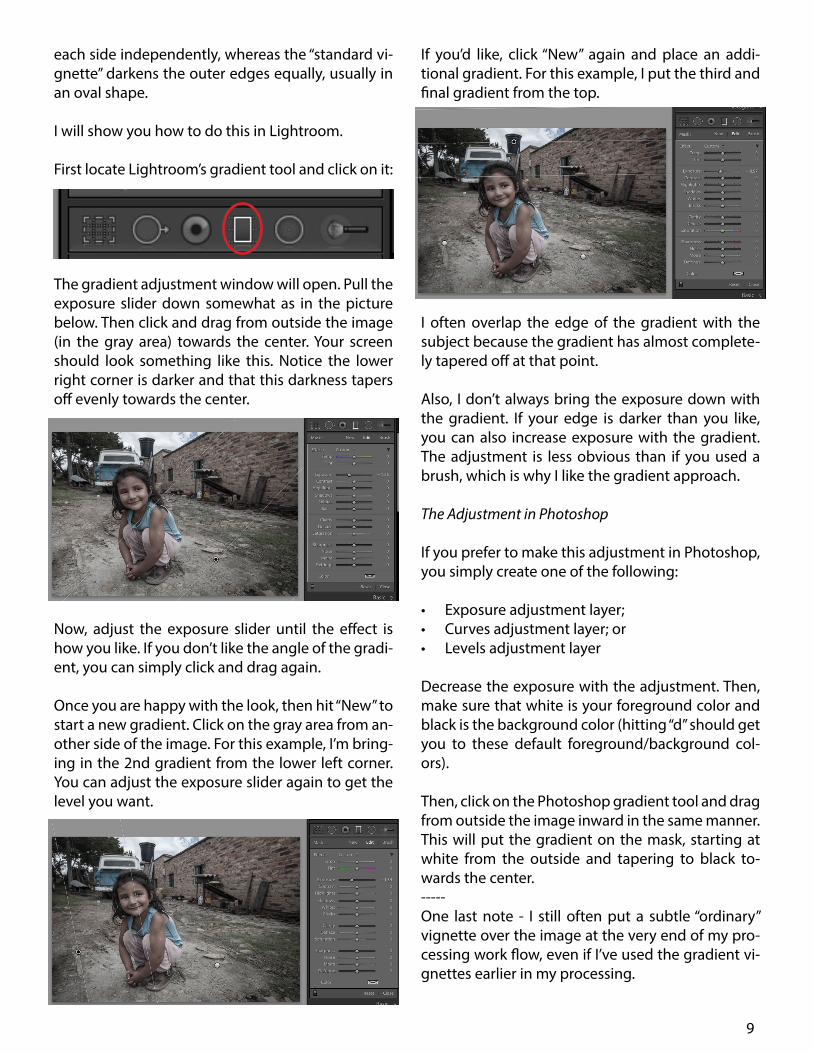
The gradient adjustment window will open. Pull the exposure slider down somewhat as in the picture below. Then click and drag from outside the image (in the gray area) towards the center. Your screen should look something like this. Notice the lower right corner is darker and that this darkness tapers off evenly towards the center.
Now, adjust the exposure slider until the effect is how you like. If you don’t like the angle of the gradi-ent, you can simply click and drag again.
Once you are happy with the look, then hit “New” to start a new gradient. Click on the gray area from an-other side of the image. For this example, I’m bring-ing in the 2nd gradient from the lower left corner. You can adjust the exposure slider again to get the level you want.
If you’d like, click “New” again and place an addi-tional gradient. For this example, I put the third and final gradient from the top.
I often overlap the edge of the gradient with the subject because the gradient has almost complete-ly tapered off at that point.
Also, I don’t always bring the exposure down with the gradient. If your edge is darker than you like, you can also increase exposure with the gradient. The adjustment is less obvious than if you used a brush, which is why I like the gradient approach.
The Adjustment in Photoshop
If you prefer to make this adjustment in Photoshop, you simply create one of the following:
• Exposure adjustment layer;• Curves adjustment layer; or• Levels adjustment layer
Decrease the exposure with the adjustment. Then, make sure that white is your foreground color and black is the background color (hitting “d” should get you to these default foreground/background col-ors).
Then, click on the Photoshop gradient tool and drag from outside the image inward in the same manner. This will put the gradient on the mask, starting at white from the outside and tapering to black to-wards the center. -----One last note - I still often put a subtle “ordinary” vignette over the image at the very end of my pro-cessing work flow, even if I’ve used the gradient vi-gnettes earlier in my processing.
10
Complementary Colors
Those who know me well would probably say that I’m not a fashion god. I don’t lay my clothes out be-fore getting dressed to make sure the colors com-plement each other or at least match. I’m more of a “this dark blue shirt probably matches with these light blue jeans and my brown shoes go with every-thing” kind of person.
Now, before you rush to judgment, you should know that this is all different when it comes to pho-tography. When I’m composing a picture, I think a lot about color. In fact, using complementary colors in your pictures can make your images stand out.
So, what are complementary colors and how do you use them in photography? Although there are large books written on color, I’ve never read them. Because I’m not an expert on the topic, I think I can make this really simple. Let’s start with the basics.
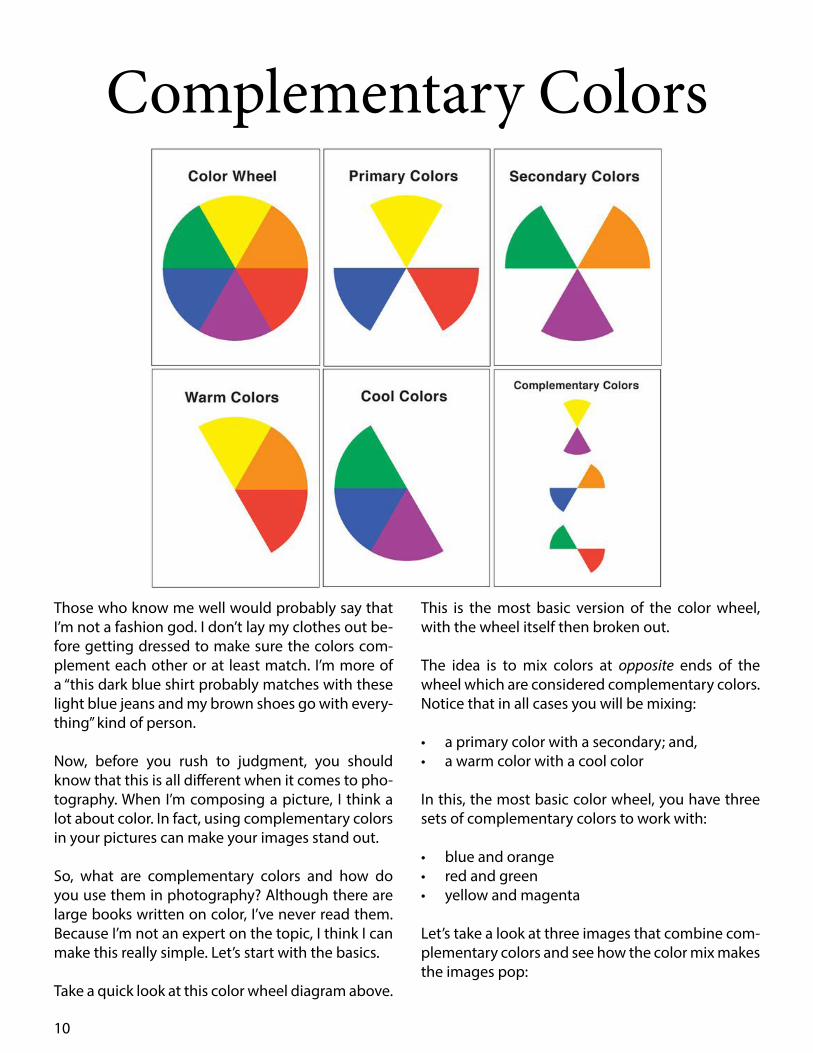
Take a quick look at this color wheel diagram above.
This is the most basic version of the color wheel, with the wheel itself then broken out.
The idea is to mix colors at opposite ends of the wheel which are considered complementary colors. Notice that in all cases you will be mixing:
• a primary color with a secondary; and, • a warm color with a cool color
In this, the most basic color wheel, you have three sets of complementary colors to work with:
• blue and orange• red and green• yellow and magenta
Let’s take a look at three images that combine com-plementary colors and see how the color mix makes the images pop:
11
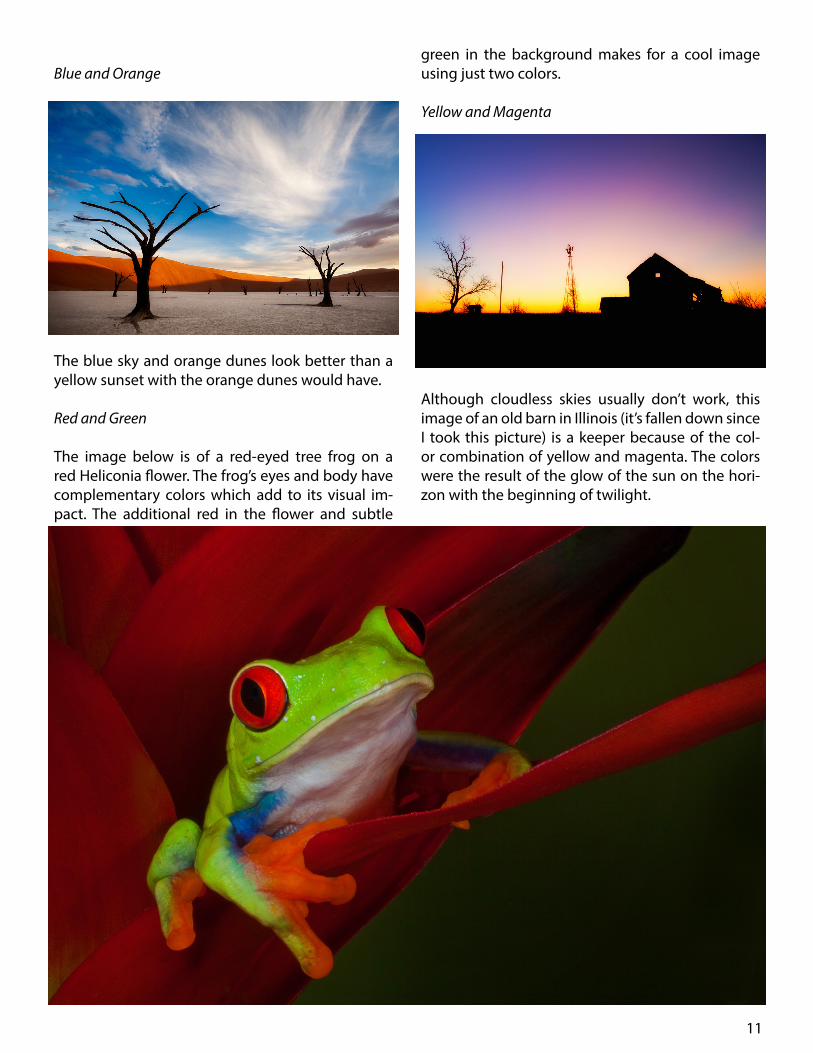
Blue and Orange
The blue sky and orange dunes look better than a yellow sunset with the orange dunes would have.
Red and Green
The image below is of a red-eyed tree frog on a red Heliconia flower. The frog’s eyes and body have complementary colors which add to its visual im-pact. The additional red in the flower and subtle
green in the background makes for a cool image using just two colors.
Yellow and Magenta
Although cloudless skies usually don’t work, this image of an old barn in Illinois (it’s fallen down since I took this picture) is a keeper because of the col-or combination of yellow and magenta. The colors were the result of the glow of the sun on the hori-zon with the beginning of twilight.
12
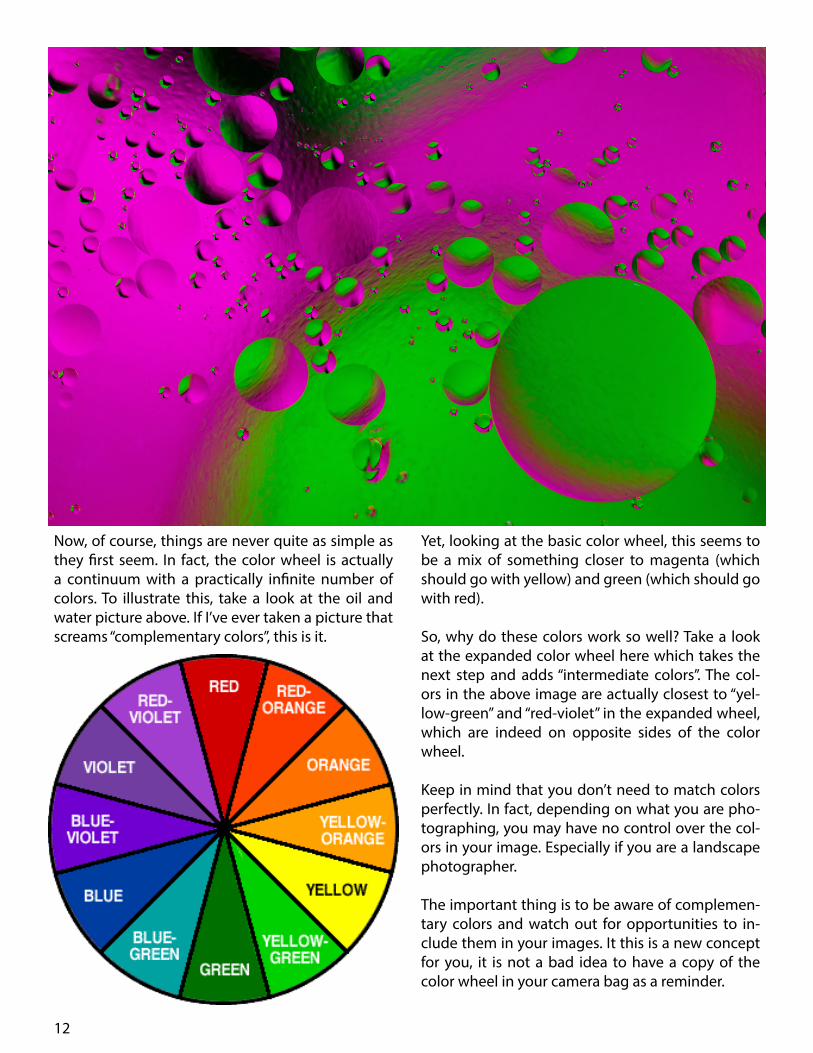
Now, of course, things are never quite as simple as they first seem. In fact, the color wheel is actually a continuum with a practically infinite number of colors. To illustrate this, take a look at the oil and water picture above. If I’ve ever taken a picture that screams “complementary colors”, this is it.
Yet, looking at the basic color wheel, this seems to be a mix of something closer to magenta (which should go with yellow) and green (which should go with red).
So, why do these colors work so well? Take a look at the expanded color wheel here which takes the next step and adds “intermediate colors”. The col-ors in the above image are actually closest to “yel-low-green” and “red-violet” in the expanded wheel, which are indeed on opposite sides of the color wheel.
Keep in mind that you don’t need to match colors perfectly. In fact, depending on what you are pho-tographing, you may have no control over the col-ors in your image. Especially if you are a landscape photographer.
The important thing is to be aware of complemen-tary colors and watch out for opportunities to in-clude them in your images. It this is a new concept for you, it is not a bad idea to have a copy of the color wheel in your camera bag as a reminder.
13
The Story Behind the PictureNorthern Lights in Iceland
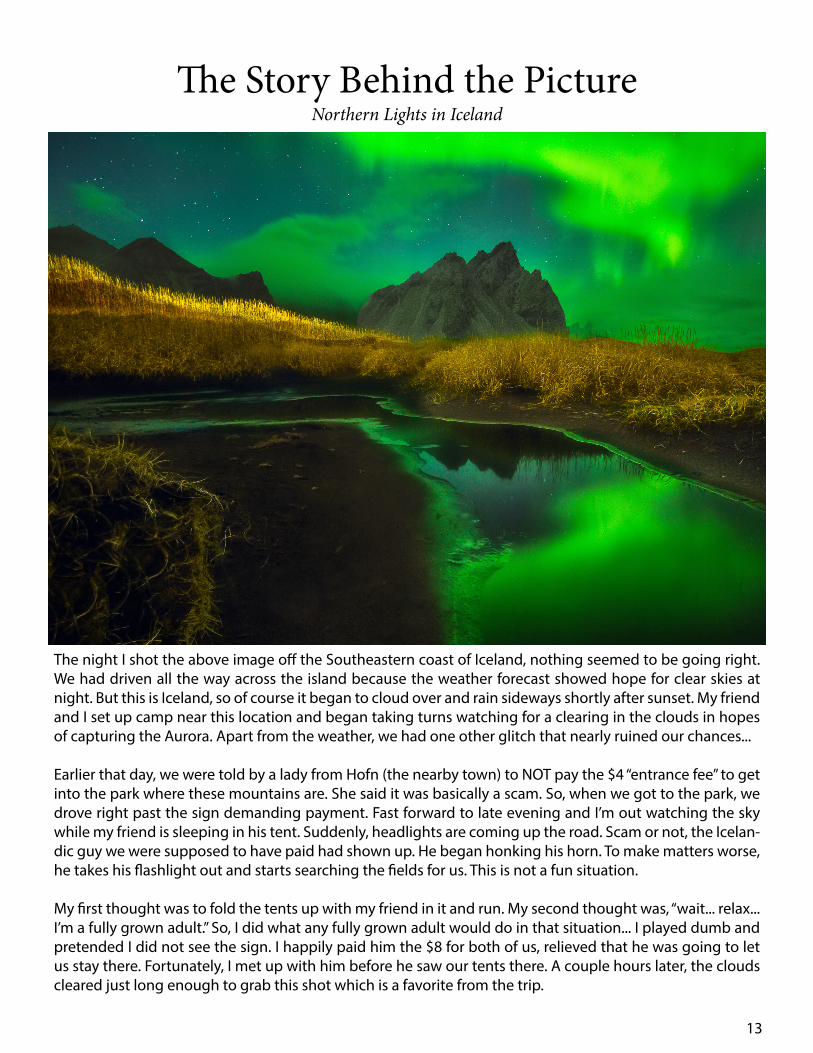
The night I shot the above image off the Southeastern coast of Iceland, nothing seemed to be going right. We had driven all the way across the island because the weather forecast showed hope for clear skies at night. But this is Iceland, so of course it began to cloud over and rain sideways shortly after sunset. My friend and I set up camp near this location and began taking turns watching for a clearing in the clouds in hopes of capturing the Aurora. Apart from the weather, we had one other glitch that nearly ruined our chances...
Earlier that day, we were told by a lady from Hofn (the nearby town) to NOT pay the $4 “entrance fee” to get into the park where these mountains are. She said it was basically a scam. So, when we got to the park, we drove right past the sign demanding payment. Fast forward to late evening and I’m out watching the sky while my friend is sleeping in his tent. Suddenly, headlights are coming up the road. Scam or not, the Icelan-dic guy we were supposed to have paid had shown up. He began honking his horn. To make matters worse, he takes his flashlight out and starts searching the fields for us. This is not a fun situation.
My first thought was to fold the tents up with my friend in it and run. My second thought was, “wait... relax... I’m a fully grown adult.” So, I did what any fully grown adult would do in that situation... I played dumb and pretended I did not see the sign. I happily paid him the $8 for both of us, relieved that he was going to let us stay there. Fortunately, I met up with him before he saw our tents there. A couple hours later, the clouds cleared just long enough to grab this shot which is a favorite from the trip.
14
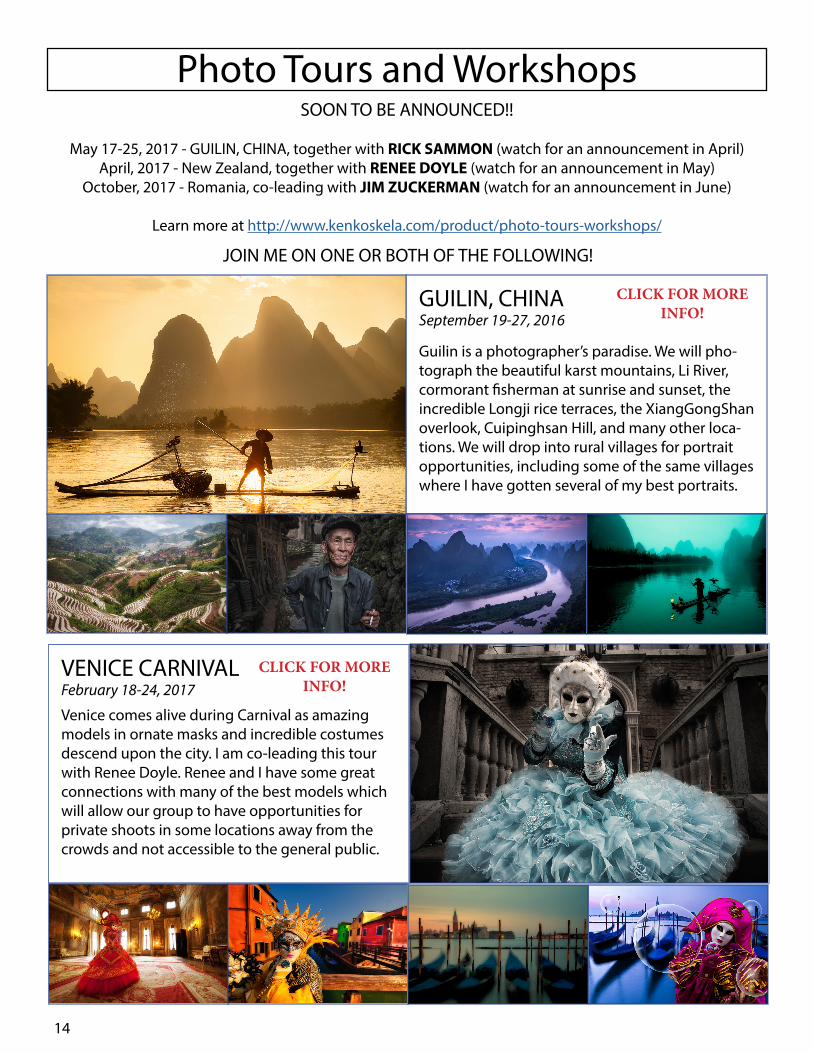
Photo Tours and WorkshopsSOON TO BE ANNOUNCED!!
May 17-25, 2017 - GUILIN, CHINA, together with RICK SAMMON (watch for an announcement in April)April, 2017 - New Zealand, together with RENEE DOYLE (watch for an announcement in May)
October, 2017 - Romania, co-leading with JIM ZUCKERMAN (watch for an announcement in June)
Learn more at http://www.kenkoskela.com/product/photo-tours-workshops/
GUILIN, CHINASeptember 19-27, 2016
Guilin is a photographer’s paradise. We will pho-tograph the beautiful karst mountains, Li River, cormorant fisherman at sunrise and sunset, the incredible Longji rice terraces, the XiangGongShan overlook, Cuipinghsan Hill, and many other loca-tions. We will drop into rural villages for portrait opportunities, including some of the same villages where I have gotten several of my best portraits.
CLICK FOR MORE INFO!
VENICE CARNIVALFebruary 18-24, 2017
Venice comes alive during Carnival as amazing models in ornate masks and incredible costumes descend upon the city. I am co-leading this tour with Renee Doyle. Renee and I have some great connections with many of the best models which will allow our group to have opportunities for private shoots in some locations away from the crowds and not accessible to the general public.
CLICK FOR MORE INFO!
JOIN ME ON ONE OR BOTH OF THE FOLLOWING!
15
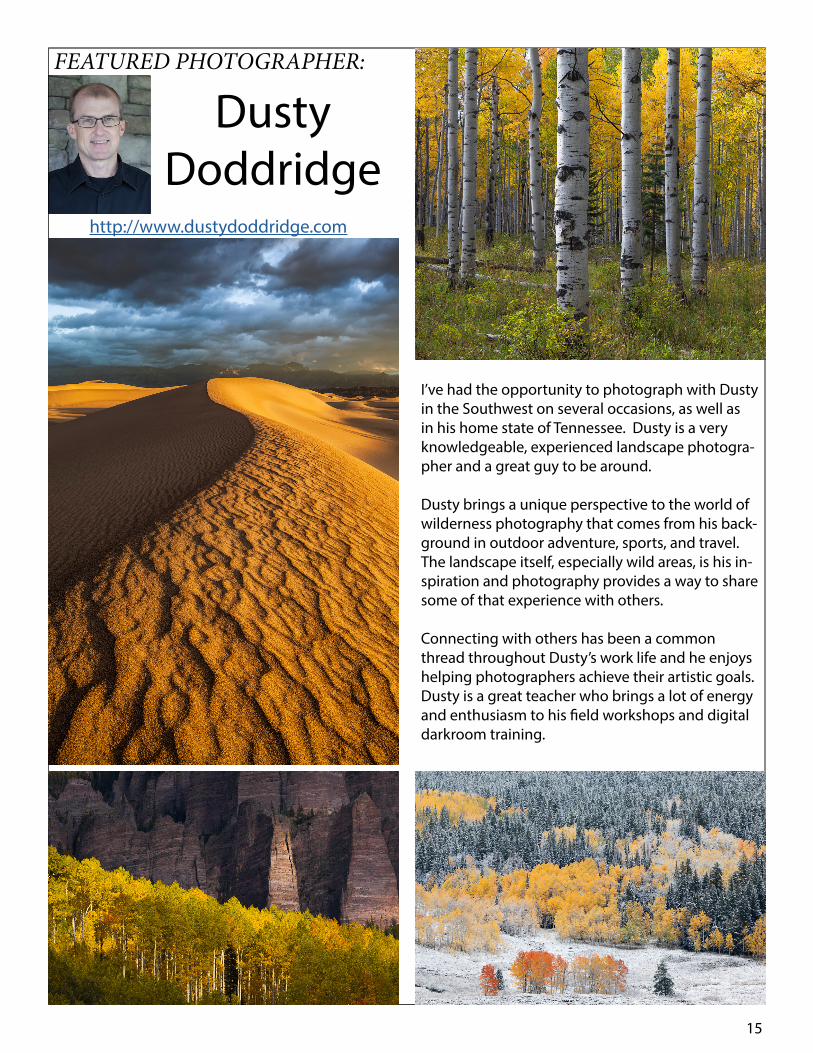
FEATURED PHOTOGRAPHER:
Dusty Doddridge
http://www.dustydoddridge.com
I’ve had the opportunity to photograph with Dusty in the Southwest on several occasions, as well as in his home state of Tennessee. Dusty is a very knowledgeable, experienced landscape photogra-pher and a great guy to be around.
Dusty brings a unique perspective to the world of wilderness photography that comes from his back-ground in outdoor adventure, sports, and travel. The landscape itself, especially wild areas, is his in-spiration and photography provides a way to share some of that experience with others.
Connecting with others has been a common thread throughout Dusty’s work life and he enjoys helping photographers achieve their artistic goals. Dusty is a great teacher who brings a lot of energy and enthusiasm to his field workshops and digital darkroom training.
16
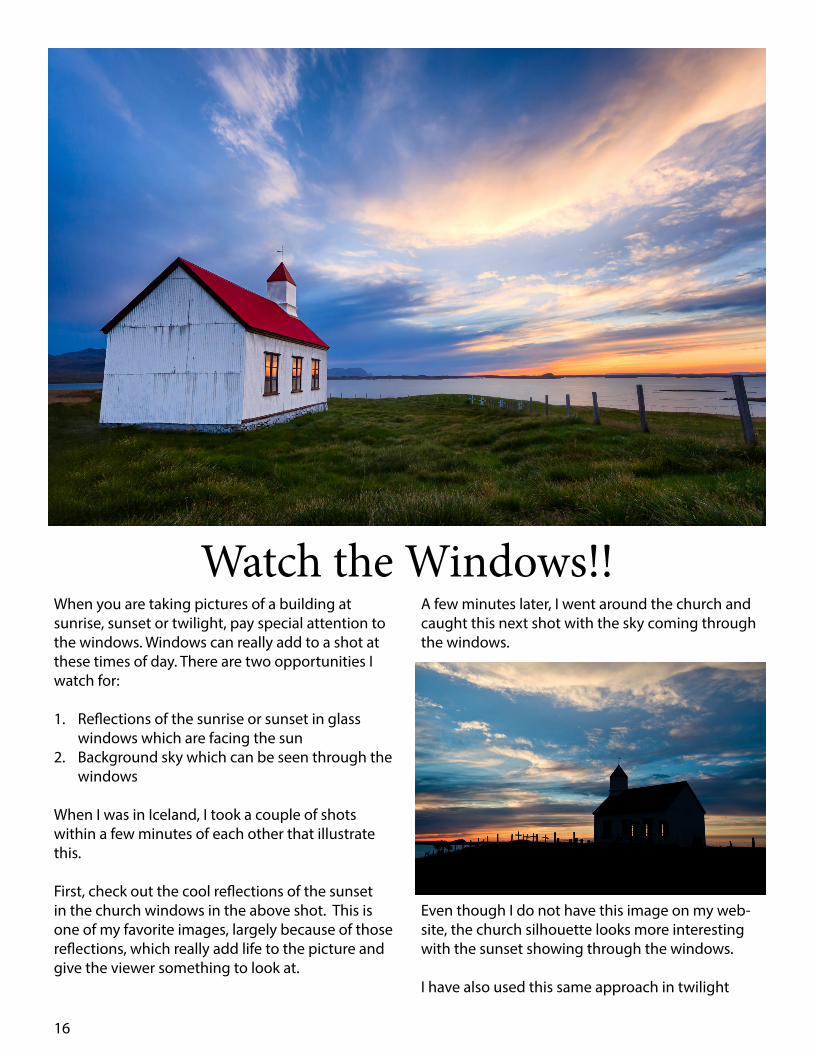
When you are taking pictures of a building at sunrise, sunset or twilight, pay special attention to the windows. Windows can really add to a shot at these times of day. There are two opportunities I watch for:
1. Reflections of the sunrise or sunset in glass windows which are facing the sun
2. Background sky which can be seen through the windows
When I was in Iceland, I took a couple of shots within a few minutes of each other that illustrate this.
First, check out the cool reflections of the sunset in the church windows in the above shot. This is one of my favorite images, largely because of those reflections, which really add life to the picture and give the viewer something to look at.
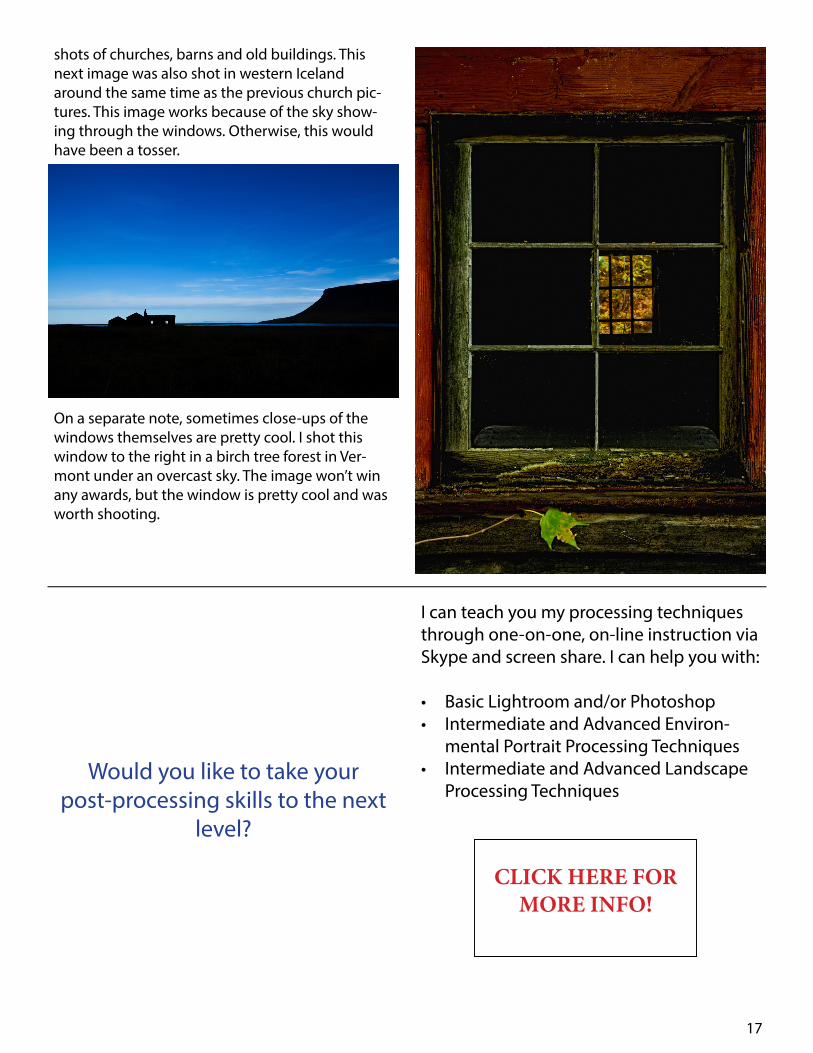
A few minutes later, I went around the church and caught this next shot with the sky coming through the windows.
Even though I do not have this image on my web-site, the church silhouette looks more interesting with the sunset showing through the windows.
I have also used this same approach in twilight
Watch the Windows!!
17
shots of churches, barns and old buildings. This next image was also shot in western Iceland around the same time as the previous church pic-tures. This image works because of the sky show-ing through the windows. Otherwise, this would have been a tosser.
On a separate note, sometimes close-ups of the windows themselves are pretty cool. I shot this window to the right in a birch tree forest in Ver-mont under an overcast sky. The image won’t win any awards, but the window is pretty cool and was worth shooting.
Would you like to take your post-processing skills to the next
level?
I can teach you my processing techniques through one-on-one, on-line instruction via Skype and screen share. I can help you with:
• Basic Lightroom and/or Photoshop• Intermediate and Advanced Environ-
mental Portrait Processing Techniques• Intermediate and Advanced Landscape
Processing Techniques
CLICK HERE FOR MORE INFO!
18
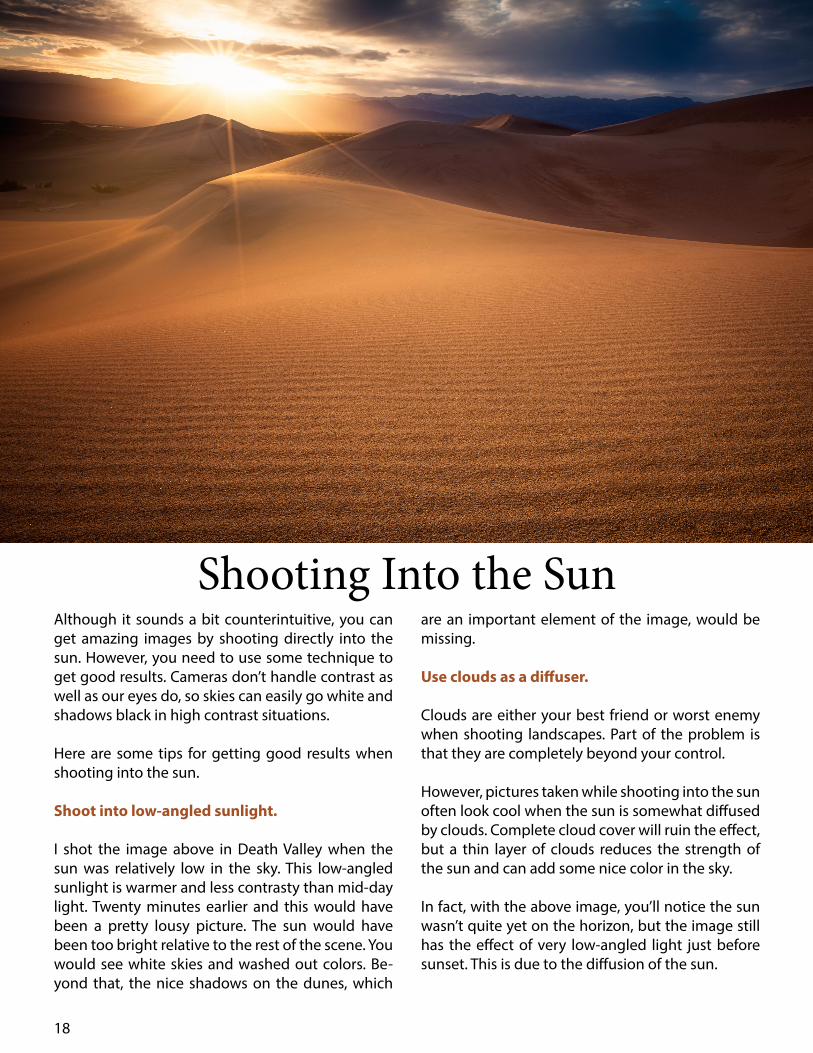
Shooting Into the SunAlthough it sounds a bit counterintuitive, you can get amazing images by shooting directly into the sun. However, you need to use some technique to get good results. Cameras don’t handle contrast as well as our eyes do, so skies can easily go white and shadows black in high contrast situations.
Here are some tips for getting good results when shooting into the sun.
Shoot into low-angled sunlight.
I shot the image above in Death Valley when the sun was relatively low in the sky. This low-angled sunlight is warmer and less contrasty than mid-day light. Twenty minutes earlier and this would have been a pretty lousy picture. The sun would have been too bright relative to the rest of the scene. You would see white skies and washed out colors. Be-yond that, the nice shadows on the dunes, which
are an important element of the image, would be missing.
Use clouds as a diffuser.
Clouds are either your best friend or worst enemy when shooting landscapes. Part of the problem is that they are completely beyond your control.
However, pictures taken while shooting into the sun often look cool when the sun is somewhat diffused by clouds. Complete cloud cover will ruin the effect, but a thin layer of clouds reduces the strength of the sun and can add some nice color in the sky.
In fact, with the above image, you’ll notice the sun wasn’t quite yet on the horizon, but the image still has the effect of very low-angled light just before sunset. This is due to the diffusion of the sun.
19
This is especially helpful when you are dealing with hills positioned such that the horizon line is blocked.
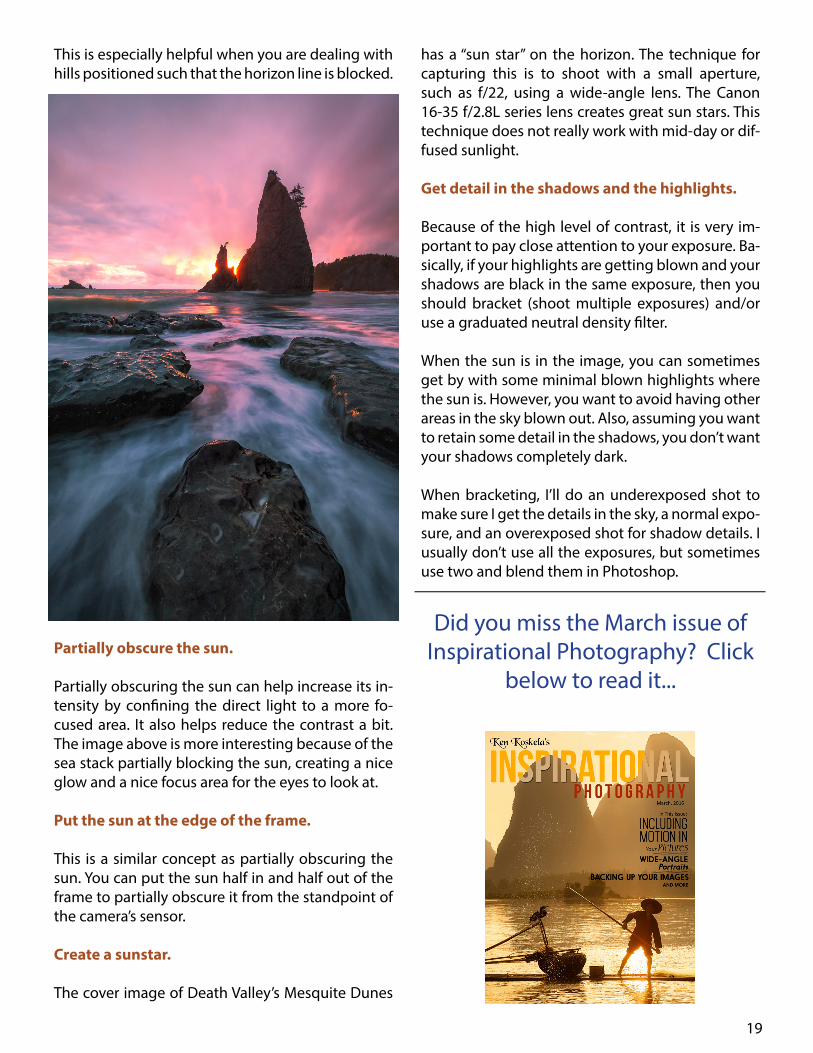
Partially obscure the sun.
Partially obscuring the sun can help increase its in-tensity by confining the direct light to a more fo-cused area. It also helps reduce the contrast a bit. The image above is more interesting because of the sea stack partially blocking the sun, creating a nice glow and a nice focus area for the eyes to look at.
Put the sun at the edge of the frame.
This is a similar concept as partially obscuring the sun. You can put the sun half in and half out of the frame to partially obscure it from the standpoint of the camera’s sensor.
Create a sunstar.
The cover image of Death Valley’s Mesquite Dunes
has a “sun star” on the horizon. The technique for capturing this is to shoot with a small aperture, such as f/22, using a wide-angle lens. The Canon 16-35 f/2.8L series lens creates great sun stars. This technique does not really work with mid-day or dif-fused sunlight.
Get detail in the shadows and the highlights.
Because of the high level of contrast, it is very im-portant to pay close attention to your exposure. Ba-sically, if your highlights are getting blown and your shadows are black in the same exposure, then you should bracket (shoot multiple exposures) and/or use a graduated neutral density filter.
When the sun is in the image, you can sometimes get by with some minimal blown highlights where the sun is. However, you want to avoid having other areas in the sky blown out. Also, assuming you want to retain some detail in the shadows, you don’t want your shadows completely dark.
When bracketing, I’ll do an underexposed shot to make sure I get the details in the sky, a normal expo-sure, and an overexposed shot for shadow details. I usually don’t use all the exposures, but sometimes use two and blend them in Photoshop.
Did you miss the March issue of Inspirational Photography? Click
below to read it...

20
Click the link below to sign up to receive this magazine for free each month!http://www.kenkoskela.com/page/inspira-tional-photography-magazine/
Website:http://www.kenkoskela.com
Click here for my Facebook page
Click here for my 500px page
Instagram: @kenkoskela
Questions? You can reach me at:[email protected]